Teres Major Exercises
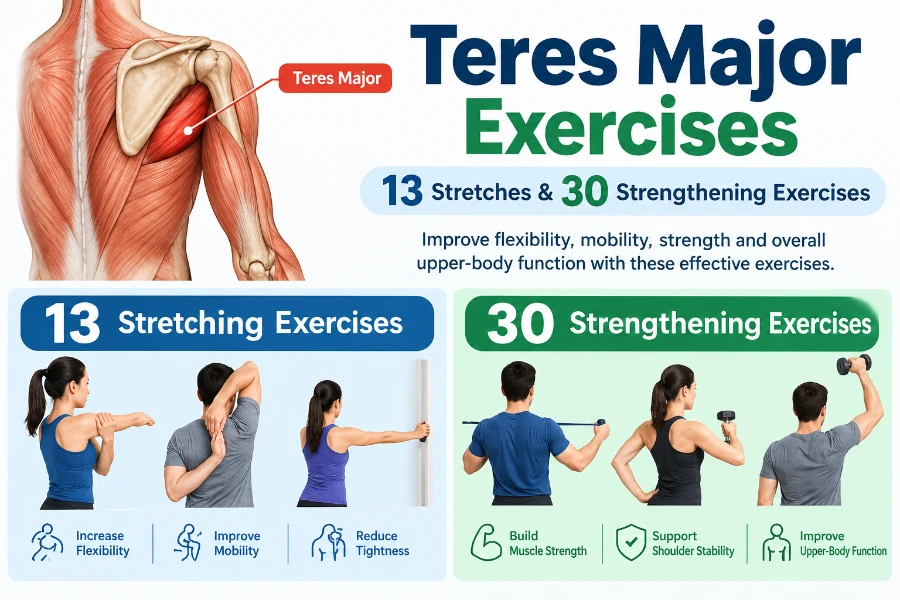
The teres major is a small but important muscle located at the back of the shoulder and upper arm. It helps with shoulder movements such as pulling the arm inward, rotating it inward, and extending the arm. Tightness or weakness in this muscle can affect shoulder mobility, posture, and upper-body movements.
In this article, we have included 13 effective teres major stretching exercises to improve flexibility and mobility, along with 30 strengthening exercises to build muscle strength and support better shoulder function. These exercises can be useful for improving movement, supporting shoulder stability, and maintaining overall upper-body strength.
Which muscle is the Teres Major?
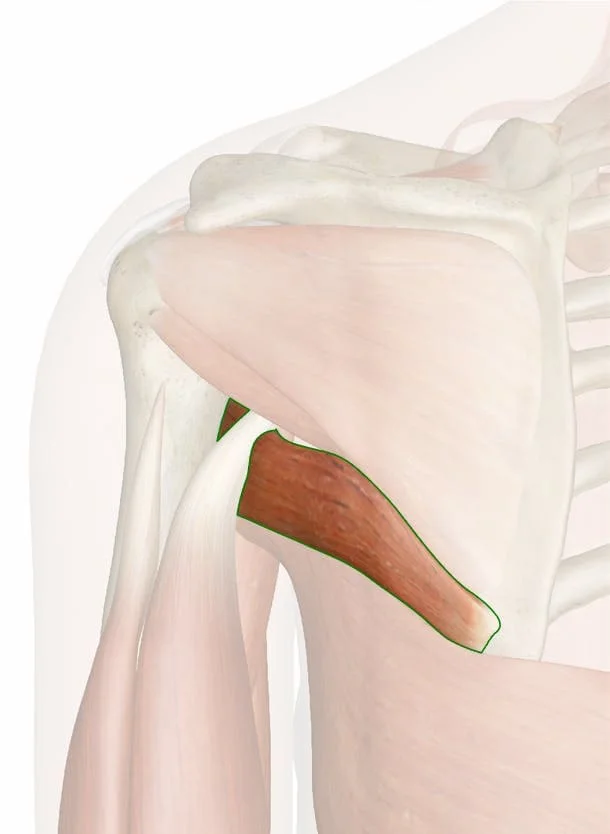
It begins at the proximal end of the humeral shaft and progresses to the inferior aspect of the scapula. The glenohumeral capsule is not connected to the teres major muscle. As a result, it is not regarded as a component of the rotator cuff muscles.
The main purpose of this muscle is to propel the arm towards the shoulder joint. When it contracts, the humerus rotates internally towards the trunk and is pulled posteriorly (extension). It also helps the shoulder joint’s stabilization.
The Teres Major Muscle’s Relations
It is important for the stability and motion of the shoulders.
The neighboring fibers of these two muscles can fuse. The axillary groove is formed by the teres major and minor muscles. Their insertion tendons or muscular bellies can occasionally even merge.
- Origin: The inferior angle of the lateral border of the scapula.
- Insertion: The humerus’s medial lip, or intertubercular sulcus.
- Nerve: C5–C7 is the nerve supply.
- Action: The humerus (arm) extends and rotates internally.
Teres Major Stretching Exercise
Why Should the Teres Major Be Stretched?
The teres major must be stretched to develop and preserve general muscle health. It keeps the scapula and surrounding muscles relaxed, promotes healthy shoulder joint movement, and helps preserve postural alignment.
As a result, it can lessen shoulder joint pain when lifting, increase shoulder joint range of motion, and improve performance in daily activities and sports. Regular stretching can help lower stress levels and raise awareness of one’s body’s posture, leading to an overall sense of enhanced well-being.
Finally, by improving muscle balance and flexibility, stretching helps to prevent injuries caused by overstressing existing tight muscles. For these reasons, it’s critical to incorporate teres major stretching into your daily exercise regimen to achieve these benefits.
What are the health benefits of stretching the teres major?
The patient should be aware of the following several advantages:
- This helps to stabilize the shoulder joint.
- Teres major rotates internally and adducts the shoulder joint.
- Boost your ability to perform physical activities
- Reduce the possibility of injury.
- Increase the motion’s range (ROM)
- Boost blood flow to the muscles
- Make muscles function as efficiently as possible
- Boost your capacity to carry out everyday tasks
Teres major stretch:
How to do it: The patient can do the stretch while sitting or even while standing. Elevate one hand above your head.
Then, aim between your scapulae by bending your right elbow so that the palm of your hand extends down your back.
The patient can assist the right elbow gently toward the left from this position.
To keep the scapulae tight on the back, also point them in the direction of the tail.
A small movement may cause the patient to feel the strain if his teres muscles are tight.
The patient may lean to the left with their upper body to deepen the stretch.
On the back, keep your scapulae tight and your pelvis level.
After five to eight minutes, move to the left side in a single repeat. Perform three sets of three repetitions. Work out three times a day.
Doorway Stretch:
Get yourself close to a door frame or a corner of a wall.
While forcing the arm in opposition to the wall and flexing the shoulder and elbow to a ninety-degree angle, keep the spine straight.
Draw the opposing shoulder back and then the body in a straight line while keeping the arm firmly planted against the wall.
Repeat a day thrice, 3-5 times in total on each side, after holding for twenty seconds.
Stretching in Camel Pose:
While you place your hands on your hips and kneel on the ground. Firmly sink or tuck your toes into the prepared surface.
Reach back slowly and plant one hand on each heel.
Maintain an elevated chest, and relaxed shoulders, tighten your core, and gradually drive your hips forward.
Repeat 2-3 times, holding for 30 seconds.
Hand behind your back stretch:
Place your feet wide apart and stand tall. Extend your arms and make a clapping sound with your fingers behind your back.
Maintain a backward-pointing shoulder and a lifted chest.
Repeat 2-3 times, holding for 30 seconds.
Stretching for Floor Angels:
Lie on the surface with your hands pointing upward towards the roof, and raise both of your arms to the side at a 90-degree angle.
Slowly raise the arms across the head till they are fully extended, keeping your feet planted on the ground at all times.
Subsequently, elevate both arms to the starting 90-degree position slowly.
Do this three sets of ten times.
Always keep your back straight against the floor and your ribs tucked under.
Stretching the chest above the head:
The patient can be seated or standing, with their fingers interlocked, their elbows bent, and their arms raised above their heads.
After that, softly press the shoulder edges together, stretch the elbow joint, and return your hands.
To bring out the shoulder joint and chest, raise the hands so they are behind the head, above the head.
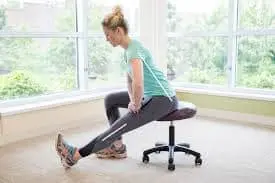
Sitting on Heels & stretching Teres Major
Sit on your heels to begin. Next:
Fold your arms
Holding your shoulder blade towards your spine, gently press your upper body towards the ground.
Keep this stretch going for thirty seconds.
You can also stretch the infraspinatus muscle with this stretch.
Advantages of Teres Major Stretching
Lifting your arm above will increase your shoulder joint’s range of motion.
Improving the scapulohumeral rhythm to increase the health of a shoulder joint
Building muscle in bodybuilding, weightlifting, and throwing sports
Prevents severe injuries
When you raise your arms, try not to rotate your shoulder blades upward excessively to prevent rounded shoulders or thoracic kyphosis.
Wall Stretch with bent arms:
The patient who is receiving care is Put your right leg in front of your left leg and adopt a split stance where you are at the end of a wall and in a doorway.
Subsequently, raise your left arm to shoulder height and place your palm and inner arm against the wall or doorway.
The person’s arm had the appearance of a goalpost.
After that, to feel the stretch, slowly press your chest through the aperture.
Raising and lowering the arm can be used to stretch the various areas of the chest.
Next, perform the identical exercise on the other side.
Expanding the Chest
Start by standing with your feet shoulder-width apart to perform this stretch correctly.
Take your hands and place them behind your back, slightly below your waist.
Try to spread your arms apart by slightly flexing your elbows and pressing against a wall or door frame.
Breathe deeply, keeping them as close to the ground as possible to allow for a slow release of tension in the affected muscle group.
Hold this position for a further 10 seconds. For best results, repeat this exercise multiple times during the day.
To ensure adequate mobility and range of motion in the teres major muscle, you should stretch frequently and maintain excellent posture during daily tasks.
Back of the Elbow Squeeze
The best way to stretch it is to squeeze your elbows behind your back.
Begin by standing straight and aligning your forearms with your torso.
Stack your elbows together and back straight.
Gently separate your elbows until you feel a stretch in the area between your shoulder blades.
Maintain this stance for at least 15 to 30 seconds, then release and repeat as many times as you like.
Maintaining an upright posture throughout each repetition of this stretch is critical for minimizing additional tension on the shoulders or neck.
Regular practice will allow you to fully profit from this important action.
Cross-Body Arm Reach
To begin this stretch, stand upright.
Afterward, transfer your body to the other side and raise one of your arms as far as you can.
Following that, apply light pressure with your left hand to adjust the intensity as necessary. Before changing arms, think about maintaining this posture for ten seconds.
For individuals seeking a straightforward yet efficient method of relieving stress in their upper back and shoulders, the Cross-Body Arm Reach integrates relaxation and tension release.
Bends on the sides
How to carry out this task: Maintaining a straight posture while extending your feet.
Rotate your right foot ninety degrees outward and point the toes sideways.
With one arm raised above your head and your hand resting on your knee, slant to the side.
In one repetition, pause when the patient’s left upper body starts to stiffen, and then keep it for 20 seconds. Do 3 sets of exercises. Engage in three daily workouts. Stretch again in the opposite way.
During the activity, maintain your thighs and chest facing forwards.
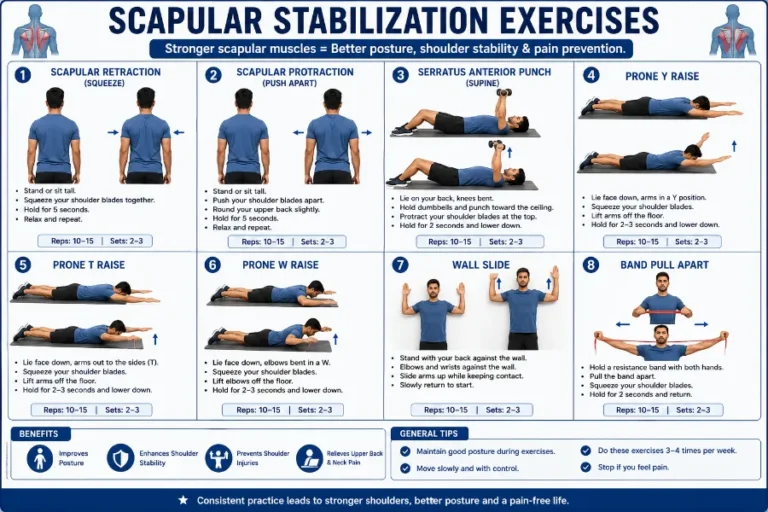
Squeezing the Shoulder Blades
The Shoulder Blade Squeeze is a great workout to strengthen your Teres Major muscle and improve your posture, flexibility, and alleviate upper back pain. Not only will you gain an increased range of motion, but your shoulder pain will also decrease!
Firstly, take an erect stance and raise your arms to shoulder height in front of you.
Hold the shoulders in for 20 seconds.
Remain calm and continue this pattern multiple times, lengthening the squeezes as you get more accustomed to the exercise.
Frequent use of this exercise will stretch your upper back thoroughly and assist in the release of tension in the teres major muscle.
What safety measures and precautions apply to Teres major stretching?
The patient should have the following in mind during stretching:
- Avoid bouncing. Perform yourself smoothly and without bouncing. Both true muscle tension and harm to the muscle might result from bouncing while stretching.
- Maintain the stretch. Hold each stretch for approximately 20- 30 seconds while breathing normally; if the patient is having difficulty breathing, they may need to hold for as long as 60 seconds.
- Avoid aiming for suffering. When you stretch a patient, you want them to experience tension rather than pain. The patient has gone so far if they are in pain.
- Once again, bring the patient back to the point of no pain and hold it there.
- Continue your stretching regimen. The greatest benefit for the patient can be obtained by stretching every day, or around twice a week.
- If daily stretching is neglected, the patient’s danger increases, perhaps reducing the benefits. For instance, if stretching helps you extend your range of motion, the patient’s range of motion may return if they stop stretching.
- Incorporate movement into your stretches. Pilates and yoga are gentle forms of exercise that might help you become more flexible in some areas.
- The patient must modify their stretching methods if they have an injury or a persistent ailment. In this matter, speak with the physical therapist.
- Before stretching, do a warm-up.
- Stretching both before and after exercise has advantages.
- Both gently and slowly stretch.
- It’s usual to breathe when stretching.
- During the exercise, the patient should only concentrate on the task.
Teres major strengthening exercises:
These are excellent additions to your exercise regimen to help strengthen your teres major muscles. Because your teres muscles work with other muscular groups, each of these workouts targets a different muscle in the back, shoulders, or chest.
Pull apart the band.
Start by standing upright.
Hold the band towards its ends with an overhand grasp.
Elevate both hands in front of you. To release the band, squeeze your shoulder blades together.
Return your steps to the beginning slowly.
Keep going until you’ve completed the necessary number of reps.
Dumbbell Internal Rotation
Grasp a small dumbbell in your upper hand while lying on your side on a work surface or the floor.
Execution:
Maintaining your elbow close to your body, bend it to a 90-degree angle.
To raise the dumbbell towards your tummy, rotate your shoulder.
With the dumbbell dropped, go back to the beginning and repeat.
Reps: ten to fifteen on each side for two to three sets.
Resistance Band Shoulder Extension
Attach a waist-height resistance band to a stable anchor point.
Implementation:
Hold the band in one hand while facing the anchor point.
Take a step back to make the band tense.
To lengthen and bring your arm back to you, pull the resistance band back.
Replicate from the beginning position.
10–15 repetitions for each.
Dumbbell Pullover:
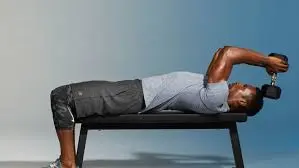
When you lie down on the bench, it should just support your neck and upper back.
Hold the dumbbell with both hands, forming a triangle or grasping the inner plate.
Holding the dumbbell straight above your heart, slightly bend your elbows.
Ensure you use your core to slowly bring the dumbbell across your face and over your head.
Pull the dumbbell across your face to return it to its starting position.
Repeat the appropriate number of reps.
Pullovers with barbells
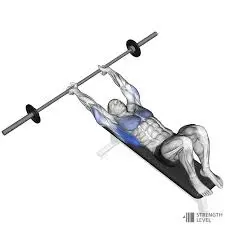
Using a barbell increases the intensity of this workout significantly.
Unlike dumbbell pullovers, you want to keep your elbow flexion extended the entire time to prevent dropping the barbell by moving too far.
Begin this exercise on a bench, holding the barbell with your hands close together, just over your ribs.
Place the barbell up and return your arms behind your head while maintaining a flexed elbow position.
To return the barbell to the starting position, contract your back for 10 to 12 repetitions.
Pulling down the straight arm cable:
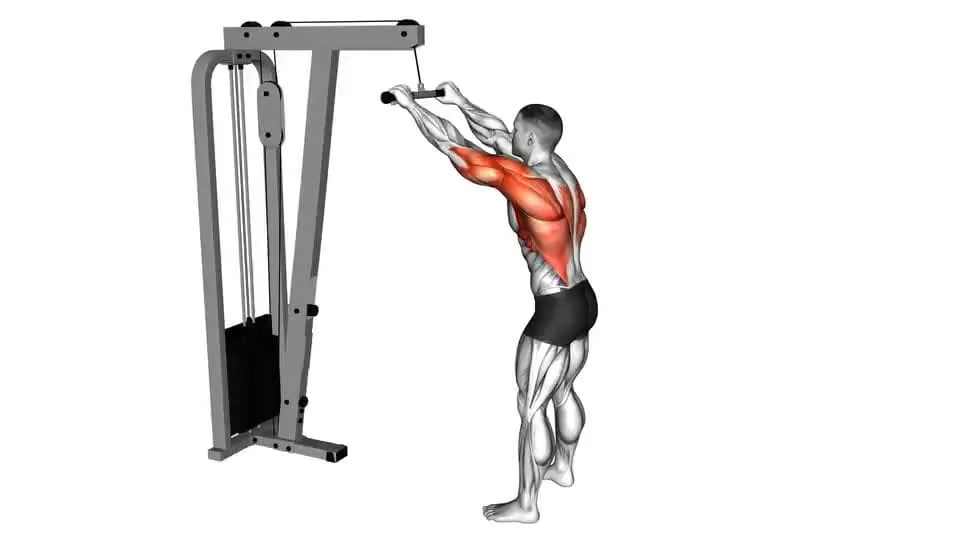
A wide-grip handle or an above-the-head attachment should be used to connect the cable machine.
With both hands separated by a shoulder, take an overhand grip on the handle.
To press down on the grip, flex forward, drop your shoulder blades, and elongate your shoulders while maintaining a tiny bend in your elbows and a slight forward lean in your hips.
Pull down the handle when it reaches your thighs.
Gradually decrease to the starting point.
Keep going until you’ve completed the necessary number of reps.
For the straight-arm lat pulldown, it is important to maintain a tight core throughout the exercise and concentrate on using your lats rather than your arms to pull the bar down.
Shoulder Extension at the Prone
Setup: Extend your arms upwards while lying face down on a bench or the floor.
Execution: Raise your arms straight up off the ground.
At the peak of the movement, hold for a little while before lowering them again.
Throughout the workout, maintain an upright head posture.
Reps: 10–15 for two to three sets.
Wand Exercise:
This workout will allow you to expand your range of motion.
Using both hands, the patient grasps the wand.
Next, flex your elbow and shoulder joints.
Perform the following motions with the wand: abduction, adduction, shoulder flexion, elbow flexion, extension, and external and internal rotation. Each person exercises 2-3 times a day.
Isometric exercise for shoulder internal rotation:
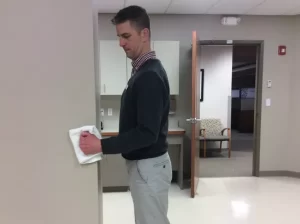
Position yourself outside the corner of the wall, in front of a door frame.
The damaged shoulder joint is located close to the door’s corner.
Next, create a fist and bend your elbow joint to a 90° angle.
Try to rotate the arm inward toward the tummy and carefully press a towel against the door jamb and corner wall.
Release the pressure gradually after 10 to 15 seconds of application.
Do ten to fifteen repetitions.
Isometric exercises for shoulder extension:
To perform a shoulder extension, you should stand with your back to the wall and six inches apart.
Your elbow joint is straight, so your hand stays at your buttocks and clenches into a fist.
Following that, make an effort to gently press the towel up against the wall.
After applying pressure for five to ten seconds, slowly release it.
Complete the ten to twenty reps.
Exercise for Bent-Over Horizontal Abduction:
You’re lying on your stomach with your injured arm hanging over the side of the bed or table.
You must carefully raise your arm to eye level while maintaining its upright posture.
Lower it gradually back to the starting position to repeat this exercise.
Work out like this three times a day.
Exercise for Bent-Over Horizontal Adduction:
You’re on your stomach, your injured arm hanging over the side of the bed or table.
Maintaining a straight arm is necessary as you slowly raise it to eye level.
Gently lower it back to the starting position to repeat this exercise.
Work out three times a day using this method.
Inverted Row:
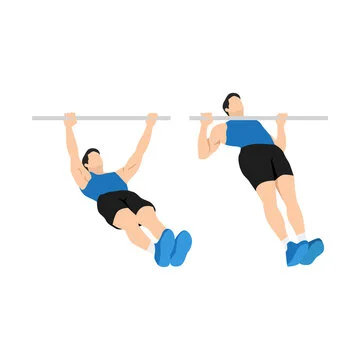
Put the bar just above the level of your arm above the ground.
Stretch your legs out in front of you and take a position beneath the bar.
To grab the bar, raise your arms and put both hands in an overhand hold wider than your shoulders.
Verify that your feet are on the floor and that your limbs are straight. Pull the shoulders back till your chest makes contact with the bar to stand up.
Reduce gradually to the beginning.
Continue until you’ve performed the required number of repetitions.
Note: Throughout the exercise, maintain a neutral spine and an engaged core without allowing your hips to sink.
Underhand Yates Row.
Grab a barbell with both hands and use an underhand grip to hold it at shoulder-width.
Bend at the knees to bring your hips to a 45-degree angle.
Your arms should be almost fully extended, and the bar should be over your thighs.
Elevate the standard to your waist.
Steadily return to the starting location after a little rest at the summit.
Keep going until you’ve completed the necessary number of reps.
Remember to draw up via your elbows rather than your biceps while maintaining your body motionless.
Pull down with an underhand grip lat:
Put yourself on a work surface with your back to the cable machine.
Reach out with both hands and use an underhand grip to hold the bar shoulder-width apart.
Pull down on the bar by pulling your shoulder blades back and down when it reaches your chest.
Return to your starting position gradually.
Keep going until you’ve completed the necessary number of reps.
Rising lateral:
Take hold of a pair of light dumbbells to start.
When you stand, your feet are somewhat wider apart than the width of your hip joints.
Try to move the weights to the sides and raise them to shoulder level.
Remember to engage your core muscles and progressively lower the dumbbells to the sides.
For this workout, perform 3 sets of 10 repetitions two times a week.
Lat Pull Down:
To perform a standard lat pulldown, take the following actions:
Attach a bar to the cable pulley/lat pull-down machine (either a straight bar or a wide grip bar).
When you are seated, adjust the leg pads so that they press on the tops of your legs to reduce movement and hold you in place.
Pull down through your elbows to keep the bar descending straight down until it hits your upper chest. Retract your shoulder blades and reach up with both hands, utilizing an overhand hold (palms facing away) with hands slightly wider than shoulder-width apart.
When the movement is at its lowest, tighten your lats.
Gently move the bar back to its starting position.
Continue till the desired number of times.
Pulldown of V-Bar lat
This variation of the lat pulldown requires you to pull down with your elbows tucked in because it uses a neutral grip. Your shoulder extension will improve, which means your lats will be able to move more weight. By activating more muscles, the V-bar lat pulldown will enable you to lift heavier weights.
This lat pulldown variation also requires you to slant your back a little bit, which increases your leverage and allows you to transfer more weight. All things considered, this is an excellent lat pulldown variation that works for the entire lat muscle group and provides a full range of motion. Don’t pass up this exercise, which can help you gain strength and size.
How to Apply
After attaching the V-bar to the cable pulley, take a position.
Reach up and take a neutral grip on the V-bar with both hands.
Lean back a little while extending your arms fully and pulling down with your elbows until your hands are at your upper chest.
Return to the starting posture slowly while extending your arms fully.
Keep going until you’ve completed the necessary number of reps.
Note: Use your lats instead of relying on your rocking momentum to bring the bar down.
Neutral grip, lat pulldown, kneeling
Advantages of the lat pulldown.
For a full lat stretch, the kneeling neutral grip lat pulldown is a fantastic workout. This workout will help you develop a broader back. Your arms begin at a broader angle to your sides in this version, even though the grip may be comparable to the V-bar lat pulldown. From this starting position, substantial activation is obtained in the upper lats, teres major, and lower traps. We find it simpler to truly concentrate on contracting and squeezing the lats with this exercise because of the way the body is positioned.
How to Apply
Place yourself in the middle of the cable machine, then raise your arms and take hold of both handles with a neutral grip.
Pull your elbows inward and down towards your sides while maintaining your core engaged, until your hands are near your shoulders.
At the bottom of the exercise, tense your lats, then slowly come back to the beginning position.
Keep going until you’ve completed the necessary number of reps.
Exercise for Chin-Ups:
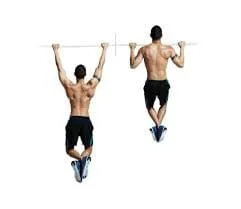
With an underhand grip and keeping your hands wider than your shoulders, grasp the bar with both hands.
Start with your arms extended completely and raise your upper body as far as you can towards the bar.
Take a few steps back to begin, then hold at the top for a short while.
Complete the ten or so repetitions.
Repeat, a single set at a time.
One-Arm Dumbbell Row:
Using a neutral grip, grasp a dumbbell in your right hand. Next, take a seat with your right knee bent and your hand under your shoulder.
Grip the dumbbell with the left hand straight beneath your left shoulder.
Pull the dumbbell upward while flexing at your elbow and maintaining your arm close to your hip when it gets close to your body. Gradually return to the initial position.
Complete the ten or so repetitions.
Repeat, a single set at a time.
Cable Rows with Seats
Seated on a bench, bend at the knees and reach forward to hold the triangle handle.
Pull the grasp back towards your belly while keeping your back straight and your shoulder blades squeezed together.
Gradually decrease to the starting point.
Complete the ten or so repetitions.
Repeat, a single set at a time.
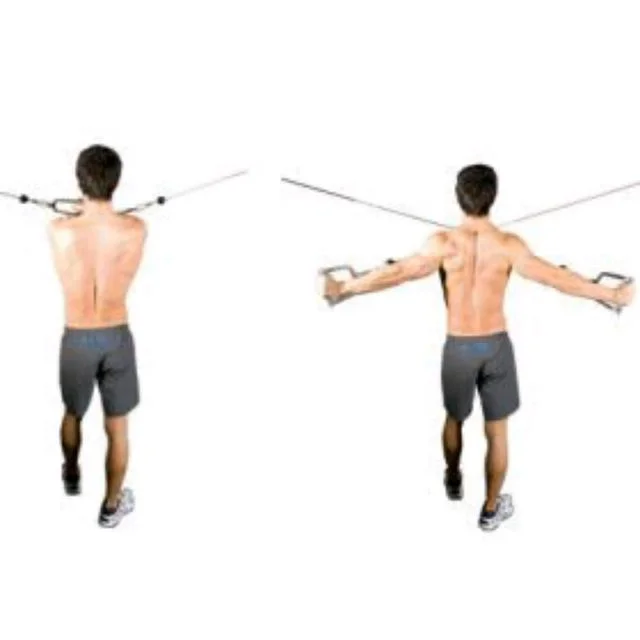
Fly Reverse Crossover Using High Cable
Hold both handles at head height to begin operating the cable machine.
Position yourself at the center of the two-pulley device.
When your arms are parallel to the back, draw the elbows as far down, out, and back as you can with both hands. Raise up and around your body and grab the grasps with an overhand hold (or grasp the cables).
Gradually decrease to the starting point.
Complete the ten or so repetitions.
Repeat, a single set at a time.
Exercise for Reverse Flying with Cable Supine:
With a bench positioned between two pulleys, begin.
Raise your hand across your torso and grasp both handles (the cable) using an overhand grip.
Sit on the bench with your elbows bent just slightly and your arms folded across your chest.
Pull your arms down to your sides so that your elbows are level with your shoulders while keeping your body perpendicular.
Gradually decrease to the starting point.
Complete the ten or so repetitions.
Repeat, a single set at a time.
Reverse fly with dumbbells:
Hold the dumbbells with a regular grip, using both hands.
Next, bring your body almost parallel to the floor by bending at the hips.
Holding the dumbbells with the arms swinging down from the shoulders, raise and lower them until the elbows are parallel to the shoulders.
Gradually decrease to the beginning point.
Complete the ten or so repetitions.
Repeat, a single set at a time.
Exercise with pull-apart bands:
Get into an upright posture.
Keep the band close to the ends using an overhand grip.
Lift your arms to shoulder height in front of you.
The band will separate as you squeeze your shoulder blades together.
Gradually decrease to the beginning point.
Complete the ten or so repetitions.
Repeat, a single set at a time.
Workout Using Face Pulls:
Lift the cord to your head.
Grab the rope and handles using an overhand grip.
Pull back until your hands are parallel to your face, keeping the elbows below the shoulders.
Gradually decrease to the beginning point.
Complete the ten or so repetitions.
Repeat, a single set at a time.
Dumbbell rows
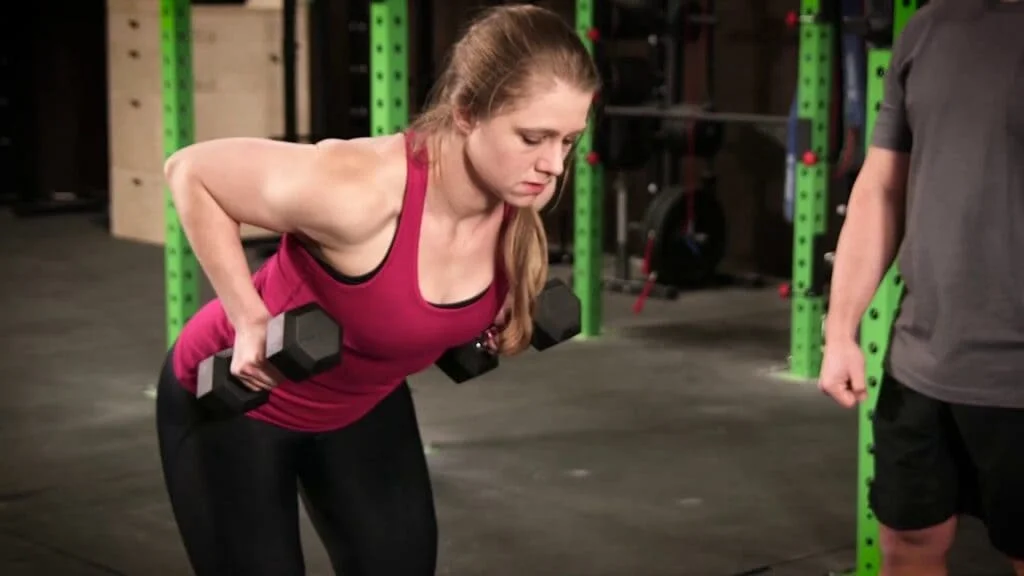
Keep your abdominals firm, your back flat, and hinge from your hips for this exercise.
Squeezing your back, you raise the elbows to the level of your trunk with the weights hanging downward (they should be hefty).
You want to use your back muscles to manage the movement, rather than tugging the dumbbells up. Elbows should come to a modest stop just above the trunk.
You’re leaning over and hanging dumbbells, so your lower back has to work too hard to keep the body in neutral.
Flex your knees and keep your abdominals braced if you experience lower back discomfort.
Rows of Seating with Resistance Bands
The total rowing activity can be altered with resistance bands. Because the resistance band offers resistance during the exercise, the muscle fibers will fire somewhat differently.
This is a workout that you can do while sitting or standing.
Using both hands, grasp the grips and use a resistance band to wrap a stable object in front of you. Continue backward until the opposite stress is felt by the band.
With your shoulders lowered, draw in your back to align your elbows with your trunk. After releasing, repeat for 12 to 16 repetitions.
Pulling Your Lats With Bands
This exercise mimics the lat pull machine at the gym.
You can use a door holder to hold the band and place it in a doorway above you to make this workout more challenging, or you can hold the band above your head and use your back muscles to lower your elbows down towards your rib cage.
To make this workout harder, hold the band with your hands closer together.
For a more focused workout, you may also attempt to perform this one arm at a time.
Perform 12–16 repetitions of this.
FAQs:
1. What is the function of the teres major muscle?
The teres major is a small muscle situated beneath the shoulder in the upper back. It is essential to the stability and movement of the shoulder because it helps with internal rotation, adduction, and extension of the shoulder joint.
2. Why are the workouts in Teres Major Important?
Improving shoulder stability, mobility, and general upper body strength is achieved by strengthening the teres major. Additionally, it can aid with posture and shoulder injury prevention.
3. What is the recommended frequency of these major exercises?
Try to include two to three times a week of these major movements in your workout regimen for the best results. To enable muscular healing, make sure you give yourself at least 48 hours of rest in between workouts.
4. Is it possible for teres major workouts to alleviate shoulder pain?
Yes, by enhancing joint stability and muscle balance, major strengthening can help reduce shoulder pain. But before beginning any workout program, it’s imperative to speak with a healthcare provider if you have severe or chronic shoulder pain.
5. What tools am I going to need for the three major exercises?
Numerous tools can be used for the three major workouts, including bodyweight, stability balls, dumbbells, and resistance bands. Select the gear according to your level of fitness and the resources at your disposal.
6. When practicing these major workouts, are there any common faults to watch out for?
Overusing weight, moving too rapidly through workouts, and ignoring form are common errors. Start with smaller weights, go through exercises slowly and deliberately, and concentrate on keeping proper form and technique to prevent injury.
7. How can a beginner adjust the three major exercises?
Beginners should concentrate on perfecting form and begin with smaller weights or resistance bands. Increase the weight or resistance gradually as your confidence and strength grow.
8. Can someone with a shoulder injury do these major exercises?
It’s important to speak with a healthcare provider before beginning any fitness program if you have a shoulder issue. They can offer advice on safe workouts and adjustments to prevent making the condition worse.
9. For experienced lifters, what are some good teres major exercises?
More difficult exercises, such as single-arm dumbbell rows, heavy bent-over rows, and weighted internal rotation with resistance bands, can be added by advanced lifters. The teres major may be more challenged by adding weight and intricacy to the exercises.
10. Can I do other shoulder exercises in addition to these major exercises?
Definitely! A well-rounded shoulder workout can be made by combining these major movements with other shoulder exercises, including deltoid and rotator cuff exercises. This method guarantees increased shoulder function overall and balanced muscular development.
11. How can I tell whether my exercises are correctly targeting the teres major?
When performing workouts that target the teres major, you should feel your shoulder blade and upper back muscles contract. To make sure you’re utilizing the proper form and technique, seek advice from a fitness expert if you’re unsure.
12. After these main workouts, are there any stretches I should perform?
Stretching your upper back and shoulders after a workout can help increase flexibility and lessen tension in your muscles. The doorway stretch and the cross-body shoulder stretch are two examples.
References:
- Maheshwari, R. (2020, June 20). There is major and Minor Pain. SlideShare. https://www.slideshare.net/slideshow/teres-major-and-minor-pain/235961876
- Set, S. F. (2024a, May 6). Top 15 Strengthening Exercises For Teres Major And Teres Minor. SET FOR SET. https://www.setforset.com/blogs/news/teres-major-teres-minor-exercises
- Patel, D. (2024, May 23). 51 Best Exercises for Latissimus Dorsi Muscle. Physical Therapy Treatment and Exercise. https://physical-therapy.us/exercises-of-latissimus-dorsi-muscle/#Pullovers_with_Barbells
- Jyoti. (2022b, July 18). Teres Major Muscle: Origin, Insertion, Function, Exercise. Samarpan Physiotherapy Clinic. https://samarpanphysioclinic.com/teres-major-muscle/
- Colletta, M. (2021, December 14). 10 Best Teres Major & Minor Exercises for Strength. Steel Supplements. https://steelsupplements.com/blogs/steel-blog/10-best-teres-major-minor-exercises-for-strength
- Gkw, I. (2023, October 20). Top 15 Strengthening Exercises For Teres Major And Teres Minor. Pinterest. https://www.pinterest.com/pin/top-15-strengthening-exercises-for-teres-major-and-teres-minor–666180969905613804/
- Thomsen, A. (2023, July 5). How to Strengthen Your Teres Major. ASFA. https://www.americansportandfitness.com/blogs/fitness-blog/how-to-strengthen-your-teres-major
- Koshti, A. (2024, January 19). 15 Best Exercises For Teres Major Muscle. Mobility Physiotherapy Clinic. https://mobilephysiotherapyclinic.net/best-exercises-for-teres-major-muscle/
- Teres Major — Exercise Library & Database — Rehab Hero. (2024, April 23). Rehab Hero. https://www.rehabhero.ca/exercise/tag/Teres+Major
- Nora. (2023, January 10). Teres Major Stretch: 5 Effective Moves. Stretch.com. https://stretch.com/blog/teres-major-stretch/
- Guslov, T. (2023, September 24). How To Stretch Your Major Muscle. https://www.linkedin.com/pulse/how-stretch-teres-major-muscle-trivo-guslov