Best Stretches For Upper Cross Syndrome
Introduction
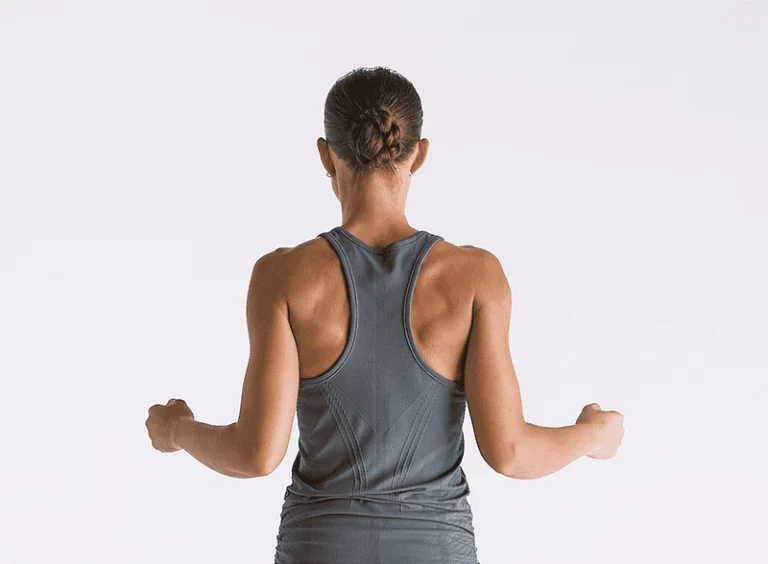
Upper Cross Syndrome is a common postural imbalance that affects the muscles of the neck, shoulders, chest, and upper back. It often develops from prolonged sitting, poor posture, excessive computer or smartphone use, and repetitive activities that keep the head and shoulders positioned forward.
In this condition, certain muscles—particularly the chest and upper neck muscles—tend to become tight and overactive, while important postural muscles in the deep neck and upper back may become weak or underactive. This imbalance can contribute to forward head posture, rounded shoulders, neck stiffness, upper-back pain, shoulder tension, headaches, and reduced mobility.
Regular stretching can be an important part of managing Upper Cross Syndrome because it helps reduce tightness, improve flexibility, and make it easier to maintain a more comfortable upright posture. Stretches targeting the chest, neck, shoulders, and upper back are especially useful when combined with strengthening exercises for the deep neck flexors, scapular stabilizers, and upper-back muscles.
The best stretches should be performed slowly and comfortably without forcing the joints or causing pain. With consistent practice, appropriate stretching and strengthening can help improve movement patterns, reduce muscular tension, and support better posture during everyday activities.
Stretches For Upper Cross Syndrome
Active Levator Stretch
How to do
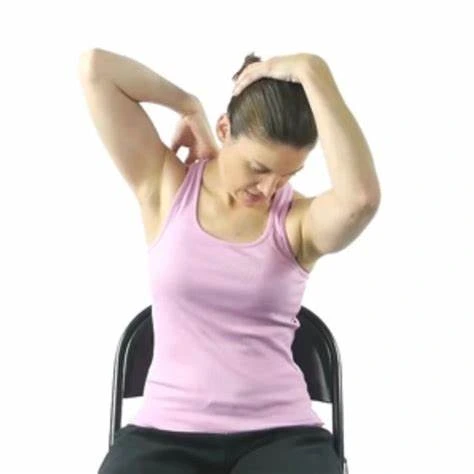
- For this workout, please sit.
- Turn your head to one side and lower it forward.
- Do not pull on the head; instead, rest the same-side hand on the back of the head.
- Slowly switch between shrugging and reaching for the floor with the other hand.
- Reps: twice
- Hold: 20 seconds
- Frequency: three times each week
Trapezius In Standing
How to do
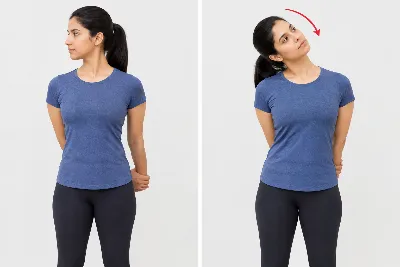
- Stand up, grasp the wrist of the side that needs to be stretched behind your back, and move your body to the other side.
- To feel a stretch in the side of the neck, turn your head to the side that needs to be stretched and tilt your head away (from ear to shoulder).
- Reps: twice
- Hold: 20 seconds
- Frequency: three times each week
Active/Pecs Horizontal Abduction
How to do
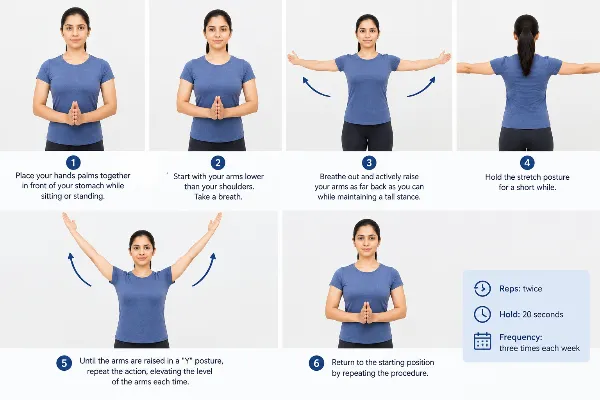
- Place your hands, palms together, in front of your stomach while sitting or standing.
- Start with your arms lower than your shoulders. Take a breath.
- Relax and take a standing position while aggressively raising your arms as far back as you can.
- Hold the stretch posture for a little while before returning to the beginning position.
- Until the arms are raised in a “Y” posture, repeat the action, elevating the level of the arms each time.
- Return to the starting position by repeating the procedure.
- Reps: twice
- Hold: 20 seconds
- Frequency: three times each week
Thoracic Spine Extension Mobile Supine Towel
How to do
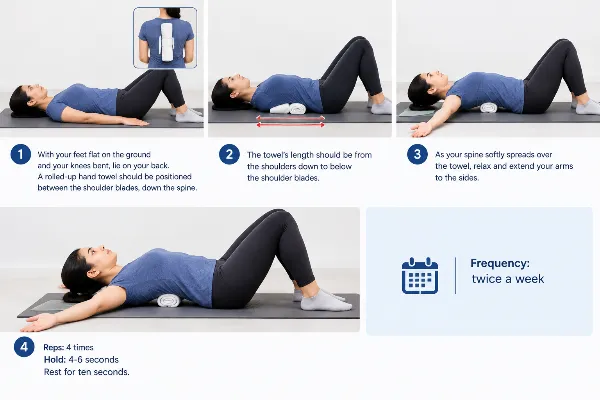
- Lie on your back with your knees bent and your feet flat on the floor.
- A rolled-up hand towel should be positioned between the shoulder blades, down the spine.
- The towel’s length should be from the shoulders down to below the shoulder blades.
- As your spine softly spreads over the towel, relax and extend your arms to the sides.
- Reps: 4 times
- Hold: 4-6 seconds
- Rest for ten seconds.
- Frequency: twice a week
Thoracic Spine Extension Mobile Towel
How to do
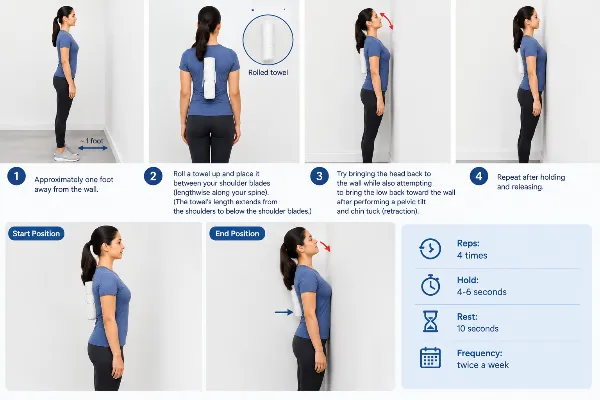
- Approximately one foot away from the wall.
- Roll a towel up and place it between your shoulder blades (lengthwise along your spine). (The towel’s length extends from the shoulders to below the shoulder blades.)
- Try bringing the head back to the wall while also attempting to bring the low back toward the wall after performing a pelvic tilt and chin tuck (retraction).
- Repeat after holding and releasing.
- Reps: 4 times
- Hold: 4-6 seconds
- Rest: 10 seconds
- Frequency: twice a week
Side-Lying Hip Flexor
How to do
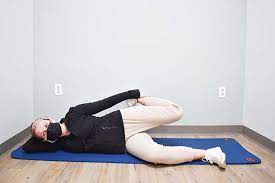
- Lying on your side, hold the ankle of the upper leg.
- Maintain the posture of the knee, hip, and shoulder.
- To feel a stretch at the front of the hip, keep the pelvis tilted and contract the buttock muscles to extend the hip farther (do not pull with the hand).
- Reps: twice
- Hold: 20 seconds
- Frequency: three times each week
QL Side Bend Reach
How to do
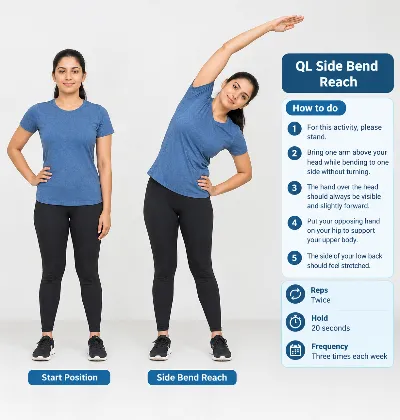
- For this activity, please stand.
- Raise one arm above your head and bend to one side without turning.
- The hand over the head should always be visible and slightly forward.
- Put your opposing hand on your hip to support your upper body. The side of your low back should feel stretched.
- Reps: twice
- Hold: 20 seconds
- Frequency: three times each week
Lumbar Rotation Supine
How to do
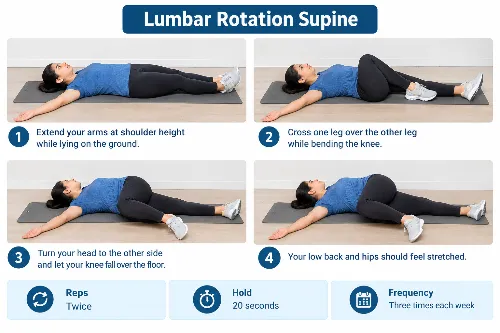
- Lying on the ground, raise your arms to shoulder height.
- Cross one leg over the other (Bend the knee)
- Let your knee drop to the floor and turn your head to the opposite side.
- Your low back and hips should feel stretched.
- Reps: twice
- Hold: 20 seconds
- Frequency: three times each week
Pelvic Tilt Seated
How to do
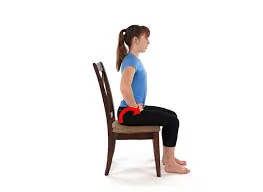
- For this workout, please sit.
- As if you were tucking your pelvis under, tuck your tummy in and sway your pelvis slowly.
- Next, arch the low back and guide the buttocks out by rocking the pelvis in the opposite direction.
- Reps: 4 times
- Hold: 4-6 seconds
- Rest: 10 seconds
- Frequency: twice a week
Abdominal Hollow Leg/Arm Extension
How to do
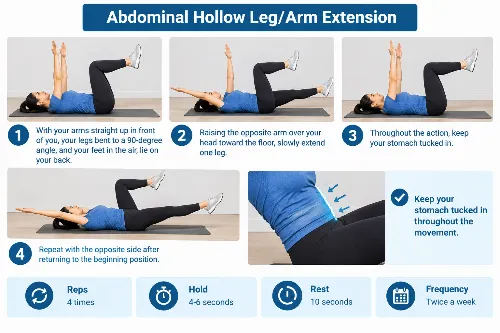
- With your arms straight up in front of you, your legs bent to a 90-degree angle, and your feet in the air, lie on your back.
- Raising the opposite arm over your head toward the floor, slowly extend one leg.
- Throughout the action, keep your stomach tucked in.
- Repeat with the opposite side after returning to the beginning position.
- Reps: 4 times
- Hold: 4-6 seconds
- Rest:10 seconds
- Frequency: twice a week
Abdominal Crunches
How to do
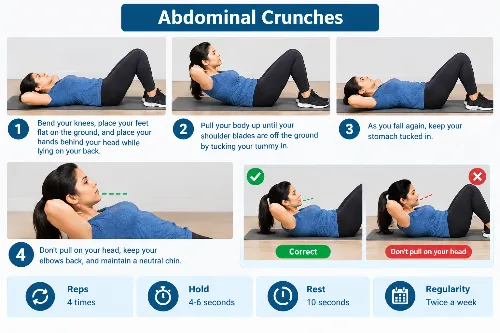
- Lie on your back
- Bend your knees
- Keep your feet flat on the floor while keeping your hands behind your head.
- Pull your body up until your shoulder blades are off the ground by tucking your tummy in.
- As you fall again, keep your stomach tucked in.
- Don’t pull on your head, keep your elbows back, and maintain a neutral chin.
- Reps: 4 times
- Hold: 4-6 seconds
- Rest: 10 seconds
- Regularity: twice a week
Front Plank With Forward Shift
How to do
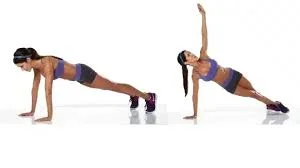
- Support your body in a plank position with your feet together and your forearms shoulder-width apart.
- Maintain a straight line across the shoulders, hips, and knees.
- Shift your body weight forward over your shoulders and tuck your abdominals in while maintaining the transverse abdominal contraction.
- Hold and go back to the plank.
- Reps: 4 times
- Hold: 4-6 seconds
- Rest: 10 seconds
- Frequency: twice a week
One Arm Stretch
How to do
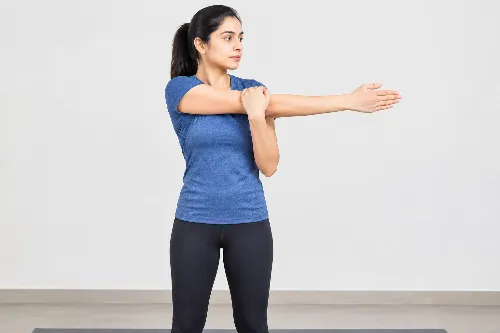
- To begin, stand comfortably 5 to 6 inches away from a wall with your back to it.
- Put your palm down, raise the arm on the injured side, and use the thumb side of your hand to try to touch the wall.
- Always keep your arm straight.
- Move your body away from your lifted arm as soon as your muscles start to stretch.
- For thirty seconds, keep doing this stretch.
- Next, maintain a neutral stance.
- Then relax.
- Continue on the opposite side.
Seated Shoulder Stretch
How to do
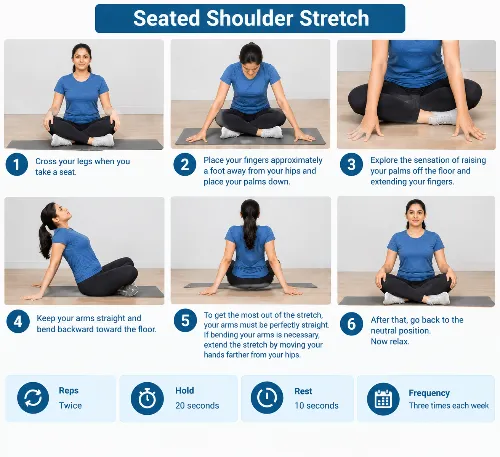
- Cross your legs when you take a seat.
- Place your fingers approximately a foot away from your hips and place your palms down.
- Explore the sensation of raising your palms off the floor and extending your fingers.
- Keep your arms straight and bend backward toward the floor.
- To get the most out of the stretch, your arms must be perfectly straight.
- If bending your arms is necessary, extend the stretch by moving your hands farther from your hips.
- After that, go back to the neutral position.
- Now relax.
Reverse Shoulder Stretch
How to do
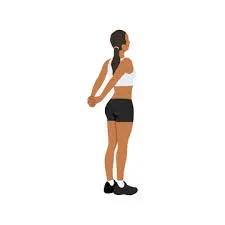
- Take a comfortable posture first.
- Lock your elbows behind you and slowly extend your arms behind your body.
- There should be tension in the muscles that connect your shoulder blades.
- Avoid stepping outside of your comfort zone.
- Minor pain in the muscles or burning is fine, but not arm or neck pain.
- Don’t shrug your shoulders away from your ears.
- After that, go back to the neutral position.
- Now relax.
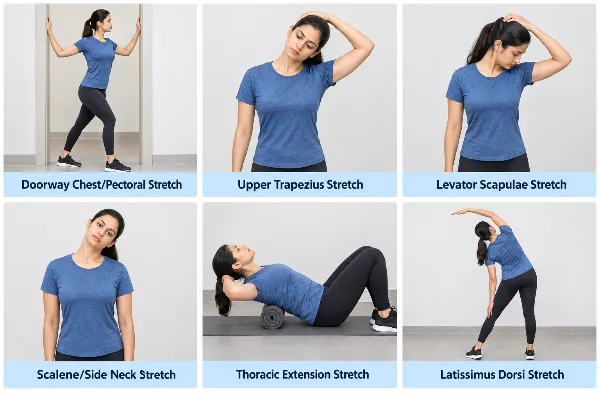
Doorway Shoulder Stretch
How to do
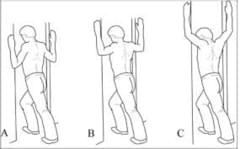
- Take a position in an open doorway.
- Each arm should be raised to the side with the palms facing front and the elbows bent at a 90-degree angle.
- Place your hands on the door frame.
- Try dropping your elbows a little if this causes too much pain
- Slowly step one foot forward.
- Your chest and shoulder muscles should feel stretched.
- When standing, keep your posture upright.
- Hold for a few seconds.
- Next, maintain a neutral stance.
- Then relax.
What safety measures are necessary when exercising?
- Before working out, warm up and stretch.
- When exercising, keep your spine straight.
- Avoid physically demanding activities.
- If you suddenly feel uncomfortable, stop working out.
- Rest in between workouts.
- Stay hydrated.
When do you stop working out?
- Severe pain in the muscles
- You’re infectious.
- If any numbness or pain is present.
- Fever and Headache
- If it hurts, you should stop exercising.
Prevention of upper cross syndrome
You can reduce how much time you spend reading, driving, watching TV, or using laptops and computers by taking breaks every ten to fifteen minutes while seated or concentrating on difficult activities. Get enough cardiovascular exercise—ideally 30 to 35 minutes a day—from low-impact activities like cycling, swimming, or walking.
Acknowledge and stay away from behaviors, gestures, or activities that increase and worsen symptoms for as long as possible. The pain doesn’t go away when you rest.
Stretching tight muscles in the rear neck, shoulders, and chest, as well as exercising to target weaker muscles in the upper front neck and lower shoulders, should be done many times a day.
Conclusion
Upper Cross Syndrome can gradually lead to forward head posture, rounded shoulders, neck stiffness, shoulder tension, and upper-back discomfort, especially in people who spend long hours sitting, working at a computer, or using smartphones. Regular stretching can help loosen tight muscles in the chest, neck, shoulders, and upper back while improving flexibility and overall movement. Stretching, however, is most effective when paired with strengthening activities for the upper back, shoulder blade stabilizers, and deep neck flexors.
Consistency is important for achieving lasting improvements. Perform each stretch slowly, maintain good posture, and avoid forcing your body into painful positions. Taking regular movement breaks and improving your sitting and working posture can also help prevent the same muscular imbalances from returning.
If pain is severe, persistent, associated with numbness or weakness, or worsens during exercise, consult a physiotherapist or other qualified healthcare professional for an appropriate assessment and individualized exercise program.
FAQs
Which muscle is tight in upper cross syndrome?
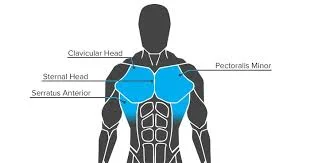
Tightness in the pectoralis major and minor, upper trapezius, levator scapulae, sternocleidomastoid, and suboccipital muscles is a characteristic of upper crossed syndrome.
What is the best exercise for upper crossed syndrome?
Face pulls and resistance-band pull-aparts are commonly regarded as the finest overall strengthening exercises since they specifically target the weak rear deltoids, rhomboids, and mid/lower traps that fail during upper crossed syndrome. However, there is no one “best” exercise.
Treating upper crossed syndrome requires a balanced program that strengthens weak upper-back and neck flexors and stretches tense chest and neck muscles.
What does upper crossed syndrome feel like?
Tension headaches frequently accompany upper crossed syndrome, which is characterized by a persistent dull pain, tightness, and exhaustion in your neck, shoulders, and upper back.
How to tell if your upper traps are weak?
A dropping shoulder blade, a flat or depressed collarbone angle, or a reduced ability to withstand a weighted shoulder shrug are all signs of weak upper traps.
How does NASM characterize upper cross syndrome?
Driven by unique muscular imbalances, upper crossed syndrome (UCS) is defined by a particular postural deformity pattern with a forward head and rounded shoulders. The National Academy of Sports Medicine (NASM) states that this syndrome results in a crossover pattern of underactive (lengthened) and overactive (shortened) upper body muscles.
How long does it take to correct upper cross syndrome?
Major structural improvements and pain reduction from upper cross syndrome can be observed after 4 to 12 weeks of regular daily activity, while severe instances may require several months.
How to get rid of upper cross syndrome?
You must strengthen weak upper-back and deep neck flexors and stretch tight chest and neck muscles as part of a regular daily practice to eliminate upper crossed syndrome (UCS).
References
- Back to Health, Back to Health, & By Back to Health. (2023, February 3). Cross syndrome stretches. Back to Health Wellness Centre. https://www.back2health4you.com/cross-syndrome-stretches/
- Xu, B. H. (2025, February 3). Exercises/Stretches to help counter Upper Cross Syndrome | Holistic Balance. Holistic Balance |. https://www.holisticbalancemelbourne.com.au/exercises-stretches-to-help-counter-upper-cross-syndrome/