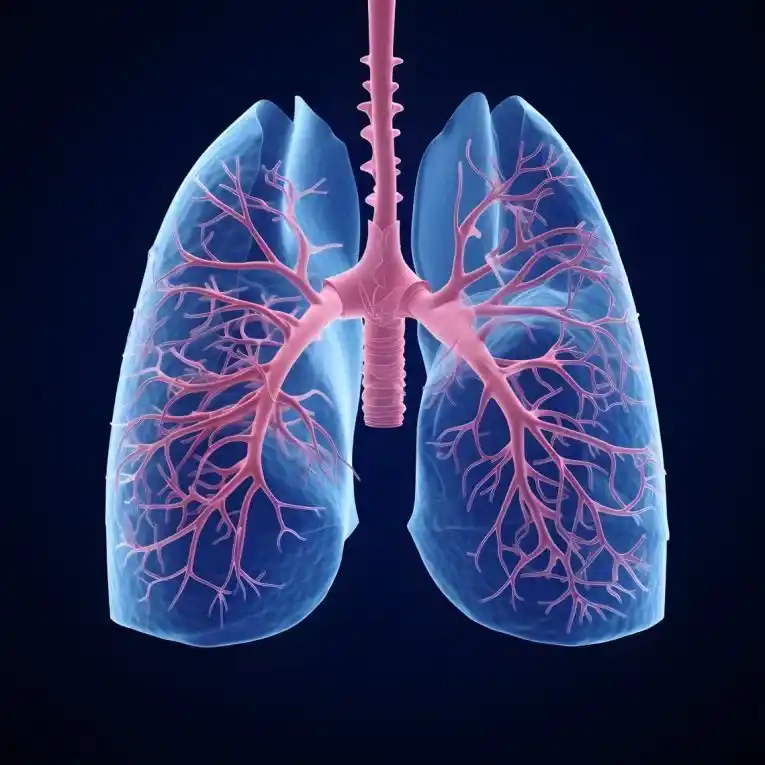
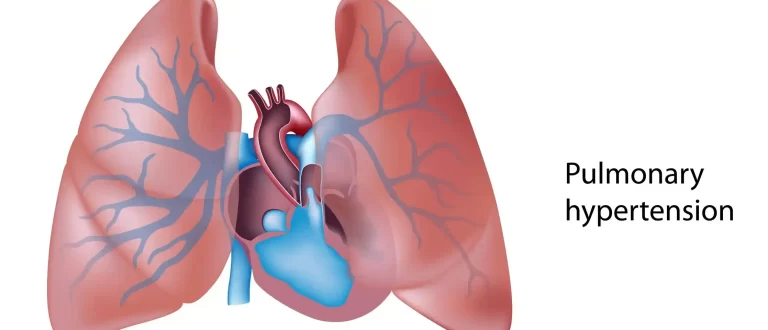
Blog

  • Amputation

    Amputation

    Definition of Amputation:

    Amputation is the surgical removal of a limb or part of a limb, often performed to treat severe injury, infection, disease (such as diabetes or peripheral artery disease), or certain cancers. It can also be a result of traumatic events.

    Rehabilitation, including physical therapy and the use of prosthetics, plays a crucial role in helping individuals regain mobility and adapt to daily life post-amputation.

    What is a Amputation?

    The surgical removal of all or part of an arm, leg, foot, hand, toe, or finger is known as amputation. Trauma, extended constriction, or surgery are the methods used. As a surgical measure, it is used to reduce pain or a disease process in the affected limb, such as cancer or gangrene. It is sometimes performed on patients as a prophylactic procedure for these issues.

    Congenital amputation, a congenital condition in which constrictive bands have severed embryonic limbs, is a unique instance. People who have committed crimes in some countries have been punished by having their hands, feet, or other bodily parts amputated. The most common type of amputation surgery is a leg amputation, which can occur above or below the knee.

    Prevalence of Amputations

    Every year, one million limb amputations are reported worldwide. Additionally, 57.7 million people worldwide were living with traumatic amputation as of 2017. According to the Amputee Coalition, there are about 185,000 amputations in the US annually. Additionally, more than 2 million Americans had amputations as of April 2021, and another 28 million were at risk of having their limbs amputated surgically because of underlying reasons.

    According to data from Stanford Healthcare, the overall number of amputations during the COVID-19 pandemic increased by 49% between March 2020 and February 2021.

    Congenital Amputation: What is It?

    This term refers to a nonexistent or incompletely formed hand, foot, arm, or leg that is present from birth rather than the result of surgery. Children with congenital amputations may have surgery or artificial limbs in the future if the child, parents, and care team believe it will improve their function and quality of life.

    Level of Amputation:

    Level of Amputation
    Level of Amputation

    Amputation in the Upper Limb:

    • Forequarter
    • Shoulder Disarticulation (SD)
    • Transhumberal (Above Elbow AE)
    • Elbows Disarticulation ED
    • Transradial (Below Elbow BE)
    • Hand/ Wrist Disarticulation
    • Transcarpal (Partial Hand PH)

    Amputation Lower Limb:

    • Hemicorporectomy
    • Hemipelvectomy/ Hindquarter amputation
    • Hip Disarticulation
    • Short transfemoral(above knee)
    • Transfemoral (above Knee)
    • Long transfemoral (above knee)
    • Knee Disarticulation
    • Short transtibial (below knee)
    • Transtibial (below knee)
    • Long transtibial (below knee)
    • Ankle Disarticulation (Symes)
    • Tansmetatarsal
    • Partial Foot/ray resection
    • Toe disarticulation
    • Partial Toe

    Surgery for Amputation:

    The first stage in each surgery is anesthesia. The type of amputation, as previously mentioned in the section on stages of amputation, determines the anesthesia to be used during the procedure.

    Particular caution must be used when performing amputation to ensure that the operation does not impair the residual limb’s ability to function. To ensure a healthy stump that can support the weight of a prosthetic limb in the future and lower the risk of complications, it is imperative to condition, shorten, and smooth the residual bone.

    In order to preserve the maximum strength of the remaining limb, the muscle is sutured to the bone at the distal residual bone. Myodesis is the term for this process.

    It is usually advised to distal stabilize the muscles in order to facilitate efficient muscle contraction and less atrophy. This preserves the soft tissue covering of the remaining bone and permits a more practical use of the stump.

    After the amputation surgery is finished, the wound is closed with myoplasty, which involves suturing the opposing muscles of the remaining limb to one another, the periosteum, or the distal end of the severed bone for weight bearing, and then covering it with a bandage. To remove any extra fluid, a drainage tube could be inserted. Therefore, every effort is made to lower the danger of infection.

    Procedure of Amputation?

    To stop bleeding, the supplying artery and vein must be tied off as the initial step. After transsecting the muscles, an oscillating saw is used to cut through the bone. After filing down the bone’s sharp and uneven edges, skin and muscle flaps are placed over the stump, sometimes with prosthesis attachment components inserted.

    Muscle distal stabilization is advised. This enables efficient muscle contraction, which lessens atrophy, permits the stump to be used functionally, and preserves the soft tissue covering of the remaining bone. Myodesis, in which the muscle is connected to the bone or its periostium, is the recommended stabilizing method. Tenodesis may be utilized in joint disarticulation amputations in cases when the muscle tendon is connected to the bone. The tension at which muscles are linked should be comparable to that of normal physiological conditions.

    Ideal stump

    • Skin flaps: the skin should be pliable, have no scars, and be able to move.
    • To lessen the risk of neuroma complications, muscles are separated 3 to 5 cm distal to the level of bone resection, and nerves are carefully pulled and sliced such that they retract well proximally to the bone level.

    Location of pulses

    • Femoral Triangle
    • Foot pulse
    • Popliteal (behind the knee)
    • Femoral (within the femoral triangle)
    • The remaining limb is checked for a pulse if a leg has been amputated due to gangrene.

    The surgeon may decide to do a closed amputation, which involves sewing skin flaps to seal the wound immediately. Alternatively, if more tissue needs to be removed, the surgeon might keep the incision open for a few days.

    After applying a sterile dressing to the incision, the surgical team may cover the stump with a stocking to accommodate bandages or drainage tubes. The physician may apply a splint or put the limb in traction, which uses a device to hold it in place.

    Causes of Amputation?

    Amputation may be required for a variety of reasons. The most prevalent is peripheral arterial disease, which is impaired circulation caused by artery damage or constriction. The body’s cells cannot receive the oxygen and nutrients they require from the bloodstream if there is insufficient blood flow. As a result, infection may develop and the affected tissue starts to die.

    Circulatory disorders

    • The most common cause of infection-related amputations is diabetic foot infection or gangrene.
    • Peripheral necrosis in sepsis

    Neoplasm

    • Amputation of the transfemur because of liposarcoma
    • Osteosarcoma, chondrosarcoma, fibrosarcoma, epithelioid sarcoma, Ewing’s sarcoma, and synovial sarcoma are examples of cancerous bone or soft tissue tumors.
    • Melanoma

    Trauma

    • During World War I, a soldier’s right hand suffered severe amputation of three fingers.
    • severe limb injuries, where attempts to rescue the limb are unsuccessful or the limb cannot be saved.
    • An unexpected amputation that takes place at the scene of an event and results in the partial or complete amputation of a limb as a direct consequence of the accident is known as traumatic amputation.
    • An example of this would be a finger that is severed from the table saw blade.
    • Amniotic band amputation during pregnancy.

    Deformities

    • digit and/or limb abnormalities (such as fibrular hemielia and proximal femoral focused deficit)
    • Additional limbs and/or fingers (polydactyly, for example)

    Infection

    Athletic performance

    • Professional athletes occasionally decide to have a non-essential digit removed in order to alleviate persistent pain and performance impairment. Daniel Chick, an Australian Rules football player, decided to have his left ring finger removed since his performance was being hindered by persistent pain and injury. Jone Tawake, a rugby union player, too had a finger amputated. Ronnie Lott, a safety in the National Football League, had the tip of his little finger amputated after it was injured during the 1985 NFL season.

    Legal punishment

    • Many nations, including Saudi Arabia, Yemen, the United Arab Emirates, Iran, Sudan, and the Islamic parts of Nigeria, use amputation as a legal punishment.

    Other causes:

    • severe tissue damage due to an infection
    • Gangrene
    • Trauma from an accident or injury, like a blast wound or crush wound
    • Amputation of a congenital or pediatric limb deficit through conversion
    • Congenital abnormalities of the limbs or fingers
    • Congenital additional limbs or fingers
    • Necrotizing or Necrosis Fasciitis
    • Cellulitis
    • Disease of the Peripheral Arteries
    • Frostbite
    • malignant or cancerous tumor in the limb’s muscle or bone, for example. Osteosarcoma
    • For instance, conditions that impact blood flow Diabetes

    Special Investigation:

    • X-rays
    • CT scan
    • Angiogram (outlines blood vessels)
    • Doppler ultrasound (occlusion of vessels)
    • Venogram and arteriogram
    • Radioactive dye injected into the blood

    The Amputation Surgery Team

    Orthopaedic and orthopaedic oncologic surgeons work with a plastic and reconstructive surgeon, multiple nurses, and surgical technicians to accomplish surgical amputation. After working together to remove the diseased or damaged body part, they create the stump using the remaining bone and soft tissue.

    In order to better fit a prosthetic, the surgical team may choose to sculpt the soft tissue at the end of the limb or leave the bone in place for subsequent osseointegration (OI).

    Treatment of Amputation?

    Pre-Operative Management:

    The doctor will recommend medicine and/or counseling if the patient is experiencing grief over the lost limb or phantom pain, which is a feeling of pain in the amputated limb.

    Physical therapy frequently starts shortly after surgery and starts with mild stretching and strengthening exercises. It is possible to start using the mechanical limb as soon as 10 to 14 days following surgery.

    After Amputation, Healing and Wound Management:

    Whether or not you wish to wear a prosthetic, the individualized rehabilitation program and the healing process can give you the best chance to carry on with your everyday activities.

    In order to remove the sutures, the post-amputation stump must be kept clean, dry, and wrapped. You will examine the surgical site with your surgeon to check for any areas that are open or not healing well.

    After the initial bandaging is taken off, the doctor could recommend a shrinker sock to prevent the stump from getting bigger while the blood vessels heal. This process helps prepare the stump for a prosthesis if you plan to use one. To ensure that it doesn’t pinch the skin, you often start wearing it for a brief period of time before gradually increasing to 23 hours a day.

    Phantom Limb and Other Post-Amputation Sensory Issues:

    Patients who have had an amputation nearly invariably experience pain and phantom limb symptoms. Although the precise cause is yet unknown, it is likely that remnant nerve connections in the brain and spinal cord “remember” the amputated body part following amputation. It is unknown exactly what causes this illness. These symptoms and indicators can be rather distressing.

    During the amputation operation, the surgeon can target the nerves that provide impulses to the brain that impact pain and phantom sensations. These steps can decrease the probability and intensity of problems, even though they might not fully resolve them. Nerve therapies may also be performed later on in patients who have previously undergone amputation but are still experiencing excruciating pain.

    Risk of Falling Following Amputation:

    Patients who have had a foot or leg amputated are more vulnerable to falls in the initial phases of their recuperation. This is more likely to occur if they forget they have been amputated and try to get out of bed in the middle of the night. Because they can exacerbate the surgical site and necessitate more care or possibly surgery, these falls have the potential to be quite deadly. It could be a useful reminder to never try standing and walking alone to have a wheelchair or walker beside the bed.

    With the help of rehabilitation therapy and exercises performed in front of a mirror, the patient can learn to cope with the loss of the limb and avoid falls.

    The management of Pain After Amputation:

    Since any treatment might result in unbearable pain, the amputation team does everything they can to make the suffering manageable. Plans for pain management should begin prior to surgery, if at all possible. It can be necessary to do a peripheral nerve block in order to treat pain and phantom limb symptoms.

    Physical Therapy Treatment of Amputation:

    Burger’s Exercise

    Burger’s Exercise
    Burger’s Exercise
    • increases the patient’s leg’s collateral blood flow
    • It lasts for twenty minutes.
    • After raising the leg until the toes turn white, it is lowered and then leveled.
    • Do this two or three times to increase collateral circulation.

    Post-Operative Management:

    Post-operative Care:

    • To preserve peripheral circulation, keep the remaining leg and stump functioning.
    • Maintaining respiratory function is crucial for patients undergoing general anesthesia and smokers.
    • Get ready for the rehabilitation of your mobility.

    Connective tissue massage

    Dynamic stump exercises

    Balance exercise and gait retraining

    • Improve the balance between static and dynamic
    • Employ crutches, a walking frame, and parallel bars in that order.
    • The therapist stands on the amp side and supports the patient with a belt around the waist.
    • If the patient is fatigued, take a break.
    • Keep the remaining leg and stump functioning to preserve peripheral circulation.
    • Preserve respiratory function (particularly for smokers and individuals undergoing general anesthesia).

    Stump Care:

    Stump Care
    Stump Care
    • For skin care and hygiene View the amputations handout.
    • A flexion of the hip Elevation to lessen edema may promote contracture.
    • In order to prevent oedema, which happens when there is no muscular pump and the stump hangs, stump bandaging is used to “cone” the stump.
    • In order for the prosthesis to adhere properly and to avoid pressure sores, swelling must be avoided.
    • The prosthesis is put on after the stump sock.
    • Children who are still growing out of their prostheses require regular cleaning and upkeep.

    Mobility Aids

    The individual’s degree of strength, balance, and fitness determines which mobility aids are best for them:

    • Walking frame
    • Axillary crutches
    • Elbow crutches
    • Walking stick
    Walking stick
    Walking stick

    A wheelchair is recommended for amputees who have lost both lower limbs because walking with prosthesis requires a lot of energy.

    Psychological Implications of Amputation:

    A person’s mental health is greatly impacted by losing a limb, as if they had lost a loved one. Coping with the loss of function and sensation from the amputated leg is challenging. Additionally, it alters how you (the patient) and others perceive your body image, which can result in anxiety and melancholy because negative thoughts are prevalent.

    The patient’s psychological health is essential to a successful rehabilitation procedure. Therefore, it is the responsibility of a physical therapist or physiotherapist to understand the natural grieving process and to accept the patient’s worries.

    Complications of Amputation:

    There aren’t many issues after amputation. Additional issues that are directly linked to the amputated limb are also a possibility.

    Your age, the kind of amputation you’ve had, and your general level of fitness and health are just a few of the numerous variables that increase your risk of amputation-related complications.

    Compared to emergency amputations, planned surgeries carry a decreased risk of major complications.

    The following are some complications that come with having an amputation:

    • stump pain (phantom limb” pain)
    • slow wound healing
    • wound infection
    • heart problems such as heart attack
    • DVT (deep vein thrombosis)
    • pneumonia

    In certain instances, additional surgery can be necessary to address developing symptoms or aid in pain relief. For instance, the damaged nerve cluster may need to be removed if neuromas (thickened nerve tissue) are believed to be the source of radiating discomfort.

    Prevention:

    Techniques for limb-sparing and amputation prevention are based on the issues that could need amputations. Gangrene, which requires amputation as it spreads, is frequently caused by chronic infections, which are frequently caused by diabetes or decubitus ulcers in bedridden people.

    First, many patients have poor circulation in their extremities, and second, they have trouble healing infections in limbs with poor circulation. These are the two main problems.

    Hyperbaric oxygen therapy (HBOT) is also beneficial for crush injuries with poor circulation and significant tissue damage. High levels of revascularization and oxygenation hasten healing and guard against infection.

    According to a study, the patented Circulator Boot technique significantly reduced the risk of amputation in individuals with arteriosclerosis and diabetes. According to a different study, it also works well to treat limb ulcers caused by peripheral vascular disease. In order to heal wounds in the walls of veins and arteries and to force blood back to the heart, the boot checks the heart rhythm and compresses the leg in between heartbeats.

    Replantations of severed body parts are now feasible for trauma victims thanks to developments in microsurgery throughout the 1970s.

    People are shielded from traumatic amputations by the implementation of laws, regulations, and guidelines as well as the use of contemporary equipment.

    Prognosis:

    Emotional distress and psychological trauma may be experienced by the person. There will continue to be less mechanical stability in the stump. Practical limits resulting from limb loss can be severe or even catastrophic.

    Between 50 and 80 percent of amputees report experiencing phantom limbs, which is the sensation of body parts that are no longer there. These limbs may feel stiff, dry or damp, locked in or confined, itchy, aching, burning, or as though they are moving. According to some scientists, the reason for this is that the brain contains a neural map of the body that communicates information about limbs to the rest of the brain, regardless of whether they are present or not. Phantom pain and phantom sensations can also happen after body parts other than the limbs are removed, such as after the breast is amputated, a tooth is extracted (phantom tooth pain), or an eye is removed (phantom eye syndrome).

    Unexplained sensation in a body component unrelated to the amputated limb is a comparable condition. A person who has had an arm amputated may experience unexplained pressure or movement on his face or head, according to a theory that the area of the brain that processes stimulation from amputated limbs expands into the surrounding brain after being deprived of input (Phantoms in the Brain: V.S. Ramachandran and Sandra Blakeslee).

    Since it allows the user to perceive proprioception of the prosthetic limb, the phantom limb frequently facilitates adaption to a prosthesis. Some kinds of stump socks can be worn in place of or in addition to a prosthesis to promote better resistance, use, comfort, or healing.

    Heterotopic ossification is another adverse outcome that may occur, particularly when a brain injury is coupled with a bone injury. Nodules and other growths can interfere with prosthesis and occasionally necessitate additional procedures. The brain instructs the bone to develop rather than scar tissue. During the Iraq War, soldiers injured by improvised explosive devices have been particularly susceptible to this kind of injury.

    A lot of amputees lead active lives with little limitations thanks to advancements in prosthetic technology. To provide amputees with the chance to participate in adaptive sports like amputee soccer and athletics, organizations like the Challenged Athletes Foundation were established.

    Almost 50% of people who undergo a vascular disease-related amputation will pass away within five years, typically as a result of their numerous co-morbidities rather than the actual effects of the amputation. The five-year mortality rates for prostate, colon, and breast cancer are lower than this. Up to 55% of diabetics who have had their lower extremities amputated may need to have their second leg amputated within two to three years.

    Conclusion:

    While it presents physical and emotional challenges, improvements in medical technology, prosthetics, and rehabilitation have significantly improved the quality of life for amputees. With the right medical care, psychological support, and rehabilitation, people can adapt and regain their independence.

    Amputation is a life-changing procedure that is occasionally required due to severe trauma, infections, tumors, or chronic conditions like diabetes. Further research and innovation in surgical techniques and prosthetic development will further improve outcomes for those undergoing amputation.

    FAQs

    What is the treatment for amputations?

    Your wound will be sutured shut following the amputation. A tube may be inserted beneath your skin to remove any extra fluid, and it will be bandaged. To lower the danger of infection, the bandage must typically be left in place for a few days.

    Amputations are performed by whom?

    However, even though vascular and general surgeons execute around 90% of the amputations performed in this nation, they hardly ever participate in amputee clinic sessions or act as other team members.

    Can I go home with my amputated leg?

    Possession of human body parts, even if they are your own, is also prohibited in several places. States differ greatly in these laws, with some being more lenient than others. Hospital regulations: Internal policies at the majority of medical facilities prohibit patients from bringing severed body parts home.

    How do you amputate feet?

    LisFranc’s amputation entails detaching the cuboid and cuneiform bones from the forefoot’s metatarsal bones at the tarsometatarsal joints. The talus and navicular bones, as well as the calcaneus and cuboid bones, are disarticulated at the midtarsal joints in Chopart’s amputation.

    Which body part is most frequently amputated?

    Above-the-knee and toe amputations were more prevalent than other types of amputations, accounting for 56 instances (25.92%) and 54 cases (25%) of the total. Lower limb amputations were more common, both major and minor. Lower extremity amputations occurred in all patients with diabetes.

    Amputate means to chop off, right?

    Amputation is the process of cutting something off. An amputation is a procedure in which a physician removes a body part due to a serious injury or infection. It is possible for a finger, foot, or leg to be amputated.

    What happens to bodily parts that have been amputated?

    The limb is destroyed after being taken to biohazard crematoria. The limb is given to a medical school to be used in anatomy and dissection courses. The limb will be given to the patient in rare circumstances if they want it for personal or religious reasons.

    At what age do amputations occur most frequently?

    The majority of amputations occur in older persons; over 45% of people who lose limbs are 65 years of age or older, and almost 42% are between the ages of 45 and 64.

    How are limbs amputated?

    The goal of an amputation is to preserve as much good tissue as possible while removing all damaged tissue. To decide where to make an incision and how much tissue to remove, a doctor may employ a number of techniques. Checking for a pulse around the area the surgeon intends to cut is one of these.

    Can someone who has had two legs severed walk?

    People who have had their legs amputated may find it easier to move around using prosthetic legs, often known as prostheses. They imitate how a real leg works and occasionally even how it looks. While some people may walk freely with a prosthetic leg, others still use a cane, walker, or crutches.

    Which two kinds of amputations are there?

    First, doctors usually distinguish between two types of amputations: top and lower. Upper amputations affect the arm, wrist, or fingers. Toes, ankles, or legs are affected by lower amputations.

    What is meant by amputate?

    The loss or removal of a body part, such as a finger, toe, hand, foot, arm, or leg, is known as amputation. It can be a life-altering event that impacts your mobility, employment, social interactions, and independence.

    Why are amputations performed?

    While surgical amputations can be caused by a number of illnesses, such as blood vessel disease, cancer, infection, severe tissue damage, malfunction, discomfort, etc., traumatic amputations are the result of accidents or injuries. Missing a body component before birth is known as congenital amputation.

    How do amputations take place?

    General anesthesia, which puts the patient to sleep, or spinal anesthesia, which numbs the body from the waist down, can be used to execute amputations. During an amputation, the surgeon keeps as much healthy tissue as possible while removing all damaged tissue.

    Do amputations pain?

    Two things can happen when you lose a limb. The first is the psychological and bodily pain of an amputation. For over 80% of amputees, the resulting chronic pain can be nearly as incapacitating as the initial damage. Some claim that the removed limb is the source of their discomfort.

    When a body component is severed, what happens?

    The pathology department is frequently given two choices after the inspection: either the removed body part is disposed of as “specific hospital waste” or it is employed for medical research. Following that, this trash is disposed of with other hospital waste.

    References

    • Dhameliya, N. (2024, July 20). Amputation – causes, types, procedure, exercise. Samarpan Physiotherapy Clinic. https://samarpanphysioclinic.com/amputation/
    • Professional, C. C. M. (2024, October 15). Amputation. Cleveland Clinic. https://my.clevelandclinic.org/health/procedures/21599-amputation
    • Wikipedia contributors. (2025, February 4). Amputation. Wikipedia. https://en.wikipedia.org/wiki/Amputation
    • Crna, R. N. M. (2022, March 31). Amputation: Causes, Statistics, and Your Most-Asked Questions. Healthline. https://www.healthline.com/health/amputation
  • 15 Best Weight Bearing Exercises For Osteoporosis Of Spine

    15 Best Weight Bearing Exercises For Osteoporosis Of Spine

    Weight-bearing exercises are crucial for managing osteoporosis of the spine, as they help maintain bone density and strengthen the supporting muscles. These exercises involve working against gravity while staying upright, promoting bone remodeling and reducing the risk of fractures.

    Incorporating activities like walking, stair climbing, and strength training can enhance spinal health, improve balance, and support overall mobility. Always consult with a healthcare professional before starting a new exercise regimen, especially if you have osteoporosis.

    Introduction:

    Osteoporosis causes the density of bones to decrease, making them weaker and more inclined to break. Postural abnormalities, height loss, and vertebral fractures can all be serious issues caused by osteoporosis affecting the spine. Weight-bearing activities are one of the greatest ways to prevent osteoporosis of the spine since they help maintain or build

    Bone density, maintain balance, along with improving overall spine health.
    Osteoporosis can weaken the vertebrae in the spine, which increases the risk of fractures, particularly in the lumbar and thoracic areas.

    For those with osteoporosis in this area of the body, strengthening the muscles supporting the spine is especially important. When exercising, people with osteoporosis in the spine should avoid certain motions and activities, such as high-impact exercises, activities that increase the risk of fractures, and forceful twisting movements.

    Types of Weight-Bearing Exercises for Osteoporosis of the Spine:

    All types of exercise require the body to support its weight, but selecting the right exercises is important, particularly for those with spinal osteoporosis. Some exercises are more suitable for people whose spine health is damaged.

    Walking

    One of the easiest and most effective weight-bearing activities for people with osteoporosis is walking. This low-impact exercise can help preserve bone mass, strengthen the heart, and improve balance. For those with osteoporosis, walking on flat ground or a treadmill is the best option because there is less chance of damage.

    Strength Training (Resistance Exercises)

    To develop muscles and bones, resistance exercises use weights or resistance bands. Exercises that target the spine and core muscles are vital for osteoporosis because they support the spine. Beginners should start with small weights, but as the muscles and bones get stronger, the intensity can be progressively increased.

    Standing Exercises

    Standing exercises support bone stability and strength, particularly in the lower body and spine. By encouraging the body to support its weight, these exercises help with balance and posture.

    Water Aerobics

    Water aerobics are low-impact workouts that are done in a swimming pool. For those with advanced osteoporosis or joint pain, the water’s gravity lowers the chance of straining the bones and joints. By promoting muscle strength and endurance, water aerobics could improve general bone health even though they aren’t often weight-bearing.

    Tai Chi

    Tai Chi is a mild workout that involves deep breathing and slow, intentional motions. Although not a conventional weight-bearing exercise, the slow, controlled movements help to increase core strength, flexibility, and balance all of which are essential for lowering the risk of fractures and falls. Additionally, tai chi strengthens the muscles that support the spine, improving spinal health.

    Pilates and yoga

    Strength, flexibility, and balance are the main goals of yoga and Pilates. Certain positions may improve posture, increase flexibility, and strengthen the muscles that support the spine. However, because they may cause unnecessary strain on the spine, several positions that require a lot of twisting or forward bending should be avoided.

    Benefits of Exercise:

    For those with osteoporosis, weight-bearing exercises are essential, especially if the illness affects the spine. These types of exercise are essential for improving quality of life, avoiding additional bone breakdown, and increasing general bone health.

    Here are some more details on the main advantages of weight-bearing activities for treating spinal osteoporosis:

    • Bone Density Increase

    One of the best methods to promote bone formation is to engage in weight-bearing activities. These workouts improve bone density by activating osteoblasts, or bone-forming cells, by putting pressure or strain on the bones. For those who have osteoporosis, this is particularly important because it can delay the disease’s course and possibly stop additional bone loss in the spine.

    • Lowering the Chance of Fractures

    As osteoporosis weakens bones, people are more likely to fracture, particularly in the wrists, hips, and spine. Bones can be strengthened by weight-bearing activities, increasing their capacity to endure everyday stresses. Strengthened supporting muscles and increased bone density help avoid fractures from falls and even small movements.

    • Better Spinal Alignment and Posture

    Vertebral fractures caused by osteoporosis can cause postural abnormalities including kyphosis, or a rounded, stooped back. Weight-bearing exercises help maintain suitable spinal alignment and stop the spine from becoming more curved by strengthening the muscles in the back, abdomen, and core. This lessens the strain on weaker vertebrae and the pain caused by bad posture.

    • Increased Mobility and Flexibility

    The spine and other joints may become stiff and have a reduced range of motion as a result of osteoporosis. Yoga and Pilates, two weight-bearing exercises that combine flexibility and stretching, can help improve flexibility, which will make daily tasks easier and lower the chance of painful joints and muscle tightness.

    • Pain Control

    Spinal osteoporosis frequently results in muscle strain and pain from vertebral fractures. By strengthening the muscles that support the spine, increasing circulation, and decreasing inflammation, weight-bearing activities help to relieve this pain. Additionally, these workouts promote the body’s natural pain-relieving hormones, endorphins, to be released.

    • Improved Coordination and Balance

    Balance and coordination can also be improved by weight-bearing activities that require mobility, including walking, tai chi, or standing strength training. The risk of falls rises when osteoporosis weakens the bones and muscles. Balance-focused exercises, including heel-to-toe walking or standing leg lifts, increase stability and make it simpler to go about daily tasks without worrying about falling.

    • Better Quality of Life and Increased Independence

    Weight-bearing exercises help people with osteoporosis stay independent for longer by improving their muscle strength, flexibility, and balance. People’s quality of life can be significantly improved when they can keep their mobility and functionality since they are less dependent on others for everyday tasks.

    • Stopping Future Bone Loss

    People with osteoporosis can help stop additional bone loss by including weight-bearing exercises in their regular fitness routine. By encouraging the retention of calcium and other minerals in the bones and stimulating bone turnover, these workouts support the preservation of bone mass and health.

    • Supports Weight Control

    People with osteoporosis should maintain a healthy weight since being overweight might strain their bones and joints more. Exercises involving weight bearing can be a useful strategy for controlling body weight since they promote calorie burning and the development of lean muscle mass.

    • Improved Mood and Mental Wellbeing

    Exercise in general, and weight-bearing exercises in particular, are known to improve mental health. It has been proven that regular exercise helps those who are struggling with chronic illnesses like osteoporosis feel less stressed, depressed, and anxious.

    Weight Bearing Exercises For Osteoporosis Of Spine:

    Walking

    One of the best ways to treat osteoporosis in the spine is to walk. Over time, it helps to maintain bone density, increase flexibility, and improve your general quality of life. It’s easy to include in your routine.

    • Start with quick walks (ten to fifteen minutes) a few times a week if you’ve never exercised before or haven’t been active in a long time.
    • Increase the frequency and length gradually as you feel more comfortable.
    • When walking, maintain a straight back and refrain from hunching over.
    • To support your spine, concentrate on maintaining a stable, upright posture.
    • To minimize the effects of every step, choose shoes that are supportive and cushioned.
    • Increase the intensity by walking quickly for 20 to 30 minutes most days of the week until you feel comfortable doing so.
    • To increase the advantages and add variation, you can also use small inclines, such as walking uphill or using a treadmill with an incline setting.
    • Short breaks are allowed if necessary.
    • Being constant and progressively increasing your stamina over time is the aim.
    • Try to walk for at least half an hour every day, five days a week.
    • Maintaining bone health and preventing additional bone loss requires regularity.
    Brisk Walking
    Brisk Walking

    Seated Row with Resistance Bands

    • With your legs straight out in front of you, take a seat on the floor.
    • Attach the resistance band to a door or another sturdy object in front of you, or loop it around your feet.
    • With your arms out in front of you, hold one end of the resistance band in each hand, palms facing one another.
    • To protect your spine, maintain a straight back and use your core.
    • Maintain a relaxed posture and keep your shoulders away from your ears.
    • Keeping your elbows close to your sides, slowly pull the bands toward your body.
    • As you row, concentrate on squeezing your back muscles by squeezing your shoulder blades together.
    • Your elbows should be bent at a 90-degree angle as your hands approach your body, right under your ribs.
    • Hold this position for a few seconds.
    • Then let the resistance band expand before carefully returning to the beginning position under control.
    • Then relax.
    • Repeat this exercise five to ten times.
    band seated row
    band seated row

    Chair Squats

    • You should stand with your feet shoulder-width apart and your toes pointed slightly outward.
    • Make sure the chair behind you is stable and won’t move while you’re performing the workout.
    • For balance, keep your arms out in front of you or rest them on your hips.
    • Maintain a straight spine, shoulders back, and a raised chest.
    • Maintaining your knees in line with your toes (don’t let them buckle) as you slowly push your hips back as though you were going to sit on the chair.
    • While maintaining a straight back and an elevated chest, bend your knees and hips to lower yourself.
    • When you squat, be sure your knees don’t go past your toes.
    • Don’t sit down; instead, lower yourself until your glutes lightly tap the chair.
    • To get back up, push through your heels rather than your toes.
    • Return to a completely upright position by pulling your hips forward and straightening your legs.
    • As you rise, make sure to use your quadriceps and glutes.
    • Then relax.
    • Repeat this exercise five to ten times.
    chair squats
    chair squats

    Seated Hamstring Stretch

    • With your back straight and your feet flat on the floor, take a seat on the edge of a supportive chair.
    • Maintain a comfortable posture with your shoulders and an active core.
    • With your toes pointing upward and your heel on the ground, extend one leg straight out in front of you.
    • Maintain the foot flat on the ground and the other leg bent.
    • Though not locked at the knee, your extended leg should be straight.
    • For support, place your hands on your thighs or hips.
    • The hamstrings at the back of your extended leg should feel a little stretched.
    • The stretch should feel mild to moderate; don’t push it.
    • Lean over your outstretched leg and slowly tilt forward at the hips (not the waist) while maintaining a straight back.
    • Instead of bending from the waist, imagine reaching your chest toward your extended leg.
    • Keep your extended leg’s knee straight, but do not lock it.
    • Hold this position for a few seconds.
    • Return to an upright posture gradually.
    • Then relax.
    • Repeat this exercise five to ten times.
    • Do the same with the other leg.
    Seated Hamstring Stretch
    Seated Hamstring Stretch

    Cat-Cow Stretch

    • Start with your knees behind your hips and your hands directly beneath your shoulders, making a tabletop position on all fours.
    • To improve stability, spread your fingers wide and maintain shoulder-to-wrist alignment.
    • Maintain the natural curvature of your back and a neutral spine.
    • Look at the floor with your head aligned with your spine.
    • Start by slowly rounding your spine upward toward the ceiling while breathing.
    • Imagine tucking your pelvis down and pushing the middle of your back toward the sky.
    • Look at your belly button while lowering your head toward your chest.
    • Make sure you’re not overarching or putting excessive strain on your lower back by using your abdominal muscles to help with the action.
    • As you gently reverse the motion, arch your back and lower your tummy toward the floor, take a breath.
    • Without putting excessive pressure on your neck, raise your head and chest and look forward or slightly upward.
    • Make your lower back curve deeply by lowering your tailbone toward the floor.
    • Keep switching between Cat and Cow positions gently and easily, coordinating your breathing with each posture.
    • Breathe in as you arch your back into Cow and out as you circle your spine into Cat.
    • Then relax.
    • Repeat this exercise five to ten times.
    Cat-and-Cow-Stretching
    Cat-and-Cow-Stretching

    Wall Push-Up

    • Your feet should be shoulder-width apart as you face the wall.
    • Straighten your arms in front of you and place your hands flat on the wall at chest height.
    • Spreading your fingers wide will improve stability.
    • While keeping your spine neutral that is, without arching or rounding walk your feet back a little to form a straight line from your head to your heels.
    • Maintain a straight body alignment from head to heels during the exercise by using your core muscles.
    • Keep your chest open and your elbows slightly bent.
    • With your feet placed firmly, place your hands either just beneath your shoulders or a little broader.
    • Lower your chest toward the wall while slowly bending your elbows.
    • As you lower, maintain your elbows at a 45-degree angle from your body.
    • Your body should move as a single unit without causing your hips to lift or your lower back to sag.
    • As you lower your body toward the wall, take a breath.
    • Make sure your chest is only a few inches from the wall, or as low as your range of motion allows.
    • As you reach the highest point, maintain a gentle, not locked, elbow position.
    • Straighten your arms and push through your hands to raise your body back to the beginning position.
    • As you push yourself back up to standing, release your breath.
    • Then relax.
    • Repeat this exercise five to ten times.
    Wall Push-up
    Wall Push-up

    Mountain Pose

    • With your toes pointed forward and your feet together (or hip-width apart for extra stability), take a tall position.
    • Make sure both of your feet are securely planted on the ground and divide your weight equally between them.
    • You can increase your balance by slightly separating your feet if needed.
    • Lift your thighs a little to engage them, then feel the energy move up into your core from your legs.
    • Stand tall and pull your pelvis under lightly (imagine a tiny, neutral pelvic tilt) to lengthen your spine.
    • Make sure your shoulders are lowered and pulled back from your ears as you raise your chest overhead.
    • Refrain from overly arching your back.
    • Pull your belly button slightly toward your spine to activate your core and provide more stability.
    • Your spine will lengthen if you visualize an object that is fastened to the top of your head and slowly pulls you higher.
    • With your palms facing front, let your arms rest loosely by your sides.
    • Spread your fingers wide.
    • Alternatively, depending on how comfortable you are, you can turn your palms either forward or toward each other.
    • Your chin should be parallel to the floor, and your neck should be long and relaxed.
    • To keep your neck aligned, keep your eyes relaxed and either look straight ahead or slightly downward.
    • Maintain the posture for a few seconds or more while concentrating on taking slow, deep breaths.
    • Exhale via your mouth or nose after taking a deep breath through your nose that allows your lungs to fill.
    • Keep your posture stable and your body engaged and active at all times.
    • Just take a few moments to stand in a neutral stance and relax your arms to exit the pose.
    • Then relax.
    • Repeat this exercise five to ten times.
    Mountain-Pose
    Mountain-Pose

    Pelvic Tilts

    • With your knees bent and your feet flat on the floor, lie on your back on a level surface.
    • You should have your arms at your sides, relaxed, palms down.
    • Maintain a neutral spine alignment and space your feet about hip-width apart. There should be a tiny space between your lower back and the floor, and your lower back should naturally curve slightly.
    • Take a deep breath to get ready, then release it as you tilt your pelvis upward and gently flatten your lower back into the floor.
    • Tighten your abdominal muscles and pull your pelvis gently (think of it as pointing your tailbone toward the floor) to do this.
    • Your pelvis should shift slightly as it approaches a neutral posture.
    • Avoid pushing yourself into the exercise with your arms or legs; instead, keep your upper body relaxed.
    • Breathe in as you slowly move back to the beginning position, allowing your lower back to arch just a little bit off the ground.
    • Relax your abdominal muscles and keep your spine in its natural bend.
    • Then relax.
    • Repeat this exercise five to ten times.
    PELVIC TILT
    PELVIC TILT

    Standing Leg Raises

    • Stand upright with your feet hip-width wide.
    • Make sure your shoulders are back, your core is active, and your posture is straight.
    • For support and balance, place one hand on the back of a solid wall, counter, or chair.
    • Your other hand might rest at your side or be used on your hip.
    • Maintaining a straight knee and forward-pointing toes, slowly raise one leg straight out to the side.
    • Keep your foot from turning outward.
    • As you raise your leg, contract your hip muscles and core, keeping your standing leg slightly bent for stability.
    • Lift the leg as far off the ground as is comfortable for you; try to get it between 8 and 12 inches.
    • Avoid straining or overextending.
    • For two to three seconds, hold the raised leg in place, paying attention to maintaining a tall posture and an active core.
    • Use your supporting hand and provide light pressure through your standing leg to keep your balance.
    • Controllably return your raised leg to the beginning position slowly.
    • Refrain from dropping the leg too soon.
    • To get the most muscular engagement, move slowly and gradually.
    • Then relax.
    • Repeat this exercise five to ten times.
    Standing Leg Raises
    Standing Leg Raises

    Single leg balance

    • Stand up straight up and place your feet hip-width away.
    • Make sure your shoulders are back, your chest is raised, and your core is carefully engaged in an upright position.
    • For support, place your hands on a wall, counter, or strong chair (optional), particularly if you are worried about your balance.
    • Bend your knee to a nearly 90-degree angle and slowly raise one foot off the ground.
    • For increased stability, keep your standing leg slightly bent.
    • Avoid tilting to one side and concentrate on using your core muscles.
    • Avoid arching or slumping your lower back and maintain a straight back.
    • Depending on how comfortable and balanced you are, try holding the position for a few seconds.
    • Keep your hips level during the hold, and use your core for further stability.
    • As you get stronger at balancing, try to progressively lessen the dependence on support if you’re using it.
    • As you slowly and deliberately descend your lifted leg back to the floor, you are maintaining control.
    • Get back to standing and get ready to switch legs.
    • Then relax.
    • Repeat this exercise five to ten times.
    Single leg balance
    Single leg balance

    Side Leg Raises

    The muscles surrounding the hips and lower back can be strengthened by side leg lifts. Balance improves and the spine is protected by stronger hips and glutes.

    • Maintaining your legs placed on top of one another, lie on your side on a level surface.
    • You can put a little pillow under your head for comfort or rest your head on your lower arm for support.
    • Stay away from twisting or tilting and maintain a straight body from head to toe.
    • To help with alignment, lay your top hand on your hip or bend your lower arm and place it in front of you.
    • For support, keep your lower leg bent; if it seems comfortable, you can lengthen it.
    • Maintaining a straight but not locked leg, flex your top leg until your toes point forward or slightly downward.
    • To keep your body stable, use your core.
    • Lift your upper leg slowly up toward the ceiling, aiming at a 45-degree angle, or as close as it feels comfortable.
    • Maintain a straight leg with your toes pointed front.
    • Instead of depending on progress, concentrate on lifting your leg with the muscles in your thighs and outer hip.
    • Hold the position for two to three seconds once your leg reaches the correct height, making sure your body stays still and your hips stay in alignment. Return to the beginning position by lowering your leg slowly and gradually.
    • Don’t lower your leg too soon.
    • Then relax.
    • Repeat this exercise five to ten times.
    • Repeat the exercise for the same number of repetitions after finishing one side.
    Lying Lateral leg Raises.
    Lying Lateral Leg Raises.

    Step-Ups

    Step-ups are an excellent weight-bearing exercise that improves cardiovascular fitness and strengthens the legs, hips, and core. Posture and stability can be improved with this workout.

    • Place your feet hip-width apart and face the step or bench in an upright posture.
    • For extra balance, rest your hands on your hips or, if needed, hold to a wall or chair.
    • Maintain a straight back, shoulders back, and an active core.
    • Using your right foot, step onto the platform and push through the heel to raise your body.
    • Move your left foot up to meet your right foot on the platform as you step up, straightening your right leg.
    • Step your left foot down to the floor after lowering your right foot slowly.
    • Avoid jerking during the slide and concentrate on keeping control.
    • Then relax.
    • Repeat this exercise five to ten times.
    step-ups
    step-ups

    Heel-to-Toe Walking

    • Take an upright posture with your feet hip-width apart.
    • Keep your shoulders back, your core strong, and your posture straight.
    • Throughout the workout, concentrate on keeping your alignment correct.
    • Step forward with your right foot slowly.
    • While doing this, position your right foot’s heel firmly in front of your left foot’s toes.
    • Try for a straight toe line and make sure your heel maintains the ground first.
    • Place your left heel properly in front of your right toes as you advance with your left foot.
    • Continue walking slowly in this “heel-to-toe” rhythm.
    • As you move, concentrate on maintaining your body’s height and alignment.
    • To help stabilize your posture, contract your core.
    • If you’re new to balance exercises, you might want to start using a wall or other significant object for balance.
    • Then relax.
    • Repeat this exercise five to ten times.
    Heel-to-Toe Walking
    Heel-to-Toe Walking

    Bridges

    • Place your feet flat on the floor, hip-width apart, and bend your knees while lying on your back on a level surface.
    • With your hands facing down, place your arms at your sides.
    • Maintain the alignment of your head, neck, and spine.
    • Make sure your lower back has a slight natural curvature.
    • To get ready for the exercise, gently contract your abdominal muscles and squeeze your glutes (buttocks).
    • Maintain a level foot and hip-to-knee alignment.
    • As you get ready, take a deep breath.
    • Press through your heels to slowly raise your hips toward the ceiling as you release your breath.
    • Keep your body straight and concentrate on raising your lower back and pelvis.
    • To ensure that your knees, hips, and shoulders make a straight line at the top of the exercise, squeeze your glutes as you raise your hips.
    • Don’t push your tummy outward or arch your back too much.
    • To keep your spine safe, maintain an active core.
    • Keep your core active and your glutes tightened while you hold the bridge posture for two to five seconds at the peak.
    • Make sure your body stays in a straight line from your shoulders to your knees and avoid overextending your lower back.
    • Taking a breath, slowly return your hips to the beginning position while keeping your movement under control.
    • Don’t let your hips drop too soon, and maintain a neutral spine.
    • Then relax.
    • Repeat this exercise five to ten times.
    Bridging-exercise
    Bridging-exercise

    Water Aerobics

    Water aerobics is a low-impact, joint-friendly workout that offers resistance. Water aerobics, which are not often weight-bearing, improve cardiovascular health and general muscle strength, both of which support bone health.

    • Participate in water-based activities such as leg lifts, marching, or mild swimming in a pool, or participate in a water aerobics class.
    • Two to three times a week, try to get in 30 minutes of water aerobics.
    water-aerobics
    water-aerobics

    What safety measures should be followed when working out?

    When exercising with osteoporosis of the spine, care must be taken to avoid damage and make sure the workouts are good for you rather than bad for you. Exercises involving weight bearing may significantly improve bone health, strength, and posture, but they must be performed carefully and with the right form.

    The following are the main precautions to take when performing weight-bearing activities for spinal osteoporosis:

    • Talk to Your Healthcare Professional

    It’s important to speak with your doctor before beginning any workout program, especially if you have osteoporosis or another medical condition. Depending on how serious your disease is, your healthcare professional may analyze your particular requirements, suggest suitable activities, and help with choosing which exercises you should avoid.

    • Begin slowly and make progress over time.

    It’s important to take your time with intense workouts, particularly if you’ve been inactive for a long time or are new to weight-bearing activities. As your strength and bone density increase, start with low-impact workouts and progressively increase their duration, complexity, and intensity. Unnecessary strain on your spine might result from sudden increases in activity.

    • Don’t Overstretch

    Although stretching can help develop flexibility, it’s important to avoid overstretching as this raises the possibility of injury or muscle strain. Stretch your muscles gently without applying too much force.

    • Make Use of the Correct Form and Technique

    When performing workouts, it’s essential to maintain good form and posture to prevent strain on the spine. Incorrect methods, including rounding the back when performing workouts, can raise the possibility of vertebral compression fractures.

    • Get enough sleep and stay hydrated.

    Both general health and muscle function depend on enough hydration. Muscle cramps or tiredness caused by dehydration may make injuries more likely. Furthermore, getting enough sleep is important for avoiding overuse injuries.

    • Stay away from jarring and high-impact movements.

    People with osteoporosis may be more at risk for fractures if they engage in high-impact activities like running, jumping, or heavy lifting. These exercises overstress already weak bones, particularly the spine. Limit your exercise to low-impact weight-bearing activities like walking or mild strength training.

    • Put on the correct Shoes.

    For stability and balance when performing weight-bearing workouts, suitable footwear is essential. To lower the chance of falls and ensure proper alignment when performing exercises like walking, standing leg lifts, or strength training, choose shoes that provide enough arch support and cushioning.

    • Ask for Help When You Need It

    You might need to use a wall, chair, or other support for some exercises, especially strength training or balancing exercises, to maintain the proper form and stability. Always make sure you have a solid object to grasp for support when performing standing exercises or balancing tasks, particularly if you run the danger of falling.

    • Avoid Twisting Movements

    Twisting motions, such as those performed during some yoga poses or certain sports activities, can place excessive strain on the spine and increase the risk of injury in people with osteoporosis. Avoid exercises that require you to twist your spine or bend forward too much.

    • Concentrate on Core Muscle Strengthening Exercises

    Your back, abdominal, and core muscles are among the muscles that surround your spine and give it essential support. By strengthening these muscles, you can lower your chance of vertebral fractures, and avoid back pain, while improving your posture. Core strengthening exercises like modified planks, bridges, and pelvic tilts work well.

    • Pay Attention to Your Body

    During exercising, be mindful of any pain or difficulty. Stop the exercise right once and speak with your healthcare physician if you experience any severe pain, especially in your spine. When beginning a new training program, mild pain is common, but pain shouldn’t be ignored.

    • Think About Working with a Physical Therapist

    Depending on your unique needs, skills, and the degree of your osteoporosis, a physical therapist can create a safe and customized exercise program. A specialist may recommend adjustments, teach you the correct form, and guarantee that the exercises are both secure and effective.

    When should you stop working out?

    It’s important to pay attention to your body and identify when you should reduce or alter your weight-bearing workouts, especially while treating osteoporosis of the spine. Although bone health can benefit from exercise, pushing through pain, overexertion, or poor technique can have the opposite effect.

    The following are some important symptoms and conditions that indicate you should stop exercising:

    • Severe or Sharp Pain

    You should stop doing any exercise right once if you feel sudden, severe pain, especially in your back or spine. This may be a sign that you are overstressing your muscles or bones, which can cause harm or even fractures in people who have osteoporosis. As an example, it’s critical to pause and evaluate the situation if you experience unexpected pain when engaging in weight-bearing activities like walking, strength training, or balance exercises.

    • Feeling sick or uncomfortable

    It’s important to stop exercising if you experience nausea, illness, or unusual feelings of exhaustion. These symptoms could suggest that you are not fully recovered from your workout or that your body is under stress.

    • Lightheadedness or dizziness

    Spinal osteoporosis can occasionally affect posture and balance, which raises the possibility of falls while exercising. It’s important to end the workout right away if you experience lightheadedness or dizziness. Dehydration, weakness, or sudden shifts in position can all produce dizziness, which can result in falls or other accidents.

    • Tingling or numbness

    Nerve compression or other spinal problems may be indicated by numbness or tingling in the limbs, especially in the arms or legs. These feelings might suggest that your spine or nerves are being overstressed by the workout.

    • Excessive Weakness or Fatigue

    You may be overexerting yourself if you experience unexpected tiredness or weakness when exercising. Fatigue, strained muscles, and a higher chance of falling can result from overexertion. In people with osteoporosis, where excessive strain on bones or muscles might result in injury, this is especially worrying.

    • Having Trouble Breathing

    Breathing difficulties or shortness of breath while exercising could be a sign that you’re exerting yourself too much or that you have further health issues. Breathing correctly is important when performing weight-bearing workouts, and being out of breath may indicate that your muscles aren’t receiving enough oxygen.

    • Unable to Maintain Correct Form

    When conducting weight-bearing exercises, proper technique and posture are essential, particularly when dealing with osteoporosis of the spine. Exercises that focus on the legs, back, or core may put you at higher risk for injury, including spinal fractures if you begin to lose form.

    • Loss of Coordination or Balance

    Fall risk can be increased by osteoporosis, particularly when engaging in weight-bearing activities that require balance, such as walking or standing leg lifts. It may indicate that you are overdoing the exercises or that your spine is not receiving enough support if you start to lose your balance or feel uncoordinated.

    • Bruising or Swelling

    Following exercise, any bruising or swelling around the joints or spine could be a sign of strain or injury. Overstretching muscles or even little tears in the muscles supporting the spine can cause swelling.

    If you have osteoporosis of the spine, which workouts should you avoid?

    Certain exercises might cause excessive strain on your bones and raise your risk of fractures if you have osteoporosis of the spine. Activities that might require twisting, extreme forward bending, or high-impact movements should be avoided.

    In general, you should stay away from the following exercises:

    • High-impact workouts

    Based on the strain on the spine, running, jumping, and sports involving sudden stops and starts (like basketball and tennis) might raise the risk of fractures.

    • Twisting motions

    As they might cause stress on the bones, activities that twist or rotate the spine such as some yoga postures should be avoided.

    • Leaning forward (flexion)

    Activities like toe touches, forward-bending yoga positions, and sit-ups can be dangerous because they raise the risk of compression fractures in the spine.

    • Heavy lifting of weights

    Heavy lifting can put a strain on your spine and raise your risk of compression fractures, especially when done above or on your back.

    • Physically demanding sports

    Sports that require rapid or violent movements, such as martial arts or skiing, should be avoided to reduce the chance of falls and injuries.

    Summary:

    One effective strategy for treating osteoporosis of the spine is weight-bearing activities. Walking, weight training, yoga, or other suitable exercises regularly can help maintain bone density, improve general spinal health, improve posture, and lessen pain.

    Combining strengthening and flexibility exercises can help people with osteoporosis. They should, however, stay away from anything that puts them at risk of falling, such as sudden movements and strong twisting.

    To make sure a fitness program is safe for your condition, always remember to speak with a healthcare provider before starting. Weight-bearing activities can lower the risks of osteoporosis of the spine and improve quality of life if done properly.

    FAQ:

    Can someone with osteoporosis of the spine exercise?

    Exercise is really helpful for those who have osteoporosis in their spines. In addition to strengthening muscles and improving balance, it can help increase bone density and lower the risk of fractures. However, you must stay away from high-impact activities that can strain your spine and select exercises that are safe for your condition.

    What kinds of physical activities are safe for people with osteoporosis of the spine?

    Exercises involving weight bearing include walking, standing, and resistance training using resistance bands or small weights.
    Strength training: focused on bolstering the muscles that support the legs, hips, and spine.
    Exercises for balance: To enhance coordination and prevent falls (e.g., standing on one leg, heel-to-toe walking).
    Yoga poses and mild stretching that supports spine health without going overboard are examples of flexibility exercises.

    If I have osteoporosis of the spine, are there some workouts I should avoid?

    To prevent injuries, some workouts should be avoided or changed.
    High-impact exercises that raise the risk of fractures include running, jumping, and heavy lifting.
    Twisting motions: Exercises that cause the spine to twist excessively, such as contact sports or some yoga positions.
    Deep forward bending: The spine may be overworked by exercises like sit-ups and toe-touching.
    Avoid lifting heavy weights without the right equipment or supervision, especially when doing so overhead.

    How frequently should I work out if I have spinal osteoporosis?

    It is advised that most people with osteoporosis try to get in at least 30 minutes of activity most days of the week. Particularly if you’re just beginning out, this can be divided into shorter periods (e.g., 10 to 15 minutes at a time). The goal is to combine strength training, balancing work, and weight-bearing activities.

    Is osteoporosis of the spine reversible by exercise?

    Exercise can help preserve bone density and moderate the rate of bone loss, but it cannot completely reverse osteoporosis. Additionally, it improves posture and lowers the chance of fractures by strengthening the muscles surrounding the spine. Frequent exercise can greatly enhance quality of life and stop additional bone loss when combined with healthy eating and medical care.

    During exercising, what if I feel pain?

    Pain must not be ignored. Stop exercising right now and take a break if you feel any kind of sharp, intense, or uncomfortable pain. It’s common to feel a little sore after working out, but if the pain continues or gets worse, talk to your doctor or a physical therapist about changing your routine or activities.

    If I have severe osteoporosis or a spinal fracture, is it safe to engage in weight-bearing exercise?

    Before beginning or continuing any fitness program, you must speak with a physician or physical therapist if you currently have a spine fracture or if your osteoporosis is severe. To make sure you don’t worsen your illness or run the danger of getting more fractures, they will evaluate your situation and offer personalized advice.

    Can I practice yoga if I have spinal osteoporosis?

    Yes, gentle yoga poses can benefit those who have osteoporosis, particularly if they require for improving flexibility, posture, and core strength. On the other hand, postures that place too much strain on the spine, spinal twists, and deep forward bends should be avoided. To ensure safety, think about working with an instructor who knows of osteoporosis.

    How might exercise help people with osteoporosis of the spine improve their balance?

    By strengthening the muscles in the legs, core, and lower body that offer stability and deter falls, exercise may improve balance. You can lower your risk of falls by including balance activities like heel-to-toe walking, tai chi, and standing on one leg in your routine. This is important for those with osteoporosis who are more likely to suffer fractures.

    Can water aerobics or swimming help with osteoporosis of the spine?

    Swimming and water aerobics are great for people with osteoporosis since the water’s gravity lowers the chance of joint strain and provides resistance for muscle building. These activities, which are not exactly weight-bearing, can improve cardiovascular health, strength, and flexibility without putting excessive stress on the spine.

    Can I monitor how I’m doing with osteoporosis and exercise?

    You can monitor your progress by:
    Evaluating your stamina: You can measure your level of fitness by keeping track of how long you can walk, carry out weight training, or perform balancing exercises without getting tired.
    Keeping an eye on pain levels: Over time, take note of any reduction in back pain or stiffness as a sign of progress.
    Bone density measurements: To see how exercise and other therapies are affecting your bone density, your doctor could suggest routine bone density testing (DEXA scans).
    Capacity for function: Monitor your progress in posture, mobility, and balance. With time, you should experience fewer problems with movement and balance.

    Can individuals with osteoporosis of the spine avoid more fractures by exercising?

    Exercise reduces the risk of fractures by increasing bone density, strengthening muscles, and improving balance, even if it cannot completely prevent fractures. Bones are supported by strong muscles, which lowers the risk of falls and spinal injuries. A key component in lowering the risk of fractures is regular exercise, together with healthy eating and medical supervision.

    What causes spine osteoporosis?

    The major cause of osteoporosis is a loss in bone mass and strength, often related to aging. Hormonal changes (particularly during menopause), poor diet, inactivity, smoking, and excessive alcohol usage are other concerns.

    References:

    • Osteoporosis with exercise: Maintain an active lifestyle safely. (undated). The Mayo Clinic. In-depth information about osteoporosis can be found at https://www.mayoclinic.org/diseases-conditions/osteoporosis/art-20044989.
    • Hellicar, L. June 9, 2023. Six exercises for spine osteoporosis. Exercises for Osteoporosis of the Spine: https://www.medicalnewstoday.com/articles/exercises
    • Exercises for spine osteoporosis. (undated). The following are the best exercises for osteoporosis of the spine: https://www.getwellen.com/well-guide/
    • Clinic, C. August 13, 2024. The finest osteoporosis exercises. Cleveland Medical Center. https://health.clevelandclinic.org/the-best-osteoporosis-exercising
    • Bone health and exercise: OrthoInfo, AAOS, n.d. Exercise-and-bone-health https://orthoinfo.aaos.org/en/staying-healthy
    • Dumain, T. October 20, 2022. Exercises to Avoid: The Workouts You Should Probably Avoid If You Have Osteoporosis. Exercises to Avoid with Osteoporosis: CreakyJoints. https://creakyjoints.org/diet-exercise/
    • Image 9, Posture for Life: Armchair exercises, supported standing, and backward leg lifts (Iposture.com, n.d.). This is the URL for the exercise armchair-backward.php.
  • Tarsometatarsal Joints

    Tarsometatarsal Joints

    The tarsometatarsal joints (also known as Lisfranc joints) are the articulations between the tarsal bones of the midfoot and the metatarsal bones of the forefoot. These synovial plane joints play a crucial role in maintaining foot stability and enabling movements such as walking and running. Strong ligamentous support, including the Lisfranc ligament, provides stability, while limited motion at these joints aids in transferring forces during gait.

    The first, second, and third cuneiform bones, the cuboid bones, and the metatarsal bones are all involved in the tarsometatarsal joints. The 18th and 19th-century surgeon and gynecologist Jacques Lisfranc de St. Martin is the namesake of the Lisfranc joint.

    Introduction

    Lisfranc joints, sometimes called tarsometatarsal joints, are planar synovial joints made up of articulations between the bases of the foot’s metatarsal bones and the distal surfaces of some tarsal bones. The cuboid articulates with the fourth and fifth metatarsals, the lateral cuneiform with the third and fourth, the medial cuneiform with the first, and the intermediate cuneiform with the second.

    Dorsal and plantar tarsometatarsal ligaments, along with cuneometatarsal interosseous ligaments, make the tarsometatarsal joints relatively tiny and closely packed, which primarily restricts their range of motion to mild gliding.

    In general, it is said that the fourth and fifth tarsometatarsal joints are more movable than the first three. While the capsules of the second and third joints and the fourth and fifth joints can communicate with one another, the first tarsometatarsal joint has its fibrous capsule.

    Structure

    The first, second, and third cuneiforms and the cuboid bone, which articulate with the bases of the metatarsals, are the bones that enter their creation.

    The cuneiform is articulated with the first metatarsal bone; the cuboid and third cuneiform are articulated with the fourth; the cuboid is articulated with the fifth; and the second, which is firmly wedged between the first and third cuneiforms, articulates with the second cuneiform by its base.

    Synovial membrane

    The synovial membrane forms a unique sac between the first cuneiform and the first metatarsal.

    The synovial membrane of the great tarsal region includes the space between the second and third metatarsals in front and the second and third cuneiforms behind.

    Between the neighboring sides of the second and third metatarsals and between the third and fourth metatarsals, it sends forward two prolongations.

    The synovial membrane forms a unique sac between the cuboid and the fourth and fifth metatarsals.

    Between the fourth and fifth metatarsals, a prolongation is extended forward from it.

    Ligament

    The bones are held together by interosseous, dorsal, and plantar ligaments.

    Dorsal ligaments

    • Dorsal ligaments are flat, robust bands.
    • A broad, thin band connects the first metatarsal to the first cuneiform; three, one from each cuneiform bone, three from the third cuneiform, four from the cuboid one from the third cuneiform, and five from the cuboid.

    Plantar ligaments

    • The longitudinal and oblique bands that make up the plantar ligaments are arranged less regularly than those of the dorsal ligaments.
    • The strongest are those for the first and second metatarsals; oblique bands connect the second and third metatarsals to the first cuneiform, while a few fibers connect the fourth and fifth metatarsals to the cuboid.

    Interosseous ligaments

    Three types of interosseous ligaments are present.

    • The first, which extends from the first cuneiform’s lateral surface to the second metatarsal’s adjacent angle, is the strongest.
    • The second joins the neighboring angle of the second metatarsal to the third cuneiform.
    • Third, it joins the opposite side of the base of the third metatarsal to the lateral angle of the third cuneiform.

    Blood supply

    The lateral plantar, medial plantar, and dorsalis pedis arteries all have branches that give blood to the Tarsometatarsal (Lisfranc) joints. Particularly:

    The anterior tibial artery continues as the dorsal pedal artery.

    Creates branches that support the dorsal portion of the joint, including the deep plantar artery and the arcuate artery.

    A branch of the posterior tibial artery is the lateral plantar artery.

    Provides support for the joint’s plantar facet and helps create the deep plantar arch.

    A branch of the posterior tibial artery is the medial plantar artery.

    Provides support to the tarsometatarsal region’s medial wall.

    Innervation

    Branches from the following nerves innervate the tarsometatarsal (Lisfranc) joints:

    Deep Peroneal (Fibular) Nerve

    • Facilitates the joints’ dorsal aspect
    • Helps with pain perception and proprioception.

    Medial Plantar Nerve (Branch of the Tibial Nerve)

    • Innervates the joints’ medial surfaces, primarily the first TMT joint.

    Lateral Plantar Nerve (Branch of the Tibial Nerve)

    • Innervates the joints’ lateral side, primarily the TMT joints’ fourth and fifth.

    Sural Nerve

    • The lateral aspect of the foot could get some sensory input.

    Saphenous Nerve

    • Permits the medial aspect of the foot to receive some sensory innervation.

    Proprioception, pain perception, and motor control—all essential for stable and mobile feet—are facilitated by these nerves.

    Function

    Only minimal sliding of the bones upon one another is allowed between the tarsal and metatarsal bones.

    • These joints are essential for preserving the foot’s transverse arch.
    • When walking or running, they aid in the transmission of force.
    • They help with foot stability and flexibility on uneven surfaces.

    Movement

    The main gliding and rotational motions made possible by the tarsometatarsal (Lisfranc) joints help the foot become more flexible and adapt to various surfaces. The various joints move in different ways:

    First Tarsometatarsal Joint (Medial Cuneiform & 1st Metatarsal)

    • Plantarflexion and some dorsiflexion
    • Slight rotation

    Second & Third Tarsometatarsal Joints (Intermediate & Lateral Cuneiforms & 2nd/3rd Metatarsals)

    • The foot arch is stabilized by the strong ligamentous support that renders these joints nearly motionless.

    Fourth & Fifth Tarsometatarsal Joints (Cuboid & 4th/5th Metatarsals)

    • Permit more movement than the medial joints
    • Plantarflexion, some dorsiflexion, and a small amount of eversion or inversion
    • An essential component of stress absorption and foot flexibility

    Clinical significance

    The role that the tarsometatarsal (Lisfranc) joints play in foot stability and movement makes them clinically relevant. Important clinical features include:

    Lisfranc Injury (Tarsometatarsal Joint Complex Injury)

    • Lisfranc joint complicated dislocation or fracture-dislocation.
    • High-energy trauma (such as falls or auto accidents) or low-energy injuries (like stepping while twisting).
    • Incapacity to support weight, pain, bruising, and swelling.

    Arthritis of the Tarsometatarsal Joints

    • The second and third TMT joints are frequently affected by osteoarthritis, which causes stiffness and pain.
    • Lisfranc injuries may result in post-traumatic arthritis.
    • The TMT joints may be affected by rheumatoid arthritis, which can lead to joint degeneration and abnormalities.

    Pes Planus (Flatfoot)

    • Foot biomechanics may be impacted by TMT joint instability, which can lead to medial longitudinal arch collapse.
    • May result in discomfort and irregular walking.

    Gout & Other Inflammatory Conditions

    • Gout: Crystal deposition of uric acid can harm the TMT joints, particularly the first joint.
    • Other circumstances: Some joints may also be affected by psoriatic or septic arthritis.

    Stress Fractures & Overuse Injuries

    • The stability of the TMT joint may be impacted by stress fractures in the metatarsals caused by repetitive stress, such as that experienced by sports or military personnel.

    Charcot Foot (Neuropathic Arthropathy)

    • Dislocation, foot deformity, and joint degeneration are common in diabetic neuropathy.
    • Comprehending the clinical importance of the tarsometatarsal joints is essential for accurately identifying and treating foot conditions and injuries.

    FAQs

    Tarsometatarsal joints: what are they?

    The intricate joints in the middle of the foot are called tarsometatarsal (TMT) joints, or Lisfranc joints. These joints serve to unite the metatarsal and tarsal bones. The metatarsal bones join the tarsal bones to the toe bones, and the tarsal bones form the foot’s arch.

    What are the tarsometatarsal joint numbers four and five?

    The fourth and fifth metatarsals’ bases are joined together as a single unit by the fourth and fifth intermetatarsal joints. However, due to the weaker connection of the ligaments, the articulation is more loosened than the other intermetatarsal joints.

    What other name does Lisfranc’s joint go by?

    The tarsometatarsal articulations are the Lisfranc joints. The lateral two metatarsals articulate with the cuboid, while the first three metatarsal bases articulate with their corresponding cuneiforms in the normal Lisfranc joint complex. The three cuneiform bones create a mortise that securely recedes into the second metatarsal base.

    Are the tarsometatarsal bones long?

    The middle part of the foot is called the tarsometatarsal joint or Lisfranc joint. It connects the metatarsal bones, which are the five long bones in the foot, with the tarsal bones, which are the bones in the foot arch. Lisfranc fractures can result from a violent car accident or a fall from a height.

    Why do tarsometatarsal joints hurt?

    Wear and Tear: Over time, osteoarthritis can develop as a result of the tarsometatarsal joints’ cartilage gradually deteriorating due to years of repetitive strain and use. This is particularly prevalent in highly active people who play high-impact sports.

    References

    • Wikipedia contributors. (2024b, February 11). Tarsometatarsal joints. Wikipedia. https://en.wikipedia.org/wiki/Tarsometatarsal_joints
    • Tarsometatarsal joints. (2024, March 6). Kenhub. https://www.kenhub.com/en/library/anatomy/tarsometatarsal-joint
  • Restless Legs Syndrome (RLS)

    Restless Legs Syndrome (RLS)

    What is The Restless Legs Syndrome?

    Restless Legs Syndrome (RLS) is a neurological disorder characterized by an uncontrollable urge to move the legs, often accompanied by uncomfortable sensations like tingling, itching, or aching.

    Symptoms typically worsen during rest or inactivity, especially in the evening or at night, leading to disrupted sleep. The exact cause is unknown, but it is linked to dopamine dysfunction and may have genetic, iron deficiency, or other underlying factors. Treatment includes lifestyle changes, iron supplementation (if deficient), and medications in severe cases.

    All ages can be affected by RLS, however middle-aged and older adults are more likely to have it. It is also known as “pregnancy-related RLS” when it affects expectant mothers. While RLS is normally a non-life-threatening disorder, its impact on quality of life and sleep can be severe, leading to physical and emotional suffering.

    Modest lifestyle adjustments and self-care practices may help reduce symptoms. Additionally, a lot more patients with RLS benefit from medications.

    The impulse to move the legs (rarely the arms) and strange, unpleasant sensations (paraesthesia) deep in the legs are symptoms of the widespread neurological condition known as restless leg syndrome (RLS). Sensations often diminish with movement and resurface with rest or inactivity, particularly at night and in the evening. Unpleasant paraesthesia can significantly disrupt sleep. People with RLS, sometimes referred to as Willis-Ekbom disease, are compelled to move their legs. RLS is a common, long-term, complex limb movement disorder. Unusual, non-painful sensations that start at rest and get better with movement are commonly associated with RLS. Symptoms tend to worsen at night on a daily basis. There are over three million cases in the US annually.

    RLS has been described as either a symptomatic syndrome commonly associated with anemia, pregnancy, or end-stage renal failure, or as an idiopathic illness with no known etiology. But there are underlying genetic, environmental, or both variables that contribute to the condition’s complexity. The fact that the disease initially appears in childhood indicates a significant hereditary component, despite the fact that the start can vary widely, from an early age to over 80 years of life. New epidemiological studies employing community samples have revealed that between 3% and 10% of persons exhibit the primary symptoms of RLS, despite previous underestimations of the condition’s incidence.

    Epidemiology of restless leg syndrome:

    An estimated 2.5–15% of Americans suffer from RLS. A small percentage of people (about 2.7% of the population) have severe or ongoing symptoms. RLS affects women twice as frequently as it does males, and it is more common in Caucasians than in persons of African origin. RLS affects 3% of people from the Mediterranean or Middle East and 1% to 5% of those from East Asia, suggesting that various environmental or genetic variables, such as nutrition, may contribute to the syndrome’s incidence. The course of RLS is more severe when it is identified later in life. Those with end-stage kidney disease, pregnancy, or iron insufficiency are even more likely to get RLS. According to the 1998 Sleep in America survey by the National Sleep Foundation, up to 25% of expectant mothers experienced RLS in the third trimester. It is also associated with poor general health.

    Uremia, familial history, and advanced age are some of the risk factors for RLS. RLS is more common as people age, and its symptoms also tend to get worse and last longer. The prevalence of uremia in patients undergoing renal dialysis ranges from 20% to 57%, but outcomes for kidney transplant recipients are better than those for dialysis patients.

    Although it can happen at any age, RLS typically first appears in the third or fourth decade of life. Nineteen risk loci have been linked to RLS by genome-wide association studies. Parkinson’s disease, spinal cerebellar atrophy, spinal stenosis, [specify] lumbosacral radiculopathy, and Charcot-Marie-Tooth disease type 2 are among the neurological disorders associated with RLS.

    Pathophysiology

    The characteristic of RLS, a neurological condition usually accompanied by unpleasant sensations, is uncontrollable desires to move the legs. Although the precise pathophysiology of RLS is still unclear, a number of processes have been suggested as likely causes. Iron levels in the brain are known to have a major impact on RLS. Iron deficiency has been linked to blood-brain barrier (BBB) dysfunction, which can lead to altered iron conduction across the BBB and reduced iron storage in brain endothelial cells. This deficiency can affect a number of processes, including neurotransmitter synthesis and metabolism, and result in oxidative damage.

    Dopaminergic cells are especially susceptible to iron shortage because of their role in controlling movement, which might interfere with dopamine transmission and potentially result in RLS symptoms. The dopaminergic system, which is essential for controlling movement and rewarding behavior, is intimately associated with RLS. It has been demonstrated that medications that change dopamine levels can change the symptoms of RLS. By altering the action of specific enzymes involved in the synthesis of dopamine, iron deficiency may result in dopaminergic dysfunction. Dopaminergic A11 cells in the midbrain are thought to play a key role in the pathophysiology of RLS because they appear to be engaged in the spinal cord’s dopamine production. Changes in thalamic activity caused by dopaminergic input are also connected to RLS.

    RLS susceptibility is significantly influenced by genetic factors. It has been discovered that a number of genetic variants, including MEIS1, BTBD9, PTPRD, and MAP2K5, increase the incidence of RLS. These genes include examples of those linked to iron homeostasis, dopamine synthesis, sleep regulation, and the development of embryonic neurons. These genes’ interactions with the dopamine and iron metabolism pathways may have an impact on the development of RLS. Research on the pathophysiology of RLS has focused on regions of the brain like the basal ganglia, dopaminergic A11 cell group, and substantia nigra. A11 cells, which regulate sensory, motor, and autonomic processes, send dopaminergic impulses to the spinal cord. RLS has been associated with changes in cerebral and thalamic activity as well as hyperexcitability in the spinal cord.

    Mechanism of the Restless Legs Syndrome (RLS)

    The pathogenesis of restless legs syndrome may involve abnormalities in the dopamine and iron systems, though this is yet not fully understood. Additionally, it has a widely accepted explanatory mechanism that can be clinically demonstrated by body temperature and other circadian rhythm biomarkers. The development of RLS is influenced by the interplay between decreased neuronal iron uptake and the activities of the neuromelanin-containing and dopamine-producing cells, suggesting that iron deficiency may have distinct effects on brain dopaminergic transmissions.

    Along with the limbic system, which is influenced by the dopaminergic system and may impact pain perception, medial thalamic nuclei may also play a function in RLS. Patients on low-dose dopamine agonists experience an improvement in their RLS symptoms.

    What are the types of restless legs syndrome?

    Principal RLS and secondary RLS are the two principal forms of RLS.
    Although the exact cause of RLS is unknown, it might have something to do with the way the body handles dopamine, a neurotransmitter involved in muscle contraction regulation. Pregnancy is also connected to it.

    Primary or idiopathic RLS

    • Idiopathic denotes an unidentified etiology. In between 25% and 75% of cases, there may be a familial connection, suggesting that it has a genetic origin.
    • Usually, primary RLS starts before the age of forty.

    Secondary RLS

    The cause of secondary RLS is another condition. The following are some examples of situations that can result in secondary RLS:

    • diabetes
    • iron deficiency
    • kidney failure
    • Parkinson’s disease
    • peripheral neuropathy
    • venous insufficiency
    • pregnancy
    • fibromyalgia
    • celiac disease

    Secondary RLS can also result from certain drugs, especially those that interfere with dopamine action. The following are some examples of drugs that may induce or exacerbate secondary RLS:

    • selective serotonin reuptake inhibitors (SSRIs)
    • serotonin-norepinephrine reuptake inhibitors (SNRIs)
    • tricyclic antidepressants
    • beta-blockers

    RLS and periodic limb movement disorder (PLMD) can coexist. A related sleep condition called PLMD makes the limbs jerk or twitch uncontrollably while you’re asleep.

    Causes of the Restless Legs Syndrome (RLS)?

    Restless Legs Syndrome (RLS) frequently has no identified etiology. Researchers believe that a discrepancy in the brain chemical dopamine, which sends impulses to regulate muscle action, may be the cause.

    Heredity

    RLS can occasionally run in families, particularly if it first manifests before the ages of 35 to 40. Researchers have identified potential locations for Restless Legs Syndrome (RLS) genes on the chromosome.

    Pregnancy

    Signs and symptoms of Restless Legs Syndrome (RLS) may be momentarily exacerbated by pregnancy or hormonal changes. Some pregnant women experience their first episode of Restless Legs Syndrome (RLS), particularly in the final trimester. till the symptoms often go away after giving birth.

    Symptoms of the Restless Legs Syndrome (RLS)?

    The RLS has a long history, but Ekbom was the first to recognize it as a distinct clinical entity in 1944. The factors that are essential for diagnosing this illness, however, have not yet been agreed upon by a large worldwide study group. The following four clinical characteristics of RLS were determined by this study to be the least requirement for diagnosis. When patients are impelled to move and employ different motor strategies to alleviate discomfort related to their restless legs, motor restlessness must also be present. The affected limbs must move at least partially and severely, and the symptoms must be more severe in the evening or at night or only present when at rest (i.e., sitting or lying down).

    The urge to move the legs is the main symptom. The following are typical symptoms that accompany restless legs syndrome (RLS):

    • Feelings that start while you’re sleeping: These sensations typically start after you’ve been sitting or lying down for a time, such as in a theater, an automobile, or an airplane.
    • Movement-induced relief: Walking, stretching, or jiggling the legs can all help reduce the symptoms of restless legs syndrome.
    • Symptom worsening in the evening: The majority of symptoms occur at night.
    • Leg twitching at night: Periodic limb movement of sleep, a much more common condition that may be linked to restless legs syndrome (RLS), is characterized by the legs kicking and twitching, possibly during the night, while you sleep.
    • The symptoms of restless legs syndrome (RLS) are typically described as strong, disagreeable feelings in the legs or feet. Usually, both sides of the body experience them. The arms are frequently affected by the sensations.

    The following are some descriptions of the sensations, which typically occur inside the limb rather than on the skin:

    • Crawling,
    • Creeping,
    • Pulling,
    • Throbbing,
    • Aching,
    • Itching,
    • Electric.

    The feelings can be difficult to describe at times. RLS sufferers typically don’t characterize their symptoms as numbness or cramping in their muscles. They do, until they often talk about wanting to move their legs.

    It’s common for the intensity of symptoms to change. Symptoms can occasionally disappear for a while before returning.

    Risk factors

    Even in childhood, restless legs syndrome (RLS) can strike at any age. The illness is more common in women than in males, and it becomes considerably more common as people age.

    Typically, there is no significant underlying medical issue linked to restless legs syndrome (RLS). Until it occasionally comes with additional conditions, such as:

    • Peripheral neuropathy: Chronic conditions like diabetes and alcoholism can occasionally cause damage to the nerves in the hands and feet.
    • Iron deficiency: Iron deficiency can induce or exacerbate restless legs syndrome (RLS) even in the absence of anemia. You may be at risk for iron insufficiency if you have a history of gastrointestinal bleeding, have heavy periods, or donate blood frequently.
    • kidney failure: Iron deficiency, frequently accompanied by anemia, may also be present in individuals with renal failure. Iron levels in the blood may decrease as a result of renal dysfunction. RLS may be caused by or made worse by these and other alterations in bodily chemistry.
    • Spinal cord disorders: Restless Legs Syndrome (RLS) has been connected to spinal cord lesions caused by injury. Restless Legs Syndrome (RLS) is also less likely to occur after spinal cord anesthesia, such as a spinal block.
    • Parkinson’s disease: Individuals with Parkinson’s disease who use certain medications known as dopaminergic agonists are more likely to get RLS.

    Diagnosis

    To diagnose RLS, the clinical history is evaluated. If there is a medical possibility of sleep apnea or if sleep issues persist even after RLS symptoms have been treated, polysomnography should be done. Iron status (the serum ferritin level and iron saturation) should be evaluated because RLS frequently happens without anemia and may be a sign of iron shortage. Additional laboratory tests ought to be performed. essential requirements for RLS diagnosis. the International Restless Legs Study Group’s criteria for RLS.

    The desire to move one’s legs due to discomfort that radiates from the legs to the feet is one of the symptoms of the diagnosis. It is possible that painful sensations in the arms will accompany the need to move the legs. During periods of idleness or sleep, there may be a desire to move the legs. Movement may or may not completely alleviate the restlessness. Unpleasant feelings or the need to move may only happen at night or be worse at night than during the day.

    After reviewing your medical history, your doctor will ask you to describe your symptoms. The following standards, developed by the International Restless Legs Syndrome (RLS) Study Group, are necessary for a diagnosis of RLS:

    • You have a powerful, frequently alluring need to move your legs, which is frequently accompanied by unpleasant feelings.
    • Resting, such as sitting or lying down, is when your symptoms start or worsen.
    • Activity, such as stretching or walking, can temporarily or partially alleviate your discomfort.
    • The severity of your symptoms increases at night, and they cannot be well explained by another behavioral or medical issue.
    • Your physician may do neurological and physical examinations. In order to rule out further potential reasons of your symptoms, blood tests may be conducted, especially for iron deficiency.

    Additionally, you may be sent to a sleep specialist by your provider. If another sleep condition, such as sleep apnea, is suspected, this may include an overnight stay and a study at a sleep clinic. However, a sleep study is typically not required for a diagnosis of restless legs syndrome (RLS).

    History and Physical Examination:

    Sensations that are localized to deep structures rather than the surface, such as crawling, creeping, pulling, itching, drawing, or stretching, are described by patients. Typically, there is no sensitivity to skin contact and no pain or tingling paresthesia of the kind seen in severe peripheral neuropathy.

    Some patients may have relatively minor issues, while others may have significant sleep disturbances and quality of life deficits. The symptoms usually peak at night, within 15 to 30 minutes of lying down in bed, and they usually get worse toward the end of the day. In extreme situations, the patient may have symptoms earlier in the day when seated, making it difficult for them to participate in activities like going to meetings or watching movies.

    In less severe situations, people will shift about in bed, kick, or massage their legs to feel better. On rare occasions, the arms could be impacted. In order to alleviate their symptoms, patients with more severe ones feel compelled to get out of bed and pace the floor. Involuntary, strong dorsiflexion of the foot lasting 0.5 to 5 seconds, occurring every 20 to 40 seconds during sleep, is a characteristic of periodic leg movements of sleep. While you sleep, you might twitch your limbs. Eighty percent of RLS sufferers experience them. Patients with RLS typically have normal physical examination results. The purpose of it is to find secondary causes.

    Essential diagnostic criteria (all must be met):

    • Unpleasant and uncomfortable sensations may accompany an insatiable desire to move the lower extremities.
    • During the day, the impulse to move the extremities is less intense, but it gradually gets worse at night and in the evenings. Additionally, the symptoms manifest while at rest or during times of inactivity and sleep.
    • Walking or stretching the legs can help to partially or totally reduce the urge to move the lower extremities. As long as the activity is continuing, the symptoms are either negligible or nonexistent.
    • In the evenings, the impulse to move the lower extremities intensifies, making it impossible to fall asleep. As a result, the patient frequently feels exhausted during the day.
    • It is important to rule out other behavioral disorders including tardive dyskinesia, leg cramps, muscular spasms, or positional pain when these symptoms are present.

    During sleep, the leg movements, which are typically involuntary, may include abrupt dorsiflexion motions that last one to five seconds and repeat every thirty to forty seconds. Children typically have a positive family history. The physical examination is typically routine. To rule out a neurological condition, radiculopathy, or Parkinson’s disease, the patient must be examined.

    Evaluation

    Other than tests to rule out secondary causes, there are no tests to diagnose RLS. Additionally, blood tests is performed to rule out other causes. If neuropathy or radiculopathy is suspected, nerve conduction tests and electromyography are performed. To measure the frequency of leg movements and describe the sleep pattern, polysomnography is frequently used. Every patient with RLS symptoms should have an iron study completed. Serum iron, ferritin, transferrin saturation, and total iron-binding capacity are all important components of detailed iron investigations. If a full iron panel is not available, at least a ferritin level should be performed. When a patient’s RLS is under control but their symptoms reappear or worsen, they should once more undergo an evaluation of their iron status.

    • The onset of symptoms sooner in the evening
    • Morning symptoms are more severe.
    • Upper body symptoms are also present.

    A complete blood count and an assessment of the following levels should be performed, among other laboratory tests, if a secondary cause is suspected:

    • Blood urea nitrogen
    • Fasting blood glucose
    • Creatinine
    • Magnesium
    • Vitamin B-12
    • Thyroid-stimulating hormone
    • Folate

    Regarding the nervous system, if radiculopathy or polyneuropathy seems likely based on clinical examination, nerve conduction investigations and needle electromyography should be taken into consideration, even if the neurological examination is normal.

    Differential Diagnosis

    Leg cramps, positional pain, local leg injuries, arthritis, leg edema, venous stasis, peripheral neuropathy, radiculopathy, repetitive foot tapping/leg rocking, anxiety, myalgia, and drug-induced akathisia are the most prevalent disorders that should be distinguished with RLS.

    Leg discomfort can also be caused by peripheral artery disease and arthritis, but it usually gets worse as you walk.

    Among the less frequent differential diagnoses are myelopathy, myopathy, hypotensive akathisia, vascular or neurogenic claudication, orthostatic tremor, aching legs, and wiggling toes.

    • Tardive dyskinesia
    • Akathisia
    • Leg cramps
    • Vascular disease
    • Muscle spasms
    • Radiculopathy

    Treatment of Restless Legs Syndrome:

    RLS is no known cure, however there are a number of therapy options that can help control the symptoms and enhance the general health of those who are impacted. The discomfort linked to restless legs syndrome can be reduced by medication, lifestyle modifications, and avoiding specific triggers. For those with RLS symptoms to receive an accurate diagnosis and a customized treatment plan, speaking with a healthcare expert is crucial.

    RLS symptoms can occasionally be significantly reduced by treating a primary illness, such as iron deficiency. Oral or intravenous iron supplements may be necessary to treat an iron deficiency. However, only use iron supplements under medical supervision and following a blood iron level test from your healthcare professional.

    The goal of treatment for restless legs syndrome (RLS) without an accessory ailment is to modify one’s lifestyle. Your healthcare professional may suggest medication if those don’t work.

    Reducing or eliminating the patient’s leg discomfort when they sleep or rest is the major objective. Resolving sleep disturbances caused by RLS is also crucial. Patients will feel more refreshed if they can manage their daily weariness and fatigue caused by sleep disruption. The main goal is to enhance the patient’s quality of life. Techniques for managing RLS include both pharmaceutical and non-pharmacological therapy. Non-pharmacological Other options for managing RLS include changing one’s lifestyle to abstain from substances that aggravate the condition, such as alcohol, coffee, and nicotine; engaging in activities that stretch the muscles in the back of the legs; and using heat to relieve pain by applying hydrocollator packs or warm baths. Iron replacement therapy may be helpful for people with low serum ferritin levels.

    Medical Treatment of Restless Legs Syndrome:

    There are numerous prescription medications available to reduce leg anxiety, the majority of which were created to treat other illnesses. These include:

    • Drugs that increase dopamine in the brain: These drugs have an impact on the brain’s dopamine levels. The Food and Medication Administration has approved rotigotine (Neupro) and pramipexole (Mirapex) for the treatment of moderate to severe RLS.
    • These drugs often have modest short-term side effects, such as weariness, lightheadedness, and nausea. However, they can also result in daytime sleepiness and impulse control problems like compulsive gambling.
    • Calcium channel-affecting medications: Some persons with RLS respond well to certain drugs, such as pregabalin (Lyrica), gabapentin enacarbil (Horizant), and gabapentin (Neurontin, Gralise).
    • Muscle relaxants and sleep aids: These medications help you sleep at night, but they don’t stop leg pain and may make you drowsy throughout the day. Usually, these medications are only used when no additional therapy is effective.
    • Opioids: Narcotic drugs are primarily used to treat acute symptoms, but excessive use of them can lead to addiction. Examples include codeine, hydrocodone (Hysingla ER), oxycodone (Oxycontin), tramadol (Ultram, ConZip), and more.
    • Finding the ideal medication or drug combination for you may need a number of trials between you and your healthcare provider.

    Caution about medications

    Restless legs syndrome can occasionally be treated with dopamine medications that must work for a while, or you may discover that your symptoms, including those in your arms, return earlier in the day. We refer to this as augmentation. To address the issue, your doctor may recommend a different prescription.

    Pregnancy is not advised when using the majority of medications used to treat restless legs syndrome (RLS). Alternatively, your doctor may recommend self-care techniques to alleviate symptoms. However, your doctor may authorize the use of specific medications if the symptoms are especially unpleasant during your last trimester.

    Certain medications may exacerbate restless legs syndrome (RLS) symptoms. A few antidepressants, antipsychotics, nausea-relieving medications, and cold and allergy medicines are among them. If at all feasible, your doctor may advise you to stay away from these medications. However, if you must take these drugs, discuss with your doctor the possibility of taking other medications to help control your restless legs syndrome (RLS).

    Physical Therapy Treatment of Restless Legs Syndrome:

    Yoga and Pilates

    Numerous other experts recommended yoga, Pilates, and aerobics as ways to help with the symptoms of restless legs syndrome (RLS), but they also advised against doing Ashtanga, hot yoga, or any other pose that is particularly troublesome or puts undue strain on the body.

    Cycling

    Another activity that helps reduce discomfort is cycling. Aim for 8 to 10 miles per hour or a little bit slower if you want to ride at a leisurely pace.

    Swimming

    Swimming In a warm pool, swimming or water aerobics helps you relax your muscles while gaining strength and improving your range of motion.

    Stretching exercise:

    Stretching may help prevent the symptoms of Restless Legs Syndrome (RLS). To help you get started, here are some stretches.

    Calf stretch

    heel-and-calf-stretch
    Calf stretch
    • Extend your arms until your elbows are almost straight and your hands are flat against a wall.
    • Your left leg is stepped back a foot or two and your right knee is bent to a small degree, placing your foot and heel flat on the ground. For 15 to 30 seconds, hold.
    • Then, with your heel and foot flat on the floor, bend your left knee.
    • Move your foot back a little bit for a deep stretch.
    • Repeat with a different leg.

    Front thigh stretch

    • Pull one ankle across your back while maintaining a straight leg while standing with your back to a wall for balance.
    • For 15 to 30 seconds, hold.
    • Repeat with a different leg.

    Hip flexor stretch

    hip-flexor-stretch-on-chair
    Hip flexor stretch
    • For assistance, position the back of a chair across from the wall and face the chair.
    • With your knee bent, elevate your left foot and lay it flat on the chair. (Alternatively, attempt to balance by placing your foot on a stair while maintaining the guardrail.)
    • Maintaining a neutral spine, gradually push your pelvis forward until you feel a stretch at the top of your right thigh. Your pelvis will just slightly advance.
    • For 15 to 30 seconds, hold.
    • Repeat with a different leg.

    You can alleviate the symptoms of Restless Legs Syndrome (RLS) by engaging in mild to moderate exercise. Discuss effective weekly daily routines that will work best for you with your physician. Make sure to ask them about safe activities for you if you are pregnant.

    Lifestyle and home remedies of Restless Legs Syndrome:

    Simple lifestyle adjustments can help reduce restless legs syndrome (RLS) symptoms:

    • Try massages and baths: You can relax your muscles by rubbing your legs and soaking in a warm bath.
    • Put on cool or warm packs: Applying heat or ice, or switching between the two, may lessen the symptoms in the limbs.
    • Start practicing good sleep hygiene: It’s important to maintain good sleep hygiene because fatigue can exacerbate symptoms of restless legs syndrome (RLS). Get at least 7 (seven) hours of sleep every night, ideally in a calm, peaceful, and well-sleeping environment, and go to bed and wake up at roughly the same time every day.
    • Exercise: Regularly engaging in moderate exercise may help reduce the symptoms of restless legs syndrome (RLS); but, overdoing it or exercising too late in the day may make them worse.
    • keep away of caffeine: Reducing caffeine intake can help with restless legs. For a few weeks, stay away from anything that contains caffeine, such as chocolate, coffee, tea, and soft drinks. See if this helps.
    • Think about applying a vibrating pad or a foot wrap: Wearing a foot wrap applies pressure to the foot, potentially alleviating symptoms of restless legs syndrome. Applying a vibrating pad to the back of your legs may also help.

    Coping and support

    The disorder known as restless legs syndrome (RLS) frequently lasts a lifetime. It could help you create coping mechanisms that are effective for you, such as:

    • Inform them that you suffer from Restless Legs Syndrome (RLS): Giving your friends, family, and coworkers information about restless legs syndrome (RLS) will help them understand you when they watch you go to the water cooler, pace the halls, or stand in the back periodically.
    • Avoid putting up with your need for mobility: You may notice that your symptoms get worse if you try to stop the impulse to move.
    • Maintain a sleep log: Keep a record of the tactics and medications that help you fight restless legs syndrome, and let your doctor know about them.
    • Massage and stretching: Stretching and a light massage are good ways to start and end the day.
    • Ask for assistance: Family members and individuals with restless legs syndrome (RLS) get together in support groups. By participating in a group, your insights can benefit both you and perhaps someone else.

    Key points about Restless Legs Syndrome (RLS)

    • When you have Restless Legs Syndrome (RLS), you feel a compelling need to move the affected limb.
    • Although there is no surefire test to identify Restless Legs Syndrome (RLS), your doctor can make the diagnosis based on your medical history, symptoms, and physical examination.
    • Changes in medication and lifestyle can help reduce the symptoms of restless legs syndrome (RLS).
    • Understand why you are there and what you hope to achieve.
    • Write down the questions you would like answered before your appointment.
    • Remember what your healthcare practitioner tells you, ask questions, and have someone with you to help.
    • During the visit, make a note of any new diagnoses, prescriptions, tests, or therapies. Take note of any instructions your physician gives you as well.
    • Understand the benefits of a medication or treatment and why it is recommended. Be aware of the adverse consequences as well.
    • Find out whether there are other methods to handle your circumstance.
    • Understand the rationale behind a recommended test or operation and the potential consequences.
    • Be aware of what to anticipate if you choose not to take the medication or undergo the test or operation.
    • Note the time, date, and purpose of any follow-up appointments you may have.
    • If you have any questions, know how to get in touch with your healthcare practitioner.

    Restless legs syndrome in children

    The same tingling and tugging feelings that adults with RLS experience in their legs can also affect children. However, they can find it difficult to explain. They may refer to it as a “creepy crawly” sensation.

    A strong desire to move their legs is another symptom of RLS in children. Compared to adults, they are more prone to experience symptoms during the day.

    Sleep disturbances caused by RLS can have an impact on many facets of life. A youngster with RLS may exhibit signs of fidgeting, irritability, or inattention. They could be classified as hyperactive or disruptive. Addressing these issues and raising academic achievement can be achieved through the diagnosis and treatment of RLS.

    The adult criteria must be fulfilled in order to diagnose RLS in children under the age of twelve:

    • strong want to move, typically accompanied by odd feelings
    • The feelings get worse at night and are caused by attempting to unwind or fall asleep.
    • When you move, the symptoms subside.
    • The youngster must also be able to use their own words to explain the sensations in their legs.

    Two of these must be true otherwise:

    • Age-related sleep disruption is present.
    • RLS was present in a sibling or biological parent.
    • A periodic limb movement index of five or higher per hour of sleep is confirmed by a sleep study.
    • It is necessary to correct any nutritional deficits. Children with RLS should learn excellent nighttime routines and abstain from caffeine.
    • Benzodiazepines, anticonvulsants, and dopamine-affecting drugs may be provided if needed.

    Dietary guidelines for individuals suffering from restless legs syndrome

    For those who have RLS, there are no particular dietary recommendations. To make sure you’re getting enough vital vitamins and nutrients, it’s a good idea to evaluate your diet. Reduce your intake of processed foods that are high in calories but have little to no nutritional value.

    Certain vitamin and mineral deficiencies are seen in certain RLS sufferers. You can take dietary supplements or alter your diet if that’s the case. It all depends on the findings of your tests.

    Try increasing your intake of these iron-rich foods if you’re iron deficient:

    • dark green leafy vegetables
    • peas
    • dried fruit
    • beans
    • red meat and pork
    • poultry and seafood
    • foods enriched with iron, such bread, pasta, and several cereals

    Since vitamin C aids in the body’s absorption of iron, you may also wish to combine foods high in iron with these vitamin C sources:

    • citrus juices
    • grapefruit, oranges, tangerines, strawberries, kiwi, melons
    • tomatoes, peppers
    • broccoli, leafy greens

    Caffeine is a complex substance. For some, it can exacerbate RLS symptoms, but for others, it is beneficial.

    In addition to being known to interfere with sleep, alcohol can exacerbate RLS. keep away of it, especially at night.

    Restless legs syndrome and sleep

    You may experience pain or discomfort from those odd sensations in your legs. Additionally, it may be nearly tough to get to sleep and stay asleep with those symptoms.

    Fatigue and lack of sleep are harmful to your health and wellbeing.

    There are a few things you may do to increase your chances of getting a good night’s sleep in addition to consulting your doctor to find relief:

    • Examine your pillows and mattress. It could be time to replace them if they are old and bumpy. Investing in cozy clothes, blankets, and sheets is also worthwhile.
    • Make sure that outside light is blocked by curtains or window coverings.
    • Clocks and other electronic devices should be put away from your bed.
    • Clear the clutter in the bedroom.
    • To prevent overheating, keep the temperature in your bedroom cool.
    • Establish a sleep schedule for yourself. Even on the weekends, make an effort to go to bed and wake up at the same time every day. It will assist in maintaining a healthy sleep schedule.
    • At least one hour before going to bed, stop using electronics.
    • Give your legs a massage or have a hot bath or shower right before bed.
    • Consider placing a pillow between your legs as you sleep. It may lessen the likelihood that your nerves would compress and cause problems.

    Restless legs syndrome and pregnancy

    RLS symptoms typically appear for the first time in the final trimester of pregnancy. Pregnant women may be two or three times more likely to have RLS, according to data.

    This is due to poorly understood factors. Hormonal fluctuations, nerve compression, and vitamin or mineral deficits are a few potential causes.

    Leg pains and trouble sleeping are other side effects of pregnancy. It can be challenging to differentiate these symptoms from RLS. Consult your physician if you suffer RLS symptoms while pregnant. Testing for iron or other deficiencies can be necessary.

    Some of these home care methods are also available for you to try:

    • keep away of prolonged periods of inactivity, particularly in the evening.
    • Even if it’s simply a stroll in the afternoon, make an effort to get some exercise each day.
    • Before you go to bed, stretch your legs or give them a massage.
    • When your legs are irritating you, try applying heat or cold.
    • Maintain a consistent sleep routine.
    • keep away of alcohol, tobacco, caffeine, and antihistamines.
    • Verify that your diet or prenatal supplements are providing you with all the nutrients you require.
    • It is not safe to use some of the drugs used to treat RLS while pregnant.

    During pregnancy, RLS typically resolves on its own in the weeks following delivery. Consult your physician about alternative treatments if it doesn’t. If you are nursing, make sure to mention it.

    Prognosis:

    Though more slowly for those with the idiopathic form of RLS than for those with a related medical illness, RLS symptoms may progressively deteriorate with age. The disease can be managed with current therapies, which reduce symptoms and lengthen sleep duration. Furthermore, some people experience remissions, which are times when their symptoms lessen or go away for a few days, weeks, or months, though they typically return in due course.

    RLS is not a sign of or a portent of another neurological condition, such Parkinson’s disease. When dopamine-related medications are taken for treatment, RLS symptoms may get worse with time. This phenomenon is known as augmentation, and it may mimic symptoms that happen all day long and impair all limb movements. RLS has no known cure.

    • If an underlying cause can be addressed, the symptoms of restless legs syndrome will typically go away.
    • However, if the cause is not recognized, the symptoms may worsen over time and have a significant impact on the individual’s life.
    • Although severe cases of restless legs syndrome can cause anxiety and sadness in addition to disrupting sleep (insomnia), the condition is rarely life-threatening.
    • For those who suffer from restless legs syndrome, the charity Restless Leg Syndrome UK (RLS-UK) offers support and information.

    Complications:

    The disease’s own complications are restricted to affecting quality of life because of weariness and sleep disturbances. For the majority of patients, the symptoms worsen over time and significantly impair their quality of life.

    Conclusion:

    Before they consider seeking a diagnosis, people may be exhibiting signs of restless legs syndrome. Extreme exhaustion, irregular limb sensations, and poor sleep patterns are typically the initial signs. Although medication interventions are the first line of treatment, it has been demonstrated that modest to moderate exercise can help reduce symptoms of RLS.

    It is advised to perform the various targeted, low-intensity exercises covered in this article since they offer relief from RLS symptoms without causing any negative side effects, unlike when medications are used to treat the condition.

    • Legs that suffer from restless legs syndrome (RLS) feel heavy. When the legs are moved or stretched, the symptoms normally go away.
    • Although the etiology of primary RLS is unknown, symptoms may be lessened with the use of both medical and home therapies.
    • Entering a time of remission is another possibility. where symptoms subside over the course of weeks or months.
    • An underlying condition, such as diabetes, iron deficiency, kidney illness, and others, might result in secondary RLS.
    • Pregnancy can potentially result in secondary RLS.
    • If you have any concerns regarding RLS, get in touch with a physician.
    • In addition to ordering tests to rule out other potential reasons, they can evaluate the symptoms to help confirm the diagnosis.

    FAQs

    Does consuming water ease tense legs?

    Dietary adjustments may also aid in lessening restless legs syndrome symptoms: keep away of stimulants like alcohol, nicotine, and coffee, especially right before bed. Keep yourself hydrated by drinking lots of water.

    Which workout is ideal for restless legs?

    Pilates and yoga
    RLS symptoms can be soothed, stress can be decreased, and flexibility can be increased with gentle yoga and Pilates exercises. keep away of vigorous or taxing motions and concentrate on positions that encourage relaxation. Child’s pose, seated forward folds, and gentle twists are a few examples.

    Which sleeping posture is ideal for people with restless legs?

    How you sleep is crucial to reducing RLS symptoms, in addition to getting a new mattress. For example, resting on your back is the best option since it allows your back muscles to relax and distributes your body weight evenly.

    What should I drink to calm my restless legs?

    Low blood iron levels are common in people with RLS. Iron is necessary for your body to produce dopamine, a neurotransmitter that aids in motor coordination. Consult your physician about the potential benefits of taking an iron supplement. If so, to aid in the body’s absorption of the iron, take it with a glass of orange juice or another vitamin C-rich beverage.

    Are you serious about restless legs?

    Although severe cases of restless legs syndrome can cause anxiety and sadness in addition to disrupting sleep (insomnia), the condition is rarely life-threatening. For those who suffer from restless legs syndrome, the charity Restless Leg Syndrome UK (RLS-UK) offers support and information.

    What lack results in restless legs?

    A lack of iron.
    RLS can be caused by or made worse by iron insufficiency, which is the body’s insufficient supply of iron. Individuals with a history of bowel or stomach bleeding may be iron deficient. Those who frequently donate blood or have heavy menstrual cycles may also be impacted by deficiencies.

    Does restless leg syndrome improve with walking?

    Moving may help with the syndrome’s symptoms, which tend to manifest or aggravate during periods of immobility and rest. As a result, modest exercise may be beneficial. Walking, massage, stretching, swimming, and stationary cycling are among exercises that can help reduce symptoms.

    What relieves twitchy legs?

    You can lessen your symptoms by engaging in relaxation-promoting practices like yoga, meditation, or other methods. This method works particularly well right before bed. Reducing alcohol and caffeine intake and quitting smoking can exacerbate RLS symptoms. You might be able to help your RLS by abstaining from these substances.

    Why does restless leg syndrome occur?

    The cause of restless legs syndrome (RLS) is mostly unknown. However, families of gene variations have been linked to Restless Legs Syndrome (RLS), which frequently runs in families. Restless Legs Syndrome (RLS) may potentially be caused by low brain iron levels. A malfunction in the part of your brain that regulates movement may also be linked to restless legs syndrome (RLS).

    What is the onset age of restless legs syndrome?

    The early-onset type can begin as early as childhood and occasionally before the ages of 40 to 45. This form’s symptoms typically get worse gradually over time. The signs and symptoms of the late-onset variety typically worsen quickly and begin after the ages of 45 to 50.

    Is it mental health issues that cause restless legs?

    A neurological sleep disorder known as restless legs syndrome frequently has concurrent psychiatric comorbidities (40%) with it. During sleep, patients with any mental comorbidity experienced sporadic leg movements. Patients with restless legs syndrome should be evaluated for psychiatric illnesses.

    How can someone with restless legs sleep?

    To keep your blood sugar stable, consume a protein snack before bed, such as beef, hard-boiled eggs, or a little amount of poultry. Restless Legs Syndrome (RLS) is caused by low blood sugar, and protein stabilizes. keep away of carbohydrates and sweets right before bed because they raise blood sugar levels and subsequently cause them to plummet.

    Can restless legs be stopped by walking?

    For the majority of people, regular exercise that includes aerobic and lower-body resistance training can clearly reduce the symptoms of restless legs syndrome. Pick workouts that you like, particularly those that focus on using your legs.

    Which vitamin prevents the symptoms of restless legs?

    Supplementing with magnesium and vitamin B6 can improve the quality of sleep and lessen the intensity of symptoms in those with restless legs syndrome (RLS).

    How can my restless legs be stopped?

    The limb feelings may be lessened by using heat or cold packs, or by switching between the two. Start practicing good sleep hygiene. It is crucial to maintain proper sleep hygiene because fatigue tends to exacerbate the symptoms of restless legs syndrome (RLS).

    Which major factor contributes to restless legs syndrome?

    The cause of Restless Legs Syndrome (RLS) is unknown in the majority of individuals. On the other hand, RLS frequently runs in families, and certain gene variations have been linked to the condition. Restless Legs Syndrome (RLS) may potentially be caused by low iron levels in the brain. Another possible cause of restless legs syndrome is a malfunction in the part of the brain that regulates movement.

    References

    • Dr.RaviPatel. (2023, July 29). Restless legs syndrome – Symptoms, cause, treatment. Samarpan Physiotherapy Clinic. https://samarpanphysioclinic.com/restless-legs-syndrome/
    • Restless legs Syndrome. (2025, February 11). Cleveland Clinic. https://my.clevelandclinic.org/health/diseases/9497-restless-legs-syndrome
    • Citra, W. (2024, February 23). Driving smarter to avoid neck pain. Elevate Physiotherapy. https://elevatephysio.com.sg/the-role-of-physiotherapy-in-managing-restless-leg-syndrome/
    • Pietrangelo, A. (2023, June 20). Everything you need to know about Restless Legs Syndrome (RLS). Healthline. https://www.healthline.com/health/restless-leg-syndrome
    • Felman, A. (2025, February 5). Everything to know about restless legs syndrome (RLS). https://www.medicalnewstoday.com/articles/7882
    • Department of Health & Human Services. (n.d.). Restless legs syndrome (RLS). Better Health Channel. https://www.betterhealth.vic.gov.au/health/conditionsandtreatments/restless-legs-syndrome-rls
  • Temple Fay Technique: A Progressive Pattern Movement

    Temple Fay Technique: A Progressive Pattern Movement

    What is Temple Fay Technique?

    The Temple Fay Technique is a neurodevelopmental approach that uses progressive pattern movements to facilitate brain organization and motor development. It is based on the idea that reenacting early movement patterns can help individuals with neurological impairments improve coordination and function.

    American neurosurgeon and neurologist Temple Fay is most recognized for his research on hypothermia, or lowering body temperature, and his views on how children gain their motor abilities.

    In physical therapy, people with motor control issues especially children with cerebral palsy are treated with the neurodevelopmental Temple Fay technique, also referred to as the progressive pattern movements technique. Early in the 20th century, neurosurgeon and physiologist Dr. Temple Fay created it.

    Principals

    Developmental Sequence: The method is predicated on the concept that motor skills advance in a particular order, starting with rolling and crawling and ending with walking and running. It seeks to assist the person in navigating these typical phases of growth.

    Reflex Integration: Normal movement patterns may be disrupted by abnormal reflexes. Inhibiting these reflexes and promoting the growth of more sophisticated postural reactions are the goals of the Temple Fay method.

    Sensory Stimulation: To stimulate or inhibit motor responses, a variety of sensory stimuli are employed, including pressure, movement, and touch.

    Functional Activities: Improving the person’s capacity to carry out functional tasks including eating, dressing, and walking is the ultimate objective.

    The exercises and activities used in the Temple Fay approach are intended to:

    • Stop atypical reflex activation
    • Encourage postural responses
    • Lead the person through the typical motor development sequences; encourage voluntary control of typical responses; and support the usual integration of both sides of the body

    The following are some essential elements of the usual application of the Temple Fay technique:

    Evaluation

    Comprehensive evaluation: The person’s motor skills, reflexes, posture, and functional abilities will all be carefully evaluated by the therapist.

    Developmental history: They will compile details on the person’s past, including any delays or difficulties faced as well as any developmental milestones reached.

    Particular requirements: The therapist will determine the patient’s particular requirements and therapeutic objectives.

    Plan of Treatment

    Personalized approach: The therapist will create a customized treatment plan with targeted exercises and activities based on the evaluation.

    Developmental sequence: From rolling to crawling, sitting, standing, and walking, the activities will be made to lead the person through the typical progression of motor development.

    Integration of reflexes: The therapist will employ strategies to suppress aberrant reflexes and promote the growth of more sophisticated postural responses.

    Sensory stimulation: To either stimulate or inhibit motor responses, a variety of sensory stimuli will be employed, including touch, pressure, and movement.

    The Temple Fay method places an extreme value on helping people progress through the normal motor development process. The movement patterns involved are broken out as follows:

    Integration of Reflex:

    Primitive reflex inhibition: The method seeks to lessen the impact of reflexes that exist during infancy but usually go away as the nervous system develops.

    These reflexes, like the Asymmetrical Tonic Neck Reflex (ATNR) or the Moro reflex (startle reaction), may prevent the development of more coordinated motions.

    Developmental Sequence

    The Temple Fay approach moves through the following phases in a particular developmental sequence:

    • Rolling
    • Homolateral Stage
    • Cross-lateral Stage
    • Crawling
    • Elephants walk on hands and feet
    • Walking
    Temple Fay Technique
    Temple Fay Technique

    Stage:1 Rolling

    This is the fundamental motion that encourages body awareness, coordination, and trunk rotation.

    Techniques: To encourage the patient to start and regulate the movement, the therapist may help them roll from back to stomach and vice versa.
    Benefits: Rolling increases body awareness, strengthens the core muscles, and boosts upper- and lower-body coordination.

    Stage:2 Homolateral Stage

    Strength and coordination are further developed by creeping, which is crawling on hands and knees.

    Methods: The therapist can help the patient stay in a quadrupedal posture and urge them to alternate between forward and backward motions with their arms and legs.
    Benefits include increased balance, better upper- and lower-body coordination, and strengthened core muscles.

    Homolateral Stage: These are actions that are performed on the same side of the body, as stepping with the right leg and reaching with the right arm.

    Lying prone with head turned to one side. The hand is open, the arm is in abduction-external rotation on the face side, the elbow is semi flexed, and the thumb is pointed toward the mouth.

    The face side of the leg is in abduction, and the knee flexes against the foot’s dorsiflexion. The child’s hand opens at his side or the lumbar area of his back, his arm is internally rotated, and his leg is extended on the occiput side.

    The head can be moved from side to side, the opposite arm and leg can be flexed up to the position near the face, and the face, arm, and leg can be swept down to the extended position.

    Stage:3 Cross-lateral Stage

    Include actions on the opposing sides of the body, as walking with the left leg and reaching with the right arm.

    Walking and other sophisticated motor abilities need cross-lateral motions.

    Prone lying

    Like in stage 2, the head is pointed to the side and the arm is placed on the face. On the face side, however, the leg was enlarged. The other leg was flexed on the side of the occiput. 

    Stage:4 Crawling

    Crawling increases balance, strengthens the core muscles, and boosts upper- and lower-body coordination.

    Techniques: Using a tunnel to crawl through or positioning toys or other items just out of reach are two ways to promote crawling.

    Benefits: Crawling improves posture and balance, increases spatial awareness, and strengthens and coordinates the arms and legs.

    Stage:5 Elephants walk on hands and feet

    It does include quadrupedal motions like crawling and creeping, which are mimicked by animal developmental processes. While there are some parallels between these motions and those of elephants, there are also significant differences.

    Quadrupedal Movement: Both need moving with all four limbs.
    Weight Bearing: Both involve using the hands and feet to support weight.

    Coordination: Both require synchronizing the limbs’ motions.
    Strength: Arms, legs, and core muscles must be strong for both.

    Variations:

    Elephants have a distinctive gait pattern in which they move their legs in a certain order to stay balanced and stable. Although it incorporates quadrupedal motions, the Temple Fay approach does not always aim to replicate an elephant’s precise walking pattern.

    Weight Distribution: Because of their size and morphology, elephants distribute their weight differently than people do. The Temple Fay method concentrates on human balance and weight shifting, which may differ slightly from elephant balance.

    Stage:6 Walking

    The “sailor’s walk” is a component of the Temple Fay approach, particularly at the stage of walking patterns. It’s an innovative way to enhance coordination and make walking easier.

    The sailor’s walk is a particular pattern of walking in which the person’s body moves similarly to how sailors walk on a ship, usually with a broader stance and a swaying motion. This pattern aids in:

    Increase stability and balance by adopting a wider posture, which offers a larger base of support.

    Improve coordination: The swaying action requires coordinating trunk, arm, and leg motions.
    Encourage weight shifting: One of the most important walking techniques is the sailor’s walk, which promotes weight shifting from one leg to the other.

    Technique

    The person begins by placing their feet a little wider than shoulder-width apart.

    Movement: They swing the opposing arm forth and backward after shifting their weight to one leg.

    Stepping: They move their weight to that leg and swing the opposing arm forward after taking a stride forward with the weight-bearing leg.

    With every step, they switch between their arms and legs as they continue this cycle.

    The Temple Fay method uses the sailor’s walk to:

    Encourage walking: This can be a useful strategy for teaching or enhancing walking abilities, particularly for people who struggle with balance or coordination.

    Strengthen muscles: The sailor’s walk exercises work the arms, legs, and core, among other muscles.

    Enhance motor control: The sailor’s walk’s synchronized motions improve planning and motor control.

    Temple Fay Technique Video

    FAQs

    The Temple Fay Technique: What is it?

    Physical therapy uses this neurodevelopmental method to correct motor control issues, especially in kids with cerebral palsy.
    It places a strong emphasis on helping people go through the normal motor development sequence, which includes rolling over to walking.

    Which conditions does it treat?

    used mostly to treat cerebral palsy, but it can also be used to treat other neurological disorders or developmental delays that impact physical abilities.

    Is it possible to perform Temple Fay exercises at home?

    It’s important to have direction and training from the therapist, even though certain exercises could be appropriate for at-home practice.

    Are the Doman Method and the Temple Fay Technique similar?

    Although both strategies emphasize early developmental patterns, they are different approaches. Temple Fay focuses only on motor development, whereas the Doman Method takes a more comprehensive neurodevelopmental approach.

    References

    • Contributors to Wikimedia projects. (2024, December 29). Temple Fay. Simple English Wikipedia, the Free Encyclopedia. https://simple.wikipedia.org/wiki/Temple_Fay
    • Temple Fay technique: a progressive pattern movement. Samarpan Physiotherapy Clinic. https://samarpanphysioclinic.com/temple-fay-technique/
    • Jose, S. (2020, August 15). Temple fays and phelps approach in neurophysiotherapy and cerebral palsy [Slide show]. SlideShare. https://www.slideshare.net/slideshow/temple-fays-and-phelps-approach-in-neurophysiotherapy-and-cerebral-palsy-237941522/237941522
  • Brudzinski Sign

    Brudzinski Sign

    What is Brudzinski Sign?

    Brudzinski’s sign is a clinical test used to assess meningeal irritation, commonly seen in meningitis. It is positive when passive flexion of the neck causes involuntary flexion of the hips and knees, indicating possible meningeal inflammation.

    The doctor Józef Brudziński, who initially characterized it in the early 1900s, is remembered by the name.

    The inflammation of the meninges, the membranes that surround and protect the brain and spinal cord, is known as meningitis.

    Numerous causes, such as bacterial, viral, fungal, or parasite diseases, might contribute to this condition

    Purpose

    Brudzinski’s sign is used to assist determine whether meningeal irritation, a defining feature of meningitis, is present. The inflammation of the membranes around the brain and spinal cord results in meningeal irritation, which makes them sensitive and unpleasant.

    Technique

    • Step1: A person rests on their back.
    • Step 2: The examiner flexes the subject’s neck forward and raises their head off the bed or table.
    • Step 3: In reaction, if the person’s knees and hips bend uncontrollably, the sign is positive. The meaning of a positive Brudzinski’s sign: An individual may have meningitis if their Brudzinski’s sign is positive. However, as other disorders might also provide a positive result, it is not an accurate diagnosis for meningitis.

    Brudzinski’s Sign Examination Video

    Types of Brudzinski’s Sign

    There are three types of Brudzinski’s sign:

    Although Brudzinski’s sign may be classified into three forms (neck, cheek, and symphyseal), the “upper” and “lower” are not commonly used to refer to them.

    Neck sign: The most common type of Brudzinski’s sign is this one. The patient’s neck is flexed forward to induce it. When the patient’s hips and knees flex uncontrollably, it is a positive.

    Cheek sign: Applying pressure to the patient’s cheek causes this indication. The patient’s arm flexing at the wrist and elbow is positive sign

    Symphyseal sign: By putting pressure on the patient’s pubic bone, this symptom is produced. When the patient’s legs bend at the hips and knees, it’s a  positive sign

    Clinical Significance

    Since Brudzinski’s sign is not very sensitive, not every meningitis patient will exhibit it.

    Yet it is rather specific, which means that meningitis is more likely to be indicated if it is present.

    It’s important to remember that Brudzinski’s sign can also occur in other illnesses like encephalitis or subarachnoid hemorrhage that irritate the meninges.

    Indications

    Patients with suspected meningitis should undergo the Brudzinski test, especially if they have fever, headache, and stiff neck.

    Patients who have other symptoms of meningeal irritation, such as photophobia (sensitive to light) and nausea or vomiting, should additionally take it.

    Patients of all ages can be evaluated for meningitis with the Brudzinski test, but newborns and young children may have more challenging results.

    Contraindications

    Babies that show extreme sluggishness or unconsciousness: In certain situations, the baby might not participate throughout the exam, and the outcomes might not be accurate.

    It might be challenging to properly administer the Brudzinski test to neonates due to increased muscular tone or stress.

    Evidence

    The Brudzinski test for meningitis has a somewhat complicated diagnostic value since it has both advantages and disadvantages.

    Advantages:

    High specificity: Meningeal irritation, frequently caused  by meningitis, is strongly indicated if the Brudzinski test is positive, which means the patient bends their hips and knees uncontrollably when their neck is flexed.

    This indicates that it is effective in determining who genuinely has the condition.

    Weaknesses:

    Low sensitivity: Not all instances of meningitis can be detected by the Brudzinski test.

    Many meningitis patients may have a negative Brudzinski test, which means they may not exhibit the involuntary bending of their legs.

    This implies that it may overlook certain situations of the disease.

    Practical implications of this:

    A positive Brudzinski test raises serious concerns of meningitis and is a useful clue for medical professionals.

    A negative Brudzinski test does not rule out meningitis.

    To determine a diagnosis, doctors must take into account additional variables such as symptoms, medical history, and more testing.

    FAQs

    Is Brudzinski sign seen in TB meningitis?

    The sensitivity of Brudzinski’s nape-of-the-neck a sign was 96%.

    Which sign is Kernig’s vs Brudzinski?

    Kernig’s sign: Place the patient in a supine position with their hips 90 degrees flexed. If the knee suffers when passively extended, the test is positive. Place the patient in a supine position and passively flex their neck to demonstrate Brudzinski’s sign. If the hip and knee reflexively flex as a result of this maneuver, the test is positive.

    What is the lowest of Brudzinski’s sign?

    Applying pressure on the pubic symphysis results in the similar bending of the lower limbs.

    What is the sensitivity of Brudzinski and Kernig signs?

    In 1909, Brudzinski reported that the nape-of-the-neck sign was 96% sensitive and Kernig’s sign was 57% sensitive for patients with bacterial or tuberculous meningitis . These clinical observations are now thought to be signs of inflammation of the meninges.

    What are 5 symptoms of meningitis?

    Fever and / or vomiting. …
    Severe headache. …
    Limb / joint / muscle pain
    Cold hands and feet / shivering. …
    Pale or mottled skin. …
    Breathing fast / breathless

    What is the difference between upper and lower Brudzinski sign?

    Upper: When the chin is moved toward the chest to check for neck stiffness, the lower limbs’ hips and knees reflexively flex. b) Lower: Applying pressure to the pubic symphysis causes the same bending of the lower limbs.

    References

    • McLean, A. (2022, October 13). Brudzinski’s Sign: Purpose, limitations, diagnosis, and more. Healthgrades. https://resources.healthgrades.com/right-care/symptoms-and-conditions/brudzinski-sign
    • Brudzinski’s sign of meningitis. (n.d.). https://adamcertificationdemo.adam.com/content.aspx?productid=146&pid=2&gid=19069
    • Kernig’s and Brudzinski’s signs – Citizendium. (n.d.). https://citizendium.org/wiki/Kernig%27s_and_Brudzinski%27s_signs

  • Costochondritis

    Costochondritis

    What is a Costochondritis?

    Costochondritis is the inflammation of the cartilage connecting the ribs to the breastbone (sternum), causing chest pain that may worsen with movement or deep breathing. It is often benign and self-limiting but can mimic heart-related pain. Causes may include strain, injury, or infections, and treatment typically involves pain relief with rest, anti-inflammatory medications, and heat or ice therapy.

    Costochondritis can produce mild to severe chest pain. In mild cases, pushing on the area may simply cause a small tenderness or soreness in your chest. Deep breathing and specific movements can exacerbate more severe cases. Though some individuals may need treatment, the ailment usually goes away in a few weeks or months.

    Definition

    The self-limiting ailment known as costochondritis is characterized by excruciating, persistent inflammation of the anterior chest wall’s costochondral junctions of the ribs.

    • In the absence of accompanying cardiopulmonary symptoms or risk factors, it is a clinical diagnosis and does not necessitate particular diagnostic testing.
    • Tietze syndrome and costochondritis are frequently mistaken.
    • The affected cartilage segments may extend out into the chest wall, and palpating the affected chondrosternal joints of the chest wall causes soreness and pain.

    The upper ribs on the left side of the body are the most frequently affected by costochondritis. Although pain can occur where the cartilage joins to the rib, it is usually most severe where it attaches to the breastbone (sternum).

    Other names for costochondritis include costosternal syndrome, cost sternal chondrodynia, and chest wall pain syndrome. Pain can occasionally be accompanied by swelling (Tietze syndrome).

    It’s uncertain what causes costochondritis. The goal of treatment is to reduce pain while allowing the illness to heal itself, which may take weeks or longer.

    Relevant Anatomy

    The components of the thoracic wall are the:

    • The sternum in front, 12 paired ribs and related costal cartilages in the back, and 12 thoracic vertebrae in the back.
    • Bone and cartilage make up ribs, with cartilage acting as an elastic link between the sternum and the bony part of the rib.
    • The ribs are divided into three categories based on how they adhere to the sternum: true, false, and floating ribs.
    • The ribs 1–7 that directly articulate with the sternum through their costal cartilages are considered true ribs. Their articulation with the sternum is made possible by the sternocostal joints. An exception to this rule is the first rib, which has synarthrosis and can articulate with the clavicle only through the costoclavicular joint.
    • Since their costal cartilages link the seventh costal cartilage through the costochondral joint, the false ribs (8,9,10) are the ribs that articulate with the sternum indirectly.
    • The sternum does not articulate with the floating ribs (11,12) in any way (distal two ribs).

    In addition to truncal motion, or movement of the upper extremities, the ribs move during breathing.

    Epidemiology

    Costochondritis epidemiology is not well understood.

    • According to a short 1994 study, Hispanics and females were more likely to have costochondritis.
    • 36 individuals (30%) out of 122 who arrived at the emergency room with chest pain that wasn’t caused by a fever, trauma, or cancer were diagnosed with costochondritis.
    • Can have an impact on both adults and children. Thirteen percent of adolescents with chest pain had musculoskeletal reasons, with costochondritis accounting for fourteen percent of these cases, according to a study conducted in an outpatient adolescent clinic.

    Signs and Symptoms

    Which symptoms are present?

    The upper and middle ribs on each side of the breastbone are frequently the site of chest pain in people with costochondritis. This pain may start slowly and get worse over time, or it may start quickly.

    Other signs and symptoms may include:

    • The pain worsens when lying down.
    • Pain that worsens with pressure on the chest, such as when wearing a seatbelt, and that gets worse when you cough or take heavy breaths.
    • It’s crucial to remember that symptoms like radiating pain and stiffness in the chest might be signs of other illnesses, such as a heart attack. If you have severe, ongoing chest pain, get medical help right once.
    • Occurs on the opposite side of your breastbone, which faces left.
    • Impacts several ribs.
    • May transfer to the arms and shoulders.
    • It gets worse when you Deep breathing, cough, sneeze, or move your chest wall in any way.

    If you have severe chest pain or difficulty breathing, you should see your doctor immediately. Anytime you experience unusual and incapacitating chest pain, you should always get emergency care right once. It may be a sign of a heart attack or something more serious.

    The likelihood of problems is reduced by seeking treatment as soon as possible, particularly if your costochondritis is the result of an underlying condition.

    Risk factors and causes

    For the majority of persons, the cause of costochondritis is unknown. However, the following circumstances could lead to it:

    • Chest injuries from falls or harsh impacts from auto accidents, as well as physical strain from heavy lifting and intense activity
    • Some infections or respiratory diseases, such as tuberculosis, can lead to inflammation in the joints.
    • The cause of costochondritis is mostly unknown. Costochondritis, on the other hand, may be linked to physical strain, such as intense coughing, illness, or trauma.
    • Coughing.

    According to some studies, women are more likely than males to develop costochondritis, particularly if they are athletes. Additionally, you can be more susceptible to this illness if you:

    • Engage in activities that have a significant impact.
    • Have allergies and are regularly exposed to irritants; recently experienced physical trauma or fall that impacted the chest area.

    Diagnosis

    Before diagnosing costochondritis, look into alternative explanations of chest pain including One excluding the diagnosis is costochondritis. It will be necessary to rule out respiratory and cardiac reasons. Radiating pain, dizziness, fever, shortness of breath, exertional chest pain, and productive cough are symptoms that could point to more serious and distinct causes of chest pain. An occult rib fracture should also be taken into consideration if there has been trauma. Following the exclusion of trauma and cardiac causes, the following results should be present in varying degrees.

    Among the possible findings are:

    • The patient will describe how the pain gets worse as they move and in particular postures. Additionally, when the sufferer inhales deeply, the pain usually gets worse.
    • Although the intensity of the pain varies, it can be characterized as either dull or intense.
    • Patients complain of pain and swelling in the upper costal cartilage adjacent to the costochondral junction that might develop gradually or quickly.

    Palpation

    • Palpation of mild to moderate pain is typically reproducible. There is frequent point tenderness where one or two ribs meet the sternum (pain from acute coronary syndrome can also be described as repeatable, which is a drawback of the usual physical exam findings).
    • Symptoms can arise gradually and go away on their own in a few days, but they can also take years to go away. The symptoms could reappear at the same spot or at a different rib level even after they have subsided.
    • The lateral ribs, costovertebral joints, and upper thoracic spine may all be hypermobile.

    It is important to differentiate costochondritis from other, more severe causes of chest pain because it is typically benign and self-limiting.

    • Three to six percent of adult patients with palpable chest pain and chest wall soreness have coronary artery disease.
    • To make the diagnosis in children, adolescents, and young adults, a history and physical examination of the chest that records reproducible pain by palpating over the costal cartilage are typically sufficient.
    • An ECG and maybe a chest radiograph should be performed on patients over 35, those with a history or risk of coronary artery disease, and any patient exhibiting cardiopulmonary symptoms.
    • If clinically indicated by age or cardiac risk status, take into consideration additional testing to rule out cardiac reasons.

    Examination

    Individuals who have costochondritis will exhibit:

    • Palpation of the affected area reveals reproducible chest pain, primarily in ribs 2 to 5.
    • Exercise and slouching can be aggravating factors.
    • It usually has a unilateral origin and frequently happens after a recent illness that includes coughing or vigorous exercise.
    • On examination, the concomitant costotransverse and costovertebral restrictions might be related.
    • Loss of normal spinal motion is linked to the pain in the chest.
    • One digit should be used to palpate the clavicle, cervical, thoracic, and anterior, posterior, and lateral sides of the chest. When applied to the affected location, repeatable pain may indicate costochondritis, however, this cannot be confirmed.
    • A joint is manually moved into its maximum end range of motion during motion palpation, and then it is tested with a mild springing movement. This joint movement endpoint serves as the foundation for identifying whether a joint movement is normal or pathological. A joint is deemed fixated or hypokinetic when motion palpation is diminished.

    In patients with a high risk, cardiac reasons should be ruled out.

    Diagnostic tests

    Although there isn’t a test to identify costochondritis, your doctor will probably conduct several tests and ask you several questions to find out what’s causing your chest pain.

    Laboratory tests

    Costochondritis may usually be diagnosed without laboratory testing, but your doctor may order certain tests based on your medical history to rule out other conditions like pneumonia or coronary heart disease as the cause of your chest pain.

    ECGs and X-rays

    To ensure that nothing strange is wrong with your lungs, your doctor could advise you to have an X-ray. Your X-ray should appear normal if you have costochondritis.

    Differential Diagnosis

    The three main categories of intrathoracic and chest wall pain syndromes, as well as systemic illnesses that can induce chest wall pain, can all be used to differentiate between costochondritis.

    Chronic pain

    • When a patient presents with any kind of chest pain, consider acute coronary syndrome. Age, family history, and lifestyle variables such as tobacco use, preexisting diabetes, hypertension, and coronary artery disease are important differentiating risk factors for this condition.
    • Patients with acute onset positional chest pain that gets better when they sit forward and gets worse when they lie supine should be evaluated for pericarditis. Pericarditis can be idiopathic, linked to an underlying connective tissue disease like lupus, or preceded by a recent respiratory infection or postcardiac surgery.
    • Patients who have acute distress, shortness of oxygen, and chest pain should be evaluated for pneumothorax. Antecedent trauma, a history of pneumothorax, collagen vascular diseases such as Ehlers-Danlos syndrome, lung disease, and recent chest surgeries are risk factors.
    • Patients who have fever, coughing, dyspnea, and chest pain should be evaluated for pneumonia. Immunosuppressive conditions such as diabetes, chronic kidney disease, dialysis reliance, immunosuppressive medication use, drug or alcohol abuse, and malnourishment are risk factors, as is senior age.
    • Patients who have asymmetric limb blood pressure and chest pain that radiates to the arm or back may have an aortic dissection. Coronary artery disease and high blood pressure are risk factors. If a dissection is suspected based on the patient’s history, examination results, or the evidence of a dilated mediastinum on a chest x-ray, a chest computed tomography angiography (CTA) may be ordered.
    • Consider pulmonary embolism in patients who experience dyspnea and chest pain. A history of cancer, recent travel, recent surgery or trauma, a history of deep vein thrombosis or pulmonary embolism, tobacco use, and the use of oral contraceptives are risk factors. When a pulmonary embolism is suspected in low-risk patients, the Wells score with a d-dimer may be used. For high-risk people, imaging studies such as a chest CTA or ventilation-perfusion scan are recommended.
    • Patients experiencing severe or sudden chest pain should be evaluated for esophageal perforation. Acute prolonged vomiting, alcohol use problems, thoracic disorders like lung cancer, and recent gastrointestinal procedures like endoscopies are risk factors.
    • Patients who experience chest pain that gets worse after eating or when lying down should be evaluated for gastroesophageal reflux disease. Hoarseness, Globus feeling, bloating, and regurgitation are other symptoms. Antacid consumption may result in an instant improvement in symptoms.

    Chest Wall Disorder

    Destructive costal cartilage lesions caused by an infection or tumor, or sternoclavicular, stern manubrial, or shoulder arthritis: These conditions may be accompanied by obvious edema, redness, or warmth, and they typically produce regional pain. When the xiphoid process is palpated, painful xiphoid syndrome results in localized pain.

    • Herpes zoster: A skin examination may show vesicular lesions or erythema on the chest wall in a dermatomal pattern. Severe neuropathic pain is common.
    • Slipping rib syndrome: This condition manifests as pain when palpating the lower chest wall or abdomen, as well as soreness along the costal border.
    • Tietze’s syndrome: Usually affecting the region between the second and third ribs, Tietze’s syndrome frequently results in localized edema of the cost sternal, sternoclavicular, or costochondral joints.

    Overuse myalgia and traumatic muscle pain are conditions caused by severe upper extremity exercise during work or athletic activities. Patients may have experienced trauma in the region in the past.

    Systemic Disorders

    • Patients with fibromyalgia may have chest pain, but they also frequently have persistent, chronic pain in several different parts of their bodies. Mood disorders, sleep disturbances, and fatigue may also be observed.
    • Inflammation of the costovertebral, costotransverse, and thoracic apophyseal joints are symptoms of ankylosing spondylitis. On pelvic X-rays, patients may exhibit symptoms of fusion or inflammation in the sacroiliac joint, stiffness in the morning, and impaired spinal mobility.
    • Psoriatic arthritis: Painful inflammation that may affect the chest. Typically, there are distinctive skin lesions and swelling in the extremity joints.
    • The symptoms of synovitis, acne, pustulosis, hyperostosis, and osteitis (SAPHO) syndrome include sterile osteomyelitis, palmoplantar pustulosis, acne, peripheral or axial arthritis, and arthritis of the anterior chest wall.
    • Systemic lupus erythematosus: Individuals with lupus may experience chest pain as a result of costochondritis, myocardial infarction, pulmonary embolism, fibromyalgia, or pleural or pericardial inflammation.

    Patients with chest pain and nonspecific symptoms, such as arm and leg pain or other unusual sensations, disorientation, a sense of impending doom, palpitations, and dyspnea, may be diagnosed with panic disorder. It is possible to elicit a history of anxiety. There may or may not be a precipitating event for the syndrome.

    Costochondritis can be differentiated from these illnesses with a thorough clinical evaluation and pertinent diagnostic testing. Before starting treatment, life-threatening conditions must be ruled out.

    The majority of costochondritis cases are managed with over-the-counter drugs. Your doctor would most likely suggest nonsteroidal anti-inflammatory medicines (NSAIDs) like naproxen (Aleve) or ibuprofen (Advil) if your pain is mild to severe.

    Over time, costochondritis typically resolves on its own. A few weeks to many months may pass during that time. Ibuprofen and other painkillers that reduce inflammation might be suggested to relieve the pain. If the intense pain continues to not go away with time, you may be administered an injection of steroid to help reduce inflammation or a topical anesthetic to soothe the agony.

    Treatment of Costochondritis

    Among the aspects of management are:

    • Refer patients for outpatient follow-up if they have severe or refractory costochondritis. The treatment for refractory costochondritis may involve physical therapy.
    • Ice, acupuncture, manual therapy, exercise, and other drugs like sulfasalazine are examples of alternative treatments that may also be beneficial in the long run for managing costochondritis.
    • Rest, physical rehabilitation, and hot or cold therapy with ice and a heating pad
    • Usually, costochondritis improves in a few weeks. It is frequently described as a self-limiting illness. This implies that it can improve on its own over time. Pain relievers and self-help techniques can help you control your symptoms.
    • Any action that puts stress on your chest, such as intense exercise or repeated motions, might exacerbate costochondritis.
    • You should adjust any movement that exacerbates your chest pain until the cartilage and rib inflammation have subsided.

    Here are a few instances of changed activities:

    • Taking regular pauses.
    • Holding items close to your body when lifting them, shifting positions frequently. While sitting or lying down, and cuddling with a pillow while coughing.

    Medical Treatment

    Pain can be lessened by doing the following:

    • Strength of prescription drugs NSAIDs, oral steroids, or steroid injections entailed transcutaneous electrical nerve stimulation (TENS), which uses a tiny, battery-operated device to apply a modest electric current to the affected area.
    • Local steroid injections into the tendon sheath, joint, or surrounding nerve increase mobility by reducing pain, edema, and inflammation.
    • Either oral or topical analgesics.
    • Painkillers can make it easier for you to move, which will aid in the healing process.

    Physical therapy treatment

    • Education: Explain the condition to the patient to reassure them.
    • Minimizing symptoms-inducing activities (e.g., lowering the frequency or intensity of work or exercise activities)
    • A course of pain-relieving trigger point therapy, such as cross-fiber friction massage
    • Conservative pain management techniques include applying heat or cold treatments.
    • Retrain good posture in functional positions with postural exercises (neuro-muscular control). The main goal of functional training is to maintain proper posture during regular tasks by engaging the appropriate muscles at the appropriate times. To guarantee proper technique and muscle engagement, simple exercises like sitting to stand, walking up stairs, and proper standing posture must be addressed.
    Costochondritis-physical-exercise
    Costochondritis-physical-exercise

    To reduce strain on inflammatory rib cartilage, physical therapy for costochondritis focuses on improving movement, reducing inflammation, and assisting you in managing your pain. Working with a musculoskeletal physical therapist, who specializes in treating musculoskeletal disorders, is beneficial for the majority of persons with costochondritis.

    You can use several modalities and movements to enhance your movement. These could consist of:

    • Strengthen the way your ribs slide up and down after regular breathing with these rib mobilizations.
    • Using spinal joint mobilizations can help your thoracic outlet spinal joints move and slide more smoothly.
    • Stretching and range-of-motion activities might relieve the strain on irritated rib cartilage and enhance mobility.
    • Exercises for postural strengthening to help you stay in the right positions and relieve pressure on your rib cartilage.
    • Breathing techniques that enhance the movement of your ribs during deep breathing
    • Pain and inflammation can be reduced with the use of additional therapies. These could include ice to reduce pain and edema around inflammatory tissues and heat to increase circulation. Because the affected cartilage is near the heart, other popular physical therapy procedures like ultrasonic or electrical stimulation are not used. It is not advised to do these treatments close to your heart structures.

    Participating actively in your treatment is essential. Your therapist will probably recommend exercises to improve the movement of your thorax (chest) and

    Exercises

    • The goal of costochondritis exercises is to increase the general mobility of the ribs and chest wall. This can enhance the movement of your thorax and ribs and lessen pain. Inflamed cartilage might be relieved by postural exercises.
    • Consult your healthcare professional to be sure exercise is acceptable for you before beginning any costochondritis exercise regimen.

    Pectoral Stretching

    Wall Stretch
    Wall Stretch

    Your pectoral or chest muscles will become more flexible if you perform the pectoral corner stretch. To carry out the stretch:

    • Position yourself two feet from the wall, facing a corner.
    • With the forearms resting upon the wall on either side of the corner, raise both of your arms. Make sure your elbows, hands, and forearms touch the wall.
    • Stretch the muscles at the highest point of your chest by slowly leaning into the corner.
    • After holding the contraction for 15 to 30 seconds, let go.
    • Three to five times, repeat the stretch.

    Doorway Pectoral Stretching

    Additionally, you can use a doorway opening to stretch your pecs. To carry out this stretch:

    • Place your forearms and elbows up against the doorjamb on the opposite side of you as you stand in a doorway.
    • Stretch the muscles at the front of your chest by slowly bending forward while maintaining your elbows against the doorjamb.
    • Hold
    • Then Relax.
    • Do this three or five times.

    Scapular Squeeze

    Shoulder Blade Squeeze
    Shoulder Blade Squeeze

    Squeezing your scapula can help you manage your thoracic muscles and posture. To carry out this exercise:

    • Press both of your shoulders together softly in the back while seated comfortably in a chair.
    • Hold the pose for three seconds while feigning that you are attempting to squeeze a pencil through your shoulder blades.
    • Return to the starting position after releasing slowly.
    • Ten to fifteen times, repeat.
    • With a resistance band, the top of the scapula squeeze exercise may be more difficult:
    • Hold either end of the band as you loop it around a sturdy object.
    • Pinch your scapulae together and bend your elbows back like you’re rowing a boat.
    • Then let go gradually.
    • Ten to fifteen times, repeat the workout.

    Stretching the Chest with a Stability Ball

    Using a stability ball is another excellent method to stretch your pectorals and chest muscles and loosen up your chest wall. To perform this stretch:

    • Over a 25-inch stability ball, lie on your back.
    • Raise both arms in front of you, then slowly spread them apart as though you were going to embrace someone.
    • As you open your arms, let your back relax and let your arms fall toward the floor, exposing your chest.
    • As you perform the exercise, you should get a mild tugging feeling in your chest.
    • Return your arms to the midline after holding the stretch for 15 to 30 seconds.
    • Do this three or five times.

    Stop exercising and consult your physical therapist if you get persistent pain in your ribs or chest. You can often modify your exercises to make them more pleasant.

    Home care Advice

    Here are some costochondritis home remedies that are beneficial in costochondritis treatment-

    • Rest
    • Ice or heat
    • Gentle stretching costochondritis exercises like chest stretch, shoulder roll, and neck stretch
    • Epsom salts in a warm bath
    • Maintain good posture
    • Avoid smoking
    • Manage stress
    • Get enough sleep

    Lifestyle Changes

    Treat-costochondritis By positioning
    Treat-costochondritis By positioning

    If you have chronic or persistent costochondritis, your doctor may advise you to adjust your lifestyle permanently. Certain forms of activity, such as weightlifting and rowing, can make this disease worse. Negative effects can also result from manual labor.

    Prevention

    Learning to prevent future issues with your illness is a crucial part of any successful physical therapy program. Some ways to prevent costochondritis include:

    • Developing and preserving proper posture.
    • Stretching frequently, a few times a week, and strengthening the muscles in your abdomen and back.
    • Exercising regularly.
    • Following your at-home stretching, breathing, and postural exercise regimen may help manage your costochondritis symptoms if you start to notice them reoccurring.

    Complication

    What are the complications of costochondritis?

    • Usually, there are no complications from costochondritis. It might not recur very often or the symptoms might not get better. Your doctor could recommend a rheumatologist—a specialist in conditions affecting the joints, muscles, and bones—if this occurs.
    • If your symptoms don’t get better, your rheumatologist might suggest corticosteroid injections.

    Conclusion

    • Inflammation is the source of costochondritis, which usually manifests as chest pain that worsens with pressure or specific movements. Usually, this situation doesn’t last. Costochondritis often resolves on its own.
    • After a few days, mild cases of costochondritis could go away. Most cases don’t persist for more than a year, while chronic cases might linger for weeks or more.
    • Use caution when lifting and carrying large objects to reduce your risk of acquiring chronic costochondritis. If at all feasible, try to limit your physical labor and high-impact exercise.
    • If you have chest pain while engaging in any of these activities, get medical help right once.
    • Labs, an ECG, and a chest x-ray should all be within normal ranges, and a scan or bone scintigraphy and a physical examination of the affected costal cartilage are used to confirm the diagnosis. Conservative management is the usual course of treatment for costochondritis, which is typically symptomatic. If the condition does not improve, physiotherapy is frequently prescribed.

    FAQs

    Which foods shield against costochondritis?

    The signs, causes, cost, treatment, and side effects of costochondritis…
    Dietary anti-inflammatory: Inflammation is the primary cause of pain areas associated with costochondritis, and it can be decreased by eating a diet rich in anti-inflammatory vegetables and herbs. Green leafy vegetables, ginger, turmeric, cherries, and so forth may be included in the diet.

    How can someone who has costochondritis sleep?

    To reduce rib pain, use an ice pack or heating pad on the affected area, stretch your chest gently, and take over-the-counter pain medicines. Which sleeping posture is best for those with costochondritis? Do not lie on the side of your chest that hurts. For people with costochondritis, lying on your back is the ideal position.

    Which type of exercise is beneficial for those with costochondritis?

    Stretch of the doorway Facing an open doorway, stand. Bend your elbows to a 90-degree angle and raise your hands to the sides. To stretch your chest muscles, bend backward through the open doorway while keeping your elbow at the level of your shoulder and your forearm resting against the wall. Before you relax, hold the stretch for 30 to 60 seconds.

    What is costochondritis first aid?

    Applying a moist compress or warming pad to your chest at a low temperature may be beneficial. Switching heat and ice is another option. Apply a cold pack of ice to the area for ten to twenty minutes at a time.

    Does costochondritis benefit from drinking water?

    Decreased Lubrication: Sustaining the lubrication of cartilage and joints requires enough hydration. Dehydration may aggravate the inflammation linked to costochondritis by reducing lubrication and increasing friction between the ribs and the sternum.

    How should costochondritis be treated?

    The most popular treatment for costochondritis is to rest your ribs and chest. The best treatment for costochondritis is to give your irritated costochondral joints time to heal. Pain can be managed using over-the-counter (OTC) medications such as acetaminophen or NSAIDs (nonsteroidal anti-inflammatory drugs).

    Costochondritis is caused by what deficiency?

    Children with hypertrophy costochondral junctions and adults with osteocalcin who have sternal pain are known to be affected by vitamin D deficiency. We suggest that the chest pain linked to costochondritis may be caused by a vitamin D deficiency.

    Can someone with costochondritis benefit from massage therapy?

    Pain may be lessened with neuromuscular massage because it may enhance blood flow, reduce tissue stiffness, and moderate inflammation. It should be mentioned that while some cases of costochondritis are quite chronic, others are transient and may resolve with time.

    Reference

    • Stoltzfus, S. (2023, February 1). What is costochondritis? Healthline. https://www.healthline.com/health/costochondritis#takeaway
    • Costochondritis – Symptoms & causes – Mayo Clinic. (2022, May 11). Mayo Clinic. https://www.mayoclinic.org/diseases-conditions/costochondritis/symptoms-causes/syc-20371175
    • Website, N. (2022, August 1). Costochondritis. Nhs.uk. https://www.nhs.uk/conditions/costochondritis/#:~:text=Costochondritis%20is%20inflammation%20where%20your,on%20its%20own%20over%20time.
    • NHS inform. (2025, February 6). Costochondritis | NHS inform. NHS Inform. https://www.nhsinform.scot/illnesses-and-conditions/muscle-bone-and-joints/chest-and-rib-problems-and-conditions/costochondritis/#:~:text=About%20costochondritis,Diagnosing%20costochondritis
    • Pt, B. S. (2024, May 2). Costochondritis and what to expect from physical therapy. Verywell Health. https://www.verywellhealth.com/costochondritis-physical-therapy-exercises-5199284#:~:text=Common%20Assessment%20Tests,Pulmonary%20function%20and%20breathing%20assessment
  • Interphalangeal Joints of the Foot

    Interphalangeal Joints of the Foot

    The interphalangeal (IP) joints of the foot are the articulations between the phalanges (toe bones). These hinge joints allow for flexion and extension, contributing to toe movement and balance.

    The toes’ interphalangeal joints are synovial. The proximal and distal interphalangeal joints on the four lesser toes connect three phalanges, while the hallux has a single IP joint that connects two phalanges.

    Introduction

    Interphalangeal joints are the points of articulation between the foot’s successive phalanges. Two of the four lateral toes and one on the big toe make up each foot’s nine interphalangeal joints. Frequently, they can be divided into:

    • Between the proximal phalanges’ heads and the middle phalanges’ bases are the proximal interphalangeal joints.
    • Between the bases of the distal phalanges and the heads of the middle phalanges are the distal interphalangeal joints.

    The big toe has a single interphalangeal joint between the proximal and distal phalanges because it lacks a middle phalanx.

    The flexion (plantarflexion) and extension (dorsiflexion) of the middle and distal phalanges are examples of the movement along a single axis that is possible with uniaxial hinge joints, a kind of synovial joint that includes the foot’s interphalangeal joints.

    The articulations between neighboring phalanges in the foot are called interphalangeal joints. Each foot has nine interphalangeal joints. The lesser digits each have a proximal and a distal interphalangeal joint, whereas the hallux has a single interphalangeal joint.

    Since the great toe only has two phalanx bones (proximal and distal phalanges), it only has one interphalangeal joint, or “IP joint” as it is commonly shortened. A proximal interphalangeal joint (abbreviated “PIP joint”) connects the proximal and middle phalanges, while a distal interphalangeal joint (abbreviated “DIP joint”) connects the middle and distal phalanges.

    A plantar (underside) and two collateral ligaments are present in every interphalangeal joint, which is a ginglymoid (hinge) joint. The dorsal ligament locations in this ligament arrangement are supplied by extensor tendons, which are comparable to the metatarsophalangeal articulations.

    Articular surfaces

    The phalanges of the toes articulate with one another to form the foot’s interphalangeal joints. A proximal and distal set of interphalangeal joints can be found in toes 2–5. The concave articular surface on the neighboring base of a middle phalanx and the convex trochlear surface on the head of a proximal phalanx produce a proximal interphalangeal joint.

    A homologous process forms the distal interphalangeal joints of toes 2–5, between the concave articular surface on the neighboring bases of a distal phalanx and the trochlear surfaces on the heads of a middle phalanx.

    As previously stated, the trochlear surface of the proximal phalanx’s head and the concave articular surface of the distal phalanx’s base form the big toe’s sole interphalangeal joint.

    Joint capsule

    A joint capsule lined with synovial membrane entirely encloses each interphalangeal joint. Attached to the articular borders, the joint capsule is strengthened by the plantar ligament, collateral ligaments, and the extensor expansions of the foot’s intrinsic and extrinsic muscles.

    Ligaments

    The proximal and distal interphalangeal joints are supported and stabilized by two different kinds of ligaments:

    • Strong ligaments called collateral interphalangeal ligaments are located on the medial and lateral sides of each joint. They run medially and proximally from the tiny tubercles on either side of the proximal phalanx’s head to the base of the following phalanx.
    • The plantar surface of the phalangeal heads at the interphalangeal joints contains a dense fibrocartilaginous plate called the plantar interphalangeal ligament, which is not a real ligament.

    Innervation

    The medial and lateral plantar branches of the tibial nerve’s appropriate plantar branches supply nerves to the interphalangeal joints.

    Dorsal digital branches, which originate from the deep fibular (peroneal), intermediate dorsal cutaneous, and sural nerves, provide minor innervation to the lateral toes’ interphalangeal joints. Additional innervation of the big toe’s interphalangeal joint is provided by the superficial fibular nerve’s medial dorsal cutaneous branch.

    Blood supply

    Through an anastomosis created by the lateral and deep plantar arteries, digital branches of the plantar arch provide arterial blood supply to the foot’s interphalangeal joints.

    Movements

    The only motions allowed in the interphalangeal joints, which are uniaxial hinge joints, are flexion (plantarflexion) and extension (dorsiflexion), which take place in the sagittal plane around a frontal axis. Extension is restricted by the plantar and collateral ligaments, but flexion is possible to a significant degree. Additionally, the proximal interphalangeal joints exhibit noticeably more movement than the distal ones.

    The interphalangeal joints are fully extended in the close-packed position and slightly flexed in the loose-packed (or resting) position. Flexion is more restricted than extension in these joints’ capsular pattern, which is the loss of passive range of motion during inflammation.

    Muscles acting on the interphalangeal joints

    The main flexor of the distal interphalangeal joint is the flexor digitorum brevis, whereas the flexor digitorum longus is the primary flexor of the proximal interphalangeal joint. Flexor hallucis longus is responsible for flexing the big toe’s interphalangeal joint.

    The lubricants, interossei, extensor digitorum longus, and extensor digitorum brevis are the main extensors of the interphalangeal joints.

    Clinical significances

    The articulations between the phalanges (toe bones) make up the foot’s interphalangeal (IP) joints. The big toe, which has two phalanges rather than three, has only one interphalangeal joint. All other toes have one distal interphalangeal (DIP) joint. When walking, these joints are essential for weight distribution, balance, and mobility.

    1. Osteoarthritis (OA)

    • Pain, stiffness, and a decreased range of motion can result from degenerative changes in the IP joints.
    • More prevalent in elderly people or people with a history of trauma.

    2. Rheumatoid Arthritis (RA) and Other Inflammatory Conditions

    • Synovitis, joint abnormalities, and erosion of the IP joints can be brought on by psoriatic arthritis, RA, and other inflammatory diseases.
    • Causes functional impairment, edema, and pain.

    3. Hallux Rigidus

    • The big toe’s IP joint or metatarsophalangeal joint is affected by this arthritis.
    • Causes walking difficulties and stiffness.

    4. Hammer Toe, Mallet Toe, and Claw Toe Deformities

    • The proximal interphalangeal (PIP) joint is impacted by the hammer toe, which results in abnormal bending.
    • The DIP joint is impacted by a mallet toe, which makes it bend downward.
    • Claw toe: Causes aberrant curling in both PIP and DIP joints.

    5. Gout

    • The IP joints are susceptible to urate crystal deposits in gout, particularly in the big toe (hallux IP joint).
    • Produces severe pain, warmth, redness, and swelling.

    6. Diabetic Foot Complications

    • Diabetes-related peripheral neuropathy can cause a decreased sensation, which makes IP joint abnormalities invisible.
    • Can result from abnormal foot mechanics, which can lead to infections and pressure ulcers.

    7. Trauma and Fractures

    • Sports injuries, falls, or direct trauma can all result in IP joint fractures, dislocations, or ligament damage.
    • Can result in stiffness and persistent pain if untreated.

    8. Bursitis and Capsulitis

    • Excessive pressure (such as from poorly fitting shoes) can cause inflammation of the bursae or joint capsule surrounding the IP joints.
    • Causes discomfort, edema, and trouble walking.

    9. Surgical Considerations

    • For severe deformities or arthritis, particularly in the hallux or lesser toes, IP joint fusion (arthrodesis) may be used.
    • Reduces pain and stabilizes the toe, but it may restrict movement.

    10. Congenital Disorders

    • The IP joints may be impacted by conditions such as syndactyly (fused toes) or polydactyly (extra toes).
    • May need to be surgically corrected for either function or appearance.

    FAQs

    In the foot, where would the interphalangeal joint be located?

    The phalanges of the toes articulate with one another to form the foot’s interphalangeal joints. A proximal and distal set of interphalangeal joints can be found in toes 2–5.

    What are the foot’s interphalangeal joints?

    The articulations between neighboring phalanges are known as the foot’s interphalangeal joints. In every foot, there are nine interphalangeal joints. The lesser digits each have a proximal and a distal interphalangeal joint, whereas the hallux has a single interphalangeal joint.

    Why does the interphalangeal joint in the great toe hurt?

    Pain in the affected great toe is a common symptom of great toe interphalangeal (IP) joint arthritis. A partial or total loss of joint cartilage in the affected joint causes pain, swelling, and stiffness in the big toe region. It is typical to have a prior history of great toe trauma or fracture.

    References

    • Interphalangeal joints of the foot. (2023, October 30). Kenhub. https://www.kenhub.com/en/library/anatomy/interphalangeal-joints-of-the-foot
    • Wikipedia contributors. (2024b, July 30). Interphalangeal joints of the foot. Wikipedia. https://en.wikipedia.org/wiki/Interphalangeal_joints_of_the_foot
    • Morgan, M., & Melville, P. (2018). Interphalangeal joint of the foot. Radiopaedia.org. https://doi.org/10.53347/rid-59893


  • 13 Best Exercise for Squint Eyes (Strabismus)

    13 Best Exercise for Squint Eyes (Strabismus)

    Strabismus exercises aim to strengthen eye muscles, improve focus, and enhance coordination between both eyes. Techniques like pencil push-ups, Brock string, and eye patching can help improve alignment. Regular practice under professional guidance can support better visual function.

    Introduction:

    A condition called strabismus, or squinting, happens when both eyes are not correctly aligned. One eye may focus on an object while the other eye turns upward, downward, inward, or forth. This misalignment can happen continuously or occasionally affecting concentration and leading to difficulties including double vision, difficulty recognizing length, and even eye pain.

    Even though vision therapy, surgery, or corrective lenses are frequently used to cure this condition, Exercise for Squint Eyes (Strabismus) may sometimes help with alignment, particularly in moderate cases.

    Strengthening the eye muscles while improving the brain’s capacity to regulate eye movements are the usual goals of these exercises. To find the best workouts and treatment plan for your particular case in point of squint eyes, you must speak with an eye expert.

    Causes:

    The optimal course of treatment for strabismus depends on knowing the different disorders and variables that can cause it.

    The primary causes of strabismus are as follows:

    • An imbalance of muscles

    An imbalance in the muscles that govern eye movement is frequently the cause of strabismus. The six muscles that regulate each eye enable it to move in various directions. The eye may not align correctly if one or more of these muscles is weaker or stronger than the others.

    • Errors in Refraction

    Blurred vision results from refractive errors, which happen when the eye’s shape makes it difficult for light to concentrate correctly on the retina. Strabismus may result from one eye being noticeably more able to see visually impaired, or astigmatic than the other.

    • Amblyopia

    A disorder known as amblyopia, or lazy eye, occurs when one eye’s vision becomes blurred and cannot be completely corrected with glasses or contact lenses. Strabismus, in which the brain fails to receive signals from the misaligned eye, is frequently the cause of amblyopia. This results in poor visual development in that eye.

    • Factors related to genetics

    Strabismus may run in families because it can be genetic. One is more likely to develop strabismus if a parent or sibling already has it.

    Brain or Neurological Disorders Strabismus can result from nerve damage or neurological problems that affect the nerves controlling the eye muscles. These disorders can affect eye coordination and result in misaligned eyes.

    • Injury or Trauma

    Strabismus can be caused by physical harm to the eye or the muscles that surround it. A direct hit to the eye region, an accident, or surgery could cause this.

    • Thyroid Eye Disease (TED)

    The tissues surrounding the eyes are affected by thyroid eye disease, an autoimmune disorder that frequently results in inflammation and swelling of the eye muscles. Especially when the eyes are misaligned or protruding, this problem can lead to strabismus.

    • Systemic Illnesses

    Strabismus can be worsened by some systemic health disorders that affect how the eye muscles develop and function. Down syndrome, craniofacial deformities, and other genetic syndromes affecting the eyes and eyesight are examples of these conditions.

    • Issues with Vision Caused by Convergence Lack

    A condition known as convergence insufficiency happens when the eyes cannot cooperate to focus on close things, such as reading. When attempting to focus on anything nearby, this may cause one or both eyes to tilt outward.

    • Environmental Aspects

    Particularly in youngsters, strabismus can develop or worsen as a result of excessive screen time, extended near-vision jobs, or bad posture when reading or studying.

    Signs and symptoms:

    Squinting, also known as strabismus, is a condition in which one or both eyes turn inward, outward, upward, or downward due to improper eye alignment. Numerous physical and visual issues may result from this imbalance. Early detection of the condition’s symptoms is important for its management and avoiding consequences like double vision amblyopia, or lazy eye.

    The following are typical strabismus symptoms and indicators:

    • Eye misalignment

    The most noticeable symptom of strabismus is the eyes’ obvious misalignment. Both eyes might not line up correctly, or one eye can seem to be looking in a different direction than the other.

    • Double Vision (Diplopia)

    Due to visual confusion caused by the brain receiving two separate pictures from the misaligned eyes, people with strabismus may experience double vision. When the eyes cannot adequately focus simultaneously, this can occur.

    • Fatigue or Eye Strain

    The eyes may have to work harder to focus or stay in alignment if they have strabismus. Particularly when engaging in activities that demand extended eye strain, like reading or screen time, this additional effort may result in eye strain or feeling exhausted.

    • Challenges in Perceiving Depth (Binocular Vision)

    The eyes cannot properly coordinate to perceive distance and depth when they are misaligned. Driving, participating in sports, and even going down stairs may become more challenging as a result.

    • Head Turning or Tilting

    Some people who have strabismus can sway or turn their heads in a specific direction to correct eye misalignment and improve their vision. This improves attention and lessens the effect of double vision.

    • Shutting One Eye in Direct Light

    Strabismus sufferers may squint or close one eye to lessen their pain from misalignment, particularly in bright light. This routine can also be used to block out one eye to control double vision.

    • Frequently Reported Blurred Vision Issues

    Blurred or unclear vision can result from strabismus, especially if the eyes cannot properly concentrate together. This can make it more difficult to see properly, particularly while doing tasks that call for close attention to detail.

    • Headaches or Eye Pain

    Frequent headaches or eye pain may result from strain on the eye muscles caused by strabismus. When the eyes are continuously trying to focus or align correctly, this might happen.

    • Esotropia, or crossed eyes, in newborns or young children

    In young children, strabismus may be more obvious, particularly in babies. One or both of an infant’s eyes may appear to turn inward toward the nose, giving them the appearance of crossed eyes. By six months of age, this condition usually goes away on its own, but if it continues, therapy is necessary.

    • Narrowing or Squinting the Eyes

    To make up for their poor eye alignment, people with strabismus frequently squint or narrow their eyes. This could happen unconsciously to improve focus or lessen double vision.

    • Children’s Abnormal Visual Behavior

    Young children’s conduct can reveal the presence of strabismus even though they may not always be able to articulate its symptoms verbally.

    • Unable to Concentrate on Close or Far Objects

    Since their eyes are not correctly aligned, people with strabismus may find it difficult to focus on objects that are too close or too far away. This can make it difficult to read, watch TV, or play sports.

    Advantages of  Exercises:

    The treatment of strabismus (squinting) can benefit greatly from eye exercises, which are frequently a component of vision therapy. Even though they might not be effective in every situation, exercises have several advantages, especially for people with mild to severe strabismus. These exercises are helpful in the management of this problem since they may improve eye alignment, strength, and coordination.

    The following are the main benefits of squint eye exercises:

    • Better Eye Coordination

    The eyes can be trained to move and focus at the same with exercises like the Brock string and convergence exercises, which will improve alignment and muscle coordination.

    • Building Up Weak Eye Muscles

    Frequent eye muscle strengthening exercises, such as pencil push-ups or concentration exercises, help improve alignment and control over eye movement.

    • Decreased or eliminated diplopia, or double vision

    The likelihood of seeing double can be decreased by exercises that encourage good eye alignment, such as utilizing the Brock string or focusing on a target.

    • Improved Sensation of Depth

    The brain’s capacity to integrate visual information from both eyes is improved by exercises that support binocular vision, or the cooperation of both eyes, resulting in improved depth perception.

    • Preventing Lazy Eye, or Amblyopia

    Amblyopia can be prevented or treated with regular eye workouts that strengthen the weaker eye and motivate the brain to use both eyes.

    • Improved Eye Strain Reduction and Visual Comfort

    Exercise for the eyes can help lessen headaches, ocular tiredness, and pain caused by overexertion and muscle imbalance.

    • Improved Visual Focus and Attention

    By strengthening the brain’s capacity for maintaining attention on objects, exercises that encourage visual tracking and focus improve visual processing in general.

    • Improved Muscle and Eye Health

    Frequent exercise can help maintain healthy eye muscles while improving their performance, which may stop further eye alignment degeneration.

    • Self-Management and Empowerment

    Exercise increases motivation and a person’s sense of control over their condition by providing them with the means to independently maintain their eye health.

    Exercise for Squint Eyes (Strabismus):

    The exercises listed below might help people with strabismus align their eyes better.

    Pencil Push-Ups

    One of the most popular strabismus exercises is this one. It promotes both eyes to focus together and helps to strengthen the eye muscles.

    • Look for a pen, pencil, or any other small thing that has a sign or text on it.
    • For your eyes to follow, the object should ideally have a distinct focus point.
    • Maintain proper posture when sitting upright in a comfortable chair.
    • Avoid slouching since this may affect your ability to complete the workout.
    • Stretch your arm straight out in front of your face while holding the pencil or object at eye level in front of you.
    • Both of your eyes should be able to view the pencil well.
    • Try to concentrate on the pencil (or object).
    • Make sure both eyes are focused on the same thing.
    • Keep your attention on the bridge of your nose as you slowly move the pencil or object toward it.
    • To stay focused, your eyes should converge, or shift inward toward one another, as you move the pencil closer.
    • Continue slowly drawing inward with the pencil until you begin to see double or lose focus on the thing.
    • At this point, your eyes are unable to cooperate with a single view. As soon as double vision or concentration problems arise, put the pencil back at arm’s length.
    • Moving it slowly back and forth while keeping as much attention as you can is your aim.
    • Slowly move the pencil toward and away from your nose as you do the exercise five to ten times.
    • Every time you move the pencil, try to keep your attention on it.
    pencil push-ups exercise
    pencil push-ups exercise

    Eye-Tracking

    For those with strabismus, eye movement synchrony is essential and this exercise helps with that.

    • Choose a fixed object that is simple to see and concentrate on, such as a pencil or pen, or a small target like a ball or colored sticker.
    • Use something that contrasts sharply with the background, if possible.
    • Get into a comfortable standing or sitting position.
    • Keep your head forward and your posture neutral.
    • To prevent strain on the neck, keep the target at eye level.
    • Hold the target in front of your eyes, 10 to 12 inches from your face.
    • Focus both eyes on the subject and look at it.
    • While keeping the target within your field of vision, move it carefully in the following directions: up, down, left, and right.
    • Keep your pace constant while you move the target a few inches at a time.
    • The goal is for the object to be easily followed by both eyes.
    • Make sure both eyes are following the target continuously as you move it, avoiding eye separation.
    • As the object moves, your eyes should follow it together, moving in the same direction and keeping your attention on it.
    • Move the target slowly to the left and right at first, then progressively pick up the pace when you feel comfortable.
    • Moving the thing smoothly without jerking your eyes is the goal.
    • Track the target in one direction for a few seconds, then move it back to the center of your field of vision, right in front of you.
    • Then, repeat the exercise in alternate directions.
    • Focus on maintaining fluid and coordinated eye movements while you perform this exercise for two to three minutes each session.
    Eye-Tracking
    Eye-Tracking

    Constant Blinking

    Exercises that involve blinking can help maintain eye moisture and lessen eye strain.

    • Either stand in a neutral position or sit on a comfortable chair.
    • Make sure your shoulders and neck are not strained and that you are at ease.
    • Select an object, wall, or target in front of you to serve as your point of focus.
    • If it’s more convenient, you can alternatively choose to concentrate on your image in the mirror.
    • Start by slowly and carefully blinking both eyes.
    • Every blink needs to be fluid and organic.
    • Try to blink every three to five seconds.
    • With each blink, gently close your eyes for one to two seconds.
    • Keep your attention on the thing you’re looking at as you blink.
    • This practice relaxes the muscles used for blinking while encouraging your eyes to stay in alignment and cooperate.
    • Blink more quickly and frequently after a few minutes; try to blink two to three times per second.
    • By doing this, tension will be lessened and the eye muscles will become more flexible.
    • Without straining yourself, keep blinking for two to three minutes.
    • Remain calm and concentrate on keeping a constant pace.
    Continue blinking eye exercise
    Continue blinking eye exercise

     Palming

    As it promotes muscle relaxation and reduces eye fatigue, palming is one of the most effective traditional workout methods.

    • Maintain a straight back while sitting comfortably in a chair.
    • Make sure you’re calm and in a place where you won’t be bothered.
    • For 10 to 20 seconds, softly rub your palms together.
    • This warms your hands, which could increase the exercise’s calming effects.
    • Gently close your eyes.
    • Next, cover your closed eyes with the palms of your hands.
    • Your palms should completely enclose your eyes, obstructing all light, and your fingers should rest on your forehead.
    • Make sure your hands are not putting pressure on your eyes; instead, place them lightly over them.
    • Your hands should be raised so that they comfortably cover your eyes.
    • Cover your eyes with your palms and concentrate on letting your whole body relax.
    • Breathe slowly and deeply to help you relax even more.
    • Imagine the tightness in your face and eyes diminishing as you breathe.
    • Concentrate on the shadows behind your eyelids.
    • Keep your thoughts clean and your body relaxed.
    • For one to three minutes, keep your hands still and your eyes closed.
    • Take slow breaths, let your eyes rest, and concentrate on the calming darkness throughout this time.
    • After one to three minutes, carefully take your hands away from your eyes.
    • To readjust your vision, slowly open your eyes and blink a few times.
    Palming exercise
    Palming exercise

    The game of barrel cards

    A barrel card must be held parallel to the nose for this exercise. The circles are positioned with the largest circle most distant and in perfect horizontal alignment.

    • During this exercise, concentrate on the red circles with one eye and the green ones with the other.
    • Now focus on the distant circles and adjust your vision such that the two circles merge into a single, equal red-green circle.
    • Later, move this focus to the center and then the smallest circle using the same technique.
    • Take a minute to unwind and let your eyes rest after completing a cycle.
    • You should complete ten cycles of this exercise.
    The game of barrel cards
    The game of barrel cards

    Exercise Dot-to-Dot

    This exercise contributes to better control over eye movement and alignment.

    • Sketch a random pattern of dots on a piece of paper.
    • Focus on the first dot at first, then visually link the dots as you move on to the next one.
    • Continue until all the dots on the paper are connected.
    • This exercise contributes to better control over eye movement and alignment.
    Exercise Dot-to-Dot
    Exercise Dot-to-Dot

    Focus Shifting

    The ability of the eyes to shift focus from one object to another is improved by this exercise, which can be particularly beneficial in strabismus situations where focusing issues are present.

    • Take out a pencil, pen, or any other little object that is comfortable to hold at arm’s length.
    • If using your finger is more handy, you can do it as well.
    • The object should be kept directly in front of you, 12 to 18 inches from your eyes, and at arm’s length.
    • Make sure that both eyes are focused on the object for ten to fifteen seconds.
    • After concentrating on the close object, gradually move your eyes to a far-off object (such as a point on the wall ten to twenty feet away or something outside a window).
    • Spend ten to fifteen seconds concentrating on the faraway item.
    • Return your attention to the item you were holding at arm’s length and hold it there for ten to fifteen more seconds.
    • For a total of five repetitions, keep switching between the close and far objects.
    Focus Shifting
    Focus Shifting

    Focus on the Near and Far (Accommodative Facility)

    Improving eye coordination and focusing power is a benefit of this exercise, particularly when switching between close and far objects.

    • Locate two objects: one close by (such as a pen, your finger, or a little book) and one far away (10–20 feet), such as a tree, a building, or a picture on the wall.
    • The near object should be held 6 to 8 inches away from your eyes.
    • Spend ten to fifteen seconds concentrating on the object.
    • Verify that both eyes are focused on it.
    • Focus on the distant item, which should be between 10 and 20 feet away, without turning your head.
    • Make sure both eyes are in alignment and concentrated for 10 to 15 seconds while you concentrate on the faraway item.
    • Keep switching between the close and faraway things every ten to fifteen seconds.
    • When switching, make an effort to maintain both eyes’ coordination and focus.
    • Do the exercise for two to three minutes, switching between the close and faraway items five to ten times.
    Focus on the Near and Far (Accommodative Facility)
    Focus on the Near and Far (Accommodative Facility)

    Brock String Exercise

    This more complex exercise trains integration, or the eye’s capacity to focus on an object that is near.

    • This is a string that is between 10 and 15 feet long and has several pearls scattered throughout it.
    • One can be made by tying various colored pearls at different points along a thread, or it can be made using a piece of yarn and small, obvious items (such as knots, buttons, or pearls).
    • Anyplace you can attach the string such that it extends horizontally, such as a flat wall.
    • About three to five feet in front of you, fasten one end of the rope to a stationary item, such as a chair, door handle, or other strong object.
    • Place the string’s opposite end against your nose tip.
    • Now, stretch the material out in front of you, marking it with pearls or markers at regular intervals.
    • The distance from the string’s attachment point should be between 10 and 15 feet.
    • Start by concentrating on the pearl that is closest to your nose.
    • You should see a single image of the bead when both eyes are focused. 
    • In each bead, look for the “X” design where the chain crosses.
    • It will seem as though the string is divided into two lines, one for each eye. Try for the same bead with both eyes.
    • Focus on the closest item first, then move your attention to the next piece a few feet distant along the string.
    • Once more, concentrate on a single pearl and try to envision only one image.
    • The tiny object should remain in the focus of both eyes.
    • The string may now seem more clearly divided, but it’s still important to keep your attention on the pearl.
    • One by one, slowly shift your attention to the next piece along the connecting line.
    • Give each bead five to ten seconds of attention.
    • Double vision, or seeing two beads of various sizes, indicates that your eyes are not aligned correctly. 
    • Try again with greater focus.
    • Once you have worked your way along the rope, make sure both eyes are focused on the pearl nearest your nose before refocusing your attention there.
    • Spend five to ten minutes on the exercise, paying five to ten seconds to each pearl.
    • As you gain comfort, gradually raise the speed from a low starting point.
    Brock String Exercise
    Brock String Exercise

    Window Gazing

    Trains your eyes to better align and concentrate at close and far distances.

    • Select a window that provides a clear view of both nearby and far-off things.
    • It might be a window with buildings, trees, or any other type of scenery that combines features from close and far away.
    • Start by concentrating on an object near the window.
    • This might be anything within a few feet of you, such as a plant or decoration next to the window or a portion of the window frame.
    • Make sure both eyes are focused on this object for ten to fifteen seconds.
    • When focused, try to keep your eyes relaxed and not strain.
    • Once the object in front of you has captured your attention, carefully move your eyes to something outside the window, like a building, tree, or far-off landscape.
    • Make sure both eyes are lined up and sharply focused for ten to fifteen seconds as you concentrate on this far-off item.
    • Return your attention to the close object you began with and hold it there for ten to fifteen more seconds.
    • Keep switching between the close and far items, paying ten to fifteen seconds to each.
    • Try to do this by switching concentration 5–10 times.
    • After finishing the exercise, let your eyes relax by gently closing them for a short while.

    Convergence Exercise

    Improves convergence, which is the capacity of both eyes to concentrate on the same object.

    • Choose a tiny object that you can hold in front of you with relaxation like a pen, pencil, finger, or anything else.
    • As it offers an individual point of attention, pens are frequently utilized.
    • Focus on the object while holding it at arm’s length and straight in front of your eyes.
    • Make sure it is not too high or too low and that it is at eye level.
    • Use both eyes to focus on the object.
    • The object should appear as a single image.
    • Your eyes need to be gently trained to focus together if you experience double vision, which indicates that they are not aligned correctly.
    • Move the thing carefully toward the tip of your nose while maintaining eye contact.
    • To maintain focus as you move the object closer, both eyes should converge, or turn inward toward the nose.
    • Until you begin to experience double vision, or when the object appears as two pictures, continue to move it closer to your nose.
    • At this time, the item can no longer be maintained in focus as a single image by your eyes.
    • After you notice double vision, slowly move the thing away from your nose until the double vision goes away and the object is once again a single image.
    • Ten to fifteen times, move the thing back and forth.
    • To maintain the object’s alignment and clarity, concentrate on getting both eyes to cooperate.
    • Make sure both eyes are converging without straining as you do the exercise for five to ten minutes.
    • To relax your eyes, softly close them for 30 seconds after finishing the activity.
    • To help release tension, you can also perform palming, which involves gently placing your hands over your closed eyelids and rubbing them together to create heat.

    Making Eight

    • Use your eye to slowly rotate the number eight.
    • By doing this, you will stretch your muscles in every direction and increase the flexibility of your eyes.
    • You can also repeat this exercise by making different A letters or numbers.
    • Overall, this is a great and effective way to improve your focus and visual clarity.

    Vision Therapy

    • Vision therapy is an extensive program that is made up of a variety of exercises and activities to improve visual skills.
    • It is typically performed with the help of an optometrist or vision therapist.
    • By teaching the brain and eyes to work together properly, vision therapy helps treat squint eye and other underlying visual problems.

    What precautions must be considered when working out?

    To prevent pain, strain, or even eye damage, safety should always come first when doing eye exercises for strabismus.

    Here are some essential safety precautions to take:

    • First, speak with an eye specialist.

    It’s important to speak with an eye specialist (ophthalmologist or optometrist) before starting any eye exercises. They can assess how severe your strabismus is and advise you on the best workouts for your issue. They also help you in developing reasonable goals for benefits and advancement.

    • Don’t Overdo It

    Avoid doing too many exercises. As you become more comfortable, progressively extend the length of your sessions from short ones of five to ten minutes. Eye strain or pain may result from prolonged or too severe exercise.

    • Pay Attention to Your Body

    Exercise should be stopped right once if you feel any pain, extreme difficulty, headache, or dizziness. Double vision or ongoing pain are indicators that the workouts may not be suitable for your condition or that they should be modified. For more advice in this situation, speak with your eye care professional.

    • Use the Correct Method

    Always follow your eye specialist’s advice when performing workouts. It’s essential to use the proper strategy to prevent overstressing your eyes. Incorrect movement or posture may worsen the illness or cause new eyesight issues.

    • Take pauses in between workouts.

    Take a few moments between exercises if you are doing more than one so that your eyes can rest. This lowers the possibility of eye strain and keeps concentration and coordination high during each workout.

    • Practice in an Area with Good Lighting

    Make sure the space where you are doing your eye exercises is comfortable and well-lit. The effectiveness of the workouts may be affected by poor lighting, which might strain your eyes and make it difficult to concentrate on the things you’re utilizing.

    • Make Use of the Right Equipment

    Use an obvious, visible object, such as a pencil or a marked card, for exercises like pencil push-ups or tracking. Stay away from using anything that might be difficult to focus on or that could strain your eyes, such as tiny or extremely complicated objects.

    • Avoid Eye Fatigue

    Take rests before performing eye exercises if you’ve been using your eyes for long periods (such as reading, using a computer, etc.). You might not be able to focus properly and your eyes could not react well to exercises if you are tired, which could cause strain or pain.

    • Minimize Distractions

    To complete the exercises, pick a place that is peaceful and free from distractions. This guarantees that you may concentrate entirely on the exercises and stops unnecessary eye movements caused by distractions from outside.

    • Be patient while remaining constant.

    Consistent practice over time is necessary for eye exercises, but effects may not be seen for weeks or months. Do not expect results immediately or speed up the procedure. Follow the recommended routine if the workouts are beneficial, but take it slow and easy on yourself.

    • Track Development and Report Modifications

    Evaluate the exercises’ success regularly. Inform your doctor of any changes you observe in your vision, such as increasing double vision or growing trouble focusing. They might need to think about alternative approaches or modify their treatment plan.

    When should you stop practicing exercise?

    If any of the following conditions or symptoms appear, it’s important to stop strabismus eye exercises. When these problems arise, continuing to exercise could worsen the situation or result in more complications.

    The following are some indicative indicators that you should stop doing eye exercises:

    It’s important to stop the workouts if your eye pain continues or becomes worse. When you initially start, little pain may be typical, but if the pain continues or becomes acute, it may indicate that you are overexerting your eyes or that the exercises are not suitable for your condition.

    •  Severe double vision

    As you train your eyes to focus together, some moderate double vision may happen. However, if double vision gets worse or lasts longer during exercises, it’s a sign that your eyes aren’t cooperating correctly. Stop and speak with your eye doctor to modify your treatment plan if this happens.

    • Feeling lightheaded or unwell

    Stop doing eye exercises right once if you start to feel lightheaded or nauseous. This may indicate visual strain or confusion as a result of your brain’s inability to fully process the visual information from both eyes. These signs may suggest that the exercises are too strenuous or unsuitable for your health.

    • A headache

    A warning sign is frequent or severe headaches during or after eye exercises. Headaches might result from eye strain caused by performing workouts too fast or for an extended period. If this happens, shorten the duration or intensity of your sessions and make sure you are performing the exercises properly by speaking with your eye care professional.

    • Increased Eye Fatigue or Strain

    Your eyes should be stopped if they are constantly fatigued, strained, or overworked. Putting too much effort on your eye muscles without getting enough sleep could worsen the issue. To prevent tiredness, make sure you take enough breaks during your workouts.

    • No Change Following Regular Practice

    It could be time to review your treatment plan if, after weeks or months of regular practice, you still don’t see any change in alignment, coordination, or symptom relief from your eye exercises. To find out if you need surgery, corrective lenses, vision therapy, or another treatment, speak with your eye doctor.

    • New or Increased Visual Issues

    If you have new visual problems like blurriness, light sensitivity, or trouble focusing on things, stop the exercises and get evaluated by a professional. These can indicate that a different strategy is required or that your condition is not improving with the activities.

    • Redness, irritation, or swelling of the eyes

    Take a break and keep an eye out for any more signs if your eyes get swollen, red, or itchy during or after exercising. These could point to an underlying problem that needs medical care, like an eye infection, allergies, or other ailments.

    • Medical Advice to Stop

    For this reason, you should heed your eye care provider’s advice and stop performing the activities. They might conclude that the exercises aren’t suitable for your particular illness or that a different kind of treatment is needed.

    • Pain on an emotional or psychological level

    Eye workouts can occasionally be frustrating, particularly if you feel that your progress is slow or challenging. It may be beneficial to take a break if you are feeling anxious or distressed while completing the exercises. Any worries can be avoided by discussing your experience with your healthcare professional.

    Additional Advice for Managing Strabismus:

    • Wearing Corrective Lenses: It’s important for people with optical problems that cause strabismus to use suitable glasses or contact lenses. Verify that your prescription is current.
    • Vision Therapy: Under the guidance of an optometrist, vision therapy can help correct strabismus while improving eye coordination in addition to exercises.
    • Surgical Options: To realign the eye muscles or correct muscle imbalances, surgery can be required in severe cases.
    • Use of Patches: Applying a patch to the stronger eye can sometimes strengthen the weaker eye while improving alignment.

    When to Consult an Ophthalmologist:

    It’s important to contact an eye specialist if the squint is ongoing or substantially affects your vision or ability to carry out routine tasks. The kind and severity of the strabismus will determine the available treatment options. Additional treatments, such as glasses, vision therapy, or even surgery, could be suggested if eye exercises prove ineffective.

    Summary:

    Exercise and other therapies can help restore eye alignment and function, even though strabismus can be a difficult condition. The eye muscles can be strengthened and good eye coordination can be promoted with regular practice of eye exercises including pencil push-ups, eye tracking, and focus shifting. To be sure the exercises are suitable and beneficial for your particular condition, it is important to speak with a healthcare provider.

    Beyond only improving vision, regular practice offers advantages including increased focus, less eye strain, and possibly even protection against amblyopia. Adopt these workouts for a better future and a clearer, healthier vision.

    To improve the alignment and coordination of the eyes in strabismus, keep in mind that early intervention and regular practice are essential. Many people can see significant improvements in their quality of life and vision with the correct approach.

    FAQ:

    Is it possible to correct squinty eyes using eye exercises?

    In fact, in mild cases of strabismus, eye exercises may help improve eye alignment. They can help focus better, strengthen the muscles in the eyes, and increase eye-eye coordination. However, people with mild or intermittent squinting seem to benefit more from activities. Surgery, glasses, or vision rehabilitation can be required in more extreme situations.

    How much time should I spend performing eye exercises for squints?

    Eye exercises should be performed every day for ten to fifteen minutes at a time for optimal effects. Before you notice significant benefits, you might need to perform these exercises for a few weeks or months, depending on the severity of your problem and the recommendations of your healthcare professional. The secret is regularity.

    Do adults with strabismus benefit from these exercises?

    Yes, eye exercises may help adults with minor strabismus, although treating adults with this condition might be more difficult than treating children. Optometrists frequently advise individuals to undergo vision therapy, which may include eye exercises, to improve eye alignment and coordination.

    If I feel pain or experience blurred vision, should I stop practicing eye exercises?

    When doing eye exercises, it’s important to pause and speak with your healthcare physician if you feel uncomfortable, have double vision, or have any other strange symptoms. Although some pain is common when beginning an exercise program, ongoing symptoms could mean that further treatment is required or that the activities aren’t helping your problem.

    Can strabismus be treated with eye exercises instead of surgery?

    Surgery is unlikely to be replaced by eye exercises alone, particularly in situations of severe strabismus. When the eye muscles need to be moved or adjusted for enough alignment, surgery is frequently advised. However, because they improve eye coordination and help sustain the effects of surgery, exercises can be used in conjunction with surgery or other treatments.

    Are eye exercises for strabismus beneficial for kids?

    Yes, eye exercises can be quite beneficial for kids with strabismus, especially if they begin early. By training the eyes to cooperate, regular practice can improve vision and avoid long-term issues. To guarantee that activities are performed correctly, parents need to work with an eye specialist.

    Do strabismus eye exercises have any side effects?

    In general, there are no serious side effects, and eye exercises for strabismus are safe. However, eye strain or temporary pain could result from overdoing it or using the wrong technique. To prevent such problems, always do as your eye doctor or optometrist instructs.

    Can I combine eye exercises with other strabismus treatments?

    Yes, eye exercises can be done in conjunction with other strabismus therapies including vision therapy, patching one eye to strengthen the weaker eye, or wearing corrective glasses. The best way to manage strabismus is frequently to combine several different treatment methods.

    How can I determine whether eye exercises are effective?

    After a few weeks of regular practice, you should begin to see changes in your eye alignment and coordination. Reduced double vision, increased focus, improved understanding of depth, or more continuous eye coordination are all indicators that the exercises are having an effect. See your eye care specialist for another assessment if, after a few months, you still don’t see any improvement.

    If squinting is not treated, might it lead to vision issues?

    Untreated strabismus can result in visual issues like amblyopia, also known as lazy eye, in which the brain chooses one eye over the other, impairing vision in the weaker eye. Additionally, it may result in double vision, eye strain, or weakness, as well as affect your sense of depth. These issues can be avoided with early action.

    Is it possible to treat squinting without surgery?

    It is possible to treat a lot of strabismus cases without surgery, particularly if the disease is identified early. Corrective lenses, eye exercises, vision therapy, and patching are among the available treatment methods. In situations that are more severe or unresponsive, surgery is typically recommended.

    After I get well, how can I keep up with the effects of my eye exercises?

    To make sure the alignment remains perfect after improvement is observed, it’s important to keep up with management exercises or follow-up appointments with an eye care professional. Periodic workouts may be advised in some situations to maintain the strength of the eye muscles and stop degeneration.

    Does squinting result in headaches or other symptoms?

    Headaches, eye strain, and pain can result from strabismus, particularly if the eyes are straining more to correct the misalignment. Additionally, this may result in exhaustion and trouble focusing. These symptoms can be lessened with the use of workouts, corrective lenses, or other therapy.

    References:

    • Sankhla, D. October 6, 2023. 16 Strabismus exercises that work best for squint eyes. Samarpan Clinic for Physiotherapy. You may get the greatest squint-eyes-strabismus exercise at https://samarpanphysioclinic.com/16.
    • Wylee, Oscar (n.d.). Four strabismus eye exercises. Glasses/eye/strabismus-and-eye-exercises https://www.oscarwylee.com.au
    • How might workouts for squint eyes aid in vision improvement? March 12, 2024. The Sight Avenue. https://thesightavenue.com/blog/squint-eye-exercise
    • Admin. December 5, 2024. There are eleven simple exercises for squinting eyes that you can do at home. Bynocs. Squint-eye exercises: https://www.bynocs.com/
    • Goel, S., and Goel, S. (November 6, 2023). 3. To expedite squint treatment, squint doctors prescribe squint eye exercises. Arohi Eye Hospital. https://www.arohieye.in/3-best-exercises-by-squint-specialists-to-speed-up-squint-treatment/
    • Fitness Trinetra. February 1, 2022. Exercises for Natural Squint Eye Correction at Home [Video]. YouTube. YouTube video: https://www.youtube.com/watch?v=uZAlPSUFxso
    • K, Y. (2025, January 17). Best squint eye Exercises: Effective approaches for squint correction. Nethradhama. https://nethradhama.org/blog/squint-eye-exercises/
    • Image 1, Health has been restored. September 7, 2018. Restoring health with pencil push-ups. Push-ups with pencils: https://healthrestored.com/
    • Image 2, On February 24, 2020, Forrest, S., and Forrest, S. Eye-tracking: assisting kids with reading. The best method for teaching struggling readers is to assist them in reading. Eye-tracking causes: https://helpingchildrentoread.com/
    • Image 3, Online yoga classes: Do Yoga (n.d.). https://do.yoga/blog/yoga-practices/blinking-exercise-:-practice-and-its-benefits-107
    • Image 4, From Shah, E. Y. C. E. Y. E. S. (September 21, 2018). Palming: Take some time to rest your eyes. “Give your eyes a break, palming” https://www.linkedin.com/pulse/siddhi-shah.
    • Image 5, Felsted, D., DO. October 8, 2024. Nine Steps to Correct Exotropia (with Pictures) https://www.wikihow.com/Fix-Exotropia – wikiHow.
    • Image 6, Dot card: Convergence Insufficiency Orthoptic Exercises (n.d.). Cambridge University Hospitals. The following is a list of dot-card orthoptic exercises for convergence insufficiency: https://www.cuh.nhs.uk/patient-information/
    • Image 7, Khuba, A. May 8, 2024. EYE STRAIN REDUCTIVE EXERCISES. Eye exercises to minimize eye strain/eye-hospital/general-ophthalmology/eye-tests-general-ophthalmology/ Vijaya Nethralaya. https://vijayanethralaya.com/
    • Image 8 S, S. March 18, 2024. Unbelievably, double vision might cause further problems. https://specscart.co.uk/blog/double-vision Specscart
    • Image 9, Vision therapy optometrist: https://www.visualsymptomstreatmentcenter.com/eye-care-services/brock-string-exercise/