Knee Rehabilitation Exercises
Exercises for knee rehabilitation are essential for accelerating healing and regaining function after knee operations or accidents. A well-designed rehabilitation program may help increase knee joint strength, flexibility, and stability whether you’re recuperating from knee replacement surgery, a strained ligament, or a meniscus rupture.
Targeting certain muscle groups, improving joint mobility, and progressively reintroducing weight-bearing activities are the goals of these workouts.
Purpose of Knee Rehabilitation
- Pain Reduction: Reducing inflammation and pain.
- Strength Recovery: Strengthening and stabilizing the knee’s surrounding muscles.
- Enabling the return to regular activities and, if appropriate, sports is a functional improvement.
- Re-injury prevention involves strengthening the knee to lower the chance of further issues.
This guide examines a variety of efficient rehabilitation exercises to aid in the healing process and promote a return to knee function at its best. Before beginning any fitness program, it is essential to speak with a healthcare provider to ensure the activities are appropriate for your particular condition and recovery stage.
This program should be carried out under your doctor’s supervision to guarantee your safety and effectiveness. To find out which exercises will help you reach your rehabilitation objectives, see your physician or physical therapist.
An exercise conditioning program will assist you in getting back to your regular activities and leading a healthier, more active lifestyle following an accident or surgery. Returning to sports and other social activities will also be facilitated by keeping to a well-organized conditioning program.
Program for Knee Exercise
An exercise conditioning program will help you return to your regular activities following surgery or an injury and help you lead a healthier, more active lifestyle. A well-crafted conditioning regimen may also make it easier for you to resume sports and other activities you enjoy. However, it is important to follow this regimen under your doctor’s supervision to ensure your safety and effectiveness.
Strength: By strengthening the muscles that support your knee joint, you can reduce the load on it. Stiff muscles help the knee joint absorb stress.
Flexibility: To regain range of motion and avoid injury, you must stretch the muscles you have strengthened. Stretching your muscles gently after strengthening exercises will help maintain their length and flexibility and lessen soreness.
Muscles to Target: The following muscle groups are the emphasis of this conditioning program
- The front quadriceps of the thigh
- Outer thigh abductors and hamstrings in the back of the thigh
- Inner adductors of the thighs
- Gluteal Muscles
Program duration: You should continue this for four to six weeks, or longer if your physician or physical therapist recommends otherwise. Once you’ve healed, you may continue doing these exercises as part of a maintenance program to keep your knees safe and healthy for the rest of your life. You can maintain the strength and flexibility of your knees by performing these exercises two or three times each week.
Exercises for knee rehabilitation
The primary goal of these exercises is to strengthen the quadriceps, hamstrings, and calf muscles, which surround the knee.
Straight Leg Raises
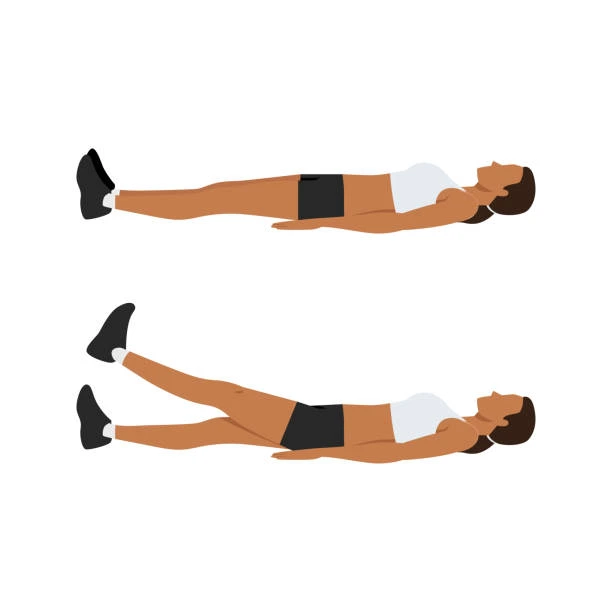
One leg should be bent and the other straight while you are lying on your back.
Lift the straight leg a few inches off the ground by contracting the thigh muscle.
Drop it gradually after holding it for a few seconds.
Quadriceps are strengthened by this type of exercise.
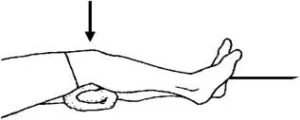
Quad Sets
With your leg straight, sit or lie down.
Press the back of your knee on the floor or a folded towel to tighten the thigh muscle.
Hold for a short while, then relax.
There is no movement in this isometric exercise.
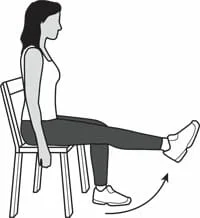
Leg Extensions
As you sit in a chair, slowly extend one leg in front of you.
Return to the starting position by lowering the leg gradually.
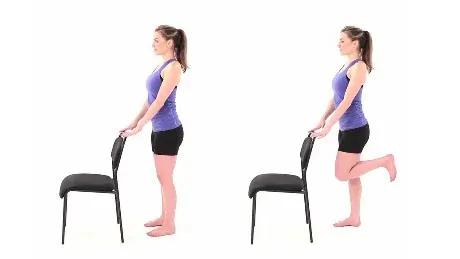
Hamstring Curls
Stand with your feet hip-width apart.
For balance, you may stick to a wall or chair.
Bring your heel to your buttocks by bending one knee.
Repeat with the opposite leg after lowering the first one back down.
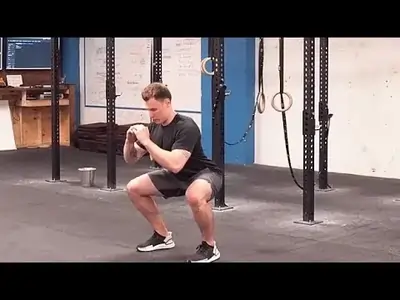
Squats
Mini Squats/Partial Squats
Place your feet shoulder-width apart and balance your weight equally.
You can support yourself using a wall or a chair.
Bend your knees slowly, bringing your hips down just a little bit.
Make sure your core is active, and your back is straight.
To go back to where you were before, push through your heels.
This exercise is an excellent approach to start strengthening the muscles surrounding the knee without overloading the joint.
Wall Squats
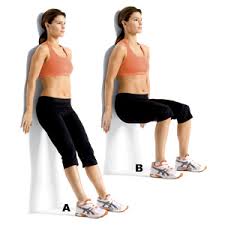
Place your feet shoulder-width apart, stand a few steps away from the wall, and lean your back against it.
Bend your knees and slide down the wall until your thighs are as near to the floor as feels comfortable.
For a few seconds, maintain the position.
Return to the beginning position by sliding up the wall.
This is a useful technique for learning correct form and for supporting the back.
Chair Squats
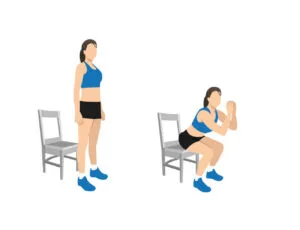
Pick a stable chair to stand behind you.
Maintain a shoulder-width distance between your feet.
Hips should be lowered as though you were going to sit in the chair.
Return to standing by pushing through your heels after lightly touching the chair with your buttocks.
Both an objective and a safety net are provided by this.
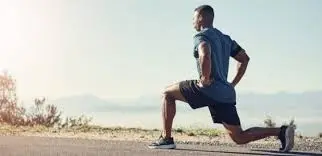
Lunges
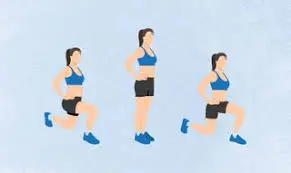
Your back should be straight, and your feet should be hip-width apart.
Maintain this position with the help of your core.
Your hands might be by your sides or on your hips. With one leg, take a large step forward.
Make sure the ground receives your front foot flat. Lower your hips toward the floor by bending both knees.
Make sure both knees are at a 90-degree angle.
It is important that your front knee does not extend behind your toes and is positioned squarely above your ankle.
Although it doesn’t have to contact the ground, your back knee should drop toward it. Return to your original standing position by pushing off with your front foot.
With the other leg, repeat the lunge.
Calf Raises
When standing, position your feet standing shoulder-width apart and point your toes forward.
You have two options: stand on a level surface or, for more range of motion, stand on something a little higher, such as a weight plate or a step, with your heels dropping off the edge.
Push through the soles of your feet as you slowly lift your heels off the ground.
At the peak of the exercise, tighten your calf muscles.
Stop at the highest point for a moment. Lower your heels gradually to return to the starting position.
Do it again
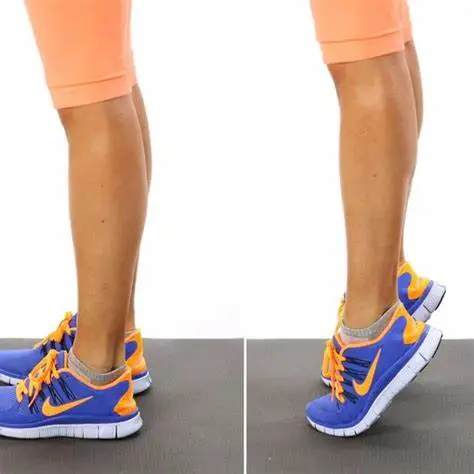
Toe raises
Toe lifts can be done while sitting or standing.
Standing: Stand with your feet hip-width apart. If you require balance, you may stick to a wall or chair.
Sitting: Set your feet down on the ground and sit in a chair.
With your heels firmly planted, raise your toes off the ground.
To raise your toes, concentrate on activating the muscles in the front of your shins.
For a few seconds, maintain the elevated posture. Lower your toes carefully to return to the starting position.
In sets of ten to fifteen, try to do this action two or three times.
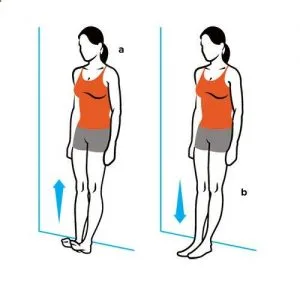
Clamshells
Fold your knees and hips to a 45-degree angle while lying on your side.
- Keep your legs on top of one another.
- Your head can be supported by a cushion or your lower arm.
- Throughout the workout, keep your feet together.
Tighten your abdominal muscles to maintain the stability of your spine.
Rotate your hip outward and steadily raise your top knee away from your bottom knee while keeping your feet together.
Do not turn your pelvis back.
Hold for a few seconds. In order to return to the starting position, gradually lower your knee.
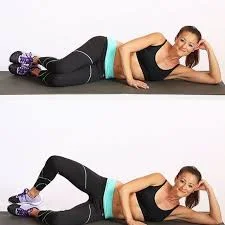
Side-Lying Leg Raises
On the floor or a mat, lie on your side.
Put your legs on top of one another and keep them straight.
For stability, hold your upper hand in front of you.e Movement:
In order to maintain your spine stable, tighten your abdominal muscles. Holding your upper leg in alignment with your upper torso, gradually raise it straight up.
Prevent your hips from turning back.
At the beginning of the movement, pause for a moment.
Lower your leg carefully to return to the beginning position.
Do 10–20 repetitions for each leg
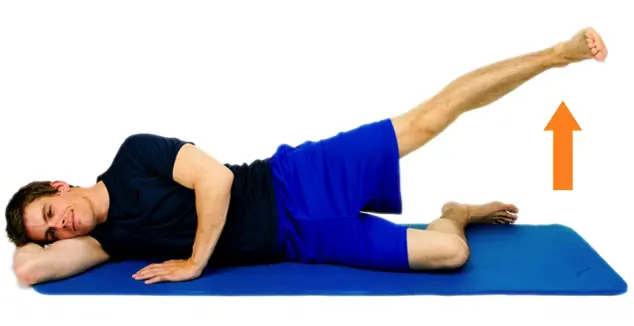
Hip Adduction
You should lie on your back on an appropriate surface.
Depending on the variant, you should either have your legs straight out or bend your knees.
You can provide support by placing your hands on both sides.
As you approach your body’s midline, slowly draw your legs together.
Feel the adductor muscles contract as you hold the position for a few seconds. Return your legs to the initial position slowly. Keep going until you’ve finished your required number of repetitions. Repeat on both legs for 15-20 repetitions.
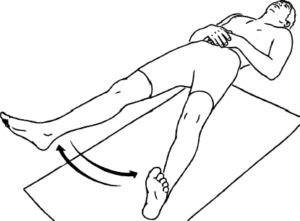
Prone leg raises
Lying face down on the floor or a yoga mat. Keeping your legs straight behind you and your toes pointing.
Squeeze your glutes and lower back. Slowly raise one leg straight up while keeping the knee straight. Avoid lifting your hips off the floor. Hold the position up for a few seconds. Drop your leg gently and carefully to return to the position you started in.
With the opposite leg, repeat the step.
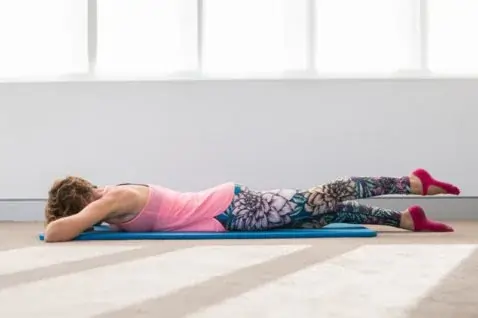
Bridging
Flex your knees while lying on your back and place your feet with your hips apart on the floor. Hold with your arms by your sides, palms down.
Make sure your spine is neutral, meaning it shouldn’t be too flattened or arched.
Activate Your Core:
As though preparing for a mild blow, tense your abdominal muscles.
Elevate Your Hips: To raise your hips off the ground, tighten your glutes and push through your heels.
Continue lifting until your knees and shoulders are parallel to each other.
Keep your back from arching too much.
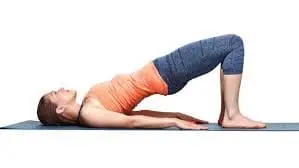
Monster walks
Put a resistance band on your ankles or knees.
Place yourself as shown in the picture.
Maintaining a straight back and an active core, lower yourself into a half squat position.
Lateral (Side-to-Side) Movement: While keeping the resistance band tight, take a large stride to the side.
Keep the band tight as you follow with your second foot.
After a certain number of steps, repeat this side-to-side motion, then turn around.
Moving Forward and Backward: While keeping the band pulled, go forward in little stages from the partial squat posture.
Then, while maintaining the band tight, take little steps backward.
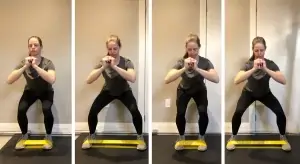
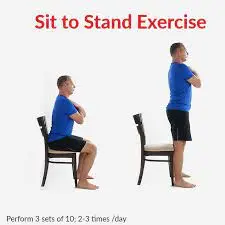
Sit-to-stand exercise
With your feet hip-width apart and flat on the floor, take a seat in a comfortable chair.
Place yourself close to the chair’s front edge.
You should have your knees bent around 90 degrees.
Bring your shoulders over your feet and lean forward a bit.
Use your leg muscles (hamstrings, glutes, and quadriceps) and core.
To stand up, straighten your legs and push through your heels.
As you rise to your complete standing posture, keep your balance.
To return to a sitting position, lower your body in a controlled manner while bending your knees gently.
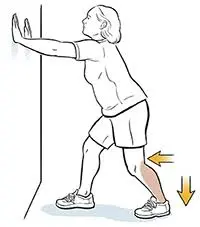
Calf wall stretch
Place your hands on the wall for support as you face the wall.
Make sure both feet are pointed forward and place one leg just behind the other.
Keep your heel firmly planted on the floor and the back leg straight.
Lean your hips and body toward the wall while slowly bending your front knee.
Your rear leg’s calf muscle should feel stretched.
Maintaining the Stretch:
For 15 to 30 seconds, hold the stretch.
On each leg, perform the stretch two to four times.
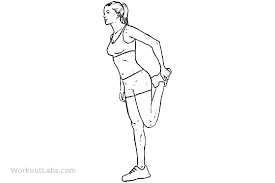
Standing quadriceps stretch
Place your feet shoulder-width apart and stand tall.
If necessary, you can use a chair or wall for balance.
The Stretch: Bring your heel up to your buttocks while bending one knee.
Using your same-side hand, reach back and grab your ankle or the top of your foot.
Feel a stretch in the front of your leg as you gently move your heel toward your buttock.
Make sure your knees are in line, and your thighs are near together.
Be careful not to arch your lower back and maintain a straight back.
Stretching for 15 to 30 seconds is known as holding the stretch.
Return to the starting position gradually.
Stretch the opposite leg as well.
On each leg, repeat two to four times.
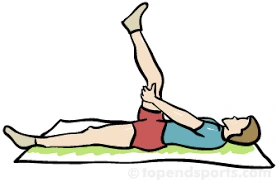
Supine Hamstring Stretch
- Lying on your back.
- Bring one knee up to your chest by straightening it.
- Put your hands on the back of your thigh.
- Push your heel toward the ceiling as you gradually straighten your knee.
- The back of your thigh should feel stretched.
- Stretching for 15 to 30 seconds is known as holding the stretch.
- Return to the starting position by slowly lowering your leg.
- On each leg, repeat two to four times.
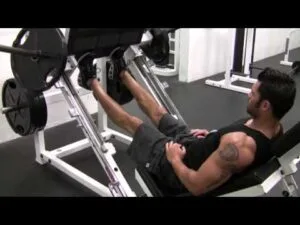
Leg Presses
For this workout, an elastic stretch band with a comfortable resistance is perfect. As the workout becomes easier, gradually increase the resistance level. Leg press workouts should not be performed with ankle weights. If you have access to a fitness center, you may also perform this exercise on a weight machine. A fitness assistant at your gym may provide you with safety advice on how to use the machines.
Position yourself comfortably on the leg press machine by adjusting the footplate and seat.
Make sure your feet are level and shoulder-width apart before placing them on the footplate.
For support, hold onto the handles.
Stretch your legs nearly to their maximum length and push the platform away.
At the top, don’t lock your knees.
Return to the beginning position by lowering the platform gradually.
Continue until the required number of repetitions is reached.
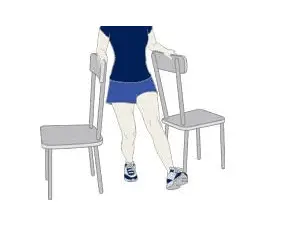
One-leg dip
Pick a low, solid platform, such as a box or sturdy step.
Place yourself close to the edge of the platform.
Extend one leg forward a little by lifting it off the platform.
With the supporting leg (the one on the platform) bent at the knee and hip, slowly lower it toward the floor.
Control the descent and aim for a light heel-to-floor contact.
To go back to the beginning position, push up through the supporting leg once again.
Buttocks bridges
The glutes are a group of muscles in the buttocks that affect knee movement. The glute bridge is a great workout that works them and other leg muscles.
- Lie on your back
- With your arms relaxed and far from your body, raise your hands.
- With your knees contracted, slowly raise your hips off the floor and push them upward as your body forms a straight line from your knees to your shoulders.
- Hold the position
- Then slowly lower.
- The right form is essential for the buttocks bridge exercise. Do not arch or circle your back. Keep your hips, knees, and feet in alignment.
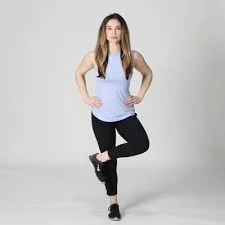
Figure four standing
- Start by placing your feet hip-width apart and standing tall.
- To aid with balance, locate a focus point in front of you.
- Creating “Figure 4”:
- Transfer your weight to your standing leg (the left leg will be used for this example).
- Put your right foot forward.
- To deepen the stretch, bend your left knee slowly, like reclining on a chair.
- Your right hip and glute should feel stretched.
- For extra balance, lay your hands on your hips or, for a prayer stance, bring them together in front of your chest.
- To extend the stretch, some people will additionally lightly press down on the bent right knee if they can. However, this needs to be handled carefully.
- Holding the Stretch: Continue holding the stretch for as long as it feels comfortable, usually 20 to 30 seconds.
- Throughout the stretch, keep your breathing constant.
- Repeat on the opposite side.
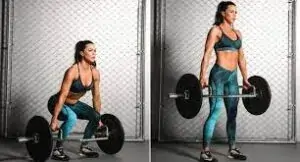
Deadlift
Your feet should be shoulder-width apart, with your toes pointed slightly outward.
Maintaining your weight on the front of your body, tighten your core and move your hips backwards as though you were tapping your butt against the wall behind you.
As you lower the weight toward the floor, slide it along the front of your tibia bone while keeping your back level. Continue until your hamstrings feel tight and/or your spine starts to round. Lastly, tense your glutes to thrust your hips forward. One rep.
Perform 10 repetitions in three sets.
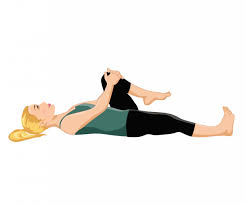
Knee-to-Chest Stretch
- On your back, lie down.
- Bring one knee up to your chest gently.
- Hold for 30 seconds.
- Repeat on the opposite side.
Cross-Legged Forward Fold
Your feet should be in line with your hips, your legs should be crossed, and your sit bones should be firmly planted in the ground.
With your shoulders relaxed and your back upright, take a deep breath and extend your spine.
Fold Forward: Release your breath and move your chest toward your legs by softly folding forward from your hips.
Pay attention to your breathing while holding the stance for as long as it feels comfortable.
Press yourself back up with your hands to slowly return to the starting position.
Repeat: Alternate how your legs are crossed and repeat the position.
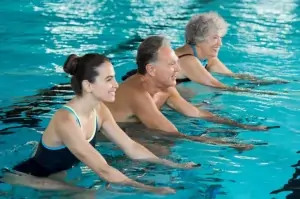
Swimming
Swimming is one of the finest exercises you can perform to rehabilitate your injured knees.
Finding a nearby pool is the first step in learning how to swim. Nowadays, many gyms and community centers offer lap swimming hours in addition to aqua-jogging and water aerobics programs.
Instruction in swimming
For those who have never swum before, private or group swimming instruction might be helpful. In order to maximize your workout, you will learn new strokes, breathing techniques, and other useful tips in lessons.
Walking
To start walking, all you’ll need is a pair of supportive shoes. Choose a route that will allow you to walk home. As an alternative, look for nice spots to take a walk in your area, such as a walkway or beach.
Getting a friend or family member to accompany you on your stroll and offer accountability is an additional choice. Another option is to make walking a regular part of your routine. Here are some ideas:
If you’re using a bus or train, get off one stop early and walk the rest of the way to work.
You need to park farther from your workplace and walk there and back.
If you find jogging annoying, consider walking instead of driving. You may complete your work and work out simultaneously.
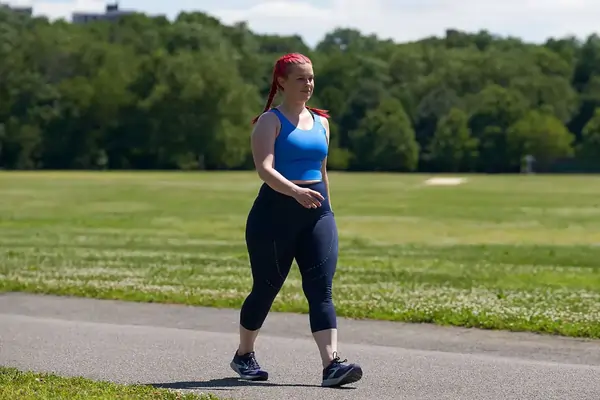
Tips for safe walking
Step into areas meant for pedestrian traffic. Look for well-lit areas if at all possible.
Put on supportive footwear with heel and arch support.
- Dress comfortably and loosely.
- Before and after your walk, make sure you drink enough water to keep hydrated.
- Use sunscreen to prevent sunburn.
Advantages of knee rehabilitation
Numerous advantages come with knee rehabilitation, which greatly enhances quality of life, particularly for people recovering from accidents or managing chronic medical conditions.
Pain Control: In order to reduce pain and suffering, rehabilitation programs frequently incorporate exercises and treatments that focus on the muscles and tissues around the knee.
The knee joint itself experiences less stress when supporting muscles are strengthened.
Inflammation can also be decreased with physical therapy.
Increased Range of Motion and Mobility: The goal of knee rehabilitation is to increase range of motion and flexibility so that people may carry out everyday tasks more easily.
The purpose of the exercises is to progressively improve the joint’s capacity for rotation, bending, and straightening.
Decreased Chance of Further Injuries: Rehab reduces the chance of further injuries by strengthening the knee and enhancing stability.
In addition, appropriate rehabilitation teaches people how to prevent injuries and maintain good body mechanics.
Reduced Dependency on Drugs: People may be able to lessen their dependency on painkillers with successful recovery.
By doing this, possible negative consequences and long-term reliance may be avoided.
Better Recuperation After Surgery: For those who have had knee surgery, rehabilitation is crucial to a full recovery.
It aids in healing, reducing swelling, and regaining strength and mobility.
Enhancement of Proprioception and Balance:
The capacity of your body to sense its location in space is known as proprioception. Surgery and knee injuries can harm this. Rehabilitative activities aid in regaining this and enhance balance, both of which are critical for averting falls in the future.
Cooling down and warming up:
Warm-up: To improve blood flow to your muscles and get your joints ready for exercise, start with a mild warm-up that includes walking, cycling, or moderate stretching.
An effective warm-up lowers the risk of injury and improves flexibility.
Cool-down: To increase flexibility and lessen muscular tightness after working out, stretch gently.
Choosing the Right Exercise: Low-impact Exercises: Select low-impact activities like walking, cycling, swimming, or aerobic training to reduce the strain on your knees.
Progressive Loading: Increase the length and intensity of your workouts gradually. Don’t push yourself too quickly or too hard.
When using weights in workouts, start with very small weights and gradually increase them.
Pay Attention to Your Body: Observe the cues from your body. If you feel any severe pain or discomfort, stop working out right away.
Encouragement: Proper Footwear: Put on stable, supportive shoes with adequate padding.
Appropriate Surfaces: To reduce knee strain, work out on smooth, soft surfaces. Steer clear of concrete and other hard surfaces when working out.
How to care for your knee following rehabilitation?
Continued Exercise and Strengthening:
- Maintain your exercise routine:
- Even after formal rehabilitation ends, continue the exercises prescribed by your physical therapist.
- Gradually increase the intensity and duration of exercises as your knee gets stronger.
- Focus on key muscle groups:
- Quadriceps, hamstrings, and calf muscles are vital for knee support.
- Include exercises that strengthen these muscles.
- Low-impact activities:
- Engage in activities like swimming, cycling, or walking, which are gentle on the knee.
Controlling Pain and Swelling:
Ice: Several times a day, especially after an exercise, apply ice packs to your knee for 15 to 20 minutes at a time.
Elevation: To lessen swelling, raise your leg over your heart.
Painkillers: Whether using prescription or over-the-counter painkillers, take them as directed by your doctor.
Keep Your Knee Safe:
Avoid high-impact exercises: Until your physician or physical therapist gives the all-clear, refrain from exercises that overstress your knee, such as jogging or jumping.
Put on supportive footwear: Pick footwear that offers adequate cushioning and arch support.
Keep your weight within a reasonable range since carrying too much weight strains your knees.
Pay attention to how you move: Do not pivot or twist on your knee.
To avoid falls, be mindful of uneven surfaces.
Assistance Devices: Follow instructions if your physician or physical therapist has suggested using a cane or other assistance device.
Aftercare:
Keep your follow-up appointments:
To track your progress and treat any issues, you must see your doctor or physical therapist on a regular basis.
Talk to your healthcare professional:
Give your doctor or physical therapist a call right away if you suffer from any worsening pain, edema, or other symptoms.
Changes in Lifestyle:
Change the things you do every day:
Reduce the amount of strain on your knee by making changes to your home and workplace.
Pay attention to your body: Avoid overworking yourself. Take breaks as necessary.
FAQs
How often should you do knee exercises?
A physiotherapist may be able to provide you with further details on the frequency of these workouts. This is due to the fact that it depends on your particular circumstances and knee health. However, to help with muscle development, it is recommended that people exercise at least twice a week.
Why are exercises for knee rehabilitation important?
They help you to resume your regular activities by strengthening the knee’s surrounding muscles, increasing flexibility, easing discomfort, and restoring function.
What is the duration of knee rehabilitation?
Recovery times vary widely. Depending on how serious the injury or ailment is and how well you follow the workout protocol, it might take anything from a few weeks to several months.
Can I perform activities for knee rehabilitation at home?
Yes, you may perform a lot of knee rehabilitation activities at home. To make sure you’re doing things correctly, it’s essential to have first advice from a physical therapist.
What if my knees are in pain when I’m doing rehabilitation exercises?
While some little discomfort is normal, severe or worsening pain is not.
As soon as possible, stop the workout and speak with your doctor or physical therapist.
References:
- Altius. (2026). Easy Knee Rehabilitation Exercises To Do At Home – Altius Group. Altius. https://altius.au/news-and-research/easy-knee-rehabilitation-exercises-you-can-do-at-home
- (2026). Exercises for knee muscle and joint problems. NHS inform. https://www.nhsinform.scot/illnesses-and-conditions/muscle-bone-and-joints/leg-and-foot-problems-and-conditions/exercises-for-knee-problems/
- (2025). Knee rehabilitation exercises and information – United Lincolnshire Hospitals. United Lincolnshire Hospitals. https://www.ulh.nhs.uk/patients/patient-information-library/knee-rehabilitation-exercises-and-information/
- Sara Lindberg. (2024). 10 Visuals of Exercises to Help Relieve Knee Pain. Healthline Media. https://www.healthline.com/health/exercises-for-knee-pain