Blog

  • Spinal Decompression Therapy

    Spinal Decompression Therapy

    Spinal Decompression: What Is It?

    Spinal decompression therapy is used to relieve pressure on the spinal discs and nerves. It involves gently stretching the spine, which creates negative pressure within the discs, allowing bulging or herniated discs to retract and promoting the flow of oxygen, water, and nutrient-rich fluids into the discs. This process can help alleviate pain associated with conditions such as sciatica, herniated discs, and degenerative disc disease.

    A common injury is compression of the spinal nerve roots. However, compression can also impact your knees, hips, and other joints where nerves and muscles come together. Accordingly, compression may result in excruciating pain that makes it difficult to sit and stand, among other everyday tasks.

    The decompression process therapy often relieves nerve discomfort without surgery, reducing risks and speeding up recovery. Numerous factors, such as inflammation, trauma, aging, and bone loss around your joints, can cause nerves to become pinched.

    Through the process of creating these spaces, decompression therapy releases pressure on spinal nerve roots that pass through your spine and knees, among other places. To prevent excruciating or incapacitating pain, this can also help realign joints and cure slipped discs.

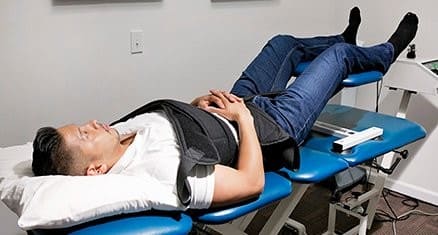
    Spinal compression therapy can be administered with the use of mechanical traction. Traction is mostly applied by chiropractors or physiotherapists.

    Traction devices, often known as nonsurgical spinal decompression (NSD) therapy, are another popular form of treatmentTrusted Source. By using a sensitive computerized feedback system, these devices essentially decompress the spinal nerve roots through a technique known as segmental distraction, which is essentially a more sophisticated type of mechanical traction.

    Different Spinal Decompression Traction Therapy Types:

    There are two types of spinal decompression therapy: nonsurgical and surgical. By gently stretching the spine and encouraging nerve health and repair, motorized tractions are used in non-surgical spinal decompression therapy to relieve back and neck discomfort. Degenerative disc disease, damaged spinal nerve roots, and worn-out spinal joints can all be treated with it.

    In contrast, surgical spinal decompression entails the removal or repositioning of painful growths in the spine by techniques such as osteophyte removal, laminotomy, foraminotomy, corpectomy, and discectomy.

    • Discectomy: Also referred to as an endoscopic percutaneous disc removal, this treatment relieves pressure on a spinal disc by removing a part of it.
    • A laminotomy is a sort of surgery where the lamina, which makes up the vertebrae arch, is sliced away to enlarge the spinal canal and remove any potential osteophytes (bone forms) along the spine.
    • Like a laminotomy, a laminectomy involves removing the entire lamina.
    • Foraminotomy: To make greater space around the opening of a nerve root in your spinal column, this treatment includes removing bone and connective tissue.
    • During a corpectomy, some or all of the vertebrae are removed, along with any required discs that divide them.

    How would one go about determining whether they require decompression therapy?

    Decompression therapy is not usually the first choice for treating nerve discomfort caused by compression.

    In cases of mild or transient compressed nerve discomfort, a physician might advise:

    • putting the affected region to rest
    • using heat or ice frequently
    • using OTC (over-the-counter) painkillers
    • employing at-home pain management methods, like stretching
    • putting on a brace to stop more discomfort or damage

    In case these therapies prove ineffective, a physician might suggest decompression therapy.

    Decompression therapy may also be necessary if you suffer from any of the following medical problems that cause nerve compression:

    • inflammation or autoimmune conditions like Ehlers-Danlos syndrome (EDS) can cause recurrent bulging or sliding discs.
    • conditions are known as degenerative disc disorders, which promote the degeneration of the spinal discs.
    • Radiculopathy or any spinal nerve root problem.
    • A condition known as sciatica causes excruciating pain in the legs, buttocks, and lower back.
    • The condition known as spinal stenosis causes your spine’s nerve-encircling gaps to narrow, which results in back pain.

    Spinal Decompression Traction Therapy Advantages:

    Spinal decompression traction therapy is an effective treatment for a variety of lower back pain disorders. Most patients find it simple to decide whether they want this treatment because there is no danger involved. Among the main advantages of undergoing this therapy are:

    Intradiscal pressure becomes negative with regular therapy. Repositioning the misaligned, ruptured, or bulging disc becomes easier to handle and less painful as the pressure on the spinal discs decreases.

    Important nutrients are also made available to the spinal discs by the decrease of intradiscal pressure. After consistent therapy, their health gets better.

    Ligaments, tendons, and muscles all stretch and become more pliable and loose.

    As the gel nucleus is drawn towards the centers of the bulging discs with consistent therapy, the discs restore their place.

    The neuron exits the spinal system through larger tubes. As a result, nerves receive more blood and oxygen.

    Patients are taught the detrimental effects of gravity and bad posture on the spinal joints.

    This therapy is administered after spine surgery to a large number of individuals. Experts in spinal decompression can assist any patient, even those who have had unsuccessful back procedures. People must speak with medical experts to find out if they are eligible for this therapy, though.

    Spinal Decompression Traction Therapy Hazards:

    All things considered, this therapeutic approach is secure and cozy. Never do patients leave the doctor feeling worse off than when they arrived. When administering this therapy, expert physicians adhere to the “DRS protocol” (Decompression, Reduction, and Stabilisation). The majority of people who receive this therapy do not have any unfavorable side effects or consequences. A common “risk” associated with this therapy is experiencing body aches or pain.

    This is because the body feels a little dull for a few weeks while it adjusts to stretching and decompressing. Your muscles will be stretched in unfamiliar directions throughout this therapy. As a result, patients experience mild discomfort for a few days. Fortunately, most patients report feeling at least 50% improvement after dealing with this minor pain.

    In which cases is traction therapy for spinal decompression not the best option for you?

    There are certain situations in which this kind of decompression therapy is not suitable:

    • individuals with spondylolisthesis and osteoporosis.
    • those who already have tumors or spinal infections.
    • Patients with ankylosing spondylitis.
    • Individuals who take blood thinner drugs.
    • pregnant women because this therapy puts much pressure on their abdomens.
    • Individuals who have chronic problems with spinal instability (such as osteoporosis).
    • Individuals who recently underwent metal plate implants or spinal surgery

    It is not simply these people who can benefit from this therapy. However, it is essential to speak with a doctor beforehand.

    Which examinations establish the extent of the damage?

    • Bone scans: An imaging test to find infections, tumors, or bone fractures. Your doctor prescribes a bone scan to identify the cause of your back pain.
    • Diskography: A dye that appears on X-rays and other images is injected into your back by your healthcare professional. Diskography can display any disc damage.
    • Electrical tests: To examine the electrical activity in your muscles and nerves, your doctor prescribes electromyography. The speed at which electrical signals travel from your nerve to your brain is measured in an evoked potential examination. The function of your nerves is examined by the nerve conduction velocity test (NCV).
    • Diagnostics scanning: Your medical professional will use imaging techniques to provide “pictures” of the internal workings of your body. These pictures might help you figure out what’s hurting. X-rays, CT scans, and magnetic resonance imaging (MRI) are examples of specific imaging.

    Procedures to Follow Before Beginning Spinal Decompression Traction Therapy:

    The following actions can help you become ready for this kind of therapy:

    Be Aware: You’ll receive anything from 15 to 30 treatments. A treatment takes thirty to forty-five minutes. Patients begin to experience transformations after four to six weeks.

    Wearing a Harness: Patients need to wear customized harnesses for them to receive optimum decompression. Safety switches are included with these harnesses. In case they feel uncomfortable throughout the therapy, they can press the switch to stop it.

    Health: On the day of the therapy, hydrate well with water. To improve strength and mobility following therapy, work out at home.

    What should I expect following a session of spinal decompression traction therapy?

    After 12 to 20 sessions of this therapy, the majority of patients report getting remarkable improvement in their pain and symptoms. Following this therapy, they have greater motivation to exercise and move around more. There aren’t any noteworthy “recovery periods.” More visits are necessary for certain conditions. Patients’ conditions, however, never worsen.

    The following advice will help you recover from this therapy successfully:

    • Follow the post-treatment care recommendations in the letter.
    • Remain active, but steer clear of strenuous activities.
    • Keep your posture straight all day.
    • Yoga and stretching exercises might help you become more flexible and reduce tension.
    • Eat a nutritious diet along with plenty of water.

    Conclusion

    When severe or chronic pain from compressed nerves interferes with your daily life, decompression therapy is thought to be a useful treatment.

    If you experience excruciating pain in your lower back, hips, knees, or spine that does not improve with at-home remedies or other therapies, make an appointment with a physician or chiropractor

    FAQs

    How long does it take for results from spinal decompression traction therapy to manifest?

    The degree of the ailment, how long it has been there, and general health all affect the results of spinal decompression traction therapy. It may take a few sessions or several weeks/months to notice any improvement. After multiple sessions, the majority of patients report improved mobility and a reduction in symptoms.

    Is Traction Therapy for Spinal Decompression Safe?

    Spinal decompression traction therapy is generally regarded as a safe procedure by a skilled healthcare expert. However, there are some hazards associated with any medical treatment, such as increased pain, muscular spasms, and nerve damage. Individuals suffering from specific medical disorders, such as severe osteoporosis or spinal fractures, might not be suitable candidates for spinal decompression therapy.

    Does Traction Therapy for Spinal Decompression Cause Pain?

    For spinal decompression, traction therapy typically causes little pain. During the procedure, patients lie on a table as a specialized gadget gradually stretches their spines, giving them a little pulling or stretching sensation. After treatment, patients may feel some moderate pain or discomfort, but this normally goes away in a few hours. On the other hand, patients should get in touch with their healthcare professional right away if they have severe or persistent discomfort during or after therapy.

    How long is a session of spinal decompression traction therapy?

    Depending on the type and severity of treatment needed, the length of the sessions might range from thirty minutes to an hour. It is essential to negotiate the length of each session with a skilled healthcare expert to get the greatest possible outcomes.

    Spinal decompression therapy: what is it?

    A form of traction therapy called spinal decompression is performed on the spine to provide several potential advantages, such as: Encouraging the herniated or bulging disc material to retract or realign, creating a negative intradiscal pressure.

    Who wouldn’t benefit from spinal decompression?

    Spinal decompression is not a recommended course of action if you have spinal implants, a tumor, a fracture, or are pregnant.

    References

    • Professional, C. C. M. (n.d.-b). Spinal Decompression Therapy. Cleveland Clinic. https://my.clevelandclinic.org/health/treatments/10874-spinal-decompression-therapy
    • Physiotattva. (n.d.-a). Effective Spinal Decompression Traction Therapy at Physiotattva. PhysioTattva. https://www.physiotattva.com/therapies/spinal-decompression-traction-therapy
    • Jewell, T. (2022, December 2). Decompression Therapy: What You Should Know About This Technique. Healthline. https://www.healthline.com/health/decompression-therapy#takeaway
  • VMO Activation Exercises

    VMO Activation Exercises

    What is a VMO Activation Exercise?

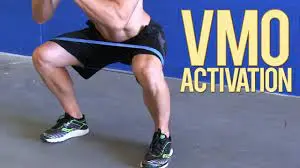
    VMO (Vastus Medialis Oblique) activation exercises are essential for strengthening a crucial part of the quadriceps muscle group located on the inner side of the thigh. The VMO plays a vital role in stabilizing the knee joint and maintaining proper alignment of the patella (kneecap).

    Maintaining knee joint stability and regulating the patella’s (kneecap) tracking is essential. For knee stability and the prevention or treatment of knee injuries such as patellofemoral pain syndrome, proper activation of the VMO is crucial.

    Exercises designed specifically to target and isolate the VMO are necessary to activate it. These workouts aim to strengthen the VMO and improve neuromuscular control. It’s significant to remember that VMO activation exercises are frequently included in knee injury rehabilitation programs. Still, they can also help people who want to enhance their general knee stability and function.

    What is the VMO?

    Whether the VMO is a part of the Vastus Medialis or a distinct muscle is a matter of debate among anatomists.

    The muscles in the front leg that stretch the knee are called quadriceps. The muscles converge at the quad tendon, which is connected to the patella or knee cap.

    These four muscles comprise the quadriceps:

    • Vastus Medialis
    • Vastus Lateralis
    • Vastus Intermedius
    • Rectus Femoris

    The VMO is the lower part of the Vastus Medialis that slopes downhill into the knee cap.

    • Origin of the VMO: The bone in the thigh, or the medial aspect of the fibula
    • Insertion: Quadriceps tendon near the knee
    • Artery: Femoral artery
    • NerveFemoral nerve
    • Actions: Knee extension (straightening the knee)

    Function: Apart from knee extension, VMO is essential for correct knee-cap tracking. The quadriceps contract and pull on their insertion sites at the patella, which causes the knee cap to track higher in the femoral groove. The patella should move smoothly and upward through the femoral groove at the same time as the quadriceps contracts properly.. Unfortunately, several maladaptations within the system may prevent the patella’s smooth upward pull.

    Clinical Significance: During bouts of acute inflammation, the knee joint capsule often expands and fills with fluid. This insufficiency may lead to secondary issues, such as biomechanical imbalances caused by tight or weak structures. Poor patella tracking is an excellent illustration of this. This highlights how important it is to reduce joint edema in the aftermath of recent trauma. Minimize swelling to avoid problems later on in your recovery by keeping the VMO muscle from weakening or atrophying.

    What Happens When the VMO Is Weak?

    There are two possible causes of abnormal patella tracking at the knee: weakness or diminished VMO activation.

    As the quadriceps contracts correctly and in the correct sequence, the patella, which is located at the knee’s end of the femur, is balanced in the middle of the groove. Because of this, the knee may bend and straighten as the knee cap moves smoothly up and down.

    When the VMO is weak, the other quadriceps muscles force the knee cap out of its groove. The lateral or outside patellofemoral joint region may experience severe wear and tear resulting in friction of the joint surfaces.

    What makes the VMO weak?

    The VMO gets weaker when it stops activating as much. This usually happens when there is knee pain or swelling.

    When there is swelling inside the knee joint capsule, the brain may decide to stop the quadriceps from performing their normal function. The way the four muscles of the quadriceps contract or fire may be affected by this. The VMO weakens and atrophy as a result.

    How Do You Make the VMO Strong?

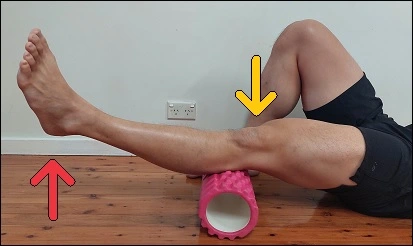
    Exercises designed to increase VMO strength can help the VMO grow stronger. Usually, it has to be activated by isometric movements and attention.

    How to work your VMO:

    VMO Activation

    VMO Activation
    VMO Activation
    • The VMO muscle must be able to be felt and used.
    • This contraction is necessary for every workout that is outlined in this blog post.
    • Instructions
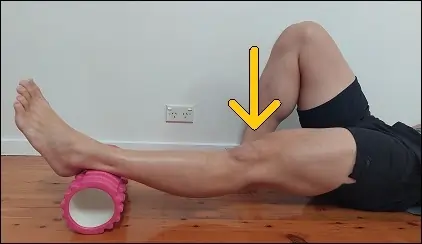
    • On the ground, lie down.
    • Under your ankle, position a foam roller.
    • Allow your leg to roll outward, causing your foot and knee to slightly lean outward.
    • Try to successfully contract the VMO muscle in the lower/inner thigh area.
    • Feel the contraction in the VMO muscle by placing your palm over it.
    • Hold on for five seconds.
    • Ten to twenty times over.

    Knee Push Down (Sitting)

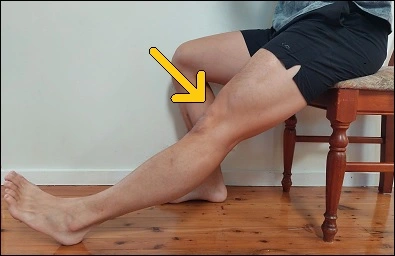
    • Instructions:
      • Sit on the edge of a chair.
      • Straighten your leg in front of you.
      • Ensure that your knee and foot are pointing out.
      • Place your heel firmly on the floor.
      • Drive down your knee forcefully, as far as it is comfortable for you.
      • Give it a five-second hold.
      • Repeat 10 to 20 times.
    Knee Push Down (Sitting)
    Knee Push Down (Sitting)

    Straight Leg Raise

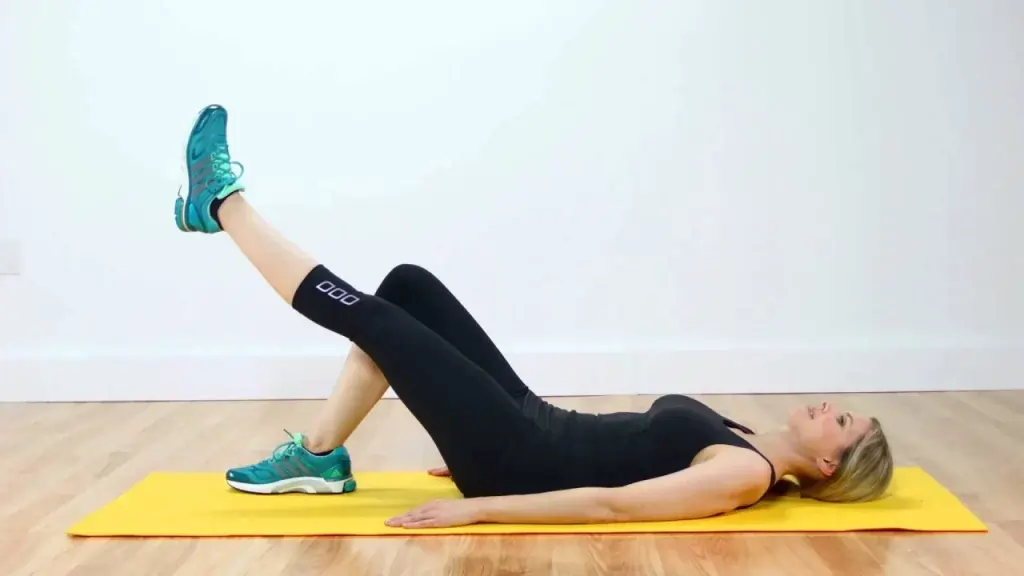
    • Instructions:
      • squatting on the ground
      • Use your knee to press it down.
      • Throughout this exercise, maintain a straight knee lock position.
      • Stretch your leg a little bit outside of your body.
      • Lift one leg a small distance.
      • Perform twenty iterations.
      • Use an ankle weight to ascend.
    Straight-leg-raise
    Straight-leg-raise-

    Terminal Knee Extension

    • Instructions:
      • On the ground, lie down.
      • Under your knee, position a foam roller.
      • Turn your leg outward.
      • Grab the foam roller with your knee.
      • You lift your foot off the ground.
      • Give it a five-second hold.
      • 20 times, repeat.
      • Climb up by putting on some ankle weight.
    Terminal Knee Extension
    Terminal Knee Extension

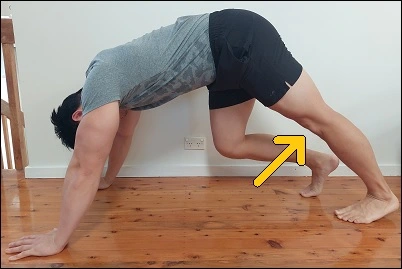
    Modified Plank

    • Instructions:
      • Assume the above-mentioned role.
      • Set your knee straight.
      • Give it a five-second hold.
      • 20 times, repeat.
      • Make progress by doing this workout with just one leg.
    Modified Plank
    Modified Plank

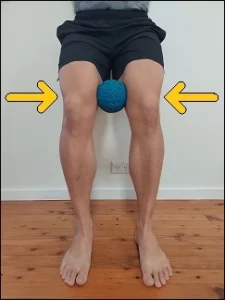
    Squat with a Ball Squeeze

    • Instructions:
      • When standing, maintain a shoulder-width distance between your feet.
      • Place a ball between your knees.
      • Squeeze the ball with your inner knees the entire time you perform this exercise.
      • Perform a low squat.
      • Try to feel the VMO muscle contracting hard during the workout.
      • Perform twenty iterations.
      • Progress: Hold on to the weights.
    Squat with a Ball Squeeze
    Squat with a Ball Squeeze

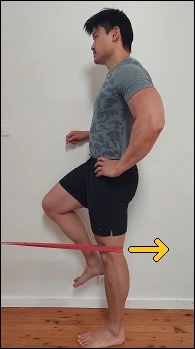
    Knee Extension Against Resistance Band

    • Instructions:
      • Using a resistance band, apply pressure on the rear of your knee.
      • Step back while applying a lot of stress on the band.
      • Hold on to something for balance.
      • Extend the leg on the other side.
      • Against the band’s resistance, straighten your leg.
      • Give it a five-second hold.
      • Repeat 20 times.
    Knee Extension Against Resistance Band
    Knee Extension Against Resistance Band

    More advanced VMO exercises:

    It is recommended to use the VMO at various knee angles.

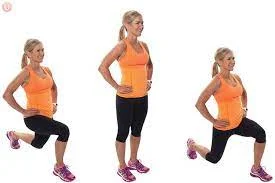
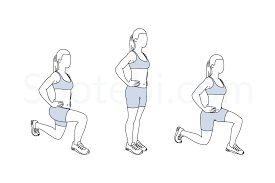
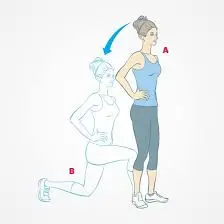
    Forward Lunge

    • Instructions:
      • Step by step, please.
      • Make a lunge forward.
      • Push your knees forward as much as you can without allowing them to click.
      • If you can, offer to provide a hand with the tasks.
      • Perform twenty iterations.
      • Progression: Provide additional space for the knee to move.
      • Reduce the amount of support your arms are giving you little by little.
    Forward Lunge
    Forward Lunge

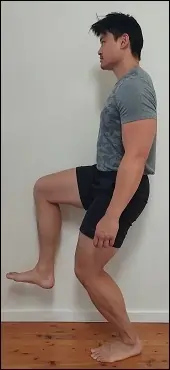
    Single-Leg Mini Squat

    • Instructions:
      • Get into an upright posture.
      • Hold on to something for balance.
      • Assume a single-leg position.
      • Perform a brief squat.
      • Attempt to feel a strong flex in the VMO muscle.
      • Perform twenty iterations.
      • Advancement: Cling to the weights.
    Single-Leg Mini Squat
    Single-Leg Mini Squat

    Backwards Walking

    • Instructions:
      • Make your way back the way you came and up a little hill.
      • Analyze your perception of the VMO contraction.
      • Continue for a full minute more.
      • Advancement: Cling to the weights.

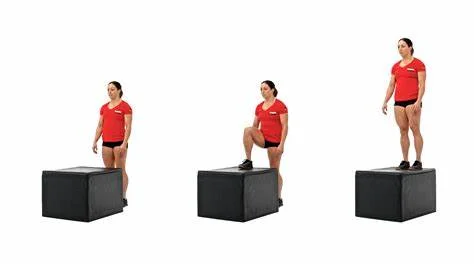
    Step up

    • Instructions:
      • Take a step on a step.
      • The entire time you should be standing on the foot.
      • Step onto the step without going any farther.
      • Stretch your leg to its maximum length.
      • Feel how your quadriceps are tense.
      • Repeat 20 times.
      • (You can use anything to help you stay balanced if needed.)
    step-ups
    step-ups

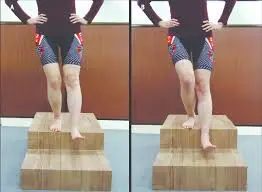
    Step down

    • Instructions:
      • Place yourself upon a step.
      • Grab hold of anything that is motionless for support.
      • Slowly extend your other foot to touch the ground.
      • Return to the starting point.
      • Perform twenty iterations.
      • Progress: Go slowly through the exercise.
      • Go a step beyond.
      • Cut back on the quantity of arms assistance you employ.
    Forward-Step-Downs
    Forward-Step-Downs

    Can you isolate the VMO for strength training?

    Although there has been a lot of discussion on this topic, the VMO cannot be isolated on its own. The brain also sends a contraction signal to the remaining muscles.

    When the quadriceps are tightened, there are methods to improve and increase the VMO’s efficiency. This comprises:

    • Manual Biofeedback: Try pressing your fingers against the VMO to see if the muscle contracts firmly.
    • Electrical Biofeedback: The user of this gadget can choose to tighten their muscles more to detect a stronger signal by measuring the electrical activity in their muscles. Muscle contractions typically result in the production of lights or sounds.
    • Electrical Stimulation: A muscle contracts as a result of an electrical impulse brought on by electrical stimulation. It does not take the place of a standard self-activated contraction but rather provides sensory input to the brain to assist it in becoming more aware and efficient while performing VMO contractions.

    Will VMO strength exercises fix knee pain?

    Increasing the activity of the VMO can often alleviate knee soreness. The VMO can assist in reestablishing normal knee mechanics and stabilizing the position of the knee cap.

    However, there are other potential causes of lateral patellofemoral discomfort than the VMO. Additional reasons consist of:

    • The state of being extremely prickly (Genu Valgum)
    • Syndrome of Gluteus Medius IT Band Weakness/Tightness
    • Both of these issues have an impact on the normal mechanics of the patellofemoral joint and may contribute to knee discomfort and dysfunction.

    The Gluteus Medius can be strengthened to help with some types of knee soreness.

    Conclusion

    The knee muscle known as the Vastus Medialis Oblique, or VMO for short, is an important muscle that aids in strength, control, and stability.

    Where is VMO most active?

    The most active phase of the VMO occurs in the final thirty degrees of knee extension. In most cases, prophylactic bracing lowers the chance of harm to the protected joint. The patella functions as a pulley for the large muscle that produces force and extends the knee.

    What happens if your VMO is weak?

    This weakening of the VMO muscles may result in “patellar maltracking”. Because the patella does not track correctly in the groove of your tibia (shin bone) or femur (thigh bone), this suggests that your knee cap is not positioned properly.

    What are the symptoms of a weak VMO?

    Foot pronation, or favoring of one side of the foot over the other, knee soreness, and difficulty walking or executing exercises like lunges and squats are signs of a weak VMO muscle.

    Does cycling build VMO?

    Foot pronation, or favoring of one side of the foot over the other, knee soreness, and difficulty walking or executing exercises like lunges and squats are signs of a weak VMO muscle.

    Why is the VMO so important?

    VMO runs obliquely and helps with the patella’s medial translation, whereas it runs more longitudinally and contributes more to knee extension. By exerting a sufficient and medially focused forward force, the VMO lessens the strain on the patellofemoral joint.

    References:

    • Vaghela, M. (2023a, December 13). VMO Activation Exercises for Knee Stability and Performance. Mobile Physiotherapy Clinic. https://mobilephysiotherapyclinic.in/vmo-activation-exercises/
    • Vastus Medialis Exercises: Strengthen & Stabilize VMO. (n.d.). Knee-Pain-Explained.com. https://www.knee-pain-explained.com/vastus-medialis-exercises.html
    • Mark. (2024, June 24). 12 VMO Exercises To Strengthen Your knee. Posture Direct. https://www.posturedirect.com/vmo-exercises/

  • Bicipital Groove

    Bicipital Groove

    Bicipital Groove Anatomy

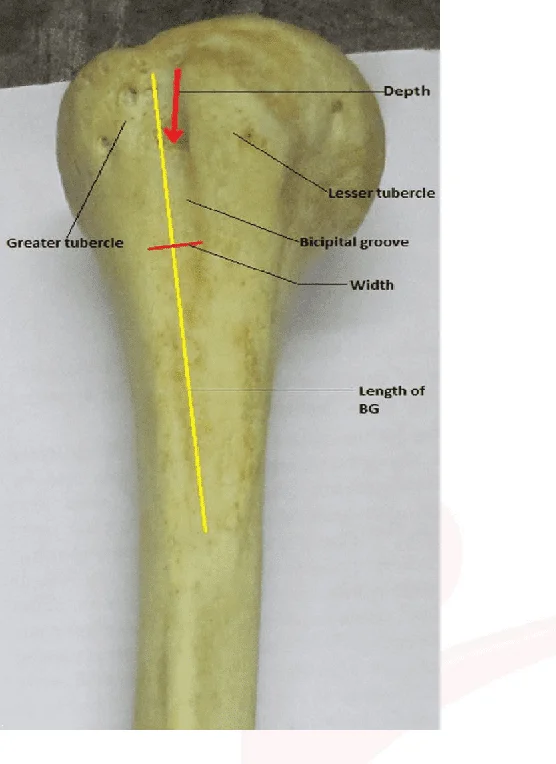
    The Bicipital Groove, also known as the intertubercular groove or sulcus, is an anatomical structure present in the humerus bone of the upper arm. Situated on the front (front) aspect of the bone, the bicipital groove performs a key function in accommodating and protecting the long head of the biceps brachii muscular tendon as it passes from the shoulder to the elbow.

    This specific groove helps to preserve the stability and appropriate functioning of the biceps tendon, allowing for smooth movement of the arm and effective transfer of muscle forces. Understanding the structure and significance of the bicipital groove is fundamental in the study of human anatomy, particularly for comprehending the mechanics of the upper limb and the interactions between bones, muscles, and tendons.

    It is most convenient to evaluate the bicipital groove along the humerus from behind the patient. Palpate inferiorly from the acromion to identify the bigger tuberosity on one side. Hold one hand at this level while using the other to rotate the arm at the shoulder externally.

    Palpating the groove lightly is done since applying too much pressure would hurt. If the long head of the biceps is affected by bicipital tendonitis, even gentle palpation may cause pain.

    The bicipital groove separates the larger and smaller tubercles. 4-6 mm in depth, 1 cm in width, and 8 cm in length are typical measurements for people. The teres major tendons on the medial lip and the pectoralis major tendons on the lateral lip are where the long Biceps brachii tendon is lodged. Also, the anterior humeral circumflex artery branches off at the shoulder joint. Insertion of the teres major muscle occurs on the medial lip of this groove.

    It curves downward and terminates close to the point where the top layer of the bone joins the middle third. It is the axilla’s lateral wall.

    Attachments of Bicipital Groove

    Musculotendinous

    The following three tendons are inserted in the bicipital groove:

    • Pectoralis major, lateral lip;
    • latissimus dorsi, floor
    • teres major on the medial lip

    Relations and Boundaries:

    The bicipital groove is located on the anterior surface of the proximal humerus and has the following boundaries:

    • Transverse humeral ligament superiorly
    • Laterally: the humerus’s increased tuberosity
    • Medially: the humerus has reduced tuberosity.

    Function

    The transverse humeral ligament and the muscular fibers that extend from it stabilize and facilitate the tendon of the long head of the biceps brachi muscle in this groove, preventing subluxation during multidirectional biomechanical movements of the arms. Furthermore, the main biomechanical motions of the biceps brachi muscle, whose tendon is situated in the bicipital groove, are supination, flexion, and screwing.

    Clinical Significance

    • Biceps tendon dislocation in the long head
    • Tear in the pectoralis major
    • Injured latissimus dorsi

    FAQs

    A bicipital groove injection: what is it?

    Corticosteroids are injected into the tendon during a bicipital tendon injection to reduce inflammation and pain. Steroids are useful medications that reduce inflammation. It works well to relieve symptoms that last longer than four weeks.

    In an MRI, what is the bicipital groove?

    Usually, the bicipital groove is between 4 and 6 mm deep 1. It has the tendon of the long head of the biceps brachii muscle, which is covered in the glenohumeral joint’s synovial reflection.

    What is the bicipital groove landmark?

    Due to its presence in preoperative imaging as well as in the operating field, the bicipital groove has the potential to serve as a reference landmark for precise humeral version reproduction in shoulder arthroplasty.

    How are bicipital grooves located?

    Palpate inferiorly from the acromion to identify the bigger tuberosity on one side.

    What role does the bicipital groove have in medicine?

    Bicipital groove pathology may be the source of anterior shoulder pain. Several studies evaluating different methods of treating the long-head biceps tendon (LHBT) have not revealed any clinically significant changes.

    Why is the name of the bicipital groove given?

    The bicipital groove, a deep groove on the humerus also referred to as the intertubercular groove or sulcus intertubercular, separates the greater and lesser tubercles. It allows the long tendon of the biceps brachii muscle to pass through. To the left is Humerus.

    Which anatomical structure occupies the bicipital groove?

    The bicipital groove (BG), a hollow created between the greater and lesser humeral tubercles, is home to the ascending branch of the circumflex humeral artery and the long head of the biceps brachii tendon (LHBBT).

    In which direction does the bicipital groove nerve pass?

    The lateral bicipital groove, which is evident on the lateral aspect of the upper arm, is formed by the same anatomical elements that generate the medial groove. The structures that comprise the medial bicipital grove include the brachial artery, brachial vein, ulnar nerve, and median nerve.

    To which muscles does the bicipital groove attach?

    Three muscle tendons are inserted in the bicipital groove area:
    Pectoralis major: the lateral lip, located on the crest of the greater tuberosity.
    Latissimus Dorsi: the ground
    The medial lip, or the top of the lesser tuberosity, is Teres major.

    Bicipital groove: what is it?

    The bicipital groove (BG) is a depression on the anterior aspect of the proximal section of the humerus. The tendon of the long head of the biceps brachi muscle, which is covered in a synovial sheath, and the ascending branch of the anterior circumflex humeral artery.

    How is the bicipital groove located?

    Put your ring finger on the other tubercle and your index finger on the first tubercle. To palpate the bicipital groove, insert the middle finger of the same hand between the other two fingers. This groove contains the tendon of the long head of the biceps brachii.

    Bicipital grooves: where are they found?

    the nearest humerus
    The tendon of the long head of the biceps brachii muscle is located in the bicipital groove, an indentation that runs along the anterior portion of the proximal humerus.

    The bicipital groove contains which ligaments?

    The lengthy head of the biceps tendon really fuses with the shoulder joint’s lining as it passes well inside the joint.

    References

    • Physiotherapist, N. P. (2024, January 14). Bicipital Groove – Anatomy, Attachments, Function. Mobile Physiotherapy Clinic. https://mobilephysiotherapyclinic.in/bicipital-groove/
    • Bicipital groove (examination). (2018, January 1). https://gpnotebook.com/pages/musculoskeletal-medicine/bicipital-tendinitis/bicipital-groove-examination
  • Hamstring Strain

    Hamstring Strain

    What is Hamstring Strain?

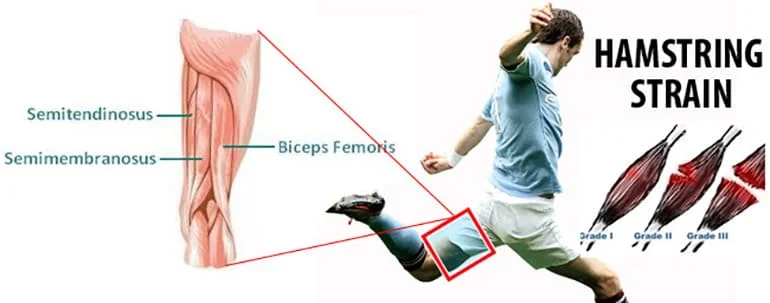
    A hamstring strain is a common injury affecting the muscles at the back of the thigh, which are responsible for bending the knee and extending the hip. This type of strain occurs when these muscles are overstretched or subjected to excessive force, often during activities that involve sprinting, jumping, or sudden changes in direction.

    • Mild hamstring strains might have little pain and a quick healing period. Alternatively, they may require weeks on crutches and surgery due to their severity.
    • You may bend your knee and extend your hip by using the biceps femoris, semitendinosus, and semimembranosus, three muscles that go down the back of your leg from your thigh to your knee. The phrase “hamstring” refers to all of them combined.

    What Are the Symptoms of a Hamstring Strain?

    • If you strain your hamstring while jogging, you probably won’t notice it right away. There will be a sudden, intense pain and maybe a popping feeling at the back of your leg. You might stumble and lose the ability to run.

    Additional signs of a pulled hamstring include:

    • discomfort when bending or straightening your legs near the back of your thigh.
    • back pain, bruising, and thigh edema.
    • a prolonged period of weakness in your leg following the injury.

    What Causes a Hamstring Strain?

    • Muscle overload, like when you’re jogging and your leg is completely extended right before your foot hits the ground, is usually the cause of a hamstring strain. The muscles may get overstretched and tear when your foot hits the ground while standing on it.
    • People who participate in sprinting or jumping-intensive activities such as track and field, soccer, football, lacrosse, basketball, and dance are more likely to develop hamstring strains. These kinds of injuries are also more likely in teens who are going through growth spurts. This is because a person’s muscles may develop taut and more prone to overstretching when their leg bones grow more quickly than their muscles.
    • Here is a summary of some of the most common reasons why people get hamstring strains.
    • not fully warming up before working out.
    • being overweight or going overboard. Muscles that are weaker are less able to endure the strain of exercise, and muscles that are tired are less able to absorb energy, both of which raise the risk of injury.
    • An imbalance in the muscle mass of your legs. Quadriceps, or front-leg muscles, are often bigger and stronger than hamstrings. The hamstring muscles are more prone to straining during running-related activities because they can tire out faster than the quadriceps.
    • Ineffective method. Your hamstring muscles may experience more strain if you run with poor form.
      you are taking up activities too soon after being hurt. To completely recover from hamstring issues, a lot of rest and patience are required. You risk reinjuring your hamstring if you attempt to recover from a strain too quickly.

    Risk Factors of Hamstring Strain:

    • Older age
    • Previous hamstring injury
    • Limited hamstring flexibility
    • Increased fatigue
    • Poor core stability
    • Strength imbalance
    • Ethnicity
    • Previous calf injury
    • Previous substantial knee injury
    • Osteitis pubis
    • The incidence of hamstring strains among amateur Australian Rules football players was found to be negatively linked with better quadriceps flexibility.
    • Participation in particular preventive programs is recommended for players who exhibit specific polymorphisms, such as IGF2 and CCL2 (especially in its allelic form GG), as they may be more susceptible to serious injuries.
      Tight hip flexors
    • Anomalies that were formerly connected to the lower back. Research indicates that standing with straight legs and performing core-strengthening workouts can worsen lordosis. The iliopsoas muscle group, which is mainly used in workouts like sit-ups and straight leg lifts, appears to strengthen this muscle, according to anatomic theory. As a result, the athlete can be more susceptible to injury from particular training plans and sporting activities that exacerbate postural issues.
    • The hamstrings lengthen in concert with hip flexion and knee extension during running and kicking; this lengthening may result in microscopic muscle damage or push the muscle to its mechanical limits.
    • A hamstring injury may arise from an uncoordinated contraction of the biceps femoris muscle due to an imbalance in the dual nerve supply.
    • There should be more discussion on the variations in the design of the hamstring muscles. This allows for more muscle flexibility and reduces the risk of overextending during eccentric contraction.
    • The hamstring muscle group is stretched out when there is an excessive anterior pelvic tilt, and some research suggests that this could raise the likelihood of strain injuries.

    How Is a Hamstring Strain Diagnosed?

    • A trainer or physical therapist may diagnose a hamstring strain while you’re sitting on the sidelines. Getting frequent medical attention is also necessary if you have a hamstring problem. The doctor will examine your leg and enquire about the nature of the injuries and the degree of your discomfort.

    The assessment will assist in determining your level of strain:

    • Grade 1: It’s a light strain. When you use your leg, you could feel some slight pain and swelling, but nothing severe.
    • Grade 2: It is possible to walk with a limp and experience pain at work. Not only may you be unable to fully extend your leg, but you may also notice some swelling and bruises.
    • Grade 3: You will immediately observe swelling, experience pain, and be unable to fully extend your leg. Walking will be quite difficult, and crutches may be required.

    Differential Diagnosis

    • For example, the physiotherapist may need to differentiate between multiple injuries during the patient’s assessment.
    • sciatica, hamstring tendinitis, adductor strains, avulsion injuries, piriformis syndrome, lumbosacral referred pain syndrome, and ischial bursitis.
    • It is crucial to consider alternative reasons for posterior thigh soreness that could be misdiagnosed as hamstring strains throughout the diagnostic process. Certain tests and imaging are used to assess and rule out those different pain-causing possibilities.
    • Restrictions on the sciatic nerve’s range of motion can exacerbate posterior thigh pain; in certain cases, discomfort may be solely due to adverse neurological strain when there isn’t a specific muscle injury. Sometimes it’s hard to tell if the injury is to the hip adductors (e.g., M. Gracilis and M. Adductor Magnus and Longus) or the hamstrings because of their close closeness. Sometimes imaging examinations are required to identify the exact location of the damage.
    • Strains in the popliteus muscle, tendonitis at either gastrocnemius origin, sprained posterior cruciate ligament, and apophysitis (pain in the ischial tuberosity), Other conditions that resemble the look of hamstring strains include lesions in the upper tibiofibular joint and illnesses of the lumbar spine.

    Diagnostic Procedures of Hamstring Strain:

    • Most acute injuries can be easily identified by asking the patient to recount how the injury occurred. To be certain, they must additionally examine the hamstrings.
    • If the therapist is unsure, he may ask for medical imaging. This will eliminate all other possibilities.
    • Radiographs: One benefit of radiography is that it allows one to distinguish between different pain etiologies. It is capable of differentiating between disorders of the bones (such as stress fractures) and the muscles (like muscular strain).
    • Ultrasound (US): Because this type of imaging is so inexpensive, it is used extensively. The fact that it can dynamically visualize muscles makes it an even more useful tool. One disadvantage of the fact that it can dynamically visualize muscles makes it an even more useful tool. ultrasonography is that it needs to be performed by a professional with experience.
    • Magnetic Resonance Imaging (MRI): A thorough image of muscle damage is provided by an MRI. Sometimes, subsequently, the images might not make it clear. In that case, the patient’s account provided to the therapist will have to be trusted.

    Examination of Hamstring Strain:

    • Running gait: The running gait is examined first during the physical assessment. Since they frequently manifest days after the initial damage, swelling and ecchymosis are not usually visible at the outset of the injury.
    • Palpation: The posterior thigh can be palpated to determine the precise area affected by pain provocation and to assess if a palpable musculotendon unit defect is present or absent. To locate each hamstring muscle and tendon, do repeated resistance-free knee flexion-extension motions throughout a restricted range of motion while the patient is in the prone position. It is also possible to palpate the site of maximal discomfort and identify it about the ischial tuberosity. The overall measurements of the ischial tuberosity’s length, width, and centimeters between it and the location of the most discomfort are provided.
    • Range of motion: Two common tests are used sequentially to measure the maximum length and flexibility of the hamstrings: the passive straight leg raise (hip) and the active knee extension test (knee). In the passive straight leg raise and the active knee extension test, a typical hamstring length should permit the hip to flex 80 degrees and 20 degrees, respectively. Given that these tests are frequently impeded by pain in athletes who have just had an acute injury, they might not be a reliable measure of musculotendon extensibility. Again, a bilateral comparison is recommended.
    • The sprinters’ pelvis and opposite leg were strapped securely as they lay supine. Ten centimeters above the patellar base was where a conventional flexometer was placed. on the Borg CR-10 scale. The damaged leg’s values were stated as
    • Knee flexion strength: The athlete was positioned in a prone position with their pelvis and opposing leg locked to measure their isometric knee flexion strength. The foot was in plantar flexion and the knee was extended. At progressively higher effort levels, three maximum voluntary isometric knee flexion contractions were executed. Every three seconds, there was a 30-second rest interval. The strongest force value obtained from the strength test was selected. It can be helpful to try to bias the lateral or medial hamstrings through internal or external rotation of the lower leg to identify the muscles tested.

    How Can You Prevent a Hamstring Strain?

    • The best defense against hamstring strains is to maintain strong muscles. The following are some strategies to help guard against them (as well as other sports injuries):
    • Before engaging in strenuous exercise or physical activity, fully warm up. To get your muscles moving, do some jumping jacks or jog stationary for a minute or two. After that, perform some dynamic stretching; see an athletic trainer or your coach for instructions. Stretch your muscles gently using static stretches after playing, holding each stretch for at least 30 seconds.
    • Maintain your year-round muscular strength and flexibility. Exercise frequently and follow a proper stretching regimen to prevent your muscles from being shocked during a strenuous workout
    • As a general guideline, aim to increase your weekly mileage or time spent participating in sports by no more than 10%.
    • Should you get thigh discomfort, you should stop your activity immediately. Give your hamstring some time to rest if you think you may have strained it. Resuming your activities shouldn’t happen until your damaged leg feels strong, the pain is gone, and you can move it as easily as your other leg.

    What’s the Treatment for a Hamstring Strain?

    • Fortunately, surgery is only required for the most serious muscle damage. The majority of hamstring strains heal on their own or with little medical assistance.

    To treat a hamstring strain, consider the following advice:

    • As quickly as possible after the injury, use the RICE formula:
    • Rest: Try not to put any weight on your leg and reduce your walking if your doctor tells you not to.
    • Ice: For the first 48 hours following the injury, use a bag of ice or a cold compress to minimize swelling. This should be done for 20 to 30 minutes every 3 to 4 hours until the swelling goes down, starting as soon as possible after the accident. Cover the ice or ice pack with a cloth.
    • Compress: If your doctor advises it, support your leg and reduce swelling by using sports wraps or elastic bandages.
    • Elevate: Keep your leg up when you are sitting or lying down.
    • Take pain medicine: Non-steroidal anti-inflammatory medications (NSAIDs), such as ibuprofen, can help lessen leg pain and swelling. Certain doctors favor alternative medications such as acetaminophen. Discuss the recommended medication with your physician.
    • Engage in strengthening and stretching activities. Your leg’s strength and flexibility can be increased by gradually adding some workouts (and, possibly, preventing the injury from recurring again). Your hamstring’s readiness for these exercises can be assessed by a physician, sports medicine specialist, or physical therapist.

    Medical Management:

    • Only in cases where the hamstrings are ruptured is surgery recommended. Almost every patient claimed that their situation had improved after surgery. According to research, 91% of respondents felt content following surgery and gave their level of contentment a 75% or higher rating. Muscle strength assessments after surgery varied from 45% to 88%. Physical inspection and follow-up confirm that all fixes were kept.

    Physical therapy of Hamstring Strain:

    • Your physical therapist will begin therapy to address your hamstring strain after talking with you about your alternatives for treatment. For a hamstring strain, physical therapy’s key objectives are to help you return to optimal function, minimize pain and swelling, regain normal strength, and restore normal flexibility and range of motion.
    • Your physical therapist has a wide range of options when it comes to treating your hamstring strain. These could consist of:
    • Ultrasound: A deep heating therapy called ultrasound can assist increase your hamstring’s affected tissues’ extensibility and circulation. Although evidence suggests that it may not provide the benefit formerly thought in musculoskeletal applications, your physical therapist may still employ this treatment.
    • Massage: Improving scar tissue mobility can be achieved by massaging the damaged area.
    • Electrical stimulation: During your hamstring rehabilitation, electrical stimulation may be utilized to achieve a variety of objectives. Your PT may utilize e-stim to improve the contraction of your hamstring muscles, lessen edema, or help you manage your discomfort.
    • Kinesiology taping: To aid enhance hamstring muscle functions, some physical therapists employ kinesiology taping procedures. You can also use kinesiology tape to reduce bruises and edema around your hamstring muscles. Talk to your therapist about using K-tape as there hasn’t been much study on its use.
    • Gait training: When recuperating from a severe hamstring strain, you might have to use crutches to walk. Your physical therapist should show you how to walk correctly and move from needing walking assistance to walking normally.
    • Ice: To reduce swelling and pain during the acute stage of an injury, ice might be applied.
    • Heat: To help your hamstring muscles relax up and increase tissue flexibility, your physical therapist could apply moist heat packs before stretching.

    Therapeutic Exercise of Hamstring Strain:

    • A therapeutic exercise is the most significant treatment your therapist can do for you. In addition to giving you particular exercises to perform in the clinic, your physical therapist will probably also recommend a regular at-home workout regimen. This puts you in charge of your care and lets you take charge of your rehabilitation from hamstring strains.
    Exercises for a Hamstring Strain may include:
    • Hamstring stretches: Exercises that stretch the hamstrings both dynamically and statically can aid with hamstring function. Stretching is one of the finest strategies to rebuild scar tissue that is formed during the healing process of injured muscle. Stretching should feel like a tug, but after a few minutes, it should stop feeling that way.
    • Lower extremity strengthening exercises: Your physical therapist could recommend strengthening workouts for your hamstrings and surrounding muscles if you have a hamstring strain. Exercises ought to be easy to begin and painless. You can advance to more strenuous strengthening activities as your ailment recovers.
    • Hip and core strengthening exercises: After suffering a hamstring strain, research suggests that strengthening your hips and core muscles will help you get back to your regular activities. During your hamstring rehabilitation, you can be prescribed advanced hip strengthening and dynamic abdominal strengthening exercises.
    • Agility drills: Your physical therapist could assign you to increasingly difficult agility exercises, such as jumping and hopping, as your recovery goes on. When you return to active sports, understanding how to leap and land correctly can help you avoid hamstring and other lower-limb joint and muscle injuries.
    • Balance and proprioception exercises: Your rehabilitation may include working on maintaining proper lower extremity awareness and balance. By doing so, you may make sure that your muscles are functioning correctly and maintaining the proper alignment of your hips, knees, and ankles as you run, jump, and walk.

    Rehabilitation of Hamstring strain:

    Phase 1

    Goals:

    • Protect healing tissue
    • Minimize atrophy and strength loss
    • Prevent motion

    Protection:

    • Stay clear of overly stretching your hamstrings either actively or passively.
    • Avoid antalgic gait pattern
    • Ice 2–3 times daily

    Therapeutic exercise (performed daily):

    • Stationary bike
    • Single leg balance
    • Balance Board
    • Soft tissue mobilization (STM)/Instrument assisted (IASTM)
    • Progressive hip strengthening
    • Pain-free isotonic knee flexion
    • Active sciatic nerve flossing
    • Ice with sensory electrical stimulation (e.g. Conventional TENS)

    Criteria for progression to the next phase:

    • Normal walking stride without pain
    • Painless isometric contraction during a prone knee flexion (90°) manual strength test against submaximal (50%–75%) resistance

    Phase 2:

    Goals:

    • Restore your hamstring strength while exercising all ranges without experiencing any pain.
    • Develop the pelvic and trunk’s neuromuscular control by gradually increasing movement speed to get ready for functional actions.

    Protection:

    • Avoid end-range lengthening of hamstrings if painful
    • Ice
    • Post-exercise, 10–15 min

    Therapeutic exercise:

    • Stationary bike
    • Moderate to high-intensity treadmill use (gradual increases in pace and stride length), pain-free
    • Isokinetic eccentrics in non-lengthened state
    • Single-limb balance windmill touches without weight
    • single-leg pose with an interruption (e.g. reaching, tossing a ball)
    • Supine hamstring curls on Swiss ball
    • STM/IASTM
    • Nordic hamstring exercise
    • Shuttle jumps
    • Prone leg drops
    • Lateral and retro band walks
    • Sciatic nerve tensioning

    Criteria for progression to the next phase:

    • During the prone knee flexion (90°) manual strength test, full strength (5/5) without pain
    • Pain-free forward and backward jog, moderate intensity
    • Less than 20% less strength is lost than in the unaffected limb.
    • Pain-free max eccentric in a non-lengthened state

    Phase 3:

    Goals:

    • free of symptoms (such as tightness and discomfort) during all activities
    • Typical hamstring strength throughout the whole range of motion and speeds, both concentric and eccentric
    • improved trunk and pelvic muscular control
    • Integrate postural control into sport-specific movements

    Protection:

    • Train within symptom-free intensity
    • Ice
    • Postexercise, 10–15 min, as needed

    Therapeutic exercise:

    • Treadmill moderate to high intensity as tolerated
    • Hamstring dynamic stretching
    • Isokinetic eccentric training at the end ROM
    • STM/IASTM
    • Plyometric jump training
    • 5–10 yard accelerations/decelerations
    • A windmill with one limb balanced and weighing down on an unstable surface
    • sport-specific exercises

    Criteria for return to sport:

    • Complete strength without discomfort in the extended state examination posture
    • bilateral alignment in the knee flexion angle of the highest force
    • Full range of motion without pain
    • recreation of movements unique to a sport at a competitive pace without experiencing any symptoms

    Summary

    • The damage that results from stretching one or more of these muscles to the limit is called a hamstring strain, also referred to as a strained hamstring. Mild hamstring strains might have little pain and a quick healing period.
    • You may bend your knee and extend your hip by using the biceps femoris, semitendinosus, and semimembranosus, three muscles that go down the back of your leg from your thigh to your knee. The damage that results from stretching one or more of these muscles to the limit is called a hamstring strain, also referred to as a strained hamstring.

    FAQs

    Even with a pulled hamstring, can you walk?

    Avoid doing any strenuous exercise until your hamstrings are completely healed, even though walking, swimming, and light cycling are normally safe, and can help you restore strength.

    Can an injury to the hamstring cure itself?

    Even though these wounds can cause excruciating pain, they typically heal on their own. However, extra care and a carefully thought-out rehabilitation program are required for a hamstring injury to heal completely.

    In three days, can a hamstring heal?

    It all depends on how serious your injury is and how long it will take to recover. About three days may pass for a grade 1 strain. Weeks or months may suffice for grades two and three.

    Is massaging a pulled hamstring appropriate?

    During and after rehabilitation, massaging a strained hamstring can be beneficial. In addition to flushing fluid and promoting blood flow that is necessary for healing, a massage also helps reduce scar tissue and stretches and loosens muscles.

    How bad of a strain does a hamstring get?

    At-home therapy is an option for minor hamstring strains. However, consult a physician if you are unable to walk more than four steps without experiencing excruciating pain or if you are unable to bear weight on the damaged leg.

    References:

    • Hamstring Strain. (n.d.). Physiopedia. https://www.physio-pedia.com/Hamstring_Strain
    • Dhameliya, N. (2021a, September 24). HAMSTRING STRAIN . Samarpan Physiotherapy Clinic. https://samarpanphysioclinic.com/hamstring-strain/
    • Hamstring Strain. (2023, July 18). WebMD. https://www.webmd.com/fitness-exercise/hamstring-strain
    • Hamstring Muscle Injuries – OrthoInfo – AAOS. (n.d.). https://orthoinfo.aaos.org/en/diseases–conditions/hamstring-muscle-injuries/
  • Elbow Joint Stiffness

    Elbow Joint Stiffness

    What Is Stiff Elbow?

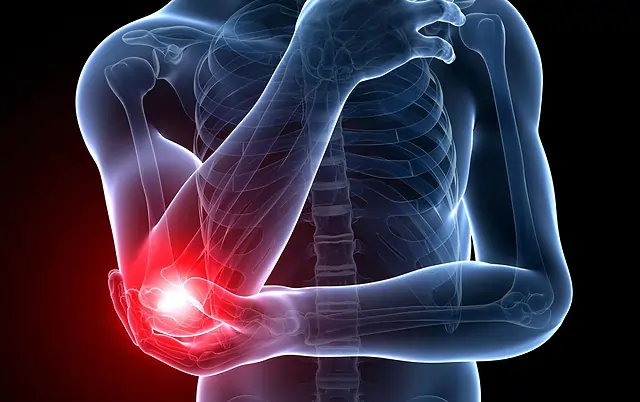
    Elbow joint stiffness is a common condition characterized by a restricted range of motion in the elbow, often resulting from injury, surgery, or prolonged immobilization. This stiffness can significantly impact daily activities, as the elbow plays a crucial role in both gross and fine motor functions.

    Stiffness after a disease or injury might become more difficult in the elbow joint. This is because the elbow is formed up of three joints that fit exceptionally well together and are close to multiple soft tissue structures.

    Causes of stiff elbow

    Elbow stiffness after an injury: Elbow stiffness is the most frequent reason for accidents in our community.

    Soft tissues like tendons or ligaments that are stretched or inflamed are the main cause of elbow pain.
    A medical problem can rarely bring on elbow pain. Although pain usually goes quickly, this might result from loose cartilage or bone fragments in the joint. During surgery, loose components could be removed.

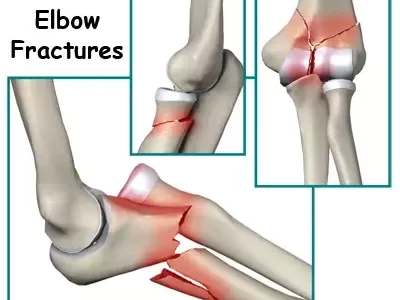
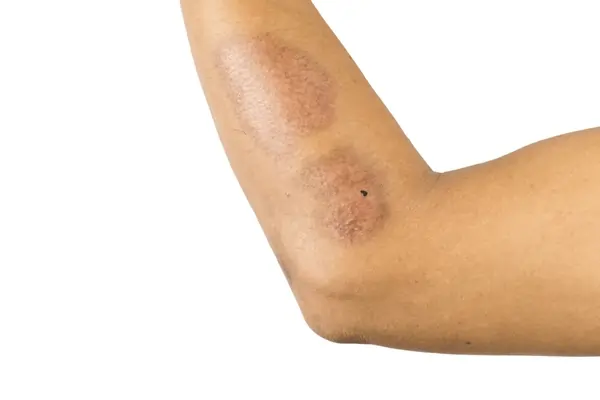
    Elbow Fracture
    Elbow Fracture

    Injuries or arthritis are two diseases that might cause elbow stiffness. A painful, swollen joint is referred to as arthritis, and several varieties of the condition exist.

    In some situations, soft tissue can form into scar tissue after an injury or operation. This can cause elbow stiffness.

    scar tissue
    scar tissue

    Congenital issues: Elbow stiffness may also be a symptom of several congenital issues.

    Stiff elbow risk factors

    Long-Term immobilization: Individuals who have been immobilized for an extended period because of an accident or disease are most likely to experience elbow stiffness.

    Joint damage: Elbow stiffness is also predisposed by conditions such as infections that harm the articular cartilage.

    Symptoms of stiff elbow

    When bending the elbow, your range of motion will be restricted, affecting when your forearm rotates. The presence or absence of pain as a correlated symptom depends on the underlying issue.

    Diagnosis

    Diagnosis of stiff elbow Seeking standard medical care first without having X-rays evaluated to rule out fractures can frequently result in long-term elbow joint damage, pain, and stiffness.

    Seeking medical consultation is advised to rule out any major elbow disease if you have elbow pain suddenly without any history of trauma. The elbow pain may worsen if it is not managed. The physiotherapist assesses the range of motion on the first day to know how much the range is affected and plan the treatment accordingly.

    Elbow flexion0-135 to 140 degree
    Elbow extension140 to 135-0 degree

    Treatment

    The best course of treatment will depend on the extent of damage to the soft tissue components around the elbow joint and the underlying reason for the elbow stiffness. Splints, exercises, and appropriate surgery are typically the initial options for treating elbow stiffness.

    In certain cases, surgical relaxation of the stiff elbow may be the next step when conservative approaches prove ineffective or inappropriate.

    Managing symptoms

    Drugs to reduce pain:
    Pain can be reduced with the use of painkillers like paracetamol. They should be taken as needed, but taking them before the pain is too terrible is advisable.

    A class of non-steroidal anti-inflammatory medicines (NSAIDs) is useful in reducing pain, swelling, and stiffness. One common NSAID that you may get at pharmacies and grocery shops is ibuprofen.

    You should stop using the medication and consult your doctor if you experience gastrointestinal issues after taking NSAIDs or pain relievers. Additionally, you can use stomach-safe anti-inflammatory gels or lotions on your elbow.

    Physical therapy Treatment

    Manual Therapy

    There is research that manual therapy can lessen pain and increase grip strength immediately following treatment. It has been demonstrated that Mulligan mobilizations, which target pain-free movement during a mobilization method, are advantageous.

    Mobilization for elbow flexion:

    When the patient is in a supine posture, use a medial humero-ulnar glide to promote and enable elbow flexion. Usually, we lay a towel roll or bolster beneath the distal humerus and let the forearm drape across the anterior belly. Positioning themselves on the ipsilateral side, the physician will stabilize the distal humerus and put the opposite hand’s thenar eminence on the proximal ulna and olecranon.

    Mobilization for elbow extension:

    For a lateral glide that assists in extension, the patient is lying supine. The doctor pushes upward using a lumbrical grip—that is, positioning the thenar eminence posteriorly over the olecranon and proximal ulna.

    Information about the condition:

    The condition’s pathophysiology, symptom mitigation, healing phases, and overall self-management are crucial components of any condition education program.

    Physical Rehabilitation

    Although ideal loads have not yet been established, various loading techniques may help certain patient subgroups. Although isometric exercises may have analgesic effects, tendon-loading exercises shouldn’t worsen the pain.

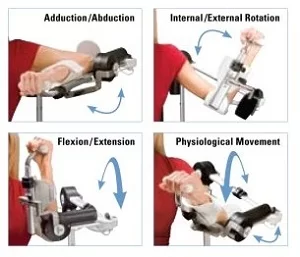
    CPM machine for elbow joint surgery
    CPM machine for elbow joint surgery

    Heat or ice packs:

    Every few hours, you should try applying an ice or heat pack on your elbow for ten to fifteen minutes to reduce pain and stiffness.
    Heat makes it easier for blood to reach a particular area of the body, which reduces stiffness, and pain, and speeds up the healing of injured tissue. If your elbow is swollen or recently injured, avoid applying heat, which may exacerbate the condition.

    Every few hours, you should try applying an ice or heat pack on your elbow for ten to fifteen minutes to reduce pain and stiffness. Be cautious not to apply heat or an ice pack to your skin, as this may burn or aggravate it. Wrap them in a towel first.

    Ice helps lessen edema by limiting blood flow to specific body areas. People have reported that switching between heat and ice throughout the day can assist.

    Exercises

    Elbow Flexion
    Your elbow may bend, a condition known as elbow flexion. Techniques to Increase Elbow’s Range of Motion:

    • Stand with one arm by your sides.
    • To relieve stress, bend your elbow for five to ten seconds before straightening it.
      Ten times through, repeat the workout.

    Elbow Extension
    Work on elbow extension range-of-motion exercises if you want to get better at completely straightening your elbow. To execute this:

    • For greater intensity of the stretch, fully extend your elbow and then press down your wrist or forearm.
    • Put pressure on your elbow to extend it as far as possible, then maintain the position for five to ten seconds.
      You should perform the workout ten times.

    Forearm Supination
    The wrist motion known as supination causes your palm to face upward.

    To carry out the task:

    Using your other hand, reach beneath the supinated arm’s forearm to exert further pressure on the stretch.  Grasp your wrist and twist your hand farther into the supination to apply some pressure.

    Forearm and Elbow Pronation
    The ability to flip your hand over such that your palm faces the floor is known as forearm pronation.

    The forearm pronation ROM stretch is done as follows:

    • The second hand should then be extended across your forearm. Start with your hands and wrists fully extended.
    • Release your stance and relax the stretch after five to ten seconds of movement.
    • Ten times, repeat the pronation ROM stretch.

    Summary

    Elbow stiffness can be caused by a variety of disorders, such as sprains, strains, and various types of arthritis. A fracture or other more severe injuries might be the cause. Depending on the etiology, the area may also exhibit several additional connected symptoms. ROM exercises like mobilization, stretching exercises, and manual therapy help the patient to improve elbow stiffness.

    FAQs

    What causes stiff elbows?

    A medical condition like bursitis or arthritis and joint injuries are commonly responsible for joint stiffness. Bending and straightening the elbow, as well as rotating the arm, are all restricted by tight elbows.

    Is elbow stiffness permanent?

    Elbow stiffness is not fatal; it can be effectively treated with a tried-and-true surgical procedure.

    How long does stiffness last?

    muscle stiffness will happen in the morning and persist for a few days following new or more difficult activity, or less than thirty minutes after waking up. The location and underlying reasons for muscular stiffness usually determine other associated indications and symptoms.

    Does joint stiffness go away?

    Joint stiffness is a typical condition as individuals age. Moving around and getting up generally relieves this stiffness. On the other hand, some persons may have joint stiffness due to an underlying medical issue.

    What medicine is good for stiff elbows?

    Take NSAIDs and stay away from activities that hurt the elbows.
    References

    • Clinic, C. (2024, April 30). Elbow Stiffness: A Systematic Approach to Prevention and Treatment. Cleveland Clinic. https://consultqd.clevelandclinic.org/elbow-stiffness-a-systematic-approach-to-prevention-and-treatment
    • Elbow pain. (n.d.). Versus Arthritis. https://versusarthritis.org/about-arthritis/conditions/elbow-pain/
    • Helmer, J. (2024, May 27). Elbow Arthritis. WebMD. https://www.webmd.com/arthritis/elbow-arthritis-symptoms
    • He, X., Fen, Q., Yang, J., Lei, Y., Heng, L., & Zhang, K. (2021). Risk Factors of Elbow Stiffness After Open Reduction and Internal Fixation of the Terrible Triad of the Elbow Joint. Orthopaedic Surgery, 13(2), 530–536. https://doi.org/10.1111/os.12879
    • Ocs, T. P. D. (2022, October 28). Elbow Pain. Verywell Health. https://www.verywellhealth.com/elbow-pain-5225371
  • Calf Raise Exercise: Muscle Worked, Benefits, How to Do?

    Calf Raise Exercise: Muscle Worked, Benefits, How to Do?

    What is the Calf Raise Exercise?

    • One kind of exercise that helps build typical calves is calf raises.
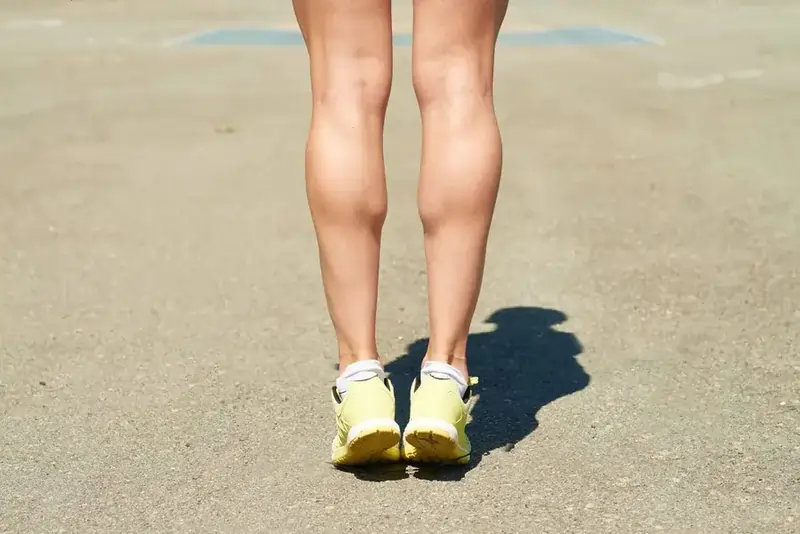
    • This workout tones and strengthens the soleus and gastrocnemius muscles using your body weight.
    • While calf muscles are sometimes overlooked during workouts, they are essential for numerous weight-bearing exercises, including running, jumping, and reaching.
    • To make all of your activities easier, consider standing calf raises into your lower body routine.
    • Before doing this, you need to be aware of the muscles involved. The soleus and gastrocnemius are the two main muscles in your calf.
    • However, in addition to its twin function of promoting plantar flexion, the two-headed, superficial gastrocnemius muscle helps with knee flexion.
    • While the soleus muscle helps in maintaining balance and raises blood flow from your lower leg back to your heart, the gastrocnemius muscle also contributes to knee flexion through its complementary attachment with the hamstring muscle.

    Which Muscles Are Activated During Calf Raises?

    • Calves

    The gastrocnemius, or rounded muscle at the top of your calf, and the soleus are the two muscle groups used in this exercise. This long, flat muscle runs down your lower leg below the gastrocnemius. Both are essential for proper ankle flexion and bending, balance, and “power” exercises like sprinting, jumping, or lunging.

    • Ankles

    Stretches for the calves and ankles improve the tendons, ligaments, and muscles in your body. This increases stability, maintains the health of your ankle joints, and guards against sprains and other ailments.

    Benefits of Calf Raise:

    Increased muscle flexibility improved leg strength and general fitness are two benefits of calf raise exercises. By strengthening the muscles surrounding the ankles and lower legs, calf raises also contribute to healing. Firm calf muscles obtained from calf raises allow improved posture throughout daily tasks and physical activity.

    • Better coordination and balance

    Raising your calves can help you do significant neurological changes that improve balance and help avoid age-related decreased mobility, especially in older persons. Frequent calf-raise exercise improves balance performance by reducing gastrocnemius and soleus muscle activations during standing.

    Exercises such as single-leg calf raises improve ankle joint range of motion and target particular muscles, strengthening the lower body while also significantly improving balance and body control. When practicing calf raises, it is vital to breathe correctly and maintain a slow pace for maximum benefits in developing balance. This will support creating balance and strengthening the center.

    • Improved stability of ankles

    Stronger calves can have several advantages, such as;

    Improving the stability of the ankle.
    Lowering the danger of injuries related to the ankle.
    Increasing the strength and mobility of the ankle joint while strengthening the surrounding tendons, ligaments, and foot muscles.
    Improving the strength and mobility of the foot and ankle.
    Calf raises are a useful workout to undertake to build stronger calf muscles.

    • Improved performance whilst running

    To improve running mechanics, calf muscles are essential since they increase muscular output and explosiveness. During running, particularly during the toe-off phase, powerful calf muscles allow people to move forward and upward. Increased calf strength improves the push-off with each step, which impacts stride length and running rate. Making calf strengthening a priority improves running and sprinting performance, stabilizes and strengthens the ankle, and lowers the chance of injury.

    • Preventing as well as Recovering Injury

    Strong calf muscles are necessary for daily activities like jogging and walking. Additionally, they lessen the chance of injury during physical activity by supporting and stabilizing the lower body. Weak calf muscles can influence your stability and balance as well as your ability to perform daily duties. Additionally, it might increase the risk of ankle and lower leg injuries. inversely, ankle sprains and other related conditions can be avoided with greater calf strength.

    • Burning calories and losing weight

    Calf increases the need to use energy, which is used to burn calories. Calf raises are a useful complement to a calorie-burning exercise regimen, even though they don’t burn as many calories as some high-intensity workouts. When combined with a healthy diet and comprehensive exercise program, calf raises can help achieve weight loss objectives.

    Lifting your legs to strengthen your muscles and exercising your lower body will help you burn more calories and have a faster metabolism over time. The overall number of calories burnt during calf raises may increase the overall use of energy when paired with other full-body activities.

    Calf raise exercise:

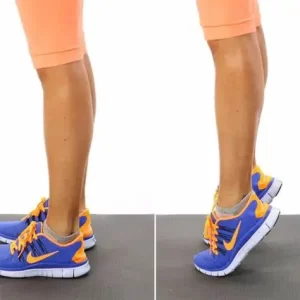
    Calf raises can be done on the floor while standing if you don’t have a mat. You might even attempt to use a wall.

    • Position your feet shoulder-width apart and tip your toes forward while standing on a yoga or exercise mat.
    • Keep your shoulders down, your back straight, and your abdominal muscles tight.
    • While maintaining your stretched (but not locked) knees, gradually raise your heels.
    • Pause for a moment, keeping your feet as firmly planted as you can.
    • Hold this position for a few seconds.
    • To get back to where you started, drop your heels to the ground.
    • Then relax.
    Calf Raises
    Calf Raises

    Additional Calf Raise Exercise Variations:

    There are several ways to perform this workout depending on your fitness level and objectives.

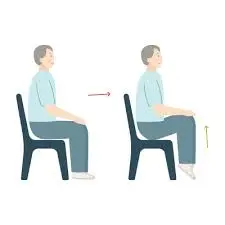
    Seated Calf Raise

    When doing calf raises while seated, just the soleus muscle which is located below the gastrocnemius is engaged. This variation of the method is perfect for those who have trouble maintaining their balance when standing.

    • When performing this exercise while seated in a chair, your shoulders and back should be straight.
    • Maintaining a straight foot touch on the ground and a tight core.
    • Your heels must be lifted off the ground and you must press down with the toes of your foot
    • One heel at a time or both heels raised are other options.
    • Hold this position for a few seconds.
    • Then return to your neutral position.
    • Then relax.
    seated-calf-raises
    seated-calf-raises

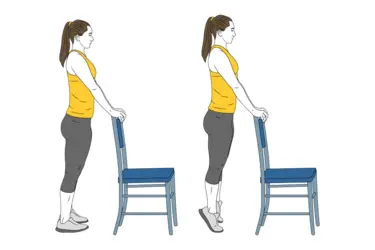
    Assisted Standing Calf Raise

    If maintaining balance during a standing calf raise becomes difficult, you can alternate this exercise by grabbing chair support for stability.

    • You must perform this exercise while standing on the floor with both feet pointed forward and shoulder-width apart.
    • Put your best effort to tighten your abdomen, lower your shoulders, and arch your back.
    • You must lift both of your heels toward the ceiling while holding onto a chair with your hands.
    • Both of your knees should be straight but not twisted.
    • After a short while of holding, make an effort to stand as tall as you can on your toes.
    • After that, bring your heels down to the ground and take a step back to begin.
    • Then relax.
    calf-raise
    calf-raise

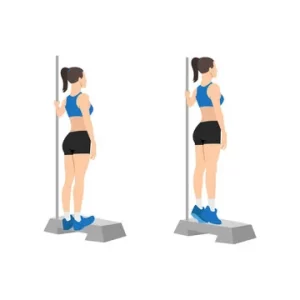
    Standing Calf Raise on a Step

    By performing this exercise on steps or stairs, you can improve the range of motion in your calves.

    • You must perform this exercise by placing the base of your feet on the steps or stairs and pushing your heels as high as you can.
    • Hold this position for a few seconds.
    • Then lowering them gradually until they are just below the top of the steps or stairs.
    • Return to your starting posture once your calf muscles have a comfortable degree of stretch.
    • Then relax.
    calf-raise
    calf-raise

    Think about the following suggestions for making sure safe exercise:

    • Ensure your body has enough time to warm up before working out.
    • You should progressively increase the duration and number of repetitions in your workouts to prevent overtraining and sore muscles.
    • Always utilize the right form when working out to protect your body and achieve the desired results.
    • If at all possible, avoid wearing anything that will restrict your range of motion while exercising. Instead, dress comfortably loose.
    • When exercising, keep your back straight.
    • It’s advised that you inhale deeply and exhale slowly from your lips before exercising.

    A common mistake to avoid:

    • Not expanding in advance

    Among all the calf exercises, stretching is the most important since it keeps the muscles flexible and helps to avoid complaints associated with exercise. Before performing a calf raise, stretch your calf muscle for five to ten minutes to prevent these problems.

    • Not Being Able To Complete A Contraction

    You must experience enough contraction for a muscle to be completely stimulated. This will be done by fully extending the muscle and adding an adverse stretch. By using this technique and taking your time throughout each repetition, you may give your calf muscle enough time under tension, which will eventually lead to muscular growth.

    • Moving Too Quickly

    Regulate the workout’s speed to get the greatest advantages from standing calf raises. For beginners, moving too quickly won’t provide as much benefit. For better strength and performance, it is best to elevate and lower your heels gradually. To get the greatest benefits from this exercise, you should perform calf raises with greater power and force if you have mastered the technique.

    • Leaning Forward

    Standing tall is necessary to keep your chest elevated and to maintain your balance when performing these exercises. Exercising with a forward leaned posture might worsen pain in the back and reduce its advantages. Thus, you have to stand straight to prevent this.

    Summary:

    One of the best exercises you can do to increase your general health and fitness level is the calf raise. They are simple to perform, don’t call for any specialized equipment, and have several advantages, such as better posture, injury prevention, and increased strength and flexibility. Strong calves are beneficial in and of themselves. You’ll have greater self-control, be able to complete more, and feel better about yourself.

    FAQs

    What advantages can calf raises provide?”

    Calf raises strengthen your foot and ankle muscles, ligaments, and tendons. This increases stability, maintains the health of your ankle joints, and guards against sprains and other ailments.

    Should you perform calf raises every day?

    Yes, performing calf raises every day is typically safe and will provide results with regular practice. For possible benefits, try adding calf lifts to your regular exercise.

    Will the size of the calf increase with calf raise exercise?

    Compared to the seated form, the standing variation showed noticeably larger improvements in muscle size. Standing calf raises were found to be far more successful than sitting calf raises in promoting muscular hypertrophy, particularly in the gastrocnemius muscle.

    How many calf workouts are done each day?

    Pick two or three calf workouts to incorporate into their weekly routine. Try for at least 6–12 repetitions for 4–5 sets twice a week to promote muscle growth. To keep improving, change the exercises, rep ranges, and sets as necessary.

    Does walking work the calves?

    Your calves will get stronger with exercises like walking, hiking, and jogging, especially if you do them uphill. Your calves will have to use more energy on a higher rising. Running sports, including basketball, tennis, and soccer, require you to sprint, jump, and apply force to your calves to rapidly change direction or fast.

    Do calf raises make legs thinner?

    Although they won’t help you reduce fat in that area, calves-specific strengthening exercises can help define and tone your calf muscles. Stand up straight and place your hands on a wall or the back of a chair for stability when performing a basic calf raise. Refrain from locking your knees.

    Is it safe to raise calves?

    The calf’s anatomy, which consists of the gastrocnemius and soleus muscles, determines the lower leg’s strength and mobility. Calf raises are a simple exercise that can help people of all fitness levels avoid injuries, improve posture, and run more effectively.

    Do calf raises improve strength?

    You may define and shape your calves for a more toned and sculpted appearance by doing calf raises daily, which help muscular growth in these areas. The ligaments, tendons, and muscles that surround the ankle joint are also strengthened by ankle raises.

    Do calf raises help you gain muscle?

    Standing calf raises are one of the best techniques to grow your calves. The gastrocnemius, the biggest muscle in the calf, is highlighted in this exercise. You can use weights for it or not. Step into an upright position with your feet shoulder-width apart.

    Why do you need strong calves?

    When you stand, the calf muscle provides stability and allows you to move your foot and lower leg. Whether you walk or run, it pulls you onward. In addition, you can “lock” your knee, bend your foot, jump, and spin your ankle.

    What does the calf muscle do primarily?

    The plantarflexion of the foot and ankle is controlled by the calf muscles. Activities like running and jumping use the calf muscles.

    References:

    • Physician, N. P. (2022a, 9 January). Exercise for calf raises: Muscle exercise, health benefits, how to perform? – Mobile. A mobile clinic for physical therapy. Exercise your muscles and improve your health with this calf raise exercise (https://mobilephysiotherapyclinic.in/).
    • Power, A. (2024, 26 March). Arsenal Strength: 7 Advantages of Calf Raises. advantages of calf raising https://blog.myarsenalstrength.com
    • Rise of the Calf. (n.d.). [Visual]. Calf-raises: Hingehealth. https://www.hingehealth.com/resources/articles
    • September 30, 2020, Myprotein. How To & Frequently Made Errors in the Standing Calf Raise Exercise The calf-raise exercise: a guide to typical mistakes. – MYPROTEINTM. MYPROTEINTM. https://www.myprotein.co.in/blog/training/
  • Text Neck Syndrome

    Text Neck Syndrome

    What is Text Neck Syndrome?

    Text neck, sometimes referred to as tech neck, is a syndrome that arises from placing our heads forward, which puts continuous tension on the neck area.

    Three things occur when you look down:

    • Your neck extends forward.
    • Your shoulders may elevate towards your ears or become rounded forward.
    • The muscles in your shoulders and neck begin to tense.

    Maintaining this position for extended periods might have negative effects on your cervical spine and neck in addition to your shoulder muscles and supporting ligaments.

    Because you typically don’t notice the consequences of your posture until it’s too late, text neck can be very annoying. Sometimes you’re so engrossed in what you’re seeing that symptoms don’t even occur to you until much later. Regretfully, there is a cascade-like effect.

    How does one develop text neck?

    The tilting of the head that usually happens when staring down at a phone or tablet screen is called “text neck.”

    Long-term staring down at our devices is the cause of the neck ache that results from this type of stress. Dr. Bang clarifies that while a few minutes here and there won’t make much of an impact, the length of time is what truly begins to damage your neck and spine.

    he says The real issue arises when you’re scrolling on TikTok for hours at a time, even reading a lengthy email or watching something on YouTube.

    What signs of text neck are present?

    • The discomfort in the neck: Prolonged or irregular neck pain is one of the primary indicators of text neck. Pain can range greatly from mild discomfort to excruciating pain that is debilitating.
    • Upper back pain: Pain or discomfort in the upper back that aches, especially in the area between the shoulder blades.
    • Pain or discomfort in the shoulder: The forward head posture can tense and strain the shoulder muscles.
    • Headaches: Issues with the neck can result in tension headaches, sometimes referred to as cervical dysplasia.
    • Restricted range of motion: Turning one’s head or looking up may cause discomfort for people who have stiff necks.
    • Muscle stiffness: Common symptoms include tightness and stiffness in the muscles of the upper back and neck.
    • Posture changes: Weakness in the muscles and strain on the shoulders and neck can aggravate someone’s posture.

    Other signs that may exist include:

    • Flattening of thoracic kyphosis
    • Early-onset arthritis (Cervical spondylosis)
    • Spinal degeneration
    • Disc compression
    • Muscle weakness & tightness
    • Loss of lung capacity

    How to Diagnosis Text Neck Syndrome:

    • Shoulders and neck are painful, either severely or sharply.
    • The degree of range of motion reduction has been linked to stiffness after exercising or tightness in the shoulder and neck.
    • headaches that are intermittent or persistent.
    • upper limb nerve pain accompanied by tingling and insensitivity.
    • eye pain.
    • X-ray imaging: X-ray imaging can detect problems such as bone spurs and anomalies in the degenerative spine.
    • Computed tomography (CT)
    • Magnetic resonance imaging (MRI)
    • Electromyography (EMG): A pinched nerve can be diagnosed with an EMG and nerve conduction study, which entails inserting a needle into a muscle to measure nerve signal speed.
    • Blood tests: To determine whether inflammation or infection is present, a complete blood count (CBC), erythrocyte sedimentation rate (ESR), and C-reactive protein (CRP) test might be performed.

    Treatment of Text Neck Syndrome:

    When using telephones or other hand electronic devices, bear in mind the following conditions from a systematic review of Text Neck:

    Refrain from overusing and take regular pauses.

    refused extended periods of immobility.

    Adjust the gadget so that it relieves pressure on the neck, head, and upper limbs.

    Keep clear of repetitive motions like long-term talking or swiping.

    Avoid holding bulky or heavy devices for extended periods in just one hand.

    For people suffering with text neck, rehabilitation was proven to be quite beneficial. A 2-4 week program for rehabilitation may begin with soft tissue mobilization, Grade 1 and 2 joint mobilization, active and passive stretching of tense muscles, muscular strengthening, posture retraining, and at-home exercise regimens.

    In active instances, the primary objective is pain alleviation. It is attainable through:

    • a common neck activity includes extending and rotating.
    • Exercises for the chin
    • Heat/ice packs
    • Massage
    • Medication for discomfort, facet joint injections, or trigger point therapy are options in severe chronic instances.

    Physiotherapy Treatment of Text Neck Syndrome:

    Pain Control:

    • Initially, modalities including electrical stimulation, heat therapy, cold therapy, or ultrasound may be utilized to assist reduce inflammation and pain.
    • Massage and soft tissue mobilization are two more manual treatment procedures that can assist reduce muscle soreness and stress.

    Soft cervical collar.

    Soft cervical collar.

    This is a cushioned neck ring that secures around the neck with Velcro. Your doctor may suggest wearing a soft cervical collar to help you relax the muscles in your neck and reduce neck motion. This may help lessen the pinching of the nerve roots that happens when the neck is moved. Wearing a soft collar for an extended length of time can weaken the muscles in your neck.

    Active neck movements for a range of cervical spine :

    • Neck Flexion and Extension: To extend your neck, gently tilt your head back. To flex your neck, gently lower your chin towards your chest.
    • Neck Side Bending: To extend the muscles in your neck, tilt your head sideways in the direction of each shoulder.
    • Neck Rotation: Look over each shoulder as you turn your head to the right and left.

    Strengthening Exercises:

    Exercise for scapular stabilisation:

    Exercise for scapular stabilisation
    Exercise for scapular stabilisation

    Goal: to ease neck pain

    • Start by laying down on your back with your arms hanging at your sides, your shoulders relaxed, and your head up.
    • Pull the shoulder blades back and down while repositioning the shoulders gradually.
    • When doing this move, the chest should only slightly thrust forward.
    • Hold for five seconds.
    • After doing the three repetitions twice a day, gradually extend the time.
    • Next, as a progression, a person can pull towards you with both ends of a thera band while performing a scapular squeeze.

    Isometrics Neck Exercise

    isometric neck exercise

    The purpose of isometrics is to strengthen the muscles in the upper back and neck.

    • Put your hand on your forehead.
    • Do not bend the neck in any way; instead, press the head against the palm.
    • Hold for five seconds.
    • Five times a day, repeat

    Levator scapular stretch:

    • The idea is to stretch the levator scapulae, which is often the big knot in your upper back.
    • Begin by adopting the proper seating position and lowering your shoulders.
    • Using one hand, grasp the seat’s bottom.
    • Turn the chin slightly towards the armpit until the other side of the neck feels comfortably extended.
    • Repeat on the other side, holding for ten seconds.
    • Do two sets of five repetitions every day.

    Chin tuck:

    Starting from an erect sitting position, tuck your chin slightly, creating the appearance of a double chin. Verify that your chin and nose are pointing upward rather than downward. Keep your posture for five seconds. Do this thirty times.

    Scapular Retraction:

    Sit up straight to begin. Tense the muscles between your shoulder blades by gently pressing them together. 30 repetitions of holding this posture for 5 seconds are required.

    Pectoralis Stretch:

    Stretch your pectoralis by placing one hand up to your shoulder level on a door frame. Bend forward gradually until you feel your chest stretching.

    Adjusting posture:

    Better posture might help to lessen the tension on the cervical spine. You might learn the right ways to sit, stand, and sleep from your physical therapist.

    Massage with effleurage to ease tense muscles:

    What is the process?

    A form of massage called effleurage aids in muscle relaxation and promotes lymph and blood flow. Effleurage, often known as gliding, is a widely used massage method that is applied in a way that avoids attempting to move the muscles that are immediately beneath the skin.
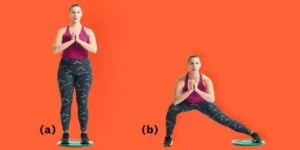
    Complications of Text Neck Syndrome:

    Text neck can result in more serious diseases or complications if left untreated, such as:

    • Chronic pain: If text neck is left untreated, it can eventually turn into upper back and chronic neck pain, which can have a serious negative impact on a person’s quality of life and day-to-day activities.
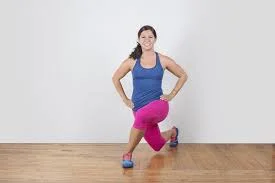
    • Muscle imbalances: The neck’s and upper back’s muscles and ligaments may become constantly strained, resulting in muscular imbalances. In addition to causing discomfort, this may have an impact on posture and general musculoskeletal health.
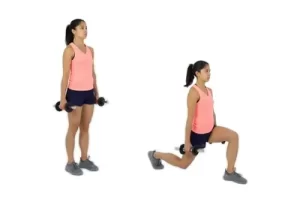
    • Spinal misalignment: Text neck may alter the spine’s natural curvature, which may result in disorders such as an excessively curved upper or lower back.
    • Degenerative disc disease: Improper posture can put more strain on the cervical spine, which can hasten the intervertebral discs’ deterioration. This could aggravate degenerative disc degeneration, which causes pain, stiffness, and reduced mobility in the affected area.
    • Nerve compression: Long-term compression of the neck’s nerves can result in disorders such as radiculopathy, or pinched nerves, which can cause discomfort, tingling, or numbness in the hands and arms.

    How to Protect Your Text Neck?

    Here are some preventive measures that can be useful:

    Adjust the way you hold the phone.
    To avoid having an excessively forward-leaning head, raise your phone to eye level. To align your ear with your shoulders, maintain a neutral spine, advises Cupp. This will stop the head from cocking forward.

    Take phone pauses.
    Every hour, even a quick two- to three-minute break from the phone can be helpful.
    The consensus for preventing text neck is to break the habit of looking down to use a phone or do any work, however, most people find this to be quite uncomfortable. Thus, Goodrich suggests that individuals attempt to deliberately take breaks from using their phones. Utilize a Post-it note or set up a computer or phone reminder. This small realization has the power to alter history.

    Check out the Text Neck app.
    A green or red light indicates the “instant real-time feedback” that an Android app called Text Neck gives you about your posture. Additionally, you can choose to have a beep reminder alert you when you’ve reverted to old, unhealthy behaviors.

    If your pain lasts for a long time, identify the source.
    It is advised to get adjusted if your pain lasts for a long time. This will aid with pain relief and will treat the structural problems that text neck causes over time. And perhaps they have a point. According to a reliable study published in 2007, chiropractic care is one of the main nonpharmacological treatments for both acute and chronic back and neck pain that is thought to be helpful.

    Practice yoga for ten minutes.
    Yoga is a superior approach to prevent and manage back and neck discomfort, according to Goodrich. The rationale is that it involves breath work, enhances body awareness, and assists with movement patterns. Daily yoga practices can help rectify muscular imbalances, such as tight rhomboids, which are the source of neck pain. Text neck conditions can be improved by performing the aforementioned exercises or by practicing yoga for ten minutes each day.

    Outlook

    The increasing usage of electronic gadgets has led to an increase in concerns around text neck syndrome. Text neck may go away in time if it is detected early and is not too severe. As long as a person practices proper self-care, such as better posture, consistent stretching, and using over-the-counter pain medications, this is acceptable.

    Rehabilitation can also be accelerated by lifestyle changes like reducing screen time and using ergonomic devices.

    Moderately severe cases could take several months to become betterTrusted Source. Exercises to strengthen the muscles in the neck and upper back, as well as physical therapy and chiropractic adjustments, may be helpful. Recovery depends on consistent devotion to these treatments and lifestyle modifications.

    Serious text neck sufferers could need extra time to heal, particularly if they also have other medical issues such as disc compression or nerve impingement.

    FAQs

    How much time does text neck syndrome recovery take?

    Recovery times from text neck syndrome can depend on several factors, including the severity of the condition, the patient’s overall health, their willingness to modify their lifestyle and adhere to treatment guidelines, and the specific therapy they use.

    How should someone with text neck syndrome sleep?

    Research suggests sleeping on the side or back if a person has upper or lower back pain, claims a 2019 review trusted Source. The authors do note that additional high-caliber research is required.

    How can someone with a text neck sleep?

    While sleeping on your side has its advantages as well, laying on your back keeps your spine in the most neutral posture.

    Which illnesses make text neck syndrome more likely to occur?

    Prolonged downward gaze with the cervical spine in flexion is the primary factor aggravating this clinical condition.

    Is massage therapy beneficial for tech neck?

    Massage is effective in easing stiffness and soreness in the muscles.

    Can text neck cause anxiety?

    Because incorrect posture patterns force the body to move forward and down, which can lead to hyperventilation, stress, and anxiety, they can also cause poor breathing, poor balance, and headaches in the neck and lumbar region.

    References

    • Parmar, R. (2022, June 11). Text Neck: Cause, Symptoms, Diagnosis, Treatment, Exercise – Mobile P. Mobile Physiotherapy Clinic. https://mobilephysiotherapyclinic.in/text-neck-cause-treatment-exercise/
    • Therapy, C. P. (2022, October 31). Text neck: Signs, Symptoms and What You Can Do. Clarity Physical Therapy & Wellness Center. https://claritypt.com/blog/text-neck-signs-symptoms-and-what-you-can-do/
    • Ames, H. (2023, November 10). What to know about text neck syndrome. https://www.medicalnewstoday.com/articles/text-neck-syndrome#faq
    • Clinic, C. (2024, June 27). How Your Smartphone May Be Giving You ‘Text Neck.’ Cleveland Clinic. https://health.clevelandclinic.org/text-neck-is-smartphone-use-causing-your-neck-pain
    • Dalwani, D. (2024, April 29). Cervical Radiculopathy – Cause, Symptoms, Treatment. Physical Therapy Treatment and Exercise. https://physical-therapy.us/cervical-radiculopathy/
  • Meralgia Paresthetica

    Meralgia Paresthetica

    Meralgia paresthetica is a medical condition that causes burning, tingling, and numbness in the outer thighs. The nerve that supplies feeling to the skin of the thigh is compressed, which is the reason behind it. Lateral femoral cutaneous nerve entrapment is another name for meralgia paresthetica.

    Meralgia paresthetica has been connected to numerous diseases, such as obesity, pregnancy, and weight gain. Meralgia paresthetica, on the other hand, might be caused by an accident or condition, such as diabetes. Wearing looser clothing is one of the conservative techniques that can help reduce meralgia paresthetica. If those approaches don’t reduce the symptoms, medication may be used. Surgery is rarely required.

    What is the Lateral Femoral Cutaneous Nerve?

    The area known as the lumbar plexus is the network of neurons that connects the lower back’s spinal cord along with the legs and lower body’s motor and sensory neurons, It refers to the point where the cutaneous nerve of the lateral femur branches out. It gives the front and sides of the thigh a feeling. This neuron does not control any muscles; it is purely sensory.

    The Lateral Femoral Cutaneous Nerve’s course

    • The lateral femoral cutaneous nerve can be derived via the dorsal branches of the second and third lumbar ventral rami. This nerve extends diagonally across the iliacus muscle after entering from the lateral edge of the psoas major muscle. It continues to the anterior superior iliac spine after that. It supplies innervation to the iliac fossa’s parietal peritoneum along the route. The right nerve travels between the caecum in a posterolateral manner. The peritoneum and iliac fascia both serve to differentiate it away from the caecum.
    • The inguinal ligament transports nerves from left to right through or behind it. Next to one another, they either go through or pass right next to the Sartorius muscle to enter the thigh from the anterior. They have been separated into two different types anterior and posterior.
    • The nerve’s anterior branching can be visible just inches below the anterior superior iliac spine. This branch then innervates the skin on the front and outside sides of the thigh. This innervation also affects the knee. The cutaneous units from the anterior branch of the femoral nerve were joined to the saphenous nerve’s infrapatellar units. All of these branches subsequently bring together to create the peripatellar plexus.
    • When compared to the anterior branch, the posterior branch breaks off from the fascia lata at a higher point. Then it splits off to supply innervation to the outer layer of skin. Via the greater trochanter, this innervation ascends to the middle of the thigh. The posterior branch may also provide sensation to the skin in the gluteal area.

    What is Meralgia Paresthetica?

    • Meralgia paresthetica is a disorder that produces burning, tingling, and numbness in the outer area of the thighs. The disorder is caused by compression of the lateral femoral cutaneous nerve (LFCN), which happens when you squash or apply pressure on it. This large nerve offers a feeling to the front and side of your thigh.
    • Itching, tingling, or scorching pain has been described as “paresthetica,” and thigh discomfort has been defined as “meralgia.”Although the ailment may cause discomfort, there is no risk to your life or health.

    Meralgia Paresthetica affects whom?

    Anyone can get meralgia paresthetica, however, the following circumstances raise your chance of getting it:

    • Diabetes, hypothyroidism, and/or alcohol use disorder.
    • Have obesity or be overweight.
    • Have lead poisoning.
    • Are hurt in an automobile accident while wearing a seatbelt.
    • Have been carrying a child.
    • Had surgery recently in the area of your hips.
    • Wear tight clothing, stockings, girdles, or a heavy-duty belt (like a tool belt).
    • Have two different lengths of legs.
    • Having scoliosis.

    How frequent is Meralgia Paresthetica?

    Although quite common, meralgia paresthetica is frequently misdiagnosed. According to research, it impacts three to four out of every 10,000 persons annually.

    What causes the Meralgia Paresthetica?

    The lateral femoral cutaneous nerves may have been compressed or pinched in disorders such as meralgia paresthetica. Sensory input gets transmitted through nerve endings on the skin that cover the outer thigh. The nerve does not affect your capacity to activate your leg muscles it just influences sensation.

    For a great number of individuals, this nerve crosses painlessly from the groin to the upper thigh. While the lateral femoral cutaneous nerve experiences compression with meralgia paresthetica. The inguinal ligament frequently entraps the lateral femoral cutaneous nerve. This ligament joins the abdominal cavity to the upper thigh via the groin.

    Any problem that raises pressure on the groin is a common cause of this compression, such as:

    • Tight garments, including corsets, belts, and tight pants.
    • An increase in weight or obesity.
    • Wearing a heavy tool belt.
    • Pregnancy.
    • There has been a significant build-up of fluid in the abdominal cavity, which has elevated intraabdominal pressure.
    • Near the inguinal ligament exists scar tissue from an injury or prior surgery.
    • Meralgia paresthetica can also be caused by nerve damage. Nerve damage can result from diabetes, surgical trauma, or injuries sustained from a car seat after an accident.

    What symptoms of Meralgia Paresthetica are present?

    • On one side of the body, the front of the upper thigh is the only area where meralgia paresthetica symptoms occur. Among them are:
    • Pain that could radiate to your knee’s outside side.
    • tingling, burning, numbness, or discomfort in your thigh.
    • Increased pain sensitivity ( for example touching your thigh lightly, can cause pain).
    • Increased discomfort with extended standing or walking.
    • Your muscles or mobility are not immediately impacted by meralgia paresthetica.

    What are the risk factors for Meralgia Paresthetica?

    The following factors may raise the risk of meralgia paresthetica.

    • Excessive weight. Your lateral femoral cutaneous nerve may experience increased pressure if you are overweight or obese.
    • Pregnancy. The lateral femoral cutaneous nerve is located in your groin and becomes increasingly stressed as your belly expands.
    • Diabetes. Meralgia paresthetica may be the result of nerve damage caused by diabetes.
    • Ages. The age group of 30 to 60 years old is more vulnerable.

    What are the diagnoses for the Meralgia Paresthetica?

    A physical examination and an evaluation of your medical history would enable the doctor who is treating you to confirm that you have meralgia paresthetica. A test can be necessary to determine how your thigh feels.

    Additionally, your medical providers could ask you to pinpoint the numb or uncomfortable location on your thigh and explain the pain. Tests may also be performed to diagnose nerve root issues, neuropathy, or femoral nerve impairment.

    They will undertake a practical test which is called the pelvic compression test in addition to an extensive physical examination. Strength and reflex tests are two more assessments that could be performed to help rule out other possible reasons for your symptoms.

    • Pelvic Compression Test: Your doctor will apply pressure to your thigh during this exam to rule out other possible causes of your symptoms. Other simple touch and reflex tests might be conducted.

    They’ll probably prescribe certain medical tests if they cannot identify the reason for meralgia paresthetica.To verify the following, they might order blood tests:

    • Thyroid hormone levels for hypothyroidism symptoms.
    • check your B vitamin levels for symptoms such as vitamin B12 or folate deficiencies, which can affect how well your nerves function.
    • Lead levels for lead poisoning unpleasant symptoms
    • Blood glucose levels to look for diabetes symptoms.
    • Hematocrit or hemoglobin checking needs to be performed if you are screening for symptoms associated with anemia.

    Your medical practitioner may also suggest:

    • Imaging study: An X-ray will not reveal any abnormalities associated with meralgia paresthetica. However, to rule out other medical diseases as the source of your symptoms, x-rays of your hip and pelvic region may be useful. Your doctor may arrange a computed tomography(CT scan) or magnetic resonance imaging (MRI) if they believe that a tumor is the source of your symptoms.
    • Electromyography: By analyzing and identifying abnormalities with the muscles and nerves, this kind of test examines the electrical discharges where the muscles release. An electrode, which looks like a tiny needle, monitors the electrical activity of the muscle. It could be necessary to perform this test to rule out other illnesses. To rule out additional health conditions, an examination might be necessary.
    • Nerve conduction study: Your skin can be subjected to a tiny quantity of electrical electricity by stimulating the nerve with electrode patches. Nerve injury can be detected with the use of electrical impulses. The lateral femoral cutaneous nerves on both sides can be compared to one another. Using ultrasonography to your advantage is one technique to assist with the needle.
    • Nerve block: Your meralgia paresthetica can be confirmed by an anesthetic injection that reduces pain at the site of your thigh’s lateral femoral cutaneous nerve entry. It is appropriate for directing the needle using ultrasonography.

    How is Meralgia Paresthetica treated?

    To treat meralgia paresthetica, the primary cause must be treated. A majority of cases are resolved with conservative measures.

    Conservative Treatment

    Among the conservative actions are: 

    • Wearing looser clothing is one example of a conservative action.
    • Losing extra weight.
    • Consuming over-the-counter painkillers. These could include ibuprofen (Advil, Motrin IB, etc.), aspirin, or acetaminophen (Tylenol, etc.).
    • Physical therapy helps prevent hip issues and improves the muscles in the legs and buttocks.

    Medication

    If conservative measures fail to relieve your discomfort or if your symptoms last longer than two months, you might think about the following treatments:

    • Injections of corticosteroids. Temporary relief from discomfort and inflammation reduction that is feasible with injections. Typical adverse effects include skin lightening near the injection site, discomfort, inflammation of the joints, and damage to the nerves.
    • Tricyclic antidepressants. These medications may help you feel better. The adverse effects consist of impaired sexual function, dry mouth, insomnia, and constipation.
    • Anti-seizure medications. Pregabalin (Lyrica), phenytoin (Dilantin, Phenytek), or gabapentin (Gralise, Neurontin).Pain relief may be achieved with these anti-seizure medications. Dry mouth, sleepiness, constipation, and decreased sexual function are all examples of the side effects.

    Surgery

    In rare cases, surgical decompressing of the nerve can be an option. Only those with severe and persistent symptoms should consider this route of treatment.

    Physical Therapy for the Meralgia Paresthetica

    The symptoms of meralgia parasthetica may be lessened with stretching and strengthening activities that assist the release of the compressed nerve. The exercises listed below may be able to reduce your problems.

    Psoas muscle stretch when standing

    Psoas muscle stretch when standing
    Psoas muscle stretch when standing

    The psoas muscle moves from the lower back towards the upper leg, traveling across the pelvis in its course. The purpose of this exercise is to lift the upper leg while simultaneously flexing the hip joint. To complete this task:

    • Stretch your legs shoulder-width apart after taking a step backward about two meters from a wall.
    • Position each of your palms on a vertical surface at shoulder height. You can also place your hands on your hips if that makes you more comfortable.
    • Lunge the pelvis in the direction of the sidewall as quickly as you experience stretching at the front of the hip. Keep your elbows fully extended if you are keeping in touch with the wall; if you have to support your hips, keep them flexed.
    • As you maintain this posture, take ten long, steady breaths.
    • At the very least, make sure to work out twice a day.

    Clamshell Exercise

    Clamshell exercise with a resistance band
    Clamshell exercise with a resistance band

    This workout strengthens the hip stabilizers.

    • For the initial step of the exercise, take a left-side stance, position both feet together, and curve your knees 45 degrees in the direction of your hips.
    • Expand your right side knee gradually. Return to your beginning posture by bending your knee after maintaining the stance for a brief period.
    • Change sides once you’ve completed 15 repetitions of the workout.
    • Create a target of finishing this at least once every day.
    • A person might wrap a resistance band around their thighs to add exercise intensity.

    Lunges

    Lunges
    Lunges

    Lunges are an effective way to strengthen and stretch key leg muscles, such as the gluteal, hamstring, and quadriceps, which are found at the front, rear, and side of the thighs, making up the buttocks. Lunges additionally help in enhancing balance. When performing a lunge more intensely, a person may choose to grasp a weight with each hand. To engage in a lunge:

    • Maintain a straight posture while placing your hands on either side.
    • With the right leg, take a large step forward and place both hands on your hips. Keep both arms straight against the sides if you are holding weights.
    • While you drop, your right shin may be upright, but the right side of your thigh must remain parallel to the floor. Verify that the right knee does not extend over the toes of the right foot. There should always be a noticeable toe peak.
    • Repeat the exercise on the other leg after 15 repetitions.
    • Do three sets of lunges on each side once or twice a day.

    Other exercises

    Thirty minutes of physical activity three or four times a week should help reduce the pain associated with meralgia paresthetica. Some exercises to try are:

    • Brisk walking
    • Low-impact exercises
    • Water aerobics 
    • Swimming
    • Cycling outside or on a stationary cycle

    What is the prognosis for meralgia paresthetica?

    • In cases of paresthetic meralgia, the prognosis is usually good. With conservative therapy, over 85% of individuals with meralgia paresthetica recover.
    • Patients who have undergone surgery or suffered a direct nerve injury usually recover in three months.
    • Conditions related to pregnancy usually get better once the baby is born.

    What occurs if the meralgia paresthetica is left untreated?

    Meralgia paresthetica may worsen discomfort, induce numbness, or produce burning sensations if treatment is not received. It could be difficult for you to walk or move as you usually do because of these negative effects.

    What are the prevention for Meralgia Paresthetica?

    • One cannot avoid meralgia paresthetica. To reduce the probability of getting it, do the following:
    • keeping yourself at a healthy weight.
    • wearing clothes loosely.
    • Steer clear of belts and girdles, especially tool belts.

    Summary

    Thigh pain and feelings of burning, numbness, stabbing, and aching are caused by a physical illness known as meralgia paresthetica. Meralgia paresthetica might have uncomfortable and unpleasant symptoms, but it is not harmful to your health. See a medical professional if the illness is affecting your quality of life. They can determine the root of the issue and offer treatments.

    FAQs

    How should meralgia paresthetica be treated?

    Treatment for Meralgia Paresthetica
    Physical therapy reduces hip injuries and strengthens muscles in the legs and buttocks.
    Putting on less constricting apparel.
    Controlling weight loss.
    Injection of corticosteroids to decrease swelling.

    Is paresthetic meralgia a serious condition?

    Your front and side thighs receive your sensation from this big nerve. “Thigh pain” is commonly known as “meralgia,” whereas “burning pain, tingling, or itching” is described as “paresthetica.” The condition can be uncomfortable, but there is no chance that you will die from it.

    How should someone with meralgia paresthetica sleep?

    The most practical technique is to insert a pillow between your legs and sleep on the side that pains. (If your left thigh is burning, sleep on your right side.) This may lessen the nerve’s compression to the point where you can fall asleep.

    Does meralgia paresthetica worsen with sitting?

    Long periods of sitting or standing are thought to be risk factors for Meralgia Paresthetica, even though brief periods of sitting may not cause symptoms.

    Which workout is ideal for those with meralgia paresthetica?

    Lunges are regarded to be the most effective exercise for meralgia paresthetica. It is a multi-joint workout that improves lower-body muscular tone and strength. The quadriceps, hamstrings, and gluteal muscles are the main leg muscles that are stretched during this exercise.

    Is meralgia paresthetica able to recover by itself?

    A condition like meralgia paraesthetica is difficult to self-diagnose because, even though the condition can heal itself, if you just “hope” that the trapped nerve will somehow release itself, it won’t go away; instead, the condition will just persist until the pressure on the nerve is unintentionally applied.

    How can I get rid of the burning feeling?

    Anti-inflammatory medicines including prescription or over-the-counter painkillers are capable of helping you control the burning pain. A doctor can also advise you on certain at-home treatments that might be able to help with your illness.

    References

    • The lateral femoral cutaneous nerve. (2023, November 2). Kenhub. https://www.kenhub.com/en/library/anatomy/lateral-femoral-cutaneous-nerve
    • Meralgia paresthetica: Symptoms and causes: Mayo Clinic. (2024, January 26). Mayo Clinic. https://www.mayoclinic.org/diseases-conditions/meralgia-paresthetica/symptoms-causes/syc-20355635
    • Professional, C. C. M. (n.d.). Meralgia Paresthetica. Cleveland Clinic. https://my.clevelandclinic.org/health/diseases/17959-meralgia-paresthetica
    • Mayo Clinic: Meralgia paresthetica: Symptoms and Causes. (2024, January 26). https://www.mayoclinic.org/diseases-conditions/meralgia-paresthetica/diagnosis-treatment/drc-20355639
    • Meralgia Paresthetica. (2020, March 27). Johns Hopkins Medicine. https://www.hopkinsmedicine.org/health/conditions-and-diseases/meralgia-paresthetica
    • Barrell, A. (2020, December 23). Which activities are most effective for treating meralgia paresthetica? https://www.medicalnewstoday.com/articles/meralgia-paresthetica-exercises#summary
    • OrthoInfo – AAOS – Burning Thigh Pain (Meralgia Paresthetica). https://orthoinfo.aaos.org/en/diseases–conditions/burning-thigh-pain-meralgia-paresthetica/
  • Lunges Exercise: Benefits, Type, Variations, How to Do?

    Lunges Exercise: Benefits, Type, Variations, How to Do?

    What is the Lunge Exercise?

    • Lunge exercises are excellent for strengthening the legs and buttocks.
    • Lunge exercise primarily works for your lower body’s major muscular groups.
    • This raises your metabolism, which speeds up the weight loss process.
    • After you lose this excess fat, lunges improve the strength and form of your lower body.
    • Due to the fact that lunges work on both sides of the leg separately, they are categorized as lower-body unilateral exercises.
    • Your stabilizing muscles are activated during one-leg movements, which improves joint stability, balance, and coordination.
    • The lunge is a popular leg-strengthening exercise that may liven up your routine because there are so many variations available.
    • You can use different variations of lunges to activate different muscles or specific sections of those muscles.
    • Both the prevention of injuries and the recovery process following leg injuries can benefit from this exercise.
    • It frequently forms a part of a rehabilitation protocol or basic strength program, letting athletes and sportsmen get back to their favorite activities as quickly as feasible.
    • Another useful exercise that gets you ready for actions you’ll need in everyday life is the lunge.
    • Walking includes getting up quickly from the ground, sprinting up or down steps, and climbing.

    What muscles work during a Lunge?

    Many muscles are utilized to stabilize and move the upper and lower bodies during a lunge exercise.

    • Quadriceps muscle
    • Gluteal muscles
    • Hamstrings
    • Calves (gastrocnemius and soleus)
    • Transverse abdominis
    • Obliques

    Benefits of Lunges Exercise:

    Here are some advantages of performing lunges;

    • Improved balance

    Exercises like lunges train one side of your body separately from the other at the same time.
    By doing this, you can achieve the best possible physical balance and coordination.
    Lunges provide far more stabilizing advantages than exercises like squats and deadlifts.

    • Makes the gluteal muscle and legs stronger

    The gluteal muscles and legs can be effectively strengthened using lunges. Lunges strengthen all the lower body muscular groups, which increases metabolism and speeds up weight loss. Once excess fat is eliminated, lunges promote the strength and form of your lower body.

    • Flexibility in the hips

    In most other types of training, flexor muscles get overlooked during a workout.
    Sedentary lifestyles are an important factor in stiff flexor muscles.

    • Improved spinal health

    Lunges help the strain that many workouts place on your spine by giving it a moment to rest.
    Lunges relieve tension and restore mobility to your spine while you work on other areas of your body.

    • Excellent workout for runners

    Lunges are an excellent exercise for runners since they involve similar muscular activation as running. The steps that are done before landing are similar to a running stride.

    • Lunges are easy to do and quite helpful

    Lunges are an excellent way for anyone, regardless of fitness level, to start strength training. You can become good at this equipment-free technique and gradually progress to more difficult variations. You can begin at your own house, at the fitness center, or even during your midday meal at work.

    What is the correct way to perform Lunges Exercise?

    It’s important to perform lunges correctly and comfortably. To prevent injury, you shouldn’t put too much strain on your knee and hip joints.

    Here, we go over how to perform a correct lunge;

    • Your quadriceps, hamstrings, and glutes will all get stronger with lunges.
    • You’ve stepped your right leg forward in front of you and positioned your feet together on the ground for this.
    • Press your left knee to the floor while keeping your right leg at a 90-degree angle.
    • You can examine your body’s alignment and posture by examining yourself in a mirror.
    • You must take a step off with your right foot in order to return to the starting position.
    • Step forward with your left leg while extension at the hips, and lower your right knee to the ground.
    • Then relax.
    Lunge Stretch Exercises
    Lunge Stretch Exercises

    Lunges Exercise Video

    Lunges Exercise Variations:

    The lunge has several different versions. All of them exercise the same muscles, although some are worked more than others. To add variation and difficulty to your workout, you may perform a different version each time or mix and match different variations.

    Low Lunge

    • Start the downward dog position by putting your right foot in front of your hands as soon as you let go of the breath.
    • Bend your left knee toward the floor and plant the toe of your left foot on the ground.
    • Take a breath, raise your chest, and put your head to the sides.
    • Breathe out for a short while from the low lunge stance.
    • Take a step back, exhale, place your hands on the floor, lift your left leg, and then lower yourself back into downward dog.
    • Continue with the other leg.
    • Return to your neutral position.
    • Then relax.
    Low Lunge Pose (Anjaneyasana)
    Low Lunge Pose (Anjaneyasana)

    Walking lunge

    Walking forward is the main way to perform the walking lunge, but it can also be done backward.

    • You must maintain a wide stance with your feet spread apart.
    • As you raise your right leg forward and drop it until your knees make a 90-degree angle, bend both of your knees.
    • Lean forward with your left leg.
    • Step up after each lunge, utilizing both legs to push off.
    • Continue doing this on a different leg until it becomes comfortable.
    • The forward lunge is one type of walking lunge that is employed.
    • This type of walking lunge requires less balance and is simple.
    • Then, by adding some weights, you can further increase the difficulty.
    • Start with a lighter weight and work your way up to a heavier one if you want to make it more difficult.
    • Then relax.
    Walking lunge
    Walking lunge

    Lateral lunge

    • The only distinction between the lateral lunge and the forward-stepping lunge is that the latter requires you to move your foot to the side.
    • A single one that is in movement. 
    • A greater priority is placed on the adductors, a kind of muscle found in the inside thighs.
    • This involves keeping your feet apart, bending your right knee to a 90-degree angle as you go down, and moving your right leg sideways while holding the same upright position.
    • Return to the beginning position now.
    • Use this for your left leg.
    • Then relax.
    lateral-lunges-
    lateral-lunges-

    Curtsy lunge

    In this lunge version, we focus extra on the gluteus medius and hip adductor muscles. During the gritty lunge, the gluteus medius stabilizes your pelvis.

    • This exercise requires you to bend both of your knees until your front thigh is just parallel to the floor.
    • It would help if you stood with your legs crossed so that the heel of your back foot would rise off the ground.
    • Your knees will go straight to your toes if you attempt to tighten your core muscles.
    • During this exercise, the gluteus medius stabilizes your pelvis while you lunge with your legs crossed, and the inner thigh muscles maintain that position as you drop.
    • You have to extend both of your legs to do this.
    • With the opposite leg cross, perform the previously described movement once more.
    • Then relax.
    curtsy-lunge
    curtsy-lunge

    Lunges with dumbbells

    You will need two dumbbells of the same weight that you can lift comfortably while performing lunges for this type of lunge workout.

    • Put your left foot back and your right foot forward, nearly three feet apart, this is how you should stand for this exercise.
    • Dumbbells must be held in both hands and by your sides.
    • Your knees must be bent in order to lower your body to the ground.
    • Instead of lowering forward, keep the front knee straight and avoid letting it go past the toes.
    • Maintaining your posture with your trunk straight and your abs strong, pull through the front of your heel to reset you.
    • It is best not to lock your knees when lunging.
    • Then relax.
    Dumbbells Lunges
    Dumbbells Lunges

    Split Squat With Rotation

    An exercise for strengthening muscles, lower body power, coordination, and stability that can be done on one leg is the split squat.

    This exercise will test your glutes and core muscles because it involves an elevated split squat plus an additional trunk rotation in the opposite direction.

    • Place your right foot on top of it so that it rests on the toe.
    • At this point, regain your balance and extend both of your arms to the sides.
    • At this point, you must lunge while bending your left leg.
    • Raise both arms above your head and shift your entire body to the left.
    • Next, face forward and raise yourself to a standing position.
    • To complete this workout, you must step up three to four feet.
    • Then relax.
    Split-Squat-With-Rotation
    Split-Squat-With-Rotation

    Bodyweight Reverse Lunge

    • Maintain a shoulder-width distance between your feet.
    • You can do this by putting your hands together in front of your chest or by touching your hips.
    • Here’s where we start.
    • Raise your right foot and take a few backward steps, making sure that you touch down on your foot’s base rather than the bottom of it.
    • You should be nearly parallel to the ground once you have bent both legs.
    • To avoid having an arched or rounded back, your body should bend slightly forward.
    • Together with a tightened core and butt, you ought to bend your left knee over your left foot.
    • To get back to where you were before, push from your left heel.
    • Once you have completed all the repetitions on one leg, move on to the other.
    • If you’d rather, you can even switch up the legs.
    • Then relax.
    Alternating-Reverse-Lunge
    Alternating-Reverse-Lunge

    Jump Lunge

    • Continue to stand with your shoulders shoulder-width apart, your core firm, and your posture straight.
    • Slide your left leg backward while maintaining strong forward foot planting with your entire body supported by your feet’s heel.
    • To switch your legs midway through a jump, bend forward and bring your right leg back.
    • Ensure your chest is raised and use your arms to help you jump wildly before landing with both legs bent 90 degrees.
    • Continue alternating legs without letting your knees get out of alignment.
    • Then relax.
    Jump Lunge
    Jump Lunge

    Use this advice to work safely:

    • Before beginning an exercise routine, make sure your body is warmed up appropriately.
    • If exercising hurts, you should stop.
    • Increase the length and repetition count of your workout gradually to prevent overdoing it and causing tight muscles.
    • Always use good form when exercising to avoid physical harm and to achieve the intended results.
    • Try to wear clothing that won’t significantly limit your range of motion while you are working out. Wear relaxed clothing instead.

    When should you stop exercising the lunge?

    • Hip damage
    • Injury to the knee
    • In recent leg surgery
    • If any pain arises while performing the workout.
    • Use the easy form of this exercise if you have trouble with your balance.
    • If as you exercise your pain increases.

    When doing lunges, what typical mistakes should you avoid making?

    To maximize performance and reduce damage risk when lunging, stay away from these typical mistakes;

    • Not warming up

    To avoid strains or pulls, warm up your muscles before lunging.

    • Overloading

    To avoid putting undue strain on your joints, avoid overextending by keeping your front knee in line with your ankle.

    • Lying forward

    To avoid putting too much strain on your back, keep your posture straight and make use of proper muscles.

    • Repetition speeding

    To guarantee correct form and muscle engagement, concentrate on thorough motions rather than completing repetitions quickly.

    • Foot placement ignored

    If you want to stay stable and avoid twisting, make sure both feet are firmly planted and pointed forward.

    Summary:

    Lunges are a well-liked and adjustable strengthening exercise. It provides several advantages and activates a lot of muscles at once. Switching up your technique lets you highlight different muscles or areas of them.

    Both injury prevention and recovery are helped by this exercise regimen. It is often included in a basic strength program or rehabilitation treatment, allowing athletes and exercisers to return to their intended sport or activity as quickly as possible.

    Add this exercise into your routine, and enjoy the variations to maintain it interesting.

    FAQs

    Why are lunges a beneficial exercise?

    The quadriceps, hamstrings, and glutes are among the big lower body muscles that are worked out during lunges. Strength training exercises like this one can improve flexibility, reduce muscular imbalances, and raise metabolism. It is common practice to perform the forward lunge variation of this exercise.

    Are thighs slimmed by lunges?

    The best exercise for lowering thigh fat is lunges. They target your glutes, quadriceps, hamstrings, and thigh adductors in addition to increasing muscle strength and metabolism.

    Can I perform lunges daily?

    Because your muscles need extra time to repair, you shouldn’t practice lunges with weights more often than every other day. On the other hand, doing bodyweight lunges every day of the week has advantages.

    How much should I practice a lunge?

    Three to four sets of fifteen to twenty bodyweight lunges in each leg are recommended. Beginners should work each leg 10–12 times during their first few sets. Use a weight that allows you to perform 12–15 lunges on each leg for three sets if you’re using a barbell or dumbbell to add external resistance to your lunges.

    What is the best lunge variation?

    For applying transverse plane loads to the knee and regulating tri-planar motion, transverse and curtsey lunges are excellent exercises. Most people believe that rotational lunges are a step up or more complex than standard forward or backward lunges.

    What three advantages do lunges have?

    It helps build muscle, develop your lower body, and give you the ideal pair of buttocks you’ve always wanted. Lunges are very safe, easy to learn, and don’t require any special equipment, which is their best feature.

    Is performing lunges every day advisable?

    Although lunges are an excellent exercise to include in your training regimen, you don’t have to perform them every day, particularly if you’re performing weighted lunges.

    How quickly should I perform lunges?

    Moving into lunges too quickly and carelessly increases the risk of injury, particularly to the knees and lower back. Form is important to me, but when working hard to achieve a goal, you should make the most of your efforts and minimize any dangers.

    What is the target of a lunge?

    Large lower-body muscles, such as the quadriceps, hamstrings, and glutes, are worked during lunges. This strengthening exercise can improve flexibility, speed up metabolism, and serve to treat muscular imbalances. The forward lunge is the variation of the exercise that is most frequently performed.

    References:

    • N. P. (2023f), a physiotherapist, December 13. Exercises: Lunges: Advantages, Type, Variations, How to Perform? Mobile Clinic for Physiotherapy. Exercise for the Lunges: https://mobilephysiotherapyclinic.in/
    • April 14, 2023: Mpt, T. E. P. Lunges Employ Which Muscles? The website Healthline provides information about fitness exercises, including lunges and exercised muscles.
    • (2024, May 10). Ningthoujam, N. The top ten lunge variants to work on your butt. The following link: https://www.healthshots.com/fitness/muscle-gain/lunge-variations/
    • February 14, 2023: Nasm-Cpt, R. B. Lunges: How Strength Is Built by the Seven Advantages. You can improve your physical condition and muscle power by doing lunges. reputable Rx website
    • Image 2, Daisy. August 8, 2021i. Exercise Guide with Illustrations: Walking Lunges. Walking lunges are an exercise type that can be found on SPOTEBI.
    • Image 6, Dumbbell Lunges in Opposition. (2021b), October 1. Press My Keyboard. alternating dumbbell lunges at https://hitmymacros.com/exercises/
    • Image 7, On June 13, 2024, Cpt., P. W. The Correct Form, Variations, and Frequently Made Errors in Lunge Technique. well-fitting. This page describes how to do lunge variations, modifications, and mistakes (123,320).
    • Image 9, P. T. Food (2016) 22 January. Segment leaps. Our Meal Plan Blog for Losing Weight. split-jumps are discussed in https://www.personaltrainerfood.com/blog/

  • Polyneuritis

    Polyneuritis

    What is Polyneuritis?

    The simultaneous inflammation of several peripheral nerves throughout the body is the hallmark of a medical condition known as polyneuritis. Numerous symptoms, including numbness, discomfort, muscle weakness, and loss of reflexes, can be caused by this condition.

    When these nerves become inflamed, it disrupts normal nerve function, leading to a range of symptoms such as numbness, tingling, pain, and muscle weakness.

    Types of Neuritis

    • Multiple neuritides or polyneuritis
    • Brachial neuritis
    • optic neuritis
    • Also known as peripheral neuropathy,
    • peripheral neuritis
    • Neuropathic vestibular pain
    • Bell’s palsy, also known as arsenic neuritis, is a common manifestation of cerebral neuritis

    Often, only one nerve is affected rather than a widespread disruption of the nerves. However, occasionally the cause is a tumor pressing on the nerve or damage to the nerve from a gunshot, blow, or cut.

    The sciatic nerve, a large nerve that descends from the spinal cord into the lower limb, can become inflamed or damaged. Additional causes include back pain, rheumatoid arthritis of the spine, or nerve strain from certain types of labor.

    Neuritis of the Spinal Nerves: For example, chest pain associated with inflammation of the nerves between the ribs may be indicative of pleurisy or a true coronary blockage (heart attack). Additionally, there are several traumas or diseases that might affect the nerves that travel from the neck to the arm. For example, brachial paralysis is caused by excessive force applied to the fetus’s neck nerves during complicated obstetrical births.

    Neuritis of the Cranial Nerves: Chewing, a draft of chilly air, and other variables can delay it.

    Optic neuritis: Optic neuritis refers to any of the various conditions in the nerves that supply the retina of the eye; it can impair vision and necessitates rapid medical attention. The eighth cranial nerve, which aids in preserving the inner ear’s sense of balance, can occasionally sustain damage from the antibiotic streptomycin. Any abnormality that affects speech, swallowing, taste, hearing, vision, balance, or cranial nerves should be reported to a physician or healthcare professional very away.

    Cause of Polyneuritis

    Polyneuritis, or peripheral polyneuropathy, can result from various underlying conditions and factors. Some common causes include:

    1. Infection:
    • Simplex herpes
    • Shingles
    • Guillain-Barre syndrome
    • leprosy
    • Chemical injuries
    • Physical injury
    • Medicines for radiation: Vinblastine, Pergolide, and Disulfiram

    The following conditions can cause localized neuritis, which affects just one nerve:

    • Diabetes, 
    • localized injury, 
    • Diphtheria

    Underlying medical conditions can cause polyneuritis (pain affecting several nerves):

    • Vitamin B12 Deficiency
    • Beriberi
    • metabolic diseases
    • Diabetes 
    • Hypertension
    • Porphyria
    • Viral or bacterial infections
    • An inflammatory disease, especially multiple sclerosis
    • Alcoholism Alcohol 
    • Cancer
    • Migratory sensory neuropathy of Wartenberg

    Symptoms of polyneuritis

    Polyneuritis presents with a range of symptoms due to the inflammation and dysfunction of multiple peripheral nerves. Common symptoms include:

    • Numbness, tingling or tingly feelings, and “stinging” (also known as paraesthesia)
    • Burning feeling in the hands or feet
    • Abrupt onset of discomfort and extreme sensitivity to touch (sometimes referred to as allodynia).
    • Weakness in the limb, possibly brought on by atrophy or weak muscles.
    • Incapable of walking straight, easily stumbling or falling.
    • Difficulty swallowing

    Depending on the underlying cause, polyneuritis symptoms can vary, however the following are the most typical ones: tingling or tingling sensations, numbness, “stinging” (sometimes referred to as paraesthesia); lack of feeling in the legs and arms; burning feeling in the hands or feet; abrupt onset of pain; allodynia, or acute sensitivity to touch; limb weakness, potentially brought on by atrophy or weakening of the muscles; unable to walk steadily and prone to stumbling or falling; trouble swallowing.

    Symptoms can vary in severity and may develop gradually or suddenly, depending on the underlying cause and progression of the condition.

    Diagnosis

    A thorough physical examination is the first step towards accurately diagnosing and characterizing neuritis, as it helps identify and pinpoint any symptoms of a specific nerve or distribution of nerves.
    In addition to evaluating if the conditioning process impacts motor, sensory, or sensorimotor nerves, an examination will look at the time course, distribution, severity, and nerve dysfunction.

    A more careful investigation may employ precise techniques appropriate for the affected nerves once the lesion has been localized.
    Blood tests should be performed to detect serum B12 and blood glucose levels along with their metabolites. If the physical examination and record are consistent, additional assessments of specific vitamins or toxins may be performed. However, a number of disorders linked to neuritis are diagnosed clinically and do not require a specialized diagnostic test.

    Treatment of Polyneuritis

    Medical treatment

    Topical medications such as creams like capsaicin, which can be applied to the affected area to cause either a loss of sensation or a hot pepper-like sensation, lidocaine patches on the skin, antidepressants such as doxepin, amitriptyline, and nortriptyline, which interfere with chemical reactions in the brain and spinal cord to relieve pain, duloxetine (Cymbalta), venlafaxine (Effexor XR), are some other antidepressants that help relieve the pain primarily caused by diabetes, anti-seizure medications such as pregabalin (Lyrica) and gabapentin (Neurontin, Gralise) have been proven to be helpful in treating epilepsy.

    For the disorder, opioids such as tramadol (Ultram, Conzip) and oxycodone (Roxicodone, Oxycontin) are some additional pain relievers in case over-the-counter treatments don’t work. In addition to prescribing a wheelchair, walker, foot braces, or cane, the doctor may also recommend physical therapy as a means of relieving the patient’s discomfort and enhancing mobility.

    IV immunoglobulin and plasma exchange therapy, which involves removing specific proteins and antibodies from the blood, as well as transcutaneous electrical nerve stimulation (TENS) therapy, which involves applying electrodes to the skin and passing mild electric current at various frequencies, can also be helpful in treating inflammatory conditions. When non-surgical methods fail, surgery might be used to relieve the pressure that tumors are placing on the nerves.

    Physical therapy treatment

    Although aerobic and flexibility exercises have many general benefits, patients with polyneuritis particularly need to increase their heart rate and range of motion. Engaging in physical activity helps improve blood circulation, which increases oxygen delivery to nerve tissues.

    Go for a Walk

    If you find it difficult to walk right now, start out slowly by going to the mailbox or a nearby location. A stroll is just the beginning.

    Resistance Exercise

    Not everyone is a bodybuilder, and that’s okay. Resistance exercise, whether it’s lifting five-pound weights or performing pushups or situps, can enhance blood flow and flexibility when included in everyday routines.

    Stretching Increases Flexibility

    Remember that your body needs to heal and that healing occurs when you continue to be active and allow blood to continue to flow.

    Take a cue from the tortoise and the hare: perseverance is more important than speed when it comes to reaching your destination.

    Enhancing symptoms is another purpose for a number of medicines. Based on the severity of a patient’s condition and their goals, doctors determine which therapy is ideal for a certain patient.

    Complications of polyneuritis

    Patients with chronic polyneuritis may burn themselves or cause an open injury to themselves without realizing it since they commonly lose the capacity to feel pain and warmth.
    The individual may experience diarrhea or constipation, as well as a loss of bladder and bowel control if the affected nerves are located in the internal organs. Polyneuritis in extra also manifests as abnormally low blood pressure and disruption in sexual function.

    Guillain-Barre syndrome is among polyneuropathy’s most serious complications. This is an acute, recurrent, progressive illness where nerves are attacked by the body’s immune system as soon as they leave the spinal cord. The patient will first experience tingling and weakness in one limb, then spread across the entire arm.
    Guillian-Barre syndrome is a chronic disease called chronic polyneuritis. Since 30% of people are likely to require a wheelchair, early identification and treatment are crucial.

    These entail controlling any underlying cause and maintaining a well-balanced diet. Regular exercise and the intake of vitamin B supplements can both help. There are other actions that can be taken, such as quitting smoking, managing stress, and consuming too much alcohol. Medical professionals may also advise patients to practice relaxation techniques.

    Conclusion

    A condition known as polyneuritis is characterized by inflammation of several peripheral nerves, which can cause a range of symptoms including tingling, discomfort, numbness, and weakening in the muscles. It can be caused by infections, autoimmune disorders, nutritional deficiencies, exposure to toxins, chronic diseases, and certain medications.

    Effective management of polyneuritis involves addressing the underlying cause, using medications for symptom relief, engaging in physical therapy, and making necessary lifestyle changes. If you experience signs of polyneuritis, seeking medical advice is crucial for proper care and management.

    FAQs

    What is the course of polyneuritis?

    Many peripheral nerve problems can be caused by infections, toxins, medicines, malignancies, nutritional deficiencies, diabetes, autoimmune illnesses, and other conditions.

    What is polyneuritis a vitamin deficiency?

    Pregnancy may be made more difficult by polyneuritis, a nerve illness that typically results from a vitamin B shortage. This is especially prevalent if the patient has experienced severe and protracted vomiting. The gestation is unaffected by polyneuritis.

    Are polyneuritis and polyneuropathy the same thing?

    A condition known as polyneuritis, sometimes known as polyneuropathy, is characterized by abnormal peripheral nerve function in one or more peripheral nerves. Motor weakness, sensory loss, and pain in varied degrees follow. In affected areas, tendon reflexes are either absent or severely reduced.

    Can polyneuritis be cured?

    Improvements may occur for certain individuals if the underlying problem is treated. For others, there is irreversible harm. In certain situations, the symptoms could worsen over time.

    Does neuritis have a cure?

    Treatment for Peripheral Neuropathy
    Your healthcare professional will take care of any underlying diseases, such as diabetes, before treating the pain and other neuropathy symptoms.

    What is the most effective way to treat neuritis?

    Depression and problems with the bladder can also be treated with duloxetine.

    Is neuritis a severe disease?

    In extreme cases, it might cause paralysis. Depending on where the disease is present, there are several forms of it. Signals that travel from the spinal cord to the arm, hand, and shoulder are often carried by active nerves.

    What does neuritis look like?

    One common way to characterize leprosy is as a direct brain infection caused by the mycobacterium leprae pathogenic organism.

    References

    • Hirpara, D. (2023, December 13). Polyneuritis – Cause, Symptoms, Treatment – Samarpan. Mobile Physiotherapy Clinic. https://mobilephysiotherapyclinic.in/polyneuritis/
    • Symptoms and Complications of Polyneuritis. (2024, July 10). Vinmec International Hospital. https://www.vinmec.com/eng/article/symptoms-and-complications-of-polyneuritis-en
    • Sharma, A. (2024, July 30). Polyneuritis: Treatment, Procedure, Cost, Recovery, Side Effects And More. Lybrate. https://www.lybrate.com/topic/polyneuritis