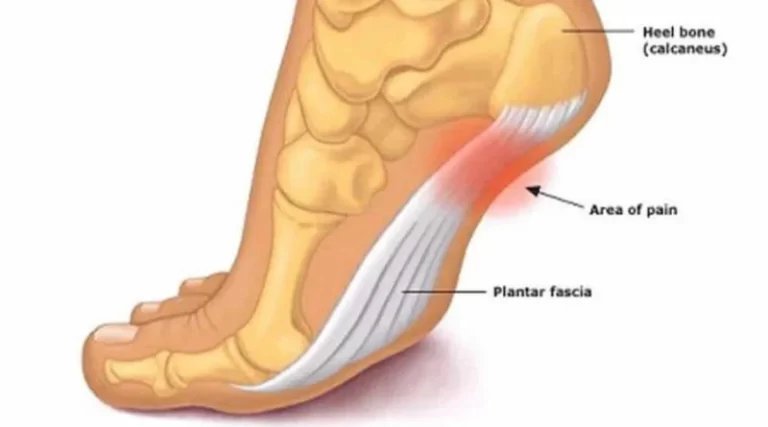
Blog

  • Shoulder Hand Syndrome

    Shoulder Hand Syndrome

    What is Shoulder-hand syndrome?

    Shoulder-Hand Syndrome, also known as Complex Regional Pain Syndrome (CRPS) Type I, is a chronic pain condition that typically affects one of the upper limbs, such as the shoulder, arm, or hand. It usually follows an injury or surgery and is characterized by severe pain, swelling, and changes in skin color and temperature in the affected area.

    The exact cause of Shoulder-Hand Syndrome is not fully understood, but it is believed to involve an abnormal response of the nervous system to injury.

    • A disorder that affects people over 50 who have had an acute MI, a cerebrovascular accident, or a head trauma. It is characterized by shoulder discomfort, swelling, stiffness, vasomotor signs in the arm and hand, and skin edema/in duration.
    • Reflex sympathetic stimulation has been linked to shoulder-hand syndrome; some patients go on to develop sclerodactyly, adhesive capsulitis, and reduced range of motion as a result of regional demineralization.
    • The hand may get hot, sweaty, and bloated due to a loss of muscular mass. Recovery that occurs on its own is typical, but it can take up to two years.
    • Steinbrocker syndrome, commonly referred to as reflex sympathetic dystrophy syndrome, is a term used to describe a complex of integrated finger contracture symptoms as well as ipsilateral hand discomfort and edema that are related to shoulder pain and shoulder mobility disorders.
    • 90% of patients had a 50-year-old age at onset, with a slightly higher proportion of women than men.
      In most cases, the shoulder-hand syndrome begins as a reflex dystrophy accompanied by causalgia, which is a sore shoulder.
    • Additionally, this is linked to pain and edema on the affected side of the hand.
    • A stiff shoulder becomes more and more uncomfortable as a result of underusing the affected muscles.
    • The hand starts to enlarge uniformly and slowly loses its range of motion in the finger joints.
    • In response to pain that is felt remotely, the sympathetic nervous system in the affected area initiates a reflexive efferent reactive vasomotor action.
    • (1) The patient reports that they have a burning sensation in their hand that is concurrently chilly and clammy or cold, red, wet, stiff, and touch or pressure-sensitive on the surface.
    • (2) The skin has grown, the hand looks white and creaseless, and it is getting colder and stiffer.
    • (3) Osteoporosis may become visible on an x-ray, and the hand appears pale and thin with muscle atrophy (guttering) and joint contractures. The hand and arm are usually non-functional and unusable at the end of this process.

    Pathology:

    • The distal degeneration of small-diameter peripheral axons may be the cause of shoulder hand syndrome, which manifests as discomfort, edema, osteopenia, and vasomotor instability.
    • Cortical alterations point to a potential pathophysiological role.
    • Damage to Nerves: It’s believed that a nerve insult at first may set off an inflammatory reaction that becomes dysregulated.
    • Immune Response Alterations and Inflammation: CRPS is linked to both of these conditions. Pain and additional symptoms may be exacerbated by this ongoing inflammation.
    • Autonomic Nervous System Dysfunction: The illness may also result in issues with the autonomic nervous system, which controls involuntary body processes like blood flow and perspiration.
    Mechanism of shoulder hand syndrome
    Mechanism of shoulder hand syndrome

    Causes of Shoulder Hand Syndrome

    • trauma (usually mild).
    • cardiac infarction and ischemic heart disease.
    • spinal cord injury.
    • brain damage.
    • infections following a stroke.
    • surgery.

    This “short circuit” causes the sympathetic (unconscious) nervous system to become overactive, which in turn affects the local blood flow and sweat glands. It seems that certain people are more genetically predisposed to this illness than others.

    Signs and Symptoms of Shoulder Hand Syndrome:

    as a result of many causes and clinical presentations. following the commencement of the disease by longer than 2 to 16 weeks, with the longest period being up to 14 months, secondary to myocardial infarction.
    Left shoulder and hand stiffness, tiredness, and discomfort were slightly more common than right shoulder and hand stiffness, or bilateral shoulder and hand onset. On the other hand, the hands can suddenly become painful, stiff, swollen, hypersensitive, sweaty, or change color.

    Three stages:

    • Stage 1: includes discomfort in the hands and shoulders, movement abnormalities that cause swelling to spread later, a progressive stiffness that appears, and a broader range of shoulder pain that does not involve the elbow.
    • Stage 2: Shoulder joint dysfunction, finger flexion contracture and stiffness, and muscular atrophy may gradually decrease and disappear.
      Significant osteoporosis was seen on the X-ray film; this phase will last three to six months.
    • Stage 3: There was reduced residual pain in the frozen shoulder, major obstacles to finger tonic deformation activities, and contraction of the palm and subcutaneous tissue. The length of the symptoms varies; some last for several years, and some end as the body develops or heals.

    Clinical Features of Shoulder Hand Syndrome:

    Pain:

    • Severe, continuous, scorching, and/or deeply painful pain that affects one or more extremities.
    • All tactile stimulation of the skin, such as clothes or a slight breeze, can cause pain perception, known as allodynia.
    • Flaccid dysaesthesias and sharp pains.
    • Skin changes: The skin can look scaly, dry, or glossy (dystrophy-atrophy).
    • pustules, rashes, and ulcers.
    • Skin that feels either warm or chilly to the touch may be a sign of abnormal sympathetic (vasomotor) activity.
    • elevated goose-flesh-induced perspiration (sudomotor changes) or elevated skin temperature (pilomotor changes).

    Swelling:

    • localized; pitting at first, then Brawnyb.On the skin’s surface, edema can be distinguished clearly along a line.

    Movement disorder:

    • might become dystonic.
    • Natural history begins with disuse atrophy.
    • Symptom spread: A “continuity type” of spread occurs when the symptoms move up from the original location, for as from the hand to the shoulder.
    • an “independent type” in which the illness extends to a different, remote area of the body. This kind of spread could be brought on by a second trauma or it could be spontaneous.
    • entire body RSD.

    Differential Diagnosis

    • Undiagnosed local pathology (sprain, fracture).
    • acute vasospasm.
    • cellulitis.
    • lymphatic swelling.
    • Raynaud’s syndrome.
    • obliterans thromboangiitis.
    • erythromelalgia.
    • DVT.
    • Additionally, diabetic neuropathy, occupational overuse syndromes, and nerve entrapment syndromes.

    Treatment of Shoulder Hand Syndrome:

    Undoubtedly, the secret to a successful course of treatment is a highly qualified multidisciplinary team that is driven, well-coordinated, and employs tailored therapy to address the illness.
    There is no known scientifically proven remedy.
    The goal of therapy is to control the disease’s symptoms and indicators.

    It is best to take a comprehensive strategy that includes physical therapy, psychological counseling, and medication.

    Physiotherapy Treatment:

    • In order to prevent the injured limb from contracting and atrophying, early physical therapy is crucial.
    • demands that the patient participate actively in their treatment.
    Shoulder Hand Syndrome Exercise
    Shoulder Hand Syndrome Exercise
    • physical therapy intervention.
    • TENS.
    • Aquatic therapy.
    • Mirror therapy
    • Desensitization.
    • Gradual weight bearing.
    • Stretching.
    • Fine motor control.

    In acute phase:

    Treatment for the acute phase should consist of immobilization and contralateral therapy. In the acute period, worsening may result from intensive aggressive therapy.

    In the chronic stage:
    The edema can be helped to recede by lymphatic drainage. more proximal or more medial tender points are addressed before more distally and laterally located points; more severe tender points as determined by tenderness.
    Therapeutic exercise consists of sensory desensitization programs combined with isometric strengthening therapy and active isotonic training.
    Exercises for the torso and all four extremities are part of the strengthening program. Theraband can be used for workouts.
    Programs for desensitization involve exposing patients to stimuli such as various textiles, light or deep pressures, vibration, tapping, heat, or cold. Exercises such as stress-loading (e.g., walking, carrying weights, cleaning), functional training, endurance training, and textual instructions can all be included. Providing a home fitness routine for the patient is also beneficial.

    Mirror therapy

    Mirror therapy, also known as mirror visual feedback, is putting both hands into a box with a mirror between the two compartments and moving both hands to observe the unaffected hand’s reflection in the mirror.
    Increase performance.

    Graded motor learning and imagery:

    Graded motor imagery includes both imagined hand movement and the awareness of hand laterality.
    relaxation.

    Cognitive-behavioral therapy:

    Deep breathing techniques, biofeedback, and relaxation training are all part of cognitive-behavioral therapy.

    Neuromodulation or invasive stimulation techniques:

    Techniques for invasive stimulation, also known as neuromodulation, include deep brain stimulation, electrotherapy, epidural spinal cord stimulation, and peripheral nerve stimulation using implanted electrodes.
    Electrotherapy includes non-invasive brain stimulation (repetitive transcranial magnetic stimulation), spinal cord stimulation, and transcutaneous electric nerve stimulation (TENS).

    Additional therapies:

    Whirlpool and contrast bathrooms.
    Rehabilitation for both hobbies and occupations.
    Psychological interventions include counseling, pain education, cognitive-behavioral therapy (CBT), operant conditioning (OC), and relaxation methods.
    Electroacupuncture and acupuncture.
    training in tactile sensory discernment.
    bearing weight.
    therapy using ultrasound.
    Applying Kinesiotape.

    Psychological therapy:

    A crucial component of the interdisciplinary treatment strategy is psychological therapy. Significant psychological dysfunction is seen in many individuals with shoulder hand syndrome; however, this is a reflection of the disease process rather than its cause.

    Pain management techniques.

    biofeedback.
    training for relaxation.
    Cognitive behavioral intervention.
    mirroring oneself.

    Invasive/intervention therapy:

    Sympathetic nerve blocks are an invasive/interventional therapeutic option.
    stimulation of the spinal cord.
    Chemical and/or surgical sympathectomy.
    auxiliary nerve stimulant.
    intrathecal pump for baclofen.

    Surgical Treatment

    Surgical procedures could be a more successful way to treat the illness if non-surgical options don’t work.

    An apparatus for stimulating the spinal cord

    Small electrodes that deliver mild electric shocks to the injured nerves are inserted in your spine.

    Installing a pain pump:
    Important supplementary therapies for shoulder-hand dysfunction include counseling and psychological testing.

    Conclusion:

    Often affecting one of the extremities (arms, legs, hands, or feet), shoulder-hand syndrome is often referred to as complex regional pain syndrome (CRPS) or reflex sympathetic dystrophy (RSD). Excruciating pain, edema, and skin changes are its hallmarks.

    Several important elements are included in the conclusion regarding shoulder-hand syndrome (CRPS):

    • Early Diagnosis and Intervention: In order to minimize symptoms and stop the illness from getting worse, early treatment options may include physical therapy, pain management, and, in certain situations, medication.
    • Multidisciplinary Approach: Because the syndrome is complicated, a thorough, multidisciplinary approach is frequently required to manage it. Physical therapy, occupational therapy, pain management, psychological support, and even surgical procedures might all fall under this category.
    • Effective symptom management aims to minimize discomfort, enhance function, and stop or restrict the progression of symptoms. Treatment regimens are frequently customized for each patient and may include nerve blocks, pharmaceuticals, physical therapy, and behavioral therapy.
    • Prognosis: Depending on the severity and timing of treatment, there are different outcomes for shoulder-hand syndrome. While some individuals would totally heal, others might struggle with ongoing pain and impairment.
    • Patient Support and Education: It is crucial that patients and their families receive information about the illness, how it progresses, and available treatments. Patients can manage the emotional and psychological effects of having chronic pain with the aid of support groups and counseling.

    To control symptoms and enhance the quality of life for those impacted, shoulder-hand syndrome is an intricate disorder that calls for a coordinated, individualized approach to care.

    FAQs

    How can shoulder-hand syndrome be avoided?

    It works well for stroke patients to reduce discomfort and swelling in their upper limbs and to improve their sensory-motor function. In stroke survivors, a functioning shoulder orthosis lowers the chance of shoulder subluxation and shoulder-hand syndrome.

    What three CRPS symptoms exist?

    cold or tactile sensitivity.
    swelling where the discomfort is.
    Variations in skin temperature, with patches of sweat and cold patches.
    skin color variations, from blotchy and white to red or blue.

    Which score corresponds to shoulder-hand syndrome?

    The effectiveness of subluxation treatment in avoiding or lowering SHS may be monitored using this method.

    Are CRPS and shoulder-hand syndrome the same thing?

    CRPS can also affect the arms, legs, and feet. Reflex sympathetic dystrophy, Sudeck’s atrophy, shoulder-hand syndrome, and causalgia were some of the earlier names for this illness.

    Shoulder-hand syndrome: what causes it?

    Shoulder-hand syndrome: what causes it?
    Causes: This syndrome may result from falls, fractured wrist bones, heart attacks, strokes, and possibly the use of certain medicines (such as barbiturates).

    What is shoulder-hand syndrome’s third stage?

    Shoulder Hand Syndrome stages include:
    Stage 1: Acute
    Stage 2–dystrophic
    Atrophic stage three.

    What other term would you give the shoulder-hand syndrome?

    Shoulder-hand syndrome is also known as:
    Dystrophia reflex sympathetic
    Sudeck’s atrophy Syndrome of the shoulders
    The Steinbrocker condition
    causative pain.

    What is the best way to relieve shoulder and hand pain?

    To relieve pain:
    Gradually get back to your regular activities.
    Ibuprofen or acetaminophen (found in Tylenol) can help reduce pain and inflammation.

    Why does shoulder-arm syndrome occur?

    Occasionally, a sprain, cut, or small fracture might result in shoulder-arm syndrome, a painful disability. Even though the initial reason may not have been severe, the patient nonetheless has a full, discolored, sore, unpleasant, and non-functional arm and hand.

    Shoulder-hand syndrome: what is it?

    The term “shoulder hand syndrome” describes excruciating impairments of the upper extremities brought on by sympathetic nervous system disturbances. The observed trophic and vasomotor symptoms are assumed to be the result of reflexive stimulation of the sympathetic nervous system.

    References

    • Physiotherapist, N. P. (2023, December 13). Shoulder Hand Syndrome Cause, Symptoms, Treatment. Mobile Physiotherapy Clinic. https://mobilephysiotherapyclinic.in/shoulder-hand-syndrome-physiotherapy-management/
  • 16 Best Exercises for Subtalar Osteoarthritis

    16 Best Exercises for Subtalar Osteoarthritis

    Exercises for Subtalar Osteoarthritis, together with pain medication and physical therapy treatment, are vital parts of your total treatment plan. exercises improve flexibility and mobility in the foot and ankle, strengthen the muscles supporting the ankle, and lessen stiffness and irritation.

    Introduction:

    Standing and walking, especially on uneven surfaces, may worsen the pain caused by subtalar arthritis in the hindfoot. Stiffness during side-to-side foot movement is most likely related to this. The most prevalent causes of subtalar arthritis are fractures of the calcaneal or misalignment of the mended bone, which often follow a history of trauma.

    Osteoarthritis causes cartilage degradation, which can cause pain, swelling, and rarely, the rubbing of bones against one another during movement. Not only does osteoarthritis destroy cartilage, but it can also harm bones, muscles, ligaments, tendons, and other tissues.

    If you have osteoarthritis, you must continue to be active. You know that exercise will improve your condition because it will strengthen your tendons and muscles and support your cartilage, but you are afraid it will make your symptoms worse.

    After surgery or an injury, an exercise training program can help you return to your usual activities and lead a healthier, more active lifestyle. Resuming your sports and other interests will also be made easier with the help of a well-planned training program. By strengthening the muscles that support your foot, ankle, and lower leg, you can potentially maintain the health of your ankle joint.

    Maintaining the strength of these muscles can help avoid further injury and relax stiffness in the foot and ankle. Your muscles will remain long and flexible when you engage in relaxing activities if you stretch gently after strength training.

    The advantageous:

    The following are some benefits of regular physical activity sessions;

    • Relaxing muscles
    • Become more flexible.
    • It helps to strengthen the weak muscles.
    • Release no matter the tension or tightness you may have.
    • Improve your movement.
    • Minimize Ankle pain

    Exercises for Subtalar Osteoarthritis:

    Among the best exercises for subtalar osteoarthritis are listed below;

    Ankle circle

    • Use a rolled towel under your ankle.
    • You should rotate your ankle ten slow times in both clockwise and counterclockwise directions.
    • Make sure you only move your ankle and foot, not your whole leg.
    • Try circling the letters with your big toe to mix up the stretch.
    • Then return to your neutral position.
    • Then relax.
    • Repeat this exercise 5 to 10 times.
    ankle-circle
    ankle-circle

    Standing heel raise

    • Place your feet shoulder-width apart when standing.
    • In case you need help, grab a chair or a wall close by.
    • Raise your heels off the ground and maintain your weight on the heel of your feet.
    • Hold this position for a few seconds.
    • Reduce your heels to the ground gradually.
    • Then return to your neutral position.
    • Then relax.
    • Repeat this exercise 5 to 10 times.
    heel-raise
    heel-raise

    Ankle pump

    • Take a seat on the ground comfortably to begin.
    • Extend your toes away from your ankle.
    • Hold this position for a few seconds.
    • Bring your toes up to your ankle.
    • Hold this position for a few seconds.
    • Then return to your neutral position.
    • Then relax.
    • Repeat this exercise 5 to 10 times.
    ankle pumps
    ankle pumps

    Toe raise

    • Place your feet shoulder-width apart and stand up straight.
    • Get your toes and the front of your feet off the floor.
    • The only body parts that should be in contact with the ground are your heels.
    • Hold this position for a few seconds.
    • Bring your toes down to the ground.
    • Then return to your neutral position.
    • Then relax.
    • Repeat this exercise 5 to 10 times.
    toe-raise
    toe-raise

    Towel curl

    • Place a little towel on the ground in front of you as you sit.
    • Keep your feet neutrally contacting the ground.
    • Grab the towel by its center and curl up with it using your toes.
    • Then return to your neutral position.
    • Then relax.
    • Repeat this exercise 5 to 10 times.
    Towel-curl
    Towel-curl

    Resisted Ankle Dorsiflexion

    • Begin by sitting down on the ground.
    • Set up a loop with a resistance band and fasten it with a door that is closed or a heavy, sturdy object.
    • As an alternative, you may ask someone to support a resistance band.
    • The affected ankle’s top of the foot needs to be looped up.
    • Bring your toes up towards your ankle to flex it slightly while keeping your leg and knee straight.
    • Hold this position for a few seconds.
    • Then return to your neutral position.
    • Then relax.
    • Repeat this exercise 5 to 10 times.
    Resisted Ankle dorsiflexion
    Resisted Ankle dorsiflexion

    Towel stretch

    • Spread your feet wide in front of you while seated on the ground.
    • Wrap up the heel of the affected foot with the towel, holding its ends in your hands.
    • Hold the towel in front of you while maintaining a straight leg.
    • Hold this position for a few seconds.
    • Then return to your neutral position.
    • Then relax.
    • Repeat this exercise 5 to 10 times.
    Lying Stretch
    Lying Stretch

    Wobble cushion exercise

    • Stand near a chair, wall, or counter for stability and safety.
    • On your chosen surface, place the leg you need to utilize for balance.
    • Once your weight has been fully moved into the leg opposite you, raise it off the ground.
    • Keep your leg solid and your abdominal core strong as you regain your balance.
    • Hold this position for a few seconds.
    • Then return to your neutral position.
    • Then relax.
    • Repeat this exercise 5 to 10 times.
    wobble cushion exercise
    wobble cushion exercise

    Standing calf stretch

    • Take a posture facing a wall to begin.
    • Step one leg straight out in front of you and one leg behind you.
    • Keep the heel of your other foot planted on the floor.
    • After that, lean against the wall.
    • As soon as the back of your left calf muscles starts to pull.
    • Hold this position for a few seconds.
    • Then return to your neutral position.
    • Then relax.
    • Repeat this exercise 5 to 10 times.
    Standing Calf Stretch
    Standing Calf Stretch

    Toe Splaying

    • Sit in a chair with your back upright and your feet comfortably rested on the floor.
    • Spread your toes as widely apart as you can without hurting.
    • Hold this position for a few seconds.
    • Then return to your neutral position.
    • Then relax.
    • Repeat this exercise 5 to 10 times.
    Toe-splay
    Toe-splay

    Golf ball roll

    • Use a seat on the ground with a chair to start.
    • A golf ball needs to be placed on the ground close to the feet.
    • Place one foot on the ball and exert as much pressure as feels comfortable to move it around.
    • The ball must be used to massage the foot’s bottom.
    • Continue moving the ball in this manner over the next two to three minutes.
    • Then return to your neutral position.
    • Then relax.
    • Repeat this exercise 5 to 10 times.
    Golf-ball-roll-exercise
    Golf-ball-roll-exercise

    Single-foot heel raise

    • If necessary, place your hands on the wall while standing straight.
    • Make sure your toes are pointed forward and your feet are hip-distance apart.
    • Lift your left leg off the ground and shift your weight to your right leg.
    • Shift your weight to the heel of your right foot slowly.
    • Raise your heel off the ground and apply pressure to the top of it.
    • Hold this position for a few seconds.
    • Then return to your neutral position.
    • Then relax.
    • Repeat this exercise 5 to 10 times.
    Single-foot heel raise
    Single-foot heel raise

    Marble pick up

    • Sit up on a chair with both feet flat on the ground.
    • Two bowls should be set on the ground in front of the feet, one should be empty and the other should contain at least ten to twenty marbles.
    • Each marble should be placed using only one foot’s toes in the unfilled bowl.
    • Then return to your neutral position.
    • Then relax.
    • Repeat this exercise 5 to 10 times.
    marble pickup
    marble pickup

    Big toe stretch

    • To start, find a comfortable spot to sit on the bed or table.
    • Grasp your big toe with the fingers of one hand and your heel with the other.
    • Extend it slowly in the upward, downward, and side directions for a few seconds each.
    • Then return to your neutral position.
    • Then relax.
    • Repeat this exercise 5 to 10 times.
    big-toe-stretch
    big-toe-stretch

    Heel Cord Stretch

    • With your affected leg in front of you and your knee slightly bent, face a chair.
    • The affected leg is directly behind you, with a flat heel and slightly twisted toes inward.
    • Maintaining both heels flat on the floor, shift your hips forward and toward the chair.
    • Hold this position for a few seconds.
    • Then return to your neutral position.
    • Then relax.
    • Repeat this exercise 5 to 10 times.
    Soleus calf stretch
    Soleus calf stretch

    Toe Salutes

    • Take a seat in a chair with your feet flat on the ground.
    • Lift your big toe and hold the other four fingers firmly on the ground.
    • Hold this pose for a few seconds.
    • Then release.
    • All four fingers should be raised simultaneously, with the big toe remaining on the floor.
    • Then return to your neutral position.
    • Then relax.
    • Repeat this exercise 5 to 10 times.
    toe salutes
    toe salutes

    When exercising, what safety precautions are required?

    • If you feel any kind of pain when exercising, stop right away.
    • Before doing exercise, warm up and stretch.
    • You should not perform any jerky or trick movements when exercising.
    • Avoid doing strenuous activity.
    • Stretches before exercises pauses in between activities, and the right amount of repetitions for each exercise should all be done in order with the protocol.
    • It is ideal to exercise in loose, casual attire that encourages relaxation and free movement. Don’t dress in fashionable or tight outfits.
    • Take a break in between exercise sets.
    • Stretching the stiff muscles in your joint could be difficult, but it’s natural and even necessary. Stretching or exercise should never generate stabbing or painful sensations as this is negative and worsens the disease.

    When do you quit exercising?

    • Fever
    • Headache
    • A feeling of burning in the muscles
    • You’re not feeling well.
    • Whether numbness or pain is felt at all.

    Which exercises or physical activities are best avoided by someone who has subtalar osteoarthritis?

    • It might be necessary to refrain from engaging in activities that overstress the joints.
    • Running on uncertain ground.
    • Sports that cause trauma.
    • Moving heavy objects.
    • Wearing high heels.
    • Avoid going on a jog.
    • Avoid jumping.
    • Stay away from repetitive stretches and exercises that put more strain on joints.

    Summary:

    The articulation of the talus and calcaneum forms the subtalar joint, which is a joint in the foot. The cartilage around the ankle joint decreases due to arthritis in the foot’s subtalar joint. Joint inflammation resulting from subtalar arthritis may be caused by an injury, an infection, or other reasons. Subtalar arthritis patients report pain below the ankles, on one or both sides of the foot.

    Physical therapists typically recommend a stretching and strengthening program to help restore flexibility and increase strength after the inflammation has subsided. By doing this, the injured joint will be under less stress. Stretching the tissues surrounding the joint with more forceful ranges of motion can help improve ankle mobility once the pain subsides.

    FAQ:

    How much time does it take for the subtalar joint to heal?

    When the joint is stronger, you might be able to start placing weight on your foot. You may require the help of a physical therapist to learn how to walk without falling over. Take at least 10 to 12 weeks off from your regular activities before returning to them.

    Does subtalar osteoarthritis heal with exercise?

    Exercise is a common way to lessen pain, remove suffering, and avoid damage. Exercising with a stretching motion can help strengthen the muscles which help support the body. Exercise on a regular basis may help to lessen the amount of persistent pain.

    What are the symptoms of subtalar osteoarthritis?

    The subtalar joint, the joint in the backfoot below the ankle joint, has been affected by a type of arthritis known as subtalar arthritis. The disease is characterized by painful hindfoot pain that gets worse when walking and standing, especially on uneven surfaces.

    Can osteoarthritis be completely recovered from?

    In some cases, osteoarthritis even becomes better with time, despite being a chronic ailment for which there is no known solution. To lessen the symptoms, there are also numerous therapy options visible. Moderate symptoms can occasionally be managed with simple techniques like consistent exercise.

    Can subtalar arthritis heal on its own?

    Difficulties with the subtalar joint can lead to issues with gait and mobility, particularly when walking on uneven surfaces. The subtalar joint could suffer permanent damage if therapy is not received. Simple procedures are typically the first choice for treating subtalar difficult joints.

    What maintains the subtalar joint stable?

    The talus and calcaneus have equal anterior, middle, and posterior facets that make up the subtalar joint. Numerous medial and lateral ligaments support and stabilize it. It is possible to evert or invert the hindfoot in the major line of motion.

    Is osteoarthritis alleviated by walking?

    Due to its low-impact nature, ability to maintain joint flexibility, improve bone health, and lower risk of osteoporosis, walking is frequently suggested for individuals with arthritis.

    In what way is a subtalar joint supported?

    Use of an ankle brace, such as an ankle lacer, or even taping the ankle and hindfoot can be helpful because it helps to limit motion via an arthritic subtalar joint.

    References:

    • December 13, 2023a, Bariya, D. The Top 24 Subtalar Osteoarthritis Exercises – Mobile Physiotherapy. Clinic for Mobile Physiotherapy. The top 24 exercises for subtalar osteoarthritis can be found at https://mobilephysiotherapyclinic.in.
    • March 1, 2024; Pt, B. S. Activities to Manage Your Ankle Arthritis. Verywell Medical Center. Exercises for Ankle Arthritis at https://www.verywellhealth.com/5114508
    • Physiotherapy, Treatment, Causes, and More for Subtalar Arthritis. (No date). Subtalar arthritis causes, treatments, physiotherapy, and more can be found at https://www.fixhealth.com/blogs/
    • Image 6, L. Putra, n.d. Stretching using a resistance band is a man’s exercise routine. Achilles exercise. Vecteezy.com/vector-art/22915229-man-performing-dorsiflexion-and-resistance-band-workout-stretch-ankle-exercise
    • Image 8, Physique Fitness Stores: Concorde Balance Disc Wobble Cushion (2024, July 31). Family-owned Physique Fitness Stores in Edmonton Held and Run Since 1962. The Concorde Balance Disc Wobble Cushion is available at Physique Fitness.
    • Image 12, MSK Physiotherapy (2023, May 27). https://www.physiomsk.com/search?max-results=1&updated-max=2023-05-27T14:03:00-07:00
  • 11 Best Exercises for Herniated Disc

    11 Best Exercises for Herniated Disc

    Herniated discs are a frequent spinal ailment that develops when the soft inner part of a spinal disc pushes through the outer layer, pressing on nearby nerves and producing pain and inflammation. Exercise is often recommended as part of conservative care for herniated discs to increase flexibility, strengthen the supporting muscles, and lessen pain.

    Pain from a herniated disk might be lessened with the help of light exercises, stretches, and motions. Exercise can also help to maintain and increase the flexibility of the spine, neck, and back. Additionally, they might help stop a herniated disk from happening again. As mentioned earlier, exercise is a part of the recovery process for herniated discs. The type and intensity of exercise are essential for speeding up recovery and reducing the risk of further injuries.

    What is a Herniated Disc?

    When one of the discs is out of its normal position, it can cause a herniated disc, which is also referred to as a bulging or compressed disc. In particular, the annulus fibrosis, the outer part, is pressed upon by the nucleus pulposus, the inner component. This could cause harm to the spinal cord and nerve roots.

    Though disc herniation is possible anywhere in the spine, it most frequently occurs in the neck (cervical spine) and lower back (lumbar spine).

    Signs and symptoms:

    While each person’s symptoms of a herniated disc are unique, the majority of them can be found below.

    By applying pressure to the spinal cord or nearby nerve roots, the disc may result in symptoms (pinched nerve). A person may show minor, major, or severe symptoms, or they may show no symptoms at all.

    Symptoms of the lumbar spine:

    • A pain in the lower back, usually the initial sign
    • Pain in the lower limbs that goes up and down
    • Leg tingling or numbness
    • Weakness in the lower limbs
    • Sitting causes more harm than pain.
    • Sciatica pain

    Symptoms of the cervical spine:

    • Hand numbness 
    • Arm pain
    • Ache in the upper back
    • Restricted mobility of the neck

    How is exercising beneficial?

    Long durations of sitting or lying down are bad for your health and don’t help your body heal from a herniated disc. It may worsen your disease or require more time to heal. Engaging in physical exercise can promote the healing of your neck and back while protecting and improving your general health.

    Physical therapy and exercises are frequently crucial components of herniated disk healing. When a patient has a herniated disk, the doctor typically advises taking a few rest days.

    The muscles that support the spine will become stronger with modest exercise, which will also relieve pressure on the spinal column. They may also help lower the chance of a repeat herniated disk by increasing spine flexibility.

    A physician could advise reducing activity at first and increasing it gradually. They’ll go through which particular activities are OK to do during rehabilitation and which ones are not.

    Practice flexibility and slowness in all of your activities, particularly while bending or lifting. Pain shouldn’t follow exercise. An individual needs to stop exercising and consult the doctor if they experience pain.

    The advantages of exercises:

    • Increased blood flow to the spine to help support and repair injury.
    • Increased strength in the spine’s supporting muscles
    • Reduced strain on the spine, which reduces pain
    • Improving pain-related unusual postures
    • Stretching the back muscles gently
    • Increased spine flexibility

    Exercises for Herniated Disc:

    The ideal exercise for lumbar and cervical herniated discs is described here;

    Stretches & Exercises for the Cervical Spine:

    A Herniated Disc frequently results in neck pain. Pain in the neck and shoulder muscles might result from pressure on the nerves in the neck. Moreover, it could result in shooting pain.

    Isometric neck exercise

    • Take a seat comfortably to begin.
    • Place your hand over your forehead.
    • try to withstand the pull.
    • Hold this pose for a few seconds.
    • Then return to your neutral position.
    • Then relax.
    • Keeping your palm on the back of your head, gently press your neck in the direction of the force.
    • Put slight pressure in the opposite direction of your movements while staying in the same position.
    • Hold this pose for a few seconds.
    • Then return to your neutral position.
    • Then relax.
    • Next, maintain a straight head while holding your left side of the head.
    • Gradually press your left side of the head against your left shoulder.
    • Hold this pose for a few seconds.
    • Then return to your neutral position.
    • Then relax.
    • The right side of the neck should be bent with the same movement.
    • Hold this pose for a few seconds.
    • Then return to your neutral position.
    • Then relax.
    Isometric neck exercise
    Isometric neck exercise

    Chin tuck

    • Sitting or standing upright, begin by focusing your eyes at a certain point in the room.
    • Place your index finger on your chin to facilitate your motions.
    • Shift your head slightly to the side and place your chin towards your neck.
    • Due to the movement, your head shouldn’t sag to look at your toes; instead, it should create a double chin while you maintain your forward gaze.
    • Hold this position for a few seconds.
    • Then return to your neutral position.
    • Then relax.
    • Repeat this exercise four to eight times.
    supine chin tuck exercise
    supine chin tuck exercise

    Shoulder Retraction Exercise

    • The exercise requires you to sit or stand with your back to a wall to begin.
    • Your arms ought to rest loosely at your sides.
    • When your arms are at a ninety-degree angle at the elbow, flex your elbows.
    • Rotate the shoulders back and down.
    • Your shoulder blades should be pressed together as you press the backs of your upper arms against the wall.
    • Hold this position for a few seconds.
    • Then return to your neutral position.
    • Then relax.
    • Repeat this exercise four to eight times.
    Shoulder Blade Squeeze

    Side Bending Neck Stretch

    • Start with a seating position on the chair.
    • You can support your right arm by sitting on your hand or by gripping the front edge of the chair.
    • Point your left ear toward your left shoulder while maintaining a straight line of sight.
    • To progressively extend the stretch farther, you might utilize your left hand.
    • Hold this position for a few seconds.
    • Then return to your neutral position.
    • Then relax.
    • Repeat this exercise four to eight times.
    Neck stretch
    Neck stretch

    Stretches & Exercises for the The Lumbar Spine:

    By releasing tension from the muscles and relieving pressure on the spine, the exercises listed below can help relieve pain in the lower back.

    Pelvic tilt

    • Start with relaxing by lying down on the ground. 
    • Next, flex your knees together.
    • Place both hands on your chest or your sides.
    • The muscles in your abdomen should feel strong.
    • Hold this position for a few seconds.
    • Then return to your neutral position.
    • Then relax.
    • Repeat this exercise four to eight times.
    PELVIC TILT
    PELVIC TILT

    Bridges

    • Start by settling into a comfortable position on the bed.
    • After that, bend your knees while keeping your feet flat on the mattress.
    • Then, contract your abdominal muscles.
    • Lift your upper body.
    • Keep your arms by your sides.
    • Hold this position for a few seconds.
    • Lower your body.
    • Then return to your neutral position.
    • Then relax.
    • Repeat this exercise four to eight times.
    Hip bridge exercise
    Hip bridge exercise

    Cat cow

    • Starting with your hands in the tabletop position, lay them on the ground.
    • Make sure you have a straight back.
    • Use both hands and feet to remain connected.
    • Take a deep breath, hold your head up, and allow the air to fill your stomach.
    • Hold this position for a few seconds.
    • Then exhale, turn your back to face upward, and bring your chin up into your chest.
    • There’s a slight extension of your lower back.
    • Hold this position for a few seconds.
    • Then return to your neutral position.
    • Then relax.
    • Repeat this exercise four to eight times.
    Cat-and-Cow-Stretching
    Cat-and-Cow-Stretching

    Bird dog

    • Start by lying down on your back and make sure your body is comfortable.
    • Set your knees under your hips and your hands under your shoulders at this point.
    • Hold your shoulder blades together tightly.
    • Next, extend your left leg and right arm toward the ceiling.
    • Keep a posture where your shoulders and hips are parallel.
    • Hold this position for a few seconds.
    • Then return to your neutral position.
    • Then relax.
    • Repeat this exercise four to eight times.
    Bird-dog Exercise
    Bird dog with elbow-to-knee

    Knee to chest

    • Start with a relaxing supine lying position on the ground.
    • Bend your one knee.
    • Your hand should be behind your knee or just below your kneecap.
    • At this point, raise your knee to your chest.
    • Hold this position for a few seconds.
    • Then let your leg go down.
    • Then return to your neutral position.
    • Then relax.
    • Repeat this exercise four to eight times.
    One-Knee-to-Chest
    One-Knee-to-Chest

    Piriformis stretch

    • To begin, lay down on your back on the ground.
    • Be careful to flex each knee.
    • Maintain a level foot contact with the ground.
    • You now have your left leg folded over your right ankle.
    • Bring your leg up to meet your upper body.
    • Hold this position for a few seconds.
    • Then let your leg go down.
    • Then return to your neutral position.
    • Then relax.
    • Repeat this exercise four to eight times.
    supine-piriformis-stretch
    supine-piriformis-stretch

    Back extensor exercise (cobra pose)

    • Start with relaxing prone position on the ground.
    • Place your palms flat on the ground near your shoulders.
    • Holding your sides, your elbows should be straight back.
    • look straight down at your mat with your neck in a neutral position.
    • Take a deep breath to raise your chest off the ground.
    • Keep your neck in a neutral position.
    • Maintain a fixed gaze on the ground.
    • Hold this position for a few seconds.
    • Exhale to get back on the ground.
    • Then return to your neutral position.
    • Then relax.
    • Repeat this exercise four to eight times.
    Bhujangasana (Cobra Pose)
    Bhujangasana (Cobra Pose)

    Top 7 Exercises to Relieve a Disc Bulge – Lower Back

    What precautions should I take when exercising?

    • Every exercise should be done following the protocol, which requires stretches before and after each exercise as well as suitable repetitions.
    • It is ideal to exercise in loose, relaxed outfits that encourage relaxation and free movement. Don’t dress in fashionable or tight outfits.
    • Stretching the stiff muscles could be difficult, but it’s natural and even necessary. Stretching or exercise should never generate stabbing or painful sensations as this is harmful and contributes to the condition.
    • Holding your breath while exercising is never recommended. after you start your exercise routine, take a deep breath, and after you’re done, exhale the breath slowly through your mouth. When exercising, holding your breath can lead to tense muscles and high blood pressure.

    When did you stop taking part in this exercise?

    • Fever
    • Headache
    • If your pain gets worse while exercising, just stop.
    • Blurry vision
    • If your physician suggests that you rest.

    If you have a herniated disc, which exercise should you avoid?

    If you have a herniated disk, you should refrain from doing repetitively demanding activities, heavy lifting, and sudden pressure on your back. All exercises that cause pain or make the patient feel as though they are aggravating the pain should be avoided by the patient.

    Physical activity and high-impact sports may lead to or worsen a herniated disk. Heavy lifting, prolonged, intense exercise, or rapid pressure on the trunk can all cause a herniated disc. If you are recovering from a herniated disc, you should avoid doing anything physically demanding until your physician gives the all-clear.

    • Activities with a high impact
    • Activities that rely on flexibility
    • Sit-ups
    • Rotational movements
    • Advanced core strengthening exercises
    • Overhead weightlifting 
    • Bending forward repeatedly at the trunk

    How Can Disc Herniation Be Prevented?

    Even though it’s not always possible to completely prevent disc herniation, there are things you can do to reduce the risk and maintain the health of your spine.

    The following guidance can help you in preventing disc herniation;

    • Take a warm-up before working out

    Before engaging in physical activities or exercising, warm up your muscles with gentle stretches and brief aerobic exercises. As you warm up your muscles and joints for exercise, you reduce your chance of injury.

    • Engage in regular exercise

    Regular exercise will develop your core muscles, which will help your spine. Your top priorities should be exercises that work the muscles in your back, pelvis, and abdomen. Stabilizing and maintaining the discs in your spine can be achieved by strengthening your core.

    • Keep a healthy weight

    Being overweight may put additional strain on your spine and increase your chance of developing a disc herniation. Your spine will experience less strain if you maintain a healthy weight through exercise and a balanced diet.

    • Maintain proper body mechanics when carrying out daily duties.

    Observe how your body performs when you raise it bend, and carry objects. To lessen the strain on your spine, keep focus on your posture and make any necessary adjustments.

    • Stop smoking

    By reducing blood flow and oxygen supply, smoking may harm spinal discs and make them less immune to damage. Quitting smoking can help your discs work better and lower your chance of disc herniation.

    • Properly lift

    Make sure you lift with the proper form to avoid back pain. To elevate using your legs rather than your back, bend your knees while maintaining a straight posture back. Stay away from twisting movements when lifting and moving large items.

    Summary:

    The pain and pressure associated with a slipped or herniated disk might be reduced by performing mild stretches and exercises. Before beginning an exercise program, make sure you consult your doctor to be sure you won’t injure your muscles or create new pain. Depending on where the herniated disk is located, a doctor can advise on the ideal exercise routines for each patient.

    FAQ:

    Can exercise help a herniated disc become more functional?

    Stretching exercises are one of the greatest treatments for herniated disc symptoms. Back muscles can be gently stretched to increase flexibility and helps in stabilizing the disc herniation site. Exercises for herniated discs additionally improve general strength, movement, and discomfort.

    What is the cause of herniated discs?

    Numerous reasons, such as disc degeneration and aging, acute trauma or injury, lifting large objects incorrectly, frequent or excessive strain on the spine, and hereditary potential, can lead to disc herniation.

    Is exercising safe for disc herniation people suffering?

    While exercise can help with disc herniation, speaking with a physician or physical therapist before beginning any exercise regimen is important. They can advise you on safe workouts that help you manage your pain and build endurance, flexibility, and strength while avoiding clear activities that could make your condition worse.

    Can a disc herniation recover by itself?

    With conservative measures like rest, physical therapy, and medication, disc herniation symptoms can often get better or go away by themselves. However several factors, including the extent of the herniation, personal characteristics, and following specified treatment protocols, affect how quickly the wound heals.

    Are there long-term effects associated with disc herniation?

    Occasionally, ongoing symptoms or chronic pain might result from disc herniation. There may be a need for surgery if non-invasive therapies fail or the illness gets worse. Yet many people with disc herniation can have active, satisfying lives if they receive the right care and make lifestyle adjustments.

    What’s the healing time of a herniated disc?

    The length of recovery can vary based on several factors, including the individual, the effectiveness of treatment, and the degree of the herniation. While more severe cases or those requiring surgery may take longer to recover, mild to moderate disc herniations may improve within a few weeks to a few months.

    References:

    • Pietro Tirgar (2023, December 13). The Top 19 Exercises for Disc Herniation – Mobile Clinic for Physiotherapy. Mobile Clinic for Physiotherapy. Which workout is most beneficial for a herniated disc? https://mobilephysiotherapyclinic.in/19 for physical therapy
    • On July 10, 2023, Patel, D. The Top 25 Exercises for Neck, Middle, and Lower Back Herniated Discs. Physiotherapy Clinic in Samarpan. What type of exercise is most beneficial for a disc herniation? For PT, visit https://mobilephysiotherapyclinic.in/19
  • Upper Cross Syndrome

    Upper Cross Syndrome

    What is an upper cross syndrome?

    Upper Cross Syndrome (UCS) is a common postural imbalance that occurs when certain muscles in the upper body become tight while others weaken. This muscular imbalance leads to a forward head posture, rounded shoulders, and a hunched upper back, often associated with prolonged sitting, poor posture, and repetitive tasks.

    UCS can cause neck pain, shoulder discomfort, and headaches, affecting daily activities and overall quality of life.

    The rhomboid and lower trapezius muscles in the lower shoulders, as well as the cervical flexor muscles in the front of the neck, are weak in upper crossed syndrome. The “x” shape that forms when areas of hyperactive and underactive muscles overlap gives the illness its name.

    Postural abnormalities include a forward head position, lifted and prolonged shoulders, increased thoracic kyphosis and cervical lordosis, as well as scapular winging and rotation. Because of the weakened serratus anterior, the glenoid fossa becomes more vertical, causing the scapulae to rotate, abduct, and wing. To maintain glenohumeral centration in the face of this loss of stability, the activity of the levator scapulae and upper trapezius must increase.

    As a side consequence, though, mobilizers become more active (hyperactive) and less flexible as a result of this compensation, which may ultimately set off a pathological series of events inside the musculoskeletal system.

    Understanding the causes and addressing them through corrective exercises and ergonomic adjustments are essential steps in managing and preventing Upper Cross Syndrome.

    Mechanism of Injury / Pathological Process

    Muscle imbalance typically arises prior to functional dysfunction. These repetitive tasks and immobile settings can lead to pain and inflammation as well as other side effects, which are mostly responsible for the expected patterns.

    Primarily affecting the anterior neck and posterior superior muscles, which are short and tonic, this disease inhibits and weakens the posterior shoulder girdle and the anterior deep muscles of the neck, which are predominantly phasic. This condition, which is frequently linked to forwarding heads, round shoulders, protracted scapulae, and thoracic kyphosis, is caused by changes in the elevation, protraction, and abduction of the shoulder as well as an increase in the angle of the forwarding head and hyperextension of the upper cervical spine. Joint degeneration may result from these muscular imbalances and movement dysfunctions because they may directly affect the surfaces of the joints.

    The structural lesions’ contributing factors are examined using the functional approximation. When managing chronic “dysfunctions” with physical therapy, such as tendinitis and persistent joint pain, this approximation is most helpful.

    A physiological muscle imbalance may or may not be the outcome of an initial traumatic incident, but it is usually linked to dysfunction and pain. It’s possible for the pathological imbalance to be subtle; many persons experience this muscular imbalance painlessly. It should be noted that this continuum of muscle imbalance can advance in either way: changed motion patterns might result from muscle imbalance and vice versa. Pathological imbalances can occasionally serve as functional damage compensation.

    For instance, an imbalance in muscle can lead to an imbalance in the biomechanical pressures on joints, which can lead to joint damage, pain, and inflammation. As a result, a lesion may be both structural and functional; nevertheless, in order to properly diagnose and treat a patient, a clinician must determine which lesion is the real source of dysfunction.

    Clinical Presentation

    Postural abnormalities such as kyphosis, round shoulder, and FHP include thoracic spine flexion and excessive neck protraction, anterior tilt, and downward rotation of the scapula with an inclined tendency and internal rotation of the shoulder. Thoracic kyphosis and FHP are associated.

    Weak muscles:

    • Reduced SA activity in the serratus anterior will result in less control over the scapula in both static and dynamic conditions.
    • The infraspinatus
    • People with FHP have weak, protracted muscles that are improperly stimulated.

    Tight muscles:

    • Upper trapezius: An increase in UT activity causes the scapula to tilt and elevate anteriorly, which reduces subacromial space and raises the risk of shoulder disease.
    • An anterior tension is applied to the glenohumeral joint by the pectorals and tight pectoralis major, which reduces stability.

    What is a diagnosis of upper cross syndrome?

    • The doctor is given a thorough grasp of the patient’s muscle function through posture and gait analysis. It is difficult for the clinician to focus only on the local level of the lesion and instead evaluate the patient’s entire motor system.
    • Assessment of equilibrium.
    • excessive movement.
    • It is important to exercise caution when evaluating muscle imbalance in patients with acute severe pain syndrome, as it is not a reliable method. When a patient experiences chronic pain or continues to experience pain after an acute episode has passed, it can be very helpful.

    The muscles involved in a defensive flexor reaction are the most likely to become tense. This tests the upper trapezius muscle.

    Upper-Quarter Muscles

    Tests for the levator scapulae muscle are similar, however they include rotating the head to the opposite side.

    Before the arm is positioned in abduction, the trunk needs to be secured since the trunk may rotate to resemble the usual range of motion.

    • Lower sternal fibers: The patient’s arm is abducted by the therapist to 150 degrees with a small external rotation.
    • Midsternal fibers: The patient’s arm can relax below the horizontal motion since these fibers are normal in length. Tenderness does not result from palpation.
    • Clavicular fibers: The patient’s arm can relax below the horizontal due to the typical length of these fibers. The fibers should not be palpably sensitive and should resist this pressure gradually.

    Pectoral The patient is assessed while supine for minor muscles. The patient’s mark is seen from above by the therapist. It is possible to compare the anterior portions of the acromion process’s horizontal levels with one another. The two acromions ought to be operating at the same elevation. The lumbar spine arching upward and the arm relaxing above the horizontal are signs that this muscle is very tight.

    What are the causes of upper cross syndrome?

    People who suffer from upper crossing syndrome typically exhibit a similar set of postural anomalies, which might be mistaken for slouching.
    While there are a variety of actions that might induce upper crossed syndrome, the majority of cases arise from weakening and poor posture, particularly while sitting or standing for extended periods of time with the head forward.

    The following activities support this posture:

    • using a laptop or computer while driving
    • using a phone to watch TV surf, message, use apps or games, read, or biking

    What are the symptoms of upper-crossed syndrome?

    The following are typical signs of upper crossed syndrome:

    The head is constantly or frequently facing forward. shoulders that are rounded, elevated, or prolonged, with muscles that are continuously drawn or pushed forward. Because the twisted muscles strain the surrounding tendons, bones, and joints, the majority of people with upper cross syndrome experience symptoms like these:

    • headache
    • tightness and chest pain
    • pain in the upper back, particularly in the shoulder blades or shoulder joint
    • fatigue; jaw pain; trouble sitting, reading, or watching TV; tightness or pain in the neck or shoulders that prevents you from driving for long periods of time; rib pain and restricted range of motion; upper arm numbness, tingling, and pain
    • lower back pain.

    Differential Diagnosis

    • Scheuermann’s Kyphosis
    • Stress and anxiety
    • Pseudoradicular syndrome
    • Scalene syndrome

    Management

    In the past few decades, therapists have primarily used structural and functional methods to create exercises that are appropriate for correcting musculoskeletal malalignments. According to the conventional structural approach, biomechanics is responsible for the alterations in malalignments like UCS, which are thought to result in modifications to the strength and length of nearby muscles. This could explain why, during the correction phase, short muscles are stretched and weak muscles are strengthened at the issue spot while other related malalignments are ignored. Moreover, the usefulness of stretching and strengthening exercises for the treatment of postural abnormalities has been called into question by several review studies.

    The interaction of the central and peripheral nerve systems, as well as the role of the skeletal and muscular structures in producing and regulating motion, are the foundations of the functional (neurological) approach to musculoskeletal issues.

    Physical therapy treatment

    Pain management:

    For the treatment of pain, electrotherapy can be useful.

    How does electrotherapy work?
    All of these treatments typically involve applying a low-voltage electrical current to the pain locations using an electrode-equipped device.

    Pain management is electrotherapy’s primary objective.

    • Pain management with electrotherapy frequently involves the use of TENS (Transcutaneous Electrical Nerve Stimulation). Electrodes are positioned over or close to the painful area using small, sticky pads. a sequence of low-voltage electrical currents delivered to the region by the battery-powered device.
    • Interferential Current Therapy
    • Therapy with ultrasound:
    • It works well for people with neck pain who have myofascial pain syndrome or trigger points over the trapezius muscle.
    • Cervical traction: This technique aids in pain relief.

    Exercises of the upper cross syndrome

    UCS isometric exercises: You can sit, stand, or lie on your back to complete these exercises.

    • Cervical flexion: Put your palm on your forehead and flex your neck slightly forward.
    • Cervical extension.
    • Cervical side flexion: Press on the left side with your left hand, then repeat the side flexion on the other side.
    • Cervical rotation.
    • Your physical therapist will give you specific instructions on how long and how often to perform these exercises depending on your unique set of symptoms.

    Strengthening Exercises of the Upper Cross Syndrome

    The four-step corrective exercise process for UCS begins with lengthening and inhibiting any potentially overactive muscles (usually through foam rolling). Next, the corresponding underactive muscles are strengthened, and lastly, the involved muscles are integrated to restore functional, synergistic movement patterns.

    Usually, the goals of this corrective technique are to extend the client’s range of motion, strengthen their local muscles, and help them learn how to better control their newly acquired range of motion. Additional advantages include the potential for less pain and discomfort, upper torso stability, and enhanced athletic performance during play and training.

    • Step 1:
      Apply pressure to sore regions for 30 seconds using the upper trapezius, levator scapulae, and sternocleidomastoid muscles.
    • Step 2: Static Stretching and Lengthening
      Levator Scapulae: The movement of the chin downward until the right side feels a typical stretch.
    • SCM: Same as above, but with the chin turned upward.
      Execute the exercise on both sides, spending 30 seconds in each stretch position.
    • STEP 3: Activate/strengthen
    • Floor Cobra: For two seconds, hold.
    • Step 4:
      After holding at each spot, bring the arms back to their stretched frontal positions.

    Postural exercise of UCS

    An additional upper cross syndrome exercise

    The best course of action for treating upper-crossed syndrome involves core stability exercises and body posture adjustments. Even though some people may find stretching exercises quite uncomfortable, it’s still necessary for them to try some kind of moderate stretching and movement to prevent deformity because restricting activity can lead to soreness and stiffness. Before working out, people should make sure their tissues are warmed up, either by taking a warm bath or shower or by moving slowly and gently. Build up to each workout gradually and start out softly.

    Exercise while lying down
    Place a thick pillow or towel approximately a third of the way up your back while lying down, keeping your spine straight. Ensure that your head is in a neutral, relaxed position and that it is not tense or stretched out against the muscle. For ten to fifteen minutes, hold this posture, and then practice the exercise multiple times over the day.

    Exercise while sitting
    The stiff muscles in your shoulders, chest, and side neck should start to extend and relax. Press your palms into the floor without really moving them for a more intense chest stretch. Then, move softly and relax. For five minutes, or for as long as it is comfortable, maintain this posture.

    Exercise standing up
    Remain calm while placing your feet three to four feet apart. Turn your right foot out ninety degrees and pivot your left foot inward to around a thirty-degree angle while maintaining your current torso position. Bend your right knee to a maximum of 90 degrees while maintaining a straight left leg and body.

    Stretching in upper cross syndrome.

    Forward and Backward Tilt

    You can perform this either sitting or standing. Continue moving slowly and smoothly.

    • For 20 to 30 seconds, bring your chin up to your chest and hold there. Return to the starting posture and raise your head slowly once more.
    • Do this as many times as possible. Include it in your everyday routine.

    Side Tilt

    How would one go about doing that?

    • Don’t raise your shoulder.
    • On your right side, repeat. You can increase to ten repetitions by doing multiple sets.

    Side Rotation

    How would one go about doing that?

    • Your back should be straight and your head should be directly over your shoulders.
    • After thirty seconds of holding this stretch, carefully bring your head forward once more.
    • On your right side, repeat.
    • Perform ten sets at a time.

    Shoulder Roll

    How would one go about doing that?

    • Repeat six times. Go back to the starting point and draw six more circles, but you have to go the other way this time.

    Neck Flexion (Forward Bending)

    How would one go about doing that?

    • You must gaze down and slowly move your neck toward your chest while just moving your head in order to complete this workout.
    • The posterior region of the neck experiences the neck flexion stretch.

    Lateral Neck Flexion (Bending Side to Side)

    How would one go about doing that?

    • The neck bends laterally to the side during this stretch, while the shoulders and back stay stable.
    • Try to hold this stretch for five seconds after the head has bent as far to the side as it can safely go before bringing it back to its starting position. The left side is stretched in the same manner.

    Neck Rotation (Turning Side to Side)

    How would one go about doing that?

    • With your shoulders firm and your back straight, carefully rotate your head to the right as far as it will naturally go without getting worse.
    • The left side is stretched in the same manner.

    Neck Retraction

    How would one go about doing that?

    • Start this exercise by gazing straight ahead and giving yourself permission to unwind.
    • Move your head backward smoothly, keeping your chin slightly tucked in, until it is dragged back as far as it can go without causing you any pain or strain.
    • While performing this stretch, keep your head straight ahead and take care not to cock it to the side or the back.
    • Stay in this posture for three to five seconds, and then take a step back to where you were before.
    • Do this ten to fifteen times over.

    Seated Clasped Neck Stretch

    How would one go about doing that?

    • You must sit comfortably on the ground or in a chair and ensure that your body is in the correct alignment in order to complete this exercise. Place both of your hands behind your head while holding them.
    • At least 30 to 40 seconds should pass while holding the position, or 7–8 deep diaphragmatic breaths in and out.
    • Your upper back and trapezius muscles are targeted by a seated clasped neck stretch. Instead of using both hands to pull in the middle of your head, use just one if you feel more stretched.

    Advantages of exercise:

    Regular exercise can help you obtain the following benefits:

    • improves performance in regular activities
    • Reduce suffering
    • Improve mobility
    • Enhanced flexibility
    • strengthens weakened muscles.
    • lessen tenseness or rigidity.
    • Increasing cooperation.

    Exercise for the upper cross syndrome:

    Lying down exercises

    • With a thick pillow placed a third of the way up your back and in line with your spine, lie flat on the ground.
    • Next, relax.
    • Once more adopt a neutral stance after that.

    Floor cobra

    Floor cobra
    Floor cobra
    • With your hands facing down and your arms at your sides or in front of you in the “Superman” posture, take a floored stance.
    • For a short while, hold.
    • Decide on a neutral stance after that.
    • After that, relax.

    Self massage sternocleidomastoid (SCM)

    Self massage sternocleidomastoid (SCM)
    Self massage sternocleidomastoid (SCM)
    • Using your right thumb and fingers, grab the middle of your left SCM muscle until you feel a painful or sore spot in the muscle belly.
    • Hold that position for fifteen seconds.
    • After releasing this area, lift your thumb and forefinger a single fingerbreadth apart.
    • Continue holding each spot as you move along the muscle until you get to the top of it.
    • Then take a neutral position.
    • Next, unwind
    • Repeat on the right SCM.

    Quadruped Thoracic Rotation Stretch

    Quadruped Thoracic Rotation Stretch
    Quadruped Thoracic Rotation Stretch
    • On both knees, bend.
    • After that, take an unbiased position.
    • Then unwind.

    Warrior 1 Pose (Virabhadrasana I)

    • After taking a breath to release the stance, stand up straight.
    • After that, take an unbiased position.
    • Then unwind.
    • Repeat the exercise while switching feet.

    One Arm Stretch

    • Always keep your arm straight.
    • Move your body away from your lifted arm as soon as your muscles start to ache.
    • Next, adopt an impartial stance.
    • After that, relax.
    • Proceed to the opposite side.

    Levator Scapula Stretch

    • Hold your shoulders and back straight.
    • Examine the region underneath the arms.
    • For a short while, keep on stretching.
    • Then return to your neutral posture.
    • After that, relax.
    • On the other side, repeat

    Chin Tucks

    Chin-tucks
    Chin-tucks
    • Start by sitting or standing with an erect posture and looking straight across the room.
    • This should be performed as a double chin while maintaining a straight line of sight, not as a head tilt to check your toes.
    • Then, go back to your neutral posture.
    • Next, relax.

    Prone Ys

    • Exercises can be done off the side of a bed or while lying on your stomach on a large exercise ball with your arms hanging straight down.
    • Raise your arms just to shoulder height.
    • Return to your neutral position after that.
    • Next, unwind.

    Cat-Cow Pose

    • Keep your back straight.
    • As you say this, a little stretch is being applied to your lower back.
    • After that, adopt a neutral stance.
    • Next, relax.
    Cat-and-Cow-Stretching
    Cat-and-Cow-Stretching

    Child’s Pose

    • Start by settling into a kneeling posture.
    • Raise your forehead to the floor.
    • Arms straight out in front of you is how you will greet them.
    • Hold this position for a short while.
    • Take a breath out.
    • After that, relax.

    Cobra Pose

    • Starting on your stomach, lie flat.
    • Place your hands on your shoulders.
    • Place your elbows toward your ribs.
    • Next, lift your torso off the ground.
    • Maintain an upright neck posture.
    • Next, adopt an impartial stance.
    • After that, relax.
    cobra-pose
    cobra-pose

    Supine Spinal Twist

    • Lay on your back to start.
    • Bring both knees down.
    • Sustain a level foot posture.
    • Breathe deeply.
    • Stretch both knees to one side.
    • Turn to look at the other side.
    • Keep it there for a brief moment.
    • After that, relax.
    • Gradually switch sides.

    Wall Angels

    wall-slides
    wall-slides
    • I’m still holding my elbows sideways.
    • Then, progressively lower your arms.
    • As far back as you can, position your elbows.
    • Then the shoulder blades together.
    • Hold this posture for a short while.
    • Next, relax.

    Seated shoulder Stretch

    • Cross your legs as you sit down.
    • Place your fingers about a foot away from your hips and place your palms down.
    • Experiment by feeling what it’s like to raise your hands off the floor and spread your fingers.
    • Keep your arms straight and lean back toward the ground.
    • Now relax.

    Reverse shoulder stretch

    • Start by adopting a sensible stance.
    • There should be tension in the intermuscular muscles between your shoulder blades.
    • Minor muscular pains or burning are fine, but not arm or neck pain.
    • Now relax.

    Supine Chin Tuck

    • When sleeping on your back, tuck your chin in, but keep your head from gazing up at your chest.
    • From here, carefully raise your head 3 to 4 inches off the floor or the surface of your bed, or wherever you are sitting.
    • She held this pose for a duration of almost five seconds.
    • Return to your neutral position.
    • Next, relax.

    Door Way Shoulder Stretch

    • Position yourself at an open doorway.
    • Place your palms on the door frame.
    • Step forward carefully with one foot.
    • When standing, keep your posture upright.
    • Hold on for a brief moment.
    • After that, adopt a neutral stance.
    • Next, relax.

    Plank

    PLANK
    PLANK
    • Assume a comfortable floor position first.
    • Place your forearms just below your shoulders.
    • Raise your knees now, and tuck your toes under.
    • Hold this posture for a short while longer.
    • Next, gradually adopt an impartial stance.
    • Next, relax.

    Shoulder Blade Retraction

    • Place yourself in a comfortable stance on the ground to start.
    • Keep your neck and head at ease.
    • Now clench your shoulder blades together.
    • For a short while, hold it.
    • Next, unwind.

    Upper Trapezius Stretch

    Upper-trapezius-stretch
    Upper-trapezius-stretch
    • Incline your chin slightly.
    • Turn your head slightly to the left.
    • Hold on for a brief moment.
    • Use slight pressure to extend the stretch.
    • Return your head and neck to their original positions.
    • Next, unwind.
    • Turn the sides over and carry on.

    Foam roller for neck

    • Slowly tilt your head to the right, holding where you feel stiff.
    • Continue for a short while.
    • Next, unwind.

    Back Rows with hand

    • Next, create a loop on each foot by encircling each foot once more and wrapping each end inside.
    • Release progressively.
    • After that, adopt a neutral stance.
    • Next, relax.

    Reverse fly

    • Take a standing stance on the ground to begin.
    • Step onto the middle of the band.
    • Bring the shoulder blades together.
    • Next, relax.

    Isometric Neck Strengthening:

    • By adding resistance, it can be made to resemble the Range of Motion Neck Stretch.
    • Try not to use your head to push the hand back.
    • Keep the posture for a short while.
    • Next, return to the Neutral position.
    • Now relax.

    Bear Hugs

    • Start by lying down on the ground in a comfortable position.
    • Gripping a theraband, encircle your shoulder blades in the center.
    • At this moment, make a 90-degree angle with your arms extended straight out to the side.
    • keeping your arm as straight as possible.
    • Next, when you are giving someone a hug, pull the band forward and within.
    • returning to the starting location after that.
    • Next, relax.

    What safety precautions are required when working out?

    • Warm-up and stretch before working out.
    • Straighten your back while exercising.
    • Avoid doing intense workouts.
    • Exercise should be stopped if you feel any unexpected discomfort.
    • Take a break in between workouts.
    • Keep yourself hydrated.

    It’s crucial to speak with a medical expert or physical therapist before starting any fitness program to make sure the exercises are appropriate for your condition and to get individualized advice.

    What is the prevention of upper cross syndrome?

    The best strategy to prevent and treat upper crossed syndrome is to keep away of activities that need prolonged head-forward stretching.

    Additional advice to avoid pain reliving and upper crossing syndrome is as follows:

    • Minimize the amount of time spent on reading, driving, watching TV, or using laptops and computers. Take ten to fifteen-minute breaks while working or sitting still.
    • getting the recommended 30 to 35 minutes a day of cardiovascular exercise from low-impact sports like walking, swimming, and cycling.
    • recognizing and avoiding activities, motions, or movements that exacerbate and intensify symptoms while also practicing relaxation as long as the pain lasts.
    • 1-2 times a day, perform strengthening exercises to target the weak muscles in the upper front neck and lower shoulders.
    • utilizing the phone’s eye level while transcribing or during extended phone calls while wearing a headset.
    • It’s relaxing to use a single pillow that conforms to your body posture.
    • In order to prevent upper-crossed syndrome and treat it, correcting posture through practice is equally crucial to UCS.
    • getting enough cardiovascular exercise—ideally 30 to 35 minutes a day—through low-impact activities like cycling, walking, and swimming.
    • identifying and staying away from behaviors, movements, or activities that prolong and worsen symptoms Even when I relax, the discomfort still exists.
    • Stretching to target tight muscles in the rear neck, shoulders, and chest, exercising to target weakened muscles in the upper front neck and lower shoulders, and continuing and repeating a few times a day, are all recommended.

    Tips for Avoiding UCS in the Future

    Begin by adopting proper posture, making necessary corrections, and avoiding postures that cause pain or numbness. Especially, prevent slouching and bad posture from becoming ingrained in your routine.

    • Other things to attempt for excellent posture and improved posture are as follows:
    • Keep an eye on your weight.
    • Put on supportive footwear.
    • To improve your posture, lift a book or screen at eye level rather than bending over to read with your head lowered.
    • When sitting for extended periods of time, don’t forget to stand up and stretch your muscles sometimes, as well as take a break and relax your body.
    • When standing for extended periods of time, place one foot on a short table and a solid object for support.
    • When you’re in bed, use pillows or similarly sized rolled towels to support your lower back and neck.

    At least twice a week, work out the muscles in your neck, shoulders, and chest.
    Make an effort to work out your back, abdominal, and core muscles every day—even if it’s just for a quick stroll.

    The Upper Cross Syndrome’s dos and don’ts:

    • Keeping your posture straight
    • Easy exercises to reduce tension and pressure on the neck’s internal structures: Stretch your neck gently up and down and side to side.
    • Sustain a healthy weight and general state of health. Avoid rolling your neck.
    • Avoid using firm pillows at night.

    Conclusion:

    Remedial exercises, stretches, and lifestyle modifications targeted at posture improvement are all part of treating Upper Crossed Syndrome. In order to stop UCS from happening again, it’s also essential to use appropriate ergonomics, maintain excellent posture, and pay attention to how your body works when performing regular tasks. The secret to successfully managing and treating Upper Crossed Syndrome is early intervention and constant corrective actions.

    FAQs

    Is the syndrome of the upper cross permanent?

    If left untreated, upper cross syndrome can, however, result in a lifelong postural hunch known as “dowager’s hump.” It is caused by a combination of weak muscles.

    What differentiates upper-crossed syndrome from lower-crossed syndrome?

    The lower body involving the pelvis, lower back, abdomen, and upper thighs is referred to as lower cross syndrome.

    What is the upper cross syndrome patient’s best course of treatment?

    The upper cross syndrome can be caused by persistently bad posture, which includes head forward and rounded or slumped shoulders whether sitting or standing. Exercises for strengthening and stretching can be used to treat upper cross syndrome.

    Does anxiety arise from upper cross syndrome?

    This may affect our ability to breathe by constricting the muscles in our chest and decreasing the amount of air we can breathe.

    What upper cross syndrome exercises are prescribed by a physical therapist?

    Place the opposing leg slightly forward and bend forward while holding a weight in one arm. Repeat after lowering the weight gradually to the starting position.

    Is there a cure for upper cross syndrome?

    Conclusions: For patients with UCS, treatment plans that incorporate a variety of exercises and approaches to repair neuromuscular imbalances and correct incorrect posture are successful in reducing pain and relieving postural deviations and neck impairments.

    What is the upper cross syndrome-specific test?

    To check for UCS, there are two easy tests you can do at home. They go by the names floor angel or standing wall angel.

    How may upper cross syndrome be treated?

    Physical therapy (PT) has been shown to be effective in treating UCS. In one instance, PT was administered to thirty college students with UCS, and the researchers discovered that it was beneficial. Nearly every student experienced an improvement in alignment and an increase in ease of use of their upper shoulder muscles.

    Which of the following describes upper crossed syndrome (UCS) symptoms?

    The head being forward most of the time is one of the common characteristics of upper crossing syndrome. the neck’s internal curvature within the spine (increased cervical lordosis).

    What is the most effective treatment for upper cross syndrome (UCS) patients?

    Physical therapy is an effective treatment for UCS. In one instance, 40 college students with Upper Cross syndrome (USC) were seen by researchers, who discovered that the therapist was beneficial. Nearly all of the pupils experienced an improvement in alignment and were able to exercise their upper shoulder muscles more comfortably.

    Does upper cross syndrome have a cure?

    It is typically caused by bad posture or improper repetitive action, and it is correctable with the right, regular remedial exercise.

    What upper cross syndrome symptoms are present?

    headaches.
    back of the neck ache or tension.
    chest stiffness and pain.
    prolonged difficulty sitting still when operating a vehicle.

    What is the syndrome of the upper cross?

    These muscles appear to gather together in the shape of an X when viewed from the side of the upper torso, which is how the condition got its name.

    References

    • Patel, D. (2023d, December 13). Upper Cross Syndrome – Mobile Physiotherapy Clinic. Mobile Physiotherapy Clinic. https://mobilephysiotherapyclinic.in/upper-cross-syndrome/#google_vignette
    • Bariya, D. (2023, December 13). 27 Best Exercises for the Upper Cross Syndrome – Mobile Physio. Mobile Physiotherapy Clinic. https://mobilephysiotherapyclinic.in/27-best-exercises-for-the-upper-cross-syndrome/
    • Young, B. (2018, September 18). Upper Crossed Syndrome. Healthline. https://www.healthline.com/health/upper-crossed-syndrome
  • 31 Best Vastus Lateralis Exercise

    31 Best Vastus Lateralis Exercise

    Vastus Lateralis Exercise is essential for strengthening one of the key muscles in the quadriceps group, located on the outer part of the thigh. This muscle plays a critical role in extending the knee, supporting leg movements, and maintaining overall lower body strength.

    Engaging in exercises that target the vastus lateralis can improve athletic performance, enhance muscle balance, and reduce the risk of knee-related injuries.

    Overview

    • The vastus lateralis is the quadriceps’ largest muscle, so it’s important to target it when doing leg exercises. This muscle, found on the outer thigh, can make your legs appear wider and larger.
    • In this article, we’ll focus on the vastus lateralis, providing 7 of the best exercises and tips for specifically targeting it, as well as 5 vastus lateralis stretches to incorporate into your training routine.
    • It is located on the outer thigh. The Latin words Vastus, which means great, and Lateralis, which means lateral side, are the source of the name of the vastus lateralis muscle.
    • It joins the other quadriceps muscles in the quadriceps tendon, which extends over the knee and connects them to the tibia. It forms the lateral wall of the thigh alongside the iliotibial band.
    • Regardless of training objectives or athletic discipline, the muscles of the legs are regarded as one of the most important parts of the body to develop.
    • The vastus lateralis, a muscle located on the outside of the thigh, is an important component of said muscles because it helps to stabilize and execute movement about the knee joint.
    • To train the vastus lateralis, resistance exercises that target the greater quadriceps femoris will be required.
    • While split squats and lunges are good starting points, more advanced exercisers may prefer exercises with more specificity, such as leg extension and narrow stance squats.

    What Is Vastus Lateralis ?

    • The vastus lateralis, also known as the “quad sweep” by bodybuilders, is a portion of the four-headed quadriceps femoris muscle located atop the thighs.
    • Because of its position and size, the vastus lateralis is regarded as one of the strongest and most aesthetically important muscles in the lower body.
    • Unfortunately, it is not possible to completely isolate the vastus lateralis because the entire quadriceps functions as one unit.
    • Instead, exercises can be performed with the vastus lateralis emphasized, allowing for more volume to be placed there.

    Anatomy Of Vastus Lareralis

    Origin

    • femur
      • lateral part of the intertrochanteric line.
      • the margin of the greater trochanter.
      • the lateral border of the gluteal tuberosity.
      • lateral lip of Linea Aspera

    Insertion

    • The quadriceps tendon
    • lateral margin of the patella

    Action: extend the leg.

    Arterial supply: lateral circumflex and deep femoral arteries

    Innervation: femoral nerve (L2–L4)

    Function as a muscle

    The vastus lateralis is the strongest member of the quadriceps muscle group, and it works in tandem with the vastus intermedius, medialis, and rectus femoris to extend the knee joint.

    Can you Isolate the Vastus Lateralis?

    • It is not always possible to target as well as isolate the vastus lateralis muscle when performing leg exercises. However, there are some tips and tricks that can help you target it more effectively.
    • To better target this quad muscle during various pressing exercises, keep your knees closer together and push inwards while avoiding allowing your knees to open.
    • Another tip is to point your toes inwards while performing exercises like leg extensions, which puts more strain on the outer thighs

    There are two types of exercises for the vastus lateralis muscle:

    • Stretching
    • Strengthening.

    Vastus Lateralis Muscle Stretching exercises

    • Vastus lateralis muscle Stretching exercise: After 2-3 days of electrotherapy for muscle pain, physiotherapists may recommend stretching to relieve muscle tightness.
    • This stretching is done after your pain has been relieved and you are comfortable.
    • This stretching exercise helps release muscle pain and tightness.

    Vastus Lateralis Stretch

    • How to Perform this Exercise: This stretching exercise Begins in a high lunge position, with your left foot forward.
    • Then, carefully lower your right knee joint to the floor and take a moment to balance.
    • When you’re ready, reach back with your right arm to grab your ankle or toes.
    • grasp this stretching position for thirty seconds. while keeping the body steady.
    • Then gradually return to the lunge position, switching from the left foot to the right foot.
    • Perform this stretching exercise three times at once and three times per day.

    Kneeling Quad Stretch

    To make this stretch more difficult, tilt your pelvis back while keeping your chest upright and lean into the hip. Another variation is to twist at the hips and reach back to grab the opposite foot.

    kneeling-lunge-stretch
    kneeling-lunge-stretch

    How to Perform the Kneeling Quad Stretch:

    • Kneel on your left knee at a 90-degree angle, with your left foot behind you.
    • Grab your foot behind you, and gently push it away from the center of your body.
    • Drive your hip forward, keep your back straight, and lean forward.
    • Hold for thirty seconds.
    • Repeat with the other leg.

    Side Lying Quad Stretch

    This not only stretches your quads but also lengthens your hip flexors, which are notoriously tight in many people.

    side-lying quadricep stretch
    side-lying quadricep stretch

    How to Perform the Side Lying Quad Stretch:

    • Lie on your side.
    • Bend your upper leg’s knee and move your foot behind you.
    • Reach back and grab your foot.
    • Pull gently towards you, pushing your hips forward.
    • Hold this for thirty seconds.
    • Repeat with the other leg.

    Hero Pose

    The hero pose is simple yet effective. Hold it for at least thirty seconds in order to effectively lengthen your quadriceps.

    How to Perform the Hero Pose Stretch:

    • Kneel on the ground, knees together, feet separated behind you, toes facing in.
    • Sit back into the area between your feet and lean back slightly. Use your arms to brace yourself.
    • Hold the position for a few seconds.
    • Slowly return to the starting position.

    Hands And Knees Quad Stretch

    To perform this stretch effectively, you’ll need some balance and coordination, but believe us when we say it’s well worth it. You’ll feel a deep stretch in your Vastus Lateralis.

    How to Perform the Hands as well as Knees Quad Stretch:

    • Get on your hands and knees!
    • To raise your leg behind you, flex your knee.
    • Reach back and grab your ankle, pulling your heel towards your glutes.
    • Hold for thirty seconds.
    • Slowly return to the starting position.
    • Repeat with the other leg.

    Standing Quad Stretch

    Sometimes the most basic stretches are the most effective. If you need extra balance, stand near a wall and lean on it for support.

    How to Perform the Standing Quad Stretch:

    • Stand with your feet hip-width apart.
    • Reach down behind you, grab your foot, and bring it up behind your glutes
    • Pull gently
    • Hold for 10- 20 sec.
    • Repeat with the other leg.

    Vastus Lateralis Muscle Strengthening Exercises

    • After the physiotherapist has administered electrotherapy and massage for 2 -3 days to relieve muscle pain, the therapist will recommend strengthening exercises to relieve muscle weakness.
    • This strengthening exercise is always recommended when you want to relieve pain and feel comfortable.

    Leg Extension (TOES-IN)

    Leg extensions are a staple in many gym workouts, and for good reason! This machine builds killer quads and is an excellent vastus lateralis exercise.

    How to Do Leg Extensions:

    • Sit down on the leg extension machine and position the pad over your ankles
    • Rotate the toes inward.
    • Fully extend your legs at the knee.
    • Slowly lower to the starting position.
    • Repeat for the desired number of reps.

    Close Stance Leg Press

    This is a versatile piece of gym equipment because you can change the leg press foot placements to target different muscles. To hit your vastus lateralis, keep your legs close together while performing the narrow stance leg press.

    How to Perform:

    • Sit on the leg press machine.
    • Place your feet on the platform, slightly closer than hip-width apart.
    • Press your heels into the platform and perform knee extension until your legs are nearly fully extended.
    • Slowly return to the starting position.
    • Repeat for the desired number of reps.

    Note: Keep your toes off the platform throughout the movement to effectively target the vastus lateralis.

    Dumbbell Lunges

    As long as you have a set of dumbbells, you can easily incorporate this lunge variation into your at-home workout.

    How to do dumbbell lunges:

    • Grab dumbbells with both hands and use a neutral grip.
    • Standing with feet hip-width apart, step forward with one leg while bending the front knee.
    • Lower your knees to 90 degrees, with your back knee just above the ground. Then, push off with your front foot’s heel to return to the starting position.
    • Switch sides.
    • Repeat for the desired number of reps.

    MACHINE HACK SQUATS

    If you have access to a gym with a hack squat machine, make sure to include it in your leg day workout. If you don’t have this equipment in your gym, check out the Best Hack Squat Alternatives.

    How to Perform the Machine Hack Squat:

    • Position yourself with your feet hip-width apart on the hack squat machine.
    • After releasing the safety grips, bend your knees to a 90-degree angle and gradually lower them.
    • Push through your heels until you reach the starting position.
    • Repeat for the desired number of reps.

    SISSY SQUAT

    Despite its name, the sissy squat is not an easy exercise! A prop can help you stabilize during the movement, but as you progress, you should be able to avoid using one.

    How to Perform the Sissy Squat:

    • Stand with feet shoulder-width apart.
    • Raise up on your toes, pointing forward, and place your hands on a prop to help with stability.
    • Bend at the knees and tilt your body backward, lowering into a squat as far as you can without losing balance.
    • Hold at the bottom for up to three seconds.
    • Using the balls of your feet, raise yourself back up to the starting position.
    • Repeat for the desired number of reps.

    FRONT SQUAT

    We will go over the barbell variation here, but you can also perform the front squat with dumbbells. Simply hold the dumbbells in front of you and place them on the front of your shoulders while performing this move.

    How to Perform the Front Squat:

    • Get under the bar. Hold the bar in front of you with your elbows bent, palms facing away from you, resting it on your upper chest, or with your arms folded across your chest and the bar resting across the front of your shoulders.
    • Stand with your feet hip-width apart, engage your core, and lower down into a squat position until your thighs are parallel to the floor.
    • Until you get to the beginning posture, push up through your heels.
    • Repeat for desired.

    DUMBBELL BULGARIAN SPLIT SQUAT

    Prepare to feel the burn from the Bulgarian split squat! Don’t go too heavy with the weights; proper form and foot placement are more important.

    How to Perform:

    • Stand one step in front of a platform (chair or bench).
    • Grab dumbbells with both hands and use a neutral grip.
    • Reach back with your left leg and place the top of your foot on the platform behind you.
    • Standing straight, slowly lower your left knee until it is near the ground.
    • Push up through your front foot until you return to the starting position.
    • Repeat, then switch sides.

    Lying Pigeon Progression

    • To perform the Lying Pigeon Progression: first place a mat on the floor and lie face down.
    • Then, secure a resistance band around the affected foot, keeping the excess band in a reachable area.
    • Grab the band with the left hand while keeping the right leg extended or bending the left knee joint.
    • Keep your feet pointed toward the ceiling.
    • Then, use the resistance band to pull forward until you feel a stretch.
    • Hold this exercise position for ten seconds.
    • Perform this strengthening exercise ten times in one session and three times per day.

    The frog pose

    • How to Perform this Exercise: This exercise begins by lying on your stomach in a prone position and propping your torso up on your elbow joints.
    • Bend both knee joints and reach back to hold your feet.
    • You can feel the stretch at this point.
    • Then, adjust your fingers to point in the same direction as your toes, and slowly lift your elbow joint to point to the ceiling.
    • Raise your chest as high as possible.
    • When you feel pain in your hip or knee joint, stop doing this exercise immediately.
    • Hold this exercise position for ten seconds.
    • This strengthening exercise should be performed three times a day and ten times in a single session.

    Floor Extension

    • How to Perform this Exercise: You’re sitting on the floor with a tall posture.
    • Pull your shoulder joint down the back, keeping your chest proud.
    • Then Bend your left knee joint in toward your chest, keeping your left foot flat on the floor.
    • Extend your leg in front of you, your foot pointing slightly to the side.
    • Hold under the left knee joint with both hands interlocked, and keep your muscles flexed throughout the exercise.
    • Do the Exhale. Lift the right leg as high in the air as possible while maintaining your posture and leaning away from the wall.
    • Hold this position for ten seconds.
    • Then, inhale and slowly lower yourself to your starting position.
    • Repeat the strengthening exercise 10 times in 1 time &  do the 3 times per day.

    Lateral heel drop

    • How to Perform this Exercise: You are standing tall, your left leg straight but not locked, and your foot rests on a small step.
    • Bend your right knee slightly and keep your left foot flat on the floor.
    • Your right knee joint must cross over your toes.
    • Then Squeeze your core muscles to maintain balance.
    • Exhale and push up from the right leg until both legs are fully straightened.
    • Inhale, contract your left vastus medialis muscle and slowly return to your starting position.
    • Hold this exercise position for ten seconds.
    • This strengthening exercise should be performed three times a day and ten times in a single session.

    Step Downs

    • How to Perform this Exercise: You’re standing with your right foot on the step and your left foot off to the side.
    • Inhale and flex the vastus medialis muscle.
    • Then bend your right knee joint so that your left foot is flat on the ground.
    • Must be Again, try to maintain your hip joint level at all times.
    • Exhale and engage your core muscles.
    • Then push off your foot and return to the starting position.
    • Hold this exercise position for ten seconds.
    • This strengthening exercise should be performed three times a day and ten times in a single session.

    Leg Extension

    • How to Perform this Exercise: You sit in a chair and scoot to the front of the seat.
    • Then, wrap a resistance band around your ankle joint and feed it under the chair, reaching back and grabbing it with your hand.
    • Exhale, and then slowly extend your leg to full extension in front of you.
    • Then inhale, contract your muscles, and slowly lower the leg back to 30 degrees.
    • Hold this exercise position for ten seconds.
    • This strengthening exercise should be performed three times a day and ten times in a single session.

    Single-leg raises

    How to Perform:

    • With your knees bent and your feet flat on the mat, you are resting on your back.
    • A weighted ankle should be placed on your thigh while you completely extend your right leg in front of you.
    • Squeeze your core muscle, contract the vastus medialis muscle, and lift the right leg about 2 inches off the mat.
    • This exercise requires keeping the leg elevated for the entire duration.
    • Make sure you’re not arching your spine.
    • You do not leave any space between the back and the mat.
    • Hold this exercise position for ten seconds.
    • This strengthening exercise should be performed three times a day and ten times in a single session.

    Terminal knee extension (TKE)

    • How to Perform this Exercise: Tie a resistance band around a sturdy anchor and slide the other end up to just above the back of your right knee joint, facing the anchor.
    • Step back until the band is taut.
    • Then Straighten your left leg and keep your right knee slightly bent.
    • Exhale, then push your right knee back to match your left knee joint, exaggerating the contraction in your vastus medialis muscle.
    • Hold this exercise position for ten seconds.
    • This strengthening exercise should be performed three times a day and ten times in a single session.

    Vastus Lateralis Activation Exercise

    • How to Perform this Exercise: You are sitting upright in a chair, with your knees bent.
    • Place the ball between your knees and your feet flat on the floor.
    • Then Place your thumbs on the soft, squashy area on the inside of the knee joint, just above your kneecap (patella), and press down firmly.
    • Next, clench your glutes and give the ball a light squeeze.
    • Make sure the movement originates in your knee joint rather than your inner thigh.
    • If you don’t think stretching is necessary, try clenching your buttocks, clenching your knee joint, and squashing the backs of your thighs down into the chair.
    • Hold this exercise position for ten seconds.
    • This strengthening exercise should be performed three times a day and ten times in a single session.

    Ball Clench Extensions

    • How to Perform this Exercise: You are lying on your back, with a rolled-up towel beneath your knee joint and the ball between your knees.
    • After that, clench your buttocks, grasp the ball lightly, and raise one heel off the floor to straighten your knee joint.
    • Keep clenching the ball and holding for 10 seconds before slowly returning to the starting position.
    • This strengthening exercise should be performed three times a day and ten times in a single session.

    Twisted Leg Raise

    • How to Perform this Exercise: You’re lying on your back, with one leg straight and the other knee bent.
    • It relieves tension in the lower back while you work the straight leg.
    • Turn your foot outwards about 20 degrees in external rotation, then lift it until your thighs are parallel.
    • Hold this exercise position for ten seconds.
    • This strengthening exercise should be performed three times a day and ten times in a single session.
    • Keep your leg turned outwards during this exercise to activate the vastus medialis muscle.

    Ball bridges

    How to Perform this Exercise

    • With your feet hip-distance apart and your legs bent, you lie on your back.
    • Position the ball between your knee joints.
    • Then clench your glutes and gently squash the ball.
    • Lift your bottom to the highest point possible without arching your back.
    • Hold this exercise position for ten seconds.
    • This strengthening exercise should be performed three times a day and ten times in a single session.

    Ball wall squats

    • How to Perform this Exercise: You’re standing with your back against a wall and a squashy ball between your knee joints.
    • Heels must be placed about 6? away from the wall, with toes pointing forward.
    • Clench your glutes and gently squash the ball to activate the vastus medialis muscle, then slowly slide down the wall while bending your knee joints.
    • Hold this exercise position for ten seconds.
    • This strengthening exercise should be performed three times a day and ten times in a single session.

    Isometric contraction of the vastus lateralis muscle

    • How to Perform this Exercise: You Sit on your bed or the floor with your legs straight out and a towel under your knees.
    • Flex your quadriceps muscle with your hip joint/leg slightly externally rotated.
    • Hold this contraction for 10 seconds, then place your fingers on your vastus medialis muscle to ensure it is activated and firing.
    • This strengthening exercise should be performed three times a day and ten times in a single session.
    • Seated Isometric Vastus Medialis Muscle and Adduction:
    • Your feet are hanging freely while you sit on a platform and chair.
    • Place a ball between your thighs and squeeze it together to activate the vastus lateralis muscle.
    • Hold the muscle contraction for 10 seconds.
    • Repeat this strengthening exercise ten times in one session and do the 3 times per day.

    Externally Rotated Half Squats

    • How to Perform this Exercise: You’re standing with your legs shoulder-width apart and your knees and feet externally rotated.
    • Squat halfway down and come up slowly, focusing on activating the vastus medialis muscle to return to a standing position.
    • Perform this strengthening exercise ten times in one session and three times per day.

    Wall/ball squats

    • How to Perform this Exercise: You are leaning against the wall while holding a Swiss ball.
    • Then Slowly squat down to a near-seated position with your thighs parallel to the ground.
    • Slowly get back up and avoid locking your knee joint.
    • This strengthening exercise should be performed three times a day and ten times in a single session.

    Split squats or static lunges

    • How to Perform this Exercise: This exercise requires you to stand with your feet shoulder-width apart and take one large step forward.
    • You can put your hands on your hip joint.
    • To make this exercise more difficult, hold dumbbells by your side.
    • Maintaining an erect stance, lunge down and up while preventing your front knee joint from moving in front of your big toe.
    • But concentrate on using your front heel to support most of your weight and try not to allow your knee to buckle
    • This strengthening exercise should be performed three times a day and ten times in a single session.

    Step-Ups

    • How to Perform this Exercise: You are Standing in front of a bench and chair.
    • Step onto a platform and drive with your glutes rather than your toes.
    • Make sure your knee joint isn’t buckling inward.
    • It is forced or pushed out.
    • Then Step down slowly, ensuring that your knee joint remains stable.
    • This strengthening exercise should be performed three times a day and ten times in a single session.

    Foam rolling the quadriceps

    Fascia is the thin layer of fibrous tissue that surrounds your muscles. Each muscle is connected to its neighbor and separated from it by fascia. It is possible for the fascia to get “gummed up,” which causes tense, aching muscles. Trigger points, reduced blood flow, and diminished function may result from this.

    Self-myofascial release, or foam rolling, is a form of self-massage that can help you relax tight fascia and regain your range of motion. The mobility and function of your hip and knee joints are enhanced when you foam roll your quadriceps.

    How to Perform this Exercise:

    • Lie on your front on the foam roller. The ideal place for the roller is beneath your thighs. Shift your weight across, emphasizing one leg at a time. Bend the knee on the leg you intend to work on.
    • Roll back and forth on your thigh. Turn your leg in and out to target all sides of your quads.
    • Look for any spots where you feel tightness and continue to work on them until they start to go away.
    • Apply more pressure by crossing your other leg over the one you’re treating.
    • Continue for 2-4 minutes, then switch sides.

    Benefits of Vastus Lateralis Exercises

    Strong and healthy leg muscles, including the vastus lateralis, provide numerous benefits. We rely on our legs to carry us around daily, so it only makes sense to properly exercise and stretch the quadriceps.

    • Makes your legs appear wider and fuller.
    • Promotes improved knee stability.
    • Improves joint health and stimulates growth hormones.
    • maintains good bone health
    • Helps you burn more calories.

    Note: that foam rolling can be painful. That being said, following foam rolling sessions should get easier as the adhesions start to disintegrate. Increase the pressure gradually to avoid causing unnecessary pain.

    FAQs

    What is the function of the vastus lateralis?

    The muscle is one of four quadriceps muscles and the largest in the group. The vastus lateralis muscle collaborates with the other quadriceps muscles to help extend the knee joint. It also helps to maintain proper thigh and kneecap positions while walking and running.

    What Happens When You Have a Weak Vastus Lateralis?

    If you have a weak vastus lateralis, it can impair the function of the other thigh muscles, limiting mobility and walking and increasing the risk of muscle strain and injury.

    Where is the vastus lateralis?

    The vastus lateralis muscle is located on the lateral side of the thighs. This muscle is the largest of the quadriceps, consisting of the rectus femoris, vastus intermedius, and vastus medialis.

  • Fluidotherapy

    Fluidotherapy

    Fluidotherapy: What is it?

    A therapeutic technique used in physical therapy and rehabilitation settings is fluidotherapy. To create a fluid-like medium, cellulose particles (such as finely crushed maize husks) are coupled with a dry thermal airflow produced by a specifically constructed machine. For treatment, patients put their affected body parts—such as their hands, feet, or limbs—into the fluidotherapy machine.

    A warming and massaging feeling is produced around the injured body area during the therapy by the cellulose particles and dry thermal air. The patient’s needs and tolerance can be taken into account when adjusting the fluidotherapy’s temperature.

    Fluidotherapy creates dry Whirlpools of smaller solid particles floating in heated air and gives the two substances liquid-like properties by employing high-intensity heating. In addition to surface heating, it allows for an active range of motion and tactile stimulation.

    Research contrasting its heating capacity with that of a Whirlpool and a paraffin bath found that they were similar. Because fluid treatment lowers pain, edema, and muscular spasms, it can be used to treat acute or subacute traumatic or non-traumatic musculoskeletal issues of the extremities. It has been demonstrated that reducing pain and stiffness and increasing range of motion are beneficial for hands and wrists that are injured or arthritic.

    A dry heat-in-order technique called fluidotherapy transfers energy by forced conduction. It is often referred to as dry heat treatment. Heat is transferred when heated air and cellulose particles are pushed around the body part being treated inside the machine’s chamber. We call this method forced convection. Particles of a solid nature are propelled by the air and end up suspended.

    Heat, massage, and fluidized particles work together to improve the range of motion, reduce inflammation, and improve blood flow.

    Fluidotherapy’s characteristics are comparable to those of a dry or waterless whirlpool. Depending on the patient’s tolerance, the temperature and level of agitation can be changed. Usually between 100 and 125 degrees, the working temperature can be decreased to room temperature. Treatments last between fifteen and thirty minutes on average.

    Different amounts of stimulation can be used to desensitize hypersensitive areas. Patients can move the afflicted body part through the particles and perform exercises while undergoing fluid therapy.

    The Functions of Fluidotherapy Equipment:

    So, how exactly do these devices perform their magic? The heating element of the fluidotherapy machine brings the particles and air to a precise, regulated temperature to start the procedure. The finely powdered particles are suspended in the warm air after the desired temperature is reached, resulting in a calming and pleasant ambiance.

    The particles in the chamber move and twirl gently as you submerge your body part, mimicking the sensation of a light massage. The heat and massaging motion enhance blood circulation, reduce tense muscles, and encourage the body’s natural healing processes. It’s similar to getting both heat therapy and a relaxing massage at once!

    Advantages of Hydrotherapy:

    Fluid treatment could be beneficial for:

    • decrease in pain and inflammation
    • reduction of joint stiffness
    • Increased range of motion and less muscle spasm
    • Improving tissue repair
    • Increasing the blood and nutrition flow to the area
    • The diagnosis may be acute to subacute, traumatic, or non-traumatic extremity musculoskeletal diseases.
    • Treatment with heat is safe to use while exercising.
    • The treated area receives very little pressure.
    • Applying heat treatment is easy.
    • gives out an amazing, dry warmth.

    Fluidotherapy is similar to whirlpools, moist heat packs, and paraffin baths, therefore it can be used in place of several other heat therapy techniques. The purpose of administering heat is to ease the signs and symptoms of specific disorders by altering the core temperature within the connective tissue and the skin.

    Fluidotherapy’s dry atmosphere makes it more resistant to the growth of microorganisms.

    Because heat promotes tissue flexibility, it helps release painful knots and relax stiff muscles while at rest. It may comfort strained, hurting nerve endings. Your regular metabolic rate is accelerated, which expedites the healing process.

    Fluidotherapy’s limitations:

    • The apparatus is highly costly.
    • If the limb is maintained in a dependent position, edema could worsen.
    • The device could cause overheating and blistering of tissue.
    • Some individuals can’t stand the inside particles in the equipment.
    • The particles may spill on a smooth floor, making the surface slippery and increasing the risk of falls.

    Tools of fluidotherapy:

    • The device is a cabinet filled with cellulose that is made from finely ground maize cob.
    • The gadget circulates heated air through the particles, causing them to flow like a liquid.
    • It allows for more heating than treatments with water or paraffin.
    • The device blows hot air through and over the particles using an electric fan inside a steel cabinet with a top that is thermostatically controlled.

    Features To Take Into Account When Selecting A Fluidotherapy Device:

    Knowing the essential characteristics is essential as it will direct you in the direction of the ideal match. Come along as we dissect the crucial elements to take into account when selecting a fluidotherapy device.

    Portability And Size

    Compact Options for Home or Small Clinic Use: A compact fluidotherapy machine may be the best choice for you, depending on your demands and available space. These portable variants are perfect for use at home or in smaller clinics since they offer convenience without compromising the therapeutic benefits. They are made to be readily put up in different locations and transportable.

    greater Models Fit for Commercial Use: A fluidotherapy machine with a greater capacity may be necessary if you manage a larger clinic or spa to accommodate many patients or clients. These high-end, commercial machines are made to endure repeated use and offer plenty of room for treatments.

    Controlled Temperature And Safety Components

    Adjustable temperature settings are essential since different people and situations may call for different heat intensities. As a result, selecting a fluidotherapy equipment with temperature settings that can be changed is crucial.

    Safety precautions to avoid burns and overheating: People’s health and safety should always come first. Consider fluidotherapy apparatus that has security precautions such as temperature monitors, automated shut-off processes, and heat protection. By using these safety measures, the treatment environment is kept safe and secure and the risk of burns and overheating is decreased.

    Friendly User Interface And Customisation Possibilities

    Simplified Regulations for Quick Operation: With a fluidotherapy machine, you can concentrate on providing the finest care possible by making it easy to operate. Search for models that have easy-to-use interfaces and directions that are clear. Simple temperature, time, and other parameter modifications are made possible by intuitive controls, guaranteeing a hassle-free and easy experience for you and your patients or clients.

    Extra functions like Timers and Pre-set Programs: Some fluidotherapy machines come equipped with extra functions that improve patient comfort and treatment efficiency. By utilizing timers to record the duration of every appointment, you can ensure that the treatment times are constant. Processes can be streamlined and decision-making made easier with pre-made programs tailored to certain diseases or treatment objectives.

    What conditions does fluidotherapy treat?

    Many different disorders can be effectively treated with fluid therapy.

    • Elbow
    • Wrist
    • Hand
    • Ankle
    • Foot

    Indications of fluidotherapy:

    • inflammatory response
    • After surgery, rehabilitation
    • Subacute disease
    • maintaining state

    Not recommended:

    • Fever
    • Zone of  Anaesthesia
    • severe cardiovascular conditions
    • Bleeding
    • Individuals who are sensitive to heat

    Optimizing The Advantages: Guidance For The Best Fluidotherapy Treatments:

    Let’s now explore some useful advice and techniques to help you get the most out of these amazing devices and maximize your fluidotherapy sessions.

    It’s Important to Prepare:
    For best results, arrange your therapy region and the machine before beginning a fluidotherapy training session. Some essential actions that must be taken are as follows:

    Make sure the device is neat and reach and operating correctly: To guarantee the fluidotherapy machine’s longevity and optimal function, undertake routine maintenance and cleaning. Observe the maintenance schedule and safety instructions provided by the manufacturer.

    Decide on the right temperature: Adapt the temperature settings to your patient or client’s demands and comfort level. Take into account any particular ailments or sensitivity they could have. Choose a temperature that offers healing warmth without being too hot or uncomfortable.

    Prepare the treatment area: For the meeting, provide a warm and welcoming space. Arrange any extra items that could improve the client’s comfort and relaxation, such as pillows and towels. Remove any obstacles or distractions that can make the session challenging.

    Interaction And Personalisation:
    Customization and efficient communication are essential for optimizing fluidotherapy’s advantages. Think about the following tactics:

    Evaluate each patient’s or client’s unique needs by spending time getting to know their preferences, worries, and specific goals. To identify the areas that need more attention or specialized treatment, conduct a thorough examination.

    Talk about the course of treatment: Make sure you explain the goals, advantages, and expectations of the fluidotherapy session in clear terms. Respond to any queries or worries that your customer or patient may have. This makes it easier for trust to grow and promotes a team-based therapy approach.

    Customize the course of action: Adapt the fluidotherapy session to each person’s needs. To maximize the therapeutic benefits, modify the session’s duration, intensity, and temperature. Take advantage of other techniques, such as therapeutic massage or being stretched, to improve the fluidotherapy procedure.

    Observation and Aftercare:
    Long-term success depends on tracking the improvement and giving the proper follow-up treatment. Think about the following tactics:

    Observe and evaluate: Pay great attention to your patient or client’s responses and reactions throughout the fluidotherapy session. Keep track of any changes in overall comfort, range of mobility, or degree of pain. Note any noteworthy advancements or areas that still need work.

    Analyse results: Following the session, assess the results and get your patient’s or client’s input. Evaluate how effectively the treatment is working for them and how it affects their general health, functionality, and symptoms. Make use of this data while arranging your next course of treatment.

    Continue to support the client: In the interim between fluidotherapy treatments, provide direction, self-care activities, or suggestions. Give your client or patient the resources and information they need to continue improving outside of the therapeutic environment.

    Wrapping Up

    Greetings, readers, on successfully finishing this fluidotherapy tour. You’ve heard from experts, become aware of its many advantages, and figured out how to get the most out of your fluidotherapy sessions. This brings us to the recognition of fluidotherapy’s powerful ability to foster change and well-being in our lives.

    Fluidotherapy is a demand for a whole-person approach to health, not just a method of treatment. It motivates us to take advantage of the inherent healing powers of our bodies to enhance general well-being. As you explore this field, maintain your curiosity, keep learning, and accept the limitless possibilities fluidotherapy has to offer. Remember that you can heal and transform and, therefore harness the power of healthcare and fluidotherapy.

    FAQs

    For what reason is liquid therapy used?

    Because fluid treatment lowers pain, edema, and muscular spasms, it can be used to treat acute or subacute traumatic or non-traumatic musculoskeletal issues of the extremities. It has been demonstrated that reducing pain and stiffness and increasing range of motion are beneficial for hands and wrists that are injured or arthritic.

    What is the mechanism of action of fluidotherapy?

    fluid-based treatment. Particles close to the affected extremities are stirred by this type of superficial dry heat, which has a desensitizing effect. The range of temperatures is 115 °F to 120 °F, or 46.1 °C to 48.9 °C.

    How long does a course of fluid therapy take to finish?

    Treatments last between fifteen and thirty minutes on average. Different amounts of stimulation can be used to desensitize hypersensitive areas. Patients can move the afflicted body part through the particles and perform exercises while undergoing fluid therapy.

    What are the advantages of fluid therapy?

    To reduce minor pain and stiffness associated with non-rheumatoid arthritis, dry heat therapy promotes range of motion, reduces localized discomfort, decreases localized blood circulation, and relieves localized pain.

    When should one apply fluidotherapy?

    Localized pain relief
    treating patients with minor pain and stiffness who do not have rheumatoid arthritis
    Enhance regional blood flow
    In conjunction with physical activity, joint range of motion management

    References

    • Fluidotherapy Machines: A Modern Wonder of Therapy. (n.d.). MassageTools. https://massagetools.com/blog/fluidotherapy-machines-are-they-worth-your-bucks?srsltid=AfmBOoq25M_5bxxxiZ04L2S5fArU9FyndxKJnwjykqa5sXAEO5GFCRUw
    • Sankhla, D. (2023, August 6). Fluidotherapy – Equipment, Benefits, Contraindication. Samarpan Physiotherapy Clinic. https://samarpanphysioclinic.com/fluidotherapy/
  • 12 Best Exercises for Lumbar Spondylosis

    12 Best Exercises for Lumbar Spondylosis

    The most natural therapy for lumbar spondylosis recovery is exercise. Exercise increases spine mobility while also strengthening the muscles in our lower backs.

    A significant portion of the global population suffers from lumbar spondylosis. Roughly 55–60% of those over 60 are thought to have lumbar spondylosis to some degree. The aging of the lower spine’s discs and vertebral joints due to natural agility is the cause of its high frequency. Genetics, sedentary lifestyle, obesity, and bad posture are further contributing factors.

    Thankfully, physical therapy can improve overall back strength and reduce lumbar problems.

    What is Lumbar Spondylosis?

    A disorder known as lumbar spondylosis can come on by facet joint or lumbar disc degeneration. It is a degenerative condition affecting the lower vertebrae’s discs, vertebral bodies, and related joints. These are progressive, irreversible alterations that typically result from an older patient’s exposure to mechanical force.

    Degeneration of the structural segments of the spine is the primary cause of lumber spondylosis. Age is the usual risk factor for developing lumber spondylosis. In fact, on imaging tests such as MRIs or X-rays, the majority of people will show signs of spondylosis by the age of 65.

    Although lumber spondylosis is common, it is typically not severe. Surgery is not usually used to treat lumbar spondylosis. Steroid injections, muscle relaxants, anti-inflammatory medications, and pain relievers are examples of medical therapeutic alternatives. In addition to having various exercises, physical therapy is incredibly useful in relieving pain.

    Causes:

    Lumbar spondylosis can have a variety of causes, some of which are as follows;

    • Ages-old
    • Genetics
    • Back pain,
    • Continual stress on the spine

    Signs and symptoms:

    • lower back pain.
    • legs are numb to the touch.
    • Weakness.
    • Challenging to stand and sit.

    How Can Exercises Help in Reducing Pain from Lumbar Spondylosis?

    Your core (abdominal) and spinal muscles should be strengthened via the exercises listed below. Your body will benefit from a healthier spine if the muscles surrounding your backbone support and stabilize your back, even if you experience mild pain.

    The secret to back health is having a strong core. Strong muscles supporting your spine will likely reduce the symptoms of spinal osteoarthritis, including joint discomfort and immobility.

    Exercises for Lumbar Spondylosis:

    Many people find the exercises below to be beneficial. Adjust your position as needed to ensure comfort.

    Knee to chest

    This exercise releases tension in the lower back muscles.

    • Lie down on your back to start.
    • Keeping the other foot on the ground, bring one knee up to the chest.
    • Hold this position for a few seconds.
    • Lower your leg.
    • Then return to your neutral position.
    • Then relax.
    • Repeat this exercise five to ten times.
    One-Knee-to-Chest
    One-Knee-to-Chest

    Cat-cow

    • Start by getting down on your hands and knees in the tabletop posture.
    • Make sure your back is straight.
    • Place both of your hands and feet securely on the ground.
    • As you open your eyes and inhale, bring some air into your stomach.
    • Hold this position for a few seconds.
    • With your back to the ceiling, pull your chin into your chest and release the air.
    • It appears like your lower back is slightly stretched.
    • Hold this position for a few seconds.
    • Then return to your neutral position.
    • Then relax.
    • Repeat this exercise five to ten times.
    Cat-and-Cow-Stretching
    Cat-and-Cow-Stretching

    Bird dog

    • Placing your hands and knees about hip-width apart, begin in the tabletop position.
    • Take a straight back, place your knees behind your hips, and place your wrists beneath your shoulders.
    • Lift your left knee off the mat with your raised right hand.
    • Keep your balance while you straighten your arm in front of you and your leg behind you.
    • Make an effort to move cautiously and slowly.
    • Hold this position for a few seconds.
    • Then return to your neutral position.
    • Then relax.
    • Repeat this exercise five to ten times.
    Bird-dog Exercise
    Bird dog with elbow-to-knee

    Front plank

    • Put your forearms and toes on the ground and face downward in a plank position.
    • Lay your forearms out in front of you, putting your elbows under your shoulders.
    • You should be staring at the floor, yet your head is relaxed.
    • As you move your belly button toward your spine, contract your abdominal muscles.
    • Keep your body in a straight line from your ears to your toes, without bending or loosening, and maintain a firm and upright spine.
    • This is the position of the neutral spine.
    • Make sure your shoulders are down and not pulled up close to your ears.
    • Hold this position for a few seconds.
    • Then return to your neutral position.
    • Then relax.
    • Repeat this exercise five to ten times.
    PLANK
    PLANK

    Lower-back-rotational-stretch

    • Start with lying down on the ground.
    • Bend your both knees.
    • Avoid bending your neck or lowering your back to the ground.
    • Take a deep breath.
    • This should be a relaxed and comfortable position for you.
    • Lower your knees to the same one side.
    • Shift your focus to the opposite side.
    • Maintain a level shoulders-to-floor position.
    • Hold this position for a few seconds.
    • Change sides gradually.
    • Then return to your neutral position.
    • Then relax.
    • Repeat this exercise five to ten times.
    lower-back-rotational-stretch
    lower-back-rotational-stretch

    Bridging

    • Lay comfortably on your back.
    • Use a yoga mat or another soft place to practice this.
    • Push through your feet to raise your hips off the ground, keeping your knees bent and your feet flat on the floor.
    • Tighten your butt muscles when the exercise reaches the highest point.
    • Hold this position for a few seconds.
    • Then return to your neutral position.
    • Then relax.
    • Repeat this exercise five to ten times.
    Hip bridge exercise
    Hip bridge exercise

    Double knee to chest

    • Begin by lying down on the ground in a comfortable position.
    • Now bend both your knees.
    • Contracting your stomach muscles can be achieved by pulling your belly button to the floor.
    • Using your hands, raise both legs to your chest.
    • Hold this position for a few seconds.
    • Lower your legs now.
    • Then return to your neutral position.
    • Then relax.
    • Repeat this exercise five to ten times.
    Double Knee to Chest
    Double Knee to Chest

    Modified sit-ups

    • You must lie on your back on the mat to perform this exercise.
    • One leg should be flexed while the other remains stretched and flat.
    • You should place your hands beneath your lower back’s arch to preserve its natural curve.
    • Apply pressure to your hands while you slowly raise your head, shoulders, and chest off the bed as a single unit to avoid twisting your lower back.
    • Your head does not rise very high off the ground during this limited range of motion.
    • For a few seconds, maintain this posture while taking deep breaths.
    • Then return to the starting position gradually.
    • Then relax.
    • Repeat this exercise five to ten times.
    Modified sit-ups
    Modified sit-ups

    Back extension exercise

    Back extensions alleviate stiffness and help with posture.

    • Start by lying on your stomach and supporting yourself with your elbows.
    • Press down with your hands to lift your back while maintaining an extended neck.
    • Your stomach muscles need to feel somewhat stretched.
    • Hold this position for a few seconds.
    • Then return to your neutral position.
    • Then relax.
    • Repeat this exercise five to ten times.
    back-extensions-exercise
    back-extensions-exercise

    Pelvic tilt

    By engaging your abdominal muscles, pelvic tilts can relieve lower back stress.

    • Arms by your sides, feet flat on the ground, and knees bent, enter a laying position on your back.
    • Put your arms out at your sides, palms down.
    • Your neck should be in line with your spine and the back of your head should be in contact with the mat.
    • Leave space between your lower back and the mat so that your back can continue to curve naturally.
    • Your hand ought to be able to glide inside this opening.
    • Take a breath.
    • Exhale as you squeeze the area between your lower back and the mat or floor, lifting your back with your abdominals pulled up.
    • It will cause a slight flexion of your lower back.
    • Hold this position for a few seconds.
    • Then return to your neutral position.
    • Then relax.
    • Repeat this exercise five to ten times.
    PELVIC TILT
    PELVIC TILT

    Wall angels

    • Place your feet a few inches away from the wall and bend your knees slightly while standing with your back to the wall.
    • Slide your chin back into the wall to help extend your neck, and press your back on the wall while you’re doing it.
    • Arms raised at a ninety-degree angle, place your elbows first and press the backs of your hands against the wall.
    • To make a Y pose, slowly extend your arms above your head.
    • While doing this, make sure your entire back, head, elbows, and hands stay in touch with the wall, and that your shoulder blades stay down.
    • Hold this position for a few seconds.
    • Then return to your neutral position.
    • Then relax.
    • Repeat this exercise five to ten times.

    Lying hamstring stretch

    • You must lie in a supine position to perform a hamstring stretch.
    • Lift one leg off the ground slowly while keeping it straight.
    • Gently pull the leg towards you while holding your hands behind your calf or thigh until you feel a stretch in the back of your thigh.
    • Hold this position for a few seconds.
    • Then return to your neutral position.
    • Then relax.
    • Repeat this exercise five to ten times.
    Supine hamstrings stretch
    Supine hamstrings stretch

    When exercising, what safety precautions need to be taken?

    • Stretch and warm up before working out.
    • Maintain proper posture during the exercise.
    • Stay away from intensive exercises.
    • If doing exercise is difficult for you, stop.
    • In between sets of exercises, rest.
    • Try to wear comfortable, loose-fitting attire that won’t limit your range of motion when working out.
    • When you stretch a tight muscle, it’s normal to feel pain. However, during the stretch, you shouldn’t experience any sudden or intense discomfort.

    What times do you not work out?

    • A burning sensation in the muscles
    • You don’t feel good.
    • If any pain or numbness is experienced.
    • Fever
    • Headache

    Which exercise ought to be stayed away from?

    • Heavy lifting,
    • Prolonged bending,
    • Twisting,
    • Stay away from any jobs or hobbies that put a strain on your lumbar spine.
    • Avoid doing activities requiring quick, forceful movements.
    • You should refrain from doing any physical activity that hurts or is uncomfortable for you.
    • Avoid high-impact activities like jumping and sprinting.

    Lifestyle modifications when managing lumbar spondylosis:

    A few lifestyle modifications combined with prescription medications can help effectively manage lumbar spondylosis. The goals of these adjustments are to lessen the strain on the spine, encourage healing, to improve general health.

    Consider the following lifestyle modifications:

    • Stay away from high-impact activities

    The symptoms of lumbar spondylosis can intensify when engaging in repetitive or forceful motions, such as jumping or jogging. Make the switch to low-impact, spine-friendly options.

    • Maintain proper posture

    The signs and symptoms of lumbar spondylosis might be made worse by bad posture. It is possible to reduce pain and stop additional injury by keeping good alignment when standing, sitting, and walking. Back-strengthening exercises and the use of ergonomic furniture are also beneficial to good posture.

    • Continue being active

    A regular exercise regimen is crucial for managing lumbar spondylosis. Walking, biking, and swimming are low-impact exercises that make the muscles supporting the spine more flexible and strong. Consultation with a doctor or physical therapist is essential for choosing a suitable fitness program for your particular situation.

    • Take rest periods

    Take regular breaks to stretch and switch positions if your job requires you to sit or stand for extended periods. This is especially crucial if you have a sedentary lifestyle. This lessens the tension in your lumbar region and helps relieve stiffness.

    By adding these lifestyle changes into your daily routine, you can manage lumbar spondylosis successfully and improve your quality of life. Never skip consulting the doctor before starting any significant changes to your diet or exercise regimen.

    Summary:

    The common sedentary lifestyle of today is contributing to an increase in lumbar spondylosis, a degenerative condition affecting the lower vertebrae of the spine. This illness is characterized by the gradual degradation of the facet joints and spinal discs, which results in chronic back pain, stiffness, and decreased mobility.

    Having said that, specific exercise is necessary to treat lumbar spondylosis, improve posture, and maintain good spine health.

    FAQ:

    In which positions should one avoid if they have lumbar spondylosis?

    Sleeping on your stomach puts additional strain on your lumbar spine because it is more likely to arch. So, for people with spondylosis, sleeping on one’s stomach is generally not the best option. When side sleeping with flexed knees, there is less compression on the lumbar spine.

    How should lumbar spondylosis be treated?

    The first step toward strengthening the muscles that support the spine is almost always physical therapy. Epidural steroid injections are sometimes used as a pain and inflammation reliever. Anti-inflammatories and other short courses of oral pain medicine may also be recommended.

    Which sleeping posture is ideal for people with lumbar spondylosis?

    It’s often accepted that the best sleeping position for spinal health is on your back. It could take some getting used to given that for a lot of individuals, this is also the least comfortable position to sleep in.

    Can someone with lumbar spondylosis lead a normal life?

    There are several things you may do to make daily living easier if you have lumbar spondylosis, such as reducing the amount of bending, lifting, and carrying heavy objects that strain your lower back.

    Is there a permanent cure for lumbar spondylosis?

    Loss of motion and back pain are possible symptoms of this specific type of arthritis. Although there is no known treatment for lumbar spondylitis, most patients may control their symptoms with conservative measures. If you experience neurological or other incapacitating consequences, your physician might advise surgery.

    For lumbar spondylosis, is yoga beneficial?

    Yoga may assist in easing the lower back pain and stiffness brought on by lumbar spondylosis. By practicing yoga poses that promote spinal health, flexibility, and pain management, people with lumbar spondylosis can find comfort and an improved quality of life.

    When I have lumbar spondylosis, can I still exercise?

    The condition is characterized by increasing facet joint and spinal disc degradation, which results in stiffness, restricted range of motion, and chronic pain in the back. However, focused exercise is essential for managing lumbar spondylosis, maintaining posture, and supporting ideal spine health.

    Is spondylosis in the lumbar region serious?

    Although lumbar spondylosis is typically not dangerous, you should consult a physician at away if any of the following signs appear: Sciatica is typified by pain, tingling, or numbness that radiates from your back down your legs, feet, or toes. variations in the way you walk or the difficulty you face.

    References:

    • June 25, 2024; Tirgar, P. The Top 9 Most Effective Exercises for Lumbar Spondylosis – Mobile Physiotherapy Clinic. The best lumbar spondylosis exercises are available at https://mobilephysiotherapyclinic.in.
    • November 6, 2023; Movva, V. The Complete Manual for Treating Lumbar Region Spondylosis. In India, RegenOrthoSport. The definitive manual for treating lumbar spondylosis can be found at https://regenorthosport.in/
    • May 8, 2024: Nakamura, K., and Nakamura, K. Exercises for Spondylolysis to Stabilize Your Lower Back. Bodi Initiation. Spondylolysis exercises to help support your lower back: A website dedicated to empowering women
    • 10 January 2024, Admin. What kind of exercise is best for treating lumbar spondylosis? Sanjeevanam. How should a person exercise if they have lumbar spondylosis? Sanjeevanam’s blog can be found at this URL.
    • Image 8, 2018 August 13; Morrisey, M. Modified Curl-Up Exercise – 166703623692521372, a 10-Minute Core Workout for Strength and Stability – SilverSneakers, Pinterest.
  •  14 Best Stretches for Shin Splints

     14 Best Stretches for Shin Splints

    Introduction:

    Stretches for Shin Splints are essential for anyone experiencing the sharp, persistent pain along the front of the lower leg, often triggered by overuse or improper technique in activities like running, walking, or dancing.

    Medial tibial stress syndrome, another name for shin splints, is a common injury that affects the tibia (shinbone) and surrounding muscles.

    An everyday overuse injury is shin splints. The cause of shin splints is overuse of the leg’s muscles and bones from repeated motion. A common injury suffered by athletes and dancers is shin splints.

    Benefits

    • Relaxation of muscles
    • Reduce pain
    • Increased flexibility
    • Lessen any tightness or strain.
    • Minimize inflammation
    • Your balance and coordination will improve with stretches Because they improve the balance between your body and mind by calming your muscles, stretches are also excellent for lowering stress levels.
    • Stretches relieve soreness and stiffness.

    Stretches for Shin Splints:

    The stretches listed below are beneficial for treating shin splints;

    Gastrocnemius calf stretch

    • Step up carefully and place your hands on a wall or the back of a chair to support yourself.
    • Now put one foot behind you.
    • Keep going to place your feet flat.
    • Maintaining your back straight and your heel down, flex your front knee until you feel a stretch in your back leg’s calf.
    • Hold this position for a few seconds.
    • Then return to your neutral position.
    • Then relax.
    • Repeat this stretch three to five times.
    Standing-Gastrocnemius-Stretch
    Standing-Gastrocnemius-Stretch

    Seated calf stretch

    • Begin by taking a long, comfortable seat on the floor.
    • Tie a rope or cloth over the front of your foot to raise it to its maximum length.
    • Legs should remain parallel to the ground.
    • The only joints in your body that should move are your ankles.
    • Hold this position for a few seconds.
    • Then return to your neutral position.
    • Then relax.
    • Repeat this stretch three to five times.
    Long sitting Calf Stretching
    Long sitting Calf Stretching

    Soleus calf stretch

    • To begin, place yourself in front of a closed door or wall.
    • Place both hands against the wall.
    • Proceed to step slightly ahead of the other after that.
    • To feel the stretch, slowly lower you till your knees are bent on both sides.
    • Don’t take your heels off the ground.
    • Hold this position for a few seconds.
    • Then return to your neutral position.
    • Then relax.
    • Repeat this stretch three to five times.
    Soleus calf stretch
    Soleus calf stretch

    Lying Shin Stretch

    • Start with relaxing while lying on your side.
    • Your foot should be behind your back when you bend your upper leg accordingly.
    • You may move your front foot to your back by reaching back and gripping it.
    • Hold this position for a few seconds.
    • Then return to your neutral position.
    • Then relax.
    • Repeat this stretch three to five times.
    Lying Shin Stretch
    Lying Shin Stretch

    Kneeling shin stretch

    • Start on all fours and gently lower yourself so that your heels are below your glutes.
    • Place your hands on both knees.
    • Apply more force while lowering the heels gradually.
    • Hold this position for a few seconds.
    • Then return to your neutral position.
    • Then relax.
    • Repeat this stretch three to five times.
    Kneeling shin stretch
    Kneeling shin stretch

    Hamstring wall stretch

    • Look for an open door.
    • Lie flat on the ground or a mat with your back flat and your left leg fully extended on the floor.
    • It should be possible to fit the left leg through the door hole.
    • The right leg should be rested on the wall next to the entryway.
    • Change the gap between the body and the wall so that the right leg feels a tiny amount of pressure.
    • Hold this position for a few seconds.
    • Then return to your neutral position.
    • Then relax.
    • Repeat this stretch three to five times.
    Hamstring stretch on wall
    Hamstring stretch on wall

    Standing hamstring stretch

    • Start by taking a comfortable posture on the ground.
    • Up until you feel a slight pull in the back of your leg, keep your back straight and progressively flex forward from your hips.
    • To provide support, place one leg on a tiny stool or table and feel the stretch.
    • Hold this position for a few seconds.
    • Then return to your neutral position.
    • Then relax.
    • Repeat this stretch three to five times.
    standing-hamstring-stretch
    standing-hamstring-stretch

    Ankle Dorsiflexion Stretch

    • With a stand facing a wall, begin.
    • Don’t take your heel off the ground.
    • Maintain a straight knee.
    • Touch the ground with the toe of your front foot.
    • Your calf muscles will experience stretching.
    • Hold this position for a few seconds.
    • Then return to your neutral position.
    • Then relax.
    • Repeat this stretch three to five times.
    Ankle Dorsiflexion Stretch
    Ankle Dorsiflexion Stretch

    Standing Anterior Tibialis Shin Stretch

    • Make sure you are comfortable standing up first.
    • You can place your hand on a wall or another item to help with balance.
    • The knees are slightly bent on both sides.
    • Then put one foot firmly on the ground.
    • Position the other foot such that it is directly behind this stable foot and its toe touches the ground.
    • You should feel a stretch from the top of your stretching foot into your shins if you pull your bent leg forward while maintaining a firm toe grip.
    • Hold this position for a few seconds.
    • Then return to your neutral position.
    • Then relax.
    • Repeat this stretch three to five times.
    Standing Anterior Tibialis Shin Stretch
    Standing Anterior Tibialis Shin Stretch

    Achilles tendon seated stretch

    • First, take a seating position on the ground surface.
    • Bend one knee while keeping your heel on the ground, then extend the other leg out in front of you.
    • Tie a belt, cloth, or workout band around the heel of your foot to pull your toe towards you.
    • Hold this position for a few seconds.
    • Then return to your neutral position.
    • Then relax.
    • Repeat this stretch three to five times.
    Achilles-tendon-seated-stretch
    Achilles-tendon-seated-stretch

    Standing calf stretch

    • Beginning by standing facing a wall.
    • Take a step backward with one leg extended straight and forward with the other.
    • Maintain the heel of your other foot on the ground.
    • Then, press yourself up against the wall.
    • As soon as your left calf muscles’ posterior begin to pull.
    • Hold this position for a few seconds.
    • Then return to your neutral position.
    • Then relax.
    • Repeat this stretch three to five times.
    Standing Calf Stretch
    Standing Calf Stretch

    Low Runner’s Lunge

    • Starting from a standing posture, swiftly advance with your right foot to create a low lunge.
    • Increasing the stretch as you lower your chest onto your upper right thigh.
    • The calf and ankle of the right leg will feel stretched.
    • Hold this position for a few seconds.
    • Then return to your neutral position.
    • Then relax.
    • Repeat this stretch three to five times.

    Foam Roller Stretch

    • Place the foam roller on the surface of the ground.
    • It should be sturdy enough for you to rest your shins on top of it.
    • After that, roll back and forth for a short while.
    • Then return to your neutral position.
    • Then relax.
    • Repeat this stretch three to five times.
    Foam Roller Stretch
    Foam Roller Stretch

    Seated shin stretch

    • First, take a seat in a chair.
    • One knee should be bent till the toe hits the floor and the knee should be extended in front of the other.
    • As you gradually move your weight forward and feel a stretch in your shin, keep your toe firmly planted on the ground.
    • Hold this position for a few seconds.
    • Then return to your neutral position.
    • Then relax.
    • Repeat this stretch three to five times.
    Seated shin stretch
    Seated shin stretch

    What safety measures are necessary when stretching?

    • Stretch gently and warm up.
    • Stretching should be done with proper posture.
    • Stay away from painful stretches
    • If a sharp pain occurs, stop stretching.
    • Between stretches, take some time to relax.
    • Wearing comfortable clothes.

    When do you not perform stretching?

    • Fever
    • Headache
    • You’re feeling sick
    • If you feel any pain or numbness

    Which physical activity should you stay away from if you have shin splints?

    • High jumping
    • Running
    • Sports activity

    How to Avoid Getting Shin Splints:

    • Wearing the Right Footwear

    You can significantly decrease your chance of getting shin splints when you exercise in the correct shoes. By using running shoes with shock-absorbing technology, shinbone stress can be reduced. Your risk of getting shin splints can be decreased by wearing shoes with orthotic inserts. Your foot’s arch is kept in place with orthotic inserts.

    • low impact exercise

    To reduce the strain on your shins, involve low-impact exercises in your program. Better options for getting many of the same advantages without the stress of running include biking, swimming, or walking.

    • Enough time to heal

    Allow your body the time it needs to heal in between workouts. Over time, inflammation may lessen, protecting the injured area from further injury. Applying ice to the hurting location could perhaps help in decreasing swelling and inflammation.

    • Stretching

    Your lower limbs and Achilles tendon will experience increased strain if your calf or Achilles muscles are too tight. Stretching after an exercise session can help you avoid shin splints.

    Summary:

    You should avoid engaging in your favorite activity if you have severe shin splint pain. However, you have control to stop them. Additionally, there are ways to help heal from shin splints, such as rest, ice, stretching, and low-impact activity.

    Consult with your doctor to rule out other possible causes of the pain if it worsens.

    FAQ:

    How can shin splints be relieved by stretching?

    Shin splints can be avoided with shin stretches. Stretches for shin splints target the soleus muscles, which are located in the calf. You can do these stretches either before or after your usual workout routine.

    Can you avoid shin splints by stretching?

    Stretches for the feet and ankles may promote better movement and help avoid shin splints. To help prevent shin splints, a stretching regimen can help the muscles in your ankle, foot, and upper legs.

    When is the right time to stretch someone with shin splints?

    Every day, perform the shin splint stretches for at least 15 to 30 minutes. A modest daily stretching regimen will help you.

    Can I run while having shin splints?

    Once the pain slows down, take a break from running and gradually resume at smaller, less painful levels. To lower your risk of running-related injuries and improve your running performance.

    Can someone with shin splints walk?

    Reduce Your Level of Activity
    For one to two weeks, refrain from doing any lower leg exercises repeatedly. As long as you are pain-free, try alternative low-impact exercises like riding, swimming, or using an elliptical bike.

    Do you ever get rid of shin splints?

    Shin splints go away with time. Rest, a modification in your activity plan, and wearing supportive footwear should help alleviate shin splint pain.

    How should someone with shin splints go to sleep?

    Sleeping on your back with your legs extended and toes pointed in your direction to maintain your calves extended if your athletic injury manifests as shin splints. People with Plantar Fasciitis or sore heels can also benefit from this position.

    Is physical therapy beneficial for shin splints?

    Techniques such as physical therapy that focus on strengthening the affected area and surrounding areas are essential when treating shin splints. As you gradually increase your activity level, you have to include enough rest into your exercise regimen.

    References:

    • On December 13, 2023, Bariya, D. The Top 25 Shin Splint Stretches to Promote Quick Healing – Mobile. A mobile clinic for physical therapy. There are 25 best stretches for shin splints at https://mobilephysiotherapyclinic.in.
    • March 6, 2019; Hecht, M. Shin splint stretches: 7. Hints for stretches to relieve shin splints from Healthline.
    • October 12, 2022: Grose, K. Ways to Extend Your Shin Splints. A WebMD guide on stretch for shin splints. Workouts at https://www.webmd.com/
    • Image 3, Stretch Soleus (Adaptability). (As of now). Saint Luke’s Medical Center. This article regarding the soleus muscle’s mobility may be found in the wellness library.
    • Image 4, (2019, April 9) PhilaMassages. Tibialis Anterior (shin) sideways stretched [Video]. YouTube. Visit YouTube to view this: https://www.youtube.com/watch?v=-VTcJeC-esk
    • Image 5, On July 24, 2023, Harwood, T. Relax Release Renew with a kneeling shin stretch. Unwind, let go, and regenerate. Kneeling Shin Stretch Exercise: Relax Release Renew Co., Ltd.
    • Image 8, April 28, 2020: Reinold, M. Exercises for Ankle Mobility to Enhance Dorsiflexion. Michael Reinold. Improve your dorsiflexion with these ankle mobility exercises: https://mikereinold.com/
    • Image 9, Sept. 22, 2022, Prajapati, N. Exercise for stretching the tibialis anterior: Health Benefits, How to Do It? Samarpan Clinic for Physiotherapy. Exercise for Tibialis Anterior Stretching: https://samarpanphysioclinic.com/
    • Image 11, On September 16, 2023, Song, D. Rehabilitation Hero: Extend Your Calf While Standing. Rehabilitation Champion. Try this standing calf stretch exercise: https://www.rehabhero.ca
  • Locking and Unlocking of Knee Joint

    Locking and Unlocking of Knee Joint

    Introduction:

    A critical procedure that is necessary for the knee’s ultimate extension is the locking and unlocking mechanism of the joint, often known as the “Screw home mechanism (SHM)”.

    An individual with a locked knee may find it difficult to bend or straighten their leg for extended periods. This ailment might be chronic or uncommon.

    Knees may bend in both directions and can even rotate somewhat. If your knee is unable to carry out these tasks, it may compromise your range of motion and your capacity to sit, stand, squat, and kneel comfortably.

    A pseudo-locked knee occurs when discomfort makes it difficult to move the knee, whereas a genuine locked knee occurs when the knee joint is physically locked into place and cannot move.

    Knee anatomy:

    The joint between the knees can mainly be used for both flexion and extension because it is a hinge-type synovial joint (with a limited amount of medial and lateral rotation as well). The formulations of the patella, femur, and tibia generate it.

    This piece will address the knee joint’s articulating surfaces, ligaments, and neurovascular supply.

    Articulating Surfaces:

    The patellofemoral and tibiofemoral articulations together comprise the knee joint. Hyaline cartilage lines the joint surfaces, which are contained in a single joint cavity.

    Tibiofemoral: One articulates each tibial condyle and the medial and lateral femur condyles. It is the part of the knee joint that bears weight.

    The anterior portion of the distal femur articulates with the patella in the patellofemoral joint. Allowing the quadriceps femoris tendon, also referred to as the knee extensor, to be placed straight across the knee, it increases the muscle’s effectiveness.

    The patella functions as a stabilizing structure that lessens the frictional stresses put on the femoral condyles and acts as a fulcrum to boost the power of the knee extensor because it is both created and lives within the quadriceps femoris tendon.

    Nerve Supply

    The genicular branches of the femoral and popliteal arteries send blood to the genicular anastomoses surrounding the knee, which in turn supply blood to the knee joint.

    Menisci

    Within the knee joint are C-shaped rings made of fibrocartilage called the medial and lateral menisci. They fulfill two primary purposes:

    Increases the stability of the joint by deepening the articular surface of the tibia.
    Increases the surface area of the joint and lowers the forces that are passed throughout it, acting as a shock absorber.

    They are attached to the extremities of the tibia at the intercondylar area. The medial meniscus is furthermore attached to the joint capsule and the medial collateral ligament. Corresponding ligament injury is often associated with a medial meniscal rupture.

    Its reduced size and lack of additional attachments make the lateral meniscus more flexible.

    Bursae

    Little amounts of synovial fluid are stored in a structure called a bursa, which resembles a sac. Its purpose is to lessen the friction that occurs during movement between tendons, bones, and skin. The knee joint contains four primary bursae:

    Situated amidst the femur and the quadriceps femoris lies the suprapatellar bursa.
    There are two types of infrapatellar bursa: superficial and deep. Positioned between the patella ligament and the tibia is the deep bursa.
    The semimembranosus bursa is situated between the medial head of the gastrocnemius and the semimembranosus muscle, posterior to the knee joint.

    Ligaments

    The following are the main knee ligaments:

    Distal to the patella, the quadriceps femoris tendon continues as the patellar ligament.

    Two strap-like ligaments are called collateral ligaments. They function to stabilize the knee’s hinge action, limiting excessive lateral or medial movement.

    The broad, flat medial collateral ligament is located on the medial side of the joint. It connects distally to the medial condyle of the tibia and proximally to the medial epicondyle of the femur.

    The lateral collateral ligament is rounder and thinner than the medial collateral ligament. The attachment point is situated on the lateral side of the fibular head, close to the lateral epicondyle of the femur. It is situated distally.

    Cruciate Ligaments: These two critical ligaments connect the tibia and femur. In Latin, they are called “cruciate” because of the crossing.

    The anterior cruciate ligament joins the medial meniscus at the anterior intercondylar area of the tibia. It climbs posteriorly through the intercondylar fossa to join the femur. It keeps the bone of the tibia coming from displacing anteriorly against the femur.

    From its attachment at the posterior intercondylar portion of the tibia, the posterior cruciate ligament travels anteriorly to connect to the anteromedial femoral condyle. It stops the tibia from posteriorly dislocating onto the femur.

    Movements:

    Movements The knee joint allows for the following four primary movements:

    Extension – The quadriceps femoris, which inserts into the tibial tuberosity, produces extension.
    Flexion is produced by the popliteus, sartorius, hamstrings, and gracilis muscles.
    Femur biceps contractions cause lateral rotation.
    medial rotation

    Mechanism of locking system:

    When a person is standing up, normal knee locking occurs in the latter stages of extension. The lateral condyle of the femur uses up space at the tibia’s lateral condyle during extension, which causes the femur to rotate medially. As a result, the medial femoral condyle rotates backward on the lateral femoral condyle’s axis. This movement is made possible by the quadriceps muscles contracting and the knee ligaments pulling obliquely. The ligaments tense up when the knee joint is locked in place when standing.

    Different Knee Locking Types:

    There are two basic types of knee locking: true and pseudo. When a section of your knee joint stalls out and remains immobile in a specific posture, it results in a true knee lock. The knee joint may rotate and bend both upward and downward by design. The knee may lock and become immobile if something is obstructing its range of motion. At times, this phenomenon can be extremely painful.

    When a person experiences pseudo knee locking, they may feel completely immobile due to the intense discomfort. But in this instance, there isn’t anything stopping the person from moving their legs. Usually, a muscle spasm that produces pain in or around the knee region is the source of this.

    The causes of a locked knee:

    • Depending on the kind, locked knees might have different causes.

    Reasons for knee pseudo-locking:

    Some possible causes of pseudo-locked knees include the following:

    • pain resulting from a knee injury
    • inflammation resulting from damage or degenerative joint disease (osteoarthritis)
    • plica syndrome, or inflammation of the tissue surrounding the knee joint
    • incorrect kneecap motion

    Causes of a truly locked knee:

    A truly locked knee can be caused by several things, including:

    Meniscal tear

    • Two pieces of cartilage with a “c” shape that rest on either side of the knee joint are called menisci. Between the thigh and shin bones, they act as a cushion.
    • If a meniscus tear occurs, a fragment may break off and become stuck in the knee, locking the joint.
    • Severe knee rotation or twisting may cause a meniscal tear. Overuse and degenerative changes to the knee are additional factors.

    bodies loosened in the knee

    Similar to cartilage, bone shards can lodge in the knee joint and cause it to lock.
    Following an accident or developing osteoarthritis cartilage as well as bone fragments may become loose.

    Dislocation of the patella

    A few different types of knee injuries can cause the patella, or kneecap, to move. We refer to this as patella dislocation. It may cause the knee to become rigid during extension.

    inflammation of the knee joint

    If the structures inside the knee joint expand and become inflamed, it may be difficult to extend the knee. Swelling can be brought on by injury, osteoarthritis, or overuse.

    Acute Osteochondritis Dissecans

    Osteochondritis dissecans (OCD) is a joint disorder that arises from inadequate blood flow behind the protective cartilage at the ends of bones. These bone layers begin to erode, separating them from the main bone and removing the cartilage along the way. Children and teenagers are more likely to suffer from this condition.

    The knee joint locking:

    extension of the knee flexion from a 30-degree angle in the closed kinematic chain.
    When the smaller lateral side halted, the larger medial femoral condyle continued to roll and glide posteriorly. In the final five degrees of extension, this causes the femur to rotate medially on the tibia. Known as “automatic” or even “terminal rotation,” a medial rotation of the femur near the end of the extension is not voluntary or caused by muscle action.

    A joint is brought into the closed, packed, or locked position by rotation within the knee joint.
    Lateral rotation of the tibia on the femur is known as an open kinematic chain.

    Unlocking the knee joint:

    The knee needs to be unlocked to begin flexion.
    The flexion force will inevitably cause the femur to rotate laterally.
    Because of this, the longer lateral condyle will shift after the larger medial condyle.
    The main muscle used to unlock the knee is the popliteus.

    Features of a locked knee:

    • Having unsteadiness in the knees
    • discomfort when bending the knee
    • stiffness in the knee joint
    • swelling around and in the knee joint when injured
    • The sensation of catching when extending the knee
    • challenges with sprinting, leaping, walking, and climbing stairs.

    Diagnosis:

    A physician will initially enquire about any soreness and edema. Subsequently, a physical examination of the knee will be performed to look for indications of discomfort, swelling, and bruising.

    During the examination, the doctor may exert force or apply pressure to the knee joint to evaluate it. They can then ask the person to cross the room to evaluate their mobility.

    Sometimes a doctor will suggest further examination of the knee through diagnostic imaging. These tests include, for example:

    • CT (computerized tomography) scan and magnetic resonance imaging (MRI) scan
    • Ultrasound
    • X-ray

    With the use of extra testing, the physician can search for signs of inflammation or infection. These consist of arthrocentesis procedures and blood testing. During this operation, a knee fluid sample is taken.

    Treatment:

    Treatments for locked knees different according to the kind of condition and its underlying cause.

    Meniscal tears:

    The location and degree of a meniscal tear determine the kind of treatment that is needed.

    The RICE treatment may be advised by the doctor if the tear is tiny and located on the outer portion of the meniscus. RICE, as an acronym, stands for:

    • Rest: Give up on the painful activity.
    • Ice: Several times daily, administer a 15–20 minute application of a wrapped ice pack.
    • Compression: use an elastic compression bandage.
    • Elevation: Raise your knees above your heart. This aids in removing extra blood from the knee, which lowers swelling.

    One nonsteroidal anti-inflammatory medication (NSAID) that can help lessen inflammation and discomfort is ibuprofen.

    In certain situations, a physician could advise physical therapy to aid in the patient’s recovery of knee mobility.

    Loose body in the knee:

    A person may need surgery to remove a loose bone or fragment of cartilage if it is causing their knee to lock.

    Additional reasons:

    Other causes, such as plica syndrome or patellar maltracking, typically call for physical treatment in addition to rest, ice, and anti-inflammatory drugs.

    Prevention:

    Sometimes there is no way to avoid the ailments and injuries that can result in a locked knee.

    On the other hand, there are steps that people can do to better safeguard their knees. Among them are:

    • Stay away from contact sports
    • stopping the activities that cause knee pain
    • exercising within your physical capabilities
    • supporting the leg muscles and maintaining the flexibility of the core
    • exercising caution in locations that are unstable or slippery to help prevent falls

    Summary

    True and pseudo-locked knees are the two varieties. The knee joint is immovable while it remains firmly in place. A person with a pseudo-locked knee can move their knee physically, but they are unable to do so because of excruciating discomfort or swelling.

    For both kinds of locked knees, rest, ice, and painkillers are usually necessary. Physical therapy may also be suggested by a physician to assist the knee joint regain its range of motion. If these remedies prove ineffective, surgery may be required.

    For a diagnosis, a person experiencing a locked knee should visit their physician as soon as feasible.

    FAQs

    When is a knee locked or unlocked?

    It is called a locked knee whenever the knee cannot be bent or straightened. Two varieties of locked knees exist. When the knee joint is genuinely locked into position and is immobile, it is said to have a truly locked knee. A pseudo-locked knee occurs when pain limits the knee joint’s natural range of motion.

    Why does this locking and unlocking thing happen to my knee?

    The most prevalent reason for knee locking, particularly in the elderly, is frequently arthritis. The knee joints sustain a great deal of wear and strain since they bear weight. A joint’s inflammation may make it difficult to move the knee properly. This inflammation may appear following a previous sports injury or knee fracture

    Which muscles unlock the knee?

    Due to its necessity in “unlocking” the knee, which results in the femur on the tibia bending and rotating laterally, popliteus muscle contraction is referred to as the “key” to the knee joints.

    Can you walk while your knee is locked?

    It varies. If a meniscus tear does not impede joint movement, you might be able to walk on a locked knee.

    Can one repair lock knees?

    When a child’s growth is complete, osteotomy surgery can be used to address more severe abnormalities or knock knees that do not heal on their own.

    Is it typical for knees to lock?

    Knee locking can occur for non-traumatic reasons as well. For example, teenagers who have osteochondritis dissecans are more likely to develop loose bodies down the road. However, the majority of knee-locking events are more frequently caused by trauma.

    How can I prevent the locking in my knee?

    Rest: Give your knees time to heal by avoiding strenuous activities like running and leaping.
    Stretching: The knee’s supporting muscles can be strengthened and the joint stabilized with easy at-home stretching.
    Ice packs: Ice packs can be used to lessen pain, edema, and inflammation.

    References

    • Joint locking (medicine). (2023, November 3). Wikipedia. https://en.wikipedia.org/wiki/Joint_locking_(medicine)#:~:text=The%20ligaments%20are%20pulled%20taut,the%20lateral%20rotation%20of%20femur.
    • 7 Main Causes of Locked Knees | OrthoNeuro | Columbus, OH. (n.d.). OrthoNeuro. https://orthoneuro.com/knee/locked-knees/
    • Locked knee: Causes and what to do. (2019b, November 2). https://www.medicalnewstoday.com/articles/326877#summary
    • Prajapati, N. (2022, July 19). Knee locking and unlocking mechanism – Screw home mechanism. Samarpan Physiotherapy Clinic. https://samarpanphysioclinic.com/knee-locking-and-unlocking-mechanism/
    • Knee Locking: Causes & Treatment For A Locked Knee. (2021, December 8). Knee-Pain-Explained.com. https://www.knee-pain-explained.com/knee-locking.html
    • DrBurkeWP. (2022, November 1). Locked Knee: Causes, Treatments and When to Seek Help – Dr. Burke Orthopedics. Dr. Burke Orthopedics. https://drburkeortho.com/locked-knee-causes-treatments-and-when-to-seek-help/
  • Ankle Sprain

    Ankle Sprain

    Introduction

    Ankle sprains are common musculoskeletal injuries caused by a partial or complete tear or stretch of the ankle’s ligaments. They mostly affect active and sports-related populations and arise when the ankle breaks away from its normal range of motion.

    Epidemiology

    The second most common joint that experiences an injury in sports is the ankle joint, which is prone to sprains.

    Ankle sprains commonly occur as lateral ligament injuries, making up around 85% of all sprains; acute medial and syndesmotic sprains are less common. Females are more likely than males and children to get ankle sprains.

    Anatomy with Clinical Significance

    The Anterior Talofibular ligament is the ligament in the lateral ankle ligament complex that suffers damage the most frequently (ATFL). The act of forcefully twisting the movement of a foot that is plantar flexed can result in sprain injuries to the ATFL and CFL. In this case, it suggests that there is a decreased likelihood of harmful loads on the posterior talofibular ligament (PTFL) and the calcaneofibular ligament (CFL). Rarely is the PTFL harmed unless it is connected to a talus dislocation.

    Forceful pronation and rotation movements of the hindfoot harm the strong, deltoid ligament complex on the medial side, which is made up of the posterior Tibiotalar (PTTL), anterior Tibiotalar (ATTL), calcaneal (TCL), and tibiinavicular (TNL) ligaments.

    The stabilizers distal to the tibio-fibular syndesmosis is formed by the inferior transverse ligament, the anterior-inferior, posterior-inferior, and transverse tibiofibular ligaments, as well as the interosseous membrane and ligament. When the ankle’s dorsiflexion and the leg’s external rotation are coupled, a syndesmotic (high ankle) sprain results.

    Mechanism of Injury

    Lateral ankle sprains usually occur during a rapid shift of the body’s center of mass over the landing or weight-bearing foot. The lateral ligament stretches and tears as the foot twists inside and the ankle rolls outward. Rarely does a ligament’s previous strength and flexibility return to normal once it tears or is overextended. Some situations when a return to play is allowed too soon have been reported by researchers, affecting proper ligamentous repair.

    According to a study on 94 young competitive volleyball and basketball players in Brazil, the likelihood of ankle sprains increased to 80.6% when the athlete had a dominant lower leg (left leg), a peroneus brevis electromyographic response time greater than 80 ms, they were wearing shoes without dampers, and they played in a particular position.

    Additionally, the dominant leg is 2.4 times more likely to sprain than the non-dominant leg, according to a study on the epidemiology of unilateral ankle sprains. A less frequent mechanism of injury is a powerful deltoid ligament injury caused by an active eversion action at the ankle.

    • Aspect – Lateral
    • Mechanism of injury- Inversion and plantarflexion
    • Ligaments- anterior talofibular ligament,
      calcaneo-fibular ligament
      posterior talofibular ligament
    • Aspect- Medial
    • Mechanism of injury: Eversion
    • Ligaments: posterior tibiotalar ligament
      tibiocalcaneal ligament
      tibionavicular ligament
      anterior tibiotalar ligament
    • Aspect: High
    • Mechanism of injury: External rotation and dorsiflexion
    • Ligaments: anterior-inferior tibiofibular ligament
      posterior-inferior tibiofibular ligamen
      transverse tibiofibular ligament
      interosseous membrane
      interosseous ligament
      inferior transverse ligament

    Classification of Ankle Sprain

    Ankle sprains can be categorized using some grading plans, each with unique advantages and disadvantages. For effective continuity of care, therapists use several systems that reflect the patient’s circumstances and educational background.

    Ankle sprains can be categorized using a grading system that concentrates on one particular ligament:

    • Grade I (Minimal stretching, no tearing): minor overstretching/damage to fibers
    • Grade II (Partial tear): A partial tear of the ligament
    • Grade III (Full tear or rupture): represents the complete rupture of the ligament

    The use of a grading system created to describe the status of a single ligament may not always be straightforward unless it is certain that just one ligament is injured, as the ankle joint is covered by numerous ligaments. Other grading system based on the number of injured ligaments is used for ankle sprains. It is, however, hard to determine the exact number of ligaments torn unless there is clear high-quality radiographic imaging or surgical evidence.

    An alternative system that may be used depends on how severe the sprain injury is:

    Grade I: Mild impairment – Minimal swelling and tenderness with little impact on function, tenderness. Usually no bruising. No joint instability. No difficulty bearing weight. Recovery time is around 1–3 weeks
    Grade II: Moderate swelling, pain, and tenderness with limited range of motion and ankle instability. Possible bruising. Mild to moderate joint instability. Loss of range of motion and function. Pain during weight-bearing activities and walking. Recovery time is around 3–6 weeks

    Grade III: Severe injury with swelling, tenderness, loss of Ankle function, and marked instability. Unable to bear weight or walk. Recovery time Up to several months

    Causes of Ankle Sprain

    An ankle sprain is common when the foot flips or twists unexpectedly, causing the ankle joint to become malpositioned. Ankle twists can occur during physical exercise when there is an abrupt or unplanned movement. This may result in a tearing of one or more ankle ligaments.

    These injuries cause swelling or bruises. Pain or discomfort may also be felt when you place weight on the injured area. Potentially injured blood vessels, tendons, and cartilage could result from the sprain.

    Sports-related activities, uneven terrain, and even the wrong kind of shoes can result in this kind of injury.

    When your ankle is forced to move from its natural position, one or more of the ligaments may stretch, partially tear, or rupture completely, resulting in a sprain.

    It may result from the following:

    • Twisting Ankle Movement
    • During Jumping, landing awkwardly on your foot.
    • Walking or exercising on an uneven surface
    • Another person stepping or landing on your ankle during any activity or sports.

    Clinical Symptoms

    Ankle sprain indications and symptoms can vary depending on the kind and extent of the injury. Here are some examples:

    • pain during weight-bearing activity on the affected foot.
    • tenderness upon palpation of the ankle joint.
    • bruising, edema, and swelling.

    skin discoloration, stiffness

    Ankle Stiffness and instability at the level of the joint.
    Complains of paresthesia which could affect neurovascular. compromise of the peroneal nerve.
    Forceful eversion injury to the ankle.
    Previous history of ankle injuries or instability.

    Special tests: Anterior Draw, Talar Tilt, or Squeeze Test are Positive. (depending on the ligament affected).

    It should be noted that the symptoms of a lateral ligament sprain should be replicated by passive inversion or plantar flexion with inversion, and the symptoms of a medial ligament sprain by passive eversion.

    Outcome Measures

    Lower Extremity Functional Scale (LEFS)
    Foot and Ankle Ability Measure (FAAM)

    Foot and Ankle Disability Index (FADI)
    Star Excursion Balance Test

    Diagnosis

    Your doctor will check your ankle, leg, and foot during a physical examination. The physician will move your foot to evaluate your range of motion and determine which positions hurt or cause discomfort. They will also touch the area surrounding the injury to look for any painful spots.

    Your doctor might suggest one or more of the following imaging tests if the injury is serious to rule out a broken bone or evaluate the extent of ligament damage specifically:

    X-ray. Radiation passes through your ankle. Bone fractures may be confirmed with this test.

    Magnetic resonance imaging (MRI). A powerful magnetic field and radio waves are used in MRI (magnetic resonance imaging) to create highly detailed 3-D or cross-sectional images of the soft internal ankle structures, such as ligaments.
    CT scan. CT scans can provide more specific information about the joint’s bones. CT scans provide cross-sectional or three-dimensional images by combining X-rays taken from different angles.
    Ultrasound. An ultrasound creates real-time images by using sound waves. These images may help your doctor assess the condition of a ligament or tendon when the foot is in different positions.

    Clinical Examination

    An ankle sprain involves various structures, therefore foot and ankle assessment is important. To help with the diagnosis, the evaluation of the injured ankle involves examining the patient’s past medical records to determine whether the injury was similar, different, or never happened. Following the collection of the patient’s past medical history, it’s important to observe the patient’s progress and posture, taking note of any deformities, malalignments, atrophy, swelling, or ecchymosis. After that, the patient’s passive and active range of motion must be evaluated. Palpating the affected structures is required to feel any pain over bony prominence, muscle, or even ligaments.

    Special Tests
    Anterior Drawer Test – tests the Anterior Talo-Fibular Ligament
    Talar Tilt Test- tests the Calcaneofibular Ligament

    Posterior Draw – tests the Posterior Talofibular Ligament
    Squeeze test – tests for a Syndesmotic sprain
    External rotation stress test (Kleiger’s test) – tests for a Syndesmotic sprain

    Different Diagnosis

    An Ankle fracture, tendon subluxation, tendinopathy, tendon rupture, and several other related conditions are associated with the differential diagnosis of an ankle sprain. The diagnosis is made based on the patient’s medical history, examination results, and the results of an ultrasound to determine whether a tendon damage has taken place. In chronic cases, when the Ottowa Rules do not apply, diagnostic imaging can be used to confirm the diagnosis.

    Additional differential diagnoses to look out for:

    • Impingement
    • Tarsal Tunnel Syndrome
    • Sinus Tarsi Syndrome
    • Cartilage or osteochondral injuries
    • Peroneal Tendinopathy or subluxation
    • Posterior Tibial Tendon Dysfunction

    Treatment

    The severity of your injury determines how you should be treated for a sprained ankle. Reducing discomfort and swelling, improving ligament healing, and restoring ankle function are the objectives of treatment. If your injuries are serious, you can be referred to an orthopedic surgeon or a doctor who specializes in physical medicine and rehabilitation, who are specialists in treating musculoskeletal problems.

    Self-care

    After ankle sprain, use the R.I.C.E. method for self-care:

    • Rest. Avoid painful activities.
    • Ice. Use an ice pack for 10 to 15 minutes. Repeat every two to three hours. See your doctor before using ice if you have diabetes, vascular problems, or reduced feeling.
    • Compression. Apply an elastic bandage to the ankle and squeeze it until the swelling decreases. Don’t wrap too tightly as this may prevent circulation.
    • Elevation. Elevate your ankle above your heart to minimize swelling, particularly at night. Gravity drains extra fluid, which helps minimize swelling.

    Medications

    For the most part, sprained ankle pain can be effectively treated with over-the-counter analgesics like ibuprofen (Advil, Motrin IB, etc.), naproxen sodium (Aleve, etc.), or acetaminophen (Tylenol, etc.).

    Devices

    Using crutches until the pain goes away can be necessary if you have a sprained ankle because walking could be uncomfortable. Your doctor may advise using athletic tape, an ankle support brace, or an elastic bandage to stabilize your ankle, depending on how severe your sprain is. If the sprain is severe, you might be required to immobilize the ankle with a walking cast.

    Physical Therapy

    Your doctor will have you start an exercise plan of exercises that will improve your ankle’s strength, flexibility, range of motion, and stability once the swelling and pain are completely reduced. The proper technique and workout progression will be explained by your physician or physical therapist.

    Retraining the ankle muscles to play a role in supporting the joint and preventing recurrent sprains requires a special focus on balance and stability training. These activities, like standing on one leg, may present different types of balancing challenges.

    Physical therapy plays an important part in the management of ankle sprains, particularly in athletes. It’s important to remember that the course of treatment differs based on the severity of the injury and whether the sprain is acute (lasting less than four weeks) or chronic (lasting more than four weeks).

    The objectives of physical therapy are to strengthen the ankle joint and lessen pain and edema. A patient’s recovery typically takes five to fourteen days. Physical treatment aims to restore functional movement and stability while also lowering pain and edema in cases of chronic ankle sprains. A patient’s recovery often takes three to twelve weeks, or longer.

    The PRICE (Protect, Rest, Ice, Compress, Elevate) therapy program is commonly used. It involves providing the injured ankle 72 hours of rest, protecting the ankle joint with crutches if needed, applying ice to reduce swelling and pain, applying a compress with a bandage or brace to stabilize the joint, and elevating the ankle to relieve pain and edema.

    Exercise for ankle sprain

    When to start ankle sprain exercise

    If the injury is not too serious, most patients can start ankle rehabilitation activities three days following the accident. However, no timetable is set up. Take note of what your body tells you, and follow medical advice.

    You should rest and apply an ice pack to your damaged ankle for ten to fifteen minutes every few hours during the first few days. Avoid touching your skin with the ice and avoid leaving it on for too long as this could cause burns.

    The rest period is normally three days for most people. Following that, you can start a program of at-home workouts or physical treatment, and you can progressively increase the use of your ankle.

    Types of exercises for a sprained ankle

    Ankle range of motion exercises, stretching, and ankle strengthening: First 1–2 weeks
    These easy exercises can help you keep your ankle’s flexibility and range of motion intact.

    The Ankle alphabet

    Take a seat on a comfortable chair. Stretch your leg wide and use your big toe to draw the alphabet’s letters in the air. 2 or 3 repetitions of this. These easy exercises help to improve your ankle’s movement.

    Knee motion
    Take a comfortable seat on a chair. Keep your foot on the floor and gently move your knee up and down for two to three minutes. This helps relax and stretch the ligaments that surround your ankle.

    Towel and tissue scrunches
    Sit in an uncomfortable chair and keep a little towel on the floor. Taking off your shoes and socks, use your toes to gently grip the towel, tear it up, and count backward from five. Next, remove the towel and carry on. Repeat 8 to 10 times.

    Ankle stretching exercises
    Your calf muscles and heel bone are connected by the Achilles tendon, which runs behind your ankle. Stretching your Achilles tendon is the next series of exercises that you should begin as soon as possible.

    Towel stretch
    With your leg extended in front of you, take a seat on the floor. Grip the ball of your foot with a strap or towel. Toes coming towards you, pull back on the towel. Stretch for a duration of 15 to 30 seconds. Avoid going overboard. Your calf muscle should only feel slightly to moderately stretched.

    Standing calf stretch
    Place your hands on the countertop or wall in front of you for support. Step back on your hurt ankle with your good foot forward. Keep your back heel level on the ground and flex the knee of your good leg progressively until you feel a slight stretch in the calf on your injured side. Repeat three times, holding this for thirty seconds each time.

    Heel raise

    Place your hands in front of you and lean them on a countertop, wall, or the back of a chair for balance. Step up and down on your toes slowly while keeping your feet shoulder-width apart. Increase to at least 20 of these over time, starting with about 10. Remember that you want no pain, only a small stretch. When the toes on the injured side are comfortable, you can switch to utilizing them alone.

    Balance on one leg

    Raise your normal leg behind you so that the leg with the injured ankle supports your weight, with your hands on a wall or chair. For 20 to 30 seconds, try to hold this. As you get stronger, try doing it with just one or two fingers. Continue doing this till you reach a stronger point.

    Exercises to strengthen your ankles
    It’s proper to move on to strengthening exercises after you can bear weight on your sprained ankle easily and have a good range of motion. A resistance band will be needed for these exercises.

    You can get this simple elastic band online, via a physical therapist’s clinic, or from a sporting goods store.

    Elastic band push

    Take a seat on the ground. To keep your heel off the ground, prop up your ankle with a swimming noodle or rolled-up towel. Hold the ends of the elastic band while circling the of your foot. Now, gradually extend your ankle forward as though you were pointing a toe. Then return it gradually. Ten times over, repeat this. If your ankle looks unstable or if there is any pain, don’t use the band.

    Elastic band tug

    Use your resistance band to secure it around an important item, like a desk or table leg. wrap your toes and upper foot with the thera-band while seated on the floor. Now, carefully raise your foot back up to your body and straighten it out. Ten times over, repeat this.

    Ankle out

    Wrap your resistance band around something heavy. wrap the inside of your foot into the band’s end in a seating or standing position. Step your foot back and forth slowly. Increase the number of repetitions to 20 from 10 at the beginning.

    Ankle in
    Encircle a substantial object with the resistance band and insert your instep into it. Now, move your foot inward against the resistance band and slowly draw it back. Repeat ten times, then increase to twenty repetitions.

    Basic balance
    Raising the other foot off the ground behind you, try to keep your balance while standing on the damaged foot. At first, try holding this for a few seconds. Then, if you can, increase to 30 and 1 minutes.

    Balance with eyes closed
    Now close your eyes and practice the basic exercise of balance. This is more harder because you can’t rely on visual clues to help you balance. Ensure that you have a rescue strategy. See if you can reach thirty-one minutes once more.

    Pillow balance
    Do the same basic balance practice while standing on a pillow. This is much harder. Even if your ankle is not hurt, you will constantly need to adjust your balance because your foot will be wobbling a lot. Aim for between 30 and 60 seconds. Stop if you begin to have ankle pain.

    Surgery

    In rare cases, following prolonged physical therapy and rehabilitative activity, surgery is necessary if the injury does not heal or if the ankle does not become stable. Surgery could be done to:

    Repair a ligament that won’t heal
    Reconstruct a ligament with nearby ligament or tendon.

    Consult your doctor about when you can return to your activities if you injured your ankle while working out or playing a sport. In order to assess how well your ankle operates, your doctor or physical therapist may ask you to perform certain movement and activity tests if you participate in sports.

    Rehabilitation of an ankle sprain

    The aim is to improve your:

    • Developed Muscles around the Ankle
    • Stability in the Ankle joints
    • Balance, and coordination

    Your doctor will go over specific rehabilitation objectives with you if an ankle sprain is the diagnosis. However, the broad timeframes in question are:

    1-2 weeks. a reduction in edema and improved mobility. Walking and standing up should get simpler.
    two to four weeks. Walking normally again now. Nearly 100% movement and a decrease in edema.
    8–12 weeks. Your routine tasks are starting to become more easier for you to complete.
    Each soft tissue injury is unique, so you may need more time or less time than this estimate to heal.

    Risk Factors

    Athletes who experience chronic ankle instability are prone to both internal and external risk factors.

    • Extrinsic factors: A history of sprains is one example of an external cause that can harm sensory nerve fibers and reduce stabilizer strength and integrity.
    • Intrinsic factors: Intrinsic factors include limb dominance, postural sway, foot architecture, height, weight, and sex.
    • Other external factors include the type of shoe type, the duration of the competition, bracing, taping, and exercise intensity.

    Complication

    • Chronic ankle instability (CAI): This is the most common complication of ankle sprains. Your ankle may feel loose and unsteady as a result of the ligaments in your ankle being stretched or damaged.
    • Arthritis: Repetitive sprains of the ankle joint may damage the cartilage over time, eventually resulting in arthritis. Ankle discomfort, stiffness, and edema can all be symptoms of arthritis.
    • Reflex sympathetic dystrophy (RSD): This is a complex condition that can cause pain, swelling, and stiffness in your ankle and foot. It is an uncommon side effect of sprained ankles.
    • Peroneal tendon injuries: The peroneal tendons run along the outside of your ankle and help to stabilize your ankle joint. These tendons may be injured if you sprain your ankle.
    • Neurovascular injury: There is a slight chance that a severe ankle sprain may damage the blood vessels or nerves that run along your ankle. Your foot may become weak, uncomfortable or numb as a result of this.

    Prevention

    While there is no way to completely prevent the possibility of suffering an ankle sprain, there are things you may do to greatly lower your risk.

    Strengthening and Flexibility:

    Regular Stretching: Stretching your ankles, hamstrings, and calves regularly helps to maintain their flexibility and reduces the tension that may give rise to sprains.
    Exercises for Ankle Strengthening: Exercises that focus on the muscles surrounding your ankle joint improve support and stability.

    Balance Training:

    Balance exercises: Activities like single-leg stands or wobble boards improve proprioception, and your body’s awareness of joint position, which helps maintain ankle stability.

    Footwear:

    Supportive Shoes: When participating in activities that increase your risk of rolling your ankle, wear shoes that fit properly and offer sufficient ankle support.
    Replace Worn-Out Shoes: Uneven or worn-out treads might affect stability. It is advisable to regularly replace your athletic shoes.

    Warming Up and Avoiding Uneven Surfaces:

    Warm Up Before Activity: Before engaging in any type of activity or sports, warm up your muscles with a gentle jog or dynamic stretches.
    Mind Your Footing: Take care when running or walking on uneven surfaces, such as cluttered areas, loose gravel, or hiking trails.

    Other Advice:

    Gradual Increase in Activity: To prevent overloading it, if you’re beginning a new fitness program, gradually increase the duration and intensity of your workouts.
    Pay Attention to Your Body: If you feel any pain in your ankles, take care of it and avoid activity accordingly.
    Ankle braces or taping may be recommended by a doctor if you have a history of ankle sprains in order to provide additional support during high-risk activities.

    Conclusion

    Ankle sprains are common, but with proper care, they typically heal well within a few weeks. This is an overview:

    Healing Timeline: The majority of sprains heal in 4-6 weeks, at which time rest, edema reduction, and following strength and mobility restoration are priorities.
    Complications: Repeated sprains or poor healing can lead to tendon problems, arthritis, and chronic instability, though these are rare.

    The Key Is Prevention: The risk of sprains is greatly decreased by regular stretching, strengthening exercises, balance training, and wearing supportive shoes.
    Listen to Your Body: Recognise when anything hurts and modify your activity accordingly. Early medical evaluation guarantees a correct diagnosis and a treatment plan that will help recovery and reduce side effects.

    References

    • Recovering from an ankle sprain. (2024, March 28). Harvard Health. https://www.health.harvard.edu/pain/recovering-from-an-ankle-sprain
    • Hecht, M. (2019, February 15). 15 Exercises for Your Sprained Ankle. Healthline. https://www.healthline.com/health/sprained-ankle-exercises#takeaway
    • Ankle sprain | NHS inform. (2024, February 5). NHS Inform. https://www.nhsinform.scot/illnesses-and-conditions/muscle-bone-and-joints/conditions/ankle-sprain/
    • Sprained ankle – Diagnosis and treatment – Mayo Clinic. (2022, August 11). https://www.mayoclinic.org/diseases-conditions/sprained-ankle/diagnosis-treatment/drc-20353231