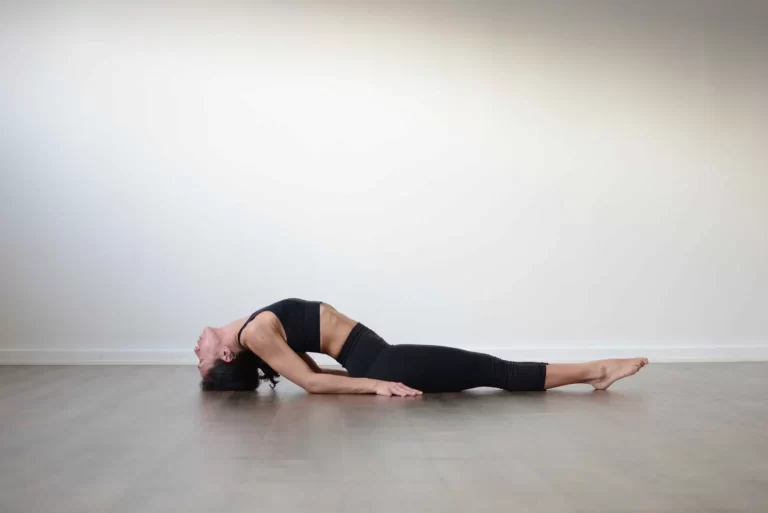
Blog

  • Shoulder Joint Stiffness

    Shoulder Joint Stiffness

    Introduction to Shoulder stiffness

    Shoulder joint stiffness can be a painful and limiting condition. It often occurs when the connective tissue around the shoulder joint thickens, leading to limitations in the range of motion. This stiffness can develop gradually over time due to various factors, such as injury, surgery, prolonged immobilization, or underlying health conditions like diabetes.

    Tight shoulders may produce pain or stiffness in your neck, back, and upper body, limiting your regular activities. Stress, strain, and overuse can cause your shoulders to feel locked in and constricted. Accidents, prolonged sitting, and bad sleeping positions can all cause tight shoulders. An incorrectly aligned body and poor posture might also be contributing factors.

    Anatomy

    The relationship between all parts is crucial to the shoulder’s functionality, and occasionally things go wrong. We frequently evaluate tendinopathies — repeated injuries to tendons — inflamed bursae or bursitis, muscular rips and injuries commonly known as rotator cuff problems. Frozen or constricted shoulder is a disorder in which the soft tissue capsule enclosing the shoulder joint contracts, resulting in stiffness.

    Causes

    Shoulder joint stiffness causes are:

    Shoulder clicking, cracking, or grinding sounds are additional symptoms. Shoulder arthritis can be brought on by rotator cuff tears, overuse, and injuries either on the job or in sports.

    Systemic conditions: Shoulder stiffness can be more likely to occur in several diseases, including diabetes, cardiovascular disease, Parkinson’s disease, TB, and overactive or underactive thyroid.

    Risk Factors


    Age and Sex: Individuals over 30, especially women, are more prone to experience stiff shoulders.

    Immobility or Reduced Mobility: Shoulder stiffness development is more likely to occur in people with extended immobility or decreased shoulder mobility. Impairment may result from a variety of factors, including

    • damage to the rotator cuff
    • fractured arm
    • Recovery after Surgery
    • Stroke

    Symptoms of Shoulder Stiffness

    Shoulder stiffness presents as pain and a tight, difficult-to-move shoulder. Your upper arm might have a similar sensation. It could be harder to fall asleep at night because of the chance of severe pain.

    There are three stages of shoulder stiffness when it’s frozen

    • Phase of Freezing
      Every time the shoulder moves, it becomes painful.
    • restricted shoulder mobility
    • Even if there is no or less pain the stiffness increases during the frozen phase.
      It becomes harder to raise your arm and harder to carry out regular tasks.
      Four to twelve months pass during this phase.

    Diagnosis and Tests

    How will your doctor diagnose you?

    Your symptoms, the time they started, any shoulder injuries you have ever had, and other related medical information will all be questioned by a doctor. Your doctor could ask you to perform certain movements( stiffness) to assess your arm and shoulder’s strength and mobility.

    Your doctor may examine you to determine tenderness in the soft tissues around the joint and estimate your range of motion in your arm and shoulder. To find any damage to the soft tissues or bones in your shoulder joint, your doctor might recommend you have an MRI or X-ray done.

    Complications of Shoulder stiffness

    • Muscle weakness
    • Joint stiffness
    • Damage to bones and cartilage
    • Instability
    • Shoulder Stiffness Treatment
    • exercise
    • medicines
    • steroids
    • surgery

    Medical treatment for Shoulder

    Over-the-counter medicines.
    Pain and stiffness in the shoulders can be relieved by over-the-counter nonsteroidal anti-inflammatory drugs (NSAIDs), such as ibuprofen and aspirin. Your doctor may suggest a stronger medication if they don’t work.

    However, your physician could suggest further treatments, such as
    A corticosteroid injection is needed to ease the soreness of your shoulder joint and increase your range of motion. Your doctor will extend your shoulder capsule by pumping sterile water into it as a result, your shoulder will move faster.

    Surgery
    Surgery is hardly needed to cure tight shoulders.  A tight shoulder could require an arthroscopic procedure. Although arthroscopic surgery has displaced shoulder manipulation as the preferred system for releasing shoulder tissue, it’s now extremely rarely used. This surgery carries an advanced risk of consequences, such as fractures.

    Shoulder Stiffness Exercises

    Range of Motion Exercises

    The normal range of motion

    Shoulder flexion0 to 180 degree
    Shoulder extension0 to 45 degree
    Shoulder abduction0 to 180 degree
    Shoulder adduction0 to 50 degree
    Shoulder external rotation0 to 90 degree
    Shoulder internal rotation0 to 90 degree
    Normal range of motion


    Bend forward till your back touches the ground. Make circles with your aching arm. Draw smaller circles at first, then larger ones. Perform this exercise daily five to ten times. Stop if you have pain. You should try again later. 

    Pendulum exercise.
    Shoulder shrug.
    Shoulder blade pinches.
    Isometric internal and external rotation.
    Ball squeeze exercises.
    Supine passive arm elevation.
    Supine Passive Forward Flexion.
    Supine external rotation.

    Shoulder wheel
    Shoulder wheel
    Assisted shoulder exercises
    Assisted shoulder exercises

    Upper Extremity Strengthening:
    As the pain subsides, consider implementing a basic upper-body weightlifting program using free weights or weight machines.

    Resisted external rotation
    Resisted external rotation

    Patient Education: Patients with stiff shoulders must comprehend their situation and actively participate in therapy. Physiotherapists play a key role in helping patients understand their disease, the value of regular exercise, and lifestyle changes that may be taken to stop a recurrence.

    Shoulder Joint Mobilization:

    Glenohumeral Anterior Glide: The shoulder’s external rotation and extension are facilitated by anterior glenohumeral glides.

    Hand Position: The therapist offers two stabilizing points. The arm closest to the patient’s torso will make contact with the scapula and coracoid process. The humerus’s neck is in contact with the web area separating the first and second digits.

    Glenohumeral Inferior Glide: Inferior glenohumeral glides aid in shoulder abduction-related arthrokinematic movements.

    Position of the patient: The patient is positioned as it is on its back, its shoulder relaxed and its elbow completely extended.

    Hand placement: The hand with a larger skull will be stabilizing. The proximal second phalanx will make contact with the inferior glenoid edge when the hand is positioned at the radial boundary.  

    Glenohumeral Posterior Glide: Internal rotation and flexion of the shoulder joint become easy by posterior glenohumeral glides.

    Hand Position: The cephalic hand will make contact with and sandwich the scapula with the fingers on the scapula’s spine and the thumb on the coracoid.

    Good Posture:
    Shoulder stiffness can be avoided partially by maintaining good shoulder alignment. People who suffer from shoulder stiffness frequently hunch over or elevate their shoulders. If you catch yourself slouching or stooping over, straighten your posture. Throughout the day, focus on bringing your shoulder or shoulder blade down and holding it. You may also exercise by putting your back, knees, and feet up against a wall.

    Prevention

    Stiff shoulder stiffness is frequently brought on by immobilisation following a shoulder injury, stroke, or arm break recovery. If you have an injury that makes lifting your shoulder difficult, ask your doctor what exercises you should take to maintain the range of motion in your shoulder joint.

    Summary

    Shoulder joint stiffness is caused by an inflammatory or systemic disease. The patient suffers from pain, stiff, and has a limited range of motion. MRI and X-rays have been advised by the doctor. Medical treatment includes anti-inflammatory drugs and steroids.

    Physiotherapy treatment includes mobility exercise, stretching, strengthening exercise, and mobilization to improve range, and physiotherapy guides the patient to improve their posture to reduce future risk of increasing stiffness.

    FAQs

    What is the best exercise for shoulder stiffness?

    Pendulum exercise.
    Isometric internal and external rotation.
    Ball squeeze exercises.
    The spinal rolls of Eagle Arms
    Twist when seated. 
    Shoulder circles

    How can I get immediate relief from shoulder stiffness?

    Ice packs for 15-20 mins, regular exercise, and rest help you to get relief from shoulder stiffness.

    what causes tight shoulders?

    Your shoulders may feel stiff and tense due to strain, stress, and misuse. Tight shoulders can also be caused by accidents, poor sleeping reasons, and prolonged sitting. Incorrect alignment of the body and poor posture can also contribute to a stiff shoulder.

    When should I worry about shoulder pain?

    It would be best if you urgently had medical treatment. You can also seek immediate medical assistance if an accident is the source of your shoulder ache. Please get medical attention right once if you have a malformed joint, are unable to utilize the joint, are feeling severe pain, or are suffering abrupt swelling.

    References:-

    • Hospitals, M. (n.d.-c). Shoulder Stiffness: Causes, Symptoms, and Treatment Options. Best Hospitals in India | Medicover Hospitals. https://www.medicoverhospitals.in/articles/shoulder-stiffness
    • MikeJLeech. (2023, September 13). Stiff & Painful Shoulder. Fay Pedler. https://www.faypedlerclinic.co.uk/stiff-painful-shoulder
    • Firdous, H. (2023, March 14). Shoulder stiffness: Causes, Symptoms, Treatment and Cost. Lybrate. https://www.lybrate.com/topic/shoulder-stiffness
    • Shoulder stiffness ▷ Symptoms, diagnosis & specialist. (n.d.). https://www.primomedico.com/en/treatment/shoulder-stiffness/
  • 13 Best Exercise For Heel Pain

    13 Best Exercise For Heel Pain

    Introduction:

    Exercise For Heel Pain is essential for strengthening the muscles, tendons, and ligaments surrounding the heel and improving general foot function. The right exercises can reduce inflammation, increase flexibility, and stop another flare-up of heel pain.

    Heel spurs, plantar fasciitis, Achilles tendonitis, stress fractures, and other conditions can all contribute to the prevalent ailment of heel pain. It can greatly impair one’s capacity for comfortable walking, exercise, and day-to-day tasks. Targeted exercise sessions may help manage heel pain and aid in the healing process; however, getting an accurate medical diagnosis and advice is important.

    Over time, pain can be reduced with rest, orthotics, and exercise (such as range-of-motion exercises). If you ignore heel pain or the acute stage of the illness, you run the risk of developing chronic issues that will take more time to heal. There are factors other than underlying medical conditions that might cause heel pain. Shoes that don’t fit right, shoes with too much heel, standing for extended periods, excessive walking or running, sprains, traces, or trauma are a few examples.

    Stretching activities (particularly those involving the gastrocnemius and soleus muscles), supported exercises, ankle joint movement, and end-strengthening exercises that increase muscle strength are all utilized in physical therapy.

    Causes:

    Oftentimes, foot and ankle conditions appear as heel pain. A pain behind the heel or on its side is possible. Several conditions can cause heel pain, and these include the following symptoms;

    • Bone spurs
    • Plantar fasciitis
    • Stress fractures.
    • Sever’s disease
    • Calcaneal stress fractures
    • Tarsal tunnel syndrome
    • Inflamed tendons
    • Achilles or flexor tendonitis

    Signs and symptoms:

    • Stiffness
    • Swelling
    • Pain
    • Tenderness
    • Difficulty after standing up after sitting or resting.
    • The heel’s excessive bone development.

    Benefits of exercise:

    • Improve your posture and balance.
    • Helping muscles to loosen up.
    • As much as possible, try to lessen your level of pain.
    • Be more flexible as a result.
    • This strengthens the weaker muscles.
    • You can increase your range of motion by exercising.

    Risk factor:

    Heel pain can result from anything, or from any specific activity, that places a lot of pressure and strain on your feet.

    Increase the possibility that this illness will cause you to have heel pain;

    • Overweight
    • Intense physical activity, such as running or jumping for fitness or sports.
    • Put on a pair of stylish high heels or tight shoes that lack a cushion or arch support.
    • Have high arches in the feet, flat feet, or arthritis in the feet and ankles.

    Examine the following safety precautions before starting an exercise program:

    Before you start any exercise program, think about a few safety measures and optimize the benefits. Talk to your doctor or physical therapist about which exercises are most effective for your particular issue. Recognizing your body’s needs and not pushing yourself when it hurts are essential. While soreness is a typical after-effect of exercise, persistent or severe soreness may indicate exhaustion. Start with low-impact exercise sessions until you can tolerate an additional level of pain before progressing to more intense ones.

    Maintaining proper form and posture is essential to avoiding repeated injuries. If you’re not sure how to start exercising correctly, speak with a doctor. Warm up before starting any workout to get your joints and muscles ready for the current task.

    Exercise For Heel Pain:

    Golf ball roll

    • Seated upright, choose a chair with your feet flat on the floor.
    • A golf ball should be placed on the ground close to your feet.
    • Apply as much pressure as comfortable with one foot to the ball to move it in different directions.
    • It should be the ball rubbing against the foot.
    • For another two to three minutes, keep moving the ball.
    • Then return to your neutral position.
    • Then relax.
    • Repeat this exercise five to ten times.
    Golf-ball-roll-exercise
    Golf-ball-roll-exercise

    Toe raise, point, and curl

    • Take a seat so that you are straight and have your feet level on the ground.
    • Elevate the heels while keeping the toes planted in the ground.
    • Stop when your feet are the only portions of your body that remain on the ground.
    • Step down after a short while by releasing your heels.
    • Just the tips of the big and second toes should touch the ground during the second stage, with heels lifted and toes pointing downward.
    • After a short while, release your grip.
    • In order to reach the third stage where only the tips of your toes touch the floor, lift your heels and curl them in.
    • Maintain your position for a short while.
    • Then return to your neutral position.
    • Then relax.
    • Repeat this exercise five to ten times.
    Toe-raise-point-and-curl-
    Toe-raise-point-and-curl

    Towel curl

    • Take a seat (you can alternatively stand) with your heels beneath your knees.
    • Make sure the toes on both your legs and feet are parallel to each other and pointing forward.
    • Spread the towel out and plant a level foot on it.
    • The towel will be shifted in your direction.
    • When you flex your foot back and lift your toes, maintain your heel downward.
    • Keeping your heel on the towel, extend your foot evenly along both sides and the middle to bring your foot as far out on the towel as possible.
    • Squeeze the towel in with your toes and arch, making sure your heel stays put.
    • Bring the towel in your direction.
    • Make use of all five fingertips on both sides of the foot to create a wide circle under the arch area.
    • You will be able to move a limited area of the towel with each drawback and extension.
    • Then return to your neutral position.
    • Then relax.
    • Repeat this exercise five to ten times.
    Towel-curl
    Towel-curl

    Marble pickup

    • Seated in an upright chair, place both feet straight on the floor.
    • One empty bowl and one with at least twenty marbles in it should be placed on the ground in front of the feet.
    • Using the toes of only one foot, place each marble into the empty basin.
    • Then return to your neutral position.
    • Then relax.
    • Repeat this exercise five to ten times.
    marble pickup
    marble pickup

    Alphabet write with the toe exercise

    • Decide where to sit or stand comfortably.
    • Starting with the capital letters, raise your foot a few inches and use your big toe to write the alphabet in the air.
    • Use lengthy, downward motions.
    • Once you’ve finished the alphabet, write lowercase letters.
    • Then return to your neutral position.
    • Then relax.
    • Repeat this exercise five to ten times.
    Alphabet
    Alphabet

    Towel Stretch

    • Sitting on the floor or in bed, you can do this simple stretch.
    • Legs out in front of you, take a seat on the floor or in your bed.
    • Hold a towel that has been rolled up from both ends under the heels of your feet.
    • Maintaining a straight knee, gradually pull the towel towards yourself.
    • Hold this position for a few seconds.
    • Then return to your neutral position.
    • Then relax.
    • Repeat this exercise five to ten times.
    Lying Stretch
    Lying Stretch

    Ankle Plantarflexion

    • Settle down on the floor, placing your other leg correctly and resting on your heel.
    • Bend one leg at the knee.
    • While the band is looped over the front of your foot, hold onto its ends with both hands.
    • Point your toes forward and then back slowly to release the pressure.
    • Then return to your neutral position.
    • Then relax.
    • Repeat this exercise five to ten times.
    ankle-plantar-flexion-exercises
    ankle-plantar-flexion-exercises

    Ankle dorsiflexion

    • Sit with your legs straight in front of you for an extended length of time on the mat.
    • Wrap the band over one foot after securing it around the leg of a chair or table.
    • After gently pointing your toes in your direction, take a step back and start over.
    • Then return to your neutral position.
    • Then relax.
    • Repeat this exercise five to ten times.
    Resisted Ankle dorsiflexion
    Resisted Ankle dorsiflexion

    Heel Raises

    • Step onto the ground and take a standing position.
    • Hold this position for a few seconds.
    • Let your heels come off the ground and point your toes next.
    • Push through your first and second toes firmly, keeping your ankles from shifting outward during the heel lifts, to try and maintain your feet in the ideal neutral line.
    • The muscles in your lower back and calves should be under use.
    • Then return to your neutral position.
    • Then relax.
    • Repeat this exercise five to ten times.
    heel-raise
    heel-raise

    Inversion and eversion of the ankle

    For eversion,

    • Your affected foot should be flat on the ground to begin this active foot drop exercise.
    • Next, extend the tips of your toes and the outer part of your foot, then return to your starting posture.
    • Make sure your leg action is different from your foot and ankle to avoid overreacting with it.
    • Then return to your neutral position.
    • Then relax.
    • Repeat this exercise five to ten times.

    For inversion,

    • To complete the ankle inversion, start with your feet in the same posture and lift the inside edge of your foot toward your body’s midline.
    • Next, bring them back down.
    • Then return to your neutral position.
    • Then relax.
    • Repeat this exercise five to ten times.
    ankle-eversion-and-inversion
    ankle-eversion-and-inversion

    Standing calf stretch

    • A wall or other sturdy object should be your face as you advance and take your place.
    • Taking a single step forward, point both of your toes directly forward.
    • Stretch by putting your leg behind you while extending your knee.
    • With your arms supporting your body, bend your front knee until you feel a small stretch down the back of your leg as you lean forward toward the wall.
    • By going in or out of the wall, take steps to lengthen your rear leg.
    • It’s also possible to modify the front knee’s bend to better control the stretch.
    • Hold this position for a few seconds.
    • Then return to your neutral position.
    • Then relax.
    • Repeat this exercise five to ten times.
    Standing Calf Stretch
    Standing Calf Stretch

    Ankle-toe movement

    • First, lying down on the bed in an upright posture.
    • Next, bring your toes as near to your body as possible.
    • Hold this position for a few seconds.
    • After that, move them off.
    • Then return to your neutral position.
    • Then relax.
    • Repeat this exercise five to ten times.
    ankle-toe-movement
    ankle-toe-movement

    Seated foot stretch

    • Place your affected heel over your other leg while you sit in a chair.
    • Draw the toes in toward the shin to tighten the arch of the foot.
    • Using the other hand, feel for pressure in the plantar fascia on the bottom of the foot.
    • Hold this position for a few seconds.
    • Then return to your neutral position.
    • Then relax.
    • Repeat this exercise five to ten times.
    Seated foot stretch
    Seated foot stretch

    What safety measures must be taken while exercising?

    • Aim to avoid using any force or fast movements when working out.
    • Avoid engaging in difficult activities.
    • When you exercise, take care of yourself and remain alert to prevent falling.
    • To improve your range of motion and encourage relaxation throughout your workout, wear loose, comfortable clothing. Avoid wearing anything too tight or stylish.
    • Stretching and bending should be done gently.
    • Between your workouts, take a rest period.
    • Stretching the muscles in your stiff joints is typical, however, it might be difficult at times. Exercise and stretching should not cause pain or give you the impression that someone is stabbing you since they are unhealthy and exacerbate your illness.
    • Exercise should be stopped as soon as the pain gets severe.
    • Maintain a straight posture when exercising.
    • Before and after sets, as well as for the recommended number of repetitions for each exercise, stretches should be done in keeping with the protocol.
    • Remain hydrated.

    When are you going to stop working out?

    • Fever
    • Headache
    • Exercise should be stopped if it hurts.
    • Severe burning in the muscles.
    • You don’t feel good.
    • If numbness or pain are present.
    • Blurry vision

    Prevention:

    • You can prevent heel pain by wearing shock-absorbing soles, strong shanks, and supportive heel counters.
    • You should also warm up and stretch as soon as you get out of bed before beginning any strenuous exercise that needs muscular relaxation, wear suitable footwear for every physical activity you engage in, and always start cautiously.
    • Avoid wearing shoes with very high heels or soles.
    • Reducing weight can also help persons who are overweight or obese avoid heel pain.

    Summary:

    A sharp stabbing pain that is felt in the center of your foot is known as heel pain. Even though you might eventually require surgery to get rid of heel pain, there are some conservative options to treat it in the comfort of your own home.

    Heel spurs, plantar fasciitis, Achilles tendonitis, and other underlying diseases can cause heel pain in addition to direct heel injuries. Whatever the root cause, your quality of life and your capacity to walk may be significantly impacted by heel pain.

    Keeping yourself physically active and engaging in regular exercise that targets strengthening and extending the muscles and ligaments that attach to your heel is one of the best strategies to prevent pain.

    FAQ:

    Does exercising relieve the pain in the heel?

    Sure, regular exercise may help in the healing or reduction of heel pain. Stretching helps to provide the muscles flexibility during exercise. Exercises that strengthen certain muscles do just that. Stretching and strengthening the muscles and ligaments that attach to your heel are two things that exercise takes into account. activities for pain-free range of motion should be done first, then go on to strengthening activities.

    Can heel pain be relieved by walking?

    Your heel condition is the determining factor. When your disease is at its acute stage, you should avoid walking and instead take it easy and relax until your pain subsides. If not, walking could exacerbate and worsen your heel pain. As little walking as possible should be done at first.

    Why is there pain in the heel?

    Heel pain is frequently caused by obesity, poorly fitting shoes, running and jumping on hard surfaces, unusual gait patterns, injuries, and specific illnesses.

    Does heel pain respond well to hot water?

    If you’re considering taking a hot bath to relieve your foot pain, remember the following: Take cold and/or hot baths in turn. For some runners, the mere presence of heat might exacerbate problems. Finish the hot baths by immersing your heels in cold water if you are performing contrasting baths.

    If I have heel pain, should I continue to exercise?

    Strengthening workouts, both general and specific, can increase the plantar fascia’s ability to support loads. If you are experiencing more pain when running, walking, or jumping, you may need to cut back on these activities until your tolerance to exercise has improved.

    Which workout relieves heel pain the most effectively?

    Ankle toe movement
    Ankle dorsiflexion
    Towel curl
    Standing calf stretch
    Standing heel raise

    Does stretching make the heel pain go away?

    Plantar fascia and calf muscles can be stretched to improve flexibility and lessen heel pain. Before or following an activity, people can do this exercise several times a day.

    References:

    • On July 14, 2023a, Prajapati, D. Physio Samarpan: The Top 15 Exercises for Treating Heel Pain. Physiotherapy Clinic in Samarpan. Here are the top 15 exercises to relieve heel pain: https://samarpanphysioclinic.com/
    • June 25, 2024: Villines, Z. The ideal stretches and workouts for plantar fasciitis. The article “Medical News Today (USA): 324535,” is this one.
    • Four exercises for heel pain relief are provided by Old Tampa Intervention Pain and Sports Medicine: Pain Management (n.d.). Four exercises to relieve heel pain: https://www.newtampapain.net/blog
    • Bhoomika. June 15, 2024. 13 Therapeutic Physio Exercises That Are Best For Heel Pain. Physiotherapy in Therapeutics. https://therapeuticphysio.com/exercise-for-heel-pain/
    • On September 5, 2024, Kapadia, S., & Kapadia, S. The Top 10 Exercises and Stretches for Healthy Feet. Medicus Sumit Kapadia. Exercises to relieve heel pain can be found at https://www.drsumitkapadia.com/blog/
    • Kelly L. Geoghan, DPM, a podiatrist, provides four exercises to relieve heel pain (n.d.). Four exercises to relieve heel pain: https://www.flawlessfeet.net/blog
    • Image 13, Stretches and workouts to improve the condition of your feet: The Harvard Medical School’s “Staying Healthy” webpage
  • Abnormal Gait

    Abnormal Gait

    Introduction

    Abnormal gait, more commonly known as a walking abnormality, happens whenever someone is unable to walk normally. An accident, underlying medical issues, or anomalies in the legs and feet could be reasons for this.

    Walking appears to be a straightforward action. However, the body’s multiple systems, such as strength, coordination, and sensation, work together to allow a person to walk with a normal gait.

    When one or more of these interconnected systems fails to function properly, it might cause an irregular gait or walking pattern.

    What is Gait?

    Gait refers to the pattern in which you walk. Walking requires muscle balance and coordination. Trauma or underlying health issues can result in an irregular gait. You may notice an irregular stride if you drag your toes, take large steps, or feel off balance while walking. While some gait disorders fade entirely on their own, several need persistent medical attention.

    What is Abnormal Gait?

    An abnormal gait is a visible variation in our normal walking rhythm. Each person has a natural walking style that is unique to them. However, various accidents and medical disorders can alter our normal walking rhythm. Anything that affects our brain, spinal cord, legs, or feet can alter our walking patterns.

    An abnormal gait could be caused by any of these variables such as

    • Disease
    • Hereditary variables
    • Trauma
    • Deformities of the legs or feet

    A few typical instances of an abnormal gait are:

    • Limping.
    • Dragging your toes.
    • Shuffling your feet.
    • Short steps.
    • Difficulty bearing your body’s weight.
    • Having trouble coordinating.

    An abnormal gait is also known as ambulatory dysfunction. In certain cases, irregularities in gait resolve on their own. In other situations, an abnormal gait might not go away. Physical therapy can help in both situations by enhancing a person’s gait and easing any unpleasant symptoms.

    Types of Abnormal Gait

    While there are many various kinds of irregularities in gait, the following are the most prevalent:

    • Antalgic gait: The primary occurrence of antalgic gait is pain. It’s the most prevalent kind of irregular gait. You become limp as a result (avoid using your affected leg or foot when stepping).
    • Propulsive gait (also known as Parkinson’s disease gait): Individuals with Parkinson’s or Parkinson’s disease are affected by this type of walking. A stiff, squatted posture, together with a forward-bending head and neck, are variables of a propulsive gait. To keep your center of gravity stable, you often take quick, short steps (festinating gait).
    • Scissors gait: The way your knees and thighs strike or cross one other while you walk gives the impression that you are cutting paper. You might move slowly and in little steps. Those who have been diagnosed with spastic cerebral palsy typically exhibit this walk pattern.
    • Hemiplegic gait: Walking with one rigid leg is the result of a spastic gait, also known as hemiplegic gait. That leg drags or swings in a semicircular pattern as you lift it to walk (circumduction). People with multiple sclerosis, cerebral palsy, or hemiplegia frequently have this kind of walk.
    • Steppage gait (neuropathic gait): This kind of gait results in a high step, where your leg is raised above the typical level by elevating your hip. When your foot falls, it could look unsteady. When you walk, your toes often point downward and scratch the earth. Steppage gait can be caused by muscle atrophy or damage to the peroneal nerve (such as from spinal stenosis or a herniated disc).
    • Waddling gait: A waddling gait is an excessively upper-body-moving walk that appears to be a duck. Hip dislocation or progressive muscular degeneration that develops gradually from birth can be the cause of waddling.
    • Crouching gait: When walking, a crouching gait can be described by the flexion of the hips, knees, and ankles. Walking can sometimes give the impression that you are going to stoop over. You might feel your toes drag. Having cerebral palsy is typical to cause this kind of gait.
    • Ataxic gait: Cerebellar atrophy is the cause of this kind of gait. It results in crooked steps that impair your ability to walk heel to toe in a straight path. An ataxic gait may make you feel shaky.
    • Shuffling gait: Walking with a shuffling gait involves not taking your feet off the ground entirely. It makes your feet feel heavy. If you have an injury that keeps your feet from rising off the ground when you walk, or if you feel unbalanced, you might shuffle.
    • Lurching gait: Individuals with paralysis or weakening of the gluteus medius (the muscles that surround your hips and butt) sometimes have a lurching stride. It results in a lengthy, sluggish gait. You could move your upper body to the front or back to lessen the amount of weight bearing on the affected leg.

    How frequent is Abnormal Gait?

    Gait problems become more common as people age. Approximately 15% of people have developed an uneven gait by the time they are 60 years old. despite this, almost 80% of people over 85 have an abnormal gait. Children are less likely to develop a gait irregularity unless they have a medical condition or are injured.

    What causes Abnormal Gait?

    Gait abnormalities are irregular walking patterns that can be caused by a variety of factors, including injury, pain, an inner ear (balance) impairment, or nerve damage. There are numerous probable causes and contributing factors for gait abnormalities. The most common causes are:

    • Joint pain.
    • A painful injury like a bone fracture or sprain.
    • Foot issues may include sores, calluses, ingrown toenails, warts, and corns.
    • Shoes that do not fit well.
    • Inner ear problems.
    • Nerve injury.
    • Vision issues.

    The following are some of the underlying health issues that may induce gait abnormalities:

    • Parkinson’s disease (also known as parkinsonism).
    • Multiple Sclerosis.
    • Stroke.
    • Arthritis.
    • Cerebral palsy.
    • Hemiplegia.
    • Spinal stenosis and herniated disk.

    Some irregular gaits have multiple causes.

    What are the symptoms of Abnormal Gait?

    The signs and symptoms of gait irregularities differ depending on the type of abnormality being experienced. Among the symptoms that are most frequently experienced are:

    • Dragging or shuffling your steps.
    • Feeling unbalanced while walking.
    • Stiff joints or muscles in your legs and hips.
    • Swaying from side to side with each step (waddle).
    • Walking with your head and neck bent to the ground.
    • Take higher-than-normal steps and drop your feet with each one.
    • Take little steps.
    • Walking causes pain.

    What are the risk factors for Abnormal Gait?

    • If you are over 60, you may have an increased risk of having gait problems.
    • Have a condition that impairs your movement, joints, bones, muscles, brain, or spine.
    • Have to suffer an injury.

    What are the complications of Abnormal Gait?

    The complications of gait disorders may include:

    • Increased danger of falling or being injured.
    • Muscular weakness.
    • Sudden inability to walk.
    • Pain.
    • Reduced capacity for preserving independence.

    How is Abnormal Gait diagnosed?

    During a physical exam, healthcare providers can discover gait problems. They will take a comprehensive medical history, including:

    • Evaluate your muscular strength, tone, and coordination.
    • Check the length of your legs (for example, prosthetic hips might create varying leg lengths).
    • Examine your eyesight and blood pressure.
    • Examine your cervical and spine.
    • Check your balance.
    • Evaluate the walking joints’ range of motion.

    A healthcare physician may do a variety of tests to learn more about the sort of gait impairment you have and what causes it. Imaging examinations, such as X-rays, and laboratory tests may be suggested.

    How is Abnormal Gait treated?

    Treatment for gait irregularities differs depending on the kind of gait and its etiology. Treatment options may include:

    • Medications are used to treat underlying illnesses such as arthritis, Parkinson’s disease, and multiple sclerosis.
    • Resting if you are injured.
    • Physical treatment and strength exercises.
    • Surgery, including hip and knee replacements.
    • Using assistive mobility equipment such as a cane or walker.
    • Adjusting footwear (wearing shoe lifts) or applying splints or braces.

    If you have an abnormal gait, your healthcare practitioner will advise tips to prevent falls and accidents.

    What part does physical therapy play in the case of Abnormal Gait?

    Physical therapy is essential for controlling abnormal gaits and improving mobility. It includes a customized protocol of exercises and strategies meant to:

    Goals of physical therapy

    Increase muscle strength.
    Increase flexibility.
    Improve your balance and coordination.

    Common physical treatment techniques for abnormal gait are:

    • Strength training focuses on the muscles involved in walking and balance, which can help improve gait stability. Resistance bands, weight, or bodyweight exercises can help to improve the muscles that control gait.
    • Stretching exercises may enable you to gain greater flexibility and release stiff muscles. Stretching tight muscles can increase the range of motion and decrease stiffness.
    • Balance exercises can help people retain their balance and avoid falls. Standing on one leg, walking in tandem, and using a balancing board can all help you improve your balance. Gait training can help people learn to better coordinate their movements.
    • Physical therapists can teach people how to use assistive devices effectively, such as canes or walkers.

    Physical therapists may educate patients on ideal walking skills and support gadgets. The physiotherapy treatment plan will be designed for abnormal gait. For example, individuals with Parkinson’s disease may focus on exercises to enhance balance and coordination, whereas stroke patients may focus on strengthening afflicted muscles and restoring gait symmetry.

    Are there any side effects of the treatment?

    Before starting therapy, discuss the potential side effects with your healthcare professional. You may have discomfort, edema, or scars following surgery. You may also have adverse effects that are specific to the medication prescribed by your practitioner.

    Prognosis

    • Certain changes in your gait, particularly after an injury, are transitory and disappear as your body heals. Some people might need constant care for the remaining period of their life.
    • The primary goal of the program is fall prevention. You run a higher risk of injury if your gait is abnormal. Your healthcare provider will offer you tips on how to reduce your risk of injury if you have an irregular gait.
    • A cane or walker are example of aided mobility equipment that many individuals find useful. These tools help you become more adept at solo navigation. They may also boost your confidence if you struggle to remain upright on your feet by themselves.
    • See your doctor, occupational therapist, or care team about at-home options if you struggle to accomplish everyday tasks because of a mobility-impairing condition.

    Is it possible to prevent Abnormal Gait?

    Abnormalities in gait resulting from underlying medical conditions cannot be prevented. There are various strategies to lower your danger of getting hurt:

    • Using safety gear whether participating in sports or doing your job.
    • Paying attention to your body, stopping activities, or taking pauses when you start to feel sore.
    • Relaxing following an injury to avoid causing more harm or worsening the injury
    • Utilizing appropriate form, building muscle, and improving flexibility to prepare for demanding exercises.
    • Getting your vision examined periodically.

    Summary

    Gait abnormalities are prevalent and worsen as you age. Some gait irregularities are caused by an underlying health problem that can be treated to improve or resolve. Others may need lifetime care. Additional aches and pains associated with their walking pattern may be experienced by someone with an unstable gait.

    Some reasons for aberrant gait are temporary and easily treated, but others might last a lifetime. If you have a gait irregularity, you may be more likely to have an injury or fall. Take precautions and seek counsel from a healthcare provider. Physical therapy and other therapies can assist to improve or cure an abnormal gait. People should seek medical advice and treatment as needed to manage their medical disorders.

    FAQs

    What defines an abnormal gait?

    Your walking pattern is called your gait. An abnormal gait may also be caused by a trauma or underlying medical condition. If you feel unstable, drag your toes, or take huge steps when walking, you may have an abnormal gait.

    What is considered a normal gait?

    Due to improved stability and limb length, mature gait features reciprocal arm-swing and heel striking with increased velocity, cadence, step length, single-limb stance time, and the ratio of pelvic span should widen your ankles when you have both feet on the flat surface.

    What is meant by the phrase “walking gait”?

    One of the most basic aspects of human mobility is gait or the way one walks or runs. Variations in gait can point to underlying health issues in several medical specialties. Any divergence from a person’s regular gait or way of walking is referred to as a gait disturbance.

    How are gait abnormalities treated?

    Your doctor can create a plan to treat your gait problems once they have determined the cause of it. Numerous gait abnormalities can be corrected with drugs or surgery.

    What are the different types of gait?

    Spastic gait.
    scissors gait.
    Steppage gait.
    Waddling gait.
    Propulsion gait.

    References:

    • Patel, D. (2023, December 13). Abnormal Gait – Types, Symptoms, Treatment, Exercise – Mobile. Mobile Physiotherapy Clinic. https://mobilephysiotherapyclinic.in/abnormal-gait/
    • Gait Disorders and Abnormalities. (2024, May 2). Cleveland Clinic. https://my.clevelandclinic.org/health/diseases/21092-gait-disorders
    • Gait Abnormalities. (n.d.). Stanford Medicine 25. https://stanfordmedicine25.stanford.edu/the25/gait.html
    • Fletcher, J. (2017, December 31). What is abnormal gait? https://www.medicalnewstoday.com/articles/320481
  • Gait Training: Physical Therapy to Improve Walking

    Gait Training: Physical Therapy to Improve Walking

    Introduction

    Gait training is a physical therapy method that enhances walking patterns and mobility. It is frequently used to assist persons who are recovering from injuries or surgeries, or who have disorders that limit their ability to walk.

    Your physical therapist will design a series of exercises called gait training to improve your walking. Enhancing range of motion in your lower limb joints, enhancing strength and balance, and simulating the repetitive action of your legs during walking are all goals of the exercises.

    Gait training activities aim to improve a person’s walking pattern, thereby restoring a normal, efficient gait. Developing balance and strength enhances mobility and minimizes the danger of falling. This is critical for increasing quality of life and promoting independence in mobility. Increasing mobility through expert gait retraining is critical for patients recovering from knee dislocations or other injuries. This comprehensive handbook allows people to walk with confidence and comfort. Expertly designed gait training activities improve your walking pattern while also increasing your balance and stability.

    Any imbalances or anomalies must be addressed to restore mobility, avoid falls, and avoid injuries. You can rediscover the joy of pain-free, efficient walking with the help of healthcare specialists, which will help you manage and improve your everyday activities. Invest in your health to open the door to a more independent and active life.

    What is Gait Training?

    Gait training aims to improve a person’s walking pattern and restore a normal, efficient gait. It improves balance and strength, resulting in increased mobility and reduced chance of falling. This is critical for increasing quality of life and allowing for independence in mobility.

    For patients suffering from injuries such as knee dislocations, it is crucial to improve mobility through professional gait retraining. People are given the confidence and comfort to stroll with this extensive guidance. Skillfully crafted gait training routines enhance your gait, improving stability and balance.

    The following common forms of gait impairments may be needed for gait training:

    • Trendelenburg walking gait
    • high steppage gait
    • Spastic gait
    • Antalgic gait (abnormal gait caused by pain)

    Training your gait can be helpful to:

    • Strengthen your joints and muscles.
    • Improve your posture and balance.
    • Increase your endurance level.
    • Enhance your muscle memory.
    • Retrain your legs to perform motions repeatedly.
    • Lessen the chance of falls while gaining more mobility.

    Who would benefit from Gait Training?

    If you’ve lost your ability to walk as a result of an injury, illness, or another health problem, your doctor may recommend gait training for you. For instance, the following circumstances may make it difficult to walk:

    • Spinal cord injury.
    • Possible injuries include broken legs, pelvis
    • Joint replacements.
    • Lower limb amputations
    • Stroke or neurological disorders
    • Muscular dystrophy or musculoskeletal disorders

    Treatment for abnormal gait may be necessary for children with neurological disorders, musculoskeletal issues, or brain injury. Gait treatment may be advised by their doctors either before or after they learn to walk.

    The Benefits of Gait Training 

    Gait retraining is required to address inappropriate walking patterns, and reduce the possibility of falls while enhancing mobility. It’s crucial to ensure a safe and effective return to regular walking for those who are healing from injuries.

    Increasing Mobility

    Regaining independence and a higher quality of life requires increased mobility, which can be achieved through specific exercises, physical therapy, and gait training. People can improve their range of motion, feel less pain, and be able to carry out everyday tasks with confidence and efficiency again.

    Managing and Reducing Pain

    Pain management techniques, exercise, and good posture all contribute to pain prevention and relief by easing suffering, improving overall health, and facilitating a person’s quicker return to normal activities.

    Handling Conditions and Disorders of the Gait

    Physical therapy, gait retraining, and customized therapies can assist people with gait disorders and diseases manage their symptoms, feeling less uncomfortable, and restoring confidence in their ability to walk.

    Enhancing Stability and Balance

    Targeting core strength and proprioception, balance training exercises, and therapies assist people in regaining their equilibrium and self-assurance in everyday tasks. Better quality of life and increased mobility freedom are some benefits of this.

    Promoting Neurological Recovery

    To assist regain lost sensory and motor abilities, rehabilitation is essential. This includes neuromuscular reeducation and focused activities. For those with neurological involvement, promoting nerve regeneration and enhancing muscular control improves mobility and quality of life, resulting in a more thorough rehabilitation process.

    Encouraging Prolonged Joint Health

    Discomfort, joint wear, and overuse issues can be prevented by minimizing walking abnormalities and preserving ideal biomechanics. This all-encompassing strategy, which incorporates proprioception training, posture correction, and exercises, promotes sustained joint function, speeds up healing, reduces the risk of more knee dislocations, and improves general health in the process.

    How Physical Therapists Identify Gait Problems and Develop Effective Approaches

    • When evaluating a patient’s gait, physical therapists watch how they walk and search for abnormalities in posture, foot placement, and stride length. They might record specifics about movement via video analysis.
    • To determine the root causes, therapists assess joint mobility, muscular strength, and flexibility through manual examination.
    • They create specialized treatments based on these results, including workouts and gait retraining methods to deal with particular problems.
    • To improve the general effectiveness and quality of walking, these may include proprioceptive training, strength training, and balancing activities.

    Methods of Gait Training

    The goals of several gait training methods vary from one another. Physical therapists lead these techniques, which could include:

    Gait Analysis

    Understanding a patient’s gait pattern is essential for physical therapists to identify any abnormalities or disorders that may exacerbate gait problems. Once these difficulties are recognized, targeted treatments can be developed to successfully address them.

    Biofeedback and Suggestions

    These methods assist people in becoming more conscious of their gait by utilizing sensory information and real-time data. With the use of biofeedback systems, patients can make deliberate changes for a more effective and balanced gait by receiving immediate feedback on their weight distribution and stride length.

    Equilibrium Exercises

    These exercises are vital for increasing walking stability, which is necessary for avoiding falls and guaranteeing secure and assured mobility. Exercises for balance improve proprioception and strengthen the core muscles, which improve gait control.

    Exercise on a Treadmill

    It enables patients to practice walking in a supervised environment, which facilitates real-time gait analysis and adjustment by therapists. Better walking habits and greater cardiovascular fitness may result from this.

    Analyzing Efficient Techniques for Gait Training

    A range of exercises and activities known as “Gait Training” are used with patients to help them restore their ability to walk and increase their general mobility. When we get into the details, we’ll look at a variety of successful gait training techniques that address diverse requirements and the scientific underpinnings of their effectiveness.

    Personalizing Your Gait Training Course

    Customization is essential to meeting each person’s particular demands and obstacles. Tailored regimens can target certain deficiencies, such as proprioceptive impairments, joint restrictions, or muscle imbalances. A more successful and individualized gait training program is possible when factors like joint limits, muscular weakness, or aberrant gait are taken into account. This enables focused workouts and treatments to address particular issues.

    Moving Gradually Toward a Better Gait

    This method gradually increases the level of difficulty, duration, and intensity of walking tasks and exercises. It makes sure that patients increase their gait gradually without using too much physical force. Better gait quality and general mobility occur from individuals taking on increasingly difficult gait-related tasks as their strength, stability, and confidence grow. This is especially true for people recuperating from knee dislocations or other diseases that influence their walking patterns.

    Keeping an Eye on Your Gait Training Progress

    Measuring improvements in variables such as gait symmetry, balance, and stride length allows patients and therapists to modify the training strategy accordingly. This data-driven strategy guarantees that the gait training program stays efficient and customized to each person’s needs, allowing for improved results and assisting people in regaining confidence in their walking abilities, especially following hip or knee injuries.

    Using Assistive Technology to Improve Gait

    It can be advantageous to use assistive devices to improve one’s gait, particularly for those who are less mobile or are in the early phases of gait training. Canes, walkers, and orthotic aids are examples of equipment that offer extra support and help with balance and stability during a patient’s progression. With time, the patient may become less dependent on these devices and eventually walk alone.

    Participating in Group Exercises to Gain Motivation

    You may encourage cooperation and encouragement by exchanging experiences, challenges, and achievements with people who are going through similar things, much as participating in group gait training sessions acts as inspiration as well as guidance during rehabilitation. In particular, for individuals recuperating from knee dislocations or other injuries, group dynamics and friendly competition can enhance morale, making the gait training trip more engaging and pleasurable and ultimately assisting advancement.

    Basic Gait Training Exercises to Improve Mobility

    Gait training comprises strength and flexibility exercises, while also improving balance and numerous additional skills. These exercises improve overall walking patterns, promote mobility, and address irregularities in gait.

    Strength and stability Exercises

    Strength and stability exercises, which focus on core muscle groups and strengthen joint stability, are especially beneficial for those recovering from knee dislocations or related injuries. They minimize the possibility of falling, enhance balance, and encourage a more intentional and effective walking gait.

    Range of Motion and Flexibility Exercises

    To promote a more comfortable and natural gait, range-of-motion and flexibility exercises are concentrated on increasing joint mobility while lowering stiffness. Increased flexibility helps people move pain-free and correct anomalies in their gait, allowing them to walk more comfortably and effectively. This is especially beneficial when recovering from knee dislocations or other diseases that impair mobility.

    Balance and Coordination Exercises

    Exercises for balance and coordination focus on enhancing proprioception, muscle control, and equilibrium all of which are critical for avoiding falls and guaranteeing a secure, confident gait. These exercises are essential for improving general mobility, healing after knee dislocations or associated injuries, and lowering the chance of gait-related problems.

    Practical Walking Exercises

    Practical walking drills are crucial for gait training because they help people restore their ability to walk easily and confidently by focusing on real-world applications of walking that replicate everyday activities. Especially following knee dislocations or associated injuries, they help patients traverse daily chores with stability and a lower chance of discomfort by enhancing gait efficiency and reinforcing normal walking patterns.

    Suggestions for Efficient Gait Training 

    Efficient gait training can improve overall mobility and well-being, minimize falls, and maximize rehabilitation success.

    Selecting the Correct Footwear for Ideal Gait

    The correct arch support, cushioning, and stability can be achieved by choosing the appropriate shoes. They need to fit properly, taking into account the need for any orthotic devices. Wearing the proper footwear promotes healthy and effective walking patterns by lowering the risk of discomfort and irregularities in gait.

    Keep a Regular Speed and Rhythm

    Maintaining a constant speed while walking lowers the danger of overstretching muscles and minimizes energy expenditure. Additionally, it facilitates a more pleasant and seamless walking experience. Predictable and controlled movements are made possible by a consistent rhythm, which promotes healing and reduces excessive strain on the muscles and joints.

    Improving Alignment and Posture During Walking

    Good posture minimizes discomfort and encourages a natural gait by easing the pressure on the musculoskeletal system. Alignment of the head, shoulders, hips, and feet should be the main focus to achieve effective and harmonious movement. This is particularly important for those healing from any kind of injury since it promotes joint stability and lowers the possibility of recurring problems, which makes the healing process go more smoothly and successfully.

    Reduce Discomfort and Tiredness

    It’s crucial to progress gradually, wear appropriate footwear, and take enough breaks. Exercises for strengthening and stretching the muscles correct imbalances that frequently cause pain. Keeping adequate nourishment and hydration also helps to sustain energy levels. Reducing pain and weariness makes it possible for people to continue their gait training program, which eventually improves mobility and gives better results.

    Summary

    Training your gait might be challenging. Walking or learning to walk again after prolonged immobility can be physically and mentally exhausting. Share concerns with your medical professional or physical therapist. Inquire about their long-term prognosis, gait training program, and particular ailment.

    FAQs

    What exactly is gait training, and what makes it crucial?

    Gait training is a therapeutic practice that enhances walking patterns. It is essential for movement, balance, and avoiding falls after an injury.

    How long does it usually take to show improvement in gait through training?

    Depending on the individual and their condition, gait improvement might take anywhere from a few weeks to many months.

    Are there any workouts or strategies that are appropriate for diverse gait problems?

    Indeed, particular workouts and methods are designed to target individual problems for more successful rehabilitation. These methods address various gait abnormalities.

    Can people of different ages and fitness levels benefit from gait training?

    Because it can be tailored to meet different demands and conditions, gait training is beneficial for people of all ages and fitness levels.

    What advantages does gait training give?

    Gait training has various advantages such as retraining the legs and fostering muscle memory.
    Strengthening the affected joints and muscles.
    Enhancing equilibrium.
    Enhancing alignment.
    Enhancing endurance.
    Boosting movement.
    Lowering the risk of falls.

    What does a gait training example look like?

    When exercising, such as walking on a treadmill, you can wear a harness. In addition, your therapist might advise you to practice sitting, standing, stepping over objects, and elevating your legs, among other exercises.

    How does a gait trainer help people?

    Similar to walkers, gait trainers are assistive technology that can help kids who might not be able to stand or walk on their own. By doing this, kids can learn to walk independently and explore their surroundings without needing assistance from an adult.

    References

    • Pt, B. S. (2022, March 14). Gait Training Exercises In Physical Therapy. Verywell Health. https://www.verywellhealth.com/gait-training-in-physical-therapy-5069884
    • Gabbey, A. E. (2017, March 21). Gait Training. Healthline. https://www.healthline.com/health/gait-training#process
    • Cscs, A. T. P. D. N. (2022, December 30). Gait Training Exercises for Stroke Patients: How to Improve Your Walk. Flint Rehab. https://www.flintrehab.com/gait-training-exercises/
  • 22 Best Exercises for Shoulder Tendonitis

    22 Best Exercises for Shoulder Tendonitis

    Exercises for Shoulder Tendonitis play a crucial role in the recovery process, helping to strengthen the muscles around the shoulder, improve flexibility, and reduce inflammation. With the right exercises, individuals can not only relieve pain but also prevent future injuries, restoring shoulder function and mobility.

    Shoulder tendonitis is a common condition that occurs when the tendons in the shoulder become inflamed due to overuse, injury, or repetitive movements. This can lead to pain, stiffness, and a limited range of motion, making daily activities challenging.

    To effectively cure shoulder tendonitis, you need to follow your doctor’s instructions, perform rehabilitation Exercises for Shoulder Tendonitis that focus on the entire range of motion, and ensure the joint gets enough rest.

    What is Shoulder Tendonitis?

    A frequent medical illness known as “shoulder tendonitis,” sometimes spelled “tendinitis,” is defined by inflammation or irritation of the tendons in the shoulder joint.

    The rotator cuff, an intricate web of tendons in the shoulder, helps in the mobility and stability of the shoulder joint. Shoulder tendonitis may result from inflammation or irritation of these tendons.

    Shoulder tendinitis is a typical injury that occurs in sports where the forearm is used overly, such as tennis, baseball, and swimming. When the arm is raised above the body or twisted, the pain typically arises at the shoulder point and refers to or radiates down the arm. Severe pain will be continuous and may even cause you to wake up from a deep sleep.

    Because these activities frequently entail overhead or external rotation, the majority of cases of non-degenerative shoulder tendonitis are caused by a person’s job or preferred sport.

    Causes:

    Numerous factors can lead to the development of shoulder tendonitis, including:

    • Age

    Tendons degenerate gradually with age, making them more prone to damage and inflammation. Joint stiffness may be associated with an increased incidence of osteoarthritis in older adults.

    • Job

    Sports that require a lot of repetition, effort, and certain movement patterns may be harmful. For instance, pitchers in baseball frequently come across it.

    • Overuse

    Tendinitis can result from repetitive or excessive use of the shoulder joint, as in swimming or tennis, as well as several tasks associated with a job.

    • Poor posture

    Shoulder tendinitis can be caused by long-term poor posture control, especially when working a desk job.

    • Injury

    Tendon damage and inflammation might result from an unanticipated accident, fall, or trauma to the shoulder.

    Signs and symptoms:

    One of the possible signs of shoulder tendonitis is movement pain.

    Additional signals consist include;

    • Stiffens the shoulder joint and causes difficult movement.
    • When moving the shoulder, some people may hear snapping or clicking noises.
    • Inflammation and soreness surrounding the injured region.
    • Chronic pain in the shoulder, especially with arm lifts or movements.
    • Decreased strength in the shoulders.

    Advantages of exercises:

    People with shoulder tendonitis can benefit from exercise in several ways. Exercise can help control and improve the disease when done properly, but it’s crucial to do it cautiously and under the supervision of a doctor or physical therapist.

    • Strengthening of Muscles

    To treat shoulder tendonitis, it is essential to strengthen the muscles surrounding the shoulder joint. Stronger muscles are better able to support the shoulder joint and lessen some of the load on the tendons during movement. Resistance and targeted strength training help to increase muscle strength.

    • Reduction of Pain

    Exercising can help lessen shoulder tendonitis pain when done properly and gradually. Targeted exercise can improve shoulder joint support and lessen the load on the inflamed tendon by strengthening the muscles surrounding the injured tendons.

    • Increased Flexibility

    Exercises targeted to promote mobility and flexibility can help to improve the flexibility of the shoulder joint. Your capacity to carry out routine duties and activities without experiencing pain may improve as a result.

    • Improved Capabilities

    For patients with shoulder tendonitis, full restoration of shoulder function is usually the final result of treatment. You can restore your strength and function with the help of progressive and moderate exercises, which will allow you to get back to your regular daily tasks and, in certain situations, sports or social activities.

    • Improved Standard of Living

    For people with shoulder tendinitis, exercise can significantly improve their quality of life by reducing pain, expanding their range of motion, and recharging capabilities. Thanks to exercise, they can participate in engaging hobbies and work on their daily occupations with less pain.

    Exercises for Shoulder Tendonitis:

    Shoulder pulley

    • While seated directly below the shoulder pulley, attach it to the door.
    • With your palms facing each other, hold the pulley at both ends.
    • By pulling the handle down to and over the knee with your “good” hand, you may raise your right arm.
    • Elevate and maintain your rigid arm as high over your head as you can.
    • Then return to your neutral position.
    • Then relax.
    • Repeat this exercise 5-10 times a day.
    shoulder-pulley
    shoulder-pulley

    Finger walk

    • The patient is standing and facing a ladder that is leaning against a wall.
    • Suggest that they place their affected hands gently on the ladder’s low step.
    • Then, slowly make your way back to the starting point by reaching the top of the finger ladder.
    • Then return to your neutral position.
    • Then relax.
    • Repeat this exercise 5-10 times a day.
    finger-ladder
    finger-ladder

    Wand flexion

    • Select a peaceful location on the ground to begin with.
    • You ought to put your hands shoulder-width apart when gripping a stick.
    • Stretch your arms out in front of you with caution.
    • While you relax the affected arm, let your unaffected arm elevate your affected arm.
    • Move carefully as you complete the moves.
    • Hold this position for a few seconds.
    • Slowly drop your arms.
    • Then return to your neutral position.
    • Then relax.
    • Repeat this exercise 5-10 times a day.
    wand-flextion
    wand-flexion

    Wand extension

    • Initially, make an effort to get yourself on the ground in a comfortable standing position.
    • Take hold of a stick with both hands behind your back.
    • Make a backward motion with the stick.
    • Hold this position for a few seconds.
    • Then return to your neutral position.
    • Then relax.
    • Repeat this exercise 5-10 times a day.
    wand-extension
    wand-extension

    Shoulder abduction and adduction

    • Start from a relaxed standing stance on the floor.
    • Use both hands to grasp a stick.
    • Take the stick and squeeze it between your front thighs.
    • As much as you can, use one arm to push the other arm up and to the side while keeping your elbow straight.
    • Then return to your neutral position.
    • Then relax.
    • Repeat this exercise 5-10 times a day.
    Stick shoulder abduction
    Stick shoulder abduction

    Pendulum

    • Take a standing stance on the ground to begin.
    • You can maintain your center of gravity on a counter or table as you go.
    • You should leave the other arm swinging by your side.
    • Make a gentle back-and-forth swing with your arm.
    • Before moving it in a circular motion, step your arm from side to side while repeating the exercise.
    • Then return to your neutral position.
    • Then relax.
    • Repeat this exercise 5-10 times a day.
    pendulum
    pendulum

    Standing Row

    • Take a comfortable standing position on the ground to start.
    • Your shoulder should feel extended in the back.
    • Tie the ends of the elastic band into a three-foot loop and secure it.
    • Secure the loop onto a sturdy object, like a doorknob.
    • Hold the band as you stand with your elbow bent and by your side.
    • Move your elbow back straight, taking care to keep it close to your side.
    • Pull with your shoulder blades pressed together.
    • Then return to your neutral position.
    • Then relax.
    • Repeat this exercise 5-10 times a day.
    Standing-band-row
    Standing-band-row

    Scapula squeeze

    • Stand with your back straight and your arms at your sides, palms facing forward.
    • Put your shoulder blades together lightly and squeeze them toward your back.
    • For a few seconds, maintain this posture.
    • Take a deep breath and release.
    • Then return to your neutral position.
    • Then relax.
    • Repeat this exercise 5-10 times a day.
    Shoulder Blade Squeeze
    Shoulder Blade Squeeze

    Passive Internal Rotation

    • Take hold of the stick behind your back with one hand and grasp it firmly at the opposite end.
    • To passively stretch the shoulder until it feels pulled but is not uncomfortable, move the stick horizontally as shown.
    • Hold this position for a few seconds.
    • Then return to your neutral position.
    • Then relax.
    • Repeat this exercise 5-10 times a day.
    passive-internal-rotation-workout
    passive-internal-rotation-workout

    Side-lying external rotation

    • Lay on your side on the floor or on a bed.
    • Keeping your elbow 90 degrees bent and your forearm pressed palm down against your chest, rest your upper arm by your sides.
    • Rotate your shoulder outward to raise your forearm until it is level with your shoulder.
    • Hold this position for a few seconds.
    • Lower your hand gradually.
    • Then return to your neutral position.
    • Then relax.
    • Repeat this exercise 5-10 times a day.
    side-lying-external-rotation
    side-lying-external-rotation

    Horizontal abduction

    • With your injured arm hanging over the side of the bed or table, lie on your stomach.
    • Gently raise your arm to eye level while keeping it straight.
    • Hold this position for a few seconds.
    • Slowly drop your arms.
    • Then return to your neutral position.
    • Then relax.
    • Repeat this exercise 5-10 times a day.
    Horizontal-shoulder-abduction
    Horizontal-shoulder-abduction

    Arnold Press

    • Decide on the ideal weight for you and take a ground stance.
    • With your hands pointing inward, use a neutral grip to lift the dumbbells off the ground.
    • In a safe and controlled manner, set each dumbbell to its correct place.
    • Turn your palms so they are facing you after you have the dumbbells in place.
    • Learn the weights overhead with your elbows while inhaling deeply and contracting your deltoids.
    • Turn the dumbbells so that your hands face-front as you press.
    • Depending on the length of your limbs, this will result in the arms being about 90 degrees lower or somewhat lower.
    • Then return to your neutral position.
    • Then relax.
    • Repeat this exercise 5-10 times a day.
    arnold-press
    Arnold-press

    Shoulder shrug

    • First, choose a comfortable spot on the ground to stand.
    • Take a deep breath, then raise your shoulders to your ears.
    • As you return your shoulders to their natural position, squeeze your scapulae together.
    • Exhale and let your shoulders drop.
    • As you reach your elbows forward, notice how your shoulders are stretched.
    • Then return to your neutral position.
    • Then relax.
    • Repeat this exercise 5-10 times a day.
    Shoulder-shrug
    Shoulder-shrug

    Prone Rows

    • Lying on your front, take hold of the dumbbell with an underhand grip.
    • Retracting your shoulder blades, bring the dumbbell to the bench.
    • Hold this position for a few seconds.
    • Once your arms are fully extended, carefully lower the dumbbell.
    • Do not hurry the motion; instead, keep it calm and gradual.
    • Then return to your neutral position.
    • Then relax.
    • Repeat this exercise 5-10 times a day.
    prone row
    prone row

    Cross-over Shoulder Stretch

    • Initially, find a comfortable spot on the ground.
    • Raise and reach your right arm toward your chest.
    • Hold your arm with your left hand, or place it in the opening created by your left elbow.
    • Hold this position for a few seconds.
    • Then return to your neutral position.
    • Then relax.
    • Repeat this exercise 5-10 times a day.
    Crossover-arm-stretch
    Crossover-arm-stretch

    Quadruped Thoracic Rotation

    • Begin by putting yourself in the quadruped position on the floor or an exercise mat.
    • Your knees should be beneath your hips and your hands squarely beneath your shoulders.
    • Verify that your back is in a neutral posture and that your lower back has a slight natural curve.
    • Hold one hand behind your head so that your elbow is pointed sideways. This is where you will begin.
    • Lean your elbow forward and slowly twist your upper body.
    • While maintaining the stability of your lower back and hips, concentrate on rotating through your thoracic spine.
    • Keep your lower back from twisting or overarching.
    • Rotate in this manner until your upper back and shoulder region experience some stretch or slight strain.
    • Take a few moments to hold the final position while maintaining your balance and feeling the stretch.
    • Then return to your neutral position.
    • Then relax.
    • Repeat this exercise 5-10 times a day.
    quadruped thoracic rotation stretch
    quadruped thoracic rotation stretch

    Sleeper stretch

    • If you are lying on your side on a flat surface with your affected arm resting on a work surface, flex your elbow to a 90-degree angle.
    • Then, progressively apply pressure on your forearm with the opposing arm.
    • Hold this position for a few seconds.
    • Then return to your neutral position.
    • Then relax.
    • Repeat this exercise 5-10 times a day.
    Sleeper-stretch
    Sleeper-stretch

    Resistance Internal Rotation

    • Choose a band that has the right strength.
    • Around an elbow height, fasten the band.
    • As you lift your arms, point your left shoulder toward the band.
    • Bend your right elbow to around ninety degrees and use your left hand to get a neutral grasp on the band.
    • As you exhale, rotate your arm and pull the band as far as you can.
    • Hold this position for a few seconds.
    • Breathe in and smoothly go back to the beginning position.
    • Then return to your neutral position.
    • Then relax.
    • Repeat this exercise 5-10 times a day.
    Resistance Internal Rotation
    Resistance Internal Rotation

    Resistance external rotation

    • Put both of your feet hip-width apart on the floor.
    • An underhand grip (palms upward) is used to hold one end of a band in each hand after folding it in half horizontally.
    • With your elbows bent so that your forearms are parallel to the floor, place your arms so they are in close touch with your sides.
    • Bring your shoulder blades down and back softly to straighten your chest.
    • Take a breath.
    • Pull your forearms outward while attempting to keep your shoulders as stable as possible to increase the tension in the band.
    • There should be a little pressure behind your shoulders and in the space between your shoulder blades.
    • Hold this posture for a few seconds.
    • Then return to your neutral position.
    • Then relax.
    • Repeat this exercise 5-10 times a day.
    Resisted external rotation
    Resisted external rotation

    Doorway stretch

    • Assume a position where your back is against a wall and your face is toward a room corner.
    • With your fingers pointing upward, flex your elbows and shoulders to a ninety-degree angle.
    • Keep your elbows at shoulder height and press one hand against each wall.
    • You should extend your chest in this manner.
    • Hold this position for a few seconds.
    • Then return to your neutral position.
    • Then relax.
    • Repeat this exercise 5-10 times a day.
    Doorway Shoulder Stretch
    Doorway Shoulder Stretch

    Wall Angels

    • Trying to keep your buttocks and upper back in contact, place your feet a few inches away from the wall while standing with your back to it.
    • To prevent getting a severe low back arch, push your abdomen toward the wall.
    • Try to push your forearms against the wall by bringing your elbows up to a 90-degree angle and pointing your hands upward.
    • Lift your arms up against the wall and move them slowly, softly.
    • Hold this position for a few seconds.
    • Then return to your neutral position.
    • Then relax.
    • Repeat this exercise 5-10 times a day.
    Wall Angel
    Wall Angel

    Resistance Band Biceps Curl

    • Start by placing your feet hip-width apart in the center of a resistance band and grasping one end of the band in each hand with the palms facing the front.
    • Maintain an upright posture, a raised chest, and relaxed shoulders.
    • Contract your core for balance while keeping your arms fully extended out to the sides.
    • By bending your elbows and moving your hands towards your shoulders, gently curl the band upwards while exhaling.
    • When the exercise reaches its peak, squeeze your biceps and hold the position for a few seconds.
    • Extend your arms and take a breath as you slowly lower your hands back to the beginning position.
    • Then relax.
    • Repeat this exercise 5-10 times a day.
    resistance band biceps curl
    resistance band biceps curl

    What safety measures are necessary when exercising?

    • When starting any exercise, stretch and warm up.
    • Before working out, eat something light. Avoid eating right after exercising while avoiding exercising when you’re hungry.
    • Make slow, gentle bends and stretches.
    • When you exercise, maintain a straight posture.
    • Stretching the stiff muscles in your joint is normal and necessary, but it could be difficult. Since it is unhealthy and exacerbates your sickness, exercise, and stretching shouldn’t pain or make you feel as though someone is stabbing you.
    • Wear loose, casual clothing that promotes relaxation and maximal range of motion for the best possible training experience. Avoid wearing tight or extremely stylish apparel.
    • Try to stay away from sudden or forceful motions when working out.
    • Stretching should be performed in line with the protocol both before and after sets, in addition to performing the recommended number of repetitions for each exercise.
    • Refrain from taking on challenging tasks.
    • Between exercise sessions, take a rest.
    • If a certain movement causes you pain, record how this movement gets better each week to monitor your progress.
    • Stay hydrated.
    • Stop immediately if the pain becomes severe.

    What time will you stop exercising?

    • Fever
    • Headache
    • Intense muscle burning.
    • You’re not feeling well.
    • If there is pain or numbness.
    • If exercising hurts, you should stop.

    FAQ:

    What is tendinitis in the shoulder?

    Inflammation or irritation of the tendons in the shoulder joint, especially those of the rotator cuff muscles, is referred to as shoulder tendonitis, also known as rotator cuff tendonitis. Pain, discomfort, and limited range of motion are possible outcomes.

    Is surgery required for tendinitis in the shoulder?

    Surgery is usually only advised as a last option for treating shoulder tendonitis when non-invasive therapies are ineffective. Surgery is not necessary to treat shoulder tendonitis in the majority of instances.

    I have pain from shoulder tendinitis; can I use heat or cold therapy?

    Some people with shoulder tendonitis may find relief from their symptoms by using heat to help relax their muscles and increase blood flow. Ice therapy, also known as cold therapy, can ease pain and reduce inflammation. To find out which therapy is best for what you are going through, speak with a doctor.

    What part does physical therapy play in the management of tendinitis in the shoulders?

    A common essential part of treating shoulder tendonitis is physical therapy. In addition to lowering discomfort and inflammation, a physical therapist can offer exercises and strategies to increase shoulder strength, flexibility, and range of motion.

    Can someone with shoulder tendinitis still play sports or participate in physical activities?

    It’s crucial to get advice from a healthcare professional on your ability to engage in physical activity or sports. You may be able to manage your condition and continue with some activities while adhering to a rehabilitation program and making necessary modifications to your daily routine.

    Which variables are the main causes of shoulder tendonitis?

    Poor posture, aging, activities involving repeated shoulder motions, repetitive overhead arm movements (such as in tennis or swimming), and a history of shoulder injuries are common risk factors.

    Does treatment-free self-healing occur for shoulder tendonitis?

    When treating minor shoulder tendonitis, resting and avoiding aggravating activities can sometimes cause the problem to improve on its own. However, to reduce pain and encourage healing, more severe or persistent instances frequently need to be treated.

    If shoulder tendonitis is left untreated, are there any potential complications?

    If left untreated, shoulder tendonitis can result in degenerative changes such as rotator cuff tears, which may need surgery, as well as chronic pain and loss of shoulder function.

    Can someone with shoulder tendinitis still exercise?

    Getting advice on exercising from a physical therapist or healthcare professional is imperative. Rehabilitative programs and adapted workouts may occasionally be able to control and alleviate shoulder tendinitis.

    Is it possible to avoid shoulder tendonitis?

    It can be reduced or avoided by avoiding repetitive motions with the overhead arms, keeping the right posture, employing safe lifting practices, and warming up before working out.

    References:

    • Patel, D. (September 29, 2023c). Samarpan Physio: 53 Greatest Shoulder Tendonitis Exercises. Samarpan Clinic for Physiotherapy. The following website has the very top 53 shoulder tendonitis workouts: https://samarpanphysioclinic.com/
    • Hyderabad et al. (2021, June 16). Hyderabad, S. C. Shoulder The condition Activities For Shoulder Relief Of Pain | Shoulder Clinic Hyderabad. Shoulder Care Hyderabad – Simply Other WordPress Site. Squeeze your shoulder blades back like you would other exercises to relieve shoulder pain (https://hyderabadshoulderclinic.com/shoulder-tendonitis-exercises-for-relief/#:~:text=.
    • Exercises & Stretches for Shoulder Tendonitis: 12. (As of now). Feel Well. Exercises for Shoulder Tendonitis at https://www.vivehealth.com/blogs/resources
    • Image 14, WebArcherySchool.com. Jan. 9, 2023. Anterior Rows. Academy of Online Archery. www.onlinearcheryacademy.com/prone-rows
    • Image 18, Internal rotation of resistance bands: Exercise regimens. (n.d.). The resistance band internal rotation exercise is available at https://www.workoutsprograms.com.
    • Image 22, October 9, 2022, KFAdmin. How to Choose the Best Resistance Band for Workouts. Visit https://www.keepufitness.com/ to learn how to choose a resistance band for your workout.
  • Pott’s Paraplegia

    Pott’s Paraplegia

    What is Pott’s paraplegia?

    Pott’s paraplegia, which causes severe spinal deformity, is a major complication that is challenging to cure with surgery and treatment alone. It has become accepted that chemotherapy alone can effectively cure Pott’s paraplegia in cases of early spinal TB.

    The most prevalent location for musculoskeletal tuberculosis is the spine, and symptoms such as paraplegia, lower limb paralysis, and back pain are frequently associated with this condition.

    Spinal tuberculosis (TB) was formerly known as “Pott’s Disease” since it was initially described by Percival Pott in 1779. One of the earliest known diseases in human history is tuberculosis (TB) of the spine, which is the common extrapulmonary type of the disease.

    Spinal TB most commonly affects the lower thoracic and lumbar vertebrae, then the middle thoracic and cervical vertebrae. According to reports, 3 to 5% of instances involve the second cervical to seventh cervical localization, and atlantoaxial articulation is less frequent. The most often affected region was the lamina, which was followed by the transverse, articular, spinous, and pedicle processes.

    It results in an intervertebral joint form of tuberculous arthritis. Through the intervertebral disc gap that separates two neighboring vertebrae, the infection may spread. The disc is normal if only one vertebra is impacted; however, if two vertebrae are impacted, the avascular disc collapses due to a lack of nutrients. The disc tissue dies in a condition known as caseous necrosis, which causes vertebral constriction, vertebral collapse, and eventual spinal injury. Superinfection is uncommon and a dry soft-tissue tumour usually develops instead.

    One to two percent of patients with tuberculosis also have osteoarticular tuberculosis, which is invariably a secondary infection in patients who have primary tuberculosis elsewhere in the body. Pott’s paraplegia is the most severe form of bone TB. Compression of the spinal cord, progressive loss of neurologic function, and possible deformity result from the infection, which often begins from the vertebral body with visible damage and the formation of a cold abscess.

    Epidemiology

    Although Pott’s sickness is more common in countries with high incidences of HIV/AIDS and tuberculosis, a definitive diagnosis is still difficult to get. One to two percent of patients have osteoarticular tuberculosis, which is invariably a secondary infection in those with primary tuberculosis elsewhere in the body. While the disease is always present, in the great majority of cases (80%), it may be difficult to pinpoint the exact area of the ailment at first. One localized sign of a disease that affects the entire body is osteoarticular tuberculosis.

    One-third of people worldwide contract tuberculosis (TB) as a result of the bacteria M. tuberculosis, which is primarily located in the lung. Based on data from 200 nations, the World Health Organisation (WHO) has published statistics on the prevalence and mortality rates of tuberculosis (TB) worldwide. The data shows a decline in prevalence since 1990, indicating a notable advancement in tuberculosis control.

    A 2013 study that was previously completed claims that there was an almost 40% decrease in TB-related deaths between 1990 and 2010. There has been a recent rise in the number of TB cases migrating from endemic to non-endemic parts of the world, despite major efforts to avoid TB infection. The TB control tactics were complicated by the rise in unemployment, poverty, AIDS infections, and drug resistance to anti-TB chemotherapy.

    Pathogenesis

    Other mycobacteria that cause tuberculosis in humans include Mycobacterium microti, Mycobacterium bovis, and Mycobacterium africanum. Mycobacterium is a slow-growing, careful aerobic bacterium. The majority of these microbes are destroyed. Very few are able to live and multiply in macrophages, triggering a type IV inflammatory response that leads to the development of granulomas. Bacteria in this granuloma have the ability to lie dormant for many years.

    The effectiveness of the immune response mediated by host cells determines whether an infection can be controlled or not. If there is insufficient immune response to the pathogen, mycobacterium may be able to escape from granuloma. An escaping mycobacterium can travel by hematogenous and lymphatic pathways to infect other organs, or it can create an active lung infection. Spinal involvement often occurs after hematogenous spread of infection from a source place. The genitourinary system or the lungs are the source of spinal involvement.

    Since the intervertebral disc does not have its own blood supply, the infection moves from the neighboring vertebra to that location. Through the venous or arterial channel, mycobacterium reaches the highly vascular cancellous bone of the vertebral body. When the infection spreads through the vascular plexus created by the arterial arcade made up of the posterior and anterior arteries, it causes parodialysis. Blood can flow freely via the valveless Batson’s paravertebral venous plexus system, albeit this is pressure-dependent.

    What are the causes of Pott’s Paraplegia?

    • Mycobacterium is a slow-growing, careful aerobic bacterium. The majority of these microbes are destroyed. Few are able to endure and multiply in macrophages, resulting in a type IV inflammatory response that gives rise to granulomas.
    • The degree of success of the host cell-mediated immune response determines whether an infection heals or not. If there is insufficient immune response to the pathogen, Mycobacterium may be able to escape from granuloma. An escaping mycobacterium can travel through hematogenous and lymphatic pathways to other organs, or it can create an active lung infection. Spinal involvement usually follows the hematogenous spread of infection from a primary site. The genitourinary system or the lungs is when spinal involvement begins.
    • The infection spreads from the vertebra proximal to the intervertebral disc to that location since it does not have its own blood supply. Mycobacterium enters the vertebral body’s highly vascular cancellous bone through the venous or arterial channel. When infection spreads through the vascular plexus created by the arterial arcade produced by the posterior and anterior arteries, it results in parodiasal involvement. The unrestricted flow of blood via Batson’s paravertebral venous plexus system is dependent on pressure and is made possible by a valveless system.

    What are the symptoms of Pott’s paraplegia?

    Pott’s Paraplegia
    Pott’s Paraplegia
    • While there are a number of early indicators of tuberculosis, such as fever, weight loss, and night sweats, the disease can also cause significant back pain, which can make it difficult for the patient to walk and stand. Although the most prevalent symptom of Pott’s disease is severe back pain, other systemic symptoms like anorexia, fever, exhaustion, night sweats, weight loss, etc. are also frequently observed.
    • Leg weakness or numbness could be caused by the infected site’s swelling. Patients with complex tubercular spine disease may exhibit deformity, instability, and pain at rest, and sometimes the primary symptom is radicular pain. A neurologic deficit is not very prevalent in Pott’s paraplegia, and the incidence varies widely depending on the stage of the disease. Therefore, paralysis of the limbs and a considerable curvature of the spine are possible outcomes of Pott’s sickness. Direct pressure from the formation of an abscess and bone sequestra may result in spinal cord involvement in Pott’s sickness.
    • The main clinical features include spine abnormalities, neurological impairments, tenderness, and spasms. The patient also had sensory deficiencies, paraplegia, and nerve root pain. He even reported having trouble breathing, having trouble carrying out everyday tasks, and having bowel and bladder incontinence.
    • There may be some neurological deficiency during or after the healing phase of active Pott’s paraplegia. The anterior spinal tract would get involved as a result of the TB-related vertebral collapse. Later, the lateral spinal pathways gradually become involved after the absence of the posterior column. The modified Tuli classification is the most helpful classification for Pott paraplegia with spinal cord involvement. When motor fibers are not positioned identically, as in the case of anterior spinal TB or typical Pott’s paraplegia, they are initially crushed. Consequently, the sensory fibers are only subsequently implicated.
    • It appears dubious that Bosworth et al. claimed that a substance in the tubercular pus inhibits appropriate spinal cord conductivity. Regardless of whether anterior or posterior spinal TB is the cause of Pott’s illness, the degree of motor involvement that determines the degree of cord compression should be the primary criterion for classification. Motor recovery follows sensory recovery.
    • At initial observation, an intraspinal tuberculous granuloma frequently presents with compressive myelopathy or a cauda equina lesion involving the sphincter. Since there is no obvious clinical spinal deformity, they are diagnosed with “spinal tumor syndrome,” which comprises both tumorous and non-tumorous diseases of the spinal cord and meninges.

    Classification of Pott’s paraplegia:

    • Negligible: oblivious of neurological deficiency.
    • Mild: aware of the deficit but able to walk with assistance; the doctor finds plantar extensor or ankle clonus.
    • Moderate: nonambulatory paralysis with a 50% sensory deficiency in extension.
    • Severe: 3+flexor spasm/flexional paralysis/flaccidity, sensory impairment greater than 50% sphincter involvement.

    What is the diagnostic procedure for Pott’s paraplegia?

    The gold standard for diagnosing tuberculosis is mycobacterium culture; however, because this bacteria is meticulous, relying only on positive cultures for diagnosis may not be very sensitive. Additional laboratory reference standards, including hematological, immunological, microbiological, serological, and other diagnostic investigations, should be used to confirm the diagnosis. The most common method for diagnosing cold abscesses with ultrasound is MRI. Myelography plays a critical part in the diagnosis of patients who do not heal neurologically and in determining which of several skipped multifocal spinal lesions is compressing a patient.

    Imaging modalities:

    • Radiography
      It was originally recommended to use plain radiographs as an imaging modality for Pott’s illness. Conventional lateral radiographs are used as a first-stage diagnostic tool to check for tuberculosis infection. Usually, diffuse osteopenia and osteolysis involving the entire vertebral body are shown on these radiographs.
    • CT (Computerised Tomography) scan
      Computed tomography (CT) is a highly sensitive diagnostic tool that can assist far earlier than standard X-rays (100%). When Pott’s disease is present, computed tomography (CT) is a useful and often-used diagnostic technique that can clearly show the extent of soft tissue involvement. CT scans can also be used in conjunction with image-guided biopsies to aid in the diagnosing process.
    • Magnetic Resonance Imaging.
      MRI is the most effective method of identifying the abscess site, the level of soft tissue enhancement, and spinal canal damage. In cold abscesses, MRI can also show the number of lesions and where they are located. T2 STIR pictures could guarantee the early diagnosis of inflammatory edema.
    • Nuclear imaging
      Descriptive evidence of the activity in the affected tissues can be obtained using nuclear imaging.
    • Laboratory tests
      There are several limitations to the serological tests. Antibody test results for IgG and IgM cannot distinguish between a person who has recovered from a natural tuberculosis infection and those who have been vaccinated against the disease. BACTEC test, Acid-fast Bacilli Staining, and Traditional TB Culture are a few common laboratory procedures. A reliable diagnosis can be obtained by isolating Mycobacterium tuberculosis by open surgical surgery or needle biopsy guided by computed tomography (CT). Hematoxylin-eosin staining of normal acid-fast bacilli is difficult to show in cases undergoing anti-TB treatment prior to surgery, and TB cultures usually have negative results in these cases. Formalin-fixed and paraffin-embedded tissue specimen blocks often exhibit a granulomatous pattern with caseating necrosis and giant-cell granuloma upon histological analysis.
    • Molecular  diagnosis
      Numerous molecular approaches are employed to achieve excellent sensitivity and specificity in diagnosis. A 75% sensitive and 97% specific polymerase chain reaction (PCR) is used to diagnose paucibacillary extrapulmonary tuberculosis infections. High sensitivity and specificity fully automated Gene Xpert MTB/RIF aid in the identification of antibiotic resistance. Histopathological tests reveal particular characteristics such as Langhans big cells, epithelioid cell granuloma, and caseating necrosis in 72% to 97% of patients.
    • Tests to detect latent tuberculosis
      Although the skin hypersensitivity test has been promoted as an inexpensive diagnostic, people with impaired immune systems should not use it.

    Treatment

    • Prior to beginning Pott’s paraplegia treatment, it’s critical to assess the spinal TB disease’s severity based on presentation and symptoms. Chemotherapy or antitubercular therapy is used to treat uncomplicated cases of the disease, but chemotherapy and surgery are typically required for complex cases. There are many different kinds of surgical procedures accessible.
    • The modified Tuli classification, which consists of five stages, is the most helpful classification for Pott paraplegia with spinal cord involvement. Ankle clonus, plantar or Babinski extensor, and strong tendon reflexes are all present in the first stage. The patient has spasticity and a motor impairment (UMN-type) during the second stage. Stage three sees the patient becoming bedridden and spastic. In the fourth stage, the patient develops pressure sores and a significant sensory impairment, rendering them bedridden.
    • Pott’s paraplegia, which was derived from clinical and radiological state, was categorized into three groups (IA/B, II, and III). A new classification method that is easily adjusted based on the GATA system was introduced by M. Turgut et al. (2017). For aspiring spine surgeons, the updated method serves as a straightforward reference for treatment strategies for patients with Pott’s disease.

    Medical treatment for Pott’s paraplegia:

    The majority of antituberculous medications enter tuberculous spinal abrasions with ease. The assessment of antituberculosis medications, including pyrazinamide, isoniazid, and rifampin, was conducted on the vertebral tissues associated with spinal tuberculosis.

    The lowest inhibitory concentrations of pyrazinamide and rifampin, respectively, were matched by the levels of these drugs in foci. One factor preventing the antituberculosis medication from penetrating the affected vertebra was its sclerotic bone. The result suggested that during the procedure, osseous tissues 4 mm surrounding the sclerotic wall should be removed.

    Antituberculous treatment:

    • The majority of patients (82–95%) with spinal TB respond extremely effectively to medical treatment, according to several studies. Pain relief, a reduction in neurological deficiency, and even the correction of spinal deformity are all clear signs of the treatment’s effectiveness.
    • Medical treatment is well-received by patients with potentially serious craniovertebral junction TB. Before surgery is scheduled, patients with medically resistant spinal TB need to have their differential diagnosis carefully reevaluated.

    Therapeutic regimen:

    • The World Health Organisation (WHO) supports treating tuberculosis depending on categories. Under the WHO treatment categorization, spinal TB falls under the category. There are two phases to the category-1 antituberculosis treatment program: the first, or intensive phase, and the continuation phase. Four first-line medications are used in conjunction during the 2-month intense phase of antituberculous therapy: isoniazid, rifampicin, streptomycin, and pyrazinamide.
    • The World Health Organisation recommends nine months of treatment for tuberculosis of the bones or joints due to the significant risk of disability and mortality as well as the challenges in evaluating treatment response.
    • For adults with spinal TB, the American Thoracic Society advised chemotherapy for six months, and for children, for twelve months.
    • Regardless of age, the British Thoracic Society recommends a 6-month course of daily treatment consisting of rifampicin and isoniazid, augmented in the first two months by pyrazinamide and either ethambutol or streptomycin.
    • Even if six months of treatment is thought to be adequate, many specialists still recommend waiting 12 to 24 months, or until pathological or radiological evidence of disease regression is obtained. Short-term regimens and directly observed treatment may be used to prevent low compliance. With the exception of spinal arachnoiditis and spinal TB, corticosteroids have no specific function in spinal tuberculosis.

    Supportive measures:

    • Nowadays, ambulatory care which does not require prolonged recumbency and rest cures most patients with bone TB. Immobilization with a cast or brace was common, however it was eventually proven to be ineffective and was typically dropped.

    Surgical Treatment for Pott’s Paraplegia:

    • It promoted conservative care with chemotherapy that included many drugs and surgery that were saved for certain conditions.
    • Nonetheless, in certain cases, surgery seems helpful and may be necessary. Fast pain alleviation, less kyphosis, instant reduction in symptoms of compressed neural tissue, a larger percentage of bony fusion, faster bony fusion, less recurrence, early return to prior normal. If fusion does not take place, it may also prevent neurological issues that arise later on due to spinal kyphosis. Pan-vertebral injury, severe kyphosis, refractory disease, a developing neurological deficit, and clinical worsening or less clinical improvement, according to one expert, should be considered reasons for surgery.
    • There is no attempt made to stabilize the spine during this kind of surgery. Debridement with spinal stabilization is the second procedure. This is a more involved procedure, and bone grafts are used in the reconstructions. Fabricated materials such as titanium, steel, or carbon fiber can also be used for stabilization.
    • Following substantial posterior decompression instrumented fusion and three-level posterior vertebral column resection, anterior debridement fusion with cage reconstruction is the surgical course of treatment.
    • Early detection and prompt, wise surgical intervention are essential for successful treatment; the choice of surgery must be made with consideration for the patient’s age, and the antitubercular therapy’s response.

    Physical Therapy Treatment for Pott’s Paraplegia:

    The goals of treatment are to cure the illness and to avoid and identify any complications, such as paraplegia, as soon as possible.

    Rest: Administer bed rest to alleviate pain and prevent more vertebral collapse and dislocation.

    Taylor’s brace
    Taylor’s brace

    Orthoses of the spine:

    • Taylor’s brace,
    • Collar, and
    • Minerva jacket.

    Early therapy is the most crucial component of the SCI rehabilitation approach. Positioning the patient during the acute period and initiating passive, active-assisted, and active workouts early on will significantly help the patient stand up sooner and become more mobile. For these patients, standing and mobilization are not advised during the acute phase. Bracing with a conforming orthosis in conjunction with antituberculous medications has been utilized as an initial treatment for patients with spinal tuberculosis. Three months following the initial radiologic indication of bone fusion, bracing is maintained.

    Early on in exercise programs, any pain that appears or becomes more intense should be closely monitored. Exercises that exacerbate pain should be avoided, and the program should be stopped if the patient has a marked increase in pain after completing the rehabilitation program. Exercise and mobilization should not wear the patient out, and they should have enough time to relax afterward. Since metabolic needs rise during illness and the rehabilitation phase, high-calorie meal plans should be implemented.

    The patient’s neurologic state is taken into consideration when designing the rehabilitation program. For this reason, prior to program execution, the levels at which spinal cord damage may occur and the segments implicated are identified. Establishing a realistic and optimal rehabilitation program requires determining the region in which the lesion affects the patient’s age, concomitant diseases, urologic and neurologic status, type of paralysis, and involved area after a thorough physical and neurologic assessment.

    Patients should be regularly watched after this examination to ensure proper bed hygiene, posture, and positioning during the early stages of recovery. The kind of surgical procedure used and the existence of instability are critical factors in the execution of a rehabilitation program. The prevention and monitoring of musculoskeletal issues and subsequent problems resulting from immobilization is recommended.

    There are differences in the rehabilitation approach for individuals with significant neurologic abnormalities due to spinal cord compression based on their acute, subacute, and chronic stages. Even in cases when a paravertebral abscess has compressed the spinal cord, medical treatment should be tried first in cases of spinal infections. Nevertheless, when there is neurologic involvement, both surgery and medication are required.

    List of problems and physical therapy techniques:

    • Pain: Bilateral lower limb tenses were applied, along with frequent positioning and ergonomic guidance.
    • Sensory deficiencies: Both lower limbs received sensory reeducation.
    • Reduced Strength: For weak muscles, active range of motion and mildly resistant exercise training were administered.
    • Issues with the respiratory system: Exercises for breathing, thoracic expansion, and autogenic drainage were imparted.

    Acute stage

    Determining the patient’s physical capacity is the most crucial component in determining how long acute rehabilitation will take. Muscle weakness in the lower, upper extremity, and trunk muscles might be observed in varied degrees depending on the severity of the infection. During the acute phase of flaccidity, it is crucial to perform breathing exercises, passive joint movements, and bed placement in appropriate dermatomal areas. Exercises that are isometric, passive, active-assisted, and active are used to increase muscular function. To help prevent contractures, this should be done at least once a day.

    Given that contractures are most commonly seen in the shoulder, elbow, hip flexors, and ankles in the acute rehabilitation unit, these joints are the most crucial to the range of motion. The treatment of the colon, bladder, and lungs, deep vein thrombosis, gastrointestinal prophylaxis, and appropriate bed placement with rotating at least every two hours are the most crucial elements during the acute phase. The feet should be supported in a neutral position, and the trunk and extremities should be positioned correctly. Respiratory exercises are recommended if the thoracic vertebrae are affected by the spinal disease.

    Every two hours, the patient is rotated from one side to the other while in the supine position to relieve pressure, and they are continuously checked for the development of erythema. By rotating from one side to the other, the patient is helped to become mobile within the bed. The lumbar, thoracic, and sacrospinal muscles are isometrically compressed in the direction of the bed in order to maintain an isometric contraction. Bilateral gluteal muscles are flexed and relaxed, while the pelvic muscular group is isometrically constricted.

    Subacute stage

    The time when patients are ambulating outside of bed is known as the subacute period. The goal of mobilization is to have the patient back out of bed by then using a walker or crutches, depending on the extent of the infected area. workouts on the side of the mattress must be performed actively, as well as bearing and quadriceps workouts.

    In the subacute phase, workouts are done both actively and with assistance. With the feet straight up, the bilateral quadriceps muscles are lifted by about 20 cm, which contracts the hip flexors and lumbar extensors. Using the corset, the patient is assisted in sitting on the bed, either supported or unsupported. This position is used to perform balance exercises. A walker or cane is used to help the patient walk. You can repeat mobilization up to 3 or 4 times a day. When indicators of exhaustion appear, the patient should go to rest. Following the patient’s successful independent mobilization, the assistive equipment is removed.

    The patient needs to drink plenty of water, stay constantly mobile, and have a urine infection checked out at specific intervals. High-fiber meals should be given to the patient in order to avoid constipation, which could be a serious issue. To encourage feces, the patient should be brought to the toilet once or twice a day. All upper extremity joints should get active strengthening activities if the upper extremities are preserved.

    Chronic stage

    The phrase “chronic period” refers to the time when a patient resumes his prior life and achieves maximum independence. Patients should not be near beds for this reason. It is important to provide mobilization with either independent or no support. Active and resistive activities should be included in lying down, sitting, and standing exercises. Lifting-related exercises such as squatting, sitting on the ground, and climbing stairs should be performed.

    Exercises include forward flexion-extension, backward, and sideways stepping, as well as neutral position exercises, which are done in a standing position. Dorsal and abdominal muscles are strengthened by the use of cat and camel stretching exercises.

    Patients with paraplegia may experience special health issues called decubitus ulcers. individuals with spinal cord compression may experience depression; consequently, psychological help should be given to these individuals.

    Home exercise program

    A capacity-based home exercise program ought to be created in a language that the patient can comprehend. To enable patients to return home after rehabilitation, a home evaluation is a crucial step in the process. The bedroom, kitchen, bathroom, and entryways are the primary areas of concern in the home evaluation, along with general safety concerns.

    To ensure patient independence, the patient’s home environment (toilet, bathroom, bedroom, hallway, etc.) should undergo the greatest amount of ergonomic modifications. Regular evaluations of patients’ overall status and check-ups are necessary. When the patient is close to being able to resume employment, specific recommendations should be made to help with everyday life activities.

    Following the conclusion of the hospital’s rehabilitation program, the patient is sent home with an exercise regimen and scheduled follow-up visits. Hand and wrist joint exercises, complete abduction, extension, and flexion exercises for the abdominal, sacrospinal, iliopsoas, gluteus maximus, gluteus minimus, hamstring, and quadriceps muscles, and resistive exercises for the oblique abdominal muscles are advised to be done at home in addition to the exercises done during the subacute and chronic stages.

    There are exercises that improve breathing capacity. Exercises for cardiovascular endurance are recommended following the complete healing of the vertebrae. The existence of neurological findings led to the recommendation of a rehabilitation program. During the follow-up appointments, a neurologic examination and laboratory testing are performed. In addition to infectious infections, pulmonary disorders are treated using a multidisciplinary follow-up program.

    When we examined motor scores for lower limbs and modified Barthel index (MBI), we found significant improvements in the discharge scores of the patients with tuberculosis and brucella following their admission to the hospital. Patients in the program reported minimal pain and an improvement in their ability to carry out their daily tasks by the end of the rehabilitation.
    Degenerative modifications at the pathologic disc space were observed to be smaller than expected in all patients’ final radiological tests. After Yen et al. assessed MBI, they found that patients’ discharge ratings significantly improved in comparison to their admission scores. In terms of the lower limb motor scores, they also discovered a noteworthy improvement in the discharge ratings of the same individuals.

    What are the complications of Pott’s paraplegia?

    A specific amount of time is spent in bed for patients with spinal infections; this time is extended for those with neurologic impairments or those who were advised to have surgery. These patients need to be thoroughly monitored for any problems and given the appropriate care. Morbidity and mortality are increased when problems like depression, osteoporosis, spasticity, contractures, decubitus ulcers, lung infections, hypertension, hypotension, deep vein thrombosis, urine retention, and infections are not identified and treated. The prolonged length of immobilization results in a higher frequency of complications and a delayed response to treatment.

    Conclusion:

    Anyone who can treat tuberculosis may also treat spinal tuberculosis. While the treating surgeon assumes the majority of the patient care responsibility, the contributions of health service professionals at all levels are critical to the management of Pott’s paraplegia.

    Orthopedic surgeons are usually needed when there is a neurological defect or impairment. The next specific step is to assess the effects of the disease and make an informed decision about whether surgery and long-term treatment are required. The challenges of long-term chemotherapy management, including drug side effects and consequences, noncompliance issues, socioeconomic factors, and others, are also crucial.

    FAQs

    Can a TB paralysis be healed?

    It can lessen impairment and reverse paralysis. For most patients, a combination of conservative care and surgical decompression results in success.

    What is the duration of paraplegia?

    Some persons may be able to regain some function up to eighteen months following their accident. Many, however, will suffer from a permanent loss of function necessitating long-term care.

    What is TB spine late-onset paraplegia?

    A well-known condition in old-healed spinal TB is late-onset paraplegia, which can be caused by a bony ridge transposing the cord or by fibrous tissue or granulation constricting the chord.

    Can Pott’s disease be cured?

    Pott’s illness can be managed with surgery or a strict drug regimen. Pott’s Disease is caused by long-term neglect; on the other hand, a protracted drug regimen is usually required to completely cure the disease.

    What is the prognosis for Pott’s disease?

    Antitubercular therapy is an effective treatment for Pott’s disease. Neurological impairments and pain improvement are markers of treatment response. All patients have a fair prognosis; however, if progress is not maintained, another differential diagnosis needs to be made.

    How long does spinal tuberculosis last?

    Spinal tuberculosis progresses slowly and stealthily. The average length of the disease ranges from 4 to 11 months, while the overall duration of the illness varies from a few months to a few years. Patients typically only consult a doctor when they have a noticeable deformity, excruciating pain, or neurological issues.

    Is Pott’s disease a serious one?

    Since Pott disease can induce bone loss, deformity, and paraplegia, it is the most serious type of musculoskeletal TB. Most frequently, the thoracic and lumbosacral spines are affected by Pott illness. Published series have, nevertheless, demonstrated some variance.

    Can TB in the spine result in paraplegia?

    In the active stage of spinal TB, early-onset paraplegia occurs and necessitates therapy. This kind of paraplegia is more common in adults with Pott’s spine and has a better prognosis.

    References

    • Mehta, Y. (2022b, December 14). Pott’s Paraplegia – Cause, Symptoms, Treatment, Exercise. Samarpan Physiotherapy Clinic. https://samarpanphysioclinic.com/potts-paraplegia/
    • Ahmed, N., Khan, M. S. I., & Ahsan, M. K. (2022). Pott’s Paraplegia. In IntechOpen eBooks. https://doi.org/10.5772/intechopen.107851
  • Recurrent Shoulder Dislocation

    Recurrent Shoulder Dislocation

    Introduction

    Recurrent shoulder dislocation is a disease that develops when the glenohumeral joint, or shoulder joint, dislocates frequently. Being one of the most moving joints in the human body, the shoulder is among the most susceptible to dislocation. Shoulder instability, also known as recurrent shoulder dislocations, is the state in which the dislocations become recurring. Such unstable shoulders typically have shallower shoulder joints with a wider diameter than the socket.

    A recurrent shoulder dislocation may result from:

    • The front of the socket is prone to anterior dislocation.
    • Posterior Dislocation is the socket behind it.
    • The inferior dislocation socket is located below.

    Because the shoulder joint is inherently unstable, the glenoid labrum, muscles, and tendons work together to hold it in place. A severe trauma may result in a dislocated joint. Osteoarthritis can result from a recurrent shoulder dislocation, which is far more likely to occur again after one incidence. Eventually, the shoulder may dislocate even during routine activities. This will happen more frequently. Two types of treatment are available: Latarjet repair (a bone block) or Bankart repair (arthroscopic surgery to repair the labrum and restore capsule tension).

    Relevant Anatomy

    • Human shoulders are some of the most dynamic and vulnerable joints. It allows the humerus to articulate against the shoulder blade’s glenoid rim: glenohumeral ligaments and the glenoid labrum, a fibrous ring of tissue, supply stability.
    • The glenoid labrum separates from the glenoid and loses some of its stabilizing power when the shoulder dislocates. Moreover, the bone on the humerus head and shoulder blade degrades with each full or partial dislocation of the joint.
    • The two bones lose contact and the joint becomes more and more unstable. This is the reason why the dislocation keeps happening. We call it recurring dislocation.

    What is Recurrent Shoulder Dislocation?

    • Recurrent shoulder dislocation occurs whenever the glenohumeral joint, or shoulder joint, repeatedly dislocates. The shoulder joint is very dynamic in the human body, which makes it especially fragile to displacement.
    • In contrast to posterior dislocations, anterior shoulder dislocations take place more frequently. In addition to repetitive strain from specific sports or hobbies, traumatic events like falling onto an outstretched arm can result in shoulder dislocations. The most common indication when a shoulder is dislocated is pain. The intensity of the pain may vary depending on whether the dislocation was immediate or progressive.
    • When the humerus’ head is outside of the shoulder joint, it is called a dislocated shoulder. Out of all the joints in the body, the shoulder is the least stable and most flexible. Consequently, it is the joint that is most vulnerable to dislocations or subluxations. After the first dislocation, the shoulder tends to dislocate or subluxate more frequently in a percentage of these patients. Patients are considered to have an unstable shoulder or shoulder instability if they have a propensity for recurrent dislocation or subluxation.

    Epidemiology

    • Recurrence after the first dislocation of the shoulder is more than 90% likely. This is particularly true for youth under the age of twenty. This is because a dislocated shoulder involves more than just a joint injury. It is damage to soft tissues like tendons and ligaments as well as the surrounding muscle. These muscles and tissues work together to keep the joint firm. The shoulder joint becomes weaker when a dislocated shoulder causes these soft tissues to be ripped or injured. Additionally, it might dislocate once again.
    • However, recurring shoulder dislocations are less common in older adults, particularly in those 50 years of age or later. When it occurs, a ruptured ligament at the rotator cuff at the top of the shoulder usually coexists with it. This is due to the gradual degeneration of our soft connective tissues with aging. Our ligaments and tendons are therefore more prone to tearing.

    What are the Types of Recurrent Shoulder Dislocation?

    Three primary types can be used to categorize recurrent shoulder dislocation.

    1. Anterior Dislocation
    2. Posterior  Dislocation
    3. Inferior Dislocation

    Anterior (forward) Dislocation of the Shoulder Joint:

    • The humerus is displaced anteriorly in more than 95% of shoulder joint dislocations. In the majority of cases, a sub-coracoid dislocation occurs when the humerus’ head rests beneath the coracoid process. Dislocations of the subglenoid, subclavicular, and, extremely infrequently, intrathoracic or retroperitoneal regions can also happen.
    • An outstretched arm is typically struck directly or falls on it, resulting in an anterior dislocation. Usually, the patient retains his or her arm slightly abducted and externally rotated.
    • Lesion of Hill-Sachs. An impaction of the humeral head caused by the glenoid rim during dislocation is known as a Hill-Sachs deformity.
    • An injury to the axillary nerve results in weakening or palsy of the deltoid muscle. Unilateral deltoid atrophies result in the loss of the shoulder’s typical rounded shape.

    Posterior (backward) Shoulder Dislocation:

    • Periodically electrical shocks generate convulsions or muscular spasms that lead to posterior dislocations. They could be caused by an imbalance in the rotator cuff muscles’ strength. Patients usually arrive with their arms held internally rotated and adducted, and they usually have a large coracoid process and anterior shoulder flattening.
    • Unrecognized posterior dislocations can occur, particularly in patients who are unconscious from trauma or who are elderly. In a group of forty patients, the mean time between damage and diagnosis was one year.

    Inferior (downward) Shoulder Dislocation  :

    • An inferior dislocation of the shoulder following a car collision. Observe the way the humerus is taken off. There is also a greater tuberosity fracture present.
    • The least typical kind, inferior dislocation, appears in just over one percent of cases. The name “luxation erect” refers to another situation in which the arm seems to be held behind the head or upward all the time.
    • The humeral head is pressed onto the acromion simply because of the arm’s hyperabduction. Due to the increased likelihood of vascular, neurological, tendon, and ligament injuries resulting from this mode of injury, such injuries have a high prevalence of complications.

    What might be the cause of Recurrent Shoulder Dislocations?

    Recurrent shoulder dislocation may arise from a variety of causes, the entire extent of which is unknown. Although there are numerous additional reasons why shoulder dislocations occur repeatedly, surgery performed on the same shoulder following an injury is the most frequent cause. The causes of recurrent shoulder dislocation might be traumatic or nontraumatic. A shoulder might become unstable for three primary, prevalent reasons:

    Past History of Shoulder Dislocation

    • Trauma or damage that occurs suddenly tends to cause the first dislocation of the shoulder.
    • When the head of the humerus dislocation occurs, the shoulder ligaments and the glenoid, are also sometimes affected.
    • The labrum, which is the band of cartilage around the glenoid, may also be bursting. The majority of the time, we define it as a Bankart lesion.
    • A significant initial dislocation may result in further dislocations, collapse, or instability.

    Repeated Strain

    • Nearly all individuals who have chronic instability in their shoulders have not previously experienced a shoulder dislocation. The majority of these patients’ shoulder ligaments are more loosened.
    • Sometimes this enhanced looseness is just a natural feature of their anatomy. It can occasionally be caused by frequent overhead motion.
    • Activities like swimming, volleyball, and tennis demand a lot of overhead shoulder motion, which can strain the shoulder ligaments. Moreover, a lot of jobs call for overhead repetition.
    • Shoulder stability might be difficult to maintain due to looser ligaments. Activities that are unpleasant or repetitive might put a strain on a weak shoulder. An uncomfortable and unsteady shoulder may arise from this.

    Multi-directional Instability

    • Shoulder instability can occur in a small percentage of individuals even in the absence of past injuries or repetitive strains.
    • Patients with this condition may experience a dislocated shoulder that feels loose and can dislocate out of the front, back, or bottom of the shoulder. We call this multidirectional instability.
    • These individuals may be “double-jointed,” with naturally loose ligaments throughout the body.

    What indicators are present with Recurrent Shoulder Dislocations?

    • Sometimes, there is significant pain that extends past the shoulder along the arm.
    • The shoulder sounds like it’s falling out of the joint when doing abduction and external rotation.
    • An external rotation and rotation of the shoulder and arm characterize an anterior dislocation, whereas an adduction and internal rotation constitute a posterior dislocation.
    • Tingling and numbness in the arm.
    • Visually misplaced shoulder. A dislocated shoulder might give the appearance of being unusually square.
    • There is not a noticeable bone on the shoulder’s side.

    How is a Recurrent Shoulder Dislocation treated?

    • The symptoms are usually used to make the diagnosis, which is then verified by X-rays.
    • The diagnosis of recurrent shoulder dislocation is often depending on the patient’s medical history and physical examination.
    • The diagnosis is verified using radiographs. Radiographs displaying glenohumeral joint inconsistency often show the majority of dislocations. While they may be difficult to spot on typical AP radiographs, posterior dislocations are easier to spot on alternative views.
    • Radiographs are typically taken again after reduction to ensure that the reduction was successful and to look for bone damage.
    • To evaluate soft tissue damage following recurrent shoulder dislocations, an MRI scan may be performed.
    • The apprehension test (anterior instability) and sulcus sign (inferior instability) are helpful tools for assessing susceptibility to subsequent dislocation in cases of recurrent dislocations.

    How is a Recurrent Shoulder Dislocation treated?

    Recurrent shoulder dislocations can be treated in two main ways:

    1. Non-Surgical Treatment
    2. Surgical Treatment

    Non-Surgical Treatment

    • Typically, a splint or sling has been employed to preserve the shoulder in a particular posture. Arrange a soft cushion between the arm and the torso to give support as well as comfort. To relieve the pain and anxiety associated with a dislocation, powerful painkillers are required.
    • Initially, the doctors would attempt to address this disease with non-surgical measures; if they failed to improve the shoulder’s pain and instability, they would next consider surgery.

    Surgical Treatment

    When non-surgical treatment fails to relieve discomfort and shoulder instability, doctors turn to surgical intervention. In certain situations, surgery may be recommended to repair the torn and injured ligaments that stabilize the shoulder joint. The surgeons may choose to use one of the two techniques listed below.

    Arthroscopy or key-hole surgery

    This kind of procedure is typically performed same-day or as an outpatient. The doctors create tiny incisions close to the shoulder during this minimally invasive procedure. The process of mending the soft tissues with tiny devices is then carried out while a tiny camera views the shoulder. Relapse after arthroscopic surgery is 5%, which is extremely unusual with a bone block. The patient will require open surgery if it occurs.

    Open Surgery

    For certain patients, the surgeons may advise open surgery because of several reasons. During this procedure, a big incision will be made across the shoulder, and the surgeon will do surgery and direct tissue restoration. In modern treatment, open surgery is only necessary when a bone graft is required to repair the lost shoulder bone; bone reconstruction procedures can now be completed arthroscopically.

    Post SurgeryCare

    After surgery, it could be important to provide temporary assistance to the patient’s shoulder with a sling. The physical therapist and doctor might suggest exercises to strengthen the ligaments after the sling is taken off. Rehabilitation will aid in enhancing the shoulder’s range of motion and avoiding scarring during the healing process. The physician will also suggest shoulder muscle-strengthening activities.

    Complication

    • Nerve Damage: Although uncommon, this is a dangerous complication. Because the surgeon is repairing so near to the brachial plexus the bundle of nerves supplying the arm runs the risk of injuring a nerve, which could result in momentary loss of sensations, movement, or sensation of having pins and needles.
    • Complications consist of Bankart lesions, Hill-Sachs lesions, rotator cuff tears, and axillary nerve injury.

    What is physical therapy for the Recurrent Shoulder Dislocation?

    • Shoulder dislocations Physical therapy is an important part of recovery following a shoulder dislocation or subluxation. It helps to:
    • Strengthening activities that could be included in a rehabilitation program for a dislocated shoulder.
    • As soon as the discomfort permits, an anterior dislocated shoulder strengthening program can be started. As this is the shoulder posture most likely to dislocate again, the athlete must avoid early motions that abduct and laterally rotate the shoulder.
    • Static exercises that don’t require any movement should be done first and increased progressively.

    Common physical therapy exercises for shoulder dislocation include the following:

    • Pendulum exercises entail gently circularly swinging your arm to improve range of motion.
    • Range of motion exercises helps increase shoulder flexibility and mobility by progressively rotating the joint in all directions.
    • Strengthening exercises focus on shoulder muscles, such as the rotator cuff.
    • Proprioception exercises increase your body’s ability to locate your shoulder joint in space.

    The following exercises are suggested by physical therapists:

    • Isometric shoulder external rotation: With your affected arm out in front of you, bend it to a 90-degree angle and press the back of your hand up against the wall.
    • Shoulders External rotation: Using both hands, grasp an exercise band, pull it apart until you feel a stretch, and then slowly go back to the beginning position.
    • Shoulder blades Squeeze: Squeeze your shoulder blades as if you were holding something on your back, and hold the position for ten seconds while standing or sitting up straight.
    • Isometric shoulder flexion wall: Place your arm against a wall while standing facing it, then hold the contraction.

    Listen to your physical therapist’s directions to the entirety to promote a speedy recovery. Regular physical treatment is required for a successful recovery. Attempt to attend all of your appointments. Working closely with a physical therapist can help you restore your shoulder function and prevent the risk of future dislocations.

    What are the prevention for the Recurrent Shoulder Dislocation?

    Recurrent shoulder dislocations are prevented with a mix of lifestyle changes, exercises, and medical interventions. Here are a few effective approaches:

    • Reduce your involvement in contact sports and overhead throwing, as well as other activities that put undue strain on the shoulder joint.
    • Maintain a healthy weight: Excess weight can cause additional strain on the shoulder joint.
    • To avoid putting excessive strain on your shoulders, lift large objects with good form.
    • Strengthen the rotator cuff muscles, which serve to support the shoulder joint. External rotations, internal rotations, and side-lying external rotations are all exercises that can help strengthen them.
    • In some circumstances, using a brace or sling can help keep the shoulder from dislocating.

    FAQs

    What leads to recurrent dislocation of the shoulder?

    The risk factors for shoulder dislocation are weak shoulder muscles, loose ligaments, and shallow joint sockets. Previous dislocation: Shoulder dislocations increase the likelihood of subsequent dislocations by stretching and tearing the muscles and ligaments holding the shoulder in place.

    How can a recurrent shoulder dislocation be treated?

    Patients who experience recurrent shoulder dislocations may be eligible for surgery to repair damaged or strained ligaments, which will improve the ligaments’ ability to stabilize the shoulder joint. It is possible to surgically correct bankart lesions. Anchors are used to sew the ligament back over the bone.

    References

    • Recurrent shoulder dislocation, recurrent pain. (n.d.). https://www.samitivejhospitals.com/article/detail/recurrent-shoulder-dislocation-recurrent-pain
    • Recurrent Shoulder Dislocation – Docteur Bruno Lévy. (2023, March 13). Docteur Bruno Lévy. https://docteurbrunolevy.com/en/chirurgie/recurrent-shoulder-dislocation/
    • Physiotherapist, N. P.-. (2023, July 22). Recurrent shoulder dislocation: Cause, Symptom, Treatment. Mobile Physiotherapy Clinic. https://mobilephysiotherapyclinic.in/recurrent-shoulder-dislocation/
    • Recurrent Shoulder Dislocation Bangalore | Shoulder Dislocation Treatment. (n.d.). https://www.orthobangalore.com/recurrent-dislocations
  • Gibbus Deformity

    Gibbus Deformity

    What is a Gibbus Deformity?

    Gibbus deformity is a spinal condition characterized by a sharp angulation or curvature of the spine, often resulting from a vertebral compression fracture.

    This deformity can be caused by several conditions such as trauma, tumors, or congenital defects, but it is most usually linked to Pott’s disease, also known as TB of the spine.

    The TB infection in Pott’s spine disease mostly affects the vertebral bodies, which results in bone loss. At that point, the spine bends suddenly forward as a result of the damaged vertebrae collapsing. The Gibbus deformity’s unusual hump-like appearance is caused by the angular deformity that results.

    When a person is viewed from the side, they frequently exhibit a prominent protuberance or conspicuousness in the mid-back region as a result of this disorder. Other possible reasons include osteoporosis-related fractures, congenital spinal anomalies, spinal trauma or injury, and certain genetic disorders influencing bone growth.

    The deformity results in an excessive forward curvature of the spine in the affected location when one or more vertebral bodies collapse or fuse together. As a result, the spine loses its proper alignment and the impacted vertebrae become compressed and distorted. Gibbus deformities can cause pain, limited mobility, and many cosmetic problems for those who have them.

    A thorough physical examination, a clinical history questionnaire, and imaging modalities such as X-rays, computed tomography (CT) scans, or attractive reverberation imaging (X-ray) are typically used to determine gibbous distortion. The hidden cause, the severity of the deformity, and any associated adverse effects all influence the treatment decisions. Tormenting the executives, non-invasive treatment, and the use of orthotic devices to support the spine are examples of moderate management. Surgery may be required in more severe cases for deformity repair and spine stabilization.

    Gibbus deformity patients need to work closely with orthopedic specialists and other medical professionals to determine the best course of therapy and handle any issues that may occur. Prompt mediation and appropriate management can help reduce suffering, enhance capacity, and improve the quality of life for persons affected by this condition.

    Pathology

    Gibbus deformity is essentially the result of tuberculosis’s damaging effects on the vertebral bodies.

    The following is a breakdown of the pathogenic process that leads to gibbus deformity:

    • Tuberculous Disease: Mycobacterium tuberculosis spreads hematogenously from the primary tuberculosis site elsewhere in the body to the spine in the early stages of tuberculous disease.
    • Vertebral Body Inclusion: The anterior portion of the vertebral body is the main region impacted by the TB infection, leading to necrosis and bone loss. The intervertebral circles and adjacent endplates are completely destroyed as a result of the pollution.
    • Granulation Tissue Formation: Incendiary cells, fibroblasts, and veins make up the granulation tissue that the body forms as a result of the illness. As a defensive mechanism, the granulation tissue tries to keep the infection under control.
    • Vertebral extinction: occurs when the vertebral body is destroyed, weakening its main integrity and causing the affected vertebra to break down. This collapse results in the angular deformity known as the gibbous deformity.
    • Stability of the Spine: As the vertebral bodies decompose, the affected spinal segment becomes less stable, which causes the deformity to gradually worsen. Neurological abnormalities could possibly arise from the collapse’s impact on the spinal cord or nerve roots.
    • Formation of a Paravertebral Abscess: Paravertebral abscesses result from the TB infection permeating the surrounding soft tissues as well as the vertebral bodies. These abscesses may necessitate cautious waste and can further exacerbate the deformity.

    If treatment is not received, the deformity known as Gibbs will eventually emerge due to the continuous collapse and destruction of several vertebral bodies. Severe pain, spinal instability, neurological deficiencies, cosmetic concerns, and neurological issues can all result from it.

    It is imperative to obtain a precise diagnosis and promptly administer the necessary medical treatment, such as antituberculous medication, in order to prevent the deformity’s growth and minimize its implications. Surgery may be necessary in certain cases to rectify the deformity, decompress neural tissues, and stabilize the spine.

    Types of Gibbus Deformity

    It is often associated with congenital kyphosis or spinal TB (sometimes called Pott’s disease). Some instances of gibbous malformations are as follows:

    • Gibbus Tuberculosis: The most common type of gibbus deformity is Gibbus TB, which is associated with Pott’s illness, sometimes referred to as spinal TB. It results from the destruction of the vertebral bodies caused by tuberculosis infection, which causes the spine to break down and become precisely deformed.
    • Gibbus during birth: Formative abnormalities of the spine result in inborn gibbous deformity, which is present from birth. It could be related to diseases like scoliosis or congenital kyphosis.
    • Gibbus Post-Traumatic: Serious spine traumas such as fractures or dislocations result in this type of gibbous deformity.
    • Gibbus neuromuscular: Disorders affecting the muscles and nerves that regulate the spine may be the cause of gibbous deformity. Weakness or imbalance in the back muscles can result in progressive curvature and the development of a gibbous.
    • Gibbus caused by injury: Iatrogenic gibbous deformities are Gibbus deformities that develop as a result of a medical operation or intervention. It may occur following spinal surgery, particularly in cases when there are issues with hardware malfunction, implant migration, or inadequate correction for the curvature of the spine.

    These are a few of the more common types of gibbous deformity, but it’s important to remember that every patient will have unique traits and underlying medical issues. Gibbus distortion therapy and the board of Gibbus distortion may involve clinical administration, propping, or cautious intervention, depending on the underlying cause, the severity of the deformation, and specific patient variables.

    Symptoms of Gibbus Deformity

    Possible reasons include spinal tuberculosis (Pott’s disease), trauma, and congenital abnormalities. The symptoms may vary depending on the gibbus deformity’s degree and underlying cause. Among the common symptoms are:

    • Back torment: The pain may be little or severe, and if you move or apply pressure to the region, it could get worse.
    • Mobility limitations: The deformity may hinder spinal growth and result in reduced flexibility in the affected region. This restriction may make daily tasks difficult as well as make it more difficult to rotate, bend, or twist the spine.
    • Breathing difficulties: In severe circumstances, gibbous malformation might impair the respiratory system’s normal function. The aberrant curvature may compress the lungs and chest cavity, which could lead to breathing difficulties, dyspnoea, and decreased lung capacity.
    • Neurological side effects: Should the deformity apply pressure on the spinal cord or nerve roots, neurological problems could ensue. These may include weakness, shaking, or deadness in the arms, legs, or other body parts where the nerves are affected.
    • Stiffness and fatigue: The limited range of motion and chronic pain associated with gibbus deformity can lead to fatigue and muscular weakening. This is particularly apparent in the back and core muscles.

    It’s important to remember that these side effects can vary depending on the specific cause and personal circumstances. For a diagnosis and the best course of action, you should consult a doctor as soon as possible if you have any of these symptoms or suspect that you may have gibbous deformity.

    Causes of Gibbus Deformity

    Gibbus deformity, sometimes called kyphotic deformity, is an abnormal curvature of the spine characterized by a severe angulation or hump-like protrusion in the upper back. There could be a multitude of underlying problems and causes involved. Gibbus deformity frequently results from the following causes:

    • M. tuberculosis: When a TB infection in the spine breaks down the vertebral bodies and the affected segments collapse, it might result in a gibbous deformity.
    • Birth abnormalities: Gibbus deformation may progress as a result of these conditions.
    • Osteoporosis: Severe osteoporosis can weaken the vertebral bodies. Gibbus deformity may arise from compression fractures, which are more prone to happen in the weaker vertebrae.
    • Trauma: Severe spinal trauma, such as fractures or dislocations, can result in a vertebral collapse and a gibbous deformity. Trauma-induced abnormalities may also arise from compression fractures caused by high-impact injuries or accidents.
    • Tumors: Both benign and malignant spinal tumors can compromise the structural integrity of the vertebral bodies. Gibbus deformation and spinal collapse can be triggered by the development of cancer.
    • Ankylosing spondylitis: Ankylosing spondylitis is a persistent inflammatory disease that drastically affects the spine. Over time, the inflammation can lead to the development of kyphotic deformities, such as gibbous deformity, ankylosis, or the fusing of the spinal joints.
    • Neuromuscular disorders: The neuromuscular ailments of muscular dystrophy and atrophy can cause the muscles supporting the spine to weaken and become unbalanced.
    • Mechanical factors and poor posture: Prolonged poor posture, especially severe slouching or forward bending of the spine, can progressively change the spinal alignment and play a role in the development of gibbous deformity. Spinal or muscular imbalances are examples of mechanical variables that may possibly be involved.

    It’s critical to keep in mind that the degree and underlying cause of gibbus deformity determine how the condition is treated and managed. Every situation requires a thorough medical assessment by a healthcare professional in order to decide on the best course of action.

    Diagnosis

    Gibbus deformity, sometimes referred to as kyphotic deformation or hunchback, refers to an atypical ebb and flow of the spine that causes the upper back to resemble a visible mound. There are two types of anomalies that might occur: congenital (existing from birth) and acquired (formed later in life). Gibbus deformity is usually diagnosed by a combination of imaging investigations, physical examination, and medical history. An overview of the demonstration cycle is provided below:

    1. Medical History: The physician should first obtain a complete medical history and ask about any symptoms, such as altered posture, restricted range of motion, or back pain. They will also ask about any relevant past surgeries, injuries, or medical issues.
    2. Examining the body: The physician will assess the patient’s posture for any signs of an unusually rounded upper back or a noticeable hump. In addition, they may check for neurological issues such as muscle weakness or loss of sensation.
    3. Imaging Research: To determine the severity of the gibbous deformity and to confirm the diagnosis, imaging investigations are usually required. Among the instances are:
    • Radiography Spine X-rays can provide a thorough view of the spinal column, the degree of curvature, and any structural anomalies.
    • Computed Tomography (CT) scan: A CT scan might be requested to get cross-sectional pictures of the spine. It makes it possible to examine the bones in greater detail and can be used to assess the degree of any skeletal anomalies or compression of the spinal cord or nerve.
    • Magnetic Resonance Imaging, or MRI: It might help determine whether spinal tumors, infections, or spinal cord compression are the underlying causes of the gibbous deformity.
    • Bone scintigraphy: When there is a suspicion of spinal TB, it might help to identify any active inflammation or infection in the spine.
    • Extra testing: In certain cases, extra testing may be necessary to identify the underlying cause of the gibbous deformity. These could involve genetic testing, blood testing, or additional imaging investigations like ultrasounds or bone scans, depending on the suspected cause.

    Once the diagnosis is established, a treatment strategy can be created based on the underlying cause and severity of the gibbous deformity. Options for treatment could include physical rehabilitation, physical support, brainwashing the executives, cautious intervention, or a combination of these approaches. It is crucial to speak with a licensed healthcare provider, such as an orthopedic surgeon or spine specialist, for an accurate diagnosis and personalized treatment suggestions.

    Treatment of Gibbus Deformity

    One feature of gibbous deformity, sometimes called angular kyphosis, is a malformation of the spine that resembles a hump. Although spine tuberculosis, or Pott’s disease, is the most common cause of it, congenital defects, trauma, and certain metabolic conditions can also cause it. Treatment for gibbus deformity depends on a number of factors, including the underlying cause, severity, and existence of concomitant symptoms.

    Medical Treatment

    When the deformity is moderate and does not produce apparent symptoms, conservative treatment could be adequate.
    Mostly, this calls for a mix of the following:

    • Brace work: Putting on an orthosis or spinal brace to stabilize the spine and stop the deformation from getting worse.
    • Stretches and exercises: that strengthen the muscles supporting the spine, enhance flexibility, and improve posture are known as exercise therapy.

    Surgical Treatment

    Surgery might be necessary in cases of severe gibbus deformity or when non-invasive treatment is unable to relieve symptoms. The location and etiology of the deformity are among the parameters that define the specific surgical technique. Cautious decisions could consist of:

    • Fusing the spine: One may use bone joins or embeds to progress the combination.
    • Osteoplasty: A surgeon may occasionally perform a wedge osteotomy, in which a wedge-shaped section of the malformed vertebra is excised to treat the angular kyphosis.
    • The instruments: Additional stability and support can be given by metal rods, screws, or other devices during the fusion process.

    When choosing a treatment strategy, it is important to take into account the patient’s general health, the degree of the deformity, and the possible risks and benefits of each approach. An orthopedic surgeon or spine specialist must perform a comprehensive evaluation to determine the optimal course of treatment for gibbous deformity.

    Physical Therapy Treatment

    The term “gibbus deformity” describes an angular, kyphotic, aberrant curvature of the spine that is often linked to infections of the spine or illnesses such as “Pott’s disease.” Physical therapy can help control gibbus deformity by addressing pain reduction, encouraging overall functional well-being, improving posture, and increasing mobility.

    It is important to remember that, depending on the underlying cause and severity of the deformity, therapeutic administration such as antitubercular medications or cautious intervention is typically part of the necessary therapy for gibbus deformation. Physical therapy can support these treatments and aid in rehabilitation.

    Gibbus deformity can be treated with physical therapy in the ways listed below:

    • Pain management: Physical therapists can employ various techniques to alleviate pain associated with gibbous deformity. Examples of these include hot/cold therapy, electrical modalities such as TENS and ultrasound, and manual therapy techniques including joint mobilization and soft tissue mobilization.
    • Postural correction: Physical therapists can focus on enhancing postural alignment and muscular balance to reduce the deformity’s progression and associated pain. To strengthen weak muscles and lengthen taut muscles, they may prescribe specialized stretches and exercises. This could involve exercises that target the hip flexors, back extensors, and muscle strength, among other areas.
    • Exercises to improve range of motion: Physical therapy may involve exercises designed to maintain or improve the range of motion in the spine and its supporting joints. Flexibility exercises, joint mobilization techniques, and mild stretching may be beneficial for the shoulders, hips, and spine.
    • Stabilizing the core: Increasing the strength of the deep abdominal and back extensor muscles helps with posture and general spinal stability. Physical therapists may suggest certain exercises, such as planks, bridges, and abdominal bracing, to enhance core strength.
    • Practical preparation:  Physical therapists can assist individuals with gibbus deformity in performing activities of daily living and functional duties by teaching them appropriate body mechanics and movement methods. This can help minimize the impact of the deformity on daily activities and maximize functional independence.

    It’s important to remember that the course of treatment may change depending on the state of the individual, the underlying cause of the gibbous deformity, and the severity of the distortion. A physical therapist will consider each patient’s unique requirements and develop a personalized treatment plan that takes into account their specific circumstances. For thorough management, collaboration with other medical specialists, such as professionals with training in physical therapy and medicine, may also be crucial.

    Summary

    Gibbus deformity refers to an unusual ebb and flow of the spine that is typically seen in the thoracic region of the upper back and is characterized by a crisp, precise conspicuousness. Although Pott’s illness, sometimes known as spine tuberculosis, is often linked to it, there are other potential causes.

    FAQs:

    Gibbus on the spine: what is it?

    These abnormalities in the vertebrae are indicative of the collapse of one or more vertebral bodies, also known as a gibbous deformity, which produces kyphosis. This deformity is often caused by condition, metabolic problems, or congenital disorders.

    How should a gibbus be examined?

    The doctor could perform Adam’s test of forward bending: When you do that, your waist sags forward. The physician will be looking for either an angular curve or a rounded curve, which is more suggestive of postural kyphosis. The angular curvature, often called a gibbous deformity, becomes more noticeable when you lean forward.

    What causes the creation of Gibbus?

    Gibbus deformity is more common in children than in adults and is most commonly caused by tuberculosis osteomyelitis, however, it can also be caused by metabolic disorders or genetic abnormalities such as achondroplasia or cretinism.

    Explain the Gibbus deformity.

    The Latin word gibbous, which means “hump,” is the source of the adjective gibbous. It became part of Middle English to refer to rounded, convex items.

    What differentiates gibbous and kyphosis?

    Girdle kyphosis is a gibbous malformation. From behind, the curvature looks steeply slanted rather than smooth. Bending forward, a humpback with this deformity could be seen to be more pronounced. The curvature that is larger than typical is referred to as “extreme” (hyper) curvature.

    What does TB gibbus formation mean?

    Traditionally linked to tuberculosis, these abnormalities are mostly caused by spinal infections; other pathogens are hardly mentioned in the literature.

    What shape is a gibbus?

    The word “gibbous” comes from the Latin “gibbous,” which means “humpbacked.” When the moon is convex on both sides, giving it a “hump” shape, the phase between half and full is referred to as “Gibbus” (spelled gibbous) in English.

    What physical results does Gibbus report?

    The spinal canal anatomy is distorted, resulting in severe kyphosis, myelopathy, and even paraplegia.

    Thoracolumbar Gibbus: What is it?

    The collapse of one or more vertebral bodies, resulting in kyphosis, is known as gibbous deformity.

    References

    • Wikipedia contributors. (2022, April 8). Gibbus deformity – Wikipedia. https://en.wikipedia.org/wiki/Gibbus_deformity
    • Patel, D. (2023, July 4). Gibbus Deformity – Cause, Symptoms, Treatment – Samarpan. Samarpan Physiotherapy Clinic. https://samarpanphysioclinic.com/gibbus-deformity/
  • 15 Best Exercises For Deep Infrapatellar Bursitis

    15 Best Exercises For Deep Infrapatellar Bursitis

    The disease known as deep infrapatellar bursitis is characterized by inflammation of the bursa right below the kneecap, under the patellar tendon.

    Exercises for deep infrapatellar bursitis help reduce stress in the affected area and promote strength, flexibility, and pain alleviation to manage the symptoms of this condition effectively. With a concentration on improving knee function and minimizing pain, we will examine some of the finest Exercises For Deep Infrapatellar bursitis in this introduction.

    Introduction:

    The tiny sacs or pockets called bursae are found between tendons, muscles, and bones. They offer lubrication and cushioning, This permits the soft tissues to freely move over the bone or against one another. The bursae surrounding the knee come in several varieties. The patellar tendon, a large tendon that joins the quadriceps to the leg, is surrounded by the deep infrapatellar bursa, which is situated beneath the patella.

    The Superficial Infrapatellar Bursa is located between the patellar tendon and the skin covering it on the tendon’s anterior side.

    Under the patellar tendon, between the tendon and the tibia (shin), is the Deep Infrapatellar Bursa. The deep and superficial bursa within the patella is seen as one continuous body.

    Causes:

     If you don’t exercise or stay active, your muscles may weaken and your knee may lose the support it needs to function properly.

    Overuse, damage, or breakdown of the knee’s protective tissue are the usual causes of inflammation of the infrapatellar bursae or the surrounding tendons.

    Particular reasons consist of;

    • Infection (septal bursitis)

    The closer the bursa is to the skin’s surface, the higher the chance that it will become infected with certain bacteria that are frequently found there. The common bacteria that causes this infection is called Staphylococcus Epidermis (or Staphylococcus aureus).

    • Acute injury

    In sports, a direct hit to the upper part of the tibial knee might result in a fall on the knee or damage to the infrapatellar bursa. In these situations, there is a chance that blood could leak into the bursa, resulting in pain, inflammation, and irritation.

    • Persistent crawling or kneeling

    Standing on one knee compresses the knee due to increased pressure going through it. Bursa swelling and thickening result from this.

    • Overstress

    Your knee may lose the muscle support it needs to move properly if you don’t exercise or engage in other physical activity. Your weight may be distributed unevenly within your knee joint as a result, or your knees and hips may bear an excessive amount of stress. When weight is distributed unevenly, some regions may experience greater stress than others, which will cause abnormal wear and tear on the stressed areas.

    Signs and symptoms:

    • Knee pain

    Usually causing pain below the knee, deep infrapatellar bursitis is felt in the front of the knee, directly below the patella. The leg’s anterior surface is affected by the pain. Pain from deep Infrapatellar bursitis is typically worsened by knee bending and stairs. Because the knee compresses the bursa, it hurts a lot.

    • Fever

    Fever as a sign of deep infrapatellar bursitis. The presence of organisms in the knee joint causes fever and an elevated white blood cell count in patients with septic infrapatellar bursitis.

    • Intense redness and warmth

    Bursitis patients may have redness on the front of their knees and feel warm when they touch.

    • Inability to sleep

    Bursitis frequently interferes with sleep and causes sensations of pain when one bends the knee or falls asleep, which frequently wakes the patient.

    • Swelling in the knee area

    Infrapatellar bursitis frequently causes swelling around the front of the knee. Immediately below the kneecap, at the front of the lower leg, there may be an extensible pocket of fluid that is tender to the touch.

    • Weakened and stiff knees

    Joint stiffness and weakening can eventually result from restricted knee use caused by knee discomfort.

    Risk factors:

    Some factors that are thought to increase the likelihood of developing deep infrapatellar bursitis include the following;

    • Engaging in sports involving contact

    Sports like basketball, rugby, football, and wrestling all need powerful knees, which increases the risk of prepatellar bursitis.

    • Immunodepressive state

    Diabetes and other immune-system-compromising conditions make you more open to infections that can lead to deep patellofemoral bursitis.

    • Either gout or rheumatoid arthritis

    You have an increased risk of developing deep patellofemoral bursitis if you have gout or rheumatoid arthritis.

    • Kneeling repeatedly

    Kneeling involves applying stress to the knee and the prepatellar bursa. The ailment known as deep patellofemoral bursitis is more prevalent in people who frequently kneel, particularly when working.

    Think about the following safety measures before beginning an exercise plan:

    Every exercise protocol should start with a few safety precautions to maximize the advantages. Consult a physician or physical therapist to determine the right exercises for your specific problem. You must listen to your body and stop pushing yourself when it becomes painful. While soreness following exercise is normal, severe or chronic pain could indicate excessive training.

    Maintaining proper form and technique is essential to avoiding repetitive injury. See a doctor if you’re unsure how to follow an exercise program correctly. Warming up your muscles and joints before an exercise session is useful.

    Exercises For Deep Infrapatellar Bursitis:

    The right stretches and activities must be chosen when developing an exercise routine to help heal knee bursitis. To recover knee function and resume a regular life, consider some of the suggestions below.

    Side-lying leg raise

    • Either the floor or a yoga mat can be used to sleep on your right side.
    • By keeping your feet flat on the ground and your legs up, you may maintain an upright posture.
    • As an alternative, support yourself by holding your arm with your elbow bent or by placing it straight on the ground beneath your head.
    • For further support, place your left hand on your hip or leg or hold it out in front of you.
    • Raise your left leg off the ground.
    • Stop elevating your leg as soon as you feel the muscles contract.
    • After inhaling deeply a few times, pull the leg down until it contacts the right leg again.
    • Then return to your neutral position.
    • Then relax.
    • Repeat this exercise five to ten times.
    side-lying-leg-raise
    side-lying-leg-raise

    Calf stretch

    Increased flexibility and less knee pain can be achieved by stretching your calves.

    • Lean up against a wall.
    • Make sure to keep your posture straight during the exercise.
    • Place the leg that has to be stretched behind you and take a stride forward.
    • Proceed forward until you feel pressure in your knee or calf while maintaining a straight knee on the leg you are extending.
    • Hold this position for a few seconds.
    • Then return to your neutral position.
    • Then relax.
    • Repeat this exercise five to ten times.
    standing calf stretch
    standing calf stretch

    Standing quadriceps stretching

    • For stability, place yourself against a wall.
    • The distance between your feet must be shoulder-width.
    • Push your foot into your glutes by bending one knee.
    • While holding your ankle, gently bring it in the direction of your glutes.
    • Hold this position for a few seconds.
    • Put your leg down.
    • Then return to your neutral position.
    • Then relax.
    • Repeat this exercise five to ten times.
    Quadriceps stretching exercises
    Quadriceps stretching exercises

    Heel slide

    • When you sleep on your back, keep your legs straight.
    • Bend the knee and gently slide one heel back toward the buttock.
    • Keep your posture like this for a short while.
    • Slowly extend your heel in the other direction after your leg is straight.
    • Then return to your neutral position.
    • Then relax.
    • Repeat this exercise five to ten times.
    heel-slide
    heel-slide

    Straight leg raise

    • Start by finding a comfortable spot to lie on the floor or a table.
    • Next slightly bend your knees.
    • After that, raise one leg slowly.
    • However, keeping the other knee straight.
    • Hold this position for a few seconds.
    • After that, lower your leg.
    • Then return to your neutral position.
    • Then relax.
    • Repeat this exercise five to ten times.
    Straight-leg-raise
    Straight-leg-raise

    Hamstring stretch

    • Start on the ground in a comfortable laying position.
    • Just one knee should be bent at this point.
    • Position your hands slightly behind your knees.
    • Raise one leg to your chest and raise it off the ground.
    • You can loop the band over your thigh if you have trouble getting your hands behind your leg.
    • Grasping it with your band, bring your leg closer to you.
    • Hold this position for a few seconds.
    • Next, let go of your leg.
    • Then return to your neutral position.
    • Then relax.
    • Repeat this exercise five to ten times.
    Hamstring-stretch
    Hamstring-stretch

    Single leg balance

    • Get into an upright posture.
    • Keep your arms at your sides.
    • Raise one foot behind you by bending it at the knee.
    • Take a stand and use your other foot to balance.
    • Hold this position for a few seconds.
    • Bring the elevated foot down.
    • Then return to your neutral position.
    • Then relax.
    • Repeat this exercise five to ten times.
    • Repeat on the other side.
    single-leg-balance
    single-leg-balance

    Static quadriceps exercise

    • Stretch your legs straight out in front of you while sitting or lying down with your back supported.
    • Under your knee, put a rolled-up towel.
    • One foot should be pushed toward you with a slight sideways angle.
    • Firmly pressing your knee down should cause your thigh muscles to tense.
    • Hold this position for a few seconds.
    • Then return to your neutral position.
    • Then relax.
    • Repeat this exercise five to ten times.
    Static quadriceps exercise
    Static quadriceps exercise

    Prone leg raise

    • Instead of working out on a hard floor, you can use a mat or a plinth to give yourself some support.
    • You can first extend your legs behind you while lying on your stomach.
    • If this seems uncomfortable, you are free to put your head between your arms.
    • Using your left leg, extend your leg as far as it will go without hurting by contracting your hamstring and gluteus muscles.
    • A pelvic bone stabilization by the physical therapist is required before beginning this activity.
    • Hold this position for a few seconds.
    • Then return to your neutral position.
    • Then relax.
    • Repeat this exercise five to ten times.
    prone-leg-raise
    prone-leg-raise

    Step up

    • Take a comfortable standing position to start.
    • Put one at the foot of a step bench, the lowest step of a stairwell, or a platform.
    • Maintain your height at your pelvic level.
    • Slowly lower your opposing foot to the ground while bending your knee.
    • After placing your toe lightly on the ground, step back up to take your spot.
    • Then return to your neutral position.
    • Then relax.
    • Repeat this exercise five to ten times.
    step-up-exercise
    step-up-exercise

    Seated knee extension

    • Sit upright in a long chair, placing your leg on the floor or a plinth.
    • To increase your strength without getting out of the chair, tense your thigh muscles, face forward, and raise one leg as high as you can.
    • Hold this position for a few seconds.
    • Lower your leg then.
    • Then return to your neutral position.
    • Then relax.
    • Repeat this exercise five to ten times.
    knee-extension
    knee-extension

    Butterfly stretch

    • The initial position is seated.
    • Keep your head and body up when you’re sitting on the ground.
    • Your legs are formed by forming a triangle with the soles of your feet.
    • For the benefit of the patient, as much as possible, bend the knees to the sides.
    • Patients may also apply pressure with their arms on their knees for a deeper stretch.
    • Maintaining the body as well as the head of the patient as straight as possible.
    • Patients’ inner thighs are being stretched.
    • Hold this position for a few seconds.
    • Then return to your neutral position.
    • Then relax.
    • Repeat this exercise five to ten times.
    Butterfly-stretch
    Butterfly-stretch

    Wall sit

    • When you are facing a wall, your feet should be about two feet from the wall and shoulder-width apart.
    • Squeeze your abs and carefully drop your back down the wall after your thighs are level with the floor.
    • Instead of placing your feet over your toes, position them such that your knees are squarely above your ankles.
    • Stay facing the wall with your back flat.
    • Hold this position for a few seconds.
    • After standing up straight, turn around and proceed back up the wall.
    • Then return to your neutral position.
    • Then relax.
    • Repeat this exercise five to ten times.
    Wall Squat exercises
    Wall Squat exercises

    Lateral band walking

    • After wrapping the band around both legs, somewhat above each knee, it should be flat and not twisted.
    • Maintain a shoulder-width distance between your feet.
    • While not excessively stretched, the band should be tight.
    • Bending your knees slightly and taking a half-squat will cause your gluteus medius to contract.
    • As you face forward, keep both of your feet parallel to your shoulders and your body weight properly distributed.
    • Move your weight over one leg and your other leg sideways while maintaining your half-squat position.
    • This leg should be moved sideways in and out five to ten times.
    • Hold your hips level throughout the workout.
    • When doing this exercise, it helps to keep your posture low and forward-facing.
    • Modify your weight and your legs progressively.
    • Then return to your neutral position.
    • Then relax.
    • Repeat this exercise five to ten times.
    lateral-band-walks
    lateral-band-walks

    Prone knee bends

    • Laying prone on the bed or table, find an ideal position for yourself.
    • At this point, gradually bend your knee to a comfortable posture.
    • Hold this position for a few seconds.
    • Release your leg.
    • Then return to your neutral position.
    • Then relax.
    • Repeat this exercise five to ten times.
    • Continue to the opposite side.
    prone-knee-bend
    prone-knee-bend

    What safety precautions are required when exercising?

    • When exercising, try to avoid making any rapid or forceful movements.
    • Stay away from challenging activities.
    • Stretch and bend moderately.
    • While working out, maintain a straight posture.
    • Make sure you are properly fit for the equipment you utilize.
    • Take care of yourself and stay alert to avoid falling as you exercise.
    • Dress comfortably and loosely to maximize your range of motion and promote relaxation during your workout. Avoid wearing clothing that is very tight or overly stylish.
    • In between exercise sessions, take a rest.
    • It’s common if sometimes challenging, to stretch your stiff joint muscles. Exercise and stretches shouldn’t cause you pain or give you the feeling that someone is stabbing you because they are unhealthy and make your illness worse.
    • As soon as the pain becomes intense, quit exercise.
    • Holding your breath while exercising is never recommended. When you exercise, you should take deep breaths and release them slowly. Inhaling deeply causes your muscles to tense up and your blood pressure to rise.
    • Stretches should be performed according to the protocol before and after sets and for the suggested amount of repetitions for every exercise.
    • Stay hydrated.

    When will you stop exercising?

    • Fever
    • Headache
    • If exercising hurts, you should stop.
    • Intense muscle burning.
    • You’re not feeling well.
    • If there is pain or numbness.

    Prevention:

    • Both before and after exercise, stretch

    Stretching activities can help prevent bursitis. Before starting the activity, warm up with some mild stretching. It releases tension from the legs’ joints and muscles. It’s important to stretch a little to aid in your recovery from your workout. This reduces the possibility of discomfort and inflammation surrounding the knee joint. For warming up and cooling down, static stretches are a great choice.

    • Stay away from high-impact activity

    Avoiding strenuous activity is advised if you are prone to knee bursitis. This covers activities like sports, running, and jumping. Stretch properly before and after this exercise, and take regular pauses. For those who have knee bursitis, low-impact exercise is preferable. These consist of cycling, swimming, and walking. To increase your likelihood of maintaining an activity, try to choose something you enjoy.

    • Utilize a support such as a knee pad

    When engaging in an activity that may result in knee bursitis, it is a good idea to utilize some sort of support. Anything from knees to braces or a wrap can be used for this. This will help to support your knees and lower your chance of bursitis. You can experiment with several types of support. For sports like skateboarding or cycling, knee protectors are a wise investment. If you participate in sports, a brace or wrap can help in joint stabilization and help stop more damage. Be sure to discuss whatever kind of support is right for you with your doctor.

    • Put on supportive, well-fitting footwear with plenty of cushioning

    To choose the best shoes for knee bursitis, choose supportive, well-fitting styles. Comfortable clothing is also essential for reducing joint tension. A variety of shoe styles can be helpful in the management of knee bursitis. Cross-trainers and running shoes are typically excellent options because they provide significant cushioning and support.

    • Allow yourself enough time to relax and heal

    You must take a break from your regular activities if you experience pain and swelling in the area surrounding your knee. Muscle relaxation results from rest. Ice the region for twenty minutes many times a day, if necessary. To lessen pain and inflammation, you can also use over-the-counter medications like acetaminophen or ibuprofen. It is worthwhile to visit a doctor if the pain is severe or persists for longer than seven days. They may advise different treatment plans or stronger medications.

    FAQ:

    Regarding knee bursitis, is exercise beneficial?

    For the treatment of knee bursitis, begin with slow stretching and progress to strengthening exercises. Exercises like heels, straight leg raises, and quads are beneficial if you have knee bursitis.

    What is the treatment for deep infrapatellar bursitis?

    Avoiding actions that put a strain on the infrapatellar bursa and related tendons (such as jumping, jogging, and kneeling) is part of the initial treatment for deep infrapatellar bursitis. using ice to pain and inflammation. Serum outflow into the deep infrapatellar bursa under extreme situations.

    Can infrapatellar bursitis be helped by physical therapy?

    The following are typical physical therapy interventions used to treat infrapatellar bursitis: The Manual Therapeutic Technique (MTT) is a hands-on approach used by physical therapists to help patients regain knee range of motion and mobility.

    I have bursitis; is it okay to exercise?

    While some types of stretching can be highly beneficial, others can worsen knee bursitis. The most important piece of advice to live by is “Always listen to the body.” Stop engaging in any activity even a seemingly ordinary stretch if it makes the joint pain worse.

    What is the duration of recovery for infrapatellar bursitis?

    The swelling and other symptoms normally go away in a few weeks if you rest and take home remedies for your prepatellar bursitis. Consult your healthcare physician if, despite two or three weeks of rest, your prepatellar bursitis doesn’t improve. You may require medical attention.

    Can someone with knee bursitis walk?

    Walking may make knee bursitis symptoms worse, so it’s critical to pay attention to your body’s signals and take it easy if you’re in pain. However, walking helps reduce swelling and is unlikely to do more harm to the joints.

    To what extent is infrapatellar bursitis painful?

    Particularly when the knee is bent, this condition is very uncomfortable. It can therefore be very painful to walk and climb stairs. However, while the person is at rest or not moving, they only experience a little pain.

    References:

    • As of September 17, 2023, Prajapati, D. The Top 13 Activities for Deep Infrapatellar Bursitis – Samarpan. Samarpan Physical Therapy Clinic. The ideal exercises for deep infrapatellar bursitis can be found at https://samarpanphysioclinic.com/
    • MendMeShop. [n.d.]. bursitis infrapatellar. Inflammrapatellar bursitis causing knee pain: https://mendmyknee.com/knee-and-patella-injuries.php
    • On September 4, 2020, Dpt, J. V. P. Home Exercises for Knee Bursitis. Feel Well Vive. exercises for knee bursitis https://www.vivehealth.com/blogs/resources/knee-bursitis-exercises?srsltid=AfmBOop9_AVGTZba3x22xhijSDskoqxGG0hxEiyKvHsSsREOdt2T7vOt
    • Clinic for ProHealth Prolotherapy. July 6, 2024. The causes and best treatment options for infrapatellar bursitis in 2024. Infrapatellar bursitis: https://prohealthclinic.co.uk/blog/
  • Pott’s Spine Disease

    Pott’s Spine Disease

    What is Pott’s spine disease?

    Pott’s spine, also known as spinal tuberculosis or tuberculous spondylitis, is a form of tuberculosis that affects the vertebrae of the spine. It occurs when Mycobacterium tuberculosis, the bacteria responsible for tuberculosis, spreads from the lungs to the bones of the spine. This condition often leads to the destruction of the vertebrae, causing pain, deformity, and neurological complications due to spinal cord compression.

    Spinal TB, or Pott disease, is typically caused by the hematogenous spread of tuberculosis from other locations, most commonly the lungs. The typical extra-pulmonary form of tuberculosis (TB) is known as spine TB and is one of the oldest known diseases in human history.

    In developing countries with dense populations, spinal tuberculosis (TB) has a greater morbidity and fatality rate than other illnesses.

    The vertebrae most often affected by spinal TB are the lumbar and lower thoracic, followed by the cervical and middle thoracic vertebrae. According to reports, 3 to 5% of occurrences involve the second cervical to the seventh cervical region, and atlantoaxial articulation is less frequent. The most often affected region was the lamina, which was followed by the transverse, articular, spinous, and pedicle processes.

    Through the intervertebral disc gap that separates two neighboring vertebrae, the infection may spread. The disc is normal if only one vertebra is impacted; however, if two vertebrae are impacted, the avascular disc collapses due to the inability to obtain nutrition. The disc tissue dies in a process known as caseous necrosis, which causes vertebral constriction, vertebral collapse, and eventual spinal injury. Often, a dry soft-tissue mass develops, and superinfection is not common.

    An abscess is frequently caused by an infection that travels from the lumbar vertebrae to the psoas muscle. The disease has recently demonstrated an increasing incidence in industrialized countries, especially among immunocompromised individuals as a result of international migration and tourism. Over the past few decades, there has been a concerning increase in the prevalence of multidrug-resistant bacterial strains of tuberculosis in underdeveloped countries, posing a serious threat to the international community. As a result, the illness is still a serious worldwide public health threat today.

    What are the causes of Pott’s spine disease?

    • An infection can go to the spine from the lungs. Hematogenous spread refers to the spread that occurs through blood.
    • When someone has an active tuberculosis infection, they can spit, sneeze, cough, talk, and other bodily fluids that release aerosol particles into the air. Up to 40,000 aerosol droplets can be released with each sneeze, and all it takes for TB to spread is one contaminated droplet.
    • Prolonged contact with infected patients, immunodeficiencies like HIV, alcoholism, drug addiction, overcrowding, malnourishment, poverty, and a lower socioeconomic status are some of the established risk factors for tuberculosis.
    • Mycobacterium TB typically causes spinal involvement when it hematogenous spreads into the thick vasculature of the cancellous bone of the vertebral bodies. Either a genitourinary tract infection or a lung lesion is the main site of infection.
    • Either the venous or arterial pathways are used for spread. The anterior and posterior spinal arteries give rise to an arterial arcade that generates a rich vascular plexus in the subchondral region of each vertebra. The hematogenous dissemination of the illness to the paradisiacal regions is facilitated by this vascular plexus.
    • A system without valves in the vertebra called Batson’s paravertebral venous plexus permits blood to flow freely in both directions based on the pressure created by the intrathoracic and intra-abdominal cavities during intense actions like coughing. Again, greater infection is disseminated to several vertebrae by the vertebral venous system in patients with noncontiguous vertebral tuberculosis.
    • Initial symptoms of spinal TB are felt in the anterior inferior region of the vertebral body. After that, it extends into the disc or core region of the body. Central, anterior, and parietal injuries are the most common forms of vertebral involvement. The disc is unaffected in the core lesion, and vertebra plana are the result of the vertebral body collapsing. Complete compression of the vertebral body is indicated by vertebral plana.
    • The disc is frequently included in younger individuals due to its increased vascularization. The disc is not particularly affected in old age since avascularity is seen at a higher age. Because its segmental arteries bifurcate to deliver blood to two adjacent vertebrae, spinal TB affects more than one vertebra.
    • Multiple nearby vertebrae are involved in the disease’s spread beneath the anterior or posterior longitudinal ligaments. It is suggested that the reason for the subligamentous spread of infection in mycobacterial infections is a deficiency of proteolytic enzymes.
    • The destruction of the intervertebral disc space and the surrounding vertebral bodies, the collapse of the spinal elements, and anterior wedging, which results in the formation of gibbous (a palpable deformity caused by the involvement of multiple vertebrae), are characteristic features of spinal tuberculosis.
    • The most frequently affected regions are the lower thoracic and upper lumbar spines. Usually, more than one vertebra is impacted, with the vertebral body being impacted more frequently than the posterior arch.
    • Because the disc is more vascularised in younger people, this is where the involvement primarily occurs. Due to its age-related avascularity, the disc is not particularly involved in old age.
    • In the active stage of spinal tuberculosis, early-onset paraplegia develops and requires intensive therapy. Adults with Pott’s spine are frequently affected by this kind of paraplegia, which has a better prognosis. Because the intervertebral disc and bone have been destroyed in each of these cases, paraplegia has resulted from the production of pus and debris-granulation tissue.
    • Extensive tuberculous deterioration may result in concertina collapse, a compression fracture that does not affect the intervertebral disc.
    • Meningomyelitis is caused by intrinsic causes that might directly affect the spinal cord, the area around the meninges and roots, or the blood vessels that supply the spinal cord.
    • A neurological consequence known as “late-onset paraplegia” can develop in a patient who has recovered from tuberculosis after varying amounts of time. A late-onset paraplegia may appear two to three decades following an active infection. It frequently has a connection to noticeable spinal abnormalities.

    What are the symptoms of Pott’s spine disease?

    • A cold abscess, gibbous, a noticeable spinal deformity, and localized pain, tenderness, stiffness, and spasms of the muscles are among the characteristic clinical characteristics of spinal tuberculosis. When a tuberculous infection spreads to nearby ligaments and soft tissues, a cold abscess gradually develops.
    • Spinal tuberculosis is a slowly developing, sneaky illness. The illness can last anywhere from a few months to many years in total, with an average disease length of four to eleven months. Patients typically only seek guidance when they are experiencing excruciating pain, a noticeable deformity, or neurological problems.
    • Approximately 20–30% of cases of osteoarticular TB have constitutional symptoms. The basic constitutional signs of tuberculosis—malaise, hunger and weight loss, night sweats, evening fever, generalized body pains, and fatigue—signify the presence of active disease.
    • POTS is characterized by a number of symptoms, such as headache, palpitations, tremors, nausea, weariness, blurred vision, difficulty thinking and concentrating (brain fog), intolerance to exercise, and lightheadedness (sometimes accompanied by fainting).
    • The most common sign of spinal tuberculosis is back pain. The intensity of pain varies from a persistent, dull hurting to a severe, incapacitating pain. Pain is usually restricted to the site of involvement and is most frequently found in the thoracic cavity. The pain may be exacerbated by weight bearing, coughing, and spinal motion due to pathological fracture, progressive disc disintegration, and spinal instability. In half of the instances of spinal TB, the only sign was chronic back pain.
    • When the cervical and thoracic areas are involved, neurologic impairments are common. Early neurologic involvement may develop into tetraplegia or total paraplegia if ignored. Any moment and at any stage of the spinal disease can result in paraplegia. The degree of neurological signs depends on the inclusion level of the spinal cord.
    • Upper extremity function remains normal if the thoracic or lumbar spine is involved, but lower extremity problems worsen with time and eventually result in paraplegia. Due to damage to the lumbar and sacral vertebrae, patients with cauda equina compression experience pain, weakness, and numbness, but their affected muscle groups’ reflexes are either absent or severely reduced. This is in contrast to the cauda-equina syndrome, which is characterized by hyperreflexia caused by spinal cord compression and bladder involvement.
    • A chilly abscess forming around the spinal lesion is another telltale indication of tuberculosis in the spine. The creation of abscesses is frequent and can get very large. The damaged region of the spinal column determines the size of a cold abscess. A retropharyngeal abscess is created in the cervical region when pus builds up posterior to the prevertebral fascia. The abscess may travel to the mediastinum and penetrate the esophagus, trachea, or pleural cavity. Significant pressure effects, such as dysphagia, hoarseness of voice, or respiratory pain, might result from a retropharyngeal abscess. The cold abscess typically manifests in the thoracic spine as a fusiform or bulbous paravertebral swelling, and it may also cause posterior mediastinal lumps.
    • The most typical symptom of the cold abscesses formed at the lumbar vertebrae is swelling in the groin and thigh. On the medial aspect of the thigh, an abscess may form after descending beneath the inguinal ligament.
    • One important aspect of spinal TB is spinal deformity. The location of the tuberculous vertebral lesion determines the kind of spinal deformity. The most frequent spinal deformity resulting from thoracic vertebral injuries is kyphosis. The number of affected vertebrae determines how severe the kyphosis is. Up to 20% of cases may still show a 10° or greater increase in kyphotic deformity following treatment. Torticollis deformity is a possible presentation of atlantoaxial TB.

    Differential diagnosis of Pott’s spine disease?

    • Pyogenic spondylitis, osteoporotic, metastasis, multiple myeloma, brucella spondylitis, and lymphoma are common differential diagnoses. Most cases of brucella spondylitis occur in middle-aged people. Usually included is the lumbar spine, which is followed by the cervical and thoracic spines. Although there is disc involvement and a limited amount of soft tissue in the paraspinal area, brucella spondylitis instances do not exhibit gibbous development.
    • Any age can develop pyogenic spondylitis, which often affects the cervical and lumbar spines. There are visible signs of epidural abscesses, substantially increasing lesions, destruction of vertebral bodies, and intervertebral discs. The posterior elements are spared in pyogenic spondylitis, and gibbus deformity is typically absent. The sparing of the pedicles in osteoporosis often affects the thoracic vertebrae. In addition to the loss of several vertebral bodies, osteoporotic vertebrae typically exhibit reduced bone density.
    • Most often, the thoracic region is affected by metastatic disease. Metastatic disease involves the lamina, pedicles, and posterior wall of the vertebral body; intervertebral disc heights are not affected. Multiple myeloma and lymphoma can also impact the intervertebral discs. It is always important to consider the possibility of metastatic spine disease in older people suffering from vertebral collapse.

    Diagnosis of Pott’s spine disease?

    The characteristic clinical appearance, systemic constitutional manifestation, evidence of prior TB exposure or concurrent visceral TB, and neuroimaging modalities are used to make the diagnosis of spinal tuberculosis.

    Spinal tuberculosis is also diagnosed by skin examinations and hematological tests such as polymerase chain reaction (PCR), erythrocyte sedimentation rate (ESR), enzyme-linked immunosorbent assay (ELISA), complete blood count (CBC), and Montoux test. Samples of bone tissue or abscesses are obtained in order to stain for acid-fast bacilli (AFB) and isolate organisms for culture, antibiotic sensitivity, and histology; CT-guided or ultrasonography-guided needle biopsy & aspiration or surgical biopsy.

    Plain radiographs

    When a patient has spinal TB, plain radiographs are typically the first examination performed. Bone mineral loss is required for radiolucent abrasions to show up on a plain radiograph.

    Either atrophy or protrusion into the disc tissue’s vertebral body causes the disc space to narrow. A varied degree of kyphosis results from anterior wedging or collapse with continued advancement. A paravertebral abscess forms in the anterior type of lesion due to the accumulation of necrotic material and tuberculous granulation tissue. The bird’s nest appearance is a fusiform or globular radiodense shadow seen in the thoracic spine region on plain radiographs.

    In the dorsal spine of children, the anterior form is far more common. The central form of abrasions manifests as concentric collapse, vertebral body inflation, and disintegration. The posterior arches the spinous process, pedicle, lamina, and transverse process as well as the atlas’s lateral masses, erosion of the ribs next to it in the thoracic region, pedicular or laminar destruction, or the posterior cortex of the vertebral body with relatively sparse intervertebral discs and a sizable paraspinal mass—are all included in the appendiceal or neural arch type of lesion.

    Computed tomography
    Compared to a plain radiograph, computed tomographic scanning provides better bony detail for irregular lytic lesions, disc collapse, sclerosis, and disruption of bone circumference. However, CT is not as good at illustrating how the disease affects neural structures and how it extends epidurally.

    On a CT scan, the pattern of bone loss may clearly be seen as fragmented, osteolytic, sclerotic, and subperiosteal. It works great for directing a percutaneous diagnostic needle in areas that are somewhat inaccessible or potentially harmful. Practically speaking, the presence of calcification within the abscess indicates spinal tuberculosis. One of the methods used to evaluate cord compression in cases of spinal tuberculosis (TB) was CT myelography, however, it has since been replaced.

    Magnetic resonance imaging (MRI)
    A gadolinium contrast agent is injected intravenously, and then non-contrast T1-weighted (T1W), T2-weighted (T2W), and short tau inversion recovery (STIR) sequences are performed in the axial, sagittal, and coronal planes. Following this, contrast-enhanced T1W sequences are performed. Abnormal signal intensities exhibiting hypointense on T1W and hyperintense on T2W sequences with the heterogeneous augmentation of the vertebral body are characteristics of Pott’s spine on MRI.

    When separating fluid from fatty components in non-contrast sequences, STIR sequences come in handy. Prevertebral, paravertebral, and epidural abscesses were among the characteristic findings, along with the destruction of two neighboring vertebral bodies and opposing end plates, the intervening disc’s disintegration, vertebral body edema, and other conditions. MRI has a significant role in the high specificity and sensitivity diagnosis of spinal tuberculosis.

    MRI is superior to most other imaging modalities in that it can directly image in several planes and provides strong contrast resolution for soft tissues and bone. Granulation tissue and a cold abscess may be distinguished with great accuracy on magnetic resonance imaging (MRI) with the use of intravenous magnetic resonance contrast agents.

    Compared to ordinary films, an MRI can reveal more extensive involvement. For patients with suspected TB spondylitis, MRI offered more precise anatomic localization of vertebral and paravertebral abscesses in various planes, which was not previously possible with more traditional diagnostic modalities. When CT results were uncertain, MRI provided a clear picture of the soft tissue disease’s extent and how it affected the cord, theca, and the foramen. For diagnosis, CT and MRI are both very useful, and tissue aspiration is a useful confirming procedure.

    By demonstrating disc enhancement, gadolinium with diethylene triamine pentaacetic acid (Gd-DTPA) administration is used to measure the amount of soft tissue mass and distinguish postoperative spondylitis from a typical postoperative course. Disc enlargement is rare throughout the typical postoperative recovery period. It should be diagnosed as postoperative spondylitis if it is connected to nearby spinal bone marrow abnormalities.

    It can be challenging to differentiate between pyogenic, tuberculous, fungal, and postoperative spondylitis, even if the pattern of improvement in TB spondylitis differs from that of other spondylitis cases. When attempting to differentiate between pyogenic and tubercular spondylitis, magnetic resonance imaging (MRI) is a highly helpful tool.

    The most typical effects were cord compressions and kyphosis. If early decompression is carried out urgently at the outset of the disease, the neurological inclusion is comparatively benign. A neurological condition known as late-onset paraplegia can develop in patients who have recovered from TB of the spine after a varied amount of time. When detecting rare and challenging disease locations, such as the craniovertebral junction, MRI is incredibly helpful.

    Few cases of sacroiliac joint tuberculosis (TB) have been reported, and it is even more uncommon for TB to coexist with spinal TB. The best imaging technology for identifying sacroiliitis in its early stages is magnetic resonance imaging (MRI). If diagnosis and treatment are postponed, sacroiliac joint TB may progress to later stages with substantial joint damage and periarticular abscesses. Early detection of sacroiliac joint pathology may be possible with the standard MRI screening of individuals under study for lumbar disc disease, which now includes a coronal STIR T2-weighted sequence.

    Cytological and microbiological confirmation

    For the early histological identification of spinal TB, the gold standard method is to use neuroimaging guided-needle biopsy from the affected area. Usually, enough material is obtained from a nearby abscess or the spine itself during a CT-guided needle biopsy. When further treatments, including decompression and maybe arthrodesis, are planned or when closed approaches have proven ineffective, an open spine biopsy is typically carried out.

    In India, spinal TB was successfully diagnosed by fine needle aspiration biopsy performed under CT guidance. In order to determine the etiological diagnosis, surgery might be necessary. It is necessary to send biopsy material for cytologic, histologic, and bacteriologic investigations. Up to half of cases may show smear positivity for acid-fast bacilli, whereas most cases will show culture positivity. However, due to the difficulty in detecting mycobacterial bacilli from extrapulmonary locations, culture is not the gold standard for diagnosing spinal tuberculosis, just like it is for respiratory tuberculosis.

    About 60% of individuals have their diagnosis of spinal TB confirmed by histologic testing. The most often seen cytological abnormalities are lymphocytic infiltration, granular necrotic background, and epithelioid cell granulomas. In as many as half of the cases, scattered multinucleated and Langhans’ large cells may be observed. Since false-negative biopsy results are frequent, the diagnosis of spinal tuberculosis must be based on radiological findings and clinical signs in the event that bacteriology returns negative data.

    Polymerase chain reaction and other immunological tests
    Traditional microbiological techniques, such as cultivating Mycobacterium tuberculosis on Lowenstein Jensen media and using Ziehl-Neelsen staining for acid-fast bacilli, have poor sensitivity and specificity. It also takes a while to cultivate Mycobacterium tuberculosis; it takes 7-8 weeks for the growth to show up. Thus, the primary basis for diagnosing tuberculosis is histological evidence.

    The polymerase chain reaction has demonstrated extremely encouraging outcomes for the quick and early detection of the disease. As low as 10–50 tubercle bacilli can be found with this approach in a variety of clinical samples. Compared to smears, this test is more accurate and can be completed more quickly than cultures.

    By quantifying interferon-gamma extracted in plasma from whole blood incubated with the Mycobacterium tuberculosis-specific antigens, the QuantiFERON-TB Gold test detects cell-mediated inflammatory responses in vitro to tuberculosis infection.

    A positive smear or culture, a biopsy that confirmed the disease, or a positive response to antituberculosis treatment were used to classify the patients as having tuberculosis. A small number of individuals had a vertebral collapse that could not have been caused by anything other than tuberculosis. The examination yielded an estimated 84% sensitivity and 95% specificity.

    Other tests
    The majority of individuals with spinal TB typically have elevated erythrocyte sedimentation rates (ESRs) by several orders of magnitude. Following control of the active tuberculous lesion, the ESR returns to normal or nearly normal.

    Leucocytosis and raised ESR are correlated in pyogenic infections, but patients with spinal tuberculosis exhibit significantly elevated ESR along with normal WBC.

    Treatment of Pott’s Spine Disease?

    Medical treatment for Pott’s spine disease:

    Early antitubercular treatment should be started in patients with spinal tuberculosis. It is often necessary to start antituberculous treatment empirically, long before an etiological diagnosis is made. Etiological diagnosis may not be made at all in developing nations. Surgery might also be required for patients with spinal TB problems that have been identified.

    The majority of antituberculous medications are highly permeable to tuberculous spinal abrasions. In severe spinal tuberculosis vertebral tissues, the distribution of antituberculosis medications such as rifampin, isoniazid, and pyrazinamide was assessed. Isoniazid concentrations in tuberculous foci were bactericidal in patients without vertebral sclerotic walls surrounding the foci.

    The minimal inhibitory concentrations of pyrazinamide and rifampin in foci matched each drug’s level. In a different investigation, three medications produced an effective bactericidal concentration level in the osseous tissues around the spinal tuberculosis foci, with the exception of the 4 mm of osseous tissue that encircles the sclerotic wall. The findings suggested that during the procedure, osseous tissues within 4 mm of the sclerotic wall should be removed.

    Antituberculous medication:

    • The majority of patients (82–95%) with spinal TB respond extremely effectively to medical treatment, according to several studies. Pain relief, a reduction in neurological deficiency, and even the correction of spinal deformity are all clear results of the treatment.
    • Individuals with craniovertebral junction TB, which has the potential to be dangerous, also respond well to medical intervention. Prior to scheduling surgery, patients with medically resistant spinal TB require a thorough reevaluation of their differential diagnosis.

    Therapeutic regimen:

    • According to the WHO treatment classification, spinal TB is classified as category 1. There are two phases to the category-1 antituberculosis therapy regimen: an intensive or initial phase and a continuing phase. Four first-line medications are used in conjunction during the 2-month intense phase of antituberculous therapy: isoniazid, rifampicin, streptomycin, and pyrazinamide. Isoniazid and rifampicin are the two medications permitted for four months during the continuation phase.
    • The World Health Organisation recommends nine months of treatment for tuberculosis of the bones or joints due to the significant risk of disability and mortality as well as the challenges in determining treatment response.
    • Regardless of age, the British Thoracic Society recommends a 6-month course of daily treatment consisting of rifampicin and isoniazid, augmented in the first two months by pyrazinamide and either ethambutol or streptomycin.
    • Even if six months of treatment is seen to be adequate, many specialists still advocate for a 12- to 24-month duration, or until pathological or radiological evidence of disease regression is obtained. Short-term regimens and directly observed treatment may be used to ignore low compliance. With the exception of cases of spinal arachnoiditis or spinal TB, corticosteroids have no clear role in spinal tuberculosis.

    Supportive measures: 

    • Prior to the antituberculous chemotherapy phase, a patient with tuberculosis of the spine was treated with a combination of common supportive treatments, extended recumbency, and rest. Treatment for people with pulmonary and bone TB used to be provided at sanitariums.
    • Immobilization using a cast or brace was a traditional treatment method, however, it was eventually proven to be ineffective and was typically dropped.

    Surgical Treatment for pott’s spine disease:

    • However, a number of specialists believe that not all instances of spinal TB need to be operated on, nor do all cases need to be treated conservatively.
    • A larger percentage of bony fusion, quicker bony fusion, less kyphosis, quicker pain relief, an earlier return to prior activities, and less bone loss were among the potential advantages of surgery. It also relieved compressed neural tissue more quickly. If fusion has not taken place, it may also avoid neurological issues that arise later on as a result of spinal kyphosis. According to one expert, pan-vertebral lesions, extensive kyphosis, resistant disease, an increasing neurological deficiency, and clinical worsening or lack of clinical progress should all be considered criteria for surgery.
    • There are two kinds of surgical operations carried out. Debridement with spinal stabilization is the alternative procedure. This is a more involved procedure where bone grafts are used to perform the reconstructions. Artificial materials such as titanium, steel, or carbon fiber can also be used for stabilization.
    • Excellent outcomes were obtained from the combination of medical and surgical care. Following a three-level posterior vertebral column resection and significant posterior decompression/instrumented fusion, anterior debridement/fusion with cage reconstruction is the surgical course of treatment.
    • Early detection and prompt, wise surgical intervention are essential to successful management; the choice of which must be made in light of the patient’s age, the degree of antitubercular therapy (ATT) response, and clinical-radiological compression of the spinal cord and nerve roots.

    Physical therapy Treatment for Pott’s spine disease:

    The goal of treatment is to cure the illness and to avoid, identify, and treat any complications, such as paraplegia, as soon as possible.

    Indications for Taylor’s brace spinal orthosis:

    Taylor’s brace
    Taylor’s brace

    could be applied to reduce pain and stop cervical spine deformities:

    • Taylor’s brace,
    • collar,
    • Minerva jacket

    Spinal fusion or decompression procedures are often performed on patients with Pott’s disease in order to repair the structural deformity and stop additional neurological problems. There are no set standards that specify the kinds of treatments that will work for these people. However, therapy plans should be tailored to each patient specifically, taking into account any disabilities, functional restrictions, or impairments they may have at presentation.

    Following spinal decompression surgery, PT management

    • Exercises for Spinal Stabilisation:
    • Exercise and Strengthening for Back-to-School
      In comparison to alternative physical therapy interventions and self-care, spinal stabilization exercises yielded noticeably higher ratings in overall outcomes. However, in contrast to the other two treatment options, pain and impairment did not significantly improve.

    PT Management Following Spinal Fusion Surgery

    • Aquatic Therapy
    • TENS (Transcutaneous Electrical Neuromuscular Stimulation)
    • Training Above Ground (Walking Program)
    • Aerobic Exercise 
    • Strengthening the Trunk
      Research on the application of TENS has demonstrated that neuropathic pain can be reduced more effectively at higher frequencies. Pain, psychological distress, and impairment have all been shown to significantly diminish with aerobic exercise, physical therapy, and trunk strengthening therapies.

    How to prevent Pott’s spine disease?

    Individuals who do not currently have active tuberculosis but have a positive PPD test may reduce their risk by appropriately using antitubercular medications. In order to effectively cure tuberculosis, patients need to take their drugs as directed.

    What is the prognosis of Pott’s spine disease?

    • collapse of the vertebrae resulting in kyphosis
    • compression of the spinal cord
    • Sinus formation
    • (Pott’s paraplegia) paraplegia

    For patients without neurological impairments or abnormalities, the prognosis is usually favorable. Numerous studies demonstrate that 80% of cases improve with medical treatment alone, resulting in pain relief, neurological deficiency improvement, and spinal deformity correction.

    In a newly published study, 92% of patients with neurologic abnormalities showed considerable improvement, and 74% of them went from being nonambulatory to being ambulatory. The majority of patients in research conducted in an endemic nation exhibited severe motor and sensory impairment. Although antituberculous medication was used to handle all patients, some also needed surgical intervention.

    FAQs

    Is it improper to walk in spinal TB?

    In the event that the back pain gets worse, the patient may have numbness, stiffness, or weakness in their legs, making it difficult for them to walk or stand. Back pain is another indication of tuberculosis in the spine.

    How long does Pott’s spine therapy last?

    Traditional courses last anywhere from nine months to more than a year, but some studies recommend a six- to nine-month duration. The length of therapy should be customized and determined by the patient’s clinical stability and the remission of active symptoms.

    How is Potts being treated?

    Rifampin and isoniazid should be given for the duration of the therapy. A second round of medication is given during the first two months of treatment.

    Does age affect the POTS spine?

    The good news is that, although POTS tuberculosis is a chronic condition, about 80 % of teens grow out of it after they reach the end of their teenage years when the bodily changes of puberty are over. POTS TB symptoms typically go gone by the time a person turns 20.

    What is the life expectancy of POTS disease?

    There is no evidence of a shortened life expectancy and POTS tuberculosis is not a life-threatening condition.

    Is the POTS spine regarded as a handicap?

    If a patient fits both a Blue Book listing and the Social Security Administration’s (SSA) definition of disability, their POTS may be classified as a disability. You may be eligible for disability compensation if your POTS does.

    References

    • Mehta, Y. (2022, November 21). Pott’s spine – Cause, Symptoms, Diagnosis, Treatment. Samarpan Physiotherapy Clinic. https://samarpanphysioclinic.com/potts-spine/