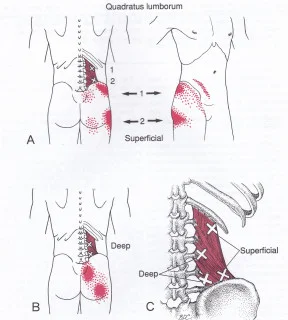
Blog

  • Ankle Joint

    Ankle Joint

    Ankle joints are complex mechanisms that play important roles in allowing movement in the lower extremities and providing stability. Several ligaments support the ankle’s overall stability by joining the bones and ensuring optimal joint function.

    The anterior talofibular ligament (ATFL), posterior talofibular ligament (PTFL), and calcaneofibular ligament (CFL) comprise the lateral (outside) portion of the ankle joint. These ligaments contribute lateral support to the ankle by attaching the talus and calcaneus, two-foot bones, to the fibula, one of the two lower leg bones.

    Ankle ligament overstretching or taking produces a sprain. Ankle sprains are a common problem that can either worsen or heal quickly.

    Introduction Of Ankle Joint

    Your shin bone (tibia), calf bone (fibula), and talus bone relate to the ankle joint. It attaches to your lower leg and foot. Further, your ankle comprises blood vessels, muscles, ligaments, cartilage, and nerves. You use your ankles when moving your feet and legs in two main ways.

    The joint enables both plantarflexion and dorsiflexion of the foot, acting as a hinge.

    The talus, tibia, and fibula bones interact to form the ankle joint, which is a hinged synovial joint. Ankle mortise is determined by these three boundaries.

    • The bony protrusion on the lower fibula, known as the articular facet of the lateral malleolus, forms the longer side of the ankle joint.
    • The lower tibia’s bony protrusion, the articular facet of the medial malleolus, establishes the joint’s medial border.
    • The inferior articular surface of the tibia and the superior border of the talus combine to form the superior portion of the ankle joint.

    The calcaneus and navicular articulate inferiorly and anteriorly, as well, with the talus.

    • Ankle dorsiflexion and plantarflexion are allowed given the upper surface, defined as the trochlear surface, being rather cylindrical.
    • The talus has a greater anterior diameter and a more posterior narrowing.
    • The ankle is most durable in dorsiflexion when it forms a wedge that stands between the lateral and medial malleoli.

    Anatomy of the Ankle joint

    The 26 distinct foot bones that comprise the foot and ankle, as well as the long bones of the lower limb, join to form 33 joints. The talocalcaneal frequently referred to as a subtalar joint, the tibiotalar, formerly known as a talocrural, and the transverse-tarsal, also called a talocalcaneal navicular joint, comprise the ankle joint complex.

    The subtalar joint

    subtalar-jont
    subtalar-joint
    • The calcaneus, the biggest, strongest, and most posterior bone in the foot, connects to the Achilles tendon in the lower thighs.
    • This is located inferiorly to the talus bone and joins the talus in the lower leg to form a tri-planar, uniaxial joint. The talus bone is maintained by the anterior part of the calcaneus bone.
    • The facets for the articulation of the posterior talocalcaneal joint are concave on the inferior surface of the talus bone and convex on the superior surface of the calcaneus. On the superior aspect of the calcaneus bone, the two similarly articulated facets of the anterior talocalcaneal joint are concave and strong, while on the inferior aspect of the talus bone, they are convex and strong.
    • The ankle may rotate in both directions due to its geometry, although this joint can also move in a different path. The two bony parts are attached by a multitude of ligaments.
    • The interosseous talocalcaneal ligament, a strong, wide, and thick ligament that binds the superior aspect of the calcaneus bone to the articular facets of the inferior talus bone, is the most important ligament separating the two.
    • Talocalcaneal ligaments, both anterior and lateral, provide additional support for the fixed position of the subtalar joint.
    • The talocalcaneal joint is further stabilized by the lateral collateral ligament of the ankle joint and the interosseous talocalcaneal ligament. Additional support is offered by the long tendons of the flexor hallucis longus, tibialis posterior, peroneus longus, and flexor digitorum longus muscles.

    The tibiotalar joint

    • It is well-known for being a talocrural joint. The distal tibia and fibula bones of the lower leg and the talus bone of the foot collaborate at the tibiotalar joint, formerly referred to as the talocrural joint.
    • Here, the weight is maintained via the tibial-talar interaction. The talus bone in the foot does not directly connect to the head, neck, or torso through muscles.
    • The talus bone’s trochlea was developed to fit into the mortise formed by the distal ends of the long shin bones of the lower leg. The talus bone is constrained by the malleoli of the tibia and fibula bones, causing the joint to operate as a hinge joint. The main functions of this joint are to help the foot’s dorsiflexion and plantar flexion. However the joint’s geometry—the trochlear surface’s cone shape and the oblique rotation axis—indicates that it may not function as a hinge joint isolated.
    • Dorsiflexion may improve joint stability because the talus is located in the anterior region. The greatest shape of the tibiotalar joint seems to have a bearing on the stability of the ankle joint. The soft tissue parts of the ankle joint provide stability when the ankle joint’s geometry alone isn’t sufficient for resisting eversion motion during the stance phase.
    • A capsule connecting the talus bone inferiorly, the tibia malleoli, and the superior tibia bone control the diarthrosis that approaches the tibiotalar joint.
    • Three ligamentous groups give stability to the ankle joint.
    • To maintain stability between the tibia and fibula’s bone ends, the tibiofibular syndesmosis restricts movement between the tibia and fibula bones during regular activities.
    • The anterior tibiofibular, posterior tibiofibular ligament, and interosseous tibiofibular joint are the three aspects of the syndesmosis. The medial collateral ligaments, formerly known as the deltoid ligaments, support the medial surface of the ankle joint and are mainly responsible for avoiding eversion motions and valgus stresses within the joint.
    • The anterior and posterior tibiotalar ligaments, the talonavicular ligament, and the talocalcaneal ligament compose the fan-shaped deltoid ligament, referred to as the medial collateral ligament.
    • By limiting varus a lot and decreasing rotation, the lateral collateral ligaments decrease the joint’s ability for inversion. This structure consists of the anterior and posterior talofibular ligaments, as well as the calcaneofibular ligament. Plantar flexion and dorsiflexion, respectively, provide significant strains to the anterior and posterior ligaments, respectively. These ligaments give stability to the lateral tibiotalar joint and are frequently damaged during inversion injuries, such as injuries of the ankle. The tibiotalar and subtalar joints are united by the calcaneofibular ligament, which is the only direct connective tissue.

    Inferior tibiofibular joint

    • In some literature, the inferior tibiofibular joint is considered an essential part of the tibiotalar joint, while it may be considered a distinct joint. The interosseous membrane and fibrous tissue connect the two distal parts of the fibula and tibia joints; it is not a synovial type articulating joint.
    • Adding stability rather than facilitating bigger lower limb movement at the foot and ankle is the primary goal of the inferior tibiofibular joint. The tibia and fibula bones connect by the anterior, posterior, and interosseous tibiofibular ligaments, as previously stated.
    • Ankle fractures and eversion injuries usually involve the ligamentous structure that reduces the joint, rendering it highly susceptible to damage.

    Transverse tarsal joint

    Transverse-tarsal-joint
    Transverse-tarsal-joint

    The talus and navicular bone junction, where the talar head articulates with the posterior surface of the navicular bone anteriorly, and the calcaneocuboid joint, which becomes the calcaneus and cuboid bones come together to form the transverse tarsal joint, also known as Chopart’s joint. As this joint and the subtalar joint share an axis for movement and both assist in the eversion-inversion action of the foot, they are considered to form the same functional unit.

    Structure of ankle joint

    • The ankle joint plays an essential part in ambulation as it responds to the walking surface.
    • The ankle joint can move in any of these directions: dorsiflexion, eversion, inversion, and plantar flexion.
    • It is known that the leg muscles have anterior, posterior, and lateral compartments.

    Articulating Surfaces of the ankle joint

    • Three bones contribute to the complex ankle joint: the trochlear surface of the talus (the foot bone), the lateral malleolus of the fibula (the leg bones), and the distal end of the tibia attached to the medial malleolus. Hyaline cartilage keeps an ankle joint’s articular surfaces in contact.
    • The ankle joint consists mainly of three articulations:
    • Tibiofibular ligaments, which are situated at the distal end of the lower leg, completely attach the tibia and fibula, or leg bones. The tibia and fibula join creating a socket with a bracket-like shape that is covered in hyaline cartilage. We describe it as a mortise (socket).
    • The talus’s body slides easily into the groove formed by the lower leg’s bones. The talus’s articulating component has a wedge-shaped shape that is expansive in front and thin in back.
    • Dorsiflexion and plantarflexion of the foot are made possible by the ankle joint, which is connected to some inversion and eversion through the subtalar and midtarsal joints. Whenever the heel contacts the ground at the initial stages of walking, the ankle joint also serves as a shock absorber.

    The joint capsule of the ankle joint

    The superior capsule of the ankle joint connects to the articular surfaces of the medial malleolus of the tibia and the lateral malleolus of the fibula. The margins of the talar trochlear surface establish the capsule inferiorly. The ankle joint capsule is thin and somewhat fragile. strengthened laterally and medially, still by strong collateral ligaments. The synovial membrane continues into the distal tibiofibular joint and protects the interior of the ankle joint capsule up to the interosseous tibiofibular ligament.

    Ligaments of the ankle joint

    The ankle joint requires to be stabilized because it bears a lot of weight, but only to the extent that maximum movement is still allowed. The lateral collateral and medial collateral ligaments are the ligaments that help stabilize the ankle joint.

    Lateral collateral ligament

    Lateral-collateral-ligament
    Lateral-collateral-ligament
    • The lateral aspect of the ankle joint is stabilized by the robust and broad lateral collateral ligament. It is built from three distinct brands:
    • Anteromedially, the anterior talofibular ligament extends from the lateral malleolus of the fibula to the lateral side of the talus’s neck. It acts as a weak, flat band. The ankle joint ligament is often injured.
    • Function: Protect the talus bone from moving anteriorly concerning the tibia and fibula bones. Refuses to Invert when performing plantarflexion.
    • The posterior talofibular ligament is a muscular band that joins the lateral tubercle of the talus to the distal section of the lateral malleolar fossa on the fibula. It extends both medially and posteriorly. There is a tibial slip of fibers which links it to the medial malleolus. Ligaments are rarely damaged since the ankle’s dorsiflexion protects them from injury due to bone stability.
    • Function: Forms the trochlear of the talus recipient socket’s posterior wall. Prevent talus bone posterior displacement.
    • The calcaneofibular ligament is a strong, complex band that extends posteroinferiorly from the apex of the fibula’s lateral malleolus to a tubercle on the lateral side of the calcaneus.
    • function: Provides help with talofibular stability during dorsiflexion. Limit the calcaneus’ inversion concerning the fibula. Avoid talar tilting into an inverted position.

    Medial collateral ligament

    Another name for the medial collateral ligament is the deltoid ligament. The medial portion of the ankle joint is strengthened by this lengthy, robust, triangular band. Avoiding ankle joint dislocations (over-eversion) and stabilizing the ankle joint in eversion is important. The proximal ends of the medial malleolus and its apex are where the medial collateral ligament is tethered. The ligament then spreads outward to fasten to the foot’s talus, calcaneus, and navicular bones. The medial collateral ligament is typically divided into three continuous segments according to the distal attachment locations, however, the fact that it can be very variable and consist of three to six aspects ranging from the superficial to the deep parts:

    • Tibionavicular ligament: The sum of the superficial fibers of the ankle joint’s medial collateral ligament that descend from the medial malleolus and attach distally to the foot’s navicular bone’s tuberosity. From the attachment site, the talonavicular ligament connects with the medial border of the plantar calcaneonavicular ligament.
    • The talocalcaneal ligament is formed out of the intermediate region of the ankle joint’s medial collateral ligament, which originates from the medial malleolus nearly vertically downward and attaches to the sustentaculum tali.
    • Tibiotalar ligament: This ligament is a structure made up of the medial collateral ligament’s deep section. Both an anterior and a posterior part are present. Both start at the apex of the tibia’s medial malleolus. From there, the posterior tibiotalar ligament joins to the non-articular posterior portion of the medial talar surface, while the anterior tibiotalar ligament descends to attach to the medial tubercle of the foot’s talus bone.

    Muscles of the ankle joint

    Which muscles in the ankle generate plantarflexion at the ankle joint?

    • Gastrocnemius
    • Soleus
    • Flexor hallucis longus
    • Flexor digitorum longus
    • Tibialis posterior
    • Peroneus Brevis
    • Peroneus longus

    Which muscles in the ankle produce dorsiflexion at the ankle joint?

    • Tibialis anterior
    • Extensor hallucis longus
    • Extensor digitorum longus
    Muscles-of-the-posterior-of-the-lower-leg
    Muscles-of-the-posterior-of-the-lower-leg

    Gastrocnemius

    • Origin: Above the lateral and medial condyles of the femur, on the lower posterior border of the femur bone.
    • Insertion: The Achilles tendon descends into the posterior side of the calcaneus bone.
    • Movement: Plantarflexion.
    • Nerve supply: Tibial nerve.

    Soleus muscle

    • Origin: The upper third of the posterior fibula and the upper half of the posterior end of the tibia bone, along with the sole line.
    • Insertion: Through the Achilles tendon at the ankle, the posterior side of the calcaneus bone is exposed.
    • Actions: Plantarflexion.
    • Nerve supply: Tibial nerve.

    Flexor Hallucis Longus muscle

    • Origin: The lower two-thirds of the posterior surface of the fibula bone.
    • Insertion: The sole base of the first metatarsal’s distal, or farthest, phalange.
    • Actions: Plantarflexion, Inversion, and Big Toe Flexion.
    • Nerve supply: Tibial nerve.

    Flexor Digitorum Longus muscle

    • Origin: The bottom two-thirds of the tibia bone’s back surface.
    • Insertion: Plantar (bottom) aspect of the base of the second, third, fourth, and fifth metatarsal phalanges, which are the farthest.
    • Three movements: toe flexion, inversion, and plantarflexion.
    • Nerve supply: Tibial nerve.

    Tibialis Posterior

    • Origin: Interosseous membrane, which stretches between the fibula and tibia bones. lower leg bones near to the interosseous membrane are the fibula and the posterior side of the tibia.
    • Insertion: Second, third, and fourth metatarsal bones of the foot; cuneiforms; cuboid; navicular tuberosity of the navicular bone.
    • The ankles are inverted and plantarflexed.
    • Nerve supply: Tibial nerve.

    Peroneus brevis muscle

    • Origin: Its tendon approaches the lateral malleolus of the fibula by wrapping posteriorly and going upward from the distal 2/3 of the lateral fibula.
    • Insertion: At the proximal end of the 5th metatarsal, on the styloid process.
    • Nerve supply: Superficial Peroneal nerve.
    • Action: Planterflexion and eversion.

    Peroneus Longus muscle

    • Origin: The upper second third of the fibula and the head of the bone.
    • Insertion: The undersides of the cuneiforms and the base of the primary metatarsal.
    • Actions: Eversion and Plantarflexion.
    • Nerve supply: Superficial peroneal (fibular) nerve.

    Tibialis Anterior Muscle

    • Origin: Tibia bone (superior and inferior portions).
    • Insertion: Foot’s medial cuneiform bone and first metatarsal beneath the surface.
    • Action: Dorsiflexion and inversion.
    • Nerve supply: Deep peroneal nerve.

    Extensor Hallucis Longus muscle

    • Origin: Midway on the inner surface of the fibula bone’s anterior two-thirds.
    • Insertion: The first metatarsal distal phalanx.
    • Actions: Inversion, dorsiflexion, and big toe extension.
    • Nerve supply: Peroneal (fibular) nerve.

    Extensor Digitorum Longus muscle

    • Origin: The interosseous membrane (between the tibia and fibula), the head and anterior surface of the fibula, and the lateral condyle of the tibia bone.
    • Insertion: The middle and last phalanges of the four outer toes are situated on the dorsal (top) surface.
    • Actions: Dorsiflexion, eversion, and toe extension.
    • Nerve supply: Peroneal (Fibular) nerve.

    Blood supply of the ankle joint

    The aortic arch and posterior fibular and tibial arteries deliver arterial blood to the ankle joint. To be able to supply the ankle joint, these arteries develop an anastomosis around the foot’s malleoli, separating into anterior, lateral, and medial regions. The similar veins around the ankle release venous blood.

    Starting in Malleolar Branches of:

    • Peroneal Artery
    • Anterior and posterior Tibial Artery

    Nerve Supply of the ankle joint

    • Common Peroneal Nerve
    • Tibial Nerve

    Innervation of the ankle joint

    The body’s lumbar and sacral plexus generate the sensory and motor materials that supply the ankle complex. Tibial, deep, and superficial peroneal nerves provide the muscles with the necessary motor supply, while the sural and saphenous nerves supply the muscles with their sensory supply. Also supplying the muscles with motor function are these three mixed nerves. It has been established that mechanoreceptors that contribute to proprioception are extensively innervated in the lateral ligaments and joint capsules of the talocrural and subtalar joints.

    Movements at the ankle joint

    The tibia and fibula, which lie on the talus and calcaneus bones at the back of the foot, are situated in the ankle joint. There are twenty-six bones in the foot. The movements that are in evidence are:

    • Plantarflexion: a rise of the toes. Range of motion normal: 0 to 50 degrees.
    • Dorsiflexion is the action of elevating your foot. The normal range of motion is from 0 to 20 degrees.
    • Inversion: The inward rotation of the foot’s sole. In a normal range of motion, 0 to 15 degrees.
    • Eversion is the flattening or turning outward of the foot’s sole. The normal range of motion is from 0 to 10 degrees.
    • It is uncommon to perform plantarflexion and dorsiflexion alone at the ankle joint; instead, they are usually combined with motions at the subtalar and midtarsal joints. That is to say, dorsiflexion is followed by abduction and eversion allowing the foot to lead, whereas plantarflexion generally follows by adduction and inversion allowing the foot to supinate.
    • The ankle joint represents the 90-degree angle generated by the foot and the leg when one is standing. At a plantarflexion range of 0–10 degrees, this is the neutral, or dispersed, state for the ankle joint. Strong and wide muscular support is required posterior to the joint to preserve stability and prevent collapse or forward inclination when standing because the weight of the body acts through a vertical line that travels anteriorly to the joint. The soleus and gastrocnemius muscles are the main sources of this support. Ankle joints are most stable when they are packed together and at maximal dorsiflexion.

    Clinical Significance of the ankle joint

    Ankle Fracture

    All ages are vulnerable to ankle fractures involving one or both malleoli. The fracture pattern indicates how stable the fracture is. Patients usually complain of ankle joint pain, edema, and trouble bearing weight. When healing stable fractures, a leg cast should be worn partially for four to six weeks. An open reduction and internal fixation (ORIF) is necessary for unstable fractures to rebuild a congruent mortise and fibular length.

    Talus Fracture

    This kind of injury usually occurs from a high-energy trauma, including a car crash or a fall from a height. There is a risk of avascular necrosis (AVN) in talus fractures due to its fragile blood supply.

    Ligament Injury

    Ankle sprains rank among the most typical musculoskeletal injuries. Indoor and court sports provide the largest risk of ankle sprains, with females more likely to receive one than males and children having a greater chance than adolescents and adults.

    FAQs

    Is the ankle a joint that hinges?

    The talus, tibia, and fibula bones are defined to form the ankle joint, which is a hinged synovial joint.

    What is the ankle joint play?

    Plantar flexion, dorsiflexion, inversion, and eversion are the movements that can be accomplished at the ankle joint.

    What’s the name of the ankle joint?

    The joint that connects your foot to your lower leg has the name the ankle. Healthcare providers tend to refer to it as the talocrural joint or the tibiotalar joint. Your ankles participate in the skeletal system, just like any other joint. Additionally, your ankles are comprised of cartilage, muscles, ligaments, and nerves.

    The ankle: is it a pivot joint?

    The ankle does not have a pivot joint. However, the ankle can rotate in a way that is similar to a pivot joint’s actions.

    Which four ankle joints move in these ways?

    Ankle joints are hinge-type joints that may move in a single plane. Thus, the biggest movements at the ankle joint are dorsiflexion and plantarflexion. The other foot joints, especially the subtalar joint, are responsible for causing eversion and inversion.

    References

    • Prajapati, N. (2023, August 18). Ankle joint: Anatomy, Function, Movement, Exercise – Samarpan Physio. Samarpan Physiotherapy Clinic. https://samarpanphysioclinic.com/ankle-joint-anatomy-function-movement-exercise/
    • Goriya, D. (2024, January 1). Ankle Joint Ligament: Anatomy its Function and Prevention. Mobile Physiotherapy Clinic. https://mobilephysiotherapyclinic.in/ankle-joint-ligament/
    • Professional, C. C. M. (2024a, May 1). Ankle Joint. Cleveland Clinic. https://my.clevelandclinic.org/health/body/24909-ankle-joint
    • https://www.physio-pedia.com/Ankle_Joint.
    • Image-https://www.google.com/url?sa=i&url=https%3A%2F%2Fwww.lecturio.com%2Fconcepts%2Fankle-joint%2F&psig=AOvVaw1FV2sbSX_KejYt4oWE_qhY&ust=1726122948776000&source=images&cd=vfe&opi=89978449&ved=0CBQQjRxqFwoTCNiNsbejuogDFQAAAAAdAAAAABAE.
  • 23 Best Exercise for Iliotibial Band Syndrome

    23 Best Exercise for Iliotibial Band Syndrome

    Introduction:

    Exercise for iliotibial band syndrome, along with pain medication and physical therapy, is an important element of your entire treatment plan.

    Iliotibial Band Syndrome (ITBS) is a common overuse injury, particularly among runners, cyclists, and other athletes involved in repetitive lower limb activities. The iliotibial band (IT band) is a thick band of connective tissue that runs along the outside of the thigh, from the hip to the shin.

    When this band becomes tight or inflamed, it can cause pain and discomfort, typically around the outer knee. Proper exercise and stretching routines are crucial in managing ITBS, as they help to alleviate tension in the IT band, strengthen supporting muscles, and improve overall biomechanics to prevent future injury.

    Long-distance running, cycling, weightlifting, and military training are the activities most frequently linked to iliotibial band syndrome. a severe knee injury that sportsmen frequently suffer. This ailment manifests as a weakening of the hip abductor muscles. You may have iliotibial band syndrome if you get pain on the outside of your knee, particularly if you run.

    Examining what additional considerations should be made before performing a specific exercise is a good place to start when talking about Exercises for iliotibial band syndrome (IT band syndrome). We will go over the things to consider while creating an exercise program for iliotibial band recovery in this post, along with suggestions for exercises based on your objectives and the current state of the condition.

    Causes of Iliotibial Band Syndrome:

    Iliotibial band syndrome is caused by excessive friction from the iliotibial band pressing on the bone as a result of its high tightness. The main cause of the injury is overuse from repetitive motions. iliotibial band syndrome impairs knee movement by causing pain, irritability, and friction. It appears to occur in a small number of individuals, while the causes are unknown.

    Other factors;

    • Bowlegs
    • Flat feet
    • Repetitive activities such as running and cycling
    • Knee arthritis

    Signs and symptoms:

    Your hip’s greater trochanteric is constantly rubbed by your iliotibial band. The broadening of the bone toward the head of your femur is known as the larger trochanteric region. Hip pain and tendon irritation are put on by the friction. There may be a snapping noise.

    • Redness and warmth

    Your knee may appear inflamed on the outside and feel hot to the touch.

    • Sensations of clicking

    Something on the outside of your knee may pop, crack, or click.

    • Pain in the knees

    When you bend and extend your knee, your stretched iliotibial band rubs against your lateral epicondyle repeatedly. The friction causes your tendon to get inflamed and your knees to pain.

    Exercise for Iliotibial Band Syndrome:

    Side plank

    • Take a plank position.
    • Press into your left arm after moving your right arm.
    • It is usual to place your right hip so that it points upwards.
    • Make sure your hips are straight.
    • To provide support, lift your ankles or droop your left leg.
    • Place your right hand on your right hip or extend your arm toward the ceiling.
    • Next, raise your right leg as high as you can.
    • Hold this position for a few seconds.
    • Then return to your neutral position.
    • Then relax.
    • Repeat this exercise five to ten times.
    • After that, complete the other side.
    Supported-Side-Plank-Reach
    Supported-Side-Plank-Reach

    Towel stretch

    • You may perform this easy stretch while sitting on the floor or in bed.
    • Stretch your legs out in front of you while sitting on the floor or in bed.
    • Place a rolled-up towel beneath each heel of your feet and grasp its ends.
    • Move the towel slowly toward you while maintaining straight knees and a straight posture.
    • Hold this position for a few seconds.
    • Then return to your neutral position.
    • Then relax.
    • Repeat this exercise five to ten times.
    Towel-stretch
    Towel-stretch

    Lateral Band Walks

    • Place the band slightly above each knee and wrap it around both legs, making sure it stays level and untwisted.
    • Step with your feet shoulder-width apart.
    • The band must be strong but not stressful.
    • Lower your body into a half-squat position with your knees slightly bent to activate your gluteus medius.
    • With your feet parallel to your shoulders and your body weight evenly distributed over both feet, face forward.
    • Continue to flex your other leg out to the side and retain your half-squat stance.
    • This leg should be moved sideways in and out five to ten times.
    • Throughout the exercise, maintain your hips level.
    • Then return to your neutral position.
    • Then relax.
    • Repeat this exercise five to ten times.
    lateral-band-walks
    lateral-band-walks

    Low lunge

    • To create a low lunge, place your left knee on the floor just below your hips and step your right foot ahead.
    • Stretch your left arm to the right after placing your right hand onto your right thigh.
    • Maintain an upright posture to prevent your hips from falling forward.
    • The left outer hip is stretched.
    • Hold this position for a few seconds.
    • Then return to your neutral position.
    • Then relax.
    • Repeat this exercise five to ten times.
    • Repeat with the other side.
    low-lunge-workout
    low-lunge-workout

    Wide-legged standing forward bend

    • Step or leap from a standing position until your feet are broader than your shoulders.
    • Tilt your toes in and bend your knees just a little bit.
    • Lean forward slightly by bringing your hands to the floor and stretching your hips.
    • Put your hands on the outside of your right leg to feel the stretch along the outside of your lower body.
    • Slide your hands to the right after moving your upper body in that direction.
    • If your hands are not able to reach the floor, use a block or chair for support.
    • Hold this position for a few seconds.
    • Then return to your neutral position.
    • Then relax.
    • Repeat this exercise five to ten times.
    Wide-legged standing forward bend
    Wide-legged standing forward bend

    Standing Iliotibial Band Stretch

    • Arrange your right leg so that it crosses your left leg when standing, and firmly plant both feet.
    • Attempt to maintain a shoulder-width distance between your feet.
    • Go as far to the right as your body will allow, drooping, and feel how your outer hip and knee stretch.
    • Reach your left arm overhead to extend the stretch farther.
    • For more support or resistance, press your left hand into a wall.
    • Hold this position for a few seconds.
    • Then return to your neutral position.
    • Then relax.
    • Repeat this exercise five to ten times.
    standing-iliotibial- band-stretch
    standing-iliotibial- band-stretch

    Seated Spinal Twist

    • Bend your knees, place your hips on the floor, and sit with your feet flat on the floor.
    • Bend your left knee such that the outside of your right buttocks is grounded and the front of your knee faces forward.
    • Lift your right foot and plant it against the outside of your left leg, applying pressure with it.
    • With your right fingertips behind you and your hands on the mat or a block, maintain a straight and straightened spine.
    • Taking a breath, extend your heart and entire spine upward by pressing your hips down, then raise your left arm.
    • When you release the air, push your left elbow out to the side of your right leg.
    • With every inhalation, stretch your back and bend your neck more deeply.
    • Hold this position for a few seconds.
    • Then return to your neutral position.
    • Then relax.
    • Repeat this exercise five to ten times.
    Seated Twist Stretch
    Seated Twist Stretch

    Clamshell Exercise With Band

    • Place your forearm on the mat while lying on your side with your legs stacked on top of one another.
    • Put a resistance band over each of your two thighs after that.
    • Maintaining your feet together and your knees and hips arranged, bend your knees to a 45-degree angle.
    • Lay your other hand on the mat in front of you and put your head on your palm for further support.
    • Engage your core by pulling your belly button toward your spine and squeezing your abs.
    • As you slowly raise your upper knee toward the highest point, maintain your lower leg on the mat.
    • Hold this position for a few seconds.
    • Then return to your neutral position.
    • Then relax.
    • Repeat this exercise five to ten times.
    Clamshell exercise with a resistance band
    Clamshell exercise with a resistance band

    Side-lying hip abduction

    • As you lie on your side, elevate your affected leg.
    • Imagine that your toes are attempting to touch the front of your leg by straightening your upper leg and bringing them toward you.
    • For balance, maintain your bottom leg slightly bent, your hips arranged in a and your abdominals contracted.
    • Raise your rear leg slightly and slowly.
    • Hold this position for a few seconds.
    • Slowly down your leg.
    • Then return to your neutral position.
    • Then relax.
    • Repeat this exercise five to ten times.
    • Repeat the exercise on the opposite leg.
    side-lying-hip-abduction
    side-lying-hip-abduction

    Thomas flexor stretch

    • Place your mid-thigh in line with the edge of the table when you sit at its end.
    • Press and retract your scapulae without arching your lower back after contracting your abdominal muscles to engage your spine.
    • As you pull your left knee off the table and toward your chest, maintain your core contractions.
    • Put your hands beneath your left leg without shifting your body.
    • Lean backward a little more, maintaining your head in line with your spine and your abs firm.
    • Stretch your right leg upward in order to raise your right thigh off the table.
    • Start straightening out your back, one vertebra at a time, lowering it to the table.
    • Holding on to your left thigh, keep your right knee pointing straight up toward the ceiling.
    • To allow your lower leg to extend over the table and give your right hip flexor a stretch, as you drop your head into a supine (on your back) position, hold onto your left leg and lower your right thigh straight down to the table while keeping your knee bent.
    • Hold this position for a few seconds.
    • Then return to your neutral position.
    • Then relax.
    • Repeat this exercise five to ten times.
    • Repeat the exercise on the opposite leg.
    thomas-stretch
    Thomas-stretch

    Pigeon Pose

    • Standing, position your feet hip-width apart.
    • You should position your arms by your sides.
    • Make the front bend while standing.
    • Lean at the hips and pull your body in the direction of your legs so you can do this.
    • Keep your back straight when bending forward.
    • Breathe in and extend your right leg while maintaining a straight left leg behind you.
    • The right knee should be on the floor at this point.
    • Attempt to maintain a raised left heel.
    • Take a deep breath out and place your right shin on the mat.
    • Your left hip and right heel should be in close contact.
    • Legs up on the mat left knee down.
    • Face the ceiling with your left foot.
    • On the carpet in front of you, place your palms.
    • Put your hands on your shins if you find it hard to keep them on the mat.
    • Then, raise your chest and stretch your back.
    • Maintain a calm gaze as you look forward.
    • Hold this position for a few seconds.
    • Then return to your neutral position.
    • Then relax.
    • Repeat this exercise five to ten times.
    • Repeat the exercise on the opposite leg.
    Pigeon-Pose
    Pigeon-Pose

    Bridging

    • Lying flat on your back, bend both knees and place both feet flat on the floor.
    • Arms should be kept by the sides and palms down.
    • As you gradually raise your pelvis, raise your back.
    • Ensure that your upper body and shoulders stay on the ground.
    • Hold this position for a few seconds.
    • Beginning at the top of the spine, slowly lower the pelvis and return toward the ground.
    • Lower into the spine until the entire back is flat against the floor again.
    • Then return to your neutral position.
    • Then relax.
    • Repeat this exercise five to ten times.
    Hip bridge exercise
    Hip bridge exercise

    Single-leg heel drop

    • Take a step in front of a wall or next to a railing for stability, then straighten your back while standing on the step.
    • As you stand up onto the heel of your feet, maintain a straight knee.
    • After that, elevate the leg behind you by shifting all of your weight onto the affected leg.
    • Return your heel to the ground while maintaining slow, careful movement.
    • To go back to the top of the exercise, put your other leg back on the step and push up through both.
    • Then return to your neutral position.
    • Then relax.
    • Repeat this exercise five to ten times.
    single leg heel drop
    Single-leg heel drop

    Side-lying leg raise

    • You can sleep on your right side by lying on the floor or a yoga mat.
    • Maintain an upright posture by keeping your legs raised and your feet placed on top of each other.
    • Instead, use your arm to support yourself by holding it upright or with your elbow flexed, positioned below your head.
    • Extend your left leg off the ground.
    • Don’t raise your leg anymore until you feel the muscles contract.
    • Hold this position for a few seconds.
    • After inhaling deeply several times, pull the leg down until it contacts the right leg again.
    • Then return to your neutral position.
    • Then relax.
    • Repeat this exercise five to ten times.
    side-lying-leg-raise
    side-lying-leg-raise

    Hip hikes

    • On a step, take a sideways stance with your left leg hanging over the edge.
    • Maintain an upright posture with your shoulders and hips.
    • Leg straightening on the right, elevate your left hip.
    • Next, lower the left leg once more.
    • Then return to your neutral position.
    • Then relax.
    • Repeat this exercise five to ten times.
    • Next, work on the other side.
    hip hikers
    hip hikers

    Foam-roll-stretch

    • Press down with your thigh to position the foam roller on your right side.
    • Keep your right leg straight and plant the sole of your left foot to take advantage of the floor’s support.
    • Raise yourself to the right or place both hands on the ground for stability.
    • After reaching the knee, the foam then goes back up to the hip.
    • Look back over your shoulder.
    • Change to the other side after maintaining the extended position for up to one minute.
    • Then return to your neutral position.
    • Then relax.
    • Repeat this exercise five to ten times.
    foam-roll-stretch
    foam-roll-stretch

    Prone leg raise

    • Instead of using a hard surface for this workout, you can use a mat or a plinth to give yourself some support.
    • You can first extend your legs behind you while lying on your stomach.
    • You can rest your head on your arms if it is uncomfortable for you.
    • For your left leg, extend your leg as high as it will go without hurting by contracting your gluteus and hamstring muscles.
    • Before starting this activity, confirm with the physical therapist that your pelvic bones are stabilized.
    • Hold this position for a few seconds.
    • Then return to your neutral position.
    • Then relax.
    • Repeat this exercise five to ten times.
    • Apply the same movement to the opposing leg.
    Prone-straight-raise-leg-exercise
    Prone-straight-raise-leg-exercise

    Forward fold with crossed legs

    • Keep your feet hip-distance apart while standing.
    • Align your pinkie toes as much as possible when you cross your left foot over your right.
    • Stretch your arms above your head and release the breath.
    • Bend forward from the hips, extending your spine, and release the breath.
    • Extend the back of your neck and extend your hands toward the floor.
    • Maintain a small bend in your knees.
    • Hold this position for a few seconds.
    • Then return to your neutral position.
    • Then relax.
    • Repeat this exercise five to ten times.
    •  Then proceed to the other side.
    Forward fold with crossed legs
    Forward fold with crossed legs

    Cow face pose

    By releasing deep tension in your thighs, hips, and glutes, this yoga pose increases your range of motion and flexibility. It also makes your knees and ankles longer.

    • As you begin, take a seat and Your left knee should be bent to the center of your body.
    • Slide the left foot into your hip.
    • Raising your knees, fold your right over the left.
    • Position your right ankle and heel outside of your left hip.
    • Hold this position for a few seconds.
    • To go deeper, bend your hands forward and step forward with them.
    • Then return to your neutral position.
    • Then relax.
    • Repeat this exercise five to ten times.
    Cow-Face-Pose-Gomukhasana-Variation-pose
    Cow-Face-Pose-Gomukhasana-Variation-pose

    Hamstring stretch

    • Start with lying down on the ground in front of an open door.
    • While on your back, extend your affected leg through the opening.
    • When you feel a stretch at the back of your thigh, straighten your knee and elevate the affected leg up against the wall.
    • Hold this position for a few seconds.
    • Then return to your neutral position.
    • Then relax.
    • Repeat this exercise five to ten times.
    Hamstring stretch on wall
    Hamstring stretch on wall

    Straight leg raise

    • Lay down on your back on the floor where you feel relaxed.
    • With your foot planted firmly on the ground, bend one leg to a ninety-degree angle.
    • Make sure your other leg is straight.
    • To help improve the support of your straight leg, engage your quadriceps and raise it off the ground.
    • Hold this position for a few seconds.
    • Breathe out and slowly return your leg to the floor.
    • Then return to your neutral position.
    • Then relax.
    • Repeat this exercise five to ten times.
    Straight-leg-raise
    Straight-leg-raise

    Standing calf stretch

    • Place your hands at approximately eye level against a wall while facing it.
    • With the heel of each leg planted firmly on the ground, maintain one leg extended forward and the other back.
    • As you gradually lean against the wall, turn your rear foot slightly inside until you feel a stretch in the back of your calf.
    • Hold this position for a few seconds.
    • Then return to your neutral position.
    • Then relax.
    • Repeat this exercise five to ten times.
    standing calf stretch
    standing calf stretch

    Side-lying Iliotibial Band Stretch

    • Lying on your side, your affected knee should be on top.
    • Grip your bottom leg while bending your upper leg.
    • Your quadriceps muscle should be feeling tense.
    • Step back a little, keeping your bottom foot on the side of your upper knee.
    • Extend the outer section of your top thigh by gently pulling the foot on your knee toward the floor.
    • The area on the side of your leg where the iliotibial band joins the knee ought to be stretched.
    • Hold this position for a few seconds.
    • Then return to your neutral position.
    • Then relax.
    • Repeat this exercise five to ten times.
    lying iliotibial band (IT band) Stretch
    lying iliotibial band (IT band) Stretch

    What safety precautions are required when working out?

    • Try not to use any forceful or jerky movements when working out.
    • When you exercise, maintain a straight posture.
    • Stay away from challenging activities.
    • Stretches should be performed before and after sets, along with the correct quantity of repetitions for each exercise, under the protocol.
    • Take rest in between your physical activity sessions.
    • For the most beneficial exercise experience likely, dress comfortably and loosely to encourage relaxation and full range of motion. Avoid wearing clothes that are too tight or stylish.
    • Do gradual stretches and bends.
    • Although it may be challenging, stretching the tense muscles in your joint is essential and usual. Exercise and stretching shouldn’t hurt or make you feel as though someone is stabbing you because doing so is unhealthy and worsens your illness.
    • If the pain worsens, stop immediately.

    When are you going to stop performing the exercises?

    • Intense muscle burning.
    • Swelling or pain in the joints.
    • You feel unwell.
    • Fever
    • Headache
    • If there’s any kind of pain or numbness.

    Exercises to avoid:

    Therefore, if you experience more pain and inflammation during any certain activity, we provide a list of things you should avoid doing. Until your physical therapist gives you the all-clear, generally limit the movements that first activate your condition. Running, cycling, squats, and push-ups are some of these exercises.

    Find out from your physical therapist when and how you can safely pick up your favorite activities again if they are a regular part of your fitness regimen.

    Summary:

    People suffering from Iliotibial Band Syndrome can receive treatment from physical therapists for their stiffness and pain. These consist of manual therapy, stretches, strengthening exercises, and other techniques that help with pain management and proper alignment. The exercises that physical therapists modified to lessen the strain on the knees and hips were also included.

    FAQ:

    Can someone still run if they have Iliotibial Band Syndrome?

    Experiencing Iliotibial Band Syndrome when running
    Most of the time, running is still possible with iliotibial band syndrome; however, to lessen tissue inflammation, you will need to lower your training load. Stretching as part of a restorative exercise regimen and anti-inflammatory medicine are the best treatments for IT band syndrome.

    Is yoga beneficial for Iliotibial Band Syndrome?

    By stretching the surrounding muscles and your iliotibial band, a gentle yoga position helps to release tension and promote fluid mobility. The pressure that causes pain opposite the femur and iliotibial bursa can be reduced by relaxing those thick, fibrous iliotibial bands.

    Is the Iliotibial Band Condition Permanent?

    IT band syndrome often resolves on its own. The amount of time it takes for an injury to heal with proper medical attention and physical therapy will determine when the patient can resume normal activities. If treatment is initiated during the initial stages of the ailment, healing from this condition often occurs quickly.

    Which exercises are beneficial for treating Iliotibial Band Syndrome?

    Standing Iliotibial Band Stretch
    Side-lying leg raises
    Lateral Band Walks
    Clamshell Exercise With Band

    When I have iliotibial band syndrome, can I still exercise?

    Try going shorter than usual distances whether cycling or running. Completely avoid these activities if you are still in pain. Swimming is one workout that can be necessary for you to do as it doesn’t aggravate your ITB.

    What is the flexibility of the iliotibial band?

    There’s a lengthy section of fascia, or connective tissue, lining the outside of your leg that extends from the hip to your knee and shinbone. The IT band aids in hip abduction, rotation, and extension functions. It also helps to move and stabilize the side of the knee while protecting the outside thigh.

    For what kind of physical therapy is iliotibial band syndrome treated?

    This could involve the physical therapist applying soft tissue techniques to relax tense or spasming muscles, extending the hip and knee muscles and joints, or helping the hip, knee, foot, Improve the range of motion in the ankles with specific joint mobilizations for certain activities.

    The iliotibial band syndrome is caused by what?

    While it can affect anyone, it typically only affects athletes, particularly distance runners. The movement is caused by the iliotibial band, which is located on the outside of the thigh: Having poor running form and using the incorrect running materials increases your chance of acquiring iliotibial band syndrome.

    How should someone with IT band syndrome sleep?

    By reducing the amount of stress you place on your body’s pressure points, sleeping on your back can help relieve IT band pain. Using a cushion to raise your legs while you sleep is one way to solve this problem. By doing this, you can lessen the strain and pressure in your hips, which can exacerbate your IT band pain.

    References:

    • September 5, 2023b; Prajapati, D The Best 22 Exercises for Iliotibial Band Syndrome (Samarpan). Samarpan Physical Therapy Clinic. The ideal exercises for iliotibial band syndrome can be found at https://samarpanphysioclinic.com.
    • Australia (n.d.). Bauerfeind. Bauerfeind in Australia. Top 5 exercises for ITB syndrome: https://bauerfeind.com.au/blogs/news/top-5-exercises-for-itb-syndrome?srsltid=AfmBOooEhzbfntrA46x6VZ7VdmpOc71jR2OOj6RDn60NOnn7s8pWpGkO
    • Syndrome of the Iliotibial Band. (2024, May 1). Cleveland Medical Center. ILBIOTibial Band Syndrome: https://my.clevelandclinic.org/health/diseases/21967
    • Exercises for Iliotibial (IT) Band Syndrome in New York New York Idiotibial Band Syndrome. (As of now). Jaspal The website of Ricky Singh, M.D. provides information on iliotibial itband syndrome.
    • (2013) OrthOpaedics. Iliotibial Band Syndrome Strengthening Exercises. It-band-exercises.pdf can be found at https://www.dartmouth-hitchcock.org/sites/default/files/2020-12.
    • E. Cronkleton (2018) 18 August. Stretches for the IT Band, Strength Training, and More. www.healthline.com/health/it-band Healthline.
    • Image 5, 2024b, July 24; Moves, A. Practice the Wide-Legged Forward Fold in Yoga as one of the Aloha Moves. Alo Swings. In yoga, the forward-facing fold with wide legs is a practical movement technique that everyone may learn.
    • Image 13, The Sports Injury Clinic’s website. (December 13, 2011). Heel drops as a thigh exercise [Video]. YouTube. YJav8RVoh6I can be seen on YouTube.
    • Image 16, Maggie. (2021, August 21). An effective stretch for Iliotibial Band Syndrome is the foam roller stretch. Dr. Malone Peggy. ILIOTibial Band Syndrome Foam Roller Stretch: https://drpeggymalone.com/
    • Image 18, On December 11, 2015, Kyoung, L. H. Pinterest: Yoga Sequences. https://in.pinterest.com/pin/339599628131531446/
  • 17 Best Exercise for Flat Feet

    17 Best Exercise for Flat Feet

    Exercise for flat feet is a crucial part of your overall treatment plan. Incorporating specific exercises, along with foot supports, helps strengthen the arch of the foot, improving stability and reducing discomfort.

    Introduction:

    Pes planus, often known as fallen or collapsed arches, is the medical term used to describe the ailment known as flat feet. This is a fairly common condition that affects up to 30% of the population and causes symptoms to appear every ten years for people who have it. Although it is more common for both legs to be affected, a collapsed arch may develop in just one. Flat feet can be caused by a variety of issues, including obesity, arthritis, and traumas.

    Flat feet require careful management since they can lead to imbalance, trouble walking, and occasionally pain in the ankle, hip, or knee joints. They can also put stress on other joints. Body-wide balance can be achieved by attending to one’s sense of well-being. Your flat feet may be the source of various health issues it can help you with.

    Causes:

    Genetics can play a role in flat-foot conditions at times. Due to flat feet, some people with this condition have shallow arches, while others have very high arches.

    The following factors raise the likelihood of flat feet;

    Signs and symptoms:

    • Muscles in the legs that hurt or feel exhausted
    • Leg cramps
    • Ankle, heel, arch, and sole pain
    • When the front of the foot extends outside the shoe, this is known as toe rolling.
    • Having trouble running and walking
    • Ankle swelling could happen internally.
    • Pain when walking or instabilities in your gait

    Risk Factors:

    Flat feet raise the possibility of developing this illness or other issues, such as;

    • Shin splints
    • Obesity
    • Arthritis
    • Bone spur
    • Hallux valgus
    • Diabetes

    Consider the following safety precautions before starting an exercise program:

    It’s crucial to take a few safety measures and optimize the benefits before beginning any exercise program. See your doctor or physical therapist to find out which exercises are best for your particular issue. It’s imperative that you pay attention to your body and not push yourself when it hurts. Exercise-related pain is common, but chronic or severe pain could indicate excessive exercise.

    It’s crucial to keep up good form and technique to prevent repetitive injuries. If you’re not sure how to properly complete an exercise plan, consult a doctor. It is beneficial for your joints and muscles to warm up before an exercise session.

    Exercise for Flat Feet:

    Towel curls

    • Take a seat in a comfortable position.
    • Place your foot on top of the towel after spreading it out.
    • It will begin to move toward you, the towel.
    • All you have to do is raise your toes while maintaining a downward heel flexion.
    • Keeping your heel on the towel, extend your foot as far as possible by stretching it equally in all directions and in the middle.
    • Squeeze the towel in with your toes and up, keeping your heel straight.
    • Grab the towel and bring it closer to you.
    • On both sides of the foot, use all five fingertips to draw a broad circle beneath the arch area.
    • Each pushback and extension movement just moves the towel in that designated area.
    • Then return to your neutral position.
    • Then relax.
    • Repeat this exercise five to ten times.
    • Repeat exercise with the other leg.
    Towel-curl
    Towel-curl

    Heel Walking

    • It is advised that during heel walking, you go forward on your heels.
    • Walking on your heels will strengthen your heel muscles and improve your ankle joint’s balance.
    • If you require some help with the exercise, use a wall.
    • five to ten rounds of toe walking are possible in a single session.
    • Then return to your neutral position.
    • Then relax.
    • Repeat this exercise five to ten times.
    • You might add the barefoot or sand walking exercise into the program as you advance through it.
    Heel Walking
    Heel Walking

    Calf Heel Raise One Leg

    • Step onto the ground and adopt a standing position.
    • Find your center of balance over your right foot and cross your left foot behind your right ankle.
    • As you gradually lift your right heel off the ground or gracefully, brace your core and maintain forward vision.
    • Hold this position for a few seconds.
    • After holding at the top, pull your heel down under that step to go back to the beginning.
    • Then return to your neutral position.
    • Then relax.
    • Repeat this exercise five to ten times.
    Calf Heel Raise One Leg
    Calf Heel Raise One Leg

    Marble pickup

    • Sit upright on a chair and place both feet firmly on the floor.
    • Arrange two bowls on the floor in front of the feet.
    • One should be left empty, and the other should contain a minimum of ten to twenty marbles.
    • All you have to do is plant each one with the toes of one foot in the empty bowl.
    • Then return to your neutral position.
    • Then relax.
    • Repeat this exercise five to ten times.
    marble pickup
    marble pickup

    Ankle Plantar Flexion Isometrics

    • The foot muscles become stronger with the ankle planter flexion isometric exercise.
    • For this exercise, you can sit on the mat or plinth for a long time, and then With your foot supported up on a towel against the wall.
    • Press your foot up against the towel.
    • Hold this position for a few seconds.
    • Then return to your neutral position.
    • Then relax.
    • Repeat this exercise five to ten times.
    Ankle Plantar Flexion Isometrics
    Ankle Plantar Flexion Isometrics

    Heel raise with scrunch

    • You needed a chair for support as well as a wedge and napkin for the heel rise with scrunch exercise.
    • The affected foot’s heel can now be placed on a towel-covered wedge.
    • Using your toes, compress or curl the towel, then bring your heel down to the surface below the horizontal.
    • Use just your opposing leg to move yourself upward; after, shift all of your weight to the leg that is involved and return to your starting or regular position.
    • Then return to your neutral position.
    • Then relax.
    • Repeat this exercise five to ten times.
    Heel raise with scrunch
    Heel raise with scrunch

    Arch lifts

    • With your feet exactly beneath your hips, begin in a standing posture.
    • Raise your arches as high as you can while maintaining touch with the floor with your toes and rolling your weight against the outside borders of your feet.
    • Hold this position for a few seconds.
    • Then, lower the arches of your foot.
    • Then return to your neutral position.
    • Then relax.
    • Repeat this exercise five to ten times.
    • Your arch-supporting and elevating muscles will be exercised.
    arch lifts
    arch lifts

    Plantar Fasciitis Stretch

    • Take a seat on a chair on the ground.
    • Across your front, extend your legs.
    • Elevate the affected foot a few inches above the floor.
    • Maintain a straight leg.
    • Your affected foot’s toes should be grabbed and pulled in your direction.
    • Feel the plantar fascia with your other hand.
    • It should feel like it’s pushing forth.
    • Hold this position for a few seconds.
    • Then return to your neutral position.
    • Then relax.
    • Repeat this exercise five to ten times.
    • Repeat with exercise on the other leg.
    seated-plantar-fascia-stretch
    seated-plantar-fascia-stretch

    Tip Toe Walking

    • You should walk on tiptoes when performing tiptoe walking.
    • It’s an excellent way to strengthen the muscles and ligaments in your legs, ankles, and feet.
    • It also makes balance better.
    • five to ten rounds of toe walking are possible in a single session.
    • Walking on tiptoe helps strengthen the ankle joint‘s balancing muscles.
    • This gives the ankle joint stability and balance.
    • Then return to your neutral position.
    • Then relax.
    • Repeat this exercise five to ten times.
    Tip Toe Walking
    Tip Toe Walking

    Towel Stretch

    • Stretch both legs out in front of you while seated on the floor.
    • Then, secure the towel over the heel of the affected foot.
    • Grab the ends in your hands.
    • Bring the towel towards you while maintaining the straight leg that is affected.
    • Hold this position for a few seconds.
    • Then return to your neutral position.
    • Then relax.
    • Repeat this exercise five to ten times.
    Towel-stretch
    Towel-stretch

    Inward calf heel raise

    • Using the standing position, bring your heels nearer each other while keeping your toes apart to perform an inward turn calf heel raise.
    • Elevate your heels and apply pressure on your toes.
    • Hold this position for a few seconds.
    • Lower your heels.
    • Then return to your neutral position.
    • Then relax.
    • Repeat this exercise five to ten times.
    Inward calf heel raise
    Inward calf heel raise

    Toe raises

    • To start, walk forward and lean your back against a wall.
    • Next, raise your toes on the ground.
    • Hold this position for a few seconds.
    • Lower your toes.
    • Then return to your neutral position.
    • Then relax.
    • Repeat this exercise five to ten times.
    toe-raise
    toe-raise

    Calf Stretching

    • To finish the calf stretch, stand facing a wall with your hands resting on it for support.
    • Make sure your heel touches the ground when you shift your foot.
    • Don’t forget to maintain your heel grounded and your rear leg straight.
    • Hold this position for a few seconds.
    • Then return to your neutral position.
    • Then relax.
    • Repeat this exercise five to ten times.
    • Repeat with exercise on the other leg.
    standing calf stretch
    standing calf stretch

    Heel Raise

    • To start, find a comfortable standing position.
    • To maintain balance, grip the chair’s back.
    • To take a stand on them, raise your heels off the ground.
    • Hold this position for a few seconds.
    • Then take down your heels.
    • Then return to your neutral position.
    • Then relax.
    • Repeat this exercise five to ten times.
    heel-raise
    heel-raise

    Sand walking

    • Walking on the sand barefoot helps build strong, flexible legs and powerful calves.
    • If you’re feeling exhausted, move to laps sooner rather than walking in the sand, which is more strenuous than walking on firm ground.
    • If you find yourself at a volleyball court, beach, or desert, search for sand.
    • Off with your shoes and socks and Take a quick walk after that.
    • Then relax.
    sand walking
    sand walking

    Stair arch raises

    • Place your left foot one step higher than your right when standing on steps.
    • As you bring your right foot down so that your heel hangs below the step, use your left foot for balance.
    • Focus on strengthening your arch and progressively raise your right heel as high as you can.
    • Your knee and calf should rotate slightly to the side as you rotate your arch inward, making it higher.
    • Return to the starting position slowly.
    • Then return to your neutral position.
    • Then relax.
    • Repeat this exercise five to ten times.
    stair-arch-raise
    stair-arch-raise

    Tennis Ball Rolls

    • To begin, grab a seat in the chair.
    • Place the back of your knee a few centimeters away from the chair’s edge.
    • Place a tennis ball or any other ball with a similar size and firmness on the ground.
    • Using your leg weight as an advantage, roll your foot over the ball softly, paying particular attention to the arch area.
    • Continue for two to three minutes.
    • Then return to your neutral position.
    • Then relax.
    • Repeat this exercise five to ten times.
    • Repeat with the other leg.
    Tennis-ball-roll
    Tennis-ball-roll

    What safety measures are necessary when working out?

    • Make moderate bends and stretches.
    • Keep your posture straight when exercising.
    • For the ideal training experience, choose loose, casual clothes that encourage relaxation and maximum range of motion. Stay away from very fashionable or tight clothing.
    • When working out, try to avoid using any jerky or aggressive movements.
    • Avoid engaging in difficult activities.
    • Take a break between exercises.
    • In line with the protocol, stretches should be done both before and after sets, as well as the recommended number of repetitions for each exercise.
    • It is common, though sometimes challenging, to stretch the strained muscles in your joint. Since stretching and exercise are bad for you and worsen your sickness, they shouldn’t hurt or make you feel like someone is stabbing you.
    • If the pain gets severe, stop right away.

    When are you going to stop working out?

    • Fever
    • Exercise should be stopped if it hurts.
    • Severe burning in the muscles.
    • You don’t feel good.
    • If numbness or pain are present.
    • Headache

    How to prevent getting flat feet:

    It is not possible to avoid the development of flat feet by specific sports or exercise regimens. You may, however, stay away from the risk factors listed below, which raise your likelihood of developing this illness:

    • Obesity is known to raise the risk of developing pes planus problems.
    • Individuals who suffer from diabetes must make an effort to control their blood sugar levels.
    • Make an effort to manage or sustain your inflammatory disease (like rheumatoid arthritis).
    • Sometimes there is no cure for pes planus in inherited diseases, therefore your only options are to avoid the factor or engage in regular activity to keep your arches normal.
    • Pay attention to the shoes you choose. For everyday wear, stay away from flat or heeled shoes. Make sure your shoes fit properly, especially if your job requires you to walk or stand for extended periods.

    Home remedies:

    The following at-home treatments for flat feet can be used if your symptoms are not too severe;

    • Get some rest if you can

    Refrain from sports and physical activity. if participating in a particular activity causes you to have foot pain or other symptoms. Alternatively, elevate your foot and apply cold packs to the areas that hurt. cold therapy involves giving your feet a three to four-hour ice massage, three times a day.

    • Change Out Old, Damaged Shoes

    Your anxiety may worsen if you wear old shoes. Purchase customized shoes with arch support if you begin to experience pain and discomfort in your legs.

    • Keep your weight in check

    You should reduce your weight if flat feet have started to cause you pain and discomfort.

    Summary:

    When the flat foot begins to experience stressful or challenging walking, irregular locomotion, or walking pattern, can occasionally result from flat feet, and this irregular gait puts strain on other lower extremity joints such as the ankle, knee, and hip joints. You experience pain, tenderness, cramping in your legs, and swelling when you have flat feet.

    Start with the stretching exercise, which lengthens and improves the mobility of the muscles in your feet. Next, include the mobility exercise, which involves extending and flexing all ankle joints. The muscles and joints can move more freely after engaging in mobility exercises. Exercises for strengthening the flat feet might help reduce or perhaps get rid of pain. Nonsteroidal anti-inflammatory medicines (NSAIDs) are the recommended medication if you are experiencing acute discomfort.

    FAQ:

    In what ways does being flatfoot impact a person’s life?

    Foot flatness has many disadvantages. Those who have flat feet, for instance, may experience instability when jogging or walking and are more likely to experience back pain. It is not evenly distributed throughout the body, which puts additional strain on specific joints including the ankle, knee, and hip joints.

    If we had flat feet, what activities did we stay away from?

    Shoes with thin or flat soles, flip-flops, and some styles of high heels should be avoided by both men and women with flat feet as they provide little to no arch support. Seek out footwear that offers the stability you require to engage in physical activity safely. Long periods of standing should also be avoided as they become increasingly painful.

    What situations can lead to flat feet?

    Hallux valgus, calluses, and corns Overpronation, which occurs when your foot flattens and lands on the ground unevenly, can result in the development of a hallux valgus deformity. Flat feet can also cause corns and calluses from parts of your foot rubbing against your shoes undesired.

    Does speed change with flat feet?

    The condition known as Pus planus, or flat foot, is characterized by excessive pronation of the foot. This causes the ankle to lose its ability to stabilize the body, which decreases the ankle’s capacity to absorb shock. Running speed is unaffected, but running puts additional strain on the ankle, hip, and knee joints, among other lower extremity joints.

    Is it possible to treat flat feet with exercise?

    It’s possible to cure flat feet, and you should do exercises like heel stretches regularly to help with pain management and arch correction. Another name for pes planus is collapsing or falling arches. It is a comparatively common illness that can afflict up to 30% of the population, with symptoms appearing in 10% of cases. You can use an orthosis to give your flat feet the correct anatomical structure, except for workouts.

    Is it possible to correct flat feet?

    Certain exercises for strengthening and lengthening muscles can be prescribed by a physical therapist for treating flat feet. Additionally, they might advise you on specific lifestyle modifications, such as working on strengthening your core and changing the way you stand and walk.

    Are flat feet ever going to become normal?

    This could delay until a youngster is older than five years old if they have flexible flat feet. By the time they are ten years old, the majority of children with flat feet typically start to acquire regular arches, thus having flat feet in their early years does not guarantee it.

    References:

    • D. Prajapati (2024, Jan. 13). Physio Samarpan: The Top 23 Exercises for Flat Feet. Physiotherapy Clinic in Samarpan. The 23 Best Exercises for Flat Feet at Saramarpan Physio Clinic
    • Cronkleton, E. April 19, 2023. Activities for Uneven Feet. Flat-foot workouts on Healthline: https://www.healthline.com/health
    • B. Australia (n.d.-b). Bauer-Feind. Germany-Australia. #top-7-flat-foot-exercises – https://bauerfeind.com.au/blogs/news/?srsltid=AfmBOoocn3SqCFt1dov1fHJ8SLPgjzl2dMZW2JSKYUfoP0rDzeBjPUJo
    • S. Physio (n.d.–b). Surrey Physio’s Top 5 Flat Foot Exercises. Physio Surrey. The top five exercises for flat feet are available at https://www.surreyphysio.co.uk.
    • Image 2, On March 6, 2022, Song, D. Heel Walk: Hero in Rehabilitation. Rehabilitation Champion. Exercise: heel walk at https://www.rehabhero.ca
    • Image 3, Physiology. (n.d.-a). Calf endurance blog at Spooner Specialist Physiotherapy, Inc.
    • Image 5, Get My Patient Well Again. 2022a, 25 January. Exercise for Ankle Plantar Flexion Using Isometrics [Video]. YouTube. This video can be seen at https://www.youtube.com.
    • Image 6, Upstep: Online Custom Orthotics Insoles for Daily & Sport Use. (No date). eccentric heel raises scrunch exercise at https://www.upstep.com
    • Image 7, April 26, 2021: Digital, R. Foot Doming Exercise’s Advantages – Burlington Sports Therapy. Sports Therapy in Burlington. Benefits of foot-doming exercise: https://burlingtonsportstherapy.com/blog/
    • Image 9, On February 10, 2020, Leigh, K., and Leigh, K. Facts That Parents Should Understand About The Incredible Kids That Toe Walk. Sensational Kids. What Parents Need to Know About Toe Walking: https://www.sensationalkids.ie/
    • Image 11, On February 21, 2014, Wilkins, T. Fit Fridays: Seven Exercises to Avoid the Most Common Sports Injuries – Hoops Education. The most popular sports that cause injuries and the seven exercises that can help prevent them are covered by Hoops Education.
    • Image 16, Whitney Stevenson. (April 19, 2019). [Video]: Stair Arch Raises. https://www.youtube.com/watch?v=Ur4PR_vXuxs
  • Chondromalacia Patella (CMP)

    Chondromalacia Patella (CMP)

    What is a Chondromalacia Patella?

    Chondromalacia patella (CMP) is a disorder characterized by the weakening and deterioration of the cartilage beneath the patella (kneecap). This cartilage normally allows smooth movement of the knee joint, but when it deteriorates, it can cause pain, discomfort, and a grinding sensation during movement. Often referred to as “runner’s knee,” Chondromalacia Patella is common in young athletes, but it can also affect older adults, especially those with arthritis.

    The condition is typically aggravated by activities that place stress on the knee, such as climbing stairs, squatting, or sitting for prolonged periods. Early diagnosis and appropriate management can help alleviate symptoms and prevent further cartilage damage.

    The hyaline cartilage below the patella is softening, swelling, fraying, and eroding, and the underlying bone is sclerosis as a result of degenerative changes in the articular cartilage of the posterior surface of the patella.

    Anatomy related to Chondromalacia Patella

    Knee Joint
    Knee Joint
    • The femur, tibia, fibula, and patella are the four main bones that make up the knee joint.
    • For effective knee joint mobility, the patella must be able to slide along the femoral groove, which is made possible by articular cartilage on the underside of the patella.
    • The articular cartilage’s nutrition may be negatively impacted by excessive and persistent twisting forces on the lateral side of the knee, particularly in the medial and central regions of the patella, where degenerative change is more likely to develop.
    • During knee extension, these muscles particularly the VL on the lateral side and the VMO on the medial side act as active stabilizers. Its job is to maintain the patella’s center of gravity within the trochlea.
    • The quadriceps have an impact on the knee’s passive components in addition to the patella position. The majority of the lateral retinaculum originates from the iliotibial band (ITB), and these passive structures are stronger and more extensive on the lateral side than the medial side.
    • Excessive lateral tracking and/or lateral patellar tilt may result from an overly taut ITB. The ITB is a non-contractile structure, therefore this could be the result of the tensor fasciae lata being tight.
    • Other significant anatomical structures:
    • The disorder known as femoral anteversion, or medial torsion of the femur, affects how the bones align at the knee. This may result in femur misalignment with respect to the patella and tibia, which could cause overuse problems to the knee.
    • It represents the geometric relationship between the pelvis, tibia, patella, and femur.
    • The Q-angle will rise in response to increasing hip adduction and/or internal rotation, which will also raise the lower extremity’s relative valgus. The contact pressure on the lateral side of the patellofemoral joint—which is also raised by the tibia’s external rotation—will rise as a result of the higher Q-angle and valgus.

    Epidemiology

    • Young individuals who are physically active and participate in running activities or who work in jobs that require frequent stair climbing and/or kneeling are more likely to develop chondromalacia.

    Causes of Chondromalacia patella

    The articular cartilage may also become softer due to instability or maltracking of the patella.

    Principal causes of malalignment of the patella:

    • Q-angle: One of the most important causes of patellar malalignment is an aberrant Q-angle. For men, a normal Q-angle is 14°, and for women, it is 17°.
    • Tightness in the Rectus femoris muscle: impairs patellar mobility during knee flexion.
    • Tensa Fascia late; influences the ITB Hamstrings: Tight hamstrings during running cause the knee to flex more, which increases the dorsiflexion of the ankle. The talocrural joint has compensatory pronation as a result.
    • Gastrocnemius: a tight muscle will causes the subtalar joint to compensate by pronating.
    • Excessive pronation: The patella will become misaligned as a result of this internal rotation.
    • A condition known as patella alta occurs when the patella is positioned unusually superior. When the patellar tendon’s length is 20% longer than the patella’s height, it is present.
    • It’s critical to maintain a muscular balance between the VM and VL. Degenerative disease may result from the patella being dragged too far laterally in areas where VM is weaker, increasing contact with the condylus lateralis.
    • Trauma can result in degenerative changes in the articular cartilage, such as instability brought on by prior trauma or overuse during the healing process.
    • Microtrauma repetition and inflammatory disorders
    • Postural distortion: results in the patella being misplaced or dislocated within the trochlear groove.
    • Patellofemoral pain syndrome prevalence is related to hip posture and strength. Exercises for hip stability and strengthening may therefore be helpful in the treatment of patellofemoral pain syndrome.

    Stages of Chondromalacia patella

    Oedema may also result from this, which is linked to the cartilage’s increasing thickness. A more uneven surface with localized thinning that can expand to reveal the subchondral bone will be present in the later stages.

    • Stage 1: articular cartilage swells and softens as a result of broken vertical collagenous fibers. Upon arthroscopy, the cartilage seems spongy.
    • Stage 2: the separation of the deep and superficial cartilaginous layers causes blisters to form in the articular cartilage.
    • Stage 3: less than 50% of the patellar articular surface is affected by fissures, ulcerations, fragmentation, and fibrillation of cartilage that extend to the subchondral bone.
    • Stage 4: sclerosis and erosions of the subchondral bone, together with crater development and eburnation of the exposed subchondral bone, exposing more than 50% of the patellar articular surface. At this stage, osteophyte formation also takes place.

    Rather, it is a pathological or surgical finding that denotes areas of divergent loading or articular cartilage trauma.

    Clinical features of Chondromalacia patella

    • The primary sign of chondromalacia patellae is anterior knee pain, which is made worse by routine movements including running, stair climbing, squatting, kneeling, and getting up from a sitting to a standing posture that puts stress on the patellofemoral joint.
    • discomfort coming from the patella’s back side. The pain is taken on by the patella pressing against the femoral condyle. Pain frequently results in handicaps that limit short-term engagement in daily tasks and physical activity.
    • pain when the patella is palpated beneath its medial or lateral border; crepitation felt during movement; mild edema; and a high Q-angle.

    Risk Factors of Chondromalacia Patella:

    There are numerous variables that could make you more susceptible to chondromalacia patellae.

    • Age: Young adults and adolescents are more susceptible to this disease. Rapid bone and muscle development occurs during growth spurts, which may be a factor in temporary muscular imbalances.
    • Sex: Both improper knee posture and increased lateral (side) pressure on the kneecap may result from this.
    • Flat feet: Compared to people with higher arches, people with flat feet may experience greater strain on their knee joints.
    • Previous injury
    • High activity level: You run a higher chance of developing knee issues if you exercise frequently or have a high activity level that puts strain on your knee joints.
    • Arthritis: Another disorder that can cause inflammation in the joint and tissue is arthritis, which can also manifest as a runner’s knee. A kneecap that is inflamed may not operate as intended.

    Differential Diagnosis

    • Chondromalacia patellae
    • Osteochondritis desiccant
    • Patellofemoral osteoarthritis
    • Patellofemoral pain syndrome
    • Lateral patellar compression syndrome
    • Plica syndrome
    • Quadriceps tendonitis/tendinopathy
    • Patellar tendonitis/ tendinopathy
    • Saphenous neuroma
    • Postoperative neuroma
    • Patellar fat pad inflammation
    • Hoffa disease
    • Patella Alta
    • Patella Baja
    • Patella instability
    • Bi-partite patella

    Diagnosis of Chondromalacia patella

    Examination

    A knee examination consists of four components: mobility, feel, X-ray, and observation.

    Effusion test:

    • Patellar tap test: The patient has one leg outstretched while they are supine.
      On the other hand, the therapist applies pressure to the medial and lateral recesses, pressing the fluid beneath the patella while preserving the pressure on the suprapatellar pouch.
      Since the test may yield a false positive, we must always compare results from both sides.
    • Patellar grind test or Clarke’s sign.
    • Compression test.
    • Extension-resistance test.
    • The critical test: involves the patient sitting up straight and contracting their quadriceps isometrically at five various angles (0°, 30°, 60°, 90°, and 120°) while rotating their femur externally and holding the contractions for ten seconds. The leg is extended to its maximum length if pain is experienced. Keep this glide going as you repeat the isometric contractions. There is a good possibility of a successful outcome if this lessens the discomfort and originates from the patellofemoral region.
    • Feel: If the patella is crushed against the femur in either a vertical or horizontal direction when the knee is fully extended, pain and crepitus will be experienced.
      Generally, a sharp ache under the patella will occur when you resist a static quadriceps contraction. Both knees may exhibit this, with the affected side experiencing more severe symptoms.
    • X-ray: Except in the most severe cases, there is no discernible radiological alteration. The patellofemoral joint space narrows and osteoarthritic abnormalities start to show in the latter stages.

    Treatment:

    Medical Treatment of Chondromalacia patella:

    • Education and exercise are two crucial components of a therapeutic plan. Education aids in the patient’s comprehension of the ailment and the best course of action for managing it.
    • There are several potential surgical techniques in case the conservative methods prove ineffective.
    • Chondrectomy is a term that can be shaved. As part of this procedure, the damaged cartilage is shaved away to reveal the healthy cartilage underlying.
    • Another technique that’s widely utilized to repair damaged cartilage is drilling. Perforating tiny holes through the injured cartilage may be more effective in treating more localized tissue deterioration. This makes it easier for healthy tissue to develop through the gaps left by the layers below.
    • Complete palate excision: This is the most invasive surgical procedure. The quadriceps will weaken as a result of this approach, which is only employed when no other treatments are helpful.
    • There are two other treatments that might work.
    • Replacement of the injured cartilage: Although the opposing articular surface will eventually wear down, the early outcomes have been positive.
    • implantation of autologous chondrocytes beneath a tibial periosteal patch.
    • Chondromalacia patellae cannot be cured by merely removing the cartilage. There are several treatments to help manage the biomechanical weaknesses that need to be addressed.
    • The medial capsule (MC) becomes taut: Pulling the patella back into the proper position will tighten the MC if it is slack.
    • Lateral release: The patella will be pulled laterally by an extremely tight lateral capsule. The patella can properly track into the femoral groove after the lateral patellar retinaculum is released.
    • The tibial tubercle’s medial shift: The quadriceps can pull the patella more directly if the tendon’s insertion is moved medially at the tibial tubercle. Additionally, it lessens the amount of patellar wear on the underside.
    • partial patellar excision
    • While opinions on how to treat chondromalacia vary, non-surgical methods are generally seen to be the most effective.

    Physical therapy Treatment of Chondromalacia patella

    Pain-relieving modality

    • Transcutaneous electrical nerve stimulation, or TENS, is an electrical technique that reduces pain by modulating it.TENS shuts down the spinal cord’s anterior grey horn gate mechanism.
    • Short wave diathermy, or SWD for short, is a deep heating technique that employs heat to reduce pain, enhance blood flow to specific muscles, and eliminate waste.
    • IFC: Interferential current therapy generates a low-frequency effect at the targeted tissue, enhances blood flow, decreases edema, stimulates the endogenous opioid system, and blocks the transmission of pain signals. It also eliminates waste products.
    • Cold therapy: a method of reducing pain and inflammation Ice massage: Apply ice to the irritated area to reduce inflammation. To prevent frostbite, use ice in a paper or Styrofoam cup that has been pulled away for five to seven minutes.
    • Initially, the knee is immobilized in a pop cylinder cast if it is too painful.
    • The training regimen consists of passive or active knee swinging that is relaxed to preserve a broad range of motion and single-leg exercises supported by a mild isometric quadriceps contraction to increase strong hip ankle-foot movements.
    • Tensor fascia lata, gastrocnemius, hamstring, and rectus femoris muscles should all be stretched.
    • strengthening activities for the oblique vastus medialis muscle.

    Patellar taping:

    Patellar taping
    Patellar taping

    Taping the patella to change its movement may offer some temporary comfort, but the data is conflicting.

    Knee braces:

    • Supporting the patella and knee joint with bracing is an additional method of pain relief, but it will also change patella tracking and lessen the quadriceps’ active activity.
    • In the short term, bracing may be helpful in providing patients with pain relief and support to assist them avoid antalgic motions and return as close to normal gait as feasible.
    • When patients with chondromalacia patellae follow physical treatment, wearing a patellar realignment brace has a synergistic impact.

    Foot orthoses:

    • Another alternative for pain management is to wear foot orthoses, but only if it is determined that the knee discomfort is caused by abnormalities in the lower limb mechanics. These abnormalities may be caused by:
    • Inadequate control over-pronation, excessive internal rotation of the lower limbs when carrying weight
    • An elevated Q-angle

    Foam Roller:

    Foam roller exercise for hamstring muscle
    Foam roller exercise for hamstring muscle
    • One helpful technique for releasing tight muscles and lowering pressure over the patella is to use a foam roller.
    • Hamstring muscle exercise using a foam roller
    • Glute muscle training with foam rollers
    • Tensor fascia lata and iliotibial band exercises with foam rollers.

    Prognosis

    • Knee pain associated with chondromalacia patella often resolves entirely in affected individuals.
    • Depending on the situation, recovery could take a month or several years. Teenagers often heal for a long time because their bones are still growing and their symptoms normally get better with age.

    Complications

    • Patients with chondromalacia patella may have secondary issues from bracing a reaction in which the skin occasionally responds to the brace material or from using NSAIDs (e.g., gastrointestinal complaints).
    • Therapeutic exercises almost seldom make problems worse.
    • In the event that the activity is linked to worsening symptoms, the patient, the physician, and the therapist should work together to modify it. This could entail adjusting the exercise’s duration, frequency, or intensity or, if necessary, temporarily ceasing it altogether.

    Patient Education

    Patient education emphasizes taking medications as directed, recovering from surgery, performing therapeutic exercises, and minimizing pain when engaging in any activity or movement.

    Conclusion

    • The prognosis is determined by the severity and response to therapy. Conservative methods, such as physical therapy, rest, and modifying one’s activities, are frequently successful.
    • In some cases, surgical options may be investigated. For a customized plan, speaking with a healthcare professional is essential.

    FAQs

    With chondromalacia patella, how should one sit?

    Try the following to lessen chondromalacia symptoms and hasten your recovery: Raising the injured knee: While seated, elevate your leg by placing a pillow beneath the leg that is injured.

    What is chondromalacia patella stage 1?

    Grade 1, the least severe, denotes some cartilage deterioration. Grade 2 is characterized by softness and irregular surface features, which most likely signal the onset of tissue deterioration. In Grade 3, the tissue is actively deteriorating and the cartilage is thinned.

    How may chondromalacia be naturally healed?

    Low-impact exercises like swimming can assist an athlete in maintaining their fitness during this period; jogging and other knee-stressing sports should be avoided.

    Does chondromalacia patella require surgery?

    Many times, the issue becomes worse with activity and gets better with rest since the kneecap has been misaligned for the entirety of the patient’s life. A lot of folks choose to have this issue surgically fixed. With arthroscopic surgery, this issue can be surgically corrected really easily.

    Is chondromalacia ever completely gone?

    However, one may be able to make it become asymptomatic with the use of an exercise regimen, injections, weight loss, and/or avoiding behaviors that exacerbate the condition.

    Is there a complete recovery from chondromalacia?

    Because articular cartilage heals slowly, chondromalacia usually lasts a lifetime. Nonsurgical therapy, however, can often eliminate knee stiffness within a few months.

    Is it beneficial for chondromalacia patella to walk?

    Low-impact workouts, such as walking on flat ground or swimming, are the best.

    What is the most efficient method for chondromalacia to heal?

    Non-operative therapy is the standard of care for this problem. You may need to see a physical therapist for four to six weeks in order to treat your chondromalacia patella. After that, you will likely need to spend many more months performing strengthening and stretching exercises at home. The initial step is to control the soreness and inflammation.

    At what age is patella chondromalacia common?

    Between the ages of 15 and 35, patients with chondromalacia patella are frequently young and enjoy active lives. The symptoms of the illness can be extremely crippling and include recurrent knee effusion, knee instability, and crepitus.

    Does chondromalacia have a non-surgical cure?

    For chondromalacia, nonsteroidal anti-inflammatory drugs (NSAIDs) and rest are the most often used over-the-counter pain medications. Surgery is indicated less commonly; physical treatment is advised occasionally.

    Is patella chondromalacia serious?

    Chondromalacia patella is not usually a significant ailment. In reality, most people can manage it with rest, elevation, ice, and stretching. However, in some people, the illness can worsen to the point that over-the-counter painkillers and complementary home remedies are insufficient to relieve symptoms.

    References

    • Dhameliya, N. (2024, May 30). Chondromalacia Patellae: Physical therapy Management. Samarpan Physiotherapy Clinic. https://samarpanphysioclinic.com/chondromalacia-patella/
    • Prajapati, D. (2023, May 28). chondromalacia patella physical therapy protocol Archives – Samarpan Physiotherapy Clinic. Samarpan Physiotherapy Clinic. https://samarpanphysioclinic.com/tag/chondromalacia-patella-physical-therapy-protocol/
    • Physiotherapist, B. (2023, December 13). Chondromalacia Patella: Causes, Symptoms, Treatment. Mobile Physiotherapy Clinic. https://mobilephysiotherapyclinic.in/chondromalacia-patella-and-physiotherapy-management/
    • Dhameliya, N. (2024b, September 13). Chondromalacia Patellae (CMP). Mobility Physiotherapy Clinic. https://mobilephysiotherapyclinic.net/chondromalacia-patellae/
  • Shoulder Subluxation

    Shoulder Subluxation

    Introduction

    Shoulder subluxation occurs when the lining of the shoulder joint (the capsule), ligaments, or labrum become strained, torn, or detached, causing the ball of the shoulder joint (humeral head) to move entirely or partially out of its socket.

    Individuals with shoulder subluxation typically experience pain when their shoulder “gives way.”
    A physical examination together with X-rays is used to determine various possible causes of shoulder pain and diagnose shoulder subluxation. Shoulder subluxation can be treated non-operatively or surgically.

    This article will cover the signs and treatment options for shoulder subluxation. We also talk about the recovery process and exercises that can help.

    What exactly is a Shoulder Joint?

    Shoulder Joint
    Shoulder Joint

    The shoulder is a ball-and-socket joint that allows for a large range of motion. The ball of the humerus (humeral head) is intended to remain near the socket, similar to a ball bearing in a holder. The humeral head is anchored into the socket by the lining of the joint (the capsule), thickenings of the capsule known as ligaments, and a cartilage rim.

    What is Shoulder Subluxation?

    • The shoulder joint is one of the most often misplaced joints in the body, hence shoulder subluxation and shoulder pain, in general, can significantly negatively impact your life.
    • Shoulder subluxation is one of the more prevalent types of shoulder dislocation, though there are others as well. The humerus head, or arm bone, partially separates from the glenoid, or socket, resulting in subluxation, which is also recognized as partial shoulder joint dislocation.
    • Your shoulder dislocates, completely separating the humerus, or head of the humerus, from the glenoid cavity. Nevertheless, the head of the arm only partially emerges from the socket when there is a subluxation of the shoulder.
    • Shoulder subluxation can cause your humerus to shift forward, backward, or downward. It can also cause the muscles, ligaments, or tendons surrounding the shoulder joint to rupture.
    • You should be aware that due to its mobility, the shoulder is one of the joints that is most easily damaged or dislocated. You can lift weights, swing your arms, toss a baseball or basketball, and use your shoulders normally with this same mobility. Particularly in the case of athletes.
    • Shoulder subluxation can also happen after a prolonged time of identical movements (e.g., a baseball, AFL, or rugby player). Shoulder subluxation can also be caused by swinging your arms too hard or too quickly, such as while throwing a ball under or overhand.

    Shoulder Subluxation vs. Shoulder Dislocation

    • Shoulder subluxation is the term for a partial shoulder dislocation. When the shoulder ball moves out of its natural position but does not completely dislocate from the glenoid fossa, it is referred to as a humeral head subluxation.
    • The glenoid fossa, or shoulder socket, is completely separated from the humeral head of the shoulder during a complete dislocation. The most typical cause of a dislocation is abrupt impact damage, but repetitive motions that destroy cartilage, ligaments, and muscles can result in a subluxation.
    • During shoulder subluxation and dislocation, the capsule, ligaments, or labrum may be strained, ripped, or separated from the bone. These components have the potential to heal in a stretched or loose position once the humeral head is returned to place, which could raise the risk of further subluxation or dislocation episodes.
    • Further tissue damage may result from each subsequent incident, raising the likelihood of future instability.

    Epidemiology

    • The majority of studies concentrate more on shoulder dislocations than the epidemiology of shoulder subluxations, which is a subject of limited research.
    • Forty-five percent of the participants in a study on shoulder subluxations had repeated shoulder subluxations, whereas 45.5% of the participants had only one subluxation event.
    • Patients with hemiplegic stroke or upper limb paralysis often experience shoulder subluxations (see Hemiplegic Shoulder Subluxation). The observed incidence ranges widely, from 17% to 81%.

    Causes of the Shoulder Subluxation

    The shoulder is capable of dislocating forward, backward, or downward since it can move in multiple planes. The same applies to subluxations. A partial dislocation may become more difficult to treat if the shoulder capsule is ripped or strained.

    The humerus rarely pops out of position unless there is a severe impact or fall. The arm may potentially be pulled out of its socket by extreme rotation. A shoulder dislocation might make the joint unstable and more prone to subluxations or other dislocations in the future.

    Frequently, a shoulder subluxation happens on by:

    • Accidental Injury. Subluxation may arise from accidents or incidents that injure the shoulder joint or other stability-supporting structures. Auto accidents and falls are two common examples.
    • A sports-related injury. Shoulder subluxations are frequently caused by contact sports like football and hockey as well as by activities involving falls like gymnastics and skiing.
    • Stroke. Muscle weakness caused by strokes frequently results in shoulder joint destabilization and subluxation. Eighty percent of stroke survivors also had a subluxation of the shoulder, based on examination.

    The highest risk of subluxation is seen in younger males and other populations that engage in intense physical activity.

    Symptoms of the Shoulder Subluxation

    Painful and stiff joints might result from shoulder subluxation. It can be more challenging to diagnose a subluxation than a total dislocation. On the other hand, the partially dislocated humerus may occasionally be seen through the skin.

    The ball of the humerus may be felt moving in and out of the shoulder socket; this movement is typically painful and uncomfortable. A shoulder subluxation may cause the following symptoms.

    Symptoms may include

    • A malformed or misaligned shoulder
    • Shoulder Pain
    • Swelling
    • Paresthesia, or numbness or tingling, along the arm
    • Difficulty in moving the joint

    a clicking or catching sensation in the shoulder during daily activities, particularly those that require reaching overhead.

    Diagnosis of the Shoulder Subluxation

    Examination

    • The patient should first be questioned by the examiner on the history of the reason for his arm subluxation. After that, he can conduct an inspection. However, before doing so, he must ensure that he can simultaneously observe both shoulders to detect any differences.

    Functional test

    • When the patient lifts their arm into a throwing stance and rotates it in the internal rotation direction, the subluxation test is positive = resistance is supplied.
    • A frontal capsule lesion is indicated by pain in the ventral capsule.
    • Ventral gliding may be induced by applying pressure to the dorsal aspect of the humerus during a resistance test. The outcome is often a subluxation to the front and an abrupt discomfort in the shoulder. This test can be performed with or without upper arm support, and at varying degrees of abduction.

    Radiographic examination

    • It is thought that radiographic measures provide the most accurate means of determining the extent of subluxation.
    • Before looking at your shoulder, your doctor will get a physical and ask about your problems. To determine whether the bonehead has completely or partially separated from the shoulder socket, you might require X-rays. X-rays can also reveal injuries to the shoulder, such as shattered bones.
    • Your doctor can assist in realigning your shoulder and create a treatment plan once they have determined the extent of your problem.

    Differential Diagnosis

    • Biceps Tendinopathy: This stands for biceps tendon inflammation. Biceps tendinopathy is a prevalent cause of shoulder pain because of the tendon’s location.
    • Collarbone injuries: A fracture or other injury to the clavicle, also called the collarbone, may cause shoulder pain and difficulty moving the joint.
    • Rotator cuff injury: It is common for people of all ages to experience shoulder pain due to injuries to the rotator cuff tendon.
    • Shoulder dislocation: The upper arm bone completely separates from the shoulder socket after a dislocation. Only a trained medical practitioner may be able to differentiate between the symptoms, as they are identical to those of a subluxation.
    • Swimmer’s shoulder
      • Swimmer’s shoulder is a common term for shoulder soreness experienced by competitive swimmers. Swimmers frequently have hypermobility of the joint and a higher risk of injury since swimming demands a high degree of shoulder flexibility and range of motion.

    Treatment for Shoulder Subluxation

    Reestablishing the shoulder’s alignment is crucial. It is safer to have a doctor use this procedure at an emergency room or doctor’s office, even if it can be done on the field or wherever the injury happened.

    Closed-reduction

    • A closed reduction is a method used by medical professionals to realign the shoulder capsule. You could be prescribed painkillers in advance of this procedure because it can be uncomfortable. Alternatively, you could get general anesthesia and sleep painlessly.
    • Your arm will be slowly rotated and moved by your doctor until the bone repositions itself. After the ball is repositioned, the pain should subside. After that, your doctor might order X-rays to confirm that your shoulder is properly positioned and free of any additional injuries.

    Immobilization

    • You will be required to immobilize your shoulder joint for a few weeks soon after a closed reduction by putting on a sling. Stopping the joint from moving will stop the bone from coming out once more. As the injury heals, keep the shoulder in a sling and refrain from doing too much stretching or moving.

    Medications

    • After the physician completes a closed reduction, the patient should experience less pain from the subluxation. If your pain persists, your physician can recommend a medication like hydrocodone or acetaminophen (Norco).
    • However, you should not use prescription medications for more than a few days at a time.
    • Try an NSAID like ibuprofen (Motrin) or naproxen (Naprosyn) if you require longer-lasting pain relief. These drugs can lessen shoulder pain and edema. Don’t take more medication than is advised; instead, adhere to the directions on the packaging.

    Surgery

    • If you experience recurrent bouts of subluxation, surgery might be necessary. Any issues resulting in an unstable shoulder joint can be resolved by your surgeon.
    • It consists of torn ligaments, rotator cuff tears, and fractures of the humerus head or socket.
    • Shoulder surgery will be performed using extremely tiny incisions. An arthroscopy is this. An arthrotomy, an open operation, or reconstruction, may be necessary in certain cases for this. You will require therapy following surgery to restore shoulder mobility.

    Physical therapy for Shoulder Subluxation

    Following surgery or the removal of the sling, physical therapy can aid in your shoulder’s regaining strength and mobility. You will learn mild exercises from your physical therapist to build stronger muscles that stabilize your shoulder joint. Some of these methods may be employed by your physical therapist:

    • Therapeutic massage
    • Improving flexibility by moving the joint in a variety of ways or mobilizing it
    • Exercises for stability 
    • Strength exercises
    • Ice pack 
    • Ultrasound therapy

    A schedule of exercises that you can perform at home will also be provided. You have to perform these exercises as frequently as your physical therapist advises. Refrain from sports and other activities that could result in further injury.

    Prognosis

    When there is only a minor subluxation and no significant nerve or tissue damage, the damaged shoulder joint should heal fast. On the other hand, if someone becomes involved too soon, they might feel a dislocation later on. A surgeon treating a dislocated shoulder will frequently advise wearing a sling for a few weeks after the procedure. A patient receiving physical therapy might progressively regain their strength and range of motion. To avoid difficulties, it is important to avoid making strong motions with the shoulder.

    Complications for Shoulder Subluxation

    It’s critical to understand the potential complication of shoulder subluxation. The humerus is kept centered in its socket by the robust ligaments, muscles, and connective tissue that make up the shoulder. Subluxations or dislocations may become more difficult to treat if these structures are overextended or damaged.

    The following are a few outcomes of a subluxation of the shoulder:

    • Injury to the shoulder’s nerves and blood vessels.
    • Additional shoulder concerns, such as muscle or ligament tears.
    • A reduction in flexibility and movement.
    • Instability in the shoulder that causes recurrent subluxations.

    Home care

    • Apply ice: Several times a day, place an ice pack or cold pack on your shoulder and hold it there for 15 to 20 minutes. Ice is a great way to ease pain and minimize swelling immediately after an accident. A few days later, you can convert to heating.
    • Rest: Shoulder dislocations are more prone to recur once they have occurred once.

    Prevention for Shoulder Subluxation

    • Steer clear of any activity like throwing or lifting heavy objects that could cause your humerus to pop out of its socket.
    • When you feel ready, gradually resume sports and other activities, utilizing only your shoulder.
    • Improve your flexibility by performing the daily exercises that your physical therapist has prescribed.
    • Regular mild exercises will keep the shoulder joint from stiffness.

    Summary

    Shoulder subluxations can be effectively treated when the patient seeks prompt medical attention and receives an accurate diagnosis. In cases where surgery is not required, recovery may take several months, during which time the effectiveness of the treatment becomes more evident.

    The duration of recovery depends on the severity of the subluxation and whether surgical intervention was necessary. To prevent recurrence, patients should avoid strenuous activities and heavy exercise immediately after treatment, allowing the shoulder to heal properly and regain stability.

    FAQs

    How can a subluxated shoulder be fixed?

    A closed reduction is one method of treating shoulder subluxation. To put it another way, this method entails rotating and moving the arm to realign the shoulder until the humerus glides back into the glenoid, or, to put it more simply, the arm bone is back in its socket.

    How can one experience a subluxation of the shoulder?

    A quick, acute pain that feels like something is slipping or squeezing in the shoulder is usually the result of a subluxation. The shoulder can become so lax that frequent dislocations occur.

    Can a subluxation of the shoulder repair itself?

    Even while shoulder subluxations frequently recover without significant consequences, it’s crucial to understand any potential hazards related to the injury. Subluxations have the potential to worsen joint discomfort and instability if left untreated. They may also impede mobility or result in persistent pain in certain situations.

    How is a shoulder subluxation different from a dislocated shoulder?

    It is possible to aggressively sublux or dislocate the humeral head when there is considerable damage to a joint that was previously normal. When the humerus rapidly slips partially in and out of place, it results in a shoulder subluxation. When the humerus fully exits the glenoid, shoulder dislocations happen.

    How long does a subluxation take to heal?

    Mild subluxation can take several weeks to cure with rest, physical therapy, and over-the-counter pain relievers. A more severe subluxation may require several months to recover. To restore range of motion and strength, it may be necessary to immobilize the patient in a sling or brace for some time before beginning physical therapy.

    What not to do after a shoulder subluxation?

    Stay away from sports, lifting, and overhead movement over the next six weeks. Drivers shouldn’t operate while wearing a sling. You can return to work as soon as you are capable of doing your usual duties.

    References

    • Dhameliya, N. (2024, February 24). Shoulder Subluxation – Mobile Physiotherapy Clinic. Mobile Physiotherapy Clinic. https://mobilephysiotherapyclinic.in/shoulder-joint-subluxation/
    • Shoulder Instability. (2023, March 21). Johns Hopkins Medicine. https://www.hopkinsmedicine.org/health/conditions-and-diseases/shoulder-instability#:~:text=A%20shoulder%20subluxation%20occurs%20when,into%20place%20with%20medical%20assistance.
    • Vitoonpong, T., & Chang, K. (2023, April 6). Shoulder Subluxation. StatPearls – NCBI Bookshelf. https://www.ncbi.nlm.nih.gov/books/NBK507847/
    • What to know about shoulder subluxation. (2023, June 26). https://www.medicalnewstoday.com/articles/321902
    • Watson, S. (2018, September 18). How to Identify and Treat Shoulder Subluxation. Healthline. https://www.healthline.com/health/shoulder-subluxation
    • Shoulder Instability: Treatment, Diagnosis, & Causes | Massachusetts General Hospital. (n.d.). Massachusetts General Hospital. https://www.massgeneral.org/orthopaedics/sports-medicine/conditions-and-treatments/shoulder-instability

  • 15 Best Exercise for Hallux Rigidus

    15 Best Exercise for Hallux Rigidus

    Exercise for Hallux Rigidus is an important component of your total treatment plan, along with splinting, medicine treatment, and physical therapy.

    Exercise regularly can help manage hallux rigidus, but it’s important to select activities that don’t make the problem worse, for those who have hallux rigidus, low-impact, non-weight-bearing exercises are excellent. These exercises help in the maintenance of general joint mobility and cardiovascular health without overly straining the damaged joint.

    Introduction:

    Hallux rigidus is the name given for a foot deformity. The condition is characterized by the development of osteoarthritis in the first metatarsophalangeal joint, which is linked to the first big toe on the foot. This illness can cause foot pain and difficulty walking. In this situation, there is a problem with toe movement and your big toe gets extremely rigid.

    Your big toe can become extremely painful to move when you have a frozen joint, which is the inability to bend your toe after rest. the big toe’s surrounding region gets stuffed and inflamed. You feel or have more pain in your big toe in the cold. It is known as the hallux rigidus ailment because the primary cause of your stiffness is a severe, deep (dull ache pain).

    When you have hallux rigidus, you have significant trouble performing daily tasks. This severe pain may cause you to change your gait, or how you move, which could lead to issues with your back, hip, or knee.

    You can find a lot of exercises for the hallux rigidus problem on this page. Exercises for range of motion, stretches, strength training, and finishing with massages for the stressed foot muscles were all included in the routine. Exercise improves muscle strength and relaxes tense muscles while also maintaining or increasing joint mobility.

    Causes:

    • Gout
    • Rheumatoid arthritis, for example, or other forms of inflammation
    • Stress on the big toe repeatedly
    • Flat foot deformity
    • Osteoarthritis

    Signs and symptoms:

    • Stiffness in the big toe area

    Another common symptom of arthritis that may be caused by changes in the cartilage is stiffness. Your big toe may be difficult for you to flex.

    • Swollen area surrounding the big toe

    The big toe is not a modification to the general rule that swelling is an indication of arthritis, which is put on by a buildup of fluid in the joints. If your arthritis symptoms have flared up and you have increased swelling around your big toe joint, it could be harder to wear certain shoes comfortably.

    • Pain in the area of your big toe

    Walking or standing up can often cause pain for those who have hallux rigidus. The pain is typically felt on the outside of the joint, but it can also be felt deep within. This is because your big toe bears the majority of your weight when you stand.

    • Limit the movement of your big toe.
    • A callus or bunion-like lump that forms on the outer edge of your big toe joint. Irritation and edema are potential causes of this. “That area might also appear red,”

    Take these safety measures into consideration before beginning an exercise program:

    Before starting any exercise program, it is important to take a few safety precautions and maximize the advantages. Consult your physician or physical therapist to determine which exercises are most effective for your specific problem.

    It’s critical to pay attention to your body and refrain from pushing force when in pain. While some soreness is a common side effect of exercise, persistent or intense soreness may be a sign of overworking.

    Maintaining proper form and technique is essential to avoiding repeated injuries. Consider medical advice if you’re unsure about how to carry out an exercise program correctly. Warming up before an exercise session will help your joints and muscles get ready for the activity.

    Exercise for Hallux Rigidus:

    Exercises such as the ones listed below are frequently advised for patients with this illness. Consult your physical therapist regarding the suitability of these exercises before beginning.

    Always start slowly and work your way up to a stronger degree of activity or a longer activity period as okay. You should stop exercising and see your doctor if you feel any pain or discomfort during or after.

    Towel curls

    The purpose of towel curls, also known as scrunches, is to build up and straighten the big toe. They improve your balance and foot stability by strengthening and stretching the tendons and muscles in your feet.

    • Place your heels under your knees when sitting.
    • Verify that the toes of both your feet and legs point forward and that they are level with one another.
    • After spreading the towel, place a level foot on top of it.
    • The towel will start to come in your direction.
    • Simply keep your heel down and flex your foot backward while you elevate your toes.
    • Stretch your foot equally on all sides and in the center, keeping your heel on the towel, to extend it as far as you can.
    • Squeeze the towel in with your toes and upward while maintaining an upright heel position.
    • Holding the towel, pull it toward you.
    • Draw a wide circle under the arch area with all five fingertips on either side of the foot.
    • The towel can only be moved in a certain area each time you push back and extend.
    • Then return to your neutral position.
    • Then relax.
    • Repeat this exercise five to ten times.
    Towel-curl
    Towel-curl

    Foam Roll

    • First, take a seat in the chair.
    • Place a foam roller or golf ball on the ground close to your feet.
    • To move the ball around as much as it feels comfortable, plant one foot and press down.
    • The bottom of the foot has to be massaged with the ball.
    • Once you’ve reached a sensitive location, apply more pressure and continue massaging the area until you feel the pressure.
    • The next two to three minutes should be spent moving the ball in this manner.
    • Then return to your neutral position.
    • Then relax.
    • Repeat this exercise five to ten times.
    Golf-ball-roll-exercise
    Golf-ball-roll-exercise

    Toe raise, point, and curl

    • A seat should be taken, you should sit up straight, and your feet should be flat on the floor.
    • As you maintain your toes firmly planted, raise your heels.
    • When your sole remaining body part on the ground is your feet, stop.
    • You should get off your heels after a few seconds of holding this posture.
    • For the next stage, keep your heels up and your toes pointed down, only letting the tips of your big and second toes touch the floor.
    • Hold this pose for a few seconds.
    • Toe tips just contact the floor in the third stage as you raise and curl your heels inward.
    • For a few seconds, maintain this pose.
    • Then return to your neutral position.
    • Then relax.
    • Repeat this exercise five to ten times.
    Toe-raise-point-and-curl-
    Toe-raise-point-and-curl-

    Toe splay

    A simple yet effective exercise that helps flex and develop your toes, especially the big toe that has been affected by hallux rigidus, is toe splay. Stretching the ligaments and muscles of your foot helps reduce the risk of additional injury, increase stability and balance, and relieve pain and tightness in the joint.

    • Place your feet firmly on the floor and sit with your back straight in a chair.
    • As far apart as you can without getting harmed, spread your toes.
    • Hold this position for a few seconds.
    • Then return to your neutral position.
    • Then relax.
    • Repeat this exercise five to ten times.
    Toe-splay
    Toe-splay

    Ankle pump

    • This releases tension from your toe joints by causing them to move.
    • Start with a sitting position on the bed.
    • The foot should be rotated 10 to 20 times in a clockwise direction first.
    • Make ten to twenty more circles in the other direction after you’re done.
    • Then return to your neutral position.
    • Then relax.
    • Repeat this exercise five to ten times.
    Ankle Pumps
    Ankle Pumps

    Marble pickup

    • Using both feet flat on the ground, sit down straight in a chair.
    • Place two bowls on the ground in front of the feet; one bowl should be empty and the other should be filled with ten to twenty marbles minimum.
    • To plant each one in the empty bowl, you simply need to use the toes of one foot.
    • Then return to your neutral position.
    • Then relax.
    • Repeat this exercise five to ten times.
    marble pickup
    marble pickup

    Ankle circle

    • Put a towel roll beneath your ankle.
    • It is advised to gently rotate your ankle ten times, clockwise and counterclockwise.
    • Make sure you are only moving your foot and ankle and not your entire leg.
    • To vary up the stretch, try circling the letters with your big toe.
    • Then return to your neutral position.
    • Then relax.
    • Repeat this exercise five to ten times.
    Active ankle circles
    Active ankle circles

    Heel raise

    • Take a comfortable standing stance to begin.
    • Hold on the chair’s back for support.
    • Lift your heels off the ground in order to take a stance on them.
    • Hold this position for a few seconds.
    • Next, drop your heels.
    • Then return to your neutral position.
    • Then relax.
    • Repeat this exercise five to ten times.
    Heel Raises
    Heel Raises

    Toe Stretch

    • Locate a relaxing spot on the bed or table to start.
    • Put one hand’s fingers around your big toe and the other’s around your leg.
    • Stretch it out for a few seconds in each of the following directions: up, down, and sideways.
    • Then return to your neutral position.
    • Then relax.
    • Repeat this exercise five to ten times.
    big-toe-stretch
    big-toe-stretch

    Calf stretch

    Your big toe joint can be greatly relieved and your entire foot flexibility increased by stretching your calf muscles.

    • Place your hands on the wall for support while you stand facing a wall to complete the calf stretch.
    • Move your foot such that your heel makes contact with the floor.
    • Remember to keep the back of your leg straight while keeping your heel grounded.
    • Hold this position for a few seconds.
    • Then return to your neutral position.
    • Then relax.
    • Repeat this exercise five to ten times.
    standing calf stretch
    standing calf stretch

    Sand walking

    • You can develop strong, flexible legs and strong calves by taking barefoot walks in the sand.
    • Change to laps sooner if you’re feeling very exhausted because walking in the sand is more strenuous than walking on firm surfaces.
    • If you’re at a beach, desert, or volleyball court, look for sand.
    • Take your socks and shoes off.
    • After that, take a short walk.
    • Then relax.
    Sand-walking
    Sand-walking

    Figure eight rotation

    • For this condition, the figure eight rotation exercise is rather easy, much like the toe curl exercise.
    • Just make a figure eight with your big toe (not a circle, but this way of moving your toes) and do it.
    • The big toe muscles’ range of motion and flexibility are both improved by it.
    • Then return to your neutral position.
    • Then relax.
    • Repeat this exercise five to ten times.
    seated figure eight rotation exercise
    seated figure eight rotation exercise

    Toe resistance exercises

    • You needed a resistance band to complete this exercise.
    • Using a resistance band (theraband), sit for an extended on a mat or plinth.
    • Grasp both ends of a resistance band with your hands while you loop your big toe.
    • Now pull your big toe towards your body.
    • Hold this position for a few seconds.
    • Then return to your neutral position.
    • Then relax.
    • Repeat this exercise five to ten times.
    toe resistance exercise
    toe resistance exercise

    Alphabet write with the toe exercise

    To increase the mobility of your big toe and ankles, try writing the alphabet with it.

    • Find a spot to sit or stand comfortably.
    • Lift your foot a few inches and use your big toe to write the alphabet in the air starting with the capital letters.
    • Use lengthy, downward movements.
    • Once you’ve finished writing the alphabet, move on to lowercase characters.
    • Then return to your neutral position.
    • Then relax.
    • Repeat this exercise five to ten times.
    Alphabet
    Alphabet

    Single Leg Balance On a Cushion

    • Place a cushion on the ground.
    • Begin in a comfortable standing posture on the ground.
    • Now, put your hands by your sides and bend one knee.
    • Hold this position for a few seconds.
    • Lower your leg then.
    • Then return to your neutral position.
    • Then relax.
    • Repeat this exercise five to ten times.
    single-balance-on-cushion
    single-balance-on-cushion

    What safety precautions must be taken while exercising?

    • Always warm up and stretch before and after your workout.
    • When you exercise, maintain a straight posture.
    • Choose loose, casual clothing that promotes relaxation and maximal range of motion for the best possible training experience. Avoid wearing clothes that are too tight or stylish.
    • Try not to use any forceful or jerky motions when working out.
    • Stay away from challenging activities.
    • Rest in between your workouts.
    • Perform gentle stretches and bends.
    • Stretches should be performed before and after sets, along with the appropriate number of repetitions for each exercise, following the protocol.
    • Although it may be challenging, stretching the tense muscles in your joint is essential and typical. Exercise and stretching shouldn’t hurt or make you feel as though someone is stabbing you because doing so is unhealthy and exacerbates your illness.
    • If the pain worsens, quit immediately.

    When do you stop performing the workouts?

    • High fever
    • Headache
    • If exercising hurts, don’t continue.
    • Intense muscle burning.
    • You feel unwell.
    • If there’s any pain or numbness.

    How may Hallux rigidus be prevented?

    Although you can’t stop hallux rigidus from happening, you might be able to slow down its progress if you do the following;

    • To maintain mobility in your big toe joint, exercise.
    • After an intense exercise session, give your joints some rest; never push yourself while in pain.
    • Put on comfortable shoes and allow sufficient space for your toes.

    Summary:

    Your big toe’s initial joint may develop Hallux Rigidus, a degenerative arthritis. The cartilage covering your big toe bones starts to break down or become injured, causing the space between them to decrease and ultimately causing pain and suffering.

    Even though your big toe is small, it surprisingly contributes significantly to your ability to move around. Walking, running, standing on the heel of your feet, and even standing still would be much more difficult without it. So, it can be uncomfortable and difficult to go about doing everyday tasks when your big toe hurts.

    This exercise will engage the entire foot, which has major benefits for strength and mobility. Along with reducing pain, the exercise also helps you move better overall, which is beneficial when going about everyday tasks.

    FAQ:

    Does Hallux rigidus receive treatment through physical therapy?

    Because physical therapy increases the range of motion in the joint and strengthens the surrounding muscles, it can help cure hallux rigidus.

    With hallux rigidus, is walking still possible?

    A hallux rigidus, often known as a stiff big toe, can develop from stiffness in the joint at the base of the phalange. Walking can be uncomfortable and challenging due to this sort of foot arthritic condition, which is somewhat common. The average age range for symptoms in adults with hallux rigidus is thirty to sixty years old.

    Is it ok to massage the hallux rigidus?

    To relieve your pain and help the joints move within their normal range, a hands-on treatment like soft-tissue massage for the calf and foot muscles, traction, and mobilizations of the big toe joint and other ankle or foot joints may be performed.

    Can the Hallux rigidus recover by itself?

    If treatment is not received for hallux rigidus, the condition will only worsen. This means that it will eventually make it impossible for you to stand, walk, or wear shoes, in addition to creating chronic foot issues and impacting other body parts.

    Does heat help with the hallux rigidus?

    The initial line of treatment for hallux rigidus is always non-surgical care. To ease pain, a doctor might advise using cold or heat packs, painkillers, and anti-inflammatory medications.

    How may hallux rigidus be treated non-surgically?

    ​For this illness, nonsurgical care is always the initial course of treatment. To treat pain and stiffness, a doctor could advise using cold or heat packs, medications called anti-inflammatory painkillers, or even joint injections.

    Which exercise is most effective for treating Hallux rigidus?

    Toe curl
    Toe resistance exercises
    Toe stretch
    Heel raise

    Does hallux rigidus spread?

    When you have hallux rigidus, you have significant trouble performing daily tasks. You may need to modify your gait due to this intense pain, which may result in problems with your knee, hip, or even your back. So this joint is affected by the chronic stage of this illness.

    Which exercises should I stop doing if I have toe arthritis?

    You might want to avoid or stop some specific types of exercise if you have arthritis. Running, jogging, jumping rope, and intense aerobic exercise are high-impact exercises that should be avoided when suffering from joint-damaging arthritis. Excessive physical activity or high-impact workouts performed while suffering from this illness might worsen joint pain, cause inflammation, and break down the cartilage in the joints.

    For hallux rigidus, how long does recovery take?

    Usually, six months following surgery, patients can resume their regular activities, including walking and engaging in high-impact sports. edema may occur following surgery, but within a year of the procedure, recovery should be complete and any edema should have decreased. Following surgery, you can go to the physical therapy facility to improve your range of motion, flexibility, and muscle strength.

    References:

    • 2024, September 13; Hallux Rigidus. Cleveland Clinic. The following link: https://my.clevelandclinic.org/health/diseases/14665-hallux-rigidus
    • August 29, 2024; Yeargain, J. Hallux Rigidus: 5 Quick Exercises for Building Muscle. Gain Ankle & Foot Yeargain. Exercises for Hallux Rididus: https://dryeargain.com/
    • Calf Extension. (n.d.). [Video]. https://www.hingehealth.com/resources/articles/hallux-rigidus/ Hingehealth
    • On May 28, 2023, Adebajo, B., and Štefanović, D.There are four ways for treating big toe arthritis or hallux rigdus. Upstep. Exercises to prevent big toe arthritis (hallux rigidus) https://www.upstep.com/a/blog/?srsltid=AfmBOoq_diHrJL_jKyBccB2lINlaBI-n4yuzwJsp_0kVayp6cybtG53V
    • 2024, May 22; raymond.delpak. Doctors Delpak and Errico of exas Foot and Ankle Consultants: 5 Simple Activities for the Hallux Rigidus to Help with Pain Relief and Increased Mobility. Drs. Errico and Delpak of Texas Foot and Ankle Consultants. To alleviate pain and improve range of motion, try these five simple exercises for the hallux rigidus: This website, txfootandankleconsultants.com
    • Image 12, On July 24, 2023a, Prajapati, D. Physio Samarpan: The Top 19 Exercises for the Hallux Rigidus. Physiotherapy Clinic in Samarpan. The ideal exercise for treating hallux rigidus is this one: The URL is https://samarpanphysioclinic.com/19
    • Image 15, Exercises, regimens, and routines related to Single-Leg Pillow Balance. (No date). The single-leg pillow balance exercise is available at https://www.workoutsprograms.com.
  • Eccentric Exercise

    Eccentric Exercise

    What is Eccentric strength training?

    Eccentric exercise refers to a type of muscle contraction where the muscle lengthens while under tension, typically during the lowering phase of a movement. Unlike concentric exercises, where muscles shorten as they contract, eccentric exercises focus on the controlled elongation of muscles, making them highly effective for building strength, improving muscle control, and enhancing flexibility.

    This method is widely used in rehabilitation and athletic training due to its ability to target muscle endurance and recovery. Eccentric exercises are particularly beneficial for injury prevention and rehabilitation, especially in conditions like tendonitis or after muscle strain.

    Individuals who want to recover particular muscles and tendons, the elderly, and athletes participating in professional and leisure sports can all benefit from eccentric exercise.

    This later part of the action is the subject of eccentric training, which increases difficulty by decreasing the eccentric phase’s cadence, or speed. Less force than gravitational pull is required to move the weight during the eccentric part of the cycle.  For this reason, eccentric exercise is frequently called “negative” repetitions in training.

    Physiological mechanisms

    The minuscule contractile units, sarcomeres, comprise the “tension-producing tissue” found in muscles.

    Actin is dragged across myosin during a concentric exercise by the periodic union and disassociation of myosin and actin cross-bridges, causing a muscle to shorten. To connect and disconnect, the cross-bridge requires splitting one adenosine triphosphate (ATP) molecule. Two such workouts include lifting weights and kicking a ball.

    In controlled release reversals of such concentric motions, the eccentric action strains the muscle with an opposing force greater than the muscular force. When the muscle fiber’s myofilaments are stretched during such eccentric contractions, there could be fewer cross-bridge myosin and actin detachments. The muscle contracts more forcefully the more cross-bridges there are joining. Walking up an incline or lowering a heavy object against gravity are two exercises that include eccentric muscular activation.

    Exercise-induced sarcomere stretching, or delayed onset muscle soreness (DOMS), is a condition in which eccentric motions stretch the sarcomeres to the point that the myofilaments are strained. To improve strength and allow the strain (in response to a certain force level) to decrease over time, the exerciser would eccentrically stimulate the muscle and then repeat at weekly intervals. This would hasten recovery from the eccentric activity and assist prevent or reducing DOMS.

    Eccentric exercises

    These days, resistance training, also known as eccentric exercise, is used to heal sports injuries and provide older people with Geriatric Diseases, neurological diseases, and cardiovascular issues.

    Muscle loss is a common occurrence for such individuals, and many find it difficult to stick to rigorous workout schedules. Eccentric muscle contractions provide significant forces with minimal energy usage. According to Hortobágyi, eccentric exercise has the most potential for muscular growth because of these qualities. To become stronger, muscles must be overcome by an outside force as they elongate. Eccentric contraction is fundamentally the concept that characterizes muscle strengthening.

    Eccentric contractions are limited since they can cause harm and damage to the muscles. Even while an eccentric contraction doesn’t harm or injure the muscle, it might progressively induce discomfort in the affected area.

    Proof of muscle growth without harm

    One recurring problem in ACL healing is building up quadriceps strength without reinjury. It is possible to increase muscle strength and volume with early, high-force eccentric training without damaging the surrounding soft tissue, the articular cartilage, or the ACL graft. Twenty sessions of low-intensity eccentric training on a treadmill resulted in a substantial increase in the wet weight of the muscles and the fiber cross-section of the rat muscles compared to the control and level groups. Low-intensity eccentric contractions may “cause enough mechanical stress to create muscle growth without over-stressing, which could induce muscle fiber damage,” according to the conclusions drawn from this data.

    According to other studies, hypertrophy can occur without causing injury to the muscles. People who perform eccentric training undergo hypertrophy because eccentric contractions increase mechanical stress. Studies on older volunteers have shown that low-intensity eccentric exercise helps minimize muscular damage. Seniors should engage in low-intensity eccentric activity since it requires less energy and oxygen.

    Oxygen consumption and eccentric contraction:

    • For muscles to work correctly, they need oxygen. This kind of muscle activity is known as negative work since the muscle is contracting eccentrically against resistance. When the force applied to a muscle is larger than the force that caused it, it absorbs mechanical energy.. known as negative work. An experiment was conducted on bicycles. Measured oxygen consumption occurred during “positive work,” or cycling forward, and “negative work,” or pedaling against resistance.
    • With a ratio of 3:7 for oxygen consumption, negative effort required less oxygen than positive activity. Because eccentric activity uses less oxygen, research has been done on those with severe COPD. Following an eccentric cycling exercise program, the patients showed high compliance, little muscle soreness that did not influence power, and no harmful side effects. Eccentric cycling was found to be a safe alternative for COPD patients by other cycling research because it allows them to perform high-intensity labor at a lower cost.

    Eccentric exercise and cardiac output:

    • With oxygen becoming less expensive, what effect may eccentric exercise have on the heart?

    The impact of concentric and eccentric cardiac contractions on cardiac autonomic regulation was investigated following exercise. The findings indicated that resistance training—specifically, eccentric contractions—facilitated the development of strength. It was also shown that there was an increase in cardiac vagal modulation during recovery.

    The argument that eccentric exercise is preferable to concentric exercise for training and rehabilitation reasons has a lot of evidence to back it up in terms of power, energy cost, oxygen usage, and muscle building.

    Benefits of eccentric strength training

    Eccentric training is a potent training technique utilized by athletes, bodybuilders, and physical therapists because of its many muscle-building benefits.

    The key advantages of eccentric training are outlined below:

    Allows for training at a higher level

    Supramaximal training is the process of completing an activity with resistance that is somewhat greater than what a particular muscle can endure on its own.

    Research on eccentric training shows that our muscles are stronger while doing an eccentric contraction as opposed to a concentric contraction. Because of this, eccentric exercise enables you to apply more weight to the muscle than you could with traditional training.

    The use of supramaximal eccentric loading on the leg press was found to boost force output and movement velocities in a 2018 study including fifteen young males. Sports that need an explosive element, such as volleyball, basketball, jogging, and soccer, may go well with these effects.

    To avoid harm, it’s important to remember that this training method is most effective for those with at least a few months of training experience.

    More effectiveness when moving

    Eccentric movements are uncommon because they need the same amount of force as concentric motions but require less energy and muscle work.

    Moreover, eccentric muscle contractions need just around 25% of the energy used by concentric muscle contractions, while having the same or greater potential for producing muscular force. Titin, an elastic molecule found in muscles that inhibits them from stretching and opposes them from uncoiling like a spring, is thought to be the cause of this. Your muscles may effectively “put on the brakes” thanks to this mechanism.

    Given that eccentric training yields superior results without using as much energy as concentric contractions, it could be a better option for strength training. This is the reason it’s a popular choice in rehabilitation and sports training environments. When done correctly, eccentric exercise may give a greater stimulus in a shorter amount of time, making it a particularly beneficial tool for persons with limited time.

    Greater hypertrophy of the muscles

    Since it has been shown that eccentric movements place greater stress on the muscle than concentric ones, it has been theorized that including eccentric-focused sessions in your training regimen may promote muscular hypertrophy (growth).

    Concentric training in healthy individuals following a resistance training regimen. Overall, the study found that compared to concentric exercise (6.8%), eccentric training produced somewhat higher muscle growth (10%).

    This is thought to be because somewhat higher muscle damage from eccentric exercise results in a greater increase in muscle protein synthesis, which is essential for muscular growth. Though training with an eccentric focus may be somewhat more successful in promoting muscular growth, it’s important to include both concentric and eccentric muscle contractions for the best results.

    Strength training eccentrically versus concentrically

    During eccentric and concentric training, emphasis is concentrated on two diametrically opposite types of muscle contractions. The muscle tightens during concentric contractions to overcome the resistance, and then it stabilizes during the contraction.

    Conversely, during eccentric contractions, the muscle lengthens when the resistance rises above the muscle’s capacity to produce force.

    During strength training exercises, a certain muscle is frequently contracted both concentrically and eccentrically. Moreover, on the opposing side of the joint, the antagonist, or opposing muscle, contracts eccentrically while the agonist muscle contracts concentrically.

    For example, in a typical bicep curl, your biceps contract eccentrically as you return the weight to your side and contract upwards throughout the curling motion. During the concentric part of the exercise, the biceps shorten while the triceps extend and contract eccentrically.

    As such, every strength training regimen you follow will involve both eccentric and concentric muscle contractions.

    However, traditional strength training routines usually emphasize the concentric part of the motion. A training regimen that prioritizes eccentric strength will frequently slow down the exercise’s eccentric phase to highlight that particular element.

    How do eccentric training methods fit into physical therapy and rehabilitation?

    Physical therapists and other rehabilitation specialists still use eccentric exercise as part of their toolset. This is understandable given that eccentric exercise has been shown to hasten the recovery from several musculoskeletal disorders.

    Could aid in knee recovery

    Eccentric training is a common tool used by physical therapists to aid patients in their recovery following knee surgery or injury. According to a study, performing eccentric workouts after knee surgery may assist build muscles and connective tissue while also improving knee stability and have no discernible negative consequences.

    May provide enhanced neuromuscular control

    Eccentric exercise has also been shown to improve neuromuscular control following an injury, strengthening the connection between your brain and the injured muscle. This could be crucial to the healing process since studies have demonstrated that the brain changes following trauma.

    It can aid in maintaining muscular mass

    Particularly in the elderly population, eccentric exercise has been shown to help preserve and even increase muscle mass when included in a carefully thought-out rehabilitation program.

    This is explained by the ability of eccentric training to provide great force production with little energy expenditure. That being said, this group is more susceptible to the inflammation that results from muscle damage caused by exercise.

    To optimize results while limiting negative effects, rehabilitation professionals usually maintain loads and intensities at a modest level.

    How often should eccentric training be performed?

    Eccentric-focused workouts are often part of a well-rounded strength training program that incorporates other training methods. It is typical to perform eccentric training two to four times a week, depending on your degree of proficiency.

    In rehabilitation settings, eccentric training sessions could be conducted a bit more often to encourage the regeneration of muscle and connective tissue and to improve mobility. Nevertheless, to avoid further damage, the intensity is frequently reduced.

    It’s advisable to do a few eccentric-focused exercises at the conclusion of your regular training program when you first start, just so you can have a feel for them. Following that, you might up the ante and incorporate them into your regular training routines many times a week.

    Exercises for a programme of eccentric training

    Your sport, skill level, and goals will significantly impact your eccentric exercise program.
    You might want to consult a qualified physical therapist or trainer for more expert guidance.
    Try these well-liked eccentric exercises as a starting point. For every one of these exercises, try to keep the eccentric portion to a slow count of five. Then change the count to make it more difficult or easy.

    Hamstring rollouts with a physioball eccentrically

    Hamstring rollouts with a physioball 
    Hamstring rollouts with a physioball 
    • Raise your butt slightly off the floor by stretching your legs and placing both of your feet on the physioball.
    • To return the ball to the starting position, slowly extend your legs while focusing on eccentrically contracting your hamstrings.
    • Then alternate sides once more.
    • Use one leg raised in the air and the other on a ball to complete the eccentric leg extension exercise, which will intensify your workout.

    Eccentric hamstring curl

    Eccentric hamstring curl
    Eccentric hamstring curl
    • Throughout this exercise, you will curl the weight with both legs. To increase the eccentric power, you will then gently return the weight to the starting position with one leg.
    • You may do this exercise by sitting or lying down and curling your hamstrings.
    • The rear of your calves should rest against the pad while you sit or lie in a hamstring curling position.
    • Opt for a slightly lower weight than you usually use for leg curls.
    • Curl the weight with both legs by tensing your hamstrings until the pad hits the back of your upper thighs.
    • Take one leg off the cushion.
    • For the needed number of reps and sets, continue lowering the weight with the opposite leg on the next rep.

    Barbell squats

    Barbell squats
    Barbell squats
    • You may also perform this exercise without any weight if you’re not experienced with eccentric training.
    • Place a barbell on a squat rack that is the appropriate weight; this weight is frequently far less than what you would use for regular squats.
    • To make the bar heavier, place it on your back. Next, adopt a posture where your feet are wider apart than shoulder-width apart.
    • As you progressively descend, kneel, apply pressure to the weight on the bar, and count to three.
    • At the bottom of each rep, pause for a short while before pushing through the floor to go back to the starting position.
    • Proceed with the previous stages, being careful to reduce progressively each time.

    Eccentric box step-downs

    Eccentric box step-downs
    Eccentric box step-downs
    • To make the eccentric portion of this workout more intense, step up onto a box with one leg and then slowly step off the box with the other leg.
    • You may finish them with a shorter box or without any weights to make things easier.
    • Step forward in front of a step-up box holding a dumbbell in each hand that is the appropriate size.. A smaller box and fewer weights are a good starting point for beginners.
    • Feel your quadriceps contract eccentrically as you cautiously step down from the box with your left leg once you’ve reached the top and gained stability.

    Pull-ups with a bandEccentrically

    Pull-Up
    Pull-Up
    • To maximize muscle activation and intensity, slow down the descent phase of a standard pull-up when executing this exercise.
    • Position yourself in front of a pull-up bar that has a long resistance band tied firmly across the middle.
    • Step forward slowly or lunge to grab the bar that is broader than your shoulder. Step with one or both feet to enter the band.
    • Rise to the occasion with the band’s help. As you gently descend to the beginning position, your back muscles should begin to strain. First, maintain your head slightly above the bar to stabilize at the top.

    Eccentric seated cable row

    Eccentric seated cable row
    Eccentric seated cable row
    • In this sitting cable row variation, you may put more strain on your back muscles by slowing down the eccentric phase.
    • When loading a seated cable row machine, use somewhat less weight than normal.
    • Hold on to the grips or bar as you sit down.
    • Maintain a straight torso while you row the weight back until the grips or bar nearly touches your lower sternum.
    • When you feel your lats contract eccentrically, carefully reverse the movement and return the weight to the beginning position.

    Dumbbell curl

    Dumbbell curl
    Dumbbell curl
    • A dumbbell that is somewhat lighter than the one you would normally use for a dumbbell curl is what you should use.
    • Holding both dumbbells at your sides, take a small break at the top as you curl them both up at the same time. An alternative method of doing this movement is to curl up one arm at a time in alternation.
    • As you slowly move the weights back to the beginning position, feel your biceps contract eccentrically.
    • Repeat this exercise for the desired amount of repetitions and sets.

    Typical mistakes and considerations when engaging in eccentric exercise

    Eccentric training may appear like a fairly simple exercise, but mistakes can still be made, especially in the beginning.

    The following list of common mistakes along with advice on how to prevent them:

    Using a very hefty weight

    Selecting the appropriate weight is essential, even if the eccentric portion of an exercise program strengthens the muscles.

    You run the danger of straining a muscle or connective tissue when you apply too much resistance during eccentric movement. An overuse of weight that results in a proper breakdown might also lessen the workout’s effectiveness.

    Risks Associated With Eccentric Exercise

    Every kind of training has its risks. After onset, DOMS frequently appears 12 to 24 hours later and goes away 5 to 7 days later.

    The effects of eccentric exercise on your muscles will vary based on your level of intensity. It’s crucial to remember that tiny microtears in the muscles are advantageous: according to Pedemonte, “that’s what’s been shown to create a stimulus for muscle growth.”

    Walking, swimming, or yoga are excellent forms of active recuperation since your muscles are weaker and more prone to damage throughout the healing process.

    Remember that lifting too much weight too quickly might cause strains (stretching or ripping a tendon) or sprains (stretching or tearing a ligament) since eccentric exercise enables your body to handle more weight. According to Guglielmo, you run the danger of lowering too quickly and ripping or pulling something when performing an eccentric pull-up, which is when you slowly lower your body but can’t support your weight when you move away from the bar.

    Be cautious as you progressively boost your strength to prevent injury. Additionally, don’t be afraid to ask for a spotter if you need one.”Some exercises, like a bench press with a barbell, are safer when done alongside someone else,” Guglielmo said. Starting “easy” and building up the intensity when you’re ready is always preferable to starting too hard and getting injured.

    Speeding up or slowing down

    Be cautious as you progressively boost your strength to prevent injury. Starting “easy” and building up the intensity when you’re ready is always preferable to starting too hard and getting injured.

    You cannot reap the benefits of eccentric exercise if you move too rapidly since you won’t be able to appropriately engage your muscles. Conversely, moving too slowly may cause muscular exhaustion and excruciating agony. Thus, you must adhere to the time guidelines that your training program has provided.

    Pay attention to symptoms of DOMS

    Delay in onset muscle soreness, or DOMS, is a painful discomfort in the muscles that often appears one to three days following a strenuous exercise. Often, the cause is microtears that are created in the muscle during action.

    Depending on how severe it is, it may last between 24 and 72 hours; in severe cases, it may last longer. Eccentric activity, in particular, is known to cause pain because it can cause microtrauma to the muscle.

    To avoid DOMS during eccentric activity, it’s best to begin with moderate weights at a low intensity and gradually increase the resistance as you have a feel for the movements.

    Summary

    Exercises that are eccentric involve contractions of the muscles that lengthen them, and exercises that are concentric require activities that shorten the muscles.

    Eccentric exercise can improve muscle and tendon strength with less effort than concentric exercise, which makes it a more practical option for those who are short on energy. It is risk-free for usage by people with a range of conditions, including tendinopathy and arthritis. Exercises that involve lowering and raising the body quickly include modified push-ups, squats, and heel drops.

    FAQs

    What is eccentric vs. concentric?

    contractions that are concentric and eccentric simultaneously: Muscles shorten with concentrated contractions as stress rises to overcome resistance. A muscle lengthens during an eccentric contraction because it is exerting more force than the resistance.

    What do eccentric exercises work?

    A motion that falls is called an eccentric movement. It happens when a muscle contracts while extending, like in the case of your biceps after a curl or your glutes as you lower yourself into a squat. It turns out that every muscle fiber in your body is stronger during eccentric movement.

    Is yoga an eccentric exercise?

    Yoga emphasizes eccentric contraction, which increases joint and muscle flexibility and causes the muscle to expand as it contracts, giving the muscles a sleek, extended appearance.

    Is walking eccentric exercise?

    Walking downhill is a common example of eccentric exercise. The quadriceps muscle contracts eccentrically with each step we take down the slope, regulating the speed at which our knees bend against the force of gravity.

    What are the 3 benefits of eccentric training?

    There are several possible benefits to eccentric exercise, including the ability to do supramaximal training, improved movement efficiency, and increased muscle development.

    Is eccentric stronger than concentric?

    Muscles that lengthen in response to stimulation (i.e., eccentric muscle action) are generally stronger and require less energy (per unit of force) than muscles that either shorten in response to stimulation (i.e., concentric contraction) or remain at a fixed length in response to activation (i.e., isometric contraction).

    References:

    • Hellicar, L. (2023, June 16). Eccentric exercise benefits and examples. https://www.medicalnewstoday.com/articles/eccentric-exercise#summary
    • Parmar, D. (2023, December 13). Eccentric Exercise – Benefits, Examples, How to Do? Mobile Physiotherapy Clinic. https://mobilephysiotherapyclinic.in/eccentric-exercise/
    • Cscs, D. P. R. (2023, July 13). Eccentric Training Offers Big Bang for Your Strength Training Buck. Healthline. https://www.healthline.com/health/fitness/eccentric-training
  • Patella Baja

    Patella Baja

    What is Patella Baja?

    Patella Baja is a condition characterized by an abnormally low position of the patella (kneecap) in relation to the femur (thigh bone). It typically occurs following knee surgeries such as total knee replacement or after trauma, where scar tissue formation restricts the movement of the patella, pulling it downward

    It may make it difficult or impossible to bend your leg past 90 degrees. Not only does this limited range of motion cause pain, but it also frequently results in weak leg muscles. More specifically, weakened quadriceps.

    Patella Baja, sometimes called Patella Infera, is an unusually low-lying patella that causes pain in the retropatellar region as well as reduced range of motion and crepitations. Extensor dysfunction may develop with considerable morbidity if it is persistent.

    Three characteristics define it: the patella tendon is shortened, the patella is positioned distally in the femoral trochlea, and the distance between the patella’s inferior pole and the proximal articular surface of the tibia is shortened. It may also be congenital. This biomechanical link is upset by changes in patellar height, leading to aberrant joint reactive forces.

    Quadriceps Weakness

    Because of how low your knee cap sits, the tendon above your knee is continually stretched beyond its natural length in order to get to your knee cap. That tendon gets stretched even more as you bend your leg farther and farther; ultimately, at a certain point usually around 90 degrees, it just gives out.

    Exercises involving the legs only strengthen the range of motion that your legs can bend to a maximum of ninety degrees. This might make it possible for you to sit up rather easily from a high chair, but you would never in your wildest thoughts try to bend down and pick something up.

    Pathology

    It appears in several clinical situations, such as the following:

    • Dysfunction of the quadriceps
    • Poliomyelitis
    • Tourniquet paralysis fractures, osteotomies,
    • Tubercle transplants from the tibia,
    • ACL surgery,
    • Total knee replacement (TKR)
    • Osteoporosis: rarely causes symptoms.

    Measurement of the Patella Baja:

    Several techniques have been developed to measure patella height, including:

    • Install-Salvati ratio
    • Blackburne-Peel ratio
    • Method of Norman, Egund, and Ekelund
    • Method of Caton-Linclau
    • Blumensaat Method

    Making sure the patella hasn’t been removed during prior surgery is crucial because the ratio will undoubtedly change if the patellar morphology changes.

    Treatment of Patella Baja

    Post-surgical or traumatic patella baja is often symptomatic and necessitates early surgical correction due to the low success rate of conservative therapies. Patellar tendon lengthening or a tibial tuberosity osteotomy with proximal reimplantation are the required treatments.

    Since many individuals with patella baja have had numerous previous surgical procedures, treating the condition can be difficult. Physical therapy, aggressive range of motion, systemic steroids, extracorporeal shock wave therapy, and, with varying degrees of efficacy, dry needling can all be used as non-operative care.

    It is crucial to initiate a vigorous range of motion and muscle stimulation after surgery, especially targeting the quadriceps muscle groups, in order to prevent the development of patella baja following surgery. Patients who present with symptoms of patella baja may benefit from the following surgical procedures: tibial tubercle proximalization, lengthening of the patellar tendon, excision of the lower portion of the patella, repair of the patellar tendon using allograft, and patellectomy in cases when salvaging is possible.

    Conclusions:

    Acute patella baja is more likely caused by changes in the natural anatomy, but chronic patella baja is caused by a complicated combination of inflammation, immobility, and quadriceps dysfunction that results in attachments and infrapatellar scarring. However, a thorough assessment of surgical treatment results is constrained by the absence of a larger case series.

    FAQs

    What are alta and baja patellas?

    Patella alta refers to a patella that sits too high, and patella baja refers to a patella that sits too low. When it comes to human gait, knee range of motion, and extensor power production, the patella is crucial.

    A patella baja: what is it?

    An aberrant patella that lies low and stays distal to the femoral trochlea is called a patella baja. Tracking of the patellofemur may be impacted.

    What risks come with having patella Baja?

    Patella Baja, sometimes called patella infra, is an unusually low-lying patella that causes pain in the retropatellar region as well as reduced range of motion and crepitations. Extensor dysfunction may develop with considerable morbidity if it is persistent.

    How is patella Baja treated in physical therapy?

    Physical therapy: The kneecap’s resting height is altered by the therapist manually gliding the knee. These treatments might lessen discomfort and help realign the kneecap. The best course of treatment for correcting patella alignment is tapping.

    Is affected with patella baja?

    Unfortunately, there aren’t many effective treatment options for patella baja after the problem is well established, and it can cause significant handicaps.

    Is Baja patella uncommon?

    All things considered, patella baja is a dangerous disease that, despite its rarity, can cause chronic pain and a reduction in motor function if it is not well managed and treated quickly.

    How is patella baja measured?

    An oblique line joining the most inferior point of the lower pole with the inner border of the patella’s higher pole is used to quantify patellar length (PL). The ISI defines normal as 1.0 +/-20%.

    How is the patella baja exercised?

    Slide down while leaning against the wall until your knees are bent 20 to 30 degrees. After a brief period of rest, squeeze once again. Do this eight or twelve times.

    What differentiates Alta’s knee from Baja’s knee?

    Patella Baja, also known as patella infra, occurs when the patella is positioned too low, resulting in a short patellar tendon.

    Does patella baja occur permanently?

    While there is currently no known cure for Patella Baja, there are treatments available for the ailment, and even better, strategies to avoid developing Patella Baja in the first place.

    In what way is patella Baja treated?

    Patellar tendon repair, patellar tendon lengthening, and tibial tubercle proximalization are among the treatment approaches. Autografts and allografts can be used to support reconstructive or tendon-lengthening surgeries.

    Is patella baja a birth defect?

    Patella Baja can be acquired or congenital. Congenital patella baja is typically not treatable and is frequently linked to other skeletal abnormalities.

    Why is the Baja patella bad?

    Because patella baja causes knee-related stiffness, discomfort, and weakness, it can result in considerable functional limits. For patients with extension deficits who do not improve with conservative treatment, arthroscopy combined with scar tissue removal is considered the gold standard of care.

    References

    • Jin, T., & Gaillard, F. (2009). Patella Baja. Radiopaedia.org. https://doi.org/10.53347/rid-7498
    • McClellan, M. (2024, January 12). Patella Baja: The Most Common Knee Condition Nobody Knows About. X10 Therapy. https://x10therapy.com/patella-baja-the-most-common-knee-condition-nobody-knows-about/
    • Barth, K. A., & Strickland, S. M. (2022). Surgical Treatment of Iatrogenic Patella Baja. Current Reviews in Musculoskeletal Medicine, 15(6), 673–679. https://doi.org/10.1007/s12178-022-09806-y
  • Ankle Dislocation

    Ankle Dislocation

    Introduction

    Ankle dislocation occurs when the bones that form the ankle joint are forced out of their normal alignment, typically due to trauma or injury. It’s a serious condition that is mostly associated with ligament damage, fractures, and edema. Immediate medical attention is crucial to reduce the risk of complications like poor blood circulation, nerve damage, and long-term joint instability.

    A typical cause of ankle dislocation is injury to the ligaments that support the joints as well as a fracture of the distal ends of the tibia and fibula. It can affect persons of various ages and is frequently followed by a fracture. With the help of X-rays and a physical examination, your healthcare practitioner can diagnose your problem. Splints, casts, restructuring your bones, and painkillers are possible forms of treatment. Also, a lot of people will require surgery. There could be issues for some people. Ankle arthritis and infections are two examples of them.

    Anatomy of the Ankle Joint

    Ankle joints are hinged-type joints that attach the bones of the lower leg and foot. The tibia (shin bone), fibula (calf bone), and talus (ankle bone) make up this structure. The talocrural or tibiotalar joints are other names for the ankle joint.

    ankle-joint
    ankle-joint

    Our ankles consist of:

    • Bones.
    • Cartilage.
    • Ligaments.
    • Muscles.
    • Nerves.
    • Blood vessels.

    Bones

    Your ankle joint is created of three bones.

    • Tibia, the shin bone.
    • Calf bone, or fibula.
    • Talus.

    Cartilage

    Cartilage is a strong and flexible tissue that protects joints. It works as a shock absorber throughout the body. Your ankle is lined with hyaline cartilage. Hyaline cartilage is the most frequent form of cartilage found in the body.
    Hyaline cartilage is slippery and smooth, allowing your bones to slide effortlessly past each other in your joints. The surfaces of your tibia, fibula, and talus that touch each other are lined with hyaline cartilage.

    Ligaments

    The ligaments that connect the bones in your foot to the bones in your lower leg are similar to cords. Your ankle is composed of three primary groups of ligaments:

    • Deltatoid ligaments, or Medial ligaments: Starting at the base of your tibia, or the medial malleolus, are these four ligaments. They spread apart to join the navicular bones, calcaneus (heel bone), and talus in your foot.
    • Lateral ligaments: On the outside of your ankle, the ends of your fibula form an arch at the lateral malleolus, which is the beginning of all of these ligaments. They attach to the calcaneus and talus.
    • Syndesmotic ligaments: The tibia and fibula are joined by these four ligaments.

    Muscles

    Stretchy fibers form the soft tissue that makes up muscles. To pull and move different portions of your body, they flex, tightening up. Your ankle movements are controlled by the muscles in your legs and feet. Plantarflexion muscles allow you to flex your foot downward and away from your body. Among them are the:

    • Gastrocnemius.
    • Soleus.
    • Plantaris.
    • Tibialis Posterior.
    • Flexor digitorum longus.
    • Flexor hallucis longus.
    • Peroneus brevis.
    • Peroneus longus

    Dorsiflexion muscles allow you to lift your foot toward your body. They include the 

    • Tibialis anterior.
    • Long finger extensor.
    • Long extensor hallucis.
    • Peroneus tertius.

    Nerve supply

    Nerves function like wires, carrying electrical impulses between your brain and the rest of your body. These impulses allow you to experience sensations and move your muscles. The nerves in your ankle include the:

    • Tibial nerve.
    • The superficial peroneal nerve.
    • The deep peroneal nerve.

    Blood supply

    The pathways that distribute blood throughout your body are called blood vessels. They come together at your heart to form a closed loop that functions similarly to a circuit. Blood travels through three arteries to and from your ankle, including the following:

    Function

    Anytime you move, your ankles flex and bend to keep you balanced and stable. There are two ways that your ankles move:

    • Plantar flexion: a downward, body-away motion.
    • Dorsiflexion: lifting and moving in the direction of your body.

    What is Ankle Dislocation?

    • A dislocation of a joint occurs when the bones of a joint separate abnormally. An ankle dislocation occurs when something like this occurs in the ankle joint. It is a serious wound.
    • Your foot’s up-and-down motion is assisted by the ankle joint. The subtalar joint is an additional ankle joint located underneath this. This joint is located in your foot between the calcaneus, another bone, and the talus. This joint enables your foot to sway from the right to the left side. Normally, all of these bones are securely held in place by a strong network of ligaments.
    • These ligaments can be torn or pulled out of place by a severe injury. As a result, there is an unusual gap between one or more bones. Strong and difficult to pull away from or tear easily are the ligaments. Ankle dislocations frequently coexist with one or more ankle bone breaks.
    • An ankle dislocation may occur in certain situations even in the absence of an ankle bone break. Rarely, a significant ankle sprain has occurred alongside an ankle dislocation. When the ligaments are ripped, the sprain becomes severe. Considerable repeatedly, the damage drives the talus bone to move dropping behind the additional ankle bones. It can also be shifted upward, to the front, or to either side.
    • People of all ages can get ankle dislocations. They happen far more frequently with ankle fractures than with simple sprains.

    What is Ankle Subluxation?

    A partial dislocation is called a subluxation. Ankle subluxation or dislocation frequently results in strained or torn ligaments as well as a possible break in the bone.

    What are the types of Ankle Dislocation?

    Around the ankle joint, dislocations of the posterior, anterior, lateral, and superior types are observed.

    • Posterior Dislocation: Ankle dislocations most frequently occur from posterior dislocations, in which the talus shifts backward relative to the tibia. The foot must be plantarflexed that is, with the toes pointed downward at the time of the injury for this to happen. The ligaments and tissues that support the ankle are torn when the ankle is pulled either inward from the outside (inversion) or outward from the inside (eversion).
    • Anterior Dislocation: When the foot is fixed or dorsiflexed (the toes pointed upward), anterior dislocations where the talus is forced forward occur. The force directly in front of the foot forces the tibia backward.
    • Lateral Dislocation: When the ankle is twisted, either invertedly or evertedly, lateral dislocations happen, but there are always fractures connected to the medial or lateral malleolus, or both.
    • Superior Dislocation: Superior dislocation, additionally recognized as a pilon injury, takes place when an axial stress injury drives the talus to become dropped vertically in the hollow between the tibia and fibula. This could happen if you fall and land on your feet, or if you are in an accident and your foot is pressed hard against the brake pedal.

    What could be the cause of Ankle Dislocation?

    • Ankle dislocation is the outcome of a serious ankle injury. If these ligaments holding your bones together weren’t present, many ankle ligaments would tear and your ankle bones would break apart.
    • This might occur in a car collision. It can also occur when participating in sports, particularly those that require jumping. During impact, it is more likely to occur when your foot is pointed downward.
    • Typical reasons for dislocations include falls, auto accidents, and sports-related injuries.

    What signs and symptoms indicate an Ankle Dislocation?

    You could experience the following symptoms from your ankle injury:

    • Acute, excruciating pain
    • Bruising and swelling
    • Tenderness to the touch
    • Inability to support your weight with your foot
    • Having trouble extending your ankle
    • An abnormal appearance on your ankle
    • A bone piercing your epidermis

    Who is at risk for Ankle Dislocation?

    Ankle dislocation may be more likely to occur if:

    • You are physically active quite a bit more.
    • You’ve previously experienced an ankle sprain, fracture, or dislocation.
    • Since birth, your ankle has been deformed.
    • You suffer from a disorder like Ehlers-Danlos syndrome that causes your ligaments to become loose.
    • You either smoke cigarettes or are overweight.

    How do you diagnose an Ankle Dislocation?

    • You will discuss your symptoms and medical history with your healthcare professional. They will examine you physically and look for any more injuries. Your ankle and lower leg may be compressed by the medical professional. This is to assess for inflammation and discomfort. Additionally, your doctor might verify that the blood arteries in your leg aren’t obstructing the blood flow to your ankle and foot.
    • To check for broken bones, X-rays of your foot, ankle, and leg are required. Also, you could require an MRI or CT scan. These enable your clinician to examine your injuries more thoroughly.

    How do you treat an Ankle Dislocation?

    To address your injuries, an orthopedic physician will probably see you. Depending on the nature of your dislocation and any additional injuries, your course of therapy may change. Among the possible treatments for you are:

    Pain medications

    • A physician realigning your bones without the need for surgery (closed reduction)
    • Utilizing cold packs and maintaining an elevated ankle position
    • In certain circumstances, urgent surgery is required.
    • A splint to first stabilize your ankle
    • A boot or cast to support your ankle after the swelling subsides.

    Surgery

    • Surgery may be required to treat your injury. Your doctor will realign your bones during surgery so that proper healing may occur. We refer to this as reduction.
    • To secure the bones in place, your doctor might employ specialized plates and screws. We refer to this as internal fixation. They might also repair ligament tears.

    Ankle dislocation rehabilitation

    • Your doctor can prescribe a detachable brace or splint once your limb has partially recovered. This will enable you to begin physical treatment. You can maintain and regain your strength and range of motion with the use of these workouts.
    • Right after your harm, you might be relay on crutches or a walking device for a temporary period. You’ll be informed by your physician or physical therapist when it’s safe to resume your regular activities.
    • You might receive dietary guidance from your doctor. Consuming a diet rich in protein, calcium, and vitamin D will help you cure yourself. Your doctor may advise against using any over-the-counter pain relievers.
    • A few of these may interfere with normal bone regrowth. Your doctor will encourage you to give up smoking if you currently smoke. Moreover, smoking can impede bone regeneration.

    What is the Ankle Dislocation prognosis?

    Patients who have dislocated their ankles may not always be able to reach the objective of getting back to their pre-injury level of function, even though that is the aim of any injury.

    Whether or not surgery is necessary after the first course of treatment is finished, the patient may need six to twelve weeks of rehabilitation before they can resume their pre-injury activities.
    Ankle dislocations may cause damage to the blood flow to the cartilage lining the bone inside the joint, which could ultimately result in arthritis (rthro=joint + it is=inflammation).

    In addition, the chance of developing arthritis rises if the bones do not realign perfectly following an injury.
    Joint arthritis can result in stiffness and pain. A reduction in ankle range of motion can impact other skeletal regions such as the hips and back by changing walking gait and walking motion.

    What is the physical therapy treatment for Ankle Dislocation?

    For the first three days, while traveling to the hospital or before seeing a doctor, the R.I.C.E. procedure should be followed every few hours.

    • Rest: By not putting any weight or moving your ankle joint, you may obtain rest.
    • Ice Therapy: To reduce swelling and pain, apply ice therapy, also known as cryotherapy, to the ankle for 20 minutes.
    • Compression: An elastic bandage is wrapped around the ankle to achieve compression.
    • Elevation: The injured ankle is at about the same level as the heart. One simple method is to sit in a chair and rest the damaged ankle on another chair or stool.
    • Thermotherapy: Thermotherapy is utilized to relax muscles, allowing them to conduct the training program more effectively.
    • Ultrasonic Therapy: Ultrasound has been discovered to be beneficial in breaking down adhesions and increasing flexibility.
    • Transcutaneous electrical stimulation (TENS): Transcutaneous electrical nerve stimulation (TENS) helps eliminate discomfort associated with stretching activities.
    • Laser therapy: Laser therapy is used to treat the discomfort associated with ankle dislocation.
    • Kinesio Taping: Kinesio-taping helps to decrease ankle joint mobility by holding the ankle in the appropriate position while the muscles around it work properly to keep it in place.
    • Manual therapy: Manual therapy comprises several techniques such as manipulation, soft tissue mobilization, joint mobilization, and so on, all of which serve to reduce discomfort and enhance functional mobility in the ankle.
    • Range of motion exercises: Range of motion exercises serve to improve ankle muscle contraction, such as dorsiflexion and plantar flexion, which are performed by moving the foot directly up and down using the ankle joint, and ankle circles, which are performed by moving the toes in a circle of the ankle joint. These exercises are particularly helpful for improving muscular flexibility and ankle functionality.
    • Strengthening Activities: Patients can complete the range-of-motion exercises after beginning strengthening exercises like forcing their ankle up against a fixed object, counting to 10, relaxing, and repeating five times with the least amount of pain. Another example is to stand using the foot of the injured ankle, hold this position for 30 seconds, and repeat three times. The approach requires adding resistance to the base of the toes. Using your hands to hold the band’s ends, slowly press the ankle down as far as it will go. After that, carefully move it back to the initial position and repeat ten to fifteen times.
    • Exercises for Stretching: Exercises for stretching increase the flexibility of the ankle muscles. To make sure that every muscle group is operating within its maximum range of motion, these workouts are crucial.
    • Exercises for proprioception and balance: To enhance the stability and balance of the injured ankle joint, proprioceptive and balancing exercises are also advised.
    • Gait Training: Crutches and a brace to stabilize the joint are used to progressively introduce gait training.

    Educating the patient

    It is recommended that the patient keeps up the workout regimen even after they have recovered. If the patient participates in sports, they should practice strenuous activities and motions. However, they should be careful not to execute the exercises incorrectly, as this might cause repetitive strain on the joints and muscles.

    What complications could an Ankle Dislocation cause?

    Your dislocated ankle may cause you to experience the following complications:

    • Joint stiffness (physical therapy may assist).
    • Ankle arthritis results in persistent pain in the ankle.
    • Infection that may necessitate antibiotic medication or further surgeries.
    • A fractured bone that does not mend properly and may require further surgery.
    • Pain from the surgical plates and screws (which might be taken out later).
    • Issues with the healing of wounds.
    • Your fracture or dislocation may have led to damage to your blood vessels or nerves.
    • Blood clot.

    There may be variations in your risk of consequences based on the degree of seriousness of your injuries and your general health. Pay close attention to all of your doctor’s directions. By doing this, you’ll lower your chance of difficulties.

    Can an Ankle Dislocation be prevented?

    Ankle dislocations are unintentional injuries that are typically unavoidable. Below are the prevention tips for ankle dislocation.

    • Perform appropriate stretches and warm-ups before the activity.
    • Put on support and safety gear, such as an ankle brace.
    • When running, cutting, and jumping, use the appropriate form.
    • Maintain ideal levels of physical strength, endurance, flexibility, and conditioning as well as cardiovascular fitness.

    Summary

    The displacement of the ankle joint’s bones from their natural placements results in an ankle dislocation. This frequently occurs after suffering a serious injury from something like a fall or auto accident.

    Severe discomfort, edema, deformity, and trouble walking are among the symptoms. Emergency care, immobilization, reduction of the joint, and possibly surgery are the usual course of treatment. Early detection and therapy are essential to avoid chronic problems.

    FAQs

    How severe of an ankle dislocation is it?

    Ankle dislocations can cause harm to the tendons, ligaments, bones, and nerves. You may require additional care. Your ankle was realigned by the doctor, who might have also placed a cast or splint on it. Your ankle will stay stable as a result until your follow-up appointment.

    How long does it take to heal after an ankle dislocation?

    Whether or not surgery is necessary after the first course of treatment is finished, the patient may need six to twelve weeks of rehabilitation before they can resume their pre-injury activities.

    With an ankle dislocation, is it still possible for you to walk?

    Crutches could be necessary for you to walk while your ankle heals. Crutches assist you in avoiding further damage to your ankle by removing your weight from it. If advised, visit a physical therapist. You can learn exercises from a physical therapist to improve your ankle’s range of motion.

    Is it possible to fix an ankle joint?

    To fix the ankle, a cut around 15 cm (6 inches) long is made across the front of the ankle. The worn-out joint surfaces are removed and replaced with two metal parts that have a hard plastic component positioned in between to allow for free movement of the joint. The procedure takes sixty to ninety minutes.

    References:

    • Ankle Dislocation –  Health Encyclopedia – University of Rochester Medical Center. (n.d.). https://www.urmc.rochester.edu/encyclopedia/content.aspx?contenttypeid=134&contentid=504
    • Faaem, B. W. M. F. (2023, July 3). Dislocated Ankle: Symptoms, Treatment, Recovery, and Surgery. MedicineNet. https://www.medicinenet.com/dislocated_ankle_ankle_dislocation/article.htm
    • Sports Medicine: Ankle Dislocation or Subluxation. (n.d.). https://www.nationwidechildrens.org/conditions/sports-medicine-ankle-dislocation-or-subluxation
    • Streitz, M. J. (2022, September 8). How To Reduce an Ankle Dislocation. MSD Manual Professional Edition. https://www.msdmanuals.com/en-in/professional/injuries-poisoning/how-to-reduce-dislocations-and-subluxations/how-to-reduce-an-ankle-dislocation#Warnings-and-Common-Errors_v45399885
    • What is an Ankle Dislocation? Symptoms, Causes, Diagnosis & Physiotherapy Treatment of Ankle Dislocation. . . (n.d.). Cbphysiotherapy. https://cbphysiotherapy.in/condition/ankle-dislocation
    • Facep, J. E. K. M. (n.d.). Ankle Dislocation Management in the ED Clinical Presentation: History, Complications. https://emedicine.medscape.com/article/823087-clinical?form=fpf
  • 11 Best Exercise for Knee Varus Deformity

    11 Best Exercise for Knee Varus Deformity

    Introduction:

    Exercises for knee varus deformity are designed to strengthen the muscles surrounding the knee, improve alignment, and enhance stability. Proper exercise routines can alleviate pain, reduce stress on the joints, and improve overall mobility, preventing further complications.

    An orthopedic condition known as knee varus deformity is defined by the inward point of the thigh in the lower leg. This knee misalignment can have many negative effects, including joint pain, instability, and an increased risk of osteoarthritis. To treat knee varus deformity, exercise has been identified as a crucial non-surgical strategy.

    Exercises that strengthen the hip’s external rotators can help with knee varus. By improving hip flexibility, this exercise can lessen lower back pain caused by improper leg positioning. Exercises for mobility and flexibility might help lessen the pain given on by this illness. Exercises for strengthening and extending the muscles can help prevent varus deformity after corrective surgery.

    Knee Varus Alignment Characteristics:

    Varus alignment results in an inward shift of the foot’s bearing axis, which increases force and stress on the medial, or inner, part of the knee. The knees bend outward as a result of this. As a result, those who suffer from this ailment are known as club feet. You are more likely to get osteoarthritis in your knees if you are stooped over. The development of knee varus is more likely in those who are obese or overweight. On the other hand, weight loss can lower your risk of osteoarthritis in the knee.

    The degree of varus alignment is another factor, besides weight, that raises the risk of osteoarthritis in the knee. An increased risk of developing osteoarthritis in the knee is associated with a higher score (or worse abnormality). If you have varus alignment, your chances of developing osteoarthritis in your knees are higher. The affected meniscus is the medial in varus abnormalities.

    Knee varus deformity causes:

    Newborns often have varus knees. Many of their bones are still immature, and their knee joints are still forming. Some newborns may develop varus knees as a result of rickets, a medical condition marked by low or missing vitamin D levels and bones that are weak.

    Among the other potential reasons for varus knee are:

    • Rickets
    • Abnormal growth of bones
    • Bone infections
    • Leg length discrepancy
    • Bone tumors

    Signs and symptoms:

    Therefore, there are other symptoms such;

    • Inability to run or walk comfortably
    • Patients experiencing knee instability may feel as though their knee is twisting and about to “give out.”
    • Reduce range of motion
    • Knee pain
    • Swelling in the area surrounding the knee.
    • Hip and knee pain

    Exercise’s Advantages for Knee Varus Deformity:

    Getting more exercise is essential to improving general health. Exercise shouldn’t be limited by bowed legs. Many people without pain or issues can work and exercise despite having front feet. By taking good care of your knees and engaging in correct exercise, you can even avoid issues. As an example, maintaining the health of your knees can be achieved by strengthening and stretching your legs and hips.

    To avoid joint issues, exercise can help you control your weight. Osteoarthritis of the knee is further aggravated by obesity.

    Exercise for Knee Varus Deformity:

    Varus knee has been found to respond well to exercises that strengthen the hip’s external rotator muscles.

    Always get medical advice before starting an exercise program to find out which exercises work best for your particular situation. Exercises or methods used incorrectly may make your condition worse.

    Clamshell

    • You lie on your side to begin.
    • Recline to your left side, bending at the elbows.
    • The support should then be held up to your head with your left hand.
    • Place your right foot and leg over your left, bending your knees to a 45-degree angle.
    • Put your right hand lightly on the ground in front of you or on your hip to help with balance.
    • After that, cautiously raise your right knee toward the sky while keeping your feet close to your body.
    • Hold this position for a few seconds.
    • While maintaining a tight core, shift your lower right leg toward your left.
    • Then return to your neutral position.
    • Then relax.
    • Repeat this exercise five to ten times.
    • On the other side, repeat the exercise.
    Clam Shell exercise
    Clam Shell exercise

    Standing side Leg Raise

    Because you can perform a standing leg raise in almost any place, including while waiting, it’s a very adjustable exercise.

    You may want to utilize a chair or some other form of support for improved stability.

    • Put your hands first, either in front of you or on your hips.
    • With your toes pointing front, stand straight.
    • Breathe in and transfer your weight to your left foot as you raise your right leg off the ground with the foot contracted.
    • Hold this position for a few seconds.
    • Bring the leg back down to meet the left as you release the breath.
    • Then return to your neutral position.
    • Then relax.
    • Repeat this exercise five to ten times.
    • Repeat the exercise on the opposite side.
    Standing side leg raise
    Standing side leg raise

    Squat

    • Keeping your legs wide apart, plant your feet firmly on the ground.
    • Don’t raise your weight from your toes or heels; instead, keep it centered.
    • Keep your body upright as you slowly bend your knees.
    • Refrain from bending forward.
    • Always keep your hips beneath the support.
    • Your hip and knee joints have almost similar angles at the bottom of the movement. 
    • Keep your muscles taut, regulated, and at a constant pace.
    • Take a breath as you squat down.
    • Hold this position for a few seconds.
    • Then return to your neutral position.
    • Then relax.
    • Repeat this exercise five to ten times.
    squats-exercise
    squats-exercise

    Sitting hamstring stretch

    • One leg should be extended while you sit upright with your back to the front.
    • The bottom of your foot should press against your mid-thigh as you bend the other leg.
    • Stretch out to touch your ankle.
    • Maintain a straight back, neck, and knee.
    • Your thigh’s back should feel stretched.
    • Hold this position for a few seconds.
    • Then return to your neutral position.
    • Then relax.
    • Repeat this exercise five to ten times.
    • Repeat the exercise on the opposite side.
    Seated-hamstring-stretch
    Seated-hamstring-stretch

    Internal Hip Rotation

    Leg alignment is improved and hip flexibility is increased with this exercise. There are stretches and exercises for internal hip rotation that may stress your knees. If you have any knee pain, you should stop.

    • Begin by standing on the ground with your knees bent 90 degrees.
    • Arrange your feet so that their soles are comfortably separated on the ground.
    • Your right leg should be bent such that your right toe points upward.
    • When you rotate your hips internally, this helps protect your knee.
    • Keeping your right knee securely planted, rotate your right inner thigh toward the ground.
    • Your right thigh and right calf should form a right angle when you lower your thigh.
    • Your hips’ front and outer regions ought to feel stretched.
    • Hold this position for a few seconds.
    • Return to the beginning position with your right leg raised.
    • Then return to your neutral position.
    • Then relax.
    • Repeat this exercise five to ten times.
    • Repeat the exercise on the opposite side.
    hip internal rotation
    hip internal rotation

    Standing calf muscle stretch

    • Begin by placing your hands against a wall for support, then split your legs into a half-split posture.
    • To stretch the muscles in your posterior leg, keep the heel flat on the floor and bend your hips forward.
    • Hold this position for a few seconds.
    • Then return to your neutral position.
    • Then relax.
    • Repeat this exercise five to ten times.
    • Repeat the exercise on the opposite side.
    standing calf stretch
    standing calf stretch

    Lungus

    • Place your feet hip-width apart as you begin in a standing stance.
    • Take a step forward that is longer than a walking stride, placing one leg in front of you and the other behind your body.
    • Your foot ought to touch the ground flat and stay that way through.
    • Your back heel will lift off the surface.
    • Lower yourself until your knees are 90 degrees bent.
    • Do not forget to maintain an upright trunk and an engaged core.
    • Hold this position for a few seconds.
    • Then return to your neutral position.
    • Then relax.
    • Repeat this exercise five to ten times.
    • After that, firmly push off with your front leg to get back into the starting position.
    • Repeat the exercise on the opposite side.
    Lunge-Exercise
    Lunge-Exercise

    External hip rotation

    When the knee and thigh turn outward away from the body, the hip external rotation takes place. Place the foot that is closest to the immovable object inside the band that is firmly fastened to it. Move away from the object with a few cautious steps.

    • To begin, raise the working leg off the ground while maintaining the balance of your off leg.
    • Use your arms to support yourself against a firm object.
    • Your lower and upper legs will make an angle of around 90 degrees if you raise your higher leg slightly and bend your knee.
    • Now start the repetition by turning your upper leg toward the floor and away from your body.
    • Hold this position for a few seconds.
    • Then return to your neutral position.
    • Then relax.
    • Repeat this exercise five to ten times.
    • Repeat the exercise on the opposite leg.
    hip external rotation
    hip external rotation

    Single leg bridging

    • With your knees bent, feet flat on the floor, and hands by your sides, lie on your back.
    • Elevate one foot and fully extend the leg, making it approximately 45 degrees from the floor.
    • This is the initial position.
    • When your shoulders and knees are in a straight line, raise your hips while contracting your abs and buttocks to help with the lift.
    • Gently contract your abdominal muscles, creating a pull toward your spine from your belly button.
    • Hold this position for a few seconds.
    • Then return to your neutral position.
    • Then relax.
    • Repeat this exercise five to ten times.
    • Repeat the exercise on the opposite leg.
    single-leg-bridge
    single-leg-bridge

    Butterfly Stretch

    • With your feet pressed together, take a seat on the ground or something to support yourself.
    • To make the sensation more intense, bring your feet closer to your hips.
    • Press into your sitting bones and legs.
    • Tuck your chin in toward your chest while lengthening and straightening your spine.
    • With each exhale, lean a little bit deeper into the stretch or drop heavily to the ground.
    • Hold this position for a few seconds.
    • Then return to your neutral position.
    • Then relax.
    • Repeat this exercise five to ten times.
    Butterfly-stretch
    Butterfly-stretch

    Piriformis muscle stretch

    • Place yourself on the chair in order to begin.
    • Raise your right ankle and rest it on top of your left knee.
    • After that, sit up straight and tall and flex your right foot by bringing the toes toward your shin.
    • Bend your chest forward toward your legs while maintaining a straight spine.
    • Bend forward just enough to feel stretched but not so much that it hurts.
    • Hold this position for a few seconds.
    • Then return to your neutral position.
    • Then relax.
    • Repeat this exercise five to ten times.
    • Repeat the exercise on the opposite leg.
    Seated-piriformis-stretching
    Seated-piriformis-stretching

    What safety precautions must be taken while exercising?

    • Before, during, and after the workout, warm up and stretch.
    • As instructed, stretch, hold, and complete the exercise.
    • When exercising, try to avoid making any sudden or jerky movements.
    • Stay away from tough activities.
    • Stretches before and between sets, as well as the proper sequence for completing the recommended number of repetitions for each exercise, are all outlined in the protocol.
    • Between each set of exercises, take a rest.
    • Wearing loose, comfortable clothing during a workout maximizes the range of motion and promotes relaxation. Don’t wear clothing that is too tight or trendy.
    • You must work with good posture.
    • Holding your breath while exercising is never recommended. Breathe deeply and slowly when you exhale during the activity. Deep inhalation tightens your muscles and increases blood pressure.
    • Remain hydrated.

    When do you not exercise?

    • You feel unwell.
    • If any pain or numbness is felt
    • Severe muscle burn
    • Fever
    • Headache
    • If exercising hurts, don’t continue.

    Braces and Orthotics:

    Your doctor may recommend braces, shoe inserts, or knee braces as part of a personalized workout program. Orthopedics may be a good choice for you if you run or engage in other physically demanding sports and have a forefoot. The purpose of this interior shoe portion is to adjust your gait.

    When a youngster with bow legs needs surgery, corrective braces are more frequently used. They include a modified knee-ankle-foot device that is used day and night. It is rare to use flexible boards for adult foot restoration. For adults, taking advice from a physician or physical therapist is recommended. They can provide advice on whether wearing braces would improve or worsen your issue.

    Summary:

    A condition that alters a person’s leg’s bone alignment is called varus knee, or genu varum. This ailment is characterized by a misalignment of the bigger tibia (calf bone) and femur (thigh bone) bones.

    You can work out even if you have a varus deformity in your knees. Your priorities should be keeping up a healthy lifestyle and engaging in enjoyable exercise. Make sure you spend some time strengthening your legs and hips, increasing your balance, and stretching your lower limbs to maintain the health of your knees. You might decide to utilize orthotics if your feet are planted firmly on the ground.

    At last, if activity-induced knee pain is a concern, non-impact training may be an option. To begin a suitable exercise routine, speak with your doctor. You can also wear a suitable or comfortable orthosis for proper knee and ankle alignment if you have a varus deformity in your knee.

    The pain associated with the condition can be lessened with a variety of exercises. It may be possible to avoid the need for surgery to treat the condition by performing strengthening and stretching activities.

    FAQ:

    How is a varus deformity corrected?

    The talus is usually translated and bent away from the lateral malleolus in a varus deformity, resulting in lateral gaping. Compression with a partially threaded screw must be applied on the lateral side to cure this deformity.

    Which workout is ideal for genu varum?

    Exercises including swimming, cycling, rowing, yoga, pilates, and tai chi are advised. Running, soccer, aerobics, basketball, tennis, and volleyball are not advised forms of exercise. If your legs are bent forward, you can still maintain a healthy lifestyle and gradually get better at your gait with gentle workouts.

    How can knee varus be avoided?

    The varus knee has been shown to benefit from exercises that strengthen the external rotator muscles in the hip. By improving hip flexibility, the following exercise helps lessen lower back pain caused on by bad leg posture.

    Is varus knee harmful?

    Your chance of developing osteoarthritis in your knees is increased not just by your weight but also by the degree of your varas alignment. Your chance of getting osteoarthritis in your knees rises with a greater or more severe degree of misalignment. You run a higher risk of getting worsening osteoarthritis in your knees if you have a varus alignment.

    How are varus knees balanced?

    During primary total knee arthroplasty, femoral component rotation, osteophyte excision, soft-tissue release, and bone resection are techniques utilized to balance the varus knee.

    Varus knee: is it normal?

    No, varus alignment is one set component that contributes to osteoarthritis in the knee. Ligament imbalance, tibial deformity, or tibial-femoral combined deformity could be the cause. Malalignment needs to be understood to restore the frontal plane neutral mechanical axis after total knee arthroplasty.

    Why does genu varus occur?

    The most common cause of genu varum is rheumatoid arthritis and associated disorders that obstruct normal bone formation. If bone problems, infections, or tumors prevent one leg from developing normally, the limb may end up bow-shaped.

    How do valgus and varus deformities differ from one another?

    Someone with a valgus deformity of the knee, for example, will seem knock-kneed because the distal part of the leg below the knee will slant outward with regard to the femur. Despite this, an individual with a varus deformity at the knee appears to be bowlegged, with the distal leg bending inward toward the femur.

    References:

    • D. Prajapati (2023, Aug. 26). Samarpan Physio recommends Eleven effective exercises for knee varus deformity. Physiotherapy Clinic in Samarpan. @google_vignette https://samarpanphysioclinic.com/11-best-exercise-for-knee-varus-deformity
    • Contributing Editor for WebMD. (2023b, September 15). Top Varus Knee Exercises. Web Medical. Best Varus Knee Exercises: https://www.webmd.com/a-to-z-guides
    • Image 5, Get My Patient Well Again. 2022a, 25 January. Hip Internal Rotation Band Exercise on a Standing Mat [Video]. YouTube. /watch?v=MoYxDnoqPJE
    • Image 8, Get My Patient Well Again. 2022a, 25 January. Exercise with the Hip External Rotation Band While Standing [Video]. You Tube. YouTube: https://www.youtube.com/watch?v=1hh80dQpqYY