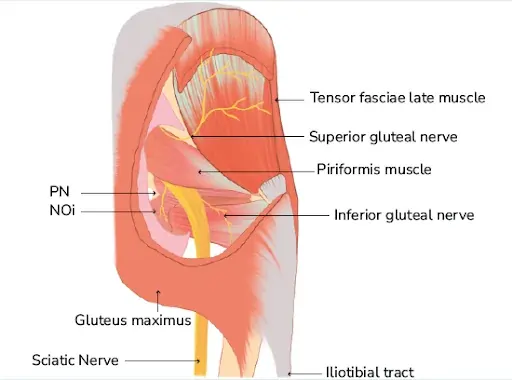
The superior gluteal nerve, a motor branch of the sacral plexus, originates from the posterior divisions of the L4, L5, and S1 anterior roots. The superior gluteal nerve and vessels travel through the greater sciatic foramen before passing superiorly to the piriformis muscle.
From there, the nerve splits into its superior and inferior branches, the former of which innervates the gluteus medius muscle and the latter of which innervates the gluteus minimus and the tensor fasciae latae muscle.
Structure
The superior gluteal nerve innervates the muscles of the gluteus medius, gluteus minimus, and tensor fasciae latae. With the gluteus minimus and tensor fasciae latae, the gluteus medius is in charge of hip joint abduction.
Because of its anterior component, the gluteus minimus is essential for the medial rotation of the thigh in addition to facilitating hip abduction. In contrast, the tensor fasciae latae helps in hip extension by providing traction on the iliotibial tract through the gluteus maximus muscle. The abductor mechanism, which enables foot clearance during the swing phase of gait and stabilizes the pelvis during the single leg phase, is made up of these three parts.
Alongside the inferior gluteal nerve, sciatic nerve, and coccygeal plexus, the superior gluteal nerve emerges from the posterior divisions of the L4, L5, and S1 nerve roots of the sacral plexus. After that, the nerve moves posterolaterally before exiting the pelvis through the superior gluteal vessels and the larger sciatic foramen.
Being the sole nerve to leave via the larger sciatic foramen above the piriformis muscle, the superior gluteal nerve is special. The pudendal nerve, inferior gluteal nerve, sciatic nerve, and all other nerves that leave through the larger sciatic foramen are inferior to the piriformis. The tensor fasciae latae muscle is where its branches end. It then enters the gluteal area, passes across the inferior aspect of the gluteus minimus, and then moves anteriorly and laterally inside the plane between the gluteus medius and gluteus minimus muscles.
Function
The superior gluteal nerve splits into superior and inferior branches above the piriformis muscle. The superior division innervates the gluteus medius and, on occasion, the gluteus minimus. It follows the top segment of the deep division of the superior gluteal artery. An estimated 5 cm above the tip of the greater trochanter, the superior gluteal nerve runs over the deep aspect of the gluteus medius.
In contrast, the inferior branch of the superior gluteal nerve crosses the gluteus minimus and innervates both the gluteus medius and the lower part of the deep division of the superior gluteal artery. The inferior branch finally culminates in and innervates the tensor fasciae latae muscle.
Course
Through the larger sciatic foramen, which is located above the piriformis muscle, it leaves the pelvis. Additionally, the superior gluteal vein and artery accompany it.
Alongside the deep branch of the superior gluteal artery, it travels laterally between the gluteus medius and gluteus minimus muscles. It splits into two branches: superior and inferior.
The tensor fasciae latae muscle is where the inferior branch ends after continuing to travel between the two muscles.
Muscle Supply
The superior gluteal nerve innervates the gluteus minimus, gluteus medius, and tensor fasciae latae muscles. Since they offer a substantial stabilizing force during the terminal swing phase, the gluteus medius and gluteus minimus muscles are both functionally essential to the gait cycle.
The Trendelenburg or gluteal gait is a distinctive loss of motor function caused by damage to this nerve that manifests as a crippling gluteus medius limp. In this condition, the center of gravity shifts to the unaffected leg due to the weakening of the gluteus medius muscle. A waddling gait is frequently the outcome of bilateral superior gluteal nerve injuries.
The thick, fan-shaped gluteus medius muscle originates from the middle gluteal nerve inferiorly, the gluteal line posteriorly, and the outside portion of the ilium superiorly from the iliac crest. After that, the muscle moves inferolaterally in the direction of the greater trochanter’s lateral surface. To enable powerful hip abduction, the gluteus medius collaborates with the gluteus minimus and tensor fasciae latae.
The anterior fibers of the gluteus medius facilitate medial rotation of the thigh as well. Walking and running are made possible by the functional cooperation of the gluteus medius muscle, gluteus minimus, and tensor fasciae latae. The contraction of the contralateral gluteus medius, gluteus minimus, and tensor fasciae latae prevents the lower extremity limb that is not in contact with the ground from tilting downward when walking or running.
The gluteus minimus, which originates from the lateral portion of the ilium between the inferior and intermediate gluteal lines, is also a fan-shaped muscle situated deep in the gluteus medius. Inferolaterally, the muscle fibers move in the direction of the greater trochanter’s anterior surface. Similar to the gluteus medius, the gluteus minimus is in charge of hip abduction and the thigh’s medial rotation.
The tensor fasciae latae is a little muscle that originates from the outside portion of the iliac crest and is located between the iliac tubercle and the anterior superior iliac spine. Encased in a sheath made of the iliotibial tract of the fascia lata on the lateral thigh, the muscle moves inferiorly and posteriorly. To help the gluteus maximus with hip and knee extension, the tensor fasciae latae provides traction on the iliotibial tract. To keep the knee in a fully extended posture, this motion is essential.
Anatomical Variation
However, a more frequent variation was the distribution of the nerve around the greater trochanter. Additionally, cadaveric dissections have shown that the superior gluteal nerve divides into the typical two branches in 86.20% of cases, while it further subdivides into three branches in 13.8% of cadavers.
Variations have been documented in the course of the superior branch of the superior gluteal nerve, specifically that of the superior branch traversing below the inferior branch of the superior gluteal nerve, that descended inferolateral and entered the tensor fasciae latae.
It has been noted that the piriformis muscle has an abnormal double belly composition, with the superior gluteal nerve stuck between the two muscular bellies. This finding points to a distinct anatomical variation that might be the uncommon source of unidentified persistent gluteal discomfort and piriformis syndrome.
Clinical Importance
The standing leg’s little gluteal muscles aid in maintaining the pelvis’ coronal plane stability during normal walking. A weak abduction of the affected hip joint may arise from muscular paralysis or weakness caused by damage to the superior gluteal nerve. The Trendelenburg gait is the name given to this kind of gait impairment.
Abduction of the ipsilateral hip joint should raise the opposing pelvis higher while the patient is standing on one leg. The positive Trendelenburg sign is caused by the pelvis sagging when the abductors are weak because of superior gluteal nerve paresis. The pelvis sags towards the swing leg, which is the typical unsupported side, in a patient with a positive Trendelenburg sign. The Duchenne limp is a deficiency that arises when the reverse happens, causing the pelvis to rise on the swing side.
Bilateral injury to the superior gluteal nerve causes a gluteal gait, or “waddling.” Additionally, as the leg swings forward during ambulation, the patient may elevate the foot of the unsupported side, resulting in a steppage gait. When the foot on the unsupported side swings out laterally, this is known as a swing-out gait.
Surgical Importance
Hip dislocation, hip fractures, hip arthroplasty, and intramuscular injections into the buttocks can all cause damage to the superior gluteal nerve. Hip discomfort can have several causes, including fractures, tendinitis, bursitis, and arthritis. Over the past few years, surgical treatment for hip osteoarthritis has changed.
The anterior side of the gluteus medius and vastus lateralis are separated and reflected forward as a single sheet using innovative surgical reconstructive procedures, and this sheet is then reattached to the greater trochanter. Nevertheless, there are risks associated with these treatments, including infections and harm to neurovascular structures. Crucially, there is a higher chance of harm to the superior gluteal nerve and superior gluteal vasculature if the gluteus medius muscle splits more than a few centimeters (usually 5 cm) above the greater trochanter’s apex.
The route and branching pattern of the superior gluteal nerve mostly determines the likelihood of damage. Determining the superior gluteal nerve’s safe zone and the distance between it and the greater trochanter are crucial when making approaches to the hip joint. For the anterior third of the gluteus medius, the safe distance for the superior gluteal nerve after hip surgery is 4 cm from the tip of the greater trochanter, and for the posterior and middle third, it is 5 cm. Furthermore, it was shown that the greater trochanter’s average distance from the gluteus medius innervation site varies with body height.
Therefore, a straight lateral approach, sometimes referred to as the Hardinge approach to the hip, increases the risk of neurological damage during hip surgeries.
Additionally, abduction weakness and limping are frequent side effects of closed antegrade femoral nail insertion, and they are most likely caused by iatrogenic damage to the gluteus medius and the superior gluteal nerve. However, the risk of damage to the gluteus medius and the superior gluteal nerve is reduced by increasing the degree of hip flexion and adduction during femoral nail insertion.
Higher degrees of hip flexion and adduction can be achieved using either the lateral position on a fracture table or the “sloppy” lateral position on a regular table, depending on how the hip is positioned.
Drugs are also frequently administered in the gluteal area, especially when quick action is needed if the medicine is not viable when taken through the intestines. To avoid the branches of the sciatic nerve and superior gluteal nerve, which are normally found in the lower quadrants of the buttock, the injection should be given in the superolateral quadrant.
FAQs
What are gluteal nerves?
The superior gluteal nerve innervates the muscles of the gluteus medius, gluteus minimus, and tensor fasciae latae. Alongside the superior gluteal artery and vein, the nerve leaves the pelvis through the larger sciatic foramen, which is located above the piriformis muscle.
Is walking good for buttock pain?
Lower back disc degeneration may cause discomfort in the thighs and buttocks. This discomfort can worsen when you sit, bend, or lift anything. Walking is one form of movement that helps alleviate it.
How long can gluteal pain last?
Minor strains often heal in a few days to a week. Mild strains may recover completely in two to three weeks, but severe strains may take four to six weeks or longer.
What is the best exercise for buttock pain?
Hip and buttock pain physiotherapy This information is to help you learn more about hip and buttock problems and some basic exercises that can help. … Hip abduction and clam. … Hip flexor stretch. … Hip flexion, external rotation, and bridging. … Piriformis stretch. … Split squat lunge. … Chair squats/squats. … Quads and hamstring stretch.
Is buttock pain serious?
If the buttock pain is severe, persistent, or accompanied by other symptoms such as numbness, tingling, difficulty walking, or bladder or bowel dysfunction, it is advisable to seek medical attention promptly. These might point to a more serious underlying condition that needs to be evaluated and treated by a specialist.
References
Gluteal nerves. (2023, October 30). Kenhub. https://www.kenhub.com/en/library/anatomy/gluteal-nerves
Gluteal nerves. (2023, August 14).StatPearlshttps://www.ncbi.nlm.nih.gov/books/NBK535408/
Wikipedia contributors. (2024a, February 11). Superior gluteal nerve. Wikipedia. https://en.wikipedia.org/wiki/Superior_gluteal_nerve
Stretches for posterior pelvic tilt target specific muscle groups to correct the imbalances associated with this condition.
Posterior pelvic tilt occurs when the pelvis rotates backward, flattening the lower back and potentially causing discomfort. Stretching tight muscles—especially the hamstrings, glutes, and lower back—can help restore balance and improve posture. Effective stretches include standing quadriceps stretch, hip flexor stretch, cobra pose, and seated forward bend.
Introduction:
Posterior pelvic tilt (PPT) is a frequent postural condition in which the pelvis tilts backward, flattening out the natural curvature in the lower back. This condition, caused by muscle imbalances such as tight hamstrings and weak hip flexors, can cause feelings of pain, and stiffness in the lower back and hips.
In a neutral pelvic position, the pelvis should not be inclined forward or backward. When the pelvis tilts posteriorly, it flattens the lumbar spine, reducing the natural curve (lordosis) required for suitable movement and posture.
Fortunately, specific stretches and exercises can help improve pelvic condition and reduce pain.
In this article, we’ll look at some effective stretches for correcting posterior pelvic tilt, how to perform them, and how to maintain good posture.
What is Posterior Pelvic Tilt?
A condition known as posterior pelvic tilt (PPT) happens when the pelvis tilts backward, flattening the lumbar spine’s normal curvature. The pelvis is positioned to support the spine’s natural curve when the pelvis is in a neutral posture. This condition is upset when the pelvis tilts posteriorly, though, and this can result in aches and pains and postural problems.
Chronic lower back, hip, and leg pain may result from posterior pelvic tilt if treatment is not received. Additionally, it may affect general posture, making it more difficult to maintain proper posture when sitting, standing, or walking. In some cases, it might worsen condition like sciatica or disc degeneration.
Using specific stretches, strengthening exercises, and posture correction for dealing with posterior pelvic tilt can help restore a more neutral pelvic disease and lessen related pain.
Causes:
Correcting posterior pelvic tilt (PPT) and avoiding more issues requires an understanding of its causes.
The main reasons for posterior pelvic tilt are listed below:
Tight Hamstrings
The muscles at the rear of your thighs, known as the hamstrings, are one of the most frequent causes of posterior pelvic tilt. The pelvis becomes tilted when these muscles are tense because they pull the pelvis backward and downward. This imbalance may cause a flattened spine by upsetting the lumbar lordosis, the lower back’s natural curve.
Core Muscle Weakness
Supporting the pelvis and lower back is mostly dependent on the core muscles, which include the lower abs and deep stabilizing muscles like the transverse abdominis. The inability of these muscles to maintain pelvic stability might result in posterior pelvic tilt and bad posture. The pelvis cannot be maintained in a neutral position with no support from a weak core.
Extended Sitting
Long periods of sitting and sedentary lifestyles are major causes of posterior pelvic tilt. Long-term sitting, especially when stooped over or slouched, weakens the glutes and hamstrings and tightens the hip flexors. Over time, this muscular imbalance may cause the pelvis to tilt back.
Muscle Imbalances
A posterior pelvic tilt can result from a muscular imbalance caused by a mix of weak and tight muscles. For example, weak hip flexors, glutes, and core muscles are unable to provide enough support to stop the pelvis from tilting posteriorly, while tight hamstrings, hip flexors, and lower back muscles (such as the erector spinae) pull the pelvis into this tilt.
Hip Flexor Weakness
The rectus femoris and iliopsoas are two examples of hip flexors that are in charge of raising the thighs and supporting the pelvis. Weakness in these muscles prevents them from compensating for hamstring tightness. Therefore, the pelvis can turn back, which adds to posterior pelvic tilt.
Habits of Poor Posture
Posterior pelvic tilt can be encouraged by muscular imbalances caused by bad posture. For instance, slouching or rounding the lower back when standing or sitting puts strain on the pelvic muscles, which causes the pelvis to tilt back. These postural habits can worsen the problem by making it more difficult to achieve proper pelvic posture.
Weak Glutes
Although they don’t cause it directly, weak glute muscles, especially the gluteus maximus, might worsen posterior pelvic tilt. The glutes help in controlling and supporting the pelvis. The pelvis may rotate rearward more readily when the glutes are weak, which can make posterior pelvic tilt worse.
Weakness in Lower Back Muscles
The pelvis may move backward to make up for the lack of stability in the spine if the lower back muscles, particularly the lumbar extensors, are weak. This may cause the lower back’s natural curvature to disappear and worsen posterior pelvic tilt.
Problems with Structure
Posterior pelvic tilt can sometimes result from structural problems or abnormalities in the pelvic and spinal bones and joints. Although less frequent, scoliosis and congenital abnormalities can cause an improper tilt of the pelvis.
Degenerative Changes and Age
As muscular strength and flexibility generally decline with age, muscle imbalances are more likely to happen. Posterior pelvic tilt may also happen as a result of age-related illnesses such as arthritis or disc degeneration that alter posture.
Signs and Symptoms:
The most typical symptoms and signs of posterior pelvic tilt are listed below:
One of the most prevalent signs of Posterior pelvic tilt is chronic lower back pain or stiffness. The lower back’s muscles, ligaments, and intervertebral disks are under more stress as a result of the lumbar spine flattening. Inflammation and muscular strain may result from this, contributing to ongoing pain.
Hamstring tightness
One of the main indicators of posterior pelvic tilt is tight hamstrings, which are the muscles at the rear of the thighs. The hamstrings experience increased strain as the pelvis tilts backward, which eventually results in their tightness or shortening. The legs’ range of motion and flexibility may be restricted by this tightness.
Decreased Hip and Lower Back Flexibility
People who have a posterior pelvic tilt may have less hip and lower back flexibility. The hip joints’ range of motion is affected by the pelvic misalignment, making it more difficult to bend or stretch without experiencing pain.
Having Trouble Keeping an Upright Posture
For people with posterior pelvic tilt, maintaining an upright or neutral posture becomes difficult. A person with a backward tilt of the pelvis may slump or become hunched, which can result in bad posture and an incentive to lean forward. Standing or walking for long periods may become uncomfortable as a result.
Hip Pain
Hip pain may result from the hips becoming misaligned as the pelvis tilts rearward. Hip joint mechanics may be affected by the changed pelvic posture, leading to hip and groin pain or stiffness.
Lower back or gluteal fatigue
The lower back and glute muscles may become weak or fatigued in those with posterior pelvic tilt. This happens because the changing pelvic position causes these muscles to become overstretched or weak, which causes pain or fatigue in these areas.
Sometimes the secondary sign of posterior pelvic tilt is knee pain. Increased strain on the knee joints can result from pelvic misalignment, which may also affect knee alignment, especially while walking, running, or climbing stairs.
Benefits of Stretching:
One of the best strategies to treat the imbalances that lead to posterior pelvic tilt (PPT) is to stretch. By correcting these imbalances, you may improve your posture, flexibility, and general comfort by including targeted stretches in your daily routine.
These are the main advantages of posterior pelvic tilt (PPT) stretching.
Reduces Pain in the Lower Back
The pain caused by the lumbar spine’s flattening in posterior pelvic tilt can be lessened by stretching the lower back and related muscles, such as the hamstrings and hip flexors. Stretching helps ease lower back pain or stiffness by increasing mobility and relaxing tight muscles, which lessens the pressure on the spine.
Restores Pelvic Alignment
By encouraging a more neutral pelvic position, stretches that target the hip flexors, hamstrings, and lower back in particular help alleviate the effects of posterior pelvic tilt. Stretching can help realign the pelvis and lessen the tilt by extending the muscles that hold it back, which will improve posture and spinal condition.
Encourages Improved Posture
Restoring the lower back’s natural curve (lumbar lordosis) can be achieved by stretching the muscles that contribute to posterior pelvic tilt, particularly the hamstrings and hip flexors. By promoting a more upright posture, this condition can lessen the likelihood of bending over or hunching over while performing daily tasks. This eventually results in better posture all around.
Increases Mobility
Joint and muscular mobility can be improved by stretching the muscles surrounding the hips, lower back, and pelvis. It is simpler to perform daily tasks including bending, slumping, walking, and climbing stairs when one has improved mobility in these areas. Because it gives you more mobility, it also improves your performance during exercises or other physical activities.
Improves Hip and Lower Back Flexibility
Muscle stiffness resulting in decreased hip and lower back flexibility is one of the most frequent results of posterior pelvic tilt. Stretching improves general flexibility by expanding the range of motion in these regions. Exercise, maintaining good posture, and carrying out regular tasks may become simpler as a result.
Muscle Tension Is Reduced
Hip flexors, lower back muscles, and tight hamstrings are frequently the cause of posterior pelvic tilt. By reducing muscle tension, stretching these muscles can improve comfort and help avoid strain or injury. This can facilitate mobility and stop the progression of muscular imbalances.
Improves Muscle Performance
Stretching serves to improve muscular function in addition to increasing flexibility. You can lessen the tension on other muscles and improve their capacity to maintain the pelvis by stretching the tight muscles (such as the hamstrings and lower back) and letting them extend. This encourages proper mobility and position, especially when combined with strengthening exercises.
Reduces Postural Problems
Stretching tense muscles like the hip flexors and hamstrings regularly helps the body regain balance, resulting in improved posture. By improving pelvic position, stretching can reduce the likelihood to lean forward or adopt poor posture, which is frequently the result of posterior pelvic tilt. A more upright, balanced, and aligned stance results from this.
Helps in Preventing Further Injuries
Joint misalignments, pain, and muscular strain can result from tense and unbalanced muscles. You can lessen your risk of injury by maintaining muscle flexibility, reducing tension, and restoring balance by routinely stretching the muscles involved in posterior pelvic tilt. Additionally, stretching gets muscles ready for action, increasing their resistance to strain and physical demands.
Encourages Calm and Decreases Stress
Stretching relaxes both the neurological system and the muscles. You can feel relieved and relaxed by gradually stretching tense muscles, especially those in the hips and back. This could improve your general sense of well-being and lessen stress. By lessening the pain caused by tense muscles, stretching can also help people sleep better.
Helps in Resolving Muscle Unbalances
The underlying reason for posterior pelvic tilt is frequent muscular imbalances, where some muscles are weak and others are tight. While strengthening exercises can target weak muscles, stretching helps target and release tight muscles. Stretching and strengthening gradually support proper pelvic alignment and help regain muscular balance.
Stretches for Posterior Pelvic Tilt:
It’s important to strengthen the weak muscles and stretch the usually tight ones to treat the causes of posterior pelvic tilt.
Some essential stretches that can help in getting back to proper posture are listed below.
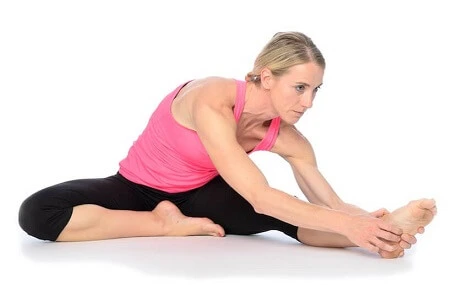
Seated static hamstring stretch
One of the main causes of posterior pelvic tilt is frequently tight hamstrings. By stretching these muscles, you may reduce tension and lessen the pelvic pulling effect.
With both legs straight out in front of you, take a seat on the floor.
Stretch one leg straight out while bending the other so that the inner thigh of your extended leg touches the sole of your foot.
To engage the hamstring, flex the foot of the extended leg (raise your toes).
Reach for the toes of your extended leg while sitting upright and slightly bending forward at the hips rather than the waist.
Avoid curving your spine and maintain a straight back.
Feel the stretch down the back of your thigh (hamstring) and hold it for a few seconds.
Then return to your neutral position.
Then relax.
Repeat this exercise 5 to 10 times.
hamstring-stretch
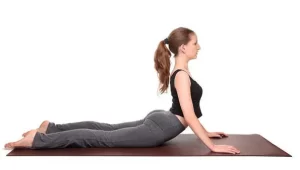
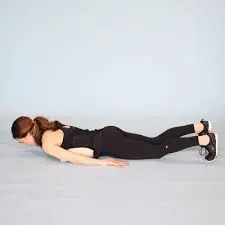
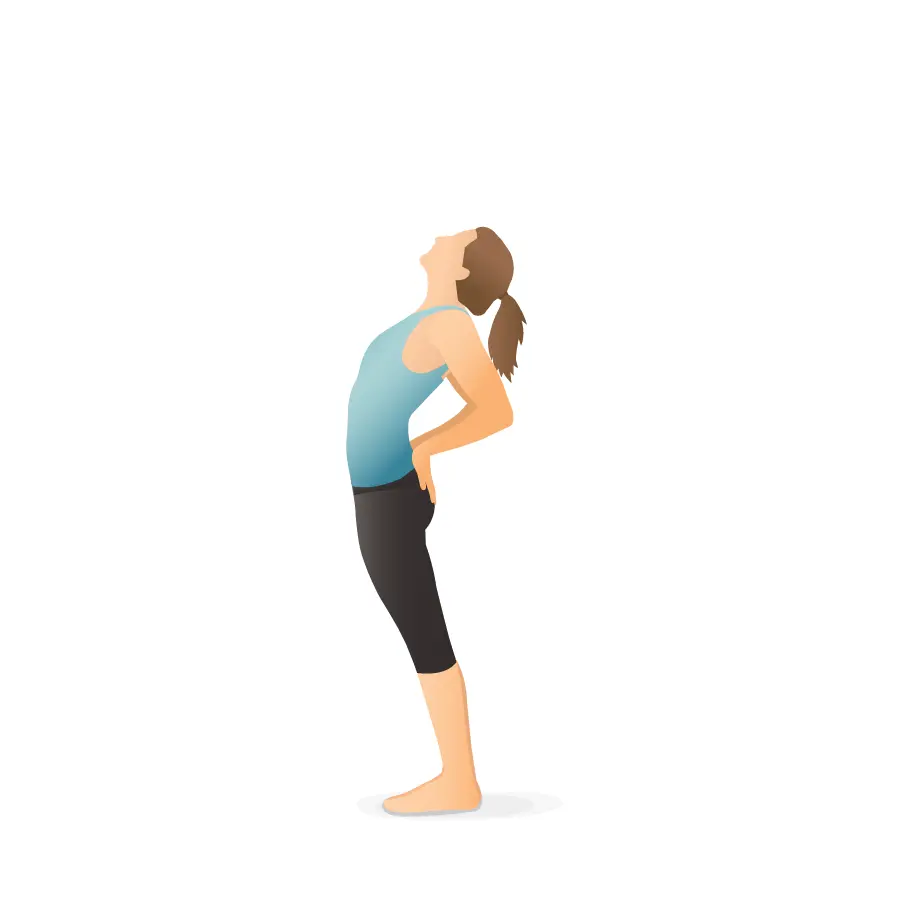
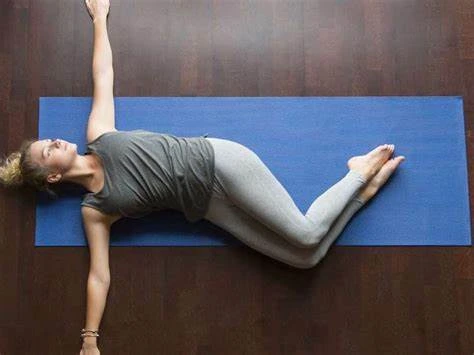
Cobra stretch
This backbend stretch relieves lower back pain that may result from posterior pelvic tilt and increases spinal flexibility.
With your legs out in front of you, hip-width apart, and the tops of your feet pressed into the floor, lie flat on your stomach.
Position your hands on the floor just beneath your shoulders, keeping your elbows close to your body.
Press into your hands, straighten your arms, extend your spine upward, and slowly raise your head and chest off the floor.
As you lift, make sure your elbows are straight or minimally bent.
Avoid pushing into your lower back and keep your thighs and hips on the floor.
As much as you can without putting excessive stress on your back, raise your chest.
Your lower back and abdominals should feel stretched.
Hold this position for a few seconds.
Slowly lower yourself back to the ground.
Then return to your neutral position.
Then relax.
Repeat this exercise 5 to 10 times.
cobra stretch
Kneeling hip flexor stretch
This stretch helps to relieve tightness and pain caused by posterior pelvic tilt by targeting the lower back, glutes, and hips.
To create a 90-degree angle at the knee, kneel on one knee and rest the other foot flat on the floor in front of you.
The front knee should be exactly above the ankle.
For a more thorough stretch, place your hands on your hips or raise them overhead.
Press your hips forward while maintaining a straight back as you shift your weight forward onto the front leg.
The hip flexor of the leg you are kneeling on should feel stretched.
To increase the stretch without putting too much strain on your lower back, contract your glutes, or the muscles in your buttocks.
Hold this position for a few seconds.
Then return to your neutral position.
Then relax.
Repeat these exercise 5 to 10 times.
Repeat the stretch on the opposite leg after switching legs.
Hip flexors stretch
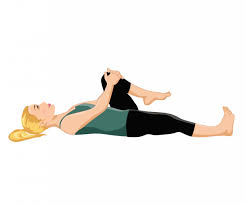
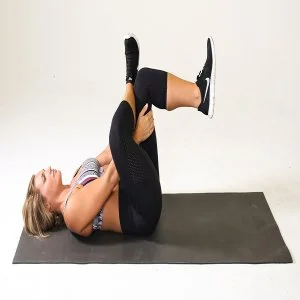
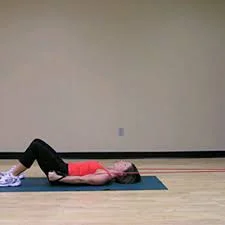
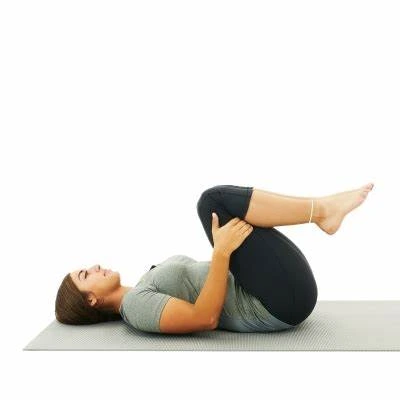
Knee-to-Chest stretch
This stretch helps to relieve tightness and pain caused by posterior pelvic tilt by targeting the lower back, glutes, and hips.
On a comfortable surface (such as a carpet or mat), lie on your back with your feet flat on the floor, hip-width apart, and your knees bent.
Gently draw one knee toward your chest with both hands.
If you would like, you can extend the other leg straight out, but keep it bent with the foot on the floor.
Grasp your knee with both hands around your shin or just below it.
Feel your hip and lower back stretch as you gradually raise your knee to your chest.
Hold this position for a few seconds.
Then return to your neutral position.
Then relax.
Repeat this exercise 5 to 10 times.
Repeat the stretch with the opposite leg after switching legs.
One-Knee-to-Chest
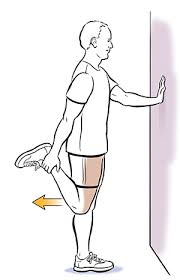
Quadriceps Stretch
The posterior pelvic tilt can be made worse by tight quadriceps (front thigh muscles), which pull the pelvis lower. The anterior muscles are more balanced when these muscles are stretched.
Maintain proper posture by keeping your shoulders back and standing upright with your feet hip-width apart.
Move your foot close to your glutes, or the rear of your leg, while bending one knee.
The hand on the same side as the bent leg should be used to grasp your ankle.
Hold onto a chair, wall, or other firm object for balance if needed.
Pull your ankle gently toward your glutes while maintaining a tightly connected grip.
To increase the stretch, gently push your hips forward while keeping your knees close together.
Hold this position for a few seconds.
Then return to your neutral position.
Then relax.
Repeat this exercise 5 to 10 times.
Quadriceps stretching exercises
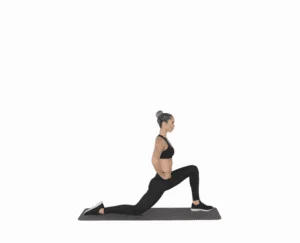
Lunges
Using your core, take an upright posture with your feet hip-width apart.
Lower your hips until both knees are bent at about 90-degree angles after taking a single stride forward and landing on your heel first.
Although it shouldn’t touch the floor, the back knee should be near it.
Instead of being over your toes, the front knee should be just above your ankle.
Hold this position for a few seconds.
To go back to where you started, push through the heel of your front foot and pull your rear leg forward.
Step forward with the opposing leg and repeat on the other leg.
Then relax.
Repeat this exercise 5 to 10 times.
LUNGES
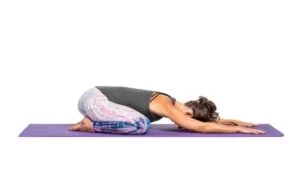
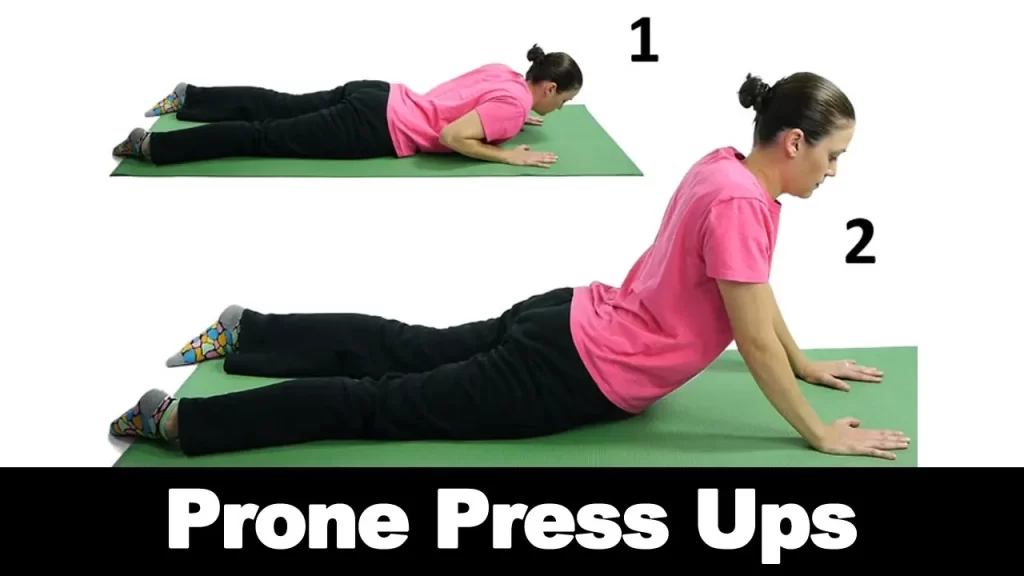
Child’s Pose
Posterior pelvic tilt tightness can be relieved by stretching the lower back.
Start by placing your wrists directly beneath your shoulders and your knees beneath your hips in a tabletop position.
Lower your chest toward the floor and slowly sit your hips back toward your heels.
If your hips are too far from your heels, you can support yourself by placing a yoga block or cushion between them.
Keep your palms facing down as you extend your arms forward on the ground.
This will open up your shoulders and lengthen your spine.
Lay your forehead lightly on the ground (or, if necessary, on a cushion). In addition to deepening the stretch, this helps to peaceful the mind.
As you stretch, take long, consistent breaths. Feel your spine stretching with each breath. Let your body drop further into the stretch with each exhalation.
For as long as it seems comfortable, hold the pose for a few seconds to a minute.
Gently move your hands back to your body and raise your torso back up to a seated posture to release the pose.
Then return to your neutral position.
Then relax.
Repeat this exercise 5 to 10 times.
Childs-Pose
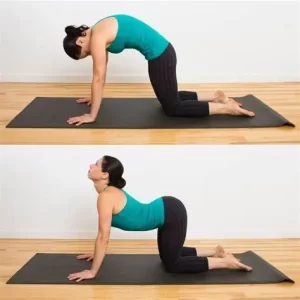
The Cat-Cow Stretch
This dynamic movement promotes pelvic mobility and spinal flexibility.
Start by assuming a neutral tabletop position while on your hands and knees.
Make sure your knees are directly behind your hips and your wrists are directly beneath your shoulders.
Make sure your head and spine are in alignment and keep your spine neutral.
Arch your back down as you take a breath, letting your belly drop to the floor.
As you raise your chest and tailbone toward the ceiling, let your shoulders drop back and your chest expand.
Look up slowly (without straining your neck).
Your spine should gently curve as a result, extending your abdomen and raising your chest and pelvis.
Tuck your chin into your chest as you exhale and round your back upward toward the ceiling.
As you pull your tailbone down toward the floor, pull your belly button into your spine.
Pull the pelvis under and round your spine while pressing your hands into the mat and extending the distance between your shoulder blades.
Breathe in as you arch into Cow stance and out as you go into Cat pose, continuing to alternate between the two poses.
Then return to your neutral position.
Then relax.
Repeat this exercise 5 to 10 times.
Cat-and-Cow-Stretching
Piriformis Stretch
If you suffer from problems like posterior pelvic tilt, stretching the piriformis can help reduce tension and increase flexibility.
Start by laying flat on your back on a soft carpet yoga mat, or any other comfortable surface.
Bend both knees so that your knees are pointing toward the ceiling and your feet are flat on the floor.
Make a “figure 4” with your legs by crossing your right ankle over your left knee.
You should have your right knee facing sideways.
Gently draw your left thigh toward your chest with your hands behind it (the leg that is still on the floor).
When the right leg is crossed, the outer hip and glute should feel stretched.
Make sure to breathe deeply and relax into the stretch while you hold it for a few seconds.
Don’t jerk or bounce throughout the stretch; instead, work gently.
Then return to your neutral position.
Then relax.
Repeat this exercise 5 to 10 time.
supine-piriformis-stretch
What precautions should be taken when performing stretches?
You must pay attention to specific safety precautions when performing stretches for posterior pelvic tilt (ppt) to avoid injury and maximize the exercises’ effect.
The following are important safety precautions to take when performing posterior pelvic tilt stretches:
Before stretching, warm up.
Stretching should never be done before warming up your body. Warming up improves flexibility and lowers the chance of muscular strains by increasing blood flow to the muscles. Walking, cycling, or a few minutes of dynamic movements are examples of mild aerobic exercises that can get your body ready for the stretching session.
Don’t Overstretch
When stretching, don’t exert too much force. It’s natural to stretch until you feel difficult but you shouldn’t experience pain. When exercising on tight muscles like the hamstrings or hip flexors, overstretching can cause pressure on the muscles or ligaments.
Pay Attention to Your Body
Throughout your stretches, keep an eye out for any indications of stiffness. Pain or serious pain is a warning sign; a moderate stretch or mild strain is acceptable. Should you feel any pain or a sharp ache, stop the stretch right once, change positions, or get medical advice if needed.
Begin slowly.
Go slowly with the stretches if you’ve never done them before or if you’re just beginning to treat posterior pelvic tilt. Start without overtaxing your body. Over time, gradually increase the stretches’ duration and intensity to give your muscles time to adjust.
Stay hydrated
Drink plenty of water before, during, and following stretching. Maintaining proper fluid intake lowers the chance of cramping or damage and preserves muscle flexibility. Dehydrated muscles may become less flexible and more subject to stress.
Keep Your Form Correct
To prevent damage and guarantee that the stretch works on the correct muscles, proper form is essential. For instance, make sure your back remains neutral and refrain from curving your lower spine when you stretch your hamstrings or hip flexors. Injuries or worsening of the issue might result from poor form.
Avoid bouncing and hold stretches.
When performing stretches (sometimes called ballistic stretching), refrain from jumping or jerking. Instead, carefully hold each stretch for 20 to 30 seconds. Injuries can result from microtears in the muscles caused by bouncing. For increasing flexibility, controlled static stretches are safer and more effective.
If necessary, use components.
If you struggle to get into certain postures or need additional support, use props like yoga blocks, belts, or pillows. You can avoid straining and maintain proper posture by performing them.
Take Proper Breaths
As you stretch, take deep, even breaths. Holding your breath might make your body tense and make the stretch less effective. You can relax and go deeper into the stretch without straining by taking long, regular breaths.
Maintain Regularity While Letting Rest
When treating posterior pelvic tilt, regularity is essential, but you also need to give your muscles time to heal. Avoid going overboard by stretching too much or too often. To give the muscles time to heal and adjust, maintain a balanced schedule that includes enough rest in between stretching sessions.
Avoid forcing your movement.
Don’t push yourself past your existing limit of flexibility. Excessive exertion might cause injury by putting tension on ligaments or muscles. The goal is not immediate flexibility but rather gradual improvement.
If necessary, consider professional advice.
See a physical therapist or fitness expert if you’re unclear about the proper methods or if you continue to feel pain when stretching. They can evaluate your condition, help you in creating an individual stretching program, and offer form and technique advice.
When do you stop performing stretches?
It’s important to know when to stop doing posterior pelvic tilt (PPT) stretches to prevent injury and overstretching.
The following are important signs that can help you decide when to stop stretching:
When You Experience Pain
If a stretch causes you to feel sharp or severe pain, stop right away. Stretching shouldn’t hurt. It might feel a little uncomfortable or like a little push, but if it hurts more than that, you’ve gone too far. Pain is an indication that something is incorrect, and ignoring it could result in harm.
The Point at Which Your Range of Motion Is Maximum
You should try to stretch until you feel a little tense, but after you’ve reached your maximum range of motion, you shouldn’t be able to move any further. When you feel that you have reached your maximum level of flexibility in that posture, or if you are unable to further deepen the stretch, it is time to stop. Excessive movement might cause damage and muscular strain.
If You Experience Lightheadedness or Dizziness
Stop the stretches and take a break right away if you start to feel lightheaded, faint, or dizzy. There should never be any soreness during stretching beyond the typical muscular stretch. Feeling faint could be a sign that you’re breathing incorrectly during the stretches or that you’re pushing yourself too much.
The Moment You Feel Muscle Fatigue
You’ve stretched enough for that session if the muscle you’re stretching begins to feel weak or exhausted. An inability to maintain enough form or complete range of motion due to muscle exhaustion may result in incorrect alignment and possible injury. It’s important to pay attention to your body and take a break if you’re feeling exhausted.
When You Experience Tingling or Numbness
Stop away if the part being stretched starts to feel tingly or numb. This feeling could be a sign that you’re aggravating a sensitive part of your body or squeezing a nerve. Any stretch that results in these feelings should be avoided.
Advice on Keeping Your Posture Correct:
Sit comfortably: When you sit, ensure sure your chair supports your spine’s natural curvature. Stay away from prolonged sitting in one position or slouching.
Take breaks: To avoid muscle stiffness, get up and move around every 30 minutes if your job requires you to be seated.
Remain active: Maintaining muscle balance and avoiding imbalances that cause posterior pelvic tilt can be achieved with regular exercise.
Use your core: To support your pelvis and lower back, work on using your core muscles throughout the day.
Summary:
Physical activity and stretching are combined to correct posterior pelvic tilt and restore proper pelvic condition. You could improve your posture and lessen pain by strengthening your core and glutes, as well as your tight hamstrings, hip flexors, and lower back.
Long-term improvements in posture, mobility, and pain can result from routinely including stretches that target tight muscles (such as the hamstrings, hip flexors, and lower back). For best results, handle muscular imbalances and promote a more neutral pelvic position by combining stretching with strengthening exercises and posture awareness.
For maximum effects, remember to do these stretches regularly and integrate posture-friendly practices into your everyday routine. It’s important to speak with a healthcare provider for individualized guidance and treatment if symptoms continue.
FAQ:
How does Posterior Pelvic Tilt benefit from stretches?
Stretches help by loosening tense muscles and increasing the range of motion in the lower back, hip flexors, and hamstrings. Stretching helps to improve posture, alleviate Posterior Pelvic Tilt pain, and restore pelvic balance by lengthening these muscles. Frequent stretching can improve general mobility and help in pelvic realignment.
With posterior pelvic tilt, which muscles are usually tense?
Hamstrings (back of the thighs) Lower back muscles (erector spinae) Gluteal muscles (buttocks) The tilt is caused in part by these tight muscles pulling the pelvis backward.
With posterior pelvic tilt, which muscles are usually weak?
Hip flexors (iliopsoas) Abdominals (particularly the lower abdominals) Gluteus maximus (in some cases) These muscles are in charge of supporting the spine and maintaining pelvic condition.
Which stretches work well for posterior pelvic tilt?
Stretches that work the hamstrings, hip flexors, and lower back are the best way to treat posterior pelvic tilt. Stretches that work well include: Lunges and kneeling hip flexor stretches are examples of hip flexor stretches. Hamstring Stretch (e.g., hamstring stretch when sitting or standing) Lower Back Stretch (e.g., cat-cow stretch, child’s stance) Figure-four stretch and pigeon posture are examples of gluteal stretches.
How much time should I spend holding each stretch?
Hold each stretch for 20 to 30 seconds, then repeat two to three times on each side. This prevents overstretching and allows the muscles to extend and rest. When stretching, refrain from jumping or jerking.
For posterior pelvic tilt, how frequently should I stretch?
For maximum effects, try to stretch three to four times per week. You could stretch more often if you’re in pain or uncomfortable, but pay attention to your body and schedule rest days as necessary. The secret to treating muscular imbalances is regularity.
Will the Posterior Pelvic Tilt be corrected by stretching alone?
Strengthening exercises are also required to address weak muscles and restore pelvic posture, even if stretching is important for releasing tense muscles. To correct the tilt and improve posture, strengthening activities for the glutes, hip flexors, and core are equally necessary.
When should I stop doing the posterior pelvic tilt stretching?
If you experience dizziness, numbness, or sudden or severe pain, stop stretching. Avoid overstretching as well; stretching should be somewhat uncomfortable but not painful. It’s time to stop and take a break if you’re exhausted or can’t maintain the stretch with good technique.
Can lower back pain be alleviated by stretching for posterior pelvic tilt?
Indeed, stretching can greatly reduce lower back pain caused by posterior pelvic tilt. Stretching may alleviate pain and lessen the strain on the spine by releasing tense lower back muscles and increasing hip flexor and hamstring flexibility.
Should I stretch with equipment or accessories?
If you have limited flexibility, using tools like cushions, belts, or yoga blocks might help you do stretches with perfect technique. Blocks can offer support in positions like the hip flexor stretch, and a strap can help you reach your feet in a hamstring stretch.
Is it possible for bad posture to worsen posterior pelvic tilt?
Indeed, bad posture can make posterior pelvic tilt worse. Examples of this include slouching and prolonged sitting. Avoid leaning and try to keep your spine neutral when you’re seated. Maintaining proper posture and using ergonomic furniture might help lower the chance of Posterior Pelvic Tilt getting worse.
When is the right time for me to consult a doctor about posterior pelvic tilt?
It could be beneficial to speak with a medical expert, such as a physical therapist, if you continue to have pain, or trouble correcting your posture even after stretching and strengthening. They can assess your condition, find any underlying problems, and design a customized plan to meet your individual needs.
References:
Patel, D. (2022, July 14). Posterior pelvic tilt: Cause, symptoms, therapy, and exercise. Samarpan Physiotherapy Clinic: https://samarpanphysioclinic.com/posterior-pelvic-tilt
S. McQuilkie, DC. February 7, 2023. The best workouts and stretches to correct posterior pelvic tilt. Intelligence from the back. Fix-posterior-pelvic tilt: https://backintelligence.com/
Admin. March 25, 2021. correcting the pelvic tilt in the back. https://www.starkwoodchiropractic.com/fixing-posterior-pelvic-tilt/ Starkwood Chiropractic
What is a pelvic tilt? (undated). What is Pelvic Tilt? WebMD. https://www.webmd.com/a-to-z-guides
Cpt, A. A. March 5, 2023. A posterior pelvic tilt: what is it? Verywell Health. This link: https://www.verywellhealth.com/posterior-pelvic-tilt-297132
Image 2, Bowman, S. (March 28, 2013). To feel lighter, stronger, and pain-free, try this yoga stance right now. Oneself. https://www.self.com/story/benefits-of-fitness-cobra pose
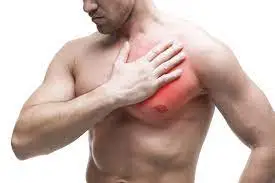
Chest muscle pain, or myalgia, often results from muscle strain, overuse, or injury to the pectoral muscles. It can also be caused by poor posture, muscle imbalances, or referred pain from the neck or upper back.
Symptoms include localized soreness, tenderness, and difficulty with movements like pushing or lifting. While usually benign, persistent or severe pain should be evaluated to rule out cardiac or other serious conditions.
Chest muscle pain is indicated when you experience breathing difficulties and have trouble moving the affected shoulder area.
When you cough, sneeze, or take heavy breaths, the pain gets worse.
Additionally, you have pain and soreness in the chest wall.
There are numerous causes of this pain, including rib injuries and muscle sprains.
The cause of this injury is muscle spasms. The RICE concept, pain relieving Medicine, and physical therapy are used to relieve chest muscle pain.
In the pectoral region, this muscle is the most superficial.
This muscle is big and shaped like a fan.
It is made up of the clavicular and sternal heads:
The humerus bone’s inter-tubercular sulcus is where both heads are distally joined.
The anterior surface of the medial clavicle bone is where the clavicular head begins.
The aponeurosis of the external oblique muscle, the superior six costal cartilages, and the front side of the sternum are the origins of the sternocostal head.
The purpose of these Pectoralis Major is to draw the scapula anteroinferior and medially rotate the upper limb.
This muscle’s clavicular head flexes the upper limb on its own as well.
Pectoralis Minor:
Beneath the pectoralis major muscle is the pectoralis minor.
These two muscles are a component of the axilla region’s anterior wall.
The third to fifth ribs are the origin of this muscle.
It enters into the scapula bone’s coracoid process.
By pulling the scapula bone antero inferiorly against the thoracic wall, the pectoralis minor stabilizes it.
Serratus Anterior:
The serratus anterior muscle forms the medial border of the axilla area and is situated more laterally in the chest wall.
The lateral portions of ribs 1–8 are the origin of the many strips that make up this muscle.
The costal surface of the scapula bone’s medial edge is where this muscle is placed.
The scapula is rotated by this serratus anterior muscle, which also enables the arm to be elevated more than 90 degrees.
The scapula bone is held against the rib cage by this muscle as well.
Subclavius:
Located right behind the collarbone bone, this tiny muscle runs horizontally.
The first rib and its costal cartilage meet to form this muscle.
It is placed into the middle portion of the clavicle bone’s inferior surface.
This subclavius muscle’s work is to anchor and depress the clavicle bone.
Overuse is the main cause of damage to the chest muscles.
Chronic strains are caused by lifting heavy objects and being hurt when participating in sports like gymnastics, tennis, rowing, and golf. All of these activities require repeated action.
The following are additional activities that can also result in muscle strain:
when you spend a lot of time raising your arms above your head.
when contact injuries from sports, auto accidents, and other circumstances happen.
Your body is twisting as you lift something.
The warm-ups before to the exercise are always skipped.
when an injury is caused by faulty equipment.
Chest muscular strain is another symptom of some disorders.
Muscle pain is categorized as either acute or chronic based on the symptoms:
Acute strain is caused by injuries received right after a direct trauma, such as in a vehicle accident or fall.
Longer-term activities like repetitive motions employed in sports and other work responsibilities can lead to chronic strain.
Three grades are assigned to muscle strains based on their severity:
Grade 1: Less than 5% of muscle fibers are mildly damaged in a grade 1 muscle strain.
A grade 2: muscular strain is characterized by greater damage but not a complete rupture, which results in a loss of strength and mobility.
A grade 3: muscle strain is characterized as a total muscle rupture, which occasionally necessitates surgery.
The following are some potential reasons of chest pain:
Anxiety attacks
Peptic ulcers
Digestive upset, like esophageal reflux
Pericarditis
Bruising as a result of injury
Injured ribs:
When it will happen Chest pain can also result from rib injuries such as fractures, breaks, and bruising. At the time of injury, a person may occasionally hear a crack and experience excruciating pain.
Peptic ulcers:
Although it is created in stomach lining lesions, it often does not cause excruciating pain. It is administered to cause persistent chest pain. You can take antacids, which are beneficial and typically reduce peptic ulcer pain.
Gastroesophageal reflux disease – GERD:
The condition known as gastroesophageal reflux disease, or GERD, is characterized by the reflux of stomach contents into the throat. It may cause a sour taste in the mouth and a burning sensation in the chest.
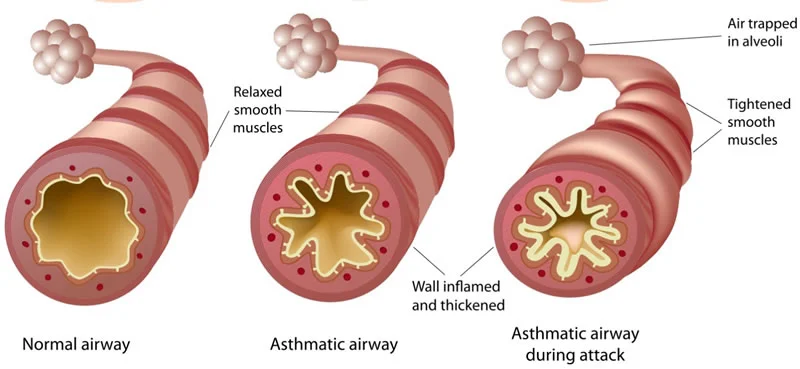
This frequent respiratory condition is characterized by airway inflammation, which results in chest pain.
Collapsed lung:
When air accumulates in the area between the lungs and ribs, it may collapse, causing an abrupt pain in the chest when inhaling. People who have a collapsed lung report fatigue, shortness of breath, and an elevated heart rate.
Costochondritis:
This condition causes inflammation of the rib cage’s cartilage, which results in chest pain. When you are sitting and lying down, this ache gets greater.
Esophageal contraction disorders:
Chest pain is caused by contractions and spasms in the food pipe in this situation.
Esophageal rupture:
When the food pipe bursts, causing an abrupt and severe pain in the chest.
Hiatal hernia:
Heartburn and chest pain are caused by a hiatal hernia, which occurs when a portion of the stomach pushes up into the chest.
Tuberculosis:
When tuberculosis bacteria proliferate in the lungs, symptoms include a severe cough, blood in the cough, and chest pain are produced.
The following are more significant potential causes of chest pain:
Angina is the result of decreased cardiac blood flow.
If a blood clot forms in your lung’s pulmonary artery, it’s called a pulmonary embolism.
Aortic dissection is the result of an aortic rip.
Symptoms of the chest muscle pain:
Every damage causes pain, which might be mild from a persistent strain and intense from an abrupt pull.
You have been seen to have bruises and swelling.
Having trouble moving the affected area as well.
The more the chest muscle moves, the more this ache gets.
Additionally, this ache gets greater when you cough, sneeze, and breathe deeply.
Additionally, you have stiffness and tightness where the chest muscles hurt.
You may get upper back ache occasionally.
Are some individuals [people of a specific age] more at risk?
Generally speaking, anyone can get a strain in their chest muscles:
Fall-related injuries to the chest wall are more likely to occur in older adults.
Chest pulls and injuries from auto accidents and sports activities cause chest pain in adults.
Children are the least likely to have damage to their chest muscles.
Under what circumstances should you call a doctor in an emergency?
These symptoms include:
Dizziness
Irritability
Fainting & fever
Difficulty breathing
Sweating
Sleepiness
Additional conditions that require contacting a physician include:
If you breathe quickly or laboriously
If the pain doesn’t go away after taking medicine and gets worse over time,
If you experience excruciating pain and numbness for more than an hour
If you feel weak and lethargic
If the affected area is red and inflammatory
Make a popping noise as soon as the damage happens.
Diagnosis of the chest muscle pain:
When you call a doctor after experiencing severe symptoms, the doctor will ask you questions about your symptoms and medical history in an attempt to determine the source of your suffering.
Since the RICE approach (rest, ice, compression, and elevation) is the first line of treatment for minor chest muscle pain:
R- Rest = As soon as you have chest pain, stop the activity. Two days after the injury, you are engaging in light exercise, but you stop when the pain returns.
I- Ice = Always place a towel between the ice pack and your skin to avoid ice burns. This helps you get rid of pain and swelling.
C-Compression: To reduce swelling, wrap any inflammatory regions with an elastic bandage; however, avoid wrapping too tightly as this will hinder circulation.
Elevation E = You have to be Maintain a raised chest, primarily at night, to make sleeping more comfortable.
Pain medication:
To relieve muscle pain, you can also take non-steroidal anti-inflammatory medicines (NSAIDs), such as Diclofenac and Etodolac.
Stronger analgesics, muscle relaxants, and occasionally both are prescribed by doctors to treat severe and chronic pain in order to lessen pain and muscle spasms.
Physical therapy treatment for chest muscle pain:
Massage:
You start by looking for the sensitive areas, and then you massage each one using very, extremely brief strokes.
Maintain muscle relaxation and concentrate just on the sore areas.
Never apply more than 15 strokes to a single vulnerable region.
It is preferable to have brief massage sessions and repeat them often in order to address the trigger points.
Three massages are given each day.
Exercise therapy:
Exercise therapy for muscle pain includes both strengthening and stretching routines.
Stretching exercises help release stiff muscles and strengthen them. Exercise can help with muscle weakness.
Stretching exercise:
After electrotherapy has been utilized for two to three days to reduce muscle pain, the physical therapist is told to stretch to release tight muscles.
Your muscles will feel less tense and sore after doing this stretching exercise.
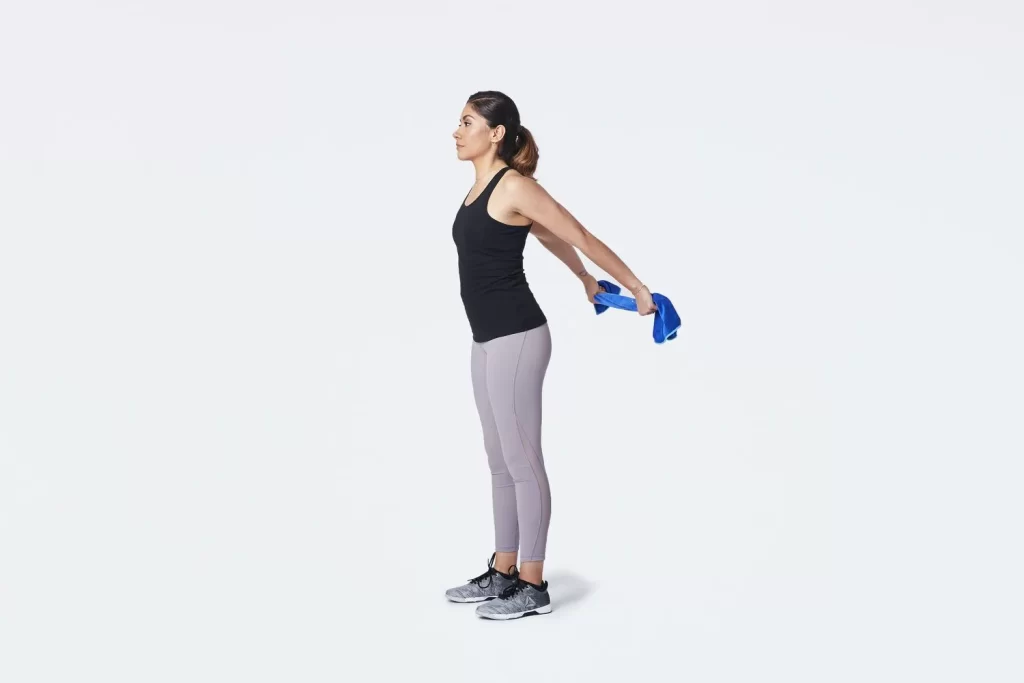
Hands-behind-the-back chest stretch
Stability ball chest stretch
Ball Stretch
Corner Stretch
Wall Stretch
Elbow Wrap Stretch
Back Bend Stretch
Lying Chest Stretch
door jamb stretch
Hands-behind-the-back chest stretch:
Surely Interlace your fingers behind your back and maintain an elevated chest throughout the exercise.
Then, as you continue to raise your chest or look up at the ceiling, straighten your arms and draw your shoulder blades down your back.
After 30 seconds of holding this stretching stance, slowly unhook your hands from the clasp.
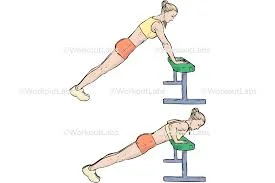
Stability ball chest stretch:
Initially Stretch your right arm straight out to your right, like it’s three o’clock, while on all fours.
Next, insert a stability ball on your right palm.
The right palm should then be raised off the stability ball.
For 30 seconds, hold this stretching position.
After that, lower your palm and do it twice more.
At two and one o’clock, repeat this stretching exercise with the ball.
Repeat this process in each of the three spots after switching sides.
Ball Stretch:
Look behind you and lean back.
Your chest must be expanding toward the ceiling.
For 30 to 60 seconds, maintain this stretching position.
Corner Stretch:
You are facing a corner while standing, with your right foot stepped back and your left foot near the corner.
The upper arms should then be parallel to the floor after raising them at the sides.
On either side of the corner, place your forearms up against the walls.
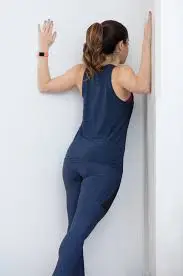
Wall Stretch:
Wall Stretch
Positioned against a doorway or the outer corner of a room, you are standing.
To get your upper arm parallel to the floor at shoulder height, bend your right elbow joint to a 90-degree angle.
With your left side facing the room, place your right forearm against the wall’s corner.
To experience a stretch in your right pectoral muscle, lean your left side into the open doorway room and then softly press onto your right forearm.
Elbow Wrap Stretch:
You are sitting or standing with both feet firmly planted shoulder-width apart, cross-legged on the floor.
Put your arms behind your back and wrap each hand around the forearm or elbow joint on the other side.
For 30 seconds, maintain this stretching position.
Next, concentrate on raising your collarbones and pressing your shoulder blades together or downward.
Back Bend Stretch:
For this stretching, you are either sitting or standing.
Make an effort to place your hands behind your head.
Extend your elbow joint toward the room’s sides.
After then, open your chest and let your head drop back into your hands.
Put pressure on your shoulder blades.
Take a deep breath and hold it while pressing your chest upward.
Lying Chest Stretch:
You are in a prone position on a training mat while you are resting on your stomach.
In order to form a T shape with your body, try reaching your arms to the sides of the room.
As you slowly start rolling to the right, place your left hand on your left hip joint.
Hold this stretching stance for 30 seconds once you feel the right pectoral muscle stretch.
Door jamb stretch:
Place your right upper arm on the door frame while standing in a doorway, elbow joint flexed at a 90-degree angle.
To get a nice stretch at the front of your right shoulder joint, try leaning forward with your entire body and rotating your shoulder away from the door.
Strengthening Exercises:
Following two to three days of follow-up electrotherapy and massage to relieve muscle pain, the physical therapist recommends strengthening exercises to relieve muscle weakness.
Camel pose
Bow pose
Chest opener
Floor Chest Roll
Doorway Roll
Standing Chest Expansion
Push-Up Plus
Release Chest Tightness
Incline push up
Flat bench press
Decline bench press
Cable crossover
Resistance band pullover
Camel pose:
Camel pose
Initially Place your hands at your waist and kneel on the floor, hip-width apart.
Put your hands on your lower back if this exercise feels too tough for you.
Then, while keeping your chin down, slowly drive your hip joint forward.
Release your head slowly backwards once you feel comfortable.
Bow pose:
Reach back and use your hands to grasp the tops of your feet while bending your knee joint.
Surely Make sure your legs are as parallel as you can.
Kick your feet into your palms after raising your chest.
As you continue in this stretching position, take at least five breaths.
Next, release your feet gradually and return to your starting position.
Stretch like this five times in a single session and three times a day.
Chest opener:
Chest opener
Position your right hand between waist and chest height on a bench or other sturdy surface.
Then, without exerting yourself, straighten your arm and slowly spin to the left until you feel a stretch in your chest.
Floor Chest Roll:
A big foam roller is placed beneath your shoulder blades, perpendicular to your body, as you lie on the floor.
After that, roll onto your left side and keep rolling until the roller is beneath your left chest.
Try rolling up your body and then going back to where you were before.
Doorway Roll:
Next, Position a tennis ball, lacrosse ball, and massage ball between the wall and the left side of your chest, directly in front of your shoulder joint.
To feel a light massage when the ball touches your chest, try reaching your left arm through the door and lifting or lowering the arm.
Standing Chest Expansion:
Standing Chest Expansion
After that, intertwine your fingers behind your tailbone.
As you open your chest up and out, try pressing your knuckles toward the floor.
For ten seconds, maintain this exercise position.
For 30 seconds, maintain this stretching position.
Push-Up Plus:
Perform a standard push-up after starting in the plank position with your arms shoulder-width apart.
When you’ve finished a repetition and your arms are completely extended at the top position, you get the “plus.
” Now, extend your shoulder blades and thrust them upward toward the ceiling while keeping your palms firmly planted on the floor.
Hold this posture for 30 seconds to activate the serratus anterior muscle.
Release Chest Tightness:
Initially, using a tennis ball results in less pressure, whereas using a lacrosse ball results in higher pressure.
Position a ball beneath the outer border of your collarbone.
Using the ball on the top and outside of your chest, try pushing against a wall.
When you perform this exercise correctly, you may experience some soreness in the targeted location.
For 30 seconds, hold this workout.
Incline push up:
Incline push up
You begin by placing your hands on a surface that is countertop height and the wall.
Bring your chest down to the surface you’re resting on.
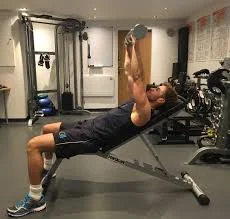
Flat bench press:
Next, pull the weight off the rack by pressing your arms straight up toward the ceiling.
The weight should ideally be moved above chest level.
Surely Make sure the bar is roughly parallel to your nipples.
Incline bench press:
Incline bench press
To remove the weight from the rack, press your arms straight up toward the ceiling.
The weight should be positioned above your collarbone.
Next, Reduce the weight gradually until it is slightly over your nipples and about in line with your mid-chest.
Decline bench press:
On the decline bench, you are laying on your back with your ankles fastened behind the ankle rests and your knee bent.
Lifting the weight off the rack requires you to press your arms straight.
Place the weight in the upper belly area, above your lower chest.
The weight should then be lowered to your chest and roughly in line with your nipples by slowly bending your elbow joint.
Cable crossover:
Cable crossover
You are standing far from a resistance band that is fixed to the ceiling and a series of high pulley cable machines.
Next, choose light to moderate weight to increase difficulty while ensuring your achievement.
As you take a single foot forward, try to grasp the hands.
Surely Maintain the handles in front of your chest by maintaining adequate tension and control.
Next, tighten your chest muscles and lower the handles.
Move forward across your body at about the level of your belly button.
Chest dip:
You’re Hold the two parallel bars with your hands facing in a standing position.
In order to raise your body into alignment with your hands, try to straighten your elbow joint and apply pressure to your hands.
Resistance band pullover:
Resistance band pullover
Your head is facing the anchor point as you lie on your back.
The band is positioned between one and two feet above your head.
Next, hold the band over your head so that it is somewhat taut.
Surely Keep your palms facing apart and your thumbs pointed up at tky.
Maintain a taut core and a straight elbow joint.
Pull the band in the direction of your hip.
Next, Return to the starting position gradually and under control.
Complications of chest muscle pain:
Breathing problems are a consequence of chest trauma.
Having trouble breathing increases the chance of getting a lung infection.
What is Recovery from chest muscle pain?
Heavy lifting and other forms of intense exercise should be avoided while you’re recovering.
Once the pain subsides, gradually resume your prior sports and activities.
However, you should take a few days off from activities if you have any pain or other symptoms.
Your injury will determine how long it takes you to recover.
In two or three weeks, mild injuries recover.
It may take months for more severe injuries to recover.
Prevention of chest muscle pain:
Always exercise caution when engaging in activities that raise the possibility of falling or suffering another injury.
When climbing and descending, try to use handrails.
You must examine the athletic equipment before using it and refrain from walking on slick places.
Lift heavy objects with caution, especially when performing heavy works, and carry bulky backpacks on both shoulders rather than the side.
Prognosis:
The prognosis is usually excellent because musculoskeletal disorders account for the majority of chest wall pain cases. With rest and physical treatment, the majority of people can recover completely in a few weeks.
Depending on the severity of the condition, medicines and other therapies can be used to control other causes of chest wall pain. For instance, rheumatoid arthritis treatments can help you reduce the inflammatory response, manage your pain, and eventually achieve remission.
If treatment is not received, pulmonary embolisms and heart attacks can be fatal. In addition to chest wall pain, you should immediately seek emergency medical attention if you experience any of the following symptoms:
Shortness of breath
Nausea
High fever
Abrupt and intense lung pain,
Weakness,
lightheadedness, or fainting,
Coughing up blood or dark sputum
Black or dark red stools.
Conclusion:
Chest muscle pain typically not a serious condition and is caused by muscle tension, overuse, or injury. Rest, cold or heat therapy, and over-the-counter painkillers frequently help. To rule out heart-related problems, it is crucial to get medical help if chest pain is severe, ongoing, or accompanied by symptoms like dizziness, shortness of breath, or pain that spreads to the arm or jaw.
FAQs
Who should I see if I have muscle soreness in my chest?
For assistance with chest pain, consult a cardiologist or pulmonologist. Physicians who specialize in heart diseases are known as cardiologists, and those who specialize in lung conditions are known as pulmonologists.
How can chest pain be treated using first aid?
Have them take a seat, relax, and make an effort to remain composed. Unfasten any tight garments. Find out if they take any medications for chest pain, such as nitroglycerin for a known heart issue, and assist them in taking it.
Is chest pain on a daily basis normal?
Angina, heart attacks, panic attacks, gastrointestinal issues, and more are among the potential causes. Acid reflux is one example of a mild underlying cause of chest pain. It might, however, be a sign of a heart attack or another dangerous condition. It’s critical to identify warning indicators and search for concomitant symptoms.
How can pain in the chest muscles be stopped?
The physical therapist may include additional treatments for strained chest muscles in the rehabilitation process in addition to the exercises that are specifically prescribed. As a first line of treatment for pain and inflammation during the acute stage of an injury, this may involve the R.I.C.E. method, which stands for Rest, Ice, Compression, and Elevation.
How can I undertake at-home chest physical therapy?
Clap the palm rhythmically over the entire rib cage, behind the arm, and in front of the breast. It may take five to fifteen minutes. To repeat on the opposite side, you will have to flip over. Even when you are healthy, chest physical therapy is typically performed twice a day.
What prevents a tight chest?
Chest congestion can be lessened, mucus can be diluted, and ventilation can be enhanced by drinking lots of water. Steer clear of triggers: Recognize and stay away from triggers that could make your tightness in your chest worse. Allergens, irritants like smoke or chemical fumes, and specific foods that might aggravate acid reflux are a few examples.
What is the physical examination for pain in the chest?
The majority of patients should first have chest radiographs, ECGs, and pulse oximetry. A full echocardiography or a point-of-care ultrasound (POCUS) may occasionally be helpful in further assessing potentially fatal reasons, especially in patients with hemodynamic instability.
How long may soreness in the chest muscles last?
You may experience chest pain for a few minutes or for several hours. It frequently gets worse when you strain yourself and gets better when you’re relaxing.
Does chest pain go away with exercise?
Frequent exercise enhances your body’s capacity to absorb and utilize oxygen, making daily tasks easier and reducing fatigue. By encouraging your body to use a network of microscopic blood veins that supply your heart, it can also help lessen the symptoms of angina, such as shortness of breath and chest pain.
How can I get over my chest muscle pain?
RICE (rest, ice, compression, and elevation) is the best initial treatment for the majority of mild to moderate chest muscle strains, as it is for all muscular strains. Rest: Put an end to any activity that makes you pull your chest muscle. Ice: To lessen pain, apply heat or ice packs to the damaged area.
How can I ease my chest pain?
When experiencing heart pain, it may be helpful to lie down right away and raise your head above your body. When reflux is the cause of the pain, a somewhat upright posture is beneficial.
How can I sleep if my chest hurts?
Try sleeping with your upper body raised for the first few days following your injury. This can be accomplished by supporting oneself with a wedge pillow or a number of standard pillows behind your trunk.
Is soreness in the chest muscles normal?
A heart attack may be the source of chest pain, but there are many other potential causes as well, and not all of them are fatal. Since pain is your body’s method of alerting you to a problem, chest pain may be caused by muscle strains, acid reflux, or even indigestion.
Who requires physical therapy for the chest?
condition for which chest physical therapy is beneficial. For lung or neuromuscular disorders that result in an excess of thick or sticky mucus that needs to be expelled from the lungs, doctors may suggest chest physical therapy. Among those conditions are: bronchiectasis.
How can I relax my chest muscles?
Press your chest out and squeeze your shoulder blades together. You can increase the stretch in your shoulders or chest by changing the height of your hands on your head. For five to ten breaths, hold the posture.
Can chest pain be helped by a physical therapist?
Numerous physical reasons of chest pain can be treated with physical therapy, which can also help manage a number of chronic conditions like heart and lung disorders that cause persistent chest pain. Physical therapy may include physical activity.
References
Ladva, V. (2024, December 11). Chest muscle pain cause, symptoms, diagnosis, treatment, exercise. Samarpan Physiotherapy Clinic. https://samarpanphysioclinic.com/chest-muscle-pain/
Professional, C. C. M. (2025a, January 13). Musculoskeletal chest pain. Cleveland Clinic. https://my.clevelandclinic.org/health/symptoms/musculoskeletal-chest-pain
Cafasso, J. (2018, March 28). Chest wall pain. Healthline. https://www.healthline.com/health/chest-wall-pain
Galan, N., RN. (2023, November 24). What causes chest pain on the right side? https://www.medicalnewstoday.com/articles/321146
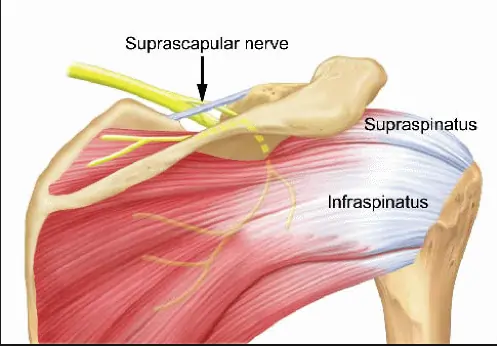
The suprascapular nerve is a branch of the brachial plexus (C5-C6) that supplies motor innervation to the supraspinatus and infraspinatus muscles, which are key for shoulder movement and stability.
It also carries sensory fibers to the glenohumeral joint and surrounding ligaments. The nerve passes through the suprascapular notch, where it is susceptible to compression or injury, leading to shoulder pain and weakness.
Structure
The infraspinatus and supraspinatus muscles are innervated by the suprascapular nerve, which emerges from the brachial plexus upper trunk. It begins in the neck’s posterior triangle and extends laterally and downward parallel to the omohyoid muscle’s belly to the top portion of the scapula. It connects to the supraspinatus fossa beneath the suprascapular ligament. Here, it innervates the muscles of the supraspinatus and infraspinatus.
Function
As a mixed nerve, the suprascapular nerve has both motor and sensory components. As sensory innervation, the acromioclavicular and glenohumeral joints receive sensory branches from the suprascapular nerve. The supraspinatus and infraspinatus muscles are innervated by the motor portion of the suprascapular nerve, respectively.
The ventral rami of the fifth and sixth cervical nerves from the upper trunk of the brachial plexus unite to form the suprascapular nerve, which has its origin in the upper trunk of the brachial plexus. In about 18% of people, the ventral ramus of the fourth cervical nerve is also affected. Along the neck’s posterior triangle, the suprascapular nerve emerges from the upper trunk. It passes parallel to the omohyoid muscle’s belly and descends to the top portion of the scapula.
From there, it passes beneath the suprascapular ligament and ends at the supraspinatus fossa. It passes beneath the supraspinatus muscle in the supraspinous fossa, branching twice for innervation, and then curves around the spinoglenoid notch, over the lateral edge of the scapula’s spine, and into the infraspinous fossa. The infraspinatus muscle is innervated by the nerve branches in the infraspinatus fossa.
Course
The superior trunk of the brachial plexus is the origin of the suprascapular nerve (root values C5, C6). Along with the dorsal scapular nerve, long thoracic nerve, subclavian nerve, and auxiliary phrenic nerve, it is regarded as one of the brachial plexus’s preterminal or supraclavicular branches. It should be noted that the nerves that emerge from the brachial plexus’s cords are referred to as the terminal branches, whilst the cords themselves are known as the infraclavicular branches.
The suprascapular nerve travels laterally from its origin, past the posterior triangle of the neck, and above the brachial plexus. It subsequently enters the supraspinous area of the scapula by passing through the scapular notch, which is inferior to the superior transverse scapular ligament. Here, it branches off to the supraspinatus muscle and proceeds to the infraspinous fossa via the larger scapular (spinoglenoid) notch, which is situated between the glenoid cavity and the scapula’s spine root.
Ultimately, the nerve innervates the infraspinatus muscle by terminating there. The suprascapular nerve’s route is distinct from that of the suprascapular artery and vein, which run above the superior transverse scapular ligament, to prevent confusion.
Muscle Supplied
Both motor and sensory innervation are present in the suprascapular nerve. The muscles of the supraspinatus and infraspinatus receive their motor innervation. The glenohumeral (shoulder) joint is composed of four muscles, two of which are the supraspinatus and infraspinatus.
The posterior scapula’s supraspinous fossa is where the supraspinatus muscle begins. After that, it joins the larger tubercle of the humerus at its superior facet. The supraspinatus, which receives innervation from the suprascapular nerve, works in tandem with the rotator cuff muscles to begin and assist the deltoid in the abduction of the arm.
The posterior scapula’s infraspinous fossa is where the infraspinatus muscle begins. After that, it attaches to the middle facet of the larger tubercle by encircling the lateral proximal humerus. The rotator cuff muscles work in tandem with the infraspinatus to externally rotate the arm.
Branches
A mixed nerve is the suprascapular nerve. Its primary job is to deliver motor power to two of the rotator cuff’s five muscles, which include:
Supraspinatus muscle
Infraspinatus muscle
Two joints get sensory innervation from the sensory branch that the neuron produces along its path:
The glenohumeral joint (shoulder)
Acromioclavicular joint
Embryology
The suprascapular nerve is derived from the ventral rami of the fifth and sixth cervical nerves, as well as the ventral ramus of the fourth cervical nerve in some populations. The motor nerve roots originate in the spinal cord’s ventral ramus.
The neural tube’s intermediate zone produces the motor neuroblasts of the ventral and lateral horns, from which the ventral (motor) plate grows as a ventrolateral thickening of the neural tube.
Branched axons start at the motor neuroblast, leave the spinal cord, and become the ventral (motor) roots. The basal plate subsequently transforms into the dorsal horn of the spinal cord. After migrating to the nerve, the neural crest undergoes differentiation to become Schwan cells.
Anatomical Variation
Variants of the suprascapular nerve are not well documented. Three variations in the interaction between the suprascapular vessels, nerve, and superior transverse scapular ligament are described in the literature by Polguj et al.
The most prevalent variation is the one in which the nerve and vein travel inferior to the superior transverse scapular ligament, while the suprascapular artery runs superior to it. The second is where the nerve travels inferior to the ligament and the artery and vein flow superior to it. The third and least frequent variation occurs when the nerve, artery, and vein pass beneath the superior transverse scapular ligament.
Examination
The gold standard for diagnosing suprascapular nerve palsy is thought to be nerve conduction tests and electromyography. Suprascapular nerve compression and denervation are indicated by prolonged latency, reduced amplitude, fibrillation potentials, and positive sharp waves in the nerve conduction examination.
X-rays can be used to rule out bone trauma in the area.
The location of the damage can be determined with the use of diagnostic ultrasonography, CT, and MRI. The diagnosis may be supported by immediate pain alleviation after an anesthetic injection to the suprascapular or supraglenoid notch.
Clinical Importance
Suprascapular nerve entrapment
An uncommon disease known as suprascapular nerve entrapment (suprascapular neuropathy) is characterized by discomfort and weakness in the posterior shoulder area, which weakens the shoulder’s abduction and external rotation.
The supraspinatus and infraspinatus muscles become weak as a result of damage to the nerve fibers induced by a traumatic injury to the suprascapular nerve. Compression of the nerve during its passage through the suprascapular notch, whether acute or non-traumatic, is the other common reason.
Surgical Importance
When doing extensive rotator cuff repairs, the suprascapular nerve is in danger. The nerve is near the surgical region utilized for rotator cuff repairs, according to literature. The nerve is vulnerable in the vicinity of the acromion’s lateral border, rotator cuff footprint, and glenoid rim.
When using a double interval sliding approach for arthroscopic cuff repairs, the nerve is also susceptible to damage in the vicinity of these regions. When treating shoulder pain, suprascapular nerve blocks may be used since the nerve is susceptible to compression neuropathy at the spinoglenoid notch and suprascapular regions.
FAQs
What is the function of the suprascapular nerve?
As sensory innervation, the acromioclavicular and glenohumeral joints receive sensory branches from the suprascapular nerve. The supraspinatus and infraspinatus muscles are innervated by the motor portion of the suprascapular nerve, respectively.
What happens if the suprascapular nerve is damaged?
What is suprascapular nerve palsy? Damage to the suprascapular nerve results in suprascapular nerve palsy. The muscles that the suprascapula nerve innervates (controls) may become weak and painful as a result. The shoulder muscles known as the supraspinatus and infraspinatus are innervated by the suprascapula nerve.
How do you treat suprascapular nerve pain?
Suprascapular neuropathy can also be treated using nerve blocks in addition to conservative and surgical methods. By anesthetizing (numbing) the suprascapular nerve with an injection, these blocks significantly reduce symptoms and the shoulder discomfort associated with this disorder.
What is the recovery time for suprascapular nerve palsy?
Full recovery, including a return to normal activities, can take around 3 to 6 months, depending on the severity of the initial condition, the degree of muscle and nerve damage; and a patient’s overall health. For arthroscopic suprascapular nerve release, patients are placed under general anesthesia
How to stretch the suprascapular nerve?
Using the hand behind your back, hold a towel draped over your opposite shoulder. 3. Pull your hand slowly up your back with the towel until you feel a slight stretch.
References
Suprascapular nerve. (2023, October 30). Kenhub. https://www.kenhub.com/en/library/anatomy/suprascapular-nerve
Dyspnea (Shortness of Breath) refers to a sensation of difficulty or discomfort in breathing. It can be caused by various conditions, including lung diseases (like asthma or COPD), heart problems, anxiety, or high-altitude exposure.
The severity ranges from mild to severe and may be acute or chronic. Proper diagnosis and management depend on identifying the underlying cause.
Dyspnea: What is it?
Healthcare professionals use the term dyspnea, which is pronounced DISP-nee-uh, to refer to feeling out of breath. You could characterize it as chest tightness, difficulty in breathing, or an inability to acquire enough air (air hunger).
Breathlessness is often an indication of heart and lung problems. But it could also be a sign of other conditions including asthma, allergies, or nervousness. Breathlessness can also be caused by a cold or vigorous exercise.
Dyspnea on exertion:
The feeling of running out of air and not being able to breathe quickly or deeply enough while exercising is known as dyspnea on exertion.
What distinguishes shortness of breath from dyspnea?
Shortness of breath and dyspnea are interchangeable. Dyspnea is the medical name for the sense of not being able to receive enough air.
Mechanism
The respiratory system‘s inappropriate reaction to unrestricted motor control is the first cause of dyspnea.
Dyspnea appears to be caused by the activation of sensory systems related to breathing. The final appearance of the evoked sensation is shaped by environmental, cognitive, and behavioral factors as well as central processing of respiratory-related signals after sensory information has been transmitted to higher brain centers.
A framework for understanding the mechanisms of dyspnea is provided by the homeostatic systems involved in the regulation of respiration.
Both the limbic system and the brain are probably involved in the neural basis of dyspnea.
Dyspnea has a significant emotional component and is characterized by an elevated awareness of respiratory feeling.
Dyspnea can occur in healthy persons in a variety of circumstances, such as high altitudes, after holding their breath, in stressful situations that create anxiety or panic, and most frequently during intense activity.
The mechanisms of dyspnea are influenced by a number of elements, including central motor output, mechanical and chemical afferents, and the functional state of the breathing muscles.
Types of Dyspnea:
It can be Acute or Chronic.
The duration and onset phases of acute and chronic dyspnea are different. Their causes are distinct.
Acute dyspnea
Acute dyspnea can happen unexpectedly and lasts for a short time (hours to days). Acute dyspnea can be caused by allergies, worry, physical activity, and illnesses like the flu or the common cold. Acute dyspnea can also be caused by serious illnesses including a heart attack, a blood clot (pulmonary embolism), or acute airway restriction (anaphylaxis).
Chronic dyspnea
Breathlessness that persists for a long period of time (weeks or more) or occurs frequently is known as chronic dyspnea. Chronic dyspnea can be caused by long-term medical disorders such COPD, heart failure, and asthma.
Because your muscles are attempting to obtain more oxygen, not getting enough exercise might also lead you to feel out of breath all the time.
Dyspnea occur in various positions:
Orthopnea
It is the feeling of dyspnea while lying down, which is relieved by standing or sitting.
Paroxysmal Nocturnal Dyspnea (PND)
It is a dyspnea sensation that usually occurs after one or two hours of sleep and disappears when the patient is upright.
Paroxysmal Nocturnal Dyspnea
Trepopnea
It is a sensation of dyspnea that occurs more commonly in one lateral decubitus position than the other.
Platypnea
It is a type of dyspnea that is relieved by lying down immediately after standing.
Symptoms
Shortness of breath, or dyspnea, can be caused by exerting oneself excessively, spending time at high elevations, or being a sign of a number of illnesses.
A person may exhibit the following symptoms of dyspnea:
Breathlessness following work or strained breathing
Chest tightness and shallow, fast breathing
Heart palpitations and sensations of suffocation or choking
Coughing and wheeze
Dyspnea may indicate a dangerous medical disease if it happens quickly or if the symptoms are severe. Dyspnea emergency symptoms can include:
Significant breathing difficulties,
A heavy chest pain radiating to the arms, back, neck, and jaw, pale, blue, or gray lips or skin, and Sudden confusion
Causes of Dyspnea
A person’s health does not necessarily have a direct correlation with a dyspnea episode. When traveling to a high altitude or experiencing significant changes in temperature, a person may have dyspnea following vigorous activity.
Dyspnea, however, is typically associated with medical issues. Sometimes the symptoms are simply the result of inactivity, and exercise might help. Dyspnea, however, may indicate a more serious medical condition.
Shortness of breath is an acute case of dyspnea if it occurs suddenly.
Airway obstruction by foreign items, allergic reactions
Acute onset weakness, such as iron insufficiency, anemia, and exposure to harmful carbon monoxide levels
Heart failure
Low blood pressure is known as hypotension.
A blood clot in an artery leading to the lung is known as a pulmonary embolism or collapsed lung.
Multiple sclerosis and hiatal hernia
People who have a terminal illness also frequently experience dyspnea. A person is said to have chronic dyspnea if they have shortness of breath for more than a month.
Heart problems such as pericarditis or cardiomyopathy
Interstitial pulmonary fibrosis, which causes scarring of lung tissues
Pneumonia
Lung cancer
Sarcodiosis
Pulmonary hypertension
Tuberculosis (TB)
Blood clot
Choking
Partial or collapsed lung
Complications
Low blood oxygen levels, or hypoxia or hypoxemia, can be caused by dyspnea. Reduced consciousness and other serious symptoms may result from this.
A person may suffer from temporary or permanent cognitive impairment if they frequently experience hypoxia.
Prevention
Shortness of breath can be prevented by:
Together with your provider, create a care plan and follow it to manage any underlying conditions.
This covers the kind of drugs you should take methods of exercise, breathing techniques, and any other therapies your doctor may recommend.
Stay away of substances like paint fumes and vehicle exhaust that might irritate your lungs.
Using relaxation methods or breathing exercises.
Not smoking.
Keeping your weight within a healthy range.
Avoid activities in extremely hot or cold temperatures or when there is a lot of humidity.
Look for air pollution (ozone) alerts if you have lung disease; these are typically included in the Weather forecast.
Stay clear of the outdoors during periods of heavy air pollution.
Scales for Dyspnea
Three scales are there:
MRC Scale
Modified borg scale or RPE
American Thoracic Society(ATS)
The MRC Dyspnea Scale
The degree of baseline functional limitation by dyspnea is measured using the mMRC (Modified Medical Research Council) Dyspnea Scale.
When describing baseline dyspnea in individuals with respiratory conditions like COPD, it is helpful. The scores are variably related to patients’ views of the burden of respiratory symptoms, even if they have a considerable correlation with other healthcare-associated morbidity, mortality, and quality of life scales (especially in COPD).
It is a part of the BODE Index, which forecasts negative outcomes like hospitalization risk and mortality. The scale is simple to use and effective.
The grades based on the mMRC breathlessness scale are 0–4.
MRC Dyspnea Scale
Description Grades
I only get breathlessness with strenuous exercise – 0
I get short of breath when hurrying on level ground or walking up a slight hill – 1
On level ground, I walk slower than people of my age because of breathlessness, or I have to stop for breath when walking at my own speed on the level – 2
I stop for breath after walking about 100 yards or after a few minutes on level ground – 3
I am too breathless to leave the house or I am breathlessness when dressing/ undressing – 4
Modified Borg Scale or Rating of Perceived Exertion (RPE)
An outcome measure scale called the Rating of Perceived Exertion (RPE) is used to measure exercise intensity without depending on physiological indicators like heart rate, lactate levels, or peak O2 uptake. Rehab specialists frequently utilize RPE to help prescribe exercises.
For the purpose of rating exertion, dyspnea, and exhaustion during physical exercise—that is, the degree of difficulty of the activity as indicated by heart and respiratory rate, excessive perspiration, and muscle exertion—Gunnar Borg created the Borg RPE scale .
The scale is also used to track exercise habits and progress in patient populations, such as those recovering from neurological, pulmonary, and cardiac conditions.
The range of the original Borg scale is 6–20. It is highly correlated with one’s heart rate, and the training heart rate at the moment of scoring is obtained by multiplying each value by 10. The modified Borg Dyspnea Scale is a variant of the Borg CR-10 Scale, which was subsequently reconstructed to a category (C) ratio (R) scale of 0–10.
It is mostly used to evaluate the severity of musculoskeletal discomfort, chest pain, and dyspnea. The CR-10 scale works best when measuring a particular bodily sense, like muscle soreness or exhaustion, or pulmonary reactions, like tightness in the chest or dyspnea.
Throughout the activity, participants are asked to rate their level of exertion on a scale that accounts for physical stress and exhaustion. Leg discomfort or dyspnea are ignored in preference to concentrating on the overall impression of exertion.
This number indicates the activity intensity level, enabling the individual to increase or decrease their activity rate. The scale can be self-administered or delivered by a researcher before and after the person has exerted themselves. It takes a short while to finish.
0 Nothing at all
0.5 Extremely Slight
1 Very slight
2 Slight
3 Moderate
4 Somewhat severe
5 Severe
6
7 Very severe
8
9 Extremely severe
10 Maximal
Diagnosis
Your healthcare practitioner will conduct a physical examination, which includes taking your blood pressure and using a stethoscope to listen to your lungs in an attempt to determine what is causing your dyspnea. To measure the amount of oxygen in your blood, they will place a sensor on your finger.
They may also do other testing, like:
Chest X-rays, CT scans, and other specialized imaging techniques. Your doctor can use photos of the inside of your chest to assess whether you have a lung issue.
Blood examinations: Your healthcare provider may use blood tests to look for anemia or other illnesses.
Tests of lung function: Tests that measure your respiratory health.
Tests for cardiovascular exercise: For this test, your healthcare professional will have you use a stationary bike or treadmill. The tests can tell your doctor how much carbon dioxide you exhale and how much oxygen you breathe in when exercising.
Differential Diagnosis
One of the primary symptoms is dyspnea. Respiratory, cardiac, neuromuscular, psychogenic, systemic sickness or a mix of these are the four main groups from which it has emerged.
Respiratory conditions include aspiration, pneumonia, pulmonary embolism, lung cancer, asthma, pneumothorax, and acute or chronic exacerbation of congestive obstructive pulmonary disease (COPD).
Acute coronary syndrome, pulmonary edema, pericardial a blockage, valvular heart defect, pulmonary hypertension, cardiac arrhythmia, congestive heart failure, or intracardiac shunting are all signs of cardiovascular
Massive chest trauma with a fracture or instability Neuromuscular disorders include obesity, kyphoscoliosis, spinal cord or central nervous system (CNS) dysfunction, paralysis of the phrenic nerve, myopathy, and neuropathy.
Foreign body aspiration, vocal cord dysfunction syndrome, hyperventilation syndrome, and psychogenic dyspnea are examples of psychogenic causes.
Anaemia, abrupt renal failure, metabolic acidosis, thyrotoxicosis, liver cirrhosis, anaphylaxis, sepsis, angioedema, and epiglottitis are examples of systemic disorders.
Treatment
The following are the treatment:
Medical Treatment
Medicine: Asthma and COPD patients are offered bronchodilators, which are inhaled medications that relax the airways. Breathlessness may be improved by taking medication for pain or anxiety.
Oxygen treatment: Your doctor will prescribe additional oxygen if your blood oxygen level is extremely low. Through a tube or mask, it enters your nose..
Physical Therapy Treatment
Exercise: Regular exercise will lessen thestrain on your heart and lungs if you exercise often.
Relaxation techniques: You and your healthcare practitioner can practice breathing techniques and relaxation techniques. These can alleviate anxiety and dyspnea caused by underlying respiratory disorders.
Training using resistance exercises( Upper and lower limb)
Patients with a flat diaphragm may benefit from poses that use pressure from the abdominal contents to dome the muscle. Many breathless people find that self-posture helps them breathe.
In order to maximize accessory muscle function, the arms are best supported without tension or active fixation.
Pursed lip breathing improves physical function and exertional dyspnea over time while also relieving dyspnea and boosting exercise tolerance.
Dyspnea relieving position:
Dyspnea Reliving Positions
High side-lying.
Many people find that sitting up straight in a chair with arms to support them makes breathing easier than lying in bed.
While some people prefer to lean forward slightly to expand the diaphragm, others prefer to lean back for support.
Leaning forward from the waist, with feet on the floor and arms resting on table pillows
Standing comfortably, arms resting on a support, such a window wall, and bending forward.
Standing calmly, legs slightly apart, leaning back against a wall.
If the auxiliary muscles require assistance, stand comfortably with your arms in your pockets and lean sideways against a wall.
Sometimes the pressure of the contents of the abdomen against the diaphragm makes lying flat helpful. Some people may benefit from a small head-down tilt.
FAQs
What is dyspnea’s primary cause?
Acute myocardial ischemia, heart failure, cardiac tamponade, bronchospasm, pulmonary embolism, pneumothorax, pulmonary infection in the form of pneumonia or bronchitis, or upper airway blockage due to aspiration or allergy are the most frequent causes of acute dyspnea.
Is dyspnea fluctuating?
Dyspnea is the medical word for breathing difficulties or shortness of breath.. It is a sign of numerous respiratory system-related disorders.
Is it possible to treat dyspnea?
Treating the underlying illness or condition is the first step in treating dyspnea. For instance, removing fluid from the chest can lessen dyspnea if it is caused by a pleural effusion. Dyspnea may occasionally be treated with medicine or surgery, depending on the underlying reason.
Does oxygen help with dyspnea?
We observed that breathing difficulties can be somewhat relieved by oxygen. Oxygen must be administered during exercise in order to be effective. The majority of research assessed oxygen administered in a lab setting during exercise testing. Daily oxygen therapy did not significantly alter the quality of life of patients and had unclear effects on dyspnea.
Which neurological conditions can produce dyspnea?
The breathing mechanism is affected differently by various disease conditions of the nervous system since the respiratory center is located in the brain. Stress, anxiety, strokes, panic episodes, tumors, traumas, encephalitis, and impaired cerebral circulation are among the conditions that frequently cause dyspnea.
For shortness of breath, is there an inhaler available?
One class of medication known as a bronchodilator includes salbutamol. It facilitates easier breathing by relaxing the muscles that control the lungs’ airways.
References
Dresden, D. (2025, January 27). What is dyspnea? https://www.medicalnewstoday.com/articles/314963
Professional, C. C. M. (2024a, May 1). Dyspnea. Cleveland Clinic. https://my.clevelandclinic.org/health/symptoms/16942-dyspnea
MRC Dyspnea Scale | Primary Care Respiratory Society. (n.d.). https://www.pcrs-uk.org/mrc-dyspnoea-scale
Diaphragmatic Breathing Exercises focus on deep breathing using the diaphragm rather than shallow chest breathing. This technique enhances lung efficiency, reduces stress, and improves oxygenation.
It involves inhaling deeply through the nose, allowing the abdomen to rise while keeping the chest still, and exhaling slowly through the mouth. Common exercises include lying down breathing, seated diaphragmatic breathing, and paced breathing. Regular practice can help with relaxation, respiratory conditions, and core stability.
What is Breathing Exercises?
The autonomic nervous system regulates breathing. Breathing exercises are one type of exercise that might increase the effectiveness of the lungs overall. They may help people with healthy lungs as well as those with impaired lung function.
In the absence of illness, stress causes changes in our breathing, which, if untreated, can lead to abnormal breathing patterns. Disordered breathing may disrupt with the exchange of carbon dioxide and oxygen, as well as cause anxiety, panic attacks, fatigue, and other mental and physical health problems.
Breathing exercises are beneficial for several health-related reasons. For example, to boost breathing efficiency, strengthen respiratory muscles, improve ventilation, and lessen stress and anxiety.
Types of Breathing exercises:
Diaphragmatic breathing
Pursed- lip breathing
Deep breathing
Active cycle of breathing technique
Box breathing
Diaphragmatic Breathing Exercises
The diaphragm: what is it?
The most effective breathing muscle is the diaphragm. It is a big muscle at the base of your lungs that has a dome shape. Your abdominal muscles provide you with extra force to expel air from your lungs by moving the diaphragm.
Introduction:
Diaphragmatic breathing is a kind of breathing exercise that helps to develop your diaphragm (a vital muscle) to facilitate breathing because it accounts for 80% of it. Another name for this breathing technique is abdominal breathing or belly breathing.
Ventilation is efficient and the muscles of ventilation use less oxygen during relaxed (tidal) breathing when the diaphragm is performing its duty as the main muscle of inspiration. The mechanical effort of breathing (oxygen consumption) rises and ventilation efficiency falls when a patient depends significantly on the auxiliary muscles of inspiration.
The goal of controlled breathing techniques, which emphasize diaphragmatic breathing, is to enhance gas exchange and oxygenation, reduce respiratory effort, increase diaphragm excursion, and improve ventilation efficiency. Additionally, slow breathing can be achieved by using the diaphragm to generate intra-abdominal pressure for posture control.
Aims
Is to teach breathing control and mobilize secretions.
To clear secretions and teach coughing techniques.
To impart relaxing skills.
To provide knowledge about posture
To move shoulder girdle and thorax
Impact on the Physiology
The physiological effects of diaphragmatic breathing are numerous.
It has the following effects on the respiratory system:
Consciously using the diaphragm during breathing expands lung capacity and enhances oxygen ventilation effectiveness by raising tidal volume and lowering respiratory rate. Increasing arterial oxygen saturation and decreasing alveolar dead space to improve alveolar ventilation and blood oxygen levels
Additional physiological impacts consist of:
Reduction of sympathetic nerve activity and activation of parasympathetic nerve activity
Increasing the stability of the core muscles.
Reduces the negative effects of the stress hormone cortisol on your body by promoting relaxation.
Surgical operations like abdominal or thoracic surgery.
Benefits of diaphragmatic breathing
Diaphragmatic breathing helps you relax,
Improves muscle function during exercise and prevents strain,
Increases oxygen levels,
Facilitates the release of gas waste from your lungs,
Lowers blood pressure, and lowers heart rate.
Contraindications
Patient with heart-related conditions or those who have undergone heart surgery should take their time to practice diaphragmatic breathing. It is also advisable for them to perform under the supervision of a qualified therapist.
Additionally, patients recovering from head or neck injuries, severe osteoporosis, collarbone fractures, spinal injuries, or rib cage damage should proceed with caution. Those with a history of tuberculosis (TB) or severe asthma should also be careful.
Diaphragmatic breathing should be stopped immediately if the patient feels that the deep breathing is causing suffocation. Connecting with this type of breathing can be challenging initially, especially if one’s breathing is shallow.
Connecting to this type of breathing can be challenging at first, particularly if the breathing is shallow. In these situations, diaphragmatic breathing should be promoted while lying on one’s back and then progressively moved to a chair and the floor.
This type of breathing should not be required of pregnant women because it will put strain on their abdomen. They can do the same, pausing occasionally to rest and unwind. Diaphragmatic breathing should be done carefully and under supervision if dyspnea is diagnosed.
People with dyspnea could not benefit from this practice because it lowers the number of breaths in a minute with practice. Therefore, the activity should be avoided or handled carefully.
Precautions
Patients should never be permitted to force expiration. Breathing should be easy or moderately regulated. Bronchospasm or increased airway limitation result from forced expiration, which merely makes the airways more turbulent.
Don’t let a patient take an extremely long expiration. With the subsequent inspiration, the patient gasps as a result. At that point, the patient’s breathing rhythm becomes inadequate and irregular.
Don’t let the patient use their upper chest and auxiliary muscles to start inspiration.
To prevent hyperventilation, only let the patient breathe deeply for a maximum of four inspirations and expirations at a time.
What is GI Patients’ Diaphragmatic Breathing?
Diaphragmatic breathing, sometimes referred to as belly breathing or deep breathing, is a basic method that GI patients are taught to help them cope with the stress that comes with GI disorders.
One useful technique for promoting relaxation in the body is to concentrate on one’s breathing. The stomach, not the chest, moves with each breath when diaphragmatic breathing is practiced. It expands during inhalation and contracts with exhalation. The mind is diverted and calmed by consciously focusing on each breath.
How Is It Beneficial?
Learning diaphragmatic breathing has several benefits:
Reduces blood pressure and heart rate
Reduces muscle tension and raises oxygen levels
Warms the hands and feet and boosts motivation
Increases focus and lower stress hormones
Triggers the relaxation reaction in the body, which in turn counteracts the stress response.
It Is simple to use and doesn’t involve any expenses or medication.
There are particular advantages to diaphragmatic breathing for people with GI symptoms:
Reduced abdominal pain, urgency, bloating, and constipation might result from the diaphragm’s mild massaging action, which is felt by internal organs such as the stomach and intestines.
The parasympathetic nervous system, also known as the body’s relaxation response or rest and digest state, is activated when you breathe diaphragmatically. In certain GI-related circumstances, diaphragmatic breathing can be beneficial:
Urgency and diarrhea: Diaphragmatic breathing helps reduce panic attacks and soothe the digestive system.
Constipation: To relax and massage the system, try using diaphragmatic breathing while sitting on the toilet and trying to make a bowel movement. A more thorough bowel movement could be the outcome.
How can I practice diaphragmatic breathing?
Diaphragmatic breathing can be practiced in two ways:
Supine lying position
Sitting Position
Diaphragmatic breathing method in supine lying
Diaphragmatic breathing in supine lying
It could be simpler for you to follow the directions while lying down when you are initially learning the diaphragmatic breathing technique.
With your head supported and your knees bent, lie over your back on a level surface or on a bed. To support your legs, place a pillow beneath your knees.
Grasp your upper chest with one hand and your rib cage with the other.
Breathe in deeply through your nose until your hand rises and your stomach moves out.
As you exhale through pursed lips, tighten your abdominal muscles such that your hand descends as your stomach moves in Try to keep the hand on your upper chest as still as you can.
Diaphragmatic breathing method in Sitting Position:
Diaphragmatic breathing in sitting
You can try the diaphragmatic breathing technique while seated in a chair as you get more comfortable with it.
Take a comfortable seat with your head and neck relaxed, shoulders relaxed, and knees bent.
Grasp your upper chest with one hand and your rib cage with the other. This will allow you to feel how your diaphragm moves while you breathe.
Take a slow, deep breath through your nose, allowing your tummy to press against your palm.
Contract your abdominal muscles to bring your stomach back in as you release the breath through pursed lips. You need to keep the hand on your upper chest as still as you can.
Diaphragmatic Breathing for children
Diaphragmatic Breathing Benefits for Children
Children might benefit from practicing the abdominal breathing method in several ways. Breathing through the abdomen can be helpful whether they are going through a stressful circumstance or just feeling overburdened and worried.
Calms the nervous system. The parasympathetic nervous system can be activated in children by deep breathing and relaxation practices. When this occurs, the brain receives a signal informing anxiety that it is safe. The fight, flight, or freeze reaction is lowered as a result.
How to teach belly breathing to your children
When your child is struggling with stressful or overwhelming situations, try this breathing technique for children.
Assume a comfortable position, such as sitting upright or resting on your back.
Place one hand on your child’s chest and one on their abdomen to support normal breathing. Another option is to put a plush animal on their stomach. Ask your child what they observe after that. How do they feel? When they breathe, which hand moves more? Is the stuffed animal rising and falling?
Ask your child to hold their breath for four seconds, then ask them to slowly exhale all of the air out.
If they are having trouble doing so, a great trick is to have them do it through a straw or pursed lips. Until the air fills their chest and reaches their abdomen, have your child take four deep breaths.
Let your child breathe in this manner until you both feel at ease.
A few minutes later, ask your child if they feel different than they did at the beginning. Inquire about the types of bodily sensations they experience and their emotional state.
Remember that your child can do this children’s breathing method anytime you’re feeling anxious. Include this belly breathing exercise in your child’s daily routine to help them learn and retain it.
Advantages of diaphragmatic breathing in various conditions:
Advantages of diaphragmatic breathing for those with COPD Patients:
Reduced dyspnea: More efficient use of the diaphragm reduces the feeling of being out of breath, especially when engaging in activities that could cause it.
Increased tidal volume: By enabling a greater volume of air to be inhaled with each breath, diaphragmatic breathing enhances oxygen intake.
Reduced respiratory rate: A slower breathing rate results from more effective use of the diaphragm, which lessens the demand for quick, shallow breaths.
Better ventilation: By distributing air more uniformly across the lungs, diaphragmatic breathing maximizes gas exchange.
Increased exercise tolerance: Diaphragmatic breathing can help those who have trouble breathing by making it easier for them to engage in physical activity.
Stress reduction and relaxation: Diaphragmatic breathing’s regulated breathing rhythm can help induce relaxation.
Advantages of Diaphragmatic Breathing for Anxiety Patients:
Stress management: You can control your worry and stress by taking deep breaths.
Relaxation: You can feel more relaxed by using diaphragmatic breathing.
Better muscular function: During exercise, deep breathing can help stabilize your core muscles and avoid strain.
Improved oxygen exchange: Diaphragmatic breathing can raise blood oxygen levels and enhance your body’s capacity to withstand physical activity.
Lower blood pressure and heart rate: You can lower your blood pressure and heart rate by taking deep breaths.
Decreased negative effects of cortisol: The stress hormone cortisol can have negative impacts on your body, but diaphragmatic breathing can help lessen those effects.
Advantages of diaphragmatic breathing for TB patients:
Enhanced lung performance
Exercises involving deep breathing can help patients increase their oxygenation and restore lung capacity.
Breathing techniques can aid in lowering fatigue, which has a effect on performance, sleep, nutrition, and quality of life.
Better Health
By raising SpO₂ levels and lowering anxiety and dyspnea, breathing exercises can enhance general well-being and reduce stress levels.
Advantages of Diaphragmatic breathing for Asthma Patients:
Better lung function: More air can be breathed and expelled when the diaphragm is engaged correctly, which improves oxygen intake and lung capacity.
Decreased respiration rate
To control rapid breathing during asthma attacks, diaphragmatic breathing promotes slower.
Reduced anxiety: Deep breathing exercises, which are frequently linked to diaphragmatic breathing, can help people relax and feel less anxious, which can lessen asthma symptoms.
Muscle strengthening: The diaphragm muscle becomes stronger with regular diaphragmatic breathing practice, increasing its ability to support breathing.
Improved symptom management: Diaphragmatic breathing can help control asthma symptoms including chest tightness and wheeze by enhancing breathing mechanics.
Advantages of Diaphragmatic Breathing for Bronchiectasis Patients:
Better lung ventilation: More air may enter the deeper lung regions by aggressively contracting the diaphragm, which helps in the removal of mucus accumulation in the dilated bronchi.
Decreased shortness of breath, or dyspnea: By reducing the breathing rate, diaphragmatic breathing minimizes the feeling of dyspnea and permits deeper inhalations.
Mucus mobilization: Deep breaths produced by diaphragmatic breathing can facilitate coughing by releasing and moving mucus in the airways.
Increased relaxation: The parasympathetic nervous system can be activated by the controlled breathing pattern of diaphragmatic breathing, which promotes relaxation and lowers stress. This can further enhance breathing.
Decreased load on accessory muscles: By depending more on the diaphragm, breathing exhaustion is avoided by reducing the effort on the neck and chest muscles.
FAQs
What differentiates abdominal breathing from diaphragmatic breathing?
Belly, deep, relaxed, or abdominal breathing are other names for diaphragmatic breathing. It facilitates deeper, slower breathing by making the best use of the diaphragm, the primary breathing muscle. It can be a valuable tool in a patient’s toolbox for self-management.
Does diaphragmatic breathing require practice?
Yes, it is made easier by practicing diaphragmatic breathing. You could observe that using your diaphragm correctly requires more effort. You will most likely initially feel exhausted from this activity. However, persevere since diaphragmatic breathing will become automatic with enough practice.
How frequently should I perform breathing exercises using my diaphragm?
Start by performing this exercise three to four times a day for five to ten minutes. Increase the time you spend performing this exercise gradually. You might even make it harder by supporting your abdomen with a book.
Is diaphragmatic breathing something you can do all day?
You can remember to practice or relax the body before stressful circumstances by scheduling a regular time each day to practice diaphragmatic breathing. Although several quick exercises can be helpful, some experts advise 10 to 30 minutes of steady diaphragmatic breathing every day.
Which position is ideal for breathing problems?
Positions to alleviate dyspnea Leaning forward while standing or sitting: Maintain a straight back, stoop from the hips, and place your forearms on a table or windowsill.
What is the ideal sleeping position for breathing?
Most people agree that sleeping on one’s side is the best way to breathe. Your airway is naturally kept open while you sleep on your side. Additionally, it can help keep your neck and spine in alignment, which might lessen back pain, which is why it’s frequently advised. Shoulders loosened up. Avoid putting your hands on your outstretched arms, as this can strain your shoulders.
Reference
Diaphragmatic breathing for GI patients | University of Michigan Health. (n.d.). https://www.uofmhealth.org/conditions-treatments/digestive-and-liver-health/diaphragmatic-breathing-gi-patients
Professional, C. C. M. (2025, January 24). Diaphragmatic breathing. Cleveland Clinic. https://my.clevelandclinic.org/health/articles/9445-diaphragmatic-breathing
Belly breathing for kids. (2024, February 7). Mental Health Center Kids. https://mentalhealthcenterkids.com/blogs/articles/belly-breathing-for-kids
Reactive Arthritis (Reiter’s syndrome): What is it?
Reactive Arthritis is an inflammatory joint condition that develops in response to an infection, usually in the urinary tract, intestines, or genitals. It commonly affects the knees, ankles, and feet, causing pain, swelling, and stiffness.
Other symptoms may include eye inflammation (conjunctivitis), urinary problems, and skin issues. The condition is often triggered by bacterial infections such as Chlamydia, Salmonella, or Shigella. While symptoms typically resolve within a few months, treatment focuses on managing pain and inflammation with NSAIDs, physical therapy, and, in some cases, antibiotics if an underlying infection is present.
Reactive arthritis occurs when your immune system reacts abnormally to an infection in your esophagus, digestive tract, genitalia, or urinary tract. To combat infections, your immune system typically produces inflammation. However, with Reiter’s syndrome, your immune system causes inflammation in areas of your body that were never infected. It doesn’t seem to believe that the fight is done.
What causes Reactive Arthritis?
A bacterial infection is the initial cause of reactive arthritis. Typically, it is a:
Urinary tract infection (UTI).
Sexually transmitted infection (STI).
Gastrointestinal infection (such as food poisoning).
Throat infection (sore throat).
Among the particular microorganisms that might cause it are:
Chlamydia.
Gonorrhea.
Salmonella.
Shigella.
Campylobacter.
Yersinia.
Mycoplasma.
C. difficile.
Streptococcus.
Only a small number of people get Reiter’s syndrome, which usually appears days to weeks after the initial infection is over. An autoimmune reaction seems to be triggered by the infection. This indicates that your immune system overreacts and starts to cause inflammation in healthy areas of your body. Thankfully, reactive arthritis is typically a transient symptom, in contrast to the majority of autoimmune diseases.
Spondyloarthritis is a group of inflammatory arthritis disorders that includes reactive arthritis. These are mostly autoimmune disorders. Why some people develop autoimmune disorders while others do not is a mystery to scientists. Reactive arthritis can develop without a serious infection. A gene known as HLA-B27 is one potential contributing factor. Many persons with Reiter’s syndrome also have spondyloarthritis.
Signs and symptoms of Reactive Arthritis:
Reactive arthritis symptoms often appear one to four weeks following exposure to a triggering illness. They could consist of:
Stiffness and pain. The knees, ankles, and feet are where reactive arthritis-related joint discomfort most frequently manifests. In addition, there may be pain in the buttocks, low back, or heels.
Eye inflammation. Conjunctivitis, or inflammation of the eyes, is common in persons with reactive arthritis.
Urinary problems. Urination may become more frequent and uncomfortable, and there may be cervical or prostate gland inflammation.
Inflammation (enthesitis) of the ligaments and tendons where they connect to the bone. The soles of the feet and heels are where this occurs most frequently.
Swollen toes or fingers. In certain instances, fingers or toes may swell to the point of resembling sausages.
Skin problems. Mouth sores and a rash on the palms of the hands and soles of the feet are just two ways that reactive arthritis can impact the skin.
Low back pain. Usually, the discomfort is greatest in the morning or at night.
Who is susceptible to Reactive Arthritis?
Reactive arthritis can strike anyone, but it’s more likely to strike you if:
You’re a man under 40 years old.
You are HIV positive.
Another autoimmune condition affects you.
The HLA-B27 gene is present in you.
How is Reactive Arthritis diagnosed?
Your doctor will want to see them and hear about any new arthritic symptoms you may have developed. Reactive arthritis will be suggested by specific symptom combinations. If you have just recovered from an infection that may have caused Reiter’s syndrome, they will especially want to know.
Several tests may be performed to aid in the diagnosis, such as:
X-rays.
Computed tomography (CT) scan.
Magnetic resonance imaging (MRI).
Joint aspiration (arthrocentesis).
Throat culture.
Urinalysis.
Blood tests.
Blood examinations:
Your physician may suggest that a blood sample be examined for:
Evidence of an infection, either current or past
Inflammatory symptoms
Antibodies linked to different forms of arthritis
Reactive arthritis and a genetic marker
Tests for joint fluid:
Your physician may take a fluid sample from inside an affected joint using a needle. We’ll test this fluid for:
Count of white blood cells. An infection or inflammation may be indicated by an increase in white blood cells.
Infections. The presence of bacteria in your joint fluid may be a sign of septic arthritis, which can cause serious damage to your joints.
Crystals. Crystals of uric acid in your joint fluid could be a sign of gout. The big toe is frequently affected by this excruciating kind of arthritis.
Treatment of Reactive Arthritis:
The goal of treatment is to manage any residual sickness and regulate your symptoms.
Drugs
If there is evidence of a chronic infection, your doctor may prescribe an antibiotic if a bacterial infection causes your reactive arthritis. The bacteria present determines the antibiotic you should take.
Reactive arthritis symptoms and Signs can be reduced by:
NSAIDs, or nonsteroidal anti-inflammatory medications. Reactive arthritis pain and inflammation can be reduced using prescription nonsteroidal anti-inflammatory medications (NSAIDs), such as indomethacin (Indocin).
Steroids. A steroid injection into the affected joints will lessen inflammation, allowing you to resume your regular activity level. Steroid creams can be used for skin rashes, and steroid eye drops can be used for eye complaints.
Medications for rheumatoid arthritis. There is little proof that drugs like methotrexate (Trexall), etanercept (Enbrel), or sulfasalazine (Azulfidine) can help some patients with reactive arthritis with their pain and stiffness.
Physical Therapy
You can get specific joint and muscle workouts from a physical therapist. By strengthening the muscles surrounding the affected joints, strengthening activities improve joint support. Exercises involving range of motion might help your joints become more flexible and less stiff.
Risk factors of Reactive Arthritis:
Reactive arthritis is more likely to occur if you have certain factors:
Age. The majority of people with reactive arthritis are between the ages of 20 and 40.
Sex. Reactive arthritis in reaction to foodborne illnesses is equally common in men and women. However, reactive arthritis caused by sexually transmitted germs is more common in men than in women.
Hereditary factors. Reactive arthritis has been associated with a particular genetic signature. However, the syndrome never manifests in the majority of those with this marker.
Prevention of Reactive Arthritis:
The likelihood of developing reactive arthritis seems to be influenced by genetic factors. You can lessen your exposure to the microorganisms that can cause reactive arthritis, even though you cannot alter your genetic composition.
Cook your food correctly and store it at the right temperatures. By taking these precautions, you can steer clear of several foodborne bacteria, such as salmonella, shigella, yersinia, and campylobacter, that can cause reactive arthritis. Reactive arthritis can be triggered by certain sexually transmitted diseases. To reduce your risk, use condoms.
Is it possible to cure Reactive Arthritis?
Reiter’s syndrome often resolves on its own in three to twelve months, as it is self-limited. Meanwhile, therapy frequently suppresses symptoms and may hasten their resolution. However, no autoimmune disease is truly treatable, and reactive arthritis is one of them. This implies that symptoms could always recur, for instance, if you contract another illness.
Reiter’s syndrome appears to precipitate a more severe and chronic form of spondyloarthritis in a small proportion of individuals. They experience chronic joint inflammation, which over time might cause serious harm. It is uncertain if you have a distinct condition or if this is chronic reactive arthritis. Many people have many autoimmune diseases, and one might provoke another.
How should I care for myself if I have Reactive Arthritis?
While reactive arthritis is likely to be short-term, it might significantly affect your daily life during its duration. While many people experience intermittent, minor symptoms, others suffer from extreme exhaustion and discomfort. Your everyday routine or method of working may need to change during this period.
Your physician may suggest:
Physical therapy. The muscles and tendons that support your aching joints can be gently exercised in methods that a physical therapist might recommend. Your joints may become less strained and stiff as a result.
Orthotics. You can change how you utilize your joints or get advice from an occupational therapist on how to support them. Wearing a brace, splint, or shoe insert may help you.
Hot/cold therapy. Soreness can be relieved in different ways by ice packs and heat packs. For instance, your healthcare practitioner may advise applying heat to your tense muscles and ice to your aching joints.
Take power naps. While prolonged bed rest won’t assist your stiff muscles or hurting joints, chronic exhaustion might wear you down. Try taking quick sleep and getting up and moving about in between instead.
Advice on how to lower your risk of infection:
If you know someone has an infection, try to keep your distance from them.
Keep a tiny bottle of antibacterial hand gel on hand and wash your hands frequently.
Regularly cleaning your teeth will help you maintain a clean mouth.
If you are a smoker, quit.
Ensure that your food is prepared and kept correctly.
Make an effort to keep your home tidy and sanitary, paying particular attention to the restrooms, kitchen, and toilets.
FAQs
Does blood testing reveal reactive arthritis?
HLA-B27, a hereditary risk factor for reactive arthritis, is detected by this blood test. Although having this marker is suggestive of reactive arthritis, it is not conclusive; not all individuals who test positive have reactive arthritis, and those who test negative can nevertheless have the disorder.
Which three conditions make up reactive arthritis?
The classic trifecta of conjunctivitis, urethritis, and arthritis that follows an infection—especially one in the gastrointestinal or urogenital tracts—is called Reiter’s syndrome, or reactive arthritis.
Is there a speedy recovery from reactive arthritis?
Reactive arthritis is a condition in which an infection causes your joints to swell and hurt. Although it can last longer, it usually disappears around six months.
Which medication works best for reactive arthritis?
Reactive arthritis pain and inflammation can be reduced using prescription nonsteroidal anti-inflammatory medications (NSAIDs), such as indomethacin (Indocin). Steroids. You can resume your regular activity level after receiving a steroid injection into the affected joints, which will lessen inflammation.
What was reactive arthritis’s previous name?
In young males, reactive arthritis, often known as Reiter’s syndrome, is the most prevalent form of inflammatory polyarthritis. It can occasionally be the initial sign of an infection with the human immunodeficiency virus. More than two-thirds of reactive arthritis patients have an HLA-B27 genotype as a risk factor.
What is the impact of nutrition on arthritis?
Omega-3 fats, which are present in oily seafood like salmon and sardines, may help persons with inflammatory diseases like rheumatoid arthritis. Drinking lots of water and avoiding foods strong in purines, such as beer, seafood, and offal, may help persons with gout, a form of arthritis.
References
Reactive arthritis – Symptoms & causes – Mayo Clinic. (2022, January 25). Mayo Clinic. https://www.mayoclinic.org/diseases-conditions/reactive-arthritis/symptoms-causes/syc-20354838
Reactive Arthritis (Reiter’s Syndrome). (2025, February 7). Cleveland Clinic. https://my.clevelandclinic.org/health/diseases/reactive-arthritis-reiters-syndrome
Reactive arthritis. (n.d.). Versus Arthritis. https://versusarthritis.org/about-arthritis/conditions/reactive-arthritis/
McKenzie exercises, developed by physiotherapist Robin McKenzie, are a set of movements designed to relieve back pain and improve spinal mobility. They focus on extending the spine to alleviate pressure on discs and nerves, making them particularly effective for conditions like sciatica and disc herniation.
Common exercises include prone lying, press-ups, and standing back extensions. These movements help reduce pain, restore function, and prevent future episodes. Always consult a professional before starting.
Introduction of the McKenzie Protocol:
Mechanical examination and treatment, or MDT, is a different name for the McKenzie method, which is used to identify and treat orthopedic conditions of the spine and limbs.
According to back expert and author Stuart McGill, sitting up encourages a flexed spinal posture that can push intervertebral discs outward, causing pain and inhibiting spinal extension. The purpose of McKenzie’s workout regimen is to promote the displaced disc’s return to its proper position, which will reduce discomfort and enable more flexible spinal movement.
People who experience back pain might find the McKenzie approach, a classification system, useful.
Reducing pain, centralizing symptoms (making them go to the midline of the body), and fully recovering from pain are the objectives of the therapy. One preventive measure is teaching and encouraging the patient to exercise regularly and to take care of themselves.
What exactly are McKenzie’s exercises?
Back discomfort is a common occurrence for many people throughout their lives. In the US, between 75 and 85% of people have back pain.
It is advisable to follow up with your healthcare professional to find out what’s causing your back discomfort if you experience it. Choosing the most secure and best course of care may be made simple with this.
In certain individuals, the McKenzie technique—also referred to as musculoskeletal assessment and treatment is utilized. There are posture and spinal exercises, as well as a set of exercises to assess someone’s movement.
To get the most benefit of this Method, work with a physical therapist who can provide an extensive assessment.
For back pain treatment, you can still attempt a few McKenzie exercises at home.
There are 4 steps in MDT:
Evaluation: The doctor requests a history of the patient’s symptoms as well as information on what activities make the symptoms worse or better. To find out if the patient has any movement loss and how the signs relate to it, a mobility examination is then performed. The doctor will next ask the patient to make certain movements again or continuously to measure how they affect their symptoms.
Classifying: A categorization is produced by using prolonged, repeated movement tests to assess the clinical response. In a multidisciplinary treatment setting, the activities prescribed are determined by which way the symptoms lessen, center, or go away.
Treatment: The initial step in treatment is to identify a consistent or repetitive activity that lessens or eliminates the discomfort. The next task is to carry on this progress for some days. To assess whether they are pain-free at this point, the patient undergoes recovery of function, which involves having them do once-painful activities.
Preventative: The patient is educated and encouraged to engage in regular exercise and self-care as part of the preventative step.
Classification:
The Derangement Syndrome This syndrome is increasingly prevalent and well-known.
The signs could appear progressively or simultaneously as time passes without immediate explanation. Throughout the day, they could be constant or irregular. Daily activities may affect on the symptoms. A distinguishing feature of derangement syndrome is directional preference, wherein a certain repetitive movement or prolonged posture results in a meaningful amelioration of symptoms. Specific motions that reduce, centralize, or eliminate pain are part of the treatment.
Syndrome of Dysfunction Defines pain that results from the mechanical stretching of tissues that have defects in the structure, including adherent or shorter, more flexible tissue. There must be symptoms for a period of eight to twelve weeks for the muscle to deteriorate. Through exercise, the goal is to restructure that tissue, which restricts movement, until eventually there is no more discomfort.
The Postural Syndrome Defines the pain resulting from extended end-range pressure in muscles, which physically deforms healthy soft tissue. while the spine is motionless, as while sitting in a protracted slouched posture, pain arises. The patient is move from immobilize stage, then pain subsides. Performing a movement causes no pain. The treatment plan calls for educating the patient, avoiding provocative postures, correcting posture by realigning the lumbar lordosis, and avoiding extended tensile stress on healthy tissue.
Irreversible derangement There are elements of derangement. No method can bring about a long-lasting improvement in symptoms.
Reducible derangements display a single, preferred direction of recurrent movement that reduces or centralizes referral symptoms.
MDT is used to diagnose and treat musculoskeletal disorders having “mechanical” origins, or diseases where a physical blockage inside a spinal joint produces pain.
The McKenzie technique is primarily used to treat the indications and symptoms of spinal disorders, including:
Static: Middle Range -> End Range of Static Dynamic: Middle Range ->End Range->Excessive Self-Pressure Therapist-Generated: Patient to End Limit -> The excess pressure -> Therapist Mobilization -> Manipulation
Exercise Guidelines
The exercises that should be suggested depend on how the patient responds to the physician. The following is an illustration of a prescription that was given to a patient in response to a favorable reaction during a therapy session:
Do this exercise ten times every two hours.
Move to the end of the range.
Sense of posture
Check in again in the next 24 to 48 hours to see if anything has improved.
During the follow-up session, the doctor will assess the patient’s original symptoms as well as how they responded to the recommended exercise or activity. The suggested exercises are often continued if the patient returns and shows notable improvement. Different methods or force progress may be examined if the patient appears in the same condition upon returning.
How to perform McKenzie exercises safely
Not everyone can benefit from the McKenzie method. It is best to stay away from this program if you have had back surgery. Furthermore, you should avoid it if you have a serious spinal ailment, such as a spinal fracture. Consult to doctor before doing these exercises. They can assist you in making sure that they won’t exacerbate your back discomfort. Make sure to move slowly if you choose to try McKenzie exercises on your own. Suddenly moving can make your symptoms worse.
You should cease exercising right away if you get any of the following symptoms in one or both legs: growing tingling, numbness, and discomfort
This exercises can lead you to for a moment experience back pain. This is anticipated. Don’t shift to the next one until the pain subsides.
McKenzie’s back exercises:
These are common exercises used to treat patients. When choosing a movement, patient assessment and clinical response should be done. The choice of motions or exercises is influenced by how the symptoms respond to a given exercise regimen or activity, both during and after it is done.
Lying Prone
prone lying
The patient is positioned prone on the surface. The arms are positioned parallel to the chest and pelvis, however. One side of the head is turned. The lumbar spine naturally becomes lordosis in this position. Even though this position could be uncomfortable, if the pain is felt centrally, it does not necessarily mean the surgery is bad.
When getting out of their posture and onto their feet, patients with posterior derangement should use caution. Maintaining lordosis is essential when standing. It’s crucial to carry out the activity for five to ten minutes for the fluid to shift anteriorly in any kind of derangement. Patients with lumbar kyphosis, for instance, might not be able to endure the prone position unless they are propped up on several pillows.
Lie on a pillow
To help your lower spine, place a cushion below your abdomen.
prone-lie-on-pillow
Pronely lie on a cushion with your abdominals supported. Place your arms by your sides. Turn your head down or to the side. For two to three minutes, hold. Repeat up to 10 times daily.
Lying Extension
Prone on elbow
An essential McKenzie Method exercise for lowering lower back discomfort, particularly that caused by disc issues, is the Prone on Elbows. By stretching the back, it transfers pain to the legs to the lower back, centralizing the ache.
Start by putting your face down on a mat, the floor, or any other hard surface. Put your elbows straight up against your shoulder while maintaining your forearms horizontal to the ground. Your palms should be downward. Slowly elevate the upper part of your body on your forearms. There should be an arch in the back, but try not to overdo it. Maintain this posture for one to two minutes while breathing regularly and letting your lower back unwind.
Prone extension
Make sure your shoulders remain relaxed and do not droop over your ears. You should cease the workout and see a doctor if you experience any severe pain or discomfort.
You can progressively extend the duration as you get more accustomed to this position. Your lumbar spine should be able to gradually expand to relieve disc pressure and encourage healing.
For optimal effects, include this exercise in your regimen two to three times a day, especially if you spend a lot of time sitting or in a flexed position. It can be especially helpful to offset the effects of persistent flexion after extended periods of sitting.
The Prone on Elbows exercise can help promote general back health, reduce lower back pain, and increase spinal mobility when done regularly.
Modifications to Prone Extensions:
PA pressure is applied as the patient extends. The physical therapist manipulates the patient’s spine while it extends. Roll your hips toward the center, starting on the side that hurts. Repeat press-ups ten to fifteen times. Like previously, but with lateral overpressure on the ribs and iliac rest.
Prone on Hands (McKenzie Press-Up)
The McKenzie Press-Up, also known as the Prone on Hands exercise, is a potent extension exercise that can lower lumbar disc pressure, ease back discomfort, and increase spinal mobility.
Laying face down on the ground or a mat is a safe place to start. Hands keep on the ground. Press your hands softly into the floor while contracting your core muscles. Extend your elbows to slowly raise your upper body while maintaining your hips and pelvis in contact with the ground. To help with the spinal extension, try to arch your lower back without raising your hips off the floor. You can also glance slightly upward.
Prone-Press-Ups
For a little while—two to three seconds, at most—maintain the fully extended posture while breathing normally and paying attention to de-stressing your lower back and preventing tenseness in your shoulders and neck. Slowly raise your upper body back to the starting position while bending your elbows and bringing your chest to the floor. Ten times through, repeat this press-up exercise, progressively lengthening the hold as your back adjusts to the extension.
When your comfort and strength develop, it’s important to progressively increase the number of repetitions and hold times. Keep an eye on your pain threshold; modest soreness or mild stretching is typical; if you feel intense or excruciating pain, stop. Try this exercise two or three times a day for optimal benefits, particularly if you spend a lot of time sitting or in a flexed position.
To avoid straining your back, keep the movement regulated and within a comfortable range of motion. It could be good to warm up with some walking or stretching.
By including the Prone on Hands exercise in your regimen, you can promote total back function, enhance spinal health, and reduce lower back discomfort.
Standing Extension
standing-back-extension-exercise
One of the main exercises in the McKenzie Method is the Standing Extension exercise, which is intended to reduce lower back pain and enhance spine health. To combat the negative consequences of extended sitting and bad posture, it promotes spinal extension.
Start the exercise by standing upright. Press your hands against your lower back for support, pointing your fingers downward. Lean back from your waist gently, supporting your lower back with your hands. Maintain a slight arch in your lower back by extending your knees as far back as is comfortable while keeping them straight but not locked. Try glancing up a little to help with the extension.
For a brief period—starting with one or two seconds—maintain the stretched posture while breathing regularly and concentrating on relaxing your lower back. Return to a standing position gradually, using your back muscles as support. 5–10 repetitions of this extension action should be done. As your back adjusts to the extension, you should progressively lengthen the hold.
When your comfort and strength develop, it’s important to progressively increase the number of repetitions and hold times. It’s acceptable to feel a little discomfort or stretch slightly, but if you encounter strong or severe pain, discontinue the workout immediately. It could be good to warm up with some walking or stretching.
The standing extension exercise, when performed regularly, can enhance spinal mobility, reduce lower back discomfort, and promote general back health. It is especially helpful for maintaining good posture and mitigating the negative consequences of extended sitting.
Flexion while lying.
Flexion is the term for bending forward. To begin this exercise, lie down and place your feet flat on the floor while bending your knees. Slowly raise both feet so that your knees are in your chest. As close to your chest as possible, both hands should be above your knees. Keep your position for a brief period.
Flexion in lying
When carrying out this exercise:
Keep your head down. Never, ever straighten your legs. This exercise should be repeated 10 times every three hours during the day.
Flexion in sitting
This exercise should only be attempted after completing exercise 5 consistently for at least a week, and only if leg soreness has not worsened from the previous postures.
lumbar flexion in sitting
To carry out this exercise:
With your feet and knees apart while seated on the chair, rest both hands on your thighs. You can bend forward from the waist, make contact with the floor, or hang onto your ankles. Return immediately to the starting position. Repeat this exercise 10 times a day, every three hours. Try to bend more with each repeat, if at all feasible.
Flexion while standing
standing-lumbar-flexion
The hardest exercise in this series, standing flexion, also strengthens your spine’s capacity to bend forward.
As you stand, maintain a larger distance between your feet and shoulders. Remember to keep your knees straight while bending forward at the hips. Stretch your hands forward in a downward motion. Take a quick pause for a minute or two. Return to the starting point. Repeat with six reps. Do it three times a day. Don’t worry if you can’t get very far. This will become better in due course.
Lower Back Flexion Rotation Exercise
The goal of the flexion-rotation exercise is to reduce lower back pain, especially in those who have sciatica or lumbar spine issues. Its primary objectives are to improve spinal mobility and relax the hip and lower back muscles.
Lying on your back on a surface. Bend your knees, position your feet flat on the floor, and adopt a comfortable posture with your arms at your sides. Raise one leg until the knee comes close to the chest. Stretch your right leg across your torso and to the left, attempting to land your left hand on the ground while keeping your shoulders parallel to the floor.
Lower Back Rotation
For a mild spinal twist, extend your right arm to the side and move your head to the right. Observe how your hips and lower back are stretched out as you hold this position for 20 to 30 seconds.
Return your right knee to its initial position. To do the same exercise on the left side, raise your left leg to your chest and lead it across your torso with your right hand. Hold for 20 to 30 seconds between each set of five to ten repetitions on each side.
Increase the hold times and repetitions progressively as you get more accustomed to the exercise. Make sure the action is deliberate and slow; refrain from jerking or making abrupt movements. Pay close attention to your breathing, taking deep breaths as you approach the stretch and letting them out as you maintain it.
Use a firm, comfortable surface for the exercise to support your back. If you have sudden or severe discomfort while exercising, stop and consult a physician. Incorporate this exercise into your daily routine, especially if you lead a sedentary lifestyle or spend a lot of time in front of a computer.
You can help relieve lower back discomfort, increase general flexibility, and improve spinal mobility by completing the Flexion Rotation exercise daily. This exercise is especially helpful for people who have problems with their lumbar spines since it is a gentle yet efficient method of mobilizing and stretching the hips and lower back.
The-Low-Back-Side-Glide-Exercise-for-Sciatica
The Sciatica Low Back Side Glide Exercise
To perform the practice of standing side glide:
Place your feet close and stand perpendicular to a wall, about one or two feet away. Place your elbow against your ribs and rest your shoulder against the wall. It should feel like your pelvis is sliding beneath your ribs when you place your hand against it and gently press your hips toward the wall. Repeat ten times while keeping an eye out for centralization. You can try the prone press-up once more when you can complete this exercise effectively. The objective is to be able to do a press-up without experiencing any lower back, thigh, or leg pain.
Additional Success Tips
Consistency: The best outcomes come from consistent practice. Try to complete these exercises two or three times a day, particularly if you spend a lot of time sitting down. Pay Attention to Your Body: If you encounter sudden or severe pain, discontinue the exercises immediately. Mild discomfort is okay. Warm-Up: Before beginning the exercises, take a quick stroll or do some light motions to help your muscles get warmed up. Posture: To support the advantages of these workouts, keep your posture correct throughout the day. Steer clear of slouching or extended sitting.
How and When to Get Professional Assistance
Although many people find great success with the McKenzie Method, it’s crucial to get expert advice if:
Despite daily activity, your pain remains or becomes worse. You start to feel new sensations in your legs, such as tingling, numbness, or weakness. You’re not sure how to perform the workouts with proper technique or progression. Speaking with a physical therapist who has received McKenzie Method training can offer you individualized advice and guarantee that you are completing the exercises correctly.
Conclusion
The McKenzie Method offers a practical and effective approach to managing back pain and enhancing spinal health through targeted extension exercises. By regularly practicing key exercises such as prone lying, prone on elbows, prone press-ups, standing extensions, and lumbar flexion in lying, individuals can alleviate discomfort, improve mobility, and support their overall well-being. Consistency and proper technique are crucial for maximizing the benefits of these exercises.
For those experiencing persistent pain or new symptoms, consulting with a physical therapist trained in the McKenzie Method is advisable to ensure the correct form and receive personalized guidance. Embracing the McKenzie Method can lead to significant improvements in back pain relief and contribute to a healthier, more active lifestyle.
FAQs
What is the McKenzie method?
Robin McKenzie, a physiotherapist from New Zealand, created the McKenzie Method, sometimes referred to as Mechanical Diagnosis and Therapy (MDT). It entails particular exercises intended to promote spinal extension and centralize pain to reduce back pain, enhance spinal health, and restore function.
How do exercises by McKenzie operate?
To relieve nerve root compression and lessen pressure on intervertebral discs, McKenzie exercises encourage spinal extension. To facilitate management and treatment, the exercises are designed to transfer pain from the extremities—such as the legs—back to the lower back.
To whom does the McKenzie Method offer advantages?
The McKenzie Method helps people with sciatica, herniated discs, and other problems with the lumbar spine that cause back pain. Those with chronic back pain and those trying to avoid back issues in the future may also benefit from it.
How frequently should I work out with McKenzie?
Try doing McKenzie exercises two or three times a day for optimal benefits. Maintaining consistency is essential for relieving pain and enhancing spinal health.
Which McKenzie exercises are essential?
This is one of the primary McKenzie exercises: Prone Lying: Lie face down to commence lumbar extension and relax the back muscles. This is one of the primary McKenzie exercises. Elbow Prone: Raise yourself on your elbows to lengthen your lower back and ease disc pressure. Prone Press-Ups: To further expand the lower back, press up while prone. Standing Extension: To offset the effects of extended sitting, stand and lean back. Lumbar Flexion in Lying: To extend your lower back, lie on your back and pull your knees to your chest.
If I have excruciating back pain, can I still do McKenzie exercises?
Before beginning any fitness program, it’s crucial to speak with a healthcare provider if you suffer from significant back pain. A physical therapist with McKenzie Method training may offer you individualized advice and make sure you complete the exercises safely and correctly.
What should I do if my discomfort gets worse when I exercise?
Stop exercising right away if it hurts too much or too sharply. While some discomfort is natural, severe pain may be a clue that this exercise is not right for you. Seek advice from a medical practitioner.
What is the best way to make sure I’m doing the exercises correctly?
To guarantee proper form, adhere to the comprehensive guidelines provided for every exercise and contemplate seeking advice from a physical therapist skilled in the McKenzie Method. They can offer you individualized advice and technique modifications.
Can future back discomfort be avoided using the McKenzie Method?
Yes, doing McKenzie exercises regularly can help keep your spine healthy, increase your flexibility, and strengthen your back muscles—all of which lower your risk of developing back discomfort in the future.
Is everyone a good fit for the McKenzie Method?
The McKenzie Method has many benefits, but not everyone can use it—especially those with serious back problems or specific medical disorders.
Reference:
Ocs, N. U. P. D. (n.d.). 7 McKenzie Method Exercises for Back Pain and Sciatica. Spine-health. https://www.spine-health.com/wellness/exercise/7-mckenzie-method-exercises-back-pain-and-sciatica
Nunez, K. (2020, November 5). Try This: McKenzie Exercises for Back Pain. Healthline. https://www.healthline.com/health/mckenzie-exercises
Ocs, N. U. P. D. (n.d.-b). What Is the McKenzie Method for Back Pain and Neck Pain? Spine-health. https://www.spine-health.com/wellness/exercise/what-mckenzie-method-back-pain-and-neck-pain
SpineOne. (2023, July 18). The McKenzie Method for Lower Back Pain Relief. Spine One | Denver Spine Pain Specialists. https://spineone.com/mckenzie-method-back-pain/
Pt, B. S. (2023, August 24). McKenzie Exercises for Your Lower Back. Verywell Health. https://www.verywellhealth.com/mckenzie-exercises-for-your-low-back-2696222
Dhameliya, N., & Dhameliya, N. (2022, March 1). McKenzie Protocol For Low Back Pain: – | Samarppan Physio clinic. Samarpan Physiotherapy Clinic. https://samarpanphysioclinic.com/mckenzie-protosal/
Admin. (2024, April 14). What is the Mckenzie Method of Physical Therapy? Mobility Physiotherapy Clinic. https://mobilephysiotherapyclinic.net/mckenzie-method-of-physical-therapy/
Chauhan, S. (2022b, February 20). McKenzie’s Method For Exercise Therapy: Introduction, Steps ,Goals , Exercises for Lower Back Pain and Neck Pain. Mobility Physiotherapy Clinic. https://mobilephysiotherapyclinic.net/mckenzies-method-for-back-exercise/
Exercise-induced asthma, also known as exercise-induced Bronchoconstriction(EIB), occurs when physical activity causes your airways to narrow, increasing asthma symptoms. This could involve wheezing, coughing, or dyspnea. You can avoid asthma attacks and expand your airways by warming up, using inhalers, and taking other drugs.
What is Exercise-induced Asthma?
Breathing becomes difficult during exercise when your airways narrow, a condition known as exercise-induced asthma. During or after physical exertion, you could have asthma symptoms such wheezing, coughing, and shortness of breath.
When the air is dry and chilly, or when pollen counts and pollution levels are high, symptoms may worsen. Sports-induced asthma or exercise-induced bronchoconstriction (EIB) are other names for exercise-induced asthma.
How common is Exercise-induced Asthma?
Between 40% and 90% of asthmatics experience symptoms during or after physical activity. However, up to 20% of people in the general population, who may or may not have asthma, have exercise-induced asthma symptoms, proving that it can occur even in the absence of an asthma diagnosis.
Pathophysiology
A significant increase in minute ventilation and the demand on the respiratory system to heat and humidify the air with exercise-related hyperpnea cause evaporative water loss, thermal changes, and irritant exposure, which alter normal lung physiology and lead to exercise-induced bronchoconstriction.
There is a 200 L/min increase in ventilation, airway relaxing and mucosal dehydration. When cells get dehydrated, their pH rises and their size decreases, which causes coughing, mucus production, and the loss of the epithelium’s physical barrier function.
Edema and the release of inflammatory mediators, such as histamine, leukotrienes, cysteine, tryptase, prostaglandins, and mast cell degranulation, are believed to result from a regulatory increase in cell volume caused by decreased pH and elevated electrolyte concentrations.
Blood flow through the bronchi is enhanced. Increased lipid peroxidation results in the production of reactive oxygen species. Autonomic and sensory nerves are triggered. Direct and neural stimulation of bronchoconstriction are the outcomes.
Additionally, inadequate nasal breathing results in mouth breathing and increased lung surface contact to allergens, pollutants, and irritants, which causes reactive oxygen species to be produced as well as a neutrophilic inflammatory response.
Those who have a genetic susceptibility to EIB may be less able to use cysteine to counteract oxidative stress. Mucus blocking and bacterial growth can result from modifications in mucus composition and a decline in mucociliary function.
Excessive physical activity has been connected to an increase in the condition and viral upper respiratory infections (URIs), and it can also cause temporary immune suppression with a shift to T2 cell response.
Prolonged exposure can cause asthma-like inflammation, remodeling, and epithelium damage and shedding. W hen exposure and exercise are discontinued, lung damage and hyperresponsiveness improve over the course of weeks to years, indicating that the process is somewhat reversible.
Evidence that the severity of EIB is strongly correlated with the rate of water loss in the airways, that EIB can be avoided by breathing in fully humidified air at body temperature, and that hyperosmolar saline can likewise cause bronchoconstriction all give support to the osmotic theory. Increased exhaled nitric oxide and a higher number of epithelial cells in sputum samples, which are signs of greater airway inflammation, injury, and shedding in people with EIB.
Signs and Symptoms
The following are signs of Exercise-induced Asthma:
Chest tightness.
Coughing (for certain people, coughing is the only symptom).
Breathing problems (shortness of breath). You can have trouble forcing air from your lungs.
Mild to severe symptoms are possible.
They may show up a few minutes after you begin working out or after you’ve completed a session. After resting for around half an hour, symptoms normally begin to get better.
Asthma symptoms caused by exercise might occasionally reappear up to 12 hours after you’ve stopped exercising. Even when you’re sleeping, they can still show up. We refer to these as late-phase symptoms. Late-phase symptoms can persist for up to a day.
Causes
Exercise-induced asthma can be triggered by vigorous aerobic physical activity. It gets worse when:
It’s dry and freezing outside.
The level of pollen is high.
Poor air quality is caused by excessive pollution levels.
You’re recovering from a respiratory illness or cold.
You’ve inhaled fumes from paint or cleaning products, smoke, or chemicals.
Activities that causes Exercise-induced Asthma:
Although symptoms can arise from any exercise, cold-weather sports and those requiring continuous physical exertion with little rest are the most likely to aggravate asthma. Among the examples are:
Basketball.
Ice hockey.
long-distance running.
Skating.
Snowboarding.
Soccer
Lung irritation can also result while swimming, diving, or playing water sports in an indoor pool that has been chlorinated.
Risk factors for exercise-induced asthma:
People with asthma and allergies are more prone to experience exercise-induced bronchoconstriction. It’s more common among professionals like Olympic athletes and professional football, soccer, and hockey players.
Between 30% and 70% of professional sportsmen suffer from asthma caused by activity.
Prevention
You might be able to prevent an asthma attack with preparation and strategy. Prior to engaging in physical activity, you must:
Give yourself enough time to warm up: Spend six to ten minutes warming up before beginning any physical activity. Your age, level of health, and sport or activity will all affect your warm-up routine. Consult to your Doctor about what’s best for you.
Prior to exercising outside, check the air quality index and pollen levels: You might wish to stay inside if there is a lot of pollution and pollen.
Cover your mouth and nose: To shield your airways from chilly, dry air, wear a mask, scarf, or gaiter.
Control your asthma symptoms: When using inhalers and taking asthma treatments, according to your doctor’s directions.
Inform teachers and coaches: Make sure coaches and teachers know if your child has asthma. Adults should be aware of the symptoms to look out for, how to assist with medicine, and what to do if symptoms arise.
Keep a watch out for symptoms: Keep a look out for signs of sports-induced asthma in yourself or your child. If you see symptoms of an EIB episode, have a strategy in place. Keep in mind that symptoms may show up minutes or even hours after you stop working out.
Select lower-intensity or indoor sports: You might wish to avoid some activities if you have asthma caused by athletics. The likelihood of experiencing symptoms is higher for endurance sports and activities that occur in colder climates.
Doing water sports in a saltwater pool or unchlorinated bodies of water could be beneficial if you enjoy them.
Which sports have a lower risk of causing Exercise-induced Asthma?
Sports that are played indoors, are less strenuous or only need brief bursts of exertion are less likely to cause an asthma attack. Among the examples are:
Bowling, baseball, and fencing.
Play golf.
Gymnastics.
pickleball.
Runs.
Tennis.
volleyball.
strolling.
Testing and Diagnosis
Your healthcare professional will inquire about the duration and timing of your symptoms. Additionally, they will inquire about any family history of asthma or other respiratory disorders. In addition to listening to your heart and lungs, they might run other tests. These consist of:
Testing for pulmonary function: These assess the function of your lungs. One popular pulmonary function test for asthma is spirometry.
Challenge yourself with exercise: An exercise challenge exam, also known as a bronchoprovocation test, involves running on a treadmill or riding a stationary bike or run on a treadmill. Before and after exercise, your healthcare professional measures your breathing using spirometry.
Chest X-ray: To rule out infections or other possible causes of your symptoms, your doctor may recommend that you have a chest X-ray.
Differential Diagnosis
Exercise-induced symptoms such as coughing, wheezing, chest tightness, and dyspnea may be signs of airway pathology. Clinical symptoms alone are not always sufficient to diagnose exercise-induced bronchoconstriction; objective evidence of a decline in lung function with activity is needed.
The following are the most typical differential diagnoses for EIB Additionally, EIB may be linked to underlying illnesses like:
Interstitial fibrosis and diaphragmatic paralysis:
Vocal Cord Issues
Tracheal and laryngeal processes
respiratory tract infections
Esophageal-gastric reflux
hyperventilation syndromes
Treatment
Prevention and symptom relief are the main goals of treatment for exercise-induced asthma. Your doctor might recommend helpful drugs in addition to preventive measures like warming up before exercise. While some medications prevent symptoms, others widen your airways while you’re experiencing them.
Medical treatment
Physical therapy treatment
Medical treatment
Medications
Your doctor may prescribe drugs that you inhale through a nebulizer or inhaler. They can help relieve or avoid symptoms. Among the inhaled drugs for exercise-induced asthma are:
Inhaler
Short-acting beta-agonists (SABAs): One kind of bronchodilator that relaxes the muscles in your airways is SABA. SABAs, also known as rescue inhalers, may reduce symptoms during an attack of EIB. Asthma symptoms can also be avoided by taking SABAs around fifteen minutes prior to engaging in physical activity.
Long – acting beta agonist (LABAs): Another kind of bronchodilator that is used in conjunction with corticosteroids to treat asthma is LABAs; they are not used alone. If you inhale LABAs 30 to 60 minutes before exercising, they can help prevent an EIB episode.
Corticosteroids: By decreasing airway inflammation, corticosteroids improve airflow. To avoid symptoms, your doctor could advise you to take them every day.
Stabilizers for mast cells: Stabilizers of mast cells lessen airway inflammation. To help avoid symptoms, you can use a nebulizer to inhale this drug around fifteen minutes before exercising.
Some people’s asthma symptoms can also be lessened by leukotriene modifiers and antihistamines.
Physical therapy Treatment:
Education
Some persons with EIB may find that the following advice helps them manage their symptoms in addition to taking their medications as directed:
Getting warmed up before working out
Being as fit as you can: Getting raises the EIB threshold, which means that even moderately intense exercise may not trigger an attack.
Avoiding areas with high concentrations of allergens, pollutants, irritating gasses, or airborne particles; instead, exercise in a warm, humid environment.
Using the nose to breathe in order to warm and moisten the air
Filtering air with a mask, while this can be inconvenient or make breathing more difficult
Doing cooling exercises, inhaling through the nose, and covering the lips in cold, dry conditions after intense exercise
If the customer smokes, think about discussing stopping with the doctor.
Acute Treatment:
Physical therapists may be the first to notice asthma symptoms in a patient with undiagnosed EIB because exercise triggers the condition.
Physical therapists must therefore be knowledgeable with the symptoms and indicators of EIB as well as any warning indications that might point to the necessity for medical referral and treatment.
The physical therapist should determine the intensity of the asthma attack and, if necessary, place the patient in high Fowler’s position for diaphragmatic and pursed-lip breathing if the patient experiences an acute asthma attack during therapy.
The physical therapist should support the patient in self-administering the medication while promoting relaxation if the patient has an inhaler available.
Long-Term Treatment
Patients with EIB may be discouraged from exercising for a number of reasons, including the perception that exercise is harmful to their illness.
There is substantial evidence to support the advantages of physical activity for cardiovascular training in this patient population, despite the lack of data supporting inspiratory muscle training or breathing exercises in asthmatic patients.
As a result, by educating patients and prescribing exercises, physical therapists can contribute significantly to the management of care.
The impact of physical therapy on children with asthma’s quality of life will be determined by a study procedure.
The Physical Therapy Guide to Practice lists the following Preferred Practice Patterns for this patient population:
Pattern 6E: Reduced Respiration and Gas Exchange Related to Ventilatory Pump Failure or Dysfunction
Pattern 6F: Respiratory Failure-Related Impaired Ventilation and Respiration/Gas Exchange
FAQs
What is the most effective way to manage Exercise-induced Asthma?
Before working out, the most often prescribed medications are short-acting beta-agonists (SABAs). Among these medications are levalbuterol and albuterol.
How can I prevent Exercise-induced Asthma?
Exercise-induced asthma symptoms can be avoided by wearing a loose-fitting scarf or mask when exercising in cold, dry air or in warmer, more humid air. Before engaging in strenuous activity, some patients find that warming up helps lessen the symptoms of their asthma.
For asthma, what kind of exercise is best?
The best types, advantages, and safety precautions of exercise for asthma.Yoga, swimming, walking, riding, and more can all be considered forms of exercise. Certain types of exercise can trigger asthma attacks, which can result in tightness in the chest or wheezing. However, by employing particular strategies and engaging in appropriate activities, people may be able to prevent symptoms or asthma attacks.
How long does Exercise-induced Asthma last?
Within 30 to 90 minutes, symptoms typically go away on their own. There is a refractory phase of 1 to 3 hours during which further exertion does not cause bronchoconstriction. Additionally, some patients may not exhibit any symptoms, which could lead to an under diagnosis of EIB.
What distinguishes asthma from Exercise-induced Asthma?
Chronic asthma is a respiratory disease that irritates the airways. Both those with and without normal asthma can be affected by exercise-induced asthma. Wheezing, coughing, and trouble breathing are signs of exercise-induced asthma, which causes the bronchial tubes to shorten during physical exertion.
How do medical professionals check for Exercise-induced Asthma?
Spirometry: Your lungs’ capacity to hold air and exhale it forcefully is measured by a spirometry test. lung volume test: The amount of air in your lungs and the amount that remains after a typical breath is measured by a lung volume test.
Reference:
Exercise-Induced asthma. (2024, June 20). Cleveland Clinic. https://my.clevelandclinic.org/health/diseases/4174-exercise-induced-asthma
Exercise-induced asthma – Diagnosis & treatment – Mayo Clinic. (2022, December 7). Mayo Clinic. https://www.mayoclinic.org/diseases-conditions/exercise-induced-asthma/diagnosis-treatment/drc-20372306
Post-traumatic elbow stiffness is a condition characterized by reduced range of motion in the elbow joint following an injury, such as fractures, dislocations, or soft tissue damage. It results from scar tissue formation, joint contractures, or heterotopic ossification. Management typically involves physical therapy, stretching, and, in severe cases, surgical intervention to restore mobility and function.
The elbow joint range of motion is restricted by a common condition called post-traumatic elbow stiffness. After an injury to the elbow joint or surrounding tissues, it may happen.
Several surgical procedures are now available, and the recommendation must be based on the surgeon’s skill level, the patient’s features, and the extent of joint limitation. Joint degradation and incongruence negatively impact the prognosis, while a positive surgical prognosis has been linked to heterotrophic ossification alone.
Post-traumatic Stiffness: What Is It?
In medicine, stiffness is the inability to move a joint because of a loss of range of motion caused by an illness or injury (such as trauma).
A crippling consequence of trauma that results in decreased or lost motion and functional impairment is post-traumatic stiffness. It will be challenging for you to bend or straighten your elbow and carry out daily tasks if you have post-traumatic stiffness in it. Both intrinsic and extrinsic post-traumatic stiffness are possible.
Pathogenesis
Post-traumatic elbow stiffness has a complex etiology, with both extrinsic and intrinsic causes frequently contributing to the development of a clinically stiff elbow. The elbow articulation itself has intrinsic causes of post-traumatic elbow stiffness, which might include impinging osteophytes from future arthrosis or articular incongruities from the initial trauma. Motion-limiting intra-articular adhesions can arise after immobilization following trauma or surgery.
Retained hardware, capsular contractures, and heterotopic ossification are common extrinsic causes of elbow stiffness. One type of dystrophic calcium deposition that arises from local tissue damage due to stress, whether from injury or surgery, is heterotopic ossification. Depending on its location, the ossified deposit might limit flexion-extension, or both.
It functions as a mechanical block to motion. Although there are no known patient-related risk factors for the development of heterotopic ossification following elbow trauma, glenohumeral dislocation, a longer recovery period between injuries and surgeries, and more surgical operations are independent risk factors for the development of heterotopic ossification.
Classification
The Kay and Morrey classification systems are the two primary classification schemes used to describe elbow stiffness. The process that contributes to stiffness is the foundation of the Kay classification system.
Soft-tissue contracture (type I)
Soft-tissue contracture with ossification (type II)
Nondisplaced intra-articular fracture with soft-tissue contracture (type III)
Displaced intra-articular fracture with soft-tissue contracture (type IV)
Post-traumatic osseous bars (type V)
Soft tissue contracture(type I)
Elbow motion is physically restricted by soft tissue contractures, which results in stiffness. The elbow capsule thickens in individuals having surgery to remove soft tissue contractures and is frequently linked to post-traumatic stiffness. Additional investigation has also shown that there are more myofibroblasts, which are very contractile, and that the extracellular matrix is proliferating. Increased collagen crosslink production, decreased proteoglycan content, and lower water content have all been shown by histology.
Heterotopic ossification(type II)
The improper production of mature lamellar bone into non-skeletal tissue is known as HO, and it may also be the cause of post-traumatic stiffness. Pluripotent mesenchymal cells undergo differentiation into osteoblasts, which then generate osteoid, which mineralizes into bone, to form this heterotopic bone. The resulting ectopic bone has no real periosteal layer and is more metabolically active.
The heterotopic bone may be differentiated from other pathological bone-forming states such as myositis ossificans and periarticular calcification, where amorphous calcium deposits accumulate in soft tissues surrounding the elbow following injury, since histologically it looks exactly like natural bone. Clinically, HO shows up as a mechanical block to elbow joint action, which limits the range of motion. Imaging can be used to identify the appearances.
Nondisplaced intra-articular fracture with soft-tissue contracture (type III)
An elbow stiffness condition known as “nondisplaced intra-articular fracture with soft-tissue contracture (type III)” occurs when there is a little fracture within the joint itself that is not greatly displaced but is accompanied by tightening of the soft tissues around it.
Displaced intra-articular fracture with soft-tissue contracture (type IV)
The term “displaced intra-articular fracture with soft-tissue contracture (type IV)” describes a kind of elbow stiffness that particularly denotes a considerably displaced fracture within the joint along with tightened soft tissues surrounding the elbow joint.
Post-traumatic osseous bars (type V)
Because of the disruption of the germinal matrix and related vascular supply, which may result in bone development arrest, altered joint mechanics, and functional impairment, Salter-Harris V injuries frequently have a bad prognosis. Orthopedic examination and subsequent surgical intervention are therefore frequently necessary.
Causes
Orthopedists are aware of the elbow joint’s tendency to become stiff following trauma, which can happen even in cases of minor trauma. The high degree of congruence, the intricacy of the joint surfaces, and the high tissue sensitivity to trauma, particularly in the joint capsule, are the primary factors that expose the elbow joint to this problem. Orthopedists can directly affect parameters related to a range of motion loss, in addition to the direct correlation between elbow joint stiffness and trauma, inadequate rehabilitation, and needless protracted immobilization.
The following are the main reasons for post-traumatic elbow stiffness:
Heterotopic ossification (bone growth in non-skeletal tissues)
Cranial trauma (injury to brain, skull)
Post-traumatic elbow stiffness is diagnosed and treated based on its cause.
Symptoms
Pain in the elbow
A feeling of a locked elbow
Decreased motion of the joint
Diagnosis
Assessment
Measuring and comparing elbow flexion and extension to the contralateral side is important because, in healthy individuals, maximal flexion and extension range from 140° to 150° and –10° to 10°, respectively, and are influenced by age and sex. Even though elbow stiffness is typically painless, end-range pain is typically present. Although it might be challenging to measure in patients with a restricted range of motion, elbow stability is frequently not abnormal.
The chance of ulnar entrapment in stiff elbows is increased by pathological alterations of the posteromedial capsule, tissue scarring, or even protruding iron from prior surgery, particularly in posttraumatic stiffness. Consequently, the location in the ulnar nerve’s sulcus should be meticulously recorded, and the nerve itself should be closely inspected for indications of instability or entrapment. Deep flexion may cause symptoms of adhesion or ulnar entrapment.
Unpleasant stiffness, tenderness, or warmth can be a sign of an active infection or inflammation. Measurements of inflammatory indicators (erythrocyte sedimentation rate and C-reactive protein level) are necessary for additional evaluation to rule out infection.
Aspirating the elbow joint and sending synovial fluid for additional examination is recommended for patients exhibiting signs of an active infection. The function of the ulnar nerve must always be given particular consideration during a neurological examination. Assessing the degree of brain injury may require nerve conduction investigations and electromyography.
Physical examination
X-ray for elbow stiffness
A physical examination of the affected elbow and a review of your medical history are the initial steps in diagnosing post-traumatic stiffness. Following that, the physician will check for inflammation and flexion range. The initial diagnosis may also be confirmed by an MRI, CT scan, or X-ray (radiograph).
Treatment
Nonoperative treatment
The initial nonoperative therapy strategy will involve either static or dynamic elbow splinting. Additional choices include:
Physical therapy
Occupational therapy
Serial casting of the joint
Passive mobilization
Joint immobilization
Manipulation under anesthesia
Administration of NSAID
Botulinum toxin A injections
Splinting or bracing.
Maintaining the maximum range of motion acquired during surgery is the aim of postoperative rehabilitation. Early active mobilization within 24 to 48 hours is therefore crucial. Sufficient management of postoperative pain is necessary for this. In a specific postoperative rehabilitation plan, patients should be encouraged to rebuild their elbow’s strength and reintegrate it into their daily lives.
The majority of ROM improvement occurs during the initial months of rehabilitation, according to several studies. Contractures that are resistant to conventional exercise regimens can be successfully treated with adjuvant splinting, which can be utilized for 20 days to three months. Since only slight improvements in range of motion are seen until 12 months into treatment, sticking with it can be beneficial.
Physical therapy treatment
Physiotherapy (PT) is an essential and adaptable treatment for posttraumatic stiff elbow. Starting within six months after the stiffness’s development yields the best outcomes. Supine is the ideal posture for active mobilization because it elevates the upper arm and lessens the strain on the joint stabilizers. Exercises that improve proprioception and increase vascular circulation in the hands and wrists can be added in addition to active and passive mobilization to reduce edema.
Elbow flexion
Elbow-flexion Extension
Drop your arm to one side and stand up.
Slowly bend your arm upward until your hand touches your shoulder, using a modest weight or none at all.
Repeat ten times while holding this position for 15 to 30 seconds.
Elbow Extension
Hold one arm straight over your head.
Relax to the starting position after bending your arm backward at the elbow until it is no longer possible.
Perform ten repetitions in each of the first three sets.
Supination/Pronation
Supination-Pronation hand
Holding a hammer, lower it from right to left, then back again while keeping your elbow on a table.
Throughout the movement, maintain a straight wrist and maintain control.
Do this exercise ten times.
Towel Twist
Towel Twist
Hold a towel in both hands while reclining in a chair.
As if you were wringing out water, twist the towel in different directions.
After ten repetitions, switch directions for ten more repetitions.
Foam Ball Squeeze
Ball exercise
Squeeze a ball of soft foam in your hands.
Repeat ten to fifteen times with both hands after holding for thirty seconds.
Do this exercise two or three times every week.
Stretching exercises:
Overhead elbow extension: Hold the stretch while extending your arm overhead and bending your elbow slightly back.
Forearm rotations: Turn your forearm inward and outward while keeping it bent at a 90-degree angle.
Elbow flexion stretches: With your other hand, gently draw your elbow toward your shoulder.
Wrist flexor stretches: Bend your wrist gently in your direction while extending your arm straight out with your palm facing down.
Splinting
Splinting post-traumatic elbow stiffness
The conservative management of posttraumatic elbow stiffness frequently involves the use of static, static progressive, and dynamic splinting procedures. To provide stretch in the area that needs the greatest improvement, static splinting entails immobilizing the joint with a static splint. The static progressive kind allows the patient to enhance joint mobility by progressively increasing tension using a turnbuckle or a strap and loop. It is advised to wear static (progressive) splints for 30 minutes, three times a day. Conversely, dynamic splints employ a spring to allow for flexion or extension in the other direction during active movements while facilitating less tension in the direction that needs development.
It is advised that dynamic splits be worn for a further 6 to 8 hours, ideally at night. Nevertheless, dynamic splints are generally fairly heavy, which makes wearing them at night unsightly. Additionally, these splints cost more than turnbuckle splints. For the treatment of elbow stiffness, splinting can be static, static progressive, or dynamic.
Every splinting technique produced a significant and long-lasting increase in range of motion (ROM), with the static progressive and dynamic splinting groups experiencing improvements in ROM of about 40°. However, static progressive splinting and dynamic splinting produced better results than static splinting for improving flexion.
Continuous passive motion therapy
There has been discussion over the effectiveness of continuous passive motion (CPM) therapy in postoperative rehabilitation for many years. CPM is thought to hasten the removal of hemarthrosis while halting the development of further periarticular soft tissue edema caused by variations in IA pressure. Although a favorable effect was shown, there was insufficient proof in earlier research, and employing a CPM raised patient expenses considerably.
However, O’Driscoll et al. conducted a recent single-center randomized controlled trial in which they directly compared the use of PT and CPM four weeks following surgical arthrolysis. While pain levels, opiate use, and patient-recorded outcome measures were comparable, the results demonstrated that CPM was superior to PT at three, six, and one year in terms of regained total and functional range of motion and time lost from performing daily tasks.
Manipulation under anesthesia
To reduce the risk of iatrogenic fractures, we advise against manipulating under anesthesia for more than eight weeks following trauma or surgery. However, manipulation under anesthesia can be used as a treatment option for early-evolving joint stiffness resistant to intensive physical therapy and splinting, and it is an effective addition to therapy for increasing flexion-extension if used within three months of the injury, fracture fixation, or arthrosis.
Immediate Postoperative Phase:
To preserve the surgical site and promote recovery, the elbow is usually immobilized with a brace or splint.
To avoid stiffness and encourage joint mobility, early range-of-motion exercises are started under the direction of the surgeon and physical therapist.
Weeks 1-6:
To stop stiffness from returning, the focus is on early mobilization and mild progressive range-of-motion exercises.
To regain function stability and strength around the elbow joint, forearm, and upper arm strengthening activities are started.
Weeks 6-12:
The rehabilitation program advances to incorporate more strenuous range-of-motion exercises and functional activities as the patient heals.
Under the direction of the medical team, elbow-related tasks like lifting and reaching are gradually reintegrated.
Months 3-6:
The emphasis switches to maximizing joint strength, flexibility, and function as well as a gradual return to daily tasks and leisure activities.
To provide the best possible functional recovery, progressive strengthening activities and neuromuscular re-education are prioritized.
Long-Term:
It takes several months to fully heal and resume high-impact activities, with continued monitoring to evaluate joint stability, function, and any possible surgical-related issues.
Patients must carefully follow the recommended rehabilitation program, show up for follow-up appointments, and discuss any issues or worries they may have during the healing process to maximize the results of elbow stiffness release surgery.
Operative treatment
Elbows with osseous contact or tissue contractures that do not respond to conservative treatment should be treated surgically. The choice between open arthrolysis and arthroscopic arthrolysis depends on several factors, such as the etiology, the location of prior surgery, and the involvement of the ulnar nerve. Arthroscopy provides better joint visualization, less scarring, a lower risk of infection, less pain and swelling, and a quicker recovery than open arthrolysis.
Open arthrosis (with external fixation)
Arthroscopic arthrosis
Partial or total elbow arthroplasty
Interposition arthroplasty
Corrective osteotomy with arthrodesis
Capsular release
Osteophyte excision
Musculocutaneous neurectomy
Arthroscopic Surgery for Elbow Stiffness
The limited range of motion in the elbow joint can be addressed with minimally invasive arthroscopic surgery, also referred to as arthroscopic capsular release or arthroscopic contracture release. The procedure entails making small incisions around the elbow, inserting an arthroscope to view the inside of the joint, and using specialized tools to remove adhesions, release scar tissue, and increase joint mobility.
External fixation
In the previous paragraph, the benefits and efficacy of external fixation were presented. After elbow arthrolysis, Shanghai Sixth People’s Hospital has implemented a three-phase external fixation rehabilitation program. Forearm rotation exercises (at least twice daily) and active, assisted, and passive cycles of flexion-extension exercises (30 on the first day, increased by 30 per day until 300 were achieved) are prescribed to patients during the first six weeks following surgery, under the careful supervision of a physical therapist or family members. After every ROM training session and while you sleep, the fixator is locked in the most severe position for elbow flexion or extension. Fixator removal is often done in the outpatient operating room for six weeks.
Total elbow arthroplasty
This is recommended for older individuals (over 65) who exhibit significant elbow functional impairments in addition to joint surface deterioration.
Due to the connection between the ulnar and humeral components, a total elbow arthroplasty used to treat fractures is an intrinsically stable structure. A possible drawback of this method is the possibility of stem loosening due to polyethylene wear at the implant connection and transferring weight to the stem-cement-bone contact.
This procedure is not well documented in the orthopedic literature. Results and complication rates from complete elbow arthroplasty in individuals who had previously had interposition arthroplasty were similar to those following a series of revisions.
Precautionsfor total elbow arthroplasty
Active extension should be stopped for 4–6 weeks to facilitate bone-tendon healing if a triceps-reflecting technique has been used.
Such a restriction is not required if a triceps-sparing technique has been employed.
To reduce the chance of early polyethylene wear and stem loosening after complete elbow replacement, patients are advised to refrain from heavy or repetitive usage of the operated arm for the rest of their lives.
Interposition arthroplasty
Replacing the joint can significantly reduce pain and restore a reasonable amount of elbow motion for elderly individuals with advanced posttraumatic osteoarthritis-related elbow stiffness. For younger, more active patients, however, interposition arthroplasty may be a viable option for joint replacement since it seeks to improve function and reduce pain while maintaining functional stability. The distal humeral and ulnar articular surfaces are reshaped, a new congruent joint is made, and biological materials such as dermal allographs, Achilles tendon, or fascia Lata allograft are used to resurface the joint. Furthermore, it is possible to repair the collateral ligaments. Nevertheless, this technique’s results are not very predictable.
Capsular release
In the context of post-traumatic elbow stiffness, a “capsular release” is a surgical procedure that allows the elbow to bend and straighten more freely by cutting the contracted joint capsule around the elbow via an open incision or arthroscopically using tiny cameras and tools. This procedure is usually performed when significant stiffness develops after an elbow injury.
Complication
Heterotopic ossification (HO): The formation of new bone in the soft tissues surrounding the elbow, known as heterotopic ossification (HO), is a serious problem since it severely restricts the range of motion.
Capsular contracture: This condition limits elbow flexion and extension by tightening the joint capsule.
Nerve damage: Numbness and tingling in the hand can result from damage to the ulnar nerve, which is especially susceptible to injury close to the elbow.
Post-traumatic arthritis: Degenerative arthritis characterized by pain and stiffness can result from repeated trauma to the elbow joint.
Functional limitations: Everyday tasks including eating, dressing, and maintaining personal hygiene can be severely impacted by severe elbow stiffness.
Prevention for elbow stiffness
Preventive measures are crucial since treating a stiff elbow can be challenging. It has been hypothesized that stiffness after surgery or joint damage progresses via four stages: granulation tissue, fibrosis, edema, and bleeding. 24 Active mobilization, which helps to minimize edema and a rise in the viscosity of inflammatory exudates, which may ultimately predispose the joint to adhesion development, and early surgical intervention for fracture or joint instability are important strategies to prevent elbow stiffness.
Conclusion
A patient’s ability to do activities of daily living is seriously hampered by elbow stiffness, which is also difficult for doctors to treat. To gain a better understanding of the underlying etiology and to establish a strong foundation for the suggested treatment, a comprehensive preoperative workup that includes a 3D CT scan and a radiologic evaluation with a particular focus on the ulnar nerve is necessary. The basis for treatment is whether osseous impingement, soft tissue contracture, or a mix of the two are involved. If conservative measures are ineffective, arthroscopic arthrolysis has emerged as a reliable initial surgical option. Compared to open arthrolysis, this approach has fewer indications but lower rates of complications and revisions. In postoperative rehabilitation, splinting or CPM is necessary in addition to early active mobilization.
FAQs
How can my elbows be relaxed?
Just move your fingers gently toward the bottom of your wrist while keeping your elbow straight out and your palm toward the floor. The back of your forearm should feel stretched. For 30 seconds, hold it.
How is stiffness in the elbow after trauma treated?
Post-traumatic elbow stiffness can be managed non-surgically with joint immobilizers and physical therapy. Conservative treatment is common up until the fourth month, especially when stiffness is not linked to heterotopic ossification or joint deformity.
What is the duration of elbow stiffness following trauma?
Patience is necessary since splinting can alleviate posttraumatic elbow stiffness over a 6- to 12-month period. As a result, we advise a minimum of six months of treatment, or until a pending contract is reached.
How can pain after an elbow fracture be eliminated?
If left untreated, it can potentially result in long-term joint dysfunction and limited range of motion. Therefore, to help lessen post-fracture elbow stiffness and enhance joint function, physical therapy is usually advised. This includes manual treatment, soft tissue mobilization, and range of motion exercises.
How can stiff elbows be loosened?
Applying a body wash that has additional moisturizers added. Treating a particular skin disease, like eczema, with a moisturizer that has been specially prepared. If someone spends a lot of time resting on hard surfaces, they should use elbow pads. Steer clear of aggressive exfoliator products that could aggravate skin irritation or exacerbate dryness.
How can a stiff elbow be massaged?
A popular method here is to apply deep pressure with both thumbs at the center of the muscle, pressing into the knots or scar tissue. Smaller adhesions and scar tissue are broken away with a circular motion when the muscle feels like it is relaxing.
How can someone who has a stiff elbow sleep?
Lying on your back with a pillow supporting your arm is one of the greatest ways to sleep if you have a sore elbow. By doing this, you can lessen the tension on your elbow joint and maintain your arm in a neutral position. To add support, you can also try sleeping on your side with a pillow between your arms and body.
After an injury, how may stiffness be reduced?
Use ice in the evening to lessen pain or swelling from movement during the day, and heat in the morning to warm up tense muscles. Contrast treatment, which alternates between cold and heat, helps to shift inflammation away from the affected area by constricting and widening the blood vessels.
What signs of elbow post-traumatic arthritis are present?
Elbow bending and straightening become more challenging for patients. Rotation of the forearms frequently causes pain for patients as well. Locking of the elbow or a catching sensation from loose bodies in the elbow are further signs of elbow arthritis.