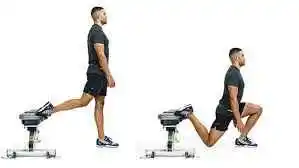
Blog

  • Musculocutaneous Nerve Injury

    Musculocutaneous Nerve Injury

    Musculocutaneous Nerve Injury can result from various traumatic events, including direct trauma, compression, stretching, or iatrogenic causes such as surgical procedures. Depending on the severity and location of the injury, individuals may experience a range of symptoms, including weakness, sensory disturbances, and loss of motor function in the affected muscles.

    The musculocutaneous nerve is the nerve that supplies the upper limb and controls motor and sensory functions. Damage to this nerve can cause a variety of problems that affect feeling and arm movement. The musculocutaneous nerve is one nerve that serves the upper limb and is susceptible to several types of injury.

    The musculocutaneous nerve innervates the muscles of the upper arm and forearm, providing sensation and control over movement. Among these muscles are the brachialis, which facilitates elbow bending, and the biceps brachii, which are involved in elbow bending. This nerve can cause impairments to movement and sensation in the affected arm. This article describes the cause, its symptoms, and treatment for the musculocutaneous nerve injury.

    Anatomy of the Musculocutaneous Nerve

    • The musculocutaneous nerve originates from the C5–C6 nerve roots and the terminal branch of the lateral cord of the brachial plexus. The pectoralis minor, a muscle in the upper chest that is located close to the armpit and shoulder, is where the musculocutaneous nerve begins. You call that part of your body the axilla. The coracobrachialis muscle, which connects the humerus bone to the upper arm, is where the nerve enters the arm.
    • Then between the biceps brachii and brachialis muscles, it descends to the upper arm. The nerve in the elbow emerges close to the brachioradialis muscle and biceps muscular tendon after piercing the deep fascia, a type of connective tissue.
    • The lateral cutaneous nerve then branches off and finishes at the wrist after running down the lateral side of the forearm. The musculocutaneous nerve can travel with the median nerve’s lateral head before returning it to the musculocutaneous nerve for communication.
    • Its fibers are both motor and sensory. The lateral aspect of the forearm’s skin and the muscles in the front of the arm are supplied by it. The nerve travels between the brachialis muscle and the biceps, passing through the coracobrachialis muscle. After that, it pierces deep fascia to enter the elbow and gives rise to the forearm’s Lateral Cutaneous nerve. It provides sensory branches of the nerve below the elbow, but just motor branches above.
    • The flexor muscles on the front side of the arm, the elbow joint, and the lateral side of the forearm are all supplied by the musculocutaneous nerve. The clinical relevance varies as well because of anatomical variances.

    Root: C5, C6, and C7’s ventral rami.

    Musculocutaneous nerve branches:

    • Motor branches: The coracobrachialis, Brachialis muscle, Biceps Brachii Muscle
    • Sensory branch: lateral cutaneous nerve reaching the back and front of the lateral forearm.
    • Articular Branch: Elbow and Humerus Joints.

    Functions of the Musculocutaneous Nerve:

    The muscles in the upper arm receive motor function from the musculocutaneous nerve. It is referred to as the lateral cutaneous nerve when it enters the forearm and provides the sensory branch there.

    Motor Function:

    • Your arms can move because of the musculocutaneous nerve, which supplies the biceps, brachialis, and brachioradialis muscles. To produce the flexion movement of the arm at the elbow and shoulder, palm facing upward, similarly to a bodybuilder’s position, the musculocutaneous nerve collaborates with the biceps.
    • In the upper arm, directly beneath the biceps muscle, is the coracobrachialis muscle. It is attached from the elbow to the shoulder. Muscle plays a small part in drawing the arm in towards the body and aids in shoulder flexion.
    • The main muscle that assists in flexing the elbow is the brachialis muscle. It begins in the middle of the upper arm, beneath the biceps brachii muscle, travels past the elbow, and ends below the elbow joint, where it joins the ulna bone. The musculocutaneous nerve supplies the following muscles and their actions:
    • The coracobrachialis stabilizes the humeral head in the glenoid fossa during free-side movement by flexion and adduction of the glenohumeral (GH) joint.
    • The brachialis is an elbow joint flexion movement.
    • Biceps Brachii: When the elbow flexes and retracts in response to weight, it stabilizes the glenohumeral joint.

    Sensory Function:

    • The lateral cutaneous nerve has several branches that reach the skin as it travels down the forearm and towards the wrist. The nerve supplies feeling to the forward part of your lateral part, extending from the elbow to the wrist, and the front half of your inner upper arm, extending from the elbow to the thumb’s base.

    Anatomical Nerve Variation:

    • There are various anatomical variants in the musculocutaneous nerve. It can attach itself to, cling to, and trade fibers with the median nerve in certain individuals.
    • rather than passing through the coracobrachialis muscle, it runs under it.

    What is the Musculocutaneous Nerve Injury

    • The musculocutaneous nerve is a nerve located in the upper arm that provides sensory function to the lateral forearm and motor function to the biceps brachii and brachialis, two muscles involved in elbow flexion. Damage to this nerve can result in biceps muscle atrophy, numbness or tingling in the lateral forearm, and impairment in the elbow’s ability to bend.
    • Severe brachial plexus trauma is frequently correlated with musculocutaneous nerve damage. Isolated musculocutaneous neuropathy can be brought on by trauma. Any vigorous exercise might cause this injury. Nerve damage is the cause of weak elbow flexion and supination movement. Sensation decreased on the forearm’s lateral side.
    • The brachialis muscle is supplied by the radial nerve and the musculocutaneous nerve. One study found that the musculocutaneous nerve provides 42% of the muscle strength needed to flex the elbow.

    Causes of the Musculocutaneous Nerve Injury

    Multiple conditions can lead to damage to the musculocutaneous nerve. Here’s a more thorough explanation of the reasons:

    Trauma: 

    • Penetrating injuries: These include shooting, stabbing, and other severe impacts that cause direct injury to the nerves in the armpit or upper arm.

    Compression: 

    • Prolonged uncomfortable positions: This might happen when you’re sleeping and holding a heavy object for a long time. Tight bandaging can also compress a nerve.
    • Repetitive stress: People who work in occupations involving repetitive arm motions or athletes who participate in sports like weightlifting or rowing that frequently need forceful elbow flexion are susceptible.

    Accidental factors:

    • Shoulder surgery: Because the nerve is vulnerable to compression or stretching during operations around the shoulder, especially when the deltopectoral technique is used, damage to the nerve may result.

    Additional, less frequent causes:

    • Injury to the brachial plexus: Since the brachial plexus is the source of the musculocutaneous nerve, serious damage to this nerve network may also impact the musculocutaneous nerve.
    • Anatomical anomalies: Occasionally, changes in the nerve’s path through the arm may render it more susceptible to damage or compression.

    Symptoms of the Musculocutaneous Nerve Injury

    Depending on how severe the injury is, musculocutaneous nerve injuries can present with a range of symptoms. Typical signs and symptoms include:

    • Weakness in elbow flexion: This might make it challenging to raise objects, bend the elbow against opposition, or put your hand to your lips.
    • The biceps muscle may atrophy, shrink, and weaken over time.
    • Numbness or tingling on the lateral forearm: This could impair feeling from the elbow to the wrist in the region surrounding the outside of the forearm.
    • Pain: The forearm, upper arm, or armpit may all experience pain.

    Risk Factors of the Musculocutaneous Nerve Injury

    • Trauma: Damage to the nerve can result from fractures, deep cuts, or penetrating wounds such as stabs to the armpit that affect the humerus and the upper arm bone.
    • Compression: Damage to a nerve can result from sustained pressure on it. This can result from prolonged elbow bending when leaning on a hard surface.
    • Repetitive stress: Players of sports involving repetitive forearm supination and elbow flexion are more vulnerable. This covers rowing, baseball, and weightlifting.
    • Accidental injury: This can happen after procedures like intravenous line implantation or shoulder surgery.
    • Specific medical disorders
    • Osteoporosis, osteomalacia, and Paget’s disease are examples of metabolic illnesses that can weaken bones and raise the risk of fractures.
    • Rheumatoid and osteoarthritis are two types of arthritis that can lead to inflammation and constriction of the area surrounding the nerve.

    Diagnosis of the Musculocutaneous Nerve Injury

    Physical examinations, medical histories, and occasionally further testing are used to diagnose musculocutaneous nerve injuries. Here is an explanation of the procedure:

    Physical Assessment:

    Initially, a physician will evaluate your symptoms and do a physical examination to look for:

    • Muscle weakness: Test your elbow bending capacity against resistance, paying special attention to your biceps muscle, to determine your muscle weakness.
    • Atrophy: To determine whether there is any wasting or shrinking, the physician will examine and feel the biceps muscle.
    • Sensory loss: Your lateral forearm, the region extending from the elbow to the wrist on the outside of your forearm will be tested by the physician.

    Medical History:

    The physician will look into the following aspects of your medical history:

    • Recent injuries: Any deep cuts, fractures, or puncture wounds in the shoulder or upper arm that occurred recently.
    • Repetitive activities: Engaging in sports or work that requires repetitive, hard elbow flexion and forearm supination are examples of repetitive activity.
    • Previous surgeries: Shoulder and upper arm surgery.
    • Medical illnesses that may be underlying: Diabetes, metabolic bone diseases, or other disorders that could raise the risk of nerve injury.

    Additional Tests:

    Although a physical examination and medical history are frequently adequate for a diagnosis, other tests could occasionally be required to verify the injury and determine the degree of nerve damage.

    • The test known as electromyography (EMG) detects the electrical activity of the muscles and nerves. EMG can identify abnormal electrical activity in the biceps muscle, indicating nerve damage in the event of a musculocutaneous nerve injury.
    • Studies on nerve conduction: This examination measures the speed at which nerve impulses pass through the damaged nerve. In this instance, it can evaluate the musculocutaneous nerve’s integrity and conduction speed.
    • Imaging studies: To find fractures or other abnormalities in the bone that might be compressing the nerve, X-rays or MRI scans may be useful in certain situations.

    Differential Diagnosis of the Musculocutaneous Nerve Injury

    A musculocutaneous nerve injury might imitate other medical disorders’ symptoms. Through a procedure known as differential diagnosis, medical professionals examine multiple options to guarantee an accurate diagnosis and appropriate therapy. A physician may distinguish the following important disorders from a musculocutaneous nerve injury:

    • Tendon injury or rupture in the biceps: This mostly affects the biceps muscle, which results in pain and weakness when bending the elbow. On the other hand, sensory loss (numbness or tingling) on the lateral forearm would not occur, in contrast to nerve injury. A biceps muscle belly bulge or bunching could be noticeable.
    • Biceps or Brachialis Muscle Strain or Tear: Similar to a biceps tendon injury, a brachialis muscle strain or tear manifests as localized discomfort and weakness in the flexion of the elbow. The forearm’s sensory function would not be affected, either.
    • C5 or C6 Radiculopathy: This is the term used to describe injury to the C5 and C6 nerve roots that leave the spinal cord in the neck. In the arm and forearm, it may result in weakness, discomfort, and sensory loss. But in addition to the biceps, there would be weakness in the shoulder and neck muscles as well.
    • Damage to the Brachial Plexus: This is a more serious injury that affects the Brachial Plexus, the network of nerves supplying the entire arm. Along with other possible consequences, it would result in severe weakness, discomfort, and sensory loss throughout the arm and hand.

    Treatment of the Musculocutaneous Nerve Injury

    The source and extent of the damage determine the treatment plan for a musculocutaneous nerve injury. Below is a summary of the possible treatment modalities:

    Conservative Management:

    • Relax: Reducing activities that aggravate the injury promotes nerve healing. This may entail applying an elbow brace or sling for support.
    • Physical therapy: A program can be created by a physical therapist to:
    • Keep your range of motion intact: To avoid elbow joint stiffness and contractures, perform mild exercises.
    • To make up for biceps weakness, strengthen the surrounding muscles by performing exercises that focus on unaffected muscles.
    • Enhance proprioception, or bodily awareness, with exercises that help you remember where your arms and hands are.
    • Pain management: Over-the-counter (NSAID) pain medications are one type of medication that can help control pain and discomfort.

    Surgical Intervention:

    When conservative treatment is unable to alleviate symptoms, surgery may be required in some situations. Surgery may be recommended if a reasonable trial of conservative therapy fails to provide noticeable improvement.

    • Severe nerve damage: Surgery is required to heal a nerve that has been extensively injured or transected (cut).
    • Nerve compression: Surgery is a viable treatment option if the nerve is being squeezed by scar tissue or other structures.

    Surgical options could consist of:

    • End-to-end Repair: When nerve ends are in good condition and closely separated, they can be sutured (sewn) back together.
    • Nerve grafting: A healthy nerve segment from another area of the body can be used to bridge a substantial gap between the nerve ends.
    • Nerve transfer: A healthy nerve from another area may occasionally be transferred to supply the muscles that the injured musculocutaneous nerve was initially responsible for innervating.

    Rehabilitation:

    • To ensure the best possible recovery after surgery, intensive therapy is required. To rebuild muscular strength, enhance coordination, and restore arm function, physical therapy is usually required.

    Physical Therapy of the Musculocutaneous Nerve Injury

    One of the most important aspects of musculocutaneous nerve damage rehabilitation is physical therapy. Here’s how physical therapists can be of assistance in more detail:

    Evaluation & Assessment:

    • Testing for muscular strength: The therapist will measure the brachialis, biceps, and other muscles used in elbow flexion.
    • Evaluation of range of motion: To determine any restrictions, the therapist will measure the elbow joint’s range of motion.
    • Sensory testing: To ascertain the degree of nerve injury, the therapist will assess sensation in the lateral forearm.
    • Gait analysis (if applicable): This may be required in extreme situations that impair coordination or balance.

    Methods of Treatment:

    • Rest and protection: To minimize physically demanding tasks that can exacerbate the nerve injury, the therapist might advise wearing an elbow brace or sling.
    • Pain management: You can reduce pain and inflammation by using methods including electrical stimulation, ultrasound therapy, and applying heat or cold.
    • Neuromuscular re-education: The therapist will lead you through activities to enhance muscle recruitment patterns and bring affected muscles back to normal operation. This could include:
    • Passive exercises: Gentle motions carried out by the therapist to preserve joint mobility and avoid stiffness are known as passive exercises.
    • Active-assisted exercises: These involve the patient trying a movement with the therapist’s help to progressively regain strength.
    • Proprioceptive exercises: Exercises that promote body awareness and the perception of where an arm is in space are called proprioceptive exercises.

    Techniques to Promote Nerve Healing:

    • Electrical stimulation: Low-level electrical stimulation may be used to encourage neuron repair and enhance blood flow to the wounded location.
    • Therapeutic ultrasound: This kind of ultrasound treatment can aid in tissue repair and inflammation reduction.
    • Preventing Additional Damage:
    • Posture correction: Any imbalances in posture that may lead to nerve compression can be addressed by the therapist.
    • Ergonomic education: To avoid aggravating the nerves more, the therapist might offer advice on how to adjust everyday activities and maintain good body mechanics.

    Functional Training:

    To enhance the capacity to carry out daily duties efficiently, the therapist will progressively add exercises that replicate daily activities as the patient makes progress. This could entail tasks like carrying groceries, dressing, or lifting goods.

    Collaboration and Communication:

    To guarantee a coordinated treatment strategy, the physical therapist will work in tandem with other medical specialists providing your care, including physicians and surgeons.

    Additional Things to Consider About:

    • Treatment duration: The length of physical therapy is contingent upon the severity of the injury and the progress made by the individual.
    • Exercise program at home: To sustain and enhance the newly acquired strength and flexibility, the therapist will prescribe a customized program of exercise to be performed at home regularly.
    • An effort is important: For the best chance of healing, regular attendance at physical therapy sessions and strict commitment to the prescribed program of exercise are essential.

    Prevention of the Musculocutaneous Nerve Injury

    The following actions can be taken to lessen the risk of musculocutaneous nerve injury:

    • Adhere to proper posture: Prolonged slouching or relying on your elbows might compress the nerve.
    • Good body mechanics: Use caution when lifting objects and stay out of uncomfortable positions that strain the shoulder and upper arm.
    • Taking care of underlying issues: If you have diabetes or metabolic bone diseases, keeping these problems under control will help you avoid fractures and nerve damage.
    • Appropriate training: To reduce nerve stress, athletes who participate in activities like weightlifting, baseball, and rowing that demand repetitive elbow flexion and forearm supination should adhere to correct training schedules and use the right equipment.
    • Warming up and cooling down: To increase blood circulation and lower the chance of injury, always warm up before engaging in physically demanding activities and cool down afterward.
    • Ergonomics: Consult an ergonomist to adjust your workstation and work practices to minimize stress on the nerve if your employment entails repetitive tasks or extended postures that strain the upper arm.
    • Observing safety regulations: When using personal protective equipment (PPE), make sure it fits properly and follow workplace safety procedures to avoid incidents that could injure nerves.
    • Exercise regularly: Maintaining muscle strength and flexibility through regular exercise helps lower the chance of injury.
    • Keep your weight in check: Being overweight can exacerbate the pressure on your joints and nerves.
    • Diet and nutrition: Consuming a well-balanced diet full of vital nutrients will help maintain nerve function and general health.
    • Getting quick medical help: See a doctor right once if you sustain any injuries to your upper arm or shoulder, such as fractures, serious cuts, or penetrating wounds, to avoid complications including nerve damage.

    FAQs

    What signs and symptoms indicate an injury to the coracobrachialis?

    This disorder is much less common than musculocutaneous nerve entrapment. A coracobrachialis tear can cause pain, stiffness, decreased strength, edema, and redness in the affected area.

    Why does musculocutaneous neuropathy occur?

    Why does musculocutaneous neuropathy occur?
    Damage to the brachial plexus could do it harm.
    Weightlifting and sports requiring a lot of forearm flexion and supination can cause Compression injuries.
    Shoulder dislocation.
    Surgery on the shoulders.
    Entrapment of the elbow nerve.

    How can pain from musculocutaneous nerves be treated?

    Treatments for musculocutaneous neuropathy include splinting, physical therapy, nonsteroidal anti-inflammatory medications, relative rest, and, in cases when conservative management is ineffective, surgical decompression.

    What differentiates a musculocutaneous nerve?

    The C5–C7 nerve roots give rise to the musculocutaneous nerve, which is the final branch of the brachial plexus’s lateral cord. It gives branches to the coracobrachialis muscle before entering it, which is the first muscle it penetrates.

    References

    • Musculocutaneous nerve. (n.d.). Physiopedia. https://www.physio-pedia.com/Musculocutaneous_Nerve
    • Desai, S. S., Arbor, T. C., & Varacallo, M. (2023, September 4). Anatomy, shoulder and upper limb, musculocutaneous nerve. StatPearls – NCBI Bookshelf. https://www.ncbi.nlm.nih.gov/books/NBK534199/
    • Dellwo, A. (2022, February 27). The anatomy of the musculocutaneous nerve. Verywell Health. https://www.verywellhealth.com/musculocutaneous-nerve-anatomy-4782934
    • Mbbs, L. K. (2019, August 8). Musculocutaneous nerve lesion (C5-C6). https://patient.info/doctor/musculocutaneous-nerve-lesion-c5-c6
  • Optic Nerve

    Optic Nerve

    Introduction

    The optic nerve is the second cranial nerve (CN II) that transmits visual information. The optic nerve has only afferent (sensory) fibres and, like all cranial nerves, is paired. During embryogenesis, the optic nerve develops in the retina, exits the orbit via the optic canal, and travels throughout the central nervous system.

    The optic nerve’s synaptic targets include the suprachiasmatic nucleus (SCN), the lateral geniculate nucleus (LGN), the pretectal nucleus, the superior colliculus, and the primary visual cortex. The stimulation of these various structures produces different functions. Additionally, the optic nerve acts as an afferent limb for the pupillary light and accommodation reflexes.

    The optic nerve originates in the back of the eye. This particular pair of cranial nerves is the second in a series. The optic nerve uses electrical impulses to transfer visual information to the retina to the brain’s vision centres.

    The optic nerve is composed of ganglionic or nerve cells. It contains over a million nerve fibres. Our blind spot is caused by the lack of specialised photosensitive (light-sensitive) cells, or photoreceptors, in the part of the retina where the optic nerve exits the eye.

    Anatomy

    The retinal ganglion cells’ axons (nerve fibres) make up the majority of the optic nerve. The optic disc, also known as the nerve head, is where the axons of the retinal ganglion cells leave the eye.

    The nerve head is visible as a white circular structure in the back of the eye. There are no photoreceptors in this structure. As a result, humans possess a natural blind spot.

    The lamina cribrosa, a structure that allows nerve fibres to pass through multiple holes and enter the extraocular (outside of the eyeball) space, is the mechanism by which nerve cells exit the nerve head. As the fibres pass through, they are covered in a type of insulation known as myelin. Oligodendrocytes, a type of glial cell, insulate nerve fibres.

    Embryology

    The optic stalk appears during the fourth week of gestation and eventually develops into the optic nerve. The lumen of the optic stalk connects the diencephalon of the forebrain proximally and the optic vesicle distally. The lateral walls of the optic vesicle invaginate, forming the optic cup that eventually develops into the retina. Invagination also occurs on the inferior surface of the optic stalk and vesicle, resulting in the choroidal fissure. The hyaloid artery and vein are located within this fissure and will eventually fuse to form the central retinal artery and vein.

    The optic nerve is a CNS structure that develops from the diencephalon. The optic nerve is a CNS structure that is myelinated by oligodendrocytes and encased in three layers of meningeal tissue. As previously discussed, myelination begins centrally and ends at the lamina cribrosa.

    Almost all optic nerve fibres will be myelinated during or soon after birth. The three meningeal layers surrounding the optic nerve are connected to the three meningeal layers of the brain. As a result, increased intracranial pressure can spread from the intracranial subarachnoid space to the perineural subarachnoid space, resulting in papilledema visible on fundoscopy.

    Anatomical Course of the optic nerve

    The anatomical course of the optic nerve describes how special sensory information is transmitted from the retina of the eye to the brain’s primary visual cortex. It is divided into intracranial and extracranial components, which are located outside the cranial cavity.

    Extracranial

    The optic nerve develops while the axons of retinal ganglion cells converge. These cells receive impulses from the eye’s photoreceptors (rods and cones).

    Following its formation, the nerve exits the bony orbit via the optic canal, which runs through the sphenoid bone. It enters the cranial cavity and runs along the middle cranial fossa (near the pituitary gland).

    Intracranial (the Visual Pathway)

    The optic chiasm exists whenever the optical nerves of each of the eyes meet in the middle cranial fossa. At the chiasm, fibres from the nasal (medial) half of each retina cross over to the contralateral optic tract, whereas fibres from the temporal (lateral) halves remain ipsilateral:

    • The left optic tract contains fibres from both the left temporal (lateral) and right nasal (medial) retinas.
    • The right optic tract contains fibres from both the right temporal and left nasal retinas.

    Before arriving at the lateral geniculate nucleus (LGN), a system of relays in the thalamus where fibres synapse, each optic tract is connected to its corresponding cerebral hemisphere.

    Axons from the LGN then carry visual information along a pathway known as optic radiation. The route itself is separated into:

    • Fibres coming from superior retinal quadrants—which correspond to the inferior visual field quadrants—are transported by upper optic radiation. It travels from the parietal lobe to the visual cortex.
    • Fibres enter the inferior retinal quadrants (corresponding to the superior field of vision regions) when optic radiation levels are lower. It travels through the temporal lobe, via Meyers’ loop, to the visual cortex.

    When in the visual cortex, the brain processes sensory information and reacts appropriately.

    Blood supply

    The ophthalmic artery (OA) is the primary artery that supplies the optic nerve and is the first branch of the internal carotid artery (ICA). The OA emerges from the ICA just distal to the cavernous sinus and flows through the optic canal. Within the optic canal, the OA runs inferior and lateral to the optic nerve. The OA has numerous branches, but the two primary ones are the central retinal artery (CRA) and the posterior ciliary arteries (PCAs).

    The CRA is the first branch of the OA and runs within the optic nerve’s dura mater. The CRA then penetrates the optic nerve approximately 12 mm posterior to the globe and travels anteriorly to perfuse the inner layers of the retina. The OA results in several PCAs. The PCAs travel anteriorly and penetrate the sclera, perfusing the optic nerve and posterior uveal tract.

    Function

    The typical function of the optic nerve is to deliver signals from the eye to the brain, acting as a messenger that helps us understand what we see.

    When light enters the eye, the cornea attempts to focus it directly on the retina to produce the clearest image. The retina detects light and uses it to generate impulses or currents. The optic nerve receives the current and transports it to the brain, where it is registered as an image.

    While the optic nerve appears to have a simple function, it is an essential component of our ability to make sense of our surroundings. It is so important that scientists are working to develop a machine that can perform the same function as the optic nerve to restore vision to people who have had their optic nerves damaged.

    The optic nerve also controls the light reflex and the accommodation reflex.

    Pupillary Light Reflex.

    The optic nerve is the afferent limb of the pupillary light reflex. When light enters the eye, photoreceptors become activated and transmit the signal to the retinal ganglion cells. The nasal retinal fibres transmit the stimulus to the contralateral pretectal nucleus, while the temporal retinal fibres transmit it to the ipsilateral pretectal nucleus.

    The nerve fibres in the two pretectal nuclei turn bilaterally on neurons in the Edinger-Westphal nucleus, triggering the reflex’s efferent limb. The branches of these preganglionic parasympathetic neurons innervate the ciliary ganglion by travelling along the periphery of the oculomotor nerve (CN III).

    The short ciliary nerves are composed of the ciliary ganglion’s postganglionic parasympathetic axons. The short ciliary nerves stimulate the sphincter pupillae to constrict, resulting in miosis. Because both the pretectal nuclei and the Edinger-Westphal nuclei are activated bilaterally, stimulating one eye with light causes pupillary constriction in the ipsilateral eye (direct response) and in the contralateral eye (consensual response).

    Accommodation Reflex

    The accommodation reflex is triggered by shifting focus to a nearby object. The optic nerve serves as the afferent limb of this reflex. Unlike the pupillary light reflex, an afferent stimulus must be relayed through the visual pathway to the primary visual cortex and visual association areas. The neurons situated in the visual association regions stimulate the Edinger-Westphal nucleus and the oculomotor nucleus in the midbrain, activating the reflex’s efferent limb.

    Similar to the pupillary light reflex, pupillary constriction is caused by the activation of the previously described two-neuron system. In addition to stimulating the sphincter pupillae, the short ciliary nerves innervate the ciliary muscle.

    The ciliary muscle contracts, causing the zonular fibres attached to the lens to relax. This relaxation causes the axial thickness to increase, resulting in higher refractive power. Finally, the somatic fibres of the oculomotor nerves stimulate the medial rectus muscle.

    Contraction of the medial rectus muscles causes the eyes to adduct, which coincides with convergence. Thus, the accommodation reflex consists of miosis, an increase in lens refractive power, and convergence.

    Causes

    Such conditions may affect the optic nerve and impair vision.

    • Glaucoma: Fluid buildup in the front of your eye causes pressure on the optic nerve. The pressure harms your optic nerve. Glaucoma is the leading cause of blindness among adults over the age of sixty.
    • Anterior ischemic optic neuropathy is caused by a loss of blood flow to the optic nerve. The condition results in sudden vision loss.
    • Congenital abnormalities: Some babies are born with differences in their optic nerve(s), which can cause poor vision.
    • Optic atrophy occurs when the optic nerve does not receive enough blood. Trauma, strokes, hydrocephalus, infections, and brain tumours can all cause optic atrophy. Certain cases are inherited.
    • Optic nerve coloboma is an inherited condition in which one or both optic nerves do not develop normally.
    • Optic nerve drusen: This condition develops when protein and calcium deposits (drusen) accumulate on the optic nerve.
    • Gliomas are tumours (growths) of the optic nerve. They are usually benign (not cancerous). These tumours frequently affect people with an inherited condition known as neurofibromatosis type 1 (NF1).
    • Optic nerve meningiomas: Although rare and benign, these slow-growing tumours can cause severe vision loss.
    • Optic neuritis occurs when infections or autoimmune diseases such as multiple sclerosis irritate or inflame the optic nerve.
    • Papilledema occurs when the optic nerve swells due to pressure around the brain caused by a traumatic brain injury, brain tumours, meningitis, or another condition.
    • NMO, also known as Devic’s disease, is a condition in which the immune system mistakenly attacks the optic nerves and spinal cord.

    Symptoms

    Optic nerve problems cause a variety of symptoms depending on the underlying condition. The symptoms could be temporary or permanent. You might experience:

    • Colour blindness.
    • Eye pain.
    • Headaches.
    • Nausea and vomiting.
    • Night blindness.
    • Partial or total vision loss.
    • Peripheral (side) vision loss.
    • Tinnitus, or ringing in the ears.

    Assessment

    The optic nerve is not assessed separately from other cranial nerves involved in vision (such as CN III, IV, and VI). Still, particular tests for the optic nerve consist of visual acuity, colour perception, visual fields, pupillary light reflexes, accommodation, and funduscopic examination.

    Treatment

    The treatment of optic nerve, chiasma, and optic radiation damage is determined by the cause. However, treatments for optic nerve damage may not restore lost vision. In most cases, precautions are taken to prevent further damage and worsening of symptoms. For example:

    Glaucoma is caused by increased pressure inside the eye, so medications for glaucoma are designed to reduce the pressure to the point where the disease process stops. Although glaucoma can be treated with surgery, lasers, and oral medications, the majority of cases are treated with topical medication in the form of eye drops.
    Oral and intravenous steroids are used to treat diseases like optic neuritis, which causes inflammation. Additionally, if the cause of the optic neuritis is identified, the underlying condition will be treated.

    Diseases of the optic chiasm are frequently treated with neurosurgery and medication or hormones. Depending on the severity of optic chiasm disease, such as a pituitary adenoma, simple observation may be sufficient.

    Vascular accidents, or strokes, are more difficult to treat unless the condition is detected quickly. Occasionally, blood thinners are prescribed. Surgery may be required if the disease is caused by aneurysms.

    Surgical requirements

    Fenestration of the optic nerve sheath is a widely accepted treatment for benign intracranial hypertension. Optic nerve sheath meningioma and optic nerve glioma may require surgical intervention in some cases.

    Protection

    To care about your vision, take the following steps:

    • Get regular eye examinations.
    • Maintain a healthy weight by exercising and eating a nutritious diet.
    • Diabetes and high blood pressure are two conditions that can impair vision and nerve function.
    • Seek help for quitting smoking. Smoking heightens the risk of optic nerve damage and other vision issues.
    • Wear sunglasses and eye protection (goggles or safety glasses) when participating in sports or activities that may harm your eyes.

    Summary

    The optic nerve is the second cranial nerve (CN II) that transmits visual information. It originates in the back of the eye and uses electrical impulses to transfer visual information to the retina and the brain’s vision centres. The optic nerve is composed of ganglionic or nerve cells and contains over a million nerve fibers. The optic disc, or nerve head, is where the axons of retinal ganglion cells leave the eye. The optic nerve is myelinated by oligodendrocytes and encased in three layers of meningeal tissue.

    The optic nerve’s anatomical course describes how special sensory information is transmitted from the retina to the brain’s primary visual cortex. Blood supply to the optic nerve is provided by the ophthalmic artery (OA), which is the first branch of the internal carotid artery (ICA).

    The optic nerve is responsible for delivering signals from the eye to the brain, helping us understand our surroundings. It controls the pupillary light reflex and the accommodation reflex, which are triggered by shifting focus to a nearby object.

    Various conditions can affect the optic nerve, impairing vision, such as glaucoma, anterior ischemic optic neuropathy, congenital abnormalities, optic atrophy, optic nerve coloboma, optic nerve drusen, gliomas, optic nerve meningiomas, optic neuritis, papilledema, and NMO. Symptoms can include colour blindness, eye pain, headaches, nausea, vomiting, night blindness, partial or total vision loss, peripheral vision loss, and tinnitus.

    Treatment for optic nerve damage is determined by the cause, but precautions are taken to prevent further damage and worsening of symptoms. For example, glaucoma can be treated with surgery, lasers, and oral medications, while optic neuritis can be treated with neurosurgery and medication.

    Protection for vision includes regular eye examinations, maintaining a healthy weight, quitting smoking, and wearing sunglasses and eye protection.

    FAQs

    What nerve has been damaged in the optic?

    Optic neuritis develops when swelling (inflammation) damages the optic nerve, a bundle of nerve fibres that transmits visual information from the eye to the brain. Optic neuritis can cause pain with eye movement and temporary vision loss in one eye.

    Which is the most common optic nerve disorder?

    Glaucoma is the most common optic nerve disorder, affecting over 3 million people each year in the United States.

    How many optic nerves exist in the eye?

    The junction of the two optic nerves is called the optic chiasm. The optic nerve from each eye splits at this point, and half of the nerve fibres from each side cross over to the other.

    What is the location of the optic nerve?

    The axon to the retinal ganglion cells converges to create the optic nerve. These cells receive impulses from the eye’s photoreceptors (rods and cones). Following its formation, the nerve exits the bony orbit via the optic canal, which runs through the sphenoid bone.

    Which nerve connects the eye and brain?

    The optic nerve is a bundle of over 1 million nerve fibres that transmit visual signals. You have one that connects the back of each eye (the retina) to your brain. Loss of vision may occur from damage to the optic nerve.

    What is the main function of the optic nerve?

    Visual images are created by relaying messages from your eyes to your brain via the optic nerves. They play a critical role in your vision. Each optic nerve consists of millions of nerve fibres.

    References:

    • Smith, A. M., & Czyz, C. N. (2022, November 7). Neuroanatomy, Cranial Nerve 2 (Optic). StatPearls – NCBI Bookshelf. https://www.ncbi.nlm.nih.gov/books/NBK507907/#:~:text=The%20optic%20nerve%20is%20the,all%20cranial%20nerves%20is%20paired.
    • Professional, C. C. M. (n.d.). Optic Nerve. Cleveland Clinic. https://my.clevelandclinic.org/health/body/22261-optic-nerve
    • Optic nerve. (2018, January 21). Healthline. https://www.healthline.com/human-body-maps/optic-nerve#1
    • Optic Nerve. (n.d.). Physiopedia. https://www.physio-pedia.com/Optic_Nerve
    • The Optic Nerve – Visual Pathway – Chiasm – Tract – TeachMeAnatomy. (2022, December 16). TeachMeAnatomy. https://teachmeanatomy.info/head/cranial-nerves/optic-cnii/
    • Bedinghaus, T. (2023, May 28). The Anatomy of the Optic Nerve. Verywell Health. https://www.verywellhealth.com/optic-nerve-anatomy-4686150
    • Sprabary, A. (2021, February 16). Optic nerve: Anatomy, function and conditions. All About Vision. https://www.allaboutvision.com/eye-care/eye-anatomy/optic-nerve/
  • Hamstring Muscle Pain

    Hamstring Muscle Pain

    What is a Hamstring Muscle Pain?

    Hamstring muscle pain refers to discomfort or soreness in the muscles located at the back of the thigh, known as the hamstrings. These muscles play a crucial role in various leg movements, including walking, running, and bending the knee.

    Hamstring injuries and pain are common, especially among athletes and individuals engaged in activities that involve sudden acceleration, deceleration, or intense stretching.

    Introduction

    The hamstring is the muscle of the back of the leg. The most typical sign of overuse, discomfort, and spasms in the hamstring muscles, which are found near the back of the thigh, is hamstring pain. If you sense discomfort and aches is indicative of a hamstring strain or injury.

    The most frequent injury to the hamstring muscle is a strain, which mostly affects athletes who play sports like track, basketball, soccer, or sprinting. Athletes who run and sprint are particularly prone to damage to their hamstring muscles.

    When reducing speed, and changing direction, the hamstring muscles are severely strained. When running, extending the leg is overstretching the hamstring muscle.
    When the patient is doing well, mild hamstring muscle injuries can be treated with rest, ice, and over-the-counter (OTC) drugs. More severe instances require months to recover. For exercise, get in touch with your doctor and physiotherapist in severe circumstances.

    Anatomy of The Hamstring muscle

    Skeletal muscles include the hamstring muscles. Since these muscles are voluntary, an individual may regulate how they move and function.

    The three hamstring muscles in the human body are located behind the thigh.

    These muscles are employed in a variety of leg motions, including walking, climbing stairs, and squatting. These hamstring muscles are responsible for rotating the lower leg from side to side, flexing the knee, and extending the thigh at the hip joint.

    The muscle that is closest to the skin is the biceps femoris.
    The muscle that is closest to the body’s center is the semimembranosus.
    The semitendinosus muscle is situated between the biceps femoris and the semimembranosus muscle.

    What makes up the muscles in the hamstrings?

    Thousands of small, elastic muscular fibers make up the hamstring muscles. The hamstring muscle’s muscular fibers aid in the contraction and tightening of the muscles.
    These are reddish-white muscle fibers.

    Therefore, the striated (striped) muscle that is visible beneath the skin may be examined in this hamstring.
    Causes Of the Hamstring Muscles pain
    During workout: This muscle in the hamstrings When the hamstring muscle lengthens and contracts (shortens) during a regular workout, strains, and tears occur.
    Excessive stretching of the hamstring muscle: it is occurs during a regular workout can also result in this type of muscle injury.

    Overload: it is the primary cause of the hamstring damage.
    Tendinitis: Muscle soreness results from tendinitis, an inflammation of the tendon that happens after an exercise. It happens following a workout that involves repetitive motion at the knee joint. The movements exacerbate this tendinitis pain.

    Tendon rupture: Rarely, discomfort from exercise is caused by a ruptured tendon. A substantial rip in the tendon is referred to as a tendon rupture. There is both partial and complete tendon rupture.
    Delay onset muscular soreness, or DOMS: It’s encouraging if your muscles are screaming today from yesterday’s workout. The term for it is DOMS or delayed onset muscular soreness. Muscle fibers can develop microscopic rips when overworked.

    Risk factors for Hamstring Pain

    • Using the Sore muscles to exercise.
    • Athletes are more likely to sustain an injury because of their tense muscles.
    • Muscular imbalances, whereby certain muscles are more powerful than others.
    • Muscle’s inadequate Power
    • muscle fatigue, as weary muscles are less able to absorb energy
    • A higher danger applies to older athletes who mostly exercise by walking. Likewise, teenagers whose bodies are growing. Bones and muscles don’t always grow at the same speed. indicates that any effort or stress applied to the muscles—such as from a jump or an impact—leaves them open to tearing.
    • The nature and degree of hamstring muscle discomfort varies from person to person and depends on the underlying cause of the pain. A severe, dull, aching ache in the back of the leg, often accompanied by tightness, is how some people describe their hamstring pain.

    A common cause of hamstring muscle tension is participation in the following activities:

    • Basketball
    • Dancing
    • Tennis
    • Running
    • Football

    Signs and symptoms of Hamstring Muscle Pain

    Among the symptoms that could point to a more serious illness are:

    • Bloating
    • Numbness and tingling in the leg
    • Leg weakness
    • blue color of the leg
    • fluids retention
    • Pigmentation of the hamstring
    • Hamstring warmth and tenderness
    • If you have any concerns, you ought to be seeing a physician.

    Diagnosis

    Physical examination and patient history
    People who have hamstring strains frequently visit a physician due to an acute back thigh ache that flares up after exercise.
    Your doctor will inquire about the injuries and feel for soreness or bruises on your thigh during the physical examination. To check for discomfort, weakness, swelling, or a more serious muscle injury, he or she will press or palpate the back of your leg.

    Imaging Examinations

    Your doctor may order imaging tests to help confirm your diagnosis, such as:

    Radiography. Your doctor can determine if you have a hamstring tendon avulsion by looking at an X-ray. This is the result of a little piece of bone being dragged away by the damaged tendon.

    Imaging with magnetic resonance (MRI). This research can improve the visuals of soft tissues like muscles.

    What does your physician check the appointment

    Write the following on a list:

    Full details regarding your symptoms, including when they started.
    details regarding any health issues you may have experienced.
    Every medication and dietary supplement you take, along with the dosages.
    You have some questions for the future.

    Your healthcare professional may inquire about any of the following:

    What was the time and method of the injury?
    Was there a popping or tearing sound you felt?
    Does the pain change or get worse with certain movements or positions?
    When is it necessary to call a doctor in an emergency?
    with home treatment and normal activities, the tightness in the hamstring muscles does not go away in one to two days.
    when your discomfort gets worse over time.
    If following a workout, you experience a progressive onset of tingling, numbness, or weakness in your leg.
    When the skin becomes warm to the touch and develops a rash similar to a fever.

    Treatment of the Hamstring Muscle Pain

    Early Treatment

    To prevent further injury, stop what you’re doing if you suddenly feel pain in your hamstrings. You are likely familiar with the RICE principle. It will facilitate a quicker and better recuperation for you.

    Rice Protocol for Early Treatment

    Rest: Avoid activities that could make your injury worse. this could entail taking a complete break or perhaps using crutches or another mobility device.
    Ice: Throughout the day, use a cold pack for 15 to 20 minutes every two to three hours. You may even use something as simple as lightly towel-wrapped frozen peas. Avoid putting ice on exposed skin.
    Compression: To limit swelling and movement, you might want to consider bandaging your thigh with an elastic wrap.
    Elevation: A rise in altitude, Try to keep your leg elevated to the level of your heart on a pillow.
    In order to lessen inflammation
    After suffering a hamstring muscle injury, adhere to the RICE principle: rest, ice, compression, and elevation.
    Use cold packs if there is any swelling.
    As soon as symptoms appear, the injury must be rested in order to prevent further tissue damage.
    To lessen edema, wrap with elastic.
    Apply heat to the injured muscles.

    Medical care

    Your hamstring strain discomfort may be lessened by over-the-counter painkillers. For short-term comfort, oral non-steroidal anti-inflammatory drug (NSAID) medications like ibuprofen (Motrin, Aleve) or another over-the-counter pain reliever like acetaminophen (Tylenol) may be helpful.
    NSAID gels or lotions applied topically can also help reduce pain.

    Using a foam roller to offer myofascial release to your hamstrings is another way to relieve pain. To massage the muscles, place the roller just above the back of your knee and roll upward in the direction of blood flow. Additionally, a professional sports massage might ease your discomfort.

    Patient Education

    In the highly competitive world of professional sports, hamstring injuries are among the most frequent sports-related ailments. It’s also one of those injuries that keeps a player out of the game for a long period and needs to be properly healed before they can play again.

    Recurrences occurring frequently could make rehabilitation more difficult. Acute, sharp posterior thigh pain that prevents continued sports participation should be taken into consideration in both non-athletes like dancers and athletes who play running or sprinting sports unless it can be definitively ruled out clinically or radiologically. It’s crucial to talk to the patients about the potential duration of their absence from sports. They ought to be advised about the necessity of surgery in cases of extreme injury or pain.

    Physical Therapy Treatment

    The objectives of physiotherapy care are:

    • alleviate the hamstring pain
    • Diminish Edema in the muscles
    • strengthening of the hamstring muscles.
    • Restore the patient’s whole range of motion
    • Use pain-relieving methods during the first few days. Mild to moderate activity without pain should be started following pain alleviation.

    Electrotherapy

    Ultrasound

    Ultrasound improves blood circulation and mobility and has been utilized for tissue healing and repair.
    help lessen discomfort and lumps

    Cryotherapy

    Applying cryotherapy—which involves using ice packs and cold water cataracts—to the affected area can help reduce swelling and inflammation.
    It is advised to apply colds continuously for 25 to 30 minutes at a time, multiple times a day.

    TENS

    TENS, or transcutaneous electrical nerve stimulation, is a potential treatment for pain and spasms in the muscles.

    IFC (interferential Current)

    These are the primary clinical uses that IFC seems to have. alleviation of pain, Stimulation of muscles, increases blood flow locally, decreases in Edema

    Exercises for Hamstring muscle

    Stretching of hamstring muscle

    Hamstring stretches while lying down:

    As you are Stretch your legs wide apart and lie flat on the ground or a mat.
    Using both hands, grasp the rear of the right knee joint to extend the right leg.
    Make an effort to bring the leg up to the chest.
    Stretch the knee joint slowly until you feel a pull in the muscle.
    For thirty seconds, maintain the stretched posture.
    Stretch three times in a single session and three times a day.

    Hamstring stretches with a strap while lying down

    With your legs completely extended, you are resting flat on the ground or a mat. in order to bend and extend the right leg.
    Next, position the strap over the right foot’s ball. Both hands should be on this strap. must maintain the left leg extended and the foot flexed on the ground.
    The leg and calf are pushed towards the floor in this position.
    With the foot flexed, attempt to slowly extend the right leg.
    The right leg is straight, with the foot’s bottom facing the ceiling and the knee joint slightly bent. Next, Pull the strap gently until you feel a little tightness in your hamstring muscles. For thirty seconds, maintain the stretched posture.
    Stretch three times in a single session and three times a day.

    Stretching your hamstrings while lying near a wall

    Locate an open entryway first. With your left leg completely stretched on the floor or your back flat, you are either lying on the ground or on a mat.
    The left leg is going to go through the opening.
    Make an effort to rest your right leg against the wall close to the entrance.
    To generate mild stress in the right leg, the distance between the body and the wall needs to be adjusted.
    For thirty seconds, maintain the stretched posture.
    Stretch three times in a single session and three times a day.

    Stretching your hamstrings while sitting

    Sitting on the ground with your left leg bent at the knee and your foot facing inward, you can stretch your right leg.
    The butterfly stance is what we name this posture.
    The right leg should be extended and kept slightly bent at the knee.
    Next, bend forward at the waist, being careful to maintain a straight back.
    For thirty seconds, maintain this posture.
    Stretch three times in a single session and three times a day.

    Hamstring stretches while seated in a chair

    Your back is straight as you sit close to the chair’s edge.
    Feet must remain flat on the ground.
    Straighten the right leg with the toes pointed upward and the heel on the floor to extend it.
    Strive to flex your hips forward.
    Next, for support, rest the hands on the left leg.
    Stretch three times in a single session and three times a day.

    Hamstring stretches while standing

    Your spine is in a neutral posture as you stand up.
    With the foot flexed, bring the right leg in front of the body.
    The toe pointing skyward and the heel digging into the earth.
    Next, bend your left knee slightly.
    Attempt to sag slightly forward and rest your hands on your straight right leg.
    must maintain a neutral stance.
    For thirty seconds, maintain posture.
    Stretch three times in a single session and three times a day.

    Hamstring stretch while standing at a table:

    Locate a table that is a little less than hip height first.
    Your spine is in a neutral posture as you stand up.
    Flex the foot to allow the toes to touch the table and place the right leg there. Toe toward ceiling upward. Make an effort to distance yourself from the table so that your foot and a portion of your calf rest on it.
    Extend your waist forward until your hamstrings are stretched.
    Bend forward a little and place your hands on your leg or the table for support to intensify the stretch.
    For thirty seconds, maintain posture.
    Stretch three times in a single session and three times a day.

    Hamstring stretches with towels

    Using a towel in one hand and a cozy spot for stretching:
    Wrap a towel around the back of one thigh while you are on your back.
    must grip the towel’s ends in order to support the thigh.
    The thigh is held in place using the hands if there isn’t a towel available.
    The other leg must remain level on the ground.
    When you feel a stretch in the back of your leg, try to gradually straighten your knee joint.
    Seems to be attempting to align the foot’s bottom with the ceiling.
    Then, just until the stretch is comfortable, extend the leg and straighten the knee joint.
    For thirty seconds, maintain this posture.
    Stretch three times in a single session and three times a day.

    The hamstring stretches against the wall

    This stretching practice is done next to a couch and at a wall corner:
    One leg must Be on the floor.
    Next, lean the opposite leg against a couch arm and a wall.
    In order to get the lifted leg as straight as is humanly possible, try to gently press the knee joint.
    Stretch for ten seconds, then progressively extend it to thirty.
    Stretch three times in a single session and three times a day.

    Stretching your hamstrings on a bed’s edge:

    You will be sitting on the side of a bed for this stretching exercise.
    With your foot resting on the floor, you are lying with one leg along the edge of the bed and the other leg down.
    Bend forward at the hips, while maintaining your spine straight.
    Maintaining the leg in the bed as straight as possible without pain
    Stretch three times in a single session and three times a day.

    Hamstring Stretch for Hurdlers

    This floor exercise for stretching the hamstrings of hurdlers is easy to perform.
    One leg is straight out in front of you while you sit on the floor.
    Place the sole of the second leg against the inside thigh of the other and attempt to bend the other leg at the knee.
    Next, bend at the waist as much as is comfortable to stretch forward over the straight leg with your arms extended.
    For thirty seconds, maintain this posture.
    Stretch three times in a single session and three times a day.

    Bending Forward While Standing

    This is a simple hamstring stretch that may be deepened by allowing gravity to work its way into the pose. Choose a new stretch and proceed cautiously if your lower back is hurting. With your arms extended high, you are standing erect.
    Reaching your hands down towards the floor, bend forward from the hip joint. You should have your hip joint positioned over your ankle joint.
    This stretch is not intended to get you to touch your toes.
    bending your knees as much as possible (you need to be ever so slightly bent; however, do not bend to get lower as this will not stretch your hamstring muscle). To make the hamstring muscle stretch farther, try to tighten your quadriceps.
    For thirty seconds, maintain this posture. Stretch three times in a single session and three times a day.

    Active exercise of hamstring

    Prone SLR, Prone Straight Leg Raise

    An exercise that focuses on the gluteal muscles of the thigh is the prone leg raise. Legs raised in the air, this exercise is typically done while reclining on the floor. Leg lifts are performed by tensing the thigh muscles and raising the legs into the air, parallel to the body. Typically, this exercise is done on a carpet or mat to prevent scratches on the floor. This exercise is also known as hip extensions or prone leg lifts.

    This is an easy workout that you can incorporate into your at-home workout regimen. This is a strengthening workout that works your hamstrings, lower back muscles, and hip gluteal muscles. This is a crucial exercise for the rehabilitation of your lower limbs, hips, or spine. Leg, hip, or lower back pain can be caused by a variety of circumstances.

    Should your physical therapist determine that you could gain advantages from fortifying your gluteal and lower back muscles?

    Physical therapy treatments that involve strengthening exercises can help people with back pain or hip discomfort by increasing their mobility and reducing their symptoms.
    As part of your recovery, you could work on strengthening your hips and lower back muscles with certain exercises. It will help you achieve and maintain proper posture or assist you in walking with more grace.
    This is beneficial for ladies since it strengthens the thighs and legs.

    Prone knee bending

    While performing this exercise, you might want to place a small, flat pillow underneath your hips and stomach. resting comfortably and flat on your front. Bend your knee and move your foot towards your buttock in a smooth, controlled motion.

    Stop and return your foot to the starting position as soon as you experience any back pain or a strain in your leg or back. Repeat immediately after, moving slowly and fluidly. Do both legs in this exercise.
    Maybe perform this exercise steadily for thirty seconds or so, then let go and repeat it once more before getting up. You can do this periodically during the day as you discover that the exercise is increasingly beneficial to you.

    Heel press

    Although this exercise doesn’t seem very spectacular, it will greatly benefit your leg and back muscles. To reduce back pain and increase stability, it’s critical to strengthen and lengthen your leg muscles. The heel press is performed as follows:

    Stretch your legs wide apart while lying flat on your back.
    As you press your right heel down against the bed, maintain a straight leg.
    For five to ten seconds, maintain this posture.
    Repeat ten times, pressing the left heel down each time.
    Just remember to stop working out and see your doctor if you feel any pain or discomfort. Additionally, you should avoid forcing motions since this could make your condition worse.

    SLR, Straight Leg Raise

    With your legs comfortably spread out on the floor and your hips square, lie on your back.
    Place your non-injured leg flat on the floor and bend its knee to a ninety-degree angle.
    Contracting your quadriceps, or the group of muscles on the front of your thigh, will stabilize the muscles on your straight leg.

    Take a calm breath and raise the straight leg six inches off the floor.
    For three seconds, hold.
    With a controlled exhale, lower the leg to the floor. Unwind and repeat ten more times.
    When performed properly, the entire movement will cause tension in your hips, thighs, and abdomen.

    Strengthening exercises

    The physical therapist will prescribe electrotherapy and massage for two to three days to relieve neck muscular pain. Following this, the therapist will suggest you perform strengthening activities to address neck muscle weakness.
    It is always recommended to perform this strengthening activity when you are comfortable and have pain relief.
    This whole strengthening exercise relieves the pain and weakness in your muscles.

    Downward dog\Dog yoga with a downward face\Reverse Dog

    downward-facing-dog
    downward-facing-dog

    Take a supine position.
    After that, raise your knee joint and point your tailbone upward.
    Next, slowly extend your legs.
    You have to maintain your knee slightly bent since it becomes difficult when your hamstring muscles are stiff.
    Remember to maintain a straight back.
    After that, inhale deeply and hold the position for as long as your instructor instructs you to.
    Take ten seconds to hold this workout position.
    Do this exercise three times a day, or ten times in a single session.

    Triangle Pose Extended

    Begin this workout by standing up.
    Try separating your legs by three or four feet.
    Next, extend your arms parallel to the floor, pointing your palms downward.
    Make an effort to turn your left foot out ninety degrees and your right foot in towards the left.
    You have to maintain a straight line between your heels.
    With your left hand extended towards the floor and a yoga block for support, try to progressively bend your torso over your left leg.
    Next, extend the right side of the arm towards the ceiling upward.
    Do this exercise ten times in a single session and three sessions in a day.

    Hamstring foam rolling

    Using a foam roller to exercise helps you release and stretch your muscles.
    Your foam roller is beneath your right leg as you sit on the floor.
    Lay your left leg on the ground for support.
    Roll the entire back of your thigh, from the bottom of your buttocks to your knee joint, using the support of your arms behind you. You have to concentrate on your abdominal muscles during this exercise.
    Roll gently for a duration of 30 to 2 minutes on the foam roller.
    Do this exercise three times a day, or ten times in a single session.

    Hamstring exercises in Solmetric

    These workouts target the hamstring muscles statically, which means that they must be performed at different degrees of flexion (knee bend).
    In the prone position, you are lying on your front.
    As you tighten your hamstring muscles, the therapist applies tension. Hold the pose for ten seconds before letting go.
    Next, To work the muscle at varied lengths, adjust the amount your knee joint is bent.
    After exerting your muscles from a variety of angles, perform the exercise with your foot facing outward. Attempt once more while pointing your foot inward.
    Both the inner and outer hamstring muscles are worked during this workout. Take ten seconds to hold this workout position.
    Do this exercise ten times in a single session and three sessions in a day.

    Knee flexion while standing

    You use only gravity to bend the other leg as you stand on the other.
    As an early-stage workout, begin with this one slowly and carefully.
    Once a day, aim for three sets of ten repetitions with this exercise, gradually increasing to four sets of twenty.
    when applied to ankle weights, which are meant to further raise the load.

    Hamstring pulls

    You must maintain your composure while your leg descends due to gravity.
    to tighten the hamstring muscles in order to keep the foot from touching the ground.
    This has a very mild dynamic training effect and begins to work eccentrically with the hamstring muscles.
    Again, start with one set of ten repetitions and increase to three each day.
    If you need to put more strain on the muscle, use the ankle weights.
    Recall that you should perform this exercise painlessly both during and after, as well as the next day.

    Bridge drills:

    With your knee bent, you are lying on your back.
    To engage the hamstrings and gluteal muscles, elevate the hip joint.
    Initially, try pushing up with both feet planted on the ground.
    Briefly hold this position and lower it.
    Ascend to three sets of twelve repetitions from three sets of eight.
    Make progress with single-leg bridges in this workout.
    A similar technique is used for single-leg bridges to make sure the gluteal muscles are squeezed.
    From the ground up to the knee at the shoulder joint, try to keep a straight line.

    Hamstrings curl while sitting

    This exercise, which targets the hamstring muscles specifically in a highly constricted close range of movement (ROM), is rather challenging.
    A resistance band’s first end is fastened to a stationary object.
    The therapist is holding it, and the foot is fastened to the other end.
    Strive to tuck your heel into your thighs.
    Take ten seconds to hold this workout position.
    Do this exercise three times a day, or ten times in a single session.

    Hip extensions of a single

    An advanced version of the bridge exercise is this one.
    Elevate your elbow joint with a step or box, then alternately plant each heel on the ground.
    It’s crucial to keep your hips and shoulders still and to maintain adequate core stability when exercising. When your heel strikes the floor, your hamstrings and glutes contract isometrically to maintain your body’s stability.
    Take ten seconds to hold this workout position.
    Do this exercise three times a day, or ten times in a single session.
    One leg lifts up with the ball

    This is another workout that targets the hamstrings and appears easy at first but is quite tough.
    The hamstring muscles are worked in a highly extended position during this single-leg ball pick-up exercise, especially the muscle fibers closer to the buttock.
    After that, step forward with one foot and bend to take up the medicine ball.
    To set the ball back down, repeat this motion.
    Take ten seconds to hold this workout position.
    Do this exercise three times a day, or ten times in a single session.
    Take a ball and lunge

    Using a ball to help with balance, perform a basic lunge.
    The purpose of this exercise is to strengthen the quadriceps, hamstrings, and glutes.
    With your damaged leg spread wide in front of the other, you are standing.
    Attempt to grasp a medicine ball around your chest.
    Next, lower yourself by shifting your weight to your front leg and lowering your back knee to the ground.
    Take ten seconds to hold this workout position.
    Do this exercise three times a day, or ten times in a single session.
    Norway Leg curl

    Although this is one of the more difficult hamstring exercises, don’t perform it right before attempting a sprint
    To begin, kneel with your ankles held by a therapist.
    Then, carefully lean forward as much as you can while resisting the urge to move forward by using your hamstring muscles.
    For a more difficult variation, curl back up using your hamstring muscles.

    Sumo Squat

    Your feet are somewhat wider than your hips as you stand.
    Keep your hip joint rotated outward and your toes pointed around 45 degrees outward.
    Attempt to extend your arms shoulder-joint height in front of you.
    If you’d like to utilize a weight to hold the dumbbells in a goblet posture in front of you and securely at the shoulder joint, Should you choose to utilize a weight, make sure to hold the dumbbells in a goblet posture in front of your chest and tightly at the shoulder joint.

    Next, Breathe deeply, contract your core, press your hip joint back, and lower yourself into a squat.
    Exhale, halt at the bottom and push yourself back up to a standing position.
    The midfoot and heel must maintain an equal distribution of weight.
    Do the 12 to 15 repetitions.

    Swing a kettlebell

    Hold onto the handles of the kettlebell while putting it slightly in front of you. Shoulders must remain back and down.
    Your toes are slightly slanted out as you stand with your feet slightly broader than hip-width apart. You need to maintain a straight back and shoulders.
    Send your hips back and slightly bend your knee joint. This is not a squat position. Since the knee joint is a hinge on the hip, avoid bending it too much.
    In order to reverse the hip hinge, try to grip the kettlebell and roll your shoulder joint back. Alternatively, focus on your core muscles and start the exercise by contracting your hamstrings and glutes to completely extend your hips, After that, raise the kettlebell to your chest.
    You must maintain your weight in your heels.
    To repeat, try lowering the kettlebell and swinging it through your legs. Complete the 15–20 repetitions and the allotted amount of time.
    Verify that you are hip-hinging rather than squatting. You may work on your glutes and hamstrings by using the hinge movement.

    One-Legged Deadlift:

    You have a slight bend in your right knee as you stand on it. Your left foot will be off the ground as you hold a kettlebell in your right hand.
    You have to shift your weight towards the ground and tilt your body forward by hinged at the hip joint. You have to keep your left leg straight back behind you and your chest up.
    Stretch as far as you can until your right hamstring starts to tense. You straighten up again, squeeze your glutes, and take a step back to where you were before.
    Before switching to the left leg, finish all of the repetitions on the right leg.
    Perform eight to ten repetitions for every leg.

    Leg curls when lying down

    The roller pad should first be adjusted so that it sits over the heels.
    The roller pad is positioned over your lower calves as you lie on your stomach. Just be careful to extend your legs completely. Next, Hold onto the machine’s grips on either side.
    Lift your feet and flex your knees while maintaining your hips on the bench, or bring your ankles towards your glutes. After pausing for a few while, carefully bring your leg back to the starting position.
    Perform the ten to fifteen reps. You’ve chosen a weight that’s not too heavy to allow you to keep precise form.
    Lower the weight if, when curling, your hip joint is slipping off the bench.

    Press your legs against the ball

    Seated on a big exercise ball is you. Step your feet out until your torso is elevated over the ball.
    Your shoulder and head are not in line with the ball.
    Keep your neck naturally erect and refrain from looking up or down. Set your arms down at your sides.
    Make an effort to bend your knee joint as though you were squatting.
    Next, push through your heels to go back to the starting position, but this time, your main focus needs to be on tightening your hamstrings. Perform the ten to fifteen reps.
    You have to maintain your weight on your heels instead of your toes.

    Reverse Plank

    Start by laying an exercise mat down on the ground. With your legs out in front of you, you are seated. Try extending your fingers wide or putting your hands slightly behind you.
    The hand is positioned parallel to your shoulder joint but outside of your hip joint. Next, elevate your hips and upper torso towards the ceiling by pressing into your hands.
    Your head to your heels is a straight line in your body. You Gaze up to the ceiling. Next, tighten your hamstrings, glutes, and core muscles.
    After 15 to 30 seconds, hold this workout position and then return to the starting position. Perform the ten to fifteen reps. To enhance the hamstring muscle’s tension, apply a toe tap.
    Attempt to flex your right knee and point your toe in the direction of your glutes. Next, extend your leg and tap your toes, or switch to your left leg. Next, carry out this activity one more.

    Everyday 5-Minute Plank Exercise

    Your feet are somewhat broader than shoulder-width apart as you stand.
    Lift a dumbbell with each hand and use it as a weight.
    You must maintain a goblet squat position and keep your arms at your sides.
    Next, Squat down or gradually bend your legs until your thighs are parallel to the floor by using your core muscles.
    For as you squat down, only raise your arms in front with your body weight.
    You have to stare straight ahead and keep your head erect.
    For a short while, maintain this bottom position, then exhale Perform eight to ten repetitions.
    Prevention of hamstring muscle pain
    Not every hamstring strain can be avoided.
    Which patient falls into the higher risk category, such as the adult or adolescent who was injured in a sudden impact?
    Engage in regular strengthening and stretching activities to help reduce your chance of developing hamstring strain.
    Get the doctor to recommend the precise workouts that are most effective for the given activity.
    Here are a few typical preventive guidelines for hamstring pain

    Before working out or participating in sports, always complete the warm-up and cool-down.
    Exercise on a regular basis to keep your muscles and heart fit.
    Take some time to stretch and strengthen the muscles used in your weekly workout regimen. Occasionally When engaging in a particularly strenuous physical activity, take two days off or engage in light exercise as a means of providing the body with enough recovery.
    It feels better. Applying the RICE principle—rest, ice, compression, and elevation—to the feet quickly helps the back.
    When the patient experiences more significant damage or hamstring pain, do call or contact the doctor.
    in order to return to regular exercise following therapy.
    Chronic and Persistent hamstring pain
    When a patient has chronic hamstring pain, they have muscle soreness that lasts for several days or months.
    The patient is assisted in recovering and managing chronic hamstring issues by an urgently needed orthopedic physician, pain management specialist, and musculoskeletal regenerative medicine physician.

    Who is more prone to chronic hamstring pain and discomfort?

    Runners, athletes, and weekend warriors who engage in sports like basketball or tennis that need quick stops and starts are susceptible to hamstring strains.
    The hamstring muscles extend from the knee joint at the rear of the thigh to the hipster joint below.
    When loading and stretching too far during this athletic activity, the hamstring muscle is always affected.
    The tendon that connects the leg muscles to the bone, the hamstring tendon, is also injured in this case.
    Doctors can treat hamstring strains urgently by merely stretching them, but if this doesn’t cure the discomfort, surgery is required. Without surgery, most cases of chronic hamstring pain resolve in a matter of days.
    Treatment of Chronic and Persistent hamstring strain

    Cross-training workout

    Swimming is a good low-impact exercise to cross-train with after the healing stage. but always give healing time to pass.

    Injection

    A steroid injection is recommended by the doctor if the hamstring pain does not improve.
    Alternatively, an injection of platelet-rich plasma (PRP) is given to the physician.
    Platelet-rich plasma, or PRP, injections are used to extract highly concentrated blood platelets on their own.
    Rich in nutrients, the platelets quickly travel to the site of inflammation and aid in the speedier healing process.
    Applying traction to treat musculoskeletal problems and showing potential in hamstring muscle tendinopathy is the aim of this regenerative medicine method.
    Tenotomy using a needle

    When the issue arises in the tendon, do a needle tenotomy, a minimally invasive procedure that frequently relieves intractable hamstring tendinopathy.
    In a needle tenotomy, a doctor uses a needle to make a tiny wound in the tendon, introducing fresh platelets and ensuring that the blood of the injured tissue is nutrient-rich.

    Complication

    An injury and persistent hamstring strain caused by an early return to play
    re-injury associated with calcified and inflammatory regions in the hamstring following an injury
    Scarring and pressure on the sciatic nerve are symptoms of hamstring syndrome.

    Prognosis

    Imaging tests and clinical evaluation both contribute to the delineation of the variables influencing a hamstring injury’s prognosis. Less time to return to play indicates that patients with grade I and II injuries, negative MRI results, the ability to walk pain-free within 24 hours after the injury, or short muscle tears often have a good prognosis for healing from the injury.

    However, a poor prognosis and a longer healing period are associated with Grade III MRI injuries, proximal tendon injuries, hamstring injuries with an avulsion fracture of bones, and injuries involving extensive and deep hematomas. The prognosis for an injury resulting from low-speed stretching exercises is worse than it is for an injury.

    Summary

    A hamstring injury may be the cause of any aches and pains in the back of your legs. A collection of muscles on the back of your thighs is called your hamstring. These muscles are prone to strain, particularly in athletes who participate in sprint-heavy sports like track, basketball, or soccer. More severe occurrences of hamstring injuries may require months to heal, while milder cases may respond well to rest, ice, and over-the-counter (OTC) treatments.

    Continue reading to find out more about hamstring injuries, how to treat them, and when to visit a doctor. It can be inconvenient to miss out on your favorite sports and other activities due to hamstring strain. The majority of strain situations will probably get better in a few days. Rest, ice, compression, and elevation should help you get back on your feet quickly.

    If you believe your injuries to be more serious, don’t be afraid to call your doctor. You can resume your favorite pastimes sooner if you receive assistance as soon as possible.

  • Short Wave Diathermy (SWD)

    Short Wave Diathermy (SWD)

    What is Short-wave Diathermy?

    Short wave diathermy is also known as SWD. Physical therapy treatment involves applying deep heat to an individual’s joints and soft tissues to repair bone or tissue injuries. This approach improves healing by concentrating heat generation on specific areas and reaching deep tissues.

    This therapy strategy can effectively reduce inflammation, and joint discomfort, and enhance soft tissue disorders.

    The term diathermy refers to heating or causing deep warmth directly in the tissues of the body.
    Dia-through
    Thermy -heat
    Thermotherapy promotes circulation, alleviates pain, and speeds up tissue repair.

    • Benefits of heat:
    • increased blood flow.
    • Relieving Pain
    • Improving tissue mobility while healing
    • Improved flexibility
    • Reduces inflammation.

    Frequency of Short-wave Diathermy:

    It’s between 10000000 Hz and 100000000 Hz [10-100 MHz].
    Mostly used: 27120000 [27.12 MHz].

    Wavelength of Short Wave Diathermy:

    It is between 30 and 3 meters.
    Mostly used 11 metres.

    How does shortwave diathermy (SWD) work?

    Shortwave treatment uses high-frequency electromagnetic radiation that is absorbed by the body’s tissues. Because bodily tissue includes ions, electromagnetic radiation causes the ions to flow in different directions, resulting in friction between the moving ions and the surrounding tissues. This alleviates joint discomfort and promotes soft tissue recovery.

    The machine circuit for short-wave diathermy:

    Because no mechanical device can create enough fast movement to produce a high-frequency current, this current is generated by discharging a condenser through a low-ohmic resistance inductance. The fundamental oscillator circuit comprises a condenser and an inductance, and currents of various frequencies are generated by selecting appropriate condensers and inductions.

    If a very high-frequency current is required, the capacitance and inductance are minimal, but to create a current of lower frequency, a bigger condenser and/or inductance are utilized. To generate the high-frequency current, the condenser must be induced to charge and discharge frequently. To do this, the oscillator is integrated into a valve circuit.

    The patient circuit for short-wave diathermy:

    Inductors connect the circuit to the machine circuit, generating a matching high-frequency current in the resonator circuit via electromagnetic induction.
    The oscillator and resonator circuits must be in resonance with one another, which means that the product of inductance and capacitance must be the same in both circuits.
    The electrodes and the patient’s tissues create a capacitor, the capacitance of which varies on the size of the electrodes, as well as the distance and material between them, and is thus distinct for each application.

    Indication of the circuit: 
    To indicate a circuit, the equipment’s indicator light turns on or changes color.
    An ammeter hooked into the resonator circuit displays a maximum reading, which is reduced by rotating the knob that controls the variable capacitor in either direction.
    A tube carrying a tiny quantity of neon gas is put into the electric field between the electrodes or at the end When the circuits are in resonance, the cable will flash the most intensely.

    Indication of Short Wave Diathermy:

    • Musculoskeletal Disorder
    • Ligament Sprain
    • Muscle Strain
    • Capsular lesion (frozen shoulder).
    • Degenerative joint disease (OA)
    • joint stiffness.

    Chronic Inflammatory Conditions:

    • Tendinitis & Bursitis
    • Tenosynovitis

    Application of Short-wave diathermy:

    • Capacitor Field Method
    • Cable technique.
    • The monode electrode approach

    Capacitor Field Method:
    Electrodes are inserted on each side of the portion to be treated, separated from the skin by an insulator.
    The electrodes function as capacitor plates, while the dielectric is made up of the patient’s tissue and the insulating substance that separates them from the electrodes.

    When the current is supplied, rapidly alternating charges form on the electrodes, resulting in a rapidly alternating electric field between them.
    The electric field affects the materials it contains.

    Cable technique:
    When SWD is administered via cable, the electric field, magnetic field, or both effects can be employed at the same time.
    The Electrodes are made of a thick, insulted cable that completes the patient’s circuit of the machine.
    The cable is positioned in proximity to the patient’s tissue, but separated by an insulating layer.
    The high-frequency current oscillates in the wire, creating a fluctuating electrostatic field between its ends and a variable magnetic field around its center.

    The monode electrode approach:
    It operates on the same concept as a cable.
    It is made out of a flat helix of thick wire set on a stiff support.
    A condenser in parallel with the coil allows you to utilise a shorter length.
    Heating an eddy current produced in an area formed like a hollow ring, but with structural support, allows the electrode to be employed with air spacing.

    Types of electrodes used in short-wave diathermy:

    Flexible pads: 
    it is made of metal electrodes enclosed in rubber, creating an electrostatic field.

    Space plates:
     it is made of hard metal electrodes.
    Perspex covers the electrostatic field.

    Coil or cable:
    Electrodes, which are wires with plugs at each end, produce an electromagnetic field.

    The monode:
     it is a flat, stiff coil with a plastic cover Electromagnetic field.

    The diplode:
     electrodes consist of a flat coil. Electrodes wrapped in a perspex cover with two wings An electromagnetic field.

    Position of Electrode for Short Wave Diathermy:-

    The Electrodes’ positions should be set such that the electric field is directed through the structure to be treated.

    • High impedance structure = Electrode as distant as possible from the electric field.
    • Low impedance structure = electrode parallel to the electric field.
    • If achievable, put electrodes across an even surface of the body.
    • Irregular surface = field tends to concentrate on the most conspicuous section.
    • Regular surface = lower concentration by employing a broad gap.

    Contra-planer position: 
    it is typically employed for deep-placed structures.
    The electrodes are put on opposing sides of the bodily portion that has to be treated.

    Thus, the electric field is guided through the deep tissue.
    Electrodes must be parallel to the skin and not near to one another.
    For example, trunk or limb.

    Co-planer position:
    it is often employed for shallow constructions.
    The electrodes are put side by side on the identical areas of the body that need to be treated.
    Provide a suitable spacing between electrodes so that the tissue route has a lower resistance.
    For example, the spine.

    The cross-fire position:
     it is utilized to treat air-filled cavities and deep structures located in vascular areas.
    In this posture, half of the therapy is delivered in one aspect, while the other half is given in the opposite aspect of the first.

    As a result, the electric field is at a right angle to the one obtained during the first stage of the therapy.
    For example, for the knee joint, half therapy means medial and lateral, whereas half treatment means anterior and posterior.

    Examples include the frontal, maxillary, and ethmoid sinuses, as well as pelvic organs.
    For the face, if the patient wears contact lenses, they should be removed during treatment since the heating action causes the lenses to melt.

    Monopolar position:
    it is Typically utilized for superficial lesions.

    The active electrode is put over the lesion, whereas the indifferent electrode is attached to a distant portion of the body.
    Each electrode has its electric field.
    The lines of force emanating from the electrode.
    Thus, as the distance from the electrode increases, the field density decreases.

    Dosage of the Short-wave Diathermy Machine:

    In most cases, the machine’s intensity is determined by its comforting warmth.
    Duration is 20 to 30 minutes and chronic lesions place for at least 30 minutes.
    Treatment must be administered daily or on alternate days.

    For acute inflammation:

    Less intensity.
    Increased frequency.
    5–10 minutes.
    Twice a day provide a treatment

    Preparation to the patient:

    first, check for any contraindications and assess their skin feeling.
    The patient is entirely comfy and supported by a hardwood frame that is devoid of metal.

    Mostly relied on the sofa, chair, or table for support.
    Remove any jewelry, money, and metallic objects from the sufferer.
    Wash your skin over the treatment area.
    Wounds and sinuses should be cleaned and covered with a dry dressing.

    Monitoring the treatment:

    all meters of equipment are set to zero (beginning position) before commencing.
    Select the appropriate power level for the patient’s condition.

    Gradually increase the intensity until you achieve your preferred heating level.
    The physical therapist should be on call for the patient throughout the therapy time.
    At the end of the treatment, the control knobs are reset to zero, the current is turned off, and the electrodes are removed.

    Physiological effects of short-wave diathermy:-

    • Heat increases the diameter of blood vessels.
    • Increase blood circulation.
    • Remove waste products.
    • Increases nutrient supply in the afflicted region.
    • Relieve Pain and Reduce Muscle Spasms.

    Therapeutic use of Short Wave Diathermy

    Effect on inflammation:

    Dilated arterioles and capillaries enhance blood flow to the region, providing more oxygen and nutrients.
    Adding more antibodies and white blood cells.
    Increases the flow of fluid into the tissues. These effects help to remove waste products.
    This impact helps to resolve inflammation.
    acute stage = regular dosage.
    Sub-acute stage = higher dosage.
    chronic stage = thermal dosage.

    Effects of bacterial infection:

    Inflammation is the tissue’s natural reaction to the presence of microorganisms.
    The main hallmarks include vasodilation, fluid exudation into the tissue, and a rise in white blood cell and antibody concentrations in the region.
    Heating the tissues enhances these changes.
    As a result of reinforcing the body’s usual strategy for dealing with the infecting organism, short-wave diathermy may be useful in the treatment of bacterial infections such as boils, carbuncles, and abscesses.
    Heat may directly kill bacteria.
    However, raising the bodily tissue to the required temperature would result in tissue damage.

    Traumatic conditions :
    SWD has the same effect on traumatic situations as inflammation due to the presence of lesions.
    Exudation of fluid into the tissue and increased blood flow to the region aid in waste elimination.

    Improved blood flow promotes healing:
    Recent injuries require the same treatment as those in the acute stage.
    Stiff joints and other injury-related symptoms require a higher dosage.

    Reducing healing time:
    it can help to enhance wound healing.
    An increased blood flow to the tissues may be beneficial, assuming that the vascular response to heat is normal.

    Relief of pain:
    Research suggests that modest warmth can effectively relieve pain.
    Presumably as a result of sedative effects.
    Pain may be caused by the buildup of metabolic waste products in the tissue.
    Increase the flow of blood and aid in the removal of harmful substances.
    Strong superficial heating relieves pain by counteracting inflammation.
    The inflammatory process relieves pain by resolving inflammation.

    Contraindication of Short Wave Diathermy

    Haemorrhage:
    Heating tissue with a diathermic current can dilate blood vessels, thus it should not be used immediately after an accident or in cases of recent haemorrhage. It should not be applied to the abdomen or pelvis during menstruation, nor should it be used in diseases where bleeding is possible, such as gastric or intestinal illness with ulceration or hemophilia.

    Venous thrombosis or phlebitis.
    These conditions exclude the administration of SWD to the area drained by the afflicted vessels, since the increased flow of blood may dislodge the clot or exacerbate the inflammation.

    Artery disease.
    Diathermy should not be used on portions with a faulty arterial blood supply. The failure of the circulation to disperse heat may result in a rise in temperature to a level that might cause a tissue burn.

    Diathermy:
    it should not be used on the abdomen or pelvis during pregnancy.

    Metal in tissues:
    Metal causes tissue heating and raises the risk of burns from post-operative metal implants in the body.

    Disturbed skin feeling.
    It is safer to avoid using diathermy on regions with a lack of skin sensibility.

    Tumours:
    Avoid using short-wave diathermy near malignant growths. The increase in metabolism caused by the rise in temperature may enhance the pace of growth.

    x-ray:
    X-rays devitalize tissues, making them more prone to injury. SWD should not be used on locations that have recently been exposed to therapeutic amounts of X-rays.

    Patients at particular risk
    It is risky to administer SWD to patients who do not comprehend the level of heating necessary and the importance of reporting excessive heating. As a result, therapy is not appropriate for little children or people with mental disabilities. Similarly, it is unsafe to treat unconscious patients or those who are prone to losing consciousness, such as epileptics.

    Who Is Unqualified for Short Wave Diathermy?

    • Pacemaker 
    • Prothesis
    • The intrauterine device (IUD)
    • Cancer
    • Reduced skin sensation.
    • Peripheral Vascular Disease
    • Tissue with a limited blood supply (ischemia).
    • Infections
    • fractured or shattered bones
    • Bleeding Disorders
    • Serious heart, liver, or renal diseases.
    • Low skin feeling.
    • Pregnancy
    • Perspiration
    • Wound dressings

    Dangers of Short Wave Diathermy:

    Burn:
    SWD can produce heat burns.
    So before therapy, alert the patient.
    In severe situations, coagulation and blistering can cause tissue damage, resulting in white areas.
    In Milder cases, tissue is not damaged, but may be visible red patches. 
    If the damage develops as quickly as feasible, remove the electrodes.

    • Causes of Burn:

    The intensity of the electric field
    Use of excess current.
    Hypersensitivity in the skin
    Impaired blood flow.
    Leads that contact the skin

    Scalds:
    it is caused by wet heat.
    This may happen if the area being treated is moist.

    Overdose:
     it can lead to heightened symptoms, discomfort, and inflammation in tight spaces.
    At that point, lessen the strength of successive applications.

    Gangrene:
    Heat promotes chemical and metabolic changes in tissues, leading to gangrene formation.
    As a result, there is an increase in demand for oxygen, and gangrene develops.
    Heat should never be delivered directly to a region with poor arterial blood flow.

    Electric shock:
    it can occur when contact is made with the equipment circuit when the current is switched on.
    However, the current apparatus is frequently not feasible.

    Sparking:
    it happens when one electrode is contacted while the current is applied.
    As a result, the patient must be reminded not to touch the electrodes.

    Faintness:
    it is caused by hypoxia in the brain after a drop in blood pressure.
    It mainly happens in intensive therapy.

    FAQs

    What is the principle behind shortwave diathermy?

    Shortwave diathermy generates heat by converting high-frequency electromagnetic radiation. It may be used in pulsed or continuous energy waves. It has been used to relieve discomfort from kidney stones and pelvic inflammatory illness.

    How does SWD work?

    Short-wave diathermy is a therapy method that uses high-frequency electromagnetic waves to generate heat and relieve pain and edema caused by soft-tissue injuries.

    What exactly is short-wave diathermy used for?

    Short-wave diathermy is a physiotherapy treatment that generates deep heat in the joints and soft tissues to aid in recovery. This type of therapy is used to treat a variety of ailments, including arthritis, back pain, tendonitis, and chronic bone and muscle injuries.

    How long does it take to treat short-wave diathermy?

    The therapy normally takes 20-30 minutes.

    What are the advantages of SWD?

    Short Wave Diathermy (SWD) is a technique that uses electromagnetic waves to target soft tissues and joints. This method of therapy has several advantages, including reduced inflammation, joint discomfort, and complete retention. Furthermore, the application of heat waves promotes circulation and muscle rehabilitation.

    What is SWD, and how is it used in osteoarthritis?

    Short-wave diathermy (SWD) is an electrotherapeutic technique for the conservative treatment of knee osteoarthritis.

    What are the benefits of short-wave diathermy?

    Diathermy has several advantages, including pain reduction, quicker healing, enhanced blood flow, range of motion, and greater mobility. Heating the targeted regions of injured tissue enhances blood flow and makes the connective tissue more flexible.

    When not to use diathermy?

    Diathermy should not be used on a patient with a pacemaker or an implanted neurological device.

    References

    • What is Shortwave Diathermy (SWD)? What conditions are treated by Shortwave Diathermy (SWD)? Who will benefit from Shortwave Diathermy (SWD)? (n.d.). Cbphysiotherapy. https://cbphysiotherapy.in/therapies-offered/shortwave-diathermy-swd
    • P. (2022, December 27). Short Wave Diathermy | Physiotherapy Treatment & its Effectiveness. https://www.physiotattva.com/blog/short-wave-diathermy-physiotherapy-treatment-its-effectiveness
    • Clinic, M. P. (2023, November 4). SHORT WAVE DIATHERMY (SWD): Indication, Contraindications. Mobile Physiotherapy Clinic. https://mobilephysiotherapyclinic.in/short-wave-diathermy/
    • V. (2023, July 7). Use of Short Wave Diathermy (SWD) in Physiotherapy. Mobility Physiotherapy Clinic. https://mobilephysiotherapyclinic.net/use-of-swd-in-physiotherapy/
  • Olfactory nerve

    Olfactory nerve

    Introduction

    The first and smallest cranial nerve is the olfactory nerve. This nerve is one of two that do not connect to the brainstem. Your olfactory nerve anatomy is part of the central nervous system.

    The process begins in the brain and ends in the upper nose. It is also part of your autonomic nervous system, which controls bodily functions.

    The olfactory nerve, or first cranial nerve, is responsible for your sense of smell. The olfactory nerve is composed of multiple sensory nerve fibres. This nerve is essential for using your senses to appreciate your favourite smells.

    Each nostril contains approximately six to ten million olfactory sensory neurons. That means there’s a lot of work going on inside your nostrils to help you smell your surroundings or the food you’re eating.

    Anatomical Course of Olfactory nerve

    The anatomical course of the olfactory nerve describes how special sensory information is transmitted from the nasal epithelium to the brain’s primary olfactory cortex.

    Nasal epithelium

    Olfactory receptors are found in the nasal epithelium and detect smell. These axons (fila olfactoria) form small bundles of true olfactory nerves that travel by small foramina within the cribriform plate in the ethmoid bone into the cranial cavity.

    Olfactory Bulb

    Once inside the cranial cavity, the fibres enter the olfactory bulb, which is located in the olfactory groove of the anterior cranial fossa.

    The olfactory bulb is an ovoid structure made up of specialised neurons known as mitral cells. The olfactory nerve fibres synapse with mitral cells, forming synaptic glomeruli. Second-order nerves originate in the glomeruli and travel posteriorly into the olfactory tract.

    Olfactory Tract

    The olfactory tract travels posteriorly along the inferior surface of the frontal lobe. In the tract approaches the anterior perforated material (at the level of the optic chiasm), it splits in medial and lateral stria:

    • The lateral stria connects axons to the primary olfactory cortex in the temporal lobe’s uncus.
    • The medial stria transports axons from the anterior commissure’s medial plane to the olfactory bulb on the opposite side.

    Numerous other brain regions, such as the piriform cortex, amygdala, olfactory tubercle, and secondary olfactory cortex, receive nerve fibre transmission from the primary olfactory cortex. These areas are involved in the memory and perception of olfactory stimuli.

    Function of Olfactory nerve

    CN 1 It allows you to detect scents, odours, aromas, and more. Smelly substances emit small molecules. Inhaling transports these molecules to your nose. These molecules are detected by specialised cells called olfactory receptors. The receptors send this information to your brain via the olfactory nerve, allowing you to perceive smell.

    The olfactory system provides a sense of smell in two ways:

    • Nostrils: Smelly substances emit small molecules that can stimulate olfactory receptors. Receptors work in specific combinations, allowing you to recognise various types of smells.
    • Back of your throat: Chewing food or sipping a drink releases molecules that aid in smell. These molecules travel up your throat to the olfactory receptors at the back of your nose.

    The olfactory mucosa contributes significantly to your ability to smell. This membrane is located in the upper part of your nasal cavity and contains a variety of cells.

    • Olfactory receptor cells support two processes: the dendritic process and the central process. Dendritic processes direct cells to tiny hairs in the olfactory mucosa, where they stimulate olfactory cells. Central processes move cells in the opposite direction.
    • Sustentacular cells provide support for nearby tissue.
    • Basal cells are the precursors to olfactory receptor cells and sustentacular cells.

    Embryology

    Embryologically, the face develops from five swellings derived from the first and second pharyngeal arches known as facial prominences that appear in the fourth week of development. These include the frontonasal prominence, as well as the mandibular and maxillary prominences. The olfactory placodes, a thickened ectoderm area on each side of the frontonasal prominence, appear around the fourth week of embryonic development.

    The olfactory placodes grow in size until the sixth week when the centres of each placode invaginate to form the nasal pits. The nostril pits ultimately develop into the olfactory epithelium, which houses olfactory nerves and is divided into two nasal processes: medial and lateral. The nose, philtrum, and primary palate then develop.

    Conditions and Disorders Related to Olfactory Nerve

    Symptoms of Olfactory nerve

    • Anosmia is the complete loss of smell.
    • Dysosmia, also known as phantosmia, is the spontaneous occurrence of unpleasant or strange odours.
    • Hyposmia is a partial loss of smell.
    • Parosmia refers to a distorted sense of smell. For example, familiar foods could smell like chemicals or mould.

    Causes of Olfactory nerve

    The following medical conditions and situations may affect olfactory nerve function:

    • Sinusitis and nasal polyps.
    • Tobacco use.
    • Poor oral hygiene.
    • Environmental toxins and chemicals, such as insecticides.
    • Severe brain injuries, including concussions.
    • Medications such as antibiotics.
    • Head and neck cancer.
    • Diabetes.
    • Alzheimer’s disease.
    • Brain tumour.
    • Parkinson’s disease.
    • Epilepsy.

    Post-viral olfactory loss

    The common cold is the most common condition that affects the olfactory nerve, but other viral illnesses can cause the same effect.

    You’re probably aware that when nasal congestion fills your sinuses, it can cause a loss of smell that returns once the congestion has cleared.

    Still, it might take a while to heal completely. This is known as post-viral olfactory loss (PVOL), and everyone has likely experienced it at some point. Researchers aren’t sure why this happens, but they suspect it’s because certain viruses, such as the common cold and influenza, cause damage to the mucous membrane and olfactory epithelium.

    Post-traumatic olfactory loss

    A head injury can cause anosmia or hyposmia, also known as post-traumatic olfactory loss (PTOL). The loss is related to both the severity of the injury and the part of the head that was damaged. Injuries to the back of the head are most likely to cause loss of smell.

    That may seem odd given that the olfactory nerves are located in the front of the brain. The brain may thrust forward and strike the inside front of the skull, precisely where the olfactory nerve is located, in the event of a blow to the back of the head. Then, as the brain recovers, it tugs on the delicate nerve fibres, which can snag on the rough edges of the tiny holes in the skull through which they emerge.

    The olfactory nerves can be severed in this way, but most smell loss is caused by bruising of the olfactory bulb.

    PTOL can also result from facial trauma, such as a blow to the nose.

    Assessment

    The olfactory nerve can easily be assessed at the bedside or in a clinic. To test the integrity of the olfactory nerve, pinch or block one nostril while the patient is blindfolded or with the eyes closed, and then have the patient smell aromatic materials like coffee, cinnamon, vanilla, and more.

    Avoid using strong or noxious-smelling substances like alcohol or ammonia. Request that the patient identify the substance by describing its smell. Next, continue the same action on the other nostril. This is done to compare the ability to smell on both sides.

    Treatment

    Medical treatment

    Corticosteroids

    The most common treatment for OD, especially after upper respiratory tract infection, is topical and oral corticosteroids, which are effective in around 25-50% of cases. The administration of nasal spray is less effective than oral and nebulized treatments, respectively.

    Antioxidant

    Oxidative stress, caused by a disruption in the balance of reactive oxygen species and protective antioxidants, is a major pathogenic factor in a wide range of diseases, including viral infections.

    Zinc

    Zinc, an important immune trace element, has a variety of effects on immune response and infection.

    Intranasal insulin.

    Insulin has been found to play a direct role in the modulation of olfactory signals. The OB has a high concentration of central insulin receptors, so central insulin is converted there. Increased central insulin resistance is linked to a variety of OD-causing diseases.

    Intranasal insulin works nicely in treating postinfectious OD because it has no side effects, does not increase blood glucose levels, and enhances olfactory function.

    Nasal saline irrigation.

    Nasal saline irrigation is a traditional method of respiratory or nasal care. Nasal saline rinsing removes dust particles, allergens, and air pollutants from the nasal cavity, improving mucosal ciliary oscillation, reducing mucosal edoema, promoting local blood circulation, and improving mucosal clearance.

    A saline wash also hydrates the mucosal mucus layer, raises the rate of ciliary oscillation, and decreases the production of local inflammatory mediators, all of which are particularly beneficial to enhancing mucociliary dysfunction and mucus stagnation caused by viral infections.

    Both hypertonic and isotonic saline can reduce nasal inflammation of the mucous membrane and help heal damaged nasal mucociliary epithelium. Multiple research studies have shown that nasal saline irrigation can effectively improve the symptoms of rhinitis and sinusitis caused by bacteria or viruses, including OD.

    Surgical Treatment

    Surgical treatments such as septoplasty, rhinoplasty, and endoscopic sinus surgery aim to eliminate

    Nasal obstruction and the removal of inflamed mucosa or polyps. Secondary benefits of these surgeries may include improved olfactory function. Delank and Stoll found that surgery improved olfactory function for 25% of hyposmia and 5% of anosmia.

    A longitudinal MRI study found that patients with CRSwNP had increased olfactory bulb volume following endoscopic sinus surgery. Nasal surgery can occasionally result in olfactory loss due to synechia, crusting, and damage to the epithelium, despite being generally effective.

    For severe and debilitating unilateral phantosmia, selective olfactory bulb removal or endoscopic olfactory mucosa removal can be performed on the affected side.

    Olfactory training.

    Olfactory training may enhance olfactory function, despite limited research. Olfactory receptor neurons regenerate after functional deficits and olfactory cues

    may influence this regenerative process. Olfactory training is a 12-week programme where patients are exposed twice daily to four strong odours (rose, eucalyptus, lemon, and cloves).

    Summary

    The olfactory nerve, the first and smallest cranial nerve, is responsible for the sense of smell. It is part of the central nervous system and helps detect scents, odours, and aromas. The nerve is composed of multiple sensory nerve fibers and is responsible for detecting smells in the nose and throat. The olfactory system provides a sense of smell through the nose and the back of the throat.

    The olfactory mucosa contributes significantly to the ability to smell. Symptoms of olfactory nerve disorders include anasmia, dysosmia, hyposmia, and parosmia. The olfactory nerve is involved in the autonomic nervous system, which controls bodily functions.

    Olfactory nerve function can be affected by various medical conditions and situations, including sinusitis, tobacco use, poor oral hygiene, environmental toxins, severe brain injuries, medications, head and neck cancer, diabetes, Alzheimer’s disease, brain tumours, Parkinson’s disease, and epilepsy. Post-viral olfactory loss (PVOL) occurs when the common cold or influenza causes damage to the mucous membrane and olfactory epithelium. Post-traumatic olfactory loss (PTOL) occurs when a head injury causes anosmia or hyposmia. The olfactory nerve can be assessed using aroma tests.

    Treatment options include corticosteroids, antioxidants, zinc, intranasal insulin, nasal saline irrigation, surgical treatments like septoplasty, rhinoplasty, endoscopic sinus surgery, and olfactory training. However, these treatments may sometimes result in olfactory loss due to synechia, crusting, and damage to the epithelium.

    FAQs

    What caused damage to the olfactory nerve?

    The olfactory nerve (ON) is the only cranial nerve that is exposed to the surrounding environment. As a result, it is susceptible to damage from head trauma, viral infection, inflammatory stimulation, and chemical toxins, all of which can cause olfactory dysfunction.

    What kind of sense is olfactory?

    Olfaction, or the sense of smell, detects and discriminates between odours as well as social cues, which influence our innate responses.

    What is the treatment for the olfactory nerve?

    The current best evidence for treating one common type of olfactory loss, rhinosinusitis, is systemic and/or topical corticosteroid therapy. If no other intervention is provided, an oral steroid taper can provide initial but usually temporary relief in these patients.

    What olfactory nerve is responsible for smell?

    The first cranial nerve (CN I) is the olfactory nerve. It is also part of your autonomic nervous system, which controls bodily functions. This nerve activates your sense of smell. Cranial nerve 1 is the shortest sensory nerve in the body.

    What are olfactory cells?

    The olfactory epithelium is made up of several different types of cells. The most significant of these is the olfactory receptor neuron, a bipolar cell that transmits olfactory information centrally through a small-diameter, unmyelinated axon on its basal surface.

    What is unique about the olfactory nerve?

    The olfactory nerve, which emerges from the embryonic nasal placode, differs from cranial nerves in how it regenerates itself if damaged. The olfactory nerve is sensory and arises from the olfactory mucosa in the upper part of the nasal cavity.

    References:

    • Dellwo, A. (2021, August 23). The Anatomy of the Olfactory Nerve. Verywell Health. https://www.verywellhealth.com/olfactory-nerve-anatomy-4686024
    • Helwany, M., & Bordoni, B. (2023, August 14). Neuroanatomy, Cranial Nerve 1 (Olfactory). StatPearls – NCBI Bookshelf. https://www.ncbi.nlm.nih.gov/books/NBK556051/
    • Olfactory Nerve. (n.d.). Physiopedia. https://www.physio-pedia.com/Olfactory_Nerve
    • The Olfactory Nerve (CN I) – Pathway – Anosmia – TeachMeAnatomy. (2018, December 24). TeachMeAnatomy. https://teachmeanatomy.info/head/cranial-nerves/olfactory-cni/
    • Professional, C. C. M. (n.d.). Olfactory Nerve. Cleveland Clinic. https://my.clevelandclinic.org/health/body/23081-olfactory-nerve
    • Hu, B., Gong, M., Xiang, Y., Qu, S., Zhu, H., & Ye, D. (2023, November 17). Mechanism and treatment of olfactory dysfunction caused by coronavirus disease 2019. Journal of Translational Medicine. https://doi.org/10.1186/s12967-023-04719-x
  • 23 Best Exercises for Cervical Spondylosis

    23 Best Exercises for Cervical Spondylosis

    A common age-related illness affecting the joints and discs of your cervical spine, or neck, is called cervical spondylosis. Cervical osteoarthritis and neck arthritis are other names for it.

    The condition is caused by cervical spine degeneration, which results in pain, stiffness, and tension in the shoulder and neck. The correct therapy may be helpful in the management of cervical spondylosis.

    Exercises can help manage your cervical spondylosis and greatly improve the condition along with the therapy recommended by your doctor.

    Introduction:

    Exercise is an important part of physiotherapy treatment because it reduces stiffness in the neck, strengthens weak neck muscles, and speeds up the healing process for cervical spondylosis. Cervical spondylosis is the common term for age-related degeneration of the spinal disks in your neck area.

    Stretching gently is necessary for relaxing and healing muscles. It improves blood circulation, reduces tension, and improves flexibility in the neck region. Frequent practice can improve neck health overall and help manage the symptoms of cervical spondylosis.

    Why do people have cervical spondylosis?

    When we age, the disks and joints of our cervical spine, or neck region, slowly degenerate. This condition is also known as cervical spondylosis or arthritis of the neck. Cervical spondylosis is the medical term that refers to aging-related, wear-and-tear changes in the cervical region.

    The most common symptoms of cervical spondylosis are neck pain and stiffness, while many people with the condition have no symptoms at all. When conservative treatment is applied, such as medication and physical therapy, cervical spondylosis usually improves.

    A frequent condition that becomes worse with age is cervical spondylosis. If you suffer neck pain, you are more likely to have cervical spondylosis than 80% of those over 60. The development of cervical spondylosis changes from person to person and is affected by multiple factors, including genetics, occupational stressful situations, and previous neck injuries. To choose the “best exercise for cervical spondylosis,” which targets particular symptoms and improves neck function overall.

    What causes cervical spondylosis:

    Bone spurs: The body attempts to develop more bone to strengthen the spine, which leads to large bone growth. However, the additional bone may put pressure on sensitive spots of the spine, such as the spinal cord and nerves, which could hurt.

    Dehydrated spinal discs: To deal with the force of lifting, twisting, and other actions, your spinal bones have thick, pad-like cushions called discs between them. These discs can become damaged. The gel-like components of these discs may dry out with time. As a result, there may be pain as your spinal vertebrae rub against one another more.

    Herniated discs: Breaks in the spinal discs might allow the inside cushioning material to leak out. The chemical may put pressure on the spinal cord and nerves, causing symptoms like numbness in the arms and pain that travels down them.

    Injury: An injury to the neck, such as that suffered in a vehicle accident or after a fall, may speed up the stages of aging.

    Ligament stiffness: As you age, the strong cords that connect your spinal bones may get even more rigid, affecting your neck’s range of motion and giving you a tight feeling.

    Overuse: Heavy lifting and repetitive motions are part of some jobs and activities (such as construction work). This may result in excessive wear and tear on the spine by applying additional pressure.

    Signs and symptoms:

    Neck pain affects most people. But sometimes, the pain will radiate to other areas, including the shoulders or head.

    Other signs and symptoms of cervical spondylosis include;

    • Stiffness in the neck
    • Swelling
    • Headache
    • Difficulty walking
    • Changes in posture
    • The sound of popping that happens as you turn your neck

    Also, there could be a loss of coordination and weakness in the arms and legs.

    The blood vessels sometimes contract as a result of these changes. This may affect the blood flow to the brain, which could lead to feeling dizzy and even falling experiences.

    How is cervical spondylosis diagnosed?

    Cervical spondylosis diagnosis includes the following;

    • Medical History: Your symptoms and medical history are checked by a physician.
    • Physical Examination: A doctor looks for stiffness, pain, and range of motion in your neck.
    • Imaging: To look at the cervical spine and verify the diagnosis by identifying spinal abnormalities and potential nerve compression, X-rays, CT scans, or MRI scans are frequently performed.

    What are the advantages of exercising with Cervical Spondylosis?

    The following are the benefits of regular exercise for cervical spondylosis:

    • To increase neck movement, and reduce stiffness.
    • They may reduce pain and soreness in the neck.
    • Improve the flexibility of neck muscles that have become tight due to cervical spondylosis.
    • Helps to improve weak neck muscles.
    • Some cervical spondylosis exercises help with posture, which reduces the load on the neck.
    • Regular exercise helps stop the condition from getting worse.
    • They improve daily functioning and general well-being.

    How to decide if your level of exercise is right for you:

    You should pay attention to your pain level when exercising, especially at the beginning. It’s possible that these workouts first make your symptoms slightly worse. But with continued practice, they should become easier and provide improved neck mobility.

    You can figure out how you’re exercising at a suitable level with the help of this guide. It will let you identify the right degree of pain or difficulty.

    Developing a pain scale from 0 (no pain) to 10 (the highest pain you have ever experienced) can be useful. For example;

    • A Pain level of 0 to 3 is minimal pain
    • A pain level of 4 to 5 is reasonable pain.
    • A pain level of 6 to 10 is severe pain.

    Pain experienced when exercising:

    Try to keep the scale of your pain between 0 and 5. If your pain passes this limit, you can modify the exercises by:

    • Reducing the number of repetitions of a particular movement
    • lowering a movement’s speed
    • Extending the time between movements for rest

    Pain following physical activity:

    Your neck pain shouldn’t get more severe as a result of exercise. However, as the body adjusts to new movements, trying out new exercises can lead to temporary muscular pain. This type of pain should go away fast, and the morning following your workout, the pain shouldn’t be any worse.

    Why Exercise Is Important for Treating Cervical Spondylosis:

    Your neck helps you move and supports the weight of your head. So, stretching and strengthening exercises are important, just as they are in preventing or reducing neck pain in the cervical region. These workouts provide many advantages. Simple neck exercises, for example, can help strengthen and develop the muscles, stabilize and support the surrounding spinal structures, and lower the risk of degenerative disorders.

    For people with cervical spondylosis, physiotherapy plays an important role because it can help manage pain while improving function without requiring costly procedures like surgery. Physical therapy may also help prevent future neck degradation by promoting better posture and reduced neck strain. Together with a physiotherapist, you can create a personalized treatment plan that improves your quality of life by considering your unique requirements and goals.

    Best Exercises for Cervical Spondylosis:

    The right exercises for cervical pain can change based on the needs and level of pain of the person being treated. Physiotherapy may help choose a suitable fitness program.

    Head turn

    • Maintain a straight back and neutral shoulders while seated in a chair.
    • Maintaining a straight chin, lean the head to one side to look like you’re looking over your shoulder.
    • Contract the neck muscles gently.
    • Hold for a few seconds.
    • Then return to your neutral position.
    • Then relax.
    • Repeat this exercise 5-10 times.
    • Now do the same exercise again on the other side.
    Neck Turn
    Neck Turn

    Side-to-side head tilt stretches

    • Keep your back and neck straight while seated in a chair.
    • Starting with the ear, gently turn the neck in the direction of the shoulder.
    • Stretch your neck muscles slightly.
    • Hold for a few seconds.
    • Then return to your neutral position.
    • Then relax.
    • Repeat this exercise 5-10 times.
    • Now do the same exercise again on the other side.
    Side-to-side head tilt
    Side-to-side head tilt

    Neck Retractions

    • To begin this exercise, you sit or stand with your back straight and your spine relaxed.
    • Gently pull your chin into your chest to create a double chin.
    • The pressure will be felt in the base of your neck.
    • To feel the muscular stretch, hold the pose for a few seconds generally.
    • Then return to your neutral position.
    • Then relax.
    • Repeat this exercise 5-10 times.
    Neck Retraction
    Neck Retraction

    Shoulder Blade Squeeze

    • Keeping your arms by your sides, take a seat, or stand up.
    • Do not shrug, instead, keep your shoulders down and relaxed.
    • At the beginning, place your elbows at your sides, bent 90 degrees.
    • While pressing your shoulder blades together, shift your elbows and shoulders back.
    • Hold this position for a few seconds.
    • Then return to your neutral position.
    • Then relax.
    • Repeat this exercise 5-10 times.
    Shoulder Blade Squeeze
    Shoulder Blade Squeeze

    Neck roll

    • Start by taking a comfortable seat.
    • Look to the right with your head as long as your neck muscles begin to gently stretch.
    • Slowly rotate your head clockwise after a few seconds.
    • When you come to your left shoulder side, hold for a short moment.
    • Your neck muscles should once again feel a bit stretched.
    • Finish the clockwise round.
    • Then return to your neutral position.
    • Then relax.
    • Repeat this exercise 5-10 times.
    Neck roll
    Neck roll

    Rolls of the shoulders

    • Sit comfortably to begin.
    • Keep your arms in a relaxed position.
    • Your shoulders should be raised toward your ears.
    • Squeeze the shoulders together by pulling them back.
    • Hold this position for a few seconds.
    • Then return to your neutral position.
    • Then relax.
    • Repeat this exercise 5-10 times.
    Shoulder Roll
    Shoulder Roll

    Prone cobra exercise

    • Place a pillow over your forehead while you’re face down on the ground.
    • Raise your arms, head, and chest.
    • Keep your elbows positioned sideways.
    • Squeezing the shoulder blades together tightly.
    • Eyes looking up and extending the neck, keep the forehead upward to the ground.
    • Hold for a few seconds.
    • Then return to your neutral position.
    • Then relax.
    • Repeat this exercise 5-10 times.
    Bhujangasana (Cobra Pose)
    Bhujangasana (Cobra Pose)

    Upper Trapezius Stretch

    • Begin by taking a comfortable seat.
    • Place your left hand over your head’s right side.
    • Carefully press down.
    • Put pressure on your head in the direction of your shoulder.
    • Hold this position for a few seconds.
    • Then return to your neutral position.
    • Then relax.
    • Repeat this exercise 5-10 times.
    • Now do the same exercise again on the other side.
    Upper-trapezius-stretch
    Upper-trapezius-stretch

    Neck Isometrics

    • Begin in a comfortable sitting position.
    • Put your palm on your forehead.
    • Use your neck muscles to resist the pull.
    • Hold for a few seconds.
    • After that, go back to the neutral posture.
    • Then relax.
    • Putting pressure on your head’s side.
    • Now switch sides.
    • Putting pressure on your head’s back.
    • Repeat this exercise.
    • Then return to your neutral position.
    • Then relax.
    • Repeat this exercise 5-10 times on all sides.
    Neck-isometric
    Neck-isometric

    Shoulder Shrugs

    • Stand up straight with your feet shoulder-width away.
    • Maintain your hands by the sides of your body.
    • Keep your chin up and face forward while bending your legs slightly.
    • As you inhale, raise your shoulders to your ears.
    • Take your time moving in this way.
    • Take a deep breath out and lower your shoulders.
    • Then return to your neutral position.
    • Then relax.
    • Repeat this exercise 5-10 times on all sides.
    Shoulder-shrug
    Shoulder-shrug

    Cat-Cow

    • Begin by placing your hands in the tabletop position on the ground.
    • Make sure you have a straight back.
    • Use both hands and feet to keep yourself grounded.
    • Inhale deeply, raise your head and let the air fill your stomach.
    • Hold this position for a short while.
    • Then exhale, turn your back to face upward, and bring your chin up into your chest.
    • Hold this position for a few seconds.
    • Then return to your neutral position.
    • Then relax.
    • Repeat this exercise 5-10 times.
    Cat-and-Cow-Stretching
    Cat-and-Cow-Stretching

    Neck Extension

    • Take a seat with your back straight.
    • Take a breath, slowly bend your neck back, and look up at the sky.
    • Hold this position for a few seconds.
    • After you’ve exhaled, take a neutral position.
    • Then relax.
    • Repeat this exercise 5-10 times.
    Neck Flexion and Extension
    Neck Flexion and Extension

    Supine retraction

    • Resting on your back and positioning your head neutrally.
    • Press down your chin to bring your head down to its resting surface and pull it in.
    • Make sure your neck feels stretched in the middle and the front.
    • Hold this position for a few seconds.
    • Then return to your neutral position.
    • Then relax.
    • Repeat this exercise 5-10 times.
    Supine-cervical-retraction
    Supine-cervical-retraction

    Prone Head Lifts

    • Resting on your elbows, lift your head, shoulders, and chest while lying face down on a stable surface.
    • Make sure that you retract your head as you raise it to the head-neutral position. (Put your chin there)
    • Then keep raising and lowering your head as high as you can to try to keep your eyes up.
    • As your head lowers all the way, your chin should rest on, or very near, your chest.
    • Hold this position for a few seconds.
    • Then return to your neutral position.
    • Then relax.
    • Repeat this exercise 5-10 times.
    Prone-head-lift
    Prone-head-lift

    Supine Head Lifts

    • Start with a relaxing resting position on the ground.
    • Raise your head off the ground completely and bring your chin up to your chest.
    • Hold this position for a few seconds.
    • Then return to your neutral position.
    • Then relax.
    • Repeat this exercise 5-10 times.
    supine-head-lift
    supine-head-lift

    Downward-Facing Dog

    • With your knees under your hips and your wrists under your shoulders, get down on your hands and knees.
    • To raise your hips and straighten your legs, flex your toes below and push back with your hands.
    • Extend the fingers and apply pressure from the forearms to the fingertips.
    • Extend your upper arms outward to lift your collarbones.
    • Relax and allow your head to down as you shift your shoulders from your ears to your hips.
    • To relieve your arms of the weight bearing on your body, gently contract the quadriceps muscles.
    • The position becomes much more of a resting pose with this action.
    • Keep your upper body up high, bring your heels into the ground, and turn your thighs inside.
    • Bring yourself forward to a plank position to make sure that the spacing between your hands and feet is correct.
    • Both of these positions should have the same amount of space between the hands and the feet.
    • In Down Dog, do not step the feet toward the hands to get the heels on the floor.
    • Return to your hands and knees while releasing your breath and bending your knees.
    • Then return to your neutral position.
    • Then relax.
    • Repeat this exercise 5-10 times.
    Downward Facing Dog
    Downward Facing Dog

    Bow pose

    • With your hands lying on either side of you and your lower jaw resting on the floor, lie flat on your abdomen.
    • As much as you can, raise your heels to your glutes while bending your knees.
    • Grasp the outside of your ankles and extend your palms backward.
    • Lift your heels toward the ceiling as you take a breath, lifting your upper body, thighs, and chest off the ground.
    • To make the stretch stronger, try lifting your heels while keeping your lower back pressed into the floor.
    • Shift your shoulders away from your ears and look forward.
    • Hold this position for a few seconds.
    • Gently drop your thighs to the floor, followed by the rest of your body, so you can let out a breath.
    • Then return to your neutral position.
    • Then relax.
    • Repeat this exercise 5-10 times.
    Dhanurasana (Bow Pose)
    Dhanurasana (Bow Pose)

    Levator Scapulae Stretch

    • Sit up straight on a chair and hold on to the chair’s edge with one hand.
    • Before pulling your chin into your chest, turn your head to the side that is opposite your extended arm.
    • Holding onto the back of your head with your free hand, slowly press it down until you feel a stretch and a hold.
    • During the workout, make sure your back keeps straight.
    • Then return to your neutral position.
    • Then relax.
    • Repeat this exercise 5-10 times.
    levator-scapular-stretch
    levator-scapular-stretch

    Chair Rise

    • Place your feet hip-width apart and take a seat in a supportive chair.
    • Pull your belly button inward toward your spine while sitting upright and with proper posture.
    • Lift your thighs from the chair and stand up by placing your hands on them and squeezing your thigh muscles.
    • Hold this position for a few seconds.
    • Then return to your seat carefully.
    • Then return to your neutral position.
    • Then relax.
    • Repeat this exercise 5-10 times.
    Chair-raise
    Chair-raise

    Arm lifts

    • Begin in a comfortable standing position.
    • Now, extend your arms straight out in front, palms facing forward.
    • Now, while taking a deep breath, raise the arms and bring them to fit your ears.
    • Take it slow so as not to cause yourself any pain.
    • Hold this position for a few seconds.
    • Then return to your neutral position.
    • Then relax.
    • Repeat this exercise 5-10 times.
    Standing-arm-lift
    Standing-arm-lift

    Neck flexion

    • With your feet shoulder-width apart on the ground, take an upright position on the edge of a seat.
    • Activate your inner core and hold your head in a neutral position.
    • Holding onto the sides of the seat can help you set your shoulder blades.
    • Move your head down and look at your belly button.
    • Hold this position for a few seconds.
    • To put your head back in neutral, keep your eyes on the belly button and extend your back away from your tailbone.
    • Then return to your neutral position.
    • Then relax.
    • Repeat this exercise 5-10 times.
    Neck flexion
    Neck flexion

    Doorway stretch for the neck

    • The doorway pectoral stretch requires standing in front of an open door frame.
    • Bend forward and feel the stretch over your chest and in front of your shoulders as you place your hands and forearms at shoulder level on either side of the doorway.
    • Hold this position for a few seconds.
    • Then return to your neutral position.
    • Then relax.
    • Repeat this exercise 5-10 times.

    Chest expansion stretch

    • Start with arms behind the back and hands behind the head to perform chest stretch.
    • Your arms should be raised and positioned behind your head in the first position, and your elbows should be pulled back as far as possible.
    • In the second, both hands are behind the back, reaching to try grasping each forearm or elbow.
    • While performing these neck exercises, squeeze your shoulder blades together and maintain your spine straight.
    • Hold for a few seconds.
    • Then return to your neutral position.
    • Then relax.
    • Repeat this exercise 5-10 times.
    Chest-expansion-stretch
    Chest-expansion-stretch

    Suggestions on Safe Exercise for People with Cervical Neck Pain:

    While doing any of these exercises, it’s important to be mindful of your technique and any health limitations. The purpose of these stretches is to help you manage and get rid of neck pain, not make it worse.

    • Begin slowly:

    You should progressively raise the intensity of your stretching and strengthening workouts. This reduces the chances of putting unnecessary stress or pressure on the neck muscles.

    • Pay attention to your body:

    Be aware of any areas in your neck that are painful, inflammatory, or injured. identify your pain level and adjust your training routine properly. So you need to get professional advice from your doctor.

    • Apply the Right Posture and Technique:

    Posture and technique are important for getting greater results when completing any activity. Because it also helps you move more effectively, increase your range of motion, perform better, and lower your chance of injury.

    What precautions Must Be Taken When Exercising?

    • For advice on a customized workout program, consult a physical therapist.
    • To avoid injury, make sure you complete exercises with the correct technique.
    • Recognize your body’s limitations and modify activities as needed.
    • For long-lasting effects, keep to a regular exercise routine.
    • Don’t overwork yourself; take breaks as needed.
    • Your neck should be slightly bent and stretched.
    • Do keep your posture straight when standing and sitting.
    • Aim to move your neck without jerking.
    • Stay away from painful exercise.

    When you not to do exercise?

    • If Exercise is painful stop the exercise
    • Before beginning any fitness program, speak with your healthcare doctor if you have any other medical problems that could make exercise dangerous.
    • You’re feeling sick.
    • Severe burning in the muscles or blurred eyesight.
    • Fever
    • Headache

    Risk factors:

    Cervical spondylosis can be worsened by factors other than age.

    Some of them are;

    • Injury to the neck
    • Age: As people age, cervical spondylosis is a common condition. As you age, your chance of getting cervical spondylosis increases.
    • Jobs: Tasks including heavy lifting, holding your neck uncomfortably for a period, or constantly moving your neck in the same way all day long can cause repetitive stress on your neck.
    • Genetic factors (cervical spondylosis in the family)
    • An inactive lifestyle
    • Overweightness- Obesity
    • Smoking
    • Joint wear and strain caused by frequent trauma or overuse

    How might cervical spondylosis be avoided?

    Cervical spondylosis may not be preventable, however, you can reduce your risk by doing the following things:

    • Stay physically active.
    • Maintain proper posture.
    • Whenever you exercise or play sports, be sure you use the correct technique and equipment to avoid neck injuries.
    • Prevent injuries to your neck.

    When to see a doctor?

    Consult your doctor and get medical help immediately if you experience a sudden onset of numbness or tingling in your arms, legs, or shoulder, or if you lose control over your bladder or bowel movements. Even after a few days of self-care, if symptoms do not get better then you can consider visiting a doctor.

    You could consider arranging a visit with your doctor if the patient’s pain and suffering begin to interfere with your regular activities Along with neck pain, there are signs of an infection, such as fever or feeling unwell. Although age is frequently the cause of the disease, some therapies may reduce stiffness and pain.

    Summary

    The ligaments, discs, and vertebrae in the neck or cervical spine degenerate as a result of cervical spondylosis. Recovery from cervical spondylosis requires gaining strength and mobility. exercise will help with tissue repair and allow you to resume your activities.

    Many symptoms can arise from cervical spondylosis. Many patients find that self-care techniques and lifestyle modifications help reduce symptoms and stop cervical spondylosis from getting worse.

    It could take some time for you to get back to your regular workout routine, and at first, results might not be visible right away. However, a slow return to regular exercise is the best course of treatment for cervical spondylosis patients to achieve both short- and long-term positive results. Many neck-stretching exercises may help in the relief of pain and stiffness.

    A doctor may recommend medicine, physical therapy, or other therapies, such as surgery if self-care is unsuccessful. It can also be advantageous to make some lifestyle adjustments, such as controlling your weight or, if relevant, giving up smoking.

    FAQs

    What major side effect does spondylosis cause?

    Spondylosis may cause spinal stenosis, which is an opening of the spinal canal. As a result, the spinal cord and spinal nerve roots may be compressed or pinched. For example, compression caused by spondylosis can affect the cervical spinal cord.

    What kinds of problems may be caused by cervical spondylosis?

    Cervical spondylosis is a medical diagnosis for neck pain resulting from aging-related changes to surrounding tissues and bones. Headaches, stiff necks, and pain are the most common symptoms of cervical spondylosis. There are cases when it can compress the neck’s nerves, sending pain down the arms.

    Does walking relieve cervical spondylitis symptoms?

    Frequent exercise may help with mild cervical spondylosis. Even if your neck pain requires you to temporarily reduce some of your activities, keeping up your activity level will help speed your recovery. Daily walkers are more likely to have low back and neck pain.

    Can cervical spondylosis be managed with exercise?

    Regular physical activity provides multiple advantages. It helps reduce neck pain, strengthen neck muscles, and improve and maintain posture. all of which can help with cervical spondylosis symptoms.

    How frequently should I perform these workouts?

    These exercises should ideally be done every day. The most effective results come from regularity, but it’s also important to pay attention to your body and make necessary adjustments.

    What should I do if these workouts hurt while I’m doing them?

    Should you feel any pain, stop the workout right away. Exercises must be done in a range that is comfortable for you. Take advice from your doctor if the pain doesn’t go away.

    Do any lifestyle modifications help these workouts work better for treating cervical spondylosis?

    These workouts can be supported by modifying your lifestyle to include better posture, practical belongings, and regular physical activity. A balanced diet and a regular amount of water are also helpful for the general health of the spine.

    For cervical spondylosis, what kind of exercise is best?

    Neck Retractions
    Neck Isometrics
    Rolls of the shoulders
    Upper Trapezius Stretch
    Side-to-side head tilt stretches

    How was my cervical spondylitis cured?

    There are many ways to manage cervical spondylosis even if there might not be a full recovery. These include exercises in physical therapy, methods for managing pain, anti-inflammatory and painkilling drugs, and, in extreme situations, surgical procedures

    When I have cervical spondylosis, how can I sleep?

    Turn over to sleep on your side.
    You should always lie on your left side in these situations. Sleeping on your side keeps your neck and head in contact with the rest of your body. Choosing a pillow that has just the right amount of thickness or softness is important for maintaining the neutral position of your head and neck.

    Can someone with cervical spondylosis have a normal life?

    Cervical spondylosis patients typically have some ongoing signs. The majority of these problems are manageable without surgery and only require non-surgical care. Many people suffering from this issue manage to lead busy lives. Certain people will always be in pain.

    How can I keep my cervical spondylosis from worsening?

    Exercise regularly, focusing on shoulder and neck muscle strengthening and stretching. Maintain a diet rich in calcium and vitamin D, along with other nutrients, to maintain strong bones. Take time to relax, reduce tension in your muscles and bones, and get lots of rest.

    With cervical spondylosis, which workouts are typically avoided?

    Stay away from stressful postures when sitting for extended periods of time. Stay away from high-impact aerobics and jogging if you experience neck pain. Never use your back or head to raise heavy things.

    Which at-home treatment for cervical spondylosis works best?

    Rest: To prevent future tension, give your neck enough rest.
    Good posture is important to have when standing, sitting, and sleeping.
    Use ice packs or heat therapy to relieve pain and minimize inflammation.

    How does bad posture affect the neck and cervical regions?

    Leaning forward, turning your head downward, and other positions that place undue strain on your neck’s muscles and nerves may eventually damage it.

    Is cervical exercise beneficial for you?

    Your neck helps you move and bears the weight of your head. To avoid or reduce cervical region neck pain, stretching and strengthening exercises are important.

    Can I perform neck stretches every day?

    To improve your posture and reduce the possibility of neck pain returning or developing worse, it’s common advice to perform daily neck stretches and exercises. The simple neck stretches and exercises that follow could provide much more comfort if done several times a day.

    What kind of movement is harmful to the cervical region?

    Bridges.
    Lat Pull-Downs
    Sit-ups and Crunches
    Military Press

    For cervical spondylosis, is yoga beneficial?

    As part of your daily routine, practice simple exercises from yoga to help relieve cervical spondylitis.

    References:

    • Cervical spondylosis exercises | NHS inform. (2023, December 1). Exercises for cervical spondylosis are available on NHS to Inform at https://www.nhsinform.scot/illnesses-and-conditions/muscle-bone-and-joints/
    • Felman, A. March 3, 2023. Information regarding cervical spondylosis. Exercises: https://www.medicalnewstoday.com/articles/172015
      Reference inside text: (Felman, 2023)
    • A. W. (November 24, 2023). ANSSI. https://www.anssiwellness.com/cervical-spondylosis-treatment-best-5-exercises-to-improve-your-condition/ Cervical Spondylosis Treatment: Best 5 Exercises To Improve Your Condition
      Reference inside text: (Center, 2023)
    • The Top 7 Best Exercises to Reduce Pain From Cervical Spondylosis. November 22, 2023. Historical Medical Facilities. Cervical spondylosis exercises: https://heritagehospitals.com/blog/
      Inside Text Citation: (Top 7 Greatest Pain-Relieving Exercises for Cervical Spondylosis, 2023)
    • P. (May 24, 2023). The Greatest Exercises to Reduce Cervical Neck Pain. The best exercises for relieving cervical and neck pain are available at https://www.physiotattva.com/blog/
      In-text Reference: (2023)
    • A. (November 1, 2023). The Complete Guide to Pain-Free Exercises for Neck Spondylosis. Nivaan Medical Center. Exercises for neck spondylosis at https://www.nivaancare.com/blog/neck-pain
      In-text Reference: (2023)
    • Brahmbhatt, B. (January 17, 2023). The Top 10 Activities for Neck Pain Relief. The top ten exercises to relieve neck pain are listed at https://www.physiotattva.com/blog.
      Citation within the text: (Brahmbhatt, 2023)
    • Image 1, Skimble.com. Head Turn Side To Side (n.d.). Exercise instructions: https://www.skimble.com/exercises/58347-head-turn-side-to-side
      Reference within the text: Head Turn Side to Side, n.d.
    • Image 2, Bordignon, M. Sept. 14, 2022. The Greatest Neck Stretches for Work. The finest neck stretches to try at work may be found at Northern Myotherapy. https://northernmyotherapy.com.au/
      Reference within the text: Bordignon, 2022
    • Image 3, Exercises for the Neck to Reduce Pain Chiropractic Reinhardt, Inc. November 11, 2022. Chiropractic Reinhardt, Inc. Chiropractic neck exercises to relieve pain can be found at https://www.reinhardtchiropractic.com/blog/
      In-text Citation: (Reinhardt Chiropractic, 2022 | Neck Exercises to Reduce Pain)
    • Image 4, Scapular Compressions, n.d. Scapular squeezes Hingehealth. https://www.hingehealth.com/resources/articlsCitation inside the text: (Scapular Squeezes, n.d.)
    • Image 5, Dr. Naveen Reddy’s neck, n.d. Medicus Naveen Reddy. Neck physiotherapy at https://www.drnaveenreddyortho.com/
      Reference within the text: Neck – Dr. Naveen Reddy, n.d.
    • Image 6, Syndrome of Thoracic Outlet – AAOS – OrthoInfo. (n.d.). Thoracic outlet syndrome: https://orthoinfo.aaos.org/en/diseases-conditions/
      In-text Citation: (OrthoInfo – AAOS, n.d.) Thoracic Outlet Syndrome
    • Image 8, Exercise programs for the upper trapezius stretch with overpressure. (As of now). www.workoutsprograms.com/exercises/overpressure-upper-trapezius stretch
      Reference inside text: (Exercises Routines: Upper Trapezium Stretch with Overpressurization, n.d.)
    • Image 9, C. W. Thane (2017) 19 December. Chikittsa Wellness Thane: Isometric Exercises for Neck Support – Medium. @chikittsawellnessthane on Medium: “Isometric Exercises for Neck Support” (8aef8849c229)
      Reference inside text: Thane (2017)
    • Image 10, Shoulder Shrug Exercise (n.d.). Saint Luke’s Medical Center. Shoulder-shrug exercise: https://www.saintlukeskc.org/health-library
      Reference inside text: Shoulder Shrug Exercise (n.d.)
    • Image 12, The source of this information is CERVICAL EXTENSIONS – Exercises, Workouts, and Routines (n.d.). https://www.workoutsprograms.com/exercises/cervical-extensions† In-text Citation:
    • Image 13, Rubio, T., and Rohn, R. D. (1980, December). Acute suppurative thyroiditis and a thyroglossal duct abscess are the causes of neck pain. 155–158 in Journal of Adolescent Health Care, 1(2). 10.1016/s0197-0070(80)80042-8 is the doi.org link.
      Reference within the text: (Rohn & Rubio, 1980)
    • Image 14, Singh, S. August 24, 2023. The Top 10 Sciatica Stretches for Pain-Free Working Life. Vantage Fit Offers Your Company Wellness Program a Comprehensive Solution. https://www.vantagefit.io/blog/the-best-sciatica-stretches
      Reference within the text: Singh, 2023
    • Image 15, Verification by Human. (n.d.). Effect of head lift exercise on Park Hwang’s kinematic motion: https://www.semanticscholar.org/paper/75fbabbd4360ee1196232e75fae8220d5a6f4816
      Reference inside text: (Human Verification, n.d.)
    • Image 16, Bidhuri, A. (February 3, 2022). Adho Mukha Svanasana, the downward-facing dog: How to Practice Its Benefits And Precautions | TheHealthSite.com. Benefits and precautions of downward-facing dog (adho mukha svanasana): A comprehensive practice guide. TheHealthSite, https://www.thehealthsite.com/fitness/yoga-asana/862135/
    • Image 17, Dhanurasana (Bow Pose) – The Yoga Collective How to Do the Bow Position. (April 7, 2020). The Collective Yoga. Bow Pose Dhanurasana https://www.theyogacollective.com/poses/ In-text Citation: (The Yoga Collective’s How to Perform Bow Pose: Bow Pose – Dhanurasana, 2020)
    • Image 18, Notice of Redirect. (n.d.). sa=i and url=https%3A%2F%2Fhotcore.info%2Fbabki%2Flevator-scapulae-stretches.htm; psig=AOvVaw1p2zHS8MsyZd8Fy13m3oln; ust=1710338360756000; source=images; cd=vfe; opi=89978449; ved=0CBMQjRxqFwoTCKj5oIzx7oQDFQAAAAAdAAAAABAJ
      Reference within the text: (Redirect Notice, n.d.)
    • Image 19, Zorzan, N. (October 31, 2022). Senior chair exercises: The Top 10. Senior chair exercises: https://www.medicalnewstoday.com/articles/
      Citation inside the text: Zorzan, 2022
    • Image 20, Exercise for the Shoulders, Upper Back, and Arms: Overhead Arm Stretch (n.d.). Saint Luke’s Medical Center. This is a link to a health library article about arm, shoulder, and upper back exercises: overhead arm stretch
      In-text Citation: (Overhead Arm Stretch, Shoulder, Upper Back, and Arm Exercise, n.d.)
    • Image 21, W. B. H. P. T. June 8, 2022. YouTube: Seated Neck Flexion. YouTube: https://www.youtube.com/watch?v=baMW92GY5Nc
      In-text Reference: (2022)
    • Image 23, N. P., physiotherapist (2022, Feb. 19). Stretching your pectorals: Health advantages, how to do it? – Clinic for Mobile Physiotherapy. Clinic for Mobile Physiotherapy. Pectoral stretch health benefits and how to do it are discussed at https://mobilephysiotherapyclinic.in.
      Citation inside the text: (Physiotherapist, 2022)
  • Brachial Plexus Injury

    Brachial Plexus Injury

    Brachial plexus injury refers to damage to the network of nerves that runs from the spinal cord to the hand, arm, and shoulder. The brachial plexus is the network of nerves that runs from the spinal cord to the hand, arm, and shoulder. The brachial plexus is harmed when these nerves are strained, compressed, or in the worst cases, torn apart or separated from the spinal cord.

    Brachial plexus injuries, often known as stingers or burners, are common in contact sports such as football. In neonates, birth trauma can occasionally result in brachial plexus injury. Two additional conditions that can affect the brachial plexus are tumors and inflammation.

    Motorcycle or car accidents typically cause the most severe brachial plexus injuries. Even though severe brachial plexus injuries may cause paralysis, the arm may be able to function again after surgery.

    What is Brachial Plexus Injury?

    • Brachial plexus injury is the term used to describe damage to the network of nerves that extends from the spinal cord to the shoulder, arm, and hand. From its placement near the top of the spine, this network spreads towards the armpit. These nerves are suddenly destroyed after a brachial plexus injury, which can cause pain, weakness, or loss of feeling in your hand, arm, or shoulder in addition to limiting movement.
    • The brachial plexus begins in your neck, crosses your upper chest, and finishes beneath your armpit. This network of nerves is often harmed when you pull or push hard on your arm, or when your head and neck are dragged away from your shoulder.
    • Brachial plexus injuries can result in discomfort, weakness, and numbness in the arm and hand and are usually caused by trauma to the neck.
    • Brachial plexus injuries that are not serious usually heal well. 90%–100% of the normal function of the arms is recovered in many cases of mild brachial plexus injuries. In cases of more severe brachial plexus injuries, function is frequently restored with surgery.
    • Brachial plexus injuries can occur in the uterus or during childbirth. Neonatal brachial plexus palsy is the name given to this injury (NBPP).
    • You should contact your healthcare physician to determine the cause of your symptoms if you have had an injury to your neck or shoulder and are unable to move or feel your hand or arm.

    What is Brachial Plexus? Its Structure and Function

    Brachial Plexus
    Brachial Plexus

    The brachial plexus is a network of nerves that connects the spinal cord to the hand, arm, and shoulder, carrying messages. This network starts near the top of the spine and extends towards the armpit.

    The brachial plexus is a network of nerve roots, connections, and branches that perform related duties. On each side of the body, there is one brachial plexus that contains the nerves supplying each arm. The anatomy, while initially complex, can be made simpler by breaking it down into five separate sections.

    The structure

    The brachial plexus is made up of the nerve cells that make up its several portions. Nerves are made up of axon fibers, which transport information to and from the brain. The supporting cells that surround nerve cells are called neuroglia. These cells secrete a substance known as myelin, which coats neurons and enables quick message transmission to and from the brain.

    The brachial plexus is made up of nerve roots that leave the spinal cord, pass via the cervicoaxillary canal in the neck, cross the first rib, and enter the armpit. It is located in what is known as the posterior triangle of the neck. The brachial plexus is divided into five separate anatomical divisions that differ in both location and composition.

    Roots (5):

    Five nerves leave the lower cervical and upper thoracic spinal cord (via the ventral rami), marking the beginning of the brachial plexus.

    • Four nerve roots (C5–C8) emerge from the cervical spinal cord’s lower region.
    • The first nerve to leave the thoracic spinal cord is called T1.

    The brachial plexus’s roots arise from the spinal cord and go behind the scalenus anterior. Following that, they emerge alongside the subclavian artery between the anterior and middle scalene muscles.

    Trunks (3):

    The five nerves combine to form three nerve trunks shortly after they leave the spinal cord.

    • Superior (created when C5 and C6 combined)
    • Middle (from C7)
    • inferior (C8 and T1 branches)

    The inferior, or lower, portion of the posterior triangle of the neck is traversed by the nerve trunks. At this point, they cross the first rib and continue laterally around the subclavian artery.

    Divisions (6):

    • There are six divisions formed by the separation of the three trunks into an anterior (sensory division) and posterior (motor) division.
    • These divisions are situated in the back of the collarbone, or clavicle. Above the collarbone are the roots and trunk (supraclavicular), while below are the cords and branches (infraclavicular).

    Cords (3):

    After that, the six divisions combine to form three cords. These cords, which are lateral, medial, or posterior regarding the axillary artery, are named thus because they are located close to it.

    • Lateral cord: The anterior branches of the superior and medial trunks combine to form the lateral cord.
    • Medial cord: The inferior trunk’s anterior branch continues as the medial cord.
    • Posterior cord: The posterior cord is created when the posterior branches of the three trunks combine.

    Terminal Branches:

    The three cords then give rise to the five primary upper extremity nerves (the remaining nerves originate via distinct brachial plexus points and are covered below). The location of a potential brachial plexus injury can be determined with great assistance if one is aware of the origins of these nerves as well as their purpose.

    • The musculocutaneous nerve: Comes from nerve roots C5–C7 and flexes the upper arm muscles at the elbow and shoulder.
    • The axillary nerve: Originating from C5 and C6 nerve roots, it facilitates shoulder rotation and allows the arm to elevate off the body. This nerve passes through the surgical neck of the humerus after emerging from the brachial plexus.
    • The radial nerve: Originates at nerve roots C5–T1 and regulates several muscles in the hand, elbow, forearm, and upper arm. The brachial plexus’s main branch is located here. It leaves the brachial plexus and follows the humerus’s radial groove.
    • The median nerve: Which originates in the C6–T1 nerve roots, permits movement in the forearm and certain hand regions. The median travel passes anterior to the elbow as it descends the arm from the brachial plexus.
    • The ulnar nerve: Originating in C8-T1, this nerve permits the fingers’ fine motor control. The ulnar nerve passes posterior to the medial epicondyle of the humerus after emerging from the brachial plexus.

    The musculocutaneous nerve arises from the lateral cord. The radial and axillary nerves originate from the posterior chord. The ulnar nerve originates in the medial chord. The median nerve is produced by the union of the medial and lateral trunks.

    Other Branches:

    Numerous other “pre-terminal” nerves arise at different locations along the brachial plexus.

    Branches from the roots:

    • Dorsal scapular nerve
    • Long thoracic nerve
    • A branch to the phrenic nerve

    Branches from the trunks:

    • Suprascapular nerve
    • Nerve to the subclavius

    Branches from the cords:

    • Upper subscapular nerve
    • Lower subscapular nerve
    • Thoracodorsal nerve

    Function

    • With two exceptions, the brachial plexus innervates the entire upper extremity (the arms and hands) and is responsible for sensation and movement in the forearms, hands, fingers, and upper arms.
    • The spinal accessory nerve innervates the trapezius muscle, which is used to shrug your shoulder.
      sensitivity to a region close to the armpit that receives innervation from the intercostobrachial nerve instead of the other nerve (this nerve can be injured when breast cancer surgery removes lymph nodes from the armpit).

    Motor Function

    The following motor functions are performed by the brachial plexus’s five terminal branches:

    • The musculocutaneous nerve: The muscles that flex the forearm are supplied by the musculocutaneous nerve.
    • Axillary nerve: This nerve controls several arm movements that circle the shoulder joint and innervates the teres minor and deltoid muscle (shoulder anterior flexors). An elbow injury would prevent someone from bending their elbow.
    • The ulnar nerve innervates all of the interosseus muscles as well as the medial flexors of the hand, wrist, and thumb muscles. A person may exhibit an “ulnar claw hand,” meaning they are unable to extend their fourth and fifth fingers if they are hurt.
    • Median nerve: The thumb and the majority of the forearm flexor muscles are innervated by the median nerve.
    • Radial nerve: This nerve supplies innervation to the brachioradialis, extensor muscles of the forearm, and triceps muscle.

    When one follows the nerves back to the cords, one finds that the lateral and medial cords give rise to the terminal branches, which in turn innervate the anterior side of the body’s flexor muscles. The extensors are then innervated as a result of the posterior cord.

    Sensory Function

    All of the upper extremities’ sensation, except a tiny patch under the armpit, is provided by the five terminal branches:

    • Musculocutaneous nerve: This nerve is in charge of the forearm’s lateral side sensation.
    • The axillary nerve is in charge of feeling in the area surrounding the shoulder.
    • Ulnar nerve: The lateral half of the ring finger and the pinky finger are sensed by the ulnar nerve.
    • Median nerve: The thumb, index finger, middle finger, medial half of the ring finger, palmer surface of the hand, and upper dorsal surface of the hand all send sensory information to the median nerve.
    • Radial nerve: This nerve receives sensory information from the posterior forearm and arm, as well as the back of the hand on the thumb side.

    The Autonomic Function

    • Additionally, the brachial plexus is linked to nerves that perform autonomic tasks including regulating the arm’s blood vessel diameter.

    Types of the Brachial Plexus Injury

    The type of damage and the amount of force involved determine how severe a brachial plexus injury is. The same incident might cause injuries to numerous separate brachial plexus nerves, ranging in severity.
    Among the most common types of brachial plexus injuries are:

    • Stretch (neuropraxia): This condition results from a brachial plexus nerve that has slightly stretched, damaging the nerve’s protective sheath. Though the underlying nerve may not always sustain damage as a result, this impairs the conduction of nerve signals. It might heal itself or need straightforward, non-surgical care to get back to normal, such as physical therapy.
    • Rupture: This occurs when a brachial plexus nerve is stretched more forcefully, causing it to rupture entirely or partially. Surgery is frequently an option for healing these kinds of wounds.
    • Avulsion: The most serious kind of injury to the brachial plexus. It occurs when your spinal cord is torn apart by the nerve root. Surgery is necessary for certain injuries to restore function.

    Causes of the Brachial Plexus Injury

    There are several possible causes of brachial plexus injuries, including: 

    • Forceful trauma.
    • Tumors.
    • inflammation.
    • birth injuries.

    Forceful trauma

    When your neck is driven up and away from your shoulder and your shoulder is forced down, damage to the upper part of your brachial plexus frequently results. If your arm is suddenly thrust above your head, there is a greater chance that damage will occur to the lower region of your brachial nerves. The following are some causes of trauma that can harm your brachial plexus:

    • High-speed accidents involving motor vehicles, particularly those involving motorcycles.
    • Falls
    • Forceful punches are delivered directly.
    • Collisions in contact sports (sometimes referred to as “burners” or “stingers”) are often more modest injuries to the brachial plexus.
    • Penetration injuries such as those caused by a knife or a gunshot (violent trauma).

    Tumors

    • Brachial plexus tumors can press against or grow in the brachial plexus.
    • The most prevalent tumors involving the brachial plexus are lung and breast cancers.
    • Tumors that can move to your axillary (underarm) lymph nodes and impact your brachial plexus include malignant mesotheliomas, squamous cell carcinomas, melanoma, and lymphomas that start in your head and neck.

    Inflammatory reaction

    • Your body triggers its immune system when it comes into contact with pathogens (such as viruses, bacteria, or poisonous substances) or sustains an injury. Inflammatory cells and cytokines substances that encourage the production of more inflammatory cells are the first reactions your immune system releases.
    • To either start repairing damaged tissue or to trap germs and other harmful agents, these cells initiate an inflammatory reaction. Although in many situations this inflammatory reaction is required, occasionally your immune system will target healthy tissue without any apparent cause. Alternatively, your body may experience a too-strong inflammatory reaction to an offending agent, which could harm bodily tissues.
    • Brachial plexus inflammation is caused by a rare disease known as Parsonage-Turner disease (brachial neuritis), which manifests as inflammation without a visible shoulder injury. The symptoms may start as an excruciating arm or shoulder pain and progress to weakening and numbness. Cervical radiculopathy is a common misdiagnosis for this disease.

    Birth injuries

    Babies may sustain brachial plexus injuries as a result of compression within the uterus of their giving parent or during a challenging delivery. Neonatal brachial plexus palsy is the name given to this injury (NBPP). The following circumstances have the potential to cause harm:

    • As the baby’s shoulders go through the birth canal, its head and neck pull to one side.
    • Stretching the baby’s shoulders when giving birth head-first.
    • Applying pressure on the raised arms of the breech (feet-first) baby during birth.

    Symptoms of the Brachial Plexus Injury

    Brachial plexus injuries can present with a variety of symptoms, depending on the type of damage and the nerve or nerves involved. If you have more injuries, you can also be experiencing additional symptoms at the same time.

    The following are the most typical signs of a brachial plexus injury in both adults and children:

    • An extremity that is limp.
    • Paralysis of the hand or arm.
    • Reduced ability to operate your wrist, hand, or arm muscles.
    • Your arm or hand is numb, meaning you cannot feel or sense anything.
    • Ache in your wrist, hand, or arm.
    • A baby with brachial plexus damage may not be able to move their hands, arms, or lower extremities.
    • Absence of the startle reaction, or Moro reflex, on the side which is affected.
    • They extend (straight) their arm at the elbow and hold it against their body.
    • Reduced force on the injured side.

    What differentiates a brachial plexus injury from cervical radiculopathy?

    Although they are different illnesses, brachial plexus injuries, and cervical radiculopathy share several symptoms.

    • A disorder called cervical radiculopathy, sometimes referred to as “pinched nerve,” causes compression and inflammation of any of the nerve roots in your cervical spine, or neck, leading to neurological impairment. Muscle weakness, numbness, and/or radiating pain are examples of neurological dysfunction.
    • In contrast to cervical radiculopathy, which is caused by compression and inflammation, a brachial plexus injury is typically caused by tearing or overstretching the plexus’s nerves.
    • Unlike cervical radiculopathy, brachial plexus injuries typically involve several nerve roots and are not associated with neck symptoms like pain or spasms.

    Risk Factors of the Brachial Plexus Injury

    The risk of brachial plexus injury is increased by involvement in contact sports, especially football and wrestling, as well as high-speed motor vehicle accidents.

    Risks Associated with Brachial Plexus Birth Trauma

    • Shoulder dystocia, (restriction of the baby’s shoulder on the mother’s pelvis)
    • Diabetes in mothers
    • large size during gestation
    • Challenging delivery requiring outside support
    • Prolonged labor
    • Breech presentation at delivery

    There are no recognized risk factors for more than 50% of brachial plexus injuries.

    Diagnosis of the Brachial Plexus Injury

    • It is normal for forceful incidents to result in brachial plexus injuries, so if your healthcare practitioner suspects you have one, they will do a thorough examination to diagnose the injury and rule out any additional problems.
    • The exact location and extent of the nerve injury will be determined by your provider by looking at every group of nerves connected to the brachial plexus. Your healthcare practitioner will be able to identify possible nerve injury sites with the assistance of the pattern by which nerves from the brachial plexus govern various muscles in your arm and hand.
    • Your infant’s doctor will do a physical examination to see whether your baby can move their upper or lower arm or hand if they exhibit symptoms of brachial plexus damage. When their provider rolls them from side to side, their affected arm can fall. The side of the damage also lacks the startle reaction or Moro reflex.

    To rule out other potential injuries and assist in the diagnosis of a brachial plexus injury, your healthcare professional may order several tests. Among these tests are:

    • X-rays: This imaging procedure uses very small, safe doses of radiation to provide clear images of solid objects, such as bone. To rule out related bone fractures, you’ll probably have X-rays taken of your neck, chest, shoulder, and arm. This is because brachial plexus injuries frequently result from traumatic accidents.
    • Computed tomography (CT) myelogram: A CT myelogram uses X-rays and computers to create images around your spinal nerves using a particular dye injection. This allows the physician to see internal body components. According to providers, this imaging technique is the most accurate way to identify injuries caused by spinal nerve avulsions. Additionally, certain medical professionals might employ magnetic resonance imaging (MRI) in addition to or instead of a CT scan.
    • Electrodiagnostic exams: These examinations examine muscle signals and nerve conduction. They include electromyograms and nerve conduction investigations. They can find the nerve injury, identify its severity, and assist in determining how quickly the nerve will heal from a brachial plexus injury. After your injury, your doctor will probably do a baseline electrodiagnostic examination three to four weeks later. This makes it possible to identify any potential nerve degeneration.

    To determine whether the nerves are regaining their strength, your provider will retake the assessment two to three months following the first one and then on an ongoing basis.

    In case your baby exhibits symptoms of a brachial plexus injury, the doctor could ask for an X-ray to check for any fractures in the collarbone. Injury to the brachial plexus in a newborn might mimic pseudoparalysis. This occurs when a baby breaks their arm and becomes immobile due to pain rather than nerve damage.

    Differential Diagnosis of the Brachial Plexus Injury

    Damage to the brachial plexus might resemble other illnesses’ symptoms. Therefore, to establish an accurate diagnosis, a comprehensive medical evaluation is essential. The differential diagnosis for an injury to the brachial plexus has been simplified as follows:

    Disorders of the cervical spine:

    • Cervical Radiculopathy: This is brought on by irritation or compression of the cervical spine’s nerve roots. Like a brachial plexus injury, it can result in discomfort, weakness, numbness, and tingling in the arm and shoulder.
    • Cervical spondylosis: Brachial plexus injuries might resemble the symptoms of degenerative changes in the cervical spine.

    Shoulder difficulties:

    • Rotator cuff tear: This condition, which can be misdiagnosed as a brachial plexus injury, results in shoulder pain and weakness due to a tear in the tendons of the rotator cuff muscles.
    • Shoulder impingement: Pain and weakness that resemble those of a brachial plexus injury can result from compression of the tendons in the shoulder joint.

    Other disorders of the nervous system:

    • Stroke: Similar symptoms to those of a brachial plexus injury can result from a stroke that affects the area of the brain responsible for controlling the arm and hand.
    • Multiple sclerosis: This neurological condition can affect the arm and hand as well as other regions of the body, causing numbness, weakness, and other symptoms.
    • Guillain-Barre syndrome: This autoimmune disease affects the peripheral nerves, causing tingling, weakness, and numbness in the hands and arms as well as throughout the body.

    Vascular conditions:

    • Thoracic outlet syndrome: Pain, weakness, and numbness in the arm and hand might result from compression of the blood vessels and nerves in the upper chest.

    Conditions affecting the muscles:

    • Polymyositis: Muscle inflammation that mimics a brachial plexus injury can result in discomfort and paralysis.

    Psychological conditions :

    • Conversion disorder: Rarely, a psychological disorder can cause symptoms that resemble brachial plexus injuries, such as weakness and numbness.

    It’s crucial to remember that this is not a complete list, and a medical expert should do a thorough assessment to rule out any further possible reasons for your symptoms. A physical examination, neurological testing, imaging studies (MRIs, X-rays), and electrodiagnostic testing to evaluate nerve function may be part of this.

    Treatment and Management of the Brachial Plexus Injury

    Many patients suffer further injuries because brachial plexus injuries are usually the result of acute, powerful events. These could consist of: 

    • Vein or artery injuries.
    • Fractures to the arm, spine, shoulder, or ribs.
    • A lung that collapsed.
    • spinal cord damage.
    • Brain trauma.

    This means that before beginning treatment for the brachial plexus injury, your healthcare team may need to attend to these more serious problems. The best care for a brachial plexus injury is provided by a group of medical specialists, which may include

    • Neurologist.
    • Neurosurgeon.
    • surgical hand specialist.
    • A physical therapist.
    • Occupational Therapist.
    • primary supplier of healthcare.
    • For brachial plexus injuries, there are two primary treatment options: nonsurgical and surgical.

    Conservative Treatment

    When it comes to Brachial Plexus injuries, conservative treatment is the best course of action, particularly in mild to moderate cases. Its main goals are to maximize function recovery, reduce problems, and promote nerve repair.

    Your physician can decide to wait to do surgery until after your injury recovers if they believe there is a good chance it will heal without surgery. The following are some typical conservative treatment approaches:

    Medication

    Medication can help control the pain and discomfort brought on by Brachial Plexus injuries, but it cannot heal the underlying injury. This may entail:

    • Painkillers are available over-the-counter: Ibuprofen is one example of a nonsteroidal anti-inflammatory drug (NSAID) that can help lessen pain and inflammation.
    • Prescription medications: Stronger medications, such as opioids, may occasionally be administered for the acute phase of pain relief to provide short-term pain relief. However, a doctor should continuously monitor their use due to potential dependence and negative effects.

    Targeting particular symptoms:

    Some drugs can target other symptoms that brachial plexus injuries may cause.

    • Anticonvulsants: Drugs such as Pregabalin or Gabapentin can be used to treat neuropathic pain, which is characterized by a tingling or burning feeling that frequently occurs in these situations.
    • Tricyclic antidepressants: These are sometimes prescribed to treat brachial plexus injuries together with chronic pain and sleep difficulties.

    Physical Therapy

    • Physical therapy is a fundamental component of conservative treatment plans. It helps prevent contractures, minimize stiffness, maintain and enhance range of motion, and strengthen muscles.
    • Immobilization: Slings or splints may occasionally be used to immobilize the arm and aid in the healing process, particularly in the early phases of an injury.
    • Electrical Stimulation: This method helps keep muscles from atrophying and can help with muscle function.
    • Nerve Blocks: Local anesthetic or steroid injections can be used to temporarily relieve pain.
    • Bracing: Braces can increase joint stability and provide arm support.

    Here are some other points to consider:

    • Early Intervention: To maximize recovery, physiotherapy must be started as soon as possible.
    • Pain Management: Improving the patient’s quality of life and enabling physiotherapy require effective pain management.
    • Patient education: Individuals recognize the possibility of long-term healing and actively engage in their rehabilitation program.
    • It is noteworthy that conservative measures may not always yield positive results, particularly in cases of serious injuries. To restore function or heal nerve damage, surgery can be required.

    When brachial plexus injuries occur, medical professionals usually advise surgery if the nerves are injured and cannot heal sufficiently to regain the necessary function in your arm and hand. It’s crucial to understand that surgery might not be able to restore your arm or hand to its pre-injury state, depending on how severe the injury was.

    Depending on the nature and extent of the injury as well as the length of time that has passed since the incident, neurosurgeons treat nerve injuries using a variety of procedures.

    Surgical Treatment

    • Nerve repair: It involves the attachment of a severed nerve’s two torn edges by your surgeon. Surgeons often tend to you immediately if you suffer a knife wound or other sharp lacerations to your nerves.
    • Nerve graft: In this surgery, the ends of a severed (lacerated) nerve are sewn together with a healthy nerve from another area of your body. As your damaged nerve endings grow back together, your healthy transplanted nerve serves as a support system.
    • Nerve transfer: When there are no viable nerve stumps in your neck that can be attached to nerve grafts, surgeons will perform nerve transfer surgery. Using this approach, the surgeon cuts the injured nerve and reattaches a healthy donor nerve to give a signal to the paralyzed muscle.

    Treatment for brachial plexus injuries in newborns

    • Your baby’s doctor may suggest range-of-motion exercises and gentle arm massages as treatments for a moderate brachial plexus injury.
    • Your child could require the care of a pediatric neurosurgeon if the damage is extensive or if it does not get better in the first few weeks. If, by the time your infant is three to nine months old, their strength hasn’t improved, they might think about surgery.

    Anesthesia-related problems are one of the hazards associated with any surgery

    • Infection.
    • Significant blood loss.
    • Furthermore, you might have extra risk factors if you already have medical disorders that could increase the likelihood of the following complications:
    • Persistent discomfort.
    • blood clots
    • Heart attack
    • A stroke.

    Complications of the Brachial Plexus Injury

    Many brachial plexus injuries in adults and children heal with little to no lasting harm if given adequate time. However, some wounds might result in either short-term or long-term issues, like:

    • Joint stiffness. The joints may stiffen if you develop paralysis in your hand or arm. If you finally regain use of the limb, this may make movement challenging. Because of this, your doctor may advise continuing physical therapy as you heal.
    • Pain. This is caused by injury to the nerves and could become chronic.
    • Numbness. You run the danger of burning or hurting yourself without realizing it if you lose feeling in your arm or hand.
    • Atrophy of muscles. After an injury, nerves regenerate slowly and may take years to mend. Muscle breakdown in the affected muscles may occur during that period if they are not used.
    • Irreversible impairment. Several variables, such as your age and the kind, location, and severity of the damage, affect how effectively you heal from a significant brachial plexus injury. Some persons have lifelong paralysis or muscle weakness even after surgery.

    Living with the Brachial Plexus Injury

    If you have sustained a brachial plexus injury, you will require follow-up visits with your medical team at regular intervals to track the healing process and nerve function.
    If you have a rehabilitation plan, you will also need to see your physical therapist regularly. To get the finest results possible, you must dedicate yourself to these therapies.

    Prevention of the Brachial Plexus Injury

    Even though brachial plexus damage is frequently unavoidable, there are things you may do to lessen the likelihood of problems after an injury has happened:

    • For itself. Physical therapy together with daily range-of-motion exercises can help prevent joint stiffness if you are temporarily unable to use your hand or arm. Steer clear of wounds and burns since you might not feel them if you’re numb. Your physician might advise you to use special padding to protect the brachial plexus area when playing sports if you’re an athlete who has had brachial plexus injuries.
    • For your children. Parenting a kid with brachial plexus palsy requires you to start exercising your child’s joints and functional muscles as early as a few weeks of age. This keeps the working muscles in your child strong and healthy and helps prevent the joints from becoming permanently stiff.

    Summary

    Nerves recover gradually. After a brachial plexus injury, particularly following surgery, the healing time is frequently prolonged and necessitates a strong dedication to a rehabilitation program to restore physical capacities.

    Even though a lengthy rehabilitation can be intimidating, it’s critical to keep an optimistic mindset. Seek assistance from your friends and relatives. Additionally, your healthcare specialists are here to give thorough treatment programs and assistance.

    FAQs

    What signs and symptoms indicate damage to the brachial plexus nerve?

    The arm, wrist, and hand are impacted if there is damage to the nerves that originate lower in the brachial plexus. Typical signs of damage to the brachial plexus include tingling or loss of sensation in the arm or hand. incapacity to move or control the hand, wrist, arm, or shoulder.

    How is a brachial plexus injury treated?

    To maintain range of motion, avoid stiff joints, and keep the muscles and joints functioning properly, your physician could suggest physical therapy. Generally speaking, brachial plexus nerve restoration surgery needs to happen six months following the damage. Success rates are lower for surgeries performed after that.

    Is an injury to the brachial plexus permanent?

    Many brachial plexus injuries in adults and children heal with little to no lasting harm if given adequate time. However, some wounds might result in either short-term or long-term issues, like stiff joints. The joints may stiffen if you develop paralysis in your hand or arm.

    Which medication benefits brachial plexus patients?

    Your range of motion may be restricted by brachial plexus injuries, which can also result in pain in your wrist, hand, arm, neck, or shoulder. For pain treatment, your doctor can suggest an over-the-counter pain reliever such as ibuprofen or acetaminophen. For one or two weeks, a stronger pain reliever may be recommended if necessary.

    How is an injury to the brachial plexus diagnosed?

    Examining the Brachial Plexus for Injuries your doctor will inquire about your symptoms and conduct a comprehensive physical examination of your neck, shoulders, arms, and hands to identify a brachial plexus injury.
    Imaging tests: MRI scans, X-rays, electromyography, a study of Nerve Conduction, etc.

    What is the most frequent cause of injuries to the brachial plexus?

    The majority of traumatic brachial plexus injuries result from pulling or stretching the arm violently. Numerous incidents, such as falls, car crashes, gunshot and knife wounds, and most frequently, motorbike crashes, can result in injuries.

    Does a brachial plexus injury require surgery?

    Brachial plexus injuries that are severe enough to require surgery cannot heal on their own. If surgery is necessary, it should be done no later than six months after the accident. The likelihood that a particular muscle can ever function normally again decreases with the amount of time you spend without a nerve activating it.

    References

    • Brachial plexus injury. (2022, December 22). Johns Hopkins Medicine. https://www.hopkinsmedicine.org/health/conditions-and-diseases/brachial-plexus-injuries
    • Brachial plexus injury – Symptoms and causes – Mayo Clinic. (2022, June 3). Mayo Clinic. https://www.mayoclinic.org/diseases-conditions/brachial-plexus-injury/symptoms-causes/syc-20350235
    • Brachial Plexus. (n.d.). Physiopedia. https://www.physio-pedia.com/Brachial_Plexus
    • Brachial Plexus Injury | Symptoms, Diagnosis & treatment. (n.d.). https://www.cincinnatichildrens.org/health/b/brachial-plexus
    • Brachial plexus injuries – OrthoInfo – AAOS. (n.d.). https://orthoinfo.aaos.org/en/diseases–conditions/brachial-plexus-injuries/
    • Professional, C. C. M. (n.d.-a). Brachial plexus injury. Cleveland Clinic. https://my.clevelandclinic.org/health/diseases/22822-brachial-plexus-injury
    • Eldridge, L., MD. (2023, July 14). The anatomy of the brachial plexus. Verywell Health. https://www.verywellhealth.com/brachial-plexus-anatomy-4777639
  • Therapeutic Ultrasound (US)

    Therapeutic Ultrasound (US)

    Introduction

    Therapeutic Ultrasound(US) treatment is a therapeutic approach that uses sound waves, or ultrasound, to treat a variety of medical ailments. Ultrasound therapy can help to decrease inflammation and discomfort while also improving joint and muscle range of motion.

    It also aids in the recovery of chronic and acute injuries to the muscles, tendons, and ligaments, as well as certain medical problems.

    The treatment also introduces energy into the body, causing microscopic gas bubbles to inflate and compress rapidly around the tissues. Because of the contraction and expansion of the bubbles, wounded tissues recover more quickly.

    Physical therapists with licenses and credentials can use the therapy to get a successful outcome. The therapy approach is extremely useful and applicable to a variety of tissues.

    Types of Ultrasound Therapy:

    There are two methods for practitioners to employ therapeutic ultrasound

    Diathermy:
    Diathermy is a therapeutic technique that involves producing heat beneath the skin. Body tissues absorb sound wave energy, causing molecular vibration and converting the sound energy into heat.

    Deep muscles, subcutaneous tissues, and joints are all potential targets. It can be treated for discomfort, joint contractures, and muscle spasms. It might potentially boost the efficacy of radiation and chemotherapy.

    Cavitation:
    Ultrasound waves cause pressure fluctuations in tissue fluids, also known as cavitation. Bubbles develop and then burst, causing changes in surrounding tissue. Doctors frequently utilize cavitation to break down fat cells.

    Cavitation can cure the following conditions:
    Cancer: Doctors employ targeted ultrasound to break down cancer cells and make them more responsive to therapy.
    Diabetes: Doctors employ cavitation to help diabetics recover their wounds. It may assist in avoiding heart issues caused by diabetes.
    Cardiovascular disease: Physicians can treat calcified arteries, veins, varicose veins, and blood clots with ultrasonic cavitation.
    Kidney disease: Doctors utilize cavitation to break down kidney stones.

    Production of ultrasound:

    Ultrasound generation requires a vibrating source with a frequency of one million cycles per second.
    This is accomplished with either a quartz or a barium titanate crystal.

    These crystals distort when subjected to fluctuating potential differences, resulting in a piezoelectric action.

    Components of ultrasound apparatus:

    A high-frequency current source is connected to a transducer circuit or treatment head via a coaxial connection.
    A coupled electrode inside the transducer circuit delivers a high-frequency current to the crystal.
    The crystal is being bonded to the treatment head’s metal front plate.

    Any variation in the crystal’s form corresponds to a distinct ultrasonic effect.

    Parameters of ultrasound therapy:-

    Frequency:
    Mostly used at 1 MHz and 3 MHz.
    1MHz = warms tissue from 2 to 5 cm.
    3 MHz: warms superficial tissue.

    Mode:
    continuous= it involves the treatment head producing ultrasonic energy continually.
    Pulsed = periods of ultrasound followed by periods of quiet.

    Intensity:
    The unit of intensity is watt.
    Space averaged intensity indicates that it is utilized in continuous mode [watt per square centimeter].
    Time-averaged intensity is utilized in pulse mode and corresponds to per-second intensity [watt per square centimeter].

    Reflection of ultrasound:
    To minimize ultrasound reflection, it’s important to prevent leaving air between the treatment head and the patient, as air cannot transfer ultrasonic waves. However, there will always be some reflection at each interaction that the ultrasound beam contacts. This creates acoustic impedance. When the acoustic impedance is low, transmission is increased, and vice versa.

    Transmission of ultrasound:
    Ultrasound beams can be refracted when delivered over an interface between two media. Because refraction does not occur when incident waves travel along the normal, therapy should be administered with the bulk of waves traveling along the normal whenever possible.

    Attenuation of ultrasound:
    Ultrasound attenuation refers to the progressive drop in the strength of the ultrasonic beam after it leaves the treatment head. Two key elements contribute to attenuation.

    Absorption of ultrasound:
    Ultrasound is absorbed by tissues, resulting in heat generation. This is the thermal impact of ultrasonography.

    Scatter:
    This occurs when the usually cylindrical ultrasonic beam deviates from its course due to reflection at contacts, bubbles, or particles. The combined impact of these two causes the ultrasonic beam’s intensity to decrease as it travels deeper. Therefore, while treating deep structures, care must be paid to the frequency and strength of the ultrasound selected.

    Ultrasonic Fields:
    The ultrasonic beam’s depth of penetration and intensity are determined by dividing it into a near and distant field. The near and far fields occur because wavefronts from various regions of the source must travel different distances, resulting in interference between neighboring fronts. The interference is beneficial at certain times, but damaging at others.

    The close field’s extent is significant since it is more intense than the distant field and may have a greater impact on the treatment of certain disorders. When treating tissues deeper than 6.5 cm, the ultrasonic frequency and transducer radius may need to be addressed.

    Coupling media:
    Because air cannot transfer ultrasonic waves, a media that can transmit them must be placed between the treatment head (transducer) and the patient’s skin. No complaint allows for complete transmission, and only a fraction of the original intensity is communicated to the patient.

    Air reflects the ultrasonic beam into the treatment head, resulting in standing waves that may harm the crystal. When the treatment head is not in touch with a transmission medium, it is always turned off.

    How does the ultrasound work?

    Ultrasound treatment makes use of a metallic probe. The technique begins with the application of gel to either the probe’s head or the skin. This gel allows sound waves to permeate the skin uniformly. After applying the gel, this probe is pushed repeatedly over the targeted region for 5 to 10 minutes.

    The intensity or strength of an ultrasound is adjusted to get the desired impact. Some patients may experience moderate pulsating during this therapy, while others may experience little warming in the targeted location.

    Ultrasound Therapy offers various advantages since it may be utilized for a wide range of conditions. The most common usage is to heat and relax muscles to relieve discomfort. Increasing blood flow, or lymph (lymph: a fluid that transports white blood cells throughout the body), helps speed up the healing process of not just muscles but also joints and ligaments.

    Softening of any existing scar tissue. Fracture repair is performed with low-intensity pulsed ultrasound. Management of knee osteoarthritis.

    Ultrasonic field of ultrasound:

    The ultrasonic field refers to the depth and intensity of the ultrasonic beam in both near and far fields.
    The extent of the near field is determined by the transducer’s radius [r] and the wavelength (?) of the ultrasound in the medium.

    The near field’s depth is equal to the square of the radius divided by the wavelength.

    The near field’s depth transducers for different sizes:

    NO.TRANSDUCER RADIUS (mm )FREQUENCY ( MHz )EXTENT OF NEAR FIELD ( cm )
    115115
    215345
    31016.5
    420126.5

    Ultrasound Therapy is used for what conditions?

    The treatment addresses orthopedic injuries and involves.

    • Bursitis
    • Frozen shoulder, 
    • sprains, and ligament problems
    • Tendonitis
    • Tears and  muscular strains
    • Tightness and Joint Contracture
    • swelling of the joint
    • Fractures and Pain
    • Muscle spasm
    • Osteoarthritis
    • Myofascial Pain
    • Rheumatoid arthritis.
    • Carpal Tunnel Syndrome
    • Varicose ulcers
    • Phantom limb ache
    • Pressure sores
    • Temporomandibular Joint Disorder
    • Meniscal Injury
    • Prolapsed intervertebral disc
    • Dupuytren’s Contracture
    • The therapy also addresses soft tissue injuries, neck discomfort, low back pain, and rotator cuff tears.

    Advantages of ultrasound:

    Ultrasound treatment has several therapeutic advantages for pain and injury sufferers.

    Flexibility: Applied Ultrasound Therapy is intended to increase the flexibility of tendons and ligaments, reducing stiffness and increasing the capacity to move rapidly and effectively.

    Inflammation & discomfort reduction: For novices, the therapy alleviates discomfort and cures the body’s deep tissues. It also lowers muscular spasms and stiffness, inflammation, which may be the underlying causes of pain, and speeds up recovery.

    Relaxing in the tissues: Ultrasound treatment reduces tissue tension and cures musculoskeletal disorders caused by muscular tissue damage from accidents or injuries. Deep heat to the tissues relaxes stress and stimulates blood flow, allowing cells to absorb healing fluids. This makes it useful for treating soft tissue diseases and surgical wounds.

    Improved Circulation: Ultrasound Therapy can assist boost circulation by opening up vessels and allowing blood to circulate more freely to regions in need of repair. Improved circulation also contributes to faster tissue healing.

    Breaking down scar tissue: The treatment creates microscopic vibrations, which disrupt the fibers and cause scar tissue to develop. Scar tissue breakdown enhances and preserves mobility range, providing long-term comfort.

    Who Shouldn’t Receive Ultrasound Therapy?

    The therapy is both safe and effective, and it is non-invasive. However, those with the following conditions should avoid treatment.

    • Cardiovascular problems.
    • Broken skin and fractures that have yet to heal.
    • Not to be used around the breasts, eyes, or sexual organs.
    • Malignant tumors
    • After laminectomy
    • Cannot be applied to spina bifida.
    • Avoid the pelvic areas, abdomen, and lower back of pregnant or menstrual women.
    • Acute Sepsis

    The physiological impact of ultrasound therapy:-

    • Increased blood flow.
    • Reduced muscular spasms
    • Increased collagen fiber extensibility
    • A pro-inflammatory reaction

    Biological Effects of Ultrasound Therapy Machine:

    On this effect, non-thermal helps to heal in three stages:
    Inflammatory = increases the fragility of lysosome membranes, allowing the contained enzymes to be released, which aids in the clearance of debris.
    Proliferative = fibroblasts and myofibroblasts may have ca+ ions pushed into them by ultrasound, increasing their mobility and encouraging them to go toward the location of repair.
    Remodeling =increasing the scar’s tensile strength by altering the direction, strength, and elasticity of the fibers that comprise the scar.

    Thermal impact of the Ultrasound Therapy Machine:

    Ultrasound is absorbed by the tissues and turned into heat at the spot.
    The quantity of heat relies on:

    • Absorption qualities of the tissue.
    • Times of therapy.
    • The efficiency of circulation through insonated tissue.
    • Continuous ultrasound equals the intensity and duration of insonation.
    • Pulsed means less effect than continuous
    • Uses:
    • Accelerate healing.
    • Scar Flexibility and Adhesion
    • Reduce pain.

    How to test an ultrasound machine?

    • Before using the machine always check first.
    • The simplest approach to determine whether ultrasound is being created is to use a water bath and reflect an ultrasonic beam up to the surface, which should cause ripples.
    • The mechanism is used to switch on and off the treatment head beneath the water.

    Techniques of using ultrasound:-

    Techniques of using ultrasound:-

    1. Direct contact
    2. water bath
    3. water bag

    Direct Contact:

    If the surface is regular, a coupling medium is applied to the skin to remove air between it and the treatment head.
    The treatment head is moved in tiny, concentric circles over the skin.

    The machine is switched on and off when in touch with the patient.
    This approach is appropriate for regions up to three times the size of the treatment head.
    For a huge region, split it and address each part independently.

    Water Bath:

    A water bath filled with de-gassed water is employed.
    When used with tap water, it creates gas bubbles on the patient’s skin and treatment head.

    So, if you use tap water, remove the gas bubbles from these surfaces periodically.
    This approach involves holding the treatment head 1 cm from the skin and moving it in tiny concentric circles.
    Keep the front plate aligned to the skin surface to minimize reflection.

    Water Bag:

    On uneven bony surfaces, a rubber bag filled with degassed water can be applied.
    To exclude air, a coupling medium should be inserted between the rubber bag and the skin, as well as between the rubber bag and the treatment head.

    It is a slippery bag, so the treatment head moves as if it were on the patient’s skin.

    Dosage for Ultrasound Therapy Machine:

    In acute circumstances, prevent aggravation of symptoms.

    • The initial step involves using a modest dose [0.25 or 0.5 W/cm2] for 2-3 minutes.
    • Using a pulsed beam reduces the heating impact, which provokes the symptoms.
    • For progression = the same dose is repeated.
    • If you fail to improve, raise the intensity to 0.8 W/cm2 for 4-5 minutes.
    • Aggravation of symptoms is not always a bad indication because it might suggest that healing processes are taking place.
    • Ratio = m:s pulse [extremely acute – 1:7; less acute – 1:1]
    • Chronic Conditions:
    • Pulsed or continuous beam
    • For continuous: maximum intensity utilized – 2 W/cm2 for 8 minutes.

    Dangers of ultrasound therapy:-

    Burns can occur when a continuous beam remains steady.
    Excess heat may build in the tissue. This finally leads to a burn.

    Overdose: Excessive therapy may worsen symptoms.
    Equipment damage: it occurs when the treatment head is held in the air while turned on and the beam is reflected into it, damaging the crystal.

    How many sessions are required in therapeutic ultrasound?

    The number of sessions necessary varies according to the specific ailment being treated, its severity, and the individual’s response to therapy. Acute diseases may only require a few sessions, but chronic problems may involve a longer-term treatment plan. Your physiotherapist will evaluate your development and estimate the number of sessions required based on your reaction to therapy.

    It’s crucial to remember that therapeutic ultrasound is only one part of a full therapy approach. It is frequently used in combination with other physical therapy methods, exercises, and lifestyle changes to produce the best outcomes.

    FAQs

    What is therapeutic ultrasound?

    Therapeutic ultrasound is a typical physical therapy procedure that provides deep warmth to the body’s soft tissues. These tissues consist of muscles, tendons, joints, and ligaments. Diagnostic ultrasonography is not the same as physical therapy ultrasound.

    Is therapeutic ultrasound safe?

    While therapeutic ultrasound is typically safe for treating some illnesses, it is not suggested for open wounds.

    What ailments can benefit from ultrasound therapy?

    Ultrasound treatment reduces pain and stiffness in joints while also promoting tissue repair. It has also enhanced circulation, decreased edema, and increased relaxation.

    How frequently should I utilize ultrasound therapy?

    It depends on the condition being treated. Working with a trained practitioner to identify the best frequency for your condition is critical.

    What are the disadvantages of ultrasound therapy?

    If used over an extended length of time, the skin may sustain superficial burns. This may be avoided by continually moving the ultrasound wand. Mechanical therapeutic ultrasounds may produce internal bleeding or damage depending on the length of exposure.

    Is ultrasound effective for knee pain?

    Therapeutic ultrasound is a non-invasive treatment that has the potential to effectively cure knee and hip osteoarthritis. The treatment looks to be quite safe, with little side effects, and is reasonably priced. There are a variety of osteoarthritis therapies available.

    References

    • What is Ultrasound Therapy? What conditions are treated by Ultrasound Therapy? Who will benefit from Ultrasound Therapy? (n.d.). Cbphysiotherapy. https://cbphysiotherapy.in/therapies-offered/ultrasound-therapy
    • P. (2022, August 3). Physiotherapy Treatment : Ultrasound Therapy. https://www.physiotattva.com/blog/physiotherapy-treatment-ultrasound-therapy
    • Lovering, N. (2023, February 1). Can ultrasound therapy reduce pain? https://www.medicalnewstoday.com/articles/ultrasound-therapy-for-pain
    • Clinic, M. P. (2023, August 13). Ultrasonic therapy machine: Types, Effects, Indications. Mobile Physiotherapy Clinic. https://mobilephysiotherapyclinic.in/ultrasonic-therapy-machine-ultra-sound/
  • Finger Pain

    Finger Pain

    Finger pain is a prevalent issue that is commonly caused by hand injuries such as fractures, cuts, or broken nails. It can also be a symptom of underlying medical conditions like osteoarthritis, rheumatoid arthritis, and carpal tunnel syndrome.

    The pain in fingers can be described as a throbbing, cramp-like, or achy sensation that can affect any finger, including the thumb, usually stemming from an injury or medical ailment.

    While most cases of finger pain are not severe and tend to resolve on their own, persistent or unexplained finger pain might signal a more serious medical problem. It is advisable to seek medical attention if you are experiencing ongoing finger pain.

    Anatomy of Fingers

    The hand comprises a total of 14 phalanges, which are the bones forming the fingers. Each finger consists of three phalanges known as proximal, middle, and distal, with the thumb having two phalanges. These finger segments are commonly identified as the thumb, index finger, middle finger, ring finger, and pinkie finger. The finger bones are labeled based on their proximity to the palm, with the proximal phalanx being closest to the palm, followed by the middle phalanx, and finally the distal phalanx furthest from the hand.

    The fingers have three main joints:

    • Metacarpophalangeal joint (MCP): Also known as the knuckle, this joint connects the finger bones to the hand bones. The thumb’s MCP joint connects to the trapezium bone.
    • Proximal interphalangeal joint (PIP): The proximal and middle phalanges of the finger are connected by this joint.
    • Distal interphalangeal joint (DIP): This joint joins the middle and distal phalanges and is next to the fingertip. Unlike the other fingers, the thumb does not have a DIP joint or distal phalanx bone.

    These finger joints are encased with a cartilage layer to facilitate smooth movement between the bones. Each joint has a fibrous capsule lined with synovium, a membrane secreting lubricating fluid for joint movement. The thumb possesses unique capabilities such as touching all fingers of the same hand’s tips and a wide range of motion necessary for grasping and holding objects.

    Causes of Finger Pain

    There are situations when the cause of your finger pain symptoms is unknown. The list of frequent causes provided below can be useful to you in your search for relief. Not all of these factors, though, are self-diagnostic.

    Traumatic Finger Pain Causes

    Finger pain caused by trauma can stem from various sources. Examples include:

    • Bruises and Strains: Accidents like slamming a finger in a door or playing sports can lead to finger injuries.
    • Fractures: Despite their strength, finger bones can easily break or fracture. Stress fractures, especially in fingers, may not be immediately noticeable. Symptoms can include swelling, limited hand and finger movement, and difficulty grasping objects.

    Infectious Finger Pain Causes

    Infections can also be a source of finger pain. Some possibilities are:

    • Bacterial Infections: The most common bacterial infection affecting hands is paronychia, typically seen around the fingernails. Any cut on the finger can potentially lead to a painful infection if left untreated.
    • Viral Infections: Conditions like herpetic whitlow can cause finger pain, particularly in the fingertip area.

    Medical Conditions Contributing to Finger Pain

    Several medical conditions can result in finger pain, such as:

    • Joint Issues: Arthritis can manifest with finger pain, alongside weakness in the hands.
    • Nerve Damage: Conditions like carpal tunnel syndrome can cause tingling and discomfort in the fingers due to nerve damage.
    • Blood Vessel Trauma: Thoracic outlet syndrome, characterized by compression impeding blood flow to the extremities, can lead to symptoms like finger tingling and numbness.

    Rheumatoid Arthritis

    Rheumatoid arthritis is a persistent inflammatory condition affecting joint linings, leading to thickening and pain. It can also impact various body parts such as the heart, lungs, eyes, and circulatory system. This disease is autoimmune, where the body’s immune system mistakenly attacks itself for unknown reasons.

    The main demographic at risk is women between 30-60 years old, along with factors like family history, smoking, and obesity playing a role. Initial symptoms consist of warm, swollen, stiff, and painful joints, particularly in the fingers and toes, accompanied by fatigue and fever. Usually, the body’s joints on both sides are impacted.

    Without treatment, irreversible joint damage and deformities may occur, alongside other complications. Early detection allows for preventive measures to commence promptly. Diagnosis involves physical examinations, blood tests, and imaging scans like X-rays, CT scans, or MRIs.

    While there isn’t a cure for rheumatoid arthritis, management strategies can enhance a person’s quality of life. Treatment options include nonsteroidal anti-inflammatory drugs, steroids, anti-rheumatic medications, physical therapy, and sometimes corrective joint surgery.

    Raynaud Phenomenon

    Raynaud phenomenon, also known as Secondary Raynaud syndrome, causes abnormal constriction of small skin arteries when exposed to cold air or water. This restricts blood flow to the hands, fingers, feet, toes, nose, and ears. Secondary Raynaud syndrome, typically triggered by an underlying medical condition like rheumatoid arthritis, scleroderma, or lupus, is rare.

    More prevalent among women living in cold regions, the Raynaud phenomenon presents symptoms like numb and cold hands and feet, with skin color changing from pale to bluish and then red once warmed. Untreated cases may lead to ulcers, finger/toe deformities, and potentially gangrene due to reduced circulation.

    Diagnosis involves a patient’s history, physical exams, and blood tests. Treatment consists of medications to improve circulation, addressing underlying conditions, and lifestyle adjustments for enhanced extremity protection in cold conditions.

    Psoriatic Arthritis

    Psoriatic arthritis, a complication of psoriasis, results in thickened, red, scaly skin. Arthritis might emerge before or after psoriasis develops. Both conditions, stemming from genetic and environmental factors, are autoimmune diseases where the body attacks itself.

    Primarily affecting individuals aged 30-50 with a family history of psoriasis, psoriatic arthritis manifests with painful, swollen, and warm joints on one or both sides of the body, finger/toe swelling and deformities, flaking fingernails, and foot discomfort. Seeking treatment is crucial to prevent permanent joint, eye, and heart damage.

    Diagnosis involves physical exams, x-rays, and MRIs with blood and joint fluid tests confirming psoriatic arthritis. Treatment includes over-the-counter anti-inflammatory drugs, anti-rheumatic meds, immunosuppressants, and joint steroid injections. Joint replacement surgery may be considered in extreme situations.

    Non-Serious Finger Injury

    Injuries to the fingers are a common occurrence and usually do not require medical intervention. You can manage these injuries at home by applying ice and allowing the affected finger to rest. If there is swelling and difficulty moving the finger, an X-ray may be necessary to rule out a fracture.

    Symptoms and Characteristics:

    • Common symptoms include recent finger injury, finger pain from an injury, swollen finger, and severe finger pain.
    • Consistently present symptoms of a non-serious finger injury are: new damage to the finger
    • Symptoms that are never present in non-serious finger injuries include: a twisted or bent finger
    • Urgency level: Self-treatment

    Nail Infection (Paronychia)

    Paronychia is an infection that affects the skin around the fingers or toes, specifically where the skin meets the nail. Acute paronychia, characterized by sudden onset, is typically caused by the staphylococcus bacteria. On the other hand, chronic paronychia is often a result of a fungal infection, particularly common in individuals who frequently have wet hands due to their line of work.

    Those with diabetes or compromised immune systems are at a higher risk of developing nail infections. Symptoms may include sore, reddened, and swollen skin around the nail, sometimes accompanied by pus. Diagnosis involves a physical examination and occasionally a skin culture to identify the infecting organism.

    Treatment:

    • Acute paronychia: Treatment involves having a healthcare professional clean any wounds, drain infections if needed, and prescribe antibiotics if necessary.
    • Chronic paronychia: Management includes ensuring the affected skin stays dry and using antifungal medications on the affected nail.

    Symptoms and Characteristics:

    • Top symptoms include swollen, painful, and spontaneously occurring fingers and nails.
    • Urgency level: Phone call or in-person visit

    Mallet Finger

    Mallet finger is an injury to the tendon at the furthest knuckle of the finger, resulting in the inability to straighten the tip of the finger. Seeking medical attention from a primary care physician or visiting an urgent care clinic within 24 hours is essential.

    Diagnosis typically involves X-rays to assess the severity of the injury, and treatment consists of splinting. In cases where the bone is protruding through the skin, immediate emergency room care is necessary.

    Jammed Finger

    Jammed fingers, often associated with sports activities but also possible during everyday tasks, require evaluation by a physician or at an urgent care facility within the next day. In most instances, surgery is not needed, and splinting the finger is sufficient.

    Symptoms and Characteristics:

    • Top symptoms: finger bruise, finger joint stiffness, swollen finger, finger discomfort following an injury, and recent finger injury
    • Symptoms that always occur with a jammed finger: recent finger injury, finger pain from an injury
    • Urgency level: Primary care doctor

    Dislocated Finger

    Dislocations at the finger’s base are uncommon but can damage the finger’s blood supply and nerves. Immediate care is necessary, and seeking treatment at an urgent care facility or emergency room is advised. A physician can safely “reduce” – realign the finger back into place.

    Simple dislocations typically require buddy taping to an adjacent finger, while more complex fractures necessitate immobilization with a splint. After the reduction, monitoring the blood flow to the fingertip is crucial. If the finger cannot be reduced, consultation with a hand surgeon is recommended.

    Boxer’s fracture

    • Boxer’s fracture is the term used to describe a fracture in one of the fingers, often resulting from a closed fist striking a hard object.
    • To alleviate pain and swelling, apply ice. If there is an open wound, clean it gently with soap and water before seeking care at your nearest urgent care clinic.
    • Symptoms of a boxer’s fracture include finger pain, swelling, and a history of a forceful impact on the finger.
    • If you notice your finger is misshapen, it is important to have it examined through an x-ray. Trying to realign it on your own is not recommended.
    • In cases where a finger appears bent or crooked, seeking attention at a hospital emergency room is necessary to address the issue promptly.

    Identifying Different Types of Finger Pain

    Finger discomfort can manifest as a dull, achy sensation or as a sharp, cramp-like pain, sometimes starting suddenly and then subsiding.

    Accompanied by swelling, a broken finger typically appears swollen, purple, or bruised, and causes intense pain. Occasionally, the bone might even be visibly dislocated underneath the skin.

    Throbbing or movement-induced pain can be indicative of conditions like carpal tunnel syndrome, affecting nerves and muscles in the hand and arm. Symptoms might include throbbing pain in the fingers, discomfort when moving the affected areas, difficulty with typing or writing, and hand tremors.

    Sharp shooting pain may occur from a finger dislocation, where the bones become dislocated from their joints, sometimes visibly. This type of injury can also lead to throbbing or sharp pain.

    In cases of a finger cut, pain localized to the site of injury might extend to surrounding areas based on the severity of the cut.

    Discomfort accompanied by lumps in the hand could indicate the presence of growths like boils or nodules. This may be experienced alongside typical finger pain, presenting as a fluid-filled lump, a firm patch of skin, a movable lump under the skin’s surface, or a tender lump upon touch.

    Symptoms of Finger Pain

    Finger pain may be associated with various other symptoms. For instance, infections in the finger could extend to the bloodstream, triggering fevers, inflammation, and shivering.

    Additional symptoms that might coincide with finger pain can encompass:

    • Discomfort in the arm or wrist
    • Areas with bruising
    • Changes in skin color
    • Weakened grip
    • Presence of discharge or pus
    • Issues with fingernails, such as bruising beneath the nail or nail detachment
    • Flu-like manifestations
    • Cuts, ulcers, lesions, or scrapes
    • Bumps on the finger
    • Limitation in joint movement range
    • Rigidity
    • Swollen regions
    • A sensation of numbness”

    When to Seek Medical Attention

    If your finger pain persists for more than a week without a known injury, it is advisable to contact a healthcare provider. Finger pain and swelling can be indicative of underlying conditions that require attention.

    Certain signs and symptoms should prompt a visit to a healthcare provider, including:

    • Pain that significantly hinders fine motor movements
    • Inability to move fingers without pain
    • Red, hot, or swollen fingers
    • Loss of sensation in the finger
    • Presence of symptoms like fever, fatigue, or unexplained weight loss alongside the pain.

    Diagnosis

    Your healthcare provider will conduct a physical examination and inquire about your medical background, specifically how and when your finger pain symptoms emerged, to identify the source of your discomfort.

    Imaging or blood tests may be recommended by your healthcare provider to aid in the diagnostic process.

    Medical Background

    In the initial assessment, your healthcare provider will review your medical history, focusing on any existing medical conditions and the onset of your finger pain.

    Furthermore, your healthcare provider will pose queries regarding your symptoms, such as:

    • Are you experiencing tingling, numbness, swelling, burning sensation, or muscle weakness?
    • Has the pain intensified over time?
    • Does the pain occur at rest or specifically when you perform certain actions or move your fingers?
    • Have you suffered any prior injuries to your hand or fingers?

    Inform your healthcare provider if you have recently dealt with an infection or are experiencing symptoms like fever, fatigue, or unexplained weight loss, as these could indicate an underlying systemic condition contributing to your finger pain.

    Physical Examination

    A physical examination will be conducted by your healthcare provider to assess the condition of your hands and fingers, as well as to check for any limitations in the movement or signs of pain in your finger joints.

    During the examination, signs of the following will be observed:

    • Redness
    • Warmth
    • Swelling
    • Tenderness
    • Bruising
    • Numbness
    • Abnormal skin texture

    Blood Tests

    Suppose conditions such as gout, autoimmune disorders like rheumatoid arthritis, psoriatic arthritis, lupus, scleroderma, or an infection are suspected. In that case, blood tests will likely be recommended by your healthcare provider to aid in the diagnosis.

    Blood tests can help determine the diagnosis by measuring levels of uric acid, C-reactive protein (CRP), erythrocyte sedimentation rate (ESR), rheumatoid factor, and antinuclear antibodies, among others.

    Imaging

    Various imaging techniques are commonly used to examine your finger joints, evaluate joint alignment, and identify indications of damage or inflammation. X-rays are usually the first choice to detect arthritis or fractures, while a magnetic resonance imaging (MRI) test may be conducted to assess a sprain or tear in cases of suspected tendon or ligament injuries.

    Joint Aspiration

    When a joint infection or conditions like gout are suspected, joint aspiration may be performed by your healthcare provider. This procedure involves extracting fluid from your finger joints for testing for any irregularities.

    Nerve Conduction Study

    In cases where nerve compression or damage is believed to be the cause of your finger pain, a nerve conduction test may be conducted to assess the nerve functionality. This test involves the application of electrodes on your skin and administering small electrical shocks to measure the speed of signal transmission in your nerves, thereby evaluating nerve function.

    Home Remedies for Finger Pain

    If you believe a visit to the doctor is unnecessary for treating your finger pain, there are various home remedies you can attempt.

    Remedies to Try at Home:

    • R.I.C.E. Method: If your finger pain is not severe, follow the R.I.C.E. method – rest, ice, compression, and elevation. Rest your finger as much as possible, apply ice several times a day, compress it gently, and elevate it when at rest.
    • Buddy Taping: Secure your injured finger to a healthy adjacent finger using stiff tape that prevents movement. This technique acts as a makeshift splint, keeping your injured finger stable during the healing process, particularly beneficial for minor fractures and sprains.
    • Pain Relief Medication: Over-the-counter pain relievers like ibuprofen, naproxen, or aspirin can help alleviate swelling and discomfort if taken as directed.
    • Epsom Salt Soak: To relieve general pain, consider soaking your finger in a bowl of Epsom salt. This method can help relax stiff joints and soothe muscle discomfort effectively.

    Treatment Options for Finger Pain

    The treatment options for finger pain will differ based on the root cause and severity of your symptoms. While many cases of finger pain can be effectively managed with medication and self-care techniques, more severe or chronic injuries may necessitate surgical intervention.

    Lifestyle Treatments

    Certain home remedies can aid in alleviating finger pain, including:

    • Applying topical pain relief creams or gels
    • Using ice or heat for pain relief
    • Engaging in gentle finger and wrist stretching exercises
    • Taking a break from activities that involve grasping or gripping
    • Using splints or immobilizers for added support during the healing process
    • Implementing adaptive equipment and modifications to reduce stress on finger joints
    • Making dietary adjustments, such as avoiding shellfish and alcohol in cases of gout
    • Avoiding exposure to cold temperatures if you have Raynaud’s syndrome

    Medications

    Depending on the level of pain experienced, medication may be necessary to manage symptoms. Over-the-counter nonsteroidal anti-inflammatory drugs (NSAIDs) or stronger prescription opioids can be taken orally. Steroids may also be injected directly into the finger joints to reduce inflammation.

    For individuals with systemic or autoimmune conditions, healthcare providers may prescribe medications like colchicine or allopurinol for gout, antibiotics for infections, or disease-modifying antirheumatic drugs (DMARDs) for autoimmune conditions. Iontophoresis, a method that delivers dexamethasone through the skin via electrical stimulation, can also be used to alleviate pain.

    Surgery

    In cases of significant finger injuries or deformities causing persistent pain and impaired hand and finger function, surgery may be necessary to improve joint alignment. Surgery is usually considered a last resort after attempting other treatment options. However, for severe finger fractures, immediate surgery may be required to stabilize and realign joints.

    Surgical procedures can also address chronic conditions like carpal tunnel syndrome or de Quervain’s tenosynovitis. Releasing the wrist or thumb retinaculum during surgery can reduce compression on inflamed tendons, alleviating pain and associated symptoms.

    Physical Therapy for Finger Pain

    Benefits of Physical Therapy

    Physical therapy provides numerous valuable benefits for individuals with finger pain. Here are some key advantages of integrating physical therapy into the treatment plan for this condition:

    • Non-Surgical Approach: Physical therapy offers a non-invasive and conservative option for treating finger pain, making it ideal for those seeking to avoid surgery or invasive procedures.
    • Pain Management: Physical therapists utilize various techniques and exercises to reduce pain and discomfort related to finger pain. These methods may include manual therapy, stretching, and modalities like ultrasound or heat therapy.
    • Enhanced Range of Motion: The goal of physical therapy is to improve joint function and flexibility in the affected finger or thumb. By working on increasing the range of motion, patients can move their digits more easily and without pain.
    • Muscle Strengthening: Specific exercises target the hand and forearm muscles to enhance strength and stability. Stronger muscles offer better support to the affected finger, reducing the risk of further complications.
    • Personalized Treatment Plans: Physical therapists create tailored treatment plans based on the individual’s condition and requirements. This personalized approach ensures that therapy addresses the specific challenges presented by the finger pain.
    • Prevention of Future Problems: In addition to treating current symptoms, physical therapy focuses on preventing future issues. Therapists emphasize techniques to maintain hand health and lower the chance of trigger finger recurring.
    • Improved Quality of Life: As symptoms improve and function is restored, individuals benefit from an overall enhancement in their quality of life. This allows for easier performance of daily activities and work-related tasks.
    • Patient-Centered Approach: Close collaboration between physical therapists and patients ensures progress is monitored and treatment plans are adjusted accordingly. This patient-centered approach guarantees that therapy remains effective throughout the recovery journey.

    Physical Therapy Exercises for Fingers

    Passive Range of Motion (PROM) Exercises

    Finger ROM
    Finger ROM

    These exercises involve the physical therapist gently moving the finger through its full range of motion to improve mobility and flexibility.

    • Finger Flexion: The therapist will hold the patient’s hand and gently bend the affected finger towards the palm, moving it through the full range of flexion.
    • Finger Extension: The therapist will hold the finger and gently straighten it, moving it through the full range of extension.
    • Abduction/Adduction: The therapist will spread the fingers apart (abduction) and bring them back together (adduction), working on the full range of motion for each finger.
    • Circumduction: The therapist will move the finger in a circular motion, rotating it through its full range of motion in all directions.

    Active Range of Motion (AROM) Exercises:

    These exercises involve the patient actively moving the affected finger(s) through their full range of motion without assistance.

    • Finger Flexion/Extension: The patient will bend and straighten each finger, one at a time, moving through the full range of motion.
    • Finger Abduction/Adduction: The patient will spread the fingers apart and bring them back together, focusing on moving each finger individually.
    • Finger Circles: The patient will make circular motions with each finger, rotating them in both clockwise and counterclockwise directions.
    • Finger Oppositions: The patient will touch the tip of each finger to the tip of the thumb, working on the full range of motion for each digit.

    Strengthening Exercises

    Finger Strengthening
    Finger Strengthening

    Finger Grip Strengthening:

    • Squeeze a soft rubber ball or stress ball with the affected hand/fingers
    • Perform repetitions of squeezing and releasing
    • Gradually increase resistance by using a firmer ball or adding putty/therapy clay

    Finger Abduction/Adduction:

    • Place a rubber band around the fingers, creating resistance
    • Spread the fingers apart (abduction) against the resistance of the band
    • Bring the fingers back together (adduction)
    • Repeat for the desired number of repetitions

    Finger Extension:

    • Place a rubber band around the fingertips
    • Straighten the fingers against the resistance of the band
    • Hold for a few seconds, then release
    • Repeat for the desired number of repetitions

    Wrist Curls:

    • Hold a lightweight dumbbell or a soup can in the affected hand
    • Rest the forearm on a table, with the wrist hanging off the edge
    • Curl the wrist upward, then downward, bending at the wrist joint
    • Repeat for the desired number of repetitions

    Finger Ladder:

    • Use a finger ladder or a similar device with rungs or loops
    • Insert the fingers into the rungs or loops
    • Perform finger flexion and extension by straightening and curling the fingers
    • Progress to using smaller rungs or loops for increased resistance

    Putty/Therapy Clay Exercises:

    • Squeeze and release a ball of putty or therapy clay with the affected hand/fingers
    • Knead and roll the putty, working the muscles of the hand and fingers
    • Gradually increase the resistance by using a firmer putty or clay

    Resistance Band Exercises:

    • Fasten a resistance band to a steady surface.
    • Loop the band around the fingers or hand
    • Perform exercises such as finger flexion, extension, abduction, and adduction against the resistance of the band

    The physical therapist may also incorporate the use of specialized hand exercisers or other resistance devices to target specific muscle groups and movements. They will guide the appropriate resistance level, number of repetitions, and sets based on the individual’s condition and goals.

    Prevention

    Swollen and achy joints in the fingers may indicate various systemic and autoimmune conditions. Maintaining optimal overall health and embracing an anti-inflammatory lifestyle can help prevent or reduce the severity of symptoms.

    Habits that support an anti-inflammatory lifestyle include:

    • Following a nutritious and balanced diet
    • Making sure you consistently receive seven to eight hours of good sleep
    • Effectively managing stress levels
    • Seeking strong social support from loved ones
    • Minimizing exposure to harmful toxins and chemicals

    Additionally, taking care of your fingers and hands can aid in preventing injuries. This involves minimizing repetitive hand and wrist movements whenever possible and giving your fingers a break from activities that cause discomfort.

    Summary

    • Various factors can lead to finger discomfort, such as osteoarthritis, rheumatoid arthritis, gout, fractures, and sprains, among others.
    • While certain finger pain causes can be managed with home remedies like ice packs, heat packs, or over-the-counter medications, more severe or persistent pain may necessitate broader treatment methods to reduce inflammation across the body.
    • Minimizing repetitive strain on hands and fingers, and taking breaks from activities that exacerbate discomfort, particularly if fingers are already painful, can aid in preventing symptoms from emerging or worsening.

    FAQs

    What are the most common causes of finger pain?

    The most common causes of finger pain include injuries (such as sprains, fractures, or dislocations), arthritis (osteoarthritis, rheumatoid arthritis, or psoriatic arthritis), tendinitis (like trigger finger or de Quervain’s tenosynovitis), nerve compression (carpal tunnel syndrome or cubital tunnel syndrome), infections (paronychia or felon), autoimmune diseases (lupus or scleroderma), repetitive strain injuries, Raynaud’s phenomenon, and gout.

    How can I tell if my finger pain is serious or not?

    Seek medical attention if you experience severe or persistent pain, significant swelling or deformity, inability to move the finger, signs of infection (redness, warmth, fever), numbness or tingling, or if the pain interferes with your daily activities. These signs could point to a more serious underlying illness that needs to be evaluated and treated right away.

    What are the best ways to manage finger pain at home?

    Home care strategies for finger pain include resting and immobilizing the affected finger(s), applying cold or heat therapy, keeping the hand elevated, taking over-the-counter pain relievers or anti-inflammatory medications, performing gentle exercises and stretches, using ergonomic modifications, practicing self-massage, managing stress, making lifestyle adjustments, and using supportive aids like splints or grip aids.

    When is physical therapy recommended for finger pain?

    Physical therapy is often recommended for finger pain caused by conditions like arthritis, tendinitis, nerve compression syndromes, or injuries. Physical therapists can provide pain management techniques, range-of-motion exercises, strengthening exercises, joint mobilization, splinting, ergonomic education, and customized home exercise programs to promote healing and restore function.

    What types of medications are used to treat finger pain?

    Medications commonly used to treat finger pain include over-the-counter pain relievers (acetaminophen, ibuprofen, naproxen), prescription-strength non-steroidal anti-inflammatory drugs (NSAIDs), corticosteroid injections, disease-modifying antirheumatic drugs (DMARDs) for autoimmune conditions, and topical analgesics or anti-inflammatory creams or ointments.

    When is surgery necessary for finger pain?

    Surgery may be recommended for severe cases of finger pain or when conservative treatments have been ineffective. Surgical procedures include arthrodesis (joint fusion), arthroplasty (joint replacement), tendon repair or reconstruction, nerve decompression, or drainage or debridement of infections.

    Can finger pain be prevented?

    While some causes of finger pain may be unavoidable, there are preventive measures you can take, such as proper warm-up and cool-down exercises, maintaining good posture and ergonomics, taking breaks and stretching during repetitive tasks, using appropriate protective equipment, and managing underlying conditions like diabetes or arthritis.

    How can I cope with chronic finger pain?

    Coping with chronic finger pain involves developing healthy coping mechanisms (deep breathing, meditation, mindfulness), modifying activities and tasks to reduce strain, using assistive devices and adaptive equipment, engaging in regular exercise and physical therapy, managing medications properly, and seeking support through counseling or support groups.

    References

    Maday, R. (2018, March 26). Finger Pain | Possible Causes, Arthritis, & Treatment | Buoy. https://www.buoyhealth.com/learn/finger-pain

    Dpt, K. G. P. (2022, December 12). Causes of Finger Pain and Treatment Options. Verywell Health. https://www.verywellhealth.com/finger-pain-6373927

    Kahn, A. (2023, March 1). Understanding Finger Pain. Healthline. https://www.healthline.com/health/finger-pain#treatment

    The Role of Physical Therapy in Managing Trigger Finger. (2023, September 14). Online Physiotherapy | Best Physiotherapists | PhysioMantra. https://physiomantra.co/physical-therapy/physical-therapy-for-trigger-finger/

    Parmar, D. (2023, December 20). Finger Pain Cure: Causes, Symptoms, Treatments. Mobile Physiotherapy Clinic. https://mobilephysiotherapyclinic.in/finger-pain/

  • Facial Nerve

    Facial Nerve

    Introduction

    The facial nerve is also called the seventh cranial nerve (CN7). This nerve has two main functions. It transmits sensory information from the tongue and the inside of the mouth. CN7 specifically serves the tip of the tongue, accounting for roughly two-thirds. The nerve extends from the brain stem to the pons and medulla. This nerve also innervates facial muscles, controlling their contraction and expression.

    Over its route, CN7 divides into multiple branches. The lacrimal gland, which secretes tears, the nasal cavity, and the sphenoid, frontal, maxillary, and ethmoid sinuses—skull cavities—are all served by the greater petrosal nerve. The stapedius muscle in the inner ear receives motor signals from one of the branches.

    The sublingual glands, a significant salivary gland, and the submandibular glands, located beneath the floor of the mouth, are supplied by the chorda tympani branch. The chorda tympani also communicate taste perceptions from the tip of the tongue.

    Most facial nerve problems involve paralysis, which is most commonly associated with Bell’s palsy. This condition, as well as other types of paralysis, can be caused by a viral infection or Lyme disease complications.

    What is the facial nerve?

    The facial nerve connects your brain to specific muscles in your face. It controls the muscles that allow you to make expressions such as raising your brow, smiling, or frowning. This nerve is also linked to the tongue’s sensations of taste.

    Anatomical Course

    The facial nerve’s course is extremely complex. Numerous branches transmit a variety of sensory, motor, and parasympathetic fibres.

    Anatomically, the course of the facial nerve is divided into two parts:

    • Intracranial – the path of a nerve through the cranial cavity and the cranium.
    • Extracranial refers to the nerve’s course outside the skull, through the face and neck.

    Intracranial

    The nerve originates in the pons, a part of the brainstem. It starts with two roots: a large motor root and a small sensory root (the part of the facial nerve that emerges from the sensory root is sometimes called the intermediate nerve).

    The inner acoustic meatus, a 1 cm-long aperture in the petrous region of the temporal bone, is where each of the two roots enters. These are extremely near to the inner ear.

    Further inside the temporal bone, the roots emerge from the internal acoustic meatus and go into the facial canal. The canal is a ‘Z ‘-shaped structure. Three major events take place within the facial canal:

    First, the two roots combine to form the facial nerve.
    The nerve then forms the geniculate ganglion, a collection of nerve cell bodies.
    Finally, the nerve leads to:

    The greater petrosal nerve carries parasympathetic fibres to the mucous glands and lacrimal glands.
    Motor fibres connect the nerve to the stapedius muscle in the middle ear.
    The Chorda tympani contains sensory fibres for the tongue’s front two-thirds along with parasympathetic fibres for the submandibular and sublingual glands.
    The stylomastoid foramen is where the facial nerve ends the facial canal and cranium. This exit is located just posterior to the temporal bone’s styloid process.

    Extracranial

    The facial nerve exits the skull and runs superior to the outer ear.

    The posterior auricular nerve was the first extracranial branch to arise. It supplies motor innervation to some of the muscles surrounding the ear. Motor branches are sent to the digastric muscle’s posterior belly as well as the stylohyoid muscle.

    The nerve’s main trunk, also known as the motor root of the facial nerve, extends both anteriorly and inferiorly to the parotid gland (note that the glossopharyngeal nerve, not the facial nerve, innervates the parotid gland).

    Within the parotid gland, the nerve branches into five different directions:

    • Temporal branch
    • Zygomatic Branch
    • Buccal Branch
    • Marginal mandibular branch.
    • Cervical Branch

    These branches innervate the facial expression muscles.

    Embryology

    During the 3rd week of the embryo, the bioacoustic primordium grows, and that structure eventually gives rise to the facial nerve. During the fourth week of life, the facial nerve divides into two parts: the chorda tympani and the caudal main trunk.

    The geniculate ganglion and nervus intermedius emerge in the fifth week. The facial muscles emerge from the second branchial arch during their seventh and 8th weeks. Between weeks 10 and 15, the peripheral segment of the facial nerve undergoes extensive branching. From the 16th week to birth, the bony canal undergoes ossification.

    Branches of the facial nerve

    The facial nerve then enters the parotid gland and divides into five sections (see above). The facial nerve has five main branches, though the anatomy varies slightly between individuals. The branches are listed from top to bottom: frontal (or temporal), zygomatic, buccal, marginal mandibular, and cervical. Each of these branches sends signals to a specific set of facial expression muscles.

    The following is a rough guide to which areas each branch innervates. There is some “cross-talk,” or circuitry overlap, between branches.

    • Frontal (temporal): Muscles of the forehead
    • Zygomatic: Muscles involved in forceful eye closure.
    • Buccal: The muscles responsible for moving the nose, upper lip, spontaneous eye blinking, and raising the corner of the mouth to smile.
    • Marginal mandibular branch: the facial muscles that depress the lower lip.
    • Cervical: The lower chin muscle (platysma) is frequently tense during facial hair shaving. Additionally, it brings your mouth’s corner down.

    Functions of the facial nerve.

    Special visceral efferent fibres

    The facial nerve has particular visceral efferent or branchiomotor fibres that supply the flattened skeletal muscles of the face and scalp, the stapedius muscles of the middle ear, the digastric muscle’s posterior belly, and the stylohyoid muscle. They are neurons, with cell bodies located in the motor neurons of the facial nerve.

    General visceral efferent (GVE) fibres

    The general visceral efferent fibres in the facial nerve are involved in the parasympathetic component of the autonomic nervous system and play an important role in the innervation of lacrimal, nasal, or palatine glands, along with the submandibular or sublingual glands. They are neurons whose cell bodies are located in the superior salivary nucleus.

    General somatic afferent (GSA) fibres.

    General somatic afferent (sensory) fibres from neurons with cell bodies in the geniculate ganglion innervate the skin around the external acoustic meatus and the retroauricular region. They form synapses with second-order neurons in the trigeminal nerve’s principal sensory nucleus.

    Special visceral afferent (GVA) fibres.

    Last but not least, the facial nerve (chorda tympani branch) serves a unique sensory function by carrying special visceral afferent fibres that convey taste sensation from the anterior two-thirds of the tongue to the soft palate. They are neurons with cell bodies in the geniculate ganglion and synapses in the nucleus of the solitary tract.

    Which problems and diseases affect the facial nerves?

    Several conditions can cause weakness or paralysis of the facial nerve, such as:

    • Accidents can lead to facial fractures.
    • Bell’s palsy is an irritation of the facial nerve.
    • Cancers such as salivary gland cancer and meningioma (skull base tumour).
    • Ear infections or tumours, such as acoustic neuromas and schwannomas.
    • Facial surgery includes cosmetic procedures such as facelifts.
    • Guillain-Barré syndrome is an autoimmune disease.
    • Lyme disease.
    • Nerve blocks are used for dental procedures as well as neuropathy.
    • Ramsay Hunt syndrome (a neurological disorder caused by infection with the chickenpox or shingles virus).
    • Sarcoidosis.
    • Stroke.

    What signs indicate facial nerve paralysis?

    The symptoms of facial nerve paralysis vary according to the cause. The symptoms could be temporary or permanent. You might experience:

    • Unclear or slurred speech.
    • Drooling, food coming out of your mouth, and difficulty eating and drinking.
    • Drooping brow on the affected side of your face.
    • Facial twitches (tic).
    • Inability to move facial muscles such as the forehead, brow, and corner of the mouth.
    • A lopsided smile or facial appearance.
    • Loss of smell or taste.
    • Nasal blockages.
    • You’re having trouble closing or blinking your eyes.
    • Sounds from your ear are amplified on the affected side of your face.

    Impairment of the branches of the facial nerve

    Frontal: Frontal paralysis is the inability to move the brow. Typically, this means the brow ‘hangs down’ in front of the eye, which can impair vision.

    Zygomatic: Difficulties with forced eye closure.

    Buccal: Difficulty smiling or moving the mouth. This causes problems with speech, particularly for sounds like “bee” and “papa,” which require precise lip motion to articulate. Food or liquid may drop out of the mouth unexpectedly due to abnormal lip movement. Furthermore, nasal obstruction on the affected side may occur due to paralysis of the muscles that keep the nostril open, resulting in an obstructed nostril. Normal blinking could be slowed or absent.

    Marginal mandibular: The muscles innervated by the marginal mandibular are involved in the downward motion of the mouth corner. Injuries here can cause an asymmetric smile as well as eating and drinking issues.

    Cervical: This is probably the least important of the branches. Damage on this nerve paralyses the platysma muscle, which is a thin sheet that lies just below the skin. Some patients may develop lower lip asymmetry when they smile.

    Summary

    The facial nerve, also known as the seventh cranial nerve (CN7), transmits sensory information from the tongue and mouth, mainly serving the tip of the tongue. It extends from the brain stem to the pons and medulla and innervates facial muscles. The nerve divides into multiple branches, including the greater petrosal nerve, which serves the lacrimal gland, the stapedius muscle in the inner ear, and the chorda tympani branch, which communicates taste perceptions. Most facial nerve problems involve paralysis, often associated with Bell’s palsy.

    The facial nerve, a part of the human body, is formed during embryonic development. It is separated into frontal, zygomatic, buccal, marginal mandibular, and cervical branches. Each branch sends signals to specific facial expression muscles.

    The facial nerve has special visceral efferent fibers that supply facial muscles, general visceral efferent fibers that innervate glands, general somatic afferent fibers that innervate skin, and special visceral afferent fibers that convey taste sensation. Several conditions can cause facial nerve weakness or paralysis, including accidents, cancers, ear infections, facial surgery, autoimmune diseases, and sarcoidosis.

    Facial nerve paralysis can cause symptoms like slurred speech, difficulty eating and drinking, a lopsided smile, loss of smell or taste, nasal blockages, and difficulty closing or blinking eyes. It affects the frontal, zygomatic, buccal, marginal mandibular, and cervical branches of the facial nerve, affecting vision, speech, and eating and drinking.

    FAQs

    What causes facial paralysis?

    Bell’s Palsy is the most common cause of facial paralysis, but it is only diagnosed after all other possible causes have been eliminated. Stroke, Lyme disease, Ramsay Hunt syndrome, brain tumours, head and neck tumours, trauma, surgery, and congenital abnormalities are all potential causes of facial paralysis.

    What are the symptoms of facial paralysis?

    Symptoms of facial paralysis are:
    Facial weakness.
    Facial asymmetry.
    Difficulty with facial expressions, including smiling and blinking.
    Difficulty closing eyes.
    Changes in tear and saliva production
    Taste changes in one side of the mouth.
    sensitivity to loud sounds.
    Pain near the ear on the affected side of the face.

    How can you tell if your facial nerve is damaged?

    People suffering from facial nerve damage may experience a variety of symptoms. The most common symptom is facial paralysis. Facial paralysis can leave a patient unable to move their facial muscles or perform involuntary facial movements.

    How many facial nerves are present?

    This nerve next arranges at the pes anserinus, forming the upper and lower divisions of the facial nerve. It then divides into five branches (temporal, zygomatic, buccal, marginal mandibular, and cervical), which innervate the muscles of facial expression.

    Where is the facial nerve located?

    The chorda tympani branch of the facial nerve innervates the anterior two-thirds of the tongue, giving it a unique sense of taste. The nerve originates in the facial canal and travels across the middle ear bones before exiting through the petrotympanic fissure and entering the infratemporal fossa.

    What is the function of the facial nerve?

    The facial nerve is the seventh cranial nerve and contains nerve fibres that control facial movement and expression. The facial nerve also transports nerves that control taste to the anterior two-thirds of the tongue and produces tears (lacrimal gland).

    References:

    • The Facial Nerve (CN VII) – Course – Functions – TeachMeAnatomy. (2023, July 20). TeachMeAnatomy. https://teachmeanatomy.info/head/cranial-nerves/facial-nerve/
    • Professional, C. C. M. (n.d.). Facial Nerve. Cleveland Clinic. https://my.clevelandclinic.org/health/body/22218-facial-nerve
    • Facial nerve. (2018, January 23). Healthline. https://www.healthline.com/human-body-maps/facial-nerve#1
    • Facial nerve (cranial nerve VII). (2023, October 30). Kenhub. https://www.kenhub.com/en/library/anatomy/facial-nerve
    • What is the Facial Nerve? (n.d.). Otolaryngology—Head & Neck Surgery. https://med.stanford.edu/ohns/OHNS-healthcare/facialnervecenter/about-the-facial-nerve.html
    • Seneviratne, S. O., & Patel, B. C. (2023, May 23). Facial Nerve Anatomy and Clinical Applications. StatPearls – NCBI Bookshelf. https://www.ncbi.nlm.nih.gov/books/NBK554569/