15 Best Exercises for Sacroiliac Joint Pain
Exercises for sacroiliac joint pain is a significant component of your total treatment strategy since it reduces pain, and stiffness in the Sacroiliac joint, and improves its function.
It can hurt and be annoying to have sacroiliitis (SI) pain. It is a painful condition that arises from inflammation of the lower back joint, located directly where your pelvis attaches to your spine. If it attacks, you might have pain in your buttocks and lower back that extends down your leg. It might become worse with prolonged sitting, standing, or stair climbing.
Your pelvis and sacrum are connected to many different muscles. Should any of these muscles become excessively tight, it may lead to modifications in your gait. As a result, there may be more stress in your Sacroiliac Joint.
You can start by reducing tight areas by stretching the muscles surrounding your Sacroiliac Joint. You might be able to decrease the feeling of discomfort and stiffness in the lower back when moving around.
If you have ongoing pain in your Sacroiliac Joint that doesn’t seem to improve with mild stretches, you might wish to see a physical therapist. They might create a personalized stretching and strengthening routine that helps you manage your pain.
Sacroiliac joints: what are they?
The lower spine and pelvis are joined by the Sacroiliac joint. The top portion of the pelvis, known as the ilium, and the bony structure above the tailbone, known as the sacrum, combine to form these two joints. When standing, the upper limb’s weight is supported by the sacroiliac joints.
Your body can transfer energy from your lower limb to your body when you walk, run, or move about thanks to several muscles and ligaments that support the Sacroiliac joint. Furthermore, the muscles and ligaments in your lower body absorb shock, reducing the strain on your spine.
Causes:
The sacroiliac joint is incredibly subject to pain as we age, due to physical activity, illness, and aging. It may crash for a variety of reasons, such as;
- Accidents involving cars and motorcycles
- Severe injuries, or other physical trauma
- Overweight or obesity
- Being pregnant
- Recurrent anxiety
- Urinary tract infection
- Extreme physical activity in osteoarthritis
- Biomechanical problems such as irregular gait
Pregnancy-related sacroiliac joint pain is also to be expected as your body produces more relaxing, a particular hormone. To allow your pelvis to expand during childbirth, this hormone causes your joints to become more elastic.
Although sacroiliac joint pain is frequently caused by pregnancy, in this case, the cause of the pain is hypermobility, or “too much movement.” Stretching might not help if your pain is related to a recent pregnancy.
Sacroiliac (SI) joint pain can be reduced, mobility may be improved, and function can be restored by providing support to the muscles in the lower back, thighs, and abdomen. The hip bones and sacrum are connected to these muscles.
Before beginning an exercise program, take the following steps:
It’s important to think about a few safety precautions and improve the benefits before beginning any exercise program. For guidance on the exercises that are most effective for your particular issue, speak with your physician or physical therapist.
It’s important to pay attention to your body and stay away from pushing past pain. While some soreness is common after exercise, severe or persistent pain may indicate that you’re pushing yourself too hard. Exercises with low impact should be your first option, and as soon as you can handle more challenges, you should progressively advance to harder ones.
Maintaining good form and technique is essential to avoiding more injuries. See a physical therapist if you have any questions about how to carry out your exercise routine properly. To better prepare your joints and muscles for the workout, warm up before beginning any exercise.
Exercise for Sacroiliac Joint Pain:
Single knee-to-chest stretch
- With the backs of your heels flat on the ground, lie on your back on a solid surface.
- Through your lower back stretches, slowly bring one knee to your chest.
- As close to your chest as is comfortable, bring your knee.
- Whether your leg is extended or your knee is bent, make sure your opposing leg is comfortable and relaxed.
- Hold this position for a few seconds.
- Then return to your neutral position.
- Then relax.
- Repeat this exercise five to ten times.
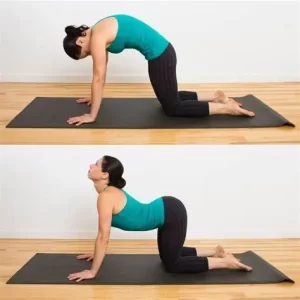
Cat-Cow
In yoga, the pose is commonly referred to as the cat-camel pose. You can use it to get warm. It can also be used to stretch and strengthen the muscles in your abdomen, hips, and back.
- Take the tabletop position by placing your hands on the floor.
- Verify that your back is straight.
- To keep grounded, use your feet and hands together.
- Take a deep breath, hold your head up, and allow air to fill your stomach.
- Hold this position for a short while.
- Next, release your breath, raise your chin to your chest, and turn your face upward.
- Your lower back is slightly extended.
- Hold this position for a few seconds.
- Then return to your neutral position.
- Then relax.
- Repeat this exercise five to ten times.
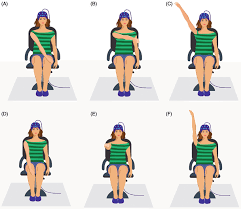
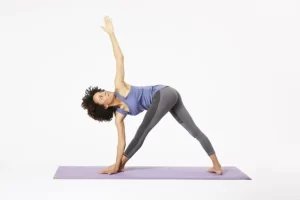
Triangle Pose
- The Triangle pose, also called Trikonasana, is achieved by facing the long side of your mat with your feet spaced about a leg’s length wide.
- Turn your left toes in at a 45-degree angle and turn your right foot out so that your toes point toward the mat’s short edge.
- You’re trying to find both legs to be stable.
- Pull your legs together and extend your right thigh until your right knee aligns with your first two toes.
- Make your lower abdomen in and upward, lengthen through both sides of your waist, and raise your arms so they are parallel to the ground.
- Inhale, stretch your body over your right leg, reaching to the right with your hips moving toward the rear of the mat.
- Exhale as you place your hand on a block, the ground, or a leg, and lower your right arm.
- Make sure your lower abdomen is facing upward.
- Raise your left arm straight up to the sky, keeping your hand parallel to your shoulder and your palm facing forward.
- Maintaining your neck’s alignment with your spine, extending through its sides.
- Either look directly ahead or pull your chin slightly and look up at your left hand.
- As you continue to press through the feet, extend through the fingertips and encircle of the head, and rotate your upper body, maintain a relaxed expression and take gentle breaths.
- To exit, plant your feet firmly on the ground, take a breath, and raise your left arm to the ceiling as you straighten up again.
- Then return to your neutral position.
- Then relax.
- Repeat this exercise five to ten times.
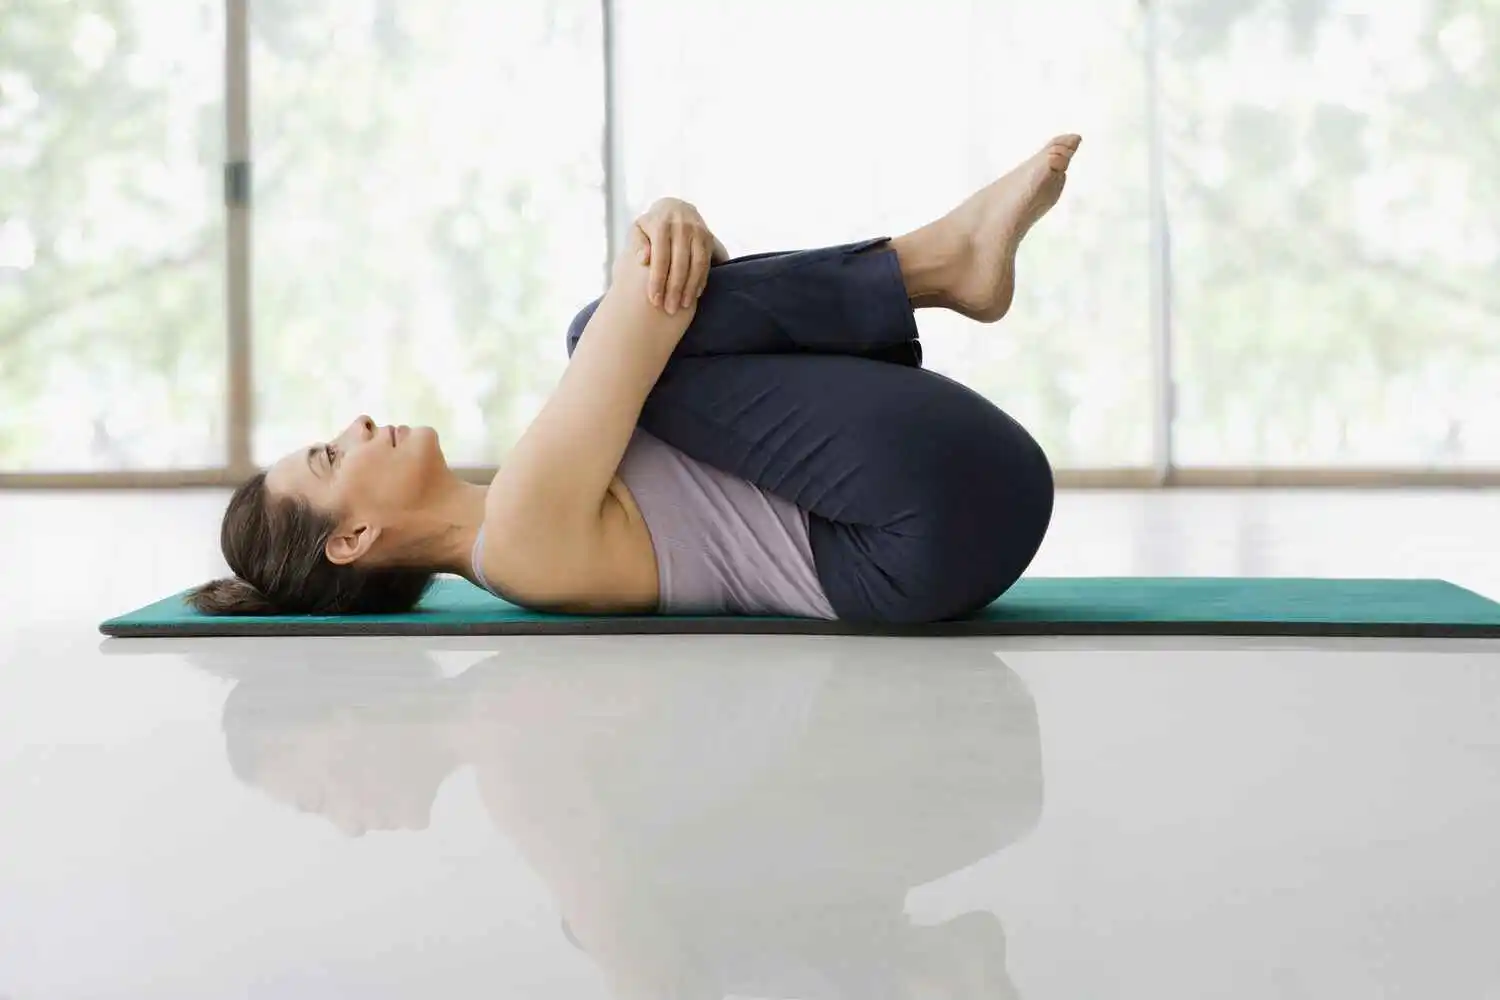
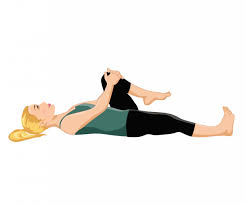
Hip and lower back stretch
- Start with lying down on your back with your knees bent and your feet flat on the floor.
- Raise one bent knee just far enough so that you can use both hands to hold your lower leg.
- Your fingers should be together just below the knee.
- Hold your wrists or loop your fingers between your lower legs just next to your knees.
- Using your hands, carefully pull your bent knee or knees toward your trunk.
- As you pull, make every effort to keep your lower back, pelvis, and legs as relaxed as possible.
- Hold this position for a few seconds.
- Then return to your neutral position.
- Then relax.
- Repeat this exercise five to ten times.
Trunk rotation stretch
- Lying on your back is a comfortable place to start.
- Bend your knees both ways.
- Keep your feet flat on the floor.
- Take a deep breath in.
- Keep your shoulders firmly planted in the ground.
- Bend forward at the knee.
- Look over there on the other side.
- Hold it for a few seconds.
- Then, return to your neutral posture by taking one step at a time.
- Then relax.
- Repeat this exercise five to ten times.
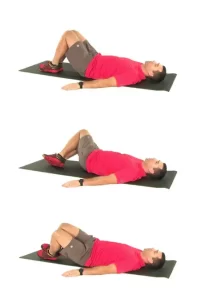
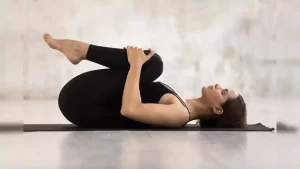
Figure Four stretch
- Lie down on the yoga mat.
- Lie upright with your hands by your sides, knees bent, and feet flat.
- Raise your right leg and cross it over your left knee, bending your knee slightly while you rest your foot there.
- Grasp both hands behind your left knee and pull that leg toward your body while keeping your feet flexed and your head and shoulder relaxed on the mat.
- You’ll feel your right hip gradually extend.
- Hold this position for a few seconds.
- Then return to your neutral position.
- Then relax.
- Repeat this exercise five to ten times.
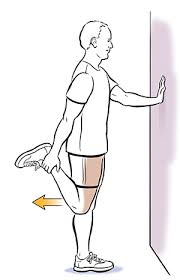
Standing Quad Stretch
- To help with balance while standing, grab onto a countertop or chair back.
- Grasp your ankle with one hand and bring your foot towards your buttocks to bend your knee.
- To bend your knee as much as possible, gently pull on your ankle.
- Hold this position for a few seconds.
- Then return to your neutral position.
- Then relax.
- Repeat this exercise five to ten times.
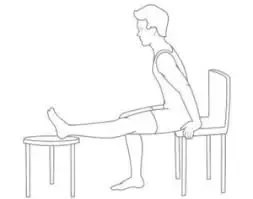
Seated Hamstring Stretch
- To start this stretch, take a seat on a chair’s edge.
- Stretch your left leg out in front of you while placing your right leg on the ground for support.
- To extend your spine, bend forward and raise both of your arms into the air.
- Breathe out, then lean forward in the direction of your left foot.
- Your left thigh should feel stretched at the back.
- Hold this position for a few seconds.
- Then return to your neutral position.
- Then relax.
- Repeat this exercise five to ten times.
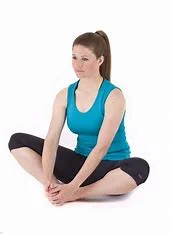
Sitting Hip Adductor Stretch
- To begin this exercise, lie on a mat with your legs out in front of you.
- Stretch your feet straight out, with your toes pointing skyward, and slightly widen your legs.
- Maintain a straight spine while bending slightly from the hips.
- Hold this position for a few seconds.
- Then return to your neutral position.
- Then relax.
- Repeat this exercise five to ten times.
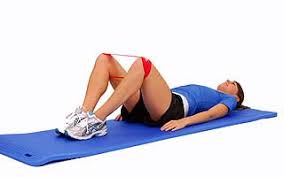
Lying Hip Abduction (Resistance Band)
- Laying on your back on the ground with your knees bent and your feet flat on the floor is the first step in the lying hip abduction exercise using a resistance band.
- Contract the muscles in your core and buttocks while putting a resistance band around your thighs, just above the knees.
- To put compression in the band, place your feet slightly apart and bend your knees.
- Next, separate the legs as much as is comfortable.
- Hold this position for a few seconds.
- Then return to your neutral position.
- Then relax.
- Repeat this exercise five to ten times.
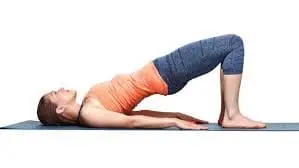
Bridges
- To start, take a Supine position on the mat.
- Now, place your feet flat on the platform and bend your knees.
- Next, contract your abdominal muscles.
- Lift your upper body.
- Kindly keep your arms at your sides.
- Hold on for a short while.
- Lower your body.
- Then return to your neutral position.
- Then relax.
- Repeat this exercise five to ten times.
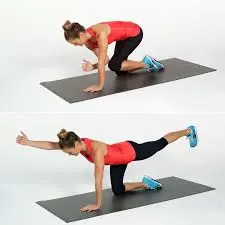
Bird Dog
- Start by putting yourself in a tabletop position and calming down on all fours.
- Put your hands under your shoulders and your knees below your hips now.
- Keep your spine in a neutral position.
- Squeeze your shoulder blades together.
- Next, extend your left leg and right arm toward the ceiling.
- Maintain a posture where your shoulders and hips are parallel.
- Hold this position for a few seconds.
- Then return to your neutral position.
- Then relax.
- Repeat this exercise five to ten times.
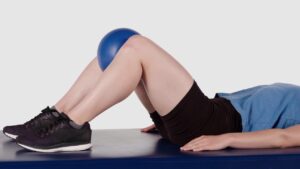
Adductor squeeze
- Bend your knees to a nearly 90-degree angle and lean back, supporting your weight on your elbows.
- Put a small object, such as a softball, between your knees.
- Hold the ball for roughly three seconds while applying as much pressure as you can comfortably.
- Then return to your neutral position.
- Then relax.
- Repeat this exercise five to ten times.
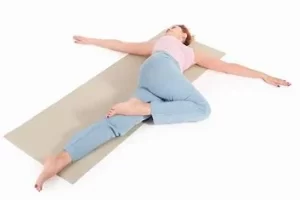
Spinal Twist
- Begin lying down with your legs straight.
- Raise your knees, flex them to a 90-degree angle, and then bring them down to one side of your body, keeping your shoulders and back square.
- Take it carefully and be aware of any pain.
- After a short while, raise your legs once more.
- Go back to lying down.
- Then relax.
- Repeat this exercise five to ten times.
Minimal-Efficacious Aerobics
The American Heart Association recommends 140 minutes a week of aerobic activity at a moderate intensity. It’s an excellent aim to work for. However, aerobic activity is the best treatment for sacroiliac joint pain. Continue at your speed. Even though raising your heart rate is the target, you do not need to work out as hard to lose weight. Keep your focus on the issue at hand and only allow yourself to move at a pace that makes you feel comfortable.
The following aerobic exercises are simple to modify to your individual speed and pain level.
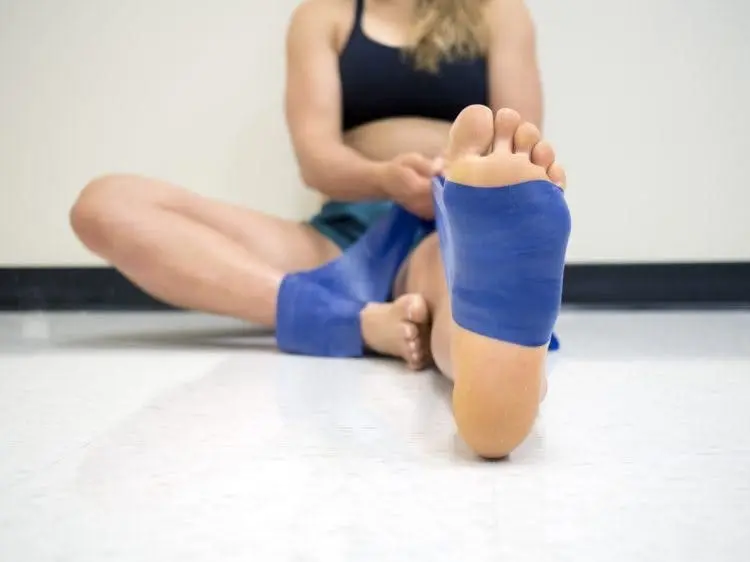
- Water aerobics
One of the greatest low-impact workouts for those who suffer from chronic pain is this one. Try floating while holding onto a raft or going in the pool if swimming isn’t your thing.
- Stationary cycling
Take part in a class if your home lacks the presence of a static bike. Take your time and don’t feel obligated to keep up with those nearby.
- Tai chi
This mild workout uses controlled, progressive movements and relaxation methods to strengthen, lengthen, and increase blood flow.
Precautions to take when exercising safely:
It is advisable to start exercising only after speaking with a doctor or physical therapist. It’s important to provide safe, efficient exercises that take note of your specific needs.
- Before starting to exercise, warm up and stretch.
- Throughout the exercise, maintain good posture.
- Avoid strenuous exercise.
- Give up if working out makes you uncomfortable.
- Take a break between sets of exercises.
- Wear loose clothing to allow your body to move freely during the workout; avoid wearing clothing that is too tight.
- Holding your breath while exercising is never a good idea.
- When you exercise, it is advised that you inhale deeply and release the air gradually through your mouth.
- While exercising, holding your breath makes your muscles more rigid, which increases the chance of high blood pressure.
When do you stop working out?
- Fever
- Headache
- You’re not feeling well
- If your exercise causes you any pain, stop
- A feeling of burning pain in the muscles
- If numbness or pain are felt at all.
Exercises for avoiding pain in the sacroiliac joint:
Sacroiliac joint pain can be made worse by certain sports and activities. If you suffer from sacroiliitis, try to minimize or avoid these activities;
- Golf
- Volleyball
- Performing weightlifting
- Football
- Long-distance cycling
- Curl-ups
- Abdominal crunches
Take precautions:
In addition to regular stretching, the following exercises may help prevent or lessen sacroiliac joint pain.
Adjust the way you are sitting
- Keeping your sit bones in contact with your chair and your hips level with each other is the most effective way to sit when suffering from sacroiliac joint pain.
- This can control the way your sacroiliac joint’s surrounding ligaments push.
- Avoid crossing your legs and keep your knees slightly apart.
- Often, if your hips are higher than your knees, the sacroiliac joint may be more comfortably able to maintain the natural curve of your back.
Don’t sit for too long
- Long durations of sitting can stiffen and tighten your back, which may worsen sacroiliac joint pain.
- At least once every 40 to 60 minutes, try to get up and move around, stretch, or go for a quick walk.
Improve your glutes’ strength
- Glute strengthening may be beneficial for people with weak glutes and chronic pain in their sacroiliac joint.
Switch between cold and heat
- For 15 to 20 minutes at a time, try alternating between heat and ice to help manage pain and increase blood flow.
Consult a physical therapist in case the painful sensation continues. You can manage your sacroiliac joint pain by following a customized schedule made by a physical therapist.
Summary:
Stretching the muscles around your sacroiliac joint might help relieve pain by relieving tension in your lower back. When it comes to stretching, it’s preferred to be overly soft rather than excessively forceful. Stretching too firmly might tighten your muscles and make your health issues worse.
A physical therapist may be of help to you if you are experiencing persistent pain in your sacroiliac joint. They can help in developing a stretching and strengthening treatment that has been specifically designed for you.
FAQs
What is the sensation of sacroiliac joint pain?
The lower back, thighs, hips, or tailbone are the typical locations for sacroiliac joint pain. Some suffer burning excruciating pain that radiates into their thigh, knee, or foot, while others only feel dull, aching pain.
What kinds of activities could make sacroiliac joint pain worse?
Leg lunges and other standing exercises where you only have one foot on the ground at a time are examples of exercises that involve shifting weight on your hips. Avoid high-impact exercises like jogging or jumping rope, as well as cardio equipment like treadmills and stair climbers.
What causes pain in the sacroiliac joint?
An accident or injury may cause acute sacroiliac joint pain. The chronic sacroiliac joint usually comes from aging, arthritis, chronic illnesses, bad posture, and overuse.
Which factors put you at risk for sacroiliac joint pain?
Women experience sacroiliac joint pain more often than men do. Risk factors include advanced age (above 40), pregnancy, overweight/obesity, history of back damage, prolonged sitting, exerting oneself more than four times per week, and working in a job requiring heavy lifting, bending, or labor.
For sacroiliac joint pain, what kind of exercise is best?
Bridge Pose
Bird-Dog Pose
Seated Hamstring Stretch
Sitting Hip Adductor Stretch
Single knee-to-chest stretch
Does sacroiliac joint pain improve with walking?
Walking is a short, low-impact workout for sacroiliac joint pain. In addition to being easier to work into a daily routine, exercise walking has a lower injury rate and is gentler on the sacroiliac joint than running or jogging.
Does sacroiliac pain never go away?
Mild sacroiliac (SI) pain in the joints is frequently cured in a few days to weeks with the right care, but more severe cases may take several months to recover completely.
Can a sacroiliac joint heal itself?
With rest, sacroiliac joint pain may go away on its own. However, it can also worsen and hurt more. It may make it difficult to engage in your favorite daily activities and workouts. To find the source of your pain and a suitable treatment, it is therefore advisable to consult a physician.
What makes pain in the sacroiliac joint more serious?
Sacroiliitis pain may worsen as a result of the following: sleeping or spending a lot of time seated. standing for an extended period. one leg bearing a greater weight than the other.
References:
- Pietro Tirgar (2023, December 13). Mobile Physiotherapy Clinic: The Top 15 Exercises for Sacroiliac Joint Pain. This is the top 15 exercises for sacroiliac joint pain (https://mobilephysiotherapyclinic.in/).
- March 15, 2021: Yetman, D. 7 Methods to Reduce Pain in the SI Joint. Well line. Sitting joint stretches: https://www.healthline.com/health/
- On February 21, 2024, Cpt., A. A. Stretches for the SI Joint and Other Exercises. Very well Medical Center. The move that causes sciatica-lateral joint pain is 296392.
- Image 14, Yoga ClassPlan.com: Spinal Twist in a Reclining Position. 2021 July 2. YogaClassPlan.com. In this yoga pose, you can achieve a reclining spinal twist.