Overview
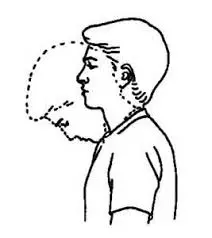
Reflexology therapy was developed on the basis of the theory that respective organs and body components are bonded to pressure point spots on the hands, feet, and face, ear.
Reflexology is regarded as a complementary therapy, which means that rather than being used in place of standard medical care, it should be utilized in addition to it. It shouldn’t be recommended by science to treat or cure any illness. It might aid in the relief of specific symptoms, such as pain and anxiety.
Reflexology trials should be regarded with caution since many of them are ill-conceived. Although study findings have been inconsistent, some show promise in symptom reduction and merit additional investigation.
What Is Reflexology?
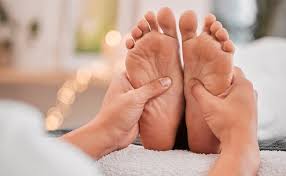
Reflexology is a therapy that aids you in feeling better by using light force on specific points on your feet (and probably your hands or ears). By easing stress, your body will perform more effectively. pressure point treatment is another term for reflexology techniques.
Similar to acupuncture and acupressure, reflexology connects the exterior and interior of the human body. But needle therapy and acupressure treatment utilize focus entirety of the body, not on the feet, hands, and ears. Furthermore, although reflexologists utilize their hands to catch the points related to pain
Reflexology, like those other forms of therapy, is a supplemental treatment to medical procedures. Although reflexology can be used with conventional treatment, it is not a replacement for it, and reflexologists are not medical professionals.
What conditions might Reflexology help with?
Although there isn’t much proof to support the claim that reflexology is superior to foot massages, reflexologists do think reflexology can help with the following:
- immune system.
- Bacterial infections or colds.
- Sinus problems.
- back pain.
- imbalances in hormones.
- breakdown.
- Pain from arthritis.
How Does Reflexology Work?
The foundation of reflexology is the idea that every body part can be mapped onto and corresponds with a certain place on the hands or feet. Reflexology commonly utilizes the feet but periodically involves the hands, ears, and face.
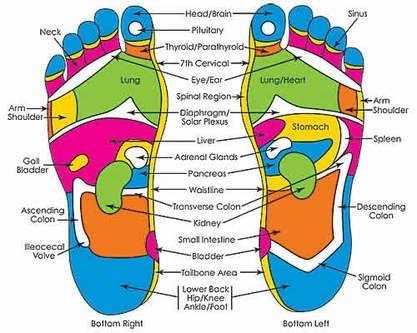
Reflexologists use hand and foot maps with points representing certain body parts. In a reflexology session, these spots are stimulated and pressured utilizing the reflexology procedure to promote blood and energy circulation, induce relaxation, and preserve homeostasis the steady state of the body’s systems as they adapt to external circumstances
Although the precise mechanism of action (how reflexology functions) is still unknown, the following theories have been put forth:
- According to the nerve impulse theory: stimulating particular reflex points on the feet improves the nervous system’s ability to communicate with the body components that correspond to those locations. The central and autonomic nerve systems are likely to be involved in reflexology’s benefits. It’s possible that reflexology works by inducing the release of endorphins, which the neurological system produces neurotransmitters to control pain, lower tension, and improve mood.
- Hemodynamic theory: According to the hemodynamic principle, stimulation brought on by reflexology improves blood flow to the affected organ or area of the body.
- Energy-related theories: They suggest that body parts can use electromagnetic fields to communicate with one another and that this communication might get obstructed or crowded. By dissolving lactic acid crystals collected in the feet, reflexology may be capable of opening these blocks and reforming energy flow.
- Fascia involvement: suggests that modifications to the fascia could be influenced by reflexology
Although there are numerous hypotheses on the precise mechanisms underlying reflexology, they all revolve around the idea that certain parts of the body are associated with particular parts of the feet and that using force on one part of the foot might affect the interconnected organ.
According to a 19th-century view, reflexology treatment processes by eliciting the nervous procedure. Calm pressure applied on specific foot regions activates nearby nerves, transmitting a signal to the central nervous system. This has an unwinding effect on the body and progresses the bloodstream, breathing, the body’s defense system, and other regions.
According to a different hypothesis, reflexology can help counteract how your brain perceives pain. The soothing feelings that come from having your feet massaged may help you decompress and feel better, which may lessen the intensity of your pain perception.
According to yet another idea, stress has an impact on the “vital energy” that your body possesses. Your body cannot function as well as it should if you don’t take steps to remove the stress, which could result in discomfort or sickness. It is believed that reflexology might assist you in keeping your body’s vital energy flowing through it. a thin fibrous sheath or membrane that envelops and divides bodily organs, which consequently has an impact on particular body parts.
Reflexology is a non-invasive, low-risk treatment option that can be recommended in addition to traditional medical treatments to evaluate if it improves a patient’s symptoms. But it shouldn’t take the place of traditional medical care and attention.
What You Should Expect in a Reflexology Consultation
To ensure that reflexology is a good fit for you, the therapist will first ask you questions regarding your lifestyle, eating habits, health, and any issues you may be experiencing. They will treat your hands, feet, ears, or a combination of them based on the information you supply. It would help if you also asked any queries you may have at this stage.
Sessions of reflexology ordinarily run between thirty and sixty minutes.
During the intake, or initial session, the reflexologist will:
- Ask detailed questions about your health and way of life, as well as your medical history
- Describe the principles of reflexology, what it can and cannot do (such as treating particular conditions), and what to anticipate.
- Have you signed a consent form? (This is not required in every setting.)
- Allow yourself enough time and space to ask questions; if the reflexologist brushes off your inquiries, worries, or lack of information, this should raise red flags.
You frequently recline in a chair or lie down during sessions. If you are having work done on your feet, you will remain completely covered.
You’ll most likely be in a quiet, spa-like environment with dim lighting, relaxing music, and perhaps aromatherapy. the person should be positioned supine on a massage table or grab a seat on a reclining seat. You’ll be staying in your clothes, so dress comfortably to help you unwind.
lots of reflexologists will initiate by slightly kneading cream or oil onto the sole of foot. At that point, utilizing different strategies, they will apply light to direct weight to one foot at a time. Throughout the session, they will cover the entire area, not only the points related to any issue locations you may have. However, they may go over some pressure points again. Eventually, you might experience a rush of emotions as energy flows through your body, or you might feel so at ease that you nod off. Following, you can experience calmness or a sensation of energy.
Treatment for a variety of problems requires the use of reflexology. You can schedule regular weekly sessions, treat yourself only sometimes, or see a reflexologist once weekly for a set amount of time. In between sessions, you might ask your reflexologist for counsel on how to do it on your possess. A map of all the pressure locations is available on special socks, which you can use as a reference.
Even five minutes of hand reflexology could have some advantages. It’s simple to do, even at your workplace, whenever you’re feeling anxious. It should be just as important as using one hand to circle each of the other person’s fingers individually. Take a few minutes to grasp the thumb, then move on to the next digit, and so on, until you reach your pinkie. Next, switch hands and use the other finger to resume the procedure.
Using Foot Reflex Points for Weight Loss
The purpose of reflexology is to apply pressure on the bottoms of the feet to elicit a response from another part of the body, such as the limb or the muscular system.
It is necessary to exert pressure on some body parts that cause a response in other body parts.
The brain is activated when specific areas are pressed.
- The spleen reflex is activated by using your left thumb to press your left foot while supporting it with your right hand. Splenic stimulation decreases appetite.
- Work the reflex spots in your stomach and pancreas: Using your right hand, cup your left foot, then use your left thumb to press each spot. Work the reflex points back in the other direction with your other hand until you’ve reached the outside boundary of the reflex area. Your digestion will improve if you stimulate these sites. Located immediately behind the ball of your sole, on the inside arch of your foot, is your stomach point. The middle of the inside arch of your foot is where your pancreas point is located.
- Work on your gall bladder reflex point: Bile, the digestive juice that your liver continuously secretes, is kept in storage in your gall bladder. Partially digested food’s fats are dissolved by the bile, helping with weight loss. Enhancing the gallbladder’s function can also help with digestion.The bigger liver reflex range component corresponds to the modest gall bladder weight point on the right sole.This is directly beneath the ball of your sole, facing the outside of your foot.
- Give your main glands an energy boost: Appropriate appetite and regulated hormone secretion will result from this. Your reaction to stress is determined by your endocrine glands, so you can balance your physiological and emotional stress by applying pressure to the reflex points for your pituitary gland (in the middle of your big toe, adrenal gland between your waist and diaphragm line, and thyroid at the base of your big toe. Your chances of sticking to your diet are better the less stressed you are. Moreover, adrenal stimulation can increase your motivation to work out.
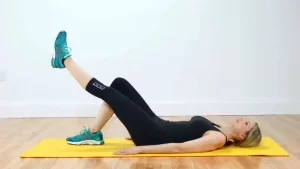
- Improve your ability to relax each night to ensure that you get a decent night’s sleep: Reflexology may be a very useful tool for enhancing the quality of your sleep, according to studies. push the right thumb from the internal side to the external side of the cleared-out foot along the diaphragmatic line. Tie your toes up and down as you do this action across your left thumb. Every time you bend your toes over, move your right thumb along your diaphragm line.
Using Hand Reflex Points for Weight Loss
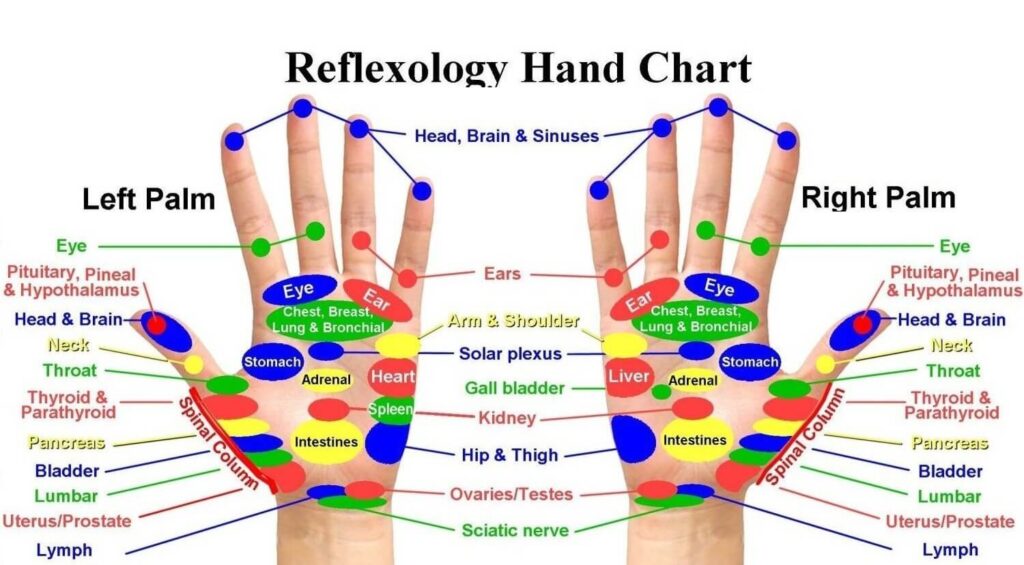
- decide the correct weight focuses for you on the hand chart: the spleen underneath your cleared-out small finger, the cushion underneath your right small finger, and the gall bladder.. the digestive organs beneath your breast and lung on both hands and the important endocrine glands on both hands at the center and base of your thumbs
- Firmer pressure should be applied to your hands’ reaction points. give force firmly, but not to the pinpoint of distress. Additionally, you will have to apply more pressure than you would on your foot.
- Applying pressure with one finger or your thumb, allows the object to “creep” or edge forward gradually. Make constant contact with your skin and move as though you are pressing pins into a pincushion. Work methodically and meticulously over all the pertinent areas; the reflex area in your hands is much smaller than your feet
Reflexology for headaches
The body has a few well-known reflexology sites that are thought to help relieve headaches. Where they are located and how to utilize them are as follows:
The Valley of Union (large intestine 4)
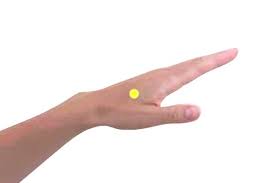
The zone of Union Valley (LI4) points is the anatomical snuffbox, located between your thumb and index finger. For the treatment of headaches:
Begin by tightly, but not uncomfortably, pinching this region for ten seconds with the thumb and index finger of the opposing hand. Next, use your thumb to draw little circles on this area for ten seconds in each direction. On the Union Valley point with your other hand, repeat these steps.
Reflexology therapy of this type releases stress in the head and neck. Headaches are commonly linked to tension.
Drilling bamboo (UB2)

The zone of Union Valley (LI4) points is the anatomical snuffbox, located between your thumb and index finger. For the treatment of headaches:
Begin by tightly, but not uncomfortably, pinching this region for ten seconds with the thumb and index finger of the opposing hand. Next, use your thumb to draw little circles on this area for ten seconds in each direction. On the Union Valley point with your other hand, repeat these steps.
Reflexology therapy of this type releases stress in the head and neck.. Headaches are commonly linked to tension.
Gates of consciousness (GB20)
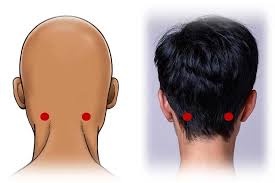
employ the gates of awareness reflexology procedure sites are located at the base of the skull, in the perpendicular concave gaps between the two vertical neck muscles using these pressure points
Point your middle and index fingers to gates of consciousness reflexology spots with either hand. For 10 seconds, press hard upward on both sides at once. Then, remove the pressure and repeat.
Firmly touching these reflexology spots can help ease headaches brought on by tense neck muscles.
Third eye (yin tang)
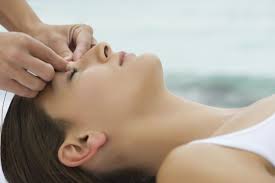
The site of the third eye, or yin tang, is discovered between your two eyebrows at the conjunction point of your forehead and nasal bridge.
For a minute, firmly push this area with one hand’s index finger.
It is believed that applying firm pressure to the third eye spot relieves headache-causing sinus pressure and eyestrain.
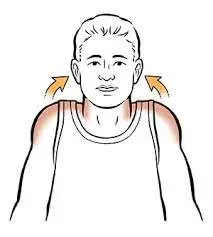
Shoulder wall (GB 21)
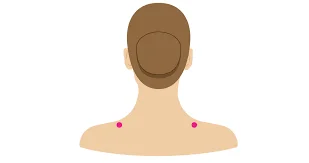
The shoulder wall is discovered at the end boundary of the shoulder, the midpoint between the acromion process of scapula and the bottom of the neck (GB 21). Using this pressure point as an example
Apply firm pressure in a circular motion with one hand’s thumb on this location for a duration of one minute.
Firmly pressing the shoulder well pressure point will assist ease shoulder and neck stiffness, as well as relieve neck discomfort and avoid headaches brought on by this type of sensation.
What possible advantages does Reflexology offer?
Some people may choose to use reflexology as a complementary and alternative medicine (CAM) treatment to aid in the treatment of ailments. This straightforward method is simple to learn and may be used by anyone as a daily stress reliever. Based on research, reflexology may be able to address the underlying causes of several medical issues.
Only a small number of the many possible advantages of reflexology have been thoroughly examined in research studies.
There’s not much evidence yet that reflexology can help with:
- lessen worry, elevate happiness, and enhance overall wellbeing
- Aids in the Treatment of Headaches and Migraines: Reflexology can help persons with chronic headaches and migraines experience relief from excruciating pain on one side of the head, which is usually accompanied by light and sound sensitivity as well as nausea.. In women aged 33-58, activating reflex sites in the feet reduced the duration, severity, and frequency of migraine flare-ups.
- Handles Low Back discomfort: Low back discomfort can lead to stiffness, decreased range of motion, and difficulty standing up straight. Reflexology was offered to nurses who suffered from chronic low back pain once a week for thirty minutes. After four weeks, the nurses reported much reduced low back pain. reflexology when combined with conventional therapy, may help reduce low back pain. Back braces, cold and heat therapy, and stretching exercises are the standard therapies for low back discomfort.
- May Assist With Depression and Anxiety: Depression and anxiety frequently result in difficulty going to sleep and remaining asleep, which leads to exhaustion. Those with anxiety and sadness may find that their sleep improves when reflex sites in their feet are pressed. Generally speaking, symptoms get better the longer the reflexology session lasts.
- Lessens Stress: Studies have connected several illnesses to long-term stress. Reflexology relieves stress in several ways to help regulate qi and stave off illness, according to TCM. For example, applying pressure to certain places on your hands and feet may cause you to feel generally relaxed. Your body relaxes when your parasympathetic nervous system is stimulated, which can be done by stimulating reflex sites in your foot. Remember that it may take a few reflexology treatments to see changes in your stress level.
- Pain Relieved: Reflexology facilitates the production of endorphins, which are pain-relieving compounds. Reflexology was given to patients with rheumatoid arthritis (RA) once a week for forty minutes. After six weeks, the researchers saw a considerable reduction in pain.
Furthermore, many have mentioned the following benefits of reflexology:
- strengthen their defenses
- cure cancer
- conquer bacterial infections and colds
- resolve sinus problems
- recuperate from spinal issues
- rectify abnormalities in hormones
- accelerate fertility
- enhance digestion and lessen the discomfort of arthritis
- treat peripheral neuropathy, a condition in which cancer medications cause nerve damage and numbness.
Is Reflexology Effective?
No medical problem or disease can be cured or prevented by reflexology, according to scientific evidence. Although the outcomes of research trials have been inconsistent, there are a small number of high-quality investigations that provide evidence that reflexology may be helpful for pain, relaxation, and stress alleviation.
Reflexology is primarily supported by anecdotal evidence from people who certify its benefits as well as research that is faulty or untrustworthy due to issues including limited sample sizes and uncontrolled procedures. There isn’t enough solid proof that reflexology is effective.
Despite the lack of data supporting reflexology techniques and approaches, speculations about how reflexology may improve people’s feelings have been generated by the fact that many individuals report feeling better after sessions.
The following variables could have an impact on reflexology’s efficacy as well as the validity of study findings:
- climate/ambiance: Reflexologists frequently employ calming music, candles, and aromas during reflexology sessions, which may aid in pain and anxiety treatment as well as relaxation and stress reduction.
- Assistance from the reflexologist: During the session, the client may talk to the reflexologist to get clarity or work through personal issues, particularly when they are lying face up. This psychological support may help to promote improvements in health and well-being, particularly when combined with a relaxation response.
- Physical touch: Research has demonstrated that human touch can be an effective technique for comfort and healing. Touch is used in reflexology treatments, including soft tissue manipulation, rubbing, and stroking
- Placebo effect: By the power of suggestion, it’s feasible that anticipating good things will also bring about good things. This does not cancel out the reality of the favorable outcomes. This implies that they might not have been directly brought on by the reflexology therapy (or the process alone).
Reflexology treatments might help some people even if they are not directly responsible for results; as long as they don’t conflict with conventional medical care, they might be worth a try.
However, if you suffer from any of the following medical conditions, you should consult your physician first:
- circulation issues in the lower limbs
- thrombosis or edema in your lower extremities
- gout ulcers on the feet
- fungus-related illnesses, such as athlete’s foot, open sores on your hands or feet
- thyroid issues
- epilepsy, low platelet counts, or other blood disorders that increase the risk of bleeding and bruising
- Inaccurate or missed diagnosis
- Inefficient medical care
- Treatment that is delayed
If you have any of these conditions, you could still be able to try reflexology; however, you might need to take some care to prevent any negative effects.
Consult a Specialist in Reflexology
Make sure the reflexologist you select has the necessary training and credentials. Find out where they received their training and whether they are a member of any reputable organizations, such the Association of Reflexologists.
Keep an eye out for warning signs. A reflexologist ought not to:
- Recognize medical issues
- Write prescriptions for drugs
- Address particular ailments
- Create any sort of healing-related statements and reject conventional medicine.
- Urge you to discontinue using prescription drugs or to disregard the advice or treatment regimens provided by your healthcare provider
If you feel any discomfort or warning signs, it’s acceptable to end the session and/or stop visiting the reflexologist.
Most people agree that reflexology has minimal negative effects. For some persons, adverse consequences could include:
- Feeling dizzy
- Tenderfeet: An emotional reaction
- having more frequent urination needs
Speak with your reflexologist (and/or your healthcare provider if the effect is more than transient or small) if you have any bad effects
Who should not utilize Reflexology?
Though typically safe, reflexology may be something that certain people should avoid. Some people with certain health conditions or concerns may experience unintended negative consequences with reflexology.
In cases of vomiting and diarrhea, reflexology may overstimulate the body and raise the gastrointestinal (GI) systems.
Reflexology uses force to the face, hands, feet, and ears to treat conditions related to headaches, foot pain, and hand pain. If you have skin conditions affecting specific areas, this form of massage may be uncomfortable.
Fever: A fever puts your body under a lot of stress. Your body may be overstimulated by reflexology, which would put additional strain on it.
Pregnancy: Consult a medical professional before booking a reflexology appointment in the first trimester. Certain stimuli may cause labor, which increases the possibility of an early delivery.
If, despite having several sessions, you are still feeling agitated, you might want to stay away from reflexology. Reflexology might not be a good fit for your body in such a situation.
Caution
Tell your reflexologist if you are expecting before your appointment, as certain pressure sites in the hands and feet may cause contractions. Get your doctor’s consent before attempting to induce labor using reflexology. Premature birth is a possibility, and newborns are at their healthiest when born at 40 weeks gestation.
Summary
In reflexology, certain parts of the foot are stimulated; occasionally, the hands, ears, or hands are also engaged. The theory is that specific hand and foot portions represent distinct body parts and organs.
FAQs
How often is reflexology possible?
Monthly treatments are advised if you are utilizing reflexology as a preventative healthcare alternative and do not have any health concerns. Weekly or fortnightly treatments would be helpful if you are experiencing a very stressful period, have health issues, and/or are in pain.
What is the duration of reflexology?
Reflexology sessions often go from thirty to sixty minutes. For the treatment, you often lie down or sit in a recliner chair. Most people report feeling calm and relaxed after receiving reflexology. However, applying pressure to specific locations may cause discomfort or mild pain.
How should I dress for reflexology?
It is advised to dress comfortably, loosely, and casually. You want to unwind without having your belt or tight clothing dig into you when you’re lying back on the reflexology chair.
What is reflexology’s plan for the audience?
Among its many advantages, reflexology massage therapy targets the hands, feet, and outer ears. It can also diminish your stress level.
Reflexology points on the feet are depicted in this picture. These points, when pushed or massaged, may encourage healing because they theoretically correspond to other parts of the body.
How much powerful is reflexology?
Although there isn’t much proof to support the claim that reflexology is more effective than a foot massage, reflexologists do think it can enhance the following: the immune system, bacterial infections, or colds. Sinus problems.
Is it a whole-body reflexology that happens?
in common, It’s a foot manipulation, but it goes superior to that. Reflexology works to relieve stress and pain by using force at particular points of stress across the body.
How many sessions of reflexology are required?
Each person experiences reflexology differently. Some people report feeling more at ease and invigorated, while others find it to be highly stimulating. Your body may react to the therapy right away, but most individuals don’t fully experience the advantages until four to six sessions.
Which three categories of reflexology exist?
Applying specific hand and finger methods to the foot to stimulate it for health issues in other parts of the body is known as reflexology.
The practice of applying hand stimulation to treat illness in other body parts is known as reflexology of the hand. Reflexology is the practice of applying certain hand and finger motions to stimulate the external ear auricle muscle for health issues in other sections of the body.
What is reflexology’s aftercare?
After your session, unwind and recover; don’t engage in any strenuous activities for a few hours. It is best to schedule your reflexology treatment for a day when you don’t have many plans so that you may unwind and recuperate afterward. Perhaps read a book or magazine, enjoy the environment from a seat in the garden, or listen to calming music.
Is reflexology appropriate for all people?
Reflexology therapy is beneficial for people of all ages, from premature infants to those receiving care close to the end of their lives. On the other hand, there might occasionally be circumstances in which giving a treatment is inappropriate
Can reflexology cause pain?
Throughout the session, provide feedback: Throughout the session, don’t be afraid to provide your reflexologist comments. Tell them right away if you encounter any pain or discomfort. To guarantee your comfort, they can then modify their methods or apply more pressure as necessary.
Reflexology: who invented it?
Eunice Ingham, Fitzgerald’s reflexology pressure point therapy was purified in the 1930s. It is acknowledged that Ingham founded contemporary reflexology. This natural treatment approach was created in the 1930s by her as a physical therapist.
Is reflexology beneficial for losing weight?
Reflexology is a well-liked and enjoyable method for weight loss. Although there is currently no evidence to back this theory, you can use the pressure points on your foot to elicit different bodily responses that may help you lose weight.
Do you think you should give it an attempt?
In addition to being combined with other therapies like acupuncture and massage therapy, reflexology is a common service offered in massage studios and institutes by massage therapists and reflexologists. Be that as it may, you should counsel your doctor sometime recently utilizing reflexology. Your doctor might recommend changes or adjustments if you have athlete’s foot, epilepsy, gout, thyroid difficulties, cardiovascular problems, or blood clots to avoid any negative effects.
References
- Jones, H. (2024b, January 5). What Is Reflexology and What Are the Benefits? Verywell Health. https://www.verywellhealth.com/reflexology-5323773
- Cirino, E. (2018, December 4). Reflexology 101. Healthline. https://www.healthline.com/health/what-is-reflexology
- Davis, J. (2023, September 15). Reflexology. WebMD. https://www.webmd.com/balance/what-is-reflexology
- Clinic, C. (2024, April 30). Reflexology: What It Is, and Does It Work? Cleveland Clinic. https://health.clevelandclinic.org/reflexology
- Jahangir, K. (2024, January 24). What Is Reflexology? Health. https://www.health.com/reflexology-7488750
- Om, K. K. L. D. D. (2024b, February 21). How to Lose Weight With Reflexology: 10 Steps (with Pictures). wikiHow. https://www.wikihow.com/Lose-Weight-With-Reflexology