Blog

  • Hip Joint Stiffness

    Hip Joint Stiffness

    Introduction of Hip Joint Stiffness

    Hip joint stiffness is a challenging condition that makes daily duties and mobility difficult. Understanding the reasons, identifying the symptoms, and looking into therapies can help people find relief and enhance their quality of life, regardless of whether aging, injuries, or lifestyle choices bring it on.

    Causes of Hip Joint Stiffness

    Muscle tightness

    Abnormalities in the hamstring, gluteal, and hip flexor muscles result in a restricted range of motion. Tight hamstrings can cause pain in the lower back and poor posture. Injuries are more likely to occur and imbalances can result from tight glutes. Stretching, strengthening, and corrective exercises address stiffness to increase hip function, decrease stress, and improve flexibility. For ongoing problems, it is advised to seek advice from a physical therapist or medical expert.

    Inflammation of the joints

    Stiffness and pain are caused by inflammation of the hip joints resulting from disorders such as bursitis, tendinitis, or arthritis. Hip tendon inflammation caused by overuse or injury is known as tendinitis, and it results in pain and restricted range of motion.

    Trauma or Injury

    Hip dislocations, fractures, and muscular strains are examples of prior traumas that can cause scar tissue to develop and limited hip movement.

    Abnormal Posture

    Hip pain and stiffness can develop over time due to extended standing or sitting, as well as repetitive activities that tighten the hip joints.

    Age

    The degradation and stiffness of the cartilage in the hip joint can be caused by age-related wear and strain, including osteoarthritis and avascular necrosis.

    Symptoms of Hip Joint Stiffness

    Difficulty moving: After sitting or lying down for a long, you may find it difficult to flex or move your hip joints.

    Various levels of pain: Hip, thigh, and groin pain are possible locations for pain, which might vary in intensity.

    Heat and edema in the hip joints might indicate inflammation.

    Difficulty while exercising: This pain might be so severe that it makes it difficult to walk. It could, however, go worse after resting and get better with light activity. However, intense activity also typically results in pain.

    When should you get medical attention?

    symptoms like:-chills, fever, dizziness, and acute pain, especially in the groin or upper thigh, that gets worse as you try to raise your leg or spin it outward, as well as a sudden rash or redness around the hip and abnormalities, such as a hip deformity.
    Another serious worry is the sudden incapacity to support oneself without experiencing excruciating hip pain or instability.

    Diagnosis

    After examining you physically, considering your medical history, and conducting tests, your doctor may determine that you have a stiff hip.

    Among the things your medical history includes:

    • any health issues
    • Have you had recent falls or injuries diagnosed?
    • a summary of other signs and symptoms

    Your physician will carry out the following procedures when doing a physical examination:

    Examine the skin around your hips, feel the joint, and note any sore spots.
    While you stroll, have someone look at you for any problems or abnormalities.

    Treatment of Hip Joint Stiffness

    The main objective of the treatment approach is to address the underlying cause of a tight hip.

    Physical therapy and anti-inflammatory painkillers are the usual treatments for hip stiffness.

    • applying cold and heat treatment to the injured hip.
    • improve mobility at home by executing actions using physical therapy or occupational therapy.
    • Physicians may recommend more potent drugs. These consist of steroids, analgesics, and prescription-strength nonsteroidal anti-inflammatory medications (NSAIDs).
    • Hip stiffness can also be relieved by cortisone injections.
    • In the end, surgery could be necessary to treat hip stiffness brought on by an accident or OA.

    Physical Therapy

    Range of motion:

    Abduction0 to 45 degrees
    Adduction45 to 0 degrees
    Flexion0 to 135 degrees
    Extension 30 to 0 degrees
    External rotation0 to 45 degrees
    Internal rotation0 to 45 degrees

    Hip Inferior Glide: Using your hips flexed to a ninety-degree angle, do this technique while lying supine. To improve grip and decrease slipping on the client’s skin, the clinician can either employ a mobilization strap or clasp their hands at the superior proximal femur.

    Hip Anterior Glide: The unaffected leg is draped over the afflicted leg at the knee while the affected leg is positioned in a figure-4 posture during anterior glides. The physician applies an anterolateral push to the proximal femur by making hand-over-hand contact below the gluteal fold.

    Hip Lateral Glide: With a strap covering the proximal thigh and the hips stretched at a 90-degree angle, the patient is positioned on their back. For a lateral force to be applied via the strap around the client’s proximal thigh and the clinician’s hips, these two stabilizing points must work together. A straightforward adjustment in the clinician’s weight can provide this force. To help with mobilization, the clinician pushes their butt back and tightens the strap by bending back or doing an anterior pelvic tilt. By using a mobilization strap, a clinician and client with different sizes can have better grip, less skin sliding, and more room for size differences.

    Flexibility, Strengthening, and Endurance Exercise

    Patients with particular muscle limits, reduced hip (thigh) muscular flexibility, and inadequate hip range of motion should be treated by physicians with customized strengthening, endurance, and flexibility exercises. Exercises for group-based programs should be customized to address patients’ most pertinent physical disabilities. It is advised that individuals with mild to severe hip osteoarthritis take one to five times a week for six to twelve weeks as their course of therapy.

    Stretching Activities

    Reduce stiffness and increase flexibility with simple stretches focusing on the hip muscles. Your hips’ range of motion and stability can be enhanced by regularly stretching them.

    Treatment with Heat and Cold

    Hip stiffness can be relieved by putting heat packs on strained muscles or having warm baths. Hip stiffness-related pain can be eased and inflammation reduced by using ice packs or cold compresses.

    Massage

    In the hip region, light massage methods can reduce tension, enhance circulation, and encourage relaxation.

    Functional, Gait, and Balance Training

    When hip stiffness is observed and documented during a patient’s history or physical examination, clinicians should provide patients with hip stiffness impairment-based therapy alternatives, such as activity limitations, gait limitations, and balance impairment.

    Posture Correction

    Hip stiffness and soreness can be avoided by keeping proper posture and limiting extended sitting or standing times.

    correct-sitting-position
    correct-sitting-position

    Prevention

    Some cases of hip stiffness cannot be avoided. But keeping your weight within a reasonable range might help ease the pressure and strain on your hips. A stiff hip may be avoided by appropriately warming up, stretching, and cooling down after exercise.

    FAQs

    What can cause stiff hips?

    Arthritis is more common in elderly persons. We now know that tight hips might be an indication of more significant hip disorders, which is something that people with stiff hips often ignore.

    How can I loosen my stiff hips?

    Hip FAI (hip arthritis) patients may not be able to fully extend their hip range of motion due to bone abnormalities. Stretches, yoga, and physical therapy can all aid in “loosening” and improving hip range of motion.

    What’s the healing time for a stiff hip?

    For mild problems, complete recovery often requires one to three weeks of rest and rehabilitation. Furthermore, injuries not immediately treated may need months to heal completely and may result in persistent pain.

    Can sitting cause tight hips?

    The hip flexors may experience tension or tightness after extended hours of sitting. This is because prolonged sitting makes the muscles relaxed and deactivated, or “turned off.” As a result, the hip flexors shorten, producing pain and stiffness.

    References:

    • Crna, R. N. M. (2020, April 24). What You Need to Know About Stiff Hips. Healthline. https://www.healthline.com/health/hip-stiff
    • Hip pain. (n.d.). Versus Arthritis. https://versusarthritis.org/about-arthritis/conditions/hip-pain/
    • Sloan, J. (2018, December 18). Hip Joint Stiffness Symptoms, Causes & Common Questions | Buoy. https://www.buoyhealth.com/learn/hip-joint-stiffness
    • Stiff hip (Concept Id: C0239957)  – MedGen – NCBI. (n.d.). https://www.ncbi.nlm.nih.gov/medgen/536940
  • Knee Joint Stiffness

    Knee Joint Stiffness

    Introduction

    Knee joint stiffness is a common issue that can affect people of all ages, often resulting in reduced mobility and discomfort. This condition occurs when the knee joint becomes rigid or difficult to move, which can be caused by factors such as injury, arthritis, prolonged inactivity, or overuse. Stiffness in the knee can make everyday activities like walking, climbing stairs, or sitting down challenging, impacting one’s overall quality of life.

    Knee joint pain and edema are frequently accompanied by knee joint stiffness. Knee joint stiffness is a typical finding in arthritic diseases and can be caused by joint injury or illness.

    Due to the presence of two cartilage pieces known as menisci, the knee joint bones may glide easily against one another. Additional traumatic reasons for stiff knee include bone fractures, bursitis in tendons or bursae, or injury to the kneecap’s cartilage.

    While rheumatoid arthritis, a chronic autoimmune illness that produces inflammation in the joints, is due to immune system malfunction, osteoarthritis is caused by wear and tear on the joint.

    If you sprain your knee, you might have more serious joint problems later on. Emergency care might be required.

    Serious symptoms, such as paralysis, loss of feeling, absent foot pulses, total incapacity to move the knee joint, elevated temperature, significant bleeding, or unbearable pain, should be checked by a doctor.

    Movements

    Four movements are allowed by knee joint
    Extension and Flexion, Rotation laterally
    Rotation medially

    Knee flexion 0-135 to 140
    Knee extension 140 to 135-0

    Pathophysiology

    Knee joint stiffness and its surrounding pain can include

    Inflammation due to arthritis, infections, or autoimmune systemic inflammatory diseases.

    Non-inflammatory issues that are often mechanical (e.g., internal derangements, trauma)

    An injury is more likely to result in meniscal pain.

    What are the causes of Knee Joint stiffness?

    Injured ligaments

    Ligament injury might result from a strained or overextended knee. These injuries frequently occur in athletes or persons who have very busy lives. A sprained, torn, or ruptured knee ligament might result in internal bleeding.

    acl-injury-knee-tear-torn
    ACL-injury-knee-tear-torn

    Injured meniscus

    A meniscus injury arises from tearing or damage to the cartilage that separates the bones in your knee joint. This can occur when you apply pressure to the knee or rotate it, which frequently happens when playing sports that require quick spins and pauses. Even something as basic as utilizing stairs or rising too quickly from a squat might cause a meniscus tear.

    Meniscus tears can cause pain and edema. It could be difficult to move your knee through its full range of motion and appear to be held in one place. As a result of these mobility limitations, the knee may become stiff.

    • Stiffness after knee surgery
    • Knee surgeries most often performed are:
    • ACL repair
    • arthroscopy of the knee
    • knee ligament reconstruction
    • Lateral release
    • meniscus replacement or repair
    • microfracture, plica excision, tendon repair, meniscectomy, complete knee replacement

    Following surgery, you must follow the right procedures to promote complete healing and avoid knee stiffness. Spend time performing rehabilitation exercises to strengthen, stabilize, and flex your knee.

    Osteoarthritis and rheumatoid arthritis

    Osteoarthritis of the knee causes cartilage degradation, leading to misalignment—inflammation results from rheumatoid arthritis’s degeneration of the joint lining. Deformity, stiffness, reduced function, and range of motion are possible outcomes.

    Muscles, weak and strong

    It is maintaining knee muscles that are both flexible and strong enough to support your entire body while minimizing or eliminating knee pain. It is believed that having strong legs, hips, and buttocks would lessen knee stiffness.

    In a 2010 research, nearly 2,000 knees of men and women with osteoarthritis or at risk for the condition were examined. The results showed that neither quadriceps nor hamstring strength was a predictor of common knee symptoms including pain, aching, or stiffness.

    Nonetheless, as stronger muscles can aid in supporting the knee joint, having strong quads may help lower the chance of developing knee issues.

    When to see your doctor

    Seeing a doctor is crucial while seeking medical attention. Your doctor can identify the reason behind your knee stiffness and you two can work out a plan of care to get well. Imaging examinations, physical examinations, or laboratory testing can be required.

    A physician who specializes in physical therapy, musculoskeletal and joint issues, or rheumatology may be recommended to you. If surgery is required, you will be sent to an orthopedic surgeon.

    Diagnosis and Tests

    How is a diagnosis of knee stiffness made?
    To rule out arthritis, your doctor will most likely prescribe knee X-rays. The X-rays need to show:

    The kind of arthritis.
    Any alterations to your skeletal structure.
    The spurs are on the bones.
    The slenderness of the interosseous membrane. As cartilage decreases, the space gets smaller. The pain increases with space restriction.
    An MRI or computed tomography scan may be necessary for medical specialists.

    How would a medical professional diagnose knee stiffness?
    Your medical professional will give you details when you report your symptoms. Some questions might include:

    • Is your skin often red?
    • Does your knee swell up?
    • Is your skin often warm?
    • How long have you had these symptoms?
    • What medications do you take?
    • How severe is your pain?
    • Do you struggle to walk?
    • Do the symptoms interfere with your daily activities?

    How is knee stiffness treated?

    However, they provide some advice that may lessen the intensity of your symptoms and perhaps prevent the stiffness from growing worse, such as:

    Sustain a healthy weight.
    Instead of engaging in high-impact exercises like jogging or tennis, choose low-impact ones like cycling or swimming.

    • Put in shock-absorbing shoe inserts.
    • Treat the area with ice or heat.
    • Use a brace or knee sleeve.
    • Use a cane
    • Plasma high in platelets.

    Medications

    PT Exercises for Knee Stiffness

    The knee may be strengthened and made more mobile with targeted workouts.

    For the treatment of your knee stiffness, your physical therapist may suggest the following exercises:

    Straight leg lifts and quad sets
    Quads with short arcs
    Exercises for building hip strength. Your hip flexors assist in regulating your knee posture. Knee pain might result from weakness here.
    Stretches for the lower extremities
    exercises for balance

    PT Treatments for Knee Stiffness

    • Ultrasound
    • Electrical activation
    • Kinesiology taping
    • Using cold or heat
    • massages using soft tissues
    • mobilization of the knee joint
    • Exercises and stretches that may help

    However, exercise may benefit a stiff knee resulting from an arthritis-related condition.

    Continuous Passive Motion (CPM): CPM machines enhance the range of motion; a maximum of five to six hours per day, with a two-hour interval between sessions, are preferred. The patient may easily modify it according to their range of motion because it’s passive.

    CPM machine for knee joint surgery
    CPM machine for knee joint surgery

    Mobilization of the knee joint:

    Anterior Glide
    Indication: Anterior glide increases knee extension.

    Patient Position: The patient is placed in a crook-laying position to adopt the drawer test posture. The knee joint is gradually stretched to the limit of its range when kept in a resting posture.

    Posterior Glide:

    Indication: to increase knee flexion.

    The mobilizing force and hand location are arranged so that the force used during the mobilization is parallel to the tibia’s line. This technique is most frequently used in the closed-packed posture, comparable to the PCL’s posterior drawer test. As an alternative, you can perform it with your knee nearly fully bent.

    Knee Muscle Stretching exercise:

    Calf Muscle Stretching

    Long sitting Calf Stretching
    Long sitting Calf Stretching

    Hamstring Muscle Stretch:

    lying-hamstring-stretch-with-band
    lying-hamstring-stretch-with-band

    Exercises for strengthening: Raising the strength of the muscles surrounding the knee helps to lessen joint stress—activities like leg lifts and hamstring curls.

    ROM exercise: Stretches and activities that extend the knee’s range of motion help keep the joint moving and relieve stiffness. These workouts involve stretching with a yoga strap and heel slides.

    knee-exercise
    knee-exercise

    Aerobic exercises can increase a person’s energy levels and help them lose any additional weight that could put undue strain on their knees. These workouts include swimming and cycling.

    Exercises for balance: These build muscle around the knee and lessen the chance of falling, which might cause more injury to the joint.

    Summary

    Knee stiffness is a frequent problem. It is especially prevalent in elderly folks and those with much physical activity.

    However, if a person’s stiffness is accompanied by additional symptoms or a history of knee damage, they should see a physician. For a diagnosis and a course of treatment, individuals who think they may have knee arthritis should also consult a physician. Painkillers, various physiotherapy exercises, stretches, and flexibility exercises are all part of the treatment.

    FAQs

    Why does my knee feel tight and stiff?

    Joint tightness may arise from damage to the knee’s interior cartilage, tendons, or ligaments.

    How do I know if my knee is stiff?

    Knee stiffness is an experience of difficulty bending or extending your knee’s range of motion, which impairs your leg’s overall flexibility, strength, and stability.

    Should you stretch a stiff knee?

    Range of motion and flexibility may be enhanced while the pain is reduced with mild stretching and strengthening activities.

    Which exercise is best for knee joint stiffness?

     Strength and Flexibility First
    Water aerobics. Cycling is a great kind of physical activity for those with knee pain. Another option is water aerobics. Strength, flexibility, and range of motion can all be greatly increased by biking.
    Yoga. Yoga is great for increasing flexibility, particularly in the potentially stiff regions surrounding the knee.
    Strolling.

    References:

    • Fletcher, J. (2020, January 15). What to know about knee stiffness. https://www.medicalnewstoday.com/articles/327499#causes
    • Knee pain – Symptoms and causes – Mayo Clinic. (2023, January 25). Mayo Clinic. https://www.mayoclinic.org/diseases-conditions/knee-pain/symptoms-causes/syc-20350849
    • Gambrah-Lyles, C. (2018, March 18). Knee Stiffness | Causes, Home Relief, & When to See a Doctor. https://www.buoyhealth.com/learn/knee-stiffness
    • Holland, K. (2022, August 5). Stiff Joints: Why It Happens and How to Find Relief. Healthline. https://www.healthline.com/health/stiff-joints
    • Physiotherapist, N. P. (2022b, September 24). Knee Joint stiffness : Cause, Symptoms, Treatment, Exercise. Mobile Physiotherapy Clinic. https://mobilephysiotherapyclinic.in/knee-joint-stiffness-physiotherapy-exercises/
  • 21 Best Kettlebell Exercises

    21 Best Kettlebell Exercises

    Kettlebells are a well-liked alternative to conventional barbells, dumbbells, and resistance machines in strength training.

    Introduction:

    If you’re feeling a little tired with your usual dumbbell workouts, we could suggest including some Kettlebell Exercises. Changing up your load can breathe new life into your program and open up a world of possibilities to fit into whatever routine you may have.

    This is because kettlebells are a very useful piece of equipment. For this reason, they are great instruments to increase the difficulty of your full-body, lower-body, or upper-body workouts.

    For certain weighted exercises, kettlebells work well, especially when the movements are fast. Their linked handle and rounded bell-bottom form also make them easier to move around.

    Additionally, because your range of motion will be slightly varied, you will also see variations in the performance of your muscles when you grab them from above. However, choosing which workouts to perform with kettlebells can be unsettling if you’ve never used them before. As a result, we put together a list of the best Kettlebell Exercises that engage every muscle in your body.

    What is the ideal weight for a kettlebell?

    Your degree of strength and equipment knowledge are two important elements that will affect the weight of the kettlebell you utilize. (Similarly, beginners should start with bodyweight exercises until they feel comfortable doing the movements with proper form.)

    However, a kettlebell weighing ten to fifteen pounds is a suitable place to start. You can start with a kettlebell that weighs 20 pounds or more if you are more seasoned in weightlifting and feel comfortable working with heavier weights.

    Furthermore, it’s important to keep in mind that the exercises you do with kettlebells define what weight is “suitable” for them. For example, you might be able to lift more weight with a deadlift because it works greater muscles than a triceps extension, which works smaller muscles.

    What advantages may kettlebell exercises provide?

    When compared to other weights like dumbbells or plates, the kettlebell has a different form. It appears to be a handle-equipped ball.

    • Improves Stability and Balance

    Strengthening your balance with kettlebell exercises will help you stay stable and avoid falls as you age. The aging process affects the muscles, joints, and bones.

    • A Type of Strength and Cardio Exercise

    Kettlebell exercises increase muscular mass and heart rate while improving strength and cardiovascular fitness. Just as much as high-intensity interval running, kettlebell exercise has the potential to increase aerobic capacity.

    Best Kettlebell Exercises:

    Turkish Get-Up

    • Your arms and legs should be extended at a 45-degree angle while you lie on your back in the starting posture.
    • Put your right foot level on the ground and flex your right leg just a few inches outside of your hip and away from your butt.
    • With your right hand, make a fist and point your knuckles straight up toward the ceiling as you raise your right arm straight up toward the ceiling.
    • Keep your wrist from bending back.
    • Eventually, the kettlebell will land in your fist, so focus on that.
    • Then, to raise yourself onto your left elbow, push through your right heel and your left elbow.
    • This is how your left shoulder should be positioned.
    • Putting together your shoulder involves first rounding it forward and then forcing your arm through the floor to pack it down and away from your ears in the opposite direction.
    • Face the wall in front of you with your chest instead of the ceiling.
    • Laying your left palm on the floor, pressing into it, and using your abs to pull your body in, is how you sit.
    • Make sure your left shoulder is firm at all times.
    • To extend your elbow away from you and rotate your fingertips slightly back behind you, try pressing your palm into the ground.
    • Following that, go your left leg beneath you and in the direction of your butt, aligning your left ankle and knee with your left hand.
    • The distance from your left knee to your left hip should be the same as the length of your body, and your left knee should be positioned squarely underneath your left hip.
    • If you need to make any adjustments, move your knee, not your hand.
    • Move your weight back toward your left heel from this position.
    • Put yourself in a half-kneeling, open position.
    • Both your “up” and “down” knees should be 90 degrees and pointed in the same direction to the left and straight forward, respectively.
    • Now, bring your left leg (down knee) behind you to the left so that it is facing straight ahead of you, then extend your legs into a half-kneeling (or lunge) position.
    • Now you ought to be facing directly ahead.
    • To bring your feet together and stand, concentrate on strengthening your core, getting nice and strong, and pressing your back foot into the ground.
    • Then return to your neutral position.
    • Then relax.
    • Repeat this exercise six to twelve times.
    turkish get up exercise
    Turkish get-up exercise

    Kettlebell Halo

    • Start with a relaxing standing position.
    • The shoulders ought to be loose and positioned above the hips.
    • The knees should remain straight and sturdy, not locked or stiff.
    • Gripping the handle’s vertical sides, or the horns, hold the kettlebell in front of your body.
    • The kettlebell’s ball or bottom should be facing up, while the handle should be facing down.
    • Turn to the right to start.
    • Lift and rotate the kettlebell around your head to the right, then release it behind your neck.
    • On the left side of your head, finish the circle by going back to the starting point.
    • You’re going to want to touch your hair as you turn around, and you’ll be reaching for it.
    • Turn around after you’ve completed one full rotation.
    • Starting from the left, complete the circle by turning around and returning to the starting point on the right.
    • Then return to your neutral position.
    • Then relax.
    • Repeat this exercise six to twelve times.
    Kettlebell Halo
    Kettlebell Halo

    Kettlebell Sumo Squat

    • With your feet roughly shoulder-width apart and your toes pointing forward, begin in the standard squat position.
    • Put your hands together at your chest.
    • Step out to the right with your right foot until your stance is three to four feet wide, or broader than the depth of your hips.
    • If you can do the movement correctly, wider is okay.
    • Rotate your hips laterally to angle your toes outward and away from your body’s center, around 45 degrees.
    • Bend your knees and gently realign your hips as you lower yourself into a squat position.
    • Take a straight line to the floor with your buttocks.
    • Throughout the exercise, pay attention to maintaining your eyes forward, your core active, and your spine neutral.
    • After you bring your thighs level to the ground’s surface, lower yourself.
    • If you can’t keep your legs aligned or if the parallel is too low, you can shorten or lower the squat.
    • Hold this position for a few seconds.
    • After that, press up through your heels while using your glutes to press yourself up to standing.
    • Then return to your neutral position.
    • Then relax.
    • Repeat this exercise six to twelve times.
    Classic squat
    Sumo squat


    Kettlebell Triceps Extension

    This workout targets the muscles at the back of your upper arms, or your triceps. Your back should be straight, not arched, to guarantee that your triceps are performing all the work.

    • Hold the kettlebell at chest height with both hands by the horns, bell facing up.
    • Take a step forward with your left foot and take a tall posture.
    • To keep your back foot flat on the ground, you can either point your right toe out or come up on your toes.
    • Maintaining a bent hip and an engaged core will help you press the weight above.
    • Keep your arms raised and your elbows firm as you drop the kettlebell behind your head by straightening at the elbows.
    • Hold this position for a few seconds.
    • To shift the weight and get back to the beginning position, extend your arms straight.
    • Then return to your neutral position.
    • Then relax.
    • Repeat this exercise six to twelve times.
    Kettlebell Triceps Extension
    Kettlebell Triceps Extension

    Row of Chainsaws

    • Begin a split stance with the kettlebell on the ground.
    • Maintain the body position low and pull with your elbow as you quickly row the bell.
    • Hold this position for a few seconds.
    • Before attempting the next repetition, place the kettlebell back on the floor and give it a moment to rest.
    • Then return to your neutral position.
    • Then relax.
    • Repeat this exercise six to twelve times.
    Row of Chainsaws
    Row of Chainsaws

    Kettlebell Glute Bridge

    • Place your feet level on the floor, hip-width apart, and lie on your back with your knees bent.
    • A kettlebell should be held by its handle, just over your hip bones.
    • Contracting your glutes and core, together with pushing through your heels, will raise your hips a few inches off the ground and create a straight line in your body from your shoulders to your knees.
    • Hold this position for a few seconds.
    • Then return to your neutral position.
    • Then relax.
    • Repeat this exercise six to twelve times.
    Weighted Glute Bridge Exercise
    Weighted Glute Bridge Exercise

    Kettlebell Single-Arm Row

    • Spread your feet hip-width apart when standing.
    • Grasp a kettlebell by its handle with your small right hand.
    • With your core engaged, push your butt back, bend your left knee, and tilt forward at the hips without rounding your shoulders.
    • The flexibility and range of motion in your hips and hamstrings affect how easily you can bend over.
    • Look down at the ground a few inches in front of your feet to keep your neck in a comfortable position.
    • Pull the weight up to your chest, keeping your elbows close to your body, and squeeze your shoulder blade at the top of the movement.
    • Your elbow will reach your back as you bring the weight up to your chest.
    • Hold this position for a few seconds.
    • The weight is progressively released as you reach for the floor with your arms.
    • Then return to your neutral position.
    • Then relax.
    • Repeat this exercise six to twelve times.
    Kettlebell Single-Arm Row
    Kettlebell Single-Arm Row

    Kettlebell Single Leg Deadlift

    • By keeping your feet hip-width apart and using your core, you can keep your spine neutral. Keep your knees slightly bent.
    • With one leg extended straight behind you, move your weight to the other while keeping your foot contracted.
    • Furthermore, take a bending hip position and use your free hand to reach down and grasp the kettlebell handle in a neutral posture.
    • Maintain a straight back and lowered shoulders.
    • Lower your body and the kettlebell towards the floor gradually while maintaining a long spine and extending your leg parallel to the floor.
    • Hold this position for a few seconds.
    • Your hamstrings and glutes ought should feel stretched.
    • To align your body, contract your glutes and push into your standing leg.
    • Keep the kettlebell close to your body during the entire workout.
    • Then return to your neutral position.
    • Then relax.
    • Once you have completed the required number of repetitions on one leg, switch legs and do the activity on the other side.
    • Repeat this exercise six to twelve times.
    • Repeat with the opposite side.

    Kettlebell Swing Two Hands

    • Push your hips back and down while keeping your shoulders down and your back straight.
    • Using your hamstrings and glutes as the starting points, “hike” the kettlebell back a little bit between your legs at the same time.
    • Bring your hips forward when the kettlebell reaches its lowest point.
    • To raise the kettlebell higher, flex your abs and core.
    • Maintain a straight back while standing tall and extending your hips.
    • The kettlebell should naturally rise to chest height with a momentum, so you shouldn’t need to pull it with your arms.
    • Allow the kettlebell to swing controllably back between your legs as you prepare for the next repetition, then hinge again at the hips.
    • Keep swinging in a smooth, rhythmic manner, focusing on using your hips and core to push the movement.
    • Then return to your neutral position.
    • Then relax.
    • Repeat this exercise six to twelve times.
    Kettlebell Swing Two Hands
    Kettlebell Swing Two Hands

    Kettlebell Goblet Squat

    • Position yourself such that your feet are slightly wider than hip-width apart and your toes are slightly pointing out.
    • Grasp a kettlebell at your chest level.
    • If you find it more comfortable to hold it by the handles, you can alternatively carry it by the bell.
    • As you lower yourself into a squat, push your hips back, compress your core, and shift your weight into your heels, keep your chest up and your back flat.
    • Next, squeeze your glutes after pushing through your heels.
    • Hold this position for a few seconds.
    • Then return to your neutral position.
    • Then relax.
    • Repeat this exercise six to twelve times.
    kettlebell goblet squat
    kettlebell goblet squat

    Kettlebell Romanian Deadlift

    Kettlebell deadlifts are among the top workouts for strengthening the lower body using kettlebells. You may strengthen your hamstrings and the backs of your legs by performing deadlifts. They also gently challenge your core since you need to keep your abs firm to avoid arching your back.

    • Gently bend your knees and place your feet hip-width apart.
    • Press a kettlebell between your thighs with both hands, palms facing inward.
    • Lean your hips and push your butt back as you drop your body and the weight towards the floor.
    • At the bottom of the exercise, your body should be almost parallel to the floor. 
    • Hold this position for a few seconds.
    • To stand up straight and keep your arms in a straight position, push through your heels with a strong core.
    • Then return to your neutral position.
    • Then relax.
    • Repeat this exercise six to twelve times.
    Kettlebell Romanian Deadlift
    Kettlebell Romanian Deadlift

    Kettlebell Thrusters

    • Two kettlebells should be held by their handles while your weight is supported by your back.
    • Knee slightly bent, bend down while keeping your legs parallel to your shoulders.
    • Elevate the kettlebells over your head by lifting through and straightening your legs, and then spreading out with your arms.
    • Hold this position for a few seconds.
    • Then return to your neutral position.
    • Then relax.
    • Repeat this exercise six to twelve times.
    kettlebell thrusters
    kettlebell thrusters

    Sit-Up to Press-Up

    Adding weight to a sit-up strengthens your core and tones your arms and shoulders at the same time. Whatever your hips feel comfortable with.

    • Grasp a kettlebell with both hands at your chest while lying comfortably with your legs bent and your feet flat.
    • That’s where everything begins.
    • Your back should be straight as you sit up straight, therefore use your abs to lift your body up.
    • At the same time as you press the weight overhead, extend both arms until your elbows are straight.
    • Hold this position for a few seconds.
    • Then return to your neutral position.
    • Then relax.
    • Repeat this exercise six to twelve times.
    kettlebell-Sit-Up-to-Press-Up
    kettlebell-Sit-Up-to-Press-Up

    Kettlebell Overhead Press

    • Standing, position your feet hip-width apart.
    • Hold a kettlebell by the handle in each hand at your shoulders, with your elbows bent and your palms pointing inward.
    • With your elbows extended to their maximum length and your hands turned palms out, lift the dumbbells overhead.
    • A strong core and curled hips will help you avoid arching your lower back when you raise your arms.
    • Hold this position for a few seconds.
    • Gradually bend your elbows to move the weight back to its starting point.
    • Then return to your neutral position.
    • Then relax.
    • Repeat this exercise six to twelve times.
    Kettlebell Overhead Press
    Kettlebell Overhead Press

    Kettlebell Clean and Press

    • Take a position with kettlebell by your thighs, with your legs shoulder-width apart and your knees slightly bent.
    • Take a small leap off the ground and quickly raise your arms above your head.
    • Raise your arms straight up above your head, shoulder-width apart, while gently planting your feet and bending your knees slightly in a squatting motion.
    • Hold this position for a few seconds.
    • Then return to your neutral position.
    • Then relax.
    • Repeat this exercise six to twelve times.
    Kettlebell-Clean-and-Press
    Kettlebell-Clean-and-Press

    Kettlebell Slingshot

    • Select a weight for the kettlebell that is difficult yet practicable.
    • Use less when you first begin the exercise regimen.
    • As you stand, place your feet shoulder-width apart and point your toes slightly out.
    • While tensing your core, keep your back straight.
    • Grip the kettlebell near the bottom of the handle with both hands, in front of your thighs.
    • To begin, swing the kettlebell between your legs and allow it to land between your knees.
    • Keep your arms in a straight position.
    • As it rises slightly behind you, strongly swing the kettlebell up and around the outside of your right hip.
    • Rotate your shoulders and body to generate force.
    • At the highest point of the movement, swing the kettlebell to your left hand, passing it over your chest and under your right arm.
    • Throughout the exercise, try to maintain the straightest possible arm posture.
    • Continue swinging the kettlebell around your left hip and under your left arm, then into your right hand.
    • Try to keep your hips moving and your core active with an easy, rotating motion.
    • Then return to your neutral position.
    • Then relax.
    • Repeat this exercise six to twelve times.
    Kettlebell-Slingshot
    Kettlebell-Slingshot

    Kettlebell Swing

    • Place your feet shoulder-width apart and grasp a kettlebell in each hand.
    • Let the kettlebell swing back between your legs by bending your knees slightly and pushing at the hips.
    • The kettlebell is pushed forward and up to chest height by applying pressure to your heels, contracting your glutes, engaging your core, and driving your hips forward.
    • Hold this position for a few seconds
    • Allow it to drop back between your legs organically. That is an example of repetition.
    • Then return to your neutral position.
    • Then relax.
    • Repeat this exercise six to twelve times.
    kettlebell-swings
    kettlebell-swings

    Kettlebell Pistol Squat

    • Using both hands, grasp one kettlebell slightly behind your chin.
    • Extend one leg off the floor and lower the other into a squat.
    • Hold this position for a few seconds.
    • To go back to standing, push through your heel without letting your leg touch the ground.
    • Then return to your neutral position.
    • Then relax.
    • Repeat this exercise six to twelve times.
    Kettlebell-Pistol-Squat
    Kettlebell-Pistol-Squat

    Kettlebell Single-Handed Swing

    • Push your hips back while maintaining a straight back and lowered shoulders.
    • While maintaining your arm engaged, similarly “lift” the kettlebell back between your legs a little bit using your hamstrings and glutes.
    • As the kettlebell reaches its lowest point, quickly push your hips forward.
    • To raise the kettlebell higher, tighten your core and glutes.
    • Maintain a straight back and an upright position with expanded hips.
    • Focus on using your hips and core to generate force instead of your arms.
    • As the kettlebell picks up speed, it should naturally rise to chest height.
    • Allow the kettlebell to swing back between your legs under control as you prepare for the next repetition, then hinge at the hips once more.
    • Then return to your neutral position.
    • Then relax.
    • Repeat this exercise six to twelve times.
    • After performing as many repetitions as possible on one side, carefully move the kettlebell to your other hand and carry out the workout there.
    Kettlebell-Single-Handed-Swing
    Kettlebell-Single-Handed-Swing

    Kettlebell Split Squat

    The split squat works your quads and glutes similarly to a goblet squat, but because it puts you in a lunge position and requires more effort from your front leg, it’s considered a unilateral exercise. However, balancing won’t be as difficult as it would be in a regular lunge because you aren’t pushing forward.

    • Place both hands at your chest to grasp a kettlebell.
    • Keeping your left heel firmly planted with your feet beneath your shoulders, step your left foot forward as though you were completing a forward lunge.
    • Bend both knees so that your legs form a 90-degree angle.
    • Your chest should be straight and your body positioned somewhat forward to guarantee that your back is flat and not rounded or arched forward.
    • You should have your left knee over your left foot and your left quadriceps parallel to the floor.
    • Hold this position for a few seconds.
    • Use your core and butt and Push through your left foot to return to the starting position.
    • Then return to your neutral position.
    • Then relax.
    • Repeat this exercise six to twelve times.
    Kettlebell-Split-Squat
    Kettlebell-Split-Squat

    Kettlebell Chest Press

    Pressing exercises are a great way to build your pectorals, or chest muscles, which is a key component of any comprehensive fitness program. Together with your pecs, this workout will work your triceps.

    • Place your feet flat on the floor and bend your knees to lie down.
    • With your hands evenly spaced and your palms pointing inward, take hold of a kettlebell with your elbows slightly bent on the ground.
    • This is the starting point of everything.
    • As you press the weights toward the sky, keep your hands pointed inward and extend your elbows fully.
    • Hold this position for a few seconds.
    • Slowly bend your elbows and then put them back on the ground.
    • Then return to your neutral position.
    • Then relax.
    • Repeat this exercise six to twelve times.
    kettlebell-chest-press
    kettlebell-chest-press

    Safety factors:

    Exercises using kettlebells require care to lower the chance of damage.

    Here are some guidelines for safety to take;

    • If you’re new to exercising, gradually increase the number of repetitions and sets you perform in kettlebell exercise sessions.
    • As you gain strength and comfort with the exercises, start with a lesser kettlebell and work your way up to a heavier one.
    • Wear loose-fitting attire. Put on supported, non-slip shoes that preserve the arches of your feet.
    • Don’t perform kettlebell workouts two days in a row to give your muscles a chance to heal.
    • As you lift and swing the kettlebell, move smoothly. Avoid locking your legs or arms.
    • Don’t forget to warm up and cool down with five to ten minutes of light aerobic activity before and after each session.

    Summary:

    Workouts using kettlebells are an excellent method to combine strength and cardio training. Kettlebells are weights with handles that are used to work different muscle groups by lifting or swinging weights. There are numerous kettlebell workouts available. To avoid injuries, make sure you use a kettlebell properly, which includes choosing a weight that is suitable for you. With this weight, you may work out different body regions in a variety of ways, such as your core with kettlebell Exercises.

    The key is to begin slowly and, if possible, with the help of a qualified personal trainer. Once you can perform the exercises with good form with a lighter weight, you can advance to using a larger weight and increase your repetitions and sets.

    FAQ:

    Do kettlebell exercises work?

    As with dumbbells, kettlebells are an effective tool for strength training since you can use them to gradually test your muscles by increasing the weight or the number of repetitions.

    What is the daily number of kettlebell workouts performed?

    Your degree of fitness and your goals, which could include improving your vertical leap or deadlift, explosive power, or endurance, will be key factors in this. To begin, include three to five sets of ten to twenty kettlebell swing repetitions into your regular training regimen.

    Which kettlebell workout targets the most muscle groups?

    Because they work your entire body and demand a lot of strength, kettlebell thrusters rank among the best workouts you can do with a kettlebell. Start by gripping two kettlebells by the handles and placing the weight on your back shoulders to perform a thruster.

    Can I lose weight with only kettlebells?

    You can add specific kettlebell movements to your fitness regimen or use them alone to generate a full-body workout. Your overall health and the type of workout you’re doing are two more elements that could affect the kettlebell weight you choose.

    Are kettlebells safe to use every day?

    Overuse of kettlebells might have hazards despite their many benefits. The likelihood of overtraining syndrome increases with daily exercise. Your ability to perform may decline, and a variety of health problems such as persistent fatigue and sprains and strains may appear.

    Does ten minutes of kettlebell training be enough?

    You may work out with kettlebells for 10 minutes and challenge your cardio while using every muscle in your body.

    What kind of body can you expect from a kettlebell?

    Exercises with a kettlebell increase the amount of strong muscle tissue in your body, making you appear more firm, more muscular, and more toned. Your body produces thicker muscular tissue while burning fat, making your muscles appear tighter and your body appear slimmer.

    Do kettlebells help people lose tummy fat?

    By building muscle and boosting the calories you burn off through exercise each day, kettlebell swings can help in weight loss. Although kettlebell swings cannot specifically target belly fat, they can help in overall body fat loss, eventually leading to belly fat loss.

    To whom should kettlebell swings be avoided?

    Kettlebell swings are not recommended for anyone with herniated discs or back problems.

    References:

    • August 11, 2023: Brookes, G. 52 Kettlebell Workouts for Both Men and Women. Greg Brookes: Kettlebell Workouts. https://kettlebellsworkouts.com/workouts-with-kettlebells/
    • R. Sharma (2024, Jan. 5). For every fitness level, here are the top 31 kettlebell exercises. Mobile Clinic for Physiotherapy. Best Kettlebell Exercises: https://mobilephysiotherapyclinic.in/
    • May 19, 2024; Frazier, R. S. The Top 6 Kettlebell Workouts for the Whole Body. wellness. Exercise with kettlebells at https://www.health.com/fitness
    • May 21, 2024; Roland, J. Make Time for These 7 Kettlebell Workouts in Your Exercise Program. The website Healthline provides information about exercise, fitness, and kettlebell workouts.
    • Image 2, M. Koban (2020, Dec. 4). The Kettlebell Halo 20kg Green Kettlebell is available at https://martinkoban.com/cardio-exercises-pain/kettlebell-halo-20kg-green-kettlebell/. Martin Koban
    • Image 4, BodBot. [n.d.]. http://www.bodbot.com/Exercises/1006/Kettlebell-Tricep-Extension-_-Standing,-One-Arm
    • Image 5, Whether you’re working out in the gym, outside, or both, our big workout will leave your entire body exhausted. (18 August, 2021). male health. Great workout for building muscle. https://www.menshealth.com/uk/workouts/a36208446/
    • Image 7, Lift Instructions. (2023, April 24). Directions, Benefits, and Practice for the Kettlebell Single Arm Row. kettlebell one-arm row: https://liftmanual.com/
    • Image 8, December 15, 2023: Downey, J. This is what happened to my body after a week of doing kettlebell single-leg deadlifts every day. The Guide of Tom. They practiced kettlebell single-leg deadlifts at https://www.tomsguide.com/features every day for an entire week. My physical appearance reacted in this way.
    • Image 11, On October 2, 2019, Lefkowith, C. Work Your Backside Using The Deadlift. Strength Redefined. https://the-deadlift.redefiningstrength.com/
    • Image 12, Botond, B. (2017, May 10). Kettlebell Thruster How To Exercise Guide. https://get-strong.fit/Kettlebell-Thruster-Exercise-Guide/Exercises#google_vignette
    • Image 13, Skimble.com. Kettlebell Sit & Press (n.d.). This is an example of how to perform the 34000-kettlebell-sit-press exercise on Skimble.com.
    • Image 14, Zack & Zack. January 14, 2024. Zack Henderson Fitness: The Complete Guide to the Kettlebell Press. Fitness Zack Henderson -. The Ultimate Kettlebell Press Guide, available at https://zackhenderson.com/
    • Image 15, June 6, 2022, DMoose. DMoose’s Kettlebell Clean & Press Exercise Guide Will Give You Explosive Power. The kettlebell clean-press exercise is a popular post on the Dmoose blog.
    • Image 16, (2020, August 20). Fit. These 22 Kettlebell Workouts Will Make You Feel Like A Boss. Exercises, Training Plans, and Workouts. 22 kettlebell exercises at FitMw.com
    • Image 18, How to Perform Properly and Work Your Muscles with Kettlebell Pistol Squats? (As of now). Kettlebell Pistol Squats: Home Workouts, https://homeworkouts.org/exercise/
    • Image 19, On July 9, 2024, Ascm-Cep, L. W. M.Kettlebell Swings: Proper Form, Modifications & Frequent Mistakes. incredibly comfortable. https://www.verywellfit.com/kettlebell-swing-techniques-benefits-variations-8691529
    • Image 20, D. Luna (2023b), May 29. The benefits, muscles used, and more of the kettlebell split squat. Motivate US. The kettlebell split squat is available at https://www.inspireusafoundation.org.
    • Image 21, L. Putra (n.d.–b). A woman uses one arm to do a kettlebell floor press workout. A flat vector artwork featuring an isolated workout character set on a white background. The graphic titled “Woman Practicing One Arm Kettlebell Floor Press Workout Flat Vector Illustration Isolated on White Background Workout Character Set” was discovered by Vecteezy.
  • Patella Alta

    Patella Alta

    Introduction

    Patella Alta, commonly referred to as a high-riding patella, is a condition in which the kneecap (patella) is positioned higher than its normal alignment in relation to the femur.

    • As a result, the knee loses stability and becomes more vulnerable to anterior knee pain and dislocation.
    • Patella alta is usually a congenital disorder, but it can sometimes come from injuries to the knee, like a ruptured patellar tendon.
    • Here, we look at what patella alta is, why it’s a concern, typical causes and symptoms, diagnosis procedures, and available treatments.

    What Is Patella Alta?

    The quadriceps tendon surrounds the patellofemoral joint, which is made up of the kneecap lying in a dip on the front of the femur bone, or lower thigh bone. This dip is known as the patellofemoral groove, but it is also referred to as the patella groove, trochlear groove, or intercondylar groove. From the base of the kneecap, the patellar tendon connects the kneecap to the tibia or shin bone.

    The groove is significantly shallower here than it is further down, so there’s only a very minor barrier on either side of the kneecap.

    Why Is Patella Alta A Problem?

    When the knee is bent and straightened, the patella usually travels up and down the middle of the patellofemoral groove. The patella is retained firmly in place because the good depth of the groove prevents the kneecap from moving sideways.

    However, because the kneecap is positioned higher than normal in the shallower region of the groove, there is less sideways stability in the patella alta.

    Consequently, during knee flexion, the patella is pulled sideways over the low edge of the groove, potentially resulting in partial or total dislocation. It is estimated that approximately 30% of cases of recurrent patella dislocation are caused by patella alta.

    Patella dislocation or subluxation (partially dislocating) can cause chondromalacia and patellofemoral pain, commonly referred to as anterior knee pain.

    Clinically Relevant Anatomy

    The flat, triangular patella bone, which has one inverted corner, is situated in front of the knee joint. The patellofemoral joint is the region of the knee joint that lies between the patella and the femoral condyles. The patellofemoral articulation is absolutely necessary for the, which is attached to the patella by a common tendon, to function.

    Another tendon is the patellar tendon, which connects the patella base to the tibia. These three bones are covered in articular cartilage, a very hard, smooth material designed to reduce forces of friction.

    What Causes Patella Alta?

    • The common causes of patella alta are as follows:
    • Following a knee injury—typically a dislocated kneecap—patella alta may develop.
    • Patella alta is most commonly observed in children who walk with bent knees and in conditions related to cerebral palsy and diplegia.
    • Congenital defect: An embryo develops this flaw throughout development. An individual with this ailment has had patella Alta problems since birth.
    • Long Patellar Tendon: Patella Alta is frequently seen by individuals whose patellar tendons are excessively long (more than 52 mm).
    • Knee Injuries: A knee injury, usually a dislocation of the kneecap, may cause the Patella Alta to form.
    • Brain palsy: Patella Alta is a frequent defect that may be associated with cerebral palsy, especially in children who walk with their knees bent.
    • The patella alta may be brought on by an individual’s body structure. An individual with a tall build and a slender body type is most susceptible to this specific illness.
    • Patella alta may result from patellofemoral pain. This particular ailment develops when a knee cap comes into contact with the thigh bone. A person who has this syndrome is more likely to develop patella alta disorder.
    • Patella Alta can result from injuries to the knee. Given that playing sports and other physically demanding activities might cause the kneecap to pop out, this may be the main reason for the patella Alta’s medical condition. During the action, a quick shift in direction could make it happen frequently. A pulled-out kneecap would cause the patella to dislocate, which could lead to high-ride kneecap disorders.
    • Patella Alta may also be caused by knee twisting. Any factor other than athletic activity, which is frequently linked to abrupt changes in direction, like jerks, could result in patella alta.
    • Although sports injuries can cause patella alta, most cases of the syndrome are congenital or developmental in nature and unrelated to trauma. Although the etiology of patella Alta is not fully understood, excessively long patellar tendons (>52 mm) are thought to be one of the reasons.

    Patella Alta Sign and Symptoms

    Patella alta is a disorder when a person’s kneecap becomes dislocated and becomes abnormally positioned at the higher side of the femur bone. It produces few symptoms. This abnormality may result in a few distinguishable symptoms and indicators, such as:

    • The patient may report pain in the patella region; however, as not all patella pain can be classified as a high-ride condition, accurate diagnosis is necessary for patella alta conditions.
    • Patella alta is the primary cause of unsteady gait, hence anyone with unstable or irregular gait may have this disorder.
    • Another severe indication of patella alta is a dislocated knee cap. The knee cap becomes painfully dislocated when the patella is bent more than it normally does, pulling the knee cap out of its natural grooves. The patella alta illness could be caused by any of these disorders.

    The following are typical signs of patella alta:

    • Instability: People who have patella alta frequently lament that their knee feels unstable or weak, especially when they’re running or walking.
    • Recurrent Kneecap Dislocation: Individuals who have a high patellar tendon may frequently have knee dislocation. Few people have free will to freely push their kneecap in and out of the patellar groove, causing it to dislocate and subsequently reposition.
    • It is particularly felt when crouching, walking up and down hills, sitting for extended periods of time, or climbing stairs.
    • Sign of the camel’s back: the patella usually points forward. The patella points upward in people with high-riding patellas. The infrapatellar fat pad and tibial tuberosity are prominent in these patients, creating the appearance of an impact prominence akin to a camel’s back.
    • The bilateral patella Alta allows for a better appreciation of the grasshopper’s eyes. A small number of patients may also exhibit patella Alta, lateral tilt, and externally rotated patellae.

    Differential Diagnosis

    First, your knee will be examined by your doctor to rule out patella alta. They will look at the connection between the femur and kneecap from different angles and with the knee in different configurations.

    Patella alta is known to be associated with a wide range of illnesses, including:

    • instability of the patellofemoral
    • Patellofemoral dislocation recurring
    • poliomyelitis and other neuromuscular disorders
    • cerebral palsy that is spastic
    • Osgood-Schlatter disease
    • Sinding Larsen Johanssen Disease
    • Friction syndrome of the patella tendon-lateral femoral condyle
    • Chondromalacia patella

    Outcome Measures

    Since then, many approaches, such as those by Blackburne and Peel, Caton et al., and de Carvalho et al., have been developed in an attempt to categorize the patella position. Patella alta happens at higher ratios.

    The Blackburne-Peel index can also be used to identify patella alta. The lengths of three surfaces must be measured in order to identify the presence or absence of a patella alta. The first length is a vertical line that ascends to the top of the inferior aspect of the patella articular surface from the horizontal line of the tibial plateau. The locations of both vertical lines are on the posterior aspect of the patella articular surface. The third length is shown as a horizontal line on the tibial plateau.

    This technique is challenging to utilize with an MRI since it requires measurements across multiple areas. A ratio greater than one indicates the occurrence of patella alta.

    The Caton-Deschamps index is a widely used radiographic tool for determining patellar height. This method is easy to measure on an MRI to determine the height of the patella. A normal patella ratio is between 0.66 and 1.33.

    Diagnosis

    Diagnostic Procedures

    Although the cutoff values for both indices were rarely used on MRI, they were similar to those for conventional radiographs.

    Physical Examination

    Tests:

    Full Knee Extension: When the knee is fully extended and relaxed, the kneecap can move very slightly from side to side.

    Knee Slightly Bent: When the patella alta is flexed at a degree or so, it often displays the “camelback sign.” From the side, there are two humps that resemble the two humps on a camel. One is brought on by an upward-pointing high-riding patella, and the other by an expanded infrapatellar fat pad or bursa.

    Knee Bent: When the knee is at a 90-degree right angle and the patella alta is present, the kneecaps point upward instead of forward and may be rotated, twisted, or tilted externally.

    Fairbanks patellar apprehension test:
    The positive test results indicate that lateral patellar instability is a substantial component of the patient’s problem. This may be so effective that when the therapist reaches for the knee, the patient pulls back on the leg or clutches the therapist’s arm to avoid contact.

    Patellar glide test:
    This test is used to evaluate the instability. A medial/lateral displacement of the patella with this test that is larger than or equal to three quadrants is consistent with ineffective lateral/medial constraints. Lateral patellar instability happens more frequently than medial instability.

    Measurement of the patella alta

    The following techniques are frequently employed:

    • Install-Salvati ratio
    • Modified Insall-Salvati ratio
    • Blackburne-Peel ratio
    • Caton-Deschamps index (knee)
    • Blumensaat method

    The Blackburne-Peel index
    Using this technique, a knee lateral radiograph with 30 degrees of flexion is produced. Measurement of the lengths of three surfaces is required to determine the presence of a patella Alta. The horizontal tibial plateau line and the top of the inferior portion of the patella articular surface form the primary length, which is a vertical line. On the tibial plateau, the third length could appear as a horizontal line. This method needs measuring over multiple sections, which makes it challenging to apply on an MRI. A ratio of 0.5 to 1.0 is considered the typical value of the patella.

    The Caton-Deschamps index
    It is the radiographic method most frequently employed to assess patellar height. This is measured in 30 degrees of flexion on a lateral radiograph of the knee. It is the ratio of the length of the patellar joint surface to the distance between the upper limit of the tibia and the inferior aspect of the patellar articular surface. When the knee is flexed at a 30º angle on a lateral radiograph or sagittal knee CT or MRI reconstruction, the Caton-Deschamps index can also be determined. to measure the patella’s height.

    Blumensaat technique
    The lateral image of an x-ray taken at 30 degrees of flexion is also processed using this procedure. As a reference line, it makes use of the Blumensaat line or the roof of the intercondylar notch. It is reported where the patella’s lower pole is located in relation to the Blumensaat line. In a 30-degree flexion, the patella’s lower pole typically contacts this line. Additionally, the millimeter distance in millimeters between the lower patellar pole and the Blumensat line is indicated.

    Complications in Patella Alta

    The two primary problems associated with patella alta are instability and patellofemoral arthritis. An individual with patella alta is typically more susceptible to developing another patellar instability issue. The patella became involved around a flexion arc if the dislocation or bending was of a very elevated form. There is a bend of about 20 to 30 degrees at the angle. It suggests that the patella is not very stable over time.

    However, the longer patellar tendon has a greater windscreen wiping effect, or more activity, as you can put it. Because of the patellar tendon’s growth, it becomes extremely unstable and slides side to side. Because of the elevated riding patella, pressure is placed on the kneecap, potentially resulting in greater wear and tear, articular cartilage injury, and knee pain. In the end, patellofemoral arthritis may also arise in a variety of circumstances.

    Treatment:

    Medical Treatment

    A tibial tuberosity osteotomy may be necessary for patients with patella alta. The patellar ligament’s connection is transferred from the kneecap to the tibia during this treatment. Because the patella is attached to this ligament as well, it travels downward. Increased quadriceps angle can be related to patella alta; this can be corrected by inwardly shifting the patellar ligament’s bone attachment.

    A few things that could happen after the procedure include infection, stiffness in the knee joint, injury to the nerves, and recurrent instability. Since pain and swelling will limit the knee’s range of motion, physical therapy and exercise should be performed following surgery to minimize these side effects. Your muscle control will also improve with physical therapy. You should take three to six months off while you heal.

    Physical Therapy Treatment:

    The patella’s resting height can be changed by manual gliding before knee extension, potentially alleviating knee pain. Tape can be used to fix the positioning problem with the patella, hence correcting patellar alignment. Patients stated that they were taking fewer medicines, that walking was not too difficult for them, and that their average pain level was a VAS score of 12.

    Ice Packs: Using ice packs on a regular basis may also help with patella alta symptoms. Ice packs used for the knees can help relieve discomfort, swelling, and inflammation. They may also be helpful for long-term knee issues or injuries. These could be anything from single-use, throwaway packs to specialty ice packs and knee brace inserts with superior cryotherapy. The top ice wrap for you can be selected from the five varieties discussed below, or you can compare models and read reviews.

    Knee Brace: The indications and symptoms of a high-riding patella may be lessened by using a brace while wearing one. To keep the brace from riding up, it should preferably feature a tubular section that rests above the kneecap. Knee braces come in a variety of fixing methods and support intensities. They also fluctuate widely in price and are available in a multitude of materials. Despite this, a study by Shellock et al. Patella, Alta, was present in four of the five knees in this study’s group that did not get better.

    Patellar Taping: Taping can also be used to change the position of the patella. Taping is an often-used adjunctive or temporary method. Physiotherapists frequently use the tape to reduce the risk of recurrent injuries, enhance joint stability, increase athlete confidence, inhibit or facilitate muscle action, lessen the strain on damaged or vulnerable tissues, enhance proprioception, compress when edema is present, and encourage lymphatic drainage.

    Strengthening Exercises:

    Strengthening the muscles in the buttocks, kneecap, and knee can help realign a high-riding patella, reducing pain and improving knee stability. Treatment for knee pain and prevention of recurrence can be achieved with exercise.

    Quad crunches allow the knee to be fully extended while simultaneously maintaining and strengthening the quad muscles. knee or leg straight, Tighten the muscle at the front of your thigh by lowering your knee all the way. Your thigh muscles should be taut. Hold for three seconds. Repeat 10–20 times every 3–4 hours. If you are experiencing difficulty getting your knee to fully extend, try lifting your leg off the bed a little bit by rolling up a towel under your ankle. Next, carry out the exercise as instructed. The knee can straighten by being gently raised by gravity.

    Short Arcs: With minimal knee movement, this exercise strengthens and improves control over the quadriceps muscles. Either lie flat on your back or sit up straight with your leg outstretched on a level surface, such as a bed. Place a cloth that has been folded up and roughly 10 cm in diameter under the knee and/or As you draw your toes nearer to your body, tighten your thigh muscles. Hold for three to five seconds, then gradually descend. Ten to twenty times, repeat. You can push yourself farther by increasing the weight by putting on a shoe or using a little ankle weight, for example, and increasing the difficulty level.

    Straight Leg Raise (SLR): Assume a prone position, keeping your hips straight and your legs relaxed on the floor. With the foot flat on the floor, your unaffected leg should be bent at the knee to a 90-degree angle. As you gradually lower the leg to the floor, release the breath slowly. Repeat ten more times after unwinding. The movement should tighten your hips, thighs, and abdomen when done correctly.

    The Clamshell: Lay on your side and stack your hips and feet. Bring your knees in close to your body until your feet are parallel to your butt. Put a hand on the other hip to keep it from sinking back. This is where you should start. Maintaining your abs firm and your feet together, raise one knee as high as you can without rotating your hips or raising the other knee off the ground. At the peak of the movement, engage your glutes and hold for one second before lowering one knee slowly to the starting position. After 20 total repetitions, switch to the other side and repeat.

    Surgical Treatment

    When conservative measures fail to relieve severe cases of patella alta, such as when the kneecap keeps dislocating, surgery becomes necessary, for patella alta, there are various surgical techniques available, such as:
    At this moment, the patella and the patellar tendon attachment are pushed downward.
    The tibial tuberosity is taken out of the front of the shin bone, shifted downhill, and then secured in place with wires and a screw during a tibial tuberosity osteotomy.
    Lateral Release: Lateral release surgery can be used to loosen the excessively tight structures on the outside of the knee that are causing the patella to ride high. Go over the process in more detail in the section on lateral release.
    A patellectomy, which is only advised in cases of severe patellofemoral arthritis or when all other surgical treatments have failed, involves the total removal of the patella.

    FAQs:

    Can the patella Alta be used for sports?

    They frequently exhibit strong athleticism and seem to excel at basketball, the step and leap, and the high jump. The knee cap’s high degree of mobility and propensity for dislocation during sports activities are the patella Alta’s problems.

    How can someone be diagnosed with patella alta?

    The dislocation of the kneecap is the primary sign of patella alta. A dislocation may result from the patella bending more than usual, pulling the knee out of its groove. Because it wears down the cartilage, having a misplaced patella might lead to further problems with the patella.

    What is the course of patella alta?

    The patella will only engage in the trochlear groove later within the flexion arc (that is when the knee is bent beyond the typical 20 to 30 degrees) if the patella is sitting too high (patella Alta). This suggested that a higher proportion of time could see the patella becoming less stable.

    Patella Alta: is it really real?

    Patella Alta is assumed to be the source of recurrent patella dislocation in about 30% of instances. The cartilage on the back of the kneecap is susceptible to damage if the patella dislocates or subluxates (partially dislocates). This can also result in chondromalacia and patellofemoral discomfort, often known as anterior knee pain.

    Is the patella alta a displacement?

    People who have patella alta, or a patella or kneecap that is located higher up on the femur than usual, are also more likely to experience a dislocation since the patella should travel farther during knee flexion before fully engaging in the femur’s groove or track.

    Is surgery necessary for your patella alta?

    Surgery can be used to effectively treat a patient whose patella alta is causing them particular problems, such as instability and/or patellofemoral wear and pain, by moving the patella downward as much as is required to return it to its natural position.

    Can a dislocation result from patella alta?

    Patella alta (high riding patella), trochlear dysplasia or lateral femoral condyle hypoplasia, and severe lateral patella tilt are among the anatomical characteristics that contribute to dislocation.

    How long does healing take after surgery for patella alta?

    Most of the time, you can return home the following day with your knee immobilized in a brace. You should be able to support your own weight with the brace after about two weeks; most people can stand on their own without a brace after six weeks.

    Do you have patellar tendon surgery scars?

    You most likely won’t require crutches or a cane for almost a month after surgery, but a few days afterward you should be able to start walking and bearing some weight on your knee. Most of the time, the pain feels like you ran into a table.

    Painful patellar surgery?

    You will be in pain, but it should be tolerable. During the initial few days following surgery, a tiny amount of drainage may occur at the surgical site.

    References

    • Patel, P. (2023, December 13). Patella Alta – Cause, Symptoms, Treatment, Exercise. Mobile Physiotherapy Clinic. https://mobilephysiotherapyclinic.in/patella-alta/
    • Darji, H. (2023, May 26). Patella Alta – Cause, Symptoms, Treatment, Surgery. Samarpan Physiotherapy Clinic. https://samarpanphysioclinic.com/patella-alta/#google_vignette
  • 14 Best Exercises for Sinus Tarsi Syndrome

    14 Best Exercises for Sinus Tarsi Syndrome

    Introduction:

    Including the right Exercises for Sinus Tarsi Syndrome in your rehabilitation regimen will help manage symptoms and promote healing if you have Sinus Tarsi Syndrome (STS). The symptoms of Sinus Tarsi Syndrome (STS), which is often caused by biomechanical problems, overuse, or past ankle injuries, include ankle pain and tenderness in the sinus tarsi area.

    The fundamental reasons for Sinus Tarsi Syndrome, such as weak ankle stabilizers, abnormal biomechanics, and restricted range of motion, can all be significantly improved with exercise. A balanced and pain-free gait depends on strengthening the ankles, restoring flexibility, and improving the sense of balance, or awareness of joint position. With the right exercises, all of these are achievable.

    It is important to remember that the beneficial effects of exercises may vary based on particular factors, including the intensity of your post-traumatic stress disorder and any related conditions. Therefore, to get a customized exercise plan catered to your unique needs, it’s best to speak with a licensed healthcare provider, such as a physical therapist or orthopedic specialist, before beginning any exercise regimen.

    We will look at a few of the exercises that are frequently suggested for people with Sinus Tarsi Syndrome in the sections that follow. Keep in mind that these exercises should only be done under the supervision of a medical practitioner to verify that they are secure and right for your situation. They are meant to be used as basic guidelines.

    What is Sinus Tarsi Syndrome?

    The painful swelling in the area between your heel and ankle bone is known as sinus tarsi syndrome. The area of your subtalar joint where your heel and ankle bones meet is called the sinus tarsi. Typically, ankle sprains are the reason. Surgery is rarely required to cure sinus tarsi syndrome.

    Although the exact cause of Sinus Tarsi Syndrome is not commonly known, it is frequently linked to trauma, such as ankle sprains or fractures. The tarsal sinus ligaments can get damaged by trauma, which leads to instability. This problem may develop as a result of additional factors like overuse, arthritis, or structural abnormalities in the foot.

    A thorough examination by a medical professional, usually an orthopedic specialist or podiatrist, is necessary to diagnose sinus tarsi syndrome. The main goal of the diagnostic approach is to correctly diagnose sinus tarsi syndrome while ruling out other conditions that may present with similar symptoms.

    Causes:

    Any condition or trauma that affects your sinuses or subtalar joint might cause sinus tarsi syndrome.

    Ankle sprains are most commonly the cause. When spraining their ankle, most individuals (approximately 80%) with sinus tarsi syndrome rolled it outward, away from their stomach. People commonly sprain their ankles via sports-related injuries, falls, and slips.

    Another complication of an ankle injury is called sinus tarsi syndrome, which can be carried on by swelling in the subtalar joint as a result of synovitis.

    Sinus tarsi syndrome can develop over time as a result of additional strain placed on your sinus tarsi by your natural foot form, your gait, and certain medical problems.

    Sinus tarsi can arise from non-injury sources such as;

    • Arthritis in the feet and ankles.
    • Being overweight.
    • Being flat-footed.
    • Bone Spurs
    • Foot biomechanics problems
    • Unsuitable Footwear
    • Weakness in the muscles and poor flexibility
    • Using excessive pronation whether running or walking.

    Signs and symptoms:

    Sinus tarsi injuries can be treated similarly to a sprained ankle since they frequently connect with damage to the ankle’s lateral ligaments. If so, there might be some improvement when the lateral ligaments mend; but, if sinus tarsi syndrome is also present, the ankle might not feel better for several weeks after the injury. Typically, this discomfort is worse in the morning and gets better over the day.

    The following are typical signs of sinus tarsi syndrome:

    • Pain and tenderness in the ankles
    • Patients with sinus tarsi syndrome often feel hindfoot instability when walking on surfaces that are uneven.
    • Pain on the feet that gets worse over time.
    • Swelling
    • The foot and ankle are painful on top and/or outside.
    • A feeling of sharp pinching.
    • Decreased range of motion
    • Balance problem

    Risk factors:

    Due in large part to the prevalence of ankle sprains, sinus tarsi can affect anyone.

    You can be put in more trouble if you;

    • Pregnant women are more likely to overpronate.
    • Sprain the same ankle multiple times. There is a greater chance of sinus tarsi syndrome if you sprain your injured ankle again.
    • Engage in an activity that requires you to twist and unexpectedly shift course, such as hockey, basketball, or soccer.
    • Exercise or spend a lot of time standing on hard surfaces.

    Consider the following safety precautions before starting exercises:

    Before starting any workout program, consider a few safety measures and maximize the advantages. Consult your physician or physical therapist to determine the most effective exercises for your issue.

    It’s important to know what your body needs and to refrain from exerting yourself when it aches. While pain is a frequent side effect of exercise, persistent or severe pain may indicate that you overexert yourself. Before moving on to more strenuous activities, begin with low-impact exercise routines until you can handle a greater degree of pain.

    To stop injuries from happening again, it’s critical to maintain proper form and posture. If you are unclear about how to start exercising correctly, see a doctor. To get your joints and muscles ready for the task at hand, warm them up before beginning any exercise.

    Exercises for Sinus Tarsi Syndrome

    It is often recommended that patients with this condition engage in the exercises suggested below. Before starting, you should speak with your physical therapist about how suitable these exercises are.

    Always begin cautiously and work your way up to a higher level of difficulty or longer time of exercise as tolerated. It’s critical to stop exercising and speak with a healthcare provider if you feel any pain or discomfort during or after.

    Ankle pump

    • This causes your toe joints to move, which reduces stiffness.
    • Seated on the ground or in bed.
    • 10 to 20 clockwise rotations of the foot should be done first.
    • After finishing it, draw 10 to 20 more circles in the opposite direction.
    • Then return to your neutral position.
    • Then relax.
    • Repeat this exercise five to ten times.
    Ankle Pumps
    Ankle Pumps

    Ankle alphabet

    • Select a comfortable place to sit.
    • Lift your foot a few inches and use your big toe to write the alphabet in the air starting with the capital letters.
    • Make long, downward movements.
    • Once you’ve finished writing the alphabet, move on to lowercase characters.
    • Then return to your neutral position.
    • Then relax.
    • Repeat this exercise five to ten times.
    Alphabet
    Alphabet

    Towel stretch

    • This is a simple stretch that you may do in bed or while seated on the floor.
    • Legs out in front of you, take a seat on the floor or your bed.
    • Underneath both heels of your feet, place a rolled-up towel and hold onto both ends.
    • With your knees straight, slowly draw the towel in your direction.
    • Hold this position for a few seconds.
    • Then return to your neutral position.
    • Then relax.
    • Repeat this exercise five to ten times.
    Towel-stretch
    Towel-stretch

    Ankle Plantarflexion

    • Seated on the floor, one leg bent at the knee, place your heel on the floor and your other leg comfortably resting on it.
    • As you loop the band around the front of your foot, hold onto the ends with both hands.
    • Pointing your toes forward and then back will help release pressure.
    • Hold this position for a few seconds.
    • Then return to your neutral position.
    • Then relax.
    • Repeat this exercise five to ten times.
    ankle-plantar-flexion-exercises
    ankle-plantar-flexion-exercises

    Toe curls

    • Seat yourself with your heels beneath your knees.
    • Check that your legs and feet are level with each other and that the toes point forward.
    • After spreading the towel, place a level foot on top of it.
    • It will begin to move toward you, the towel.
    • Just keep your heel down while you raise your toes and flex your foot back.
    • Remaining with your heel on the towel, stretch your foot equally on both sides and in the middle to get it as far out as possible.
    • Keeping your heel constant pinch the towel in with your toes and upward.
    • Pull the towel in your direction.
    • Using all five toes on either side of the foot, create a broad circle beneath the arch area.
    • Every time you push back and stretch, the towel can only be moved in a limited region.
    • Then return to your neutral position.
    • Then relax.
    • Repeat this exercise five to ten times.
    Toe-curls
    Toe-curls

    Ankle dorsiflexion

    • Sit for a long time on the mat, keeping your legs straight in front of you.
    • Wrap the band over one foot after securing it around the leg of a chair or table.
    • Step back and start again after softly pointing your toes in your direction.
    • Hold this position for a few seconds.
    • Then return to your neutral position.
    • Then relax.
    • Repeat this exercise five to ten times.
    dorsiflexion-exercise
    dorsiflexion-exercise

    Inversion and eversion of the ankle

    • Your affected foot should be flat on the ground to begin this exercise.
    • After that, extend your toe tips and the outside of your foot before resuming your normal position.
    • Next, inwardly bend your toe tips.
    • Keep your leg action apart from your foot and ankle to avoid overreacting.
    • Then return to your neutral position.
    • Then relax.
    • Repeat this exercise five to ten times.
    ankle-eversion-and-inversion
    ankle-eversion-and-inversion

    Ankle circle

    • Start by lying down on the ground in a comfortable position.
    • Ten moderate rotations of your ankle in both clockwise and counterclockwise directions are recommended.
    • Make sure you are only moving your foot and ankle and not your entire leg.
    • For an interesting variation on the stretch, try circling the letters with your big toe.
    • Then return to your neutral position.
    • Then relax.
    • Repeat this exercise five to ten times.
    ankle-circle
    ankle-circle

    Gastrocnemius Stretch

    • Place yourself three feet away from a wall.
    • Move forward and press your right foot into the wall.
    • Put your two palms against the wall.
    • Your right knee should be bent.
    • Lean forward while maintaining a straight left leg and a planted left heel.
    • Hold this position for a few seconds.
    • Then return to your neutral position.
    • Then relax.
    • Repeat this exercise five to ten times.
    Standing-Gastrocnemius-Stretch
    Standing-Gastrocnemius-Stretch

    Heel raise

    • Start up in a relaxed standing posture.
    • Take a seat next to a wall or use the chair’s back as support.
    • Elevate both of your heels off the ground to take a position on your heels.
    • Hold this position for a few seconds.
    • Lower your heels now.
    • Then return to your neutral position.
    • Then relax.
    • Repeat this exercise five to ten times.
    Heel Raises
    Heel Raises

    Lunge

    • Start with your feet hip-width apart while standing.
    • Take a longer step forward than a walking stride, placing one leg in front of your body and the other behind.
    • When your foot touches the ground, it should land and stay level.
    • Your heel will come off the ground when you elevate it.
    • While lowering yourself, bend your knees to around a 90-degree angle.
    • Always maintain an upright trunk and a tight core.
    • Hold this position for a few seconds.
    • To get back to where you were initially, push off with your front leg firmly.
    • Then return to your neutral position.
    • Then relax.
    • Repeat this exercise five to ten times.
    lunges
    lunges

    Standing single leg

    • Grab a sturdy chair or tabletop for support.
    • Keep your back to the chair or tabletop and keep it within reach.
    • Bend the knee to a comfortable posture and raise one foot off the ground.
    • Depending on the comfort level and capabilities of the patient, the non-standing leg may be maintained straight, slightly elevated, or bent.
    • Your primary objective should be to keep your balance while using your core muscles.
    • Don’t lean or rely on one direction.
    • Gradually extend the first short moment of balance as your strength grows.
    • If necessary, you can use the chair or countertop for support, but as you get more stable, try reducing how much you rely on it.
    • Then return to your neutral position.
    • Then relax.
    • Repeat this exercise five to ten times.
    single-leg-balance
    single-leg-balance

    Standing calf stretch

    • Place yourself facing a wall to begin.
    • Step with one leg straight forward and one leg behind you.
    • Make sure your other foot is firmly planted on the ground.
    • Next, take a lean against the wall.
    • As soon as you feel a pulling sensation in the rear of your left leg.
    • Hold this position for a few seconds.
    • Then return to your neutral position.
    • Then relax.
    • Repeat this exercise five to ten times.
    standing calf stretch
    standing calf stretch

    Resisted ankle inversion

    • Individuals should be able to put their legs down on the floor while seated in a chair.
    • Make a long loop with the band; knot one end under the foot on the ground and the other around the inside of the foot that is injured.
    • Raise the affected foot inside out and rotate it against the resistance of the band.
    • Hold this position for a few seconds.
    • Then return to your neutral position.
    • Then relax.
    • Repeat this exercise five to ten times.
    ankle-inversion
    ankle-inversion

    Which safety measures should I follow when working out?

    • As you work out, remember to warm up and stretch.
    • When working out, avoid making any sudden or abrupt movements.
    • Stay away from difficult activities.
    • The recommended number of repetitions for each exercise, together with stretches before and between sets, should all be performed in the correct sequence according to the protocol.
    • Between each set of exercises, take a rest.
    • It may be challenging to stretch the tight muscles in your joint, but it’s normal and even essential. Exercise and stretching should never cause stabbing or painful sensations as this is harmful and worsens the illness.
    • Wearing loose, casual clothing that promotes freedom of movement and relaxation is perfect for working out. Avoid wearing tight or stylish clothing.

    When do you stop working out?

    • Fever
    • Your health is not good.
    • If pain or numbness is experienced.
    • Headache

    How may sinus tarsi syndrome be prevented?

    Particularly if you’re an athlete, there may be no way to avoid sinus tarsi syndrome. You can, however, reduce your risk in a few ways.

    • Don’t “play with the pain” if you experience ankle pain during or after physical activity.
    • Before engaging in sports or physical activity, warm up and stretch.
    • After a workout, stretch and cool down.
    • Verify that you are using the right footwear that fits properly.
    • After an intense workout, give your ankles some time to rest and heal.

    Prognosis:

    A proper physical therapy program helps in the recovery of the majority of people with this illness. In contrast, this might be a protracted process that takes several months for people who have had their condition for a long time. When detected and treated properly, mild cases of this illness typically go away in a few weeks. To speed up healing and guarantee the best possible result, early physical therapy treatment is essential.

    Summary:

    A common cause of ligamentous injuries or chronic foot conditions is sinus tarsi syndrome, which is characterized by ankle pain and instability. It is a quiet disruptor that frequently goes unnoticed until it begins to interfere with day-to-day activities. One typical characteristic of sinus tarsi syndrome is subtalar joint instability, which may be on by an injury to these ligaments.

    Although sinus tarsi syndrome can have significant adverse effects on quality of life, it can also be efficiently cured and prevented with the appropriate information and proactive care.

    Keys to managing sinus tarsi syndrome include knowing the signs and symptoms, identifying the many treatment choices, and knowing the role that sinus tarsi plays in preserving ankle stability.

    FAQ:

    For sinus tarsal syndrome, who provides care?

    The optimum course of action for treating sinus tarsi syndrome can be determined by an orthopedic foot and ankle surgeon before surgery is recommended.

    For what length of time does sinus tarsi heal?

    The course of treatment for sinus tarsi syndrome might often involve several weeks when employing conservative measures. Patients frequently require several weeks of recovery following surgery. In certain cases, it may take them three months to get back to their previous level of athletic performance and six to twelve months to fully recover.

    Methods for treating sinus tarsi syndrome?

    Exercises for strengthening muscles, bracing and taping, proprioceptive training, and balancing training, and are all part of the STS treatment regimen. Anti-inflammatory medications can help lessen the inflammation in athletes who suffer from synovitis of the joint.

    Is it possible to exercise with sinus tarsi syndrome?

    Standing on one leg is one of the balance exercises that improves the sense of balance and stability, two important aspects of controlling sinus tarsi syndrome. Other exercises that improve ankle range of motion include the Ankle Alphabet exercises, in which the patient grabs the alphabet with their toes.

    Which nerve passes via the sinus tarsi?

    The cutaneous dorsolateral nerve, a branch of the superficial peroneal nerve, proprioceptive nerve endings, ligaments, adipose connective tissue, and branches of the peroneal and posterior tibial arteries that anastomose in the sinus are among the structure’s contents.

    What kind of pain does sinus tarsi syndrome cause?

    Signs and symptoms of sinus tarsi syndrome include localized discomfort or swelling that is restricted to one area. Your subtalar joint the joint where your calcaneus and talus meet may become more painful as you move, making walking and other activities challenging and uncomfortable.

    Is ice beneficial for sinus tarsi syndrome?

    Since sinus tarsi causes swelling in and around the foot and ankle joint, icing is usually advised.

    Does sinus tarsi syndrome make walking worse?

    Long periods of time spent walking or standing up frequently aggravate the pain. Possible soreness or weakening.

    Is Sinus Tarsi Syndrome a chronic medical condition?

    Results for sinus tarsi syndrome differ based on how severe the problem is and how well treatment goes. If they obtain the proper medicine, many patients can manage the disease and experience a reduction in their symptoms.

    Is it possible for Sinus Tarsi Syndrome to affect both feet at once?

    Indeed, depending on the underlying causes and contributing variables, Sinus Tarsi Syndrome can affect one or both feet at the same time.

    References:

    • December 13, 2023b; Tirgar, P.Mobile Physiotherapy Clinic: Eleven Finest Workout for Sinus Tarsi Syndrome. Telemedicine Physical Therapy Clinic. The mobilephysiotherapyclinic.in website has the top 11 exercises for treating Sinus Tarsi Syndrome.
    • Modern Foot & Ankle: A Guide to Symptoms, Causes, and Recovery for Sinus Tarsi Syndrome: Find Relief. (n.d.-b). Sinus Tarsi Syndrome: https://www.modernfootankle.com/resources/foot-care/guides
    • Sinus Tarsi Syndrome. May 1, 2024. Cleveland Clinic. The Cleveland Clinic website describes Sinus Tarsi Syndrome as one of the diseases.
    • Ankle, C. F. A. June 28, 2023. Approaching and Managing Tarsal Sinus Syndrome. Experts in Foot and Ankle Care Certified. How can tarsal sinus syndrome be diagnosed and treated? https://certifiedfoot.com/
    • Tarsi Syndrome of the Sinus. (2024a, 7 March). Masterton Foot Clinic, New Zealand. www.mastertonfootclinic.co.nz/condition/sinus-tarsi-syndrome
  • Hip Dislocation

    Hip Dislocation

    Introduction

    Hip dislocation occurs when the ball of the femur (thigh bone) is forced out of its socket in the pelvic bone, typically resulting from high-impact trauma like a car accident or severe fall.

    Most frequently, this injury happens in an automobile accident, high-impact fall, at work, or in sports, particularly when it also results in a fractured pelvis or leg. When the femur, or ball joint, positions separated from the acetabulum or socket, it results in a hip dislocation. There is an urgent medical situation.

    A displaced hip can be crippling and extremely painful. If a dislocated hip is severe or not properly treated within hours of the incident, it may result in major, lifelong, impairing issues. A person should be evaluated by an orthopedic specialist to rule out a hip dislocation if they sustain any kind of strong impact that causes severe hip discomfort or discomfort in the knee, leg, or even the groin. Short-term problems are less likely when treated right away.

    Anatomy of Hip Joint

    Hip Joint Anatomy
    Hip Joint Anatomy
    • The anatomy of the hip joint consists of a ball and socket.
    • The acetabulum, a component of the big pelvic bone, forms the socket.
    • The femoral head, or top end of the femur, is the ball.
    • The surface of the ball and the socket are covered in a smooth substance known as articular cartilage. It produces a surface that is low-friction, facilitating easy bone-to-bone movement.
    • The surface of the ball and the socket are covered in a smooth substance known as articular cartilage. It produces a surface that is low-friction, facilitating easy bone-to-bone movement.
    • The labrum, a strong fibrocartilage, encircles the acetabulum. The labrum serves as a barrier that securely seals the socket and enhances joint stability. The strong bands of tissue known as ligaments give the hip joint extra stability.
    • The head of the femur rests comfortably inside the acetabulum in a healthy hip.

    What is Hip Dislocation?

    • A painful condition known as hip dislocation occurs when the hip’s ball joint pops out of its socket. The cause generally includes a significant traumatic injury. (It is a little bit easier to dislocate an artificial hip replacement.)
    • An injured hip requires immediate medical attention. Until it is fixed, it incapacitates your leg and produces severe pain. It may also cause secondary harm to nearby blood vessels, ligaments, nerves, and tissues. Long-term harm may result from hip dislocation, particularly if it is not immediately treated.
    • A developmental condition known as hip dysplasia causes your hip joint to not fit properly in its socket. It can occasionally lead to hip dislocation. Hip dysplasia frequently gets referred to as developmental dislocation. Hip dysplasia patients have shallow hip sockets, which make it harder for their joints to stay in position than it would be for healthy hips. It’s also possible that they have loose hip ligaments and muscles, which means it takes less effort to dislocate their joint than it would for the majority of us.

    What is a Subluxation, or Partial Hip Dislocation?

    • In medical terms, an incomplete dislocation is categorized as a subluxation. It indicates that your ball joint has slipped partially away from its socket, but not completely. A subluxation may be moderate or severe. It is common in patients who have hip dysplasia or have had their hip replaced.
    • Injuries are commonly the cause of severe subluxations. More severe occurrences may be as painful and debilitating as a total dislocation, necessitating a healthcare professional’s intervention. Listen to your body and seek professional assistance if you are in extreme pain or unable to walk.
    • A lesser case may result from general wear and strain on your hip, such as damaged cartilage that helps seal your joint in its socket. It could be chronic or recurrent. If you have a mild subluxation, you may be able to walk and gently stretch it back into position.

    What are the different types of Hip Dislocation?

    1. Posterior dislocation
    2. Anterior dislocation.
    3. Central dislocation

    Posterior dislocation

    • Among the three kinds of hip dislocations, it occurs most frequently.
    • It happens when there is a forceful thrust to the knee that pushes the adducted and flexed femur backward, like when a passenger’s knee strikes the dashboard of an automobile.
    • The posterior hip of the acetabulum may fracture as a result of the femoral head being forced backward.

    Clinical Symptoms:

    • Significant localized discomfort and tenderness.
    • The lower limb posture with a posterior dislocation consists of internal hip rotation, flexion, and adduction. There is identified limb shortening.
    • The attempted movement was stiff and unpleasant.
    • Localized hematoma
    • The femoral head is palpable posteriorly at the gluteal area.
    • The decreased femoral pulsation

    Anterior dislocation

    • It is uncommon and happens because of violent abduction force, with the thigh flexed.
    • It happens in road traffic accidents.
    • The displaced head of the femur might rest on the obturator foramen or the symphysis pubis.

    Clinical Symptoms:

    • Tenderness, stiffness, and localized discomfort.
    • Inability to weight-bearing
    • The limb seems to lengthen as it is externally rotated.

    Central dislocation

    • This kind of dislocation happens when someone falls onto their greater trochanter or when they are in an automobile accident.
    • The acetabulum base fractures as a result of the femoral head being forced deeply into the pelvis.

    Clinical Symptoms:

    • Severe stiffness and localized discomfort
    • When attempting to move the hip joint, there is considerable pain and restrictions on hip abduction and rotation.
    • The lower limb stays in a short, neutral rotational position.

    What are the causes of the Hip Dislocation?

    • The most frequent cause of traumatic hip dislocations is motor vehicle crashes. When a knee collides with the dashboard, it frequently dislocates.
    • This strain forces The thigh backward, forcing the femur’s ball head out of the hip socket.
    • Using a seatbelt can significantly lower your chance of hip dislocation in an accident.
    • A hip dislocation can also result from an industrial accident or a fall from a considerable height, such as a ladder.
    • Hip dislocations can occur from collisions during sports, such as hockey or football, however, they are significantly less common.
    • Hip dislocations frequently result in other injuries, such as head, back, abdomen, and leg fractures as well as pelvic and leg fractures. The most widespread fracture occurs when the posterior portion of the hip socket is damaged due to a collision with the femur head after a concussion. This phenomenon is referred to as a posterior wall acetabular fracture and dislocation.
    • In children: It may require significantly less effort to dislocate the joint if the child has developmental hip dysplasia or hip dislocation.
    • Occasionally due to underlying medical issues, such as neuromuscular diseases or cerebral palsy.

    What is the appearance of a Dislocated Hip?

    • Your leg is trapped in a fixed posture, rotated inward or outward if you view the injury from the outside.
    • Your hip joint is driven backward out of its socket (posterior dislocation) about 90% of the time, causing your foot and knee to point inward. Your knee and foot will point outward if your hip is forced forward from its socket (anterior dislocation).
    • Twisted legs may look longer or shorter than the other. You might see hip discoloration or swelling, or you might be able to detect that your hip isn’t aligned.

    What are the risk factors for the Hip Dislocation?

    • Compared to women, men are more likely to have suffered from hip dislocations.
    • You have an increased chance of experiencing another hip dislocation if you have already had one.
    • Common causes include falls from heights, motorbike accidents, and car crashes.
    • Sports involving contact, such as rugby, football, and hockey, can raise risks.
    • A disorder when there is an incorrect formation of the hip joint, increasing the risk of dislocation.
    • Rheumatoid arthritis and osteoarthritis can weaken the joint, increasing the risk of dislocation.
    • Osteoporosis and osteonecrosis are two conditions that can weaken bones and raise the risk.
    • Fall risk is increased by conditions that affect balance and coordination, such as cerebral palsy and Parkinson’s disease.

    How are Hip Dislocations Diagnosed?

    Medical History:

    • The doctor will ask about the circumstances that led to the injury, previous hip problems, and any associated symptoms.

    Physical examination:

    • The doctor will check the hip joint’s range of motion, stability, and discomfort. They may additionally look for nearby areas for additional injuries.

    Imaging tests:

    • A pelvic x-ray taken from the front and back would confirm the diagnosis.
    • An excess of the femur’s head or neck and the acetabular edge may be shown on the X-ray.
    • Labrum and cartilage can be found with an MRI.
    • Accurate visualization of the bone and soft tissues surrounding the hip joint, including bursae and ligaments, is possible with CT scans.
    • To identify malignancies, necrosis, and stress fractures in the hip, scintigraphy, or bone scans, are utilized.
    • One method for identifying hip irregularities and soft tissue issues like edema is ultrasonography.

    What is the treatment for Hip Dislocations?

    Hip dislocations can be treated both surgically and non-operatively. Time for reduction is important because the longer the hip is dislocated, the higher the risk of avascular necrosis in the native hip, according to several studies.

    Non-surgical Treatment

    Hip dislocation is prevented by applying traction force in the opposite direction when the hip is at a 90° flexion. This is known as closed relocation of the hip. To avoid further damaging cartilage and soft tissue, this should ideally be performed under general or regional anesthetic with muscular relaxation. 

    In a theater, it could potentially be performed under anesthesia. The hip’s stability should be closely examined following the relocation. Depending on the hip’s stability and the severity of the soft tissue damage, a period of bed rest may be advised.

    Surgical Treatment

    Surgical Guidelines:

    • Ineffective conservative approach
    • Instability after a conservative move
    • Associated acetabular or femur head fractures
    • Pieces of loose bone in the joint area following the reduction.

    Hip arthroscopy: This procedure can be performed to look for chondral damage and intra-articular fractures as well as to remove fragments from within the joint.

    Hip replacement: If relocation and stabilization of the related injuries do not result in satisfactory stability, hip replacement surgery may also be considered. Dislocation after hip replacement surgery may need revision surgery to guarantee the hip’s long-term stability.

    Open reduction indicators: When challenged with difficult relocations or when any obstacles (such as loose pieces or soft tissue) hamper closed reduction.
    Decreasing neurological symptoms after closure reduction, particularly after posterior dislocation for sciatic nerve function.
    Cases where leg manipulation is not advised in individuals with proximal femur fractures.

    What is the physical therapy for Hip Dislocations?

    People who have dislocated their hips will need a lot of physical therapy. The amount of time needed for soft tissue healing (and bone healing in cases where there are accompanying fractures) must be carefully taken into account during hip dislocation rehabilitation. The orthopedic surgeon will guide any potential weight-bearing limits that may arise after hip medical therapy. Following a hip dislocation, recovery can be completed in three to six months.

    • Gait training: Starting with crutches or a walking frame to restrict weight bearing, and progressing from there.
    • Boost hip mobility, using hip mobilizations.
    • Strengthening of hip-supporting muscles, with a focus on hip stabilizers such as hip flexors, hip extenders, hip abductors, and hip adductors.
    • Stretching
    • Graded return to sport or activity

    To lessen discomfort and inflammation during a hip dislocation physical therapy treatment plan, therapists may employ modalities like

    • Ice.
    • Ultrasound.
    • Electric stimulation.
    • Cold laser.

    Prognosis

    After a dislocation, the hip requires some time to heal up to two-three months. Further fractures could result in a prolonged recuperation period. To prevent the hip from dislocating once more, the doctor could advise restricting hip motion for a few weeks. Physical treatment is frequently advised when recovering. In a short amount of time, patients frequently start to walk with crutches. Walking aids assist patients in regaining their movement. Devices ranging from crutches, walkers, and, finally, canes.

    What are the complications of Hip Dislocation?

    Long-term effects may result from a hip dislocation, especially if there are accompanying fractures.

    • Nerve damage: Nerves in the hip can be crushed and stretched when the femur is forced out of its socket, especially in posterior dislocations. The most frequently affected nerve is the sciatic nerve, which runs from the lower back down to the back of the legs. A sciatic nerve damage might result in lower limb paralysis as well as typical mobility impairment in the knee, ankle, and foot. Approximately ten percent of sciatic injury cases originate from hip dislocation. Most of these patients will recover some nerve function.
    • Osteonecrosis: The femur can rip blood vessels when it is forced out of its socket. Osteonecrosis, also known as avascular necrosis, is the outcome of a bone dying due to a lack of blood flow. This is a painful ailment that may eventually result in arthritis and hip joint degeneration.
    • Arthritis: Damage to the protective cartilage that covers the bone may also occur, raising the possibility of joint arthritis. Arthritis may eventually necessitate other surgeries, such as a total hip replacement.

    How to prevent Hip Dislocation?

    • Safety: Standard safety precautions are the best defense against hip dislocation, which typically occurs as a consequence of an accident. When driving, buckle up, and when playing contact sports, put on protective gear. Furthermore, proceed with caution when utilizing a ladder or other work equipment.
    • Posture awareness: Sit with your back in a neutral position and your feet flat on the floor. Do not cross your legs. Avoid bending forward when seated on a chair. Your knees ought to stay apart. Position a wedge or pillow between your knees when you sit or lie down. Do not bend your knees. Do not elevate your knees higher than your hips.
    • Steer clear of low chairs. Using the armrests and your upper body strength, push yourself up to stand from a seated posture. When you are picking anything up off the ground, try not to bend at the waist. You can bend your knees or use a tool to pick up the object.
    • Conditioning: Your hip may be more prone to dislocating again if you have already experienced one. By maintaining your hip tendons and muscles conditioned through regular exercise and strengthening them through physical therapy, you can assist in strengthening your joints.
    • Treatment for hip dysplasia: To avoid further harm, children with this condition should receive treatment while their skeletons are still forming.

    Summary

    Don’t mess around with a dislocated hip. It’s a medical emergency, and both short-term relief and long-term healing rely on prompt treatment. Most likely, a stressful incident led to your dislocated hip. If this is the case, there are likely to be additional injuries such as fractures and rips. However, if you have a replacement hip, it may have dislocated more easily, even while sitting in a low chair or crossing your legs.

    You may not have secondary injuries, but treating the dislocated hip is still important for relieving pain and restoring functionality. Quality medical care will assist you in preserving as much hip functionality as possible for an extended period. If you think you may have a dislocated hip, don’t wait to get emergency attention.

    FAQs

    What causes hip dislocation mostly?

    The most frequent cause of traumatic hip dislocations is motor vehicle crashes. When a knee collides with the dashboard, it frequently dislocates. This strain forces the thigh backward, forcing the femur’s ball head out of the hip socket.

    Even with a dislocated hip, are you still able to walk?

    A hip dislocation arises when the hip’s ball joint dislodges from its socket. Until it is realigned, this painful medical emergency usually keeps you from walking. Most hip dislocations happen because of trauma, which takes months to heal and sometimes requires surgery.

    Can I sit when my hip gets dislocated?

    During the healing process following a dislocated hip, you must refrain from bending your hip past 90 degrees. When you sleep on your side, keep the top leg from crossing over the bottom leg by placing a pillow between your legs and knees. Don’t cross your legs when seated.

    What is the hip dislocation’s immediate course of treatment?

    A hip dislocation requires immediate medical attention. Seeking early medical attention is a crucial aspect of the treatment plan. A “closed reduction” is the standard approach used by paramedics or other medical personnel to realign the hip joint. This is frequently done while under sedation. 

    How long does it generally take to heal from a hip dislocation?

    Following a hip dislocation, recovery is contingent upon the extent of the damage and any coexisting issues. To allow the hip to heal, it typically entails a period of immobility with a wheelchair, crutches, or brace. It is common to offer physical therapy and rehabilitation activities to regain range of motion, flexibility, and strength.

    Does a hip dislocation have any long-term complications?

    Even though most hip dislocations respond well to treatment, problems are possible. Hip instability, repeated dislocations, fractures, injury to nerves or blood vessels, avascular necrosis (inadequate blood supply to the femur head), and the onset of post-traumatic arthritis are a few examples of these.

    References:

    • Hip Dislocation – OrthoInfo – AAOS. (n.d.). https://orthoinfo.aaos.org/en/diseases–conditions/hip-dislocation
    • Hip Dislocation. (2024b, May 1). Cleveland Clinic. https://my.clevelandclinic.org/health/diseases/22222-hip-dislocation
    • Weatherford, B. (n.d.). Hip Dislocation – Trauma – Orthobullets. https://www.orthobullets.com/trauma/1035/hip-dislocation
    • Dislocated Hip Symptoms, Diagnosis, and Treatments | HSS. (n.d.). Hospital for Special Surgery. https://www.hss.edu/condition-list_hip-dislocation.asp
    • Williams-Johnson, J., Williams, E., & Watson, H. (2010). Management and Treatment of Pelvic and Hip Injuries. Emergency Medicine Clinics of North America, 28(4), 841–859. https://doi.org/10.1016/j.emc.2010.07.002
    • Sutariya, H. (2023, June 9). Hip Dislocation – Type, Cause, Symptoms, Diagnosis, Treatment. Samarpan Physiotherapy Clinic. https://samarpanphysioclinic.com/hip-dislocation/
  • 25 Best Exercises For Hamstring Strain

    25 Best Exercises For Hamstring Strain

    Introduction:

    Hamstring strains are a common injury, particularly among athletes and individuals who engage in activities requiring sudden bursts of movement. These injuries occur when the muscles at the back of the thigh are overstretched or torn, leading to pain, stiffness, and limited mobility. Proper rehabilitation is crucial to avoid recurrence and restore full function.

    Incorporating targeted exercises helps strengthen the hamstring muscles, improve flexibility, and support the recovery process. A well-structured exercise regimen not only aids in healing but also prevents future injuries by enhancing muscle resilience and overall stability.

    When they contract, they help to bend (flex) the knee and extend the hip (move the leg backward). A regular program that includes significant physical activity includes hamstring muscle routines. These exercises are typically performed to strengthen the hamstrings.

    A hamstring strain is caused by an overload on one or more of these muscles. You might even start to tear muscles. The most common places for these types of tears are in the muscle fiber itself or where the muscle joins the tendon that runs along your lower leg, knee, and pelvis.

    Sports injuries commonly seen in athletes are hamstring strains. The three various types of strains are denoted by grades 1, 2, and 3.

    • Grade I: Little structural harm comes about, and the muscle recovers gradually.

    The amount of ripped or fractured muscle fibers is rather minimal. This usually affects the muscle’s strength and endurance. Depending on the person, pain and sensitivity typically begin the day following the injury. The most common complaint from patients is stiffness in their rear legs. The patients can move their feet normally. A small amount of edema does not prevent the knee from bending normally.

    • Grade II: A partial rupture has occurred.

    The percentage of broken fibers is about 50%. The symptoms include edema, mild loss of function, and acute pain. Walking will be impacted for the patient. Applying specific pressure to the hamstring muscle or bending the knee against resistance are two techniques that simulate pain.

    • Grade III: This suggests a full tear in the tissue and a prolonged healing period.

    Including a complete muscle rupture to a rupture of more than half of the fibers. This injury may affect the tendon. It is really painful and swollen. The hamstring muscle is extremely weak and has lost its ability to operate.

    Rehabilitation Exercises For Hamstring Strain help hasten healing and prevent more damage. Most rehabilitation methods involve a mix of strengthening and flexibility exercises. Exercises designed to strengthen your hamstrings are initially taught in a rehab program and can be performed at home without any specialist equipment.

    Exercises For Hamstring Strain:

    The exercises that are ideal for pulling the hamstrings are mentioned below.

    Straight leg raise

    • To begin, find a comfortable supine position on the floor or a table.
    • Flex both knees now.
    • Then slowly elevate your one leg.
    • Hold this position for a few seconds.
    • Then lower your leg.
    • Then return to your neutral position.
    • Then relax.
    • Repeat this exercise five to ten times.
    Straight-leg-raise
    Straight-leg-raise-

    Seated-hamstring-stretch

    • Maintain a straight posture when sitting on the ground.
    • Put your heel down on the floor with your toes spread wide and pointing skyward while extending the leg you want to stretch.
    • As you shift your weight forward, keep your back flat and lean forward at the hips.
    • Continue to bend your trunk forward until you feel a stretch in the back of your leg.
    • Hold this position for a few seconds.
    • Then return to your neutral position.
    • Then relax.
    • Repeat this exercise five to ten times.
    hamstring-stretch
    hamstring-stretch

    Hamstring Curls with Resistance Band

    • Take a position in the middle of the looped band and wrap the other end around your other ankle.
    • Involve your core and maintain a tall standing posture.
    • Extend the covered leg outward while maintaining a straight knee.
    • Gradually bend your ankle toward your glute.
    • Hold this position for a few seconds.
    • Then return to your neutral position.
    • Then relax.
    • Repeat this exercise five to ten times.
    Hamstring Curls with Resistance Band
    Hamstring Curls with Resistance Band

    Leg swings

    • To do hamstring swings, spread your feet hip-width apart.
    • Swing one leg forth and backward to progressively increase the range of motion.
    • Start with modest swings and progressively increase the intensity to avoid tension or losing your balance.
    • Maintaining good balance and refraining from jerking or using excessive force are also important.
    • Then return to your neutral position.
    • Then relax.
    • Repeat this exercise five to ten times.
    Leg Swings
    Leg Swings

    Bridges

    • With your feet flat on the floor and your legs bent at a 90-degree angle, begin lying flat on your back.
    • Try to align your knees with your toes, so that they point in the same direction.
    • To lower yourself, lift your hips and apply pressure with your heels.
    • Hold this position for a few seconds.
    • Make sure your knees stay above your toes during the entire exercise.
    • Keep them from going over the toes in front of you.
    • Allow your hips to return to the floor calmly.
    • Then return to your neutral position.
    • Then relax.
    • Repeat this exercise five to ten times.
    Hip bridge exercise
    Hip bridge exercise

    Single leg bridge

    • Lay down on an exercise mat with your hands flat on the floor and your arms at your sides.
    • Bend your knees while keeping your feet flat on the floor and a few inches away from your buttocks.
    • Raise one foot and completely extend the leg so that it is at a 45-degree angle to the ground. This is where everything begins.
    • Pull your stomach and buttocks to assist with the lift, then elevate your hips until your shoulders and knees are in a straight line.
    • At the same time contract your core, as though attempting to pull your belly button back towards your spine.
    • Hold this position for a few seconds.
    • Gently and slowly drop the hips to the floor while maintaining the outstretched leg.
    • Then return to your neutral position.
    • Then relax.
    • Repeat this exercise five to ten times.
    single-leg-bridge-
    single-leg-bridge

    Seated-hamstring-curls

    • A resistance band’s ends can be fastened to an exercise machine, stuffed item, or any other substantial object.
    • Before the band starts please have a seat.
    • Encircle the loop around one of your heels while maintaining a close foot placement.
    • Bend your knee and pull your heel back, pausing when you can no longer pull it back.
    • Hold this position for a few seconds.
    • Then return to your neutral position.
    • Then relax.
    • Repeat this exercise five to ten times.
    resisted-seated-hamstring-curl
    resisted-seated-hamstring-curl

    Leg-Press-on-the-Ball

    • Settle down on a large exercise ball.
    • Move your feet outside until your upper body is positioned over the ball.
    • You’re going to be looking away from the ball.
    • Keep your head down and your neck in its natural position.
    • Your arms will be by your sides.
    • Bend your knees as if you were going to squat.
    • Hold this position for a few seconds.
    • Then return to the starting posture by pushing through your heels, keeping your hamstrings firm.
    • Then relax.
    • Repeat this exercise five to ten times.
    Leg-Press-on-the-Ball
    Leg-Press-on-the-Ball

    Hamstring stretch on wall

    • With your healthy leg through the wall, you should lie on your back at the entrance.
    • To straighten your injured leg, raise it against the wall.
    • You should have a slight sensation of the rear leg being extended.
    • Keep your back neutral.
    • Have your knees straight.
    • Maintain one heel on the ground and the other pressed up against a wall.
    • Keep your toes pointed away.
    • Hold this position for a few seconds.
    • Then return to your neutral position.
    • Then relax.
    • Repeat this exercise five to ten times.
    Hamstring stretch on wall
    Hamstring stretch on wall

    Standing kickbacks

    • Place your hands one to two feet away from you, against a wall, counter, or box.
    • Take your left foot off the ground and bend your knee as you move slightly forward.
    • Ensure that your core is tight and your back is straight.
    • As you extend your leg backward at an angle of 60 to 90 degrees, contract your glutes.
    • Hold this position for a few seconds.
    • Then return to your neutral position.
    • Then relax.
    • Repeat this exercise five to ten times.
    standing kickbacks
    standing kickbacks

    Prone leg raise

    • Get on the ground and lie flat on your face.
    • Tighten your core muscles progressively as your abdominal muscles are tensed.
    • Breathing should be possible while doing this.
    • Slowly raise one leg backward while keeping your knees straight and your abs tight.
    • Keep your knee straight once your thigh has lifted off the ground.
    • Hold this position for a few seconds.
    • Gently return your straight leg to the ground after releasing it from the air.
    • Then return to your neutral position.
    • Then relax.
    • Repeat this exercise five to ten times.
    PRONE-HIP-EXTENSION
    PRONE-HIP-EXTENSION

    Running High Knees

    • Take an upright position with your arms by your sides and your feet around hip-to-shoulder width apart.
    • Use your core, lower your chest, and maintain an upright posture.
    • Elevate your right knee such that it is in your chest and just above your waist.
    • Use your left hand to move air at the same point.
    • Lower your right leg and left hand rapidly.
    • Continue with your left hand and leg as before.
    • Then return to your neutral position.
    • Then relax.
    • Repeat this exercise five to ten times.
    Running High Knees
    Running High Knees

    Single knee to chest

    • Start by lying down on your back on a comfortable surface, such as a yoga mat, or bed.
    • While holding this stretch, keep your head and shoulders in a relaxed position.
    • Either bend your knee or maintain the leg opposite you straight.
    • Using both hands behind it, gently bring your left knee toward your chest.
    • Hold this position for a few seconds.
    • Then let go of the leg.
    • Then return to your neutral position.
    • Then relax.
    • Repeat this exercise five to ten times.
    One-Knee-to-Chest
    One-Knee-to-Chest

    Hip-flexor-stretch-on-chair

    • Your right foot should be placed on the chair in front of you.
    • Maintain an upright posture while engaging your pelvic floor and core.
    • Stretch your muscles by bending your right knee and gradually pushing your hips forward.
    • Be cautious not to arch your back.
    • Hold this position for a few seconds.
    • Then return to your neutral position.
    • Then relax.
    • Repeat this exercise five to ten times.
    Hip-flexor-stretch-on-chair
    Hip-flexor-stretch-on-chair

    Squats

    • Begin in a neutral standing position on the ground.
    • Keep your body facing outward and provide strong foot pressure while you push your hips back, engage your abdominals, and shift your weight back to your heels.
    • Lower yourself into a squat as soon as your heels begin to lift off the floor or as soon as your body begins to lean or flex forward.
    • Hold this position for a few seconds.
    • Your form ought to decide how deep you go.
    • To get back to your starting posture, push through your heels with your chest out and your core tight.
    • Tighten your glutes at the highest point.
    • Then return to your neutral position.
    • Then relax.
    • Repeat this exercise five to ten times.
    Full-Squat-Exercise
    Full-Squat-Exercise

    Prone hip extension on the stability ball

    • Place the ball under your hips or lower abdomen.
    • Your toes should barely just touch the ground when you hang your legs over the back of the ball.
    • Press your hands into the ground in front of the ball with your arms extended straight.
    • Compression in your glutes will help you raise your feet off the floor and bring them into line with your upper body.
    • Maintain an active core while holding onto the ball.
    • Hold this position for a few seconds.
    • Refrain from extending your lower back and keep your kneeling position straight.
    • Then return to your neutral position.
    • Then relax.
    • Repeat this exercise five to ten times.
    Prone hip extension on the stability ball
    Prone hip extension on the stability ball

    Half-kneeling hip flexor stretch

    • Put your right leg at a 90-degree angle in front of you and kneel with your left knee on the floor.
    • Maintain a straight back while placing your hands on your right knee.
    • Lean forward onto your right hip and squeeze your left buttock muscles while maintaining your left knee pushed firmly to the floor.
    • Hold this position for a few seconds.
    • Gradually bring your extended leg back to its starting position.
    • Then return to your neutral position.
    • Then relax.
    • Repeat this exercise five to ten times.

    Leg extension

    • Sit in a chair or at the edge of the bed, around mid-thigh.
    • Try not to touch the ground with your legs.
    • Your hands should be on the seat.
    • Extend the affected leg to its fullest extent.
    • Hold this position for a few seconds.
    • Lower your leg.
    • Then return to your neutral position.
    • Then relax.
    • Repeat this exercise five to ten times.
    knee-extension
    knee-extension

    Single-leg deadlift

    • Take a standing position on the ground to begin.
    • Keeping your other leg straight behind you, lean forward with your hips to shift your weight onto one leg.
    • As your body forms a “T” shape, elevate your extended leg and bend forward.
    • During bearing the weight, your arms must be hanging straight down.
    • Keep your leg slightly bent as you stand.
    • Hold this position for a few seconds.
    • Slowly bring your outstretched leg back to its starting position.
    • Then return to your neutral position.
    • Then relax.
    • Repeat this exercise five to ten times.
    Single-leg-deadlift
    Single-leg-deadlift

    Standing hamstring stretch

    • When standing, maintain a straight back and an equal spine.
    • Bring the right leg forward in front of the body with the foot flexed, heel planted into the ground, and toe pointed upward.
    • Extend the left knee slightly.
    • Using your hands to stabilize your right leg, gradually bend forward.
    • Hold this position for a few seconds.
    • Then return to your neutral position.
    • Then relax.
    • Repeat this exercise five to ten times.
    standing-single-leg-hamstring-stretch
    standing-single-leg-hamstring-stretch

    Standing hamstring curl

    • As you stand, plant your feet firmly on the ground.
    • If you need help staying balanced, rest your hands on your waist or a chair.
    • Your left leg should now be bearing the majority of your weight.
    • With the right knee bent slightly, move the heel toward the butt.
    • Maintain a parallel thigh.
    • Hold this position for a few seconds.
    • Bring your foot down gradually.
    • Then return to your neutral position.
    • Then relax.
    • Repeat this exercise five to ten times.
    standing-hamstring-curl
    standing-hamstring-curl

    Lying hamstring stretch

    • Lie on a mat and extend your legs so that you are laying on the ground.
    • To straighten the leg, insert the band through the heel of the right foot and bend it.
    • While holding the strap, use both hands.
    • Continue to extend your left leg and place your foot flat on the ground.
    • Your thigh and calf should come closer to the floor as a result.
    • Gradually lengthen your right leg while maintaining a bent foot.
    • With a slight bend in the knee, the right leg should be straight.
    • The bottom of the foot should face upwards.
    • Your hamstrings should get a little stretched as you slowly tighten the strap.
    • Hold this position for a few seconds.
    • Then return to your neutral position.
    • Then relax.
    • Repeat this exercise five to ten times.
    lying-hamstring-stretch-with-band
    lying-hamstring-stretch-with-band

    Lunge

    • Starting from a standing stance, place your feet hip-width apart.
    • Step forward more slowly than you would when walking, putting one leg in front of you and the other behind you.
    • Throughout the entire process, your foot should remain flat on the ground.
    • Bend your knees to a roughly 90-degree angle as you drop.
    • Hold this position for a few seconds.
    • Do not forget to keep your trunk upright and your core engaged.
    • To return to the starting stance, push off strongly with your front leg after that.
    • Then return to your neutral position.
    • Then relax.
    • Repeat this exercise five to ten times.
    LUNGES
    LUNGES

    Prone knee bend

    • Make sure you’re lying prone in an upright position on the bed or table.
    • Now, flex your knee to a level that feels suitable for you.
    • Hold this position for a few seconds.
    • Then return to your neutral position.
    • Then relax.
    • Repeat this exercise five to ten times.
    hamstring-curls
    hamstring-curls

    Bulgarian Split Squat

    • Beginning with a step bench or table at knee height, place yourself about two feet in front of it.
    • Put your right foot back on the stool by extending its top.
    • Your right foot should be far enough in front of the bench so that you can lunge easily; move your feet about a little to find the ideal location.
    • The distance between your feet should still be about shoulder-width.
    • If placing your feet closer together helps, just make sure that your left knee does not cross your toes as you lower.
    • Roll your shoulders back and lean your waist slightly forward while contracting your core.
    • Next, begin bending the knee of your left leg by lowering it.
    • During this lowering phase, take a breath and drop until your left thigh is almost parallel to the floor.
    • To get back up to standing, push through your left foot and use your hamstrings and quadriceps for strength.
    • Then relax.
    • Repeat this exercise five to ten times.
    Bulgarian-split-squat
    Bulgarian-split-squat

    What precautions must be taken while exercising?

    • Maintaining good posture while exercising is vital.
    • Verify that the equipment you’re using fits you correctly.
    • Do not engage in strenuous exercise.
    • To guarantee that your body has enough time for rest between exercises.
    • Extend, hold, and repeat the exercise correctly.
    • When working exercise, wear loose clothing to allow your body to move freely.
    • It’s fine if stretching seems difficult for the stiff muscles, but you shouldn’t ever experience severe or extreme pain.
    • The protocol, which specifies the proper number of repetitions for each exercise as well as the warm-up and cool-down times, must be followed for each exercise.
    • Take your time when you exercise. You are not required to move very quickly.

    When do you stop exercising?

    • Headache
    • Fever
    • If you were told by your doctor to stop exercising for a few days.
    • Severe pain in the muscles.
    • It is possible to spread infection.
    • Exercise should be stopped if it hurts.

    Time needed for recovery after hamstring strain:

    Like all things recovery-related, the answer is different. Factors such as age, size, multiple medical conditions, compliance, exercise intensity, and degree of muscle strain may all affect the healing time. Results from muscle strains on gradual 1 often appear in a few days or weeks. A few weeks are the expected healing period for grade 2 muscle strains. Grade 3 muscle injuries require surgery, which delays the recovery process.

    Summary:

    The most prevalent condition affecting the hamstrings is muscular strains. Stretching and strengthening the muscle can help speed up its healing process. It is essential to follow a doctor’s rehabilitation plan and make follow-up sessions with physical therapists.

    Exercise and stretching are crucial components of a good rehabilitation program for healing. We’ll go over hamstring strengthening and flexibility stretches because it’s important to avoid hamstring strains.

    Exercises that lengthen and strengthen the body are essential. After the first acute period, very gentle static stretching activities can begin if there is no pain. After your injury heals, you can add dynamic stretching, which calls for movement, and eventually sports-specific exercises.

    FAQ:

    Which stretches work best for relieving strains in the hamstrings?

    Knee to chest
    Standing hamstring stretch
    Hamstring wall stretch
    Hip flexor stretch on chair
    Half-kneeling hip flexor stretch
    Lying hamstring stretch

    Does physical therapy work well for hamstring strain pain?

    A physical therapist may also advise you on the best therapy for hamstring strain injuries particular to your situation and when it could be safe for you to return to your regular activities. Though it may take days, weeks, or even months to recover from a hamstring sprain, visiting a physical therapist could hasten the healing process.

    Can heat help with hamstring pain?

    Hamstring strain recovery (4–7 days)
    The heat should be applied for ten to fifteen minutes to increase the flexibility of the muscle fibers and the circulation of cells. After applying heat, the area can be gently massaged while the tissue is still soft and warm.

    How frequently do people have hamstring strains?

    Ankle strains, like those caused by a “pulled hamstring,” are common among sportsmen. They are more common among athletes who play fast-paced sports like basketball, soccer, and track & field.

    When recovering from a hamstring strain, what typical mistakes can one avoid?

    Avoid common mistakes during the recovery process from hamstring strains, such as sleeping too little, disregarding pain, missing workouts, performing incorrect exercises, following a recommended treatment plan, and trying to return to sports too soon.

    Can an exercise regimen help a hamstring strain heal?

    One common treatment for hamstring strain pain that helps prevent more damage and suffering is exercise. Stretching is one kind of exercise that supports the body’s muscles and helps them get stronger. Frequent exercise can lessen the intensity of the recurrent ache.

    References:

    • 2024a, January 28; Bariya, D. The Best 36 Exercises To Release Hamstring Strain. Mobile Clinic for Physiotherapy. The greatest hamstring muscle exercises are available at https://mobilephysiotherapyclinic.in.
    • Physiotherapist N. R. S. (2023, June 1). Hamstring Exercises at SportsInjuryClinic.net. Sports Injury Clinic states that hamstring exercises can help with back and thigh pain. Internal citation: (Physiotherapist, 2023)
    • Expert C. C. M. (n.d.). Hamstring Pull. The following link: https://my.clevelandclinic.org/health/diseases/17039-hamstring-injury Cleveland Physicians
    • A hamstring strain. February 28, 2007. WebMD hamstring strain. Workouts at https://www.webmd.com/ Internal citation: (Strain, Hamstring, 2007)
    • January 30, 2020 / Smith, M. Exercises for Rehabilitation from High Hamstring Injuries: AccessHealth Chiropractic. Exercises for Rehabilitation from High Hamstring Injuries: AccessHealth Chiropractic. https://www.accesshealthchiro.com/ offers hamstring injury rehab exercises. The paragraph cites Smith, 2020.
    • Image 3, June 8, 2024; Rogers, P. Beginner’s Guide to Leg Curls: Form, Variations, and Common Errors… well-fitted. This is the proper way to perform the leg curl exercise: 3498304 at https://www.verywellfit.com
    • Image 10, Exercises, regimens, and routines for STANDING GLUTE KICKBACK. (No date). Exercises: Standing Glute Kickback (https://www.workoutsprograms.com/)
    • Image 11, Daisy. (1 June, 2021a). Elevated Knees | Detailed Exercise Manual. SPOTEBI. a website that provides high kneeling individuals with a workout plan.
    • Image 13, On July 25, 2019, Jones, T. Stretching for the Hip Flexors | Tampa Bay Sports & Medical Massage. Massage Therapist in Tampa | Sports & Medical Massage Tampa Bay. Hip-flexor stretches at Tampa Bay Sports Massage & Massage are discussed in the blog
    • Image 15, A Guide to Stability Ball Prone Hip Extension (May 20, 2015). https://in.pinterest.com/pin/177047829077845230/
  • Dowager’s hump

    Dowager’s hump

    What is a Dowager’s hump?

    A Dowager’s hump is a term used to describe a noticeable curvature of the upper back, which often results in a hunched posture. It’s mostly seen in osteoporosis, where the bones become weak and brittle. The condition can also be linked to aging and spinal degeneration. This hump occurs when the thoracic spine (mid-back) becomes excessively rounded, often due to vertebral compression fractures or other spinal issues. It’s important to address this condition with medical advice and physical therapy to manage symptoms and improve posture.

    Dowager’s hump is more common in women as compared to male mainly due to osteoporosis. But a Dowager’s hump might also result from other aspects besides age. We commonly observe a dowager’s hump as a secondary condition to postural problems, especially in those who constantly look down at their phone or computer screen.

    Causes of Dowager’s hump:

    • Postural causes: started from stooping posture during concentration on a computer or phone. Some postural causes of a dowager’s hump include the way you sit at work and other behaviors you may have.
    • Osteoporosis: This condition usually affects elderly persons. These patients may experience kyphosis, or the forward bending of the upper back, which results in a bent forward posture. Known also as a kyphotic deformity, a Dowager’s hump caused by osteoporosis develops more gradually as the condition’s effects on the spine deepen.
    • Vertebral Compression Fractures: Often due to osteoporosis, these fractures occur when the vertebrae collapse, leading to a curved spine.
    • Congenital Conditions: Some people are born with spinal abnormalities that can cause kyphosis.
    • Other Medical Conditions: Conditions like ankylosing spondylitis or Scheuermann’s disease can also lead to an increased curvature of the spine.
    • Age-Related Changes: As people age, the spinal discs can lose hydration and elasticity, contributing to kyphosis.

    Symptoms of Dowager’s hump

    Symptoms are:

    • Seeing that your head is tilted forward
    • Visible hump that starts from the base of your neck to the top of your back
    • Pain in your upper back and neck, especially during specific activities
    • You could also feel discomfort and stiffness in the region that is affected if your Dowager’s hump is linked to kyphosis, osteoporosis, or if you’ve ever had a fracture.
    • stiffness and pain near the shoulder blades and neck
    • In extreme circumstances, you can have trouble looking up
    • Breathing Difficulties: In severe cases, the curvature may compress the chest and affect lung function, leading to shortness of breath or respiratory issues.
    • Numbness or Tingling: If the kyphosis is severe and compresses spinal nerves, it might cause sensations like numbness or tingling in the arms or legs.
    • Decreased Mobility: Stiffness in the upper back, Neck, and shoulders.

    Diagnosis

    A CT scan may be recommended by your doctor in addition to X-rays; an MRI may not be required. By evaluating your bones, disc, and disc space, he will be able to rule out malignancies and other potential causes of your clinical presentation. A thorough physical examination may also be conducted by the physician.

    Treatment of the Dowager’s hump

    The most effective treatment for Dowager’s hump is postural retraining, which involves strengthening and stretching the muscles in your upper neck and back. This is especially true if your hump is caused by poor posture.

    Working with a physical therapist to learn some of the essential exercises for correcting postural imbalances and misalignments is the basis of treatment.

    Medications: To control pain and inflammation, doctors may give anti-inflammatory or painkilling medications.

    Given how long a Dowager’s hump takes to form, it will most likely take some time for it to become better. Your muscles and posture need to be retrained; if you follow these exercises consistently, they should strengthen gradually over several months.

    When your Dowager’s hump is more closely associated with an osteoporotic condition or kyphosis, which can result from osteoporosis, some of these physiotherapeutic therapies are crucial. However, there is also an additional layer of care.

    Your healthcare professional must first determine and treat the source of your osteoporosis if it is the cause of your Dowager’s hump.

    Lifestyle Modifications: Incorporating activities that promote bone health, such as weight-bearing exercises, can be beneficial. Avoiding activities that exacerbate symptoms is also important.

    Assistive Devices: In some cases, using ergonomic furniture or support cushions can help alleviate discomfort.

    If an abnormality in your spine is the cause of your Dowager’s hump, or if you have significant trouble holding your head erect, you may be able to have the condition surgically corrected. Even so, these surgical procedures are rarely used by most doctors.

    It’s critical to speak with a medical expert to identify the best course of treatment depending on each patient’s unique requirements and the unique features of the Dowager’s hump.

    Surgical Treatment

    If a person has hyperkyphosis that is greater than fifty degrees, surgery can be necessary. Doctors may advise surgery if you also have deficiencies in your neural system, such as compression of the nerve roots as they emerge from the spinal column or damage to the spinal column itself.

    Spinal fusion of the affected vertebrae is one of the most common surgical procedures. In essence, it is similar to “welding” two vertebrae together such that they function and recover as one solid bone. There will be reduced spinal mobility after fusion surgery. However, as there aren’t many bones involved, motion and mobility are unaffected.

    Bracing

    It is possible for young children, teenagers, and young adults to wear braces for roughly two hours per day. This usually stops the kyphosis from getting worse since the growing bones can still be shaped to lessen the curvature of the spine. Older persons can wear a weighted spinal kyphosis orthosis, especially when they move. Furthermore, wearing a brace encourages proper posture, which lowers the chance of falling.

    Taping

    You can also use tape during any of your physical therapy activities. You can apply the therapeutic tape on both sides, diagonally from the highest point of your shoulder joint to the T6 vertebrae, and across the trapezius muscle. This provides the spine with passive assets. Three separate static standing jobs lasting 40 seconds each were used to demonstrate satisfactory outcomes with taping. It showed that they had a reduced kyphosis tic angle soon after the task in comparison to those who received false taping or no taping at all.

    How to Prevent Dowager’s hump?

    It’s critical to prioritize proper ergonomics when treating postural issues in order to avoid Dowager’s hump. Pay attention to your sitting position and posture, particularly if you spend a lot of time sitting at your desk.

    Stay Active: Regular physical activity, including stretching and flexibility exercises, can improve posture and prevent stiffness.

    Strengthen Core Muscles: Exercises that strengthen the abdominal and lower back muscles can support the spine and improve posture.

    To avoid spending a lot of time staring down at your screen, make sure you are seated in the right posture and at eye level. Maintaining a strong core and spine with postural exercises can also assist avoid Dowager’s hump.

    Taking these steps can help reduce the risk of developing Dowager’s hump and promote overall spinal health.

    When looking for osteoporotic reasons, bone health is crucial. Historically, people have believed that older women are more susceptible to developing a dowager’s hump, but the truth is that anyone can develop one.

    Conclusion

    Osteoporosis or spinal degeneration are common causes of dowager’s hump, also known as kyphosis, a disorder marked by a significant curve of the upper back. Symptoms are humping upper back, back pain, Neck and upper back stiffness, and reduced mobility.

    Prevention involves maintaining good posture, regular exercise, bone health through calcium and vitamin D, avoiding smoking, and managing osteoporosis. Treatment options vary based on severity and may include physical therapy, medications, bracing, or in severe cases, surgery.

  • Wrist Dislocation

    Wrist Dislocation

    Introduction

    A wrist dislocation is one type of ligament injury that can produce unbearable pain. It happens when one or more of the carpal’s small bones in the wrist move out of place from their usual position. Wrist dislocation can be incredibly painful and significantly disrupt your daily life.

    It happens when one or more carpal bones in your wrist become misaligned from their natural position. This is typically caused by a tear in the ligaments that hold them together. These dislocations commonly impact the lunate and scaphoid bones, as well as the radius and ulna bones in your forearm. You can learn about the signs, causes, diagnosis, and treatments of a dislocated wrist from this article.

    Anatomy

    The articulation between the hand’s radius and carpal bones is called the wrist joint, or radiocarpal joint. The synovial joint that suggests the transition from the forearm to the hand is of the condyloid type.

    Structure

    wrist joint
    wrist joint

    The articulation that forms the wrist joint is between:

    • The articular disk and the distal end of the radius.
    • The carpal bones’ proximal row, excluding the pisiform.

    The convex surface of the carpal bones fits into the concave shape of the articular disk and radius when combined. The articular disk, a fibrocartilaginous ligament, keeps the ulna from articulating with the carpal bones. Rather, the distal radioulnar joint is where the ulna and radius articulate, close to the wrist.

    Ligaments

    Four primary ligaments surround the wrist joint. The ulnar and radial collateral ligaments, along with the palmar and dorsal radiocarpal ligaments, are the four ligaments in charge of preserving the joint’s stability.

    Blood Supply

    Your wrists are supplied with blood by two arteries. Your radius, the area proximal to your thumb, is where the radial artery runs. Your ulna, or the part proximal to your pinkie finger, is where the ulnar artery runs.

    The nerve supply

    Three nerve branches supply sensation to the wrist:

    • The anterior interosseous branch (medial nerve).
    • The radial nerve’s posterior interosseous branch.
    • Dorsal and deep branches of the ulnar nerve.

    Muscles and their Function

    The wrist is a synovial joint that may move in two directions mainly because it is ellipsoidal (condyloid). This indicates that the wrist joint can be used for flexion, extension, adduction, and abduction. The forearm muscles are responsible for every wrist movement.

    The function of these muscles can be categorized into two groups:

    Flexors: These muscles enable you to turn your wrists downward and in the direction of your palm. Among them are:

    • Flexor Carpi Radialis
    • Flexor carpi ulnaris
    • Flexor digitorum superficialis.
    • Flexor digitorum profundus.
    • Flexor pollicis longus.
    • Palmaris longus

    Extensors: These muscles allow you to bend your wrist up and away from your palm. They include:

    • Extensor carpi radialis longus
    • Extensor carpi radialis brevis
    • Extensor carpi ulnaris
    • Extensor digitorum
    • Extensor indicis

    What is Wrist Dislocation?

    The eight little bones in your wrist are known as carpals. They can move and are held in place by an elastic network of ligaments. Two or more of your carpal bones may be forced out of their natural position if one of these ligaments tears. This leads to wrist dislocation.

    All eight carpals may be involved in a dislocated wrist, however the scaphoid and lunate bones are frequently impacted. The radius and ulna bones of your forearm, as well as the other, smaller wrist bones, are connected by these two bones.

    Types of the Wrist Dislocation

    There are several types of wrist dislocations. They include:

    • Anterior lunate dislocation. The lunate bone rotates, whereas the other wrist bones remain stationary.
    • Perilunate dislocation. This type includes the lunate bone and the three ligaments that surround it.
    • Galeazzi fractures. This form includes a break in the radius bone and dislocation of the radioulnar joint.
    • Monteggia fracture. This causes a break in your ulna, as well as a dislocation of one of your radius, ends.

    Causes of the Wrist Dislocation

    A dislocated wrist can occur from any form of acute damage to the hand or arm. Typical reasons for these wounds include:

    • High-impact sports, including hockey or football: Dislocated wrists are frequently caused by injuries sustained while playing high-impact sports like hockey or football. These sports involve sudden force that can abnormally twist your hand and arm, dislocating your wrist joint. But contact sports are not the only activities that can result in this kind of injury; gymnastics and cheerleading, for example, entail acts and movements that can call for precise balance and coordination, making them more prone to dislocations.
    • Car crashes: Car crashes are a major contributing factor to dislocations. Any kind of collision, whether you are the driver or a passenger, has the potential to apply enough force to your arm or hand to cause the ligaments surrounding your wrist joint to extend beyond their usual range, which could result in bone displacement.
    • Using your hand to break a fall: Many individuals break falls with their hands without thinking about it, but if you use too much force, this kind of motion raises the danger of dislocating your wrists.
    • Repetitive Motions: Constant pressure on the wrist can cause repetitive strain on the ligaments, which can potentially result in dislocations. When using tools like power tools, repetitive actions are typically the source of this form of injury
    • Genetics and degenerative joint conditions like arthritis are other reasons.
    • A dislocated wrist can also occur from strain on the wrist ligaments. This degree of strain is typically caused by activities like crutch walking that continuously strain the wrist.

    Symptoms of the Wrist Dislocation

    Severe discomfort is the main indicator of a dislocated wrist, and it usually gets worse as you try to move your wrist up and down or side to side. Additionally, you may get forearm soreness.
    You might additionally see a few things surrounding your wrist:

    • Swelling
    • Tenderness
    • Weakness
    • Bruises or discolorations

    Your wrist nerves may be compressed if your lunate bone is affected. Your fingertips may get tingly or numb as a result of this.

    Risk factors for Wrist Dislocation

    Wrist Dislocation is at risk for:

    • Engaging in high-impact, severe sports like hockey and football can increase a person’s risk of dislocating their elbow.
    • Dislocations of the elbows are more common in sports like volleyball, gymnastics, and downhill skiing because they involve falls.
    • Some people are more prone to injure ligaments and joints from birth.
    • Patients who are more likely to fall, such as the elderly, are more likely to have dislocations of the elbows.

    Diagnosis of the Wrist Dislocation

    • Make an appointment with your doctor right away if you believe you have a wrist injury, or go to urgent care to prevent aggravating the problem.
    • First, your physician will manipulate your wrist in various postures while inquiring as to whether you are in any pain. They can use this to determine which bones and ligaments may be affected. Any harm done to the tendons, blood vessels, and nerves supplying the hand and wrist will be evaluated by your physician.
    • They will most likely conduct an X-ray of your hand and forearm to confirm the diagnosis.
    • An MRI may also be used by your doctor to help in the diagnosis if they believe you have a ligament injury. Your soft tissue, including your ligaments, is more clearly seen thanks to this imaging test.

    Treatment of the Wrist Dislocation

    Conservative treatment

    • For modest dislocations, a reduction procedure is typically performed. During this process, your physician carefully realigns the bones to their original locations. The degree of pain you experience depends on the extent of your injury. Your doctor will administer either local or general anesthesia in advance to aid with the pain.
    • Required to wear a splint after the treatment to keep your wrist immobile. You may also require the use of a sling.

    Surgical Treatment

    • In more extreme situations, surgery may be required to straighten the bones in your wrists or to heal torn ligaments. Sometimes screws or pins are used for this to keep everything in place.

    What is the duration of healing?

    • The degree of the dislocation determines how long it takes for the wrist to heal. You should heal in two to three months if you just require a reduction surgery. It can take six months to a year to fully recuperate, though, if surgery is necessary.
    • To restore strength and flexibility to your wrist, physical therapy will be necessary after receiving any kind of treatment. While you heal, it could be necessary for you to visit a physical therapist or complete mild exercises by yourself.
    • Try not to put any strain on your wrist as much as you can as you heal.

    Physical therapy for Wrist Dislocations

    Physical therapy is vital in the rehabilitation process after a wrist dislocation.

    • Modalities: Ice, heat, and electrical stimulation can all help to relieve pain and inflammation.
    • Splinting: Making use of a splint might help the wrist heal by immobilizing it.
    • Increase range of motion: Gentle workouts will help you regain flexibility and avoid stiffness.
    • Strengthening exercises: These involve using resistance bands or weights to increase wrist and forearm strength.
    • Functional training: Activities that replicate daily chores can help you regain normal wrist function.

    Summary

    A wrist injury can significantly affect your daily life. This is why it is critical to get prompt care for any wrist injury. Depending on whether you need surgery, your recovery time will range from two months to a year. Even after you’ve recovered, you may need to wear a wrist brace when performing tasks that place a lot of strain on your wrist, such as heavy lifting.

    FAQs

    What are the different types of wrist dislocation?

    Scapholunate dissociation, lunate dislocation, and perilunate dislocation are the three most frequently occurring wrist dislocations.

    What causes the wrist to dislocate?

    The lunate or capitate, the carpal bones at the base of the hand, shift from their natural position. When the wrist is bent backward and significant force is applied, these dislocations typically happen. People can’t move their hands and wrists normally, and they hurt and may appear malformed.

    How is a dislocated wrist fixed?

    When a patient has a dislocated wrist, medical professionals move the wrist bones back into position without cutting (a procedure known as closed reduction). The elbow and wrist are then stabilized with the application of a splint. Doctors typically also recommend orthopedists right away to patients.

    Which wrist bone dislocations occur most frequently?

    A fall into an extended hand is what induced this injury. The lunate bone of the proximal row of carpal bones as well as other bones are involved in most wrist dislocations.

    How much time does it take for a wrist dislocation to heal?

    Depending on the extent of the damage, a dislocated wrist might heal over a wide range of times. If surgery is necessary, full recuperation may take up to a year. In milder cases, reduction treatments might be sufficient, and you should see a difference in two or three months

    What differentiates a dislocation from a sprain?

    Fracture and “broken bone” have identical interpretations. Different types of fractures exist. Sprains are caused by tearing and stretching of the ligaments that hold joints together. When the bones split at the joint, it is called a dislocation.

    References

    • Hand, Wrist, or Elbow Dislocations. (n.d.). https://www.mercy.com/health-care-services/orthopedics-sports-medicine-spine/specialties/hand-wrist-elbow/conditions/hand-wrist-elbow-dislocations
    • Cast. (2023, November 28). Wrist Dislocations: Types, Symptoms, and Treatment Options. https://www.cast21.com/blog/dislocated-wrist
    • Roland, J. (2018, May 3). Everything You Need to Know About Dislocated Wrists. Healthline. https://www.healthline.com/health/dislocated-wrist#healing-time
    • Halimi, K. M. (n.d.). Wrist Dislocation in Sports Medicine: Practice Essentials, Etiology, Epidemiology. https://emedicine.medscape.com/article/98552-overview?form=fpf
    • Germann, C. A., & Perron, A. D. (2010). Risk Management and Avoiding Legal Pitfalls in the Emergency Treatment of High-Risk Orthopedic Injuries. Emergency Medicine Clinics of North America, 28(4), 969–996. https://doi.org/10.1016/j.emc.2010.06.002
  • Knee Joint

    Knee Joint

    Introduction

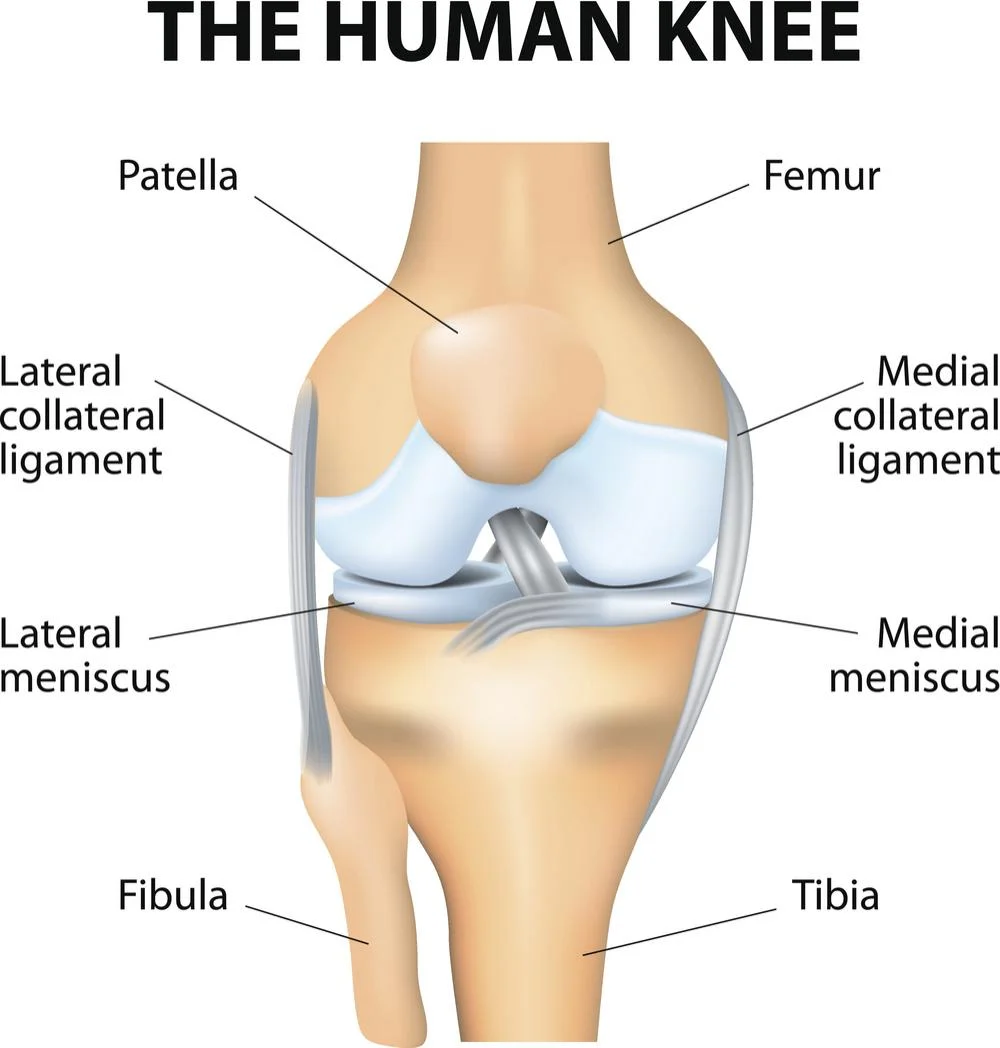
    The knee joint is one of the largest and most complex joints in the human body, playing a crucial role in our ability to move and bear weight. It connects the thigh bone (femur) to the shin bone (tibia) and includes other structures like the kneecap (patella) and cartilage, which help in smooth movement. The knee joint is vital for activities such as walking, running, and jumping, making it susceptible to injuries and degenerative conditions.

    The knee is an improved hinge joint, a type of synovial joint, made up of three functional compartments: the medial and lateral tibiofemoral articulations attach the tibia, the main bone of the lower leg, to the femur, the thigh bone, and the patellofemoral articulation, which involves the patella, or “kneecap,” and the patellar groove on the front of the femur through which it slides.

    Synovial fluid, which resides inside a synovial membrane known as a joint capsule, around a joint. Recently, there has been a renewed focus on and research on the posterolateral corner of the knee.

    The largest and most important joint in the body is the knee. This has an important influence on motion involving moving the body in both vertical (jumping) and horizontal (running and walking) directions.

    The kneecap’s initial structure is cartilage, which will ossify (turn into bone) between the ages of three and five. Its ossification process takes somewhat longer because it’s the largest sesamoid bone in the human body.

    Anatomy of Knee joint

    The knee is known as the joint in the middle of your leg. It is the femur’s (thigh bone) and tibia’s (shin bone) connective tissue.

    The joint of the knee is synovial. They are formed up of one bone with an oral cavity in it that another bone can go into. The ends of the bones that make up a synovial joint are covered in slick hyaline cartilage. The synovial membrane, a fluid-filled sac that protects and covers the joint, is what is found in between the bones. Synovial joints can move with the least friction possible because of this additional cushioning.

    The knee is a hinge joint for function. Imagine the hinges that provide support for a door. A few sections are stationary, while the rest move to open and close by traveling a predetermined distance. Similar to your knee, hinge joints only open and close in a single direction.

    Articulating Surfaces of the knee joint

    The tibiofemoral and patellofemoral joints enable the thigh bone (femur), the shin bone (tibia), and the kneecap (patella) to articulate.

    Articular cartilage, a very smooth and strong material intended to lessen friction forces, covers these three bones. The patella is situated in the intercondylar groove, which is a common femur indentation.

    The superior tibiofibular joint, which attaches the smaller fibula to the tibia, is not involved in the knee joint, but it does provide a surface on which vital muscles and ligaments can attach.

    The proximal articulating surface of the knee, which is made up of two massive condyles, is formed by the distal portion of the femur. A medial as well as lateral. Even though the short shallow groove between these two condyles anteriorly—which is known for having either a patella groove or patella surface, or even a femoral sulcus—connects them inferiorly by an intercondylar notch. The patella develops an early flexion.

    Two asymmetrical, relatively flat condyles on a tibia are termed the tibial plateau. These are seen on both the medial and lateral surfaces. The diameter of the proximal tibia is significantly greater than the posterior shaft, which is sloped at a 7 to 10-degree angle to allow the flexion of the femoral condyles on the tibia. The medial tibial plateau is longer than the lateral anteroposteriorly.

    Intercondylar tubercles—two roughened bony spines—separate the two tibial condyles, and they play an aspect in knee extension. The stability of the knee joint is increased when they are caught in the femur’s intercondylar notch. Given the plateaus’ minor anterior and posterior convexity, the tibiofemoral joint is often considered to be an unstable joint. This indicates the import of the menisci, one of the other knee structures.

    Menisci

    The region between the tibial and femoral condyles is mostly the location of two menisci. Their cross-section is triangular, and they have crescent-shaped lamellae with anterior and posterior points on each. Each meniscus’s surface is flat inferiorly according to the tibial plateau’s relative flatness and concave superiorly to give a congruous surface with the femoral condyles.

    Although relative to a lateral meniscus, which has a more “O” shaped meniscus, the horns of a medial meniscus are farther apart and have a “C” shape. The larger medial meniscus, which consequently leaves a wide exposed portion that may be vulnerable to damage, is the reason for this.

    Menisci increase the surface of contact, weight distribution, and stress absorption by correcting alignment between the articular surfaces of the tibia and femur. They are also highly important knee stabilizers because they help control and arrange knee movements.

    Menisci’s fiber arrangement enables axial loads to be distributed radially, lessening the strain on the hyaline articular cartilage. It is crucial as, according to the gait and stair climbing, a compressive force through the knee can be as much as 1-2 times body weight, and as much as 3–4 times body weight when running.

    Cardiovascular ligaments connect the menisci to the tibia. The medial meniscus has a significantly lesser range of motion than the lateral meniscus because of its strong attachment to the medial collateral ligament (MCL) and the knee joint capsule. A meniscus has no attachment to the lateral collateral ligament (LCL) and is less tightly connected to the joint capsule on its lateral side. However, a tendon of the popliteus muscle, which descends from the lateral epicondyle of a femur, completely separates the posterior horn of a lateral meniscus from the posterolateral side of the knee joint capsule.

    The menisci are vascularized during the first year of life, but after weight bearing begins, the vascularity decreases to the outer third (red zone), where the only area with a slender healing capacity. Through the flow of synovial fluid within the joint, the white zone, an inner non-vascularized area, is nourished.

    Bursa

    In a bag filled with fluid, the bursa lessens friction between two tissues. There are several bursae surrounding a knee. When a knee injury occurs, the suprapatellar bursa, the most substantial sac in the body, frequently fills with fluid.

    Bursae in front of the patella and pes anserine bursa at the point when the three medial muscles of the knee joint insertion connect are the most often injured bursae.

    Structure of Knee Joint

    What makes up your knee is:

    • Bones.
    • Cartilage.
    • Ligaments.
    • Muscles.
    • Nerves.

    Bones in the knee

    In the knee joint, there are three bones:

    • Femur (thigh bone).
    • Tibia (shin bone).
    • Patella (kneecap).

    These points of intersection between the bones are referred to as articulations or articulating surfaces. Your knee has two locations where it can be articulated.

    • Your femur’s patellofemoral joint is situated where it defines up with your patella.
    • Tibiofemoral: The point on your tibia and femur that joins.

    Bones

    The bones of the knee are the patella (kneecap), tibia (shin bone), and femur (thigh bone). These bones are maintained in place by the knee joint.

    The patella is a very small, triangular bone that is located inside the quadriceps muscle at the front of the knee. Due to the extreme stress of its activities, it has the thickest layer of cartilage in the body.

    Cartilage

    The knee’s cartilage is formed of two types:

    Meniscus: these are crescent-shaped discs that serve as a “shock absorber” or cushion to allow the knee’s bones to move easily without contact with one another directly. The nerves in the menisci relate to increased stability and balance as well as proper weight distribution between the tibia and femur.

    Two menisci exist in the knee:

    • The medial side of the knee is the smaller of the two regions.
    • lateral: on the knee’s outside surface

    The thin, smooth layer of cartilage known as “articular cartilage” sits on the back of the patella, the top of the tibia, and the femur. It helps bones run easily over one another and act as a shock absorber.

    Ligaments Of Knee Joint

    A joint capsule has a structure of smaller layers deep down and thicker, fibrous layers on the outside. It maintains the stability of the knee as part of the capsule ligaments. As is usually the case with other knee structures, they are most stable when extended (closed packed), as opposed to when flexed (open packed), when there is laxity.

    The specialized membrane known as the synovial membrane, which supplies sustenance to all surrounding structures, is located inside the capsule. A knee joint is lubricated by synovial fluid, which forms a synovial membrane. The bursa and infrapatellar fat pad are two more tissues that mostly serve as cushions for external stresses on the knee.

    The synovial fluid that lubricates the knee joint is pushed anteriorly during extension and posteriorly during flexion. The semi-flexed knee is the most relaxing posture in the event of a knee joint effusion since the fluid is under the least tension at this point.

    A knee’s stability is preserved by its ligaments. Every ligament serves a specific purpose in helping to preserve the best possible knee stability.

    Medial Collateral Ligament (MCL) 

    There are two types of fibers in this medial collateral ligament: superficial fibers and deep fibers. This band usually appears along the superior portion of the tibia’s medial surface and extends from the medial epicondyle of the femur to the medial condyle. The superficial fibers attach to the medial aspect of the proximal tibia, which is distal to the pes anserinus, and start from the medial femoral condyle. The deep fibers emerge on the inferior aspect of the medial femoral condyle, run the length of the knee joint capsule, and insert into the proximal aspect of the medial tibial plateau.

    The deep fibers of a ligament attach to the medial meniscus in the middle. The medial collateral ligament generally opposes valgus forces acting on the outside of the knee, but it also opposes a tibia’s lateral rotation on the femur. The flexibility of a ligament in the open-packed position (flexed) allows the medial collateral ligament to resist the valgus stress more successfully in the closed-pack position (extension).

    The medial collateral ligament indeed has another purpose in avoiding a tibia from anteriorly shifting onto the femur. Anterior cruciate ligament protection must therefore be taken into consideration when someone suffers an MCL injury.

    Lateral Collateral Ligament (LCL)

    The tendon of the biceps femoris, or hamstring muscle, and the cord-like ligament that rises on the lateral epicondyle of the femur to form a conjoined tendon. It is thought that the ligament is called the extracapsular ligament, which is different than the medial collateral ligament.

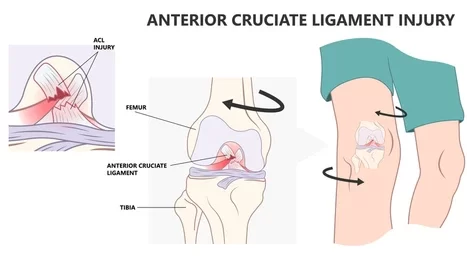
    Anterior Cruciate Ligament (ACL)

    The anterior tibial translation on the femur is the main purpose of the anterior cruciate ligament (ACL), an essential element of the knee joint. The cause of the cruciate ligaments being so well-known is that they create a cross in the center of the knee joint. As it shifts proximally, the anterior crucial ligament twists medially. The ACL is thought to be formed of two bundles of fibers: the posterolateral bundle (PLB) and the anteromedial bundle (AMB). The knee’s resistance to anterior shearing pressures is due to the anterior important ligament.

    Posterior Cruciate Ligament (PCL)

    This ligament comes from the tibia’s posterior surface and grows superiorly and anteriorly between the menisci’s two posterior horns prior to establishing the lateral aspect of the medial femoral condyle. According to the anterior cruciate ligament, the posterior cruciate ligament is shorter, less oblique, and has a much larger cross-sectional area. As it crosses to a tibial connection, the posterior cruciate ligament matches with a posterior capsule.

    Muscles Around the Knee joint

    Articularis genus muscle

    • Origin: First femoral shaft distal end.
    • Insertion: A knee joint capsule extended proximally.
    • Blood supply: Femoral artery
    • Nerve supply: Femoral nerve
    • Action: Pulling a suprapatellar bursa while extending the knee.

    Rectus femoris muscle

    • Origin: Anterior inferior iliac spine or a portion of the acetabulum are passed on by the outer layer of a bony ridge.
    • Insertion: via the patellar ligament, including the patella and the tibial tuberosity.
    • Blood supply: Femoral artery.
    • Nerve supply: Femoral nerve.
    • Action: Both hip flexion and knee extension.
    • The hamstring muscle is the antagonist.

    Vastus lateralis

    • Origin: Ankle, trochanter, and femur’s linea aspera as well as the intertrochanteric line.
    • Insertion: At the patellar ligament, both the patella and the tibial tuberosity.
    • Blood supply: Femoral artery.
    • Nerve supply: Femoral nerve.
    • Action: Stabilizes and extends the knee.
    • The hamstring muscle is the antagonist.

    Vastus intermediates

    • Origin: The lateral intermuscular septum of the thigh, as well as the superior two-thirds of the anterior and lateral sides of the femur.
    • Insertion: The deep part of the quadriceps tendon is inserted by the lateral edge of the patella.
    • Nerve: Femoral nerve
    • Blood supply: Lateral circumflex femoral artery
    • Action: Knee extension

    Vastus medialis

    • Origin: the lower part of an intertrochanteric line, medial intermuscular septum, adductor magnus aponeurosis, and spiral line to medial lip of a linea aspera.
    • Insertion: Into the quadriceps tendon’s medial side, where it connects the rectus femoris and other quadriceps muscles. It then surrounds the patella after passing through a patellar ligament and into the tibial tuberosity.
    • Blood supply: Femoral artery.
    • Nerve supply: Femoral nerve.
    • Action: A knee extension.
    • The hamstring muscle is the antagonist.

    Knee Flexors muscles

    The main knee flexor muscles are the hamstrings.

    Posterior compartment

    Sartorius

    • Origin: The pelvic anterior superior iliac spine.
    • Insertion: Anserinus pes.
    • Blood supply: The femoral artery, the descending geniculate artery, the lateral femoral artery, the deep femoral artery, or the superficial circumflex iliac artery.
    • Nerve supply: Femoral nerve.
    • Action: Abduction, flexion, and lateral rotation at the hip joint. The two flexions when medial rotation happens at the knee joint.
    • Antagonism: partial quadriceps muscle

    Biceps femoris muscle

    • Origin: Short head: a femur’s linea aspera; long head: the tuberosity of an ischium.
    • Insertion: It connects the fibula’s afterward lateral tibial condyle.
    • Supply of blood: Perforating arteries, popliteal artery, and inferior gluteal artery.
    • Nervous system supply Short head: a lateral (common fibular) part of the sciatic nerve, long head: the medial (tibial) portion of the sciatic nerve.
    • Action: Raising the hip joint (long head only), flexion of the knee, and laterally moving the leg at the knee (while the knee is in flexion).
    • Quadriceps muscles are the antagonists.

    Semitendinosus

    • Origin: Ischial tuberosity impression from the posterior part of the skull.
    • Insertion: Pes anserinus links the proximal end of the tibia to the medial condyle below.
    • Action: Thigh extension, internal rotation, and pelvic support are the activities at the hip joint. The knee joint allows for internal rotation and leg flexion happen.
    • Nerve supply: Sciatic nerve (L5-S2) tibial division
    • Blood supply: inferior gluteal artery, medial femoral circumflex artery, first perforating branch of the deep femoral artery, and inferior medial geniculate artery.

    Semimembranosus

    • Origin: Ischial tuberosity superolateral impression.
    • Insertion: Tibial condyle medially.
    • Action: Do thigh extension and internal rotation at the hip joint.
    • Knee joint: The pelvis is supported by flexion and internal rotation of the leg.
    • Nerve supply: Sciatic nerve (L5–S2) tibial division
    • Blood supply: It also involves popliteal and femoral artery perforating branches.

    Gastrocnemius muscle

    • Origin: Lateral head: The posterolateral borders of the lateral condyle on the femur. Medial head: The popliteal surface of the femoral shaft and the posterior surface of the medial femoral condyle.
    • Insertion: Via the calcaneal tendon, the posterior element of the calcaneus.
    • Nerve supply: Tibial nerve (S1, S2)
    • Action: Plantar flexion of the foot at the talo-plantar joint and flexion from the leg at the knee joint.

    Plantaris

    • Origin: The popliteal ligament of the knee, and the lateral supracondylar line of the femur.
    • Insertion: The calcaneal tendon connects to the posterior part of the calcaneus.
    • Joint action: Plantar flexion of the talo-plantar and flexion of the knee.
    • The tibial nerve (S1, S2) is the nerve’s root.
    • Blood travels superficially via the lateral sural and popliteal arteries, and further below by the superior lateral genicular artery.

    Popliteus

    • Origin: The posterior horn of the knee joint’s lateral meniscus and the lateral condyle of the femur.
    • Insertion: The front side of the proximal tibia.
    • Nerve supply: The L4-S1 tibial nerve
    • Blood supply involves the posterior tibial recurrent artery, posterior tibial artery, and tibia’s nutrient artery as well as the inferior medial and lateral genicular arteries (popliteal artery).
    • Action: Loosens and stabilizes the knee joint.

    Medial compartment

    Gracilis

    • Origin: The anterior pubic area body, ischial ramus, and proximal ramus.
    • Insertion: Pes anserinus to the medial surface of the proximal tibia.
    • Action: Leg internal rotation and flexion at the knee joint; Leg flexion and adduction at the hip joint.
    • Nerve supply: The L2-L3 obturator nerve
    • Blood supply: The adductor arteries take blood from the deep femoral artery.

    Blood supply of knee joint

    The plexus, or vascular network, around the knee joint, is partially formed by the femoral and popliteal arteries. The anterior tibial artery’s recurrent branch, the descending genicular artery, two superior genicular arteries, and two inferior genicular arteries form the six main branches. Into the knee joint are the medial genicular arteries.

    The popliteal and femoral arteries are the primary donors to the genicular anastomosis that forms the abundant vascularization of the knee joint. Approximately 10 arteries are involved in the genicular anastomosis growth method:

    • Descending branches: The genicular branch of the femoral artery and the descending branch of the lateral circumflex femoral artery.
    • Ascending branches: anterior and posterior tibial recurrent branches of the anterior tibial artery, and the circumflex fibular branch of the posterior tibial artery.
    • Three main branches develop in the popliteal artery: the lateral superior and inferior genicular arteries, the medial superior and inferior genicular arteries, and the middle genicular artery.

    Innervation of the knee joint

    The saphenous nerve and muscle branches supply the femoral nerve’s innervation to the knee joint. The posterior division of the obturator nerve, as well as the tibial and common fibular (peroneal) nerves, all assist the joint.

    Movements of the knee joint

    Since the knee joint is a hinge, its primary motions are flexion and extension in the sagittal plane. When the knee is flexed and at the final stage of extension, it permits limited medial rotation as well as lateral rotation. The knee joint, which is sometimes referred to as a modified hinge joint, is not a true hinge like the elbow joint since it has a moving component, an auxiliary motion that goes along with flexion and extension.

    The knee joint enables four main types of movements:

    • As the quadriceps femoris inserts into the tibial tuberosity, it generates extension.
    • The hamstrings, gracilis, sartorius, and popliteus create flexion.
    • The biceps femoris produce lateral rotation.
    • The semimembranosus, semitendinosus, gracilis, sartorius, and popliteus are the five muscles that generate medial rotation.

    The function of the knee joint

    The knee can be grew and flexed about a virtual transverse axis. When the knee is flexed, it may pivot partially medially and laterally about the lower leg’s axis. The femur rolls and glides over both menisci during extension-flexion, and the lateral meniscus goes over the tibia during rotation, giving it the term “mobile” for the knee joint.

    Located anterior to the transverse axis center of the extension/flexion movements is a connection among the collateral and cruciate ligaments. The femur’s center moves in both directions during flexion, and as the femoral condyles’ curvature reduces, this affects the distance between the center and the articular surfaces of the femur. Several factors, including tight hamstrings, active insufficiency, and soft-tissue restrictions, affect the general range of motion.

    Clinical Significance

    • Patellofemoral syndrome, or chondromalacia patella, is an irritation of the patella cartilage that ends in knee pain. The young knee pain can often be caused by this.
    • Osteoarthritis: The most common kind of arthritis, osteoarthritis usually impacts the knees. Knee pain, stiffness, and swelling are some of the symptoms of osteoarthritis, which come from aging and cartilage deterioration.
    • Knee effusion: a formation of fluid, usually brought on by inflammation, inside the knee. An injury or arthritis of any kind may end in a knee effusion.
    • Meniscal tear: Twisting the knee may cause damage to the meniscus, which is the cartilage that cushions the knee. Knee stiffness may result from large rips.
    • Tear or strain of the anterior cruciate ligament (ACL): The stability of the knee is dependent on the ACL. An ACL tear may need surgical repair since it often leads the knee to “give out.”
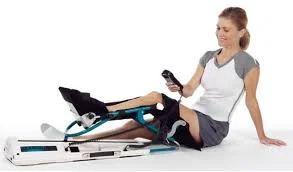
    • PCL (posterior cruciate ligament) strain or tear: Inflammation, pain, and instability in the knee may occur from PCL tears. Usually, the best plan of action is physical therapy rather than surgery for these injuries, which are less prevalent than ACL tears.
    • Tear or strain of the medial collateral ligament (MCL): This injury can result in pain as well as instability on the inner side of the knee.
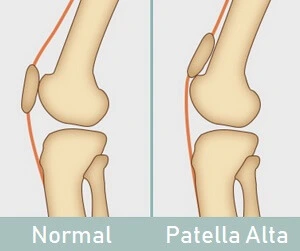
    • Patellar subluxation: When a person is active, their kneecap could move or dislocate along their thigh bone. Pain around the kneecap is what happens.

    FAQs

    Which joint is the knee?

    Synovial joint in the hinge style
    The primary range of action for the knee joint, which is a hinge-type synovial joint, is flexion and extension (with small medial and lateral rotation as well). It forms by the patella, femur, and tibia articulations.

    How many components make up the knee joint?

    The actual knee is formed up of four joints: one relates the patella (kneecap) and femur (thigh bone); a different divides the tibia and fibula (a smaller lower leg bone); and two join the tibia (shin bone) to the femur.

    \Where is cartilage found in the knee?

    The knee’s articular cartilage
    Articular cartilage protects the surfaces of the tibia’s higher the kneecap’s back, and the femur’s lower bone. The substance known as articular cartilage is extremely durable, flexible, and smooth.

    What three knee joints are there?

    The knee’s medial compartment, or the inner joint between the tibia and femur. The joint on the outside where the femur and tibia relate is called the lateral compartment of the knee. The area where the kneecap connects the femur’s groove is known as the patellofemoral compartment.

    Which three components make up the knee joint?

    In the knee joint, there are three bones:
    The femur, or the thigh bone
    Lower leg bone: tibia
    Kneecap Patella

    References

    • Physiotherapist, N. P. (2023b, December 13). Knee Joint: Anatomy, Physiology, Movement, Exercise, Importance. Mobile Physiotherapy Clinic. https://mobilephysiotherapyclinic.in/knee-joint/
    • Dhameliya, N. (2023, August 10). Hip Joint – Anatomy, Structure, Function. Samarpan Physiotherapy Clinic. https://samarpanphysioclinic.com/hip-joint/
    • Professional, C. C. M. (2024b, May 1). Knee Joint. Cleveland Clinic. https://my.clevelandclinic.org/health/body/24777-knee-joint
    • Knee. (2024, July 14). Wikipedia. https://en.wikipedia.org/wiki/Knee
    • Knee joint. (2023, October 30). Kenhub. https://www.kenhub.com/en/library/anatomy/the-knee-joint