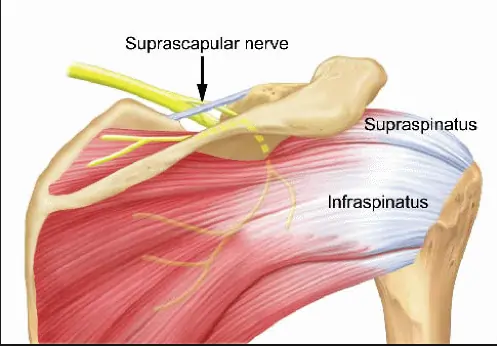
Blog

  • Plica Syndrome

    Plica Syndrome

    What is Plica Syndrome?

    Plica syndrome is a disorder that causes pain and discomfort by irritating or inflaming the plica, a fold of tissue in the knee joint. Usually caused by overuse or repetitive motions, it can cause symptoms like swelling, clicking, and knee pain.

    Rest, physical therapy, anti-inflammatory medications, and in certain situations, surgery, may all be part of the treatment. For a precise diagnosis and suitable therapy, it’s critical to speak with a healthcare provider if you’re exhibiting symptoms.

    Clinically Relevant Anatomy of Plica Syndrome:

    Types of Plica

    The plicae in the knee joint can vary in size and structure; they can be longitudinal or crescent-shaped, fibrous or fatty, and depending on their anatomical location within the knee joint cavities, they can be classified as suprapatellar, mediopatellar, infrapatellar, or lateral plicae. The latter is rarely observed, so there is some debate about its existence or precise nature.

    Suprapatellar plica

    The plica synovialis suprapatellaris, superior plica, supramedial plica, medial suprapatellar plica, or septum are other names for the suprapatellar plica, which is a domed, crescent-shaped septum that typically sits between the knee’s tibiofemoral joint and suprapatellar bursa. It inserts above the patella after running downward from the synovium at the anterior side of the femoral metaphysis to the posterior side of the quadriceps tendon.

    Under normal circumstances, its free border appears thin, wavy, crenated, or pointed. This kind of plica can surround an aperture known as a porta as a peripheral membrane or an arching membrane. It frequently becomes part of the medial plica. When the knee is moved, the suprapatellar plica, which is anteriorly connected to the quadriceps tendon, changes size and orientation.

    Medial patella plica

    The plica synovialis mediopatellaris, medial synovial shelf, plica alaris elongata, medial parapatellar plica, meniscus of the patella, and, after its first two descriptors, Iion’s band or Aoki’s ledge are other names for the medial patellar plica. It is located along the joint’s medial wall. It enters the synovium around the infrapatellar fat pad after attaching to the lower patella and lower femur and passing through the suprapatellar plica.

    The look of its free border can vary.The medial plica also changes size and orientation during knee movement since it is connected to the ligamentum patellae and the synovium that covers the fat pad. Because of its anatomical placement, the medial plica is recognized to be the most frequently injured plica, and it is typically this plica that is implicated when describing plica syndrome.

    Infrapatellar plica

    Ligamentum mucosum, plica synovialis infrapatellaris, inferior plica, and anterior plica are other names for the infrapatellar plica. Starting from a narrow base in the intercondylar notch, this synovial fold extends distally in front of the anterior cruciate ligament (ACL) and inserts into the inferior of the infrapatellar fat pad.

    Distinguishing the ACL from the infrapatellar plica is frequently challenging. It typically manifests as a thin, fibrous band that resembles a cord. The most prevalent plica in the human knee is thought to be the infrapatellar plica. Discussion is on-going whether this plica is structurally crucial to proper knee movement or whether it is superfluous.

    Lateral plica

    Other names for the lateral plica include lateral para-patellar plica and plica synovialis lateralis. It is 1-2 cm lateral to the patella, longitudinal, and thin. It extends inferiorly and inserts into the synovium of the infrapatellar fat pad, forming as a synovial fold along the lateral wall above the popliteus hiatus. Some authors question whether it originates from the parapatellar adipose synovial border or if it is a genuine septal remnant from the embryological period of development. This kind of plica is extremely uncommon, with an incidence far below 1%.

    Epidemiology of Plica Syndrome:

    The majority of synovial plicae are asymptomatic and have minimal clinical significance. However, when they are hurt or agitated, they may start to exhibit symptoms. Numerous conditions, including direct trauma or blow to the plica, blunt trauma, twisting injuries, repetitive knee flexion and extension, increased activity, intra-articular bleeding, osteochondritis dissecans, torn meniscus, chronic or temporary synovitis, and more, can cause this.

    Patients may experience no symptoms for a while after the initial injury has healed, but weeks or months later, they may suddenly develop anterior knee discomfort. Pilia syndrome is the term used to describe an internal disturbance of the knee that impairs normal knee joint function and is caused by inflammation or damage to the medial patellar, lateral plica, suprapatellar, or a combination of the three. Because of its anatomical placement, the medial plica is thought to be the most often injured plica.

    The appearance of plica syndrome typically does not imply the presence of the infrapatellar plica. Because the plica syndrome is frequently caused by overuse of the knee, it is more common in people who perform exercises that require repeated flexion-extension motions.

    Both the reported incidence of plica syndrome and synovial plicae exhibit significant variance. The primary causes of these discrepancies include variations in nomenclature and assessment methods, as well as interpretations by the individual researchers.

    Pathophysiology:

    Normal knee joint components called plicae unite during pregnancy. Although autopsy studies show that plicae are present in 50% of persons, plicae usually involute when the fetus is around 12 weeks old.

    There are four types of normal plicae for the roughly 50% of persons who have one. They are medial, lateral, suprapatellar, and infrapatellar. Having several plicas is not unusual in patients.

    The knee joint and the suprapatellar bursa are separated by the suprapatellar plica. The synovium surrounding the infrapatellar fat pad and the intercondylar notch are separated by the infrapatellar plica. The medial facet of the knee joint and the infrapatellar fat pad are separated by the medial plica. The most prevalent kind of plicae and the most likely to exhibit symptoms are medial plicae. The rarest plica is the lateral plica. It is situated between the lateral patellar facet and the infrapatellar region.

    It is crucial to remember that not every plicae is painful. When normal plicae experience inflammation, they may become painful. When this inflammation causes impingement between the patella and femur, it might result in a tight, fibrotic plica that can cause symptoms during knee flexion.

    Causes of Plica Syndrome:

    The plica is a tissue remnant that arises during fetal development, and irritation or inflammation of the plica is usually the cause of plica syndrome. Although the precise origin of this irritation can vary, overuse, repetitive knee movements, or direct trauma to the knee are frequently linked to it.

    The risk of developing plica syndrome may be increased by activities that require a lot of bending, crouching, or kneeling. A history of prior knee injuries or structural problems with the knee joint may also be contributing factors.

    • Repetitive Motions: The plica may become irritated and inflamed as a result of frequent motions that require bending, straightening, or rotating the knee joint.
    • Trauma: The plica may become irritated as a result of direct impact or trauma to the knee, causing inflammation.
    • Overuse: Plica syndrome can develop as a result of activities that place an excessive amount of tension on the knee joint, particularly when there is inadequate rest or recuperation.
    • Muscle Imbalances: Weak or unbalanced knee muscles can impact the stability and mechanics of the joint, which may cause plica discomfort.
    • Infection or Inflammation: Scar tissue formation and plica irritation can occasionally result from infections or inflammatory disorders affecting the knee joint.

    Symptoms of Plica Syndrome:

    • Activity-Related Pain: Activities that require knee bending, such running, walking, or climbing stairs, may make the pain worse.
    • Localized Tenderness: The inside side of the knee joint or the region surrounding the plica may feel tender to the touch.
    • Knee Stiffness: After extended periods of inactivity or rest, people with plica syndrome may have stiffness in their knee joint.
    • Sensation of Locking: When the inflamed plica becomes lodged in the joint, some persons may experience the sensation that their knee “locks” or becomes momentarily trapped in a particular position.
    • Sensation of Giving Way: During motions that cause the plica to catch or fold, the knee may feel unstable or as though it will give way.
    • Swelling: Localized swelling surrounding the knee joint may result from plica inflammation.
    • Pain Along the Joint Line: Because the plica tissue is found along the inner side of the knee, pain may be felt there.
    • Limited Range of Motion: Because of the discomfort caused by the inflamed plica, some people may find it difficult to fully bend or straighten their knees.

    Risk Factors of Plica Syndrome:

    • Anatomical Factors: Some people may have a larger or more noticeable plica by nature, which makes discomfort more likely.
    • Improper Biomechanics: The knee joint and the plica may be subjected to additional stress due to poor alignment or mechanics during movement.
    • Age: Adolescents and young adults are susceptible to plica syndrome.
    • Employment: Jobs requiring a lot of kneeling or repetitive knee motions may increase the risk.
    • Repetitive Motions: Activities that require kneeling, crouching, or bending repeatedly might aggravate the plica and raise the risk.
    • Overuse: Running, jumping, and other activities that put undue strain on the knee joint can aggravate the plica.
    • Knee Injuries: A history of trauma, surgery, or knee injuries may cause structural alterations in the knee joint, increasing its vulnerability to plica irritation.
    • Muscle Imbalances: Pplica syndrome can be exacerbated by imbalances in the muscles surrounding the knee, which can change joint mechanics.

    Diagnosis of Plica Syndrome:

    A physical examination, medical history, and occasionally imaging tests are used to diagnose plica syndrome:

    • Medical History: You will be asked to describe your symptoms, their onset, and any activities that may have caused them. Additionally, they will ask about any prior knee operations or injuries.
    • Physical Examination: The physician will check your knee for any strange sensations, such as clicking or catching, as well as any indications of swelling or soreness. To determine your knee joint’s range of motion and to pinpoint any particular painful spots, they might move it.
    • Imaging Research: Imaging procedures such as MRI scans or X-rays can be performed to better evaluate the interior components of the knee and rule out other disorders, though they are not always required. By illustrating any inflammatory or anatomical problems with the plica, they can aid in diagnosis confirmation.
    • Diagnostic Injections: In certain situations, administering a local anesthetic injection to the vicinity of the plica can assist ascertain whether the symptoms go better, which can confirm the diagnosis.

    Physical Examination:

    Getting a relevant history from the patient is one of the most crucial steps in detecting medial synovial plica disease.
    The proximo-medial part of the knee and the patella’s border are frequently reported as having a dull discomfort. An internal hydrops and a perceptible string are common. Activity and overuse exacerbate the pain, which is especially painful at night. Because stair climbing, squats, and standing up from a chair put stress on the patello-femoral joint, the majority of patients complain about these activities.

    After sitting for extended periods of time, the patient may also complain of pain. Approximately half of the patients inform us that they have been performing repetitive flexion and extension exercises. Although they are less common, injuries or excessive use of the other plica might result in the same problems.

    The plica and mediopatellar plica stutter tests are unique physical examinations used to diagnose a medial plica. However, when the joint is inflamed, the plica stutter test will not function. The medial subluxation test, McMurray’s, Appley’s test for instability, and Cabot’s test are further testing techniques that could reveal the existence of a medial plica.

    The patient is placed in a supine position with their knee extended during the MPP test. Next, using the thumb, manual force is given to the inferomedial portion of the patellofemoral joint to check for discomfort. The test is deemed successful if, upon applying the same manual force, this discomfort obviously decreases at 90° of flexion. This test has a diagnostic accuracy of 89.0% and a sensitivity and specificity of 89.5% and 88.7%, respectively, in comparison to arthroscopy.

    The knee extension or flexion test are further provocation tests that can be used to detect medial plica syndrome. The active extension test involves rapidly extending the tibia in a manner similar to kicking. Because the quadriceps femoris muscle causes an abrupt stress on the plica, the test is deemed positive when it is uncomfortable. The tibia is swiftly swung from full extension into flexion and then stopped between 30 and 60 degrees of flexion to conduct the flexion test. When the plica is extended with an eccentric contraction of the quadriceps muscle, the test is once more positive.

    To determine whether the medial plica is irritated, use the plica snap test. The patient rests supine on the examination table with both legs relaxed in order to palpate the medial synovial plica. The examiner rolls their fingers along the plica fold, which is between the adductor tubercle region of the medial femoral condyle and the medial border of the patella, to palpate the medial synovial plica.

    The ligament will appear as a ribbon-like fold of tissue beneath the finger, which rolls directly against the medial femoral condyle underneath. When the test replicates the symptoms, like a slight pain, it is considered successful. Additionally, compare it to a normal knee to see if the level of pain is different. Because the synovium and medial joint are extensively innervated, it has been shown that it can cause significant discomfort in certain patients.

    Clicking or popping sensations on the anterior part of the knee are common in patients with plica syndrome. One of the main symptoms of plica syndrome is anterior knee discomfort. Stairs, squatting, getting out of a chair, and other actions that put strain on the patellofemoral joint might cause pain. There may be no history of trauma or injury, or there may be a history of blunt trauma or a twisting injury. When getting a history, one should take into account secondary causes of plica. These include rheumatoid arthritis, intra-articular lesions, loose foreign bodies, and hemophilia-related hemarthrosis.

    A taut band that is painful to the touch may be felt beneath the skin during a physical examination. If so, it is necessary to evaluate the contralateral knee to determine whether a plica is generating discomfort when palpated there as well. Tight quadriceps, hamstrings, and an effusion are possible additional physical examination findings.

    There are two physical examination methods that can indicate plica syndrome. These assessments are the Hughston and Stutter tests. The diagnosis of plica syndrome should be suspected when both tests come back positive. Although it is less suspicious, plica syndrome should still be taken into consideration if only one of the two tests is positive. In order to administer the Stutter test, the patient must sit up straight and have their legs hang at a 90-degree angle off the edge of the examination table. The examiner touches the center of the affected leg’s patella with his or her index and middle fingers. The inspector then feels for a patella stutter as the patient extends the affected leg. A positive test result involves experiencing a stutter.

    The patient extends their knee while lying supine in the Hughston test. With one hand wrapped around the plantar aspect of the patient’s heel and the other palm covering the patient’s patella, the examiner stands on the side of the injured knee. After that, the examiner takes the patient’s knee through flexion and extension while pushing the patella medially and inwardly rotating the tibia. When the patient feels discomfort or the practitioner notices popping during range of motion, the Hughston’s test is considered affirmative.

    Evaluation:

    Though they are frequently normal even if plica syndrome is the diagnosis, anteroposterior (AP), lateral, and skyline radiographs should be taken when plica syndrome is suspected.

    There is debate on the usefulness of magnetic resonance imaging (MRI) in the diagnosis of plica syndrome. On MRI, plicae are only sometimes visible. When there is an effusion, plica is easier to see on MRI. If plicae are seen, their signal intensity will be minimal. On MRI, symptomatic plicae can occasionally be distinguished from normal plicae due to their thick appearance and potential for synovitis. Normal plicae, on the other hand, could seem slender. Therefore, MRI is crucial for assessing additional possible reasons of knee pain and can be helpful in pre-operative planning.

    Several studies that examined 492 knees and contrasted the sensitivity and specificity of physical examination with ultrasonography and MRI were found in a review of the literature. These findings showed that the MRI had 77% sensitivity and 58% specificity, the physical examination had 90% sensitivity and 89% specificity, and the ultrasound had 90% sensitivity and 83% specificity.

    Differential Diagnosis of Plica Syndrome:

    • Patellar femoral syndrome
    • Patella bipartite
    • Patellar maltracking
    • Degenerative joint disease
    • Hoffa syndrome
    • Sinding-Larsen-Johansson disease
    • Medial collateral ligament sprain
    • Osteochondritis dissecans
    • Pes anserinus bursitis
    • Meniscal tears

    Treatment of Plica Syndrome:

    Medical Treatment of Plica Syndrome:

    • Anti-Inflammatory Drugs: NSAIDs, or non-steroidal anti-inflammatory drugs, are medications that help reduce inflammation and pain. These, however, ought to be used under a doctor’s supervision.
    • Ice and Elevation: You can relieve and lessen swelling in your leg by applying ice and raising it.
    • Corticosteroid Injections: To lessen inflammation and discomfort, a corticosteroid injection into the knee joint may occasionally be advised.
    • Pain management: To control discomfort, over-the-counter painkillers may be suggested.
    • Rest and Activity Modification: You can lessen plica discomfort and inflammation by allowing your knee to rest and avoiding activities that exacerbate symptoms.

    Physical Therapy Treatment of Plica Syndrome:

    • By reducing discomfort, increasing joint mobility, and fortifying the muscles surrounding the knee, physical therapy is essential in the treatment of plica syndrome. The following is one possible technique to plica syndrome physical therapy treatment:
    • Evaluation: A physical therapist will evaluate the strength, range of motion, and general function of your knee. In order to customize the treatment plan to meet your unique needs, they will also go over your medical history and symptoms.
    • Hand Therapy: To increase joint mobility and lessen muscular tension, manual methods like soft tissue massage and joint mobilizations may be employed.
    • Stretching: Mild stretching techniques can ease tension in the knee muscles and increase flexibility.
    • Exercises for Strengthening: It’s critical to strengthen the muscles that support the knee joint. To improve knee alignment and stability, exercises may focus on the calf, hip, hamstring, and quadriceps muscles.
    • Functional Training: To increase functional strength and stability, physical therapists frequently work on exercises that replicate your everyday motions.
    • Biomechanical Corrections: By identifying and addressing any incorrect movement patterns that lead to plica irritation, the therapist can help you move more effectively and lessen the strain on your knee joint.
    • Electrotherapy: To lessen pain and encourage healing, techniques like electrical stimulation or ultrasound may be employed.
    • Home Exercise Program: To assist you maintain the improvement you make in sessions, your physical therapist will probably give you a series of exercises to perform at home.
    • Education: You will be given instructions on how to move correctly, maintain good posture, and use self-management techniques for your symptoms.
    • Progress Monitoring: To guarantee the best outcomes, your physical therapist will monitor your development over time and modify the treatment plan as necessary.
    • Bracing: During activities, using a knee brace or support can assist stabilize the joint and offer relief.
    • Activity Modification: Adjusting your activity to eliminate movements that increase symptoms can aid in recuperation.

    Exercise of Plica Syndrome:

    Indeed, a physical therapist may suggest the following exercises to assist control and lessen plica syndrome symptoms:

    Quad Sets: The patient should sit on the floor with their legs straight. Press the back of your leg onto the floor while contracting your quadriceps, the muscles in your thighs. After a few seconds of holding, release the position. Repeat a number of times.

    Straight Leg Raises: Place one leg bent and one leg straight on the patient’s back. Raise the straight leg a couple of inches off the floor, then hold it there for a few seconds before lowering it again. The quadriceps are strengthened by this exercise.

    Single leg raises:
    Straight Leg Raises

    Hamstring Stretches: Stretching the hamstrings involves lying on the patient’s back and gently drawing one knee up to the patient’s chest. Maintaining the opposing leg flat, straighten the leg as much as you can. This should cause the back of your thigh to gently stretch.

    Calf Stretches: For calf stretches, place the patient’s hands on the wall as they stand facing it. Keep one leg straight and take a step back. Feel the calf muscle stretch as you bend the front knee while maintaining the rear heel on the floor.

    Inner Thigh Stretch: Place the soles of your feet together while sitting on the floor to perform an inner thigh stretch. To feel a stretch in your inner thighs, gently press your knees toward the floor.

    Step-Ups: Take a stance facing a low platform or a step. One-leg step up, followed by a step down. Before moving on to the second leg, perform a series of repetitions on the same leg.

    Mini Squats: Place your feet hip-width apart to perform little squats. Straighten your knees after bending them slightly, as you’re reclining in a chair. The muscles surrounding the knee are strengthened by performing this little squat exercise.

    Mini-squat
    Mini Squat

    Lateral Leg Raises: For balance, stand close to a wall or other support. Keeping one leg straight, raise it out to the side and then bring it back down. The hip abductor muscles are the focus of this leg lift exercise.

    Bridges: Place your feet flat on the floor and bend your knees while lying on the patient’s back. Lift your hips off the floor with a gluteal squeeze, then bring them back down.

    Wall Slides: Slide down into a squatting stance while leaning your back on a wall. Maintain your knees in line with your feet and the patient’s back against the wall. Before sliding back up, hold the position for ten to fifteen seconds.

    Clamshells: Place your feet together and bend your knees while lying on the patient’s side. Raise your upper knee as high as the patient can without shifting your pelvis, while keeping their feet in contact. Put it back down. The hip abductor muscles are the focus of this clamshell exercise.

    Clamshells
    Clamshells

    Seated Knee Extension: Bend your knees 90 degrees while seated in a chair. Straighten the patient’s knee and slowly extend one leg in front of them. Hold for a few seconds, then drop the leg back down.

    Heel Slides: Keep your legs straight while lying on the patient’s back. Bend your knee and slide one heel up toward your buttocks, then back down. Knee mobility is improved by doing this exercise.

    Hamstring curls: While lying on your stomach, fasten a resistance band around your ankle if you have one. To resist the pull of the band, bend your knee so that your heel is closer to your buttocks. Return your leg to its natural position slowly.

    hamstring-curls
    Hamstring curls

    IT Band Stretch: Reach your arm over your head to the other side while crossing one leg in front of the other. Feel a stretch down the outside of your leg as you tilt your upper body sideways.

    Calf Standing Raises: Place your feet flat on the floor and stand. Lift your heels off the ground and stand up onto the patient’s toes. Return the patient’s heels to the ground.

    Isometric Quad Contractions: Bend your knees at a 90-degree angle while sitting on the edge of a chair. Using your quadriceps, press your knee against the chair. After ten to fifteen seconds of holding the contraction, release it.

    Step-Ups with Knee Lift: This variation on the standard step-up involves raising the opposing knee toward your chest after stepping onto the platform and then stepping down.

    Resistance Band Leg Abduction: Stand with your feet hip-width apart and wrap a resistance band around your ankles. Lift one leg out to the side against the band’s resistance while maintaining a straight posture.

    Exercises with a Foam Roller: To assist relieve tension and increase blood flow, gently move a foam roller around the outside of your calf and thigh muscles.

    Ankle Pumps: While lying on your back, slowly pump your ankles up and down. This lessens stiffness and increases circulation.

    Ankle Pumps
    Ankle Pumps

    Quadruped Hip Circles:  Get on your hands and knees and perform quadruped hip circles. Draw circles with the knee of the affected leg while keeping your back flat and your core stable.

    Prone Hangs: Place your legs hanging off the edge of a table or bed while lying on your stomach. The front of the thigh can be gradually stretched in this way. Stretch your hip flexors by placing one foot in front of the other while kneeling on one knee. Lean forward to feel a stretch close to the front of the kneeling leg’s hip.

    Seated Wall Slides: Bend your knees normally while sitting against a wall. Straighten your knees and slowly slide your feet away from the wall. Next, return your feet to a bent posture by sliding them up.

    Quad Foam Rolling: Place a foam roller beneath your thighs while lying on your stomach. To massage the front of your thighs, gently roll from side to side.

    Hip Hikes: Raise the opposing hip higher while standing on one leg. Repeat after lowering it back down. The hip muscles are strengthened by this hip hike workout.

    hip hikers
    Hip Hike

    Dynamic Hamstring Stretch: Reach for your toes with one leg out in front of you as you’re standing. Next, stretch your hamstrings by swinging the leg behind you while bending at the waist.

    Seated Leg Extension with Resistance Band: Place a resistance band around your ankle while sitting on the edge of a chair. Despite the band’s resistance, extend your leg in front of you.

    Single-Leg Balance: Try to keep the patient balanced while standing on one leg. This strengthens the muscles surrounding the knee and enhances stability.

    Stationary Bike: Low-impact exercise on a stationary bike can help increase knee mobility and circulation.

    Leg lifts while side-lying: Keep your legs straight while lying on the patient’s side. Raise your upper leg a couple of inches above the floor, then bring it back down. The hip abductor muscles are the focus of this side-lying leg lift exercise.

    Wall Sit: Slide into a sitting position with your knees bent at a 90-degree angle while leaning against a wall. Before getting back up, hold the position for a predetermined period of time.

    wall-sit-calf-raise
    Wall Sit

    Active Knee Extension: Hang your legs down while sitting on the edge of a table or other elevated surface. Your knees should be gently extended and straightened before being lowered again.

    Isometric Hip Adduction: Sit with a pillow or small ball between your knees. For a few seconds, squeeze your knees together, then let go.

    Toe Taps: Place your feet on the floor while seated in a chair. One foot at a time, alternate tapping your toes on the ground in front of you.

    Seated-toe-taps
    Toe Taps

    Seated Heel Raises: Lifting your heels off the floor while maintaining the balls of your feet on the floor is known as a “seated heel raise.” Bring your heels back down.

    Resistance Band Side-Lying Hip Abduction: Place a resistance band around your ankles while lying on your side. Raise the patient’s upper leg against the band’s resistance.

    Resistance Band-Assisted Resisted Knee Flexion: Place a resistance band around your ankle while seated in a chair. To raise your foot off the ground against the band’s resistance, bend your knee.

    Water Exercises: Low-impact mobility and joint support can be obtained by water exercises such as leg swings, water walking, and mild kicking if you have access to a pool.

    Surgical Treatment of Plica Syndrome:

    When conservative measures such as rest, physical therapy, and medication have failed to adequately alleviate symptoms and the condition substantially hinders your everyday activities and quality of life, surgery is usually considered for plica syndrome. This procedure, called a “plica resection” or “plica excision,” involves removing the irritated or inflamed plica tissue from the knee joint. Here are some things you should know about plica syndrome surgery:

    Plica resection: Plica excision is a surgical operation performed to treat plica condition. It involves the removal or trimming of the irritated or inflammatory plica, which is a fold of synovial tissue in the knee joint. The procedure is frequently carried out arthroscopically, which is a minimally invasive method that involves tiny incisions and an arthroscope, a tiny camera that guides the surgeon’s tools. To ease discomfort and lower inflammation, the surgeon locates the troublesome plica and then carefully removes or trims it during the procedure. This can lessen the pain caused by the irritated plica and help knee function.

    • Indications: When non-surgical treatments have failed, surgery is typically regarded as a last option. Based on your response to conservative treatments and the severity of your symptoms, your healthcare provider will evaluate your case and decide whether surgery is necessary.
    • Procedure: To remove the irritated plica tissue, the surgeon will carefully make a small incision close to the knee’s affected area. Usually, minimally invasive techniques are used to perform this operation.
    • Success Rates: Plica syndrome surgery generally has a good success rate in relieving symptoms; however, like any type of surgery, there are potential risks and complications that the patient’s healthcare provider will discuss with you beforehand.
    • Recovery: Recovery time varies, but it usually involves a period of rest and rehabilitation. Physical therapy is commonly recommended post-surgery to help regain strength, flexibility, and mobility in the knee.
    • Patient preparation: Prior to the procedure, the patient’s healthcare provider will give you instructions on how to prepare, which may include fasting and making plans for transportation and post-operative care.
    • Post-Surgery Care: You must adhere to your surgeon’s instructions regarding physical therapy, pain management, and wound care after surgery. To prevent placing too much weight on the limb that was operated on, you might be told to wear crutches for a while.
    • Consultation: It’s crucial to have a thorough consultation with an expert who can explain the procedure, any dangers, anticipated results, and the recovery period if surgery is being considered.

    Home Advice of Plica Syndrome:

    Indeed, the following self-care and home remedies can help you manage the symptoms of plica syndrome and aid in your recuperation:

    • Rest: Give your knee enough rest, especially if your symptoms are getting worse. keep away of activities that make your pain worse.
    • Ice: Applying ice to the affected area for 15 to 20 minutes several times a day can help reduce inflammation and provide pain relief.
    • Elevation: To help minimize swelling and promote blood circulation, elevate your leg while you’re at rest.
    • Over-the-counter Pain Relief: If your doctor has given the go-ahead, you may use over-the-counter pain relievers (like ibuprofen or acetaminophen) to manage pain and inflammation.
    • Compression: Using a knee compression sleeve or bandage can help support the joint and reduce swelling.
    • Stretching: To avoid stiffness, perform mild range-of-motion exercises. keep away of motions that hurt or make you uncomfortable.
    • Low-Impact Activities: If your doctor has given the all-clear, participate in sports like cycling or swimming that are less taxing on the knee joint.
    • Shoes: To lessen the impact on your knees, choose shoes with adequate cushioning and arch support.
    • Appropriate Footwear: keep away of shoes with low support and high heels as these might exacerbate knee alignment issues.
    • Eat a nutritious, well-balanced diet to promote the general health of your joints.
    • Hydration: To keep your body properly hydrated and to support joint function, drink a lot of water.
    • Weight management: To lessen undue strain on the knee joint, keep your weight within a healthy range if needed.
    • Being aware of your posture will help you distribute your weight evenly and avoid putting undue strain on your knees.
    • Supportive Seating: When sitting for long periods of time, place a cushion or other support beneath your knees.
    • Orthopedic Supports: To support your knee as you sleep, think about using orthopedic pillows or cushions.
    • Pain Diary: To find trends and triggers that either aggravate or lessen your symptoms, keep a journal of your activities and symptoms.
    • Stress Reduction: Using relaxation methods like meditation and deep breathing can help you deal with stress and pain.
    • Gradual Return to Activity: As your symptoms subside, progressively resume your routines, exercises, and motions while monitoring your knee’s reaction.

    Complication of Plica Syndrome:

    Even though plica syndrome is generally thought to be a benign condition, if the symptoms are not adequately managed or if the condition is left untreated, complications may occur. Some possible complications of plica syndrome include:

    • Chronic Pain and Discomfort: If plica syndrome is not treated, it may result in chronic pain and discomfort that affects everyday activities and quality of life.
    • Knee Instability: Knee joint irritation of the plica may cause feelings of instability or “giving way,” which may raise the risk of falls or injuries.
    • Secondary Issues: Pain-induced compensatory movements may cause muscle imbalances and changed movement patterns, which may eventually lead to other musculoskeletal problems. Inflammation: Prolonged irritation of the plica tissue may cause persistent inflammation in the knee joint.
    • Decreased Range of Motion: If left untreated, plica syndrome may result in restricted knee joint mobility and trouble bending or completely extending the knee.
    • Functional Limitations: People may find it difficult to engage in sports, physical activities, or even daily duties when their symptoms develop.
    • Development of Scar Tissue: Prolonged irritation and inflammation can cause scar tissue to grow around the plica, which can worsen symptoms and impair joint function.

    Prevention of Plica Syndrome:

    While plica syndrome can often be tough to prevent fully, there are things you can take to lower your risk of getting the condition or experiencing recurrent episodes:

    • It’s crucial to fully warm up before engaging in any kind of exercise. Your muscles and joints can be better prepared for the exercise with the use of mild dynamic stretches and movements.
    • Gradual Progression: Increase the intensity of your workouts or begin a new fitness routine gradually. keep away of abrupt activity increases that could put strain on your knee joint.
    • Cross-training: To prevent overusing the same muscles and joints, mix up your program with other exercises and activities.
    • Correct Technique: To prevent putting undue strain on your knee joint, make sure you’re exercising with the right form and alignment.
    • Listen to Your Body: Keep an eye out for any pain or ache in the patient’s knees; if you notice any unusual sensations, it’s best to address them early rather than pushing through.
    • Maintain a Healthy Weight: Carrying too much weight can put additional strain on the knee joint; choosing shoes that provide enough support and cushioning for your feet and knees, especially during physical activities, can help prevent joint strain and irritation.
    • Stay Hydrated: Staying properly hydrated can help prevent stiffness.
    • Balanced Muscles: Include strength training exercises that focus on all major muscle groups, supporting balanced muscle development and joint stability.
    • Flexibility and Mobility: Maintaining appropriate joint range of motion and lowering the chance of stiffness can be achieved with regular stretching and mobility exercises.
    • Rest and Recovery: Allow your body to recuperate in between workouts. An increased risk of injuries, including plica irritation, can result from overtraining.
    • Pay Attention to Experts: If you’ve had a previous knee injury, or surgery, or are prone to knee issues, work closely with a physical therapist or healthcare provider to develop a safe exercise plan.

    Prognosis:

    The prognosis for plica syndrome is favorable after it is treated adequately. At a median follow-up of 27.5 months, 10% of the 969 patients in one trial had not reacted to treatment, while 26% had improved and 64% were symptom-free.

    Conclusion:

    The condition known as plica syndrome is caused by irritation or inflammation of the knee’s synovial plica, which frequently results in pain, swelling, and discomfort, particularly when moving. It frequently affects athletes or those who move their knees a lot.

    Clinical evaluation and imaging studies are usually used to make the diagnosis, and conservative measures including rest, physical therapy, and anti-inflammatory drugs are used as treatment options. To ensure a full recovery and avoid long-term consequences, early detection and management are crucial.

    FAQs

    What is the average healing time for a plica?

    Physical therapy or an exercise regimen at home are effective treatments for the majority of plica syndrome sufferers. These often entail quadriceps strengthening and hamstring stretches. Within six to eight weeks of beginning an exercise or physical therapy program, the majority of people begin to feel better.

    How is plica neuropathica treated?

    Dermatoscopy revealed matting and honey-colored concretions entwining the hair shaft, giving the appearance of a “wrangled mesh of wires.” In order to prevent recurrence, plica neuropathica is treated by removing the matted hair and assessing any underlying mental health conditions.

    Is there a cure for plica syndrome?

    The middle of your knee will hurt and swell if you have plica syndrome. Usually, stress or overuse is the culprit. Although some patients may need surgery, plica syndrome is typically successfully treated with medicine and physical therapy.

    Is it possible to massage Pica?

    In order to reduce plica inflammation, we could also use therapies like friction massage and ultrasound. Iontophoresis is a technique we occasionally utilize in our therapy sessions to apply anti-inflammatory medication to the sore spot using a moderate electrical current.

    What occurs if treatment for plica syndrome is not received?

    What occurs if treatment for plica syndrome is not received? You run the danger of making your knee condition worse if you don’t get enough sleep and keep doing things. One can anticipate cartilage degradation and a progressive worsening of pain.

    Which exercises are appropriate for people with plica syndrome?

    To protect your lower back, lie on your back with one knee bent and the other straight. To maintain your knees straight and lock out your knee, bring your toes closer to you. Raise your leg straight slowly while locking it at a 60-70 degree angle. Hold for one second.

    How is suprapatellar plica treated?

    In most cases, knee plica issues resolve without surgery. You’ll need to apply ice and rest your knee for a bit. Your doctor might advise extending your leg muscles, particularly your quadriceps and hamstrings, and using anti-inflammatory pain relievers such ibuprofen or naproxen.

    Does plica syndrome benefit from physical therapy?

    By addressing all of the contributing causes, including discomfort and any lack of strength, flexibility, or body control, physical therapy aids in the rehabilitation from plica syndrome.

    What side effects might untreated plica syndrome cause?

    Chronic discomfort, knee instability, changes in movement patterns, inflammation, decreased range of motion, and functional restrictions are some examples of complications.

    What at-home self-care activities can I do for Plica syndrome?

    Resting, using ice, elevating your leg, using over-the-counter painkillers (if permitted), practicing mild movements, wearing appropriate footwear, and maintaining a healthy weight are all things you may do at home.

    What side effects might untreated plica syndrome cause?

    Chronic discomfort, knee instability, changes in movement patterns, inflammation, decreased range of motion, and functional restrictions are some examples of complications.

    What is the Plica syndrome treatment?

    Rest, physical therapy, ice, anti-inflammatory drugs, and in certain situations, corticosteroid injections are available as forms of treatment. If conservative measures are inadequate, surgery may be considered.

    How is a diagnosis of Plica syndrome made?

    A combination of the patient’s medical history, physical examination, and occasionally imaging tests like MRIs or X-rays are used to make the diagnosis. In certain situations, the diagnosis may also be confirmed by diagnostic injections.

    Which factors lead to plica syndrome?

    Overuse or repetitive knee motions, like bending, squatting, or kneeling, are frequently the cause of plica syndrome. Anatomical issues, prior knee operations, or injuries may also play a role.

    Plica syndrome: what is it?

    The illness known as “plica syndrome” is characterized by inflammation or irritation of the plica, a fold of synovial tissue inside the knee joint, which results in symptoms like clicking, swelling, and knee pain.

    References

    • Patel, D. (2023b, September 5). Plica syndrome – cause, symptoms, treatment. Samarpan Physiotherapy Clinic. https://samarpanphysioclinic.com/plica-syndrome/
    • Plica Syndrome. (2024, May 1). Cleveland Clinic. https://my.clevelandclinic.org/health/diseases/21705-plica-syndrome
    • Plica Syndrome: Effective Physiotherapy Management. (2023, July 17). https://arunalaya.com/news/details/154/Plica-Syndrome-Effective-Physiotherapy-Management
  • Chest Pain

    Chest Pain

    Overview

    Chest pain is a symptom with various possible causes, ranging from mild to life-threatening. It can originate from the heart (e.g., heart attack, angina), lungs (e.g., pulmonary embolism), muscles, ribs, or digestive system (e.g., acid reflux).

    A variety of factors can cause chest pain. The two most potentially lethal causes are the cardiovascular system and the lungs. Therefore, seeking medical assistance is crucial for a precise diagnosis. Call 911 or your local emergency number immediately if you believe that your chest pain is the result of a heart attack.

    Chest pain is anything painful or uncomfortable that you experience between the cervical region and upper belly, anywhere across the upper portion of your body.

    There are numerous reasons for chest pain, including problems with your heart, lungs, or digestive system. While some causes pose a threat to life, others do not. A medical professional can relieve your anxiety by determining the reason for your chest pain. Treatments for chest pain may involve medication or surgery.

    Your initial reaction to chest pain can be that it’s a heart attack. However, chest pain can also be caused by other less dangerous illnesses. One of the most frequent reasons patients go to the emergency department (ER) is for chest pain.

    Each person experiences chest pain differently. Additionally, it differs in:

    • Location of pain.
    • Intensity.
    • Duration.
    • It could be a mild pain or a severe, searing pain. It could indicate a significant heart condition or be the result of a common, non-life-threatening reason.

    What is the Chest Pain?

    Any pain in the chest is referred to as chest pain. It could extend to other parts of your upper body, like your neck, jaw, or down your arms. Sharp or dull chest aches are both possible. You can have achiness or tightness. It could feel like someone is crushing or squeezing your chest.

    You may experience chest pain for a few minutes or several hours. It can sometimes linger for six months or more. It frequently gets worse when you strain yourself and gets better when you’re relaxing. Or it might occur when you’re sleeping. It may seem to be in a particular location or a broader, more universal one. You could get chest pain on the right side, left side, or in the middle.

    If your chest pain is a sign of a cardiac arrest or another potentially fatal condition, you should visit a doctor. Many patients with chest pain are seen by medical professionals. It’s a fairly typical symptom. However, it’s not always about your heart.

    How does pain in the chest feel?

    Heart-relate(COPD)d symptoms of chest pain include:

    • Pressure.
    • Squeezing.
    • Crushing.
    • Weeping.

    You might also experience:

    • Exhausted.
    • Breathless.
    • Pain in your neck, back, jaw, arms, shoulders, and abdomen.
    • Nausea.
    • Sweaty.
    • Dizziness.
    • Lung conditions that require prompt medical attention can also cause some of these symptoms.

    What is the primary reason for pain in the chest?

    The most frequent cause of chest pain is gastroesophageal reflux disease, sometimes known as GERD. Whether you have a heart condition or not, you should see a doctor to receive the diagnosis and necessary treatment.

    Which factors are most frequently responsible for chest pain?

    Chest aches may be caused by stomach, lung, cardiac, or other problems. Due to their numerous causes, they are challenging to diagnose. First, medical professionals search for potentially fatal causes.

    Causes of chest pain include:

    • Heart attack (heart attack without blood flow).
    • Coronary artery disease (CAD) is a condition where the arteries in your heart narrow or become blocked.
    • Coronary artery dissection (heart artery rip).
    • Pericarditis is an inflamed sac that surrounds your heart.
    • Hypertrophic cardiomyopathy (HCM).
    • The largest artery in the body, the aortic, can burst or dissect.
    • A weak region in your major artery is called an aortic aneurysm.
    • Mitral valve prolapse (loosely sealed heart valve).
    • The disease known as aortic stenosis occurs when the heart valve malfunctions, obstructing blood flow.
    • Arrhythmia.
    • The stomach lining is where ulcers are found.
    • Esophageal muscle spasms (food tube).
    • Food tube inflammation, or esophagitis.
    • Gallstones.
    • A hiatal hernia occurs when a portion of the stomach pushes up toward the food tube.
    • Inflammation of the stomach lining, or gastritis.
    • Pancreatitis, or inflammation of the pancreas.
    • A blood clot in your lung is called a pulmonary embolism (PE).
    • Chronic obstructive pulmonary disease (COPD).
    • Pneumonia.
    • Pleurisy.
    • Pneumothorax, or lung collapse.
    • High blood pressure in the pulmonary arteries is known as pulmonary hypertension.
    • Asthma.
    • Rib fracture (broken rib).
    • Chest muscle strain.
    • Swollen cartilage in the chest is called costochondritis.
    • Shingles (rash and infection).
    • Lung cancer.
    • A panic episode is an unexpected, severe fear.

    Causes of the heart and blood vessels

    The following are a few heart-related reasons for chest pain:

    • Angina. This is any tenderness in the chest caused by the heart muscle receiving less blood. Squeezing, pressure, weight, tightness, or pain in the chest are common descriptions. One sign of cardiovascular disease is angina. A heart attack or near-heart attack can be caused by unstable angina.
    • Heart attack. When the heart muscle’s blood supply is cut off, a heart attack occurs. Chest pain from angina may result from it. To avert mortality from a heart attack, emergency care is required.
    • An aortic dissection. The aorta, the body’s principal artery, is affected by this potentially fatal illness. Blood is forced between the aorta’s inner layers if they split apart. The aorta may burst as a result. An infection of the sac around the heart is called pericarditis. Usually, this illness causes severe pain that worsens when you lie down or take a breath.

    Causes related to digestion

    The following illnesses or digestive system issues can result in chest pain:

    • Gastroesophageal reflux disease (GERD). In this scenario, acid from the stomach rises into the tube that joins the neck and stomach. The esophagus is the name of that tube. Heartburn is a burning sensation in the chest that can be caused by GERD.
    • Dysphagia. Esophageal disorders can make swallowing challenging or even painful. Chest pain could result from this.
    • Pancreatic or gallbladder illness. Stomach pain that radiates to the chest may be caused by gallstones or irritation of the pancreas or gallbladder.

    Chest pain can be caused by a variety of lung disorders, including:

    • A pulmonary embolism (PE) is a blood clot that forms in the lung. The flow of oxygen to lung tissue can be stopped by a blood clot that becomes lodged in a lung artery. Pulmonary embolism symptoms can resemble a heart attack.
    • Pleurisy irritates the thin tissue layers that divide your lungs from your chest wall. Sharp chest pain is a symptom of this illness, and it worsens when you cough or breathe in.
    • Lung collapse. When air seeps into the area around the lung and the ribs, the lung collapses. Another name for it is a pneumothorax. Usually, chest pain from a collapsed lung begins abruptly. Hours may pass through it. Usually, it results in dyspnea.
    • Pulmonary hypertension is the term for High blood pressure in the arteries of the lungs. The arteries that supply blood to the lungs are impacted by this illness. It may result in pressure or pain in the chest.

    Causes of muscles and bones

    Damage or injury to the components that comprise the chest wall can cause some types of chest pain. Among these conditions are:

    • Costochondritis. The cartilage that joins a rib with your breastbone is inflamed. A heart attack-like chest pain may result from it. The left side of the body is where the pain is most frequently felt.
    • Rib fracture. Chest pain may be caused by a fractured or bruised rib.
    • Chronic pain. Chronic pain in the chest region can be caused by illnesses like fibromyalgia, which can create painful muscles.

    Heart Issues

    These heart issues are frequently caused by:

    • Coronary artery disease (CAD). The cardiac muscle receives less oxygen and blood flow as a result of this blockage in the blood arteries. It may result in angina, a painful condition. The heart is typically not irreversibly damaged, even though it is an indication of cardiac disease. However, it is an indication that you may have a heart attack in the future. Your arm, shoulder, jaw, or back may have pain in addition to your chest. It could have a squeezing or pressing sense to it. Angina can be triggered by physical activity, excitement, or emotional distress; relaxation relieves it.
    • Heart attack (myocardial infarction). Heart muscle cells die as a result of the decreased blood flow through the heart’s blood channels. A heart attack is typically a more severe and crushing pain, usually in the center or left side of the chest, and rest does not alleviate it, even though it is comparable to angina chest pain. The pain may be accompanied by acute weakness, nausea, shortness of breath, or sweating.
    • Cardiovascular disease. This inflammation of the heart muscle can produce fever, exhaustion, an accelerated heartbeat, and difficulty breathing in addition to chest pain. The symptoms of myocarditis can resemble a heart attack even if you don’t have a blockage.
    • Pericarditis. There is inflammation or infection in the sac that surrounds the heart. It frequently results in sharp, continuous pain throughout the muscles of the upper neck and shoulders, while it can also generate agony that is comparable to that of angina. Breathing, swallowing, or lying on your back can sometimes make pain worse.
    • Hypertrophic Cardiomyopathy. The cardiac muscle becomes excessively thick due to this hereditary condition. This can occasionally result in issues with the heart’s ability to pump blood. Breathlessness and chest pain are common side effects of exercise. When your heart muscle thickens significantly over time, you may develop heart failure. This makes it more difficult for the heart to circulate blood. Among the symptoms of this kind of cardiomyopathy are lightheadedness, dizziness, and fainting.
    • Mitral valve prolapse. It occurs when one of the heart’s valves malfunctions. Mitral valve prolapse has been linked to several symptoms, such as dizziness, palpitations, and chest pain, but it can also be asymptomatic, particularly if the prolapse is modest.
    • The coronary artery dissection. This rare but fatal illness arises when a tear forms in the coronary artery and can be caused by a variety of factors. It could result in an abrupt, intense pain that travels up into the neck, back, or abdomen and feels like it is tearing or ripping.
    • An aortic dissection. It occurs when a weak region in your aorta, the large artery that carries blood from your heart to the rest of your body, has a rip in its inner layer. Suddenly, you can experience a searing ache in your back or chest that feels like it’s tearing or ripping. Dizziness, fainting, and shortness of breath are further symptoms.
    • Aortic aneurysm. Aortic aneurysms develop in the aorta and resemble protruding balloons. The aorta’s walls are normally strong enough to withstand the pressure of blood flow. However, these walls can occasionally be weakened or damaged by illness, heredity, or trauma. An aneurysm may develop if blood presses against these vulnerable spots.
    • Arterial stenosis. Like a gatekeeper, the aortic valve permits blood to flow from the left ventricle, the heart’s lower chamber, into the aorta, which then distributes the blood throughout your body. When this valve narrows, the normal flow of blood is disrupted, resulting in aortic stenosis.
    • Arrhythmia. This condition, also referred to as cardiac rhythm problems, can affect anyone, including those without any other heart conditions. However, those who have additional heart issues are at greater risk. There are three types of heart rhythm issues: When there are problems with your heart’s electrical system, which generally maintains a regular rhythm, irregular heartbeats, or arrhythmias, occur. The heartbeat may become erratic and disorderly, too fast, or too slow.
    • Circulatory System Diseases. The primary causes of your circulatory problems are coronary artery disease and high blood pressure, which result in blockages in the arteries that feed blood to the heart. Heart attacks or strokes may result from these disorders.
    • Structural heart diseases. Your heart muscle or its valves may sustain damage from congenital anomalies, which are problems with the heart and blood vessels’ development at birth, and heart muscle disease, sometimes referred to as cardiomyopathy.

    Lung Issues

    The following are typical reasons for chest pain:

    • Pleurisy. This inflammation or irritation of the lining of the chest and lungs is also referred to as pleurisy. When you cough, sneeze, or breathe, you probably experience acute pain. Pneumothorax, pulmonary embolism, and bacterial or viral infections are the most frequent causes of pleuritic chest pain. Cancer, lupus, and rheumatoid arthritis are other less frequent causes.
    • Lung abscess. Pleuritic and other forms of chest pain, including profound chest pain, can be caused by certain lung infections. Pneumonia frequently strikes without warning and manifests as fever, chills, coughing, and respiratory tract pus.
    • Pulmonary embolism. Acute pleuritis, breathing difficulties, and a fast heartbeat can result from a blood clot that enters the bloodstream and lodges in the lungs. It might also result in shock and fever. Following deep vein thrombosis after being immobilized for a few days after surgery, or as a side effect of cancer, a pulmonary embolism, is more likely to occur.
    • Pneumothorax. Pneumothorax, which is frequently caused by a chest injury, occurs when a portion of the lung collapses, allowing air to enter the chest cavity. In addition to other symptoms like low blood pressure, this might produce pain that worsens as you breathe.
    • Hypertension. This unusually high blood pressure in the pulmonary arteries causes the right side of the heart to work too hard, resulting in chest pain that resembles angina.
    • Asthma. Shortness of breath, wheezing, coughing, and occasionally chest pain are symptoms of asthma, an inflammatory disease of the airways.
    • Chronic obstructive pulmonary disease(COPD). Emphysema, chronic bronchitis, and chronic obstructive asthma are among the three conditions that fall under this category. By reducing and harming the airways that carry gases and air to and from your lungs as well as the tiny air sacs (alveoli) that carry oxygen into your bloodstream and expel carbon dioxide, the illness prevents airflow. The most common cause is smoking.
    • Lung cancer. When abnormal cells in your lungs proliferate uncontrollably, you develop lung cancer. It can be lethal and is a serious health issue. A persistent cough, chest pain, and difficulty breathing are among the symptoms.
    • TB (tuberculosis). It is an infectious disease that typically affects the lungs and is caused by bacteria. When those who are infected cough, sneeze, or spit, TB is transferred through the air.
    • Viral infection. Myocarditis, a rare illness frequently caused by an infection reaching the heart, can be caused by respiratory viruses including influenza and SARS-CoV-2 (which causes COVID-19). The heart muscle swells, thickens, and weakens. Chest pain that resembles a heart attack is one sign.

    Panic attack and Anxiety

    Anxiety and panic attacks can also be a cause of chest pain. It’s difficult to determine when anxiety turns into an anxiety disorder because everyone experiences anxiety at some point. However, it’s advisable to consult a mental health professional if your anxieties begin to interfere with your day-to-day activities for an extended length of time. Although stress and anxiety disorders can take many different forms, they usually have certain symptoms in common:

    • Tachypnea.
    • Muscle stiffness.
    • Chest tightness.
    • Restlessness and ongoing concerns.
    • Focusing on unimportant things that cause compulsive behavior.

    It’s critical to have a conversation with a friend or family member about getting professional mental health care if you observe these symptoms in them.

    Other reasons

    Other causes of chest pain include:

    • A panic attack. You might be experiencing a panic attack if you have severe chest pain and terror. A rapid, pounding heartbeat, rapid breathing, excessive perspiration, shortness of breath, nausea, and dizziness are further signs of a panic attack. Distinguishing between a panic attack and a heart attack might be challenging. If you are unsure about the reason for your chest pain, you should always seek medical attention.
    • Shingles. The varicella-zoster virus, which also causes chickenpox, is the cause of this infection. It may result in excruciating agony and a band of blisters that extend from the back to the chest.
    • Neuropathic pain. Some people may experience chest pain if their middle back nerves are pinched.

    Heartburn or acid reflux, particularly after eating, can result from swallowing issues linked to esophageal gallstone disorders, which can cause upper abdomen pain or pain following meals due to inflammation of the pancreas or gallbladder.

    Signs and symptoms

    The reason determines the symptoms of chest pain.

    Chest pain associated with the heart

    Heart disease is frequently linked to chest pain. The following are possible signs of chest pain caused by an attack of the heart or another cardiac condition:

    • Chest pressure, constriction, pain, squeezing, or hurting.
    • Pain that radiates to the upper abdomen, jaw, teeth, neck, shoulder, arm, or back.
    • Breathlessness.
    • Exhaustion.
    • Indigestion.
    • Chills.
    • Dizziness.
    • Tachycardia.
    • Nausea and vomiting.
    • Different kinds of chest pain
    • The sensation of food returning to the mouth or a sour flavor.
    • Dysphagia.

    Determining if pain in the chest is caused by a heart problem or anything else can be challenging.

    Heart issues and chest pain

    The following are the most typical heart issues that result in chest pain:

    • Angina and pericarditis both have similar symptoms, but a heart attack is potentially fatal. Pericarditis typically causes a sudden, intense, stabbing pain that worsens when you swallow deeply or lie down.
    • If you are older or at risk for coronary heart disease, you are more prone to experience heart issues.

    For instance, coronary heart disease may be a possibility for you if you:

    Smokers who are obese, have high blood pressure, diabetes, or high cholesterol, or have family members under 60 who have experienced heart attacks or angina.

    How can a diagnosis of chest pain be made?

    Seek immediate emergency attention if you think you may be having a heart attack. This is especially important if your chest pain is sudden, inexplicable, or lasts more than a few seconds.

    To determine the reason for your chest pain, your doctor will ask you a series of questions. Be ready to share details about any drugs, therapies, or other health issues you may have, as well as to talk about any associated symptoms.

    Tests for diagnosis

    To help identify or rule out heart-related issues as the source of your chest pain, your doctor could prescribe testing. These could consist of:

    • Blood tests that gauge the levels of enzymes in your body an electrocardiogram (ECG or EKG), which records the electrical activity of your heart
    • A chest X-ray looks at your blood vessels, heart, and lungs.
    • An echocardiography, which records moving pictures of your heart using sound waves
    • An angiography is used to check for blockages in particular arteries; an MRI is used to check for damage to your heart or aorta; stress tests are used to monitor your heart performance after exertion.
    • The Healthline Find Care tool allows you to search for primary care physicians in your area if you need assistance finding one.

    For those who experience chest pain, what is the prognosis?

    Many common diseases can cause chest pain, which your doctor can treat and alleviate. These could include asthma or similar conditions, anxiety episodes, and acid reflux.

    On the other hand, chest pain may also indicate a potentially fatal illness. If you believe you could be having a heart attack or any heart issue, get medical help right away. Your life may be saved by this. Following a diagnosis, your physician may suggest further therapies to help you control your illness.

    How Does Pain in the Chest Feel?

    Anywhere from your neck to your upper abdomen, you could experience chest pain. Additionally, it may extend to other parts of your upper body, such as your back, jaw, or arm. For a few minutes to several hours, and maybe even for months or more, the pain may continue. It may worsen when you’re actively moving, but it will subside when you’re relaxing. Or even while you’re just unwinding, it might strike. The pain may feel concentrated in one area or more dispersed.

    This ailment can be bilateral, meaning it affects both sides or the middle of your chest, or unilateral, meaning it affects just one side. Chest pain may be caused by the following factors:

    • Sharpshooting.
    • Burning pain.
    • Stabbing Aches.
    • A feeling of constriction, compression, or crushing.

    Treatment and Care

    How is pain in the chest managed?

    The reason for the pain determines how to manage chest pain. As soon as you seek aid, you will receive emergency care if your chest pain is being caused by a heart attack. This can involve taking medicine and having surgery to get your heart’s blood flowing again.

    Your healthcare practitioner will discuss treatment choices with you if your chest pains are due to a noncardiac condition. Depending on how severe your disease is, they might suggest:

    • Lifestyle changes.
    • Medications.
    • Surgery or a process.

    What hazards or consequences could arise if chest pain is not treated?

    There are some potentially fatal reasons for chest pain. This also includes several causes of pain in the chest that are related to the lungs. Seeing a medical professional who can identify and treat your pain in the chest is your best option.

    Your doctor may prescribe medication, non-invasive techniques, surgery, or a mix of these to manage your chest pain. The origin and intensity of your chest pain will determine how it is treated.

    The following are some treatments for heart-related chest pain:

    • Cardiac catheterization. which may entail the use of balloons or stents to open blocked arteries; medicines, such as nitroglycerin and other therapies that open partially closed arteries; clot-busting agents; or blood thinners
    • Coronary artery bypass graft surgery(CABG). surgery Bypass surgery is another name for the surgical repair of the arteries.

    Additional causes of pain in the chest can be treated with the following:

    Your doctor will undertake lung reinflation for the collapsed lung by inserting a chest tube or similar device. The symptoms are treated with antacids or specific procedures for heartburn and acid reflux.

    • Anti-anxiety drugs are used to treat panic attack-related chest pain.
    • Get some antacids.

    Is it possible to avoid chest pain?

    Maintaining a healthy lifestyle can lower your risk of heart disease, vascular disease, and other illnesses. This comprises:

    • Consuming a nutritious diet. A certified dietician or your healthcare physician can assist you in developing a personalized dietary plan.
    • Take care of your medical conditions, such as diabetes, high blood pressure, and high cholesterol.
    • Working out on most days of the week.
    • Attaining and preserving a healthy weight.
    • Limiting your alcohol consumption.
    • Avoiding tobacco products.

    You can avoid the following other causes of chest pain:

    • Avoid asthma triggers.
    • As soon as possible, treat respiratory infections.
    • If you are susceptible to blood clots, take medication to prevent them.
    • Vaccinate yourself against shingles or chickenpox.
    • Avoid heartburn-causing foods.
    • Get up and take a short walk once every two hours during lengthy flights or road trips to avoid blood clots in your legs.

    Because there are many different causes of chest pain, there are also many different ways to prevent it. To help avoid some of the root cause of chest pain, heed the following advice:

    • Make an effort to maintain appropriate body weight, eat a heart-healthy diet, learn efficient stress management techniques, make sure you get enough exercise, and consume less alcohol.
    • Avoid smoking and foods that can cause heartburn, such as those that are acidic, greasy, or spicy.
    • To prevent blood clots, take frequent walks or stretches and think about donning compression socks.

    When to Make a Doctor’s Appointment

    How can I determine whether my upper body pain is severe?

    Seek attention right away if your chest pain doesn’t go away after taking medicine or resting for more than five minutes. Make a quick call to 911, contact the emergency services number, or arrange for a ride to the nearest emergency room (ER).

    Chest pain from the heart might be fatal. chest pain may be a sign of an impending heart attack. Additional heart attack warning symptoms include:

    • Sweating.
    • Nausea and Vomiting.
    • Breathlessness.
    • Fainting or feeling dizzy.
    • Tachycardia.
    • Pain in your upper abdomen, arm, shoulder, jaw, neck, or back.

    Physical therapy treatment

    Physiotherapy is essential for treating chest wall pain, which can be caused by several conditions, including trauma, inflammation, and musculoskeletal problems. Relieving pain, increasing mobility, and addressing the underlying causes of chest wall pain are the main objectives of physical therapy. A variety of therapeutic approaches are used to accomplish these goals.

    Hand Therapy

    Physiotherapists treat musculoskeletal problems that cause pain in the chest wall by using manual treatment techniques. To ease muscular tension, increase flexibility, and improve general mobility of the chest wall, this may involve soft tissue mobilization, massage, and joint mobilization.

    Thorax Mobilization

    The goal of thoracic spine techniques is to increase mid-back mobility, which might affect the chest wall. Stretching Activities

    Stretching exercises that target the chest muscles and associated structures are part of physiotherapy for chest wall pain. Enhancing flexibility, reducing muscle tension, and relieving chest wall strain are the goals of these workouts.

    Postural correction

    Pain in the chest wall may be exacerbated by poor posture. Physiotherapists evaluate and adjust posture to guarantee that the shoulders and spine are properly aligned, which lessens strain on the chest muscles and promotes ideal biomechanics.

    Breathing Exercises

    Breathing exercises are essential for managing pain in the chest wall. Physiotherapists help patients relax, improve lung capacity, and ease tension in the chest muscles by teaching them diaphragmatic breathing and other strategies.

    Prescription Exercise

    Strengthening the muscles that support the chest wall is the goal of customized workout regimens. Recurrence of chest wall pain can be decreased by strengthening the shoulder, back, and core muscles, which can increase overall stability.

    Heat and Cold Therapy

    By decreasing inflammation and easing muscle soreness, the use of heat or cold packs can offer relief. Depending on the type of chest wall pain, physiotherapists may advise either hot or cold therapy.

    Patient education in physiotherapy entails teaching patients about their illness and self-management techniques. To stop chest wall pain from getting worse, this may entail advice on ergonomics, good body mechanics, and lifestyle changes.

    Modalities

    Physiotherapists occasionally employ modalities like electrical stimulation, laser therapy, or ultrasound to increase pain relief and supplement other treatment techniques.

    Conclusion

    You should see your doctor if you experience intermittent chest pain. For you to obtain therapy, it is crucial that they assess and correctly diagnose your illness.

    Keep in mind that chest pain may sometimes indicate a more serious illness, such as a heart attack. If you suspect a heart attack or experience inexplicable chest pain, you should never be reluctant to seek emergency medical treatment.

    Chest pain can indicate several diseases, including lung diseases like pneumonia and heart disorders like aortic dissection. Pain may also result from bone and muscular problems (like costochondritis) or digestive problems (like GERD). Another possible cause of the disorder is anxiety and panic episodes.

    Additionally, keep in mind that depending on the source, the pain may be brief or prolonged. If you experience symptoms like breathing difficulties or pain that spreads to your jaw or arm, you should see a doctor.

    FAQs

    Pain How can a tight chest be relieved?

    Breathe slowly out of your mouth after taking a deep breath through your nose and holding it for a few seconds. Techniques for Relaxation: Take part in stress-reduction and relaxation exercises like yoga, progressive muscle relaxation, or meditation to ease tension or anxiety-related tightness in your chest.

    Which three symptoms indicate chest pain?

    Chest pressure, constriction, pain, squeezing, or hurting.
    Pain that radiates to the upper abdomen, jaw, teeth, neck, shoulder, arm, or back.
    Breathlessness.
    Exhaustion.
    Indigestion or indigestion.
    Chills.
    Dizziness.
    Rapid heartbeat.

    How can I be sure that my chest pain isn’t caused by my heart?

    However, it could not be heart-related if you have relatively short-lived chest pain that goes away after a few seconds or minutes and is not accompanied by any of these symptoms.

    Can chest pain be caused by stress?

    Long-term increases in cortisol, another stress hormone, raise blood pressure, blood sugar, cholesterol, and triglycerides. Shortness of breath, irregular heartbeats, chest pain, and an elevated risk of heart attack and stroke can all be symptoms of chronic stress.

    At what age does chest pain occur?

    Fortunately, less than 1% of children who experience chest pain between the ages of 7 and adolescence will have an underlying cardiac issue. It is more often associated with stress, viral illnesses, or, most frequently, musculoskeletal pain.

    Can chest pain result from dehydration?

    Heart palpitations and chest pain are symptoms of dehydration.
    Your heart works harder and pumps more quickly to make up for dehydration. The absence of water may also cause your blood to thicken, which would put more strain on your heart. Chest pain might result from all that extra work, particularly for those who have heart disease.

    How should chest pain be treated initially?

    First, call for emergency assistance. If nitroglycerin is prescribed, take it. If your doctor has prescribed nitroglycerin in the past and you believe you are suffering a heart attack, take it as instructed. Never take nitroglycerin from someone else.

    Reference

    • Chest pain – Symptoms and causes. (n.d.). Mayo Clinic. https://www.mayoclinic.org/diseases-conditions/chest-pain/symptoms-causes/syc-20370838
    • Website, N. (2023, December 6). Chest pain. Nhs.uk. https://www.nhs.uk/conditions/chest-pain/
    • Professional, C. C. M. (2024, September 9). Chest pain. Cleveland Clinic. https://my.clevelandclinic.org/health/symptoms/21209-chest-pain
    • Seladi-Schulman, J., PhD. (2019, May 30). What you need to know about chest pain that comes and goes. Healthline. https://www.healthline.com/health/chest-pain-that-comes-and-goes
    • Stuart, A. (2024, June 6). What’s causing my chest pain? WebMD. https://www.webmd.com/pain-management/whats-causing-my-chest-pain
  • Proximal Interphalangeal Joint

    Proximal Interphalangeal Joint

    The proximal interphalangeal joint (PIPJ) is the hand’s articulation between the proximal and middle phalanx. It is found in every digit except for the thumb.

    The bending and extension of the fingers in the middle are made possible by this synovial hinge joint, which aids in fine motor control.

    Introduction

    The fingers’ proximal interphalangeal (PIP) joints play a crucial role in hand gripping, particularly in the so-called “power” grip. The articular surface and soft tissue of the joint, being a hinge joint, prevent lateral mobility.

    Its uniaxial design permits a good range of motion, but only in one plane; for a more diverse range of motion, including adduction and abduction, it depends on the more proximal metacarpophalangeal joint.

    During flexion, the ligaments that surround this joint become tense, forming a useful grasping mechanism. Consequently, the PIP joint plays a vital part in the “power grip,” which, in conjunction with the “precision grip,” allows humans to discover how to make and use tools.

    Anatomy

    The finger’s proximal interphalangeal (PIP) joint’s structure and function are closely linked. The PIP joint, which is far more intricate than a basic mechanical hinge, is essential to the hand and fingers’ regular operation. The relative lengths of the phalanges and metacarpals in the hand are accurately described by the Fibonacci series, as noted by Littler and Thompson. Fibonacci, also known as Leonardo of Pisa (1170–1230), defined the mathematical series where each number is equal to the sum of the two numbers before it.

    When the Fibonacci sequence is applied to the hand, the length of the metacarpal is equal to the sum of the lengths of the middle and proximal phalanges, and the length of the proximal phalanx is equal to the sum of the lengths of the middle and distal phalanges. Due to these length correlations, the PIP joint is positioned in the middle of the finger, halfway between the metacarpophalangeal joint and the fingertip.

    Our hands’ strength and versatility determine their utility. Due to our extreme adaptability, humans can grab items with uneven shapes. We can adapt our hands to surface imperfections. A spiral arc is followed by metacarpointerphalangeal flexion and extension. As we grip or encircle an object, the PIP joint accounts for 85% of total encompassment, while the distal interphalangeal (DIP) joint only contributes 15%.

    This fact is demonstrated by the fact that DIP joint fusion is far more well tolerated in terms of finger function than PIP joint fusion. The hand’s PIP and DIP joints’ distinct architecture allows for such precisely coordinated functions.

    Hard tissue

    The proximal phalanx’s head and the intermediate phalanx’s base articulate to produce the PIP joint. A transversely directed apex and a lateral pit, into which the collateral ligaments are attached, are features of the head of the proximal phalanx that result in an inter-condylar concavity on the articular surface.

    Two articulation-oriented concavities, separated by a saddle-shaped ridge and a tubercle for attachment to the extensor slip of the extensor expansion, are seen in the intermediate phalanx. Additionally, the distal palmar plate has an attachment site, surrounded by tiny palmar tubercles that serve as attachment points for flexor sheath and joint capsule components.

    Soft tissue

    The PIP joints are surrounded by several soft tissue structures that serve to both protect them and prevent undesired movement. This protective envelope’s primary constituents are the:

    • Joint capsule
    • Palmar (volar) plate
    • Collateral ligaments (true and accessory)
    • The extensor tendon hood’s central slip

    Due to their malleability, the palmar plate, collateral ligaments, and extensor tendon all contribute to the joint’s increased surface area and improved joint congruence. The flexor digitorum profundus and superficialis flex the joint, whereas the extensor digitorum, lumbricals, and interossei stretch it in terms of soft tissue-producing movement. There is a synovial membrane in the PIP joint as well.

    Articulating Surfaces

    The articulation between the base of the middle phalanx and the head of the proximal phalanx forms the proximal interphalangeal joint:

    • The head of the proximal phalanx is made up of two condylar processes that curve and create a shallow groove in the center.
    • Two opposing concave portions that form an elevated ridge make up the base of the middle phalanx. This ridge offers excellent intraarticular stability and slides smoothly into the proximal groove.

    Joint Capsule

    Every proximal interphalangeal joint has a little fibrous capsule enclosing it. A synovial membrane lines it, and synovial fluid fills it.

    Ligaments

    The ligaments that surround the proximal interphalangeal joint capsule provide strength:

    The Proximal Interphalangeal Joint
    The Proximal Interphalangeal Joint

    Proper and accessory collateral ligaments:

    • The radial and ulnar aspects of the joint are home to the collateral ligaments. At the PIPJ, they stop over abduction and adduction.
    • Along the lateral aspect of the joint, they emerge from the head of the proximal phalanx and voluntarily move onto the middle phalanx.
    • An accessory collateral ligament arises from the same location as the collateral ligament and extends anteriorly to connect to the volar plate.

    Volar plate:

    • A thick fibrocartilaginous structure called the volar plate forms a “U”-“-shaped arch over the base of the PIPJ. It keeps the joint from being overextended.
    • It attaches to the head of the proximal phalanx through the checkrein ligaments and inserts into the middle phalanx’s volar base distally.

    Blood supply

    The superficial palmar arch (provided by the ulnar and radial arteries) is the source of the appropriate digital arteries, which branch off to deliver blood to the proximal interphalangeal (PIP) joint of the fingers.

    • Branches from the superficial palmar arch are known as common palmar digital arteries.
    • The proper palmar digital arteries run along the sides of the fingers and are derived from the common palmar digital arteries.
    • Branches from the dorsal metacarpal arteries (from the radial and ulnar arteries) that contribute to the dorsal aspect are known as dorsal digital arteries.
    • The PIP joint is encircled by a robust vascular network that consists of both dorsal and palmar anastomoses, which guarantees adequate collateral circulation.

    Movements

    The proximal interphalangeal joint only moves in one plane, flexion, and extension, due to the nature of hinge joints and their stability.

    Flexion:

    • The range of flexion for a healthy PIPJ is 100–110°.
    • PIPJ flexion is primarily driven by the flexor digitorum superficialis muscle.
    • The flexor digitorum profundus is the secondary driver of PIPJ flexion, mainly flexing the distal interphalangeal joint.

    Extension:

    • The interossei, lumbricals, and extensor digitorum muscles are responsible for extending back to 0°.
    • Further support for the index finger PIPJ is provided by the extensor indices.

    Clinical significance

    An important junction in the fingers, the proximal interphalangeal (PIP) joint is situated between each finger’s proximal and middle phalanx (except the thumb, which does not have a middle phalanx). It is essential for gripping, hand function, and fine motor motions. Clinical implications of the PIP joint include the following:

    1. Arthritis

    • The PIP joint is frequently affected by osteoarthritis (OA), which can cause discomfort, stiffness, and abnormalities including Bouchard’s nodes.
    • Rheumatoid Arthritis (RA): RA can cause swan-neck deformity, which is characterized by hyperextension of the PIP joint and bending of the distal interphalangeal [DIP] joint.

    2. Injuries & Dislocations

    • PIP Joint Dislocation: Hyperextension injuries, which are frequently observed in sports injuries, can cause dorsal dislocations of the PIP joint.
    • Volar Plate Injury: In hyperextension injuries, the ligamentous structure known as the volar plate may sustain injury, resulting in long-term instability.
    • Boutonnière Deformity: Causes PIP flexion and DIP hyperextension as a result of a central slip injury to the extensor tendon.

    3. Trigger Finger (Stenosing Tenosynovitis)

    • Finger locking or snapping in flexion may result from inflammation surrounding the flexor tendon sheath close to the PIP joint.

    4. Dupuytren’s Contracture

    • The PIP joint is frequently affected by fibrotic thickening of the palmar fascia, which causes gradual flexion contractures.

    5. Mallet Finger vs. Jersey Finger

    • Mallet Finger: Damage to the extensor tendon at the DIP joint that can occasionally impair the operation of the PIP joint.
    • Jersey Finger: Avulsion of the FDP tendon, which affects grip strength at the PIP joint but causes loss of flexion at the DIP joint.

    6. Stiffness & Contractures

    • The PIP joint’s intricate ligamentous nature makes it vulnerable to post-injury contractures, which can cause post-traumatic stiffness.
    • Prolonged immobility or circumstances such as spasticity in neurological illnesses can result in flexion contractures.

    7. Infections

    • Septic Arthritis: Failure to treat an infection in the PIP joint might result in fast joint deterioration.
    • Pyogenic Flexor Tenosynovitis: Pain, edema, and reduced range of motion are symptoms of an infection in the flexor tendon sheath that indirectly affects the PIP joint.

    8. Gout & Pseudogout

    • Acute inflammation and pain in the PIP joint may result from the deposition of calcium pyrophosphate crystals (pseudogout) or urate crystals (gout).

    9. Congenital & Developmental Disorders

    • A congenital disorder known as camptodactyly causes a permanent flexion deformity of the PIP joint.
    • Lateral displacement of the finger, occasionally including the PIP joint, is known as clinodactyly.

    Daily activities can be greatly impacted by injuries or diseases affecting the PIP joint because it is crucial for hand function. Depending on the severity, treatment options may include physical therapy, corticosteroid injections, splinting, or surgery.

    FAQs

    The proximal interphalangeal joint: what is it?

    The ‘power’ grip, which is a type of hand grip, depends heavily on the proximal interphalangeal (PIP) joints of the fingers. The soft tissue and articular surface of the joint, being a hinge joint, prevent any lateral movement.

    Which proximal interphalangeal joint is the first?

    The PIP joint, the finger’s first joint, is situated between the finger’s first two bones. The finger can bend and extend at the PIP joint. After injury, it easily becomes stiff.

    At the proximal interphalangeal joint, what happens?

    The hand’s articulation between the proximal and middle phalanx is known as the proximal interphalangeal joint (PIPJ). Except for the thumb, it exists in every digit. It is a synovial hinge joint that helps with fine motor control by allowing flexion and extension in the middle of the fingers.

    What are the proximal interphalangeal joint’s nodes?

    The symptoms of Bouchard’s nodes include inflammation and pain. Proximal interphalangeal (PIP) joints, the finger joints closest to the knuckles, are the middle joints of the fingers, and the nodes are bony enlargements of those joints. The hand’s nodes are a classic indicator of osteoarthritis or joint degeneration.

    When the proximal interphalangeal joint is injured, what happens?

    The following categories can be used to grade a PIP joint injury: Sprains occur when some of the fibers are torn or the ligament(s) are stretched. In a rupture, the ligament or ligaments are torn. When the ligament is ripped away from the bone, a piece of the bone is taken with it, causing an avulsion fracture.

    References

    • TeachMeAnatomy. (2024, October 28). The proximal interphalangeal joint – articulation – TeachMeAnatomy. https://teachmeanatomy.info/upper-limb/joints/proximal-interphalangeal/
    • Proximal interphalangeal joints of the hand. (2023, November 9). Kenhub. https://www.kenhub.com/en/library/anatomy/proximal-interphalangeal-joints-of-the-hand
  • Guyon Canal Syndrome (Ulnar tunnel syndrome)

    Guyon Canal Syndrome (Ulnar tunnel syndrome)

    What is a Guyon Canal Syndrome?

    Guyon’s Canal Syndrome, also known as Ulnar Tunnel Syndrome, is a condition caused by compression of the ulnar nerve as it passes through Guyon’s canal in the wrist. It can result from repetitive wrist motions, prolonged pressure, or trauma. Symptoms include numbness, tingling, weakness, and pain in the ring and little fingers. Diagnosis is based on clinical evaluation and nerve conduction studies. Treatment ranges from activity modification and splinting to surgical decompression in severe cases.

    Depending on where the nerve compression occurred, the clinical appearance may be entirely sensory, solely motor, or both. One of the primary major nerves in the hand, the ulnar nerve goes beneath the forearm muscles, down the neck via the medial epicondyle, and ends up next to the palm on the little finger.

    Clinically Relevant Anatomy:

    The brachial plexus’s medial cord (C8-T1) gives rise to the ulnar nerve, which subsequently runs via the axilla and the anterior compartment of the arm before piercing the intramuscular septum or mostly traveling in the posterior compartment. It then enters the cubital fossa posterior to the humerus’ medial epicondyle. After that, the nerve travels between the main flexor digitorum profundus and the primary flexor carpi ulnaris muscles.

    Before entering Guyon’s canal, the primary ulnar nerve branches off dorsally 8.3 cm proximal to the pisiform bone. The main Guyon Canal runs from the pisiform bone’s proximal border to the hamate’s hook, which is located farther away. From the distal forearm to the major hand, the ulnar nerve and artery pass through the Guyon canal.

    The Guyon Canal’s borders are as follows:

    • Roof: hypothenar connective tissue or palmar carpal ligament.
    • Floor: flexor digitorum profundus tendons, metacarpal ligament, transverse carpal ligament, isogametes ligament, or opponens digit minimi
    • Medial wall: pisiform, abductor digit mini, and principally flexor carpi ulnaris tendon.
    • Lateral wall: the flexor tendons, transverse carpal ligament, or hook of the hamate.

    Epidemiology:

    Guyon canal syndrome is frequently observed as a result of recurrent trauma and ganglion cysts. However, due to a paucity of research, the incidence of Ulnar tunnel syndrome in the general population has not yet been precisely determined.

    Pathophysiology:

    Zone 1: proximal to the split of motor and sensory

    • region of the main trunk’s distalmost ulnar nerve prior to its division into its deep motor or superficial sensory divisions Ganglion cysts and hook of hamate fractures, malunions, and nonunions are among the etiologies.
    • Both motor and sensory symptoms are caused by damage to the ulnar nerve in the Zone 1 major Guyon canal.

    Zone 2 (most commonly affected): zone 3 radially, or distal to the motor and sensory bifurcation.

    • If impacted, it only causes primary motor symptoms (such as weakness) and corresponds to the ulnar nerve’s main deep terminal motor branch.
    • Ganglion cysts and hook of hamate fractures, malunions, and nonunions are among the etiologies.
    • All of the interosseous muscles, the fourth or fifth lumbricals, the hypothenar muscles (opponens digit mini, abductor digit mini, flexor digit mini brevis), and the adductor pollicis muscle are innervated by this primary deep branch of the ulnar nerve.

    Zone 3: ulnar to zone 2 or distal to the motor/sensory bifurcation

    • In this region, the ulnar nerve’s superficial sensory terminal branch is compressed, resulting in only sensory sensations like burning and tingling or numbness.
    • The main ulnar artery aneurysm and/or thrombosis are among the causes.

    Causes of Guyon Canal Syndrome:

    • Vascular insufficiency, inflammation, trauma, and compression can all cause damage to the distal ulnar nerve.
    • The most frequent cause of Guyon Canal Syndrome is ganglion cysts.
    • Cancers
    • The hypertrophic muscle of normal anatomy and an odd placement are examples of anatomical abnormalities.
    • Aneurysms and ulnar artery thrombosis (such as Hypothenar Hammer Syndrome)
    • Dislocations and fractures (such as the hook of Hamate’s displacement or fracture)
    • A recurring micro injury, such cyclists’ hypothenars being repeatedly traumatized by the handlebar
    • Anatomical alterations in the ulnar tunnel caused by Carpel tunnel syndrome may result in functional problems.
    • Iatrogenic.

    Symptoms of Guyon Canal Syndrome:

    Guyon Canal syndrome symptoms can range in intensity and include:

    • Numbness or tingling: The most typical sign is to feel as though your little and ring fingers are numb or tingly. The palm side of the hand may also experience this sensation.
    • Weakness: There may be weakness in the hand, particularly in the muscles that govern the little and ring fingers. Tasks requiring fine motor skills, such typing, writing, or holding things, may become challenging as a result.
    • Loss of dexterity: The affected hand may become less coordinated and dexterous. It may become difficult to perform tasks that require precise finger movements, such buttoning clothing or handling small things.
    • Pain or discomfort: Some people may have wrist or hand pain or discomfort. Activities involving wrist movement or pressure on the affected area may exacerbate the pain, which can be severe, throbbing, or agonizing in character.
    • Hand clumsiness: People with Guyon Canal syndrome may find it difficult to do tasks requiring fine motor skills because of the hand’s weakness and impaired sensation. This can lead to a perception of clumsiness or more frequent dropping of objects.
    • It’s crucial to remember that repetitive wrist motions or extended pressure on the affected area may exacerbate or make symptoms more obvious.
    • Thumb adduction, ring or small finger digital flexion, and discomfort or paresthesias in the ulnar 1-1/2 digits

    Risk factor of Guyon Canal Syndrome:

    • Its wrist has already sustained an injury.
    • uses the hands to carry out repetitive tasks, including typing
    • Does engaging in sports or activities that strain the wrist
    • makes use of vibrating instruments.

    Diagnosis:

    Physical examination:

    • Examining and sense
    • Loss of intrinsics bending the MCPs or lengthening the IP joints results in clawing of the ring or little fingers.

    Neurovascular examination:

    • Paralysis of the primary intrinsic muscles (adductor pollicis, deep head FPB, interossei, or lumbricals 3 or 4) is the outcome of ulnar nerve palsy.
    • reduced grip strength and MP joint flexion power.
    • Thumb adduction loss due to weak pinch.

    Allen test:

    • mostly aids in the diagnosis of ulnar artery thrombosis.

    Froment sign:

    • When trying to grip a piece of paper, IP flexion makes up for the loss of thumb adduction.
    • The adductor pollicis (ulnar n.) makes up for the loss of MCP flexion or adduction, and the FPL (AIN) compensates for this.

    Jeane’s sign:

    • The primary loss of IP extension or thumb adduction by the adductor pollicis (ulna n.) is compensated for by a compensatory thumb MCP hyperextension or thumb adduction by EPL (radial n.).

    Wartenberg sign:

    • The little finger is the primary abduction posture.

    Imaging Studies:

    • A computed tomography (CT) scan and a hand x-ray can be used to check for fractures, particularly hamate fractures.
    • Anatomical changes inside the Guyon canal or structures that cause mechanical compression of the ulnar nerve, such as lipomas, ganglion cysts, and abnormal muscle, can be detected by magnetic resonance imaging of the hand.
    • Thrombosis and ulnar artery aneurysms can be assessed by angiography.
    • Nerve conduction velocity (NCV) or electromyography (EMG) are used to determine the level of peripheral nerve compromise or to distinguish between main C8-T1 radiculopathy and ulnar nerve entrapment within the Guyon canal at the wrist versus the cubital tunnel at the elbow.

    Differential Diagnosis:

    • Alcohol-related neuropathy
    • Amyotrophic lateral sclerosis
    • Brachial plexus abnormalities
    • Cervical disc disease
    • Cervical spondylosis
    • Epicondylitis
    • Pancoast tumor
    • Thoracic outlet syndrome
    • Traumatic peripheral nerve lesions

    Treatment of Guyon Canal Syndrome:

    The length and intensity of symptoms, as well as the precise etiology identified as the primary cause of the symptoms, will determine whether conservative treatment or primary surgery is chosen. Professional athletes, particularly baseball players, are susceptible to injuries such as hook of hamate fractures, which are primarily caused by acute trauma and recurrent injuries sustained during play. Hand surgeons generally agree that a major isolated hook of the hamate incision should be made in this situation since it has been shown to have low or negligible rates of postoperative complications, allow for a return to play in three to four weeks, or have high patient satisfaction ratings.

    General Considerations:

    Guyon canal syndrome and major carpal tunnel syndrome are treated similarly. Its range includes surgical decompression and conservative treatment. Splinting or patient instructions are examples of conservative management.

    The main focus of the instructions is to prevent recurrent stress or mechanical compression at the Guyon canal. There are numerous ergonomically preferred handlebar positions that cyclists can employ. Because it puts compressive forces on the hand’s major ulnar nerve, repetitive or prolonged wrist extension movements should be avoided.

    Wrist splinting may permit fingers to move freely, but it must maintain the wrist in a primary neutral posture. For one to twelve weeks, it is advised to wear a splint at least at night.

    An expert panel of medical professionals agreed to use conservative management for mild to moderately severe symptoms with acute to subacute durations up to primarily three months, according to a European Handguide study published in the British Medical Journal. Surgical decompression was preferred for moderate to severe symptoms that persisted for three months or more. Main post-operative exercises may also be part of surgical treatment, particularly for patients who have a decreased range of motion at the joint. Splinting after surgery wasn’t always necessary. Nonetheless, it might be applied to patients who frequently put strain on the affected wrist joint.

    Nerve gliding exercises and therapeutic ultrasonography are other possible treatments. Patients who are asymptomatic do not require surgical treatment for hypothenar hammer syndrome, which is a condition that involves ulnar artery thrombosis and an aneurysm. When symptoms are present, however, the primary course of treatment will involve antiplatelet drugs and surgical repair, such as bypass

    Techniques:

    Local surgical decompression

    • release the hypothenar muscle, decompress ganglion cysts, and resect the hamate hook.
    • Examine or release all three zones in the main Guyon’s canal as part of the vascular treatment for main ulnar artery thrombosis.

    Tendon transfers

    • appropriate claw fingers
    • The palmaris longus muscle tendons, ECRL, and ECRB are the most often used grafts. To flex the main proximal phalanx, they must pass volar to the transverse metacarpal ligament.
    • Use a two-tailed or four-tailed graft to connect to the ring or small fingers’ A2 pulley.
    • reestablish power pinch Smith transfer by utilizing the ring finger’s FDS or ECRB.
    • reestablish the small finger’s adduction by transferring EDM’s ulnar insertion to the A1 pulley and the small finger’s radial collateral ligament.

    Physical Therapy Treatment in Guyon Canal Syndrome

    The treatment of Guyon Canal syndrome heavily relies on physical therapy. Relieving symptoms, enhancing hand function, minimizing pain, and stopping the condition’s progression are the objectives of physical therapy treatment for Guyon Canal syndrome. The following are some typical physical therapy techniques that could be used:

    Splinting: To relieve pressure on the ulnar nerve and lessen symptoms, use a brace or splint that immobilizes the wrist in a neutral posture. To support the hand and wrist, a physical therapist can provide off-the-shelf or bespoke splints.

    Nerve gliding activities: The ulnar nerve can be mobilized and glided inside the Guyon’s canal with the use of certain exercises that require mild and controlled motions of the wrist, fingers, and thumb. These exercises can enhance nerve function, decrease adhesions, and increase neural flexibility.

    Exercises to strengthen the hand’s muscles, especially those involved in grip and finger movements, can improve hand function and make up for any weakening caused by Guyon Canal syndrome. Using therapeutic putty, resistance bands, or hand grippers, a physical therapist might recommend specific exercises.

    Range of motion exercises: To preserve joint mobility and avoid stiffness or contractures, perform mild stretches and range-of-motion exercises for the thumb, fingers, and wrist.

    Ergonomic modifications: The ulnar nerve might be less stressed by evaluating and altering the patient’s job or daily routine to maximize hand and wrist placement. A physical therapist can offer advice on ergonomic best practices, like utilizing ergonomic gear or modifying workstation configuration.

    Pain management approaches: To lessen pain and encourage tissue healing, a variety of pain management modalities may be used, such as ultrasound, transcutaneous electrical nerve stimulation (TENS), heat or cold therapy, or manual therapy techniques.

    Education and activity modification: It’s critical to inform the patient about the illness, its causes, and coping mechanisms to keep symptoms from getting worse. The physical therapist might offer advice on how to modify certain tasks, such avoiding repetitive wrist motions or applying cushioning when engaging in wrist-pressure-causing activities.

    It’s crucial to remember that a person’s symptoms, the severity of their ailment, and how they react to therapy can all affect the exact treatment plan. After conducting a comprehensive evaluation, a physical therapist will create a customized treatment plan based on the patient’s requirements.

    Nerve glide exercise :

    • Wrist extension
    • forearm pronation
    • elbow flexion,
    • glenohumeral lateral rotation
    • ,glenohumeral depression,
    • shoulder abduction.

    Grip strengthening exercise :

    Full-Grip-exercise
    Grip strengthening exercise
    • A tennis or racket ball squeezed.
    • Using a towel, stand in a cable row.
    • Exercise using Rubber Bands
    • Exercises involving tip-to-tip, pad-to-pad, and tip-to-pad using paper and a manual.

    Forehead touch exercise:

    • Keep your arms at your sides and stand erect.
    • Lift one hand and place the palm against your forehead.
    • For a few seconds, hold it here, then slowly lower the hand once more.
    • Do the exercise again.

    Hand curl exercise :

    • The ulnar nerve is stretched by that.
    • With the elbow straight and the arm held straight in front of the body, stand or sit up straight.
    • Curl your fingers and wrists toward your body.
    • Then, feel for a wrist stretch by extending the hand away from the body.
    • Lastly, lift the hand upward and bend the elbow.
    • Do the exercise again.

    Ulnar nerve Strengthening Exercise:

    • Keep your arms by your sides and stand erect.
    • Place your palm on your forehead while raising the affected arm.
    • After a few seconds of holding your hand there, carefully lower it.
    • A few times a day, repeat the exercise, progressively increasing the amount of repetitions each time.

    Other Issues:

    • Guyon canal syndrome is a mostly ulnar neuropathy that is somewhat uncommon. In addition to the distinct anatomic changes within the Guyon canal itself, the precise location of nerve compression might determine the range of presenting signs or symptoms, making diagnosis difficult. Although a number of articles offer methods for diagnosing or treating Guyon canal syndrome, thorough guidelines have not yet been firmly established because there aren’t many extensive empirical research. For instance, when an MRI should be recommended for a patient suspected of having Guyon Canal Syndrome.

    Enhancing Healthcare Team Outcomes:

    • Young people frequently suffer from Guyon Canal Syndrome, a rare neurological condition affecting the hand. The condition is hard to diagnose or has to be treated by an interprofessional team consisting of a therapist, neuro/orthopedic surgeon, neurologist, radiologist, or hand surgeon.

    FAQs

    What is the Guyon’s Canal release incision?

    Between the palmar sensory regions of the median and ulnar nerves, an incision is created from the ulnar to the thenar crease. Furthermore, the transverse carpal ligament can be divided using this method far from the median nerve.

    Which workout is ideal for cubital tunnel syndrome?

    Without creating too much difficulty, extend your arm in front of you with your palm toward the sky and your elbow fully straight. Turn your fingers slowly and gently downward after gently and slowly curling them into a fist. Bend your elbow gently and softly, then slowly spread your arms wide once more.

    What kind of surgery is performed to treat Guyon’s Canal syndrome?

    To reach the compressed nerve, surgeons cut across the Guyon’s canal during the treatment. The transverse carpal ligament is then carefully dissected and released. This develops in the canal’s roof, giving the nerve additional room.

    What are Guyon Canal’s boundaries?

    The Guyon canal’s limitations include the abductor digiti minimi muscle from the ulnar side, the pisiform and pisohamate ligaments, the hook of the hamate bone from the radial side, and the volar and transverse carpal ligaments from the top and bottom, respectively.

    What role does Guyon’s Canal play?

    The ulnar nerve and artery are protected by the Guyon canal as they pass through it from the distal wrist into the hand. The following structures make it up: The volar carpal ligament, sometimes referred to as the palmar carpal ligament, forms the volar part or roof of the canal.

    How does one get to Guyon’s Canal?

    The skin incision runs longitudinally in the palm parallel to the ring finger, crosses the proximal wrist crease diagonally, and borders the radial side of the flexor carpi ulnaris (FCU) tendon.

    Guyon’s Canal Syndrome NHS: What is it?

    A group of symptoms and indicators known as Guyon’s canal syndrome are caused by compression of the ulnar nerve in the Guyon’s canal, sometimes referred to as the ulnar tunnel. It is known as handlebar palsy when it occurs in cyclists as a result of repetitive trauma.

    How is Guyon’s Canal syndrome tested for?

    In addition to taking your medical history and evaluating your symptoms, your doctor will also do a physical examination. It may be necessary to order imaging tests like CT, MRI, or X-rays. It may be necessary to order certain tests, including doppler ultrasound, to assess ulnar artery blood flow.

    Which nerve at Guyon’s Canal is injured?

    The distal part of the ulnar nerve is injured when it passes through a small anatomical passageway near the wrist in Guyon Canal Syndrome, a very uncommon peripheral ulnar neuropathy.

    How long does it take to recover from Guyon’s Canal syndrome?

    Even while every patient recovers differently, you should anticipate that it will take many months to fully recover, and you will likely need to attend our physical therapy or occupational therapy sessions for six to eight weeks.

    What procedure is used to treat Guyon’s canal syndrome?

    Along the ulnar nerve in your palm, a little incision is made. Your surgeon might fix a fracture or remove a ganglionic cyst. In order to ease pressure on the ulnar nerve, certain ligaments may be severed. The wound is dressed and closed.

    Physical therapy it Can it assist with cubital tunnel syndrome?

    For cubital tunnel syndrome, physical therapy
    The following treatments may be administered to you, depending on how severe your symptoms are: Suggestions for changing your activities. mobilizations of the joint. exercises that build muscle.

    Guyon’s canal syndrome affects which muscles?

    Sensory deficits over the hypthenar, little finger, and medial half of the ring finger, as well as motor weakening of the ulnar innervated intrinsic muscles, are the results of compression at zone.

    How does Guyon Canal syndrome get treated?

    Guyon’s Canal Syndrome Treatment
    To alleviate pressure and minimize swelling, steroids are administered directly into the ulnar nerve. By reducing inflammation, the injections relieve pressure on the nerve. After the patient receives an injection, the pain, tingling, numbness, and weakness usually go away in a few days.

    How is injury to the ulnar nerve primarily diagnosed?

    An electromyogram. Main ulnar nerve function electrical testing frequently aids in diagnosis confirmation or can suggest the best course of treatment. By measuring the electrical impulse along nerves, nerve roots, or muscle tissue, an electromyogram assesses how well the muscles or nerves cooperate.

    When an ulnar fracture occurs, which major nerve is impacted?

    The primary disease linked to closed fractures of the forearm’s ulna is ulnar nerve paralysis. Nerve contusion, a neuropraxia-type nerve lesion, is the most common cause of paralysis.

    Which finger is most affected by the primary carpal tunnel?

    The symptoms of carpal tunnel syndrome, which include tingling or numbness, typically appear gradually. You can experience numbness or tingling in your hand or fingers. Typically, the little finger is unaffected, but the thumb, index, middle, and ring fingers are.

    Which major nerve runs through Guyon’s canal?

    Compression of the ulnar nerve as it travels through the ulnar tunnel and Guyon’s canal from the wrist into the hand is known as Guyon’s canal main syndrome. Other names for Guyon’s canal syndrome include handlebar and primary ulnar tunnel syndrome.

    Is a carpal tunnel the same as the major Guyon’s canal?

    The ulnar nerve becomes trapped as it travels through Guyon’s canal, a tunnel in the wrist, resulting in Guyon’s canal main syndrome.
    While it affects the nerve differently, it is comparable to carpal tunnel syndrome. On occasion, both situations may contribute to the primary issue simultaneously.

    References

    • Patel, D. (2023, May 19). Guyon Canal Syndrome (Ulnar tunnel syndrome) – Samarpan. Samarpan Physiotherapy Clinic. https://samarpanphysioclinic.com/guyon-canal-syndrome-ulnar-tunnel-syndrome/
    • Patel, D. (2023, May 19). Guyon Canal Syndrome (Ulnar tunnel syndrome) – Samarpan. Samarpan Physiotherapy Clinic. https://samarpanphysioclinic.com/guyon-canal-syndrome-ulnar-tunnel-syndrome/
    • Physiotherapist, N. P.-. (2022, September 4). Ulnar tunnel syndrome : Cause, Symptom’s , Treatment, Exercise. Mobile Physiotherapy Clinic. https://mobilephysiotherapyclinic.in/ulnar-tunnel-syndome-exercise/
    • Physio, R. (n.d.). Guyon’s Canal Syndrome – range physiotherapy. Range Physiotherapy. https://www.range.physio/condition/guyons-canal-syndrome/
  • Scapholunate Dissociation

    Scapholunate Dissociation

    Scapholunate dissociation is a wrist injury caused by a tear or dysfunction of the scapholunate ligament, leading to instability between the scaphoid and lunate bones. It commonly results from trauma, such as a fall on an outstretched hand, and can cause pain, weakness, and reduced grip strength.

    If untreated, it may lead to wrist arthritis. Diagnosis involves clinical examination and imaging, while treatment ranges from splinting and therapy to surgical repair, depending on severity.

    Scapholunate Dissociation: What is It?

    The scapholunate interosseous ligament holds together the scaphoid and lunate bones. This ligament is a robust ring of fibrous tissue that holds them together while permitting controlled movement between them. Scapholunate dissociation is the term for the movement of the bones when this ligament is damaged.

    Rotating subluxation of the scaphoid with scapholunate interosseous ligament injury is another name for scapholunate dissociation. X-rays show that the scaphoid and lunate bones are positioned improperly about one another. Your wrist becomes unstable due to the scapholunate ligament tear.

    The long-term effects of this damage are significant. The ligament enables the bones to move in unison while holding them together. If the ligament ruptures and does not mend, wrist movements become disorganized, and the joint is impaired. Scapholunate advanced collapse (SLAC), a common form of wrist arthritis, appears if treatment is not received.

    The scaphoid and lunate bones might separate from one another due to an unrepaired ligament. The distribution of stresses along the wrists’ numerous joints is changed by this separation. Unusual contact forces cause the cartilage between the different bones to progressively deteriorate. The capitate bone, which is normally found in the lowest row of wrist bones, gradually shifts between the lunate and scaphoid bones. We refer to this motion as the Terry Thomas sign.

    Anatomy:

    The three physically distinct parts of the C-shaped scapholunate ligament (SLL), often referred to as the scapholunate interosseous ligament (SLIL), are volar, membranous, and dorsal. The strongest and main stabilizing element of the SL joint is the dorsal portion of the SLL, which can withstand stresses of up to 260 N. The volar component of the SLL (118 N) is crucial for rotational stability, but the avascular proximal membranous portion (63 N) offers little discernible laxity control.

    Axial stresses are distributed rather uniformly by the carpal bones in the distal row of the carpus; nevertheless, the radio scaphoid joint transmits 50% of an axial force through the wrist, whereas the radio lunate joint transmits 35%. Given that the SLL lies between these two main bones that support weight, it is simple to see how destabilizing damage could happen here.

    Several extrinsic ligaments, including the dorsal intercarpal ligaments, scaphocapitate, radioscaphocapitate, and scaphotrapeziotrapezoid, serve as secondary stabilizers.

    Midcarpal supination is caused by isometric contraction of the flexor carpi ulnaris, abductor pollicis longus, and extensor carpi radialis longus (ECRL). The volar scaphoid-distal row of the carpus is tightened by midcarpal supination, which stabilizes the scaphoid. Specifically, the flexor carpi radialis (FCR) pronates the capitate and triquetrum and rotates the scaphoid into flexion and supination when loaded. The carpus gains dynamic stability from both of these activities. The stability of the scapula joint is also influenced by proprioception and neuromuscular control.

    SLL has a fragile vascular supply, with the radial artery providing the majority of the vascular contribution.

    Scapholunate dissociation: what causes it?

    The most common cause of SL dissociation is falling on an outstretched hand. Your scapholunate interosseous ligament (SLIL) may be torn by this kind of fall.

    Additional reasons for SL separation could be:

    • Clutching a steering wheel in a car crash.
    • Spastic paraparesis is inherited.
    • Congenital ligament laxity, or loose ligaments.
    • An inflammatory condition.

    Symptoms of Scapholunate Dissociation:

    Keep an eye out for the following symptoms, which could indicate scapholunate dissociation, if you have suffered a hand injury or another fall:

    • Poor grasp
    • The back of your wrist hurts when you grasp
    • wrist swelling
    • Pain on touching the wrist
    • discomfort when you move your wrist backward
    • Either clicking or clunking in the wrist

    Scapholunate dissociation may occur in whom?

    Anyone can be affected by scapholunate dissociation, regardless of gender, color, or ethnicity. However, falling on your hand puts you at the highest risk of developing this condition.

    To what extent does scapholunate dissociation occur?

    Every wrist sprain involves scapholunate dissociation in approximately 5% of cases. SL separation is seen with around 40% of all distal radius fractures, particularly severe fractures.

    The diagnosis of scapholunate dissociation:

    You should speak with your physician if you believe your wrist is hurt. To find out what’s happening, they will request X-rays. They might recommend you to an orthopedic surgeon if an x-ray shows a fracture or scapholunate joint enlargement. To identify scapholunate dissociation, a thorough clinical examination and imaging are required. Following an assessment of your wrist’s range of motion, discomfort, and edema your physician might undertake the following:

    Test of Scaphoid Shift. When you move your wrist from side to side, your doctor applies pressure on your scaphoid bone to test its stability. When pressure is released, the scaphoid flexes and then snaps back into place if the ligament has ripped.

    X-ray. The wider space between the two bones will be visible on an x-ray. The gap is usually a little more than 2 millimeters. Your doctor can assess the alignment of your wrist bones with the use of X-rays taken from various perspectives. If there is a radius fracture, X-rays will also show it.

    Magnetic resonance imaging (MRI) scan. Your wrist can be seen in more detail using this imaging technique. The scapholunate ligament tear will be visible to your physician. Additionally, an MRI scan aids in therapy planning.

    Arthroscopy. Your doctor inserts a little tube with a light at the end to gain a view of the joint. They could also be capable of doing operations to fix any wounds.

    Long-lasting wrist pain might raise your suspicions, particularly if it develops following a fall. Scapholunate dissociation has poor results and may not be completely reversible if left untreated. Because scapholunate dissociation is linked to 10% to 30% of lower radius fractures, your doctor will be notified if they discover one.

    Treatment for Scapholunate Dissociation:

    Medication will be prescribed by your physician to reduce your discomfort and swelling. To prevent your wrist from moving, they will also put on a splint. Splinting allows the damaged tissues to recover. The bones will revert to their original placements once the ligament heals. Failure to do so could result in long-term harm, which could include:

    • Persistent discomfort
    • weakened hold
    • inflammation of the joints (arthritis)
    • Unstable joints
    • Advanced collapse of the scapula due to degenerative arthritis

    After a few days of treatment, your doctor will request another X-ray to make sure the healing is proceeding as needed. Otherwise, they will suggest surgery to fix the damage.

    Surgery for Scapholunate Dissociation:

    To do surgery to correct your damage, your doctor might numb your hand and arm. The alternative is general anesthesia, which renders you unconscious. Your wrist will be in a cast for a few weeks following surgery. After that, you will receive physical therapy to strengthen your wrist.

    Your ligament might not always be able to be repaired. To join the two bones, your doctor might utilize a portion of the carpi radialis tendon. This tendon connects your hand to the bone of your arm. Arthrodesis, which involves screwing the two bones together, is an additional choice. After closely examining your X-rays and scans, your doctor will determine the best course of action for treating scapholunate dissociation. A stable, pain-free wrist should be the outcome of a successful course of treatment.

    Crucial are the scaphoid and lunate bones. Even though there are four wrist bones in the upper row, 35% of the wrist load moves to the lunate, and 50% moves to the scaphoid via the radius. The stability of the hand and wrist can be severely impacted by changes in these bone components’ relative locations. The most common cause of wrist instability is damage to the scapula.

    For optimal function restoration, scapholunate ligament injuries must be identified and treated as soon as possible. The most prevalent degenerative arthritis of the wrist, scapholunate advanced collapse (SLAC), is one of the long-term consequences of untreated scapholunate separation.

    What steps can I take to lower my chance of scapholunate dissociation?

    By taking precautions against falls, you can lower your chance of developing scapholunate dissociation. These actions could consist of:

    • Engaging in exercises that enhance your strength, balance, and coordination.
    • Preventing trip hazards in your house, such as loose cords, rugs, and dim lighting.
    • Utilizing assistive technology, such as a walker or cane, as necessary.
    • Putting on stable, flat shoes with adequate traction.

    If I have scapholunate dissociation, what can I anticipate?

    Complications for SL dissociation could include the following if therapy is delayed:

    • Persistent discomfort.
    • Inflammatory arthritis.
    • Instability of the joints.
    • Diminished strength of grasp.
    • When degenerative arthritis develops in your wrist, you may have scapholunate advanced collapse wrist.

    FAQs

    Scapholunate dissociation: what is it?

    When the scaphoid and lunate bones in your wrist go out of alignment, it’s known as scapholunate (SL) dissociation. SL separation causes a space to open up between the bones. These bones separate (dissociate) from one another when you move your wrist.

    What is the duration of healing for scapholunate dissociation?

    It is advised in these situations to immobilize the patient in plaster for four to six weeks, after which analgesics and hand therapy should be administered. It could take up to 18 months to recover.

    Is surgery necessary for a scapholunate ligament tear?

    Anti-inflammatory drugs or cortisone injections are also frequently used to reduce discomfort. Medication, however, doesn’t deal with the underlying cause of the discomfort and restricted function. You will most likely need surgery to rebuild or repair the ligament if you have suffered a moderate to severe injury.

    Is dissociation of scapula a disability?

    As previously mentioned, pain, limited mobility, and arthritis are symptoms of the veteran’s scapholunate dissociation handicap, which is currently evaluated as 20% debilitating.

    What leads to a tear in the scapula?

    The scapholunate joint is a tiny joint that connects the scaphoid and lunate bones, two carpal bones, at the wrist crease. The wrist joint’s stability greatly depends on the scapholunate joint. It is frequently hurt when playing sports, as when you fall hard on your hand.

    Are scapholunate wounds self-healing?

    Wrist arthritis may result from untreated scapholunate ligaments, which are incapable of healing on their own. The severity of your injury and how long it has been since you suffered it will determine the kind of therapy you receive.

    References

    • Scapholunate dissociation. (2024, May 1). Cleveland Clinic. https://my.clevelandclinic.org/health/diseases/23444-scapholunate-dissociation
    • Ankle Sprain vs. Broken Ankle. (2023, April 24). WebMD. https://www.webmd.com/a-to-z-guides/ankle-sprain-vs-broken-ankle

  • Ulnar Nerve

    Ulnar Nerve

    Introduction

    The ulnar nerve is a major peripheral nerve that runs from the neck down to the hand, playing a crucial role in movement and sensation. It controls fine motor functions in the hand and provides sensation to the ring and little fingers. Often referred to as the “funny bone” nerve, it is vulnerable to compression, especially at the elbow or wrist, leading to conditions like ulnar neuropathy.

    The ulnar nerve travels distally from its origin into the hand via the axilla, arm, and forearm. It is a mixed nerve that supplies sensory information to the hand’s skin and motor innervation to several forearm and hand muscles.

    Since the ulnar nerve innervates the great majority of the intrinsic hand muscles, it can be generically referred to as the nerve of the hand. Its superficial route and clinically evident significance in hand function make it one of the upper limb’s most clinically significant nerves.

    You can move your hand, forearm, and several fingers thanks to the ulnar nerve. From the elbow to the hand, your forearm is extended. Additionally, the brain receives sensory data from the ulnar nerve, including touch, temperature, and pain.

    When the ulnar nerve is under pressure, ulnar nerve entrapment happens. It may result in weakness and discomfort in the hands and fingers.

    Ulnar nerve root value

    The ulnar nerve originates from the C8 and T1 nerve roots of the brachial plexus, specifically from the medial cord. It provides motor and sensory functions to parts of the forearm and hand, including intrinsic hand muscles and the medial aspect of the hand (ring and little fingers).

    Structure

    Most of the hand and a portion of the forearm are motor innervated by the ulnar nerve. It provides the medial forearm, medial wrist, and medial one-and-a-half fingers with sensory cutaneous innervation. The hypothenar muscles (opponens digiti minimi, abductor digiti minimi, and flexor digiti minimi brevis) and the flexor carpi ulnaris and flexor digitorum profundus in the forearm receive motor innervation from the ulnar nerve and its branches. The third and fourth lumbricals, dorsal interossei, palmar interossei, adductor pollicis, flexor pollicis brevis, and palmaris brevis are all motor innervated by the ulnar nerve in the hand.

    Sensory and motor fibers from the C8 and T1 dorsal rami are carried via the ulnar nerve. Through the medial intermuscular septum, also known as the arcade of Struthers, the nerve travels down the medial arm from the anterior to the posterior compartment. The internal brachial ligament, medial intermuscular septum, and medial head of the biceps combine to produce the arcade. After passing posterior to the humerus’ medial epicondyle, it releases its first branch, which gives the elbow joint proprioception.

    The ulnar nerve crosses Osbourne’s ligament (retinaculum between the two heads of the flexor carpi ulnaris muscle) at the distal elbow. It extends superficially to the flexor retinaculum, passing via the forearm’s flexor and pronator muscles and into the wrist. Guyon’s canal, a fibro-osseous tunnel created by the pisiform and hook of the hamate, is where the ulnar nerve enters the hand. The palmar cutaneous (nerve of Henle) and dorsal cutaneous branches originate from the ulnar nerve in the hand. To provide sensation to the dorsal hand, the dorsal cutaneous nerve splits into radial and ulnar branches.

    Function

    Almost all of the hand’s tiny muscles are controlled by the ulnar nerve. Despite starting in the armpit, the ulnar nerve doesn’t accomplish anything until it reaches the forearm.

    As a motor (moving) nerve, the ulnar nerve activates muscles in the forearm, hand, and fingers so you can:

    • Straighten and bend the ring and pinky fingers.
    • Hold and grasp objects.
    • Use your fine motor skills to write with a pen, button a blouse, or flip through magazine pages.
      The ulnar nerve is a sensory nerve that provides sensation to the;
    • The pinky finger.
    • The ring finger’s side nearest to the pinky finger.
    • The pinky side of the hand’s palm and back.

    Course & Innervation

    Arm

    The ulnar nerve travels distally from the medial cord through the axilla, medial to the axillary artery. It descends on the arm’s medial aspect, medial to the biceps brachii muscle and the brachial artery. The nerve enters the posterior compartment in the midsection of the arm by penetrating the medial intermuscular septum. Here, the nerve passes beneath the arcade of Struthers in 70–80% of individuals and goes anterior to the medial head of the triceps brachii muscle. From the medial head of the triceps to the medial intermuscular septum, there is a narrow, aponeurotic band.

    The ulnar nerve then enters the anterior compartment of the forearm through the groove between the medial epicondyle and olecranon. Subcutaneous and easily perceptible, the ulnar nerve is located posterior to the medial epicondyle. In this area, it is frequently referred to as the “funny bone”. In the arm, the ulna nerve normally has no branches.

    Forearm

    The cubital tunnel, which is superficial to the posterior and oblique bands of the ulnar collateral ligament, is where the ulnar nerve exits the arm. The olecranon, medial epicondyle, and an arcuate ligament—a fibrous band connecting the two heads of the flexor carpi ulnaris muscle—all encircle this cubital tunnel. Here, the elbow joint receives articular branches from the nerve. Between the humeral and ulnar heads of the flexor carpi ulnaris, the ulnar nerve extends into the anterior compartment of the forearm.

    Over the flexor digitorum profundus muscle and deep to the flexor carpi ulnaris muscle, the ulnar nerve descends on the medial surface of the forearm. The ulnar artery, which runs lateral to the nerve, exits lateral to the flexor carpi ulnaris near the wrist. Both structures, which are solely covered by skin and fascia, enter the hand just lateral to the pisiform bone and travel superficially to the flexor retinaculum (transverse carpal ligament).

    The ulnar nerve in the forearm produces two muscular branches: the ulnar (medial) portion of the flexor digitorum profundus and the flexor carpi ulnaris. The median nerve supplies the remaining muscles of the anterior compartment of the forearm as well as the lateral half of the flexor digitorum profundus muscle. Furthermore, the palmar cutaneous nerve and the dorsal cutaneous nerve are two cutaneous branches that originate from the ulna nerve in the forearm. The hand receives sensory innervation from these nerves.

    Hand

    The Guyon’s canal, also known as the ulnar canal, is a groove between the pisiform and the hook of the hamate that is crossed by the palmar carpal ligament and the point at the wrist where the ulnar nerve and artery enter the hand.

    Here, the nerve divides into superficial and deep branches to innervate the hand both sensory and motor.

    Innervation
    Motor Innervation
    forearm
    • FCU
    • FDP ring and small
    thenar
    • adductor pollicis
    • deep head of flexor pollicis brevis (FPB)
    fingers
    • interossei (dorsal & palmar)
    • 3rd & 4th lumbricals
    hypothenar muscles
    Sensory Innervation
    1. sensory branches of the ulnar nerve
    2. dorsal cutaneous branch
    3. palmar cutaneous branch
    4. superficial terminal branches

    Muscle supplies

    The flexor muscles of the forearm, such as the flexor carpi ulnaris and flexor digitorum profundus, are innervated by the ulnar nerve. Additionally, it innervates the hand’s intrinsic muscles, such as the lumbricals, palmaris brevis, interossei, and hypothenar. The palmaris brevis muscle, the ulnar proper nerve, the fourth common digital nerve, and the hypothenar muscles are all innervated by the superficial branch of the ulnar nerve in the hand. The third and fourth lumbrical muscles, the adductor pollicis, the medial head of the flexor pollicis brevis, the hypothenar muscles, the opponens digiti minimi, and the interosseous muscles are all innervated by the deep branch.

    Branches

    There are often no significant branches of the ulnar nerve in the arm. The articular and muscular branches, as well as the palmar and dorsal cutaneous branches, are produced by the nerve in the forearm. The ulnar nerve in the hand has two terminal branches: the superficial branch and the deep branch.

    Articular branches

    The ulnar nerve produces articular branches that innervate the elbow joint as it travels through the cubital tunnel between the medial epicondyle and olecranon.

    Muscular branches

    In the proximal forearm, the ulnar nerve gives rise to two muscular branches. The medial half of the flexor digitorum profundus and the flexor carpi ulnaris receive motor innervation from these.

    Palmar cutaneous branch

    Around the middle of the forearm, the ulnar nerve gives birth to the palmar cutaneous branch. This nerve penetrates the deep fascia in the distal forearm after traveling via the ulnar artery. The skin at the base of the medial palm, which is situated above the medial carpal bones, receives sensory innervation from it.

    Dorsal cutaneous branch

    The dorsal cutaneous branch of the ulnar nerve enters the distal forearm, near the wrist. This nerve enters the medial portion of the hand’s dorsum by passing through the deep fascia and traveling posteriorly, deep to the flexor carpi ulnaris. It divides into two or three dorsal digital nerves here to supply feeling to the skin on the medial side of the hand’s dorsum as well as the proximal areas of the little finger and half of the ring finger, which are the medial 1½ digits.

    Superficial branch of ulnar nerve

    The superficial branch of the ulnar nerve provides sensory innervation to the medial palmar skin and the front part of the ulnar 1½ digits, which includes the little finger and half of the ring finger. Additionally, it provides motor innervation to the palmaris brevis muscle in the hypothenar area of the hand. It frequently splits into two palmar digital nerves after emerging from the ulnar nerve immediately distal to the pisiform bone.

    Deep branch of ulnar nerve

    The ulnar nerve’s superficial and deep branches both come from the same area of the nerve. It runs beside the deep palmar branch of the ulnar artery between the hypothenar region’s muscles and into the deep aspect of the plan. The great majority of hand muscles are motor innervated by this nerve. These consist of the deep heads of the flexor pollicis brevis and adductor pollicis, the medial two lumbricals, all three palmar and four dorsal interossei, and the hypothenar muscles (abductor, flexor, and opponens digiti minimi).

    All of the intrinsic hand muscles, except for the LOAF muscles (lateral two lumbricals, opponens pollicis, abductor pollicis brevis, and flexor pollicis brevis), as well as the medial half of the flexor digitorum profundus, receive motor innervation from the ulnar nerve.

    The following parts of the hand get sensory input from the ulnar nerve:

    the palmar and dorsal surfaces of the neighboring palm and medial 1½ digits.
    cutaneous layer on the hand’s medial side.

    Examination

    Depending on where the injury occurs along the nerve’s path, ulnar nerve injury can be caused by various factors, most frequently near the elbow. Compression at Guyon’s canal of the wrist can cause motor and sensory deficiencies in the hand, damage at the elbow can cause cubital tunnel syndrome, and proximal injury to the lower trunk of the brachial plexus can cause Klumpke palsy.

    A brachial plexus injury to the lower trunk manifests as Klumpke palsy. An upward force on an infant’s arm or upward traction on an adult’s arm are the most frequent causes of lower trunk injuries. A heavy birth weight baby or a short birth canal may cause traction of the baby’s abducted arm during a traumatic vaginal delivery, which can also result in injury. A full claw hand is a clinical manifestation of Klumpke palsy, which is characterized by a functional impairment of the intrinsic hand muscles. Clinical observations include wasting of intrinsic hand muscles (lumbricals, interossei, thenar, and hypothenar muscles) with flexion of the distal and proximal interphalangeal joints, hyperextension of the MCP joint due to flexor loss, and radial deviation of the wrist due to flexor carpi ulnaris loss. Strap hanger’s syndrome is another name for this condition.

    Loss of sympathetic input from T1 can result in Horner syndrome, which includes ptosis, miosis, and anhydrosis. Unopposed parasympathetic input to the eye causes pupil contraction.

    The area close to the elbow is where ulnar nerve injuries occur most frequently. Anatomical injury from an elbow joint synovitis, soft tissue mass, osteophyte infection, or medial epicondyle fracture might result in nerve disease. Compression from extended elbow flexion, such as during sleep, exercise, driving, typing, or phone conversations, can also harm the nerve. Cubital tunnel syndrome is a peripheral neuropathy brought on by repeated trauma or chronic compression of the ulnar nerve at the elbow between the olecranon process of the ulna and the medial epicondyle of the humerus.

    The cubital tunnel retinaculum has congenital laxity, which causes the ulnar nerve to become hypermobile. When the elbow is flexed, this may result in anterior dislocation and recurrent subluxation. Because of the frequent contact across the medial epicondyle, repetitive stress at this site may cause inflammation.

    Additionally, ganglion cysts, external nerve compression, Guyon’s canal compression, and local trauma can all result in ulnar nerve impingement at the wrist. Guyon’s canal is a fibro-osseous tube created by the pisiform and hook of the hamate. Within the canal, the ulnar nerve splits into deep and superficial branches. Bicyclists who experience excessive pressure from their handlebars and prolonged compression while typing at a desk can also induce nerve compression at the wrist.

    With a comprehensive history, musculoskeletal examination, and neurological examination, ulnar nerve damage can be diagnosed. Nonetheless, nerve conduction tests and EMG might be utilized as a supplement to identify and pinpoint the lesion.

    The following clinical characteristics can be used to describe ulnar nerve damage.

    flattening of the forearm’s medial border and loss of feeling at the fourth and fifth digits’ distal interphalangeal joints
    reduction in hypothenar prominence
    lack of thumb adduction and loss of finger abduction
    pronounced clawing of the fourth and fifth fingers
    minor trophic, vasomotor, and sensory alterations in the fourth and fifth digits

    Neuro exam

    Weakness:

    • Flexion of the wrist
    • The little finger’s flexion
    • The index and little fingers are abducted.
    • Thumb adduction.

    Reduced feeling

    • The medial 1-and-a-half fingers’ palmar surface
    • The dorsal side of the medial 1-and-a-half fingers
    Neurodynamic

    The patient is placed in a supine position for the ulnar nerve upper limb neurodynamic test (ULNT3). Until symptoms appear, the joints are gradually pushed to the end of their range. Patients should be told to report any pain, tingling, or strain that appears anywhere in the arm or neck.

    The sequencing of ULNT3:

    • Girdle depression of the shoulders
    • Abduction of the shoulders
    • External rotation of the shoulders
    • Extension of the wrist and fingers
    • Flexion of the elbow
    • Abduction of the shoulders

    Froment’s Sign

    A test for ulnar nerve palsy, especially adductor pollicis paralysis, is called Froment’s sign:

    By holding a piece of paper between their thumb and index finger, the patient is instructed to pull the paper away.

    With a thumb adduction, they ought to have no trouble holding the paper there.
    When the patient is unable to adduct the thumb, the test is considered affirmative. Instead, in an attempt to keep their grip on the paper, they bend their thumb at the interphalangeal joint.

    Clinical Importance

    Ulnar Nerve Palsy

    Elbow damage

    Medial epicondyle-level trauma (such as a single medial epicondyle fracture or a supracondylar fracture) is the mechanism of injury. The cubital tube might compress it as well.

    Motor functions:

    It affects every muscle that the ulnar nerve innervates.
    Wrist flexion is still possible, although it is accompanied by abduction (since the medial half of the flexor digitorum profundus and the flexor carpi ulnaris are paralyzed).
    Because the interossei are paralyzed, fingers cannot be abducted or adducted.
    The paralysis of the medial two lumbricals and hypothenar muscles impairs the movement of the fourth and fifth fingers.
    Because the adductor pollicis is paralyzed, the patient will have a positive Froment’s sign and impaired thumb adduction.

    Sensation loss will occur throughout the regions innervated by the ulnar nerve as all sensory branches are impacted.

    Characteristic indicators include hypothenar eminence wasting, positive Froment’s sign, and the inability of the patient to hold the paper between their fingers.

    Damage to the Wrist

    The mechanism of injury involves lacerations on the anterior wrist.

    Motor functions:

    The hand’s intrinsic muscles are the only ones impacted.
    Because the interossei are paralyzed, fingers cannot be abducted or adducted.
    The paralysis of the medial two lumbricals and hypothenar muscles impairs the movement of the fourth and fifth fingers.

    Because the adductor pollicis is paralyzed, the patient will have a positive Froment’s sign and impaired thumb adduction.

    Sensory functions: The dorsal branch remains intact, while the palmar and superficial branches are typically cut off. There is just a sensory loss on the palmar side of the medial one-and-a-half fingers.

    When your ulnar nerve becomes inflamed or compressed (squeezed) near the inside of your elbow, it is known as Cubital Tunnel Syndrome.

    Compression of the distal ulnar nerve at the wrist level as it passes through the ulnar tunnel, also known as the Guyon canal, is known as Guyon canal syndrome.

    Characteristic indicators include hypothenar eminence wasting, positive Froment’s sign, and the inability of the patient to hold the paper between their fingers.

    Claw hand

    A disease known as claw hand malformation causes the finger to bend like a claw. Depending on the source, it might impact all of the fingers or just a few. One or both hands may be affected by the malformation, which typically results in bent or twisted fingers. A hand deformity known as claw hand occurs when the intrinsic muscles of the hand weaken, causing the metacarpophalangeal (MCP) joints to hyperextension and the interphalangeal (IP) joints to flex. Patients with neurological abnormalities that weaken or paralyze their intrinsic finger muscles may try finger extension and develop claw finger deformity. After intrinsic muscular palsy, the deformity is typically not immediately noticeable.

    Claw Hand deformity can be:

    When it affects every finger, it is considered complete and is caused by both Ulnar and Median Nerve Palsy.

    Known as an isolated Ulnar Nerve Palsy, it is incomplete or partial when it only affects the ulnar two digits.

    wasting of the hypothenar and interosseous muscles.
    numbness in the affected nerve.
    incapacity to abduct and adduct fingers while extending the IP joints.
    The lumbricals of digits 4 and 5 are paralyzed, causing the extensors and flexors digitorum profundus to contract without resistance.

    Surgical Considerations

    The elbow in the cubital tunnel is the most typical location for ulnar nerve entrapment. Orthopedic procedures such as cubital tunnel decompression and potential ulnar nerve transposition are very prevalent. Osbourne’s ligament (cubital tunnel retinaculum) and the deep layer of the aponeurosis of the two heads of the flexor carpi ulnaris muscle make up the cubital tunnel. The proximal ceiling of the cubital tunnel, Osbourne’s ligament, keeps the nerve from subluxing when the elbow is flexed.

    Osbourne’s fascia is cut during surgical decompression for cubital tunnel syndrome to alleviate pain and paraesthesia brought on by nerve damage. Another suggested surgical procedure is to move the nerve from the arcade of Struthers to the flexor carpi ulnaris. Just proximal to the medial epicondyle of the humerus, the internal brachial ligament, medial head of the triceps, and medial intermuscular septum create the arcade of Struthers. Compression of the ulnar nerve may also occur here.

    Incidental injury to the ulnar nerve during carpal tunnel release surgery is another surgical concern. A little incision is made close to the wrist crease during surgery for carpal tunnel syndrome. To release the median nerve’s compression, the surgeon will cut through the wrist’s soft tissues and down the transverse carpal ligament.

    Because the deep motor branch of the ulnar nerve runs along the hamate carpal bone just medial to the carpal tunnel, damage to the branch may result from this dissection. The incision must stay in line with the ring finger’s radial border, even though ulnar nerve injury is an uncommon side effect of carpal tunnel release surgery.

    FAQs

    What signs point to ulnar nerve damage?

    Weakness or tenderness in the hand.
    tingling in the fourth and fifth fingers as well as the palm.
    Sensitivity to cold.
    Tenderness in the elbow joint.

    What is the best treatment for ulnar nerve damage?

    Ulnar Nerve Pain Relief Techniques
    Medications. Nonsteroidal anti-inflammatory drugs can help reduce pain and inflammation. …
    splinting. The afflicted part can be supported and immobilized by wearing a brace or splint.
    Physical therapy. …
    Cold or heat therapy. …
    Transcutaneous electrical nerve stimulation (TENS).

    What is the recovery of the ulnar nerve?

    It might take up to five years to fully heal from ulnar nerve injury. When motor loss is thought to be irreversible following nerve repair, tendon transfer should be taken into consideration as a backup option.

    What is the best exercise for the ulnar nerve?

    Wrist flexion and extension
    Place your forearm on a table. …
    Allow your hand to clench into a fist by bending your wrist to raise it.
    Now let your fingers straighten and drop your hand as far as you can.
    Repeat both directions 8 to 12 times.
    Repeating these actions with your other hand is a smart idea.

    Can you fix your ulnar nerve without surgery?

    Surgery is typically not necessary to treat ulnar nerve compression. Your NYU Langone physician might suggest that you avoid activities that exacerbate your symptoms and rest the afflicted hand and elbow.

    Referencess

    • TeachMeAnatomy. (2024b, October 4). The ulnar Nerve – course – motor – sensory – TeachMeAnatomy. https://teachmeanatomy.info/upper-limb/nerves/ulnar-nerve/
    • Woon, C., MD. (n.d.-b). Ulnar nerve – Anatomy – Orthobullets. https://www.orthobullets.com/anatomy/10108/ulnar-nerve
    • Ulnar nerve. (2023b, July 5). Kenhub. https://www.kenhub.com/en/library/anatomy/the-ulnar-nerve
    • Professional, C. C. M. (2025d, January 24). Ulnar nerve. Cleveland Clinic. https://my.clevelandclinic.org/health/body/21664-ulnar-nerve

  • Strength-Duration Curve (SD Curve)

    Strength-Duration Curve (SD Curve)

    Introduction

    The Strength-Duration Curve (SD Curve) visually represents the connection between the intensity of an electrical stimulus applied to a muscle’s motor point and the time required to trigger a minimal contraction in that muscle.

    In this context, “strength” pertains to the intensity of the stimulus plotted on the vertical axis, while “duration” refers to the pulse length on the horizontal axis. This curve is a diagnostic tool for assessing nerve damage in cases of lower motor neuron lesions.

    The Strength-Duration Curve: A Deep Dive into Neuromuscular Excitability

    The Strength-Duration (SD) curve, although it appears straightforward, contains extensive information regarding the complex functions of the neuromuscular system. It illustrates the connection between the intensity and the duration of an electrical stimulus needed to provoke a minimal muscle contraction.

    This curve is not merely an academic exercise; it acts as an essential diagnostic instrument, revealing details about nerve integrity, muscle performance, and the overall condition of the neuromuscular system.

    This article examines the details of the SD curve, investigating its foundational principles, clinical uses, limitations, and significance in enhancing our grasp of neuromuscular physiology.

    Foundations of the SD Curve: Physiology and Electrophysiology

    The SD curve is based on the basic tenets of electrophysiology and muscle physiology. Muscle contraction begins with the depolarization of the muscle cell membrane, initiating a sequence of events that lead to the interaction of actin and myosin filaments. This depolarization can occur through several mechanisms, including the arrival of a nerve impulse at the neuromuscular junction or, as illustrated by the SD curve, through the application of an external electrical stimulus.

    Applying an electrical stimulus to a muscle excites both the nerve fibers that innervate the muscle and the muscle fibers themselves. The intensity and duration of the stimulus are critical factors that influence whether a muscle contraction will occur. The SD curve effectively illustrates this relationship.

    Stimulus Intensity: This refers to the strength of the electrical current, generally measured in milliamperes (mA) or volts (V). A stimulus with higher intensity typically recruits more nerve and muscle fibers, increasing the chances of provoking a contraction.

    Stimulus Duration: This relates to the length of time the electrical current is applied, usually measured in milliseconds (ms). A stimulus with a longer duration permits a more extended depolarization of the nerve and muscle membranes, also enhancing the likelihood of a contraction.

    The SD curve is established by systematically altering the stimulus duration and determining the lowest intensity necessary to induce a barely noticeable muscle contraction for each duration. These data points are subsequently plotted on a graph, with stimulus intensity on the vertical axis and stimulus duration on the horizontal axis.

    The Strength-Duration Curve: A Deep Dive into Neuromuscular Excitability

    The Strength-Duration (SD) curve, albeit a seemingly simple graphical depiction, encapsulates a significant amount of information about the complex functions of the neuromuscular system. It charts the relationship between the intensity and duration of an electrical stimulus that is required to evoke a minimal muscle contraction.

    This curve extends beyond being just a laboratory demonstration; it acts as a crucial diagnostic tool, providing insights into nerve integrity, muscle functionality, and the general health of the neuromuscular unit.

    Types of Strength-Duration Curve

    Normal Innervation

    NORMAL_SDC
    NORMAL_SDC

    Also known as a “nerve curve,” this type denotes that all nerve fibers supplying the muscle are intact. The curve adopts the form of a continuous rectangular hyperbola. The same intensity is needed to elicit a response over extended durations, while the intensity gradually increases with shorter durations. Typically, the curve begins rising around the 1 ms mark.

    This curve represents a muscle that has normal innervation.

    Complete Denervation

    COMPLETE_DENERV_SDC
    COMPLETE_DENERV_SD

    This condition is referred to as a “muscle curve.” All the nerve fibers that supply the muscle have deteriorated. The curve is typically steep and has shifted to the right. The intensity continues to rise when the duration is decreased below 100ms. No response is observed at very brief durations.

    This curve illustrates a muscle that is fully denervated.

    Partial Denervation

    Partial Denervation
    Partial Denervation

    Some nerve fibers supplying the muscles have deteriorated while others remain intact. A distinctive kink is evident in the curve. The right segment of the curve represents the denervated portion of the muscle, while the left segment illustrates the innervated fibers of the muscle.

    This curve represents a muscle that is partially denervated.

    Foundations of the SD Curve: Physiology and Electrophysiology

    The SD curve is based on the essential concepts of muscle physiology and electrophysiology. Muscle contraction begins with the depolarization of the muscle cell membrane, triggering a series of events that ultimately result in the interaction of actin and myosin filaments. This depolarization can occur through various mechanisms, including the arrival of a nerve impulse at the neuromuscular junction or, as seen with the SD curve, through an external electrical stimulus.

    When an electrical stimulus is applied to a muscle, it activates both the nerve fibers that innervate the muscle and the muscle fibers themselves. The intensity and duration of the stimulus are crucial elements that influence whether a muscle contraction will take place. The SD curve effectively illustrates this relationship.

    Stimulus Intensity: This refers to the strength of the electrical current, usually measured in milliamperes (mA) or volts (V). A stronger intensity stimulus typically recruits more nerve and muscle fibers, thereby enhancing the chances of a contraction.

    Stimulus Duration: This term indicates the amount of time the electrical current is applied, generally measured in milliseconds (ms). A longer-duration stimulus permits more prolonged depolarization of both the nerve and muscle membranes, which also raises the probability of a contraction.

    The SD curve is formed by systematically altering the stimulus duration and identifying the minimum intensity needed to achieve a noticeable muscle contraction for each duration. These data points are then charted on a graph, with stimulus intensity represented on the vertical axis and stimulus duration along the horizontal axis.

    The Shape and Characteristics of the SD Curve: Deciphering the Code

    In a normal individual, the SD curve displays a distinct hyperbolic shape. It begins with a steep incline on the left side, indicating that high intensities are needed to provoke a contraction from short-duration stimuli. As the stimulus duration increases, the necessary intensity decreases, and the curve gradually levels off, ultimately reaching a plateau.

    Several key parameters can be derived from the SD curve, each offering important insights into the neuromuscular system:

    Rheobase: This describes the minimum intensity of a long-duration stimulus (usually defined as durations exceeding 10ms) required to elicit a muscle contraction. It reflects the excitability of the muscle membrane and is mainly affected by the characteristics of the muscle fibers themselves.

    Rheobase
    Rheobase

    Slope of the Curve: The steepness of the initial part of the curve offers information on the recruitment of nerve and muscle fibers. A steeper slope implies a more uniform population of fibers with similar excitability.

    Chronaxie
    Chronaxie

    Utilization Time: This represents the duration taken by a stimulus at the basic strength to stimulate the nerve and induce muscle contraction. Below this threshold, no muscle contraction will occur.

    Compound Action Potential

    Strength-Duration Curve

    This section of the lab aims to investigate the relationship between stimulus strength and stimulus duration in the activation of nerves and to create a Strength-Duration Curve.

    Background

    We’ve observed how the shape, height, and length of the CAP change as stimulus strength increases because stronger stimulation engages more individual nerve fibers, whose individual action potentials combine to produce a CAP. Therefore, as the stimulus becomes more intense, a greater number of fibers reach their activation threshold.

    However, a fiber’s activation threshold is influenced not only by the strength of the stimulus but also by its duration.

    To depolarize an excitable membrane, a flow of electrical charge must move across the membrane. Due to the membrane’s significant electrical capacitance, the total quantity of charge transferred across the membrane is the crucial factor for effective membrane depolarization.

    For a brief duration stimulus generating a constant trans-membrane current, the charge (Q) that gets transferred is proportional to the product of current (I) and time (T):
    Q = I x T

    Thus, if the amount of charge necessary for fiber activation is defined as Qt, and the stimulus duration is labeled as D, the current (It) needed to achieve this activation will be:
    It = Qt / D

    This indicates that a plot of threshold stimulus strength against stimulus duration should trend downward to nearly zero with increased stimulus duration. In other words, the stimulus strength necessary to reach the threshold should diminish with prolonged stimulation. It is important to note that voltage (V) and current (I) can be used interchangeably as measures of stimulus strength.

    The Strength-Duration Curve for a typical neural membrane exhibits some similarities but also diverges in that the curve notably levels off with extended stimulus durations, achieving a limiting value called the RHEOBASE. When the stimulus strength falls below the rheobase, stimulation fails to be effective even with very long stimulus durations.

    The difference between the observed shape of the Strength-Duration curve and the prediction from the equation above arises from the fact that the predicted relation holds for an ideal capacitor with no leakage resistance. During prolonged stimulation (large values of t), the equation is unable to accurately estimate the charge transfer across the nerve membrane since under these circumstances, the actual charge transfer is lower than predicted due to leakage caused by the significant electrical resistance of the membrane.

    Thanks to the interaction between resistive and capacitive effects within the membrane, charge transfer (and membrane potential) rises exponentially to a plateau during long stimulation instead of increasing linearly over time. Therefore, if the stimulus is inadequate, the membrane potential fails to reach the threshold.

    When analyzing the Strength-Duration relationship in a nerve trunk that contains numerous nerve fibers, one must take care to identify which specific fibers the threshold pertains to. The threshold stimulus voltage for the entire CAP effectively corresponds to the threshold of the fastest, most responsive fibers in the nerve. As accurately determining this threshold is challenging, the outlined procedure employs a reference signal where the peak amplitude of the CAP is about one-fifth of its maximum. Consequently, this threshold represents that of another, less excitable group of fibers.

    compound-action-potential
    compound-action-potential

    Procedure

    To start, the stimulator’s knob is adjusted to set the stimulus duration at 1.0 ms.

    STEP A: Gradually increase the stimulus voltage until a compound action potential (CAP) is detected. In this instance, we adjusted the voltage until the CAP amplitude fills two segments of the horizontal grid displayed on the screen. This CAP amplitude will serve as a benchmark for the remainder of the experiment. (Alternatively, another reference line can be selected, as long as it is consistently maintained throughout the procedure.)

    We note the stimulus voltage from the stimulator, as well as the corresponding stimulus duration (in this initial case, 1 ms), and record this pair of values in a table. Thus, this combination of stimulus duration and voltage has reached the threshold for a small group of excitable nerve fibers, although they are not the most excitable.

    STEP B: Next, we gradually decrease the stimulus duration until the CAP is no longer visible. (We cease when the display indicates a flat line where the CAP was previously observed.)

    Then, we repeat STEP A; that is, we increase the stimulus voltage until the CAP reaches the previously noted reference amplitude. (This corresponds to filling two intervals of the grid.) We document the new stimulus voltage and stimulus duration from the stimulator and record this pair of values in our table.

    This entire procedure is iterated until we have obtained 10 distinct pairs of values. Using our collected data, we can plot the strength-duration curve:

    In addition to identifying the Rheobase, the Strength-Duration Curve offers another significant piece of information known as the Chronaxie. The Chronaxie is a duration measurement that represents twice the Rheobase.

    From the graph above, the Rheobase is approximately 0.64 volts, while the Chronaxie measures around 0.16 ms.

    Clinical Applications of the SD Curve: A Window into Neuromuscular Disorders

    The SD curve has numerous applications in diagnosing, predicting, and managing various neuromuscular disorders. Its capability to distinguish between nerve and muscle dysfunction makes it an essential resource in clinical settings.

    Peripheral Nerve Injuries: The SD curve is especially beneficial for evaluating the extent and severity of peripheral nerve injuries. After a nerve injury occurs, the SD curve exhibits specific alterations. In instances of nerve conduction block (where the nerve signal is impeded, but the nerve fibers remain intact), the curve may initially shift rightward, necessitating higher stimulation intensities to activate the muscle.

    Nevertheless, the chronaxie may largely remain unchanged. Conversely, in situations of axonal degeneration (where the nerve fibers are damaged), the curve shifts further to the right, and there is a notable increase in the chronaxie. The degree of these modifications aids clinicians in assessing prognosis and directing treatment plans. Serial measurements of the SD curve can also be utilized to observe nerve regeneration and recovery.

    Muscle Disorders: The SD curve can be employed to assess muscle functionality across various muscle disorders. In conditions such as muscular dystrophy, where muscle fibers progressively deteriorate, the SD curve may demonstrate a rightward shift and a reduction in rheobase, indicating diminished excitability of the muscle tissue. In myasthenia gravis, an autoimmune disorder affecting the neuromuscular junction, the SD curve may exhibit a characteristic “fatigue” pattern, wherein the intensity required to trigger a contraction escalates with repeated stimulation.

    Neuromuscular Junction Disorders: Disorders that affect the neuromuscular junction, such as Lambert-Eaton syndrome, can also influence the SD curve. These conditions often interfere with the release of acetylcholine, the neurotransmitter essential for muscle activation, resulting in alterations in muscle excitability and contractility as reflected in the SD curve.

    Monitoring Neuromuscular Diseases: In progressive neurological disorders like Amyotrophic Lateral Sclerosis (ALS), the SD curve can be useful for tracking the decline in motor neuron function and muscle strength. Changes in the parameters of the curve can yield valuable insights into disease progression and treatment responses.

    Guiding Rehabilitation Strategies: The SD curve can play an important role in customizing rehabilitation programs for individuals with neuromuscular disorders. For example, in patients suffering from peripheral nerve injuries, the SD curve can help identify the most effective parameters for electrical stimulation therapy, facilitating nerve regeneration and muscle strengthening.

    Technical Considerations and Limitations of the SD Curve

    Although the SD curve is a useful tool, it is important to recognize its constraints and the technical elements that may affect its precision and interpretation.
    Electrode Placement: The positioning of the stimulating electrodes is vital. Electrodes should be placed deliberately to specifically stimulate the intended muscle or nerve. If electrode placement is inconsistent, it can result in variability in the recorded data.

    Stimulus Parameters: In addition to intensity and duration, other stimulus factors, such as waveform and frequency, may also affect the muscle response. Standardized stimulation protocols are necessary for obtaining reliable and comparable results.

    Patient Cooperation: The assessment of the SD curve requires the cooperation of the patient since they must perceive and report minimal muscle contraction. Factors such as pain, anxiety, or cognitive impairment can compromise the reliability of the test.

    Subjectivity: Identifying the minimal muscle contraction can be somewhat subjective, particularly for weak or subtle contractions. This subjectivity may introduce variability into the data.

    Limited Specificity: While the SD curve is capable of detecting neuromuscular dysfunction, it might not always be able to identify the specific underlying issue. Additional investigations, like nerve conduction studies and electromyography (EMG), may be required for a conclusive diagnosis.

    Technical Expertise: Conducting and interpreting the SD curve necessitates specialized training and expertise. Insufficient training can lead to incorrect results and misinterpretations.

    Advancements and Future Directions

    Regardless of its limitations, the SD curve continues to be a valuable asset in both clinical practice and research. Ongoing technological and methodological advancements are further enhancing its usefulness.
    Automated SD Curve Measurement: Automated systems for measuring the SD curve are being developed to minimize subjectivity and increase testing efficiency.

    Integration with other Electrodiagnostic Techniques: Merging the SD curve with other electrodiagnostic methods, like nerve conduction studies and EMG, can yield a more thorough assessment of the neuromuscular system.

    Quantitative Analysis of SD Curve Data: The creation of more advanced techniques for analyzing SD curve data can provide more objective and quantitative evaluations of neuromuscular function.

    Applications in Sports Medicine and Rehabilitation: The SD curve has potential uses in sports medicine and rehabilitation, such as monitoring muscle fatigue, evaluating muscle recovery following injury, and optimizing training plans.

    • Factors Affecting the Strength-Duration Curve
    • Skin resistance
    • Subcutaneous tissue such as fat
    • Temperature
    • Electrode size, material, and placement
    • Age of the subject
    • Fatigue

    How would the strength-duration curve for a set of slow fibers (not very excitable) compare to the strength-duration curve for a set of quick fibers (very excitable)?

    The curve for the slower fibers would be shifted to the right, indicating that a longer stimulus duration is required to reach the threshold with a given stimulus strength.

    Advantages of the Strength-Duration Curve

    It is quick and straightforward to perform. It needs minimal training. It is cost-effective compared to other clinical tests.

    Disadvantages of the Strength-Duration Curve

    It only provides qualitative data regarding the degree of denervation. It cannot determine the location of the lesion. In larger muscles, only a limited number of fibers can be examined due to the method’s constraints.

    Clinical Significance

    It assesses the excitability of the nerve and thus, can indicate the extent of nerve damage. It can demonstrate recovery over time. It serves as a valuable diagnostic and prognostic tool. It is typically conducted after three weeks of nerve injury to allow for Wallerian degeneration.

    The interrater reliability (r = .541) is lower than the interrater reliability (r = .945), which has been linked to normal physiological variations among subjects.

    Conclusion

    The SD curve serves as an important resource for evaluating neuromuscular health and performance. It offers essential insights into the functionality and responsiveness of the nerves and muscles, which can be beneficial in diagnosing, treating, and tracking various conditions. Although the SD curve has specific drawbacks, its uses in a clinical setting are extensive, making it a crucial instrument in neuromuscular medicine.

    The Strength-Duration curve, although conceptually simple, offers significant insight into the complex realm of neuromuscular physiology. Its capacity to differentiate between nerve and muscle dysfunction makes it an essential instrument in the diagnosis and treatment of various neuromuscular disorders.

    While recognizing its limitations and the technical factors that may affect its interpretation, the SD curve remains a fundamental component of electrodiagnostic testing, contributing greatly to our understanding of neuromuscular health and disease. Ongoing research and technological advancements are likely to further refine and broaden the applications of this enduring tool, ensuring its continued importance in the field of neuromuscular medicine.

    FAQs

    What is the SD curve?

    [Purpose] Strength-duration (SD) curves are utilized in electrical assessments by physiotherapists to verify muscle degeneration. Nevertheless, the extent to which SD curves are beneficial for comparing muscle degeneration in DJ-1 homozygous knockout (DJ-1−/−) versus wild-type mice (DJ-1+/+) remains incompletely understood.

    What is the SD of a curve?

    How to Calculate Standard Deviation (Guide)
    The distribution’s degree of dispersion is indicated by the standard deviation. A curve with a smaller standard deviation has a tall peak and a narrow spread, whereas a curve with a higher standard deviation appears flatter and more widely spread.

    What is the SD curve on a facial nerve?

    Strength – Duration (SD) Curve
    The creation of a strength-duration curve illustrates the strength of an impulse of varying durations necessary to trigger a muscle contraction. It is straightforward and reliable. It indicates the degree of denervation but cannot specify the location of a nerve injury.

    What is the use of the strength-duration curve?

    In this context, strength refers to the intensity of the stimulus displayed on the vertical axis, while duration signifies the pulse length represented on the horizontal axis. It is employed to assess nerve damage associated with lower motor neuron injuries.

    What is a strength curve?

    It represents the relationship between muscle fibers within a joint and the amount of force they can generate at specific angles. This curve can be divided into three primary components: the stretched position of the muscle, the mid-range position, and the shortened position.

    References

    • n.d. https:/www.physio-pedia.com/Strength-Duration_Curve
    • Strength-duration curve. (n.d.).
    • https://www.medicine.mcgill.ca/physio/vlab/Other_exps/CAP/S-D.htm
    • A Case Study of Electrical Stimulation for the Treatment of Facial Nerve Damage After TMJ Surgery. Biomedical and Pharmacology Journal.
    • https://biomedpharmajournal.org/vol10no4/facial-nerve-injury-following-tmj-surgery-and-its-management-by-electrical-stimulation-a-case-study/#:~:text=Strength

  • Cystic Fibrosis

    Cystic Fibrosis

    What is a Cystic Fibrosis?

    Cystic Fibrosis (CF) is a genetic disorder that affects the lungs, pancreas, liver, intestines, and other organs. It is caused by a defective gene that makes the body produce abnormally thick and sticky mucus.

    Because CF affects the airways and lungs, which can make breathing difficult and lead to frequent infections, many people consider it to be a lung illness.

    However, because it also results in pancreatic cysts and scarring (fibrosis), it is also known as cystic fibrosis. It may be difficult to obtain nutrients through your digestive tract because of this damage and the thick mucus that can obstruct ducts that release digestion enzymes. Your liver, sinuses, intestines, and sex organs may also be impacted by cystic fibrosis.

    You have thin, watery mucus lining your organs and cavities, such your nose and lungs. A genetic mutation causes low quantities of specific proteins or proteins that don’t function correctly in patients with cystic fibrosis. These defective proteins cause minerals that thin your mucus by transferring water into it to become trapped inside cells, making the mucus thick and sticky.

    Cystic fibrosis is a congenital condition. It’s a chronic condition that worsens with time. The majority of CF patients do not live as long as those without the condition.

    The Pathological Process

    Cystic Fibrosis is a hereditary condition that mostly affects the lungs, liver, pancreas, and intestines.

    It affects the exocrine glands, which produce sweat and mucus. It results in inflammation, lung tissue damage, and an increased risk of bacterial infections.

    Cystic Fibrosis Transmembrane Conductance Regulator (CFTR) is an aberrant gene that causes the creation of thick, sticky mucus that obstructs the lungs’ airways and frequently causes lung infections. Additionally, the thick mucus obstructs the pancreatic ducts, which prevents the digesting pancreatic enzymes from entering the small intestine and carrying out their regular activity.

    Three theories exist:

    The lungs’ nutrient-rich mucus builds up and becomes more viscous due to the absence of chloride migration via the CFTR protein, which allows bacteria to evade the body’s immune system.

    The CFTR protein deficiency causes a paradoxical increase in the absorption of salt and chloride. Mucus becomes thick and dehydrated as a result of increased water absorption.

    According to this view, dry mucus, pancreatic secretion, biliary secretion, and other conditions are caused by abnormal chloride move out of the cell.

    According to these beliefs, the main cause of harm in CF patients is the thick secretions that obstruct the affected organs’ narrow channels. Because of the buildup of enzymes and obstructions of the channels, infections result from blockages in the lung airways.

    Worldwide Prevalence or Incidence

    One case every 3200 white people, one case per 15,000 black people, one case per 9,200 Hispanic people, and one case per 31,00 Asian Americans are the prevalence rates in the United States. Sharma and Girish (2008).

    According to another study, 70,000 people worldwide and about 30,000 children and adults in the US have cystic fibrosis (CF) (Grief, 2008). Although CF is lethal, the survival rate has gone up due to advancements in medical research and treatment methods. Over 40% of people with CF are at least 18 years old.

    Cystic fibrosis types

    Cystic fibrosis comes in two varieties:

    Multiple organs are frequently affected by classic cystic fibrosis. Usually, a diagnosis is made during the first few years of life.

    A less severe version of the illness is called atypical cystic fibrosis. One organ may be the sole one affected, or symptoms may appear and disappear. Usually, older kids or adults are diagnosed with it.

    Cystic fibrosis (CF) symptoms

    Symptoms of cystic fibrosis include:

    • chronic lung conditions such pneumonia or bronchitis.
    • Loose or greasy stool.
    • Breathing difficulties.
    • Frequent wheezing.
    • Frequent infections of the sinuses.
    • A persistent cough.
    • Slow growth.
    • Failure to thrive, or the failure to put on weight even when eating a healthy diet and getting enough calories.

    Atypical symptoms of cystic fibrosis:

    Some of the symptoms of traditional cystic fibrosis may also be present in people with atypical CF. Over time, you may also encounter:

    • Persistent sinusitis.
    • Polyps in the nose.
    • Heatstroke or dehydration caused by incorrect electrolyte levels.
    • Diarrhea.
    • pancreatitis.
    • Unintentional weight loss.

    Cystic fibrosis: what causes it?

    Cystic fibrosis is caused by variations or mutations in the CFTR gene. On the cell surface, CFTR produces a protein that functions as an ion channel. Certain chemicals can flow through ion channels, which function similarly to gates in a cell’s membrane.

    For chloride ions, a class of mineral with a negative electrical charge, CFTR typically creates a gate. Mucus is thinned and made more slick by chloride, which leaves the cell with water. This is prevented in CF patients by CFTR gene mutations, which keeps the mucus thick and sticky.

    CFTR gene mutations are classified into classes I through VI based on their respective effects. others create proteins that don’t function correctly, others make very little protein, and some produce no protein at all.

    The most recent classification scheme groups mutations according to the issues they cause with the CFTR protein’s production:

    • Class 1 Mutations in the synthesis of proteins
    • Class 2 Mutations in protein processing
    • Class 3 gating mutations
    • Class 4 conduction mutations
    • Class 5 Not enough mutations in proteins

    Class 1 Mutations in Protein Production

    Mutations affecting protein synthesis, such as splice and nonsense mutations, prevent the CFTR protein from being produced.

    Amino acids, the building blocks of all proteins, including CFTR, are joined to form a lengthy chain. The cell knows which of the 20 available amino acids to employ at each location in the chain thanks to the protein-building instructions encoded in the CFTR gene. The gene’s letters also form a “stop” signal, which informs the cell that it has finished the instructions and can cease producing the protein.

    The protein-building instructions include an early stop signal that results in the premature termination of CFTR protein production in the event of a nonsense mutation in the CFTR gene. As a result, the cell starts producing the CFTR protein as usual up to the early stop signal.

    The cell prematurely halts synthesis because it “thinks” that the instructions have been completed. CFTR does not produce a functional protein because the cell stops reading the instructions before it completes the protein synthesis.

    The signal that tells the cell where the unnecessary letters in the instructions start or stop is altered by a splice mutation. The cell can no longer determine where to start and stop reading when it attempts to read its RNA copy of the instructions.

    The cell will consequently either eliminate some pertinent letters or leave in some irrelevant ones. The cell will be unable to produce the proper CFTR protein if it attempts to follow the RNA instructions that either contain irrelevant letters or omit pertinent ones.

    In a healthy individual, segments of DNA letters that do not code for protein interrupt the instructions written in a gene, much way advertisements may interrupt a magazine article. A unique signal is used to indicate the start and finish of these unnecessary letter segments.

    The cell converts the DNA letters into a similar alphabet called ribonucleic acid (RNA) in order to produce the protein. It then follows the signals to remove all of the unnecessary letters, just like you might remove advertisements. In this manner, it is possible to read the instructions from beginning to end.

    Class 2 Mutations in Protein Processing

    The 1,480 amino acids that make up the CFTR protein. The CFTR protein takes on a stable three-dimensional form when it is assembled with all of the appropriate amino acids. For chloride to be transported, it must have the proper form.

    The CFTR protein is unable to form its proper 3-D shape and function when a mutation results in the deletion of an amino acid or the addition of an erroneous amino acid. These mutations are classified as mutations that affect how proteins are processed.

    F508del, the most prevalent CF mutation, is typically regarded as a processing mutation. The F508del mutation causes the CFTR protein to lose one amino acid. The CFTR protein cannot maintain its proper three-dimensional form without this building ingredient. The cell gets rid of the protein after realizing it isn’t in the proper structure.

    By allowing the CFTR protein with the F508del mutation to fold in a more proper form, the medication combination activates the protein, allowing more chloride to pass through. This medicine combination aids in the movement of some chloride by the mutant CFTR protein, although it is not a perfect solution. This chloride migration lessens CF symptoms.

    Missense mutations, in addition to F508del, can occasionally result in processing issues and, in those situations, may be regarded as processing mutations. When an erroneous amino acid is integrated into the CFTR protein due to a change in DNA letters, this is known as a missense mutation. This results in either a decrease in the protein’s function (defective gating or conduction) or its abundance at the cell surface (defective processing).

    Class 3 Mutations in Gating

    The structure of the CFTR protein resembles a tunnel or channel with a gate. When chloride must pass through the channel, the cell can open the gate. The gate remains closed otherwise.

    Gating mutations prevent chloride from passing through by locking the gate in the closed position. By keeping the CFTR channel’s gate open, the medication aids patients with gating mutations. This lessens CF symptoms by allowing chloride to pass through the channel.

    Class 4 Mutations in Conduction

    A mutation in one of the CFTR’s amino acids can occasionally cause the protein to function less properly even when it forms the proper 3-D structure. Chloride must be able to pass through the protein’s channel swiftly and smoothly for CFTR to function properly. Certain mutations alter the channel’s internal geometry, making it more difficult for chloride to pass through. We refer to this type of mutation as a conduction mutation.

    Class 5 Not Enough Protein Mutations

    There is less of the typical CFTR protein on the cell surface as a result of insufficient protein mutations. A tiny quantity of CFTR protein is created, just a small portion of the cell surface protein functions properly, or normal cell surface protein breaks down too quickly, leaving only a small amount of protein left. These are some of the possible causes of this.

    In each instance, the chloride channel only partially or partially functions due to a lack of functional proteins on the cell surface. Missense and splice mutations are two of the many mutations that might result in insufficient protein.

    Issues related to CF?

    Among the complications of CF are:

    • Infections: Bacteria that you are unable to expel from your lungs and airways can be trapped there by thick mucus. Frequent infections may result from this.
    • Congenital bilateral vas deferens absence (CBAVD): Males with this disorder lack the vas deferens, or sperm ducts. If they wish to have biological children, they frequently require the assistance of reproductive treatments.
    • Diabetes: Diabetes associated with cystic fibrosis can be caused by damage to the pancreas.
    • Malnourishment: You may be at risk for malnutrition if you have thick mucus in the intestines and insufficient pancreatic enzymes to aid in digestion.
    • Both osteoporosis and osteopenia: Conditions that cause your bones to become too thin can result from your digestive tract’s incapacity to absorb nutrients.
    • Complications throughout pregnancy: Inadequate nutrition can result from CF’s effects on the digestive system. The chance of pregnancy difficulties may rise as a result. The most frequent complication is preterm birth, or early birth.

    Testing and Diagnosis

    How is a diagnosis of cystic fibrosis made?

    Cystic fibrosis is frequently tested for by medical professionals as part of a newborn screening. A few drops of blood taken from your baby’s heel are used by the providers to conduct this test. Your pancreas produces a substance called immuno-reactive trypsinogen (IRT), which a lab tests for in a blood sample. IRT levels in the blood are greater in CF patients. IRT testing is frequently performed on newborns within a few weeks of their birth.

    IRT levels can be elevated by certain situations, such as preterm birth. A positive IRT test does not, therefore, indicate that your child has cystic fibrosis. Your doctor will order more tests to reach a final diagnosis if your baby’s IRT levels are greater than anticipated.

    The newborn test fails to identify high IRT levels in a person with cystic fibrosis in approximately 5% of instances. It’s also possible that you were born before regular CF screening became accessible. A healthcare professional will conduct a sweat test and, if necessary, additional tests if you or your child exhibit symptoms of cystic fibrosis.

    Cystic fibrosis tests

    • Sweat test: The sweat test calculates how much chloride is present in your perspiration. Those with cystic fibrosis have greater sweat chloride levels. Although it is the most definitive test for CF, individuals with atypical CF may have benign results.
    Sweat test
    Sweat test
    • Genetic examinations: Blood samples are tested for alterations in the genes that cause cystic fibrosis.
    • Imaging tests, such as chest and sinus X-rays, are used by providers to validate or support a diagnosis of cystic fibrosis. CF cannot be diagnosed by imaging alone.
    • Testing for pulmonary function: These tests assess the function of your lungs.
    • Sputum culture: Sputum, or mucus that has been coughed up from your lungs, is sampled by your healthcare professional, who then examines it for microorganisms. Pseudomonas is one of the bacteria that is most frequently discovered in CF patients.
    • A pancreatic biopsy: This can let your doctor know if you have pancreatic damage or cysts.
    • Differential in nasal potential (NPD): The little electrical charge that is often found in the lining of your nose is measured by this test. This charge is produced by ion mobility. Because of the way CF affects their ion channels, people with CF have less ion mobility.
    • Measurement of intestinal current (ICM): To conduct this test, a healthcare professional obtains a sample of rectal tissue. The amount of chloride secreted by the sample is measured by a laboratory.

    Treatment of Cystic Fibrosis

    How is cystic fibrosis treated?

    A cure for cystic fibrosis does not exist. A cystic fibrosis specialist and other healthcare professionals can help you manage the illness and its symptoms. Management entails:

    • Using breathing exercises and tools to break up mucus will help you keep your airways open and clear.
    • Drugs known as CFTR modulators that aid in resolving problems with CFTR proteins.
    • Drugs that lessen particular symptoms.
    • Ensuring that you eat enough of the appropriate kind of calories.
    • Surgery.

    Techniques for clearing the airways

    If you have cystic fibrosis, there are several methods you may assist maintain clear airways:

    Techniques for breathing and coughing.

    You can learn ways to clear your airways and reduce mucus from a physical therapist who specializes in treating CF.

    PEP stands for positive expiratory pressure: PEP devices are worn in your mouth or on your face as a mask. By keeping your airways open and pushing mucus out, they create resistance that makes it harder to exhale. Certain PEPs, such as oscillating PEP devices (Flutter), vibrate to break up mucus.

    PEP Device
    Acapella

    Vests for airway clearance: An inflated vest that fastens to a machine is known as an airway clearance vest or high-frequency chest wall oscillation device. To break up mucous, the vest vibrates.

    The Active Cycle of Breathing Techniques (ACBT) is a set of breathing techniques that include thoracic expansion, forceful expiration (huffing), and breathing regulation in order to mobilize and remove secretions.

    Active cycle of breathing
    Active cycle of breathing

    Drainage of Posture
    Postural drainage, which involves positioning the body so that secretions can gravitationally flow from the smaller airways into the major airway, is a crucial component of cystic fibrosis treatment. Which particular postural drainage positions are required will be taught and advised by the physical therapist.

    Vibration and Percussion
    These methods are employed to mobilize and loosen secretions. The physical therapist can suggest sitting, lying on either side, or on your front or back.
    The technique known as “chest clapping,” or percussion, involves rhythmically and firmly clapping the chest over a layer of clothing or a towel for 15 to 20 seconds, pausing for at least five seconds, over the area that needs to be drained.

    At the conclusion of the position, vibrations or “chest shaking” are performed. As the patient exhales, it describes brief, rhythmic squeezes on the chest wall.

    Chest-physiotherapy
    Chest-physiotherapy

    Inhibitors of CFTR for cystic fibrosis

    Drugs known as CFTR modulators can help fix problems with proteins produced by mutant CFTR genes and boost the quantity of functional proteins on the surface of your cells. They don’t treat cystic fibrosis. However, some people have had significant improvements in their life expectancy and symptoms.

    Nevertheless, some CF patients are ineligible for or unable to tolerate modulator treatments.

    Among the CFTR modulators are:

    • Ivacaftor
    • Ivacaftor/lumacaftor,
    • (ivacaftor/tezacaftor)
    • (ivacaftor/tezacaftor/elexacaftor)

    Additional drugs for people with cystic fibrosis

    Additionally, your doctor can recommend drugs to control symptoms, treat infections, or lessen inflammation. These consist of:

    Antibiotics. Antibiotics may be prescribed by your doctor for the prevention or treatment of infections.

    Bronchodilators inhaled. Through the opening and relaxation of your airways, bronchodilators facilitate breathing.

    Hypertonic saline was inhaled. Saline solutions’ salt draws water, and which thins mucus and facilitates its removal.

    Medications that reduce inflammation. These drugs lessen edema. These consist of nonsteroidal anti-inflammatory medications (NSAIDs) and corticosteroids.

    Enzymes found in the pancreas. These aid in food digestion and nutrient absorption.
    stool softeners. These can ease constipation and facilitate bowel movements.

    The diet for cystic fibrosis

    Your dietary requirements differ from those of a person without cystic fibrosis (CF). Enzymes that aid in food digestion may not be produced or secreted by your pancreas if you have cystic fibrosis.
    This indicates that nutrients and fats from meals are not completely absorbed by your intestines.

    A certified dietician or your CF specialist could suggest a nutrition plan. It might consist of:

    Consuming more calories every day. Compared to someone without CF, this could be up to twice as many calories.

    Consuming foods heavy in fat. This is crucial for increasing your intake of fat-soluble vitamins.

    Keeping a weight that is higher than normal from an early age. Growing taller and having bigger lungs can assist alleviate symptoms as you get older.

    Taking pills of an enzyme supplement. Supplemental enzymes aid in meal digestion.
    consuming more salt. This aids in replenishing the extra salt lost through perspiration. This is particularly crucial when exercising and in hot, muggy weather. Find out from your provider how much salt you require on a daily basis.

    Cystic fibrosis surgeries

    If you have cystic fibrosis or one of its consequences, you might require surgery. These could consist of:

    • Either sinus or nasal surgery.
    • Surgery to eliminate obstructions in the bowel.
    • Lung replacement.
    • Transplantation of the liver

    Prevention

    Is CF preventable?

    It cannot be prevented because you are born with cystic fibrosis. Ask your healthcare practitioner regarding prenatal genetic testing or the likelihood that your biological children will have cystic fibrosis (CF) if you carry a variation of the CFTR gene.

    Prognosis

    The prognosis for cystic fibrosis has improved as a result of improved access to healthcare, better treatment, and earlier detection through screening. In the United States, children with cystic fibrosis had a median survival age of six months in 1959.

    The predicted survival rates for men and women in 2010 were 40 and 37 years, respectively. The median lifespan in Canada rose from 24 years in 1982 to 47.7 years in 2007. When treated at specialty clinics, people with CF born in the United States in 2016 are expected to live for 47.7 years.

    In recent years, life expectancy has quickly increased due to the introduction of novel medications, such as CFTR modulators.

    Given the low number of deaths among people with cystic fibrosis each year, projections of the median expected life expectancy in 2020 were imprecise, but it was approximately 59 years.

    As of 2009, 92% of CF patients over the age of 18 in the US had completed high school, 67% had at least some college education, 15% had a disability, 9% were unemployed, 56% were single, and 39% were married or cohabitating.

    Quality of life

    Managing chronic conditions can be challenging. CF is a long-term disease that impacts the respiratory and digestive systems, leading to persistent respiratory infections and widespread malnourishment.

    The lungs’ airways get blocked by the thick secretions, which frequently results in inflammation and serious lung infections. When it is affected, it impacts a person with cystic fibrosis’s quality of life and their capacity to perform daily duties.

    CF patients can improve their quality of life in a variety of ways. The goal of exercise is to improve lung function. A CF patient’s quality of life can be greatly enhanced by including an exercise program into their daily routine.

    Although there is currently no known cure for cystic fibrosis (CF), a variety of drugs are used to treat the condition. These include steroids, bronchodilators, mucolytics, and antibiotics. These drugs are used to enlarge airways, reduce inflammation, fight lung infections, and loosen mucus, respectively.

    FAQs

    What is cystic fibrosis primary cause?

    Mutations in a gene known as the cystic fibrosis transmembrane conductance regulator (CFTR) produce the hereditary disease known as cystic fibrosis. The CFTR protein is instructed by the CFTR gene. A person will have cystic fibrosis if they inherit two copies of a mutant CFTR gene, one from each of their biological parents.

    In what way is cystic fibrosis diagnosed?

    A sweat test looks for elevated chloride levels in your perspiration. The most common test for identifying cystic fibrosis is the sweat test. It can be used to confirm a positive diagnosis from a newborn screening or if you or your kid exhibit symptoms that might point to cystic fibrosis.

    What are CF early warning indicators?

    Fever, possibly accompanied by sweating at night. digestive problems such constipation, persistent (long-term) diarrhea, or excruciating stomach discomfort. lung and sinus infections. Yellowing of the skin and eyes for an unusually extended period of time after delivery is known as jaundice.

    Which bodily parts are impacted by cystic fibrosis?

    Thick mucus produced by cystic fibrosis clogs the intestines, pancreas, and lungs. Malnutrition, stunted growth, recurrent respiratory infections, breathing difficulties, and chronic lung disease might result from this. Every state in the US mandates CF testing for infants.

    Is hair loss a symptom of cystic fibrosis?

    Changes in our bodies caused by CF and the drugs it demands are among the issues that many of us with the condition face. Common problems that can arise include bruises, acne outbreaks, hair loss, water retention, and bloating.

    When does CF begin to manifest?

    The majority of children are now diagnosed with cystic fibrosis (CF) within the first month of their lives, frequently before they exhibit any symptoms, thanks to a rise in newborn screening programs. Children with cystic fibrosis are often diagnosed by the age of two.

    Is there a birth CF test?

    At five days of age, newborns are offered newborn screening, often called the heel prick test, to check for a number of rare but dangerous illnesses, including cystic fibrosis (CF). A positive newborn screening result may indicate that a baby has cystic fibrosis (CF), but follow-up testing may not confirm a diagnosis.

    Reference

    • Types of CFTR mutations. (n.d.). Cystic Fibrosis Foundation. https://www.cff.org/research-clinical-trials/types-cftr-mutations
    • Cystic fibrosis. (2025, February 7). Cleveland Clinic. https://my.clevelandclinic.org/health/diseases/9358-cystic-fibrosis
    • Seo, C. (2023, January 13). Physical Therapy management of cystic fibrosis. Scandinavian Physical Therapy Center, Dubai. https://scandinavianphysical therapy center.com/blog/physical therapy -management-of-cystic-fibrosis
  • 15 Best Exercise for Dancer’s Heel

    15 Best Exercise for Dancer’s Heel

    Exercise for a dancer’s heel is an important part of your entire treatment plan, in addition to pain management, rest, and physical therapy.

    Achilles tendinitis, also name as dancer’s heel, is a common ailment among sports and dancers. You must include certain activities in your program if you want to effectively treat this illness.

    Introduction:

    Achilles tendinitis, also referred to as a dancer’s heel, is a common injury among dancers, especially those who perform in ballet, jazz, and modern forms. The Achilles tendon, a strong band of tissue that connects the calf muscles to the heel bone, is irritated. Overuse, poor technique, incorrect footwear, or a sudden rise in physical activity are common causes of this injury.

    Bone formation in the rear of the ankle causes compression of the ankle. A sprained ankle or tissue trapped between the ankle and the heel may be the cause of the pain. Compression of the soft tissue at the rear of the ankle causes inflammation and pain. Ballet dancers frequently suffer from back impingement syndrome.

    Since the ankle is the joint that connects the foot to the foot and provides stability for the lower limb, it is important to comprehend it when discussing dance injuries. It is among the body parts that dancers get injuries to the most frequently.

    In practically every dancing move, the Achilles tendon is essential, particularly when lifting onto the toes, leaping, or jumping. Repetitive strain and stress on the tendon over time can result in micro-tears, which can cause pain, inflammation, and decreased range of motion. A dancer’s heel can cause severe pain and potentially irreversible tendon damage if treatment is not received.

    Causes:

    Dancer’s heel is a term that refers to heel pain that dancers frequently feel as a result of overuse, repeated motion, or poor technique. It is frequently associated with heel spurs, plantar fasciitis, and Achilles tendinitis.

    The primary causes of a dancer’s heel are listed below:

    • Repetitive stress or overuse

    High-impact motions like jumping, spinning, and toe-balancing are frequently performed by dancers. Inflammation or microtears in the tissues may result from repeatedly applying pressure on the heel without enough rest.

    • Poor Footwear

    Incorrect support from poorly fitting or worn-out dance shoes might increase the risk of heel pain.

    • Incorrect Method or Position

    Incorrect technique or poor alignment when dancing can put excessive strain on the heels, ankles, and feet.

    • Overwhelming Pressure from Ballet Pointe Work

    Ballet dancers who frequently perform on pointe, or their toes, may feel a great deal of strain on their heels, metatarsals, and toes.

    • High Arches or Flat Feet

    High arches or flat feet are examples of abnormal foot structures that might change how pressure is transferred during dancing moves.

    • Excessive training or not enough sleep

    Dancers frequently put their bodies through intense practice, sometimes without allowing enough time for relaxation and recovery.

    Signs and symptoms:

    Depending on the situation, pain is frequently felt at the rear or bottom of the heel.

    • Redness or Swelling

    When tissues like the plantar fascia or Achilles tendon get irritated, swelling may develop around the heel.

    • Sensitivity to Touch

    When pressure is exerted, such as when standing on tiptoe, pressing on the heel, or performing specific dancing steps, the heel may feel sensitive or sore. Plantar fasciitis or Achilles tendinitis are frequently linked to tenderness.

    • Morning Stiffness

    Stiffness in the heel, especially after waking up or after being off their feet for a long time, is one of the typical symptoms of Dancer’s heel. When you have plantar fasciitis, the tissues on the bottom of your foot tighten when you’re at rest.

    • Restricted range of motion

    Due to pain and tightness in the affected area, the ankle or foot’s range of motion may noticeably decrease.

    • Having trouble walking or bearing weight

    As it is difficult to place weight on the heel or foot in severe cases of a dancer’s heel, it might be difficult to walk or stand normally.

    Benefits of Exercises:

    Dancer’s heel exercises can be highly beneficial for both prevention and recovery.

    The following are the primary advantages of engaging in exercises created especially for this condition:

    • Decreased Inflammation and Pain

    Pain and inflammation can be decreased by targeted activities that release tension in the muscles and tissues surrounding the heel, particularly stretching and strengthening.

    • Improved Posture and Alignment

    You can lessen unnecessary pressure on your heel by aligning your legs, ankles, and feet with strengthening and stretching activities.

    • Preventing Further Injuries

    Frequent workouts can lower the risk of other foot ailments and help prevent Dancer’s heel from returning.

    • An increase in flexibility

    Consistent stretching exercises help improve plantar fascia, Achilles tendon, and calves’ flexibility.

    • Increased Strength

    Strengthening activities increase foot and ankle stability, which helps better support the heel and lessen stress.

    • Better Circulation of Blood

    Exercises that require ankle and foot movement help improve blood flow to the affected area, speeding up the healing process and relieving stiffness.

    • Healing and Rehabilitation

    Exercise strengthens muscles and promotes tissue repair, making it a safe way to recover from an injury.

    • Dancers’ Improved Endurance

    In addition to strengthening the heel, strengthening exercises also improve foot endurance in general.

    • Improvement of Balance and Coordination

    Balance and coordination are also key components of many dancers’s Heel exercises, which help dancers prevent falls and other injuries.

    Exercise for Dancer’s Heel:

    The Achilles tendon can be strengthened, made more flexible, and allowed to heal with a few specific exercises. These exercises are particularly important to dancers recovering from the dancer’s heel and can be done daily.

    Calf Stretch

    By increasing the Achilles tendon and calf muscle flexibility, this exercise lowers the chance of injury.

    • Place your hands on the wall for support as you face it.
    • With the front leg slightly bent at the knee and the back leg straight, place one foot behind the other.
    • Both feet should remain flat on the ground with their toes pointed forward.
    • Maintaining your rear heel on the floor, gently lean against the wall.
    • Your back calf, or the leg behind you, should feel stretched.
    • Hold this position for a few seconds.
    • Then return to your neutral position.
    • Then relax.
    • Repeat this exercise 5 to 10 times.
    • Repeat the stretch with the other leg.
    Standing Calf Stretch
    Standing Calf Stretch

    Eccentric Heel Drops

    Achilles tendinitis can be effectively treated using eccentric workouts, which cause the muscle to extend under tension. The Achilles tendon and calf muscles are the targets of heel drops.

    • Place your heels over the edge of a stair or other raised surface.
    • For balance during this phase, you may grasp the wall or railing.
    • To begin, use both legs to get up onto your toes.
    • For balance during this phase, you may grasp the wall or railing.
    • Control the action as you carefully lower your heels down below the step level.
    • For best results, proceed carefully during this eccentric (lowering) phase; try for three to five seconds.
    • If you are targeting a single leg, the lowering action should only be performed by the affected leg.
    • After lowering your heel as much as is comfortable, raise yourself back up to the starting position using both legs.
    • Then relax.
    • Repeat this exercise 5 to 10 times.
    heel-drop
    heel-drop

    Towel Stretch

    Ankle and Achilles tendon flexibility can be strengthened with a towel stretch.

    • With your legs out in front of you, take a seat on the floor.
    • Take a resistance band, towel, or belt and fold it in half.
    • To stretch a leg, wrap the towel around the ball of one foot.
    • Using both hands, grasp the towel’s ends.
    • Maintaining a straight knee, carefully pull the towel in your direction.
    • The Achilles tendon, calf, and rear of your lower leg should all feel stretched.
    • Hold this position for a few seconds.
    • Then return to your neutral position.
    • Then relax.
    • Repeat this exercise 5 to 10 times.
    towel stretch
    towel stretch

    Standing Calf Raises

    The Achilles tendon is supported and the calf muscles are strengthened by this easy exercise.

    • Place your feet hip-width apart and stand upright.
    • Hold onto a chair, railing, or wall for balance, or keep your arms at your sides.
    • Elevate your heels as high off the ground as you can comfortably while slowly rising onto the balls of your feet.
    • Instead of using your toes, concentrate on pressing through the heel of your feet.
    • To fully activate your calf muscles, hold this position for a few seconds.
    • Return to the starting posture by lowering your heels carefully and slowly, without jerking or moving too quickly.
    • Then relax.
    • Repeat this exercise 5 to 10 times.
    calf-raise
    calf-raise

    Foam Rolling

    Recovery can be helped by foam rolling the calf muscles to reduce tension and increase blood flow.

    • Place a lacrosse ball or a tiny, soft foam roller beneath your foot’s arch while you sit on the floor.
    • Beginning at the heel and working your way toward the toes, gently roll the foam roller beneath your foot.
    • Roll for one to two minutes while applying light to moderate pressure.
    • Stop and apply pressure to a particularly tight area for 20 to 30 seconds.
    • If necessary, you can also exert greater pressure with the other foot.
    • Then return to your neutral position.
    • Then relax.
    • Repeat this exercise 5 to 10 times.
    Foam Rolling
    Foam Rolling

    Ankle circles

    • You can either lie down with your legs outstretched or sit comfortably in a chair with your feet flat on the floor.
    • You can also stand and balance on one leg, but if you’re just starting, it’s easier to perform the exercise while seated.
    • While maintaining a straight and relaxed leg, raise one foot off the ground.
    • You can do this exercise without using your hands, but if you need assistance guiding the movement, you can use your hands to hold your foot.
    • Beginning at the ankle joint, slowly begin to rotate your foot in a circular motion.
    • Make the circle as big as you can without feeling uncomfortable by maintaining a smooth and controlled motion.
    • Make ten to fifteen circles in one direction, then switch it up and do ten to fifteen circles in the other direction.
    • Then return to your neutral position.
    • Then relax.
    • Repeat this exercise 5 to 10 times.
    • Make sure to work both ankles by doing the same procedure with the opposite foot.
    ankle-circle
    ankle-circle

    Single leg balance

    • Keep your posture strong and upright by keeping your feet hip-width apart and standing tall.
    • To improve stability, use your core muscles.
    • Try to maintain an upright posture as you slowly raise one foot off the ground while raising your knee to your chest or out in front of you.
    • Focus on balancing on your standing leg while keeping it slightly bent (not locked out).
    • Hold this position for a few seconds.
    • Keep your body still and avoid tilting or shaking.
    • Avoid being inclined to one side and try to maintain a level hip position.
    • Return to the beginning position by carefully lowering the raised leg back to the floor.
    • Then relax.
    • Repeat this exercise 5 to 10 times.
    • Switch to your other leg and do the exercise.
    Single leg balance
    Single leg balance

    Marble pickup

    • You can either sit on a chair with your feet flat on the floor or stand with your feet hip-width apart.
    • You can also sit on the floor with your legs out in front of you for a more challenging position.
    • Arrange small stones or small objects like pencils or paper clips on the floor in front of you.
    • Depending on how skilled you are, you can start with five to 10 marbles.
    • One marble at a time, pick it up with your toes without using your hands.
    • To raise the marble off the ground, curl your toes and grasp it.
    • After picking up a marble, gently set it in a cup, bowl, or other container (for convenience, keep the container near your feet).
    • Until every stone has been picked up, keep picking them up one at a time and putting them in the container.
    • For a more difficult session, try picking up the marbles as fast as you can, or try increasing the quantity.
    • Then return to your neutral position.
    • Then relax.
    • Repeat this exercise 5 to 10 times.
    marble pickup
    marble pickup

    Ankle plantarflexion

    • Sit on the floor
    • Keeps your leg straight.
    • Take a resistance band and wrap it around one foot’s ball.
    • Hold the resistance band’s ends in your hands or firmly grasp the opposite end.
    • The resistance band should be tightened before beginning the exercise.
    • As you set up, you should feel some initial strain in the band.
    • Maintain a straight leg and a slightly bent knee (avoid locking your knee).
    • Point your toes down toward the floor slowly, as though you were pushing the gas pedal on a vehicle.
    • The movements need to be gradual and slow.
    • As you point your foot, feel your calf muscles contract as you attempt to move through the entire range of motion.
    • To get the most contraction, point your toes as far down as you can and then hold them there for a few seconds.
    • Maintaining control of the action, gradually relax the strain on your foot and go back to the beginning position.
    • Then relax.
    • Repeat this exercise 5 to 10 times.
    ankle-plantar-flexion-exercises
    ankle-plantar-flexion-exercises

    Ankle dorsiflexion

    • With your legs straight out in front of you, take a seat on the floor.
    • Wrap the top of your foot, right below the toes, with a resistance band.
    • Use your hands to hold the other end of the resistance band, secure it to a solid object, or have a partner hold it for you.
    • Before you begin, make sure the resistance band is taut, which will create stress in the band.
    • Maintain a straight leg and a flexed foot, with the toes first facing in your direction.
    • As though you were attempting to move the top of your foot closer to your torso, slowly pull your toes upward toward your shin.
    • As you attract the foot upward, you should feel your shin muscles (tibialis anterior) contract.
    • The action should come from your ankle joint.
    • Make sure you are raising your foot as much as your mobility allows as you move through the entire range of motion.
    • To get the most contraction out of your tibialis anterior, hold your toes as high as you can for a few seconds.
    • Release the tension gradually while keeping control of the movement and putting your foot back in the beginning position.
    • Then relax.
    • Repeat this exercise 5 to 10 times.
    Resisted Ankle dorsiflexion
    Resisted Ankle dorsiflexion

    Toe splay

    • Begin by standing comfortably on the floor.
    • Make sure your toes are pointed forward and your feet are comfortable.
    • Try to gradually create space between each toe by spreading them apart as far as you can.
    • Instead of forcing them all at once, try to isolate each toe and spread them one at a time.
    • Consider making the distance between your toes as large as you can.
    • Hold the stance for a few seconds (or longer if you can) after spreading your toes apart.
    • Keep yourself in check during the exercise and refrain from over-stretching your toes if doing so makes them uncomfortable.
    • Return your toes to their neutral position gradually.
    • Then relax.
    • Repeat this exercise 5 to 10 times.
    Toe-splay
    Toe-splay

    Planter fascia strech

    • With your knees bent at a nearly 90-degree angle and your feet flat on the floor, take a seat comfortably.
    • To reach the bottom of the foot, cross one leg over the other so that the affected foot rests on the thigh on the other side.
    • Gripping the toes with the hand on the same side as the stretched foot, gradually draw them back towards your shin.
    • This exercise aids in stretching your foot’s arch muscles and plantar fascia.
    • You should experience a stretch throughout the arch of your foot, particularly in the plantar fascia region (on the bottom of the foot), as you bring your toes back.
    • To prevent the tissue from being overstretched, keep the stretch light.
    • Feel a light pull in the arch of your foot as you hold the stretch for a few seconds.
    • Breathe deeply and let yourself relax while you perform the stretch.
    • Then return to your neutral position.
    • Then relax.
    • Repeat this exercise 5 to 10 times.
    Sitting Plantar Fascia Stretch
    Sitting Plantar Fascia Stretch

    Lunges

    • With your shoulders back, your core strong, and your feet hip-width apart, take a strong posture.
    • You can maintain your balance by keeping your hands on your hips or out in front of you.
    • Step forward with one leg while lowering your body so that your knee and ankle remain in alignment.
    • Bend both knees while keeping your upper body straight and avoiding excessive forward tilt.
    • Both knees should be bent at a 90-degree angle to lower your body.
    • Although it shouldn’t touch the floor, the back knee should approach it.
    • Make sure your front knee doesn’t go past your toes and that your front thigh is parallel to the floor.
    • To put your feet back together and go back to the beginning, push through the heel of your front foot.
    • Use the opposite leg to lead the movement as you switch legs.
    • Then relax.
    • Repeat this exercise 5 to 10 times.
    Lunge Stretch Exercises
    Lunge Stretch Exercises

    Towel curl

    • With your feet flat on the ground and your knees bent at a 90-degree angle, take a seat on a chair or bench.
    • A little towel should be placed on the floor in front of you.
    • Ensure that the towel is long enough for you to curl it.
    • For this exercise, make sure you are barefoot so you can feel your foot muscles contracting.
    • Place one foot’s toes on the towel’s edge while keeping your heel flat on the ground.
    • Under your foot, the towel should be spread flat.
    • By flexing and grasping with your toes, you may curl the towel in your direction and pull it in.
    • Try to grasp the towel with just your toes and pull it toward you, using your foot’s plantar flexor muscles.
    • Hold the towel in place for a few seconds after it has completely curled beneath your foot.
    • Then return to your neutral position.
    • Then relax.
    • Repeat this exercise 5 to 10 times.
    Towel-curl
    Towel-curl

    Sand walking

    • Look for a sandpit or beach with loose, soft sand.
    • If you want to make it more intense, try to find deeper, dry sand because walking on firmer sand (nearer the waterline) is easier.
    • It works best when you’re walking barefoot on the sand because it helps your foot muscles contract.
    • Start by moving across the sand at a regular speed.
    • As you walk, pay attention to your posture, maintaining a straight back and an engaged core.
    • To change up the difficulty, walk quickly, moderately, and slowly.
    • Alternate your gait; walking in a straight line, sideways, or backward will help you strengthen your muscles and increase your coordination.
    • Avoid falling over uneven sand by walking with your feet raised higher than you would on solid ground.
    • Your calves, feet, and ankles will have to work harder to complete every move due to the resistance of the sand.
    • As your strength and endurance improve, progressively extend the duration of your walk from ten to fifteen minutes.
    • For maximum benefits, try to walk two or three times a week.
    Sand-walking
    Sand-walking

    What safety measures should be taken when exercising?

    It’s important to take safety measures when managing or preventing a Dancer’s heel to prevent more injuries and guarantee healing.
    The following are important safety guidelines to remember:

    • Properly Warm Up

    To improve blood flow to the muscles and get your body ready for exercise, warm up your entire body with dynamic stretches. To prevent tension around the heel, concentrate on extending the calves, hamstrings, and feet.

    • Pay attention to your body.

    Keep your eye out for any sudden pain in your heel. Take a break and give yourself time to heal if you feel pain while dancing or after. Chronic harm can result from ignoring the pain.

    • Take a Break and Get Well

    Do not put too much strain on your body by practicing dancing too much. To give your foot and heel muscles time to heal, include rest days in your daily routine. Rest is essential for healing because overuse may worsen the disease.

    • Put on the Right Footwear

    Select dance shoes that offer sufficient stability, cushioning, and arch support. Stay away from overly tight shoes, worn out, or provide little support. If you need more heel and arch support, think about getting custom orthotics.

    • Use the Proper Technique

    To make sure you’re employing the right alignment and posture throughout movements, work with a dancing instructor. When you leap, try not to land too hard or place too much weight on your toes since these can put more strain on your heel.

    • Regularly stretch and strengthen.

    Include targeted exercises that target strengthening your feet, ankles, and calves. To ease pain, stretch your Achilles tendon and calves every day. Better support and less pressure on the heel are provided by strong muscles in these regions.

    • Use ice after intense.

    To lessen swelling and inflammation, apply ice to the injured heel for 15 to 20 minutes after dancing or engaging in any high-impact exercise. To avoid freezing from direct contact with the skin, make sure to cover the ice with a cloth.

    • Seek Early Advice from a Healthcare Professional

    Consult a physician, podiatrist, or physical therapist if you are in constant pain or difficulty. They can offer specialized treatment regimens, including physical therapy, specially designed exercises, and, if required, referrals for additional procedures like injections or surgery.

    By following these safety measures, you can lessen your chance of developing a Dancer’s Heel and better manage the pain you already have, letting you resume dancing with a lower risk of getting hurt again.

    When should you stop practicing Dancer’s Heel?

    Understanding when to stop using a Dancer’s Heel for dancing or practice is important for avoiding more injuries and allowing a full recovery.

    Key signs that it’s time to pause and get some rest or medical counsel include the following:

    • Severe or Sharp Pain

    Severe pain may be a sign of a more serious injury, like a heel spur or a tendon tear.

    • Pain That Remains After Rest

    It indicates that the issue is either becoming worse or not getting better if the pain persists even after you’ve rested.

    • Having Trouble Putting Weight on the Heel

    It’s time to quit practice if you can’t stand or walk normally without experiencing pain. Further harm may result from bearing weight on the damaged heel.

    • Pain That Gets Worse With Time

    Pain that gets worse over time may indicate that the injury is not getting better or that you are making it worse.

    • Limited Progress Even with Self-Care

    If you have tried every self-care technique (ice, rest, stretches) and nothing has changed, stop dancing and get a more complete evaluation from a medical professional.

    When to Get Medical Help:

    A physical therapist or orthopedic expert should be consulted if you have chronic pain, edema, or stiffness that doesn’t go away with rest or exercise. In addition to developing a personalized treatment plan that may involve advanced techniques like ultrasound, manual therapy, or, in rare instances, surgery, they can also help with evaluating the extent of the injury.

    Summary:

    Any dancer may find that a dancer’s heel is a painful injury, but it may be prevented or successfully treated with the right exercises, care, and technique. Exercises that improve mobility, strength, and flexibility are essential for both prevention and recovery.

    Rest, ice, stretching, strengthening exercises, and suitable footwear are usually part of the treatment. Medical treatments such as physical therapy, orthotics, or even injections may be required in more severe situations. Avoiding pushing through heel pain could make it worse; instead, focus on treating the underlying reason.

    Getting advice from a healthcare professional to identify the best rehabilitation plan is always a smart idea if you’re dealing with chronic pain.

    FAQ:

    Dancer’s Heel: What is it?

    Ballet, jazz, and other dancing styles that demand a lot of footwork can induce heel pain, which is known as “dancer’s heel.” Tight calf muscles, plantar fasciitis, or Achilles tendinitis are some of the possible causes of this condition.

    Which dancer’s heel workouts are the best?

    Calf Stretch
    Towel Stretch
    Heel Raises
    Foot Flexes

    At what frequency should I perform these exercises?

    Do the exercises two or three times a day at the very least, especially if you are healing from an injury. To increase strength and flexibility, regularity is essential.

    With Dancer’s Heel, can I continue dancing?

    Depending on how bad the pain is, yes. Resting and consulting a healthcare provider is essential if you’re feeling severe pain. If the underlying problem fails to be solved, dancing can get worse. It could be beneficial to cross-train with low-impact exercises like cycling or swimming.

    What kind of shoes should I wear?

    Wearing suitable shoes is essential. Shoes with enough arch support and cushioning should be chosen by dancers. Alignment problems that can be causing heel pain can also be resolved with the use of custom orthotics.

    What happens if the pain remains?

    See a medical expert, such as a podiatrist or physical therapist, if the pain doesn’t go away with rest, activity, and suitable footwear. After evaluating the problem, they could suggest other therapies like massage, ultrasound, or orthotics.

    Does icing help with Dancer’s heel?

    Actually! After dancing, icing your heel for 15 to 20 minutes can help relieve pain and inflammation. To prevent freezing to the skin, insert a piece of cloth between your skin and the ice pack.

    Can a Dancer’s Heel be alleviated by stretching?

    The prevention and treatment of Dancer’s heel do require stretching. Excessive strain on the heel can result from tight muscles, especially in the calf and foot. Frequent stretching relieves tension.

    What signs and symptoms indicate Dancer’s heel?

    The heel’s back or bottom hurts
    Swelling in the area of the heel
    Pain that gets worse after standing for Extended periods or dancing quickly
    Heel stiffness and soreness when you wake up or after sleeping, 
    Pain that gets better with movement but comes back later

    What is the cause of the dancer’s heel?

    Typical reasons include of:
    Overuse: Repetitive motions, excessive hopping, and balancing can cause heel pain.
    Tight muscles: Especially in the arches of the feet or calves, which put more strain on the heel.
    Wearing shoes that are excessively tight or don’t provide enough support can cause heel pain.
    Incorrect technique: Heel stress can be worsened by poor posture or foot alignment during dancing.

    What are the best ways to treat Dancer’s Heel?

    Some alternatives for treatment are:
    Rest: Avoid high-impact exercises and give the heel time to heal.
    Applying ice for 15 to 20 minutes can help relieve inflammation.
    Stretching Exercises: To increase flexibility, regularly stretch your calves and Achilles tendon.
    Wear shoes that offer enough stability, cushioning, and arch support.
    Orthotics: Custom insoles can assist equally in distributing pressure and improving foot alignment.

    How can a Dancer’s Heel be avoided?

    Warm-up and cool-down: Injuries can be avoided by properly warming up before dancing and stretching afterward.
    Exercises to build muscle: To avoid putting undue tension on the heel, work on strengthening the muscles in the ankle and foot.
    Footwear: Select dance shoes that fit properly and offer sufficient arch support.
    Take breaks: To avoid overuse injuries, refrain from excessive activities and schedule rest periods.

    For Dancer’s heel, should I consult a physician?

    It is advised to consult a physician or physical therapist if pain worsens or if it does not go away after resting, stretching, and other self-care techniques. They can assist in diagnosing the ailment, suggesting a course of treatment, and looking for underlying problems such as plantar fasciitis or tendinitis.

    Can I apply cold or heat therapy?

    In general, cold therapy (ice) works better to reduce pain and inflammation, especially after exercise. Although it should be used carefully, heat therapy can help loosen up tense muscles. Use cold to reduce inflammation and heat to relax muscles.

    References:

    • Insanity, D. January 20, 2025. Strong ankle and foot exercises are essential for all dancers. Dancing Madness. https://www.danceinsanity.com/tutorial/strong-ankle-foot exercises/
    • Prajapati, D. September 16, 2023. Samarpan Physio’s Top 22 Dancer’s Heel Exercises. Samarpan Clinic for Physiotherapy. #google_vignette https://samarpanphysioclinic.com/22-best-exercise-for-dancers-heel
    • Training tailored to dance. February 10, 2025. Seven HEELS 👠 Dancer Exercises [Video]. YouTube. SSmXP5OmZrA https://www.youtube.com/watch?v
    • Spencer, R. J. December 10, 2024. Ballet dancers’ heel discomfort in Southern California ankle and foot. Foot and Ankle Specialists in Southern California. Heel pain in ballet dancers: https://socalfootandankle.com/
    • Dancer-Fitness.Com (May 18th, 2019). Use these three moves to improve the dancer’s balance and ankle strength. Dancer-Fitness.com. These three moves will help dancers improve their ankle strength and balance: https://dancer-fitness.com/
    • Take care of Dancer’s heel right now with a skilled podiatrist in Idaho. (undated). Rocky Mountain Ankle & Foot. Treat dancer’s heel now: https://www.rockyfootandankle.com/library/
    • Image 2, Achilles Tendon Eccentric Exercises | London Foot and Ankle. (n.d.). https://www.londonorthopaedicsurgery.co.uk/therapies-exercise-regimes/achilles-tendon-eccentric-exercises/
    • Image 5, March 2, 2021; Thomas, Z. Can plantar fasciitis be alleviated by foam rolling? Pulseroll. https://pulseroll.com/blogs/blog/is foam rolling beneficial for plantar fasciitis?

  • Dolichocephaly

    Dolichocephaly

    Dolichocephaly: What is it?

    Dolichocephaly is a condition where the head is longer than usual in relation to its width, resulting in an elongated skull shape. It can be congenital or develop due to external factors, such as prolonged positioning in infants. In some cases, it is associated with genetic conditions like craniosynostosis. Treatment depends on the cause and may involve repositioning techniques or helmet therapy in infants.

    In some cases, variables that impact skull growth during fetal development can be linked to dolichocephaly. Dolichocephaly may also be more likely to occur in babies who are born preterm or who experience unusual pressure on their heads after birth.

    Causes of Dolichocephaly:

    Premature fusing of the skull sutures can result in dolichocephaly, which causes aberrant development of the head shape.

    Dolichocephaly can be caused by genetic reasons, as some inherited features affect the growth and shape of the skull.

    During fetal development, an intrauterine restriction may cause dolichocephaly, which alters the shape of the skull in the womb.

    Dolichocephaly, which changes the form of the skull, can occasionally result from prolonged pressure on the baby’s head during birthing.

    Individuals may experience dolichocephaly as a result of certain medical diseases, such as craniosynostosis, a disorder in which the skull sutures close too soon.

    Dolichocephaly Types:

    Dolichocephaly comes in various forms, such as true dolichocephaly, posterior dolichocephaly, and anterior dolichocephaly. The front portion of the skull elongates in anterior dolichocephaly, whereas the back part elongates in posterior dolichocephaly. An overall extension of the entire skull is referred to as true dolichocephaly.

    These differences can have a variety of underlying reasons and are occasionally linked to specific illnesses or developmental disorders.

    • A long, thin head shape is a characteristic of primary dolichocephaly.
    • External events or a variety of medical disorders might cause secondary dolichocephaly.
    • A lengthy head shape that is defined by genetics is known as true dolichocephaly.
    • When cranial sutures close too soon, acquired dolichocephaly may result.
    • Pressure on the baby’s head for an extended period might cause positional dolichocephaly.
    • Certain genetic syndromes are linked to syndromic dolichocephaly.
    • There are no underlying genetic disorders associated with non-syndromic dolichocephaly.
    • Genetic and acquired variables may play a role in mixed dolichocephaly.

    What Signs Indicate Dolichocephaly?

    An extended head shape, potential facial asymmetry, and a high forehead are some of the indications of dolichocephaly, a disorder in which the head form is longer than usual. Some people with dolichocephaly may have trouble rotating their heads or laying flat, among other head placement problems.

    In extreme situations, neurological problems or developmental delays may also manifest. It’s advised to get evaluated by a healthcare professional if you or a loved one exhibits any of these symptoms to decide on the best course of action.

    One of the most obvious symptoms of dolichocephaly is an irregular head shape, where the skull is longer than usual.

    Infants with dolichocephaly may exhibit delayed developmental milestones, such as sitting up or crawling.

    Because of the increased pressure inside the skull, dolichocephaly can cause headaches, especially in the rear of the head.

    People with dolichocephaly may experience vision issues, such as double vision or trouble focusing.

    Dolichocephaly may be linked to speech difficulties, such as problems with articulation or language development.

    Risk elements of Dolichocephaly:

    Numerous risk factors can lead to dolichocephaly, a disorder marked by an abnormally long skull shape. Among these is genetic predisposition, which makes some families more susceptible to dolichocephaly. Furthermore, this issue may potentially be exacerbated by intrauterine limitations during fetal development, such as a lack of space in the womb.

    Other possible risk factors for dolichocephaly include premature birth, specific medical problems that impact skull growth, and environmental variables such as maternal smoking during pregnancy. Early detection and effective treatment of dolichocephaly can be facilitated by an understanding of these aspects.

    Dolichocephaly may become more likely in infants who spend a lot of time in a supine position.

    Newborns may develop dolichocephaly as a result of premature birth and related conditions.

    Dolichocephaly can be more likely to be inherited if there is a genetic predisposition or family history of the disorder.

    Compared to single births, dolichocephaly is more common with multiple births, such as twins or triplets.

    Some babies may develop dolichocephaly as a result of intrauterine confinement caused by the womb’s limited room.

    Diagnosis of Dolichocephaly:

    Measurements of the head and a physical examination are usually required to diagnose dolichocephaly.

    MRIs and CT scans are examples of radiological imaging that can be used to evaluate the size and shape of the skull.

    Genetic testing may be taken into consideration to assess the underlying genetic variables causing dolichocephaly.

    To determine any possible causes or related diseases, a thorough assessment of medical history is necessary.

    The diagnosing process may benefit from a consultation with experts such as geneticists or pediatric neurosurgeons.

    What is the Dolichocyphaly Treatment?

    As your kid grows and develops, moderate occurrences of dolichocephaly and other types of skull malformations will often go away independently. However, different treatments and interventions could be required for moderate or severe skull abnormalities. Your healthcare professional will usually discuss with you to decide whether to pursue these interventions on a case-by-case basis.

    According to the American Academy of Paediatrics (AAP) guidelines, physical treatment, helmet therapy, and surgery are the three main interventions for positional skull abnormalities and malformed skulls.

    Physical Therapy:
    Getting a pediatric physical therapist to help Get treatment can help you deal with the difficulties that dolichocephaly presents. In addition to evaluating your child for any developmental delays, they can provide advice on at-home stretching and posture techniques to support your child’s development.

    Helmet Therapy:
    The usage of a molding helmet may be beneficial for certain infants with malformed heads. This is usually advised when a baby’s head does not reach a healthy shape by the time they are five or six months old. Professionals perform the fitting and adjusting of these helmets.

    Surgery:

    In more extreme situations, particularly when sagittal craniosynostosis is severe, surgery may be required. The baby’s head is reshaped during surgery by surgically correcting the damaged suture. To have the optimum results, this surgery should ideally be done in the first few months of life.

    Dolichocyphaly Treatments at Home:

    You may promote your baby’s skull development at home with certain habits in addition to specialized therapy. The American Academy of Paediatrics (AAP) has issued the following guidelines:

    Variety in Positioning: Steer clear of holding your infant in one posture for long periods, especially if it puts pressure on their head. Limit extended use of infant swings, bouncy chairs, and car seats, for instance.

    Encourage Movement: Give your infant lots of chances to move, especially during tummy time. Increased tummy time can help babies with skull malformations by allowing them to move their arms, shoulders, hips, back, neck, and head normally. If your baby resists at first, start slowly and gradually increase the length of your tummy time sessions.

    Alternate Feeding Positions: To encourage balanced head growth, alternate your baby’s arms while they are eating.

    Change the Crib Position: Although it is necessary to put infants to sleep on their backs, you can move them around in the crib to help with head-shape balance.

    Which complications are associated with dolichocephaly?

    The American Academy of Paediatrics (AAP) states that most occurrences of malformed newborn heads or skull abnormalities are not life-threatening and do not endanger the health or general welfare of the child. The American Academy of Paediatrics states that “positional skull deformities do not impact brain growth or intellectual development.” Most of the time, these defects are purely cosmetic and don’t require surgery.

    Severe forms of dolichocephaly, however, can be more complicated and could affect a baby’s development and health.

    Furthermore, as a person enters maturity, a noticeable deformity may have an impact on their confidence and sense of self. In addition to improving the head’s shape, surgical repair in infancy might help avoid any psychological problems that might arise from serious cosmetic abnormalities.

    You should speak with your pediatrician if you are worried that your child may have severe dolichocephaly, which could cause problems with development, health, or psychology. To further understand how dolichocephaly might affect your kid, they will evaluate the situation and decide whether more testing, such as a CAT scan, is required. Your pediatrician will go over particular interventions and therapies if necessary.

    Approaches to Prevent Head Deformities:

    Early detection and preventative actions can have a big impact on preventing head abnormalities and promoting healthy head development in your child.

    Here are some helpful pointers:

    Reduce the amount of time your child spends in a carrier, such as a stroller, car seat, bouncy chair, or baby swing. Long-term use of these devices can put pressure on your baby’s head, which may cause malformation.

    Make stomach Time a Priority: While putting your baby on their back during the night is crucial for safe sleep (which lowers the chance of SIDS), make sure they get plenty of stomach time during the day. Muscle tone development in your baby’s arms, shoulders, hips, back, and neck is aided by tummy time. It gets them ready for milestones like crawling, sitting up, rolling, and changing postures on their own.

    Alternate FeedingPosturess: Alternate your infant’s feeding postures frequently. This approach encourages the development of a regular head shape by preventing their head from being in the same position all the time.

    Rotate Sleeping Orientation: Switch up the ends of the cot your infant uses before putting them to sleep. Your baby can benefit from different lighting and visual stimuli at different ends of the cot. This relieves pressure on the same area of the skull and promotes a wider variety of head movements.

    You can actively support your baby’s healthy head growth and lower the chance of abnormalities by heeding these guidelines.

    FAQs

    Are dolichocephalic disorders normal?

    According to the American Academy of Paediatrics, most cases of dolichocephaly are not serious and do not affect the infant’s health. However, other, more severe situations could be related to delayed physical skills like gripping and reaching.

    What consequences can dolichocephaly cause?

    One key characteristic that distinguishes CED from most other ciliopathies is dolichocephaly. It usually occurs after sagittal craniosynostosis. Developmental delays and abnormalities of the brain are also conceivable.

    Dolichocephalic head shapes: what are they?

    During this phase, babies are at their least mobile and cannot sit up, roll over, or change positions on their own. The positional skull deformity in infants with dolichocephaly (scaphocephaly) is characterized by a head shape that is longer and narrower, analogous to a boat.

    Dolichocephaly resolves when?

    Infants are sometimes sent home with dolichocephaly, even though the condition may resolve before hospital discharge. Despite being described for almost thirty years, few studies characterize the frequency of dolichocephaly in preterm infants and the pace at which it resolves with treatment.

    What is causing my baby’s head to grow longer?

    An oblong shape may be formed by the pressure of the delivery canal when a baby is born head first. These fissures between the skulls may cause a child’s head to change shape. Depending on the pressure’s duration and severity, the skull’s bones may precisely overlap.

    References

    • Vaghela, D. (2023, December 13). Dolichocyphaly – Causes, complications, treatment. Mobile Physiotherapy Clinic. https://mobilephysiotherapyclinic.in/dolichocyphaly/
    • Wikipedia contributors. (2024b, December 23). Dolichocephaly. Wikipedia. https://en.wikipedia.org/wiki/Dolichocephaly