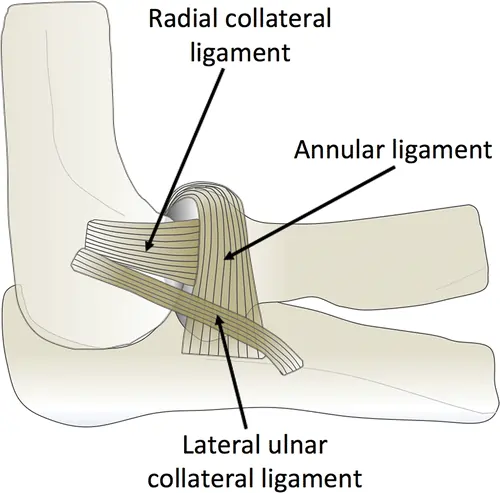
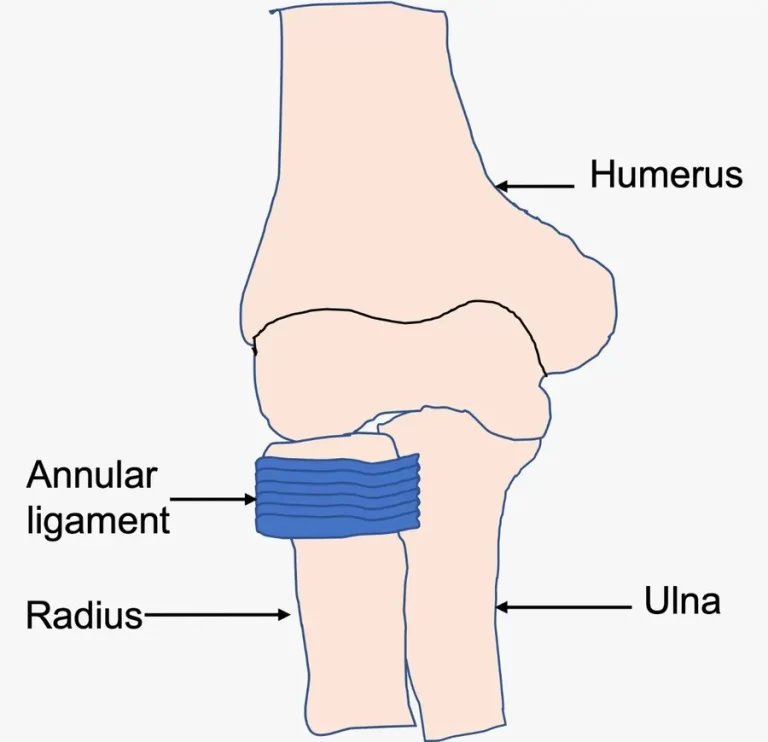
Blog

  • Jersey’s finger

    Jersey’s finger

    Definition

    The Jersey finger, often known as the “rugby finger,” is an avulsion of the flexor digitorum profundus tendon (FDP) from the distal phalanx (zone I), where it is inserted. The most often impacted is the ring finger. In the gripping posture, the ring finger protrudes the farthest, making it more susceptible to FDP avulsion, which results in an inability to flex at the DIPJ.

    A rupture of the flexor tendon, which is responsible for bending the fingertip downward, is referred to as a “jersey finger.” Football players who have grasped the jersey of an free to play who is Its name comes from its attempts to escape. The finger unexpectedly straightens as the player tries to release themselves while still attempting to flex and hold. As a result, the tendon is pulled in two different directions, creating a tug of war. As a result, the tendon may detach from the bone where it inserts at the fingertip. Occasionally, a fragment of the bone is also ripped off. Although this is a classic illustration, jersey finger can also result from other sports and hobbies (like rock climbing).

    The forearm is where the majority of the tendons that move your fingers begin. The muscle that bends the fingertip downward is called the flexor digitorum profundus. Consequently, FDP avulsion is the medical word for a “jersey finger.” Type I, Type II, and Type III are the three varieties. The most severe is kind I, in which the tendon completely retracts into the palm. The most advantageous type is Type III.

    The tendon retracts very little or not at all. Every joint has a blood supply to the flexor tendon. Therefore, more of the blood supply is interrupted when the tendon is retracted toward the base of the finger, away from the tip. The speed of your recovery and the effectiveness of your treatment may be impacted by a loss of blood flow.

    Epidemiology

    Of all acute injuries to the upper extremities, 38% are to the fingers. According to a recent study, the frequency of hand tendon injuries is 33.2 per 100,000 person-years. The flexor tendon zone accounts for just 4% of these injuries.

    The most frequent closed flexor tendon injury is a Jersey finger, which can occur in any digit. In 75% of instances, the ring finger is the digit most frequently affected. For the great majority of people, the ring fingertip is the most noticeable digit while gripping.

    Additionally, the ring finger is particularly susceptible to hyperextension injuries because it is lumbrical muscle-bound on both sides. According to some reports, the ring finger’s FDP tendon requires a far lower force to failure than other digits.

    Pathophysiology

    Failure is caused by excessive extension of the DIP joint during maximal FDP tendon belly contract (clenched fist). The distal tendon insertion at the base of the phalanx is injured since it is its weakest place.

    Types

    Partial Rupture

    The injury may be less serious if only a portion of the tendon is ripped. Although it will be uncomfortable and restricted, you may still be able to move your finger to some degree. Your doctor may determine that a finger splint, rest, ice, and elevation are appropriate treatments if the damage only involves a partial rupture of the tendon.

    Complete Tendon Rupture or Bone Chip Rupture

    The damage is more severe and the finger won’t heal on its own if the tendon is torn or if there is a chipped bone attached. To fix soft-tissue damage and regain your finger’s range of motion, surgery will be necessary.

    Mechanism of Injury

    • The Tackle Attempt: During a tackle or block, a player may reach out and grasp their jersey in an attempt to bring the pace down or gain control of the opponent. This motion is frequently executed swiftly and forcefully.
    • Finger Entanglement: The player’s finger may become twisted in the fabric as their hand closes around the jersey. The force created by abruptly pulling the jersey might cause the finger to extend uncomfortably.
    • Tendon Overstretch: The finger’s flexor tendon, which runs along it and gives its bending ability, can be tugged or overstretched beyond its typical range of motion. This overstretching might cause the tendon to tear or rupture.
    • Impact Force: The severity of the damage may be influenced by the impact force. For example, the force may exacerbate the rip if the player’s A finger gets jammed in the jersey and is struck by the opponent’s body or another object.

    Stages and classification of injury

    The degree of tendon retraction and the existence or absence of a fracture serve as the basis for the classification system of jersey finger injuries.

    • Type I: The FDP tendon retracts to the palm at the origin of the lumbrical.
    • Type II: Involves the FDP tendon retracting to the proximal interphalangeal (PIP) joint, which is the A3 pulley.
    • Type III: Large bone fragment avulsion. Both the fracture fragment and the FDP tendon withdraw to the A4 pulley because the bone fragment prevents further retraction.
    • Type IV: A big bone fragment is avulsed, and the FDP tendon separates from the bone fragment as a result. The FDP retracts into the palm because the avulsed FDP is not joined to the bone fragment.
    • Type V: A substantial bone fragment is avulsed, and the distal phalanx sustains another large fracture.

    Causes

    Pull-away devices expose the distal phalanx to significant stresses. Young athletes frequently develop flexor digitorium distal avulsion, particularly in contact sports. Usually, a flexed digit’s forceful extension causes the damage mechanism.

    In American football or rugby, a typical example is grasping an opponent’s jersey to make a tackle, which causes the flexor digitorium profundus tendon to be forced to extend during maximal contraction of the muscle belly.

    Signs and Symptoms

    Although the wounded finger may be able to bend at the other joints, a jersey finger prevents the injured finger from bending at the fingertip. Depending on how the damage happened and how much time has gone by after it happened, the fingertip may be painful and swollen. When an injury occurs, people frequently describe hearing or experiencing a “popping” sound. Any finger may be impacted, although the ring finger is most frequently. A Type 1 rupture may be indicated if there is significant pain in the palm immediately before the base of the finger.

    • Numbness in your fingertip
    • At the site of injury, there was a pop sound.
    • Pain: It’s normal to experience a sharp or throbbing pain at the fingertip or near the joint. Usually, this sensation gets worse as you try to move the finger.
    • Swelling: In comparison to the other fingers, the affected one may swell up and appear puffy.
    • Inability to Bend: The inability to bend the fingertip is one of the most obvious signs. The tip of your finger is still stiff, but the rest of it may bend.
    • Tenderness: The finger may probably feel sensitive to the touch, particularly in the vicinity of the damaged tendon joint. Tenderness on the hand’s palm side of the hand.
    • Bruising: Although it’s not always there, some bruising may develop around the location of the injury.
    • Deformity: In extreme situations, you may observe an obvious deformity or an unusual finger posture.

    Risk Factors

    The following variables may make getting a jersey finger more likely:

    • High Contact Sports: Players who regularly grasp and tug on each other’s clothing in sports like rugby and football are more likely to sustain this injury.
    • Aggressive Play: Players who are extremely aggressive or employ strong techniques are more prone to such injuries.
    • Inappropriate Technique: Inappropriate attacking or gripping techniques can occasionally cause extra finger strain, which might result in a jersey finger.

    Diagnosis

    The history and physical examination are frequently the only factors used to make the diagnosis. Many times, patients and even physicians who don’t specialize in hand surgery may miss a jersey finger. They won’t notice that the fingertip is not moving since they will only notice that the first two finger joints are bending. In other instances, the fingertip may be seen to be immobile, but people often assume that this is because of pain or swelling. Your hand surgeon may attempt to isolate your movement during the diagnostic by keeping your knuckle joint straight to avoid bending and testing your fingertip’s range of motion. You most certainly ruptured the tendon if it does not move.

    When a patient is unable to flex their DIP joint, a clinical diagnosis is made. Ultrasound can be used to confirm the diagnosis and identify the proximal stump of the avulsed tendon.

    Athletes who experience finger pain should have a physical examination, X-rays, and ultrasound to rule out fractures and link these injuries to damage sustained during sports. Although it is infrequently used, MRI can assist in a thorough assessment of the injury and may be useful in determining the degree of tendon retraction. To check for FDP avulsion, do the following test.

    Radiographic features

    Plain radiograph

    X ray for jersey finger
    X-ray for jersey finger

    Radiographs can often be normal. When a bone avulsion occurs, there may be a triangular avulsion fragment at the volar aspect of the distal phalanx base, along with visible soft tissue swelling.

    MRI

    Avulsion fragment at the volar base of the distal phalanx disrupting the flexor digitorum profundus (FDP). The placement of tendon ends can also be seen using MRI, which influences the patient’s surgical classification and care.

    A physical examination will also reveal that, in comparison to the other digits, the wounded finger remains extended. Additionally, the retracted tendon is palpable proximally to the avulsion; the DIP joint does not flex, and gripping and flexing against resistance hurts a lot.
    Bony pieces may be visible in the X-ray’s lateral and anterior views. To assess tendon retraction and direct additional treatment, ultrasound is typically essential. Although it is rarely done, MRI can be utilized to more precisely measure the increased tendon-bone distance.

    Differential Diagnosis

    • Muscle sprain
    • Phalanx fracture

    Treatment

    Your injury will determine the course of treatment. Your course of treatment can change if you also have a fractured bone in addition to the jersey finger. Surgery is usually beneficial for most of these injuries because it allows the fingertip to bend again, repairs the bone fracture if needed, and reattaches the damaged tendon. This is especially true for athletes and young, energetic patients.

    Due to underlying medical issues or an inability or unwillingness to adhere to post-surgical instructions, such as taking it easy and/or getting hand rehabilitation, some patients may choose not to have surgery. Without surgery, the inability to flex the fingertip will probably be irreversible. Discuss the best course of action with your hand surgeon.

    Medical Management

    • Surgery might not be required if the flexor tendon was only partially ripped, which is uncommon.
    • To assist in stabilizing the finger and give the injured tendon time to heal, the patient can be advised to wear a splint.
    • After one to three weeks of immobilization and rest, physical therapy will be used in conjunction with the use of a splint to assist restore strength and movement to the injured finger.
    • Most often, injuries to the jersey finger are treated with surgery. Restoring blood flow and function requires early intervention. Blood veins inside the mastoidal (long and short vincula) provide nutrition for flexor tendons. There are few reports of conservative care for surgical patients at high risk.

    Surgical Management

    • The mainstay of treatment for Jersey’s finger is surgery; conservative measures are only taken when complications prevent surgery. Restoring the damaged digit’s pain-free active range of motion requires surgery.
    • The best course of treatment is surgery, which should be done as soon as possible—typically within three weeks after the accident. Staged tendon reconstructions, tenodesis, and DIP joint arthrodesis are surgical salvage techniques for late presentation.

    Avulsion injuries of the FDP are treated with a variety of surgical methods, such as the following:

    • The Bunnell pull-out suture technique
    • Suture anchor repair
    • Integration of the volar plate to repair the tendon.

    Clinical outcome studies are still being developed for the latter approach, which is the most current to be described.

    • The most often utilized method has historically been the pull-out suture procedure.
    • Effective postoperative rehabilitation should allow patients to resume routine activities and sports after 8–12 weeks.

    Acute: 3 weeks following the injury.

    • Direct tendon repair or tendon reinsertion (mini-suture anchor) are options if there is no fracture.
    • Fracture fragment: needs open reduction and internal fixation (wires, mini-screws). These days, bone avulsions are also treated with suture anchors.
    • For acute injuries, there are numerous documented, effective treatment methods. It appears that none of these are noticeably better than the rest.

    Chronic: lasting longer than three months after an injury.

    • Tendon grafting in two stages (assuming the entire range of motion is available).
    • DIP joint arthrodesis (in the event of persistent stiffness). Every patient must have a thorough conversation about joint arthrodesis. For some patients, tendon reconstruction may be a viable alternative to distal interphalangeal joint motion, which is necessary for their careers and hobbies.
    • Unfortunately, to obtain a successful long-term rehabilitation outcome, tendon repair necessitates a large time commitment from the patient.

    Surgical Tips Include

    • Final circumferential suture improves final repair strength.
    • Incisions should be made in low-risk areas to retrieve the tendon.
    • Accurate tendon orientation is crucial.
    • Tendon handling should be minimal.
    • Sheath closure is only done if it enhances tendon gliding; it is not required.

    Physical therapy treatment

    After surgery, athletes should anticipate missing 8–12 weeks of play. After surgery, athletes are evaluated according to their position during play and level of competition using a sport-specific hand rehabilitation plan that includes

    Initial care for Partial Ruptures

    Treatment for a partial flexor tendon rupture often consists of non-surgical techniques:

    Finger Splint:
    Splint for jersey finger
    Splint for jersey finger

    To facilitate healing, this keeps the finger in a steady position. Eight finger splints and various finger splints can be used to cure oval jersey fingers. A Jersey finger is a common injury in contact sports, such as ball sports. It stabilizes the finger, relieves pain and suffering, and lets the injured tendon heal itself.

    • Rest: To avoid more harm, do not use the damaged finger.
    • Elevation and ice are two techniques that assist in lessening pain and swelling.
    • Dorsal Blocking Splint (DBS). To immobilize the finger and encourage healing in the proper posture, a dorsal-blocking splint is frequently utilized initially.
    • Passive Range of motion (ROM) exercises in the early postoperative phase. The therapist uses light finger movements to preserve joint mobility, particularly in the initial post-operative period.
    • Active or assisted ROM exercises. After being given permission, the patient will progressively advance to increasingly difficult activities by actively moving the finger through its range of motion.

    Exercises that facilitate the tendon’s smooth movement within its sheath are known as tendon gliding exercises.

    Tendon gliding exercises
    Tendon gliding exercises jersey finger
    Tendon gliding exercises for jersey finger

    Procedure:

    • Hook the tips of your fingers toward your palm after starting with your fingers straight. Keep your wrist and knuckles straight. Return to your starting point.
    • Beginning with your fingers straight, bend them at the knuckles to create a perfect angle while maintaining their straightness. Return to your starting point.
    • To create a “flat fist” on your palm, begin with your fingers straight and gradually curl their tips inward. Return to your starting point.
    • Start with your fingers straight, then roll them into a full fist by curling the tips down. Return to your starting point.

    After hand surgery or an injury, tendon gliding exercises are crucial for preventing and minimizing tendon adhesions. When the body begins to mend, adhesions are created; scar tissue holds two surfaces together that aren’t supposed to be together.

    Nerve glide is a nerve-stretching exercise, sometimes referred to as nerve flossing or nerve stretching. It makes it easier for the body’s peripheral nerves to move smoothly and regularly. It releases the nerve from compression and permits the nerve to move freely with the joint.

    The primary advantage of glides is that they are more effective at protecting surfaces than wheels or permanent bases because they take more force to move than wheels, making them ideal for furniture that won’t be moving about a lot. Additionally, they are simple to install, making it simple to swap out worn glides.

    Strengthening/power grasping exercises.
    Power grasping exercises for jersey finger
    Power grasping exercises for jersey finger

    Activities such as grip and pinching exercises progressively increase the strength of the finger muscles. The towel ring is an excellent workout to do at home to strengthen your grip if you have little equipment. To wring out the water, soak a small towel, grasp it at either, and twist it in opposite directions. Repeat multiple times with the directions inverted.

    Hand Kinetics will determine the muscles involved, analyze the cause, and develop a training program that will accomplish two primary goals to increase grip strength:

    • First: Safeguarding brittle joints
    • Second: Promote the contraction of the muscles required to carry out particular tasks.

    This usually include a graded schedule that includes daily activity and one or two days off. Initially, these are simple exercises designed to create a neural pathway for movement. Exercises that are later eccentric and concentric can be added.

    We test your muscles with resistance bands, grip masters, and dumbbells, and we provide tips on how to employ everyday tasks to work out your hands at home.

    For instance:

    • To strengthen your wrist muscles, lift a bottle of water several times before drinking it.
    • For 30 seconds, try holding two tin cans in the palm of your hand.
    • Try wringing out a damp cloth with warm water.
    Scar massage
    Cross-friction massage
    Cross-friction massage

    Manual therapy is used to increase flexibility and break down scar tissue.

    A “jersey finger” scar massage include using light to medium pressure and circular motions to gently massage the scar tissue left behind after surgery to repair the injured flexor digitorum profundus (FDP) tendon. Usually, a moisturizing cream is used to reduce adherence and increase flexibility in the affected finger. This should be done as prescribed by a healthcare provider after healing has occurred.

    Massage technique:

    • Apply a small amount of moisturizer or lotion to the scar area. 
    • Use your fingertips to gently massage in circular motions along the scar. 
    • You can also try gentle linear motions, moving in the direction of the scar. 
    • Gradually increase pressure as tolerated, but avoid excessive force. 
    • Frequency: Massage the scar several times a day, for a few minutes each session. 

    Benefits:

    • Helps to soften and flatten the scar tissue. 
    • Enhances the area’s blood flow, which aids in healing.
    • Can reduce pain and tightness associated with the scar. 

    For example,

    Early Phase (0-6 weeks):

    • Active Range of Motion (ROM): Gently bend and straighten the affected finger, keeping the middle and distal joints straight.
    • Passive ROM: The therapist or caregiver performs the movements for the patient.
    • Splinting: A dorsal blocking splint immobilizes the finger in a slightly bent position to protect the tendon.

    Intermediate Phase (6-12 weeks):

    • Active Resistance Exercises: Use rubber bands or light weights to resist the bending motion of the finger.
    • Tendon Gliding Exercises: Massage and stretch the tendon to improve its mobility.
    • Proprioceptive Exercises: Activities that challenge the patient’s sense of position and movement in the hand.

    Advanced Phase (12 weeks and beyond):

    • Strengthening Exercises: Progress to heavier weights or resistance bands to build finger strength.
    • Functional Exercises: Incorporate activities of daily living, such as grasping objects or making a fist.
    • Sports-Specific Drills: For athletes, specific drills are tailored to their sport to regain full function.

    Home care

    Ice

    Three to five times a day, apply an ice pack to the affected finger for five to ten minutes at a time. To prevent ice burns, avoid putting the ice directly on the skin.

    Elevation

    When you are seated or lying down, place your hand on a pillow. Reducing edema and pressure on the damaged area can be achieved by elevating the hand.

    Prognosis

    • Excellent functional outcomes and accelerated treatment are the results of early diagnosis. Excellent patient-reported outcomes are associated with surgery performed within 10 days of the accident.
    • After around eight to twelve weeks, patients may resume sports with both a full active functional range of motion and no pain.
    • Loss of pinch strength and dexterity are two functional effects of decreased DIP joint mobility.
    • Accurate reduction, high-quality repairs, and a suitable rehabilitation regimen are necessary for both functional and aesthetic outcomes after surgery. Maintaining finger function requires preventing the growth of scar contractures.

    Complications

    Quadriga is a concern if a tendon advances more than 1 cm. Quadriga is the inability to flex the digits next to the injured digit due to increased tension over the tendon that has been healed.

    Adhesions, nail matrix damage, tendon repair rupture, infection, and skin necrosis are other surgical complications.

    • Unstable DIP joint
    • Development of secondary osteoarthritic changes
    • DIP flexion contracture or quadrigia

    Conclusion

    • A tendon tear that causes the fingertip to bend is known as a jersey finger. Another name for it is rugby finger.
    • The most frequent injury to the closed flexor tendon is this one. It is frequently caused by attempting to seize an opponent’s jersey during a fast-paced athletic event.
    • Although surgery is the most common form of treatment, occupational therapy and splinting may also be used. Although it may take up to six months to restore a complete range of motion, the repaired tendon will often return to full strength after 12 weeks.

    FAQs

    What distinguishes jersey finger from mallet finger?

    Even if treatment is postponed for up to three or four months, the majority of mallet finger injuries will recover with non-operative care over eight to twelve weeks. Acute jersey finger diagnosis necessitates surgery and typically results in 8–12 weeks of incapacity to participate in most contact sports.

    What is the unique jersey finger test?

    Most likely diagnosis: A rupture of the FDP tendon from the distal phalanx is known as a jersey finger. Special test: Ask the patient to flex at the DIP while holding their MCP and PIP at full extension. The patient will be able to flex at the DIP if the FDP is unbroken. To isolate the FDP function, the PIP must be held at full extension.

    Can an injured jersey finger cure itself?

    A full tendon rupture or a rupture with a bone chip attached are the most common types of jersey finger injuries that prevent the finger from healing on its own. To restore your finger’s flexibility and cure soft-tissue damage, surgery will be necessary.

    How can a jersey finger be fixed?

    Surgery is necessary in almost all cases of severe jersey finger, particularly when the tendon is severely damaged or ripped. The tendon is surgically reattached to the bone, and then the patient is immobilized and undergoes targeted rehabilitation.

    What kind of surgery is used to treat jersey fingers?

    In addition, injuries to the jersey finger must be identified and treated right away to prevent the affected finger from becoming permanently disabled. Unfortunately, many of these injuries have delayed expression. A pull-through approach with a dorsal flap over the nail is the basic surgical repair technique.

    How long does it take to recuperate from surgery on the jersey finger?

    You will have a splint to assist brace your hand when you wake up. You will be given physical therapy exercises to start performing at home after wearing the splint for a few weeks. Your finger’s range of motion will be entirely restored with the use of these workouts. A full recovery should occur in eight to twelve weeks.

    What kind of jersey finger splint is best?

    The orthosis shouldn’t make the skin red or irritated. Because they can be made with a heat gun, Oval-8 Finger Splints—which come in CLASSIC Beige and NEW Oval-8 CLEAR—are an excellent option. A “must have” for creating or custom-fitting thermoplastic splints is a heat gun.

    How can my fingertips become better?

    Give your finger joints some rest so they can recover. Raise the finger and apply ice. To lessen pain and swelling, take over-the-counter medications such as naproxen (Aleve) or ibuprofen (Motrin). Buddy tapes the wounded finger to the adjacent one if necessary.

    What’s the term for a stuck finger?

    A disorder known as trigger finger makes it difficult to move your thumb or fingers. They may become “frozen” in a flexed position. Your thumbs and fingers’ tendons are impacted. The term “trigger finger” refers to the position in which your fingers can become caught, giving the impression that you’re attempting to pull an invisible trigger.

    Reference

    • Jersey Finger: Symptoms and Treatment | The Hand Society. (n.d.). https://www.assh.org/handcare/condition/jersey-finger
    • Saber, M., & Ho, A. (2013). Jersey finger. Radiopaedia.org. https://doi.org/10.53347/rid-23394
    • Patient, R. M. (n.d.). Jersey Finger | Rehab my patient. https://www.rehabmypatient.com/hand-fingers-thumb/jersey-finger
    • Stockton, T., & Stockton, T. (2024, September 6). Jersey finger: What is it? | The Jackson Clinics. The Jackson Clinics Physical Therapy. https://thejacksonclinics.com/jersey-finger-you-got-a-problem-with-that/
  • Common Peroneal Nerve

    Common Peroneal Nerve

    Introduction

    The common peroneal nerve (also known as the common fibular nerve) is a branch of the sciatic nerve, originating in the lumbosacral plexus (L4-S2). It wraps around the head of the fibula, making it vulnerable to injury. The nerve then divides into the superficial and deep peroneal nerves, innervating the lateral and anterior compartments of the leg, respectively.

    It provides motor function to muscles involved in foot eversion and dorsiflexion and sensory function to the anterolateral leg and dorsum of the foot. Injury can cause foot drop and sensory deficits.

    In particular, it starts from the sciatic nerve, splits off from it proximal to the popliteal fossa, and travels via the popliteal fossa and down the posterolateral side of the leg, passing behind the proximal fibular head and deep to the long head of the biceps femoris. It splits into the superficial and deep fibular nerves at the fibular neck, just inferior and lateral to the fibular head. Within the lateral compartment, the superficial fibular nerve runs anterolaterally between the extensor digitorum longus and fibularis longus muscles.

    Before it reaches the ankle and foot, it ends its distal journey inside the lateral compartment. Between the tibialis anterior muscle and the extensor digitorum longus muscle, the deep fibular nerve flows anteriorly and parallels the anterior tibial artery. The deep fibular nerve passes between two muscles in the anterior leg compartment as it moves distally. These muscles include the tibialis anterior and extensor hallucis longus.

    The nerve splits into medial and lateral branches as it gets closer to the foot anterior to the talus. The medial branch ends between the first two metatarsals after following the dorsalis pedis artery. The lateral branch ends close to the fifth metatarsal after following the lateral tarsal artery.

    Structure

    The sciatic nerve’s smaller terminal branch is known as the common fibular nerve. Root values for the common fibular nerve are L4, L5, S1, and S2. It begins from the superior angle of the popliteal fossa and runs along the medial edge of the biceps femoris to the lateral angle of the popliteal fossa.

    It then splits into terminal branches of the superficial and deep fibular nerves after winding around the fibula’s neck to puncture the fibularis longus. The popliteal fossa is where the common fibular nerve produces several branches before division.

    Cutaneous branches

    The skin of the top two-thirds of the lateral side of the leg is supplied by the lateral sural cutaneous nerve, also known as the lateral cutaneous nerve of the calf.
    It connects to the sural nerve after running along the posterolateral side of the calf.

    Articular branches

    • Superior lateral genicular nerve – sits above the lateral femoral condyle and is associated with the artery of the same name.
    • The Inferior lateral genicular nerve – is located right above the fibula’s head and runs alongside the artery of the same name.
    • Recurrent genicular nerve – It originates at the site where the common fibular nerve divides, and it subsequently ascends anterior to the knee joint along with the anterior recurrent tibial artery to supply the tibialis anterior muscle and the knee joint.

    Motor branches

    The nerve to the short head of the biceps femoris muscle is the sole motor branch that emerges directly from the common fibular nerve.

    Function

    Nerve roots: L4 – S2

    Motor: directly innervates the biceps femoris’ short head. further feeds the muscles in the leg’s anterior and lateral compartments (via branches).

    Sensory: innervates the lower posterolateral and upper lateral leg skin. furthermore provides cutaneous innervation to the dorsum of the foot and the skin of the anterolateral leg (via branches).

    Motor Functions

    The short head of the biceps femoris muscle, which is a component of the hamstring muscles that flex at the knee, is innervated by the common fibular nerve.

    Furthermore, muscles are innervated by its terminal branches:

    Superficial fibular nerve: innervates the fibularis longus and brevis muscles, which are located in the leg’s lateral compartment. The foot is everted by these muscles.

    Deep fibular nerve: innervates the tibialis anterior, extensor digitorum longus, and extensor hallucis longus muscles, which are located in the anterior compartment of the leg. These muscles aid in dorsiflexion of the foot and finger lengthening. Additionally, it innervates a few of the foot’s intrinsic muscles.

    The patient may lose the capacity to dorsiflex, evert the foot, and stretch the digits if there is injury to the common fibular nerve.

    Sensory Functions

    As the common fibular nerve passes across the lateral head of the gastrocnemius, it immediately gives rise to two cutaneous branches.

    • Sural communicating nerve: The sural nerve is created when this nerve joins a branch of the tibial nerve. The skin on the lower posterolateral leg is innervated by the sural nerve. Lateral sural
    • cutaneous nerve: innervates the upper lateral leg’s skin. Along with these nerves, the common fibular nerve’s terminal branches also have a cutaneous purpose:


    Superficial fibular nerve: innervates the dorsum of the foot and the skin of the anterolateral leg, except the area between the first and second toes. The skin between the first and second toes is innervated by the deep fibular nerve.

    Course

    The smaller of the sciatic nerve’s two terminal branches—the other being the tibial nerve—is the common fibular (peroneal) nerve (root value L4-S2). The majority of the fibers of the common fibular (peroneal) nerve come from the sacral plexus’s posterior division.

    At the distal portion of the thigh, close to the top of the popliteal fossa, the nerve emerges from the sciatic nerve. After that, it moves inferolaterally via the popliteal fossa in the direction of the fibular head. It is situated lateral to the gastrocnemius muscle and medially to the tendon of the biceps femoris muscle in the fossa.

    The nerve subsequently enters the leg’s anterior compartment by puncturing the leg’s fascia. The fibular neck is surrounded by the common fibular nerve. Under the fibularis longus muscle, the nerve then splits into two terminal branches, the superficial and deep fibular (peroneal) nerves.

    Branches

    The common peroneal nerve emits the following when it is still in the popliteal fossa:

    The knee joint is reached via the genicular branches.
    The calf’s lateral cutaneous nerve

    A sural communicative branch.
    The two terminal branches consist of

    • Superficial peroneal nerve L5, S1, 2
    • Deep peroneal nerve L4,5, S1,2

    Superficial fibular (peroneal) nerve

    Between the fibula and the proximal portion of the fibularis longus muscle, the common peroneal nerve bifurcates to form the superficial branch, commonly referred to as the superficial fibular (peroneal) nerve.

    The fibularis longus muscle is reached by this nerve when it dips deeply. It splits into the medial dorsal cutaneous nerve and the intermediate dorsal cutaneous nerve after penetrating the deep fascia in the distal part of the leg. The superficial fibular (peroneal) nerve supplies the lower anterolateral leg’s skin with sensory information and motor control to the muscles of the fibularis longus and fibularis brevis.

    Deep fibular (peroneal) nerve

    The bifurcation of the common fibular nerve also gives birth to the deep branch of the fibular nerve, which is also referred to as the deep fibular (peroneal) nerve. This nerve gives innervation to the leg’s extensor (anterior) compartment after passing through the interosseous membrane.

    Together with the anterior tibial artery, the nerve then descends on the crural interosseous membrane between the tibialis anterior and extensor hallucis longus. The lateral and medial terminal branches of the deep fibular nerve split off near its termination.

    Anatomical Variations

    Similar to most human anatomy, the common fibular nerve’s route and surrounding anatomy have several variations that surgeons should be aware of, particularly if they plan to decompress the nerve. The chance of compressed nerves may also rise or fall as a result of these variations.

    Research comparing the anatomy of surgically decompressed nerves and cadavers revealed some significant differences. The first one has fibrous tissue behind the superficial head of the peroneus longus, forming a structure resembling a band. The next variation likewise has fibrous tissue that forms a band-like structure, however, this tissue is found on the superficial surface of the peroneus longus muscle’s deep head. The last variation mentioned involves two muscles along with their unusual origin and junction.

    Though some persons begin together at the fibular head and split apart as they progress distally, the soleus and fibularis longus muscles often begin independently on the fibular head.

    Examination

    Common Peroneal Tension Test

    The patient’s symptoms were replicated by a standard peroneal nerve stress test (SLUMP test while biassing the foot and ankle in PF/IN). The three requirements for positive neural tension were satisfied by the symptoms:

    The patient’s symptoms are reproduced differently from side to side, with a remote component.

    Symptoms may be replicated by the peroneal nerve tension test, a variant of the SLR in which the ankle is plantarflexed and inverted at the site of initial resistance.
    Symptoms may also be reproduced by Tinel’s sign, which is the palpation or tapping of the nerve around the fibular head.
    The deep peroneal nerve is quickly and grossly screened by heel walking (dorsiflexon, L4, L5).
    The superficial peroneal nerve (L5, S1) and tibial nerve (S1-2) are quickly and grossly screened during toe walking.
    Weakness of the tibialis anterior, extensor digitorum longus and brevis, extensor hallucis longus and brevis, peroneus longus, peroneus brevis, and peroneus tertius may also be detected by manual muscle testing. The physical therapist may see toe drag during the swing phase, foot drop, or a “slapping” gait during the gait analysis.

    Clinical Importance

    Compared to other neuromuscular problems, the common fibular nerve is a topic that is explored a lot because of its characteristic clinical appearance and frequent damage. It is fairly susceptible to harm due to its placement. It passes across the fibula’s neck on the lateral part of the knee, where skin, subcutaneous fat, and fascia provide their only defense. Thus, the common fibular nerve is frequently harmed by a variety of lateral knee injuries. For instance, a football player may sustain a common fibular nerve damage and a fibular neck fracture if they are tackled from the side.

    The patient would probably arrive with knee discomfort, ankle eversion, loss of foot dorsiflexion, and loss of feeling in the dorsum of the foot and along the lateral leg. Patients who are unable to dorsiflex their feet are also prone to exhibit a “foot drop.”

    The swinging phase of the gait cycle is when this phenomenon happens. Instead of clearing the ground as in a normal stride, the toes drag on it due to a lack of dorsiflexion. Exaggerating hip abduction to provide more foot space is a common way for the patient to make up for foot-dragging.

    Nerve compression when it passes over or distal to the fibular head and neck is another typical source of damage to the common fibular nerve. This can happen when a cast or splint is applied too tightly or improperly, or it can happen when someone has compartment syndrome following a burn or trauma.

    In both cases, the compressed nerve would first induce paresthesias, then weakening and loss of feeling, and finally, if treatment is not received, loss of ankle eversion and dorsiflexion of the foot. It should be mentioned that distal pulses should be checked in these situations since there may be a vascular compromise.

    Proximal injuries at the sciatic nerve level can also cause clinical manifestations that resemble damage to the common fibular nerve. Piriformis syndrome is a typical case. The sciatic nerve, which supplies fibers to the common fibular nerve, may become trapped inside the piriformis muscle in certain situations or anatomical variations.

    Loss of dorsiflexion, loss of foot eversion, and loss of sensation to the anterolateral part of the leg and dorsum of the foot are symptoms of a tight piriformis that might be comparable to those of a traditional common fibular nerve injury. Nevertheless, in addition to these symptoms, the patient may also have pains that are close to the knee, which is how sciatica often manifests. To create an appropriate treatment strategy, it is crucial to distinguish between sciatica, piriformis syndrome, or just typical fibular nerve damage.

    Surgical Importance

    Nerve-related surgical procedures include:

    Decompression of the fibular (peroneal) nerve

    An incision is created across the fibula’s neck to surgically decompress the common fibular nerve. The fascia that envelops the nerves on the leg’s lateral side is freed.

    Decompression of the deep fibular (peroneal) nerve

    A ligament from the extensor digitorum brevis muscle that crosses over the deep fibular nerve, applying pressure and producing discomfort, is freed during surgery to treat deep fibular nerve entrapment in the foot.

    FAQs

    What is the common peroneal nerve’s primary purpose?

    The sciatic nerve gives rise to the common peroneal nerve. It gives the foot, toes, and lower leg mobility and feeling. Peripheral neuropathy, or injury to the nerves outside the brain or spinal cord, includes common dysfunction of the peroneal nerve. Any age can be affected by this disease.

    Which workout is best for the peroneal nerve?

    Exercise Program for Peroneal Tendonitis
    Place your hands on the wall as you face it. Bend your front knee and shift your weight forward while maintaining both heels on the ground and your toes pointed forward. If you can, hold the stretch for at least 15 to 30 seconds. Do this three times.

    What is the route of the common peroneal nerve?

    From the knee to the lower leg, the common peroneal nerve passes below the fibula’s head. After that, it divides into the deep and superficial fibular nerves.

    Where is the peroneal nerve most frequently injured?

    Both the knee (common peroneal nerve) and the spine (lumbar nerve roots) are frequently affected. In particular, the deep branch of the peroneal nerve is in charge of the loss of function when it is affected.

    References

    Common fibular (peroneal) nerve. (2023, October 30). Kenhub. https://www.kenhub.com/en/library/anatomy/common-fibular-nerve

    TeachMeAnatomy. (2024a, March 30). The common fibular nerve – course – motor – sensory – TeachMeAnatomy. https://teachmeanatomy.info/lower-limb/nerves/common-fibular-nerve/

    Wikipedia contributors. (2024a, August 4). Common fibular nerve. Wikipedia. https://en.wikipedia.org/wiki/Common_fibular_nerve

    Common fibular (peroneal) nerve. (2022,October 17).StatPearlshttps://www.ncbi.nlm.nih.gov/books/NBK532968/

  • Anatomical Snuff Box

    Anatomical Snuff Box

    Introduction

    The anatomical snuffbox, or the radial fossa, is a triangular indent located on the outer side of the back of the hand. It can be found at the level of the wrist bones and is most noticeable when the thumb is extended.

    Historically, this indent was used to hold snuff (finely ground tobacco) before inhaling through the nose, which is how it got the name ‘snuffbox.’

    History and Etymology

    When snuff was in vogue, users would take a small quantity of snuff from their container and place it into the “anatomical” snuffbox (in contrast to a physical snuffbox carried in one’s pocket, hence the term “anatomical”), then block one nostril with their index finger and inhale the snuff through the open nostril. It was a common practice to share snuff with those around you.

    Detailed Anatomy

    The anatomy of the anatomical snuffbox consists of its borders, base, roof, and contents.

    Borders: The lateral (radial) side is defined by the tendons of the abductor pollicis longus (APL) and extensor pollicis brevis muscles (EPB), while the medial (ulnar) side is defined by the tendon of the extensor pollicis longus muscle (EPL).

    Base: It is made up of the distal edge of the extensor muscles retinaculum and where the tendons of the extensor pollicis longus and extensor pollicis brevis muscles attach. The base of the anatomical snuffbox contains several bony landmarks. From proximal to distal, they include the radial styloid, scaphoid, trapezium, and the base of the thumb metacarpal. These landmarks can be felt when the hand is in ulnar deviation with the thumb extended.

    Roof: The roof is composed of skin and superficial fascia.

    Contents: The radial artery crosses through the floor of the anatomical snuffbox at an angle, passing deep between the heads of the adductor pollicis muscles. Additionally, the cephalic vein and the superficial branch of the radial nerve can be found on the roof of the anatomical snuffbox.

    Gross Anatomy

    Boundaries

    • Medial: Tendons of the extensor pollicis longus
    • Lateral: Tendons of the extensor pollicis brevis and, more laterally, the abductor pollicis longus.

    Floor

    • Scaphoid and trapezium bones, along with the tendons of the extensor carpi radialis longus and brevis
    • One may feel the radial styloid process proximally and the base of the first metacarpal distally.

    Contents

    • The radial artery, superficial branch of the radial nerve, and cephalic vein (which may vary).

    Structures

    Boundaries

    The medial boundary (ulnar side) of the snuffbox is the tendon of the extensor pollicis longus. The lateral boundary (radial side) is formed by two closely aligned tendons, the extensor pollicis brevis and the abductor pollicis longus. Consequently, the anatomical snuffbox is most evident, exhibiting a more pronounced concavity, during thumb extension. The proximal border is delineated by the radius styloid process, and the distal border is approximated by the vertex of the isosceles triangle that represents the snuffbox.

    The floor of the snuffbox varies based on wrist movement, but both the trapezium and primarily the scaphoid can be palpated.

    Contents

    The primary components of the anatomical snuffbox include the radial artery, a branch of the radial nerve, and the cephalic vein:

    • The radial artery runs across the floor of the anatomical snuffbox, before turning inward to pass between the heads of the adductor pollicis muscle.
    • In some cases, the radial pulse may be detected by placing two fingers on the upper portion of the anatomical snuffbox.
    • The superficial branch of the radial nerve is located within the skin and subcutaneous tissue of the anatomical snuffbox, providing sensation to the dorsal surfaces of the lateral three-and-a-half digits, along with the corresponding area on the back of the hand.
    • The cephalic vein originates from the dorsal venous network of the hand and traverses the anatomical snuffbox to ascend along the anterolateral side of the forearm.

    To better understand the anatomical snuffbox’s contents, it helps to separate the structures into two categories: those located above the extensor retinaculum the tendons of the outcropping muscles, and those situated beneath these elements.

    The extensor retinaculum is a thin fibrous connective tissue band that spans the posterior part of the distal forearm, functioning to prevent the tendons of the extensor and outcropping muscles, located beneath it, from bowing out during muscle contraction, which could place tension on the tendons.

    contents of anatomical snuff box

    Structures superficial to the extensor retinaculum and outcropping muscle tendons include the dorsal digital branches of the superficial radial nerve. The radial nerve descends from the posterior compartment of the arm and moves into the cubital region by crossing in front of the lateral epicondyle of the humerus. After that, it divides into superficial and deep branches. The superficial cutaneous branch proceeds down the forearm under the brachioradialis muscle. As it approaches the distal part of the forearm, it enters the roof of the anatomical snuffbox and divides into several dorsal digital branches. One of these branches extends into the anatomical snuffbox.

    Structures located beneath the extensor retinaculum and the outcropping muscle tendons include:

    Radial artery: The radial artery originates as a branch of the brachial artery as it traverses the cubital fossa. It descends along the outer side of the forearm, positioned deep to the brachioradialis muscle, and at the wrist, it lies lateral to the flexor carpi radialis tendon. Subsequently, it exits the forearm by moving posterolaterally to navigate obliquely along the base of the anatomical snuffbox.

    Cephalic vein: The cephalic vein emerges medial to the digital nerve. It develops from the dorsal venous network that drains the dorsal side of the hand. The vein ascends from the outer side of the forearm and the arm, running superficially within the subcutaneous tissue.

    Tendons of extensor carpi radialis longus and brevis: As the outcropping muscles emerge from beneath the extensor digitorum, they are located superficially to the tendons of the extensor carpi radialis longus and brevis. These tendons run medially to the radial artery along the floor of the anatomical snuffbox and attach to the base of the second and third metacarpals.

    Neurovascular anatomy

    Beneath the tendons forming the edges of the anatomical snuffbox lies the radial artery, which passes through the anatomical snuffbox on its path from the typical area for detecting the radial pulse to the proximal space between the first and second metacarpals, contributing to the superficial and deep palmar arches.

    Within the anatomical snuffbox, the radial artery is nearby (within 2 mm) to the superficial branch of the radial nerve near the styloid process of the radius in 48% of cases, whereas in 24%, it is in close relation to the lateral cutaneous nerve of the forearm. The cephalic vein originates within the anatomical snuffbox, while the dorsal cutaneous branch of the radial nerve can be felt by gently stroking along the extensor pollicis longus with the back side of a fingernail.

    Clinical significance

    The radius and scaphoid articulate beneath the snuffbox, forming the foundation of the wrist joint. In a situation where a person falls onto an outstretched hand (FOOSH), this area absorbs the majority of the impact. Consequently, these two bones are the most commonly fractured in the wrist. If there is localized tenderness in the snuffbox, an understanding of wrist anatomy allows for a quick assumption that a fracture is probably present in the scaphoid.

    This is logical since the scaphoid is a small, irregularly shaped bone that facilitates movement but does not provide stability to the wrist joint. Under excessive force applied to the wrist, this small scaphoid is likely to be the weakest point. Scaphoid fractures frequently lead to medico-legal issues.

    An anatomical variation in the blood supply to the scaphoid indicates that blood first reaches this area distally. Thus, in the event of a fracture, the proximal portion of the scaphoid will lack a blood supply and, if not addressed, will suffer avascular necrosis within the snuffbox. Due to the scaphoid’s small size and shape, it can be challenging to ascertain, early on, whether it is fractured using an X-ray. Additional complications include carpal instability (ligament rupture) and fracture dislocations.

    Clinical relevance

    Scaphoid fractures: The anatomical snuffbox is crucial for evaluating scaphoid fractures. Within the anatomical snuffbox, the scaphoid and radius join to be part of the wrist joint. Following a blow to the wrist (such as falling on an outstretched hand), the scaphoid absorbs most of the force. If localized pain is detected in the anatomical snuffbox, a scaphoid fracture is likely the cause. Notably, tenderness in the snuffbox is highly sensitive to scaphoid fractures but lacks specificity. Given this lower specificity, patients with tenderness in this area must undergo radiographic examinations of the wrist. Failing to detect a fracture could impact quality of life due to the risk of non-union. Additionally, the location of this fracture plays a crucial role in determining treatment options to avoid avascular necrosis of the bone due to its unique blood supply.

    Radial artery aneurysms are uncommon and are typically linked to trauma, including penetrating or iatrogenic causes. They occur less frequently than ulnar artery aneurysms, though the reasons for this difference are unclear. Cases following blunt trauma have been documented.

    Venous Cannulation: The dorsal lateral (radial) section of the wrist is most frequently used for venous cannulation because the cephalic vein is more pronounced in that area.

    De Quervain Tenosynovitis: The diagnosis of De Quervain’s Tenosynovitis is associated with the anatomical snuffbox. This condition affects the first dorsal compartment, which includes the muscles that form the lateral compartment of the anatomical snuffbox (APL and EPB). The diagnosis of De Quervain tenosynovitis is established through a comprehensive history and physical examination.

    Mnemonic

    If you’re looking for an easy way to recall the elements of the anatomical snuffbox, consider using the mnemonic provided below!

    • CARTs
    • Cephalic vein
    • Artery (radial)
    • Radial nerve (Superficial branch)
    • Longus and brevis tendon attached to the extensor carpi radialis

    Summary

    The boundaries of the anatomical snuffbox and the structures that cross them are summarised below.

    Borders
    Proximal = radial styloid process
    Distal = base of 1st metacarpal
    Floor = scaphoid and trapezium
    Medial = extensor pollicis longus
    Extensor pollicis brevis & abductor pollicis longus are lateral.

    Contents
    Dorsal digital branches of the radial nerve and the cephalic vein are considered superficial.
    Extensor carpi radialis longus and brevis tendons, deep = radial artery

    FAQs

    What three muscles form the anatomical snuffbox?

    The abductor pollicis longus, extensor pollicis brevis, and extensor pollicis longus are the three thumb muscles that define the medial and lateral margins of the snuffbox.

    What purpose does the snuffbox serve?

    Anatomical Snuff Box
    Injuries to the Scaphoid: The anatomical snuffbox is clinically important for evaluating scaphoid fractures. Within the anatomical snuffbox, the scaphoid and radius join to constitute a portion of the wrist joint. When a wrist experiences trauma (such as falling on an outstretched hand), the scaphoid absorbs the majority of the impact.

    Why is it called the anatomical snuffbox?

    The term “anatomical snuffbox” originates from the tradition of placing powdered tobacco or snuff in the depression and inhaling it through the nose.

    What does pain over the anatomical snuffbox indicate?

    Tenderness in the anatomical snuffbox is a highly sensitive indicator for scaphoid fractures, while pain during scaphoid compression and tenderness at the scaphoid tubercle are often more specific.

    References

    • Skalski, M., & Knipe, H. (2013). Anatomical snuff box. Radiopaedia.org.
    • https://doi.org/10.53347/rid-22107
    • Anatomical snuffbox. (2023, November 22). Kenhub.
    • https://www.kenhub.com/en/library/anatomy/anatomical-snuffbox
    • (n.d.)https://www.physio-pedia.com/Anatomical_Snuff_Box
    • Wikipedia contributors. (2025, January 10). Anatomical snuffbox. Wikipedia.
    • https://en.wikipedia.org/wiki/Anatomical_snuffbox
    • TeachMeAnatomy. (2023, October 2). The Anatomical Snuffbox: Contents, Boundaries
    • TeachMeAnatomy. https://teachmeanatomy.info/upper-limb/areas/anatomical-snuffbox/

  • Spirometry

    Spirometry

    Spirometry is a common pulmonary function test used to assess lung function by measuring the volume and speed of air a person can inhale and exhale. It is widely used to diagnose and monitor respiratory conditions such as asthma, chronic obstructive pulmonary disease (COPD), and other lung disorders.

    The test involves breathing forcefully into a device called a spirometer, which provides key metrics like Forced Vital Capacity (FVC) and Forced Expiratory Volume in one second (FEV1). Spirometry is a simple, non-invasive, and effective tool for evaluating lung health.

    Pulmonary Function Tests

    Tests known as pulmonary function tests (PFTs) measure how well your lungs are functioning. Lung capacity, volume, flow rates, and gas exchange are all measured by the tests. Your healthcare professional can use this information to diagnose and treat certain lung conditions.

    Types of Pulmonary Function Test:

    There are two tests for performing PFTs. These two tests can be combined to perform other testing. The information your healthcare provider is seeking will determine this:

    • Spirometry
    • Plethysmography

    Spirometry

    A mouthpiece connected to a tiny electronic machine is called a spirometer.

    One kind of pulmonary function test is spirometry. By monitoring the amount of air that enters and exits your lungs during breathing, it assesses how well your lungs are functioning. Although frequent deep breathing may cause lightheadedness or dizziness, spirometry is safe.

    Plethysmography

    Plethysmograph
    Plethysmograph

    The tests are conducted while standing or sitting inside an airtight box.

    Spirometry: What is it?

    One popular kind of pulmonary function test is spirometry, which is pronounced spy-rom-uh-tree. A lung function test is another term for a pulmonary function test. A spirometry test calculates how much air is in your lungs by measuring the airflow through them. Additionally, it provides information to your doctor about how well you breathe and how powerful your lungs are. Spirometry is secure. It is frequently ordered by medical professionals to assess lung function.

    Different types of Spirometer

    Basic Incentive Spirometer:

    Incentive Spirometer
    Incentive Spirometer
    • Incentive spirometers are portable devices that help in the healing of the lungs following surgery, illness, or infection. This is a very simple device that uses a piston system to function.
    • The amount of air the lungs take in is actively measured by pistons on the interior of the tube rising when the user breathes in. The sole measurement that an incentive spirometer can offer is inhaled air.
    • By encouraging lung activity and preventing fluid accumulation, an incentive spirometer helps avoid the development of pneumonia.

    Professional Spirometer:

    Professional Spirometer
    Professional Spirometer
    • Spirometers of the professional grade frequently use the same kind of pressure sensor technology, which measures exhaled air using a pressure plate.
    • The distinction is that these devices are typically far more costly and may only be ordered with a prescription. PEF (Peak Expiratory Flow Rate), FEV1 (Forced Expiratory Volume in the first second you exhale), and FVC (forced viral capacity) may all be measured using a professional spirometer, which is extremely accurate.
    • They are frequently big, heavy devices that are wired to a little computer or screen. This kind of monitor is difficult for non-prescription users to obtain and impractical for everyday home use.

    Digital Peak Flow Meter:

    Digital peak flow meter
    Digital peak flow meter
    • Peak flow meters quantify the amount of air that is exhaled from the lungs, as opposed to an incentive spirometer. Additionally, these devices can measure FEV1 (Forced Expiratory Volume in the first second you exhale) and PEF (Peak Expiratory Flow Rate).
    • Because they are digital, they are electronic devices that use an internal turbine system to measure exhaled air. Internal turbine systems have the drawback of having a shorter lifespan due to their susceptibility to dust and damage.

    Other Digital Smart Spirometers:

    • Digital Smart Spirometers are not rechargeable and only monitor PEF and FEV1, just like Digital Peak Flow meters. Unlike SpiroLink, they do not measure FVC and instead function using an internal turbine system.
    • Despite having Bluetooth and compatible apps, digital smart spirometers frequently lack a digital screen, which makes it challenging to operate them without the appropriate software.

    SpiroLink (Digital Smart Spirometer)

    Spirolink Spirometer
    Spirolink Spirometer
    • It is a cutting-edge digital spirometry tool that may be used both at home and on the road. SpiroLink stands apart from most other digital spirometers or peak flow meters. This clinical-grade gadget uses a pressure sensor to detect PEF, FEV1, and FVC precisely instead of an internal turbine system. The pressure sensor’s design prolongs the device’s life by preventing harm from dust, dirt, or mucus.

    Indication

    Spirometry checks to see if your lungs are working as they should. Additionally, it helps in the diagnosis of lung and airway conditions such as:

    • Asthma.
    • COPD stands for chronic obstructive pulmonary disease.
    • Cystic fibrosis.
    • Pulmonary fibrosis.
    • Chest tightness, pain or pressure.
    • Coughing, especially coughing with mucus.
    • Difficulty taking a deep breath.
    • Shortness of breath (dyspnea).
    • Wheezing.

    Spirometry can additionally:

    • Find out how much lung capacity you have.
    • Track changes caused by chronic lung conditions over time.
    • Recognize any abnormalities in lung function early on and, in certain situations, assist in directing treatment.
    • Check for airway narrowing.
    • Determine the likelihood that inhaled drugs can help your symptoms.
    • Indicate if your lung function has changed as a result of exposure to specific chemicals.
    • Prior to surgery, assess your risk of respiratory problems.

    Contraindications

    • Aneurysm
    • Unknown cause of hemoptysis
    • A pneumothorax
    • Unstable heart condition, recent myocardial infarction, or pulmonary embolism
    • Acute conditions like nausea or vomiting that impair test performance
    • Recently performed abdominal or thoracic surgeries
    • Surgery for the eyes
    • Pleural effusion
    • After a Myocardial Infarction(MI).

    Risks 

    • In general, spirometry is a safe test. After taking the test, you might experience shortness of breath or lightheadedness for a brief while.
    • If you have recently experienced a heart attack or another heart illness, you are not eligible to take the test because it involves some physical exertion. The test typically results in serious respiratory issues.

    Calibration:

    • The equipment used for spirometry needs to be calibrated before use, or at the very least, the calibration needs to be checked before the start of the session. Devices require different calibration methods.
    • For more details, see the instructions that came with your spirometer. If the calibration is incorrect, some meters must be sent back to the manufacturer for repair. Spirometric measurements should ideally be taken once a week using a biological control, which is a healthy team member.

    Positioning of the patient:

    The following is the proper stance for measurements:

    • As long as the patient is sitting up straight and there are no limitations, standing is preferable to sitting since there is a difference in the amount of air the patient can exhale from a sitting position compared to a standing or lying supine
    • Legs uncrossed and feet flat on the floor: no abdominal muscles are used to support the position of the legs.
    • Loosen clothes that are too tight.
    • Implants are typically left in place; unless they are extremely loose, it is preferable to have some structure around the mouth.
    • Use a chair with armrests because patients may feel dizzy and sway or faint when they exhale as much as they can.
    • Since your patient might not be able to sit in a chair in a hospital setting, they should remain in the same position, which is typically supine, and have this recorded for any further tests.

    Technique:

    • Spirometry can be performed using a variety of methods. Typically, though, the patient inhales as deeply and forcefully as they can, then exhales as quickly and forcefully as they can, continuing until no air remains. The FEV1 and FVC maneuver is used to calculate PEF.
    • Don’t be afraid to speak louder to the patient, especially as the maneuver comes to a close, because encouragement makes a great difference. Until no more air can be expelled, the patient must continue to blow. On a forced maneuver, some patients may have trouble exhaling entirely, especially those with obstructive illness.

    Test for Spirometry

    Your test may be performed in a specialized lung-function laboratory or in your doctor’s office. Your nose will be fitted with gentle clamps. The spirometer’s mouthpiece is the sole way to breathe in and out thanks to the clips.

    After that, you will inhale deeply and use the mouthpiece to blow hard into the spirometer. Both the amount of air you exhale and the amount you breathe in are measured by the spirometer.

    To make sure your results are precise and repeatable, you will run the test at least three times.

    Additionally, your doctor might advise you to inhale a medication that facilitates airway opening. After that, you will test the spirometer once more. Test findings before and after you breathed the medication will be compared by your healthcare professional. After that, they will determine whether the medication can be used as part of your treatment plan.

    Duration for Spirometer

    The kind of spirometry that your doctor orders will determine this. However, the test often takes 15 to 30 minutes to finish.

    Does a spirometry test cause pain?

    A spirometry test is not uncomfortable.

    However, the deep inhalation and exhalation may cause you to feel lightheaded, exhausted, or dizzy. Coughing may also result by blowing into the spirometer. After you finish the exam, these symptoms will likely disappear quickly. If you require a break during testing, inform your healthcare provider.

    Additionally, spirometry may raise your heart rate. If you have ever experienced a heart attack or any other heart-related issues, let your healthcare professional know.

    What may I expect after a spirometry?

    • You can resume taking any medications that your doctor advised you to stop taking after the test. You can also resume your routine, which includes working out.
    • When to expect your test results will be communicated by your healthcare practitioner.
    • Following a spirometry test, they might also occasionally measure lung volume and diffusion capacity. These tests assess both the volume of your lungs and their capacity to deliver oxygen to your blood. These tests help in the diagnosis of specific lung or breathing disorders by supporting spirometry. These tests may be performed regularly by your provider to monitor the progress of your breathing.

    Results

    Your healthcare professional will calculate a normal reading for your demographics based on these factors. Two primary components are measured by spirometry:

    • FVC stands for forced vital capacity. The maximum volume of air you can forcibly and exhale after inhaling deeply is known as FVC.
    • FEV1, or forced expiratory volume. The amount of air you exhale in a second is known as your FEV1.
    • Your healthcare practitioner will compare your test results to the average reading for your population after you take it. 80% or more above the average demographic reading is considered normal.
    • Your healthcare professional can also use your findings to identify the type of lung illness you have. These could consist of:

    Obstructive Lung Diseases: It is challenging to exhale all of the air in your lungs when you have damage to your lungs or airways. Cystic fibrosis, COPD, bronchiectasis, and asthma are common causes of obstructive lung disease.

    Restrictive Lung Diseases: Your lungs cannot expand completely. Amyotrophic lateral sclerosis (ALS), interstitial lung disease, muscular dystrophy, sarcoidosis, and scoliosis are among the common causes of restrictive lung disease.

    Measurement of FVC

    FVC, or the maximum volume of air you can forcibly exhale after taking your deepest breath, is one of the main spirometry metrics. Your breathing is being restricted if your FVC is lower than normal.

    Lung diseases that are restrictive or obstructive may be the cause of an abnormal FVC. In addition to having either restrictive or obstructive lung disease alone, you may also have a combination of both conditions at the same time.

    To identify the type of lung disease present, various spirometry tests are needed.

    Measurement of FEV1

    FEV1 is the second important spirometry metric. This is the most air that you can expel from your lungs in a single second.

    Your doctor can use this measurement to assess the severity of your breathing problems. You may have a serious breathing obstruction if your FEV1 reading is lower than normal.

    Your doctor will rate the severity of any breathing issues based on your FEV1 measurement.

    Ratio of FEV1/FVC

    Physicians frequently compute your FEV1/FVC ratio after analyzing your FVC and FEV1 independently. The percentage of your lung capacity that you can exhale in one second is shown by the FEV1/FVC ratio.

    The higher the percentage a doctor determines from your FEV1/FVC ratio, the healthier your lungs are, provided that you do not have restrictive lung disease that influences this ratio.

    A low ratio indicates that your airways are being blocked.

    FAQs

    What is the purpose of a spirometry test?

    By measuring the amount of air you can exhale in a single forced breath, spirometry is a straightforward test that can be used to detect and track specific lung problems. It is performed with a spirometer, a tiny machine that is connected to a mouthpiece via a cable.

    What range of spirometry is considered normal?

    A FEV1/FVC ratio of more than 0.70 and both FEV1 and FVC above 80% of the expected value are considered normal spirometry data. TLC above 80% of the predictive value is considered normal if lung volumes are performed. Diffusion capacity beyond 75% of the expected value is likewise considered normal.

    How does PFT differ from spirometry?

    Determines how quickly air can be expelled from the lungs and how much air can be exhaled. Asthma and COPD are two lung conditions that can be diagnosed with spirometry.

    A good spirometry result is what?

    Comparing a person’s measured value with the reference value is necessary for interpreting spirometry data. The results are regarded as normal if the FEV1 and FVC are within 80% of the reference value. The FEV1/FVC ratio is normally 70%, while for people over 65, it is 65%.

    In asthma, is spirometry normal?

    Common respiratory symptoms are the first signs of asthma, and physical examinations are frequently normal. Unless the patient is experiencing exacerbation, the most commonly used tests, peak flow and spirometry, can also be normal.

    Which two PFT kinds are there?

    Spirometry. A mouthpiece connected to a tiny electronic machine is called a spirometer.
    Plethysmography. The tests are conducted while standing or sitting inside an airtight box.

    How much does a spirometry test cost?

    The cost of a spirometry test often varies slightly between cities, ranging from ₹1,200 to ₹2,500. The ultimate cost may vary depending on the area and the level of experience of the medical team. Avoid drinking or smoking for a few hours prior to the exam.

    Reference

    • Akins, D. (2021, June 2). Different types of spirometers | CMI Health. CMI Health Store. https://www.cmihealth.com/blogs/news/different-types-of-spirometers?srsltid=AfmBOorLGKRtNtIJVfzkiwfCb22hprnifYe_eJOzFq_iSkz_gWjf2F2c
    • Professional, C. C. M. (2025b, February 11). Spirometry. Cleveland Clinic. https://my.clevelandclinic.org/health/diagnostics/17833-spirometry
    • Cirino, E. (2024, March 22). What to know about a spirometry test. Healthline. https://www.healthline.com/health/spirometry#next-steps

  • Rheumatoid Arthritis Rashes

    Rheumatoid Arthritis Rashes

    Rheumatoid Arthritis Rashes: What is it?

    Rheumatoid Arthritis (RA) Rashes are skin manifestations that can occur in individuals with RA, an autoimmune disorder primarily affecting the joints. These rashes may result from inflammation of blood vessels (vasculitis), medication side effects, or immune system activity.

    An autoimmune condition known as Rheumatoid Arthritis (RA) occurs when the body’s immune system targets itself, causing inflammation of the joint’s protective membrane. As a result, minor to severe symptoms may appear.

    The majority of symptoms are associated with joint issues. However, you might also have flare-ups, when your symptoms worsen. This could involve inflammatory rashes on the body.

    Additional skin disorders linked to RA may include:

    Rheumatoid neutrophilic dermatitis, pyoderma gangrenosum, and Sweet’s syndrome are neutrophilic dermatoses.

    Urticaria: Hives, or urticaria, can appear.

    Rare skin conditions: People with RA may occasionally experience uncommon skin reactions like erythema dictum.

    Medication side effects: Drugs such as methotrexate (Otrexup, preservative-free; Xatmep; and Trexall) can cause periungual infarcts, which are tissue deaths in the nails caused by a lack of blood flow, and rheumatoid vasculitis (RV).

    For RA-related rashes, there are usually therapies available.

    RV can also occur in people with RA. RV is an uncommon condition experienced in just 1% to 5% of persons with RA.

    Rheumatoid Arthritis Rashes: What causes them?

    Flares are episodes that are common in people with RA. A flare is a sign that a person’s body is experiencing more illness activity.

    They could experience additional symptoms, including fever, joint swelling, and exhaustion, during a flare-up. During a flare, an RA rash is more likely to appear.

    One of RA’s complications is RV. It is caused by the immune system and the interaction of elevated blood levels of rheumatoid factor (RF) with blood vessels.

    Small veins and arteries become inflamed as a result. Although it is uncommon, RV tends to happen to patients who have had severe RA for a long period, and it can be quite devastating. Ulcers and skin sores may result from this illness.

    Symptoms of Rheumatoid Arthritis rash:

    How does a rash from rheumatoid arthritis appear? Depending on the kind of rash, yes. The four skin disorders listed below are linked to RA and can manifest as rash-like symptoms. Usually, both sides of the body experience the symptoms.

    Palmar erythema

    Palmar erythema, or “red palms,” can result from a range of health issues. It affects roughly 60% of RA patients. It occurs when the hand’s tiny blood arteries dilate, bringing more blood to the surface.

    Redness in both palms, which may spread to the fingers, is one of the symptoms. There may be a faint sensation of warmth along with the redness. Usually, palmar erythema doesn’t itch or hurt.

    Pressing on the skin will cause the redness to go away. When you lift your hand, when you’re under stress, or when the temperature of the air changes, the intensity of the redness can also fluctuate.

    Rheumatoid vasculitis

    Usually, those who have had severe RA for at least ten years get this illness. Thanks to increasingly potent systemic treatments for RA, it is less prevalent than it formerly was.

    Small and medium-sized blood capillaries narrow due to inflammation in rheumatoid vasculitis. This disrupts the skin’s blood flow. Rheumatoid vasculitis is more likely to occur in those who smoke.

    Signs and symptoms include:

    • Piles, sores, or spots surrounding the fingernails
    • Pain, edema, and redness in the fingertips or fingers
    • When larger blood vessels become irritated, it can cause a painful red rash, usually on the legs.
    • Ulcers on the skin

    The whole body is impacted by rheumatoid vasculitis, not only the skin. Additional symptoms and indicators include:

    • Numbness and tingling in hands and feet
    • Cough, shortness of breath
    • Pain in the chest
    • Pain in the abdomen

    Rheumatoid neutrophilic dermatitis

    Long-term RA is linked to a rare skin disorder called rheumatoid neutrophilic dermatitis. It typically manifests as a raised rash on both arms and/or legs that is red, blue, or purple. It may also show up on the torso or o single limb. Blisters or skin ulcers may develop in extreme cases of neutrophilic dermatitis.

    Interstitial granulomatous dermatitis

    Another uncommon skin ailment linked to inflammatory illnesses like RA is interstitial granulomatous dermatitis.
    Usually on the back, chest, or abdomen, but occasionally on the limbs, it results in red or skin-colored lumps or patches. Over days or months, patches may vary in size or shape. Usually, this ailment doesn’t hurt. Some people can feel a slight burning or itchy sensation.

    Diagnosis:

    When someone has rheumatoid arthritis, not all of their rashes are caused by the disease. For example, shingles, psoriasis, and contact dermatitis are frequent causes of rashes. For a precise diagnosis, consult a board-certified dermatologist because rashes can be challenging to diagnose on your own.

    Based on the rash’s appearance and symptoms, your doctor might be able to diagnose it. The provider might wish to do a skin biopsy in certain situations. The sole conclusive laboratory test for rheumatoid vasculitis is a biopsy.

    Continue taking your RA medication until you consult your rheumatologist if you think it might be the source of your rash. To manage your RA and maintain the healthiest possible skin, your dermatologist and rheumatologist can collaborate.

    What is the Treatment for Rheumatoid Arthritis Rashes?

    The cause and intensity of an RA-related rash determine how it should be treated. A remedy that is effective for one kind of rash might not be effective for another.

    Typically, the goals of treatment are to control pain and discomfort and avoid infection. Since rashes could indicate that your RA isn’t being adequately managed, it’s also critical that treatments focus on the underlying issue.

    Acetaminophen (Tylenol) is a common over-the-counter (OTC) medicine that may help ease rash pain. Nonsteroidal anti-inflammatory medicines (NSAIDs) might be harmful to your organs, so avoid using them for RA rashes.

    Avoidable drugs include:

    • ibuprofen (Advil, Motrin IB, Nuprin)
    • naproxen sodium (Aleve)
    • Aspirin (Bayer, Bufferin, St. Joseph)

    A doctor might also think about prescribing painkillers if your pain is severe. Due to their great potential for addiction, opioid painkillers are often only recommended for really severe pain.

    Additionally, a doctor might prescribe corticosteroids to lessen rash inflammation, which could lessen uncomfortable symptoms.

    However, long-term use of these medications is not advised. If the doctor is concerned that your rash could grow infected, they’re likely to prescribe either a topical or oral antibiotic or both.

    When it comes to addressing the underlying problem, there are various pharmacological alternatives available:

    Immunosuppressive medications

    By lowering the immunological reactions that harm your joints, these medications treat RA. However, they also increase your risk of infections and diseases since they weaken your immune system.

    Biologics and disease-modifying antirheumatic medications (DMARDs) are two categories of immunosuppressive medications. DMARDs can slow the course of RA by reducing inflammation. Biologics are injectable medications that lower inflammation by targeting particular immune cells.

    For those with weakened immune systems, DMARDs and biologics are not advised.

    If other immunosuppressive medications are ineffective, Janus-associated kinase (JAK) inhibitors are the next course of treatment. By altering genes and immune cell activity, they aid in the prevention of inflammation.

    Rash treatment:

    Different kinds of RA rashes have different therapies.

    Corticosteroids, like prednisone, are typically used as the first line of treatment for RV. The underlying problem may also be treated with DMARDs, including methotrexate.

    Topical steroids and antibiotics are used to treat interstitial granulomatous dermatitis.

    Occasionally, a change in medicine causes a rash. If you experience any symptoms after switching drugs, you should consult a physician. However, unless your doctor specifically instructs you to do so, you should not stop taking your drugs.

    Can a rheumatoid arthritis rash cause complications?

    Beyond just a rash, RA can create other problems. Blood flow in veins and arteries can be impacted by vasculitis. Severe vasculitis episodes can lead to the following outcomes:

    • Loss of sensation in the hands and feet as well as nerve numbness and tingling.
    • Impacted blood supply to the limbs, which may result in gangrene in the toes or fingers.
    • Systemic vasculitis can cause a heart attack or stroke by affecting blood flow to the heart or brain.

    RV is uncommon, and the aforementioned problems are even less common. A rash, however, can be a sign that something more serious is about to happen. If you suffer from any RV symptoms, consult a physician.

    How does the prognosis for those with rheumatoid arthritis rashes look?

    There are no long-term fixes that can stop RA rashes from happening. To help you manage your disease, doctors may prescribe a mix of drugs. These therapies may lessen joint injury and inflammation.

    People with RA should make every effort to have as healthy a lifestyle as they can. A person with RA may benefit from the following lifestyle choices:

    • Getting enough sleep will help minimize joint inflammation and lessen the symptoms of weariness.
    • Whenever feasible, engage in physical activity to improve joint mobility and develop strong, flexible muscles.
    • Engaging in stress-reduction techniques including reading, walking, meditation, or other relaxation-promoting pursuits.
    • Eating a diet high in fruits, vegetables, whole grains, and lean proteins. This can assist you in keeping your weight in check, which is crucial for maintaining joint health.

    Summary

    The autoimmune disease known as rheumatoid arthritis (RA) mostly affects your joints. However, rashes or other skin issues can be caused by RA and some of the drugs used to treat it. Once your inflammation is under control, your symptoms might improve.

    If you believe that your skin issues are a result of your medicine, let your doctor know. The best method to reduce RA symptoms like rashes, nodules, or ulcers is to get treatment. To check if your skin issues improve, however, your doctor may change your dosage or prescribe an alternative medication.

    FAQs

    How does a rash from rheumatoid arthritis appear?

    A pink or purple rash may be one of the main symptoms. The face is usually unaffected, but the arms, legs, and trunk are. It generally coexists with a fever. Find out more about a rash associated with juvenile rheumatoid arthritis here.

    What is the duration of rheumatoid arthritis rashes?

    However, the underlying reason and the drug used to treat the rash determine how quickly RA rashes go away. While less severe rashes might go away in a few days, some might take months.

    Which diet is ideal for those with rheumatoid arthritis?

    First off, eating a diet high in whole foods—such as fruits, vegetables, seafood, nuts, and beans—and low in processed foods and saturated fat can improve general health and even help control the progression of certain diseases.

    Can someone with RA lead a regular life?

    Rheumatoid arthritis has the potential to alter one’s life. To manage the symptoms and prevent joint deterioration, you might require ongoing care. Simple everyday actions may become challenging or take longer to complete, depending on your level of joint injury and the amount of pain and stiffness you experience.

    What is arthritis’s final stage?

    In the absence of continuous inflammation, end-stage rheumatoid arthritis (RA) is an advanced stage of the illness characterized by significant joint destruction and damage.

    References

    • Rheumatoid arthritis rash Diagnosis & Treatment | FL Dermatologists. (2022, April 1). Water’s Edge Dermatology. https://www.wederm.com/patient-library/rheumatoid-arthritis-rash/#top
    • Crna, R. N. M. (2022, August 30). Rheumatoid arthritis rashes: pictures, symptoms, and more. Healthline. https://www.healthline.com/health/rheumatoid-arthritis/rashes#outlook
    • What are rheumatoid nodules? Causes and treatments. (n.d.). WebMD. https://www.webmd.com/rheumatoid-arthritis/rheumatoid-nodules

  • Obturator Nerve

    Obturator Nerve

    Introduction

    The obturator nerve is a peripheral nerve that arises from the lumbar plexus (L2-L4) and primarily supplies the medial thigh. It provides motor innervation to the adductor muscles (adductor longus, adductor brevis, adductor magnus, gracilis, and obturator externus) and sensory innervation to the skin of the medial thigh.

    In several pathologic disorders and operations affecting the hip and knee, the obturator nerve has clinical significance. Additionally, the obturator nerve is a crucial anatomic feature in several clinical scenarios due to its origin in the lumbar plexus and its position in the pelvis and upper thigh.

    Structure

    The second through fourth lumbar plexus nerve roots give birth to the obturator nerve. The obturator nerve, which descends via the psoas major muscle fibeRs and follows the iliopectineal line, is formed from these roots. The nerve arises close to the pelvic brim from the medial margin of the psoas major.

    Then, along the distal portion of the ureter, the lateral side of the internal iliac artery, and posterior to the common iliac arteries, the obturator nerve descends in the direction of the obturator canal. It runs in front of the obturator vessels in the lower pelvis. Through the obturator canal, the nerve leaves the pelvis on its way to the medial thigh.

    Near the obturator canal, it divides into anterior and posterior divisions. Between the adductor longus and adductor brevis, the anterior branch of the obturator nerve continues its journey until coming to an end as the cutaneous branch. The posterior branch runs between the adductor brevis and the adductor magnus.

    The obturator nerve innervates the skin of the medial region of the upper thigh through the terminal branch of the anterior division. It also provides motor innervation to the adductor muscles of the lower leg, including the external obturator, gracilis, adductor longus, adductor magnus, and adductor brevis.

    Function

    The Anterior branch provides

    • Motor innervation is received via the gracilis, adductor brevis, adductor longus, and, in rare instances, the pectineus.
    • The medial thigh and the area just above the medial knee are cutaneously innervated by the anterior branch of the obturator nerve.

    The obturator nerve’s posterior branch

    • Provides innervation to the adductor longus, adductor brevis, adductor magnus, and obturator externus.
    • The obturator nerve also sends articular branches to the knee and hip joints.

    Course

    The obturator nerve is formed by the union of the anterior roots of spinal nerves L2, L3, and L4 close to the iliac crest. Through the fibers of the psoas’ major muscle and out of its medial border at the pelvic brim, the nerve enters the smaller pelvis.

    In this case, the nerve travels along the pelvic wall posterior to the common iliac artery and lateral to the internal iliac arteries. After that, it leaves the pelvis by going via the obturator canal and into the thigh’s medial compartment.

    Through the obturator canal, which is created by the obturator membrane within the obturator foramen, the obturator nerve reaches the medial thigh. It splits into anterior and posterior branches after that.

    Anterior division (anterior to the adductor brevis):

    • Descends towards the femoral artery in a plane between the adductor longus and adductor brevis.
    • Here, it supplies motor fibers to the adductor brevis, adductor longus, and gracilis. The pectineus muscle may also receive its nourishment from it.
    • After that, it becomes the cutaneous branch of the obturator nerve by penetrating the fascia lata.

    Posterior division (posterior to the adductor brevis):

    • Descends in a plane between the adductor brevis and adductor magnus after piercing the obturator externus muscle.
    • Innervates the obturator externus and adductor magnus.

    Branches

    Both of the obturator nerve’s branches emerge in the thigh shortly after the nerve passes through the obturator canal.

    The obturator nerve’s anterior branch (or division) crosses the adductor brevis muscle’s surface and extends deep to the adductor longus. It is located in between these two muscles in cadavers. Along with muscular and cutaneous branches, this nerve ramifies into an articular branch that leads to the hip joint. While the muscular branches feed the adductor longus, adductor brevis, and gracilis muscles (and sometimes the pectineus muscle), the cutaneous branches innervate the medial thigh’s overlaying skin.

    After puncturing the obturator externus, the posterior branch (division) of the obturator nerve crosses the adductor magnus. In addition to providing articular branches that feed the knee joint capsule, it serves both of these muscles. Keep in mind that the tibial division of the sciatic nerve provides the adductor magnus’s ischiocondylar (hamstring) portion, but the obturator nerve simply supplies the pubofemoral (adductor) portion.

    In conclusion, the adductor longus, adductor brevis, gracilis, obturator externus, and ischiocondylar portion of the adductor magnus muscle are all motorly innervated by the obturator nerve. In addition to providing articular branches to the hip and knee joints, its cutaneous distribution encompasses the skin of the proximal portion of the medial thigh.

    Anatomical Variations

    The medial thigh, obturator canal, or pelvic cavity are the three different locations where the obturator nerve bifurcates. After going through the obturator canal, the obturator nerve normally splits into anterior and posterior divisions before entering the thigh. Nonetheless, the obturator nerve may bifurcate in the thigh (25%), intrapelvic (23.22%), or obturator canal (51.78%).

    Furthermore, the anterior branch may develop two, three, or four branches, with three being the most common. The posterior branch, on the other hand, might divide into one to four subdivisions, with two divisions being the most common kind. Nine distinct branching patterns were seen in the obturator nerve’s articular branches. Though it has been demonstrated to offer no cutaneous innervation in over 50% of instances, studies have indicated that the obturator nerve innervates the skin surface of the medial thigh.

    Embryology

    Neuroepithelial cells give birth to the peripheral nervous system. After migrating from the pia mater to the periphery, these neuroepithelial cells undergo differentiation into glioblasts, ependymal cells, and neurons. These cells aid in the development of future obturator nerves and the lumbar plexus.

    Clinical Importance

    The thigh adductor muscles are innervated by the obturator nerve, hence blocking it has therapeutic value. During surgery, the obturator nerve block (ONB), as previously mentioned, can aid in immobilizing the adductor muscle. Moreover, ONB can alleviate chronic groin/thigh discomfort, relieve adductor spasticity, and offer analgesia for hip and knee operations because of the articular branches of the obturator nerve to the hip and knee.

    Therefore, ONB may be beneficial for illnesses including multiple sclerosis, traumatic brain damage, hip fractures, and total knee replacement. Percutaneous radiofrequency lesioning of the articular branches of the obturator nerve has been proposed as a useful treatment for hip joint discomfort if a basic ONB is unable to provide analgesia.

    Numerous pathologic disorders involve the obturator nerve. Obturator hernias usually affect old, thin women or people who have high intra-abdominal pressure because of COPD, ascites, or a persistent cough. The small bowel becomes obstructed in an obturator hernia when the hernia sac passes through the obturator foramen and the obturator canal. Acute small intestine obstruction and discomfort in the medial portion of the upper thigh from obturator nerve compression are hallmarks of the clinical course.

    The most sensitive and accurate imaging technique for quickly diagnosing an obturator hernia is computed tomography (CT). In the meantime, surgically fixing the hernia is the final therapy. Depending on the intraoperative results, bowel resection and/or a colostomy may be necessary if the intestine is ischaemic. Because the pelvic peritoneum relaxes and a broader, more horizontal obturator canal develops during pregnancy, obturator hernias can also happen in older women.

    In the same way that a hernia can compress the obturator nerve, fascia or other pelvic tissue can also compress the nerve. In particular, the nerve may become caught by fascia farther away or near the obturator canal’s outlet. Exercise-induced medial thigh discomfort is usually experienced by athletes due to obturator nerve entrapment. While resisted adduction does not cause discomfort, hip abduction and extension make it worse. Although there hasn’t been much study on conservative treatment, manual therapy, neural gliding, cognitive behavioral education, and stretching and strengthening exercises may help reduce symptoms. If symptoms are not improving with therapy, neurolysis or neurectomy can be worth considering.

    Damage to the Obturator Nerve

    Surgery on the abdomen or pelvis may cause injury to the obturator nerve.

    Among the symptoms are weakness in thigh adduction numbness and paraesthesia on the medial part of the thigh. Alternatively, the lack of adduction may cause the patient to have issues with posture and gait.

    Block of the Obturator Nerve

    Obturator nerve blocks are used to treat persistent hip discomfort or pain following lower limb surgery. The anesthetic is administered lateral to the adductor longus muscle tendon and inferior to the pubic tubercle. It is also possible to do this surgery under ultrasound supervision.

    Obturator Neuropathy

    Signs and symptoms

    • Along the medial part of the thigh, pain and paresthesias may radiate from hip to knee.
    • Pain may worsen with lateral leg movement or extension.
    • Walking difficulties or leg weakness might result from issues adducting the ipsilateral hip.

    Indications

    • Hip adductor weakness on the affected side
    • Medial thigh wastage
    • abnormal hip abduction when walking, which causes a wide-based, circumduction gait
    • The mid and lower part of the medial thigh is an area of sensory loss or change that occasionally extends below the knee.
    • Ipsilateral lack of the hip adductor tendon reflex (which is not always present in healthy populations; check against an asymptomatic leg)

    Examination

    1. Needle EMG can verify acute or chronic hip adductor denervation while ruling out other lower extremity muscles such the quadriceps or iliopsoas
    2. When intra-pelvic mass lesions are suspected of entrapping the nerve, ultrasonic imaging, CT, or MRI may be performed.

    Surgical Importance

    Surgery involving pelvic dissection and access put the obturator nerve at risk for damage. Regardless of the surgical technique used to treat pelvic organ prolapse, the obturator nerve and ureter are more vulnerable to harm. Laparoscopic pelvic operations, such as laparoscopic lymphadenectomy, can potentially cause damage to the obturator nerve. Furthermore, transvaginal mid-urethral sling deployments may cause damage to the obturator nerve.

    When it comes to transurethral resection of bladder tumors (TURBT), which is frequently used to treat bladder wall tumors, the obturator nerve is very helpful. Due to the close closeness of the obturator nerve to the prostatic urethra, bladder neck, and inferolateral wall of the bladder, electrical stimulation caused by tumor removal may result in “adductor jerk,” or abrupt adductor contraction. This abrupt thigh movement may result in extravesical tumor seeding and bladder perforation. The obturator artery may also sustain injury as a result of the adductor jerk. The adductor jerk can be removed and a safe and efficient TURBT is made possible by conducting an obturator nerve block with a local anesthetic.

    FAQs

    Which muscle is innervated by the obturator nerve?

    In conclusion, the adductor brevis, gracilis, obturator externus, ischiocondylar portion of the adductor magnus muscle, and adductor longus all receive motor innervation from the obturator nerve.

    What are the symptoms of obturator nerve damage?

    Depending on the extent of the damage to the obturator nerve, different symptoms may appear. Numbness, tingling, burning, or discomfort in the inner thigh or groin are typical symptoms. reduced feeling in the thigh, which can occasionally spread to the calf.

    What is the primary function of the obturator?

    To offer hip movement, the obturator muscles cooperate with the surrounding muscles. The external rotation of the hip is their main purpose. Furthermore, the flexed hip can be adducted with the help of the obturator externus and abducted with the help of the obturator internus.

    How to test the obturator nerve?

    Needlestick electromyography (EMG) is perhaps the most effective diagnostic for confirming obturator neuropathy. According to Bradshaw et al., athletes who have persistent groin discomfort due to obturator neuropathy exhibit chronic denervation in their short and long adductor muscles.

    Where is the obturator muscle located?

    pelvis

    The inner surface of the pelvic anterolateral wall is where the internal obturator muscle originates. It surrounds the obturator foramen.It is connected to the ischium and inferior pubic ramus, as well as to the inside surface of the hip bone behind and under the pelvic brim.

    References

    • TeachMeAnatomy. (2023, October 15). The Obturator Nerve – course – motor – sensory – TeachMeAnatomy. https://teachmeanatomy.info/lower-limb/nerves/obturator-nerve/
    • Obturator nerve. (2023, November 3). Kenhub. https://www.kenhub.com/en/library/anatomy/obturator-nerve
    • Obturator nerve.(2023, July 24).StatPearls.https://www.ncbi.nlm.nih.gov/books/NBK551640/

  • Lyme Arthritis

    Lyme Arthritis

    Lyme Arthritis: What is it?

    Lyme arthritis is a late sign of Lyme disease. It most frequently affects the knee and results in observable warmth, edema, and joint discomfort. Antibiotics can be used to treat Lyme arthritis.

    Lyme disease is a bacterial infection transmitted through the bite of certain types of ticks. According to research, around 476,000 Americans receive a diagnosis and treatment for Lyme disease each year.

    Lyme disease can cause several late signs and symptoms if treatment is not received. Lyme arthritis is one of these, and it can cause irreversible joint damage.

    Causes of Lyme arthritis:

    The bacteria Borrelia burgdorferi is the cause of Lyme disease. The saliva of some tick species, particularly deer ticks, that have contracted the infection contains this bacterium. Humans can contract it by being bitten by a tick.

    Early on, the B. burgdorferi germs spread to the surrounding tissues and joints. However, Lyme arthritis develops later, usually after months have passed, whereas joint pains may appear during the early stages of illness.

    Your joints get extremely inflamed when you have Lyme arthritis. This may eventually cause irreversible joint injury.

    What Are the Lyme Infection Stages?

    Three phases are involved:

    • Early localized Lyme: Flu-like symptoms, including fever, chills, enlarged lymph nodes, headache, sore throat, and a bull’s-eye-shaped or circular, red rash that is at least two inches long.
    • Early-stage Lyme disease symptoms include flu-like symptoms including numbness, discomfort, or weakness in your arms and legs; visual abnormalities; chest pain and heart palpitations; a rash (which may or may not be a bulls-eye rash); and Bells palsy, a kind of facial paralysis.
    • Months, weeks, or even years after the tick bite, late-disseminated Lyme disease may develop. Severe exhaustion, headaches, disorientation, arthritis, and confusion are possible symptoms.

    About 10% of people who receive treatment for Lyme disease are unaware that they have the illness. Three main symptoms might follow: exhaustion, soreness in the muscles or joints, and disorientation or short-term memory loss. Post-treatment Lyme disease syndrome is the term for this. Since its symptoms are identical to those of other disorders, diagnosing it can be challenging. Furthermore, there is no blood test to support it.

    Experts are uncertain as to why Lyme symptoms don’t always go away. One theory is that your body continues to battle the illness, like an autoimmune condition, even after the germs have been relocated.

    The symptoms of Lyme arthritis:

    One or more joints may be impacted by Lyme arthritis. Although Lyme arthritis most frequently affects the knees, it can also affect other joints, such as the:

    • shoulder
    • hip
    • elbow
    • ankle
    • wrist
    • jaw

    Early signs can include the following and are similar to a mild flu:

    • Fever
    • Headache
    • Fatigue
    • Chills
    • Body aches
    • Swollen lymph nodes
    • Within a month following the bite, a bull’s-eye-shaped red skin rash may develop at the location.

    Usually, Lyme arthritis develops in the months following Lyme illness. Among the symptoms are joints that are:

    • swollen
    • stiff or painful
    • red
    • warm to the touch
    • Untreated Lyme arthritis may result in recurrent or chronic flare-ups of joint pain and swelling. The duration of these flares might range from weeks to months.

    How does the Rash Appear?

    Some Lyme rashes resemble a bull’s eye with a circle close to the middle. However, the majority are red, spherical, and at least two to two inches wide.

    Over many days, the rash progressively gets larger. It may grow to a diameter of almost 12 inches. Although it could seem warm to the touch, it is usually not unpleasant or irritating. It might show up on any part of your body.

    What is the tick’s size?

    Depending on their stage of life, ticks come in three different sizes. They can be as little as an apple seed, a poppy seed, or a sand seed.

    Who are at increased Risk of Lyme arthritis?

    The risk of developing Lyme disease is highest in males aged 40 to 60 and in boys under the age of 15. This is due to their ability to play outside and move on to hiking, camping, and hunting.

    Some people believe that because older adolescents and men in their 20s are more likely to be indoors and using computers, Lyme diseases are less common in these demographics.

    Additionally, they could know older adults better since they can work in their backyards, which is where the majority of Lyme illnesses happen.

    How will you know if you’ve been bitten?

    Ticks are so small that you have to have very good eyesight to see them.

    A tick bite might be the cause of a small, red patch on your skin that looks like a mosquito bite. It won’t be a problem if it goes out in a few days. Be aware that getting bitten by a tick does not always mean you have Lyme disease.

    You may have been bitten by a tick if you see a bull’s-eye-shaped rash. Discuss therapy with your physician or doctor.

    You will notice a tick bite right away if you have an allergic reaction to ticks.

    Diagnosis:

    A doctor will begin by reviewing your medical history and performing a physical examination, which includes assessing the affected joints if you start to exhibit signs of Lyme arthritis.

    A two-step antibody-based testing procedure can be performed to identify Lyme disease if your doctor believes you have Lyme arthritis. These tests are extremely sensitive in individuals with Lyme arthritis and need a blood sample.

    Your doctor may prescribe tests to rule out other forms of arthritis, such as septic and rheumatoid arthritis (RA) because Lyme arthritis can be similar to these disorders. Here are a few instances:

    • Analysis of synovial fluid.
    • Examinations for indicators of autoimmune diseases such as antinuclear antibodies or rheumatoid factor.
    • Blood tests for inflammatory indicators such as erythrocyte sedimentation rate and C-reactive protein.
    • Complete blood count.
    • Joint imaging with MRI or ultrasound.

    Treatment of Lyme arthritis:

    A 28-day regimen of oral antibiotics is used to treat Lyme arthritis. Adults may follow the following regimens, according to the Centres for Disease Control and Prevention (CDC):

    • Doxycycline (100 mg, twice daily)
    • amoxicillin (500 mg, three times daily)
    • cefuroxime (500 mg, twice daily)

    Children with Lyme arthritis may also be treated with the same drugs. However, body weight and age are taken into account while adjusting the dose.

    Nonsteroidal anti-inflammatory medicines (NSAIDs) are an example of an over-the-counter medication that may be used to assist manage pain and inflammation during therapy. Physical therapy could be suggested as part of the healing process if there has been a significant joint injury.

    Treatment of Lyme arthritis with physiotherapy:

    Only antibiotics and other supplemental medications, such as analgesics, can treat early-stage Lyme disease. Some medical professionals will recommend physical therapy to patients with persistent Lyme disease symptoms that do not improve with medication. Physical therapy serves the following main purposes in the treatment of Lyme disease:

    • lessen discomfort
    • Prepare deconditioned individuals to begin an exercise regimen at home.
    • Teach patients how to exercise properly, including the right frequency, duration, and resistance to attain fitness goals without exacerbating Lyme disease symptoms.

    Interventions in physical therapy involve:

    • Massage
    • Range of motion
    • Myofascial release
    • Modalities include paraffin, ultrasound, and moist heat.
    • Although there is no research to support this, electrical stimulation and cold packs are generally contraindicated.
    • Strengthening and gradually increasing the patient’s level of activity—which may be minimally compromised due to a persistent Lyme infection—are the goals of exercise prescriptions. Stretching, gentle exercise, and light resistance exercises with low weights and high repetitions are common components of whole-body workouts.

    Shoulder stretch

    Cross-body stretch
    Cross-body stretch
    • Maintain it with your right arm while crossing your left arm across your body.
    • Hold for almost 30 seconds.
    • Switch arms and do it once again.

    Knee to chest stretch

    One-Knee-to-Chest
    One-Knee-to-Chest
    • With the backs of your heels flat on the floor, assume a supine posture on your back.
    • As you feel a stretch in your lower back, slowly bring one knee joint up to your chest.
    • Keep the other leg relaxed.
    • Hold for almost 30 seconds.
    • Switch legs and do it once more.

    Neck stretch

    Neck Stretches
    Neck Stretches
    • Just slightly bend your head to the right.
    • Feel the left side of your neck extend comfortably as you gently lower your head with your right hand.
    • Hold for almost 30 seconds.
    • Switch sides and do it once more.

    Rolling with a foam roller

    Using a foam roller to roll tight tissue in your body is an effective at-home task. This helps your fascia, or connective tissue, to stretch and release tension. (The connective tissue that covers every muscle, including tendons and ligaments, is called fascia.)

    Rollers may be purchased online and are reasonably priced. Use the roller only to gently move the muscles surrounding sore joints or joints, or any sore muscles at all.

    Gentle strengthening

    Mildly strengthening the muscles that support the joints affected by Lyme arthritis can help reduce pain and inflammation. Everybody is different when it comes to this kind of strength training. For example, if a patient has knee soreness and wants to strengthen the weak muscles that link to the knee joint in a way that reduces pain,

    Although it takes time and patience, strengthening is almost always beneficial. Finding a qualified Pilates teacher or physical therapist to help you with this kind of work is worthwhile.

    Yoga

    You’ve heard that countless times if you’ve been there once: Yoga is a great cleanse! as well as for those who are not very energetic. Start with easy or beginner lessons, and if you feel confident, mix it up as your energy levels increase! Since you are the one who knows your body the best, avoid doing hot yoga unless you are certain that the heat won’t get to you. I had trouble controlling my body temperature, so I didn’t attempt hot yoga until two months following treatment when I was drinking a lot of water.

    Light Weight Lifting

    Muscles might weaken and shrink as a result of chronic Lyme disease. Additionally affected were the liver, lungs, heart, and nerves. My body worked together more and then began to recover, the transition went more smoothly, and I was able to keep some muscle and strength with mild weightlifting/toning and light fitness programs.

    Walking

    Walking doesn’t sound like a show if you’re in your 20s or 30s. However, if it is all you are capable of doing throughout therapy, then do it! Start with 15 minutes each day and work your way up to a standard 30-minute session. Any exercise will be beneficial, but don’t push yourself too hard.

    Bicycling

    low-impact method of encouraging positive activities. Cycling has been an excellent substitute for cardio.

    Stair-Stepping

    It helped the legs build strength.

    Differential Diagnosis

    • Acute memory disorders
    • Ankylosing spondylitis and rheumatoid arthritis
    • Atrioventricular nodal block
    • Cellulitis
    • Contact dermatitis
    • Gout and pseudogout
    • Granuloma annulare
    • Prion-related diseases

    Risk factors of Lyme Arthritis:

    Living in a region where Lyme disease-carrying ticks are common puts you at higher risk for both Lyme illness and Lyme arthritis. This encompasses the northeastern, mid-Atlantic, and north-central regions of the United States as of 2022.

    Outdoor workers, such as those in the construction, gardening, or forestry sectors, are more vulnerable. Tick bites are also more likely to occur in those who spend a lot of time outside, whether it be gardening, hiking, or camping.

    Generally speaking, spring through autumn is when infected tick bites occur most often. Tick activity peaks at these periods.

    Possible side effects of Lyme arthritis:

    Permanent joint deterioration is the primary consequence of Lyme arthritis. Joint discomfort and decreased range of motion may result from this, affecting day-to-day activities and overall quality of life.

    Other health issues that might result from untreated Lyme disease include:

    • Late-stage Lyme disease is linked to acrodermatitis chronica atrophicans, a skin disorder.
    • Heart symptoms, such as Lyme carditis.

    Neurological issues such as:

    • Numbness and tingling sensations
    • nerve pain
    • Bell’s palsy
    • symptoms similar to meningitis, including fever, stiff neck, and unbearable headache
    • vision problems

    Living with Lyme disease:

    Most Lyme disease patients have a very good prognosis after receiving treatment. Antibiotics help remove the infection, lower inflammation, and halt further joint damage.

    However, it’s crucial to remember that Lyme arthritis can cause long-term joint damage. Your quality of life may suffer, joint function may be affected, and you may be less able to perform specific tasks.

    This is why it’s critical to consult a physician if you’re exhibiting signs of Lyme arthritis. Even while Lyme disease might not be the cause of your symptoms, it could be caused by another illness that requires medical attention.

    Summary

    The bacterial infection known as Lyme disease is the cause of Lyme arthritis. It usually affects the knee and can produce warmth, discomfort, and edema in the affected joints. Lyme arthritis can result in irreversible joint damage if treatment is not received.

    An antibiotic course is an excellent way for a doctor to treat Lyme arthritis. Taking precautions to reduce your risk of tick bites is another way to avoid Lyme illness.

    FAQs

    What signs of Lyme disease arthritis are present?

    Symptoms. The primary symptom of Lyme arthritis is a noticeable enlargement of one or more joints. Other major joints including the shoulder, ankle, elbow, jaw, wrist, and hip may also be impacted, however, the knees are most frequent. When moving, the joint may hurt or feel heated to the touch.

    Is it possible to heal Lyme disease?

    A brief course of antibiotics usually cures Lyme disease entirely. However, Lyme disease is not always a straightforward sickness; if treatment is not received, it can occasionally result in persistent symptoms, even in cases when therapy is successful. This phenomenon is not fully understood.

    Which therapy is most effective for Lyme arthritis?

    Current guidelines from the Infectious Diseases Society of America36 state that oral doxycycline (100 mg twice a day) or amoxicillin (500 mg three times daily) should be used for 30 days as the first treatment for individuals with Lyme arthritis.

    With Lyme, is it possible to lead a regular life?

    A 2- to 4-week course of oral antibiotics usually results in full recovery, although some patients may experience persistent symptoms including body pains, weariness, or trouble thinking.

    Which medication works best for Lyme disease?

    Antibiotics. Doxycycline (Monodox, Doryx, Vibramycin, Oracea), amoxicillin (Amoxil), and cefuroxime (Ceftin, Zinacef) are the three first-line oral medicines for Lyme disease. In the US, the recommended antibiotic for neurologic Lyme disease is ceftriaxone (also known as “Rocephin”) given intravenously.

    Is Lyme arthritis irreversible?

    The bacterial infection known as Lyme disease is the cause of Lyme arthritis. It usually affects the knee and can produce warmth, discomfort, and edema in the affected joints. Lyme arthritis can result in irreversible joint damage if treatment is not received. An antibiotic course is an excellent way for a doctor to treat Lyme arthritis.

    References

    • Seladi-Schulman, J., PhD. (2024, April 19). Overview of Lyme arthritis. Healthline. https://www.healthline.com/health/lyme-arthritis#takeaway
    • Lyme Disease | Arthritis Foundation. (n.d.). https://www.arthritis.org/diseases/lyme-disease
    • Mexico, L. (2020, May 20). Lyme arthritis: Symptoms, diagnosis and treatment. Lyme Mexico Clinic. https://lymemexico.com/lyme-arthritis-symptoms-diagnosis-treatment/
    • Hirpara, D. (2023a, December 13). Lyme arthritis – Cause, symptoms, diagnosis, treatment. Mobile Physiotherapy Clinic. https://mobilephysiotherapyclinic.in/lyme-arthritis/

  • Myalgia

    Myalgia

    What is a Myalgia?

    Myalgia refers to muscle pain or discomfort, which can affect a specific area or the entire body. It is a common symptom that may result from muscle overuse, injury, tension, infections, or underlying medical conditions such as fibromyalgia or autoimmune disorders. Treatment typically involves rest, pain relievers, physical therapy, and addressing the underlying cause.

    We have all experienced muscular pain at some point, which is known as myalgia. After exercising or when you have the flu, you may experience sore muscles and body aches. Myalgia is typically mild and transient. However, on sometimes, it can indicate a chronic condition that requires your care. Consult a medical professional if you have no idea why your muscles hurt or if they don’t seem to be improving.

    Muscle tissue produces the uncomfortable sensation known as myalgia, or muscle pain. It is a sign of numerous condition. Overuse of a muscle or set of muscles is the most frequent cause of acute myalgia; viral infections are also a possible cause, particularly in the absence of injury.

    Metabolic myopathy, certain nutritional deficiencies, ME/CFS (Myalgic encephalomyelitis/chronic fatigue syndrome), fibromyalgia, and Increased musculoskeletal pain syndrome can all result in chronic myalgia.

    Muscle strains or overuse, infections, and vitamin deficiencies are examples of short-term (acute) causes of myalgia. Muscle soreness and pain can also be caused by long-term (chronic) conditions. These consist of depression, rheumatoid arthritis, and fibromyalgia.

    Physical therapy, self-treatment, and medication may all be used to treat myalgia, depending on the underlying ailment.

    Causes of Myalgia

    Myalgia is most frequently caused by strain, injury, and overuse. In addition, myalgia may be caused by condition, allergies, drugs, or reactions to vaccinations. Dehydration can occasionally cause muscle soreness as well, particularly in those who engage in strenuous physical activities like working out.

    Infectious diseases like influenza, muscle abscesses, Lyme disease, malaria, trichinosis, or poliomyelitis; autoimmune diseases like celiac disease, systemic lupus erythematosus, Sjögren’s syndrome, or polymyositis; gastrointestinal disorders like non-celiac gluten sensitivity (which can also occur without digestive symptoms); and inflammatory bowel diseases like Crohn’s disease and ulcerative colitis are among the many conditions that frequently cause muscle pain.

    The most typical reasons are:

    • Trauma or injury, such as hematomas or sprains
    • Overuse is when a muscle is used excessively and frequently, including to prevent another injury.
    • Prolonged stress.

    Pain in the muscles is caused by:

    • Rhabdomyolysis is linked to viral compression damage, which can result in crush syndrome.
    • Drug-related
    • Statins and fibrates are frequently used.
    • Cocaine, ACE inhibitors, and various retroviral medications are occasionally used.
    • severe lack of potassium
    • fibromyalgia
    • Ehlers-Danlos syndrome

    Autoimmune conditions, such as:

    • Multiple sclerosis (neurologic pain interpreted as muscular)
    • Myositis
    • Mixed connective tissue disease
    • Lupus erythematosus
    • Fibromyalgia syndrome
    • Familial Mediterranean fever
    • Polyarteritis nodosa
    • Devic’s disease
    • Morphea
    • Sarcoidosis

    Infections, such as:

    • Influenza
    • Lyme disease
    • Babesiosis
    • Malaria
    • Toxoplasmosis
    • Dengue fever
    • Hemorrhagic fever
    • Muscular abscess
    • Compartment syndrome
    • Polio
    • Rocky Mountain spotted fever
    • Trichinosis (roundworm)
    • Ebola
    • COVID-19.

    Overuse:

    Excessive, premature, or frequent use of a muscle is known as overuse. Repetitive strain injuries are one instance. Also see:

    • Exercise
    • Weight lifting

    Injury:

    • Strains and strains are the most frequent injury-related causes of myalgia.

    Metabolic defect:

    • Carnitine palmitoyltransferase II deficiency
    • Conn’s syndrome
    • Adrenal insufficiency
    • Hyperthyroidism
    • Hypothyroidism
    • Diabetes
    • Hypogonadism
    • Postorgasmic illness syndrome.

    Other:

    • Myalgic encephalomyelitis/chronic fatigue syndrome (ME/CFS)
    • Channelopathy
    • Ehlers Danlos Syndrome
    • Stickler Syndrome
    • Hypokalemia
    • Hypotonia
    • Exercise intolerance
    • Mastocytosis
    • Peripheral neuropathy
    • Eosinophilia myalgia syndrome
    • Barcoo Fever
    • Herpes
    • Hemochromatosis
    • Delayed onset muscle soreness
    • HIV/AIDS
    • Generalized anxiety disorder
    • Tumor-induced osteomalacia
    • Hypovitaminosis D
    • Infarction
    • Postorgasmic illness syndrome (POIS).

    Withdrawal symptoms from specific medications:

    • Myalgia can be caused by abruptly stopping high-dose corticosteroids, opioids, barbiturates, benzodiazepines, caffeine, or alcohol.

    Symptoms of Myalgia?

    The main sign of myalgia is pain in one or more muscles. The severity of the pain can vary, depending on the underlying reason and the affected body portion. The underlying reason will determine if the pain is transient or ongoing.

    The following are the most typical myalgia associated symptoms, in addition to pain:

    • Stiffness
    • Tenderness
    • Muscle weakness
    • Swelling or redness surrounding the muscle
    • Feelings of cramping, pain, or tears.

    In addition, myalgia may be accompanied by:

    • Chills and fever in the event of an condition
    • Muscle and joint pain together
    • Weariness that prevents one from engaging in daily activities
    • Depression if the pain is ongoing.

    Diagnosis

    Myalgia is not a diagnosis; it is a symptom. The goal of the diagnosis procedure is to identify an underlying condition that might have caused the beginning of muscular soreness.

    Several steps may be involved in reaching a diagnosis:

    • Medical history: The procedure is going over your entire medical history with your healthcare practitioner, including any condition and injuries you may have had. You are also covered for all of your current prescriptions.
    • Physical examination: Assesses muscle tone, strength, stiffness, and the region of pain. It also involves observing posture and gait, or how one walks.
    • Blood tests: May reveal alterations that are indicative of inflammation, muscle injury, or other underlying disorders.
    • Imaging tests, including as magnetic resonance imaging (MRI) scans and X-rays, can be used to identify and rule out certain myalgia causes.

    Condition-Specific Testing:

    • A healthcare professional may order or carry out extra diagnostic testing based on the problem they may suspect.
    • For instance, specific blood work, such as testing for particular genes and antibodies, is performed to diagnose autoimmune conditions.
    • It is possible to ascertain whether the nerves feeding the muscles are operating normally by nerve conduction examinations. Myositis, which results in inflammation and muscle tissue degradation, may be diagnosed using this.
    • Certain muscular disorders, like fibromyalgia, are difficult to diagnose or rule out using imaging or blood tests. In this case, your doctor will make a diagnosis based on your symptoms and the exclusion of other disorders.

    Treatment of Myalgia

    Myalgia should be treated symptomatically when its cause is unknown. Heat, rest, paracetamol, NSAIDs, massage, cryotherapy, and muscle relaxants are common forms of treatment.

    Rest and at-home treatment will typically alleviate muscle pain that has a transient cause, such as strain, exercise, or a transient infection. However, stiffness that lasts longer than a few days or gets worse even after resting can indicate a more serious problem that needs medical attention. If your pain doesn’t go away, give your physician a call. For some diseases, you may require medicine, physical treatment, or even surgery.

    Acute Myalgia Treatments:

    Home treatments are often effective in treating cases of short-term myalgia. Acute muscle pain can be alleviated by doing the following:

    • Putting the sore spot to rest
    • Using over-the-counter (OTC) painkillers like Tylenol (acetaminophen) or Advil (ibuprofen)
    • Using heat and ice alternately to ease pain and reduce swelling
    • Stretching muscles gently
    • Avoid high-impact activities until the pain subsides
    • Muscle tension can be relieved by practicing stress-relieving techniques like yoga and meditation.

    Chronic Myalgia Treatments:

    • The most popular treatment for persistent myalgia is physical therapy. In addition to strengthening the surrounding tissues, it can assist painful muscles become more flexible.
    • Additionally, a therapist can help you focus on ergonomics at work and at home and learn how to manage stress. To reduce the chance of harm or injury, ergonomics can enhance your workstation and surroundings.
    • To help manage your pain, your healthcare practitioner may prescribe medications or recommend over-the-counter pain medicines in addition to physical therapy. In order to reduce pain, anti-inflammatory and painkillers are occasionally injected directly into a sore spot.
    • Prescription medications can occasionally help with fibromyalgia. These include antidepressants like Cymbalta (duloxetine) and anti-seizure medications like Lyrica (pregabalin), which alter the body’s physiological reactions to pain.
    • Excessive systemic (whole-body) inflammation is a symptom of autoimmune disorders. Depending on the ailment, treatment may involve drugs like corticosteroids, which can lower inflammation.

    Home treatments of Myalgia:

    It’s normal to have painful muscles after working out, especially if you’ve tried something new. Acute muscle soreness can occur immediately, while delayed-onset muscle soreness can develop over the course of a day or two. Conversely, you could have pain if you don’t move enough or if you only use some of your muscles. For instance, prolonged sitting at desk work can lead to soreness and stiffness in the muscles.

    For common muscle aches and pains, self-care techniques include:

    • Get some rest. If you have strained or overused your muscles, the fibers have tiny tears that need to mend. Resting your muscles will allow them to recover and become stronger.
    • Stretching gently. While your muscles heal, you can avoid stiffness by stretching gently and carefully. A physical therapist can advise you on when and how to stretch if you have an injury.
    • Massage. Whether a muscle is uncomfortable from underuse or overuse, massage can ease tension and increase blood flow to the affected area. Sports massage helps athletes recuperate from workouts more quickly.
    • Cold treatment. By lowering swelling and inflammation, cold therapy can be beneficial for recent injuries or sudden, intense pain. Try applying an ice pack or taking a cold bath to relieve your aching muscles.
    • Heat treatment. By relaxing your muscles and promoting blood flow, heat therapy can help with previous injuries as well as overall stress and stiffness. Try a warm bath or a heat wrap.
    • Over-the-counter drugs. For minor aches and pains, try over-the-counter pain medications. Aspirin and ibuprofen are examples of NSAIDs (nonsteroidal anti-inflammatory medications) that also lessen inflammation.
    • Topical therapies. Localized muscular pain can be alleviated using topical pain medications. To lessen soreness, look for compounds that can numb the area, such as menthol, capsaicin, or lidocaine.

    Prevention of Myalgia:

    Take these steps to reduce your chance of getting muscle soreness again if it’s caused by stress or physical activity:

    • You should stretch your muscles both before and after working exercise.
    • Every workout should include a warm-up and cool-down, lasting around five minutes each.
    • Particularly on days when you’re active, make sure you drink enough water.
    • Exercise frequently to support the development of ideal muscular tone.
    • If you work at a desk or in an atmosphere that increases your risk of muscle strain or tension, get up and stretch frequently.

    Conclusion:

    Muscle pain is frequent, whether it’s the sore muscles you get after a long hike or the flu’s all-over body aches. Muscle soreness following exercise is a natural element of developing stronger muscles, therefore it’s not always a bad thing. However, it’s critical to recognize whether muscle soreness is more intense or persists longer than it should. You may require medical attention if myalgia is not relieved by home care.

    Muscle pain is known medically as myalgia. It may be acute or transient, as in the case of painful muscles the day after working out. Additionally, it may be chronic, or long-lasting, due to a medical condition like fibromyalgia.

    Rest and over-the-counter painkillers are common at-home treatments for muscle soreness. If it’s chronic, your doctor can examine you and prescribe tests to find the best course of action.

    FAQs

    What is myalgia’s main complaint?

    Adults who seek medical attention frequently complain of myalgia, or muscular pain. In actuality, almost everyone will at some point in their lives feel sore in their muscles. Among the most frequent causes are viral infections, trauma, and excessive effort.

    Five myalgia: what is it?

    The symptoms of fibromyalgia include extensive musculoskeletal pain, as well as problems with mood, memory, sleep, and exhaustion. By altering how your brain and spinal cord interpret painful and nonpainful impulses, researchers think fibromyalgia intensifies painful sensations.

    How can myalgia be avoided?

    The following advice will help you avoid myalgia: Stretching activities: Frequent stretching exercises can assist maintain the health of the muscle tissues and lessen muscle stiffness. Appropriate Warm-up: To improve blood flow to the muscles and prevent strain or injury, a good warm-up is required prior to any physical activity.

    Which vitamin helps with sore muscles?

    Low vitamin D levels can significantly exacerbate joint and muscle issues, according to recent studies. As physical therapists, we concentrate on identifying and addressing the root cause of your issue.

    Can myalgia be caused by stress?

    Stress can cause pain. muscular tension and pain, as well as other related pains like headaches caused by muscular tension in the surrounding areas of the head, neck, and shoulders, can be caused by abrupt onset or prolonged stress.

    Can the heart be impacted by myalgia?

    Since pain activates the sympathetic nervous system and raises cardiac strain, fibromyalgia itself may also have a detrimental effect on cardiac outcomes in individuals with CCF. In conclusion, FM is a prevalent comorbidity among people with chronic condition, including CCF.

    Which medication works best for myalgia?

    A number of things, such as an injury, infection, or disease, can cause muscle pain. The following are common drugs for muscular pain, depending on the cause: NSAIDs, or nonsteroidal anti-inflammatory drugs: Examples of medications that can relieve inflammation and pain include naproxen (Aleve), diclofenac, and ibuprofen (Advil, Motrin).

    What is the onset of myalgia?

    Muscle aches and pains, which can affect ligaments, tendons, and fascia the soft tissues that connect muscles, bones, and organs are referred to as myalgia. Myalgia can be caused by trauma, injuries, overuse, stress, certain medications, and infections.

    How is myalgia tested for?

    The most effective screening tests are creatine kinase and erythrocyte sedimentation rate; if either is abnormal, electromyography, muscle biopsy, muscle strength testing, and exercise testing are conducted.

    Where does myalgia originate?

    Among the primary categories of causes are: Overuse-related muscle stress, such as repetitive strain injuries. Your muscles may become strained if you utilize them more than they are used to, which could result in minor tears.

    What is the most effective natural treatment for aching muscles?

    Home cures for aches in the muscles
    Rest: Take a break from the activity that injured you and give the affected area some rest. Ice: To lessen pain and swelling, apply an ice pack or bag of frozen peas. Three times a day, apply ice to the region for 15 to 20 minutes.

    What is the duration of myalgia?

    The duration of pain with myalgia might vary, ranging from a few minutes to many hours. The different variables causing your pain will determine how severe it is and how long it lasts.

    What is the finest tablet for pain in the muscles?

    Acetaminophen, naproxen, and ibuprofen can all help reduce muscle soreness. These medications, known as nonsteroidal anti-inflammatory medicines (NSAIDs), lessen swelling and inflammation.

    Is there a cure for myalgia?

    Physical therapy and medicines are typically used in conjunction to treat chronic myalgia. Reducing pain and enhancing quality of life are the two main objectives of treatment. The treatment of persistent myalgia might involve the use of a variety of drugs.

    What causes fever myalgia?

    In the event of a viral infection, the body’s immune system fights the infection. According to Donaldson, this battle may cause joint and muscle pain, known as myalgia, or muscle inflammation and weakening, known as myositis.

    Is it possible to treat muscle pain?

    Stretching, resting, or using painkillers are usually effective ways to ease temporary muscle soreness. To lessen the strain, elevate and rest the affected area. Use a heated compress to increase blood flow to the aching muscles and a cold compress to reduce inflammation.

    What is myalgia’s primary cause?

    Muscle strains or overuse, infections, and vitamin deficiencies are examples of short-term (acute) causes of myalgia. Muscle soreness and pain can also be caused by long-term (chronic) conditions. These consist of depression, rheumatoid arthritis, and fibromyalgia.

    References

    • Wikipedia contributors. (2025c, February 23). Myalgia. Wikipedia. https://en.wikipedia.org/wiki/Myalgia
    • Professional, C. C. M. (2024, October 8). Myalgia (Muscle pain). Cleveland Clinic. https://my.clevelandclinic.org/health/symptoms/myalgia-muscle-pain
    • O’Connell, K. (2023, May 9). What you need to know about muscle aches and pains. Healthline. https://www.healthline.com/health/muscle-aches
    • Barhum, L. (2024, August 17). Myalgia causes and treatment. Verywell Health. https://www.verywellhealth.com/myalgia-overview-4584594
  • 16 Best Exercises to Improve Balance

    16 Best Exercises to Improve Balance

    Introduction

    The ability to balance has an important effect on several aspects of our everyday lives. It is essential for reducing the risk of falls, promoting better posture, increasing coordination, and increasing general mobility. As we age, keeping or improving our balance becomes more important for preventing injuries and protecting our independence.

    The ability to balance is extremely important for preventing falls. Balance helps us stay stable even when we need to move quickly and lets us move around without worrying about falling. It helps lower our chance of getting hurt and offers us more control over our bodies.

    Being balanced is especially important as we become older. Our balance could decrease as our bones, joints, and muscles decline, increasing our risk of falling. A fall could result from losing our footing or misunderstanding a step if we don’t have a good balance.

    Whether you are an inactive senior trying to regain your health or a young athlete, everyone can benefit from strengthening their balance. It’s incredibly easy to modify balance work to fit any speed, no matter how fast or slow. Better balance can lead to more self-confidence, improved health, increased independence, and a lower chance of injury with a little work and patience.

    What factors affect balance?

    Balance can be affected by several factors, including a mix of environmental, cognitive, and physiological components.

    The main factors that affect balance are listed below:

    Changes Related to Age

    Muscle mass and strength naturally decrease with age, and other systems, such as our vestibular and sensory systems, also lose their ability to function effectively. It becomes more difficult to stay balanced as a result.

    • Muscle Weakness: Sarcopenia, or age-related muscle loss, can make it more difficult to stay balanced, particularly in the legs and core.
    • Joint Stiffness: Joint stiffness put on by arthritis and other age-related disorders may affect balance and reduce range of motion.
    • Declining Sensory Function: As people age, their vision and sense of balance (or awareness of their body’s location) begin to decline, which might affect their ability to balance.

    Loss of Proprioception

    The body uses sensory receptors in the muscles, joints, and tendons to sense its position in space, a process known as proprioception. Balance can be affected by any interference in this sense.

    • Nerve Damage: Disorders such as diabetic neuropathy can affect proprioception, which makes it hard for a person to feel where their limbs or feet are.
    • Joint Issues: The body’s capacity for recognizing movement or position in space may be affected by joint damage, such as that caused by arthritis.

    Vestibular System Dysfunction

    The inner ear’s vestibular system helps in regulating balance and orientation in space. Dizziness, vertigo, and imbalance can result from vestibular system disorders.

    • A frequent vestibular disease called Benign Paroxysmal Positional Vertigo (BPPV) involves unexpected episodes of vertigo that are put on by particular head motions.
    • Vertigo, tinnitus, and hearing loss are symptoms of Meniere’s disease, a disorder that results in a buildup of fluid in the inner ear.
    • Labyrinthitis: An infection-induced inflammation of the inner ear that causes lightheadedness and balance issues.

    Neurological Conditions

    The signals required for balance and coordination can be affected by disorders affecting the brain or spinal cord.

    • Parkinson’s disease is a neurological condition that affects motor coordination and control, making it difficult to walk and balance.
    • Multiple Sclerosis (MS): MS can harm brain and spinal cord nerve fibers, which can lead to balance problems because of poor coordination.
    • Stroke: A stroke may affect balance and coordination by causing partial paralysis or weakness on one side of the body.

    Vision Issues

    One essential element of balance is vision. The brain can’t get the visual cues it needs to stay stable and focused if you have poor vision.

    • Cataracts: Clouding of the eye’s lens causes blurred vision, which can make it challenging to see depth and move around.
    • Macular Degeneration: A disorder that damages the retina’s central region, resulting in vision loss and problems with balance.
    • Glaucoma: Optic nerve damage that may interfere with awareness of space and result in loss of peripheral vision.

    Chronic Conditions

    By causing pain in the joints, muscle weakness, or poor circulation, several chronic diseases, including diabetes, heart disease, and respiratory disorders, can have an indirect effect on balance.

    • Diabetes: Long-term elevated blood sugar levels can cause neuropathy, or nerve damage, which affects balance.
    • Heart Disease: Because of poor circulation, conditions such as heart failure can cause lightheadedness or dizziness, which may affect balance.

    Nutritional deficiencies or dehydration

    Muscle contraction, mental clarity, and general balance can all be affected by dehydration or a shortage of vital nutrients (such as electrolytes).

    • Dehydration: This may result in lightheadedness or dizziness, which affects balance.
    • Electrolyte imbalance: Especially while standing up, a deficiency in potassium, magnesium, or calcium may affect muscular function and cause balance problems.

    Psychological Factors

    Mental health disorders like depression or anxiety can create symptoms that affect balance, either directly (like lightheadedness) or indirectly (like decreased awareness and focus).

    • Anxiety: Feeling lightheaded, dizzy, or unstable can be symptoms of anxiety and panic attacks, which can affect one’s ability to balance.
    • Depression: Depression can cause exhaustion, weakened muscles, and a loss of focus, all of which may affect stability.

    How do balance exercises work?

    Exercises for balancing strengthen your legs, lower back, and core. Exercises that strengthen your lower body might also help you become more balanced.

    Even while balance exercises can be difficult at times, they will become easier with regular effort. As the workouts get simpler, gradually increase the amount of repetitions. Particularly when you’re first starting, you can ask someone to watch over you or help you.

    The exercises can be changed to suit your needs or to make them harder or easier. To make the second side easier, begin with your affected side. If you wish to balance your body between the two sides, you can perform your affected side twice. Try performing the exercises with one or both eyes closed once you feel comfortable doing so.

    Exercise’s Advantages:

    There are several advantages to regularly performing balance exercises, particularly in terms of increasing stability, reducing the risk of falls, and promoting general physical fitness.

    The following are the main benefits of doing balance-improving exercises:

    • Preventing Falls

    Better balance lowers your risk of losing your balance and falling through allowing you to respond quickly to changes in posture or position.

    • Improved Coordination

    For movements to be fluid and regulated, the brain and muscles must coordinate. Improved coordination results from balance exercises that encourage the brain to more effectively utilize sensory data from the muscles, eyes, and hearing.

    • Strengthened Core

    Standing upright and moving with control are made easier by a strong core, which also improves general stability and posture.

    • Advantages for the Mind and Brain

    Exercises involving balance frequently call for focus and concentration, which can improve cognitive function. Balance exercises improve brain function, particularly in areas linked to focus, awareness of space, and movement control.

    • Improved Alignment and Posture

    By strengthening the muscles that maintain normal alignment, especially in the back, shoulders, and legs, balance exercises help people develop good posture.

    • Increased Flexibility

    Numerous exercises for balance also increase flexibility, especially in the legs, ankles, and hips. This greater range of motion lessens stiffness and helps in controlling movement.

    • Increased Independence and Mobility

    Frequent balance training improves general mobility and makes it possible for people to complete everyday tasks more safely and confidently, such as walking, climbing stairs, or carrying groceries.

    • Decreased Chance of Chronic Pain

    To improve movement and lessen chronic pain, balance exercises frequently focus on regions like the lower back, knees, and hips that are subject to strain and stiffness.

    • Help in Recovery after Injury

    Physical treatment for people healing from injuries like hip replacements, knee surgeries, or ankle sprains frequently includes balance exercises.

    • Preventing Injuries

    Exercises for balance increase the sense of balance and muscle strength, which lowers the risk of injury during physical activity. This is especially important for sportsmen or people recovering from injuries.

    • Improved Sports Performance

    By strengthening and stabilizing muscles, improving coordination, and improving agility, balance exercises help athletes perform better.

    • Increased Self-confidence

    Improved balance increases self-confidence in one’s physical capabilities, which encourages more active engagement in everyday tasks, physical activity, and social relationships.

    Before starting a routine of exercise, take consideration the following safety precautions:

    A few steps should be taken before starting any fitness program to maximize its benefits. See your physician or physical therapist for guidance on the exercises that are most suitable for your specific problem.

    When you’re in pain, it’s essential to listen to your body and avoid hurting yourself. Even while soreness is a common side effect of exercise, chronic or severe pain may be a sign of overworking.

    Repetitive injuries can be avoided by maintaining good posture and technique. If you’re not sure how to begin an exercise regimen, think about consulting your doctor. Your muscles and joints will be ready for action if you warm up before working out.

    Exercises to Improve Balance:

    The best benefits will come from combining a range of workouts that focus on various muscle groups and movement patterns.

    Mountain Pose (Tadasana)

    A fundamental standing pose in yoga, Mountain Pose (Tadasana) encourages concentration, balance, and alignment.

    • Start by placing your feet hip-width apart or together, with your heels slightly apart and your toes pointed forward.
    • The weight should be distributed equally throughout the entire foot, giving the feeling that your feet are grounded.
    • Lift the kneecaps without locking your knees by using your thigh muscles.
    • Lengthen your tailbone toward the floor and gently contract your quadriceps (thigh muscles).
    • After taking a breath, extend your spine so that there is space between each vertebra.
    • Imagine stretching your spine from your feet to the top of your head, all the way up.
    • Make space across your collarbones by rolling your shoulders back and down, away from your ears.
    • With your palms pointing front or slightly inward, let your arms hang loosely at your sides.
    • To engage your core muscles without holding your breath, gently pull your belly button toward your spine.
    • Maintain an active but relaxed abdominal muscular tone.
    • Keep your chin slightly tucked in and your head in line with your spine.
    • The top of your head should be pointing toward the sky, and your eyes should be relaxed and gazing forward.
    • Breathe regularly and gently as you take deep breaths in and out through your nose.
    • Concentrate on your breathing and the feeling of being secure and upright.
    • Then return to your neutral position
    • Then relax.
    • Repeat these exercises 5 to 10 times.
    Mountain-Pose
    Mountain-Pose

    Single-Leg Stands

    Balance, stability, and lower body strength can all be improved with the Single-Leg Stand exercise. It engages your hip, ankle, and core muscles and tests your sense of balance or your body’s understanding of space.

    • Keep your arms by your sides and your feet hip-width apart as you stand upright.
    • Keep your shoulders back, your chest open, and your spine in alignment for proper posture.
    • Transfer your weight to one foot gradually.
    • For stability, keep your standing leg slightly bent.
    • Ensure that your foot is bearing the weight equally.
    • Maintaining the raised foot off the floor, bend the knee to a 90-degree angle and gradually raise the opposing leg off the ground.
    • For a few seconds, maintain the position.
    • Keep your eyes on a steady spot in front of you and contract your core.
    • Stay away from leaning to one side or tilting your body.
    • Don’t strain yourself, but try to keep the raised leg parallel to the floor.
    • Return to the beginning posture by slowly lowering the raised leg back to the floor.
    • Then relax.
    • Repeat these exercises 5 to 10 times.
    • Repeat the steps with the opposite leg.
    Single leg balance
    Single leg balance

    Squat

    A great bodyweight exercise that works several muscle groups, such as the quadriceps, hamstrings, glutes, and core, is the squat. It’s a basic exercise that improves posture, mobility, balance, and lower body strength.

    • Your toes should be pointed straight ahead or slightly turned out when you stand with your feet somewhat wider than hip-width apart.
    • For balance, keep your arms by your sides or hold them out in front of you.
    • To help protect your lower back, tighten your abdominal muscles.
    • Throughout the exercise, keep your back neutral; do not round or arch it.
    • As if you were going to sit in a chair, start by pushing your hips back.
    • Make sure your knees track over your toes as you bend them and lower your body; avoid letting them droop inward.
    • As low as your flexibility allows drop your hips until your thighs are parallel to the floor.
    • Keep your chest raised and prevent leaning forward by making sure your weight is on your heels rather than your toes.
    • To get back to the beginning posture, straighten your legs and push through your heels.
    • When you get up, keep your core active, and don’t lock your knees.
    • Then return to your neutral position.
    • Then relax.
    • Repeat these exercises 5 to 10 times.
    body weight squat
    body weight squat

    High Plank With Shoulder Taps

    A difficult variation on the classic plank involving stability and balance is the High Plank with Shoulder Taps. In addition to strengthening the arms, shoulders, and core, this exercise improves stability and coordination.

    • With your hands directly beneath your shoulders and your fingers spread wide for added support, start in the high plank posture.
    • Your feet should be roughly hip-width apart, and your body should be in a straight line from your head to your heels.
    • To maintain a flat back and prevent your hips from drooping engage your core.
    • Keep your lower back supported by tightening your abdominal muscles.
    • Hold your neck in a neutral position and keep your eyes a little ahead of you.
    • Raise your right hand off the floor and tap your left shoulder while keeping your plank position stable.
    • Avoid moving around or swaying and try to keep your body as still as you can.
    • Return to the starting position with your right hand on the floor.
    • Now, with your body as firm as possible, raise your left hand off the floor and tap your right shoulder.
    • Once more, refrain from shifting or rotating your hips.
    • Maintain a constant pace and concentrate on using your core to limit any movement in your hips or lower back while you perform the necessary number of repetitions of alternating shoulder taps.
    • Then relax.
    • Repeat these exercises 5 to 10 times.
    High Plank With Shoulder Taps
    High Plank With Shoulder Taps

    Standing Side Leg Raises

    An easy yet powerful exercise that works the hips, glutes, and outer thighs (abductors) is the standing side leg raise. It strengthens the legs, engages the core for stability, and helps with balance.

    • Stand up straight and space your feet hip-width apart.
    • For balance, put your hands on your hips or reach your arms out to the sides.
    • If necessary, you can also hold to a chair, wall, or countertop for support.
    • To help you keep your posture stable and upright, contract your abdominal muscles.
    • Keep your back straight and your chest raised.
    • Maintaining your right leg straight and your toes pointed ahead, slowly raise it out to the side.
    • Avoid tilting or leaning; instead, keep your body straight.
    • Lift your leg as high as you can comfortably go or until it reaches hip height.
    • Take care not to tilt your pelvis or arch your back.
    • To improve the activation of your leg muscles, keep your foot flexed, with the toes pointed toward the floor.
    • Using your glute and outer thigh muscles at the highest point of the exercise, hold the elevated position for a short moment.
    • Controllably return to the starting position by lowering your leg slowly.
    • Then return to your neutral position.
    • Then relax.
    • Repeat these exercises 5 to 10 times.
    • Afterwards do the same movement with the opposite leg.
    Standing side leg raise
    Standing side leg raise

    Tree Pose (Vrksasana)

    Tree practice (Vrksasana) is a well-liked standing yoga practice that helps with focus and concentration, balance, and leg strength. Additionally, it promotes stability and relaxation while stretching the spine, thighs, and hips.

    • With your feet together, your arms by your sides, and your weight evenly split between both feet, take a straight posture.
    • Lengthen your spine, raise your chest, and engage your legs.
    • Set a goal for your practice and take a big breath.
    • Move your weight gently onto your left foot (or right foot, if you’d like) while maintaining a square pelvis and level hips.
    • Your standing leg should remain slightly bent but do not lock your knee.
    • Place the sole of your right or left foot just above the knee, on the inside of your left thigh. 
    • Do not place the foot exactly on the knee joint.
    • Put your foot on the calf rather than the knee if you are unable to reach your thigh.
    • To keep your balance, press your thigh and foot together.
    • To keep your body stable, firmly press your standing leg into the ground.
    • Concentrate on a fixed point in front of you to improve your balance and focus.
    • In the Anjali Mudra or prayer posture, place your palms together in front of your chest, at the center of your heart.
    • You can stretch your arms overhead, bringing your hands together or keeping them parallel with your palms facing inside, if you feel stable and wish to deepen the posture.
    • Maintain a raised chest and relaxed shoulders.
    • Depending on how comfortable you are, hold the position for a few seconds or more.
    • Keep your breathing constant and your equilibrium intact.
    • Continue using your core and grounding through your standing leg while you maintain the pose.
    • Step back down to your starting posture slowly after lowering your arms gradually.
    • Then return to your neutral position.
    • Then relax.
    • Repeat these exercises 5 to 10 times.
    Tree-pose-_Vrikshasana_
    Tree-pose-_Vrikshasana_

    Lunges

    A great workout for the lower body, lunges work the quadriceps, hamstrings, glutes, and calves, among other muscle groups. Lunges increase hip and leg muscular strength and flexibility while improving balance, stability, and coordination.

    • With your shoulders back, your feet hip-width apart, and your core strong, take an upright position.
    • For extra support, keep your arms by your sides or rest your hands on your hips.
    • Step forward with your right foot, making sure it lands flat on the ground.
    • Bend both knees as you take a stride forward to get your body down to the floor.
    • You want your back knee to drop toward the floor without contacting it, and your front knee to be exactly above your ankle.
    • The angles of both knees should be about 90 degrees.
    • It is ideal to have the front thigh parallel to the floor and the rear knee slightly elevated.
    • To get back to standing, push through the heel of your front foot.
    • Return to a standing stance by stepping your right foot back to meet your left.
    • Then return to your neutral position.
    • Then relax.
    • Repeat these exercises 5 to 10 times.
    LUNGES
    LUNGES

    Single-Leg Step-Ups

    A great lower-body exercise that works the quadriceps, hamstrings, glutes, and calves is the single-leg step-up. This exercise helps increase strength, stability, and balance by simulating the action of climbing steps.

    • Locate a stable step, box, or bench that is knee-high or just below.
    • With your arms by your sides, your feet hip-width apart, and your core engaged, take a straight position.
    • With your left foot on the floor, place your right foot on top of the step or bench.
    • To raise your body, push via the heel of your right foot, which is the foot on the bench.
    • As you raise your body while maintaining a straight back and raised chest, straighten your right leg.
    • Make sure your right knee doesn’t extend over your toes as you stand up.
    • Once your right leg is fully extended, raise your left leg until it is parallel to your right leg and on the bench or step.
    • With both knees slightly bent, your body should now be completely supported on the raised step.
    • Step your left foot back down to the floor with caution, then your right foot.
    • With both feet on the ground, return to the beginning position while keeping your movement under control.
    • Then return to your neutral position.
    • Then relax.
    • Repeat these exercises 5 to 10 times.
    single-leg-step-up
    single-leg-step-up

    Reverse lunge

    An excellent exercise that works the quadriceps, hamstrings, glutes, and core is the reverse lunge. Because it puts less strain on the knees and promotes leg strength, balance, and coordination, it’s a great variation on the classic lunge.

    • With your shoulders back, your feet hip-width apart, and your core strong, take a straight position.
    • Put your hands on your hips or keep your arms at your sides for more support.
    • Move your right foot (or left foot if you’re starting with the other leg) backward.
    • Lower yourself into a lunge while maintaining a straight back and an elevated chest.
    • As you lower your body toward the floor, bend both knees.
    • Your front knee should bend at around a 90-degree angle, staying just above your ankle, while your rear knee should approach the floor without contacting it.
    • Instead of arching out to the side, the rear knee should remain in line with your body.
    • Make sure the front knee remains just above the ankle and does not extend past your toes.
    • To get back to standing, push through the heel of your front foot, which is the foot that is still on the ground.
    • Return to the starting position with your right foot (or the leg that previously stepped back) beside your left foot.
    • Then return to your neutral position,
    • Then relax.
    • Repeat these exercises 5 to 10 times.
    • Repeat the same movement on the other leg after switching to it.
    reverse lunges
    reverse lunges

    Boat Pose (Navasana)

    Boat Pose (Navasana) is a potent yoga pose that engages the hip flexors, thighs, and spine in addition to the core muscles, which include the lower back, obliques, and abs. It is frequently used to increase flexibility, balance, and strength in Pilates and yoga exercises. Boat Pose promotes good posture and body alignment while improving stability and core strength.

    • Place your feet hip-width apart and sit on the floor with your legs straight out in front of you.
    • For support, place your hands on the floor behind you, directing your fingers toward your feet.
    • Lean back a little as you exhale, using your abdominal muscles to support your spine. 
    • Take a deep breath.
    • Start by raising your legs off the ground, either straight or, if you’re just starting, with your knees slightly bent.
    • You can maintain a slight bend in your knees if your hamstrings are tight.
    • Your balance is provided by your sit bones, which are the bony parts of your pelvis that touch the ground when you sit.
    • It’s best to have a slight lean in your back, but avoid arching your lower back or failing to give out your chest.
    • With your shoulders pulled back and your chest open, maintain a straight back.
    • After your body is stabilized and your legs are raised, straighten your arms and place them parallel to the floor, palms facing each other.
    • Maintaining balance requires you to keep your arms extended and your eyes focused on a point, either front or slightly upward.
    • Hold Boat Pose for a few breaths (beginners typically hold it for 15-30 seconds, while more experienced practitioners hold it for longer).
    • Keep your spine straight, your chest raised, and your core active while you hold the pose.
    • Return to a seated position after lowering your feet gradually back to the floor to exit the pose.
    • As you slowly drop your legs, you can additionally support yourself by placing your hands behind you.
    • Then relax.
    • Repeat these exercises 5 to 10 times.
    boat pose
    boat pose

    BOSU Ball Squats

    In addition to developing the lower body, especially the quadriceps, hamstrings, glutes, and calves, BOSU Ball Squats also work the core for stability. The half-dome-shaped BOSU ball is a balance trainer that is more effective at targeting muscles that help in stability since it introduces an element of instability that tests your coordination and balance.

    • The BOSU ball should be placed on the floor with the dome side facing up and the flat side down.
    • Place your feet hip-width apart and tip your toes forward as you stand in front of the BOSU ball.
    • Place your feet evenly on the dome and bend your knees slightly as you step onto the BOSU ball one foot at a time.
    • Maintain a shoulder-width distance between your feet and a small bend in your knees.
    • Pull your belly button toward your spine to engage your core and stand tall.
    • Avoid bending your back by keeping your shoulders loose and your chest raised.
    • As though you were settling into a chair, slowly bend your knees and push your hips back.
    • As you lower your body into a squat, be careful to keep your knees in line with your toes and not extend past them.
    • Your thighs should be lowered to at least parallel to the floor, or lower if you are active and flexible.
    • When you perform the squat, pay attention to your stability and balance.
    • The BOSU ball’s instability will test your lower body and core.
    • Avoid letting your knees slump or push too far outward; instead, keep them in line with your toes.
    • Straighten your legs and encourage your body back up to the beginning posture by pressing through your heels.
    • As you go to the highest point, keep your chest raised and contract your glutes.
    • Then return to your neutral position,
    • Then relax.
    • Repeat these exercises 5 to 10 times.
    Bosu ball squats
    BOSU ball squats

    Single leg deadlift

    A fantastic exercise for strengthening the hamstrings, glutes, and lower back, the single-leg deadlift also helps with balance and coordination. Additionally, it strengthens your core for stability and enhances your posture and range of motion.

    • Maintain a hip-width distance between your feet, stand straight, and gently bend your knees.
    • When utilizing weights, such as dumbbells or a kettlebell, place them in front of your body in a neutral grip, with your hands facing one another.
    • For beginners, the exercise can also be done without the use of weights.
    • Put all of your weight on one leg, such as your right leg.
    • On the standing leg, bend your knee slightly while maintaining a straight posture and hip level.
    • For help with stability, maintain a gentle bend in the leg that is not bearing weight.
    • Bend at the hips, not the waist, while maintaining a small bend in your standing leg.
    • It also means that you should maintain a straight spine while pushing your hips back.
    • Your lifted leg should extend behind you as your body lowers toward the floor.
    • Avoid twisting your spine and try to maintain a flat back.
    • Imagine that as you lower your body down, you are reaching behind you with your rear leg.
    • As you lower your body toward the floor, make sure the leg that isn’t carrying weight is straight and extends behind you.
    • From your head to your lifted leg, your body should ideally make a straight line.
    • Lower your body until your hamstrings begin to stretch or until it is about parallel to the floor.
    • Any weight you’re carrying should extend toward the floor in the same direction as your body.
    • To prevent your lower back from drooping, keep your core active.
    • Maintain an open chest and relaxed shoulders.
    • To get back to standing, push through the heel of your standing leg while lowering your lifted leg back to the floor at the same time.
    • Squeeze your hamstrings and glutes to help in raising your body again.
    • Continue to move slowly and carefully.
    • Then relax.
    • Repeat these exercises 5 to 10 times.
    single-one-leg-deadlift
    single-one-leg-deadlift

    Heel-to-Toe Walk

    Walking straight ahead with one foot in front of the other (heel to toe) is known as heel-to-toe walking or tandem walking, and it’s a great way to improve your balance and coordination. It tests your balance, improves your coordination, and builds muscle mass in the lower body, particularly in the legs, calves, ankles, and feet.

    • With your arms by your sides and your feet hip-width apart, take a straight stance.
    • Throughout the workout, keep your posture and balance by using your core muscles.
    • Place your right foot’s heel directly in front of your left foot’s toes as you take a step forward with your right foot.
    • Make sure there is no space between your heel and the toes of your opposing foot as you take a step forward.
    • To help you stay balanced, keep your head up and concentrate on an area in front of you.
    • After putting your right foot down, raise your left foot and take steps forward with it, aligning up the heel of your left foot with your right foot’s toes.
    • Walking in a straight line, repeat this step with one foot in front of the other in an easy, controlled motion.
    • Keep moving in a straight line, making sure that every step is heel-to-toe and that the front foot’s heel touches the back foot’s toes.
    • Pay attention to keeping your balance and managing each step.
    • Turn around carefully and return using the same heel-to-toe method after you’ve reached the end of the region or distance you’re walking.
    • Then return to your neutral position,
    • Then relax.
    • Repeat these exercises 5 to 10 times.
    Heel-to-Toe Walking
    Heel-to-Toe Walking

    Sit to stand

    The Sit to Stand exercise is a useful movement that simulates an important daily activity: getting out of a chair and sitting down again. It is great for increasing balance, stability, and general functional fitness. It also helps to strengthen the lower body, especially the legs, hips, and glutes.

    • Place your feet level on the floor, hip-width apart, and sit at the edge of a strong chair.
    • Maintain a straight back and a 90-degree bend in your knees.
    • Put your hands at your sides or on your thighs; if you want to make it harder, you can also cross your arms over your chest.
    • Make sure there is enough room for you to stand up comfortably and that the chair is solid.
    • To support your back and keep proper posture, tighten your abdominal muscles.
    • Avoid bending over and maintain a raised chest and back shoulders.
    • To stand up, push with your heels and lean slightly forward from your hips rather than your back.
    • To raise your body, push through your feet using your hamstrings, quadriceps, and glutes.
    • Instead of bending forward as you stand up, keep your head up and concentrate on standing tall.
    • Throughout the movement, be careful not to use force or move forward; instead, keep control.
    • Once you’re standing, make sure your posture is balanced and upright by straightening your legs.
    • You can grab onto a chair or wall if you need it for support, but try pushing yourself to stand on your own.
    • As you prepare to sit down again, carefully bend your knees and push your hips back while keeping your balance.
    • Avoid jerky or quick movements and lower yourself carefully while maintaining knee-to-toe alignment.
    • Maintaining a straight back and flat feet on the ground, sit back down.
    • Then return to your neutral position,
    • Then relax.
    • Repeat these exercises 5 to 10 times.
    Sit-to-stand
    Sit-to-stand

    Heel raise

    The Heel Raise exercise is a straightforward but effective activity that focuses on the calves’ gastrocnemius and soleus muscles. Additionally, it works the foot and ankle muscles, improving their strength, balance, and lower body function in general.

    • Make sure your weight is properly distributed over both feet and stand straight with your feet hip-width apart.
    • If necessary, you can grasp onto a stable surface (such as a wall, chair, or countertop) for support, or you can rest your hands on your hips for balance.
    • Throughout the workout, keep your posture straight and tighten your core muscles.
    • Do not lean or arch your back.
    • Lift your heels off the floor and slowly stand up on the heel of your feet.
    • Keep your knees straight but not locked as you lift, and concentrate on using your calf muscles to push yourself forward.
    • Your calves’ muscles need to start to tense.
    • When you reach the highest point of the action, pause for a while and contract your calves.
    • With control, carefully lower your heels back to the floor, resisting gravity as you do.
    • Then return to your neutral position,
    • Then relax.
    • Repeat these exercises 5 to 10 times.
    heel-raise
    heel-raise

    Standing March

    Balance, coordination, and lower body strength can all be improved with the low-impact aerobic Standing March exercise. It is a fantastic choice for people of all fitness levels because it simulates the motion of walking or jogging while standing unmoved.

    • Maintain an upright standing position and place your feet hip-width apart.
    • To help with balance, keep your arms at your sides or bent at a 90-degree angle in front of you.
    • To begin, raise your right knee toward your chest while maintaining a 90-degree bend in the leg.
    • At the same time, extend your left arm in a natural marching motion, which is comparable to running or walking.
    • Return your right leg to the beginning position slowly, then do the same with your left leg, moving your right arm forward and raising your left knee toward your chest.
    • March in place by switching legs, raising and lowering one knee while using the opposing arm to coordinate the motion.
    • Make sure your movements are regulated and quick.
    • To support your lower back when marching, make sure your shoulders are relaxed, your chest is raised, and your core keeps active.
    • Avoid drooping or bending forward.
    • Then return to your neutral position,
    • Then relax.
    • Repeat these exercises 5 to 10 times.
    Standing March
    Standing March

    Which safety measures should be followed when working out?

    Prioritizing safety is important when performing balance exercises to prevent injury, particularly because these exercises are frequently responsible for unstable positions or motions.

    When exercising to increase balance, keep the following important safety precautions in mind:

    • Properly Warm Up

    By improving blood flow to the muscles and increasing their flexibility, warming up helps your body get ready for balance exercises and reduces the risk of strains or injuries.

    • Keep Help Close at Nearby

    You might have to stand or move in ways that test your stability when performing balance exercises. Having support close by could increase confidence during practice and help avoid falls.

    • Make Use of a Stable Surface

    Doing balancing exercises on an uneven or unstable surface when you first start can make you more likely to fall or get hurt. Start on a level, stable surface, like a hardwood floor or a firm mat. As you progress, you can use equipment like stability balls or balance boards to test your balance.

    • Wear shoes that are suitable.

    The support and stability that proper footwear provides are necessary for preserving stability when performing balance exercises. The chance of slipping or falling can be increased by wearing shoes that are not suited.

    • Begin slowly and make progress over time.

    Injury can result from first pushing yourself too hard. As your balance improves, progressively increase the difficulty of the exercises you begin with.

    • Keep Yourself Hydrated

    Dehydration can cause exhaustion, cramping in the muscles, and feeling lightheaded, all of which can affect balance.

    • Pay Attention to Correct Technique

    When performing balancing exercises incorrectly, you run the danger of injuring your muscles, ligaments, and joints.

    • Don’t Overdo It

    Fatigue caused by overexertion could affect your balance and raise your chance of falling.

    • Take Care of Your Body

    Injury might result from pushing through pain. Be mindful of any signs your body may be sending you, such as pain or feeling dizzy.

    • Avoid performing balance exercises alone if you are a high-risk person.

    Balance exercises should not be performed unsupervised by people with severe balance problems, elderly people, or people recovering from an accident, especially if they feel unstable.

    • Make Use of the Right Equipment

    Certain balance workouts could require specific instruments, including balance pads, stability balls, or resistance bands. To avoid incidents, be sure that every piece of equipment is used correctly.

    • Consult a professional if necessary.

    Working with a fitness expert or physical therapist will guarantee that you are using the right techniques and exercises for your skills, especially if you are new to balancing exercises or have specific health problems (such as balance issues caused by a medical condition).

    • After working out, stretch and cool down.

    After working out, cooling down helps in muscular relaxation and lessens muscle stiffness. Improving flexibility through stretching helps provide improved balance.

    • Monitor Your Progression

    You can identify improvements and prevent pushing yourself too hard or too quickly by keeping track of your progress. The key to improving balance over time is to gradually increase the level of difficulty of your exercises.

    When should you stop exercising?

    It’s important to know when you should stop working out to avoid injury and make sure you’re not overdoing it, particularly while performing balance exercises. Exercises for balance can help you become more stable and coordinated, but it’s important to pay attention to your body and know when it’s time to stop.

    The following are important occasions in which you should stop exercising:

    • If You Experience Lightheadedness or Dizziness

    Excessive physical activity or certain motions that test your sense of balance might cause dizziness or lightheaded. These feelings may make falls or injuries more likely.

    • If You Feel Pain

    Pain during any workout, particularly balance exercises, is your body’s way of telling you that something is wrong. Strains, sprains, or more severe injuries might result from pushing through pain.

    • If You Feel a Nausea

    If you get nausea when exercising, it may indicate that you are working yourself excessively or that your body has trouble adjusting to the movements properly. Improper breathing or dehydration may also be contributing factors.

    • In case you have trouble breathing.

    Excessive effort may be the cause of shortness of breath during exercise, particularly if it becomes difficult to catch your breath. This can indicate breathing problems or cardiovascular strain.

    • If You’re Feeling Very Exhausted

    Exercises involving balance demand both mental and physical energy. You run a higher risk of falling or hurting yourself if you are too tired to do the exercises properly.

    • In the Case of Unexpected Muscle Weakness

    Exhaustion, dehydration, or an underlying medical issue may be indicated by sudden muscle weakness. Your ability to balance is compromised by weak muscles, which raises your chance of falling.

    • If You’re Confused or Feel Lost

    Feeling confused, lost, or “out of it” might suggest dehydration, low blood sugar, or another illness. If you’re focusing too much on balancing duties, you may potentially get mental overload.

    • Whenever You Feel Unbalanced or Awkward

    During a workout, it could indicate that your body is overworked or that you are at risk of falling if you begin to feel unstable, confused, or unable to maintain your balance.

    • If You’re Having Trouble Concentrating

    Exercises involving balance require coordination, focus, and mental awareness. Your capacity to stay balanced is significantly reduced if your mind is not concentrated or distracted.

    • If You’re Feeling Stressed Out or Anxious

    Anxiety or emotional stress may affect focus and make balancing exercises more challenging. Dizziness, slow breathing, and tense muscles are among the physical indicators of mental stress that may affect balance.

    Summary:

    Long workouts or expensive equipment are not necessary to improve your balance. You may greatly improve your strength, coordination, and balance by including these easy workouts in your routine. Be consistent, start slowly, then push yourself as you progress. These balance exercises can help you stay stable on your feet and lead a healthier, more active life, whether your goal is to reduce the risk of falls, improve athletic performance, or simply walk more confidently.

    By improving your coordination and strengthening the muscles that provide stability, these workouts can help you become more balanced. Your ability to remain committed on your feet will improve with regular practice!

    A physical therapist can assess your balance and suggest safe, at-home exercises that are suited to your individual needs and goals. Experts in movement, physical therapists improve patients’ quality of life by providing hands-on care, patient education, and recommended movement.

    FAQ:

    Why is balance important?

    Preventing falls, promoting better posture, increasing coordination, and carrying out daily tasks more effectively all depend on balance. Additionally, it improves mobility and stability, which lowers the chance of damage.

    Which exercises are most effective in improving balance?

    Single-leg stands
    Heel-to-toe walk
    Tai Ch
    Standing leg lifts
    Balance board exercises

    How frequently should I perform exercises for balance?

    Try to arrange at least two or three sessions per week, each lasting ten to fifteen minutes. The key to gradually gaining balance is regularity.

    Are balancing exercises beneficial for aging?

    Actually! Because balance exercises help older persons keep their independence, reduce falls, and improve coordination, they are highly important for them. Frequent balancing exercises also increase flexibility and muscle strength.

    What happens if I find balancing exercises challenging?

    Use support, such as a chair or wall, for safety, and start with easier exercises if you’re new to balancing exercises or have problems staying stable. Make a move forward gradually as your confidence and strength increase.

    Are there any safety measures to take into consideration?

    Actually! Exercises should always be done in a clear, safe area where you may get help if necessary. Avoid performing balance exercises close to anything that could cause you to fall or injure yourself, and make sure the surface is non-slip.

    How much time does it take to improve balance?

    If you practice frequently, you can see improvements in a matter of weeks. However, depending on where you are beginning from and how consistently you work, it may take many months to see noticeable progress.

    Can exercises for balance help with dizziness or vertigo?

    Although general stability can be improved by balancing exercises, vertigo or dizziness may have underlying reasons requiring medical treatment. It’s important to speak with a healthcare professional to make sure you’re taking care of any underlying issues.

    If I have a medical problem or injury, can I still perform balancing exercises?

    Depending on the injuries or condition, yes. Low-impact balance exercises are frequently advised for ailments like arthritis or joint pain, but it’s best to speak with a doctor or physical therapist to customize the exercises depending on your unique needs.

    How does balance relate to core strength?

    Balance depends on core strength. When completing balancing exercises, a strong core helps in maintaining posture and stabilizing your body. To increase overall stability, many balancing exercises also work the core muscles.

    References:

    • Exercises for balance: A detailed tutorial. (undated). https://www.mayoclinic.org/healthy-lifestyle/fitness/in-depth/balance-exercises/art-20546836 Mayo Clinic and Associates
    • Cronkleton, E. (March 22, 2019). 13 balancing exercises. http://www.healthline.com/health/exercises-for-balance Healthline
    • Presto, G. (October 28, 2022). 10 Exercises to improve your balance will improve your workouts. Health of men. Exercises to Improve Balance: https://www.menshealth.com/fitness/a41791562/
    • Health Advice | Six at-home activities to improve balance. May 16, 2024. Select PT. How to Maintain Balance at Home: https://www.choosept.com/health-tips/6-exercises
    • Barr, N., and Vlce, K. A. M. C. (2024, March 21). As we age, our balance deteriorates. Try these 13 exercises to increase stability and balance. Very easy. Balance exercises https://www.realsimple.com/health/fitness-exercise
    • Fletcher, J. July 8, 2022. Which balancing exercises are most appropriate for varying ages and levels of fitness? Balance-exercises: https://www.medicalnewstoday.com/articles
    • S. Physio (n.d.). The Top 5 Activities to Boost Your Balance Surrey Physio. https://www.surreyphysio.co.uk/top-5/5-best-exercises-to-improve-your-balance/ Surrey Physio
    • Image 4, layered-vector-abs-workout-flat-vector-illustration-isolated-on-white-background https://www.vecteezy.com/vector-art/20537745-plank-shoulder-taps-exercise-flat-vector-illustration-isolated-on-white-background
    • Image 9, Neudecker, K. March 6, 2023. Master the technique and develop larger wheels when performing dumbbell lunges. Health of men. Dumbbell lunge: https://www.menshealth.com/uk/fitness/a735439/
    • Image 10, Shvasa Editorial Team. April 26, 2023. How to do boat pose. #yoga-blog/how-to-practice-boat-pose https://www.shvasa.com
    • Image 17, App, O. F. (September 2, 2024). Standing marches are an easy way to warm up. O’Coach Blog: Self-Training App, Custom Workout Plans, Yoga, Rehab, and HIIT! https://blog.ocoach.app/standing-march-full-body-mobility-workout-physical-therapy-exercise/

  • Sural Nerve

    Sural Nerve

    Introduction

    The sural nerve is a sensory nerve in the lower leg, originating from the tibial and common fibular (peroneal) nerves. It runs along the posterior aspect of the calf and provides sensation to the lateral side of the foot and ankle.

    The sural nerve is often used as a donor nerve for grafting procedures due to its accessible location and sensory role.

    Structure

    The medial sural cutaneous nerve and the lateral sural cutaneous nerve, two smaller sensory nerves, combine to produce the sural nerve. The common peroneal nerve has a terminal branch called the lateral sural cutaneous nerve, while the tibial nerve has a terminal branch called the medial sural cutaneous nerve.

    Aside from the small saphenous vein, the nerve passes posterolaterally between the two gastrocnemius heads after union in the distal third of the posterior leg, becoming superficial about the mid-calf. Before continuing deep to the fibularis tendon sheath and arriving at the lateral tuberosity of the fifth toe, it passes 2.5 cm posteriorly via the lateral malleolus to the Achilles tendon. The tiny saphenous vein and sural nerve pass posteriorly between the calcaneus and lateral malleolus at ankle level.

    Function

    The lower lateral leg, lateral heel, ankle, and dorsal lateral foot are all sensed by the sole sensory sural nerve.

    Your sural nerve gives the following people skin sensations:

    • beneath your knee, towards the rear of your leg.
    • your foot’s outside.
    • outside heel.
    • Ankle.

    Muscle Supply

    The sural nerve merely innervates the skin’s sensory receptors; it does not innervate any muscle groups. Nonetheless, it passes subcutaneously between the gastrocnemius’s two heads.

    Course

    The medial sural cutaneous nerve and the lateral sural cutaneous nerve, two smaller nerves, combine to form the sural nerve (S1, S2)in the posterior leg. The tibial nerve (L4-S3) gives rise to the medial sural cutaneous nerve, which descends between the two gastrocnemius muscle heads in the posterior leg compartment. A branch of the common fibular (peroneal) nerve (L4-S2), the lateral sural cutaneous nerve crosses the lateral head of the gastrocnemius muscle. These nerves combine to create the sural nerve when it reaches the distal part of the leg. It is crucial to remember that the union’s level can vary widely, ranging from the popliteal fossa to the ankle’s level where the sural nerve enters the foot.

    The sural nerve lowers between the gastrocnemius muscle heads when it rises. After there, it runs parallel to the little saphenous vein till it reaches the ankle, passing close to the calcaneal tendon’s lateral edge. The sural nerve then enters the foot through the space between the calcaneus and the lateral malleolus. The nerve ends as the lateral dorsal cutaneous nerve when it reaches the lateral portion of the foot.

    Branches

    The skin over the posterolateral side of the distal part of the leg is directly innervated by the sural nerve.

    The sural nerve produces two terminal branches when it enters the foot:

    The skin across the lateral part of the heel is innervated by the sural nerve’s lateral calcaneal branch. The lateral dorsal cutaneous nerve supplies blood to the lateral side of the foot’s dorsum. For the sensory supply of the lateral side of the fifth toe, this nerve terminates as a dorsal digital nerve.

    Anatomical Variantions

    The lateral sural cutaneous nerve and the lateral sural cutaneous nerve fuse in different ways and locations, the fibular and tibial branches contribute (since it can form from only one of these), and variations in each lower extremity within a single person are the sources of the sural nerve’s variability.

    Embryology

    The neural tube and neural crest cells are produced by the neural plate, which develops in the third week following fertilization. The sural nerve is one of the peripheral nerves that develop from neural crest cells. Schwann cells, which improve electrical signal conduction, are also derived from myelinate neurons and neural crest cells in the peripheral nervous system.

    Examination

    The clinical examination may demonstrate discomfort with palpation posterior and lateral to the Achilles myotendinous junction (at the region of the fibrous arcade) in the event of neural irritation.

    Good dependability has also been demonstrated via monofilament testing.

    Clinical Importance

    Sural Nerve Entrapment

    The most common cause of sural nerve entrapment is fascial thickening at the superficial sural aponeurosis, which is where the nerve becomes superficial to the gastrocnemius. In the region that the nerve innervates, a patient with sural nerve entrapment will have sensory abnormalities. In the area of the postero-lateral distal leg and lateral foot to the fifth digit, there may be searing pain, hyperaesthesia, dysaesthesia, or paraesthesia.

    Upon examination, the entrapment site could also be sensitive. It must be separated from sciatica coming from sacral roots, exertional compartment syndrome, piriformis syndrome, and popliteal artery entrapment since all would appear similarly. By surgically removing the fascia that is compressing the nerve, decompression can be accomplished.

    Sural Nerve Biopsy

    A biopsy of the sural nerve may be used to determine the histological etiology of peripheral neuropathy in individuals with no apparent underlying cause. Because of the development of less intrusive technologies like genetic and electrophysiological testing, it is not frequently utilized in modern medicine.

    In situations like vasculitic neuropathy, amyloid neuropathy, and multifocal leprosy, a biopsy may still be helpful if these more recent techniques yield no clear solution or a confusing image. Because it is superficial, easily located physically, solely sensory, and persistent anesthesia to its distribution is unlikely to cause long-term patient injury, the sural nerve is an excellent choice for biopsy.

    Allodynia, infection, and inflammation of the surgical incision are potential side effects. The extent of sensory loss and recovery from the sensory deficit is closely correlated with the quantity of nerve removed. By 18 months, however, 91% of patients who had a nerve section had recovered from their sensory loss, according to research by Bevilacqua et al.

    Sural Nerve Graft

    By replacing or bridging a portion of an injured or resected nerve, nerve grafts provide a kind of “track” for the damaged nerve axons to follow as they grow to the desired location. Because it is sensory-only, simple to harvest and capable of producing a respectable amount of graft tissue, the sural nerve is a great option.

    Research by Butler et al. revealed that patients had a minor functional impairment and low postoperative discomfort following endoscopic excision of the nerve, even though sensory deficits were fairly substantial following grafting. The results of the study provide credence to the sural nerve’s ongoing usage as a frequent nerve transplant source.

    Surgical Importance

    A sural nerve block may be used by the surgeon in addition to general anesthesia for foot and ankle procedures. Although ultrasound guidance is a possibility, it is rather simple to do since the nerve is located using anatomical landmarks and is quite superficial at the ankle. As with any nerve block, there are risks, such as injection discomfort, hemorrhage, infection, and adverse response to the anesthetic.

    Procedures involving the ankle, calcaneal tendon, or small saphenous vein may cause damage to the sural nerve. Because of its closeness to the sural nerve, the saphenous vein is frequently harvested during coronary artery bypass surgeries, making it vulnerable to damage during the harvesting process.

    The anatomical variety of the nerve has been the subject of several investigations by researchers, some of which may have implications for the clinical and surgical results of treatments performed near the nerve. The nerve is frequently utilized for nerve grafting or nerve biopsy since it is not a motor nerve and only provides sensation to a limited portion of the leg and foot. As a result, damage is generally tolerated.

    FAQs

    Where does the sural nerve come from?

    The sural nerve originates within the sciatic nerve, coming from terminal branches of the tibial and common fibular nerves.

    How to diagnose a sural nerve?

    Your podiatrist will perform a physical exam and a nerve conduction test to ensure an accurate diagnosis. The information gathered will include your foot’s range of motion, your ability to move your toes, and the strength and function of your sural nerve.

    What is the problem with the sural nerve?

    Indications Your Sural Nerve May Be Having Issues

    Common signs of a sural nerve injury include a lack of sensation or numbness, tingling or burning, and sharp or throbbing pain.

    What exercises are good for spinal nerve pain?

    Nerve gliding, foot and ankle exercises, and aerobic exercise may help relieve severe nerve pain.

    Which medicine is best for foot drop?

    Amitriptyline, nortriptyline, duloxextine, pregabalin, and gabapentin are substitute therapies. Transdermal capsaicin or diclofenac used locally might also lessen symptoms. Narcotic drugs should be used sparingly, even in cases of severe pain.

    References

    • Sural nerve. (2022, December 5). Kenhub. https://www.kenhub.com/en/library/anatomy/sural-nerve
    • Professional, C. C. M. (2024h, December 19). Sural nerve. Cleveland Clinic. https://my.clevelandclinic.org/health/body/22323-sural-nerve
    • Sural nerve. (2023 July 24).StatPearls.https://www.ncbi.nlm.nih.gov/books/NBK551640/