Hip flexion and extension are basic hip joint motions that are necessary for a variety of tasks, including sitting, jogging, jumping, and walking. It is necessary to understand hip flexion and extension for the purpose of evaluating and improving functional mobility, athletic performance, and rehabilitation.
Hip flexion is the movement of the thigh bone, or femur, toward the front of the body. This action is typically initiated by contracting the hip flexor muscles, which comprise the iliacus, rectus femoris, and psoas major. During hip flexion, the angle between the leg and the body decreases, allowing for activities such as lifting the knee, moving forward, or performing sit-ups.
The thigh bone is moved farther from the front of the body during hip extension to increase the angle between the thigh and the torso. The gluteus maximus, the largest muscle in the buttocks, is principally in control of hip extension, together with the hamstrings (biceps femoris, semitendinosus, and semimembranosus), adductor magnus, and the posterior fibers of the gluteus medius.
Hip flexion and extension are necessary to maintain stability, balance, and proper alignment during a range of tasks. Since hip flexion pulls the leg forward, and hip extension pulls the body forward, these movements must be coordinated to walk.
To prevent injuries, improve athletic performance, and optimize overall movement patterns, the hip flexor and extensor muscles should remain stable, strong, and flexible. Regular exercises that target specific muscle groups for strengthening and stretching can help improve range of motion, reduce musculoskeletal imbalances, and promote functional capacity.
Numerous factors, such as aging, a sedentary lifestyle, muscular imbalances, and specific medical conditions, can influence the flexion and extension of the hips.
Hip flexion: What is it?
By moving the lower leg or thigh closer to the front of the body, hip flexion decreases the angle between the thigh and the torso. It is one of the main hip joint motions and is required for a variety of activities, such as walking, jogging, and sitting.
The femur and pelvis combine to form the hip joint, which is a ball-and-socket joint. When you flex your hip, the muscles that control this movement contract, causing your thigh to raise and advance.
The iliopsoas (which includes the iliacus and psoas major muscles), rectus femoris (a quadriceps muscle), and tensor fasciae lathe (a hip and thigh muscle) are some of the muscles that contribute to hip flexion. In order to bend the hip joint and start motions like raising the knee, bringing the knee to the chest, or kicking or stepping forward, these muscles cooperate.
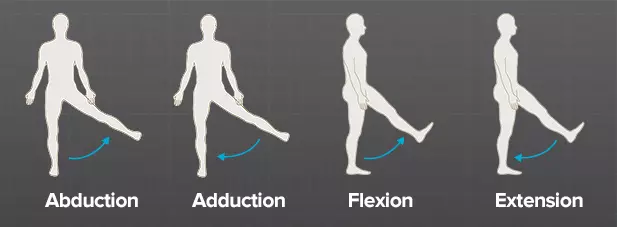
Keep in mind that hip flexion is just one of the motions that take place in the hip joint. Hip extension (moving the thigh backward), abduction (pushing the thigh away from the midline), adduction (moving the thigh toward the midline), and rotation are other actions. When combined, these motions provide the hip joint with a great deal of range of motion and functioning.
Muscles of the Hip Flexors
The hip flexors, which are muscles situated close to the front of the hip joint, are primarily responsible for hip flexion in addition to other functions like hip stability and pelvic control.
Muscles of the Main Hip Flexors
Iliopsoas: The iliopsoas, which flexes the hip joint, is made up of the iliacus and psoas major muscles. The psoas major originates in the iliac spine of the ilium and the lumbar vertebrae of the lower spine. Both enter the femur or thigh. The iliopsoas muscle, one of the strongest hip flexors, is used for walking, running, and bringing the thigh up to the chest.
Rectus femoris: The rectus femoris is one of the quadriceps muscles attached to the front of the thigh. Along with knee extension, the rectus femoris assists in hip flexion. It emerges from the ilium (hip bone) and connects to the patella (knee bone) and tibia (shin bone).
Sartorius: The sartorius muscle is long and narrow, and it diagonally spans the front of the humerus bone. It originates from the anterior superior iliac spine (ASIS) of the pelvis and is located on the medial side of the tibia. The sartorius muscle helps in hip flexion and other movements, such as leg crossing, as an external rotator, hip flexor, and abductor.
Tensor Fasciae Latae (TFL): The tensor fasciae latae is a small muscle that runs along the lateral side of the hip. The iliac spine joins the iliotibial region, a thick band of connective tissue on the outside of the thigh, starting at the highest point of the pelvis. Although its main function is abduction, or moving the thigh away from the midline, it also helps in hip flexion.
Working together, these muscles facilitate walking, running, climbing stairs, and knee lifts. Both proper posture and healthy pelvic alignment depend on them. Maintaining these muscles’ flexibility and balance is essential to preventing hip imbalance or damage.
Hip Flexion Range of Motion
Individual differences in hip flexor range of motion can be determined by a variety of factors, including age, joint health, and flexibility. The thigh can be raised forward and upward at an angle of around 90 degrees with the torso since adults typically have a range of motion in hip flexion of about 120 degrees.
However, one must keep in mind that the range of motion may vary greatly from person to person. Some people may be more flexible and have a larger range of motion than others due to factors including tight muscles, joint limitations, or prior injuries.
Remember that hip flexion can also be influenced by other factors, such as hip position and spinal alignment. For instance, tight hip flexors or limitations in the lower back may limit the range of motion during the hip flexion phase.
Walking, jogging, squatting, and other sports motions are only a few of the exercises and activities that need to maintain appropriate hip flexibility. Regular hip-flexion-based physical activity and stretching techniques can help maintain and increase range-of-motion flexibility. It is advised that you get the appropriate assessment and direction from a doctor or physical therapist if you have hip flexion restrictions or are worried about your hip flexibility.
Methods for Assessing Hip Flexion ROM
By doing a quick measurement known as the hip range of motion (ROM), you may determine your hip flexion range of motion. The following is one way to achieve this.
Preparations: Choose an open space where you can comfortably rest and dress in loose or tight clothing that allows for mobility. You may also need another individual to help you measure.
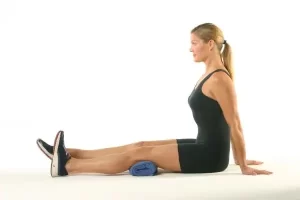
Laying down: Lean on a level surface, such as a bed or carpet, and spread your legs wide.
Beginning position: bend the other leg at the knee joint to bring the knees to the chest while keeping the other leg flat on the ground. When evaluating the hip flexion range of motion, this is the initial position.
Measurement: Hold the bent leg’s thigh lightly above the knee joint with a partner, then softly press down to stabilize it.
Movement: Raise the thigh gently to the chest while keeping the knee bent. Try to bring the knee as near to the chest as you can without experiencing any pain or discomfort.
Measuring: Using a goniometer or other comparable tool, your partner can determine the angle between your thigh and the surface once you have attained your maximum comfort level. The goniometer has to line up with the hip joint and the femur’s axis.
On the opposite leg, repeat: Repeat the measurement process on the opposite leg and compare the results.
Interpretation: Age, flexibility, and individual variances all affect the typical range of hip flexion range of motion. A healthy adult’s hip flexion range of motion should generally be between 120 and 140 degrees. A doctor, such as a physiotherapist or an orthopedist, is advised if you have a history of hip illness or injury. They may offer a more thorough evaluation and advice on how to quantify hip flexion.
Hip Flexion Special Test
A few particular tests are useful for evaluating hip flexion. In clinical settings, healthcare providers frequently utilize these tests to evaluate hip function. Two instances of particular hip flexion tests are as follows:
Thomas test
A popular test for determining hip flexor contracture and joint muscle tension is the Thomas test.
What to do:
Make sure your legs extend over the edge of a bed or table. — Make both legs stand up to your chest with your hands. — Allow one leg to hang lightly while maintaining the other knee firmly in position. — Drop the non-stick leg slowly onto the table while keeping it as straight as possible. — Observe whether the extended leg is flat on the table or still bent at the hip joint.
If the straightened leg’s thigh remains above the table, it indicates a restriction of hip flexion, which may indicate a hip flexor contracture or joint muscle tension.
Modified Ober test
Hip flexion may be limited by tension or tightness in the iliotibial band (IT band) and tensor fasciae lata (TFL), which may be evaluated using the modified Ober test.
What to do:
Lay flat on your side with your lower leg bent slightly to support it. Confirm that the upper leg is straight. The physician stands behind you and gently lifts your upper arm. The leg is then allowed to slowly go down the spine.
Interpretation: If your leg stays up or does not descend close to the table, tension or rigidity emerges in the TFL and IT area. Hip flexion may be limited as a result. It is important to keep in mind that these specialized tests can only be performed by trained professionals who are capable of accurately interpreting the results.
Techniques for hip flexor stretches.
To help your flexors and hip joints relax, try these exercises. Its original function was to increase the joint’s range of motion. After your body has warmed up following an exercise session, these stretches are great.
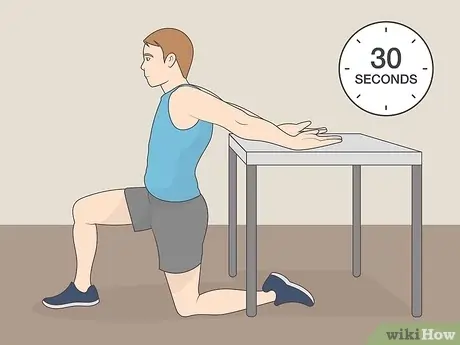
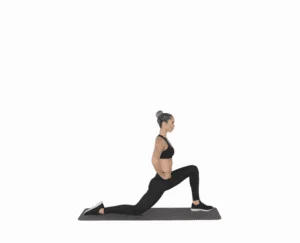
half-kneeling biceps stretch
Stretch your hip flexors while half kneeling.
This simple exercise will stretch the iliopsoas/hip flexors on the back leg and the glutes on the front leg. For this exercise, you can use a folded towel under your knee or a yoga mat.
In front of you, your left foot should be flat, and your right knee should be on the floor behind you.
Continue this exercise with your trunk in an upright position. Your hands should remain on your left knee so that you can stay balanced.
You can slowly move your right knee back to feel a small stretch in the front of your hip.
Using your right glute as if you were pushing forward, compress your hips and trunk to bring them closer to your left foot. Tuck your hips to add a slight tilt to your pelvis.
Hold this position for 10 to 30 seconds after breathing deeply.
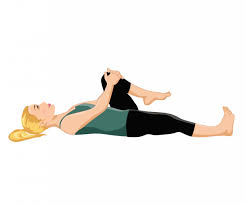
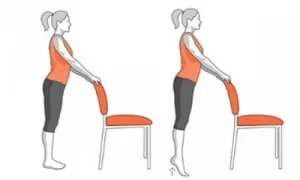
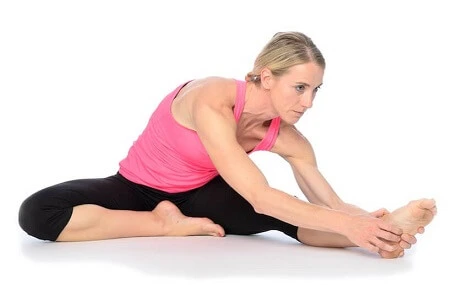
One-Knee-to-Chest
Stretching from knee to chest
Lying on your back, spread your legs wide on the floor. Gradually bend one leg toward your chest.
Keeping your back flat, pull your knee as close to your chest as you can without experiencing any discomfort.
Stretch your straight leg as far as you can while squeezing your glute.
Once you’re back in the starting position, repeat with the other leg.
If you don’t feel any stretch, try performing this stretch on a bench with your lower leg hanging over.
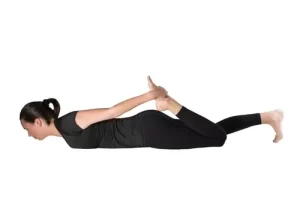
The well-known “pigeon” pose in yoga is an advanced one. Only assume the attitude if it feels natural to you. You can change it by lying down or sitting in a chair and doing a figure-four stretch.
Take a plank stance to begin.
Raise your left foot off the ground and move it forward until your foot is close to your right hand and your knee is on the floor beside your left hand. Your flexibility will determine the exact position of your knee and toes.
Sliding your right leg back as far as you can while keeping your hips square. Bring your upper body as far down as you can as you lower yourself to the floor and onto your elbows.
Maintain the stretch by keeping your chest up. Change sides as soon as you feel like you have had a good stretch.
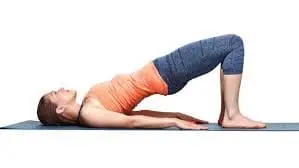
Bridge
This exercise can help extend the hip flexors while strengthening the gluteal muscles.
Hip bridge exercise
With your feet hip-distance apart, knees bent, and arms at your sides, lie on your back. Your feet should ideally be positioned such that your fingertips may touch your heels.
Raise your hips off the floor and toward the ceiling while tightening your glutes and pressing into your heels. This should be felt in your hamstrings and glutes rather than your lower back.
Repeat many times after holding the position for a few seconds and then going back to the beginning position. Keep breathing!
Benefits of hip flexion exercises
Increased mobility
You can walk, run, climb stairs, and do other activities more easily with the help of hip flexor exercises.
Enhanced posture
By stabilizing your torso and pelvis, hip flexors can help you have better posture.
Lower chance of harm
Strong hip flexors may lessen the load on your joints and surrounding muscles, which helps you avoid injuries.
Pain less after sitting
Sitting for extended periods shortens your hip flexors, therefore strengthening them can help release tension.
Enhanced athletic ability
Many sports, such as running, leaping, and kicking, require strong hip flexors.
Hip Flexion Exercise
Many tasks require hip mobility and flexibility might benefit from increased hip flexibility. The following exercises can help you increase your hip flexion:
Hip marching
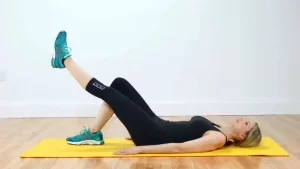
Rooster March Lying:
With your knees bent and your feet flat on the ground, lie on your back. Raising one leg off the floor and raising the knee to your chest requires core strength. Lower your leg gradually after holding for a few seconds. Do the opposite. Perform 10–12 reps for each leg.
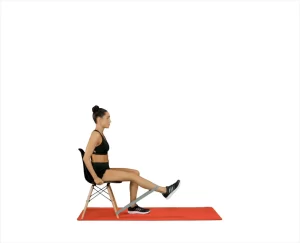
standing-hip-flextion
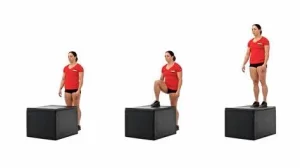
Standing hip flexion:
Place your feet apart, stand tall, and, if necessary, place your hands on a hard surface. To raise one leg, bend the knee and bring it as near to the chest as you can while keeping your balance. Hold for a short while, then drop your legs. Do the opposite. Try to do 10 to 15 repetitions on each leg.
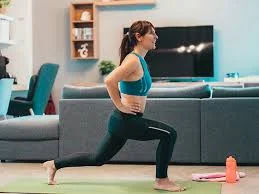
Lunge
static lunges
The rectus femoris, a hip flexor, and the lead glute and quadriceps muscles are worked during lunges. Additionally, they stretch the back leg’s hip flexors, which must lengthen based on how far you step forward.
Standing, take a big stride forward with your right foot while keeping your eyes front. Keep your trunk upright during the entire exercises.
Transfer your weight to your right leg by bending your extended knee. Until your left knee hangs just above or lightly touches the floor, keep lowering yourself slowly into the lunge. The ideal position for your right knee is just over your right ankle.
Return to a standing posture. Repeat in front of your left leg.
Sliding mountain climbers on the ground
Grab anything that slides, such as paper plates, sliding discs, or even hand towels. Prepare to ascend!
Straight-leg-raise-
Place yourself on a smooth surface, such as a wood floor.
Assume a pushup stance and put the sliders beneath the balls of your feet.
As with regular mountain climbers, pull your right leg into your chest and switch with your left.
Start gently and progressively quicken your speed.
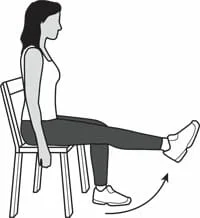
Straight-leg rise
The rectus femoris and iliopsoas are worked in this exercise. The trunk is stabilized by the abdominal muscles while the leg raises.
Bend one knee while lying on your back. With the knee straight, extend the other leg.
As you raise the leg such that the thigh aligns with the opposite bent knee, contract your abdominal muscles.
After holding for two counts, gradually return to the starting position. Repeat.
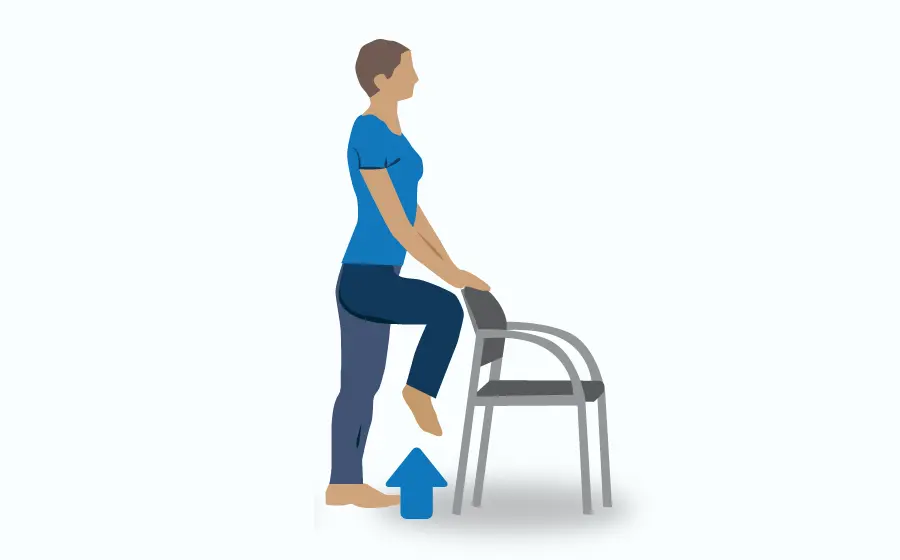
Psoas hold
This exercise develops the psoas, a deep hip flexor muscle that helps lengthen strides and prevent injuries. A situation where everyone benefits!
Raise your upper leg toward the sky while standing and bending your right knee.
For approximately 30 seconds, maintain your right knee and thigh at hip level while maintaining balance on your left foot.
Slowly lower your right leg, then do the same with your left.
Maintain a tall trunk during the whole exercise. Reduce the height of your leg if your head is bobbed forward or your trunk is rounding.
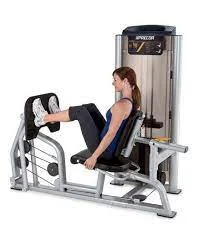
Manual Muscle Testing: Hip Flexion
Muscle strength testing is a crucial aspect of the physical examination that identifies any strength differences between the involved and uninvolved hips. It is usually done as part of the patient’s objective evaluation.
When assessing weakness, manual muscle testing can be useful in identifying between imbalances or low endurance and actual weakness. Strength testing helps the physical therapist establish a clear objective for the patient, which is to restore the involved hip’s strength to that of the uninvolved hip.
Participating Muscles
Three primary muscles are involved in hip flexion. The Sartorius, Tensor Fasciae Latae, and Rectus Femoris are two-joint muscles. The hip and knee are crossed by these muscles. In contrast, the Iliopsoas is a single, one-joint muscle that only crosses at the hip.
To evaluate students in grades 3 through 5 the patient should sit for a brief period of time with their thighs supported. The patient should be side-lying to evaluate grades 0–2, as gravity has little effect on this position.
Position of the Therapist
The therapist should stand by the patient to assess their side.
Feel the flexor muscles in your hips.
Grade 5: While the patient holds the posture, the therapist exercises maximal resistance in the opposite direction of hip flexion.
Grade 4: While the patient holds the posture, the therapist provides mild to moderate resistance in the opposite direction of hip flexion.
Grade 3: The patient performs hip flexion in the normal way.
Grade 2: After supporting the leg, the therapist instructs the patient to raise it as high as possible.
Grade 1: After supporting the leg, the therapist asks the patient to try lifting it. The patient only raises his leg a limited distance.
Grade 0: There is no movement.
How can I test?
To make the exam easier for the patient to grasp, provide instructions in his or her language.
The patient does the hip flexion on their own.
To assess grades 4 through 5 Provide resistance to the distal femur in the opposite direction of flexion.
Active resistance testing is required for grade 5, or normal muscular performance activity, and requires the patient to be strong enough to move through the whole range of motion. For the break test, patients need to keep their endpoint range opposing the maximal resistance force.
Grade 0: No motion
Grade 1: There is trace movement but not a noticeable contraction of muscles.
Grade 2: Elimination of movement with gravity
Grade 3: Opposition of gravity
Grade 4: Weak movement despite considerable resistance
Grade 5: Good strength
To check for variations in muscle strength, the therapist should use the identical technique on the other side.
Along with any relevant discoveries or observations, the therapist should record the degree of muscular strength on each side.
FAQs
How can I improve my hip flexion?
Lunges strengthen the quadriceps and the main glute, which includes the rectus femoris, a hip flexor. sliding mountain climbers on the ground. Get some sliding discs, paper plates, or even hand towels, or anything that glides, for that matter. Psoas hold. Straight-leg rise.
What is an example of hip flexion?
When the femur, or upper leg, travels forward, as it does when long jumpers land or at the conclusion of a football kick, the hip joint flexes.
What are the 5 muscles that flex the hip?
A set of muscles located close to the upper part of your thighs, the hip flexors allows you to bend forward at the hip and raise your knee toward your chest. Together, the iliacus, pectineus, psoas major, rectus femoris, and sartorius muscles provide for hip flexion.
What causes poor hip flexion?
Hip flexor discomfort can also be caused by poor posture, general overuse, and occasionally arthritis. Similar symptoms can be seen in iliopsoas muscle strains, tears, tendinosis, and bursitis. The reason is frequently overuse or eccentric hip flexion against resistance.
Is walking good for tight hips?
Get up and move more during the day to maintain the suppleness of your hip flexors. I suggest switching positions every thirty to forty-five minutes, or even earlier if required, to avoid tightness.
References:
Patel, D. (2023n, July 8). Hip flexion and extension – muscles, ROM, exercise. Samarpan Physiotherapy Clinic. https://samarpanphysioclinic.com/hip-flexion-and-extension/
Kelly, E. (2023, March 17). 8 of the Best Hip Flexor Stretches and Exercises. Healthline. https://www.healthline.com/health/fitness-exercise/hip-flexor-exercises#bottom-line
Patel, D. (2023c, May 24). Manual muscle testing of Hip – Flexion, Extension, Abduction. Samarpan Physiotherapy Clinic. https://samarpanphysioclinic.com/manual-muscle-testing-of-hip/
Pain behind the knee, also known as posterior knee pain, can result from various conditions affecting the muscles, tendons, ligaments, or joints in the area. It may be caused by overuse, injury, or underlying medical conditions such as arthritis, bursitis, or a Baker’s cyst.
In some cases, nerve compression or vascular issues can also contribute to pain. Identifying the root cause is essential for effective treatment and preventing further complications. Because the knee is a complex joint that is subjected to significant impact from even routine daily activities, people can often prevent or lessen knee damage by avoiding impact and strain on the joint.
What are the Causes?
Working closely with a physician is crucial when diagnosing back of the knee pain because certain causes take time to fully heal.
Leg cramps:
When muscles get overly tight, cramps happen. The reason for this tightness could be because the muscle is overworking itself without being stretched.
Different parts of the knee may be impacted by overuse syndrome. A person with this condition may also experience cramping in the calf or thigh close to the knee. It feels like an abrupt, severe muscle spasm.
Leg cramps are another common side effect of pregnancy for expectant mothers.
Stretching their calves on a daily basis may help some persons who frequently have leg cramps. In order to lessen the tension on the knee and surrounding muscles, individuals can also attempt decreasing their stride.
Arthritis:
Your treatment plan may include:
natural remedies
exercise
steroid injections
medications.
Chondromalacia:
When the cartilage inside a joint degrades, chondromalacia results. The patella, the area beneath the kneecap, is the most frequently affected by cartilage degradation.
Chondromalacia can be caused by knee injuries, aging, arthritis, or excessive use.
After sitting for a long time or climbing stairs, the pain could worsen. Other signs and symptoms could be:
weakness or buckling of the knee
Treatment may include ice, pain relieving medicine (NSAIDs), and physical therapy.
Baker’s cyst:
Since small cysts usually don’t hurt, Baker’s cysts might not be apparent at first. But as the cyst enlarges, it could cause pain by moving the nearby muscles or applying pressure to the tendons and nerves.
A Baker’s cyst could get as big as a table tennis ball. Baker’s cyst patients frequently experience pressure in the rear of their knee, which, if the cyst is touching a nerve, may result in a tingling sensation.
Although treatment can alleviate the symptoms, Baker’s cysts are generally not a reason for alarm.
Gastrocnemius tendonitis:
Your lower leg’s back, or calf, is made up of the gastrocnemius and soleus muscles. These muscles assist you in pointing your toes and bending your knee.
The gastrocnemius muscle may be strained or torn by sports like tennis and squash that demand you to jump from a standing position to a running one very quickly. When this muscle suddenly hurts in the back of your leg, you know you’ve strained it.
Other symptoms of a calf strain include:
pain and swelling in the calf
bruising and tenderness in the calf
trouble standing on tiptoe.
The degree of the strain will determine how the calf is treated. For a moderate sprain, for instance, your treatment regimen can involve rest, physical therapy, and over-the-counter (OTC) painkillers.
An Achilles tendon rupture, on the other hand, can take up to six months to heal and may necessitate surgery.
Osteoarthritis:
Osteoarthritis in the knee can cause other symptoms, such as loss of motion or difficulty bending the knee. Inflammation can make the joint uncomfortable and rigid. This pain may also be experienced in various areas surrounding the knee.
It is possible that autoimmune diseases like rheumatoid arthritis and lupus are contributing to the pain.
Runner’s knee:
This usually results in an uncomfortable, dull pain behind the knee.
Additional signs of runner’s knee include:
Random weakness in the leg and knee,
buckling or giving out of the knee,
restricted movement in the leg and knee,
crackling or grinding sensation as the knee bends.
Hamstring injury:
A hamstring injury occurs when one or more of the muscles in the rear of the thigh are torn or strained. Among these muscles are:
The semitendinosus and biceps femoris
The semimembranosus
Excessive pulling of the hamstring muscle results in a strain.
If it is tugged too much, it may tear completely, and it may take months for it to mend properly.
Meniscus tears:
Each side of the knee has a piece of cartilage called the meniscus. This cartilage may rip if you twist your leg when bending it or crouching. When a meniscus tear occurs, many individuals hear a pop.
Although it might not be felt right away, meniscus tear pain usually gets worse over the course of the following few days.
Meniscus tears often cause other symptoms, including:
loss of knee motion
weakness and fatigue in the knee and leg
swelling around the knee
Knee locking up when used
Jumper’s knee:
Patellar tendonitis is referred to as “jumper’s knee.” The patellar tendon, which joins your kneecap (patella) to your shinbone, is injured in this disorder.
Overuse or overloading of the patellar tendon results in jumper’s knee. For instance, the tendon may sustain microscopic tears as a result of repetitive motions like jumping or changing direction. The tendon eventually weakens and swells up.
Jumper’s knee causes pain in the kneecap. The pain gets worse over time. Other symptoms may include:
One of the bones that connect the thigh, shin, and kneecap may have been damaged or misaligned if your knee hurts a lot after a bump, bang, or tumble.
Immediately visit a doctor or the emergency department. Tiny fissures at the extremities of the leg bones can occasionally result from slower fractures. This may occur if you have begun to use your knee more.
Iliotibial Band Syndrome:
A ligament that runs along the outside of your thigh is called the “IT band,” and it can get inflamed and swollen when it rubs against the bone.
This is more likely to occur when you exercise by running or riding a bike. Sitting for a time or going downhill may make it pain worse. After warming up, you might feel better, but if you don’t rest the injury and allow it to heal, it might worsen.
Bursitis:
This is typically the result of overworking your knee, which makes it swollen, stiff, and warm or uncomfortable to the touch. The condition is also referred to as “clergyman’s knee” or “housemaid’s knee” since those who work in these occupations frequently kneel. It occurs when the bursa, which are tiny, fluid-filled sacs that cushion your knee joint, become inflamed and bloated. Even when you’re sleeping, you might still feel pain.
Gout and Pseudogout:
The symptoms of both are similar: the swelling and pain are frequently severe and come on quickly. Your knee might feel hot, inflamed, and rigid. When crystals collect in the joint, it occurs. Uric acid accumulation causes gout, which frequently affects the big toe.
Infection:
Septic arthritis may result from a direct damage to the joint or from another infection. Along with the rapid onset of the pain, you’ll also feel nauseated, irritable, and feverish. To determine which bacteria is causing it and how to treat it, your doctor could use a needle to extract some fluid from your knee. Viruses and parasites can also infect your joints, though this is less common.
Referred Pain:
For instance, knee pain may be caused by issues in your foot, hip, or back. Your brain may become confused about the source of pain signals, or nerves may transfer pain from one place to another. Although the sensation is genuine, your knee might not be the issue.
Anterior cruciate ligament injuries:
ACL strains are frequently caused by abrupt pauses or direction changes. ACL strains can produce a popping sound, followed by pain and swelling, much like meniscus tears.
A common and dangerous injury that can keep an athlete out of action for a long time is an ACL tear. Reconstructive surgery is typically necessary for torn ACLs.
Posterior cruciate ligament injuries:
Although it is less prone to sustain an injury than the ACL, the posterior cruciate ligament (PCL) serves a comparable function.
Traumatic situations like being in a car accident or falling straight onto the knee from a height can cause PCL injuries. The ligament may totally rip if sufficient power is applied.
A PCL injury may heal more quickly if the knee is completely rested. Surgery might be necessary for a significant PCL damage, though.
Deep vein thrombosis:
A thrombosis is a blood clot. Standing up causes extra agony for many DVT sufferers.
Additional signs of DVT could include:
Warm or red skin to the touch,
swelling in the affected area,
exhaustion in the leg, and clearly visible surface veins
smoking, being older, and being overweight are risk factors for DVT.
Sedentary lifestyles may also increase the risk of developing DVT.
Because DVT can worsen if the clot breaks free into the bloodstream, it requires medicine and care.
Symptoms of Pain Behind the Knee:
A Baker’s cyst causes swelling and sometimes pain at the back of your knee, which you’ll probably notice. It may start to look red too.You might feel warmth radiating down your calf and hear a pop if your cyst explodes. It might also begin to appear red.
The back of your knee may hurt if you have a meniscus tear, especially if you bend or twist it. If you tear your meniscus, you might experience a “pop.” You might have some swelling, usually a few hours following your meniscus tear. It could also feel like your knee is locking or catching.
When you put weight on your knee, osteoarthritis typically hurts, but it normally goes away when you relax. You might not be able to move your knee as easily in the morning or after sitting for a long time because it may be stiff. Once you start moving around, this usually gets easier. Additionally, there can be some swelling over your knee.
You’ve most likely hurt other areas of your knee in addition to your posterior cruciate ligament (PCL) injury. However, you might just have little soreness or even none at all if you’ve simply hurt your PCL. You might experience pain behind your knee, particularly when kneeling, if your injury is more serious. Additionally, descending an inclination could be painful. For instance, you can experience soreness behind your knee when descending stairs, walking, or jogging downhill.
Seeing a doctor is crucial if you have a sore, swelling calf. This is because a clot in your leg (deep vein thrombosis) may also be the source of this swelling, in which case you will want immediate medical attention.
Diagnosis of pain behind the knee:
If they suspect you have a posterior cruciate ligament injury, they may refer you to have an X-ray or a magnetic resonance imaging (MRI) scan.
Treatment
Stretching the muscles surrounding the knee, particularly the quadriceps, calves, and hamstrings, is always a good idea. This might improve the muscles’ response to action, but it might not guard against some of the traumatic causes of knee pain.
When an injury initially occurs, doctors frequently advise the RICE treatment to help reduce pain and swelling. RICE is an acronym for:
Resting (the leg)
Icing (the knee)
Compressing (the area with an elastic bandage)
Elevating (the injured leg)
People should speak with a doctor or physical therapist about the best course of action for them. Another way to reduce pain and swelling while the knee heals is to take nonsteroidal anti-inflammatory drugs (NSAIDs), some of which can be purchased online, like ibuprofen.
For more severe injuries, doctors could use a CT or MRI scan to get a full picture of the affected area. Depending on the severity, they may subsequently recommend physical therapy or surgery as remedies.
FAQs
Can knee pain be alleviated by walking?
Yes, especially if you have osteoarthritis, walking can help with knee pain. Walking is a low-impact workout that can help lubricate your joints and strengthen the muscles surrounding your knee.
Does an egg help the knee?
According to study, pasture-raised farm eggs are among the finest anti-inflammatory meals that people with knee arthritis may consume because they contain higher levels of vitamin D and omega-3 fatty acids than free-range or pasture-raised eggs.
Which is the best tablet for knee pain?
Non-steroidal anti-inflammatory drugs (NSAIDs) like ibuprofen (Advil, Motrin) and naproxen (Aleve) are common treatments for knee pain. You can also try creams containing a numbing agent, such as lidocaine or capsaicin.
What is the greatest drink for knee pain?
When it comes to the advantages of tea for people with arthritis, it is one of the most researched beverages. Polyphenols, which are plant-based chemicals with potent anti-inflammatory properties, are abundant in green, black, and white teas. Green and white teas have the highest quantities of polyphenols.
Does iron deficiency lead to knee pain?
A deficiency caused by low iron levels can aggravate joint and muscular pain in a number of ways. Oxygen shortage: Muscle and joint weariness results from a low red blood cell count, which reduces the amount of oxygen given. Tissue damage: Inflammation and pain in the tissues can result from a lack of oxygen.
Can knee pain be caused by a vitamin D deficiency?
Both physical and mental health can be negatively impacted by a vitamin D deficiency, but many people are unaware that they have low vitamin D levels. A deficit may manifest physically as joint muscle pain, such as rheumatoid arthritis (RA) pain, which frequently affects the knees, legs, and hips.
With knee pain, is it preferable to walk or rest?
Finding an activity that keeps you moving safely and pleasantly is crucial for those who have knee pain. For some, that entails coming up with inventive ways to work out. Try dividing your workout into three 10-minute walks if a 30-minute walk hurts too much and shorter bursts feel better.
Can knee pain be caused by a B12 deficiency?
Depression, joint pain, and exhaustion are just a few of the severe symptoms that can arise from a vitamin B12 shortage.
What caused the acute pain in my knee?
Numerous factors, such as injury, overuse, or medical disorders, might contribute to knee pain.
What is the reason of knee pain?
Knee pain may be caused by deficiencies in calcium, magnesium, vitamin D, vitamin K, iron, and vitamin B12.
Why does the back of the knee suddenly pain?
Both arthritis and Baker’s cysts can produce pain at the rear of the knee. A buildup of synovial fluid, or joint fluid, behind the knee is known as Baker’s cysts. In general, knee pain may be caused by osteoarthritis, bursitis, arthritis, ligament tears, or infection.
Can a blood clot cause pain behind the knee?
One form of deep vein thrombosis (DVT) or venous thromboembolism is a blood clot beneath the knee. Pain, swelling, warmth, and skin discoloration are some of the symptoms. Life-threatening consequences like a pulmonary embolism can be prevented with prompt treatment.
Without an accident, what can cause back and knee pain?
Reasons A fluid-filled protrusion behind the knee that can be caused by inflammation from other conditions, like arthritis, is called a Baker cyst. cancers that start in your bones or spread to them. condition known as Osgood-Schlatter.
Should I be concerned about my back knee pain?
Most of the time, knee pain below the knee is not a serious problem, but if it becomes worse or doesn’t go away, you should consult a doctor.
References
Knee pain. (n.d.). Mount Sinai Health System. https://www.mountsinai.org/health-library/symptoms/knee-pain
The coccygeal nerve is the 31st and final spinal nerve, arising from the coccygeal region of the spinal cord. It primarily contributes to the coccygeal plexus, which provides sensory innervation to the skin over the coccyx and motor fibers to parts of the pelvic floor muscles. It plays a minor role in overall nerve function but is involved in sensations around the tailbone area.
Introduction
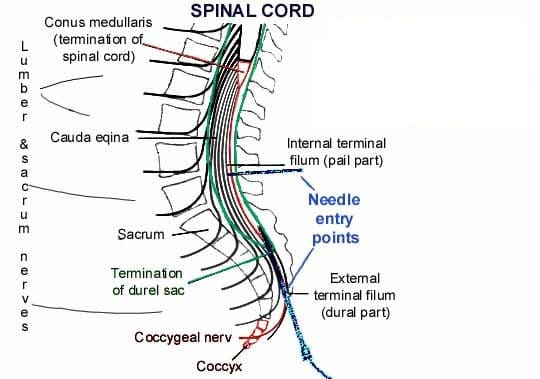
The final and smallest pair of spinal nerves are the coccygeal nerves (also known as tailbone nerves or spinal nerves Co). They come from the distal portion of the vertebral column, which is home to the conus medullaris, the final region of the spinal cord.
The sacral canal is where the coccygeal nerves leave the spinal column after descending inside the cauda equina. As an alternative, the sacral hiatus is where the nerves leave. The skin covering the tailbone (coccyx) is sensory innervated by the coccygeal nerve, which also contributes to the coccygeal plexus.
Course
They arise from the spinal cord’s terminal, the conus medullaris. The lumbar, sacral, and coccygeal spinal nerves descend to the cauda equina.
Through the sacral hiatus, the coccygeal nerve leaves the sacral canal and emerges underneath the first coccygeal segment. After circling the sacrum’s lateral edge, its anterior (ventral) ramus pierces the coccygeus muscle.
Branches
The coccygeal nerve finishes in a bifurcation, sending forth two terminal branches:
Anterior (ventral) ramus of coccygeal nerve
Posterior (dorsal) ramus of coccygeal nerve
Once the nerve leaves the sacral hiatus, the anterior ramus rises. Together with the anterior rami of the S4 and S5 spinal nerves, the coccygeal nerve’s anterior ramus helps form the coccygeal plexus. The anococcygeal nerve originates in the coccygeal plexus. Both the skin covering the tailbone and the sacrotuberous ligament are supplied by this nerve.
The skin at the back of the tailbone is supplied by the posterior ramus of the coccygeal nerve, which has a connecting branch from the S5 spinal nerve.
Examination
X-ray.
CT (computed tomography) scan.
Your healthcare professional may do an examination to look for tumors, abscesses, or inflammation.
Tailbone pain, also known as coccydynia, is a common clinical condition characterized by pain in the coccygeal region. Patients typically present with sharp or burning pain that gets worse when they are physically active.
This condition is typically caused by bone injuries that occur during sports like mountain biking, prolonged sitting, or even during the last trimester of pregnancy. Treatment for this condition varies depending on the cause, and it may even involve a coccygeal nerve block to relieve the pain.
Surgical Importance
In very unusual cases, your provider could suggest:
Partially removing your coccyx is known as a partial coccygectomy. removal of your complete coccyx, or total coccygectomy.
Following a coccygectomy, recovery may take many months. Even if a surgeon removes the bone, there is no guarantee that your pain will go away. As a result, physicians only recommend coccygectomy when no other course of therapy works.
FAQs
What is the coccygeal nerve?
The Coccygeal Nerve consists of several branches and is part of the sacral plexus. It provides sensory innervation to the skin and muscles around the coccyx (tailbone) and the perianal region. The nerve transmits pain and touch sensations from these areas to the brain.
What signs indicate injury to the coccygeal nerve?
Dull (achy) or sharp (piercing) tailbone pain. ache in the tailbone that gets worse when you rise after sitting. Pain when you poop.
What is the function of the coccyx?
Background. Despite its small size, the coccyx serves several vital purposes. In addition to serving as the point of insertion for several muscles, ligaments, and tendons, it is one leg of the tripod, along with the ischial tuberosities, that supports a person’s weight when they are seated.
What negative consequences might a coccygeal nerve block cause?
This procedure is considered to be safe, and it is a minimally invasive procedure that does not require an overnight stay. But there are hazards associated with the needle insertion, including bleeding, numbness, nerve injury, and infection.
What is the Dermatome of the coccygeal nerve?
On the buttocks, in the vicinity of the coccyx, is the dermatome that corresponds to the coccygeal nerves.
What are the side effects of Coccydynia injection?
A coccyx injection for tailbone pain may have the following side effects:
Soreness: Injection site pain, edema, or soreness Facial flushing: A temporary flushing of the face Nausea: A temporary feeling of nausea Abdominal cramps: A temporary feeling of mild abdominal cramps Menstrual cycle: For certain women, there may be a brief change in the menstrual cycle. Blood sugar: A temporary increase in blood sugar levels for people with diabetes
Serious side effects are rare but include: Rectal perforation, Hemorrhage, Infection, and Dural puncture.
You should tell your doctor if you have an allergy or have had a reaction to a steroid in the past.
Other information
If symptoms reappear, the injection can be repeated. The effects of the injection may persist for weeks, months, or even years.
References:
Coccygeal nerve. (2022, December 5). Kenhub. https://www.kenhub.com/en/library/anatomy/coccygeal-nerve
Tailbone pain (Coccydynia). (2025, February 7). Cleveland Clinic. https://my.clevelandclinic.org/health/diseases/10436-coccydynia-tailbone-pain
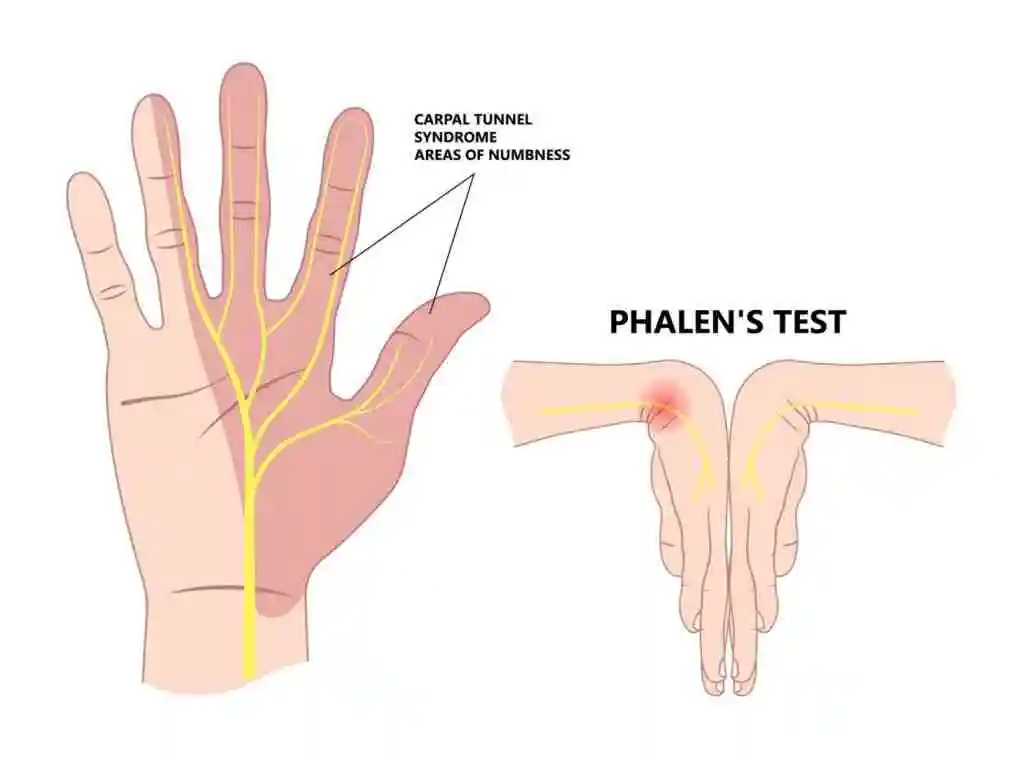
Phalen’s Test is a clinical examination test used to diagnose carpal tunnel syndrome. The patient flexes both wrists and presses the backs of their hands together for 30-60 seconds. A positive test reproduces symptoms like tingling, numbness, or pain in the median nerve distribution, indicating possible median nerve compression at the wrist.
The Phalen’s test: What is it?
To diagnose carpal tunnel syndrome, medical professionals use the Phalen’s test, which consists of a series of hand and wrist motions and postures. It may be known as the Phalen’s maneuver or Phalen’s sign. These terms are used interchangeably by Doctors.
Since it’s an in-office physical, a physician can conduct it without the need for a separate appointment or additional equipment. To apply mild pressure on the median nerve in your wrist, your healthcare provider will ask you to hold your hands and wrists in various postures. If you experience tingling or numbness during any of these movements, it’s usually a sign of carpal tunnel syndrome.
A diagnostic imaging procedure can be necessary to identify inflammation inside your wrist or to evaluate whether you have carpal tunnel syndrome.
When is the Phalen’s test required?:
If a healthcare professional believes you have carpal tunnel syndrome, you may need to do the Phalen’s test. As part of your physical examination, a doctor may ask you to do a Phalen’s test if you experience wrist pain or other hand and finger problems.
One of the most prevalent disorders affecting people’s hands and wrists is carpal tunnel syndrome. Your wrist’s bones form the carpal tunnel, which allows tendons, ligaments, and nerves to go through it and reach the rest of your hand. When the median nerve that passes through your carpal tunnel is irritated or under excessive pressure, carpal tunnel syndrome results.
How is the Phalen’s test taken?
Your carpal tunnel is lightly compressed by the various positions used in the Phalen’s test. If you experience any pain or discomfort during the Phalen’s test, let your healthcare professional know.
The following hand and wrist positions are part of the easy test:
The back of your hands, or the dorsal side, should be placed together at waist height.
Raise your arms until your elbows are roughly at chest level while keeping your hands in that posture.
You will be asked to maintain that posture for around one minute by your provider.
If you experience any tingling in your fingers or down the sides of your hand, they will inquire.
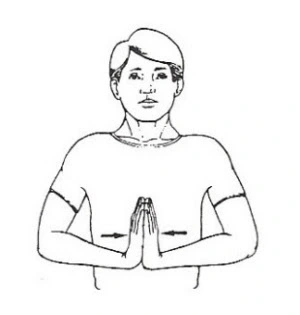
What is a reverse Phalen’s test?
The Phalen’s test and the reverse Phalen’s test are extremely similar. A separate set of hand positions and motions is used to check for carpal tunnel syndrome symptoms. During your examination, your physical therapist may ask you to complete one or both of the tests.
Reverse phalen test
To conduct a reverse Phalen’s test, follow these steps:
Holding your hands at chest height, you will place your elbows out from the center of your body and your palms together. Imagine the hand positions that some people maintain during prayer.
Lower your hands toward your stomach while maintaining your elbows.
For about a minute, your healthcare practitioner will ask you to keep your hands close to your belly button.
What is the Phalen’s test likely to involve?
As long as your provider requests it, try to follow the movements and maintain the postures. If you have carpal tunnel syndrome, you may have some tingling or discomfort but not severe pain.
FAQs
What is a Phalen sign that is positive?
When flexing the wrist to 90 degrees for one minute causes symptoms in the median nerve distribution, the Phalen’s procedure is beneficial. When tapping over the carpal tunnel causes symptoms in the median nerve distribution, Tinel’s sign is positive.
What separates Phalen’s from Reverse Phalen’s?
The way your hands are positioned makes a difference. You will push the palms of your hands together with your fingers pointing upward toward the ceiling, as opposed to flexing your wrists with your fingers pointing downward.
Phalen’s test: When would you utilize it?
One stimulating test for diagnosing carpal tunnel syndrome (CTS) is the Phalen’s test.
What does a typical Phalen test look like?
The Phalen’s test is typically conducted while standing or sitting. A passively flexed arm is placed on a table by the patient, enabling the wrists to reach their maximum flexion. The patient is then instructed by the physician to press the dorsal hand surfaces together, maintaining this position for 30 to 60 seconds.
Reference:
Professional, C. C. M. (2025a, January 24). Phalen’s Test. Cleveland Clinic. https://my.clevelandclinic.org/health/diagnostics/25133-phalens-test
Cherney, K. (2024, May 29). What is the Phalen’s maneuver for Carpal tunnel Syndrome? Healthline. https://www.healthline.com/health/phalens-maneuver#where-its-done
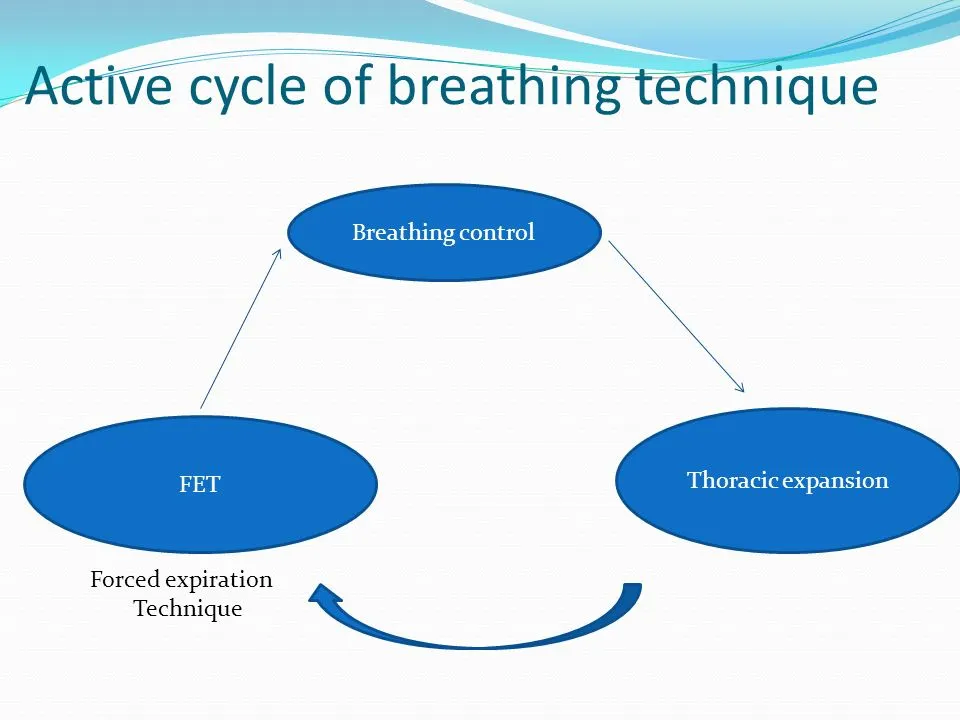
What is a Active cycle of Breathing Technique (ACBT)?
The Active Cycle of Breathing Technique (ACBT) is a physiotherapy technique used to clear mucus from the lungs, commonly for individuals with respiratory conditions like COPD or bronchiectasis.
It consists of three main phases: breathing control, deep breathing exercises, and forced expiratory technique (huffing) to improve airflow and facilitate mucus clearance.
Techniques for clearing the airways include
Autogenic drainage
Active cycle of breathing technique (ACBT).
Manual percussion is another name for chest percussion treatment (CPT).
Exercise.
High-frequency chest wall oscillation vest.
Coughing with a huff.
Positive expiratory pressure(PEP)
Introduction
The Active Cycle of Breathing Techniques (ACBT) is a patient-performed active breathing technique that can be utilized to improve lung function in general as well as mobilize and remove excessive pulmonary secretions.
It is a dynamic therapy approach that may be modified for use by the majority of patients and combined with placement. Depending on the problem facing the patient, each element can be applied alone or as a part of the ACBT cycle.
After learning ACBT, the patient can be encouraged to utilize it on their own without a physical therapist’s guidance. No specialized equipment is needed for this activity.
It is used for:
Clear or loose pulmonary secretions. This lowers the chance of developing a chest infection.
Increase the lung’s airflow.
Increase a cough’s effectiveness.
Three Stages of ACBT:
Breathing Control
Thoracic Expansion or Deep Breathing Exercise
Forced Expiratory Technique (FET) or Huffing
The method can be changed according on the patient’s condition. Additionally, if necessary, a manual technique (MT) or positive pressure can be used to produce a more complex cycle that will help in the better removal of secretions from the lungs. This could involve expiratory vibrations or percussion.
Active cycle of breathing combined with regular chest physical therapy improved arterial oxygenation, heart rate, and pain perception after Coronary Artery Bypass Surgery (CABG), according to a randomized control experiment.
Breathing Control
Breathing Control
In order to relax the airways and relieve the tightness and wheezing that typically follow coughing or dyspnea, breathing control is used. Between the technique’s more complex parts, there is a resting interval.
It can also help to create calmness if the patient is encouraged to close their eyes while doing breathing control. Breathing control is crucial because it helps the airways to relax in between the more intensive ACBT activities.
Additionally, breathing control can be helpful when someone is suffering from anxiety, panic attacks, bronchospasm symptoms, shortness of breath, or fear. Depending on the patient’s level of dyspnea, the duration of breathing control may change.
The patient may typically be told to take six breaths when this method is used with them as part of ACBT.
Instruction to patients:
As it is possible, softly inhale and exhale through your nose. If you can’t, use your mouth to breathe (the patient breathes at his own pace).
It is suggested to utilize breathing control with pursed lips breathing if you exhale through your mouth.
With each exhale, try to release any stress in your body and maintain a relaxed posture.
Try to slow down your breathing gradually.
To help you relax and concentrate on your breathing, try closing your eyes.
Until the person feels and able to go on to the other phases of the cycle, breathing control should be maintained.
Be careful that the person practicing the ACBT is not using the accessory muscles for breathing or performing trick movements like neck extension or trunk bending forward.
Thoracic Expansion or Deep Breathing Exercise
Exercises involving deep breathing and thoracic expansion concentrate on inspiration and help in the release of secretions that have been accumulated in the lungs. Before a relaxed, comfortable, and unforced expiration, active inspiration is typically followed by a three-second end-inspiratory hold.
Instructions to patient:
Keep your shoulders and chest relaxed.
Take a calm, deep breath through your nose if you can.
Hold the air in your lungs for two to three seconds after you’ve finished breathing in, then exhale (this is called an inspiratory hold).
Exhale in a relaxed, gentle manner. Don’t expel the air.
Do this three to five times. It is important that the patient return to the breathing control phase of the cycle if they experience dizziness.
Proprioceptive input, in which the patient or therapist places their hands on the thoracic cage, can help to promote a maximal inspiration. This has been related to better ventilation and more mobility of the chest wall.
To make up for asymmetrical ventilation, which can occur in some respiratory disorders because of sputum retention and/or atelectasis, a breath hold can be added to the deep breath.
Forced Expiratory Technique or Huffing
The Huff or Forced Expiratory Technique FET
This method is utilized to move secretions that have been mobilized by thoracic expansion exercises or deep breathing down towards the mouth so that they can be coughed up or removed by suction.
Rather of coughing, a huff is an exhalation through an open mouth and throat. Sputum cannot be eliminated from small airways by coughing alone, thus huffing helps transfer it from the small airways to the bigger airways where it may be coughed out.
The patient is first taught to inhale mediumly and exhale with mild to moderate effort and prolonged expiratory flow while keeping the glottis open.
To maximize air movement and the removal of secretions, the huff’s duration and the force with which the muscles of expiration contract should be changed.
Two varieties of huff exist:
Medium Volume Huff
High Volume Huff
Medium Volume huff
This facilitates the movement of lower-level secretions through your airways. Breathe in normally, then exhale vigorously and for a long time until your lungs feel completely empty. Consider that you are attempting to heat up your spectacles or a mirror.
High-Volume Huff
In the upper airways, this facilitates the movement of secretions.
Inhale deeply, then swiftly exhale by opening your mouth wide.
Huffing frequently might cause your chest to tighten, so only do one or two at a time.
You may need to cough and clear secretions; try spitting them out into a tissue or a sputum bowl if you hear crackles when you huff. Try to return from coughing if it is too much as this could make the procedure less effective and too exhausting.
For roughly ten minutes, or until the chest feels light, repeat the entire cycle.
Don’t use this huff before it feels ready to come out. Huffs function by dynamic compression, and small, long huffs move sputum from low down into the chest while huge, short huffs move sputum from higher up into the chest.
Coughing
If huffing doesn’t remove your sputum, you should cough as well. You might not need to cough, though, if it does remove your sputum.
Long coughing episodes should be avoided since they can be exhausting, cause dyspnea, or cause tightness or soreness in the chest or throat. Coughing should only be done if the sputum is easily cleared; otherwise, start the cycle again.
Indication
Post-injury/pain (ICC/rib fracture).
Sputum output is chronically elevated, as in cases of cystic fibrosis and chronic bronchitis.
Throughout ACBT, it’s critical to continuously check for increased dyspnea or dizziness. Reduce the number of deep breaths a patient takes throughout each cycle and go back to breathing control if they experience dizziness.
Insufficient pain management when required.
bronchospasm.
surgery on the head, neck, or spine that is sudden and unstable.
Contraindications
Patients are not breathing on their own.
Unconscious patient.
Individuals who have trouble following instruction.
Confused or agitated.
Positioning
ACBT positioning can be done while sitting or in a position that promotes postural drainage. You could begin by sitting for a while until you feel secure enough to explore other positions. Its effectiveness in sitting or gravity-assisted positions is well-supported by examinations.
Your medical condition and how effectively the ACBT works for you will determine the optimal position for you to perform it. Maintaining a healthy breathing pattern when seated with your shoulders relaxed, neck relaxed, and back supported helps the diaphragm work better and lessens the strain on your musculoskeletal system.
Make sure you are relaxed, comfortable, and well-supported in whatever posture you choose.
The ACBT can be carried out with or without a helper who provides shaking, percussion, and vibration. The patient may involve compression or self-percussion.
It has been demonstrated that people prefer the straight, side-lying position, which is equally as effective as the head-down position.
Time and Frequency
The recommended duration for ACBT is ten minutes or so, or until your chest feels free of sputum.
When you’re feeling good, you might only need to perform ACBT once or twice day. You might need to do it more frequently if you have more sputum. Shorter and/or more frequent sessions may be necessary when you are ill or have more sputum.
Technique for Active Cycle of Breathing (ACBT) Three steps of the Active Cycle Breathing Technique (ACBT) integrate several breathing strategies to help remove mucus from the lungs. The first stage facilitates airway relaxation. The second stage aids in clearing mucus and allowing air to pass behind it.
What is the active cycle of breathing techniques for bronchiectasis?
It involves repeating a cycle composed of several distinct steps. These consist of breathing normally for a while, then taking deep breaths to force the mucus up and loosen it, and finally coughing it out. After 20 to 30 minutes, the procedure is repeated.
Is it passive or active to exhale?
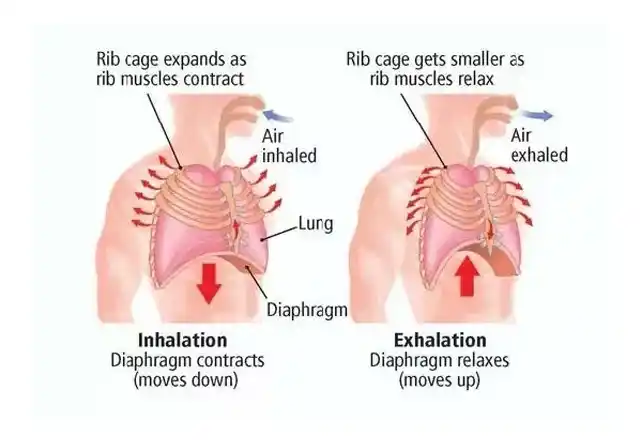
Breathing is supported by the intercostal and neck muscles, which move the rib cage. Breathing out occasionally involves the use of abdominal muscles. In the absence of exercise, exhalation, also known as expiration, is typically a passive process.
What is an asthmatic’s active breathing cycle?
A series of breathing techniques called ACBT helps clear your airways of mucus. A physical therapist is the ideal person to teach ACBT. The ACBT exercises include deep breathing, puffing, and breathing control. You do these in a cycle until your chest feels clear.
What breathing method is used in FET?
A huff is a technique used to transfer secretions that have been mobilized by thoracic expansion exercises down towards the mouth. When used in combination with breathing control, it is also known as the forced expiration technique [FET]. Although it can be used alone, it should always be a part of any practice for clearing the airways.
What is the breathing cycle?
The action of breathing in and out is known as the respiratory cycle. The respiratory cycle’s primary goals are to eliminate carbon dioxide and introduce new oxygen into the body.
References
Active Cycle of Breathing Technique (ACBT). (n.d.). Cystic Fibrosis Foundation. https://www.cff.org/managing-cf/active-cycle-breathing-technique-acbt
Bronchiectasis. (2022, October 19). The active cycle of breathing technique – Bronchiectasis. https://bronchiectasis.com.au/physical therapy/techniques/the-active-cycle-of-breathing-technique
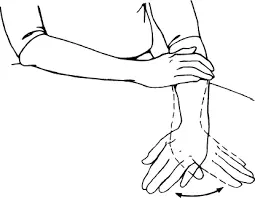
What is an Ulnar and Radial Deviation of the Wrist?
Radial and ulnar deviations are functionally significant wrist movement, they are essential for maintaining the wrist joint‘s overall stability and balance. By equitably distributing pressures across the wrist joint during weight-bearing exercises, these movements help reduce the likelihood of injury or excessive strain on specific components.
These radial and ulnar anomalies significantly impact the function of the hand and wrist. Gripping and manipulating objects are essential activities. For example, when holding a cup, radial deviation enables the hand to lean toward the thumb side, producing a more firm and stable grip. Tasks like using a key to enter a door, on the other hand, necessitate ulnar deviation since the hand must tilt to the little finger side to fit inside the keyhole.
Understanding the biomechanics and musculature involved in radial and ulnar deviation is crucial for the treatment and rehabilitation of wrist injuries or disorders. Physiotherapists, occupational therapists, and other medical professionals commonly uses specific physical activities and treatments to encourage recovery and restore optimal wrist function.
What is Wrist Radial Deviation?
Radial deviation (also known as wrist abduction) is the movement of the wrist toward the thumb side (radius). This motion occurs in the frontal (coronal) plane and is primarily controlled by muscles on the radial side of the forearm.
To visualize this motion, keep your arm in a neutral position, palm down. Then, when you bend your hand toward the thumb, the side of the little finger should move away from the forearm. The term “wrist radial deviation” describes this movement.
The radial deviation allows for a variety of functional activities, including reaching and gripping objects with the thumb side of the hand. Many daily activities, like typing, writing, using tools, and doing jobs requiring precise movements or a firm grip, need it.
The wrist’s radial deviation is controlled by muscles and tendons that attach to the hand and wrist and travel along the forearm. The main muscles engaged in this motion are the flexor-carpi radialis and the extensor-carpi radialis longus and brevis. The force required for radial deviation is produced by the cooperation of these muscles.
For a variety of tasks, such as grasping objects, playing an instrument, and performing particular sports motions, wrist radial deviation is essential. It facilitates the overall movement of the wrist joint and is crucial for wrist mobility.
The radial deviation muscles of the wrist
The forearm contains the primary muscles responsible for the radial flexion or deviation of the wrist. These muscles may cooperate to generate and regulate movement. The most important muscles for wrist radial deviation are as follows:
Flexor Carpi Radialis: The palmar side of the forearm contains this muscle. It attaches to the base of the second metacarpal after emerging from the humerus’ medial epicondyle, the bony protuberance on the inside of the elbow. The wrist deviates radially when the flexor carpi radialis contracts.
Extensor Carpi Radialis Longus: This muscle situated on the rear of the forearm. It originates from the lateral supracondylar ridge of the humerus, the bony ridge on the outside of the elbow, and is located close to the base of the second metacarpal. Another consequence of the contraction of the extensor carpi muscles is the radial deviation of the wrist.
Extensor Carpi Radialis Brevis: The extensor Carpi radialis brevis is next to this muscle. It emerges from the humerus’s lateral epicondyle and inserts on the base of the third metacarpal. One factor contributing to the wrist’s radial deviation is a contraction of the extensor carpi radialis brevis tendon.
The radial nerve innervates these muscles, controlling wrist motions and sending the impulses required for muscular contraction. Notably, whereas these muscles mainly influence radial deviation, additional forearm muscles also contribute to wrist joint stability and coordination of different hand and finger movements.
Radial deviation range of motion
The range of motion of the wrist’s radial deviation may vary from person to person. However, the usual range of radial deviation movement is often 15 to 20 degrees.
When measuring radial deviation, the neutral position—where the hand is parallel to the forearm is typically regarded as the starting point. Radial deviation can be shown by flexing the wrist or bending the thumb sideways from this neutral position. The wrist typically has a range of motion of 15 to 20 degrees in this direction before reaching its limit. Several variables might impact a range of motion, including individual variances, anatomical variations, traumas, and underlying disorders. A person’s radial deviation may vary according to their muscular strength, joint flexibility, and any carpal joint constraints.
To measure radial deviation, utilize a goniometer made especially for measuring joint angles and range of motion. Using a goniometer to measure radial deviation is explained in detail below:
Position: Start by having the subject of your radial deviation measurement sit or stand with their hand and forearm comfortably supported on a table or other level surface.
Goniometer Alignment: Align the goniometer’s center of rotation with the wrist joint’s center by placing it directly on the back of the hand. Setting the goniometer in place: To stop the goniometer from moving while you are measuring, press its base firmly against your forearm.
Decide on the initial position: Align the stationary arm with the forearm’s longitudinal axis to set the goniometer at zero degrees.
Radial Deviation Measurement: As the participant does the radial deviation, instruct them to move their hand and wrist as close to the thumb as they can. As you go, pay attention to and line up the goniometer’s moving arm with its long axis.
Examine the measurement: After achieving maximum radial deviation, observe the degree of angle shown by the goniometer’s moving arm. This measurement shows the radial deviation of the movement.
Radial Deviation Test for the Wrist
Some simple tests may be used to assess the radial deviation of the wrist. The radial deviation test is a popular test that looks like this:
Starting position: The test subject must sit or stand with their arm palms down on a table or in their lap.
Methods for taking the test: Give the participant instructions to radially deviate their hand and wrist as far to the thumb’s side as they can while maintaining a solid forearm on the ground. To prevent pain or discomfort, encourage them to move within their range of comfort.
Measurement: Visually evaluate the angle formed by the hand’s longitudinal axis and the forearm’s longitudinal axis to determine the degree of radial deviation attained. You can use a goniometer, if you can, or compare it to a reference point to obtain a more precise measurement.
Repetition and Average: It is advised to take the exam more than once to guarantee correctness and consistency. To obtain a more accurate assessment of the degree of an individual’s radial deviation, take two or three measurements and average them.
Special Test for Wrist Radial Deviation
There is not a particular test made specifically to evaluate a person’s wrist’s radial deviation. Nonetheless, as part of a more comprehensive evaluation of wrist function and range of motion, several tests requiring wrist range of motion may indirectly measure radial deviation. The following tests are frequently uses to assess wrist radial deviation:
Wrist range of motion (ROM) measurement:
The wrist joint’s whole range of motion, including radial deviation, is assessed by this test. The degree of radial deviation attained by the individual is measured by the examiner using a goniometer. While maintaining the stability of the forearm, the client is often instructed to move the hand and wrist as far to the side of the thumb as feasible. The goniometer is positioned about the hand and forearm’s long axis to measure, and the amount of radial deviation attained is recorded.
Functional assessments:
Functional tests are intended to evaluate a person’s capacity to execute particular wrist functional motions, which may include radial deviation. For instance, a radial deviation is required throughout the test when a person grasps and manipulates things with the thumb side. While observing and evaluating the individual’s capacity to carry out these functional tasks, the examiner records any restrictions, discomfort, or challenges encountered during the radial deviation.
Radial Deviation Stretching
Start by placing your forearm palm up on the table or your lap. Feel the stretch on the inside of the forearm by lightly pressing the hand and wrist against the thumb with the other hand. Hold the stretch for 15 to 30 seconds, then let go. Do this stretch two or three times for each arm.
Benefits Of Wrist Radial Deviation Exercises
In addition to increasing wrist range of motion, wrist radial deviation exercises also strengthen the forearm and wrist muscles. They can be especially beneficial for those who have diseases or accidents affecting the wrist.
Strengthening Exercises for Wrist Radial Deviation
The following exercises can assist in correcting radial wrist deviation:
Wrist radial deviators strengthening
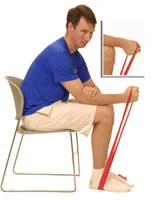
Resistance band radial deviation of the wrist
Sit in a chair with your legs slightly apart and grab an exercise band.
Bend slightly forward.
Place the affected hand and wrist in front of your knee by resting the injured side’s forearm on your lap.
Holding one end of a resistance band, make a fist and cover it with your thumb, much like you would with a hammer.
On the same side, secure the band’s opposite end around the bottom of your foot.
Pull your wrist up gently for two seconds. After that, reduce it to a count of six seconds.
Try to complete at least four sets of eight to twelve reps.
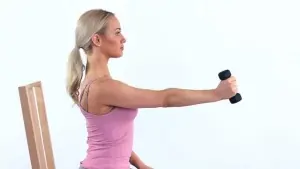
Dumbbell Radial And Ulnar Deviation
With a dumbbell, radial deviation
Hold in your hand a light stop or anything hefty. Palm up, and place your forearm on your lap or the table. The inside of your forearm will be gently stretched as you allow the bar to glide toward your fingers.
Bend your wrist to the side of your thumb and raise the dumbbell using your hand and wrist muscles. Carefully lower the stop. Perform ten to fifteen repetitions before moving on to the opposite hand. Make sure you begin with little weight or resistance and progressively increase it as your strength and comfort level develop.
FAQs
What activities require radial deviation?
Radial deviation is uses in tasks like turning a key or unlocking a door.
How much radial deviation is normal?
A wrist radial deviation usually has a range of motion of 15 to 20 degrees. However, it is crucial to remember that typical ranges might change depending on elements like age, gender, and physical characteristics.
What muscle is responsible for radial deviation?
The abductor pollicis longus (APL) is a major wrist radial deviator because of its enormous moment arm at the radioulnar deviation axis and its insertion at the base of the first metacarpal.
How do you strengthen radial deviation?
To begin, extend your arm in front of you so that the palm is facing downward. Start with small circles and work your way up to larger ones as you slowly circularly spin your wrist. Proceed to the opposite side.
References:
Patel, D. (2023k, July 4). Radial and ulnar deviation of the wrist – movement, muscles, ROM. Samarpan Physiotherapy Clinic. https://samarpanphysioclinic.com/radial-and-ulnar-deviation-of-the-wrist/
Kazmi, W. (2021, December 24). Wrist Exercises – Sports Injury & Pain Management Clinic of NYC. Sports Injury & Pain Management Clinic of NYC. https://www.sportspainmanagementnyc.com/self-care/wrist/
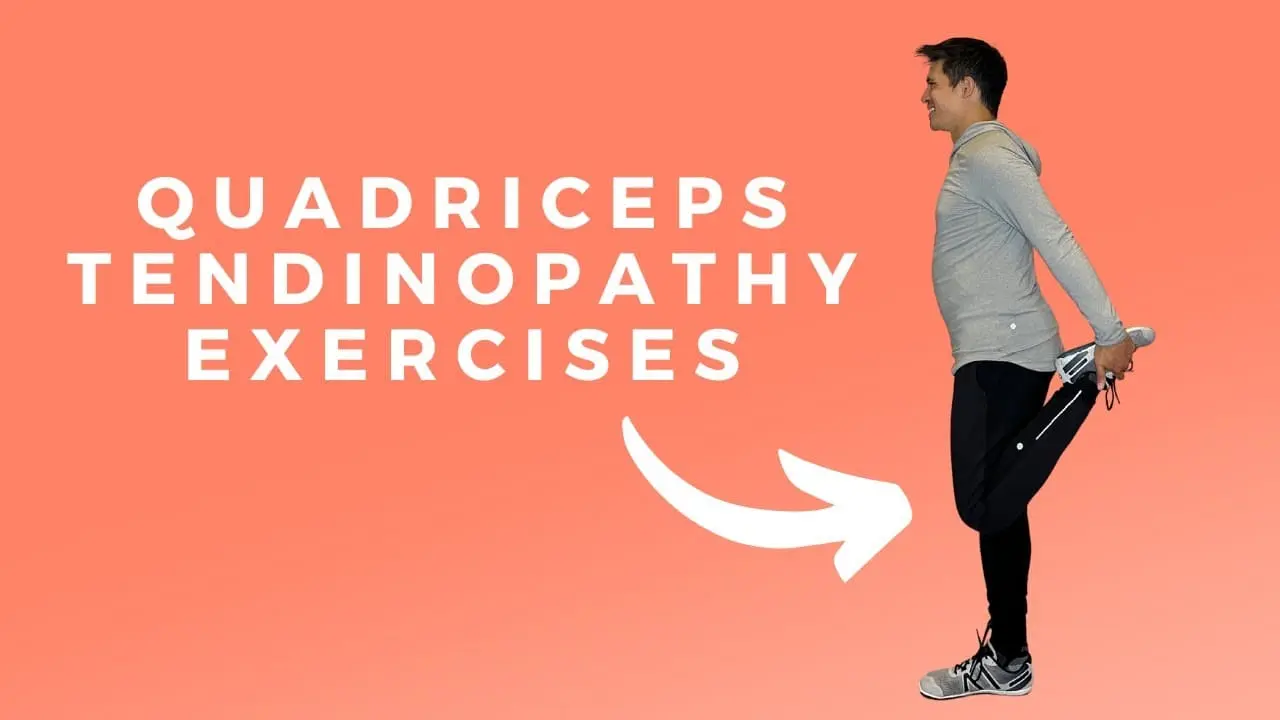
The Best Exercises For Quadriceps Tendonitis that are designed to lessen pain, increase flexibility, and strengthen the quadriceps and surrounding muscles are explained in this article.
Introduction:
The overuse injury known as quadriceps tendinitis, or quadriceps tendinopathy, results in pain and inflammation in the quadriceps tendon, which is situated in the front of the knee. Among athletes, the condition is prevalent, especially for those who engage in running, jumping, or squatting.
However, anyone who repeatedly strains their quadriceps may be affected. Certain activities may help speed recovery, regain strength, and stop additional injuries, even if rest and suitable medical treatment are necessary for healing.
An essential part of treating quadriceps tendinopathy is physical therapy. It provides an extensive approach that targets the fundamental causes of the illness in addition to its symptoms. Physical therapy aims to minimize pain, increase strength and flexibility, and encourage recovery using a variety of methods and exercises.
Causes:
Although several factors might contribute to the start of the illness, repetitive stress or overuse are typically the cause. The primary causes of quadriceps tendinitis are listed below:
Although several factors might contribute to the start of the illness, repetitive stress or overuse are typically the cause. The primary causes of quadriceps tendinitis are listed below:
Repetitive strain or overuse
The most frequent cause of quadriceps tendinitis is overuse which repeatedly stresses the quadriceps tendon. It frequently affects athletes or those who engage in repetitive or high-impact exercises like squatting, cycling, jumping, or running.
Growing older
The tendons naturally grow less flexible and smooth as people age, increasing the risk of damage.
Improper Methods
When engaging in physical activity, poor form or technique can lead to excessive tension on the quadriceps tendon.
Unexpected Increase in Intensity or Activity
Tendinitis can result from sudden increases in the level, frequency, or intensity of physical exercise, which may cause undue strain on the quadriceps tendon.
Imbalanced or Weak Muscles
Quadriceps tendinitis might be made more likely by weak or unbalanced leg or core muscles.
Tense Muscles
Quadriceps tendinitis can be caused by tight quadriceps, hip flexors, or calf muscles.
Improper Footwear
Quadriceps tendinitis can be worsened by wearing shoes that don’t offer enough cushioning or support.
Improper Stretching and Warm-Up
The risk of quadriceps tendinitis might be raised by skipping stretching exercises or incorrectly warming up before exercise.
Tendon or Injury History
Tendinitis may be more likely to develop if there is a history of previous harm to the quadriceps or knee.
Environmental Factors
Running on hard surfaces or rough surfaces are examples of environmental factors that can worsen quadriceps tendonitis.
Signs and symptoms:
An overuse injury to the tendon that connects the quadriceps muscle to the patella is known as quadriceps tendonitis. It may result in knee pain, edema, and trouble moving the knee. The following are typical symptoms and signs:
Pain
The quadriceps tendon attaches just above the kneecap (patella), which is usually where pain is felt.
Swelling
Around the tendon, especially where it connects to the kneecap, swelling may develop. In the knee region, it may be more extensive or limited.
Weakness
The quadriceps muscle can look weaker, particularly when running or squatting. It may become difficult to perform movements requiring knee strength as a result of this weakening.
Stiffness
Particularly after prolonged sitting, the knee may feel tight or rigid. This may make it challenging to bend the knee or fully extend the leg.
Tenderness
Tenderness or pain may result from applying pressure to the region where the tendon attaches, which is above the kneecap. Certain activities, such as jumping or straightening the leg, may make the area more sensitive.
Pain while moving in specific ways
When trying to straighten the leg, especially when there is resistance, you could feel pain. Running, kneeling, and other exercises requiring rapid movement can make the symptoms worse.
Crepitus (sounds that pop or crunch)
When moving the knee, you might sometimes hear or feel a popping, clicking, or crunching sound.
Redness and warmth
Inflammation may cause the affected area to feel warm to the touch and to be red.
Benefits of exercise:
When it comes to treating quadriceps tendonitis, exercise can be quite helpful because it helps increase strength, flexibility, and mobility while also lowering pain and preventing more injuries. Exercises, however, are to be performed carefully and gradually to prevent making the situation worse.
Here are several advantages of exercising for quadriceps tendinitis, as well as some suggested exercises to help with the healing process.
Encourages Recovery and Healing
By improving blood flow to the injured tendon, exercise may help in the healing process. Better circulation helps the tissue heal by removing waste and supplying nutrients.
Improves Quadriceps Strength
Tendonitis frequently causes weakness in the quadriceps muscle. Tendon tension can be reduced and additional injury can be avoided by gradually strengthening the quadriceps.
Lessens Pain
By strengthening the muscles surrounding the knee, which may take in some of the stresses that would otherwise pass through the tendon, regular, regulated exercise can help minimize pain.
Increases Flexibility
Exercises for flexibility and stretching help in regaining the knee’s range of motion, which lessens stiffness and increases mobility.
Avoids Re-Injury
Frequent exercise can help lower the risk of reinjury and stop future episodes by strengthening the quadriceps and improving knee function overall.
Promotes Joint Health
By improving the knee joint’s position, lubrication, and function, exercise can help maintain its health and lessen the strain on the quadriceps tendon.
Improves Gait and Posture
By strengthening your quadriceps and other lower body muscles, you can improve your posture and gait and lessen the unnatural strain that everyday activities have on the tendon.
Exercises For Quadriceps Tendonitis:
These exercises can help increase flexibility and strengthen the quadriceps while lowering the chance of additional tendon damage. Never forget to get advice from a medical expert or physical therapist before beginning any activities to make sure they are suitable for your particular situation.
Quad Sets
Particularly if you are in pain, quad sets are a great first workout for quadriceps tendonitis. Without straining the tendon, this exercise helps engage the quadriceps muscle.
With your legs straight out in front of you, sit or lie down on a level surface.
Make sure your knees are straight and not bent if you’re seated.
Keep your feet flat on the floor and your legs fully stretched if you’re lying down.
Pay attention to your quadriceps, the muscle at the top of your thigh.
By pressing the back of your leg down toward the floor or the surface you’re sitting or sleeping on, you can tighten your quadriceps muscles.
Think about trying to straighten your leg without really causing the knee to move.
Keeping your knee still while contracting your quadriceps is your goal.
Continue to tighten the muscle and hold the contraction for 5 to 10 seconds.
Throughout the activity, maintain your breathing.
Refrain from holding your breath.
Then return to your neutral position.
Then relax.
Repeat these exercises 5 to 10 times.
Before performing the contraction again, take a few seconds to rest.
static-quadriceps-exercise
Straight Leg raises
This exercise is perfect for the early phases of recovery since it builds quadriceps strength while reducing tendon stress.
On a comfortable surface, like the floor or a mat, lie flat on your back.
Your arms should be at your sides, and your legs should be straight out in front of you.
Your “supporting” leg will be the one that bends one knee until its foot is flat on the ground.
The opposite leg should stay on the floor, relaxed and straight.
Tighten the quadriceps, which are the muscles on the front of your thigh, with the straight leg.
While maintaining a straight leg, try pressing the back of your knee toward the floor.
Maintaining the knee completely extended, slowly elevate your straight leg 6 to 12 inches off the ground.
Instead of using your hip or lower back muscles to elevate the leg, concentrate on using your quadriceps.
To help the muscles contract more effectively, keep your foot flexed or with the toes pointed upward.
Depending on your strength and comfort level, hold your leg up for two to five seconds.
Keep your quadriceps engaged and maintain control throughout the exercise.
Return your leg to the floor carefully and slowly, being cautious not to let it fall too soon.
Then return to your neutral position.
Then relax.
Repeat these exercises 5 to 10 times.
Straight-leg-raise-
Step-Ups
Step-ups are a useful and effective workout that improves knee stability and strengthens the quadriceps, glutes, and hamstrings. This exercise is excellent for rehabilitation, particularly for people recovering from quadriceps tendonitis, because it resembles everyday tasks like climbing stairs. When done correctly, it has minimal impact and may be modified to suit varying levels of intensity.
Place yourself in front of a sturdy platform, bench, or step that is height or less; the height can be changed to suit your comfort level and existing strength.
Maintain a straight position with your shoulders back and core engaged, and keep your feet shoulder-width apart.
Make sure your knee and ankle are in line by placing one foot firmly on the platform; do not move your knee inward or outward.
To raise your body onto the platform, push through the heel of the foot on the step rather than the toes.
Don’t lock your knee, but keep your other leg straight as it remains on the ground.
Bring your other foot up to join the first one on the platform once your entire body is on the step.
At the top, stand upright with both knees in line.
To keep your balance, contract your quadriceps and glutes.
Activating the same leg that went up first, take a step back down while maintaining control and concentrating on activating your quadriceps.
Return to the beginning posture with both feet flat on the floor by lowering the other foot down to the ground.
Then return to your neutral position.
Then relax.
Repeat these exercises 5 to 10 times.
step-ups
Eccentric Squats
An effective exercise that targets the lengthening phase of muscular contraction is the eccentric squat. In addition to strengthening muscles and promoting tendon health, this kind of exercise can be especially helpful in the treatment of tendinitis. Eccentric exercises are utilized to increase strength, lessen pain, and encourage tendon healing in cases of quadriceps tendonitis without causing more damage to the tendon.
Stand with your feet shoulder-width apart and extend your toes slightly outward.
Maintain a raised chest, back shoulders, and an active core.
Eccentric squats can be done with or without weights, and for an extra challenge, you can hold a little weight (like a dumbbell) in front of you or at shoulder height.
Start by lowering your body into a squat by gradually bending at the hips and knees.
Try for a lowering phase of three to five seconds and concentrate on slowing down the drop.
The eccentric (lengthening) portion of the squat is the main focus.
Make sure your knees don’t bend inward and stay in line with your toes.
Your hips, not your knees, should move back first.
Depending on your degree of comfort and mobility, you can lower yourself as much as you feel comfortable, reaching for a squat depth where your thighs are parallel to the floor or slightly deeper.
To extend the time under strain for the quadriceps, you can hold the position for two to three seconds after you reach the bottom of the squat.
Once you’ve paused, return to the starting position as you would in a standard squat, but stay focused on holding your speed.
As eccentric exercises focus on the going down phase, this section can be completed more quickly.
As you stand back up, push through your heels and use your quads and glutes.
Then return to your neutral position.
Then relax.
Repeat these exercises 5 to 10 times.
eccentric squats exercise
Wall Sits
Without needing movement at the knee joint, wall sits are a static exercise that helps develop the quadriceps, glutes, and other lower body muscles. They can help improve muscle strength and endurance while lessening the tension on the knee joint and tendons, which makes them a great option for people recovering from quadriceps tendonitis.
Place your feet shoulder-width apart and lean your back against a wall.
Make sure your back is flat on the wall and place your feet one to two feet away from it.
Keep your arms relaxed in front of you or at your sides.
Bending your knees, slowly slide down the wall until your thighs are parallel to the floor (or slightly higher, depending on your comfort level).
Avoid allowing your knees to extend over your toes and make sure they are in line with them.
At the lowest point, your knees should make a 90-degree angle; however, if this range is uncomfortable, don’t force it.
Hold a suitable squat position as long as you can while keeping your form correct.
To maintain the position, keep your back flat against the wall, your core active, and concentrate on squeezing your glutes and quadriceps.
Breathe normally throughout the hold; do not hold your breath.
Once you’ve held the wall sit for the amount of time you want (start with 10 to 15 seconds and work your way up), softly push through your heels to go back to standing.
To get back to where you were before, contract your quadriceps and glutes.
Then relax.
Repeat these exercises 5 to 10 times.
Wall-sit-exercise
Lunges
For balance, place your arms at your sides or in front of you, and stand with your feet shoulder-width apart.
Maintain an upright stance with your shoulders back, chest raised, and core active.
Lower your body toward the floor and take a large, one-legged step forward.
Both knees should be bent to a 90-degree angle when you take a step forward.
Directly over the ankle, without going over the toes, should be the front knee, while the rear knee should float slightly above the floor (or softly touch it, if necessary).
Do not lean forward or backward; instead, maintain a straight posture.
To get back to where you started, push off the heel of your front foot.
Remain in control of your movement and refrain from standing up by using force.
Step forward and lower into the lunge with the opposing leg in the same manner.
For as many repetitions as you like, keep switching legs.
Then return to your neutral position.
Then relax.
Repeat these exercises 5 to 10 times.
static lunges
Leg Press
The leg push is a machine-based workout that targets the quadriceps, hamstrings, glutes, and calves. When healing from quadriceps tendonitis, it’s important to strengthen the muscles surrounding the knee joint, which can be achieved with this excellent lower-body workout.
Place your feet on the platform of the leg press machine and adjust the seat so that your knees are at a 90-degree angle.
To improve alignment, place your feet shoulder-width apart and point your toes slightly outward.
On the platform, the heels ought to stay flat.
Place your head and back against the backrest in a comfortable position.
With your feet hip-width apart, place them flat on the platform.
Ensure that your knees and toes line up.
At the beginning, your thighs should be parallel to the seat or slightly lower, and your knees should be bent at about a 90-degree angle.
Depending on the model, start by unlocking the machine’s safety or stop mechanism.
Press through your heels and stretch your knees to slowly push the platform upward.
As you extend your legs, be sure your knees and toes are in line.
Make sure your hips and back are always in contact with the seat.
Avoid locking your knees at the highest point.
Control the drop by bending your knees slowly to lower the platform back down.
Lower the platform until your hips and quadriceps feel comfortably stretched, or until your thighs are about parallel to the seat.
Do not let the weight pile slide down completely, since this may put undue strain on the knees.
Then return to your neutral position.
Then relax.
Repeat these exercises 5 to 10 times.
Leg press machine
Heel raises
A straightforward yet effective exercise, heel raises, also called calf raises, work the muscles in the calf, especially the gastrocnemius and soleus, as well as the muscles surrounding the ankle and lower legs. In addition to strengthening the calves, heel raises can help support the knee joint and increase lower leg stability, all of which are advantageous for recovering from quadriceps tendinitis.
Place your feet hip-width apart and put your toes forward as you stand.
Maintain a raised chest, relaxed shoulders, and an active core.
For balance, place your hands on a counter, a wall, or a solid chair (particularly if you need support or are new to this exercise).
Push through the heel of your feet and your toes as you slowly lift your heels off the ground.
As you lift, pay attention to how your calf muscles contract.
The muscles in your lower legs ought to start to contract.
Until your heels are as high as you can comfortably reach, keep rising.
Keep your knees from locking, but keep your legs straight.
Hold for one to two seconds at the highest point of the exercise, making sure your calf muscles are fully contracted.
Avoid leaning forward or overextending.
Maintain a straight posture.
Controllably return to the starting posture by lowering your heels slowly.
To prevent tension on the muscles and joints, be careful not to let your heels go down too quickly.
Then return to your neutral position.
Then relax.
Repeat these exercises 5 to 10 times.
heel-raise
Hip Flexor Stretch
Stretching the hip flexors is an essential aspect of rehabilitation since tight hip flexors can lead to greater strain on the quadriceps tendon.
To protect your knees, place a mat or other soft surface on the floor and start by kneeling with one knee on the floor.
With the knee bent at a 90-degree angle, place your other foot in front of you to make a lunge.
With your toes pointing down, place your back knee on the floor.
To prevent excessive lower back arching and maintain a stable pelvis, tighten your core.
Maintain a raised chest and relaxed shoulders.
Keep your upper body upright as you gently move your hips forward.
The hip flexor, which is located at the front of the hip and thigh of the kneeling leg, should feel stretched.
Breathe deeply and relax into the stretch while you hold it for 20 to 30 seconds.
Stretching should be done carefully; don’t push your body into an uncomfortable position.
Then return to your neutral position.
Then relax.
Repeat these exercises 5 to 10 times.
Hip flexors stretch
Prone quadriceps stretch
It helps to lengthen the quadriceps, providing relief and improving flexibility. It also helps reduce the tension around the knee joint, which is important for promoting healing and reducing discomfort from tendonitis.
Position yourself on your stomach on a level, soft surface, such as a bed or mat.
Maintain a comfortable posture while placing your arms at your sides and your head on a pillow or the floor.
To pull your heel closer to your buttocks, gently bend one knee.
Grab your ankle with the hand on the opposite side of the bowed leg.
If you have trouble reaching your ankle, wrap a towel or strap around it and slowly pull your foot up toward your buttocks.
Feel the front of your thigh (quadriceps) stretch as you gently pull your ankle towards your glutes.
Avoid overly arching your lower back and maintain a neutral pelvis.
Breathe deeply and relax into the stretch while you hold it for 20 to 30 seconds.
The stretch should feel mild yet effective, so make sure there are no severe pains.
Return to the beginning position by slowly releasing your ankle.
Then relax.
Repeat these exercises 5 to 10 times.
Prone Quadricep Stretch
Seated Hamstring Stretch
It’s essential to stretch your hamstrings to keep your front and rear legs balanced. Quadriceps tendon strain can be worsened by tight hamstrings.
Place your legs out in front of you and take a seat on the floor.
Maintain a straight back and flexed (toes pointing upward) feet.
Avoid bending your back by sitting up straight, with your shoulders relaxed and your chest raised.
You can bend one knee while keeping the other leg straight if you’re experiencing pain in the back.
This might make the stretch feel better and lessen the strain on the back.
If not, proceed into the stretch with both legs straight.
To reach your toes on the extended leg, slowly bend forward at the hips rather than the waist.
Avoid rounding your back and maintain a long spine.
Instead of simply moving your head toward your knee, try moving your chest toward your thigh.
Reach for the bottom of your foot or your toes if you can.
The hamstrings, which run along the back of your thigh, should feel stretched.
Breathe deeply and relax into the stretch while you hold it for 20 to 30 seconds.
Use a cloth or rope around your foot to help extend the stretch without straining if you can’t reach your toes.
Instead of pushing yourself into a deep stretch, concentrate on lengthening your hamstring muscles.
Then return to your neutral position.
Then relax.
Repeat these exercises 5 to 10 times.
hamstring-stretch
Knee Extensions with Resistance Band
When healing from quadriceps tendinitis, knee extensions with a resistance band are a great way to help strengthen the quadriceps muscles. Without putting excessive stress on the knee joint, this low-impact exercise can be performed safely to aid in healing.
With your knees bent at a 90-degree angle, take a seat on a chair or bench.
Attach the resistance band to a stable item, such as a heavy piece of furniture, a closed door, or even a fixed object, like a stout post, and secure it around your ankle, the leg you wish to work.
Alternatively, somebody else can hold the band for you if you have one.
Make sure your back is straight and your feet are level on the floor.
Your hip and knee should line up, and when your knee is bent, the resistance band should gently tighten it.
Start with the resistance band gently pushing on your foot while your knee is at a 90-degree angle (or wherever feels comfortable). Straighten your knee and slowly extend your leg in front of you.
As you extend your leg, concentrate on contracting your quadriceps muscle.
To get the greatest benefit out of your muscles, hold the extended position for two to three seconds.
Return to the starting position by lowering your foot slowly and bending your knees.
Do not allow your leg to be pulled back too rapidly by the resistance band.
Make sure you’re using your muscles throughout the movement by controlling it.
Then relax.
Repeat these exercises 5 to 10 times.
knee extensions with resistance band
Hamstring Curls
The muscles at the back of your thigh, known as the hamstrings, can be strengthened using hamstring curls. When recovering from quadriceps tendonitis, strengthening the hamstrings may help balance the forces around the knee joint and lessen the strain on the quadriceps tendon.
On a mat or other soft surface, lie flat on your stomach.
Keep your feet pointed and your legs straight.
Keep your head and neck relaxed by resting them on the mat while keeping your arms by your sides.
Pull your heels up to your glutes (buttocks) by bending your knees slowly.
As you curl your legs up, concentrate on squeezing your hamstrings, which are the muscles at the rear of your thighs.
On the mat, make sure your upper body remains relaxed.
Squeeze your hamstrings at the top of the action and hold the position for 1-2 seconds once your heels are as near to your glutes as possible.
Straighten your knees and keep your movement under control as you slowly lower your legs back to the beginning position.
Don’t let your legs drop too soon.
Then return to your neutral position.
Then relax.
Repeat these exercises 5 to 10 times.
standing-hamstring-curl
Single-leg seated knee extensions
Particularly while recovering from quadriceps tendonitis, single-leg seated knee extensions are an excellent workout for strengthening the quadriceps muscles. Without placing unnecessary strain on the knee joint and tendon, this exercise helps strengthen the quadriceps. It might be a useful component of your recovery program.
With your knees bent at a 90-degree angle and your feet flat on the floor, take a seat on a chair or bench.
Maintain a straight back and relaxed shoulders.
For support and balance, keep your hands on your thighs or the chair’s sides.
Maintaining your knee in line with your hip, slowly stretch one leg straight out in front of you.
As you straighten the leg, contract your quadriceps, which are the muscles at the front of your thigh.
To fully extend the leg without locking the knee joint is your goal.
For one to two seconds, maintain the extended position.
Then return to your neutral position.
Then relax.
Repeat these exercises 5 to 10 times.
Repeat the exercise for the same number of repetitions with the opposite leg.
knee-extension
Spanish squats
For people recovering from quadriceps tendonitis, Spanish squats are a great workout that can help strengthen the quadriceps without placing undue strain on the knee joint. This exercise is a flexible and effective addition to your rehabilitation program since it works the quadriceps muscles, increases knee stability, and requires no equipment.
At about knee height, attach a resistance band to a strong anchor point.
Make sure the straps on a suspension trainer are adjusted at knee height as well.
Either attach the suspension straps around your lower legs, slightly above the knees or wrap the resistance band around the back of your knees.
Place your feet shoulder-width apart and face the anchor point.
To build tension in the band, take a few steps backward; it shouldn’t be loose.
To make the band pull your knees forward, lean back a little.
Bend your knees and push your hips back to lower your body into a squat position.
Avoid bending forward too much and maintain an erect body.
While maintaining the band’s tension, make sure that you extend your knees out toward your toes.
Lower yourself as far as is comfortable; ideally, you should do so until your thighs are parallel to the floor or just a little bit deeper.
To go back to standing, straighten your legs while keeping control by pushing through your heels.
As you rise, contract your quadriceps; do not lock your knees at the highest point of the exercise.
Then return to your neutral position.
Then relax.
Repeat these exercises 5 to 10 times.
Concentrate on moving with control during the rise and lower.
banded splanish squat
When exercising, what safety measures should be followed?
It’s important to follow particular safety measures when exercising if you have quadriceps tendonitis in order to avoid more damage and promote efficient recovery.
The following are the main safety precautions and suggestions that should be followed when doing quadriceps tendonitis exercises:
Get advice from a physical therapist or other medical professional.
You must get professional advice first before beginning any fitness program. Based on your particular needs, a medical professional or physical therapist can evaluate your condition and suggest the right exercises, level of difficulty, and adjustments.
Begin slowly and make progress over time.
Putting too much strain on the tendon too soon can make it worse. As your symptoms improve, progressively increase the difficulty, intensity, and duration of your activities from low-impact, low-intensity ones.
Stretch and Warm Up Before Working Out
Injury can be avoided by increasing blood flow to the muscles and tendons with a good warm-up and stretching program. Additionally, it gets the muscles ready for more demanding activities.
Pay Attention to Correct Technique
Exercises performed incorrectly might further strain the quadriceps tendon or result in compensating in other body regions, which can cause more injuries.
Stay away from painful or high-impact activities.
Running and jumping are examples of high-impact exercises that might put more strain on the tendon, increasing inflammation or damage. Likewise, one should refrain from any movement that results in severe pain.
Pay Attention to Your Body
Stop the workout right away if you feel any kind of pain, especially if it’s sharp or severe. While slight soreness or pain may be typical, pain suggests that you may be stressing the tendon.
After working out, apply ice.
Ice helps in reducing post-exercise swelling and inflammation, particularly if the tendon is under stress.
Stay away from jerking or sudden movements.
The quadriceps tendon may be overstretched by sudden motions or jerking, which could cause more irritation or damage.
Make rest and recovery a priority.
For tendons to heal, rest is essential. Chronic tendonitis or even total tendon rupture can result from overstretching the tendon. Remember to include rest days in your workout schedule.
If required, use supportive equipment.
When exercising, using a knee brace or supportive bandage can help lessen the strain on the quadriceps tendon and offer extra support.
Don’t Overstretch
Flexibility requires stretching, but too much stretching can cause tendon irritation. When extending the quadriceps, hamstrings, or other muscles surrounding the knee, take care not to apply too much force.
Adjust the exercises as necessary.
Certain exercises might make your problems worse or be too challenging. If necessary, adjust the workouts or replace them with kinder alternatives (e.g., moving from squats to quad sets or straight leg lifts).
Monitor and Modify Exercise Intensity in Response to Pain
Depending on how the knee feels before, during, and after exercise, the intensity should be changed. You may need to reduce the frequency or intensity of exercise if the pain gets worse afterward.
Maintaining a proper balance between exercise and rest is essential when exercising for quadriceps tendonitis. Avoid actions that could put too much strain on the injured tendon and instead concentrate on controlled, low-impact activities that increase strength and flexibility. You can lessen pain, encourage recovery, and prevent more injuries by taking these safety measures.
When should you stop working out?
When recovering from quadriceps tendonitis, it’s important to pay attention to your body’s signals and know when to stop exercising. Exercises can cause more damage and slow healing if they are continued after a certain point of pain or difficulty. For quadriceps tendonitis, the following are important signs that you should stop exercising:
Acute or Severe Pain
You should stop exercising right away if you feel severe, severe, or acute pain.
Inability to Move the Knee
Stop exercising if your knee becomes significantly stiff or loses range of motion, especially after working out.
Increased Inflammation or Swelling
It might suggest that the tendon is being overused if you observe increasing swelling or obvious irritation in the knee following activity.
Pain Getting Worse with Certain Motions
Exercises like jumping, lunging, and squatting may worsen the tendon if you experience increased pain during these motions.
Pain While Doing Everyday Tasks
Following exercise, if you feel pain in your knee when performing everyday tasks like walking, climbing stairs, or standing, it’s a sign that you are working yourself too much.
Pain That Doesn’t Get Better or Go Away When You Rest
You should stop exercising if you find that your pain does not go away with rest or if it lasts for a long time after working out (several hours or even the next day).
Constant cramping or tightness
It’s advisable to stop working out if you continue to feel tight, cramped, or uncomfortable after stretching or doing light exercise.
No Symptoms Get Better With Time
It might be time to stop and see a healthcare professional if, after multiple exercise sessions, you are not experiencing any improvement in pain or functionality, or if your symptoms seem to worsen or remain the same.
It’s always a good idea to speak with a medical expert or physical therapist if you’re not sure whether to quit or change your workout. They can help you in choosing the best course of action to guarantee a safe and effective recovery.
Which exercises should be avoided if you have quadriceps tendinitis?
It’s important to stay away from exercises that can make your quadriceps tendinitis worse, put more strain on the tendon, or result in more injuries. Generally speaking, the following workouts should be avoided when recovering:
Deep Squats
The quadriceps tendon and knee joint are overstressed during deep squats (when your knees bend past 90 degrees), which could lead to inflammation.
Running or Activities with a High Impact
Running, particularly on hard surfaces, can make the quadriceps tendon more inflamed because it puts frequent strain on the knees.
Plyometric exercises or jumping
Exercises that require jumping, bounding, or forceful motions (such as jumping lunges, squat jumps, or box jumps) can put a lot of strain on the knee joint and quadriceps tendon, which may worsen symptoms.
Running up stairs or hills
The quadriceps tendon is under a lot of strain when running up hills or climbing stairs because it must work harder to stabilize the knee.
Lunges, particularly weighted or deep ones
As they require knee flexion, lunges especially deep or weighted lunges put a lot of strain on the quadriceps tendon and may cause tendon irritation.
Rotating or twisting the knees
Activities that require the knee to be rotated or twisted, like some mobility exercises, can put stress on the quadriceps tendon and the ligaments that surround it.
Riding a bike with a lot of resistance
Elevated resistance The quadriceps tendon may be overstressed by riding a bike or climbing hills, particularly if done for extended periods of time.
Excessive weightlifting, particularly leg presses, and squats
Leg presses and heavy squats put a lot of strain on the quadriceps tendon. When done with too much weight, these kinds of exercises might irritate the tendon.
Important Factors for the Recovery from Quadriceps Tendinitis:
Ice and Rest: To make it possible for the tendon to recover, rest is necessary at first. Ice can be applied to help with swelling and irritation.
Avoid Overexertion: Don’t force yourself to endure pain. If you have severe pain during an exercise, stop and see a doctor.
Gradual Progression: Begin with low-intensity workouts and work your way up to more challenging activities. Re-injury is less likely as a result.
Speak with a Professional: For further testing along with customized guidance, think about speaking with a physical therapist or other healthcare professional if the pain continues or gets worse.
Summary:
Inflammation of the quadriceps tendon, or quadriceps tendinitis, can be quite painful, but some activities can help strengthen and stretch the surrounding muscles, which may help the tendon recover and stop additional damage.
Although quadriceps tendinitis might be painful, you can recover, restore your strength, and avoid more injuries by doing the right workouts. To prevent excessive stress on the tendon, it is important to begin gently advance gradually, and always give proper technique top priority.
If you’re unsure, consult a physical therapist to make sure you’re doing the exercises effectively and correctly. With patience and continuous work, you can resume your daily activities pain-free.
FAQ:
What is quadriceps tendonitis?
The quadriceps tendon, which joins the quadriceps muscle to the patella, develops an inflammation when quadriceps tendonitis happens. Particularly in sports involving sprinting, jumping, or kicking, it can frequently come on by overuse, repetitive stress, or sudden alterations in activity levels.
Can someone with quadriceps tendonitis exercise?
Yes, however, you should concentrate on doing workouts that don’t make the pain worse. Generally speaking, low-impact exercises and strengthening routines that don’t overstress the knee joint are advised. Before beginning exercise therapy, always get advice from your healthcare professional.
Which workouts are most effective for treating quadriceps tendonitis?
The ideal workouts for strengthening the quadriceps without affecting the knee joint are straight leg raises and quad sets. Step-ups and wall sits can be used to improve stability and strength. Squat eccentrically to build strength gradually. Exercises that stretch the calves and hamstrings relieve knee strain.
When I have quadriceps tendonitis, should I stop all physical activity?
In the initial phases of recovery, rest is important, but suddenly stopping all physical activity can cause stiffness and weakness. Modified, low-impact workouts that increase flexibility and quadriceps strength can help with recovery as long as they don’t hurt. When in doubt, get advice from a medical expert and always pay attention to your body.
When exercising, how long does it take to recover from quadriceps tendonitis?
Depending on how well you follow your rehabilitation plan and how severe your tendonitis is, recovery time may vary. While more severe cases may take several months to improve, milder cases may do so in a matter of weeks. Age, the general level of fitness, and participation in the recommended activities are other factors that affect recovery.
If I have quadriceps tendonitis, can I still run or play sports?
Until your symptoms heal, it is usually advised to stay away from high-impact activities like running, jumping, and sports that strain the knees. It’s necessary to gradually resume exercise after building up your flexibility and quadriceps. Before beginning these activities again, always get medical advice.
What should I stay away from when performing quadriceps tendonitis exercises?
Stay away from activities or motions that produce severe pain, excessive strain, or irritation. Deep squats, high-impact workouts, and any other activity that puts a lot of strain on the knee joint can worsen tendinitis. Focus on painless workouts that maintain flexibility while progressively increasing strength.
How can I avoid getting quadriceps tendonitis again?
Warm up completely before engaging in any physical activity to avoid repeat. Increase the intensity of your workouts gradually. Include quadriceps and surrounding muscles (hamstrings, calves) into your strength training regimen. To keep your flexibility, stretch frequently. When participating in sports or activities, pay attention to correct form and technique. In between strenuous tasks, give yourself enough time to relax and recover.
For quadriceps tendinitis, how frequently should I perform exercises?
To prevent overworking the tendon, exercises should be performed two to three times a week at first. You can progressively increase the frequency as your symptoms get better. Particularly in the early phases of rehabilitation, make sure to factor in enough recovery time in between sessions.
Does quadriceps tendonitis require a visit to a physical therapist?
It’s really helpful to consult a physical therapist. A therapist can design a customized rehabilitation program, track your development, and teach you how to perform exercises correctly to prevent more injuries. Additionally, they can support pain management practices like soft tissue massage, strengthening, and stretching.
Can quadriceps tendinitis be treated with stretching?
Stretching can help release tension in the quadriceps, hamstrings, and calves, which are the muscles that surround the knee. The quadriceps tendon may experience less strain as a result. It is important to stretch gently and within a range of motion that doesn’t cause pain.
If my tendinitis is not getting better, when should I see a doctor?
It’s time to see a healthcare provider if your symptoms don’t go away after following a rehabilitation program or if you have severe knee pain, swelling, or trouble moving your knee. Depending on the extent of the tendonitis, they could suggest additional treatments including advanced therapies, medicine, or imaging studies.
Can I treat quadriceps tendinitis with heat or ice?
To help lessen swelling and inflammation during the acute phase (the first 48 to 72 hours), ice is advised. Heat can then be applied to promote blood circulation and relax tense muscles. Depending on each person’s demands and recovery stage, make sure to switch between ice and heat.
Will tendinitis be avoided if I strengthen my quadriceps?
Indeed, by increasing knee stability and lessening the strain on the tendon, strengthening the quadriceps and the surrounding muscles (hamstrings, glutes, and calves) can help avoid tendonitis. Additionally, a well-balanced lower body can improve performance and lessen the chance of overuse problems.
Does quadriceps tendonitis have any other treatment options?
Alternative treatments including massage, ultrasound, dry needling, or corticosteroid injections can help some persons with quadriceps tendonitis. To find out what would work best for your condition, always talk about these possibilities with your physician or physical therapist.
References:
Louw, M. (October 21, 2024). Avoid these activities if you have quadriceps tendinitis (and what runners should do instead). Exact Health. https://www.exakthealth.com/en/blog/quadriceps-tendonitis-avoidance-exercises-and-improved-focus-areas for runners
Centers for Knee Pain in America, n.d.-b. Quadriceps tendonitis exercises. @kneepaincentersofamerica.com/blog/quadriceps-tendonitis-exercises
Surdyka, M. (April 13, 2024). Rehabilitation for quadriceps tendinopathy. E3 Rehabilitation. Rehab for quadriceps tendinopathy: https://e3rehab.com/
Rafla, M. May 14, 2024. Australian Sports Physiotherapy, or ASP, offers physiotherapy for quadriceps tendinopathy. https://australiansportsphysio.com/quadriceps-tendinopathy-physiotherapy/
Nunez, K. November 14, 2024. Quadriceps tendinitis causes and remedies. https://www.healthline.com/health/quadriceps-tendonitis Healthline.
Houston Methodist Orthopedics & Sports Medicine, Fertak, L., Placette, E., and McCulloch, P. C. (n.d.). Exercise regimen at home for tendonitis of the patellar and quadriceps. 159861.pdf https://sa1s3.patientpop.com/assets/docs
Image 12, Leg extension with bands. (n.d.). https://sweat.com/exercises/banded-leg-extension Sweat.
Image 15, Drum, F. (October 24, 2022). How to do Spanish squats, their advantages, and when to utilize them drum for fitness. Exercise Drum. Spanish squats: https://fitnessdrum.com/
Camptodactyly is a congenital condition characterized by the permanent flexion of one or more fingers, most commonly the little finger. It results from abnormalities in tendons, ligaments, or muscles and may vary in severity. The condition can be hereditary or occur sporadically. Treatment options include stretching, splinting, and, in severe cases, surgery.
Camptodactyly is a condition in which the middle joint of a finger bends abnormally. Although it can occur in other fingers, it is most frequently found in the little finger.
Camptodactyly: what is it?
If your child has camptodactyly, it indicates that their finger is bent and cannot be fully straightened. At a joint known as the proximal interphalangeal (PIP) joint, the finger normally bends in the middle.
Some children can straighten their fingers (passive motion) with help from a physical therapist. Even with assistance, the joint could be too tight to straighten for others. About 1% of children have some degree of camptodactyly. Girls are more affected than boys.
Types
Type I: Infantile camptodactyly
Equally impacts boys and girls.
Adapts well to splinting and stretching
Type II: Adolescent camptodactyly
More often affects girls than boys.
Surgery might be necessary.
Type III: Syndromic camptodactyly
Impacts many fingers
Linked to several syndromes
Severe and frequently present from birth
Symptoms
Your child might not exhibit any symptoms if they have moderate camptodactyly. Although their finger—likely the small one—will be somewhat bent, it won’t interfere with how they use their hand. Your child’s hand function may be slightly affected if their case is more severe.
The primary symptom of camptodactyly is a slightly flexed posture of the middle joint, which prevents the finger from fully straightening. It is most common in the little finger, but it can also affect other fingers. Over time, the condition may get worse, and it frequently gets worse during increases in growth. In most cases, camptodactyly does not cause pain or significantly impair hand function.
Your child has camptodactyly if their finger is bent and unable to straighten entirely. It could begin in adolescence or be present from birth, and it could get worse as the child gets older.
Your child won’t have any symptoms if the condition is mild. The little curvature of the finger, most likely the little one, will not have any effect on hand function. Your child’s hand function may be slightly affected if their case is more severe.
At least one finger is bent all the time.
The proximal interphalangeal (PIP) joint is where the finger bends in the center.
In extreme situations, even with assistance, the joint is too tight to straighten.
Causes
Your child’s finger may have abnormal structures that lead to camptodactyly. These could consist of: The majority of the time, the cause of this is unknown. However, some kids with camptodactyly have a family history of similar issues with their fingers.
Camptodactyly might be caused by problems with the skin, tendons, ligaments, muscles or bones of the finger.
Camptodactyly could be a hereditary disorder (inherited in families).
Additionally, camptodactyly may be a symptom of a more widespread illness or sickness that impacts numerous body parts.
Risk factor
Risk factors for camptodactyly include abnormal structures in the fingers, genetic conditions, and syndromes.
Abnormal structures
Tight skin
Contracted tendons and ligaments
Abnormal muscles
Irregularly shaped bones
Abnormal lumbrical insertion
Abnormal flexor digitorum superficialis insertion
Abnormal extensor tendon anatomy
Genetic conditions
Camptodactyly can be inherited as an autosomal dominant trait.
Mutations in the connexin-43 gene (GJA1) may cause misassembly of channels or alter channel conduction properties.
Diagnosis
The first step in identifying camptodactyly at Children’s Hospital of Philadelphia (CHOP) is usually a physical examination of your child’s hand and fingers. To confirm the diagnosis, doctors may occasionally suggest an X-ray. X-rays assist physicians in determining the hand’s underlying structure by creating images of the bones.
X-ray-OF-Camptodactyly
Along with X-rays and a physical examination, your child might also have:
Tests of range of motion to see if the illness is impairing agility and flexibility
Tests for nerve evaluation to see whether any nerves have been harmed or compressed
A precise diagnosis aids us in choosing the best treatment plan for your child.
Treatment
Since mild camptodactyly rarely results in pain or functional issues, surgery is typically not advised. The doctor will likely advise your child to wear a splint and undertake physical therapy if their disease is moderate.
If your child’s finger curve is more severe, and it is becoming worse, surgery might be necessary. Your child’s finger may still have some bend, even though surgery can help it work better. Following surgery, splinting and physical therapy are required to avoid joint stiffness.
The majority of camptodactyly patients don’t need surgery. Nonoperative treatment will be advised if your child has minor camptodactyly, which is defined as less than a 30-degree bend in their finger that does not impair hand function.
Physical therapy treatment
Goals
Correction of palmar tissue shortening and reduction of fixed flexion contracture at the PIPJ
Prevention of contracture development or recurrence
Maintenance of flexion range
Treatment options that don’t involve surgery include:
Massage
Massage-for-camptodactyly
Before stretching the finger(s), massage your muscles and tissues to loosen them. Although older kids might be able to do this on their own, a parent or other adult should help. Please check below for advice on how to massage the affected fingers.
Apply a moisturizer or massage oil to the affected fingers and hands. (Ensure your child is not allergic to any substances in the cream or oil used.)
Apply strong pressure to the region. (Massage should not cause discomfort or damage to the skin.)
Use the other hand’s fingers to support the back of the injured finger.
With your thumb, rub the front as well as sides of the affected finger.
Splinting
Splint-for-camptodactyly
Physical therapy splinting is quite effective, and the best outcomes come from early intervention. The first treatment location, with follow-up sessions possibly taking place at a local hospital. The degree of bending and the amount of pressure required to straighten the finger will determine the course of treatment.
Throughout the treatment, the splints will be observed and modified. Splints are usually only needed to be worn while you sleep, but occasionally you may need to wear them for eight to twenty hours per day.
Splinting: With the help of an physical therapist, the initial line of treatment consists of a program of finger stretching and splinting.
Stretches for the affected finger or fingers to increase range of motion
To keep the bent finger straight, use a splint.
Dynamic finger orthosis (capener orthosis) indicated for adolescents with contractures of 45 degrees or less, who are very proactive during the day and unlikely to comply with stretching and active extension strengthening regimens, gain the most from this orthosis.
A camptodactyly splint is a device that supports and straightens a bent finger. It’s frequently composed of mouldable plastic.
When do you use a splint?
A doctor may prescribe occupational therapy and a splint for mild camptodactyly.
To treat camptodactyly in children, a therapist may propose a splint to keep the affected finger straight.
A camptodactyly splint is a device that supports and straightens a bent pinky finger. It is used to treat mild cases of camptodactyly, which causes a finger to bend.
How it functions.
The hand-based splint lengthens the palmar skin and extends the PIPJ.
It is attached with tape or Velcro at the distal end of the proximal phalanx.
The splint should be comfortable and not involve unaffected fingers, thumbs, or wrists.
Therapeutic play
Putty-games-for-camptodactyly-patient
Taking hold of blocks and bigger objects, like balls
Playdoh/putty games
Musical instruments: piano, hand drums
Weight bearing exercises and Activity
Surgical treatment
Your child’s doctor might suggest surgery if your child’s finger curvature increases quickly or if it gets to the point where it affects hand function. Surgery is dependent on the finger’s deformity. After surgery, bending the finger may become difficult, and success rates are frequently low. For children, no one surgical technique is advised.
If your child’s camptodactyly is severe, worsening over time, or impairing their hand function, surgery may be recommended. Surgery is most beneficial when performed while your child is still young and the bones have not fully developed.
Children with hand issues benefit from several surgeries performed by board-certified orthopedic and plastic surgeons at CHOP.
Two commonly used procedures are:
Dividing the tendon that causes the muscle to shorten.
Transferring a tendon and/or muscle to restore balance in the hand.
In rare situations, if a child’s camptodactyly is caused by abnormal bones or bone structure, surgeons may need to undertake surgery to repair, remove, or fuse a bone to improve hand function.
During this procedure, the joint’s range of motion may be lost. Following surgery, your child’s finger, hand, or arm may be immobilized in a cast, splint, or sling while it heals.
Complication
Stiffness: Residual stiffness in the finger after surgery
Hand function: More severe cases can affect hand function
Difficulty holding objects: People with severe camptodactyly may have trouble holding objects
Progression of deformities: In non-operative cases, the condition may progress
Other features of camptodactyly: Tight skin, contracted tendons and ligaments, Abnormal muscles, and irregularly shaped bones.
FAQs
Why does camptodactyly occur?
Why does camptodactyly occur? Issues with the skin, tendons, ligaments, muscles, or finger bones may be the cause of camptodactyly. Camptodactyly may be a genetic disorder that runs in families. A syndrome is a collection of symptoms, and camptodactyly may be one of them.
Is camptodactyly a congenital condition?
A rare, genetic, non-syndromic, congenital limb malformation known as camptodactyly of the fingers is characterized by a permanent, often bilateral, flexion contracture at the proximal interphalangeal joint of a postaxial finger that is painless, non-traumatic, and non-neurogenic. This causes the affected digit to be permanently volarly inclined.
How does camptodactyly get treated?
Since camptodactyly rarely causes pain and typically has little effect on hand function, symptoms are commonly overlooked in a child’s early years. Depending on how severe the disease is, treatment options may include surgery, splinting, and stretching.
How can a small finger that is bent be straightened?
One of the most effective strategies for restoring extension to a bent finger is to use a well-designed splint or orthosis to apply a modest, continuous corrective force over time.
What is type 3 camptodactyly?
Hand camptodactyly is linked to facial dysmorphism (flat face, hypertelorism, telecanthus, symblepharon, simplified ears, retrognathia) and neck abnormalities (short neck with striking pterygia, muscle sclerosis) in Camptodactyly syndrome, Guadalajara type 3, a rare genetic bone development disorder.
My baby’s finger is bent; why?
A child with clinodactyly has a finger that curls to one side. Although it can affect other fingers, it often affects the little (pinky) finger. Usually, it is caused by abnormal finger bone growth and development.
Does camptodactyly tend to progress?
The proximal interphalangeal joint (PIPJ) of the fifth finger is most frequently affected by camptodactyly, a nontraumatic and progressive flexion deformity that may or may not affect the other fingers. The first finger is always spared.
Will my bent finger straighten out?
If mallet finger injuries are treated promptly, the majority of fingers recover. You should be able to straighten your fingertip once again following hand therapy and splinting. It occasionally stays slightly bent or has a bump on the underside of the joint, but it still works as it should.
Where may one see camptodactyly?
In the general population, 1 in 300 people have camptodactyly, or flexion contracture of the proximal interphalangeal joint (PIP), a solitary deformity that can be inherited as an autosomal dominant trait with different manifestations. It usually manifests as a tiny finger malformation, which might be bilateral.
What is the camptodactyly surgery?
A wide range of surgical techniques, including capsular release, lumbrical excision, tendon transfer, flexor digitorum superficialis (FDS) lengthening, osteotomy, and arthrodesis, are used to address the underlying structural abnormalities.
Reference
Camptodactyly | Boston Children’s Hospital. (n.d.). https://www.childrenshospital.org/conditions/camptodactyly
Camptodactyly in Children | Children’s Hospital Colorado. (n.d.). https://www.childrenscolorado.org/conditions-and-advice/conditions-and-symptoms/conditions/camptodactyly
Glick, Y., & Weerakkody, Y. (2011). Camptodactyly. Radiopaedia.org. https://doi.org/10.53347/rid-13487
Wikipedia contributors. (2024, November 18). Camptodactyly. Wikipedia. https://en.wikipedia.org/wiki/Camptodactyly
Kate. (2022, June 28). Camptodactyly – GC Hand Therapy. GC Hand Therapy. https://gchandtherapy.com/camptodactyly/
St George’s University Hospitals NHS Foundation Trust, H. T. D. (2023). Hand therapy treatment for children with camptodactyly. https://www.uhs.nhs.uk/Media/UHS-website-2019/Patientinformation/Childhealth/Hand-therapy-treatment-for-children-with-camptodactyly-3474-PIL.pdf
Philadelphia, C. H. O. (n.d.). Camptodactyly. Children’s Hospital of Philadelphia. https://www.chop.edu/conditions-diseases/camptodactyly
Occupational Therapy Department. (2014). Congenital hand anomalies: camptodactyly. In The Royal Children’s Hospital. https://www.rch.org.au/uploadedFiles/Main/Content/hand-therapy/congenital_hand_anomalies-camptodactyly.pdf
Pulmonary hypertension (PH) is a condition characterized by high blood pressure in the arteries of the lungs, leading to increased strain on the heart. It can be caused by various factors, including heart disease, lung disease, chronic blood clots, or genetic mutations.
There are two upper chambers and two lower chambers in a normal heart. The lower right chamber of the heart pumps blood to the lungs each time blood passes through it. The pulmonary artery is a large blood vessel that the blood travels through.
Normal Heart
Normally, blood travels to the left side of the heart with ease via blood arteries in the lungs. The pulmonary arteries, capillaries, and veins are examples of these blood vessels.
However, alterations in the cells lining the arteries in the lungs might result in thick, bloated, thin, and rigid arterial walls. Pulmonary hypertension can result from these alterations, which slow or stop blood flow through the lungs.
Pulmonary Hypertension: What is it?
High blood pressure in the pulmonary arteries, which transport blood with low oxygen content from your heart to your lungs, is known as pulmonary hypertension. Breathlessness during daily activities is the first sign. Heart disease, lung disease, and hypoxia are the most frequent causes. A higher quality of life can be yours with early diagnosis and treatment.
A typical diagnosis of pulmonary hypertension (PH) indicates that your pulmonary arteries are experiencing elevated blood pressure. These blood arteries transport blood with low oxygen content from your heart to your lungs.
There are numerous causes of pulmonary hypertension. Usually, it is a side effect of lung or cardiac problems. However, your risk for PH might be increased by a number of other illnesses and environmental factors.
Because it restricts the flow of blood via the heart and lungs, pulmonary hypertension is harmful.
The pulmonary arteries narrow as a result of elevated blood pressure. Your heart has to work harder to pump blood that is low in oxygen to your lungs as a result.
PH harms your heart over time and leads to issues all over your body. If left untreated, it can be dangerous.
What are the effects of pulmonary hypertension on my body?
Serious health issues caused by pulmonary hypertension include:
Pregnant women should avoid PH. Both the mother and the fetus may experience difficulties as a result.
Pulmonary hypertension can overwork your heart and ultimately cause death if left untreated. Your heart must work harder to pump blood with low oxygen content to your lungs when your pulmonary arteries are under high blood pressure.
This blood must be pumped to your lungs by your right ventricle, also known as the lower right chamber. Because of the additional effort, PH eventually causes your right ventricle to enlarge. Right-sided heart failure may result from this disorder, which is known as right ventricular hypertrophy.
The effects of right-sided heart failure are felt throughout the body. Numerous organs and systems may have disruptions in their regular functions.
Early diagnosis and treatment are crucial since pulmonary hypertension can impact every part of your body. The cause of your PH will determine the course of treatment your doctor recommends. Untreated PH can be fatal, regardless of the etiology.
Pathogenesis
The constriction of blood arteries that are attached to and inside the lungs is a pathophysiological feature of pulmonary arterial hypertension (WHO Group I). Since it is considerably more difficult to force water through a narrow pipe than a wide one, this makes it more difficult for the heart to pump blood through the lungs.
Fibrosis is the process by which those with damaged blood vessels thicken and stiffen over time. Vasoconstriction, thrombosis, vascular remodeling, excessive cellular proliferation, fibrosis, and decreased apoptosis/programmed cell death in the vessel walls are the mechanisms underlying this narrowing process.
These processes are caused by inflammation, abnormal metabolism, and dysregulation of specific growth factors.
This worsens the lungs’ blood flow and raises blood pressure even further. These alterations cause the right side of the heart to work harder, as is the case with other forms of pulmonary hypertension.
With systolic ventricular pressures that are lower than those the left ventricle typically experiences, the right ventricle is typically a component of a low-pressure system. Because of this, the right ventricle is unable to handle increased pressures as well.
While right ventricular adaptations, such as hypertrophy and increased heart muscle contractility, initially help in maintaining stroke volume, they eventually prove insufficient; as a result, the right ventricular muscle is unable to receive enough oxygen to meet its demands, which leads to right heart failure.
The left side of the heart receives less blood when the amount of blood passing via the lungs declines. Additionally, this blood may contain less oxygen than usual. As a result, especially during physical activity, the left side of the heart finds it increasingly difficult to pump enough oxygen to the rest of the body.
The Gaussian curvature and mean curvature of the right ventricular endocardial wall of PH patients were found to be significantly different from controls during the end-systolic volume phase of the cardiac cycle.
Although the exact molecular cause of pulmonary arterial hypertension (PAH) is unknown, it is thought that endothelial dysfunction leads to a reduction in the production of endothelium-derived vasodilators like prostacyclin and nitric oxide.
Additionally, the production of vasoconstrictors such thromboxane and vascular endothelial growth factor (VEGF) is stimulated. Patients with PAH are characterized by adventitial hypertrophy, vascular smooth muscle, and significant vasoconstriction as a consequence.
Pathway of nitric oxide-soluble guanylate cyclase
Under normal circumstances, L-arginine and oxygen are converted into nitric oxide by the vascular endothelial nitric oxide synthase.
Diffusing into nearby cells, such as platelets and vascular smooth muscle cells, this nitric oxide raises the activity of the soluble guanylate cyclase enzyme, which in turn promotes the production of guanosine triphosphate (GTP) to cyclic guanosine monophosphate (cGMP).
PKG (protein kinase G) or cGMP-dependent kinase are subsequently activated by cGMP. Activated PKG suppresses platelet activation, changes the expression of genes involved in smooth muscle cell contraction, migration, and differentiation, and promotes vasorelaxation (by lowering intracellular calcium levels).
Additionally, nitric oxide-soluble guanylate cyclase signaling has anti-inflammatory properties.
Endothelin
Endothelial cells produce the peptide endothelin-1, which is made up of 21 amino acids. It causes vasoconstriction, hypertrophy, proliferation, inflammation, and fibrosis by acting on the endothelin receptors ETA and ETB in a variety of cell types, including fibroblasts and vascular smooth muscle cells.
Additionally, it acts on endothelial cells’ ETB receptors, which causes those cells to release vasoconstrictors and vasodilators and removes endothelin-1 from the body.
Thromboxane and prostacyclin
In endothelial cells, prostacyclin is produced from arachidonic acid. Prostacyclin primarily interacts with the prostaglandin I receptor in vascular smooth muscle cells.
This causes adenylate cyclase activity to rise, which in turn causes cyclic adenosine monophosphate (cAMP) synthesis to rise. Increased cAMP-dependent protein kinase or PKA (protein kinase A) activity follows, which eventually encourages vasodilation and suppresses cell division. Additionally, prostacyclin signaling has anti-inflammatory, anti-fibrotic, and antithrombotic properties. Phosphodiesterases 3 and 4 lower levels of cAMP, which mediates the majority of prostacyclin’s biological actions.
Arachidonic acid is also used to make the vasoconstrictor thromboxane. The production of thromboxane takes priority over the synthesis of prostacyclin in PAH.
Types and Causes of pulmonary hypertension
According to its cause, pulmonary hypertension is classified into five classes by the World Health Organization (WHO).
Group 1 due to Pulmonary Arterial Hypertension
Group 2 due to left sided heart diseases
Group 3 due to Hypoxia or lung diseases
Group 4 due to lung obstructions
Group 5 due to other conditions
Group 1 PH due to Pulmonary Arterial Hypertension: There are numerous causes of PAH, from underlying illnesses to specific medications. Your pulmonary arteries become stiff, thick, or narrowed as a result of PAH. Your pulmonary arteries’ pressure rises as less blood can pass through.
Cause include:
Idiopathic pulmonary arterial hypertension is a condition with unknown cause.
Heritable pulmonary arterial hypertension is a condition caused by alterations in a gene that runs in families.
Use of illegal drugs, such as methamphetamine, or certain medications.
Congenital heart defects are cardiac issues that manifest from birth.
Additional medical disorders include lupus, cirrhosis, scleroderma, and chronic liver disease.
Group 2 PH due to left sided heart diseases: Your heart’s left side circulates blood throughout your body. Your entire pulmonary circuit and the right side of your heart are impacted if there is an issue with this side of your heart. Your heart backs up with blood, which causes your pulmonary arteries to become more pressurized.
Cause include:
left heart failure.
Aortic or mitral valve disease are examples of left-sided cardiac valve disorders.
Group 3 PH as a result of hypoxia or lung diseases: Your lungs’ arteries constrict when you have certain lung conditions. Your pulmonary arteries’ pressure will rise as less blood can pass through your lungs.
Prolonged exposure to high elevation in those who might be more susceptible to pulmonary hypertension.
Group 4 PH as a result of lung obstructions: Your blood cannot pass through your lungs normally if you have a blood clot or scar from one. This increases pulmonary blood pressure and strains the right side of the heart more.
Cause include:
Pulmonary emboli are long-term blood clots in the lungs.
Tumors that block the pulmonary artery
Group 5 PH because of additional conditions: Blood problems and metabolic abnormalities are among the illnesses that coexist with PH. There is sometimes uncertainty regarding the exact processes by which the disease causes PH.
Cause include:
Blood disorders, including polycythemia and essential thrombocythemia.
Inflammatory disorders such as sarcoidosis.
Metabolic disorders, including glycogen storage disease.
Kidney disease.
One form of congenital cardiac disease that results in pulmonary hypertension is Eisenmenger syndrome. Unresolved gaps between the heart’s chambers may cause it. Ventricular septal defects, which are big holes in the heart between the two lower heart chambers, are one example.
Blood flows in the heart incorrectly as a result of the hole. Blood with and without oxygen combines. After that, the blood goes back to the lungs rather than the rest of the body. Pulmonary hypertension results from this increase in blood flow and pulmonary artery pressure.
Pulmonary hypertension: Who is affected?
Any age of adult might be affected by pulmonary hypertension. It frequently affects those with lung or cardiac disorders. Additionally, those who have other medical disorders are more likely to have it. PH influences:
Almost all patients have significant mitral valve disease.
Aortic valve disease affects roughly 65% of persons.
up to 30% of scleroderma patients.
20% to 40% of sickle cell disease patients.
HIV affects about 1 in 200 persons.
Adults are typically affected by PH. Rarely, though, it may have an impact on babies. Persistent Pulmonary Hypertension of the newborn (PPHN) , is the term for this condition. Treatment in the critical care unit may be necessary for infants with this illness.
What is the prevalence of pulmonary hypertension?
Pulmonary arterial hypertension (PAH) and PH caused by blood clots are two uncommon forms of PH. However, other forms, particularly PH caused by heart or lung issues, are far more prevalent.
The precise number of people with PH worldwide is unknown. However, according to some estimates, 1 in 100 persons may have PH. This indicates that between 50 million and 70 million people have PH.
The prevalence of PH in older persons is significantly higher. Approximately 10% of persons over 65 worldwide suffer from PH.
Signs and symptoms
Pulmonary hypertension symptoms appear gradually. For months or even years, you might not see them. As the illness worsens, the symptoms worsen.
Symptoms of pulmonary hypertension include:
Breathlessness, initially during physical activity and thereafter during rest
Low oxygen levels can cause the skin to turn blue or gray. These changes may be more or less noticeable depending on the color of your skin
People between the ages of 30 and 60 are typically diagnosed with pulmonary hypertension. The risk of Group 1 pulmonary hypertension, also known as pulmonary arterial hypertension (PAH), might rise with age. Younger persons are more likely to have PAH from an unidentified etiology.
The following additional factors may increase the risk of pulmonary hypertension:
A history of the illness in the family.
Being overweight.
Smoking.
Blood-clotting conditions or a family history of lung blood clots.
Asbestos exposure.
A congenital heart defect is a heart condition that you are born with.
Residing at a high elevation.
Use of specific substances, such as illegal narcotics like cocaine or methamphetamine, and some weight-loss medications.
Complications
The following are possible side effects of pulmonary hypertension:
Heart failure and hypertrophy of the right side: This disorder, also known as cor pulmonale, results in an enlargement of the right lower chamber of the heart. In order to pump blood through constricted or blocked lung arteries, the chamber must work harder than usual.The heart walls thicken as a result. To expand its capacity to hold more blood, the lower right chamber of the heart contracts. The right lower heart chamber eventually fails as a result of these alterations, which put additional strain on the heart.
Thrombi: Blood clots in the lungs’ tiny arteries are more likely to occur in people with pulmonary hypertension.
Irregular pulses: Arrhythmias are potentially fatal cardiac abnormalities caused by pulmonary hypertension.
Bleeding in the lungs: Coughing up blood and potentially fatal lung hemorrhage are two symptoms of pulmonary hypertension.
Complications throughout pregnancy: Both the mother and the developing child may be at risk for death from pulmonary hypertension.
Stages of Pulmonary Hypertension
Pulmonary hypertension occurs in four major stages. These are referred to as “functional classes” by the World Health Organization (WHO). They relate to your ability to perform daily tasks and are based on the symptoms you experience. The symptoms of PH grow increasingly obvious and interfere with day-to-day functioning as the condition worsens.
Class 1: You are symptom-free.
Class 2: When you’re sleeping, you don’t experience any symptoms. However, while performing certain everyday tasks, you experience some discomfort or dyspnea. These include climbing stairs and doing housework.
Class 3: When you’re sleeping, you might still feel good. However, because you feel exhausted or out of breath, it is now much more difficult to perform everyday tasks.
Class 4: Even while you’re at rest, you get symptoms. Attempting to perform any routine task exacerbates the symptoms.
Testing and Diagnosis
How is the diagnosis of pulmonary hypertension made?
To diagnose pulmonary hypertension, your doctor will do a physical examination and provide tests.
You will first undergo a physical examination to look for any indications of pulmonary hypertension or other lung or heart conditions. In this examination, your healthcare provider will:
Inquire about your health and medical background.
Inquire about your symptoms.
Examine the veins in your neck for size. Jugular venous distention, or bulging neck veins, may indicate right-sided heart failure.
Feel the upper right section of your abdomen to determine the size of your liver.
Listen to your heart and lungs with a stethoscope.
Check for edema in your legs, ankles, and abdomen.
Check your blood pressure.
Use a pulse oximeter to find out how much oxygen is in your blood.
Since many of the symptoms of pulmonary hypertension (PH) can be confused with those of other disorders, diagnosing PH can be challenging.
Your provider may use various tests for various objectives.
Your pulmonary artery blood pressure is measured by these tests:
Another name for this test is pulmonary artery catheterization, or right heart catheterization: It tests the amount of blood your heart can pump in a minute and measures the pressure inside your pulmonary arteries.
Doppler echocardiogram: A Doppler echo shows the function of your right ventricle by using sound waves. Additionally, it gauges the flow of blood via your heart valves. It enables the computation of your systolic pulmonary artery pressure by your healthcare professional.
These examinations seek to identify the underlying cause of pulmonary hypertension:
Blood tests: Examine for a variety of conditions pertaining to infections, hormone levels, and organ function. A full blood count and a complete metabolic panel are examples of specific blood tests.
A chest CT scan checks for blood clots and other lung disorders that could be contributing to or exacerbating your pulmonary hypertension.
An X-ray of your chest can reveal whether your pulmonary arteries or right ventricle are larger than they should be.
An nightly sleep test called a polysomnogram (PSG) can determine whether you have sleep apnea.
A pulmonary ventilation/perfusion (VQ) scan checks your lungs for blood clots.
A six-minute walk test may also be conducted by your provider. This test measures the amount of oxygen in your blood during exercise and the amount of activity you can tolerate. The findings show whether your pulmonary hypertension is severe or mild.
Treatment
Your underlying medical issues and the type of pulmonary hypertension you have will determine how you are treated. Your medical team will customize care to meet your specific needs. Only two forms of PH are currently directly treatable:
Pulmonary arterial hypertension (PAH) is treated with the following:
Blockers of calcium channels: These drugs can assist in lowering blood pressure throughout your body, including in your pulmonary arteries.
Diuretics: These water pills help your body to eliminate extra fluid.
Oxygen treatment: If your blood oxygen level is low, you may require this treatment.
Pulmonary dilatation agents: These drugs facilitate the relaxation and improved opening of your pulmonary arteries. This lessens the strain on your heart and increases blood flow.
CTEPH treatment consists of:
Anticoagulants: These medications help in the prevention of blood clots.
Atrial balloon septostomy (BAS): Babies with serious cardiac abnormalities are usually the ones that undergo this treatment. However, adults with PH can also utilize it. It serves as a stabilizing bridge while you await a lung transplant.
balloon-atrial-septostomy
Balloon pulmonary angioplasty (BPA): Your pulmonary artery is widened with a balloon during this catheter-based surgery. It is typically performed when open surgery is not an option.
Medicine: The progression of the disease may be slowed down with the use of a soluble guanylate cyclase stimulator (SGCS).
Pulmonary endarterectomy (PEA): Blood clots in your lungs are removed during this procedure. It is the only treatment for pulmonary hypertension that is currently available, and it is solely for those who have CTEPH.
Managing the underlying disorders is the main goal of treatment for PH caused by heart or lung issues. Treatment regimens might vary greatly from person to person because PH is caused by so many distinct heart and lung problems. Discuss what’s best for you with your provider. Generally speaking, your provider might suggest:
Dietary adjustments
Lifestyle changes
Medication to treat conditions like heart failure or hypertension.
Oxygen treatment.
Surgery, such as replacing a heart valve.
A lung transplant is the last option for some patients with severe pulmonary hypertension.
Drugs called pulmonary vasodilators are used to treat CTEPH and PAH. Other forms of PH, such as those caused by underlying heart or lung conditions, cannot be treated with them.
Your pulmonary arteries relax with the help of pulmonary vasodilators. This lessens the strain on your heart’s right side and decreases blood pressure.
Depending on their underlying medical issues, people with PH may take several different drugs.
Physical therapy
Physical therapists may have used a variety of typical therapies to help in the acute patient’s recovery and discharge, such as:
Treadmill walking
Programs for progressive walking
Customized exercise regimens based in chairs or beds
Education for patients, their families, and caregivers: Patients frequently experience anxiety when they exercise and are unsure of the appropriate amount of exercise.
They might have preconceived ideas about the negative consequences of exercise because they were warned against overdoing it in the past, or they might have had severe dyspnea in the past and believed that exercise could be harmful.
Referrals for pulmonary rehabilitation, an accurate strategy for many respiratory disorders, are beneficial.
Provide Activity Guidelines:
Because these actions raise the pressure in your arteries and lungs, limit your lifting, pushing, and shoving to less than 10 kg.
Walking is essential for maintaining muscle strength and enhancing circulation.
Because the lungs may not be able to meet the oxygen demands placed on the body during these activities, it is not advisable to engage in strenuous aerobic activity on a regular basis.
Pacing exercises should be used in place of activities that make you feel lightheaded or short of breath.
FAQs
Can someone with pulmonary hypertension live a long life?
At one year, the average survival rate was almost 86%. 67% after three years. 54% after five years.
Is it possible to cure pulmonary hypertension?
PAH management and treatment. Although pulmonary arterial hypertension cannot be cured, there are drugs and therapies that can help you live a better life and delay the disease’s progression.
What is the latest PAH treatment?
Every three weeks, a subcutaneous injection of Winrevair is administered. Other PAH therapies are administered in conjunction with the injection. In clinical trials, Winrevair users demonstrated a markedly enhanced capacity for exercise and a reduced rate of illness progression.
Does pulmonary hypertension improve with walking?
If you have PAH, there are some exercises that are beneficial for you. Light aerobic exercise, such as swimming or walking, is a good option. Train your hands, shoulders, and other tiny muscular groups with mild resistance.
Which examination verifies pulmonary hypertension?
It can become fatal if left untreated. However, right heart catheterization, an invasive outpatient technique that uses a tiny device put through a neck vein to detect pressures inside the heart and lungs, is presently the only approach to definitively identify pulmonary hypertension or feet
Which medication works best for lung conditions?
The best long-term control medication on the market right now is inhaled steroids. They enhance lung function and relieve lung disease symptoms. Leukotriene modifiers are long-term asthma treatments that relax the smooth muscles surrounding the airways and minimize swelling inside them.
Reference
Pulmonary hypertension – Symptoms and causes. (n.d.). Mayo Clinic. https://www.mayoclinic.org/diseases-conditions/pulmonary-hypertension/symptoms-causes/syc-20350697
Pulmonary hypertension (PH). (2025, February 18). Cleveland Clinic. https://my.clevelandclinic.org/health/diseases/6530-pulmonary-hypertension-ph
Lung cancer is a type of cancer that starts in the lungs, typically in the cells lining the airways. Lung carcinoma, another name for lung cancer, is a type of malignant tumor that starts in the lung. Genetic damage to the DNA of airway cells, frequently caused by cigarette smoking or harmful chemical inhalation, is the cause of lung cancer.
A tumor can arise as a result of damaged airway cells having the capacity to proliferate unregulated. Tumors spread throughout the lung and impair lung function if left untreated. Lung tumors eventually spread to other areas of the body through metastasis.
In the United States, lung cancer ranks third in terms of incidence. It is caused by dangerous cells in your lungs proliferating out of control. Surgery, immunotherapy, chemotherapy, radiation, and targeted medications are among the available treatments. It is advised to get screened if you are at high risk. Lung cancer deaths have significantly decreased in recent years due to advancements in treatment.
Normal lung structure and function
Normal Lung
The two sponge-like organs in your chest that make up your lungs are divided into portions known as lobes. You have three lobes in your right lung. There are two lobes in your left lung. The left lung is smaller because the heart takes up more space on the left side of the body.
Air enters your lungs through the trachea (windpipe) after passing through your mouth or nose when you inhale. After splitting into tubes known as bronchi, the trachea enters the lungs and further splits into smaller bronchi. These split into bronchioles, which are smaller branches. Small air sacs called alveoli are located at the end of bronchioles.
When you exhale (breathe out), the alveoli take carbon dioxide out of your blood and absorb oxygen from the air you breathe in. The primary roles of your lungs are to take in oxygen and expel carbon dioxide.
The lungs are surrounded by a thin lining layer known as the pleura. As your lungs expand and collapse while breathing, the pleura shields them and facilitates their movement back and forth against the chest wall.
The diaphragm, a narrow, dome-shaped muscle, divides the chest from the belly under the lungs. The diaphragm rises and falls during breathing, pushing air into and out of the lungs.
Lung Cancer: What Is It?
Lung cancer is caused by cell division in the lungs. The cell’s normal function is to divide and produce additional copies of itself. Your organs’ ability to operate is eventually compromised by tumors, which are lumps of tissue created when damaged cells divide rapidly.
The term lung cancer refers to tumors that originate in the lungs, typically in the small air sacs (alveoli) or airways (bronchi or bronchioles). The term cancer that’s metastatic to your lungs may be used by your healthcare practitioner to describe cancers that originate elsewhere and spread to your lungs.
Pathogenesis
Mutations that enable tumor cells to proliferate indefinitely, promote blood vessel growth, avoid apoptosis (programmed cell death), produce pro-growth signaling molecules, disregard anti-growth signaling molecules, and ultimately spread into surrounding tissue or metastasize throughout the body are the cause of lung cancer, as they are for all cancers.
Although different alterations can give distinct malignancies these capabilities, oncogenes and tumor suppressors are typically activated and inactivated by cancer-contributing mutations. Certain mutations, known as driver mutations, are disproportionately involved in the development of tumors and are especially prevalent in adenocarcinomas.
The receptor tyrosine kinases EGFR, BRAF, MET, KRAS, and PIK3CA are usually where these arise. Tyrosine kinases ALK, ROS1, NTRK, and RET are overexpressed in some adenocarcinomas due to chromosomal rearrangements.
Usually, a single driver mutation is present in a particular tumor. On the other hand, SCLCs frequently feature mutations that have made the tumor suppressors p53 and RB inactive rather than these driving alterations.
Early in the course of all lung malignancies, a group of tumor suppressor genes on chromosome 3’s short arm are frequently lost.
Types of lung Cancer:
Although there are many types of lung cancer, the two primary types that are commonly referred to as lung cancer are small cell lung cancer and non-small cell lung cancer.
Non-small cell lung cancer
Small cell lung cancer
Non-small cell lung cancer (NSCLC)
The most common kind of lung cancer is non-small cell lung cancer (NSCLC). More than 80% of cases of lung cancer are caused by it. Squamous cell cancer and adenocarcinoma are common varieties. Two less prevalent forms of NSCLC are sarcomatoid carcinoma and adenosquamous carcinoma.
Small cell lung cancer (SCLC)
Compared to NSCLC, small cell lung cancer (SCLC) grows more quickly and is more difficult to cure. It frequently manifests as a tiny lung tumor that has already metastasized to other body areas. Small cell carcinoma (also known as oat cell carcinoma) and mixed small cell carcinoma are two distinct forms of SCLC.
Other lung cancer type Sarcomas (cancer of the soft tissues or bones), lymphomas (cancer of the lymph nodes), and pleural mesothelioma (cancer of the lining of the lungs) are among the other cancers that can begin in or near the lungs. These are treated differently and are usually not called lung cancer.
What are the stages of lung cancer?
The size of the original tumor, its depth and extent in the surrounding tissue, and whether it has migrated to lymph nodes or other organs are the main factors used to stage cancer. Guidelines for staging vary depending on the type of cancer.
Lung cancer staging
Multiple size and spread options for each stage can fit into that group. For example, a Stage III cancer may have a smaller primary tumor than a Stage II cancer, but it may be at a more advanced stage due to other causes. Lung cancer is generally staged as follows:
Stage 0 (in-situ): The lung or bronchus’s upper lining is cancerous. It hasn’t extended outside of the lung or to other lung regions.
Stage I: The lung has not been affected by the cancer.
Stage II: The cancer is larger than Stage I, contains many tumors in the same lung lobe, or has progressed to the lymph nodes of the lung.
Stage III: The cancer is bigger than Stage II, has spread to neighboring structures or lymph nodes, or has many tumors in various lung lobes.
Stage IV: The cancer has progressed to the heart, other lung, the fluid surrounding the lung, or distant organs.
Although stages I through IV are currently used by clinicians for small cell lung cancer, the terms limited or extensive stage may also be used. Whether the region can be treated with a single radiation field is the basis for this.
One lung is all that is affected by limited stage SCLC, which can also occasionally be found in the lymph nodes in the middle of the chest or above the collar bone on the same side. One lung is completely covered in extensive stage SCLC, or it has progressed to the other lung, the lymph nodes on the opposite side of the lung, or other body areas.
Metastatic lung cancer Metastatic lung cancer is a type of cancer that starts in one lung and spreads to the other lung or other organs. Compared to lung cancer that has not moved beyond its original site, metastatic lung cancer is more difficult to treat.
Prevalence
Over 200,000 new cases of lung cancer are reported by health systems annually, making it the third most frequent disease in the United States.
Signs and symptoms of lung cancer
Most lung cancer symptoms resemble those of other, less dangerous conditions. Many people do not feel symptoms until the disease has advanced, although some do in its early stages. Only one or a few of these symptoms may be present in persons who do:
Horner’s syndrome is characterized by a small pupil and drooping eyelid in one eye, along with little or no perspiration on that side of the face.
First signs of lung cancer? Although it can also be an indication of less serious illnesses, a cough or pneumonia that persists after treatment may occasionally be an early indicator of lung cancer. The most typical symptoms of lung cancer are hoarseness, chest pain, shortness of breath, coughing that doesn’t go away, or unexplained weight loss.
Some of these symptoms may appear early (in stages I or II), depending on where the cancer begins in the lungs, but they frequently do not appear until the cancer has spread to later stages. If you’re at a higher risk, it’s crucial to get examined for lung cancer.
How long is it possible to have lung cancer without being aware of it? It might take years for cancer to develop in your body before you become aware of it. In its early stages, lung cancer frequently shows no symptoms.
Causes
Cells that continue to divide when they shouldn’t are the source of lung cancer. Even though cell division is a natural process, every cell has an internal switch that stops it from dividing into new cells (senescence) or, if necessary, causes it to die off (apoptosis). When a cell undergoes too many divisions or modifications (mutations), the off switch is activated.
Normal cells in your body that have undergone mutations that cause them to lose their off switch are called cancer cells. Unchecked, cells continue to proliferate and disrupt your normal cells. Cancer cells have the ability to spread damage throughout your body by entering your lymph nodes or bloodstream.
Although the exact origin of these alterations that cause cancer in some people but not in others is unknown, smoking tobacco products is one of the factors that can increase your chance of lung cancer-causing cell damage.
Risk factors
Although there are numerous variables that can raise your risk of developing lung cancer, the largest risk factor is smoking tobacco products of any type, such as cigarettes, cigars, or pipes. According to experts, smoking is responsible for 80% of lung cancer deaths.
Additional risk factors consist of:
Being in close proximity to tobacco smoke.
Being exposed to dangerous substances such as coal products, silica, diesel exhaust, uranium, asbestos, radon, air pollution, and others.
Having received radiation therapy to the chest in the past (for example, for lymphoma or breast cancer).
Lung cancer running in the family.
Is lung cancer a result of vaping? Certain compounds, including some known carcinogens, may be inhaled when vaping, which is the practice of using a device to inhale a mist of nicotine and flavoring. Although the whole range of long-term repercussions of vaping is unknown, it may harm the lungs.
Is it possible to develop lung cancer without smoking? Up to 20% of individuals with lung cancer have never smoked, despite the fact that smoking is the main risk factor for the disease. For this reason, it’s critical to discuss any troubling symptoms with your healthcare physician.
Testing and Diagnosis
How is a diagnosis of lung cancer made? Lung cancer diagnosis may involve several steps. A medical professional will often listen to your symptoms, ask about your medical history, and perform a physical examination (such as listening to your heart and lungs) during your initial visit.
A chest X-ray and blood tests may be the first things your doctor does because the symptoms of lung cancer might be confused with those of many other, more prevalent conditions.
A biopsy and other imaging tests, such as a CT scan, are typically the next stages in the diagnosis process if your doctor believes you may have lung cancer.
Additional tests include examinations of malignant tissue from a biopsy to assist in establishing the best course of treatment and a PET/CT scan to check for the spread of cancer.
Does lung cancer appear on a chest X-ray? When it comes to detecting lung tumors, especially in their early stages, CT scans are more accurate than X-rays. On an X-ray, tumors may be too small to see or may be obscured by other body parts, such as your ribs. Lung cancer cannot be diagnosed by X-rays; they can only alert your healthcare professional to any unusual activity that warrants further investigation.
What tests will be performed? Blood tests, imaging, and fluid or tissue biopsies are among the procedures your healthcare professional may order or carry out.
Blood examinations: Although blood tests cannot identify cancer on their own, they can assist your doctor in assessing the health of your organs and other body parts.
Imaging CT scans and chest X-rays provide your doctor with pictures that may reveal lung abnormalities. PET/CT scans are typically performed to assess a troubling CT scan result or determine whether cancer has spread following a cancer diagnosis.
A biopsy: Your healthcare professional may employ several techniques to examine the contents of your chest in greater detail. Your doctor may do a biopsy, which involves taking samples of tissue or fluid.
These samples can then be examined under a microscope to check for cancer cells and identify the kind of cancer. Additionally, samples can be examined for genetic alterations (mutations) that could impact your course of treatment.
The following procedures are used to either learn more about the spread of lung cancer or to make an initial diagnosis:
Biopsy using a needle: Your healthcare practitioner will use a needle to take tissue or fluid samples for analysis during this procedure.
Video-assisted thoracic surgery (VATS), thoracoscopy, or bronchoscopy: Using these techniques, a healthcare professional examines several lung regions and obtains tissue samples.
Thoracentesis: This process is used by a healthcare professional to collect a sample of the fluid surrounding your lungs for analysis.
Endoscopic esophageal ultrasonography or endobronchial ultrasound: These techniques are used by a provider to examine and biopsy lymph nodes.
Either mediastinotomy or mediastinoscopy: Using these techniques, a healthcare professional examines and collects samples from the mediastinum, the space between your lungs.
Molecular analyses: During a biopsy, your doctor may screen a sample of tissue for gene alterations (mutations) that can be targeted by certain medications as part of your treatment regimen. The following genes may have alterations that can be targeted in NSCLC:
KRAS,
EGFR,
ALK,
ROS1,
BRAF,
RET,
ME, and
HER2
NTRK.
Prevention
How can lung cancer be avoided?
The only way to avoid cancer is to lower your risk because we don’t know for sure what causes the majority of them. Here are a few strategies to lower your risk:
Avoid smoking, or if you already smoke, stop. Within five years of stopping, your risk of lung cancer begins to decline.
Avoid substances that can damage your lungs, such as secondhand smoke.
Eat well and keep your weight within a healthy range. Consuming two to six and a half cups of fruits and vegetables daily may help lower your chance of developing cancer.
If your risk of lung cancer is high, get screened.
Screening
With screening tests, you can improve your chances of detecting cancer early on. If you fulfill each of the following criteria, you are qualified for a lung cancer screening:
You are in the 50–80 age range.
You either smoke now or have given it up in the previous 15 years.
The number of packs of cigarettes you smoke each day multiplied by the number of years you have smoked is 20 pack-years.
Treatment
What is the treatment for lung cancer?
The goal of lung cancer treatments is to either kill the cancer or stop its spread. Your immune system can eliminate, destroy, stop the growth of cancerous cells, or teach them to fight. Additionally, several therapies are utilized to reduce pain and lessen symptoms. How you are treated will depend on several factors, including the kind, location, and severity of your lung cancer.
Which drugs or therapies are utilized to treat lung cancer?
Surgery, radiofrequency ablation, radiation therapy, chemotherapy, targeted medication therapy, and immunotherapy are among the treatments for lung cancer.
Surgery may be an option for SCLC with only one tumor and non-small cell lung cancer (NSCLC) that hasn’t spread. To ensure that no cancer cells are left behind, your surgeon may remove the tumor along with a tiny portion of the surrounding healthy tissue. In certain cases, resection the removal of all or part of your lung is necessary to increase the likelihood that the cancer won’t return.
Radiofrequency ablation Sometimes, radiofrequency ablation (RFA) is used to treat NSCLC tumors close to the outer borders of your lungs. RFA heats and kills cancer cells using high-energy radio waves.
Radiation treatment High-energy beams are used in radiation therapy to destroy cancer cells. It can be taken on its own or to increase the efficacy of surgery. Additionally, radiation therapy can be used to reduce discomfort, decrease tumors, and provide palliative care. Both SCLC and NSCLC use it.
Chemotherapy Chemotherapy is frequently a mix of several drugs intended to prevent the growth of cancer cells. It can be used before, following, or in conjunction with immunotherapy or other forms of medication. Chemotherapy for lung cancer is usually given intravenously.
Targeted drug therapy Lung cancer cells in certain NSCLC patients contain certain alterations (mutations) that promote the growth of the malignancy. In an effort to slow down or eliminate cancer cells, certain medications target these alterations.
Additional medications known as angiogenesis inhibitors can prevent the tumor from generating new blood vessels, which are necessary for the growth of cancer cells.
Immunotherapy Normally, our bodies identify and eliminate damaged or dangerous cells. Cancer may cover itself from the immune system in order to avoid being eliminated. Immunotherapy helps your body fight cancer by exposing cancer cells to your immune system.
Symptom-relieving therapies (palliative care) Breathing difficulties and other symptoms decrease by certain lung cancer treatments. These include procedures to remove fluid from the area surrounding your lungs and prevent it from returning, as well as treatments to shrink or remove tumors that are obstructing your airways.
Physical therapy
Physical therapy interventions differ according to the timing of treatment and the stage of the illness path.
Exercise intervention prescription and delivery should be an essential component of physical therapy management for lung cancer.
Exercise and physical activity are essential for addressing the three primary aspects of the cancer continuity: morbidity, death, and prevention.
Similar to the recommendations for the general adult population, the American Cancer Society advises persons with cancer to perform two sessions of resistance training and at least 150 minutes of moderate-intensity aerobic exercise each week.
Exercise
Resistance training and aerobic exercise improve lung functionality by clearing airways and reducing airflow obstruction; as a result, the enhanced functional skills boost energy levels and sputum production.
Programs for pulmonary rehabilitation are specifically designed for people who have recently undergone lung surgery, for example, to maximize their respiratory function and, consequently, their quality of life (QOL) and engagement in daily activities.
In addition to maximizing function, physical activity, psychological state, and health-related quality of life over the long term, exercise after surgery or therapy attempts to restore physical status (addressing potential treatment-related loss of muscle strength and functional ability).
Increasing one’s ability to exercise (fitness)
Enhancing muscular strength and lowering cancer symptoms, such as fatigue and dyspnea
Lowering the rate of depression
Lowering tension
Lowering cancer-related distress and enhancing life quality
How much should I exercise?
The guidelines for cancer patients include 30 minutes of aerobic exercise at least five days a week, such as jogging, swimming, brisk walking, or riding a stationary bike.
Strengthening exercises are also advised two to three days a week to maintain muscle strength, and if you have experienced falls or have poor balance, you should also do balance exercises.
There are limitations on the kind of exercise and quantity of heavy lifting and strengthening exercises you can perform in the early post-lung surgery period.
Treatment side effects
The type of treatment for lung cancer determines the side effects. For your particular treatment, your physician can advise you about potential side effects and potential consequences.
Nausea and vomiting,
Diarrhea,
Loss of hair,
Exhaustion,
Mouth sores,
Weakness, tingling, or loss of sensation (neuropathy),
Itchy rash,
Discomfort in the joints,
Pneumonitis, colitis, hepatitis, and other complications may cause further adverse consequences.
Breathlessness,
Cough,
Pain,
Having trouble swallowing,
Skin that is red, dry, or irritated,
Ache in the chest wall.
FAQs
How long can a lung cancer patient live?
Almost 65 out of 100 people (almost 65%) with stage 1 lung cancer will survive their cancer for 5 years or more after they’re diagnosed.
How can we stop the spread of lung cancer?
The goal of chemotherapy is to prevent cancer cells from proliferating in order to reduce their mass and prevent them from spreading. Patients with stage 3 or stage 4 lung cancer that has progressed to adjacent organs can use it. Depending on the results of the medical evaluation, surgery can also be necessary.
Can lung cancer be cured?
After receiving a diagnosis, roughly one in ten patients survive for at least ten years, and two out of five survive for at least a year. However, depending on how far the disease has gone at the time of diagnosis, survival rates might vary significantly.
Is it possible to survive with one lung?
If necessary, most people can survive with just one lung rather than two. Unless the other lung is injured and unable to perform these functions, one lung can frequently supply enough oxygen and expel enough carbon dioxide.
What cancer is 100% curable?
Melanoma, Hodgkin lymphoma, and cancers of the breast, prostate, testicles, cervical region, and thyroid have some of the greatest 5-year relative survival rates, despite the fact that there are no tumors that can be cured. Cancer is a condition when cells in specific body regions develop and multiply out of control.
Is it possible to treat stage 4 lung cancer?
Lung cancer frequently goes undetected until it’s at an advanced stage because symptoms don’t appear before then. If there are symptoms, they’re often similar to other health problems. Stage 4 lung cancer can’t be cured.
What is the fastest-killing cancer?
Pancreatic cancer is the most deadly kind of cancer, taking the lives of more than 80% of those who are diagnosed and having the lowest survival rate. This is partly because this kind of cancer is misdiagnosed and delayed.
Does lung cancer have a hereditary component?
Although the two main causes of lung cancer are smoking and air pollution, a number of studies have shown that hereditary factors also play a role in the development of lung cancer. Both smokers and non-smokers are more susceptible to lung cancer if there is a family history of the disease.
Reference
What is lung cancer? | Types of lung cancer. (n.d.). American Cancer Society. https://www.cancer.org/cancer/types/lung-cancer/about/what-is.html
Lung cancer. (2024, December 6). Cleveland Clinic. https://my.clevelandclinic.org/health/diseases/4375-lung-cancer