Spine Examination
What is a Spine Examination?
A spine examination is a systematic assessment of the spinal column, including the cervical, thoracic, lumbar, sacral, and coccygeal regions. It involves evaluating posture, alignment, range of motion, and identifying any deformities or asymmetries.
The examination typically includes inspection, palpation, assessment of movement, and neurological testing to assess motor, sensory, and reflex functions. It is crucial in diagnosing conditions such as scoliosis, kyphosis, disc herniation, and other spinal pathologies, guiding appropriate management and treatment strategies.
Anatomy:
The lengthy column of bones that runs from your neck to your lower back is called your spine. The base of your skull, or headbone, is where your spine begins, and it ends at your tailbone, a component of your pelvis, the big bony structure that sits between your legs and abdomen.
Three S-shaped natural curves make up a healthy spine. These curves protect your spine from harm by acting as shock absorbers.
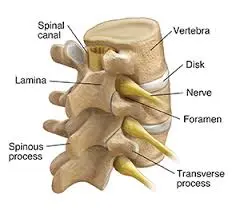
Your spine’s shock absorbers are the flat, rounded intervertebral disks located between the vertebrae. Each disk contains a flexible outer ring (annulus fibrosus) encircling a soft, gel-like core (nucleus pulposus). Because of the continuous strain on the intervertebral disks, the nucleus pulposus may squeeze out and come into contact with nerves, resulting in symptoms like sciatica.
The nerves and spinal cord: A column of nerves called the spinal cord passes through the spinal canal. From your skull to your lower back, the cord runs. Via spinal apertures known as neural foramen, thirty-one pairs of nerves emerge. Your brain and muscles communicate with each other through these nerves.
Parts of the spine:
- Vertebrae: The spinal canal comprises 33 stacked vertebrae, which are tiny bones. Your spinal cord as well as nerves are housed in a tunnel called the spinal canal that shields them from harm. The majority of vertebrae make a range of mobility possible. The sacrum and coccyx, the lowest vertebrae, are joined and immobile.
- Facet joints: Vertebrae can glide against one another because of the cartilage, a slick connective tissue, found in these spinal joints. In addition to offering flexibility and stability, facet joints allow you to twist and turn.
- Soft tissues: Your spine is held in place by the ligaments that join the vertebrae. Your muscles help you move and support your spine. Tendons facilitate movement, connect muscles to bone, and protect against muscle damage.
Segments of the spine:
- Five separate spine segments are composed of thirty-three vertebrae. The portions of your spine that run from your neck to your tailbone are as follows:
- The cervical spine, or neck, is made up of seven vertebrae (C1 through C7). You can tilt, turn, and nod your head down to these neck vertebrae. The cervical spine forms a lordotic curve, which is an inward C-shape.
- The middle back, or thoracic spine, is made up of 12 vertebrae (T1 through T12). The thoracic spine is where your ribs attach. This part of your spine forms a kyphotic curve, which is a minor bend in a backward C shape.
- Sacrum: This bone joins your hips in a triangular configuration. During fetal development, the five sacral vertebrae (S1 through S5) fuse (weld together), meaning they are immobile. The pelvic girdle is a ring made up of the hip and sacral bones.
- The coccyx, or tailbone, is a little bone located at the base of your spine that is made up of four fused vertebrae. The coccyx is where the ligaments and muscles of the pelvic floor attach.
Common disorders affecting the spine:
- Ankylosing spondylitis and other arthritic diseases.
- Sprains and strains of the back..
- Spurs of bone.
- Curvatures of the spine (scoliosis and kyphosis).
- Disk herniation.
Other conditions affecting the spine include:
- Neuromuscular diseases, such as amyotrophic lateral sclerosis.
- Damage to the nerves, such as sciatica, pinched nerves, and spinal stenosis.
- Osteoporosis.
- Spinal cord injuries, such as paralysis and spinal fractures.
- Malignancies and tumors of the spine.
- Infections of the spine, such as osteomyelitis and meningitis.
Common signs or symptoms of spine conditions:
- Muscle spasms.
- Loss of bowel or bladder control.
- Weakness or numbness in limbs (arms and legs).
- Paralysis.
Primary functions of the spine
- Protecting the internal organs, nerve roots, and spinal cord.
- Providing our body’s shape, mobility, and flexibility.
- Providing balance and structural support for erect posture.
Kyphosis:
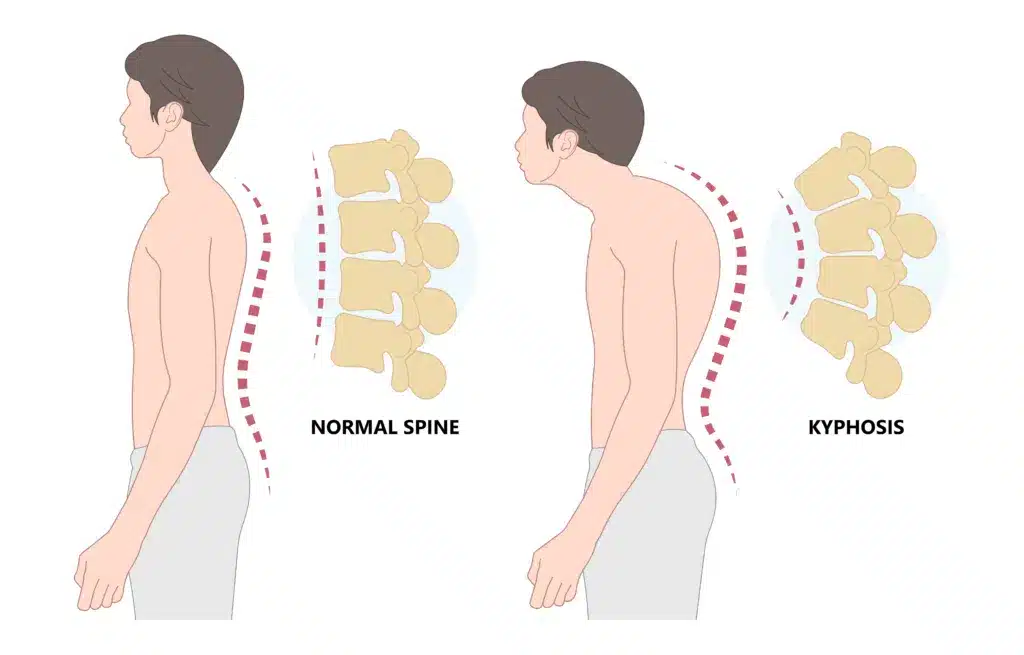
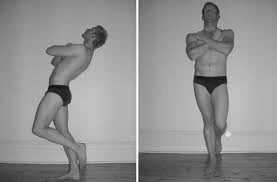
- Your spine will curve outward more than it should if you have kyphosis. As a result, your upper back bends forward around the thoracic region, which is the area of your spine between your neck and ribs. The curvature may give the impression that you are slouching or bent over. Other names for it include “roundback” and “hunchback.”
- There is natural curvature in your spine. Standing upright is made easier by these curves, which also assist your posture. However, too much curvature can have negative effects on your body making standing difficult.
Types of kyphosis:
- Postural kyphosis
- Scheuermann’s kyphosis
- Congenital kyphosis
- Cervical kyphosis (military neck)
- Hyperkyphosis
Lordosis:
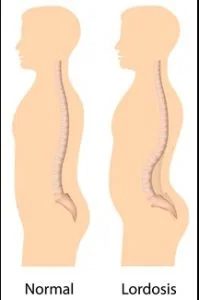
- The forward-curving spine in your neck or lower back is called lordosis.
- Naturally, your lumbar and cervical spines curve slightly forward, toward the front of your body. This lordosis, which occurs spontaneously, aids with posture maintenance and shock absorption during movement.
- A lordotic curvature is anything that causes the parts of your spine to curve more than they should.
- If your posture deviates from its natural alignment due to excessive curvature of the spine, lordosis develops. You may experience swayback, a lordosis that affects your lumbar spine. Recall that lumbar and cervical lordosis are normal. It is typical for the cervical spine to curve between 30 and 40 degrees. Typically, the lumbar spine curves between 40 and 60 degrees.
Scoliosis:
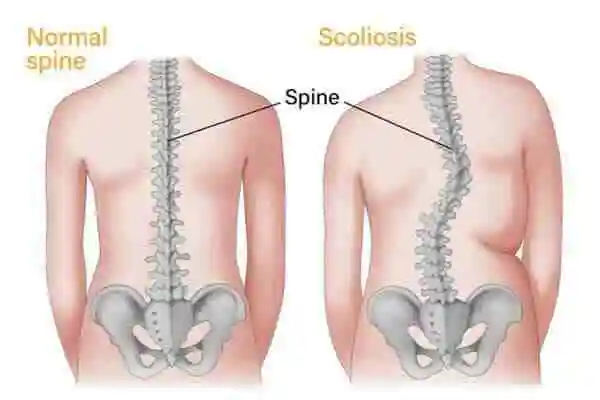
- The excessive side-to-side curvature of your spine is known as scoliosis. Your backbone, or spine, naturally curves slightly forward and backward. Your spine will curve in a C or S form to the left and right if you have scoliosis.
Three types of scoliosis
- Idiopathic scoliosis
- Congenital scoliosis
- Neuromuscular scoliosis
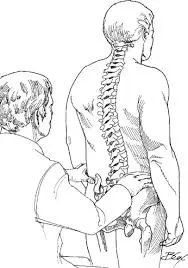
Examination:
Observation:
- Examine the alignment of the spine from the front, side, and back. Check whether the spinal curvatures are normal:
- Excessive lordosis
- Excessive kyphosis
- Scoliosis
- Examination for:
- Skin changes
- Scars
- Swelling
Palpation:
- Palpate each spinous process for tenderness
- Start with the atlantooccipital joint and finish at the sacroiliac joint
- Check for pain, spasm, and muscle mass by palpating the paraspinal and trapezius muscles.
- Check for discomfort or tenderness by lightly tapping down the spine.
- Sensitive for infection, trauma, or neoplasm
- Feel for temperature down the spine
Motion Examination:
Systematically examine the spine.
Cervical spine:
- “Chink-to-chest” flexion and “look at the ceiling” extension
- Lateral rotation (“look over your shoulder”)
- “Take your ear downward toward your shoulder” identifies lateral flexion.
Thoracolumbar spine:
- Request that the patient touch their toes for a more accurate evaluation of flexion.
- Extension (helping the sufferer stay upright)
- Ask the patient to move their arms laterally along the side of each leg one at a time.
- Lateral rotation involves asking the patient to move from one side to the other while sitting on the bed with their arms crossed to correct their pelvis.
Neurological assessment:
Dermatomes
To determine whether neurological deficits exist, a complicated combination of skin and muscle locations innervated by certain nerves also referred to as dermatomes is examined. Muscle atrophy or loss of strength in certain dermatomes, discomfort, and numbness are indications of disease to a specific spinal level. This may be a result of trauma, a neurodegenerative disease, or nerve impingement caused by a disc herniation.
Cervical spine’s nerves:
- The motor and sensory functions are controlled by the cervical spine’s nerves and the dermatomes that correspond to them:
- C5 Deltoid
- C6 Thumb
- C7 middle finger
- C8 Little finger
- sensory nerves in the upper limbs
- Sensory analysis of the lower arm’s neurological triangle control.
- Nerves that originate from the thoracic vertebra Th1 and cervical vertebrae C6 and C8 regulate sensory function.
Evaluation of the thoracic nerves using sensory systems:
- Nerves that originate from the thoracic vertebrae Th4, Th7, Th10, and Th12 regulate the dermatomes in the thoracic and abdominal areas; these nerves correspond to the following landmarks:
- Th4 nipple
- Th7 xiphoid
- Th10 umbilicus
- Th12 symphysis
The lumbar spinal nerves
- The lumbar and sacral spine’s nerves and associated dermatomes regulate sensory and motor function:
- L4:medial leg
- L5: First and second toes
Assessing paraplegia and tetraplegia
The American Spinal Cord Injury Association’s ASIA Impairment Scale is used to determine the degree of paralysis. The ASIA impairment scale is intended to compare and comprehend residual function in order to help categorize varying degrees of spinal cord damage.
A-Complete: The lowest sacral segment (S4-S5) has no motor or sensory function.
B: No motor function below the neurologic level in S4–S5, and incomplete sensory function below the neurologic level
C: Incomplete More than half of the major muscle groups have a muscle grade of less than 3, and motor function is maintained below the neurologic level.
D: Incomplete Below the neurologic level, motor function is maintained, and at least half of the major muscle units have a muscle grade of 3.
E – Normal Sensory and motor function.
Levels of paralysis:
Methods to define the level of the paralysis:
- Biceps jerk C5 /C6
- Supinator jerk C6
- Extensor digitorum reflex C7
- Triceps jerk C7/ C8
- Abdominal reflex T8-T12
- Knee jerk L2 / L4
- Ankle jerk L5 / S1 / S2
- Bulbo-spongiosus reflex S2-S4
- Anal reflex S5
- Plantar reflex L5-S
Reflex arc:
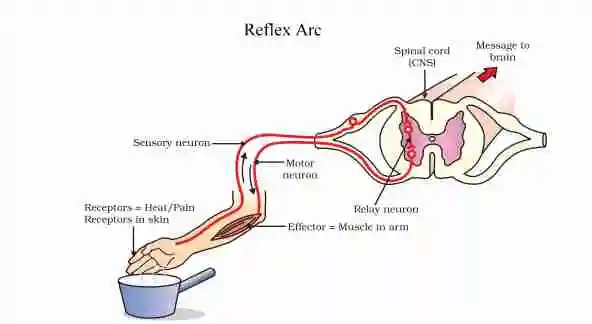
- After a spinal cord injury, the examiner will test reflexes for vital information about the nervous system. The pathway that is triggered to cause a reflex after a stimulus is known as the reflex arc. It is an autonomous neural circuit that is triggered by sensory nerves, such as those in the skin and travels to synapses in the spinal cord to excite motor nerves and quickly cause a muscle reaction. It is not dependent on brain activity.
Special Test:
For Cervical Spine:
Distraction Test:
- The importance of this examination: Cervical radiculopathy identification
- The first of the patients is lying down.
- An examiner flexes the patient’s neck to a comfortable posture, grasps beneath the chin and occiput, and controls a little distracting force of up to about 14 kg.
- When a patient’s scapular or upper extremity symptoms decrease or are absent, the test is positive. If a patient doesn’t show any symptoms in the upper extremities or even the scapular region, a test is not recommended.
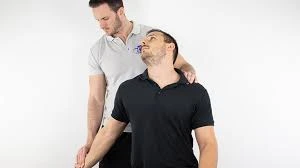
Jackson compression test:
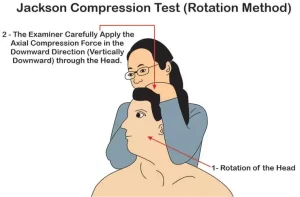
- Ways to perform this examination to the patient:
- The patient must sit. An examiner passively tilts a patient’s head to either side while standing behind them and placing a hand on top of their head. An examiner applies axial pressure to the spine by pressing down on the head during maximum lateral bending.
- Examination: Increased compression of the facet joints, exiting nerve roots, and intervertebral disks is the outcome of an axial loading. Distal discomfort that does not completely match the identifiable segmental dermatomes is caused by pressure on the intervertebral foramina acting on a facet joint.
- Radicular pain symptoms may arise from inflammation of the nerve roots.
Cervical rotation and lateral flexion Test:
- Goal
- This test is used to assess whether brachialgia patients have hypomobility in their first ribs.
- Method
- During this test, the patient is primarily seated. The cervical spine is rotated both maximally and passively away from the side that is being examined. An ear is moved toward the chest while the spine is gently flexed as far as possible to preserve the position.
- Blocking a lateral flexion motion is a positive result for this test.
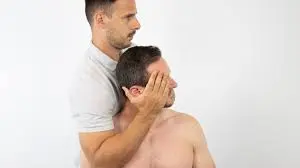
Flexion compression Test:

- How to perform this test: The patient is asked to sit down. In addition to standing behind the patient, an examiner passively tilts the patient’s head forward by moving the cervical spine into the flexion position. The top of the head is then placed under axial compression.
- How to do an examination: It’s a good way to check an intervertebral disk’s integrity. An extruded piece of a disk may be pressed posteriorly by the technique if there is posterolateral disk extrusion present, which would increase the compression on the nerve root.
- The presence of posterolateral disk extrusion may be indicated by an increase in radicular symptoms.
Extension Compression Test:
- The test can be performed with the patient sitting and the examiner standing behind them. The cervical spine is 30 degrees extended. Axial compression is applied to the top of the skull by the test, who is in charge of the examination department.
- How to do an examination: The test examines an intervertebral disk’s integrity. Shifting pressure on the disks anteriorly could reduce symptoms in cases where there is a posterolateral extrusion with the intact annulus fibrosus.
- Could aggravate the discomfort without causing radicular sensations, which typically signifies irritation in the facet joints due to decreased mobility caused by degenerative changes.
Vertebral Artery Test:
- Test’s method
A cervical spine’s active range of motion is often completed before a passive examination. - The patient should next be placed in a supine position while the passive extension and side flexion of the head and neck are performed.
Rotate a neck passively to the same side and keep it there for around 30 seconds.
Attempt to repeat the test by moving your head to the other side.
If there is pronation of the hands, loss of balance, or falling of the arms, the repeat test is deemed positive; this suggests a decreased blood flow to the brain. - Modifications: Next, rotate a head as far as possible to the tested side and maintain the position for around five to seven seconds.
For five to seven seconds, return to neutral.
Hold your head out for 10 to 11 seconds.
For five to seven seconds, go back to the neutral position.
For nine to fifteen seconds, the head is maximally extended and rotated (against the opposing testing side).
The five D’s—dizziness, diplopia, dysarthria, dysphagia, drop attacks, nausea and vomiting, sensory abnormalities, and nystagmus—are examples of positive symptoms.
For the Thoracic spine,
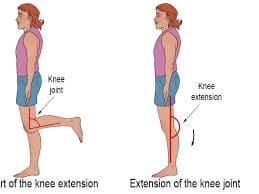
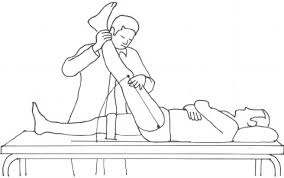
Prone Knee Bend Test:
- To determine whether neural stress is causing the patient’s symptoms.
- Test Position: Prone.
- How to succeed in a test: For forty-five seconds, the examiner passively flexes the patient’s knee until it reaches the end range. It is not advised to rotate the hip. Anterior thigh discomfort may be caused by neural tension in the femoral nerve or a tight or strained quadriceps muscle. One-sided lumbar, buttock, or posterior thigh discomfort may be the result of lumbar radiculopathy of the L2-L3 nerve roots.
- Test Relevance
- Knee flexion puts tension on the femoral nerve and its rootlets since it runs along the anterior aspect of the lower extremity. If the femoral nerve becomes lodged in the tissues it travels through, pain or other neurological symptoms could manifest in the lower extremities.
- By applying stress on the whole nerve and its rootlets, the slump test may reveal radicular discomfort or pain resulting from irritation of the spinal structures. The test should not be utilized only for diagnosis, even though the femoral nerve’s innervation may irritate the L2-L3 nerve roots.
- Treat the patient’s deficits’ underlying cause as you would ordinarily. You should be able to identify the pathology and decide how to treat a patient with the help of the location of the pain and symptoms.
Slump Test:
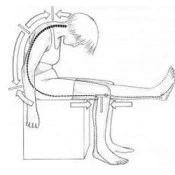
- The neural tension test, often known as a “slump test,” is primarily used to check for changes in neurodynamics or even sensitivity in neural tissue.
- Method:
- The slump test is described differently in several sources. One common characteristic across sources is the reproduction of pain when the dura is subjected to stress during testing. The following method was inspired by Mark Dutton.
- Described:
- Before the test begins, a patient may be seated with their hands behind their back to produce a neutral spine. The initial step is to slump the patient forward at the lumbar and thoracic spines. If the patient doesn’t have pain, let them stretch their neck by resting their chin on their chest and then extending one knee as far as they can.
- If extending a knee hurts, have the patient extend their neck into the normal position. If the patient still feels discomfort when extending their knee, the test is considered positive.
- If extending the knee does not cause pain, ask the patient to aggressively dorsiflex the ankle. If the patient is experiencing pain, have them slightly flex their knee while still dorsiflexing. If the discomfort reappears, the test is considered positive.
- Repeat the test on the other side.
- It is possible to apply excessive pressure in any of the test positions.
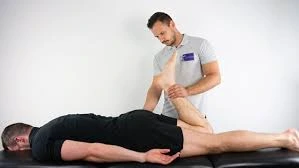
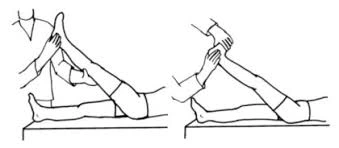
Straight Leg Raise:
- Method
- Passively, a typical straight leg raise is performed. First, the unaffected leg is checked, and then each leg separately. To maintain knee extension while the patient is lying down, the clinician places their proximal hand on the patient’s distal thigh (anterior) and their distal hand around the patient’s heel while standing on the side being examined.
- The healthcare provider lifts the patient’s leg by the posterior ankle while maintaining the patient’s knee completely extended. The physician continues to slowly raise the patient’s leg by flexing the hip until the patient experiences the same tightness in the posterior thigh or back.
- When pain arises, the examiner ceases hip flexion and notes the site of the pain and range of motion. The range of motion between the affected and unaffected legs can be used as an outcome measure. It should be emphasized, nevertheless, that the correlation between the scores for this is low.
- A true positive SLR test should show the following symptoms: Radicular leg discomfort (below the knee).
- Pain occurs when the hips flex 30 degrees, 60 degrees, or even 70 degrees from the horizontal plane. Lumbar disc herniation at the L4-S1 nerve roots is indicated by neurological pain in the leg and lower back between 30 and 70 degrees of hip flexion. Tightness in the hamstrings, gluteus maximus, or hip capsule, or an issue with the hip or sacroiliac joints, maybe the cause of pain that arises at more than 70 degrees of hip flexion.
- A disc herniation or a more central pathology is most likely the cause of the pressure on the spinal cord’s anterior theca if back pain is the primary problem. In a sense, people with plate prolapses experience more minor, more focused prolapses.
- A pathology that applies pressure to neurological tissue or even tissues is more likely to be lateral if the pain is frequently felt in the leg.
- Disc herniations or other conditions that put pressure between the two extremes are more likely to induce discomfort in both places.
- Additionally, nerve root irritation such as facet joint cysts or hypertrophy may show up on the SLR test. A positive SLR test can also be caused by inflammatory radiculopathy or intraspinal malignancies.
Passive Neck Flexion:
- To learn how the patient’s symptoms are affected by neural strain, do the Passive Neck Flexibility Test.
- Test position: supine.
- How to perform the examination: The patient nods actively in the upper cervical region. The examiner passively flexes the lower cervical spine. When the thoracic spine replicates pain or other neurological signs, the test is considered affirmative. Stretching is a common sensation.
- The diagnosis’s accuracy is unknown.
- Test Relevance: As nerves pass through the many tissues of our body, they may become adhered to certain structures. This test aims to reproduce these symptoms by applying tension to the spinal cord by cervical flexion.
Adson’s test:
- Objective
- Adson’s test is a stimulating test for Thoracic Outlet Syndrome, which is characterized by tight anterior and middle scalene muscles or rib compression of a subclavian artery. When there is no lateral flexion motion, the test is considered successful.
- The Technique’s Starting Point
- With their elbow completely extended, the patient can be positioned either sitting or standing.
- The patient’s arm is maximum extended and abducted 30 degrees at the shoulder while they are seated or standing.
- The examiner feels the radial pulse while holding the patient’s wrist.
- After that, the patient is instructed to move their head toward the affected shoulder, lengthen their neck, and take a deep breath and hold it.
- Throughout the operation, the quality of the arm resting at the patient’s side is compared with the quality of the radial pulse.
- Some physicians advise patients to move their heads away from the side being evaluated as part of a modified test.
- Test Results:
- The test is considered successful if the radial pulse rapidly reduces or disappears. The radial pulse on the opposite arm must be checked to determine the patient’s normal pulse.
- The positive side should be contrasted with the non-symptomatic side.
Roos Stress Test:

- The Roos Stress Test is a diagnostic technique used to detect thoracic outlet syndrome (TOS). Another name for it is the “elevated arm stress test,” or “EAST.”
- Starting position: The patient is positioned with both arms in the 90° abduction-external rotation position and the frontal plane of the chest.
- The patient is told to open and close their hands gradually for three minutes.
- The only signs of TOS that could occur are forearm muscle tiredness and little discomfort:
- Shoulder and neck pain that gradually worsens and spreads down the arm When artery compression occurs, paraesthesia occurs in the fingers and forearm: In the situation of venous compression, reactive hyperemia occurs when the limb is dropped, and pallor occurs when the arm is raised: Reproduction of normal symptoms includes swelling and cyanosis, the difficulty to complete the test, and the patient putting their arms on the floor in noticeable pain.
Halstead Test:
- The purpose of the Halstead Test is to search for indications of a potential thoracic outlet syndrome.
- Method
- The patient is standing or sitting. The therapist continuously feels the radial pulse on the side that is being checked. While abducting the arm to 45 degrees, extending the shoulder to 45 degrees, and externally twisting the upper extremity while still feeling the radial pulse, the therapist delivers a downward distraction to the arm. The patient is then told to stretch her cervical spine and turn her head completely away from the side being evaluated.
For lumbar spine,
Schober test:
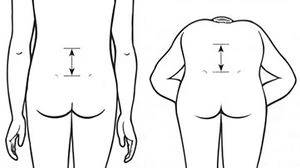
- The Schober test’s objective is to gauge the extent of lumbar spine bending.
- Method = To determine the extent of lumbar spine flexion, the Schober test can be used.
- There is a spot between the two PSIS. Characterizes the S2-level pelvic dimples.
- Points are then drawn 5 cm (2 inches) below and 10 cm (4 inches) above the level.
- The patient is asked to bend forward while the three locations are being measured, and the distance is then measured once more.
- The difference between the two measures indicates the degree of flexion occurring in the lumbar spine.
- A variation of the Schober test that can also evaluate extension is not well understood.
- After the flexion movement was complete, the patient stretched their spine, and the spacing between the markings was noted.
- Additionally, Little suggested spacing four marking points 10 cm (4 inches) apart.
Bragard’s Signs:
- The Bragard’s sign also called the Braggard’s test, is used to determine whether lumbar or ischemic pain is due to lumbosacral radiculopathy (such as disc herniation causing nerve root compression.
- Method
- On his: back, the patient is resting. The Lasegue’s Sign or Straight Leg Raise Test: Passively raising the straight leg into hip flexion is done until the noticeable discomfort is felt. The leg is then dropped slightly below the threshold of discomfort, bringing the foot into dorsiflexion. A useful sign for Bragard is a recurrence of the usual pain. This would suggest that the patient’s pain was caused by an involvement of the neurological system.
Yeoman’s test:
- This Yeoman’s examination is intended to evaluate lumbar spine pain.
- Method: The patient lies down in the prone position for the exam.
- In order to stabilize the pelvis, the examiner (therapist) extends the patient’s knee. Next, they extend each patient’s hip.
- The examiner (therapist) next stretched each patient’s leg separately while keeping the knee bent.
In every situation, the patient is passive.
Lumbar spine pain all over any test component indicates a good outcome.
Quadrant test:
- Finding the maximal constriction of the intervertebral forearm is the aim of this quadrant exam. Method: The patient and the examiner both stand up while the examiner stands behind them. To control the motion, the examiner (therapist) grasped the patient’s shoulder as they stretched their spine. By grasping the occiput with the shoulders, the examiner can bear the weight of the head. As the patient’s side flexes and rotates to the uncomfortable side, too much pressure is applied during the extension.
- The movement continues until the top limit of the range is reached or until symptoms start to show. This led to maximal contraction of the intervertebral forearm and stress on the facet joints on the side where rotation took place. If symptoms are present, the test is positive. Cipriano described a quadrant test that was comparable to Kemp’s test.
One leg standing lumbar extension test:
- The pathophysiology of the facet joints is evaluated with this one-leg standing lumbar extension test.
- Method: The patient balances and stands on one leg while extending their spine.
- The patient stands on the opposite leg during the exam.
- The results show that a positive test is associated with back pain and pars interarticularis stress fracture (spondylolisthesis).
- If rotation comes along with extension and pain, it may indicate facet joint disease on the affected side.
Crossed Straight Leg Raise Test:
- The examiner bends the unaffected leg at the hip while the patient is in a supine position, keeping their knee extended.
- The test is deemed successful when the patient experiences pain in the affected limb at a 40-degree hip flexion angle.
Milgram test:
- The goal of the Milgram test is to look for any neurological issues in the leg.
- The initial supine position of the patient is referred to as the method.
- After that, the patient is told to actively raise both legs off the examination table simultaneously, raising them 5 to 10 cm (2 to 4 inches) above the floor and holding them there for 30 seconds.
- Result: If the limbs or affected limb cannot be held for 30 seconds or if the symptoms are replicated during the test, the test might be deemed positive.
FAQs
What is the number of nerves in the spine?
31 pairs
There are 31 spinal nerve pairs in all, organized by spinal region. In particular, there is a single coccygeal nerve pair, eight cervical nerve pairs (C1-C8), twelve thoracic nerve pairs (T1-T12), five lumbar nerve pairs (L1-L5), and five sacral nerve pairs (S1-S5).
What shape is a good spine?
The spine of a healthy back is shaped like a “S” by its three natural front-to-back curves. Problems might arise from either too little curve (flat back) or too much curve (swayback).
What is the spine’s basic anatomy?
The cervical, thoracic, and lumbar spines are the three primary segments of the spine. Comprising seven vertebrae, the cervical region is the uppermost segment of the spine. With twelve vertebrae, the thoracic region is the middle part of the spine.
How is a back examined?
Observe the patient get up. First, check the patient’s back for any visible signs of asymmetry, scoliosis, or muscle atrophy. Check for proper lumbar lordosis, thoracic kyphosis, and cervical lordosis from the side.
A positive Spurling test is what?
When radicular pain that radiates to the shoulder or upper extremities ipsilateral to the direction of head rotation—is replicated, the test is deemed positive. By compressing the afflicted nerve root, the Spurling Test is intended to replicate symptoms.
The th4 syndrome: what is it?
T4 syndrome is described as “a pattern that involves upper extremity paresthesia.”Thoracic hypomobility may be the cause, but sympathetic origins are also possible. ‘Bilateral stocking-glove’ paresthesia, headaches, and arm and neck pain are common symptoms.
References:
Professional, C. C. M. (2025a, January 24). Spine structure and function. Cleveland Clinic. https://my.clevelandclinic.org/health/body/10040-spine-structure-and-function
The spine: anatomy and function. (2024, August 19). National Spine Health Foundation. https://spinehealth.org/article/spine-anatomy/
Articles. (n.d.). https://www.cedars-sinai.org/health-library/diseases-and-conditions/a/anatomy-of-the-spine.html
American Association of Neurological Surgeons. (2024, September 6). Anatomy of the Spine and Peripheral Nervous System – AANS. AANS.
Spine Basics – OrthoInfo – AAOS. (n.d.). https://orthoinfo.aaos.org/en/diseases–conditions/spine-basics/
Examination of the spine – TeachMeSurgery. (2022, November 19). TeachMeSurgery. https://teachmesurgery.com/examinations/orthopaedic/spine/
Spine examination. (n.d.). https://examination.lexmedicus.com.au/collection/spine