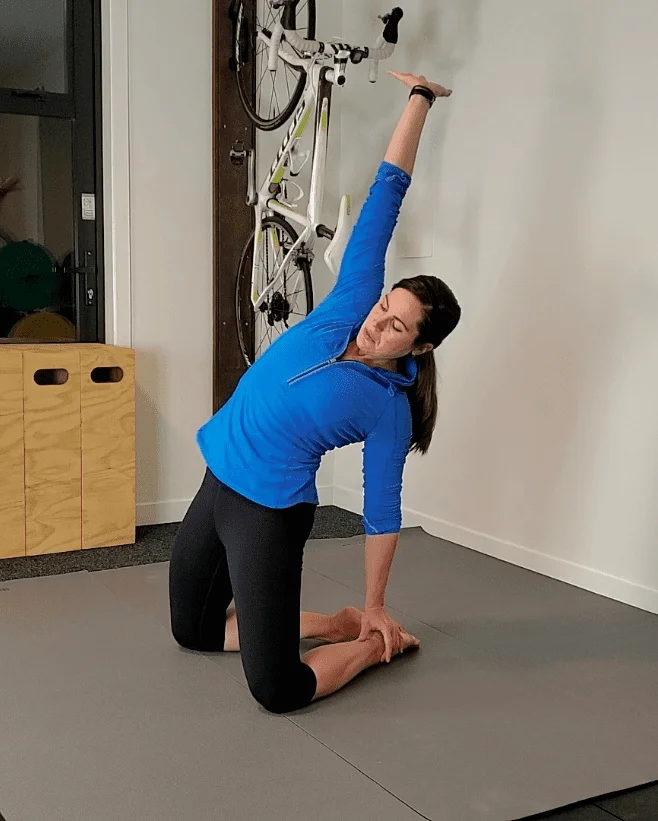
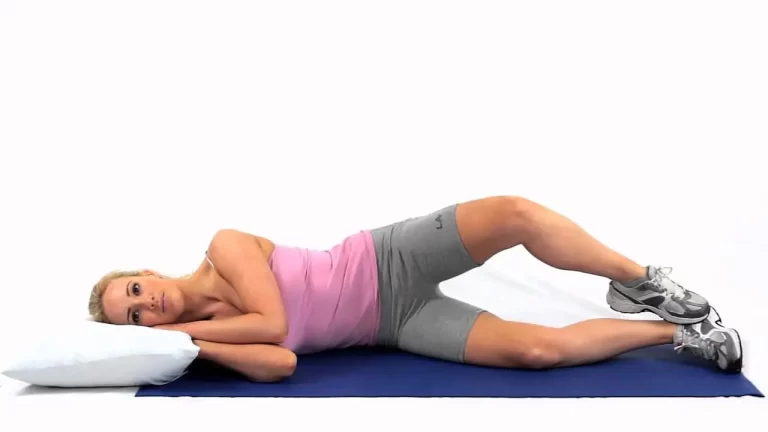
Blog

  • Rigid Taping Techniques

    Rigid Taping Techniques

    What Is Rigid Tape?

    Rigid taping is a widely used method in sports medicine and physiotherapy aimed at supporting and stabilizing joints and soft tissues during physical activity. Unlike elastic taping, which allows for a degree of movement, rigid taping restricts movement to provide maximum stability.

    This technique is particularly beneficial for managing acute injuries, preventing re-injury, and providing structural support to weak or compromised areas of the body.

    Additionally, it aids in stabilizing the ligaments and joints during vigorous exercise, such as training and sporting events. This tap tape is frequently used for rehabilitation but also acts as a safeguard.

    Sports medical tape of this kind typically comes in white or skin-colored color and is frequently self-adhesive. It is strong and non-elastic, with sharp edges that make tearing simple. Sizes for these tapes include 50mm, 38mm, 25mm, and 12.5mm.

    What Differentiates Kinesiology Tape from Rigid Tape?

    These two serve nearly identical functions, particularly in sports medicine. Both of them:

    • Reduce inflammation
    • Reduce pain
    • Support injured parts of the body
    • Assist in healing
    • Despite their similarities, there are two main areas in which they differ.

    To begin with, kinesiology tape encourages movement while stiff tape restricts it. Both serve almost the same function, but the firm tape has more support for its work. Conversely, KT tape has greater flexibility.

    Second, joints are usually the most benefitted by stiff tape. Kinesiology tape primarily provides muscle support.

    What Should You Know Before Using Rigid Tape?

    You should know certain things about the stiff tape before applying it to any part of your body. Wearing stiff tape, for example, is safe for extended periods. This is because the zinc oxide-based join that is frequently used for this tape has a two-day maximum expiration date. Even so, removing the tape after a few hours rather than several days is still advised.

    Regarding compatibility, zinc oxide glue is not appropriate for all skin types. Start by applying tiny areas of your skin. Assess your skin’s response to the tape before completing the strapping.

    For the best results, it’s always advisable to speak with a certified physical therapist. These medical professionals are aware of the ideal duration for which to apply tape to your body. Depending on the type of injury and how long it takes for recovery, the duration will change.

    Can You Use Rigid Tape in the Shower?

    Rigid sports tape comes in a variety of varieties designed to help sweat evaporate. While perspiring, it might not be an issue, but while taking a shower, it becomes problematic.

    It is not a good idea to get your strapping wet. Water causes the adhesive to wear off, which could lessen the tape’s effectiveness. To promote healing and ensure that the tape stays on, injuries should constantly be kept clean and moist.

    Can You Use Rigid Tape While Sleeping?

    This tape’s main purpose is to restrict movement. It is airtight and rigid. It’s meant to remain stationary. You are therefore unable to sleep with this sports medicine tape on.

    The substance of the tape will make it difficult and uncomfortable to sleep. Wearing them in bed will make you sweat because it’s hot. Not being able to move around freely will also keep you from sleeping through the night. This suggests that it is neither advisable or healthful to sleep with stiff tape.

    The Benefits of Rigid Taping

    You might not believe that rigid taping is as beneficial for your injuries and general health as you might think. Here are all the advantages of stiff tape for when you’re awake and not in the shower:

    Injury Prevention and Joint Stability

    Rigid taping offers several benefits, chief among them the prevention of injuries and the stabilization of joints. Your base is the tape, which limits excessive movement. It lessens the possibility of sprains, strains, and ligament injury as a result.

    For this reason, athletes in high-impact sports like football, basketball, and hockey benefit from stiff tape. It protects delicate regions from sudden twists and hyperextensions by strengthening areas like the ankles, knees, and wrists.

    Support for Weak or Injured Muscles

    Rigid tape is a fantastic aid for people healing from weakness and even muscular injuries. The tape assists in off-loading the injured muscles, minimizing strain, and accelerating recovery by offering external support.

    If you have a history of muscular injuries, mainly from sports, rigid tape can be quite beneficial. Athletes who use rigid taping will be able to get back to training and maybe play their current sport sooner.

    Alleviating Pain

    Rigid taping can be a lifesaver for people who are in pain as a result of overuse or joint injuries. By stabilizing the affected area, it relieves pressure on the tissues that have been damaged. This reduces the amount of pain experienced during any kind of physical exercise.

    Athletes can maintain and improve their performance while guaranteeing their recovery because of the tape’s pain-relieving properties.

    Enhanced Proprioception and Body Awareness

    Proprioception is the ability of your body to detect its position and movements in space. This is improved by rigid taping, which gives the brain sensory stimulation. It heightens one’s consciousness regarding the alignment and mechanics of their body.

    Athletes will find this extremely helpful. Better control, balance, and coordination are the results of increased proprioception during physical activities and sports.

    Improved Circulation and Lymphatic Drainage

    Rigid taping, when done properly, can improve blood circulation, which aids in supplying vital nutrients and oxygen to tissues. In addition, it reduces inflammation and edema by enhancing lymphatic drainage. These two encourage quicker healing in the area that has been taped.

    Keep in mind that this only functions in cases when the patient or athlete does not have lymphatic or venous disorders or poor blood circulation eg. deep vein thrombosis.

    Postural Support and Alignment

    Rigid tape, as any serious athlete knows, provides postural support throughout training and competition. Injuries can be kept in their correct alignment and kept from being overused by carefully applying tape.

    Maintaining proper posture is essential for achieving maximum sports performance. Long-term musculoskeletal problems can also be avoided with the use of appropriate stiff tape.

    Psychological Benefits and Confidence enhance

    Rigid tape has benefits for athletes psychologically in addition to its physical ones. Their confidence could increase as a result of feeling less exposed and supported, giving them a sense of security when playing. It could enhance performance. It keeps athletes safe while enabling them to push boundaries and produce their best work.

    Who Shouldn’t Use Rigid Tape?

    Any athlete’s game can be enhanced by rigid tape, but not every athlete should use it. With a few exceptions, these people should find another way. If you have any of the following, see a physical therapist before applying stiff tape:

    Severe Allergic Reactions to the Tape

    People with a history of allergy to tape materials should avoid using stiff tape. The tape’s adhesive or backing may cause sensitivities in certain individuals. It could result in allergic responses or skin irritation.

    Any allergy history must be taken into consideration before putting the tape. If there is an allergy, it’s a good idea to consider another approach.

    Open Wounds

    Never place rigid tape over cuts, wounds, or locations with an active skin infection. The tape may hold on to germs and other particles, slowing the body’s natural healing process and perhaps resulting in more serious issues.

    Treating the wound or infection should come first in these situations. Rigid taping should be considered only after it has healed.

    Pre-existing Skin Conditions

    Individuals with skin disorders including psoriasis, dermatitis, or eczema should avoid using hard taping. The tape’s adhesive may worsen these disorders, which can itch, cause pain, and worsen the skin condition.

    It’s crucial to make sure the skin is healthy and clear of inflammation before applying stiff tape.

    Poor Blood Circulation

    People with impaired circulation, such as those with diabetes or peripheral vascular disease, shouldn’t have rigid tape applied to them. The tape itself may further compromise proper blood flow to the extremities. It might make things more difficult and delay healing.

    Before considering taping, a person’s circulation must be properly evaluated.

    Sensory Impairments

    When applying stiff tape to people who have sensory impairments, proceed with care. These include ailments like neuropathies and nerve injury. The tape may be overly tight, making it difficult for them to express any pain or pain.

    Should the tape be excessively tight, more issues may arise. In situations like this, observation and regular evaluation are essential.

    Immobilising Fractures or Joints

    Rigid tape alone is insufficient for fractures and dislocated joints. It is not a suitable replacement for a suitable medical examination and immobilization techniques, such as casts or splints. In these cases, seeking immediate medical attention is important. To make sure you’ll employ the appropriate course of treatment.

    Lymphatic or Venous Conditions

    Rigid tape should not be used by those who have lymphedema, deep vein thrombosis, or other lymphatic or venous disorders. Similar to normal blood flow, the tape may obstruct the flow of fluids. Rigid tape application may potentially make the situation worse.

    If someone truly does have such a disease, it’s advisable to look for a different taping option.

    Compromised Sensation/s

    It is strongly discouraged to use stiff tape if you suffer from conditions like neuropathies or nerve injury. In certain regions, people with these disorders may not feel anything at all, therefore the tape masks any pain or pain.

    Healthcare practitioners need to apply the tape and periodically assess these patients carefully.

    Tips for Applying Rigid Taping

    There are various methods for using stiff tape. It is dependent upon the sport or even the location of the injury. The general guidelines you should live by before, during, and following strict taping are listed below:

    Preparing Your Skin

    • If possible, shave the region of the skin where the sports tape will be applied. The results will be better if you use an electric or traditional razor to shave. Before using the tape, it should be completed at least 12 hours beforehand.
    • To remove extra oil from your skin, gently clean the area with a dry towel. This will ensure that the tape stays in place.
    • Apply bandages to any cuts or injured flesh.
    • Put on an under wrap to protect the skin from irritation or even rashes.

    Applying the Tape

    • For best effects, use athletic tape on joints that are at rest.
    • Don’t overextend your muscles when wrapping the tape over them. In doing so, the tape’s hold will be lost.
    • To ensure that the tape goes across your skin smoothly, only apply it in one direction.
    • Gently overlap the tape with itself. The tape grip will improve with this method.

    Checking the Strapping

    • In order to determine how tight the tape should be, slightly flex your muscles. It won’t be able to protect the joints and limbs in the proper posture if it is positioned too loosely.
    • If the skin gets tingly or numb, remove the strapping tape and reapply with less strain. Since this will slow down blood circulation, it shouldn’t be overly tight.
    • When taping, try to use the least amount of tape. Use just enough tape to avoid immobilizing muscles. Recall that the quantity of tape required still depends on how much assistance you require.

    Removing the Tape When Done

    • As soon as your training or game for the day is over, remove the tape. Rigid tape strapping should only be used for a few hours at a time.
    • With scissors, cut the tape short. It will facilitate taking off the tape. Take care when using tape scissors close to the skin.
    • After cutting the tape apart, carefully remove it from the skin. Use tape remover, oil, alcohol, or body lotion to remove the tape gently and without leaving any marks.

    Conclusion

    In sports and rehabilitation, rigid tape has emerged as an essential and priceless aid. The tape’s many benefits and ongoing application in sports medicine attest to its importance to experts like sportsmen. These folks strive to perform better and accomplish their objectives in a safe and efficient manner. All because of the stiff tape.

    With stiff taping as their trusted ally, these athletes may confidently accomplish their objectives and succeed in their chosen fields. In the end, using stiff tape is definitely advantageous. It is meant for those who wish to strike a compromise between the demands of comfort, security, and safety and optimum performance.

    FAQs

    What is rigid taping used for?

    The joints that are most commonly affected include the knees, elbows, wrists, ankles, and shoulders. By restricting movement, the tape serves to physically support the joint. The tape is mostly utilized when a joint strain, like an ankle sprain, prevents you from returning to sports.

    What is the difference between Kinesio taping and rigid taping?

    Usually, rigid tape is applied to the affected area to offer stability and support. Kinesio tape, as contrast to rigid tape, is put in a particular pattern based on the injury or the goal of extra help behavior in order to improve joint and muscle proprioception, expand range of motion, and improve performance.

    What is rigid sports tape?

    Restricting the movement of ligaments, tendons, and joints is the main goal of the tape in order to avoid damage or re-injury under high-stress situations. Because it is constructed with a durable rayon backing and a rubber zinc oxide adhesive mass, a significant degree of support may be provided.

     How is physical therapy using stiff taping? 

    muscular Protection: It provides compression and lessens muscular vibration during activity when applied to muscles that are prone to strains or overuse problems. Postural Correction: By giving weaker or tired muscles an external support, rigid tape can help preserve good alignment and posture.

    Can you sleep with rigid strapping tape on?

    It varies. While Kinesio tape can be used to wrap your ankle while you sleep, athletic tape should not be used for this purpose. Athletic tape is stiff and won’t provide you with much flexibility. Wearing athletic tape for extended periods of time is not recommended.

    Reference

    • Mehta, A., & Mehta, A. (2022, August 2). Rigid Taping techniques – Samarpan Physio. Samarpan Physiotherapy Clinic. https://samarpanphysioclinic.com/rigid-taping-injury/
    • A. (2023, September 13). Rigid Tape: A Comprehensive Guide. GulfPhysio – UAE’s Online Physiotherapy Store. https://www.gulfphysio.com/injuries-and-treatments/rigid-tape-a-comprehensive-guide/
  • Manual Muscle Testing (MMT)

    Manual Muscle Testing (MMT)

    What is Manual Muscle Testing (MMT)?

    Manual Muscle Testing (MMT) is a standardized procedure used by healthcare professionals, most commonly physiotherapists, to assess muscle strength and function.

    It includes measuring the muscle’s force production capacity by applying a certain resistance to its range of motion.

    Manual muscle testing is used by several medical specialties, such as orthopedics, chiropractic, physical therapy, rehabilitation therapy, and sports training. Different testing techniques are relevant in different sources and aren’t necessarily the same.

    The most regularly scheduled contention is that MMT is a method used to assess the muscle’s maximal force production. However, things aren’t always like this. Maximum force can be produced when a muscle has proper innervation, and this is mostly dependent on the size of the muscle. Regardless of the muscle’s size, all medical professionals need to be able to test muscles in order to distinguish between disorders affecting the central nervous system, peripheral nerves, and nerve roots. Usually, these tests are submaximal.

    Furthermore, MMT is used by practitioners of applied kinesiology, conventional orthopedic, and neurologic evaluation to determine what is considered to be a quick neurological reflection of different tasks and treatments. Extreme force tests are hardly useful for this purpose. The purpose of this descriptive review is to identify the components of muscle testing and provide an explanation of a kinetic MMT in order to properly elaborate on research involving a kinetic MMT.

    One method of assessing muscular strength that is frequently used as part of an objective evaluation of a patient is manual muscle testing. This is an essential component of the physical examination that can provide specifics about any neurologic abnormalities. It is highly helpful in assessing weakness and can help distinguish between imbalance or low muscle endurance and muscular weakness.

    There are other synonyms for it, including manual muscle testing, muscular strength grading, and motor testing. There are three methods available for evaluating muscle strength: mechanical, functional, or manual. A combination of morphological and neurological parameters, including musculotendinous stiffness, motor unit recruitment, motor unit synchronization, and neuromuscular function, influence strength.

    The manual muscle testing techniques used now are compared to those from the early 1900s. Gravity tests were performed in the early 1900s to assess spinal nerve injury. A medical practitioner can comprehend and convey the results of muscle testing thanks to the new physiological assessment method’s generally acknowledged procedure and grading systems.

    When using MMT, the patient is instructed to work against gravity or while the examiners apply manual resistance in the opposite direction to determine the appropriate muscle delivery grade. The patient is then expected to hold the appropriate limb or body part to be examined at a specific level within its range of motion.

    Grading strength is a crucial ability that, when performed flawlessly, will provide the rehabilitation therapist with crucial information that will help them create suitable evaluation programs, adjustments, or therapies. MMT is an essential component of a physical therapy examination. When doing MMT, there are established protocols to follow in order to ensure ideal outcomes.

    Range of muscle work

    Full range of Muscle WorK

    The entire range of motion indicates that in order to totally reduce that muscle length, the muscles must function from a fully extended posture. Muscles in this kind of motion contract both concentrically and eccentrically, meaning that when the muscle is stretched, it contracts concentrically, and when it is shortened, it contracts eccentrically.

    We can retain the muscles in their full range by employing this technique, which should be mandatory for our daily tasks.

    There are three sections to the total range of motion.

    • Outer range
    • Middle range
    • Inner Range
    Range of muscle work
    Range of muscle work

    Inner-Muscle Range Exercise

    The muscle travels from a mid-contracted to a completely stretched state in the inner range. Moreover, the muscles contract from their least contracted range to their maximum contracted position.
    Reaching maximum inner range motion is exceedingly difficult since it requires a larger motor unit.

    The Muscle Work medium range

    There is no completely extended or fully contracted posture during this kind of muscle activity.
    The muscle is contracting to its minimal range and then to its intermediate range.
    Throughout our regular tasks, we frequently use our middle muscular range.
    When we perform the exercise in this position, our muscle strength, endurance, and tone increase.

    Outer Range of Muscle Activity

    It’s really challenging to perform the outside range.
    Muscles are stretched from their maximal length to their intermediate-range in this kind of range.
    The articular surface of the bone is constricted when we perform this muscle activity because the angle of pull is unfavorable.
    Additionally, gravity is influencing this action, making it extremely challenging to execute.

    Preparation for assessing Manual Muscle Test

    It is crucial to have a complete medical history and physical examination from the patient before completing MMT in order to evaluate their general health and find any underlying disorders that might compromise the test’s accuracy.

    It is important to let the patient know why they are being tested as well as what to anticipate during the examination. Additionally, they must be told to dress comfortably so that their muscles may be easily accessed and moved in.

    The patient should be positioned such that the assessor may readily access the muscles being assessed during the exam. Throughout the examination, the assessor must also make sure the patient is at ease and not tensing their muscles.

    To obtain precise results and reduce the danger of damage, it is crucial to do MMT with appropriate technique and steady pressure. Together with any pertinent details regarding the patient’s health or test-taking behavior, the evaluator should also record their results.

    In general, appropriate planning and execution are necessary to get precise and trustworthy MMT outcomes.

    Protocols for accurately measuring MMT

    a crucial action you should do to get more precise results from manual muscle testing:

    • Make sure you and the patient are fully informed about every aspect of the test, including the outcomes you hope to achieve.
    • Examiners should begin their work on the side that is not damaged or dominant and apply continuous pressure over the whole range.
    • A forced result may arise if your patient holds their breath during the test, so make sure they breathe normally.
    • To enable the patient to move freely, make sure they are dressed loosely.
    • To fully concentrate on the body region being checked, the patient has to be in a posture that provides appropriate support.
    • It is imperative for therapists to ensure that patients are constantly assessed in the antigravity position. As long as your muscles are too weak to test contrary gravity, you can view a horizontal plan.
    • Resistance should be applied in the exact opposite direction of the muscle being studied’s “line of pull.”
    • Prior to moving on to the next position, determine the test points by testing each muscle that has to be evaluated in that position. As a result, less energy is used during the examination, saving treatment time.
    • Always provide the required stability to unimportant joints to prevent unnecessary difficulties. Shoulder stabilization, for example, will halt further movement if the patient resists elbow flexion or bending.
    • Always evaluate both sides and differentiate between the strength or grade of the muscles in each limb to obtain the best results possible for muscular strength and any injury.
    • When it comes to obtaining the most reliable results from manual muscle testing, these guidelines are crucial. Conversely, there are a few items to stay away from that can negatively impact results.
    • Avoid these errors while evaluating manual muscle testing (MMT)
    • Make sure you are not moving jerkily as you provide resistance to the patient’s movement.
      Stop the movement right away if the patient is complaining of pain or pain. Never refuse medical care to a patient.

    Types of Manual Muscle Testing (MMT)

    This category covers all aspects of manual muscle testing, particularly when performed by a muscle group.

    “Resistance” in a manual muscle test always refers to a concentric force delivered in the opposite direction of the muscle or muscles that are contracting at the hands of the therapist.

    Break Testing

    In manual muscle testing, the therapist assessed the muscles by applying resistance at the conclusion of the motion. This is known as a “break test,” which indicates that the patient should try to avoid breaking the muscle’s range of motion when the therapist applies pressure against the motion.

    Active Resistance Testing

    This kind of manual muscle testing involves applying pressure across the joint’s predetermined range. The use of this approach by a therapist should be avoided in the absence of appropriate training and experience.

    The Oxford Scale for MMT

    The Oxford Scale is the most widely used tool for measuring muscular strength.

    With this method, the patient’s muscular strength is measured using a 0–5 scale, with the main muscles of the upper and lower limbs being evaluated in opposition to the therapist’s force:

    Oxford Grading for MMT
    Oxford Grading for MMT

    Modified oxford scale

    • (0): Absence of contraction
    • (1): contraction of flicker
    • (2-): traverses a partial ROM with gravity removed
    • (2) capable of traveling through the entire range of motion;
    • (2+): travels through the entire range of motion while encountering resistance. The person holds posture against gravity with little resistance
    • (3+): a complete range of motion against gravity
    • (3): partial range of motion against gravity
    • (4): the whole range of motion against gravity with a modest resistance
    • (5): maximal resistance with the complete range of motion against gravity

    Kendal scale

    Kendall scale
    Kendall scale

    MRC scale

    • 0- No visible or experienced contraction
    • 1- Visible or Feelable Contracture
    • 2- Complete ROM gravity elimination
    • 3- Complete resistance to gravity
    • 4-Complete Range of Motion Against Gravity, Mild Resistance
    • 5- Maximum Resistance, Complete ROM Against Gravity

    Shoulder abductors, elbow flexors, elbow extensors, wrist extensors, finger flexors, hand intrinsics, hip flexors, knee extensors, dorsiflexion, great toe extensor, and plantar flexors were the muscles that were often evaluated.

    Examiners typically use these muscles to evaluate the vital spinal nerve roots. For example, the therapist tested the strength of the elbow flexors, elbow extensors, wrist extensors, finger flexors, and hand intrinsics from C5 to the T1 nerve root.

    A few variables influence the Oxford scale’s outcome. It has to do with subpar performance compliance.
    Just as the distinctions between grades 4 and 5 are not significant, neither is the divergence between grades 3 and 4.

    The assessment muscle’s weariness causes variations in the outcomes.
    Muscle can only be assessed during concentric contraction.
    Due to underlying pathologies, some patients examined by physical therapists do not have full range of motion, hence we are unable to apply this scale to all patients in the clinical setting.
    For these reasons alone, therapists often employ the modified Oxford Scale.

    How to Perform Manual Muscle Testing (MMT)?

    Healthcare practitioners utilize this technique to assess a patient’s muscular strength and function. When the patient contracts the muscle, resistance is applied to that particular muscle group. The steps to do a manual muscle test are as follows:

    Place the patient in a comfortable posture: The patient should be in a relaxed position, with the muscle group you wish to test in it. To assess the strength of the biceps muscle, for instance, the patient’s arm should be relaxed and stretched.

    Describe the process to the patient: Let them know what you’ll be doing and checking for. Inform them that when they are contracting their muscle, you will be providing resistance.

    Check for gravitational resistance first: This should be the first thing you do. Asking the patient to move a limb against gravity is part of this. For instance, ask the patient to straighten their leg while they are on their back to gauge the strength of their quadriceps muscle.

    Apply resistance: Ask the patient to contract their muscle against your hand by placing your hand on the distal end of the limb, which is the part that is furthest from the body, and applying resistance to the muscle group being examined. To determine if the muscle is powerful enough to overcome it, apply enough resistance.

    Grade the strength: To evaluate the tested muscle’s strength, apply a grading system. The grading system goes from 0 to 5, where 5 represents normal strength and 0 denotes no movement.

    Repeat the exam: To guarantee correctness, repeat the exam many times. Give the patient a break if they are tired before testing them again.

    Record the outcomes: Note the tested muscle group, the strength rating, and any further information on the patient’s capacity to complete the test.

    An effective method for assessing a patient’s muscular function and strength is manual muscle testing. Healthcare providers may correctly determine a patient’s strengths and create a treatment plan by following these procedures.

    Benefits of Manual Muscle Testing (MMT)

    Both individuals and healthcare providers can benefit from manual muscle testing (MMT) in a number of ways. Among these advantages are:

    • Accurate diagnosis: MMT enables medical practitioners to identify patients’ muscular imbalances or weaknesses with accuracy. This aids in creating a suitable treatment strategy that deals with the issue’s underlying causes.
    • Individualized care: Based on MMT findings, medical practitioners may create a personalized care plan that meets the unique requirements of every patient. This ensures that patients receive individualized treatment based on their particular circumstances.
    • Objective assessment: MMT offers a methodical approach to evaluate the function and strength of a patient’s muscles. By doing this, biases resulting from subjective evaluations are reduced.
    • Monitoring progress: MMT has the ability to track a patient’s advancement over time. This enables medical practitioners to modify the treatment plan as necessary to guarantee that the patient is moving closer to their objectives.
    • Improved results: Medical practitioners may create a treatment plan that targets the underlying problems by precisely evaluating a patient’s muscle strength and function. Patients may have better results and a higher quality of life as a result of this.

    The principles of use of MMT

    The following are some MMT use guidelines:

    Consistency: To provide accurate and trustworthy findings, the examiner should execute MMT regularly. This entails evaluating the same muscles in the same sequence, using the same grading scale, and delivering force in the same way.

    Standardization: Although there isn’t a set protocol for MMT, healthcare providers should adhere to established norms and procedures to guarantee precision and uniformity. This entails stabilizing the patient’s body, adopting particular testing postures, and refraining from compensatory movements.

    Patient cooperation: To guarantee accurate findings during MMT, patients should be told to unwind and cooperate. They must be made aware of the test’s objectives as well as any hazards or pain that may arise.

    Experience as an examiner: To correctly interpret the patient’s answer in MMT, the examiner must possess both expertise and experience. To stay proficient in MMT, healthcare personnel need to undergo continuous practice and training.

    Interpretation: The patient’s general health and function should be taken into consideration while interpreting the findings of MMT. When analyzing MMT data, healthcare providers should take into account additional parameters including pain, flexibility, and joint mobility.

    Consistency, standardization, patient compliance, examiner expertise, and correct result interpretation are all stressed in the general principles of using MMT. Healthcare providers can get trustworthy and helpful information on a patient’s muscle function and strength by adhering to these guidelines.

    Manual Upper Extremity Muscle Testing:

    • Shoulder Extension and Flexion
    • Abduction of the Shoulders
    • Horizontal Adduction of the Shoulders
    • Scapular Adduction/Retraction
    • Scapular Elevation
    • Extending the elbow
    • Elbow flexion
    • Wrist extension
    • Wrist flexion

    Lower Extremity Manual Muscle Testing: 

    • Hip flexion 
    • Hip extension
    • Hip abduction 
    • Hip adduction 
    • Hip internal rotation 
    • Hip external rotation
    • Knee extension 
    • Hip abduction 
    • Ankle dorsiflexion 
    • Ankle planter flexion 
    • Ankle inversion 
    • Ankle eversion 

    Clinical Significance

    Examining muscular weakness is a crucial aspect of many disorders that may be assessed with the aid of manual muscle testing (MMT). Valid and high-quality assessments require careful inspection and the right methodology.

    The Oxford Scale has acceptable interrater reliability, is widely acknowledged across the world, and doesn’t require any special equipment. In the long run, hand-grip dynamometry may be applied to more accurate techniques of measuring since it is less subjective and produces a meaningful measurement.

    Manual muscle testing looks at a patient’s ability to carry out everyday tasks and determines whether muscular strength is a barrier.

    Supplementing with protein can accelerate improvements in anaerobic and aerobic power as strength training volume, frequency, and duration increase.

    Disadvantages of the use of MMT

    Although there are several advantages to manual muscle testing (MMT), medical professionals should also be aware of potential drawbacks. Among them are:

    Unreliable outcomes: MMT depends on the examiner’s arbitrary evaluation of the patient’s muscular power. Because various examiners may evaluate a patient’s strength differently, this might result in conflicting findings.

    Limited scope: MMT evaluates a patient’s muscular function and strength alone. It doesn’t offer details on other facets of their health, such as flexibility or joint mobility.

    Lack of standardization: The absence of a set methodology for MMT may cause variations in its use. Because of this, comparing results between several patients or examiners may be challenging.

    Risk of injury: MMT requires exerting force on a patient’s muscles, which some patients may find unpleasant or uncomfortable. If excessive force is used, there is also a chance of becoming hurt.

    Limited applicability: Not all individuals will benefit from MMT, especially those who have specific illnesses or injuries. Patients experiencing extreme pain or inflammation, for instance, could find it difficult to endure the examination.

    In conclusion, even though MMT can be a useful tool for medical practitioners, it’s critical to understand its constraints and any negative effects. MMT should be used in conjunction with other evaluation techniques by medical practitioners to provide a thorough picture of a patient’s function and health.

    Precautions for MMT

    It’s critical that medical personnel take all reasonable safety and comfort measures when doing MMT on patients. These safety measures might consist of:

    Good positioning: To avoid needless movement or harm, the patient should be placed in a secure, comfortable position.

    Communication: Throughout the examination, the medical practitioner should have open lines of communication with the patient, outlining the process and giving precise directions.

    Gradual resistance: To avoid putting the muscle under undue or abrupt pressure, the resistance should be increased gradually.

    Observation: In order to avoid harm, the medical practitioner should watch how the patient reacts to the resistance and make necessary adjustments.

    Patient feedback: During the examination, the patient should be invited to share their level of comfort as well as any pain or discomfort they may be feeling.

    Use of suitable equipment: To guarantee the patient’s stability and safety throughout the examination, the healthcare provider should make use of appropriate equipment, such as straps or supports.

    Healthcare practitioners may guarantee a safe and effective MMT examination for their patients by adopting these essential safety measures.

    Limitations of Manual Muscle Testing (MMT)

    Even though the MMT grades are still very helpful in clinical practice because of their quicker turnaround times and cheaper cost, there are a number of limitations that must be understood before evaluating patients:

    Subjectivity: The subjective assessment and interpretation of the therapist is a major component of MMT. Muscle strength is graded according to the therapist’s subjective assessment of movement or resistance, which can lead to subjectivity and variability in the findings.

    Lack of standardization: MMT lacks a generally acknowledged standard. It is possible for various therapists to employ marginally different methods or grading schemes, which might cause discrepancies in the evaluation and make comparing outcomes across practitioners challenging.

    Cooperation is required: MMT calls for the active engagement and collaboration of the patient. The validity of the examination may be jeopardized by certain patients’ inability to comprehend or adhere to the instructions, such as those with neurological or cognitive problems.

    Restricted evaluation of functional movements: MMT evaluates muscular strength during single motions or contractions. It could not accurately depict the muscle’s capacity for intricate functional motions or coordinated actions involving several muscular groups.

    Impact of weakness and pain: A patient’s capacity to produce a maximum muscular contraction during MMT may be impacted by the pain or discomfort they are experiencing. In a similar vein, weariness may affect later test iterations and result in erroneous strength evaluation.

    Incapacity to evaluate components necessary: for ideal movement and function, such as muscle coordination, timing, and neuromuscular control, is a result of MMT’s primary focus on muscle strength.

    Lack of sensitivity: In individuals with minor weakness or those who are already at a high level of strength, MMT may not be sensitive enough to detect subtle changes in muscular strength.
    The first restriction is that each person’s MMT scale is unique, thus the score is determined by the clinician’s assessment.
    The MMT scale’s second limitation is its inability to distinguish subtle variations in muscular strength. This is mostly because of the scale’s step-by-step design, which has encouraged the development of alternative scales with a few more diagnostic levels.

    Clinically meaningful variations in muscle strength cannot be detected by manual muscle testing.

    MMT Grades were originally designed to evaluate corrected strength in individuals undergoing rehabilitation from paralytic diseases and muscular dystrophies. Therefore, the reason why MMT is utilized in a range of therapeutic circumstances is probably due to tradition rather than sound scientific reasons. The subjectivity and purported inaccuracy of MMT have led many doctors (and insurers) to choose more objective, sensitive ways of assessing strength, including portable dynamometer measurements.

    Conclusion

    Healthcare practitioners utilize a technique called manual muscle testing to assess the body’s muscle strength and function. It entails providing resistance to particular muscle groups while the patient retains a position or executes an action. The test’s results can be used to guide treatment strategies, assess the degree of muscular weakness or dysfunction, and track improvement over time.

    FAQs

    How does MMT become used?

    MMT is used to evaluate the function and strength of different muscles. Strength is measured in a range of 0 to 5. There is a defined testing posture for every muscle to evaluate strength effectively.

    What is the MMT scale?

    1-2 Modify the criteria for the range of motion to account for muscular contractures. 3. Only muscles assessed in the conventional (against gravity) testing position are eligible for this grade. After a 60-second recovery period, 3–5 MMT grades in this range should be retested for the next highest grade.

    Which disadvantages exist with manual muscle testing?

    The subjective nature of manual muscle testing gives rise to its limitations. This force may vary throughout tests since the external resistance has to be provided by the tester. Given alternative more dependable techniques, the variability leads to interrater reliability scores that are unacceptable.

    What benefits might manual muscle testing offer?

    MMT may assist in locating and isolating the damaged muscle. It can also assist in ascertaining whether there is a neurological impairment resulting from aging, trauma, or any other cause.

    Why perform manual muscle testing?

    The most widely accepted opinion is that MMT is an effort to determine the most force that a muscle can produce. This isn’t always the case, though. The maximal force produced, given proper innervation, is largely dependent on the muscle’s size.

    What other name would you give muscle testing?

    Applied kinesiology (AK) or manual muscle testing (MMT) are other names for muscle testing. This alternative medical approach makes the claim to be able to accurately diagnose mental, chemical, physical, and structural conditions.

    Is MMT a tool for evaluation?

    The MMT is used in the fields of physical therapy, homeopathy, chiropractic, orthopedics, neurology, medicine, and dentistry to evaluate locomotor system malfunction and track a patient’s improvement throughout treatment.

    How is MMT checked?

    Process. The patient is seated straight and positioned to provide complete mobility of the joint against gravity while the examiner stands to the side of the muscle being evaluated. The required movement against gravity is shown by the examiner. The patient is then asked to repeat the move by the examiner.

    Which MMT scale is typical?

    In a single posture, several muscles can be scored from 0 to 5. The initial testing position for other muscles will show a grade range of three to five. The muscle will need to be tested again in a different.

    What is the purpose of the MMT?

    Muscle Test by Hand[edit | edit source] A standardized battery of tests known as manual muscle testing (MMT) is frequently employed in clinical practice by physical therapists who treat patients with spinal cord injuries. It measures muscle strength and function in relation to predetermined criteria.

    What is manual testing of the muscles?

    Manual muscle testing is a technique where a practitioner applies external resistance to a particular muscle or muscle in an attempt to stress the muscle and see if it is strong enough to withstand the demands of daily activities, including sports.

    Who initiated the practice of muscle testing?

    Physical therapists Kendall, McCreary, and Provance are among the researchers and practitioners who created manual muscle testing (MMT). However, the development of an early dynamometer in the 19th century by Swedish physician Gustav Zander is credited with giving rise to MMT. The dynamometer was a machine used to test muscular strength by exerting different muscle units with resistance.
    Muscle testing was later introduced into clinical practice by physical therapist Florence Kendall in the early 1900s, and this finally resulted in the creation of the Kendall technique of MMT. This method assessed muscular strength in several muscle groups using grading systems and established methodologies. Physical therapy was greatly impacted by Kendall’s work, which also established the groundwork for contemporary MMT methods.
    Since then, a number of scholars and professionals have made contributions to the advancement of MMT and its uses in therapeutic contexts. MMT is now a widely utilized technique in sports medicine, physical therapy, and other healthcare domains to evaluate muscle function and strength.

    Which situations are suitable for manual muscle testing evaluation?

    A variety of problems that impact muscle strength and function, such as neurological abnormalities, musculoskeletal traumas, and chronic illnesses, can be assessed by manual muscle testing.

    How are manual muscle tests carried out?

    Applying resistance to particular muscle groups while the patient moves or maintains a posture is known as manual muscle testing. The degree of resistance the patient can overcome will be used by the medical expert to grade the muscle’s strength.

    How frequently should one conduct manual muscle testing?

    The patient’s condition and treatment strategy will determine how often manual muscle testing is done. It can be carried out on a regular basis to track development and make necessary therapy adjustments.

    How do therapists assess MMT in a patient?

    For each muscle test, the patient should sit in a position that allows him to fully extend the range of motion in that joint, and the examiner should stand close to the tested extremity. It should be an antigravity movement. After demonstrating the process, the initial examiner requests that the patient repeat the same motion.

    To what extent is MMT accurate?

    In clinical contexts, manual muscle testing, or MMT, is a commonly employed technique for evaluating muscular strength. However, a number of variables can cause variations in its accuracy and dependability. Here are some things to think about while evaluating MMT’s accuracy:
    Interrater dependability: The dependability of various therapists or assessors may have an impact on MMT’s accuracy. Variations in experience, training, and subjective assessment among practitioners can cause discrepancies in evaluation and outcomes. Enhancing inter-rater reliability can be achieved through training and standardization.
    Intra-rater reliability: MMT outcomes might vary, even when administered by the same therapist. The consistency of resistance application, changes in patient posture, and disparities in subjective interpretation are some of the factors that might compromise the validity of repeated measurements taken by the same professional.
    Subject cooperation and effort: The patient’s capacity to cooperate and exert their fullest effort throughout the test is critical to the accuracy of MMT. The accuracy of the results might be impacted by variables such as patient understanding, pain, discomfort, and weariness. Individuals who suffer from neurological or cognitive disabilities may find it challenging to consistently put out effort or follow directions.
    Limitations in measuring certain muscle functions: MMT measures muscle strength mainly during single contractions or motions. It might not accurately depict the muscle’s capacity for intricate motions or useful tasks requiring the cooperation of several muscular groups. This restriction may have an impact on MMT’s accuracy when evaluating certain functional motions.

    References

    • Dhameliya, N. (2023e, May 6). Manual Muscle Testing (MMT): Grading, Procedure – Samarpan. Samarpan Physiotherapy Clinic. https://samarpanphysioclinic.com/manual-muscle-testing/
    • Patel, D. (2023, December 13). Manual Muscle Testing (MMT) – Grade, Type, Scale, Benefits. Mobile Physiotherapy Clinic. https://mobilephysiotherapyclinic.in/manual-muscle-testing-mmt/
  • Magnetotherapy

    Magnetotherapy

    What is Magnetotherapy?

    Magnetotherapy, also known as magnetic therapy, is a form of alternative medicine that involves the use of static magnetic fields to improve health and alleviate pain.

    This treatment technique involves applying artificial magnetic fields to an affected human body area while adjusting the strength and frequency.

    When we expose the damaged body’s region to a magnetic field similar to the Earth’s, we may acquire larger frequency and application duration with artificial magnetic fields.

    Magnetotherapy is a physical treatment that involves applying particular magnetic fields to the human body. Magnetic fields play an important role in biological life; consider that the Earth itself is a massive magnet and that many living organisms adapt their lifestyles to the fluctuations in the Earth’s magnetism.

    Magnetotherapy is used to treat pain, inflammation, and edema because it affects immune system cells and circulation. Furthermore, clinical investigations have demonstrated that magnetotherapy can effectively cure osteoporosis while also boosting fracture healing, soft tissue repair, and regeneration. It is utilized in orthopedics, sports medicine, physiotherapy, and other specialized fields. Given its therapeutic properties, it can be used alone or in conjunction with other therapies. To optimize both the application method and the treatment effects, several aspects must be considered.

    • Selection of magnetic field and waveform.
    • Application method: contact or targeted, broad or total.
    • Various applicators.

    Treatment modes include manual and automated. Equipment with various techniques for delivering a magnetic field to tissues.

    What is the mechanism behind magnetotherapy:

    The magnetotherapy equipment employs electromagnetic radiation to carry out the therapy. The machine is made up of several magnets through which current flows and it generates an electromagnetic field with changing frequencies. There are two frequencies: low and high, which are employed depending on the difficulty. One of the most prevalent applications is to stimulate new tissue creation after a bone fracture.

    The magnets are placed in touch with the patient’s body and create a magnetic field loaded with energy created by the machine’s computer. Magnets are attached to the body portions that require the greatest attention at the beginning of the therapy.

    Magnets used in this therapy are generally rectangular plates with a Velcro attachment that allows them to be arranged in tiny bands around the treatment area. Some magnetotherapy equipment producers have also developed solutions that can be used while sleeping, such as a magnetized blanket that keeps the therapy going at night or a customized brace that covers the leg area.

    The biological effects of magnetic fields:

    • Cellular effects.
    • Effects on Organs and Systems

    Cellular effects.

    Benefits of enriched oxygen in cells include improved oxygen utilization, increased metabolism, increased ATP generation, increased energy, and positive impacts on organs and systems.

    1. Osseous trophic effects

    The magnetic field, due to the bone’s piezo-electric nature, improves the architectural course of osseous trabeculas in the damage zone, directing them in the same direction. This indicates that a better osseous callus is developed.
    In conclusion, a specific number of exposures to a low-frequency magnetic field cause the production of a high-quality osseous callus in a short period.

    • Magnetic fields:

    Collagen production increases.
    Calcium deposits grow and alter the osseous architectural process.
    enhancement of hyaluronic acid production.

    2. Vascular impact
    Magnetic fields have been reported to enhance capillary neoformation, the development of pericytes in capillaries, and the opening of precapillary sphincters. , Local vasodilation occurs as a result of improved arterial circulation.
    There is a rise in oxygen partial pressure.

    3. Analgesic effects

    There is a noticeable analgesic effect, although the cause is yet unclear.
    Hypothesis: Increased synthesis of oligopeptides consisting of endorphins, encephalins, and encephalins, with effects at both the central and peripheral levels.

    4. Autonomic nervous system impacts

    Increased amounts of chemical mediators such as catecholamines or acetylcholine.
    Depending on the direction of the nodular ganglion and vagus nerve in a field, an increase or inhibition of the nervous system
    Transmission is seen. This is due to the magnetic field’s direction on the ions of the cellular membrane.

    Types of artificial magnetic field:

    Magnetic field treatment applies various magnets to the body to improve overall fitness. It may also be useful in treating some disorders.

    There are several varieties, including:

    • Static magnetic field therapy: it involves touching a magnet to your skin. You may wear a magnetic bracelet or other magnetized jewelry. A magnet might be embedded in a bandage or used as a shoe insole. You might also sleep on a magnetic mattress pad.
    • Electrically charged magnetic therapy (electromagnetic therapy): The magnets used here are electrically charged. Electromagnetic treatment is typically delivered by an electric pulse.
    • Magnetic treatment and acupuncture: Magnets are applied to the same places of your skin that an acupuncturist would likely focus on during an acupuncture session; these areas are sometimes referred to as energy pathways or channels.

    Indications of magnetotherapy:

    Magnetic therapy is a non-invasive treatment for the musculoskeletal system. It works on the edema-contracture-pain triad, repairing and regenerating cutaneous, muscular, and bone tissues. Magnetic fields have a wide range of biological effects, including deep-seated tissues.

    • Osteoporosis, fractures, and arthrosis 
    • Trauma, including contractures, sprains, strains, and fractures 
    • Pain, including tension headaches and neuralgia 
    • Skin lesions include burns, ulcers, and wounds.
    • Inflammation, including arthritis, myositis, tendinitis, epicondylitis, lumbago, and adductor syndrome.

    The therapeutic expectations can be concisely described as follows:

    • Non-invasive and painless treatment
    • Antalgic, anti-inflammatory, and draining effect
    • Repairs tissues, even deep.
    • spondylosis
    • muscle spasm
    • epicondylitis
    • sciatica pain
    • trigeminal neuralgia
    • gout
    • RA
    • recent trauma
    • fractures
    • trophic ulcers
    • CRPS
    • Dupuytren’s contracture
    • osteoporosis
    • osteomyelitis acute and chronic
    • dysmenorrhea and prostatitis
    • sinusitis
    • depression and migraines

    Contraindications of magnetotherapy:

    • Presence of acute illness- particularly septic TB.
    • hemorrhagic foci (bleeding ulcers) might cause more hemorrhage due to the vasodilation effect.
    • cardiac pacemakers.
    • Pregnancy – because it might harm the fetus.
    • tumors exist because they may spread.
    • individuals undergoing hydrocortisone therapy.
    • in the event of a vascular blockage, since the obstructive piece may be freed and impede another region of the body, causing more injury.
    • juvenile diabetes – During PMF therapy, BGL should be evaluated.

    What are the benefits of magnetotherapy:

    Now that you understand the principle and significance of magnetotherapy, it’s time to learn about its primary advantages. Find out what they are below:

    Encourages enhanced blood circulation.
    In general, one of the most noticeable effects of magnetotherapy is improved blood circulation. This is because the magnetic field tends to diminish the contraction that blood vessels produce.

    Provides immediate pain relief.
    The magnetic field stimulates our bodies to manufacture endorphins, which are natural painkillers. In this way, it can be particularly useful for fractures, pain, and local discomfort.

    Reduces inflammation.
    This is purely due to increased circulation and a reduction in blood pH. As a result, the patient can get effective and speedy improvements in inflamed regions.

    Enhanced cell regeneration.
    Not just cells, but also bones and tissues. Magnetotherapy can improve cell function, and reduce and even prevent muscle and bone wear and tear, among other benefits.

    Prevents aging.
    Because magnetic treatment eliminates toxins that affect health and destroy cells, the procedure can help to prevent premature aging as well as the appearance of disorders associated with skin aging.

    Application Rules:

    The patient should not insert metal items into the solenoid since they can alter the magnetic field. Not to cause harm, but rather to modify magnetic field characteristics.
    The therapy normally produces a speedy response, although this is dependent on the patient’s pathology, age, and other circumstances. If we find that the patient has moved along the curative process after ten sessions, we should discontinue the therapy since it indicates that the patient is not responding to the treatment.

    For optimal results, the patient’s affected zone should be in direct contact with the solenoid throughout therapy sessions lasting 30 minutes to 2 hours.
    The sessions must be applied continually. If it is required to hasten the patient’s recovery, we might do two treatments on the same day with a 12-hour interval between them.
    Electromagnetic field therapy can be used with other therapies.

    BASIC GUIDELINES: 

    Begin treatments with lower settings and monitor responses to modify accordingly.
    Pain may rise, which is a good sign that the patient is responding to the treatment.

    BASIC RULES:

    Pain intensity decreases at lower settings. If there is no change in the condition, move to a higher setting. Headaches and migraines should not be treated beyond 1-3mT, 2 Hz, 10 min. Patients with allergies may require lower settings. For patients with severe circulatory diseases, the recommended settings are 1-3 mT, 2-4 HZ, and 10- 20 minutes. Low settings may cause discomfort owing to increased blood flow in peripheral capillaries.

    Side effects of magnetic field:

    it may include;

    • pain
    • Nausea
    • Dizziness

    However, these adverse effects are uncommon.

    Summary

    Further research is needed to understand how magnetic fields affect biological systems, how treatment affects magnetic field parameters, and if distant therapeutic effects are possible. The methodology of previously conducted clinical trials should be thoroughly yet critically examined since the parameters stated in the study and the units in which they are expressed may create concerns.

    The benefits of lengthier follow-up are especially noteworthy in research that employs disability questionnaires and quality-of-life assessments. Furthermore, the inclusion of a large and homogeneous group of patients in the study will provide clear evidence of the successful use of magnetotherapy in the treatment of patients with RA. This necessitates the thorough creation and dissemination of methodological standards for the use of magnetic fields to get the best possible results from such therapy.

    FAQ’s

    What exactly is magnetic treatment used for?

    Magnets and magnetic treatment have been used for hundreds of years to cure a variety of pains, including arthritis and headaches. Magnetic treatment devices are readily available and are mostly utilized for pain relief, inflammatory disorders, and wound healing.

    What is the mechanism behind magnetotherapy?

    Perhaps the most often proposed explanation is that magnets enhance blood flow in underlying tissues.

    What are the advantages of magnetic cupping?

    It assists in lifting and stretching soft tissue to separate fascia and limitations. It can also assist in improving joint mobility and flexibility. Cupping promotes good circulation and opens up the energy flow in the body.

    What are the downsides of magnetic therapy?

    Side effects of transcranial magnetic stimulation:

    Mild headaches are most prevalent.
    lightheadedness.
    Scalp pain.
    Neck discomfort.
    tingling.
    Facial twitches.
    sleepiness.
    changed cognition during the therapy.

    What is the indication for magnetotherapy?

    Magnetotherapy in physiotherapy is used to treat bone and joint disorders, osteoporosis, skin ailments, and female health difficulties.

    What are the fundamentals of magneto therapy?

    The fundamental premise of pulsed magnetic (PEMF) treatment is the creation of electromagnetic pulses. These pulses penetrate the garments as well as the whole depth of the tissue to reach the desired application spot.

    Can magnets decrease swelling?

    Magnets have been shown in studies to greatly decrease edema when administered soon after tissue damage.

    Can magnets relieve back pain?

    Magnets have been recommended as a pain reliever, particularly for low back and knee discomfort. Magnets can be worn as bracelets, taped to your joints, or utilized in a variety of magnetic devices, such as mattress pads.

    Can magnets influence your body?

    A powerful magnetic field is not harmful to the human body if handled carefully.

    What are the limitations of magnetotherapy?

    Magnetotherapy has some limitations, including potential side effects such as dizziness, low energy, palpitation, nausea, and vomiting, as well as a decrease in blood pressure or itchy, burning, and painful skin areas. However, these side effects are rare.

    Do magnets affect nerves?

    Magnets have no detrimental or beneficial effects on the brain, nerves, blood, or any other component of the body.

    References

    • Magnetotherapy: what it is, what it is used for, and ideal devices – Sixtus Italia. (n.d.-b). Sixtus Italia. https://www.sixtusitalia.com/electromedical/magnetotherapy/
    • Barduzzi, G. (2022, August 26). Discover The Benefits of Magnetotherapy. GB Sports Physio. https://www.gbsportsphysio.com/post/discover-the-benefits-of-magnetotherapy
    • Dhameliya, N. (2023b, January 2). MAGNETOTHERAPY USE IN PHYSIOTHERAPY. Samarpan Physiotherapy Clinic. https://samarpanphysioclinic.com/magnetotherapy-use-in-physiotherapy/
    • Ellis, R. R. (2023, June 3). What Is Magnetic Field Therapy? WebMD. https://www.webmd.com/pain-management/magnetic-field-therapy-overview
  • Human Body Parts

    Human Body Parts

    Introduction

    First of all, the human body parts are incredibly amazing. Every one of the numerous parts that comprise the human body serves a particular function. We carry out all tasks with our bodies. Let us educate you with the many names for our body parts.

    Body parts are the different sections of an individual that allow us to move and sense our environment, such as our mouth, nose, arms, and legs. Check out the list of names below for the different bodily parts.

    The human body can be thought of as a complex machine with many moving parts. The many body parts keep it preserved by functioning normally. Our brain serves as the control center, assisting us in thinking and emotion. Our energy comes from the blood that our heart pumps.

    Oxygen is taken up by our lungs during breathing. Our bones give our body the shape of a frame. Our skin shields us from harm and feels touch. Our muscles enable us to move. Our bodies cooperate to sustain our life. A quick summary of some of the bodily parts and their functions may be found in the article below.

    The Head

    The Brain

    brain
    brain

    The brain is a complex organ that regulates all bodily functions, including thought, memory, emotion, touch, motor skills, vision, breathing, temperature, and hunger. The central nervous system, or nervous system, comprises the brain and the spinal cord that branches off of it. The body constantly receives and sends chemical and electrical messages from the brain. Various impulses control different processes, which your brain interprets. For instance, whilst some result in discomfort, others generate fatigue.

    Some messages are kept in the brain, and others are sent from the spine to the body’s far-flung extremities through the vast network of nerves. Billions of neurons, or nerve cells, are used by the central nervous system to achieve this.

    The cerebellum, brainstem, and cerebrum are the three main divisions of the brain. The brain and spinal cord are covered in three layers of tissue known as the meninges. The four areas of the brain, referred to as lobes, are frontal, parietal, temporal, and occipital in each hemisphere of the cerebrum. Particular functions are governed by each lobe.

    There are four open regions and pathways located deep within the brain. They also open into the space underneath the meninges’ arachnoid layer and the central spinal canal. The brain is supplied with blood and oxygen by two distinct sets of blood vessels: the carotid and vertebral arteries.

    The Skull

    Skull
    Skull

    The human skull is made up of 22 bones (or 29 if the hyoid bone and inner ear bones are included), most of which are joined by ossified joints, sometimes known as sutures. The braincase (neurocranium) and the facial skeleton (viscerocranium) are the two sections of the skull. Its primary responsibility is to safeguard the brain, the body’s most vital organ.

    The skull base and the skullcap, often known as the calvarium, make up the braincase. The pairs of parietal bones, as well as fragments of the frontal and occipital bones, make up the skull cap. The following are the human skull’s most significant sutures:

    • The coronal suture, which connects the parietal and frontal bones
    • The sagittal suture, divides the parietal bones in half.
    • The occipital bone and the two parietal bones are separated horizontally by the lambdoidal suture.

    Of the 33 sutures that the bones of the human skull form, these three are the most important.

    The inferior part of the neurocranium is called the skull base. It can be separated into the anterior, middle, and posterior cranial fossae when viewed from the inside. Parts of the frontal, ethmoid, sphenoid, occipital, and temporal bones make up the base of the skull.

    All of the skull bones that are anteroinferior to the cranial cavity are referred to as the face skeleton. The mandible (lower jaw) and maxilla (upper jaw) are prominent representations. The zygomatic, nasal, palatine, lacrimal, vomer, and inferior nasal concha (lower turbinate) comprise the orbital and nasal cavity.

    The Sensory Organs

    sensory organs
    sensory organs

    Specialized organs called sense organs help in our ability to perceive our surroundings. They are essential to our existence and the only sense that allows us to understand our surroundings.

    Sense organs use a network of nerves and various organs to respond to specific physical phenomena by giving the information needed for interpretation. These senses govern our relationships and interactions with the outside world.

    Our five sensory organs are as follows: eyes, ears, nose, tongue, and skin

    These five sense organs have receptors that send information to the proper locations in the nervous system via sensory neurons. The general and special receptors are the two categories into which the receptors can be divided. Whereas the latter comprises mechanoreceptors, photoreceptors, and chemoreceptors, the former is distributed throughout the body.

    Eyes – Sight or Ophthalmoception

    These are our body’s visual sense organs. They react to images with light. Our eye color is determined by the quantity of melanin present in our bodies. Identifying and concentrating on bright pictures helps with the sense of sight.

    The colored portion of the eye called the iris regulates the pupil’s diameter and size, which has an immediate impact on the amount of light that enters the eyes. The vitreous body is located below the eye’s lens. The vitreous humor, a gelatinous substance, fills it. This material gives the eyeball its shape and allows light to reach the retina, which is located at the extreme rear of the eyeball. Photoreceptors in this retina are used to sense light.

    Ears – Hearing or Audioception

    Our body’s auditory sensory organs are our ears. They help in our ability to hear sounds. We perceive sounds through our auditory system, which picks up vibrations in the atmosphere. This is referred to as audio captioning or hearing.

    The three parts of the ear are the middle ear, inner ear, and outer ear. Since all sounds are essentially vibrations, the outer ear sends these vibrations into the ear canal, where the brain converts them into audible stimuli. This sense, in addition to hearing, is crucial for maintaining our equilibrium or bodily balance.

    Tongue – Taste or Gustaoception

    The tongue helps in the sense of various tastes and flavors. On the tongue, taste buds are located in between papillae and assist in the perception of various flavors. Taste and smell tend to collaborate. Something could not be tasted if it could not be smelled. Another name for the sense of taste is gustaoception.

    Chemoreceptors found in taste buds on the tongue function similarly to those found in the nasal cavity. Though there are four various kinds of taste buds, each of which can detect different tastes like sweetness, sourness, bitterness, and saltiness, the chemoreceptors in the nose would sense any kind of smell.

    Nose – Smell or Olfalcoception

    One sense organ is the nose. We can tell the difference between various odors thanks to our olfactory system. Our perception of taste is also aided by this organ. Smell perception is also known as olfaction. The nasal cavity’s upper wall is often lined with olfactory cells. Olfactory cells have cilia on one end that protrude into the nasal cavity and olfactory nerve fibers on the other end.

    Air enters the nasal cavity during inhalation. Because the olfactory cells are chemoreceptors, they possess protein receptors that enable them to differentiate between minute variations in substances. These substances attach themselves to the cilia, which transmit a nerve impulse to the brain. These impulses are subsequently translated by the brain into a detectable smell. The mucus produced by the body during a cold impairs scent perception, which explains why food feels bland.

    Skin – Touch or Tactioception

    The entire human body is made up of skin. It has to do with the tactile sense. The sensation of touch is often referred to as tactioception.

    The skin has general receptors that can detect touch, pain, pressure, and temperature. They are found all over the skin. When skin receptors are active, an impulse is produced that travels to the brain via the spinal cord.

    Other Sense Organs

    Two additional sense organs aid in helping us orient ourselves in the world in addition to these five. They are as follows:

    1. Vestibular System

    The vestibular system functions as the body’s sensory system and sends information about head position, motion, and spatial orientation to the brain. Additionally connected to motor functions, this system aids in:

    • Keep our bodies in proper alignment.
    • Keeping our physical equilibrium.
    • While moving, keep our head and body steady.
    • Recognizing how our bodies are positioned and oriented concerning our surroundings.

    Thus, proper balance and mobility depend on the vestibular system.

    2. Proprioception system

    The awareness of joint position, whether conscious or unconscious, is referred to as the proprioception system. This system aids the body in recognizing its muscles, joints, and limbs in three dimensions as well as the direction in which it is moving concerning the body.

    Proprioception includes things like walking or kicking without looking at our feet, balancing on one leg, touching our noses with closed eyes, and feeling the surface we are standing on.

    The Torso and Its Vital Organs

    Human Heart

    heart
    heart

    The muscular organ that makes up the heart is located at the front of the chest. It circulates blood throughout the body by pumping it there. The cardiovascular system consists of the blood arteries and the blood itself, excluding the heart. One of the most vital organs needed to keep life alive is the human heart. It is a four-chambered, muscular organ. The heart resembles a tightly balled fist in size.

    One of the strongest and hardest-working muscles in the human body, the heart continues to beat throughout an individual’s life. Any organism’s heart’s function is to keep the blood flowing through the body continuously. The tissues and cells therefore get new nutrients and oxygen.

    The heart serves the primary purposes listed below:

    • The pumping of blood throughout the body is one of the heart’s main jobs.
    • Blood carries many components, including hormones, carbohydrates, and oxygen, to every area of the body, including the heart.
    • Additionally, the heart makes sure that the body maintains a healthy blood pressure level.

    The body has two different forms of circulation: systemic circulation and pulmonary circulation.

    Two ventricles and two atria make up the four chambers of the human heart. It is roughly the size of a fist. The chambers that receive blood are called the atrium, while the chambers that pump blood are called ventricles. The “right heart” is comprised of the right atrium and ventricle, whereas the “left heart” is made up of the left atrium and ventricle. The aorta, the largest artery in the body, is located within the anatomy of the heart.

    The septum, a wall of muscle, divides both sides of the heart. The right ventricle pumps blood to the lungs for reoxygenation through the pulmonary arteries. The closure of the right semilunar valve stops blood flow backward into the heart. The oxygenated blood is subsequently sent from the lungs to the left atrium via the pulmonary veins.

    The Lungs

    lungs
    lungs

    A vital component of the respiratory system, the lungs take in fresh air and expel old, stale air. Your breathing system enhances your ability to speak as well. The lungs can aid in the movement of oxygen-rich blood throughout your body by absorbing fresh air. This is accomplished by drawing in air through the nose and directing it into the pulmonary capillaries, which develop into oxygen-rich cells that support breathing.

    The body has two lungs, a left, and a right, however they are not the same size. The left lung lobe is smaller and consists of just two lobes, whereas the right lung is larger and has three lobes that are separated by fissures. Due to its necessity for supporting the heart, the left lobe is likewise smaller.

    The body receives its supply of fresh air from the lungs. By contracting its muscles during inhalation, the diaphragm aids in the upward movement of air into the lungs (relaxing pushes air out). Air passes via the trachea, into the bronchi, and fills the alveoli in the lungs after entering through the mouth and nose (with the aid of mucus, which prevents dust and dirt from entering the air). Air then makes its way to the blood arteries that encircle the alveoli. Oxygen is exchanged for carbon dioxide by the red blood cells, and the oxygen binds to hemoglobin molecules. The blood that has been oxygenated moves throughout the body. The lungs expel carbon dioxide and other gases that the body does not require.

    The Digestive System

    The Digestive System
    The Digestive System

    The digestive system in humans, which the body uses to carry out the digestion process. The digestive tract, or the collection of tissues and organs that pass through food and liquids as they are transformed into forms that may be absorbed into the bloodstream, constitutes the bulk of the digestive system in humans. The organs that supply the juices required for digestion as well as the structures that wastes go through throughout the evacuation process make up the system.

    Stomach

    The upper abdominal cavity contains the muscular, hollow, J-shaped stomach. Its primary function is to start the food’s digestion. The stomach can churn and break down food through muscular contractions called peristalsis because its walls are made of three layers of muscle. Gastric juices, which include pepsin and hydrochloric acid, are secreted by the stomach lining. These powerful ingredients aid in the digestion of proteins and the destruction of dangerous food microbes. The contents of the chyme, a viscous liquid produced by mechanical and chemical breakdown, are progressively discharged into the small intestine for additional digestion.

    Liver

    Beneath the diaphragm in the right upper belly is the huge, meaty organ known as the liver. It performs almost 500 vital functions! Producing bile for the digestion of fats, breaking down proteins, fats, and carbs, storing vital nutrients, and cleansing blood are some of its important functions. To keep waste materials, medications, and environmental pollutants from entering the systemic circulation, the liver breaks them down and filters them out of the bloodstream.

    Intestines

    The five-foot-long, tortuous small intestine comprises the duodenum, jejunum, and ileum portions.
    The small intestine finishes the chemical breakdown of food with assistance from the pancreas’ digestive enzymes and the gallbladder’s bile. Villi, which are millions of microscopic projections that resemble fingers, increase the surface area so that nutrients including vitamins, minerals, proteins, carbohydrates, and lipids may be absorbed into the bloodstream. Any water left over is absorbed by the large intestine (colon), which also compacts indigestible waste into feces expelled.

    The Kidneys

    Kidney
    Kidney

    Your blood is filtered by the kidneys. The urinary system includes your kidneys. 200 quarts of fluid a day, or enough to fill a big bathtub, are filtered by your kidneys. Your kidneys eliminate waste during this procedure, which exits your body as urine. An individual typically needs to urinate twice daily. Your body recycles the remaining 198 quarts of fluid. The fluids and electrolytes in your body—mostly water—are also balanced by your kidneys. Sodium and potassium are two examples of important minerals that are electrolytes.

    The kidneys provide a variety of vital purposes. They purify your blood of waste products and poisons. Common waste products include acids, muscle waste (creatinine), and nitrogen waste (urea). They help in your body’s removal of toxic waste. About half a cup of blood is filtered by your kidneys every minute.

    Additionally,

    • The kidneys regulate your blood’s pH balance and acid-base equilibrium.
    • If there is not enough sugar in your blood, make sugar (glucose).
    • Produce renin, a protein that raises blood pressure.
    • Create the hormones erythropoietin and calcitriol. A kind of vitamin D called calcitriol aids in the body’s absorption of calcium. Erythropoietin aids in the production of red blood cells in your body.

    The Limbs

    The Arms

    Upper Limbs
    Upper Limbs

    Bone structure: The humerus, which is located in the upper arm, and the radius and ulna, which are located in the forearm, make up each arm. While the ulna and radius link to the wrist bones, the humerus joins the arm to the shoulder socket.

    Major muscles: The two primary muscle groups responsible for enabling arm movement are the triceps and biceps. The biceps, which are found in front of the upper arm, enable elbow flexion, which bends the arm. Arm extension is made possible by the triceps, which are located at the rear of the upper arm.

    Functions: The muscles and bones of the arms combine to give the upper body strength and mobility for a variety of motions. This involves the capacity to grasp, elevate, push, pull, toss, and perform other manipulations on items in our surroundings. Writing, using tools, and making art are among the other talents made possible by fine motor control in the arms.

    The Hands

    Bone structure: The hand’s skeletal system consists of the phalanges (14 finger bones), metacarpals (5 hand bones), and carpals (8 wrist bones). The amazing flexibility and dexterity of the human hand are attributed to this system of several connecting bones.

    Dexterity and gripping: The hand’s remarkable range of motion can be attributed to its 27 bones and many joints. Additionally helpful in detecting characteristics like texture, temperature, and pressure are sensitive nerve endings. The ability to work in unison with the fingers allows the opposable thumb to tightly grasp and precisely handle items.

    The Legs

    lower limb
    lower limb

    Bone structure: There are three primary bones in each leg: the tibia and fibula in the lower leg/calf area, and the femur in the upper leg/thigh area. The tibia and fibula attach to the ankle bones, whereas the femur attaches to the hip socket.

    Major muscles: The two main muscle groups that support leg movement are the hamstrings, located in the back of the thighs, and the quadriceps, located in the front. The leg extension is made possible by the quadriceps muscles, which also enable straightening and kicking. To bend, the leg is flexed at the knee joint by the hamstring muscles.

    Functions: The muscles and bones of the legs cooperate to give the body full-length mobility and structural support. Basic motions including walking, running, jumping, climbing, and sitting/standing are made possible by the legs. The strong leg muscles are also essential for bearing the upper body’s weight.

    The Feet

    Bone structure: The 26 bones in each foot are divided into three primary groups: the phalanges (14 toe bones), the metatarsals (5-foot bones), and the tarsals (7 ankle bones). This arrangement creates a flexible, semi-rigid arching foot framework.

    Balance and propulsion: When standing or moving, the feet serve as a stable basis that evenly divides the body’s weight between the legs. The arched design aids in impact absorption and balance maintenance when flexed muscles and joints are used. The unique skeletal structure of the feet also permits the vital toe push-off necessary for running and walking.

    The Support Systems

    The Skeletal System

    The Skeletal System
    The Skeletal System

    The skeletal system gives the muscles a point of attachment and helps protect the body’s interior organs. Humans have an endoskeleton, which is the layer of bone that lies beneath the muscles and skin. Other species, like insects, have an exoskeleton covering their exterior bodies. The skeletal system in humans is made up of bones, joints, and related cartilage. A mature human body consists of 206 bones and many joints.

    The axial skeleton and the appendicular skeleton make up the two parts of the human skeleton. The skull, spine, and ribcage are all parts of the axial skeleton, which is shaped around the body’s central axis. It shields the main sense organs, including the eyes, ears, nose, tongue, brain, spinal cord, heart, lungs, and esophagus. The bones of the arms and legs, as well as the shoulder and hip girdles, make up the appendicular skeleton, which is connected to the limbs.

    Protection: The skeletal system’s protection of the delicate interior organs is its next evident purpose. This is evident in the human skull, which fully encloses the brain. The ribcage, which surrounds the heart and lungs but yet allows expansion, is another example of it. To fend off predators, even invertebrates with robust exoskeletons, such as prawns and snails, frequently have them.

    Blood Cell Production: The bone marrow, the main location for adult humans to produce red blood cells, is located in the center of a bone. Adults have two different forms of bone marrow. About half of the bone marrow is red, containing supporting tissue and hematopoietic stem cells. The remaining portion of the bone marrow is composed of fat, which turns yellow as we age.

    Production of Other Cell Types: The skeletal system’s bone marrow is where a variety of different cells are produced in addition to red blood cells. Among them are lymphocytes, immunological cells that move through the lymphatic system. The skeletal system not only supports immune system functions but also houses stem cells that can differentiate into muscle, cartilage-producing, and bone-forming cells (osteoblasts).

    Storing Minerals: The skeletal system’s bones serve as a calcium ion storage, adjusting the amount of mineralized deposits inside of them to keep the plasma calcium ion concentration within a specific range. Every cell’s plasma membrane has essential sodium ion channels, which are impacted by calcium ions and might compromise general equilibrium.

    The Muscular System

    The Muscular System
    The Muscular System

    One organ system that is primarily involved in bodily movement is the muscular system. Roughly half of a person’s body weight is composed of their 700+ muscles, which are attached to their skeletal system. Made up of skeletal muscle tissue, tendons, nerves, and blood arteries, each muscle is a unique organ. The heart, blood vessels, and digestive system all contain muscle tissues.

    Muscle tissues are classified into three types: skeletal, visceral, and cardiac.

    Cardiac Muscle: There are only cardiac muscles in the heart. These muscles are in charge of the heart’s pumping function, which in turn controls blood circulation throughout the body. When examined under a microscope, the straight heart muscle cells appear to have dark and bright stripes. The arrangement of protein fibers causes the black and light stripes in the cells.

    Visceral Muscle: Organs include the stomach, blood arteries, and intestines have visceral muscles. The contractions that these muscle tissues produce inside the organs help in the movement of materials throughout the organs. These muscles are likewise classified as involuntary as their activity cannot be deliberately regulated. Spindle-shaped, uninucleated cells make up the visceral muscle. Because of its homogeneous and smooth appearance under a microscope, it is also referred to as a smooth muscle.

    Skeletal Muscle: The voluntary muscles in the body are called skeletal muscles. These muscles can be made to contract with conscious thought. These muscles are useful for carrying out bodily tasks including walking, lifting, and writing. The bodily parts that are attached to the bone can move because of the skeletal muscle. Skeletal muscle cells are cylindrical, striated, and multinucleated.

    The Control Centers

    The Nervous System

    Nervous System
    Nervous System

    The primary function of the nervous system, which is made up of a network of neurons, is to create, modify, and transfer information throughout the entire body. This characteristic makes it possible for the nervous system to perform a wide range of critical tasks, including the control of respiration, digestion, heart rate, sensation, and movement. Everything that ultimately defines us as humans—including our consciousness, cognition, behavior, and memories—is governed by the structures of the nervous system.

    The nervous system is divided into:

    • Central nervous system (CNS): The body’s command and integration center is the central nervous system (CNS).
    • Peripheral nervous system (PNS): The PNS serves as a conduit between the central nervous system (CNS) and the body. Two more divisions are the somatic nervous system (SNS) and the autonomic nervous system (ANS).

    The nervous system sends electrical and chemical impulses quickly throughout the body by using specialized nerve cells called neurons. Sensory neurons receive sensory data and send electrical impulses to the central nervous system (CNS) for processing to perceive stimuli such as light, sound, and smell. Motor neurons receive electrical impulses from the brain and spinal cord that direct muscles to contract or secrete secretions from glands.

    Neurons transform electrical signals into chemical neurotransmitters at junctions known as synapses, which then transfer the signal to the subsequent cell or organ of importance. The nervous system serves as the body’s communication center by gathering information from the senses, processing it in the central nervous system (CNS), and then transmitting commands to control all physiological processes, movements, and bodily functions.

    The Endocrine System

    The Endocrine System
    The Endocrine System

    The structures in your body (mostly glands) that produce and release hormones are called the endocrine system. Hormones are chemicals that go through your bloodstream to interact with your organs, skin, muscles, and other tissues to control a variety of body functions. These signals are received by your body, which then knows what to do and when. Hormones are vital to your existence and well-being.

    Your endocrine system’s primary function is to release hormones into your bloodstream while continuously checking their levels. To transmit their signals, hormones lock into the cells they intend to affect. There are more than 50 different hormones in your body, and they impact almost every part of your health, either directly or indirectly. Among the instances are:

    • Endocrine glands create hormones, which are chemical messenger molecules.
    • The bloodstream is filled with hormones released to travel to specific cells and organs.
    • Hormones control and guide some bodily functions, including growth, metabolism, mood, appetite, sleep, and sexual function.
    • They work gradually over time to keep the body in a state of homeostasis, or stable internal circumstances. Feedback loops based on blood hormone levels control the body’s production and release of these hormones. Hormone imbalances can cause diseases and disorders such as diabetes, infertility, and thyroid issues.

    The Protective Layers

    The Skin

    Skin
    Skin

    The epidermis, dermis, and hypodermis are the three primary layers of skin (subcutaneous tissue). There are more layers within these layers. The skin has eight or ten layers, depending on how you count the layers within the layers.

    The largest and most complex organ in the body is the skin. Its main purpose is to protect against harmful surroundings and pathogens that cause disease. It also collects sensory data from your surroundings and aids in controlling body temperature.

    • The skin’s outermost layer is called the epidermis. It protects the body from harm by acting as a waterproof barrier. Dead, flattened cells comprise the outermost layer, continuously losing old cells and growing new ones.
    • The middle layer, or dermis, comprises blood vessels, sweat glands, hair follicles, and connective tissue. It does this by modifying blood flow and sweating to assist control of body temperature.
    • The bottom layer, or hypodermis, is composed of fat cells. It cushions the layers of skin on the outside and serves as insulation to assist in controlling body temperature.

    Roles in protection and temperature regulation

    • Protection: The skin serves as a physical barrier to keep out dangerous substances, UV rays, germs, and excessive water loss. Special cells help in the fight against infections.
    • Temperature regulation: The skin is essential for preserving a healthy internal body temperature. Dermal blood arteries can dilate or contract to alter blood flow and heat transmission. Sweat glands secrete moisture, which evaporates and cools the body.
    • Other functions: The skin has nerve endings that are responsible for perceiving temperature, pressure, and pain. It retains fat, water, and vitamin D that is produced when exposed to sunshine.

    The Immune System

    The Immune System
    The Immune System

    The body uses the immune system as a tool to prevent or control infection. The immune system protects the body against pathogens thanks to its complex network of tissues, proteins, organs, and cells.

    An immune system that is working properly can tell undesirable chemicals from healthy tissue. It will launch a complex defense mechanism known as an immunological response if it finds something foreign, such as bacteria, viruses, or parasites. Moreover, it can identify and eliminate damaged and dead cells.

    The immune system interprets incorrectly beneficial tissue as diseased in autoimmune disorders and allergies, causing an unwarranted attack that can result in uncomfortable and occasionally severe symptoms.

    For the immune system to function properly, it must be able to differentiate between healthy and unhealthy cells and tissue. It does so by recognizing signals that are referred to as danger-associated molecular patterns, or DAMPS.

    Cell damage can arise from a variety of sources, including:

    • Infectious agents, like viruses or bacteria
    • Poisons, like a sting or bite
    • Physical harm that is not contagious, like a burn
    • A genetic issue that arises in cells, as in the case of cancer

    An antigen is typically a bacteria, fungal, virus, toxin, or foreign material. But it could also be a dead or defective cell. The immune system recognizes pathogen-associated molecular patterns, or PAMPs, in the antigen.

    Summary

    The human body is an incredible biological machine comprised of numerous interrelated systems and components that enable life itself. From the protective outer layers like the skin and immune system to the internal structural framework of the skeletal system and muscles, every part serves an essential role in sustaining our existence.

    At the core lie the vital organs – the brain acting as the command center, the heart incessantly pumping life-giving blood, the lungs breathing in vital oxygen, the digestive system breaking down nutrients, and the kidneys filtering wastes. These organs are intricately regulated by the nervous system’s electrochemical signals and the endocrine system’s hormonal messengers. Together, they orchestrate the symphony of biological processes that allow us to move, grow, sense our surroundings, and respond to the ever-changing conditions of life.

    Underlying it all is the sheer architectural genius – from the amenable design of our limbs that provide mobility and dexterity, to the multilayered composition of tissues affording protection, flexibility, and strength. The human body exemplifies nature’s crowning achievement of form wed to function on a molecular and macro scale. Understanding this extraordinary vessel we inhabit instills a profound appreciation for the precious gift of life itself.

    FAQs

    How many bones are in the adult human body?

    206 bones make up the adult human skeletal system. This includes long bones in the limbs, short bones in the wrists and ankles, flat bones like the ribs, and irregular bones like the vertebrae.

    Which organ in the human body is the largest?

    The skin is the largest organ, with a total surface area of about 20 square feet. It serves as a protective barrier and plays a role in regulating temperature and enabling sensation.

    How many muscles are in the human body?

    An estimated 639 muscles are present in the human body. These are classified as skeletal muscles that control movement, smooth muscles lining organs, and cardiac muscles that make up the heart.

    How many pints of blood are in the average adult?

    The average adult has around 10 pints or 4.7 liters of blood circulating oxygen and nutrients throughout the body.

    What percentage of the human body is water?

    About 60% of the average adult human body is composed of water, which is essential for biological processes and temperature regulation.

    How long can a person survive without water?

    A person can generally survive around 3 days without drinking water under normal conditions before severe dehydration and health consequences.

    Which organ works hardest in the human body?

    The heart is considered the hardest working muscle, beating about 100,000 times per day to pump blood through the circulatory system.

    What is the longest bone in the human body?

    The femur or thigh bone is the longest bone, measuring around 19 inches in adults and enabling movement of the leg.

    How many taste buds does the average human tongue have?

    The average healthy tongue contains about 10,000 taste buds that allow us to detect sweet, sour, salty, bitter, and umami tastes.

    How many times a day on average does a human heart beat?

    The human heart beats approximately 100,000 times per day on average, pumping around 2,000 gallons of blood.

    References

    Shah, D. (2023, December 13). Body Parts Name – A Comprehensive Guide. Mobile Physiotherapy Clinic. https://mobilephysiotherapyclinic.in/body-parts-name/

    Brain Anatomy and How the Brain Works. (2021, July 14). Johns Hopkins Medicine. https://www.hopkinsmedicine.org/health/conditions-and-diseases/anatomy-of-the-brain

    Skull. (2023, November 21). Kenhub. https://www.kenhub.com/en/library/anatomy/the-skull

    Admin. (2021, July 28). Sense Organs – List of Five Sense Organs and their Functions. BYJUS. https://byjus.com/biology/sense-organs/

    Admin. (2023, August 23). Human Heart –  Anatomy, Functions and Facts about Heart. BYJUS. https://byjus.com/biology/human-heart/#functions-of-the-human-heart

    Travers, C. (2023, August 16). Anatomy of the Lungs. Verywell Health. https://www.verywellhealth.com/lung-anatomy-4843718

    Digestive system. (2023, November 2). Kenhub. https://www.kenhub.com/en/library/anatomy/the-digestive-system

    Professional, C. C. M. (n.d.). Kidney. Cleveland Clinic. https://my.clevelandclinic.org/health/body/21824-kidney#function

    Klenerman, L. (2015). 7. The limbs. In Oxford University Press eBooks (pp. 112–134). https://doi.org/10.1093/actrade/9780198707370.003.0007

    Buckley, G. (2021, January 15). Skeletal System. Biology Dictionary. https://biologydictionary.net/skeletal-system/

    Admin. (2022, July 22). Muscular System- Types and functions of Muscles in the Human Body. BYJUS. https://byjus.com/biology/muscular-system/

    Nervous system. (2023, November 3). Kenhub. https://www.kenhub.com/en/library/anatomy/the-nervous-system

    Professional, C. C. M. (n.d.-a). Endocrine System. Cleveland Clinic. https://my.clevelandclinic.org/health/body/21201-endocrine-system

    Brannon, H. L. (2023, May 19). Layers of Skin and Their Functions. Verywell Health. https://www.verywellhealth.com/skin-anatomy-1068880

    Newman, T. (2023, November 22). How the immune system works. https://www.medicalnewstoday.com/articles/320101#immunity

    https://th.bing.com/th/id/OIP.yvuZATHt1bwiJWzylOQT0wHaEK?rs=1&pid=ImgDetMain

  • Facial muscles

    Facial muscles

    Introduction

    The facial muscles, also known as craniofacial muscles, are a group of approximately twenty flat skeletal muscles that are located beneath the skin of the scalp and face. The majority of them originate in the skull’s bones or fibrous structures before spreading to the skin.

    The facial muscles are a collection of striated skeletal muscles supplied by the facial nerve (cranial nerve VII), which, among other things, controls facial expression. Mimetic muscles are another name for these muscles. They are only found in mammals, but they are descended from neural crest cells found in all vertebrates. They are the only muscles that connect with the dermis.

    The facial muscles include:

    • The occipitofrontalis muscle
    • The Procerus muscle
    • Nasalis muscle
    • Platysma muscle
    • Orbicularis Oculi Muscle
    • Corrugator supercilii muscle.
    • Depressor Septi Nasi.
    • Orbicularis Oris.
    • Buccinator
    • Levator Labii Superioris Muscle
    • Depressor labii inferioris muscle.
    • Levator Labii Superioris Alaeque Nasi Muscle
    • Mentalis Muscle
    • Risorius Muscle
    • Levator Anguli Oris Muscle
    • Depressor Anguli Oris Muscle
    • Zygomaticus major.
    • Zygomaticus minor.
    • Auricular Muscles

    The occipitofrontalis muscle

    A massive muscle called the occipitofrontalis runs from the brows to the superior nuchal lines of the occipital bones. The muscle is divided into two parts: occipital and frontal, which are connected by a fibrous sheath called the epicranial aponeurosis (galea aponeurotica). Both the occipital and frontal parts have quadrangular muscle heads.

    Origin and insertion

    Origin: The frontal part is formed by the skin between the brows and the superior parts of the periorbital group of facial muscles.

    Insertion: It then curves posterolaterally to meet the epicranial aponeurosis at the level of the skull’s coronal suture.

    Origin: The occipital part develops from the lateral two-thirds of the superior nuchal line of the occipital bone.

    Insertion: courses superiorly to attach to the epicranial aponeurosis via the lambdoid suture.

    Innervation

    The facial nerve (CN VII) innervates both parts of the occipitofrontalis. The temporal branches supply the frontal part, whereas the posterior auricular branch of the facial nerve innervates the occipital part.

    Blood supply

    The ophthalmic and superficial temporal arteries provide blood supply to the frontal part, while the posterior auricular and occipital arteries vascularize the occipital part.

    Function

    The occipitofrontalis’ function is determined by the part of the muscle that contracts:

    • Frontal part: When its forehead attachment is fixed, the frontal part contracts, pulling the scalp forward and wrinkling the forehead, resulting in a frown. If its aponeurotic attachment is fixed, the frontal belly elevates the brows and skin on the forehead, resulting in a surprised expression.
    • When its nuchal attachment is secure, the occipital part retracts the scalp. When its aponeurotic attachment is fixed, this part of the muscle moves the scalp forward.

    The Procerus muscle

    The procerus is a small pyramidal muscle located between the brows.

    Origin

    It originates from the nasal bone and superior part of the lateral nasal cartilage and extends superiorly in a fan-like fashion.

    Insertion

    Place on the skin above the glabella and the medial ends of the brows.

    Innervation

    This muscle is supplied by the temporal, lower zygomatic, and buccal branches of the facial nerve (CN VII).

    Blood supply

    It receives blood from the angular and lateral nasal branches of the facial artery.

    Function

    The procerus wrinkles the skin surrounding the glabella and depresses the medial ends of the brows using its superior attachment. This results in a frowning facial expression to convey anger or sorrow, or when exposed to bright light or other eye irritants.

    Nasalis muscle

    The nasalis is a small muscle located on each side of the dorsum of the nose. According to its origin, it is divided into two parts: alar and transverse.

    Origin and insertion

    The alar part is located near the nostrils.

    • Origin: Originating from the frontal part of the maxilla, superior to the incisive fossa and medial to the transverse part of the nasalis
    • Insertion: It extends upwards and anteriorly to insert on the skin of the ala, above the lateral crus of the major alar cartilage.

    The transverse part is located over the dorsum of the nose.

    • Origin: It develops superolateral to the incisive fossa and laterally to the alar part.
    • Insertion: By merging with its counterpart across the nose’s bridge, it passes superomedially to insert at the dorsum of the nose.

    Innervation

    The nasalis muscle is innervated by the buccal branch of the facial nerve (CN VII)

    Blood supply

    The superior labial, septal, and lateral nasal branches of the facial artery, as well as the infraorbital branch of the maxillary artery, supply blood to this area.

    Function

    The nasalis muscle’s transverse part compresses the nasal aperture while the alar part dilates the nostrils. These actions are notable for creating specific facial expressions, such as anger, as well as enhancing deep breathing.

    Platysma muscle

    The platysma is a muscle that looks like a sheet and is located within the superficial cervical fascia of the anterior neck.

    Origin

    It grows from the skin and fascia of the superior thoracic and shoulder regions and ascends to the anterolateral sides of the neck. The medial fibres of the platysma attach to the lower border of the mandible and the skin of the lower lip.

    Insertion

    The lateral fibres of the platysma insert on the skin of the perioral region, where they combine with the various muscles surrounding the mouth to form the modiolus.

    Innervation

    The platysma gets a nervous supply from the cervical branch of the facial nerve (CN VII).

    Blood supply

    The blood supply comes from the facial artery’s submental branch and the thyrocervical trunk’s suprascapular branch.

    Function

    The platysma’s functions vary depending on which part of the muscle contracts. The platysma can help lower the corners of the mouth and lower lip by contracting the lateral fibres that attach to the modiolus, whereas its medial attachment to the mandible can help depress the mandible and open the mouth.

    Orbicularis Oculi Muscle

    Origin and insertion

    The orbitalis muscle is a sphincter-like muscle that surrounds the orbit and periorbital area. It consists of three parts:

    The orbital part is the most peripheral part that covers the orbital rim.

    • Origin: The medial palpebral ligament, the frontal process of the maxilla, and the nasal portion of the frontal bone are the sources of its development.
    • Insertion: Its fibres encircle the orbit and connect to surrounding soft tissue structures.

    The palpebral part is the centre of the muscle that forms the eyelids.

    • Origin: The medial palpebral ligament is where it starts.
    • Insertion: inserts into the lateral palpebral ligament.

    The deep palpebral (lacrimal) part is the orbicularis oculi’s deepest point.

    • Origin: Located between the medial palpebral ligament and the lacrimal sac.
    • Insertion: These fibres pass laterally posterior to the lacrimal sac and attach to the superior and inferior tarsi of the eyelids, as well as the lateral palpebral ligament.

    Innervation

    The facial nerve’s zygomatic and temporal branches innervate the orbicularis oculi (CN VII).

    Blood supply

    Blood supply comes from branches of the maxillary, superficial temporal, and facial arteries.

    Function

    The orbicularis oculi function is determined by the part of the muscle that contracts. Contraction of the orbital part pulls the skin of the forehead and cheeks towards the nose and tightly closes the eyes, typically for protection. In turn, the palpebral part has finer control over the eyelids, closing them gently while blinking or sleeping. In the end, the lacrimal papillae and eyelids are pulled medially by the deep palpebral portion, which also compresses the lacrimal gland and ducts and widens the lacrimal sac. These actions aid in the movement of tears across the lacrimal apparatus.

    Corrugator supercilii muscle.

    Origin

    The corrugator supercilii is a slender muscle located deep within the medial brow. It extends laterally and slightly superiorly, emerging from the medial end of the frontal bone’s superciliary arch.

    Insertion

    Insert into the skin near the middle of the brow.

    Innervation

    The facial nerve’s temporal branches innervate the corrugator supercilii (CN VII).

    Blood supply

    The superficial temporal branch of the external carotid artery and the ophthalmic branch of the internal carotid artery supply it with blood.

    Function

    A frowning facial expression is produced when the corrugator supercilii contracts, pulling the brows medially and producing vertical wrinkles over the glabella.

    Depressor Septi Nasi.

    The depressor septi nasi muscle helps the alar part of the nasalis to open the nostrils.

    Origin

    originate in the maxilla (above the medial incisor tooth).

    Insertion

    inserts into the nasal septum.

    Innervation

    Buccal branches of the facial nerve.

    Function

    Pull the nasal septum inferiorly, widening the nasal opening.

    Orbicularis Oris.

    The orbicularis oris is the primary sphincter muscle in the lips.

    Origin

    The maxilla and other cheek muscles form attachments.

    Insertion

    It attaches to the skin and mucous membrane of the lips.

    Innervation

    Buccal branches of the facial nerve.

    Blood supply

    Its blood supply is primarily provided by the superior and inferior labial branches of the facial artery, with support from the mental and infraorbital branches of the maxillary artery and the superficial temporal artery’s transverse facial branch.

    Function

    The function of the orbicularis oris is to move the lips. A bilateral contraction of the entire muscle pulls the lips together and closes the mouth. Specific muscle groups can contract in isolation to produce a variety of mouth movements, including puckering, twisting, and pouting of the lips. The orbicularis oris facilitates speech and contributes to the production of various facial expressions.

    Buccinator

    The buccinator muscle is thin and square-shaped. It is located between the mandible and the maxilla, deep within the facial muscles.

    Origin

    originate in the maxilla and mandible.

    Insertion

    The fibres run inferomedially, blending with the orbicularis oris muscle and the skin of the lips.

    Innervation

    Buccal branches of the facial nerve.

    Blood supply

    The buccal branch of the maxillary artery provides the majority of the vascularization, with contributions from facial artery branches.

    Function

    The buccinator muscle compresses the cheek against the molar teeth, preventing them from being bitten during mastication. Additionally, it aids in keeping the food bolus in the centre of the mouth cavity and stops it from spilling into the oral vestibule. Furthermore, by compressing the cheeks, the buccinator allows air to be blown from the inflated vestibule, which is necessary for playing wind instruments or whistling.

    Levator Labii Superioris Muscle

    Origin

    The zygomatic process of the maxilla and the maxillary process of the zygomatic bone give rise to the short, triangular levator labii superioris muscle.

    Insertion

    It runs downward and medially before attaching to the upper lip’s skin and submucosa, where it blends with other facial muscles that are inserted here.

    Innervation

    The levator labii superioris is innervated by the facial nerve’s zygomatic and buccal branches (CN VII).

    Blood supply

    It receives blood from the facial artery and the infraorbital branch of the maxillary artery.

    Function

    It elevates and everts the upper lip, revealing the maxillary teeth and deepening the nasolabial lines. This movement is crucial for producing specific facial expressions, like contempt, a smile, and a grin.

    Depressor labii inferioris muscle.

    The depressor labii inferioris is a short quadrangular muscle located in the chin region.

    Origin

    It originates from the oblique line of the mandible and is continuous with the labial part of the platysma.

    Insertion

    The muscle inserts into the lower lip’s skin and submucosa after travelling superomedially.

    Innervation

    The mandibular branch of the facial nerve (CN VII) supplies the depressor labii inferioris with nerve fibres.

    Blood supply

    It is supplied with blood by the inferior labial branch of the facial artery and the inferior alveolar artery’s mental branch.

    Function

    The depressor labii inferioris is the lower lip’s main tractor, pulling it anteromedially along with the labial part of the platysma.

    Levator Labii Superioris Alaeque Nasi Muscle

    Origin

    The levator labii superioris alaeque nasi is a thin, strap-like muscle located on both sides of the nose. It emerges from the maxilla’s upper frontal process and moves inferolaterally.

    Insertion

    covering the major alar cartilage of the nose with skin and the perichondrium. A portion of the fibres attach to the levator labii superioris and orbicularis oris when they pass through the lateral region of the upper lip.

    Innervation

    The buccal and zygomatic nerves supply the levator labii superioris alaeque nasi.

    Blood supply

    branches of the facial nerve (CN VII). It receives blood from the facial artery and the infraorbital branch of the maxillary artery.

    Function

    The levator labii superioris alaeque nasi elevates, deepens, and increases the curvature of the nasolabial furrow in addition to lifting and everting the upper lip.

    Mentalis Muscle

    Origin

    The mentalis is a short, conical muscle found in the chin area. It descends inferiorly after emerging from the mandibular incisive fossa.

    Insertion

    Insert into the chin skin near the mandible’s mento labial sulcus.

    Innervation

    The mentalis muscle receives nerve supply from the mandibular branch of the facial nerve (CN VII).

    Blood supply

    It is supplied by the inferior labial branch of the facial artery and the mental branch of the maxillary artery (via the inferior alveolar artery).

    Function

    The mentalis muscle depresses and everts the base of the lower lip, as well as creating wrinkles on the skin of the chin. When drinking, these gestures help form the lips and produce expressions on the face that suggest doubt, disdain, and melancholy.

    Risorius Muscle

    Origin

    The risorius is a highly variable and inconsistent muscle in the buccolabial region. It has multiple origins, including the fascia of the parotid gland, the fascia of the masseter and platysma muscles, and, on rare occasions, the zygomatic arch.

    Insertion

    The modiolus is formed by the convergence of the risorius fibres medially and their horizontal movement towards the mouth’s angles, where they unite with other facial muscles.

    Innervation

    The buccal branch of the facial nerve (CN VII) innervates the risorius muscle.

    Blood supply

    vascularized by the facial artery’s superior labial branch.

    Function

    The risorius muscle is commonly referred to as the “smiling muscle” due to its main purpose of pulling the mouth’s angles superiorly and laterally, which causes smiling.

    Levator Anguli Oris Muscle

    Origin

    The maxillary canine fossa is the origin of the levator anguli oris, a thin, sheet-like muscle.

    Insertion

    It travels almost vertically inferiorly towards the angle of the mouth, attaching to the modiolus and blending with several other facial muscles.

    Innervation

    The buccal or zygomatic branches of the seventh facial nerve (CN VII) supply the levator anguli oris.

    Blood supply

    Its blood supply comes from the superior labial branch of the facial artery and the infraorbital branch of the maxillary artery.

    Function

    The levator anguli oris, like the risorius and zygomaticus major and minor, has the primary function of elevating the angles of the lips, which contributes to the formation of a smile.

    Depressor Anguli Oris Muscle

    Origin

    The depressor anguli oris is a triangular muscle located lateral to the chin on both sides of the face. It originates from the oblique line and mental tubercle of the mandible.

    Insertion

    courses almost vertically upwards to connect with the modiolus.

    Innervation

    The marginal mandibular and buccal branches of the facial nerve (CN VII) provide nerve supply to the depressor anguli oris.

    Blood supply

    It is supplied by the maxillary artery’s mental branch as well as the facial artery’s inferior labial branch.

    Function

    The depressor anguli oris works to reduce the angle of the mouth, which aids in expressing feelings of sadness or anger. Furthermore, this muscle facilitates opening the mouth for eating or speaking.

    Zygomaticus major.

    Origin

    The lateral surface of the zygomatic bone gives rise to the slender muscle known as the zygomaticus major.

    Insertion

    reaches diagonally to the angle of the mouth. It interlaces with several other facial muscles to help form the modiolus.

    Innervation

    The facial nerve (CN VII) innervates the zygomaticus major through the zygomatic and buccal branches.

    Blood supply

    Its blood supply comes from the superior labial branch of the facial artery.

    Function

    The zygomaticus major muscle elevates and elevates the angle of the mouth superolateral, producing a smile in conjunction with other muscles.

    Zygomaticus minor.

    Origin

    The zygomaticus minor, like its major counterpart, grows from the lateral surface of the zygomatic bone and extends diagonally towards the lips.

    Insertion

    It inserts medially into the zygomaticus major and the upper lip’s skin.

    Innervation

    The zygomatic and buccal branches of the facial nerve (CN VII) innervate the zygomaticus minor.

    Blood supply

    The superior labial branch of the facial artery provides its vascular supply.

    Function

    The zygomaticus minor works with other upper lip tractors to elevate and evert the upper lip, allowing for a variety of facial expressions such as smiling, frowning, and grimacing.

    Auricular Muscles

    The auricular muscles are thin, fan-shaped muscles that connect the auricle to the scalp and move it to a limited extent. These muscles include:

    • The auricularis anterior originates from the lateral border of the epicranial aponeurosis and connects to the spine of the auricle helix.
    • The auricularis posterior emerges from the temporal bone’s mastoid process and enters the ponticulus on the eminentia conchae.
    • The epicranial aponeurosis is the source of the auricular superior, which converges into a thin, flat tendon that joins the upper part of the auricle.

    Innervation

    The facial nerve branches innervate all of the auricular muscles; the temporal branches supply the auricularis anterior and superior, while the posterior auricular branch supplies the auricularis posterior.

    Blood supply

    The posterior auricular artery provides the majority of the blood supply to the auricular muscles.

    Function

    In humans, the auricular muscles serve little purpose because they are so primitive. The majority of ear movements produced by these muscles occur during smiling and yawning, with the auricle being pulled anteriorly, posteriorly, or superiorly.

    Embryology

    The facial muscles begin to develop in the fourth week from the first and second branchial (pharyngeal) arches. The arches depict the branchial apparatus’ mesodermal components. Branchial clefts contain ectoderm, which develops into skin, whereas branchial pouches contain endoderm, which forms the mucosal lining. The Meckel cartilage, which later forms the maxilla, mandible, malleus, and incus, is located within the first arch. The muscles that develop from this arch are masticatory and controlled by CN V3. Other muscles controlled by this cranial nerve include the tensor veli palatini, which tenses the soft palate, and the tensor tympani, which regulates malleus movement during sound transmission.

    The mimetic muscles originate in the second branchial arch, which contains the Reichert cartilage. This structure eventually gives rise to the temporal bone’s styloid process, the stylohyoid ligament, and the hyoid bone’s lesser cornu. The mandibular depressors, stylohyoid and posterior digastric, as well as the facial expression muscles, are all under the control of CN VII, the second branchial arch nerve.

    Clinical significance of facial muscles

    • Autoimmune diseases, such as Guillain-Barré syndrome or multiple sclerosis, can lead to facial palsy over time.
    • Bell’s palsy occurs when swelling compresses the facial nerve, resulting in facial weakness or paralysis on one or both sides of the face. It almost always results in a total inability to wrinkle your forehead. Bell’s palsy develops suddenly but is usually temporary.
    • Head and neck cancer: A growing tumour can impair facial muscle function over time.
    • Infection: A bacterial or viral infection can cause facial nerve inflammation as well as muscle problems. Examples include ear infections, Lyme disease, and Ramsay-Hunt syndrome.
    • Injury to the head or face: Facial trauma, such as a blow to the head or a car accident, can cause nerve and muscle damage.
    • Whenever a blood vessel in the brain ruptures or gets blocked, a stroke happens. It can result in sudden facial weakness or paralysis. Other symptoms could include paralysis on one side of the body, confusion, memory loss, and difficulty communicating. A person who has had a stroke can usually still wrinkle their brow, unlike Bell’s palsy.
    • Facial paralysis.: This condition can result from local or systemic pathologies affecting the central or peripheral nervous systems. Bell palsy is the most commonly reported cause of facial paralysis. This disorder has a good prognosis, with 70-90% of patients eventually regaining premorbid function. Patients who do not regain normal mimetic function may experience long-term complications such as persistent corneal exposure, difficulty eating and speaking, and psychosocial issues.

    Exercises for facial muscles

    Here are some practice tips:

    • Sit in front of a mirror.
    • Do these exercises slowly and carefully.
    • To avoid unwanted movement, gently move muscles with your fingers.

    Ideally, you may stay faithful to the following general guidelines:

    • Perform 5–10 repetitions of each exercise.
    • Hold each position for 5-10 seconds, then relax and rest briefly before repeating.
    • When appropriate, repeat on the other side.
    • Aim to do facial exercises at least three or four times per day.
    • As you gain confidence, gradually increase the number of repetitions, duration, and intensity.

    Eyebrow Exercises

    Eyebrow exercises work the frontalis muscle, which raises the brows. It also facilitates emotional expression and nonverbal communication.

    Strengthening this muscle can improve facial symmetry and overall muscle control, making it easier to express shock and surprise.

    To exercise this muscle:

    • Frown and draw your brows together and downward.
    • Gently raise your brows while keeping your eyes open. Use your fingers to help if necessary.
    • Press your fingertips firmly into your brow and gradually slide them towards your hairline.
    • Gently press the back of your index finger against your eyelid. Then use your opposite hand to gently stretch your brow upward.

    Eye exercises.

    These exercises work the muscles around the eyes, including the orbicularis oculi muscle, which is responsible for blinking and closing the eyes.

    To exercise these muscles:

    • Close your eyelids tightly to form wrinkles at the outer corners of your eyes.
    • Squint your eyes as if you want to see something far away.
    • Widen your eyes without moving your brows. If necessary, hold your brows in place with your fingers.
    • Close your eyes and gently press your fingertips against the top and bottom eyelids.
    • Wink one eye slowly.
    • Maintain a straight neck and slowly gaze downward.

    Nose exercises.

    These exercises work on strengthening the muscles around the nose and upper lip, such as the nasalis muscle, which flares the nostrils, and the levator labii superioris muscle, which lifts the top lip.

    To exercise these muscles:

    • Inhale deeply, then sniffle.
    • Wrinkle and flare your nostrils as much as possible.
    • Flare your nostrils and take a deep breath through them.
    • Use your index finger to push the skin down while flaring your nostrils, resulting in wrinkles at the base of your nose.

    Tongue exercises

    Tongue exercises improve strength, mobility, and control.

    To exercise this muscle:

    • Press the tongue strongly against the roof of the mouth.
    • Slide your tongue back towards your molars, keeping the tip against the back of your top front teeth.
    • Extend your tongue as far as possible, then curl the tip towards your nose.

    Mouth exercises.

    These exercises target the lips, cheeks, and jaw muscles.

    To exercise these muscles:

    • Slowly pucker your lips and push them forward.
    • Gently draw the corners of your mouth down, using your index fingers if necessary.
    • Puff your cheeks as much as possible.
    • Press your cheeks firmly against your teeth, then pull back the corners of your mouth while drawing your chin back.
    • Move your jaw slowly to one side while keeping your teeth together.
    • Stretch your lips into a wide smile, revealing your teeth.

    Chin and Neck Exercises

    These exercises primarily target the platysma muscle, which controls mouth, jaw, and neck movements.

    To exercise these muscles:

    • Tuck your chin towards your neck.
    • Tighten the chin and neck muscles.
    • Jut out (extend) your chin.
    • Tilt your head slightly back and to the side.
    • Tilt your head back, bring the corners of your mouth down, and move your lower jaw up and down.

    Summary

    Facial muscles, also known as craniofacial muscles, are a group of approximately twenty flat skeletal muscles located beneath the skin of the scalp and face. They originate from the skull’s bones or fibrous structures before spreading to the skin. These muscles are supplied by the facial nerve (cranial nerve VII), which controls facial expression. Mimetic muscles, also known as mimetic muscles, are only found in mammals but are descended from neural crest cells found in all vertebrates.

    Facial muscles are categorized into four main types: corrugator supercilii, depressor septi nasi, orbicularis oris, buccinator, levator labii superioris, depressor labii inferioris, levator labii superioris alaeque nasi, mentalis, risorius, and levator anguli oris. Corrugator supercilii is a slender muscle located deep within the medial brow, while depressor septi nasi helps open the nasalis and is found in the maxilla.

    The muscle known as the buccinator, which is situated between the mandible and the maxilla and has a thin, square shape, presses the cheek against the molar teeth. Levator labii superioris and depressor labii inferioris work to elevate and evert the upper lip, exposing the maxillary teeth and deepening the nasolabial lines.

    Auricular muscles are thin, fan-shaped muscles that connect the auricle to the scalp and move it to a limited extent. Facial muscles develop in the fourth week from the first and second branchial arches, and conditions such as Bell’s palsy, head and neck cancer, infection, facial trauma, stroke, and facial paralysis can impair facial muscle function.

    Facial muscles can be strengthened through various exercises, such as eyebrow exercises, eye exercises, nose exercises, tongue exercises, mouth exercises, and chin and neck exercises.

    FAQs

    What are the most common uses of facial muscles?

    Two main functions are carried out by your facial muscles. Chewing (also known as masticating). Make facial expressions like smiling, pouting, or raising your brow in surprise.

    What type of muscle is responsible for facial expression?

    The facial muscles are striated muscles that connect the facial skin to the skull bone, allowing for important daily functions like mastication and emotional expression. The facial muscles perform a variety of movements but are commonly divided into facial expression (mimetic) and mastication muscles.

    What nerve controls facial muscles?

    The seventh cranial nerve (CN VII) contains the facial nerve. It originates from the brain stem and runs posteriorly to the abducens nerve and anteriorly to the vestibulocochlear nerve.

    What other names do facial muscles go by?

    Located beneath the skin of the face and scalp, the facial muscles, also referred to as craniofacial muscles, are a group of about 20 flat skeletal muscles.

    Which muscle closes the eye?

    The orbicularis oculi muscle
    The muscle known as the orbicularis oculi helps to pump tears from the eye into the nasolacrimal duct system and closes the eyelids. The orbital section of the orbicularis oculi is more involved in voluntary eyelid closure, such as winking or forced squeezing.

    How do I work my facial muscles?

    Purse your lips together, then smile, causing the cheek muscles to rise. Place your fingers on the corners of your mouth and slide them up to the top of your cheeks, then hold for 20 seconds.

    References:

    • Facial muscles. (2023, November 21). Kenhub. https://www.kenhub.com/en/library/anatomy/the-facial-muscles
    • Facial muscles. (2024, February 15). Wikipedia. https://en.wikipedia.org/wiki/Facial_muscles
    • Westbrook, K. E., Nessel, T. A., Hohman, M. H., & Varacallo, M. (2024, April 20). Anatomy, Head and Neck: Facial Muscles. StatPearls – NCBI Bookshelf. https://www.ncbi.nlm.nih.gov/books/NBK493209/
    • Professional, C. C. M. (n.d.-j). Facial Muscles. Cleveland Clinic. https://my.clevelandclinic.org/health/body/21672-facial-muscles
    • Cronkleton, E. (2023, April 10). 6 Types of Facial Exercises for Bell’s Palsy. Healthline. https://www.healthline.com/health/bells-palsy-exercises
  • Parkinsonian Gait

    Parkinsonian Gait

    Our walking pattern is referred to as our gait. Our bodies are normally upright, not falling forward or backward, with arms swinging to the sides and an even stride. Our center of gravity is stabilized when we stand up straight, which helps us to keep our balance.

    A Parkinsonian gait: what is it?

    Parkinsonian gait is a distinctive movement pattern often seen in individuals with Parkinson’s disease. Characterized by a shuffling walk, short steps, and a stooped posture, this gait disorder significantly affects mobility and quality of life.

    Particularly when the condition has been developed, Parkinsonian gait is a clear sign of Parkinson’s disease. It is usually thought to have less of an impact on a person’s standard of life than other Parkinson’s symptoms. People with Parkinson’s disease often have small, shuffling steps. They could struggle to stand back up on their feet.

    Abnormalities in Parkinsonian gait might be recurrent or persistent. Recurrent alterations could happen unexpectedly and suddenly, such as a stiff gait. Walking with constant gait alterations, such as walking more slowly than you initially expected, is referred to as continuous change.

    A person must be able to flex their foot, bend their knee, and shift to the heel of their foot to be able to move. Parkinsonian gait loses the knee and foot flexion of normal movement, therefore it might be difficult for some persons to start walking. Because the leg cannot be turned or moved, turning can be slow and uncomfortable, and managing stairs, slopes, and uneven surfaces can be practically impossible.

    Introduction:

    Parkinsonian gait is one of the numerous motor symptoms that are specific to Parkinson’s disease, along with tremors and slowness of movement. Two typical motor symptoms of Parkinson’s disease are difficulty starting muscle movements and losing control over motions.

    Deficiencies in postural stability and balance probably cause this patient group’s increased risk of falls and fractures. Parkinson’s disease patients show distinctive weight-shifting behaviors in response to balance disturbances caused by a posterior waist pull. They perform a modified ankle joint movement before taking off and landing with a posterior weight shift in contrast to healthy, age-matched controls.

    Parkinson’s disease patients may become inactive because they are unable to get back up on their feet. This sickness is caused by dopamine insufficiency in the basal ganglia circuit, which leads to motor problems. One of the most impacted motor characteristics of Parkinson’s disease is gait, although the condition has numerous other symptoms.

    A person’s stride may freeze in response to environmental factors including entering a crowded space, changing directions, or entering a small doorway. Emotions, especially a panic attack can also cause it.

    Parkinsonian gait patients are characterized by small shuffling steps, general slowness of movement (hypokinesia), or total immobility (akinesia) in extreme situations. Parkinson’s disease (PD) patients had reduced stride lengths, walking speeds, and cadence rates during free ambulation, despite an increased double support duration. The patient finds it tough to quit as well as to stop once they get going. This is caused by the hypertonicity of the muscles. A person may become immobile at any point in time. However, that typically happens when you stand up. You might find that you are unable to move or get to your feet.

    Many therapies, including medication, physical therapy, and assistive equipment like walkers or canes, can be used to manage Parkinsonian gait. Individuals with Parkinson’s disease should work together with the doctors who treat them to develop a customized treatment plan that targets their particular requirements and symptoms.

    How are gait and freezing evaluated by the doctor?

    A doctor must ask about your medical history to evaluate your gait. Perhaps a full neurological examination is necessary. Your examination may include a check for decreased arm swing, foot clearance, stride length, walking speed, and difficulty making turns.

    Timed examinations may also be used, and the physician may attempt to freeze your gait by having you rotate, walk-in confined spaces, or perform two tasks simultaneously. For a more thorough evaluation and therapy, your doctor may suggest that you see a physical therapist.

    What particular causes are there?

    Parkinson’s disease causes a reduction in dopamine production as well as the degeneration of nerve cells in the brain’s basal ganglia. Dopamine facilitates the basal ganglia’s ability to connect neurons. This suggests that fewer interactions are caused by lower dopamine levels.

    Your body moves smoothly because of the basal ganglia. That part of the brain cannot operate as well when there are fewer connections there. This leads to the movement signs of Parkinson’s disease, such as Parkinsonian gait.

    Features of an abnormal gait:

    Heel-to-toe features

    The gait patterns of people with Parkinson’s disease differ from those of healthy people.

    Heel-to-toe walking is the gait in which the heel contacts the ground before the toes. Toe-to-heel walking, on the other hand, occurs less frequently and in the later stages of the condition. In a flat foot strike, however, the entire foot contacts the ground at the same time (a motion known as your foot contacting the ground first). Parkinson’s disease patients also have less foot lifting during the swing phase of gait, which contracts the space between their toes and the ground.

    Patients with Parkinson’s disease feel less force when they land on their heels. Analyses have indicated that this progression is correlated with the severity of the ailment, and its influence decreases with time. Patients with Parkinson’s disease also frequently experience a shift in load toward the medial foot portions and greater relative loads in the forefoot areas. It is thought that this load shift helps in compensating for postural instability. The intra-individual variability in foot strike patterns is found to be significantly lower in people with Parkinson’s disease compared to normal individuals.

    Vertical ground response force

    During normal gait, the second peak on the vertical ground reaction force (GRF) plot is caused by the push-off force from the ground. The foot touches the ground, causing the first peak to rise. The vertical ground response force signal has a unique shape in Parkinson’s illness.

    In the early stages of the disease, lower forces (or peak heights) are seen for heel contact and the push-off phase, which are comparable to those of older participants. Throughout the most severe phases of the disease, when short, shuffling steps characterize gait, patients with Parkinson’s disease (PD) have a single narrow peak in their vertical ground response force signal.

    Falls and frozen gait

    Two episodic events that are commonly associated with Parkinsonian gait include falling and freezing. Because both symptoms are more common in the later stages of the disease and less common in the earlier stages, falls and freezing of gait are commonly thought to be closely related in Parkinson’s disease (PD).

    Additionally, freezing of gait frequently leads to falls. Both symptoms typically respond insufficiently and sometimes paradoxically to dopaminergic treatment, which may point to the same underlying etiology. It is achievable to show a poor and irregular dopamine-producing pharmaceutical reaction when a demanding technique is utilized to examine gait both during the entire on-medication state and following medication removal.

    Freezing of Gait: Usually an episode lasting less than a minute, the patient who experiences Freezing of Gait (FOG) will stop walking and remark that their feet are immobilized. After the patient crosses the block, walking should be rather easy. While the pathophysiology of the phenomenon remains mostly unknown, it is most likely the result of a dispersed functional-anatomic network. Sadly, there are not many advantages to the freezing of gait treatments that are currently available.

    The most common kind of freezing of gait is called “start hesitation,” which happens when the patient wants to start moving. The second most common is “turning hesitation.” Additionally, freezing of gait can be experienced when stepping through a doorway or other tiny area, changing one’s steps to reach a particular location, and when confronted with stressful situations like an elevator door opening or a doorbell ringing. freezing of gait may appear on its own, even in an open runway area, as the sickness worsens. Psychological therapy has been shown to lessen the negative effects of psychosocial factors, such as anxiety or depression, which may aggravate tremors or freezing of gait in Parkinson’s patients.

    Psychosocial intervention may therefore be helpful for all patients in reducing pain, anxiety, dejection, and insomnia as well as the aggravating effects of psychosocial factors on motor symptoms.

    Falls: Similar to freezing of gait, falls are uncommon in the early stages of the illness and increase in frequency as it worsens. The main causes of falls are sudden alterations in posture, especially when the trunk is turned, or attempting to walk or balance while doing many tasks at once.

    Falls also frequently occur when transferring, like getting out of a chair or bed. In 45% of all falls, patients fall forward, and 20% fall laterally. Falls that are frequent in the early stages of the illness may be a sign that you need to get checked for other diagnoses, such as progressive supranuclear palsy.

    Swaying posture

    Postural instability in end-stage Parkinson’s disease (PD) is frequently characterized by the difficulty of maintaining balance during everyday movements like walking, turning, and getting up from a chair. Individuals with advanced Parkinson’s disease (PD) have fallen as a result of growing rigidity in their movements and an inability to maintain sufficient bodily balance with their center of mass over the base of support.

    Although postural sway in a normal posture usually reduces in Parkinson’s disease patients, it typically increases in people with cerebellar ataxia, stroke, or head injuries. The reason for this is that Parkinson’s disease appears to be caused by a lack of flexibility in postural responses. Such rigidity makes these patients more likely to fall.

    In Parkinson’s disease, what leads to problems with gait?

    Why some individuals with Parkinson’s disease have trouble walking while others do not is unknown.

    The complex brain circuit that controls walking involves several connections between various brain regions, including;

    • The motor cortex is responsible for leading and planning movements.
    • The basal ganglia include brain cells that control movement.
    • Motor coordination is facilitated by the cerebellum.

    Parkinson’s disease symptoms and signs that affect gait:

    A few common symptoms are what a doctor examining Parkinson’s disease looks for.

    These can include;

    • Moving more slowly than normal
    • Slow motion
    • Lower movements of the body
    • Placing the feet close together
    • Arm swing is minimal or absent.
    • Problems when moving
    • The feet land level on the ground as opposed to on the heel.
    • Small, sharp movements

    Being immovable or unable to elevate oneself off the ground Turning, starting, moving through confined places, and coming close to their objective are the times when people freeze the most. It may happen when something draws attention away from the original target.

    Typical Gait Pattern for Parkinson’s Disease:

    People with Parkinson’s disease often experience further abnormalities in their stride as the disease progresses and their symptoms worsen.

    Among the deficiencies are;

    • Hypokinesia, or walking more slowly and with fewer steps
    • Reduced coordination, as seen by shorter steps and a higher rhythm at the destination
    • Freezing of gait is the inability to generate steps during gait or a complete absence of stepping during gait.
    • Finding it difficult to multitask while walking.

    There is an increased risk and frequency of falls in conjunction with these impairments of gait. A higher chance of falls increases the danger of injuries like hip fractures and also affects a person’s freedom and ability to interact with others in the community. Additionally, fear of falling can lead to depression and self-isolation, among other psychological effects.

    Kinematics of Gait:

    Gait kinematics changes include variations in the excursion of the hip and ankle joints. A toe-heel sequence or a flat foot in place of a heel-toe development may develop in the patient as the problem worsens. Parkinson’s disease patients show a more rudimentary gait, as though they have lost their ability to walk with maturity.

    The flat-footed gait makes it more difficult to step over obstacles or walk across carpets. Plantar flexion is reduced at the terminal stance based on three-dimensional gait learning. Modifications in hip flexion may also have an impact on the ankle path. However, the overall quality of the experience appears to be unaltered.

    Pathophysiology:

    Reduced balance responses may be the cause of festinating gait, according to a specific conceptual structure. If walking is nothing more than a series of controlled falls, and if the normal response to falling is either insufficient or delayed, the person will either fall completely or continue taking short, running-like steps.

    One situation where improper termination of the nervous system may result in ever shorter steps is bradykinesia. If the motor unit stops in the middle of the motion or is unable to increase its frequency to a sufficient level, the entire range of motion will be limited. Walking would become shorter as a result of this. Fascination may also result from kinematic changes in the gait.

    What is the outcome like?

    Apart from tremors and slowness of movement, Parkinson’s disease is linked to a range of motor symptoms, including Parkinsonian gait. While the specifics of Parkinsonian gait may vary from person to person.

    Most people share a few notably different characteristics. These are a few of them;

    • When you start taking shorter, smaller steps, it may appear as though you’re rushing. Alternatively, you are walking more slowly than is reasonable for someone your age. Walking with fewer arm movements leads to frequent falls and gait freezing.
    • Parkinsonian movement patterns include freezing and stooped posture, which are likely to get worse with time. As you age, your range of motion may change, which may lead to a decrease in activity. As a result, your muscles and reflexes can weaken. Consequently, this may result in musculoskeletal abnormalities that worsen slumped shoulders and bad posture, raising the risk of falling.
    • It is simple to lose confidence due to a fear of falling if you start to become slower to move or feel unstable. Getting help for improving your gait is essential since it could have an impact on your social life and overall quality of life.

    Treatment:

    Parkinson’s disease does not presently have a recognized treatment. As of right now, there are no medicines that can stop or delay the disease’s progression. Most people with Parkinson’s disease use medicine to reduce their symptoms. Dopamine-related medication can help manage walking issues; however, their effectiveness decreases with the severity of the condition.

    Levodopa (L-dopa) and other medications that improve the brain’s synthesis of dopamine or increase its utilization can be used to treat Parkinsonian gait. Using these medications is the main treatment for all symptoms of Parkinson’s disease. One medication that is commonly administered in addition to levodopa (L-dopa) is carbidopa. This medication stops the body from metabolizing levodopa (L-dopa) before it reaches the brain.

    Deep brain stimulation has also been shown to help certain people with Parkinsonian gait when paired with levodopa (L-dopa). During deep brain stimulation, tiny wires are implanted into the parts of the brain that control movement. The wires are connected to a device that, like a pacemaker for the heart, continuously pulses electricity into the brain.

    Patients with Parkinson’s disease may benefit from deep brain stimulation and medication to alleviate gait issues, although these treatments often have less of an impact than other Parkinson’s symptoms. Long-term usage of levodopa (L-dopa) and associated medications, for example, may increase the risk of gait freezing. This is due to the possibility that if you take medication for a long period, its effects can start to alter during the day. If this happens, sometimes when the effects of the medication aren’t as strong, you can have a freeze in your stride.

    • Focusing on techniques:

    Patients with Parkinson’s disease (PD) are showing signs of an improved gait by deliberately practicing each step before taking it and paying closer attention to their walking. A caregiver who walks beside the Parkinson’s patient can sometimes help the patient focus on their gait or indicate where to step over by placing their foot in front of the patient.

    Forcing the patient to concentrate on the stepping motion instead of the involuntary walking activity, redirects their attention away from the faulty basal ganglia circuit and makes the behavior voluntary. It has also been shown that by avoiding concurrent tasks requiring either motor or cognitive attention, the gaits of patients with Parkinson’s disease (PD) can revert to normal.

    • Exercise

    It has been proven that physical therapy and exercise can help Parkinson’s disease patients’ walking patterns.

    Physical therapists can help patients improve their gait by creating training plans that lengthen their stride, widen their base of support, improve their heel-toe gait pattern, straighten their posture, and improve their arm swing patterns.

    During gait training, stride length and walking speed can be improved by wearing an overhead harness while using a treadmill. The harness helps the patient keep their posture straight by removing the need to employ a mobility help a practice that often encourages a posture that is forward-flexed. The improvement in gait patterns is thought to be caused by the activation of the central pattern generator.

    Trunk flexibility and the strength of the lower limbs and core muscles have been connected to improved walking form and increased balance. Cardiovascular exercises like water aerobics and pair cycling help improve balance and strength. As a degenerative condition, Parkinson’s disease requires ongoing exercise to maintain its benefits.

    Improved vertical postural alignment can also be attained through methods such as using a vertical walking pole. The therapist may also use floor tiles or footprints to help the patient place their feet more precisely and broaden their base of support. Additionally, it is advantageous to visualize the ideal movement and use creative imagination to walk with a more normalized gait pattern.

    The patient should be challenged when walking on a variety of surfaces, such as grass, tiles, carpet, or foamed surfaces, to help them move closer to normalizing their gait pattern.

    Gait training:

    The term “Parkinsonian gait” refers to a specific, unsteady walk caused by slowness, a shortened stride, and anomalies in posture.

    The goal of physical therapy is to keep your body in the most functioning state possible so that you can keep moving safely and independently. Physical therapists frequently help you manage your symptoms and improve your quality of life.

    Through treatment and exercise, physical therapists help you maintain your ability to function in day-to-day living. In addition to working with patients in hospitals and community settings, physical therapists also see them in their homes.

    The following are the main objectives of physical therapy for Parkinson’s disease;

    • To lower the chance of falling, to maintain a person’s strength and flexibility.
    • To keep moving while walking securely.
    • To maintain and improve independence and functional abilities.
    • To improve and adjust posture and balance.
    • For improving routine activities (such as getting out of bed and out of a chair)

    Among dealing strategies include breathing exercises to maintain healthy airways, teaching relaxation techniques to alert caregivers to possible freezing, and employing auditory or visual signals to improve manual skills (such as reaching and gripping).

    The objectives of physical therapy will vary depending on the patient’s disease state.

    • Initial stage:

    The primary goals of treatment in the early stages of the illness are to avoid inactivity while improving physical function, including strength, flexibility, and aerobic capacity.

    Your physical therapist can provide you with a set of exercises that you can practice alone or with others, as well as advice on how to keep up your current level of fitness.

    • Intermediate stage:

    Physical therapy now tries to improve upper limb function, particularly reaching and gripping, as well as posture, balance, walking, and transfers.

    Your physical therapist might suggest a range of exercises that can help with these tasks, like hand exercises to strengthen your manual ability so you can button a shirt more easily, for example.

    To minimize the risk of falls and secure your house, a physical therapist might work with an occupational therapist.

    • Late stage:

    Preventing issues that might come up from people who use wheelchairs or are bedridden is currently the primary goal of physical therapy.

    To achieve this, you must maintain regular breathing, stay away from pressure sores, and work with your caregivers to ensure that you are properly positioned and that they are safe when lifting you.

    • Pay Attention to Balance:

    You achieve proper balance when the inner ear, which helps in orientation, interacts with what you view (visual feedback) and how your feet feel the ground under them.

    Your gait may become uneven and you may become tense in busy or public places due to Parkinson’s disease-related damage to this balancing system.

    Walking-based exercises, often known as gait training, have benefits. A physical therapist should supervise any activities intended to improve balance since they might help you identify any balance problems and educate you on how to overcome them.

    • Flexibility and Stretching:

    Muscle tension in the hamstring, hip flexor, and calf is common in Parkinson’s disease patients. Stretching frequently throughout the day is beneficial to doing it only once to help with that stiffness.

    • Strengthening Exercise:

    Everyone has to engage in strength training because age-related muscular atrophy develops. But there’s a sign that people with Parkinson’s disease may find their lives more challenging due to the weakness of their muscles.

    A therapist may suggest resistance exercises using resistance bands (a thick rubber band) or light dumbbells, depending on the severity of your disease.

    Exercises in a swimming pool that use the resistance of the water to build muscle can also be beneficial.

    What methods of self-care can I apply?

    Since there are few advantages to using medicine to improve gait, it’s important to think about how you might improve your gait and use helpful signals to become a better version of yourself.

    You could find the following advice useful;

    • Instead of looking down at your feet when you walk, look forward.
    • Take care to maintain a straight posture when you walk.
    • You can learn to be more aware of your posture by taking a position where your heels, hips, shoulders, and head are all in touch with the wall.
    • Elevate your toes and land your heel firmly on the ground after each step to extend your stride.
    • To keep your stride from getting shorter over time, take a long walk and keep your attention on its length.
    • Maintain a swinging arm at your sides.
    • While you’re walking, avoid talking or engaging in any other activity.
    • Avoid wearing high heels or shoes with crepe soles as they could “snap on the ground.”
    • Stretching is a useful technique to increase the range of motion and decrease stiffness or rigidity.

    Summary:

    The main explanation for Parkinson’s disease (PD) is that it is a degenerative brain disorder that affects the brain areas responsible for movement control. The most prevalent motor dysfunctions in people with Parkinson’s include shuffling gait, poor balance, and freezing gait.

    Postural control and walking difficulties can develop in individuals with early-stage Parkinson’s disease. They are defined by a slower gait, reduced arm swing, shorter steps, postural instability, and a loss of disconnected trunk and arm movements during gait.

    If you become less mobile or feel shaky, it is easy to lose confidence because of a fear of falling. Getting advice on how to improve your gait is needed since it may have an impact on your social interactions and overall well-being.

    Gait changes are caused by modifications to the nerve cells in the area of the brain that regulates movement. It’s not a muscular ailment. Engaging in therapies and activities that activate the brain and nervous system can be advantageous.

    There is no known cure for Parkinson’s disease. A gradual Parkinsonian gait will be experienced by the majority of people. If therapy or treatment is not received, Parkinson’s gait will get worse. It can improve with medical care.

    FAQs

    What is the Parkinsonian disease syndrome?

    Parkinson’s disease is a chronic neurological disorder that affects both the nervous system and the body’s nerve-controlled areas. The symptoms appear gradually at first. The first sign could be a barely noticeable tremor in one hand. While tremors are common, you may also feel stiff or move more slowly due to the sickness.

    How long can someone with Parkinson’s disease walk?

    Walking daily can greatly improve a person with Parkinson’s disease’s ability to live a life that is both fulfilling and independent. It has been shown that even 20 to 30 minutes a day of intense walking can improve tremor, flexibility, gait, and balance as well as halt the course of Parkinson’s symptoms.

    What types of anomalies in gait might a person with Parkinson’s disease (PD) experience?

    Based on their appearance, these walking disturbances can be classified into two groups.
    Constant
    Periodic

    What is the gait test for Parkinson’s disease?

    The testing component is observing the patient’s steps. To improve the likelihood that any anomalies may be detected, the patient should ideally walk back and forth multiple times in a hallway that is at least 10 feet long. These irregularities in gait are typical for Parkinson’s disease.

    Which movements are best for walking?

    Keep your shoulders down and your arms at your sides in a free-flowing, flexible stance. Maintain a back-and-down posture with your shoulders and maintain a loose, flexible arm position at your sides.

    Does Parkinson’s have a broad or narrow gait?

    When walking, people with Parkinson’s disease typically have a small base of support.

    How is gait affected by Parkinson’s disease?

    Gait abnormalities and poor postural control can appear early in Parkinson’s disease (PD). Their steps get shorter, their gait slows down, postural instability sets in, and they lose the capacity to move their arms and trunk in rhythm with their trunk during movement.

    Can an individual’s gait be corrected with physical therapy?

    When it comes to helping patients improve their gait, physical therapists are helpful. Your physical therapist and you will work together to develop a treatment plan that will allow you to achieve your particular goals. A unique treatment plan will be developed by your physical therapist for your specific problem.

    What are the five stages of Parkinson’s disease?

    Rigidity or stubbornness
    Bradykinesia causes slow movement.
    Bodily parts that tremble or shake uncontrollably.
    Difficulties keeping one’s posture and balance.
    Difficulty walking or moving.

    What is the walking pattern of a person suffering from Parkinson’s disease?

    Parkinson’s disease (PD) is mainly understood to be a degenerative brain disorder that affects the brain areas responsible for motor control. The most prevalent motor dysfunctions among PD patients are freezing gait, shuffling gait, and poor balance.

    How does the Parkinson’s walk look?

    The relatively short, shuffling steps of Parkinsonian Gait, sometimes referred to as Parkinson’s Walk, set it apart from typical adult gait in which the feet do not rise very high off the ground.

    References:

    • November 7, 2023; A., & A. What is Parkinsonian gait, and what are some ways to improve it? NexStride *. What is a better way to walk if you have Parkinson’s disease? The blog at https://www.getnexstride.com/ Inside text reference: (2023)
    • Parkinson-style gait. January 16, 2024. Wikipedia, https://en.wikipedia.org/wiki/Palidian gait Parkinsonian Gait is mentioned in the text (2024)
    • Veazey, K. September 29, 2022. understanding of Parkinson’s disease sufferers’ gaits. Parkinson’s disease treatment and gait: The website Medical News Today Citation inside the text: Veazey, 2022
    • Gait. (No specific date). Parkinson’s Europe. The website for Parkinson’s Europe provides information on the disease, symptoms, motor symptoms, and gait Gait (n.d.) is cited inside the text.
    • E. Hersh, September 18, 2018. Knowing the Parkinsonian Gait. The Parkinson’s disease: http://www.healthline.com/health/gait Citation inside the text: Hersh (2018)
    • Full Citation: Essential Knowledge for Parkinson’s Disease Patients Regarding Gait Issues and Freezing. (For the time being). Parkinson’s disease-related freezing and abnormal gait Movement Disorders Society (MDS): Resources/Patient-Education.htm (PARKINSON’S DISORDER AND FREEZING: ESSENTIAL INFORMATION FOR PATIENTS, n.d.) Quote inside text
  • 16 Best Exercises for Pes Anserine Bursitis

    16 Best Exercises for Pes Anserine Bursitis

    Introduction:

    Exercises for Pes Anserine Bursitis are an essential part of your overall treatment plan, along with medication and physical therapy.

    One condition that might result from muscular instability around your knee joint is pes anserine bursitis. Most injuries require exercise to help them heal. Exercises that focus on your tendons and muscles can reduce your pain.

    Exercise helps build stronger muscles. Exercise increases function and strength. Physical therapy and focused strengthening exercises can help you achieve better knee function with less pain. You can maintain proper posture by exercising. Stretching is a very useful and efficient treatment for pesanserine knee pain.

    What is pes anserine bursitis?

    The sartorius, gracilis, and semitendinosus tendons, three separate thigh muscles, come together to form the large tendon known as the pes anserine. The pes anserine protects against rotational stress and stabilizes the inside side of the knee in conjunction with these muscles.

    This pes anserine bursa is located precisely on top of the anserine pes. In between tendons and bones, bursae are microscopic fluid-filled sacs that serve as cushions. They reduce friction by moving. As the pes anserine becomes inflamed, inflammation of the underlying bursa may lead to bursitis.

    Pain, tenderness, and swelling are signs of pes anserine bursitis. Particularly, 4 to 5 centimeters below the knee, on the inner side of the shinbone, is where these symptoms are found. Repetitive knee bending, running, and stair climbing aggravate pes anserine bursitis.

    Cause:

    Pes anserine bursitis is a common condition in athletes, especially runners, and is also associated with osteoarthritis in the knee. Bursitis typically results from overuse or continuous friction and stress on the bursa.

    Pes anserine bursitis can happen as a result of various factors, such as;

    • Using improper training methods, such as skipping stretches, running too many hills, and making sudden mileage increases
    • Tense hamstrings muscles
    • Overweight
    • Having knock-kneed knees or having duck feet
    • Arthritis of the knee joint

    Signs and symptoms:

    Pain is a common symptom of pes anserine bursitis. After the joint has been in a fixed position for some time, the pain might be worse in the morning. The degree of pain you experience depends on the severity of your condition.

    The following are typical signs of pes anserine bursitis;

    • Pain on the inside of your knee or in the middle of your shinbone that gradually spreads to a location two to three inches below the knee joint
    • Pain that could radiate down the lower leg and to the front of the knee
    • Pain that gets worse when you exercise or go up and down stairs
    • Pain that wakes you up when you’re sleeping on your side
    • Pain that gets worse when one sits up from a chair or crosses one’s legs
    • Localized swelling or tenderness to the touch in the affected area Knee
    • Joint muscle weakness and reduced range of motion

    Exercise’s advantages for pes anserine bursitis:

    • Strengthen balance or posture
    • Relaxing muscles
    • lessen pain
    • Improve movement
    • Improved flexibility
    • Increased level of physical fitness
    • Improves performance in daily activities
    • Improved Range of Motion
    • Reduce inflammation

    Before beginning a workout plan, take the following actions:

    It’s important to go through a few safety precautions and maximize the advantages before starting any exercise program. To find out which exercises are best for your particular issue, speak with a doctor or physical therapist.

    You must pay attention to your body and avoid pushing beyond difficulties. Although pain after exercise is common, chronic or intense pain could suggest that you’re pushing yourself too hard. Your best bet is low-impact exercises, which you should gradually transition to more difficult ones as soon as you are able.

    Maintaining correct technique and posture is important to prevent additional injuries. See a physical therapist if you have any questions about how to successfully carry out your exercise routine correctly. Warm up your joints and muscles before beginning any activity to help them get ready for the workout.

    Exercises for Pes Anserine Bursitis:

    The management of pes anserine bursitis can benefit from exercise. Knee function can be improved and pain can be reduced with the use of physical therapy and targeted strengthening exercises. Additionally, stretching exercises can help you stay flexible and lower your chance of having attacks in the future.

    To create a suitable exercise program, speak with a physician or physical therapist. If done incorrectly, some exercises can make symptoms worse.

    Straight leg raise

    • Comfortably in a supine position on the bed or floor to begin.
    • Now flex just one knee.
    • After that, carefully raise your whole leg off the table.
    • Maintaining the straightness of your opposite knee.
    • For a short while, hold it.
    • Slowly bring your leg back down to the floor.
    • Then return to your neutral position.
    • Then relax.
    • Repeat this exercise five to ten times.
    Straight-leg-raise
    Straight-leg-raise-

    Calf stretch

    • Place yourself on the ground and stand with your legs straight in front of you.
    • Using both hands, loop the towel around the heel of your foot.
    • Using the cloth, turn your foot back toward you.
    • Hold this position for a few seconds.
    • Maintain a straight knee.
    • Then return to your neutral position.
    • Then relax.
    • Repeat this exercise five to ten times.
    Lying Stretch
    Lying Stretch

    Heel slide

    • To start, take a comfortable supine position on the bed or table.
    • Next, extend the affected leg towards the buttocks while bending at the knees.
    • Attempt to put your heels on the buttocks.
    • Feel until you find a comfortable position.
    • Hold this position for a few seconds.
    • Straighten your leg now, carefully.
    • Then return to your neutral position.
    • Then relax.
    • Repeat this exercise five to ten times.
    Heel slide exercise
    Heel slide exercise

    Static quadriceps exercises

    • Laying or sitting on your back with support for your back, extend your legs straight in front of you.
    • Place a tiny towel under your knee and roll it up.
    • Pull the other foot toward you while moving the first one slightly to the side.
    • As you firmly press your knee down, your thigh muscles will contract.
    • Hold this position for a few seconds.
    • Then return to your neutral position.
    • Then relax.
    • Repeat this exercise five to ten times.
    static-quadriceps-exercise
    static-quadriceps-exercise

    Leg extensions

    • Sit up straight in a long chair and place your leg on the floor or a plinth to start.
    • Tighten your thigh muscles, face forward, and raise one leg as high as you can to build strength without getting off the chair.
    • Hold this position for a few seconds.
    • Then return to your neutral position.
    • Then relax.
    • Repeat this exercise five to ten times.
    knee-extension
    knee-extension

    Lunges

    • Start by placing your feet hip-width apart on the floor in a comfortable standing position.
    • Now take a step forward that is longer than a walking stride, putting one leg in front of the other.
    • When your foot touches the ground, it should land and stay level.
    • Now lower yourself while bending your knees to around a 90-degree angle.
    • Hold this position for a few seconds.
    • Do not forget to maintain a straight core.
    • After that, slowly raise your front leg and take a step back to your starting point.
    • Then relax.
    • Repeat this exercise five to ten times.
    Lunge Stretch Exercises
    Lunge Stretch Exercises

    Hamstring curls

    • Starting by taking a comfortable position on the ground.
    • Place your hands on your waist or a chair to stay balance.
    • Put your left leg behind your body.
    • With your heel pointing toward your butt, slowly bend your right knee.
    • Maintain a parallel thigh.
    • Hold this position for a few seconds.
    • Then return to your neutral position.
    • Then relax.
    • Repeat this exercise five to ten times.
    standing-hamstring-curl
    standing-hamstring-curl

    Clamshell

    • You begin by lying on your side.
    • Bend your elbow while lying on your left side.
    • Next, raise the support to your head with your left hand.
    • After placing your right foot and leg on top of your left, flex your knees to a 45-degree angle.
    • For balance, place your right hand on your hip or lightly on the ground in front of you.
    • Next, slowly lift your right knee toward the sky while keeping your feet close to your body.
    • Keep your core tight as you raise your lower right leg back up to meet your left.
    • Hold this position for a few seconds.
    • Then return to your neutral position.
    • Then relax.
    • Repeat this exercise five to ten times.
    Clamshells
    Clamshells

    Standing quadriceps stretch

    • Begin in a comfortable standing position.
    • Use a chair or wall to support yourself.
    • Maintaining your grip on your left ankle, bend to your left knee.
    • Behind the body, move the left foot.
    • With your hand on the ankle, attempt to pull the leg up and back.
    • Hold this position for a few seconds.
    • Remember to maintain a straight posture and parallel knees.
    • Your knee side and thighs may feel stretched.
    • Slowly move your leg back to your neutral position.
    • Then relax.
    • Repeat this exercise five to ten times.
    Quadriceps stretching exercises
    Quadriceps stretching exercises

    Hamstring stretch

    • Put both of your knees on the floor, bent.
    • Place your hands behind your leg and just behind your knee.
    • Stretch your leg out straight and then slowly raise it to your head till it reaches your head.
    • You can loop towels over your thigh if you have difficulty getting your hands behind your leg.
    • Grasping it with your hand, move your leg closer to you.
    • Hold this position for a few seconds.
    • Let go after a short while.
    • Then return to your neutral position.
    • Then relax.
    • Repeat this exercise five to ten times.
    lying-hamstring-stretch-with-band
    lying-hamstring-stretch-with-band

    Prone knee bend

    • On the bed or table, take a comfortable position while lying prone.
    • At this point, gradually bend your knee to a tolerable position.
    • Hold it for a short while.
    • Next, progressively bring your leg back to its neutral posture.
    • Then return to your neutral position.
    • Then relax.
    • Repeat this exercise five to ten times.
    prone hamstring curls
    prone hamstring curls

    Prone leg raise

    • Instead of a hard floor, you can use a mat or a plinth to give yourself some support during this exercise.
    • Initially, you can extend your legs behind you while lying on your stomach.
    • You can rest your head on your arms if that makes you uncomfortable.
    • Stretch your left leg as far as you can without experiencing any pain by bending your gluteus and hamstring muscles.
    • Before starting this exercise, make sure the physical therapist has stabilized your pelvic bones.
    • Hold this position for a few seconds.
    • Then return to your neutral position.
    • Then relax.
    • Repeat this exercise five to ten times.
    PRONE-HIP-EXTENSION
    PRONE-HIP-EXTENSION

    Wall Squats

    • The starting point is to stand close to the wall.
    • Keep your feet planted on the ground.
    • If at all possible, back up against a wall.
    • Ensure the distance between your feet is shoulder-width.
    • While keeping your back and pelvis against the wall, progressively bend your knees.
    • Don’t push yourself too hard.
    • Hold this position for a few seconds.
    • Then return to your neutral position.
    • Then relax.
    • Repeat this exercise five to ten times.
    Wall Squat exercises
    Wall Squat exercises

    Hip adductor stretch

    • Put your feet together in front of you while lying on the ground.
    • Extend your knees to the sides.
    • Putting your hands on your feet, pull your heels toward you.
    • As you let your knees loosen and progressively approach the floor, maintain a straight back and a contracted abdominis.
    • There will be a little pressure applied to your pelvic area.
    • Inhale deeply, then hold this posture for a few seconds.
    • Then return to your neutral position.
    • Then relax.
    • Repeat this exercise five to ten times.
    Hip-adductor-stretch
    Hip-adductor-stretch

    Sidelying Hip Adduction

    • With both legs straight, lie on your left side on the mat or the ground.
    • With your right foot level on the floor and your right knee pointing towards the ceiling, bend and pass your right leg over your left.
    • Your right hand should be on the ground in front of you, left hand must be below your head.
    • Lift your left leg up towards the ceiling, making sure it remains straight at all times.
    • Hold this position for a few seconds.
    • After a short while, carefully return the left leg to its original position.
    • Then return to your neutral position.
    • Then relax.
    • Repeat this exercise five to ten times.

    Sidelying Quadriceps Stretch

    • Take a lateral side-lying position.
    • Using your hand to gently pull, bend the knee of your upper leg as far as possible
    • Hold this position for a few seconds.
    • Then return to your neutral position.
    • Then relax.
    • Repeat this exercise five to ten times.
    side-lying-quadriceps-stretch
    side-lying-quadriceps-stretch

    Which Precautions must be taken during exercising?

    • When doing the exercise, keep your posture correct.
    • To properly perform the exercise, extend, hold, and repeat.
    • Stay away from uncomfortable workouts.
    • If an unexpected pain arises, stop working out.
    • Obtain the Correct Balance
    • Between exercises, take a break.
    • Make minimal bends and stretches.
    • When working out, try not to make forceful knee movements.
    • Wear loose clothing so that your body may move easily while working out.
    • If the muscles feel stiff, stretch them; however, you should never feel sharp or severe pain.

    When should you stop exercising?

    • Intense burning in the muscles
    • You’re experiencing illness.
    • If you experience any numbness or pain.
    • Heatstroke
    • Exercise should be stopped if it hurts.

    With pes anserine bursitis, what kind of activities should you avoid?

    • Stay away from climbing stairs
    • Avoid high-impact activities.
    • Running
    • Jumping
    • Playing sport
    • Steps from a long walk

    Helpful recommendations:

    • Think about including your workouts in your routine.
    • Completing each exercise in a single session is not required.
    • You don’t have to complete the exercise movement in its entirety the first time.
    • If you have problems falling asleep, try using a cushion to support your knee.
    • Proceed with your forward progress. You have to train your knee muscles for them to stay healthy.

    Pes anserine bursitis: how common is it?

    Athletes are most likely to get pes anserine bursitis. Adults with obesity and osteoarthritis are also at high risk for the illness. Anterior knee pain, or pain in front of the knee, is more common among obese women over 50, according to data.

    Prevention:

    A little prevention goes a long way. Maintaining proper muscle balance around the knee is important for possibly preventing pes anserine bursitis. Moreover, preparing before engaging in any physical activity is Stretching the muscles in the front, back, and inside the thigh and knee is advised. It’s important to gradually increase your level of exercise over time, especially after a period of relative inactivity or after surgery. By doing this, you can lower your risk of developing bursitis and other diseases that can arise from starting exercise again too soon. Keep in mind that in races, “the slow and steady wins the struggle.”

    Summary:

    Inflammation of a fluid-filled sac (bursa) on the inside of the knee is the result of pes anserine bursitis. It hurts when you bend your knee, climb and go downstairs, or get out of a chair. Damage, illness, or overuse are the causes of this issue. Those who engage in repetitive motions at work, elderly individuals, and athletes are particularly vulnerable to this issue. Women in their middle years who weigh more than is considered healthy also frequently experience it.

    Most of the time, conservative measures like rest, ice, painkillers, and specific exercises are helpful. Never forget that you should always get medical advice before beginning a new fitness regimen, particularly if you have pes anserine bursitis. They can design an individual plan just for you.

    FAQs

    How can pes anserine be avoided?

    In trying to avoid pesanserine bursitis, a daily exercise plan can help strengthen and stretch the muscles in the middle of your body, upper legs, and knees.

    Which workouts are most effective for pes anserine?

    exercises that will strengthen, stretch, and improve the flexibility of your joints.
    Exercises like heel slides, hamstring curls, quadriceps, and calf stretches are some examples of these.

    Which exercises worsen bursitis?

    high-impact activities. Increase the force applied to the joints and muscles. The bursa may get irritated and more painful when walking far away.

    Does pes anserine bursitis result from squats?

    Going up and down stairs, getting in and out of a chair, and performing exercises like lunges or squats are common factors for the pain, which progressively gets worse. Running athletes who may have poor form are also subject to this syndrome. One may notice swelling and tenderness in the pes anserine area.

    With pes anserine bursitis, is walking acceptable?

    Rest, ice, and medications that are anti- and physical therapy exercises are effective treatments for pes bursitis because the condition is typically caused by inflammation.  Stay away from strenuous activities and extended walks, particularly on uneven surfaces.

    What is the duration of healing for pes anserine?

    healing. In three to six weeks, you can usually resume your regular activities if pes anserine bursitis is diagnosed.

    Which three muscles attach to the pes anserine?

    The tendinous insertions of the sartorius, gracilis, and semitendinosus muscles combine to form the pes anserinus (PA).

    I have pes anserine bursitis; can I still exercise?

    It is important for athletes who have pes anserine bursitis to adjust how they train to prevent further inflammation. Additional therapies consist of: Relax. Until the bursitis goes away, stop doing the activity or switch to something else.

    What is the overuse of pes anserine?

    Pain in the inner part of the knee caused by overuse, direct trauma, or underlying diseases like osteoarthritis is a common symptom of pes anserine bursitis. The prognosis for pes anserine bursitis is generally good.

    Does bursitis in pes anserine go away?

    In most cases, pes anserine bursitis or tendinopathy does not resolve on its own if the underlying cause is left untreated and you keep up your routine of physical activity. You should speak with the closest sports medicine specialist if you believe you may have pes anserine tendinopathy. Meanwhile, you can start the first course of treatment.

    For pes anserine bursitis, is heat beneficial?

    As the pressure increases on top of your injury, you’ll experience even more pain. Inflammatory bursitis injuries, new injuries (within the first 24 to 72 hours), injuries immediately following surgery, and injuries following a relapse are not well treated with heat. Heat therapy should be given later in the healing cycle in these situations.

    With pes anserine bursitis, how can one sleep?

    The amount of pain varies according to how much of your knee is inflamed.It can be very sharp or very mild. Many who suffer from knee bursitis suggest placing a pillow between your thighs and knees at night to help with pain during the night.

    Can a cold help with bursitis?

    As soon as you feel pain in your muscles or around a joint, apply ice or cold packs. For three days (seventy-two hours), apply ice for ten to fifteen minutes at a time, up to twice an hour. After the first 72 hours, you can experiment with heat or alternating heat and ice. Apply painkillers.

    Does rest help with bursitis?

    Usually, bursitis can be treated with rest. Stay out of the postures or activities that aggravated your bursa. Your body will have more time to heal and recover if you take a break from activities that strain that area. Find out from your doctor how long you’ll need to take it easy and refrain from exercising.

    Is bursitis long-term or short-term?

    While crystalline joint disease, trauma, or infections are the usual causes of acute bursitis, inflammatory arthropathies and repetitive strain/overuse, or “micro traumas,” are more likely to cause chronic bursitis. Patients with acute bursitis usually have pain when the bursa is palpated.

    Does the pain associated with pes anserine bursitis worsen at night?

    Individuals experiencing knee bursitis may also have trouble sleeping. Merely bending your knee or turning over while you sleep can put pressure on the bursa that is inflamed, which will exacerbate your pain. Depending on how much inflammation there is in your knee, the pain can be anywhere from moderate to excruciating.

    Who suffers from bursitis the most?

    Often impacted are men in their middle years. That’s likely because their occupations are more frequently linked to an increased risk of bursitis. Within two to three weeks, the inflammation usually goes away if the area is rested.

    Does bursitis in the pes anserine last forever?

    The condition Pes anserine bursitis/tendinopathy has no long-term effects as long as it is correctly recognized and treated. If not, you could have to take an extended break from sports and other activities due to chronic pain in the region right below the inside of the knee.

    For pes anserine bursitis, is cycling beneficial?

    An overuse injury called pes anserine bursitis is frequently made worse by exercises like squatting, cycling, and jogging. If both the tendon and the pes anserine bursa are affected, the pain may be extremely intense. Often, the pain gets worse after activity and gets better afterward.

    How is pes anserine bursitis tested for?

    Your doctor will examine your knee and talk to you about your problems. The symptoms of pesanserine bursitis might be mistaken for those of a stress fracture, so an X-ray is usually required for the diagnosis.

    References:

    • Knee Tendon Bursitis Caused by Pes Anserine – OrthoInfo – AAOS. (n.d.). https://orthoinfo.aaos.org/en/diseases–conditions/pes-anserine-knee-tendon-bursitis/
    • A. Patil (2021). The exercises for biomechanical correction in PES anserine bursitis. 10(3), 2337–2339, Journal of Medical Pharmaceutical and Allied Sciences. The URL is 10.22270/jmpas.v10i3.1079.
    • Exercises for Knee (Pes Anserine) Bursitis | Kaiser Permanente, n.d. The Kaiser Permanente. The article “He.Knee-Pes-Anerine-Bursitis-Exercises.bo1586” can be found at https://healthy.kaiserpermanente.org/health-wellness/health-encyclopedia.
    • Bursitis Pes Anserine (2008). Orthopedics, 31(4). 10.3928/01477447-20080401-30 is the doi link.
    • 2022, December 21; Giorgi, A. Escherichia bursitis: What Is It? Verywell Medical Center. PES Anserine Bursitis 6890790 https://www.verywellhealth.com
    • С. (2020). Vestnik.uriu.ranepa.ru/wp-content/uploads/2020/10/48-53-1.pdf is the URL for this file. NORTH CAUCASUS LEGAL VESTNIK, 1(3), 54–58. https://doi.org/10.22394/2074-7306-2020-1-3-54-58
    • Image 2, K. P. explained (2020, March 17). Knee Pain Explained: Enhance Your Flexibility with Calf Stretches. Pinterest. PIN: 249105423127107410 from Pinterest
    • Image 14, Online store 51898664. (n.d.). The product details for 51898664.html can be found here.
  • Thoracic Radiculopathy

    Thoracic Radiculopathy

    Radiculopathy is caused by the compression or irritation of a nerve root located in the spinal column. In the case of “Thoracic Radiculopathy,” the symptoms are caused by a disease process that occurs within the thoracic spine.

    What is a Thoracic Radiculopathy?

    Thoracic radiculopathy refers to a condition where the nerve roots in the thoracic (mid-back) region of the spine are compressed or irritated, leading to pain, numbness, weakness, or tingling sensations along the nerve’s pathway. This condition can result from various factors such as degenerative changes in the spine, herniated discs, spinal stenosis, trauma, infections, or tumors.

    Anatomy of the Thoracic Spine:

    1. Vertebrae: Adult humans have 12 thoracic vertebrae (marked as T1-T12), which are located between the cervical and lumbar vertebrae, with a typical size that is greater than the cervical but shorter than the lumbar. Each of the 12 thoracic vertebrae has a corresponding pair of ribs. The thoracic vertebrae expand in size as they fall towards the lumbar vertebrae; this is because the lower vertebrae must support more of the body’s weight when a person stands against gravity.
    2. Intervertebral Discs: The vertebrae are separated by intervertebral discs of fibrocartilage, which are flexible cartilage discs that allow movement in the spine and have a shock-absorbing or cushioning function as well. An intervertebral disc is made up of an inner gelatinous nucleus pulposus surrounded by a ring of fibrocartilage called the annulus fibrosus.
    3. Spinal cord and nerves: Your spine houses the spinal cord and nerves. As they travel down the spinal canal, these “electrical cables” send signals from your brain to your muscles. Nerve roots leave the spinal cord via vertebral openings (foramen).
    4. Intervertebral Foramina: These are openings located on both sides of the vertebrae through which nerve roots pass. The foramina allows nerves to extend out from the spinal cord to innervate different parts of the body.
    5. Facet Joints: Facet joints, are the presence of small joints formed where the rib connects with the vertebral body.  These are called costal facet joints.  The costal facet joints of the thoracic spine allow for rotation, flexion, and rotation.
    6. Ligaments: Various ligaments support the thoracic spine, including:
      • the anterior longitudinal ligament (along the front of the vertebrae),
      • posterior longitudinal ligament (along the back of the vertebrae),
      • ligamentum flavum (connecting adjacent laminae),
      • interspinous ligaments (between spinous processes), and 
      • Radiate Ligament They have 3 bands:  superior, middle, and inferior. 
        • The costotransverse ligament
        • The Lateral costotransverse ligament
        • The superior costotransverse ligament
    7. Muscles: Muscles in the thoracic region play a crucial role in supporting the spine and facilitating movement. These muscles of the thoracic spine are vital for maintaining posture, stability, and movement in the upper back.  They are arranged in layers.
      • Superficial back muscles These are the muscles that are closest to your skin. They are large muscles that include
        • Trapezius: The trapezius is A large triangular-shaped muscle that runs from the base of your head to the center of the back. It is responsible for moving the shoulder blades and holding the weight of the arms.
        • Rhomboids: The rhomboids, which are located between the shoulder blades and linked to the spine and shoulder blades, aid in stabilizing the shoulder blades and assist in actions such as drawing them downward and backward.
      • The intermediate back muscles are positioned deep inside the superficial back muscles.  As so, they form the thoracic spine’s intermediate portion of muscles.
        • The erector spinae muscles: run parallel to the spine, extending from the base of the skull to the sacrum. They help to maintain posture and aid in actions like bending and twisting.  
      • Deep Back Muscles These muscles are located deep in the erector spinal muscles. They are a collection of short muscles known as transversospinales.
    8. Blood Supply: The thoracic spine receives blood supply from various arteries, including the vertebral arteries, intercostal arteries, and branches of the aorta.
    9. nerve supply The thoracic spine covers the spinal cord and nerve roots. The nerves and nerve roots of the thoracic spine are in charge of transmitting and receiving signals from the muscles, skin, and organs of the chest and upper abdomen.
      • Sympathetic nerves: The sympathetic nervous system is a component of the autonomic nervous system that regulates involuntary activities including heart rate, blood pressure, and digestion. The sympathetic nerves go through the thoracic spine and connect to the sympathetic ganglia.
      • Vagus nerve: The vagus nerve, the tenth cranial nerve, regulates numerous critical systems in the body, including heart rate, respiration, and digestion. It travels through the thoracic spine to innervate organs including the heart, lungs, and stomach.
      • The phrenic nerve: it starts in the cervical spine, travels down the thoracic spine, and innervates the diaphragm, the most important muscle involved in breathing.
      • The intercostal nerve: also known as the ventral rami of the thoracic spinal nerves, emerges from the front of the spinal cord. The intercostal nerves travel between the ribs and supply information to the respiratory muscles (intercostal muscles).
      • Dorsal rami of the thoracic spinal nerve: The backside of the spinal cord is where little branches of spinal nerves arise. The dorsal rami of the thoracic nerves transmit information to the thoracic muscles, joints, and skin. They control cutaneous sensations and thoracic muscle action.

    Types of Thoracic Radiculopathy

    Thoracic radiculopathy can affect just certain thoracic nerve roots. The thoracic spine is made up of twelve vertebrae (T1 through T12), each with a pair of nerve roots that leave the spinal cord on either side. When these nerve roots are crushed or inflamed, many kinds of radiculopathy develop. The most popular types are:

    Upper thoracic radiculopathy: This kind of affects the nerve roots located in the upper thoracic spine (T1 to T4). Symptoms may include pain and discomfort in the chest and upper back, which may spread to the ribs and front of the chest.

    Middle thoracic radiculopathy: This kind involves nerve roots in the middle thoracic spine (T5–T8). Symptoms may include discomfort in the mid-region that spreads to the front of the chest or covers around the ribs.

    Lower thoracic radiculopathy: This kind of affects the nerve roots in the lower thoracic spine (T9–T12). Symptoms may include lower back pain or discomfort, which may radiate to the ribs or abdomen.

    What are the causes of Thoracic Radiculopathy?

    Thoracic radiculopathy is caused by an obstruction between thoracic nerve roots. Any disease, physical alteration, or damage to these nerves impairs their function, resulting in painful symptoms. Common causes of thoracic radiculopathy include:

    • Degenerative disc disease is caused by long-term wear and tear.
    • Bulging or herniated discs in the center of your back. 
    • A compressed or pinched nerve
    • spinal stenosis 
    • Bone spurs in your spine
    • Spondylolisthesis
    • Ossification of the spinal ligaments
    • A spinal injury
    • Connective tissue disease
    • Rheumatoid arthritis in the spine
    • Spinal injury or infection
    • Spinal tumors, including bone cancer
    • A tumor in the thoracic spine
    • Degenerative joint disease
    • Diabetes mellitus
    • Diseases like tuberculosis

    What are the risk factors for Thoracic Radiculopathy?

    While a back injury may happen to anybody, specific habits may place you at a higher risk for thoracic radiculopathy. These risk factors include:

    • Aging that naturally leads to spinal degeneration
    • A family history of spinal disorders, such as radiculopathy
    • Poor posture
    • Spinal abnormalities, such as scoliosis, kyphosis
    • Being overweight or obese
    • Repetitive motions in work, hobbies, or other activities 
    • Rheumatoid arthritis and osteoarthritis are two examples of joint conditions.
    • Bone cancer or a spinal tumor
    • Herniated disc
    • Spinal stenosis
    • Spine infection
    • Traumatic spinal injury

    What are the symptoms?

    Signs and symptoms of thoracic radiculopathy include:

    • Sudden pain – shooting, intense, burning, and/or aching
    • A burning or shooting pain that begins in your lower neck and spreads to your chest, posterior shoulder, and back.
    • Pain associated with a change in posture
    • Tingling (similar to pins and needles sensations)
    • Weakness in your arm and trunk affects your motions.
    •  Numbness and tingling sensations in your neck, back, chest, and back of shoulders (complete or just a decreased sensation)
    • Swelling/inflammation
    • Muscle/limb weakness
    • A decrease in reflexes in your arms or legs 
    • A reduced range of motion
    • Problems sitting
    • A sharp pain when doing strenuous activities
    • Muscle spasms or tightness
    • Loss of or reduced reflexes
    • Unable to stand straight or keep their balance.
    • Complications of the neurological system
    • Pain and discomfort around a pinched nerve.
    • The thoracic spine is a complicated structure that supports the rib cage while also protecting your heart and lungs. Any structural alterations to this spinal area can have an impact on how vital organs operate.

    in severe cases, symptoms may worsen to 

    • Difficulty with coordination
    • Pain in your neck, arm, leg, or lower back 
    • Tingling, numbness, or weakness
    • Trouble keeping your balance
    • Trouble walking
    • Struggling with fine motor skills, such as using a pen to write or using a zipper
    • Urinary or stool incontinence

    How to diagnose Thoracic Radiculopathy?

    Your physician might conduct the following tests to diagnose your thoracic radiculopathy: 

    • X-ray: An X-ray can show the narrowing and changing alignment of your spinal cord, as well as any spinal fractures.
    • Computed tomography (CT) scan: A CT scan shows 3D images and more detail of your spine than an X-ray can.
    • Magnetic resonance imaging (MRI): An MRI can reveal whether soft tissue injury is causing nerve compression. It will also reveal any damage to your spinal cord.
    • Electromyography (EMG): An EMG detects electrical impulses in your muscles. This can assist assess whether a nerve is functioning properly. This informs your healthcare practitioner if your symptoms are caused by pressure on your spinal nerve roots or whether another medical condition (such as diabetes) has injured your nerves.

    what are the treatments for Thoracic radiculopathy? 

    Your doctor may suggest one or more of the following therapies for your thoracic Radiculopathy:

    Medication

    • Your doctor may offer drugs to assist ease the discomfort caused by your thoracic radiculopathy. Over-the-counter NSAIDs: For most people, over-the-counter NSAIDs (such as aspirin or ibuprofen) are sufficient to manage their radiculopathy symptoms. 
    • Corticosteroids: Your healthcare professional may prescribe powerful anti-inflammatory drugs like prednisone to ease your pain. These can be taken in tablet form or injected directly into the afflicted region of your back.
    • Topical Analgesics: creams, gels, or patches that include drugs such as lidocaine or capsaicin that can be applied directly to the painful spot to offer localized pain relief.
    • Opioid Pain Medications: These are often reserved for severe cases of pain that cannot be successfully treated with other drugs, and their usage is strictly regulated because to the potential of dependency and negative effects.

    Physical therapy 

    Physical therapy can help relieve discomfort and promote healing from thoracic radiculopathy.

    Physical therapy aims to stabilize the spinal column by employing exercise to unload the spine and relieve pressure on the spinal nerve roots. This is accomplished by physical therapy, which focuses on stabilizing the spinal column and exercising to unload the spine and relieve pressure on the spinal nerve roots. This is done through:

    Assessment

    The first step in identifying thoracic radiculopathy begins with a review of current and past medical and surgical history along with a thorough physical examination, current symptoms, functional limitations, and specific goals for treatment.

    physical examination: it involves assessing posture, range of motion, muscular strength, sensitivity, reflexes, and any neurological abnormalities caused by nerve compression

    Pain management

    • Teach pain treatment options such as using hot or cold packs, proper body mechanics, ergonomic changes at work or home, relaxation techniques, and figuring out important factors such as bad posture, improper lifting skills, or sedentary lifestyle choices.

    Modalities

    • Ice and heat therapy to reduce pain and discomfort associated with muscle spasms.
      • Heat Therapy:
        • Application of heat packs or warm compresses to the lower back to relax muscles, increase blood flow, and reduce pain.
      • Cold Therapy:
        • Ice packs or cold therapy for acute pain or inflammation management, are applied in a controlled manner to avoid skin damage.
      • Electrical Stimulation:
        • Transcutaneous Electrical Nerve Stimulation (TENS) or interferential current therapy (IFT) helps to reduce pain by blocking pain signals from reaching the brain. 
      • Ultrasound: Ultrasound applied on a tender point can help to improve blood flow and promote healing.
      • Infra-red heat therapy: it helps to reduce pain, reduction of muscle tension, relaxation, and improve circulation.     

    Exercise

    The best way to improve your thoracic mobility is to move more. Daily, consistent mobility exercises and stretching are required to improve stiffness. Experiment with organizing exercises throughout the day or putting up a particular period.

    Scapular Retraction

    Stand up straight and slowly draw your shoulders back, as if you were aiming to make your shoulder blades connect behind you. It’s a basic workout that has great easing potential. A similar impression may be created by standing in a doorway with one hand on either side and barely stepping through.

    scapular-protraction-and-retraction
    scapular-protraction-and-retraction

    Thoracic Rotations

    Sit on a stability ball or chair, feet flat on the floor. Position the patient’s hands behind your head, with their elbows pointed outward. Slowly twist your upper body to one side, aiming to get your elbow near the opposing knee. Return to your starting position and repeat on both sides. Exercise in a controlled manner, with a concentration on thoracic spine rotation.

    side-lying-thoracic-rotation
    side-lying-thoracic-rotation

    Cat and Cow

    This is a widely recognized and effective essential movement. 

    • Improves posture and balance.
    • Strengthens and stretches the spine and neck.
    • Stretches the hips, abdomen, and back.
    • Increases coordination.
    • Provides massages and activates organs in the abdomen, including the kidneys and adrenal glands. 
    • Creates emotional balance.
    • Relieves stress and calms the mind

    If kneeling is not a possibility, you can perform the same action standing with your hands on a desk or counter. The surface must be hip-level or below. 

    If the strain of a standard quadruped posture bothers your wrists, you can execute this action on your forearms instead.

    Tips: Take full, deep breaths throughout. When going into extension, be careful not to twist your lower back.

    Cat-and-Cow-Stretching
    Cat-and-Cow-Stretching

    Thread the needle

    This is an excellent exercise for thoracic rotation with some degree of extension. The extra difficulty of working against gravity while on all four limbs makes it extremely effective and less likely to twist the lower back. 

    1. Inhale and elevate your right arm to the sky, allowing the chest and arm to expand to the right. Allow your eyes to follow your right arm
    2. Exhale to lower your right arm and slip it beneath your left arm, extending across your body and down the floor. 
    3. Move your eyes to the left. Allow your left elbow to bend to allow for the stretch as your right ear rests on the floor.
    4. Repeat 4-5 repetitions, then change arms. 

    Tips: Maintain a reasonable pace and breathe completely into the rib cage.

    threading-the-needles
    threading-the-needles

    Downward Dog

    This is another good mobility exercise for thoracic extension and opening up the front shoulders.

    Downward Facing Dog
    Downward Facing Dog
    1. Start in a plank position. Exhale to lift your hips off the floor and bend your hips into an upside-down V.
    2. Inhale and push your chest through your arms towards your legs. 
    3. Exhale and push your weight forward, returning to the plank posture. 
    4. Repeat 5 times.

    Tips: Move at a slow to moderate pace, pausing Downward Dog to breathe deeply and feel your spine lengthen and extend. If the stretch is too strong, bend your knees slightly. Downward dogs can always be modified by placing your arms on a counter, chair, or table to make this stretch more accessible.

    Windmill

    1. Lie on one side of the floor, legs bent and placed in front of the hips. Your arms should be straight out in front of you at shoulder level, stacked.
    2. Keeping your knees together, raise your upper arm towards your ear and circle it up over your head, opening your shoulders and chest to the sky, until your arm reaches the opposite direction from where it began. Turn your attention to follow your arm’s movements.
    3. Stay in this position and take 2–3 deep breaths, then slowly retrace your movements, moving the arm, head, chest, and shoulders back to the starting position. 
    4. Repeat 3 times, then perform 4 repetitions on the opposite side.

    Tips: Keep your knees positioned exactly on top of each other to prevent your pelvis from shifting. If stiff shoulders restrict you from reaching the opposite side, put your head on a small cushion and move your arm as far as you can without pain.

    windmill Exercise
    windmill Exercise

    Assisted thoracic extension on a foam roller

    You may also use props like a foam roller or rolling ball.

    1. Place the roller on the ground horizontally and sit in front of it, facing away from it. Lean on it with the bottoms of your shoulder blades resting on it. Put your hands behind your head to help support your neck.
    2. Using your breath, expand your chest and bend backward over the roller to make an arc in your upper back.
    3. If your neck feels supported, relax your hands and stretch your arms up and back. Stay in this position and breathe deeply into all sides of your rib cage, allowing your body to soften towards the floor. Stay for a few breaths before returning your arms to your side.
    4. Repeat 3–4 times.

    A more advanced variation involves continuing the stretch while holding a dumbbell with the arms raised overhead.

    This stretches the chest and extends the thoracic spine.

    Tips: Continue to breathe completely into your ribs. If the stretched posture puts strain on your neck, place your hands, a block, or a hard cushion beneath your head.

    Thoracic Extension on Foam Roller
    Thoracic Extension on Foam Roller

    Child’s Pose with an exercise ball

    This exercise will expand your chest while providing support for your entire arm throughout the twist.

    1. Kneel on the floor, facing the exercise ball. Sit back on your heels, opening your knees wider than your hips.
    2. Place both hands on the workout ball and move it forward until you’re bent forward like a child. Bring your chest as low towards your knees as possible without causing shoulder strain.
    3. Breathe in this position for 2 deep breaths. Then, keeping your hands on the ball, roll the ball to the right so that your chest is opening to the right side. Looking under your right arm, focus on breathing and lengthening the spine.
    4. Return to the center and repeat the twist to the left while looking beneath your left arm.
    5. Repeat up to the center, then roll back up to the beginning position, one vertebra at a time.
    6. Complete 3–5 reps on each side.

    Tips: If kneeling is not an option, try sitting on a bench or low stool.

    Child Pose Over Ball
    Child Pose Over Ball

    Pilates Spine Twist variation

    For this variant, sit in a chair with a block or hard cushion between your knees.

    1. Lengthen your spine and feel your sit bones on the chair. Cross your arms across your chest.
    2. On the exhale, compress the cushion between your legs, think of yourself growing taller, and spin three times to one side, moving a bit further each time.
    3. Inhale to return to the center.
    4. Repeat the other way. Repeat the whole sequence 4-5 times.

    Tips: Keep your legs squeezed together to prevent your pelvis from moving. Keep breathing and try to become higher with each repetition.

    Spine Twist
    Spine Twist

    Side Angle Pose (Parsvakonasana)

    This Yoga pose will be done sitting on a chair to focus on maximizing spinal rotation.

    1. Sit on the edge of the chair and open your legs wide, Straighten one leg to create a lunge-like position in the legs.
    2. Keeping your spine straight, lean over your bent leg, slide the arm down your lower leg toward your ankle, and reach your arm towards the floor.
    3. On the inhale lift your opposite arm up and over your head, reaching it to the ceiling or the opposite. Keep your elevated arm straight, open your arm and chest, and look up at the ceiling.
    4. Exhale to return to the beginning position, then pull back up to a sitting posture with your legs bent.
    5. Repeat on the other side. Complete 4–5 reps on each side.

    Tips: Aim to keep your spine long and keep breathing into your ribcage.

    side angle pose
    side angle pose

    Manual therapy: Manual therapy can help to improve flexibility, reduce pain, and improve nerve function. This includes techniques such as 

    • massage,
    •  joint mobilization,
    • Soft tissue mobilizations (massage)
    • Neural Glides
    • Heat therapy
    • Shockwave Therapy
    • Taping
    • A tailored home exercise program
    • Graded Exposure to load program

    surgical management

    When conservative treatment and steroid epidural injections do not give considerable or long-term relief, some patients are recommended for surgical consideration.

    The 3 most frequent thoracic procedures are described, They include.

    Posterior thoracic fusion This procedure is performed by placing bone grafts or bone graft substitutes in between the affected vertebrae to promote bone growth and eventually fuse the vertebrae into a single, solid bone. Spinal instrumentation or implants, including rods, plates, screws, and interbody devices, may be used to stabilize the spine following fusion.

    Thoracic Laminectomy A laminectomy is the removal of the lamina, a part of the spine that forms a bony “roof” over the spinal canal. 

    Thoracic Discectomy: A herniated thoracic intervertebral disc is surgically removed from the spinal column during a minimally invasive lateral thoracic discectomy, also known as a mini-open lateral thoracic discectomy.

    Spinal decompression surgery. During this surgical procedure, your expert will remove the source of your thoracic radiculopathy, such as a bone spur or herniated disc.

    Laminoplasty. The procedure for more severe cases of thoracic radiculopathy involves widening the gap through which your spinal cord passes. This helps to relieve pain and other symptoms.

    Complication 

    The main issue with thoracic spine surgery is complications. They include:

    • Infection
    • Bleeding
    • Nerve injury
    • Lung Injury/Collapse
    • Rib Injury
    • Increased pain
    • Spinal cord injury

    The complication rate can reach 35%, and because of the specific characteristics of the thoracic spine, rib attachments, surrounding lungs, numerous big blood arteries, spinal cord, and other essential organs, problems following surgery can be serious and life-threatening.

    Infections, re-herniation of the disc, prolonged discomfort, more disc degeneration, and spinal cord or nerve damage are all possible consequences. Some issues may not show until after surgery. Some appear fast, while others might take months to become apparent.

    Do’s and Don’ts

    Do’s

    • Apply heat or ice: Alternate between heat and ice packs on your back for 15-20 minutes at a time. Heat can help relax muscles and improve blood flow, while ice can help reduce inflammation and pain.
    • chevron_right
    •  Heat pack on the back 
    • Maintain good posture: Stand tall with your shoulders back and down, and keep your core engaged. This will help to take pressure off your spine and nerves.
    •  Good posture 
    • Get regular exercise: Exercise can help to strengthen your core muscles and improve your flexibility, both of which can help to reduce pain. However, avoid strenuous activity that could aggravate your condition.
    • See a physical therapist: A physical therapist can teach you exercises to strengthen your core and improve your flexibility. They can also help you to improve your posture and body mechanics.
    • Manage your weight: Being overweight can put extra strain on your spine and nerves. Losing weight can help reduce your problems.

    Don’ts:

    • Slouch: Slouching can put extra pressure on your spine and nerves.
    • Twist or bend awkwardly: Avoid twisting or bending awkwardly, as this can irritate your nerves.
    • Lift heavy objects: Avoid lifting heavy objects, as this can put a strain on your spine.
    • Smoke: Smoking can worsen inflammation and pain.
    • Ignore your pain: If you are in pain, don’t ignore it. Consult a doctor for a diagnosis and treatment plan.

    See a doctor if:

    • You have discomfort that extends down your arm or leg
    • You have numbness or weakness in your arm or leg
    • You have difficulties managing your bowels and bladder.
    • You have a fever or chills.

    Summary

    Thoracic radiculopathy is a spinal disorder characterized by the compression or irritation of nerve roots in the upper back (thoracic spine). It is less prevalent than radiculopathy in the neck or lower back, but it could be similar to other conditions such as heart disease or shingles.

    Here is a brief overview of thoracic radiculopathy:

    Symptoms: Thoracic radiculopathy can cause chest, mid-scapular, lower extremity, or stomach discomfort, as well as lower limb paralysis if myelopathy is present. pain, numbness, and tingling in the chest, belly, or back that can spread to the front of the body. Pain may intensify as you breathe or cough.
    Causes: The most common cause is narrowing of the area where nerves exit the spine as a result of disc degeneration, bone spurs, or another disorder. Diabetes may also be a factor.
    Diagnosis: This can be difficult, but doctors may utilize X-rays, an MRI, or electromyography to confirm the diagnosis.

    Treatment often includes non-surgical methods such as medication, physical therapy, and injections. Surgery may be necessary in rare cases.

    FAQs

    What is the pain pattern of thoracic radiculopathy?

    Symptoms of thoracic radiculopathy include burning or shooting pain in the ribs, sides, or belly, as well as abdomen numbness and tingling.

    What not to do with radiculopathy?

    The following behaviors and habits may worsen lumbar radiculopathy:
    Prolonged sitting.
    Coughing and sneezing can have a quick impact on the spine.
    Twisting the spine (i.e. golf, gymnastics, some yoga poses)
    High-impact exercise, including Running or jogging. Weightlifting.

    What are the risk factors for radiculopathy?

    Risk Factors: Men are impacted at a somewhat higher rate than women. Heavy physical labor that requires lifting, smoking, driving, operating vibrating equipment, neck trauma (from sports or a car accident), and a history of spinal nerve damage are all risk factors for this disorder.

    What does thoracic nerve pain feel like?

    Pain and discomfort begin in the neck and spread to the shoulder, back, and chest. Tingling or numbness may be felt across the neck, posterior shoulder, back thorax, and chest. Muscle spasms and postural alterations in reaction to the injury.

    What is the pain pattern of thoracic radiculopathy?

    Symptoms of thoracic radiculopathy include burning or shooting pain in the ribs, sides, or belly, as well as abdomen numbness and tingling.

    References

    1. Menzies, R. (2022, May 9). Thoracic mobility exercises for a strong, Pain-Free back. Healthline. https://www.healthline.com/health/fitness/thoracic-mobility-exercises#bottom-line
    2. Knadmin. (2021, December 22). Thoracic Radiculopathy/Myelopathy | PM&R KnowledgeNow. PM&R KnowledgeNow. https://now.aapmr.org/thoracic-radiculopathymyelopathy/
    3. Thoracic radiculopathy: Causes, symptoms, treatments. (2024, March 18). Centeno-Schultz Clinic. https://centenoschultz.com/condition/thoracic-radiculopathy/
    4. Thoracic Radiculopathy Vancouver – Dr. Craig Best. (2023, September 22). Dr. Craig Best. https://www.drcraigbest.com/spine-neck-pain/thoracic-radiculopathy-vancouver/
    5. Thoracic radiculopathy | Spine care | Bon Secours. (n.d.). https://www.bonsecours.com/health-care-services/spine-care/conditions/thoracic-radiculopathy
    6. Thoracic radiculopathy – upper back – conditions – musculoskeletal – What we treat – physio.co.uk. (n.d.). https://www.physio.co.uk/what-we-treat/musculoskeletal/conditions/upper-back/thoracic-ridiculopathy.php
    7. Page Updated on Mar 22, 2024, by Dr. Hosny (Interventional Spine Specialist) of The Spine & Rehab Group. (2024, March 22). Thoracic radiculopathy NJ & NYC. Spine & Rehab Group. https://www.thespineandrehabgroup.com/thoracic-radiculopathy
    8. Foorsov, V., & Pastoriza, S. M. (2018). Thoracic radicular pain. In Oxford University Press eBooks (pp. 237–242). https://doi.org/10.1093/med/9780190298357.003.0027
    9. Landa Spine & Orthopedic Center. (2019, April 19). Thoracic Radiculopathy – Landa Spine & Orthopedic Center. https://landaspine.com/conditions-and-procedures/thoracic-mid-back/conditions/thoracic-radiculopathy/
    10. Solanki, V. (2023, July 28). Thoracic radiculopathy – Type, Cause, symptoms, treatment. Samarpan Physiotherapy Clinic. https://samarpanphysioclinic.com/thoracic-radiculopathy/
    11. Zahran, A. (2019). Thoracic radicular pain. In Springer eBooks (pp. 617–620). https://doi.org/10.1007/978-3-319-99124-5_135
    12. SAN LEANDRO CA Thoracic Radiculopathy | Oakland Compressed Nerve Relief | Fremont. (2022, December 14). Allied Pain & Spine Institute. https://myalliedpain.com/san-leandro-thoracic-radiculopathy
    13. Thoracic radiculopathy – upper back – conditions – musculoskeletal – What we treat – physio.co.uk. (n.d.-b). https://www.physio.co.uk/what-we-treat/musculoskeletal/conditions/upper-back/thoracic-ridiculopathy.php
  • Heel Pain

    Heel Pain

    What is Heel Pain?

    Heel pain is a common complaint that can affect people of all ages. Fractures and sprains are two types of injuries that can cause heel pain. Additionally, a few medical conditions including reactive arthritis and bursitis may cause it. The reason could determine the course of treatment.

    There are almost 100 tendons, 33 joints, and 26 bones in each foot and ankle. The biggest bone in your foot is the heel.

    Heel pain can occur if you misuse or damage your heel. This may be minor or impairing. If basic home remedies don’t relieve the pain, you might need to see a physician or podiatrist to determine the problem.

    Causes of Heel Pain

    Common Causes

    Any injury or infection to the calcaneus, the heel bone, or its surrounding structures is typically the cause of heel pain. Another possible cause is damage to the nerves supplying the foot and ankle.

    Under the ankle at the rear of the foot is the heel bone. The heel, working together with the talus, a tiny bone, and connective tissues, facilitates side-to-side movement and balance of the rear foot.

    The two most common sources of heel pain are the connective tissues connecting the heel to the bottom of the calf muscle (called Achilles tendonitis) or the base of the foot (called plantar fasciitis).

    Planter Fasciitis

    The band of connective tissue that creates the arch of your foot and joins your heel bone to the base of your toes becomes inflamed when you have plantar fasciitis. When weight is applied to the heel after a period of rest, it produces a throbbing or stabbing pain on the bottom of the heel.

    Long periods of standing can also cause plantar fasciitis pain, which is typically greater during the first few steps of the morning.

    Risk factors are among them:

    • Increased body mass index (BMI), a popular but unreliable health measure for determining weight and obesity
    • Jobs or pursuits involving a lot of weight-bearing
    • Your foot’s dimensions and form, including any problems with the arch
    • When bone spurs are present

    Because the illness is a degenerative process that results in subsequent inflammation, it is also known as plantar fasciopathy. Usually, it just affects one foot, leaving the other free to support your weight.
    Long-term plantar fasciitis may result in the formation of a heel spur, which is a bony protrusion where the fascia attaches to the heel bone. Heel spur pain is frequently characterized as “cutting” or “stabbing.” Rarely, the plantar fascia may rupture or tear, resulting in severe pain, bruising, and edema.

    Achilles Tendonitis

    The big, cord-like tendon that connects the back of the heel bone to the calf muscle is called the Achilles tendon, and Achilles tendonitis is inflammation of that tendon.

    The tendon right above the heel becomes taut or burns when someone has Achilles tendinitis. Mild edema and morning calf and heel pain are also frequent.

    The most common cause of Achilles tendonitis is overuse, which can result from long-distance jogging. Achilles tendonitis can also be caused by wearing shoes that are too small, not warming up your calves before exercising, or having arthritis.

    Ruptures of the Achilles tendon are rare. This usually happens when the foot quickly pivots during intense physical exercise (such as tennis or basketball). In addition to excruciating heel pain, some claim to have heard a “popping” or “snapping” sound as a result of tendon rips.

    Severe Disease

    For children and teenagers, the most prevalent cause of heel pain is severe disease. Known as calcaneal apophysitis, it usually affects active youngsters, such as running or leaping, between the ages of 8 and 12. In times of growth spurt, it might get worse.

    The injury, which is typically caused by playing sports like basketball or soccer, involves bone inflammation or edema. Conservative care, which includes rest, ice, and painkillers, is typically effective.

    Peroneal Tendonitis

    A typical source of pain on the outside of the heel, where the tendons connect the calf muscles to the foot, is conditions affecting the peroneal tendon. Tendonitis can result from these tendons rupturing, dislocating, or stretching.

    Peroneal tendinitis is frequently caused by overuse injuries. Pain, tingling, and numbness are among the symptoms that can result from damage to the peroneal nerve. With this injury, some persons have a foot drop, which can cause weakness and abnormalities in gait when walking.

    Uncommon Causes

    There exist alternative, less frequent reasons for heel pain, varying in intensity from minor to incapacitating:

    Bruise Heel Pad

    Sharp pain across the bottom of the heel is the result of a bruised heel pad. If you step forcefully on a stone or land hard on your heel, you could sustain this relatively small injury. Excessive weight-bearing exercises might also cause it.

    Tarsal Tunnel Syndrome

    A major nerve at the back of the foot called the posterior tibial nerve becomes pinched in people with tarsal tunnel syndrome. Tarsal tunnel syndrome can result in painful or scorching heels; however, the pain is typically felt on the ball of the foot and near the toes.

    Similar to carpal tunnel syndrome of the wrist, tarsal tunnel syndrome also causes tingling and numbness along with pain that gets worse at night.

    Stress Fractures

    Stress fractures of the heel are frequently experienced by athletes (like long-distance runners) who overtrain or increase the intensity of their training in a short amount of time. A crack in the heel bone eventually results from repeated stress.

    Severe heel pain from a stress fracture gets worse with movement and gets better with rest. At the fracture site, one may also experience soreness and edema.

    Fat Pad Atrophy

    The cushioning fat in the heel of older persons may degrade and shrink over time. This is called atrophy of the fat pads, and it hurts when the heel wears down. Although it has a separate origin, the condition can also result from steroid therapy for co-occurring plantar fasciitis.

    Another similar condition is called heel pad syndrome when repeated trauma thins the fat pad. Obese individuals and marathon runners are more vulnerable to this. A sharp, deep ache in the center of the heel is the result of heel pad syndrome, and it worsens as you bear weight.

    Haglund’s Syndrome

    Haglund’s syndrome, commonly called “pump bump,” is a condition where a heel spur develops behind the heel. This usually happens to persons who wear shoes that are too tight or too rigid. Redness, warmth, and swelling could occur alongside limping due to the pain.

    Bursitis is a possible ailment that arises from irritation of the soft tissue surrounding the bony bump. The inflammation of the bursa, a fluid-filled sac located between joints, is known as bursitis. It can happen where the Achilles tendon joins to the back of the heel bone (retrocalcaneal bursitis) or at the top and side of the tendon (calcaneal bursitis).

    Sinus Tarsi Syndrome

    The area on the exterior of the foot between the ankle and heel bones is called the sinus tarsi, sometimes known as “the eye of the foot.” Despite its modest size, this area is home to several ligaments as well as fatty tissues, tendons, nerves, and blood vessels.

    Sinus tarsi syndrome is a condition that causes ongoing pain in the front and sides of the ankle and is usually the result of acute injury. When engaging in weight-bearing activities, the heel pain often gets worse. There may also be “looseness” in the ankles and difficulty walking on uneven surfaces.

    Rare Causes of Heel Pain

    Heel pain can occasionally be caused by:

    • Piezogenic papules: Usually caused by connective tissue disorders such as Ehlers-Danlos syndrome, these painful lumps appear when fat protrudes from the heel capsule.
    • Heel bone infection: This type of osteomyelitis, or inflammation of the bone, is characterized by persistent heel pain, frequently accompanied by fever and exhaustion. Individuals with diabetes mellitus are more vulnerable.
    • Heel bone tumors: A deep, dull heel pain that gets worse at night can be caused by these usually benign (non-cancerous) growths.

    Symptoms of Heel Pain

    Depending on the cause of your pain and the area of your heel that is injured, your heel pain symptoms may change. Additionally, each person’s experience with pain may not be the same. Some may experience severe or stabbing sensations, while others may only experience a dull, throbbing ache. The pain may be continuous, intermittent, or more intense when walking, standing, or at particular times of the day, such as in the morning.

    If you believe you are suffering from heel pain, watch out for the following signs:

    • Redness or swelling
    • A bulge or hump on the heel’s underside
    • Tightness or stiffness, particularly after inactivity
    • Pain that radiates, or extends, to other parts of the foot or leg from the heel
    • Sensitivity or tingling
    • Standing, moving, or running with difficulty
    • Increasing pain with exercise or extended standing

    Diagnosis

    A medical history and physical examination are sufficient to diagnose the majority of heel problems. Blood testing and imaging examinations may be required in specific situations.

    Medical History

    Often, the most important indicator in the diagnosis of heel pain is a thorough medical history.

    Some such questions are:

    • Where exactly are you feeling pain?
    • When did you first feel pain?
    • How does the ache feel in your body?
    • Does putting weight on it cause you pain?
    • Does the pain vary in intensity throughout the day or night?
    • Can you remember anything you did that might have harmed your foot?
    • Do you have any more symptoms?

    Physical Examination

    Your foot, ankle, and heel will be examined and palpated by the medical professional during the physical examination to look for any abnormalities, bruising, rash, or pain. Additionally, they might move (manipulate) your ankle and foot to determine whether and where it hurts.

    The healthcare professional could also choose to assess your gait by looking at the location and angle of your heel, ankle, and foot.

    Blood Tests

    Although your doctor may order blood tests if they suspect (or wish to rule out) a specific condition, they may order one or more even though they are not frequently ordered for the diagnosis of heel pain.

    Blood testing could consist of:

    • Complete blood count (CBC): This blood test can assist in identifying infection-related symptoms.
    • C-reactive protein (CRP): The body’s overall level of inflammation can be determined by this blood test.
    • Erythrocyte sedimentation rate (ESR): blood test is a useful tool for identifying systemic inflammation.

    Imaging Studies

    To diagnose diseases including a stress fracture, heel spur, bone tumor, or Haglund’s syndrome, an X-ray of the heel may be requested. A magnetic resonance imaging (MRI) scan is a less prevalent diagnostic tool for soft tissue injuries and infections.

    Differential Diagnoses

    Although it makes sense to think that your heel would be the cause of your pain, this isn’t always the case. Other disorders can resemble Achilles tendinitis, plantar fasciitis, and other heel pain reasons.

    Among them are:

    • Radiculopathy: This happens when pain in one area of the body is referred to another by a pinched spinal nerve. The pain may radiate down the calf muscle and into the heel when the lower back is affected.
    • Peripheral neuropathy: Damage to the nerves supplying the limbs can result in peripheral neuropathy, which is characterized by burning or pins-and-needles sensations. Diabetes, alcoholism, and certain drugs are among the causes.
    • Skin issues: Plantar warts, and bacterial and fungal skin diseases, including athlete’s foot, can also result in heel pain (like cellulitis).

    Treatment

    Fortunately, several treatments can improve heel pain. Depending on what is causing your pain and how bad your symptoms are, there are many approaches to treating heel pain.

    Non-Surgical

    The majority of the time, conservative measures are sufficient to reduce heel pain and encourage healing. Your medical professional might advise:

    • Taking breaks from high-impact exercises and resting your body
    • Try engaging in low-impact sports like cycling or swimming.
    • Several times a day, apply cold packs to your heels for 20 minutes at a time to reduce inflammation.
    • Using over-the-counter analgesics, such as Aleve (naproxen) or Advil (ibuprofen), which are non-steroidal anti-inflammatory medicines (NSAIDs)
    • Putting on over-the-counter orthotics in your shoes, such as heel cups or pads
    • Purchasing shoes with adequate cushioning and arch support
    • Stretching the plantar fascia or Achilles tendon while you sleep at night can help to relieve stiffness.
    • Applying kinesiology tape (KT) to your foot to support your heels’ arches

    Physical Therapy:

    Stretches and exercises like calf raises and sliding an ice-filled plastic bottle under the foot are specifically made to relax the tissues that surround the heel bone. These are part of a physical therapy treatment plan and are done in the morning and the evening.

    You can be recommended to a physical therapist for the Alfredson protocol, a type of treatment if you have Achilles tendinitis. This entails using eccentric activities to strengthen the Achilles tendon while stretching the supporting muscles.

    Footwear Modification:

    Various foot supports may be recommended by your healthcare practitioner, depending on the reason behind your heel pain.

    If you have plantar fasciitis, you can keep your foot straight at night by wearing a splint. It can also be beneficial to wear supportive, comfortable shoes with appropriate arch and heel support.
    Shoe orthotics or heel wedges can stabilize the ankle and reduce pain if you have Achilles tendinitis.
    Your doctor could advise you to change the heel height of your shoes if you have Haglund’s syndrome.

    Surgical

    Surgery is usually only advised for heel pain that has not responded to six to twelve months of conservative treatment.

    A plantar fascia release is a surgical procedure that can be done to remove the plantar fascia from the heel bone in patients with plantar fasciitis. To treat plantar fasciitis, a different surgery known as a gastrocnemius resection surgically lengthens the calf muscle.

    Complementary and Alternative Medicine (CAM)

    Some complementary and alternative medicine (CAM) therapies may relieve heel pain, but they should not be used in place of traditional medical care. Among them are:

    • High-energy sound waves: High-energy sound waves are used in shockwave therapy to promote tissue healing and cure persistent heel pain. For best outcomes, it might be required to undergo repeated treatments.
    • Acupuncture: Acupuncture is a type of Traditional Chinese Medicine (TCM) in which tiny needles are inserted into the body at predetermined locations to promote healing and reduce pain. Acupuncture treatment can greatly reduce heel pain in one to two months.
    • Platelet-rich plasma therapy: To promote tissue healing and lessen pain, concentrated platelets from your blood are injected into the injured heel. This procedure is known as platelet-rich plasma therapy or PRP therapy.

    Prevention

    There are steps you can take to prevent injury to your heel and supporting tissues, regardless of whether you have ever had heel pain.

    • Keep your weight in check: Being overweight puts more strain on your lower limbs, especially your heels.
    • Put on appropriate footwear: For many forms of heel pain, wearing appropriate, well-fitting shoes with sufficient support and cushioning is essential.
    • Warm up before you do anything: This is particularly important if you’re playing a strenuous activity or going for a long run.

    Never ignore your body’s signals; pain is never “normal.” If you have unexplained heel pain, take a step back and see if it gets better. Consult a medical professional if it worsens or recurs.

    Living with Heel Pain

    Even while heel pain usually goes away with rest and the right care, chronic heel pain that lasts for more than a few months can make daily living difficult.

    The following are some methods for handling persistent pain:

    • Follow your prescribed course of treatment: Heel pain can be managed and the risk of problems reduced by following your healthcare provider’s recommendations for self-care practices, medication, physical therapy, and lifestyle modifications.
    • Try different pain-management strategies: Try using several methods for managing your pain and relaxing, like breathing exercises, meditation, and visualization techniques.
    • Keep up the level of activity: For minimal heel pain, try low-impact exercises like stretching, cycling, or swimming to help you stay in shape and prevent stiffness.
    • Prioritize rest and recovery: Pay attention to your body and take pauses during the day as necessary.
    • Stretch: Include stretching exercises for your feet and ankles in your daily regimen to help keep pain from getting worse and to increase your range of motion.

    Summary

    Heel pain is a prevalent issue that can impact individuals of all age groups. The most frequent cause of heel pain is plantar fasciitis, which is inflammation of the plantar fascia, a band of tissue that runs along the bottom of the foot. This inflammation can cause sharp pain, especially when taking the first steps in the morning or after getting up from a seated position. Other causes of heel pain include Achilles tendinitis, which is inflammation of the tendon that connects the calf muscle to the heel bone, and bursitis, which is inflammation of the fluid-filled sacs that cushion the bones, tendons, and muscles around the heel.

    Heel pain can be caused by a variety of factors, including overuse, improper footwear, and obesity. Treatment for heel pain typically involves rest, ice, and over-the-counter pain medication. In rare cases, corticosteroid injections or physical therapy may be required. If you are experiencing heel pain, it is important to see a doctor to get a diagnosis and discuss treatment options.

    Early diagnosis and treatment of heel pain can help prevent the condition from worsening and can lead to a faster recovery. If you are experiencing heel pain, there are some things you can do to help relieve the pain and improve your condition. These include resting your foot, icing the affected area, and wearing supportive shoes. You may also want to try stretching exercises or physical therapy.

    FAQs

    What is the most common cause of heel pain?

    The most common cause of heel pain is plantar fasciitis, which is inflammation of the plantar fascia, the ligament that supports the arch of your foot.

    What are the symptoms of heel pain?

    Heel pain is often described as a sharp or stabbing pain in the bottom of the heel, especially when taking the first steps in the morning or after getting up from sitting.

    What causes heel pain?

    Heel pain can be caused by overuse, improper footwear, obesity, tight calf muscles, or certain activities that put a lot of stress on the heel.

    How can I treat heel pain at home?

    Rest, ice application, and over-the-counter pain medication can help relieve heel pain. Stretching exercises and wearing supportive shoes can also be beneficial.

    When should I see a doctor for heel pain?

    If your heel pain is severe or doesn’t improve with home treatment after a few weeks, you should see a doctor to get a diagnosis and discuss treatment options.

    Are there any long-term complications of heel pain?

    Untreated heel pain can lead to chronic pain and difficulty walking.

    How can I prevent heel pain?

    Maintaining a healthy weight, wearing supportive shoes, and stretching your calf muscles regularly can help prevent heel pain.

    References

    • Professional, C. C. M. (n.d.-c). Heel Pain. Cleveland Clinic. https://my.clevelandclinic.org/health/articles/10060-heel-pain
    • Cluett, J. (2024b, April 25). What Causes Heel Pain and How Is It Treated? Verywell Health. https://www.verywellhealth.com/heel-pain-information-and-causes-2549378#toc-diagnosing-the-cause-of-heel-pain
    • Burke, D. (2024b, February 7). What Causes Heel Pain? Healthline. https://www.healthline.com/health/heel-pain#prevention
    • Curtis, L. (2024b, January 23). What Causes Heel Pain—And How Can You Find Relief? Health. https://www.health.com/heel-pain-8423065
  • Spinal Accessory Nerve Palsy

    Spinal Accessory Nerve Palsy

    Spinal Accessory Nerve Palsy, also known as Accessory Nerve Palsy, is a neurological condition characterized by the dysfunction of the spinal accessory nerve (cranial nerve XI). This nerve is primarily responsible for innervating the sternocleidomastoid and trapezius muscles, which are essential for head rotation, shoulder elevation, and certain movements of the neck and scapula.

    Damage to the spinal accessory nerve can lead to muscle weakness or paralysis, resulting in difficulties with shoulder movement and neck function.

    Common causes of this palsy include surgical trauma, particularly during procedures involving the neck or upper back, as well as tumors, infections, or direct injuries. Early diagnosis and treatment are crucial to prevent long-term disability and to optimize recovery of muscle function.

    What is the Spinal Accessory Nerve? Anatomy and its Function

    • The accessory nerve supplies motor function (movement) to the larynx (voice box), various structures in the throat, and the two muscles necessary for movement of the neck and shoulders: the trapezius and the sternocleidomastoid (SCM). It is frequently called CN XI, the eleventh of the twelve cranial nerves.
    • It has been classified as a cranial nerve, carrying messages from the brain to various regions of the body. It is divided into two sections. The brain is the source of one portion, and the spine is the source of the other. It is frequently referred to as the spinal accessory nerve because of this.

    The spinal accessory nerve, or cranial nerve XI (eleven), regulates the sternocleidomastoid and trapezius muscles:

    • The sternocleidomastoid muscle flexes your neck and aids in head rotation.
    • The trapezius muscle controls shoulder movements like shrugging your shoulders. The trapezius muscle maintains the scapula, or shoulder blade, to provide a stable foundation for using your arm.

    Anatomy

    • The spinal accessory nerve (SAN), which is vital for preserving motor function, has a complicated anatomical course. It is divided into two sections: the cranial and the spinal. The spinal portion comes from the upper cervical segments (C1–C5/C6) of the spinal cord, whereas the cranial portion comes from the nucleus ambiguus in the medulla oblongata.
    • After leaving the spinal cord, the nerve ascends via the foramen magnum and leaves the skull via the jugular foramen. The sternocleidomastoid muscles (SCM) and trapezius are then innervated by it.

    Function

    Since the accessory nerve only transmits motor signals, it only permits motion and not sensation.

    Cranial Region

    Some of the muscles in the pharynx, larynx, and soft palate can move because of the cranial component of the accessory nerve’s vagus nerve supply. Eating, speaking, and breathing are all facilitated by those head and throat structures.

    Spinal Region

    The spinal component of the auxiliary nerve innervates important muscles as well.

    The range of motion in your upper body would be greatly restricted if your trapezius and SCM were not functioning. The trapezius muscle lifts and retracts the scapula and aids in shoulder abduction, whereas the SCM muscle rotates the head to the other side and flexes the neck.

    What is the Spinal Accessory Nerve palsy?

    • The disorder known as spinal accessory nerve palsy, or SAN palsy, results in weakening or paralysis in the neck and shoulder muscles. It happens when there is an injury to the spinal accessory nerve, which regulates these muscles.
    • The most typical sign of spinal accessory nerve palsy is weakness or trouble raising the arm on the side that is affected. Persons who have spinal accessory nerve palsy may also experience neck or shoulder pain, as well as improper movement of their shoulder blades.
    • Spinal accessory nerve palsy can be brought on by a variety of factors, including an infection, trauma, tumor, or surgery.
      The underlying cause of spinal accessory nerve palsy affects the course of treatment. Physical therapy is the only treatment required in many cases. Increasing the range of motion and strengthening muscles are two benefits of physical therapy. Surgery can be required in certain cases to repair the injured nerve.

    Causes of the Spinal Accessory Nerve Palsy

    There are several causes of spinal accessory nerve palsy, such as:

    • Inflammatory and Infectious Causes: Sarcoidosis, herpes zoster, and Lyme disease are a few illnesses that can harm a nerve.
    • Blunt or Penetrating Trauma: A straight hit to the shoulder or neck can cause nerve damage.
    • Surgical Trauma: Accidental injury caused during surgical procedures, specifically neck dissections for tumors, carotid endarterectomy, or lymph node biopsies, is the most common cause of surgical trauma.
    • Tumors: The nerve may be compressed by tumors in the base of the head or neck.
    • Idiopathic means: The exact cause of certain cases is yet unknown.

    Symptoms of the Spinal Accessory Nerve Palsy

    The following are the most common symptoms of spinal accessory nerve injury: 

    • Pain and weakness in the shoulder resulting from the weakening of the trapezius muscle are the most typical signs of injury to the spinal accessory nerve.
    • The prominent medial border of the scapula causes scapular winging because the trapezius muscle cannot stabilize the scapula.
    • Atrophy and Weakness in the Trapezius and Sternomastoid Muscles.
    • Restricted range of motion in the shoulders.
    • Abduction and overhead activities are difficult.
    • Asymmetry in shoulder height and a drooping shoulder.
    • These symptoms might greatly impact the quality of life in general and everyday activities.

    Diagnosis of the Spinal Accessory Nerve Palsy

    A routine physical examination is the first step in the diagnosis of spinal accessory nerve palsy. Your physician may use neurological testing and imaging methods like electromyography (EMG).

    • Physical Examination: A comprehensive physical examination and history are essential. Muscle atrophy, range of motion, and strength should be the main areas of assessment. The function of the trapezius muscle can be examined with the use of certain tests, such as the scapular flip test and shoulder shrug test.
    • Imaging Studies: Tumours and inflammatory processes are examples of structural reasons that can be found using magnetic resonance imaging (MRI) and computed tomography (CT scans). An ultrasound can help assess muscle atrophy.
    • Electrophysiological Tests: To verify the diagnosis and determine the extent of the nerve damage, electromyography (EMG) and nerve conduction studies (NCS) are required.

    Treatment of the Spinal Accessory Nerve Palsy

    The underlying cause, the extent of the nerve damage, and the length of the symptoms all influence how spinal accessory nerve palsy is treated. Among the available treatments are:

    Conservative Treatment

    • Many spinal accessory nerve palsy cases, especially those caused by idiopathic causes or slight trauma, may get better with conservative care.
    • Corticosteroid injections or NSAIDs for pain control may also be helpful.
    • Botulinum toxin is useful in treating pain and muscular imbalance, especially when compensatory muscles become hyperactive.
    • Physical therapy is part of this to enhance shoulder function and strengthen the residual muscles.
    • Occupational therapy: It can assist patients in adjusting to modifications in shoulder function while improving their capacity to carry out everyday tasks.

    Surgical Treatment

    Surgical examination and nerve repair may be required in cases of severe damage or during neck procedures where the nerve is accidentally wounded. Procedures include muscular tendon transfers, nerve grafting, and transfers of nerves. One such method is Eden-Lange surgery, which involves re-aligning the rhomboid and levator scapulae muscles to correct for dysfunction of the trapezius. Scapulothoracic fusion is a commonly performed surgical technique.

    Scapulothoracic (ST) Fusion

    A restoration technique called scapulothoracic (ST) fusion is used to stabilize the scapula on the thorax. It includes the union of the scapula’s medial edge with the three to five ribs underlying. The elevation and abduction of the shoulder are greatly impacted by the scapulothoracic (ST) motion. When tendon transfer is ineffective in treating long thoracic nerve palsy and spinal accessory nerve palsy, this treatment is advised. Scapulothoracic fusion is also a treatment option for brachial plexus, facioscapulohumeral dystrophy, and medial clavicular insufficiency.

    Procedure

    The following are the fundamental procedures in scapulothoracic fusion surgery:

    • The patient gets positioned on the operating table and given general anesthesia.
    • A cut is made along the scapula’s medial edge.
    • The underlying three to five ribs are then visible, as is the inner edge of the scapula bone along its entire length.
    • Next, the nearby ribs are linked to the scapula.
    • To encourage fusion, a bone stimulator is implanted together with a bone transplant at the contact point.
    • The incision has finally closed.
    • The entire process typically takes three to four hours, and the patient may need to spend three to five days in the hospital.

    Post-operative care

    • Patients who have had scapulothoracic fusions are recommended to pay attention to the following basic instructions: For the first six weeks after surgery, wear a sling and avoid using the affected extremity.
    • Observe your therapist’s recommendations for exercise and activities during the healing period. The shoulder’s complete recovery could take six months or maybe a year.

    Risk and Complication

    While scapulothoracic fusion is a safe treatment, there are several dangers and problems to be aware of. These include:

    • Metalwork malfunction
    • Adhesive Capsulitis
    • Bone nonunion 
    • Pneumothorax
    • Pleural effusion
    • Thoracic outlet syndrome
    • Pneumonia
    • Fracture of the scapula
    • Deep Venous thrombosis

    Physical Therapy for Spinal Accessory Nerve Palsy

    Physical therapy plays an important role in the recovery from spinal accessory nerve palsy. A personalized rehabilitation plan with a focus on:

    • Strengthening Exercises: To improve shoulder stability, focus on the deltoid and other compensating muscles.
    • Range of Motion Exercises: To keep your body flexible and prevent stiffness.
    • Postural training: To deal with compensatory alterations in posture that may result from weak muscles.
    • Functional Training: The goal of functional training is to improve your daily function.
    • A physical therapist must closely observe the patient to modify the rehabilitation program as needed.

    Prognosis of the Spinal Accessory Nerve Palsy

    The degree and cause of the damage decide the prognosis for spinal accessory nerve palsy. Persons with minor wounds or those who receive immediate medical attention typically have a good prognosis that improves progressively with time. Even with surgery, severe injuries especially those involving full nerve transection may leave a patient permanently impaired.

    Summary

    Spinal Accessory Nerve Palsy is a disorder with various causes and significant functional implications. spinal nerve palsy can cause paralysis or dysfunction. Early diagnosis and proper treatment are crucial for optimizing results. Therefore, you should visit a medical center for a checkup and diagnosis as soon as you feel you may have a sickness. You’ll regain better motor function if you receive treatment early.

    FAQs

    What occurs if there is injury to the accessory nerve?

    A spinal accessory nerve injury may result in trapezius dysfunction. The trapezius is a primary stabilizer of the scapula and consists of three parts. Scapula elevation, rotation, and retraction help in scapulothoracic rhythm.

    What is the eleventh cranial nerve?

    The eleventh paired cranial nerve is the accessory nerve. It innervates the muscles of the sternocleidomastoid and trapezius, and it is a mainly motor function.

    How are spinal accessory nerves tested?

    Two muscles are examined while examining the accessory nerve: the sternocleidomastoid and trapezius. Request that the patient shrug their shoulders before applying resistance to test the trapezius. Weakness in the accessory nerve will show up as little to no resistance to your downward force.

    How is spinal accessory nerve palsy treated?

    A  of treatments involving conservative care, physical combination therapy, and surgical restoration is used to treat spinal accessory nerve (SAN) damage and dysfunction of the trapezius muscle.

    Which symptoms would you link to spinal accessory nerve damage?

    The most frequent presenting symptom of spinal accessory nerve (SAN) injury is shoulder discomfort, whereas the most common sign is restricted or lack of sustained abduction of the shoulder.

    References

    • Dellwo, A. (2023, July 17). The anatomy of the accessory nerve. Verywell Health. https://www.verywellhealth.com/accessory-nerve-anatomy-4783765
    • Cance- Resources from OncoLink, Treatment, Research, Coping, Clinical Trials, & Prevention. (n.d.). Spinal Accessory Nerve Palsy | OncoLink. University of Pennsylvania – OncoLink. https://www.oncolink.org/cancers/head-and-neck/side-effect-management-support-resources/spinal-accessory-nerve-palsy
    • Spinal Accessory Nerve Palsy (SANP)-Treatment New Orleans LA. (n.d.). https://www.mistysurimd.com/patient-info/conditions-procedures/shoulder/spinal-accessory-nerve-palsy/
    • What is spinal accessory nerve palsy (SAN)? (n.d.). Vinmec. https://www.vinmec.com/en/oncology-radiotherapy/medicine-information/what-is-spinal-accessory-nerve-palsy-san/
    • Machens, A., Schmid, K. W., & Dralle, H. (2020). Advances in the diagnosis & surgical management of medullary thyroid carcinomas. In Elsevier eBooks (pp. 11–25). https://doi.org/10.1016/b978-0-323-66195-9.00002-9