Blog

  • Intercarpal Joints

    Intercarpal Joints

    The intercarpal joints are synovial plane joints located between the carpal bones of the wrist. They allow for small gliding movements, contributing to the flexibility and overall motion of the wrist.

    These joints are reinforced by ligaments, including the dorsal, palmar, and interosseous ligaments, which provide stability. The midcarpal joint, between the proximal and distal carpal rows, plays a key role in wrist movement, especially flexion and extension.

    Introduction

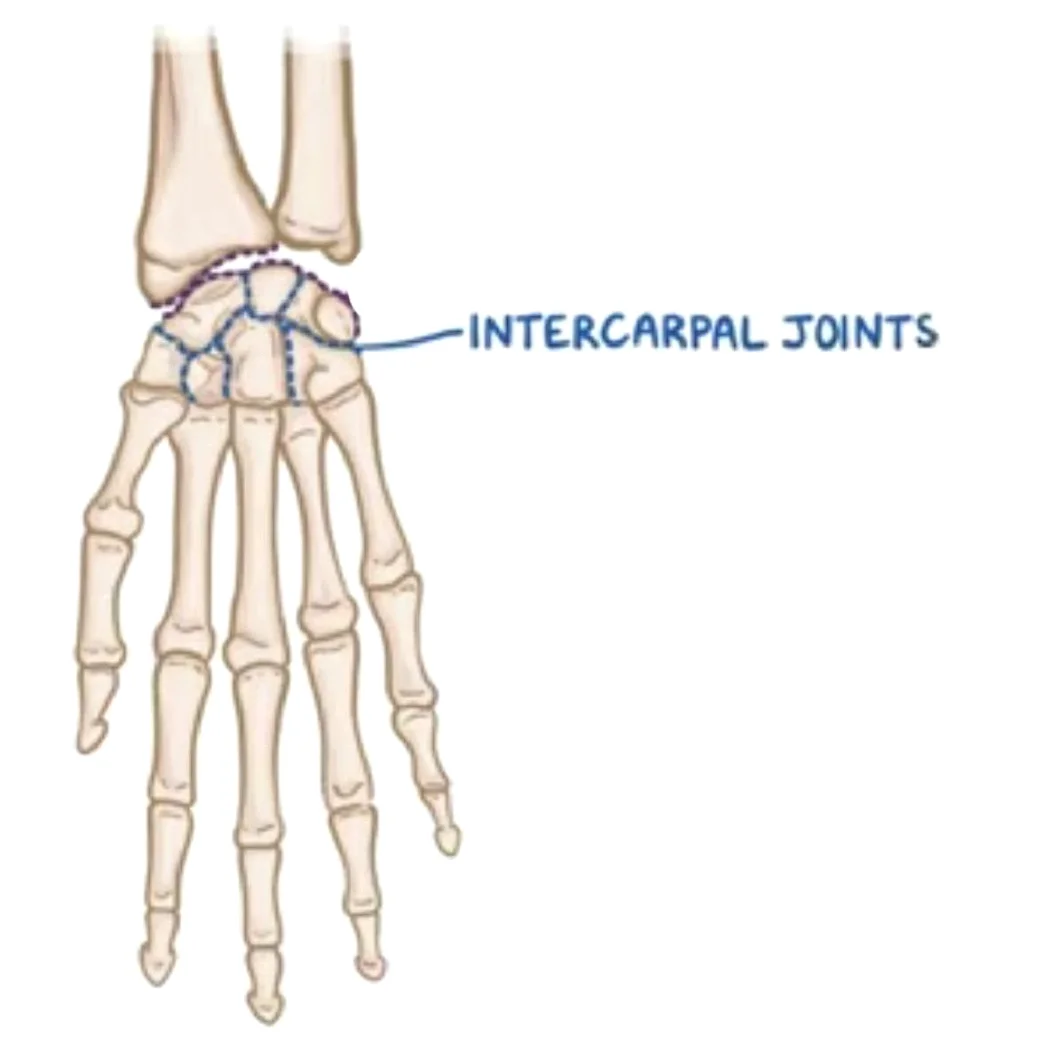
    The joints in the synovial plane that unite the carpal bones are called intercarpal joints. They assemble three joint sets;

    • Proximal carpal row joints join neighboring surfaces of the scaphoid, lunate, and triquetrum bones. The pisiform joint, an articulation between the pisiform and triquetrum, is a part of the proximal carpal joints but is also referred to as a separate joint.
    • The distal carpal row joints allow the neighboring surfaces of the hamate, capitate, trapezium, and trapezoid bones to articulate.
    • The carpal rows articulate with one another through the midcarpal joint.

    Little mobility occurs inside the proximal and distal carpal rows because they are held and anchored by several ligaments. They are responsible for coordinating the movements of the midcarpal and wrist (radiocarpal) joints. However, the midcarpal joint can create a considerable range of motion that is divided into two degrees of freedom: abduction-adduction and flexion-extension.

    Articular surfaces

    The articular surfaces of all intercarpal joints are functionally regarded as being almost flat and coated with fibrocartilage, making them all synovial plane joints. Thin fibrous capsules that have synovial membranes lining their interiors encircle the joints.

    Scapholunate and lunotriquetral joints are formed by the proximal carpal row’s joints, which join the comparatively flat/planar neighboring surfaces of the scaphoid, lunate, and triquetral bones. The palmar surface of the triquetrum bone articulates with the pisiform bone, which is located within the tendon of the flexor carpi ulnaris muscle, to form the pisiform joint. Additionally, the pisohamate and pisometacarpal ligaments connect the pisiform bone to the fifth metacarpal and hook of the hamate bones, respectively.

    In the distal carpal row, the trapezium, trapezoid, capitate, and hamate bones are joined by joints. The trapeziotrapezoid, trapezoid capitate, and capitohamate joints are formed by these articulations and are significantly less flexible than the proximal carpal row joints.

    The compound articulation between the proximal and distal surfaces of the carpal bones is known as the midcarpal joint for short. More precisely, it is a joint that was created by the following:

    • Proximally, the scaphoid, lunate, and triquetral bones
    • Distally, the trapezium, trapezoid, capitate, and hamate bones

    There are two compartments in the midcarpal joint: the medial and lateral. Two articular areas are visible in the medial compartment. The convex surface of the capitate bone’s head, which is received by the concave distal surfaces of the scaphoid and lunate bones, forms the first.

    The triquetrohamate component, the second half, is more complicated and has both concave and distally convex surfaces. The plane surfaces of the trapezium and trapezoid bones make up the lateral compartment, and they articulate with the scaphoid bone’s distally convex surface. This joint is hence a planosellar compound joint that is slightly convex distally.

    Synovial membrane

    The carpus’s wide synovial membrane encloses a highly irregularly shaped synovial cavity.

    The upper part of the hollow sits between the upper surfaces of the second row of bones and the under surfaces of the navicular, lunate, and triangular bones.

    It sends three prolongations downward between the four bones of the second row and two upward between the navicular and lunate and the lunate and triangular.

    Due to the lack of the interosseous ligament, the prolongation between the greater and lesser multangulars, or between the lesser multangular and capitate, is frequently continuous with the cavity of the carpometacarpal joints, possibly of the second and third metacarpal bones, and occasionally of the fourth and fifth.

    The latter condition is characterized by a distinct synovial membrane at the joint between the hamate and the fourth and fifth metacarpal bones.

    The synovial spaces in these joints extend between the metacarpal bone bases for a brief distance.

    The triangular and pisiform have different synovial membranes.

    Ligaments and joint capsule

    An uneven, two-layered joint capsule encloses the intercarpal and midcarpal joints. A synovial membrane that secretes synovial fluid, which keeps the joint lubricated, makes up the inner layer of the capsule, whilst fibrous connective tissue makes up the outside layer, giving the joint structural support. It connects the distal surfaces of the proximal carpus to the distal carpus’s proximal surfaces. Proximal projections across the scapholunate and lunotriquetral joints are another example of how it interdigitates between the bones.

    Similarly, the capsule extends between the distal carpal row’s bones. There is frequent communication between the joint space of the corresponding carpometacarpal joint and the distal projection between the trapezium and trapezoid bones. Typically, the joint between the triquetrum and pisiform bones is isolated and has a synovial membrane lining its thin fibrous capsule.

    Several ligaments support the joints of the carpal bones, including the palmar, dorsal, and interosseous intercarpal ligaments. It is important to note that there is some misunderstanding regarding the architecture of these ligaments because of the inconsistent descriptions found in the literature.

    Both the palmar and dorsal intercarpal ligaments are attached to the carpal joint capsule; the palmar ligaments are significantly more numerous than the dorsum. On the other hand, the interosseous intercarpal ligaments are intracapsular. Moreover, the flexor retinaculum additionally supports the stability of the carpus.

    Interosseous intercarpal ligaments

    The scapholunate and lunotriquetral ligaments are the names of the interosseous ligaments of the proximal carpal row, which are called after the bones they connect. These structures separate the joint spaces of the midcarpal and radiocarpal joints by extending between the opposite surfaces of the relevant carpal bones.

    In the distal row, the trapezium, trapezoid, capitate, and hamate bones are connected by interosseous ligaments. They are composed of both deep and surface elements.

    Dorsal intercarpal ligament

    From the dorsal tubercle of the triquetrum bone to the dorsal groove of the scaphoid bone, the dorsal intercarpal ligament forms a horizontal strap. It may also transmit extra fibers to the trapezoid and capitate bones.

    It makes up the floor of the wrist’s fourth and fifth dorsal (extensor) compartments. The dorsal scaphotriquetral ligament is the term used to describe the enlarged proximal portion of the dorsal intercarpal ligament that runs between the dorsal sides of the scaphoid and triquetrum bones.

    Palmar intercarpal ligaments

    The fan-shaped ligaments that comprise the palmar midcarpal ligaments are named after the bones they link. From radial to ulnar, they are as follows:

    • The distal pole of the scaphoid bone is joined to the trapezium and trapezoid bones by the scaphotrapeziotrapezoidal ligament.
    • The ligament known as the scaphocapitate runs from the scaphoid to the capitate bone.
    • The triquetra capitate ligament connects the capitate bone’s body to the distal edge of the triquetrum.
    • The triquetrohamate ligament, joins the hamate and triquetrum bones.

    Flexor retinaculum

    A fibrous band that runs across the anterior surface of the carpus is called the flexor retinaculum, or transverse carpal ligament. The retinaculum encloses the anterior/palmar concavity of the carpus into the carpal tunnel, which serves as a route for the tendons of the digital flexors and the median nerve.

    The flexor retinaculum’s medial attachment lies on the pisiform and the hamate bone’s hook, but its lateral attachment is divided into superficial and deep laminae. While the deep lamina affixes to the medial lip of the groove on the medial aspect of the trapezium, the superficial lamina inserts into the tubercles of the scaphoid and trapezium bones.

    The flexor carpi radialis tendon travels via a tunnel enclosed by this groove and the two laminae. The superficial surface of the retina is traversed by the ulnar artery and ulnar nerve. Guyon’s canal is a tube that encloses the superficial fibers of the retinaculum as they glide across the ulnar neurovasculature and adhere to the lateral face of the pisiform bone.

    Innervation

    The radial and median nerves, respectively, give rise to the anterior and posterior interosseous nerves, which innervate the intercarpal joints. These joints are additionally innervated by the dorsal and deep branches of the ulnar nerve.

    Blood supply

    The palmar and dorsal carpal arches, which are the anastomoses of the terminal branches of the ulnar and radial arteries, provide blood to the intercarpal joints.

    Movements

    A total of four articular surfaces are involved in the articulation of the hand and wrist:

    • The inferior surfaces of the articular disk and radius;
    • The superior surfaces of the triangular, lunate, and scaphoid, while the pisiform is not necessary for hand movement;
    • The triangular, lunate, and scaphoid inferior surfaces that combine to form an S-shaped surface;
    • The upper surfaces of the second row’s bones form a reciprocal surface.

    Two joints are formed by these four surfaces: the wrist joint proper, which is proximal, and the mid-carpal joint, which is distal.

    The motions of the radiocarpal joints are typically described in conjunction with those of the intercarpal and midcarpal joints, which follow their movements. There is minimal movement at the proximal and distal intercarpal joints because the carpus’ ligamentous structure firmly holds the bones together. The distal intercarpal joints move far less than the proximal ones, which provide notable flexion and extension. As the motions on the radiocarpal and midcarpal joints take place, these movements are crucial for modifying the hand’s morphology.

    Keep in mind that the radiocarpal joint is a biaxial joint with two degrees of motion;

    • Range of motion (ROM): 35° for flexion and 50° for extension
    • RoM 8° abduction – RoM 15° adduction.

    It is also feasible to combine the aforementioned actions to perform circumduction.

    These motions on the radiocarpal joint are followed by minor movements on the midcarpal joint. The transverse and sagittal axes that go through the capitate bone’s head are where they occur. The following are the movements:

    • When the wrist is flexed and extended, the hamate spins against the triquetrum, and the head of the capitate rotates against the nearby surfaces of the scaphoid and lunate.
    • The proximal end of the capitate rotates laterally during wrist adduction, also known as ulnar deviation. The hamate rotates similarly, moving toward the lunate and dislodging it from the triquetrum bone.
    • In abduction (radial deviation), the hamate and lunate are separated by the rotation of the proximal portion of the hamate towards the triquetrum.

    The minor torsion movements between the carpal rows come after abduction and adduction. Abduction is characterized by the proximal row rotating in the opposite direction (pronation and flexion) and the distal row twisting in the direction of supination and extension. The proximal row spins in the direction of supination and extension during adduction, whereas the distal row twists in the direction of pronation and flexion.

    As the hand is extended, the joint assumes a tightly packed configuration. The hand is in the open (resting) position when it is neutral or slightly flexed. In contrast to the midcarpal joint, which has equal limitations in flexion and extension, the capsular pattern has not been defined in the intercarpal joints.

    The proximal and distal intercarpal joints allow any two adjacent bones to glide anteroposteriorly. Anteroposterior gliding between the proximal and distal rows of the carpus can also occur on the midcarpal joint.

    Muscles acting on the intercarpal joints

    The muscles that move the radiocarpal (wrist) joint are the same muscles that move the intercarpal joints.

    • The flexor carpi radialis, flexor carpi ulnaris, and palmaris longus are the primary muscles involved in flexion. The flexor digitorum profundus, flexor digitorum superficialis, and flexor pollicis longus all aid in it.
    • The digitorum, digiti minimi, indicis, and pollicis longus muscles support the primary extensors, which are the carpi radialis longus, brevis, and ulnaris.
    • The carpi ulnaris flexor and extensor are the adductors.
    • The flexor radialis, extensor radialis longus, and extensor radialis brevis are the main abductors. This movement uses the abductor pollicis longus and extensor pollicis brevis as accessory muscles.

    Clinical signifiacnces

    The wrist’s intercarpal joints are synovial plane joints that are situated in between the carpal bones. Small gliding motions are made possible by them, which enhance wrist motion and flexibility in general. Among their clinically significant aspects are:

    1. Arthritis (Osteoarthritis & Rheumatoid Arthritis)

    • Reduced wrist mobility, pain, and stiffness can result from degenerative changes in the intercarpal joints, especially the scaphotrapeziotrapezoidal (STT) joint.
    • The wrist joints are frequently impacted by rheumatoid arthritis (RA), which can cause progressive deformity.

    2. Carpal Instability

    • Scapholunate Dissociation: When the scapholunate ligament is damaged, the scaphoid and lunate bones become unstable, which impairs wrist function.
    • Lunotriquetral Instability: Wrist pain and dysfunction may result from lunotriquetral ligament weakness or rupture.

    3. Carpal Tunnel Syndrome (CTS) Relation

    • CTS symptoms can be made worse by median nerve compression in the carpal tunnel, which can be caused by intercarpal joint swelling or degenerative changes.

    4. Kienböck’s Disease (Avascular Necrosis of the Lunate)

    • When the lunate bone’s blood supply is disrupted, the midcarpal joint gradually collapses and develops arthritis.

    5. Fractures & Post-Traumatic Arthritis

    • Avascular necrosis or nonunion are common outcomes of scaphoid fractures, which impair intercarpal stability and cause post-traumatic arthritis.
    • The integrity of the intercarpal joint can be seriously impacted by perilous dislocations.

    6. Ganglion Cysts

    • Intercarpal joints, especially the scapholunate joint, are frequently the source of these fluid-filled sacs, which can be uncomfortable or compress nerves.

    7. Wrist Motion & Surgical Considerations

    • The wrist’s flexion, extension, and circumduction are facilitated by the intercarpal joints.
    • When intercarpal arthritis or instability is severe, proximal row carpectomy (PRC) may be necessary.

    FAQs

    What are the joints between the carpal bones?

    The articular surfaces of all intercarpal joints are functionally regarded as being almost flat and lined with fibrocartilage, making them all synovial plane joints. The thin fibrous capsules that enclose the joints have synovial membranes lining their interior surfaces.

    Does the intercarpal joint glide?

    The hand contains multiple intercarpal joints, all of which fall under the category of sliding joints. Between bones that glide past one another along a plane formed by the flat sides of the bones where they articulate, there are sliding joints, also known as gliding joints.

    Which intercarpal joint is the first?

    The distal joint on the trapezium and the proximal joint facet of the first metacarpal combine to form the first carpometacarpal joint. The morphologic characteristics of these facets, in conjunction with a strong yet flexible joint capsule, provide the thumb with exceptional mobility and are crucial in thumb opposition.

    What is the typical distance between the carpal bones?

    There should be 1-2 mm between each carpal bone.

    Which joint is the intercarpal?

    There are three sets of joints, also known as articulations, that make up the intercarpal joints (joints of the wrist’s carpal bones): The carpal bones in the proximal and distal rows, as well as the two rows to one another, are among them. intercarpal joints.

    Is there multiaxiality in the intercarpal joint?

    Plane joints are multiaxial joints that only permit brief nonaxial gliding motions because their articular surfaces are nearly flat. The gliding joints that were previously discussed—the joints between vertebral articular processes and the intercarpal and intertarsal joints—are two examples.

    What kind of movement takes place in the wrist’s intercarpal joint?

    The wrist’s intercarpal joints are mainly used for gliding motions. Gliding motions happen when relatively flat bone surfaces pass one another. Very little rotation or angular movement of the bones results from this kind of motion.

    What do the intercarpal and radiocarpal joints mean?

    The intricate joint that joins the hand and forearm is the wrist. The intercarpal joints, which are tiny joints between the carpals, and the radiocarpal joint, which is located between the radius and the proximal row of the carpal bones (apart from the pisiform), make up this structure.

    The intercarpal joint is what kind of joint?

    An articulation between two flat bones of comparable size is called a planar joint, or gliding joint. Although multiaxial, planar joints are constrained by the surrounding ligaments. The acromioclavicular, intercarpal, and intertarsal joints are a few examples.

    References

    • Intercarpal joints. (2023, November 3). Kenhub. https://www.kenhub.com/en/library/anatomy/intercarpal-joints
    • Wikipedia contributors. (2024a, February 11). Intercarpal joints. Wikipedia. https://en.wikipedia.org/wiki/Intercarpal_joints
  • 12 Best Yoga For Knee Strengthening Exercises

    12 Best Yoga For Knee Strengthening Exercises

    Strengthening the knees through yoga helps improve stability, flexibility, and joint support while reducing pain and injury risk. Key poses like Chair Pose, Bridge Pose, and Warrior variations build strength in the quadriceps, hamstrings, and surrounding muscles. Regular practice enhances mobility and balance, supporting overall knee health.

    Introduction:

    Yoga is a great way to strengthen your knees, increase their flexibility, and lessen pain or stiffness. When performed properly, it improves mobility and strengthens the muscles surrounding the knee joint.

    In addition to increasing flexibility, yoga helps the body become stronger and more stable. Concerning the knees, several yoga poses for knee pain focus on the quadriceps, hamstrings, and glutes muscles that support the knee joints. It is possible to reduce knee strain and improve injury resistance by strengthening these muscles. Additionally, yoga helps maintain good posture throughout physical exercise and improves body awareness. Avoiding knee problems caused on by poor posture or dislocation requires this knowledge.

    Every time we walk, squat, or move, our knees bear the weight of our bodies, making them essential joints. They give us balance, movement, and stability in our day-to-day tasks. Knee weakness and pain, however, can arise with age, trauma, or inactivity, resulting in pain and restricted movement. Yoga is among the most effective approaches for managing knee weakness and stiffness.

    Advantages of Knee Strengthening Yoga Pose:

    For knee strengthening, yoga is a mild yet very powerful approach. Weak quadriceps, hamstrings, and calves are among the muscles that surround the knee joint and are the cause of many common knee issues. Yoga strengthens these muscles and encourages mobility, balance, and flexibility.

    The following are the main advantages of yoga for strengthening the knees:

    • Strengthens the knee’s surrounding muscles.

    Strong muscles lower the chance of injury by giving the knee joint stability and support. The quadriceps, hamstrings, calves, and glutes are all used in many yoga postures and are essential for knee stability. By strengthening these muscles, the tension on the knee is less likely to take place and the weight is distributed more evenly.

    • Increases Joint Mobility

    Increases the knee joint’s range of motion, helping in avoiding stiffness and preserving normal movement patterns. Regular yoga practice maintains or increases the knee joints and the surrounding tissues’ flexibility. The pain caused by limited movement is lessened by this increased mobility.

    • Helps in the Recovery from Injuries

    Help in recovery by gradually restoring knee strength and range of motion. Following knee injuries, yoga allows a regulated, low-impact recovery phase. Gentle strengthening and stretching poses lower the chance of re-injury while offering a secure recovery environment.

    • Increases Flexibility

    Tension and soreness are lessened when the muscles surrounding the knee are more flexible. Pain or dislocation may result from tight muscles that put strain on the knee joint, such as the calves, hamstrings, and quadriceps. Yoga stretches extend these muscles, increasing the range of motion and reducing stiffness.

    • Improves Stability and Balance

    Promotes stability and balance overall, supporting knee function. You may strengthen the knee-supporting muscles while improving joint coordination by doing yoga positions that test your balance and stability. This can help you avoid falls and lessen knee pain.

    • Lessens Knee Pain

    Knee pain caused by overuse, injuries, or diseases like arthritis can be relieved by yoga. Yoga lessens the load on the knee joint by strengthening the muscles surrounding it and improving its alignment. The comforting and relaxing effects of yoga can help in pain management and recovery.

    • Prevents Knee Problems in the Future

    Maintains strength and flexibility, preventing knee issues and muscular imbalances. Regular yoga practice helps maintain muscular balance around the knee joint, preventing each group of muscles from becoming weak or too tense. This balance reduces the chance of getting runner’s knee, patellar tendonitis, and osteoarthritis.

    • Helps Encourage Correct Alignment

    Correct alignment issues that could be causing knee pain or strain. A lot of yoga positions focus on body awareness and alignment. Yoga helps you avoid bad habits that might cause imbalances and injury, such as allowing your knee to fold inward, by focusing on good knee alignment during practice.

    • Promotes Awareness of the Body

    Makes you more aware of the alignment and movement patterns of your body, which promotes better movement habits. Yoga promotes awareness of the body’s actions and paying attention to movement. This increased awareness helps in avoiding compensations or imbalances that may be a factor in knee injury or pain.

    • Reduces Tension and Stress

    Lessens the body’s general tension, which may have an effect on the knees. Yoga uses relaxing positions and breathing exercises called pranayama to promote deep relaxation. Muscle tightness that could normally cause knee pain can be lessened by lowering stress and tension in the body.

    Yoga For Knee Strengthening:

    By strengthening the muscles that support the joint the hamstrings, quadriceps, glutes, and calves you can lessen the likelihood of knee pain and injury.

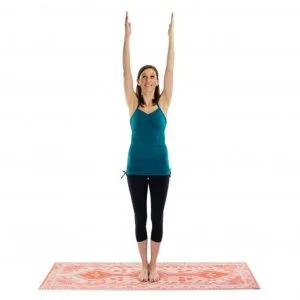
    Mountain Pose (Tadasana)

    Strengthens the legs, activates the quads and glutes to support the knees, and improves posture.

    • Place your feet hip-width apart or together.
    • Make sure your feet are set firmly on the ground and that your weight is distributed equally between your heels and knees.
    • Maintain contact between your big toes while leaving just a little distance between your heels if your feet are together.
    • Gently raise your kneecaps to engage your leg muscles.
    • Use your quads (the muscles in front of your thighs) a little to make your legs longer.
    • Think about pulling the inner thighs together without locking the knees.
    • Pull your lower abdomen in (without pushing) and tuck your tailbone under a little.
    • This helps with the development of a neutral pelvic posture.
    • Think of your spine being lengthened by something dragging you upward from the top of your head.
    • Relax your shoulders away from your ears and slowly pull your shoulder blades down your back.
    • With your hands facing front or slightly twisted toward your body, keep your arms by your sides.
    • Make sure the top of your head is pointing toward the ceiling.
    • You can keep your chin parallel to the floor and look directly ahead.
    • Push your belly button toward your spine by gently contracting your abdominal muscles.
    • By doing this, you can keep your posture straight and stabilize your entire body.
    • Take deep, calm breaths.
    • Create a balance between strength and relaxation by inhaling to stretch your body and exhaling to relax yourself into the pose.
    • Then return to your neutral position.
    • Then relax.
    • Repeat this pose 5 to 10 times.
    Mountain-Pose
    Mountain-Pose

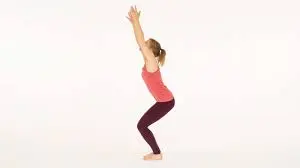
    Chair Pose (Utkatasana)

    Improves knee stability by strengthening the calves, quadriceps, and glutes.

    • Start by placing your feet hip-width apart or together and standing tall.
    • Engage your legs and apply equal pressure through your feet.
    • As if you were sitting in an imaginary chair, take a deep breath and start bending your knees and pulling your hips back.
    • Maintain a balanced weight on your feet.
    • Refrain from extending your knees over your toes.
    • Keep lowering your hips until your thighs are as low as you can comfortably go or as parallel to the floor as you can.
    • Consider sitting in a chair where your knees should not extend over your toes.
    • As you take a breath, raise your arms next to your ears, either parallel or pulling them together (palms facing forward or each other).
    • Remain calm and keep your shoulders away from your ears.
    • To activate your core, pull your belly button toward your spine.
    • Make sure your back doesn’t round out or arch.
    • Maintain a raised chest.
    • Hold for five to ten breaths, bending your knees more deeply with each exhale if you can.
    • Then return to your neutral position.
    • Then relax.
    • Repeat this pose 5 to 10 times.
    Chair Pose (Utkatasana)
    Chair Pose (Utkatasana)

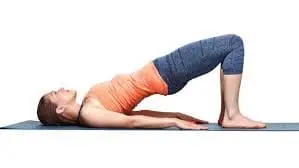
    Bridge Pose (Setu Bandhasana)

    Helps to stabilize the knee by strengthening the lower back, hamstrings, and glutes.

    • Place your feet flat on the mat, hip-width apart, and bend your knees while lying flat on your back.
    • Keep your arms by your sides and place your hands down.
    • Maintaining your feet in line with your hips, press your feet onto the mat.
    • Ensure that your knees are pointed directly ahead rather than out to the sides.
    • Press your feet into the floor and raise your hips toward the ceiling as you take a breath.
    • As you elevate your hips, contract your thighs, glutes, and core.
    • As you raise your hips, you can choose to connect your fingers under your back or maintain your arms by your sides.
    • Press your arms into the mat for support if your arms are on the floor to keep them moving.
    • Try to pull your chest toward your chin as your hips rise, being careful not to strain your neck.
    • Keep your neck and shoulders relaxed.
    • Maintain your feet, arms, and legs firmly planted.
    • Press your feet firmly into the mat and raise your chest with each breath as you hold for five to ten seconds.
    • Carefully lower your hips back down to the mat to release.
    • Then return to your neutral position.
    • Then relax.
    • Repeat this pose 5 to 10 times.
    Hip bridge exercise
    Hip bridge exercise

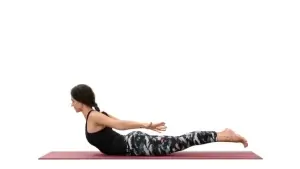
    Locust Pose (Salabhasana)

    Strengthens the thighs, glutes, and lower back, giving the knees additional support.

    • With your arms out by your sides, palms down, lie flat on your stomach.
    • Keeping the tops of your feet pressing into the mat, maintain your legs straight and together.
    • Keep your neck relaxed and in alignment with your spine while lowering your forehead to the floor.
    • Your lower body is activated by pressing the tops of your feet into the floor and using your thighs and glutes.
    • You can strengthen your back muscles by imagining attempting to raise your legs off the ground without using your hands.
    • As you take a breath, start slowly raising your arms, legs, and body off the floor at the same time.
    • Try reaching your legs up and back while keeping your arms outstretched, as though you were stretching your body in two different directions.
    • Make sure your neck is neutral and keep your eyes down or slightly forward.
    • As you continue to raise your legs and chest, use your inner thighs and core to support your lower back.
    • As your chest rises higher, continue to extend your arms toward your feet.
    • Hold this position for a few seconds.
    • As you raise your weight, concentrate on stretching your body.
    • Release by controlling the slide of your arms, legs, and chest back to the mat.
    • Then return to your neutral position.
    • Then relax.
    • Repeat this pose 5 to 10 times.
    Locust Pose (Salabhasana)
    Locust Pose (Salabhasana)

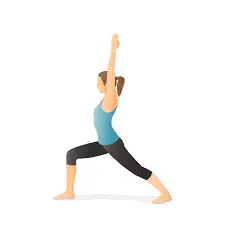
    Warrior I (Virabhadrasana I)

    Increases balance and strengthens the calves, hips, and thighs.

    • Maintain a tall stance with your arms by your sides, shoulders relaxed, and feet hip-width apart.
    • As you inhale deeply, stretch your spine and ground yourself via your feet.
    • Keeping your right foot forward, take a large step back with your left foot.
    • Depending on your height and level of flexibility, try to keep your feet 3–4 feet apart.
    • With your right thigh parallel to the floor, place your right knee exactly over your right ankle.
    • Place the heel of your left foot firmly on the ground and lean it out to a 45-degree angle.
    • Your left leg should remain strong and straight.
    • Make sure your right knee stays just above your right ankle and doesn’t extend past your toes by bending it significantly.
    • Lengthen your tailbone toward the floor by using your thigh muscles.
    • Keeping your shoulders relaxed and away from your ears, raise your arms upward with your palms facing one another as you take a breath.
    • Stretch your fingers toward the sky and raise your arms so that your wrists and shoulders are separated.
    • With your sternum slightly raised, maintain an open chest and face forward.
    • Look directly ahead or, depending on how comfortable your neck is, gradually tilt your eyes upward toward your hands.
    • Hold for 5–10 breaths while keeping your legs and core strongly engaged.
    • Straighten your front leg and slowly lower your arms to release.
    • Then return to your neutral position.
    • Then relax.
    • Repeat this pose 5 to 10 times.
    Warrior 1 Pose
    Warrior 1 Pose

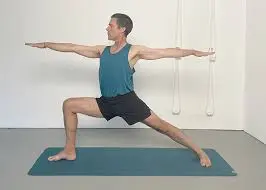
    Warrior II (Virabhadrasana II)

    Stabilizes the knees by strengthening the hips and quadriceps.

    • With your shoulders relaxed, arms by your sides, and feet hip-width apart, take an upright stance.
    • Depending on your flexibility and body size, space your feet 3 to 4 feet apart.
    • Your left foot should be angled in around 45 degrees, while your right foot should be turned out 90 degrees, pointing toward the front of your mat.
    • As you bend your right knee about 90 degrees, be sure it remains just above your right ankle and does not go past your toes.
    • Press your left foot’s outer edge into the mat while maintaining a firm, straight left leg.
    • You should have your shoulders level over your hips and the rest of your body looking forward.
    • To prevent your butt from showing, imagine gently drawing your hips back.
    • Stretch your arms out to the sides at shoulder height, palms down, as you take a breath.
    • Maintain a firm, straight arm position while actively reaching with your fingertips.
    • Keep your eyes neutral and gentle while you check your right hand.
    • Maintain your shoulders and upper back from rounding; instead, keep your chest open and raised.
    • Hold for five to ten breaths while keeping your posture firm.
    • Move your arms back down to your sides and slowly straighten your right leg to release.
    • Then return to your neutral position.
    • Then relax.
    • Repeat this pose 5 to 10 times.
    Warrior II (Virabhadrasana II)
    Warrior II (Virabhadrasana II)

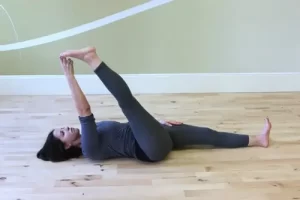
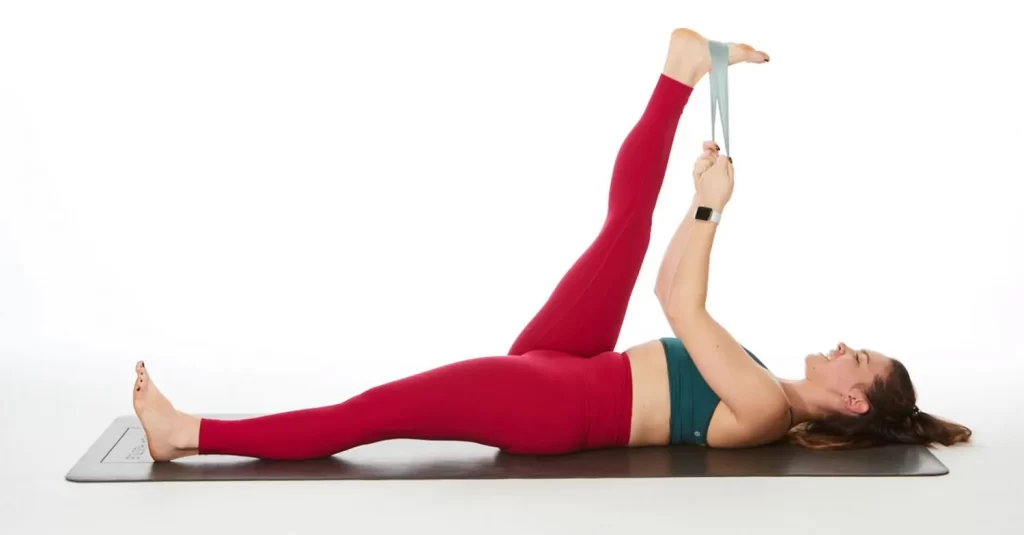
    Reclining Hand-to-Big-Toe Pose (Supta Padangusthasana)

    Releases tension from the knees by stretching the calves and hamstrings.

    • To start, lay flat on your back with your arms by your sides and your legs outstretched.
    • Maintain the alignment of your spine, neck, and head with the ground.
    • Bend your right knee and pull it up to your chest to begin.
    • Move your right knee closer to your chest while holding the back of it with both hands.
    • Maintaining your left leg outstretched on the floor, straighten your right leg as you inhale.
    • If at all possible, use your right hand to grip your big toe while, if necessary, wrapping a yoga strap around the ball of your foot for support.
    • Maintain the toes of your left leg pointed directly ahead while actively pressing them into the floor.
    • Maintaining the heel pressed forward, flex your right foot and contract your extended leg’s quadriceps.
    • Make sure your lower back remains pressed into the mat and that both hips are squared and grounded; do not arch your back.
    • Maintain the pose for five to ten breaths, extending the stretch slightly with each release.
    • Hold the strap or your foot firmly while keeping your arms moving.
    • To get a deeper hip stretch, try gently opening your right leg out to the side if you can, but pay attention to your comfort level and flexibility.
    • Your right leg should be carefully released and returned to the floor to exit the stance.
    • Extend the left leg and bend the left knee toward your chest to repeat on the left side.
    • Then return to your neutral position.
    • Then relax.
    • Repeat this pose 5 to 10 times.
    reclining-big-toe-touch
    reclining-big-toe-touch

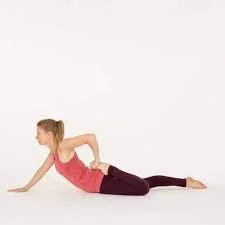
    Half Frog Pose (Ardha Bhekasana)

    Engages the hamstrings and glutes, strengthening the knees and stretching the quadriceps.

    • With your arms by your sides, palms down, and your legs straight out in front of you, start by lying on your stomach.
    • Keep your forehead on the floor or your head on the mat to promote neck relaxation.
    • Your right foot should be pointing toward your glutes as you bend your right knee toward your chest.
    • Press the top of your left foot into the mat while keeping your left leg straight out on the floor.
    • Using your right hand, reach back and gently pull the outside of your right foot toward your right buttock.
    • Avoid bending your body forward and keep your chest open.
    • To help raise the chest and prevent stressing the lower back, contract your back muscles.
    • Take a breath and raise your chest slightly off the ground, bringing your elbows down if necessary for additional support.
    • Pay attention to opening the front of the body and experiencing the stretch in the chest, hips, and quadriceps (front of the thigh).
    • Don’t allow your head to droop or tilt too high; instead, keep it neutral and long.
    • Hold the posture for five to ten breaths, maintaining the slight backbend while taking deep, even breaths.
    • Pulling the foot closer to your glutes while maintaining an elevated chest can help you deepen the stretch if you feel comfortable doing so.
    • Lower your chest softly to the floor and let go of your right foot to exit the pose.
    • To switch to the left side, bend your left knee and repeat the exercise, grasping the foot with your left hand as you reach back.
    • Then return to your neutral position.
    • Then relax.
    • Repeat this pose 5 to 10 times.
    Half Frog Pose (Ardha Bhekasana)
    Half Frog Pose (Ardha Bhekasana)

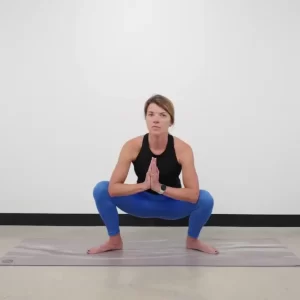
    Garland Pose (Malasana)

    By stretching your legs from your instep to your glutes, a deep squat promotes joint health.

    • Start by placing your feet hip-width apart or slightly wider, depending on how comfortable you are, in Tadasana (Mountain Pose).
    • Position your toes at a 45-degree angle and point them outward.
    • Bend your knees as you take a breath and start lowering your hips toward the floor, creating a feeling that you are sitting in an imaginary chair.
    • Try to maintain your heels on the floor.
    • You can support your heels with a block or rolled towel if they lift off.
    • Maintain a straight spine and use your core muscles to support your lower back as you squat down.
    • Do not fall forward; instead, keep your chest open and raised.
    • After you’re in a deep squat, place your palms together in front of your chest in the Anjali Mudra, or prayer pose.
    • To help open the hips and deepen the stretch, gently press your elbows against the inner thighs.
    • Make sure your knees do not bend inward and remain in alignment with your toes.
    • Maintain a neutral head and neck posture when looking directly ahead or slightly downward.
    • Keep your palms together, contract your legs, and use your core while you hold for five to ten deep, even breaths.
    • To exit the pose, straighten your legs and stand up again by gently pressing onto your feet.
    • Then return to your neutral position.
    • Then relax.
    • Repeat this pose 5 to 10 times.
    Garland Pose (Malasana)
    Garland Pose (Malasana)

    Crescent Lunge (Anjaneyasana)

    Stretches the hip flexors and strengthens the hips and quads.

    • Place your hands shoulder-width apart and your feet hip-width apart to start in a downward-facing dog.
    • To find your alignment and ground yourself, take a few deep breaths here.
    • As you take a breath, place your right foot between your palms and lower your left knee to the mat in a low lunge.
    • With your left knee on the floor, make sure your right knee is exactly over your right ankle and does not extend past your toes.
    • Make a high lunge position by pressing your left knee into the mat and raising it off the floor with your following inhalation.
    • Make sure your hips are squared forward and your left leg is active.
    • Make sure your hips are facing forward and that your pelvis is angled slightly forward to release the back leg’s hip flexors.
    • If you are concerned about comfort or flexibility, you can do a kinder version by lowering the back knee to the mat.
    • Raise your arms toward the ceiling while maintaining your ears in alignment as you take a breath.
    • You can tilt your palms inward or outward.
    • Don’t arch your lower back; instead, lengthen your spine and engage your core.
    • To help support your lower back, keep your core active.
    • To help balance your body, engage your leg muscles.
    • To keep your balance, firmly press against the outside edge of your back foot.
    • Open your chest and raise toward the sky as you extend your arms upward.
    • Look straight forward or slightly up, depending on how comfortable your neck is.
    • Focus on stretching the spine and increasing the stretch in the legs and hips as you hold for five to ten breaths.
    • Step back into Downward-Facing Dog, let your arms down, and carefully lower your back knee to the floor if it is up.
    • Then relax.
    • Repeat this pose 5 to 10 times.
    Crescent pose
    Crescent pose

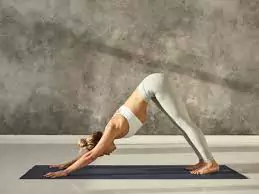
    Downward-Facing Dog (Adho Mukha Svanasana)

    Stretches the calves and hamstrings while strengthening the legs.

    • Place yourself on your hands and knees in a tabletop position to begin.
    • Place your knees just behind your hips and your wrists beneath your shoulders.
    • Press your palms firmly into the ground while spreading your fingers wide.
    • Press your hands onto the floor as you take a breath and start to raise your hips toward the ceiling.
    • Try to make an inverted “V” with your body as you raise.
    • Place your hands shoulder-width apart and your feet hip-width apart.
    • If your hamstrings are tight, keep your knees slightly bent while you straighten your legs.
    • Gently press your heels into the floor.
    • Your calves and hamstrings should feel stretched, but they don’t have to touch the ground.
    • Press your chest back into your thighs as you exhale to expand your shoulders and lengthen your spine.
    • Make sure your ears line up with your upper arms and keep your head between them.
    • Be certain that your back stays flat and avoid rounding your spine.
    • Imagine extending your body in a long line from your wrists to your hips.
    • To maintain the pose’s stability and strength, contract your leg muscles and activate your core.
    • Raise your kneecaps, contract your thighs, and attempt to turn your inner thighs in the direction of the mat’s back.
    • Keep your neck neutral and extended while allowing your head to rest.
    • Look between your feet or at your thighs, depending on what is most comfortable for your neck.
    • Maintain an active and involved body while holding for five to ten breaths, deepening the stretch with each one.
    • To exit the pose, return to a tabletop position by bending your knees and lowering your hips gradually back to the floor.
    • Then return to your neutral position.
    • Then relax.
    • Repeat this pose 5 to 10 times.
    downward-facing-dog
    downward-facing-dog

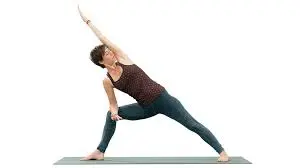
    Utthita Parsvakonasana (Extended Side Angle Pose)

    Your stamina is increased with Utthita Parsvakonasana. Your legs, knees, and ankles are strengthened and stretched in this pose.

    • Put your feet wide apart when you start Warrior II.
    • Your left foot is angled roughly 45 degrees inward, while your right foot is pointing forward.
    • Your right knee is exactly over your right ankle, and both of your knees are bent.
    • With your palms facing down, you hold your arms out at shoulder height and parallel to the floor.
    • As you exhale from Warrior II, maintain your legs powerful and extend your chest forward over your right leg.
    • Your right hand can be placed inside or outside your right foot, depending on comfort and flexibility, or it can be lowered to the floor or placed on a yoga block.
    • Make sure the block is beneath your right hand if you’re using one to keep the spine long.
    • As you take a breath, raise your left arm toward the ceiling and then raise it above your head to align it with your body, palm down.
    • From your left hand, extend a long line of energy through your legs and side of your body to your rear foot.
    • Engage your legs and rise through your core by applying pressure to your feet.
    • Don’t let your right knee go past your toes; instead, keep it bent at a 90-degree angle.
    • Maintain the strength and alignment of your back leg by using it.
    • Make sure your chest expands toward the left side of the room by slowly rotating your body as you extend your arms.
    • Keep your neck relaxed and your spine extended to prevent your neck and chest from dropping.
    • Hold for five to ten breaths, letting your body and chest expand with each one.
    • Make sure that your body and legs are stable and strong.
    • Take a breath, straighten your right leg, and raise your arms back to shoulder height to exit the pose.
    • Go back to the Warrior II pose and do it again on the opposite side.
    • Then return to your neutral position.
    • Then relax.
    • Repeat this pose 5 to 10 times.
    extended-side-angle-pose
    extended-side-angle-pose

    What safety measures need to be followed when doing yoga poses?

    To prevent injury and get maximum benefit out of your yoga practice, it’s important to pay attention to body alignment, technique, and any underlying medical issues when performing poses.

    The following are essential safety measures to follow when doing yoga:

    • Properly Warm Up and Cool Down

    Always finish with a few minutes of cool-down stretches and relaxation to allow your body to rest and heal. Begin with easy movements and stretches to prepare your body for deeper postures.

    • Pay Attention to Your Body

    Don’t push yourself too hard and always pay attention to your body. Back off, change positions, or take a break if something doesn’t feel right.

    • Go Slowly

    Begin with basic positions and gradually advance your practice. Take your time creating difficult or interesting yoga positions. The secret to properly building strength and flexibility is patience and regularity.

    • Be careful of pre-existing conditions.

    If you have any medical issues, speak with a healthcare provider before beginning yoga. Avoid positions that could put strain on injured areas and adjust your postures to suit your condition.

    • Adjust Pose as Necessary

    Make adjustments to create more comfortable and approachable yoga positions.

    • Don’t Overstretch

    Instead than pushing your body into extreme positions, try to achieve a gentle stretch or sense of release. Over time, gradually increase your level of flexibility.

    • Use a Stable Surface for Practice

    To guarantee stability in every posture, always practice on a firm, non-slip surface, such as a yoga mat. Stay away from uneven or slick surfaces when practising.

    • Do Not Hold Your Breath

    Breathe slowly and relaxing, taking deep breaths through your nose and letting them out through your mouth. Breath awareness, which encourages calm and helps in developing a breathing pattern, is an essential component of yoga.

    • Use accessories to provide support.

    Use blankets, harnesses, bolsters, or yoga blocks to help in stretching, balance, and alignment. For instance, you can safely deepen a hamstring stretch by wrapping a strap around your foot or placing a block beneath your hips in seated positions.

    • Know Your Limits

    Don’t compare yourself to others and adjust your positions as necessary. To make positions more approachable and comfortable, use accessories like blankets, straps, or blocks.

    • Do not lock your joints.

    To prevent locking your knees, elbows, and other joints, always maintain a small bend in them.

    • Pay Attention to Correct Alignment

    Throughout each posture, be aware of the alignment of your spine, hips, and knees.

    When should you stop performing yoga poses?

    It’s important to know when to stop doing a yoga position for knee strengthening to maintain safety and prevent damage.

    The following are important signs to look out for when deciding whether to pause or adjust a yoga pose:

    • If you experience any sharp, intense, or sudden pain, particularly in or around the knee, it’s important to stop immediately. Although slight pain is common when stretching, severe pain might be a sign that your body is not aligned properly or that you are overextending.
    • During a posture, if your knee feels weak or unstable, it could be an indication that you are overtaxing the knee joint or not using the proper muscles.
    • The muscles or tendons surrounding the knee may be overstretched or overworked if you experience extreme tightness or strain in the knee area that doesn’t feel like a typical stretch or release.
    • Stop right away if you begin to feel lightheaded, dizzy, or unbalanced. Breathing irregularly or holding poses for extended periods might cause this.
    • Fever
    • Headache

    It’s important to speak with a medical professional, physical therapist, or skilled yoga instructor if you continue to have knee pain, instability, or pain during or after yoga. They can evaluate your form, offer adjustments, and create a strategy for properly strengthening your knees.

    Summary:

    Many people frequently experience knee pain, particularly those who engage in high-impact sports like running. Because they take responsibility for most of our everyday activities, our knees are prone to pain and injury over time. Yoga is among the most natural and effective ways to prevent and treat knee pain, even though there are many different treatments available.

    Yoga is an effective way to strengthen your knees and improve the health of your joints in general. You may create a strong base that promotes knee stability and flexibility by including these knee-strengthening poses in your practice. Yoga can be very helpful whether you’re trying to prevent knee issues, recovering from an accident, or just want to maintain your knees strong and healthy.

    Yoga is an exercise that has several advantages for the knees. If you have chronic aches and pains, always pay attention to your body and get medical advice. Yoga can help you maintain strong, pain-free knees for many years to come if you practice it consistently.

    Always be mindful of your body, and if you have any pain, get medical treatment to ensure that you’re performing correctly. If you do yoga regularly, it can become an essential part of your program to maintain your knees strong and healthy for many years to come.

    FAQ:

    Which yoga positions help strengthen the knees most effectively?

    Warrior I (Virabhadrasana I)
    Warrior II (Virabhadrasana II)
    Chair Pose (Utkatasana)
    Reclining Hand-to-Big-Toe Pose (Supta Padangusthasana)
    Mountain Pose (Tadasana)

    Is yoga beneficial for knee injury or pain?

    Indeed, yoga can relieve knee pain and help in the healing process following an injury. Yoga may alleviate knee pain and increase mobility and flexibility by strengthening and stretching the muscles surrounding the knee joint. Certain poses, such as Bridge Pose (Setu Bandhasana), Child’s Pose (Balasana), and Cat-Cow (Marjaryasana-Bitilasana), can help reduce stress, increase circulation, and help in the healing process. If you’re recovering from a serious injury, always get medical advice.

    How frequently should I do yoga to get stronger knees?

    Doing yoga two or three times a week might help strengthen your knees. Being regular is important, but don’t go overboard. Knee function can be gradually improved with a well-rounded practice that includes stretching and strengthening exercises. Start with shorter yoga sessions if you’re new to the practice, and as your strength and flexibility improve, progressively extend them.

    Does yoga help protect against knee injuries?

    Yes, doing yoga on a daily basis can help avoid knee injury. Yoga helps build a strong basis for your knees by strengthening the muscles surrounding the knee joint, increasing flexibility, and encouraging correct alignment. Additionally, yoga raises awareness of body mechanics, which can help avoid bad movement habits that might result in injury.

    Which yoga positions should I stay away from if I have knee pain?

    Warrior poses or deep lunges if they make your knees hurt.
    Any posture that requires prolonged sitting with the knees bent, such as Hero Pose (Virasana).
    Posture when the knees are bent past their comfort level, such as Goddess Pose (Utkata Konasana) or deep squats.
    As necessary, adjust your poses by maintaining more neutral knee positions or by using props for support.

    If I have osteoarthritis in my knee, is it safe to do yoga?

    People with osteoarthritis in their knees can safely do yoga, but it’s important to adjust poses to prevent undue strain on the knee joint. Concentrate on low-impact, soft poses that can develop the muscles surrounding the knee without placing undue strain on the joint, such as Child’s Pose (Balasana), Legs Up the Wall Pose (Viparita Karani), and Bridge Pose (Setu Bandhasana).

    Does yoga help with reduced mobility and stiff knees?

    Yes, yoga can help a lot with limited mobility and stiff knees. Flexibility and range of motion are improved by mild yoga poses that target the muscles surrounding the knee. Over time, mobility can also be improved by positions like Chair Pose and Warrior I & II that target the quadriceps and hamstrings.

    After yoga, is it typical to experience knee soreness?

    After doing yoga, it’s common to feel a little sore in your muscles, especially if you’re working on the muscles surrounding your knees. Usually, this indicates that those muscles are being used. In order to avoid injury, safety and proper alignment should always come first. If you experience severe irritation or serious pain in the knee joint itself, you should pause the posture and examine your technique.

    References:

    • Mehdi, S. December 12, 2024. STYLECRAZE. https://www.stylecraze.com/articles/effective-baba-ramdev-yoga-asanas-for-knee-pain/?sem_campaign=PMAXDynStylecraze_India&gad_source=1&gclid=CjwKCAiAwaG9BhAREiwAdhv6YyGdXWECT134HQGYmcPnWEYPdPNz25CsbXlbEJynJiwwHmLU3xZmthoCCK8QAvD_BwE#infographic-7-effective-yoga-asanas-to-relieve-knee-pain
    • Stevenson, S. (April 5, 2024). Eight yoga exercises to strengthen your knees. BODi. This article describes 8 yoga poses that strengthen the knees.
    • Pizer, A. P. (September 27, 2023). Ten knee-strengthening yoga positions. https://liforme.com/blogs/blog/10-yoga-poses-to-strengthen-your-knees Liforme and
    • TIMESOFINDIA.COM. January 15, 2023a. Eight yoga positions to improve knee strength. India’s Times. 96972558.cms?picid=96972649 https://timesofindia.indiatimes.com/life-style/health-fitness/fitness/8-yoga-poses-to-strengthen-your-knees
    • Yoga15abi. November 11, 2024. Yoga 15. Yoga 15. A quick guide to five yoga poses that will strengthen your knees can be found at https://yoga15.com/ Five simple yoga practices to improve knee strength
    • On October 28, 2024, O’Brien, E., and O’Brien, E. Five yoga poses that strengthen your knees to help relieve pain. Yoga Journal. The following is a list of yoga poses for knee pain: https://www.yogajournal.com/poses/anatomy/knees
    • B. Allianz (2024, Nov. 28). Ten Yoga Positions That Help Build Stronger, Pain-Free Knees. Allianz, Bajaj. https://www.bajajallianz.com/blog/wellness/best-yoga-poses-for-relieving-pain and strengthening the knees.html
    • Singhdeo, A. November 16, 2023. Seven yoga positions to improve knee strength. This is a blog post about yoga poses that strengthen the knees: https://www.shvasa.com/yoga-blog/7
    • American Knee Pain Centers. (undated). Unlocking the potential of yoga poses to strengthen the knees to combat knee pain. Yoga poses for strengthening the knees: https://www.kneepaincentersofamerica.com/blog/
    • Image 6, Rod. July 5, 2023. Virabhadrasana 2: Develop your strength and concentration by mastering Warrior Pose 2. Yoga Selection. For strength and focus, try this: https://yogaselection.com/virabhadrasana-2-mastering-warrior-pose-2
  • Vastus Intermedius Muscle

    Vastus Intermedius Muscle

    Introduction

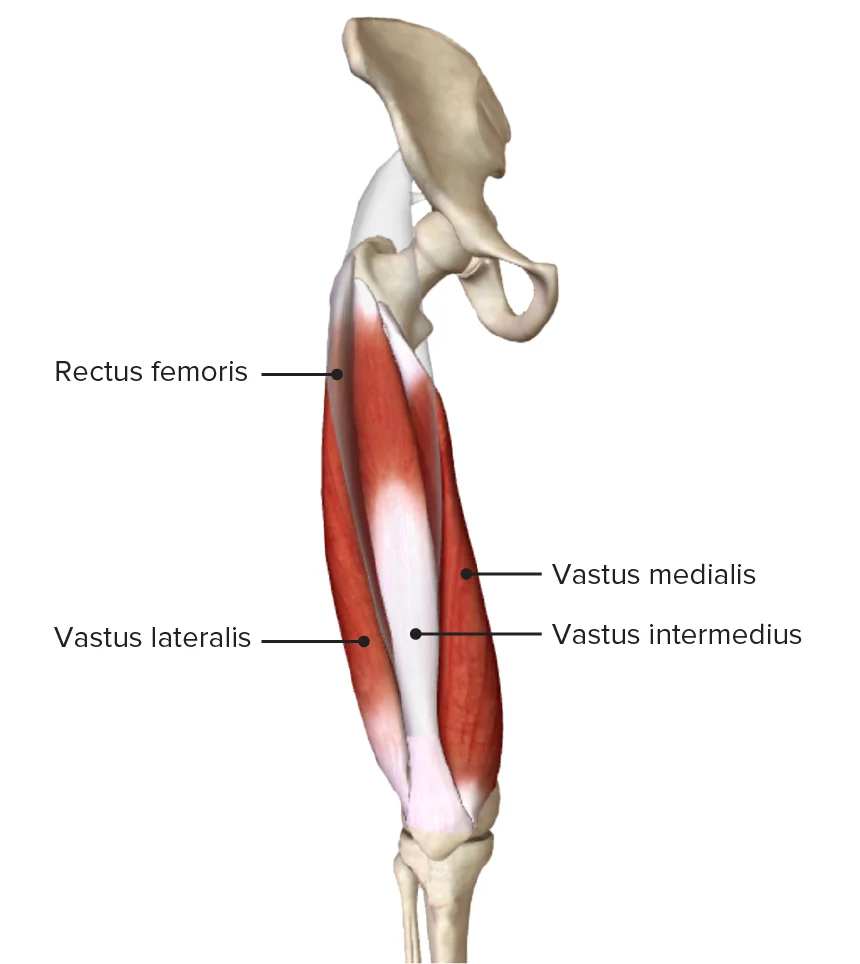
    The Vastus Intermedius is one of the four muscles that make up the quadriceps femoris group in the anterior thigh. Located deep between the vastus lateralis and vastus medialis, it lies beneath the rectus femoris and plays a crucial role in knee extension.

    As a key component of the quadriceps, the vastus intermedius contributes to movements such as walking, running, and jumping by helping to straighten the leg at the knee joint. Its function is essential for lower limb stability and strength, making it an important muscle for both daily activities and athletic performance.

    Origin

    The Vastus Intermedius originates from the anterior and lateral surfaces of the proximal two-thirds of the femoral shaft, specifically along the upper portion of the femur’s anterior and lateral aspects. It also arises from the lower part of the lateral intermuscular septum.

    Insertion

    The Vastus Intermedius inserts into the tibial tuberosity via the quadriceps tendon, patella, and patellar ligament. Specifically, its fibers merge with the deep portion of the quadriceps tendon, which attaches to the superior border of the patella.

    Innervation

    Neural impulses coursing through the femoral nerve, specifically from lumbar nerve roots L2, L3, and L4, animate the Vastus Intermedius muscle.

    Blood supply

    This muscle is supplied by the lateral circumferential femoral artery’s descending branch.

    Lymphatic drainage

    The vastus intermedius, a quadriceps muscle in the thigh, primarily drains its lymph into the inguinal lymph nodes. Lymphatic vessels accompanying the major blood vessels of the thigh facilitate this drainage. Ultimately, lymph from this region converges into the common iliac lymph nodes, reflecting the general drainage pattern of thigh muscles towards the inguinal lymph node chain.

    Functions

    Extension of knee

    The quadriceps muscle group, comprised of the vastus intermedius, vastus medialis, vastus lateralis, and rectus femoris, plays a crucial role in extending the knee.

    Exercises

    Stretching Exercises of Vastus Inter-medius

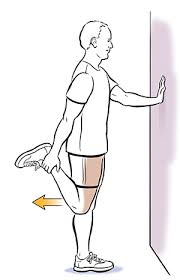
    Standing Quadriceps Stretch:

    Quadriceps stretching exercises
    Quadriceps stretching exercises
    • Stand upright, using a wall or chair for balance.
    • Flex one knee, drawing your heel towards your buttocks.
    • Gently grasp your ankle or foot with the same side hand.
    • Pull your heel gently in the direction of your buttocks until the front of your thigh feels stretched.
    • Maintain this position for 15-30 seconds, then switch legs.

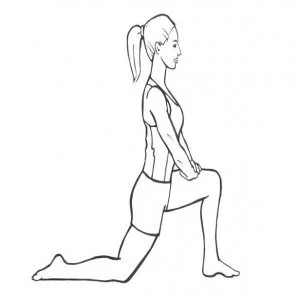
    Kneeling Quadriceps Stretch:

    kneeling-lunge-stretch
    kneeling-lunge-stretch
    • Begin by kneeling on the floor. Bend one knee to a 90-degree angle, placing the other foot flat on the ground in front of you.
    • Gently lean forward, placing your hands on the ground for support.
    • Transfer your weight to the front foot.
    • You should feel a comfortable stretch in the quadriceps muscle of the back leg.
    • Hold this position for 15-30 seconds, then switch legs and repeat.

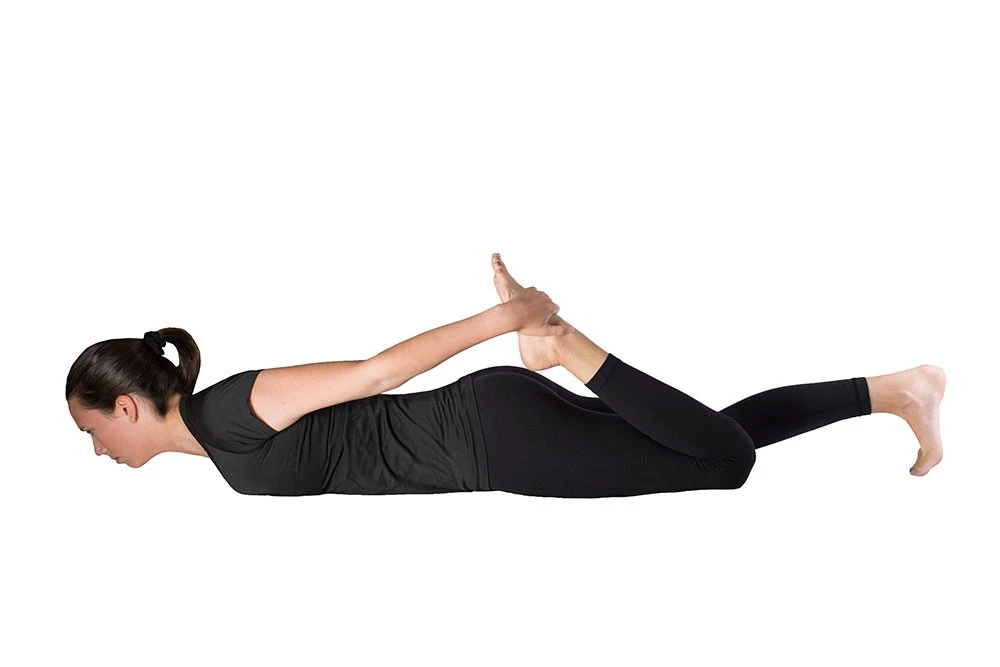
    Lying Quadriceps Stretch:

    Prone Quadricep Stretch
    Prone Quadricep Stretch
    • Lie on your side, bottom leg bent, top leg extended.
    • Bend your top knee and grasp your ankle or foot.
    • Gently pull your foot towards your buttocks, stretching your thigh.
    • Hold for 15-30 seconds, then switch foots.

    Strengthening Exercises

    1. Leg Extensions:
    • With the seat and weight properly adjusted, sit on a leg extension machine.
    • Squeeze your quads at the peak of the exercise as you extend your legs against the machine’s resistance.
    • Push off with your front foot to go back to the starting position.
    knee-extension
    knee-extension

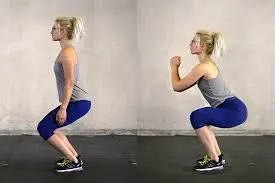
    2. Squats:

    • Place your toes slightly out and your feet shoulder-width apart.
    • Maintaining a straight back and an active core, lower your body as though you were reclining on a chair.
    • To go back to the beginning position, push through your heels.
    SQUATS
    SQUATS

    Among the variations are:

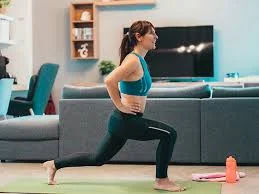
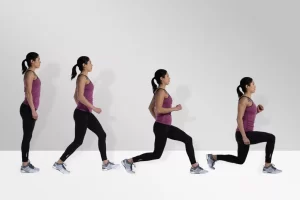
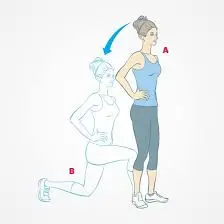
    3. Lunges:

    • Bend both knees to a 90-degree angle and take a single stride forward.
    • Use your front foot to push off the ground and return to the starting position.
    • Do the same with the opposite leg.
    • Variations include:
    static lunges
    static lunges
    1. Walking lunges: Make a walking motion by stepping forward with one leg first, then the other.
    Walking-lunges
    Walking-lunges

    2. Reverse lunges: Step backward with one leg to do a reverse lunge.

    Alternating-Reverse-Lunge
    Alternating-Reverse-Lunge

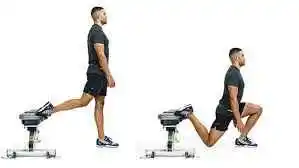
    3. Bulgarian split squats: Put one foot on a chair or bench behind you to perform Bulgarian split squats.

    bulgarian split squat exercise
    bulgarian split squat exercise

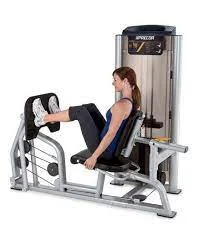
    4. Leg Press:

    • Adjust the weight on a leg press machine while seated.
    • Stretching your legs can help you push the weight away from you.
    • Return to the starting position gradually.
    Leg press machine
    Leg press machine

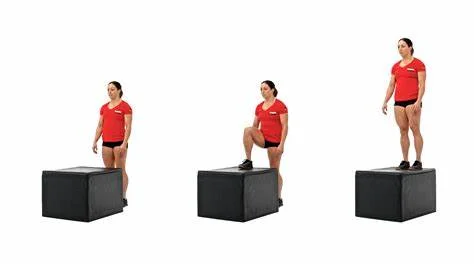
    5. Step-Ups:

    • Use one foot to ascend onto a platform or step, then raise the other foot to join it.
    • Take one foot and then the other to step back down.
    step-ups
    step-ups

    Vastus Intermedius Muscle Pain

    Vastus intermedius muscle pain can arise from various factors, including:

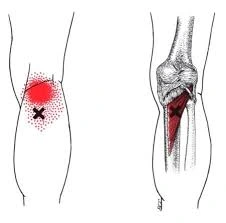
    • Referred pain: Pain felt in the vastus intermedius may originate from another area, such as the lower back.
    • Muscle strain: Overexertion or sudden injury can lead to muscle strain, a common cause of vastus intermedius pain.
    • Tendinitis: Inflammation of the tendon connecting the vastus intermedius muscle to the kneecap can cause pain.
    • Bursitis: Inflammation of the bursa, a fluid-filled sac cushioning the joint, can also lead to pain.
    • Nerve entrapment: Compression or pinching of a nerve can cause pain and numbness in the affected area.

    Treatment for Vastus intermedius muscle pain:

    • Reducing swelling by icing the afflicted region.
    • Compression to provide support to the afflicted area.
    • For reduction of swelling you can elevate the limb which is affected.
    • NSAIDs, or anti-inflammatory drugs, are used to lessen pain and swelling.
    • Passive range of motion exercises are a possible treatment.

    FAQs

    What is the cause of Vastus Intermedius muscle pain?

    Vastus intermedius pain is frequently caused by muscle strain, often resulting from sudden, forceful eccentric contractions. Overuse, overstretching, or muscle fatigue can also lead to pain in this area.

    How is a vastus intermedius injury treated?

    The treatment for a vastus intermedius injury will depend on the severity of the injury. Mild injuries may heal with rest, ice, compression, and elevation (RICE). More severe injuries may require physical therapy or even surgery.In the early phases of acute injury, NSAIDs are frequently recommended. Oral steroids or muscle relaxants may be used in severe instances involving several joint areas. Treatment methods may include steroid injections, botox, or trigger point injections.

    What does the vastus intermedius do?

    The main function of the vastus intermedius is to extend your knee joint, which means straightening your leg. It also helps with other movements like walking, running, and squatting.

    How long does it take to recover from vastus intermedius?

    You won’t be able to play after experiencing an abrupt, severe ache. You may get slight bruising or some swelling, and you frequently experience knee pain when walking and bending. It will take four to six weeks to fully recover, and in order to restore your full function, you will need appropriate therapy.

    How can the vastus intermedius be strengthened?

    Step Ups
    Goblet Squat
    Pulse Squat

    How is a strain of the vastus intermedius treated?

    By adhering to the RICE concept (rest, ice, compression, and elevation), the goal of acute phase therapy for quadriceps strains is to reduce bleeding into the muscles. Resting the muscle stops the initial injury from getting worse.

    References:

    • Vastus intermedius muscle. (2024, July 29). In Wikipedia. https://en.wikipedia.org/wiki/Vastus_intermedius_muscle
    • Valand, B. (2022, September 23). Vastus intermedialis muscle Origin, Insertion, Function, Exercises. Samarpan Physiotherapy Clinic. https://samarpanphysioclinic.com/vastus-intermedialis-muscle-anatomy/
    • Vastus Intermedius, Physio pedia , https://www.physio-pedia.com/Vastus_Intermedius

  • Popliteus Muscle Pain

    Popliteus Muscle Pain

    What is a Popliteus Muscle Pain?

    Popliteus muscle pain refers to pain or injury affecting the popliteus muscle, a small but crucial muscle located at the back of the knee. This muscle plays a key role in knee stability and unlocking the knee joint during movement.

    Popliteus muscle injuries are rarely isolated; instead, they are frequently linked to other injuries affecting the posterolateral corner of the knee, such as meniscal tears, anterior cruciate ligament injuries, posterior cruciate ligament injuries, or lateral collateral ligament injuries.

    An injury to the gastrocnemius muscle in your calf, a popliteal cyst or Baker’s cyst, or an injury to the hamstring muscles in the back of your thigh can all result in pain at the back of your knee.

    There is another, less frequent, and occasionally disregarded cause, though. a strain or tendinopathy of the popliteus muscle. A tiny, triangular muscle at the rear of your knee is called the popliteus.

    People with popliteal problems often experience pain in the back and outer regions of the knee, which is often worse when walking downhill, bending the knee against resistance, and running. The area behind the knee is often swollen and tender to the touch, and if the tendon is involved, there may be a crackling sound with movement. If an athlete continues to overwork the knee with this injury, the symptoms will worsen and the healing process will be delayed.

    Anatomy of Popliteus Muscle Pain?

    The distal muscular attachment is called the insertion, while the tendinous proximal (femoral) attachment is called the origin, making the Popliteus Muscle tendinous unit unique. Above the soleal line, the muscle inserts into a triangular region along the posteromedial portion of the proximal tibial metaphysis.

    The popliteus fossa’s floor is formed by it. The popliteus tendon enters the knee joint through the popliteal hiatus and inserts into the lateral femoral condyle at the end of the popliteal sulcus. Variable aponeurotic attachments to the posterior horn of the lateral meniscus and the fibular head allow the major tendinous component to penetrate into the lateral femoral condyle.

    The femoral insertion is crescent shaped, with the superior aspect concave. The insertion into the lateral meniscus retracts and protects the meniscus in flexion, though this function has been disputed.

    Causes of Popliteus Muscle Pain?

    Most often, runners and triathletes who compete on hills or uneven terrain, as well as downhill skiers, suffer from popliteus muscle strains and tendinopathies. A direct hit to the inside of the knee or an abrupt, violent overextension or overstraightening of the knee are the usual causes of damage. Poor dynamic stability and muscle weakness can make training more likely to result in injury.

    • Repetitive stress or overuse
    • Due to frequent knee flexion and rotation, this condition is common in sports (runners, bikers, and skiers).
    • Direct Injury or Trauma
    • The popliteus muscle may be strained by a blow to the rear of the knee, such as occurs during contact sports or falls.
    • Hyperextension of the Knee
    • The popliteus is strained when the knee is too straightened, as occurs during abrupt stops or jumping.
    • Inappropriate footwear or problems with biomechanics
    • Inappropriate footwear, overpronation, or poor foot alignment can all contribute to knee pain.
    • Ligament Damage (PCL/ACL Sprains or Tears)
    • The popliteus aids in knee stabilization, and compensatory strain may result from ligament damage.
    • Meniscus Damage
    • Injuries to the popliteus muscle might result in pain because of its close relationship to the lateral meniscus.
    • Calves or Hamstrings Tight
    • Unbalanced knee muscles might put too much strain on the popliteus.
    • Weak Hip or Quadriceps Muscles
    • Overuse of the popliteus might result from weakening of these muscles.
    • Knee Osteoarthritis
    • The popliteus muscle may become irritated by joint deterioration, resulting in pain.
    • Unexpected Shifts in Activity Level
    • Overloading the muscle can occur when the intensity, frequency, or duration of a workout is rapidly increased.

    Symptoms of Popliteus Muscle Pain?

    • The back of the knee pain
    • acute or aching pain in the popliteal area, particularly when the knee is bent or straightened.
    • Pain When Strolling Downstairs or Downhill
    • increased pain because of the popliteus’ function in knee stability when descending stairs or slopes.
    • Edema or Sensitivity
    • back of the knee pain and mild swelling, particularly after exercise.
    • Tightness or Stiffness
    • a stiffness behind the knee that makes it hard to move.
    • Pain When Rotating the Knee
    • pain during turning or pivoting since knee rotation is controlled by the popliteus.
    • Pain Getting Worse with Activity
    • Walking, running, or sitting for extended periods of time may exacerbate symptoms.
    • Knee instability sensation
    • The knee may feel weak or give out, especially when shifting directions.
    • Pain During Extended Sitting
    • After holding the knee bent for long periods of time, pain may develop.

    Diagnosis of Popliteus Muscle Pain?

    Medical History & Physical Examination

    A medical professional will inquire about:

    • The onset and intensity of the pain.
    • Things that make the pain worse or better.
    • history of knee ailments or injuries, such as arthritis or torn ligaments.
    • challenges with running, walking, or climbing stairs.
    • Throughout the physical examination, they might:
    • To feel for pain, press or palpate the back of the knee.
    • To evaluate muscular function, conduct resistance, rotation, and knee flexion tests.
    • Examine biomechanics and gait for abnormal movement patterns.

    Special Clinical Tests

    • In the Garrick Test, the patient externally rotates the leg and bends the knee while the physician applies resistance; pain indicates popliteus involvement.
    • Active Knee Flexion Test: Popliteus strain may be indicated by pain during resisted knee flexion.

    Imaging Tests

    • X-ray: Disqualifies arthritis, fractures, and other disorders affecting the bones.
    • Real-time ultrasound detection of muscle or tendon inflammation.
    • The most effective diagnostic for identifying soft tissue injuries, such as meniscus tears, ligament damage, or popliteus muscle strains, is magnetic resonance imaging, or MRI.
    • Doctors may rule out the following because popliteus muscle pain might mirror other conditions:
    • Baker’s cyst, or accumulation of fluid behind the knee.
    • Tear in the meniscus (pain when twisting).
    • Pain that travels up the back of the leg is known as hamstring tendinopathy.
    • knee ligament damage, such as tears or sprains of the ACL or PCL.

    Treatment of Popliteus Muscle Pain:

    Immediate Treatment

    Rice Principle:

    • Rest: keep away of exercises like deep squats and running that exacerbate the pain.
    • Ice Therapy: To lessen inflammation, apply ice packs for 15 to 20 minutes every two to three hours.
    • Compression: To reduce swelling and offer support, apply an elastic bandage or knee brace.
    • Elevation: To lessen swelling, keep the knee up.

    Medications

    • Ibuprofen and naproxen are examples of non-steroidal anti-inflammatory drugs (NSAIDs) that can help lower pain and swelling.
    • Pain relievers: If NSAIDs are not appropriate, acetaminophen may be used.

    Advanced Treatments

    • Injections of corticosteroids may be recommended if inflammation is severe and ongoing.
    • Surgery is only required in rare instances for complicated knee injuries involving the popliteus, such as meniscus damage or ligament tears.

    Supportive Measures

    • Extra support is provided by knee braces or taping, particularly during activities.
    • Proper footwear and orthotics minimize strain and guarantee proper knee alignment.

    Physical Therapy of Popliteus Muscle Pain:

    When the popliteal muscle is injured or damaged, rehabilitation helps to relieve knee pain and restore function. Naturally, lowering pain and inflammation is the aim of the exercises. In order to lessen the strain of walking or jogging on the popliteus muscle, exercises can help strengthen the muscles surrounding your knee.

    Popliteus muscle exercises may improve proprioception, balance, and agility by strengthening other lower limb muscles, such as the calves, hips, and pelvic muscles. Your technique and function when you resume full exercise in running, squatting, jumping, and walking can also be improved by strengthening and rehabilitating this muscle. According to the American Academy of Orthopaedic Surgeons, it might also aid in preventing further injuries.

    Supine Hamstring Stretch

    Hamstring-stretch
    Supine Hamstring Stretch
    • Using both hands, grasp the back of your right thigh as you bring it in toward your chest.
    • Pull the leg slowly toward your head, lengthening it toward the ceiling.
    • Repeat on the other side after 30 to 60 seconds of holding.

    Half Squats

    • Your feet should be hip-distance apart. Use the back of a chair or a wall for balance if you feel unsteady.
    • As you softly bend through your hips and knees, keep your spine long and your chest raised. As though you were sitting toward a chair, let your hips to bend by about ten inches. Keep your weight on your heels and your feet firmly planted.
    • Return to a standing position after pausing for three to five counts.
    • Do this ten or twelve times.

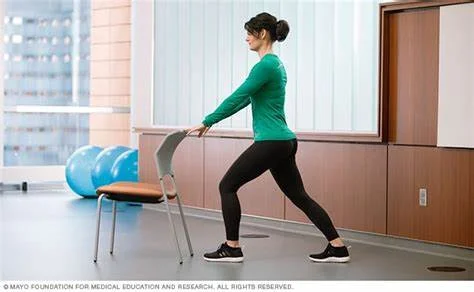
    Heel Cord Stretch

    Heel-cord-stretch-with-bent-knee
    Heel Cord Stretch
    • Face a wall.
    • Put your healthy leg in front of you and slightly bend your knee.
    • Position the affected leg directly behind you, with the toes slightly pointed and the heel flat.
    • Press your hip complex forward, toward the wall, while keeping your heels flat on the ground.
    • Wait 30 seconds.

    Standing Quadriceps Stretch

    • For stability, place your hands on the back of a chair while standing behind it.
    • Pull the heel up toward your right buttocks while bending your right knee.
    • Using your right hand, grasp your ankle and draw it nearer to your torso.
    • Hold for 30 to 60 seconds. Continue on the opposite side.

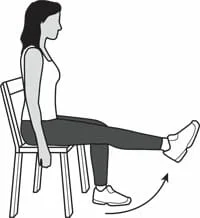
    Leg Extensions

    knee-extension
    knee-extension
    • Take a seat at the edge of a straight-backed, firm chair.
    • Raise your right leg as high as you can while straightening it and contracting your thigh muscles.
    • For roughly five seconds, hold the raised leg aloft.
    • Lower the leg back toward the floor after relaxing it.
    • Perform on the other side and repeat 10 to 15 times.

    Hamstring Curls

    • Stand with your back to a chair. Hold on for assistance.
    • Raise the heel of your right knee as far as it can go toward the ceiling while bending it behind you. If pain arises, stop.
    • Hold for five seconds. Do this ten to fifteen times. On the other leg, perform.

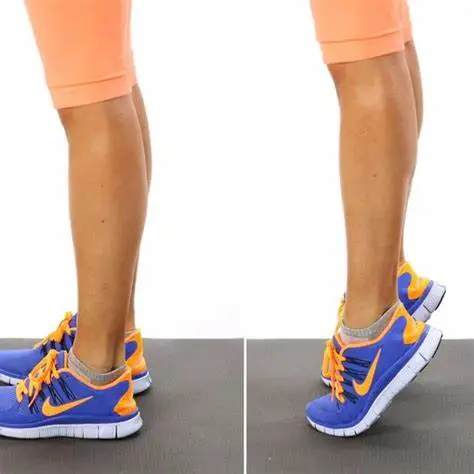
    Calf Raises

    Calf Raises
    Calf Raises
    • Hold on for balance as you stand facing the back of a chair.
    • Your weight should be properly distributed over both feet.
    • Put all of your weight on your right foot and bend your left knee behind you.
    • As high as you can, lift your right heel, then slowly bring it down.
    • Do this ten times.

    Conclusion of Popliteus Muscle Pain:

    Knee stability and mobility can be impacted by popliteus muscle pain, which can be caused by overuse, poor biomechanics, or unexpected injury. Strengthening the surrounding muscles, preserving flexibility, employing appropriate movement mechanics, and avoiding undue knee strain are all ways to prevent this pain.

    Stretching, appropriate footwear, and adequate warm-ups are all essential for lowering popliteus stress. To address underlying reasons and avoid other issues, it can be helpful to seek expert examination if pain continues. People can preserve knee health and keep away from pain from popliteus muscle tension by implementing these preventive actions.

    FAQs

    If I have popliteus pain, can I still run?

    For at least the first six weeks, patients should limit their involvement in sports and refrain from running or skiing until their knee is pain-free. You can gradually resume playing once you are pain-free.

    What is the popliteus muscle surgery?

    The best course of action for treating an avulsed popliteus tendon in the knee joint is surgery. Over the injured tendon, an incision is created on the knee’s side. The bone and tendon may be screwed back onto the femur bone if the avulsion fracture is new (occurred within a week).

    How is the popliteus massaged?

    You will need a ball in order to massage the Popliteus. Place your legs straight out in front of you while you sit on the floor. With your hands back behind you for support, place the ball about two fingers below the back of your knee. Apply a little pressure on the ball.

    What is the severity of a popliteus strain?

    Knee instability is rarely caused by isolated popliteal injuries, and non-operative treatment is typically recommended, incorporating early weight bearing and functional rehabilitation. Nevertheless, no particular regimen for non-operative rehabilitation has been established. One possible form of rehabilitation is cryotherapy.

    Is the popliteus muscle deep?

    Owing to its deep location, popliteus muscle injuries are uncommon on their own but can be linked to other knee problems such meniscus and ACL tears.

    What is Popliteus’ primary purpose?

    During the closed chain phase of the gait cycle (the one in which the foot touches the ground), the popliteus muscle in the leg is employed to laterally rotate the femur on the tibia, releasing the knees during walking.

    How can popliteus pain be resolved?

    Rest, ice application, elevation, an elastic bandage, physical therapy, and nonsteroidal anti-inflammatory painkillers like ibuprofen or aspirin are all part of the treatment for popliteus tendinopathy. Corticosteroid injections or oral corticosteroids may be used as additional treatments for popliteus tendinopathy.

    Why is the muscle in my popliteus so tight?

    The signs, causes, diagnosis, and treatments of popliteus tendinitis
    The popliteus may experience additional strain if the foot rolls inward (over-pronation), has a low arch, or is flat. running athletes that haven’t warmed up properly before participation.

    Can popliteus be massaged?

    Massaging oneself, Popliteus
    Now apply pressure on the lateral side of the calf and the lower lateral side of the knee hollow. Look for any painful tensions by running your thumbs over the muscle. The skin must be moved over the muscle, but it must not slide over the muscle.

    How is the popliteus muscle tested?

    Strain of Popliteus
    The patient is seated during the exam, and both hips and knees are flexed to 90 degrees. The examiner resists the patient’s vigorous outward rotation of the lower leg. Pain during the popliteus muscle or tendon motion indicates a positive test.

    Can someone with a popliteus strain walk?

    Strain of Popliteus
    A popliteus muscle strain can result in mild to severe pain in the fold of your leg near the rear of the knee. Pain will worsen if you run a lot or walk downward. Your pain may worsen if you rotate your knee or stand with it slightly bent.

    Which exercise works best for the popliteus?

    mobility. The popliteus stretch is a great mobility exercise. Cross the leg you wish to stretch over your other knee while seated. Targeting the popliteus muscle, press the knee downward with the other hand while holding the ankle with the other for stability.

    How much time does it take for a popliteus strain to recover?

    The majority of these wounds heal without any more problems or complications. After completing a functional assessment, the patient can resume full physical activity without any limitations, and recovery time may range from three to sixteen weeks.

    How does a popliteus muscle strain feel?

    Back and outer knee pain are common in people with popliteal problems. When bending the knee against resistance or fully straightening it, pain is frequently experienced. Pain is typically worse when jogging, climbing stairs, and walking downhill.

    How can popliteus pain be relieved?

    Advice for Treating a Popliteus Muscle Injury
    Ice and Rest: To lessen inflammation, stay away from physically demanding tasks and use ice.
    Compression and Elevation: Keep your leg elevated and apply a compression bandage.
    Strength Training Activities: Step-Ups: By stepping up on an elevated platform, you can strengthen the popliteus.

    References

    • Digital, R. (2021, February 19). Pain behind the knee: popliteus strain and/or tendinopathy. Burlington Sports Therapy. https://burlingtonsportstherapy.com/blog/pain-in-the-back-of-the-knee-popliteus-strain-and-or-tendinopathy/
    • Abelson, B., DC. (2024, August 8). Popliteus muscle – “The key of the knee.” msrsite. https://www.motionspecificrelease.com/post/2019/06/19/popliteus-muscle-e2809cthe-key-of-the-kneee2809d
  • Morbid Obesity

    Morbid Obesity

    Morbid Obesity: What is it?

    Morbid obesity is defined as a body mass index (BMI) of 35 or greater. It is also called class III obesity. BMI is used to calculate body fat and can help you evaluate whether you are at a healthy weight for your size. BMI is not a perfect measurement, but it does provide an overall notion of appropriate weight ranges for height.

    What are the causes of morbid obesity?

    When you eat, your body uses the calories you take in to function. Even at rest, the body requires energy to pump blood or digest meals. If those calories are not expended, the body stores them as fat. If you continue to consume more calories than your body can burn through everyday activities and exercise, your body will accumulate fat stores. Obesity and morbid obesity are the outcome of excessive fat storage in your body.

    Certain drugs, such as antidepressants, might lead to weight gain. Medical diseases such as hypothyroidism can cause weight gain, although they are usually manageable so that obesity does not develop.

    Obesity can be caused by a variety of circumstances.

    Genetic factors: Several studies have found that obesity can run in families and that multiple genes are linked to weight growth.

    Hormone imbalances: Your body produces hundreds of hormones, each of which serves a unique and crucial role. Many of these hormones can influence how your body signals when you need food and how it uses energy. Cortisol, often known as the stress hormone, accelerates fat and carbohydrate metabolism, increasing energy levels. While this mechanism is necessary for survival (fight-or-flight), it also stimulates your hunger.

    Chronic stress can raise your cortisol levels and increase your hunger and desire for sweet, fatty, and salty foods, resulting in weight gain. Another example is having low thyroid hormone levels (hypothyroidism). Thyroid hormone is required to keep your body’s metabolism functioning properly. Low thyroid hormone levels might reduce your metabolism and induce weight gain.

    Socioeconomic and geographical factors: Having a low socioeconomic position, as well as easier financial and/or geographical access to unhealthy fast foods versus healthier whole foods, can all contribute to obesity. Obesity can also be exacerbated by limited access to recreational facilities or parks, as well as a lack of safe or simple walking routes in your neighborhood.

    Cultural factors: The prevalence of calorie-dense food marketing and advertising, as well as larger portion sizes, can all contribute to obesity.

    Environmental factors: Chemicals known as obesogens can alter your hormones and increase adipose tissue in your body.

    Why was Class III obesity referred to as morbid obesity?

    The term “morbid obesity” was coined by two healthcare experts in 1963 to justify insurance reimbursement for the expense of intestinal bypass surgery for weight loss in persons with a BMI greater than 40.

    Healthcare practitioners frequently use the word “comorbidity,” which refers to an individual having multiple illnesses or diseases at the same time. The medical term “morbid” is appropriate for defining this type of obesity because class III obesity is considered a disease and is frequently connected with other chronic health issues.

    The problem is that, like many terms, “morbid” has multiple meanings. Outside of the medical context, “morbid” indicates unsettling or unpleasant. Because most people are unfamiliar with the medical terminology, they linked morbid (class III) obesity and obese persons to those bad terms. The usage of the term “morbid” to describe obesity contributes to a misleading and detrimental societal stigma that implies that persons with obesity lack the willpower to lose weight, which is virtually never the case.

    Healthcare practitioners, researchers, and health organizations, including the World Health Organisation (WHO), now refer to “class III obesity” rather than “morbid obesity.”

    Health hazards associated with class III obesity:

    Obesity complications may include the following:

    Metabolic syndrome comprises type 2 diabetes, high blood pressure, and other characteristics.

    • High levels of triglyceride
    • stroke
    • Heart illness.
    • Gallbladder Disease
    • osteoarthritis
    • Sleep apnoea and other respiratory disorders
    • Depression and anxiety are two examples of mental health disorders.
    • Some cancers
    • Symptoms include physical pain, trouble with regular activities, and an increased risk.

    Who is affected by Class III obesity?

    Everyone, including children and adults, can develop class III obesity. However, due to its complexities, class III obesity affects people in different ways. According to a study on the prevalence (commonness) of class III obesity in adults in the United States from 2017 to 2018, here’s how class III obesity affects different people:

    Sex: About 11.5% of females have class III obesity, compared to 6.9% of males.

    Age: Class III obesity affects 11.5% of individuals aged 40 to 59, 9.1% of adults aged 20 to 39, and 5.8% of those aged 60 or more.

    Race: Non-Hispanic Black people had the highest prevalence of class III obesity (13.8%), while non-Hispanic Asian adults had the lowest (2.0%).

    Diagnosing morbid obesity:

    Your doctor will do a medical examination and enquire about your weight history and weight loss initiatives. They’ll ask about your food and exercise routines, as well as your medical history.

    Calculate BMI:

    To find your BMI, divide your height in meters squared by your weight in kilograms. You may calculate your BMI using a calculator. The Centres for Disease Control and Prevention give a credible source.

    Here are the BMI ranges and accompanying classifications of obesity:

    Underweight: <18.5 percent; normal: 18.5 to 24.9 percent; overweight: 25.0 to 29.9 percent; obese (class 1): 30.0 and 34.9 percent; and severe obesity (class 2): 35-39.9 percent.

    There are limits to using BMI as a diagnostic tool for obesity. Your BMI is simply an estimation of your body fat. Athletes, for example, may be overweight due to their increased muscle mass. They may have a BMI that indicates obesity or severe obesity, but they have a tiny quantity of body fat. As a result, your doctor may conduct additional tests to obtain an accurate assessment of your body fat percentage.

    Calculate Body Fat Percentage

    A skinfold test may also be used to determine your body fat percentage. A doctor uses a caliper to measure the thickness of a fold of skin on the arm, belly, or thigh. Bioelectrical impedance testing is another method for determining body fat percentage, which is commonly performed using a special type of scale. Finally, body fat can be quantified more precisely using specialized equipment that calculates water or air displacement.

    Other Tests

    Healthcare practitioners may perform specific laboratory tests to check your health and determine whether you have any health disorders that could be causing weight gain and/or are strongly connected with class III obesity. These tests can include:

    • Complete the blood count.
    • A basic metabolic panel.
    • Kidney (renal) function testing.
    • Liver function testing.
    • Lipid panel.
    • HbA1C (hemoglobin A1C).
    • TThyroid-stimulating hormone (TSH) test.
    • Vitamin D level test.
    • Urinalysis.
    • C-reactive protein (CRP) testing.

    Providers may also offer further tests, such as an electrocardiogram (EKG) to assess your heart health and sleep studies.

    Management and Treatment of Morbid Obesity:

    There are various treatments available for morbid obesity.

    Healthy lifestyle changes:

    Certain lifestyle modifications can help you manage obesity, enhance your overall health, and/or reduce weight, including:

    Heart-healthy eating: Your healthcare practitioner may recommend that you consult with a licensed dietitian or nutritionist to learn about the foods and quantities that are part of a healthy eating pattern. If you’re trying to lose weight, you should progressively cut your total daily calories. Before making any dramatic dietary changes, consult your provider.

    Physical activity has numerous health benefits, and it plays a significant role in deciding whether a person can maintain a healthy body weight, shed excess body weight, or maintain healthy weight reduction. Before beginning any exercise program, consult your healthcare physician about the amount and type of physical activity that is appropriate for you.

    Healthy sleep: If you are not receiving enough sleep or have a sleep disorder, it is critical to resume healthy sleep and/or seek treatment for sleep disorders to manage obesity.

    Stress management: Chronic stress can contribute to weight gain, therefore it’s critical to learn to handle stress healthily, such as through meditation or breathing exercises, and to reduce it as much as possible.

    Behavioral and Psychological Therapy:

    To manage obesity, your healthcare physician may prescribe that you participate in individual or group behavioral weight-loss programs. In these programs, a properly educated healthcare provider will create a personalized weight-loss plan for you.

    Obese people are more likely to experience mood disorders like despair and anxiety. As a result, if you have a mental health condition, your provider may suggest psychological therapy.

    Obesity can be treated using several behavioral and psychological interventions, including:

    Motivational interviewing is a method of treatment that promotes behavior change. It is intended to empower you to change by allowing you to define your purpose, importance, and potential for change.

    Cognitive behavioral therapy (CBT) is a type of therapy in which a therapist or psychologist helps you transform detrimental or unhelpful thinking and behavioral habits. CBT normally consists of several sessions. Your therapist or psychologist can help you develop a new perspective by talking and asking questions. As a result, you develop stronger responses to and coping strategies for stress, anxiety, and tough situations.

    Dialectical behavioral therapy (DBT) is a kind of CBT. It can be beneficial if you struggle with emotional regulation or engage in self-destructive behaviors, such as disordered eating patterns.

    Interpersonal psychotherapy (IPT) aims to improve the quality of your interpersonal interactions (relationships with others) and social functioning to alleviate stress.

    Medication:

    There are several weight loss drugs available to treat severe obesity. Doctors now have a variety of prescription drugs available to help control this medical issue. This includes:

    Semaglutide (Wegovy): an injectable that reduces glucagon and works by helping the pancreas release the proper amount of insulin when blood sugar levels are high, allowing sugar to be used for energy.

    Liraglutide (Saxenda) is an injectable drug that, like semaglutide, operates by increasing the release of insulin from the pancreas while lowering excessive glucagon secretion.

    Setmelanotide (IMCIVREE) is an injectable drug used for weight management in persons with specific genetic disorders.

    Phentermine-topiramate (Qsymia): an appetite suppressant medication for the short-term treatment of obesity.

    Orlistat (Xenical) is an oral drug that blocks the enzyme that breaks down fats in your food, causing fats to flow through the body in a bowel movement.

    Bupropion-naltrexone (Contrave) is a fixed-dose combination medicine that treats chronic obesity.

    Surgical alternatives.

    If dietary changes, lifestyle adjustments, and medications do not work, a doctor may suggest surgery. Some of these techniques are:

    In gastric banding, a surgeon inserts a ring around the stomach, reducing the amount of food that can enter.

    Gastric bypass seeks to boost the sense of fullness and lead to the absorption of fewer calories.

    Sleeve gastrectomy, in which the surgeon eliminates a portion of the stomach

    An intragastric balloon is a temporary procedure in which the surgeon implants a balloon in the stomach to take up space.

    If someone loses a lot of weight, they may develop undesirable skin folds. Surgery can also help with this.

    Risk Factors of Morbid Obesity:

    Certain factors can influence the chance of developing any type of obesity.

    • A person’s energy levels can be affected by their dietary habits and degree of activity.
    • Socioeconomic factors can limit access to fresh food and the ability to exercise.
    • Obesity may be influenced by genetics.
    • Family history may influence both genetic and environmental factors.
    • Obesity is associated with some medical problems, such as Cushing’s disease and polycystic ovarian syndrome.
    • Stress and worry can raise levels. A trusted source of cortisol, a hormone that can influence fat storage and weight growth.
    • A lack of sleep could be a contributing factor.

    Do social factors influence the risk of obesity?

    According to a 2017 assessment of studies from throughout the world, the following societal factors, among others, may play a role:

    Factors that may impact a person’s health and diet include trauma, relationship problems, financial difficulties, workplace settings, access to healthy food, and urban living and activity levels.

    Prevention of Morbid Obesity:

    There is no single strategy to lose weight or avoid weight gain. The ideal option will vary depending on the individual. However, dietary changes and exercise can help.

    Dietary suggestions may include:

    Consume fresh fruits and vegetables and prefer entire, unprocessed foods.
    To improve health, eliminate trans and saturated fats and replace them with healthy fats like safflower or maize oils. Also, restrict sugar and sweetened foods.
    To check caloric consumption, use a smaller plate as recommended by a healthcare practitioner.

    Eat more slowly. To prevent overeating, eliminate triggers and routines like eating cake with coffee during breaks.

    Current standards recommend that adults engage in at least 150 minutes of moderate-intensity activity per week. Activities like cycling, swimming, and walking may fall under this category. It could include 10-minute sessions multiple times each day, most days of the week.

    A medical professional can advise on how much in addition to what type of exercise a person should engage in, based on their overall health, age, and other considerations.

    What is the prognosis for class III obesity?

    If untreated, class III obesity can reduce life expectancy by up to 14 years. In addition to contributing to potentially major health concerns, class III obesity is linked to fewer economic and social prospects and a lower quality of life.

    It is possible to manage class III obesity while improving health outcomes. According to research, some obese patients who take prescription weight-management drugs lose 10% or more of their starting weight.

    According to studies on bariatric surgery outcomes, persons who undergo the procedure may lose 30% to 50% of their extra weight in the first six months, and 77% of their excess weight 12 months or more afterward. Another study found that persons who underwent bariatric surgery might sustain a 50% to 60% weight decrease for 10 to 14 years afterward.

    It can be difficult and intimidating to try to reduce weight and change your living choices. If you have class III obesity, remember that losing 5% to 10% of your beginning weight can greatly improve your health by lowering blood sugar (glucose), blood pressure, and lipid levels.

    Which class III obesity complications exist?

    Class III obesity is a dangerous medical condition that can lead to the emergence of several other illnesses, such as:

    Metabolic syndrome: A person is said to have metabolic syndrome if they have at least three of the following conditions: high blood pressure, elevated fasting blood glucose (blood sugar) levels, low HDL cholesterol, high triglyceride (TG) levels, and central obesity.

    Type 2 diabetes: Insulin resistance caused by excessive fat buildup might result in type 2 diabetes (T2D). For every unit increase in BMI, the chance of acquiring type 2 diabetes rises by 20%. The development of T2D is influenced by numerous different factors. Not everyone with T2D is obese, and not everyone with obesity has T2D.

    Heart disease: Long-term obesity exposure deteriorates cardiac (heart) function and causes heart disease. Larger ventricular mass, systolic dysfunction (impaired ventricular contraction), and atrial fibrillation (a quivering or irregular heartbeat) are all consequences of obesity.

    High blood pressure, often known as hypertension, is 3.5 times more common in obese people, which raises the risk of heart disease.

    Atherosclerosis: Obesity is a risk factor for atherosclerosis, which is accelerated by other obesity-related health issues such as high blood pressure, increased glucose, and systemic inflammation. Atherosclerosis is the accumulation of plaque inside your arteries.

    Some cancers: Thirteen different forms of cancer are linked to obesity. About 40% of all cancers diagnosed in the US in 2014 were these types of tumors.

    Obstructive sleep apnoea is one type of sleep disorder. Obesity and obstructive sleep apnoea, which occurs when you repeatedly stop breathing while you’re asleep, are related. Obesity causes the airway to constrict due to fat deposits in the upper respiratory tract, which reduces muscle activity in this region and causes sleep apnoea and breathing problems.

    Breathing problems: Some obese people have a breathing condition called obesity hypoventilation syndrome (OHS). Your blood contains too little oxygen and too much carbon dioxide as a result of the illness. It can result in severe and potentially fatal health issues if treatment is not received.

    Osteoarthritis: Being overweight puts additional strain on your knees and other joints. This increases your risk of developing osteoarthritis (OA), a degenerative joint disease, or exacerbates existing conditions.

    Depression: About 43% of individuals who suffer from depression are also obese, and those who are obese are 55% more likely to have depression in their lifetime than those who are not obese.

    Summary

    Although severe obesity is not a disease, it can raise the risk of many different illnesses, some of which can be fatal. Severe obesity may usually be reversed.

    Anyone worried about obesity or any of its potential signs should consult a doctor. A person may be able to change their weight with treatments, which may also help avoid potentially dangerous consequences.

    FAQs

    At what weight level is someone deemed morbidly obese?

    If an individual weighs more than 80 to 100 pounds over their optimal body weight, they are typically classified as grossly obese. A person is considered morbidly obese and a potential candidate for bariatric surgery if their BMI is greater than 40.

    What distinguishes obesity from morbid obesity?

    If your body mass index (BMI) is more than 30, you are considered obese, meaning you have too much body fat. Your weight about height are measured by your BMI. Being over 100 pounds overweight or having a BMI of 40 or greater are common definitions of morbid obesity, often known as “clinically severe obesity.”

    What weight is considered morbidly obese?

    BMI is calculated by dividing a person’s height (in meters) by their weight (kg).². If an adult’s BMI is between 25 and 29.9 kg/m2, they are termed overweight; if it is 30 kg/m² or above, they are called obese. A person is deemed morbidly obese if their BMI is 40 kg/m² or over.

    Is 35 a dangerously obese BMI?

    A patient must have a body mass index, or BMI, of 35–39.9 with one or more serious medical issues, or a BMI of 40 or higher, to be classified as clinically severe, or morbidly obese.

    Is it possible to cure morbid obesity?

    Class III obesity can be treated to enhance health results. According to research, some obese patients who take prescription weight-loss drugs reduce their initial weight by 10% or more.

    Which three phases of obesity are there?

    A BMI between 25.0 and 29.9 indicates overweight (but not obese). Class 1 (low-risk) obesity corresponds to a BMI between 30.0 and 34.9. Class 2 (depression: About 43% of individuals who suffer from depression are also obese, and those who are obese are 55% more likely to have depression in their lifetime than those who are not obese.

    References

    • Class III obesity (Formerly known as morbid obesity). (2025, February 7). Cleveland Clinic. https://my.clevelandclinic.org/health/diseases/21989-class-iii-obesity-formerly-known-as-morbid-obesity
    • Slightham, C. (2022, January 19). Morbid obesity. Healthline. https://www.healthline.com/health/weight-loss/obesity#prevention
    • Fletcher, J. (2023, November 13). What you should know about morbid obesity. https://www.medicalnewstoday.com/articles/320460#takeaway

  • Sudeck’s Atrophy (Complex Regional Pain Syndrome)

    Sudeck’s Atrophy (Complex Regional Pain Syndrome)

    Introduction

    • Sudeck’s atrophy is an old word for what is now called Complex Regional Pain Syndrome (CRPS). After an injury, surgery, stroke, or heart attack, this constant pain condition usually affects one arm or leg.
    • It is characterized by severe pain that is either burning, throbbing, or shooting, and that is beyond proportion to the original injury.Although CRPS can affect any part of the body, the arms and legs are the most frequently affected areas.there are two types of CRPS .
    • Type 1 CRPS: This kind of CRPS develops following an illness or injury that did not directly harm the limb’s nerves. Reflex sympathetic dystrophy (RSD) is another name for it.
    • Type 2 CRPS: This kind of CRPS develops with a specific nerve damage. Another name for it is causalgia.

    Causes for Sudeck’s atrophy

    • It is believed that a neurological system malfunction is involved. The following are some of the causes of this malfunction:
    • Injury: Even a small injury, like a sprain or fracture, might result in CRPS.
      Surgery: Even simple surgical procedures can occasionally cause CRPS.
    • Stroke: CRPS may develop with a stroke, especially if the affected arm or leg is affected.
    • Heart attack: CRPS can occasionally arise following a heart attack.
    • Additional medical conditions: Diabetes, thyroid disorders, and autoimmune diseases have all been connected to CRPS.

    Pathophysiology

    Though the exact mechanisms are still unclear, a number of elements are thought to have been a role in its formation.

    • Nerve damage: CRPS may occur as a result of damage to the nerves. An injury, surgery, or other trauma may cause this .
    • Inflammation: It is believed that inflammation contributes to CRPS. An injury or other incident may cause the inflammation, which can worsen nerve damage and cause pain.
    • Brain and spinal cord alterations: CRPS may result in brain and spinal cord alterations that increase pain. Increased pain sensitivity and modifications to the brain’s pain signal processing are two examples of these alterations.
    • Psychological aspects: CRPS may also be influenced by psychological variables including stress and anxiety.These elements can worsen the discomfort and make managing the condition more challenging.
    • Increased pain sensitivity: Individuals with CRPS frequently experience pain more intensely than those without the disorder. Changes in how the brain interprets pain impulses are assumed to be the cause of this.
    • Alterations in the sympathetic nervous system: The sympathetic nervous system regulates a number of the body’s natural processes, including blood pressure and heart rate. Pain, edema, and other symptoms may result from an overactive sympathetic nervous system in CRPS.
    • Inflammation: It is believed that inflammation contributes to CRPS. An injury or other incident may cause the inflammation, which can worsen nerve damage and cause pain.
    • Bone loss: In the affected location, CRPS may cause bone loss. This may weaken the bones and raise the possibility of fractures.
    Mechanism of shoulder hand syndrome
    Mechanism of RSD

    Sign and Symptoms of sudeck’s atrophy

    • Pain: Depending on the underlying reason, muscular atrophy may be accompanied by stiffness or neck pain.
    • In the event that nerve damage is the cause of the atrophy, you may feel numb, tingly, or have radiating pain in your arms, shoulders, or neck.
    • Visible Muscle Loss: A noticeable reduction in the size and shape of the neck muscles is the most obvious symptom. The neck may appear slimmer or less toned as a result.
    • Weakness: Muscle weakness may be evident if you have trouble raising your head, twisting it, or making other neck motions.
    • Voice Changes: Atrophy of the neck muscles can occasionally impact the voice box, resulting in a weak or harsh voice.

    Stages of CRPS syndrome

    Stages of CRPS syndrome
    Stages of CRPS syndrome
    • Acute Stage 1 (up to 3 months): Heat, redness, swelling, and severe burning or throbbing pain in the affected limb are symptoms of this stage. Sweating, altered nail and hair growth, and sensitivity to touch are possible side effects.
    • Dystrophic stage 2 (three to twelve months): In addition to the swelling possibly spreading, the pain gets worse and more persistent. More noticeable changes to the skin include dryness, coldness, and a glossy look. There may also be joint stiffness and muscle atrophy.
    • In the 3 stage, known as atrophic (lasting longer than a year), the pain may lessen in severity but may still be there.
    • Significant muscle atrophy, contractures (tightening of muscles or tendons), and restricted movement may be present in the affected limb. The skin may feel cool to the touch, be thin, and be pale.

    Diagnosis

    • Medical History and Physical Examination: Your physician will inquire about your symptoms, including where, how much, and how long you have been in pain, as well as any prior surgeries or injuries. In order to check for symptoms including edema, skin changes, and restricted movement, they will also perform a comprehensive physical examination.
    • Budapest Criteria: To assist diagnose CRPS, doctors frequently employ a set of diagnostic standards known as the Budapest Criteria. These requirements center on the existence of particular symptoms and indicators, like:
    • Persistent discomfort that is out of proportion to the original injury
      Changes in the senses (such as touch sensitivity and temperature changes)
      Skin alterations (such as swelling, color shifts, and temperature variations)
      Motor/trophic alterations (e.g., altered nails or hair, reduced mobility)
    • Eliminating Other Conditions: Because CRPS can resemble other illnesses, your doctor will probably prescribe tests to rule out other potential reasons for your symptoms.
    • These assessments could consist of:
    • Testing for infections or other underlying disorders using blood
    • Looking for bone fractures or other structural issues with X-rays ,
    • To evaluate nerve function, nerve conduction studies
    • To view tissues and rule out other disorders, use MRI.

    The following are the diagnostic standards for complex regional pain syndrome I (RSDS) as listed by the International Association for the Study of Pain (IASP):

    • Persistent discomfort that is out of proportion to any trigger. This indicates that the pain is either significantly worse or lasts longer than would be predicted given the original injury or incident that caused it.

    At least one symptom from three of the four categories listed below:

    • Sensory: Allodynia (pain from a stimulation that wouldn’t typically induce pain) and/or hyperesthesia (increased sensitivity to touch).
    • Vasomotor: Skin color changes and/or asymmetry, and temperature asymmetry (difference in temperature between affected and unaffected limb).
    • Edema (swelling), alterations in sweating, and/or asymmetry in sweating are examples of sudomotor/edema.
    • Reduced range of motion, trophic alterations (in the skin, hair, or nails), and/or motor dysfunction (weakness, tremor, or dystonia) are examples of motor/trophic disorders.
    • At least one sign was present in two of the four categories listed below at the time of evaluation:
    • Sensory: Allodynia to light touch, temperature perception, deep somatic pressure, and/or joint movement; hyperalgesia (increased pain response to a painful stimulus) to pinprick.
    • Vasomotor: Skin color changes, asymmetry, and/or temperature asymmetry (> 1°C).
    • Sudomotor/edema: Sweating asymmetry, alterations in sweating, and/or edema.
    • Reduced range of motion, motor dysfunction (weakness, tremor, or dystonia), and/or trophic alterations (in the skin, hair, or nails) are examples of motor/trophic disorders.

    Treatment

    • Reducing pain and restoring function to the affected limb are the main objectives of treatment for Complex Regional Pain Syndrome (CRPS), which aims to enhance the patient’s quality of life.
    • This calls for a comprehensive approach that takes into the condition’s psychological, emotional, and physical components.

    Medical Treatment

    • pain relievers: For minor discomfort, over-the-counter medications such as acetaminophen or NSAIDs (such as ibuprofen) may be helpful. Opioids may be prescribed by doctors for more severe pain, but because of the possible adverse effects and addiction dangers, they are generally not advised for long-term usage.
    • Topical analgesics: Pain and sensitivity in the affected area can be lessened with creams or patches that include lidocaine or capsaicin.
    • CRPS-related nerve pain can be managed with antidepressants and anticonvulsants, which were first created for other ailments.
    • In certain situations, corticosteroids may be administered to lessen inflammation.
    • Medication for bone loss: Bisphosphonates and other drugs may be recommended if CRPS has caused a decrease in bone density.

    Surgical treatment

    • The first line of treatment for Complex Regional Pain Syndrome (CRPS) is typically not surgery. Nonetheless, surgical procedures might be taken into consideration in some particular circumstances.
    • Nerve decompression surgery
    • Spinal cord simulators
    • Sympathectomy
    • Amputation

    Physiotherapy treatment

    • It uses a variety of methods and exercises to lessen pain, enhance function, and avoid impairment. Physiotherapy can help with CRPS in the following ways:

    Handling Pain:

    • Easy mobility and stiffness-reduction workouts
    • Methods for modifying pain signals include TENS (Trans cutaneous Electrical Nerve Stimulation).
    • Techniques for desensitization to lessen temperature and touch sensitivity
    • To retrain the brain and lessen the sense of pain, use graded motor imagery (GMI).

    Function Restoration:

    • Activities to increase coordination, strength, and range of motion
    • Exercises that enhance proprioception (body awareness) and balance
    • Exercises that are useful for everyday chores and activities

    Additional Methods:

    • Using manual therapy to treat muscular imbalances and joint limitations
    • Compression treatment and elevation mirror therapy are two edema management strategies that might enhance motor function and lessen pain.

    Latest treatment

    • One form of neuromodulation therapy that can be used to treat chronic pain, including CRPS, is dorsal root ganglion (DRG) stimulation.
    • It involves implanting a tiny gadget that communicates with the DRG, a group of nerve cells in the spine involved in pain perception, by sending electrical signals.
    • People with chronic pain may find relief from the device’s ability to block or hide pain signals by stimulating the DRG.
    • Despite being a relatively new treatment, DRG stimulation has demonstrated potential in clinical trials.
    • The foot, leg, and groin are among the lower extremities where it is most frequently used to relieve persistent discomfort. For those with CRPS who have not responded to conventional therapies including medicine, physical therapy, or spinal cord stimulation, treatment could be a possibility.

    The following are some recent developments in the management of CRPS:

    • Deep brain stimulation (DBS): This modifies abnormal brain activity that contributes to pain by surgically implanting electrodes in the brain. DBS is still being investigated for CRPS, however in certain instances, it has showed promise.
    • The goal of regenerative therapies is to encourage tissue repair and healing in the region that is affected. The potential of platelet-rich plasma (PRP) injections and other regeneration methods to enhance function and lessen discomfort in CRPS is being investigated.
    • Immunomodulatory treatments: Studies indicate that there may be an autoimmune component to CRPS. Potential treatments for CRPS include immunomodulatory therapy, such as drugs that target particular elements of the immune system.
    • Targeted drug delivery: This strategy uses topical treatments or injections to deliver drugs straight to the damaged area. This can minimize adverse effects and increase the medication’s effectiveness.
    • Virtual reality therapy: This cutting-edge method makes use of virtual reality technology to produce immersive experiences that can help CRPS sufferers feel less pain and perform better.

    Other treatment

    • Psychological Therapies: Anxiety, depression, and stress are among the mental health issues that CRPS can cause. These problems can be addressed and coping skills can be enhanced with the use of psychological therapies.
    • Acupuncture: In order to promote energy flow and lessen pain, tiny needles are inserted into particular body locations.
    • Massage therapy can ease stress, promote circulation, and relax muscles.
    • Biofeedback: This technique monitors body functions using electronic sensors and teaches people how to control them to lessen discomfort.
      Practices based on mindfulness can assist people in reducing their experience of pain and concentrating on the here and now.
    • Mirror therapy is a treatment that uses a mirror to make the afflicted limb appear to move normally. In CRPS, it can lessen pain perception and aid in brain retraining.

    FAQs

    What causes CRPS most frequently?

    Trauma or injury to the affected limb or other body part typically causes CRPS.

    Is it possible to fully heal from CRPS?

    Over time, CRPS may resolve on its own. However, the symptoms may persist or worsen in certain individuals.

    What is the most effective CRPS treatment?

    One of the most crucial CRPS treatment modalities is physical therapy. With specific exercises, a physical therapist can help you improve blood flow to the affected limb and enhance your muscle tone, function, strength, and flexibility.

    Which three CRPS stages are there?

    Atrophic, dystrophic, and acute CRPS are the three stages into which CRPS is typically divided.

    What is the new treatment for CRPS?

    For CRPS, dorsal root ganglion stimulation (DRGS) seems to be a potential therapeutic alternative.

    References

    • Website, N. (2024, March 7). Complex regional pain syndrome. nhs.uk. https://www.nhs.uk/conditions/complex-regional-pain-syndrome/
    • Complex Regional Pain Syndrome (CRPS). (2024, July 16). Cleveland Clinic. https://my.clevelandclinic.org/health/diseases/12085-complex-regional-pain-syndrome-crps
    • Complex regional pain syndrome (CRPS). (n.d.). Versus Arthritis. https://versusarthritis.org/about-arthritis/conditions/complex-regional-pain-syndrome-crps/
    • Nandan, A., MD. (n.d.). Complex Regional Pain Syndrome Type 1 (Reflex Sympathetic dystrophy) Treatment & management: approach considerations, medical care, surgical care. https://emedicine.medscape.com/article/334377-treatment
    • Complex Regional Pain Syndrome – OrthoInfo – AAOS. (n.d.). https://orthoinfo.aaos.org/en/diseases–conditions/complex-regional-pain-syndrome-reflex-sympathetic-dystrophy/
  • Bone Cancer

    Bone Cancer

    Bone cancer is a rare disease that occurs when cells in the bone begin to grow out of control. It can develop in any bone but most commonly affects the long bones of the arms and legs. The main types include osteosarcoma, chondrosarcoma, and Ewing sarcoma.

    • Symptoms often include persistent bone pain, swelling, fractures, and reduced mobility. The exact cause is unclear, but genetic factors and previous radiation exposure may increase risk.
    • Treatment options include surgery, chemotherapy, and radiation therapy, depending on the type and stage of the cancer.

    Introduction

    • When normal cells in the bone change into abnormal cancer cells that multiply uncontrollably.
    • Bone cancer : a rare and serious disease which forms in the bones. Primary bone cancer means the cancer begins in the bones, whereas secondary bone cancer means the cancer spreads to the bones from another part of the body.
    • An abnormal growth of tissue inside a bone is called a bone tumor.
    • Cell Growth Without Control:
      • In cancer, bone cells begin to grow and uncontrollably replace themselves.
        A mass or tumor is created inside the bone by these aberrant cells.
    • Bone structure damage:
      • The normal structure of the bone is disrupted by the expanding tumor.
        It may weaken the bone, increasing the risk of fractures.
    • Effect on the Tissues Around It:
      • The tumor may compress or spread to neighboring blood arteries, nerves, and other tissues as it grows.

    Types of Bone Cancer

    Primary Bone Cancer

    Cancer that develops inside the bone itself.x

    Osteosarcoma

    • Most often occurring in teenagers and young adults, osteosarcoma is the most prevalent form of bone cancer.
    • A type of cancer called osteosarcoma arises in the osteoblasts, which are cells that create bones.
    • The abnormal bone produced by these malignant cells is weaker than normal bone.
    • It most frequently affects the body’s long bones, including: The distal femur, the bottom portion of the thighbone.
    • The proximal tibia, the top portion of the shinbone
    • The proximal humerus, the upper arm bone
    • Symptoms includes
    • Pain in the bones (usually worse at night)
      Tenderness or swelling close to the affected area
      Unaccounted fractures
      Restricted range of motion
    • Although exactly why is unknown but possible contributing variables include:
    • Rapid bone growth: Osteosarcoma is more common in teens because it frequently arises during times of rapid bone growth.
    • Radiation exposure: The risk may be increased by prior radiation treatment for other cancers.
    • Genetic factors: Li-Fraumeni syndrome is one genetic disorder that may raise the risk.

    Chondrosarcoma

    • Chondrosarcoma is a rare type of cancer that develops in cartilage cells. In numerous areas of the body, such as the nose, ears, and the ends of bones, cartilage—a firm, elastic substance—supports and cushions the body.
    • Its source is cartilage cells.
    • Typical Places:
      The Shoulder, Hip ,Pelvis
      In the arms, legs, and ribs, less often.
      Growth: May proceed at a slower pace or more rapidly.
    • Certain varieties have the ability to spread to other bodily areas, usually the lungs.
    • The most common type, Conventional chondrosarcoma is graded according to its aggressiveness and rate of growth.
    • Dedifferentiated chondrosarcoma: begins as a low-grade tumor and progresses to a more aggressive, high-grade tumor;
    • Mesenchymal chondrosarcoma: is uncommon and aggressive; and clear cell chondrosarcoma is less aggressive and frequently found in the upper arm and thigh.

    Ewing sarcoma

    • Children and young adults are the main victims of the uncommon bone cancer known as Ewing sarcoma.
    • Origin: Takes root in the bone or surrounding soft tissue.
    • Typical Sites:
      Bones of the legs (femur, tibia)
      Arms and Pelvis
      The ribs
      the spine
    • Bone pain is frequently the first and most prevalent symptom, and it might get worse at night.
    • Swelling: Around affected location, a noticeable lump or mass may form.
    • Fever: In certain situations, it may be present.
    • Unidentified Bones that are fractured may become weaker and more brittle.
    • Fatigue and Weight Loss
    • Genetic Alterations: A particular genetic defect that arises after birth is the cause of Ewing sarcoma.

    Chodroma

    • A chondroma is a cartilage-based benign (non-cancerous) tumor.
    • The firm, pliable connective tissue known as cartilage supports and cushions many inside components, including the nose, ears, and the ends of bones.
    • Types:
    • Enchondromas: These develop inside the bone’s marrow cavity.
    • Chondromas periosteal: These develop on the bone’s surface.
      Typical Sites:
    • Found most frequently in the little bones of the hands and feet.
    • Can also happen in the ribs, thighbone (femur), and upper arm (humerus).
    • Signs and symptoms
    • Frequently, no symptoms.
    • Fractures with pain and swelling (the bone may weaken)

    Fibrosarcoma

    • A rare kind of soft tissue sarcoma is called fibrosarcoma. Malignancies known as sarcomas start in the body’s connective tissues, which include bone, muscles, tendons, and ligaments.
    • Origin: Grows in the fibrous connective tissue that gives the body structure and support.
    • Typical Sites:
      Legs (most typical)
      Arms
      Abdominal trunk symptoms:
    • A bump that is tender or painless is frequently the initial symptom.
    • As the tumor expands and presses against nerves, pain may be experienced.
    • Reduced range of motion due to swelling
    • Feeling numb or tingling.
    • Reasons:
    • Most of the time, unknown.
    • Possible Risk Elements:
    • Radiation exposure: The risk may be increased by prior radiation treatment for other cancers.
    • Specific genetic disorders:
    • A genetic condition that damages nerve tissue is called neurofibromatosis.
      An genetic condition called Li-Fraumeni syndrome raises the risk of developing a number of malignancies.

    Adamantinoma

    • A rare kind of bone cancer is called anaemia.
    • Rarity: Less than 1% of all bone tumors are caused by it.
    • Location: Usually in the middle part, it mostly affects the tibia (shinbone).
    • Age: Young adults (20–40 years old) are most affected.
    • Growth: Slow, yet capable of causing harm to the nearby bone and maybe spreading to the lungs.
    • Signs and symptoms
    • Pain: Usually the initial symptom, it might come on gradually or suddenly.
    • Swelling: The shinbone may have a prominent bulge or bulk.
    • Limited Range of Motion: The affected leg is difficult to move.
    • Shinbone Bowing: The tibia may curve in certain situations.
    • Reasons: Unknown, It’s unclear exactly what caused it.

    Secondary bone cancer

    Metastatic bone cancer

    Cancer cells from another area of the body can move (metastasize) to the bone, resulting in metastatic bone cancer.

    • Origin: It is not a bone-related primary cancer. Cancer cells move from the initial (primary) cancer location to the bone via the lymphatic or circulatory systems.
    • Common Cancers:
    • Breast cancer
      Breast cancer
      Lung cancer
      carcinoma of the kidneys
      Thyroid cancer
    • A form of blood cancer called myeloma
    • Typical Locations of Bone Involvement:
    • The Spine Ribs
      The pelvis
      Long bones (humerus, femur)
    • Symptoms: The most frequent and initial symptom is frequently bone pain. It may start off as a dull ache or get worse at night.
    • Fractures: Cancer weakens bones, making them more brittle.
    • High blood calcium levels caused by bone deterioration are known as hypercalcemia, and they can cause symptoms like disorientation, nausea, constipation, and exhaustion.
    • Back discomfort, paralysis, numbness, and maybe a loss of bladder and bowel control can result from spinal cord compression, which is caused by cancer in the spine pressing on nerves.

    Rare type of bone cancer

    Giant cell tumor

    • An uncommon, usually benign (non-cancerous) tumor that develops in the bone is called a giant cell tumor of bone.
    • Origin: Found in the bone, usually close to the end of lengthy bones.
    • In the surrounding of the knee (upper end of the tibia, lower end of the femur)
    • Additional sites: the pelvis, wrist, and shoulder.
    • Age: Most prevalent among young people (those aged 20 to 40).
    • Growth: Has the capacity to expand quickly and forcefully, which could harm nearby bone.
    • Signs: Pain is frequently the initial indication and gets worse as you move.
    • Swelling: There may be a visible bulk or lump.
    • Having trouble moving the affected joint is known as limited range of motion.
    • A fracture occurs when a bone weakens and breaks.

    Malignant fibrous histiocytoma

    • Sarcomas are malignancies that start in the body’s connective tissues, including muscles, tendons, ligaments, and bone. One kind of soft tissue sarcoma is malignant fibrous histiocytoma (MFH).
    • Origin: Takes root in the body’s soft tissues, including deep layers of skin, muscles, tendons, and ligaments.
    • Typical Sites:
    • The legs, particularly the thighs
    • Abdomen, arms, and trunk
    • Symptoms:
    • A bump that is tender or painless is frequently the initial symptom.
    • As the tumor expands and presses against nerves, pain may be experienced.
    • Reduced range of motion due to swelling
    • Feeling numb or tingling.
    • Reasons:
    • Most of the time, unknown.
    • Possible Risk Elements:
    • Radiation exposure: The risk may be increased by prior radiation treatment for other cancers.

    Eosinophilic granuloma

    • The mildest type of Langerhans cell histiocytosis, a rare condition that causes your body to manufacture an excessive number of immune cells, is called eosinophilic granuloma.
    • Benign Tumor: Eosinophilic granulomas are not carcinogenic; they are classified as benign bone tumors.
    • Common in Children: Children under the age of ten are typically affected.
    • The skull, pelvis, ribs, humerus (upper arm bone), mandible (jaw bone), femur (thigh bone), and spine are the most often affected areas.
    • Signs and symptoms
    • Frequently no Symptoms: A large number of kids with eosinophilic granulomas don’t exhibit any symptoms.
    • Pain: Pain is a common symptom, if it exists.
    • Tenderness or swelling could appear close to the affected location.
    • Additional Possible Symptoms:
    • A headache
    • heightened urination and thirst (diabetes insipidus)
    • Stiffness (if a joint is close to the growth)
    • Skin discoloration above or close to the growth

    Symptoms

    • Bone pain: the most prevalent and first symptom is frequently bone pain.
    • The discomfort could be:
    • Persistent: Lasting a lengthy period.
    • Night time worsening: Usually more obvious when you’re sleeping.
    • Localized: Focused on a particular region.
    • Deep and aching: This type of pain might be mild or more intense, throbbing.
    • Swelling: A significant lump or swelling may appear around the bone’s injured location.
    • Tenderness: The bone’s surrounding tissue may feel sensitive to the touch.
    • Limited Range of Motion: Inability to move the affected joint because of discomfort or edema.
    • Unaccounted-Fractures: Even mild injuries might cause the bone to deteriorate and break more readily than usual.
    • Fatigue: The state of being abnormally exhausted despite getting enough sleep.
    • Weight Loss: Sometimes people lose weight without knowing reason.
    • Fever: There may be a fever in some situations.

    Diagnosis

    • A comprehensive evaluation by a healthcare professional is necessary to determine the cause of bone pain.
    • The following is a general outline of the diagnostic process:
    • Medical History and Physical Examination: Detailed Medical History, The doctor will collect information about your symptoms, such as: Location and nature of the pain: Where exactly does it hurt? Is it sharp, dull, aching, or throbbing?
    • Onset and duration: When did the pain start? Is it constant or intermittent? Aggravating and relieving factors : What causes the pain to worsen (e.g., activity, weight-bearing) or what relieves it (e.g., rest, medication)?
    • Other symptoms: Any accompanying symptoms like swelling, redness, fever, fatigue, or weight loss? Previous medical history: Any surgeries, injuries, or medical conditions? 
      Medications: Any medications you are currently taking?
    • Physical Examination: The physician will closely inspect those affected region, looking for:
    • Swelling: Any lumps or swelling that are noticeable.
    • Tenderness: Touch-sensitive areas.
    • Range of motion: Any restrictions on how the affected joint can move.
    • Any odd forms or irregularities in the bone are called deformities.

    Imaging examinations:

    • X-ray: Frequently the initial imaging test carried out.
    • Can show problems such as arthritis, bone cancers, and fractures.
    • Magnesium resonance imaging, or MRI, produces fine-grained pictures of bone cancers, soft tissues, and bone marrow.
    • Compared to X-rays, a CT scan (Computerized Tomography) produces cross-sectional images of the body that provide more detailed information.
    • A radioactive tracer is used in a bone scan to find regions of elevated bone metabolism, which may be a sign of malignancies, infections, or fractures.

    The biopsy

    • A biopsy could be required in certain circumstances in order to collect a sample of bone tissue for microscopic inspection.
    • Two types: needle biopsy and open biopsy

    Staging Bone Cancer

    The American Joint Committee on Cancer’s (AJCC) TNM method is used to determine the stage of bone cancer

    TNM system

    T (tumor): explains the primary tumor’s size and scope.

    • T1: The tumor’s largest dimension is 8 cm or smaller.
    • T2: The tumor’s largest dimension exceeds 8 cm.
    • T3: The same bone contains many cancerous areas.

    N (Node):

    • Explains if adjacent lymph nodes have been affected by the malignancy.
    • N0: There are no cancerous cells in the lymph nodes nearby.
    • N1: Nearby lymph node cancer cells.

    M (Metastasis):

    • Explains if the disease has spread to other body parts.
    • M0: No metastases to other places.
    • M1a: Lung metastatic disease.
    • M1b: Spreading beyond the lung to other areas of the body.

    Grouping of Stages Overall:

    • Stage 1: Small, confined, low-grade tumor (T1 N0 M0)
    • Stage 2: Larger, higher-grade tumor that has not spread (T2/3 N0 M0)
    • Stage 3: Any size tumor that has migrated to lymph nodes (T1-3 N1 M0)
    • Stage 4: Any T, Any N, or M1 distant metastases are present.

    Treatment

    Surgical approach

    This is often the primary treatment.

    Limb-sparing surgery

    • The goal of limb-sparing surgery, sometimes referred to as limb-salvage surgery, is to remove only the diseased area of the bone in order to preserve a limb that has been affected by bone cancer. When possible, this method is chosen over amputation since it greatly enhances a patient’s functional ability and quality of life.
    • Tumor Removal: To assure the patient that the tumor is completely removed, the surgeon carefully removes the diseased bone along with a margin of healthy tissue surrounding it.
    • Reconstruction: One of the following is used to replace the collected bone.
      Metal implant (prosthesis): To give structural support, a synthetic implant is placed.
    • Bone graft: To replace the removed bone, bone tissue is either auto grafted from another region of the patient’s body or allografted from a deceased donor.
    • Rehabilitation: To rehabilitate and regain full function of the limb, extensive physical and occupational treatment is essential.
    • limb-sparing surgery considered when,The tumor has not spread to other areas of the body; it is confined.
    • Because of its size and placement, the tumor may be completely removed without impairing limb function.
    • The patient is in sufficient general health to endure the procedure and the ensuing recovery.

    Amputation

    • Necessary if the tumor cannot be completely removed or limb/joint function cannot be maintained; this is most frequently the case with pelvic cancers whose position or extent precludes limb-sparing.
    • Despite previous surgeries, it is occasionally required for malignant sarcomas or recurring tumors.
    • Prosthetic limbs may now bend and rotate for better function .
    • A typical long-term adverse effect that requires pain management is phantom limb pain.
    • Strength, balance, and movement coordination with a prosthesis are the main goals of rehabilitation.

    Bone Reconstruction

    • One of the most important parts of limb-sparing surgery for bone malignancy is bone rebuilding.
    • In order to restore the limb’s structural integrity and functionality, the excised malignant bone must be replaced with an appropriate substance.
    • Method of bone reconstruction is Metal prosthetics, or implants:
    • These are synthetic implants composed of metals such as stainless steel or titanium.
    • They offer structural support and can be tailored to meet the patient’s unique requirements.
    • Rods, plates, and specially designed prostheses are examples of implant types.
    • Grafts of bone:
    • Autograft: The patient’s hip or fibula (a smaller bone in the lower leg) are two examples of other body parts from which bone tissue is taken.
    • Allograft: A deceased donor’s bone tissue is used.
      Composite grafts: A mix of bone transplants and metal implants.

    Radiation therapy

    • Radiation Therapy: An Effective Treatment for Bone Cancer
    • High-energy rays are used in radiation therapy, a cancer treatment, to destroy cancer cells. It is essential for treating bone cancer and is frequently combined with chemotherapy and surgery.
    • How Does Bone Cancer Radiation Therapy Operate?
      Radiation therapy applies targeted radiation doses to the malignant region.
    • These high-energy radiations harm cancer cells’ DNA, stopping them from proliferating and reproducing.
    • Bone Cancer Require Radiation Therapy when
    • Prior to Neoadjuvant Surgery:
    • To reduce the tumor’s size so that surgery can remove it more easily.
    • To increase the likelihood that limb-sparing surgery will be effective.
    • Following Adjuvant Surgery:
    • To eliminate any cancer cells that could have remained after surgery.
    • As an alternative to surgery:
    • For tumors that, because to their location or size, cannot be surgically removed entirely.
    • For patients with underlying medical issues that make them unsuitable candidates for surgery.
    • For Symptom Relief: To manage pain and additional tumor-related symptoms, such as spinal cord or nerve compression, in circumstances where a cure is not possible

    Types of Radiation Therapy

    • External Beam Radiation Therapy (EBRT) is one type of radiation therapy used to treat bone cancer.
    • the most prevalent kind, in which radiation is administered externally by a machine.
      Stereotactic body radiation therapy (SBRT) and intensity-modulated radiation therapy (IMRT) are two methods that minimize harm to nearby healthy tissues while enabling more accurate tumor targeting.
    • Brachytherapy:
    • Include positioning radioactive sources close to or inside the tumor.
    • Utilized in some circumstances, such as during surgery for intraoperative radiation treatment (IORT).
    • Side effects of radiation therapy
    • Skin irritation: The treated area’s skin becomes red, dry, and sensitive.
    • Fatigue: Weakness and discomfort.
    • Vomiting and nausea: Although less frequent with contemporary radiation treatments.
    • A reduction in blood cell counts may result from bone marrow suppression.
    • Long-term adverse effects: The risk of developing secondary malignancies, bone weakening, and harm to adjacent organs may vary depending on the location and intensity of radiation exposure.

    Chemotherapy and Targeted Therapy in Bone Cancer

    • Systemic treatments for bone cancer include chemotherapy and targeted therapy, which can affect cancer cells all over the body. For many individuals, these treatments are essential in boosting their results.
    • For bone cancer, common chemotherapy medications include:
    • Ifosfamide, Cisplatin, and Doxorubicin,Etoposide
    • Although chemotherapy can effectively cure bone cancer,
    • There are some potential side effects, including:
    • Vomiting and feeling queasy
      Loss of hair
      Weariness
      Sores in the mouth
      Having diarrhea
      A higher chance of infection
    • The type and stage of bone cancer, along with the patient’s general health, will determine the best course of treatment. Before choosing a course of treatment, it is crucial to discuss the advantages and disadvantages of chemotherapy with a physician.
    • Drugs are used in targeted therapy for bone cancer to target particular flaws in cancer cells. Compared to chemotherapy, this kind of treatment is less likely to harm good cells, but it might not work for all forms of bone cancer.
    • Denosumab is one approved targeted therapy medication for the treatment of bone cancer.
    • Bone cancer may also be treated with the following targeted therapies:
    • Kinase inhibitors: These medications target proteins that aid in the growth and metastasis of cancer cells. A uncommon kind of bone cancer called chordomas is frequently treated with kinase inhibitors.
    • Immunotherapy: This kind of treatment supports the body’s defenses against cancer. Although they are not yet generally accessible, immunotherapy medications are being researched for the treatment of bone cancer.

    Care and Rehabilitation Support

    Helpful Care

    • The broad variety of services included in supportive care are intended to manage treatment side effects and enhance general comfort. Among the crucial facets of supportive care are:
    • Pain management: The treatment of bone cancer can be painful. Effective pain management techniques, such as drugs, nerve blocks, and other treatments, can be created by pain management specialists.
    • Handling Fatigue: A typical side effect of cancer and its treatments is fatigue. Fatigue can be managed with strategies including exercise, energy conservation, and dietary advice.
    • Management of Nausea and Vomiting: Anti-nausea drugs and dietary changes can help control these chemotherapy side effects.
    • Handling Mouth Sores: Using specialist mouthwashes and practicing good oral hygiene can help prevent and manage mouth sores.
    • Nutrition and Hydration: Throughout therapy, it’s critical to maintain proper nutrition and hydration. Personalized dietary advice can be obtained from a licensed dietitian.
    • Psychological and Emotional Assistance:
    • Cancer can affect a person’s emotions profoundly. Patients can manage their anxiety, depression, and other emotional difficulties with the aid of counseling, support groups, and other psychosocial interventions.

    Rehabilitation exercises

    • Physical Therapy: Strength, flexibility, range of motion, and balance can all be enhanced with the assistance of physical therapists. Exercises to enhance coordination and gait can also be taught by them.
    • Occupational Therapy: Occupational therapists can assist patients in creating plans for independent living and adjusting to changes in their everyday routines. This could entail employment retraining, house changes, and assistive technology.
    • Prosthetics and Orthotics: Prosthetic limbs and other supporting devices can be made and fitted by prosthetists and orthotists for patients who have had limb-sparing surgery or amputation.
    • Management of Lymphedema: Certain cancer treatments may result in lymphedema, a swelling caused by fluid accumulation.
    • To treat this illness, lymphedema therapists can offer customized compression and massage treatments.

    Psychological and emotional assistance

    • A person’s emotional and psychological health can be greatly impacted by a cancer diagnosis, particularly bone cancer.
    • Typical Psychological and Emotional Issues:
    • Significant anxiety can be caused by a fear of the unknown, adverse treatment effects, recurrence, and the influence on day-to-day functioning.
    • Depression: Feelings of sorrow, helplessness, and a loss of interest in activities might result from the emotional strain of receiving a cancer diagnosis.
    • Fear and Uncertainty: Receiving a diagnosis and not knowing how a therapy will turn out can be quite stressful.
    • Issues with Body Image: Self-esteem may be impacted by physical changes caused by surgery, adverse treatment effects (such as hair loss), or the requirement for prosthesis.
    • Grief and Loss: Grief and mourning can be caused by facing the possibility of losing one’s ability to function, one’s independence, or even one’s life.
    • Financial Concerns: The expenses of medical care, missed wages, and possible disability can lead to a great deal of financial strain.

    Support That Is Available

    • Psychotherapy: Cognitive-behavioral therapy (CBT) and other talking treatments can assist people in managing their emotional problems, such as depression and anxiety.
    • Support groups: Making connections with people who have gone through comparable struggles helps to understanding and a sense of community.
    • Counseling: Communication problems, relational difficulties, and emotional distress can all be addressed through individual or family counseling.
    • Social Work Support: Social workers can aid with practical issues such as obtaining community services, managing insurance, and financial support.
    • Support from Loved Ones: It’s critical to have open lines of communication with family and friends.
    • Encourage family members to lend a sympathetic ear, practical help, and emotional support.
    • Mind-Body Techniques: Stress and anxiety can be reduced by practicing relaxation techniques like yoga, deep breathing, and meditation.

    Getting Assistance

    • Healthcare Team: Social workers, nurses, and oncologists can all be referred to support groups and mental health specialists by your healthcare team.
    • Cancer organizations: Resources and support services are available for those with cancer from groups such as the National Cancer Institute and the American Cancer Society.
    • Numerous internet resources provide cancer patients communal forums, support, and information.

    Prevention and perspective

    Prevention strategies

    Continue to Lead a Healthful Lifestyle:

    • A balanced diet should emphasize lean protein, entire grains, fruits, vegetables, and low-fat dairy products. For strong bones, make sure you’re getting enough calcium and vitamin D.
    • Frequent Physical Activity:
    • Take part in weight-bearing activities on a regular basis, such as jogging, walking, or weightlifting.
    • Every week, try to get in at least 150 minutes of moderate-intensity exercise.

    Reduce Risk Elements:

    • Reduce Radiation Exposure: Reduce needless radiation exposure from medical procedures.
    • Take the appropriate safety measures if you work in an environment where radiation exposure is a possibility.
    • Avoid Dangerous Substances: Reduce your exposure to substances that are known to raise your chance of developing cancer, such as those present in particular locations or jobs.
    • Give Up Smoking: Smoking raises your risk of developing a number of malignancies, including several that can damage your bones.

    Early Identification:

    • Frequent Checkups: Make an appointment for routine checkups with your physician, particularly if you have a family history of cancer or other risk factors.
    • As soon as you notice any strange symptoms or changes in your bones, report them.

    Genetic Guidance:

    • Consider genetic counseling to determine your risk and go over possible preventive steps if bone cancer or other malignancies run in your family.

    Outlook and rates of survival

    • The prognosis and survival rate for bone cancer vary depending on several factors, including the type of cancer, stage at diagnosis, location of the tumor, and overall health of the patient.  
    • Here’s a general overview:
    • Overall Survival Rate: The five-year survival rate for all bone cancers combined is about 70%. However, this number can vary significantly depending on the specific type and stage of the cancer.  
    • Type of Bone Cancer: Some types of bone cancer have better prognoses than others. For example, chondrosarcomas tend to have a higher survival rate compared to osteosarcomas.  
    • Stage at Diagnosis: Early-stage bone tumors that are still limited to the bone have a considerably better prognosis than those that have migrated to other regions of the body.
    • Location of the Tumor: Tumors located in certain areas, such as the limbs, may be easier to treat and have a better prognosis compared to tumors in the pelvis or spine.  
    • Overall Health: Patients with good overall health and no other significant medical conditions tend to have a better prognosis.

    FAQs

    How can bone cancer be identified early?

    X-rays. When a bone tumor of any kind is detected, an x-ray of the bone is frequently the first test performed.

    Which seven indicators point to bone cancer?

    Pain. Even if you’re sleeping, you may experience pain or tenderness most of the time.
    swelling. It is not usually possible to see or feel a lump, but you may have some swelling.
    Moving around is problematic…
    A fractured bone….
    Exhausted (fatigued)…
    A fever, or high temperature…
    Loss of weight

    What causes bone cancer to begin?

    When DNA alterations occur in cells within or close to a bone, bone cancer begins.

    Is it possible to cure bone cancer?

    In otherwise healthy individuals whose cancer has not spread, bone cancer is typically considerably easier to cure.

    What are the symptoms of bone cancer?

    bone cancer can result in discomfort, edema, and trouble moving. Fatigue, a lump, and inexplicable weight loss are further symptoms.

    Is bone cancer painful?

    The most typical indication of bone cancer is pain near the tumor. The pain may not always be present at first. while the bone is used, like while walking for a tumor in a thigh bone, it could get worse at night.

    Referances

    • Bone cancer. (2024, December 27). Cleveland Clinic. https://my.clevelandclinic.org/health/diseases/17745-bone-cancer
    • Stuart, A. (2024, December 17). Bone cancer. WebMD. https://www.webmd.com/cancer/bone-tumors
    • Macon, B. L. (2022, February 16). Bone cancer: types, causes, symptoms, and more. Healthline. https://www.healthline.com/health/bone-cancer
    • NCI Dictionary of Cancer Terms. (n.d.). Cancer.gov. https://www.cancer.gov/publications/dictionaries/cancer-terms/def/bone-cancer
    • Bone Cancer: diagnosis and treatment principles. (2018, August 15). PubMed. https://pubmed.ncbi.nlm.nih.gov/30215968/
  • Teres Major Muscle Pain

    Teres Major Muscle Pain

    Teres Major Muscle Pain occurs when the teres major, a small but powerful muscle in the upper back, becomes strained or overworked. This muscle plays a key role in shoulder movement, including adduction, internal rotation, and extension.

    Pain in this area may result from overuse, poor posture, or repetitive activities like lifting or throwing. Symptoms often include aching, stiffness, and restricted shoulder mobility. Proper stretching, strengthening, and posture correction can help alleviate discomfort and prevent future issues.

    What is a Teres Major Muscle Pain?

    It plays a crucial role in arm movement, particularly in internal rotation, adduction, and extension of the shoulder joint. Pain in the teres major muscle can result from overuse, poor posture, or strain due to repetitive activities such as weightlifting, swimming, or throwing motions. This type of pain may present as localized pain in the back of the shoulder, restricted movement, or even radiating sensations down the arm. Understanding the causes, symptoms, and treatment options for teres major muscle pain is essential for effective management and recovery.

    The shoulder’s stability and mobility team includes the teres major muscle, which runs down the shoulder blade. It facilitates pulling, throwing, and lifting motions by joining the upper arm to the lower edge of your shoulder blade. This muscle aids in the execution of strong upper body movements, whether you’re a swimmer, weightlifter, or recreational athlete. It is prone to strain, though, if overworked or stretched incorrectly.

    You may be experiencing severe shoulder pain if it has been acting up. This muscle rupture is regarded as uncommon and isn’t often covered in the literature. Your teres major may be the cause of your shoulder ache if it is in the back!

    The teres major is working hard for you if you engage in repetitive overhead motions or play sports like baseball or football. Now let’s get into the important details concerning the teres major and what to do if you have pain.

    Anatomy of Teres Major Muscle Pain?

    On the underside of your scapula, your teres major muscle slides into a groove on your humerus. There is a teres minor, in case you were wondering, and it is directly below the teres major.

    Together with the latissimus doors and subscapularis, the teres major forms the rear portion of the axilla (armpit) and creates crucial connections to the deltoid.

    Function

    • “To extend, medially rotate, and adduct the humerus” was the stated purpose of the teres major. These functions are not unique to this muscle. Additionally, the latissimus dorsi facilitates the humerus’s adduction and medial rotation.
    • Is your arm moving away from your body or above it? You’re in good hands with your teres major.
      Any motions that include internal rotation, adduction, and extension You’re succeeding with your teres major!
    • Injuries seldom damage just the teres major since the latisimmus dorsi and teres major work as a single muscle.

    Causes of Teres Major Muscle Pain?

    As mentioned in past posts on the QL Blawg, you can discover that there are common root causes of muscular pain. Although professional athletes aren’t the only ones who can sustain this kind of injury, there are a few things to be mindful of:

    • Poor posture
    • injury or trauma (automotive accidents)
    • Repeated motions, such as throwing and overhead movements
    • Insufficient warm-up
    • Baseball pitchers and others who perform repetitive tasks like cutting wood are among the professions that are susceptible to teres major pain. Beware of lumberjacks.

    Symptoms of Teres Major Muscle Pain?

    Arm movement is influenced by the teres major muscle, which is situated in the upper back, close to the shoulder blade. Overuse, tension, or injury can cause pain in this muscle. The following are typical signs of teres major muscle pain:

    • Upper back or shoulder ache: a dull, aching pain that occasionally spreads to the upper arm and is located close to the lower shoulder blade.
    • Pain During Arm Raising or Rotation: Pain during arm lifting, reaching upwards, or inward rotation.
    • Tightness and Tenderness: The teres major region may feel painful to the touch.
    • Reduced Shoulder Mobility: The arm becomes stiff and difficult to move in specific directions.
    • Pain While Sleeping on the Affected Side: The affected side causes more pain when sleeping down.
    • Pain During Physical Activity: Weightlifting, swimming, and throwing are among activities that might exacerbate pain.

    Diagnosis of Teres Major Muscle Pain:

    • For a diagnosis, a medical professional’s thorough examination is an excellent place to start. In addition to determining which muscle is causing your pain, they can also recommend practical solutions that will help you fully recover.
    • The most used imaging method is magnetic resonance imaging (MRI). An MRI can assist in differentiating between a tear’s major tear and a strain.
    • To examine the area for bruises, ultrasonography may also be prescribed.
    • You should obtain a professional evaluation if your pain doesn’t go away! They can be used to determine which muscle is impacted and to be sure that nothing more serious is causing the problem.

    Treatment of Teres Major Muscle Pain:

    I hope conservative techniques can readily treat your pain. If you haven’t visited a doctor yet, keep in mind the PRICE procedure!

    • P – Protection
    • R – Rest
    • I – Ice
    • C – Compression
    • E – Elevation

    This intervention is simple to perform at home, requires little additional equipment, and can be started immediately.

    The goal of the elevation exercise should be to maintain a neutral posture for your arm and shoulder, without exerting any pressure.

    Medication Options

    Over-the-counter drugs can be used to treat muscular pain at first, but inflammation-induced damage will take time to heal. Before starting medicine, it’s crucial to confirm with your doctor that you are having muscle pain. Ideally, other therapies will be required if PRICE has not been able to alleviate your pain.

    Trigger Point

    You can use massage therapy or even acupuncture to relieve a knot or trigger point in your teres major. Given the placement of this muscle, your best option might be to contact a massage therapist. Look for a deep tissue massage or myofascial release specialist.

    Physical Therapy of Teres Major Muscle Pain

    Physical therapy may be required as part of your required treatment. To help you regain your strength and range of motion, a therapist can offer the right stretching and strengthening exercises.

    Although it’s simple to start a stretching regimen at home, it can be challenging to determine which stretches and activities are safe to perform without making your pain worse. Resting if moving still hurts is a helpful tip to follow.

    Exercise of Teres Major Muscle Pain

    Face pulls

    Face Pulls
    Face pulls
    • For optimal effects, use a cable machine rope or resistance band.
    • The cable machine rope should be adjusted to head height.
    • Maintain a neutral grip on the rope while facing the machine and taking a step back with your feet shoulder-width apart.
    • Pull the rope toward your face until your hands are close to your ears by extending your arms, raising your chest, and tightening your core.
    • Take a moment, squeeze your shoulder blades, and then gently return to the starting point. Do it again.

    Single Arm Dumbbell Row

    Single-Arm Dumbbell Row
    Single Arm Dumbbell Row
    • Place one hand on a bench or sturdy surface for support while maintaining a neutral spine and a slightly slouched posture.
    • Extend your arm straight down while holding a dumbbell in the other hand.
    • Before initiating retraction, let your scapula stretch.
    • Pull the dumbbell up to your hip while maintaining a tight body to contract your teres major and squeeze your shoulder blade.
    • Return slowly and do it again.
    • Reduce the weight if you find yourself pushing excessively to compensate.
    • Change arms once you’ve performed the required amount of repetitions.

    Band Pull Aparts

    • Select the resistance band that you like most.
    • Your feet should be shoulder-width apart.
    • Lift the resistance band until it is shoulder-width apart.
    • Spread your arms straight out in front of you and retract your shoulder blades while holding the resistance band.
    • While keeping a tall chest and a firm core, extend both arms out to the sides.
    • Pull the band till it touches your chest.
    • Try to squeeze your shoulder blades together and hold for a moment.
    • Allow the band to slowly revert to its starting position.
    • Repeat as many times as you’d like.

    Side-lying External Rotation

    Side-lying external rotation
    Side-lying External Rotation
    • For more support and easier rotation, place a cloth under your armpit.
    • Keep your elbow pinned to your side as you slowly spin upward.
    • Use a lighter weight at first, and if you have pain, reduce your speed or stop.

    Vertical Rotation Exercise

    • Throughout the exercise, retract your shoulder blades.
    • Pull back rather than raise.
    • Use a lighter weight to begin.
    • Use this as a warm-up before working out to strengthen your shoulders.

    Rear Cable Fly

    • In your gym, look for a twin cable machine.
    • Attach handles—or nothing at all—to either side of the machine, depending on what is most comfortable to hold.
    • Raise the cables to around head height to isolate the teres major.
    • Hold the attachments in front of your face while facing the machine and crossing your arms.
    • As you drag the weight across your torso, pull your shoulder blades back.
    • Make a 45-degree angle with your body by extending and lowering your arms. Your elbows should remain slightly bent.
    • After pausing, go back to where you were before and repeat.
    Reverse Dumbbell Flyes
    Reverse Dumbbell Fly

    Reverse Dumbbell Fly

    • Hold two dumbbells of mild to moderate weight and place them shoulder-width apart.
    • Put yourself in a bent-over row position with your hips hinged at about a 45-degree angle and your knees slightly bent.
    • Raise your arms laterally in place of rowing, as though you were performing the reverse motion of a chest fly.
    • For lateral abduction, concentrate on squeezing your shoulder blades.
    • As you continue, you should have some upper back strain.

    Pull-ups: Neutral Grip or Chin-Ups

    • Maintain a neutral or narrow grip to target the teres major and minor. Because a narrow or neutral grip maintains a more natural shoulder position, it will encourage more engagement of the back muscles. The lats are put under the most strain during standard wide-grip pull-ups.

    Supinated Lat Pulldown

    • Reach up and grasp the bar while seated on the bench. To properly target the teres major, hold the bar underhand and a little outside shoulder width.
    • Pull the bar to your upper ribs while keeping your elbows taut and your shoulder blades back as you lean back a little.
    • Stop at the bottom, squeeze, and then slowly go back to the beginning so that your teres major and lats may stretch.

    Cable Pullover

    • Feel a lat and teres major stretch as you grasp the attachment while hunching slightly at the hips and arching your spine.
    • Squeeze your shoulder blades, brace your core, and bend your elbows slightly.
    • Allow your upper body to raise a little as you draw the weight to your waist.
    • At the bottom, squeeze your lats, hold for a moment, and then gently go back to the beginning.
    • Concentrate on making deliberate, slow movements. To preserve your shoulders and prevent damage, start with a lesser weight.

    Low Cable Row

    • Place your feet on the footrests and bend your knees slightly while sitting on the cable machine.
    • With your shoulders back, chest out, and back straight, hold the attachment with a small forward tilt.
    • Pull the weight a little bit down and into your stomach to engage your teres major and upper back.
    • Pinch your shoulder blades and keep your elbows in.
    • Don’t use momentum. Return to the beginning position after stopping when the handle is near your belly button. Do it again.

    Prevention of Teres Major Muscle Pain

    Muscle pain prevention techniques are simple and require little to no equipment. You can avoid stress by implementing some of these practices immediately!

    Adequate warm-up

    • Do you ever catch yourself neglecting your cool-downs and warm-ups? This might be alluring since its significance is often disregarded or misinterpreted.
    • Since injuries were predicated on the long-term effects of skipping a warm-up, the authors of this study contend that it is challenging to investigate the immediate impacts of skipping. According to the interpretation, if you are consistent with your warm-ups, you can effectively prevent injuries!

    Proper posture

    • Any muscle strain can be lessened by maintaining good posture. This ideally entails lowering and repositioning your shoulders. Your teres major and other muscles must work harder to stabilize your shoulder joint when you round your shoulders forward.
    • Furthermore, a neutral spine might avoid the need for muscles to adjust, which could result in muscular imbalances.

    Recovery time

    • To prevent injuries, make sure you have adequate time to heal. This not only facilitates the healing of minor tears but also prepares your muscles for your subsequent exercise session. Muscle fatigue can be avoided and improved performance can result from getting enough sleep.
    • Being active while taking the right measures is the key to avoiding any pain. Prioritizing a routine that suits you is what it means to schedule warm-ups and recuperation time, even though being attentive to your posture may call for some mindfulness!

    Incorporate a stretching routine

    • You’re in luck because BMS wrote a piece about 8 Teres Major Stretches That Work! You won’t regret it if you come over and give them a try! Additional helpful information regarding the teres major, provided by Sam Ayd, is also available.

    Conclusion

    Your teres major may have been strained if you have pain in the posterior shoulder region following a throw or repetitive arm motion. It can be adequately treated with the right measures. It turned out that after 18 days of cautious measures, a football player’s pain and limits had completely disappeared. Keep in mind that there are simple steps you may take to prevent this severe pain.

    FAQs

    What advantage does Teres Major offer?

    The teres major’s primary job is to generate the humerus’ movements at the glenohumeral joint by pulling the humerus’ anterior surface medially in the direction of the trunk (internal rotation). Additionally, it can extend the arm from a flexed position.

    When teres major is tight, what happens?

    The teres major muscle should be kept in mind. The arm and shoulder movements depend on this little yet vital muscle. It might hurt and limit your range of motion if it is overly tight or overworked.

    How long does it take for teres major to heal?

    Any baseball player with a magnetic resonance imaging (MRI)–identified injury to the latissimus dorsi or teres major was included. Nonoperative treatment for all injured athletes aimed to get them back to throwing at full velocity three months after the injury.

    What sign of teres major soreness is it?

    A quick, severe pain in the shoulder, upper arm, and armpit is the primary sign of a teres major tear. This typically occurs when the muscle is not rested and no treatment is administered.

    What causes teres major pain to flare up?

    Where are the main trigger points for Teres? One trigger point is located where the latissimus dorsi and teres major muscles connect in the posterior axillary fold. Over the rear surface of the lower scapula is another trigger point.

    How can my teres major be stretched?

    Stretching the Teres Major Muscle
    From a standing position, one of the best teres major stretches you can perform is to raise your arm to the opposite side (horizontal adduction), grasp your underarm with your other hand, and drive your arm upward and to the opposite side. Wait 30 seconds.

    What is the purpose of teres major?

    This premium cut is nothing short of a culinary marvel, usually weighing a hearty 8 to 12 ounces. With a softness that rivals the legendary beef tenderloin, it’s a steak lover’s paradise.

    What kind of exercise is good for the teres major?

    One of the best workouts for strengthening your teres major muscles is the lateral rise. Supporting lateral or external rotation of the arm at the shoulder joint is a critical function of the teres minor.

    Is the teres major difficult?

    The chuck part of beef, which is located just beneath the front leg, produces the somewhat uncommon teres major steak. It is comparable to the popular chuck roast, but the teres major is much softer. Though it rarely weighs more than 10 to 12 ounces, it is soft enough to be compared to tenderloin.

    What is the sensation of a teres major pain?

    The first step to a successful recovery is identifying the symptoms of a teres major strain: Sharp or dull pain around the shoulder or upper back.

    How can teres major be stretched to relieve pain?

    You might attempt a few simple stretches to help relax your teres major. If you’re seeking examples, social media and YouTube can be your best friends.
    Here are a few well-known examples:
    Stretching while standing overheadStretching the shoulders over the body pose of a child (with arms outstretched)
    Your teres major would be stretched by the majority of mobility exercises that require shoulder and arm movement.

    What is the average recovery time for a teres major pressure?

    The interventions you can use will determine the solution to this inquiry. According to the study cited in this article, an injured athlete can recover from a severe major strain in as little as eighteen days. The severity of your injury has a significant impact on how quickly you recover.

    How can teres pain be alleviated?

    For relief, the acronym RICE is simple to memorize. Elevation, compression, rest, and ice! Over-the-counter drugs can also be helpful if your pain is chronic. It is advised that you contact the doctor to have a precise diagnosis and a customized treatment plan.

    Why does teres major hurt?

    Pain in the teres major muscle can be caused by trauma, injury, repetitive motions, high levels of stress, and bad posture. Throwing and batting are examples of repetitive overhead or shoulder-focused motions that might exacerbate teres major pain.

    References

    • Debutify. (2024, September 17). Root causes of Teres major pain (and how to fix it!). Back Muscle Solutions. https://backmusclesolutions.com/blogs/the-ql-blawg/teres-major-pain?srsltid=AfmBOooA0g3MKC-UnJj-Q35OqsCvC2JcVAWvlLrKhzLAm2NXlFIRBYGS
    • Levarda, T. (2024, May 8). Acupuncture for Teres Major pain — Morningside Acupuncture NYC. Morningside Acupuncture NYC. https://www.morningsideacupuncturenyc.com/blog/acupuncture-for-teres-major-pain
    • Debutify. (2024a, August 21). 11 BEST Teres Major and Minor Exercises. Back Muscle Solutions. https://backmusclesolutions.com/blogs/the-ql-blawg/teres-major-and-minor-exercises?srsltid=AfmBOor24VndCtEzfqWlrqOIf97iWM09XimL7OsB5lwnj4jzxeAmlkjx
  • How Long Does It Take to Lower Cholesterol?

    How Long Does It Take to Lower Cholesterol?

    How Long Does It Take to Lower Cholesterol?

    Statins and other cholesterol-lowering drugs can lower cholesterol to moderate levels in as little as six weeks. However, dietary and lifestyle changes may take several months to reduce cholesterol.

    Statins and other cholesterol-lowering drugs may be prescribed by doctors to patients who have cardiovascular disease or are at high risk of developing it.

    Dietary and lifestyle modifications are essential for long-term management, even though they usually take longer to lower blood cholesterol levels.

    For some people, lowering cholesterol by a healthy diet and regular exercise may take three to six months, but it may take longer. Medication may still be necessary for certain individuals.

    Maintaining good cholesterol levels is crucial since they directly affect heart health.

    According to the Centers for Disease Control and Prevention (CDC), between 2017 and 2020, 10% of adults aged 20 and over had elevated levels of low-density lipoprotein (LDL), or “bad” cholesterol. People who have high LDL cholesterol are also far more likely to develop heart disease, according to the organization.

    Lower LDL levels can be achieved with diet and exercise in 3–6 months, while some people may require more time as they adapt to these lifestyle changes at varying rates.

    What is cholesterol?

    The liver creates the waxy, fatty material known as cholesterol. Cholesterol comes in various forms:

    Animal items in the diet are the source of cholesterol. The liver produces it as well. Certain blood proteins known as “lipoproteins” are responsible for transporting cholesterol throughout the body. During a cholesterol test, the lipoprotein level is measured. Included in these lipoproteins are:

    Because it transports cholesterol from your blood back to your liver, high-density lipoprotein, or HDL, is referred to as “good cholesterol.” After that, the liver eliminates it from your body.

    Because it can accumulate in your arteries and cause heart disease and stroke, low-density lipoprotein, or LDL, is referred to as “bad cholesterol.” Your organs and tissues may not receive enough blood flow as a result of these deposits, which are called plaques.

    VLDL, or very low-density lipoprotein, is also present in artery plaques. It binds to your blood’s triglycerides.

    The breakdown of certain fatty acids and cell activity are both influenced by cholesterol in the body. The body is capable of producing all the cholesterol it requires.

    The other source is cholesterol from the diet. The meals that a person eats cause this to enter their bloodstream. Among other animal products, cholesterol can be found in meat, egg yolks, and full-fat dairy. The liver may produce more cholesterol in response to certain fats and oils, which could raise the levels even further.

    How much cholesterol is considered normal?

    Depending on your age and gender, a normal, or healthy, cholesterol level will differ. Typically, those levels for adults are:

    • Chest fat: less than 200 mg/dL
    • Less than 100 mg/dL of LDL
    • For men, HDL is greater than 40 mg/dL.
    • HDL in females: more than 50 mg/dL

    Normal cholesterol values for individuals under the age of 19 are:

    • Less than 170 mg/dL of total cholesterol
    • LDL: <100 mg/dL
    • HDL: more than 45 mg/dL

    Triglycerides are an additional test included alongside cholesterol on your lipid panel. Although they don’t contain cholesterol, triglycerides can cause heart disease. Regardless of your age or gender, your triglycerides should be below 150 mg/dL.

    Decrease your cholesterol

    Research and clear guidelines about the time required to decrease cholesterol levels are scarce.

    However, the National Heart Lung, and Blood Institute (NHLBI) stated in its 2024 annual guide on decreasing cholesterol levels that some lifestyle or therapy modifications may take up to six weeks to implement.

    Depending on the medication, how you react to lifestyle modifications and other variables, that period could be longer—three months or longer.

    Your doctor and healthcare team may decide to start you on cholesterol-lowering drugs in addition to your continuous physical activity, dietary adjustments, and other lifestyle modifications if those improvements don’t pay off after around six weeks.

    Together with your healthcare team, you can decide on the best course of action for reducing cholesterol and advancing your own health objectives.

    Changes in lifestyle

    One of the most crucial strategies to reduce cholesterol and enhance general health is to adopt healthier lifestyle choices.

    Your cholesterol levels can be affected by the lifestyle choices you make. According to research, you can somewhat reduce your cholesterol by making changes to one or more aspects of your life:

    • Giving up smoking
    • Stress management
    • Getting adequate rest
    • Keeping a healthy weight

    These adjustments are frequently suggested in addition to a balanced diet, regular exercise, or prescription drugs. “About three months of lifestyle modification, including dietary instruction and exercise advice,” is what Dr. Vaughn Payne, a cardiologist and medical director with CVS Caremark, suggests.

    eating patterns

    Eat less saturated fat and more dietary fiber to help lower LDL cholesterol. Your body produces more LDL cholesterol when it consumes saturated fats.

    Experts advise consuming whole-grain foods, fruits, vegetables, and nuts on a daily basis while reducing sodium and saturated fat.

    Additionally, certain foods and plant-based diets can help reduce cholesterol and enhance the general health of your heart and body. The Mediterranean diet and the DASH diet are suggested by some nutritionists because they both place a strong emphasis on eating a lot of fiber and healthy fats.

    Part of the DASH diet is:

    • lots of whole grains, fruits, and veggies
    • Low-fat or nonfat dairy lean proteins (beans, fish, poultry, and soy)
    • good fats (found in nuts, seeds, and vegetable oils)
    • Red meats, processed meals, sugar, and salt in moderation

    Mediterranean diets consist of:

    • lots of whole grains, fruits, and veggies
    • Instead of bad fats like butter, use good fats like almonds and olive oil.
    • minimal salt (using spices & herbs instead)
    • Protein should mostly come from fish and poultry, with red meat very seldom (a few times a month).

    Do some exercise

    Higher LDL and lower HDL values can result from a lack of physical activity.

    According to a 2023 study, aerobic exercise can assist your body increase its levels of good HDL cholesterol, even if exercise and physical activity, in general, are beneficial to your health and can support heart function.

    You will benefit from cardio exercises such as jogging, swimming, dancing, gardening, brisk walking, bicycling, and aerobics.

    Medication

    If diet, exercise, and lifestyle modifications alone don’t provide “satisfactory improvement in lipid levels,” Dr. Payne suggests adding medication. Additionally, he points out that if you have a known cardiovascular illness, you might need to start taking medicine sooner.

    In as little as two weeks, certain drugs may start to reduce cholesterol. Numerous potent drugs are available to help reduce cholesterol levels.

    The following are some of the most popular kinds of drugs used to reduce cholesterol:

    • Statins: They function by preventing cholesterol from being produced. Lovastatin and simvastatin (Zocor) are two examples.
    • Sequestrants of bile acids: These drugs hold cholesterol in the bile until the body eliminates it. Cholestyramine (Prevalite) and colesevelam (Welchol) are two examples.
    • Niacin, also known as nicotinic acid, lowers LDL and triglycerides while increasing HDL.
    • Injectable drugs called PCSK9 inhibitors are used to treat extremely high cholesterol. They may be used with or without statins. Repatha and Praluent are two examples.

    FAQs

    How quickly can cholesterol be reduced?

    Changes in lifestyle may alter cholesterol levels in a matter of weeks. It could take longer, though, typically three months or longer. If a patient’s LDL cholesterol has not decreased after 12 weeks of lifestyle modifications, some physicians advise adding a cholesterol-lowering medication.

    What is the duration required to eliminate cholesterol from your body?

    Lower LDL levels can be achieved with diet and exercise in 3–6 months, while some people may require more time as they adapt to these lifestyle changes at varying rates. A waxy, fatty material that passes through the bloodstream, cholesterol is a part of the body.

    Is it OK to skip cholesterol medicine?

    If you are using a statin to lower your cholesterol, you must continue taking it as prescribed or your cholesterol will probably rise again. If you stop taking your statin, you run the risk of developing heart disease and other avoidable health issues including stroke and heart attack due to elevated cholesterol.

    Can you go from high cholesterol to normal?

    You can improve your cholesterol and increase the effectiveness of drugs that lower cholesterol by making lifestyle changes. You run a higher risk of heart disease and heart attacks if you have high cholesterol. Your cholesterol can be improved with medication.

    What is the average age for high cholesterol?

    After age 40, the risk of high cholesterol rises. Individual health risks, such as family history or the existence of additional illnesses like diabetes, and age all influence the suggested target for total cholesterol, LDL (bad cholesterol), and HDL (good cholesterol).

    At what age should you start worrying about cholesterol?

    People who are 20 years of age or older should check their cholesterol levels at least once every 4–6 years, or more regularly if they have other risk factors for cardiovascular disease, according to the CDC. Children should get a cholesterol test at least once between the ages of 9 and 11 and again between the ages of 17 and 21.

    At what age do you stop treating cholesterol?

    Patients over 75 years of age without ASCVD or those over 85 years of age without ASCVD, regardless of whether they have type 2 diabetes, do not appear to benefit from statin medication.

    References:

    • Goldman, R. (2024b, November 26). How long does it take to lower cholesterol? Healthline. https://www.healthline.com/health/high-cholesterol/how-long-does-it-take-to-lower#takeaway
    • Frank Schwalbe, MD. (2025,February 04). https://www.goodrx.com/conditions/high-cholesterol/time-to-lower-cholesterol
  • Costovertebral joints

    Costovertebral joints

    The costovertebral joints are synovial joints that connect the ribs to the thoracic vertebrae. Each rib articulates with the vertebral body at two points: the costocorporeal joint (between the rib head and the vertebral bodies) and the costotransverse joint (between the rib tubercle and the transverse process). These joints facilitate rib movement during respiration and provide stability to the thoracic cage.

    Introduction

    The term “costovertebral joints” refers to two sets of synovial plane joints that enclose the thoracic cage from the back by joining the proximal end of the ribs with their respective thoracic vertebrae.

    • The head of the rib is connected to the vertebral bodies by articulating the rib head.
    • The costotransverse junction joins the rib and the vertebral transverse processes.

    The purpose of these motions is to allow the ribs to be raised and lowered during breathing. This ultimately leads to the thorax’s lateral diameter increasing and the lung parenchyma expanding as air is inhaled.

    Anatomy

    The head of the rib (a normal rib has two facets, each with a distinct synovial joint divided by a ridge) makes up the costovertebral joint. For every rib, the head articulates with:

    • The upper costal facet of the same vertebra connects with the lower rib facet
    • The upper facet connects with the lower facet of the vertebral body situated above.
    • The first rib connects exclusively to the T1 vertebra, while the three lowest ribs connect solely to their respective vertebral bodies.

    Structure

    Costovertebral joints, which are synovial in nature, link the ribs with the vertebral column. They are essential for the movement of the rib cage when breathing. These joints are made up of two primary articulations:

    Joints of heads of ribs (costocorporeal joints)

    Articular surfaces

    The costocorporeal joints link the concave costal facets of thoracic vertebrae with the convex articular facets located on the heads of all ribs;

    • There are two costal facets on vertebrae T1–T10: an inferior and a superior one. Often called costal demi facets, these facets are broken by the superior or inferior borders of the vertebral body.
    • The superior costal facet of the numerically comparable vertebra and the inferior costal facet of the vertebra directly above it are the two adjacent vertebrae that the heads of ribs 2–9 articulate with (For instance, rib 2 articulates with T1 and T2 vertebrae). As a result, the ribs touch the intervertebral disc between the appropriate vertebrae.
    • One continuous costal facet on each thoracic vertebra (T1, T10, T11, and T12) accommodates ribs 1, 11, and 12.

    The simple synovial joints are the first, tenth, eleventh, and twelfth costocorporeal joints. The complicated and compound joints are those that have intra-articular ligaments that divide the synovial cavity into two sections. These are joints 2 through 9.

    Ligaments and joint capsule

    A fibrous capsule encloses costocorporeal joints, which are further strengthened by intra-articular, radiating, and capsular ligaments. Every joint has a fibrous capsule that runs between the edges of the vertebral and costal articulating surfaces. The costotransverse ligaments merge with the back edges of fibrous capsules.

    From the anterior surface of each rib head to the nearby vertebral bodies and intervertebral disc, radiate ligaments extend. They extend in three different directions.

    • The superior connection between the rib and the vertebra directly above
    • Horizontally, to attach the IV disc to the rib head
    • Secondly, attach the rib to the appropriate thoracic vertebra (rib 2 to vertebra T2).

    The second to tenth complicated costocorporeal joints are affected by this. The radiate ligaments are what attach the first, eleventh, and twelfth ribs to the appropriate vertebra and the vertebra above.

    The only complicated costocorporeal joints that have intra-articular ligaments are those of the ribs 2–9. This ligament extends horizontally from the crest on the rib head to the nearby intervertebral disc in each joint. The superior and inferior compartments of the joint cavity are thus separated by the intra-articular ligaments.

    Costotransverse joints

    The connections between the articular facet on the rib’s tubercle and the transverse process of its numerically equal vertebra are known as costotransverse joints. The only ribs that engage in these joints are the top 10, which articulate with the corresponding vertebrae’s transverse processes.

    The costotransverse joints are absent on T11 and T12 levels because the eleventh and twelfth ribs lack articular surfaces and tubercles.

    Articular surfaces

    The connections between the articular facet on the rib’s tubercle and the transverse costal facet on the vertebra’s transverse process at the same numerical level are known as costotransverse joints.

    On the tubercles of ribs 1–6, the articular surfaces are vertically convex, while on the transverse processes, the corresponding costal facets are concave. The articular facets of ribs 7–10 are orientated posteriorly and inferomedially, facing the superior surfaces of the transverse processes, and are almost flat.

    Ligaments and joint capsule

    Attached to the edges of the articular facets are the fibrous capsules that encapsulate costotransverse joints. Each capsule’s inner surface is lined with a synovial membrane that encloses the joint’s synovial cavity.

    The costotransverse, superior and lateral costotransverse, and accessory ligaments all serve to support the joints:

    • The costotransverse ligament fills the little space between the vertebral transverse process and the rib neck. From the rear of the rib neck to the anterior surface of the neighboring transverse process, its numerous short, horizontally oriented fibers make this link.
    • The superior surface of the rib neck and the inferior surface of the transverse process of the vertebra directly above are joined by the superior costotransverse ligament. Except for the first costotransverse joint, it is present in all of them. The external intercostal muscle fibers divide the ligament’s two layers, which are anterior and posterior. The course of the posterior layer is superomedial, whereas the route of the anterior layer is superolateral. The posterior layer unites with the external intercostal muscle, while the anterior layer fuses with the internal intercostal membrane on their spinal attachments.
    • The transverse process’s tip and the lateral, non-articular portion of the rib tubercle are joined by the lateral costotransverse ligament.
    • Located medially to the superior costotransverse ligament, an accessory ligament is isolated from it by the thoracic spinal nerve’s posterior ramus.

    Innervation of the Costovertebral Ligaments

    The posterior rami of spinal nerves C8–T11 innervate both kinds of costovertebral joints through their lateral branches.

    • There are segments in the innervation.
    • Both the level above and a spinal nerve of its numerically comparable level supply the fibers to each joint.

    Blood supply

    The First-10th posterior intercostal arteries and the supreme intercostal arteries are the branches of the thoracic aorta that supply the costovertebral joints.

    Movements

    The motions occurring at these joints are referred to as ‘pump-handle’ or ‘bucket-handle’ movements, and they involve only a small degree of gliding and rotation of the rib head.

    • These movements serve to allow the ribs to be lifted upward and outward while breathing.
    • Ultimately, this leads to an increase in the thorax’s lateral diameter and an expansion of the lung parenchyma during inhalation.

    An important element of the biomechanics of chest wall movement is the costovertebral complex. The actions of the costovertebral joints and intervertebral movement are made possible by the costovertebral ligaments. The ligaments serve to:

    • At the costovertebral joint, affix and stabilize the ribs on the thoracic vertebra while permitting some movement. They assist in the load-bearing, protective, postural, and scaffolding functions of the thoracic cage due to its stabilizing properties.
    • Permit and restrict movement of the ribs at the transverse joint to enable maximum expansion of the thoracic cavity as required for respiratory demand. Their behavior regarding the costovertebral and intervertebral complexes permits lateral bending and axial rotation.

    Muscles That Act on the Costovertebral Joints

    The muscles responsible for breathing are the main movers of the costovertebral joints.

    • Respiratory diaphragm
    • Intercostal muscles.

    All muscles that are connected to the ribs and classified as accessory respiratory muscles can, however, move these joints;

    Sternocleidomastoid, scalene, serratus anterior, pectoralis major, pectoralis minor, latissimus dorsi und serratus posterior superior.

    Clinical Significance

    The costovertebral joints, which are articulations between the vertebral column and the ribs, are essential for spinal movement, respiratory mechanics, and thoracic stability. Among their clinical significance are:

    1. Respiratory Function

    • During respiration, these joints permit rib movement (such as pump-handle and bucket-handle motions).
    • Breathing difficulties and ailments such as respiratory insufficiency in chronic diseases (e.g., COPD, ankylosing spondylitis) can result from dysfunction.

    2. Pain Syndromes

    • Costovertebral joint dysfunction: Often misdiagnosed as thoracic spine problems or cardiac pain, this condition can cause localized pain close to the spine and ribs.
    • Sharp, localized pain that gets worse with deep breathing or movement is caused by rib subluxation.
    • Referred pain: Pain that mimics other conditions and radiates to the chest, back, or abdomen can be a sign of dysfunction.

    3. Trauma & Fractures

    • Costovertebral joint disruption from rib fractures can cause pain and compromised lung function.
    • Whiplash injuries can result in a strain on the costovertebral joint, which can lead to chronic pain after trauma.

    4. Arthritis & Degeneration

    • Osteoarthritis: Common in the elderly, this condition causes pain, stiffness, and decreased thoracic mobility.
    • Fusing these joints can result from ankylosing spondylitis, which can cause severe spinal stiffness and restrictive lung disease.

    5. Postural & Mechanical Issues

    • Chronic pain and dysfunction can result from changes in joint biomechanics caused by kyphosis, scoliosis, or poor posture.

    6. Medical Procedures & Considerations

    • Costovertebral joint integrity must be taken into account during thoracic surgeries (such as rib resections and spinal surgeries).
    • Nerve involvement: Joint inflammation may be a contributing factor to disorders such as complex regional pain syndrome (CRPS) due to its proximity to sympathetic nerves.

    FAQs

    Costovertebral joints: what are they?

    The term “costovertebral joints” refers to two sets of synovial plane joints that enclose the thoracic cage from the back by joining the proximal end of the ribs with their respective thoracic vertebrae.

    The costovertebral area is located where?

    The 12th rib on your back, at the base of your rib cage, is the costovertebral angle (CVA). It’s the 90-degree angle that forms between your spine and that rib’s curve. The Latin words “costo” and “vertebra” mean “rib” and “joint,” respectively.

    Is amphiarthrosis present in the costovertebral joint?

    Since the costovertebral joint is categorized as a diarthrosis, it is a synovial joint that can move freely. A synovial cavity full of synovial fluid, which permits easy movement between the articulating bones, is a characteristic of diarthrosis.

    What is the term “costovertebral” in medicine?

    Costovertebral may refer to: The articulations that join the thoracic vertebrae’s bodies and rib heads called costovertebral joints.

    Costovertebral joints are what?

    The thoracic cage is enclosed from the back by two sets of synovial plane joints known as the costovertebral joints, which join the proximal end of the ribs with their matching thoracic vertebrae.

    In what location is the costovertebral region?

    The acute angle that forms between the vertebral column and the twelfth rib on either side of the human back is known as the costovertebral angle (Latin: arcus costovertebralis). The costovertebral angle is indicated in this rear view of the human skeleton.

    Costovertebral: What is it?

    Of or on a rib and the vertebra that it is attached to.

    Which word is the root of costovertebral?

    There is only one root in the term costovertebral. To elaborate, the prefix “costo” denotes the ribs, the root “vertebra” denotes the spine’s vertebrae, and the suffix “al” denotes “about.”

    References

    • Wikipedia contributors. (2024f, November 13). Costovertebral joints. Wikipedia. https://en.wikipedia.org/wiki/Costovertebral_joints
    • Costovertebral and costotransverse joints. (2023, November 3). Kenhub. https://www.kenhub.com/en/library/anatomy/costovertebral-joints