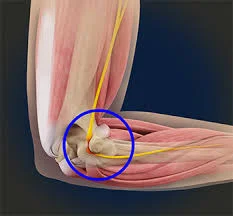
Blog

  • Cervical Degenerative Disc Disease

    Cervical Degenerative Disc Disease

    Cervical Degenerative Disc Disease: What is it?

    Cervical Degenerative Disc Disease (CDDD) is a condition where the intervertebral discs in the neck (cervical spine) gradually deteriorate due to aging, wear and tear, or injury. This degeneration can lead to reduced disc height, loss of cushioning between vertebrae, and sometimes the formation of bone spurs.

    Common symptoms include neck pain, stiffness, and, in some cases, radiating pain, numbness, or weakness in the shoulders, arms, or hands. Treatment typically involves a combination of physical therapy, pain management, and, in severe cases, surgical intervention.

    Cervical degenerative disc disease, however, is often unknown to its sufferers. They might first learn about the illness at a normal checkup or when being evaluated for another medical issue. Asymptomatic disc disease is usually not an issue. The mere presence of abnormal X-ray data does not necessarily indicate that therapy is necessary.

    Anatomy of the Cervical Spine:

    The cervical spine is an intricate and vital component of the skeletal system, situated in the neck. Its anatomy is broken down as follows:

    Vertebrae

    Structure:

    The seven vertebrae that make up the cervical spine are designated C1 through C7.
    A vertebral body, a vertebral arch, and many processes (spinous, transverse, and articular) are normally present in each vertebra.
    Transverse foramina, or holes in the transverse processes that permit the vertebral arteries to flow through, are a crucial feature of cervical vertebrae.

    Certain Vertebrae:

    Atlas (This first cervical vertebra)
    It has anterior and posterior arches but no vertebral body or spinous process.
    It articulates with the skull’s occipital bone.

    Axis (C2): The head can rotate thanks to this second cervical vertebra.
    It includes the bony protuberance known as the dens (odontoid process), which extends upward and articulates with the atlas.

    The lower cervical vertebrae (C3–C7) have articular facets, spinous processes, and vertebral bodies, making them more typical in structure.
    Their uncinate processes, which aid in the formation of the uncovertebral joints, are one of their distinctive characteristics.
    There is a noticeable and immediately perceptible spinous process on the C7 vertebra, sometimes referred to as the vertebra prominens.

    Intervertebral Discs:

    These discs serve as shock absorbers and are situated in between the vertebral bodies.
    They are made up of an inner gel-like core (nucleus pulposus) and an outside ring (annulus fibrosus).

    Ligaments:

    • The cervical spine is stabilized by several ligaments, including the anterior and posterior longitudinal ligaments.
    • Flavum ligamentum.
    • Ligament nuchal.
    • Ligament transverse.

    Joints:

    • The atlanto-occipital joint, which permits nodding movements, is located between the occipital bone and the atlas.
    • The atlantoaxial joint, which allows the head to rotate, is located between the axis and the atlas.
    • Facet joints: These allow for gliding motions between the articular processes of neighboring vertebrae.
    • Uncovertebral joints: Located between the lower cervical vertebrae’s uncinate processes, these joints are also known as the Luschka joints.

    Blood vessels and nerves:

    • The upper part of the spinal cord, which carries nerve impulses from the brain to the body, is housed in the cervical spine.
    • Spinal nerves: Through intervertebral foramina, cervical spinal nerves leave the spinal cord.
    • Vertebral arteries: These arteries feed blood to the brain by passing through the cervical vertebrae’s transverse foramina.

    Causes of Cervical Degenerative Disc Disease:

    Although aging naturally is the main cause of cervical degenerative disc disease, several variables can either cause it to develop or hasten its course. Below is a summary of the main reasons:

    Naturally Aging :

    • Disc Dehydration: As we age, the water content of the discs in our spine decreases, making them thinner and less pliable. They are less able to withstand shock as a result.
    • Disc Weakening: Tiny rips or breaks in the disc’s outer layer (annulus fibrosus) can cause the disc to lose structural integrity.

    Contributing Elements:

    • Genetics: A hereditary tendency to earlier or more severe disc degeneration may exist in some people.
    • Injury: Neck trauma, like whiplash or falls, can hasten the deterioration of the discs.

    Lifestyle Elements:

    • Bad posture: Prolonged bad posture puts additional strain on the cervical spine, particularly as a result of the growing use of technological gadgets.
    • Smoking: Smoking lowers blood flow to the discs, which makes it more difficult for them to absorb nutrients and causes dehydration.
    • Obesity: Excessive weight puts stress on the spine.
    • Repetitive Strain: Heavy lifting and repetitive neck motions are two jobs or activities that can raise the risk.

    Signs and Symptoms of Cervical Degenerative Disc Disease:

    The following are some typical traits of cervical DDD symptoms:

    Pain in the neck. The most typical sign of cervical degenerative disc degeneration is a stiff neck with low-grade discomfort. But occasionally, the discomfort may also intensify and continue for a few hours or days.

    Pain in the nerves. This kind of discomfort can travel down the shoulder into the arm, hand, and/or fingers and is typically acute or electric shock-like. Nerve pain usually only affects one side of the body.

    Neurological symptoms affecting the fingers, hand, or arm. The arm, hand, and/or fingers may have pins-and-needles tingling, numbness, and/or weakness that travels down the shoulder. Daily tasks like typing, dressing, and handling objects may be hampered by these kinds of sensations.

    Movement exacerbates the pain. In general, the movement seems to exacerbate degenerative disc pain, whereas rest tends to relieve it.

    The discomfort will probably go away on its own in a few weeks or months if it is caused by the degenerative disc itself. In contrast, if facet joints in the neck also begin to degenerate and/or a spinal nerve becomes pinched, other symptoms of cervical degenerative disc disease are more likely to become chronic and need therapy.

    The spinal canal is more likely to constrict and endanger the spinal cord the more the cervical spine degenerates. Compression of the spinal cord may cause myelopathy, which manifests as symptoms like:

    • Having trouble moving your arms or legs
    • Issues with balance and/or coordination
    • inability to control one’s bladder or bowels
    • Anywhere weakness and/or numbness below the neck
    • Aches in the arms or legs that resemble shock and are exacerbated by bending forward

    Diagnosis of CDDD

    Accurate diagnosis is the foundation of all successful therapy. To guarantee an accurate diagnosis, your doctor will combine their experience with cutting-edge diagnostic tools. The diagnostic procedure consists of:

    Medical background. Inquiries concerning your symptoms, their intensity, and previous therapies will be made by the doctor.

    Physical assessment. You will get a thorough examination to check for discomfort, balance issues, and movement limits. The doctor will also check for neurological injuries during this examination, such as loss of reflexes, muscle weakness, or loss of sensation.

    Diagnostic examinations. To rule out other issues like tumors and infections, most doctors begin with xX-rays We can also see whether the disc space between the vertebrae has decreased thanks to the films. To establish the diagnosis, we occasionally also employ a test known as a discography. To get a crisper image, contrast dye is injected into the damaged disc (or discs) during this examination.

    Treatment of Cervical Degenerative Disc Disease:

    Some steps can be taken to help decrease cervical degenerative disc disease symptoms and pain if they worsen. Self-care and/or non-surgical therapy alternatives are usually the first steps, and they will usually be beneficial in managing the pain.

    Surgery may be considered in rare instances where spinal cord health is at risk or when pain and symptoms worsen or continue after several months of treatment.

    Non-Surgical Treatment:

    A physician will usually suggest one or a combination of the following treatments for neck discomfort caused by cervical degenerative disc disease:

    Rest or change one’s way of life.

    Certain activities, like craning the neck forward to look at the computer monitor or a particular swimming stroke, may cause greater neck pain than others. Usually, the discomfort can be lessened by avoiding or changing specific activities for a few days or weeks. Furthermore, it is advised to keep good posture (as opposed to slouching when sitting or extending the neck forward when driving, using a cell phone, etc.). Maintaining a nutritious diet, drinking plenty of water, and giving up smoking are also good for disc health.

    Using medicine or injections to treat pain

    Acetaminophen (found in Tylenol), ibuprofen (found in Advil and Motrin), and other over-the-counter pain medicines may be helpful. If not, a more potent painkiller, like muscle relaxants or oral steroids, might be recommended. An injection that administers medicine directly to a specific area of the neck, like a cervical facet injection or cervical epidural steroid injection, may be an additional alternative.

    Heat and/or ice therapy

    Applying a warm gel pack or an ice pack to the sore area of the neck helps some people feel less discomfort.

    Exercise and/or physical therapy :

    It’s crucial to realize that before beginning any new workout regimen, you should speak with a physician or physical therapist if you have cervical degenerative disc disease. They can offer tailored advice according to your particular situation. I can, however, offer some broad details regarding workouts that are frequently suggested for this ailment.

    These exercises’ usual objectives are to:

    • Enhance your posture: Good posture eases the load on your cervical spine.
    • Build up your supporting muscles: Stability comes from having strong neck and upper back muscles.
    • Boost flexibility: Mild stretches can alleviate stiffness and increase range of motion.

    The following exercises are frequently suggested:

    Chin Tucks:

    Chin-tuck
    Chin-tuck
    • This exercise enhances posture and strengthens the deep neck flexor muscles.
    • Start by maintaining proper posture while standing or sitting.
    • Pull your chin back straight and gently, like you’re doing a double chin.
    • Repeat after holding for a few seconds.

    Neck Retractions:

    Neck Retraction
    Neck Retraction
    • This workout involves moving the head backward, much as chin tucks.
    • With your chin tucked in, slowly slide your head back.
    • This enhances the mobility of the cervical spine.

    Isometric Neck Exercises:

    isometric neck exercise
    isometric neck exercise
    • In these workouts, your neck muscles are contracted without your head moving.
    • For instance, you may put your palm on your forehead and use your neck muscles to resist as you gradually press on it.
    • The muscles in the neck are strengthened as a result.

    Shoulder Blade Squeezes:

    Shoulder Blade Squeeze
    Shoulder Blade Squeeze
    • This exercise eases neck tension and enhances posture in the upper back.
    • Keep your arms by your sides while you sit or stand.
    • Squeeze your shoulder blades together gently and hold the position for a few seconds.

    Gentle Neck Stretches:

    • These stretches aid in increasing the range of motion and decreasing rigidity.
    • Aim your ear towards your shoulder while slowly cocking your head to the side.
    • Repeat on the opposite side after holding for 15 to 30 seconds.
    • Forward and backward flexions, as well as mild neck rotations.

    Surgical procedures of Cervical Degenerative Disc Disease:

    Your doctor may suggest surgery to relieve pain, weakness, and tingling if rest, medicine, and physical therapy are ineffective or if testing reveals compression of the nerve roots or spinal cord:

    Cervical fusion. After replacing the damaged cervical disc with a spacer, the surgeon fuses the vertebrae on each side of the spacer.

    Cervical disc replacement. Your motion is preserved when the surgeon replaces the damaged cervical disc with an artificial one.

    FAQs

    How is degenerative disc disease in the cervical region treated?

    The most prevalent reason for patients to present is pain. Surgery may be necessary for pain or when it coexists with other neurological problems. Nonoperative methods, instrumented fusion, decompression, or a combination of instrumentation and/or laminoplasty are among the available treatment options.

    When does cervical degeneration begin to occur?

    By their 30s, many people exhibit cervical spine degeneration that can be shown on MRI images, and by the time they are 70, practically everyone has it.

    Is it possible to treat degenerative disc disease?

    No. Although the structural alterations associated with DDD will not go away, treatment may eventually alleviate the symptoms, such as back discomfort.

    What signs of cervical disc disease are present?

    Cervical disc disease is characterized by arm and neck pain that might spread to the hand. Numbness and tingling in the hand and arm may accompany this pain, giving the impression that they are “asleep.” Muscle weakness in the hands and arms may also occur.

    Can someone with degenerative disc disease lead a normal life?

    The majority of people who suffer from low back pain, sciatica, neck pain, or arm pain and tingling as a result of degenerative disc disease can effectively manage their pain and restore their lives without the need for surgery, even if there is no method to completely cure the problem.

    Does degenerative disc disease benefit from walking?

    Walking daily can help stop degenerative disc disease from getting worse. Walking can help develop the paraspinal muscles and prevent atrophy and excessive tension, whether it is done freely, on a treadmill, or with equipment. Walking regularly has been proven to lessen back pain.

    References

    • Facs, J. S. M. (n.d.). Cervical degenerative disc disease. Spine-health. https://www.spine-health.com/conditions/degenerative-disc-disease/cervical-degenerative-disc-disease
    • Cervical disc disease, herniation, and degeneration – neurosurgery. (2025, January 7). Neurosurgery. https://med.virginia.edu/neurosurgery/services/spine-surgery/cervical-disc-disease-herniation-and-degeneration/
    • Medtronic. (n.d.). Cervical systems – disc degeneration. Medtronic. https://www.medtronic.com/in-en/patients/conditions/cervical/disc-degeneration.html
    • Cervical degenerative disc disease. (n.d.). https://www.spinesurgerydoctor.com/conditions/cervical-degenerative-disc-disease

  • Kernig’s Sign

    Kernig’s Sign

    What is Kernig’s Sign?

    Kernig’s sign is a clinical test for meningeal irritation, often seen in meningitis. It is positive when extending the knee from a flexed hip position causes pain or resistance in the hamstrings, suggesting meningeal inflammation.

    To check for meningeal irritation, it is frequently evaluated along with Brudzinski’s sign.

    Purpose

    The Kernig’s test’s primary objective is to assist in identifying meningitis. When medical professionals suspect meningitis, they may employ this test as one of several.

    Technique

    The patient is in a supine position with their legs and hips bent at a 90-degree angle.
    Next, while maintaining hip flexion, the examiner tries to passively extend the patient’s knee.

    Test is positive if

    Resistance to knee extension or hamstring pain during the movement are signs of a positive Kernig test. It suggests inflammation or irritation of the meninges.

    Kernig’s Sign Examination Video

    Clinical Significance

    When evaluating meningitis clinically, the Kernig test is a useful tool, especially in areas with limited resources where lumbar puncture may not be easily accessible.

    When combined with additional clinical signs, a positive Kernig test might increase the possibility of meningitis and need additional testing and care.

    The Kernig test is not a perfect diagnostic tool, though, and its findings should be interpreted in light of the patient’s overall clinical presentation as well as the results of other diagnostic tests.

    Indications

    • Patients suspected of having meningitis, an inflammation of the membranes (meninges) around the brain and spinal cord, are the main candidates for the Kernig test.
    • Infections with bacteria, viruses, or fungi can all result in meningitis.
    • Meningitis symptoms often include:
    • A rather bad headache
    • stiff neck
    • A fever
    • Vomiting and feeling faint
    • Light sensitivity
    • Irritation
    • Seizures of Confusion

    Contraindication

    In some circumstances, it might not be appropriate or needs to be avoided. Among these contraindications are:

    Babies who are tight or have strong muscles: Accurately performing the Kernig test in neonates may be challenging due to increased muscular tone or stress.
    Babies who are extremely sleepy or unconscious:

    In these situations, the baby might not be able to comply throughout the test, and the findings might not be accurate.

    People who have lower body paralysis or paraplegia: The Kernig test might not be appropriate for these people because their legs do not have the required motor function.

    People with injuries to their legs, knees, or hips: The Kernig test may worsen the damage or provide more pain in some situations.

    Evidence

    Specificity and Sensitivity:

    The Kernig test can overlook a sizable portion of meningitis infections due to its limited sensitivity (about 5%), according to studies.

    On the other hand, a positive test is more likely to suggest meningitis due to its high specificity (about 95%).

    Therefore, rather than ruling out meningitis, the Kernig test is more helpful in confirming a diagnosis when additional clinical symptoms are present.

    Limitations

    Because of the low sensitivity of the Kernig test, meningitis is not always ruled out by a negative result.

    A positive result is more likely to suggest meningitis since it is more specific, but more testing is necessary for confirmation.

    FAQs

    Which sign is Kernig’s vs Brudzinski?

    Put the patient in a supine posture with their hips 90 degrees flexed to demonstrate Kernig’s sign. The test appears positive if passive extension causes pain in the knee. To demonstrate Brudzinski’s sign, place the patient in a supine posture and passively flex their neck. The test is considered successful if the hip and knee flex instinctively as a result of this motion.

    What is the sensitivity of Kernig sign?

    Patients with bacterial or tuberculous meningitis had a 57% sensitivity for Kernig’s sign. These clinical findings are now believed to be indicators of meningeal inflammation.

    What are 5 symptoms of meningitis?

    Fever and / or vomiting. …
    Severe headache. …
    Cold hands and feet / shivering. …
    Pale or mottled skin. …
    Breathing fast / breathless

    What is a positive Kernig sign?

    If the knee hurts when passively extended, the test is positive.

    Is Kernig’s sign seen in pneumonia?

    yes, kernig’s sign is positive in Pneumonia.

    What are the causes of Kernig’s sign ?

    Kernig’s sign is caused by inflammation of the meninges, which are membranes surrounding the brain and spinal cord.

    References

    • Kernig’s sign – Meningeal stretch test : Emergency Care BC. (n.d.). https://emergencycarebc.ca/clinical_resource/procedural-video/kernigs-sign-meningeal-stretch-test/
    • Kernig’s sign of meningitis: MedlinePlus Medical Encyclopedia Image. (n.d.). https://medlineplus.gov/ency/imagepages/19077.htm
    • Wikipedia contributors. (2025, January 31). Kernig’s sign. Wikipedia. https://en.wikipedia.org/wiki/Kernig%27s_sign
    • Adcox, M. (2023, September 8). How to recognize Kernig’s Sign. Healthline. https://www.healthline.com/health/kernig-sign
    • Mph, E. B. (2022, December 20). What is Kernig’s sign? Verywell Health. https://www.verywellhealth.com/kernig-sign-6889604

  • Pneumothorax Physical Therapy Treatment

    Pneumothorax Physical Therapy Treatment

    Pneumothorax, or collapsed lung, involves the accumulation of air in the pleural space, causing lung compression and impaired breathing.

    Physical therapy for pneumothorax focuses on promoting optimal lung expansion, improving respiratory function, and preventing complications.

    Treatment typically includes breathing exercises, gentle thoracic mobility techniques, posture training, and gradual reconditioning to restore normal function. Therapy is tailored to the individual’s condition, emphasizing safety and collaboration with the healthcare team to support recovery.

    What is a Pneumothorax?

    The normal expansion of the lungs is partly facilitated by the pleural layers surrounding them. The parietal pleura, which is the outer layer, lines the chest cavity’s interior. The visceral pleura, which is the counterpart of this layer, covers the lung’s outer surface.

    A small quantity of fluid exists between these pleural layers to minimize friction as they move against one another. This very slim space between the pleural layers operates as a closed system under negative pressure.

    Consequently, when the chest wall rises and expands, it effectively pulls the lung wall upward and outward, promoting an increase in lung volume during inhalation. The lungs naturally deflate easily during exhalation due to their elastic recoil.

    A pneumothorax occurs when the negative pressure in the pleural space is disrupted, allowing gas (typically air) to enter the area between the pleural layers. In the absence of the negative pressure pull, the two pleural layers cease to move in synchronization, and the lung tissue collapses due to its elastic recoil. The extent of this collapse is influenced by the size of the breach and the volume of air that enters the pleural space.

    Types of pneumothorax

    Pneumothorax can be categorized into three main types based on their cause:

    1. Traumatic – caused by blunt or penetrating trauma to the chest. Most pneumothorax cases are of this type.
    2. Iatrogenic – resulting from interventions performed by healthcare providers, such as the insertion of central lines. a subset of traumatic pneumothorax, occurs when an injury results from a medical procedure or intervention (e.g., insertion of a central line).
    3. Spontaneous – occurring without any obvious cause or triggering event. primary spontaneous pneumothorax occurs in individuals without preexisting lung conditions or an initiating event, while secondary spontaneous pneumothorax happens in those with significant underlying lung disease and arises from a specific triggering event, such as the rupture of a bleb.
    4. Catamenial – a type of non-traumatic pneumothorax that arises in females during their menstrual cycle. Although the underlying mechanism is not completely understood, it is thought to be linked to endometriosis of the pleura.

    Pneumothorax can also be further classified into the following types based on their physiological effects:

    Types of pneumothorax
    1. Simple – occurs when the air within the pleural space does not connect with the outside atmosphere, and there is no shift in the mediastinum or hemidiaphragm. An example would be a pleural laceration from a fractured rib.
    2. Communicating – takes place when there is an opening in the chest wall, such as from a gunshot wound, that creates a direct link to the external atmosphere. This loss of chest wall integrity can lead to an air-sucking phenomenon and paradoxical lung collapse, resulting in considerable respiratory issues.
    3. Tension – characterized by a continuous accumulation of air in the pleural cavity that displaces the mediastinum to the opposite side, leading to the compression of the vena cava and other major vessels, reduced diastolic filling, and ultimately impaired cardiac output. This situation arises when a chest injury creates a one-way valve effect, allowing air to enter the pleural cavity but not to escape.

    What signs indicate a collapsed lung, or pneumothorax?

    The following are indications of a pneumothorax:

    • Pain in the chest on one side, especially during breathing.
    • Coughing.
    • Rapid breathing.
    • Elevated heart rate.
    • Fatigue.
    • Difficulty breathing (dyspnea).
    • A bluish shade of the skin, lips, or nails is called cyanosis.

    If you experience indications of a collapsed lung, seek immediate assistance at the nearest emergency department. Urgent care may be necessary.

    Pneumothorax has three primary causes: medical conditions, injuries, and lifestyle factors.

    Medical conditions:

    • Asthma.
    • Pneumonia.
    • Chronic obstructive pulmonary disease (COPD).
    • Collagen vascular diseases.
    • Cystic fibrosis.
    • Emphysema.
    • Idiopathic pulmonary fibrosis.
    • Lung cancer.
    • Lymphangioleiomyomatosis.
    • Tuberculosis.
    • Acute respiratory distress syndrome (ARDS).

    Injuries:

    • Blunt force trauma.
    • Gunshot wounds.
    • Stab wounds.
    • Medical procedures, including nerve blocks, lung biopsies, the placement of central venous lines, or mechanical ventilation.

    Lifestyle Factors

    • Use of drugs, particularly inhaled substances.
    • Smoking habits.
    • Traveling by air with significant fluctuations in air pressure.
    • Scuba diving or deep-sea diving activities.

    Epidemiology

    The occurrence of non-traumatic pneumothorax ranges from 7.4 to 18 per 100000 individuals annually.

    This rate is considerably higher among smokers (12% compared to 0.1% lifetime risk).

    Primary spontaneous pneumothorax typically affects young males, often tall and slender, usually smokers. The likelihood of recurrence is between 20 to 60% within the first three years following the initial incident.

    Secondary spontaneous pneumothorax can also affect patients with pre-existing lung diseases, leading to significant variation in epidemiology.

    Catamenial pneumothorax is seen in young women who are of childbearing age.

    What Are the Symptoms of a Pneumothorax?

    The symptoms of pneumothorax can vary widely depending on the original cause and severity. Mild cases may show no signs and can only be identified during examinations for related issues. In more severe instances, common symptoms can include:

    • breathing difficulties brought on by a decreased lung capacity.
    • Shallow and potentially rapid breathing as a compensatory mechanism for decreased volume.
    • Sharp, stabbing chest pain during respiration.
    • Reduced chest expansion on the side affected by the pneumothorax.
    • Increased heart rate as compensation for lowered blood oxygen levels.
    • Feelings of anxiety, decreased alertness, and confusion.
    • When examined with a stethoscope, normal breath sounds may be notably faint or absent on the side where the pneumothorax has occurred.

    How Is a Pneumothorax Diagnosed?

    A healthcare professional can diagnose pneumothorax through a thorough investigation of your symptoms, medical background, and specific tests to exclude other potential conditions. Auscultation with a stethoscope for breathing sounds is an effective diagnostic tool to identify a pneumothorax.

    If you believe you may have pneumothorax, it’s crucial to seek medical help without delay. If not treated, a severe pneumothorax could cause a displacement of the heart and aorta, leading to irregular pressures and possible heart failure.

    Once diagnosed and stabilized, an evaluation of your current lung function can be performed to tailor appropriate treatments.

    Imaging

    Simple pneumothorax

    Chest X-rays will subsequently be employed to confirm the pneumothorax diagnosis. In a supine chest X-ray, a deep sulcus sign is indicative, characterized by a low lateral costophrenic angle on the affected side. Additionally, the presence of air outside normal lung airways and the movement or displacement of organs away from the air leak within the thoracic cavity will suggest a pneumothorax.

    Ultrasound scans can also aid in diagnostic assessment.

    What Would a Physiotherapy Assessment for a Pneumothorax Involve?

    During your initial appointment, our physiotherapists will conduct an assessment consisting of two components:

    Subjective

    A conversation between you and the physiotherapist to determine the symptoms you are experiencing and the impact of your condition on your lifestyle.

    Objective

    An evaluation to identify any pain, your current breathing pattern, respiratory rate, lung volume, and several specific tests to assess mucus retention and lung function impairment.

    There can be significant variation in displayed symptoms, influenced by the progression of the condition and any complicating factors. The assessment process will be critical in identifying your current symptoms and needs, allowing for targeted and effective treatments.

    What Would Physiotherapy Treatment for a Pneumothorax Involve?

    Indications for physiotherapy in cases of pneumothorax include:

    • Lung collapse
    • Sputum retention
    • Ventilation/perfusion (V/Q) mismatch
    • Increased effort in breathing
    • Abnormalities in blood gases
    • Post-operative care in an intensive care unit (ITU)

    Goals for Physiotherapy

    The objectives of physiotherapy management are as follows:

    To enhance ventilation and elevate PaO2 levels

    • Participate in physical activities such as climbing stairs, walking, and engaging in moderate-intensity aerobic exercise.
    • Perform active cycles of breathing exercises.
    • Utilize techniques for sputum removal, including percussion and cough assistance.
    • Employ Positive Expiratory Pressure (PEP) devices.
    • Practice incentive spirometry.
    • Use non-invasive ventilation (NIV).

    To aid in sputum elimination

    • Implement postural drainage techniques.
    • Carry out active cycles of breathing exercises.
    • Apply percussion, shaking, and vibrations.
    • Use PEP devices.
    • Engage in physical activities such as stair climbing, walking, and moderate-intensity aerobic exercise.
    • Practice coughing and huffing (forced expiratory breathing).
    • Conduct airway suctioning.

    To lessen the work of breathing

    • Optimize body positioning.
    • Practice techniques for breathing control.
    • Use relaxation methods.
    • Employ strategies for utilizing accessory muscles.

    To enhance exercise capability

    • Initiate early mobilization and proper positioning.
    • Adhere to a structured exercise regimen.
    • Engage in breathing exercises.
    • Physiotherapy Outcome Evaluation:
    • Monitor respiratory rate.
    • Track O2 saturation levels.
    • Evaluate arterial blood gases.
    • Identify any additional O2 needs.
    • Conduct auscultation.
    • Examine chest X-ray.
    • Assess mobility status.

    Pneumothorax Physical Therapy Treatment Includes

    Grasping the concept of pneumothorax is vital for physiotherapists, especially those preparing for the APC exam. The ability to recognize and manage this condition allows physiotherapists to facilitate better recovery for patients.

    After identifying and treating the cause of the pneumothorax, and reducing or eliminating the trapped air, rehabilitative care can commence. Depending on the severity and duration of your condition, your treatment may include:

    Secretion clearance:

    Techniques for effective or productive coughing.
    Postural drainage while sitting and lying down.
    Manual assistance methods, such as percussion, vibrations, and shaking.

    Breathing technique retraining:

    • Managing respiratory rate.
    • Practicing diaphragmatic breathing.
    • Controlling or reducing breath volume.
    • Conducting relaxation breathing exercises.
    • Education and Advice:
    • Understanding the causes and progression of the illness.
    • Recognizing the impact of environmental and allergen factors.

    Observation

    If a pneumothorax is caused by a minor injury, it might heal on its own within a few days. Consult a doctor before engaging in flying or diving after experiencing a pneumothorax.

    If you’re experiencing breathing difficulties, supplemental oxygen may be necessary. Using oxygen can also help accelerate the rate at which the lungs absorb air from the cavity.

    Draining excess air

    Needle aspiration and chest tube insertion are two procedures designed to extract extra air from the pleural space in the chest. These can be performed bedside without the need for general anesthesia.

    In cases of significant damage or severe symptoms, surgical intervention may be required to remove the air or perform surgery.

    In needle aspiration, the physician inserts a needle into the cavity and removes the air using a syringe.

    For chest tube insertion, a doctor will place a hollow tube between your ribs to allow air to escape and the lung to reinflate. The tube may need to remain in place for 2 to 5 days or longer.

    Surgery

    A doctor may need to perform a more invasive procedure to examine the status of your lungs, such as a thoracotomy or thoracoscopy.

    During a thoracotomy, your surgeon will make an incision in the pleural space for better visibility of the problem. During a thoracoscopy, also referred to as video-assisted thoracoscopic surgery (VATS), a doctor inserts a small camera through the chest wall for lung examination.

    If you have experienced recurrent episodes of pneumothorax, you might need minor surgery to repair weak areas in the lung where air is leaking. The doctor may also perform pleurodesis, which involves attaching the lung to the chest wall.

    Other surgical options include:

    • Suturing blisters closed,
    • Sealing air leaks,
    • Or resecting the collapsed part of your lung, known as a lobectomy.
    • These procedures can minimize the likelihood of recurring pneumothorax.

    How can I schedule a physiotherapy evaluation for pneumothorax?

    If a doctor has diagnosed you with pneumothorax and you are facing symptoms that affect your breathing and lung clearance, it would be beneficial to seek an assessment from one of our skilled respiratory physiotherapists.

    How severe is a punctured lung?

    The severity of a punctured lung varies based on its cause and the extent of lung collapse. Certain cases are not serious, while others may pose medical emergencies. A healthcare provider can assess how much of your lung is affected and suggest appropriate treatment options.

    What can I anticipate if I have a pneumothorax?

    If you suffer from a collapsed lung, you might need to stay in the hospital for a few days or longer for treatment and monitoring. This ensures that your healthcare provider can assess your condition and provide oxygen if needed.

    How long does it take for a punctured lung to heal?

    Typically, a punctured lung can heal within several days to two weeks. Your body will reabsorb the excess air surrounding your lung, allowing it to reinflate.

    Is it possible to fully recover from a punctured lung?

    Most individuals with a punctured lung recover without significant medical intervention. However, there is a possibility of recurrence. It’s advisable to discuss your chances of recurrence with your healthcare provider and inquire about steps to take if symptoms return.

    Is pneumothorax life-threatening?

    Certain instances of pneumothorax can be life-threatening. A healthcare provider should always monitor a collapsed lung.

    Living With

    How can I take care of myself?

    After returning home from the hospital, it’s essential to follow your provider’s suggestions for self-care. They might advise you to rest and limit or avoid specific activities, including:

    • Smoking.
    • Air travel.
    • Scuba or deep-sea diving.
    • Ensure you attend all your follow-up appointments with your provider after leaving the hospital.

    When should I contact my healthcare provider?

    Reach out to your provider if your symptoms return or worsen. If you have experienced a pneumothorax in the past, you might be at greater risk of it occurring again.

    When should I visit the ER?

    Seek emergency care if you have signs of a collapsed lung. You might require immediate medical attention.

    What questions should I pose to my doctor?

    It may be beneficial to ask your provider:

    • What led to my collapsed lung?
    • What treatment options are available to me?
    • If I require a chest tube, how long will I need it?
    • Will I need supplemental oxygen?
    • Will I have to remain in the hospital?
    • What kind of care will I require post-treatment?
    • What kind of care will I need once I leave the hospital or clinic?
    • What should I refrain from doing after my treatment?

    Complications

    Misdiagnosis is a common complication of pneumothorax. Various factors, such as an incomplete or insufficient medical history or physical examination, low clinical suspicion, failure to get a chest X-ray, or failure to identify a pneumothorax on a chest radiograph, can contribute to this misdiagnosis. Such errors can result in a lack of treatment for the pneumothorax and, in certain situations, could lead to severe consequences, such as:

    • Progression to tension pneumothorax
    • Hypoxemic respiratory failure
    • Shock
    • Respiratory arrest
    • Cardiac arrest
    • Empyema
    • Re-expansion pulmonary edema
    • While most collapsed lungs recover without complications, some individuals may experience serious issues. These can include:
    • Damage or infection resulting from the treatment.
    • Iatrogenic complications from needle decompression or thoracostomy procedures – such as failure of the lung to re-expand, lung laceration, infection at the insertion site and within the pleural space, tearing of intercostal vessels or the internal mammary artery, hemothorax, ongoing air leaks, or damage to the intercostal neurovascular bundle.
    • Chest tube-induced arrhythmia
    • Pneumomediastinum – air from the pneumothorax may migrate into the mediastinum, visible on a chest X-ray as air lucency around the heart. Also, a crunching sound could be heard during a cardiac examination. This phenomenon, known as Hamman’s crunch, is best detected while lying in the left lateral decubitus position.

    Risk factors for Pneumothorax

    The risk factors differ between traumatic and spontaneous pneumothorax.

    Risk factors for a traumatic pneumothorax include:

    • Contact sports, such as football or hockey
    • Jobs where there is a risk of falls or other injuries
    • Medical procedures involving the chest or lung area
    • Ongoing assisted respiratory care

    Individuals at increased risk for non-traumatic pneumothorax include those who:

    • Smoke
    • possess an underlying lung disease, such as COPD or asthma.
    • Have a family history of pneumothorax, suggesting possible genetic factors
    • Possess tall, lean body types, as this can influence the pressure at the top of the lung
    • Experience inflammation in the small airways
    • You might have a higher risk of a collapsed lung if you:
    • Are pregnant.
    • Have a tall, thin physique, particularly as a man.
    • Have Marfan syndrome.
    • Have endometriosis.

    Summary

    Pneumothorax is a condition characterized by air accumulation between the lungs and the chest cavity. It may resolve on its own in some cases, while in others, it can be life-threatening. The severity depends on the size and cause of the issue.

    There are various forms of pneumothorax. Traumatic pneumothorax occurs as a result of injury to the chest wall or lungs. Non-traumatic pneumothorax can impact individuals with COPD and other lung disorders but can also affect those without respiratory conditions.

    Treatment focuses on removing the air and allowing the lungs to re-expand. In certain situations, surgical intervention may be necessary to repair the lungs. Pneumothorax can represent a life-threatening emergency. Anyone experiencing symptoms like sharp, stabbing chest pain should seek immediate medical assistance.

    FAQs

    Is exercising advisable for pneumothorax?

    There is no evidence linking physical activity to pneumothorax, so you can resume activity as soon as your symptoms have resolved. However, it’s wise to wait until you have fully recovered and attended your follow-up appointment before engaging in intense workouts or contact sports.

    What is the most effective treatment for pneumothorax?

    Pathophysiology of Pneumothorax
    In pneumothorax, air enters the pleural cavity either from the external environment or from the lung itself through mediastinal tissues or direct perforation of the pleura. The increase in intrapleural pressure leads to a reduction in lung volume.

    What is PT for a collapsed lung?

    Chest physical therapy
    Engaging in deep-breathing exercises using an incentive spirometer, followed by forceful coughing to assist in clearing the lungs… Adjusting your position so that your head is lower than your chest… Gently tapping on your chest over the affected area to help loosen mucus.

    What exercise is good for the lungs?

    Physical exercise to improve breathing
    Some examples of beneficial physical activities include: Walking – begin with a few minutes each week and gradually increase the duration. Stretching – maintain flexibility in your muscles. Weight training – utilize small hand-held weights.

    What is the physiopathology of a pneumothorax?

    Pathophysiology of Pneumothorax
    In pneumothorax, air enters the pleural cavity either from the external environment or from the lung itself through mediastinal tissues or direct perforation of the pleura. The increase in intrapleural pressure leads to a reduction in lung volume.

    References

    • Pneumothorax (Collapsed lung). Healthline. https://www.healthline.com/health/collapsed-lung
    • (n.d.) https:/www.physio-pedia.com/Pneumothorax
    • Pneumothorax – restrictive – conditions – respiratory – what we treat – physio.co.uk. (n.d.). https://www.physio.co.uk/what-we-treat/respiratory/conditions/restrictive/pneumothorax.php
    • (n.d.). https://www.ncbi.nlm.nih.gov/books/NBK538316/.
    • https://www.ncbi.nlm.nih.gov/books/NBK538316/
    • Cnsc, B. J. D. M. M. F. F. (n.d.). Pneumothorax treatment & management: approach considerations, treatment based on risk stratification, options for restoring Air-Free pleural space. https://emedicine.medscape.com/article/424547-treatment
    • Pneumothorax Essentials for Australian Physiotherapy Council APC Exam. Academically
    • Australia. https://academically.com/blogs/pneumothorax-essentials-for-australian-physiotherapy-council-apc-exam/
    • Pneumothorax (Collapsed lung). (2025, February 7). Cleveland Clinic. https://my.clevelandclinic.org/health/diseases/15304-collapsed-lung-pneumothorax

  • Physiotherapy Exercises for Asthma Management: Breathe Easy

    Physiotherapy Exercises for Asthma Management: Breathe Easy

    Asthma is a long-term illness that affects your lungs’ airways. It causes swelling and inflammation of the airways, which results in symptoms including wheezing and coughing. Breathing may become challenging as a result.

    Aerobic activity can occasionally cause or exacerbate symptoms of asthma. Exercise-induced asthma or exercise-induced bronchoconstriction (EIB) are terms given to this illness.

    What is asthma?

    Another name for asthma is bronchial asthma, which is a lung disease. It requires continuing medical care because it is a chronic disorder. Approximately 25 million Americans currently have asthma. This number includes more than 5 million children. Asthma can be lethal if therapy is not received.

    An Asthma Attack: What is it?

    When you breathe regularly, the muscles surrounding your airways relax, allowing air to pass through them silently and effortlessly.

    Three things may occur during attack:

    The muscles around the airways constrict (tighten) in bronchospasm. They constrict your airways as they tighten. In narrowed airways, air cannot move freely. Your airways’ lining swells as a result of inflammation. Less air may enter or exit your lungs when your airways are swollen. Production of mucous: Your body produces more mucus during the attack. Airways are blocked by this viscous mucus.

    Which kinds of asthma exist?

    Types of asthma are distinguished by the extent of symptoms and the underlying cause. According to medical professionals, asthma is:

    • Intermittent: This kind of asthma flares up and goes away, allowing you to feel normal in between episodes.
    • Persistent: Those who have persistent asthma experience symptoms most of the time. Mild, moderate, and severe symptoms are all possible. The frequency of symptoms is used by medical professionals to determine the severity of asthma. They also take into account your ability to perform tasks during an attack.

    Causes of Asthma:

    • Allergy: In certain peoples allergens can trigger asthma episodes. Pollens, molds, and pet dander are examples of allergens.
    • Non-allergic: Asthma flares up due to external influences. Weather, illness, stress, and exercise can all trigger flare-ups.
    • Other forms of asthma include: The onset of adult-onset asthma occurs beyond the age of 18.
    • Pediatric: Also known as pediatric asthma, this kind of asthma can strike infants and toddlers and frequently starts before the age of five. Asthma may outgrow children. Before determining whether your child needs an inhaler on hand in case of an asthma attack, you should be sure to talk to your healthcare practitioner about it. You can learn more about the hazards from your child’s doctor.
    • Exercise-induced asthma: Also known as exercise-induced bronchospasm, this form of asthma is caused by physical exertion.. People who work with irritating substances are more likely to develop occupational asthma.

    The condition known as asthma-COPD overlap syndrome (ACOS) occurs when a person has both asthma and chronic obstructive pulmonary disease (COPD). Breathing becomes difficult in both conditions.

    What are typical triggers for asthma attacks?

    If you come into contact with things that aggravate you, you could have an asthma attack. These drugs are referred to as “triggers” by medical professionals. It’s easier to prevent asthma episodes when you know what causes them.

    A trigger can immediately set off an attack for certain people. An attack may begin hours or days later for other persons or at different periods.

    Each person may have distinct triggers. However, a few typical triggers are as follows:

    • Air pollution: A number of external conditions might trigger an asthma attack. Factory emissions, vehicle exhaust, smoke from wildfires, and other sources are examples of air pollution.
    • Dust mites: Although invisible, these insects exist in our houses. This could trigger an asthma attack if you have a dust mite allergy.
    • Exercise: Exercise may trigger an attack in certain individuals.
    • Mold: Since mold thrives in moist environments, it could be an issue if you have asthma. An attack can occur even if you are not allergic to mold.
    • Pests: Asthma attacks can be caused by mice, cockroaches, and other household pests.
    • Pets: Your animals may trigger asthma episodes. If you are allergic, breathing in pet dander, which is composed of dried skin flakes, might irritate your respiratory system.
    • Tobacco smoke: If you or someone in your home smokes, you have a higher chance of developing asthma. Quitting smoking is the best course of action, and you should never smoke in confined areas like your home or car. Your provider can assist you.
    • strong odors or chemicals. These factors may cause attacks in certain individuals.

    Particular exposures at work: You might be exposed to a range of materials at work, including cleaning products, wood or wheat dust, and other chemicals. Any of these could be triggers for asthma.

    Which symptoms are indicative of asthma?

    Asthma sufferers typically exhibit clear symptoms. These symptoms and indicators are similar to those of numerous respiratory infections:

    • pressure, pain, or tightness in the chest.
    • coughing, particularly in the evening.
    • breathlessness.
    • wheezing.

    Not every asthma attack will cause you to feel all of these symptoms. You may have different signs and symptoms at different times if you have chronic asthma. Furthermore, the symptoms of an asthma episode can change from one to the next.

    Diagnosis

    How is asthma diagnosed by medical professionals?

    Your medical history will be reviewed by your healthcare practitioner, along with details about your parents and siblings. You will also be asked about your symptoms by your healthcare provider. Any past history of allergies, eczema (an allergic rash), and other lung conditions will be required to be disclosed by your healthcare professional.

    Spirometry may be prescribed by your physician. This test, which gauges airflow through your lungs, is used to identify conditions and track how well you’re responding to treatment. Your doctor might prescribe a skin test, blood test, or chest X-ray.

    Prevention

    How may an asthma attack be avoided?

    If your doctor says you have asthma, you need to find out what triggers an attack. You can prevent an assault by avoiding the triggers. But asthma is an unavoidable condition..

    If you don’t have asthma, you can still have EIB

    Can asthma be managed with exercise?

    Lung and heart health can both be enhanced by exercise.

    Exercise generally has many health advantages, including lowering the risk of numerous illnesses, strengthening mental health, and increasing heart health.

    Exercise also has the following additional advantages:

    • maintained activity levels throughout the day, stable blood sugar levels, and defense against age-related brain damage
    • reinforced muscles and bones
    • decreased chance of developing some types of cancer
    • enhanced sexual life, better sleep, and a lower chance of heart disease
    • assisting someone in quitting smoking

    What kinds of physical activity are beneficial for asthmatics?

    The danger about flare ups of asthma during exercise may be decreased for people with asthma if they gradually increase their exercise level. Exercises that concentrate on increasing lung capacity and controlling breathing might be particularly helpful.

    Activities and exercises that provide brief bursts of activity interspersed with rest can be beneficial. This type of exercise enables an individual to be engaged and enhance their strength and endurance without overtaxing their lungs.

    Exercises for Asthma

    The following types of exercise may be especially beneficial for those with asthma:

    Yoga

    yoga
    yoga

    A person can concentrate on their breathing by doing yoga. While strengthening muscles for general fitness, regulated, breathing patterns during exercise might assist expand a person’s lung capacity.

    Additionally, the practice of yoga and breathing exercises can help people feel less stressed. Since many people’s asthma is triggered by stress, lowering stress may help prevent asthma flare-ups.

    Swimming

    Swimming
    Swimming

    People who have asthma benefit from swimming because it allows them to breathe in warm, humid air. Breath control can also be improved by swimming. As one’s lung capacity and level of fitness increase, one can gradually go to more strenuous sessions.

    Because of the chlorine in the water, some individuals might find that swim in a pool aggravates their asthma symptoms.

    Which Breathing Techniques Are Best for Asthma?

    Breathing exercises can help your lungs in a similar way that aerobic activity helps your heart and muscles. Medications like inhalers are used to assist loosen up the airways to enhance breathing since asthma can cause your airways to become small and irritated, making it harder to breathe.

    Asthma sufferers may benefit from breathing exercises in addition to medicine, which can aid with breath and quality of life.

    People who have asthma might benefit greatly from a variety of breathing strategies. Certain exercises aid with breathing retraining, while others strengthen the respiratory muscles and enhance thoracic cage (rib cage) flexibility.

    Asthma clinics and doctors frequently recommend breathing techniques. Some are more effectively taught by somebody with experience to make sure you understand the techniques and get the most out of them.

    Papworth Method

    Papworth Method, which combines relaxation and breathing techniques, was created at Papworth Hospital in the 1960s. The Papworth Method has been demonstrated to reduce respiratory symptoms and enhance the quality of life for asthmatics.

    Physiotherapists teach the Papworth method, which focuses on learning to breathe regularly and slowly through your nostrils and from your diaphragm, the muscle below your ribcage.

    Diaphragmatic Inhalation

    The muscle beneath your lungs that facilitates breathing is called the diaphragm. Learning to inhale from your diaphragm instead of your chest, as so many people do, is the main goal of diaphragmatic breathing. In addition to strengthening the lungs, this asthma breathing technique can help reduce your breathing and lower your body’s oxygen requirements because weak muscles make you require more oxygen.

    To practice breathing diaphragmatically:

    • Maintaining a relaxed neck and shoulders, exhale through your mouth for a minimum of two to three times as long as you took in.
    • Put your hands on your stomach and upper chest, respectively. As you inhale through your nose, observe how air fills your stomach.
    • The hand on the chest should remain stationary, but the one on the stomach should ideally rise.

    Inhaling with pursed lips

    One way to assist manage dyspnea is to practice pursed lip breathing. It’s a useful technique for slowing down breathing and increasing the effectiveness of each breath. It facilitates the passage of carbon dioxide out of the lungs and oxygen into them by keeping the nostrils open for longer. This can alleviate dyspnea by reducing the rate of breathing.

    When you’re not experiencing dyspnea, try pursed lip breathing.

    • Shut your mouth and take a slow, deep breath through your nose.
    • Then, as if you were going to blow a bubble or whistle, exhale from your mouth for at least twice as long while keeping your lips pursed.
    • Counting as you exhale could be helpful.

    Buteyko Method

    Professor Konstantin Buteyko, a Russian scientist, created the Buteyko Method, a breathing retraining technique. only 10% of people breathe correctly, and many breathe too deeply, which causes the body to produce the incorrect blend of carbon dioxide and oxygen. In fact, shortness of breath might be the result of breathing too deeply.

    The technique’s goal is to teach people how to breathe consistently so that their bodies have the ideal balance of carbon dioxide and oxygen. It instructs you to use your nose, not your mouth, to breathe softly and gently. This keeps the air wet and warm, which is better for airways that are sensitive to asthma.

    How to Work Out Safely If You Have Asthma

    Exercise can occasionally exacerbate asthma symptoms. This is thought to be because when you exercise, your breathing becomes more rapid and via your mouth, and the air entering your lungs may be drier and cooler than normal.

    Some persons may experience asthma symptoms as a result of their airways narrowing due to the temperature shift. Making ensure that warm up properly before exercising and cool down afterward is one method to lower the chance that exercise can provoke asthma. Or, if the cold air bothers you, consider exercising indoors.

    Advice on how asthmatics can exercise healthy:

    • Always keep your reliever inhaler close at hand.
    • Recognize the things that make your asthma worse and attempt to avoid them.. For instance, refrain from exercising in situations where you are impacted by heat or pollen.
    • Inform others that you suffer from asthma and what to do in the event of an attack if you’re working out with them.
    • Stop and use your relief inhaler if you do have symptoms like wheezing, dyspnea that doesn’t go away after you stop breathing, or coughing while exercising.
    • Warm up and cool down, don’t forget.
    • To be sure your activity and exercise are suitable for you, consult your physician or medical team.

    Prognosis and Outlook

    What is the prognosis for an asthmatic?

    You can still lead a very active life and engage in sports and other activities even if you have asthma. With the help of your healthcare provider, you can identify your triggers, manage your symptoms, and prevent or prevent episodes.

    FAQs

    What is called asthma? 

    Another name for asthma is bronchial asthma, which is a lung disease. Since it is a chronic (ongoing) disorder, it requires constant medical attention and never goes away.

    What is the main cause of asthma?

    Typical triggers include indoor allergens including mildew, dust mites, and fur or dander from pets. Outdoor allergens, such as pollens, mold and Emotional stress.

    What are the best exercises for people with asthma?

    One of the most advised forms of exercise for those who have asthma is swimming. Walking is another excellent low-intensity activity. Other great options include hiking, recreational biking, short-distance track and field, and sports involving brief bursts of activity.

    Which breathing techniques are most effective for asthma?

    You can drive more oxygen into your lungs by inhaling through your nose and exhaling through your pursed lips. Because it helps slow your breathing quickly, this breathing technique is best used when you’re having trouble breathing. You will be able to relax and regulate your breathing with the practice.

    Does asthma benefit from chest physical therapy?

    Asthma symptoms can be effectively managed and controlled with chest physical therapy. Clients can improve their respiratory function by clearing the airways of thick secretions by using respiratory physiotherapy procedures.

    What is the best exercise for the lungs?

    Walking, running, and jumping rope are examples of aerobic exercises that provide the heart and lungs with the kind of training they require to perform at their best. Exercises that strengthen your core, such as Pilates or weightlifting, also improve posture and tone your breathing muscles.

    Reference

    • Nunez, K. (2020, January 28). All about asthma and exercise. Healthline. https://www.healthline.com/health/asthma/exercise-for-asthma
    • Fletcher, J. (2019, February 14). What are the best types of exercise for asthma? https://www.medicalnewstoday.com/articles/324445
    • Global Allergy & Airways Patient Platform. (2024, October 6). Breathing and Exercises for Asthma – Global Allergy & Airways Patient Platform. https://gaapp.org/diseases/asthma/breathing-exercises-and-techniques-for-asthma
    • Asthma. (2025, February 9). Cleveland Clinic. https://my.clevelandclinic.org/health/diseases/6424-asthma
  • Non-Pitting Edema

    Non-Pitting Edema

    What is a Non-Pitting Edema?

    The term “non-pitting edema” describes swelling that is unaffected by pressure. For instance, you can have non-pitting edema if you have swollen leg and prodding the area doesn’t leave an imprint.

    The medical term for swelling caused by excess fluid is edema. Edema can be caused by a variety of factors, including thyroid disorders and warm temperatures.

    Edema is typically categorized by doctors as either pitting or non-pitting. Non-pitting edema is defined as when you press a swollen spot with your finger and it doesn’t result in an indentation in the skin.

    Pitting vs. non-pitting edema:

    Areas with pitting edema respond to pressure, commonly from a hand or finger. For example, when you press on the skin with your finger, it’ll leave an indentation, even after you withdraw your finger. Problems with the liver, heart, or kidneys are frequently indicated by chronic pitting edema. It may also indicate an issue with the veins in the area.

    In contrast, pressure does not result in any permanent indentation when applied to non-pitting edema. It is frequently an indication of a thyroid or lymphatic system disorder.

    Causes of non-pitting edema?

    Lymphedema

    A condition known as lymphedema occurs when there is a blockage that prevents lymph fluid from draining normally. It frequently occurs as a side effect or as a result of surgery. It can also be inherited.

    Swelling results from the accumulation of lymph fluid that cannot drain. Both pitting and non-pitting lymphedema are possible.

    Myxedema

    Myxedema is a disorder that some persons with severe or advanced hypothyroidism experience. Although it usually results in swollen legs and feet, it can also induce swelling in the lips and eyelids. In certain instances, it may also result in enlargement of the tongue.

    Lipedema

    The growth and proliferation of fat cells in lipedema results in greater fluid retention surrounding the cells, causing non-pitting edema that is frequently unpleasant or uncomfortable. It nearly exclusively affects women and typically affects the legs and feet.

    Symptoms of Non-Pitting Edema?

    When swelling does not leave a pit when pressure is applied, it is referred to as non-pitting edema. Among the symptoms are:

    • When squeezed, firm, swollen skin that does not imprint
    • The affected area’s stiffness or tightness
    • thickening or solidification of the skin (fibrosis in chronic situations)
    • Discomfort or pain in the enlarged region
    • Reduced range of motion if the edema affects joints
    • Shiny, stretched, or discolored skin in severe situations
    • It frequently happens in diseases such chronic inflammatory disorders, myxedema (severe hypothyroidism), and lymphedema.

    How is it diagnosed?

    Your doctor can conduct a number of things to find out why you are experiencing unusual swelling. In order to determine if your edema is pitting or not, they will probably begin by applying pressure to the affected area.

    They might employ lymphoscintigraphy if you recently had a lymph node removed. This imaging examination examines the flow of fluid through your lymphatic system using a radioactive material. With a simple physical examination, they might be able to identify lymphedema based on your medical history.

    Along with measuring your thyroxine (T4) and thyroid-stimulating hormone (TSH) levels, they might also do a thyroid function test. Myxedema is caused by hypothyroidism, which is shown by low T4 levels and high TSH. You might not require additional testing to diagnose myxedema if you have previously been diagnosed with hypothyroidism.

    Because lipedema doesn’t usually appear on imaging testing, diagnosing it might be challenging. Rather, your physician will probably check you for physical symptoms like:

    • Easy bruising
    • Tenderness
    • Unaffected feet
    • Excess weight that is unresponsive to exercise or nutrition.

    How is it treated?

    Compared to pitting edema, non-pitting edema is typically more difficult to treat. Elevation and diuretics work effectively for pitting edema since it is frequently caused by excess water. Drainage is more challenging in non-pitting edema, which is typically caused by sources other than fluid.

    Lymphedema treatments

    Complex decongestive therapy typically works effectively for lymphedema (CDT). This includes:

    • Applying bandages to the area and gently massaging it to promote fluid circulation and open up lymphatic capillaries
    • Keeping the affected area hydrated by adhering to a skin care regimen
    • Exercising frequently while wearing compression clothing.

    Lipedema treatments

    • Although lipedema has no known cure, many people discover that CDT effectively relieves its symptoms. Early-stage lipedema may also benefit from lipectomy, a kind of liposuction.

    Myxedema treatments

    • Medication, such as levothyroxine, a synthetic T4 hormone, is typically necessary for myxedema. This will assist in bringing your thyroid hormones back into equilibrium. Remember that the effects of this treatment could not be seen for a few weeks.

    Complications of Non-Pitting Edema?

    Non-pitting edema can lead to a number of problems if it is not managed. Your skin may become dry and cracked as it stretches in reaction to swelling, making it more susceptible to infection. The deep tissue beneath the affected area may eventually become irreversibly scarred as a result of the swelling. Additionally, it can raise your risk of ulcer development and result in impaired circulation.

    A myxedema crisis may result from the source of myxedema. This medical emergency results in:

    • decreased breathing
    • low body temperature
    • confusion
    • shock
    • coma
    • seizures
    • low blood oxygen
    • high blood carbon dioxide
    • low blood sodium

    Since a myxedema crisis can be fatal, it’s critical to get help right away.

    Prevention of Non-Pitting Edema:

    Maintaining healthy circulation and treating underlying problems are key to preventing non-pitting edema. The following are important precautions:

    • Maintain a Healthy Lifestyle: A balanced diet and regular exercise assist to enhance circulation and avoid fluid retention.
    • Handle Underlying Conditions: Swelling can be avoided by appropriately treating thyroid conditions, heart illness, kidney problems, and lymphedema.
    • Compression Therapy: By wearing compression clothing, fluid accumulation can be decreased and lymphatic drainage supported.
    • Limit Salt Intake: Fluid retention can be avoided by lowering sodium intake in the diet.
    • Remain Hydrated: Maintaining adequate fluid balance is facilitated by drinking enough water.
      Avoid Prolonged Immobility: Elevating the affected limb and moving around frequently will help reduce swelling.
    • Skin care: By keeping the skin hydrated and avoiding infections, edema-causing issues can be avoided.

    Prognosis:

    The underlying cause of non-pitting edema and the effectiveness of its management determine its prognosis. Proper therapy can result in significant improvement if the illness is caused by reversible factors, such as transient inflammation or pharmaceutical side effects.

    To avoid problems, chronic illnesses like myxedema or lymphedema might need to be managed over an extended period of time. Non-pitting edema can result in skin changes, infections, and decreased mobility if left untreated. A high quality of life is maintained and better results are obtained with early diagnosis and management.

    Conclusion:

    Acute or persistent swelling that does not leave an indentation when squeezed is known as non-pitting edema. It is frequently connected to underlying medical conditions such chronic inflammation, hypothyroidism, or lymphedema.

    Treating the underlying cause, leading a healthy lifestyle, and utilizing supportive techniques like compression therapy and adequate hydration are all essential components of effective management. To avoid complications and enhance quality of life, early detection and intervention are essential.

    FAQs

    What is skin edema that is thickened but not pitting?

    One or both lower extremities may have lymphedema, which is characterized by brawny, nonpitting skin with edema. Tumors, trauma, prior pelvic surgery, inguinal lymphadenectomy, and prior radiation therapy are examples of secondary causes of lymphedema.

    Does pitting or non-pitting heart edema occur?

    When heart failure is advanced, cardiac edema changes from soft pitting edema (during the initial decompensated phases of the heart) to hard nonpitting edema due to the appearance of subcutaneous tissue fibrosis under hypoxic conditions.

    How is nonpitting edema tested for?

    It is referred to as non-pitting edema if applying pressure with your finger to a swollen spot does not result in an indentation in the skin.

    What condition causes non-pitting edema?

    With the exception of the indentation (or “pit”) that is still apparent after pressure is applied in pitting edema, non-pitting edema is comparable to pitting edema. Since non-pitting edema is caused by three very specific conditions lymphedema, myxedema, and lipedema—it is more easier to detect than pitting edema.

    How dangerous is non-pitting edema?

    Although non-pitting edema is not dangerous in and of itself, there may be more serious issues with its underlying cause. It is strongly advised to get medical help in order to identify and address any potentially harmful underlying issues.

    Does myxedema pit or does it not?

    Diffuse: The most prevalent kind of pretibial myxedema, characterized by non-pitting leg edema.
    Plaque: In addition to non-pitting edema, your skin develops raised, thick, and scaly plaques.

    Is edema from filariasis non-pitting?

    While pitting oedema is typically the hallmark of early-stage lymphoedema, more chronic phases show non-pitting oedema along with hardening of the surrounding tissues, which ultimately results in hyperpigmentation and hyperkeratosis. Male genitalia and breasts may also have chronic symptoms.

    Which pathophysiology underlies non-pitting edema?

    Although the exact cause of non-pitting edema in CAsI is unknown, it may be related to capillary leak syndrome, which is characterized by inflammation and maybe other capillary and interstitial abnormalities.

    Is DVT edema that doesn’t pit?

    Pitting edema in certain individuals may indicate a more serious medical condition, such as: Edema in the vicinity of a blood clot may result from one of these in a deep vein. Only one leg may have edema if there is a DVT in that leg.

    Why does hypothyroidism cause non-pitting edema?

    A myxedematous state is caused by the dermal buildup of mucopolysaccharides, particularly chondroitin sulfate and hyaluronic acid. Because of these molecules’ capacity to bind water, these patients frequently exhibit nonpitting edema.

    What distinguishes pitting edema from non-pitting edema in heart failure?

    Edema, or puffy leg swelling, is a symptom of right heart failure, particularly if it is pitting edema. A finger rubbed against the swollen leg creates an imprint in cases with pitting edema. Heart failure is not the cause of non-pitting edema.

    What is the sign of non-pitting edema?

    Definition. Excess fluid accumulation in the body can result in non-pitting edema, which is a swelling that does not indent under pressure. It typically affects the limbs and is frequently caused by underlying illnesses that interfere with the lymphatic system’s ability to function.

    References

    • Gotter, A. (2018, March 7). What is Non-Pitting Edema and what causes it? Healthline. https://www.healthline.com/health/non-pitting-edema
    • Facoep, J. P. C. D., & Memon, N. (2024, July 25). Edema: types, causes, symptoms, treatments and more. MedicineNet. https://www.medicinenet.com/edema/article.htm
  • Bouchard’s nodes

    Bouchard’s nodes

    Introduction

    Bouchard’s nodes, which are bony nodules, also called osteophytes, that form on the middle joint of the fingers and are commonly caused by osteoarthritis, may be the source of pain and stiffness in the finger.

    Bouchard’s nodes are fluid cysts or hard, bony protuberances on the proximal interphalangeal joints, which are the middle joints of the fingers and toes. Osteoarthritis is characterized by the development of calcific spurs of the articular (joint) cartilage. Rheumatoid arthritis is a far less common condition in which nodes are caused by antibody deposition on the synovium.

    Although Heberden’s nodes are far less prevalent, they are similar in osteoarthritic development on the distal interphalangeal joints to Bouchard’s nodes in appearance.

    Bony growths called Bouchard’s nodes, or Bouchard’s osteoarthritis nodes, develop on the fingers’ middle joints. Named for the French physician Charles-Joseph Bouchard, who first noticed them in the late 1800s, these nodes are characteristic indicators of osteoarthritis, a degenerative joint disease that affects millions of people worldwide. This article aims to explore the causes, symptoms, and treatment options associated with Bouchard’s nodes.

    Anatomy 

    • There are hard, bony lumps on the proximal interphalangeal (PIP) joint called Bouchard’s nodes.
    • The finger’s middle joint is known as the PIP joint.
    • They can also appear at the base of the thumb, which is called the carpometacarpal (CMC) joint.

    What are they?

    A frequent type of arthritis that usually affects the weight-bearing joints is osteoarthritis. They can, however, affect any joint, particularly the hands.

    When it affects the hands, nodes, or bony growths, may occur on the middle joint of the fingers, known as the proximal interphalangeal (PIP) joint. The nodes of Bouchard are these growths.

    Doctors usually associate them with more severe osteoarthritis.

    Causes

    The primary cause of Bouchard’s nodes is the same as those of all other osteoarthritis symptoms: chronic joint tissue deterioration. An indication of osteoarthritis is Bouchard’s nodes.

    Osteoarthritis: The primary Culprit

    Osteoarthritis is the main cause of Bouchard’s nodes. The breakdown of cartilage caused by this degenerative joint condition exposes the surfaces of the bones. Nodes emerge as a result of new bone creation that takes place while the body tries to repair the injury.

    Genetic Predisposition

    The development of Bouchard’s nodes is also significantly influenced by genetics. These bone enlargements are more common in those with a family history of osteoarthritis or similar disorders. The onset and severity of the nodes may be influenced by this hereditary tendency.

    • Hand, knee, hip, lower back, and neck joints are the most frequently affected by osteoarthritis. In this extremely prevalent disorder, the cartilage is eroded. Cartilage is often the connective tissue that cushions the joint area.
    • Although the exact cause of osteoarthritis is unknown, physicians believe it to be an indication of joint wear and tear. As the joints deteriorate due to the breakdown of their cartilage, new bone grows around them.
    • The main association of Bouchard’s nodes is with osteoarthritis, which is characterized by the gradual degradation of cartilage in the joints. Cartilage serves as a barrier between bones, and its degradation permits bones to rub against one another, which promotes the formation of bony protrusions such as Bouchard’s nodes. The causes of osteoarthritis are numerous and include age, genetic predisposition, joint injuries, and obesity.
    • Additionally, the formation of Bouchard’s nodes may be influenced by genetics. An earlier study from 2012 found that nodes are more likely to develop in females than in males and that they are more likely to harm the dominant hand.
    • Additionally, the National Health Service (NHS) in the United Kingdom states that nodal osteoarthritis may run in families. Knobby finger swellings, like Bouchard’s nodes, are a defining feature of nodal osteoarthritis.

    Common causes of osteoarthritis include:

    • Joint injury
    • Overuse
    • Musculoskeletal abnormalities
    • Weak muscles
    • Environmental factors

    Excessive bone tissue remodeling can result from inflammation and joint injury. Nodules may develop as a result of ossification, the process that creates bones.

    Symptoms

    On the finger’s middle joint, Bouchard’s nodes develop. Although the growths themselves usually don’t hurt, they might limit the joint’s range of motion. They may occasionally result in discomfort and inflammation.

    Several symptoms are frequently present when Bouchard’s nodes form, including:

    • Joint pain: People who have Bouchard’s nodes may feel discomfort in the joints that are impacted, particularly when moving or after being inactive for a while.
    • Stiffness: People often experience joint stiffness, which makes it difficult for them to easily move their fingers.
    • Swelling: Notable swelling and pain may result from inflammation surrounding the affected joints.
    • Limited Range of Motion: The development of Bouchard’s nodes may limit the fingers’ range of motion, which may impact everyday tasks including writing, typing, and item grabbing.
    • Misaligned bones causing crooked fingers
    • Inability to do daily chores like turning a key, opening a jar, or using a can opener due to a weak grip
    • Restricting movement
    • Putting pressure on the nearby nerves
    • Rubbing against tissue or bone

    Having said that, gout and rheumatoid arthritis can also cause pimples. People with rheumatoid arthritis may develop rubbery lumps on their thumbs and knuckles called rheumatoid nodules. Gout sufferers may get tophi, which are crystallized lumps in the joint area.

    An individual may also have hand symptoms related to osteoarthritis if Bouchard’s nodes develop as a result of the condition. These consist of:

    • Usually after sleeping, this pain can come and go, get worse with use, and get better with rest.
    • Joint Stiffness
    • Limited mobility
    • A feeling of weakness in the hand
    • A grinding or clicking noise in the hand

    Risk Factors

    The following are the same risk factors for both osteoarthritis and Bouchard’s nodes:

    • Being female
    • Smoking (females only)
    • older age, particularly beyond the age of fifty
    • Genetics
    • Being a non-Hispanic White person

    Diagnosis

    A physician can inspect a patient’s hands and check for a bony growth on the finger’s middle joint. Additionally, they could request imaging tests like:

    • Ultrasound
    • MRI scan
    • X-ray: A detailed view of the joint structure can be obtained through imaging techniques like X-rays. The presence of Bouchard’s nodes can be confirmed by X-rays, which can also show bone spurs, narrowing of the joint space, and other alterations linked to osteoarthritis.

    One of the hallmarks of osteoarthritis that helps distinguish it from other forms of arthritis like rheumatoid arthritis or gout is a Bouchard’s node.

    Clinical Examination

    A clinical examination is the primary method used to diagnose Bouchard’s nodes. A medical professional will examine the joint function and the nodes’ appearance. The evaluation also takes into account the presence of discomfort, stiffness, and decreased mobility.

    Because osteoarthritis cannot be diagnosed by blood tests, your doctor may use additional tests to rule out gout and rheumatoid arthritis as potential causes.

    • Blood tests to detect antibodies to cyclic citrullinated peptide (CCP) and rheumatoid factor (RF), which are present in rheumatoid arthritis
    • Gout is associated with increased blood uric acid.
    • Crystals of uric acid in joint fluid, linked to gout

    By searching for these nodes, a physician can rule out other forms of arthritis, such as gout or rheumatoid arthritis.

    Whereas both of these disorders can result in growth, rheumatoid arthritis creates softer lumps on the fingers and thumbs, whereas gout causes crystalline growths in the joint. After evaluating a patient’s symptoms and examining X-rays to look for cartilage degradation, a doctor can diagnose osteoarthritis.

    They might, however, occasionally request blood tests to look for antibodies to rheumatoid factor (RF) and anti-cyclic citrullinated peptide (CCP). Additionally, they might look for high blood uric acid levels, which could be a sign of gout.

    A complete blood count (CBC) can be used to determine the white blood cell (WBC) count. WBCs are often normal or almost normal in osteoarthritis since the condition is not linked to persistent inflammation. On the other hand, they are frequently increased in inflammatory diseases including rheumatoid arthritis and gout.

    Confirming the diagnosis can also be aided by imaging testing, such as an X-ray to look for joint cartilage loss.

    Treatment

    Although there are no specific treatments for Bouchard’s nodes, the same fundamental methods used to treat hand osteoarthritis may work well.

    Bouchard’s nodes cannot be removed, however you may manage finger osteoarthritis to lessen the pain they cause. The hump itself cannot be removed without surgery, however, this procedure is rarely performed. It is mostly utilized for aesthetic purposes. The treatment strategy for hand osteoarthritis without nodes is comparable to that for Bouchard’s nodes.

    Medical treatment

    • Nonsteroidal anti-inflammatory medicines (NSAIDs) such as Advil (ibuprofen) or Aleve (naproxen) or pain relievers like Tylenol (acetaminophen)
    • NSAIDs (such as Voltaren gel), lidocaine, or topical capsaicin cream for mild aches and pains
    • Steroid injections into the joint in extreme situations
    • Over-the-counter or prescription pain relievers

    Physical therapy

    • Certain stretches and exercises can assist increase joint suppleness and decrease stiffness.
    • Physical therapists can offer individualized programs based on each patient’s needs.
    • Joint Protection Techniques: To reduce the strain on the affected joints during daily activities, occupational therapists can instruct patients in joint protection techniques.
    • Supports and Splints: Applying braces or splints might assist in stabilizing the affected joints and reducing discomfort.
    • Weight management: People with Bouchard’s nodes must maintain a healthy weight because being overweight can make joint pain and inflammation worse.

    To reduce joint movement during acute flare-ups, joint immobilization may also be utilized. To increase joint mobility and avoid impairment, therapy can be required.

    • Hot and cold packs or therapy
    • A brace or splint to keep the fingers immobile
    • Strength exercises
    • Resting the joint
    • Surgery: To enhance joint function and lessen discomfort in extreme situations where conservative methods are ineffective, surgical options including joint fusion or replacement may be taken into consideration. Removal by surgery to repair the joints and cartilage
    • Occupational therapy can help you become more capable of carrying out specific daily tasks. When choosing to do strength exercises, people should be careful not to overstress their hands and fingers. Surgery may be necessary in certain situations to repair the joints, and if home remedies are not working and Bouchard’s nodes are causing pain, a person may want to see a doctor for additional treatments.

    Lifestyle Modifications to Manage Bouchard’s Nodes

    Making the following lifestyle adjustments can also help manage Bouchard’s nodes:

    Weight Management

    Asthma physiotherapy exercise
    Weight management
    • Joint tension can be decreased by maintaining a healthy weight.
    • One of the most prevalent conditions affecting bone and joint health is obesity, according to the American Academy of Orthopaedic Surgeons (AAOS). Losing extra weight helps slow down joint degeneration in addition to relieving some of the strain on your joints.
    • We understand that losing weight can be particularly challenging if you have joint mobility and functionality problems, but you can be sure that your care team will collaborate with you to establish realistic objectives and a strategy to help you reach them.

    Balance diet

    Balanced diet
    Balance diet
    • Joint health can be supported by a diet high in foods that reduce inflammation.
    • Changing your diet to include more foods and supplements that help reduce inflammation in the body is one of the best strategies to alleviate chronic joint pain.
    • Omega-3 fatty acids, which are present in foods like walnuts, soybeans, chia seeds, and salmon, are excellent at reducing joint inflammation and the associated pain and stiffness. Antioxidants, which are abundant in fresh fruits and vegetables, help prevent damage, shield healthy cells, and slow down the aging process.
    • To reduce weight and arthritis symptoms, try to cut back on (or better still, eliminate) processed foods, trans fats, and added sweets while incorporating healthy foods.

    Regular Exercise

    • Joint mobility can be improved by participating in low-impact sports like cycling or swimming.
    • Exercise has many advantages than merely helping people lose weight. Frequent exercise helps fight fatigue and other arthritic symptoms, improves strength and flexibility, and lessens pain. You might not be able to go to the gym or a fitness class, depending on how bad your joint pain is.
    • The good news is that you will quickly experience less discomfort if you have a firm grasp of workouts that boost blood flow, decrease stiffness, and allow you to move your joints through their entire range of motion. Your doctor or physical therapist may recommend a range of low-impact activities, such as walking, cycling, water aerobics, or stretching, to assist flex your joints and improve your health without putting you under more stress. When symptoms arise, remember that rest periods could be required, but total bed rest is not advised.

    Quit smoking

    • It is more difficult to recover from inflammation and injuries when smoking since it slows down the body’s natural healing processes and reduces blood flow. Some types of joint discomfort, especially in the neck and back, may worsen as a result of the coughing symptoms that many smokers experience.
    • Smoking will exacerbate the symptoms of arthritis by inducing inflammatory processes that impact all of the body’s cells. In addition to improving your general health right away, stopping smoking will also benefit your joints. Consult your physician about effective quitting techniques.

    Manage stress

    Stress causes your body to release chemicals that might affect your immune system and cause inflammation. Therefore, the more stress you are under, the more your arthritic pain may worsen. Life transitions like moving, losing a loved one, money worries, or even taking a vacation force us to adjust, and alter our routine, and can be stressful.

    Stress can be decreased in several ways, including through yoga, meditation, and other relaxation methods. Studies have shown that mindfulness meditation can benefit some persons with joint discomfort, according to the National Institutes of Health (NIH). Inflammation is decreased by stress, which also lessens pain and swelling. You can begin utilizing these stress-relieving techniques right now:

    • Breathe slowly for two minutes. Allow the inhalation to slowly enter your lungs after concentrating on a lengthy expiration.
    • Channel your stress into something creative. Paint, write, or cook.
    • Watch a movie, listen to music, or do something else that helps you forget about your worries.
    • Get outdoors. Take a stroll in the park and enjoy the warmth of the sun.
    • Laugh! Spend time with someone who makes you laugh or watch a comedy.
    • To assist channel and releasing tension or unpleasant thoughts, try yoga or meditation.

    Complications Associated with Bouchard’s Nodes

    Although Bouchard’s nodes by themselves do not pose a threat to life, they can cause serious problems that lower the quality of life. These problems could consist of:

    • Functional Impairment: Writing and holding objects might become difficult when severe nodes affect hand function.
    • Cosmetic Concerns: Emotional discomfort and self-consciousness may result from the fingers’ obvious malformation.
    • Progression of Osteoarthritis: Further joint degradation may result from Bouchard’s nodes, which may be a sign of progressing osteoarthritis.

    Bouchard’s Nodes vs Heberden’s Nodes

    Heberden’s nodes form on the distal interphalangeal (DIP) joints, which are the joints nearest to the fingertips, whereas Bouchard’s nodes form on the PIP joints. Although osteoarthritis is linked to both kinds of nodes, their positions set them apart. These nodes are indicative of an underlying arthritic process, which frequently results in decreased mobility and joint deformities.

    Conclusion

    Osteoarthritis-induced bony growths in the fingers’ middle joints are known as Bouchard’s nodes. They happen when inflammation and joint cartilage loss lead to an overabundance of bone growth. Although Bouchard’s nodes may or may not be a cause of pain, in severe cases they usually result in misaligned, crooked fingers, joint stiffness, and grip weakness.

    Lab and imaging tests are used to diagnose osteoarthritis and assist in distinguishing it from related diseases such as rheumatoid arthritis and gout. Rest, cold or heat therapy, painkillers, or, in the event of discomfort, steroid injections can all be used to treat Bouchard’s nodes. Hand treatment can improve joint mobility and help avoid disability.

    One clear indicator of osteoarthritis, a common and degenerative joint disease, is Bouchard’s nodes. Anyone impacted by Bouchard’s nodes needs to comprehend the causes, signs, and available treatments. Various interventions can help persons with Bouchard’s nodes manage their symptoms and improve their general quality of life, even though there is no known cure. Those coping with this challenging disease can benefit from seeking medical attention as soon as feasible and employing a multidisciplinary strategy.

    FAQs

    Does Bouchard’s node size increase?

    This could happen at one or more finger joints in one or both hands. These bony protuberances might hurt or not hurt. Over time, Bouchard nodes may gradually enlarge, causing restricted movement and related grip weakness.

    Bouchard’s nodes: are they real?

    Although Bouchard’s nodes may or may not be a cause of pain, in severe cases they usually result in misaligned, crooked fingers, joint stiffness, and grip weakness. Lab and imaging tests are used to diagnose osteoarthritis and assist in distinguishing it from related diseases such as rheumatoid arthritis and gout.

    What are the signs of Bouchard nodes?

    Bony extensions of the proximal interphalangeal (PIP) joints, found in the middle joints of the fingers, are known as Bouchard’s nodes. These are the finger joints nearest the knuckles. One of the hallmark signs of hand osteoarthritis, or joint degradation, is the presence of nodes.

    Does the size of Bouchard’s nodes increase?

    Over time, the tissue in our hands may degrade, resulting in diseases like osteoarthritis. Heberden’s and Bouchard’s nodes may then develop on our finger joints as a result. You can attempt to prevent and treat this sickness, though, by using a few strategies.

    What are Bouchard’s nodes in their early stages?

    What symptoms and indicators are associated with Bouchard nodes? Enlargement of the PIP joint, usually in the dorsolateral aspect, is one of the symptoms of Bouchard nodes. This could happen at one or more finger joints in one or both hands. These bony protuberances might hurt or not hurt.

    Will the nodes of Bouchard’s disappear?

    Bouchard’s nodes cannot be removed without surgery, and there are no particular therapies for them. They are usually painless, though. A person should get more guidance from a physician if they are in pain.

    Which vitamin is the best for finger arthritis?

    Curcumin (found in the root of turmeric) There is evidence that the root of turmeric contains anti-inflammatory qualities. …
    Vitamin D. Your doctor might suggest a vitamin D supplement, omega-3 fatty acids, glucosamine, and chondroitin sulfate if you have arthritis discomfort or are at high risk for developing it.

    How do nodules from arthritis begin?

    Rheumatoid arthritis causes rheumatoid nodules, albeit the exact cause is still unknown to medical authorities. After suffering rheumatoid arthritis for some years, a person usually develops rheumatoid nodules.

    How old must a person be to have osteoarthritis?

    Osteoarthritis can affect everyone, although it becomes more prevalent as people age. Osteoarthritis is more common in women than in males, particularly after the age of 50. Obesity and overweight are additional factors that may increase the risk of developing osteoarthritis.

    Which cuisine has the worst effects on arthritis?

    A diet heavy in omega-6 fatty acids, saturated fat, and trans fats can exacerbate inflammation and negatively impact your general health, even if you do need certain healthy fats from foods like avocados, almonds, and olive oil. Butter, cheese, meat, fried foods, and processed foods are common sources of these “bad” fats.

    Reference

    • Fletcher, J. (2023a, March 28). What are Bouchard’s nodes? https://www.medicalnewstoday.com/articles/bouchards-nodes
    • Eustice, C. (2024, September 16). Bouchard’s Nodes Symptoms causes, and treatments. Verywell Health. https://www.verywellhealth.com/what-are-bouchards-nodes-2552022
    • Clickr. (2023, December 8). Bouchard’s Nodes: Causes, Symptoms, and Treatment. Singapore Sports and Orthopaedic Clinic. https://www.orthopaedicclinic.com.sg/hand/bouchards-nodes-causes-symptoms-and-treatment/#:~:text=How%20do%20you%20get%20rid,they%20should%20seek%20medical%20attention.
    • Bouchard’s Nodes: Causes, symptoms & treatment. (n.d.). https://www.medicoverhospitals.in/diseases/bouchards-nodes/
    • UT Health Austin | Lifestyle changes you can make to reduce joint pain. (2024, November 8). UT Health Austin. https://uthealthaustin.org/blog/lifestyle-changes-to-reduce-joint-pain
  • 12 Early Warning Signs of Rheumatoid Arthritis

    12 Early Warning Signs of Rheumatoid Arthritis

    Rheumatoid arthritis (RA) is a chronic autoimmune disorder that primarily affects the joints, causing pain, inflammation, and potential joint damage over time. Early detection is crucial for managing symptoms and slowing disease progression.

    Recognizing the early warning signs of RA, such as joint pain, stiffness, and fatigue, can help ensure timely intervention and improved quality of life.

    Rheumatoid Arthritis (RA): What is it?

    An autoimmune illness, such as RA, occurs when the body’s healthy tissues are mistaken for foreign enemies by the immune system. It can also impact the entire body because it is a systemic condition.

    The target tissue or organ becomes inflamed as the immune system reacts. RA might include the heart, lungs, joints, and eyes.

    Rheumatoid Arthritis: What causes it?

    It is uncertain what specifically causes rheumatoid arthritis. Scientists believe a mix of environmental influences, hormones, and heredity is to blame.

    Your immune system normally protects your body from illness. However, with RA, something activates your immune system, causing it to attack your joints. Triggers might include an illness, smoking, or mental or physical stress.

    What are the primary symptoms of rheumatoid arthritis?

    Rheumatoid arthritis symptoms may include the following:

    • Pain, swelling, stiffness, and discomfort in several joints.
    • Stiffness, particularly in the morning or after sitting for extended periods
    • Stiffness and pain in the same joints on both sides of the body
    • Fatigue (Extreme fatigue)
    • Weakness
    • Fever

    RA affects everyone differently. Some people’s symptoms grow over time, and in some patients, rheumatoid arthritis symptoms worsen fast. Many people experience episodes of symptoms (flares) followed by periods of no symptoms (remission).

    What are the different phases of rheumatoid arthritis?

    It is typically developed by RA in four stages:

    • Stage 1: No bone or joint damage will be visible on an X-ray.
    • Stage 2: The effect on the bone will be visible on an X-ray.
    • Stage 3: An X-ray will reveal a specific type of bone and cartilage degradation that a physician may identify as being caused by RA, along with abnormalities in the affected joints.
    • Stage 4: Ankylosis, a condition in which a joint stiffens and fuses with the bone, will occur.

    12 early signs of Rheumatoid Arthritis:

    Fatigue

    A person with RA may feel excessively fatigued and diminished in energy before developing additional symptoms. They may also experience depression.

    Feelings of lack of energy may affect:

    • Factors such as daily activities, relationships, and sexuality might impact workplace efficiency.
    • Fatigue may be caused by the body’s response to joint inflammation.

    Slight fever

    Inflammation connected with RA can make patients feel ill and overheated. They may have a minor increase in temperature, which is an early indicator of feeling fatigued. It may come before any obvious effects on the joints.

    Weight loss

    The third early warning sign of RA is unexplained weight loss, which might be an indirect result of inflammation. When someone feels sick and weary, they may lose their appetite, which can lead to weight loss.

    Stiffness

    Joint stiffness is another early warning symptom of RA. Stiffness can develop in one or two minor joints, most often in the fingers. It might start slowly and persist for many days.

    In addition to stiffness in specific joints, a general sense of stiffness in the body may be an early indicator of RA.

    This sort of stiffness typically occurs after a person has stayed motionless for an extended period. This discomfort is the source of morning stiffness, a common complaint among RA sufferers.

    Tenderness in the joints

    One common early symptom of RA is joint soreness in the hands and feet.

    When squeezed or moved, the middle joint and the base of the fingers in the hands may feel sensitive. The joints near the base of the toes may be sore in the foot. People may walk on their heels or raise their toes as a result of this stiffness.

    Joint pain

    RA is indicated by joint discomfort in the fingers, wrists, and feet. In addition to producing more joint fluid, inflammation thickens the joint’s lining. These two elements cause pain by applying pressure to the capsule that envelops the joint and irritates its nerve endings.

    Joint swelling

    One common symptom of RA is swollen joints in the hands and feet. Although mild swelling may be an early symptom, joint swelling usually becomes more noticeable as RA worsens.

    Joint redness

    The joints may seem red due to inflammation in them. RA is indicated by discoloration of the skin surrounding the joints in the hands and feet. Because of the inflammation, the blood vessels in the surrounding skin enlarge, resulting in redness. The skin appears red because wider veins let more blood flow into this region.

    Joint warmth

    Inflammation is the source of joint warmth, which might exist before redness or swelling. This could be a precursor of RA.

    Tingling and numbness

    Hand and foot numbness and tingling might be a precursor of RA. These symptoms are caused by joint inflammation, which can compress nerves and cause loss of feeling.

    Decrease in range of motion

    A person may experience difficulty bending their wrist back and forth in the early stages of RA.
    Ligaments and tendons may get damaged as the condition worsens, making it difficult to bend and straighten them.

    Joints are affected on both sides

    People with RA frequently have symptoms in the same joints on both sides of their body. Although this symmetry is common, not all people with the disorder experience it.

    Complications of Rheumatoid Arthritis:

    Joint abnormalities may result from RA’s destruction to the joints, surrounding cartilage, and adjacent bones if treatment is not received.

    Rheumatoid nodules are solid masses that grow on or around the joints as a result of untreated RA. People frequently connect the illness with these nodules, which are a visual feature.

    Apart from rheumatoid nodules and joint abnormalities, RA can also result in:

    • Carpal tunnel syndrome
    • inflammation in the heart, lungs, eyes, and other parts of the body
    • increased risk of stroke and heart attack

    Risk factors of Rheumatoid Arthritis:

    The cause of the immune system’s attack on RA patients’ joints is unknown to medical professionals.

    • Nonetheless, experts are aware of a few characteristics that raise the likelihood of developing the condition:
    • Sex: Compared to males, women are more likely to acquire RA. According to 2011 research, 1 in 20 men and 1 in 12 women will get RA at some point in their lives.
    • Smoking: There is compelling evidence that smoking both raises the likelihood of having RA and accelerates its progression, per a 2009 research.
    • Obesity: A 2016 investigation, Obesity has been linked to a marginally higher chance of having RA.

    Researchers have also discovered a few variables that lower the incidence of RA. These consist of:

    • Moderate alcohol intake: A research conducted in 2012Moderate alcohol use was associated with a lower risk of RA.
    • Breastfeeding: A 2014 research found that breastfeeding lowers the chance of having RA.

    When to consult a physician

    A person should consult a physician if they are exhibiting the early warning signs and symptoms of RA. A medical professional can assist in making the diagnosis and suggesting the best course of action.

    The chance of developing problems from RA is decreased by early diagnosis and therapy.

    FAQs

    Which rheumatoid arthritis symptom appears first?

    The signs and symptoms of rheumatoid arthritis usually appear gradually over weeks to months. The patient frequently first experiences stiffness in one or more joints, which is typically accompanied by joint soreness and pain while moving.

    What were rheumatoid arthritis’s first discoveries?

    Swelling, pain and tenderness, stiffness, weakness and exhaustion, and the emotional effect of symptoms were among the interacting elements that were found to describe the early signs of RA.

    How early is rheumatoid arthritis defined?

    Early RA: This phrase is typically used to describe a condition that is only a few weeks to a year old. However, according to other research, “early arthritis” is defined as a condition that lasts six months or less. After 12 weeks, the transition to chronic RA starts.

    What is the first stage of rheumatoid arthritis?

    During Stage 1, also referred to as Early RA, individuals typically start to exhibit minor symptoms. Particularly in smaller joints like the hands and feet, they might include joint discomfort and mild joint edema.

    How can arthritis be identified early?

    Examine your present symptoms and medical history. Examine yourself, focusing on your joints. Get X-rays, blood work, and other imaging procedures (such as an MRI or ultrasound). Do an arthrocentesis, which is the process of draining fluid from a joint.

    How much time can you spend with RA?

    Compared to those without the condition, those with RA should expect to live 10 years less. On the other hand, RA patients are surviving longer than ever. Life expectancy may still be impacted by the condition, although it is not as significant as it formerly was.

    References

    • Rheumatoid arthritis. (2025, February 7). Cleveland Clinic. https://my.clevelandclinic.org/health/diseases/4924-rheumatoid-arthritis
    • Brazier, Y. (2024, June 14). Everything you need to know about rheumatoid arthritis. https://www.medicalnewstoday.com/articles/323361#treatment
    • Burgess, L. (2023, March 6). Twelve early signs of rheumatoid arthritis. https://www.medicalnewstoday.com/articles/319810#when-to-see-a-doctor
  • Spine Examination

    Spine Examination

    What is a Spine Examination?

    A spine examination is a systematic assessment of the spinal column, including the cervical, thoracic, lumbar, sacral, and coccygeal regions. It involves evaluating posture, alignment, range of motion, and identifying any deformities or asymmetries.

    The examination typically includes inspection, palpation, assessment of movement, and neurological testing to assess motor, sensory, and reflex functions. It is crucial in diagnosing conditions such as scoliosis, kyphosis, disc herniation, and other spinal pathologies, guiding appropriate management and treatment strategies.

    Anatomy:

    spine anatomy
    spine anatomy

    The lengthy column of bones that runs from your neck to your lower back is called your spine. The base of your skull, or headbone, is where your spine begins, and it ends at your tailbone, a component of your pelvis, the big bony structure that sits between your legs and abdomen.

    Three S-shaped natural curves make up a healthy spine. These curves protect your spine from harm by acting as shock absorbers.

    Your spine’s shock absorbers are the flat, rounded intervertebral disks located between the vertebrae. Each disk contains a flexible outer ring (annulus fibrosus) encircling a soft, gel-like core (nucleus pulposus). Because of the continuous strain on the intervertebral disks, the nucleus pulposus may squeeze out and come into contact with nerves, resulting in symptoms like sciatica.

    The nerves and spinal cord: A column of nerves called the spinal cord passes through the spinal canal. From your skull to your lower back, the cord runs. Via spinal apertures known as neural foramen, thirty-one pairs of nerves emerge. Your brain and muscles communicate with each other through these nerves.

    Parts of the spine:

    • Vertebrae: The spinal canal comprises 33 stacked vertebrae, which are tiny bones. Your spinal cord as well as nerves are housed in a tunnel called the spinal canal that shields them from harm. The majority of vertebrae make a range of mobility possible. The sacrum and coccyx, the lowest vertebrae, are joined and immobile.
    • Facet joints: Vertebrae can glide against one another because of the cartilage, a slick connective tissue, found in these spinal joints. In addition to offering flexibility and stability, facet joints allow you to twist and turn.
    • Soft tissues: Your spine is held in place by the ligaments that join the vertebrae. Your muscles help you move and support your spine. Tendons facilitate movement, connect muscles to bone, and protect against muscle damage.

    Segments of the spine:

    • Five separate spine segments are composed of thirty-three vertebrae. The portions of your spine that run from your neck to your tailbone are as follows:
    • The cervical spine, or neck, is made up of seven vertebrae (C1 through C7). You can tilt, turn, and nod your head down to these neck vertebrae. The cervical spine forms a lordotic curve, which is an inward C-shape.
    • The middle back, or thoracic spine, is made up of 12 vertebrae (T1 through T12). The thoracic spine is where your ribs attach. This part of your spine forms a kyphotic curve, which is a minor bend in a backward C shape.
    • Sacrum: This bone joins your hips in a triangular configuration. During fetal development, the five sacral vertebrae (S1 through S5) fuse (weld together), meaning they are immobile. The pelvic girdle is a ring made up of the hip and sacral bones.
    • The coccyx, or tailbone, is a little bone located at the base of your spine that is made up of four fused vertebrae. The coccyx is where the ligaments and muscles of the pelvic floor attach.

    Common disorders affecting the spine:

    • Ankylosing spondylitis and other arthritic diseases.
    • Sprains and strains of the back..
    • Spurs of bone.
    • Curvatures of the spine (scoliosis and kyphosis).
    • Disk herniation.

    Other conditions affecting the spine include:

    • Neuromuscular diseases, such as amyotrophic lateral sclerosis.
    • Damage to the nerves, such as sciatica, pinched nerves, and spinal stenosis.
    • Osteoporosis.
    • Spinal cord injuries, such as paralysis and spinal fractures.
    • Malignancies and tumors of the spine.
    • Infections of the spine, such as osteomyelitis and meningitis.

    Common signs or symptoms of spine conditions:

    • Muscle spasms.
    • Loss of bowel or bladder control.
    • Weakness or numbness in limbs (arms and legs).
    • Paralysis.

    Primary functions of the spine

    • Protecting the internal organs, nerve roots, and spinal cord.
    • Providing our body’s shape, mobility, and flexibility.
    • Providing balance and structural support for erect posture.

    Kyphosis:

    Kyphosis
    Kyphosis
    • Your spine will curve outward more than it should if you have kyphosis. As a result, your upper back bends forward around the thoracic region, which is the area of your spine between your neck and ribs. The curvature may give the impression that you are slouching or bent over. Other names for it include “roundback” and “hunchback.”
    • There is natural curvature in your spine. Standing upright is made easier by these curves, which also assist your posture. However, too much curvature can have negative effects on your body making standing difficult.

    Types of kyphosis:

    • Postural kyphosis
    • Scheuermann’s kyphosis
    • Congenital kyphosis
    • Cervical kyphosis (military neck)
    • Hyperkyphosis

    Lordosis:

    lordosis
    lordosis
    • The forward-curving spine in your neck or lower back is called lordosis.
    • Naturally, your lumbar and cervical spines curve slightly forward, toward the front of your body. This lordosis, which occurs spontaneously, aids with posture maintenance and shock absorption during movement.
    • A lordotic curvature is anything that causes the parts of your spine to curve more than they should.
    • If your posture deviates from its natural alignment due to excessive curvature of the spine, lordosis develops. You may experience swayback, a lordosis that affects your lumbar spine. Recall that lumbar and cervical lordosis are normal. It is typical for the cervical spine to curve between 30 and 40 degrees. Typically, the lumbar spine curves between 40 and 60 degrees.

    Scoliosis:

    scoliosis
    scoliosis
    • The excessive side-to-side curvature of your spine is known as scoliosis. Your backbone, or spine, naturally curves slightly forward and backward. Your spine will curve in a C or S form to the left and right if you have scoliosis.

    Three types of scoliosis

    • Idiopathic scoliosis
    • Congenital scoliosis
    • Neuromuscular scoliosis

    Examination:

    Observation:

    • Examine the alignment of the spine from the front, side, and back. Check whether the spinal curvatures are normal:
    • Excessive lordosis
    • Excessive kyphosis
    • Scoliosis
    • Examination for:
    • Skin changes
    • Scars
    • Swelling

    Palpation:

    • Palpate each spinous process for tenderness
    • Start with the atlantooccipital joint and finish at the sacroiliac joint
    • Check for pain, spasm, and muscle mass by palpating the paraspinal and trapezius muscles.
    • Check for discomfort or tenderness by lightly tapping down the spine.
    • Sensitive for infection, trauma, or neoplasm
    • Feel for temperature down the spine

    Motion Examination:

    Systematically examine the spine.

    Cervical spine:

    • “Chink-to-chest” flexion and “look at the ceiling” extension
    • Lateral rotation (“look over your shoulder”)
    • “Take your ear downward toward your shoulder” identifies lateral flexion.

    Thoracolumbar spine:

    • Request that the patient touch their toes for a more accurate evaluation of flexion.
    • Extension (helping the sufferer stay upright)
    • Ask the patient to move their arms laterally along the side of each leg one at a time.
    • Lateral rotation involves asking the patient to move from one side to the other while sitting on the bed with their arms crossed to correct their pelvis.

    Neurological assessment:

    Dermatomes

    To determine whether neurological deficits exist, a complicated combination of skin and muscle locations innervated by certain nerves also referred to as dermatomes is examined. Muscle atrophy or loss of strength in certain dermatomes, discomfort, and numbness are indications of disease to a specific spinal level. This may be a result of trauma, a neurodegenerative disease, or nerve impingement caused by a disc herniation.

     Cervical spine’s nerves:

    • The motor and sensory functions are controlled by the cervical spine’s nerves and the dermatomes that correspond to them:
    • C5 Deltoid
    • C6 Thumb
    • C7  middle finger
    • C8 Little finger
    •  sensory nerves in the upper limbs
    • Sensory analysis of the lower arm’s neurological triangle control.
    • Nerves that originate from the thoracic vertebra Th1 and cervical vertebrae C6 and C8 regulate sensory function.

    Evaluation of the thoracic nerves using sensory systems:

    • Nerves that originate from the thoracic vertebrae Th4, Th7, Th10, and Th12 regulate the dermatomes in the thoracic and abdominal areas; these nerves correspond to the following landmarks:
    • Th4 nipple
    • Th7 xiphoid
    • Th10 umbilicus
    • Th12 symphysis

    The lumbar spinal nerves

    • The lumbar and sacral spine’s nerves and associated dermatomes regulate sensory and motor function:
    • L4:medial leg
    • L5: First and second toes

    Assessing paraplegia and tetraplegia

    The American Spinal Cord Injury Association’s ASIA Impairment Scale is used to determine the degree of paralysis. The ASIA impairment scale is intended to compare and comprehend residual function in order to help categorize varying degrees of spinal cord damage.

    A-Complete: The lowest sacral segment (S4-S5) has no motor or sensory function.

    B: No motor function below the neurologic level in S4–S5, and incomplete sensory function below the neurologic level

    C: Incomplete More than half of the major muscle groups have a muscle grade of less than 3, and motor function is maintained below the neurologic level.

    D: Incomplete Below the neurologic level, motor function is maintained, and at least half of the major muscle units have a muscle grade of 3.

    E – Normal Sensory and motor function.

    Levels of paralysis:

    Methods to define the level of the paralysis:

    • Biceps jerk C5 /C6
    • Supinator jerk C6
    • Extensor digitorum reflex C7
    • Triceps jerk C7/ C8
    • Abdominal reflex T8-T12
    • Knee jerk L2 / L4
    • Ankle jerk L5 / S1 / S2
    • Bulbo-spongiosus reflex S2-S4
    • Anal reflex S5
    • Plantar reflex L5-S

    Reflex arc:

    reflex arc
    reflex arc
    • After a spinal cord injury, the examiner will test reflexes for vital information about the nervous system. The pathway that is triggered to cause a reflex after a stimulus is known as the reflex arc. It is an autonomous neural circuit that is triggered by sensory nerves, such as those in the skin and travels to synapses in the spinal cord to excite motor nerves and quickly cause a muscle reaction. It is not dependent on brain activity.

    Special Test:

    For Cervical Spine:

     Distraction Test:

    distraction test
    distraction test
    • The importance of this examination: Cervical radiculopathy identification
    • The first of the patients is lying down.
    • An examiner flexes the patient’s neck to a comfortable posture, grasps beneath the chin and occiput, and controls a little distracting force of up to about 14 kg.
    • When a patient’s scapular or upper extremity symptoms decrease or are absent, the test is positive. If a patient doesn’t show any symptoms in the upper extremities or even the scapular region, a test is not recommended.

    Jackson compression test:

    Jackson-compression test
    Jackson-compression test
    • Ways to perform this examination to the patient:
    • The patient must sit. An examiner passively tilts a patient’s head to either side while standing behind them and placing a hand on top of their head. An examiner applies axial pressure to the spine by pressing down on the head during maximum lateral bending.
    • Examination: Increased compression of the facet joints, exiting nerve roots, and intervertebral disks is the outcome of an axial loading. Distal discomfort that does not completely match the identifiable segmental dermatomes is caused by pressure on the intervertebral foramina acting on a facet joint.
    • Radicular pain symptoms may arise from inflammation of the nerve roots.

     Cervical rotation and lateral flexion Test:

    cervical rotation and lateral flexion test
    cervical rotation and lateral flexion test
    • Goal
    • This test is used to assess whether brachialgia patients have hypomobility in their first ribs.
    • Method
    • During this test, the patient is primarily seated. The cervical spine is rotated both maximally and passively away from the side that is being examined. An ear is moved toward the chest while the spine is gently flexed as far as possible to preserve the position.
    • Blocking a lateral flexion motion is a positive result for this test.

    Flexion compression Test:

    flexion compression test
    flexion compression test
    • How to perform this test: The patient is asked to sit down. In addition to standing behind the patient, an examiner passively tilts the patient’s head forward by moving the cervical spine into the flexion position. The top of the head is then placed under axial compression.
    • How to do an examination: It’s a good way to check an intervertebral disk’s integrity. An extruded piece of a disk may be pressed posteriorly by the technique if there is posterolateral disk extrusion present, which would increase the compression on the nerve root.
    • The presence of posterolateral disk extrusion may be indicated by an increase in radicular symptoms.

    Extension Compression Test:

    • The test can be performed with the patient sitting and the examiner standing behind them. The cervical spine is 30 degrees extended. Axial compression is applied to the top of the skull by the test, who is in charge of the examination department.
    • How to do an examination: The test examines an intervertebral disk’s integrity. Shifting pressure on the disks anteriorly could reduce symptoms in cases where there is a posterolateral extrusion with the intact annulus fibrosus.
    • Could aggravate the discomfort without causing radicular sensations, which typically signifies irritation in the facet joints due to decreased mobility caused by degenerative changes.

    Vertebral Artery Test:

    • Test’s method
      A cervical spine’s active range of motion is often completed before a passive examination.
    • The patient should next be placed in a supine position while the passive extension and side flexion of the head and neck are performed.
      Rotate a neck passively to the same side and keep it there for around 30 seconds.
      Attempt to repeat the test by moving your head to the other side.
      If there is pronation of the hands, loss of balance, or falling of the arms, the repeat test is deemed positive; this suggests a decreased blood flow to the brain.
    • Modifications: Next, rotate a head as far as possible to the tested side and maintain the position for around five to seven seconds.
      For five to seven seconds, return to neutral.
      Hold your head out for 10 to 11 seconds.
      For five to seven seconds, go back to the neutral position.
      For nine to fifteen seconds, the head is maximally extended and rotated (against the opposing testing side).
      The five D’s—dizziness, diplopia, dysarthria, dysphagia, drop attacks, nausea and vomiting, sensory abnormalities, and nystagmus—are examples of positive symptoms.

    For the Thoracic spine,

    Prone Knee Bend Test:

    prone knee bend test
    prone knee bend test
    • To determine whether neural stress is causing the patient’s symptoms.
    • Test Position: Prone.
    • How to succeed in a test: For forty-five seconds, the examiner passively flexes the patient’s knee until it reaches the end range. It is not advised to rotate the hip. Anterior thigh discomfort may be caused by neural tension in the femoral nerve or a tight or strained quadriceps muscle. One-sided lumbar, buttock, or posterior thigh discomfort may be the result of lumbar radiculopathy of the L2-L3 nerve roots.
    • Test Relevance
    • Knee flexion puts tension on the femoral nerve and its rootlets since it runs along the anterior aspect of the lower extremity. If the femoral nerve becomes lodged in the tissues it travels through, pain or other neurological symptoms could manifest in the lower extremities.
    • By applying stress on the whole nerve and its rootlets, the slump test may reveal radicular discomfort or pain resulting from irritation of the spinal structures. The test should not be utilized only for diagnosis, even though the femoral nerve’s innervation may irritate the L2-L3 nerve roots.
    • Treat the patient’s deficits’ underlying cause as you would ordinarily. You should be able to identify the pathology and decide how to treat a patient with the help of the location of the pain and symptoms.

    Slump Test:

    slump test
    slump test
    • The neural tension test, often known as a “slump test,” is primarily used to check for changes in neurodynamics or even sensitivity in neural tissue.
    •  Method:
    • The slump test is described differently in several sources. One common characteristic across sources is the reproduction of pain when the dura is subjected to stress during testing. The following method was inspired by Mark Dutton.
    • Described:
    • Before the test begins, a patient may be seated with their hands behind their back to produce a neutral spine. The initial step is to slump the patient forward at the lumbar and thoracic spines. If the patient doesn’t have pain, let them stretch their neck by resting their chin on their chest and then extending one knee as far as they can.
    • If extending a knee hurts, have the patient extend their neck into the normal position. If the patient still feels discomfort when extending their knee, the test is considered positive.
    • If extending the knee does not cause pain, ask the patient to aggressively dorsiflex the ankle. If the patient is experiencing pain, have them slightly flex their knee while still dorsiflexing. If the discomfort reappears, the test is considered positive.
    • Repeat the test on the other side.
    • It is possible to apply excessive pressure in any of the test positions.

     Straight Leg Raise:

    straight leg raise leg
    straight leg raise leg
    • Method
    • Passively, a typical straight leg raise is performed. First, the unaffected leg is checked, and then each leg separately. To maintain knee extension while the patient is lying down, the clinician places their proximal hand on the patient’s distal thigh (anterior) and their distal hand around the patient’s heel while standing on the side being examined.
    • The healthcare provider lifts the patient’s leg by the posterior ankle while maintaining the patient’s knee completely extended. The physician continues to slowly raise the patient’s leg by flexing the hip until the patient experiences the same tightness in the posterior thigh or back.
    • When pain arises, the examiner ceases hip flexion and notes the site of the pain and range of motion. The range of motion between the affected and unaffected legs can be used as an outcome measure. It should be emphasized, nevertheless, that the correlation between the scores for this is low.
    • A true positive SLR test should show the following symptoms: Radicular leg discomfort (below the knee).
    • Pain occurs when the hips flex 30 degrees, 60 degrees, or even 70 degrees from the horizontal plane. Lumbar disc herniation at the L4-S1 nerve roots is indicated by neurological pain in the leg and lower back between 30 and 70 degrees of hip flexion. Tightness in the hamstrings, gluteus maximus, or hip capsule, or an issue with the hip or sacroiliac joints, maybe the cause of pain that arises at more than 70 degrees of hip flexion.
    • A disc herniation or a more central pathology is most likely the cause of the pressure on the spinal cord’s anterior theca if back pain is the primary problem. In a sense, people with plate prolapses experience more minor, more focused prolapses.
    • A pathology that applies pressure to neurological tissue or even tissues is more likely to be lateral if the pain is frequently felt in the leg.
    • Disc herniations or other conditions that put pressure between the two extremes are more likely to induce discomfort in both places.
    • Additionally, nerve root irritation such as facet joint cysts or hypertrophy may show up on the SLR test. A positive SLR test can also be caused by inflammatory radiculopathy or intraspinal malignancies.

    Passive Neck Flexion:

    • To learn how the patient’s symptoms are affected by neural strain, do the Passive Neck Flexibility Test.
    • Test position: supine.
    • How to perform the examination: The patient nods actively in the upper cervical region. The examiner passively flexes the lower cervical spine. When the thoracic spine replicates pain or other neurological signs, the test is considered affirmative. Stretching is a common sensation.
    • The diagnosis’s accuracy is unknown.
    • Test Relevance: As nerves pass through the many tissues of our body, they may become adhered to certain structures. This test aims to reproduce these symptoms by applying tension to the spinal cord by cervical flexion.

    Adson’s test:

    adson test
    Adson test
    • Objective
    • Adson’s test is a stimulating test for Thoracic Outlet Syndrome, which is characterized by tight anterior and middle scalene muscles or rib compression of a subclavian artery. When there is no lateral flexion motion, the test is considered successful.
    • The Technique’s Starting Point
    • With their elbow completely extended, the patient can be positioned either sitting or standing.
    • The patient’s arm is maximum extended and abducted 30 degrees at the shoulder while they are seated or standing.
    • The examiner feels the radial pulse while holding the patient’s wrist.
    • After that, the patient is instructed to move their head toward the affected shoulder, lengthen their neck, and take a deep breath and hold it.
    • Throughout the operation, the quality of the arm resting at the patient’s side is compared with the quality of the radial pulse.
    • Some physicians advise patients to move their heads away from the side being evaluated as part of a modified test.
    • Test Results:
    • The test is considered successful if the radial pulse rapidly reduces or disappears. The radial pulse on the opposite arm must be checked to determine the patient’s normal pulse.
    • The positive side should be contrasted with the non-symptomatic side.

    Roos Stress Test:

    Roos stress test
    Roos stress test
    • The Roos Stress Test is a diagnostic technique used to detect thoracic outlet syndrome (TOS). Another name for it is the “elevated arm stress test,” or “EAST.”
    • Starting position: The patient is positioned with both arms in the 90° abduction-external rotation position and the frontal plane of the chest.
    • The patient is told to open and close their hands gradually for three minutes.
    • The only signs of TOS that could occur are forearm muscle tiredness and little discomfort:
    • Shoulder and neck pain that gradually worsens and spreads down the arm When artery compression occurs, paraesthesia occurs in the fingers and forearm: In the situation of venous compression, reactive hyperemia occurs when the limb is dropped, and pallor occurs when the arm is raised: Reproduction of normal symptoms includes swelling and cyanosis, the difficulty to complete the test, and the patient putting their arms on the floor in noticeable pain.

     Halstead Test:

    • The purpose of the Halstead Test is to search for indications of a potential thoracic outlet syndrome.
    • Method
    • The patient is standing or sitting. The therapist continuously feels the radial pulse on the side that is being checked. While abducting the arm to 45 degrees, extending the shoulder to 45 degrees, and externally twisting the upper extremity while still feeling the radial pulse, the therapist delivers a downward distraction to the arm. The patient is then told to stretch her cervical spine and turn her head completely away from the side being evaluated.

    For lumbar spine,

    Schober test:

    Schober test
    Schober test
    • The Schober test’s objective is to gauge the extent of lumbar spine bending.
    • Method = To determine the extent of lumbar spine flexion, the Schober test can be used.
    • There is a spot between the two PSIS. Characterizes the S2-level pelvic dimples.
    • Points are then drawn 5 cm (2 inches) below and 10 cm (4 inches) above the level.
    • The patient is asked to bend forward while the three locations are being measured, and the distance is then measured once more.
    • The difference between the two measures indicates the degree of flexion occurring in the lumbar spine.
    • A variation of the Schober test that can also evaluate extension is not well understood.
    • After the flexion movement was complete, the patient stretched their spine, and the spacing between the markings was noted.
    • Additionally, Little suggested spacing four marking points 10 cm (4 inches) apart.

    Bragard’s Signs:

    Bragard 's sign
    Bragard’s sign
    • The Bragard’s sign also called the Braggard’s test, is used to determine whether lumbar or ischemic pain is due to lumbosacral radiculopathy (such as disc herniation causing nerve root compression.
    • Method
    • On his: back, the patient is resting. The Lasegue’s Sign or Straight Leg Raise Test: Passively raising the straight leg into hip flexion is done until the noticeable discomfort is felt. The leg is then dropped slightly below the threshold of discomfort, bringing the foot into dorsiflexion. A useful sign for Bragard is a recurrence of the usual pain. This would suggest that the patient’s pain was caused by an involvement of the neurological system.

    Yeoman’s test:

    • This Yeoman’s examination is intended to evaluate lumbar spine pain.
    • Method: The patient lies down in the prone position for the exam.
    • In order to stabilize the pelvis, the examiner (therapist) extends the patient’s knee. Next, they extend each patient’s hip.
    • The examiner (therapist) next stretched each patient’s leg separately while keeping the knee bent.
      In every situation, the patient is passive.
      Lumbar spine pain all over any test component indicates a good outcome.

    Quadrant test:

    • Finding the maximal constriction of the intervertebral forearm is the aim of this quadrant exam. Method: The patient and the examiner both stand up while the examiner stands behind them. To control the motion, the examiner (therapist) grasped the patient’s shoulder as they stretched their spine. By grasping the occiput with the shoulders, the examiner can bear the weight of the head. As the patient’s side flexes and rotates to the uncomfortable side, too much pressure is applied during the extension.
    • The movement continues until the top limit of the range is reached or until symptoms start to show. This led to maximal contraction of the intervertebral forearm and stress on the facet joints on the side where rotation took place. If symptoms are present, the test is positive. Cipriano described a quadrant test that was comparable to Kemp’s test.

     One leg standing lumbar extension test:

    one leg standing lumbar extension test
    one leg standing lumbar extension test
    • The pathophysiology of the facet joints is evaluated with this one-leg standing lumbar extension test.
    • Method: The patient balances and stands on one leg while extending their spine.
    • The patient stands on the opposite leg during the exam.
    • The results show that a positive test is associated with back pain and pars interarticularis stress fracture (spondylolisthesis).
    • If rotation comes along with extension and pain, it may indicate facet joint disease on the affected side.

     Crossed Straight Leg Raise Test:

    • The examiner bends the unaffected leg at the hip while the patient is in a supine position, keeping their knee extended.
    • The test is deemed successful when the patient experiences pain in the affected limb at a 40-degree hip flexion angle.

     Milgram test:

    • The goal of the Milgram test is to look for any neurological issues in the leg.
    • The initial supine position of the patient is referred to as the method.
    • After that, the patient is told to actively raise both legs off the examination table simultaneously, raising them 5 to 10 cm (2 to 4 inches) above the floor and holding them there for 30 seconds.
    • Result: If the limbs or affected limb cannot be held for 30 seconds or if the symptoms are replicated during the test, the test might be deemed positive.

    FAQs

    What is the number of nerves in the spine?

    31 pairs
    There are 31 spinal nerve pairs in all, organized by spinal region. In particular, there is a single coccygeal nerve pair, eight cervical nerve pairs (C1-C8), twelve thoracic nerve pairs (T1-T12), five lumbar nerve pairs (L1-L5), and five sacral nerve pairs (S1-S5).

    What shape is a good spine?

    The spine of a healthy back is shaped like a “S” by its three natural front-to-back curves. Problems might arise from either too little curve (flat back) or too much curve (swayback).

    What is the spine’s basic anatomy?

    The cervical, thoracic, and lumbar spines are the three primary segments of the spine. Comprising seven vertebrae, the cervical region is the uppermost segment of the spine. With twelve vertebrae, the thoracic region is the middle part of the spine.

    How is a back examined?

    Observe the patient get up. First, check the patient’s back for any visible signs of asymmetry, scoliosis, or muscle atrophy. Check for proper lumbar lordosis, thoracic kyphosis, and cervical lordosis from the side.

    A positive Spurling test is what?

    When radicular pain that radiates to the shoulder or upper extremities ipsilateral to the direction of head rotation—is replicated, the test is deemed positive. By compressing the afflicted nerve root, the Spurling Test is intended to replicate symptoms.

    The th4 syndrome: what is it?

    T4 syndrome is described as “a pattern that involves upper extremity paresthesia.”Thoracic hypomobility may be the cause, but sympathetic origins are also possible. ‘Bilateral stocking-glove’ paresthesia, headaches, and arm and neck pain are common symptoms.

    References:

    Professional, C. C. M. (2025a, January 24). Spine structure and function. Cleveland Clinic. https://my.clevelandclinic.org/health/body/10040-spine-structure-and-function
    The spine: anatomy and function. (2024, August 19). National Spine Health Foundation. https://spinehealth.org/article/spine-anatomy/
    Articles. (n.d.). https://www.cedars-sinai.org/health-library/diseases-and-conditions/a/anatomy-of-the-spine.html
    American Association of Neurological Surgeons. (2024, September 6). Anatomy of the Spine and Peripheral Nervous System – AANS. AANS.
    Spine Basics – OrthoInfo – AAOS. (n.d.). https://orthoinfo.aaos.org/en/diseases–conditions/spine-basics/
    Examination of the spine – TeachMeSurgery. (2022, November 19). TeachMeSurgery. https://teachmesurgery.com/examinations/orthopaedic/spine/
    Spine examination. (n.d.). https://examination.lexmedicus.com.au/collection/spine

  • Slipping Rib Syndrome

    Slipping Rib Syndrome

    What is a Slipping Rib Syndrome?

    Slipping Rib Syndrome is a condition where the lower ribs (typically the 8th, 9th, or 10th) become hypermobile due to weakened or damaged ligaments connecting them to the rib cage.

    This can cause the rib to slip or move excessively, leading to sharp, intermittent pain in the chest or upper abdomen, often worsened by certain movements or deep breathing. Diagnosis can be challenging, and treatment options range from conservative management, such as physical therapy and pain relief, to surgical intervention in severe cases.

    Overview

    The hallmark of slipping rib syndrome (SRS) is pain in the upper abdominal or lower chest area caused by intercostal nerve impingement due to abnormal false rib movement (8–12) associated with unstable coastal cartilaginous attachments.

    There are numerous names for slippery rib syndrome, including:

    • Clicking rib
    • Displaced ribs
    • Rib tip syndrome
    • Costal margin syndrome
    • Floating rib syndrome
    • Painful rib syndrome
    • Slipping-rib-cartilage syndrome
    • Gliding ribs
    • Traumatic intercostal neuritis
    • Twelfth rib syndrome
    • Cyrix syndrome
    • Endochondral subluxation, among others.

    A little-known cause of intermittent muscular chest pain is slipping rib syndrome. It begins abruptly and intensely and then gradually lessens. It occasionally makes a popping or clicking sound.

    It occurs when the cartilage connecting two of your lower ribs becomes unstable or loose. When one of the ribs slips in and out of place, it irritates your intercostal nerve. When the sides of your ribs move a bit more than usual, you may have pain in your upper abdomen or lower chest, which is known as slipped rib syndrome.

    Ribs are the bones that surround your upper torso the middle of your chest. They serve as a link between your spine and breastbone. There are numerous names for slipping rib syndrome. Displaced ribs, clicking rib syndrome, floating rib syndrome, gliding rib syndrome, rib-tip syndrome, and Cyriax syndrome are just a handful of these.

    The medical term for this condition is interconal subluxation. A subluxation occurs when a joint partially dislocates. The cartilage (chondral) tips of your lower ribs attach to the rib above at your interconal joints.

    Relevant Anatomy

    Ribs come in three varieties:

    • The true ribs, which are the first seven, are joined to the sternum by cost sternal joints and ligaments.
    • False ribs (the eighth to tenth) are ribs that are joined to one another by a weaker cartilaginous or fibrous band. The ribs that aren’t joined to the sternum or one another (the 11th and 12th floating ribs)
    • The disease results from the anterior ends of the false rib costal cartilages being hypermobile, which frequently causes the affected rib to slide beneath the superior neighboring rib. A sprain of the lower costal cartilage, a strain of the intercostal muscles, an irritation of the intercostal nerve, or general inflammation in the affected area might result from this slipping or movement. They are more mobile and more vulnerable to shock because of their poor relationship. Since the posterior thoracic region is a closed system, anterior rib hypermobility is similarly likely to result in issues there.

    Epidemiology

    It is regarded as an uncommon condition that causes around 5% of all primary care musculoskeletal chest pain. This relatively uncommon but known cause of recurrent lower chest and upper abdominal pain in teenagers can occur at any age, but it is more common in middle-aged women.

    Although it primarily affects middle-aged persons, reports of it have been made in people as young as 7 and as old as 86.

    Pathophysiology

    The ends of the ribs curl up inside and press against the intercostal nerves due to subluxation of the rib tips caused by disturbed articulation. The pain is caused by the impingement, which repeatedly irritates the intercostal nerves. It is caused by the costal cartilage slipping, which causes a false rib to shift and pin beneath the nearby superior rib, irritating the nerves.

    Causes

    This syndrome typically affects the bottom portion of your rib cage, namely the eighth to tenth ribs (sometimes referred to as false ribs). The sternum is not attached to these ribs, which are held together by fibrous tissue or ligaments, which aid in their stability. Due to the relative weakening of the ligaments, the ribs may move a bit more than usual, which can be painful.

    It’s unclear exactly what causes slipping rib syndrome. Although cases of slipping rib syndrome have been documented without any significant injuries, it may develop with trauma, injury, or surgery.

    It is thought to be caused by hypermobility of the ligaments or the costochondral rib cartilage, specifically ribs 8, 9, and 10. These three ribs are joined to one another by loose fibrous tissue rather than the sternum. They are referred to as fake ribs at times. They are therefore particularly vulnerable to trauma, damage, or hypermobility.

    This movement or slipping rib syndrome causes pain and inflammation by irritating the nerves and possibly straining certain nearby muscles.

    The following circumstances can lead to ribs slipping:

    • Direct trauma.
    • Indirect trauma from twisting, or jerking movements.
    • Muscle tissue attached to the ligaments degenerating.
    • A severe and continuous cough.

    The following factors may contribute to the condition:

    • Chest injury sustained while participating in contact sports including football, ice hockey, and wrestling.
    • A direct injury to your chest or a fall
    • Quick twisting, pushing, or lifting movements, such as swimming or baseball tossing
    • The surrounding muscles, nerves, and other structures are compressed when the ribs move. The area becomes inflamed and painful as a result.
    • Congenital anomaly of the chest wall
    • The breakdown of the cartilage part or connective junction of the rib
    • Hypermobility of the false ribs’ costal cartilages

    Although it can happen at any age, middle-aged adults are more likely to have sliding rib syndrome. Compared to men, women can be more affected.

    The following symptoms are indicative of slipping rib syndrome:

    • Severe pain above the costal edge in the upper abdomen or lower chest, primarily at the height of the eighth, ninth, and tenth ribs (false ribs).
    • A location for a tender on the costal margin
    • Reproduction of the pain through external factors or by applying pressure to the delicate spot
    • Although the signs and symptoms are often unilateral, people have occasionally reported bilateral pain.

    Signs and symptoms

    The disease typically affects one side. On rare occasions, it might happen on both sides. Among the symptoms are:

    • Severe upper abdominal or lower chest pain. With time, the pain may subside and return.
    • A sound like popping, clicking, or slipping.
    • Pain when the affected part is compressed.
    • Lifting, twisting, bending, coughing, and laughing can all exacerbate the pain.
    • Pain in the lower anterior chest wall and upper abdomen.
    • Pain on the sides of your back just below the rib cage
    • Sensitivity to the impacted coastal margins
    • Periodically experiencing a strong, stabbing pain in the back or upper abdomen, which is followed by a dull and throbbing feeling.
    • Difficulty while breathing
    • Symptoms get worse when you bend, lift, cough, sneeze, breathe deeply, stretch, or roll over in bed.
    • Interestingly, she discovered that using a swing machine was particularly likely to cause pain and that specific movements, including sitting and leaning forward, preceded pain.

    The following distinguishing features of slipping rib syndrome pain can be utilized to diagnose the condition:

    • Sharp, stabbing pain that comes and goes, followed by a dull, continuous agony that can linger for hours or weeks.
    • Pain can range in intensity from a little annoyance to moderately severe pain that interferes with everyday tasks.
    • It has also been reported to radiate to the chest or the same level in the back from the costochondral region.
    • Exacerbated by specific positions and motions, such as coughing, walking, carrying weights, bending, twisting the trunk, lifting, extending, reaching, driving, getting out of a chair, lying or turning in bed, or coughing.
    • May have an impact on sports that require deep breathing and trunk motions, especially swimming, jogging, horseback riding, and arm abduction. Patients may experience pain that prevents them from participating in sports.
    • Several somatic and visceral symptoms, such as biliary or renal colic, may also result from the intimate relationship between the sympathetic nervous system and the intercostal nerves. Visceral innervation converges at the same spinal cord levels as sliding ribs and intercostal nerves.

    Risk factor

    The chance of getting SRS can be increased by the following factors:

    • The pain is caused by physical trauma from overuse.
    • Sudden flexion or extension, prolonged weight bearing on one side, or physical activity like swinging a bat, tossing a ball, or swimming vigorously.

    Diagnosis

    In addition to determining whether the patient has had recent trauma (which is not always present), constrained posture, or prior abdominal surgery, the physiotherapist looks for a correlation between specific movements or postures and the severity of pain and replicates the symptoms (e.g., pain, clicking).

    • Palpation: Tenderness above the costal edge is the most typical physical examination finding in cases of slipping rib syndrome. By palpating, the physiotherapist can replicate chest pain.
    • With specific movements, a painful click may occasionally be felt above the tip of the affected costal cartilage.
    • The Hooking maneuver is a successful test.

    The symptoms of slipping rib syndrome are similar to those of other illnesses, making diagnosis challenging. To determine when your symptoms began and whether anything you do exacerbates them, a doctor will first ask about your medical history. Before you begin feeling chest or abdominal pain, your doctor will want to know what you are doing and what activities you engage in.

    The hooking maneuver is a test used to diagnose slipping rib syndrome. Your doctor will hook your fingers under the rib borders and move them back and up to conduct this test.

    The primary problem is diagnosing SRS, which is determined by a thorough patient history, physical examination, and awareness of its existence. Nonetheless, the subsequent methods might be employed for diagnosis:

    • Hooking move: Create the symptoms again. The doctor pulls the hand anteriorly while placing his or her fingertips beneath the lower costal border in this rather easy clinical examination. A positive test result is indicated by pain or clicking.
    • A positive hooking maneuver might be followed with intercostal nerve blocks to confirm the diagnosis.
    • Valsalva, coughing, twisting, crushing, and push exercises can all be used in conjunction with dynamic ultrasonography of the ribs to detect SRS.

    Investigation

    • Given the nature of the pain and the numerous different chest or abdominal illnesses that can produce pain in this area of the body, diagnosing Slipped Rib Syndrome can frequently be challenging. To evaluate and look into Slipped Rib Syndrome, it is crucial to see a physician who is knowledgeable about the issue. Tenderness in the area may be relieved by a clinical examination, and sometimes the hypermobile rib tip can be palpated, which can cause pain if moved (the hook maneuver).
    • Patients may have undergone several tests already, and chest CT scans and even MRIs are frequently ineffective. A radiologist with experience in Slipped Rib Syndrome must perform dynamic ultrasound, which frequently enables the radiologist to show excessive movement of the affected rib tip.

    Differential Diagnosis

    Numerous disorders are included in the list of possible causes of slipping rib syndrome.

    • Cholecystitis
    • Esophagitis
    • Gastric ulcers
    • Stress fractures
    • Muscle tears
    • Pleuritic chest pain
    • Bronchitis
    • Asthma
    • Costochondritis
    • Appendicitis
    • Coronary heart disease
    • Metastatic bone disease. 
    • Peptic ulcer
    • Ureteric colic
    • Pancreatitis

    Treatment

    In certain instances, slipping rib syndrome goes away on its own without medical intervention; if not, the patient’s symptoms will determine the best course of action. When treating SRS, various conservative and non-conservative treatment philosophies might be considered.

    Non-Conservative treatment

    Surgery could be advised if the illness worsens or continues to cause excruciating pain. The following surgical techniques are possible:

    Adult Slipped Rib Syndrome: A Minimally Invasive Treatment Without Costal Cartilage Excision.
    In our initial experience, the rate of recurrence was considerably reduced by vertical rib plating with bioabsorbable plates.

    Things Not to Do

    Reassurance that the illness is benign together with information and guidance on avoiding certain postures Avoid the following activities:

    • Heavy lifting.
    • Twisting.
    • Pushing.
    • Pulling.

    Intercostal Nerve Blocks

    The following actions can be taken to trigger the symptoms if the pain persists after taking a pain reliever:

    • An injection of corticosteroids to help lessen the swelling
    • To lessen pain, an anesthetic is injected into the intercostal nerve during an intercostal nerve block treatment.

    Conservative Treatment

    Conservative treatment includes the following:

    • Rest.
    • Avoiding strenuous activities.
    • Using cold or heat to treat the affected area.
    • Oral medications like NSAIDs.
    • Topical analgesics.
    • Acetaminophen (Tylenol)
    • NSAIDs, or nonsteroidal anti-inflammatory medicines, include naproxen (Aleve) and ibuprofen (Advil, Motrin IB).
    • Physical Therapy.
    • Nerve blocks.
    • Local anesthetic injections
    • Manipulation of the ribs into place

    Surgical Options for Slipping Rib Syndrome

    Sutured repair

    • The physician stitches the ribs together in this repair. This procedure produces good results at first, but as symptoms reoccur, the suture repairs deteriorate over time.

    Costal cartilage excision

    • This entails cutting off the cartilage that caused the pain, but frequently, rib motion causes the pain to return. The ribs may be stabilized using a bridge plate.

    Costal margin reconstruction

    • This is the most recent method that lessens the need for revision surgery while providing pain relief. There may be less need for painkillers after this surgery. To stop the ribs from pressing on the nerve in the back after it has been taken out, the cartilage that is causing the nerve impingement is removed and some of it is auto-transplanted between the ribs.
    • A dissolvable plate is used to anchor the cartilage and ribs, allowing the cartilage to mend in place while maintaining sufficient flexibility for regular breathing.

    Physical Therapy treatment

    Manual therapy

    • Electric stimulation and costovertebral joint manipulation can help control the pain, but there is likely no long-term solution.
    • Rib tape might offer a brief sense of relaxation. Using a manual superior compression force applied through the postero-lateral aspect of the rib cage, determine the size and direction of taping. Now instruct the patient to rotate or inhale deeply. The tape should be applied at that level if the patient reports a noticeable improvement in symptoms.

    Rib mobilization with movement (MWM)

    • Rib mobilization with movement (MWM), as suggested by Brian Mulligan. Both pain threshold and range of motion are assessed. Above the uncomfortable area, a cranial glide is performed over the lateral aspect of the rib. The patient is requested to rotate once more as ROM and pain are assessed while maintaining this rib elevation (unloading). A rib above or below is used to repeat the technique if nothing changes. MWM is applied ten times to a rib at a particular level if it is determined to lessen or completely eradicate the pain.

    Home care program

    • Instructions: Actively rotate in the painful direction while raising the rib with the web space of one hand. Repeat as often as necessary. To reduce protective muscle spasms and local inflammation, the inflamed costovertebral joint should be moved as frequently as possible without causing pain.

    Which ribs are affected by slipping rib syndrome?

    Your ribs have numbers that run from top to bottom, totaling twelve. Ribs eight through ten are affected by sliding rib syndrome. Because they don’t connect to the top of your breastbone (sternum) directly, these are known as your “false ribs.”

    Each false rib, on the other hand, joins to the rib above it. Your interchondral joints are these cartilage-based attachment points. One of your artificial ribs will slip out of place if one of these joints weakens.

    Slipping rib syndrome is mislabeled as “floating rib pain” or “floating rib syndrome.” Your bottom ribs eleven and twelve are your “floating ribs.” There are no endochondral joints on these ribs.

    Because they solely adhere to your spine and not to your breastbone or other ribs, they are known as “floating ribs.” These ribs are unable to “slip” in the same manner. However, the tissues surrounding them could hurt.

    Conclusion

    • A thorough diagnostic evaluation is occasionally conducted for the frequently underdiagnosed condition known as “slipping rib syndrome.”
    • A rapid and easy diagnosis and the avoidance of months or years of persistent problems are possible with knowledge of the slipping rib syndrome.
    • The impingement may result in excruciating, ongoing pain and a slipping sensation that is triggered by many motions.
    • In addition, it may irritate the intercostal nerve or damage to nearby structures.
    • Understanding the syndrome is crucial since it can result in an easy and speedy diagnosis.
    • Pain from slipping ribs can be severe, perplexing, and terrifying, particularly if your doctor is unable to explain. Having persistent pain without a diagnosis or treatment plan is extremely frustrating.
    • Thankfully, slipping rib syndrome is becoming more widely known. Despite all of its mystery, it is merely an anatomical problem that may be fixed surgically; it is not a fatal nor incurable disease.

    FAQs

    How can slipping rib syndrome be resolved?

    Put ice or heat where the pain is. Wrap a handkerchief around the ice.
    Avoid actions like heavy lifting, twisting, pushing, and tugging that exacerbate the pain.
    To keep the ribs stable, put on a chest binder.
    Get advice from a physical therapist.

    My rib keeps falling out of position; why is that?

    When the intercostal cartilage between the ribs deteriorates and permits movement, it can lead to slipping rib syndrome. Hypermobility is a common term used to describe this movement. The cartilage may move as a result of physical harm, birth defects, or an unidentified cause.

    Can someone who has a slipped rib still work out?

    Resting the affected area and avoiding painful activities are usually the first steps in rehabilitation for this disease. This can entail avoiding activities that strain the rib cage and taking a break from sports or exercise.

    How can someone who has a slipped rib sleep?

    Use painkillers, cold and heat therapy, and rest to ease muscle soreness. To maintain your upper body supported and aligned when you sleep with intercostal muscle strain, you must arrange yourself correctly. Use a pillow to reduce pressure on the damaged area while you’re lying down, and take slow breaths.

    Is a protruding rib considered normal?

    A muscle weakening could be the cause of your rib cage’s minor protrusion or unevenness. Your rib cage is largely held in place by your abdominal muscles. One side of your rib cage may protrude or sit unevenly if the muscles on one side of your body are weaker.

    Is it possible for the slipping rib condition to resolve itself?

    Corticosteroids, physical therapy, and painkillers are all possible forms of treatment. However, it could disappear on its own in certain situations. When the cartilage on a person’s lower ribs slides and shifts, it can cause pain in the upper abdomen or chest.

    How can flared ribs be fixed?

    Although there are several techniques to address rib flare, muscle-strengthening activities are the most successful. If you want to improve the general health of your spine and posture, you must be consistent, committed, and determined. Rib flare can be resolved with breathing exercises, stretching, and massage.

    Is massaging broken ribs acceptable?

    Limit activities that could make the broken rib pain worse. Doctors will recommend complete rest. Using a bag of frozen peas or ice wrapped in a cloth, gently massage the affected area for 15 to 20 minutes, four to five times a day. This will lessen the pain and edema.

    Reference

    • Slipping rib syndrome. (2024, November 12). https://www.ucsfhealth.org/medical-tests/slipping-rib-syndrome
    • Cafasso, J. (2023, April 21). Slipping rib syndrome. Healthline. https://www.healthline.com/health/slipping-rib-syndrome#treatment
    • Slipping rib syndrome. (n.d.). Baylor College of Medicine. https://www.bcm.edu/healthcare/specialties/the-lung-institute/thoracic-surgery/slipping-rib-syndrome
    • Wikipedia contributors. (2024a, February 29). Slipping rib syndrome. Wikipedia. https://en.wikipedia.org/wiki/Slipping_rib_syndrome
    • Rib injury clinic. (n.d.). https://www.ribinjuryclinic.com/conditions/slipped-rib-syndrome/
  • Ankle and Foot Examination

    Ankle and Foot Examination

    Introduction

    The ankle and foot examination is a critical component of musculoskeletal assessment, focusing on evaluating the structure, function, and integrity of the bones, joints, ligaments, tendons, and surrounding soft tissues. A systematic approach typically includes inspection, palpation, range of motion assessment, strength testing, and special tests to identify conditions such as fractures, sprains, tendonitis, and deformities.

    Clinical evaluation aids in diagnosing injuries, guiding treatment plans, and monitoring recovery, particularly in patients with trauma, sports injuries, or chronic conditions like arthritis.

    Anatomy

    Ankle structure:

    • The foot may bend dorsiflex and plantarflex due to the ankle joint, also known as a talocrural joint. The subtalar, talocalcaneonavicular, and upper ankle joint (tibiotarsal) are its three constituent joints. The lower ankle joint is the collective term for the latter two.
    • The upper ankle joint is formed by the inferior surfaces of the tibia and fibula as well as the superior surface of the talus. The lower ankle joint is made up of the talus, calcaneus, and navicular bone. The joint is supported by the lateral collateral ligament and the medial collateral ligament, also referred to as the deltoid ligament.
    ankle and foot bone
    ankle and foot bone

    Foot bones:

    • Three groups comprise the 26 bones of the foot:
    • The seven tarsal bones
      Five bones in the metatarsals
      Fourteen phalanges
    • Tarsals offer a solid basis for supporting weight. They are similar to the carpals in the wrist and are divided into three groups: proximal, intermediate, and distal.
    • The calcaneus and talus are the proximal tarsal bones.
    • The middle tarsal bone is called the navicular.
    • The distal tarsals consist of a cuboid with medial, middle, and lateral cuneiform bones.
    • They aid in supporting the body’s weight. On the plantar side of the first metatarsal head, two distinct sesamoid bones are visible: a medial and a lateral one.
    • Phalanges also run parallel to the hand; the lateral four toes are made up of the proximal, middle, and distal phalanges. The great toe (hallux) is made up of only two phalanges: the proximal and distal.

    Foot joints:

    • In addition to the ankle joint that connects the foot and leg, the bones of the foot articulate with each other through a number of synovial joints. The four types of foot joints are intertarsal, tarsometatarsal, metatarsophalangeal, and interphalangeal.

    Foot muscles:

    • Foot muscles allow toe movements, plantar flexion and dorsiflexion, and foot eversion and inversion.
    • The foot muscles are made up of the dorsal and plantar groups. While the plantar muscles are further separated into three groups—medial, central, and lateral—the dorsal group is made up of only two muscles.
    • The dorsal foot muscles, which are found on the dorsum of the foot, are responsible for extending the toes. The extensor digitorum brevis and extensor hallucis brevis are these muscles.
    • The lateral, central, and medial groups of plantar foot muscles are separated by the foot’s deep fasciae. Plantar muscles can alternatively be viewed as four layers, even though they are depicted above as groups.
    • The lateral plantar muscles influence the fifth toe. The flexor digiti minimi brevis, abductor digiti minimi, and opponens digiti minimi are the muscles in question.
    • The central plantar muscles influence the lateral four toes. The flexor digitorum brevis, quadratus plantae, four lumbricals, three plantar interossei, and four dorsal interossei are among these muscles.
    • The medial plantar muscles influence the hallux, or great toe. The abductor hallucis, adductor hallucis, and flexor hallucis brevis are these muscles. Despite being anatomically located in the middle compartment of the foot, the adductor hallucis is functionally associated with the medial plantar muscles due to its actions on the great toe (hallux).

    Ankle nerves:

    • Nerves, which work similarly to cables, carry electrical signals from your brain to the rest of your body. These impulses might cause you to feel things and move your muscles. Your ankle contains the following nerves:
    • Tibial nerve.
    • Superficial Peroneal nerve.
    • Deep peroneal nerve.

    Ankle blood vessels:

    • Anterior Tibial Artery.
    • Posterior Tibial Artery.
    • Peroneal Artery.

    Disorders and Conditions:

    • Ankle and foot arthritis.
    • Gout.
    • Bursitis.
    • Tendinitis.
    • Foot flat.

    Sports-related ankle injuries are among the most common:

    • Ankle sprain.
    • Achilles tendon rupture.
    • Ankle fracture.

    Common indications of issues with the ankle joint

    • Discomfort, particularly when moving.
    • Swelling/inflammation.
    • Rigidity.
    • Instability.
    • Redness or discoloration around the ankle.
    • A feeling of warmth or comfort.

    History:

    • Pain, edema, deformity, stiffness, instability, and/or abnormal gait are among the common reasons why patients visit the foot and ankle.
    • Before seeing a new patient or one for whom a diagnosis has not yet been made, we encourage the examiner not to look at the prior records. This fantastic exercise allows the examiner to think more imaginatively by bringing fresh views to the problem.

    Pain:

    • Ask the patient to point to the exact spot where the pain is the worst with their fingers. When the pain is dispersed rather than focused in one area, try to identify which side or position is the most unpleasant.
    • Ask about the severity of the pain (0–10), whether it is associated with weight bearing (degenerative changes, stress fracture, or inflammatory conditions like plantar fasciitis), whether it radiates up the leg or toward the toes, whether it interferes with activity, whether it wakes you up at night, whether it is intermittent or persistent, whether it is related to walking distance, whether you are walking on a flat or uneven floor, whether it interferes with climbing and descending stairs, whether it is related to shoes, and whether there are any mitigating factors. (pain alleviation, relaxation, and preferred footwear)

    Deformity

    • Inquire about the duration of the deformity, the area it affects, when the patient or a family member first observed it, whether it is getting worse, and whether it is related to any other symptoms (e.g., discomfort, recurrent infections, skin ulcers, rapid shoe wear, or cosmetic).

    Swelling

    • Identifying whether the inflammation is bilateral or unilateral, localized to one area or the entire leg or ankle, activity-related, and how often and for how long is crucial. When bilateral edema involves the entire ankle and foot, it is usually linked to more systemic pathology, such heart or kidney problems.
    • Swelling that only affects the area around the ankle joint may be caused by inflammatory arthropathy or degenerative changes. However, localized edema is more likely to be caused by a particular local pathology.
    • For example, swelling anterior to the distal fibula may indicate chronic damage to the anterior inferior tibiofibular ligament (ATFL), whereas swelling posterior to the distal fibula may indicate disease of the peroneal tendon. Acute painful or painless swelling, with or without the midfoot deformity, might be a symptom of Charcot neuropathy.

    Unpredictability

    • Determine the time of the first sprain or instability incident, its frequency, and the potential etiology.

    History of Trauma

    Trauma history, including the date and details of any acute symptoms, as well as any identified infections, surgeries, injections, or treatments.

    Related symptoms

    Red flag symptoms like fever, night sweats, or weight loss should be closely monitored as they may be signals of malignancy or an infection. Peripheral neuropathy or spinal issues are usually linked to neurological symptoms including burning, limb weakness, or numbness.

    Examining the patient’s shoes, insole, and walking aids:

    First, ascertain whether the patient is wearing surgical or retail shoes. Look at the wear pattern, which usually affects the outside of the shoe heel. Different wear patterns suggest unusual foot-ground interaction.

    Early lateral, proximal, or mid-shoe wear indicates a supination deformity, whereas wear along the medial border indicates a pronation deformity. It can only display a brand-new, unworn pair of shoes if there is no wear. Look for any orthoses or walking aids. Examine each insole and let the patient know which one is comfortable and which hurts.

    Standing examination:

    • The patient is seated in a chair at the start of the examination in most clinical settings. After telling the patient to stand up, assess the general alignment of the lower limbs. Watch for significant abnormalities of the valgus or varus knee. Examine the alignment of the spine for signs of scoliosis and look for any signs of pelvic tilt. Look for any signs of thigh or calf muscular atrophy.
    • Check the arches of the feet from the side for pes cavus, pes planus, and any swelling or scarring. Look for huge toe deformities like hallus valgus, hallux valgus interphalangeus, or hallus varus, or minor ones like claw toes, hammer toes, or mallet toes. The medial side heel pad should not be seen when viewing a normal ankle from the front. If it was visible, pes cavus would have what is called the “peek a boo” sign. Because a wide heel pad or visible metatarsal adducts could provide a false-positive result, it is important to compare both sides.
    • Gait: Determine when the patient can walk without assistance and be prepared to assist elderly patients and those who may have difficulty standing. Ask the patient to walk as they normally would. Examining the front and rear gaits facilitates the assessment of shoulders and pelvic tilt. analyzing first contact, hip and knee motions, antalgesia, stride length, cadence, and the three rockers.

    Observation:

    Carefully inspect the sole first, followed by the rest of the foot. Examine the nails, scars, ulcers, hard or soft corns, callosity (thickened skin), lack of hair (circulatory changes), and any other signs of infection.

    Palpation:

    First, ask the patient if any areas are uncomfortable to touch to avoid causing discomfort throughout the examination. Then you start by feeling the skin’s temperature softly, continuously comparing it to the other side.

    Neurologic Evaluation:

    • With the help of a neurologic evaluation, the physical therapist might be able to identify the potential neurological origin of the observed ankle or other foot pathologies. This includes peripheral neuropathy and even central nervous system disorders.
    • A thorough neurological examination may include inspection, reflex testing, assessment of muscle tone, Achilles tendon (S1), Patella Ligament (L3/L4), sensory testing (proprioception, light touch, sharp/dull), plantar reaction (also called a Babinski response), clonus, and more.

    Vascular Evaluation:

    • If circulation is found to be poor, a physical therapist may palpate to assess the dorsalis pedis artery pulses.
    • The state of a vascular system can also be assessed by observing how symptoms respond to elevation of the lower limbs and positions of reliance.

    Movement Examination:

    • When assessing the ankle and foot’s active range of motion (AROM) and passive range of motion (PROM), a patient may find comfort in any of the testing positions. Ankle dorsiflexion and plantarflexion, for instance, are assessed when the patient is prone.
    • If the patient is unable to assume the necessary posture, a physical therapist may modify the position and document it for additional testing.
    • When an ankle fracture has been ruled out but the patient is unable to fully participate in a range of movement evaluation due to discomfort, the best course of action is to immobilize the ankle joint and delay the investigation until the pain subsides.

    Special tests:

    Knee To Wall Test:

    Knee to wall test
    Knee to wall test
    • Must always be performed while assessing injuries to the feet and ankles:
    • Provide a method for calculating the dorsiflexion range of motion of the ankle joint.
    • Examining conditions such as foot overpronation or plantar fasciitis requires
    • Place your toes against the wall to start the test, then slowly back away. The distance between your toes and the wall is measured with the ruler and recorded for future use and assessment.

    Ankle’s Anterior Drawer Test:

    Anterior drawer test
    Anterior drawer test
    • The purpose of the reported test was to determine whether the talocrural joint (also known as the higher ankle joint) was connected with any ankle mechanical imbalance or perhaps hypermobility in the sagittal plane.
    • How to finish this exam
    • With the ankle bent 20 degrees and the heel resting on the examiner’s palm resting on the table, the patient can lie comfortably in a supine position. A calcaneus is stabilized as a result.
    • An examiner then stabilizes the tibia and fibula while drawing the calcaneus anteriorly in order to gauge the amount of anterior translation at the lateral aspect of an ankle and the final change in feel. It is noted how much anterior translation there is as well as how the end feeling eventually deteriorate from hard ligamentous to weakly elastic.
    • A posterior translation of more than 1 cm relative to a healthy opposing ankle and a discernible loss of end feeling are the most prominent indicators of a partial or even complete rupture of the anterior talofibular ligament.
    • This test has a 4-point rating system. No laxity is represented by a value of 0 and excessive laxity by a value of 3.

    One Leg Stance Test:

    • The One Leg Stance (SLS) Test is used to assess balance control and static posture.
    • An essential clinical tool for managing fall risk and monitoring neurological and musculoskeletal disorders is the balance test, such as the SLS test.
    • Approach
    • finished with your eyes wide and both hands on your hips.
    • The client can stand unassisted on one leg if the timer is set to start when another toe leaves the floor and stop when the foot touches the floor again and the arms release the hips.
    • If a client can’t stand for five seconds or less, they are more likely to get hurt in a fall.

    Squeeze Test’s:

    • Syndesmotic ankle sprains can be diagnosed with the help of the squeeze test. The literature suggests that the squeeze test, also known as the fibular compression test, should be performed in tandem with the ankle external rotation test.
    • Approach
    • The squeeze test evaluates the strength of the bone, the interosseus membrane, and the syndesmotic ligaments by applying pressure to the proximal fibula on the tibia. Positive pain is experienced when a fracture or diastasis occurs.

    Kleiger’s test:

    • Kleiger’s examination, also known as the external rotation, is used to assess inferior tibiofibular syndesmotic sprains, deltoid ligament sprains, and medial ankle sprains.
    • The patient is seated with their knee bent at a 90-degree angle and their ankle relaxed.
    • Examiner
    • While the patient sits at the level of the ankle to be assessed, one hand stabilizes the leg from behind while the other hand neutrally grasps the ankle and rotates the foot externally.
    • Nussbaum et al. experimented with the ankle fully dorsiflexed.
    • A positive test result
    • whether there is pain medially or at the location of the interosseous membrane. Depending on the extent of the damage, pain may spread to the leg.

    Thompson Test:

    Thompson test
    Thompson test
    • Approach
      The patient lies prone with one foot over the end of the table. With his knee bent 90 degrees, the patient could also lie prone. The examiner presses on the gastrocnemius-soleus complex and other calf muscles with his hand. When the calf is compressed, the Achilles tendon should contract, causing plantar flexion. There will be no plantar flexion if the Achilles tendon is torn.
    • Three more clinical indicators that support the diagnosis of Achilles tendon rupture are as follows:
    • A foot on a ruptured side hangs straight down because the tendon tone is weak. Before a tendon penetrates into the calcaneus, it may have a discernible gap of three to six centimeters. The capacity used for plantar flexion is significantly reduced when the patient is lying prone with their ankles fully relaxed.

    Prone Anterior Drawer Test:

    prone anterior drawer test
    prone anterior drawer test
    • An alternative method for performing an anterior drawer examination of the ankle is to have the patient lie prone with their ankle and foot sticking out past the plinth’s end.
    • The examiner applies a continuous anterior push through the patient’s heel while holding the patient’s foot near the talofibular joint with one hand. Both sides of a translation are compared.
    • An explanation
      Compared to the uninjured foot, the foot has more anterior motion and has cracking on both sides near the Achilles tendon. This implies a successful test outcome.
    • A positive test also indicates a rupture of the anterior talofibular joint. This ankle test has no known psychometric properties.

    Navicular Drop Test:

    • Place the patient standing so that their full weight is supported through the lowest point, keeping the foot in the subtalar joint’s neutral position.
    • Note the distance between the floor or step that supports the navicular tuberosity and its most conspicuous component. Use a ruler to measure the navicular sagittal plane excursion after the patient has calmed down. The test can also be administered in reverse, with the subject standing in a relaxed, talar-neutral stance.
    • Many doctors also use an index card placed inside the foot to record the beginning and ending locations of the navicular, then use a ruler to quantify the difference.

    Eversion Stress test:

    • The eversion stress test, also known as the Eversion Talar Tilt test, evaluates the durability of the deltoid ligament.
    • Techniques
    • For the Inversion stress test, the participant is positioned similarly. The examiner stabilizes the distal tibia while everting and abducting the heel. Both sides are put to the test.
    • The damaged side may be more uncomfortable and loose than the unaffected side if the test results are positive. A complete tear is indicated by a spongy or inconsistent finish.

    Talar tilt test:

    • The talar tilt test, also called the inversion stress test, places stress on the calcaneofibular ligament.
    • Procedure
    • The patient’s knee is fully extended when they are sitting or lying supine.
    • The examiner stabilizes the distal leg with one hand while holding the heel with the ankle in a neutral position. The heel is positioned inverted with respect to the tibia.
    • The talus and calcaneus must be held together to avoid excessive subtalar movement.
    • A clunk or pain in the ligament area would be indicative of a positive test. A spongy or indeterminate end feel and an outward translation of more than 5 degrees on the injured side relative to the unaffected side are signs of a complete tear of the CFL.

    FAQs

    What is the foot and ankle’s basic anatomy?

    Complex joints formed by the ankle and foot facilitate mobility and provide stability and balance to the body. The foot and ankle are composed of 26 bones, 33 joints, and a large number of muscles, tendons, and ligaments. The three bones that comprise the ankle joint are the talus, fibula, and tibia.

    Which ankle issue is the most prevalent?

    Ankle fractures, sprains, and strains are among the most common orthopedic injuries. Although ankle injuries are commonly considered sports injuries, you don’t have to be an athlete to sustain one. Ankle twisting and pain could be caused by something as simple as walking on an uneven surface.

    What is the number of ligaments in a foot?

    The plantar fascia, the calcaneocuboid ligament, the Lisfranc ligaments, and the plantar calcaneonavicular ligament—also referred to as a spring ligament—are the four major ligaments of the foot.

    Which seven tarsal bones are they?

    Calcaneus, talus, cuboid, navicular, and the internal, middle, and exterior cuneiforms are the seven bones that make up the tarsus.

    Which three unique tests are utilized to diagnose ankle sprains?

    Among the other special tests is the ankle ligament stress test. talar tilt test. Eversion stress test.

    When assessing an ankle injury, what are the five things to look for?

    Walking is observed in the patient, but only in the absence of serious injuries that weight bearing can aggravate or complicate. Examined are asymmetry with the opposite side, skin pigmentation, muscular atrophy, edema, and anomalies of the ankle.

    How can an ankle sprain be tested?

    During a physical examination, your doctor will examine your ankle, foot, and lower leg. The doctor will manipulate your foot to evaluate range of motion or feel for painful patches on the skin surrounding the injury to identify which postures cause pain or discomfort.

    The eversion test: what is it?

    That Eversion Stress Test helps assess the level of instability following a medial ankle injury and assesses the deltoid ligament’s integrity.

    What is an ankle CFL?

    The calcaneofibular ligament is a crucial component of the lateral ligamentous complex of the ankle. Because it covers both the talocrural and talocalcaneal joints and is intimately connected to the peroneal tendon sheath, it is physically unique.

    Reference :

    • Professional, C. C. M. (2025, February 4). Ankle joint. Cleveland Clinic. https://my.clevelandclinic.org/health/body/24909-ankle-jointFoot & ankle injuries & surgery types
    • OINT Foot & Ankle Care. (n.d.). https://www.oint.org/foot-ankle-surgeon-frisco-mckinney-dallas-tx-foot-and-ankle.html