46 Best Exercises of Gluteal Muscles
Exercises Of Gluteal Muscles mainly stretching and strengthening the gluteal muscles is essential for overall lower body strength, stability, and injury prevention.
Targeted exercises can help improve muscle tone, enhance athletic performance, and alleviate issues such as lower back pain and hip instability.
What is gluteal muscle?
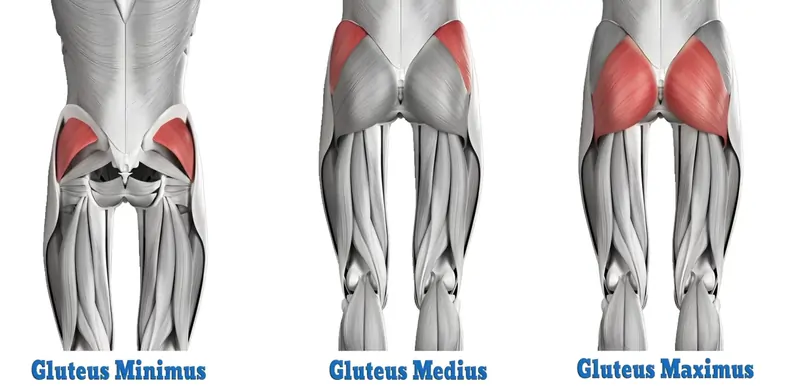
- The gluteal muscles, commonly known as glutes, are a group of 3 muscles that originate in the gluteal region as well as are often referred to as the buttocks.
- This gluteal region is an anatomical area situated posterior to the pelvic girdle.
- The 3 gluteal muscles are the “gluteus maximus, gluteus medius, and gluteus minimus.”
- These three muscles originate in the ilium and sacrum and insert into the femur bone.
- These muscles control the hip joint’s abduction, extension, external rotation (ER), and internal rotation (IR).
Where is the gluteus located?
- The gluteus maximus is the body’s largest and heaviest muscle. It is the most superficial of the gluteal muscles, located on the back side of the hip joint.
- It originates from the posterior gluteal line of the inner upper ilium, a pelvic bone that extends above and slightly below the iliac crest; from the lower part of the sacrum and the side of the coccyx, as well as the erector spinae aponeurosis (lumbodorsal fascia), the sacrotuberous ligament, as well as the gluteal aponeurosis.
Clinical Significance of Gluteal Muscles
Sitting for long periods can cause gluteal muscle atrophy due to constant pressure and disuse. This may be linked to lower back pain, and difficulty performing certain movements that simply require the gluteal muscles, such as rising from a seated position and climbing stairs.
Trendelenburg Sign:
When asked to stand without assistance on both legs in turn, the patient produces the Trendelenburg sign. As a positive sign, the pelvic drop will occur on the unsupported leg. Pelvic drops can be identified by comparing the level of the iliac crests on each side.
As an example, when the left gluteal muscles are weak, the opposite side of the pelvis will drop if the patient stands on their left leg (which is unsupported).
Gluteus minimus tendinopathy leads to Greater Trochanteric Pain Syndrome (GTPS). It is possible to distinguish between trochanteric bursitis, which is very rare, and lateral hip pain, tenderness at the greater trochanter, and Trendelenburg gait.
Anteroposterior radiographs of the pelvis are performed to rule out hip osteoarthritis. Gluteus minimus trigger points refer to pain that begins at the end of the lumbar spine and ends at the ankle, following a pain pathway similar to the sciatic nerve but without neurological symptoms such as weakness and numbness.
A supplemental injury to the superior gluteal whim-whams may result in loss of motor function. The most common indication is the pelvis dropping to the healthy side if standing on one leg (Trendelenburg sign). To maintain balance, the cases compensate by bending their upper body to the side of the station leg. Similarly, they walk with noticeable sideways movements (Duchenne gait, also known as “lurching gait”).
Physiotherapy’s Relevance
Weak gluteal muscles have been linked to a variety of lower limb issues. It may cause other muscles or tissues to suffer from overload via a cascade of events.
- Patellofemoral Pain Syndrome.
- Gluteal tendinopathy
- Iliotibial Band Syndrome.
- Trochanteric bursitis.
- Greater Trochanteric Pain Syndrome.
- Differentiating Buttock Pain: Gluteal Tendinopathy
- Exercises that strengthen the gluteus muscles in conjunction with exercises that improve core strength reduce low back pain and disability more effectively than core strengthening alone.
- Patients with impeded hip abduction may exhibit an abnormal gait. Damage to the superior gluteal nerve is often the cause of impaired hip abduction. This can be caused by pelvic fractures, space-occupying lesions, or as a complication of hip surgery.
Common causes of tight glutes include:
- Long-term sitting
- delayed muscle soreness after exercising.
- Poor posture.
- Muscle stress from striding, jumping, or running, as well as a lack of warm-up before exercise.
- Not stretching after exercise.
- Pain or soreness in hips
- Tight hip flexors.
- Chronic low-back pain.
- Tight hamstring muscles.
- Knee pain.
- Pelvic pain or instability.
- Possible conditions include herniated disk, piriformis syndrome, muscle strain, and shingles.
- arthritis in the sacroiliac joint
- bursitis
Signs and symptoms:
The gluteal muscles support various functions, including hip rotation, walking, running, and descending stairs.
They have links to several other muscles. As a result, you may feel tightness in your glutes or
Pain in certain areas of your: Legs, back, hips, and pelvis
Tight glutes may be identified by the following symptoms.
- Exercise can cause pain in the pelvis, muscle soreness, and poor form if not stretched or warmed up properly.
- Having poor posture
- Sitting for long periods.
- Having muscular imbalances
- Symptoms may include pain or tightness in the lower back, knees, hips, or hamstrings located at the back of the upper legs.
- Running, squatting, and various other leg and lower back exercises can aggravate existing pain or tenderness. Additionally, the muscles may feel especially tight first thing in the morning.
- You may feel pain in your lower back that radiates up to your thighs.
Pain after walking. - Stretching as well as strengthening the glutes can help prevent tightness, relieve pain and other symptoms, as well as lower your risk of injury.
- Tenderness or pain in the buttock.
- Tingling or numbness spreading down the back of your leg.
- Having trouble sitting.
- Feeling pain that worsens as you sit.
- Pain worsens with physical activity such as walking or exercising.
- Severe lower-body pain.
What are the gluteal stretches?
The gluteal region contains 3 types of gluteal muscles:
- Gluteus Maximus
- Gluteus medius.
- Gluteus minimus.
These are located in the buttocks area. The gluteus maximus is the body’s largest muscle and is responsible for generating a lot of power.
Your glutes are attached to bones in the hips, pelvis, legs, as well as back. This is why, if your glutes are tight, you may experience tension in your hips, back, and other areas.
Gluteal tightness can be caused by a variety of factors, including injury, poor posture, a lack of proper warmups, muscle imbalance, or poor exercise technique. If you overwork your glutes during an exercise session or while participating in a sport, you may experience tightness.
What is the purpose of doing glute stretch?
Stretching the glutes serves numerous purposes, including:
- This relaxes and relieves muscle tension.
- Reduce any discomforts, like low back pain or hip tightness.
- Improve mobility and range of motion.
- Lower the risk of injury.
- Improve your performance in physical activities.
- Increase your overall mobility.
What are the different types of glute stretches?
There are many stretching techniques you are aware of:
- Seated figure-four stretch.
- Standing figure-four stretch.
- Supine gluteal stretch.
- Seated gluteal stretch.
- Downward-facing Dog
- Pigeon Pose
- Standing Pigeon
- Reclined Pigeon
- Modified Pigeon
- Elevated Pigeon
- Recline Knee to Chest.
- Seated twist
- Cross-legged glute stretch.
- Standing side bend
- Glute Bridge
- Glute Bridge with Band
- Seated hip abduction with a resistance band.
- Lizard Pose Variation
- Cow Face Pose (Recline)
- Standing Straddle
- Rotated Low Lunge.
- Kneeling Lunge Stretch
- Yogi Squat Pose.
- Child’s Pose.
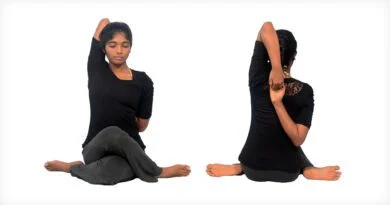
Seated figure-four stretch
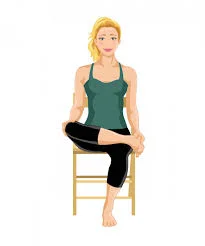
The seated figure-four stretch is a different popular exercise that works the hips, glutes, and lower back. It’s an excellent stretch to perform if you spend a lot of time sitting, as it can help to relieve tension and improve flexibility in those regions.
To do the seated figure-four stretch, take the following steps:
- Start by sitting on the surface, legs straight out toward you.
- Bend your right knee and place your right ankle on top of the left knee, making your right leg form a figure-four shape.
- Slowly bend forward from the hips, keeping the back of your body erect and your chest lifted. Your right hip and glute muscles should feel stretched.
- Keep the stretch for 15 to 30 seconds, then release as well as repeat on the other side.
- This stretch can be repeated several times per day to improve flexibility while decreasing tension in the hips and glutes.
- One must remember to breathe deeply as you relax into the stretch while avoiding any abrupt movements or bouncing. If you feel any kind of pain, relax out of the stretch. With consistent practice, the seated figure-four stretch can help you improve your balance, reduce lower back pain, as well as increase overall mobility.
Standing figure-four stretch

The standing figure-four stretch is a well-known exercise that works the hips, glutes, and lower back. It’s a simple but effective stretch for improving flexibility, reducing tension, and relieving pain in the lower body.
To do the standing figure-four stretch, adhere to these steps:
- Begin by standing shoulder-width apart, arms at your sides.
- Lift the heel of your right foot off the ground as well as place your ankle on top of your left knee, making your right leg form a figure-four shape.
- Slowly bend your left leg and lower your body to the ground while keeping your back erect and your chest lifted.
- Your right hip and glute muscles should feel stretched. Maintain the stretch for 15-30 seconds, then release and repeat on the other side.
- This stretch can be repeated several times per day to improve flexibility while decreasing tension in the hips and glutes.
- It is critical to remember to breathe deeply and relax into the stretch while avoiding any sudden movements or bouncing With regular practice, the standing figure-four stretch can help you improve your posture, reduce lower back pain, as well as increase overall mobility.
Supine gluteal stretch
The Supine Gluteal Stretch is an exercise for stretching that works the gluteus muscles while you lie on your back.
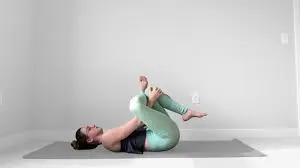
To perform this stretch, follow these steps:
- You should lie on your back, knees bent, and feet flat on the ground.
- Cross the right ankle over your left knee, with your right knee pointing to the side.
- Gently pull your left leg toward your chest, feeling a stretch in the right gluteal muscles.
- Hold the stretch for 20 to 30 seconds, deep breathing as well as relaxing into it.
Release and repeat on the opposite side. - The Supine Gluteal Stretch is an excellent way to increase gluteal flexibility and mobility while also engaging the core and lower body muscles.
- To target the gluteus muscles even more, modify this stretch by twisting or extending one leg at a time.
- As with other stretching exercises, bouncing or jerking movements should be avoided because they can cause injury.
- The Supine Gluteal Stretch is a good post-workout exercise to help reduce muscle soreness and tension.
- Stretching the gluteus muscles once exercised can help with recovery and reduce the risk of injury.
Seated gluteal stretch
- The seated gluteal stretch is a workout that works the muscles in your buttocks. It helps to improve flexibility and reduce tension in that area.
- Find a spot on the floor to stretch. You should sit with your legs straight ahead.
- Begin by bending the knee as well as firmly placing your foot on the floor, with your knee pointing upwards.
- Then, cross your lower leg over your knee so that your left foot sits gently on top of your right thigh.
- Draw your knee slowly towards your chest, keeping your back straight and your chin tucked in. Your left glute should feel stretched.
- Hold the stretch for 15-30 seconds. Then, release it before repeating the process on the opposite side.
- This stretch can be repeated several times throughout the day to improve flexibility and reduce tension in the glutes.
Downward-facing Dog
Downward-Facing Dog (Adho Mukha Svanasana in Sanskrit) is a popular yoga pose that works the muscles in the arms, shoulders, hamstrings, calves, as well as back. It’s an excellent pose to incorporate into a warm-up or cool-down routine because it helps to strengthen and stretch the entire body.
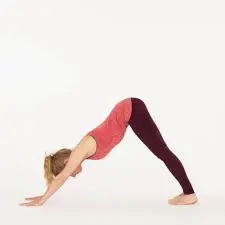
To do Downward-Facing Dog, take the following steps:
- Start in a tabletop posture on your hands and knees, placing your knees behind your hips and your wrists directly beneath your shoulders. Spread your fingers broad and press firmly into your palms to activate your core muscles.
- Exhale as well as lift your knees off the ground, straightening your legs as well as raising your hips to the ceiling.
- Keep your neck and head relaxed, and direct your gaze to your feet or navel.
- Press your heels to the ground and lengthen your spine, forming a straight line from your hands to your hips.
- Hold the pose for 5 to 10 breaths before releasing and returning to the tabletop position.
- You can do this pose several times, concentrating on deepening the stretch as well as improving your alignment each time.
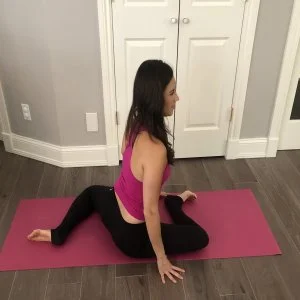
Pigeon pose
Pigeon Pose, also called Kapotasana in Sanskrit, is a well-known yoga pose that works the hips, glutes, as well as lower back. It is an excellent pose to perform after a workout or as part of a stretching routine because it can help relieve tension while enhancing flexibility in the lower body.
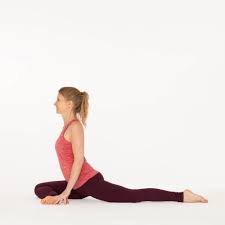
To perform the Pigeon Pose, follow the instructions below:
- Assume a tabletop position with your hands as well as knees on the surface.
- Align your shin towards your left hip, then bring your right knee forward as well as behind your right wrist.
- Extend your left leg behind you, with your toes pointed and your knee on the ground.
- Slowly lower your torso to the ground, resting on your forearms on the mat in front.
- Ensure your hips are square and level, and relax any tension in your lower back as well as hips.
- Hold the pose for 5-10 breaths before releasing and returning to the tabletop position.
- Repeat the pose on the opposite side, bringing your left foot forward while extending your right leg beneath you.
Standing Pigeon
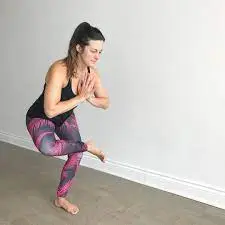
Standing Pigeon is a variation of the traditional Pigeon Pose that may be performed standing. This pose is ideal for those who have difficulty getting down to the ground or who want to add a hip-opening stretch to their standing yoga practice.
To do Standing Pigeon, follow these steps:
- Start standing with the feet hip-width apart.
- Do the following: cross the right side of your ankle over your left thigh, just above the knee.
- Flex your right foot and keep your knee pointing to the side.
- Slowly bend your left knee and sit back into a squatting position.
- Keep your spine long, chest lifted, and hips level.
- Hold the pose for 5 to 10 breaths, then release and get back to standing.
- Repeat the pose on the opposite side, crossing your left ankle over the right leg as well as squatting down.
- It is critical to breathe slowly and evenly throughout the pose, avoiding strain or tension in the neck and shoulders. If you feel any pain or discomfort, stop doing the pose and seek medical attention.
- Standing Pigeon, with regular practice, can help to improve hip flexibility, lower back pain, and overall relaxation and well-being.
Reclined Pigeon
Reclined Pigeon, additionally referred to as Thread the Needle is a yoga pose used to stretch the hips and lower back. It’s an excellent pose for people who spend a lot of time sitting or standing because it helps to relieve tension and improve flexibility.
To do Reclined Pigeon, take these steps:
- Lie on your back, knees bent, as well as feet flat on the surface.
- Cross the right ankle above the left thigh, slightly above the knee.
- Interlace the hands behind your left thigh by reaching through the space between the legs.
- Gently pull your left thigh to your chest while keeping your right leg flexed to protect your knee.
- Relax your shoulders, lengthen your neck, and breathe deeply while stretching.
- Take the pose for 5-10 breaths before releasing and repeating on the opposite side.
- As you hold the pose, you may experience a deep stretch in your hip as well as glute muscles. Listen to your body and just go as far as you feel comfortable.
- You can also use props like a yoga block or bolster under your head or hips to support your body as well as make the pose easier to achieve.
- The Reclined Pigeon is an excellent pose to practice before bedtime or after a long day of sitting or standing. It can help relieve stress as well as promote relaxation, leaving you feeling refreshed as well as rejuvenated.
Modified Pigeon
Modified Pigeon, additionally referred to as Sleeping Pigeon, is a yoga pose used to stretch the hips and lower back. It’s an excellent pose for people who spend a lot of time sitting or standing because it helps to relieve tension and improve flexibility.
To do Modified Pigeon, follow these steps:
- Begin in a tabletop position with your knees and hands.
- Put the right knee forward as well as behind your wrist.
- Extend one leg behind you, with your toes hidden under.
- Slide the right foot towards the left hip and rest your right shin on the mat.
- Lie down on the mat with your upper body supported by your forearms, a pillow, or bolster.
- Allow your hips to sink towards the mat for a deep stretch in the right hip as well as the glute muscles.
- Relax your shoulders, lengthen your neck, and breathe deeply while stretching.
- Take the pose for 5-10 breaths before releasing and repeating on the opposite side.
- The Modified Pigeon pose is ideal for practicing after a long day of sitting or standing or as part of a bedtime routine. It can help to relieve tension as well as promote relaxation, making you feel more at ease in your body.
Elevated Pigeon
- To perform this stretch: Stand as close to the table as possible.
- Lift the right leg, knee bent.
- So, bend your leg 90 degrees and rest your right knee as well as your ankle on the table in front of you.
- So your knee and ankle are parallel to the table’s edge in front of you.
- Bend as far forward toward your shin as is comfortable.
- When you feel stretched, hold for 30-60 seconds before switching legs.
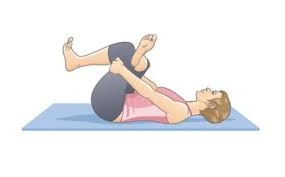
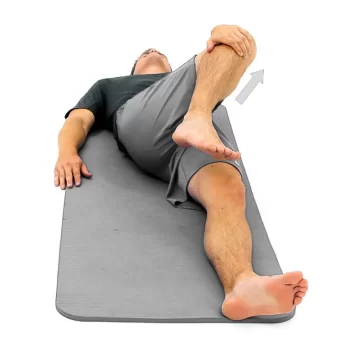
Recline Knee to Chest
Recline Knee to Chest (Apanasana) is a yoga pose that stretches the lower back as well as hips while additionally encouraging relaxation. It’s a gentle pose that anyone can do, regardless of flexibility or fitness level.
To Recline Knee to Chest, take the following steps:
- Begin by lying level on your back, legs extended.
- Take a deep breath in and exhale by drawing your right knee towards the chest.
- Clasp your hand around the right shin or knee and gently pull it closer to the chest.
- Extend your left leg on the mat or bend and place your foot flat upon the ground for comfort.
- Let go of your shoulders and neck, as well as let your lower back sink into the mat.
- Take the pose for 5-10 breaths to experience a gentle stretch in your lower back and hips.
- Release the pose by carefully lowering your right leg to the mat.
- Repeat the pose on the other side, bringing your left knee to your chest while maintaining for 5-10 breaths.
Reclining knee to Chest is an excellent pose to do before bedtime or whenever you need to relieve tension in your lower spine and hips. It can help soothe the mind and promote calmness, leaving you feeling refreshed and rejuvenated.
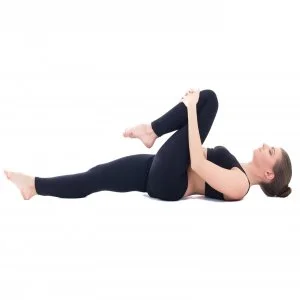
Knee to the opposite shoulder
The knee to opposite shoulder is a yoga pose that stretches the hips, lower back, as well as outer thighs. It’s a gentle pose that anyone can do, regardless of flexibility or fitness level.
To perform knee to the other shoulder, follow the steps that follow:
- Begin by lying level on your back, legs extended.
- Take a deep breath in and exhale by drawing the right knee towards the chest.
- Clasp your hands around the right shin or knee and gently pull it closer to your chest.
- Extend your left leg on the mat or bend as well as place your foot flat on the ground for comfort.
- As you inhale, traverse your right ankle over the left knee to form a figure four shape with your legs.
- Gently guide your opposite knee towards the left shoulder.
- Relax your shoulders and neck, and allow your lower back to sink into the mat.
- Hold the pose for 5-10 breaths to feel a gentle stretch in the outer hip and lower back.
To release the pose, slowly lower your right leg to the mat as well as uncross your legs.
Repeat the pose on the opposite side, bringing your left knee to your chest as well as crossing your ankle over your right knee.
The knee-to-opposite shoulder pose is extremely beneficial for releasing tension in the hips and lower back. It is an excellent exercise to do before bedtime or whenever you need to unwind. This pose successfully encourages peace of mind, rendering you feel rejuvenated and refreshed.
Seated twist
The seated twist is a yoga pose that provides numerous benefits. It enhances spine flexibility and mobility, strengthens hip and back muscles, and improves digestion. One of the best things regarding this pose is that it is appropriate for beginners as well as can be performed by people of all flexibility and fitness levels.
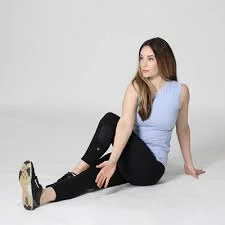
To do a seated twist, follow the instructions below:
- Start by sitting on a yoga mat with the legs extended in front.
- Bend your right knee and place the other foot on the outside of your left thigh.
- Extend your left leg and press your heel into the mat.
- Inhale and raise your arms to shoulder height, keeping them perpendicular to the ground.
- Exhale as well as twist your body to the right, introducing your left elbow outside your right knee.
- To support yourself, place one hand behind you on the mat.
- Maintain a long spine and relaxed shoulders while deepening the twist with each exhalation.
- Hold the pose for 5 to 10 breaths to feel a gentle stretch in the hips, lower spine, and shoulders.
- Release the pose by gradually untwisting as well as returning to a seated position using both legs extended.
- Perform the pose on the opposite side by bent your left knee as well as twisting the leg.
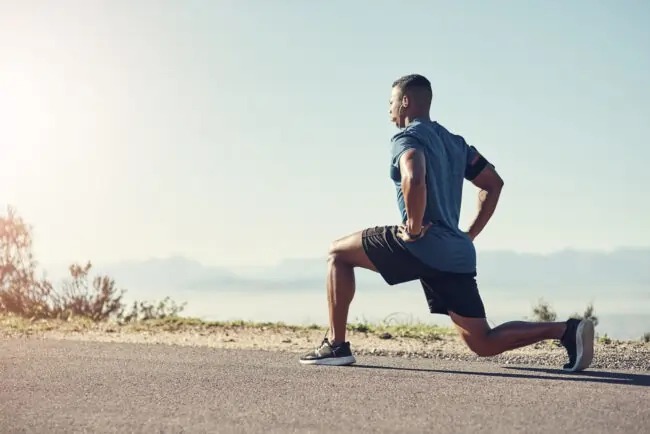
It is also critical to warm up before beginning any gluteal muscle workouts. This can assist in avoiding injuries. When selecting gluteal muscle exercises, make sure they are both challenging and safe. You should also begin with a lightweight or resistance as well as gradually boost it as you gain strength.
After your workout, be sure to cool down. This will help to reduce muscle soreness.A good cooling-off includes static stretching.
Cross-legged glute stretch
- To do this stretch, sit cross-legged on the ground and tuck your right foot into your left thigh.
- The left leg will be in front of the right shin.
- Stretch your arms in front of you.
- Gradually lean the torso forward toward crossed legs.
- Stay with the sensation for 20-30 seconds.
- Repeat the stretch, tucking the left foot into the right thigh.
- If the patient wants a deeper stretch, move down the body towards the legs even more. The patient may extend their arms further.
This stretch has a few variations:
Butterfly pose
- To perform the stretch, assume the butterfly position on the floor.
- It involves sitting with the soles of the feet pushed together as well as the knees accessible on either side, with the outer thighs pointing toward the ground.
- Following that, lean toward experiencing a deep stretch.
- Take this position for 15 to 30 seconds, then repeat.
Standing side bend.
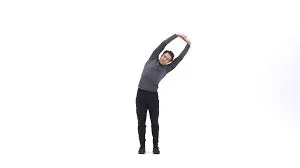
- The upper body will also be stretched out.
- Use the wall for both support and balance; stand with one side of your body facing the wall.
- Now, cross one leg away from an obstruction in front of the other leg.
- Place one of your palms on the wall and the other on the hip.
- Then bend the body far from a wall while pushing the hip toward it.
- Take for 15-20 seconds, and then do it on the other side.
- Standing side bend
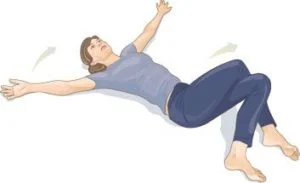
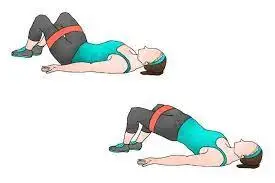
Glute Bridge
- To do this stretch, are on the back with a bent knee and your feet flat on the floor.
- Position feet hip-width apart as well as gently agree with your abdominal muscles.
- Slowly exhale while keeping the abs contracted, then raise the hips off the ground.
- Contract the glute slowly and raise the hips only to the point of comfort.
- Hold for 10-15 seconds, inhale, and gently lower back to the starting position.
- Repeat 5 to 8 times.
Glute Bridge with Band
- To stretch, tie a small, tight resistance band to your calves.
- Lie on your back and raise your hips.
- Tension the resistance band and tap the hips into to the floor before lifting back up.
- Keep the spine upright and move from the hips.
- Repeat 10 to 15 times.
Seated hip abduction with a resistance band.
- To perform this stretch, sit on the floor and tie a resistance band around your calves.
- Maintain both knee flexibility and foot placement on the floor.
- Place your hands slightly behind you.
- To perform an external rotation of the hip, keep your back straight and press your legs out to the side.
- Slowly and with control, bring the legs back in tandem. Having time should be 10 to 15 seconds.
- Repeat 8–10 times.
Lizard Pose Variation
- To perform the stretch, start in a high plank position with hands directly under the shoulders.
- Bend the left knee, bringing the left foot out of the left hand and aligning the left knee with the left ankle.
- Rest the right knee on the ground.
- Use the left foot to the ground as well as gently push the knee outward.
- For a deeper stretch, lower your forearms to the ground.
- Hold for 60-120 seconds before recurring the movement on the opposing side.
Cow Face Pose (Recline)
- To stretch, lie on your back with your legs bent.
- The feet are flat on the floor. Cross the left thigh across the right.
- Gently pull the shins up towards the chest while keeping the head on the mat.
- Position the shins parallel to the upper body.
- Hold for 60-120 seconds, then repeat with the right thigh over the left.
Standing Straddle
- Begin the stretch with your feet 2-3 feet apart and toes directed slightly inward.
- Bend forward at the waist and walk your hands to the left ankle.
- Hold for 30 to 60 seconds before moving your hands to your right ankle.
- Repeat 3–4 times.
Rotated Low Lunge
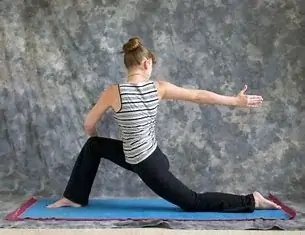
- To perform the stretch, begin in a high plank position with hands directly under the shoulders.
- Flex the right knee, bringing the foot away from the right hand and aligning it with the right ankle.
- Raise the right arm to the roof and rotate the chest towards your right knee.
- Check over the right shoulder to the roof.
- The body types a straight line from the head to the left heel.
- Hold for 60-120 seconds before repeating the motion on the opposite side.
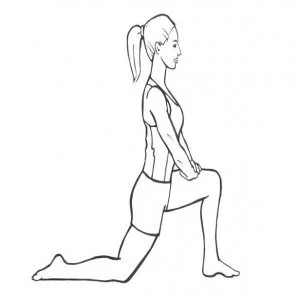
Kneeling Lunge Stretch
- To stretch, lower into a kneeling lunge with your left knee on the floor and the right foot planted in front of you.
- Carefully push the right hip towards the right foot while keeping hands on hips.
- Hold that position for 20 to 30 seconds and then switch sides. Repeat.
Yogi Squat Pose
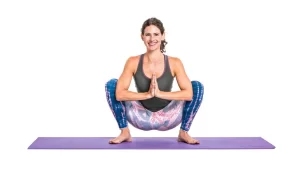
- To perform this stretch, stand with feet wider compared to hip-width apart and toes facing forward or slightly outward.
- Squat deeply, bringing the hips below the knees.
- Maintain a straight and upright posture by pressing your hands together and elbows against the insides of your knees for support.
- Hold for 10-15 seconds and repeat.
Child’s Pose
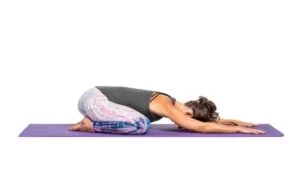
- Begin the stretch on both hands and knees, placing the knees wider compared to the hips.
- Sit back on your heels, lowering your stomach between your thighs.
- Gently bend ahead as much as possible.
- Maintain a long upper body, pressing the hips back and arms forward.
- If comfortable, place your forehead on the floor.
- Continue to maintain this position for 20-30 seconds, then repeat. The patient must perform this stretching exercise 3 times per session. Complete three sessions in one day. Furthermore, the patient must perform all exercises under the supervision of the physical therapist.
What are the most common mistakes made while stretching?
The patient should not make the following mistakes while stretching:
- Not warming up before stretching: Stretching after warm-up motions reduces the risk of injury by providing unexpected flexibility to the muscle. Stretching should never be done without first warming up unless the patient is experiencing muscle pain.
- Not stretching at all: Always stretch before beginning an exercise workout to help the muscles activate and take on a load. Without muscle stretching, the patient risks injuring or tearing the muscles as a result of sudden weight loading.
- Insufficient stretch time: The patient must stretch the muscles for an adequate amount of time; each stretch has a different duration. Static stretching can last up to 30 seconds, while dynamic stretching requires 10-12 repetitions.
- Forgetting to breathe: Do not forget to breathe while stretching, as the patient will require more oxygen. Make sure to breathe while stretching.
- Stretching into an injury: If the patient is injured, he must avoid stretching despite the pain. Stretching strains the muscles and causes pain, so avoid stretching injured areas.
- Stretching until it hurts: Don’t stretch your muscles until you feel pain. Stretching should be mildly painful, with a little force at the end. So much pain while stretching causes muscle injury and damage. Overstretching is dangerous. Furthermore, the patient must perform all exercises under the supervision of the physical therapist.
What is glute muscle strengthening exercise?
- Strengthening the gluteus muscle improves hip strength and power. This exercise has numerous health benefits and plays an important role in performing daily activities in human life.
- Glute muscles are the largest in the body and play an important role in daily life. These muscles are in charge of maintaining both balance and power when a person jumps, walks, or runs.
- Many people want to strengthen their glutes or buttocks for aesthetic reasons. The glutes are the primary mobilizers of the thighs and hips, so when a person sits, stands, jumps, or climbs stairs, the glute muscle performs all of these functions.
- Excessive sitting can weaken or underwork the gluteal muscle, increasing the risk of glute amnesia, which occurs when the gluteal muscle forgets how to function properly. If this muscle is not functioning properly, it can impair mobility and increase the risk of back and knee pain.
- Maintaining glute muscle strength is crucial in today’s sedentary lifestyles caused by work and lifestyle choices.
Health advantages of performing the glute muscle strengthening exercise
Gluteal sports are physical activities that focus on the gluteal muscle mass, which includes the muscles inside the buttocks. These sporting events can provide numerous benefits, including:
- Greater posture: Strong gluteal muscles can help to improve posture by keeping the pelvis in a neutral position. This can help relieve lower back pain and save you from injury.
- Increased energy and speed: Gluteal muscle mass is one of the largest and most powerful muscular tissues in the body. Strengthening these muscular tissues can help you gain energy as well as speed in sports like walking, leaping, as well as sprinting.
- Better balance as well as stability: Strong gluteal muscle tissues can help to improve stability by providing a solid foundation for movement.
- Reduced risk of injury: weak gluteal muscle groups may contribute to a variety of injuries, including reduced lower back, knee, and hip aches. Strengthening one’s muscular tissues can help to reduce the risk of these injuries.
- Improved athletic performance: Many sports necessitate strong gluteal muscles for optimal performance. Strengthening these muscle groups can help improve performance in sports such as soccer, and basketball, as well as soccer.
- Improved overall fitness: Gluteal sports can be an excellent addition to any health routine, as they can help improve typical strength, flexibility, as well as endurance.
- Other:
- Help relieve chronic hip pain.
- Muscle-strengthening exercises can increase one’s perceived strength.
- Increase metabolism as well as lower the risk of falling.
- Strong gluteals support proper pelvic alignment and propulsion during walking, running, and standing on one leg.
- Help improve posture.
- Gluteal muscles help to support the lower back during lifting.
- Provide support to prevent knee injuries.
- Help control movement in the pelvis, hips, legs, and trunk.
- Glute exercises may improve posture.
- Glute exercises can help develop the whole posterior chain.
What are the different types of glute strengthening exercises?
There are numerous gluteal muscle exercises that you can perform. A few of the most efficient exercises are:
- Fire hydrant
- Single leg step-ups
- Side squats
- Glute bridges
- Bulgarian split squats
- Lateral banded walking Exercises
- Mini-Band Kickback
- Alternating Reverse Lunge
- Walking Lunges
- Banded Glute Bridge
- Goblet Squat
- Lateral Lunge and Reach
- Romanian Deadlift
- Weighted deadlift
- Weighted hip extension
- Hip thrust / Glute Squeeze on the Ball
- Glute kickbacks
- Glute clamshell
- Single-Leg Glute Bridge
- Glute thrust
- Glute The Strengthening Hip Thrust Exercise
- Barbell Lunge
- Step Up
- Squat
- Dumbbell Frog Pump
- Banded Side Kicks
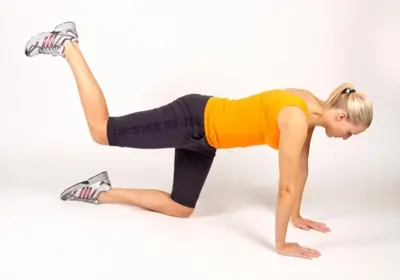
Fire hydrant exercise
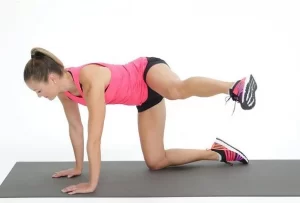
- The fire hydrant workout is an effective method for working the gluteus medius muscle. To begin this exercise, get down on your hands and knees on the floor. Your fingers must be directly beneath your shoulders, as well as your knees should be directly beneath your hips.
- After that, raise one of your legs out to the side, maintaining your knee bent at a 90-degree angle. Your foot must be flexed, and your thighs should be perpendicular to the ground. Maintain this position for a few seconds before lowering your leg and returning to the provoke role.
- Repeat this motion for several repetitions before switching to the opposite leg. It is critical to maintain the proper form at some point during the exercise, which includes keeping your core engaged as well as your back straight.
- The fire hydrant exercise works the gluteus medius muscle, which is essential for maintaining equilibrium and stability during physical activity. This exercise can also help you avoid injuries by strengthening the muscles that support your hip joint.
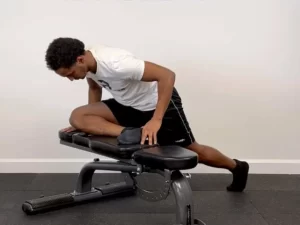
Single-leg step-ups
Single-leg step-ups are an excellent exercise for working the gluteus muscles in the buttocks. This exercise consists of standing in front of a bench or stepping one foot on the top of the bench and the other on the ground.
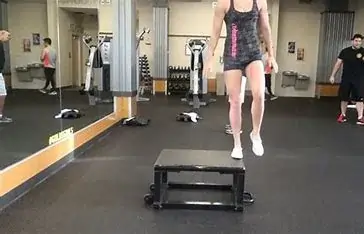
- To do a single-leg step-up, push through the heel of your foot on the bench as well as lift your body onto it. When lifting your body, remember to engage your core whilst maintaining your back straight.
- After you’ve lifted your body onto the bench, bring your back foot up to meet your front. Again, keep your core participated as well as your back straight throughout the exercise.
- Lower your body back to the starting position and repeat several times before switching to the opposite leg. This exercise can be difficult, but it is very effective for strengthening the gluteus muscles as well as improving stability and balance.
- To make the exercise more difficult, hold weights in your hands or raise the height of the bench or step. Begin at a lower height and gradually increase as you become more at ease with the exercise.
Overall, single-leg step-ups are an excellent exercise for strengthening the gluteus muscles as well as improving lower-body stability.
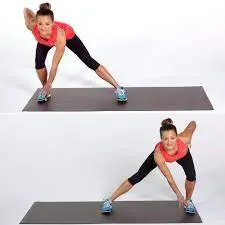
Side squats
Side squats, additionally referred to as lateral squats, are an excellent exercise for working both the inner and outer thighs, glutes, and hips. This exercise consists of stepping to the side as well as squatting down into a lunge.
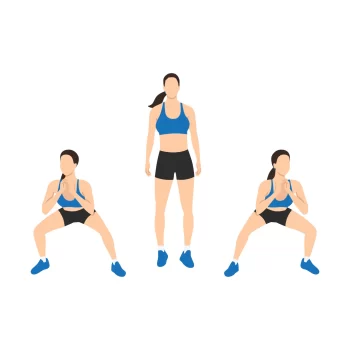
- To do a side squat, stand with the feet shoulder-width apart and your toes pointed forward. Take a large step to the side with your right foot while keeping the left foot planted on the ground. As you take a step to the side, bend your right knee and lower yourself into a squat. Maintain your left leg erect with your left foot firmly planted on the ground.
- As you squat, keep your chest raised and your back straight. Your right knee should be level with your right foot, while your left leg should be straight. Hold that position for a few seconds before pushing your right foot back to the starting position.
- Perform the movement on the other side, stepping to the left before squatting into a lunge position. Maintain your core engaged throughout the motion to ensure proper form and balance.
- To increase the difficulty of the exercise, hold weights in your hands or squat deeper. You can also incorporate a jump into the movement by pushing off your planted foot as well as jumping to the other side.
- Overall, side squats are an excellent exercise for working the inner as well as outer thighs, glutes, and hips. They can help boost lower-body strength, stability, and balance.
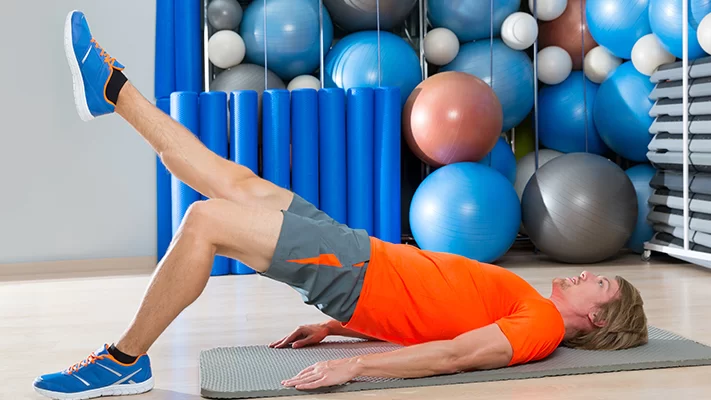
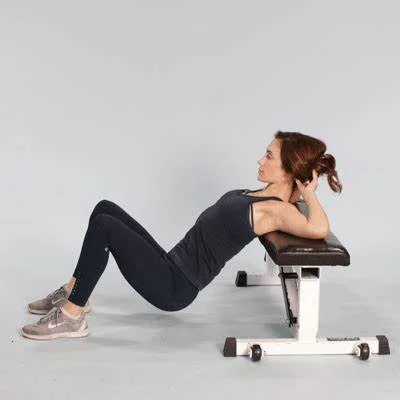
Glute Bridge
Glute bridges are an effective exercise for working the glutes and lower back. This exercise requires lying on your back with bent knees as well as your feet flat on the ground, then lifting your hips to the ceiling.
- Begin a glute bridge by lying on your back, with your knees bent and your feet flat on the ground. Your arms should rest at your sides. Make sure you’re activating your core muscles by pulling your belly button towards your spine.
- Next, press your heels into the ground and raise your hips toward the ceiling, pressing your glutes at the top of the movement. Keep your upper body and shoulders back on the ground, and draw a straight path from your knees to your shoulders.
- Hold this position for a few seconds before gradually lowering your hips back to the initiate position. Repeat the movement several times, making sure to engage your glutes as well as core muscles throughout the exercise.
- To make the exercise more difficult, place a weight or resistance band across the hip area. You can also do single-leg glute bridges by raising one leg off the ground and moving with the other.
- Glute bridges are an excellent exercise for working the glutes and lower back. It can help improve hip mobility, core strength, and lower-body stability.
Bulgarian Split Squats
Bulgarian split squats are a strenuous lower body exercise that targets the glutes, quads, hamstrings, as well as core muscles. This exercise involves standing with one of your feet elevated behind you and squatting with the other leg.
- To do a Bulgarian split squat, stand with your feet hip-width apart as well as your back to a bench or elevated surface. Place one foot on the bench beneath you, toes pointing downward and heel lifted off the ground.
- Next, take a step forward with your other foot, ensuring that your front foot is securely planted on the ground as well as your knee is directly above your ankle. Maintain your chest raised and core muscles engaged throughout the movement.
- Bend your front knee as well as lower yourself to the ground, maintaining your back erect and your weight on your front heel. Your back knee should float just above the surface.
- Pause at the bottom of the movement, then push through your front heel to get back to the starting position. Repeat the movement several times before switching sides and doing the exercise with the opposite leg.
- To make the exercise more difficult, hold a weight in both hands or place a barbell throughout your shoulders. You can also raise the bench or elevate the exterior to make getting around more difficult.
- Overall, Bulgarian split squats are an excellent exercise for focusing on multiple muscle groups in the lower body while increasing overall lower-body stability and power.
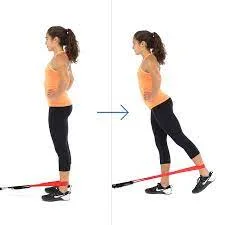
Lateral banded walking exercise
The lateral wrapped walk is a resistance band physical activity that works the hips, glutes, as well as thighs. This exercise involves wrapping a resistance band around your legs, just above your knees, then taking small steps to the side while keeping the band taut.
- To begin a lateral banded walk, stand with your feet shoulder-width apart and a resistance band wrapped around your legs just above your knees. Keep your chest raised and core muscles engaged throughout the movement.
- After that, take a small step to the side with one foot, maintaining tension on the band as you move. Then, step your other foot towards the first, keeping tension on the elastic band throughout the movement.
- Continue to take small steps to the side, alternating among your right and left foot, for several workouts before taking a brief break. Following that, repeat the procedure for several sets.
- To make the exercise more difficult, use a heavier resistance band or take larger steps to the side. You can also incorporate additional exercises into the way you work, such as squats or lunges, that target the same muscle groups from various angles.
- In general, the lateral banded walk is an excellent exercise for increasing hip and glute stability and strength, which can help improve overall lower-body function and reduce injury risk.
Curtsy lunges
The curtsy lunge is a lower-body exercise that focuses on the glutes but also works the quads, hamstrings, as well as calves. It’s similar to a traditional lunge but with one leg crossed beneath the other in a curtsy-like motion.
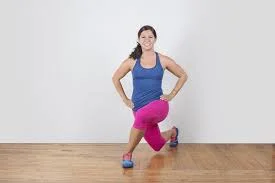
- To begin a curtsy lunge, stand with your feet hip-width apart as well as your hands on your hips or dumbbells at your sides. Take a step back toward the side with the right foot, crossing it beneath your left as you lower yourself into a lunge.
- Make sure your left knee is directly above your left ankle as well as your right knee is just above the surface. Keep your chest raised and your core engaged throughout the movement.
- Push by the left heel to get to the starting position, then repeat the movement on the other side, getting back toward the side with the left foot.
- To make the exercise more difficult, use greater dumbbells or add a heartbeat at the bottom of every lunge. You will also add a jump at the highest point of every lunge to increase the difficulty.
- Overall, the curtsy lunge is an excellent exercise for toning and strengthening the glutes, which may improve lower-body function and reduce injury risk.
Mini-Band Kickback

The Mini Band Kickback exercise works the gluteus maximus, the largest muscle in the glutes. This exercise is performed with a mini resistance band, which adds resistance to the movement as well as helps to activate the glutes more efficiently.
- To do a Mini Band Kickback, wrap the mini band around the ankles and stand with your feet hip-width apart. Put your hands on the hips or hold on a stable surface for support.
- Shift your weight to your left leg and raise the other leg behind you, keeping it parallel to the ground. Keep your core muscles engaged as well as your back straight throughout the movement.
- Slowly lower your right leg back to the starting position, and proceed on the other side, lifting your left leg behind you.
- To make the exercise more difficult, you can tighten the mini band or add a heartbeat at the top of each kickback. You can also do the exercise while holding dumbbells for extra resistance.
- Overall, the Mini Band Kickback is an excellent exercise for toning and strengthening the glutes, which can help enhance lower-body function and reduce injury risk.
Alternating Reverse Lunge.
The alternating Reverse Lunge is an intricate exercise that focuses on the glutes, hamstrings, and quadriceps. This exercise involves stepping backward into a position of lunge, which helps stimulate the glutes more effectively.
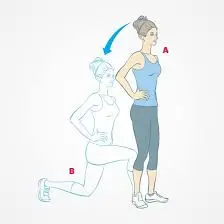
- To begin an Alternating Reverse Lunge, stand with your feet hip-width apart as well as your hands on your hips or at your sides. Take a step back with the right foot, getting on the ball of your foot while keeping your heel raised.
- Bend both knees and lower your body into a lunge position, keeping your front knee just above your ankle as well as your back knee just above the ground.
- Push through your front foot to return to the starting position, then repeat on the opposite side by stepping again with your left foot.
- You can add more resistance to the exercise by holding dumbbells or a barbell. You can also add a pulse at the bottom of each lunge, or do a jump lunge by jumping upward from the lunge position and switching legs in midair.
- Overall, the Alternating Reverse Lunge is an excellent exercise for strengthening and toning the glutes while also improving lower body strength and stability. It can also help with balance and coordination.
Walking lunges
Walking lunges are an aerobic exercise that primarily works the glutes, hamstrings, and quadriceps. This exercise involves taking a step ahead into a lunge position, and then repeating the movement with the opposite leg.
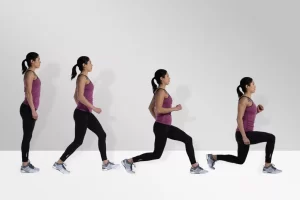
- To make Walking Lunges for glutes stand with your feet hip-width apart as well as put both hands on your hips or at your sides. Take a step forward with the right foot, landing on the ball of your foot while keeping your heel up.
- Bend both knees and lower your body into a lunge position, keeping your front knee just above your ankle as well as your back knee just above the ground.
- Push through your front foot to return to the position where you started, then repeat the movement on the opposite side by stepping forward using your left foot.
- As you walk forward, continue alternating legs, taking long strides, while keeping an upright torso. Participate your glutes as you push through your front foot as you get back up, squeezing them at the top of the movement.
- You can add more resistance to the exercise by holding dumbbells or a barbell. You can also add a pulse at the bottom of each lunge, or do a jump lunge by jumping up out of the lunge position as well as switching legs in midair.
- Overall, Walking lunges are an effective exercise for focusing on the glutes while also improving lower body strength and stability. They can also help to improve balance and coordination.
Banded Glute Bridge
Banded Glute Bridge is a common exercise that works the glutes, hamstrings, as well as lower back. This exercise is done by lying on your back with your knees bent and your feet flat on the ground and wrapping a resistance band near your thighs just above the knees.
- To begin the Banded Glute Bridge, lie on your back with your knees bent and your feet flat on the ground. Place the resistance band about your thighs just above the knees, keeping your feet hip-width apart.
- Engage the core muscles as well as glutes as you lift your hips off the ground, pushing through your heels. Take the body in a straight line from shoulders to knees.
- Stop at the top of the movements, squeezing your glutes and holding for a few seconds. Then, slowly bring your hips back into the initiate position.
- Maintain tension on the resistance band all through the movement by pressing the knees outwards against it as you lift your hips.
- To make the exercise more difficult, use a thicker resistance band or effect a weight on your hips. You can also do single-leg deviations by lifting one leg off the ground and keeping the other foot planted.
- In general, the Banded Glute Bridge is a good exercise for working the glutes, increasing hip mobility, as well as strengthening the lower back. It may additionally assist you in maintaining good posture and avoiding lower back pain.
Goblet Squat
The Goblet Squat is a common exercise that works the glutes, quads, hamstrings, as well as core muscles. This exercise requires you to squat while holding a weight close to your chest.
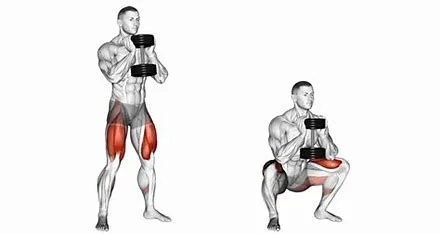
- To perform Goblet Squats, stand with the feet shoulder-width apart and hold a weight (such as a dumbbell or kettlebell) near your chest with both hands.
- Engage the glutes and core as you lower and return your hips, bending your knees while maintaining your chest up. If possible, we want to keep our thighs as close to the ground as possible.
- Stop at the bottom of the movements, then push through your heels as well as tighten the glutes as you remain back up to the start position.
- Keep your weight evenly distributed across both feet while avoiding leaning forward or rounding the back during the movement
- To make the exercise more difficult, use a heavier weight or do a single-leg variation by lifting one foot off the floor while keeping the other foot planted.
- Overall, Goblet Squats are an excellent exercise for targeting the glutes, increasing lower-body strength, and encouraging proper squatting technique. They can also help with posture and avoid lower back pain.
Lateral Lunge and Reach
The Lateral Lunge with Get is a compound exercise that works the glutes, hamstrings, quadriceps, and core. Step to the side, bend one knee and reach with both hands toward the opposite foot.
- To begin the Lateral Lunge at Reach, stand with the feet hip-width apart as well as your arms by your sides.
- Take a large step to the side with your right foot while keeping the left one planted on the surface. Bend the right knee as well as shift the weight to your right foot while taking a step.
- At the same time, reach down with both hands to your left foot while keeping your chest raised and back straight.
- Pause just at the bottom of the movements, then push with your right foot back to the starting position.
- Step to the left as well as reach for your right foot to repeat your motion on the opposite side.
- Keep the weight evenly distributed across both feet while avoiding leaning outward or rounding the back during the movement. You should feel a stretch in the inside thigh as well as the glute of the lunging leg.
- To make the exercise more difficult, keep a weight (such as a dumbbell or kettlebell) in either of your hands while performing the motion.
- In general, the Lateral Lunge with Reach is a good exercise aimed at the glutes and building lower-body strength. Additionally, it can improve flexibility, coordination, as well as balance.
Romanian deadlift
The Romanian Deadlift (RDL) is an all-around exercise that works the hamstrings and glutes while also engaging the lower back, core, as well as upper back muscles. The RDL is a controlled hinge movement that calls for correct technique and form to avoid injury.
- To do the Romanian Deadlift, stand in your feet hip-width apart as well as your knees slightly bent. Use an overhand grip to hold a barbell or dumbbell against the front side of your thighs.
- Keep your spine erect with your shoulders pulled back, then hinge forward at the hips, keeping the knees slightly bent. Lower the weight to the ground while preserving a neutral spine by maintaining it close to your body.
- As you lower the weight, concentrate on feeling the stretch in your hamstrings. Maintain stability by engaging your core and avoiding rounding your back.
- As you come to the bottom of the movement, pause briefly before using your glutes and hamstrings to lift the weight back to the starting position. Maintain your back straight while maintaining your shoulders pulled back throughout the movement.
- Repeat the movement several times, concentrating on maintaining proper form as well as control throughout.
- To make the exercise more difficult, improve the weight, or do single-leg RDLs. However, it is critical to begin with light weights as well as increase them gradually as you gain strength and refine your technique.
- In general, the Romanian Deadlift is a good exercise for working the hamstrings as well as the glutes while also interacting with other muscle groups. It can enhance lower-body strength, stability, as well as overall fitness.
Weighted deadlifts
- To perform this exercise, the patient should stand with their feet parallel and hip-width apart. If the patient is comfortable, he may use light dumbbells.
- Following that, keep the spine straight and the gaze forward. Shoulders should be pointing down and back as well.
- Squeeze the glutes fold from the hips, and bend the knees until the seat reaches past the heels. Resist the urge to round the spine and “give in to the weight.”
- Allow the glutes and belly to control descent and ascent.
- The patient can gradually increase their weight as they feel stronger and more comfortable.
Tip: To prevent spine flexing, imagine a pole strapped around the torso.
Weighted hip extension
- Be on all fours, knees directly under hips, and hands under shoulders.
- Maintain a long spine, draw the belly in, and keep the shoulders back and down. Place a light dumbbell (3-8 pounds) in the crook of the left knee.
- Use both the right and left glutes to balance and lift the leg.
- Flex the foot and raise the knees slightly higher compared to the hips. Maintain equilibrium by distributing body weight equally between both hands and the lowered knee.
- Flex the foot and raise the knees slightly higher compared to the hips. Keep balance by distributing body weight equally between both hands and the lowered knee.
- Repeat 10 times and switch sides. Repeat one to three sets per day.
Tip:
- Exhale as you lift your leg. Keep your neck long. To keep the ribs from slumping toward the ground, imagine someone balancing a teacup on their back.
- Advanced option.
- Add 10-15 pulses to the leg lift. Individuals can also use resistance bands. Anchor it with the hands and loop it around the arch of the foot. Repeat the actions with the added resistance.
Glute Squeeze on the Ball
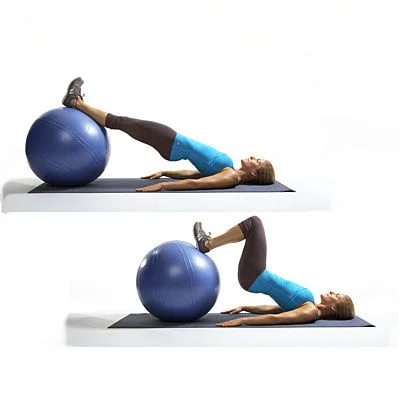
- This exercise is effective for working the glutes. A ball creates instability and requires the entire lower body to work. Carrying weights on your upper thighs adds intensity to the exercise.
- To strengthen the gluteal muscles, start in the bridge position with the head on a ball and the buttocks lifted. If desired, weights can be placed on the thighs to increase intensity.
- Finally, lower the hips to the ground.
- Squeeze your glutes to return to the embarking position.
- Perform one to two sets of ten to 15 repetitions in one day. Try lifting the toes for a more intense move.
Glute kickbacks
- For a more advanced strengthening exercise, start with a resistance band. Place this around the legs, just above the knees. Next, lift one leg back and squeeze the glutes while keeping your hands on your hips. Next, repeat on the other side. Do 10-15 repetitions in a single session. Complete three sessions in one day.
- Glute squeezes are a great exercise to start with to get the feel of glute activation and isolation.
- To start this strengthening exercise, sit or lie in a comfortable position. Next, squeeze and hold the buttocks together as tightly as possible.
- A person should feel him lift slightly. Repeat this exercise ten to 11 times in one session. Do two or three sessions in one day.
Glute Clam Shell
- The clam exercise is highly effective for strengthening the glute medius and is recommended for anyone. Glute medius is essential for both stability and control.
- Individuals with back, hip, knee, or foot issues often have weakness in their glute medius. Clam exercises are effective for strengthening and building glute muscles.
- How to Perform this Strengthening Exercise: First, to perform this exercise: To ensure proper alignment, the patient should lie on their side with their knees bent, feet together, and shoulders, hips, and feet straight.
- It Activates the glutes and lifts the top knee to avoid rolling back at the pelvis while keeping the feet together. After that, slowly lower back down.
- To lengthen the waist, keep the pelvis central and draw the top hip down away from the shoulder.
Single-Leg Glute Bridge
- Single-leg bridges provide a harder glute-strengthening workout than simple bridges, requiring both strength and control.
- If the person has weak glutes, his pelvis will drop as he lifts his leg, so be aware of this.
How to do a single-leg glute bridge: Get the buttocks you’ve always wanted! - To perform this strengthening exercise, lie on your back with your knees bent and your feet hip-width apart.
- Then, squeeze your glutes, lift your buttocks, and hold a bridge position.
- Lift one foot and straighten the knee, maintaining the thighs in line and hold. Maintain a level pelvis.
- Lower one foot and repeat with the other leg. Repeat from 9 to 13 times in one session. Complete two sessions in one day.
Progression Method:
- Single raise: For a single raise, start with one leg straight (thighs parallel) and push up through the bridge with the other leg.
- Marching Bridge: Build endurance by alternately marching feet up and down from the normal bridge position.
- Unstable Bridge: For the Unstable Bridge exercise, place the patient’s foot on a roller or gym ball while performing it.
Glute thrust
- The glute thrust, also known as a hip thrust, is a challenging exercise that strengthens the glutes more than a simple bridge.
- This physical activity is not recommended for patients with back issues.
Glute Strengthening Hip Thrust Exercise
- How to perform this strengthening exercise: How to Perform this Strengthening Exercise: Sit, lean back toward the gym ball or even a bench, feet hip-width apart, knees bent, and spine neutral.
- Clench glutes, push down with feet, and raise buttocks, allowing the upper body to move back slightly.
- Use arms for support but avoid arching the back. Repeat 7 to 14 times in one session. Complete three sessions in one day.
- Hold the position and then lower down.
How to progress:
- Hold a weight, such as a medicine ball, while performing the exercise.
- During the hold phase of marching, alternately lift one foot before lowering the other.
- Begin with one foot lifted and maintain a hip/knee angle of 90 degrees while pushing through the other leg.
Barbell Lunge
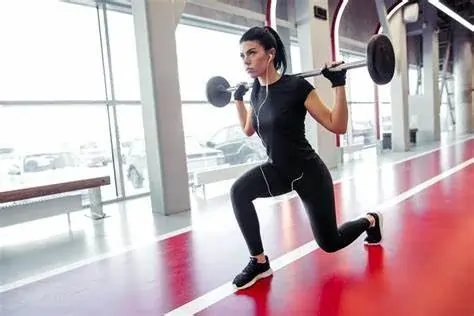
- Another excellent glute exercise is the barbell lunge, which works all three gluteus muscles at the same time through hip extension and hip abduction.
- You can vary the lunge by using dumbbells instead of a barbell, and if your gym is large enough, you can also do walking lunges.
- If you choose to do lunges in place, you can experiment with stepping forward (as shown in the gif above) or backward to see which feels better and provides the best glute muscle contact.
- How to perform barbell lunges: Take a big step ahead and sink as deep as possible in a lunge position, making sure not to hit the knee of your back leg on the floor. return to the starting position by pushing back with your front leg.
Step Up

The step-up is not commonly used in fitness programs, but research shows that it constitutes one of the exercises that activates the most glutes.6
The step-up, which is performed on one leg at a time, is another exercise that tests your gluteus minimus as well as medius in hip stabilization while also allowing your gluteus maximus to extend.
After getting used to this exercise, you may raise the resistance by holding weights in your hands or across your shoulders. Because training at long muscle lengths appears to be helpful for the glutes, it is probably best to use a fairly high box that mimics the hip position of a deep squat.
Remember that the eccentric phase (the lowering phase) is critical for maximum muscle growth, so don’t just plop down from the box; lower yourself slowly and with control so that it can feel your glutes working.
How to Perform Step-Ups:
- Stand in front of a chair, bench, or other surface that allows you to step up.
- Put your foot on the chair.
- Step up while lightly bracing your core.
- Reduce yourself in a controlled manner.
- You can keep your foot on the chair as well as repeat for reps.
Squat
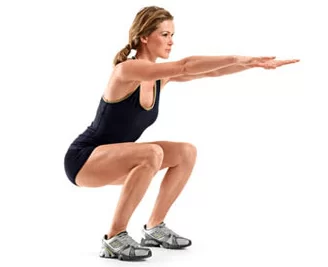
- The traditional barbell back squat remains one of the world’s most famous muscle-building exercises, and it is extremely effective for your glutes extremely well.
- Deep squats appear to be especially effective for glute muscle growth, with three times as much growth as half squats.
- Squat depth: This is most likely because deep squats stretch the glutes while under load.
- The barbell squat is a complex movement that works your glutes, quadriceps, and adductors.
Squat at Proper Form:
- Position the bar on your upper back. Inhale, brace your abdominal muscles slightly and then unrack the bar.
- Take two steps back to adjust the foot’s position.
- Squat as deep as possible using the proper technique.
- Stop and reverse the movement under control, extending your legs and hips once more.
- Exhale on the way up or exchange air at the top position.
- Inhale as well as repeat for the desired number of reps.
Dumbbell Frog Pump
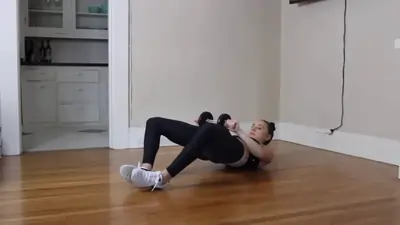
The dumbbell frog pump is a different workout that requires minimal equipment.
You can do regular frog pumps with no weight at all, but to avoid doing too many reps (especially if you have some training experience), I recommend using a heavy dumbbell for weight.
Still, it’s a good buttocks exercise to have in your arsenal for home dumbbell workouts.
How To Do Dumbbell Frog Pumps:
- Lie on your back and bring your feet in a frog position, as near to your buttocks as possible.Put a dumbbell on your hips.
- Before beginning the movement, ensure that your core is activated and your lower back as well as shoulders are pressed down on the floor.
- Press your feet into the floor as well as squeeze your glutes to propel your hips upward.
- Pause at the top, then reverse the movement. Make sure to move slowly and with control throughout the entire movement.
Banded Side Kicks
After focusing on exercises that work your glutes in hip extension, let’s take a look at two hip abduction exercises that target your gluteus medius and gluteus minimus.
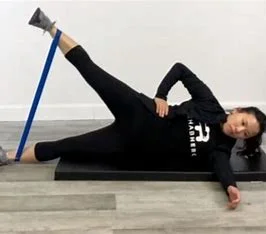
Hip abduction occurs when you move your legs apart and out to the sides. One exercise for this is the sidekick, which can be performed with a resistance mini band.
Because you are standing on one leg, you will work your hip abductors on both sides, isometrically (static) on one and dynamically (moving) on the other.
Again, this is a simple exercise that can be done at home with only a resistance band.
How to Perform Banded Side Kicks:
- Put an elastic band around your ankles. Hold onto something with your hands for balance.
- Stand on one leg and bring the other leg as much out to the side as possible.
- Pull the leg back in while resisting the band.
How many repetitions and sets should you do for each glute exercise?
- Depending on whether muscle hypertrophy or strength gain is your primary goal, you should adjust the weights and reps you use per set accordingly.
- While there is significant overlap among the two, here is how each objective is typically best achieved:
- Strength is best gained with heavy weights as well as a low rep range of 1-6 reps per set.
Muscle growth is best achieved with medium weights as well as a moderate-to-high rep range of 6-15 reps per set, or up to 20 reps per set. - If your goal is to improve athletic performance and build stronger glutes, a lower rep range for the majority of your sets is probably a good idea, whereas a higher rep range can be used if you’re more interested in glute muscle development.
- Alternatively, you can alternate between high and low reps, as we do in our glute training program.
- The number of sets you perform of each exercise has a significant impact on your muscle growth and strength gain, with more sets resulting in larger gains, Beginners can perform at least 10 sets per muscle per week.
- Highly Experienced lifters and bodybuilders might benefit from greater training amounts, such as 15 to 20 sets of glute exercises per week.
- Using a variety of rep ranges and loads, such as heavier, lower rep sets to increase overall strength before progressing to slightly lower loads with higher reps, allows you to target the muscle optimally.
- For strength training, aim for 3 to 5 reps at 89% to 94% of 1RM.
- For hypertrophy, 8 to 12 reps per set at 60% to 80% of 1RM are effective.
What precautions should I take while exercising?
- Start slowly. These are preliminary exercises. Consult your doctor to see if more advanced exercises require the services of a physical therapist. As you gain strength, you may be able to perform additional sets of each exercise or add weights.
- Stop if you experience pain. It is normal to feel a bit uncomfortable at first, but you may not experience pain. Constant exercise will help to relieve the discomfort over time.
- Warm up before performing glute exercises. Warm up your muscles by riding a stationary bike or walking for 5–10 minutes.
- Follow the physical activity program recommended by your healthcare provider. He or she will recommend the best exercises for your condition. He or she will also tell you how many repetitions and how frequently you should do the exercises.
When did the patient stop doing the Gluteus muscle strengthening exercise?
- If experiencing pain or discomfort during this exercise, stop immediately.
- If a doctor recommends rest.
- If the leg cartilage is fractured.
- If a person recently had surgery.
- If the individual experiences both back and hip pain.
Contraindications of Gluteal Exercise
Contraindications of gluteal athletic endeavors refer to situations or circumstances in which these exercises should be avoided or modified to avoid injury or exacerbation of an existing condition. Some common contraindications for gluteal sporting activities are:
- Acute injuries: If you’ve sustained an acute injury, such as a sprain or pressure, you should avoid gluteal sporting activities until the damage has healed. Conducting those sports can exacerbate the damage and delay the healing process.
- Chronic pain: If you have ongoing aches in your lower back, hips, or knees, gluteal sports may exacerbate the problem. In these situations, it is critical to consult with a healthcare professional before beginning a new workout routine.
- Joint problems: If you have joint issues such as osteoarthritis or osteoporosis, gluteal exercise can put too much stress on your joints and cause additional damage. In these cases, it is critical to modify the exercises or find alternative exercises that are less traumatic to the joints.
- Pregnancy: Gluteal sports may be prohibited due to the risk of injury or strain on the pelvic ground muscle mass. It is critical to consult a healthcare professional before beginning any workout program during pregnancy.
- Cardiovascular problems: If you have cardiovascular problems, such as high blood pressure or a heart condition, gluteal physical activities can increase your coronary heart rate and blood pressure. In these cases, it is critical to start with low-intensity activities and gradually increase the depth over time.
- Herniated disc: If you’re suffering from a herniated disc, gluteal sporting exercises that involve bending or twisting can put too much pressure on your spine and aggravate the situation.
- If you are new to exercise, you should consult your doctor before beginning any gluteal muscle exercises. I hope you found this introduction to gluteal muscle exercises helpful.
FAQs
What causes weakened glute muscles?
The most common cause of weakness in these muscles is a lack of activity or even a sedentary lifestyle. As technology advances and more people are confined to desk jobs where they spend the majority of their time sitting, the glutes atrophy, and the anterior hips adapt to the shortened position.
How long does it take to strengthen a weakened glute?
This process may take four weeks for less serious glute imbalances. For more severe glute imbalances, the procedure could take 3 to 6 months. It’s impossible to tell. Just be consistent and diligent, and the patient should be able to regain proper function.
How does the person activate their weak glutes?
Lift the hips off the floor and form a straight path from the shoulders to the knees. Reverse tilt the pelvis and squeeze the buttocks. To further activate the glutes, push the knees out into the band. Hold this position for ten seconds, then do one to two sets of 6 to 10 repetitions each.
Why aren’t the glutes getting stronger?
Inactivity is most likely the primary reason why the glutes are not growing. The unfortunate reality is that due to our modern sedentary lifestyle, people suffer from underactive glutes and struggle to develop them because they cannot fire the muscles while training.
Are there any precautions I should take while performing gluteal muscle exercises?
Yes, it is critical to use the correct technique and form to avoid injury. It’s additionally crucial to start with lighter weights or resistance as well as gradually increase as your strength grows. If you have any pre-existing medical conditions or injuries, speak with a doctor before beginning any exercise program.
What are the three glute muscles?
The gluteal region, also known as the buttocks, is comprised of three muscles known as the glutes:
1. Gluteus Maximus.
2. Gluteus medius.
3. Gluteus minimus.
The three muscles are inserted into the femur and originate in the ilium and sacrum.
What is the primary function of the gluteal muscles?
Strong gluteal muscles are essential for pelvic stability, leg propulsion while walking or running, as well as standing on one leg. Their primary function is to keep us upright and move our bodies forward. In addition, gluteals support the lower back while lifting and safeguarding against knee problems.
REFERENCES
- 5 simple exercises that will tone your butt for summer. (2018, May 2). NBC News. https://www.nbcnews.com/better/health/5-simple-exercises-stronger-tighter-glutes-ncna870381
- Gluteal Muscles. (n.d.). Physiopedia. https://www.physio-pedia.com/Gluteal_Muscles
- Elkaim, Y. (2023, August 31). 19 Best Glute Exercises and Workouts of All Time (The Definitive Guide). Yuri Elkaim. https://yurielkaim.com/19-best-glute-exercises/
- Nasm, B. W., & CSCS, J. B. (2023, December 13). The 22 Best Workout Moves to Build Your Butt. Men’s Health. https://www.menshealth.com/fitness/g19546820/best-glutes-exercises/
- Richter, D. (2023, December 19). The 15 Best Glute Exercises for Muscle & Strength. StrengthLog. https://www.strengthlog.com/glute-exercises/
- Valand, B. (2022, September 26). Gluteus muscle exercises – Health Benefits, How to do? Samarpan Physiotherapy Clinic. https://samarpanphysioclinic.com/gluteus-muscle-exercises/#What_precautions_should_take_during_exercise
- Patel, D. (2023, December 13). 26 Effective Gluteal Muscle Exercises You Can Do at Home. Mobile Physiotherapy Clinic. https://mobilephysiotherapyclinic.in/effective-gluteal-muscle-exercises/#Stretching_of_glutes_muscles
- B. (2022, August 22). How To Activate Your Glutes (3 BEST Exercises For Glutes Activation). Built With Science. https://builtwithscience.com/fitness-tips/how-to-activate-your-glutes/
- Team, W. D. (2023, July 26). 8 Best Glute Workouts: Exercises, Training, Safety, and Variations | The Workout Digest. Become Fit and Healthy at Home. https://theworkoutdigest.com/exercises/glute/
- Chander, R. (2020, August 26). 3 Moves to Strengthen Your Body’s Biggest Muscle — Your Butt. Healthline. https://www.healthline.com/health/fitness-exercise/stronger-glutes-exercises#importance-of-training-glutes
- ‘I’m a Gynecologist, and Here’s What You Should Know About Vaginal Dryness in Perimenopause and Beyond.’ (2024, February 21). Well+Good. https://www.wellandgood.com/vaginal-dryness-bonafide/
- Sayer, A., Sayer, A., & W. (2023, November 14). 5 Personal Trainers Tell Us Their Favorite Glute Exercises That Actually Work. Well+Good. https://www.wellandgood.com/best-glute-exercises-at-home/
- Ms, E. Q. (2022, September 27). The Best Exercises for Activating Your Glutes. Verywell Fit. https://www.verywellfit.com/the-best-butt-exercises-4129172
- The 6 Best Glute Exercises To Increase Strength and Size | Gymshark Central. (n.d.). https://central.gymshark.com/article/top-5-exercises-to-grow-your-glutes
- Issn-Ciss, A. C. N. C. (2024, February 29). 15 Best Glute Workout Exercises, With Tips From Our Experts. BarBend. https://barbend.com/best-glutes-exercises/