Physical Examination Test for Shoulder Joint
A thorough physical examination of the shoulder joint is essential for accurately diagnosing these issues and developing an effective treatment plan. This examination typically includes a combination of visual inspection, palpation, and a series of specific tests designed to assess the integrity, strength, and function of the muscles, tendons, and ligaments surrounding the shoulder.
What is a Shoulder Joint?
The shoulder joint is the complex joint that connects your upper arm to your upper body. Because of its extensive range of motion, it is the body’s most flexible joint.
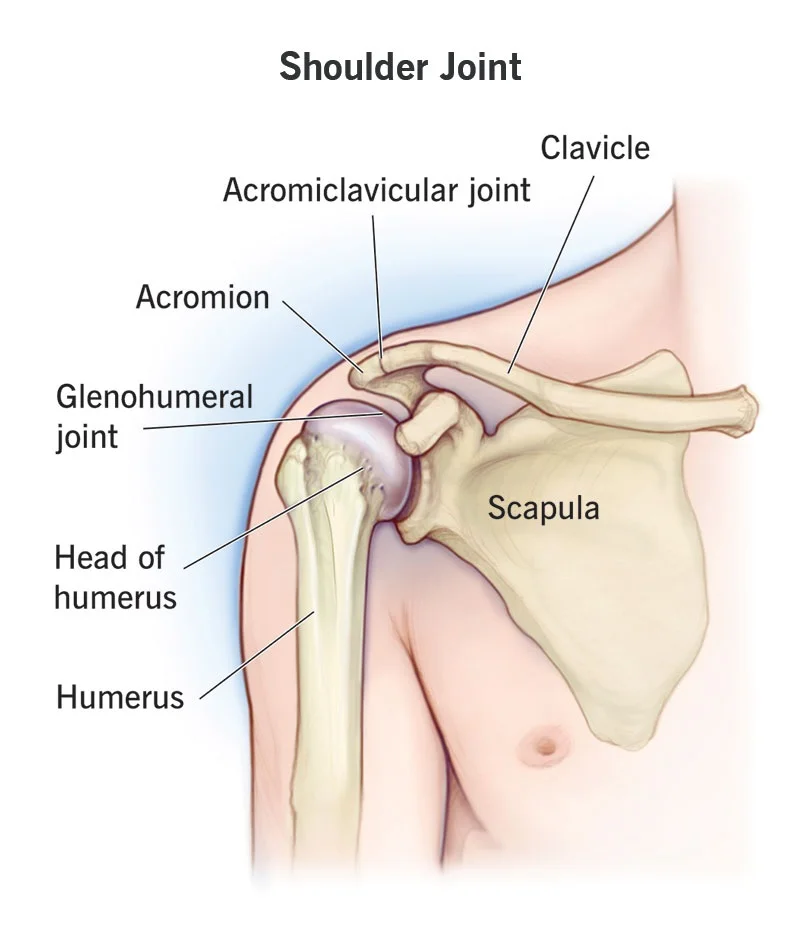
Four interconnected joints to form the shoulder joint:
- The glenohumeral joint is a ball-and-socket joint.
- The point where the clavicle, the outside end of the collarbone, and the top of the shoulder blade converge is known as the acromioclavicular joint (AC).
- The sternoclavicular (SC) joint is formed by the sternum with the inside end of your collarbone.
- The scapulothoracic joint glides between your outermost rib cage and upper arm. This joint does not move your arm, but it is very important for shoulder mobility because it allows your shoulder blade to move along your chest wall.
The glenohumeral joint is the most important joint for shoulder mobility out of these four.
Wide ranges of motion are made possible in three planes by this:
- Twisting (internal and external rotation)
- Sideways movement (abduction and adduction)
- Forward and backward movement (flexion and extension)
The other three shoulder complexes provide stability and support.
The AC joint allows for some movement of the shoulder upward and downward, while the SC joint only allows for limited movement forward and backward.
Medical History
A client’s recollection of their prior medical history is referred to as anamnesis. For people with musculoskeletal diseases, anamnesis is an essential component of the examination procedure. Various anamnestic components are gathered, such as
- Features of the symptoms
- Pain mechanisms
- Expectations, preferences, and psychological characteristics of patients (yellow flags).
- Each of these components has a weight, and the clinical reasoning process uses them to direct the physical examination that follows.
Patient History
- It is important to pay close attention to the patient’s past medical history as this can help rule out any concerns and direct the shoulder examination.
- The presenting condition’s history, the length of time the complaints have lasted, how it developed, and whether was there ever a traumatizing event.
- The distribution and severity of pain include sleep disturbances, the ability to lie on the affected side, and the degree of interference with day-to-day activities at work and home.
- Self-care and additional therapies the patient has attempted.
- The relationship between the complaints and the workplace.
- Sports activities and complaints in relation to each other.
Find out where the problems are coming from, find out
- The pain’s location—radiation in the arm
- Activities that are aggravating, such as challenges with overhead tasks, lifting objects, daily living tasks, sports, or leisure activities
- discomfort when attempting to move the upper arm in one or more directions
- a sense of unpredictability
- Additional neck complaints
Questions to ponder in order to identify potential diseases
- Does adjusting your neck affect the way you feel?
- Have you ever had unsteadiness when moving your arms?
- Does your pain level increase when you perform movements with your arms above your head?
- Do you have trouble moving your arm?
- Do your arms feel heavier when you lift them above your head to act?
Mechanism of Injury
It is crucial to enquire about the mechanism behind any given injury, especially concerning three aspects of the injury’s temporal context: the anatomical site, the limb’s position, and the individual’s subjective experiences.
Make sure you understand the patient when they describe the anatomical site. It is also helpful to provide an account of the arm’s posture at the moment of the injury.
Falling on an externally rotated, abducted arm, for example, increases the likelihood of shoulder dislocation or subluxation.
Finally, looking into the patient’s individualized experiences at the scene of the injury may be beneficial.
To give an example, hearing something “pop out” could mean that a joint has been dislocated or subluxated; on the other hand, hearing a snapping or cracking sound could mean that a bone or ligament has broken.
Overview
When a patient initially complains of shoulder pain, a general examination should be performed to rule out any musculoskeletal abnormalities and evaluate any potential functional limitations.
After that, a few specific tests can be performed to help identify any lesions in the muscle or ligamentous tissues of the joint.
Examining Shoulders
- We have the first chance to observe any functional deficiencies in the shoulder joint.
- Overall Analysis Once the patient has disclosed the upper torso and limbs, we can move on to a thorough examination of the shoulder’s anterior, posterior, and side.
- The key concept at this point in the shoulder examination is symmetry. Every shoulder ought to have a somewhat comparable composition, alignment, and purpose.
- Shoulder dominance can lead to differences; the dominant shoulder may sit lower and seem bigger because of its larger muscular mass.
- Finding any anomalies in the muscle mass or symmetrical bony deformities is our aim.
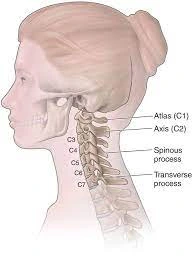
Examination of the Cervical Spine
In order to rule out any spinal pathologies as the cause of the presentation, a thorough examination of the cervical spine must be performed before treating the shoulder. At the very least, we should palpate the cervical spinous processes and measure the neck’s range of motion in flexion, extension, and rotation to look for cervical spinal tenderness.
Palpation
The physical therapist can obtain valuable information by palpating the shoulder.
The temperature, texture, and presence of any symptoms such as swelling in the tissue must all be noted by the physical therapist.
Asymmetry, variations in sensation, and the recurrence of pain are other things the physical therapist might observe.
- Important structures to feel include:
- Joints Acromioclavicular and Sternoclavicular
- Insertions of Rotator Cuff Muscles
- The Biceps’ Tendon of the Long Head
- Sensitivity and changed perception (personal) regional or recommended
- Objective: Surface temperature and texture: a hot, tight surface may indicate an infection, inflammation, malignancy, or synovitis.
- Swelling could be a sign of a nodule, effusion, tumor, or changes in the bone.
- Movement-related pain and stiffness: osteoarthritis, tendinopathy, and fractures.
Range of Motion / Flexibility of Movement
Next, we ought to assess the shoulder’s range of motion (ROM) in various orientations.
Pathology in a certain shoulder structure may be indicated by painful or limited mobility in a particular direction.
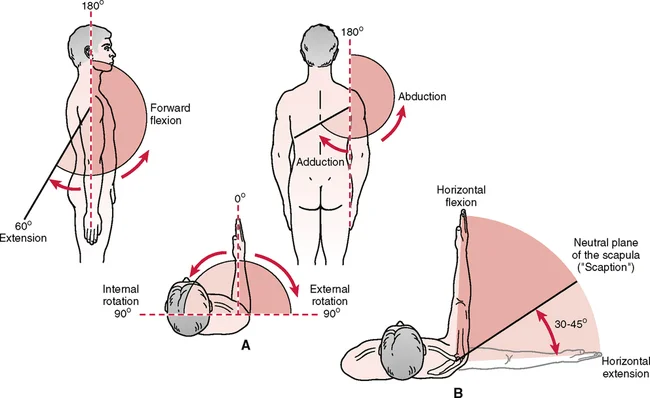
- Flexion Forward
Ask the patient to flex their arm at the shoulder by moving their upper extremity anteriorly and then superiorly until it is above their head, starting with their forearm fully positioned at the elbow and joined to their trunk’s side.
2. Abduction
Instruct the patient to abduct both arms until they are at a 180-degree angle above the head.
3. Adduction Cross-Body
Instruct the patient to flex their upper limb to a 90-degree angle. To enhance shoulder abduction from this posture, ask the patient to move their arm horizontally to the other side.
4. External Rotation / Rotation from the outside in
Aim for a 90-degree elbow flexion from the patient while the arm is still linked to the trunk and the palms are tipped downward. The patient should then externally rotate by doing their forearms away.
5. Extension
Ask the patient to extend both arms at the shoulder by moving the upper extremities posteriorly, starting with the forearm fully extended at the elbow and the palms supinated.
6. Internal Rotation
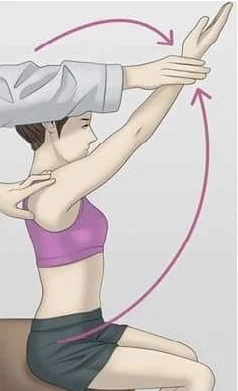
Ask the patient to clench their fists and raise their thumbs while flexing their elbows at a 45° angle. Next, ask them to place both hands behind their back until their thumbs meet the apex of their homolateral shoulder. This exercise evaluates the shoulder’s internal rotation’s functional integrity.
Motion of the Scapular
It is a good idea to perform all of the range-of-motion tests again while watching the scapulae move to finish the shoulder inspection.
Pathology in the anterior aspect of the shoulder would be indicated by any asymmetries in the scapular movement rhythm.
Dysfunction
Dysfunction that impairs mobility. which movements are restricted, as this can assist in identifying the issue.
Should you be limited in your range of motion by:
- Pain: impingement, sprain/strain, labral pathology, tendinopathy
- Mechanical block: frozen shoulder and labral pathology
- The following conditions can cause nighttime shoulder pain: rotator cuff pathology, anterior shoulder instability, and neoplasm (particularly unremitting)
- “Clicking or clunking” sensation: unstable shoulder
- The feeling of stiffness or instability
- Anterior or multidirectional instability
- Frozen shoulder
Muscle Length Assessment
Patients experiencing shoulder pain may benefit from having the flexibility of specific muscles assessed.
- Latissimus Dorsi
- Pectoralis Minor/Major
- Levator Scapulae
- Upper Trapezius
- Scalenes (anterior/middle/posterior)
Muscle Strength
To test the shoulder muscles resistively, the following movements are usually performed:
- Shoulder Flexion
- Shoulder Extension
- Shoulder Abduction
- Horizontal Abduction
- Horizontal Adduction
- Internal Rotation
- External Rotation
Exercise can help to check the scapular stability:
- Upper trapezius
- Middle trapezius
- Lower trapezius
- Serratus Anterior
- Rhomboids
- Levator Scapulae
Joint Mobility Assessment
An evaluation of the joint’s mobility may reveal hypomobility there and/or exacerbate existing symptoms.
- Glenohumeral
- Anterior
- Posterior
- Inferior
- Distraction
- Acromioclavicular
- Anterior
- Posterior
- Sternoclavicular
- Anterior
- Posterior
- Superior
- Inferior
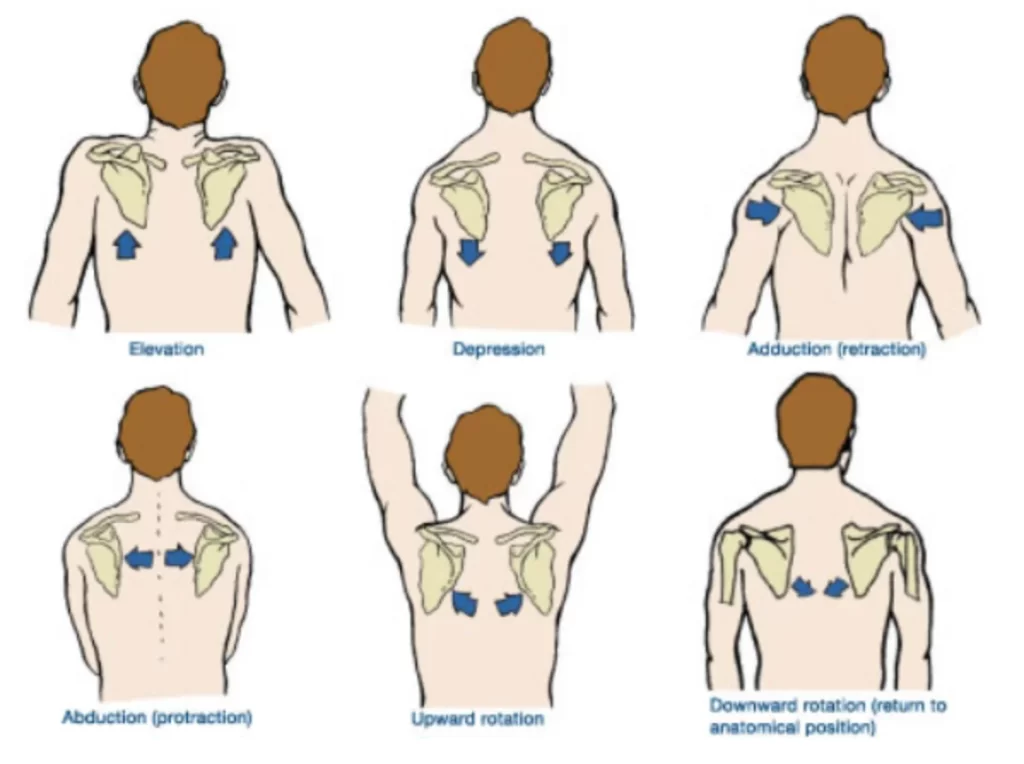
- Scapulothoracic
- Elevation
- Depression
- Upward/downward rotation
- Protraction/Retraction
Specific Examinations of Shoulder
To fully examine the shoulder, certain specialized tests and provocative maneuvers that are unique to various shoulder lesions and pathologies must be performed.
These examinations will assist us in verifying or ruling out the existence of a particular shoulder ailment, which we might become suspicious of only following the examination and evaluation of the entire range of motion.
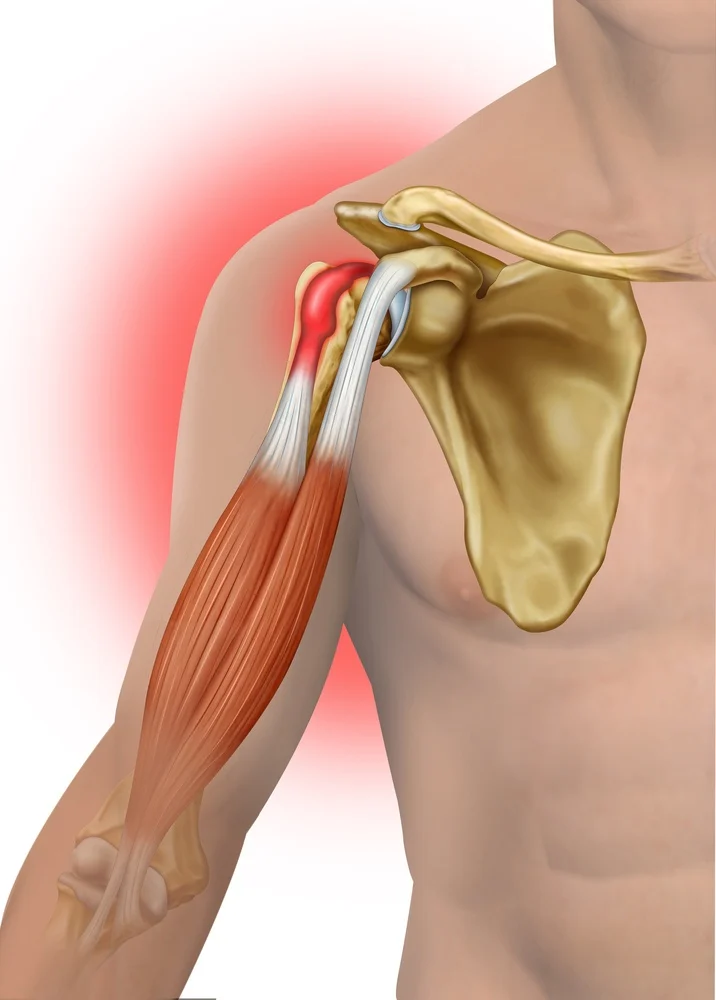
Rotator Cuff Examination
Injury to the rotator cuff muscle is one of the common causes of shoulder pain.
These may show up as tendinitis, bursitis, or tears in the tendon.
Most often, patients report discomfort and reduced shoulder function.
A rotator cuff tear in a young patient typically has a traumatic origin and manifests as acute symptoms.
On the other hand, in elderly patients, the pain usually starts more gradually and is typically brought on by a chronic degenerative process associated with aging.
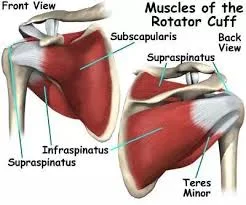
When rotator cuff pathology is suspected, the four tendons that make up the rotator cuff can be evaluated for integrity utilizing the following techniques:
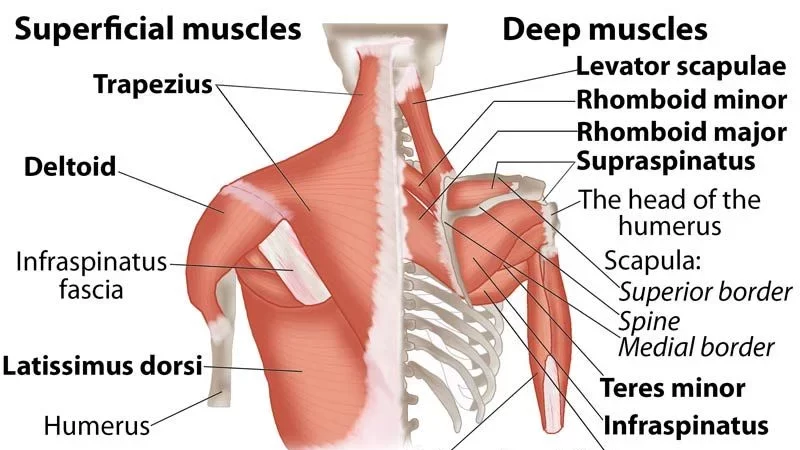
- Infraspinatus
- Supraspinatus
- Subscapularis
- Teres minor
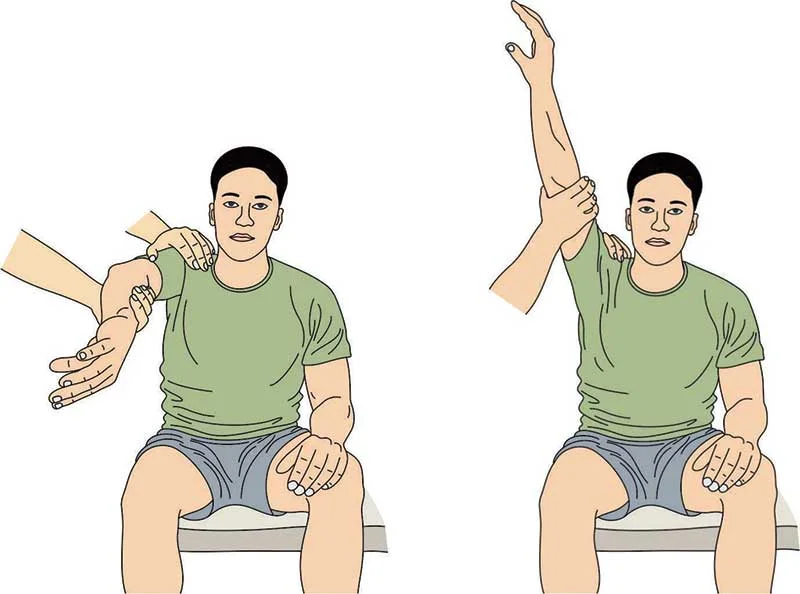
Test of Supraspinatus
The rotator cuff tendon that sustains injuries the most frequently is the supraspinatus tendon.
The therapist can determine the patient’s supraspinatus by having them abduct both arms to 90° and then bring them anteriorly with a forward flexion of 30°.
From this attitude, we will instruct the patient to thrust both arms upward against our resistance.
Any discomfort or weakness, particularly if one side is affected, will point to a supraspinatus tendon injury.
Moreover, we can do the “empty can test,” in which the patient is asked to lower both thumbs from this posture.
To check for pain and weakness, we will push downward against the patient’s resistance once more.
Teres Minor and Infraspinatus
It is important to give resistance to the shoulder’s external rotation to check the strength of the teres minor and infraspinatus tendons.
We will ask the patient to do this by flexing their forearms at a 90-degree angle with their palms supinated.
Against our resistance, we will ask the patient to move their forearms laterally to externally rotate their shoulders from this position.
An injury to one of these tendons will be indicated by any pain and/or weakness.
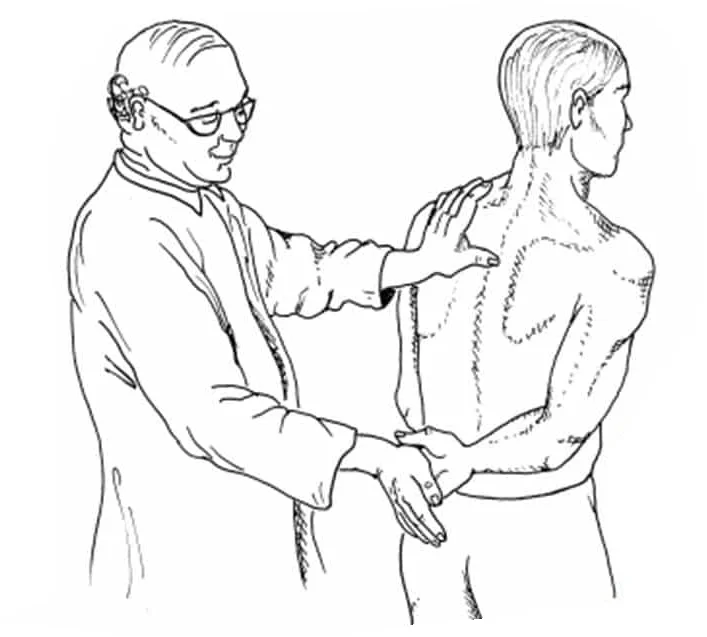
Subscapularis
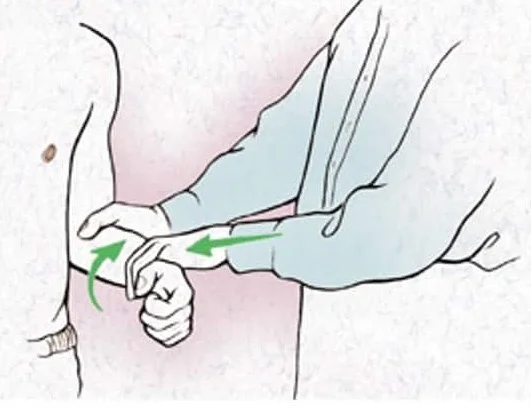
Ask the patient to place their hand on their back at the level of their lumbar region to check for the presence of a subscapularis tendon tear. After that, gradually detach the hand from the back until the shoulder has completed its internal rotation.
At this stage, ask the patient to actively keep their hand away from their back.
If the patient is unable to perform, it is stated as a positive internal rotation lag sign and is suggested a subscapularis tendon tear.
Gerber’s Lift Off Test
By placing the hand behind the back at the lumbar region and facing the lumbar spine with the dorsum of the hand, ask the patient to internally rotate their shoulder. Subsequently, request that the patient remove their hand from their back, defying your resistance. The test is deemed positive for a subscapularis tendon tear if it produces pain or weakness.
Serratus Anterior
Despite not being regarded as a component of the rotator cuff, we can assess the strength of this muscle after the rotator cuff examination because of its function in stabilizing the shoulder joint as well as the scapula.
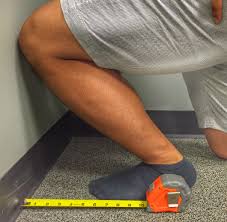
Asking the patient to perform a standing push-up against the wall will help us determine whether they have a functional deficit of the serratus anterior. A winging of the scapula signifies a weakness in that side of the muscle.
Shoulder Impingement
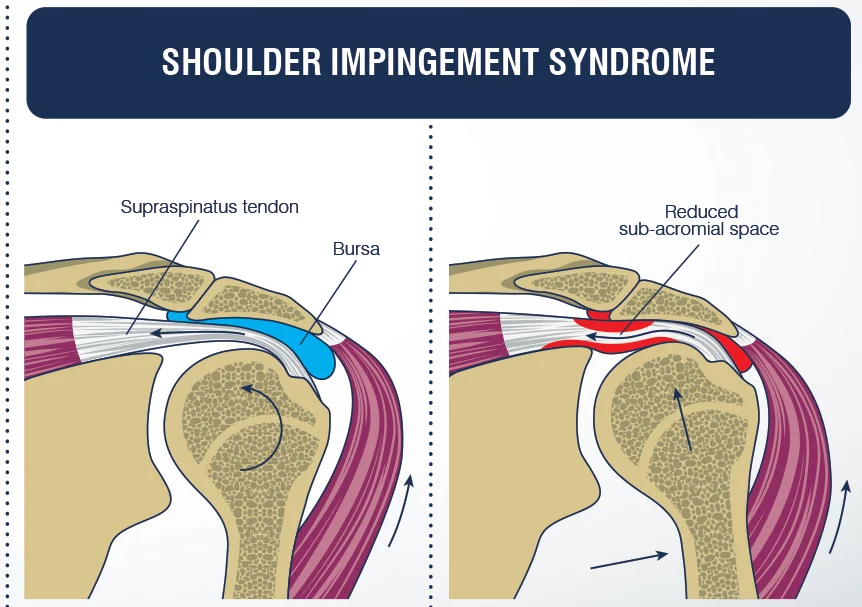
The supraspinatus tendon becomes inflamed in shoulder impingement syndrome due to recurrent trauma to its subacromial portion. This condition may develop as a result of any procedures that narrow the subacromial space as well as the shoulder’s repetitive overhead motion. Usually, it shows up as weakness in the arms’ ability to extend overhead and shoulder pain, especially at night.
To determine whether shoulder impingement is present, we can perform one of three tests:
- Neer’s Test
- Empty Can Test
- Hawkins-Kennedy Test
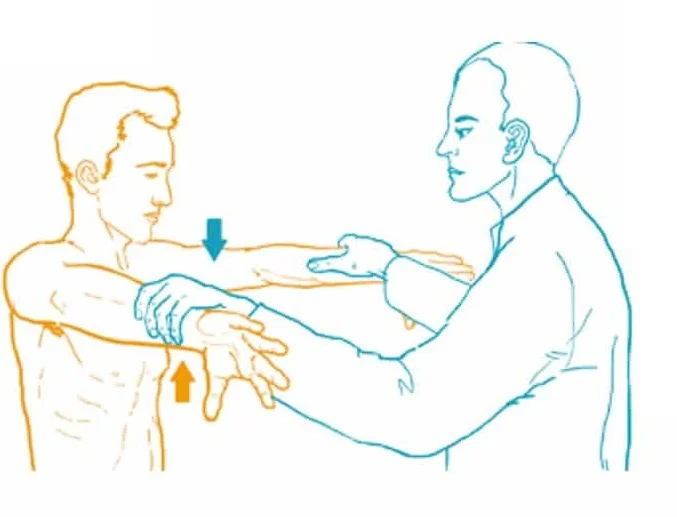
Neer’s Test
We ask the patient to fully pronate their forearm before we passively flex their arm till it is over the head. If shoulder impingement is present, this maneuver reproduces pain and narrows the subacromial space.
Empty Can Test
The supraspinatus tendon integrity is assessed using the same test. If impingement is present, it causes pain by decreasing the subacromial space.
Hawkins-Kennedy Test
Both the elbow and the shoulder must be flexed to a 90° angle to complete this test.
To allow for maximum relaxation of the upper extremities, the examiner must support the patient’s arm at the elbow level.
Next, the examiner must perform a cross-body adduction of the arm and internally rotate the shoulder.
If pain is felt, the test is considered positive.
Associated Findings
Palpating the anterior joint line may reveal tenderness in patients with shoulder impingement. Ask the patient to internally rotate their shoulder by pressing their hand against their back to reveal the subacromial and subdeltoid spaces.
Furthermore, scapular movement asymmetries and shoulder impingement are commonly linked.
Biceps Tendinopathy
Tendinopathy
In biceps tendinopathy, inflammation or degeneration of the biceps tendon’s long head. It is a significant contributor to anterior shoulder pain and is typically observed in conjunction with other shoulder pathologies like impingement and rotator cuff tears.
To determine whether biceps tendinopathy is present, there are two specific tests to perform:
- Speed’s test
- Yergason’s test
Speed’s Test
The patient is asked to fully supinate their forearm and then extend their elbow as part of this test.
The patient is then instructed to flex their shoulder forward in defiance of the examiner’s resistance.
Examiners should simultaneously feel for any tenderness along the anterior joint line.
Any discomfort felt during the exercise would be a sign of tendinopathy in the biceps.
Yergason’s Test
First, the patient is instructed to partially pronate their forearm and flex their elbow to a 90° angle.
After that, the patient is instructed to supinate their forearm against the examiner’s resistance, which the examiner may apply by holding their hand.
Examiners should also feel for any soreness or popping sensation.
If pain is felt, the test is considered positive.
Adhesive Capsulitis
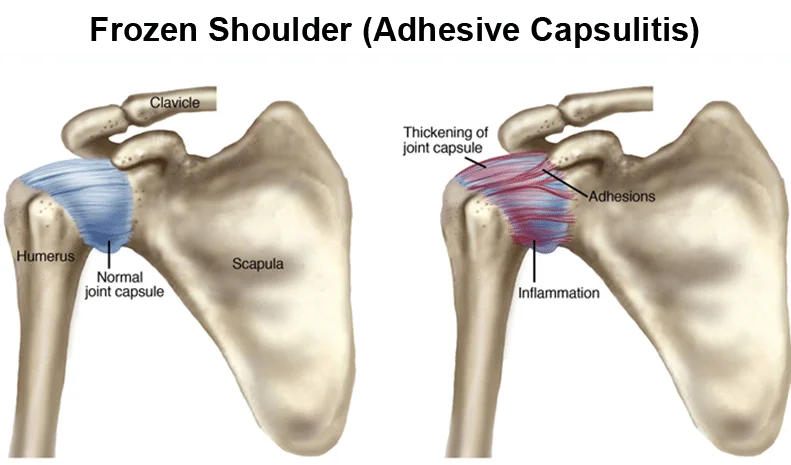
Adhesive capsulitis causes the shoulder joint’s capsule to inflame and stiffen, making movement extremely painful and challenging. Pain with shoulder movement in any direction is a hallmark of the disease’s early stages. Although the shoulder pain is mostly relieved in the later stages, the shoulder stiffness is still present. It’s critical to keep in mind that both the active and passive ranges of motion are impacted. The external rotation is the first range of motion that is impacted. Additionally, asymmetry in scapular movement is typically present.
Lastly, the trapezius muscle may become tender and spasm in these patients. Therefore, to assess muscle tone and elicit pain, palpate the upper part of the trapezius.
Disease of the Acromioclavicular Joint
All conditions, including degenerative processes and traumatic injuries, that may impact the acromioclavicular joint are indicated by this term. The complaints are nearly invariably the same, regardless of the cause. The patients will describe nighttime pain brought on by sleeping on the afflicted side as well as localized pain over the acromioclavicular joint.
Palpation of the AC Joint
When pathology of the AC joint is suspected, we should palpate above the joint to feel for any step-off sensation or crepitus, as these could be signs of AC separation. Additionally, every AC joint disorder is typically accompanied by joint tenderness.
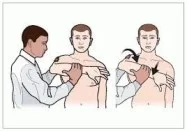
Scarf Test
The affected side’s hand is placed on the opposing shoulder by the examiner during the scarf test. Next, it pushes at the elbow to force the arm’s cross-body adduction. The therapist palpates the AC joint at the same time. An AC joint injury is indicated by any pain or crepitus.
Painful Arc Test
The interested shoulder is to be abducted to 180° by the patient. An AC joint injury is suspected if the patient reports pain when their arm is between 180° and 150°.
Shoulder Instability Test
Patients who feel instability in their shoulder area also have pain where the head of the humerus partially or fully emerges from the glenoid fossa. This disorder may result from a traumatic injury to the joint capsule or ligaments, or it may be linked to a congenital hyperlaxity of these structures.
Sulcus Sign
In this test, the examiner pulls at the wrist level to exert downward pressure on the humerus while simultaneously observing the lateral aspect of the deltoid region. The test results are interpreted as positive for shoulder instability if a sulcus develops in this area.
Tests of Apprehension and Relocation
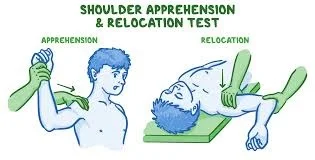
The patient should lie supine on the examination table for this test.
Next, the examiner abducts the shoulder to 90° and flexes the elbow to 90°.
At this point, the examiner places one fist behind the shoulder and applies downward pressure with the other hand at wrist level.
If instability is present, this maneuver dislocates the humerus, which should hurt or cause discomfort.
If instability is present, we then need to apply downward pressure on the anterior aspect of the shoulder to eliminate the pain as well as the anxiety.
Labral Tears (SLAP lesions)
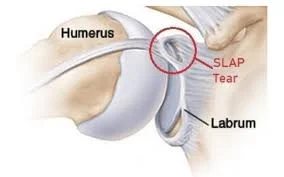
The glenoid fossa’s margins are surrounded by a ring of cartilage called the glenoid labrum. By providing the ligaments with attachment, it stabilizes the shoulder joint. The superior portion, which includes a portion of the biceps tendon, sustains damage most frequently (SLAP lesions). Athletes who perform repetitive overhead activities, like baseball players, or accidents resulting in the arm being in the overhead position due to humeral head dislocation are more likely to sustain this lesion.
To determine whether a labral tear is present, three tests are performed:
- O’Brien’s Test
- Crank’s Test
O’Brien’s Test
To perform this test, Flex the shoulder at 90° and then adduct it at 10°. We ask the patient to raise their arms against our resistance from this stance. A labrum lesion is suggested by the presence of pain.
Crank’s Test
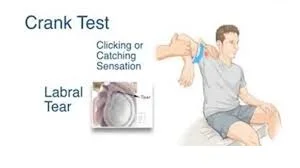
The examiner abducts the shoulder at about 90° and passively flexes the elbow at 90°. The examiner then acts on the elbow to alternately perform passive internal and external rotation of the patient’s shoulder while holding one hand on the elbow and the other on the shoulder. If the shoulder produces any pain or metallic noises, the test is positive.
Outcome Measures
- Shoulder Pain and Disability Index (SPADI)
- Disabilities of the Arm Shoulder, and Hand (DASH)
- Visual Analogue Scale (VAS)
- Patient-Specific Functional Scale
Special Questions
Asking patients if they have red or yellow flags should be done when they are experiencing shoulder pain. The first step in the screening process is a complete medical history which may involve using a medical screening form. Some of the most prevalent red-flag conditions for patients with shoulder pain are shown in the chart below.
Red Flags
Red flags are symptoms and indicators that a physiotherapist should be aware of, as they may indicate a non-musculoskeletal pathology, infection, tumor, fracture, or inflammatory rheumatic condition that could be fatal. As an example, consider:
- Polymyalgia rheumatica. Frequently manifests as weakness and pain in both shoulders. It is necessary to evaluate these patients for temporal arteritis.
- Acute syndrome of compartments. may be brought on by an overly tight bandage or cast, or it may be the result of significant limb swelling after an injury. The damage is not commensurate with the pain. Limb pulselessness rarely happens or is a very late symptom. This situation calls for immediate surgery.
- Open fractures
- Fractures compromising the nerves or vessels
- skin infections, but especially joint infections
- Neoplasia
- Conditions as serious as ischaemic cardiac pain, which can mimic shoulder pain in presentation, are life-threatening.
- Left Shoulder: Shoulder pain was experienced by 68.7% of patients following an acute myocardial infarction.
Yellow Flags
If there are any yellow flags, these tools can be used to evaluate them;
- The Fear Avoidance Belief Questionnaire (FABQ)
- Patients can be effectively screened for depression using depression screening instruments like the Depression Anxiety Screening Scale (DASS) or the Beck Depression Inventory (BDI).
- The Pain Catastrophizing Scale is a useful tool for assessing the severity of a patient’s condition overall as well as whether they are exaggerating their pain and symptoms.
Fractures
Trauma-like falls onto an outstretched hand can cause fractures. We refer to these as FOOSH injuries.
In the Shoulder area, frequent bone fractures are:
- Humeral Fractures
- Clavicle Fractures
Usually, a direct blow to the shoulder that causes axial compression causes clavicle fractures. With an incidence of less than 80%, the middle third of the clavicle is most frequently broken. Medial clavicle fractures occur 3–5% of the time, while distal clavicle fractures occur 10-15% of the time. Surgery is used to treat fractures that are significantly displaced. At one year, mid-shaft clavicle fractures have better functional outcomes and a lower rate of mal-union. For non-displaced clavicular fractures, a conservative management trial might be necessary.
Diagnostic Imaging Radiographs of the shoulder can be used to identify cysts, sclerosis, acromial spurs, osteoarthritis of the acromioclavicular and glenohumeral joint, or calcific tendonitis.
Common radiographic views may include (this may vary depending on the medical provider):
- Supraspinatus Outlet View
- Scapular Y-View
- Axillary View
- Anterior-Posterior (AP) View
Summary
A physician or physiotherapist will conduct a thorough physical examination of the shoulder joint to evaluate the range of motion, stability, and presence of pain in the shoulder. The following actions are usually involved:
- Taking a history: The doctor will question you about your symptoms, including where and how bad your pain is, any recent accidents or injuries, and any activities that aggravate or alleviate your pain.
- Observation: Your shoulder will be examined visually by the doctor, who will be looking for any deformity, swelling, or redness. They’ll also look for any obvious differences between your shoulder and the other shoulder.
- Palpation: The physician will lightly touch your shoulder to check for swelling, soreness, or a grating feeling. They will palpate the muscles and bones around the shoulder joint.
- Test of range of motion (ROM): The physician will evaluate the range of motion in your shoulder. These include the following: internal rotation (turning your hand palm inward), external rotation (turning your hand palm outward), flexion (bending forward), extension (bending backward), abduction (lifting your arm out to the side), and adduction (bringing your arm back to your side).
- Special tests: To check for particular injuries, the doctor may do some additional tests on top of the ones listed above. These tests might include the following:
- The purpose of the Apprehension Test, also known as the Anterior Instability Test, is to determine whether the shoulder joint is unstable. Your arm will be placed forward, and the doctor will apply light pressure to the front of your shoulder. Instability may manifest as pain or apprehension (fear) of dislocation.
- The Neer test, also known as the impingement test, is used to determine whether a patient has impingement syndrome, a disorder brought on by the rotator cuff tendons being pinched. After positioning your arm in a particular way, the doctor will gently press downward.
- The Grind test, also known as the Hawkins-Kennedy test, is another tool used to evaluate impingement syndrome. Your arm will be internally rotated by the doctor as they apply downward pressure.
The physician will diagnose you and suggest a course of treatment after interpreting the results of the physical examination in the context of your medical history.
FAQs
What should be examined thoroughly on the shoulders?
Physical assessment. A thorough physical examination consists of inspection and palpation, strength and range of motion assessments, and provocative shoulder testing to rule out glenohumeral instability and potential impingement syndrome.
How is impingement of the shoulder tested?
After positioning the patient’s arm shoulder in a 90-degree flexion position with the elbow 90 degrees bent, the examiner rotates the arm internally. If the patient feels any pain during internal rotation, the test is counted as positive.
What does a frozen shoulder physical examination entail?
Adhesive capsulitis, or frozen shoulder: signs and treatment
Your healthcare provider will examine your medical history and talk to you about your symptoms in order to diagnose adhesive capsulitis, also known as frozen shoulder. They will also examine your arms and shoulders physically. They’ll: Move your shoulder in every direction to see if there’s any pain when moving it.