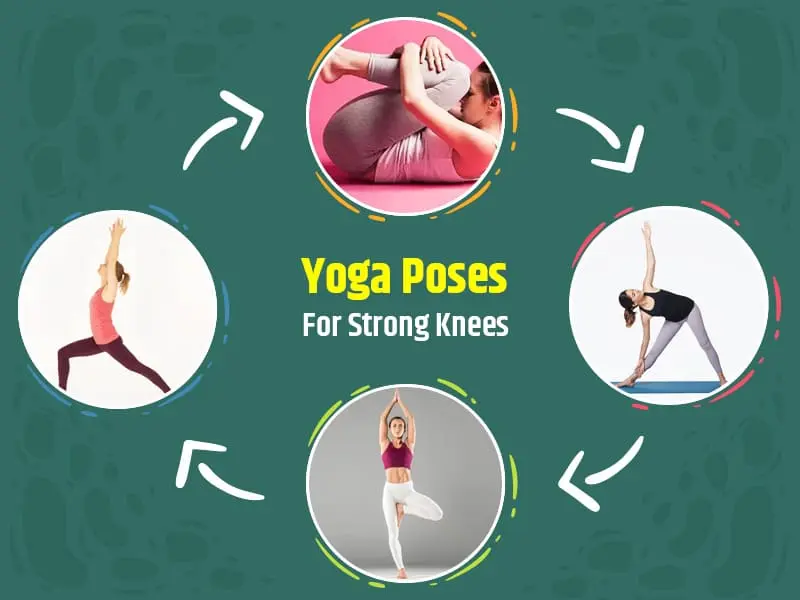
12 Best Yoga For Knee Strengthening Exercises
Strengthening the knees through yoga helps improve stability, flexibility, and joint support while reducing pain and injury risk. Key poses like Chair Pose, Bridge Pose, and Warrior variations build strength in the quadriceps, hamstrings, and surrounding muscles. Regular practice enhances mobility and balance, supporting overall knee health.
Introduction:
Yoga is a great way to strengthen your knees, increase their flexibility, and lessen pain or stiffness. When performed properly, it improves mobility and strengthens the muscles surrounding the knee joint.
In addition to increasing flexibility, yoga helps the body become stronger and more stable. Concerning the knees, several yoga poses for knee pain focus on the quadriceps, hamstrings, and glutes muscles that support the knee joints. It is possible to reduce knee strain and improve injury resistance by strengthening these muscles. Additionally, yoga helps maintain good posture throughout physical exercise and improves body awareness. Avoiding knee problems caused on by poor posture or dislocation requires this knowledge.
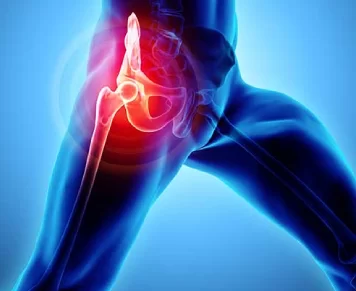
Every time we walk, squat, or move, our knees bear the weight of our bodies, making them essential joints. They give us balance, movement, and stability in our day-to-day tasks. Knee weakness and pain, however, can arise with age, trauma, or inactivity, resulting in pain and restricted movement. Yoga is among the most effective approaches for managing knee weakness and stiffness.
Advantages of Knee Strengthening Yoga Pose:
For knee strengthening, yoga is a mild yet very powerful approach. Weak quadriceps, hamstrings, and calves are among the muscles that surround the knee joint and are the cause of many common knee issues. Yoga strengthens these muscles and encourages mobility, balance, and flexibility.
The following are the main advantages of yoga for strengthening the knees:
- Strengthens the knee’s surrounding muscles.
Strong muscles lower the chance of injury by giving the knee joint stability and support. The quadriceps, hamstrings, calves, and glutes are all used in many yoga postures and are essential for knee stability. By strengthening these muscles, the tension on the knee is less likely to take place and the weight is distributed more evenly.
- Increases Joint Mobility
Increases the knee joint’s range of motion, helping in avoiding stiffness and preserving normal movement patterns. Regular yoga practice maintains or increases the knee joints and the surrounding tissues’ flexibility. The pain caused by limited movement is lessened by this increased mobility.
- Helps in the Recovery from Injuries
Help in recovery by gradually restoring knee strength and range of motion. Following knee injuries, yoga allows a regulated, low-impact recovery phase. Gentle strengthening and stretching poses lower the chance of re-injury while offering a secure recovery environment.
- Increases Flexibility
Tension and soreness are lessened when the muscles surrounding the knee are more flexible. Pain or dislocation may result from tight muscles that put strain on the knee joint, such as the calves, hamstrings, and quadriceps. Yoga stretches extend these muscles, increasing the range of motion and reducing stiffness.
- Improves Stability and Balance
Promotes stability and balance overall, supporting knee function. You may strengthen the knee-supporting muscles while improving joint coordination by doing yoga positions that test your balance and stability. This can help you avoid falls and lessen knee pain.
- Lessens Knee Pain
Knee pain caused by overuse, injuries, or diseases like arthritis can be relieved by yoga. Yoga lessens the load on the knee joint by strengthening the muscles surrounding it and improving its alignment. The comforting and relaxing effects of yoga can help in pain management and recovery.
- Prevents Knee Problems in the Future
Maintains strength and flexibility, preventing knee issues and muscular imbalances. Regular yoga practice helps maintain muscular balance around the knee joint, preventing each group of muscles from becoming weak or too tense. This balance reduces the chance of getting runner’s knee, patellar tendonitis, and osteoarthritis.
- Helps Encourage Correct Alignment
Correct alignment issues that could be causing knee pain or strain. A lot of yoga positions focus on body awareness and alignment. Yoga helps you avoid bad habits that might cause imbalances and injury, such as allowing your knee to fold inward, by focusing on good knee alignment during practice.
- Promotes Awareness of the Body
Makes you more aware of the alignment and movement patterns of your body, which promotes better movement habits. Yoga promotes awareness of the body’s actions and paying attention to movement. This increased awareness helps in avoiding compensations or imbalances that may be a factor in knee injury or pain.
- Reduces Tension and Stress
Lessens the body’s general tension, which may have an effect on the knees. Yoga uses relaxing positions and breathing exercises called pranayama to promote deep relaxation. Muscle tightness that could normally cause knee pain can be lessened by lowering stress and tension in the body.
Yoga For Knee Strengthening:
By strengthening the muscles that support the joint the hamstrings, quadriceps, glutes, and calves you can lessen the likelihood of knee pain and injury.
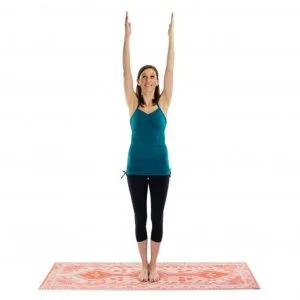
Mountain Pose (Tadasana)
Strengthens the legs, activates the quads and glutes to support the knees, and improves posture.
- Place your feet hip-width apart or together.
- Make sure your feet are set firmly on the ground and that your weight is distributed equally between your heels and knees.
- Maintain contact between your big toes while leaving just a little distance between your heels if your feet are together.
- Gently raise your kneecaps to engage your leg muscles.
- Use your quads (the muscles in front of your thighs) a little to make your legs longer.
- Think about pulling the inner thighs together without locking the knees.
- Pull your lower abdomen in (without pushing) and tuck your tailbone under a little.
- This helps with the development of a neutral pelvic posture.
- Think of your spine being lengthened by something dragging you upward from the top of your head.
- Relax your shoulders away from your ears and slowly pull your shoulder blades down your back.
- With your hands facing front or slightly twisted toward your body, keep your arms by your sides.
- Make sure the top of your head is pointing toward the ceiling.
- You can keep your chin parallel to the floor and look directly ahead.
- Push your belly button toward your spine by gently contracting your abdominal muscles.
- By doing this, you can keep your posture straight and stabilize your entire body.
- Take deep, calm breaths.
- Create a balance between strength and relaxation by inhaling to stretch your body and exhaling to relax yourself into the pose.
- Then return to your neutral position.
- Then relax.
- Repeat this pose 5 to 10 times.
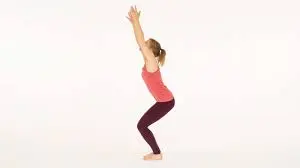
Chair Pose (Utkatasana)
Improves knee stability by strengthening the calves, quadriceps, and glutes.
- Start by placing your feet hip-width apart or together and standing tall.
- Engage your legs and apply equal pressure through your feet.
- As if you were sitting in an imaginary chair, take a deep breath and start bending your knees and pulling your hips back.
- Maintain a balanced weight on your feet.
- Refrain from extending your knees over your toes.
- Keep lowering your hips until your thighs are as low as you can comfortably go or as parallel to the floor as you can.
- Consider sitting in a chair where your knees should not extend over your toes.
- As you take a breath, raise your arms next to your ears, either parallel or pulling them together (palms facing forward or each other).
- Remain calm and keep your shoulders away from your ears.
- To activate your core, pull your belly button toward your spine.
- Make sure your back doesn’t round out or arch.
- Maintain a raised chest.
- Hold for five to ten breaths, bending your knees more deeply with each exhale if you can.
- Then return to your neutral position.
- Then relax.
- Repeat this pose 5 to 10 times.
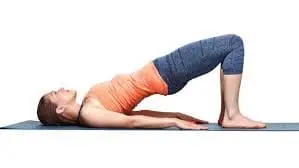
Bridge Pose (Setu Bandhasana)
Helps to stabilize the knee by strengthening the lower back, hamstrings, and glutes.
- Place your feet flat on the mat, hip-width apart, and bend your knees while lying flat on your back.
- Keep your arms by your sides and place your hands down.
- Maintaining your feet in line with your hips, press your feet onto the mat.
- Ensure that your knees are pointed directly ahead rather than out to the sides.
- Press your feet into the floor and raise your hips toward the ceiling as you take a breath.
- As you elevate your hips, contract your thighs, glutes, and core.
- As you raise your hips, you can choose to connect your fingers under your back or maintain your arms by your sides.
- Press your arms into the mat for support if your arms are on the floor to keep them moving.
- Try to pull your chest toward your chin as your hips rise, being careful not to strain your neck.
- Keep your neck and shoulders relaxed.
- Maintain your feet, arms, and legs firmly planted.
- Press your feet firmly into the mat and raise your chest with each breath as you hold for five to ten seconds.
- Carefully lower your hips back down to the mat to release.
- Then return to your neutral position.
- Then relax.
- Repeat this pose 5 to 10 times.
Locust Pose (Salabhasana)
Strengthens the thighs, glutes, and lower back, giving the knees additional support.
- With your arms out by your sides, palms down, lie flat on your stomach.
- Keeping the tops of your feet pressing into the mat, maintain your legs straight and together.
- Keep your neck relaxed and in alignment with your spine while lowering your forehead to the floor.
- Your lower body is activated by pressing the tops of your feet into the floor and using your thighs and glutes.
- You can strengthen your back muscles by imagining attempting to raise your legs off the ground without using your hands.
- As you take a breath, start slowly raising your arms, legs, and body off the floor at the same time.
- Try reaching your legs up and back while keeping your arms outstretched, as though you were stretching your body in two different directions.
- Make sure your neck is neutral and keep your eyes down or slightly forward.
- As you continue to raise your legs and chest, use your inner thighs and core to support your lower back.
- As your chest rises higher, continue to extend your arms toward your feet.
- Hold this position for a few seconds.
- As you raise your weight, concentrate on stretching your body.
- Release by controlling the slide of your arms, legs, and chest back to the mat.
- Then return to your neutral position.
- Then relax.
- Repeat this pose 5 to 10 times.

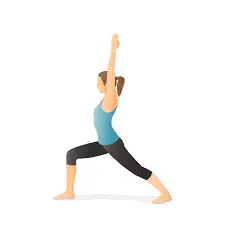
Warrior I (Virabhadrasana I)
Increases balance and strengthens the calves, hips, and thighs.
- Maintain a tall stance with your arms by your sides, shoulders relaxed, and feet hip-width apart.
- As you inhale deeply, stretch your spine and ground yourself via your feet.
- Keeping your right foot forward, take a large step back with your left foot.
- Depending on your height and level of flexibility, try to keep your feet 3–4 feet apart.
- With your right thigh parallel to the floor, place your right knee exactly over your right ankle.
- Place the heel of your left foot firmly on the ground and lean it out to a 45-degree angle.
- Your left leg should remain strong and straight.
- Make sure your right knee stays just above your right ankle and doesn’t extend past your toes by bending it significantly.
- Lengthen your tailbone toward the floor by using your thigh muscles.
- Keeping your shoulders relaxed and away from your ears, raise your arms upward with your palms facing one another as you take a breath.
- Stretch your fingers toward the sky and raise your arms so that your wrists and shoulders are separated.
- With your sternum slightly raised, maintain an open chest and face forward.
- Look directly ahead or, depending on how comfortable your neck is, gradually tilt your eyes upward toward your hands.
- Hold for 5–10 breaths while keeping your legs and core strongly engaged.
- Straighten your front leg and slowly lower your arms to release.
- Then return to your neutral position.
- Then relax.
- Repeat this pose 5 to 10 times.
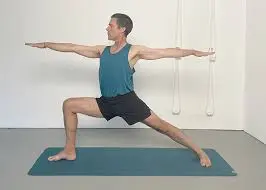
Warrior II (Virabhadrasana II)
Stabilizes the knees by strengthening the hips and quadriceps.
- With your shoulders relaxed, arms by your sides, and feet hip-width apart, take an upright stance.
- Depending on your flexibility and body size, space your feet 3 to 4 feet apart.
- Your left foot should be angled in around 45 degrees, while your right foot should be turned out 90 degrees, pointing toward the front of your mat.
- As you bend your right knee about 90 degrees, be sure it remains just above your right ankle and does not go past your toes.
- Press your left foot’s outer edge into the mat while maintaining a firm, straight left leg.
- You should have your shoulders level over your hips and the rest of your body looking forward.
- To prevent your butt from showing, imagine gently drawing your hips back.
- Stretch your arms out to the sides at shoulder height, palms down, as you take a breath.
- Maintain a firm, straight arm position while actively reaching with your fingertips.
- Keep your eyes neutral and gentle while you check your right hand.
- Maintain your shoulders and upper back from rounding; instead, keep your chest open and raised.
- Hold for five to ten breaths while keeping your posture firm.
- Move your arms back down to your sides and slowly straighten your right leg to release.
- Then return to your neutral position.
- Then relax.
- Repeat this pose 5 to 10 times.
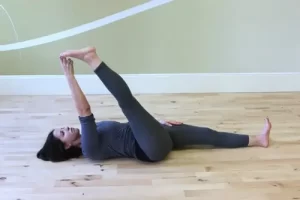
Reclining Hand-to-Big-Toe Pose (Supta Padangusthasana)
Releases tension from the knees by stretching the calves and hamstrings.
- To start, lay flat on your back with your arms by your sides and your legs outstretched.
- Maintain the alignment of your spine, neck, and head with the ground.
- Bend your right knee and pull it up to your chest to begin.
- Move your right knee closer to your chest while holding the back of it with both hands.
- Maintaining your left leg outstretched on the floor, straighten your right leg as you inhale.
- If at all possible, use your right hand to grip your big toe while, if necessary, wrapping a yoga strap around the ball of your foot for support.
- Maintain the toes of your left leg pointed directly ahead while actively pressing them into the floor.
- Maintaining the heel pressed forward, flex your right foot and contract your extended leg’s quadriceps.
- Make sure your lower back remains pressed into the mat and that both hips are squared and grounded; do not arch your back.
- Maintain the pose for five to ten breaths, extending the stretch slightly with each release.
- Hold the strap or your foot firmly while keeping your arms moving.
- To get a deeper hip stretch, try gently opening your right leg out to the side if you can, but pay attention to your comfort level and flexibility.
- Your right leg should be carefully released and returned to the floor to exit the stance.
- Extend the left leg and bend the left knee toward your chest to repeat on the left side.
- Then return to your neutral position.
- Then relax.
- Repeat this pose 5 to 10 times.
Half Frog Pose (Ardha Bhekasana)
Engages the hamstrings and glutes, strengthening the knees and stretching the quadriceps.
- With your arms by your sides, palms down, and your legs straight out in front of you, start by lying on your stomach.
- Keep your forehead on the floor or your head on the mat to promote neck relaxation.
- Your right foot should be pointing toward your glutes as you bend your right knee toward your chest.
- Press the top of your left foot into the mat while keeping your left leg straight out on the floor.
- Using your right hand, reach back and gently pull the outside of your right foot toward your right buttock.
- Avoid bending your body forward and keep your chest open.
- To help raise the chest and prevent stressing the lower back, contract your back muscles.
- Take a breath and raise your chest slightly off the ground, bringing your elbows down if necessary for additional support.
- Pay attention to opening the front of the body and experiencing the stretch in the chest, hips, and quadriceps (front of the thigh).
- Don’t allow your head to droop or tilt too high; instead, keep it neutral and long.
- Hold the posture for five to ten breaths, maintaining the slight backbend while taking deep, even breaths.
- Pulling the foot closer to your glutes while maintaining an elevated chest can help you deepen the stretch if you feel comfortable doing so.
- Lower your chest softly to the floor and let go of your right foot to exit the pose.
- To switch to the left side, bend your left knee and repeat the exercise, grasping the foot with your left hand as you reach back.
- Then return to your neutral position.
- Then relax.
- Repeat this pose 5 to 10 times.
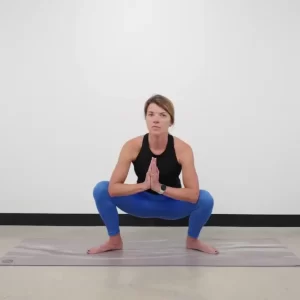
Garland Pose (Malasana)
By stretching your legs from your instep to your glutes, a deep squat promotes joint health.
- Start by placing your feet hip-width apart or slightly wider, depending on how comfortable you are, in Tadasana (Mountain Pose).
- Position your toes at a 45-degree angle and point them outward.
- Bend your knees as you take a breath and start lowering your hips toward the floor, creating a feeling that you are sitting in an imaginary chair.
- Try to maintain your heels on the floor.
- You can support your heels with a block or rolled towel if they lift off.
- Maintain a straight spine and use your core muscles to support your lower back as you squat down.
- Do not fall forward; instead, keep your chest open and raised.
- After you’re in a deep squat, place your palms together in front of your chest in the Anjali Mudra, or prayer pose.
- To help open the hips and deepen the stretch, gently press your elbows against the inner thighs.
- Make sure your knees do not bend inward and remain in alignment with your toes.
- Maintain a neutral head and neck posture when looking directly ahead or slightly downward.
- Keep your palms together, contract your legs, and use your core while you hold for five to ten deep, even breaths.
- To exit the pose, straighten your legs and stand up again by gently pressing onto your feet.
- Then return to your neutral position.
- Then relax.
- Repeat this pose 5 to 10 times.
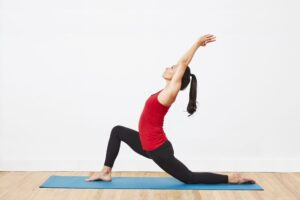
Crescent Lunge (Anjaneyasana)
Stretches the hip flexors and strengthens the hips and quads.
- Place your hands shoulder-width apart and your feet hip-width apart to start in a downward-facing dog.
- To find your alignment and ground yourself, take a few deep breaths here.
- As you take a breath, place your right foot between your palms and lower your left knee to the mat in a low lunge.
- With your left knee on the floor, make sure your right knee is exactly over your right ankle and does not extend past your toes.
- Make a high lunge position by pressing your left knee into the mat and raising it off the floor with your following inhalation.
- Make sure your hips are squared forward and your left leg is active.
- Make sure your hips are facing forward and that your pelvis is angled slightly forward to release the back leg’s hip flexors.
- If you are concerned about comfort or flexibility, you can do a kinder version by lowering the back knee to the mat.
- Raise your arms toward the ceiling while maintaining your ears in alignment as you take a breath.
- You can tilt your palms inward or outward.
- Don’t arch your lower back; instead, lengthen your spine and engage your core.
- To help support your lower back, keep your core active.
- To help balance your body, engage your leg muscles.
- To keep your balance, firmly press against the outside edge of your back foot.
- Open your chest and raise toward the sky as you extend your arms upward.
- Look straight forward or slightly up, depending on how comfortable your neck is.
- Focus on stretching the spine and increasing the stretch in the legs and hips as you hold for five to ten breaths.
- Step back into Downward-Facing Dog, let your arms down, and carefully lower your back knee to the floor if it is up.
- Then relax.
- Repeat this pose 5 to 10 times.
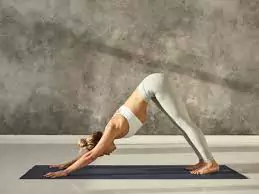
Downward-Facing Dog (Adho Mukha Svanasana)
Stretches the calves and hamstrings while strengthening the legs.
- Place yourself on your hands and knees in a tabletop position to begin.
- Place your knees just behind your hips and your wrists beneath your shoulders.
- Press your palms firmly into the ground while spreading your fingers wide.
- Press your hands onto the floor as you take a breath and start to raise your hips toward the ceiling.
- Try to make an inverted “V” with your body as you raise.
- Place your hands shoulder-width apart and your feet hip-width apart.
- If your hamstrings are tight, keep your knees slightly bent while you straighten your legs.
- Gently press your heels into the floor.
- Your calves and hamstrings should feel stretched, but they don’t have to touch the ground.
- Press your chest back into your thighs as you exhale to expand your shoulders and lengthen your spine.
- Make sure your ears line up with your upper arms and keep your head between them.
- Be certain that your back stays flat and avoid rounding your spine.
- Imagine extending your body in a long line from your wrists to your hips.
- To maintain the pose’s stability and strength, contract your leg muscles and activate your core.
- Raise your kneecaps, contract your thighs, and attempt to turn your inner thighs in the direction of the mat’s back.
- Keep your neck neutral and extended while allowing your head to rest.
- Look between your feet or at your thighs, depending on what is most comfortable for your neck.
- Maintain an active and involved body while holding for five to ten breaths, deepening the stretch with each one.
- To exit the pose, return to a tabletop position by bending your knees and lowering your hips gradually back to the floor.
- Then return to your neutral position.
- Then relax.
- Repeat this pose 5 to 10 times.
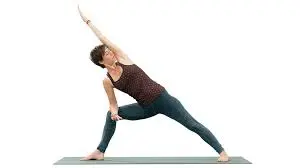
Utthita Parsvakonasana (Extended Side Angle Pose)
Your stamina is increased with Utthita Parsvakonasana. Your legs, knees, and ankles are strengthened and stretched in this pose.
- Put your feet wide apart when you start Warrior II.
- Your left foot is angled roughly 45 degrees inward, while your right foot is pointing forward.
- Your right knee is exactly over your right ankle, and both of your knees are bent.
- With your palms facing down, you hold your arms out at shoulder height and parallel to the floor.
- As you exhale from Warrior II, maintain your legs powerful and extend your chest forward over your right leg.
- Your right hand can be placed inside or outside your right foot, depending on comfort and flexibility, or it can be lowered to the floor or placed on a yoga block.
- Make sure the block is beneath your right hand if you’re using one to keep the spine long.
- As you take a breath, raise your left arm toward the ceiling and then raise it above your head to align it with your body, palm down.
- From your left hand, extend a long line of energy through your legs and side of your body to your rear foot.
- Engage your legs and rise through your core by applying pressure to your feet.
- Don’t let your right knee go past your toes; instead, keep it bent at a 90-degree angle.
- Maintain the strength and alignment of your back leg by using it.
- Make sure your chest expands toward the left side of the room by slowly rotating your body as you extend your arms.
- Keep your neck relaxed and your spine extended to prevent your neck and chest from dropping.
- Hold for five to ten breaths, letting your body and chest expand with each one.
- Make sure that your body and legs are stable and strong.
- Take a breath, straighten your right leg, and raise your arms back to shoulder height to exit the pose.
- Go back to the Warrior II pose and do it again on the opposite side.
- Then return to your neutral position.
- Then relax.
- Repeat this pose 5 to 10 times.
What safety measures need to be followed when doing yoga poses?
To prevent injury and get maximum benefit out of your yoga practice, it’s important to pay attention to body alignment, technique, and any underlying medical issues when performing poses.
The following are essential safety measures to follow when doing yoga:
- Properly Warm Up and Cool Down
Always finish with a few minutes of cool-down stretches and relaxation to allow your body to rest and heal. Begin with easy movements and stretches to prepare your body for deeper postures.
- Pay Attention to Your Body
Don’t push yourself too hard and always pay attention to your body. Back off, change positions, or take a break if something doesn’t feel right.
- Go Slowly
Begin with basic positions and gradually advance your practice. Take your time creating difficult or interesting yoga positions. The secret to properly building strength and flexibility is patience and regularity.
- Be careful of pre-existing conditions.
If you have any medical issues, speak with a healthcare provider before beginning yoga. Avoid positions that could put strain on injured areas and adjust your postures to suit your condition.
- Adjust Pose as Necessary
Make adjustments to create more comfortable and approachable yoga positions.
- Don’t Overstretch
Instead than pushing your body into extreme positions, try to achieve a gentle stretch or sense of release. Over time, gradually increase your level of flexibility.
- Use a Stable Surface for Practice
To guarantee stability in every posture, always practice on a firm, non-slip surface, such as a yoga mat. Stay away from uneven or slick surfaces when practising.
- Do Not Hold Your Breath
Breathe slowly and relaxing, taking deep breaths through your nose and letting them out through your mouth. Breath awareness, which encourages calm and helps in developing a breathing pattern, is an essential component of yoga.
- Use accessories to provide support.
Use blankets, harnesses, bolsters, or yoga blocks to help in stretching, balance, and alignment. For instance, you can safely deepen a hamstring stretch by wrapping a strap around your foot or placing a block beneath your hips in seated positions.
- Know Your Limits
Don’t compare yourself to others and adjust your positions as necessary. To make positions more approachable and comfortable, use accessories like blankets, straps, or blocks.
- Do not lock your joints.
To prevent locking your knees, elbows, and other joints, always maintain a small bend in them.
- Pay Attention to Correct Alignment
Throughout each posture, be aware of the alignment of your spine, hips, and knees.
When should you stop performing yoga poses?
It’s important to know when to stop doing a yoga position for knee strengthening to maintain safety and prevent damage.
The following are important signs to look out for when deciding whether to pause or adjust a yoga pose:
- If you experience any sharp, intense, or sudden pain, particularly in or around the knee, it’s important to stop immediately. Although slight pain is common when stretching, severe pain might be a sign that your body is not aligned properly or that you are overextending.
- During a posture, if your knee feels weak or unstable, it could be an indication that you are overtaxing the knee joint or not using the proper muscles.
- The muscles or tendons surrounding the knee may be overstretched or overworked if you experience extreme tightness or strain in the knee area that doesn’t feel like a typical stretch or release.
- Stop right away if you begin to feel lightheaded, dizzy, or unbalanced. Breathing irregularly or holding poses for extended periods might cause this.
- Fever
- Headache
It’s important to speak with a medical professional, physical therapist, or skilled yoga instructor if you continue to have knee pain, instability, or pain during or after yoga. They can evaluate your form, offer adjustments, and create a strategy for properly strengthening your knees.
Summary:
Many people frequently experience knee pain, particularly those who engage in high-impact sports like running. Because they take responsibility for most of our everyday activities, our knees are prone to pain and injury over time. Yoga is among the most natural and effective ways to prevent and treat knee pain, even though there are many different treatments available.
Yoga is an effective way to strengthen your knees and improve the health of your joints in general. You may create a strong base that promotes knee stability and flexibility by including these knee-strengthening poses in your practice. Yoga can be very helpful whether you’re trying to prevent knee issues, recovering from an accident, or just want to maintain your knees strong and healthy.
Yoga is an exercise that has several advantages for the knees. If you have chronic aches and pains, always pay attention to your body and get medical advice. Yoga can help you maintain strong, pain-free knees for many years to come if you practice it consistently.
Always be mindful of your body, and if you have any pain, get medical treatment to ensure that you’re performing correctly. If you do yoga regularly, it can become an essential part of your program to maintain your knees strong and healthy for many years to come.
FAQ:
Which yoga positions help strengthen the knees most effectively?
Warrior I (Virabhadrasana I)
Warrior II (Virabhadrasana II)
Chair Pose (Utkatasana)
Reclining Hand-to-Big-Toe Pose (Supta Padangusthasana)
Mountain Pose (Tadasana)
Is yoga beneficial for knee injury or pain?
Indeed, yoga can relieve knee pain and help in the healing process following an injury. Yoga may alleviate knee pain and increase mobility and flexibility by strengthening and stretching the muscles surrounding the knee joint. Certain poses, such as Bridge Pose (Setu Bandhasana), Child’s Pose (Balasana), and Cat-Cow (Marjaryasana-Bitilasana), can help reduce stress, increase circulation, and help in the healing process. If you’re recovering from a serious injury, always get medical advice.
How frequently should I do yoga to get stronger knees?
Doing yoga two or three times a week might help strengthen your knees. Being regular is important, but don’t go overboard. Knee function can be gradually improved with a well-rounded practice that includes stretching and strengthening exercises. Start with shorter yoga sessions if you’re new to the practice, and as your strength and flexibility improve, progressively extend them.
Does yoga help protect against knee injuries?
Yes, doing yoga on a daily basis can help avoid knee injury. Yoga helps build a strong basis for your knees by strengthening the muscles surrounding the knee joint, increasing flexibility, and encouraging correct alignment. Additionally, yoga raises awareness of body mechanics, which can help avoid bad movement habits that might result in injury.
Which yoga positions should I stay away from if I have knee pain?
Warrior poses or deep lunges if they make your knees hurt.
Any posture that requires prolonged sitting with the knees bent, such as Hero Pose (Virasana).
Posture when the knees are bent past their comfort level, such as Goddess Pose (Utkata Konasana) or deep squats.
As necessary, adjust your poses by maintaining more neutral knee positions or by using props for support.
If I have osteoarthritis in my knee, is it safe to do yoga?
People with osteoarthritis in their knees can safely do yoga, but it’s important to adjust poses to prevent undue strain on the knee joint. Concentrate on low-impact, soft poses that can develop the muscles surrounding the knee without placing undue strain on the joint, such as Child’s Pose (Balasana), Legs Up the Wall Pose (Viparita Karani), and Bridge Pose (Setu Bandhasana).
Does yoga help with reduced mobility and stiff knees?
Yes, yoga can help a lot with limited mobility and stiff knees. Flexibility and range of motion are improved by mild yoga poses that target the muscles surrounding the knee. Over time, mobility can also be improved by positions like Chair Pose and Warrior I & II that target the quadriceps and hamstrings.
After yoga, is it typical to experience knee soreness?
After doing yoga, it’s common to feel a little sore in your muscles, especially if you’re working on the muscles surrounding your knees. Usually, this indicates that those muscles are being used. In order to avoid injury, safety and proper alignment should always come first. If you experience severe irritation or serious pain in the knee joint itself, you should pause the posture and examine your technique.
References:
- Mehdi, S. December 12, 2024. STYLECRAZE. https://www.stylecraze.com/articles/effective-baba-ramdev-yoga-asanas-for-knee-pain/?sem_campaign=PMAXDynStylecraze_India&gad_source=1&gclid=CjwKCAiAwaG9BhAREiwAdhv6YyGdXWECT134HQGYmcPnWEYPdPNz25CsbXlbEJynJiwwHmLU3xZmthoCCK8QAvD_BwE#infographic-7-effective-yoga-asanas-to-relieve-knee-pain
- Stevenson, S. (April 5, 2024). Eight yoga exercises to strengthen your knees. BODi. This article describes 8 yoga poses that strengthen the knees.
- Pizer, A. P. (September 27, 2023). Ten knee-strengthening yoga positions. https://liforme.com/blogs/blog/10-yoga-poses-to-strengthen-your-knees Liforme and
- TIMESOFINDIA.COM. January 15, 2023a. Eight yoga positions to improve knee strength. India’s Times. 96972558.cms?picid=96972649 https://timesofindia.indiatimes.com/life-style/health-fitness/fitness/8-yoga-poses-to-strengthen-your-knees
- Yoga15abi. November 11, 2024. Yoga 15. Yoga 15. A quick guide to five yoga poses that will strengthen your knees can be found at https://yoga15.com/ Five simple yoga practices to improve knee strength
- On October 28, 2024, O’Brien, E., and O’Brien, E. Five yoga poses that strengthen your knees to help relieve pain. Yoga Journal. The following is a list of yoga poses for knee pain: https://www.yogajournal.com/poses/anatomy/knees
- B. Allianz (2024, Nov. 28). Ten Yoga Positions That Help Build Stronger, Pain-Free Knees. Allianz, Bajaj. https://www.bajajallianz.com/blog/wellness/best-yoga-poses-for-relieving-pain and strengthening the knees.html
- Singhdeo, A. November 16, 2023. Seven yoga positions to improve knee strength. This is a blog post about yoga poses that strengthen the knees: https://www.shvasa.com/yoga-blog/7
- American Knee Pain Centers. (undated). Unlocking the potential of yoga poses to strengthen the knees to combat knee pain. Yoga poses for strengthening the knees: https://www.kneepaincentersofamerica.com/blog/
- Image 6, Rod. July 5, 2023. Virabhadrasana 2: Develop your strength and concentration by mastering Warrior Pose 2. Yoga Selection. For strength and focus, try this: https://yogaselection.com/virabhadrasana-2-mastering-warrior-pose-2

One Comment