36 Best Exercises Of Piriformis Muscle
Exercises targeting the piriformis aim to stretch and strengthen this muscle to alleviate discomfort and improve overall hip function. These exercises often include stretches to increase flexibility and strengthen the surrounding muscles to support proper alignment and movement of the hip joint.
The piriformis muscle, located in the buttocks region, plays a crucial role in hip stability and movement. It is a deep muscle that runs from the sacrum (base of the spine) to the outer hip bone (trochanter). Dysfunction or tightness in the piriformis can lead to various issues such as sciatica, hip pain, and limited range of motion.
Overview
- The Piriformis Muscle is the flattest as well as the most superficial of the deep gluteal muscles. It exits the pelvis via the greater sciatic notch as well as connects to the superior financing of the greater trochanter. It is pyramidal and runs nearly parallel to the gluteus medius’ posterior margin.
- The muscle is placed on the medial side of the superior face of the greater trochanter of the femur after passing through the greater sciatic notch from the pelvis to the gluteal region. The piriformis muscle tendon, also known as the conjoint tendon, connects the obturator internus and inferior and superior gemellus tendons before attaching to the femur. The muscle is located next to the posterior walls of the hip joint and pelvis.
- Piriformis syndrome is a neurological condition that frequently causes hip as well as buttock discomfort. The condition is frequently untreated and misdiagnosed.
- The piriformis muscle can be quite painful. The piriformis muscle allows us to walk, which is one of the most important aspects of everyday life. Unfortunately, many people suffer from piriformis pain, and some are unfortunate enough to develop piriformis syndrome at some point in their lives.
- The stretches and exercises listed below are intended to help relieve pain or soreness caused by tight piriformis muscles. These stretches can also help relieve pain resulting from piriformis syndrome.
- If you experience exaggerated pain while performing these movements, you should stop. As always, speak with a physician before beginning a new exercise or stretching routine
What is the Piriformis muscle?
- The piriformis muscle is located in the gluteal region, beneath the gluteus maximus. This flat pyramidal-shaped muscle is one of six in the lateral rotator group. Piriformis originated from Latin and means “pear-shaped”. The piriformis muscle originates in the front of the sacrum (lower back). It is attached to the second, third, and fourth sacral vertebrae and then to the upper surface of the thigh bones.
- The piriformis muscle rotates the femur laterally during hip extension. To demonstrate this motion while sitting, lift one leg as well as cross it over the other so that your outside ankle rests against the knee of the opposite leg. The second important function of the piriformis is to abduct the femur during hip flexion.
- This is particularly important for walking. The abduction of the thigh shifts the body weight to the opposite side of the lifted foot. Without it, we’d fall.
- While many people are unfamiliar with the piriformis muscle, they may be familiar with sciatic pain. This is because the sciatic nerve runs below the piriformis muscle or, in some cases, through it.
What is the piriformis muscle stretching?
- Piriformis Muscle stretching is an important exercise for improving gluteal flexibility, providing numerous health benefits, and lowering the risk of injury such as sciatica pain, back pain, and Piriformis syndrome.
- The piriformis muscle is located in the gluteal region, beneath the gluteus maximus. This muscle has a flat pyramidal shape and is one of six in the lateral rotator group. The name piriformis comes from Latin and means “pear-shaped”. The piriformis muscle begins at the front of the sacrum. It is connected to the second, third, and fourth sacral vertebrae, and then to the upper surface of the thigh bones.
- To simulate this motion, and sitting, raise one leg as well as cross it over the other to ensure your outside ankle is against the knee of the other leg. The second primary function of the piriformis is to abduct the femur during hip flexion. This is particularly important for walking. This thigh abduction transfers body weight to the opposing side of the foot, which is raised. Without this, the person will fall.
- Although many people are unfamiliar with the piriformis muscle, it is commonly associated with sciatic pain. This is because the sciatic nerve runs beneath the piriformis muscle or, in some cases, passes through it.
- Stretching the piriformis muscle provides numerous benefits in your daily activities.
What are the benefits of Piriformis stretching?
Piriformis stretching can provide you with the following common benefits:
- Helps decrease ankle as well as knee pain: When the piriformis muscle tightens, walking can become painful. The knee joint gets too much strain, resulting in an unbalanced joint. The exterior of the knee joint becomes too tight, causing the interior to weaken. This imbalance can lead to knee as well as ankle pain.
- Alleviates Sciatic Pain: The sciatic nerve passes through the piriformis area, so when there is too much tension due to tight piriformis muscles, sciatic pain can occur. This extra pain can numb your glutes as well as hips or cause shooting pains down your legs. Stretching this muscle reduces the strain placed on the sciatic nerve.
- Reduce lower back pain: A tight piriformis muscle leads to lower back pain. Stretching the piriformis muscles reduces stress on your lower back by increasing your hip’s range of motion.
- Plantar fasciitis happens when the fascia becomes swollen. A person with very tight piriformis muscles walks like a duck, putting too much stress on the soles of their feet. Releasing the piriformis can improve your body mechanics and relieve nagging injuries such as plantar fasciitis.
- Lowers the risk of injury: Stretching the piriformis muscles reduces the likelihood of a potential injury. People participating in sports or activities involving running or rapid guidance shifts should stretch their piriformis muscles to prevent injuries and muscle tears.
- Good Muscular Function: A tight piriformis muscle reduces the range of motion in the lower back as well as hips. Piriformis stretches may assist us move more efficiently throughout our entire range of motion.
- It additionally improves blood circulation in that area and provides nutrients to the muscles.
- Increases the range of motion in the hip joint, including hip abduction, extension, and lateral rotation.
What are the different types of piriformis stretches?
There are many exercises to stretch the piriformis muscle.
- Standing Piriformis Stretch
- Standing Step Behind Piriformis Stretch
- Short Adductor Stretch
- Long Adductor Stretch
- Half Spinal Twist
- Supine Piriformis Stretch
- Lying Knees Side Stretch
- Knee to Chest
- Sleeping Pigeon
- Outer Hip Stretch
- Seated Piriformis Stretch
- Modified Pigeon Stretch
- Seated Piriformis Leg Cradle Stretch
- Prone Adductor Side Stretch
- Lying Side Clam-shell
- Glute Bridge With Feet Externally Rotated
- Kickback
- Fire Hydrant
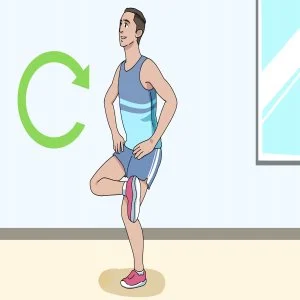
Standing Piriformis Stretch
- How to perform: To help with balance, stand with your feet spread out next to a wall.
- Place the painful leg over the knee of the opposite leg.
- Allow your hips to move as far down and back as possible while bending the leg on which you are standing.
- Maintain this standing position for 20-30 seconds.
- Continue with the opposite leg, three to four times on each side.
Standing Step Behind Piriformis Stretch
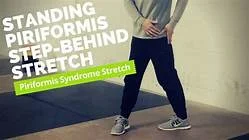
- How to perform: leg, then shift your weight to the back leg.
- Pause for 30-60 seconds, then release. Stand with the feet hip-width apart.
- Step back and perform an internal rotation of your hip, pointing your toes inward.
- Then perform an internal rotation of your front foot by turning the toes inward.
- Rotate the hips to the opposite side of your back.
Short Adductor Stretch
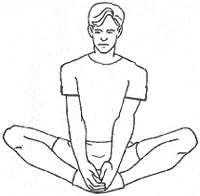
- How to perform: While sitting on the floor, bring the soles of the feet together in front of the pelvis.
- Hold both ankles with opposite hands.
- Slowly push down with your knees, attempting to feel the floor with them.
- You have to hang on right before any discomfort occurs, which means that if you feel pain, move back an inch or two and stay there.
- Hold for 15-30 seconds, then release as well as flutter the legs in that position for thirty seconds.
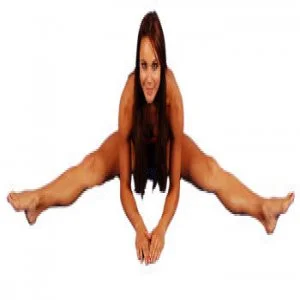
Long Adductor Stretch
- How to perform: Sit on the ground and extend the legs straight out in toward you, as far apart as possible.
- Place the hands on the ground next to each other and angle your upper body forward toward the floor.
- Bend forward, placing the elbows on the floor.
- If you are in pain, prevent right there.
- Hold the position for approximately twenty to thirty seconds before releasing.
Half Spinal Twist
- How to perform: Sit on a mat with your spine straight and both legs straight in front of you.
- Crossing one leg over another to reach the outer thigh.
- Rotate towards the crossed leg, resting your elbow on your knee as well as your other hand on the mat or ground behind you.
- When you feel stretched, hold the position for 30 seconds.
- Perform with the opposite leg.
Supine Piriformis Stretch
- How to perform: Lie on your back, with your knees bent and your feet on the ground.
- Spread your sore leg across your other leg.
- Place your hands under you’re unaffected leg and pull it towards you.
- Hold for 40-60 seconds, then release.
- Do it with the opposite leg.
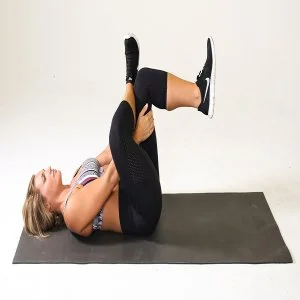
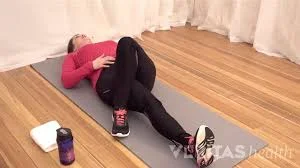
Lying Knees Side Stretch
- How to perform: Lie on the mat, legs extended.
- Bend both knees while bringing them up to your chest.
- Hold your arms out to the sides.
- Rotate the knees to the side so they’re on the ground.
- Pause for 30-60 seconds, then release.
Knee to Chest
- How to perform: Lie on your back, legs stretched out.
- Bring the leg on your left up to your chest.
- Pull the knee toward the right shoulder.
- Pause for 15-30 seconds, then release.
- Repeat with the right leg.
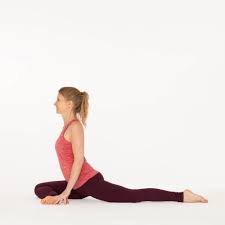
Sleeping Pigeon
- How to perform: Bring one knee up towards your hands, then fold it under the middle of your body, keeping the outer ankle toward the ground.
- Extend your other leg behind you and place your elbows on the floor in front of you.
- Lean back and push your hips to the ground.
- keep this position for 40-60 seconds. Continue with the opposite leg.
Outer Hip Stretch
- How to perform: Begin in a supine position, then turn on your right side and raise your left foot, placing it on the back of your right leg’s upper calf.
- Place your right hand upon your left knee, pressing towards the ground.
- Reach up with your left arm while keeping it straight, and rotate as far to the left as possible.
- Stop this stretch to 20-30 seconds before releasing.
- Repeat with your right leg.
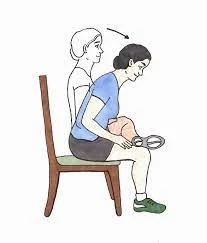
Seated Piriformis Stretch
- How to perform: Sit on a chair.
- Then raise your right leg by bending your knee and resting the outside ankle on your left knee.
- Keep your back straight and lean forward.
- When you feel a stretch, pause for 30-60 seconds before returning to the starting position.
- Perform on the left side.
Modified Pigeon Stretch
- How to perform: Sit with your knees bent.
- Lower your knee to the ground directly in front of you, ensuring the outside of your ankle is against the ground and your knee is bent at 90 degrees.
- give the opposite leg behind you, knee bent.
- Lean forward and hold for 30 seconds once you feel stretched.
- Perform with the opposite leg.
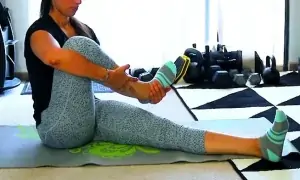
Seated Piriformis Leg Cradle Stretch
- How to perform: Sit on the floor with your legs out in front.
- Bend the right knee and lift your foot towards your chest.
- Grab your bent leg’s ankle and pull it towards you.
- Hold that pose for approximately 20-30 seconds before releasing.
- Repeat on the opposite side leg.
Prone adductor stretch
- How to perform: Start in a prone position and brace yourself in your forearms on the floor.
give your right knee out and to the side until you can feel the piriformis stretching. - Hold for 40–60 seconds.
- Repeat with your left leg.
Lying Side Clam-shell
- How to perform: Lying on one side of your body.
- Bend both of your legs back, one foot over the other, and keep your legs side by side.
You should form an “L” shape. - Keep your feet together and raise your top knee while maintaining the rest of the body in the starting position.
- Gradually return the knee to the starting position.
- Repeat 10 to 15 times.
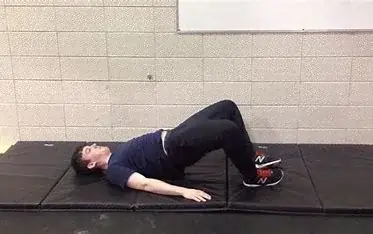
Glute bridges with feet externally rotated
- How to perform: Take a supine position with your knees bent, feet flat on the ground, hip-width apart, and arms to either side.
- Spread your toes outwards.
- Drive through the heels, bringing the waist up to a bridge position.
- Contract and hold the glutes for 5-10 seconds before slowly returning to the starting position.
- Repeat 10 to 12 times.
Kickback

- How to perform: Get on the ground with your hands stacked beneath your shoulders.
- Raise one leg off the floor, then kick back and up away until your leg is completely straight.
- Slowly return to the starting position.
- Repeat for 8-10 repetitions, then switch sides.
Fire Hydrant
- How to perform: Get on your knees as well as your hands.
- Raise your leg out to the side as far as is comfortable while keeping your knee bent.
- Lower yourself back to the starting position.
- Repeat for 5-10 times, then switch sides.
What are the safety guidelines for stretching the piriformis muscle?
Below are a few precautions you should know:
- Stretching is dangerous if done incorrectly. It can also result in injuries.
- Stretching requires normal breathing; otherwise, it may raise your blood pressure. So don’t hold your breath while stretching. Deep breathing allows you to stretch further and deeper.
- Don’t go beyond your limits.
- If you feel pain while stretching, stop right there.
- Stretch for a few minutes each day rather than once a week. It improves versatility as well as range of motion.
- Wear loose clothing throughout the stretch to prevent discomfort and restricted movement.
What is a strengthening exercise for the Piriformis?
- Piriformis strengthening exercises are a great method to improve the strength of the gluteal region, particularly the external rotators. If the patient performs this exercise regularly, it may have numerous health benefits, improve the physique and performance, and reduce the risk of injury.
- The Piriformis muscle is a tiny muscle in the glutes that is both flat and band-like. This arises from the sacrum’s internal surface and is at the superior border of the femoral trochanters. It is also why piriformis issues can be described as pain in the hips or buttocks. The piriformis helps in lower limb motion by stabilizing our hip joint and lifting and rotating our thighs out of the body.
- The piriformis muscle rotates the femur throughout hip extension as well as abducts it during hip flexion. If the piriformis muscles are weak, it puts additional strain on the knee joints by weakening the inner side and tightening the outer side. This will render the joint unstable.
- Piriformis strengthening exercises are an excellent way to enhance the strength of the gluteal region, particularly the external rotators. If the patient performs this exercise regularly, it may have numerous health benefits, improve the physique and performance, and reduce the risk of injury.
Health Advantages of Piriformis Strengthening Exercise
- Helps relieve sciatic nerve pain.
- Helps the patient run more efficiently and avoid injuries.
- The piriformis muscle revolves around the femur when the hip is extended and abducts it when the hip is flexed. A healthy piriformis muscle can also help with knee and ankle pain.
- Reduces the pain associated with piriformis syndrome.
- Improves the knee and hip range of motion.
various types of strengthening exercises for the Piriformis muscle.
Resistance band abduction
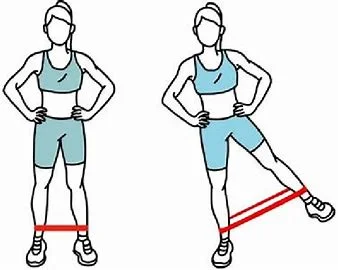
- To perform this strengthening exercise, the patient stands on the end of a resistance band tied around their ankle, and the other end is attached to a stable object near the floor.
- Move the leg off to the side, far from the body, keeping the knee straight.
- Once the patient has traveled as far as they are comfortable, slowly return to the leg from where they began.
- Repeat fifteen to twenty times, gradually increasing the repetitions to two sets of 20 in one session. Do two sessions each day.
Resistance band abduction
Side-lying clam exercise
- To perform this strengthening exercise, the patient should lie on their left side and work their hip from the top.
- Flexed the knees and positioned them forward so that the feet were in line with the spine.
- Check that the right hip is right on top of the other, and the back is straight.
- The ankles ought to be together, with the right knee raised away from the bottom one.
- Remember not to move your back or tilt the pelvis; all motions should begin at the hip.
- Slowly return to the original position. Repeat 15 to 20 times at first, then gradually increase to two sets of 25 repetitions on each side per session.
- Do three sessions per day.
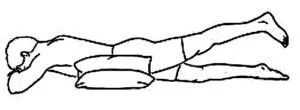
Bridging
- To perform this strengthening exercise, lie on your back with knees flexed at 45-50 degrees and feet flat on the floor.
- Place the arms at the sides.
- Gradually raise the hips by encouraging on the floor with your feet until the knee, hip, and shoulder are all in a straight line.
- Repeat 12 to 15 times per day in a session.
Seated Abductions
- To perform this strengthening exercise, the patient must sit. The backbone should be erect.
- Wrap an elastic band around your ankle joint. Support the top limb with your arms.
- Then, slightly turn the feet outward. Check that the patient isn’t lifting their feet to help pull a band.
- Complete 8-14 slow and controlled repetitions.
Leg Raises
- To perform this strengthening exercise, the patient must stand against a wall.
- Elevate the leg up along a wall while externally rotating the foot when the individual reaches the up position.
- Now, slowly Lower the leg and rotate the foot on the way down.
- The hips do not rotate forward. Repeat ten to twenty times. initially, gradually increasing to two sets of 25 repetitions per session.
Side-lying hip abduction.
- To perform this strengthening exercise, This strengthening exercise requires the patient to lie on their left side.
- Then, carefully raise the right leg to the sky.
- Lower this back to its starting position.
- The knees should be straight, and the hips should not roll backward or forward during the exercise.
- Perform 10 to 15 times, gradually increasing to two sets of 25.
Prone Hip Extension
- To perform this strengthening exercise, Begin by lying on your back and stretching both legs straight behind you.
- Slowly raise one leg as far as the patient may.
- Return the low back to the starting position without arching it.
- During the exercise, keep the knee straight and the torso steady.
- Initially, repeat 10 to 15 times before gradually increasing to two sets of 20 recurrences Do two sessions per day.
Clamshell (Small lift)
- To perform this strengthening exercise, First and foremost, the patient should maintain pelvic stability while performing this strengthening exercise.
- Lift the knee carefully until the patient feels a contraction.
- Slowly bring your knee down.
- This exercise doesn’t call for large lifts. Avoid rocking around to raise your knee. Small raises go far in this workout.
Side-by-side walks
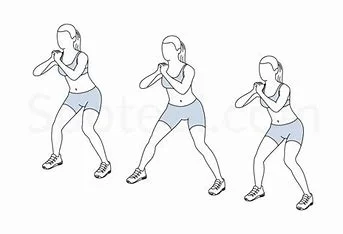
- Here’s how to properly perform lateral band walks:
Cover the wrapped band just above both ankles. Step your feet off to about shoulder width apart, or until you feel tension in the band. - Get into an athletic stance with your knees bent slightly, hips forward at approximately 45°, and hands on your hips.
- Maintaining the upper body confronting forward, take a step to the right with your right foot.
- Feel the tightness in the right hip, then carefully step the left foot to the right, bringing the feet back to shoulder width apart.
- Take 10 steps to the right, with your right foot leading. Switch directions and take 10 steps to the left, with your left foot leading.
- As the patient performs the exercise, ensure that the upper body, hips, and knees are all facing forward. Also, take a step outwards from your hip joint. When you step, the foot ought to be in line with the hips and the rest of your body.
Hip Hinging Technique.
Lowering portion (hip flexion)
- To perform this strengthening exercise, brace the core slightly.
- Begin the motion from the hips, moving the buttocks back first. As the buttocks move back, the upper body ought to naturally lean forward.
- Maintain a neutral spinal position.
Hip Hinging Technique. Reducing portion (Hip Extension)
- Upcoming portion (Hip Extension):
To start the coming-up movement, use both the knees and the glutes. - Push through the hips forward as you straighten your knees.
- Avoid arching your lower back as you rise.
- Keep a neutral spine at all times.
- To improve hip hinging to the point where it becomes second nature, practice the motion frequently and strengthen all of the muscles involved.
- The exercises below offer a variety of hip-hinging deviations and are suitable for all skill levels.
Abduction Circles
- To perform this strengthening exercise, This strengthening exercise requires the patient to lie on his or her side.
- When the patient lifts the leg, make sure the foot is straight forward and the glutes are engaged.
- The therapist will add rotational motion to this exercise, which will engage the piriformis muscles.
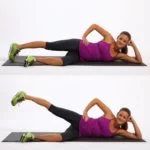
Side plank leg raises
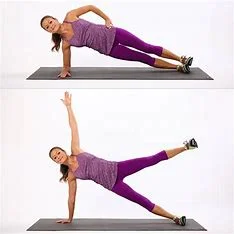
- To perform this strengthening exercise, place both the right or left elbow on the ground, raise the hips, and extend both legs.
- Equalize on the outside edge of the bottom foot and lift the top leg slightly higher than the hip.
- Slowly lower the upper leg back down.
- Repeat on the opposite side. When the patient assumes the position of a plank, keep the back straight and avoid arching or rounding the back.
- Pull the abdomen in slightly to ensure that the patient is not also using the hip flexors.
- The individual also wants to keep her glutes tight. This exercise works the glutes and is essential at the same time.
Six Hip Hinge Exercises
Squat
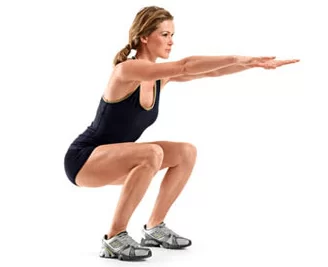
- To perform this strengthening exercise, First and foremost, Stand up straight and brace your core.
- Start the motion with your hips (buttocks going back).
- Allow the torso to shift forward slightly to balance the hips.
- Lower your knees to a 90-degree angle, or as low as you can comfortably go.
- As the patient lowers, rotates externally the knees.
- Hold the lowered position for 3 seconds before getting up.
- To get up, start with your knees and then bring your hips forward.
- Strive for ten repetitions and three sets per session.
- Maintain your chin tucked in to keep your spine neutral.
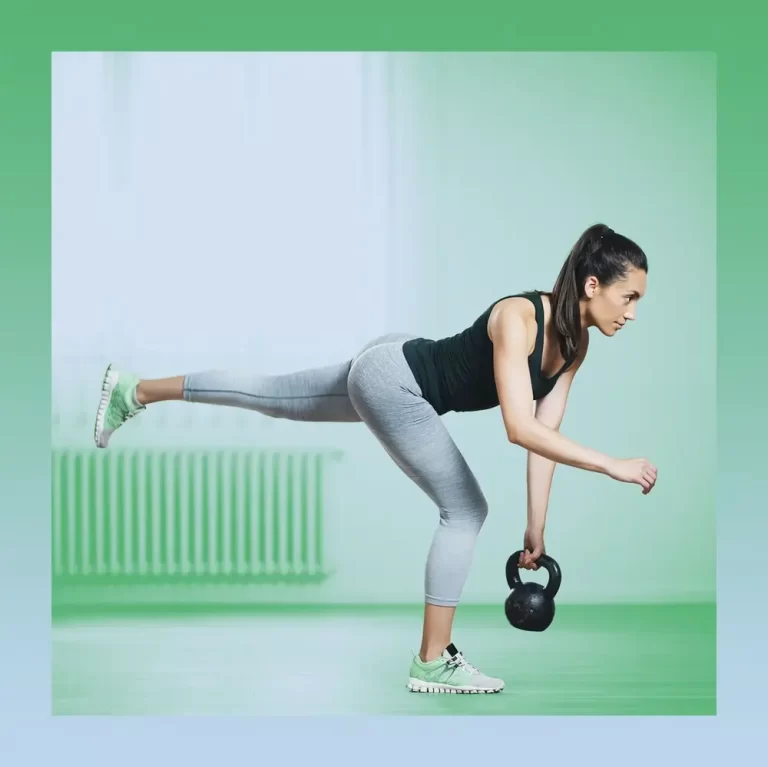
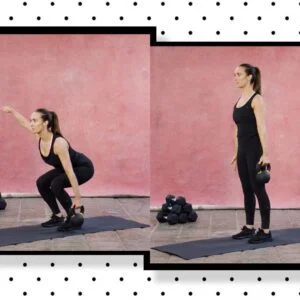
Goblet Squat
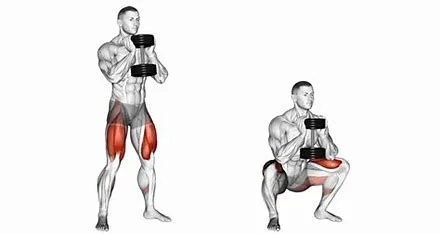
- To perform this exercise, hold the kettlebell (or dumbbell) in both hands and lock your shoulders.
- Brace the core. Begin to move from the hips (buttocks back).
- Then, move the torso forward slightly to equalize the hips.
- Lower the knees to a 90-degree angle, or as low as the patient can tolerate.
- Take the down position for about three seconds before getting up.
- To come up, start with the knees and then bring the hips forward.
- Strive for 10 repetitions and three sets per session. Do two sessions per day.
- Focus on keeping your chin tucked in and your spine neutral.
Single-Leg Deadlift
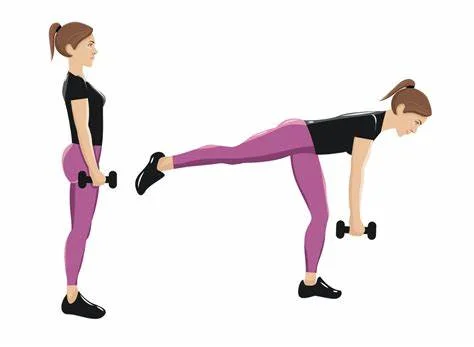
- To perform this strengthening exercise, Move with weight on one leg and brace your core.
- Begin the motion at the hip of the standing leg.
- As the patient moves forward, his free leg (back leg) will rise slightly.
- Allow the torso to shift forward slightly to balance the back leg.
- While the patient has reached a comfortable depth, use the knees and glutes to return to the embarking position.
- Strive for nearly ten repetitions with three sets per day.
Romanian deadlift with barbell (without weight)
- To perform this strengthening exercise, Take the initiative to, Stand with your feet just outside shoulder width.
- To engage the lats, hold the barbell without any weights and then externally rotate the shoulders as if the patient had broken the bar.
- Begin hanging down from the hips (the buttocks move back).
- As the patient lowers their knees, externally rotate them.
- Maintain a neutral spine the entire time.
- Bring the barbell down to mid-shin level.
- After that, use your knees and glutes to push off the ground and get up.
- Press the glutes when the patient stands.
Romanian deadlift with dumbbells.
- To begin this strengthening exercise, stand with your feet close to shoulder width.
- Hold two dumbbells, one in each arm, and press the shoulders down.
- Brace your core before you begin moving.
- Begin hanging down from the hips (the buttocks move back).
- Lower your knees while rotating them externally.
- Maintain a neutral spine the entire time.
- Keep the dumbbells in front of you and lower to mid-shin level.
- Now, use your knees and glutes to push off the ground and get up.
- Squeeze his glutes as he stands up.
How Can You Strengthen a Piriformis Without Feeling Pain?
- This is necessary to perform these routines without pain. If the patient feels their muscles beginning to spasm, do not push through the pain.
- That’s why I divided the exercises into three separate routines.
- To ensure that the patient is not triggered by pain, always begin by activating the Gluteus Medius and Maximus
- The gluteus maximus and medius are the primary hip stabilizers, and when they are inactive, the piriformis compensates by doing more than it should.
When did the patient not perform this exercise?
- If the healthcare provider advised the patient to rest.
- If your leg bone has just fractured, you should avoid these exercises.
- If the patient experiences any pain or discomfort while performing these exercises, stop immediately and consult a physical therapist.
How to Release the Piriformis.
Self-Myofascial Release.
- The most effective way to release the piriformis is to place the massage ball against the wall as well as apply gentle pressure to the areas surrounding the muscle.
- Gently roll the ball horizontally, and if you feel a tender spot, apply pressure for 1 minute. This is the most effective way to release the piriformis muscle. Stretching comes in second as piriformis trigger points can only be released by applying pressure.
FAQs
What causes tightness in the piriformis muscle?
Reasons for Piriformis Syndrome | The Spine Health
Significant impact activities, like running or jumping, can put undue strain on the piriformis muscle, resulting in overuse. Prolonged standing or sitting may trigger the piriformis muscle to tighten and spasm, exacerbating the symptoms.
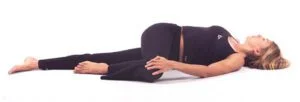
Which position relaxes the piriformis muscle?
Lying stretches
Stretching the piriformis while lying on your back works well because gravity increases the range of motion of the hip as well as leg muscles. It also encourages relaxation.
What physiotherapy works best for piriformis syndrome?
Physiotherapy maneuvers are effective in managing piriformis syndrome. Deep transverse massage, stretching the pelvic trochanter muscle & self-rehabilitation techniques, and proprioceptive pelvic femoral exercises. Talk about the clinician’s method for assessing and treating the patient.
Is stretching good for the piriformis?
Stretching the piriformis muscle can help relieve tension, decrease muscle discomfort, as well as increase mobility. A piriformis stretch can be performed while sitting or lying on the floor. The piriformis is a flat, pear-shaped muscle deep in the buttocks and hips.
Can I exercise despite piriformis pain?
Aerobic exercises can help treat piriformis syndrome by improving muscle function and increasing circulation to the buttock, pelvic, as well as hip areas, promoting healing. Aerobic exercise is believed to be most beneficial when performed for at least 20 to 30 minutes, three to five times per week.
What activities should you avoid if you have piriformis?
Avoid pain-causing activities like biking or running. You can resume these activities once the pain subsides. When participating in sports or other physical activities, ensure that you are using proper form and equipment.
How many times per day should I extend my piriformis muscle?
Piriformis stretch
Grip behind the thigh as well as pull the knee in toward your chest. Your buttocks should feel stretched. Take this stance for 30 seconds, then repeat 3-5 times. Stretch three times per day.
What exercises should not be performed with the piriformis?
It is also critical to concentrate on proper form and technique, as well as avoid exercises that set undue strain on the piriformis muscle, such as squats, lunges, and leg presses.
Does the piriformis muscle begin and end?
The piriformis muscle arises from the sacrum’s internal surface as well as inserts at the superior border of the femoral trochanter. It aids lateral rotation of the hip joint, abducting the thigh as the hip is flexed, and stabilizing the head of the femur in the acetabulum.
What symptoms indicate a weak piriformis muscle?
Symptoms
A dull pain in the buttocks.
Sciatica is a pain in the lower back of the thigh, calf, or foot.
Walking up stairs or on inclines causes pain.
Pain increases after sitting for an extended period.
The hip joint has a reduced range of motion.
REFERENCES
- McConnell, J. (n.d.). What Is Your Piriformis Muscle and Why Does It Hurt So Much? Spine-health. https://www.spine-health.com/blog/what-your-piriformis-muscle-and-why-does-it-hurt-so-much
- Piriformis muscle. (2023, September 14). Kenhub. https://www.kenhub.com/en/library/anatomy/piriformis-muscle
- Ahorschig, V. A. P. B. (2020, August 22). How to Correctly Treat Piriformis Syndrome. Squat University. https://squatuniversity.com/2017/11/21/how-to-correctly-treat-piriformis-syndrome/
- Sofia, C. (2023, October 4). 13 Effective Piriformis Stretches To Get Quick Relief From Piriformis Syndrome. Coach Sofia Fitness. https://www.coachsofiafitness.com/piriformis-stretches/
- 6 Ways to Ease Piriformis Syndrome Pain with Self-Massage and Stretches. (2021, March 10). Healthline. https://www.healthline.com/health/piriformis-massage#other-options
- Valand, B. (2023, November 9). Piriformis muscle Anatomy, Origin, Insertion, Function, Exercise. Samarpan Physiotherapy Clinic. https://samarpanphysioclinic.com/piriformis-muscle-anatomy/
- Cpt, A. A. (2023, October 21). Pririformis Syndrome: Stretches and Exercises. Verywell Health. https://www.verywellhealth.com/beginners-piriformis-syndrome-stretching-routine-4012558
- Set, S. F. (2024, January 16). 19 Best Piriformis Stretches & Exercises to Fix Sciatica. SET FOR SET. https://www.setforset.com/blogs/news/piriformis-stretches
- Chang, C., Jeno, S. H., & Varacallo, M. (2023, November 13). Anatomy, Bony Pelvis and Lower Limb: Piriformis Muscle. StatPearls – NCBI Bookshelf. https://www.ncbi.nlm.nih.gov/books/NBK519497/
- Piriformis. (n.d.). Physiopedia. https://www.physio-pedia.com/Piriformis