Wrist Flexion
Wrist Flexion
Wrist Flexion & Extension
Wrist flexion and extension are the motions that take place at the wrist joint, which enable the hand to bend and straighten in relation to the forearm. These movements are used in many sports, workouts, and professional jobs and are essential for carrying out a variety of daily life activities.
What is Wrist Flexion?
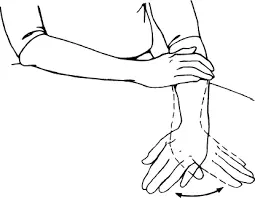
- A movement known as wrist flexion occurs when the wrist joint flexes, bringing the palm closer to the inside of the forearm. Several muscles on the front (front) aspect of the forearm are used. Wrist flexion is the result of these muscles contracting.
- The most crucial muscles used in wrist flexion are the flexor carpi radialis, flexor carpi ulnaris, and palmaris longus. Attached to the bones at the base of the wrist or hand, these muscles begin in the medial (inner) region of the elbow and forearm.
- Swinging a tennis racket, lifting weights, and gripping items are just a few of the everyday and sporting actions that frequently need wrist flexion. Additionally, it is an essential action for many professional duties, such as typing, playing an instrument, and writing.
- It is crucial to remember that the wrist joint can move in a variety of ways, and wrist flexion is just one of them. Wrist extension, radial deviation, and ulnar deviation are additional movements that cause the wrist to move to the side of the thumb and little finger, respectively. which bends the wrist back. These motions work together to give the hands and wrists a great deal of dexterity and functionality.
Wrist Flexor Muscle
The wrist flexors are a set of muscles located on the front (front) side of the forearm. Wrist flexion is the result of these muscles working together to bend the wrist and bring the palm closer to the inside of the forearm. The primary flexor muscles of the wrist are:
Flexor Carpi Radialis: This muscle, which is situated near the base of the second and third metacarpals of the hand, arises from the medial (inner) epicondyle of the humerus (arm bone). This makes it easier to move the wrist to the thumb’s side, or radial deviation, as well as wrist flexion.
Flexor Carpi Ulnaris: The olecranon process of the ulna, one of the forearm bones, and the medial epicondyle of the humerus are the origins of this muscle, which is situated on the base of the fifth metacarpal. It facilitates motion of the wrist to the side of the little finger, known as ulnar deviation, as well as wrist flexion.
Palmaris Longus: The palmaris longus muscle is not always developed in all people. It begins at the humerus’ medial epicondyle and ends at the palmar aponeurosis, a large, flat tendon in the hand’s palm.
The muscles flexor digitorum superficialis and flexor digitorum profundus, which primarily flex the fingers but also have some effect on wrist flexion, are other muscles that contribute to wrist flexion to a lesser degree. Strength and control during hand and forearm movements are provided by these muscles, which are crucial for activities involving wrist bending and gripping.
Range of Motion of Wrist Flexion
Wrist flexion, or the movement caused by bending the wrist forward, typically has a range of motion between 80 and 90 degrees. This indicates that the palm can approach the inside of the forearm at an angle of roughly 80 to 90 degrees when the wrist is fully flexed.
It is crucial to remember that each person’s actual range of motion may differ and be influenced by several variables, including age, flexibility, and any underlying medical conditions or injuries. To properly evaluate wrist movement, it is always better to speak with a physician.
The following easy test can be used to determine your wrist flexion range of motion:
Place your forearm palm up on a table or other level surface as you sit or stand comfortably.
Throughout the evaluation, maintain a calm and motionless elbow position. With a gentle wrist bend, bring your palm closer to the inside of your forearm. Wrist flexion is this.
When you bend your wrist, note the angle at the forearm and the back of your hand form.
If a goniometer (gauge) is available, you can use it to visually measure the degree of bending.
Increase the bend gradually until you can no longer move without pain or discomfort, or until you feel a comfortable stretch.
Take note of the angle at which your wrist is bent. To determine whether your range of motion falls within the anticipated range, you can compare it to the previously indicated usual range of motion, which is roughly 80 to 90 degrees.
Do the same with the opposite wrist.
Make sure to finish the evaluation and to stop if you experience any pain or discomfort.
Wrist Flexion Test
The following actions can be used to conduct a basic wrist flexion test:
- Position your forearms on a flat surface, like a table, and take a comfortable seat or stand.
- With your palms facing up, lean against the surface while maintaining an elbow angle of roughly 90 degrees.
- Your wrist should be in a neutral posture at the beginning, which means it should not be bent or extended.
- Bring your palm closer to the inside of your forearm by bending your wrist steadily and slowly.
- To start and manage the movement, concentrate on activating your forearm muscles.
- Keep bending your wrist until it feels slightly stretched or you have reached the maximum tolerable range of motion.
- Take note of the forearm’s and hand’s back angles.
- Make sure you do not experience any pain or discomfort as you hold the position for a moment.
- Reverse the motion and slowly extend the wrist after returning it to its neutral position.
- To guarantee consistency, repeat the test a few times and observe how the left and right wrists differ from one another.
- Keep track of any pain, strange feelings, or restricted movement during the exam.
Special Test For Wrist Flexion
To measure wrist flexion and analyze possible issues or injuries, medical practitioners may employ specialized testing. The “wrist flexion test,” also referred to as the “Phalen test,” is demonstrated here.
- Start by putting your arms at your sides and sitting or standing comfortably.
- To form a prayer position, place your hands in a 90-degree angle with the backs of your hands together, fingers down.
- Hold this posture for approximately one minute. If you feel any discomfort, tingling, numbness, or weakness in your hands, fingers, or wrists during the test, pay attention to it.
- The development of aberrant sensations or a rise in pain intensity could be signs of compression or irritation of the median nerve, which could be linked to conditions like carpal tunnel syndrome.
Wrist Flexion Stretching Exercises
Wrist flexibility:
- Keep your arms palms up at shoulder level.
- The forearm and wrist can be stretched by gently holding the fingers with the other hand and pulling them down. Hold the stretch for 15 to 30 seconds while pulling gently and steadily. Twice or three times, stretch each arm.
Rotations of the wrists
To perform this stretch:
- In front of you, extend your arm.
- Until you feel a stretch, carefully point the fingers downward. Draw the lifted hand slowly toward the body with the other hand. Hold for three to five seconds.
- Pointing your fingers at the ceiling should cause a stretch. Pull the lifted hand gently toward the body with the other hand. Hold for three to five seconds.
- Do this three times.
Benefits of Wrist Flexion Exercise
- Increased wrist range of motion and flexibility can be achieved using wrist flexion exercises.
- Avoid injuries: You can avoid hand and wrist injuries by doing wrist exercises.
- Boost strength: You may strengthen the muscles surrounding your wrists by performing wrist workouts.
- Reduce pain: Carpal tunnel syndrome and tendinitis are two ailments that can be lessened with wrist flexion exercises.
- Enhance coordination: You can enhance your wrists’ balance and coordination by performing wrist workouts.
- Boost performance: Wrist workouts can help you perform better overall in other activities.
- Pain control: Exercises for wrist flexion can alleviate discomfort from ailments such as tendinitis, carpal tunnel syndrome, and wrist sprains.
- Wrist stability: Wrist flexion exercises can aid with wrist joint stabilization.
Wrist Flexion Exercises
The following are some wrist flexion exercises that will increase wrist flexibility and strengthen the relevant muscles:
Dumbbell curls for the wrists:
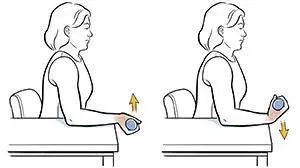
Place your arm palm up on your thigh and hang your wrist off the edge. Using the bottom handle, grasp a stop with your hand. With your weight shifting to your forearm, slowly bend your wrists upward. Slowly return the weight to the starting position after a little pause at the top. Give each arm two to three sets of ten to fifteen repetitions.
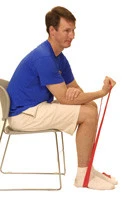
Flexing your wrist with a resistance band:
Your wrist should hang off the chair’s edge as you place your arm palm up on your thigh. Wrap one end of the resistance band around your fingers while holding it in your hand. Pull the resistance band in the direction of your forearm while bending your wrist to keep it motionless. After holding for a brief moment, carefully return the bar to its initial position. Repeat ten to fifteen reps in two to three sets for each arm.
Applying pressure on the wrist with a ball:
A stretch ball can be held in your hand or pressed into your palm. Squeeze the ball as tightly as you can while bending your wrist forward. For a few seconds, maintain the pressure and wrist flexion, then let go. Give each hand ten to fifteen repetitions of the exercise. As you gain comfort and strength, be careful to progressively increase the resistance or weights you begin with.
Wrist Curls with Cable
How to do wrist curls using cables
It is crucial to remember that you can do this exercise while standing or sitting on a seat with your legs supporting your forearms. The instructions below describe how to perform the cable wrist curl standing.
- Choose a suitable weight, fasten a straight bar to the cable, then lower the cable pulley as far as it will go.
- Maintain a shoulder-width distance from the cable. in your palms facing up, bend over and grasp the cable in a supinated grip that is slightly wider than shoulder width.
- Maintain a straight posture by extending your arms in front of you and keeping your wrists straight. The cable needs to be somewhat tense. This is where you start.
- Curl your wrist toward your forearm, brace your core, and take a deep breath to start the exercise. Throughout the entire exercise, maintain a straight elbow and a steady upper arm. Your wrist should be the only thing moving.
- Exhale and lower the bar back to the beginning position by extending your wrist back to neutral when you have reached peak contraction, pausing for one to two seconds.
- Keep going until you have completed the required amount of repetitions.
Manual Muscle Testing: Wrist Flexion
Participating Muscles:
- Flexor carpi radialis
- Flexor carpi ulnaris
Patient Positioning
The patient is seated in a supinated position with the dorsal surface of their forearm supported on a table.
Therapist Position
The therapist sits down to gain access to the test-side
Wrist flexor palpation
Grading:
Normal (5): Under severe pressure, the examiner exhibits the capacity to maintain the test posture and exert more than 95% of their effort. The test position cannot be “broken” by examiners.
Good (4+): The examiner exerts 75–95% of their effort; they can maintain the test position and withstand moderate to high pressure until their muscles fail.
Good (4): The examiner puts out 50–74% of their effort; they can sustain test position and tolerate light pressure until their muscles break down.
Good (4-): The patient can withstand mild to moderate pressure and defy gravity till muscle failure; the examiner puts in 25–49% effort.
Fair (3+): The examiner puts up 1-24% effort; capable of resisting gravity and enduring mild pressure until muscular tiredness.
Fair (3): Having the ability to sustain gravity without additional force.
Fair (3-): Due to their inability to defy gravity, the patient gradually loses the test position.
Poor (2+): The person can only move through a full range of motion (ROM) with resistance at the end range and can only do a partial range of motion (ROM) against gravity while attempting to maintain a *gravity eliminated (GE) posture.
Poor (2): Unable to maintain a full range of motion in a GE stance while defying gravity,
Insufficient (2-): Able to move in a GE stance throughout a portion of the range, but unable to keep an agape attitude.
Trace (1): The examiner feels a muscle or tendon contract, but there is no obvious osteokinematic movement.
Zero (0): No observable osteokinematic movement or contraction of muscles or tendons is present.
Gravity Eliminated, or GE: The patient is positioned so that they can resist gravity without using their muscles. Usually, this place is found on the horizontal plane.
How the MMT is performed:
- Through range, the patient actively flexes their wrist.
Using the palm, apply resistance in the opposite direction of flexion for grades 4–5.
The patient must be able to move through their whole range of motion (active resistance testing) OR sustain an endpoint range (break testing) against maximum resistance to meet the grade 5 “normal muscle” performance standards. - Patients should be taught to bias their flexor carpi ulnaris by flexing their wrists beginning with the fifth digit, applying resistance in the direction of radial deviation, and extending over the fifth metacarpal.
- The patient’s instructions include stretching across the second metacarpal bones to bias the flexor carpi radialis, providing resistance in the direction of ulnar deviation, and flexing the wrist while leading with the thumb.
FAQs
What are the wrist’s three primary flexors?
Flexion refers to the wrist’s bending toward the palm. The Flexor Digitorum Superficialis, the finger flexor that just assists, the Flexor Carpi Ulnaris and Radialis, the main movers, and the Palmaris longus, which tightens the palm’s skin and fascia, are some of these muscles.
Which nerve controls wrist flexion?
Your forearm muscles are stimulated by the median nerve, which enables you to: Bend and straighten your thumbs, first three fingers, and wrists.
What are the benefits of wrist flexion?
The wrist flexor stretch can help you increase your range of motion, flexibility, and mobility while also stretching your tense and aching wrist, forearm, and upper arm muscles.
What daily activities require wrist flexion?
Strong, flexible wrists are essential for comfort and performance when typing on a keyboard, lifting weights, or participating in any activity requiring fine motor skills.
Why is wrist flexion important?
Wrist flexor muscle strengthening can benefit several ailments or injuries, such as: Strengthening these muscles can assist in stabilizing the wrist and relieve pressure on the median nerve, which is frequently constricted in carpal tunnel syndrome.
References
- Patel, D. (2023g, June 29). Wrist Flexion & Extension – Samarpan Physiotherapy Clinic. Samarpan Physiotherapy Clinic. https://samarpanphysioclinic.com/wrist-flexion-extension/
- Jacques, H. (2023, June 7). The 7 Best Cable Forearm Exercises. Lift Vault. https://liftvault.com/exercises/cable-forearm-exercises/

