Wrist Drop (Radial Nerve Palsy)
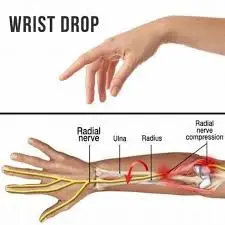
“Wrist drop” is a medical condition characterized by weakness or paralysis of the muscles that control wrist extension, resulting in the inability to lift the hand or extend the wrist properly. This condition can occur due to various underlying causes, including nerve damage, trauma, compression of nerves, or certain medical conditions such as radial nerve palsy.
What is a Wrist Drop?
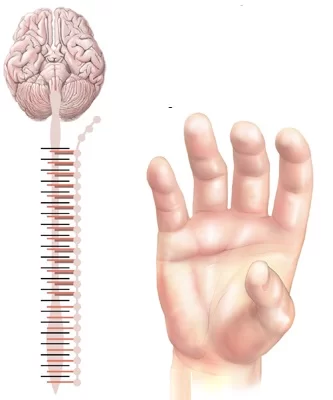
Radial nerve palsy is a condition that causes wrist droop. The extensor muscles of the wrist and fingers are innervated by the radial nerve, hence those whose radial nerve function is impaired may not be able to actively extend them. Therefore, when a patient tries to raise an arm to the horizontal position, a hand hangs loosely in the flexion position. Because of the forearm flexor muscles’ opposing activity, a wrist stays partly flexed. As a result, the posterior compartment’s extensor muscles are paralyzed.
The collection of complex, finely balanced joints that make up the hand and wrist is thought to be the most active portion of the upper extremity. For many everyday tasks, optimal overall function is necessary. An organized approach to the examination of the hand and wrist will help to ensure that the best possible working diagnosis is made for the patient. Because it might be difficult to diagnose hand and wrist disorders, a bilateral comparison could be helpful.
Three different levels of nerve injury are present:
Neurapraxia: The least serious categorization is first-degree damage.
Axinotmesis: An injury of the second, third, or fourth degree is referred to as an axinotmesis.
Neurotmesis: The most severe type of nerve damage, defined as a last-meaning fifth-degree injury.
Rarely can radial nerve injuries occur on anything other than the proximal portion of the dorsomedial forearm or the humeral shaft. High-level radial nerve injuries usually do not impair triceps function, and elbow extension is preserved; however, a pattern of motor paralysis in high radial nerve palsy includes loss of wrist extension, thumb extension & abduction, and finger metacarpophalangeal joint extension.
The major functional impairment following high radial nerve paralysis is shown by the considerable reduction in grip and the requirement for wrist extension for adequate tensioning of the flexor tendon. Low radial nerve palsy is caused by more distant nerve injuries that impact a posterior interosseous nerve. Due to the preservation of the extensor carpi radialis longus function, wrist extension is retained with a propensity toward radial deviation. However, the inability to extend the thumb, abductor, and fingers’ metacarpophalangeal joints hinders proper grip posture, resulting in noticeable hand stiffness and discomfort.
Burkhalter listed three justifications, however, for tendon transfer early on: To serve as a stand-in while the nerve regenerates, preventing the need for external splints.
To support the process of reinnervation and to step in when a nerve is deemed irreversibly damaged or when the outcomes of a nerve restoration are deemed inadequate.
Burkhalter argued that in order to achieve wrist extension early, the pronator teres must be transferred.
Burkhalter argued that the pronator teres should be relocated to establish wrist extension early on, without causing handicap, and that the transplanted till should operate as a pronator of the forearm. Damage to radial nerves in the proximal portion of the forearm causes low radial nerve palsy, which is characterized by the loss of radial abduction, thumb extension, and finger metacarpophalangeal joint extension. The more widely utilized techniques for high radial nerve palsy constitute the basis for the operations for low radial nerve palsy.
Forearm Anatomy

Not to be incorrect with an arm, which extends from a shoulder to an elbow, a forearm is the portion of a body that goes from the elbow to the wrist. The extensor carpi ulnaris, extensor digiti minimi, extensor digitorum, extensor indicis, extensor carpi radialis brevis, and extensor carpi radialis longus are the extensor muscles in the forearm.
The posterior interosseous nerve, a branch of the radial nerve, supplies the extensor muscles. This nerve also innervates the supinator muscle, abductor pollicis longus muscle, extensor pollicis brevis muscle, and extensor pollicis longus muscles in the forearm. The posterior part of the forearm, or posterior when it is in its normal anatomical position, is where all of these muscles are located. Additionally, muscle branches of a radial nerve in the arm innervate the brachioradialis, anconeus, triceps brachii, and extensor carpi radialis longus.
Pathophysiology
Just distal to an elbow, a radial nerve bifurcates into deep and superficial branches along the lateral margin of a cubital fossa. A former, also known as a posterior interosseous nerve, supplies the extensor muscles of the wrist and fingers, as well as the supinator muscle. Damage close to this bifurcation may thus be anticipated to cause both radial nerve palsy and radial nerve sensory derangement. There seems to be a level of the supinator muscle at which the radial nerve might become entrapped.
In the event that radial head entrapment occurs close to an elbow at the triceps muscle head, the wrist drop may also be accompanied by a deficiency in elbow extension. If wrist drop is the initial manifestation of mononeuritis multiplex, then immune, viral, paraneoplastic, or other mechanisms that cause axon destruction and impede nerve conduction may be involved in the pathophysiology of the condition.
What are the Causes of Wrist drop?
Muscles in the forearm contract to pull on tendons that join distally to the wrist, allowing for wrist extension. A wrist drop may happen if the tendons, muscles, or even the nerves that feed these muscles are injured or malfunctioning in some other way.
The Following causes of a Wrist Drop:
- Chest stab wounds at or below the clavicle:
The posterior cord of the brachial plexus terminates in the radial nerve. The stab wound has the potential to injure the posterior cord and cause neurological deficits, such as the inability to extend the forearm, abduct the shoulder past the first 15 degrees, decrease the ability to supinate a hand, abduct the thumb, and lose sensation on the posterior surface of the arm and hand. - Broken humerus:
If the humerus, or arm bone, is shattered, a deep brachial artery and a radial groove on its lateral border may be punctured, resulting in injury to a radial nerve. - Lead poisoning:
Because lead damages the radial nerve, wrist drop is linked to lead poisoning. - Persistent injury:
Repetitive movements or external pressure applied along a radial nerve’s path, such as prolonged crutch usage, prolonged elbow leaning, or even routine upper body rope suspension, are typical causes of persistent nerve injury. The etiology that has been explained is the source of the slang phrases for radial nerve palsy. - Correcting dislocated shoulders:
The now-discredited method of trying to move the humerus back into the glenoid cavity of the scapula by placing the foot in the patient’s armpit and tugging on the arm may cause radial nerve palsy. - Neuropathy:
Wrist drop is an uncommon side effect of rheumatoid arthritis patients who have neuropathy in their hands, arms, or both. The nerves that carry feeling adjacent to the swollen joint may get pinched. Nerve entrapment occurs when a nerve is irritated by swelling, either because of inflammation or just pressure on the nerve. In this scenario, the nerve may transmit pain, numbness, or tingling sensations to the brain.- Most often, nerve entrapment occurs in the elbow (ulnar nerve entrapment) and wrist (carpal tunnel syndrome). Neuropathy is an uncommon type of nerve illness that produces tingling or numbness in rheumatoid arthritis sufferers.
- Rheumatoid arthritis patients may experience neuropathy, or damage to their nerves, as a result of vasculitis, an inflammation of the blood vessels.
Signs and symptoms of Wrist drop:
- limply hanging wrist
- The patient has difficulty raising their wrist and has trouble extending or even straightening their fingers.
- Having trouble gripping your fist
- In addition to wrist drop, the following other signs and symptoms of radial nerve palsy can impair a person’s arm, wrist, hand, and/or fingers:
- Weakness and pain around the wrist joint
- numbness extending down the fingers from the triceps muscle
- lack of muscular control
- Absence of functionality
- Issues with grabbing and pinching
- loss of strength or possibly the incapacity to control the fingers’ triceps muscles
- Wrist drop occurs when a patient’s wrist hangs limp and is unable to be lifted.
How to Diagnose the Wrist Drop?
Nerve conduction velocity investigations are often the mainstay of the workup for wrist drop, serving to both isolate and validate the radial nerve as the cause of the issue. The inability to make the “hitchhiker’s sign” with the thumb is one of the other screening tests.
Simple films might be useful in locating any bone spurs or fractures that might have caused nerve damage. MRI imaging may occasionally be required to distinguish between subtle causes. The doctor will do a physical examination to assess numbness, weakness, and other symptoms in the arm and hand to diagnose foot drop.
Technology and powerful diagnostic techniques to accurately identify the problem, guide therapy, and closely monitor it.
Some of the diagnostic techniques are:
Electromyogram (EMG): This test assesses the type and speed of electrical impulse conduction along with the nerve, as well as the electrical activity of the muscle in response to stimulation. which might determine the degree of nerve injury and prove its existence.
Nerve conduction studies: Studies on the transmission of nerve signals from the spinal cord to the muscles quantify the degree to which particular nerves are capable of doing so. The doctor positions a recording electrode over the muscles that the examined nerve supplies and the shock-emitting electrode directly over the nerve to be researched. An electrode that emits shocks a nerve repeatedly and briefly while another electrode records the length of time it takes for a muscle to contract in response to an electrical pulse.
Imaging tests
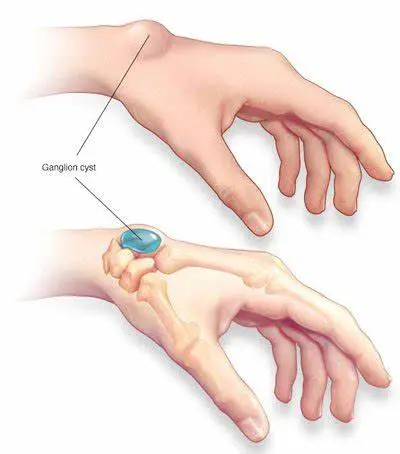
Sometimes, a tumor or even a cyst pushing on a nerve in the knee or spine can cause it, as can an expansion of bone in the spinal canal.
- X-rays: A soft tissue mass or even the bone lesion that may be generating the symptoms can be seen with a plain X-ray, which uses a low radiation intensity.
- Ultrasound: This technique creates pictures of interior structures by using sound waves. It may also be used to check for tumors or cysts on nerves, as well as to reveal swelling caused by compression on a nerve.
- CT scan: This creates cross-sectional pictures of the body’s architecture by combining X-ray images from several distinct angles.
- Magnetic resonance imaging (MRI): Radio waves and a high magnetic field are used in magnetic resonance imaging (MRI) to produce detailed pictures. When a soft tissue lesion is suspected of compressing a nerve, MRI can be used to visualize it.
Special tests
The hitchhike sign
It is used to diagnose two conditions: dystrophic small stature and radial nerve or posterior interosseous nerve palsy.

Radial nerve damage from a fracture can paralyze the extensor muscles of the fingers and wrist. Examine the patient both before and after the fracture is fixed with surgery. Wrist extension is possible for the patient with posterior interosseous nerve damage, however finger extension is not possible. The extensor muscles of the wrist, finger, and thumb are innervated by radial nerves.
The thumb and finger extensions are the only functions provided by a posterior interosseous nerve. It is likely that a radial nerve is involved in the injury at the upper level. Damage to the lower extremities, which often occurs around the elbow, is most likely related to the posterior interosseous nerve.
If a patient is able to “hitchhike,” their posterior interosseous nerve and radial nerve functioning are both intact. Both the radial and posterior interosseous nerves may be impacted if the patient is unable to perform the hitchhiking sign. Request that a patient extend their wrist. A patient’s ability to extend their wrist indicates that the affected nerve is the posterior interosseous nerve, as the radial nerve is unaffected up to this point.
Recall that sometimes it is difficult to determine if a patient has a real wrist drop or not based on the examination, splinting, and immobilization. With some assistance from the median nerve, the ulnar nerve is the primary muscle used by the patient to stretch their fingers via the intrinsic muscles. Extend the wrist and ask the patient to extend their fingers if the therapist wants to thoroughly inspect their fingers. This is not as simple as having a patient make the hitchhiking sing.
Upper Limb Tension Test (ULTT, Radial nerve)
First, the normal/asymptomatic side is subjected to this test. When it comes to upper limb joint alignment, the shoulder, forearm, wrist, fingers, and elbow are typically positioned in that sequence. The joint placement element is introduced up until the point when the discomfort or even symptoms are evoked again. Side flexion of the cervical spine can be added to the upper limb test to make it even more sensitive. It is not necessary to apply more sensitizers if the pain is elicited at the very beginning position.
If any of the following occurs during the movement into a test position or during the addition of the sensitization maneuvers—pain, tingling, or numbness—a positive test shows that there is some degree of mechanical interference impacting neural structures, especially replication of arm symptoms. The therapist should move the hand gradually, starting with the depression in the shoulder girdle and working up to the elbow extension. the entire arm’s medial rotation, followed by the inflection of the wrist, fingers, and thumb.
Treatment of Wrist drop
The etiology of wrist drops determines the course of treatment. Should the underlying reason be effectively addressed, the wrist drop may go away. Wrist drops may not be reversible if the underlying reason is untreated.
Possible treatments for wrist drops include:
Medical treatment for Wrist drop
Sometimes, laparoscopic synovectomy or sympathetic blocks are useful in managing a disease if unpleasant paresthesias arise. Pregabalin, gabapentin, amitriptyline, nortriptyline, duloxetine, and wrist drops are the second therapies.
Using diclofenac or transdermal capsaicin for local therapy might also lessen symptoms. Narcotic medicines can be minimized even in cases of severe pain. The naturally occurring hormone known as erythropoietin has been licensed by the US Food and Drug Administration for the treatment of anemia. It may also have neurotrophic and neuroprotective qualities. A dual-action system that promotes cell survival by inhibiting apoptosis and reducing inflammation has been proposed.
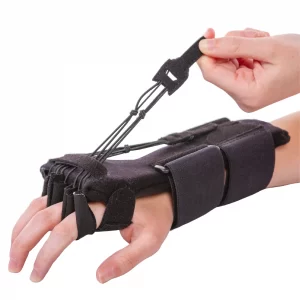
Splinting for wrist drop
A splint for radial nerve palsy is used for finger extension and limp wrist
There aren’t many radial nerve splints available on the market for those with wrist drops, Saturday night palsy, honeymoon palsy, crutch palsy, radial nerve palsy, peripheral nerve damage, or even weak fingers in both genders. What little is available in terms of price, utility, practicality, comfort, and fit? Contrary to what the patient would think, radial nerve injuries are far more prevalent in producing limp wrists. For context, radial nerve palsy can develop in as few as 2% to 17% of individuals who have had a humeral shaft fracture. For these reasons, our goal as therapists is to develop a radial nerve brace that is comfortable, effective, economical, and supportive.
Our Radial Nerve Palsy Splint allows for movement while providing support following radial nerve damage by positioning the wrist and fingers into extension, also referred to as dorsiflexion. The “BraceAbility Radial Nerve Palsy Splint” is another name for this splint, which helps hasten the healing process by strengthening the wrist extensors when function recovers.
Physical therapy treatment for Wrist drop
It aids in arm strengthening to reduce the chance of radial nerve damage. To prevent falls, the therapist teaches appropriate balancing exercises. Patients are also taught proper posture while resting and at work. By helping a patient manage medical disorders like diabetes and kidney stones, a physiotherapist can lower the chance of damage to the radial nerve.
The physical therapist uses techniques like:
Transcutaneous electrical nerve stimulation (TENS) to help with radial nerve discomfort. Radial nerve endings are helped to become less sensitive by electrical impulses transmitted from the TENS device. Massage treatment is a component of physical therapy that can help reduce edema that puts pressure on the radial nerve. This happens as a result of massage treatment helping to clear fluid out of lymphatic vessels. Most significantly, by enhancing blood circulation, physical therapy speeds up the wounded radial nerve’s healing process. Grasping exercises also restore movement to the fingers and wrist. These grasping exercises might help with wrist drops and other related issues.
Electrotherapy
A little electrical current is used in transcutaneous electrical nerve stimulation, or TENS, a pain treatment method. The tiny, battery-powered TENS machine contains leads that are attached to adhesive pads known as electrodes. The primary purpose of this equipment is to activate the wrist drop nerve.
Hot pack: The primary purpose of this method is to relieve pain.
Electrical stimulation, or ES, works by applying small electrical pulses via the skin to help contract tense muscles or reposition nerves to lessen pain. Although this method might not be suitable for everyone, those who undergo painless operations might benefit from faster recovery and alleviation of painful symptoms.
Exercise program for Wrist drop
This exercise can help the body perform better in physical duties, lower the risk of injury, support joints in their entire range of motion, promote blood flow to the muscles, maximize muscular function, and make it easier to complete everyday tasks.
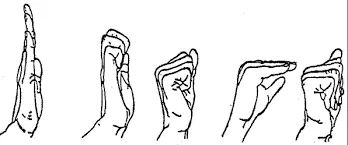
- Praying position stretching

First, instruct the patient to stand or sit with their hands clasped together in the prayer position. Put your elbows in contact with one another. The hands of the patient should be in front of the face. The patient’s arms can then come into contact with one another from the elbows to the tips of the fingers. After that, carefully stretch the elbows apart while keeping the palms pushed together.
As you do so, bring the patient’s hands down to their waist. Next, when the patient feels the stretch or their hands are in front of a belly button, give them the order to stop. For the following thirty seconds, hold this stretch; repeat three times in one session. Work out three times a day.
- Wrist flexors Stretch
No equipment is needed.
Extra guidelines: Stretching should be done often during the day, particularly before an activity. Stretching should be a component of the warm-up for grip-intensive sports like tennis, golf, and gardening after recuperation.
Instructions in detail: First, raise your arm straight and bend your wrist back, as if you were telling someone to “stop.” Next, gently apply pressure across a palm with the other hand and move it toward the patient’s face side until the patient feels a stretch on the inside of their forearm. For thirty seconds, hold the stretch. In each session, repeat three times. Work out three times a day.
- Clenched fists
First, instruct the patient to sit up and lay their open hands, palms up, on their thighs. Next, slowly close your hands into fists, being careful not to grip your fingers too firmly. Raise fists off of the patient’s legs and return them to the patient’s body, bending at the wrist, with the forearms contacting the legs. For the next thirty seconds, hold. Slowly spread your fingers apart and lower your hands. Three times in one session. Work out three times a day.
- Hooked stretching exercise
Start by hooking one elbow under the other and pulling both arms toward the center of the body to begin this stretching exercise. The patient should next wrap one arm over another such that their palms are touching and feel a stretch in their shoulders. For thirty seconds, hold it. Perform three sets of three repetitions. Work out three times a day.
- Fist-opener
First, in front of a physical therapist, create a fist and hold it for thirty seconds. Next, spread your fingers until they are together and flat, like an open hand. Five times throughout one session, repeat this motion. Work out three times a day.
- Thumb pull
Grasp a thumb with one hand and extend with the other. Pull a thumb back slowly and gently away from a hand. For the following thirty seconds, hold this stance for each repeat. Perform three sets of three repetitions. Work out for three hours a day. Do the same exercise with the opposite thumb.
- Alternate finger stretch
Bring the middle and ring fingers together to complete this exercise. Take out your index and pinky fingers from them. In one session, perform three repetitions of this stretching exercise. Work out three times a day.
- Side to Side Stretching
The therapist should first instruct the patient to lie on their side with their hands and knees on the floor in the tabletop position. The fingers should then be facing away from each other’s hands as they are moved outward. Next, take a few side steps and hold for another thirty seconds. Perform this drill three times in one session. Work out three times a day.
- Wrist circle stretching exercise
Initially, the therapist instructs the patient to sit with their hands resting on the table. The wrists should dangle off a corner. Next, create a clockwise circle with your wrist. The circle should then rotate counterclockwise. For thirty seconds, maintain this stance. Three times in one session. Work out three times a day.
- Thumb and upper wrist stretching exercise
A patient receives instruction from the therapist to extend their right arm and clench their hand around their thumb. Next, lower your fist toward the floor. The thumb and top of the wrist will then feel stretched for the patient. For 30 seconds, hold this. Additionally, repeat with the opposite hand. Perform a session of three repetitions. Work out three times a day.
- Palm-to-ceiling wrist stretching exercise
First, the patient is given an order by the therapist to extend one arm in front of their face and turn their palm toward the ceiling. Rotate your wrist so that your fingertips face the ground. Gently draw the fingers toward the body with a different hand until the patient feels a stretch in the underside of their wrist. Once you’ve held for thirty seconds, repeat with the opposite hand. Three times in one session, repeat it. Work out three times a day.
- Finger tendon glide stretch
The fingers were initially straight out in front of the patient. First, make a hook fist, then switch back to a straight hand. Form a closed fist, then bring it back to a straight hand. In one set every session, repeat it 10 times. Work out three times a day.
- Loosen-up stretching exercise
To help patients loosen up their hands and fingers before starting an exercise regimen, here is a basic stretching practice. For patients who do repeated hand movements, this is also an excellent time to take a break and relax their hands and wrists. Both your posture and the angle at which you bend your elbow should be comfortable. Make a fist first, then open it gradually by expanding and separating the fingers. Three times in one session. Work out three times a day. Hold each time for 30 seconds.
- Wrist supinators stretching
The therapist instructs the patient to first lie down or sit in a comfortable posture. Subsequently, the therapist places one hand on the patient’s hand and the other on the elbow joint. The patient’s hand is then turned outside, with the palm facing the ceiling, by the physical therapist. For the following thirty seconds, hold the activity. Perform three sets of three repetitions. Work out three times a day.
- Wrist pronators stretching
A physical therapist will first instruct a patient to assume a comfortable posture, such as sitting or supine. Subsequently, a therapist applies pressure on the elbow joint with one strong hand while holding the patient’s hand. The patient’s hand is then turned inside out, with the palm facing the floor, by the therapist. For the following thirty seconds, maintain this position. Perform three sets in one session. Work out three times a day.
- Stretch Table
Initially, choose a comfy spot next to the table. Next, spin your entire body away while maintaining the palm of your hand flat on a table. Three times a session, do it. Work out three times a day.
Range of motion exercise for Wrist drop
Passive range of motion exercise
- Passive wrist extension
Start by assuming a comfortable position, such as sitting in a chair with your affected hand fully pronated hanging over the edge of a table. Additionally, put the rolled towel beneath the affected hand. Furthermore, the physical therapist positions themselves across from the patient. When a patient is unable to move their wrist, a physical therapist will urge them to attempt, and they will then lift their hand upward until the patient feels a stretch. Do it ten times in each session. Work out three times a day.
- Passive wrist ulnar deviation
First, instruct the patient to sit comfortably in a chair with their affected hand in a mid-pronation posture. Moreover, put a wrapped towel below the affected hand. Next, a physical therapist stands in the patient’s opposite direction. The patient is then instructed by a physical therapist to try to move their wrist downward as the therapist does a movement, and the physiotherapist pushes the patient’s wrist lower until they feel a stretch. Ten times during a session, do it. Work out three times a day.
- Passive wrist radial deviation
Ask the patient to first get into a comfortable posture, such as a chair, with their affected hand in the mid-suspination position. Then, lay the cloth below the hand that is affected. A physical therapist then positions themselves across from a patient. Next, a physiotherapist conducts the radial deviation while a therapist instructs the patient to attempt to raise their wrist higher. The physiotherapist pushes the patient’s wrist upward until they feel the strain. Ten times in one session, execute it. Work out three times a day.
- Passive supination
Begin by instructing the patient to take on a comfortable posture, such as sitting in a chair with their injured hand fully pronated—that is, with their back to the roof. Furthermore, place the rolled towel beneath the affected hand. The doctor then positions himself or herself across from the patient. Next, a physical therapist rotates the patient’s wrist passively until the patient feels the strain, and a physiotherapist instructs the patient to attempt to rotate their wrist as the physiotherapist does the passive supination. Do this exercise ten times in one session. Work out three times a day.
- Passive pronation
First, instruct the patient to get into a comfortable posture. For example, they can sit on a chair with their affected hand in full supination, which means their backs are toward the ground. Moreover, put the rolled towel beneath the hand that is injured. A physical therapist then positions themselves across from a patient. After that, a physical therapist rotates a patient’s wrist passively until the patient feels the strain. The therapist instructs the patient to attempt to rotate their wrist as the therapist conducts the passive pronation. Ten times within one session, carry out this task. Work out three times a day.
- Passive finger flexion
First, the patient should lay their hand, palm up, on a table with their affected fingers flat. The next step involves the doctor applying pressure with his or her free hand to the rear of the fingers and bending them inward. One finger that is impacted won’t be able to move. For around 10 seconds, hold it. Straighten the finger after that. Do it ten times in a session. Work out three times a day.
- Passive finger extension
First, lay the affected hand, palm up, with the affected finger flat on the table. The fingers are then in the flexion position when a physical therapist applies a firm hand to the rear of the digits. Next, extend your fingers as if you were straightening them. One finger that is impacted won’t be able to move. Hold for five to ten seconds approximately. Bend the fingers after that. Ten times throughout a session, repeat it. Work out three times a day.
- Passive thumb flexion
The therapist should first instruct the patient to settle into a comfortable posture, such as sitting in a chair with their hands in a midpronation position. The affected hand is placed beneath the rolled towel. Then, bend the thumb downward using the physical therapist’s strong hand to feel the mild stretch. For each repeat, hold it for five to six seconds. In one session, repeat ten times. Work out three times a day.
- Passive thumb extension
Initially, the therapist instructs the patient to settle into a comfortable posture, such as sitting in a chair, and to put their hand in a mid-pronation position. The wrapped towel is then put beneath the hand that is ill. Next, gently extend the thumb with a physical therapist’s strong hand. Hold for the next five to six seconds after that. Ten times throughout a session, repeat it. Work out three times a day.
- Passive thumb abduction
First, instruct the patient to choose a comfortable posture, such as sitting on a chair with a rolled towel beneath the affected hand, which must be in the middle of pronation. Then, extend the thumb from the palm as though the patient were opening it to take the big jar in hand. But keep in mind to extend at a large thumb knuckle rather than the tip. For five to six seconds, hold it. In one session, repeat ten times. Work out three times a day.
- Passive thumb opposition
First, instruct the patient to get into a comfortable position—that is, to sit on a chair. Next, place your thumb on the tips of each finger. Once the patient can perform the task with ease, move the point of contact on each finger until the patient can make contact with the base of the finger. Ten times a session, repeat. Work out three times a day.
Active-assisted range of motion exercise
- Active-assisted wrist extension
To begin, the therapist should instruct the patient to settle into a comfortable posture, such as a chair, and to rest their affected hand comfortably on a table edge with complete pronation. A physical therapist then positions themself across from the patient. The physical therapist advises the patient to try moving their wrist higher if they are unable to reach the end range; in this case, the physiotherapist reaches the whole range. helps the sufferer to Do this ten times in a session. Work out three times a day.

- Active-assisted wrist ulnar deviation
First, instruct the patient to sit comfortably on a chair with their affected hand in the mid-suspension position. The rolled towel should then be placed beneath the affected hand. The physical therapist then positions themself across from the patient. A physical therapist then gives a patient instructions to try moving their wrist downward. If the patient is halted while executing the wrist ulnar deviation motion, the physical therapist then assists the patient in reaching the end range. Ten times in one session, execute it. Work out three times a day.
- Active-assisted wrist radial deviation
First, instruct the patient to sit in a chair or another comfortable posture, with the affected hand in the mid-suspension position. Then, put the cloth that has been rolled below the damaged hand. After that, the patient is instructed to try to raise their wrist, and the physical therapist assists them in reaching the end range when they become stuck throughout the action. Ten times during a session, do it. Work out three times a day.
- Active-assisted supination
First, instruct the patient to choose a comfortable posture. For example, an injured hand should be fully pronated when the patient is seated in a chair. indicating that a hand’s front will be toward the earth. The rolled towel should then be placed beneath the affected hand. The physician stands in the patient’s opposite direction. Next, a physical therapist applies external force to perform every angle of supination after a patient gives up trying to rotate their wrist after receiving instruction from a therapist. Ten times in one session, execute it. Work out three times a day.
- Active-assisted pronation
First, instruct the patient to choose a comfortable posture, such as sitting in a chair with their affected hand fully supinated. indicating that the hand’s palm will be pointing upward. The rolled towel should then be placed beneath the affected hand. A physical therapist then positions themselves in the opposite direction from the patient. In addition, a physical therapist instructs a patient to attempt wrist rotation. If the patient pauses at any point or is unable to complete the whole range, the physical therapist assists the patient in completing the movement. Do this ten times in a session. Work out three times a day.
- Active-assisted thumb flexion
To begin, have the patient relax into a comfortable posture by having them sit in a chair with their hands in a mid-pronation position. The rolled towel is then positioned under the hand that was injured. A patient receives an instruction from the doctor to bend their thumb downward, causing a little strain. The fingers will then go over the palm. Ten times throughout a session, repeat it. Work out three times a day.
- Active-assisted thumb extension
The therapist should first instruct the patient to settle into a comfortable posture, such as sitting in a chair with their hands in the mid-supination position. The tied towel is then put beneath the hand that is ill. The patient is then instructed by a physical therapist to extend their thumb outside, which implies somewhat posteriorly to their palm. If the patient is unable to reach the whole range, a physiotherapist assists in doing the full thumb extension. Ten times in one session, repeat it. Work out three times a day.
Active range of motion exercise
- Wrist supination
No equipment is required.
Extra instructions: This stretch will help with tasks that need you to grab something, hold your palm up, or twist (like using a screwdriver).
Procedure in detail: To begin, bend your elbow to the side of your body, and palm toward the roof. Next, move the patient’s forearm farther into the palm-up position while holding the wrist with the other hand until they feel a stretch. Stretch for a duration of 30 seconds. After doing this stretching exercise three times in one session, switch to the other arm. Work out three times a day.
- Wrist circles to increase range of motion
A physical therapist should first instruct a patient to settle into a comfortable posture, such as sitting in a chair. Next, make fists with your hands up and your elbows pressed close to your body. Next, to optimize the range of motion, circularly rotate wrists while maintaining to maintain palms pointing downward. In each session, complete ten circles in each direction. Also, perform in the opposite direction. Work out three times a day.
- Wrists Shake
Initially, the therapist instructs the patient to place their hand in the namaste posture. After that, just shake your wrists for one minute for each set in a session. Work out three times a day.
- Shake It Out
After holding a posture for a time, shaking out the hands and wrists is an excellent way to loosen up tight joints and restore blood flow. The patient should start with their hands out in front of them and their palms toward the ground. Shake hands slowly, allowing one wrist to fall slack. For thirty seconds, keep going. In one set, repeat up to three times. In one session, one set is sufficient. Work out three times a day.
- Fist to Fan
First, the patient’s hands should be in front of them with their palms pointing down. Make a double-handed fist. Next, crack open your fist halfway, bending your fingers at the knuckles. Next, completely extend your hands so that your five fingers are straight and wide apart. For each repeat, hold for 10 seconds. Perform three sessions in a day and five times in one session. Make a fist again and go through the same motions.
- Thumb touches
Performing this exercise helps restore blood flow to the affected area and improves thumb and forefinger coordination: Hold out your hands, palms up against the ceiling. Next, carefully move your wounded hand’s thumb to the tips of each finger. Additionally, repeat with the opposite hand. Next, go back to where you were before. For each session, repeat five repetitions using both hands. Work out three times a day.
- Wrist supination
initially, the therapist should teach the patient to take on a comfortable stance, which entails standing or sitting with an arm at the side and an elbow bent to a 90-degree angle while holding a hand midway over a table edge. The patient is then instructed to raise their hand, facing the roof, without holding it at the terminus by the therapist. Perform each set 10 times in a session. Work out three times a day.
- Wrist pronation
The physical therapist should first instruct the patient to assume a comfortable position, which entails standing or sitting with an arm at the side and an elbow flexed to a 90-degree angle, as well as placing the hand in the mid-pronation position over a table edge. The patient is then instructed by the therapist to lower their hand toward the ground while maintaining its terminus without gripping it. Ten times in one session, do it. Work out three times a day.
- Wrist extension range of motion exercise
Starting with a hand dangling off the edge of a stable surface, such as a table, with the palm down, lay a forearm on a table on top of a rolled-up towel for cushioning. The physical therapist should next instruct the patient to raise their hand till they feel a little stretch. Return to an embarking posture after that. Ten times in one session, do it. Work out three times a day.
- Wrist extension in supination position
First, instruct the patient to rest their forearm, with their hand fully supinated, on a rolled-up towel placed on a table edge for comfort. The patient should then be instructed by a physical therapist to move their hand down till they feel a little stretch. Go back to the embarking position after that. In one session, perform 10 repetitions. Work out three times a day.
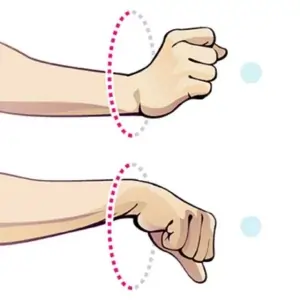
- Wrist ulnar deviation
First and foremost, it is the duty of a physical therapist to instruct a patient to assume a comfortable posture, supporting their forearm on a table with a rolled-up towel for cushioning or on a knee, with their thumb pointing upward. Swing a wrist down the whole ulnar deviation range. Ten times during a session, do it. Work out three times a day.
- Wrist radial deviation
First, a physical therapist directs the patient to settle into a comfortable posture, placing their forearms on a table, on a rolled-up towel for comfort, or on their knees, with their thumbs facing upward. Next, raise your wrist across the whole range of motion for radial deviation. Ten times in one session, do it. Do three sessions in one day.
- Thumb flexion
Initially, a physical therapist instructs the patient to get into a comfortable posture, supporting their forearm on the table with a rolled-up towel for comfort or on their knee. An outward-pointing thumb is used. Next, make a thumb movement across a palm and return to the initial position. Ten times in one session, do it. Work out three times a day.
- Thumb extension
A physical therapist should first instruct a patient to get into a comfortable posture, supporting their forearm on a table, on their knees, or on a rolled-up towel for cushioning. A thumb is then positioned in an outward manner. Next, slide a thumb over a palm, return to the initial posture, and take a little, non-abduction-related step backward. Perform ten rounds in a session. Work out three times a day.
- Hand/finger tendon glide motion
The fingers reached straight out first. Make a hook fist after that and then switch back to a straight hand. Next, return to the straight hand and produce a complete fist. Make a straight fist after that and then resume a straight hand.
- The Water Spout
Extend your arm straight from your body, parallel to the ground. Next, hold the empty cup in your outstretched hand and tilt it so that it seems like it is spilling water. Ten times during a session, do it. Work out three times a day.
- Figure Eight
With the wounded hand supported by the back of the chair or a countertop, lean forward and stand. Make a figure-eight motion with the damaged arm. Face the palm outward when the hand is closest to the body. Face the palm inward when the hand is at its farthest from the body. Ten times during a session, do it. Conduct two sessions per day.
- Hide and Seek
Maintain an elbow distance from the patient’s side. The arm should be held at a 90-degree angle, palm up. Next, while maintaining a stationary elbow, rotate the forearm behind the elbow. The palm should then be facing the roof once more but behind an elbow this time. Look at the fingers with your head turned. Do two sessions in one day, 10 times every day.
- Don’t Forget to Tip
Look in the direction of the affected side. Then, as though accepting a backhanded gratuity, take the hand behind your back. Then, wiggle your fingers both up and down. Do this exercise ten times in one session. Work out three times a day.
Strengthening exercise
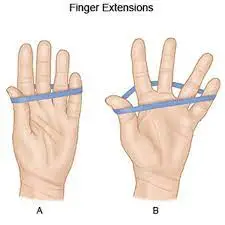
- Rubber Band Stretch
The therapist instructs the patient to sit down at the beginning. Next, wrap a rubber band over each of the affected hand’s five fingers. After that, use a rubber band to help the patient spread their fingers as widely as they can before letting them relax once more. Perform 10 repetitions of each hand in three sessions. As the patient develops strength in the damaged wrist and fingers, add more rubber bands to the mix to increase the resistance.
- Hammer Rotation
For this exercise, the patient will require a hammer, wrench, or any similar long, thin object Specifically, if the wrists are weakened or painful, the therapist should ensure that it is not excessively heavy. Lean forward in the chair so that your arm rests on your thigh while holding the selected tool in one hand. After turning the wrist progressively downward so that the palm is toward the ground, the palm should be facing inward. Rotate the palm upward so that it faces the roof after returning it to the embarking position. Ten times during a session, do it. Work out three times a day.
- Grip strengthening
Grippers are available in various tensions. The one that is only a little difficult to move can be moved first by the patient. Increase the gripper tension once a modest weight becomes effortless. The origins of grippers vary; some are light, while others need 365 pounds of force to shut (move). Give the patient instructions to sit comfortably, hold a gripper in the injured hand, and bend their arm so that the palm faces inward. Then, without holding, slowly squeeze it and release it at the end. In one session, repeat ten times. Work out three times a day. The arm should not move; just the hand should. Repeat with the other hand as well. Once a patient can perform three or four sets without discomfort, use the gripper with increased tension as well.
- First to jazz hand
Initially, the therapist instructs the patient to place the affected arm on a table, as though they were about to engage in arm wrestling. Next, clench your fist. Make a jazz hand by slowly opening your fist and spreading your fingers as wide as you can while still feeling comfortable. Ten times a session, repeat. Work out three times a day.
- Finger spread apart with theraband
First, encircle each finger with the theraband before starting. Next, press against the band’s resistance and spread your fingers as widely as you can. Release after around 10 seconds of holding. Repeat 10 times in a row, then switch to the other hand and repeat with a different theraband. Ten times in one session, do it. Work out three times a day.
- Dumbbell windshield wipers
Start by placing your forearm on a flat, firm surface, such as a table or chair. Next, place one end of the patient’s lightweight dumbbell—roughly two to five pounds—in their hand. The dumbbell may be raised and lowered in a windshield wiper motion by rotating the wrist from right to left. Perform 10 repetitions continuously in a session. Work out three times a day.
- Ball Squeeze
First, instruct the patient to hold the stress ball, tennis ball, or racquetball in one hand—that is, the hand that is affected and may be squeezed. Take 10 seconds to fully compress the ball with all of the patient’s fingers, then release it. In one session, repeat ten times. Work out three times a day. Depending on the patient’s capacity, increase the repetition of the number from 10 to 20 after 5 to 6 days.
- Using a dumbbell in pronation, strengthen your wrist extensors
First, instruct the patient to sit in a chair with their forearm resting on the table for this wrist-strengthening exercise. After that, suspend a hand and wrist over a table’s edge. A dumbbell (2 or 3 pounds) should be held in the affected hand. Next, carefully raise one hand such that the back of the hand is toward the ceiling, palm down.
The forearm of a patient needs to stay on a table. A physical therapist should next instruct the patient to raise their hand as far as possible and then return to the beginning position. Ten times in one session, do it. Work out three times a day. A physical therapist must apply hold at an endpoint for ten seconds for each repetition after five to six days.
- Strengthening your wrist extensors in supination with a dumbbell
First, the patient is instructed to sit in a chair with their forearm lying on the table for this wrist-strengthening exercise in complete supination. Next, drape a hand and wrist over a table’s edge. With the injured hand, hold the dumbbell weighing two or three pounds. Subsequently, carefully lower your hand such that the back of it touches the floor, palm facing up.
The forearm of a patient has to stay on the table. A physical therapist should then instruct the patient to move their hand as far downward as they can before returning to the beginning position. Ten times during a session, do it. Work out three times a day. A patient must be instructed by the physical therapist to hold at the endpoint for 10 seconds during a single repeat after five days. Work out three times in one day.
- Wrist supination with dumbbell
Instruct the patient to sit in the chair with their forearm resting on the table in order to perform this exercise. To check whether the hand and wrist are above a table edge, see a physical therapist. Next, grasp the end of the little 1- to 3-pound dumbbell in your hand like you would a hammer would. Then, gently rotate a hand and wrist so that the palm is facing upward toward the ceiling.
Finally, slowly rotate a hand back up so that the dumbbell is straight up once again. Perform 10 sets of ten repetitions without pausing at the conclusion of the set. Work out three times a day. After the patient has performed this exercise for five to six days, instruct them to hold an endpoint for 10 seconds for each repeat.
- Wrist pronation with dumbbell
Instruct the patient to sit in a chair with their wrist and hand over an edge and their forearm resting on the table in order to strengthen their wrist pronators. Then, hold the dumbbell such that the weight is facing upward toward the ceiling. Next, rotate your hand gently so that the wrist and palm face the floor. Then, slowly rotate your hand back to the beginning position, with the weight pointing upward toward the ceiling. Ten times during a session, do it. Work out three times a day.
- Rotation
Sit first with your arms at a 90-degree angle and your forearms in front of the patient palms down. After that, imagine the patient is holding something while holding a light resistance band, dumbbells, or going weightless. Next, carefully turn your hands so that the palms are facing upward. Next, turn the palms back to their initial position slowly. Ten times throughout a session, repeat it. Aim for three times in one day.
- Curl of the pronated wrist
In order to begin this exercise, the patient must first sit and hold an arm at a 90-degree angle with the palm pointing downward. Next, lift one wrist. Rotate your wrist back to its initial position. Ten times throughout a session, repeat it. Work out three times a day.
- Squeeze
Hold a ball, or other squeezable object, with your palm facing up while you stand or even sit. Next, give the patient ten seconds to squeeze a squeezy object as hard as they can. Release a grasp slowly. Start with 10 repetitions, then increase the number of repetitions with time.
- Wrist ulnar deviators strengthening with dumbbell
The therapist instructs the patient to sit in a chair with their forearm resting on a table to begin this wrist-strengthening exercise. Next, instruct the patient to place their hand over a table edge in mid-range supination and pronation. With the injured hand, hold the dumbbell weighing two or three pounds. Next, carefully lower a hand with a palm facing the side.
The forearm of a patient has to stay on the table. A physical therapist should then instruct the patient to move their hand as far below as possible before returning to their original posture. Ten times in one session, do it. Work out three times a day. A patient must be instructed by a physical therapist to hold at the endpoint for 10 seconds during a single repeat after five days.
- Wrist radial deviators strengthening with dumbbell
Instruct the patient to sit in a chair with their forearm resting on the table to begin the wrist strengthening exercises. Next, instruct the patient to place a hand over a table edge in the middle of the range of pronation and supination. With the injured hand, hold the dumbbell weighing two or three pounds. Next, carefully raise a hand with the palm toward the side. The forearm of a patient needs to stay on the table. A physical therapist should then instruct the patient to raise their hand as far as they are able before returning to their regular posture. Do it ten times in one session. Do three sessions per day. A physical therapist should instruct a patient to hold at the endpoint for five seconds during a single repetition after five to six days.
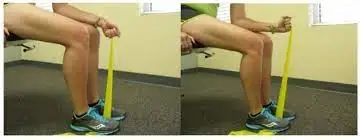
- Wrist ulnar deviators strengthening with theraband
First, the doctor instructs the patient to choose a comfortable posture, which is to sit in a chair at a table edge with their hand in a mid-pronation position and their hand covered by a wrapped towel. Next, place one end of a theraband in the patient’s hand and the other end in the hand of the therapist. Request that the patient move their hand against a theraband in a downward motion.
Ten times during a session, do it. A patient should do around three sessions each day. Hold the final posture for ten repetitions, one at a time, after five to six days. Return to the neutral position gradually. The patient should be fitted with a lighter band before the theraband’s color is changed for increased strength.
- Wrist radial deviators strengthening with the theraband
First, instruct the patient to get into a comfortable posture. This might be as simple as sitting on a chair and placing one hand on a wrapped towel and the other in a mid-supination position at the edge of a table. Next, wrap one end of a band around a patient’s hand and the other end around a therapist’s hand. Request that the patient raise their hand upward against a theraband. Ten times in one session, do it. A patient should do around three sessions each day.
Hold this position at the endpoint for ten seconds in a single repeat after doing the workout for five days. Return to the neutral position gradually. Change the band’s color to something more robust once the patient has become used to it.
- Using a theraband and a pronated hand, the extensor muscles of the wrist are strengthened
First, the therapist should instruct the patient to relax into a comfortable posture. This involves sitting in a chair or other sturdy platform, with one hand resting on a rolled cushion at the edge of the table and the other facing the ground. Next, wrap one end of a theraband around the patient’s hand while the physical therapist holds the other end in their strong hand.
Give the patient the order to move their hand up and against a band. Then repeat it ten times in each session. A patient should do around three sessions each day. Hold a position at the terminus for about 10 seconds in a single repeat after five days. Return to your natural position gradually. Change the band’s color to something more robust once the patient has been used to the lighter ones.
- Using a supinated hand and a theraband, strengthen your wrist extensors
Ask the patient to first take a comfortable posture, such as sitting on a chair or table that is sturdy and holding their hand on a rolled towel at the edge of the table with their palm toward the ceiling. Next, place the first end of a theraband on the hand of the patient and the second end on the strong hand of the physical therapist.
A patient should be instructed to slide their hand downward against a theraband. Repeat ten times in a session after that. A patient should do about two sessions each day. Following five days of maintaining this posture for one repeat of five to ten seconds at the terminus. Return to the neutral position gradually. Once a patient has been accustomed to a lighter band, change the color of the theraband to promote strength.
- Supinators strengthen with the theraband
First, the therapist instructs the patient to get into a comfortable posture. This might be as simple as sitting in a chair or on a firm surface with their hands resting neutrally on a rolled towel at the edge of the table. Next, place one end of a band in the patient’s hand and the other end in the strong hand of the physical therapist. Give the patient the order to turn their hand over a theraband such that the palm faces the ceiling.
Once you’ve completed 10 repetitions of this strengthening exercise, stop. A patient should do about two sessions per day. Hold this position at the finish line for about five seconds each repeat after five days. Return to the embarking posture gradually. Once a patient has become used to using a lightweight therapy band, change the band’s color to promote strength.
- Pronators strengthen with the theraband
The therapist then instructs the patient to settle into a comfortable posture, such as sitting on a chair or solid surface, and to place their hand in full pronation, or with the palm facing the floor and resting on a rolled towel on a table edge. Next, place the patient’s hand around one end of a theraband and the physical therapist’s strong hand around the other.
Give a patient the order to turn their hand so that it faces the floor as they spin it against a theraband. Next, perform 10 repetitions of this strengthening exercise in one session. A patient should do around three sessions each day. Return to your starting location slowly. Once a patient has become accustomed to using a lightweight therapy band, change the band’s color to promote strength.
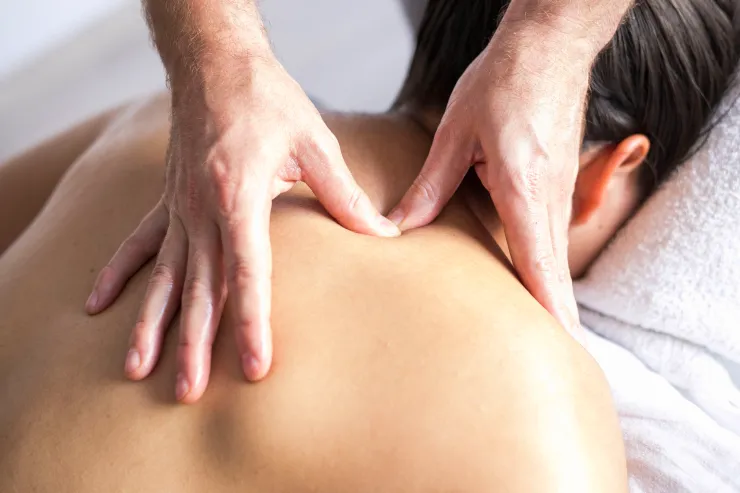
Massage Techniques
This age-old massage technique alternates between stretching and applying pressure in a rhythmic flow. Massage treatment helps release built-up tension in targeted muscles resulting from injury or stress. Massage treatment helps the patient increase blood flow, which facilitates faster healing on all fronts.
A few advantages of massage treatment
- reducing tension and promoting relaxation.
- easing tension and tightness in the muscles.
- increasing strength, circulation, and sensitivity.
- decreasing blood pressure and heart rate.
- increasing the body’s immunological response.
Effleurage (Stroking) technique
The hands are moved steadily and rhythmically over the damaged area of the patient, only in a straight line. This is done to help spread waste products, improve blood flow in that direction, stretch the patient’s tissues, and help them relax. This method, which is always the first and final one used in a massage session, entails stroking the skin of the wrist with the hands. Depending on the situational context and the intended outcome of the massage, several pressure and tempo settings might be employed for éffleurage.
Kneading technique:
The affected area is raised, lowered, squeezed, pinched, and rolled. In some muscle diseases, alternately squeezing and relaxing the tissues might induce local circulation that can relieve discomfort. The fundamental motion involves compressing, lifting, and then releasing the soft tissues. Its methods, which are usually employed when a deeper impact than effleurage is desired, consist of:
- Squeezing
The therapist will first instruct the patient to lie down in a comfortable posture, such as a supine position or even sit. Subsequently, a physical therapist employs the squeezing technique, which involves a circular hand stroke applied to the whole wrist. A patient will have a tissue brought between both hands by a physical therapist, who will then raise it up and away from the body.
- Picking up
The therapist instructs the patient to first take a comfortable posture. Then, using a pickup method, the tissue is lifted away from the body and equally compressed on both sides. A physical therapist’s hands are parallel to the limb they are treating to prevent over-extension of the outer wrist.
- Shaking
The vibration or even shaking massage method is the tiny, soft, trembling action conducted with hands or even fingers. One way to activate the body’s soft tissues is by shaking it. Vibrational movements have the potential to ease tense muscles, activate nerves, and lessen stress. Using this hand method, a physical therapist should place one hand on the injured side and place another on it, stroking to create vibrations.
- Rolling
Using a rolling motion with the thumb and fingers, the skin is separated from the tissue. After that, it is continuously moved forward to help free it from the muscle. To aid in the breakdown of scar tissues, skin rolling can be applied to certain locations.
- Wringing
Wringing involves elevating and squeezing the muscle in both the forward and backward directions. Wringing is applied as part of a post-event massage, to relieve tense muscles, and for relaxation. This approach helps with better recovery, less DOMS, and muscular tension alleviation.
Conclusion
Considering acute early symptoms, there is a fair prognosis for compressive radial neuropathy within a few weeks. Clinically, wrist or finger drop manifestations are comparable to those of other neurological diseases. Clinicians may be better able to distinguish radial neuropathy from other potential disorders if they are aware of the clinical characteristics of this condition and the functioning of the radial nerve.
FAQ
What is the cause of wrist drop?
Radial nerve palsy is a condition that causes wrist droop. Those whose radial nerve function has been damaged are unable to actively stretch their wrist and digit extensor muscles because the radial nerve innervates them.
Which muscles are weak in wrist drop?
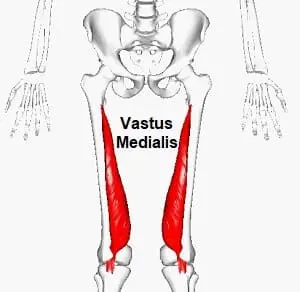
When the EIP, extensor digitorum communis, extensor carpi ulnaris, and long head of the extensor carpi radialis weaken, there is a noticeable clinical decrease in wrist drop and finger drop, as well as minor supination weakness (caused by a weakening of the supinator muscle) and elbow flexion.
What nerve root is involved in wrist drop?
Multiple lesions to the radial nerve, which runs down the arm and regulates the movement of the triceps muscle at the rear of the upper arm, can cause wrist drop. This nerve controls the wrist bend in the back and promotes mobility and sensation in the fingers and wrists.
What are the clinical features of wrist drops?
A medical problem known as wrist drop occurs when the fingers and wrist are unable to extend at the metacarpophalangeal joints. Because of the forearm flexor muscles’ opposing activity, the wrist stays partly flexed. Consequently, the posterior compartment extensor muscles stay paralyzed.
Is wrist drop treatable?
Most cases of radial nerve palsy-related wrist drop are curable. Treatment with conservative measures is effective in around 70% of instances of radial nerve palsy. It may take weeks or months for a radial nerve to recover following therapy, depending on the extent of injury.
What type of pain is a wrist drop?
It’s normal to feel tingly, numb, and have problems straightening your arm. Additionally, you could discover that your fingers and wrists are rigid. This is referred to as “finger drop” or “wrist drop,” and it is not always the case.
Why there is no wrist drop in radial tunnel syndrome?
Because the extensor carpi ulnaris is weaker than the extensor carpi radialis, there is no wrist drop during extension; instead, there is often radial deviation of the wrist.
Which orthosis is used for wrist drop?
The innovative Wrist Drop Orthosis with Universal Cuff from RCAI helps with daily tasks by holding the hand extended. The splint is made of recyclable thermoplastic that is lightweight and resilient, and it can be heat molded to fit the patient’s exact specifications.
Is wrist drop neurological?
A medical problem known as wrist drop occurs when the fingers and wrist are unable to extend at the metacarpophalangeal joints. Because of the forearm flexor muscles’ opposing activity, the wrist stays partly flexed. Consequently, the posterior compartment extensor muscles stay paralyzed.
What are the clinical features of wrist drops?
A medical problem known as wrist drop occurs when the fingers and wrist are unable to extend at the metacarpophalangeal joints. Because of the forearm flexor muscles’ opposing activity, the wrist stays partly flexed. Consequently, the posterior compartment extensor muscles stay paralyzed.
What nerve transfer is used for wrist drop?
Specifically, two sets of nerves are being transferred in this nerve transfer. In other words, the flexor digitorum superficialis (FDS) to extensor carpi radialis brevis (ECRB) and the flexor carpi radialis (FCR) to the posterior interosseous nerve (PIN)
How much time does wrist drop take to heal?
Physical therapy, over-the-counter pain medication, surgery, and wrist splints are possible treatments for radial nerve injury. It may take a few weeks or up to six months for an injury to recover.
Reference
Prajapati, N. (2023, August 30). Wrist Drop Cause, Symptoms, Diagnosis, Treatment, Exercise. Samarpan Physiotherapy Clinic. https://samarpanphysioclinic.com/wrist-drop-cause-treatment-exercise/

One Comment