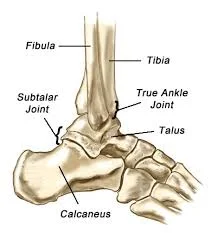
Blog

  • Abdominal Regions

    Abdominal Regions

    What is an Abdominal Region?

    The abdominal region is anatomically divided into nine distinct areas, each serving as a reference point for identifying the location of pain, symptoms, or medical conditions. These regions are arranged in a grid pattern and are crucial in clinical assessments, diagnostic procedures, and understanding the human body’s structure.

    Several crucial organs needed for digestion, excretion, and reproduction are located in the abdomen, making it an important part of the human body. In the medical sciences, knowledge of its anatomical structure and division into regions is essential for both diagnostic and therapeutic applications.

    For descriptive and clinical reasons, the abdominal regions are typically separated into nine quadrants or zones. During physical examinations, medical imaging, and procedures, these divisions aid healthcare practitioners in precisely localizing and communicating findings. The distinct organs and tissues associated with each region facilitate the diagnosis of a range of diseases and disorders affecting the abdomen.

    In anatomy and physiology, you will discover how to divide the abdomen into nine different regions and four different quadrants. If your goal is to work in healthcare as a nurse, you will use this on a daily basis when performing abdominal examinations (and when recording).

    The region between the thorax (thoracic diaphragm) and the pelvis (pelvic brim) in vertebrates, including humans, is known as the abdomen. The abdomen can be divided into nine divisions or zones for descriptive purposes.

    Anatomical regions of the Abdomen

    The abdomen is composed of multiple anatomical sections, each with a unique boundary and interior. The abdominal muscles support and shield the vital organs below, helping to stabilize the spine.

    The Four Abdominal Quadrants

    Let us first examine the four quadrants, which are produced by the junction of the median (or midsagittal) plane and the transverse (or horizontal) plane, sometimes referred to as the transumbilical plane.

    Since the left upper quadrant (LUQ), left lower quadrant (LLQ), right upper quadrant (RUQ), and right lower quadrant (RLQ) comprise the four quadrants, they are simple to recall.

    It is always understood in reference to the physical position, not from your point of view, what “left or right” and “upper or lower” mean. Keep in mind that most pupils confuse their left and right areas, so take care to avoid making the same mistake.

    Major Organs in the Four Quadrants

    The following are some of the primary organs that are located in each of the four abdominal quadrants:

    • Right upper quadrant: The right upper quadrant contains the right kidney, pancreas, liver, stomach, gallbladder, duodenum, and right adrenal gland.
    • Left upper quadrant: The pancreas, left kidney, spleen, liver, and left adrenal gland are all located in this area.
    • Right lower quadrant: The appendix, the reproductive organs, and the right ureter are located in this region.
    • left lower quadrant: The left lower quadrant contains the reproductive organs and the left ureter.

    NOTE: Each of the four quadrants contains portions of the small and large intestines.

    The Nine Abdominal Regions

    The intertubercular plane, also known as the inferior transverse plane, crosses the pelvic tubercles directly below the navel.

    As they have the same name (differentiated by a left or right prefix) and have subsequently named the bones that are nearest to them, let’s begin by talking about the right and left columns.

    Think about how memorizing common prefixes and suffixes will be very beneficial when studying anatomy, as you’ll need them again.

    Hypochondriac Regions on the Left and Right: The word “hypo” means below or under. The prefix “chondritic” describes cartilage, more especially rib cartilage. When we combine the ribs, this portion of the abdomen is below them.

    Left and Right Lumbar Regions: That is where this area’s name came from. Unlike the sections on the left and right side columns, these sections are named according to where they are in the stomach rather than the names of the bones. This therefore refers to the region above and above the belly.

    Among the nine regions are:

    • Right hypochondriac region
    • Epigastric region
    • Left hypochondriac region
    • Right lumbar region
    • Umbilical region
    • Left lumbar region
    • Right iliac (inguinal) region
    • Hypogastric (pubic) region
    • Left iliac (inguinal) region
    • Converging the pelvic tubercles, the inferior transverse plane, also known as the intertubercular plane, passes slightly below the navel.
    • After naming the bones that are closest to them later on, let’s begin by talking about the right and left columns, which share the same name but are distinguished by a left or right prefix. Remember, when studying anatomy, knowing the common prefixes and suffixes will come in very handy.
    • Hypochondriac Regions (Left and Right): The terms “Hippo” and “below” refer to the left and right hypochondriac regions. Underneath the ribs when we combine them is this region of the abdomen. There are hypochondriac areas on your left and right, yes.
    • Lumbar Regions (Left and Right): Lumbar refers to the vertebrae in your lower back that are closest to the lumbar region.
    • Left and Right Iliac Region: We have now completed the columns on the left and the right.
    • Epigastric Region:  The words “gastric” and “epi” denote the stomach or belly, respectively, and above or over.
    • Umbilical Region: The umbilicus, another name for your navel, is easily remembered because it is situated in the umbilical region.
    • Hypogastric Region: The definitions of hypo and gastric, as is already known, are “below” and “belly,” respectively.
    • If you are looking for a quick memory trick to help you remember the names of these sections, just remember that the side columns have the same titles from top to bottom: iliac, lumbar, and hypochondriac (HLI). The umbilical, hypogastric, and epigastric regions are those in the middle column (EUH). Remember this fashion statement: Hector loves Isabel unconditionally.

    Organs in the Nine Abdominal Regions

    Although most instructors of basic anatomy don’t require you to know every organ’s location based on memory, they do expect you to have a general understanding of where each organ is located.

    • Right Hypochondriac Region: Gallbladder, liver, right kidney, and sections of the small and large intestines
    • Epigastric Region: This area of the body, which also comprises a portion of the liver, contains the stomach, pancreas, duodenum, spleen, and adrenal glands.
    • Left Hypochondriac Region: The stomach, big or small intestines, liver tip, pancreas, and spleen are located in this area of the left hypochondriac.
    • Right Lumbar Region: The right kidney, part of the small intestine, and the ascending colon are located in this region.
    • Umbilical Region: small intestine, duodenum, and transverse colon.
    • Left Lumbar Region: left kidney, small intestine, and descending colon.
    • Right Iliac Region: appendix, cecum.
    • Right Iliac Region: The reproductive organs, small intestine, bladder, and a portion of the sigmoid colon are located in the hypogastric region.
    • Left Iliac Region: small intestine, descending colon.

    Differential Diagnosis

    Children

    • gastroenteritis
    • mesenteric adenitis
    • Meckel’s diverticulitis
    • intussusception
    • Henoch–Schönlein purpura
    • Lobar pneumonia

    Adults

    • regional enteritis
    • renal colic
    • perforated peptic ulcer
    • testicular torsion
    • rectus sheath hematoma
    • pelvic inflammatory disease
    • ectopic pregnancy
    • endometriosis
    • torsion/rupture of ovarian cyst
    • appendicitis

    Elderly

    • diverticulitis
    • intestinal obstruction
    • colonic carcinoma
    • mesenteric ischemia
    • leaking aortic aneurysm

    Clinical Significance

    Abdominal divisions are crucial to many facets of medical practice, including:

    • Methods for physical examinations: Physicians utilize the abdominal regions as reference points for auscultation, percussion, and palpation during physical examinations.
    • Diagnostic imaging and interpretation: Radiologists and clinicians usually refer to abdominal areas when discussing and interpreting results from imaging modalities such as computed tomography (CT), magnetic resonance imaging (MRI), and ultrasound.
    • Surgical techniques and considerations: Surgeons use the abdominal regions to plan incisions, expose specific organs, and perform procedures such as laparoscopy and laparotomy.
    • Differential diagnosis of abdominal diseases: The localization of physical findings and symptoms within specific abdominal regions facilitates differential diagnosis and narrows the range of probable diagnoses for abdominal disorders.
    • If the lower left quadrant is the site of peritonitis or abdominal pain, then possible diagnoses are pelvic inflammatory disease, diverticulitis, colitis, ureteral colic, or stomach pain from ovarian cysts. Cancers like colon and ovarian cancer can affect the left lower quadrant.
    • Intestinal malrotation may cause the LUQ to feel uncomfortable or sore. The RLQ, particularly the right iliac fossa and inguinal area, can become sensitive and painful in conditions such as appendicitis.
    • Its presence is important because it can signal acute hemorrhagic pancreatitis, abdominal injury, or even metastatic malignancy.

    Conclusion

    Healthcare personnel involved in the diagnosis and treatment of abdominal disorders need to have a thorough understanding of the abdominal areas. Clinicians can improve the quality of patient care, increase the accuracy of their diagnoses, and improve surgical results by being familiar with the anatomical divisions and clinical relevance of abdominal regions.

    FAQs

    What region is the Iliac in?

    The Regions of the Iliac Abdomen
    Of the nine abdominal areas, these are two. The inferior areas of the abdomen on the left and right are home to the iliac regions.

    What’s the point, McBurney?

    A McBurney point is a location that is one-third of the way laterally on a line that connects the right anterior superior iliac spine to the umbilicus. It is in line with the traditional position of the appendix’s base.

    What lies in the area of the hypogastrium?

    situated between the inguinal regions and directly beneath the umbilical region. bladder, rectum, small intestine, sigmoid colon, and the left and right ureters. Uterine tubes, left and right ovaries, and uterus in females. Males: prostate, seminal vesicles, and ductus deferens.

    Which abdominal organ is known as the policeman?

    This is because of the way omental tissue functions immunologically; it appears to “surveil” the abdomen for infections and, when they are discovered, wall off the areas of infection with tissue that is immunologically active.

    Which nine regions make up the abdominal region?

    The right and left hypochondriac regions, the epigastric region, the umbilical region, the right and left lateral areas of the abdomen, the hypogastric region, and the right and left inguinal regions are the nine regions that make up the abdomen according to these planes.

    Where may one find a hypochondriac?

    The two superolateral abdominal regions that are located on either side of the epigastric region are known as the hypochondriac regions.

    What area does the appendix reside in?

    The appendix is a tiny, finger-shaped tube that emerges from the large intestine’s first segment. An infection or inflammation of the appendix may result in lower right abdominal pain.

    Where in the body is the liver?

    The liver is situated above the stomach, right kidney, and intestines in the upper right section of the abdominal cavity, under the diaphragm.

    What lies within the area of the stomach?

    The epigastrium is the area of the belly where the Heimlich technique, or abdominal thrusts, can cause a powerful and quick evacuation of breath. It is possible to feel the structures beneath the epigastrium by palpating it. This covers the stomach and liver.

    Which are the main abdominal organs?

    Summary. The stomach, small intestine (jejunum and ileum), large intestine (colon), liver, spleen, gallbladder, pancreas, uterus, fallopian tubes, ovaries, kidneys, ureters, bladder, and numerous blood vessels (arteries and veins) are among the many essential organs located in the abdomen.

    Which body part is known as the abdomen?

    The body’s largest cavity is the belly or abdomen. It houses many of the body’s organs and is located between the chest and the pelvis.

    What is the total number of abdominal regions?

    Every vertical line intersects the midpoint of the symphysis pubis and the anterior superior iliac spine.

    What is the purpose of the abdominal region?

    Structure and Function
    In the end, the abdomen acts as a cavity to hold essential reproductive, circulatory, endocrine, exocrine, and digestive system organs.

    Which organs are located in the abdominal quadrants?

    The following are some of the principal organs located in each of the four abdominal quadrants: The pancreas, right kidney, stomach, gallbladder, duodenum, liver, and right adrenal gland are all located in the right upper quadrant.

    How many abdominal areas are there?

    Envision the abdominal cavity segmented into these nine areas.

    What is the abdomen’s anatomy?

    The Abdomen of Humans The Abdominal Anatomy. The area of the human body between the chest and the waist is called the abdomen. Numerous organs in the human body, including the liver, gallbladder, stomach, spleen, pancreas, kidneys, adrenal glands, and bowels, are housed in this cavity.

    References

    • Serasiya, A. (2022, October 14). Abdominal regions. Samarpan Physiotherapy Clinic. https://samarpanphysioclinic.com/abdominal-regions/
    • Physiotherapist, N. P. (2024b, March 9). Abdominal Regions – Mobile Physiotherapy Clinic. Mobile Physiotherapy Clinic. https://mobilephysiotherapyclinic.in/abdominal-regions/
  • Fibula Bone

    Fibula Bone

    Introduction

    The fibula is a long bone in the lower extremities that is part of the lateral side of the tibia. The fibula is significantly thinner than the tibia when compared. It starts at the knee joint and travels down the side of the leg to the ankle joint, which is situated right behind the tibial head.

    The fibula is much thinner and smaller than the tibia, and it is positioned directly below the tibial head. It moves down the side of the leg until it reaches the ankle joint. At the medial surface of the fibula, where it connects to the tibia through the interosseous membrane, a ridge represents the interosseous boundary.

    The two points on the interosseous membrane where they connect are known as the fibula and tibia. This boundary is the ridge seen on the medial side of the fibula. This connection has an extremely restricted range of motion for a syndesmotic joint.

    The long fibula bone is divided into three sections:

    1. the upper end,
    2. the lower end
    3. intervening shaft.

    Fibular neck formation occurs as the head narrows distally. The fibular shaft has three surfaces:

    • the lateral surface,
    • medial surface, and
    • posterior surfaces.

    It is located distal to the neck. It has a triangle shape at first, but as it moves away, it becomes more asymmetrical. The lateral malleolus, which joins the lateral talus to form the lateral ankle, supplies the distal end of the fibula. The medial and posterior malleoli are produced by the connection between the lateral and posterior tibia.

    Structure and Function

    The ankle joint is supplied by support and is mostly used to connect to the tibia. Several grooves on the distal end of the fibula are intended for ligament attachments, which support and give leverage as the ankle moves.

    The tibia and fibula can bear no weight. Its main function is to provide support to the ankle joint when the tibia is at work. Several grooves for ligament attachments on the distal end of the fibula provide support and leverage during ankle motions. The knee is stabilized are this ligament.

    Development

    The shaft and both ends form the upper fibula’s two centers. Around the eighth week of fetal life, the body swells osseously and moves toward the extremities. They have cartilaginous endings at birth.

    The upper and lower epiphyses, which unite at around the age of twenty-fifth, are what make up the body. The lower epiphysis ossifies first.

    Head

    One part of the upper limb is the head of the fibula, which has a unique quadrate structure. It is positioned above a flattened articular surface that is pointed upward, forward, and medially for articulation with the tibia’s lateral condyle.

    The prominence serves as an attachment point for the biceps femoris tendon in both its upper and lateral portions. It also provides the connection to the knee joint’s fibular collateral ligament, which separates the tendon into two sections.

    There are rough spots where muscles and ligaments follow the remaining borders of the skull. It has two tubercles: one behind the attachment site of the posterior ligament of the head and the top soleus fibers, and one in front that acts as the anterior and upper peroneus longus fibers.

    Body

    Three main components make up the fibula’s body:

    the anterior, posterior, medial, and lateral surfaces; the antero-lateral, antero-medial, postero-lateral, and postero-medial borders.

    The anterolateral boundary starts above the head, descends vertically to just below the center of the bone, then curves slightly laterally before bifurcating to enclose a triangular subcutaneous surface just above the lateral malleolus. The extensor muscles on the anterior leg surface and the peronaei longus and brevis on the lateral surface are divided by an intermuscular septum, which is attached to this boundary.

    The flexor muscles on the posterior surface and the peronaei on the lateral side are divided by an aponeurosis, to which it provides connection. It is directed considerably medial-ward below, rearward in the center of its length, and lateralward above.

    The posteromedial border, also known as the oblique line, begins at the medial side of the skull and ends at the bottom fourth of the bone, where it joins the interosseous crest. It is prominent and can be seen in the upper and central parts of the bone. It provides a connection to an aponeurosis that divides the flexor hallucis longus and soleus from the tibialis posterior.

    Joints

    The three joints involved in articulating the tibia and fibula are the superior, middle, and inferior tibiofibular joints.

    The particular tissue known as the interosseous membrane also called the middle tibiofibular ligament, facilitates the articulation of the tibia and fibula. It consists mainly up of aponeurotic lamina that connects to the oblique fibers. The tibial interosseous border is the fibular interosseous border at the ligament’s lateral and medial side attachment. Between the muscles in the front and back of the leg is a membrane.

    It is made up of a thin layer of the aponeurotic membrane that has been continuously moving. The fibula structure is the medial, lateral, and posterior surfaces. It begins as a triangle and gradually becomes more asymmetrical. The distal end of the fibula generates the lateral ankle component through the malleolus’s articulation with the lateral talus.

    Blood supply and Lymphatics

    The blood vessels that provide the blood supply to the lateral compartment of the lower leg’s back are the fibular and peroneal arteries. The tibia and fibula’s trunk contain it. Located in the posterior region of the lower leg arteries is the fibular artery’s largest branch.

    Blood needs passage through the fibular artery to reach the periosteum and the surrounding bones. The following minor branches make up its composition. Fibula transplantation for mandibular repair is improved by knowledge of the blood flow in the fibula.

    A branch of the fibular artery can pass through the bone if the foramen connected to the posterior side of the fibula is in good shape.

    The common fibular nerve’s genicular branch supplies the knee, though the deep fibular nerve supplies the ankle. The proximal and distal ends of the fibula are innervated by these types of nerves. The nervous system of the fibular periosteum is supplied by superficial and deep fibular nerves, in a manner akin to the nervous system of the muscles located nearby.

    Nerve supply

    The superficial fibular (peroneal) nerve provides sensation to the anterolateral leg and supplies the muscles of the lateral compartment of the leg. However, the deep fibular (peroneal) nerve is the main nerve supply to the dorsum of the foot and the muscles of the anterior compartment of the leg.

    It proceeds in the opposite direction, through the medial border of the biceps femoris and then through the lateral head of the gastrocnemius. The lower limb’s lateral compartment borders comprise the fibula’s lateral surface, deep fascia, and intermuscular septum. This compartment contains the superficial fibular nerve and controls plantar flexion and eversion. The fibula’s rear surface, deep fascia, and interosseous membrane constitute the lower limb’s posterior compartment and border compartment and are used by the tibial nerve, which regulates digit and plantar flexion. The medial surface of the fibula forms a partial border with the lower limb’s anterior compartment.

    The calcaneus bone’s lateral and posterior parts, the soleus muscle, and the foot’s deep tissues are all points of entry for blood.

    Muscle

    The fibular shaft gets its distinctive form from fibula attachment locations with many main muscles.

    The attaches to the medial fibula are the origin of the Extensor digitorum longus (EDL) and Extensor hallucis longus (EHL) muscles.

    The extensor digitorum longus ends are known as the superior medial border.
    The muscle called the Fibularis Tertius will enable it to connect to the smallest areas of the front surface.

    The lower two-thirds of the posterior surface is referred to as the (FHL) flexor hallucis longus.

    The part of the posterior surface where the tibialis posterior gets its origin is situated between the medial crest and the interosseus boundary.

    The deep transverse facial septum is given thought at the posterior border.

    Surgical Importance

    The best option for mandibular repair is a fibula bone transplant. The tibia is primarily responsible for supporting weight; therefore, moving the fibula out of its natural alignment will not significantly affect it.

    Clinical Importance

    Congenitally

    Fibular shaft length is an effective measure for determining newborn bone age, and recent studies strongly support its usage. This could be a more accurate alternative to conventional ways of assessing newborn bone age, such as counting ossification centers or watching hand, wrist, or knee radiographs.

    The most common pattern in the lower bones is the fibular hypoplasia-aplasia, also known as fibular bone hemimelia. This causes the fibula to be absent in part or completely. This is commonly identified at birth when a limb-length difference and a lack of digits are discovered.

    Neurologically

    The fibula’s proximal end has a slightly enlarged prominence with a facet articulating with the tibia’s lateral condyle. The common peroneal nerve’s contents are known by an individual name. It may become stuck when it passes near the fibular head, experiences trauma, or is directly injured. The neuropathy that affects the lower limbs most frequently is called the most common fibular nerve-entrapment neuropathy. Although lateral limb sensory deficits and foot drop are potential indicators, misdiagnosis due to the condition’s high incidence may postpone treatment.

    Fractures

    When the biceps femoris muscle contracts suddenly, the fibula may suffer an avulsion fracture. The biceps femoris tendon is where the fibula is connected, which means that it may become very tight.

    The point of origin on the lateral malleolus is known as the distal fibula. When the ankle is forcefully twisted externally, the lateral side’s distal fibula might also break. Direct trauma, foot eversion, or outward twisting all result in a distinct sort of damage. Transverse fibula fractures and eversion injuries are the most common injuries. Use a clinical decision-making tool such as the Ottawa Ankle Rules if you suspect lateral malleolar injury.

    Compartment syndrome is usually caused by fibular fractures. The risk of compartment syndrome increases in cases where there is both a tibial plain fracture and a fibular fracture.

    History

    Etymology

    The smaller bone in the lower leg was referred to as the “fibula” in English for the first time in around 1706; it was first used to refer to a clasp or brooch (see fibula). It comes from the Latin word fībula, which also indicates a brooch and clasp. The reason the bone got its name was that it looked like a modern defense pin clasp.

    FAQs

    Can you walk with a broken fibula?

    Since the fibula does not support weight, your doctor may decide to let you walk while your injury heals if you have an isolated fibula fracture. This is comparable, in certain circumstances, to having a major ankle sprain.

    Is a broken fibula serious?

    A fracture of the tibia and fibula is a dangerous injury that has to be treated very quickly. With timely medical intervention, a fractured tibia-fibula can be entirely healed.

    Can you replace a fibula?

    A fibula-free flap is frequently utilized in reconstructive surgery to replace lost soft tissue and bone. This treatment is frequently employed in mandibular or maxillofacial repair after trauma, cancer excision, or congenital malformations.

    How do I fix a broken fibula?

    Crutches, a walking boot, or a brace may be suggested in the majority of fibular fracture situations to immobilize your lower leg. Whether your injury was repaired surgically or you can heal quickly and fully at home, physical therapy, stretching, and consistent exercises to strengthen the affected area are advised.

    Can a fibula heal without surgery?

    The surgical reconstruction of the fibula has been demonstrated to be accelerated by returning normal ankle function as soon as feasible.

    How can I make my fibula heal faster?

    Fibula bone regeneration is accelerated when the injured ankle is allowed to walk normally as soon as possible.

    What is the best medicine for broken bones?

    Anabolic drugs facilitate the growth of new bone and speed up the healing process for nonunion and acute fractures. A synthetic type of parathyroid hormone called teriparatide is one of these medications. It may speed up the healing process by increasing blood calcium levels and stimulating the formation of new bone tissue.

    Can we eat curd in a fracture?

    Because it is the primary component of bone, calcium can be found in milk, among other items, yogurt, sea vegetables, and green leafy vegetables. To restore muscles, you need protein. Consumption of meals rich in clean, lean protein, such as the seafood taken in the wild and grass-fed cattle, will thus help hasten the body’s recuperation.

    Can you walk without a fibula?

    The fibular bone connects the knee and ankle joints on the outside of the leg. It’s a tiny, delicate bone that can be mostly removed without impairing your capacity to walk or carry weight.

    References

    • Gupton, M., Munjal, A., & Kang, M. (2023b, May 23). Anatomy, Bony Pelvis, and Lower Limb: Fibula. StatPearls – NCBI Bookshelf. https://www.ncbi.nlm.nih.gov/books/NBK470591/
  • Heel Slide Exercise: Muscle worked, Benefits, How to do?

    Heel Slide Exercise: Muscle worked, Benefits, How to do?

    The Heel Slide exercise is a fundamental movement often used in physical therapy to improve knee flexibility and strength. It’s particularly beneficial for individuals recovering from knee surgery, injury, or those experiencing stiffness due to arthritis.

    This exercise involves sliding the heel along a flat surface, such as a bed or floor, towards the buttocks while keeping the leg in a relaxed position. It’s an effective way to increase the range of motion, enhance joint mobility, and promote muscle activation in the quadriceps and hamstrings without placing excessive strain on the knee joint.

    What is the Heel slide Exercise?

    • Another name for this exercise is heel drag.
    • An exercise that works your muscles from your hips to your heels is called a Heel slide.
    • The goal of this exercise is to increase the hip and knee joints’ range of motion.
    • Lower body circulation will be improved by this activity.
    • Your leg is worked from the buttocks to the heel during this exercise.
    • In this position, you should extend your knee as far as you can and slip your heel back up to your buttocks.
    • This exercise also lessens back and hip pain.
    • To perform heel slides, simply extend your leg away from your body, bend your knee, and slide your heel toward your buttocks.
    • These are easy leg exercises.
    • Heel slides are intended to extend your knee’s range of motion.
    • Support the knee and leg muscles.

    What muscles are involved in a Heel slide?

    The advantages:

    • Heel slides are usually used to speed up recovery the body following surgery or an injury. They are an easy method to maintain physical activity, particularly in cases where mobility is limited.
    • Heel slides help mobility, flexion, and flexibility by extending the range of motion in your knee.
    • They also strengthen your hip, leg, and muscles, ligaments, and tendons.
    • Additionally, using heel slides to keep your leg moving helps to improve circulation and relax pain, both of which improve your general well-being.

    What kinds of Heel slide exercises are there?

    Here’s an explanation of the five different ways to perform heel-sliding exercises.

    Lying heel slides

    • You will be performing this exercise while lying supine on a bed or plinth, with your leg straight in the starting position.
    • Next, you must bend your knees to bring your heels closer to your buttocks.
    • Hold this position for a few seconds.
    • Finally, to fully stretch the knee, softly straighten it and slide your heels.
    • Then return to your neutral position.
    • Then relax.
    Heel slide exercise
    Heel slide exercise

    Wall heel slides

    As you slide your heel along the wall during this exercise, you can also loop your unaffected foot below your opposite foot for more support.

    • Place your hips so they are only a few inches from the wall while you rest on your back.
    • When you flex your unaffected leg, the sole of your foot should be up against the wall.
    • Press the heel against the wall while expanding the affected leg.
    • Try to flex your knee as far downward as you can while bending it slowly.
    • Keep your posture for a few seconds.
    • Next, place your unaffected foot below your opposite foot to help raise your foot back to its starting position.
    • Then return to your neutral position.
    • Then relax.
    Wall heel slides
    Wall heel slides

    Chair heel slides

    Use an armchair if at all possible. During the entire exercise, constantly press your thighs against the chair.

    • Begin by taking a comfortable seat in the chair on the ground with your legs extended.
    • Back your heel as close to the chair as you can.
    • Hold this position for a few seconds.
    • Return to the beginning position with your foot slid.
    • Then relax.
    Chair heel slides
    Chair heel slides

    Seated heel slides

    • Seated on the table or bed, extend your legs in front of you.
    • Sliding your affected heel along the floor toward your buttocks, have your foot flexed.
    • Hold this position for a few seconds.
    • Return to the beginning position by sliding your heel.
    • Then relax.
    Seated heel slides
    Seated heel slides

    There are some heel-sliding tips available:

    • Increasing the amount of pressure to finish the exercise can make things worse, particularly in older people. 
    • Warming up is a must before beginning any training program.
    • If you are unable to move your heel freely, use a heated pad.
    • Utilize a napkin to make easier the movements.
    • Move slowly and properly with each movement.
    • If you start to feel pain during your exercise, stop.
    • When exercising, try to wear clothing that doesn’t significantly limit your range of motion. As an alternative, dress loosely.

    When did you not perform this exercise?

    • If your doctor suggests that you relax.
    • If your doctor recommends that you not move your leg because of a shattered bone.
    • When performing this exercise, avoid lifting your foot off the bed if you have a total hip replacement and must keep to the 90-degree guideline.

    Summary:

    Heel slides can be performed independently or as part of a more extensive exercise program. Make it a priority to improve your mobility and range of motion while simultaneously strengthening your strength and stability. Try out different variants and see which ones help you the most, including with pain relief.

    Consult a fitness or medical expert for advice if you’re unclear about the exercises that would be most beneficial for you. In particular, if you’re recovering from surgery or an injury, pay attention to your body and refrain from pushing yourself too quickly or forcefully. To stay with your outcomes as you heal and advance, keep up your regular practice of these exercises.

    FAQ:

    Why are heel slides beneficial?

    You can increase the range of motion in your knee by using heel slides. The tissues surrounding the knee and leg muscles are also strengthened and stretched by them. This reduces the possibility of further injury and speeds up the healing process.

    Which muscles are worked out by heel slides?

    Exercises involving heel slides work the calf, hamstring, and gluteus maximus muscles.

    What is the recommended duration for heel slides?

    For optimal effects, heel slides should be performed every day. You might need to perform these exercises several times a day, depending on how severe your problem is. The optimal frequency for your particular needs can be found with the help of your physician or a physiotherapist.

    Can beginners benefit from practicing heel slides?

    Since heel slides are low impact and can help build lower body strength, they’re a wonderful workout for beginners.

    What are the advantages of heel slides?

    Ankle stability and mobility can be improved by performing heel slides. They may help by improving the range of motion, strengthening the muscles surrounding the ankle joint, and lowering the possibility of ankle injury. Furthermore, heel slides help enhance balance and coordination, which is advantageous for running and jumping.

    How many heel slides a day ought I to perform?

    How many heel slides you should do a day will vary depending on your fitness level, flexibility goals, and any special recommendations from a medical or fitness specialist. Generally speaking, as your flexibility and comfort level increase, you can begin with fewer repetitions and gradually increase them. Working each leg for 2-4 sets of 10-15 repetitions is the standard recommendation. In light of this, you would execute 10-15 slides with your right leg and then 10-15 slides with your left leg, repeating the process for two to four sets.

    Do heel slides help in the healing of an ACL?

    Your quadriceps and hamstrings will get stronger with these exercises, which will improve the stability and general functionality of your knee. Exercises like heel slides, quad sets, and straight leg raises can help you regain your strength and balance within weeks of surgery.

    How does a heel exerciser get used in physical therapy?

    This heel exerciser is used for rehabilitation and strengthening of the ankle and heel.
    This heel exerciser helps avoid foot injuries, improves flexibility, balance, and general stretch, and strengthens the muscles in your calves.
    It is frequently utilized in the physical therapy and rehabilitation of the ankle and heel.

    References:

    • P. Tirgar (2023j, Dec. 13). Exercise using a heel slide: muscles exercised, health benefits, how to perform? Clinic for Mobile Physiotherapy. Heel-slide exercise: https://mobilephysiotherapyclinic.in/
    • R. N. M. Crna (2019, March 19). Eight Meniscus Tear Exercises. Exercises to Meniscus Tears: https://www.healthline.com/health/sports-injuries/8-exercises
    • Physical Therapy Activities. (n.d.-b). [Video]. The heel slides exercise can be performed in the following manner: https://www.physitrack.com/exercise-library/128
    • Image 2, Cornell Video – Heel Slides on Wall (n.d.). Cornell Films. Foot slides on the wall: https://www.cornell.edu/video
    • Image 3, C. M. Team, May 13, 2024.A Comprehensive Visual Guide to 21 Chair Exercises for Seniors. The Mobility of California. Seniors Can Engage in 21 Chair Activities with Visual Aids at https://californiamobility.com/
    • Image 4, 2024, April 17; Strover, S. Heel Slides: mACI. https://www.kneeguru.co.uk/KNEEnotes/primers/a-z-rehabilitation-exercises
  • Windshield Wipers Exercise

    Windshield Wipers Exercise

    What is the Windshield Wipers Exercise?

    Utilizing the windshield wipers for exercise is an excellent method to improve your core and work your abdominal and lower back muscles. Its action mimics an automobile’s windshield wiper motion and gives it its name. Along with other muscle groups, the rectus abdominis, transverse abdominis, and obliques are worked during this exercise.

    A windshield wiper workout might help you burn calories and strengthen your core. Individuals who have stronger cores are less likely to suffer from lower back discomfort.

    What is the Windshield Wipers Exercise?

    This is how you do it:

    • Stretch your legs out in one direction, coming to a stop just short of the floor, and then out the other way.
    • As you get more skilled at the position, reduce the amount of support by drawing your arms in closer to your body.
    • Try three sets of ten repetitions, five on each side.

    The windshield wiper workout might be advantageous for all levels of fitness. Beginners, those with weak cores, lower back issues, or anyone with limited mobility should modify or avoid this exercise since it can increase back pain or potentially cause injury if done incorrectly.

    Which Muscles Are Involved in Windshield Wipers Exercise?

    You may engage every muscle part in your body when using the wipers on your automobile. The following muscles are used:

    Rectus Abdominis: Lower and upper abdomen exercises are similar to those done with windshield wipers. Additionally, it strengthens the primary muscle, the rectus abdominis.

    Obliques: When you correctly perform the windshield wiper exercise, your side and oblique abdominal muscles are engaged.

    Who Should Use the Windshield Wipers Exercise?

    Wiping windshields is an extremely strenuous activity best suited for more experienced athletes. Before choosing to attempt them, it is best to build a strong foundation of strength and coordination with easier, less complex core exercises.

    They are an excellent option for anyone who is between an intermediate and expert level of fitness and wants to add some diversity to their workouts.

    This is so that they may increase their level of fitness by using windshield wipers, which is a demanding and enjoyable activity.

    This is particularly true since there are several kinds of windshield wipers, thus advancements may be achieved even when exercising.

    These workouts directly relate to the activities themselves as well as the power, coordination, and control you get over your body.

    This suggests that practicing windshield wipers will improve your performance in these other areas in addition to helping you get incredible abs.

    How to Perform the Windshield Wiper Exercise?

    The windshield wiper exercise can be performed in two main ways: lying down or hanging with your arms.

    While the former is the traditional option, the latter is a more complex one for those seeking a greater challenge.

    Windshield wiper lying:

    For balance, keep your hands level on the ground and your arms extended straight out to either side.

    As you gently and carefully slide them toward one of your hands, maintain excellent posture with your legs.

    Twist across your body and raise the opposing hip slightly off the ground to get your foot as near to your hand as possible.

    Gradually bring your feet back to the starting position while maintaining an elevated posture in the middle.

    Make one smooth movement in the direction of the other side rather than stopping.

    For optimal outcomes, try to perform three to five sets of 10 repetitions, with one rep being this.

    Windshield wiper lying:
    Windshield wiper lying:

    Modifications:

    There are two further adjustments to this practice that people commonly make.

    For the first repetition, you raise your legs such that your feet’s soles point upward and toward the ceiling. Then, without tugging them in the middle, you just move them side by side.

    This makes the obliques very challenging while significantly lessening the amount of work required for the other abs.

    In the other version, the players finish a bench press by holding a barbell, either weighted or unweighted, in the same location. Then, you may perform any of the aforementioned variations of the workout by bringing your feet to the end of the barbell.

    This decision causes a slight reduction in range of motion during the exercise, but it also means that a much stronger contraction of the core is required to keep you stable while raising the weight.

    Windshield wiper hanging:

    Take hold of a pull-up bar or any other sturdy overhead object and let your arms dangle there. To maintain a straight posture as you raise your feet toward the sky, bend at the hips and tighten your lats and core.

    Your legs should remain straight as you elevate them to the maximum height possible. Your back naturally slopes in this direction, eventually reaching a 45-degree angle.

    To complete your first full rep, squeeze your abs to go back to the beginning position and then down to the opposing side.

    Just like with the laying variant, try to finish three to five sets of 10 repetitions.

    Windshield wiper hanging
    Windshield wiper hanging

    Different Types of Windshield Wipers

    These are some adjustments to windshield wipers that will let you do challenging but effective exercises.

    Dead bug:

    For beginners, the dead bug workout is an excellent option because it has the lowest risk of damage. This exercise’s primary effectiveness stems from its ability to support the back against the ground. Here’s how you go about it:

    • Raising your feet off the ground will cause your legs to bend 90 degrees.
    • Pressing in your abdominals might help you avoid arching your back.
    • Exhale, then carefully and slowly bring your arm and leg back to their initial positions.
    • You get one rep for that.
    Dead bug
    Dead bug

    Cable Wood Chop:

    The majority of the upper-body muscular groups, as well as the glutes, grow more quickly when performing the cable wood chop workout. It emphasizes the core stabilizers and anti-rotational muscles. This is how you approach it:

    • Bend left toward the cable machine while maintaining a firm grasp on the handle with both hands.
    • Manage your return to the starting position instead of letting the wire drag you to partially prevent the spin.
    • After finishing each repetition on one side, move to the other and carry out the identical exercise there.
    Cable Wood Chop
    Cable Wood Chop

    Side Plank Rotation:

    Sideway plank rotations are an excellent method for strengthening your complete core. Adding workouts that require balance and strength is a great way to intensify your training. This is a great core exercise that may also help you develop those annoying stabilizer muscles you never knew you possessed.

    To do it:

    • Lean back with your right elbow supporting you, starting on your right side. Keep your elbow straight beneath your shoulder. Place your feet atop one another while keeping your legs straight.
    • Your torso should stay vertical from your ankles to your shoulders, with your hips raised off the floor.
    • Step back to where you were after that, strengthening your core.
    • Move to the other side and repeat the same number of times after finishing all the repetitions on the first side.
    Side Plank Rotation
    Side Plank Rotation

    Bicycle Crunch:

    Think of it as a gift, and don’t miss out on this incredible core-focused ab exercise. It’s one of the best ones available. Despite its seeming simplicity, the key to this one is to proceed cautiously and gradually; there’s no need to constantly beat your record.

    To do it:

    • Put your hands behind your head while keeping your feet flat on the ground.
    • You can support your spine by maintaining a tight core and abdominal muscles.
    • Your body should swivel so your elbow hits the knee on the other side as it rises.
    • Now extend that leg to the opposite side until your elbow rests in your armpit, meeting your knee.
    • Complete three sets of 12–20 repetitions.
    bicycle crunches exercise
    bicycle crunches exercise

    The typical error that individuals make when washing their windshields

    When doing the windshield wiper, it’s easy to rely on momentum rather than core strength to regulate your leg movement. Many of my clients complain of hip or back pain because their abdomens aren’t providing adequate support or they utilize their hips excessively.

    This suggests that you shouldn’t utilize other muscle groups to get through the workout, even when it’s challenging and calls for you to use your legs. This might increase the stress level and decrease the value of the transfer. Follow these recommendations to avoid this:

    • If you see that you depend too much on momentum, slow down.
    • If you feel any lower back pain, stop and try a reduced version of the workout. It’s important to avoid strains and injuries if you want to be able to do the action appropriately in the future.
    • You’re probably not engaging your core if the majority of the action focuses on your hips or legs. After you’ve reset, give it another go, being very careful to bring the naval in toward the spine.

    You might improve your performance with your windshield wipers by doing the following four exercises:

    Making use of the windshield wiper is a difficult chore since it requires a complicated operation. If you are finding the relocation challenging, don’t worry. These extra exercises, which emphasize the many muscle groups that make up the core, can assist you in building the strength necessary to utilize windscreen wipers properly.

    Russian twist:

    Russian twists target the oblique muscles. Sit on the floor with your hands crossed over your chest and your knees bowed Once your feet are flat, tilt your upper body back a little.

    Russian twist
    Russian twist

    Side plank dips:

    Maintaining a sideways position, make sure your forearms and feet are firmly placed. When you lie on your side, make sure your forearm and foot are securely placed.

    Side plank dips
    Side plank dips

    Toe taps:

    While resting on your back, bring your feet up to a level position with the floor. As you plant your right foot and tap your toe on the mat, maintain a taut core. Continue to vary things.

    toe-taps
    toe-taps

    Windshield Wiper Progress

    Windshield Wiper Progressions

    As windshield wipers are currently rather robust, there’s no need to develop the technique further. But, you may try these more challenging variants if you’ve mastered the form and want a little more challenge.

    • Elevate your arms above your body. Your core will be under even greater stress as a result, and it will receive less stability and support.
    • For the windscreen, use hanging wipers.

    How to Exercise Safely to Prevent Injuries

    Exercise is a great way to keep your health in check, but if you have any pre-existing medical concerns, you should see your doctor before starting any fitness plan.

    When performing any exercise, pay close attention to your form and stop immediately if something seems off or hurts.

    Recall the importance of properly warming up, taking rest periods in between workouts, and eating a balanced diet. All of these factors will eventually help to guarantee continued growth and a rise in physical strength. After all the work you put into your program, the advantages ought to be obvious; if only we could get them without going above and beyond in terms of effort.

    Benefits of a Windshield Wipers Exercise

    Using the wipers on your windscreen instead of your car’s wipers is more efficient. It offers several benefits for bettering your posture, muscles, body, and emotional condition.

    • Build Muscle: Your back, legs, and core muscles are toned with resistance exercise. Wiping the windshield is one of these regular tasks. Stretching the muscles before a slow-motion workout helps to build muscle strength.
    • Improved Quality of Sleep: This exercise increases the amount of time and quality of your sleep by releasing feel-good hormones that improve your mood and general well-being.
    • Aids in Weight Loss: A high-intensity activity that aids in weight loss and calorie burning is the windscreen wiper exercise.
    • Lessons from back pain: By strengthening core muscles, exercising with windscreen wipers helps prevent and relieve backaches. You may thus include it in your back exercise routine as well.
    • Absent Equipment: Exercise with windshield wipers is simple, portable, and doesn’t require any additional tools.
    • Enhances coordination and balance: Improving balance and coordination through exercise is essential for daily living. It may seem strange to include this exercise in your fitness routine, but it’s very simple: as you rotate back and forth, you’re using distinct muscles on both sides of your body.

    Conclusion

    The workout with the windshield wipers is a great addition to any routine because it’s convenient and doesn’t require any extra equipment. It also has various physical benefits. All you have to do is keep your hands at your sides and slump back into the floor. Next, make a different motion by swaying your legs side to side. It will improve physical health, burn calories, maintain energy levels, strengthen the core, and promote blood circulation.

    This workout incorporates choices such as a dead bug or a wire wood chop to inspire challenging routines. So the next time you’re stuck in traffic, make the most of your day by using that opportunity to squeeze in a quick workout.

    FAQs

    What is the benefit of a windshield wiper?

    Windscreen wipers, while being a little part of your car, have a big impact on overall safety and driving safety. They quickly and easily get rid of waste like pollen, dirt, rain, snow, and frost with only a push of a button! The wiper arms are moved across the windshield by the windscreen wiper motor.

    What are the benefits of half-wipe exercise?

    To stabilize your body and prevent your legs from dropping to the floor during the half-wiped exercise, your obliques, or the muscles along the sides of your trunk, must tighten forcefully. Like most of the best ab exercises, the key to this one is to move slowly and methodically.

    How would one extend their knee to their chest?

    Lie flat on your back with your knees bent and your feet flat on the floor to begin. Take one knee and lift it up to your chest by wrapping your hands around it. Hold that knee to your chest and keep your lower back pushed against the floor for 15 to 30 seconds.

    How do windscreen wipers work?

    Windscreen wipers are powered by an electric motor. Through a worm gear that transmits the necessary force to an extended rod, the electric motor activates the wiper arms. The necessary force to propel the wipers at the necessary speed can be supplied by the worm gear.

    What is the purpose of the windscreen?

    Car windscreens, as its name suggests, work as a “shield” to cover the interior of the car and its occupants from a variety of outside elements, including wind, rain, stones, dust, and insects.

    Reference:

    • Vaghela, M. (2023, December 16). Windshield Wipers Exercise That Strengthens Your Core. Mobile Physiotherapy Clinic. https://mobilephysiotherapyclinic.in/windshield-wipers-exercise/
    • Beery, E. (2022, December 12). Windshield Wipers Exercise. Hybrid Athlete. https://thehybridathlete.com/windshield-wipers-exercise/
    • Osnato, J., & Walster/iStock/GettyImages, S. (2021, April 24). How to Do the Windshield Wiper Exercise for Abs. Livestrong.com. https://www.livestrong.com/article/13764019-windshield-wipers-exercise/
  • Radiation Therapy

    Radiation Therapy

    Introduction

    Radiation therapy (Radiotherapy) is a medical treatment that uses high doses of radiation to destroy cancer cells. It is one of the most common treatments for cancer and can be used alone or in combination with other treatments like surgery and chemotherapy.

    This technique proposes to help eliminate or prevent the growth of malignant cells. Usually, a linear particle accelerator delivers it. If cancer has only progressed to one portion of the body and is confined there, radiation treatment may be curative for several cancer types.

    To stop a tumor from growing back following surgery to remove a primary malignant tumor, it can also be used as adjuvant therapy (for example, early stages of breast cancer). Because radiation therapy complements chemotherapy, it has been utilized before, during, and following the drug in cases of cancer that are particularly susceptible to it.

    Because radiation therapy can limit cell reproduction, it is commonly employed to treat malignant tumors.

    Ionizing radiation damages cancerous tissue’s DNA, which results in cell death. Shaped radiation beams are focused from many angles of exposure to intersect at the tumor, producing a significantly bigger absorbed dosage there than in the surrounding healthy tissue, thus safeguarding healthy tissue (like skin) or organs that radiation treatment must enlarge to treat the tumor. In addition to the actual tumor, the radiation fields may also encompass the lymph nodes that drain from it if the cancer is clinically or radiologically associated with them, or also there is a suspected risk to get subclinical malignant spreading. These issues are frequently linked to both internal movement (breathing, for example, and bladder filling) and outward skin mark movement surrounding the tumor location.

    Unlike radiology, which uses radiation for medical imaging and diagnosis, radiation oncology is a medical profession that deals with prescription drugs. Regarding treating cancer, a radiation oncologist regularly recommends radiation therapy in addition to chemotherapy. Palliative care (when a cure is not possible and the objective is for local illness management or symptomatic relief) or treatment (where the therapy has survival advantages and can be curative). With the plus point of immunotherapy, hormone therapy, chemotherapy, surgery, or a mix of the four, radiation treatment is frequently employed. Radiation therapy is an effective therapeutic option for the vast majority of common cancer types.

    The particular motive of treatment – curative, adjuvant, neoadjuvant therapeutic, or palliative – depends on the dependency of the general health of the patient and the type, location, and stage of the tumor. For the body ready for a bone marrow transplant, whole body irradiation, or TBI, is one kind of radiation treatment. The other difference of radiation therapy that reduces exposure to healthy tissue during operations to treat malignancies of the breast, prostate, and other organs is called brachytherapy, There is a radioactive source inside or close to the area that requires consideration.

    Radiation therapy can be used to treat a variety of non-cancerous disorders, including pterygium, pigmented villonodular synovitis, auditory neuromas, trigeminal neuralgia, severe thyroid eye disease, and to prevent keloid scar formation, vascular restenosis, and heterotopic ossification. Advances in radiotherapy for the management of non-malignant diseases have been unapproachable by concerns about radiation-induced cancer.

    Cancer that has spread throughout the body cannot be cured by radiation treatment given that most of them don’t reach every part of the body.

    What are the goals of radiation therapy?

    Radiation is frequently the therapy of choice for the following reasons, however, it’s vital to keep in mind that every cancer and every individual is unique.

    To cure or shrink early-stage cancer

    Certain tumors are extremely radiation-sensitive. In some situations, radiation therapy alone may be utilized to reduce or eradicate the malignancy. In other cases as well, chemotherapy or other anticancer drugs may be used initially. For some malignancies, radiation treatment can be used either before surgery to reduce the tumor (pre-operative therapy, also known as neoadjuvant therapy) or following surgery to help prevent the cancer from returning (adjuvant therapy).

    Radiation therapy may be the recommended course of action for certain tumors that are curable only with radiation therapy or with surgery. This is because radiation therapy may result in less harm and a higher chance of the affected body part functioning normally following treatment.

    For some cancer forms, a combination of chemotherapy, radiation therapy, or other anti-cancer drugs may be employed. A class of medications known as radiosensitizers increases the sensitivity of cancer cells to radiation. Studies have demonstrated that in certain cancer cases, the combination of radiation therapy and anti-cancer medications can enhance the effectiveness of each treatment when administered alone. However, one disadvantage is that when taken in combination, side effects are frequently greater.

    To prevent cancer from returning (recurring) in another area

    From its original site, cancer can spread to different bodily areas. Medical professionals often assume that a small number of cancer cells may have already spread, even in cases where cancer cells are not apparent on imaging tests such as CT or MRI scans. Now and again radiation treatment is utilized to obliterate malignant growth cells before they form into cancers in the locale where the sickness spreads most rapidly.

    For example, because some types of lung cancer frequently spread to the brain, patients with these diseases may get radiation therapy to the head even in cases when no cancer is known to exist. By carrying out this, cancer is prevented from ever spreading to the skull. Radiation therapy for cancer treatment and cancer prevention can sometimes be administered concurrently, particularly if the tumor’s potential site of metastasis is nearby.\\

    Handle the advanced cancer’s symptoms and indicators.

    There are instances when cancer has spread too far to treat. To improve the patient’s condition, some of these tumors can still be treated to reduce in size. Radiation therapy may be able to treat symptoms such as pain, dysphagia, dyspnea, and intestinal obstructions that may be brought on by advanced cancer. We refer to this as palliative radiotherapy.

    For the treatment of cancer that has been resurfaced

    Radiation therapy may be used to treat an individual’s cancer if it has returned, or recurred, or to alleviate the symptoms brought on by advanced cancer. The use of radiation following a recurrence is dependent upon several circumstances. For example, administering more radiation therapy in the same location may not be feasible if the cancer has returned to a portion of the body that has already received radiation treatment.

    The amount of radiation that was previously utilized determines this. In other situations, radiation treatment could be given to the same area of the body or a separate one. For some cancers, radiation therapy may not be necessary even if they reoccur because of their poor response to it.

    Technique

    Mechanism of action

    Radiotherapy disrupts cancer cells’ mitosis by destroying their DNA. A charged particle or a photon is the source of energy that causes DNA damage. The atoms that make up the DNA strand ionize directly or indirectly due to this damage. The dissociation of water produces independent free radicals, particularly hydroxyl radicals. These radicals produce indirect ionization, which damages DNA.

    Free radicals are mainly responsible for radiation effects in photon therapy. Cells can repair both DNA impairments. On the other hand, double-stranded DNA breaks are far more difficult to repair and can result in significant genetic losses and chromosomal abnormalities. The likelihood that cells will die rises when double-strand breaks are targeted. Generally speaking, cancer cells are more stem cell-like and less differentiated than most healthy differentiated cells. They also multiply more often and are less able to repair damage that is not fatal. Cell division continues to perpetuate single-stranded DNA damage, which eventually leads to the accumulation of damaged DNA in cancer cells and their slower death or proliferation.

    The lack of oxygen that photon radiotherapy causes in solid tumor cells is one of its biggest disadvantages. When solid tumors grow larger than their blood supply, hypoxia, a condition of low oxygen, occurs. Because oxygen produces free radicals that damage DNA, it is a powerful radiosensitizer that can increase the effectiveness of certain radiation exposures. Tumor cells in a hypoxic environment can be as much as three times greater resistant to radiation damage than those in an oxygen-rich environment.

    The use of high-pressure oxygen tanks, hyperthermia therapy (heat therapy that dilates blood vessels to the tumor site), blood substitutes that carry increased oxygen, hypoxic cell radiosensitizer medications like metronidazole and misonidazole, and hypoxic cytotoxins (tissue poisons) like tirapazamine are just a few of the strategies that have been extensively researched to overcome hypoxia. Preclinical and clinical studies on the usage of an oxygen diffusion-enhancing substance such as trans sodium crocetin as a radiosensitizer are among the more recent research methodologies being examined.

    Protons, boron, carbon, and neon ions are examples of charged particles that can directly damage the DNA of cancer cells through a high LET (linear energy transfer). The onwards particles also have an antitumor effect which is independent of tumor oxygenation, because they work specifically by direct energy transfer, which usually results in double-stranded DNA breaks.

    Protons and other charged particles have low lateral side dispersion in the tissue because of their relatively high mass; as a result, the beam does not expand much, has minimal effect on the local tissue, and is centralized as the form of the tumor. They also use the Bragg peak effect to target the tumor more precisely. For an excellent illustration of the differences between charged particle treatment and intensity-modulated radiation therapy (IMRT), see proton therapy.

    This process establishes a restricted range for tissue impairment once the tumor has occurred and lessens harm to healthy tissue between the charged particle radiation source and the tumor. This damage already done has little therapeutic value, raises the risk of adverse drug reactions, and raises the possibility of developing cancer again. This distinction is critical in situations when the proximity to other organs renders any stray ionization extremely harmful (such as head and neck tumors). Children’s bodies are still developing, thus they are more vulnerable to the negative effects of X-rays. Depending on several conditions, children are about ten times more likely to develop secondary malignancies after radiation therapy than adults.

    Dose

    For solid epithelial cells, the usual dose for patients in remission is 60-80 Gy; the usual dose for lymphomas is 20–40 Gy. When choosing a dosage, radiation oncologists take into account several additional criteria, such as the patient’s comorbidities, whether chemotherapy is being received before or after surgery, and the surgical success rate.

    Treatment planning determines how a given dosage will be delivered (part of dosimetry).

    Treatment planning is often performed using sophisticated software on specialized computers.

    The total dose required can be calculated from several different angles or sources depending on the mechanism of radiation delivery. The planner will make an effort to create a strategy that reduces the dosage to the nearby healthy tissues while providing the tumor with a consistent prescribed dose.

    With radiation therapy, gel dosimetry is a dosimetry technique that may be used to examine three-dimensional dose distributions.//

    Fractionation

    There are numerous key reasons why the entire dosage is fractionated, or spread out over time. Normal cells can recuperate more slowly due to fractionation, however, tumor cells are often less adept at repairing themselves between fractions. Similarly, tumor cells can reoxygenate between fractions, increasing tumor cell death if they have been either acutely or chronically hypoxic (and therefore radioresistant).

    Radiation therapy facilities and even individual medical facilities have variable fractionation schedules. Medical facilities in North America, Australia, and Europe follow a conventional fractionation regimen of 1.8-2 Gy per day, five days every week. It is preferable to finish radiation therapy for some cancer types, such as head-and-neck and cervical squamous cell cancers, within a specific time frame since prolonging the dosing schedule strong dose might allow the tumor to start repopulating. Smaller fraction sizes are linked to lower incidence, hence a normal fraction size for kids would be 1.5 to 1.8 Gy per day, as in normal tissues, lower fraction sizes are linked to a lower frequency and severity of late-onset adverse effects.

    When a treatment course is coming to a close, two fractions each day may be administered in some situations. This regimen, often called hyperfractionation or simultaneous acceleration, is applied to cancers that grow faster to a smaller size. This trend is particularly seen in head and neck malignancies.

    Patients receiving palliative radiation therapy for simple painful bone metastases should not receive more than one portion of radiation therapy. A single treatment is ideal for improving patient comfort in patients with low life expectancy since it offers equivalent pain reduction and morbidity results to multiple-fraction treatments.

    Schedules for fractionation

    Hypofractionation is one fractionation schedule that is being utilized more and more and is still being researched. Standard doses for different cancer types range from 2.2 Gy/fraction to 20 Gy/fraction; the latter is more common in treatments that use stereotactic techniques, These include stereotaxic radiosurgery (SRS). Hypofractionation occurs because of the necessity to take advantage of some cancers’ radiosensitivity while simultaneously lowering the likelihood of a local recurrence by depriving clonogenic cells of the time they need to proliferate. Rather than regularly disrupting the process of clonogenic cell division (apoptosis) as with radiation therapy.

    Estimation of dose based on target sensitivity

    The susceptibility of various cancer forms to radiation varies. Genomic signals of intracellular radiosensitivity have been shown to correlate with clinical outcomes when used to predict radiation exposure in individual patients, although sensitivity is difficult to predict from biopsy proteomic or genomic analysis. samples The discovery that non-enzymatic compounds of manganese and small organic molecules provide radiation protection to bacteria offered an alternative approach to genomes and proteomics. It was discovered that manganese concentration and variation, which can be measured by electron paramagnetic resonance, are reliable indicators of radiosensitivity. This conclusion holds for human cells as well. The total cellular manganese concentrations and their fluctuation were shown to be associated with clinically inferred radio responsiveness in various tumor cells. This discovery should be helpful for more accurate radio doses and better cancer patient therapy.

    Types

    In the past, radiation treatment has been divided into three primary categories:

    Brachytherapy is as well known as sealed source radiation therapy, and external beam radiation therapy, also known as XRT EBRT or teletherapy.

    Variations include the location of the radiation source: external radiation is given externally, brachytherapy uses sealed radioactive devices precisely placed in the area to be treated, and systemic radioisotopes are administered orally or by infusion. Radioactive devices and sources can be placed by variations either permanently or temporarily during brachytherapy. The reload method is usually used to add temporary sources. Backloading is the surgical placement of a hollow tube or applicator into the organ to be treated. The sources are then loaded into the application. These included techniques that lead to more customized treatments, techniques that enhance the therapeutic ratio, an emphasis on patient satisfaction, and a list of areas that need more research.

    External beam radiation therapy

    This comes in the next three parts.

    Traditional external beam radiation treatment

    International standard source holder (usually lead), retaining ring, and remote cure “source” consisting of two stainless steel capsules welded to two stainless steel covers surrounding a shielded interior and cylinder of radioactive source material (usually made of cobalt-60) form a remote treatment radiation capsule. The specific diameter in measure of the “source” is about 30 mm.

    Historically, medical linear accelerators that produce high-energy X-rays, kilovoltage therapy X-ray units, or devices that resemble linear accelerators but employ a sealed radioactive source, such as the one above, are used to deliver standard external beam radiation therapy (2DXRT). In 2DXRT, a single radiation beam is predominantly employed as well as sides./

    Conventional suggests how the treatment is scheduled or simulated using a specially calibrated diagnostic X-ray device called a simulator. This type of equipment replicates the radiation beam arrangements that are typically well-established to achieve a desired plan, as well as the actions of a linear accelerator, sometimes by eye. Accurately targeting or localizing the volume to be treated is the goal of the simulation. This method is tried-and-true, usually efficient and dependable. The fear is that radiation poisoning to surrounding healthy tissues may limit the efficacy of some high-dose treatments.

    Tumor control may not be readily achieved due to the sensitivity of the surrounding rectum. Physicians and physicists had little idea how much radiation was applied to healthy and malignant tissue before the development of CT scans. Because of this, practically all tumor locations now get 3-dimensional conformal radiation therapy as the standard of care.

    Stereotactic radiation

    It uses detailed imaging scans with beams of radiation focused on a well-defined tumor. When treating cancers in the brain or spine, radiation oncologists use stereotactic techniques, sometimes in collaboration with neurosurgeons.

    Stereotactic radiation comes in two varieties. Stereotactic radiosurgery (SRS) is when doctors use one or more stereotactic radiation therapies to treat the brain or spine. Stereotactic body radiation therapy, or SBRT, refers to a variety of stereotactic radiation treatments administered to the body, including the lungs.

    Stereotactic therapies, according to some doctors, have the advantage of delivering the optimum amount of radiation to the cancer in a shorter period than normal treatments, which can take six to eleven weeks. Moreover, treatments are carried out with extreme accuracy, which ought to lessen the radiation’s negative effects on healthy tissues. The fact that stereotactic therapies are limited to certain tiny tumors presents a challenge.

    Because many institutions refer to stereotactic treatments by the manufacturer’s name rather than SRS or SBRT, it might be confusing. Axesse, Cyberknife, Gamma Knife, Novalis, Primatom, Synergy, X-Knife, Tomo Therapy, Trilogy, and True Beam are most of the brand names associated with these treatments. As equipment producers continue to create new, specialized technology to treat tumors, this list is subject to change.

    Three-dimensional conformal radiation treatment and virtual simulation
    The ability to employ specialist CT and MRI scanners in conjunction with planning software to generate three-dimensional pictures of tumors and surrounding normal structures has changed radiation therapy treatment planning.

    The simplest type of planning, virtual simulation, places radiation beams more precisely than conventional X-rays, which frequently makes it impossible to preserve normal tissues and difficult to analyze soft-tissue structures.

    3-dimensional conformal radiation therapy (3DCRT) is a virtual simulation enhancement approach that combines a multi-leaf collimator (MLC) and a variable number of beams to shape each radiation beam’s profile to match the profile of the target from the beam’s eye view (BEV). A larger dosage of radiation may be administered to the tumor than would be possible with traditional procedures when the treatment volume is shaped to fit the shape of the tumor. This is a result of the radiation’s lower relative toxicity to the normal tissues in the vicinity.

    Intensity-modulated radiation therapy (IMRT)

    It is delivered using a Varian True Beam Linear Accelerator. Additionally, IMRT enhances the capacity to tailor the treatment volume to concave tumor forms, which is advantageous in situations when the tumor is around a major organ or blood nutrition or spinal cord, two particularly sensitive structures.

    Accurate radiation dosages are applied to malignant tumors or certain regions inside the tumor by the use of computer-controlled X-ray accelerators. Utilizing specialized computer programs, the radiation delivery pattern is established to carry out treatment simulation and optimization (Treatment Planning). By proportionating the strength of the radiation beam, the dose of radiation is of the three-dimensional form of the tumor. When the radiation exposure to the normal region of the cell is avoided or reduced, radiation dose intensity can be increased around the gross tumor volume. Compared to 3DCRT, this results in improved tumor targeting, fewer side effects, and better treatment outcomes.

    While IMRT is increasingly used in more complicated body sites such as the CNS, head and neck, prostate, breast, and lung, 3DCRT is still commonly used in many other areas. Unfortunately, IMRT is limited by the requirement that qualified medical practitioners commit more time to it. This is because, in contrast to 3DCRT preparation, doctors have to manually outline each tumor along the whole disease location, one CT picture at a time. Then, to create a viable treatment plan, medical physicists and dosimetrists must be contacted. Even in the most cutting-edge cancer facilities, IMRT technology has only been utilized commercially since the late 1990s, thus radiation oncologists who did not learn about it during their residency programs will need to locate other educational resources before putting IMRT into practice.\

    For many tumor locations, there is increasing evidence that any of these two approaches offers a superior survival advantage than traditional radiation treatment (2DXRT); yet, the capacity to lower toxicity is widely acknowledged. According to many important experiments led by Professor Christopher Nutting of the Royal Marsden Hospital, this is particularly true for cancers of the head and neck. Both approaches allow for dose escalation, which might improve usefulness. Concerns about the increased radiation exposure of normal tissue and the potential for secondary malignancy have been raised, particularly about IMRT.

    Overconfidence in imaging accuracy can lead to a higher risk of missing lesions that migrate between or during a treatment (e.g., because of breathing or insufficient patient immobilization) or something that cannot be identified during design and therefore is not included in the treatment plan. To better regulate this uncertainty, new strategies are being developed. One such technique is to combine real-time imaging with real-time therapeutic beam formation.

    One or more tiny implantable electric devices placed inside or adjacent to the tumor can be tracked and localized in real time using this method. For this, a variety of implanted medical devices are employed. One such solution is a magnetic transponder, which measures the magnetic field produced by many transmitting coils and relays the results back to the positioning system to pinpoint the location. A small wireless transmitter that generates an RF signal that is detected by a sensor array and used for tumor localization and real-time tracking is an alternative option for the implanted device.

    The well-studied “tongue and groove effect” in IMRT refers to the phenomenon where radiation from overlapping MLC (multileaf collimator) leaves travels between their extended tongues and grooves, resulting in unwanted underdosing. While various techniques have been proven to either completely remove or significantly reduce the TG impact, their efficacy varies depending on which IMRT technique is used, and some of them incur additional costs.

    Certain literature differentiates between “tongue and groove error” and “tongue or groove error” based on whether one or both sides of the aperture are blocked.

    Volumetric modulated arc therapy (VMAT)

    A radiation approach called volumetric modulated arc treatment (VMAT) was launched in 2007 and can create highly conformal dose distributions on target volume coverage while sparing normal tissues.

    Three factors are changed while the patient is undergoing therapy, which accounts for the specificity of this procedure. To provide radiation, VMAT rotates the gantry (which is often a 360° rotating field with one or more arcs), modifies the beam’s speed and form using a multileaf collimator (MLC, or “sliding window” moving system), and increases the medical linear accelerator’s fluence output rate (dose rate). as treating patients, VMAT offers the benefit of shorter radiation delivery periods as compared to traditional static field intensity-modulated radiation therapy (IMRT). Depending on the kind of cancer, different amounts of healthy tissues and Organs at Risk (OAR) are spared during VMAT and traditional IMRT.

    When treating oropharyngeal, hypopharyngeal, and nasopharyngeal carcinomas, VMAT offers comparable or superior organ at risk (OAR) protection. OAR protection yields mixed outcomes when it comes to treating prostate cancer; some studies recommend IMRT, while others promote VMAT.

    Temporally feathered radiation therapy (TFRT)

    The goal of temporally feathered radiation treatment (TFRT), which was first proposed in 2018[87], is to spare normal tissues without changing the dosage given to the tumor by making use of the inherent non-linearities in normal tissue healing. In 2021, a small clinical experiment showed that the technique was viable, albeit its effectiveness has not yet been extensively investigated.

    Automated planning

    Radiation therapy treatment plans at the moment include automated treatment planning. Generally speaking, computerized planning uses two techniques.

    1) Knowledge-based planning: Using a library of well-designed plans, the treatment planning algorithm forecasts the target and dose-volume histogram of the organ at concern.

    2) The alternative strategy is known as protocol-based planning; in this method, the treatment planning system attempts to imitate an expert treatment planner and assesses the plan quality iteratively by comparing it to the protocol.

    Particle therapy

    In particle therapy, intense ionizing particles such as carbon ions or protons are directed at the target tumor. As the particle enters the tissue, the dosage rises to a maximum (the Bragg peak) that appears close to the particle’s range, after which it falls to (almost) zero. This energy deposition profile has the benefit of depositing less energy into the healthier tissue that surrounds the target tissue.

    Auger therapy

    Applied thermotherapy (AT) is distinct from conventional radiation therapy in a few ways. Firstly, it does not rely on radioactive nuclei to damage cells at the cellular level. Second, it does not give dosage to the intended region at a dose lower than the specified tissue/organ locations by using numerous external pencil beams pointing in different directions. Instead, the aim of the in situ delivery of a very high dose at the molecular level using AT is to alter molecules in situ through molecular reorganizations and breakages, such as altering stacking structures, and by cellular metabolic processes linked to the aforementioned molecular structures.

    Motion compensation

    In many kinds of external beam radiation, motion can cause target tissue to migrate out of the planned beam path or bring other healthy tissue into it, which can negatively impact the way that therapy is delivered. Certain types of immobilization are frequently used to keep patients from moving their bodies in substantial ways while receiving treatment, but they cannot stop all motion, such as breathing. To promote these motions, several strategies have been developed.

    Deep inspiration breath-holds, or DIBHs, are commonly used during breast treatments when it is imperative to keep radiation away from the heart. After inhaling, the patient in DIBH holds their breath to create a stable position for the treatment beam to be turned on. An external monitoring system, such as a spirometer or a camera with markers, can be used to perform this automatically.

    For respiratory-gated therapy, in which the patient breathes freely and the beam is only activated at specific times throughout the breathing cycle, the same monitoring techniques as well as 4DCT imaging can be used. Other techniques include using 4DCT imaging to schedule treatments with motion-accounting margins and actively moving the treatment couch, or beam, to track motion.

    Contact X-ray brachytherapy

    Contact X-ray brachytherapy, often known as “CXB,” “electronic brachytherapy,” or the “Papillon Technique,” is a kind of radiation treatment used to treat rectal cancer. It uses low-intensity (50 kVp) kilovoltage. A therapy applicator is inserted into the tumor through the anus into the rectum and placed against the diseased tissue after an endoscopic examination has been performed to locate the tumor in the rectum.

    Finally, the treatment tube is inserted into the applicator to deliver high-dose (30Gy) X-rays to the tumor outright, three times a week at intervals of two weeks. It is usually used to treat individuals with early-stage rectal cancer who might not be surgical candidates. According to a 2015 NICE study, the most common adverse effects were radiation-induced ulcers (occurring in 27% of cases) and bleeding (occurring in about 38% of cases).

    Brachytherapy (sealed source radiotherapy)

    A SAVI brachytherapy device

    The delivery of brachytherapy involves putting a radiation source(s) within or close to the region that is to be treated.

    Brachytherapy is a well-liked and effective treatment for tumors in a variety of body parts; it may also be used to treat cancers of the skin, breast, prostate, and cervical areas.

    Radiation sources are positioned precisely in which the malignant tumor is in brachytherapy. This indicates that the radiation only impacts a relatively small region and that healthy tissues farther from the sources are exposed to less radiation. Brachytherapy has some benefits over external beam radiation therapy. First, it allows for the treatment of tumors with very high doses of targeted radiation while lowering the risk of needless harm to nearby healthy tissues. Brachytherapy typically takes less time for it to finish than other forms of radiation therapy. By doing this, the chance that cancer cells may divide and multiply in the interval between doses of radiation therapy will be reduced.

    One instance of the confined character of breast brachytherapy is the way the radiation dosage is delivered via the SAVI device, which has numerous individually controllable catheters. When compared to previous iterations of breast brachytherapy and external beam radiation treatment, this technique reduces the exposure of healthy tissue and the associated adverse effects.

    Radionuclide therapy

    Radionuclide treatment, also known as systemic radioisotope therapy, radiopharmaceutical therapy, or molecular radiotherapy, is a type of targeted therapy. The chemical characteristics of the isotope, such as radioiodine, which the thyroid gland particularly absorbs 1,000 times better than other body organs, maybe the reason for targeting. To target a radioisotope is to link it to an antibody or a distinct molecule and let it forward to the desired region. Ingestion or infusion (into the circulatory system) are two methods of delivering the radioisotopes.

    Examples include the use of oral iodine-131 to treat thyroid cancer or thyrotoxicosis, and the infusion of metaiodobenzyl guanidine (MIBG) to treat neuroendocrine cancers using radioactive peptide receptors.

    Another instance is the radioembolization of liver tumors or liver metastases with the hepatic artery injection of radioactive yttrium-90 or holmium-166 microspheres. One treatment approach that uses these microspheres is selective internal radiation therapy. The microspheres, which have a diameter of around 30 μm, or roughly one-third of a human hair, are inserted straight into the artery that supplies blood to the tumors.

    The first step in these therapies is inserting a catheter into the leg’s femoral artery, traveling to the intended target location, and starting the therapy. In contrast to traditional systemic chemotherapy, a more focused approach is possible since the microspheres will be delivered directly to the tumor by the blood nourishing it. SIR-Spheres, TheraSpheres, and QuiremSpheres are the three types of microspheres that are now available.

    Malignant bone metastases are one of the main conditions treated with systemic radioisotope therapy. Radioisotopes ignore healthy, undamaged bone and target particular areas of sick bone. Often employed isotopes for treating bone metastases include radium-223, strontium-89, samarium (153Sm), and lexidronam.

    The anti-CD20 monoclonal antibody ibritumomab tiuxetan (Zevalin) was authorized by the US Food and Drug Administration (FDA) in 2002. It is conjugated with yttrium-90. The tositumomab/iodine (131I) tositumomab regimen (Bexxar), which consists of an unlabeled and an iodine-131 labeled anti-CD20 monoclonal antibody, was authorized by the FDA in 2003. These medications, which were approved to treat refractory non-Hodgkin’s lymphoma, were the forerunners of the modern field of radioimmunotherapy.

    Intraoperative radiotherapy

    Applying therapeutic doses of radiation to a target location, such as a cancerous tumor, while the area is exposed during surgery is known as intraoperative radiation therapy or IORT.//

    Rationale

    It accurately targets a high radiation dosage while exposing the surrounding tissues—which are either protected or moved throughout the procedure—to as little radiation as possible. After the tumor is surgically removed, conventional radiation treatments like external beam radiation therapy (EBRT) have several disadvantages: Even with contemporary radiation planning, the difficult localization of the wound cavity sometimes results in the missing tumor bed where the maximum dosage should be delivered. Furthermore, the standard waiting period between EBRT and surgical tumor removal may allow for tumor cell repopulation. By accurately targeting the targeted organs with radiation, it is possible to prevent these potentially detrimental consequences and immediately sterilize any remaining tumor cells. Tumor cell stimulation by wound fluid is an additional characteristic.

    How is radiation therapy given?

    Three methods are available:

    It is carried performed during outpatient stays at medical facilities. It is in most cases administered throughout several weeks, however occasionally it is given twice daily for a few weeks. A person exposed to radiation from the outside world is not radioactive and does not need to take extra safety measures at home. 

    Internal radiation: Inside the body, a radioactive source is placed in or near a tumor. Certain forms of brachytherapy may include injecting radiation into the body and allowing it to do its job. Periodically, it is inserted into the body and then taken out. For a while, certain safety measures are required for this kind of radiation. It’s important to realize, though, that internal radiation eventually ceases to be radioactive within the body.

    Systemic radiation: Certain cancers are treated with radioactive medications that are ingested or injected into veins.

    Then, these medications circulate throughout the body. After taking these medications, you may need to take extra care at home for a while.
    The kind and location of your cancer are going to influence what kind of radiation you may get. Several types are employed in specific situations. Regarding the kind of radiation prescribed for you, how it affects your body, and any necessary precautions, your cancer care team can provide precise answers.

    Types of cancer it treats

    According to the National Cancer Institute (NCI) Trusted Source, clinicians routinely utilize external beam radiation to treat the following kinds of cancer:

    • breast cancer
    • lung cancer
    • prostate cancer
    • colon cancer
    • cancers of the head or neck

    According to the National Cancer Institute, brachytherapy may be a highly successful treatment for malignancies in specific regions of the body, including:

    • cervix
    • vagina
    • uterus
    • rectum
    • head and neck
    • eye

    In addition, a physician could advise brachytherapy for malignancies of the:

    • prostate
    • brain
    • lung
    • skin
    • breast
    • esophagus
    • anus
    • bladder

    Side effects of radiation therapy

    Everyone reacts differently to radiation treatment. It is wise to know that side effects are possible, albeit you may not experience all or any of them.

    The intensity and amount of side effects may vary according to the location, kind of cancer, and overall health status. Any pre-existing problems you had before being diagnosed with cancer may have an impact on how you respond to treatment.

    Adverse effects might happen during or just after therapy. However, you may experience long-term negative effects for months or years after receiving radiation. Consult your doctor in advance to discuss and make plans for these possible side effects. They can assist in identifying how to avoid or control side effects when feasible.

    The most prevalent adverse effects of radiation treatment may include:

    Fatigue

    Radiation might leave you feeling exhausted since some of your healthy cells may be harmed by the malignant ones. As you continue with treatments, you may get increasingly exhausted.

    The duration and intensity of radiation fatigue can vary depending on the type of treatment. Around the third week of treatment, most radiation therapy patients start to feel tired. Fatigue frequently worsens during the sixth week of medication and may last until the end of the specified course of action.

    Inform your doctor if you suffer from any fatigue-related symptoms. They’ll want to keep an eye on your health and could recommend particular aids.

    Skin irritation

    Your skin may begin to alter around the radiation location. The intensity of the alteration might vary from slight redness to the development of sores.

    Radiation dermatitis is a typical treatment-related response. You may develop dryness and flaky skin. Radiation-induced tiredness might vary in length and intensity depending on the type of therapy received. Typically, people receiving radiation therapy start to feel weary during the third week.

    Source of therapy. Fatigue typically worsens during the sixth week of treatment and might last until the treatment is completed.

    If you are experiencing tiredness symptoms, contact your doctor. They will want to monitor your condition and may recommend particular tactics to help.

    To prevent radiation dermatitis, your physician could advise:

    • Proper skin care entails using only warm water and mild soap.
    • Avoid using oil-based lotions and creams.
    • Wear loose-fitting garments to avoid sun exposure and extreme temperatures. Apply steroid cream or gel-like hydrocortisone.
    • It is vital to advise your doctor of any skin changes you are experiencing to reduce discomfort and track the healing process. Sometimes the problems resolve themselves after you’ve finished therapy.

    Certain parts of your body may also expand. For example, if you are undergoing breast cancer therapy, the rays may cause fluid collection in your breasts, a disease known as lymphedema.//

    How do you preserve your skin during radiation therapy?

    Skin changes are a side consequence of radiation exposure, and you may need to take special precautions to preserve it. Some ways to accomplish this include:

    • Avoid wearing tight garments or elastic over the region being treated.
    • Avoid using adhesive tapes on the affected region. Instead, use paper tape.
    • Avoid scraping, scouring, or rubbing the surface.
    • Before applying a heating pad or an ice pack to the affected area, consult your doctor.
    • Consult your doctor about using sunscreen on the area to further protect it from exposure.
    • Instead of scratching, use mild soap and warm water to clean the area.
    • Consult your doctor before shaving the area.
    • Before using any lotions, fragrances, or deodorants on the spot, see your doctor.

    Hair loss

    If you undergo radiation therapy in hairy areas of your body, you may have hair loss around the treatment site. In some cases, you can lose the majority of your hair if you have radiation therapy to the head.

    Your hair may regrow following therapy. You should take some precautions to protect your scalp and the area around it from radiation. For example, if you wear a wig, ensure that the lining does not touch or irritate your scalp. Wearing a scarf or cap to shield your skin from the sun might also be useful.

    Low blood cell counts

    Radiation kills cancerous cells, but it can also harm healthy cells that aid in wound healing and infection defense. If your blood cell count drops too low, your doctor may suspend therapy until it reaches a certain threshold.

    Pain

    Radiation therapy causes edema and the loss of healthy cells, both of which might hurt your body. Your cancer doctor may recommend pain relief options, such as medication and other therapy.

    Radioprotective drugs

    Radioprotective medications, which shield healthy tissue from radiation, may be prescribed by your doctor. These medications only work for specific types of radiation and regions of the body, although they may help reduce adverse effects.

    Site-specific side effects

    You may have extra site-specific side effects if radiation is applied to particular physiological locations, such as the neck and brain. These side effects may include:

    Brain

    • hair loss
    • headaches
    • nausea
    • vomiting
    • hearing loss
    • seizures
    • Brain fog and forgetfulness

    Head and neck

    • mouth and throat sores
    • dry mouth
    • trouble swallowing
    • changes in taste
    • earache
    • tooth decay

    Breast

    • skin changes include irritation, dryness, and color
    • breast soreness
    • breast swelling

    Chest

    • sore throat
    • cough
    • shortness of breath
    • heart complications
    • radiation pneumonitis
    • chest pain
    • early coronary artery disease

    Abdomen

    • nausea
    • vomiting
    • cramps
    • diarrhea
    • constipation

    Bladder

    Symptoms may include discomfort or burning during urination, difficulty urinating, blood in urine, and increased frequency of urination.
    Urinary incontinence

    Radiation treatment accidents

    Strict measures are in place to reduce the possibility of patients being accidentally overexposed to radiation therapy. However, mistakes do occur; for example, between 1985 and 1987, the radiation treatment machine Therac-25 was involved in at least six mishaps in which patients were given up to one hundred times the authorized dose; one or two individuals died immediately as a result of the radiation overdoses. From 2005 to 2010, a Missouri hospital overexposed 76 patients (the majority of whom had brain tumors) for five years due to poorly installed new radiation equipment.

    Although medical mistakes are extremely uncommon, radiation oncologists, medical physicists, and various other radiation therapy treatment team members are attempting to eradicate them.

    In 2010 American Society of Radiation Oncology (ASTRO) established Target Safely, a safety effort that, among other things, intended to document mistakes across the country so that clinicians could learn.

    Use in non-cancerous diseases

    Quick view of the radiation portal on the surface of the hand, including the machine portal of the head shield opening. Ledderhose syndrome and early-stage Dupuytren’s disease are treated with radiation therapy. When Dupuytren’s disease is at the nodules and cords stage or when fingers have a minor distortion of fewer than 10 degrees, radiation treatment is utilized to prevent the illness from progressing further. Radiotherapy is also used in certain cases after surgery to prevent the progression of the disease. Low doses of radiation are utilized, often three grays for five days, followed by a three-month interval and again three grays for five days.

    Can radiation therapy cause cancer?

    It is one of the potential adverse effects of treatment that doctors must consider while weighing the advantages and dangers of each option. Although the risk of getting a second cancer as a result of these therapies is usually small and exceeded by the advantages of curing the illness, it is nonetheless present. This is one of the many reasons why each situation is unique, and each individual must be involved in determining which type of treatment is best for them. The danger varies depending on where the radiation therapy will be administered in the body.

    If the team treating your cancer recommends radiation treatment, it is because they feel the benefits exceed the risks. Nonetheless, you decide to make. Finding out as much as you can about the potential advantages and disadvantages of radiation therapy may help you make an informed decision about whether it’s right for you.//

    Does radiation therapy affect pregnancy or fertility?

    Females: It can damage the developing fetus. If there is a risk you will become pregnant, see your doctor about birth control choices.

    If you are or may be pregnant, notify your doctor straight away.

    If the region of your body exposed to radiation contains the ovaries, the radiation dose may cause the ovaries to stop working (sterility), rendering you unable to bear children. It is critical to understand the risks associated with this possibility before undergoing radiation therapy. If you are considering radiation therapy that will impact your ovaries, discuss with your doctor how this may influence your ability to have children in the future.

    Males: As a result, physicians frequently advise men not to conceive a woman during or shortly after therapy. To find out additional information regarding this, connect with your physician.

    If the radiation-exposed region involves the testicles, the dosage may cause the testicles to stop working (sterility), rendering you unable to bear children. No clear studies have been done on how sperm exposed to radiation affects future babies. If you are considering radiation therapy to the testicles, talk to your doctor about how it may affect your ability to have children in the future.

    Outlook

    Radiation therapy may be sufficient to cure certain early-stage malignancies.

    However, according to the NCI, research shows that cancer treatment results are higher if a patient receives both radiation and chemotherapy after surgery.

    It is crucial to remember that a human cannot receive an infinite quantity of radiation. As a result, doctors decide therapy to a particular area of the body and limit the overall quantity a person can receive during their lifetime.

    Although radiation therapy is normally painless, it can create unpleasant side effects. If a person experiences pain, he should notify his medical team.

    Radiation therapy can impair a person’s ability to have children. Before beginning therapy, you should consult with your doctor about this possibility.

    According to the ACS, radiation treatment may modestly enhance a person’s chances of developing another cancer.

    Risks

    Radiation therapy may produce adverse consequences, or it could perhaps not. The radiation dose and the component of your body that gets exposed to it both have a role. In the course of therapy, any negative effects can be treated. The majority of negative effects will subside during therapy.

    • Part of the body is being treated. Common side effects.
    • Possible side effects of the medication include irreversible hair loss, skin discomfort, and exhaustion.
    • Head and Neck Dry mouth, thicker saliva, trouble swallowing, sore throat, changes in the way food tastes, nausea, mouth ulcers, tooth decay
    • Chest difficulty swallowing, cough, shortness of breath
    • AbdomenNausea, vomiting, and diarrhea.
    • Pelvis Diarrhea, bladder discomfort, frequent urination, and sexual dysfunction.
    • Sometimes side effects appear after therapy. These are known as late side effects. New cancer can appear years or decades after cancer treatment, although this is very unusual. This can be caused by radiation or other treatments. Staging into another form of primary cancer. Inquire with your doctor about any potential short- and long-term negative effects from therapy.

    Questions about Radiation Therapy

    Before starting the treatment, you will be asked to sign a consent form, where it is written that your doctor has described the help of radiation therapy, the possible dangers, the type of radiation used, and the alternative. . treatments. and your alternative treatment choices. Before completing the permission form, be sure you’ve got all of your questions addressed.

    • To kill or reduce the tumor? To prevent or halt cancer spread? To reduce the possibility of cancer recurrence?
    • What is the likelihood of the cancer spreading or returning if I have – or do not receive – radiation therapy?
    • What form of radiation therapy will I receive?
    • Are there any other therapeutic options?
    • What can I do to prepare for treatment?
    • Is it okay for me to eat before treatment, or should I avoid particular foods?
    • Do I have to follow a certain diet while undergoing treatment?
    • What will radiation therapy be like?
    • How frequently is it given? How long will each therapy take? How long will I be undergoing radiation?
    • What should I do if I cannot obtain treatment due to transportation issues or inclement weather?
    • How will I feel when receiving treatment? Will I be able to work? Go to school? Take care of my family.
    • What side effects will I likely experience, when will they occur, and how long will they persist?
    • Will any of these adverse effects alter how I eat and drink, exercise, or work?
    • Will the therapy and/or adverse effects affect how I look?
    • What long-term adverse effects can I experience?
    • Are there any additional precautions I should take during or after treatment?

    Overview

    This radiation therapy kills cancer cells by using high-energy lasers. Proton radiation is one alternate type of radiation treatment, though.

    Radiation technologies used nowadays are quite accurate. They target beams at the malignancy while shielding healthy tissues from high levels of radiation.

    Radiation therapy can be administered within or outside of the body. The utter prevalent type is external beam radiation treatment. This therapy employs a big piece of equipment known as a linear accelerator. During the process, high-energy beams are directed from the gadget to a specific location on your body.

    Brachytherapy is a type of internal radiation treatment. Brachytherapy is a frequent cancer treatment.

    Radiation treatment harms cells by damaging their genetic information. Genetic material determines how cells develop and divide. Radiation treatment may cause harm to both healthy and malignant cells. However, healthy cells are more capable of self-repair than malignant cells. The goal of radiation therapy is to treat cancer with the lowest possible level of damage to healthy cells.

    FAQs

    Is radiation therapy safe?

    Is radiation safe and effective? Yes, radiation is a well-known, safe, and efficient method of treatment. Every year, millions of people are safely treated with radiation to cure or reduce the symptoms of malignancies including head and neck, brain, breast, cervical, prostate, and skin cancer.

    What are the side effects of radiation treatment?

    Inquire with your healthcare staff about any side effects.
    Sore skin. …
    Tiredness. …
    Hair loss. …
    Feeling sick. …
    Problems eating and drinking. …
    Diarrhea. …
    Stiff joints and muscles. …
    Sex and fertility issues.

    How does a patient’s life proceed following radiation therapy?

    Don’t be shocked if you get fatigued, lose energy, or feel weak over time. It might take some time or several weeks for you to get more accurate after treatment. You may need to speak with your employer about changing your schedule, lowering the number of hours you work, or working from home (if possible).

    How long does radiation therapy take?

    You will be in the treatment room for approximately 15 to 30 minutes for each external radiation therapy session, but only one to five minutes of that time will be spent receiving radiation.

    Which is safer, chemo or radiation?

    Radiation treatment is administering high dosages of radiation beams directly into a tumor. The tumor shrinks or dies as a result of the ionizing radiation altering its DNA structure. Because it only targets a single area of the body, this curative therapy has fewer side effects than chemotherapy.

    References

    • Radiation therapy – Mayo Clinic. https://www.mayoclinic.org/tests-procedures/radiation-therapy/about/pac-20385162
    • Radiation therapy. Wikipedia. https://en.wikipedia.org/wiki/Radiation_therapy
    • Ways where Cancer Is Processed Using Radiation Therapy. (n.d.). American Cancer Society. https://www.cancer.org/cancer/managing-cancer/treatment-types/radiation/basics.html
    • What to know about radiation therapy. https://www.medicalnewstoday.com/articles/types-of-radiation-therapy#types
  • Spinal Canal Stenosis

    Spinal Canal Stenosis

    What is Spinal Canal Stenosis?

    Spinal canal stenosis is the narrowing of one or more areas inside the spinal canal. The spinal canal is the pathway that connects each vertebra in your spine. It contains your spinal cord. A decrease in space within your spinal canal constricts your spinal cord and the nerves that arise from it (nerve roots).

    Your spinal cord or nerves may become inflamed, crushed, or squeezed as the space narrows. This can lead to back pain and sometimes compress the nerve, such as sciatica. A restricted spinal canal can be caused by a number of illnesses and events.

    Spinal Canal Stenosis
    Spinal Canal Stenosis

    The disorder mostly affects two parts of your spine which are the cervical and lumbar spine it rarely affects the thoracic spine.

    • Neck (cervical spinal stenosis): Your cervical spine has 7 vertebrae in your neck. C1 through C7 are the vertebral numbers.
    • Lower Back (Lumbar Spinal Stenosis): Your lumbar spine is made up of five bones (vertebrae) in your lower back. Your lumbar vertebrae, L1 through L5, are the largest in your entire spine. The lower back accounts for approximately 75% of all spinal stenosis cases.
    • Mid back (thoracic stenosis):  your thoracic spine area consists of 12 vertebrae in your mid back which are known as T1 to T12. it is far less than the 2 other types because the rib cage keeps this area of the back more stable and limited in terms of movements.
      • Spinal stenosis can also occur in the thoracic spine, however, this is rare.

    How common is spinal stenosis?

    Spinal stenosis is rather frequent. Up to 95% of persons over the age of 50 have degenerative spinal problems. Spinal stenosis is one of these alterations. Lumbar spinal stenosis is the most common diagnosis for those over the age of 65 who require spine surgery.

    Spinal canal stenosis can affect anybody; however, it mostly occurs over the age of 50 people.

    What are the 4 stages of Spinal Stenosis?

    The four phases are:

    • Stage 1: Dysfunction, in which the spine loses protection from shock, and you may experience slight discomfort.
    • Stage 2: Dehydration stage, in which you continue to lose function and may feel considerable pain.
    • Stage 3: Stabilisation stage, when spinal stenosis begins and you may experience considerable discomfort.
    • Stage 4: Collapsing stage, in which the spinal discs may collapse, causing extreme discomfort, and severe pain. 
    stages of spinal canal stenosis
    stages of spinal canal stenosis

    What are the symptoms of spinal stenosis?

    Depending on the severity and area involved, you may have the following symptoms in your neck, back, arms, legs, hands, or feet:

    • Pain
    • Numbness.
    • Tingling.
    • Weakness.
    • discomfort
    • burning pain

    Symptoms of lumbar spinal stenosis

    Symptoms of lumbar (low back) spinal stenosis are:

    • Pain in your lower back.
    • pain that starts in your buttocks and spreads down your leg
    • A heavy feeling in your legs may lead to cramping in one or both legs.
    • Your buttocks, leg, or foot may feel numb or tingly (“pins and needles”).
    • Pain that worsens when you stand for long periods, walk, or walk downhill.

    Symptoms of cervical spinal stenosis

    Cervical spinal stenosis symptoms can be felt anywhere below the location of nerve compression in your neck. The symptoms include:

    • Neck pain.
    • Feeling numb or tingling in your arm, hand
    • Weakness or clumsiness in your arm, hand
    • Balance problems.
    • Impaired hand function, such as difficulties writing or buttoning clothing.

    what are the complications of spinal stenosis?

    The pain caused by spinal canal stenosis is a chronic condition that can highly impair quality of life. However, this spine ailment can develop into additional issues, such as muscular weakness, which impairs balance and walking.
    Other problems of spinal stenosis include:

    • Decreased hand function
    • Loss of bowel or bladder control.
    • Sexual dysfunction.
    • Partial leg paralysis.

    These problems are the result of nerve compression caused by spinal canal narrowing. If you experience chronic neck or back discomfort, or any of the problems listed above, get expert medical attention for treatment. Early management may help decrease the course of your symptoms.

    In extreme cases, spinal stenosis may result in loss of bladder or bowel control (incontinence). Nerve disorders can lead to sexual dysfunction, including erectile dysfunction and anorgasmia.
    In rare situations, spinal stenosis can result in partial or full limb paralysis.

    What causes spinal stenosis?

    The causes are classified into two primary categories:

    • Acquired (developing after birth).
    • Congenital (from birth).

    It is mostly caused by “wear and tear” alterations that occur naturally in your spine with aging. Only 9% of cases are due to congenital factors.

    Acquired causes of spinal stenosis

    Acquired spinal stenosis occurs later in life (after birth), often beyond the age of 50. These situations are frequently caused by an accident or changes in your spine as you age (degenerative alterations).

    Causes of acquired spinal stenosis include:

    • Osteoarthritis is a “wear and tear” disease that leads to cartilage breakdown in your joints and also affects your spine. Cartilage is the protective coating for joints. As your cartilage travels downward, your bones begin to stroke together. Your body responds by growing new bones. Bone spurs on your vertebrae grow into your spinal canal, narrowing it and squeezing nerves in your spine. Paget’s disease can also lead to bone growth in the spine. Wear and tear from arthritis can cause additional bone to form on the spine. These are called bone spurs. They are able to press into the spinal canal.
    • Bulging or herniated disks: Bulging or herniated discs: Each vertebra has a flat, circular cushioning pad (vertebral disc) that serves as a shock absorber. As you age, the discs may dry up and flatten. The bulging disc then pushes on the nerves near it. Discs are soft cushions that act as shock absorbers between two vertebrae. If any of the disc’s soft inner material spills out, it might put pressure on the spinal cord or nerves.
    • Thickened ligaments: Ligaments are connective tissues that hold your spine together. Arthritis causes ligaments to imflammed, thicken, and protrude into the spinal. The strong cords that connect the bones of your spine can stiffen and thicken with time. Thick ligaments may bother into the spinal canal.
    • Spinal fractures and injuries: Broken or dislocated bones in your vertebrae or around your spine might reduce the canal space. Inflammation from injuries around the spine might also create problems. Car accidents and other trauma can cause spinal bones to fracture or shift out of place. Swelling of nearby tissue after back surgery may create stress on the spinal cord or nerves.
    • Spinal cysts or tumors: Growths within or between your spinal cord and vertebrae have a chance to restrict your spinal canal.

    Congenital causes of spinal stenosis

    Congenital spinal stenosis affects babies and children. It can happen due to:

    • Issues with spine formation during fetal development.
    • Genetic (inherited) conditions that affect bone growth. These result from genetic alterations (changes).

    Some congenital causes of spinal stenosis include:

    kyphosis-scoliosis
    kyphosis-scoliosis
    • Achondroplasia: A growth of bone problem caused by a hereditary mutation, resulting in dwarfism.
    • Spinal dysraphism: When the spine, spinal cord, or nerve roots fail to grow correctly during fetal development. such as spina bifida.
    • Congenital kyphosis: When your child’s spine bends outward more than it should. As a result, their upper back seems abnormally round. This is related to difficulty with fetal spine development.
    • Scoliosis: If you have scoliosis or other spinal abnormalities, you may be more likely to develop spinal stenosis as you age.
    • Congenital short pedicles: When a child is born with shorter vertebral pedicles (bony “sides” of the spinal canal)This decreases the size of the spinal canal.
    • Osteopetrosis: An uncommon hereditary disorder that causes your child’s bones to develop improperly and become excessively thick.
    • Morquio syndrome: it is a rare genetic disease that affects your child’s bones, spine, and other bodily functions.
    • Hereditary multiple exostoses (diaphyseal aclasis) are an uncommon hereditary disorder that results in numerous tiny bone growths (protrusions). They can affect a child’s vertebrae and reach the spinal canal.

    How is spinal stenosis diagnosed?

    Your physician will assess your medical history, question about your symptoms, and do a physical examination. The physician may feel your spine and push on different areas to see whether it causes discomfort. They will most likely ask you to bend in various ways to see whether certain spinal positions create issues.

    You will also have imaging tests performed so that your doctor can “see” your spine and determine the exact spot, type, and severity of the disease. These tests can include:

    • Spine X-ray: X-rays use a minimal quantity of radiation and can detect changes in bone structure. for example, They can indicate disc height reduction or bone spurs.
    • MRI: MRI provides detailed images of your nerves, disks, and spinal cord. It can also show tumors.
    • CT scan or CT myelogram: A computed tomography (CT) scan is a sequence of X-rays that create cross-sectional images of the spine. A CT myelogram uses contrast dye to help your doctor examine your spinal cord and nerves.

    Treatment

    There are many treatment options for spinal stenosis. What’s best for you depends on:

    • The cause.
    • The location of the issue.
    • The severity of your symptoms.

    If your symptoms are minimal, your doctor may first recommend at-home care. If these methods fail and symptoms worsen, your doctor may recommend physical therapy, medications, injections, and, eventually, surgery.

    Medications

    Your physician provider might prescribe:

    • Nonsteroidal anti-inflammatory drugs (NSAIDs). If over-the-counter pain medications do not help to relieve pain, prescription NSAIDs may be helpful.
    • Antidepressants. Tricyclic antidepressants can be prescribed to help with chronic pain.
    • Anti-seizure drugs. Some seizure medications, such as gabapentin (Neurontin, Gralise), are used to alleviate pain caused by injured nerves.
    • Topical Analgesics: creams, gels, or patches that include drugs such as lidocaine or capsaicin that can be applied directly to the painful spot to offer localized pain relief.
    • Opioids. Medications such as oxycodone (Oxycontin, Roxicodone, and others) and hydrocodone (Hysingla ER) can be habit-forming.
    • Steroid injections: Your nerve roots may become inflamed and swollen where they are pinched. Injecting a steroid drug into the area surrounding the pinched nerve may help decrease inflammation and alleviate some discomfort. However, steroid injections may not be the best way to manage spinal stenosis. According to some research, combination steroids and numbing injections cure back pain no better than numbing medication shots alone. This is significant since steroids can have substantial adverse effects. Steroid injections given repeatedly might damage adjacent bones, tendons, and ligaments. As a result, patients may have to wait many months before receiving another steroid injection.

    Physical Therapy Treatment

    Physical therapists will help you build a back-healthy workout program.

    • decrease discomfort and pain,
    • gain strength, and
    • improve your balance,
    • flexibility, and
    • spine stability.
    • Strengthening your back and abdominal muscles (your core) will help your spine become more strong.
    • Physical therapists can educate you on how to walk in a way that opens up your spinal canal, reducing pressure on your nerves.

    Initial Assessment:

    • The physiotherapist begins by completing a thorough evaluation to determine the patient’s medical history, present symptoms, functional limits, and therapy goals.
      • A physical examination evaluates posture, range of motion, muscular strength, sensibility, reflexes, and any neurological abnormalities associated with the disorder.

    Education and Pain Management:

    • Educate the patient about lumbar radiculopathy, its causes, and contributing factors such as poor posture, improper lifting techniques, or sedentary lifestyle habits.
    • Teach strategies for pain management, including the use of heat or cold packs, proper body mechanics, ergonomic adjustments at work or home, and relaxation techniques.

    Pain management

    • Applying heat: Heat is frequently a superior treatment for pain. Heat stimulates blood flow, which relaxes muscles and decreases joint pain. Use caution while utilizing heat; a high heat setting might burn you.
    • Applying ice: If heat isn’t easing your symptoms, try ice, like an ice pack, or frozen gel pack, Apply the ice for 20 minutes on and 20 minutes off. Ice relieves pain related to swelling, discomfort, and inflammation.
    • Modalities:
      • Transcutaneous Electrical Nerve Stimulation (TENS) or interferential Therapy (IFT) is used to reduce pain and improve muscular relaxation.
      • Ultrasound (US)]: Ultrasound can be applied in continuous mode for 8 minutes to treat pain caused by tenderness or inflammation.

    Exercise therapy

    Exercise for cervical spinal stenosis

    • Neck Range of Motion Exercises:
    1. Neck Flexion and Extension: Tilt your head downwards, then upwards.
    2. Neck Side Bending: Tilt your head to one side, then the opposite side. (Keep your eyes and nose straight forward at all times).
    3. Neck Rotation: Turn your head towards the side, then return to looking straight ahead.
    4. chin tuck in supine with a towel: Tuck your chin into your chest while lying on your back. Place a little rolled-up towel behind the curve of your neck. Maintain head contact with the surface when laying down.
    supine chin tuck exercise
    supine chin tuck exercise
    • Isometric neck exercise in a Supine lying position:
      • To perform an isometric neck exercise in a supine lying down posture, lie on your back on a plinth or mattress with a small cushion or rolled towel behind your head and your hands by your sides.
    1. Neck flexion
      • In the Prone Position, the pillow is kept under your head
      • Press the pillow or hold it for 5 to 10 seconds.
    2. Neck extension
      • For this exercise, lie down on your back over a plinth or a mattress, with a small cushion or a wrapped towel beneath your head and your hand by your side.
      • Push the pillow on the back of your head or hold it for 5 to 10 seconds.
    3. Neck side flexion
      • This workout requires you to lie on either your right or left side.
      • Take a cushion underneath your head and slowly push it closer to the plinth.
      • Hold this for 5 to 10 secs.
      • Perform this on the right side.
    Neck exercise
    Neck exercise
    • Strengthening Exercises: Strengthening the muscles around the neck, shoulders, and upper back can help provide support to the spine and reduce strain on the nerves. Examples include:
    1. Neck Retraction: Gently pull your head backward as if making a double chin, then relax.
    2. Shoulder Blade Squeezes: Sit or stand with your hands at your sides and push your shoulder blades together.
    3. Scapular Stabilization Exercises: These exercises target the muscles that support the shoulder blades and upper back.

    Exercise for lumbar spinal stenosis

    • Lumbar flexion exercise: most people get relief from lumbar flexion exercise as it increases the space within the spinal canal however sometimes few people get also relief from back extension exercise.
    • Lumbar flexion in sitting and standing positions: Bending forward increases the range of motion in the lumbar spine.
    seated lumbar flexion
    seated lumbar flexion
    standing-lumbar-flexion
    standing-lumbar-flexion
    • hip flexion-extension exercise: In the supine position, hips flex, while in the prone position, hips extend.
    • Lumbar flexion with rotation (lower trunk rotation): The rotating feature of this stretch improves spinal mobility. It allows for greater rotation and movement between the vertebrae, which can release the compressed nerve and contribute to a healthier and more functional spine
    • Knee to chest
      • this exercise will increase the strength of the lower back muscle and help to improve the full range of motion in both the pelvis and lower back vertebrae.
      • this exercise loosens up any stiffness and improves posture
    Recline-Knee-To-Chest
    Recline-Knee-To-Chest
    • Pelvic tilts
      • activate pelvic floor muscles and strengthen your abdominal muscles. and improve lumbar stability.
    PELVIC TILT
    PELVIC TILT
    • curl-ups
      • cat and cow The cat-cow is a mobilization of the lower back area, to bring proper movement into the lower back and pelvis.
    partial-sit-up-exercise
    partial-sit-up-exercise
    • cat and cow
      • This is a well-known and effective vital movement.
        • Improves posture and balance.
        • Strengthens and stretches the spine and neck.
        • Stretches the hips, abdomen, and back.
        • Increases coordination.
        • Provides massages and activates organs in the abdomen, including the kidneys and adrenal glands. 
        • Creates emotional balance.
    Cat-and-Cow-Stretching
    Cat-and-Cow-Stretching

    Surgical management for spinal stenosis

    Spinal stenosis is a difficult condition, and your spine is a sensitive structure. As a result, physicians only decide on surgery after exhausting all other therapy options. Fortunately, most persons with spinal stenosis do not require surgery.

    Types of spine surgery include:

    • Laminectomy (decompression surgery): This is the most frequent surgical procedure for spinal stenosis. It involves cutting off the lamina, a section of your vertebra. In addition, the surgeon may remove certain ligaments and bone spurs. The operation increases the space available for your spinal cord and nerves.
    • Laminotomy: The surgeon simply removes the little part of the lamina that is putting the most pressure on the nerve.
    • Laminoplasty: The surgeon removes a portion of the lamina to provide additional canal space. They employ metal plates and screws to form a hinged bridge over the region where the bone was removed.
    • Foraminotomy: The foramen is the space in your vertebrae where nerve roots leave. This technique includes removing bone or tissue in this location to make room for the nerve roots.
    • Interspinous process spacers: This is a minimally invasive procedure for certain persons with lumbar spinal stenosis. The surgeon inserts spacers between the spinous processes, which are the bones that protrude from the back of each vertebra. The spacers hold your vertebrae apart, allowing more room for nerves.
    • Spinal fusion: Healthcare practitioners often use spinal fusion as a last option. If your spinal canal stenosis is causing nerve pain and medical treatment, or physical therapy has failed, they will only consider it. Two vertebrae are permanently joined via spinal fusion surgery.
    • Needle procedure for thicker ligaments: Sometimes the ligament at the back of the lumbar spine becomes overly thick. A needle-like instrument put through the skin can remove portions of the ligament. This can increase room in the spinal canal, reducing pressure on nerve roots. You may be given medicine to help you relax during treatment. A lot of people can return home on the same day.

    Prevention

    Can I prevent spinal stenosis?
    Spinal stenosis cannot be prevented because the majority of its causes are normal age-related “wear and tear” issues. However, you may take basic precautions to maintain your spine healthy. They may help to lessen your chances of developing spinal stenosis. These steps include:
    You are eating healthful meals. Make sure your diet has enough calcium to keep your bones healthy.
    Maintaining a healthy body weight.
    Avoiding or stopping smoking. Smoking causes artery damage, which can lead to back discomfort and make it harder for injuries to heal.
    Practicing proper posture.
    Exercise regularly. Maintaining muscular strength, particularly in the back and core, helps to maintain your spine healthy.

    Spinal canal stenosis cannot be relieved permanently, however lifestyle changes can lower the risk of it. Health practitioners promote lowering the risk of spinal stenosis.

    • Regular exercise helps to strengthen the muscles that support the spine and back.
    • Maintaining a healthy body weight. Excess weight puts additional strain on the spine and may eventually lead to the development of spinal stenosis.
    • Avoiding misuse of the spine, such as lifting heavy objects.
    • Cigarette smoking should also be avoided due to its substantial association with degenerative disc disorders.

    FAQs

    What are the severe symptoms of spinal stenosis?

    If the spinal cord gets compressed due to spinal stenosis, you may feel pain, numbness, or other symptoms. In extreme situations, it might result in a lack of bowel or bladder control and restricted movement.

    What is spinal stenosis pain like?

    Spinal stenosis symptoms include pain, stiffness, tingling, and numbness. The pain may be heat or hurting, and it is worse when walking, sitting, or standing. These symptoms can go down the leg, arm, or buttocks, depending on which portion of the spine is afflicted.

    What position relieves spinal stenosis?

    Sleeping on your side with your knees curled up (in the fetal position) may be preferred for this problem. This helps to reduce strain on the nerve roots. Sleeping in a reclining chair or adjustable bed with the head and legs elevated might also help to reduce nerve pressure.

    References

    • Exercises for lumbar spinal stenosis. (n.d.). Jacksonville Orthopaedic Institute. https://www.joionline.net/trending/content/exercises-lumbar-stenosis
    • Mfa, J. H. M. M. (2023, September 22). Spinal stenosis. Healthline. https://www.healthline.com/health/spinal-stenosis#outlook
    • Bjerke, B., MD. (n.d.). What is spinal stenosis? Spine-health. https://www.spine-health.com/conditions/spinal-stenosis/what-spinal-stenosis
    • Spinal stenosis – Diagnosis and treatment – Mayo Clinic. (2023, March 28). https://www.mayoclinic.org/diseases-conditions/spinal-stenosis/diagnosis-treatment/drc-20352966
    • Branch, N. S. C. a. O. (2023, December 15). Spinal stenosis. National Institute of Arthritis and Musculoskeletal and Skin Diseases. https://www.niams.nih.gov/health-topics/spinal-stenosis
    • Spinal stenosis – Symptoms and causes – Mayo Clinic. (2023, March 28). Mayo Clinic. https://www.mayoclinic.org/diseases-conditions/spinal-stenosis/symptoms-causes/syc-20352961
    • Lumbar spinal stenosis – OrthoInfo – AAOS. (n.d.). https://orthoinfo.aaos.org/en/diseases–conditions/lumbar-spinal-stenosis
    • Spinal stenosis: MedlinePlus Medical Encyclopedia. (n.d.). https://medlineplus.gov/ency/article/000441.htm
    • Ms, M. B. F. M. (n.d.). Spinal Stenosis: Practice Essentials, anatomy, pathophysiology. https://emedicine.medscape.com/article/1913265-overview?form=fpf
    • Spire Healthcare. (n.d.). Spinal stenosis Symptoms causes & treatment | Spire Healthcare. https://www.spirehealthcare.com/conditions/spinal-stenosis/
    • Spinal stenosis. (2023, July 6). Yale Medicine. https://www.yalemedicine.org/conditions/spinal-stenosis
    • Spinal stenosis. (n.d.). NYU Langone Health. https://nyulangone.org/conditions/spinal-stenosis
    • Medtronic. (n.d.). Spinal conditions – stenosis. Medtronic. https://www.medtronic.com/us-en/patients/conditions/back-pain/causes/stenosis.html
    • Spinal Stenosis | Spine Center | OHSU. (n.d.). https://www.ohsu.edu/spine-center/spinal-stenosis
    • Tyneside Integrated Musculoskeletal Service. (n.d.). Tyneside Integrated musculoskeletal service information for patients. https://www.tims.nhs.uk/wp-content/uploads/2020/06/1.8-TIMS-Spinal-Stenosis.pdf
  • Burpee Exercise: Health Benefits, Muscle work, How to do it?

    Burpee Exercise: Health Benefits, Muscle work, How to do it?

    What is the Burpee Exercise?

    Burpee workouts offer a physical challenge. You will concentrate on a full-body cardio workout with this activity, which seeks to develop the strength and endurance of your upper and lower limb muscles.

    Regular burpee exercises can strengthen the muscles in your arms, chest, shoulders, buttocks, belly, legs, and hips. You may include this workout into your high-intensity interval training regimen.

    Shorter rest intervals are paired with short periods of strong effort in high-intensity interval training, a form of cardiovascular exercise. This is a great workout that increases your metabolism throughout the day, strengthens your muscles, and burns fat. You will lose fat around your abdomen and calories by doing this.

    To complete this exercise, all you need is enough space and your weight; no other equipment is needed. Therefore, you can do this exercise to raise your heart rate even in tiny spaces like offices.

    Which muscles are worked when performing burpee exercises?

    Benefit:

    • You’re going to work many muscle groups

    A straightforward yet powerful exercise for the entire body is the burpee. It’s a great way to work out most of the major muscle groups in your body and strengthen both your upper and lower body. Your limbs, including your hands, are in good shape.

    With each burpee, you strengthen your;

    • Shoulders
    • Arms
    • Core
    • Glutes
    • Quads
    • Hamstrings
    • Burpees help burn fat and calories.

    Burpees are a well-liked workout for anyone trying to lose weight because they are effective for improving both cardiovascular and strength training.

    Note that a burpee offers an almost complete body workout. You will eventually lose weight because all the muscles involved will have to work extra hard and burn calories to get the energy they require.

    • You’re going to work on your core

    Your ability to maintain stability and reduce your risk of injury depends on your core muscles. Burpees are an excellent method to build your core muscles because you have to use your core the entire time you perform the exercise. Burpees are an excellent method to improve your other muscle groups in addition to your abs.

    • You’ll gain improved posture, mobility, and balance.

    Burpees are a great way to improve your mobility, balance, and coordination because they engage a wide range of muscles and movements. Regular burpee practice will help you feel and move better, gain muscle, and improve your general health.

    • You can perform burpees without any equipment.

    The ability to perform burpees anywhere, at any time, and without any equipment is one of their greatest benefits. You don’t have to purchase exercise equipment like ellipticals or treadmills or join a gym. Burpees are a comfortable exercise that you may perform at home. You also don’t require a lot of area; you can perform burpees in your hotel room when traveling without missing a beat in your fitness plan.

    What is the proper form for performing burpee exercises?

    • Start with a relaxing standing position on the ground surface.
    • Next, drop your knees to the floor in a full squat.
    • Make sure your back is straight.
    • Next, progressively lower your hands to the position directly in front of your feet.
    • Then, as your foot is kicked backward by your hands, your entire body weight is supported by your hands and toes, just like in a plank position.
    • Once your body looks straight from head to heels, perform one push-up.
    • Refrain from excessively lifting your buttocks and arching your spine.
    • To do a frog kick, jump to your foot and then back to your starting position.
    • Lift your arms above your head and take an upright posture.
    • Jump fast enough in the air so you return to the starting position as soon as you land, bending your knees, and then squat down to complete the remaining repetitions.
    • Many people can do 20 to 25 burpees in a minute, but each person has a different maximum; therefore, you must first perform 10 burpees before progressively increasing the number of repetitions.
    • Then relax.
    burpee
    burpee

    How to Do Burpees? Video

    Burpee Exercises variations:

    Among the hardest bodyweight workouts available, the difficulty increases with each variant. Burpees are adjustable and may be customized into any form to meet your fitness requirements. Even though the majority of its variations just include basic movements, some degree of muscle strength and balance are still needed.

    Burpee box jump

    You can use any strong item that can support your weight, such as a bench or plyo box, for this variant.

    • Set up a platform or box at an arm’s length away.
    • With your legs shoulder-width apart, take a stance facing the box.
    • This is where you will begin.
    • Keeping your hands on the ground, quickly kick your legs back until your elbows, stomach, and thighs are bent.
    • As though you were doing a push-up from here, raise your hips and press up.
    • As you get ready to jump up, place your feet beneath your hips and start to stand.
    • As you jump, make sure you land on the box in front of you by jumping forward.
    • It has only ever happened once.
    • Carefully and rapidly exit the box, then do so as many times as necessary.
    • Then relax.
    Burpee box jump
    Burpee box jump

    Burpee with a Bosu ball

    A Bosu ball must be used for this variation.

    • You need to hold a Bosu ball in your hand and place it face up on a flat surface.
    • After that, squat down, put a Bosu ball in your hands, place it immediately below you, and then place your hands on its flat surface to complete push-ups.
    • Then, as you stand up, take hold of the other edge of the Bosu ball with your hands and raise it above your head.
    • Change the action by lowering it to the ground.
    • Then relax.
    Burpee with a Bosu ball
    Burpee with a Bosu ball

    Burpee with dumbbells

    • Select the correct weight for the dumbbells.
    • Maintain a straight back while separating your feet shoulder-width apart.
    • Dumbbells should be placed on the floor in front of your feet when you squat down, somewhat wider than shoulder-width apart.
    • Put your weight on your hands and jump with your legs extended straight back behind you.
    • Using your hands and toes to support yourself is the greatest option.
    • Place your hands below your shoulders.
    • After bending your arms until your chest touches the floor, stretch them fully once more (one push-up).
    • Pull the dumbbell up to the side of your chest while exhaling and contracting your shoulder blades.
    • Make sure you only move your arm during the workout and not any other portion of your body.
    • Breathe in and out while slowly bringing the opposite arm back to the beginning position.
    • Move your feet in a jump position between your hands.
    • To push through your feet and go back to the starting position, move quickly.
    • Then relax.
    Burpee with dumbbells
    Burpee with dumbbells

    Burpee Knee Tucks

    • Start with your feet hip-width apart and your core tight.
    • With your hands on the ground, leap backward with your feet and land in a high plank position.
    • After that, hop your legs back towards your hands to come to a squat.
    • Take a big stride forward after that and bring your legs up to your chest.
    • Take great care to keep your knees soft when landing.
    • Then relax.
    Burpee Knee Tucks
    Burpee Knee Tucks

    Pull-Up Burpee

    • Legs should be shoulder-width apart.
    • To complete the pull-up part, move so that you are standing exactly under a bar.
    • You now start the exercise in the starting position.
    • To get into a squat, take a breath, bend at the knees, and push your hips back.
    • Once your hip crease touches your knee, keep lowering your body.
    • With your hands flat on the ground, push your knees backward to take on the top push-up posture, which involves completely extending your arms.
    • Finish this section as soon as possible.
    • Bend at the elbows to lower your body and complete a push-up.
    • Now press up and raise your hips.
    • Put your feet in front of your hips and jump.
    • Prepare to jump by standing up now.
    • Now give yourself a powerful upward thrust.
    • Hold the pull-up bar with your hands in an overhand grip.
    • Lift your body upward and begin immediately lifting your chin above the bar.
    • Stretching your arms, lower yourself, and then let go of the bar to land back on the ground.
    • You have just completed your first round.
    • Then relax.
    Pull-Up Burpee
    Pull-Up Burpee

    Safety measures and advice for burpees exercise:

    • Like any exercise, burpees are very beneficial as long as you perform them properly and avoid injury.
    • Just perform a few repetitions at first, going gently. Increase the repetitions gradually after you are comfortable and can easily perform this exercise.
    • Before pausing and moving on to the next set, try to do 5 or 10 repetitions in one effort.
    • An additional strain on your shoulders and wrists can result from the pushups required for the burpee workout.
    • When doing push-ups, be careful not to twist your wrist when landing.
    • Before you add weights, more pushups, or leaps, make sure you’ve finished the exercise’s fundamental elements.
    • Burpees may be an extremely tough workout.
    • If you are not familiar with this exercise, look for help from a physiotherapist.

    To ensure safe exercise, consider the following recommendations:

    • Before working out, make sure your body has had enough time to warm up.
    • To avoid overtraining and tired muscles, gradually increase the duration and amount of repetitions in your workouts.
    • Always exercise with the correct form to maintain your health and achieve the desired results.
    • When you’re working out, try not to wear anything that will limit your range of motion. Instead, wear loose, comfortable clothing.
    • Before working out, it’s recommended that you take a deep breath and release it slowly through your lips.

    When have you not performed a burpee exercise?

    • If your physician suggests you relax.
    • Whether any bones are broken.
    • If you’ve had surgery recently.
    • Stop practicing this exercise right away if you experience any pain or discomfort.

    Summary:

    Burpees are a quick, full-body exercise that tones muscles and burns fat. It’s an amazing bodyweight exercise that targets every muscle in your body, from your shoulders to your ankles.
    Burpees are an excellent way to improve overall body strength and conditioning since they combine cardio and strength training into one exercise. They are simple to modify to meet the requirements of any degree of fitness.

    Ask a physiotherapist for help if you’re having trouble performing a burpee. Additionally, check with a doctor to see if burpees are safe for you if you’re new to exercise or high-intensity interval training, or if you have a medical condition.

    FAQ:

    Are burpees a fat burner?

    Yes, if you perform burpees regularly, they can burn belly fat more quickly than any other program or diet. Burpees are a kind of workout that burns fat, builds muscle, and speeds up your metabolism all day long. Even after your activity is complete, they will continue to help in the burning of calories and fat in your abdomen.

    Are abs built by Burpee?

    Burpees help burn calories for increased muscular definition while working the entire body, especially the abs.

    Which burpee variation is the simplest?

    Mountain Climbers Burpee
    Adding them to a burpee is pretty easy. After a few burpees in the bottom position, ascend to the plank position, execute a few mountain climbers, and then return to the standing position.

    What form of exercise is better than burpees?

    Kettlebell swings be used instead of burpees for more effective fitness. Strengthening your entire body with kettlebell swings, especially your legs and core, can increase your power and endurance. By developing proper form and avoiding frequently made mistakes, you may get the most out of kettlebell training.

    What is the recommended burpee speed?

    Put a higher value on form than speed when performing burpees. You can prevent sore joints after a workout by moving more slowly and concentrating on using the proper muscles at the right times.

    What is the goal of burpees?

    Burpees are an excellent exercise for building strength and endurance in both the upper and lower body, as well as strengthening the entire body. Burpees, when done correctly, build muscle in the shoulders, arms, legs, hips, chest, and buttocks.

    Is doing burpees every day okay?

    Burpees aren’t the only thing you should do for exercise; adding them to an aerobic or strength routine, or even just completing a few in the middle of the day to improve your energy, is a good idea.

    What limitations are there to burpees?

    A seamless and rapid change from squat to jump is a requirement of the burpee workout. Due to the intense pressure on the wrists, feet, and back during this rapid movement, there is an elevated risk of injury. Maintaining hip alignment is vitally important. Burpees require a lot of hip flexibility.

    What is a beginner’s burpeeing duration?

    Beginners should only spend no more than seven minutes on a burpee. The most crucial thing is to learn how to complete the exercise correctly; once you have done so, you can increase the number of minutes or repetitions in your daily routine.

    Why do people enjoy burpees so much?

    Burpees improve cardiovascular health.
    Burpees are a worthwhile exercise to try if you’re not into cardio or would rather do quick body-weight movements than strength training. These can be used to increase your aerobic fitness and strength simultaneously during high-intensity interval training or other workouts.

    Which muscles do burpees target?

    Burpees provide great upper- and lower-body strength and cardiovascular exercise for the whole body. When done correctly, burpees should help you gain muscle in your legs, arms, shoulders, hips, and buttocks.

    Burpees are strengthening or cardio exercises?

    Strength and cardio training are combined in burpees. Exercises that are performed correctly and regularly provide a high-intensity workout that will develop your muscles and stimulate your heart, lungs, and sweat glands.

    Will burpees increase my stamina?

    Your aerobic capacity and stamina will increase as a result of repeating the burpees and pushing through your increased heart rate and exhaustion. Your running capacity and interval training performance will increase with time as you perform burpees.

    References:

    • P. Tirgar (2023b), 5 December. Burpee workout: health benefits, strengthening of muscles, how-to? – Mobile Clinic for Physiotherapy. Mobile Clinic for Physiotherapy. www.mobilephysiotherapyclinic.in/burpee
    • Seven Justifications for Daily Burpee Practice. (No date). G&G Exercise Supplies. Here are seven reasons to burpee every day: The live fit blog at https://livefit.com
    • Image 1, January 16, 2020 Cross-Fit. Watch the video of the Burpee Box Jump Over. You can watch GLktGkmcvWE on YouTube.
    • Image 2, On March 14, 2016, Julie. Peanut Butter Fingers: Bosu-burpees.jpg. Fingers covered in peanut butter. 20-minute total body workout at https://www.pbfingers.com/bodu-burpees-jpg
    • Image 3, Rearick, K. (February 18, 2014). PopCulture.com: Healthful Living. Look through Pinterest. Pin: 379780181053995282 #in.pinterest.com
    • Image 4, 2017 April 19; Botond, B. The pull-up Burpee. Build Up Your Strength. Exercises & Burpee Pull-Up at https://get-strong.fit
  • Lower Cross Syndrome

    Lower Cross Syndrome

    What is a Lower Cross Syndrome?

    Lower Cross Syndrome (LCS) is a postural imbalance that affects the lower back and pelvic region. It is characterized by a pattern of muscle imbalances where certain muscles become tight and overactive while others become weak and underactive.

    Both the dorsal and ventral areas of the body are affected by this syndrome, which is typified by a high frequency of muscle weakness and stiffness.

    The cross-shaped affected muscle is where the name Lower Cross Syndrome originates.

    Patients with lower back syndrome (LCS) have altered posture and gait due to tightness in the hip flexors and the lumbar erector spine, a group of muscles that extend. To make up for these limitations, the person tilts their pelvis forward and arches their lower back.

    Clinical relevant anatomy:

    Reduced gluteal strength (gluteus maximus, gluteus medius, and gluteus minimus) and trunk strength (rectus abdominis) are traits of lower crossed syndrome. Inhibited muscles take the place of the superficial muscles when they become aroused.

    Hip flexor muscles (iliopsoas and tensor fasciae latae) and thoracolumbar extensor muscles (erector spinae, multifidus, quadratus lumborum, and latissimus dorsi) coexist with hyperactivity and tightness.

    Causes of Lower Cross Syndrome:

    These muscles are susceptible to weakening:

    The trunk muscles consist of:

    • Rectus abdominis
    • Obliques internus abdominis
    • Obliques externus abdominis
    • Transverse abdominis

    The gluteal muscles consist of:

    • Gluteus maximus
    • Gluteus medius
    • Gluteus minimus

    Thoracolumbar extensors include:

    • Erector spinae
    • Multifidus
    • Quadratus lumborum
    • Latissimus dorsi

    Hip flexors include:

    Poor posture, a sedentary lifestyle, or leisure activities such as working at a desk, watching a lot of television, using a computer for extended periods of time, or engaging. An increase in stress on those specific muscles is the cause. A lack of knowledge about how to perform daily tasks or incorrect posture or form when exercising might result in one-sided stress or excessive tension in certain areas of the muscles.

    Symptoms of Lower Cross Syndrome:

    LCS can cause pain throughout the body, impair mobility, and have an impact on a person’s posture. Additionally, people may experience:

    • Reduced range of motion or stiffness in the hip, pelvic, lumbar spine, or pelvis.
    • Anterior pelvic tilt, lumbar lordosis, lateral lumbar shift, and external hip or knee hyperextension and rotation are examples of postural abnormalities.

    Features of type A posture:

    • Hyperkyphosis: The upper back rounder in a person with this condition.
    • Hyperlordosis.
    • Anterior pelvic tilt

    Type A: Posterior pelvic cross syndrome:

    The posterior pelvic crossing syndrome is a type A subgroup. linked to an enhanced thoracolumbar extensor activity, which causes the thorax to translate anteriorly. Breathing and postural control become less effective as a result.

    Example:

    The patient will elevate their thorax during the inspiration action, resulting in an upper chest breathing pattern. Because the abdominal muscles are unable to pull the thorax back into the more expiratory neutral posture, the active expiration will be challenging.

    Lower Cross Syndrome Type A
    Lower Cross Syndrome Type A

    Type B: Anterior pelvic cross syndrome:

    Lower Cross Syndrome Type B
    Lower Cross Syndrome Type B

    What Individuals Are Most at Risk of Lower Cross Syndrome?

    Although the risk factors for Lower Cross Syndrome (LCS) can differ from person to person, the following are some common variables that increase the likelihood of having LCS:

    • Sedentary lifestyle: Individuals who lead lives or have occupations that necessitate extended periods of sitting could be more vulnerable.
    • Poor posture: Retaining bad posture, such as hunching over or sitting with an excessively bent lower back, can aggravate lower back pain (LCS). Muscle weakness, irregularities in the structure, and habits can all contribute to poor posture.
    • Lack of exercise: The gluteal and abdominal muscles, which are crucial for preserving the normal alignment and stability of the lower back and pelvis, might become weaker as a result of insufficient or irregular exercise.
    • Muscle imbalances: An increased risk of LCS can result from imbalances between opposing muscle groups.
    • Past trauma or surgeries: Trauma or surgeries to the hips, pelvis, or lower back can throw off the body’s natural muscular balance and increase the risk of lower back syndrome. For example, having a history of hip problems or low back pain may make LCS more likely to occur.
    • Hereditary factors: Some people may be more prone to developing LCS due to a hereditary predisposition to specific muscle imbalances or structural abnormalities.
    • Factors associated with sports or the workplace: Participating in sports or jobs requiring repetitive motions, extended standing, or a lot of strain on the hip and lower back muscles can raise the risk of LCS. Jobs requiring the lifting of large objects or sports involving sprinting or jumping are two examples.

    It is noteworthy that the presence of these risk factors does not ensure the development of LCS; individuals may still develop the illness in the absence of these factors. Furthermore, LCS does not always result from the presence of risk factors. Regular exercise, proper posture, and getting treated for any underlying conditions can all help lower the chance of LCS or lessen its symptoms.

    What dysfunctions are associated with Lower Crossed Syndrome?

    The SI joint, L4-L5, L5-S1, and hip joints where the pattern intersects can all experience functional impairments. In addition, it may result in plantar fasciitis, knee pain, ankle dysfunction, low back pain, and iliotibial band syndrome.

    When should I visit a doctor?

    This could cause soreness in the lower back. It’s also a good idea to see a doctor before starting any new exercise regimen, especially one that aims to help correct someone’s posture.

    Diagnosis

    Lower Crossed Syndrome Examination:

    • This illness may be diagnosed using a combination of specialized evaluations and a physical examination.

    Active examination:

    • Hip extension movement: This is assessed to see whether the hip is hyperextended during walking. Lift your straight leg.
    • Hip abduction movement

    Other special assessments are the following:

    • Overheard Squat: Pay attention to the lower back arch position throughout this examination.
      The patient experiences an increase in lower back arch and excessive forward bending when squatting.
    • Single-Leg Squat: The doctor will watch your forward lean and trunk rotation when you complete a single-leg squat.
      The patient’s knee went into a valgus position during this movement, which the doctor also observed in the LCS patient.
    • Pushup: If the patient’s hips drop to the floor and their lower back arch increases during the pushup assessment, this may be an indication of lower crossed syndrome.

    Treatment of Lower Cross Syndrome:

    Medical treatment:

    In case of extreme pain, the physician prescribes analgesics or over-the-counter pain relievers and suggests using hot and cold packs on the affected region.
    For lower back pain, patients should take the medication that their doctor prescribes; they should avoid taking any other type of medication.

    The main goals of exercise for LCS treatment are to improve weak and tense muscles that are affected by this condition and to relieve pain.

    Physical therapy treatment in Lower Cross Syndrome:


    A therapist develops a successful program for the patient and offers general direction. Both of these can aid in releasing tension in the muscles, particularly in the hip flexors. You should always consult your doctor to determine the best course of action for you, taking into account the severity of your injury or suffering.

    Relaxing technique for the muscles:

    Lacrosse balls and foam rollers are common instruments for correcting muscular imbalances.
    For instance, patients roll over particular body parts using a foam roller.

    Stretching Exercise:

    The stretching approach should loosen a tight muscle. Only soft tissue is used in this procedure, and it is repeatedly stretched and relaxed.

    Self-stretching of hip flexor muscle:

    • Erector spinae muscle stretching:

    Exhaling and extending, the patient lies supine in the fetal posture, knees to chest, arms encircling their knees. For thirty seconds, maintain this posture.

    This method provides the body’s normal activity or function imbalances. They are as follows:

    • Cut down on detector points and eliminate adhesions in the muscles.
    • To strengthen the weak abdominal muscles, use core exercises.
    • retraining the body’s posture and movements.
    • patient with posterior pelvic crossing syndrome receiving retraining.
    • Quadriceps stretching exercises
    Quadriceps stretching exercises
    Quadriceps stretching exercises

    Do this three times on each leg, both before and after working out any particular muscle group.
    Perform this exercise in three sets of three reps to four, with proper grip.

    Activating and strengthening the muscles:

    The patient works out with little to no weight and a little resistance. The patient should do 10–15 repetitions for one or two sets while holding these poses for two seconds.

    The following are some instances of stretches that are done during an activity:

    • Bridge Exercises

    Bridges exercise the maxillary gluteus. Typically, this muscle contracts when the pelvis is moved, particularly during a squat. Maintaining strong glutes can help with a variety of lower back issues because they are an essential component of your body.
    After lowering your body to the floor, take a little break before performing the exercise once more. Make 15 repetitions of this lower cross syndrome exercise. Take a minute to recover before beginning another set.

    Hip bridge exercise
    Hip bridge exercise
    • Quadruped hip extensions:
    • Before going back to the beginning posture and finishing the repetitions, the person must maintain this.
    • Holding the extension for two seconds, the person does this action for at least two sets, with ten repetitions in each set.
    • Plank exercises

    A great core and abdominal exercise that might help with low back pain is the plank. This exercise for lower cross syndrome has an effect from the pelvis to the shoulder girdle along the spine.

    PLANK
    PLANK

    For novices, maintain this posture for a minimum of 20 seconds before going back to the initial position. Hold it for however long as possible without sacrificing form if that makes you feel more comfortable.

    • Hip flexors strech exercise
    Hip flexors strech
    Hip flexors strech

    Then, squeeze your right buttock while bending forward on your left hip. Exercise selection and execution should be based on your comfort level; don’t overwork your body.

    • Wall Squat exercises
    Wall Squat exercises
    Wall Squat exercises

    In order to add squat exercises to the progression stage, concentrate initially on strengthening the hip joint muscles during this lower cross syndrome exercise. Don’t allow your knees to slide in; keep them over your toes.

    • Clam Shell exercise
    Clam Shell exercise
    Clam Shell exercise

    Another exercise that strengthens is the clamshell. Throughout the exercise, make sure your legs stay together and your core muscles are working. With your left knee still off the ground, raise your right knee as high as you can without raising your leg.

    • Clamshell exercise with a resistance band

    This crunch variation guarantees a strong core and back while targeting the glutes and hamstrings. After two seconds of holding the aforementioned motion, carefully return the knee to its initial position. Perform 20–25 reps on each side.

    Clamshell exercise with a resistance band
    Clamshell exercise with a resistance band
    • Pelvic Tilt Exercises

    The ease of use of these is immense: all you need to do is elevate your hips, bend your knees, and rest on your back. Your lower back will tense up a little before returning to its initial posture. completed three sets of this exercise each day, completing 10 to 15 repetitions with a minimum 5-second hold.

    • Kneeling leg raise with back stretch

    After two seconds of holding, adjust your spine to a neutral posture. To align your raised leg with your body, reach back and lift one leg until it is the same height as your body. Maintain a neutral posture for your spine. Change the legs. Back pain can result from excessive back bending.

    • Lunge Stretch Exercises
    Lunge Stretch Exercises
    Lunge Stretch Exercises

    Your rear knee should practically contact the surface as you extend it. For two seconds, maintain this posture. To return to the beginning posture, stretch both knees and press through your heels. and exercise caution when doing so.

    • Superman exercise

    Use a plinth or yoga mat to perform the Strat Superman exercise in a prone position. Finally, before beginning to move your spine, make as much touch with your core as you can.

    Lift your left arm and extend it forward until it is parallel to your body while squeezing your heart. Continue on the other side. Do not bend your lower back; instead, merely extend your leg and shoulder as far as it is comfortable.

    • Bird Dog Exercise
    Bird Dog
    Bird Dog

    A basic core muscle strength exercise called “Bird Dog” helps to maintain a neutral spine, increase stability, and lessen or eliminate lower back pain.

    Begin on all fours in a table position. On the mat, begin in the quadrupled position first. Retain your abs in a neutral position. Put your shoulders back. Go back to where you were before. There is just one round.

    • Quadriceps Release With Foam Roller

    You will need a foam roller for the exercises that include quadriceps release using foam rollers. Keep your lower back and lumbar region from arching or rounding; instead, support your core.

    Keep an eye on sensitive areas. When you locate a tender spot, press it for ten to twenty seconds, or until the pain goes away, and then move on to another tender spot. To isolate your inner quads, spread your legs wide and rotate them outward.

    • The lower back cat

    Begin by placing yourself in a quadrupedal stance on the plinth or mat using both hands and knees. Return the bottom to the feet.

    • Core dead bugs

    Your lower back will not quite contact the floor, as you will observe. First, determine your hip’s slope. Keep your pelvic tilt constant, breathe properly, and avoid holding your breath all the time. Switch sides after slowly and deliberately extending the opposing arm and leg at the same time while bending your hips to avoid falling. completed three sets of six repetitions a day.

    • A supine ball squeeze
    A supine ball squeeze
    A supine ball squeeze

    Make contact with your abdominal core muscles. After releasing the contraction and holding it for five seconds, pick up the chi balls or medicine balls. Make sure each adductor muscle contracts equally.

    Lower Cross Syndrome Massage Treatment

    Lower Cross Syndrome (LCS) patients may benefit from massage therapy as an adjuvant treatment to assist relieve pain, induce relaxation, enhance circulation, and ease tense muscles. It’s crucial to collaborate with a licensed, skilled massage therapist who is knowledgeable about LCS when thinking about receiving massage therapy for the disease. The following massage methods can be applied to treat LCS:

    • Swedish massage: Swedish massage has the potential to enhance bodily relaxation, lessen tense muscles, and increase circulation.
    • Deep tissue massage: To deal with muscle imbalances related to LCS, the massage therapist may concentrate on tight areas including the lower back muscles and hip flexors.
    • Myofascial release: This method works to relieve tension and blockages in the fascia, which is the connective tissue that envelops and supports the muscles.
    • Trigger point therapy: Trigger point therapy is useful for addressing specific muscle stiffness areas, like the gluteal and hip flexors, that are frequently present in LCS patients.

    In cases of lower-crossed syndrome, how may yoga help?

    By extending muscles and teaching long, weak muscles to become active again, yoga can help the body become more flexible. When practicing yoga, focus on stretching your hamstrings and hip flexors to balance the pelvic tension in a forward-backward manner if you suffer from low back syndrome.
    Yoga might assist you in growing back previously long muscles if you have extended these muscles. You are able to initiate, stabilize, and re-support the process of growing muscle.

    For example, by adding short stretch muscles to an already uneven pattern, we can create an even more complex total imbalance. First, extend the muscles that are short. Next, employ functional movement exercises such as yoga to assist in retraining muscles that were previously extended to actively support various body movements.

    How to Correct Your Posture in This Situation.

    Long periods of sitting in daily life lead to imbalances in the length and power of our muscles. We have heard a lot in the past few years about the negative effects of extended sitting, but athletes who do not spend most of their time sitting down might still experience lower back issues. Sitting for extended periods of time causes the front and rear pelvic muscles to become hyperactive and underactive.

    How to Prevent Lower Cross Syndrome?

    A person shouldn’t include additional physical activity into their daily routine if they have a sedentary lifestyle so that they are aware of the following tips for avoiding lower cross syndrome and back pain. Maintain proper form and posture, and engage in underused muscle action on a regular basis.

    Summary

    A postural imbalance known as Lower Cross Syndrome (LCS) is typified by weak gluteal and abdominal muscles and taut hip flexor muscles. It can result in poor posture, decreased stability and functional mobility, hip and groin pain, and lower back pain.

    Maintaining proper posture, exercising frequently to develop hip and core muscles, stretching frequently, and taking frequent breaks from sitting are all crucial for preventing LCS. It’s also advantageous to listen to your body, avoid lengthy static positions, practice ergonomics, and keep a healthy weight.

    In order to properly treat LCS, patients should seek appropriate treatment, such as physical therapy, which may comprise manual therapy, stretching, strengthening, posture retraining, and instruction on self-management.

    Lower cross syndrome is one of the most prevalent postural disturbances that I notice in my patients as a physical therapist. It is crucial to make an appointment with a physical therapist as soon as possible if you are in pain or uncomfortable. Our goal at Samarpan Clinic is to enhance our patients’ general quality of life by providing them with respite. A group of skilled and knowledgeable physical therapists at our clinic are assisting patients in resolving symptoms of lower cross syndrome and other postural abnormalities.

    FAQs

    Lower cross syndrome: what causes it?

    This usually occurs as a result of overactive and tight hip flexors, adductor muscles, upper and lower back extensor muscles, and calves.

    What advantages can cross-leg exercises offer?

    It also permits improved blood flow to certain parts of the body and increased bowel movement. Additionally, sitting cross-legged improves the range of motion and is good for the knees and other joints.

    Is the syndrome of lower cross permanent?

    Human bodies were meant to be in their natural state when standing and walking. Unfortunately, this means that when people sit for extended periods of time (almost an entire workday for those with “table jobs”), and over the course of years, their hip flexor and lower back muscles can become extremely tight, even as their.

    How can one determine if go syndrome has diminished?

    Tests for Lower Cross Syndrome
    Kemp’s check A high-quality check is characterized as an assessment of the affected person’s pain. The trying-out method is commonly described as having the affected person perform extension combined with rotation of the spinal neighborhood of interest.

    What results in an imbalance of muscles in the back?

    In addition to weak, tight, and short muscles, imbalance can also be made worse by tension, exhaustion, and muscle overload. When the back muscles, including the abdominals, grow shorter, longed-for, or weak, an imbalance of back muscles results.

    Which muscle in lower cross syndrome is weak?

    Muscle weakness known as lower cross syndrome
    Weakness of the gluteal muscles (gluteus maximus, gluteus medius, and gluteus minimus) and of the trunk muscles (rectus abdominis, internal oblique, external abdominis, and transverse abdominis) are linked to lower crossing syndrome.

    How can lower crossed syndrome be eliminated?

    Exercise can naturally aid in the treatment of lower back pain, strengthen the weak hip muscles, and preserve healthy muscle flexibility. The greatest exercises are those that focus on strengthening the flexor or abdominal muscles especially because they can either relax and release tight muscles or improve weak muscles.

    What are the cross-back syndrome exercises?

    As many times as you can during the day, repeat the exercise while holding this posture for three to five minutes. You can use dumbbells or resistance bands as training equipment.

    What are the greatest exercises to treat or repair lower cross syndrome?

    After one visit with a physical therapist, attempt these nine exercises for lower cross syndrome at home:
    Pelvic Tilt Exercises
    Exercises for the Squat.
    Plank exercises, bridge exercises, etc.
    Exercises to Stretch Your Quadriceps.
    Stretching Exercises for Lunges.
    Exercises for Hip Flexor Stretches:
    core a lifeless bug
    With a foam roller, release your quadriceps.
    Exercise for Bird Dogs.

    How can lower-crossed syndrome be resolved?

    Certain exercises are said to be the greatest for your abdominal or hip flexor muscles because they help to relax and loosen tight muscles as well as strengthen the weak muscles that cause the LCS condition.

    References

    • Maurya, J. (2023, July 4). Lower Cross Syndrome – Cause, Symptoms, Treatment, Exercise. Samarpan Physiotherapy Clinic. https://samarpanphysioclinic.com/lower-cross-syndrome/
    • Prajapati, D. (2023, July 19). Lower cross syndrome corrective Exercise – Samarpan Physio. Samarpan Physiotherapy Clinic. https://samarpanphysioclinic.com/lower-cross-syndrome-corrective-exercise/
    • Miller, K. (n.d.). Lower Crossed Syndrome: Starting From the Center. https://blog.nasm.org/lower-crossed-syndrome

  • Jacobsen Syndrome

    Jacobsen Syndrome

    What is Jacobsen Syndrome?

    Jacobsen syndrome is caused by the deletion of genetic material from chromosome 11. Jacobsen syndrome is also known as 11q terminal deletion disorder because it typically occurs at the end (terminus) of chromosome 11’s long (q) arm.

    The indications and symptoms of Jacobsen syndrome vary greatly. The majority of those affected report delayed development of various skills, including speech and motor skills (such as sitting, standing, and walking). Most people have cognitive impairments and learning challenges. Behavioral issues have been documented, including compulsive activity (such as shredding paper), a short attention span, and ease of distraction. Many persons with Jacobsen syndrome have been diagnosed with ADHD.

    Jacobsen syndrome is also linked to an increased risk of autism spectrum disorder, which is defined by inadequate communication and socialization abilities.

    Jacobsen syndrome is also distinguished by unique facial characteristics. These features include small and low-set ears, widely set eyes (hypertelorism) with droopy eyelids (ptosis), epicanthal folds that conceal the inner corner of the eyes, a broad nasal bridge, downturned corners of the lips, a thin upper lip, and a short lower jaw. Affected people frequently have a big head size (macrocephaly) and a skull anomaly called trigonocephaly, which gives the forehead a pointed look.

    More than 90% of people with Jacobsen syndrome have a bleeding disorder known as Paris-Trousseau syndrome. This condition has a lifetime risk of irregular bleeding and easy bruising. Paris-Trousseau syndrome is a platelet disorder that affects the blood cells responsible for blood clotting.

    Other Jacobsen syndrome characteristics include cardiac issues, such as underdevelopment of the left side of the heart (hypoplastic left heart syndrome), feeding difficulties in infancy, small stature, frequent ear and sinus infections, and skeletal abnormalities. The digestive system, kidneys, and genitals can all be affected by the condition.

    The life expectancy of people with Jacobsen syndrome is unknown, but affected individuals have reached adulthood. Complex cardiac abnormalities are the major cause of mortality in patients suffering from Jacobsen syndrome. Bleeding episodes and infections can potentially be fatal in patients with Jacobsen syndrome.

    Causes of Jacobsen Syndrome

    Genetic Mutations

    Genetic mutation in jacobsen syndrome
    Genetic mutation in Jacobsen Syndrome

    Jacobsen syndrome is caused by genetic mutations, commonly referred to as pathogenic variations. Genetic mutations can be inherited, meaning they are passed on from parents to children, or they can develop at random during cell division. Genetic mutations can also be caused by viruses, environmental factors like UV radiation from sunlight exposure, or a combination of these. Discover more about genetic illnesses at the National Library of Medicine (NLM).

    If you suspect you have this disease, start by gathering information about your family’s health history. Other family members who have experienced similar symptoms, when their/your symptoms first emerged, and any exposures to probable disease-causing environmental variables should be reviewed with your medical staff. The Surgeon General’s tool can help you compile your family’s health history.

    Chromosomal Changes

    Chromosome 11
    Chromosome 11

    Jacobsen syndrome is caused by a change in the number or structure of a person’s chromosomes. Chromosomes are the structures inside cells that contain all of our genes. People normally have 46 chromosomes, 23 inherited from their biological mother and 23 from their biological father. Most chromosomal alterations occur at random in the sperm or egg, but some changes have been shown to be passed down from parent to child.

    Given the documented chromosomal alterations associated with this disease, you should consult with your doctor to determine whether chromosome testing is appropriate for you. Chromosome testing results can confirm or rule out a suspected chromosomal disorder, as well as determine a person’s risk of passing on the condition. Visit the NHGRI website to learn about microarray technology for chromosomal testing, how a karyotype may be used to identify chromosomal abnormalities, and the FISH lab technique for detecting a specific DNA sequence on a chromosome.

    Symptoms

    Jacobsen syndrome involves a wide variety of symptoms and physical deformities.

    One of the first indicators that parents may notice is abnormally sluggish growth, both in the womb and after birth. Many people with Jacobsen syndrome will be shorter than usual for their mature height. They may also have macrocephaly, which refers to a larger-than-average head size. Trigonocephaly is an additional prevalent symptom.

    Other physical indicators include specific facial characteristics. This includes:

    • Wide-set eyes with drooping eyelids
    • Characteristics include small ears
    • a large nose
    • downturned corners of the mouth
    • a small lower jaw
    • a thin upper lip
    • and skin folds covering the inner corners of the eyes

    Many persons with Jacobsen syndrome will experience cognitive impairment. This can lead to delayed development, including the acquisition of speech and motor abilities. Some infants will have trouble feeding. Many people will have learning difficulties, which can be severe.

    Behavioral problems are also symptoms of Jacobsen syndrome. These may be linked to compulsive behavior, quick distraction, and a short attention span. Many of our patients have both Jacobsen’s syndrome and ADHD. It is also associated with autism.

    Diagnosis

    Jacobsen syndrome can be difficult to diagnose in some instances. This is due to the fact that it is an uncommon and inherited disorder.

    In genetic testing, magnified chromosomes are examined under a microscope. They’re discolored to give them a “barcode” appearance. The broken chromosome and deleted genes will be apparent.

    Jacobsen syndrome can be diagnosed when pregnant. If an ultrasound detects something abnormal, more testing may be performed. A blood sample can be taken from the mother and tested.

    Can Jacbosen syndrome result in complications?

    Many serious problems can arise from Jacobsen syndrome.

    Learning impairments affect around 97% of people with Jacobsen syndrome. These learning challenges are usually modest to moderate. They can be severe.

    Bleeding problems are a hazardous yet common complication of Jacobsen syndrome. Approximately 88% of infants born with Jacobsen syndrome also have Paris-Trousseau syndrome. This is a bleeding ailment that causes you to bruise easily or bleed profusely. This can increase your risk of internal bleeding. Even nosebleeds or blood tests might result in significant blood loss.

    Complications involving the heart are also prevalent. Heart issues affect about 56% of newborns with Jacobsen syndrome. Some of them will require surgery to be treated. Approximately 20% of children with Jacobsen will die from heart issues before the age of two. The most common cardiac defects are:

    • Heart defects consist of perforations between the left and right bottom chambers.
    • Anomalies on the left side
    • Hypoplastic left heart syndrome, which disrupts blood flow.

    Kidney problems include:

    • having a single kidney
    • two ureters (tubes connecting the kidneys to the bladder)
    • hydroneprosis or the swelling
    • cysts

    Infants with this disease frequently experience gastrointestinal issues. Pyloric stenosis produces severe vomiting due to a constricted or obstructed exit from the stomach to the intestines. Other typical issues include:

    • blocked or narrowed anus
    • constipation
    • intestinal obstruction
    • missing GI tract pieces
    • aberrant gut placement

    Many children with Jacobsen have vision problems, however many of these difficulties can be cured. Certain children will get cataracts.

    Because some children with Jacobsen syndrome are immunocompromised, they may be more vulnerable to infections. Ear and sinus infections are extremely prevalent. Some youngsters will have serious ear infections and may lose their hearing.

    Treatment of Jacobsen Syndrome

    There is currently no therapy for Jacobsen syndrome, but the symptoms can be managed. 56% of Jacobsen syndrome children have congenital cardiac problems; to keep them under control, a paediatric cardiologist can do an electrocardiogram or echocardiography as a baseline evaluation. Any issues discovered can then be resolved.

    Almost all affected children are born with a bleeding disorder; monthly CBT may alleviate the issue. Consecutively. Platelet transfusions and ddAVP can be performed.

    Medication that interferes with platelet count should be avoided, and oral contraception may be considered for women who experience severe bleeding during menstruation.

    Children with Jacobsen syndrome have severe to moderate intellectual impairments and cognitive impairment.

    A neuropsychologist or a behaviour specialist, such as a psychiatrist or psychologist, can conduct an evaluation, which may include brain imaging such as MRI or ERP. Intervention programs can then be implemented as needed.

    Music therapy is extremely effective for language development. Vision and hearing examinations, depending on age, can help with cognitive difficulties. For behavioral issues such as ADHD, medication or treatment are required, but a combination of both is more successful.

    To cure eye defects, visit an ophthalmologist. Play and interactive activities help children to speak. Habilitation in children should begin at a young age.

    A rehabilitation team consists of experts who specialize in how impairment impacts daily life, health, and development. The entire family is assisted in order to help affected children and their families adjust more effectively.

    Physiotherapy Treatment

    Jacobsen syndrome (JS) is a chromosomal condition in which children experience global developmental delays, including delayed motor and speech milestones.

    As a result, they should be sent to physical and/or occupational therapists for early intervention to address the motor developmental delay.

    Bobath’s technique is based on observation of the child and a desire to find the best way to overcome the motor delay.

    Each youngster should be evaluated based on their specific movement expression and potential for maximum movement efficiency.

    Treatment cannot be repetitious or stereotyped since it must constantly adapt to the individual’s advancement.

    The Bobath approach is a goal-oriented and task-specific idea that seeks to modify both the internal and external environments so that the individual and nervous system can perform efficiently and effectively.

    Integrating play into neurodevelopmental treatment (NDT) has been shown to have numerous benefits in treating developmental delays. It enhances cognitive and perceptual abilities and serves as a stimulant for typical movement patterns by offering appropriate activities.

    Children’s response to activity is crucial for a successful play activity. That involves:

    Changing the shape, size, and consistency of the employed material. Changing the procedure and regulations of the play activity. Adjusting the position of the materials and the child. Controlling the level of interpersonal interaction. If the motor demand is high, the cognitive demand must be reduced to accommodate the child’s changing needs.

    Intensive Neurodevelopmental Treatment (Bobath Approach) Three times weekly, 60 minutes per day, for three months, is advised since it indicates improved gross motor function and higher compliance than standard NDT.

    Summary

    Jacobsen syndrome is a rare chromosomal disorder caused by partial deletion of the long arm of chromosome 11. It is distinguished by intellectual incapacity, delayed development, and unique facial characteristics. The disorder affects around one out of every 100,000 babies and is more commonly diagnosed in girls than in boys.

    Common physical characteristics of Jacobsen syndrome include a small head (microcephaly), widely spaced eyes (hypertelorism), drooping eyelids (ptosis), and a broad nasal bridge. Many patients also have heart defects, bleeding disorders due to platelet abnormalities, and skeletal abnormalities. Cognitive impairments range from mild to severe, with most affected individuals experiencing some degree of intellectual disability and speech delays.

    Diagnosis of Jacobsen syndrome typically involves genetic testing, including chromosome analysis and more specific molecular genetic tests. Treatment is primarily supportive and focuses on managing individual symptoms through a multidisciplinary approach. This may include special education, speech and physical therapy, cardiac care, and hematological management. While there is no cure for Jacobsen syndrome, early intervention and appropriate medical care can significantly improve the quality of life for affected individuals.

    FAQs

    How is Jacobsen syndrome diagnosed?

    Diagnosis typically involves genetic testing, including chromosome analysis and more specific molecular genetic tests. Physical examinations and medical history also play a role in the diagnostic process.

    Is there a cure for Jacobsen syndrome?

    There is currently no cure for Jacobsen syndrome. Treatment focuses on managing individual symptoms and providing supportive care to improve quality of life.

    What kind of treatment do individuals with Jacobsen syndrome receive?

    Treatment is multidisciplinary and may include special education, speech and physical therapy, cardiac care, and hematological management. The specific treatments depend on the individual’s symptoms and needs.

    What is the long-term outlook for individuals with Jacobsen syndrome?

    The long-term outlook varies depending on the severity of symptoms. While affected individuals will likely require lifelong support, early intervention, and appropriate medical care can significantly improve their quality of life and help them reach their full potential.

    References

    • Orphanet: Jacobsen syndrome. (n.d.). https://www.orpha.net/en/disease/detail/2308
    • Gotter, A. (2017, July 9). Jacobsen Syndrome. Healthline. https://www.healthline.com/health/jacobsen-syndrome#coping-and-support
    • Jacobsen syndrome | Getting a Diagnosis | GARD. (n.d.). https://rarediseases.info.nih.gov/diseases/307/jacobsen-syndrome/diagnosis
    • Jacobsen syndrome: MedlinePlus Genetics. (n.d.). https://medlineplus.gov/genetics/condition/jacobsen-syndrome/#resources
    • Vastralphysiotherapyclinic. (2023, September 10). JACOBSEN SYNDROME. Mobility Physiotherapy Clinic. https://mobilephysiotherapyclinic.net/jacobsen-syndrome/
  • Push Ups Exercise: Benefits, Variations, How to Perform?

    Push Ups Exercise: Benefits, Variations, How to Perform?

    A Push-Up Exercise: What is it?

    Push-ups are a fundamental bodyweight exercise that targets multiple muscle groups, making them an essential component of any fitness routine.

    The classic Push-Up is done in a prone position and involves bending and straightening the arms to raise and lower the body while keeping the spine straight and carrying the body’s weight on the palms and toes.

    • The push-up is a basic exercise that strengthens the upper body and chest.
    • Your health will improve from this activity since it will strengthen your muscles, increase your metabolic rate to burn fat and help your cardiovascular system.
    • This exercise, which is common in strength training, begins with the performer in the prone position. 
    • Targeting the pectoral, anterior deltoids, and triceps, the performer raises and lowers their body while performing exercise.
    • The serratus anterior and coracobrachialis are also greatly benefited by this exercise.
    • This is a highly rapid and effective method of building muscle.

    Which muscle is worked when performing push-ups?

    Shoulder-muscles-Anatomy
    Shoulder-muscles-Anatomy

    Primary muscles

    Secondary muscles

    • Hip muscles
    • Leg muscles
    • Stomach muscles

    The advantages:

    Analysis has shown that there are several benefits to push-ups, such as stronger bones and improved posture.

    Here are some good reasons for including this basic workout in your daily plan.

    • Strengthening your upper body with push-ups

    The muscles in your upper body, such as your shoulders, triceps, and chest, can be strengthened and toned with push-ups. These muscles come into play when you have to lift heavy objects or push a shopping cart, among other tasks. Your functional fitness can be improved by increasing your upper-body strength, which will make regular duties easier. Additionally, it might improve your athletic performance.

    • Push-ups are beneficial to your core

    Your core needs to remain active during a push-up in order to keep your trunk strong and your form perfect. To put it another way, planks or push-ups can be utilized as an exercise to improve your core. Exercise balls or other unstable surfaces work particularly well as a surface for advanced push-ups because they support the core.

    • Push-ups help correct your posture

    Additionally, your posture can benefit from that core stability. Lifting weights with your back, shoulders, and core helps you maintain better posture. This is fortunate because poor posture can lead to headaches, back pain, and breathing difficulties. Low energy and muscle fatigue, which are related to it, can make you perform poorly when exercising.

    • Push-ups are good for your bones

    One important measure of bone health and strength is bone mineral density. The risk of fractures and osteoporosis rises as bone density declines. Thankfully, you may strengthen your bones with weightlifting and resistance training exercises like push-ups.

    • Push-ups are a flexible and easy exercise

    Strength training is often linked to weightlifting. However, there are other approaches to gaining muscle. As a result, you may work out anyplace with them as they are lightweight and require no special equipment. The flexibility action can be adjusted to make it harder or easier, depending on your level of fitness.

    Guidelines for good push-up form:

    The form of a push-up is important, just like any other exercise. You can benefit from improved health and reduced risk of injury.

    When you practice push-ups, keep the following in mind;

    • For every push-up, maintain a strong core. This will stop your hips from falling and your back from arching.
    • Hold your head, neck, and shoulders in a position that is in line with your spine. A few feet in front of you is where you should be looking down at the surface of the ground. Alternatively, you could perform push-ups while looking straight down. Your head is too high or low if you can view your feet or the ceiling.
    • Do not raise your hands above your shoulders. The space between your hands is somewhat larger than hip-width when performing a push-up. However, they need to still line up with your shoulders. Your shoulders will be under more strain if they are positioned too far forward.
    • Continue breathing. It can be easy to hold your breath or breathe wildly when working out hard. But you must continue breathing to complete your workouts. Breathe in as you lower your body and out as you raise it during each push-up.

    How is a push-up exercise performed?

    • You must perform this exercise while lying on your back on the ground with your hands wider than your shoulders.
    • Avoid twisting your elbows.
    • Maintain a slightly bent position for them.
    • When your feet are hip-width apart and your body is balanced on your hands and toes, extend your legs straight out.
    • Pulling your belly toward your spine can help you contract your core muscles and engage your abs.
    • Take a breath and slowly bend your elbows until you are lowering yourself to the ground and your elbows are at a ninety-degree angle.
    • Exhale by tightening your chest muscles, raising yourself back up with your hands and taking a step back to your starting posture.
    • Throughout the exercise, maintain the contraction of your abdominal muscles and maintain a straight body.
    • Push-ups are something you can do as much as it feels comfortable.
    Push ups
    Push-ups

    Numerous variations for push-up exercises:

    There is a push-up variation for each level of experience that can help you target a particular muscle more effectively or make the activity easier for a beginner.

    Bent-Knee Push-Up

    This modified variant of the regular push-up is performed on the knees, as opposed to the toes. Verify the alignment of the knees, hips, and shoulders. Refrain from bending at the waist.

    • This exercise starts with you lying on your back, your hands shoulder-width apart on the ground in front of you.
    • Extend your arms.
    • As you bend your arms, contract your abdominals and lower your trunk until your eyes are fully visible on the ground.
    • Hold this position for a few seconds.
    • Straightening your arms, raise your trunk once again.
    • Then relax.
    Pushups-on-the-knees
    Pushups-on-the-knees

    Incline push-ups

    Choose this version if you want to make the exercise easier. 

    • You will need a bench for this exercise, and you will need to stand a few feet away from it.
    • To perform this variation, place your hands on a bench and use the same fundamental push-up technique.
    • To lower your body, flex your elbow to a 90-degree angle.
    • Hold this position for a few seconds.
    • Then return to your neutral position.
    • Then relax.
    Incline pushups
    Incline pushups

    Decline push-ups

    It’s harder than a conventional push-up and just takes one bench or box. Place your feet up on a box or bench and perform push-ups.

    • By adjusting the bench height, you may change the resistance by utilizing only your body weight.
    • Bend with your back against the bench.
    • Put your hands on the floor, your elbows at a 45-degree angle, and your shoulders above your wrists.
    • Position your feet above the bench.
    • Use the muscles in your quadriceps, glutes, and core.
    • Next, Maintain a straight back and neck, bend your elbows, and drop your chest to the floor.
    • Hold this position for a few seconds.
    • Extend your elbows and press into the ground to return to the beginning position.
    • Then relax.
    Decline push-ups
    Decline push-ups

    Diamond push-ups

    The triceps muscles are worked during this push-up variation.

    • The following exercise is a set of push-ups, where your hands should be in the middle of your chest and your elbows should be close to your sides throughout each repetition.
    • Next, press your thumbs and index fingers together to form a diamond shape.
    • Bend your elbows to bring your hands down toward your sternum, keeping your arms firmly against your sides the entire time.
    • Hold this position for a few seconds.
    • Then return to your neutral position.
    • Then relax.
    Diamond push-ups
    Diamond push-ups

    Medicine Ball Push-Up

    Take a medicine ball in your hands. The movement gets more difficult as the ball gets smaller. Littler medicine balls have less stability, making them more proprioceptively hard.

    • Grasp the top of the ball and place it beneath your chest to begin a push-up.
    • Your hands should be directly below your shoulders and off to the top or sides of the ball.
    • As though you were performing a regular push-up, maintain a straight back.
    • Your back should be straight as though you were in a plank posture.
    • Lower your chest to the ball gradually while bending at the elbows.
    • Your elbows should be positioned horizontally, not wildly out to the sides, or designed directly at your rear.
    • Hold this position for a few seconds.
    • Then return to your neutral position.
    • Then relax.
    Medicine Ball Push-Up
    Medicine Ball Push-Up

    Wide Arm Push-up

    • When you begin in the plank posture, your hands should be wider than your shoulders.
    • Point your fingers forward or outward slightly.
    • Bend your elbows out to the side as you gradually lower your body to the ground.
    • When your chest gets slightly below your elbows, stop.
    • Hold this position for a few seconds.
    • To bring your body back to the starting position, press into your hands and engage your core.
    • Then relax.
    wide arm push up
    wide arm push-up

    Wall push-ups

    • Place your feet only a few inches away from a wall.
    • Arms and legs straight, lean forward and place your hands around chest height on the wall. (It is similar to a push-up, but on a higher plane and right up against a wall.)
    • You should be able to feel your arms supporting a portion of your weight.
    • Lower your chest toward the wall and slowly bend your elbows.
    • As your head and chest reach the wall, stop.
    • As you stop here, pay attention to maintaining your alignment of the body.
    • Avoid having your hips jump up or sag toward the wall.
    • Return to the beginning posture by pushing through your hands and straightening your arms.
    • You may feel your shoulder, chest, and arm muscles tense during each repetition.
    • Then relax.
    Wall Push-up
    Wall Push-up

    Clapping push-ups

    • To perform this exercise, you must position yourself in the push-up position and place your hand beneath your shoulder and fingers to support your arm.
    • As though you were about to perform a pushup, begin lowering your body until your chest is nearly in contact with the ground.
    • Make sure your hands are strong enough to help you raise yourself off the floor.
    • Clapping your hands together is an optional way to increase the difficulty.
    • As soon as you gently touch the ground, begin your next rep.
    • Then relax.
    Clapping push-ups
    Clapping push-ups

    Use these guidelines for safe exercise:

    • Before beginning any exercise, make sure your body is sufficiently warmed up.
    • Stop exercising if you begin to experience pain.
    • Increase the number of repetitions and length of your exercises gradually to prevent overtraining and sore muscles.
    • Use good form when exercising to protect your body and get the results you desire.
    • Try to wear clothes that don’t put too much restriction on your range of motion when working out. Use loose clothes as an option.
    • Before beginning an exercise routine, it is advised that you inhale deeply and exhale slowly.

    At what point should you stop performing this exercise?

    • In the event of a shoulder injury
    • If a wrist injury affects you
    • If you sustain an elbow injury
    • If, when exercising, you have shoulder ache
    • If your physician suggested that you relax

    Typical Mistakes Made When Pushing Ups:

    • Middle Sagging

    After you’ve gotten the hang of the plank, try your hand at push-ups to maintain your body straight.

    • Elbows Locked

    You may make the mistake of locking your elbows at the top of a push-up if you’re feeling tired and need a small break. However, this might strain or injure your joints since it puts too much stress on them. Always keep your elbows slightly bent. You can’t go on to the next set until you’ve taken a break and rested.

    • Hands Moved Too Far Forward

    Your shoulders will be under additional stress if your hands are extended farther than your shoulders.

    • Incorrect Neck Positioning

    Throughout the action, keep your neck neutral, your head in a straight line with your trunk, your eyes looking down at the floor, and your top lip pointing away from your foot. You are out of alignment when you can see your foot with your chin pointing up or down your head.

    Summary:

    One resistance exercise that you can do without any equipment to help you develop muscle strength is the push-up. Furthermore, they are not limited to dedicated gym users. Whichever style of push-up you choose standard or modified you are going to receive the health benefits.

    Push-ups are an excellent way to strengthen your upper body when you begin your day at home early in the morning. To begin this workout, choose a simple exercise that just needs five repetitions on the first day. To improve your upper-body stamina, you can practice variations and gradually increase the amount of repetitions as you grow better.

    It can be used five times a week for practice. Another option is to take one day off and spend it relaxing or practicing easy stretches for your upper body. Pain must not come after exercise.

    FAQ:

    What advantages do variants on push-ups offer?

    Your chest will be worked harder during pushup variations the more you spread your hands apart. This suggests that a wide-grip pushup will concentrate more on your pectoral strength than a standard pushup.

    What’s the ideal number of pushup repetitions per day?

    To prevent strain or injury, they must be done with the right form. People who are in the middle or advanced stages may have higher expectations. Divided into several sets, the range can be anything from twenty-five to one hundred pushups per day.

    Could I perform push-ups every day?

    In a technical sense, you could perform pushups every day. Still, there are a few things to think about if you want a safe and wealthy practice. Most importantly, you shouldn’t stop working out once you’ve reached the repetition limit.

    A push-up is what kind of exercise?

    It is a closed kinetic chain exercise that uses your body weight as resistance and doesn’t require any instruments. It may be adjusted to the individual’s level of fitness thanks to its numerous variations. The triceps, pectorals, and shoulder muscles are worked out.

    What is the objective of push-ups?

    The chest muscles, shoulders, and triceps are worked. They can also engage in the abdominal muscles, which strengthens the lower back and core when done correctly. One quick and easy workout that can help you gain strength is the push-up.

    Is performing pushups every day safe?

    Push-ups are a great way to strengthen your upper body and achieve a controlled, slim body. Try doing them every day. When performed correctly, pull-ups can help strengthen the lower back and abdomen through push-ups.

    How do variations on push-ups work?

    In terms of pushup variations, your chest will be worked more when your hands are farther apart. This means that compared to a typical pushup, a wide-grip pushup will focus on your pectoral strength more.

    Which kind of pushup works best?

    The wide push-up is a great exercise to work the muscles in your chest. To protect your shoulders, make sure to maintain your elbows pointing back and refrain from spreading your hands too far.

    References:

    • Nov. 25, 2023c: Physiotherapist, N. P. Push Ups Exercise: Health Advantages, Types, and Techniques? Mobile Clinic for Physiotherapy. Exercise for Push-Ups: https://mobilephysiotherapyclinic.in/
    • Image 1, Pediagnosis, 14 June 2019. Shoulder Anatomy Muscles. Pinterest. https://www.pinterest.ca/pin/607211962240619446
    • Image 6, F. L. Regime (2023, September 29). How to Perform, What Muscles Are Worked, and Why Should You Do Diamond Push-Ups? Mild. Diamond push-ups: how to work your muscles and reap the benefits (@fitliferegime)
    • Image 8, September 14, 2021, Pmirda. The Optimal You: The Clapping Push-Up Exercise. The Ideal Self | Holistic Nutrition & Virtual Personal Trainers. The-Optimal-You.com/clapping-push-up