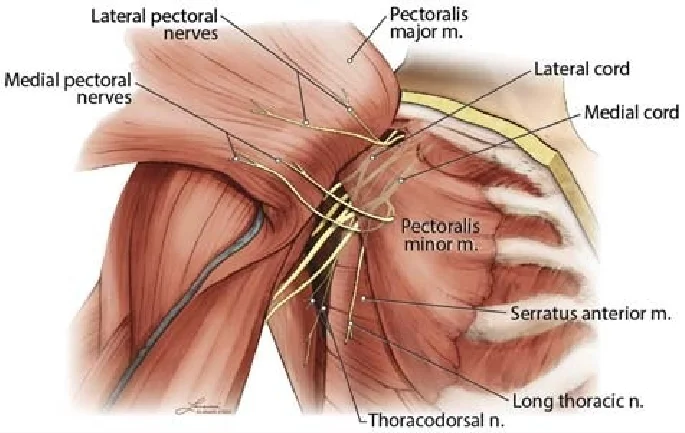
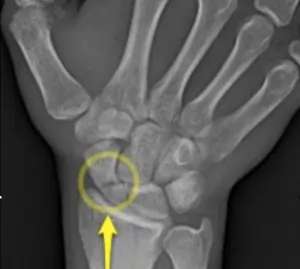
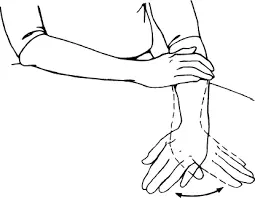
Blog

  • Lumbar Instability

    Lumbar Instability

    Introduction:

    Lumbar instability is a spinal disorder characterized by abnormal movement or joint deformation between two or more contiguous vertebrae. When a patient has lumbar instability, there is excessive movement between the vertebrae, which leads to gradual deterioration of the intervertebral joints and can impair the nervous system components that run through them.

    Lumbar instability is a major cause of low back pain and can lead to significant disability.
    According to the World Health Organization’s worldwide disease burden report, back pain is the leading cause of disability-adjusted life years.

    Spinal stability:

    Spinal stability can be attributed to one, two, or three “sub-systems” that have a significant impact on the spine. They are:

    • Spinal column and ligaments
    • The nervous system regulates spinal mobility.
    • Muscles move the spine.

    In a healthy condition, the three systems collaborate to maintain stability. When one of these subsystems is injured, for as via age-related degeneration, fractures, or neuromuscular illness, the remaining two must compensate. When it comes down to it, you can’t tell one spinal subsystem from another. Clinical instability is essentially a multi-system disorder.

    The ensuing imbalance can cause an unstable spine and discomfort, as well as significantly damage the patients’ quality of life by prohibiting them from performing their everyday duties.

    There are two types of lumbar instability: functional (clinical) and structural (radiographic).

    Functional instability, which can induce pain even in the absence of radiologic abnormalities, is characterized by neuromotor control over segmental movement during the midrange.

    Structural or mechanical instability is the failure of passive stabilizers that control excessive segmental end range of motion (ROM).
    It is also possible to have mixed instability.

    Relevant anatomy:

    Spinal instability is most commonly caused by injury or damage to the spinal column. The spinal column is a complicated structure with several potential faults in the subsystems.

    Spinal Stabilisation System:

    The passive subsystem includes the intervertebral disc, ligaments, facet joints and capsules, vertebrae, and passive muscle support.
    Facet Joint Capsular ligaments (which cover and support the facet joints) can relax. When they do, they cause excessive movement—and hence instability—in the spine. Capsular ligament laxity can be caused by various conditions, including disc herniation, spondylosis, whiplash-related issues, and others.

    Active subsystems include spinal muscles and tendons, thoracolumbar fascia, and Spinal muscles are the strong engines that propel the spine. They also offer rigidity and stability. Spinal instability can be caused by weakness or injury to the muscles that support the spine, such as multifidus and transverse abdominal. Ultrasound may reveal wasting (a symptom of weakening) in deep spinal muscles, although electromyography (EMG) is commonly utilized to identify muscle alteration.

    The nervous system receives data regarding the location of the spinal bones and columns and generates movement impulses. These impulses are sent to the muscles, prompting them to contract. Muscle contraction drives spinal motions and maintains stability. If these muscles contract slowly or in an atypical way, there may be a problem with the brain control subsystem. An EMG test can identify both of these issues.

    These disturbances can produce alterations in spinal movement patterns that can be seen with a trained eye (or a motion-detecting system). Nerve conduction studies can potentially uncover abnormalities in the neural control sub-system. An NCS is frequently conducted in conjunction with an EMG to detect related muscle stress or injury.

    Causes of Lumbar Instability:

    The main causes of lumbar instability are classified as follows:

    Degenerative: The most common cause of spinal instability in adults is degeneration or premature wear of the intervertebral discs, the most significant portion of the spine, resulting in abnormal movement of these structures. This can happen to persons who have a higher genetic susceptibility to it, as well as those whose bodies are subjected to excessive exercise. Poor posture, poor physical condition, muscle insufficiency, sedentary lifestyle, excess body weight, injury, and other factors all contribute to these degenerative disorders.

    Congenital:
    The most common congenital condition is spondylolisthesis, caused by spondylolysis (a bone abnormality at the intersection of the facet joints).
    Lumbosacral transition abnormalities (lumbarization of the first or fifth sacral vertebra).
    Scoliosis is characterized by an abnormal alignment of the spinal bodies.

    Acquired:
    After surgery.
    Infections and tumors are two examples of lumbar spine pathologies.

    Symptoms for Lumbar Spinal Instability:

    Symptoms vary according to the degree of the instability and individual circumstances. Common symptoms include:

    • Low back discomfort is the most prevalent symptom, which can be characterized as dull, aching, or acute. It may radiate to the buttocks and legs.
    • Back muscles can spasm in reaction to instability, producing discomfort and stiffness.
    • Numbness and tingling in the legs and feet might be caused by pinched nerves as a result of instability.
    • Weakness: The legs may feel weak or wobbly, which affects balance and coordination.
    • Loss of flexibility: The spine can become rigid and difficult to move, making bending and twisting difficult.
    • Difficulty walking: Walking might become unpleasant and unsteady, affecting regular tasks.

    How is Spinal Instability Diagnosed?

    Diagnosing spinal instability requires a mix of professional judgment and modern imaging tools. For example, here’s how it is usually done:

    Comprehensive Medical Evaluation:
    Patient’s History: A detailed medical history, including symptoms and previous injuries, aids in the diagnosis procedure.
    A comprehensive physical exam evaluates mobility, reflexes, and any indications of nerve injury.

    The physical examination may include numerous tests:

    Low midline sill sign:
    To identify the low midline sill sign, evaluate the patient’s lower back’s midline first. A sill resembling a capital “L” on the midline indicates a favorable test result if the lumbar lordosis increases. Next, the examiner palpates the interspinous space to determine the location of the upper spinous process concerning the lower spinous process. If the top spinous process is moved anterior to the lower spinous process, the test is affirmative.

    Interspinous gap changes during lumbar flexion-extension motion:
    This test is used to diagnose lumbar instability. First, the lower back is examined to see whether the interspinous gap has changed. The patient stands shoulder-width apart, flexes his back, and rests both hands on an examination table. After inspecting the lower back in flexion, the physiotherapist palpates and assesses the breadth of the individual interspinous space and the location of the upper spinous process concerning the lower one. Following that, the physiotherapist will instruct the patient to extend (or hollow) the lower back while assessing the interspinous gap change during this motion.

    Sit – to – stand test:
    The Sit-to-Stand test is positive (associated with instability) if a person has discomfort when sitting and partially relieves it by standing.

    Passive Lumbar Extension Test (PLE test ):
    The Passive Lumbar Extension Test (PLE) involves placing the patient in a prone posture. The therapist lifts both lower extremities passively to a height of approximately 30cm. The knees remain extended while softly pulling the legs. The examiner locates T12 ventrocaudally. This test can also be performed in a lateral posture with the patient’s legs bent. The test is positive if it produces comparable symptoms.

    Instability catch sign (active flexion test):
    The Instability Catch Sign (active flexion test) is a provocation test that involves the patient bending forward as far as possible and then returning to a neutral position. A positive result indicates that the patient is unable to return to the neutral position.

    Advanced Imaging Techniques:
    MRI Scans: Magnetic Resonance Imaging (MRI) delivers a thorough image of spinal structures, assisting in the diagnosis of herniated discs or concerns with vertebral alignment.
    CT Scans: Computed Tomography (CT) offers detailed pictures of bone structures, which is critical for detecting anomalies in the spine that may cause instability.

    Specialized Diagnostic Tests:
    X-rays are frequently used to study vertebral movement, particularly while changing postures, to diagnose instability.
    Dynamic imaging: flexion and extension. X-rays show how the spine moves, which might identify instability that static imaging may overlook.

    Treatments for lumbar instability:

    Non-Surgical Treatment Options: To address lumbar spinal instability, non-surgical therapies are frequently used first.

    • Physical therapy: Increasing core muscular strength and flexibility can help to stabilize the spine and relieve discomfort.
    • Pain management: Nonsteroidal anti-inflammatory medications (NSAIDs) and pain relievers can help with pain symptoms.
    • Wearing a lumbar brace can give support while restricting excessive movement.
    • Lifestyle changes, such as maintaining a healthy weight, avoiding activities that aggravate symptoms, and adopting excellent posture, can all assist in controlling instability.
    • Epidural steroid injections can temporarily relieve pain by lowering inflammation surrounding the nerves.

    Surgical Treatment Options:
    Surgery may be a viable option for patients with significant instability or who do not respond to non-surgical treatments. The most common surgical options are:

    Spinal fusion: This operation combines two or more vertebrae to form a stable piece. This helps to correct spinal instability and dramatically lowers pain from worn-out joints. When vertebrae are fused, the spinal column becomes more balanced, resulting in better function and comfort for the patient.

    This operation is especially advantageous for patients whose quality of life is compromised by severe spinal disorders since it provides both structural support and relief from persistent pain.

    Physical Therapy Management:

    Patient education is essential in the management of patients with segmental instability. This teaching should not be limited to the instances in which the patient should not perform. However, it should encourage the patient to be active while also recognizing which motions should be avoided or undertaken with extreme caution. These are loaded flexion motions because they may cause a posterior displacement of the disc. In addition, any end-range lumbar spine postures should be avoided since they overburden the posterior passive stabilizing elements.

    Diaphragmatic breathing with abdominal bracing:

    Lay on your back, legs bent, and lay your hands on either side of your ribs.
    Inhale through your nose and feel the breath go beneath your palms and toward the back of your rib cage. Imagine your ribcage as a balloon that expands in all directions when you breathe in. Exhale, and feel your hands sliding closer together as your ribcage narrows down towards the floor and into the center of your body. Maintain a relaxed neck, shoulders, and chest while feeling the rear of your rib cage connected to the floor.

    Maintain a neutral pelvis (not tucked or unduly arched). Inhale again.
    Then, exhale while picturing a broad belt around your lower back and lower abdomen. Gently tighten and elevate the belt as your deep core engages. Aim for a moderate contraction in these muscles, without grabbing or holding onto extra tension. You should be able to communicate with someone during contracting.

    Bridging

    Bridging-exercise
    Bridging-exercise

    inhale while lying on your back, legs bent, feet parallel, and hip-width apart.
    Exhale and brace your abdominals as described above. Lift your hips off the ground by engaging your glutes and pushing your feet onto the floor.
    Inhale as you release the position back down. Aim to maintain your shoulders and neck relaxed throughout. Avoid overarching your back.
    Complete 8-10 repetitions.

    Side plank on knees.

    Begin by sitting on your side, on one hip, with your legs bent and piled beside you. Bend your elbow and lower your forearm on the ground beside you.
    Exhale and drive your forearm into the floor, then elevate your hips into the air.
    Inhale and drop your hips halfway.
    Exhale to raise your hips again.
    Repeat 8-10 times, then inhale while lowering your hips with control.
    Repeat on the opposite side.

    Bird Dog

    Bird-dog Exercise
    Bird dog with elbow-to-knee

    Begin on all fours, knees precisely beneath your hips and hands below your shoulders.
    Aim for a neutral spine.
    Exhale to bring the abdominals inside and upward. Without changing your weight or arching your back, raise one leg behind you and your opposing arm in front.
    Breathe and maintain the posture for three slow counts.
    Inhale carefully to return your leg and hand to the mat.
    Complete 6-8 repetitions, then repeat on the opposite side.

    Long-Term Advantages of Treatment:

    Effective treatment of lumbar spinal instability can bring considerable long-term advantages.

    Reduced pain: Treatment can aid in pain management and enhance overall quality of life.
    Improved mobility: Greater flexibility and strength enable more efficient movement and involvement in daily activities.

    FAQs

    How do you manage lumbar instability?

    Treatments
    Physical therapy can help cure minor cases of spinal instability by strengthening the muscles in the spine.
    Prescription pain relievers and anti-inflammatory medications.
    A microdiscectomy is a surgical treatment that involves removing the intervertebral disc that is impinging on the spinal nerve.

    What symptoms indicate lumbar spine instability?

    Pain might be accompanied by weakness in the leg or foot. Abnormal movement might also result in excruciatingly painful muscular spasms. Signs of spinal macro-instability may include back discomfort, weakness, and/or numbness in the arms and legs.

    How do you check for lumbar instability?

    The patient is supine, and the examiner instructs him to elevate both lower extremities. The knees must be extended. The examiner next asks the patient to carefully return to the starting position. If the lower extremities slid down immediately due to low back discomfort, the test proved affirmative.

    How do you sleep when your lumbar spine is unstable?

    Sleeping on your side.
    If you sleep on your side, pull your legs up slightly towards your chest and place a cushion between them. Flexing your knees and placing a pillow between your legs might assist in aligning your spine, pelvis, and hips. This posture relieves strain on your spine. If you’d like, use a full-length body pillow.

    Can paralysis result from lumbar instability?

    Patients may occasionally additionally have muscle spasms. Weakening of the muscles. Paralysis.

    Can spinal instability be shown on an MRI?

    Until true discontinuity was shown at that level, soft tissue hemorrhage in the interspinous gap was not linked to ligament rupture. We conclude that the majority of unstable spinal injuries may be quickly and reliably assessed by MRI immediately, negating the need for further imaging.

    Is there a cure for the lumbar spine?

    Additionally, you can experience numbness or discomfort in your legs. In more extreme situations, you can experience difficulties managing your urine and bowel movements. Although lumbar spinal stenosis cannot be cured, there are several therapeutic options available.

    Is there a substantial risk of spinal instability?

    It can result in several problems that can significantly affect a person’s quality of life and is frequently brought on by trauma or degenerative diseases. That effect may be considerably lessened by educating my patients and creating individualized treatment programs.

    References

    • Lumbar instability: causes, symptoms and treatments. (n.d.). https://www.institutoclavel.com/en/lumbar-instability
    • Southwest Scoliosis Institute. (2021, January 15). THE TETHER VERTEBRAL BODY TETHERING SYSTEM. Southwest Scoliosis and Spine Institute. https://scoliosisinstitute.com/lumbar-spinal-instability/
    • Menzies, R. (2022, October 26). What are lumbar stabilization exercises? Healthline. https://www.healthline.com/health/lumbar-stabilization-exercises#bottom-line
  • 20 Best Exercises For Triceps Tendonitis

    20 Best Exercises For Triceps Tendonitis

    Introduction:

    Exercises for triceps tendonitis focus on reducing pain, improving flexibility, and restoring strength in the triceps and surrounding muscles. Gentle stretching, isometric holds, eccentric triceps extensions, and light resistance exercises help promote healing while preventing further strain.

    Triceps tendonitis is an overuse injury causing pain and inflammation at the back of the elbow. Strengthening and stretching exercises can help relieve discomfort and promote healing.

    Exercises for triceps tendonitis should be done with caution, particularly in the early phases of rehabilitation, as overstretching the tendon could worsen the problem.

    It’s important to understand what triceps tendonitis is before beginning with the exercises. The triceps muscle, which is situated at the rear of the upper arm, is connected to the elbow joint by the triceps tendon. The elbow region experiences pain, swelling, and stiffness when this tendon gets irritated or inflamed as a result of overuse, repetitive motions, or sudden increases in intensity.

    Activities involving lifting, pushing, or repetitive overhead motions are common causes of triceps tendonitis. For those with this condition, exercise, daily activities like lifting objects, and sometimes even relaxation can be difficult.

    Causes:

    This condition can result from several factors:

    • Overuse or Repetitive Stress: The triceps tendon may get strained by repetitive activities, particularly those involving pushing or pulling. This is typical of athletes or others who engage in repetitive overhead motions (e.g., swimming or tennis), weightlifting, or throwing.
    • Sudden Increase in Frequency or Intensity: Inflammation can result from suddenly raising the frequency or intensity of an activity or by beginning a new exercise regimen too soon.
    • Incorrect Technique: Overloading the tendon and causing damage might result from performing activities with incorrect form or posture. For instance, using incorrect lifting techniques when lifting weights might put additional strain on the triceps tendon and elbow joint.
    • Weak or Unbalanced Muscles: Overloading the tendon may result from weakness in the shoulder, forearm, or triceps. Muscle imbalances can also change how forces are transferred through the arm, which raises the possibility of injury.
    • Prior Injuries: The development of triceps tendonitis may be more likely in individuals who have previously had an elbow or shoulder injury because of compensatory movement patterns or structural problems.
    • Insufficient Warm-Up or Stretching: The risk of tendon strain can be increased by improperly warming up before exercise or by failing to stretch the triceps.

    Signs and symptoms:

    • The most noticeable sign is pain. Activities involving overhead lifting or pushing movements could worsen pain that is felt in the back of the upper arm, close to the elbow.
    • Swelling: Especially after activity, there may be swelling or soreness around the elbow and triceps area.
    • Stiffness: When trying to straighten the arm, the elbow may feel restricted in its range of motion or stiff.
    • Pain with Particular Motions: Actions that require lifting, pushing, or overhead motions, including throwing a ball, lifting weights, or pushing things, may cause more pain.
    • Tenderness to Touch: The affected area, such as the upper arm or elbow, may hurt when pressed.
    • Weakness: Because the triceps are less able to work correctly, there could be a noticeable weakness when attempting to push things or extend the arm.

    Benefits of exercises:

    When performed properly, exercises for triceps tendonitis can be very helpful. By strengthening the muscles and tendons, improving flexibility, and preventing further injury, the proper workouts help in pain relief, function improvement, and recovery.

    Exercises for triceps tendonitis provide the following main benefits:

    • Encourages Recovery With Eccentric Strengthening

    Tendonitis can be effectively treated using eccentric workouts, which cause the muscle to extend under tension. By strengthening collagen alignment and tendon strength, they help in encouraging the tendon to repair and rebuild.

    • Strengthens Muscle and Tendon

    By strengthening the surrounding muscles and triceps, you can prevent the tendon from getting stressed during everyday tasks. In addition to improving arm function, this can stop the injury from happening again.

    • Reduces Inflammation and Pain

    Stretching and strengthening activities might lessen tendonitis-related pain and inflammation when performed properly and regularly. By reducing corrective stress on the elbow, these exercises help in recovering normal movement patterns.

    • Reduces Tension and Promotes Flexibility

    Tendon tension may result from tight muscles, which can be lessened by stretching the triceps and other nearby muscles. Additionally, improved flexibility improves the general function and movement of the arms.

    • Prevents Muscle Unbalances

    Unbalances resulting from weakness in one muscle group can strain tendons. You may improve your muscle balance and lessen elbow strain by strengthening your triceps, biceps, and surrounding shoulder and forearm muscles.

    • Restores Normal Range of Motion

    The ability of certain workouts to help restore the elbow’s natural range of motion is one of its main advantages. By preventing stiffness and promoting more fluid arm movement, this helps with daily chores.

    • Helps Prevent Long-Term Injuries

    Performing strengthening and flexibility exercises after the tendon has recovered can help avoid further injuries. Moreover, it lowers the chance of chronic tendinitis and other arm ailments.

    • Promotes Healthy Recovery Without Overuse

    Exercises that are carefully selected help avoid stressing the tendon. Without reinjury or aggravating the condition, they help with healing and strength-building.

    You can gain a lot of advantages by carefully and gradually performing these workouts. However, it’s important to pay attention to your body, refrain from ignoring pain, and allow the tendon enough time to recover.

    When to Begin Triceps Tendonitis Exercises:

    Exercises for triceps tendonitis should only be started after speaking with a physician or physical therapist. Recovery can be greatly affected by early intervention.

    • Early Stage (Acute Inflammation): Rest, mild mobility exercises, and inflammation reduction should be the main priorities in the early stages of tendinitis. Strengthening activities could be too strenuous at this point, and it’s important to stay away from painful motions.
    • Mid to Late Stage (Recovery and Strengthening): You can start doing strengthening activities gradually when the inflammation is gone. Exercises meant for regaining strength and flexibility become essential at this point as the tendon begins to heal and recover.

    Consider the following safety measures before beginning an exercise program:

    Before starting any kind of workout program, a few precautions should be taken to maximize the advantages. To figure out which exercises are most effective for your specific problem, speak with your physician or physical therapist.

    It’s important to pay attention to your body and refrain from injuring yourself when you’re in pain. Even while soreness is a common side effect of exercise, prolonged or serious pain may be a sign of overworking.

    Maintaining proper technique and posture can help prevent repetitive injuries. Consider speaking with a doctor if you’re unsure how to work out an exercise program. Warming up before you start will help your muscles and joints get ready for exercise.

    Exercises For Triceps Tendonitis:

    The following list of exercises is the best for treating triceps tendinitis:

    French stretch

    • Sit or stand up straight.
    • Lift one arm above your head.
    • Your hand should reach down toward the opposite shoulder blade as you bend your elbow.
    • To increase the shoulder and triceps stretch, gently lift the bent elbow toward your head with your other hand.
    • A deep stretch should be felt into your shoulder and along the back of your arm.
    • Hold this position for a few seconds.
    • Then take a neutral position.
    • Then relax.
    • Repeat this activity 5 to 10 times.
    French stretch
    French stretch

    Eccentric Triceps Extensions

    • Hold a light dumbbell in one hand while standing or sitting.
    • Lift your arm above your head while maintaining a 90° elbow angle near your ear.
    • Hold the dumbbell straight overhead and keep your hand facing forward.
    • Bend your elbow and slowly lower the dumbbell behind your head while maintaining an unmoved upper arm.
    • Here, it’s important to gradually reduce the weight over a count of three to four seconds.
    • The eccentric portion of the exercise is the focus of this gradual lowering phase.
    • To prevent using other muscles to compensate, keep your arm steady and your core active.
    • Use your other arm or hand to help raise the dumbbell back up to the starting position after you have completely dropped the weight.
    • By doing this, the eccentric movement is isolated without causing muscle exhaustion.
    • Then take a neutral position.
    • Then relax.
    • Repeat this activity 5 to 10 times.
    Eccentric Triceps Extensions
    Eccentric Triceps Extensions

    Bicep Curls (with Light Weights)

    • The first step is to settle onto a chair or table.
    • With your arms fully stretched toward the floor and your palms facing front, hold a light dumbbell in each hand.
    • Maintain a relaxed shoulder position and keep your elbows near to your upper body.
    • Using your biceps, bend your elbows and slowly curl the dumbbells upward.
    • Make sure that only your forearms are moving and keep your upper arms still.
    • Curl the weights until your biceps contract well or your forearms are almost parallel to the floor.
    • To properly activate your biceps, squeeze them for one to two seconds at the top of the curl.
    • While resisting gravity, slowly return the weights to their initial position.
    • Lower the weights for 3–4 seconds to concentrate on the eccentric (lowering) phase.
    • Then return to your neutral position.
    • Then relax.
    • Repeat this activity 5 to 10 times.
    Seated Biceps Curl
    Seated Biceps Curl

    Triceps towel stretch

    • Using both hands, grasp a towel or resistance band.
    • Place your back in a neutral position and stand up straight.
    • Raise one arm over your head and bend the elbow such that your hand extends toward the shoulder blade on the other side of your back.
    • Grab the lower end of the towel behind your back with your other hand.
    • The triceps of the overhead arm will extend more deeply if you use your bottom hand to gently tug on the towel.
    • Both the back of your arm as well as your shoulder region should feel stretched.
    • Breathe deeply and relax into the stretch as you hold it for a few seconds.
    • Only pull lightly to prevent pain; try not to overstrain yourself or arch your back.
    • Then return to your neutral position.
    • Then relax.
    • Repeat this activity 5 to 10 times.
    Towel stretch
    Towel stretch

    Tricep rope pushdown

    • Fasten a rope to a cable machine’s high pulley.
    • Focus on the machine while keeping your feet shoulder-width apart.
    • Using a neutral grip, grasp the rope attachment with both hands and palms facing one another.
    • With your elbows bent at a 90-degree angle, take a few steps back from the machine to generate tension in the cable.
    • While keeping your back straight, your body should be slightly angled forward and your legs slightly bent.
    • Keep your elbows close to your sides and stretch them to push the rope down toward your thighs.
    • To truly work the triceps, spread your palms outward and split the rope apart at the bottom as you extend your arms.
    • Don’t swing or use speed; instead, concentrate on moving the weight with your triceps.
    • To get the most contraction, squeeze your triceps for a few seconds at the bottom of the exercise.
    • Allow the rope to go higher, resisting the weight as you do so, and slowly return to the starting position.
    • Keep your elbows close to your sides and don’t allow them to stretch out.
    • Then return to your neutral position.
    • Then relax.
    • Repeat this activity 5 to 10 times.
    Tricep rope pushdown
    Tricep rope pushdown

    Triceps kickback

    • In each hand, pick up a dumbbell (or utilize a cable machine that has a single handle attached).
    • Maintain a 45-degree torso lean while standing with your knees slightly bent.
    • Using a neutral grip, hold the dumbbells at your sides with your palms facing each other and begin with your elbows bent at a 90-degree angle.
    • For the duration of the exercise, keep your elbows close to your body.
    • Only your forearms should move; your upper arms should stay still.
    • Straighten your arms and extend them at the elbow joint to push the dumbbells back.
    • Control the action and concentrate on squeezing your triceps at the top of the exercise (when your arms are at their maximum length).
    • To avoid straining your joints, keep your elbows slightly bent at the end range rather than locking them.
    • Return the weights to the beginning position gradually while keeping control of the movement.
    • Then relax.
    • Repeat this activity 5 to 10 times.
    Dumbbell-triceps-kickback
    Dumbbell-triceps-kickback

    Overhead triceps stretch

    • With your back neutral, stand upright.
    • With one arm raised above your head, bend your elbow till your hand reaches the shoulder blade on the other side.
    • To increase the stretch in your triceps and along your shoulder, gently pull your elbow toward your head with your other hand.
    • The back of your arm, as well as possibly your shoulder and upper back, should feel stretched.
    • Hold this position for a few seconds.
    • Throughout the stretch, maintain stable and deep breathing to aid with muscular relaxation.
    • Then return to your neutral position.
    • Then relax.
    • Repeat this activity 5 to 10 times.
    • Repeat with the opposite arm switched.
    Overhead triceps stretch
    Overhead triceps stretch

    Supine Triceps Extension

    • On a bench, lie flat on your back; if you don’t have a bench, lie on the floor.
    • Take hold of a dumbbell with both feet.
    • Hold the dumbbell with both hands around one end, palms up, if you’re using one.
    • With the dumbbell slightly over your head, place the weights such that your elbows are bent at a 90-degree angle and your upper arms are parallel to your upper body.
    • Your lower back should stay in contact with the floor and your feet should be flat on the ground.
    • Reach up and press the barbell or dumbbell toward the ceiling with your elbows.
    • Keep your elbows from locking at the top and concentrate on engaging your triceps to straighten your arms.
    • Only your forearms should move during the workout; keep your upper arms as still as you can.
    • You should experience a powerful contraction in your triceps at the highest point of the exercise.
    • With your upper arms remaining inactive, bend your elbows and slowly lower the weight back down.
    • Drop the weight back down until your elbows are at about a 90-degree angle, or a little bit deeper if you feel comfortable.
    • Then return to your neutral position.
    • Then relax.
    • Repeat this activity 5 to 10 times.
    Triceps-extension
    Triceps-extension

    Elbow flexion

    • Keep your arm by your side when you stand.
    • After actively bending your elbow as far as it will go, take hold of your wrist or forearm with your other hand and apply a little pressure.
    • You can relieve the strain by straightening your elbow after holding it bent for a few seconds.
    • Then return to your neutral position.
    • Then relax.
    • Repeat this activity 5 to 10 times.
    elbow-bend-exercise
    elbow-bend-exercise

    Bench Tricep Dips

    • Place your hands close to your hips, fingers pointing forward, while seated on a bench.
    • With your knees bent at an around 90-degree angle and your feet flat on the floor, you may extend the exercise by extending them straight.
    • Using your hands to support your body, move your hips off the bench.
    • Your elbows should not be locked, and your arms should be straight.
    • Bring your body closer to the floor by bending your elbows to lower your body.
    • Instead of letting your elbows spread out to the sides, keep them pointing straight back.
    • Your triceps will be performing the majority of the effort thanks to this.
    • When your upper arms are parallel to the floor, stop (or go a little deeper if you feel comfortable).
    • To return to the beginning posture, push through your palms to extend your elbows.
    • Then relax.
    • Repeat this activity 5 to 10 times.
    bench tricep dips
    bench tricep dips

    Cross-body stretch

    • Maintain a straight back and relaxed shoulders while standing or sitting upright.
    • One arm should be held shoulder-high in front of you.
    • Maintaining the arm relaxed yet straight, bring the extended arm across your body to the opposing shoulder.
    • Gently pull the extended arm closer to your chest with your opposing hand the one that isn’t spread across your torso.
    • Pull your arm across your body while keeping your elbow slightly bent.
    • Maintaining an upright position, raise your arm across your chest and rotate your shoulder inward.
    • Hold this position for a few seconds.
    • Throughout the stretch, take slow breaths and let yourself relax in the position without pushing yourself.
    • Then return to your neutral position.
    • Then relax.
    • Repeat this activity 5 to 10 times.
    • On the opposite side, repeat the stretch.
    Cross-body stretch
    Cross-body stretch

    Dumbell-floor-press

    • With your knees bent and your feet flat on the floor (hip-width apart), lie flat on your back.
    • Place both dumbbells on your thighs and hold them in each hand.
    • When you’re ready, raise each dumbbell one at a time until it reaches shoulder height with the palms facing forward (or slightly inward, if you like).
    • Your elbows should bend as you lower the dumbbells.
    • Don’t spread your elbows too far; instead, keep them at a 45-degree angle to your body.
    • Allow your elbows to lightly tap the floor, and slowly and carefully lower the dumbbells.
    • To avoid putting unnecessary stress on your shoulder, halt when your elbows just touch the floor.
    • Controllably raise the dumbbells back up while fully extending your arms without locking your elbows at the top.
    • At the height of the movement, concentrate on compressing your chest.
    • For maximum muscular engagement and injury prevention, the motion should be slow and controlled, particularly during the lowering phase.
    • Then take a neutral position.
    • Then relax.
    • Repeat this activity 5 to 10 times.
    Dumbbell-floor-press
    Dumbbell-floor-press

    Sphinx-push-up

    • Make sure your elbows are just beneath your shoulders when you place your forearms on the floor. Palms down, your hands should be flat on the floor; if you want more support, join them together.
    • To make a straight line from your head to your heels, raise your hips.
    • Your body should be in a straight line with your feet hip-width apart.
    • Maintaining a straight body, go down your chest toward the floor while pressing against your forearms. The downward portion of a conventional push-up is comparable to this, except the majority of your body weight will be supported by your forearms.
    • When you lower your chest, keep your elbows curled in (near your body) so that your shoulders and triceps can work.
    • Your elbows shouldn’t slide too far away from your chest since your forearms should stay in contact with the ground.
    • To raise your body again, extend your elbows.
    • As you lift, make sure the movement is straight and controlled, using your shoulders, chest, and triceps.
    • Keep your core strong and concentrate on pressing with your forearms.
    • Avoid allowing your hips to rise or fall, and maintain a straight back.
    • Then take a neutral position.
    • Then relax.
    • Repeat this activity 5 to 10 times.
    Sphinx-push-up
    Sphinx-push-up

    Diamond-push-up

    • Place your hands directly beneath your shoulders and enter a conventional push-up position.
    • Make a diamond formation on the floor by putting your hands close together so that your thumbs and index fingers contact.
    • Your body should be in a straight line from your head to your heels, with your feet together. Keep your back from drooping by using your core and keeping your spine neutral.
    • As you drop your body toward the floor, bend your elbows.
    • Do not stretch out; instead, keep your elbows close to your sides and pointed back.
    • Maintaining the diamond position with your hands, lower your chest until it is barely over the floor.
    • Try to keep your body as straight as you can, using your legs and core to stay stable.
    • Raise your arms straight and push your body back up.
    • Throughout the exercise, concentrate on pushing through your palms and maintaining your elbows close to your sides.
    • Maintain a controlled motion at the highest point by completely extending your arms without locking your elbows.
    • Then return to your neutral position.
    • Then relax.
    • Repeat this activity 5 to 10 times.
    Diamond push-ups
    Diamond push-ups

    Wrist Extension Stretch

    • Your arm should be straight out in front of you as you sit comfortably.
    • Keep your palm down and your elbow straight.
    • Pull your fingers gently back toward your body with your other hand.
    • Your forearm, upper wrist, and maybe your elbow should all feel stretched.
    • Hold this position for a few seconds.
    • Don’t push yourself too hard; instead, keep the stretch light.
    • Relax your wrist and gradually relieve the stretch.
    • Then return to your neutral position.
    • Then relax.
    • Repeat this activity 5 to 10 times.
    Wrist-Extensor-Stretch
    Wrist-Extensor-Stretch

    Single-Arm Dumbbell Floor Press

    • Place your feet flat on the floor and bend your knees as you lie down.
    • With one hand, hold a dumbbell while keeping your elbow on the floor and your upper arm at a 45-degree angle to your body.
    • You can support yourself by placing your other arm on your hip or the floor.
    • With your arm fully extended, press the dumbbell straight up toward the ceiling.
    • Maintain a 45-degree angle between your upper arm and the ground by keeping your wrist straight and avoiding excessive elbow flex.
    • Maintaining control of the movement, slowly lower the dumbbell back down to the floor until your upper arm lightly touches the floor.
    • Be careful not to lower your elbow too much below the floor.
    • Then return to your neutral position.
    • Then relax.
    • Repeat this activity 5 to 10 times.
    Single-Arm Dumbbell Floor Press
    Single-Arm Dumbbell Floor Press

    Plank Triceps Kickback

    • Start in a high plank posture, which is comparable to the top of a push-up, with your core active, your body in a straight line from head to heels, and your hands directly beneath your shoulders.
    • Pick up a dumbbell with one hand.
    • If you’re more comfortable, you can put your feet closer together, or you can keep them wide for greater balance.
    • Move the dumbbell closer to the center of your body while maintaining the plank position by bending your elbow.
    • Maintain a 90-degree bend in your elbow and keep your upper arm close to your body.
    • From here, straighten your elbow and stretch your arm backward until your hand is moving toward the wall behind you. The “kickback” part of the movement is this.
    • Bend your elbow once more and slowly lower the dumbbell back to the beginning position while keeping control of the movement.
    • Then relax.
    • Repeat this activity 5 to 10 times.
    Plank Triceps Kickback
    Plank Triceps Kickback

    Alternating Triceps Kickback

    • Hold a dumbbell in each hand, stand with your feet shoulder-width apart, and bend your knees slightly.
    • Maintaining a straight back and a tight core, bend forward from the hips until your body is almost parallel to the floor.
    • With your hands facing inward and your upper arms close to your body, you should have your arms bent at the elbows at a 90-degree angle.
    • Squeeze your triceps at the highest point of the exercise, extend your right arm backward, and fully straighten your elbow.
    • Only your forearm should move; keep your upper arm still and refrain from swinging.
    • Once your right arm is fully extended, bend your elbow back to 90 degrees to bring it back to the beginning position.
    • Then return to your neutral position.
    • Then relax.
    • Switch to your left arm right away and perform the same motion again: squeeze your triceps, straighten your elbow, and extend your arm backward.
    • Repeat this activity 5 to 10 times.
    Alternating-Triceps-Kickback
    Alternating-Triceps-Kickback

    Overhead Triceps Extension (with Light Weight)

    Targeting the triceps from a new angle, the overhead triceps extension helps in tendon repair and muscle strength development.

    • Start with a standing position.
    • Keep your core active and your knees slightly bent.
    • Keep one dumbbell in each hand.
    • To ensure a firm grip, push your hands together and wrap your thumbs around the handle.
    • With your elbows pointed front, completely extend your arms overhead.
    • Your elbows should be near your head, and your arms should be parallel to your upper body.
    • With gentle elbow bending, slide the dumbbell behind your head.
    • Keep your elbows as close to your ears as you can while keeping them pointed up.
    • Depending on your comfort level and degree of flexibility, lower the dumbbell until your forearms are parallel to the floor or a little deeper.
    • Keep your upper arms still and refrain from swinging as you slowly extend your elbows to get the dumbbell back to the beginning position overhead.
    • To lessen the chance of strain, do not lock your elbows when you are fully extending your arms.
    • Then relax.
    • Repeat this activity 5 to 10 times.
    Overhead Triceps Extension (with Light Weight)
    Overhead Triceps Extension (with Light Weight)

    Isometric Triceps Contractions

    • Take a stand upright.
    • Press one hand’s palm flat against the surface.
    • Make sure your elbow is comfortably bent, which is often about 90 degrees.
    • If you want a different angle, you can also press your hand against the inner of your thigh or a comparable surface.
    • Focus on using your triceps, the muscle on the rear of your upper arm, to contract as you apply moderate to intense pressure to the surface.
    • Don’t let your arm move; keep it still.
    • The objective is to retain the muscle in place by contracting it.
    • Focus on squeezing the triceps while you hold the contraction for ten to fifteen seconds.
    • During the hold, maintain even and deep breathing.
    • Then return to your neutral position.
    • Then relax.
    • Repeat this activity 5 to 10 times.

    What precautions should be taken when exercising?

    It’s important to follow certain guidelines when managing triceps tendonitis to prevent more harm and promote fast recovery.

    When performing workouts for triceps tendonitis, have the following important precautions in mind:

    • Get Well Warmed Up

    The danger of straining or worsening the tendon increases if the warm-up is skipped. Your muscles and tendons will be ready for a workout if you warm up correctly.

    • Stay away from painful movements.

    Avoid pushing through pain when doing exercises. Sharp or severe pain suggests that the workout is too taxing on the tendon, while slight pain may be normal as the tendon heals.

    • Begin with resistance or light weights.

    Particularly in the early phases of recovery, begin with little weight or little resistance. The problem may worsen if the tendon gets stressed too soon.

    • Increase Intensity Gradually

    Increase the level of difficulty of the workouts gradually. Re-injury may result from excessive strain on the tendon caused by fast increases in load or intensity.

    • Focus on Eccentric Movements

    Although effective, eccentric exercises should not be overdone because they put additional strain on the tendon.

    • Pay Attention to Controlled Motions

    All exercises should be done carefully and gently to prevent jerking motions that might cause tendon irritation.

    • Don’t Overstretch

    Stretching too much, especially too forcefully, might strain the injured tendon, even though flexibility exercises are good for you.

    • Keep Your Form Correct

    By placing undue strain on the tendon and surrounding muscles, the wrong technique can make tendonitis worse.

    • Pay Attention to Your Body

    If you are pushing yourself too hard or injuring the tendon further, your body will tell you.

    • Take a Break and Get Better

    Avoid doing too much too soon or overtraining. Between workouts, the tendon requires time to heal.

    • Apply Ice to Inflammation

    To lessen inflammation and encourage healing, apply ice to the elbow for 15 to 20 minutes after working out.

    • Speak with an Expert for Advice

    A physical therapist or other medical expert should always be consulted when creating a customized rehabilitation plan for triceps tendonitis.

    You can treat triceps tendonitis safely and successfully and speed up healing by using these precautions. Strengthening the muscles without overtaxing the tendon is the goal of promoting healthy healing.

    When should you stop doing the triceps tendonitis exercises?

    The healing progress of the tendon, no sign of pain, and the advice of a healthcare professional are some of the criteria when deciding whether to stop or modify exercise for triceps tendonitis.

    To help you decide whether to stop doing particular exercises for triceps tendonitis, here are some important indicators and recommendations:

    • Sharp pain or increased pain

    It’s a big warning indicator if the pain during or after your activities gets much worse, especially if it starts to feel sharp or stabbing instead of dull.

    • Inflammation or Swelling Following Exercise

    Noticeable swelling that doesn’t go down with rest or ice applied to the elbow or tendon area.

    • Any discoloration or bruises

    Following an exercise session, black discoloration or bruises around the elbow or triceps.

    • Continuous Arm Weakness

    When you experience severe arm or triceps weakness during or after exercise, particularly while pushing or lifting.

    • Pain at Rest or Night

    Pain that gets worse at night when you’re not moving the arm or that doesn’t go away even while you’re at rest.

    • The feeling of a Pop or Click

    When exercising, a popping or clicking sensation in the triceps or elbow.

    • A tingling or numb feeling

    A sensation of numbness, tingling, or “pins and needles” in the fingers, hand, or arm.

    • Fever
    • Headache
    • No progress

    For additional assessment, speak with a physical therapist or other healthcare provider if, after a few weeks of exercise, neither pain nor function improves.

    If you have triceps tendinitis, what type of exercise should you avoid?

    Exercises that overstretch your triceps or require a lot of overhead motions should be avoided if you have triceps tendonitis.

    The following are particular workout types to stay away from:

    • Overhead Presses: Exercises that require lifting weight overhead, such as the military press or overhead shoulder press, can strain the triceps tendons.
    • Push-ups: Consistently performing push-ups can strain the triceps and worsen tendinitis, particularly if done incorrectly or with excessive repetition.
    • Chin-ups and pull-ups: Although these workouts work the biceps and back, they can also strain the triceps, particularly if performed incorrectly or with too much effort.
    • Exercises like the chest press and bench press (with a narrow grip) can nevertheless cause stress on the triceps even if they don’t directly target them. This is especially true if you utilize a narrow grip, which increases triceps engagement.

    Common Advice for Treating Tendinitis in the Triceps:

    Exercises are important for the healing process, but here are some more methods for treating triceps tendinitis:

    • Rest: Take rests from painful activities. Excessive use could worsen inflammation and slow the healing process.
    • Ice: To lessen swelling and inflammation, apply ice to the affected area for 15 to 20 minutes many times a day.
    • Anti-Inflammatory medicine: Ibuprofen and other over-the-counter NSAIDs can help reduce pain and swelling, but before using them for an extended period, always get medical advice.
    • Gradual Progression: Begin with easy workouts and increase in difficulty as tolerated. Don’t start hard workouts or heavy resistance training too soon.
    • Proper Form: To prevent overstressing the triceps tendon, be mindful of your form when performing exercises and going about your everyday routine.
    • Speak with a Professional: A physical therapist can help you create a more individualized rehabilitation plan if the pain continues.

    Summary:

    When the tendon that connects the triceps muscle to the elbow becomes inflamed as a result of overuse, repetitive strain, or injury, it can lead to triceps tendonitis. It is prevalent in those who perform repetitive arm-related occupations or in athletes who perform overhead movements, such as weightlifters, swimmers, and tennis players. Triceps tendonitis can cause long-term problems if treatment is not received, therefore it’s important to be proactive and practice the right exercises while recovering.

    Strengthening, bending, and avoiding re-injury are all made possible with triceps tendonitis exercises. You can recover well and resume your regular activities without putting more strain on your tendon by following the proper treatment, which includes low-impact exercises, eccentric strengthening, and gentle stretching.

    But always pay attention to your health, take it slow, and get help from a doctor if your symptoms worsen or continue. The majority of persons with triceps tendonitis can recover fully and return to their regular activities pain-free with time and regularity.

    You may restore triceps tendon strength and flexibility while avoiding additional damage by combining stretching, strengthening, and suitable recovery processes. It’s important to pay attention to your body and increase gradually, ensuring that each exercise is performed correctly and within a pain-free range of motion. If you use the right technique, you can heal from triceps tendinitis and return to your regular activities with more strength and endurance.

    FAQ:

    If I have triceps tendonitis, can I still exercise?

    Exercise is safe even if you have triceps tendonitis, but it’s important to pick the correct routines. In the beginning, concentrate on low-resistance movements, isometric exercises, and gentle stretches. Strengthening activities can be added gradually as your condition improves. A healthcare professional should always be consulted before beginning any fitness plan, and any painful motions should always be avoided.

    Which workouts are most effective for tendinitis in the triceps?

    Isometric Triceps Contractions: These help lessen strain by activating the triceps without causing the elbow joint to move.
    Slowly lowering the arm is the main goal of eccentric triceps extensions, which are very good for tendon healing.
    Stretching the triceps gently can help increase flexibility and ease tension.
    Modified push-ups, also known as wall push-ups, are low-impact exercises that help you build stronger triceps without overtaxing your tendon.
    Resistance Band Triceps Extensions: Depending on your strength level, these can be modified to give controlled resistance.

    After I get triceps tendonitis, when should I start working out?

    You ought to hold off until the initial pain and swelling are gone. It could take several days to a week. Until you have some range of motion again and the pain is under control, start with mild, low-intensity exercises and refrain from strengthening activities. To make sure you’re prepared for rehabilitation, always get medical advice before beginning any workouts.

    How can I decide when to stop triceps tendonitis exercises?

    You feel severe pain either during or after the workout.
    After your workout, you may experience bruising or swelling.
    Even after rest and recovery, the pain continues or gets worse.
    You experience severe stiffness or weakness that doesn’t go away.
    After several weeks of regular exercise, your condition has not improved.
    Take a break from exercising and get advice from a healthcare professional if you experience any of these symptoms.

    If I have triceps tendonitis, are there any exercises I should avoid?

    Heavy lifting: In particular, pushing or overhead movements like bench presses, overhead triceps extensions, and dips.
    Frequent overhead motions might put a strain on the triceps tendon and make the injury worse.
    Rapid motions: Rapid, jerky motions, like dynamic lifting or quick push-ups, might overstress the tendon.
    Painful movements: Until you’re completely recovered, you should refrain from any exercise that makes your symptoms worse.

    How frequently should I perform workouts for triceps tendonitis?

    Do triceps tendonitis exercises three to four times a week while you’re recovering. To prevent overtaxing the tendon and to give it time to recover, give yourself at least 48 hours off in between workouts. Always pay attention to your body; if you have pain take more days off.

    How long will it take for exercising to recover triceps tendonitis?

    The severity of the injury and how closely you follow your rehabilitation program will determine how long it takes for triceps tendonitis to heal. More severe cases may require several months to heal, while mild cases usually take four to six weeks. The key to speeding the healing process is rest, regular exercise, and preventing re-injury.

    Does triceps tendonitis respond well to stretching?

    To increase flexibility and relieve tension in the muscles surrounding the triceps tendon, stretching can be beneficial. Flexibility in the triceps muscle and elbow joint can be preserved by performing mild static stretches (holding for 20–30 seconds) and dynamic stretches (gradual movement through a range of motion) to avoid stiffness. Aggressive stretching, however, should be avoided as it may cause tendon irritation.

    What should I do if exercising makes my triceps tendonitis symptoms worse?

    If your symptoms get worse while you’re exercising, stop right away and check your health. To lessen inflammation, apply ice to the region and take it easy for 24 to 48 hours. See a doctor or physical therapist for more advice if your pain, swelling, or pain doesn’t go away or if you start experiencing new symptoms like bruising or numbness.

    For triceps tendonitis, should I apply ice or heat after working out?

    To minimize swelling and inflammation during the acute stage of tendinitis, ice is typically advised. After working out, apply ice to the elbow for 15 to 20 minutes. Heat can be utilized to increase blood circulation in the later phases of recovery by relaxing muscles before or after exercise. Depending on your state of recovery, always heed your healthcare provider’s advice when applying heat or ice.

    How can I stop tendinitis in my triceps from coming back?

    Before working out, especially any upper body exercises, make sure you warm up correctly.
    To increase total joint stability, strengthen the muscles surrounding the triceps, such as the forearm and shoulder muscles.
    Instead of overtaxing the tendon too soon, gradually raise the intensity of your workouts.
    Regular stretching will help you stay flexible.
    Avoid repetitive motions that put a strain on the triceps tendon and take breaks when necessary.

    When my tendonitis recovers, can I resume lifting weights or doing overhead exercises?

    Yes, however, it’s important to gradually resume overhead activities like weights. Start with smaller weights and stay away from activities like overhead lifts and triceps dips that directly strain the triceps tendon. Over several weeks, gradually increase the intensity while maintaining perfect form. See a physical therapist to make sure you’re improving safely.
    References:

    References:

    • Coleman, S., RelayHealth, & Clapis, P. (2009). Exercises for treating tendinitis in the triceps. Within RelayHealth. triceps tendinopathy.pdf https://www.rickysinghmd.com/wp-content/themes/ypo-theme
    • Admin. September 27, 2023. Exercises for tendinitis in the triceps. Spine and Advanced Sports. The following exercises are for triceps tendonitis: https://www.advancedsportsandspine.com/
    • J., PhD. Seladi-Schulman (2019, April 22). How to manage tendinitis in the triceps. Tricep tendinitis, https://www.healthline.com/health/sports-injuries
    • Parmar, D. October 15, 2023. Samarpan Physio’s Top 10 Exercises for Triceps Tendonitis. Samarpan Clinic for Physiotherapy. The best exercises for triceps tendonitis can be found at https://samarpanphysioclinic.com/#google_vignette.
    • Tricep extension with bands. (n.d.). [Visual]. https://www.hingehealth.com/resources/articles/triceps-tendonitishingehealth
    • Louw, M. (April 3, 2023). Reasons for and remedies for triceps tendonitis. Physiotherapist for sports injuries. This post discusses the causes and treatments of triceps tendinitis.
    • Bariya, D. December 13, 2023. 26 Mobile Physio: The Best Exercise for Triceps Tendonitis. Mobile Physiotherapy Clinic. The top 26 exercises for triceps tendonitis can be found at https://mobilephysiotherapyclinic.in/26
    • Image 1, Shoulder Exercises New York | Triceps Tendinopathy Exercises New York. (n.d.). Jaspal https://www.rickysinghmd.com/triceps-tendinopathy/ Ricky Singh, M.D.
    • Image 2, https://fitbod.me/exercises/tricep-extension with dumbbells
    • Image 5, Litfin, J. (November 26, 2024b). Five variations on how to perform tricep pushdowns. Gym Geek. https://gymgeek.com/exercises/arms/what-the-tricep-pushdown-is-and-how-to-do-it-correctly/
    • Image 10, Neudecker, K., and Cooper, E. (2024, July 3). How to perform tricep dips for stronger, larger arms. Male health. A33643012/tricep-dips: https://www.menshealth.com/uk/how-tos/
    • Image 12, Tinnetgaard. November 13, 2024. Bo- og Erhvervsskole Tinnetgaard | Uddannelse og muligheder. The URL is https://tinnetgaard.dk/?t=546813412.
    • Image 13, Luna, D. August 23, 2023b. Benefits, muscles used, and more of the sphinx push-up. Motivate the United States. Sphinx push-up: https://www.inspireusafoundation.org/
    • Image 16, Lift Manual. April 24, 2023. Form, advantages, and guidance for the dumbbell single-arm floor press. This is the dumbbell single-arm floor press: https://liftmanual.com/
    • Image 17, On March 24, 2019, Pridgett, T. How to perform a triceps kickback plank. popsugar. How to do a plank for triceps and kickback (https://www.popsugar.com/fitness)
    • Image 18, On March 20, 2022, Crocker, R., and Crocker, R. Eight efficient exercises for toned, powerful triceps. Oxygen Mag. Workouts for women: https://www.oxygenmag.com/arm-workouts-for-women/triceps/8-effective-triceps-moves-8593
    • Image 19, P. Tirgar (2024, Nov. 4). Exercise for Extension of the Overhead Triceps: Advantages, Methods? A mobile clinic for physical therapy. #google_vignette https://mobilephysiotherapyclinic.in/overhead-triceps-extension-health-benefits
  • Pulmonary Embolism

    Pulmonary Embolism

    Introduction

    Pulmonary embolism (PE) is a life-threatening condition that occurs when a blood clot, usually from the deep veins of the legs (deep vein thrombosis), travels to the lungs and blocks blood flow. This can lead to shortness of breath, chest pain, and rapid heart rate.

    PE requires urgent medical attention and is typically treated with anticoagulants or, in severe cases, thrombolytic therapy.

    The blood clot typically begins in a vein that is deep in the leg and moves to the lung. In rare instances, the clot may form in a vein in a different area of the body. Deep vein thrombosis, also known as DVT, is the term used to describe a blood clot that develops in one or more of the body’s deep veins.

    A pulmonary embolism can be fatal whenever one or more clots obstruct blood flow to the lungs. However, the chance of death is significantly decreased with early treatment. You can reduce your risk of pulmonary embolism by taking precautions against hemorrhaging in your legs.

    A disorder where a blood clot blocks any number of arteries in the lungs. Blood clots that originate in the legs or, less frequently, other regions of the body (deep vein thrombosis, or DVT) are the most common cause of pulmonary embolisms. Chest pain, coughing, and shortness of breath are some of the symptoms.

    The risk of death is significantly decreased by prompt treatment to break up the clot. Blood thinners, medications, or procedures can be used for this. Physical activity and compression stockings can help stop clots from developing in their initial place.

    The Pathological Process

    Particularly at the calf, stasis in the deep veins causes thrombus development. The degree of alterations in pulmonary blood flow and respiration depends on the patient’s initial cardiorespiratory condition as well as the size and quantity of emboli. A massive embolus can be lethal, yet a modest blockage of the pulmonary artery might not cause any symptoms.

    In the latter instance, pulmonary embolism results in a mismatch between ventilation and perfusion, which raises pulmonary artery pressures and right ventricular effort. This leads to wasteful ventilation as it increases the dead space in the alveoli. As a result of a reduction in blood volume and coronary circulation to the left ventricle, the right heart eventually fails, followed by the left.

    A Pulmonary Embolism: What Is It?

    A blood clot in one of your lung’s blood arteries is called a pulmonary embolism (PE). This occurs when a clot from another area of your body, usually your arm or leg, travels to your lungs through your veins. A PE raises blood pressure in your pulmonary arteries, decreases oxygen levels in your lungs, and limits blood flow to your lungs.

    An embolus is a blood clot that starts in a blood vessel in one part of the body, breaks off, and moves via the blood to another part of the body. A blood artery may become lodged with an embolus. An organ’s blood supply may be cut off as a result. An embolism occurs when an embolus blocks a blood artery.

    The circulatory system of the body is composed of the heart, arteries, capillaries, and veins. The heart pumps blood into the arteries with tremendous force. Blood then enters the capillaries, which are microscopic blood arteries found in tissues. Blood is returned to the heart via the veins. Blood flow slows as it returns to the heart through the veins. A clot may occasionally form as a result of this slowed blood flow.

    This is a serious medical situation. A pulmonary embolism can harm the heart or lungs and potentially result in death if treatment is delayed. Approximately one-third of pulmonary embolism victims pass away before receiving a diagnosis and treatment.

    An embolism in the lungs can:

    • Harm your lungs.
    • Cause heart failure by putting stress on your heart.
    • Depending on the size of the clot, it could be fatal.
    • PE is rarely lethal if diagnosed and treated promptly.

    What is the prevalence of Pulmonary Embolism?

    One of the most prevalent heart and blood vessel conditions worldwide is pulmonary embolism. After heart attacks and strokes, it comes in third. Approximately 900,000 persons in the US receive a PE each year.

    Causes

    A pulmonary embolism happens when a mass, usually a blood clot, becomes lodged in a lung artery, obstructing blood flow. The most common cause of blood clots is deep vein thrombosis, which occurs in the deep veins in your legs.

    There are frequently several clots involved. Each clogged artery prevents blood flow to certain parts of the lung, which could result in death. Pulmonary infarction is a term for this condition. Your lungs have a harder time supplying oxygen to the rest of your body as a result.

    Blood “pooling” or accumulating in a specific area of your body, generally your arm or leg. After extended periods of inactivity, such as following surgery, bed rest, or a lengthy travel or plane ride, blood typically pools.

    Damage to a vein, such as from surgery or a fracture (particularly in your leg, hip, knee, or pelvis). Other illnesses, such as cardiovascular disease (which includes heart attacks, strokes, atrial fibrillation, and congestive heart failure).

    A change in the clotting factors in your blood. Certain cancers and those undergoing treatment with hormone replacement or birth control tablets may have elevated clotting factors. Blood clotting disorders can also result in abnormal or decreased clotting factors.

    Sometimes things other than blood clots induce blockages in the blood vessels, including:

    • The inside fat of a fractured long bone
    • A portion of a tumor
    • Bubbles of air

    Signs and symptoms

    Symptom-of-pulmonary-embolism
    Symptom-of-pulmonary-embolism

    The degree of lung involvement, the size of your blood clots, and whether you have preexisting heart or lung illness can all affect the symptoms of a pulmonary embolism.

    Typical signs and symptoms include:

    • Breathlessness. Usually, this symptom manifests abruptly. Breathing difficulties occur even when you’re at rest and worsen when you move.
    • Chest discomfort. You can experience what feels like a heart attack. When you take a big breath, the sensation of pain is often intense. You may be unable to take a deep breath because of the pain. Additionally, you might feel it while you lean over, bend, or cough.
    • Fainting. If your blood pressure or heart rate suddenly drops, you could faint. We refer to this as syncope.

    Additional signs and symptoms of a pulmonary embolism include:

    • Coughing out mucous that may be bloody or splattered with blood
    • An erratic or fast heartbeat
    • Dizziness or lightheadedness
    • Sweating excessively
    • A fever
    • Usually located in the rear of the lower thigh, leg pain, edema, or both.
    • Cyanosis is characterized by clammy or discolored skin.

    Risk Factor

    Blood clots that cause a pulmonary embolism can happen to anyone, but some things can make you more susceptible.

    Which factors increase the risk of a pulmonary embolism?

    Individuals who are susceptible to PE include those who:

    • Have deep vein thrombosis (DVT), or a blood clot in their leg.
    • Are not active for extended periods when traveling by airline, rail, or automobile (e.g., a long, cross-country car excursion).
    • Have lately experienced vascular stress or injury, maybe as a result of varicose veins, fractures, or surgery.
    • Are utilizing hormone replacement treatment or hormonal-based contraception, such as Birth control pills, patches, or rings.
    • Suffer from a blood clotting condition.
    • Have a blood clot history in your family.
    • Smoking.
    • Possess diabetes.
    • Cancer.
    • Possess a history of heart attacks, strokes, or heart failure.
    • Possess either obesity (body mass index, or BMI) or overweight (BMI greater than 25).
    • Have either given birth within the last six weeks or are pregnant.
    • Had a central vein disease catheter inserted into their leg or arm.
    • Your healthcare practitioner can take action to lower your risk of PE if you have experienced a blood clot and have any of these risk factors.

    Health issues and therapies

    You are at risk from certain medical diseases and treatments, including:

    • Heart condition. Diseases of the heart and blood vessels, particularly heart failure, increase the risk of clot development.
    • Cancer. Blood clot risk can be increased by certain malignancies, including those of the brain, ovaries, pancreas, colon, stomach, lung, and kidneys, as well as tumors that have disseminated. The danger is considerably increased by chemotherapy. Additionally, taking tamoxifen or raloxifene (Evita) and having a personal or family history of breast cancer increases your risk of blood clots.
    • Surgery. One of the main causes of problematic blood clots is surgery. Because of this, clot-preventive medications may be used both before and after major surgery, like joint replacement.
    • Conditions that impact coagulation. Blood is impacted by certain hereditary conditions, which increases the risk of clotting. Blood clot risk might also be increased by other medical conditions, such as kidney illness.

    COVID-19 is the coronavirus disease of 2019. A pulmonary embolism is more likely to occur in people with severe COVID-19 symptoms.

    Long stretches of inactivity

    Longer than typical durations of inactivity increase the risk of blood clots, including:

    • Rest in bed. Blood clots can occur if you are bedridden for a long time following surgery, a heart attack, a limb fracture, trauma, or any other major disease. Long lengths of time spent with your legs flat might cause blood to pool in your legs when the veins’ flow slows down. Blood clots may occasionally arise from this.
    • Lengthy journeys. During long flights or vehicle rides, sitting in a tight spot reduces blood flow in the legs, increasing the risk of blood clots.

    Additional risk factors

    • Smoking. Some persons, particularly those with existing risk factors, are more susceptible to blood clots due to tobacco use for unclear reasons.
    • Being overweight. Being overweight raises the chance of blood clots, especially in those who have other risk factors.
    • Extra estrogen. Particularly in people who smoke or are overweight, the estrogen in birth control tablets and hormone replacement therapy can raise blood clotting factors.
    • Pregnancy. Blood returns from the legs may be slowed by the baby’s weight resting against pelvic veins. When blood pools or slows, clots become more likely to form.

    Issues

    The consequences of a pulmonary embolism can be deadly. Approximately one-third of patients who have an untreated and undetected pulmonary embolism do not make it out alive. However, that number sharply declines when the illness is identified and treated quickly.

    Additionally, pulmonary embolisms may result in pulmonary hypertension, a condition where the right side of the heart and lungs have excessively high blood pressure. Your heart has to work harder to pump blood through the arteries in your lungs when there are blockages in those vessels. Eventually, this weakens your heart and raises blood pressure.

    Rarely, do tiny clots known as emboli stay in the lungs, and over time, the pulmonary arteries become scarred. This causes persistent pulmonary hypertension by limiting blood flow.

    One consequence of a pulmonary embolism is:

    • Cyanosis.
    • Heart attack.
    • Stroke.
    • Hypertension of the lungs.
    • Pulmonary infarction, or death of lung tissue.

    Prevention

    Pulmonary embolisms can be avoided by avoiding clots in your legs’ deep veins. Because of this, the majority of hospitals take strong steps to avoid blood clots, such as:

    • Anticoagulants, or blood thinners. Before and after surgery, these medications are frequently administered to patients who are at risk of clotting. Additionally, they are frequently administered to hospitalized patients with certain medical disorders, such as heart attacks, strokes, or cancer complications.
    • Compression stockings. By gradually squeezing the legs, compression stockings improve the efficiency of blood flow through the veins and leg muscles. They provide a straightforward, affordable, and safe method of preventing blood from accumulating in the legs both during and after surgery.
    • Raising the legs. When at all feasible, and especially at night, elevate your legs. Use books or blocks to raise the bottom of your bed 4 to 6 inches (10 to 15 cm).
    • Engaging in physical exercise. Getting moving as soon as possible after surgery can speed up recovery in general and help prevent pulmonary embolism. This is the primary reason your nurse might encourage you to get up and move on the day of surgery, even though the area where your surgical incision is hurting.
    • Compression by pneumatics. During this procedure, thigh-high or calf-high handcuffs are used, which automatically fill with air and release it every few minutes. This promotes blood flow by squeezing and massaging your legs’ veins.

    Precautions when traveling

    Blood clots are rare when traveling, although they become more likely as long-distance travel grows. Consult your healthcare practitioner if you have blood clot risk factors and are worried about traveling.

    To assist avoid blood clots when traveling, your healthcare practitioner may recommend the following:

    • Be sure to stay hydrated. The greatest liquid for avoiding dehydration, which can hasten the formation of blood clots, is water. Steer clear of alcohol, which causes fluid loss.
    • Stop sitting for a moment. Every hour or so, take a stroll around the aircraft cabin. Stop occasionally while driving and take a few short walks around the vehicle. Bend your knees deeply a couple of times.
    • Get up from your chair. Every 15 to 30 minutes, lift your toes up and down and bend and move your ankles in circles.
    • Put on supportive stockings. To encourage fluid mobility and circulation in your legs, your doctor might suggest these. Compression stockings come in a variety of fashionable hues and textures. To assist you in putting on the stockings, there are even gadgets known as stocking butlers.

    Testing and Diagnosis

    How do you diagnose a pulmonary embolism?

    A healthcare professional will conduct the following tests to diagnose PE after reviewing your symptoms and risk factors:

    CT Scan

    CAT scan or computed tomography. This imaging exam creates fine-grained images of the body using X-rays and a computer. A CT scan provides information on the organs, muscles, fat, and bones. A contrast-enhanced CT scan improves the view of the lungs’ blood arteries. A dye-like material called contrast is injected into a vein to make the organ or tissue being studied more visible in the image.

    Lung angiography.

    Aneurysms (bulging of the blood vessels), stenosis (narrowing of the blood vessels), and blockages are among the problems that can be assessed using this X-ray image of the blood vessels. A tiny, flexible tube is inserted into an artery to administer a dye (contrast). On X-rays, this dye makes the blood vessels visible.

    MRI

    MRI stands for magnetic resonance imaging. This imaging test creates fine-grained images of the body’s organs and structures by combining radio frequencies, a magnetic field, and a computer.

    US or duplex ultrasound

    The purpose of this kind of vascular ultrasonography is to evaluate the structure and blood flow in the legs’ blood arteries. (It is common for blood clots from the legs to come loose and enter the lungs.) The US creates images of blood arteries, tissues, and organs using a computer and high-frequency sound waves.

    Chest X-ray.

    This imaging examination evaluates the heart and lungs. Information on the size, form, contour, and anatomical location of the cardiovascular system, lungs, aorta, pulmonary arteries, bronchi (big breathing tubes), and The middle part of the (area in the very center of the chest separates the lungs) can be seen on a chest X-ray.

    Ventilation-perfusion V/Q

    V/Q scan, or ventilation-perfusion scan. A tiny quantity of radioactive material is utilized to aid in the examination of the lungs during this nuclear radiology test. The flow of air into and out of the bronchi and bronchioles is measured using a ventilation scan. A perfusion scan assesses the lungs’ blood flow.

    Laboratory examinations

    Blood tests, such as the D-dimer level test, are used to determine the blood’s ability to clot. Testing for genetic abnormalities that could lead to irregular blood clotting may be part of further blood work. The amount of oxygen in the blood can be determined by measuring arterial blood gases.

    Electrocardiogram

    EKG stands for electrocardiogram. One of the quickest and easiest exams for assessing the heart is this one. Certain locations on the arms, legs, and chest are equipped with electrodes, which are tiny, sticky patches. Lead wires are used to connect the electrodes to an EKG machine. They measure, evaluate, and print the heart’s electrical activity.

    Handling and Therapy

    How do you treat a pulmonary embolism?

    To keep a careful eye on your condition, medical professionals typically treat PE patients in hospitals. The degree of seriousness of the clot will determine how long your hospital stay and treatment for a pulmonary embolism will last. It might not be necessary for some folks to stay overnight. A pulmonary embolism, or pneumonia, is mostly treated with an anticoagulant, which is a blood thinner.

    To increase blood flow within your pulmonary arteries, you might also have surgery, thrombolytic therapy, or interventional procedures, depending on the extent of the clot and how it affects other organs like your heart.

    Anticoagulant drugs

    The majority of the time, anticoagulant drugs (blood thinners) are used as treatment. Blood clotting is impeded by anticoagulants. This stops blood clots in the future. Like any medication, it’s critical to know when and how to take your thrombin and to adhere to your doctor’s instructions.

    The kind of medication you take, how long you must take it, and the kind of follow-up surveillance you require will all depend on your diagnosis. For the laboratory and your provider to track how you are responding to the medication, make sure you maintain all of your follow-up appointments.

    Prothrombin time tests, which measure how quickly blood clots, may be part of your follow-up when taking anticoagulants. This aids in determining whether you’re taking the recommended dosage.

    Stockings with compression

    Your legs’ blood flow is improved by compression stockings, often known as support hoses. They are frequently used by people who have deep vein thrombosis. Utilize them as prescribed by your physician. Typically knee-length, the stockings compress your legs to keep blood from accumulating.

    Consult your healthcare practitioner about the proper usage, duration, and maintenance of your compression stockings. To keep compression stockings from getting damaged, it’s crucial to wash them as directed.

    Treatment with fibrinolytics. These medications, often known as clot busters, are administered intravenously (IV) or intravenously (IV) to dissolve a clot. Only life-threatening circumstances call for the use of these medications.

    Vena cava filter

    To prevent clots from reaching the lungs, a tiny metal device may be inserted into the vena cava, the big blood channel that returns oxygen from the body to the heart.

    Embolectomy of the lung

    This type of surgery to remove a PE is rarely employed. Only in extreme situations—when your PE is very large, you are unable to receive anticoagulation and/or thrombolytic treatment because of other health issues, you have not responded well to those therapies, or your condition is unstable—is it usually done?

    Thrombectomy by percutaneous means.

    With X-ray guidance, a long, slender, and hollow tube (called a catheter can be inserted down the blood vessel to the embolism location. After the catheter is positioned, thrombolytic medication is used to dissolve the embolism, split it up, or draw it out.

    Preventive therapy is a crucial part of PE treatment because it stops new emboli from forming.

    Methods

    Your doctor could suggest surgery or a tube to remove the blood blockage from your pulmonary artery if a PE is life-threatening or if no other therapies are working. Another alternative is thrombolytic treatment. Additionally, your doctor can suggest an interventional treatment when a filter is inserted into the biggest vein in your body. Before clots reach your lungs, they are caught by a vena cava filter.

    Thrombolytic treatment

    The clot is broken up using thrombolytic drugs, also known as “clot busters,” such as tissue plasminogen activator (TPA). Thrombolytics are always administered in a hospital’s emergency room intensive care unit, or ICU so that a healthcare professional can keep an eye on you. If you have a unique circumstance, such as high blood pressure or an unstable state due to pulmonary embolism, you might be prescribed this kind of drug.

    Implications for Physiotherapy

    After PE, mobility is essential to the patient’s recuperation. Bed rest and inpatient therapy are usually recommended after anticoagulation and thrombolytic treatments. Restoring a clean lung field and adequate oxygen uptake is the primary goal of physical therapy. Chest physical therapy can do this, and it can be advanced to incorporate endurance exercises including walking g or motorcycle ergometry.

    Prognosis and Outlook

    In the event of a pulmonary embolism, what can I anticipate?


    An embolism of the lungs is a highly hazardous ailment that can cause death or chronic sickness if left untreated. A few hours after an embolism of the lungs occurs, some people pass away unexpectedly. This may occur before a diagnosis is made by a healthcare provider.

    If you happen to have a coronary or lung problem, you are more likely to die from a PE. Even so, just 1% to 3% of patients who have a pulmonary embolism die from it, thanks to improved imaging techniques compared to earlier times.

    Your overall health, the size of the blood clots and blockages, and the efficiency of your heart’s pumping action all affect your prognosis (outlook) after treatment.

    Treatment-related complications or adverse effects

    One potential adverse effect of drugs used to treat pulmonary emboli is bleeding. Your doctor will prescribe the appropriate dosage of thrombolytics or anticoagulants based on your circumstances. They can keep an eye on your condition by maintaining you in the hospital.

    How quickly will I get better following treatment?

    After a week of treatment, you ought to feel better. However, it may take months or even years for a pulmonary embolism to fully disappear.

    Your heart must exert more effort to counteract the decreased blood flow and elevated blood pressure caused by PE. Months later, some patients also struggle to restore normal function in one of their heart chambers as a result of this. As a result, individuals can no longer tolerate as much physical exertion as they could before their pulmonary embolism.

    Is it possible to avoid a pulmonary embolism?

    You might be able to stop it, yes. A pulmonary embolism can be avoided in the following ways:

    • Engaging in regular exercise. Spend a few minutes each hour moving your arms, legs, and feet if you are unable to walk around. Compression stockings might help promote blood flow if you know you’ll be sitting or standing for extended periods.
    • Consuming a lot of water while avoiding alcohol and coffee.
    • Avoiding tobacco products.
    • Don’t cross your legs.
    • Not dressing in apparel that is too tight.
    • Reaching a healthy weight for yourself.
    • Twice a day, spend 30 minutes elevating your feet.
    • Discuss lowering your risk factors with your healthcare professional, particularly if you or any family members have experienced a blood clot.

    Important facts about pulmonary embolisms A pulmonary embolism (PE) is a blood clot that forms in a blood vessel elsewhere in the body (usually the leg), travels to an artery in the lung, and then abruptly blocks the artery. Abnormal blood clots can form because of things like “sluggish” blood flow through the veins, abnormalities in clot-forming factors, and/or damage to the blood vessel wall. A wide range of conditions and risk factors have been associated with pulmonary embolisms, and the most common symptom of PE is sudden shortness of breath. PE is frequently challenging to diagnose because its signs and symptoms are similar to those of many other conditions and diseases.

    FAQs

    What is a pulmonary embolism’s primary cause?

    A narrowed artery in the lungs is the cause of a pulmonary embolism. A blood clot that starts in a deep vein in the leg and moves to the lungs, where it lodges in a smaller lung artery, is the most frequent cause of this kind of blockage. The deep veins in the legs are where nearly all clots from forming that result in pulmonary embolism originate.

    Is it possible to cure a pulmonary embolism?

    The expectation is that your body will eventually break up the clot on its own. More harsh treatments might be required if it doesn’t. During hospitalization, an injection is administered; however, upon discharge, the patient will switch to a tablet regimen.

    How may a pulmonary embolism be prevented?

    Keeping up a nutritious diet.
    Regular exercise.
    When sitting or standing for extended periods (especially on long-haul flights), move your arms and legs frequently to control your weight.
    Giving up smoking.
    Consuming a lot of water.

    How does one feel like a PE?

    Breathlessness and chest ache that worsen with exertion or deep breathing are typically the initial symptoms of a pulmonary embolism. You should seek medical help immediately if you experience these symptoms. Although extremely treatable, pulmonary embolism is a dangerous condition. The likelihood of mortality is significantly decreased by prompt treatment.

    Who is most vulnerable to pulmonary embolism?

    Older age. Cancer as well as cancer treatment. Several illnesses include inflammatory bowel disease, high blood pressure, stroke, heart failure, and chronic obstructive pulmonary disease (COPD). Some medications include estrogen replacement treatment and birth control pills.

    Is it possible to avoid blood clots by walking?

    One of the best ways to prevent clots is to be active. When traveling, make sure to take lots of pauses. Every thirty minutes or so during lengthy automobile rides, get out of the vehicle and take a stroll. Every hour, if you can, get up from your seat as well as walk up or down the aisle on the bus, airplane, or train.

    What are the initial symptoms of a pulmonary blood clot?

    You could assume you’re experiencing a heart attack because of the intense chest discomfort that gets worse when you breathe in.
    Dizziness, lightheadedness, or fainting as a result of an abrupt drop in blood pressure.
    Cough, which could be bloody.

    What causes blood clots?

    The body uses blood clots to stop bleeding from injured blood vessels and aid in the healing process. Your body may acquire them as a result of trauma or injury sustained during operations or other medical treatments. They may also develop as a result of atherosclerosis, which is artery damage.

    References

    • Pulmonary embolism – Symptoms and causes. (n.d.). Mayo Clinic. https://www.mayoclinic.org/diseases-conditions/pulmonary-embolism/symptoms-causes/syc-20354647
    • Pulmonary embolism. (2024, December 30). Cleveland Clinic. https://my.clevelandclinic.org/health/diseases/17400-pulmonary-embolism
    • Pulmonary embolism. (2021, August 8). Johns Hopkins Medicine. https://www.hopkinsmedicine.org/health/conditions-and-diseases/pulmonary-embolism
  • Peripheral Artery Diseases (PAD)

    Peripheral Artery Diseases (PAD)

    Peripheral artery disease is characterized by a narrowing of the vessels that transport blood from the heart to different areas of the body. The most prevalent kind, The condition known as peripheral artery disease is characterized by a narrowing of the vessels that transport blood from the heart to different areas of the body.

    The most prevalent kind, known as lower-extremity PAD, causes the legs and feet to receive less blood supply. Just 10% of people have upper-extremity PAD, which affects the arms, hands, and fingers.

    Atherosclerosis causes coronary artery disease and PAD. When fatty plaque accumulates in the arteries, it causes atherosclerosis, which narrows or stops the arteries in the heart, brain, arms, legs, pelvis, kidneys, and other organs.

    Introduction

    Peripheral artery disease (fats and cholesterol) builds up in the blood vessels in your arms or legs, causing peripheral arterial disease. As a result, your blood has a harder time delivering nutrients and oxygen to the structures in those places. Although PAD is a chronic condition, it can be improved by exercise, a lower-fat diet, and quitting smoking.

    Narrowed arteries in peripheral arterial disease (PAD) cause less blood to flow to the arms and legs. Another name for this ailment is peripheral arterial disease.

    The legs or arms, generally the legs, do not receive adequate blood flow to meet demand in PAD. Claudication, or leg discomfort when walking, is one symptom that may result from this.

    Atherosclerosis, an accumulation of fatty tissue in the arterial walls, is typically indicated by peripheral arterial disease. Exercise, a good diet, and abstinence from tobacco use and smoking are all part of the treatment for PAD.

    What is the illness of the peripheral arteries?

    PDA
    PDA

    Plaque accumulation in the arteries of your legs is known as peripheral arterial disease (PAD). Your leg arteries transport blood that is rich in oxygen and nutrients from your heart to your arms and legs. This is also known as peripheral arterial disease.

    Shaped like hollow tubes, capillaries have a smooth covering that prevents arterial from clotting and facilitates continuous blood flow. Plaque, which is composed of fat, cholesterol, and other chemicals, progressively accumulates inside the walls of your arteries when you’ve developed peripheral arterial disease. This narrows your arteries gradually. This is additionally recognized as peripheral arterial disease.

    A lot of plaque deposits have soft interiors and rigid exteriors. Platelets, which are disc-shaped molecules in your blood that aid in clotting, might enter the area when the hard surface cracks or tears. Your artery may get even smaller as a result of blood clots that develop around the plaque.

    Blood cannot flow through arteries to support organs and other tissues if plaque or a clot of blood narrows or stops them. This damages the tissues beneath the obstruction and ultimately results in gangrene, which is death. The soles of your feet are where this occurs most frequently.

    PAD can get worse faster for some persons than for others. Numerous additional elements are important, such as your general health and the location of the plaque in your body.

    The study of epidemiology

    More than 200 million adults globally suffer from PAD, and in those over 70, the prevalence might reach 20%. The prevalence of PAD seems to be the same among older men and women, even though it has historically been thought of as a disease that affects males. Since the majority of PAD patients do not exhibit the stereotypical claudication symptoms outlined in textbooks, underdiagnosis of the condition in the primary care context may be a serious problem.

    Smoking has the most effect on the severity of PAD and quadruples the risk of getting it. Smokers with PAD have shorter lives and are more likely to get critical limb ischemia and amputation than non-smokers. Race, ethnicity, diabetes, hyperlipidemia, and hypertension are additional risk factors for PAD.

    Pathophysiology

    The iliac, femoral, and abdominal aortic arteries are typically affected by atherosclerotic disease in PAD. Details of the intricate relationships between cholesterol and vascular cells that underlie the pathophysiology of atherosclerosis. On the inner of arteries, atherosclerotic plaque gradually accumulates. The arteries dilate to maintain vascular flow in the early stages of PAD to make up for the plaque accumulation. Atherosclerotic plaque begins to constrict the arterial flow channel when the artery can no longer dilate.

    Occasionally, atherosclerotic disease of the aorta or emboli of cardiac origin may be the cause of abrupt ischemia. Where arterial bifurcation occurs or where artery branches abruptly take off, emboli are typically most prevalent. The most frequent location for emboli is the femoral artery, which is followed by the iliac, aortic, and popliteal arteries.

    The extent of arterial constriction determines the hemodynamic effects of atherosclerosis. A 75% reduction of cross-sectional area, which is typically regarded as flow limiting, results from a 50% decrease in vessel diameter. Blood flow changes to smaller arteries that run parallel to the sick artery as the constriction worsens or blocks the artery entirely. The system of smaller vessels never provides as much blood circulation as the major artery, even if this collateral flow maintains distant perfusion.

    The defining characteristic of PAD and its common symptoms is this restriction of blood flow. To fulfill the increased energy requirement during ambulation, the lower extremity muscles need more blood flow. When walking, patients with PAD reach a point where collateral blood flow reaches its maximum and the lower extremity muscles are no longer able to get any further perfusion.

    The patient with PAD eventually slows down or stops walking as a result of this supply-demand imbalance, which results in transient muscular ischemia that produces discomfort, cramping, or exhaustion. The ischemia symptoms go away when the blood supply catches up with the muscle’s decreased energy needs, which can be achieved by slowing or stopping the muscle.

    The pathophysiology of claudication caused by PAD is described by brief muscular ischemia, and this cycle of blood flow limitation raises energy demand.

    Patients with PAD typically have adequate collateral blood flow, so their symptoms only appear when they walk or engage in other activities that raise their energy demands. In rare instances, the PAD worsens over time, and the blood flow is unable to keep up with the lower extremities’ resting metabolic needs.

    Ischemic rest pain, which is frequently defined as an unbearable, scorching agony in the soles of the feet, can be caused by inadequate perfusion to the nerves. Ischemic ulcers and non-healing wounds are examples of tissue loss caused by insufficient blood flow. In the worst situations, gangrene can develop and cause the toes or entire forefoot to turn black and mummified.

    Causes

    Atherosclerosis, a disorder in which lipids, cholesterol, and other chemicals accumulate in and on the artery walls, is frequently the cause of peripheral artery disease (PAD). We refer to the accumulation as plaque. Plaque can cause arteries to narrow, preventing blood flow. Plaque builds up in the arterial systems of the lower extremities in PAD.

    Peripheral arterial disease is caused by atherosclerosis that forms in the arteries of your legs or, less frequently, your arms. Peripheral vascular disease is caused by a buildup of fatty plaque in the walls of your blood vessels, similar to atherosclerosis in the coronary arteries of your heart. Your blood vessels become increasingly constricted as plaque accumulates, eventually being blocked.

    Symptoms

    Symptoms-of-PAD
    Symptoms-of-PAD

    Peripheral artery disease (PAD) may not cause symptoms, or symptoms may be minimal.

    Symptoms of PAD include:

    • Intermittent claudication, or pain, cramping, or discomfort in the legs or buttocks, is typically the initial sign of PAD. When you’re active, this occurs, and when you’re sleeping, it disappears.
    • Walking-related leg pain.
    • Arm or leg muscle soreness or cramping, usually in the calf.
    • Arm or leg muscle soreness that starts with exercise and goes away with rest.
    • After walking, climbing stairs, or engaging in other activities, one or both hips, thighs, or calves may experience painful cramping.
    • Arm pain, including cramping and aching when writing or knitting.

    Peripheral vascular disease affects half of its patients with no symptoms. Lifetime accumulation of PAD is possible. The symptoms might not show up till later in life. Symptoms won’t show up for many people until their artery narrows by 60% or more.

    To begin therapy as soon as feasible, discuss your PAD symptoms with your healthcare physician. It is crucial to discover PAD early to start the appropriate treatments before the condition worsens to the point where consequences like a heart attack or stroke occur.

    The symptoms of peripheral artery disease include:

    Mild to severe muscle pain that wakes you up, makes it difficult to walk or exercise, occurs during rest or when you lie down if the condition is severe, and manifests as coldness in the lower part of the leg or foot, particularly when compared to the other side.

    Other symptoms of PAD may include:

    • Shiny skin on the legs.
    • Skin color changes on the legs.
    • Slow-growing toenails.
    • Sores on the toes, feet, or legs that won’t heal.
    • Reduced or slowed growth of leg hair.
    • Erectile dysfunction.
    • A burning or hurting sensation in your toes and feet when you’re sleeping, especially when you’re lying flat at night.
    • Your feet’s skin is cool.
    • Your skin’s redness or other color changes.
    • Increased incidence of soft tissue and skin infections, typically in the legs or feet.
    • Unhealing foot and toe sores.

    Risk elements

    80% of people with PAD smoke or have smoked in the past, making tobacco use the most significant risk factor for PAD and its complications. Smoking increases the risk of developing PAD by 400% and causes symptoms to appear nearly ten years earlier than in nonsmokers of the same age.

    Peripheral artery disease (PAD) risk factors include:

    • The presence of peripheral artery disease, heart disease, or stroke in the family.
    • Diabetes.
    • High blood pressure.
    • High cholesterol
    • Growing older, particularly after the age of 65 or after the age of 50 if you have atherosclerosis risk factors.
    • Being overweight.
    • Smoking.

    Despite being distinct conditions, coronary artery disease and PAD are connected. Those who possess one are probably also in possession of the other. Peripheral artery disease (PAD) increases the risk of heart attacks, strokes, coronary artery disease, and transient ischemic attacks (mini-strokes). The likelihood of peripheral artery disease in the legs is one in three for a person with heart disease.

    Not surprisingly, several risk factors are similar to both diseases. The reason for this is that the arteries in your arms and legs undergo the identical alterations as the arteries in your heart due to these risk factors.

    Complication

    Atherosclerosis-induced coronary artery disease (PAD) complications include:

    • Severe ischemia of the limbs. Tissue death results from an injury or infection in this syndrome. Gross wounds on the hands and feet that don’t heal are one of the symptoms. Amputation of the afflicted limb may be part of the treatment.
    • Heart attack and stroke. The heart and brain’s blood vessels may also be impacted by plaque accumulation in the arteries.

    If left untreated, PAD patients may require amputation, which involves removing all or a portion of the foot, leg, or sometimes, the arm. This is particularly true for those who also have diabetes.

    The consequences of PAD can go beyond the afflicted limb because of the interdependence of your body’s vascular system. Individuals who have atherosclerosis in their legs frequently also have it in other body areas.

    What physical effects does my peripheral artery disease have on me?

    Claudication, a word in medicine for leg pain that begins with walking or exercise and subsides with rest, is the most common symptom of PAD. Your leg muscles aren’t receiving enough oxygen, which causes agony.

    The dangers of PAD extend well beyond difficulties walking. A nonhealing pain on either the feet or legs is more likely to occur if you have peripheral vascular disease. These sores may develop into gangrene, or patches of dead tissue, in situations with severe PAD, necessitating the removal of your foot or limb.

    What phases does peripheral artery disease go through?

    Healthcare professionals can assign a stage to your PAD using either the Fontaine or Rutherford systems.

    The simpler Fontaine phases are as follows:

    • I: Symptomless (asymptomatic).
    • IIa: Leg pain with exercise, or mild claudication.
    • IIb: Claudication ranging from moderate to severe.
    • III: Ischemic rest pain, or leg discomfort that occurs while you’re at rest.
    • IV: Gangrene or ulcers.

    Avoidance

    Maintaining a healthy lifestyle is the best defense against peripheral artery disease (PAD)-related leg pain. This implies:

    • Avoid smoking.
    • Consume foods that have a content low in saturated fats, trans fats, and sugar.
    • Engage in regular exercise, but with your care provider to determine the optimum kind and quantity for you.
    • Maintain a healthy weight.
    • Control your diabetes, cholesterol, and blood pressure.
    • Get enough rest.
    • Control stress.

    Evaluation and Diagnosis

    How may peripheral artery disease be identified?

    Usually, a physical examination, a review of your medical information, and one or more diagnostic procedures are required to diagnose PAD.

    Your physician will inquire about your symptoms and any known risk factors for PAD, including a history of cardiovascular disease, Hypertension, diabetes, and smoking. During a physical examination, your doctor will look for lesions or ulcers on your feet, check for weak circulation in the muscles of your arms and legs, and check your skin for symptoms of PAD.

    Along with a physical examination, a provider will go over your risk factors and medical history. Noninvasive tests might be prescribed to assist diagnose and assess the severity of PAD. The following tests can assist in determining whether you have a blood vascular blockage:

    Ankle-brachial index (ABI).

    Lower extremity PAD is diagnosed by ABI. You lie flat on your back with your arms and legs at the same level as your heart for this non-invasive test. After that, a Doppler ultrasonography probe is used to listen to the arterial pulse and measure the blood pressure in the arms and ankles.

    The arterial pressure ratio in the ankle relative to the arm or brachial artery is the basis for the ABI for the right and left sides of the body. An ABI of 0.9 to 1.4 is regarded as normal; if the ABI is less than 0.9, lower extremity PAD is diagnosed.

    Doppler pressure testing in segments.

    To stabilize your blood pressure, you lie flat on an exam table for fifteen minutes throughout this test, which is usually performed with an ABI. After that, three or four blood pressure cuffs are placed at various locations on your arm or leg.

    The doctor checks each cuff’s blood pressure using Doppler ultrasonography. Your doctor may be able to determine the location of the restricted or blocked artery if there is a significant enough variation in blood pressure at various arm or leg levels.

    • Practice ABI. If your resting ABI is normal but you have claudication, your doctor may order this test. You will walk on a treadmill before undergoing an ABI test for this test. It is employed to identify PAD in the lower extremities.
    • Duplex arterial. This test can identify the regions that are significantly narrowed by measuring the flow velocity inside the arteries using an ultrasound probe. Additionally, it may see the calcium and plaque in the vessel walls. It is usually done in an office setting and is non-invasive.

    Additional imaging tests, such as magnetic resonance imaging (MRI) or computed tomography (CT) scans, are usually accompanied by an intravenous contrast agent injection to improve artery visualization. These examinations give precise information about the arteries’ whole structure, including where diseased sections are located. They are usually saved for intervention planning, surgery, or certain situations where more anatomical data is required than what an ultrasound can offer.

    An invasive test known as an angiography could also be required to identify arterial blockages.

    Distinctive Diagnosis

    • Deep vein Thrombosis
    • Low back pain
    • Transient thrombophlebitis
    • The Raynaud phenomenon
    • Trombonists Obliterans
    • Sciatica

    Management and Treatment

    If you believe you may already have peripheral artery disease (PAD) or are at risk for developing it, consult your primary care physician, vascular medicine specialist, or cardiologist to begin a prevention or treatment program immediately. Research has indicated that exercise in blood pressure and cholesterol control can reverse the symptoms of peripheral vascular disease.

    The patient’s symptoms determine how peripheral artery disease is treated. However, a diagnosis of PAD carries a considerable risk of disease and mortality regardless of symptoms. Therefore, the optimal medical therapy for each patient with PAD should be started right away.

    How is peripheral artery disease treated?

    PAD can be treated with procedures, drugs, and lifestyle modifications.

    Treatments for peripheral artery disease have two primary objectives:

    • Reducing your risk of cardiovascular events.
    • Reducing the discomfort that comes with walking and enhancing your quality of life.

    Lifestyle changes

    Rehabilitation of PAD starts with implementing lifestyle modifications to minimize your risk factors.

    The following adjustments can help you manage your condition:

    • Stop using tobacco products. Inquire with your doctor about programs for quitting smoking.
    • Consume a diet rich in fiber while being low in fat, cholesterol, and sodium to maintain a healthy balance.
    • Keep fat to no more than 30% of your daily caloric intake.
    • No more than 7% of your calories should come from saturated fat.
    • Avoid items that include partially hydrogenated and fermented vegetable oils, as well as trans fats.
    • Get moving. Begin a regular fitness regimen, like going on walks.
    • One way to treat PAD is to walk. Regular walkers can enhance the distance they can cover before experiencing leg pain.
    • Control other medical disorders, such as diabetes, high blood pressure, or high cholesterol; maintain a low-stress level; yoga, meditation, and exercise may assist; and take proper care of your feet and skin to avoid infection and lower the chance of consequences.

    Drugs

    You can use pharmaceuticals to treat problems including diabetes, high blood pressure (antihypertensive drugs), and high cholesterol (statin drugs). These medications lower your risk of heart attack and stroke while treating the risk factors for PAD.

    An antiplatelet drug like clopidogrel or aspirin may be prescribed by your doctor. To increase your walking distance, they might also recommend cilostazol. People with intermittent claudication can exercise for longer periods before experiencing leg pain thanks to this medicine.

    Antiplatelet medications, lessen the chance of blood clots and, thus, the risk of heart attack and stroke. These drugs, like clopidogrel or aspirin, may lessen the symptoms of PAD and improve walking distance for those with lower extremity PAD.

    Statins can help lessen the risk of cardiovascular disease, lower cholesterol, halt the advancement of atherosclerosis, and lower the risk of PAD complications.

    Regardless of cholesterol, statins are advised for people with PAD. Cilostazol is a vasodilator that can help persons with lower extremity PAD walk farther and lessen claudication pain.

    A groin puncture is usually used for endovascular interventions, which are minimally invasive treatments. To improve blood flow to the limb, wires, catheters, and other specialized devices can be introduced to the narrowing area and utilized to open the blockage under the supervision of X-rays and sophisticated imaging.

    The following endovascular methods are used to treat PAD:

    • Angioplasty. A medical professional guides a catheter with a balloon attached to its tip to the constricted or obstructed section of the artery. The balloon is then inflated, forcing the artery to open and blood flow to resume. Occasionally, a medication that helps stop blood vessel re-narrowing is applied to the balloon. The balloon and catheter are taken out after the treatment.
    • Stenting. To help keep the narrowed portion of the artery open during balloon angioplasty, the physician may occasionally place a stent—a mesh wire tube—into the artery. When significant blockages can quickly narrow back or recoil during balloon angioplasty, stents may be employed. A drug may also be applied to the stent to stop the blood vessel from constricting once more.
    • An atherectomy. An atherectomy is a minimally invasive technique used to clear an artery of plaque. To enhance blood flow, a medical professional performs an atherectomy by inserting a catheter with a revolving blade, burr, or laser into the artery that is impacted. Then, the device is used to remove or vaporize the plaque, therefore enlarging the artery.

    Exercise regimens under supervision.

    Walking pain in your legs can be alleviated with a supervised fitness program, which will enable you to walk farther. Walking on a treadmill under supervision at least three times a week is a standard component of an organized program.

    Additionally, people with PAD should walk for at least 30 to 60 minutes each day at home. The “Start/Stop” exercise is the standard prescription:

    • Continue walking until you have moderate discomfort, and then stop.
    • Wait until all of the soreness has subsided.
    • Step back out on foot.

    Surgical or minimally invasive methods

    After a few months of exercise and medication, leg pain may continue to be a concern in the day-to-day lives of some people with more severe PAD. More serious situations require people to increase blood flow to heal a wound or reduce discomfort while at rest.

    Severe discomfort and restricted mobility from more advanced PAD may necessitate endovascular (minimally invasive) or surgical treatment. Peripheral artery disease can be treated with several heart disease medications, including:

    Operations involving surgery

    A treatment known as an arterial bypass graft involves rerouting blood flow through an artery such that it avoids a constricted or obstructed portion. A graft, which is a blood vessel (usually a vein) taken from another part of the body or a tube made of artificial materials, is attached by the surgeon above and below the restricted or blocked piece of the damaged artery. After that, blood goes through the graft and avoids the constricted or blocked section of the artery.

    By making an incision in the skin above the artery, a surgeon can do an endarterectomy, which involves cutting the artery open, physically removing plaque from it, and then using bioprosthetic material to close the artery to make it wider and less likely to narrow again.

    • Angioplasty.
    • Stents.
    • Surgery to bypass peripheral arteries.
    • Atherectomy.

    Treatment complications for PAD

    If you experience any problems following your surgery, you should speak with your healthcare physician. These might indicate an infection or other issues:

    • Discomfort, blood, or swelling where the catheter entered your body.
    • Chest discomfort.
    • Breathlessness.
    • Chills or fever.
    • Lightheadedness.
    • Your legs getting swollen.
    • Pain in the belly.
    • An open wound that is opening.

    What is the recovery period following therapy for peripheral artery disease?

    Your hospital stay could be one night or several, depending on the care you received. The recovery period following an atherectomy could be a few days. After an angioplasty, however, you will require a week. Following peripheral artery bypass surgery, recovery can take anywhere from six to eight weeks altogether.

    How can I lower my chance of developing peripheral arterial disease?

    You could be more motivated to avoid PAD if you are aware of your risk factors. Taking care of your circulation follows the same guidelines as maintaining the health of your heart:

    • Control your weight.
    • Consume at least five servings of fresh fruits and vegetables each day as part of a low-fat, low-sugar diet.
    • Avoid tobacco products.
    • On most days of the week, get at least 30 minutes of exercise each day with your doctor’s permission.
    • You should talk to your healthcare professional about your PAD risk factors if you have heart disease. Report any leg pain, weakness, or numbness you may be experiencing.

    Outlook/Prognosis

    What can I anticipate if I have peripheral artery disease?

    Like most medical conditions, PAD is more treatable if detected early by a healthcare professional. The rate at which peripheral vascular disease advances varies depending on several factors, such as your general health and the location of the plaque formation in your body.

    Prospects for peripheral arterial disease

    You will have peripheral artery disease for the remainder of your life. PAD cannot be cured, but it can be controlled. There are various methods you can prevent peripheral vascular disease from getting worse:

    • Engaging in regular exercise.
    • Consuming less fat and eating a balanced diet.
    • Controlling your risk factors, including high blood pressure, diabetes, and cholesterol.

    In what ways do I look after myself?

    Maintaining proper foot hygiene is essential to avoiding nonhealing sores. People with PAD should take care of their feet by:

    • Wearing shoes that are comfy and fit well.
    • Check for blisters, cuts, cracks, scratches, or sores on your feet and legs every day. Check for calluses, corns, ingrown toenails, redness, and increased temperature as well.
    • Not delaying the treatment of a minor skin or foot issue.
    • Keeping your feet hydrated and clean. (An open sore shouldn’t be moisturized.)
    • When your toenails are soft after taking a wash, trim them. Smooth them with a nail file after cutting them straight across.

    For specific foot care, particularly if you have diabetes, your doctor might occasionally recommend that you see a podiatrist, or foot specialist. You can get help from a podiatrist if you have calluses, corns, or other foot issues.

    When should I visit my physician?

    Consult your physician if you:

    Get a severe infection in your foot sore. The infection may spread to your bones, muscles, tissues, and blood. Going to the hospital can be necessary if your infection is severe.
    Insufficient mobility to perform daily tasks.
    Experience aches in your legs while you’re sleeping. Poor blood flow is indicated by this.

    FAQs

    What is the prevalence of peripheral artery disease?

    Between eight and twelve million Americans suffer from PAD, making it a prevalent condition. However, medical practitioners can make mistakes in diagnosing or treating PAD. The real figures are most likely greater.

    Which kind of peripheral artery disease is most prevalent?

    Lower-extremity PAD is the most prevalent kind, when blood flow to the legs and feet is diminished. About 10% of people have upper-extremity PAD, which is less frequent and affects the arms, hands, and fingers.

    Which three symptoms indicate peripheral arterial disease?

    Intermittent claudication is the word for leg pain, soreness, heaviness, or cramping that occurs during walking or stair climbing and subsides with rest.
    Leg hair and toenails may cease developing.
    It’s possible that one foot feels colder than the other.

    What is the illness of the peripheral arteries?

    The blood vessel condition known as peripheral vascular disease (PVD) develops gradually. PVD may result from blood vessel spasms, narrowing, or occlusion. Any blood vessel outside of the heart may be impacted by PVD. This encompasses the lymphatic vessels, veins, and arteries.

    What is the most effective way to treat PAD?

    The goals of treatment for peripheral artery disease, or PAD, are to lessen symptoms and stop the illness from getting worse. The majority of the time, claudication drugs, exercise, and lifestyle modifications are sufficient to delay or even reverse the progression of PAD symptoms.

    How can I do a home PAD test?

    Raise your leg over the 60-degree mark and hold it there for 30 to 60 seconds. If you have discomfort, coldness, or numbness in your upper extremities, you may have a blood flow issue. If you experience any of these symptoms, make an appointment with a PAD expert, such as Dr.

    Which vitamin is best for peripheral arterial disease?

    Discovered that taking vitamins A, C, E, B6, and B12 was linked to a decreased risk of developing PAD. Additional investigation revealed a correlation between a lower prevalence of PAD and consumption of fiber, vitamins A, C, E, B6, folate, and n-3 PUFAs. The latest is Naqvi et al.

    Can a PAD be cured by walking?

    Regular physical exercise is one of the best strategies to prevent and treat peripheral artery disease, or PAD. Dr. Eduardo Sanchez walks us through a basic walking exercise that will help reduce the symptoms of PAD and strengthen our legs, which will make it easier to walk and climb stairs.

    References

    • Peripheral artery disease (PAD) – Symptoms and causes. (n.d.). Mayo Clinic. https://www.mayoclinic.org/diseases-conditions/peripheral-artery-disease/symptoms-causes/syc-20350557
    • Peripheral artery disease. (2025, January 6). Cleveland Clinic. https://my.clevelandclinic.org/health/diseases/17357-peripheral-artery-disease-pad
    • About Peripheral Arterial Disease (PAD). (2024, May 15). Heart Disease. https://www.cdc.gov/heart-disease/about/peripheral-arterial-disease.html
    • Peripheral artery Disease (PAD). (2023, September 13). Yale Medicine. https://www.yalemedicine.org/conditions/peripheral-artery-disease-pad
  • Wernicke’s Aphasia

    Wernicke’s Aphasia

    What is Wernicke’s Aphasia?

    Wernicke’s aphasia, also known as receptive or fluent aphasia, is a language disorder caused by damage to Wernicke’s area in the brain, typically in the left temporal lobe. It affects comprehension and the ability to produce meaningful speech, though fluency and grammar remain intact.

    Individuals with this condition may speak in long, nonsensical sentences and have difficulty understanding spoken or written language. It is often caused by a stroke or brain injury and may improve with speech therapy and rehabilitation.

    • It occurs when there is damage or alteration to the left middle side of the brain. In honor of neurologist Carl Wernicke, this region of the brain is referred to as Wernicke’s area. Wernicke’s brain region is responsible for human language. We also keep our own dictionaries close by. The meaning of spoken words may be difficult for someone with Wernicke’s aphasia to process.
    • Wernicke’s aphasia is a language condition that impairs communication and word comprehension.
    • Damage to the part of your brain that regulates language is the cause of this condition. It can be quite annoying and results in a loss of linguistic skills.

    The dominant cerebral hemisphere is the site of aphasia, a language function deficiency. Aphasia is typically classified as either receptive (Wernicke) or expressive (Broca). Both forms of aphasia are seen in many people. Wernicke aphasia, also known as receptive aphasia, is discussed in this article. Impaired language comprehension is the hallmark of this illness, which was initially identified by German physician Carl Wernicke in 1874. Speech may have a normal tempo, rhythm, and grammar even when comprehension is reduced. Because Wernicke’s aphasia patients have trouble understanding what they are saying, they are unable to identify their mistakes.

    The most prevalent kind of fluent aphasia is Wernicke’s aphasia. It happens when there is damage or alteration to the left center side of the brain. In honor of neurologist Carl Wernicke, this region of the brain is referred to as Wernicke’s area. Wernicke’s brain region is responsible for human language. We also keep our own dictionaries close by. The meaning of spoken words may be difficult for someone with Wernicke’s aphasia to process.

    Pathophysiology

    Wernicke’s area is located in the dominant cerebral hemisphere’s posterior part of the superior temporal gyrus (Brodmann’s area 22). The auditory cortex is intimately related to this region. Nearly all right-handed people and 60% of left-handed people have language function localized to the left cerebral hemisphere.

    What are the causes of Wernicke’s aphasia?

    An ischemic stroke that affects the dominant hemisphere’s posterior temporal lobe is the most frequent cause of Wernicke’s aphasia. Wernicke’s aphasia can also result from degenerative brain illnesses, brain trauma, central nervous system (CNS) infections, and cerebral tumors.

    An embolic stroke that affects the inferior division of the middle cerebral artery, which supplies the temporal cortex, is the most common cause of Wernicke aphasia.

    Aphasia affects 25 to 40 percent of stroke victims. Strokes are one possible cause of this condition because they affect blood flow to the brain, and if blood does not reach Wernicke’s part of the brain.

    Additional disorders that could impact this part of the brain include:

    • head trauma
    • tumors
    • infections
    • Stroke
    • Encephalitis, or brain inflammation
    • Head injury
    • Brain infection
    • neurological disorders.

    It is also possible to experience intermittent aphasia. This could be explained by seizures, migraines, or other illnesses. In certain situations, increasing brain injury leads to worsening aphasia. These may include dementia or an expanding brain tumor. As your illness progresses, your aphasia may worsen.

    What are the symptoms of Wernicke’s aphasia?

    In terms of speech and understanding, Wernicke’s aphasia sufferers may:

    • construct meaningless words and string words together to form sentences that don’t make sense.
    • be unaware of the errors in their language
    • even though the content may not make sense, articulate their words in a typical melodic line. typically struggle to repeat words or phrases
    • Add words when attempting to repeat someone, talk quickly, and interrupt others.
    • Using a lot of words that are illogical
    • Unable to understand the meaning of words
    • Able to speak well in long sentences but they do not make sense
    • Using the wrong words or nonsense words
    • Unable to understand printed words
    • Trouble writing
    • Frustration.

    People with Wernicke’s aphasia often do not realize they’re not making sense, which can lead to frustration as they are constantly misunderstood. Problems with spoken language may not transfer to other aspects of brain functioning.

    Aphasia differs from diseases like Alzheimer’s, in which many of the brain’s functions diminish over time. If you have Wernicke’s aphasia, others may find it difficult to understand you because of paraphrastic errors, which occur when you replace a word or sound with another word or sound (for example, “telescope” instead of “glasses” or “classes” instead of “glasses).

    Wernicke’s aphasia patients may:

    • interpret visual information better than spoken or written words; have cognitive abilities unrelated to language; and have significantly impaired reading and writing skills.

    How it is diagnosed?

    If you suspect Wernicke’s aphasia or any other type of aphasia, you should always consult a physician. Depending on the diagnosis, you may need to undergo medical interventions for the underlying cause of the aphasia.

    A neurological evaluation and a thorough speech and language examination may be necessary in order to determine your receptive and expressive language deficits. These tests will likely involve brain imaging tests like an MRI or CT scan, which can also help your doctor determine whether other parts of your brain have been affected.

    Among the tasks could be:

    • requiring you to do certain tasks,
    • getting a response to a question,
    • naming or repeating objects,
    • having a conversation, or testing your writing and reading skills.
    • Following a diagnosis, your physician could advise you to consult a speech-language pathologist to help you develop your language skills.

    History and Physical Examination:

    Wernicke’s aphasia is characterized by fluent language output with normal intonation and pace. However, paraphrastic errors frequently make the content hard to interpret. There are two types of paraphrasic errors: phenomic paraphrastic errors, which involve changing one sound or syllable for another, and semantic paraphrasia errors, which include changing one term for another.

    Semantic paraphasia errors include, for instance, a patient saying “watch” rather than “clock.” As an illustration of a phonemic paraphasic error, consider a patient who says “dock” rather than “clock.” In extreme situations, these mistakes may lead to word salad or neologisms, which are new terms that render communication almost incomprehensible. Patients may find it easier to use a general term like “thing” or “stuff” rather than the word they want to use because of these impairments. Since reading requires understanding written words, Wernicke’s aphasia frequently affects reading as well.

    The size and location of the lesion determine the associated neurological symptoms, which include deficiencies in the visual field, difficulty with writing (agraphia), and difficulty with calculations (acalculia). Wernicke’s aphasia patients frequently do not experience hemiparesis in addition to their language impairment, unlike those with Broca’s aphasia. Additionally, they don’t exhibit the same level of despair and emotional outbursts as people with Broca’s aphasia.

    Names and repetition are typically abnormal. Reading impairment occurs occasionally. Their spelling and word choice are strange, even when they can write fluently. The unusual spelling is a precursor to Wernicke aphasia.

    Wernicke aphasia patients typically do not realize their deficiencies; with time, they do grow irritated when others cannot comprehend what they are saying. When given in audio format, the patient may occasionally become conscious of the linguistic faults.

    The posterior one-third of the superior temporal gyrus is typically affected by Wernicke aphasia. Recovery is rare if the inferior parietal lobule or the middle/inferior temporal gyri are involved. The extent and magnitude of the damage, the patient’s age, and the contralateral cortex’s condition all affect recovery.

    Evaluation

    Every aspect of language, including verbal fluency, object naming, simple phrase repetition, comprehension of basic and sophisticated commands, reading, and writing, should be evaluated during the bedside examination. It is best to begin understanding tests with basic instructions like “close your eyes” or “open your mouth.

    To ascertain the kind and severity of the language impairment, formal neuropsychiatric testing could be required. To pinpoint and identify the cause of the aphasia, neuroimaging tests such as CT, MRI, fMRI, PET, or SPECT may be necessary.

    Alzheimer’s dementia must be differentiated from Wernicke’s aphasia. Patients may find it difficult to respond to simple orientation inquiries in both situations. Understanding is the primary impairment in Wernicke’s aphasia, while memory is the issue with dementia. Unlike Wernicke’s aphasia, which develops suddenly after an ischemic stroke, Alzheimer disease typically has a subacute beginning and progresses over time. To differentiate between the two conditions, brain neuroimaging may be useful.

    Differential Diagnosis

    • Cancer
    • Cardioembolic stroke
    • Alzheimer disease
    • Frontal lobe syndromes
    • Head trauma
    • Seizure

    What is the treatment for Wernicke’s Aphasia?

    There are not any established therapies for Wernicke’s aphasia. Your doctor might recommend numerous treatments or therapies.

    Taking care of additional causes: Treating any additional conditions you may have, like an infection, may be beneficial. The issue is triggered by the treatment. For instance, when aphasia symptoms are caused by lesions in specific parts of your brain, your doctor may prescribe steroids.

    An essential treatment for aphasia is speech therapy. The purpose of speech therapy is to assist you to acquire better use of the language capacity you still have, developing your language abilities, and learning how to communicate in various ways. Group speech therapy can be good to practice skills with others and minimize your feelings of isolation.

    Speech devices: Picture or speech-based technology can help you communicate; it improves your ability to express yourself but does not improve your language skills. It can also help caretakers better understand your needs and communicate with you.

    Wernicke’s aphasia does not currently have a commonly accepted treatment. Due to reduced comprehension, patients might not be aware of their impairment. Because of this, remedial attempts are extremely difficult. The ideal approach to try to maximize patient result would be to create a treatment plan in collaboration with a neurologist, neuropsychologist, and speech therapist.

    The goal of the treatment plan is to enable the patient to communicate in different ways, enhance language proficiency, and make better use of their remaining language function so that their needs and desires can be met. Patients may experience less social isolation and have the opportunity to improve their communication skills through group therapy. Numerous for-profit software providers assert that their offerings will enhance language functionality.

    In addition to developing pharmacological treatments, such as drugs that affect the catecholaminergic system (bromocriptine, levodopa, amantadine, and dexamphetamine), nootropic drugs (piracetam), and Alzheimer disease medications (donepezil and memantine), researchers are also investigating medical treatment of aphasia in randomized clinical trials. Non-pharmacological approaches include transcranial magnetic stimulation and transcranial direct stimulation, but trials have been small and have yielded inconsistent results thus far.

    Recovery of language function peaks between two and six months following a stroke, after which there is little chance of further advancement in Wernicke’s aphasia. Nonetheless, as aphasia has been shown to improve long after a stroke, attempts should be taken to enhance communication.

    A successful outcome depends on social and familial support. In order to improve patient outcomes, rehabilitation should focus on treating post-stroke depression and post-stroke cognitive problems as well as treating other neurological conditions such hemiparesis, neglect, and agnosia.

    Physical Therapy Treatment:

    Physical therapists have the opportunity to treat individuals with neurological disorders that frequently result in aphasia. In order to maximize patient contact and facilitate appropriate referral if or when the physical therapist detects the problem during patient care, it is crucial to have a thorough understanding of the condition and its types.

    What is the prognosis for Wernicke’s aphasia?

    • Your language skills may be impaired by Wernicke’s aphasia, but with time and medical treatment, they may return. Over the course of a given month, the brain will attempt to heal if it has been damaged. Intervention in speech and language is most successful when it starts shortly after the brain injury.
    • Compared to someone with a milder illness, someone with extensive aphasia requires greater medical intervention. It can be important to attend therapy in order to improve your language abilities and acquire new techniques for communicating with friends and family.
    • Wernicke’s aphasia patients sometimes recover completely on their own without medical intervention. Youngsters under the age of eight frequently recover their linguistic skills even after suffering significant harm.
    • The majority of people need speech treatment. Usually, recovery takes three months. However, it could take up to a year for aphasia to become better. Many people never fully recover their language skills. Both you and your caregivers may become frustrated by this.
    • Friends, relatives, and caregivers must adjust and pick up new communication techniques. Your family can learn new techniques with the help of a speech therapist.

    These may include:

    • Making use of simpler, shorter language,
    • Posing yes/no queries,
    • Using conversational, natural language,
    • Not rewriting speech,
    • Using instruments, drawings, photos, or pointing
    • Incorporating aphasics into discussions,
    • letting aphasics express themselves for extended periods of time.

    If you have aphasia, you can practice simple sentences by yourself in a quiet environment. As you become more at ease, try practicing with friends and family after seeing your speech therapist. Practice speaking and communicating will help you feel more connected to other people.

    FAQs

    What is Wernicke’s encephalopathy’s first line of treatment?

    Wernicke’s encephalopathy is treated with multiple injections of high doses of thiamine (and other B vitamins) and an immediate cessation of alcohol consumption. A person may be sent to a service that can assist them in quitting alcohol after completing this treatment.

    Which treatment is most effective for aphasia?

    Speech and language therapy is typically the suggested course of treatment for aphasia. Aphasia can occasionally go better on its own without medical intervention. An SLT, or speech and language therapist, administers this treatment. A speech and language therapy team ought to be present if you were admitted to the hospital.

    What is Wernicke’s aphasia script training?

    One method of treating aphasia is script training, which aims to enhance communication in daily situations. Usually, it entails repeatedly practicing words, phrases, and sentences that are woven into a conversation or monologue tailored to the aphasic individual.

    Wernicke’s aphasia was found by whom?

    It has been determined to be one of the two regions in the cerebral cortex responsible for speech control.

    What differentiates Wernicke’s aphasia?

    Wernicke’s aphasia symptoms include: Using a lot of nonsensical words. incapable of comprehending what words mean. able to communicate well in lengthy phrases, yet they lack coherence.

    Wernicke’s aphasia is treated with what kind of therapy?

    Speech therapy is the main form of treatment. You will learn how to: Enhance your ability to communicate throughout speech treatment. Rebuild the language function that was lost.

    What are the objectives of Wernicke’s aphasia speech therapy?

    According to ASHA, the general goals of aphasia treatment include: regaining lost language skills. enhancing intact communication abilities. utilizing AAC and teaching tactics to make up for deficiencies.

    Can aphasia be helped by physical therapy?

    Physical therapists have the opportunity to treat individuals with neurological disorders that frequently result in aphasia.

    Which therapy is most effective for Wernicke’s aphasia?

    Training for Communication Partners (CPT)
    Sometimes the first and best way to start a conversation and develop a relationship with someone who has Wernicke’s aphasia is through communication partner training.

    What is Wernicke’s primary purpose?

    The Wernicke area of the brain, which is illustrated in blue, is responsible for phonologic retrieval, a crucial aspect of speech production in which the phonemes to be uttered and their temporal order are mentally recorded.

    What occurs if there is injury to Wernicke’s?

    Wernicke’s aphasia and other speech and language impairments can result from damage to Wernicke’s region. This disorder makes it difficult to comprehend language and construct coherent statements.

    Which three forms of aphasia exist?

    The following are the three most prevalent forms of aphasia:
    Broca’s aphasia.
    Wernicke’s aphasia.
    Global aphasia.

    What are Wernicke’s aphasia’s two characteristics?

    Wernicke’s aphasia is characterized by difficulties with writing and reading. an unable to understand what is being said (creating connected speech is unaffected). a failure to construct coherent statements.

    What signs of Wernicke’s aphasia are present?

    Wernicke’s aphasia symptoms
    Fluent speech with typical intonation and prosody.
    Words do not form a cohesive thought; speech does not produce sense.
    Neologisms and other meaningless constructed terms are frequently used in speech.
    difficulty repeating words or phrases.

    What differentiates Wernicke’s aphasia from Broca’s?

    Broca’s aphasia uses limited language to quote you. However, others can generally grasp what you’re saying.

    References

    • Serasiya, A. (2023a, January 25). Wernicke’s Aphasia – Cause, symptoms, treatment – Samarpan. Samarpan Physiotherapy Clinic. https://samarpanphysioclinic.com/wernickes-aphasia/
    • Silver, N. (2024, January 26). Wernicke’s Aphasia. Healthline. https://www.healthline.com/health/wernickes-aphasia
    • What is Wernicke’s aphasia? (2023, August 8). WebMD. https://www.webmd.com/brain/what-is-wernickes-aphasia

  • Intercostal Muscle Strain

    Intercostal Muscle Strain

    What is an Intercostal Muscle Strain?

    Intercostal muscle strain refers to overstretch in the muscles located between the ribs. These muscles assist in breathing and torso movement. Pain can result from overuse, injury, poor posture, or conditions like inflammation or nerve irritation. Symptoms often include sharp or aching pain, worsened by movement or deep breathing.

    The intercostal muscles are divided into three layers: the innermost intercostal muscles, the internal intercostal muscles, and the exterior intercostal muscles.

    The innermost intercostal muscles are on the ribs’ surface, which aids in rib compression and stability. The internal intercostal muscles extend from the posterior to the anterior rib cage and are superior to the innermost intercostal muscles. They aid in stabilizing the rib cage during exercise and depress the ribs during expiration.

    Last but not least, the outermost layer of the intercostal muscles, known as the external intercostal muscles, extends from the anterior to the posterior rib cage. They raise the ribs during inspiration and are in charge of the ribs’ movement during breathing.

    Any layer of the intercostal muscles may get overstretched, strained, or even partially torn when a strain occurs, which can cause pain and breathing difficulties. Although there are ways to lessen pain and inflammation, intercostal muscle sprains are a medical disease that resolves on their own.

    In order to help construct the chest wall and facilitate breathing, the intercostal muscles link to the ribs in various strata. Intercostal muscular strain is the result of an intercostal muscle being twisted, strained, or overstretched. We also examine the causes of these strains and the available treatments.

    Clinically Relevant Anatomy

    The muscles found inside the rib cage are known as intercostal muscles. The muscles that fill the gap between the ribs are composed of three layers: the outermost layer, the innermost layer, and the interior layer. The outermost layer, known as the external intercostals, is located just beneath the skin. It begins at the lower edge of the rib above, runs obliquely, and inserts into the upper edge of the rib below.

    During inhaling, it causes the chest wall to expand. The intermediate layer, known as internal intercostals, helps to collapse the lung during expiration. It extends from the costal groove close to the inferior border of the rib above to the upper border of the rib below. The innermost intercostal muscle helps the internal and external intercostals operate by crossing many intercostal spaces.

    Depending on the kind and severity of the injury, intercostal muscle strain can result in rib/chest pain, upper back pain, and altered breathing patterns. The patient may exhibit shallow, short breathing as a result of the pain. The muscles that run between two or more ribs are injured.

    Mechanism of Injury

    Intercostal muscle strains are not typically caused by everyday activities; rather, they occur as a result of weakening, overexertion, direct trauma from falls or auto accidents, blows from contact sports like hockey, or repetitive twisting of the torso.

    • A direct impact to the rib cage, as may occur from a car accident, a tumble, or injuries from contact sports like hockey or football. wherein the ribs are abruptly pulled apart, causing the intercostal muscles to stretch or rip.
    • Torso twisting can occur during lifting, while dancing or in yoga poses, and during some sports like tennis or golf. Excessive twisting of the torso during sports can happen when the ribs are separated from their usual range.
    • Reaching aloft: As we can see when painting the ceiling, extended periods of overhead activities or lifting over the shoulder put excessive strain on the muscles.
    • vigorous, repetitive motion, like hitting a tennis ball or rowing.

    Causes of Intercostal Muscle Strain?

    Overuse or repetition can result in intercostal muscle Strain; lifting heavy objects or playing sports like tennis or golf are examples; chest trauma, sudden twisting motions, reaching overhead, or repetitive forceful motions can also result in muscle pain.

    Poor posture can result in a muscle pain when standing or sitting for a long time; weak muscles that are not properly conditioned for the activity (e.g., rowing, tennis, golfing, batting, or pitching) can result in a strain; and dehydration can cause fatigue and raise the risk of intercostal muscle pain or strain.

    Intercostal muscle tension is typically not caused by routine activity. The most common cause of these strains is a muscle injury or overexertion.

    An impact strike from contact sports like football or hockey that twists the torso beyond its natural range of motion, or a direct blow to the rib cage from a fall or auto accident

    Twisting while lifting weights; twisting violently, like in tennis or golf; twisting from certain yoga poses or dance positions; reaching overhead, like when painting a ceiling; lifting a heavy object above shoulder height; and reaching overhead for extended periods of time while performing repetitive forceful motions, like striking a tennis ball. This is especially true when weaker muscles result from bad posture or insufficient exercise.

    Symptoms of Intercostal Muscle Strain?

    Pain in the chest or ribs, shortness of breath, restricted upper torso range of motion, and intercostal muscle spasms are some of the symptoms of intercostal muscle strain. A person may have dull or intense pain that gets worse when they move, breathe, cough, or sneeze. When the strain is considerable, there may be swelling and bruising. Swelling or soreness in the strained muscle’s location are further signs of intercostal muscular strain.

    Depending on what caused the strain, the signs and symptoms of an intercostal muscle can vary slightly. However, symptoms are restricted to this location and frequently concern respiration because the intercoastal muscles in the body’s trunk are necessary for breathing.

    Sharp upper back and rib pain, severe and abrupt pain, especially if caused by a blow to the chest or back, gradually getting worse after repetitive movements, like swimming, rowing, or other physical exercises, stiffness and tension in muscles that cause upper back pain, stiffness when bending or twisting the upper body, worsening pain when coughing, sneezing, or breathing in deeply, spasms of the intercostal muscles, and sensitiveness between the ribs.

    Risk Factors of Intercostal Muscle Strain?

    • Physical labor includes tasks like carrying heavy objects, standing up for extended periods of time, and twisting repeatedly.
    • Intercostal muscles are strained in high-thrust sports because of the repetitive usage of the arm, shoulder, and upper back.
    • Sports involving contact: when an abrupt, direct force strikes the upper body.

    Diagnosis of Intercostal Muscle Strain?

    A comprehensive medical history and physical examination are usually required to diagnose an intercostal muscle strain. The location and intensity of the pain, along with any other related symptoms, may be inquired about by the healthcare professional during the medical interview.

    A history of trauma from falls or auto accidents, upper body twisting linked to the development of pain, and participation in sports that might have exacerbated the pain are other questions they might ask. The provider may examine the range of motion and apply light pressure to the affected area during the physical examination. To rule out other potential reasons for the pain, such as a rib fracture or other injury, imaging tests like an X-ray or MRI may also be prescribed.

    A minor injury affecting only a few muscle fibers is called a grade one muscular strain. Usually, this grade of muscle strain has little effect on day-to-day activity. A moderate damage involving a greater number of muscle fibers is called a grade two muscle strain. This level of muscle strain may interfere with day-to-day activities and necessitate more intensive care. Last but not least, a grade three muscle strain is a serious injury that involves a full muscle tear and may necessitate surgery as well as a longer duration of physical rehabilitation.

    For instance, this can involve a pulmonary examination, which aids in the diagnosis of issues with the body’s trunk. Additionally, the doctor will inquire about any recent sports participation or injuries.

    An MRI or ultrasound scan are examples of imaging tests that a medical expert may request. This can assist in ruling out additional problems, including a broken rib.

    Differential Diagnosis of Intercostal Muscle Strain:

    Because intercostal muscle strains are relatively hypomobile and rarely cause injury, they can be confused with upper back pain. Long-term bad posture is the cause of upper back discomfort, which is characterized as a severe, searing ache that occasionally radiates to the shoulder and neck. Unlike the discomfort from a lung condition, which is hard to identify, the patient may locate the area of pain associated with intercostal strain, which is caused by trauma overexertion activity.

    Treatment of Intercostal Muscle Strain

    The main treatment for an intercostal muscular strain is prevention, which may involve reducing the chance of straining the muscle while performing certain activities. Stretching before and after physical exercise, drinking plenty of water, and using the right form and technique when lifting or doing other physical work are some ways to prevent muscle strains.

    Rest, the application of cold or heat, and over-the-counter pain and anti-inflammatory drugs like acetaminophen, naproxen, or ibuprofen are all possible treatments for muscle strains. These techniques aid in lowering pain and inflammation. In severe cases of intercostal muscle tension, physical therapy or additional medical treatment, such as injections, may be indicated. A physical therapist can assist in creating a list of exercises and other methods to help strengthen the affected muscles, increase mobility, and lessen pain.

    Moderate strains of the intercostal muscles can take three to seven weeks to heal, whereas mild strains usually go away in a few days. It may take much longer for severe strains that involve a full tear to heal.

    If the injury causing the intercostal muscle tension is not severe and the symptoms are modest, home therapy can be sufficient. The following are examples of home treatment options:

    • Using a cold pack or ice pack first, then heat therapy. Adhesive heat wraps, heating pads, and a warm bath are examples of heat therapy alternatives.
    • letting the muscular strain heal by taking a few days off from all physical activity and resting.
    • using painkillers to lessen pain and swelling. Intercostal muscle strain can be treated with over-the-counter drugs such as ibuprofen or acetaminophen.
    • Holding a pillow against the injured muscle will splint the area if breathing becomes difficult. However, breathing difficulties require immediate medical intervention.

    Physical Therapy Treatment of Intercostal Muscle Strain:

    After the inflammation has decreased, physical therapy begins, with an emphasis on pain management techniques, supervised stretching, endurance-boosting muscle training, posture correction, and breathing techniques.

    During a deep breathing exercise, the patient is advised to use diaphragmatic breathing while supporting the painful area with a pillow.

    Under supervision, stretching tight muscles can lead to muscle imbalance and improper mechanism stretching, such as roller stretch, certain yoga poses, or upper back extension. However, if the strain is caused by overstretching the muscle, further stretching may hurt and cause muscle weakness, which should be managed with a strength training program.

    Strength training Backward weightlifting exercises and thoracic extension exercises with breath holding for a few seconds and a slow exhale have been demonstrated to improve thoracic kyphosis and reduce intercostal muscular soreness in cases of muscle imbalance.

    Diaphragmatic Breathing

    Diaphragmatic-breathing
    Diaphragmatic Breathing
    • With one hand on your chest and the other on your stomach, lie flat on your back.
    • Take a deep breath through your nose, keeping your chest motionless and allowing your belly to rise.
    • Feel your belly drop as you slowly release the breath through your mouth.
    • For five to ten minutes, focus on breathing slowly and deliberately.

    Side Stretches

    • For balance, place your feet shoulder-width apart and stand tall.
    • Smoothly lean to your left while keeping your body in alignment.
    • To avoid strain, do not twist or reach too much.

    Thoracic Rotation

    • Maintaining your hips stationary, slowly shift your upper body to the right as much as feels comfortable.
    • Return to the center and twist to the left after holding this position for five seconds.

    Cat-Cow Stretch

    Cat-and-Cow-Stretching
    Cat-Cow Stretch
    • Place your knees behind your hips and your wrists beneath your shoulders to begin on all fours.
    • Tuck your chin to your chest, arch your back, and exhale (Cat position).
    • Take a breath, bring your abdomen down to the floor, and raise your head (Cow posture).
    • Focus on aligning and stretching your spine as you move lightly.

    Wall Stretch

    • Place your palms flat against the wall at shoulder height and stand about a foot away.
    • Lean softly against the wall until your sides and chest start to stretch, then take a small step back while maintaining a straight arm position.
    • Repeat the stretch three times while holding it for 20 seconds.

    Shoulder Rolls

    Shoulder Rolls
    Shoulder Rolls
    • Stand or sit upright, shoulders relaxed.
    • For ten repetitions, gently roll your shoulders forward in wide, fluid circles.
    • Change course and roll backward ten more times.

    Rib Cage Stretch

    • Take a seat upright on the floor or in a chair.
    • Pull your elbows back and interlace your fingers behind your head.
    • Breathe deeply, extend your ribs, and hold the position for ten seconds.
    • To release the strain, slowly exhale.

    Prevention of Intercostal Muscle Strain:

    The severity of the injury determines the duration of an intercostal muscle strain. A mild tension of the intercostal muscles usually goes away in a few days. Severe strains including a full muscle tear may require more time to heal, while moderate strains may heal in 3–7 weeks.

    Most rib injuries, including sprains of the intercostal muscles, should heal in six weeks.

    Stretching and warming up before intense workouts can help prevent future muscular strains. When it comes to exercising or playing sports, it’s crucial to avoid going overboard. Intercostal muscular strain can be avoided by maintaining strong muscles.

    Conclusion

    A common ailment that affects the muscles between the ribs is intercostal muscular pain, which can be caused by tension, injury, inflammation, or underlying medical disorders. Although usually not severe, it can be quite uncomfortable and interfere with breathing and day-to-day functioning.

    Physical therapy, medication-assisted pain management, rest, and lifestyle changes are all possible forms of treatment. To rule out more serious illnesses, a medical evaluation is required when pain is persistent or accompanied by other troubling symptoms. Intercostal muscle soreness can be avoided by maintaining good posture, warming up before exercise, and avoiding undue tension.

    FAQs

    What causes intercostal muscles to weaken?

    Physical labor, which usually involves a lot of actions that might cause intercostal injuries, such as bending, reaching, heavy lifting, and/or severe torso twisting. Intercostal strain is one of the many injuries that can be avoided with safe lifting practices.

    How can intercostal muscles be healed the quickest?

    Heat Therapy: To alleviate the strain, you can move from using an ice pack to a heating pad once the first few days have gone by. It may be possible to reduce pain and hasten the healing process by heating the affected muscles. Pain Relievers: Certain drugs can lessen the severity of the strain-related pain you feel.

    How are the intercostal muscles exercised?

    Take a deep breath, then extend your arms to the right to lengthen your left side intercostal muscles as you exhale. After taking a breath and returning to the center, extend your arms to the left while sensing the stretch in your right intercostal muscles. On each side, repeat twice more.

    Does severe intercostal Strain exist?

    Intercostal neuralgia-related chronic pain can also impair sleep and limit movement. Additionally, it may make breathing difficult. Additionally, there are several symptoms that intercostal neuralgia shares with other potentially dangerous medical disorders.

    Is massage effective in treating intercostal Strain?

    Your physical therapist will concentrate on pain management, back and breathing muscle strengthening, and stretching. Soft tissue massage and manual therapy are other helpful methods for accomplishing this. Restoring your ability to breathe and move freely is the aim.

    Which kind of physician handles intercostal Strain?

    This is the neurologist’s area of expertise. Complex therapy is sometimes administered in conjunction with a cardiologist and a therapist (gastroenterologist, pulmonologist).

    Is it true that intercostal muscles relax?

    The ribs migrate lower and inward under their own weight as the intercostal muscles relax. Air is driven out of the lungs as a result of the chest’s size being reduced and its air pressure rising.

    Which workouts are beneficial for intercostal muscles?

    Strength training Backward weightlifting exercises and thoracic extension exercises with breath holding for a few seconds and a slow exhale have been demonstrated to improve thoracic kyphosis and reduce intercostal muscular soreness in cases of muscle imbalance.

    How can intercostal Strain be avoided?

    Options for Treating Intercostal Muscle Strain
    Heat packs promote circulation and muscle relaxation, while cold packs lessen inflammation. It is advised to use an ice pack or cold pack to the affected area for the first 48 hours of pain in order to minimize inflammation and ease pain.

    Does Strain in the intercostal nerve go away?

    Intercostal Neuralgia: With treatment, intercostal neuralgia may resolve in a few weeks to months, depending on the underlying reason. Additionally, symptoms may go away without medical intervention. On the other hand, some people will endure chronic pain for a long time.

    How can someone who has intercostal muscular soreness sleep?

    Your intercostal muscles can feel less pressure if you raise your upper body a little. To create a slight inclination, place a pillow beneath your head and upper back. This can facilitate breathing and lessen ribcage tension. sleeping on one’s side.

    Is intercostal Strain a result of stress?

    The following are some causes of anxiety-related chest pain: Non-cardiac causes: the esophagus or musculoskeletal system may be the source of the pain. The intercostal chest wall muscles may tension or spasm as a result of hyperventilation, which is characterized by episodes of rapid or quick breathing.

    How much time does it take for intercostal muscles to recover?

    A physical therapist can assist in creating a list of exercises and other methods to help strengthen the affected muscles, increase mobility, and lessen pain. Moderate strains of the intercostal muscles can take three to seven weeks to heal, whereas mild strains usually go away in a few days.

    What is the sensation of intercostal Strain?

    The primary sign of intercostal neuralgia is pain, which typically manifests as a band around your chest or belly. This pain might be continuous or sporadic, and it may accompany tingling and numbness. The actual pain, which may persist long after the underlying cause has subsided.

    How is Strain in the intercostal muscles treated?

    Applying a cold pack or ice pack, then using heat therapy.
    letting the muscular strain heal by taking a few days off from all physical activity and resting.
    using painkillers to lessen pain and swelling.
    Holding a pillow against the injured muscle will splint the area if breathing becomes difficult.

    References

    • Linkage, D. (2024, October 15). Exercises for intercostal muscle strain in winters. ER Of Dallas TX. https://erofdallastx.com/blog/exercise-for-intercostal-muscle-strain/
    • Axtell, B. (2023, February 8). How to identify and treat an intercostal muscle strain. Healthline. https://www.healthline.com/health/intercostal-muscle-strain
    • Tran, H., MD. (n.d.). Intercostal muscle strain symptoms and diagnosis. Spine-health. https://www.spine-health.com/conditions/upper-back-pain/intercostal-muscle-strain-symptoms-and-diagnosis

  • Median Nerve

    Median Nerve

    The median nerve is a major nerve of the upper limb, originating from the brachial plexus (C5-T1). It runs down the arm, forearm, and into the hand, providing motor innervation to most forearm flexor muscles and some hand muscles, and sensory innervation to the lateral palm, thumb, index, middle, and half of the ring finger.

    Introduction

    Another name for the median nerve is the “eye of the hand.”,’ is a mixed nerve that has a role of vital importance in the functioning of the hand. It controls the abduction of the thumb, the flexion of the hand at the wrist, and the flexion of the digital phalanx of the fingers. It innervates the group of flexor-pronator muscles in the forearm, and well as the majority of the musculature is found in the radial area of the hand. The thumb, index, middle, and ring fingers’ palmer faces, as well as the whole palmar region of the hand’s radial half, are sensory innervated. by the nerve. Additionally, it offers sensitivity to the dorsal skin of the index and middle fingers’ last two phalanges.

    The nerve in the cervical area of the spinal cord originates from the medial and lateral cords of the brachial plexus. The ventral major rami of cervical nerve root five through eight and the first thoracic spinal segment are the origins of these cords. The median nerve descends medially to the brachial artery at the humeral level after entering the forearm between the two pronator teres heads. The nerve is quite superficial in the cubital fossa and extends deep to the bicipital aponeurosis. The flexor digitorum profundus is situated superficially to the median nerve in the forearm. and deep to the flexor digitorum superficialis.After that, it enters the palm under the flexor retinaculum, posterior to the palmaris longus tendon and lateral to the flexor digitorum superficialis tendon. Anywhere along its length, the median nerve is susceptible to pathology and damage.

    Interestingly, none of the arm’s muscles are innervated by the median nerve. There are certain vascular branches of the median nerve that feed to the brachial artery, and articular branches of the median nerve innervate the elbow joint, even though Innervated proximal to the elbow joint is the branch to the pronator teres. The median nerve innervates the palmaris longus, flexor carpi ulnaris, flexor carpi radialis, pronator teres, flexor digitorum superficialis, and the medial portion of the pronator quadratus. in the forearm. Furthermore, the flexor pollicis longus and flexor digitorum profundus of the hand are innervated by the anterior interossei branch of the median nerve.

    The carpal, radiocarpal, and distal radioulnar joints are all supplied by the median nerve’s articular branches. The ulnar nerve is connected to many connecting branches of the median nerve. The median nerve innervates the muscles of the palm’s thenar compartments, such as the flexor pollicis longus, abductor pollicis brevis, opponens pollicis, and adductor pollicis. Additionally, the palmar cutaneous branch of the median nerve innervates the skin over the two-and-a-half fingers over the dorsum of the hand, as well as the skin over the lateral two-and-a-half fingers and thenar eminences on the palmar side of the hand.

    Acute traumatic, chronic microtraumatic and compressive lesions can all impact the median nerve. Neuropathies and degenerative processes with diverse causes can potentially harm the nerve. Along the median nerve’s lengthy journey from the brachial plexus and axilla to the hand, several kinds of lesions can impact it at different levels. Neuropathies mainly concern the distal territory. The flexor retinaculum’s fascial sheath may compress the median nerve peripherally, resulting in neuropathic pain, which is characterized by tingling, numbness, and burning sensation.

    Entrapment or carpal tunnel syndrome are the names given to this ailment. The discomfort associated with carpal tunnel syndrome can be described as a pin-and-needle feeling along the median nerve’s distribution. The idiopathic disorder is linked to diabetes, hypothyroidism, and pregnancy. A medial nerve damage proximal to the carpal tunnel is indicated by decreased feeling across the patient’s thenar eminence. The palmar cutaneous branch of the median nerve, which is located close to the carpal tunnel, provides the neural supply for the thenar eminence feeling. Clinically, flare-ups and remissions are possible for sporadic symptoms.

    Structure & Function

    The flexor muscles of the hand and forearm get the majority of their motor innervation from the median nerve. Additionally, the dorsal side (nail bed) of the hand’s distal first two fingers, the palmar aspect of the thumb, index, middle, and half of the ring finger, the palm, and the medial part of the forearm are all sensory innervated by the median nerve.

    Course of the Median Nerve

    The median nerve travels distally along the median bicipital groove in a neurovascular bundle with the brachial artery after the confluence of the lateral and medial cords within the axilla. It passes beneath the bicipital aponeurosis, a sheath of connective tissue that inserts the biceps brachii to the proximal forearm, and across the brachial artery as it descends the arm, forming the cubital fossa. The median nerve does not innervate the muscles or skin above this point. Nonetheless, it gives the brachial artery and its farther-flung branches (radial and ulnar arteries) sympathetic innervation.

    The pronator teres, flexor carpi radialis, flexor digitorum superficialis (sublimes), and palmaris longus muscles are among the proximal muscle bellies of the forearm that get innervation from the median nerve when it passes beneath the bicipital aponeurosis at the elbow level. The nerve crosses the place where the superficial and deep heads of the pronator teres converge as it leaves the bicipital aponeurosis. Pronator syndrome, which is explained below, can result from compression at this stage. Before emerging to give off two branches, the anterior interosseous nerve and the median nerve proper, the median nerve makes its last pass beneath the sublime ridge, a sheath of connective tissue created by the convergence of the medial and lateral heads of the flexor digitorum superficialis (FDS).

    The median nerve properly descends the forearm, passing superficially to the flexor digitorum profundus (FDP) but deeply to the flexor digitorum superficialis. Just in front of the interosseous membrane, the anterior interosseous nerve (AIN) travels deeper than the median nerve proper. The pronator teres, palmaris longus, and flexor digitorum superficialis are innervated in the forearm by the median nerve proper. On the other hand, the AIN innervates the pronator quadratus, flexor pollicis longus, and FDP. By the conclusion of its journey through the forearm, the median nerve and all of its branches innervate every flexor muscle in the forearm, except for the ulnar portion of the flexor digitorum profundus and the flexor carpi ulnaris.
    Fifth centimeters above the flexor retinaculum,

    Just before entering the carpal tunnel, the median nerve anatomically rests between the flexor carpi radialis tendon and the muscular belly of the FDS, which terminates and transforms into a tendinous sheath. The palmar cutaneous branch, which crosses the flexor retinaculum and only supplies sensory innervation to the palm and the base of the thenar eminence, is produced by the median nerve at a variable position before the wrist.

    The cross-sectional size of the carpal tunnel is less than 2 square centimeters at its narrowest point. Together with nine other muscle tendons, the median nerve travels right beneath the flexor retinaculum sheath. Compression is likely to occur in this high-traffic location, and carpal tunnel syndrome—which is explained below—is the most prevalent of entrapment neuropathies.

    The thenar recurrent motor branch, which feeds the hand’s thenar muscles (flexor pollicis brevis, abductor pollicis brevis, and opponens pollicis), is immediately released by the median nerve when it emerges from the carpal tunnel and transverses beneath the palmar aponeurosis. The anterior interosseous nerve, which passes outside of the carpal tunnel and supplies the flexor pollicis longus, is the final contribution of the median nerve to the thumb.

    The median nerve divides into radial and ulnar divisions at the palmar aponeurosis, and these divisions then split into the common palmar digital branches. The palmar side of the thumb, index finger, middle finger, and radial half of the ring finger are all sensed by these digital branches, which also innervate the first two lumbrical muscles. Additionally, the dorsal surface of the index and middle fingers as well as the lateral portion of the ring finger beyond the proximal interphalangeal joint (i.e., over the nailbeds) receive sensory innervation entirely from the median nerve.

    Function

    The median nerve stimulates the muscles in your forearm, allowing you to:

    • Bend and straighten your wrists, thumbs, and the first three fingers.
    • Rotate your forearm and hand, bringing your palm down.

    Touch, pain, and temperature sensations are also controlled by the median nerve:

    • The bottom (palm) sides of the thumb, index, and middle fingers, as well as a piece of the ring finger.
    • middle fingers, as well as a piece of the ring finger.
    • Forearm.
    • The thumb side of the palm.
    • The upper (nail bed) side of the middle and index fingers

    Muscle supplied

    The anterior compartment of the forearm has four layers of muscles innervated by the median nerve. The first layer, which starts at the medial epicondyle, is composed of three muscles: the pronator teres, flexor radialis longus, and palmaris longus. The flexor digitorum superficialis, whose tendons attach to the middle phalanx of the four fingers, is located in the second layer. As a result, it is a finger flexor at the proximal interphalangeal joint. The median nerve properly innervates the first and second layers.

    The flexor pollicis longus, pronator quadratus, and the lateral portion of the flexor digitorum profundus, which innervates the index and ring fingers, are the muscles that make up the third layer. The anterior interosseous nerve, which lacks sensory branches, innervates them.

    Sensory innervation: None of the sensory nerves that serve the forearm crosses the wrist (except the palmar branch of the median nerve). The palmar surfaces of the index finger, middle finger, lateral half of the ring finger, and a portion of the thumb make up the hand’s median nerve’s sensory distribution. The ulnar nerve supplies the remaining sensory innervation of the hand, which includes the medial hand, the medial part of the ring finger, and the entire little finger. Through its dorsal branch, the ulnar nerve also supplies feeling to the medial dorsal surface. It is the superficial branch of the radial nerve that completes innervation of the dorsal surface of the hand.

    Branches and innervation

    The median nerve throws out several branches in the forearm and hand areas. The branches in the forearm area include:

    Innervating the equivalent muscles are the muscular branches to the pronator teres, palmaris longus, flexor digitorum superficialis, and flexor carpi radialis.

    The radial portion of the flexor digitorum profundus and the flexor pollicis longus are supplied by the anterior interosseus nerve. To nourish the pronator quadratus, this branch travels deep into the interosseous membrane alongside the anterior interosseous artery. It ends by providing articular branches to the carpal, radiocarpal, and distal radioulnar joints.

    The hand’s principal branches consist of:

    The proximal portion of the palm is supplied by the cutaneous nerve of the palm. Since this branch avoids the carpal tunnel, it is not affected by carpal tunnel syndrome.

    The first of the two common palmar digital nerves supply the radial to lumbricals. The second separates between the middle and ring fingers to provide the appropriate digital nerves that give some parts of the hand feeling.

    The muscles of the thenar eminence (flexor pollicis brevis, abductor pollicis brevis, and opponens pollicis) are the recurrent branch. Because of its significance for fundamental hand function, it is frequently referred to as the “million-dollar nerve.”

    In summary, the flexor muscles of the forearm receive their motor supply from the median nerve, except the flexor carpi ulnaris and the ulnar head of the flexor digitorum profundus, which receives its supply from the ulnar nerve. It also feeds the radial two lumbricals and the thenar muscles.

    The following are part of the median nerve’s sensory supply:

    the distal dorsal and palmar skin of the neighboring palm and the lateral three-and-a-half digits.
    the radial part of the second finger and the skin of the thumb’s palmar and distal dorsal sides.
    the distal dorsal and palmar skin of the neighboring sides of the second through fourth fingers.
    the central palm’s skin.

    Examination

    Neuro-Examination

    The following are motor indicators of a median nerve lesion:

    • Forearm pronation that is weak
    • Wrist radial deviation and weak flexion due to tendon atrophy
    • incapable of flexing or opposing the thumb

    The following are sensory indicators of a median nerve lesion:

    The thumb, radial 2 1/2 fingers, and the matching palm are included in the sensory distribution.
    When the nerve is intact, the thumb may be pronated and the nails line up at or close to 180 degrees; when the median nerve palsy is present, the thumb cannot pronate and the nail is less than 100 degrees.

    Neurodynamics

    The median nerve is strained when the elbow and wrist are extended, two essential parts of the upper limb tension test. The nerve is stretched further when the head and neck are rotated to the other side. Raising the arm above the head typically improves the reaction if the entrapment is in the inter-scalene triangle. The goal is to determine whether the patient’s arm and shoulder discomfort is coming from the median nerve, the C5, C6, and C7 nerve roots.

    Median Nerve test in the Upper Limb Tension Test 1 (ULTT1)

    • Depression of the Shoulder Girdle
    • Abduction of the Shoulder Joint
    • Supination of the Forearms
    • Extension of the Wrist and Fingers
    • Laterally Rotated Shoulder Joint Extension of the Elbow

    Median Nerve Bias, or Upper Limb Tension Test 2A

    • Elbow Extension
    • Shoulder Girdle Depression
    • Extension of the thumb, fingers, and wrists as well as lateral rotation of the whole arm

    Clinical Importance

    High Median Neuropathy

    Check for atrophy in the thenar eminence during the physical examination. Evaluate the lateral three-and-a-half digits’ mild touch sensitivity. The median nerve proper provides direct innervation to the pronator teres, flexor carpi radialis, palmaris longus, and flexor digitorum superficialis. Pronator teres weakness and severe forearm flexion weakness at the elbow (flexor carpi radialis and flexor digitorum superficialis) are the results of injury to these muscles. It is possible to measure the patient’s finger flexion by holding their hand. Because the tendons of the flexor digitorum superficialis attach to the sides of the fingers, a high median neuropathy will result in weakness at the proximal interphalangeal joint.

    To assess the anterior interosseous branch, ask the patient to use their thumb and index finger to form the “okay” sign. An anterior interosseous nerve palsy is indicated by a pinch rather than a circle. To evaluate the distal portions of the nerve, it is also possible to measure the thumb’s opposition and abduction by asking the patient to lay their hand flat on the bed and then ask them to elevate their thumb off the bed. This is one of the symptoms of neuropathy with a high median.

    Ask the patient to create a fist if there is a suspicion of median nerve pathology above the elbow. The flexor digitorum superficialis (FDS) function will be impacted by a lesion at this level, which will impede the ability to flex all four fingers at the proximal interphalangeal joint. The index and middle digits’ distal interphalangeal joint will become less flexible if the anterior interosseus nerve is lost. The middle and index fingers will stay out while trying to form a fist. This is sometimes called the “preacher’s hand” or the “hand of benediction.” A “pointer finger”—pointing with the index finger—is a better way to describe the observed phenomenon since, in clinical practice, anatomic variations of the ulnar nerve usually permit bending of the middle finger at the proximal interphalangeal (PIP) joint. A high median neuropathy includes this.

    High median neuropathy can arise from a supracondylar humeral fracture that damages the whole nerve.

    The simultaneous incapacity to flex the thumb’s distal phalanx and index finger, poor middle finger flexion, and impaired thumb opposition can result in a single-palmar crease appearance when a median nerve lesion occurs at the elbow or forearm. A high median neuropathy includes this.

    Low Median Neuropathy

    Carpal tunnel syndrome and median recurrent neuropathy are examples of low median neuropathies. The flexor pollicis brevis, opponens pollicis, and abductor pollicis brevis are all denervated when the recurrent branch of the median nerve is damaged. Near the center of the thenar muscle mass lies the rather superficial location of the median nerve’s recurrent branch. When cleaning dishes, dishwashers might cause a minor cut on a knife or shard of glass, which can harm the recurrent branch of the median nerve. When examining sensory function across the hand, an unwary ER doctor would observe no loss of sensation. He could next seal the incision with a stitch or a piece of surgical tape. Due to significant thenar muscle atrophy and loss of thumb motor function, the patient will return in a few weeks. Because the doctor was unaware that the recurrent branch of the median nerve has no sensory function, this constitutes medical misconduct. The opposition test requires the patient to touch the thumb and little finger pads together during the physical examination of such a patient. The patient would not have been able to resist the thumb if he had been asked to. it would instantly have been clear that he had experienced a median recurrent neuropathy.

    Thumb muscle mass is lost when the thumb’s innervation is compromised. Even though most apes have opposable thumbs, this is commonly referred to as the “ape hand.”

    The median nerve is located medial to the brachial artery at the elbow. Because it is readily available, the radial artery is frequently used when arterial blood gas levels need to be sampled by arterial puncture. However, because the puncture may result in thrombosis of the radial artery, the Allen test should be performed to ascertain whether the anastomosis between the radial artery and ulnar artery is enough for the ulna artery to deliver blood to the thumb and index finger. The brachial artery may be sampled if the Allen test indicates insufficient radial artery perfusion. To prevent harm to the median nerve, the anatomical location of the radial artery to the nerve becomes crucial. If at all feasible, one initially uses a pulse to get a good localization of the radial artery. If sonography is available, it should be used since it can produce better results. To protect the median nerve, it is crucial to avoid puncturing the region medial to the brachial artery.

    Injection An intramuscular injection administered close to or directly into a nerve can result in axonal and myelin degradation, which causes nerve palsy, an iatrogenic disease. The substance can enter the endoneurium, which causes edema around a single nerve fiber and, eventually, damages or even kills the nerve. The patient will experience excruciating pain, and motor function will usually be more negatively impacted than sensory function. Penicillin, chlorpromazine, meperidine, dimenhydrinate, tetanus toxoid, procaine, and hydrocortisone are considered to be the most poisonous substances.

    Wrist Lesions

    Particularly in cases of wrist fractures, traumatic damage to the median nerve at the wrist level is far more common. Simple compression by fracture stumps, nerve contusions, and infrequent nerve tears are all examples of nerve injury. Furthermore, the median nerve on the wrist is particularly vulnerable to severing wounds and puncturing items, which may result in its whole or partial section. Painful amputation neuromas can arise from traumatic or unintentional iatrogenic injury during wrist surgery, as well as from a lesion of the palmar sensory branch of the median nerve.

    Carpal Tunnel Syndrome

    The median nerve and nine flexor tendons are located inside the carpal tunnel, which is anatomically created by the flexor retinaculum superiorly and the carpal bones inferiorly. In addition to radiating into the forearm, symptoms may be localized to the wrist or the entire hand. Carpal tunnel syndrome is characterized by paresthesias, numbness in the radial three-and-a-half fingers, and thenar weakening. Additional symptoms include a burning sensation throughout the median nerve’s distribution. The symptoms may resemble those of a C6 or C7 nerve root damage.

    Carpal tunnel syndrome is an isolated damage to the distal median nerve, which helps differentiate it from a nerve root injury. Patients are usually awakened from their sleep by symptoms that are worse at night. Neither wrist extension weakness nor triceps are present. The Tinel and Phalen tests can also be used to differentiate carpal tunnel syndrome. Tenderness or swelling in the cubital fossa may indicate damage to the median nerve as well as a loss of wrist flexion and pronation muscle strength. On examination, thenar atrophy may indicate long-term damage to the median nerve. Carpal tunnel syndrome is suggested by a positive Tinel sign. Carpal tunnel syndrome is also indicated by a positive Phalen maneuver. These specialized tests are explained below.

    When a patient is awakened from sleep with carpal tunnel syndrome symptoms and has to flick their hands to alleviate the discomfort, this is known as a flick sign. For carpal tunnel syndrome, the test has a 93% sensitivity and a 96% specificity. The Tinel sign or the Phalen maneuver is just as effective as the hand elevation test. To simulate the symptoms of carpal tunnel syndrome, hand elevation tests can be performed by having the patient raise their hand over their head for one minute.

    The Phalen maneuver, Tinel sign, and median nerve compression test are additional specialized tests to be taken into account during physical examinations for carpal tunnel syndrome. The Phalen maneuver involves the patient fully extending their elbows while flexing their wrist 90 degrees. A positive test result is when carpal tunnel symptoms are recreated in less than 60 seconds. When quick, repetitive tapping across the volar surface of a patient’s wrist in the carpal tunnel region replicates carpal tunnel symptoms, the Tinel test is considered successful. Additionally, if direct pressure on the transverse carpal ligament replicates carpal tunnel symptoms within 30 seconds, the median nerve compression test is positive.

    Carpal tunnel syndrome has three severity levels: mild, moderate, and severe.

    Numbness and tingling in the median nerve distribution without motor or sensory impairments are symptoms of mild carpal tunnel syndrome. There is no disturbance in the patient’s sleep, and everyday life activities remain unchanged.
    Sleep disturbances, sensory loss in the median nerve distribution, minor carpal tunnel syndrome symptoms, and possible hand function impairments are all part of moderate carpal tunnel syndrome.

    Severe carpal tunnel syndrome includes symptoms of mild and intermediate carpal tunnel syndrome, alterations in daily living activities, and weakening of the median nerve distribution.

    Pronator Syndrome

    When the median nerve is compressed by the pronator teres, pronator syndrome, also known as pronator teres syndrome, results. This ailment might resemble carpal tunnel syndrome quite a bit. Patients with pronator syndrome frequently complain of forearm pain as they move. Pronator syndrome symptoms, such as tingling and numbness in the thumb and first two fingers, can sometimes be mistaken for an extended elbow and recurrent pronation. The feeling is generally intact to the forearm and fingers pronator syndrome; nevertheless, there is often the loss of sensation over the thenar eminence. Another method of differentiating pronator syndrome from carpal tunnel syndrome is by this presentation. In cases with pronator syndrome, the Tinel sign and the Phalen maneuver are also frequently negative. Professional cyclists are often affected with pronator teres syndrome, a condition in which the median nerve becomes stuck as it travels through the pronator teres. Although the lateral palm is the most frequently affected area, the thenar eminence is also affected, as was previously indicated.

    Elbow Lesions

    When an elbow fracture or dislocation occurs, the median nerve may be affected directly by the fracture stumps, which in extreme cases may rip the median nerve, or indirectly by the acute compression or stretching of the nerve due to perineural hemorrhages. Once more, during the reparative fibrous processes, the nerve may be involved and may be incorporated and constrained. If the dislocation is lessened or an attempt is made to realign the fracture pieces, the median nerve may get trapped or imprisoned between the articular heads after the dislocation or between the fracture stumps themselves. In addition to the fibrous laceration at the elbow, compressions of the median nerve may occur at the level of the round pronator muscle. Muscle weakness and severe neuropathic symptoms are possible outcomes of the former disease. Additionally, routine elbow surgeries such as elbow arthroscopy, stiff elbow correction, prosthetics, or fractures (iatrogenic damages) might result in a median nerve lesion.

    Arm, Axillary, or Upper Lesions

    Acute traumatic injury from a deep incision is more common than traumatic injury of the arm, such as humerus fractures, which can seldom result in paralysis of the median nerve. Nerve lesions at the axilla or higher may be caused by stab wounds, gunshot wounds, high-energy traumas like auto accidents, or more complicated brachial plexus injuries. When this kind of damage occurs, the innervated muscle of the median nerve becomes paralyzed, and sensory impairment occurs.

    Hand of Benediction

    When an elbow injury occurs, especially a supracondylar fracture, the median nerve is especially vulnerable. The flexor digitorum profundus muscle’s radial head innervation may be compromised by such injury. The inability to bend the metacarpophalangeal and interphalangeal joints of the second and third fingers results from the disruption of innervation in the two lateral lumbricals. When the patient tries to flex their fingers, the hand takes on a common position known as the “hand of benediction” (which also includes injury to the ulnar nerve), making it hard to create a fist.

    Simian/ape hand deformity

    Damage to the recurrent motor branch of the median nerve results in the denervation of the thenar eminence muscles. This comprises the two radial lumbricals, opponens pollicis, flexor pollicis brevis, and abductor pollicis brevis. As a result, the person can no longer oppose the thumb, that is, bring the thumb’s tip to the tips of the other fingers. The unopposable thumb gives the hand the look of an ape’s hand (Ape Hand Deformity). The radial head of the flexor digitorum profundus is still functioning, which sets this apart from the hand of benediction.

    Anterior Interosseous Syndrome

    Although patients may report dull forearm discomfort, Anterior Interosseous Syndrome is a pure motor neuropathy because the anterior interosseous nerve lacks sensory fibers.

    Patients usually are unable to form the “O K Sign” because of poor bending of the thumb’s interphalangeal joint and the index finger’s distal interphalangeal joint.

    A patient with the anterior interosseous syndrome will also be unable to squeeze a piece of paper between their thumb and index finger, as opposed to clamping it between their extended thumb and index fingers, like a tong rather than a clamp. This is another sensitive test.

    Up to 25% of people have the Martin-Gruber Anastomosis, which can confuse anterior interosseous syndrome. In these cases, the anterior interosseous nerve branches off to the ulnar nerve, resulting in abnormal motor innervation patterns of the hand and forearm and obscuring the usual clinical symptoms.

    Surgical Importance

    The anterior interosseous branch of the median nerve is vulnerable above the site of the ulna fracture in a Monteggia Fracture (radial head dislocation with a concomitant proximal ulna fracture). This can cause compression or stretching, which can lead to traction or compression neuropathy. Entrapment, straining, scarring, displacement, or direct trauma can also result in posterior interosseous nerve palsy. The tension on the nerve will be lessened concurrently by open reduction and internal fixation of the ulna fracture, which has been linked to the nerve’s restoration to normal function.

    A frequent condition affecting the median nerve as it travels beneath the wrist’s small flexor retinaculum (transverse carpal ligament) is carpal tunnel syndrome. When the tendons are overused, the median nerve may become inflamed and compressed as it travels through the hand, resulting in severe pain and weakness. The afflicted hand’s first three and a half fingers will be numb or painful, and this usually gets worse at night. The thenar eminence often exhibits weakness if it is significant. Pregnancy, weight increase, repetitive occupations (like typing, computer work, or writing), and excessive hand usage (like mechanics, carpenters, and cashiers) are lifestyle risk factors for the development of carpal tunnel syndrome. Additional risk factors for carpal tunnel syndrome include diabetes, hypothyroidism, arthritis, and prior trauma. Bracing, splinting, occupational therapy, and over-the-counter (OTC) anti-inflammatory drugs are examples of conservative treatment methods. Surgery to relieve the carpal tunnel may be necessary if these don’t alleviate the discomfort.

    However, because the pronator teres muscle’s bellies squeeze the nerve, the discomfort is restricted to the anterior proximal forearm. Patients will report experiencing paraesthesia in the median nerve’s distribution. Nevertheless, the palm will also feel numb. Pronator syndrome has risk factors with repeated actions that cause carpal tunnel syndrome. Nevertheless, there hasn’t been much research to back up the idea that surgical decompression can alleviate symptoms. Conservative treatment, which includes rest, ice, immobilization, nonsteroidal anti-inflammatory drugs, and physical therapy, will help the majority of patients (between 50% and 70%) recover.

    FAQs

    What is the median nerve for?

    What is the median nerve? Your forearm, wrist, hand, and fingers may all be moved with the aid of the median nerve. It also provides sensation to the forearm and certain parts of the hand. (The lower portion of your arm that runs from the elbow to the hand is called your forearm.)

    How to test the median nerve?

    Apply pressure with your thumbs over the median nerve in the carpal tunnel, which is situated immediately distal to the wrist crease, to perform the carpal compression test. If the patient experiences tingling and numbness within 30 seconds, the test is considered successful.)

    What happens if the median nerve is cut?

    When the median nerve is injured, the lateral three-and-a-half fingers on the palmar and dorsal sides of the hand may lose their general feelings. When a median nerve lesion occurs, the affected skin may become dry and heated, resulting in sensory loss.

    Which surgery is better for carpal tunnel?

    Although endoscopic carpal tunnel release is usually linked with reduced discomfort in the initial weeks of recuperation, both open and endoscopic carpal tunnel release operations have great long-term results. People can frequently go back to work early thanks to it.

    What are the symptoms of median nerve damage?

    alterations in sensation, including tingling, numbness, burning, and diminished sensation in the thumb, index, middle, and a portion of the ring fingers. a hand weakness that makes it difficult to hold objects, button shirts, or drop things.

    Referances

    • Park, S. (2024). Median nerve anatomy and entrapment syndromes. The Nerve, 10(1), 7–18. https://doi.org/10.21129/nerve.2024.00549
    • Median nerve. (2023, November 2). Kenhub. https://www.kenhub.com/en/library/anatomy/the-median-nerve
    • Carpal Tunnel Syndrome. (2025, February 7). Cleveland Clinic. https://my.clevelandclinic.org/health/diseases/4005-carpal-tunnel-syndromeLog in

  • Metatarsophalangeal (MTP) Joints

    Metatarsophalangeal (MTP) Joints

    The metatarsophalangeal (MTP) joints are the connections between the metatarsal bones of the foot and the proximal phalanges of the toes. These joints play a crucial role in weight-bearing, balance, and movement, especially during walking, running, and jumping. Dorsal collateral ligaments and extensor tendons strengthen the joint capsule surrounding these synovial joints.

    The first MTP joint, at the base of the big toe, is particularly important for push-off during gait. Common issues affecting MTP joints include arthritis, bunions, and turf toe.

    The joints that connect the foot’s metatarsal bones to the toes’ proximal bones, or proximal phalanges, are known as metatarsophalangeal joints, or MTP joints. They are referred to as toe knuckles in everyday speech because they are comparable to the hand’s knuckles. Since the metatarsal bones’ elliptical or rounded surface approaches a shallow cavity (of the proximal phalanges), these joints are known as condyloid joints. The ball of the foot is made up of the area of skin just beneath the joints.

    Introduction

    The synovial joints that bind the foot’s metatarsal bones to the proximal phalanges of the toes are called metatarsophalangeal joints (MTP). The bases of the proximal phalanges and the heads of the metatarsals articulate at these joints.

    During the stance phase of the gait cycle, or walking, the metatarsophalangeal joints—condyloid joints—permit flexion, extension, abduction, adduction, and circumduction. The capsuloligamentous and musculotendinous structures that are connected to the metatarsophalangeal joints stabilize them.

    Anatomy

    • The articulation of the metatarsophalangeal (MTP) joints is ball-and-socket. There is a noticeable dorsal lip on the proximal phalanx.
    • At the crista or plantar aspect of the metatarsal head, the first MTP joint features paired sesamoids with unique articulations.
    • The first MTP joint features tiny dorsal and plantar recesses and connects to the sesamoid articulations.
    • The smaller dorsal and larger plantar capsular recesses of the second through fifth, or lesser, MTP joints go from the metatarsal necks to the bases of the proximal phalanges.
    • Along the midline of the joints, the extensor tendons run.
    • Medial and lateral to the bones and joints are the dorsal digital nerves and arteries.

    Articular surfaces

    The rounded heads of the metatarsal bones and the shallow concavities on the bases of the proximal phalanges articulate to form the metatarsophalangeal joints. Mostly covering the distal and plantar sides, the articular surface of the metatarsal bone heads is vertically convex. At these joints, plantar flexion is made possible by the prominent plantar articular surface. Additionally, the first metatarsal bone’s head is transversely convex, which permits a greater degree of abduction and adduction than the other toes.

    Two distinct facets, separated by an anteroposteriorly oriented ridge, make up the unique plantar articular surface of the first metatarsal head. A smaller lateral facet occupies the remaining one-third of the palmar articular surface, while a larger medial facet covers roughly two-thirds of it. The sesamoid bones of the big toe’s plantar ligament/plate articulate with these.

    In a similar vein, the metatarsophalangeal joints of the second and fifth toes may or may not have a sesamoid bone.

    Joint capsule and ligaments

    A synovial membrane lines the flexible joint capsule that envelops each metatarsophalangeal joint and joins near the articular borders. Collateral ligaments on both sides and a plantar ligament on the plantar aspect support this fibrous capsule. These ligaments are crucial to the capsule. Fibers from the extensor tendons strengthen the capsule’s thin dorsal surface.

    The metatarsophalangeal joint is connected to three different kinds of ligaments: deep transverse metatarsal, plantar, and collateral ligaments.

    Collateral ligaments

    Each metatarsophalangeal joint has collateral ligaments on both the medial and lateral sides. From the tiny dorsal tubercles on either side of the metatarsal heads to the corresponding side of the phalangeal bases (phalangeal collateral ligament) and the plantar ligament distally (accessory collateral ligament), these robust ligaments extend obliquely, or inferodistally.

    Plantar ligaments

    The dense fibrocartilaginous plates known as plantar ligaments (or plantar plates) are securely fastened to the phalangeal bases’ plantar surfaces. The plantar ligaments’ dorsal surfaces, which are a component of the metatarsal heads’ articular surface, are somewhat concave. These ligaments’ edges mix in with the deep transverse metatarsal ligaments and the collateral.

    A groove in the plantar portions of the plantar ligaments allows the flexor tendons to pass through to the toes. The sesamoid bones and their ligamentous bands, which create a canal for the tendon of the flexor hallucis longus muscle, largely replace the plantar ligament of the first digit.

    Deep transverse metatarsal ligaments

    Four short, broad bands called the deep transverse metatarsal ligaments to connect the plantar ligaments of neighboring metatarsophalangeal joints to form a single unit. They stop the forefoot from splaying or expanding. The tendons of the lumbrical muscles, digital vessels, and nerves on the plantar surface, as well as the dorsal interossei tendons, enclose these ligaments.

    Innervation

    The metatarsophalangeal joints are primarily supplied by the plantar digital nerves. The first, second, third, and medial halves of the fourth metatarsophalangeal joint are all supplied with plantar aspects by the medial plantar nerve. Digital branches of the lateral plantar nerve innervate the fifth joint and the lateral portion of the fourth joint.

    The medial side of the first metatarsophalangeal joint is one of the digital branches of the superficial fibular (peroneal) nerve that primarily supplies the metatarsophalangeal joints on the dorsal aspect. The deep fibular nerve’s digital branches innervate just the medial side of the second metatarsophalangeal joint and the lateral side of the first metatarsophalangeal joint.

    Nerve Supply

    • Sensory and motor functions are provided by the medial and lateral plantar nerves, which are branches of the tibial nerve.
    • Dorsiflexor muscles are supplied by the deep peroneal nerve.

    Blood supply

    As branches of the dorsal pedal artery, the dorsal metatarsal arteries supply blood to the metatarsophalangeal joints on the dorsal surface.

    The plantar metatarsal arteries, which emerge from the deep plantar arch, provide the arterial blood supply to the plantar portions of the metatarsophalangeal joints.

    These two arteries—the deep plantar artery from the dorsal pedal artery and the lateral plantar artery from the posterior tibial artery—combine to form the deep plantar arch.

    Movements

    Flexion, extension, and limited abduction, adduction, and circumduction are all made possible by the metatarsophalangeal joints. There are two degrees of freedom in each joint.

    The metatarsophalangeal joints flex (plantarflex), which pulls the toes together and bends them toward the plantar portion of the foot. Flexor tendons that run to the digits are responsible for this motion. About 45° of range of motion is permitted by the first metatarsophalangeal joint during active flexion, while about 40° is permitted by the lateral four metatarsophalangeal joints.

    Extensor tendons that travel to the digits are responsible for the extension (dorsiflexion) of the metatarsophalangeal joints. The toes are slightly spread out and pointed laterally when the metatarsophalangeal joints are actively extended, elevating them toward the dorsal surface of the foot. About 70° of extension is possible in the first metatarsophalangeal joint, but only about 40° is possible in the lateral four metatarsophalangeal joints.

    At full extension, the metatarsophalangeal joints are in a close-packed posture; at 10° extension, they are in an open-packed position. These joints’ capsular pattern, or loss of passive range of motion during inflammation, varies, although, in the case of the big toe’s metatarsophalangeal joint, it is typically thought to be more limited in extension than flexion.

    There is very little abduction or adduction at the metatarsophalangeal joints, and it happens to the second digit, which acts as the midline.

    Certain auxiliary movements may be evoked during passive movement of the metatarsophalangeal joints. These include rotation of the bases of the proximal phalanges over the metatarsal heads and minor sliding (up and down).

    Muscles acting on the metatarsophalangeal joint

    Muscles in the leg and foot are responsible for all motions of the metatarsophalangeal joints.

    • The flexor hallucis longus, flexor hallucis brevis, and oblique head of the adductor hallucis muscle are the main muscles responsible for flexing the first digit (great toe) at the MTP joint. The lubricants, dorsal and plantar interossei, and flexor digitorum brevis are the primary muscles involved in flexing the lateral four digits. The flexor digitorum longus and the quadratus plantae support them, whereas the flexor digiti minimi brevis aids in the fifth digit.
    • The extensor hallucis longus muscle is responsible for extending the first digit’s MTP joint. The extensor digitorum longus and extensor digitorum brevis muscles are responsible for the extension of digits two through five.
    • The adductor hallucis muscle is responsible for the adduction of the MTP of the first digit, while the homologous plantar interossei perform the same function for the digits three through five.
    • The abductor hallucis muscle performs abduction of the first digit, whereas the abductor digit minimi muscle produces abduction of the fifth digit. The dorsal interossei muscles are responsible for the abduction of the MTP of digits two through four.

    Clinical significances

    The metatarsophalangeal (MTP) joint is vital for walking, balance, and weight-bearing. This joint’s dysfunction or damage can result in severe pain, problems moving about, and deformities. Key clinical conditions of the MTP joint are listed below:

    1. Hallux Valgus (Bunion)

    Hallux Valgus (Bunion):

    • A lateral displacement of the big toe with expansion of the 1st MTP joint.
    • Typical of those who wear high heels or small shoes.
    • May lead to pain, edema, and difficulty walking.

    2. Hallux Rigidus

    • First MTP joint arthritis, resulting in discomfort and stiffness.
    • Common in athletes who suffer from repetitive stress injuries or in older persons.
    • Makes walking more difficult during the push-off phase.

    3. Turf Toe

    • A hyperextension injury of the 1st MTP joint, affecting the plantar plate and ligaments.
    • Common among athletes, particularly those who play football, soccer, or gymnastics.
    • Reduces mobility and causes pain and edema.

    4. Metatarsalgia

    Metatarsalgia:

    • The MTP region experiences pain and inflammation as a result of the metatarsal heads being under too much strain.
    • Causes include high-impact sports, inappropriate footwear, and excessive use.

    5. Sesamoiditis

    • Sesamoid bone inflammation beneath the first MTP joint.
    • Common among dancers, runners, and those with high arches.

    6. Rheumatoid Arthritis (RA)

    • Impacts the MTP joints, particularly those numbered two through five.
    • Causes instability, discomfort, and joint abnormalities.

    7. Gout

    • The first MTP joint is frequently affected by uric acid crystal deposition (“Podagra”).
    • Causes swelling, redness, and abrupt, intense pain.

    8. Claw Toe & Hammer Toe

    • Abnormalities affecting the interphalangeal and MTP joints.
    • Causes include long-term pressure, ill-fitting shoes, and neuromuscular disorders.

    9. Freiberg’s Disease

    • The second or third metatarsal head may have avascular necrosis or bone death.
    • Common in female adolescents.
    • Pain, stiffness, and restricted movement are the symptoms.

    10. Capsulitis of the MTP Joint

    • The second MTP joint is typically affected by joint capsule inflammation.
    • Frequently brought on by too much forefoot pressure.

    FAQs

    The metatarsophalangeal joints: what are they?

    Approximately 2 cm from the toe webs are the ellipsoid synovial joints known as the metatarsophalangeal (MTP) joints. The plantar ligament (plate) on the plantar surface and the collateral ligaments on either side reinforce their capsule.

    What is meant by medical joint (MTP)?

    Turf toe, also known as metatarsophalangeal (MTP) joint sprain, is a sprain of the great toe plantar ligament complex. Both active and passive motion of the enlarged joint cause pain.

    In the foot, what does MTP mean?

    In your big toe, the first metatarsophalangeal (MTP) joint is located. The first MTP joint fusion is a surgical treatment used to treat big toe arthritis, also called hallux rigidus, which can cause discomfort and swelling and make it difficult to run, walk, and wear shoes.

    The first MTP joint is where?

    The base of the big toe is where the First Metatarsophalangeal joint is situated. When walking, this joint facilitates toe-off. This is frequently the location of arthritic changes in the joint or a bunion.

    What is the purpose of MTP?

    The abortion pill, sometimes referred to as medical termination of pregnancy (MTP), is a type of abortion that involves taking one or two medications.

    MTP joint pain: what is it?

    In many cases, metatarsalgia is caused by pain in the metatarsophalangeal joint. The most frequent cause of metatarsophalangeal joint discomfort is misalignment of the joint surfaces due to changes in foot biomechanics, which can lead to capsular impingement, flexor plate rips, joint subluxations, and osteoarthrosis, or the breakdown of joint cartilage.

    How is pain in the first MTP joint treated?

    The arthritis cannot be cured, but it may be less painful if orthotics are tried to relieve pressure beneath the joint or if shoes are modified to limit movement through the joint. Anti-inflammatory drugs and paracetamol, two other common analgesic regimens, might also be beneficial.

    References

    • Metatarsophalangeal (MTP) joints. (2023, October 30). Kenhub. https://www.kenhub.com/en/library/anatomy/metatarsophalangeal-mtp-joints
    • Wikipedia contributors. (2024b, September 10). Metatarsophalangeal joints. Wikipedia. https://en.wikipedia.org/wiki/Metatarsophalangeal_joints
  • Deep Core Muscles

    Deep Core Muscles

    Deep Core Muscles: What Are They?

    The deep core muscles are a group of stabilizing muscles that support the spine, pelvis, and abdomen. They include the transversus abdominis, multifidus, diaphragm, and pelvic floor muscles. These muscles work together to provide stability, improve posture, and reduce the risk of injury, especially in movements requiring balance and control. Strengthening the deep core enhances overall functional strength and protects the lower back.

    The phrase “the core” describes a collection of muscles rather than just one. The set of muscles responsible for covering the trunk and hip is known as the core. The hip core muscles, abdominal viscera, and spine are all covered by deep core muscles, which are crucial for maintaining good posture. Strength and stability are provided by core muscles.

    To regulate the midsection of the body, these deep muscles have the unusual ability to activate before a movement begins.

    List of Deep Core Muscles:

    • Rectus abdominis – (at the front).
    • Internal and external obliques – (on sides).
    • The transversus abdominis muscle wraps horizontally over your stomach.
    • Erector Spinae – (next to your spine).
    • Multifidus – (runs along your spine).
    • Quadratus Lumborum – (in your lower back, above your hips).
    • The diaphragm is located on the upper part of your core.

    The muscles that make up your body’s floor or bottom are called pelvic floor muscles.

    These deep core muscles cooperate to provide your abdominal power and stability. The deep core includes the diaphragm, pelvic floor, transverse abdominis, and multifidus muscle. Your entire body is supported by the combined action of these core muscles. Dysfunction can also occur if someone is hyperactive or engaged in the wrong way.

    The Fundamental Units:

    An inner unit and an exterior unit make up the core units. Together, these parts enable us to carry out basic daily chores and deliver more sophisticated performance.

    The Internal Unit:

    • The “inner core” is another name for the deeper muscle group.
    • Some people refer to it as “the anticipatory core.”
    • The deep core is the name given to the inner core unit.
    • The deep core muscles serve as a safety belt for the spine.
    • The spine is supported and stabilized by these intrinsic core stabilizers.
    • These muscles stabilize the pelvis in conjunction with the hip flexors and glutes.

    The following muscles are part of the deep core:

    Stability of the Deep Inner Core: The transversus abdominis (TA), multifidus (MF), pelvic floor (PF), and diaphragm are among the muscles of the lower spine.

    Transversus Abdominis (TA):

    The deepest muscle in the abdomen is this one.
    These muscles protect your spine by acting as a belt around your waist.
    Another name for it is a “corset muscle,” which surrounds the pelvis and spine. To safeguard the spinal joints, ligaments, discs, and nerves in the typical scenario, TA contracts in advance of body movements.
    Particularly significant is the transverse abdominis, which runs from your lower ribs to the top of your pelvis. Its horizontal fibers encircle your abdomen like an inbuilt back brace.

    Multifidus:

    It is yet another important pelvic-connected muscle stabilizer.
    These muscles are extremely short and extend from one vertebra’s transverse processes (on the sides) to the next vertebra’s spinous process.
    Their main purpose is to stabilize the back.
    They make an attempt to always give little, “fine-tuning” postural adjustments rather than developing a significant range of motion.

    Pelvic Floor & Diaphragm:

    It gives the pelvis support and stability.
    Together with your diaphragm and pelvic floor, the transverse abdominis and multifidus create a solid yet flexible region surrounding your lumbar spine.
    It enables you to conquer back problems and lower your risk of recurrence by stabilizing your lumbar spine in a variety of situations.

    The functions of the Core muscles:

    • For proper load.
    • The kinetic chain, pelvis, and spine should all be balanced.
    • It protects the spine from an excessive amount of strain.
    • It is also crucial for the load transfer -between the upper and lower bodies.
    • If we have a strong, steady core it assists us to prevent injuries.
    • To offer the requisite spinal stability

    The paraspinal, gluteal, hip girdle, abdominal, and other muscles are the ones that function in groups. Additionally, there is a lower quadrant core (hip and trunk) and an upper quadrant core (glenohumeral and scapulothoracic joints). These are the muscles of the core trunk: The muscles of the abdomen, lumbar region, lateral region, and thoracolumbar region. The hip flexors, extensors, abductors, adductors, and rotators are the main hip muscles.

    The diaphragm serves as the ceiling of the muscular box that is the core, with the pelvic floor and hip girdle musculature at the bottom, the abdominals at the front, and the paraspinal and gluteal muscles at the rear. The box contains 29 pairs of muscles that work together to stabilize the kinetic chain, the pelvis, and the spine during functional motions. With compressive stresses that are less than the weight of the upper body, the spine will become mechanically unreliable if these muscles are absent.

    Global Movers and Stabilisers of Core Muscles:

    Stabilizers and global movers are the two categories of core muscles.
    For the best spinal stabilization, all of the global movers and stabilizers must contract in unison.

    The stabilizer muscles include :

    • Pelvic floor
    • Transversus abdominis
    • Internal Obliques
    • Multifidus
    • Diaphragm

    The global movers/muscles include :

    • Rectus abdominis
    • External obliques
    • Erector spinae
    • Quadratus lumborum
    • Hip muscle groups

    Muscle Types: 

    Slow-twitch and fast-twitch muscle fibers, as well as stabilizers, make up the core muscles. These muscles have a significant postural component and are slow-twitch, while the global movers are fast-twitch.

    Slow-twitch fibers: Mostly make up the deep muscular layer or local stabilizing muscle system. These muscles are shorter and better at regulating intersegmental motion, which is essential for postural and extrinsic loading responses.

    Fibers with fast twitch:
    It is composed of the superficial muscular layer, which is a worldwide muscle system. Because of their length and massive lever arm, they generate a lot of torque and gross motions.

    The myofascial girdle:

    Thoracolumbar Fascia: The erector spinae aponeurosis (ESA) and the thoracolumbar fascia (TLF) are crucial components of the spine’s biomechanics. The core passes via the Erector Spinae Aponeurosis (ESA), an evaluative component of the myofascial girdle covering the lower section of the torso, and the thoracolumbar fascia (TLF). TLF and ESA also function as proprioceptors, giving signals on trunk positioning as the muscles contract.

    Aponeurosis of the erector spinae (ESA):
    With a proximal attachment on the sacrum and the spinous processes of the lumbar vertebrae, it is a common aponeurosis that merges with the thoracolumbar fascia and covers the inferior part of the erector spinal muscles.

    TLF:
    This structural component encircles the core muscles and is composed of aponeurotic and fascial planes. It serves as a hoop around the trunks and stabilizes the lumbosacral spine.

    Deep Core Muscle Exercise:

    Exercise for Core Strengthening:

    Lying on your back with your legs bent is one of the best ways to improve your core. Next, align your fingers with the anterior superior iliac spine’s (ASIS) midline. Now do a Kegel contraction as you exhale. Then, squeeze your pelvic floor muscles to experience a Kegel contraction. For five seconds, maintain the posture. Then unwind.

    Reverse star jump:

    Reverse star jump
    Reverse star jump

    Motivation: Plyometric exercises strengthen your inner core muscles and get them ready for running.
    How to execute: Place your arms over your head and your feet wide apart. Feel your tummy lift as you inhale.
    Then, when you raise your pelvic floor, release your breath.
    Keep letting out breaths.
    Then lower your arms and leap to your feet simultaneously.
    Then exit again.
    Do this ten times.
    Advance to the full-speed leaps.

    Ski jumping:

    Ski jump
    Ski jump

    Justification for performing: Assists in determining the neutral alignment when bending.
    How to execute: Stand in a neutral position or posture first.
    Now move your weight to your forefoot and bend forward from your ankles.
    Avoid pushing it in your butt.
    Inhale and exhale now.
    Do this several times.
    Continue doing this until you feel comfortable breathing in this posture.

    Squat down and pull down.

    Squat with pull-down
    Squat with pull-down

    Motivation: To strengthen your back and glutes. Additionally, it draws steadiness from your inner core.
    How to execute: Put a resistance band on top first.
    Hold both handles now.
    And when your arms are straight, take a step back.
    After that, take a breath and squat.
    Lift your pelvic floor after exhaling.
    And when you pull the grips to your hips and stand back up, continue to exhale.
    Now take a breath and squat once again, bringing your arms back to the beginning position.
    Do this five or ten times.

    Weight shift :

    Weight Shift
    Weight Shift

    Perform because it awakens your deepest core.

    How to execute:

    Kneeling on your hands.
    Take a breath first.
    Feel your pelvic floor relax and your belly grow.
    As you raise your pelvic floor, release the breath.
    As you continue to exhale, your shoulders will move from your shoulders to your wrists.
    You’ve gone too far if you overestimate the bend in your lower back.
    Reset this by taking a deep breath.
    Do this ten times.

    Goblet Squats

    Motive for performing: Weightlifting has several advantages, including changing body composition, lowering the risk of osteoporosis, increasing bone density, and lowering the risk of type 2 diabetes. It is an excellent method for strengthening and engaging your deep core muscles. Furthermore, it also works with free weight.

    TVA and multifidus, two of the deepest layers of the back muscles, are examples of deep core muscles. So pick up a kid, some dumbbells, or some soup cans and begin lifting. Just keep in mind to always start small and work your way up, and to try to keep your back straight and your eyes forward.

    The goblet squat technique:

    Hold the weight close to your chest with both hands while standing with your feet hip-distance apart and your toes slightly pointed out.
    To develop your core muscles, pull your belly button inside towards your spine.
    To get into a deep squat position, thrust your hips back and bend your knees while maintaining an engaged core.
    Advice: Throughout, try to maintain a straight back and a forward-facing chest.
    Maintain this posture, then straighten your legs and stand again by squeezing your glutes.

    How to use marches in a bridge:

    long leg glute arch
    long leg glute arch

    Keep your legs and hips apart and begin by lying on your back with your knees bent.
    After exhaling, raise your hips into a bridge posture. From this posture, raise one leg while maintaining hip level to a table at the top. With a different leg, do the same.
    Advice: Make sure that during the exercise, your core is engaged and drawn in towards your spine.
    Imagine you are balancing a glass of water on your pubic bone, and trying to maintain your hip bone level.
    Note: The TVA and multifidus muscles are strengthened by this workout. When combined, they aid in stabilizing the vertebrae.

    Bird dog :

    How to perform bird dogs:

    Beginning with, place your knees under your hips and your hands behind your shoulders.
    At this point, place your legs and hips apart and look between your hands.
    Exhale now, and while you stretch one leg back and the other arm forward, use your core to pull your belly button in towards your spine.
    Advice: As you extend, keep it at hip level and refrain from turning it. Your core remains engaged throughout.
    Return your arm and leg to the beginning position now.
    Repeat with the opposite arm and leg.

    Bird Dog Elbow to Knee:

    Knee-to-elbow contact.
    Go to your knees.
    Take a deep breath.
    Maintain a straight back.
    Lift one leg behind you.
    Now make a straight line by bending forward with the other hand.
    To stay stable, keep your core active.
    Start moving your elbow in the direction of your knee. Don’t round your back. Just bring them near to one another.
    They don’t need to make contact.
    Return to the beginning position.
    Change sides.

    Side Planks:

    The side plank technique:

    Start by straightening your legs and placing them on top of one another while lying on your side. Then, raise yourself onto the bottom of your elbow.
    With your hand and forearm lying on the floor, place your elbow just beneath your shoulder.
    Advice: Make an effort to maintain a linear posture for your feet, hips, and shoulders.
    Your belly button should be pulled in towards your spine. To raise your hips off the floor, press your glutes while maintaining an engaged core.
    Return your hips to the floor carefully now.
    Try placing your top foot on the floor in front of your bottom foot, contacting heel to toe, if putting your feet together is too tough.
    Note: This is a full-body workout that works with your shoulder stabilizers, glute muscles, back, and core.
    Consider changing the workout to involve bending your knees and lifting from your elbow and knee if it causes pain.

    Plank Shoulder Taps:

    Focus on keeping a firm plank position without lowering your hips or raising your glutes.
    Tap your shoulders as many times as you can without losing form.
    Related: Steer clear of the plank errors.

    Plank Knee Taps:

    Plank Knee Taps
    Plank Knee Taps

    Put yourself in a plank posture first.
    Maintain an active core.
    To tap the mat, start by dropping your knees, then swiftly raise them back up.
    Try to complete as many repetitions as you can without compromising your form.

    Deadbug:

    dead bug exercise
    dead bug exercise

    How to deal with dead bugs:

    Start by laying flat on your back with your knees bent, feet flat on the floor, and arms at your sides.
    To engage your core, draw your belly button in the direction of your spine.
    Lift one leg at a time into a tabletop posture while maintaining an engaged core.
    As if you were attempting to touch the ceiling, raise your arms straight up in the air.
    Advice: To avoid letting your legs touch the floor, try to move it gently and focus.

    Rollouts with stability ball:

    Rollouts with stability ball
    Rollouts with stability ball

    How rollouts are carried out:

    Place both of your knees just beneath your hips.
    Now put your hands together and lay on top of a stability ball that is right in front of you.
    To activate your core and maintain it throughout the exercise, draw your belly button in towards your spine.
    Start rolling the ball away from you with your arms.
    You will first press your forearms into the ball as it rolls, then your elbows.
    As your body descends towards the floor, maintain alignment between your knees, hips, and shoulders.
    One piece of advice is to avoid holding your breath and to keep your shoulders back and down.
    Stop the ball from rolling farther when you have successfully lowered your torso into a modified plank posture.
    As you return to a kneeling posture, strive to maintain a straight back while using your arms to draw the ball back towards you.
    Note: Throughout this exercise, keep your hips, shoulders, and knees in alignment. Don’t thrust your hips up in the air, shrug your shoulders up towards your ears, or allow your hips to drop to the floor as you roll from one position to another.

    Plank Knee To Elbow:

    Put yourself in the plank posture first.
    Use your core.
    Now, without curving your back too much, bring one knee near your elbow.
    After that, flip sides and return your leg to its initial position.

    Hip Dip:

    It essentially works the entire core, which includes the muscles of the rectus abdominis, transverse abdominis, and obliques. It is the best because it is simple to advance through and teaches you how to generate tension throughout your body. It also has a high assignment transfer to other exercises, like as push-ups and pull-ups, so you may learn how to work your abs more effectively in any activity you do.

    How to accomplish it:

    The first step is to lie face up with your arms straight over your head and your legs outstretched, keeping them near to your ears.
    Now push your lower back into the floor by contracting your abs.
    Lift your legs off the floor by pointing your toes and squeezing your glutes and thighs together.
    Keep your head in a neutral position and lift your shoulders off the floor to prevent overstressing your neck.
    You should now be in the shape of a banana with only your hips and lower back on the ground while keeping your legs and center back off the ground.
    This is where you will begin.
    Maintaining a strong grip, slowly bend forward and backward until your hands and feet almost touch the ground.
    Put yourself in the starting position and just hold if this is too hard to do.

    Raise Your Legs:

    In addition to targeting your lower abdomen, this exercise is a great way to extend and develop your hip flexors, which are crucial for core strength and stability. In addition to strengthening your abs, it will assist you increase your hip mobility, which will benefit all aspects of your fitness. It is quite normal for people to have tight hip flexors, particularly if they have a desk job all day. Adding these can help you become more flexible in that region.

    How to accomplish it:

    With your hands at your sides or tucked under your hips for additional support, lie down with your legs outstretched.
    Now, steadily lift your legs as straight as you can while maintaining their unity until your shoe bottoms face the ceiling.
    After that, carefully drop your legs. Keep your feet dangling a few inches above the ground rather than touching it.
    One rep, that is.
    Keep your lower back flat on the floor while performing this exercise. Don’t drop your legs as much if you’re having trouble accomplishing that.

    In addition to providing you with support and protection, activating and strengthening these deep core muscles will provide you with instant comfort.

    Advantages of Physical Therapy for Strengthening the Core:

    • Boost stability.
    • Boost your endurance.
    • Become more physically fit.
    • Alleviate discomfort.

    FAQs

    What is the deepest muscle in the core?

    The deepest muscle in the core is the transverse abdominis. It is the layer of muscle that is deepest. It is crucial for maintaining internal abdominal pressure and stabilizing the trunk.

    Which four deep core muscles are they?

    The diaphragm, pelvic floor, transverse abdominis, and multifidus are the four deep core muscles. These four deep core muscles cooperate to sustain the entire body. A malfunction may arise if one of them is improperly, excessively, or inactively engaged.

    How do I acquire a six-pack that is deeper?

    The upper abs can be effectively activated by performing crunches with the knees raised. To guarantee a strong contractile activation of the lower abs, you may also incorporate reverse crunches, which involve curling up from the pelvis. Crunches that twist can also be used to guarantee that the obliques are properly activated.

    What advantages can deep core workouts offer?

    Exercises for your deep core enhance your physical fitness and help you become more balanced, stable, and resilient.

    Which pack abs are the highest?

    The largest and highest-pack abs are a 12-pack. It may surprise you to learn that there have been cases of autopsy involving individuals with 12-pack abs. If you consider the general percentage of people who have another form of abs, the likelihood of getting a 12-pack is rather low.

    References

    • Department of Health & Human Services. (n.d.-a). Abdominal muscles. Better Health Channel. https://www.betterhealth.vic.gov.au/health/conditionsandtreatments/abdominal-muscles
    • Dr.AnkitaChavda. (2023, December 13). Deep Core Muscles – list, ANatomy, Function, Exercise – mobile. Mobile Physiotherapy Clinic. https://mobilephysiotherapyclinic.in/deep-core-muscles/

  • Obesity

    Obesity

    Introduction

    Obesity is a medical condition characterized by excessive body fat accumulation that poses health risks. It is typically measured using the Body Mass Index (BMI), with a BMI of 30 or higher classified as obese.

    This medical condition raises the risk of several other illnesses and health issues. Heart disease, diabetes, hypertension, hypercholesterolemia, liver disease, sleep apnea, and several types of cancer are among them.

    Some people struggle to lose weight for various reasons. Obesity is frequently caused by a combination of environmental, physiological, and genetic variables, as well as decisions about nutrition, exercise, and physical activity.

    The good news is that obesity-related health issues can be avoided or improved with even a small weight decrease. You may lose weight by changing your habits, eating a better diet, and exercising more. Other options for treating obesity include weight-loss methods and prescription drugs.

    Obesity: what is it?

    When you have too much body fat, you are considered obese. This complicated and chronic illness can have an impact on your general health and quality of life. Obesity can result in major health problems. It may have an impact on your mental health and sense of self.

    Obesity and overweight are defined by the World Health Organization (WHO) as “excessive fat accumulation that presents a risk to health.” Body fat may be calculated using a variety of methods, each with varying degrees of accuracy and potential drawbacks. One technique for checking for excessive body fat is the body mass index or BMI. Overweight is defined as having a BMI of more than 25, while obesity is defined as having a BMI of more than thirty.

    You are not alone if you are obese. Two out of every five persons in the US suffer from this prevalent illness. Finding the right therapies and health management techniques might be aided by a healthcare professional.

    Which symptoms are associated with obesity?

    Although it is an illness, obesity does not have any particular symptoms. To determine what constitutes obesity, a medical professional may compute your:

    • The BMI calculates the difference between the average height and weight of the body. To categorize obesity, medical professionals utilize BMI.
    • Measurements of your waist circumference may be taken by providers.
    • extra visceral (abdominal) fat that exceeds the total quantity of body fat in other parts
    • a waist circumference of at least 40 inches for men and 35 inches for women: a BMI of more than 30

    Classifications of BMI

    Medical professionals use your BMI to categorize obesity. When determining the best course of action for weight loss, healthcare professionals consider three broad categories of obesity. Those courses are:

    • Class I obesity is defined as having a BMI of 30 to less than 35 kg/m² (kg/sqm).
    • 35 to less than 40 kg/m² is the BMI for class II obesity.
    • BMI 40+ kg/m² is considered class III obesity.

    When considering the BMI scale, it is essential to keep in mind that it cannot reliably indicate some health concerns.

    Circumference of the waist

    Carrying excess weight may indicate a higher risk of health problems associated with obesity. A waist circumference of more than 35 inches for women and 40 inches for men may be associated with an increased risk of cardiovascular disease or Type 2 diabetes, according to the U.S. Prevention and Disease Control Centers (CDC).

    Causes Of Obesity

    Obesity is essentially the result of consuming more calories than your body can utilize. There are several reasons why you could consume more food than your body requires:

    • Some drugs: Weight gain may result from medications you use to address other diseases. Beta-blockers, steroids, antidepressants, anti-seizure drugs, and diabetic meds are a few examples.
    • Disability: Obesity is more likely to affect adults and children with physical and learning difficulties. Physical restrictions as well as a lack of finances and specialized training may be factors.
    • Eating habits: Overweight may be caused by consuming more calories than your body requires, eating highly processed meals and beverages, eating foods rich in sugar, and eating foods high in saturated fat.
    • Genetics: Studies reveal that individuals who are obese have certain genes that influence hunger, known as obesity-susceptibility genes. Whether overweight persons have the same genetic composition is unclear.
    • Absence of physical exercise: Your time for physical exercise is reduced when you spend a lot of time on screens, such as watching TV, playing video games, or using your laptop or mobile device.
    • Sleep deprivation: The hormones that regulate appetite can be impacted by not getting at least seven hours of sleep. Lack of sleep can cause hormonal changes that increase hunger and cause you to seek high-calorie foods.
    • Stress: When you experience stress, your body and brain produce more cortisol and other hunger-controlling chemicals. Stress increases your likelihood of consuming comfort foods that are heavy in fat and sugar, which your body stores as excess fat. High levels of stress might cause hormones to be produced that increase appetite and fat storage.
    • Underlying medical conditions: Weight gain is a side effect of conditions like metabolic syndrome and polycystic ovarian syndrome. High-calorie meals that stimulate your brain’s pleasure centers might be a result of mental health conditions like anxiety and sadness, High blood pressure, high blood sugar, high triglyceride levels, low HDL cholesterol, and extra body fat around the waist are all risk factors for metabolic syndrome, which increases your risk of developing several significant health disorders.
    • As people age, their metabolic rate may reduce and their muscle mass may decrease, making weight gain more likely.
    • Pregnancy, since it may be challenging to remove weight accumulated during pregnancy, which might ultimately result in obesity.
    • An imbalance of androgens is the result of a disorder known as polycystic ovarian syndrome (PCOS).
    • An uncommon congenital defect called Prader-Willi syndrome causes excessive appetite.
    • Cushing syndrome, a disorder caused by elevated cortisol (the stress hormone) levels in the body, and hypothyroidism (underactive thyroid), a disorder in which the thyroid gland fails to produce enough of a few key hormones
    • Osteoarthritis (OA) and other pain-related disorders that might cause decreased activity

    Complications Of Obesity

    Changes in metabolism

    Your body uses your metabolism to turn food into energy so that it can function. Your body turns excess calories into lipids and stores them as body fat when it has more than it needs. The fat cells themselves swell up when there is no more tissue available to store lipids. Inflammatory chemicals and hormones are secreted by enlarged fat cells.

    Insulin resistance, which prevents your body from using insulin to reduce blood sugar and fat, can be caused by inflammation. High blood pressure results from having high blood sugar and fat levels. These illnesses work together to cause metabolic syndrome. One prevalent condition contributing to obesity is metabolic syndrome. Additionally, the condition makes you more susceptible to illnesses like:

    Heart condition

    Heart disease is a phrase used to represent several conditions that impact the heart, including angina, heart failure, heart attacks, and irregular heartbeats. Being overweight or obese raises your risk of heart disease-causing illnesses such as high blood pressure, high blood cholesterol, and high blood glucose. Your heart may also have to work harder to pump blood to every cell in your body if you are overweight. Reducing excess weight may help you reduce these heart disease risk factors.

    Stroke

    When a blood artery in your brain or neck becomes clogged or bursts, the blood supply to a portion of your brain is cut off, resulting in a stroke. You may lose the ability to talk or move some body parts due to brain damage after a stroke.

    It is well-recognized that being overweight or obese raises blood pressure, and high blood pressure is the main cause of strokes. You may be able to reduce your blood pressure and other stroke risk factors, such as high blood cholesterol and blood sugar, by losing weight.

    fatty liver conditions

    The excess fats that are in your blood flow to your liver, which is in charge of purifying your blood. Long-term liver damage (cirrhosis) and chronic liver inflammation (hepatitis) can result from your liver retaining too much fat.

    When fat accumulates in the liver, fatty liver disorders can result, which can cause cirrhosis, severe liver damage, or even liver failure. Nonalcoholic fatty liver disease (NAFLD) and nonalcoholic steatohepatitis (NASH) are two of these conditions.

    Most typically, those who are overweight or obese are affected by NAFLD and NASH. Individuals with metabolic syndrome, type 2 diabetes, insulin resistance, abnormal blood fat levels, and certain genes are also susceptible to developing NAFLD and NASH.

    Gallstones,

    The accumulation of cholesterol in the gallbladder due to elevated blood cholesterol levels raises the risk of gallbladder disorders and cholesterol gallstones.

    Kidney illness

    Your kidneys are harmed and unable to filter your blood as effectively if you have renal disease. The two most frequent causes of chronic kidney disease (CKD), diabetes and high blood pressure, are increased by obesity. Obesity may raise your chance of getting chronic kidney disease (CKD) and hasten its progression, even if you do not have diabetes or high blood pressure.23.

    Losing weight may help you avoid or postpone chronic kidney disease (CKD) if you are overweight or obese. Consuming nutritious meals and beverages, exercising, and decreasing extra weight can all help delay the progression of chronic kidney disease (CKD) and prolong the health of your kidneys if you are in their early stages.

    Pregnancy issues

    Obesity and overweight increase the risk of pregnancy-related health issues that might impact both the health of the unborn child and the mother. Pregnancy-related obesity may raise the risk of:

    Acquiring gestational diabetes, or diabetes that develops during pregnancy; having high blood pressure during pregnancy; or preeclampsia, which, if untreated, can result in serious health issues for both the pregnant woman and the unborn child; requiring a cesarean delivery—or c-section—and, consequently, requiring more time to recuperate after giving birth

    Suffering issues during surgery and anesthesia, particularly if they are extremely obese, gaining weight, or remaining obese after the baby is delivered

    Gaining too much weight or being obese during pregnancy might also raise the baby’s health risks.

    being born larger than anticipated given the baby’s sex or the length of the pregnancy, and growing up to suffer from chronic illnesses such as type 2 diabetes, obesity, heart disease, and asthma

    Consult your healthcare provider about how to

    • Before becoming pregnant, attain a healthy weight.
    • Acquire a healthy amount of weight while pregnant and comfortably drop a few pounds once the baby is delivered.

    Issues with fertility

    The chance of becoming infertile rises with obesity. Women are considered infertile if they are unable to conceive after a year of trying or if they become pregnant but are unable to bring the pregnancy to term. For men, it refers to the inability to conceive a woman.

    Male obesity is associated with decreased sperm quality and quantity. Obesity is associated with ovulation and menstrual cycle issues in women. Certain infertility treatments or procedures may also make it more difficult to conceive if a person is obese.

    The likelihood of normal menstruation, ovulation, and pregnancy may rise for obese women who drop 5% of their body weight.

    Problems with sexual function

    Problems with sexual function may also be more likely to occur in obese people. Males who are overweight or obese are more likely to have erectile dysfunction (ED), a condition in which they are unable to obtain or maintain an erection that is firm enough for satisfying sexual activity.

    Few studies have examined how obesity may impact female sexual function by causing issues including discomfort during sex, lack of sexual desire, difficulty becoming or becoming aroused, or difficulty having an orgasm. However, studies show that weight loss, improved physical exercise, and a nutritious diet may help lessen issues with sexual function in obese individuals.

    Type 2 diabetes

    An excessively high blood glucose, or blood sugar, level can lead to type 2 diabetes. Of those with type 2 diabetes, about 90% are overweight or obese. Chronic hyperglycemia can cause renal disease, heart disease, stroke, nerve damage, vision disorders, and other health issues.

    It may be possible to avoid or postpone type 2 diabetes if you are at risk by reducing your initial weight by at least 5% to 7%. Your target weight would be between 10 and 14 pounds if you were 200 pounds.

    The condition of osteoarthritis

    A prevalent and chronic health issue, osteoarthritis results in joint pain, swelling, stiffness, and decreased range of motion. Ankle, hip, and knee osteoarthritis is primarily associated with obesity.

    Due to increased strain on your joints and cartilage, being overweight or obese may increase your chance of developing osteoarthritis. Inflammatory chemicals may be more prevalent in your blood if you have extra body fat. Osteoarthritis may become more likely if your joints are inflamed.

    If you are overweight or obese, decreasing weight can reduce inflammation in your body and the strain on your knees, hips, and lower back. The symptoms of osteoarthritis may be alleviated if you lose weight. One of the greatest ways to treat osteoarthritis, according to research, is to exercise. Exercise has been shown to enhance mood, reduce pain, and promote flexibility.

    Asthma

    A chronic, or long-term, disorder that damages your lungs’ airways is asthma. Your lungs’ airways are tubes that allow air to enter and exit. The airways may occasionally become irritated and constricted if you have asthma. You can have chest tightness, coughing, or wheezing.

    Being obese can raise your chance of getting asthma, make it more difficult to manage your symptoms, and increase your risk of developing the illness altogether. Your asthma may be simpler to control if you lose weight. Weight-loss surgery, commonly referred to as metabolic and bariatric surgery, may alleviate asthma symptoms in those who are extremely obese.

    Breathing issues

    Being overweight raises your chances of respiratory issues, and being obese can also impair lung function.

    Apnea during sleep

    One typical issue that might occur while you are asleep is sleep apnea. Your upper airway gets clogged if you have sleep apnea, which results in erratic breathing or, in some cases, a brief cessation of breathing. If left untreated, sleep apnea can increase your risk of heart disease, diabetes, and other health issues.

    Adults who are obese frequently develop sleep apnea. You may have extra fat accumulated around your neck if you are overweight or obese, which narrows your airway. Snoring or trouble breathing might result from a narrowed airway. Losing weight may help lessen or even eliminate sleep apnea if you are overweight or obese.

    Certain cancers

    • Such are ovarian, breast, uterine, colorectal, pancreatic, and esophageal.

    A group of linked disorders make up cancer. Some of the body’s cells start to grow weirdly or uncontrollably in all forms of cancer. Other bodily areas may occasionally be affected by the malignant cells’ spread.

    Obesity and overweight may increase your chance of getting certain cancers. The risk of prostate, colon, and rectal cancers is increased in men who are overweight or obese. Breast lining, uterine, and gallbladder cancers are more prevalent in women who are overweight or obese.

    Having high blood pressure

    A medical worker sits in a doctor’s office and takes a woman’s blood pressure.
    An increased risk of high blood pressure might result from being overweight or obese.
    Hypertension, another name for high blood pressure, is a disorder where blood rushes through your blood vessels more forcefully than usual. Your heart must work more to pump blood to all of your cells if you are overweight, which can raise blood pressure. Having too much fat can also harm your kidneys, which control blood pressure.

    High blood pressure increases your risk of heart attack, stroke, renal illness, and death. It can also strain your heart and damage blood vessels. A healthy body mass index range can be attained by losing enough weight, which can reduce high blood pressure and avoid or manage associated health issues.

    Issues with mental health

    Apart from raising the likelihood of physical health issues, obesity can also have an impact on mental health, raising the risk of

    • long-term stress issues with body image
    • Depression, low self-esteem, and eating disorders

    People who are overweight or obese are also more likely to experience weight-related discrimination at work and school, according to studies, which might negatively impact their quality of life over time. It has been shown that losing extra weight enhances self-esteem and body image while lowering depressive symptoms.

    How are obesity diagnoses made by medical professionals?

    Your waist circumference, height, and weight will be measured by your healthcare professional during your visit. A bioelectrical impedance study or a bone density test scan are examples of body composition tests they could do. By measuring the speed at which an electrical current flows through your body, this test calculates your body composition. Above all else, they will want to know how you are feeling. What they will inquire about:

    • Your past medical history, including ailments and drugs used to treat them. They could inquire about the health of your biological relatives.
    • Your weight history, including how well any weight-loss techniques have worked for you.
    • Your way of life, including your present eating patterns, sleeping patterns, and level of daily exercise.
    • Your mental health. They could inquire about stress and other issues that might have an impact on your mental health. Eating more might result from stress and other problems.

    In addition to checking your vital signs, your doctor could prescribe certain blood tests. To diagnose obesity and any associated disorders, they will use your entire profile.

    How is the treatment of obesity?

    You and your healthcare physician will collaborate to determine a weight loss strategy that suits your needs. It could take some trial and error to determine which therapy is most effective because each person is unique:

    • Changing your diet: You are special. This implies that you should adjust your diet to suit your needs. There are methods for preparing meals that are high in nutritious foods. Your healthcare professional can recommend dietary regimens that have been scientifically established to work, such as the DASH or Mediterranean diets. These differ from other diets that have drawbacks and restrictions. They are more akin to a collection of constructive rules that can assist you in reaching your dietary objectives.
    • Including exercise throughout your day: There are several methods to increase your level of exercise, which burns calories.
    • Mental health support: Positive improvements can be supported by cognitive behavioral therapy (CBT), support groups, and counseling. They can also help you deal with emotional and psychological issues that could be hindering you and manage stress.

    Is it possible to prevent obesity?

    It is simpler to prevent obesity than to cure it after it has become established. The reason for this is that your body regulates your body mass by adjusting its systems to match your hunger cues with the energy expenditure from your everyday activities. Your body considers your new baseline weight after establishing a new high “set point.” Your weight may increase on the scale or in the BMI table as a result of that new set point. You can avoid obesity by considering your habits and making sensible adjustments today. Here are a few instances:

    • Make little adjustments: Do you use calorie-dense sugary drinks as a daily snack or “pick-me-up”? Think about switching it out. A daily increase of 150 calories might result in an annual gain of 10 pounds. A snack-sized bag of potato chips or simply two double-stuffed sandwich cookies would be equivalent to that.
      Increase your level of exercise: Alternatively, think about how you may discover an activity that suits your fitness level and needs to burn an additional 150 calories each day.
    • Shop with intention: Keep sweets and snacks for special occasions when you go out, and stock your house with nutritious meals.

    Encourage general well-being by cutting back on screen time and getting some fresh air. Control your stress and make an effort to get enough sleep to maintain healthy hormone levels. Put more emphasis on healthy habits and good improvements than on how your weight changes as a result of your efforts.

    FAQs

    What do you mean by obesity?

    When a person has too much body fat relative to their height, they develop obesity, a chronic illness.

    What is the main cause of obesity?

    An imbalance in the number of calories burnt and ingested is the primary cause of obesity. An imbalance in energy is another name for this.

    What is stage 3 obesity?

    A person may be classified as class III obese if they satisfy any of the following requirements: surpass the ideal body weight range for their height and sex by 100 pounds. a BMI of 40 or above. are suffering from obesity-related illnesses including diabetes or high blood pressure and have a body mass index (BMI) of 35 or above.

    What are the effects of obesity?

    Heart disease: Heart disease and stroke are made more likely by obesity. Two risk factors for heart disease include excessive blood pressure and high cholesterol.
    Type 2 diabetes: The risk of type 2 diabetes is increased by obesity.
    Cancer: A number of cancers, including breast, endometrial, colorectal, esophageal, pancreatic, and ovarian cancers, are made more likely by obesity.
    Joint issues: Osteoarthritis and musculoskeletal pain are two joint issues that obesity can cause.
    Breathing issues: Sleep apnea and asthma are two conditions that obesity may cause.
    Mental health problems: Clinical depression, anxiety, and other mental diseases are among the mental health problems that obesity can cause.
    Life quality: Being obese might have an impact on your ability to move or sleep.
    Other illnesses: Gallstones, gallbladder problems, and urine incontinence are among the illnesses that obesity can cause.

    What is the best treatment for obesity?

    Changes in lifestyle
    Consume a balanced, healthful diet.
    Consume fewer calories and engage in more physical exercise.
    Do not overeat.
    Eat gently.
    Do some exercise
    Each week, try to get in at least 150 minutes of moderate-intensity exercise.
    Take up tennis, swimming, running, or walking.
    Consider water walking if you have arthritis.

    References:

    • Health Risks of Overweight & Obesity. (2025, January 31). National Institute of Diabetes and Digestive and Kidney Diseases. https://www.niddk.nih.gov/health-information/weight-management/adult-overweight-obesity/health-risks
    • Obesity. (2025, February 7). Cleveland Clinic. https://my.clevelandclinic.org/health/diseases/11209-weight-control-and-obesity
    • Moores, D. (2023, May 15). Obesity: What you need to know. Healthline. https://www.healthline.com/health/obesity