Blog

  • Knee Examination

    Knee Examination

    What is a Knee Examination?

    A knee examination is a systematic assessment used to evaluate knee function, stability, and potential pathology. It typically includes inspection, palpation, range of motion testing, and special tests to assess ligaments, menisci, and joint integrity.

    The femur, tibia, and patella are the three bones of the knee joint, a synovial joint. The tibiofemoral and patellofemoral joint are the two articulations of this intricate hinge joint. The patella and the femur articulate at the patellofemoral joint, whereas the tibiofemoral joint articulates between the tibia and the femur.

    The largest and possibly most strained joint in the body is the knee. Motions include flexion, extension, medial rotation, and lateral rotation.

    Knee bones
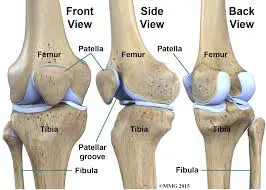
    Knee-bones
    Knee-bones

    Three bones make up the knee joint:

    • The thigh bone, or femur.
    • Tibia (bone of the shin).
    • Kneecap, or patella.

    knee cartilage

    Cartilage is the flexible connective tissue that protects your joints. It acts as a shock absorber throughout your body.

    Your knee has two different kinds of cartilage:

    • The most prevalent kind of collagen in your body is hyaline cartilage. Some medical professionals refer to it as articular cartilage. It caps both ends of the cartilage and lines your joints. Because hyaline cartilage is smooth and slick, your bones can glide past one another in your joints with ease. Hyaline cartilage lines the surfaces in your femur, tibia, and patella that come into contact with one another.
    • Fibrocartilage: Fibrocartilage is stiff cartilage composed of thick fibers, as the name suggests. It’s resilient enough to absorb blows and hold body parts in place. Your knee’s meniscus is made up of two fibrocartilage wedges. It acts as a cushion between your tibia and femur.

    Surfaces of the articulations:

    • Tibiofemoral joint: tibial plateaus, lateral and medial femur condyles.
    • Patellofemoral joint: posterior patella surface, patella surface of femur

    Menisci and Ligaments tibial (medial) collateral ligament, fibular (lateral) collateral ligament, oblique popliteal ligament, arcuate popliteal ligament, anterolateral ligament (ALL), patellar ligament, and medial and lateral patellar retinacula are examples of extracapsular ligaments.

    The medial meniscus, lateral meniscus, posterior cruciate ligament (PCL), and anterior cruciate ligament (ACL) are examples of intracapsular ligaments.

    Knee muscles

    Soft tissue composed of elastic fibers makes up muscles. To force and move portions of your body, they flex or tense up. Your knee movements are controlled by numerous muscles that are connected to your legs.

    Flexor muscles pull in your knee and include the following:

    • Genus Articularis.
    • Rectus femoris.
    • Vastus lateralis.
    • Vastus intermedialis.
    • Vastus medialis..

    Your knee can be extended by the extensor muscles, which work opposite to your flexor muscles.

    Your knee controls by the extensors listed below:

    • Biceps femoris
    • Semitendinosus muscle
    • Semimembranosus muscle
    • Gastrocnemius muscle
    • Plantaris muscle
    • Gracilis muscle
    • Popliteus muscle

    The knee’s nerves

    Electrical impulses are sent from the brain to the body through nerves, which act like cables. These impulses enable muscle movement and sensation. The nerves in your knee include

    • Femoral nerve.
    • Sciatic nerve.
    • Tibial nerve.
    • Peroneal nerve.

    Most prevalent problems or ailments affecting the knees:

    • Arthritis.
    • Osteoarthritis.
    • Bursitis.
    • Tendinitis.
    • Osteoporosis.

    Among the most frequent knee injuries are those sustained in sports:

    • ACL injuries
    • MCL injuries
    • Meniscus injury.
    • Knees that are excessively straightened
    • Sprains
    • Bone fractures
    • Disturbance
    • PFPS, which stands for patellofemoral pain syndrome, is a condition that causes pain in the area around the kneecap.

    Typical signs and symptoms of knee joint problems:

    • Discomfort, particularly when moving.
    • Swelling/inflammation.
    • Redness or discoloration around your knee.
    • A sensation of heat or coziness.
    • A sensation of grinding.
    • A popping sound or sensation.

    There are various components to the knee examination:

    history
    subjective analysis
    Palpation/Inspection Special test

    Personal

    • The patient’s diet
    • Present history ( any trauma or infection)

    Extra Details

    • Pre-existing medical issues are referred to as past medical history (PMH).
    • Drug history (DH): Are there any pertinent prescription drugs?
    • Social History (SH) (Affected by hobbies, sports, or work?

    Examination and Palpation Inspection Incorporation

    • Inadequate Alignment
    • Painful Muscle Wasting
    • Medial or Lateral collateral ligament line
    • Hamstrings Tendons Popliteus Patella Retinaculae Patellar Tendon.

    ROM:

    • Flexibility
    • 125–135 degrees
    • Extension
    • Ten degrees of hyperextension
    • Rotation (femur stabilization)
    • Internal and external tibial rotation: 10–15 degrees

    Examination

    When the patient is standing check the patient’s gait.

    Typical gaits consist of:

    • Weight-bearing on a sore leg causes analgia. The stance phase is reduced, resulting in the patient’s individual “limping.”

    Trendelenburg: weakening of the gluteus Medius and minimums, the hip abductors. This is a general examination finding rather than a sign of knee pathology.

    Check for deformity and symmetry.

    • Bilateral Genu varum (or bow-legged) patellar level, when the tibia is medially angulated for the femur
    • The condition known as genu valgum, or knock-kneed, occurs when the tibia is laterally angulated for the femur.

    Request that the patient lie down on the bed.

    • Check for Changes in the skin (such as redness from septic arthritis)
    • scars from a previous arthroplasty or arthroscopy.
    • Swellings such as para meniscal cysts, Baker’s cysts, inflammatory bursae (usually pre-patellar and infra-patella bursae), or joint effusions

    Check for fluids.

    Method 1

    • Move your hand upward after gently pressing just medially on the patella. Next, apply firm pressure to the knee’s lateral aspect.
    • Usually, no fluid will be valued.
    • A significant amount of fluid is associated with a medial aspect that “bulges” out following downward pressure (positive “bulge sign”).
    • A lot of fluid is consistent with a medial aspect that tightly reflects lateral pressure without bulging.

    Method 2

    • Check for fluid by lightly pressing down on the suprapatellar pouch, which empties into the knee joint, with one hand above the patella. Next, push toward the patella with the other hand. The patellar tendon will roll off below the bone if there is an accumulation (patella tap test).
    • A “ballotable” knee is indicated by a palpable or audible tap, which is suggestive of at least a significant volume of fluid.

    Check for laxity

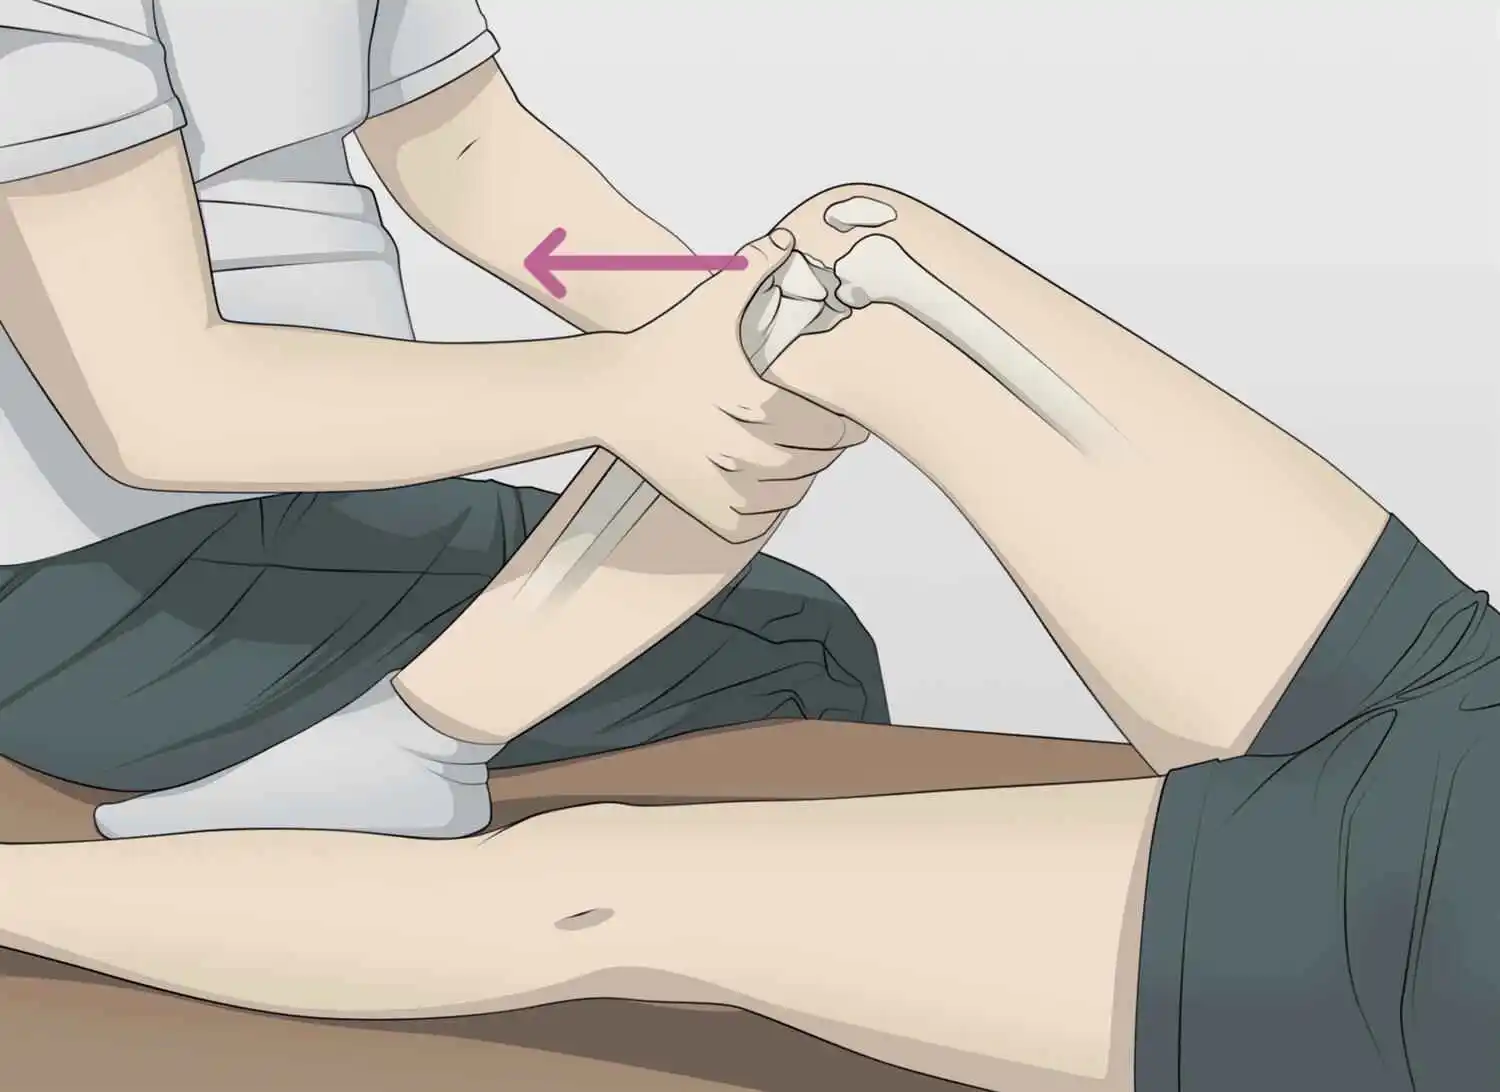
    • As the patient lies down, ask them to flex their knee and place their foot on the examination table. To immobilize the foot, sit on it. Then, using both hands, grip the tibia’s head and pull anteriorly.
    • An anterior cruciate ligament (ACL) tear is associated with movement greater than 1 cm (positive anterior drawer sign).
    • Legs hanging will complicate any results, so avoid trying to generate an anterior drawer sign with them.

    Lachman test:
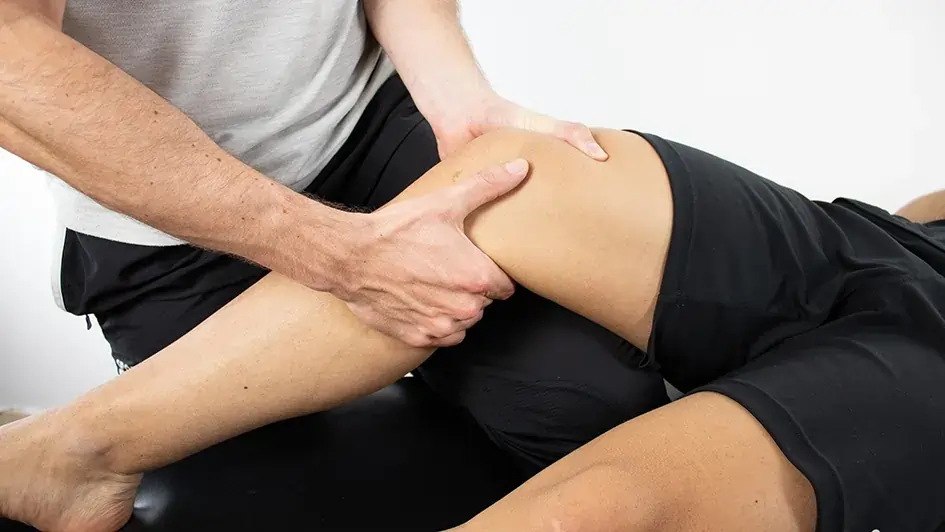
    lachman test
    Lachman test
    • Try pulling the tibia anteriorly about the femur after flexing the knee just 20–30 degrees (as opposed to 90 degrees in the anterior drawer indication). If the test is positive, a defective ACL will show increased forward motion. The anterior drawer sign is believed to be less sensitive than this test.
    • Put one hand above the patella and your other hand behind the heel to try to hyperextend the knee. It is uncommon to have more than 2-3 cm (i.e., to be allowed to place one or two fingers under the heel while the leg is flat and extended).
    • Flex and extend the knee with both hands. Continue while adding lateral and medial rotation. Check for any locking or catching that might be taking place.
    • Apply valgus and varus stresses to produce deviations larger than a few millimeters while maintaining a straight leg.

    Check for pathologies of the cartilage.

    Patellar cartilage tear, or Apley’s grind test: by pressing firmly with the palm against the patella and moving it in the sagittal plane. Only when associated with tenderness, which is associated with patellar cartilage pathology when crepitus present .

    Meniscus cartilage tear, or McMurray test:
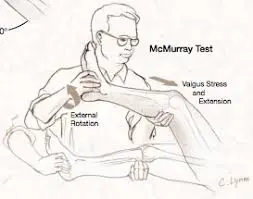
    MCMurry
    McMurry
    • Lateral meniscus tear: While the patient is in a supine position, fully flex the knee and place the forefingers on the lateral side of the joint line. Then, apply valgus stress, rotate the leg internally, and extend the knee while feeling discomfort and a snap or click.
    • Medial meniscus tear: While the patient is in a supine position, fully flex the knee and place the forefingers on the medial side of the joint line. Then, apply varus stress and rotate the leg externally, extending the knee while checking for discomfort and pops or clicks.

    Bounce Home Test:

    • A bounce-home test is used to check the integrity of the menisci.
    • Method
    • While the patient is supine, the therapist holds the heel of his foot in his palm and passively flexes the patient’s knee. After that, the knee is permitted to passively stretch. When fully extended, the knee may “bounce home” having a sharp end feel.
    • To pass the test, the knee must extend completely or feel spongy at the end, exhibiting symptoms of an intra-articular illness or a torn meniscus.
    • In the literature, a bounce-home test has already modified twice. The first change On highlighted was the knee-jerk test. It creates discomfort from the wounded tissue and forces the knee to extend.
    • The second alteration, which was only a variation of forced knee hyperextension, was described by Shybut and McGinty. The test is successful if forceful hyperextension is prevented.

    Ege’s test :

    • Starting Position:
      The patient stands with their feet 30 to 40 centimeters apart and their knees outstretched. The patient’s feet are positioned to provide maximum knee rotation for the medial meniscus or maximum knee rotation for the lateral meniscus, depending on which meniscus you are examining.
    • After kneeling with both lower legs in maximal external rotation, the patient carefully stands up to conduct the examination movement for medial meniscus injuries. Each knee externally rotates as the squat continues, increasing the space between them. The squat shall be performed with the greatest external rotation to create genu varus (knees outward). The patient returns to the initial position (with the knee extended) after squatting as much as they can.
    • To find a lateral meniscus tear, the two lower limbs are kept at their maximum internal rotation while the patient stands and squats. Since it is rarely possible to perform a full squat in the full internal rotation, even with healthy knees, the patient is allowed to stabilize themselves for a slightly less-than-full squat.
    • In contrast to the standard meniscus test, as the crouching continues, the knees go inside-turned and the distance between them decreases. Squatting with the greatest internal rotation will cause genu valgus, or inward knees. The patient returns to the initial position (together with the knee extended) after squatting as much as they can.

    final result

    • The test is considered successful when the patient feels discomfort or a clicking sound at the location of the joint line. Not all patients need a full squat because further squatting is stopped right away as the discomfort or click is felt. On rare occasions, the patient could not feel discomfort or click until they reach the maximum squats or as soon as they get out of the squat, in which case both are still regarded as positive results for this test. At about 90° of knee flexion, one frequently feels pain or maybe a click.

    Other tests:

    Ober Test
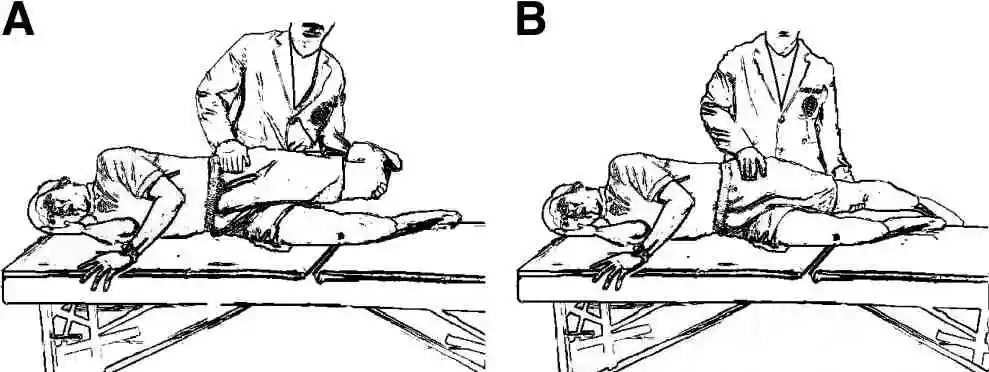
    ober-test
    ober-test


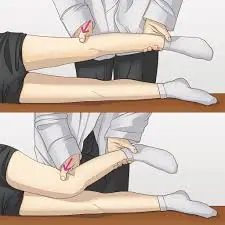
    The goal of the Ober test is to find a restricted iliotibial band. With the sore side facing up, position the patient on their lateral side to do the Ober test. Then, as seen in the example below, lay your hand beneath the lower leg and raise the entire leg posteriorly. Next, try to lower the leg below the other leg’s level while maintaining hip stability.

    A tight iliotibial band and a positive Ober’s test are suggested by the inability to lower the leg to the level of the lower leg. When a patient has lateral knee discomfort, a positive Ober’s test is strongly predictive of iliotibial band syndrome.

    Noble Test
    noble-test
    noble-test

    The noble test involves putting the patient in a supine position and flexing the knee slightly. Next, as shown in the example, position the thumb above the iliotibial band before its insertion into the lateral femoral condyle. Try to stretch the leg while applying force with your thumb, feeling for soreness beneath it.

    Instability at the Back
    sag-sign
    sag-sign

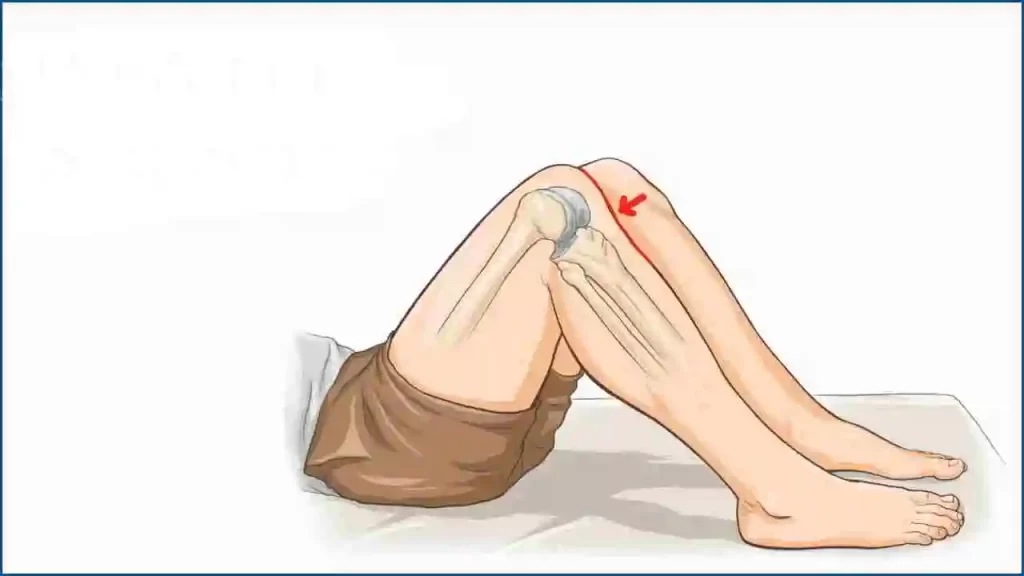
    Sag sign:

    Look for backward translation of the tibia tuberosity of the injured knee relative to the contralateral knee while the patient is supine, hips flexed to 45°, and knees flexed to 90°. Quad activation can be used to enhance this examination.

    Posterior Instability

    Posterior drawer test:

    • Place the patient in the supine position.
    • With the knee bent to 90° and the hip bent to 45°
    • The tibia remains in neutral rotation.
    • Sit on the patient’s foot to stabilize their lower extremities.
    • Try to move the tibia about the femur posteriorly.
    • A positive test is increased posterior translation.

    Frontal Instability

    Pivot shift test:

    • Put the patient in a supine posture and ask the patient to relax. ‒ Hold the knee in flexion while using one hand to grasp the ankle and the other to grasp the proximal tibia. A positive test is characterized by posterior sliding (reduction) of the lateral tibia plateau at approximately 30 degrees of flexion. This motion is secondary to the iliotibial band, which exerts an anterior force on the knee during extension and a posterior force during flexion. An ACL-deficient knee is anteriorly laterally unstable. ‒ Internally move the knee and apply a valgus stress as the knee is slowly extended.

    External Rotation Recurvatum Test:

    • An external rotation recurvatum test is used in the initial evaluation of a patient suspected to have posterolateral rotatory instability.
    • During the test, an examiner determines if this knee’s excessive extension is more severe than on the other side.
    • The test is used to measure the amount of knee recurvatum by raising the great toe and delivering a stabilizer to the distal thigh.
    • This is usually calculated using the heel position in centimeters. Measurements of the medial side of the foot are frequently made, and the outcomes are contrasted with those of the opposite side of the normal knee.
    • Studies have shown that a simultaneous anterior cruciate ligament tear is usually indicated by a higher amount of recurvatum after a posterolateral knee injury.

    Apley’s test:

    • Description of the test
    • For Apley’s grinding test, the patient lies prone with their knee flexed to 90 degrees. The patient’s thigh is subsequently secured to the exam table using the examiner’s knee. First, the examiner uses distraction to rotate the tibia laterally or medially, noting any excessive movement, limitation, or discomfort.
    • After that, compression is used to repeat the process instead of a distraction. If rotation with distraction causes more discomfort or shows more rotation than the normal side, the lesion is probably ligamentous. If there is less rotation than the typical side or if the rotation plus compression becomes more severe, the lesion is probably a meniscus damage.

    Patellar grinding test:

    Approach

    • The knee in issue is stretched when the patient is either long-sitting or supine. The examiner positions his hand’s web just over the patella while applying pressure. The patient is told to gently and gradually contract their quadriceps muscle. A positive result from this test is indicated by discomfort in the patellofemoral joint.

    A Different Approach

    • Rieder advises applying pressure to the patella directly. After that, the tester requests the patient to tighten their quadriceps muscles by applying pressure.
      The individual is on their side with their knees bowed.
      The examiner positions the thumb’s web area on the superior border of the patella while standing next to the affected side.
    • As the inspector delivers declining and substandard stress to the patella, the individual is approached to obtain the quadriceps muscle.
    • Pain when moving the patella or difficulty finishing the test are signs of patellofemoral dysfunction.
      The test is considered negative if the patient can complete and continue the compression without experiencing any pain.
      If the patient has retro patellar pain and cannot sustain a contraction pain-free, the test is considered positive.

    Precautions
    Because even normal persons can react favorably to increased pressure, the amount of pressure that is applied must be carefully managed.

    The Sensitizer

    • The best method is to repeat the process several times, applying more pressure as necessary, and then compare the results to those on the unaffected side.
    • To assess different patellar components, the knee should be examined at 30 degrees, 60 degrees, and 90 degrees, as well as full extension.

    Slocum Test:

    • Method
    • An examiner places the patient in a supine posture, with the foot secured to the examination table and the knee flexed 90 degrees. Rotating the foot applies a tibia of 30 degrees of inside rotation. To check for anterolateral rotational instability, the physician tugs on the tibia anteriorly. Bilateral comparisons of the results are made.

    Positive:

    • Anterolateral instability is indicated by an increased quantity of anterior translation of the tibia with tibial inner rotation or excessive movement on the lateral side of a knee.
    • The sign of an anterior cruciate ligament, or ACL, deficiency in the knee is anterolateral rotatory instability (ALRI).
    • Because of the knee’s 90-degree flexion, the technique enables the hamstrings to relax because the hamstrings’ origin and insertion are closer to one another in flexion.
      To investigate anteromedial rotary instability, a tibia is dragged forward once again and laterally rotated by 15 degrees. Bilateral comparisons of the results are made.

    Positive:

    • Abnormal anterior rotation of a medial tibial plateau shows laxity of the medial structures, which can occur when a tibia on a femur is pathologically elevated in both forward and outward displacement.
    • Another method for testing anterolateral rotatory instability has also been developed.
    • With his uninvolved side, uninvolved hip, and knee flexed, the patient might be in a supine laying position. The pelvis is rolled backward by the patient until it is 30 degrees off the supine position. With the knee fully extended, the medial aspect of the feet of the affected extremity is securely positioned on an examination table surface.
    • The position causes a tibia to rotate internally on a femur, eliminates any hip rotation, and permits a knee to drop into the valgus position.
    • When a patient slowly flexes their knee while holding both hands on the lateral aspect of the knee joint, the examiner assists with the procedure and applies downward pressure to cause valgus stress on the knee and, if rotatory instability is present, anterior displacement of the tibia. When the knee flexes beyond 25 to 40 ° of the flexion position, the subluxation can be felt and seen to lessen.

    FAQs

    Which three unique knee tests are there?

    Three Typical Orthopedic Knee Anterior Drawer Tests. One of the most straightforward and popular orthopedic exams for the knee is the Anterior Drawer Test. Another is the Pivot Shift Test. Another very popular and reliable test for determining a patient’s joint stability and ACL stability is the Pivot Shift Test. The McMurray Test.

    How are your knees examined?

    Check for warmth, discomfort, and swelling (including bursal or additional soft-tissue swelling, effusion, and bone swelling) by palpating. As much as you can, extend and flex your knees to move them. Zero degrees of extension to 135 degrees of flexion is the typical range. Make a comparison between the two knees.

    What is the best knee test?

    Lachman test: try pulling the tibia anteriorly about the femur after flexing the knee just 20–30 degrees (as opposed to 90 degrees in the anterior drawer indication). A defective ACL will show increased forward motion if the test is positive. The anterior drawer sign is believed to be less sensitive than this test.

    Which three components make up the knee joint?

    Three bones make up the knee joint:
    The thigh bone, or femur
    Tibia (bone of the lower leg)
    Kneecap, or patella

    What is a patella?

    Your kneecap is called the patella. It is more than just a knee cover, considering that it protects your joints. It also facilitates knee movement and the proper function of muscles, tendons, and ligaments.

    What is cartilage?

    Your bones and joints are shielded by cartilage, a robust and pliable connective tissue. Your entire body uses it as a shock absorber.

    What is the number of ligaments in the knee?

    Each knee has four major ligaments. Trauma from a car collision might result in injuries to the knee ligaments. Sports injuries may also be the cause. One of the most often injured ligaments is the anterior cruciate ligament (ACL).

    A meniscus: what is it?

    The C-shaped part of the cartilage called the meniscus serves as an insert between the thighbone (femur) and shinbone (tibia). There are two menisci on each knee. A meniscus tear, also known as cartilage damage, can be caused by a violent twist or translation of the knee.

    References:

    • Knee exam. (n.d.). Stanford Medicine 25. https://stanfordmedicine25.stanford.edu/the25/knee.html
    • Examination of the knee joint – TeachMeSurgery. (2022b, September 7). TeachMeSurgery. https://teachmesurgery.com/examinations/orthopaedic/knee-joint/
    • Knee joint. (2023, October 30). Kenhub. https://www.kenhub.com/en/library/anatomy/the-knee-joint
    • Battista, C., MD. (n.d.). Knee physical exam – adult – recon – orthobullets. https://www.orthobullets.com/recon/12755/knee-physical-exam–adult
    • Walrod, B. & The Ohio State University Wexner Medical Center. (n.d.). A standardized approach to the knee examination. https://ccme.osu.edu/storage/WebCastsFiles/876Knee%20Disorders%20-%204.pdf
    • Professional, C. C. M. (2024a, May 1). Knee joint. Cleveland Clinic. https://my.clevelandclinic.org/health/body/24777-knee-joint
  • Femoral Nerve

    Femoral Nerve

    Introduction

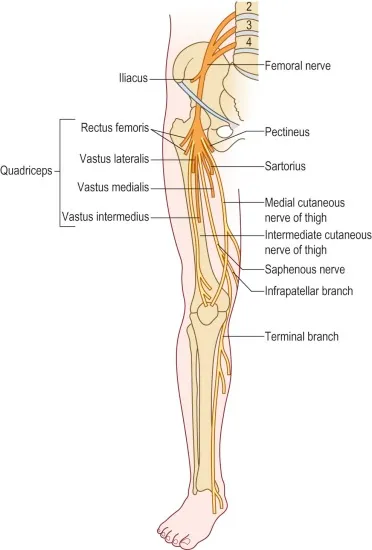
    The femoral nerve is a major peripheral nerve of the lower limb, originating from the lumbar plexus (L2-L4). It supplies motor innervation to the anterior thigh muscles (e.g., quadriceps) responsible for knee extension and hip flexion, and provides sensory innervation to the anterior thigh and medial leg via the saphenous nerve. It plays a crucial role in walking, standing, and maintaining balance.

    The lateral circumflex femoral artery separates the anterior and posterior segments of the femoral nerve.

    Structure

    In the Abdomen

    The psoas major muscle is where the femoral nerve starts its journey through the abdomen. After there, it travels laterally to the psoas major muscle distal portion before being “sandwiched” between the iliacus and psoas major muscles. The psoas major muscle is situated above the femoral nerve, whereas the iliacus muscle is situated under it.

    The femoral nerve supplies the iliacus muscle. Because the psoas major muscle is located medial to the union of the ventral rami to form the femoral nerve,  the psoas major is innervated by the ventral between L2 and L4. The thigh may flex at the hip thanks to these muscles. Weakness of the iliopsoas leads to difficulty in flexing the thigh to go upstairs.

    In the Pelvis

    After that, the femoral nerve enters the thigh. It must travel beneath the inguinal ligament to reach the femoral triangle. The femoral triangle is made up of the superior inguinal ligament, the medial adductor longus, and the lateral sartorius. From lateral to medial, NAVEL serves as a memory aid to help recall the structures’ sequence. EL stands for space with lymphatics (femoral canal with lymph node of Cloquet); N, A, and V stand for femoral nerve, artery, and vein, respectively. The lateral femoral cutaneous artery separates the two femoral nerve divisions, making them easily identifiable.

    Anterior Division

    Additionally, these muscles aid in hip flexion of the thigh.

    The anteromedial sensory innervation of the thigh is caused by these nerves working together.

    Posterior Division

    The greatest cutaneous branch of the femoral nerve is the sensory nerve, also known as the saphenous nerve. The femoral nerve changes into the saphenous nerve via the adductor canal. Up until around halfway down the tibia, it keeps moving along the medial portion of the tibia before splitting into two branches. The opposite branch, which is more anterior, ends at the hallux after continuing down the foot’s medial surface.

    Together, these muscles make up the quadriceps femoris, which is the main extensor of the leg at the knee.

    According to Hilton’s law, the articular nerves innervate the joints’ synovial membranes, ligaments, and fibrous capsules. The English surgeon Dr. John Hilton is credited with naming Hilton’s law after he observed that the nerve that innervates the muscles acting on a joint also innervates the joint and frequently the skin covering it.
    Function

    Motor Functions

    Hip flexors:

    The pectineus helps in the thigh’s medial rotation by flexing and adducting it.

    The iliacus muscle works in tandem with the psoas major and minor to produce the iliopsoas, which flexes and stabilizes the thigh at the hip joint.

    The sartorius muscle stretches the leg at the knee.

    Knee extensors:

    Additionally, the rectus femoris stabilizes the hip joint and helps the iliopsoas flex the thigh.

    Course

    The greatest branch of the lumbar plexus is the femoral nerve. It gives the front thigh muscles motor innervation and originates from the posterior cords of the lumbar plexus (L2-L4). The obturator nerve, on the other hand, nourishes the medial compartment of the thigh and originates from the anterior cords (L2-L4).

    The femoral nerve emerges at the lower lateral edge of the psoas major. It passes lateral to the femoral artery and vein and passes beneath the midway of the inguinal ligament, entering the femoral triangle.

    You can use the mnemonic NAVY to recall the content order of the femoral triangle, from lateral to medial:

    • Nerve
    • Artery
    • Vein
    • lymphatics (femoral canal)

    It splits into an anterior (superficial) and a posterior (deep) division after passing beneath the inguinal ligament. The anterior division gives branches to the sartorius muscle and divides into the medial and intermediate cutaneous nerves of the thigh. The quadriceps femoris muscle is supplied by the posterior division. In the leg’s gaiter area, the femoral nerve ends as the saphenous nerve.

    Muscle supply

    Psoas major -At the hip, the primary thigh flexor. It helps keep the body in an upright position when standing. It emerges from the T12-L5 vertebrae laterally. It attaches to the femur’s lesser trochanter together with the iliacus.

    Iliacus – At the hip is another major thigh flexor. It emerges from the sacrum as well as the iliac fossa and crest. It attaches to the femur’s lesser trochanter together with the psoas major.

    Sartorius -The thigh is laterally rotated at the hip, flexed, and abducted. Additionally, it can medially rotate and bend the leg at the knee. Additionally, it can bend the leg at the knee. The anterior superior iliac spine gives birth to the sartorius. It attaches to the tibia’s medial surface. The pes anserinus (Latin: goose’s foot) is formed at the insertion of the sartorius tendon, which combines with the gracilis and semitendinosus tendons. A web connects the three toes of a goose’s foot. The word “sartorius” comes from the Latin word “sartor,” which means “tailor.” With their leg flexed at the knee and their thigh abducted and medially rotated at the hip, tailors sit on the floor.

    Pectineus -Flexes and adducts the thigh at the hip. It originates from the pubic bone’s superior ramus. It enters into the femur’s pectineal line. The muscle’s parallel fibers at its insertion resemble a comb’s teeth, thus the Latin word pecten, which means “comb.” 

    Branches

    Motor branches

    Several motor branches are produced by the femoral nerve:

    • The iliacus muscle is supplied by the first, which are little branches that emerge in the belly.
    • The pectineus, a little muscle in the medial compartment of the thigh, is innervated by the nerve to the pectineus, which splits off the medial aspect of the femoral nerve near the inguinal ligament.
    • The anterior division of the femoral nerve gives rise to the sartorius nerve, which supplies the sartorius muscle, also known as the tailor’s muscle.
    • The four heads of the quadriceps femoris—the vastus medialis, vastus lateralis, vastus intermedius, and rectus femoris—are supplied by the muscular branches that emerge from the posterior division.

    Sensory branches

    The medial and intermediate femoral cutaneous nerves of the thigh are produced from the anterior division of the femoral nerve. The skin across the anterior and medial regions of the thigh is sensed by these nerves.

    The longest nerve in the body is the saphenous nerve, which produces the femoral nerve’s terminal branch. Together with the femoral vessels, it descends into the adductor canal. The nerve does not, however, pass through the adductor hiatus. To provide sensation to the skin above the greater saphenous vein in the gaiter area, it instead exits on the medial side of the knee.

    The femoral nerve supplies articular branches that innervate the hip and knee joint capsules and enable proprioceptive feedback regarding the joints in addition to providing cutaneous innervation.

    Examination

    The Femoral Nerve Tension Test

    To screen for sensitivity to stretch soft tissue in the dorsal part of the leg, which may be associated with nerve root impingements, the Femoral Nerve Tension Test, also called the Femoral Nerve Stretch Test (FNST), is utilized.

    The therapist stands on the side that is affected and uses one hand to stabilize the pelvis to avoid anterior rotation while the patient is lying prone. The therapist then flexes the knee to its maximum range using the opposite hand. The therapist continues to stretch the hip while keeping the knee flexed if no encouraging signals are observed in this posture. To determine which nerve is affected, the therapist might make a few changes to the test posture. While the Saphenous Nerve bias test involves prone-lying hip extension, abduction, and external rotation with knee flexion, ankle dorsiflexion, and eversion, the Lateral Femoral Cutaneous Nerve bias test involves prone laying with passive hip extension, adduction, and knee flexion.

    The typical reaction is knee flexion, which permits the heel to contact the buttocks. The quadriceps feel stretched or pulled.

    The test is deemed successful if unilateral pain is felt in the posterior thigh, buttocks, or lumbar region between 80 and 100 degrees of knee flexion in any combination of these areas. Positive results in this range may indicate a disc herniation impacting the L2, L3, or L4 nerve root because the dura is tensioned between 80 and 100 degrees. Based on the spectrum of pain reproduction, positive findings owing to a disc herniation can be distinguished from quadriceps issues. Injury or tight quadriceps may be the source of discomfort that appears before the knee flexes to 80 degrees. Additionally, when the hip flexes in reaction to passive knee flexion, the pelvis elevates on that side if there is tightness. It is crucial to do the test on both sides and compare the symptoms a since tight rectus femoris can also cause pain in the anterior thigh.

    Electromyography can be used to capture muscle electrical activity and assess nerve function. Tests of nerve conduction velocity quantify the speed at which electrical impulses pass through nerves.

    Additional tests: Trauma, hematoma, and other relevant variables can be diagnosed with the use of Conditions affecting the muscles and nerves can be diagnosed and treated with neuromuscular ultrasonography. It can assist in detecting alterations in the form of the nerve.

    Additionally, medical specialists could suggest an MRI or CT scan, which creates pictures of the interior organs.

    Clinical Importance

    Radiculopathy and Loss of Reflexes

    Irritation or inflammation of a nerve root causes radiating pain. Usually, disc herniation is the cause of this. Pain that goes dermatomally is one of the symptoms. Disc herniations can result in both sensory and motor impairments. Since reflexes include an afferent and an efferent limb, which are impacted in radicular pain, a disc herniation on the L4 spinal nerve root can also cause a person to lose their patellar reflex.

    Femoral Hernia

    Femoral hernias occur more frequently in elderly women but are less prevalent than inguinal hernias. They are outgrowths of the contents of the abdomen caused by a weakening of the femoral canal. If left untreated, they can cause strangulation and necrosis of the stomach contents in addition to creating a bulge in the groin area. The femoral vein will be situated lateral to the hernia sac as it is situated in the femoral canal.

    Psoas Abscess/Hematoma

    Any infection or hematoma might cause mass effect injury around the psoas or iliacus muscles. The femoral nerve may start to be compressed by the expanding abscess or hematoma because of the connection between these muscles and the nerve. This may result in nerve damage, which might impact the femoral nerve’s motor or sensory innervation.

    Femoral and Saphenous Nerve Blocks

    Because they avoid the negative effects and addictive qualities of opioids, femoral nerve blocks are frequently used to treat hip pain in individuals who have had hip fractures. To relieve hip discomfort, the pericapsular nerve group (PENG) inhibits certain articular branches of the femoral nerve.

    Femoral Nerve Damage

    • Sharp, direct trauma is the most frequent cause.
    • Hemostases and tumors are examples of compressive aetiologies that can cause ischemia-induced nerve injury.
    • Prolonged compression, retraction, or stretching of the nerve has been known to cause iatrogenic damage after hip and intraabdominal surgery.
    • Femoral IM nailing, which involves the implantation of proximal interlocking screws, may increase the risk of femoral nerve iatrogenic damage.
    • Femoral nerve neuropathy is rare, however it has been documented in cases of complicated anterior and posterior spinal surgery.

    Because the iliacus and pectineus muscles are involved, patients will clinically have quadriceps atrophy, loss of knee extension, and to a lesser extent, hip flexion. Because the anterior and medial cutaneous nerves of the thigh are involved, there will be a loss of feeling over the anterior and medial thigh on the sensory side. Additionally, the involvement of the saphenous nerve will result in a loss of sensation over the medial aspect of the lower leg and foot. While the majority of cases have a fair prognosis, some require nerve grafting or repair, and others result in long-lasting residual neurologic impairments.

    Obstetric Patients Having Vaginal Delivery with Femoral Neuropathy

    During vaginal birth, femoral neuropathies may develop. Patients are frequently placed in the dorsal lithotomy position, which involves flexing the leg at the knee and the thigh at the hip. The blood supply to the femoral nerve is compromised in this posture because it is compressed against the inguinal ligament. Because the quadriceps femoris muscle no longer receives innervation from the femoral nerve, the patient tries to stand after delivery but collapses to the ground. The patella is where the quadriceps femoris muscle attaches.

    The tibial tuberosity is where the patellar ligament is attached. The quadriceps femoris muscle extends the leg at the knee when it contracts. To keep the leg from buckling, this motion is essential. Therefore, one must be prepared to catch the patient if she falls owing to femoral neuropathy if they are helping her get off a gurney after delivery.

    Patients who exhibit symptoms and indicators of femoral neuropathy show an intriguing variety. They do, however, also exhibit other symptoms that show this is not a real femoral neuropathy. For instance, the patient seems to have both a foot drop and femoral neuropathy. The occurrence of foot drop suggests that the patient has a lumbosacral plexopathy rather than a genuine femoral neuropathy. A challenging delivery is also linked to this disease.

    Surgery for Patella Fractures Can Cause Femoral Neuropathy

    Femoral neuropathy may result after surgically repairing a patellar fracture.

    Testing the Femoral Nerve

    The following method can be used to test the femoral nerve. The posture of the patient is prone. The examiner elevates the leg while it is flexed at the knee (Reverse Lasegue test). The femoral nerve is stretched when the hip is hyperextended while the leg is bent at the knee, resulting in discomfort.

    Testing the Patellar Tendon Reflex 

    The quadriceps femoris muscle contracts reflexively when the patellar tendon is tapped with a reflex hammer to test the patellar tendon reflex. The femoral nerve and the L2-L4 ventral main rami are involved in this reflex. Tapping the patellar tendon stimulates the quadriceps femoris muscle spindle fibers. Because they are innervated by the femoral nerve, they activate sensory axons from L2 to L4 that have their cell bodies in the dorsal root ganglia. The dorsal roots allow the central processes of the dorsal root ganglion cells to reach the spinal cord, where they subsequently go to the ventral horn’s alpha-motor neurons. The quadriceps femoris muscle contracts in response to stimulation of these neurons, whose axons are found in the femoral nerve. The quadriceps femoris muscle’s tone is maintained via this reflex. Neurons from higher influences can regulate the activity in this circuit.

    Reasons for performing a patellar tendon reflex

    Decreased Patellar Tendon Reflex: There are several types of diseases affecting the lower motor neurons that link the quadriceps femoris muscle to the ventral horn of the spinal cord. For instance, the virus that causes poliomyelitis targets and destroys the spinal cord’s alpha-motor neurons. The quadriceps femoris muscle and other lower limb muscles may become paralyzed or die as a result. A lower motor neuron syndrome is the outcome in this instance. Reduced or nonexistent patellar tendon reflexes (hyporeflexia) are caused by damage to the femoral nerve (femoral neuropathy), which can result from a variety of conditions, including spinal cord injuries, poliomyelitis, and trauma.

    Increased patellar tendon reflexes: may be observed in strokes and other cerebrovascular events. Here, there is damage or destruction to the neurons that are part of the pathway from the motor cortex to the corticospinal tracts to the alpha-motor neurons. This results in either outright paralysis (plegia) or weakening (paresis). Furthermore, suppressor fibers connect the alpha-motor neurons to the lateral corticospinal tracts. The patellar tendon reflex is suppressed by these neurons. Hyperreflexia (increased deep tendon reflexes) is a result of the loss of suppressor neurons in the brain following a stroke or trauma.

    Femoral nerve damage

    The lateral border of the adductor longus, the medial border of the sartorius, and the inguinal ligament (the floor of which is created by the pectineus and iliopsoas) make up the femoral triangle. It includes the femoral nerve, artery, and vein from lateral to medial.

    One centimeter below the mid-inguinal point, which is halfway between the pubic symphysis and the anterior superior iliac spine, or ASIS, is where the femoral artery may be felt

    This is not the same as the inguinal ligament’s midpoint, which lies halfway between the ASIS and the pubic tubercle. Penetrating trauma to the thigh might cause injury to the femoral nerve. Additionally, it may sustain injury during hip surgeries, especially the less usual anterior approach, where the nerve may be stretched and harmed. The knee reflex is also mediated by the femoral nerve fibers.

    Surgical Importance

    For arterial access in a variety of operations, including the repair of aortic aneurysms, surgeons utilize the femoral artery. Before performing such an operation, the femoral nerve must be identified since injury to the nerve may cause any of the muscles innervated by the femoral nerve to stop functioning.

    The rectus femoris has between one and four branches, according to research, with two branches being the most typical innervation pattern. Therefore, it’s critical to recognize and be aware of the potential variations and landmarks of the several potential branches.

    Anesthesia is often administered across the medial leg as far distally as the medial malleolus when the great saphenous nerve is severed for use in heart bypass surgeries. To prevent the patient from becoming alarmed by the abrupt onset of loss of sensation in the saphenous nerve distribution, one should notify them beforehand.

    FAQs

    What symptoms and indicators point to femoral nerve damage?

    symptoms. A few examples of symptoms are as follows: alterations in thigh, knee, or leg feeling, including discomfort, tingling, burning, numbness, or diminished sensation. weakness of the leg or knee, including trouble climbing and descending stairs, particularly while descending, and a sensation of the knee buckling or giving way.

    What does the femoral nerve do?

    In the lumbar plexus, the femoral nerve is the largest. The dorsal divisions of the L2-L4 ventral rami are its source. It aids in the lower limbs’ motor and sensory processes. Consequently, it regulates the main hip flexor muscles and the muscles involved in knee extension.

    How to test a femoral nerve?

    The patient lies prone while the knee is flexed to perform the femoral nerve stretch test. When the patient has anterior thigh discomfort, the test is considered positive.

    How long does it take for injury to the femoral nerve to heal?

    The stage of your injury, your ability to adhere to your rehabilitation plan, and other medical and lifestyle considerations are just a few of the variables that will affect this. The typical recovery time is two to three months for the first recovery and three to six months for the full recovery.

    What is the best exercise for femoral nerve damage?

    Pelvic tilts

    To flatten your lower back against the floor or bed, try using your abdominal muscles. Then, as if you were trying to put your palm on the small of your back, try arching your lower back. Repeat this slowly and continuously, alternating between a flat back and an arch back.

    References

    • Femoral nerve. (2023, May 25). Kenhub. https://www.kenhub.com/en/library/anatomy/femoral-nerve
    • TeachMeAnatomy. (2025, February 12). The femoral nerve – course – motor – sensory – TeachMeAnatomy. https://teachmeanatomy.info/lower-limb/nerves/femoral-nerve/
    • Femoral nerve. (2023, July 24).StatPearls.https://www.ncbi.nlm.nih.gov/books/NBK551640/

  • Pseudogout

    Pseudogout

    What is a Pseudogout?

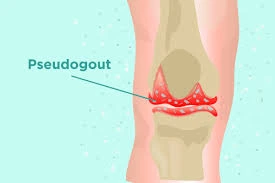
    Pseudogout (calcium pyrophosphate deposition disease, CPPD) is a type of arthritis characterized by sudden, painful swelling in one or more joints, often the knee. It is caused by the deposition of calcium pyrophosphate crystals in the joint cartilage, leading to inflammation.

    Symptoms resemble those of gout, but instead of uric acid crystals, calcium pyrophosphate crystals are involved. Diagnosis is typically made through joint fluid analysis and imaging.

    Treatment focuses on relieving pain and inflammation, often with nonsteroidal anti-inflammatory drugs (NSAIDs), colchicine, or corticosteroids. Unlike gout, there is no specific treatment to reduce crystal deposits.

    The knees are the most common joint affected by this ailment, however other joints may also be impacted. Adults over 60 are more likely to have it. Another name for pseudogout is calcium pyrophosphate deposition disease (CPPD).

    Pseudogout is a type of arthritis that causes your joints to become stiff, swell, and hurt all at once. Because it produces symptoms that are similar to gout and come and go, it is known as pseudogout. An excess of uric acid in the blood leads to gout. Pseudogout is caused by an accumulation of calcium pyrophosphate dihydrate (CPP).

    Older people are typically affected by pseudogout. Although calcium pyrophosphate crystals can cause arthritis in both men and women, men are more likely to develop pseudogout. Although it may not have a clear origin, pseudogout can occasionally occur in the context of trauma, surgery, or an acute medical condition. Although it usually affects the knee, it can also affect the shoulders, elbows, wrists, ankles, and feet.

    Pseudogout is a type of arthritis that causes your joints to swell and hurt all at once.

    A longer-term ailment known as chronic CPP crystal inflammatory arthritis also exists. It is known as osteoarthritis with CPPD when symptoms are present in certain individuals who have osteoarthritis and CPPD.

    Although pseudogout can occur in any joint in the body, it most frequently occurs in:

    • Knees.
    • Hands and wrists.
    • Shoulders.
    • Hips and pelvis.
    • Elbows.
    • Ankles.

    Other names for pseudogout are also used by medical professionals, such as:

    • Calcium pyrophosphate deposition (CPPD).
    • Calcium pyrophosphate arthritis.
    • Chondrocalcinosis.
    • The condition is referred to by all of these names.

    Causes

    Crystals of calcium pyrophosphate dihydrate have been connected to pseudogout in the affected joint. As people age, these crystals become increasingly common; over half of those over 85 have them. However, the majority of persons with these crystal deposits never get pseudogout. The reason why some people experience symptoms while others do not is unclear.

    When calcium pyrophosphate crystals develop in the joint synovial fluid, pseudogout results. Additionally, crystals may accumulate in the cartilage and harm it. A crystal buildup in the joint fluid causes severe discomfort and swollen joints.

    Pseudogout is caused by an accumulation of calcium pyrophosphate (CPP) in the affected joints. The excess CPP accumulates as tiny crystals in the fluid-filled synovial membranes and cartilage that cushion your joints. The symptoms of pseudogout flare up when the CPP crystals eventually clump together inside your joints.

    The reason why your body produces more CPP is unknown to experts. According to certain research, pseudogout may be inherited, which means that parents may expose their biological children to the danger of getting it. It can develop in some persons following trauma or a joint-damaging accident. Pseudogout may be caused by specific metabolic or endocrine disorders, according to experts.

    Calcium pyrophosphate crystals are found in the cartilage and joint fluid of many persons, particularly the elderly. The crystals might remain there indefinitely without harming anything. However, these crystals can occasionally cause an abrupt and severe inflammatory response for unknown causes.

    As if they were bacteria entering the joint, white blood cells rush into the joint area and attempt to eliminate the crystals. This results in noticeable pain, swelling, warmth, and redness. Sometimes it happens for no apparent cause, but it is more likely to happen when there is physiologic stress, like after surgery or an acute medical sickness.

    Many medical practitioners consider pseudogout to be a genetic disorder because it frequently runs in families. Additional contributing elements could be:

    • Hypothyroidism, or an underactive thyroid.
    • Hyperparathyroidism, or an overactive parathyroid gland.
    • Excess iron in the blood.
    • An excess of calcium in the blood is known as hypercalcemia.
    • Magnesium deficiency.

    Symptoms

    The knees are most frequently affected by pseudogout. It affects the ankles and wrists less frequently.

    The following are the most typical signs of pseudogout:

    • Sudden, intense joint pain.
    • Skin discoloration or redness.
    • Swelling.
    • Stiffness.
    • Fluid buildup around the joint
    • Chronic inflammation

    A sensation of warmth or heat in or near a joint.

    Flares or attacks are instances in which pseudogout symptoms occur and then disappear. Pseudogout attacks can occur without warning. Instead of experiencing symptoms gradually increasing over time, you will typically notice them all at once. The duration of a pseudogout flare-up might range from a few days to several weeks (or more).

    Warmth, redness, swelling, and excruciating pain gradually appear in a joint over a few hours or a day in pseudogout. Usually, it just affects one joint. Although most other joints can be impacted, the knee is the one that is most frequently affected. Multiple joints being impacted at once is less frequent but still feasible. Sometimes the patient will also get a low-grade temperature. Even in the absence of medication, these symptoms usually go away in a week.

    However, you should consult your physician immediately if you suffer from the above-described joint irritation. From the exterior, it is impossible to discriminate between different types of arthritis; for instance, pseudogout, gout, and infection are all identical. However, different types of arthritis require different treatments, and antibiotics are immediately needed for infections.

    Risk factors

    The following variables may raise your risk of developing pseudogout:

    • Age. As one ages, the likelihood of acquiring pseudogout rises.
    • Injuries to the joints. Pseudogout is more likely to develop in a joint that has had trauma, such as a major injury or surgery.
    • Genetic illness. Members of some families are predisposed to developing pseudogout. Pseudogout tends to strike these individuals earlier in life.
    • Imbalances in minerals. People who have too much calcium or iron in their blood or too little magnesium are more likely to develop pseudogout.
    • Other health issues. An underactive thyroid or an overactive parathyroid gland has also been connected to pseudogout.

    Although pseudogout can strike anyone, it is far more common in those over 65. Your risk of developing pseudogout may be increased by certain medical problems, such as:

    • Hypomagnesemia.
    • Hyperparathyroidism.
    • Thyroid disease.
    • Hemochromatosis (iron overload).
    • Hypophosphatasia.
    • Osteopenia.
    • Chronic kidney disease (CKD).

    Pseudogout may also be more common in people with other forms of arthritis, such as:

    • Gout.
    • Osteoarthritis.
    • Rheumatoid arthritis.
    • Post-traumatic arthritis.

    Diagnosis

    How is pseudogout diagnosed by medical professionals?

    A physical examination and a few tests will be used by a medical professional to diagnose pseudogout. In addition to examining your joints, your healthcare practitioner will inquire about your symptoms. Inform your provider:

    • When symptoms first appeared.
    • If the symptoms appear to be intermittent.
    • Whether certain activities or times of day appear to exacerbate (or alleviate) the symptoms.

    To make sure you have more CPP crystals in your joint fluid, your doctor could do an arthrocentesis, or joint aspiration. After inserting a needle into your joint and extracting some fluid, they will send the sample to a laboratory. A lab technician will use a microscope to examine the joint fluid sample.

    The most reliable method of confirming pseudogout is often to look for extra CPP crystals in your joint fluid following an aspiration.

    Aspirating a joint can be painful, particularly if you have significant joint symptoms. To help you feel less pain during the aspiration, your doctor may prescribe numbing medicine.

    Imaging tests may also be used by your provider to check for chondrocalcinosis, which is a marker of CPP accumulation. Your healthcare professional may use the following tools to obtain images of your joints and surrounding tissue:

    • An examination of joint fluid by extracting it from the joint (arthrocentesis) to detect crystals of calcium pyrophosphate
    • X-rays.
    • CT scan (computed tomography scan).
    • MRI (magnetic resonance imaging).
    • Ultrasound.

    This ailment can occasionally be misinterpreted as the following since it shares symptoms with other conditions:

    • Rheumatoid arthritis (RA), a chronic inflammatory condition that can impact multiple organs and tissues, and osteoarthritis (OA), a degenerative joint disease caused by cartilage loss
    • Gout, which frequently results in excruciating inflammation of the toes and feet but can also impact other areas

    Treatment

    Gout and pseudogout improve faster with medication, even though they usually go away on their own without therapy. Additionally, someone who experiences gout or pseudogout frequently would want to take medication every day to avoid more bouts.

    To enable the most effective treatment strategy, a precise diagnosis of pseudogout is essential. The intensity of your symptoms, along with your other medical conditions and medications, will all play a role in selecting the best course of action.

    Acute episodes of pseudogout can be treated with three different types of medications. Nonsteroidal anti-inflammatory medications, like naproxen or ibuprofen, work well. Additionally, colchicine can reduce inflammation.

    Steroids are also quite effective, whether taken orally or injected directly into the joint. Nevertheless, each of these medications has advantages and disadvantages, and each patient should receive treatment that is specific to them. The same drugs can be used to stop pseudogout attacks if a person experiences them frequently.

    Medical Treatment

    To control your symptoms and lessen the frequency of your pseudogout spells, your doctor will recommend therapies. Medications are the most often used therapies, and they include:

    • NSAIDs: Ibuprofen and naproxen are examples of over-the-counter NSAIDs (nonsteroidal anti-inflammatory medications) that reduce inflammation and relieve pain. Not everyone can safely take NSAIDs, particularly if they have specific medical issues. Before beginning an NSAID regimen or taking them for longer than ten days in a row, consult your doctor.
    • Corticosteroids: These anti-inflammatory drugs are prescribed by doctors. Your doctor may prescribe oral medications or administer a cortisone injection straight into the affected joint.
    • Colchicine: Colchicine is a prescription drug that lowers pain and inflammation. It works particularly well if taken within 24 hours of the onset of a pseudogout bout. To lessen the frequency of your symptom flares, your doctor can advise you to take a low dose for an extended length of time.
    • Biologic injections: To treat pseudogout attacks, your doctor might recommend canakinumab or anakinra injections. Colchicine functions similarly to these medicinal drugs. The U.S. Food and Drug Administration (FDA) has approved them to treat various forms of arthritis, but they are not yet authorized to treat pseudogout. This implies that they can be more costly than alternative treatment choices and that your insurance might not cover them.

    Other medications used to treat pseudogout include:

    • Hydroxychloroquine (Plaquenil, Quineprox)
    • Methotrexate (Rheumatrex, Trexall)
    • Anakinra

    Your doctor may suggest lifestyle modifications in addition to medicine to help control your symptoms and lower your chance of experiencing another gout episode. For instance, your physician might advise you to:

    • Reduce your alcohol intake, if you drink.
    • Lose weight, if you’re overweight.
    • Quit smoking, if you smoke.

    Moreover, certain alternative medical treatments have also demonstrated potential.

    Physical Therapy

    The pain, swelling, and lack of movement that come with pseudogout can be alleviated with physical therapy. Both acute and chronic pseudogout symptoms may be significantly reduced by seeing a physical therapist.

    Rice protocol

    • Rest, ice, compression, and elevation are referred to as Rice.
    • Rice, a popular at-home remedy for minor injuries including sprains and twists, may be known to you.
    • Rice is also a good at-home remedy for swelling, inflammation, and joint discomfort.
    Rest
    • Taking a day or two off from your regular physical activities will help you rest your joints. Altering routine physical activities and movements is another way to give your joints a break.
    • Your physical therapist can demonstrate various techniques, equipment, postures, and movements that can help relieve joint stress.
    Ice
    • Applying a cold compress to your joints can help minimize pain and swelling. When you have chronic pseudogout, cold can help you focus on something else and lessen the intensity of your suffering.
    • Try soaking a towel in cold water or placing some ice in a tiny plastic bag if you don’t have a cold pack at home.
    Compression
    • It is well known that compression increases blood circulation, which benefits your joints in several ways. Improved circulation reduces pain and inflammation and aids in joint healing.
    • You may be able to utilize braces, tape, gloves, or compression stockings to help with your troublesome joints.
    Elevation
    • Locate a posture that raises your sore joint if you can. Inflammation and edema can be reduced by elevating your joints.
    • This could entail lying down with your elbow or foot propped up on a pillow or sitting with your feet on a footstool. Additionally, your physical therapist may suggest elevation-based stretches or exercises.

    Exercises

    • To help you maintain your range of motion and reduce discomfort and stiffness, your physical therapist can demonstrate several exercises.
    • Moderate range of motion exercises can promote fluid circulation during active flare-ups of pseudogout. Explore the whole range of motion in your affected joints by moving them as gently as possible.
    • For days when your pseudogout is not bothering you, your physical therapist can also teach you strengthening exercises.
    • Try low-impact exercises for your overall health and pain management, such as walking, cycling, or swimming.

     Edema Control

    • The swelling that results from having too much fluid in one area of your body is called edema.
    • Wrapping your joints can help you manage swelling in its early stages. You can limit the amount of space available for fluids to accumulate by covering your joint.
    • By pushing the fluid out of your joint, you can avoid the discomfort, stiffness, and decreased mobility that come with edema. If you have chronic pseudogout and have begun to notice the development of your symptoms, this is an excellent alternative.
    • Wrapping your joint is best done before the edema has worsened. Before wrapping, consider applying cold and elevating your joint if it is already fairly swollen.

    Joint drainage

    An affected joint’s pressure and pain can be reduced by removing a portion of the joint fluid. The fluid is extracted with a needle. Additionally, the procedure aids in the removal of some of the joint’s crystals. After that, a corticosteroid and numbing drug are injected into the joint to reduce inflammation.

    Home care

    Gout episodes can be avoided and uric acid levels lowered with the use of several natural therapies.

    The foods are:

    • Tart cherries
    • Magnesium
    • Ginger
    • Diluted apple cider vinegar
    • Celery
    • Nettle tea
    • Dandelion
    • Milk thistle seeds

    However, these might not be sufficient on their own to treat gout. Some meals can aid in the fight against inflammation. Individuals can experiment with eating a lot of the following foods:

    • Fruit: Citrus fruits, cherries, strawberries, and raspberries are all good choices.
    • Salmon, herring, tuna, sardines, scallops, and anchovies are among the fish that people can sample.
    • Nuts: Walnuts, pine nuts, almonds, and pistachios.
    • Beans: Antioxidants are especially abundant in kidney and pinto beans.
    • The recommended daily intake of olive oil is two to three teaspoons.
    • Whole grains include things like oatmeal, brown rice, and quinoa.
    • Red bell peppers, tomatoes, eggplant, and potatoes are examples of nightshade vegetables. It is best to keep an eye on symptoms when consuming these meals because some people think they cause flare-ups of arthritis.

    Pseudogout flare-ups may benefit from home remedies. Among the examples are:

    • NSAIDs. NSAIDs that are available over-the-counter, like naproxen sodium (Aleve) and ibuprofen (Advil, Motrin IB, and others), are frequently beneficial.
    • Give the joint some rest. For a few days, try not to use the affected joint.
    • Ice. The inflammation linked to flare-ups can be lessened with the use of cold packs.

    Foods to Avoid

    Purines, which your body converts to uric acid, are found naturally in some meals.

    Foods high in purines can be tolerated by most people. However, if your body has problems eliminating too much uric acid, you might want to stay away from the following foods and beverages:

    • Red meats
    • Organ meats
    • Certain seafood
    • Alcohol

    Even if sugar-sweetened drinks and foods that contain fructose don’t include purines, they can still be harmful. Certain meals are beneficial for gout sufferers and help lower the body’s uric acid levels.

    Complication

    In addition to causing joint injury, the crystal deposits linked to pseudogout can also resemble the symptoms of rheumatoid arthritis or osteoarthritis.

    Additionally, flare-ups are more frequent and severe in people with untreated pseudogout. Some persons with pseudogout have neck pain or headaches. This may occur if CPP deposits develop around your upper neck’s thick bone.

    Prevention

    Is it possible to avoid pseudogout?

    As of right moment, pseudogout cannot be prevented. However, scientists are investigating the precise mechanism by which your body generates the excess CPP that results in it.

    You can lessen the frequency of symptom flares by taking care of any additional medical conditions you may have.

    Symptoms occur more frequently in certain people by nature than in others. If you have a pseudogout attack, it’s not your fault and you didn’t do anything unhealthy or incorrect. Usually, there are no obvious causes (triggers) that you can change or stay away from.

    • Limit how much alcohol you drink.
    • Limit your intake of foods high in purines, such as organ meat, beef, hog, lamb, and seafood.
    • Eat a diet high in veggies and low in fat and dairy.
    • Maintain a healthy weight.
    • Avoid smoking.
    • Exercise regularly.
    • Stay hydrated.

    Prognosis

    You should anticipate intermittent flare-ups of your symptoms. If you don’t have pseudogout identified and treated by a medical professional, flare-ups may occur more frequently. Although CPPD cannot be cured, it can be managed with medication and changes in lifestyle.

    The calcium pyrophosphate crystals, however, have the potential to worsen joint injury over time. In certain situations, this harm may lead to incapacity. Flares typically occur more frequently as people age, even if they are receiving treatment for pseudogout.

    Pseudogout attacks often subside within ten days. Mobility issues and long-term joint damage might result from chronic CPP crystal arthritis. The severity will vary depending on the underlying ailment if CPPD is caused by another sickness.

    What medical conditions may be associated with pseudogout?

    Pseudogout can occasionally be linked to additional conditions like:

    • The thyroid disorders hypothyroidism and hyperparathyroidism
    • A genetic bleeding problem called hemophilia makes it difficult for blood to clot normally.
    • A disorder called ochronosis results in the deposition of a dark pigment in the connective tissues, including cartilage.
    • The accumulation of an aberrant protein in the tissues is known as amyloidosis.
    • An unusually high blood iron level is known as hemochromatosis.

    What makes gout different from pseudogout?

    Pseudogout is named for its resemblance to gout, another form of arthritis that presents with comparable symptoms. Pseudogout is fake gout because pseudo is a prefix meaning false.

    When there is an excess of uric acid in the blood (hyperuricemia), sharp crystals of uric acid form in your joints, causing inflammation and gout.

    Pseudogout is caused by an accumulation of calcium pyrophosphate (CPP), a different mineral, in your joints. For this reason, calcium pyrophosphate deposition is another name for pseudogout. The act of putting anything is called deposition.

    The joint where your big toe joins the rest of your foot is the most frequently affected by gout. Pseudogout is far more common in larger joints and rarely occurs in the MTP joint. Both gout and pseudogout are forms of arthritis that are caused by crystals building up in the joints.

    Gout is caused by crystals of urea (uric acid), whereas pseudogout is caused by crystals of calcium pyrophosphate.

    Are foods able to cause pseudogout?

    Attacks of pseudogout are typically not caused by food or beverages. However, it may cause bouts of gout. That is one of the main distinctions between gout and pseudogout.

    Gout flares can be caused by consuming alcohol or specific foods. When your body breaks down foods or beverages that contain compounds called purines, it may produce more uric acid. For this reason, a low-purine diet is frequently used to treat gout.

    To maintain your general health or treat any diseases you may have, your healthcare professional may advise you to eat or refrain from particular foods. However, calcium pyrophosphate crystals do not accumulate in the body in the same manner as uric acid, hence pseudogout is typically unrelated to dietary factors.

    FAQs

    What circumstances lead to pseudogout?

    Risk factors for pseudogout, such as hypermagnesemia.
    Excessive parathyroidism.
    Thyroid conditions.
    Iron overload, or hemochromatosis.
    Hypophosphatemia.
    Osteopenia.
    Chronic kidney disease (CKD).

    What metabolic factors contribute to pseudogout?

    Crystals of calcium pyrophosphate dihydrate have been connected to pseudogout in the affected joint. As people age, these crystals become increasingly common; over half of those over 85 have them. However, the majority of persons with these crystal deposits never get pseudogout.

    What is the most effective way to cure pseudogout?

    NSAIDs, or nonsteroidal anti-inflammatory medications. NSAIDs of prescription strength include indomethacin (Indocin) and naproxen (Naprosyn)… Colchicine (Colcrys, Mitigare). This gout medication, corticosteroids, works well for pseudogout when taken in small doses.

    Where does pseudogout most frequently occur?

    Podagra, which first appears in the joints in 50% of gout cases and finally becomes implicated in 90% of them, is also seen in individuals with pseudogout and other illnesses. Other sites of arthritis – The instep, ankle, wrist, finger joints, and knee are affected by gout; big joints (such as the knee, wrist, elbow, or ankle) are affected by pseudogout.

    At what age does pseudogout often manifest?

    One form of arthritis is calcium pyrophosphate deposition (CPPD), commonly referred to as “pseudogout.” Crystals of calcium pyrophosphate (CPP) accumulate in the blood and land in joint cartilage in CPPD. Although it may occur early in life, CPPD is more common in people over 60.

    Which essential oil is best for arthritis?

    In rats with induced arthritis, researchers discovered that turmeric essential oil prevented joint swelling 95–100% of the time. Additionally, they discovered that the essential oil was 68 percent successful in reducing acute inflammation when the turmeric was postponed until after it peaked.

    How is pseudogout diagnosed?

    By examining the synovial fluid in the joint cavity, doctors can make the diagnosis of pseudogout. Under a microscope, joint fluid is examined as part of the routine diagnostic procedure to check for the presence of CPPD crystals among inflammatory cells, or neutrophils. X-rays can be utilized for diagnostics as well.

    How can one distinguish between pseudogout and gout?

    You can have discomfort or episodes more frequently if you have persistent gout. Attacks by pseudogout are similarly abrupt. But the discomfort can last for days or weeks and normally doesn’t change. Some folks may have persistent pain or discomfort.

    Reference

    • Pseudogout – Symptoms and causes. (n.d.). Mayo Clinic. https://www.mayoclinic.org/diseases-conditions/pseudogout/symptoms-causes/syc-20376983#:~:text=Pseudogout%20has%20been%20linked%20to,By%20Mayo%20Clinic%20Staff
    • Pseudogout (Chondrocalcinosis or CPPD). (2024, September 10). Cleveland Clinic. https://my.clevelandclinic.org/health/diseases/pseudogout-chondrocalcinosis-cppd
    • Pseudogout – Diagnosis and treatment – Mayo Clinic. (n.d.). https://www.mayoclinic.org/diseases-conditions/pseudogout/diagnosis-treatment/drc-20376988
    • Pseudogout. (2022, February 15). ColumbiaDoctors. https://www.columbiadoctors.org/treatments-conditions/pseudogout#:~:text=What%20is%20pseudogout?,feet%20may%20also%20be%20involved.
    • Kinman, T. (2023, March 8). Gout: Symptoms, causes, and treatments. Healthline. https://www.healthline.com/health/gout#takeaway
    • Osborn, C. O. (2018, November 2). Essential oils for gout. Healthline. https://www.healthline.com/health/gout/essential-oils-for-gout
    • Barrell, A. (2021, September 29). What is pseudogout, and how does it differ from gout? https://www.medicalnewstoday.com/articles/pseudogout#remedies
    • Calcium pyrophosphate deposition. (2023, August 21). https://patient.info/bones-joints-muscles/calcium-pyrophosphate-deposition-pseudogout
  • 16 Best Exercises for Good Posture

    16 Best Exercises for Good Posture

    Good posture is essential for maintaining balance, reducing strain on muscles and ligaments, and preventing discomfort. Incorporating exercises that strengthen the core, back, and shoulder muscles can significantly improve posture. Focusing on alignment, flexibility, and stability helps create a strong foundation for standing and sitting with ease and confidence.

    Introduction:

    Maintaining good posture is important for both your appearance and the health and function of your body. Poor posture can lead to fatigue, headaches, neck strain, and back pain. It is important to take action to improve your posture, no matter whether you work at a desk or are always moving. One of the best ways to increase alignment is to regularly strengthen and stretch key muscle groups.

    The following muscle groups must be balanced to maintain proper posture:

    • Core Muscles: The lower back and abdominal muscles are essential for maintaining the spine.
    • Upper back and shoulder muscles: Strong muscles in the upper back and shoulders support the alignment of the neck and the shoulders.
    • Hip flexors and glutes: Poor posture can result from pelvic tilt, which is caused by tight hip flexors and weak glutes.
    • Neck Muscles: To avoid tension and pain, keep your neck in a neutral position.

    What factors affect posture?

    Numerous physical and psychological elements might affect posture. Here are a few important ones:

    • Flexibility and Muscle Strength

    Weak muscles: Poor posture can result from weak core muscles (back, abdomen) or other muscle groups, since the body may compensate by aligning itself incorrectly.

    Tight muscles: Tight muscles can cause the body to become out of alignment, particularly in the hip flexors and chest.

    Flexibility: Poor posture can result from a lack of flexibility, especially in the hips and spine.

    • Age

    Degeneration: As we age, our posture, strength, and flexibility can decrease due to normal wear and tear on our joints and muscles.

    Bone density: Conditions such as osteoporosis can result in abnormalities of the spine, which can lead to bad posture.

    • Footwear

    Incorrect footwear: Your posture and general body alignment may be impacted by wearing shoes that are too high or don’t support your arch properly.

    • Ergonomics

    Workplace: A poorly designed workstation might encourage bending over or leaning forward, particularly while sitting for extended periods.

    Incorrect seating: Over time, bad posture can result from desks that aren’t at the proper height or chairs that don’t support your spine’s natural curve.

    • Habits of Lifestyle

    Long-term sitting: Sitting for extended periods, such as at work or when using a computer, can cause bending over and a forward head posture in many persons.

    Physical activity: Muscle imbalances caused by inactivity might make it more difficult to maintain proper posture.

    Using an incorrectly fitting backpack or carrying a big bag on one shoulder can cause back pain and alter posture.

    • Use of Technology

    Screen time: Prolonged bending from staring down at phones or tablets can cause “tech neck,” a condition in which the neck and spine become misaligned.

    • Aspects of Psychology

    Stress: Excessive stress can cause strain in the back, shoulders, and neck, which may affect posture.

    Mental state: Because mental states affect physical conduct, individuals who are unhappy, anxious, or short on energy may have a natural tendency to lean.

    • Weight of Body

    Overweight/obesity: Excess weight, particularly around the abdomen, can put stress on the spine and cause bad posture, including a body that leans forward.

    • Pain or Injury

    Past injuries: If the body adjusts its alignment to compensate for pain or weakness, a history of back, neck, or joint injuries may affect posture.

    Chronic pain issues: Misalignments and pain that affect posture can also be caused by illnesses such as scoliosis, fibromyalgia, or arthritis.

    Benefits of Exercises

    Exercise is necessary for maintaining and improving posture. Frequent exercise improves flexibility, builds muscle strength, and raises awareness of good body alignment.

    • Increases Core Muscle Strength

    Better support: Maintaining good posture requires the use of core muscles, which include the pelvic, lower back, and abdominal muscles. You can support your spine and keep your posture straighter with less effort if you strengthen these muscles.

    Decreased back pain: Having a strong core can help you avoid pain and improve spinal alignment by reducing strain on your back.

    • Lessens Muscle Unbalances

    Muscle imbalances are common, with some muscular groups (like the chest) getting stronger while others (like the back) get weaker. Round shoulders and other bad postures might be worsened by this imbalance. Exercises that focus on posture correct these abnormalities and improve alignment.

    Corrects alignment: By stretching tight, hyperactive muscles and strengthening inactive ones, exercises help in the body’s alignment.

    • Improves Spine Health

    Maintaining a neutral spine with regular exercise may help avoid slouching, hunching, or severe curvature.

    Increased bone density: Exercises involving weight bearing help to strengthen bones, which is particularly advantageous for avoiding diseases like osteoporosis that may affect posture.

    • Improves Mobility and Flexibility

    Prevents stiffness: Especially in areas that are subject to stress, such as the hip flexors, shoulders, and chest, stretching and flexibility exercises may help ease muscle tightness. Better alignment and range of motion are made possible by this.

    Flexibility balance: Good posture is supported by the muscles surrounding the spine remaining flexible, which allows it to maintain its natural curves.

    • Improves Postural Habits and Body Awareness

    Better posture awareness: Some exercises, such as yoga or pilates, help raise body awareness, which makes it simpler to identify bad posture and fix it in day-to-day tasks.

    Promotes mindful movement: Whether you’re walking, standing, or sitting, exercise teaches you how to move while maintaining good posture.

    • Reduces and Prevents Pain

    Back, shoulder, and neck pain can be lessened by strengthening and stretching the muscles that support your spine. This can avoid the pain that is frequently linked to bad posture, like shoulder and neck strain.

    Injury prevention: As a stronger, more flexible, and well-aligned body is able to endure the stresses of regular movement and physical exercise, it is less likely to get an injury.

    • Increases Energy and Circulation

    Improved circulation: Frequent exercise increases blood flow, which supports healthy posture by stimulating the muscles and tissues.

    Improved energy: Physical activity increases vitality and decreases slowdown, which can lead to bending over or bad posture.

    • Psychological Advantages

    Improved confidence: Feelings of self-assurance and confidence can be affected by having proper posture. It can have a positive effect on your self-image and how other people see you.

    Decreased stress: Exercise causes the body to release endorphins, which lessen tension and stress. The need to lean forward can be avoided with less neck and shoulder strain.

    Exercises for Good Posture:

    The purpose of the following exercises is to stretch any tight muscles that may result from bad habits and strengthen the muscles that support proper posture.

    Uttanasana

    • With your feet hip-width apart and your feet grounded, take a straight position.
    • Lift your kneecaps, stretch through your back, and engage your thighs.
    • Push your shoulder blades back and down while keeping your arms relaxed at your sides.
    • Stretch your arms upwards as you take a breath to extend your body.
    • Fold forward and bend at the hips to pull your chest closer to your thighs as you release the breath.
    • If necessary, keep your knees slightly bent, particularly if your hamstrings are tight.
    • When folding, move your head closer to your knees.
    • Allow your arms to drop, and depending on your flexibility, place your hands on your ankles, shins, or the floor.
    • Try to relax into the stretch and deepen the fold with each inhalation.
    • Avoid rounding at the back and maintain an extended body.
    • Instead of simply bending forward, consider lengthening your spine.
    • Breathe deeply and let your body settle into the stretch while you hold for a few seconds to a minute.
    • Then return to your neutral position.
    • Then relax.
    • Repeat this exercise 5 to 10 times.
    Standing-forward-bend-uttanasana
    Standing-forward-bend-uttanasana

    Shoulder roll

    • Maintain a straight spine while sitting or standing.
    • Relax your arms by your sides and maintain a hip-width distance between your feet.
    • Make sure your posture is calm and neutral.
    • Breathe in deeply.
    • Squeeze both shoulders slightly as you raise them toward your ears when you take a breath.
    • Roll your shoulders back in a gentle circular motion as you release the breath, moving them down and then back up toward your ears.
    • You should be creating large circles with your shoulders in a circular motion.
    • Perform five to ten backward shoulder rolls, paying close attention to a controlled and natural movement.
    • When performing the roll, try not to tense your face or neck; instead, maintain everything relaxed.
    • Once the backward rolls are finished, change directions.
    • Take a breath and raise your shoulders to your ears.
    • To lower your shoulders down and forward toward your chest, exhale and roll them forward.
    • Perform five to ten more shoulder rolls forward.
    • Then return to your neutral position.
    • Then relax.
    Shoulder Roll
    Shoulder Roll

    Cat-Cow Stretch

    • Start by placing your knees behind your hips and your wrists directly beneath your shoulders in a tabletop position.
    • To support your weight, keep your fingers wide apart.
    • Your neck should be relaxed, your head should be in line with your back, and your spine should be neutral.
    • Keep your eyes between your palms and look down at the ground.
    • Take a deep breath while arching your back and sliding your pelvis forward.
    • Drop your belly to the floor and raise your tailbone to the ceiling, opening your chest.
    • Look up a little while you slowly raise your head and chest (don’t strain your neck).
    • Use your back muscles and maintain a straight elbow position.
    • Pull your belly button toward your spine and tuck your tailbone as you exhale and turn your back toward the ceiling.
    • Let your chin pull in, rounding through your upper back, and lower your head towards your chest.
    • As you press onto your hands and knees, see your spine forming a “C” shape.
    • Keep your breath in line with your movement as you transition easily between Cow Pose (inhale) and Cat Pose (exhale).
    • Then return to your neutral position.
    • Then relax.
    • Repeat this exercise 5 to 10 times.
    Cat-and-Cow-Stretching
    Cat-and-Cow-Stretching

    Shoulder Blade Squeeze

    • You can perform this workout sitting or standing.
    • Make sure your spine is straight and your feet are flat on the floor if you’re seated.
    • If you’re standing, take a straight posture, place your feet hip-width apart, and contract your core.
    • Start with your arms by your sides and your shoulders relaxed.
    • Maintain a relaxed face and neck.
    • As you gently pull your shoulder blades (scapulae) toward one another, take a deep breath and release it slowly.
    • Consider trying to squeeze a piece of paper or a pencil between your shoulder blades.
    • Instead of rolling your shoulders up toward your ears, concentrate on squeezing the rhomboids and trapezius muscles, which are located between your shoulder blades.
    • For a few seconds, hold the pressure while making sure your breathing remains constant.
    • When you squeeze, keep your shoulders down and your chest open.
    • Release the squeeze gradually and go back to the beginning position.
    • Put your arms back.
    • Before you do the exercise again, take a moment to reset.
    • Then relax.
    • Repeat this exercise 5 to 10 times.
    Shoulder Blade Squeeze
    Shoulder Blade Squeeze

    Glutes Bridge

    • Start by resting on your back on a level surface, like a carpet or yoga mat.
    • To place your feet hip-width apart and flat on the floor, bend your knees.
    • When your arms are at your sides, your heels should be near enough to your glutes to allow you to touch them with your fingertips.
    • Engage your core muscles and plant your feet firmly on the ground.
    • This keeps your lower back safe while you’re moving.
    • With your hands facing down, keep your arms at your sides.
    • As you raise your hips toward the ceiling, take a breath and release it.
    • To lift your hips, tighten your glutes and push through your heels.
    • At the highest point of the exercise, your body should be in a straight line from your knees to your shoulders.
    • Stay away of too arching your lower back; the lift should originate from your hips rather than your spine.
    • Squeeze your glutes firmly at the highest point for one to two seconds once your hips are fully raised.
    • Do not let your lower back drop; instead, keep your core active.
    • Take a breath and manage the drop as you gently move your hips back to the beginning position.
    • Be sure you’re not falling too fast.
    • Then relax.
    • Repeat this exercise 5 to 10 times.
    Bridging-exercise
    Bridging-exercise

    Seated Row (with Resistance Band)

    • With your legs straight out in front of you, take a seat on the floor.
    • Holding both ends of a resistance band in your hands, loop it around your feet, making sure it is strong but not too tight.
    • With your spine straight, shoulders back, and chest raised, take an upright position.
    • Although your legs should be extended, they shouldn’t be locked out; a small knee bend is okay.
    • Using both hands, grasp the resistance band’s ends.
    • Holding the band at a shoulder-width distance, extend your arms forward.
    • To ensure stability throughout the workout, contract your core and tighten your glutes before starting the movement.
    • Pull the resistance band toward your body while inhaling and exhaling.
    • Pay attention to keeping your elbows close to your body as you raise them back.
    • As you pull the band, contract your biceps and upper back muscles (traps, rhomboids) by pulling your shoulder blades together.
    • Try to position your elbows behind you and your hands close to your body.
    • Hold the contraction for a time while keeping your shoulder blades squeezed together until your hands are close to your body.
    • Keeping the band under control and preventing it from bending back, take a breath while you slowly stretch your arms back to the beginning position.
    • Throughout the return phase, keep your chest raised and refrain from rounding your back.
    • Then relax.
    • Repeat this exercise 5 to 10 times.
    band seated row
    band seated row

    Standing Cat-Cow

    • Stand with your spine in a neutral position, your feet hip-width apart, and your knees slightly bent but not locked.
    • Stand tall with your shoulders down and away from your ears, and let your arms drop to your sides.
    • Make sure each of your feet has to support the same amount of your weight.
    • Pull your belly button toward your spine to gently activate your core. 
    • Throughout the workout, keep your posture long and upright.
    • Avoid any strain by letting your face and neck relax.
    • Take a deep breath and raise your chest and tailbone toward the ceiling by gently straightening your back.
    • To prevent neck pain, open your chest, roll your shoulders back, and let your head rise a little.
    • As you open your chest, feel your shoulder blades come together and pull downward.
    • As you raise your chest, slightly push your hips forward.
    • Pull your belly button into your spine and tuck your pelvis under as you slowly exhale around your back.
    • Let your shoulders curve forward and your head droop gently toward your chest.
    • Feel the stretch in your shoulders and upper back as you pull your shoulder blades apart.
    • Breathe in time with your movements as you alternate between Cow Pose and Cat Pose.
    • Continue to breathe in during Cow and out during Cat, moving fluidly between these two positions.
    • Then return to your neutral position.
    • Then relax.
    • Repeat this exercise 5 to 10 times.
    standing-cat-cow-pose
    standing-cat-cow-pose

    Chin tuck

    • When standing or sitting, keep your shoulders relaxed and your back upright.
    • This exercise can be performed standing with your feet hip-width apart or while seated in a chair.
    • Keep your gaze forward and your head in line with your spine.
    • To activate your core muscles, gently pull your belly button toward your spine.
    • During the activity, this supports your neck and back.
    • Without lowering your head, gently pull your chin toward your chest.
    • A “double chin” can be achieved by pulling your head straight back rather than down.
    • The muscles in the front of your neck should be slightly activated, and the rear of your neck should feel stretched.
    • Avoid rounding or bending your shoulders; instead, keep them relaxed.
    • For five to ten seconds, hold the chin tucked while keeping your spine straight and taking deep breaths.
    • Make sure your neck isn’t being overworked.
    • Return your head to a neutral position, with your ears in line with your shoulders, by slowly releasing the chin tuck.
    • Then relax.
    • Repeat this exercise 5 to 10 times.
    Chin-tuck
    Chin-tuck

    Child pose stretch

    • Start by spreading your knees hip-width apart on the mat, or wider if that is more comfortable.
    • With your toes pointed straight back or slightly bent out, sit back on your heels.
    • Exhale and gradually drop your body toward the floor, resting your forehead on the mat (or, if more comfortable, a block or cushion).
    • Keep your palms on the mat while you extend your arms forward.
    • For a more relaxed version, you may also place your arms resting palms up alongside your body.
    • Ensure that the hips are exactly above the knees.
    • As you lower yourself into the pose, keep your body upright and stretch your spine to prevent arching your lower back.
    • As you stretch, let your ribs expand by taking a deep breath into your abdomen.
    • To gently extend your lower back, let your hips drop toward your heels without pushing them.
    • Pay attention to your breathing.
    • Breathe in deeply and out gently so that each breath helps your body relax even more into the stretch.
    • Depending on how comfortable you are, hold the position for a few seconds.
    • Then return to your neutral position.
    • Then relax.
    • Repeat this exercise 5 to 10 times.
    Childs-Pose
    Childs-Pose

    Superman

    • Start by extending your arms straight in front of you and your legs straight behind you, like Superman flying, while lying face down on a mat or other level surface.
    • Keep your head in a neutral position, which means it should not be drooping or raised above your spine.
    • Pull your belly button slightly toward your spine to tighten your core. 
    • Then, engage your glutes and lower back muscles.
    • Your body will remain more stable during the movement as a result.
    • Squeeze your shoulders, glutes, and lower back to raise your arms, chest, and legs off the floor all at once.
    • Don’t overextend; instead, try to raise your legs and body a few inches off the ground.
    • From your chest to your legs, your body should gently bend, giving the impression that you are flying like Superman.
    • Avoid flexing your neck to look forward and maintain a neutral head position.
    • For a few seconds, maintain a raised posture while extending your arms and legs fully.
    • Throughout the hold, stay in control and use your core, glutes, and back.
    • Return to the beginning position by carefully lowering your arms, legs, and chest to the floor while defying gravity.
    • To keep the muscles you’re using tense, make sure you lower your body gradually.
    • Then relax.
    • Repeat this exercise 5 to 10 times.
    Superman-exercise
    Superman-exercise

    Upper-trapezius-stretch

    • Position yourself straight in a chair so that your feet are flat on the floor.
    • Maintain a neutral spine and relaxed shoulders.
    • Hold the bottom of your chair if you’re seated, or place your right hand behind your back.
    • Move your head slowly to the left, moving your left ear close to your left.
    • Do not turn your head; instead, keep your chin parallel to the ground.
    • The upper shoulder region and right side of your neck should feel slightly stretched.
    • You may direct the lean more toward your left shoulder by applying a little pressure with your left hand on the right side of your head for a deeper stretch.
    • Allow your muscles to stretch naturally without pulling or forcing them.
    • For a few seconds, hold the stretch while concentrating on deep, slow breathing.
    • Exhale and relax into the stretch.
    • Then return to your neutral position.
    • Then relax.
    • Repeat this exercise 5 to 10 times.
    Upper-trapezius-stretch
    Upper-trapezius-stretch

    Downward facing dog

    • Start on your hands and knees, placing your knees beneath your hips and your wrists exactly beneath your shoulders. The neutral tabletop position is this.
    • As you get ready to raise your hips toward the ceiling, pull your toes beneath.
    • Make an upside-down V with your body as you inhale, pressing your palms firmly into the floor and starting to raise your hips toward the ceiling.
    • You should straighten your knees and extend your arms fully.
    • Instead of just pulling your hips upward, concentrate on stretching your spine.
    • Consider trying to put as much distance as you can between your hands and hips.
    • Allow your head to hang between your arms to maintain a neutral neck position, but keep your chin away from your chest.
    • To stretch the calves and hamstrings, try to gently press your heels toward the floor, even if they might not contact it (particularly if you’re just starting).
    • You can maintain a small bend in your knees until you increase your range of motion if your hamstrings are tight.
    • Keep your legs moving and contract your core muscles, particularly your abdominals.
    • By doing this, you can keep your lower back stable and avoid strain.
    • To help divide the weight equally, apply pressure through your palms and the bases of your fingers.
    • As long as it seems comfortable, hold the downward-facing dog position for a few seconds.
    • Maintain a relaxed yet active body while concentrating on deep, regular breathing.
    • Then return to your neutral position.
    • Then relax.
    • Repeat this exercise 5 to 10 times.
    downward-facing-dog
    downward-facing-dog

    Pigeon pose

    • Get down on your knees on the tabletop Place your knees beneath your hips and your wrists just beneath your shoulders.
    • Keeping your right ankle as close to your left wrist as is comfortable, push your right knee forward toward your right wrist from the tabletop.
    • The stretch will be deeper as far as you push the knee forward.
    • Depending on your flexibility, lower your right shin to the floor so that it is parallel to or slightly inclined to the front edge of the mat.
    • Your left hip should be in the direction of your right foot.
    • Maintaining your left foot and knee on the ground, slide your left leg straight back behind you.
    • With the top of your foot on the ground and your toes pointed down, maintain an extended left leg.
    • Your left hip should remain level with the floor, and your left leg should be straight.
    • Your hips should ideally be square to the front of your mat.
    • To level your hips, gently press your right hip lower if it tries to raise toward the ceiling.
    • If your right hip feels unbalanced or uncomfortable, you can put a block or cushion underneath it.
    • Raise your chest a little as you inhale to stretch your spine.
    • Keep your neck neutral and extended, and your eyes forward.
    • For a few seconds, maintain the posture. Breathe deeply, then let your hips open with each breath as you relax into the stretch.
    • Consider using cushions or blocks as extra support and relax out of the stretch if you experience pain or difficulty.
    • Then return to your neutral position.
    • Then relax.
    • Repeat this exercise 5 to 10 times.
    Pigeon-Pose
    Pigeon-Pose

    Plank

    • Start with a prone position on the floor.
    • Spread your fingers wide for stability and place your hands directly beneath your shoulders.
    • Don’t look up or down; keep your neck neutral.
    • Stay away from lifting your hips too high or lowering them toward the floor.
    • To engage your core, squeeze your belly button toward your spine.
    • This will help protect your lower back and keep your body stable.
    • To stay in a strong, stable posture, tighten your glutes, quadriceps, and abs.
    • Make sure your feet are hip-width apart, your elbows are a little flexible yet not locked, and your wrists are exactly beneath your shoulders.
    • For a few seconds, maintain the plank position. Keep your body straight and strong, and concentrate on breathing regularly.
    • Keep your chest wide and your eyes slightly forward rather than down.
    • Keep your shoulders from leaning up toward your ears or letting your lower backdrop.
    • Then return to your neutral position.
    • Then relax.
    • Repeat this exercise 5 to 10 times.
    PLANK
    PLANK

    Wall angles

    • Maintain a neutral, upright posture while standing with your back to a wall and your feet 5 to 6 inches from the wall.
    • Without pushing, gently press your head, upper back, and lower back against the wall.
    • Your entire spine should be in a straight line.
    • Lift your arms until your elbows are 90 degrees bent.
    • With your palms facing forward (or slightly inward), place your wrists, upper arms, and backs of your forearms against the wall.
    • Make sure your elbows are in line with your shoulders and your upper arms are parallel to the floor.
    • Pull your belly button slightly toward your spine to tighten your core.
    • Maintain a straight, neutral spine and flexible hips and knees.
    • Make sure your head stays in contact with the wall and avoid arching your lower back.
    • As you slowly lift your arms overhead, try to maintain your elbows, forearms, and backs of your hands as close to the wall as you can.
    • Make an effort to keep your arms in contact with the wall as you raise them.
    • If it’s hard to keep your arms in contact with the wall, don’t fully extend them; instead, keep your elbows bent at a 90-degree angle or slightly broader.
    • Keep going until you can raise your arms as high as you can without arching your back or losing contact with the wall.
    • Return to the starting position by lowering your arms slowly while maintaining as much of your wrists and arms against the wall as you can.
    • To keep your muscles engaged, concentrate on making flexible, controlled motions.
    • Then relax.
    • Repeat this exercise 5 to 10 times.
    Wall Angel
    Wall Angel

    Side plank

    • With your legs straight and placed on top of one another, start by lying on your side.
    • To guarantee proper alignment, position your elbow just behind your shoulder.
    • Maintain your forearm parallel to your body on the ground.
    • Engage your glutes (buttocks) and tighten your core muscles (imagine pulling your belly button toward your spine).
    • Maintaining a straight body without drooping or arching your back is important.
    • Press into your forearm and the edge of your bottom foot to raise your hips off the ground as you exhale.
    • Make sure your hips don’t fall to the floor and maintain your shoulders raised above your elbows.
    • For a short while, hold the side plank.
    • By gazing directly ahead or slightly up, you may maintain a neutral neck without straining or moving your head.
    • Throughout the hold, maintain an active gluteal position and keep your core engaged.
    • When you’re ready, return to the starting position by carefully lowering your hips back to the floor.
    • Once one side is finished, switch to the other side and repeat the side plank.
    • Make an effort to maintain the same form on both sides.
    • Then relax.
    • Repeat this exercise 5 to 10 times.
    Side Plank
    Side Plank

    Which safety precautions ought to be taken when exercising?

    Safety is important when exercising, especially to improve posture, in order to prevent injuries and get maximum benefit out of your sessions.

    The following are some important safety measures to keep in mind:

    • Properly Warm Up

    Avoid injuries by always warming up before an activity session to get your heart, muscles, and joints ready. An effective warm-up lowers the chance of muscular sprains and strains by improving blood flow and flexibility.

    • Stay Hydrated

    Drink plenty of water because dehydration can affect how well muscles work and raise the chance of cramping or injury.

    • Use the Correct Form

    Correct technique: To avoid strain and injury, always make sure you’re completing exercises with the right form. When performing posture exercises, concentrate on keeping the spine in a neutral alignment and using the right muscles.

    • Be careful not to overdo it.

    Pay attention to your body: To prevent overexertion, it’s important to train within your current level of fitness. Especially when strengthening the muscles that support your posture, pushing too hard might result in muscle fatigue, strain, or injury.

    • Put on the Right Shoes

    Supportive footwear: Your posture and general safety can be greatly improved by wearing shoes that are suitable. For your particular activity, wear shoes that offer enough arch support, cushioning, and stability.

    • Do not overstretch

    Stretching gently is important for proper posture, but too much stretching can cause joint or muscle strains. Never push your body into a painful or uncomfortable position; instead, stretch carefully.

    • Pay attention to stability and balance.

    Exercises for balance: A lot of posture exercises require the use of stabilizing muscles. Practice exercises that increase balance because they develop coordination and body awareness, two things that are essential for maintaining good posture in day-to-day tasks.

    • Make Slow Progress

    Gradual intensity: It’s important to progressively increase strength and flexibility, particularly when trying to improve posture. To avoid overworking your muscles and joints, start with easy exercises and work your way up to more difficult ones.

    • Keep Your Spine Aligned Neutrally

    Spinal protection: When performing posture-correcting exercises, it’s important to keep your spine neutral during movement to prevent excessive rounding or arching. This guarantees that you’re not overstressing your spine and that you’re strengthening the right muscles.

    • Keep an eye on pain and tenderness.

    Prevent pain: While some pain is common during exercise, severe or sudden pain is not. Stop the exercise right away if you feel pain, and evaluate your form and technique to see what might have gone wrong.

    • Make Use of the Right Equipment

    Stabilizing tools: Use the correct weight or resistance level for your level of fitness while using dumbbells, resistance bands, or other equipment. Increase the weight gradually from the lighter starting position as your strength improves.

    • After working out, relax.

    Prevent stiffness: To help relieve muscle tension and stiffness, always stretch gently after working out. Additionally, it keeps you flexible and helps you avoid pain after working out.

    You can exercise safely and effectively while reducing your chance of injury and gradually improving your posture by following these safety guidelines.

    When should you stop exercising?

    If you experience any symptoms or signs that suggest it might not be safe to continue exercising, it’s important to pay attention to your body and stop.

    When performing posture exercises, the following are a few indicators that you should stop:

    • Pain

    Sharp or acute pain: You should stop exercising right once if you have sudden, sharp, or severe pain, especially in the shoulders, back, joints, or neck.

    Muscle strain: Take a break and rest if a muscle feels overworked or strained. Ignoring pain could worsen it and prevent you from moving forward.

    • Lightheadedness or dizziness

    Feeling faint: Stop exercising immediately if you begin to feel lightheaded, faint, or dizzy. Overexertion, low blood sugar, or dehydration may all lead to these symptoms.

    Nausea: Your body may require a rest if you feel nauseous or very tired. Rest and drink plenty of water.

    • Breathing Problems

    Inability to breathe: Quit working out and take a break if you can’t breathe or if it gets difficult or irregular. During activities, sustaining energy and proper posture requires proper breathing.

    Chest pain: Stop right away and, if required, get medical help if you feel any tightness or pain in your chest.

    • If you have a medical condition or are feeling ill

    Cold or flu symptoms: It’s advisable to stop and rest if you’re feeling symptoms like a cold, a fever, or muscle pains that aren’t connected to your workout.

    Underlying medical conditions: Before beginning an exercise program, speak with a healthcare provider if you have any underlying medical conditions, such as joint problems, heart problems, or other health concerns.

    • Joint Weakness or Instability

    Stop exercising if you experience any weakness or instability in any of your joints, particularly in your knees, ankles, or wrists. This might indicate bad form or a possible injury.

    Sudden joint pain: To prevent additional damage, stop exercising if a joint feels uncomfortable, or swollen.

    • Sweating excessively or being dehydrated

    Sweating excessively: Stop and take a break if you’re feeling thirsty and sweating a lot. For maximum efficiency and muscular function, hydration is essential.

    Dry mouth or severe thirst: These symptoms indicate that you need to drink more water. Before continuing, take a break and drink some water.

    • Excessive Fatigue

    Unable to maintain form: It’s time to stop exercising if you’re feeling too exhausted to continue with the exercises in a proper alignment or form. Ineffective form lowers the exercise’s effectiveness and raises the chance of injury.

    Muscle fatigue: Take a break and give your muscles time to rest if they are so tired out that you are unable to use them effectively.

    • Sudden Alignment or Posture Change

    Loss of control over posture: Stop if you observe that your posture is declining, such as when you lean or circle your back too much. When performing posture exercises, it’s important to keep your alignment correct to prevent repeating harmful habits.

    Bad form: You should take a break if you feel that your form is unsustainable or that you are no longer able to use the proper muscles.

    • Indices of Stress or Overworking

    Chronic soreness: You can be overworking if, after getting enough sleep, you still feel extremely stiff or sore. Degeneration of muscles and decreased performance may result from this. Allowing enough time for recovery in between sessions is important.

    Mental fatigue: Overtraining may also be indicated by a feeling of mental stress or difficulty concentrating. Poor form caused by mental exhaustion might raise the chance of injury.

    • Muscle Spasms

    Leg or back cramps: Dehydration or overexertion may be the cause of muscle cramps, particularly in the legs, back, or abdomen. Take a moment to relax the muscles, drink some water, and stretch slowly.

    You can guarantee a more secure and effective workout that promotes proper posture without running the risk of injury by listening to the signals from your body and pausing when needed.

    Advice for Keeping Your Posture Correct:

    • Stand tall by keeping your feet shoulder-width apart, your shoulders relaxed, and your head in line with your spine.
    • Support yourself by sitting back in your chair with your knees at a straight angle and your feet flat on the ground. Make sure the chair supports your back, particularly the lower back.
    • Set up your workspace: If you use a desk, ensure sure your chair supports your head and that your computer screen is at eye level.
    • Take breaks: To avoid tension and stiffness, get up and stretch every 30 to 60 minutes if you’re sitting for extended periods of time.

    Summary:

    Maintaining proper posture involves more than just standing straight; it also involves positioning your body to support balance, comfort, and stability. In addition to back pain and muscular strain, poor posture can cause long-term health problems like breathing problems and joint pain. Having proper posture is important whether you’re in front of a computer, working at a desk, or going about your everyday business.

    By adding posture-improving exercises to your routine, you may experience better alignment, reduced pain, and an overall improvement in your condition. You will feel and look better if you strengthen and stretch the muscles that support proper posture. The previously mentioned exercises focus on the muscles that support your shoulders, core, and spine the most.

    As you gain comfort, progressively raise the intensity of the exercises you begin with, starting with a small number at a time. Consistent practice will help you feel more balanced, pain-free, and refreshed in addition to improving your posture.

    FAQ:

    Why is good posture so important?

    Proper posture lowers the chance of developing chronic pain, especially in the shoulders, neck, and back, helps maintain the spine’s natural alignment, and reduces the strain on muscles and ligaments. Additionally, it improves digestion, respiration, and general energy.

    In what ways do exercises help with posture?

    Exercises that promote proper posture help you become more flexible, build up your body awareness, and strengthen important muscle groups like your shoulders, back, and core. This lessens the possibility of bending over or misalignments by making it simpler to maintain correct alignment throughout daily tasks.

    How frequently should I practice my posture?

    Try to perform posture exercises three to four times a week for best effects. But even making small modifications to your routine, like stretching or checking your posture, can help you keep making progress. The secret is regularity!

    Which typical issues with posture can be solved through exercises?

    Exercises for posture may help with problems like:
    Rounded shoulders as a result of weak back muscles and tight chest muscles.
    Forward head position, which is frequently caused by staring at displays.
    excessive curvature of the lower back (lordosis)
    bending over or slouching (caused by weak upper back and core muscles)
    Scoliosis (under the supervision of a medical expert)

    Which exercises are good for posture?

    Plank
    Chest Opener Stretch
    Shoulder Blade Squeeze
    Cat-Cow Stretch.
    Bridges
    Wall Angels

    Can back pain be relieved by posture exercises?

    Yes, several posture exercises focus on the shoulders, lower back, and core muscle areas that frequently cause back pain and can help reduce the pain that is caused by bad posture.

    Can rounded shoulders be improved with posture exercises?

    In fact! Round shoulders, which are frequently caused by extended sitting and bad posture, can be effectively corrected with posture exercises including back stretches, shoulder blade squeezes, and chest openers.

    What part does core strength play in proper posture?

    Maintaining an upright, balanced posture requires a strong core. It prevents straining or drooping when standing or sitting by supporting the pelvis and spine.

    When can we expect to see improvements?

    With regular practice, posture can improve in as little as a few weeks. However, it takes constant work and awareness to maintain long-term posture improvement.

    Can anyone safely perform posture exercises?

    The majority of posture exercises are safe, but before beginning a new workout program, you should speak with your doctor if you already have a medical issue such as osteoporosis, scoliosis, or herniated discs.

    Can breathing difficulties be resolved with posture exercises?

    Real! More lung expansion is possible with proper posture. Posture exercises help you keep your breathing more open and relaxed by strengthening your core muscles and opening up your chest.

    References:

    • On June 22, 2023, Hospitals, M., & Hospitals, M. The Top 8 Posture Correction Exercises for You to Try Right Now. Hospitals in Manipal. These are the top posture correction exercises you should try today: https://www.manipalhospitals.com/blog/8
    • Eske, J. (February 13, 2023). Tips and exercises to improve posture. The article 325883 can be found at https://www.medicalnewstoday.com.
    • Goswami, K. January 21, 2024. Enhance your fitness and wellness with these 19 top posture exercises. Samarpan Clinic for Physiotherapy. The best posture exercises can be found at https://samarpanphysioclinic.com/
    • Cronkleton, E. July 13, 2023. Twelve Posture-Improving Exercises. Healthline. Posture-exercises: https://www.healthline.com/health
    • Taylor, R. B. (July 10, 2011). 6 Posture-Related Exercises. Better posture exercises, WebMD. https://www.webmd.com/fitness-exercise
    • D. June 10, 2021. Wrist Stretch | Exercise Guide with Illustrations. https://www.spotebi.com/exercise-guide/wrist-stretch/ SPOTEBI
  • Global Aphasia

    Global Aphasia

    Introduction

    Global aphasia is a severe form of aphasia that results from extensive damage to the brain’s language-dominant hemisphere, typically the left.

    Damage to the parts of your brain that regulate language can result in global aphasia.
    It’s possible that a person with global aphasia can only produce and comprehend a small number of words. They frequently lack reading and writing skills.

    Damage to the left side of the brain causes global aphasia, a severe form of nonfluent aphasia that impairs auditory and visual understanding as well as receptive and expressive language skills, which are necessary for both oral and writing communication. All language modalities have acquired communicative deficits that affect language production, comprehension, and repetition. Though their total production ability is restricted, patients with global aphasia may be able to speak a few brief utterances and use non-word neologisms.

    Additionally impacted is their capacity to repeat words, phrases, or utterances. A person with global aphasia may still be able to communicate through gestures, intonation, and facial expressions since the right hemisphere is preserved. A significant lesion of the left perisylvian cortex is frequently the cause of this kind of aphasia. The lesion is linked to damage to Wernicke’s area, Broca’s area, and insular regions that are involved in language. It is caused by a blockage of the left middle cerebral artery.

    The following are the most common causes of global aphasia:

    • Stroke
    • Head injury
    • Brain tumor

    It’s possible that people with global aphasia just experience linguistic problems. In order to communicate, they occasionally use gestures, facial expressions, and tone of voice changes.

    What is transient global aphasia?

    • One short-term type of global aphasia is called transient global aphasia (TIA).
    • Transient global aphasia may be the cause of seizures, migraine attacks, or transient ischemic attacks (TIA).
    • A ministroke is another term for a transient ischemic attack (TIA). It is a transient blood clot in your brain that doesn’t damage your brain permanently. An impending stroke can be predicted by experiencing a transient ischemic attack (TIA).

    Causes of Global aphasia?

    Global aphasia can be caused by injury to Wernicke’s and Broca’s regions, which are language processing centers in the left hemisphere of the brain. Language creation and comprehension depend on these two components.

    The most common causes of brain injury that result in global aphasia are listed below:

    • Stroke: blockage of blood supply to the brain due to a stroke. Your language processing centers may suffer irreversible harm from a lack of oxygen if the stroke occurs in your left hemisphere.
    • Tumor: Global aphasia may result from a tumor in the left hemisphere of the brain. The surrounding cells are harmed when the tumor spreads. Some forms of aphasia can affect up to 30 to 50 percent of persons with brain tumors, according to reliable sources. Your brain may adjust and shift how you process language to different parts of your brain if the tumor is developing slowly.
    • Infection: Although fungi and viruses can also cause an infection, bacteria are the most prevalent cause of brain infections. If an infection damages your left hemisphere, it may lead to aphasia.
    • Trauma: The parts of your brain that regulate language can be harmed by a head injury. Trauma from events like accidents or sports injuries frequently leads to head damage.

    A blockage to the middle cerebral artery (MCA) trunk, which impacts a significant area of the left cortex’s perisylvian region, is usually the cause of global aphasia. A thrombotic stroke, which happens when a blood clot develops in the blood arteries of the brain, is typically the cause of global aphasia.

    Apart from stroke, degenerative neurological illnesses, malignancies, and traumatic brain injury (TBI) can also result in global aphasia. Since the anterior (Broca’s) and posterior (Wernicke’s) regions of the brain are distinct branches of the MCA that receive their supply from its arterial trunk, they are either eliminated or severely damaged.

    Although damage to smaller, subcortical regions can cause global aphasia, lesions typically cause severe damage to the left hemisphere’s language areas. It is commonly known that aphasia can result from a cortical lesion. Lesions to the subcortical areas of the brain, including the thalamus, basal ganglia, internal capsule, and paraventricular white matter, may also result in speech and language impairments, according to a research by Kumar et al. (1996).

    This is because the language centers in the brain are intimately linked to the subcortical areas. Lesions to the subcortical regions would seldom result in global aphasia, although they could produce some forms of aphasia, according to Kumar et al. These areas involve: “fronto-temporo-parietal lesions” , “anterior, suprasylvian, frontal lesions” , “large subcortical infarcts” , “posterior, suprasylvian, parietal infarcts” , along with “a double lesion composed of a frontal and a temporal infarct” .

    Symptoms of Global aphasia?

    One of the more severe types of aphasia is global aphasia. It may result in symptoms that impair all facets of language proficiency.
    Reading, writing, speaking, and understanding speech are all extremely challenging for those with global aphasia.

    Some individuals with global aphasia are able to respond to simple yes/no questions. They could be able to utter automatic expressions like “Pardon me.” Other communication methods include tone of voice changes, gestures, and facial expressions.

    These are some of the ways that someone who has global aphasia could find it difficult to communicate.

    Global aphasia typically develops after a thrombotic stroke (at the middle cerebral artery trunk), with different degrees of severity. The incapacity to comprehend, produce, and repeat speech and language is one of the general symptoms.These issues also continue to affect the ability to read, write, and comprehend sounds. A few familiar words and utterances (like “hello”), overlearned expressions (like “how are you”), and expletives (like “a curse word”) usually make up verbal language. Nonetheless, people with global aphasia may use gestures, intonation, and facial expressions to communicate.

    It is possible to have severe lexical (vocabulary) impairment, which would make it impossible to read simple words or sentences. Global aphasia can occur with or without hemiparesis (weakness), but it may be accompanied by right-sided facial weakness and right hemiplegia (paralysis). Moreover, apraxia of speech, alexia, pure word deafness, agraphia, facial apraxia, and depression are among the other impairments that are frequently present in people with global aphasia.

    People with global aphasia are typically task-oriented, socially acceptable, and attentive. While some people can answer yes/no questions, answers that touch on family and personal experiences are more trustworthy. Normal phonemic, phonological, and inflectional structures are retained in automatic speech.

    Additionally, right-sided sensory loss, right hemiparesis or hemiplegia, and right homonymous hemianopsia may appear. While rejecting pseudo-words and real but erroneous names, people with global aphasia may recognize single-words for common objects and locations.

    • Speaking,
    • Not being able to speak,
    • Having difficulty speaking and repeating what you’ve said,
    • Saying things in unintelligible phrases,
    • Using incorrect grammar,
    • Language understanding issues,
    • Difficulty comprehending others,
    • Incorrectly responding to yes/no questions,
    • Difficulty comprehending rapid speech,
    • Taking longer than usual to comprehend spoken text,
    • Writing,
    • Using the wrong words,
    • Utilizing poor grammar,
    • Misspelling words
    • Reading difficulties,
    • Comprehension issues with written material,
    • Difficulty pronouncing words,
    • Inability to comprehend metaphorical language,
    • Global aphasia presents challenges.
    • Because they struggle to understand others, people with global aphasia may experience difficulties in their social lives, careers, and relationships.
    • Without frequent social connection and familial support, a person may experience depression or eventually become isolated.
    • People with global aphasia have fewer job options because they are unable to read or write. Treatments are available, though, and occasionally symptoms do get better. Additionally, the number of assistive gadgets that facilitate communication is growing.

    Diagnosis

    Your doctor will probably do a number of tests to confirm the diagnosis if they suspect global aphasia.

    These examinations could include:

    • Physical exam,
    • Neurological exam,
    • MRI.

    They will probably test your language skills as well.

    These examinations could include:

    • Requiring you to repeat words,
    • Asking yes/no questions,
    • Repeating the names of common items.

    Additionally, these tests can help rule out other illnesses that are comparable, such as:

    • Dysphasia
    • Anarthria
    • Alzheimer’s disease

    The symptoms of milder types of aphasia, including Wernicke’s or Broca’s aphasia, may resemble those of global aphasia but be less severe.

    Following a neurological examination, physical examination, and testing, a medical professional will diagnose global aphasia. Your provider will question you or your caregiver about your medical history and symptoms throughout the examination. Since it will be challenging to talk or comprehend the questions your provider asks.

    To check for brain injury, your doctor could prescribe imaging tests like a computed tomography (CT) scan or magnetic resonance imaging (MRI).

    To confirm a diagnosis, you might need to consult a speech-language pathologist (SLP).

    To ascertain the extent of your language processing problems, a speech-language pathologist will assess your language proficiency. Determining which therapy choices to try is another benefit of this examination.

    A battery of medical imaging tests, such as an MRI (magnetic resonance imaging) or CT (computed tomography) scan, are performed on the patient if there is a suspicion of a brain injury. A speech and language pathologist will conduct a number of tests to classify aphasia following a brain damage diagnosis. Furthermore, a popular test for aphasia diagnosis is the Boston Assessment of Severe Aphasia (BASA). BASA evaluates both verbal and gestural responses and is used to establish treatment regimens when strokes cause aphasia symptoms. The Cognitive Test Battery for Global Aphasia (CoBaGa) is a tool for evaluating cognitive abilities.

    Because the CoBaGa only requires manipulative replies rather than verbal ones, it is a suitable tool for evaluating individuals with severe aphasia. Cognitive abilities such attention, executive functioning, logical reasoning, memory, visual-auditory recognition, and visual-spatial ability are all evaluated by the CoBaGa.

    In one study, Van Mourik et al. used the Global Aphasic Neuropsychological Battery to evaluate the cognitive capacities of individuals with global aphasia. This test evaluates visual and auditory nonverbal recognition, memory, attention/concentration, and IQ. The study’s findings assisted the researchers in concluding that people with global aphasia varied in severity.

    Treatment of Global aphasia?

    The degree of global aphasia determines how it is treated. Recovery is possible, but it could take longer and be more challenging than with other forms of aphasia.
    People with temporary global aphasia (TIA) may get well on their own without medical intervention.

    There are two types of treatment possibilities for global aphasia:

    • You can immediately enhance your language proficiency with the use of impairment-based techniques.
    • Improving your ability to speak in everyday contexts is one of the communication-based methods.

    The main treatment for people with aphasia is usually speech and language therapy. Enhancing a person’s communication skills to a level suitable for everyday life is the aim of speech and language therapy. Collaboration among speech-language pathologists, patients, and their family members or caregivers informs the selection of goals. Goals must to be tailored to each person’s communicative requirements and aphasia symptoms.

    According to Wallace et al. (2016), communication, life involvement, physical and emotional well-being, normalcy, and health and support services were the outcomes that were frequently given priority in treatment. However, there is conflicting evidence about the best effective speech and language treatment technique for treating global aphasia.

    There are two types of therapy: group and individual. Visual aids can be used in group therapy to improve the development of social and communication skills. In order to promote social communication, group therapy sessions usually center on easy, prearranged games or activities.

    Visual Action Therapy (VAT) is one type of therapy created especially to treat aphasia. VAT is a three-phase, thirty-step nonverbal gestural output program. Unilateral motions are taught throughout the program as symbolic representations of actual items. The efficiency of VAT has been the subject of scant and conflicting research.

    Teaching family members and caregivers how to communicate with their loved ones more effectively is a crucial therapeutic approach. According to research, these tactics include making sentences simpler and using more common vocabulary, getting someone’s attention before speaking, using visual clues and pointing, giving them enough time to react, and providing a distraction-free, calm space.

    There is little evidence to support the effectiveness of pharmaceutical therapies for aphasia. The advantages of pharmacological treatment have not yet been demonstrated by extensive clinical trials.

    Speech therapy

    Speech therapy is the most common form of treatment for global aphasia.
    Speech therapists employ a variety of methods to help you become more proficient in language.
    Therapists may use computer tools to support the rehabilitation process in addition to speech exercises.

    Speech therapy aims to achieve the following:

    • Recovering speech,
    • Communicating as effectively as possible,
    • looking for alternate forms of communication,
    • Keeping those who have global aphasia and their caretakers informed about the disease.

    Visual action therapy

    When spoken treatments are currently too sophisticated, visual action therapy may be employed. It is completely devoid of words. People who receive visual action therapy learn how to communicate with gestures.

    You can participate in this kind of nonverbal therapy without using words. You will learn how to depict items using gestures, which are bodily actions, from your provider. Your gestures facilitate communication. To indicate that you would want something to drink, for instance, you could put your hand to your mouth and wrap your fingers around a fictitious glass.

    Noninvasive brain stimulation

    Non-invasive stimulation of the brainA very recent addition to aphasia treatment.
    with addition to speech-language therapy, it employs methods like transcranial magnetic stimulation (TMS) and transcranial direct current stimulation (tDCS) to aid with language recovery.

    Music therapy (melodic intonation therapy):

    Your brain’s language processing regions will be stimulated by a provider using melodies and rhythms. Your ability to communicate and comprehend language may both benefit from this.

    Global aphasia recovery

    Global aphasia recovery is a gradual process.
    Regaining complete language skills is uncommon, but with the right care, many patients experience notable improvements.

    The good news is that after aphasia initially appears, its symptoms may worsen for years.The degree of brain damage and the individual’s age determine how quickly global aphasia recovers.
    Compared to other language skills, people typically regain language comprehension abilities more quickly.

    Augmentative and alternative communication:

    There are many different ways to communicate without speaking. You will learn how to communicate your requirements and desires from a healthcare professional. For instance, to indicate that you want to go outside, you may use a board with photos on it and point to the picture of a tree.

    Physical Therapy Treatment:

    Physical therapists learn how to treat individuals with neurological disorders that frequently result in aphasia. In order to maximize patient engagement and facilitate appropriate referrals, if or when funded by the a physical therapist, it is crucial to be informed about the condition and its types.

    Clinical trials, or tests on humans, are also being conducted to find out how well novel treatment approaches work for global aphasia. During clinical trials, you might be eligible to explore drugs or forms of brain stimulation, such as transcranial magnetic stimulation.

    Prevention:

    Although it is impossible to stop every cause of global aphasia, you can lower your risk by:

    • Addressing any underlying health issues.
    • Taking safety measures when engaging in activities that carry a high risk.
    • Minimizing brain damage by calling emergency services as soon as a stroke is suspected.

    Prognosis:

    Age, lesion location, pre-existing cognitive level, motivation, general health, and interactions among these are the primary contributing participant elements that affect the degree of neuroplasticity, or the brain’s capacity to change, when assessing a patient’s prognosis. Due to brain swelling (cerebral edema), the earliest symptoms of global aphasia may manifest during the first two days following brain trauma. Impairment presentation may develop into either receptive aphasia or expressive aphasia (more frequently) with time and natural recovery.

    The prognosis for language abilities is poor because of the location and extent of the lesion linked to global aphasia. According to research, the degree of aphasia that develops in the first four weeks following a stroke determines the prognosis for long-term language ability. Because of their low initial language skills, people who are diagnosed with aphasia after a month have a dismal prognosis.

    However, the Western Aphasia Battery (WAB) scores of patients with global aphasia improved from baseline in the first year following a stroke. Individuals with Broca’s aphasia demonstrated the greatest rate and degree of improvement when compared to those with Wernicke’s, anomic, conduction, and Broca’s aphasia. Global aphasia came in second. The first four weeks following a stroke had the greatest rate of improvement in verbal function.

    Even though people with global aphasia have a bad prognosis, they can nevertheless improve in a number of language-related areas. Ferro, for instance, conducted study in 1992 on the rehabilitation of people who had acute global aphasia, which was caused by five distinct lesion locations. Out of all the study participants, individuals with injuries in the fronto-tempo-parietal region of the brain experienced the least degree of improvement, and they frequently never recovered from global aphasia.

    The brain’s anterior, suprasylvian frontal region was the second lesion site; subcortical infarcts were the third; and posterior, suprasylvian parietal infarcts were the fourth. Lesions two, three, and four participants frequently recovered to a less severe type of aphasia, like transcortical or Broca’s. Patients who had lesions at the fifth lesion site, which was a twofold lesion in both the frontal and temporal infarcts, exhibited a little improvement. Though full recovery is uncommon, research indicates that spontaneous improvement, if it occurs, comes within six months.

    Speech and language treatment has been found to help people with global aphasia improve their verbal and nonverbal speech and language abilities. One study looked at the recovery of a group of people who had been diagnosed with global aphasia three months after their stroke. The patients got rigorous language and speech therapy. The study’s findings demonstrated that every patient had improved. The use of propositional discourse showed the least gain, while aural comprehension showed the most. The individuals’ communication skills remained substantially affected six months after the stroke, and they demonstrated an increasing usage of gestures.

    Although the majority of development is made during the first three years of therapy, long-term intense language intervention can cause language skills to steadily improve over time. Even though intervention can enhance language skills, only 20% of people with global aphasia are able to utilize language in a functioning way. Examples of common functional language use for this population include the ability to communicate basic needs and understand simple conversations on highly familiar topics.

    Conclusion:

    As you read this, you can’t even begin to picture what it would be like to have global aphasia. Following an event like a stroke, you suddenly lose the ability to do things like read the headline of a newspaper or sing the lyrics to your favorite song. Not being able to understand or feel understood can be a lonely experience. However, you don’t have to deal with it alone. Your loved ones and healthcare professionals will collaborate closely to create a customized treatment plan. They will assist you in discovering new forms of self-expression that facilitate and improve communication.

    Significant harm to the brain’s language-processing regions causes global aphasia, a dangerous disorder. Speaking, reading, writing, and understanding language are all challenging for those who suffer from global aphasia. Although strokes are the most frequent cause of global aphasia, other conditions such brain injury, brain tumors, and infections can also cause it.

    Global aphasia can be treated in a number of ways. Of them, speech and language therapy is usually recommended by clinicians. Numerous more recent therapy modalities are still being investigated. To find out which therapy option is best for them, people with global aphasia should speak with their doctors.

    FAQs

    Which artery is impacted when someone gets global aphasia?

    A blockage to the middle cerebral artery (MCA) trunk, which impacts a significant area of the left cortex’s perisylvian region, is usually the cause of global aphasia. A thrombotic stroke, which happens when a blood clot develops in the blood arteries of the brain, is typically the cause of global aphasia.

    Does global aphasia get better?

    In the initial weeks or months following a stroke, global aphasia may improve quickly, depending on the degree of impairment to the language regions of the brain. Over time, a global aphasia diagnosis may evolve into another type of aphasia.

    Why does global aphasia occur?

    Global aphasia is caused by severe injury to the various language processing regions of your brain, particularly Wernicke’s and Broca’s areas. These brain regions aid in word and phrase formation, vocabulary access, and language comprehension.

    Where is the global aphasia lesion located?

    Because the language and motor control regions of the cortex are close together, global aphasia follows significant perisylvian lesions in the left middle cerebral artery (MCA) zone and is accompanied by hemiparesis on the contralateral side.

    Can a person with global aphasia recover?

    After the brain has had time to heal, temporary global aphasia will go away. However, substantial treatment may be necessary to restore the capacity to generate and understand language if global aphasia was caused by a major stroke or other brain injury.

    What differentiates global aphasia from Broca’s aphasia?

    Compared to Broca’s aphasia, global aphasia is a more severe type of aphasia. Whereas the frontal lobe is affected by Broca’s aphasia, a significant portion of the brain is affected by global aphasia.

    What is the duration of global aphasia?

    The findings demonstrated that recovery from global aphasia following a stroke can last for more than ten years, not only the first few years after onset.

    What causes global aphasia?

    Damage to several language centers in the brain, including Wernicke’s and Broca’s areas, causes global aphasia. Global aphasia is likely to occur shortly after a brain injury or stroke. With advancements, global aphasia may be categorized as a different kind of aphasia.

    Which is the most prevalent aphasia?

    The most common kind of fluent aphasia, Wernicke’s aphasia, can be caused by damage to the brain’s temporal lobe. Individuals who suffer from Wernicke’s aphasia may use extended, meaningless sentences, omitting words, or even inventing new ones.

    Are those who have global aphasia able to read?

    The most severe type of aphasia, known as global aphasia, affects people who can understand little to no spoken language and produce few identifiable words. People who have global aphasia are unable to read, write, or study.

    Is it possible to reverse global aphasia?

    Some aphasics recover fully on their own without therapy. However, aphasia usually persists to some degree in the majority of people. Over time, therapies like speech therapy can help people regain some of their speech and language abilities, but many people still struggle to communicate.

    How is the diagnosis of global aphasia made?

    To establish the existence of aphasia and choose the best language treatment plan, a speech-language pathologist (SLP) can do a thorough language examination. The evaluation helps determine if the individual is able to: Name common objects. Take part in a discussion.

    What kind of stroke results in worldwide aphasia?

    Particularly during the immediate phase of a massive, left middle cerebral artery stroke, global aphasia is typical. This aphasia can occasionally be detected in patients who have had two or fewer strokes in the left hemisphere.

    What signs of global aphasia are present?

    difficulty using whole sentences when speaking,
    difficulty repeating words,
    using basic language.
    making errors in grammar.
    use the wrong terms or expressions.
    difficulty comprehending other people.
    Understanding rapid-fire communication can be challenging.

    What distinguishes global aphasia from aphasia?

    One of the most severe forms of aphasia is global aphasia. It is caused by damage to several parts of the brain involved in language processing. Only one identifiable word can be produced by patients with global aphasia. They are able to comprehend very little or no spoken language.

    What is an example of global aphasia?

    Individuals who have global aphasia may talk in “stereotypes” or just a few words, like “no,” “hey,” or “what.” Words or phrases that are used often with varying intonations are known as stereotypes. Examples include “something wonderful,” “I love you,” and “ding da ding.”

    References

    • Serasiya, A. (2023, February 1). Global Aphasia – Cause, symptoms, diagnosis, treatment. Samarpan Physiotherapy Clinic. https://samarpanphysioclinic.com/global-aphasia/
    • Global Aphasia. (2024, October 29). Cleveland Clinic. https://my.clevelandclinic.org/health/diseases/global-aphasia
    • Wikipedia contributors. (2024, March 17). Global aphasia. Wikipedia. https://en.wikipedia.org/wiki/Global_aphasia
    • Yetman, D. (2020, January 29). What you need to know about global aphasia. Healthline. https://www.healthline.com/health/neurological-health/global-aphasia
  • The Ultimate Guide to Speech Therapy

    The Ultimate Guide to Speech Therapy

    What is a Speech Therapy?

    Speech therapy is the diagnosis and treatment of communication problems including speech disorders. It is carried out by speech-language pathologists, or SLPs as they are more commonly called.

    To improve communication, speech therapy techniques are used. These could include language intervention activities, articulation therapy, and other things, depending on the type of speech or language disability.

    Speech therapy may be necessary for speech issues that appear in children or adults who have speech impairments caused by illness or trauma, such as stroke or brain injury.

    Working with individuals of all ages, from young toddlers to adults, speech therapists, also known as speech-language pathologists, treat a variety of communication issues, such as stuttering, voice abnormalities, articulation disorders, and language delays.

    Why do you need speech therapy?

    Many speech and language difficulties can be corrected with speech therapy.

    Articulation disorders

    The inability to speak certain words correctly is known as an articulation disorder. A child with this speech disorder may add, alter, drop, or distort word sounds. One example of word distortion is saying “thith” rather than “this.”

    Fluency disorders.

    The rhythm and flow of speaking are affected by a fluency problem. Stuttering and cluttering are examples of fluency problems. A stutterer has trouble making sounds, and as a result, they may block or interrupt their speech or repeat words whole or in parts. A messy individual usually speaks quickly and uses a lot of word combinations.

    Resonance disorders.

    Resonance disorders result from abnormalities in the vibrations that influence voice quality caused by blocked or impeded normal airflow in the nasal or oral canals. It could also result from the velopharyngeal valve closing incorrectly. Resonance abnormalities are often associated with cleft palate, neurological disorders, and tonsil hypertrophy.

    Receptive disorders.

    It is challenging for someone with receptive language disorder to comprehend and assimilate the words of others. This could make it hard for you to follow directions, have a limited vocabulary, or make you seem disinterested when someone is speaking. Autism, hearing loss, brain damage, and other language problems can all lead to receptive language dysfunction.

    Expressive disorders.

    An indication of expressive language dysfunction is trouble communicating or conveying information. If you have an expressive issue, you could have trouble constructing proper sentences, such as by utilizing the incorrect verb tense. It has been connected to developmental disorders such as Down syndrome and hearing loss. A medical condition or brain injury could also be the reason.

    Cognitive-communication disorders.

    Communication problems caused by injury to the part of the brain involved in mental processes are referred to as cognitive communication disorders. It could lead to issues with problem-solving, recall, and speaking or listening. The cause may be biological, such as aberrant brain development, certain neurological conditions, brain trauma, or stroke.

    Aphasia.

    This learned communication impairment affects a person’s ability to communicate and comprehend others. It often also affects a person’s ability to read and write. The most common cause of aphasia is stroke, though it can also result from other brain disorders.

    Dysarthria.

    This disorder is characterized by slow-paced or slurred speech due to a lack of control or strength in the speech muscles. The most frequent causes are neurological disorders that produce facial paralysis or weakness of the tongue and throat, such as multiple sclerosis (MS), amyotrophic lateral sclerosis (ALS), and stroke.

    What signs indicate a need for Speech Therapy?

    If your doctor believes you or your child may have a speech impairment, they will recommend some basic testing. These tests will help determine the underlying reason of any communication issues.

    For example, if your child has trouble communicating, your child’s doctor may suggest a hearing test from an audiologist. If your child passes the hearing exam, they might need a speech-language pathologist.

    What is the ideal Speech Therapy age?

    Anyone who needs help with their language or speaking skills can benefit from speech therapy. There is no ideal age or right time to ask for help. Adult and pediatric speech therapy is helpful for those with communication disorders.

    Studies show that early intervention and practice with a family member at home are most beneficial for children who need speech therapy.

    What activities are done in speech therapy?

    Play, such as language-based board games or sequencing exercises, is typically a part of speech therapy for kids.

    Speech therapy for adults typically focuses on restoring or enhancing certain skill sets, such as enhancing brain-mouth coordination.

    Activities for speech therapy include, for instance:

    • Exercises for the tongue and mouth: Your speech therapist will demonstrate movements and exercises to help you develop your tongue and mouth. Your tongue can be trained to move in coordinated patterns with these exercises.
    • Facial movements: You can enhance your motor skills by managing your facial expressions. Your therapist may ask you to pucker your lips or grin before letting your face relax.
    • Reading out loud: Reading aloud can improve the communication between your mouth and brain if your speech impairment makes it difficult for you to move your tongue and mouth correctly.
    • Playing word games: Research has demonstrated that word searches, crossword puzzles, and memory games help preserve cognitive function and enhance critical thinking.

    What takes place in Speech Therapy?

    Before starting speech therapy, an SLP will usually do an evaluation to identify the kind of communication problem and the best treatment plan.

    Speech therapy for children

    A classroom, small group, or one-on-one setting may be used for speech therapy, depending on the type of speech impediment your kid has. Depending on your child’s needs, age, and illness, different speech therapy exercises and activities are used.

    Encourage language development through play, conversation, and language intervention using books, images, and other materials.

    Teach a youngster the proper syllables and sounds to create while they play in an age-appropriate environment.

    Assign homework and provide ways for the child, parent, or caregiver to complete speech therapy at home.

    Speech therapy for adults

    An assessment that establishes your needs and the best course of action is also the first step in adult speech therapy. Exercises in speech therapy may help adults with their language, speech, and cognitive communication abilities.

    If swallowing problems have been caused by an injury or a medical condition like Parkinson’s disease or oral cancer, retraining swallowing function may also be a component of treatment.

    Activities could include:

    • Resolving problems, arranging and preserving data, and performing further cognitive communication-related duties
    • Conversational techniques that improve social communication
    • Breathing techniques to improve oral muscle strength and resonance

    Many resources are available if you wish to try speech therapy activities at home, including:

    • Applications for speech treatment
    • Workbooks for speech treatment as well as games and toys for language development, such as flip cards and flash cards.

    How much time will speech therapy take you?

    How long someone need speech therapy depends on a number factors, including:

    • Their age, the kind of speech impediment, and its severity
    • Frequency of underlying health condition therapy
    • Treatment for an underlying medical condition
    • Some speech difficulties begin in childhood and improve with age, while others last until adulthood and necessitate continuous therapy and care.
    • A communication problem caused by a stroke or other illness may improve with therapy and when circumstances improve.

    To what extent does Speech Therapy work?

    Depending on the age group and ailment being addressed, speech therapy has varying success rates. The results of your speech therapy sessions may also be impacted by their scheduling.

    It has been shown that the most successful speech therapy for young children includes early intervention and practice with a parent or caregiver at home.

    What benefits does speech therapy offer?

    There are numerous benefits to speech therapy, including:

    • heightened self-assurance.
    • greater autonomy.
    • enhanced comprehension and communication of ideas, feelings, and concepts.
    • Early childhood education in preparation for school.
    • enhanced vocal quality.
    • early language competency.
    • enhanced swallowing abilities.
    • an improved quality of life.

    Prognosis:

    The severity of the speech or language disorder, age at intervention, underlying medical disorders, and therapy consistency are some of the variables that affect the prognosis of speech therapy. Results are greatly enhanced by early intervention and consistent practice, particularly for kids with developmental speech impairments.

    While people with neurological or cognitive disorders may need long-term therapy with variable degrees of improvement, many people with mild to moderate speech difficulties make significant improvements. When customized to each patient’s needs, speech therapy generally has a good prognosis, with many people experiencing a notable improvement in their communication abilities.

    Everybody has different needs. As people age, certain speech impairments get better, while others need years of speech therapy. If you have a speech disability caused by a medical illness, your speech and language abilities might get better as you heal from the underlying problem.

    The duration of speech therapy is determined by:

    • Your age.
    • the kind of speech impairment.
    • How much your communication skills are affected by the speech impairment.
    • if you have an underlying medical ailment that has to be healed.
    • How frequently do you go to speech therapy.

    Conclusion:

    In order to address speech and language impairments, improve communication skills, and raise general quality of life, speech therapy is essential. A number of variables, including individual needs, consistency, and early intervention, affect how well therapy works. While some people recover fully, others might need constant supervision and assistance.

    Speech therapy may greatly enhance social communication, language comprehension, fluency, and speech clarity with the correct techniques and commitment, enabling people to communicate successfully in both their personal and professional lives.

    Speech therapy can be used to treat a broad range of speech and language abnormalities and impairments in both adults and children. Early usage of speech therapy helps improve self-confidence and communication.

    If you or your kid struggle with communication, ask your healthcare practitioner about making an appointment for a speech-language pathologist evaluation. You can improve your independence, self-esteem, and quality of life with speech therapy.

    Speech treatment requires practice, time, and effort. Have patience and acknowledge all of your accomplishments. If you feel like you’re having trouble, talk to your speech therapist and acknowledge your accomplishments.

    FAQs

    How much does speech treatment cost?

    Your ability to swallow is evaluated with a fiberoptic endoscopic evaluation of swallowing (FEES) test. A speech-language pathologist (SLP) inserts a small, flexible device via your nose during the process. As you swallow, the SLP then observes certain areas of your throat.

    What is the duration of speech therapy?

    Depending on how serious your child’s needs are, it takes a lot of effort spread over several months or even years. Nonetheless, improvement or total repair is achievable with persistence. Additionally, speech therapy can be more successful when parents participate, for example, by having their children complete activities at home.

    To what extent does speech therapy work?

    The ideal choice for people who want to boost their confidence and improve their speech and language abilities is speech therapy, which generally has a high success rate among both adults and children.

    Is speech treatment too late at 7?

    This neuroplasticity is used in speech therapy to assist people in overcoming communicative barriers and making long-lasting progress. Although early intervention is preferable, assistance is always accessible: It’s never too late to get help, even though early intervention has many benefits.

    At what age is speech treatment most effective?

    Although most speech problems arise between the ages of 18 months and 2 years, it’s wise to get in touch with a speech therapist as soon as possible if you have any worries.

    What is the role of a speech therapist?

    For children and adults who struggle with eating, drinking, swallowing, or communicating, speech and language therapists offer life-changing care, support, and treatment. You will assist those who struggle to talk and communicate due to physical or psychological issues.

    Can a youngster who has a speech delay overcome it?

    It could not indicate a problem if your child’s speech and language development is delayed. However, consult your physician if your child is experiencing difficulties. Testing may be recommended by the physician. With the help of therapies like speech therapy, a kid can overcome a variety of speech and language issues.

    What does speech therapy entail?

    By strengthening the muscles involved in speaking and swallowing, speech therapy helps patients become more proficient communicators. Additionally, it can aid with stuttering, voice quality, and reading and writing.

    How many speech therapy sessions are there each week?

    At the very least, your speech therapist will probably suggest scheduling appointments every two weeks to begin. The development of speech and language skills requires practice and repetition. In the end, the more you use these skills, the faster you will finish speech therapy.

    For what length of time is speech treatment appropriate?

    Yes, depending on the child’s current project. A speech-language pathologist may see children once a week or many times a week. Treatment may last a few weeks, a few months, or a few years.

    Is it too late to start speech treatment at age 4?

    There is no minimum age limit for speech therapy. Pediatric speech therapists work with newborns until the age of eighteen, so it’s never too late! If you’re unsure whether it might be helpful to take your child to see a pediatric speech therapist, keep reading.

    When does speech reach its full development?

    three to four years
    uses most of the speech sounds, while some of the harder ones, such l, r, s, sh, ch, y, v, z, and th, might be garbled. To fully understand these noises, a child may need to be 7 or 8 years old.

    To what extent does speech therapy work?

    Given its high success rate with both adults and children, speech therapy is generally the best option for anyone looking to improve their speech and language skills as well as their confidence.

    At what age is speech treatment most effective?

    Speech therapy should begin as soon as a child shows signs of a speech or language impediment. Children, especially toddlers, should begin speech therapy between the ages of two and five.

    What is the role of a speech therapist?

    Speech-language pathologists, or SLPs for short, are educated in the study of human communication, including its abnormalities and development. Speech, language, cognitive-communication, and oral/feeding/swallowing skills are assessed by SLPs. After that, they can decide on the best way to deal with the problem.

    References

    • Physiotherapist, N. P.-. (2023, December 25). Speech therapy – Improve your communication skills. Mobile Physiotherapy Clinic. https://mobilephysiotherapyclinic.in/speech-therapy/
    • Professional, C. C. M. (2025, February 14). Speech therapy. Cleveland Clinic. https://my.clevelandclinic.org/health/treatments/22366-speech-therapy
    • Santos-Longhurst, A. (2019, May 9). What is speech therapy? Healthline. https://www.healthline.com/health/speech-therapy
  • Hallux Rigidus

    Hallux Rigidus

    Hallux Rigidus: What Is It?

    Hallux Rigidus is a form of degenerative arthritis affecting the big toe joint (the first metatarsophalangeal joint). It leads to stiffness, pain, and limited motion, particularly during walking or activities that require toe bending.

    Over time, bone spurs may develop, worsening the stiffness. Treatment options range from conservative approaches, such as footwear modifications and physical therapy, to surgical interventions in severe cases.

    This condition may be very annoying and even incapacitating because people depend on the big toe for walking, stooping, climbing, and even standing. Although they both affect the same joint, many patients mistake hallux rigidus for a bunion, which calls for a distinct course of therapy.

    As a result of Hallux’s rigid progressive nature, the toe’s range of motion gradually diminishes. The disease is known as hallux limitus in its early stages when big toe mobility is only slightly restricted. However, when the condition worsens, the toe’s range of motion steadily diminishes until it reaches the last stage of rigidus, where the big toe stiffens or develops what is frequently referred to as a frozen joint.

    Why does Hallux rigidus occur?

    Although the exact etiology of Hallux rigidus is unknown, several risk factors have been found.

    Risk factors consist of:

    Being a woman. Females are more likely to have hallux rigidus. In a 2009 cross-sectional research on the demography of Hallux rigidus, women made up 66% of the 110 participants.

    Family background. It seems that having a family member with the illness raises your chances of getting it yourself. This might result from inheriting a certain foot type or gait that can cause the disorder.

    Abnormal anatomy of the foot. Your risk may be increased by foot structural abnormalities, such as an elongated or raised first metatarsal bone.

    Injury. Hallux rigidus can be exacerbated by injuries like spraining the big toe joint or stubbing your toe.

    Excessive use. Overuse of the big toe joint can result from frequent stooping and crouching. The problem is more likely to develop in people who work in particular occupations or play activities that put a lot of strain on the joints.

    Certain health issues. Osteoporosis and inflammatory conditions such as rheumatoid arthritis and gout can cause hallux rigidus.

    Signs and Symptoms of Hallux rigidus:

    The following are early indicators and symptoms:

    • Big toe pain and stiffness when walking, standing, bending, etc.
    • Stiffness and pain made worse by damp, chilly weather
    • Running and squatting are two activities that might be challenging.
    • Inflammation and swelling surrounding the joint.

    Additional symptoms might appear as the disease worsens, such as:

    • Pain, even while you’re sleeping
    • Having trouble wearing shoes due to the development of bone spurs
    • dull lower back, knee, or hip ache caused by variations in your gait
    • Limping (in extreme situations)

    Diagnosis

    A physical examination will be used by a healthcare professional to diagnose Hallux rigidus. They will measure how far you can bend your toe up and down and assess the range of motion in your toe joint. You may need to see a podiatrist, a medical professional who focuses on treating foot problems.

    To obtain images of your foot and look for bone spurs, your doctor may use a foot X-ray.

    Stages of Hallux rigidus:

    Depending on how much hallux rigidus impairs your big toe’s range of motion, your healthcare professional may assign a grade. If your symptoms worsen over time, they may refer to these grades as stages. Grades of Hallux rigidus include:

    • Grade 0: Compared to your other big toe, your affected toe can move 10% to 20% less.
    • Grade 1: Your affected big toe will move 20% to 50% less.
    • Grade 2: reduced mobility by 50% to 75%.
    • Grade 3: 75% to 100% less mobility
    • Grade 4: 75% to 100% reduced mobility and increased discomfort while moving the injured big toe.

    Treatment of Hallux Rigidus:

    The degree of your symptoms and the reason for your hallux rigidus will determine which therapy you require. Your healthcare practitioner may recommend:

    Changes in footwear: Your MTP joint may feel less pressure if you wear shoes with lots of space for your toes. Stiff-soled shoes are a pain reliever. Have a narrow toe box and stay away from shoes that compress your toes, such as high heels.

    Restricting the movement: To support and restrict the mobility of your big toe, your doctor could suggest over-the-counter (OTC) pads that you can insert into your shoe. Activities like jogging and playing sports that put stress on your toe joint may need to be avoided.

    Pain relievers: Nonsteroidal anti-inflammatory drugs (NSAIDs), which are available over-the-counter, help lessen pain and swelling. You should speak with your doctor before taking NSAIDs for more than 10 days in a row.

    Icing: You can alleviate your discomfort by applying cold packs or ice to your injured toe. To prevent applying a cold pack straight to your skin, wrap it in a small piece of towel. Find out from your healthcare practitioner how frequently and for how long you should ice your toe.

    Corticosteroids: Corticosteroids are anti-inflammatory prescription drugs. Direct injections of cortisone into your big toe joint can be necessary.

    Foot soaks: To reduce inflammation, your healthcare professional may advise soaking your feet in a contrast bath that alternates between hot and cold water. After 30 seconds in hot water, immediately immerse your foot in cold water for another 30 seconds.

    Exercises for Hallux Rigidus:

    Toe Pulls:

    toe pull
    toe pull

    These will assist you in maintaining a normal walking pattern by increasing your mobility and stretching your big toe.

    • Raise your aching foot on a chair and keep it still where your feet and toes touch.
    • Flex your big toe down and softly draw it forward with your other hand. It should stretch you gently. Hold for ten to twenty seconds.

    Extension Stretches:

    When the big toe becomes stiff, this will assist. Stretching your big toe at a 90-degree angle (towards your ankle) is the goal of the exercises. Be patience; this might take a few weeks.

    • Elevate your aching foot onto your other knee while seated in a chair.
    • Pull the big toe back towards the ankle with the other hand while holding your heel in the other. Your foot should feel somewhat stretched along the bottom.
    • For 15 to 30 seconds, hold this stretch.

    Towel Curl:

    Towel-curl
    Towel-curl

    If you have limited toe mobility, you should avoid performing these exercises, which can help you strengthen your big toe.

    • Take a seat comfortably. Put your injured foot on a little hand towel that has been placed on the ground.
    • Curl your toes to scrunch the towel, then stretch them out to flatten it again.
    • You can attempt the exercise while standing once you can perform it comfortably.

    Toe Press, Point, and Curl:

    You’ll train your entire foot with this exercise, which has major benefits for strength and mobility. These also help to lessen discomfort and enhance your general range of motion for carrying out daily tasks.

    • To maintain the posture for five seconds, do these three motions, pausing at each one.
    • Put your feet on the floor and take a seat on a chair with a straight back.
    • Elevate your heel by pressing your toes into the ground.
    • With your heel still up, point your toes.
    • With your heel still up, curl your toes under.

    Toe Salutes:

    You will increase your strength and extend your toes with this workout. Your other toes should remain on the ground, so concentrate on maintaining control of them.

    • Place your legs at a 90-degree angle while sitting on a chair.
    • Keeping all of your other toes on the ground, lift your big toe off the ground and hold it there for five seconds.
    • With your big toe still on the ground, raise the other four toes off the ground and hold for five seconds.
    • Use your other foot to perform the exercise again.

    Surgery for Hallux Rigidus:

    Most people do not require surgery to address hallux rigidus. If various therapies fail to ease your symptoms or if the hallux rigidus makes it difficult (or impossible) for you to engage in your normal activities, your doctor may recommend surgery.

    The surgical methods for hallux rigidus are:

    Cheilectomy.
    This form of surgery is used to treat minor to moderate injuries. It entails shaving any bony spurs. A cheilectomy may be combined with another treatment known as osteotomy. This slices the bone to reposition your big toe and reduce pressure on the top of the joint.

    Interposition arthroplasty.
    This treatment is intended to treat moderate to severe hallux rigidus. It is a joint-saving option to fusion or replacement. The procedure is also known as joint resurfacing.
    The surgery involves removing a portion of the diseased bone and inserting a spacer between the bones to reduce friction. The spacer can be produced from tissue from your foot, donor tissue, or synthetic cartilage.

    Arthrodesis.
    This operation is also referred to as joint fusion. It is used to treat advanced hallux rigidus, which causes significant joint injury.
    During the surgery, damaged cartilage is removed. The two bones are held together using screws. Over time, the bones merge. This form of surgery relieves discomfort but permanently limits the mobility of your big toe.

    Arthroplasty.
    This is a joint replacement operation. It comprises replacing one or both sides of your joint with artificial ones made of plastic or metal. The purpose of this procedure is to ease your discomfort while keeping your joint in mobility.
    Because arthroplasty has some hazards, such as the following, surgeons are frequently reluctant to prescribe it:

    • infection
    • implant failure
    • soft tissue instability

    Complications of Hallux rigidus surgery:

    Although they are uncommon, complications from surgery for the hallux rigidus might occur. Among the most frequent issues are:

    • Infection.
    • The rigidity of joints.
    • Development of arthritis (deterioration).
    • Recurrently misshapen toe (coming back).
    • Persistent edema.

    What is the duration of recovery from hallux rigidus?

    The severity of your hallux rigidus and the therapies you require will determine how long it takes you to heal. You may be able to alleviate your symptoms with simple treatments like wearing toe pads and changing your shoes. If so, you should be able to resume your regular activities as soon as your healthcare professional gives the all-clear.

    The procedure your surgeon conducted will determine how long it takes you to recuperate if you require hallux rigidus surgery:

    Following a cheilectomy and arthroplasty, you will need to wear a special shoe for around two weeks before you can resume wearing your usual shoes. Swelling might persist for several months.

    Osteotomy: In six to eight weeks, the swelling should subside. A complete recovery might take up to three months.

    Joint fusion: Three to six weeks will be spent in a cast or boot. You will then require crutches for a few weeks. After the operation, you can have some stiffness and edema for a few months.

    Prevention

    Although it’s unlikely that you can stop hHalluxrigidus from forming, you might be able to delay its advancement if you:

    • Maintain the mobility of your big toe joint by exercising.
    • After engaging in strenuous exercise, give your joint a rest; never play through discomfort.
    • Put on shoes that fit properly and provide adequate room between your toes.

    Can Hallux rigidus be treated at home?

    On your own, you cannot slow down the growth of hallux rigidus. However, there are a few things you may do to lessen big toe discomfort and inflammation.

    At home, try the following:

    • Apply heat and cold many times throughout the day.
    • Your feet should be soaked in both warm and cold water alternately.
    • Take ibuprofen (Advil) or other nonsteroidal anti-inflammatory medications.
    • Avoid high-impact exercises like jogging.
    • To avoid overly bending your big toe, use supportive closed-toe shoes with hard soles.

    Consult your physician about receiving corticosteroid injections if you continue to have significant pain and inflammation. These may provide more comfort.

    FAQs

    Hallux rigidus: what is it?

    The stiff big toe, or hallux rigidus, is caused by a stiffening of the joint at the base of the big toe. It is the most prevalent foot arthritic ailment and can cause discomfort and difficulty when walking. Typically, people between the ages of 30 and 60 acquire hallux rigidus.

    How is Hallux rigidus treated?

    Fusing the big toe (arthrodesis) is a common treatment for advanced stages of hallux rigidus, when the joint damage is severe. To allow the two bones to grow together, the diseased cartilage is removed and the bones are secured together with screws and/or plates.

    For Hallux rigidus, what is the best course of action?

    The preferred course of therapy for early-stage hallux rigidus is cheilectomy. A quicker recovery to daily activities is made possible by this reasonably easy surgery that maintains first MTP joint mobility. Cheilectomy has a low documented complication risk (0% to 3%).

    What is hallux rigidus in stage four?

    The big toe joint’s range of motion is severely reduced in stage 4 hallux rigidus, often referred to as end-stage hallux rigidus, and cartilage is lost.

    Which workout is ideal for hallux rigidus?

    Exercises for Treating Hallux Rigidus
    Toe Pulls. These will assist you in maintaining a normal walking pattern by increasing your mobility and stretching your big toe.
    Extension Stretches. When the big toe becomes stiff, this will assist.
    Towel Curl.
    Toe Press, Point, and Curl.
    Toe Salutes.

    References

    • Hallux Rigidus. (2025, February 10). Cleveland Clinic. https://my.clevelandclinic.org/health/diseases/14665-hallux-rigidus
    • Hallux rigidus – Foot health facts. (n.d.). https://www.foothealthfacts.org/conditions/hallux-rigidus
    • Santos-Longhurst, A. (2018, November 26). What is hallux rigidus, and how is it treated? Healthline. https://www.healthline.com/health/hallux-rigidus#home-treatment
    • Yeargain, J. (2024, August 29). 5 Simple Hallux rigidus exercises | Hallux rigidus. Yeargain Foot & Ankle. https://dryeargain.com/hallux-rigidus-exercises/
  • Bicipital Tendonitis

    Bicipital Tendonitis

    Bicipital Tendonitis: What is it?

    Bicipital Tendonitis is caused by inflammation in the tendon of the upper biceps. This tendon, sometimes called the long head of the biceps tendon, joins the shoulder blade bone to the biceps muscle. Your elbow may also develop the problem.

    This overuse injury, also known as tendinitis, is frequently caused by repeated overhead motions. For example, professional baseball players, swimmers, tennis players, and golfers are susceptible to elbow, shoulder, and arm tendonitis. A sudden, significant stress on the tendon might also result in tendinitis.

    Biceps tendinitis is typically not a single occurrence. Usually, it associated with other shoulder issues like:

    Anatomy of Biceps Muscle:

    The big, thick muscle on the front of the upper arm is called the biceps brachii, or simply the biceps.

    Its two heads—the long head and the short head—cooperate to supinate the forearm and flex the elbow.

    Origin:
    Long head: The scapula’s supraglenoid tubercle
    Short head: The scapula’s coracoid process

    Insertion: 
    The radius’ radial tuberosity

    Innervation:
    Musculocutaneous nerve innervation

    Functions:
    Elbow flexion
    Forearm supination
    Insufficient shoulder flexion

    A strong muscle, the biceps brachii is essential for various daily tasks, including lifting, carrying, and throwing. It also participates in sports including baseball, tennis, and weightlifting.

    Types of Bicipital Tendonitis:

    The biceps tendon links the muscle to the shoulders and elbows.

    Two tendons link the biceps muscle to the shoulder. One of these is the long head, which attaches to the top of the shoulder socket, or glenoid.

    The other one is the short head, which joins it to the coracoid process, or the front of the shoulder blade.

    The type of Bicipital Tendonitis a person suffers is determined by which tendon has been affected:

    The term distal Bicipital Tendonitis refers to inflammation close to the end of the tendon that joins the biceps muscle to the elbow.

    Inflammation near the end of the tendon that connects the biceps muscle to the shoulder is known as proximal Bicipital Tendonitis.

    Instead of having tendinitis in both areas at once, a person will often just have one kind.

    Causes of Bicipital Tendonitis:

    Inflammation of the biceps tendons results in Bicipital Tendonitis. Microscopic tears may occasionally be the cause of this.

    Bicipital Tendonitis can be caused by:

    • General wear and tear
    • excessive strain on a tendon from a repeated action
    • poor posture
    • heavy lifting
    • poor technique while playing sports
    • injury
    • shoulder impingement

    Signs and Symptoms of Bicipital Tendonitis:

    Bicipital Tendonitis symptoms might include:

    • Discomfort that gets worse when moving the joint, which might result in limited mobility.
    • weakening of the muscles
    • discomfort that gets worse while moving upward, especially a clicking, grating, or cracking sound as the shoulder moves, localized swelling that frequently co-occurs with fever or a change in skin tone, and trouble twisting the arm

    What are the Risk factors for Bicipital Tendonitis?

    Bicipital Tendonitis can occur due to several risk factors, such as:

    • Age.
    • Frequent overhead movements in your day-to-day tasks.
    • Engaging in physical activities, such as sports.
    • Arthritis.
    • Smoking.

    Which Side effects are possible with Bicipital Tendonitis?

    Biceps tears are among the issues that can result from severely overusing your biceps tendons.

    Tears in the biceps tendon
    When a tendon is destroyed from prolonged or heavy usage, it can cause a biceps tear. Injuries such as awkwardly bending or twisting your elbow or shoulder or falling with your arm extended can potentially cause a tendon to rip. The most common cause of bicep tendon rips near the elbow is moving a big object, such as a refrigerator or couch.
    Either the elbow or the shoulder may sustain a bicep tendon injury. Additionally, a tear may be partial or full (rupture of the biceps tendon). A ruptured biceps tendon indicates that the tendon has been ripped off the bone.

    Tears in the distal biceps tendon
    Only one tendon connects the biceps muscle to the elbow, while two tendons connect it to the shoulder bone. We refer to this as the distal biceps tendon.
    Distal biceps tendon tears are uncommon and typically occur after lifting a big object or following an accident. However, the muscle separates from the bone and retracts back when this tendon breaks and the rupture is typically complete. This results in weakness while doing strong palm-up tasks, such as using the right hand to tighten a screwdriver.

    The Diagnosis of Bicipital Tendonitis:

    A medical practitioner can diagnose Bicipital Tendonitis using several tests, such as:

    Physical assessment

    A physician can diagnose Bicipital tendonitis by reviewing a patient’s medical history and talking about their symptoms.

    They can ask someone to show the affected arm’s maximum range of motion and contrast it with the other arm.

    Examinations

    The following tests can be used to diagnose Bicipital tendonitis:

    MRI scans: This kind of scan allows medical professionals to evaluate the damage by revealing any tendon rips.
    Although soft tissues like tendons cannot be seen on X-rays, they can be used to rule out other possible explanations for a patient’s symptoms.

    Therapy:

    Different treatment approaches can be required depending on how severe the Bicipital Tendonitis is.

    Non-surgical choices:

    Home treatments may be effective for mild cases of Bicipital Tendonitis.

    The AAOS advises someone to first try:

    • Rest: Give the tendon time to recover by avoiding the action that caused the discomfort.
    • Ice: For 20 minutes, apply ice packs to the affected region. Four to eight times a day.
    • Over-the-counter medication: Ibuprofen and naproxen are examples of nonsteroidal anti-inflammatory medicines that may help reduce the discomfort and swelling associated with bicep tendonitis. Both oral and topical medications are available, which are applied directly to the skin as creams, gels, or patches.
    • Physical therapy: A person may be able to restore their arm and shoulder strength and range of motion by performing certain stretches and strengthening exercises. To prevent the injury from getting worse, it’s crucial to only perform stretches and exercises that have been authorized by a healthcare provider. Gentle massage can promote healing by reducing inflammation and repairing soft tissue damage, while ultrasound therapy can assist relieve pressure on the tendons. By promoting appropriate hand and elbow movement and lowering muscle stress, kinesiology tapes can lessen the severity and pain of bicep tendon strains.
    • Injections of steroids: In certain situations, a physician may administer steroids straight into the tendon. In rare cases, this might worsen the condition by further weakening the tendon, even while it helps reduce discomfort and inflammation.

    When the symptoms subside, it’s crucial to use the arm as normally as possible, unless a medical practitioner instructs you otherwise, to prevent further weakening.

    Bicipital Tendonitis Exercises:

    Biceps Curls

    Dumbbell curl
    Dumbbell curl
    • Don’t overdo it here! Your goal is not to develop massive biceps, but to carefully heal your tendon.
    • To begin biceps curls, stand up and pick up a small weight, like a dumbbell or tin can. With your palm facing forward, let your arm fall to your side.
    • Lift the weight at your elbow while maintaining a straight upper arm.
    • Lower your arm back down slowly. After completing this ten times, repeat the set three times, taking a break in between.

    Biceps Stretch

    Wall Biceps Stretches
    Wall Biceps Stretches
    • One of the finest stretches for bicep tendonitis is this one since you can adjust the intensity to avoid overstretching.
    • To begin a biceps stretch, stand with your back to a wall and about 6 inches from it. To align your hand with your shoulder, raise your arm to the side.
    • Your palms should be facing down as you move your hand slightly forward until your thumb touches the wall.
    • Hold that arm in place while you turn your head away from the lifted hand until your biceps start to stretch.

    Pendular motions:

    Pendulum Exercise
    Pendulum Exercise
    • At your waist, bend.
    • Your arm should lean down.
    • Sway gently in an anticlockwise or clockwise motion.
    • Do this for five minutes each hour. There will be a noticeable change.

    Shoulder Flexion:

    Shoulder flexion
    Shoulder flexion

    Position your arm at your side, palm facing your thigh, to demonstrate shoulder flexion. Maintaining a straight elbow, slowly raise your arm straight up in front of you until it is overhead. After five seconds of holding, carefully bring your arm back down. Ten to fifteen times, two to three times a day.

    Shoulder Internal Rotation:

    shoulder-internal-and-external-rotation
    shoulder-internal-and-external-rotation

    Maintain a 90-degree elbow bend while standing with your arm at your side to perform shoulder internal rotation. In your palm, hold a light resistance band. Rotate your arm inward towards your body while keeping your elbow close to your side. After five seconds of holding, carefully move back to the beginning position. Ten to fifteen times, two to three times a day.

    External Rotation of the Shoulders:

    Place your arm at your side and bend your elbow to a 90-degree angle. In your palm, hold a light resistance band. Rotate your arm outward and away from your body while keeping your elbow near your side. Return to the starting position gradually after holding for five seconds. Ten to fifteen times, two to three times a day.

    Wrist curls:

    Wrist Curls (Palms facing up)
    Wrist Curls (Palms facing up)

    Place a small dumbbell palm up in your hand. With your wrist hanging over the side, place your forearm on a table or your thigh. Raise the weight by slowly curling your wrist upwards. Reduce the weight gradually. Ten to fifteen times, two to three times a day.

    Avoid these exercises if you have Bicipital Tendonitis:

    Exercises that require you to raise your arms high or in front of you should be avoided while you heal. Squeezing the biceps tendon might exacerbate the pain.

    When dealing with Bicipital Tendonitis, avoid the following exercises:

    Lifting Overhead

    • Don’t raise anything with your arm bent more than 90 degrees. Your biceps tendon will be overstretched as a result, which will make the pain worse.
    • Bicep curls are one exercise that might be highly beneficial for shoulder rehabilitation. To assist build your muscles without overtaxing your tendons, try these instead.

    Overhead shoulder presses

    • According to studies, most men lack the shoulder mobility necessary to perform proper behind-the-neck shoulder pushes.
    • This is why doing this workout if you have biceps tendinitis is not a smart idea.

    Shoulder Shrugs

    • The shoulder shrug entails raising your shoulders. Your wounded biceps tendon is directly compressed by this, which exacerbates the agony.
    • Shoulder shrugs should be avoided if you have bicep tendinitis.

    Push-ups

    • Push-ups increase discomfort and inflammation because they require you to lift your body weight with your arms.
    • Even if you feel like you’re getting better, we advise beginning with mild wall pushups and only doing pushups off your knees when you’re sure it won’t hurt.

    Lifting Heavy Weights

    • Your biceps tendon is under a lot of stress from heavy lifting, which might make pre-existing symptoms more likely.
    • Ask for assistance with heavy lifting tasks until you feel completely recovered!

    Surgery of Bicipital Tendonitis:

    Your doctor could recommend surgery if non-invasive treatments don’t help you feel better. The operation will probably be done arthroscopically by your provider. To guide the process using tiny surgical tools, they will introduce an arthroscope, a tiny camera, into your shoulder joint to obtain photographs.

    Among the surgical possibilities are:

    • Biceps tenodesis. The injured portion of your bicep will be removed by your surgeon, and the remaining tendon will be reattached to the humerus, the upper arm bone.
    • Tenotomy. Your surgeon will extricate your damaged biceps tendon from its source.

    How much time does it take to recover from Bicipital Tendonitis?

    The severity of your injury and the course of therapy will determine how long it takes to recover from Bicipital Tendonitis. Your problem should improve in a few weeks with noninvasive therapy.

    You will need more time to heal if you undergo surgery. Your doctor could recommend wearing a sling for one to four weeks, depending on the treatment.
    Additionally, you will require physical therapy or another form of rehabilitation. A complete recovery might take three to four months.

    Is it possible to avoid Bicipital Tendonitis?

    Since the majority of tendonitis instances are caused by overuse, prevention is the best course of action. Avoiding or altering the actions that are the source of the issue is crucial. When engaging in physical activity:

    • Start slowly and increase your level of exercise gradually.
    • Limit how many repetitions you perform and how much force you apply.
    • If you experience any unexpected pain, stop.
    • In athletics or at business, take care to avoid and then rectify bad posture or technique.

    Recovery time of Bicipital Tendonitis:

    After one to two weeks, mild tendinitis that may be treated at home may go away. The healing period will be longer, though, if surgery is necessary.

    For more precise information on the healing period, people should discuss their particular instance of tendinitis with a healthcare provider.

    People run the danger of further injuring their bicep tendons if they attempt to resume their regular activities too soon, which might exacerbate their symptoms.

    Summary

    When the tendon in the biceps muscle expands and gets inflamed, it can lead to bicep tendonitis. Even while it may be a normal part of growing older, it can still hurt and need to be treated.

    Bicep tendonitis can progress to partial or complete rips of the tendons if the affected individual does not let the armrest. Surgery may then be necessary as a result.

    With the right medical care, a person should heal quickly and be able to use their arm freely again.

    FAQs

    How is bicipital tendonitis treated?

    Physical Therapy
    Reducing edema and inflammation are the primary objectives of the acute phase of therapy for bicipital tendonitis. Patients should limit lifting, reaching, and over-the-shoulder motions. For the first 48 hours, patients should apply ice to the affected region two to three times a day for ten to fifteen minutes each time.

    What causes tendinitis in the bicipital region?

    Impingement or an isolated inflammatory injury can cause disorders of the biceps tendon. Compensation for intra-articular pathology, labral tears, and rotator cuff abnormalities takes precedence over other causes.

    Does tendinitis in the biceps go away?

    It’s not necessary to put up with biceps soreness. In 75% of instances, tendinitis can be resolved with physical therapy and other non-surgical measures.

    What is the duration of tendinitis?

    Although discomfort can linger longer, tendinitis often only lasts a few days. It’s crucial to give your aching tendon some rest.

    How can someone who has Bicipital Tendonitis sleep?

    Sleeping on your front or side can exacerbate your shoulder discomfort since bicep tendinitis creates pain and soreness at the top of your arm. Using the sleeping positions listed above, it is recommended that people with bicep tendonitis sleep on their back or on the side that is not affected.

    Is it OK to massage Bicipital Tendonitis?

    Indeed, massage can assist with Bicipital Tendonitis because it promotes healing, eases muscular tension, and increases blood circulation. To prevent making the symptoms worse, it should only be carried out by a medical professional who is knowledgeable about the illness.

    References

    • Bicep tendonitis. (2025, January 24). Cleveland Clinic. https://my.clevelandclinic.org/health/diseases/bicep-tendonitis
    • Ames, H. (2021, April 29). What to know about bicep tendonitis. https://www.medicalnewstoday.com/articles/bicep-tendonitis#summary
    • Best 7 Bicep Tendonitis Exercises, with Examples | Dr. Mehta. (2024, August 18). Resilience Orthopedics. https://www.resilienceorthopedics.com/shoulder/bicep-tendonitis-exercises/

  • Amyotrophic Lateral Sclerosis

    Amyotrophic Lateral Sclerosis

    Amyotrophic Lateral Sclerosis (ALS) is a progressive neurodegenerative disorder that affects nerve cells in the brain and spinal cord, leading to the gradual loss of muscle control. It primarily damages motor neurons, resulting in muscle weakness, atrophy, and eventually, paralysis. While the exact cause of ALS is often unknown, a small percentage of cases are inherited.

    Symptoms typically include muscle twitching, stiffness, and difficulty with speaking, swallowing, and breathing. There is currently no cure for ALS, but treatments can help manage symptoms and improve quality of life.

    Amyotrophic lateral sclerosis (ALS): what is it?

    Motor neurons, the brain and spinal cord nerve cells that regulate voluntary muscle movement and breathing, are impacted by amyotrophic lateral sclerosis (ALS), formerly known as Lou Gehrig’s disease. Muscles weaken, begin to twitch (fasciculations), and atrophy due to motor neurons being degenerated and dying and losing the ability to speak with the muscles.

    The brain eventually loses the capacity to initiate and regulate voluntary actions, including breathing, talking, chewing, and walking, in individuals with ALS. Since ALS is progressive, its symptoms worsen with time.

    It goes after your motor neurons. These control respiration and voluntary muscle movements, such as those used for speaking, chewing, and moving your arms and legs.

    Your muscles receive signals from your neurons telling them to move. Similar to bad phone coverage, ALS makes communication difficult. Since the instructions that neurons give to muscles are unclear and fragmented, the call finally terminates. Neurons are unable to receive any more calls as a result of this bad connection.

    The symptoms of ALS progressively get worse over time. Muscle weakness and twitching may affect your ability to speak, chew food, reach for objects, and move independently. Your muscles progressively atrophy (waste away) as a result of ALS. Atrophy can cause breathing difficulties and potentially fatal consequences.

    ALS has no known cure, but new medicines are being developed all the time. Your quality of life can be enhanced and the disease’s progression slowed with the correct combination of treatments.

    Several ALS medications that could increase survival, slow the rate of decline, or aid in symptom management have been licensed by the US Food and Drug Administration. But as of right now, there isn’t a cure for ALS that can halt or reverse its course.

    Types

    Sporadic ALS

    Almost all ALS cases are classified as sporadic, which means that there is no family history of the disease and the disease appears to strike randomly without any obvious risk factors. Family members of ALS patients are more likely to get the condition, but the overall risk is quite low, and the majority do not get ALS.

    Familial ALS

    Familial (also known as inherited or genetic) ALS accounts for about 10% of all cases. Familial ALS has been linked to mutations in over a dozen genes. A small percentage of persons have this hereditary form of ALS. However, several recent genetic findings indicate that ALS is more common than previously believed in inherited types.

    Stages of ALS

    Amyotrophic Lateral Sclerosis (ALS) progresses through several phases, each of which symbolizes a particular stage of the disease and its effects on the patient. Knowing these phases aids in predicting the care and support needed at each step and offers insight into how ALS develops. The seven stages of ALS are described below:

    Early Symptoms Stage

    The first encounter with ALS is often accompanied by subtle symptoms, such as stiffness, twitching, cramping, or weakness of the muscles in the arms, legs, shoulders, or tongue. Initially, these symptoms are typically modest and may go overlooked.

    • Muscle weakness
    • Difficulty while breathing
    • Difficulty while speaking
    • Trouble swallowing
    • Muscle twitches

    The clinical symptom most likely to remain undiagnosed for the longest period among all of these was heavy breathing. Not everyone with early-stage ALS has these obvious symptoms. Other common symptoms include:

    • Muscle cramps
    • Tightness or “stiff” muscles
    • Slurred or pitch changes in speech

    Early on, it’s important to consider where ALS starts. The majority of cases (limb-onset ALS) start with limb weakness before progressing to the “trunk,” which is the central region of the body that houses the internal organs. One will start to feel weak when breathing when the trunk is impacted.

    Bulbar-onset ALS, however, doesn’t begin in the limbs. For instance, it can cause difficulties with eating and swallowing considerably earlier than limb-onset ALS and begins in the head and neck.

    Progressive Weakness Stage

    As the disease progresses, muscle weakness and atrophy are made worse by the death of motor neurons, which progressively spreads to other parts of the body. Daily tasks including breathing, swallowing, speaking, and walking get harder and harder.

    Advanced Disease Stage

    The majority of muscles are now significantly weak, which results in substantial impairment. Patients frequently lose their ability to walk or stand on their own and need help with self-care activities. Breathing and swallowing difficulties become frequent.

    Rapid Decline Stage

    Although each person’s decline path is unique, most ALS patients eventually require ongoing care. Breathing and swallowing problems worsen, and paralysis may spread to the trunk and limbs.

    Final Decline Stage

    There is widespread paralysis at this stage. Along with the loss of speech and swallowing abilities, the functional use of arms and legs also declines. Significant breathing impairment results, requiring the use of feeding tubes and ventilators.

    End-Stage ALS

    Except for ocular movements, patients enter a state of total paralysis. Complete communication loss results and breathing requires constant ventilator support.

    Death

    Mostly as a result of respiratory failure, the last stage ends in death. Although roughly 10% of people survive for ten years or longer, the typical survival time from onset to death is three to five years.

    Causes of ALS

    The cause of ALS is unknown to researchers. They think it’s a mix of the following factors:

    • Genetics: Up to 70% of familial cases and 5% to 10% of sporadic cases of ALS may be caused by mutations or variations in specific genes. ALS has been associated with more than 40 genes. The genes that control how neurons function—C9orf72, SOD1, TARDBP, and FUS—are the most often impacted.
    • Environment: ALS may be caused by physical trauma, infections, or exposure to specific toxic compounds (such as lead or mercury).

    Symptoms

    • Muscle weakness (arms, legs, and neck).
    • Fasciculations are twitches in your tongue, hands, feet, or shoulders.
    • Stiff muscles (spasticity).
    • Speech challenges (slurring words, trouble forming words).
    • Involuntary emotional expressions (like laughing or crying).
    • Fatigue.
    • Trouble swallowing (dysphagia).
    • Drooling of saliva (sialorrhea)
    • Speaking or forming words (dysarthria)
    • Breathing problem(dyspnea)
    • Unintentional emotional outbursts, such as laughing or crying (pseudobulbar symptoms)
    • Constipation
    • Maintaining weight and getting enough nutrients
    • Paralysis
    • Muscle atrophy
    • Cytoskeletal protein defects
    • Autoimmune and inflammatory mechanisms
    • Accumulation of protein aggregates (clumps)
    • Viral infections
    • Depression
    • Changing expressions of emotions (emotional lability)
    • Muscle cramps
    • Muscle contractions are called fasciculations.
    • Weight loss

    These symptoms worsen after beginning mildly. The rate at which symptoms appear varies from person to person. You could find it more difficult to perform daily tasks like buttoning your shirt or writing your name. You may require more time than normal to eat meals. The symptoms will extend to other areas of your body, regardless of where they start.

    People who have ALS will eventually lose the ability to walk or stand, get in and out of bed independently, use their hands and arms, or breathe on their own. They are conscious of their progressive loss of function since they typically still can reason, remember, and comprehend. Both the ALS patient and their loved ones may experience anxiety and depression as a result. Though less frequent, ALS patients may also have trouble speaking or making decisions. Additionally, some people have FTD-ALS, a type of dementia.

    Within three to five years of the onset of symptoms, the majority of ALS patients pass away from respiratory failure, or the inability to breathe on their own. But roughly 10% make it for ten years or longer.

    Risk factors

    ALS risk factors include:

    • Genetics. A risk gene was inherited from an immediate family member in roughly 10% of ALS patients. We refer to this as hereditary ALS. Children of the majority of persons with hereditary ALS have a 50% chance of receiving the gene.
    • Age. Up until the age of 75, the risk increases with age. Most people with ALS are around the ages of 60 and the middle of their 80s.
    • Sex. Under the age of 65, ALS is significantly more common in males than in women. This sex difference diminishes after the age of 70.
    • Smoking. Smoking is an environmental risk factor for ALS. Smokers appear to be significantly more vulnerable, especially after menopause.
    • Environmental toxin exposure. According to some data, ALS may be related to lead or other drug exposure at work or home. Despite extensive research, no single chemical or substance has been reliably linked to ALS. A higher risk of ALS has been linked to environmental factors including the following.
    • Military service. Military veterans are more likely to develop ALS, according to studies. What military duty might cause ALS is unknown. It could involve severe exertion, injuries caused by trauma, viral infections, or exposure to specific metals or chemicals.

    Diagnosis

    Examination

    The physical exam may show:

    • Weakness often begins in one area of the body.
    • Twitches, spasms, tremors, or a decrease in muscle mass
    • Twitching of the tongue (common)
    • Abnormal reflexes
    • Stiff or clumsy walk
    • Decreased or increased reflexes at the joints
    • Inability to control laughter or tears (also known as emotional incontinence)
    • Loss of gag reflex

    How does one identify and treat amyotrophic lateral sclerosis (ALS)?

    Getting a precise ALS diagnosis as soon as possible is crucial. Treatments for ALS might work best in the early stages of the disease. Early diagnosis of ALS symptoms can be facilitated by a neurologist with experience in the disease.

    ALS cannot be definitively diagnosed by a single test. A medical professional will examine the patient physically and go over their entire medical history. Muscle strength, reflexes, and other reactions will be tested during a neurologic examination. To determine whether symptoms are worsening over time, these tests should be conducted frequently.

    A doctor may employ radiology and muscle tests to rule out other problems. An ALS diagnosis may be supported by this.

    If you have received an ALS diagnosis, you will require several tests, such as:

    • Blood tests.
    • Urine tests.
    • Your muscles and nerves’ electrical activity can be measured with an electromyogram (EMG).
    • A nerve conduction investigation to evaluate the signaling capacity of your nerves.
    • Use magnetic resonance imaging (MRI) to check for damage to your spine or brain.
    • Other tests can help rule out other disorders that might cause similar symptoms, but they cannot diagnose ALS:

    A lumbar puncture. Lumbar puncture, or spinal tap. Your doctor inserts a specialized needle into the region surrounding the spinal cord in the lower back during this test. The pressure in the brain and spinal canal can be measured there. A tiny sample of cerebrospinal fluid (CSF) will be extracted by your healthcare professional, who will then examine it for infections and other issues. The fluid that surrounds the brain and spinal cord is called CSF.

    Muscle and nerve biopsy. During this process, a sample of tissue or cells is taken from the body and examined under a microscope by your healthcare professional.

    By evaluating the nerve’s capacity to transmit a signal to the muscle or along the nerve, a nerve conduction study (NCS) gauges the electrical activity of muscles and nerves. A needle exam is a recording method that uses a needle electrode to identify electrical activity in muscle fibers.

    Depending on the patient’s symptoms, test results, and neurological exam findings, blood and urine tests may be conducted. Cerebrospinal fluid (CSF), the fluid that surrounds the brain and spinal cord, may occasionally be obtained for further testing through a spinal tap (lumbar puncture). To rule out another disease, a doctor could prescribe these tests. To help identify if the patient has a muscle disease other than ALS, a muscle biopsy may be done.

    Treatment

    Damage to motor neurons cannot be repaired. Nonetheless, getting therapy can improve your quality of life and reduce the onset of your symptoms.

    Your care team may recommend one of the following ALS treatments:

    • Medications.
    • Therapies or rehabilitation.
    • Nutritional support.
    • Breathing support.

    You may need additional or different types of treatment as your condition progresses. To help you live as comfortably and independently as possible for as long as feasible, supportive care is also provided to match your needs.

    Currently, there is no cure for ALS or a way to repair damage to motor neurons. Nonetheless, some therapies might prolong survival, enhance quality of life, and decrease the disease’s course. In recent years, new therapies have been developed, and scientists are still looking at a variety of ways to halt or even reverse the progression of ALS.

    Physicians, pharmacists, physical, occupational, speech, and respiratory therapists, dietitians, social workers, clinical psychologists, and home care and hospital nurses are some examples of the integrated, multidisciplinary teams of specialists that are most suited to provide supportive health care. To keep patients as mobile, comfortable, and independent as possible, these teams can create a customized treatment plan and supply specialized equipment.

    To assist in controlling symptoms including muscle stiffness and cramps, excessive phlegm and saliva, unwelcome bursts of laughter or tears, or other emotional outbursts, a doctor may recommend additional drugs or therapies. Additionally, medications can aid with constipation, depression, pain, and sleep issues.

    ALS patients can benefit from the following therapies and interventions:

    • Proper body positioning
    • Exercise regimens, physical and occupational therapy
    • Devices and supports to help people walk.
    • Splints and braces for the arms and legs
    • Customized wheelchairs
    • Home evaluation to facilitate mobility within the house
    • Technological devices that help people communicate
    • Suggestions for easier-to-swallow foods and liquids
    • Support from a nutritionist
    • Nasogastric feeding tube

    Medical treatment

    To supplement an ALS treatment plan, physicians may prescribe the following drugs that have been approved by the US Food and Drug Administration (FDA):

    • Riluzole (Rilutek)
    • Edaravone (Radicava)

    An oral drug called ribulose is thought to lessen motor neuron damage by lowering glutamate levels, which are involved in the transmission of information between nerve cells and motor neurons. Ribulose may extend survival by a few months, according to clinical trials conducted on ALS patients. If the patient has trouble swallowing, the tablet that dissolves on the tongue or the thickened liquid version can be chosen.

    It has been demonstrated that degradome, an antioxidant administered intravenously or orally, can halt the functional decline of certain ALS patients. One type of degradome that can be administered orally or through a feeding tube is called RADICAVA ORS.

    An oral drug called sodium phenylbutyrate/ursodiol was developed to stop nerve cell death by preventing cells from sending out stress signals. Based on the safety and effectiveness findings of a single, smaller ALS research trial, the FDA authorized Relievo in September 2022. The producer of Relievo took the medication off the market in 2024 when a larger clinical trial failed to validate the earlier results.

    People with ALS who have been shown to have a mutation in the SOD1 gene are administered Towermen via spinal injection. It may function by lowering one of the indicators of neuronal damage, though the advantages of this medication are still being investigated.

    Treatments to control other symptoms include:

    • Diazepam or Baclofen for spasticity that gets in the way of everyday tasks.
    • Trihexyphenidyl or amitriptyline for people with problems swallowing their saliva.

    Rehabilitation

    Rehabilitation, which should be customized to the patient’s needs and may involve physical, occupational, and speech therapy, is typically a part of an ALS treatment strategy.

    For ALS, your doctor may suggest various forms of therapy or rehabilitation, such as:

    Maintaining your independence and safety is the aim of physical therapy for ALS. Mild cardiovascular exercises like swimming or walking can improve general health and help you gain muscle.

    Occupational therapy: This field gives you methods and approaches to get through your day. If you need assistive technology, such as a wheelchair, walker, or braces, this is advantageous. You can learn how to utilize these gadgets and move while feeling worn out with the assistance of occupational therapists.

    Speech and communication support

    People with ALS can learn how to communicate more effectively and loudly with the assistance of speech therapists. Eye-tracking sensors are used by computer-based voice synthesizers to enable users to text on customized screens and browse the web. People with ALS occasionally utilize voice banking to save their voices for use in computer-based speech synthesizers in the future.

    A brain-computer interface (BCI) is a device that uses just brain activity to enable people to interact with one another or operate devices like wheelchairs. More effective mobile BCIs for those with severe paralysis and/or vision impairments are being developed by researchers.

    Communication training helps you keep talking for as long as possible, and speech therapy offers techniques for safer swallowing. Speech therapists can also teach you nonverbal communication strategies. Nonverbal expression saves energy when verbal communication is not possible.

    Home care advise

    At various stages of the disease, physical therapy can assist the person with ALS in maintaining function, including reducing their risk of falls and joint pain and increasing their level of independence.

    Range-of-motion exercises combined with low-impact activities like swimming, walking, or riding a stationary exercise bike can help preserve muscular function and strength. Occupational therapists can assist with self-care and everyday life activities. To help the client become as independent as possible, they can also recommend assistive gadgets for grooming, bathing, and feeding.

    ALS patients often experience weight loss. The disease itself makes more food and calories necessary. However, swallowing and choking problems make it difficult to consume enough. A tube may be inserted into the stomach to aid with feeding. Healthy food tips can be obtained from a nutritionist with expertise in ALS.

    Receiving a diagnosis of ALS can be frightening and upsetting. ALS is always deadly, and although treatment can help control symptoms and potentially slow the loss of function, there is no known cure.

    Offering to assist a loved one in making decisions related to a terminal disease is one of the best ways to support them during this time.

    This entails talking about your loved one’s preferences for hospital care, treatment alternatives, and financial decisions. They might eventually be unable to speak up for themselves. As ALS worsens, being aware of their desires might help guarantee that they are respected.

    Additionally, you can offer assistance by:

    • Keeping their appointments
    • facilitating correspondence between insurance companies, caregivers, and medical specialists to arrange doula or palliative care services
    • keeping an eye out for indications of pain, suffering, or mental health issues in your loved one
    • Assisting them with errands or housework and spending time with them in a friendly manner—talking, listening, reading, etc.
    • When someone you care about suffers from a terminal disease, it’s tough for you too. Remember to look after yourself.

    Taking care of yourself is not selfish; rather, it’s a strategy to keep you resilient throughout this trying time.

    Support for nutrition, breathing, and feeding

    Chewing, swallowing, and obtaining the nutrition they require can be difficult for those with ALS. Registered dieticians and nutritionists can help you identify items to avoid and arrange short, nutrient-dense meals throughout the day. A feeding tube can lower a person’s risk of pneumonia and choking when they are unable to eat with assistance.

    People with ALS may experience dyspnea when exercising and have trouble breathing at night or while they are lying down as their respiratory muscles begin to deteriorate. A mask is typically worn over the mouth and/or nose to provide noninvasive ventilation (NIV), a form of breathing support. For many ALS patients, it might lessen breathing difficulty. NIV might only be required at night at first, but it might later be used all the time. As the disease worsens, the patient might require mechanical ventilators, or respirators, to help them inflate and deflate their lungs.

    People with ALS may also have difficulty coughing vigorously because the muscles that regulate breathing weaken. There are several methods, such as using mechanical cough assistance devices, to augment the force of coughing.

    Nutritional support

    With ALS, it might be challenging to consume enough food and liquids to meet your body’s demands. You can lose weight quickly and not obtain enough vitamins and minerals to sustain and strengthen your body if you have problems swallowing or eating certain meals.

    Dietitians can design a meal plan that gives you the proper number of calories, fiber, and fluids while avoiding items that are difficult to swallow. Eating balanced, healthful meals is guaranteed when you receive nutritional coaching. In cases where swallowing becomes challenging, a dietitian can also suggest alternative foods.

    You might eventually require a feeding tube to receive the nutrition you require. Additionally, a feeding tube lowers the risk of pneumonia and choking. These problems result from inadvertently breathing food or drink into your lungs.

    Breathing support

    As your ALS worsens, you can have trouble breathing. Noninvasive ventilation (NIV) is a sort of breathing support that may be helpful for you. NIV is administered by wearing a mask over your mouth and nose. It may improve the ease of breathing. Later on, you might require NIV full-time, but initially, you might only need it at night.

    Non-invasive machines (like CPAP or BiPAP) are referred to as breathing devices. Others require a tube in the trachea (invasive ventilation).

    You might eventually require mechanical ventilation, which entails wearing a respirator. This device facilitates breathing. It causes your lungs to expand and contract.

    If you have trouble breathing, especially when you’re lying down or exercising, let your care team know. They will talk about ways to ease breathing.

    Support Groups

    Since mental functioning is unaffected, emotional support is essential for managing the disease. People who are dealing with the disorder may be able to get support from organizations like the ALS Association.

    There is also available and potentially highly beneficial support for those who are caring for someone who has ALS.

    A person with ALS will require increasing assistance with everyday tasks as their disease worsens. Although it is gratifying, caring for someone with ALS can be difficult for both the caregiver and the person’s loved ones. Caregivers should look for themselves and get help when they need it. Resources for home health care services and support are available both for free and for a fee. To locate local help, check out the organizations mentioned in this article.

    Prevention

    Is it possible to avoid ALS?

    • There isn’t a known way to stop ALS. To further comprehend the reasons and risk factors, research is being done to help create future prevention solutions.

    Complications

    As ALS symptoms worsen, your life expectancy will decrease. Your mental health may suffer as a result of learning about this diagnosis and coping with it daily. You might experience tension, overwhelm, confusion, or despair. As a result, despair and anxiety are common among patients with ALS.

    Complications of ALS include:

    • Breathing in food or fluid (aspiration)
    • Loss of ability to care for self
    • Lung failure
    • Pneumonia
    • Pressure sores
    • Weight loss

    ALS is difficult to handle alone. Make sure to look after your mental health in addition to your physical health, which will be treated by a variety of experts. Seek assistance from a mental health professional or your care team.

    ALS has no known cure. Most people’s disease will worsen over three to five years, preventing them from moving their arms or legs voluntarily. In some individuals, the disease may progress slowly over many years or quickly worsen over a few months. Every individual is impacted uniquely. You will eventually require assistance with eating, moving around, and personal hygiene. Additionally, the diaphragm’s ability to move for breathing is compromised. For breathing, you could require a device called a ventilator. Respiratory failure kills the majority of ALS patients. Due to their decreased movement, people with ALS are susceptible to additional consequences. Among these are pressure injuries. Additionally, they run the danger of losing weight due to a decrease in muscle mass.

    Breathing problems

    Breathing muscles become weak as a result of ALS over time. To assist them breathe at night, people with ALS may require a mask ventilator, or similar equipment. The gadget resembles something a person with sleep apnea may wear. By wearing a mask over the mouth, nose, or both, this kind of gadget helps the user breathe.

    A tracheostomy is a choice for some patients with severe ALS. This is a surgically made opening that leads to the windpipe at the front of the neck. On a tracheostomy, a ventilator might function more effectively than a mask.

    The primary cause of death for people with ALS is breathing difficulty. Within 14 to 18 months of receiving a diagnosis, half of ALS patients pass away. Nonetheless, some ALS patients survive for ten years or more.

    Speaking problems

    The majority of ALS patients experience weakening in their speech-forming muscles. Usually, this begins with slurred words and slower speaking. Speaking therefore becomes more difficult. This may worsen to the point that the person’s speech becomes incomprehensible to others. Communication is done through technology and other means.

    Eating problems

    ALS patients may experience impairment in the swallowing muscles. Malnutrition and dehydration may result from this. Additionally, they are more likely to inhale food particles, beverages, or saliva, which can result in pneumonia. In addition to ensuring adequate nourishment and hydration, a feeding tube can lower these risks.

    Dementia

    Decision-making and language are issues for some ALS patients. Frontotemporal dementia is a type of dementia that some people are eventually diagnosed with.

    Prognosis

    What is the ALS prognosis?

    • Because ALS impairs the way your motor neurons operate, your prognosis is not good. The rate of damage to motor neurons determines your prognosis. Damage to motor neurons cannot be reversed by any existing treatment. However, your doctor will present choices to assist slow the progression of symptoms.

    Does ALS have a hereditary component?

    Indeed, there are hereditary forms of ALS. Your biological parents may pass on the genetic alterations that cause ALS to you. However, inherited ALS is uncommon. Genetic alterations can occasionally occur at random and have no family history.

    Life expectancy for ALS

    Three to five years is the typical life expectancy following an ALS diagnosis. 10% to 20% of people survive for at least ten years, while 30% of people live for five years or longer. To find out more about your circumstances, speak with your healthcare professional as your life expectancy may differ from these figures.

    Although some individuals may live for years or even decades following diagnosis, the average life expectancy is two to five years. After being diagnosed with ALS, almost half of the patients survive for three years or more. Up to 10% of people live longer than ten years, and about 25% live five years or more. Some patients have extended lifespans. For instance, Stephen Hawking, a well-known physicist, survived his diagnosis for over 50 years.

    Living with ALS

    ALS will eventually cause death and disability. Your mind and capacity for thought are typically unaffected, but your ability to move and breathe on your own will be. Your healthcare practitioner will collaborate closely with you and your family to manage symptoms as they appear. Taking medication can extend your life by several months, especially if you have swallowing difficulties. Talk about the usage of wheelchairs and other mobility aids, as well as strategies to make living areas more accessible. Discussing end-of-life choices with your loved ones is crucial.

    Clinical trials might be of interest to you if you have ALS. These tests and investigations are conducted on specific diseases to assist researchers in developing new treatment choices or preventative strategies. By doing this, the condition can be better understood. Researchers can learn more about the origins and risk factors of ALS as well as the disease itself, which could lead to a future cure.

    Who is more susceptible to amyotrophic lateral sclerosis (ALS)?

    A risk factor is a condition or behavior that is more common in people with a disease or who are more likely to develop one than in people without the risk factor. The presence or absence of a risk factor does not ensure that you will develop a disorder. ALS risk factors include:

    • Age: Although the disorder can strike anyone at any age, symptoms usually start to show up around the ages of 55 and 75.
    • Biological sex: ALS is significantly more common in men than in women. Men and women, however, have an equal chance of receiving an ALS diagnosis as they age.
    • ALS affects persons of all races and ethnicities, however, White people and non-Hispanics are more likely to have the disease.

    Although the exact cause is unknown, some research indicates that military veterans have a 1.5–2 times higher risk of developing ALS. Veterans may be at risk for exposure to environmental pollutants, pesticides, and lead. Further research is required to fully understand the relationship between head injuries and increased risk for ALS, as some studies have suggested.

    In the United States, 93% of ALS patients are Caucasian, and men make up about 60% of those with the disease. According to US demographic surveys, there are about 15 new instances of ALS identified every day in the US, or a little over 5,600 persons annually. Up to 30,000 Americans are thought to have the disease at any given moment. With an average diagnostic age of 55, ALS often strikes patients between the ages of 40 and 70. People in their 20s and 30s do, however, occasionally have the condition.

    Conclusion

    The seven stages of Amyotrophic Lateral Sclerosis (ALS) illustrate the significant effects that the disease has on those who are affected and their loved ones. The progressive nature of ALS needs a thorough understanding, early diagnosis, and a multidisciplinary approach to treatment and therapy, as symptoms can range from mild to total paralysis.

    Understanding each stage can help us better understand how the requirements of people with ALS change over time, opening the door to more patient-centered care, support, and ultimately more sophisticated therapeutic interventions.

    The degenerative disease known as ALS is caused by the death of motor neurons in the spinal cord. Early ALS symptoms often affect a single body part and result in minor disability. More areas are impacted as ALS worsens, and voluntary muscular control may completely disappear.

    Although life expectancy varies, ALS is a fatal disease. After being diagnosed, some people continue to survive for over ten years. Symptom management and disease progression can be slowed with treatment.

    Researchers are trying to find ways to prevent ALS in persons who have risk factors for the disease. Early claims of some products or potentially beneficial lifestyle modifications require more research. Schedule a consultation with your physician if you have any ALS risk factors.

    Your quality of life can be enhanced and the disease’s progression slowed with early detection and treatment.

    FAQs

    How fast does ALS develop?

    With ALS, there is no time limit on how soon symptoms appear. In the absence of treatment, they might advance more quickly. Additionally, the speed may differ depending on your age, weight at diagnosis, and symptoms. To limit the growth of the disease, your doctor might advise you to take specific medications.

    What is amyotrophic lateral sclerosis’ primary cause?

    People who have familial ALS only need to acquire the disease from one parent to experience symptoms because it is caused by an inherited mutation in a dominant gene. Novel mutations in the genes. Individuals who have sporadic ALS may exhibit spontaneous genetic mutations that are not inherited and are the source of their ALS.

    How long does it take for someone with ALS to live?

    Additionally, 20% of ALS patients live for five years, 10% for ten, and 5% for twenty years or more, even though the average survival period is three years. Additionally, an individual’s progress isn’t necessarily linear. Weeks to months of periods with little to no function loss are not uncommon.

    Which three ALS symptoms are present?

    Muscle twitches and cramps, particularly in the hands and feet.
    Impairment of hand and arm motor control.
    Difficulty moving the arms and legs.
    Falling after tripping.
    Letting things fall.
    persistently high levels of weariness
    Uncontrolled bursts of tears or laughter.

    Does having ALS cause pain?

    Does pain occur with ALS? Yes, even though it usually does so in an indirect manner. According to our current understanding, the disease process in ALS solely impacts the motor neurons—the nerve cells that govern strength—in the brain, spinal cord, and peripheral nerves.

    Which ALS patient has lived the longest?

    How uncommon is Hawking’s lifespan? Very uncommon. Although the longest-living ALS patient in North America, a Canadian named Steven Wells, has had the disease for nearly 40 years, just 5% of ALS patients live for more than 20 years, and it is almost unheard of to live for 50 years or more, according to the ALS Association.

    What are ALS’s latter stages?

    Mobility is very restricted; a caregiver is required to meet demands. Fatigue, hazy thinking, headaches, and an increased risk of pneumonia can all be symptoms of poor breathing. It can become impossible to speak. Oral consumption of food and liquids is not feasible.

    How may ALS be reversed naturally?

    Are there natural cures for ALS? As of this now, ALS has no known cure. According to some research, several herbal remedies, may help alleviate some ALS symptoms and reduce the disease’s progression.

    Why is ALS so prevalent today?

    Using data from the National ALS Registry and Biorepository, for instance, researchers discovered in 2024 that exposure to five particular chemicals present in steel, rubber, dyes, batteries, and solvents raised the risk of developing ALS by three to six times.

    Reference

    • Amyotrophic lateral sclerosis (ALS). (n.d.). National Institute of Neurological Disorders and Stroke. https://www.ninds.nih.gov/health-information/disorders/amyotrophic-lateral-sclerosis-als
    • Amyotrophic lateral sclerosis (ALS). (2025, February 7). Cleveland Clinic. https://my.clevelandclinic.org/health/diseases/16729-amyotrophic-lateral-sclerosis-als
    • Amyotrophic lateral sclerosis (ALS): MedlinePlus Medical Encyclopedia. (n.d.). https://medlineplus.gov/ency/article/000688.html
    • Amyotrophic lateral sclerosis (ALS) – Symptoms and causes. (n.d.). Mayo Clinic. https://www.mayoclinic.org/diseases-conditions/amyotrophic-lateral-sclerosis/symptoms-causes/syc-20354022
    • Cona, L. A., MD. (2024, June 5). 7 Stages of ALS: Disease progression (2024). https://www.dvcstem.com/post/7-stages-of-als
    • Gillette, H. (2023, April 12). What are the stages of ALS? Healthline. https://www.healthline.com/health/stages-of-als#summary
  • Pursed Lip Breathing Exercise

    Pursed Lip Breathing Exercise

    Pursed Lip Breathing is a simple breathing technique that helps improve airflow, promote relaxation, and enhance oxygen exchange. It involves inhaling slowly through the nose and exhaling gently through pursed lips, as if blowing out a candle.

    This method is particularly beneficial for reducing shortness of breath, especially in individuals with lung conditions like COPD, and can also aid in managing stress and anxiety.

    What is Breathing Exercises?

    One type of exercise that might increase the lungs overall effectiveness is breathing exercises. Both those with healthy lungs and those with compromised lung function may benefit from them.

    In the absence of illness, stress causes changes in our breathing, which over time, if untreated, can lead to abnormal breathing patterns. In addition to contributing to anxiety, panic attacks, exhaustion, and other mental and physical health issues, disordered breathing can disrupt the exchange of carbon dioxide and oxygen.

    Breathing exercises are beneficial for several health-related reasons. For instance, to improve ventilation, strengthen respiratory muscles, increase breathing efficiency, and reduce stress and anxiety.

    Types of Breathing exercises:

    Pursed lip Breathing exercises

    Pursed lip breathing: what is it?

    One of the easiest methods for managing dyspnea is pursed lip breathing. It gives you a quick and simple way to slow down your breathing, increasing the effectiveness of each breath. Additionally, it increases the amount of oxygen that enters your lungs.

    The basic method of pursed-lip breathing is to inhale through the nose and exhale through the mouth while keeping your lips pursed. The patient is told to seal their mouth and inhale through their nose for a few seconds before slowly exhaling through their lips while holding them in a  whistling posture for four to six seconds. This can be performed with or without contraction of the abdominal muscles. 

    One method for controlling ventilation and oxygenation is pursed-lip breathing. One must inhale through the nose and exhale slowly and carefully via the mouth in order to use the method. When compared to the inspiration to expiration ratio during normal breathing, the expiratory phase of respiration will last longer. This method generates a modest amount of positive end-expiratory pressure (PEEP) by creating a back pressure.

    The forces applied to the airways by the exhalation flow are counteracted by the positive pressure that is produced. Therefore, by widening the airways during exhalation and boosting the excretion of acidic substances in the form of carbon dioxide, pursed-lip breathing supports breathing and either prevents or eliminates hypercapnia. People can enhance gas exchange, reduce respiratory effort, and relieve shortness of breath by using purse-lip breathing. Along with improving their relaxation, they also feel more in control of their breathing.

    What kinds of breathing are there?

    There are numerous varieties of breathing, such as:

    Eupnea: Normal breathing is called eupnea. It doesn’t take any work and occurs spontaneously.

    Hyperpnea: among others Breathing deeply and intensively, is known as hyperpnea. It might happen when your body isn’t getting enough oxygen, or it can happen before, during, or after exercise. When you inhale deeply before lifting a large weight or when you inhale deeply at a higher altitude with thinner air, these are examples of hyperpnea breathing.

    Costal: Using your intercostal muscles to breathe shallowly is known as costal breathing. The muscles that encircle and occupy the area between your ribs are called intercostal muscles.

    Purpose of pursed lip breathing

    • Promotes ventilation.
    • Releases air that has been trapped in your lungs.
    • Reduces the effort required to breathe and keeps your airways open for longer.
    • Slows your breathing rate by enhancing the exhalations.
    • Enhances breathing patterns by allowing fresh air into your lungs and expelling old air.
    • Reduces breathlessness.
    • Promotes overall relaxation.

    When is it appropriate to breathe with pursed lips?

    During the challenging portions of any physical exercise, use pursed lip breathing. These activities may consist of:

    • bending.
    • lifting.
    • strolling.
    • going upstairs.
    • working out.

    Nevertheless, until the behavior becomes instinctive, it’s also a good idea to practice pursed lip breathing while at rest or in periods of relaxation. These circumstances could consist of:

    • reading.
    • occupying a desk.
    • watching TV.
    • standing in line

    Procedure

    What occurs before to inhaling with pursed lips?

    Your airways are clear when you breathe properly because the muscles surrounding them relax. Air may enter and exit your lungs silently and readily when your airways are open and relaxed.

    Breathing problems caused by lung conditions can cause your muscles to tense, your airways to swell, mucus block them, causing you to experience wheezing or shortness of breath.

    How can I breathe with pursed lips?

    Follow these steps:

    • Your shoulder and neck should be relaxed..
    • Close your mouth and take a slow, deep breath through your nose for two seconds. It’s okay to breathe normally; you don’t have to take a deep breath. Counting to yourself might help. As you inhale, you should see a gradual expansion of your stomach. Placing their hands on their tummy helps some people.
    • As if you were going to blow on a hot beverage or whistle, purse your lips.
    • For at least four seconds, slowly and gently exhale through your pursed lips. Counting to yourself might help. As you exhale, your stomach should gradually get smaller.
    • At first, pursed lip breathing can feel uncomfortable or uneasy. However, the skill will get easier with consistent practice. The following advice will help you breathe with pursed lips more naturally:
    • Avoid expelling air from your lungs.
    • Always exhale for a longer period of time than you take in.
    • Breathe in and out slowly and effortlessly until you have total control over your breathing.

    Benefits of breathing with pursed lips

    The following are some benefits of pursed lip breathing:

    • Breathing more slowly.
    • Improving the ease of breathing.
    • Expelling air from the lungs.
    • Making it simpler to engage in physical activities like exercise.
    • Lowering tension.
    • Enhancing your standard of living.

    Contraindications

    • Acute sickness : People who are seriously unwell or medically fragile might not benefit from pursed lip breathing.
    • Dizziness : If you experience lightheadedness or dizziness while performing pursed lip breathing, you should stop.

    Indication

    Learning to regulate one’s breathing can help everyone. However, if you have a pulmonary (lung) problem that limits your ability to breathe, pursed lip breathing is highly helpful. Among these conditions are:

    • asthma.
    • COPD stands for chronic obstructive pulmonary disease.
    • pulmonary fibrosis

    Benefits of pursed lip breathing in various conditions:

    Pursed lip breathing in COPD patients
    Pursed lip breathing in COPD patients

    Pursed lip breathing in copd patients:

    Mechanism

    People with impaired airways from COPD may benefit from the little pressure that pursed lips create against the airway, which keeps it from collapsing during exhalation.

    Benefits:

    • lowers the rate of breathing
    • increases the saturation of oxygen
    • helps in removing airborne particles from the lungs
    • can lessen the feeling of being out of breath

    Pursed lip breathing in empysema patients:

    Mechanism: When you purse your lips, resistance is created during exhalation, allowing for a more controlled release of air and preventing the airways from contracting too soon.

    Benefits:

    • lessens the feeling of having trouble breathing
    • increases the saturation of oxygen
    • reduces the effort required to breathe
    • promotes rest

    Pursed lip breathing in congestive herat failure patients:

    • Reduces shortness of breath: Patients with heart failure may find that pursed lip breathing helps reduce the feeling of shortness of breath by lowering the breathing rate and permitting a more thorough exhale.
    • Enhances the exchange of gases: Pursed lip breathing can assist to ensure the body receives enough oxygen by encouraging improved air exchange in the lungs.
    • Lowers respiratory effort: By maintaining airway pressure during exhalation, the approach reduces the effort needed to breathe, which is helpful for people with impaired heart function.
    • Promotes relaxation: The regulated breathing pattern linked to pursed lip breathing can be calm and help in the management of anxiety that may surround the symptoms of heart failure.

    Pursed lip breathing in anxiety patients:

    • Decreased anxiety symptoms: Pursed lip breathing helps calm the body and lessen anxiety symptoms by slowing down breathing and stimulating the parasympathetic nervous system, which is responsible for the of the rest and digest response.
    • Better control of breathing: This method gives people a greater sense of control over their breathing, which is essential for treating breathing caused by anxiety, such as shortness of breath or rapid breathing.
    • Increased oxygen intake: By enabling a more thorough exhale, pursed lip breathing can aid to optimize oxygen intake and further enhance feelings of calm.
    • Easy to practice: This method is an easily available tool for anxiety management throughout the day because it is easy to learn and can be used anywhere.

    Pursed lip breathing in post recovery patients:

    • Decreased respiratory effort: Pursed lip breathing helps to maintain airways open for a longer period of time by extending the exhalation phase, which reduces the effort required to breathe and reduces dyspnea.

    Increased oxygen saturation: Pursed lip breathing can assist raise blood oxygen levels by encouraging improved gas exchange.

    Pain management: Breathing slowly and deliberately through pursed lips can be calming and can reduce the perception of pain.

    Quicker recovery: Patients may mobilize and resume regular activities sooner after surgery because of pursed lip breathing, which promotes efficient breathing.

    Effects to the mind: Pursed lip breathing’s ability to induce calm and lower anxiety can be especially beneficial during the recovery phase following surgery.

    FAQs

    What is meant by pursed lips?

    Pursed lips may indicate an irregularity of the face, a breathing pattern, or a facial emotion.

    What is the pursed lip’s primary function?

    In addition to helping you manage dyspnea, pursed lip breathing offers a simple and quick method to lower your breathing rate, increasing the effectiveness of each breath. Pursed lip breathing promotes greater breath control by calming you down and increasing the amount of oxygen that reaches your lungs while you’re feeling out of breath.

    What is the appearance of pursed lip breathing?

    As if you were going to blow on a hot beverage or whistle, purse your lips. For at least four seconds, exhale slowly and gently through your pursed lips. Counting yourself might help.

    What is indicated by pursed lips?

    When the lips firmly press or mash together, it’s called lip pursing. This is a sign of stress and could be interpreted as annoyance or disapproval. A traditional expression of rage, even when it is repressed, is pursed lips.

    How much time should be spent inhaling with pursed lips?

    It could take some time for pursed lip breathing to seem natural. Practice for at least five to ten minutes four to five times a day is a good idea. You can only use pursed lip breathing when it becomes a natural breathing pattern.

    What occurs when you do it?

    You will have more control over your breathing, be able to relax more easily, and get relief from shortness of breath after practicing pursed lip breathing.

    Reference

    • Professional, C. C. M. (2024, December 19). Pursed lip breathing. Cleveland Clinic. https://my.clevelandclinic.org/health/treatments/9443-pursed-lip-breathing
    • Wikipedia contributors. (2023, July 10). Pursed-lip breathing. Wikipedia. https://en.wikipedia.org/wiki/Pursed-lip_breathing