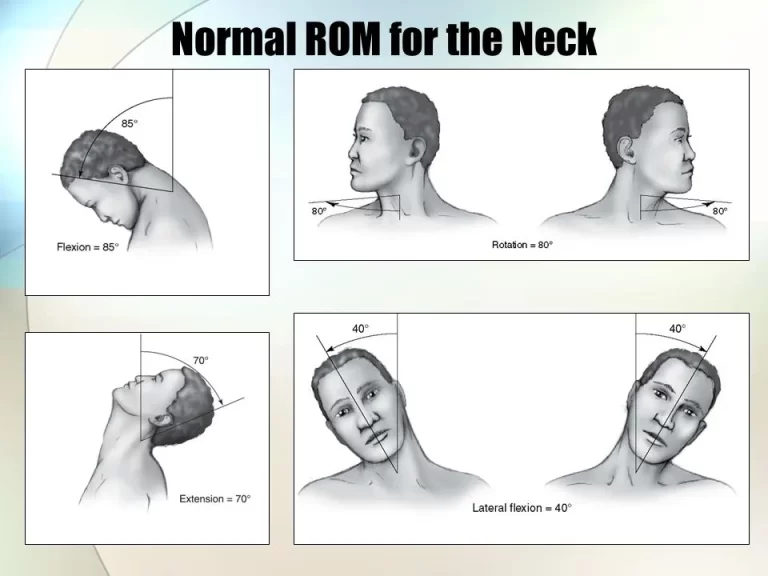
Blog

  • Annular Ligament

    Annular Ligament

    Introduction

    The annular ligament is a strong, circular band of fibrous tissue that wraps around the head of the radius, securing it to the ulna at the proximal radioulnar joint. It allows the radius to rotate smoothly during forearm movements like pronation and supination while maintaining joint stability.

    The annular ligament is made of thick connective tissue and is attached to the radius bone on one end and the ulna bone on the other. It is crucial for preserving elbow joint stability and permitting fluid forearm motion. If the annular ligament becomes injured or dysfunctional, the elbow joint may experience pain, instability, and a restricted range of motion.

    Structure of the Annular Ligament

    In the elbow joint, the head of the radius bone is surrounded by a fibrous band called the annular ligament. Attached to the radius bone on one end and the ulna bone on the other, it is a circular structure. The ligament’s strength and stability come from its dense connective tissue composition.

    The radial notch of the ulna bone, a depression on the lateral side of the ulna, is surrounded by the annular ligament. The proximal radioulnar joint is formed when the head of the radius bone slides into this notch. The radius bone’s head is held in place and given rotational motion during forearm movements by the annular ligament.

    The proximal and distal portions of the annular ligament are its two components. Attached to the ulna bone, the proximal portion is stronger and thicker than the distal portion. The distal portion, which is connected to the radius bone, is thinner and more flexible than the proximal portion.

    Some structures support the annular ligament, which aids in elbow joint stability. These include the oblique cord, which joins the annular ligament to the radius bone, and the quadrate ligament, which joins the annular ligament to the ulna bone.

    The stability of the elbow joint and the ability to move the forearm smoothly are both dependent on the annular ligament. The annular ligament permits the head of the radius bone to rotate inside the radial notch of the ulna bone during pronation and supination. The elbow joint may experience pain, instability, and a restricted range of motion if the annular ligament becomes injured or dysfunctional.

    Attachments of the Annular Ligament

    On one end, it is connected to the ulna bone, and on the other, to the radius bone. The quadrate ligament, a thickened band of connective tissue that extends from the medial border of the ulna bone to the annular ligament, is where the annular ligament is attached to the ulna bone. The elbow joint is further stabilized by the quadrate ligament, which supports the annular ligament.

    The oblique cord, a thin band of connective tissue that extends from the lateral aspect of the ulna bone to the annular ligament, is where the annular ligament attaches to the radius bone. By supporting the distal portion of the annular ligament, the oblique cord preserves its suppleness and permits fluid forearm movements.

    Additionally, the supinator crest, a bony ridge on the lateral aspect of the radius bone, is where the annular ligament attaches to the bone. The radius bone is held in place and given the ability to rotate during forearm movements by the annular ligament, which adheres to this bony ridge and wraps around its head.

    Generally speaking, the elbow joint is stabilized and the forearm can move smoothly due to the annular ligament’s attachment to the ulna and radius bones. Elbow joint pain, instability, and restricted range of motion can be caused by injury or failure to any of these attachments.

    Functions of the Annular Ligament

    The elbow joint’s stability and range of motion are greatly influenced by the annular ligament.

    These primary roles are:

    • Stabilization: The head of the radius bone is held in place within the elbow joint by the annular ligament. This is significant because when the forearm moves, the radius bone revolves around the ulna bone. The head of the radius bone may slip out of position without the annular ligament, causing pain and instability.
    • Flexibility: The annular ligament must be sufficiently flexible to permit fluid forearm movements even though it offers stability. The annular ligament can still flex and rotate as needed thanks to the support of the oblique cord and supinator crest attachments.
    • Protection: The joint is shielded from undue wear and tear by the annular ligament. It stops the radius bone’s head from rubbing against other bones or soft tissues in the joint by holding it in place.
    • Force transmission: The elbow joint is where forces are transferred during gripping and twisting activities. By distributing these forces uniformly throughout the joint, the annular ligament lowers the risk of injury.

    Thus, in general, the elbow joint’s annular ligament is an essential component that offers protection, flexibility, stability, and force transmission. Elbow joint pain, instability, and restricted range of motion can result from injury or dysfunction to this ligament.

    Injuries of the Annular Ligament

    Numerous activities that strain the elbow joint can result in annular ligament injuries. The following are a few typical reasons for annular ligament injuries:

    • Repetitive motions: The annular ligament and surrounding tissues may be severely strained by sports like tennis or baseball that require repetitive motions of the elbow joint. This can raise the risk of injury and cause the ligament to weaken over time.
    • Trauma: The annular ligament may be harmed by trauma to the elbow joint, such as a fall or a direct blow to the arm. Activities involving high-impact or contact sports are more likely to cause this kind of injury.
    • Overuse: Ankle ligament injuries can also result from excessive elbow joint use, such as lifting heavy weights or typing a lot. This is because these activities continuously strain the ligament, which over time may result in inflammation or tearing.
    • Inappropriate technique: Inappropriate technique can also raise the risk of annular ligament injuries when engaging in specific activities, such as lifting weights or playing sports. This is because improper form can cause the elbow joint and surrounding tissues to experience more stress.

    Therefore, it’s critical to take precautions against annular ligament injuries by using appropriate techniques when performing tasks, taking breaks to rest and stretch the elbow joint, and getting medical help if you experience any pain or discomfort.

    Symptoms of the Annular Ligament Injury

    Depending on how severe the injury is, annular ligament injuries can present with a variety of symptoms, but some typical ones include:

    • Elbow Pain: One of the most typical signs of an annular ligament injury is elbow joint pain. When engaging in activities that strain the elbow joint, one may experience either dull or sharp pain.
    • Swelling: Another typical sign of an annular ligament injury is swelling around the elbow joint. In addition to mild to severe swelling, the affected area may also be warm or red.
    • Stiffness: Another sign of an annular ligament injury is stiffness in the elbow joint. It may be challenging to move the arm or carry out specific tasks due to the mild to severe stiffness.
    • Weakness: An annular ligament injury can also cause weakness in the affected arm. This can make it difficult to use the arm normally and could be caused by pain or ligament injury.
    • Clicking or popping: Another sign of an annular ligament injury is clicking or popping sounds coming from the elbow joint. The joint may move abnormally as a result of a ligament tear or another injury.

    Therefore, it is crucial to seek medical attention if you experience any of these symptoms to identify the cause and obtain the proper treatment.

    Diagnosis

    Imaging tests and a physical examination are usually required to diagnose an annular ligament injury.
    The physician will assess the affected arm and elbow joint during the physical examination, looking for indications of discomfort, stiffness, and edema. They might also test for weakness or instability by moving the elbow and arm joints in various directions.

    An annular ligament injury may also be diagnosed by imaging studies like MRIs, ultrasounds, or X-rays. While MRI or ultrasound can demonstrate the extent of ligament injury, X-rays can assist in ruling out other disorders such as fractures or dislocations.

    A tiny camera is inserted into the joint to assess the annular ligament and surrounding components during an arthroscopy, which the doctor may also do in certain cases. This can provide a more complete diagnosis and help determine the best process of treatment.

    An annular ligament injury is therefore usually diagnosed and the best option for therapy is decided by a comprehensive physical examination and imaging testing.

    Treatment of the Annular Ligament Injury

    Two methods are available for treating the annular ligament:

    • Conservative treatment
    • Physiotherapy treatment

    Conservative treatment

    RICE, or rest, ice, compression, and elevation, is the standard conservative treatment for an annular ligament injury. This may lessen the wounded area’s discomfort and swelling.

    Avoiding activities that exacerbate the pain and resting the affected arm can help stop the annular ligament from getting worse. To lessen swelling and inflammation, use cold compresses or ice packs on the area for 15 to 20 minutes at a time, multiple times a day.

    Using a brace or bandage to compress the injured area can also assist in reducing swelling and provide support. Reducing edema and accelerating healing can also be achieved by elevating the arm above the level of the heart.

    To treat pain and inflammation, nonsteroidal anti-inflammatory medicines (NSAIDs) or painkillers like acetaminophen may also be suggested.

    To help increase the affected arm’s strength, flexibility, and range of motion, physical treatment may also be suggested. Exercises to strengthen and extend the muscles around the elbow joint may be part of this, as well as manual therapy methods like joint mobilization or massage.

    A brace or splint may be advised in some situations to immobilize the affected arm and promote the healing of the annular ligament. If conservative treatment fails to provide sufficient relief or if there is a possibility of more harm, this might be required.

    Therefore, minimizing discomfort and inflammation, encouraging healing, and regaining function in the injured arm are the ultimate goals of conservative treatment for an annular ligament injury.

    Physiotherapy treatment

    Exercises, manual therapy methods, and other modalities are commonly used in physiotherapy treatment for annular ligament injuries to assist in decreasing pain and inflammation, increasing the range of motion, and restoring function to the injured arm.

    The physiotherapist will first perform a comprehensive evaluation of the injury to as certain the degree of harm and create a customized treatment strategy. These could consist of:

    • Immobilization and rest: To promote the healing of the annular ligament during the acute stage of the injury, the physiotherapist could advise immobilizing that affected arm using a brace or splint.
    • Ice therapy: Applying cold compresses or ice packs to the affected region might help to reduce swelling and pain.
    • Manual treatment: Manual therapy methods that help increase the range of motion and ease muscular tension around the elbow joint include massage, joint mobilization, and stretching.
    • Strength training: By strengthening the muscles that surround the elbow joint, you can increase stability and stop additional injuries.
    • Exercises for range of motion: These exercises can assist increase the affected arm’s flexibility and range of motion.
    • Ultrasound therapy: Ultrasound therapy uses high-frequency sound waves to help the wounded area heal and to lessen pain and inflammation.
    • Electrical stimulation: This technique can be used to increase muscular strength and function and lessen pain.

    As the process of therapy progresses, the physiotherapist will keep an eye on things and modify the plan as necessary to ensure the best possible outcomes. Most patients with an annular ligament injury can anticipate a major improvement in their quality of life, function, and discomfort with appropriate physiotherapy treatment.

    Risk factors of the annular ligament

    In the forearm, the head of the radius bone is surrounded by a band of tissue called the annular ligament, which helps hold it in place within the elbow joint. Although the annular ligament is a robust and durable structure, many risk factors might raise the possibility of an injury, such as:

    • Overuse: The annular ligament may sustain injury as a result of repetitive motions of the forearm and elbow, such as those found in sports like tennis or golf.
    • Trauma: The annular ligament may stretch or rupture as a result of direct trauma to the elbow joint, such as a fall or impact.
    • Age: As we get older, our tissues lose their elasticity and become more vulnerable to injury. Older folks may be more vulnerable to annular ligament injury.
    • Genetics: Some people may have weaker or more flexible ligaments from birth, which increases their risk of injury.
    • Bad posture: Bad posture can increase the strain on the elbow joint and the ligaments that surround it, such as the annular ligament.
    • Poor technique: When playing sports or engaging in other physical activities, poor technique might raise the risk of injury to the annular ligament and other elbow joint tissues.
    • Medical problems: The annular ligament can become weaker and more prone to injury due to certain medical diseases, such as osteoarthritis or rheumatoid arthritis.
    • Poor nutrition: The body’s tissues can become weaker and the risk of injury to the annular ligament and other elbow joint components increases if a diet is deficient in vital nutrients like protein and vitamin C.

    Understanding these risk factors and taking action to mitigate them is essential to lowering the risk of an annular ligament injury. Keeping perfect posture, exercising with the right form, and eating a healthy, balanced diet are a few examples of how to do this.

    How can injuries in the annular ligament be prevented?

    A mix of lifestyle modifications, appropriate form when exercising, and medical treatment of underlying issues are necessary to prevent annular ligament injuries. The following advice can help avoid injury to the annular ligament:

    • Maintain proper posture: Bad posture can increase the strain on the elbow joint and the ligaments that surround it, such as the annular ligament. When standing, sitting, and engaging in physical activity, keep your posture correct to avoid injury.
    • Employ good form when exercising: Employ good form when exercising: In sports or other physical activities, poor form can raise the risk of injury to the annular ligament and other elbow joint tissues.
    • Stretch before exercising: Stretching before exercising can assist your muscles warm up and keep you from getting hurt. Stretching your wrist, elbow, and forearm muscles will help them get ready for action.
    • Develop your forearm muscles: Strong forearm muscles can lower the risk of annular ligament injury and support the elbow joint. Incorporate forearm-focused exercises into your training regimen.
    • Wear the proper protective equipment: If you play contact sports or other high-risk hobbies like rock climbing, wearing elbow pads or other protective gear can help you avoid getting hurt.
    • Handle underlying medical disorders: The annular ligament might become weaker and more prone to injury due to certain medical illnesses including osteoarthritis or rheumatoid arthritis. To manage any underlying conditions that could raise your risk of injury, collaborate with your healthcare physician.
    • Keep up a healthy, well-balanced diet: A diet deficient in vital nutrients, such as protein and vitamin C, can weaken bodily tissues and raise the risk of injury to the elbow joint’s annular ligament and other components. Maintain a healthy, well-balanced diet rich in fruits, vegetables, lean protein, and whole grains to help prevent injury.

    You can lower your risk of suffering an annular ligament injury or another elbow joint injury by adopting these lifestyle changes. See a doctor right away if you have elbow pain or discomfort to stop further injury and encourage recovery.

    FAQs

    The annular ligament: what is it?

    The head of the radius bone is held in place within the elbow joint by a band of fibrous tissue called the annular ligament.

    In what part of the body is the annular ligament located?

    The elbow joint contains the annular ligament, which is situated around the radius bone’s head.

    What is the annular ligament used for?

    Smooth forearm movement is made possible by the annular ligament, which stabilizes the head of the radius bone within the elbow joint.

    Which disorders or traumas are frequently linked to the annular ligament?

    Chronic elbow joint instability, radial head subluxation (partial dislocation), and annular ligament tears are common injuries or disorders related to the annular ligament.

    How are annular ligament disorders and injuries identified and managed?

    A physical examination, imaging tests (such as MRIs or X-rays), and occasionally an arthroscopy are used to detect annular ligament injuries or disorders. Depending on the severity of the injury, treatment options may include physical therapy, surgery, immobilization, or rest.

    What precautions may be taken to keep the annular ligament from getting injured?

    Wearing protective clothing during activities that put the elbow joint in danger, avoiding repetitive actions that strain it, and maintaining strong forearm muscles through training are all ways to prevent injuries to the annular ligament.

    References

    • Patel, D. (2023e, August 19). Annular ligament – anatomy, structure, function. Samarpan Physiotherapy Clinic. https://samarpanphysioclinic.com/annular-ligament/

  • 19 Best Exercises for Morton’s Neuroma

    19 Best Exercises for Morton’s Neuroma

    Introduction:

    The most effective Exercises for Morton’s Neuroma usually concentrate on strengthening and stretching the muscles in the ankle and foot. The purpose of these workouts is to improve general foot mechanics and lessen strain on the injured nerve.

    A painful condition that typically affects the ball of the foot between the third and fourth toes is Morton’s neuroma. The thickening of tissue surrounding a nerve is the cause of this illness, which causes burning, numbness, and pain. Exercises can be extremely important in controlling symptoms and avoiding more pain, even though there are treatments like orthotics, medicine, and even surgery available.

    It is important to speak with a medical expert, such as a podiatrist or physical therapist, before beginning any exercise program for Morton’s neuroma in order to receive an accurate diagnosis and individualized exercise suggestions. To guarantee that workouts are done correctly and securely, proper instruction is essential.

    Causes:

    The painful condition known as Morton’s neuroma arrives on by the swelling of tissue surrounding a nerve in the heel of the foot, usually between the third and fourth toes. This compression causes inflammation and irritation of the nerves. Morton’s neuroma develops as a result of several factors:

    Foot Deformities and Problems with Structure

    • Flat Feet (Fallen Arches): The forefoot may experience more stress if the arch is not supported.
    • High arches: This may result in an unequal distribution of weight, which may irritate nerves.
    • Bunions and hammertoes: These disorders cause nerve compression and alter foot stability.

    Overuse and Repetitive Stress

    • High-Impact Activities: Activities that repeatedly strain the heel of the foot, such as running, jumping, and other sports, can cause nerve thickening.
    • Extended Standing or Walking: Foot strain is increased when you stand for extended periods of time, especially on hard surfaces.

    Footwear choice

    • Tight or Narrow Shoes: Shoes with a narrow toe box put pressure on the nerves by squeezing the toes together.
    • High Heels: Weight is transferred to the ball of the foot by elevated heels, which increases compression of the nerves.
    • Shoes with insufficient cushioning: Insufficient support could worsen symptoms and increase foot strain.

    Nerve Disorders and Inflammation

    • Nerve Irritation: Prolonged irritation causes the nerve tissue to thicken, which is known as neuroma development.
    • Inflammatory Conditions: Pain and swelling in the nerves can be caused by arthritis and other inflammatory conditions.

    Injury or Trauma

    • Direct Injury: Inflammation and thickening of the nerves can result from a foot injury, such as falling something heavy on the toes.
    • Repeated Microtrauma: Nerve swelling may be caused by frequent irritation from excessive movement or friction.

    Signs and symptoms:

    A painful condition that usually affects the heel of the foot, between the third and fourth toes, is Morton’s neuroma. The following are typical symptoms and signs:

    • The heel of the foot is usually between the third and fourth toes, and it can cause mild to severe pain. It frequently gets worse with movement or extended standing.
    • Experiencing acute, shooting pain that goes to your toes is possible.
    • Numbness or a “pins and needles” sensation: Some persons express feeling tingly or having “pins and sensations” in their affected toes.
    • Increasing pain with high heels or tight shoes: Wearing shoes with a tiny toe box, high heels, or tight shoes frequently makes the pain worse.
    • Itching or burning: The pain might be characterized as tingling, burning, or as if there is a knot in the shoe or a rock.

    Exercise’s advantages:

    Morton’s neuroma can be effectively managed with exercise because it relieves symptoms, improves foot function, and lessens the pressure on the affected nerve.

    The following are some benefits and targeted workouts that might be beneficial:

    • Improves Foot Strength: By strengthening the foot’s muscles, the arch is better supported, which lessens the load on the injured area.
    • Improves Flexibility: By releasing tension in the surrounding tissues, stretching activities can increase the foot’s flexibility.
    • Encourages Proper Foot Mechanics: Exercises can help improve posture and alignment, which lowers the chance of making the neuroma worse.
    • Promotes Circulation: Exercise increases blood flow to the region, which may lessen inflammation and hasten healing.
    • Reduces Pressure: Exercises that involve stretching and strengthening can help relieve pain by lowering pressure on the nerve.

    Exercises for Morton’s Neuroma:

    Ankle circles

    • Either lie down with your legs straight out in front of you or sit comfortably with your feet flat on the floor.
    • Make sure your feet are supported, such as on a stool, or slightly raised if you’re seated.
    • Extend your leg a little and raise one foot off the ground. Maintain a relaxed but straight knee.
    • You may either let your foot float in the air or use your hands to grip it for more control.
    • Try rotating your foot at the ankle joint, not just the toes, and start by slowly making small circles with your foot in one direction (clockwise or counterclockwise).
    • Gradually increase the size of the circles, making sure you move through the entire range of motion at the ankle.
    • Continue making circles for a few seconds in one direction, then switch directions (clockwise if you started counterclockwise, or vice versa) and repeat for another few seconds.
    • Then return to your neutral position.
    • Then relax.
    • Repeat these exercises 5 to 10 times.
    ankle-circle
    ankle-circle

    Toe Extension Stretch

    • Sitting in the chair is the first step.
    • You have the option of sitting on a bed, on a chair, or the floor.
    • Place the foot of the crossed leg on the opposing leg’s thigh after crossing one leg over the other.
    • Your toes will be accessible easily as a result.
    • Using your hand, gently grasp your toes, ideally the big and second toes.
    • For a better stretch, you can grip your toes with both hands if necessary.
    • Gently stretch your toes by slowly drawing them back toward your shin.
    • Both your toes and the top of your foot should feel stretched.
    • Hold this position for a few seconds.
    • Concentrate on relaxing your foot and taking deep breaths.
    • Relax your toes and gradually relieve the strain.
    • Then return to your neutral position.
    • Then relax.
    • Repeat these exercises 5 to 10 times.
    Toe Extension Stretch
    Toe Extension Stretch

    Toe Flexion Stretch

    • With your legs out in front of you or bent at a comfortable angle, take a seat on a chair or the floor.
    • Place the foot of the crossed leg on the opposing leg’s thigh after crossing one leg over the other.
    • Pull your toes gently down toward the sole of your foot with your hands.
    • Your toes will flex (curl) as a result, extending the tendons and muscles on the top of your foot.
    • Hold this position for a few seconds.
    • Stretching should be felt around the top of the foot, along the toes, and maybe down into the lower ankle.
    •  Let your foot relax and gradually release the pressure.
    • Then return to your neutral position.
    • Then relax.
    • Repeat these exercises 5 to 10 times.
    Toe Flexion Stretch
    Toe Flexion Stretch

    Standing calf stretch

    • Place your hands on a wall, chair, or counter for support while standing with your feet hip-width apart.
    • Maintain a straight posture and an upright body.
    • With the heel level on the floor and the rear leg straight, take one leg and step it back two to three feet behind you.
    • Make sure your toes are pointed forward and maintain a tiny bend in your front knee.
    • Press the rear leg’s heel gently down toward the ground.
    • A stretch should be felt along the back of your leg and maybe up the back of your calf.
    • Hold this position for a few seconds.
    • Do not arch your back; instead, maintain an upright posture.
    • Be careful to relax into the stretch and take deep breaths.
    • Release the stretch gradually and stand up again
    • Then return to your neutral position.
    • Then relax.
    • Repeat these exercises 5 to 10 times.
    • Repeat the stretch on the opposite leg after switching legs.
    Standing Calf Stretch
    Standing Calf Stretch

    Big toe stretch

    • Start by sitting up straight on the table or chair.
    • If you can’t sit on the floor comfortably, you can also do the stretch while sitting in a chair with your feet flat on the floor. 
    • Grab your big toe with your hand, or if you’re sitting, bend your knee a little and hold your big toe with both hands. 
    • Slowly pull your big toe upward toward your shin (dorsiflexion) while keeping the rest of your foot on the floor. 
    • You should feel a stretch in the arch and along the bottom of your foot.
    • For a few seconds, hold the stretch while taking slow breaths and concentrating on letting your foot relax.
    • Your big toe, the arch of your foot, and maybe the muscles in your ankle and calf should all feel somewhat stretched.
    • Hold for as long as you like, then slowly return your big toe to its neutral position.
    • Then relax.
    • Repeat these exercises 5 to 10 times.
    Big toe stretch
    Big toe stretch

    Marble pickup

    • Your feet should be flat on the ground as you sit in a chair.
    • Put some marbles in front of you and keep a bowl close by.
    • One marble at a time, grasp it with your toes, particularly the big and second toe.
    • Raise it and put it in the bowl.
    • Refrain from applying too much pressure as this could irritate the neuroma.
    • Then return to your neutral position.
    • Then relax.
    • Repeat these exercises 5 to 10 times.
    marble pickup
    marble pickup

    Seated toe taps

    • Start by settling yourself onto the chair.
    • Make sure your toes are relaxed and a little apart.
    • Maintaining the heel of your feet on the floor, raise your toes.
    • About 5 to 10 times per foot, lightly tap your toes up and down.
    • Then return to your neutral position.
    • Then relax.
    • Repeat these exercises 5 to 10 times.
    Seated-toe-taps
    Seated-toe-taps

    Toe curls

    • Your feet should be flat on the ground as you sit in a chair.
    • You should lay a tiny towel on the floor in front of you.
    • On the towel’s edge, place your toes.
    • Curl up on your toes and drag the towel in your direction.
    • Keep going until your foot is completely wrapped in the towel.
    • The towel should be flattened again.
    • Then return to your neutral position.
    • Then relax.
    • Repeat these exercises 5 to 10 times.
    Toe-curls
    Toe-curls

    Towel stretch

    • Stretch your legs out in front of you while sitting on the floor or in a chair.
    • Maintain a straight back and comfortable feet.
    • Take out a resistance band, yoga strap, or towel.
    • Using your hands to hold both ends, wrap the towel around the heel of your foot.
    • Maintaining a straight knee, gently draw the towel in your direction.
    • Your calf, heel, and arch should all feel stretched.
    • Hold this position for a few seconds.
    • Then return to your neutral position.
    • Then relax.
    • Repeat these exercises 5 to 10 times.
    • Repeat the exercises other foot.
    Towel Stretch
    Towel Stretch

    Calf Raises on a Step

    • With your heels hanging off, stand on the edge of a stairway, staircase, or stable platform.
    • If you need balance, grab onto a chair, railing, or wall.
    • Raise your heels as high as you can while pushing into the heel of your feet.
    • To fully activate the calf muscles, hold at the top for a few seconds.
    • Feel a strong stretch in your calves as you slowly drop your heels down below step level.
    • Then return to your neutral position.
    • Then relax.
    • Repeat these exercises 5 to 10 times.
    calf-raise
    calf-raise

    Toe splays

    • Place your feet flat on the floor while sitting in a chair.
    • Make sure your feet are loose and a little apart.
    • Don’t curl your toes; instead, spread them as wide as you can.
    • Hold this position for a few seconds.
    • Then return to your neutral position.
    • Then relax.
    • Repeat these exercises 5 to 10 times.
    Toe-splay
    Toe-splay

    Foot roller

    • Place your foot on the ball or roller as you sit or stand.
    • Focusing on tight spots, roll the object carefully from your heel to your toes while applying light pressure.
    • Spend one to two minutes rolling each foot.
    • Then return to your neutral position.
    • Then relax.
    • Repeat these exercises 5 to 10 times.
    Foot Roller exercise
    Foot Roller exercise

    Foot Arch Lifts

    • Place your feet hip-width apart on the floor and either sit or stand.
    • Make sure your toes are relaxed and touching the floor.
    • Use the muscles in your midfoot to raise the arch of your foot without curling your toes.
    • Hold this position for a few seconds.
    • When raising the arch, make sure the toes and heel remain on the ground.
    • Then return to your neutral position.
    • Then relax.
    • Repeat these exercises 5 to 10 times.
    Foot Arch Lifts
    Foot Arch Lifts

    Alphabet drawing

    • Either lie down with your legs outstretched or sit in a chair with your feet flat on the ground.
    • Maintaining a relaxed ankle, raise one foot just a little bit off the ground.
    • Trace the letters A through Z in the air using your big toe as a “pen.”
    • Be certain that your motions are controlled and smooth.
    • Instead of moving the entire leg, concentrate on moving the ankle and toes.
    • For each foot, perform one complete alphabet.
    • Change your feet and do it again.
    • Then return to your neutral position.
    • Then relax.
    • Repeat these exercises 5 to 10 times.
    Alphabet
    Alphabet

    Toe raise, point, and curl

    • This exercise may be done standing with your feet flat on the floor or seated in a chair.
    • If standing, make sure you have a surface to balance on, such as a countertop, chair, or wall.
    • Keeping your heels and soles of your feet on the ground, begin by raising all five toes as high as you can.
    • The muscles in your lower leg and foot should start to contract.
    • After a little period of holding this position, slowly lower your toes back down to the floor.
    • Then, as though you were attempting to extend the bottom of your foot, point your toes downward.
    • From the ankle to the toes, your foot should be in a straight line, and your calves and the top of your foot should feel stretched.
    • After three to five seconds of holding the posture, carefully return your foot to its neutral position.
    • Point your toes, then curl them down toward the bottom of your foot, as though you’re attempting to use them to grasp the ground.
    • This exercise works the muscles in the arch of the foot and at the base of the toes.
    • After three to five seconds of holding the curled posture, gradually relax by putting your toes back in their neutral position.
    • Then relax.
    • Repeat these exercises 5 to 10 times.
    Toe raise, point, and curl
    Toe raise, point, and curl

    Ankle Eversion with Resistance Band

    • You may perform this exercise while sitting on a chair or sitting on the floor with your legs out in front of you.
    • Attach the other end of a resistance band to a solid object, like a doorknob, or hold it in your hand while wrapping it around the inside of the foot that will be used for exercise.
    • When you move your foot outward (eversion), the band should be positioned to give resistance.
    • Try to move your toes toward the outside by slowly moving your foot outward against the band’s resistance.
    • As you act, contract the peroneal muscles, which are located along the outside of your ankle.
    • Hold the position for a few seconds after you’ve pushed your foot as far out as is comfortable.
    • The outside of your ankle and foot should feel stretched and activated.
    • Resisting the pull of the band, carefully move your foot back to the beginning position and return to the neutral position.
    • Then relax.
    • Repeat these exercises 5 to 10 times.
    resisted ankle eversion
    resisted ankle eversion

    Ankle inversion with Resistance Band

    • Place your legs out in front of you while sitting on the floor or in a chair.
    • Wrap a resistance band around one foot’s heel.
    • Hold the band in place with your hands or secure the other end to a strong object, such as a doorknob.
    • Make sure your foot is comfortable and maintain a straight knee.
    • In order for the foot wearing the resistance band to be in a neutral posture, it should be slightly turned out to the side.
    • Turn your foot inside (inversion) slowly to overcome the band’s resistance.
    • Control the movement such that your foot approaches your midline.
    • The movement is produced by using the muscles on the inside of your ankle and lower thigh.
    • When you move your foot inside, your heel should remain on the ground or in a neutral position.
    • Feel the stretch and activation of your ankle and foot muscles as you maintain the posture for a few seconds after turning your foot inside.
    • Return your foot to the starting position gradually while keeping the resistance band under control.
    • Then return to your neutral position.
    • Then relax.
    • Repeat these exercises 5 to 10 times.
    Ankle inversion with Resistance Band
    Ankle inversion with Resistance Band

    Single-Leg Balance

    • To begin, place your feet hip-width apart, stand upright, and keep your arms at your sides.
    • Make sure you have balanced and erect posture.
    • Keeping the second leg slightly raised off the ground, gradually shift your weight onto one leg.
    • Depending on how comfortable you are, you can either keep your raised leg straight or bend it at the knee.
    • To balance on one foot, lift the opposing leg off the ground.
    • For extra difficulty, you can extend the raised knee straight in front of you or to the side, or you can bend it slightly.
    • Pay attention to maintaining your body’s balance and stability.
    • Maintain your posture and use the muscles in your standing leg to hold this position for a few seconds.
    • To help you stay balanced, try to keep your gaze fixed on anything in front of you.
    • Then return to your neutral position.
    • Then relax.
    • Repeat these exercises 5 to 10 times.
    Single leg balance
    Single leg balance

    Sand walking

    For those with Morton’s neuroma, walking is a great kind of exercise since it may minimize strain on the afflicted foot while offering several advantages. Sand’s soft, uneven surface may help in promoting improved foot mechanics, balance, and muscle strength.

    • Avoid walking on wet, compacted sand at the beach if at all possible. Instead, choose dry, soft sand.
    • Your feet get a more different exercise in dry sand.
    • To give your feet time to adjust, start with short walks (five to ten minutes) if you’re new to sand walking.
    • Increase the duration gradually as your feet get stronger.
    • Make an effort to walk with proper posture. Take little steps, maintain a straight spine, and contract your core.
    • Don’t put too much tension or effort on your feet.
    • Walking barefoot is usually the greatest way to develop your foot muscles and feel the ground more directly.
    • To lessen toe compression, use shoes with a large toe box and cushioning if you find walking barefoot painful.
    • Try walking in a variety of directions (straight, diagonal, or gently curved), and alternate between slow and moderate walking speeds.
    • This will improve muscular growth and present your foot with various challenges.
    Sand-walking
    Sand-walking

    What safety precautions should be considered when working out?

    It’s important to follow specific safety measures when exercising if you have Morton’s neuroma in order to make sure you get the most out of the workouts and avoid worsening the disease.

    Consider the following important safety measures:

    • Begin slowly.

    The affected foot may become more irritated and painful if you exert too much effort.

    • Stay away from High-Impact Activities.

    Running, jumping, and other high-impact workouts might place too much strain on the foot and worsen the neuroma.

    • Wear suitable shoes.

    Since they squeeze the toes and increase pressure on the nerve, tight, thin, or high-heeled shoes may worsen Morton’s neuroma.

    • Refrain from Standing or Walking for Extended Periods

    Prolonged standing or walking might make symptoms worse by putting more strain on the foot.

    • Keep an eye out for pain.

    Pain is a warning indication that something is incorrect and may be a sign that you are overtaxing that affected region.

    • Think About Foot Taping

     By relieving pressure on the affected location, taping the foot helps lessen nerve pain.

    • Pay Attention to Toe and Foot Flexibility

    Toe or foot tightness may worsen symptoms by putting more pressure on the nerve.

    • Apply foot rubs and roll

    Pain might be increased by tight foot muscles or fascia, which puts greater pressure on the neuroma.

    • Pay Attention to Your Body

    The risk of injury might be increased by overexertion or improper exercise technique.

    • Do Not Wear Tight or Uncomfortable Socks

    The strain on the foot may worsen due to compression from overly tight socks.

    • Gradual Advancement

    Exercises that overstress the foot too quickly could worsen existing pain.

    • Consult a Medical Professional

    It’s essential to make sure you’re performing the workouts and taking the right precautions for your particular situation.

    You may safely exercise while managing Morton’s neuroma, try to lessen symptoms, and improve the health of your feet by taking certain measures.

    When should you stop exercising?

    If you experience any of the following symptoms or indicators, you ought to stop exercising for Morton’s neuroma right away:

    • Acute or Severe Pain

    Severe pain between the toes or in the heel of the foot may be a sign that the neuroma is getting worse. The nerve may sustain more injury or inflammation if the pain is intense or gets worse.

    Stop exercising and take a break. Until the pain goes away, stay away from any activities that put pressure on the foot.

    • An increase in swelling

    Inflammation is indicated by swelling around the affected region, which can be caused by excessive effort or insufficient footwear.

    Immediately stop the workout and raise your foot. If required, use ice, and stay away from activities that worsen the swelling.

    • Radiating Pain to the Toes

    Pain that travels to your toes or the remainder of your foot might be a sign that the neuroma is becoming worse or that the nerve is under too much strain.

    Put an end to the activities and rest. Exercises that might worsen the radiating pain should be avoided.

    • Feeling numb or tingling

    Compression or irritation of the nerve may be indicated by numbness or a tingling feeling. If left untreated, this might cause further nerve injury.

    Give up working out and take a break from exercising. See a healthcare professional if tingling or numbness doesn’t go away after sleeping.

    • Uncomfortable Arch or Heel

    Pain in the arch or heel can occasionally result from adjusting for Morton’s neuroma. Other problems like Achilles tendonitis or plantar fasciitis might result from this adjustment.

    Put an end to the activity, review your form and footwear, and get advice from a healthcare professional if needed.

    • The symptoms are not improving or growing worse.

    Exercise may not be right for your condition if you’ve been doing it and don’t feel any better or if your symptoms get worse (more pain, swelling, or stiffness).

    To change or replace your present workout regimen with one that is better for you, stop it and speak with a doctor or physical therapist.

    • With rest, you’re not seeing any improvement.

    It might be a sign that the neuroma is at a more advanced stage or that the workouts you are performing are incorrect if your symptoms do not go better after taking a day or two off.

    Stop exercising, take some time off, and see a doctor for a revised treatment plan.

    Which exercises should you avoid if you have Morton’s neuroma?

    Certain exercises should be avoided if you have Morton’s neuroma because they could worsen the condition, put more strain on the affected nerve, or create further pain. High-impact, repeated stress, or foot postures that put excessive strain on the forefoot are common in these workouts.

    The following workouts should be avoided:

    • Jogging or Running

    Running, particularly on hard surfaces, can increase Morton’s neuroma pain by applying repeated pressure to the heel of the foot. Every step’s impact has the potential to worsen the nerve.

    • Plyometric exercises or jumping

    High-impact jumping activities, such as jump squats, box jumps, or jump rope, could worsen neuroma symptoms by increasing pressure on the forefoot.

    • Running uphill or incline

    Running on slopes or hills puts the foot in an unnatural posture that might worsen the neuroma by applying different pressure to the heel of the foot.

    • Dance or High-Impact Aerobics

    Intense dancing routines or high-impact aerobic programs, particularly those that include foot turns or hops, can cause significant foot stress and worsen Morton’s neuroma.

    • Excessive Weightlifting

    Exercises that force you to stand on your toes, such as calf raises or hard squats with improper footwear, might put additional strain on the forefoot, even if weightlifting isn’t always harmful.

    • Some Yoga Pose

    Certain yoga positions may increase pressure on the neuroma, especially those that call for you to put weight on your toes or arches (like Downward Dog or standing postures that strain your forefoot).

    •  Climbing Stairs

    Repetitive pressure on the forefoot from climbing stairs may worsen pain from Morton’s neuroma.

    Summary:

    The painful illness known as Morton’s neuroma typically affects the heel of the foot, between the third and fourth toes. It is distinguished by the swelling of the tissue around one of the toe-leading nerves. The affected area frequently experiences numbness, tingling, or a severe, burning pain.

    By including these exercises in your regular plan, you can strengthen the surrounding muscles, increase foot flexibility, and lessen the symptoms of Morton’s neuroma. Proactive foot care measures can have a big impact on how well this problem is managed.

    Exercise might help reduce symptoms while improving foot function, but it might not be enough to fully treat Morton’s neuroma. It is essential to speak with a physician, such as a podiatrist or physical therapist, before beginning any exercise program for Morton’s neuroma in order to receive an accurate diagnosis and individualized exercise suggestions. To guarantee that workouts are done correctly and securely, proper instruction is essential.

    FAQ:

    Even if I have Morton’s neuroma, can I still exercise?

    With Morton’s neuroma, you can still exercise, but it’s essential to concentrate on low-impact workouts and ones that don’t place excessive stress on the injured foot. Excellent alternatives include swimming, cycling, and utilizing an elliptical machine. Foot stretching and strengthening exercises can also help alleviate pains.

    Which workouts are most effective for Morton’s neuroma?

    Exercises that strengthen the foot, increase flexibility, and lessen pressure on the affected nerve are the most effective for Morton’s neuroma.
    Towel scrunches
    Foot rolling with a ball
    Toe stretches
    Arch lifts
    Calf stretches

    Can I run with Morton’s neuroma?

    Running may worsen the symptoms of Morton’s neuroma by increasing pressure on the forefoot, particularly on hard surfaces. Generally speaking, jogging and other high-impact exercises should be avoided. If you’re set on jogging, talk to your doctor and think about wearing orthotics, running on softer ground, like grass, and wearing shoes with cushions.

    If I have Morton’s neuroma, are there certain workouts I should avoid doing?

    Yes, you should stay away from workouts that put too much pressure on your forefoot or have a significant impact. These consist of:
    Running
    Plyometric or jumping workouts
    Dance or high-impact aerobics
    Lifting weights while placing your feet incorrectly (calf raises, for example)
    Basketball or tennis

    How frequently should I perform Morton’s neuroma foot exercises?

    Try to include foot workouts in your everyday regimen for the greatest results. One or two times a day, begin with mild stretches and strengthening activities. Your doctor or physical therapist can suggest more frequent workouts or varying the intensity if your symptoms are more severe.

    Can physical activity exacerbate Morton’s neuroma?

    Certain workouts could worsen symptoms of Morton’s neuroma if they are done improperly or too intensely. It’s important to pay attention to your body’s signals and stop any workout that produces excruciating pain. It’s better to relax and see a doctor if the pain gets worse.

    Does exercising with Morton’s neuroma need specific footwear?

    Yes, when exercising with Morton’s neuroma, suitable footwear is essential. Select footwear with sufficient arch support, cushioning, and a large toe box. Stay away of tight shoes and high heels since they might squeeze the toes. For extra support and cushioning, custom orthotics may also be beneficial.

    Is it possible to help Morton’s neuroma by stretching my foot and toes?

    Yes, you could reduce stiffness and lessen pressure on the neuroma by extending your calves, feet, and toes. Foot massages, calf stretches, and toe stretches are all beneficial for increasing the range of motion and reducing pain.

    When exercising, how can I manage Morton’s neuroma?

    Wear shoes with the right amount of support and cushioning when exercising to help control Morton’s neuroma.
    Stay away from demanding or high-impact activities that put a strain on the forefoot.
    Regularly do stretches and strengthening exercises for your feet.
    If you experience any pain throughout your workout, take breaks.
    For further support, apply orthotics or foot tape if necessary.

    How can I tell whether I’m performing workouts correctly?

    To prevent further pain, it’s important to complete workouts correctly. If you’re not sure, think about consulting a physical therapist who can help you with the exercises and ensure that you’re doing them safely. Stop the workout and speak with your healthcare physician if you feel any severe pain.

    Will Morton’s neuroma improve if I strengthen my feet?

    Yes, strengthening the muscles in your feet may help maintain the arch and alleviate pressure on the damaged nerve. Exercises that build strength, such as towel scrunches, arch lifts, and toe curls, can help stabilize the neuroma and lower the chance of it getting worse.

    References:

    • Patel, D. August 3, 2023c. 27 Samarpan Physio is the best exercise for Morton’s neuroma. Samarpan Clinic for Physiotherapy. Morton-neuroma exercises: https://samarpanphysioclinic.com/
    • Alexispickford and associates. December 8, 2023b. Treatment options for Morton’s neuroma: surgery or at-home exercises? America’s Ankle & Foot Centers. Morton-neuroma-treatment: https://ankleandfootcenters.com/
    • Mortons. October 9, 2023. The Center for Morton’s Neuroma: Morton’s Neuroma Foot Exercises. The Mortons Neuroma Center. Morton-neuroma foot exercises: https://www.mortonsneuroma.com/blog/
    • March 18, 2025: ProHealth Prolotherapy Clinic. Exercises for Neuromas at Morton’s ProHealth Prolotherapy Clinic. This is the blog for Morton-Neuroma Exercises: https://prohealthclinic.co.uk/
    • Novakovic, A. November 17, 2023. The definition and treatment of Morton’s neuroma. The article 179773 can be found at https://www.medicalnewstoday.com.
    • Alexispickford and associates. December 8, 2023. Exercises for Morton’s Neuroma: Avoid surgery! America’s Ankle & Foot Centers. Morton-neuroma-exercises: https://ankleandfootcenters.com/
    • Fulton. February 22, 2023. The Greatest Morton’s Neuroma Exercises | Morton’s Neuroma Inserts. https://www.walkfulton.com/blogs/learn/the-best-mortons-neuroma-exercises?srsltid=AfmBOooY4sjGh_A9h8-Qy9oiy7JhAeGF__mAsf9ElBgP1w5ut7OWl_E9
    • Štefanović, D., and Adebajo, B. (2024, December 19). Reduce foot pain with these five exercises for Morton’s neuroma. Step up. https://www.upstep.com/a/blog/mortons-neuroma-exercises-to-relieve-foot-pain?srsltid=AfmBOoqEZn_GHVugiaKEKxi2Ur5C_wi17_042eoIr1rXYqBnYdjOjelz
    • Sauer, J. March 17, 2025. The finest workouts for Morton’s neuroma. Cadence. “The best Morton-S-neuroma exercises” https://cadense.com/blogs/cadense-cares/srsltid=AfmBOoql7KiwHLLqksyiGmk1-eVkY6SzNvN53xtOIbls94t55KfE8nsA
    • When I have Morton’s neuroma, which workouts should I avoid? The Upstep Podiatry and Foot Pain Community. (undated). Step up. srsltid=AfmBOor5aF8phEhClHdQ8hqKvfv_HpdKIXCngX_9nzLNSHSAqQoYHBKk https://www.upstep.com/a/community/foot-pain/what-exercises-should-i-avoid-when-I-have-morton-s-neuroma
    • Image 2, Flexibility (TOE extension). (n.d). The Health System of Saint Luke. According to the health library, https://www.saintlukeskc.org/toe-extension-flexibility
    • Image 3, Lyfta. November 23, 2023. An image of a seated toe flexor and foot everted stretch. Exercise: https://www.lyfta.app/seated-toe-flexor-and-foot-everter-stretch-7md
    • Image 5, Cadman, B. December 21, 2023. The best foot exercises and stretches. The article #320964 can be found at https://www.medicalnewstoday.com.
    • Image 10, Litfin, J. January 13, 2025. An illustrated guide to the four variations of calf raises. https://gymgeek.com/exercises/leg/calf-raises/ Gym Geek.
    • Image 13, Mark. February 16, 2025. Rebuilding the arch is the solution to flat feet. Direct Posture. Fixing flat feet: https://www.posturedirect.com/
  • Radial Collateral Ligament

    Radial Collateral Ligament

    Introduction

    The radial collateral ligament (RCL) is a strong, fibrous band located on the lateral side of the elbow joint. It connects the lateral epicondyle of the humerus to the annular ligament, providing stability to the outer elbow and supporting the joint during activities involving arm movement. It primarily resists excessive varus forces, preventing the elbow from bending outward.

    The ligament’s two components are the radial collateral ligament proper and the annular ligament. The head of the radius bone is held in place against the ulna bone by the annular ligament, which envelops it. The elbow joint is stabilized by the radial collateral ligament, which appropriately extends from the lateral epicondyle of the humerus to the radial head.

    Repetitive stress or trauma can cause injuries to the radial collateral ligament. Elbow joint pain, edema, and instability could be signs of injury to this ligament. Physical therapy, ice, rest, and in extreme situations, surgery, may be used to treat this ligament injury. In addition to improving general joint function, proper rehabilitation, and strengthening activities can assist avoid further injuries.

    Structure of the Radial Collateral Ligament

    A strong band of fibrous tissue called the radial collateral ligament connects the radius bone in the forearm to the lateral epicondyle of the humerus bone. It’s situated on the outside of the elbow joint and is crucial for keeping the joint stable when bending and straightening the arm.

    The ligament’s two components are the radial collateral ligament proper and the annular ligament. The ring-shaped structure that encircles the radius bone’s head and attaches it against the ulna bone is called the annular ligament. It permits the radius bone to rotate on its axis, which is essential for motions like forearm twisting.

    The radial collateral ligament, which stabilizes the elbow joint, appropriately extends from the lateral epicondyle of the humerus to the radial head. The lateral, oblique, and posterior bands are its three divisions. The majority of the joint’s stability is provided by the lateral band, which is the strongest and thickest of the three.

    From the lateral epicondyle to the radial head, the oblique band extends diagonally, giving the joint more stability when rotating. The posterior band, which is situated at the rear of the joint, aids in keeping the radius bone from moving backward.

    Functions of the Radial Collateral Ligament

    For the elbow joint to remain stable during motions like arm bending and straightening the radial collateral ligament is crucial. The ligament gives the joint stability by joining the radius bone in the forearm to the lateral epicondyle of the humerus bone.

    The radial collateral ligament’s main function is to keep the elbow joint from moving too much laterally. The ligament serves as a barrier to stop the radius bone from moving too far away from the ulna bone, which could lead to joint instability and pain.

    For instance, the ligament helps maintain the proper position of the bones in the joint when the forearm is rotated or twisted. Forearm rotation is made possible by the annular ligament, a component of the radial collateral ligament, which attaches the head of the radius bone against the ulna bone.

    The radial collateral ligament is also essential for transferring stresses across the elbow joint. Significant forces are applied to the elbow joint, for instance, when we lift or carry something with our arms. The help provided by the radial collateral ligament in distributing these stresses evenly throughout the joint reduces the risk of injury.

    The radial collateral ligament, which provides stability, alignment, and force transfer capabilities, is generally regarded as a crucial part of the elbow joint. This ligament is crucial for keeping elbow joints healthy since any injury to it can cause a major loss of function and mobility.

    Blood supply of the Radial Collateral Ligament

    The radial recurrent artery, the anterior and posterior ulnar recurrent arteries, and the interosseous recurrent artery are the main blood vessels that give blood to the radial collateral ligament.

    The radial collateral ligament and the lateral portion of the elbow joint are supplied with blood by the radial recurrent artery, which emerges from the radial artery. The ulnar artery gives rise to the anterior and posterior ulnar recurrent arteries, which supply blood to the medial aspect of the elbow joint, including the ulnar collateral ligament. The annular ligament, which is a component of the radial collateral ligament, and other deep elbow joint tissues receive blood supply from the interosseous recurrent artery, which emerges from the posterior interosseous artery.

    For the radial collateral ligament to remain healthy and operate properly, its blood supply is essential. Any disturbance in the blood supply to the ligament may cause tissue death or ischemia, which could cause instability and harm to the elbow joint. The healing and rehabilitation of the radial collateral ligament might be further affected by injuries like sprains or tears that impair its blood supply. Thus, a healthy elbow joint depends on the radial collateral ligament receiving a sufficient blood supply.

    Injuries of the Radial Collateral Ligament

    Stabilizing the lateral aspect of the elbow joint and limiting excessive sideways movement are the main functions of the radial collateral ligament. The radial collateral ligament may be harmed by activities that put the lateral aspect of the elbow joint under repeated or abrupt stress. The following are a few typical actions that can result in radial collateral ligament injury:

    • Throwing: The lateral aspect of the elbow joint can sustain severe strain from throwing a ball or other objects regularly, which can result in overuse problems including radial collateral ligament sprains or tears.
    • Weightlifting: Some weightlifting workouts, including overhead or bench presses, can also strain the elbow joint’s lateral aspect, which can cause injury to the radial collateral ligament.
    • Racquet sports: Racquet sports like tennis and squash require repetitive grasping and swinging motions, which can strain the elbow joint and injure the radial collateral ligament.
    • Martial arts: The grappling and throwing methods used in martial arts like judo or jiu-jitsu can cause a lot of strain on the elbow joint and injury to the radial collateral ligament.
    • Falls or direct trauma: The radial collateral ligament may sustain injury from falls or direct trauma to the lateral aspect of the elbow joint, resulting in joint instability and injury.

    We can conclude that the radial collateral ligament can be injured by any activity that exposes the lateral aspect of the elbow joint to abrupt or repetitive stress. During these exercises, it is crucial to use the right form and technique and to get medical help if elbow joint pain or discomfort arises.

    Symptoms of the Radial Collateral Ligament Injury

    The severity of the radial collateral ligament injury can affect the symptoms. When the radial collateral ligament is injured, some typical symptoms include:

    • Elbow Pain: The most prevalent sign of a radial collateral ligament injury is pain. The elbow joint’s lateral aspect is where the discomfort is typically felt, and it can be slight or severe.
    • Swelling: Another typical sign of radial collateral ligament injury is swelling around the elbow joint. The elbow joint may enlarge locally or widely.
    • Stiffness: Elbow joint stiffness is another indication of injury to the radial collateral ligament. It may be difficult to move the arm or carry out everyday activities due to the stiffness.
    • Instability: Injury to the radial collateral ligament may potentially cause elbow joint instability. The joint may feel loose or unsteady, making it difficult to perform some tasks.
    • Weakness: Another sign of radial collateral ligament injury is weakness in the affected arm. Tasks requiring grip strength or lifting objects may become difficult as a result.

    Bruising may appear around the elbow joint in extreme situations, and there may be a popping or tearing sound at the site of the injury. You must get medical help right away if you suffer from any of these symptoms following an activity that puts strain on the lateral aspect of your elbow joint.

    Diagnosis of the Radial Collateral Ligament Injury

    Imaging tests and a physical examination are usually used to diagnose radial collateral ligament injury.
    During the physical examination, a physician will measure the affected arm’s range of motion and check for indications of elbow joint swelling, soreness, or instability.

    Radial collateral ligament injury can also be diagnosed with imaging tests like MRI scans or X-rays. X-rays can be used to rule out other conditions, like fractures or dislocations, that might be causing similar symptoms. By giving doctors more precise pictures of the soft tissues in the elbow joint, MRI scans can help determine how serious the injury is.

    In certain situations, physicians might also conduct a stress test to evaluate the elbow joint’s stability. The doctor will move the arm while applying pressure to the lateral aspect of the elbow joint during a stress test to check for instability or unusual movement.

    If you have any symptoms of a radial collateral ligament injury, you should see a doctor right away because early detection and treatment can help stop additional elbow joint injury and improve results. Physical therapy, surgery, rest, ice, compression, and elevation (RICE) are possible treatments for radial collateral ligament injuries.

    Treatment of the Radial Collateral Ligament Injury

    Special test

    Stress test

    Applying pressure to the lateral aspect of the elbow joint while moving the arm is a physical examination used to check for abnormal movement or instability in cases of radial collateral ligament injury. A physician or physical therapist usually uses the test.

    The patient will be asked to sit or lie down with their arm at their side, relaxed, for the duration of the test. After grabbing the patient’s wrist, the physician will move the arm in various directions while applying pressure to the lateral aspect of the elbow joint. Any unusual movement or instability in the elbow joint will be monitored by the physician.

    The doctor may run extra tests to assess the extent of the injury if there is instability or unusual movement. To evaluate the soft tissues in the elbow joint, these tests might involve an ultrasound or MRI scan.

    Since it can help determine the best course of treatment, a stress test is a crucial diagnostic tool for radial collateral ligament injuries. RICE (rest, ice, compression, and elevation) may be advised if the injury is minor. Surgery or physical therapy might be required to stabilize the elbow joint and stop additional injury is more severe.

    Conservative treatment

    Non-surgical methods are used in the conservative treatment of radial collateral ligament injury to control pain, lower inflammation, and accelerate healing. Some conservative treatment options for radial collateral ligament injury include the following:

    • Rest: The radial collateral ligament’s healing process depends on rest. Any activity that strains the elbow joint, like heavy lifting or repetitive motions, should be avoided.
    • Cryotherapy: Applying ice to an injured area can help to reduce swelling and pain. Ice should be applied multiple times a day for at least 20 minutes at a time.
    • Compression: Compression can support the elbow joint and lessen swelling. A physician or physical therapist might suggest a brace or compression bandage.
    • Elevation: Raising the injured arm above the level of the heart can aid in healing and reducing swelling.
    • Medication: To control pain and inflammation, over-the-counter painkillers like acetaminophen or ibuprofen may be recommended.
    • Physical therapy: To increase the range of motion, strengthen the muscles surrounding the elbow joint, and stop additional injuries, physical therapy may be advised.
    • Immobilization: To immobilize the elbow joint and promote the healing of the radial collateral ligament, a brace or splint may be advised in certain situations.

    Reducing pain and inflammation, accelerating healing, and preventing additional injury are the general goals of conservative treatment for radial collateral ligament injuries. Following a doctor’s or physical therapist’s recommended therapy treatment is crucial to a full recovery.

    Physiotherapy treatment

    Exercises, manual therapy, and other modalities are used in physiotherapy to treat the radial collateral ligament (RCL) to strengthen the muscles surrounding the elbow joint, increase the range of motion, and encourage healing. Physiotherapy treatments for radial collateral ligament injury include the following:

    Exercises involving range of motion: These exercises help to increase flexibility and decrease stiffness by moving the affected arm in various directions. These exercises could involve pronation and supination, elbow flexion and extension, and wrist flexion and extension.

    Strengthening exercises: The goal of strengthening exercises is to increase the strength of the muscles surrounding the elbow joint to provide stability and support. These workouts might involve wrist curls, tricep extensions, and bicep curls.

    Manual therapy: Manual therapy uses practical methods to increase joint mobility and lessen pain. Stretching, joint mobilization, and soft tissue massage may be part of this.

    Modalities: To lessen discomfort and inflammation and encourage healing, modalities like heat, ice, ultrasound, and electrical stimulation can be applied.

    Bracing and taping: To give the elbow joint more support when exercising, bracing or taping may be advised.

    Functional training: To enhance available performance, functional training involves particular exercises that replicate everyday tasks or athletic motions.

    Education: To stop additional injuries and encourage the best possible recovery, instruction on good body mechanics and ergonomics may be given.

    Radial collateral ligament injuries are generally treated with physiotherapy that is customized to meet the needs and objectives of each patient. A safe and efficient recovery depends on adhering to the treatment plan that a physiotherapist recommends.

    Risk factors

    On the lateral (outer) side of the elbow joint, a band of tissue called the radial collateral ligament (RCL) joins the humerus (upper arm bone) to the radius (forearm bone). Motions like bending and straightening the arm, rotating the forearm, and grasping objects, give the joint stability and support. On the other hand, radial collateral ligament injury may be more likely due to specific risk factors. Among them are:

    • Overuse: Performing tasks that require gripping, twisting, or bending the elbow joint repeatedly can strain the radial collateral ligament and cause inflammation or microtears.
    • Trauma: A sudden tear or rupture of the radial collateral ligament can result from a direct impact or force to the lateral side of the elbow, such as falling on an outstretched hand or being struck by a sports ball.
    • Participation in sports: There is an increased risk of radial collateral ligament injury for athletes who play sports like tennis, baseball, golf, or weightlifting requiring forceful or repetitive elbow movements.
    • Bad technique: When playing sports or going about daily tasks, using poor technique can put too much strain on the elbow joint and raise the risk of radial collateral ligament injury.
    • Age: As we age, our tendons and ligaments lose some of their suppleness and become more vulnerable to injury.
    • Genetics: People who have weaker or more slack ligaments from birth may be more vulnerable to radial collateral ligament injury.
    • Past injury: The radial collateral ligament may be weakened and the likelihood of further injury increased by a history of elbow injuries or surgeries.

    Recognizing these risk factors and taking preventative measures, like employing appropriate techniques, taking breaks during repetitive activities, and wearing protective gear when participating in sports, are crucial in preventing radial collateral ligament injury. If an injury does happen, getting medical help right away and adhering to a thorough physiotherapy treatment plan can help ensure the best possible recovery and help avoid more injuries.

    How may radial collateral injury to ligaments be avoided?

    To prevent radial collateral ligament (RCL) injury, several actions must be taken to lower the risk factors that lead to it. Radial collateral ligament injury can be prevented in the following ways:

    • Employ good technique: Using good technique during daily activities or sports can help prevent radial collateral ligament injury and lessen the strain on the elbow joint. For instance, to prevent undue strain on the elbow joint, use the right grip and swing technique when playing baseball or tennis.
    • Take breaks: The risk of radial collateral ligament injury can be decreased by taking breaks during repetitive activities that require gripping, twisting, or bending the elbow joint. Overuse injuries can be avoided, for instance, by taking brief breaks when working on a computer or performing repetitive manual tasks.
    • Wear protective equipment: When playing sports, wearing protective equipment, like braces or elbow pads, can help absorb impact and lower the risk of radial collateral ligament injury.
    • Sustain strength and flexibility: Reducing the risk of radial collateral ligament injury can be achieved by keeping the muscles surrounding the elbow joint strong and flexible. Enhancing elbow joint strength and flexibility can be achieved through strengthening exercises and stretching.
    • Warm-up and cool-down: Preparing the muscles and joints for exercise and preventing injury can be achieved by warming up before and cooling down after.
    • Prevent abrupt motions: Preventing abrupt motions or jerky elbow joint movements can help lower the risk of radial collateral ligament injury. For instance, refrain from abruptly bending or twisting your elbow joint when playing sports or going about your everyday activity.
    • Seek medical attention: To identify and treat any underlying conditions that might be contributing to radial collateral ligament injury, take immediate medical action if you feel pain or discomfort in your elbow joint.

    These precautions can help you maintain the best possible elbow joint health and lower your risk of radial collateral ligament injury.

    FAQs

    The radial collateral ligament: what is it?

    A thick band of tissue called the radial collateral ligament (RCL) connects the annular ligament to the lateral epicondyle of the humerus.

    What is the radial collateral ligament used for?

    The radial collateral ligament’s main work is to keep the elbow joint from experiencing excessive varus stress, which happens when the forearm is pushed inward toward the body.

    What signs and symptoms indicate an injury to the radial collateral ligament?

    Pain on the outside of the elbow, joint weakness or instability, and trouble gripping objects are all signs of a radial collateral ligament injury.

    What options are there for treating injuries to the radial collateral ligament?

    Depending on the extent of the injury, bracing, physical therapy, rest, or surgery may be used to treat radial collateral ligament injuries.

    How does the radial collateral ligament interact with the elbow’s other muscles and ligaments?

    Together with other ligaments and elbow muscles, the radial collateral ligament offers general stability and support when performing tasks like grasping and lifting objects.

    References

    • Patel, D. (2023c, August 14). Radial Collateral Ligament – Anatomy, structure, function. Samarpan Physiotherapy Clinic. https://samarpanphysioclinic.com/radial-collateral-ligament/

  • Greenstick Fracture

    Greenstick Fracture

    What is a Greenstick Fracture?

    A greenstick fracture is a type of bone fracture commonly seen in children, where the bone bends and partially breaks, similar to how a green twig snaps. It typically occurs due to a fall or direct trauma and is often seen in the arms. Treatment usually involves immobilization with a cast or splint to allow proper healing.

    Green twigs bend without breaking, but eventually, they split or shatter where you bend them. Older branches separate easily. Greenstick fractures are similar to bending that young twig; they occur when a bone breaks along one side without breaking into several pieces. Since children’s bones are softer and less brittle than adults’, almost all greenstick fractures occur in youngsters under the age of ten.

    If your kid has a greenstick fracture, they will most likely need to wear a cast while their bone heals. Surgery is necessary to fix more serious fractures, particularly if they are accompanied by additional injuries.

    Causes of Greenstick Fracture

    Although falls on an extended arm (FOOSH) are the most prevalent cause of greenstick fractures, other traumas such as car crashes, sports injuries, or non-accidental trauma involving a kid being struck by an item can also result in these injuries. Following a trauma, the incidence of greenstick fractures of the long bones is increased by malnutrition, particularly vitamin-D insufficiency.

    Epidemiology of Greenstick Fracture

    Injuries to the musculoskeletal system account for around 12% of all pediatric ED visits in the US. A considerable portion of musculoskeletal injuries that result in serious morbidity and consequences are fractures.

    Although they can happen in any age group, including adults, greenstick fractures are most frequently observed in children under the age of ten. Although the incidence rate is the same for male and female patients, fractures are more common in male patients.

    Pathophysiology of Greenstick Fracture

    Only the cortex and periosteum are disrupted on one side of the bone, while the other side remains intact in a greenstick fracture, which is a partial thickness fracture. The fibula, tibia, ulna, radius, humerus, and clavicle are among the long bones where they most frequently occur. They most frequently affect the ulna, radius, or humerus in the forearm and arm. This occurs when people use their outstretched arms to support falls, which can lead to upper extremity fractures.

    Although they happen considerably less frequently than long bones, greenstick fractures can also happen in the face, chest, scapula, and almost every other bone in the body. For instance, the jaw and nose may sustain greenstick fractures. Up to 55% of all juvenile mandibular fractures are condylar fractures, making them the most prevalent kind. Condylar fractures come in three different varieties.

    The most frequent fractures are low subcondylar fractures, which are typically incomplete greenstick fractures. Because the nasal bones are primarily composed of cartilage and the midline suture is not fused, nasal trauma most frequently results in greenstick fractures in children.

    Types of greenstick fractures

    Usually, greenstick fractures affect longer bones,

    • The humerus is the upper arm bone.
    • The ulna and radius are forearm bones.
    • Phalanges (bones of the fingers and toes).
    • The Thigh bone, or femur.
    • The calf bone, or fibula.

    Symptoms of Greenstick Fracture

    The following are the most typical symptoms of a greenstick fracture:

    • Pain.
    • Discoloration or bruises.
    • Sensitivity 
    • A portion of your child’s body seems more twisted or bent than normal.

    Doctor examination of Greenstick Fracture

    History and Physical Examination

    Patients with greenstick fractures undergo the same physical examinations and history as patients with other kinds of fractures. Important aspects of the history include age, gender, anatomic location, soft tissue involvement (open versus closed), and the mechanism of injury. A physical examination’s location, soft tissue involvement, and neurovascular condition are crucial components. Additionally, it is important to check for multiple fractures or concealed fractures in the joints above and below the location.

    Unintentional trauma, such as FOOSH, is frequently seen in history reports; however, other types of accidental trauma, such as being struck by a baseball bat or another object, may also be included. Non-accidental trauma, however, must always be taken into account. Depending on the patient’s age, they may scream uncontrollably, complain of discomfort in the wounded limb, refuse to move the injured extremity, or show protective behavior.

    Reduced range of motion, palpable discomfort, and ecchymosis over the damaged region are typical physical symptoms. Edema, tenting if displaced, soft tissue abnormalities including abrasion or laceration, and indications of neurovascular bundle damage are more serious findings. Greenstick fractures can cause median nerve damage, which should be suspected while evaluating a distal forearm. Every severe injury should have a thorough neurological examination. Multiple injuries and ecchymoses in varying stages of healing that do not follow an age-appropriate damage pattern are additional observations that can point to non-accidental trauma.

    Diagnostic evaluation

    An x-ray of the damaged extremity or region of the complaint is part of the diagnostic examination. A bending injury with a fracture line that partially penetrates the bone is typical of X-ray results. On one side (the tension side), there is a fracture of the cortex and periosteum that does not spread to the opposite side. The opposing side of the bone shows plastic deformation from compressive pressures, whereas the tension side of the bone has a visible fracture on an x-ray.

    Differential Diagnosis of Greenstick Fracture

    • Salter-Harris fracture,
    • torus fracture,
    • spiral fracture,
    • non-accidental fracture,
    • open fracture,
    • pathologic fracture,
    • non-displaced fracture,
    • plastic abnormalities,
    • toddler fracture (non-displaced spiral fracture of the distal tibia), and more.

    Management of Greenstick Fracture

    Conservative Management of Greenstick Fracture

    The medical professional must conduct a closed reduction and immobilization if the degree of angulation is substantial. Immobilization is necessary for all greenstick fractures, and casting a few days after the original injury reduces the chance of a requirement for a recast because of post-fracture swelling. Depending on the child’s age and degree of angulation, an orthopedic referral during the first visit is usually advised.

    Long bone greenstick fractures should be immobilized with a cast for around six weeks. The location of the fracture determines the kind of cast to use. While proximal fractures require long arm castings and may be converted to short arm casts at around three weeks, distal fractures can be placed in short arm casts. Closer orthopedic follow-up is necessary for patients who have proximal fractures. However, because of their instability and higher risk of refracture and displacement in comparison to buckle or plastic bending injuries, all greenstick fractures should have some kind of orthopedic follow-up.

    Splinting is a less usual treatment for greenstick fractures, although it can be used if there is little angulation and the patient or family is well monitored. Splinting may be less expensive, and it will be possible to take the splint off for showers.

    Physical Therapy of Greenstick Fracture

    Splinting can be used to cure it, but family members must be closely watched. It typically takes six weeks of immobility to correctly position the pieces.

    The following methods may be used in physical therapy to treat greenstick fractures:

    • Heat therapy and massage: it is used to reduce residual edema and relieve chronic pain.
    • Joint Manipulation: To help the early scar tissue prevent the normal range of motion from breaking down, physiotherapists may gently move the joint.
    • Exercise Program: To regain a complete range of motion and avoid problems from tissue injury need to stick to a customized exercise program created by the physiotherapist.

    Complication of Greenstick Fracture

    The following are the most frequent complications of greenstick fracture surgery:

    • Malunion: This occurs when a fractured bone does not align appropriately throughout the healing process.
    • Nonunion: A bone might not entirely or at all re-grow together.
    • Acute compartment syndrome (ACS): Prolonged pressure in the muscles can prevent blood flow to the tissue, resulting in irreversible damage to the muscles and nerves.

    Prognosis of Greenstick Fracture

    The prognosis is generally favorable; most greenstick fractures restore successfully without causing noticeable or functional alterations to the affected bone. However, there is a chance of refracture, total fracture, and fracture displacement if the patient is not correctly immobilized and receives inadequate orthopedic follow-up.

    FAQs

    How does one define a greenstick fracture?

    Rather of breaking entirely into separate pieces, a greenstick fracture 
    happens when a bone bends and splits. It resembles the fracture that occurs when a tiny, “green” limb of a tree is 
    broken.

    At what age do fractures of the green stick occur?

    Since children’s bones are weaker and more flexible than those of adults, 
    the majority of greenstick fractures occur in children under the age of ten. The injury may shatter the bone completely in adults and teenagers.

    What gives the compound the name “green stick”?

    The term “green stick compound” in dentistry refers to its distinctive green hue. When heated, this thermoplastic material, which is utilized for border 
    extensions on custom imprint trays, becomes uniformly plastic.

    How is a greenstick fracture treated?

    The majority of greenstick fractures are treated by providers by immobilizing the bone with a cast, which prevents it from moving. For around six weeks, your kid will most likely need to wear a cast.

    What alternative term would you use to describe a greenstick fracture?

    Fossils of the enormous carnivorous dinosaur Allosaurus fragilis have been found to feature greenstick fractures, sometimes known as willow breaks. The fossil bones of Lucy, the most well known example of Australopithecus afarensis, which was unearthed in
     Ethiopia in 1974, include greenstick fractures.

    For how long does a cast greenstick break?

    For kids under ten, the entire cast period will be four weeks after the injury, and for kids ten and over, it will be five weeks. Sporting activity will need to be limited for an additional six weeks after 
    the cast is taken off.

    References

    • Atanelov, Z., & Bentley, T. P. (2023, April 25). Greenstick fracture. StatPearls – NCBI Bookshelf. https://www.ncbi.nlm.nih.gov/books/NBK513279/
    • Greenstick fractures. (2025, January 31). Cleveland Clinic. https://my.clevelandclinic.org/health/diseases/17812-greenstick-fractures

  • Posterior Cruciate Ligament (PCL)

    Posterior Cruciate Ligament (PCL)

    Introduction

    The Posterior Cruciate Ligament (PCL) is one of the four major ligaments in the knee, located at the back of the joint. It connects the femur (thigh bone) to the tibia (shin bone) and primarily functions to prevent the tibia from moving too far backward. The PCL provides stability to the knee, especially during activities involving sudden changes in direction or impact.

    Posterior Cruciate Ligament (PCL) Anatomy

    The posterior cruciate ligament, or PCL, is another crucial ligament in the knee joint that aids in knee stability and stops the tibia from moving backward relative to the femur. The PCL can also cause discomfort, swelling, instability, and trouble walking or bearing weight on the injured limb, just like the ACL.

    ACL and PCL injuries can be diagnosed and treated similarly, depending on the location and degree of the injury. The likelihood of a PCL injury can also be decreased by taking preventative steps like using the right protective gear, maintaining perfect technique during sports or exercise, and warming up and stretching properly.

    Structure of the Posterior Cruciate Ligament (PCL)

    One of the most important ligaments in the knee joint is the posterior cruciate ligament (PCL). It is connected to the tibia (shin bone) and femur (thigh bone) near the rear of the knee. The PCL is the main ligament that stabilizes the knee joint and is bigger and stronger than the anterior cruciate ligament (ACL).

    The posteromedial bundle (PMB) and the anterolateral bundle (ALB) are the two distinct bundles that make up the PCL. The tibia on the femur cannot posteriorly translate because of the ALB, which is stronger and tighter than the PMB. The PMB is more flexible and gives rotating forces more stability.

    The medial femoral condyle, a bony protuberance on the inside of the femur, is where the PCL begins. The lateral surface of the tibia is where the ALB and the medial surface are attached, respectively. The menisci, which are cartilage formations that aid in stabilizing and cushioning the knee joint, are also attached to the PCL.

    Collagen strands, the building blocks of PCL, are crisscrossed to provide it strength and stability. A proteoglycan matrix around the collagen fibers aids in shock absorption and lubricates the ligament.

    Function of the Posterior Cruciate Ligament (PCL)

    The PCL’s primary work is to keep the tibia from sliding too far backward with the femur, which could harm the knee’s joint surfaces and other internal structures. The posterior (rear) portion of the knee is supported, and it also aids in stabilizing the knee joint during rotating motions.

    PCL injuries are usually caused by direct hits to the front of the knee, like in an automobile accident or when someone falls onto a bent knee, as opposed to the ACL, which is frequently hurt during abrupt stops or direction changes. PCL injuries can cause stiffness, soreness, swelling, and trouble walking or carrying weight on the injured leg.

    A person’s mobility and quality of life may be greatly impacted by injuries to the PCL, which is essential for preserving the stability and functionality of the knee joint.

    Blood supply of the PCL

    There are multiple routes of blood flow to the posterior cruciate ligament (PCL). The middle genicular artery, a branch of the popliteal artery, provides the PCL with its primary blood supply. The popliteal artery, a large artery that delivers blood to the lower leg and foot, is situated behind the knee joint.

    The inferior medial and lateral genicular arteries, which are branches of the popliteal artery, provide blood to the PCL in addition to the middle genicular artery. The PCL and other knee joint components receive extra blood flow from these arteries.

    The PCL’s blood flow is necessary to keep the ligament healthy and functioning properly. Knee instability and discomfort may result from the PCL becoming weaker or injured due to inadequate blood flow.

    PCL injuries can interfere with the ligament’s blood flow, which makes it even more difficult for it to heal and recover. Therefore, it is crucial to treat PCL injuries as soon as possible to restore normal function and avoid long-term consequences.

    Signs and symptoms of injury to the posterior cruciate ligament (PCL)

    The severity of the injury can affect the symptoms of a PCL injury. Common symptoms include the following:

    • Knee Pain: One of the most typical signs of a PCL injury is pain in the rear of the knee. Activity might exacerbate the discomfort, which can range from mild to severe.
    • Knee joint swelling: Another typical sign of a PCL injury is knee joint swelling. In addition to mild to severe edema, rigidity may also be present.
    • Instability: A PCL injury frequently manifests as a sensation of instability or looseness in the knee joint. There may be a buckling or givingaway sensation in the knee.
    • Walking difficulties: Walking can be difficult after a PCL injury, particularly if the knee joint is extremely painful or unstable.
    • Restricted range of motion: It may be difficult to fully bend or straighten the knee due to a PCL injury that also limits the knee joint’s range of motion.
    • Weight-bearing difficulties: It could be difficult to bear weight on the injured leg if the PCL injury is significant.
    • Popping or clicking noises: In certain situations, a PCL injury may be accompanied by popping or clicking noises coming from the knee.

    Activities Injuries to the ligaments are referred to as “sprains” and are graded in severity.

    Grade 1 Sprains

    Posterior cruciate ligament injuries
    Posterior cruciate ligament injuries
    • A Grade 1 sprain causes minor injury to the ligament. Even when it has been slightly stretched, it can still support the stability of the knee joint.

    Grade 2 Sprains

    • The ligament is stretched to its breaking point in a Grade 2 sprain. This is frequently called a partial ligament tear.

    Grade 3 Sprains

    • The most common term used to describe this kind of sprain is a complete tear of the ligament. The knee joint is unstable due to a split ligament.
    • Total posterior cruciate ligament rupture
      A whole posterior cruciate ligament tear is seen from the rear.
    • Usually partial injuries, posterior cruciate ligament tears can mend themselves. Individuals who have just suffered injuries to their posterior cruciate ligaments can typically resume their athletic activities without experiencing issues with knee stability.

    Injuries of the posterior cruciate ligament

    There are several methods to harm the PCL, including:

    Direct impact: The PCL may be torn or stretched if the tibia moves backward in response to a direct strike to the front of the bent knee.

    Hyperextension: If the knee is pushed straighter than it should be, this could cause the PCL to tear or stretch.

    Twisting or rotating forces: The PCL may tear if the knee experiences abrupt twisting or rotational forces, as could occur during sports.

    Automobile accidents: When the knee collides with the steering wheel or dashboard, injuries to the knee may result.

    Falls: The PCL may stretch or tear if you fall onto a bent knee, which can cause the tibia to slide backward.

    Sports: Players who play sports like basketball, football, and soccer that require quick pauses and direction changes are more likely to get a PCL injury.

    Overuse: Running and jumping put a lot of strain on the knee joint, which can weaken and potentially tear the PCL.

    How to Treat Posterior Cruciate Ligament (PCL) Injury

    Conservative treatment

    Non-surgical techniques to control pain and encourage healing are part of conservative treatment for a PCL injury. Conservative treatment aims to enhance knee stability, lessen discomfort and inflammation, and get the knee joint back to its normal function. For PCL injuries, some typical conservative therapies include:

    • Rest: The knee needs to rest to heal. Activities like jogging and jumping that make your symptoms worse might need to be avoided.
    • Ice therapy: Putting ice on the injured knee can help it feel less swollen and painful. Several times a day, you can apply ice for 20 minutes at a time.
    • Compression: Using a knee brace or compression bandage might assist in supporting the knee joint and reduce swelling.
    • Physical therapy: A physical therapist can assist you with exercises that increase the strength, range of motion, and stability of your knees. Exercises could involve lunges, squats, and leg lifts.
    • Medication: Non-steroidal anti-inflammatory medicines (NSAIDs) and acetaminophen are examples of over-the-counter pain treatments that can help lower inflammation and pain.
    • Injection therapy: To lessen discomfort and inflammation, your doctor can occasionally advise injecting medicine straight into the knee joint.

    Depending on how severe your injury is, conservative treatment could take weeks or months. Surgery may be required to repair or reconstruct the PCL if conservative treatment is unable to alleviate your symptoms.

    Physiotherapy treatment

    For PCL injuries, physiotherapy uses a mix of manual therapy, exercises, and modalities to increase knee strength, range of motion, and stability. Restoring knee joint function, promoting healing, and lowering pain and inflammation are the objectives of physical therapy.

    HEEL-SLIDES
    HEEL-SLIDES
    • Manual treatment: To lessen discomfort and increase knee mobility, a physiotherapist may employ manual therapy techniques like stretching, joint manipulation, and massage.
    • Exercises for range of motion: To increase flexibility and avoid stiffness, range of motion exercises involve exercising the knee joint through its entire range of motion. Leg swings, knee bends, and heel slides are a few examples of these workouts.
    • Strengthening exercises: The purpose of strengthening exercises is to increase the strength of the muscles surrounding the knee joint, which will give it stability and support. Squats, lunges, and leg presses are a few examples of these workouts.
    • Training for balance and proprioception: To increase knee stability, using activities that test your balance and coordination is known as balance and proprioception training. A wobble board, agility drills, and one-legged standing are a few examples of these workouts.
    • Modalities: To lessen pain and inflammation and encourage healing, modalities like electrical stimulation, ultrasound, heat, and ice may be applied.
    • Functional training: Functional training entails doing exercises that replicate the tasks you must complete in your everyday life or while participating in sports. You can lower your chance of re-injury and return to your regular activities with confidence with this kind of training.

    For PCL injuries, the duration of physiotherapy treatment may vary depending on the severity of the injury and your specific needs. Your physiotherapist will collaborate with you to create a customized treatment plan that meets your unique requirements and goals.

    Risk factors of the posterior cruciate ligament

    One of the four main ligaments of the knee joint, the posterior cruciate ligament (PCL), aids in stabilizing the joint and limiting the tibia bone’s excessive backward movement. Several risk factors can result in PCL injuries, such as:

    Trauma: A PCL injury may result from a direct impact on the knee, such as in a car accident or tumble. Due to the high-impact nature of contact sports like basketball and football, athletes participating in these activities are also more likely to sustain PCL injuries.

    Hyperextension: PCL injuries may also result from excessive knee joint extension. This may occur during abrupt pauses and twists or after landing from a jump.

    Knee dislocation: The PCL may sustain significant harm if the knee joint’s bones are pushed out of their natural position.

    Muscle imbalances: The risk of PCL injuries may be raised by weakness or tension in the muscles that surround the knee joint. Overuse, bad posture, and muscular imbalances are a few possible causes.

    Prior knee injuries: Due to the increased strain on the ligament, people who have previously suffered knee injuries, such as meniscus or ACL tears, may be more susceptible to PCL injuries.

    Gender and age: Males are more likely than females to sustain PCL injuries, and people over 40 may be more vulnerable because of aging-related changes in the ligaments and joints.

    Genetics: Due to aberrant joint anatomy or ligament laxity, certain people may be genetically prone to PCL injuries.

    To lower the incidence of PCL injuries and improve general knee health, it is critical to recognize and manage these risk factors.

    How to reduce the possibility of posterior cruciate ligament injury

    The posterior cruciate ligament (PCL) can be strengthened in some ways:

    Strengthening exercises: The PCL can be supported and protected by strengthening the muscles surrounding the knee joint. Strength training can be achieved with exercises like calf lifts, leg presses, lunges, and squats.

    Stretching: Stretching can help avoid PCL injuries by increasing flexibility and reducing muscle stiffness. Make sure to stretch your hamstrings, quadriceps, and calves.

    Correct technique: To prevent putting too much strain on the PCL, it’s critical to employ adequate technique when playing sports or engaging in other activities that need the knee joint. This can entail avoiding abrupt stops and twists and employing appropriate landing methods when jumping or turning.

    Protective equipment: During high-impact activities, using the proper protective equipment, such as knee pads or braces, can help lower the risk of PCL injuries.

    Rest and recovery: After engaging in strenuous physical activity, allowing the knee joint to rest and recuperate can assist in avoiding overuse injuries and support knee health in general.

    Maintaining a healthy weight: Carrying too much weight can put more strain on the knee joint, raising the possibility of PCL injuries. This risk can be decreased by maintaining a healthy weight through exercise and food.

    Seeing a doctor: It’s critical to get medical help right away if you feel any pain or discomfort in your knee joint. Injuries to the knee can be prevented and healing accelerated with early diagnosis and treatment.

    FAQs

    The posterior cruciate ligament (PCL): what is it?

    Among the four main ligaments in the knee joint that give the knee stability and support is the PCL.

    How can a PCL injury occur?

    A direct hit to the front of the knee, excessive knee extension, or an abrupt change in direction while the foot is planted can all result in a PCL injury.

    What features make up a PCL injury?

    Pain, swelling, stiffness, trouble walking, knee instability, and a popping sound at the site of injury are all signs of a PCL injury.

    How do you diagnose a PCL injury?

    A physical examination, imaging tests like X-rays or MRIs, and particular testing to look for PCL injury are used to diagnose a PCL injury.

    What kind of care is advised for a PCL injury?

    The conditions surrounding a PCL injury determine the course of treatment. Physical therapy, elevation, compression, ice, and rest are all non-surgical therapeutic options.

    What is the average recovery period following a PCL injury?

    How long it takes to heal from a PCL injury depends on how severe it is and how it is treated. Severe injuries may require several months to fully recover, but mild injuries may heal in a matter of weeks.

    Is it possible to avoid a PCL injury?

    A PCL injury can be avoided by warming up properly before exercise or sports activities, wearing the right protective gear, performing activities with the right technique, and keeping your knees healthy overall with frequent stretching and exercise.

    References

    • Patel, D. (2023b, December 13). Posterior cruciate ligament (PCL) – anatomy, structure, function. Mobile Physiotherapy Clinic. https://mobilephysiotherapyclinic.in/posterior-cruciate-ligament-pcl/
    • Dhameliya, N. (2023, October 21). Posterior cruciate ligament – anatomy, function, injury. Samarpan Physiotherapy Clinic. https://samarpanphysioclinic.com/posterior-cruciate-ligament/

  • 13 Best Exercises for Cervicogenic Headache

    13 Best Exercises for Cervicogenic Headache

    Introduction:

    Cervicogenic headaches often stem from neck tension or poor posture. Effective exercises to relieve these headaches include neck stretches, chin tucks, upper trapezius stretches, and scapular retractions. These help reduce muscle tightness, improve posture, and relieve pressure on the cervical spine.

    Typical characteristics of this kind of headache include:

    • Pain that spreads upward or to the front of the head from the base of the skull.
    • Restricted range of motion and stiff neck.
    • Pain that gets worse while moving the neck, maintaining a posture, or engaging in activities that put tension on the neck muscles.

    Although it sometimes affects both sides of the head, the pain is usually unilateral, or on one side. Symptoms like light sensitivity, nausea, or dizziness may also surround the headache.

    Causes:

    Headaches that start in the cervical spine (neck) are known as cervicogenic headaches (CGH). These are a few typical reasons:

    Poor Posture

    • Head posture that is forward (for example, from extended usage of a computer or phone)
    • Poor ergonomics or bending over

    Joint Illness

    • Atlantoaxial or atlantooccipital joint dysfunction (upper cervical spine)
    • Facet joint irritation

    Cervical Spine Conditions

    • Cervical disc bulges or herniation
    • Degenerative disc disease
    • Osteoarthritis in the neck
    • Cervical spondylosis

    Trauma or Injury to the Neck

    • Whiplash (caused by auto accidents)
    • Falls or direct head or neck trauma

    Tension & Strain in Muscles

    • Tightness in the suboccipital, sternocleidomastoid, or upper trapezius muscles
    • Prolonged muscle strain caused by repetitive motions or stress

    Nerve Irritation or Compression

    • Nerves in the neck that are pinched (for example, because of herniated discs)
    • The inflammation of the occipital nerves is known as occipital neuralgia.

    Post-concussion or Post-Surgical Impacts

    • Following surgery on the cervical spine
    • After a catastrophic brain injury

    Underlying health issues

    Signs and symptoms:

    Cervicogenic headaches (CGH) can be differentiated from other headache kinds, such as tension headaches or migraines, by their unique signs and symptoms. The main symptoms are as follows:

    • Head pain that is unilateral (one-sided)

    Usually affecting one side of the head, the pain might migrate to other parts.

    • Restricted Neck Movement

    Neck stiffness and decreased range of motion.

    • Neck Pain

    Originates in the neck and spreads to the forehead, temple, back of the head, or area surrounding the eye.

    • Soreness in the Shoulders and Neck

    Neck and upper back muscles that are sore or tense.

    • Potential Pain in the Arms or Shoulders

    May involve upper arm or shoulder pain (caused by inflammation of the nerves).

    • Light sensitivity or mild nausea (less common)

    These symptoms are typically milder than migraines.

    Exercise’s advantages:

    Cervicogenic headaches can be effectively managed and prevented by engaging in certain exercises regularly. Here are a few main benefits:


    Lessens the Frequency and Severity of Headaches

    • Tension can be released and headache frequency decreased by strengthening and stretching the neck muscles.
    • Reduces pain by increasing blood flow to the head and neck.

    Reduces Spasms and Tension in the Muscles

    • Tight muscles in the upper back, shoulders, and neck are released with stretching and strengthening activities.
    • Stops the muscular imbalances that cause pain.

    Improves Neck Flexibility and Mobility

    • Exercises help in regaining the cervical spine’s range of motion.
    • Lessens the pain and stiffness caused by limited mobility.

    Adjusts Posture and Avoids Headaches in the Future

    • Prevents forward head position, which is a common cause of CGH, by strengthening postural muscles.
    • Reduces neck strain by promoting proper spinal alignment.

    Decreases Reliance on Medicine

    • Frequent exercise can lessen the need for muscle relaxants or medications.
    • Offers a long-term, natural solution for managing headaches.

    Increases Neck Muscle Stability & Strength

    • The spine is better supported when the deep cervical muscles are strengthened.
    • Lessens the possibility of strained and tired muscles.

    Improving General Well-Being

    • Promotes stress reduction and relaxation.
    • Improves general posture and lessens the tension on other body regions, such as the upper back and shoulders.

    Exercises for Cervicogenic Headache:

    Neck Flexion and Extension

    • Stand or sit with your back straight.
    • Slowly lower your chin down to your chest.
    • Hold this position for a few seconds.
    • Then return to your neutral position.
    • Next, Lean your head back slowly and look at the ceiling.
    • Hold this position for a few seconds.
    • Then return to your starting position.
    • Then relax.
    • Repeat these exercises 5 to 10 times.
    Neck Flexion and Extension
    Neck Flexion and Extension

    Neck roll

    • Whether standing or sitting, keep your posture upright.
    • Lower your chin to your chest gradually.
    • Move your ear close to your shoulder as you slowly roll your head to the right.
    • Keep looking up and rolling your head back.
    • Put the opposite ear to your shoulder as you roll your head to the left.
    • Then return to your neutral position.
    • Then relax.
    • Repeat these exercises 5 to 10 times.
    Neck roll
    Neck roll

    Neck turn

    • Keep your posture upright while you’re sitting.
    • As though you were gazing over your shoulder, gently tilt your head to the right.
    • Hold this position for a few seconds.
    • Proceed back to the center.
    • Turn your head to the left slowly, then keep it there for five to ten seconds.
    • Then return to your neutral position.
    • Then relax.
    • Repeat these exercises 5 to 10 times on each side.
    Neck Turn
    Neck Turn

    Upper trapezius stretch

    • Stand or sit with your back straight.
    • Your right hand should be placed on your head.
    • Push your ear closer by gently tilting your head in the direction of your right shoulder.
    • For a deeper stretch, use your hand to provide a little pressure.
    • Hold this position for a few seconds.
    • Then return to your neutral position.
    • Then relax.
    • Repeat these exercises 5 to 10 times.
    • On the left side, repeat the exercises.
    Upper-trapezius-stretch
    Upper-trapezius-stretch

    Neck Flexion Stretch

    • Stand or sit with your back straight.
    • Lower your chin slowly toward your chest.
    • You should feel as though the back of your neck is stretched.
    • Hold this position for a few seconds.
    • To increase the stretch, put your hand on the back of your head and gently press.
    • Then return to your neutral position.
    • Then relax.
    • Repeat these exercises 5 to 10 times.
    Neck Flexion Stretch
    Neck Flexion Stretch

    Wall Angels

    • Lean your head, glutes, and back against a level wall.
    • The distance between your feet and the wall should be roughly 6 inches.
    • Make sure your lower back is not too arched and is in a neutral position.
    • Lift your arms till your elbows are 90 degrees.
    • Maintain contact with the wall with your shoulders, elbows, and wrists.
    • Maintaining your arms against the wall, slowly lift them overhead.
    • Return them to the beginning position by lowering them.
    • Keep your motion controlled and slow.
    • Take deep breaths and concentrate on keeping your form correct.
    • Then relax.
    • Repeat these exercises 5 to 10 times.
    Wall Angel
    Wall Angel

    Shoulder shrug

    • When standing, keep your feet shoulder-width apart.
    • To your sides, allow your arms rest lightly.
    • Straighten both shoulders and raise them to your ears.
    • At the highest point, contract your trapezius muscles.
    • Return your shoulders to their initial position by relaxing them.
    • Don’t drop them too soon.
    • Then relax.
    • Repeat these exercises 5 to 10 times.
    Shoulder-shrug
    Shoulder-shrug

    Chin Tucks

    • Your feet should be hip-width apart.
    • When you stand, keep your shoulders relaxed and your back straight.
    • As if you were performing a double chin, carefully pull your chin straight back.
    • Don’t raise or lower your head; instead, keep it level.
    • Hold this position for a few seconds.
    • Then return to your neutral position.
    • Then relax.
    • Repeat these exercises 5 to 10 times.
    Chin-tuck
    Chin-tuck

    Isometric Neck Exercises

    • When standing , keep your posture upright.
    • Touch your forehead with your hand.
    • Press your forehead softly on your hand while keeping your head unmoving.
    • Hold this position for a few seconds.
    • Then return to your neutral position.
    • Behind your head, place your hands.
    • Reposition your head in your hands to hold it there.
    • Hold this position for a few seconds.
    • Then return to your neutral position.
    • Position your right hand on the right side of your head.
    • Don’t tilt your head; instead, press it into your hand.
    • Hold this position for a few seconds.
    • Touch the left side of your head with your left hand.
    • Press it into your hand rather than tilting your head.
    • Hold this position for a few seconds.
    • Then relax.
    • Repeat these exercises 5 to 10 times.
    isometric neck exercise
    isometric neck exercise

    Shoulder Blade Squeeze

    • Make sure your feet are hip-width apart when standing.
    • Maintain a straight back and relaxed shoulders.
    • As though you were holding a pencil between your shoulder blades, pull them back and together.
    • Instead of shrugging, let your shoulders down and relaxed.
    • Hold this position for a few seconds.
    • Then return to your neutral position.
    • Then relax.
    • Repeat these exercises 5 to 10 times.
    Shoulder Blade Squeeze
    Shoulder Blade Squeeze

    Cat cow stretch

    • Take a tabletop position to begin.
    • Maintain a neutral spine and contract your core.
    • Tuck your chin into your chest, curve your back upward, and exhale.
    • Squeeze the button on your abdomen toward your spine.
    • Hold this position for a few seconds.
    • Inhale deeply, then arch your back to lift your chest and tailbone.
    • Take a quick lookup without straining your neck.
    • Hold this position for a few seconds.
    • Then return to your neutral position.
    • Then relax.
    • For 5–10 repetitions, alternate between the cow and cat poses.
    Cat-and-Cow-Stretching
    Cat-and-Cow-Stretching

    Thoracic Extension

    • Sit with your feet flat on the floor while maintaining your back straight.
    • Make use of a chair with a backrest, ideally one that is mid-back height.
    • With your elbows pointed outward, place your hands behind your head.
    • Keep your chin tucked in a little.
    • Raise your chest by leaning back over the chair’s backrest.
    • Maintain a neutral posture for your lower back and just move your upper spine.
    • Hold this position for a few seconds.
    • Then return to your neutral position.
    • Then relax.
    • Repeat these exercises 5 to 10 times.
    Thorasic Extension Exercise
    Thorasic Extension Exercise

    Scalene Stretch

    • Maintain a straight spine and relaxed shoulders.
    • Move your ear close to your shoulder as you slowly tilt your head to the right.
    • To work the front scalene muscles, keep your chin up a little.
    • Feel a stretch along the left side of your neck while you hold this position for a few seconds.
    • Go back to the middle and do the same on the left side.
    • Then return to your neutral position.
    • Then relax.
    • Repeat these exercises 5 to 10 times.
    Scalene stretch
    Scalene stretch

    Which safety precautions should be followed when working out?

    It’s important to pay attention to safety precautions when doing Cervicogenic headache (CGH) exercises to avoid worsening symptoms or adding to the pressure. Here are several important safety measures:

    Begin Slowly and Advance Gradually

    • Start with low-intensity workouts and gentle stretches.
    • As your neck adjusts, progressively increase the number of repetitions and intensity.

    Take Proper Breaths While Working Out

    • Avoid holding your breath because it may make you more tense.
    • Inhale and exhale slowly and regularly to maintain muscle relaxation.

    Take a rest and focus on your health.

    • Stop and take a break if you experience pain, lightheadedness, or worsening headache pain.
    • Give yourself time to rest in between workouts.

    Keep Your Posture Correct

    • When performing exercises, make sure your head and spine are in alignment.
    • Stay away from forward head posture and bending over, as they may worsen Cervicogenic headache.

    Make Slow, Controlled Motions

    • Stay away from forceful, quick, or jerky neck motions.
    • To avoid straining your muscles, move smoothly.

    Avoid strenuous neck strain or heavy lifting.

    • Avoid using hefty weights that can cause neck pain.
    • Instead of using large loads, concentrate on bodyweight workouts and resistance bands.

    Don’t overstretch or strain your neck.

    • Don’t push yourself over your comfort zone.
    • If you get severe or intense pain, stop right away.

    Make Use of Ergonomics and Proper Support

    • Exercises should be done comfortably, ideally while standing or sitting with enough support.
    • When lying down, make sure your spine is in a neutral position.

    If necessary, get professional advice.

    • Consult a physical therapist or other healthcare professional for advice if you are unclear.
    • Receive recommendations that are specific to your particular situation.

    If necessary, use heat or ice.

    • Stiff muscles can be loosened with a warm compress before activity.
    • If soreness happens after activity, ice might help reduce inflammation.

    When should you stop exercising?

    Knowing when to stop exercising is important for avoiding injury or worsening symptoms. If you experience any of the following, you should stop right away:

    An increase in neck or headache pain

    • Stop and take a break if your headache gets worse while you’re exercising or after.
    • A persistent or severe headache or neck pain indicates that you should stop.

    Pain That Is Sharp, Shooting, or Like Electric Shock

    • Nerve compression or tension is indicated by a sharp or burning pain in the arms, back, or neck.
    • If the pain comes suddenly or is severe, stop.

    Changes in Vision or Blurred Vision

    • Stop exercising if you have spots or blurred vision.
    • This can indicate that circulation is being affected by elevated neck strain.

    Lightheadedness or dizziness

    • Stop right away if you feel unstable, lightheaded, or as though the room is spinning.
    • This can be a sign of nerve compression or a problem with blood flow.

    Experiencing nausea or vomiting

    • You shouldn’t feel nauseous or ill after exercising.
    • If it happens, stop and drink some water.

    Tingling, Weakness, or Numbness

    • Nerve irritation can appear as tingling, numbness, or weakness in the hands, arms, or shoulders.
    • Before proceeding, stop and get professional advice.

    Loss of Balance or Coordination Problems

    • Feeling unstable or uncoordinated could be a sign of a major issue.
    • Take a moment to evaluate your symptoms before proceeding.

    Not improving or worsening over time

    • Exercises might not be suitable if they routinely aggravate symptoms rather than improve them.
    • For alternate workouts or adjustments, speak with a healthcare expert.

    What steps can I take to help avoid cervicogenic headaches?

    Cervicogenic headaches are caused by problems in the neck, which often come on by bad posture, tense muscles, or misaligned spines. The following actions can help avoid them:

    Improve Your Posture

    • Avoid a forward head position and maintain your head in line with your spine.
    • Make use of chairs with adequate lumbar support that are ergonomic.
    • To avoid neck pain, place screens at eye level.

    Keep Your Workspace Healthy

    • To encourage proper posture, use an adjustable chair or a standing desk.
    • If you work at a desk, take frequent breaks to exercise and stretch.

    Improve Your Sleep Positioning

    • Use a supporting pillow to sleep on your side or back.
    • Keep your head from being pushed forward by high pillows.

    Stretch and Strengthen Your Neck Muscles

    • To relieve tension, extend your shoulders and neck.
    • Use specific workouts to strengthen the muscles in your neck and upper back.
    • Try shoulder rolls, soft neck rotations, and chin tucks.

    Keep Yourself Hydrated and Eat a Balanced Diet

    • Drink plenty of water because headaches can be caused by dehydration.
    • Stay away from processed foods and too much caffeine as these can cause tension.

    Control Your Stress

    • Engage in relaxation exercises such as yoga, meditation, or deep breathing.
    • Shoulder and neck tension can be reduced with massage therapy.

    Don’t Use Your Phone or Tablet for Too Long

    • Make sure your gadget is at eye level to reduce “text neck”
    • When at all possible, use hands-free or voice-to-text technologies.

    If necessary, get expert guidance.

    • A physical therapist can assist with posture correction and muscle imbalance correction.

    When to See a doctor:

    While exercises can considerably help treat cervicogenic headaches, it is important to visit a if:

    • Exercise does not resolve your headache, or it gets worse.
    • You feel as though your hands or arms are weak, tingly, or numb.
    • Your neck hurts a lot when you move it, or you have trouble moving it.

    A physical therapist specializing in cervical spine issues can give specific recommendations and therapy.

    Summary:

    Cervicogenic headaches are a particular kind of headache that is caused by problems in the neck or cervical spine (the term “cervicogenic” refers to the region of the spine in your neck). They happen when the head receives pain signals from a physical or neurological problem in the neck. These headaches are often described as a dull, aching sensation that can be confined to one side of the head, around the temple, or behind the eye.

    Even though cervicogenic headaches can be devastating, you can greatly lessen their frequency and severity by combining exercise, posture adjustment, and stress management. By increasing neck mobility, strengthening muscles, and releasing tension, the exercises can help lower the rate of cervicogenic headaches.

    Continue to stay consistent with your exercises and consult with a doctor if needed for a customized treatment plan.

    FAQ:

    For cervicogenic headaches, which exercises are the most effective?

    Chin Tucks
    Neck Stretches
    Shoulder Blade Squeezes
    Upper Trapezius Stretch
    Cervical Rotations

    How frequently ought I to perform these exercises?

    Do stretches two or three times a day.
    Depending on tolerance, perform strengthening exercises three to four times per week.
    Always begin at a lower frequency and work your way up.

    Can cervicogenic headaches be cured by exercise?

    Exercise can greatly lessen the frequency and severity of headaches, but the underlying causes such as poor posture, muscular imbalance, or problems with the cervical spine must be dealt with for a full recovery.  Better outcomes can be achieved by combining exercises with physical therapy, ergonomic modifications, and posture correction.

    What is the duration required to observe improvements?

    While some people experience relief in a matter of days to weeks, others might not notice any noticeable change for weeks or months.
    For long-term advantages, constancy is essential.

    Can working out worsen my headache?

    Certain exercises may worsen symptoms if they are performed improperly or too forcefully.
    If you feel sharp pain, lightheadedness, or numbness, stop and avoid making sudden, jerky movements.

    Can cervicogenic headaches be caused by poor posture?

    Indeed! Slouched posture and forward head position (from extended computer or phone use) place excessive pressure on the neck, which causes headaches. Exercises for postural correction may help in their prevention.

    Should I refrain from any certain activities?

    Heavy lifting or neck-straining, high-impact exercises.
    Extended use of screens without adjusting posture.
    When sleeping in uncomfortable positions, keep your neck in alignment by using a supporting pillow.

    Do these exercises require professional supervision?

    Although many exercises can be performed at home, it is encouraged to get individualized advice from a physical therapist if problems increase or continue.

    Cervicogenic headaches: what causes them?

    Bad posture (extended periods of sitting, forward head posture)
    Injury to the neck
    Problems of the cervical spine (arthritis, herniated discs)
    Tension and strain in the neck muscles and inflammation of the nerves

    What are the typical signs?

    Headache that is one-sided and usually begins in the neck
    Pain and stiffness in the neck
    When moving the neck, the pain gets worse.
    Soreness in the shoulders, the base of the skull, or the neck
    Sometimes experience nausea or vertigo

    When should I visit a physician?

    If headaches increase in frequency or intensity
    If neurological symptoms (weakness, numbness, alterations in eyesight) are present
    If using home remedies doesn’t alleviate the pain

    References:

    • Rajput, P. (November 2, 2022). Samarpan Physio offers at-home cervicogenic headache exercises. Samarpan Clinic for Physiotherapy. https://samarpanphysioclinic.com/cervicogenic headache exercises at home
    • Healthcare NHS Foundation Trust, Berkshire, n.d. Cervicogenic headaches: what are they? Cervical headache leaflet (pdf) https://www.berkshirehealthcare.nhs.uk/media/168324
    • Physio, B. January 29, 2025. The causes, symptoms, and methods for treating cervicogenic headaches. Physio Benchmark. Cervicogenic headache symptoms that lead to quick-relieving exercises: https://benchmarkphysio.com.au/
    • Panther. February 17, 2025. Panther PT’s Cervicogenic Headache Exercises. https://pantherpt.com/4-exercises-that-can-help-ease-your-cervicogenic-headache/ Panther Physical Therapy
    • Headache caused by cervicogenic pain. March 19, 2025. https://my.clevelandclinic.org/health/diseases/cervicogenic-headache Cleveland Clinic
    • Simpson, J. August 31, 2023. the advantages of cervicogenic headache treatment with chiropractic adjustments. HealthWise released an article titled “How Chiropractic Can Help with Cervicogenic Headaches” at https://www.healthwisechiropractic.com.au.
    • On July 13, 2023, Buddy, J. F. M., and Buddy, J. F. M. Treatments, symptoms, and exercises for cervicogenic headaches. Track your headache and migraine with Migraine Buddy, identify your triggers, get relief, and take charge. Cervicogenic headache exercises, symptoms, and treatment: https://migrainebuddy.com/
    • Image 5, Day 2: BioFunctional Health Solutions Neck Stretch (2025, February 14). Neck-stretch-day 2: https://biofunctionalhealth.com/blog

  • Anterior Cruciate Ligament

    Anterior Cruciate Ligament

    Introduction

    The Anterior Cruciate Ligament (ACL) is a key ligament located in the knee joint, connecting the femur (thigh bone) to the tibia (shin bone). It provides stability by preventing excessive forward movement of the tibia and controlling rotational forces. ACL injuries, often caused by sudden stops, changes in direction, or direct impact, are common in sports like soccer, basketball, and skiing.

    The ACL joins the tibia (shin bone) and femur (thigh bone), which also stops the tibia from moving too forward to the femur. Additionally, it aids in regulating the knee joint’s rotational motion. Sports involving abrupt stops, direction changes, or jumping are prone to ACL injuries, which can cause severe knee pain and instability.

    Origin and insertion of the ACL

    The posterior aspect of the lateral femoral condyle, a bony protuberance on the outside of the thigh bone’s bottom end (the femur), is where the anterior cruciate ligament (ACL) begins. The intercondylar notch, a groove between the two bony prominences on the bottom end of the thigh bone, is directly behind the femoral attachment of the ACL.

    The ACL crosses the posterior cruciate ligament (PCL) and attaches to the anterior aspect of the tibial plateau after passing diagonally downward and forward through the middle of the knee joint from its origin. The top portion of the knee joint is made up of the tibial plateau, which is the flat upper surface of the shin bone (tibia).

    The anterior tibial spine, a tiny bony protuberance at the front of the tibial plateau, is where the ACL’s tibial attachment is situated. The ACL tibial insertion is a robust, fibrous band of tissue that connects the ACL to the tibial spine.

    Mechanism of the anterior cruciate ligament

    The anterior cruciate ligament’s (ACL) mechanism includes preventing rotational instability of the knee joint and excessive forward movement of the tibia to the femur. A combination of passive and active stabilization is used to achieve this.

    The structural support that the ACL itself provides is referred to as passive stabilization. The ligament, which joins the tibia and femur, is made of robust, fibrous tissue. Its diagonal orientation across the knee joint enables it to withstand rotational and forward forces.

    The term “active stabilization” describes how the muscles that surround the knee joint help to maintain healthy ACL function. During movement, the quadriceps, hamstrings, and calf muscles all help to stabilize the knee joint. By regulating the tibia’s movement to the femur, these muscles cooperate to lessen the strain on the ACL.

    Running, jumping, and cutting motions are among the physical activities that put a lot of strain on the ACL. An ACL injury may result from these forces causing the ligament to stretch or tear. ACL injuries are frequently caused by abrupt stops or direction changes, direct knee injuries, or awkward jump landings.

    In conclusion, the anterior cruciate ligament’s mechanism involves both passive and active knee joint stabilization. The surrounding muscles cooperate to regulate movement and lessen the strain on the ACL, while the ligament offers structural support to stop the tibia from moving too forward and rotating.

    Symptoms of the anterior cruciate ligament injury

    Depending on how severe the injury is, anterior cruciate ligament (ACL) symptoms can change. Typical signs and symptoms include:

    • Abrupt pain: An ACL injury frequently results in abrupt, severe knee pain.
    • Swelling: Swelling around the knee joint is a common indicator of ACL damage. It could take a few hours for the swelling to appear, or it could happen right away after the injury.
    • Restricted range of motion: The knee joint may have a limited range of motion due to an ACL injury. There may be stiffness or trouble moving the knee.
    • Stability: When standing or walking, the knee may feel unsteady or wobbly. This results from the ACL’s loss of stability.
    • Some people may experience a popping sound at the moment of the injury, which may be a sign of an ACL tear.
    • Weight-bearing difficulty: Pain and instability may make it difficult to bear weight on the injured leg.
    • Muscle weakness: If an ACL injury causes muscle weakness in the injured leg, it could be difficult to perform daily tasks.

    You must seek medical attention if you suffer from any of these symptoms following a knee injury. A doctor can perform imaging tests and a physical examination to detect an ACL injury and recommend the best option for treatment.

    Injuries of the anterior cruciate ligament

    Anterior cruciate ligament (ACL) injuries are usually caused by abrupt direction changes, rapid stopping, or landing from a jump. ACL injuries can result from several common activities, including:

    • Sports: Due to the abrupt direction changes and pivoting motions required, high-impact sports like football, basketball, soccer, and skiing increase the risk of ACL injuries.
    • Gymnastics: The high-risk jumps, landings, and twists that gymnasts frequently execute can cause a lot of strain on the knee joint and raise the possibility of ACL injuries.
    • Dance: The repetitive strain that jumps and landings place on the knee joint can cause ACL injuries in dancers.
    • Martial arts: Because of their training’s abrupt direction changes and pivoting motions, martial artists are susceptible to ACL injuries.
    • Running: Overuse or abrupt direction changes during running can cause ACL injuries in runners.
    • Falls: ACL injuries can also result from landing awkwardly after a fall or from falling straight onto the knee.

    Keep in mind that anyone can sustain an ACL injury, regardless of their level of fitness or physical activity. ACL injuries are more likely to occur in people who engage in high-impact sports or activities, though.

    Treatment of the anterior cruciate ligament injury

    The anterior drawer test

    anterior drawer test
    anterior drawer test

    The anterior drawer test is a useful physical examination tool for assessing the knee joint’s anterior cruciate ligament (ACL) health. One of the four main ligaments supporting the knee joint, the ACL is frequently injured during sports or abrupt twisting motions.

    The patient lies on their back with their knee bent at a 90-degree angle while performing the anterior drawer test. Placing both hands around the upper portion of the lower leg, just below the knee joint, the examiner sits on the foot of the affected leg.

    The examiner then pushes the femur (thigh bone) backward and pulls the tibia (lower leg bone) forward. The way the tibia moves to the femur during an ACL injury is replicated by this motion. The tibia should move forward very little if the ACL is unbroken.

    The tibia will move forward excessively if the ACL is torn or partially torn, though, which would indicate a positive test result. On a scale of 0 to 3, the degree of forward movement can be rated; 0 denotes no movement, while 3 denotes substantial movement.

    It is crucial to remember that the anterior drawer test is not always accurate and can yield false-positive or false-negative findings. To confirm an ACL injury, it should therefore be used in combination with additional diagnostic procedures like MRI or arthroscopy.

    In patients with suspected knee injuries, the anterior drawer test is a straightforward, non-invasive method that can be used to evaluate the ACL’s integrity.

    Surgical treatment

    ACL reconstruction surgery usually involves using a donor or graft from another area of the body to rebuild the ligament. The procedure is typically carried out under general anesthesia and can be done arthroscopically, which involves making tiny incisions and utilizing specialized tools and a camera to complete the activity.

    To position the graft in the same location as the original ACL, tunnels are drilled into the thighbone and shinbone after the torn ligament is removed during surgery. The graft is fastened in position with buttons, screws, or other tools.

    Patients usually need to use crutches and wear a brace for a while after surgery to allow for healing. A crucial component of recovery is physical therapy, which aids in regaining the knee joint’s strength, stability, and range of motion.

    Although surgically repairing the ACL can be very successful in regaining knee joint function, there are risks involved, including infection, blood clots, and nerve damage. Patients must have a thorough conversation with their surgeon about these risks before the procedure.

    Conservative treatment

    Non-surgical techniques are used in conservative ACL treatment to control the injury and encourage recovery. This method is usually advised for patients with mild to moderate ACL sprains or partial tears, as well as those who might not be suitable candidates for surgery because of other medical issues.

    For ACL injuries, conservative treatment consists of the following primary elements:

    • Rest: The first line of treatment for an ACL injury is to keep the knee immobile and refrain from activities that could aggravate it. Limiting physical activity for a while and using crutches to relieve knee weight may be necessary for this.
    • Ice: Since swelling and inflammation are typical signs of an ACL injury, applying ice to the knee can help lessen them. Ice should be applied multiple times a day for 20 to 30 minutes at a time.
    • Compression: Supporting the knee with a brace or compression bandage can help minimize swelling. Wearing these devices as prescribed by a healthcare professional is advised.
    • Elevation: Another way to lessen swelling and encourage healing is to raise the leg above the level of the heart.
    • Physical therapy: A physical therapist can collaborate with patients to create an exercise regimen that enhances knee joint stability, strength, and range of motion. This could involve training for balance and agility as well as quadriceps and hamstring strengthening exercises.
    • Medications: To treat pain and inflammation, doctors may prescribe over-the-counter painkillers like ibuprofen or acetaminophen.

    Depending on the severity of the injury and the patient’s reaction to treatment, conservative treatment for ACL injuries usually takes a few weeks to several months. Over time, patients may be able to resume their regular activities because this method can help reduce pain and increase mobility, even though it might not fully restore knee joint function.

    Physiotherapy treatment

    ACL (Anterior Cruciate Ligament) physiotherapy exercises are a crucial component of the healing process. The knee joint’s strength, range of motion, and stability are all improved by these exercises. Here are specific physiotherapy exercises for the ACL:

    Range of Motion Exercises

    Exercises involving range of motion aid in increasing the knee joint’s flexibility and range of motion. Among these exercises are:

    • Heel slides involve lying on your back with your legs straight, bending your injured knee slowly, and sliding your heel toward your buttocks. Hold the position for a few seconds, then slowly straighten your leg. Do this ten times.
    • Knee Flexion Stretch: Place your feet flat on the floor while sitting in a chair. Sliding your injured foot back slowly will cause your knee to stretch. After a few seconds of maintenance, return to the initial position. Ten times over, repeat.
    • Knee Extension Stretch: Place your feet flat on the floor while sitting in a chair. Straighten your injured leg and lift it off the ground. Hold for a few seconds, then drop your leg again. Do this ten times.

    Strengthening Exercises

    The muscles surrounding the knee joint can be strengthened with the aid of strengthening exercises. Among these exercises are:

    • Straight Leg Raises: Maintain a straight posture while lying on your back. Take your injured leg off the ground slowly, then hold it there for a short while. Ten times over, lower your leg back down.
    • Wall Squats: Place your feet shoulder-width apart and stand with your back to a wall. Slide down the wall while bending your knees slowly until your thighs are parallel to the floor. After a few seconds of holding, push yourself back up to the beginning position. Do this ten times.
    • Hamstring curls: Place a pillow under your hips while lying on your stomach. Raise your heel toward your buttocks while bending your injured knee. Hold for a few seconds, then drop your leg again. Do this ten times.

    Balance and Proprioception Training

    Training in balance and proprioception aids in increasing knee joint stability. These workouts consist of:

    • Single Leg Stance: Keep your other foot off the ground while standing on your injured leg. After a few seconds of holding, move on to the other leg. Do this ten times.
    • Bosu Ball Squats: Place your feet shoulder-width apart while standing on a Bosu ball. Squat down while bending your knees slowly. After a few seconds of holding, push yourself back up to the beginning position. Do this ten times.
    • Walking on Uneven Surfaces: To test your balance and coordination, walk on uneven surfaces like grass, sand, or gravel.

    Gait Training

    Teaching the patient how to walk normally with their injured knee is known as gait training. Among these exercises are:

    • Heel-to-Toe Walking: Step with your heel squarely in front of your toes while walking in a straight line.
    • Sidestepping: Start with your injured leg and move to the other side as you walk sideways.
    • Crossover Steps: With each step, cross one foot over the other as you move forward.

    Functional Training

    Simulating real-life activities that the patient might experience after recovery is known as functional training. Among these exercises are:

    • Jumping: To get better at jumping, clear small obstacles or cones.
    • Running: Increase your speed gradually after beginning with a slow jog.
    • Cutting and Pivoting: To get ready for sports requiring quick direction changes, practice cutting and pivoting movements.

    ACL physiotherapy exercises are, in summary, a crucial component of the healing process. The knee joint’s strength, range of motion, and stability are all improved by these exercises. A customized exercise regimen will be created by the physiotherapist based on the patient’s unique requirements and objectives. Consistently following the exercise regimen is crucial, as is discussing any pain or discomfort experienced during the exercises with the physiotherapist.

    Risk factors for ACL Injury

    The anterior cruciate ligament, or ACL, is one of the knee joint’s four main ligaments. It serves to stabilize the knee during movement by joining the tibia (shin bone) and femur (thigh bone). However, the ACL is also prone to injury, especially in athletes who play high-impact sports like football, basketball, and soccer. The following are specific risk factors for ACL injuries:

    • Gender: Women are more likely than men to sustain an ACL injury. This can result in a greater angle between the thigh and shin bones, placing more strain on the ACL, as women typically have a wider pelvis and a smaller notch in the femur.
    • Age: Adolescents and young adults are more likely to sustain an ACL injury than older people. This is because their muscles and bones are still growing, which leaves them more vulnerable to harm.
    • Sports Participation: Players who play high-impact sports like football, basketball, and soccer are more likely to sustain an ACL injury. The knee joint may be strained by the abrupt stops, starts, and direction changes that these sports require.
    • Prior Injury: People who have previously sustained an ACL injury are more likely to experience another one. This is because the ligament might still be weak from the prior injury or might not have completely healed.
    • Poor Conditioning: People who lack physical fitness or who have weak, strained muscles are more likely to suffer an ACL injury. This is because weak muscles put more strain on the ligaments by failing to adequately support the knee joint.
    • Footwear: The risk of an ACL injury can be raised by wearing inappropriate footwear, such as shoes that don’t offer enough support or traction.
    • Playing Surface: Playing on too-hard or too-soft surfaces, like sand or concrete, can make an ACL injury more likely.

    Ultimately, some risk factors for ACL injuries include age, gender, participation in sports, prior injuries, poor footwear, playing surface, and poor conditioning. Playing on safe surfaces, wearing appropriate footwear, and maintaining a high level of physical fitness are all important ways to lower these risk factors. ACL injuries can also be prevented and healing accelerated by getting medical help as soon as possible and adhering to a rehabilitation program.

    Preventing injuries to the anterior cruciate ligament

    ACL injuries can be avoided by a combination of strategies that target the risk factors mentioned above. The following strategies can help you avoid ACL injuries:

    • Strengthening exercises: To support the knee and lessen the strain on the ACL, strengthen the muscles surrounding the knee joint, especially the hamstrings and quadriceps. Leg presses, lunges, and squats are a few examples of beneficial exercises.
    • Exercises for flexibility: Stretching can help increase knee joint range of motion and flexibility, which lowers the chance of injury. Examples include stretches for the quadriceps, hamstrings, and calves.
    • Wearing shoes that offer sufficient traction and support can help lower the risk of an ACL injury. It is advised to wear shoes with a non-slip sole and adequate arch support.
    • Safe playing surface: You can lower your chance of suffering an ACL injury by playing on safe surfaces like grass or turf. Steer clear of hard or uneven surfaces like sand or concrete when playing.
    • Technique: Playing sports with the right technique can lessen the strain on the knee joint and lower the chance of suffering an ACL injury. Trainers and coaches can offer advice on appropriate techniques.
    • Protective equipment: For athletes who have already experienced an ACL injury, wearing protective equipment like knee pads or braces can help lower the risk of an ACL injury.
    • Rest and recuperation: ACL tears and other overuse injuries can be prevented by taking some time to rest and recover after intense exercise. For general health and injury prevention, getting enough sleep, staying hydrated, and eating a healthy diet are essential.

    In conclusion, a comprehensive approach that considers the various risk factors is required to prevent ACL injuries. By taking these precautions, people can lower their chance of suffering an ACL injury and keep their knees healthy.

    FAQs

    How is a diagnosis of an ACL injury made?

    A physical examination, which includes the anterior drawer test, and imaging tests like MRIs and X-rays are usually used to diagnose an ACL injury.

    How does an ACL injury manifest itself?

    Pain, swelling, instability, or a giving-way sensation in the knee, and trouble walking or bearing weight on the injured leg are all signs of an ACL injury.

    How do you treat an ACL injury?

    Physical therapy, bracing, rest, ice, compression, and elevation (RICE), and in certain situations, surgery to rebuild or repair the ligament are all possible treatments for an ACL injury.

    Is it possible to prevent an ACL injury?

    Although preventing an ACL injury isn’t always possible, some steps can help lower the risk, like stretching and warming up properly, exercising or playing sports with the right form, and wearing the right protective gear.

    References

    • Patel, D. (2023b, July 29). Anterior cruciate ligament – anatomy, structure, function, injury. Samarpan Physiotherapy Clinic. https://samarpanphysioclinic.com/anterior-cruciate-ligament/
  • High Ankle Sprain

    High Ankle Sprain

    A High Ankle Sprain: What is it?

    A high ankle sprain is caused by tearing or injuring the high ankle ligaments that connect the tibia and fibula. A sprain occurs when a ligament is stretched beyond its normal limits or ruptured. Sprains come in three levels of severity:

    • Grade 1 sprains occur when ligaments strain but do not tear.
    • Grade 2 sprains: A partial tear in the ligaments.
    • Grade 3 sprains: The ligaments are fully ripped.

    These ligaments are called syndesmosis, even though the term pertains to the joint. You could hear your high ankle sprain referred to as a syndesmotic injury.

    Our ankles link the leg and foot bones. There are two angles: one upper and one below. These two bones form the upper ankle. The talus sits between the upper and lower ankles, fitting into the arch of the other two bones.

    Ligaments are fibrous structures that link bones together.

    What causes a high ankle sprain?

    High ankle sprains almost always happen while you are running or leaping, and they are caused by your foot being bent upward and then twisted inwards or outwards. Almost usually, they are the consequence of a collision rather than the rolling motion that results in other ankle sprains.

    What signs and symptoms indicate a high ankle sprain?

    The following are the signs and symptoms of a high ankle sprain:

    • Swelling.
    • Activities such as climbing stairs become difficult because of the injury’s inability to sustain weight.
    • Unable to walk on your toes.
    • Bruising, that develops several days after the accident.

    What ligaments are impacted by a high ankle sprain?

    The following ligaments may be torn or damaged by high ankle sprains:

    • In front of the tibia and fibula lies the anterior inferior tibiofibular ligament.
    • The back of the tibia and fibula is where the posterior inferior tibiofibular ligament is situated.
    • The tibia and fibula are stabilized by the interosseous membrane, which is located in the middle of the two bones.
    • A high ankle sprain can cause any of these ligaments to be stretched, partially torn, or completely torn.

    What differentiates a minor ankle sprain from a high one?

    Location is not the only factor that distinguishes a high ankle sprain from a low one. With your foot extended up, twisting inward or outward might result in high ankle sprains. Some low ankle sprains happen when the ankle rolls outward, but most happen when the ankle rolls inward. The high ankle ligaments are not affected by low ankle sprains. We often think of low ankle sprains when we hear about someone having a sprained ankle.

    How is a high ankle sprain diagnosed?

    When you see your doctor, they will ask you about your medical history and how you damaged your ankle. After that, they’ll perform a physical examination to establish the source of your pain. A physical exam can include:

    An external rotation test: An external rotation test involves sitting with your knee bent at a 90-degree angle. Your doctor will gently rotate your foot to the outside and assess the severity and location of your pain.

    A squeeze test: Your doctor will compress your tibia and fibula together to apply pressure to the interosseous membrane. Pain from this test is typically indicative of a high ankle sprain.

    Your doctor may arrange an imaging test to confirm your injuries or determine their severity.

    MRI. The most helpful test for a high ankle sprain is magnetic resonance imaging or MRI. An MRI creates pictures of tissues within the body by using a powerful magnet and computer-generated radio waves.

    X-rays. X-rays generate images through the emission of radiation waves. Dense solids, such as bone, absorb less radiation than less dense materials, such as organs, causing bones to appear white on an X-ray. Your doctor can use an X-ray to ensure that the bones are still in place following your ligament injury. They may also do an X-ray to ensure that none of your ankle bones have been injured.

    A CT scan, which utilizes X-rays to create 360-degree pictures of your body, may also be recommended to provide your doctor with a full view of your injuries.

    Treatment for High Ankle Sprains:

    Treatment for a high ankle sprain will be determined by the degree of the damage.

    You should be able to treat your high ankle sprain at home utilizing the R.I.C.E. approach for the first 3 to 5 days. This approach includes:

    • Rest. Avoid activities that exacerbate your pain or edema. Your doctor may urge you to wear crutches and keep completely off your damaged ankle.
    • Ice. Ice on the affected region for 15 to 20 minutes every two or three hours. However, you should never put ice directly on your skin.
    • Compression. Wrap an elastic bandage across your ankle to help minimize swelling. However, look for indications that the bandage is overly tight, such as numbness, increasing pain, or swelling beneath the bandage.
    • Elevation. Keeping the damaged ankle elevated above your heart helps to minimize swelling. Try to rest your ankle on pillows or cushions.

    Over-the-counter non-steroidal anti-inflammatory medications (NSAIDS) can be used to reduce swelling and pain. NSAIDs can be taken orally as pills or tablets or applied topically as lotions, creams, or sprays.

    Your doctor may advise you to wear a brace, tape, or even a cast to prevent your ankle from bending toward your body.

    The three types of ankle braces are:

    • lace-up ankle braces
    • stirrup ankle braces
    • elastic ankle braces

    Your doctor may also suggest physical treatment, such as the use of therapeutic bands or water exercises. Being in water reduces the amount of weight your ankle needs to endure.

    In extreme cases, your doctor may suggest surgery to repair a damaged ligament.

    Ankle Pain Exercises:

    Exercises such as ankle pumps, toe curls, toe raises, and towel scrunches, with an emphasis on controlled motions and progressive progression, can help increase ankle and toe mobility and strength.

    Here’s a summary of several useful exercises:

    Ankle pumps (dorsiflexion and plantarflexion):

    Ankle Pumps
    Ankle Pumps

    Sit or stand with your foot flat on the floor, then raise your toes towards your shin (dorsiflexion) then point them down (plantarflexion).
    Benefits: Increases ankle range of motion and strengthens muscles surrounding the ankle.

    Ankle Rotations:

    Ankle-Rotation
    Ankle-Rotation

    To do ankle rotations, sit or stand with your foot off the ground and rotate circularly, first clockwise, then anticlockwise.
    Benefits: Improves ankle flexibility and mobility.

    Heel raises:

    heel-raise
    heel-raise

    Stand with your feet flat on the floor, then gently elevate up onto your toes, holding for a few seconds before lowering back down.
    Benefits: it includes increased calf muscle strength and improved ankle stability.

    Towel Scrunches:

    Towel-curl
    Towel-curl

    How to Perform Towel Scrunches: Place a towel beneath your toes while sitting with your feet flat on the floor. Use your toes to curl the towel towards you, then let go.
    Benefits: Strengthens the foot’s intrinsic muscles and increases toe flexibility.

    One-leg balancing.

    One-leg-balance-test
    One-leg-balance-test

    Support your weight with the leg with the injured ankle by lifting your good leg behind you and resting your hands on a wall, counter, or chair back. Hold this for 20 to 30 seconds, if possible. Try it with one or two fingers as your strength increases. Without waiting, do this when you’re stronger.

    Toe Raise/Heel Drop:

    toe-raise
    toe-raise

    How: Stand on a step or platform, then elevate your toes and drop your heels.
    Advantages: Strengthens the ankle and calf muscles.

    Standing Calf Stretch

    Standing Calf Stretch
    Standing Calf Stretch

    Stand in front of a wall or a countertop, with your hands on it for support. Place your healthy foot forward and your injured ankle about a step back. Bend the knee of your good leg gradually until you get a modest stretch in the calf on your damaged side while maintaining your back heel level on the floor. Repeat three times, each holding for 30 seconds.

    Heel walks:

    Heel Walking
    Heel Walking

    How: Lift your toes off the ground and walk on your heels.
    Advantages: Strengthens the ankle and calf muscles.

    Toe Tapping:

    Seated-toe-taps
    Seated-toe-taps

    Your feet should be level on the ground while you sit or stand. Tap your toes on the ground while maintaining your heels still.
    Benefits: Exercises the muscles in your feet and ankles, improving balance.

    Marble Pickup:

    marble pickup
    marble pickup

    The Marble Pickup method involves placing a marble or other small object in front of your toes while sitting with your feet flat on the floor. Pick up the thing with your toes and deposit it in a container.
    Benefits: Improves toe dexterity and strengthens the foot’s intrinsic muscles.

    Toe Yoga:

    Sit with your feet flat on the floor. Lift your big toe off the floor while keeping the other four planted. Repeat with the other four toes.
    Benefits: Enhances toe flexibility and strength.

    Important considerations:

    • Warm-up: Before beginning any workouts, warm up your ankles and feet with mild motions.
    • Listen to your body: If you experience any pain, stop immediately and seek medical attention if necessary.
    • Progress gradually: Start with a few repetitions and progressively increase as you gain strength.
    • Consistency: Regular practice is essential for increasing ankle and toe mobility and strength.

    How much time does it take to recover from a high ankle sprain?

    A high ankle sprain may need six to eight weeks of recovery. If you are an athlete, your comeback to play may take much longer. Low ankle sprains typically heal more quickly than this.

    Risks and Complications of a high ankle sprain:

    The ankle might become stiff. If surgery is undertaken, there is a risk of infection or injury to the superficial peroneal nerve, which provides feeling to the top of the foot. This is because the nerve runs extremely near to the outside of the leg, where the incision is often made. Arthritis can also develop after a severe sprain if the ankle cartilage is injured at the time of the initial injury.

    How can I lower my chances of suffering a high ankle sprain?

    Ankle sprains are accidents, and there is no way to avoid them entirely. However, there are several precautions you may take to reduce your chances of suffering a high ankle sprain. You can do:

    • Follow a workout routine that will strengthen and stretch your joints.
    • Follow an exercise regimen to enhance your balance and proprioception. Proprioception is a component of balance that allows your brain to understand where your body is in space.
    • Use braces or tape to protect your ankles.

    What is the outcome of a high ankle sprain?

    The prognosis for healing from a high ankle sprain is favorable, as most cases may be treated non-surgically. However, you’ll be more likely to injure your ankle again. You may also have stiffness in the joint later on.

    High Ankle Sprain Recovery Time:

    High ankle sprains take a bit longer to recover than low ankle sprains, often 6 to 8 weeks. However, your doctor may urge that you avoid intense activity for an extended length of time. Your doctor may also suggest physical therapy to help you regain strength and complete range of motion in your damaged ankle.

    FAQs

    How much time does it take for a high ankle sprain to heal?

    High ankle sprains can take many weeks or months to recover. Typically, the greater the pain and swelling, the more serious the ankle sprain and the longer it will take to recover. Surgery may be required for a more serious injury.

    Can you still walk with a high ankle sprain?

    Patients with a high ankle sprain without fracture may be able to bear weight, although they will have pain at the intersection of the tibia and fibula right above the ankle (green circle). This is higher than more common sprains (purple circle).

    How do you treat a high ankle sprain?

    High Ankle Sprain Treatment
    Rest. Avoid activities that exacerbate your pain or edema.
    Ice. Apply 15 to 20 minutes of ice every two or three hours.
    Compression. Wrap an elastic bandage over your ankle to decrease swelling and elevate it. Keeping the damaged ankle elevated above your heart helps to minimize swelling.

    How can I recognize a high ankle sprain?

    Perform the syndesmosis squeeze test. They will compress your tibia and fibula together, exerting pressure on the interosseous membrane. If you experience pain further up your leg, you most likely have a high ankle sprain. Press on the interosseous membrane to see whether you are experiencing pain.

    How do you sleep with a high ankle sprain?

    Back sleepers are already in the optimum position to ease pressure on the ankle, but side sleepers must rest one foot on a pillow to keep the other foot away. Stomach sleepers may need to adjust their position to avoid placing strain on their ankles.

    Can I lift weights with an injured ankle?

    Strength training is necessary, but it is essential to follow a doctor’s directions regarding when to start this stage of exercise. Strength training usually begins after a person can stand on their ankle without pain or swelling.

    Should I massage an injured ankle?

    Massaging your ankle after a sprain might help reduce pain and swelling, but be cautious. If the pain or edema appears to be worsening, stop massaging your ankle. You may have a significant injury that needs expert medical attention, so be aware of any changes to your ankle.

    References

    • High ankle sprain. (2025, March 19). Cleveland Clinic. https://my.clevelandclinic.org/health/diseases/22249-high-ankle-sprains
    • High ankle sprain (Syndesmotic injury) symptoms & Causes. (n.d.). FootCareMD. https://www.footcaremd.org/conditions-treatments/ankle/high-ankle-sprain
    • What to know about a high ankle sprain? (n.d.). WebMD. https://www.webmd.com/first-aid/what-to-know-about-a-high-ankle-sprain

  • Intercostal Nerves

    Intercostal Nerves

    Introduction

    The intercostal nerves are a group of 11 pairs of nerves that originate from the thoracic spinal cord (T1 to T11). They run between the ribs, supplying the muscles of the chest wall and providing sensory information from the skin and pleura. The 12th pair, called the subcostal nerve, runs below the last rib. These nerves play a key role in breathing by controlling the intercostal muscles.

    Both motor and sensory fibers are carried by the intercostal nerves, which are mixed nerves. Their primary role is to supply the abdominal and thoracic wall structures with segmental supply. They transport sensory afferents from the skin of the thoracic and abdominal wall, ribs, pleura, and peritoneum in addition to their motor innervation for the intercostal muscles and the muscles of the anterolateral abdominal wall. Additionally, these nerves provide sympathetic innervation to the thoracic and abdominal wall structures (blood vessels, sweat glands).

    There are twelve pairs of thoracic spinal nerves located in the thoracic portion of the spinal cord. 11 intercostal nerves are derived from the anterior/ventral rami of the first 11 thoracic spinal nerves. The subcostal nerve is the name given to the twelfth nerve since it is situated inferior to the final rib.

    Pre- and postganglionic branches (rami communicantes) link each intercostal nerve to its associated sympathetic ganglion (of the sympathetic trunk) during arising. Then, between the parietal pleura and the posterior (internal) intercostal membrane, the intercostal nerves enter the appropriate intercostal gap.

    Structure

    The associated intercostal gap between the parietal pleura and the posterior intercostal membrane is where each intercostal nerve enters. At this location, the intercostal nerve is just outside the parietal pleura before plunging into the rib’s subcostal groove, which is located directly beneath the rib.

    The innermost intercostal muscle and the interior intercostal muscle enclose the nerve as it passes through the subcostal groove. The matching intercostal gap, directly beneath the corresponding rib, is where the first six intercostal nerves terminate after branching off. After leaving the intercostal gaps, the seventh through eleventh intercostal nerves enter the abdominal wall. Because of this trajectory, the final five intercostal nerves are known as thoracoabdominal nerves.

    Intercostal nerve 1

    Around the neck of the first rib, the anterior ramus of the first thoracic spinal nerve splits into superior and inferior branches, marking its termination.

    The bigger, superior branch joins the brachial plexus after leaving the thoracic cavity. The first intercostal nerve is the inferior branch, sometimes referred to as the intercostal branch.

    This nerve terminates as the first anterior cutaneous branch on the anterior chest wall after passing through the first intercostal gap, which lies beneath the first rib.

    Intercostal nerves 2-6

    Between the posterior intercostal membrane and the parietal pleura, the anterior rami of the second, third, fourth, fifth, and sixth thoracic spinal neurons enter their respective intercostal spaces directly. Between the internal intercostal muscles and the innermost intercostal, these nerves continue anteriorly.

    These nerves run inferior to the intercostal artery and vein, passing inside or slightly below the costal groove as they travel through the intercostal region. Each of these nerves produces lateral cutaneous branches close to the midaxillary line. The intercostal nerves terminate by piercing the internal intercostal muscles and external intercostal membranes between the costal cartilages and the pectoralis major muscle to become anterior cutaneous branches at the anterior chest wall, near the sternum. They also pass anterior to the internal thoracic vessels.

    The floor of the axilla and the upper posteromedial portion of the upper extremity are supplied by the intercostobrachial nerve, which is the lateral cutaneous branch of the second intercostal nerve. Patients with acute coronary artery disorders, such as heart attacks, typically have left-sided arm and axillary discomfort. The intercostobrachial nerve mediates this cardiac-referred discomfort.

    Intercostal nerves 7-11

    Additionally, the anterior rami of the final five spinal neurons (the seventh, eighth, ninth, tenth, and eleventh) enter and travel through the appropriate intercostal gaps. Here, they feed the intercostal muscles and the thoracic wall.

    But after passing through the intercostal gaps, the nerves pierce the anterior rectus sheath and proceed behind the costal border into the abdomen wall, where they end as anterior cutaneous branches. The parietal peritoneum and the skin and muscles in this area are supplied by these intercostal nerves. The thoracoabdominal nerves are another name for these nerves since they innervate both the thoracic and abdominal walls.

    Dermatomes

    The region of the skin where sensory nerves originate from a single spinal nerve root is known as a dermatome. T1–T12 are the dermatomes associated with the abdomen and thorax.

    Each is quite uniformly spaced anteriorly, and the lines T1–T6 are almost horizontal and cross the thoracic wall.

    Additionally, the thoracic wall is where the dermatomes T7–T12 begin horizontally, but they have a tendency to dip inferiorly and extend onto the abdominal wall beforehand.

    Branches

    Intercostal nerves are usually mixed nerves that innervate the thoracic and abdominal walls both motorly and sensoryly. Typically, the nerves produce several branches as they travel:

    The muscular branches for the levatores costarum, transversus thoracis, serratus posterior superior, intercostal, and subcostal muscles.

    In addition to the anterior cutaneous branches, which further split into medial and lateral branches, the lateral cutaneous branches also split into anterior and posterior branches. The skin of the anterolateral walls of the abdomen and thorax receives segmental sensory innervation from these branches.

    The collateral branches innervate the periosteum of the rib, the parietal pleura, and the intercostal muscles. They originate near the angles of the ribs and go along the superior border of the inferior rib.

    The ipsilateral sympathetic trunk and each intercostal nerve are connected by the communicative branches, or rami communicantes. Postsynaptic fibers return from the ganglions to the closest anterior rami of spinal nerves, whereas presynaptic fibers travel from the anterior rami of the spinal nerves to the trunks. The blood vessels, sweat glands, and smooth muscle of the body wall and limb are then innervated by the sympathetic fibers after they have passed via the intercostal nerves.

    Clinical Importance

    Intercostal neuralgia is the term used to describe pain that originates from the intercostal nerves. A frequent condition known as intercostal neuralgia can be caused by herpes zoster, trauma, nerve entrapment, and chronic nerve irritation. Intercostal neuralgia patients report their pain as intense, searing, or shooting. Usually, the discomfort starts at the posterior axillary line and moves anteriorly into the intercostal nerve’s distribution zone.

    Those who do not take enough breaths have complications since the discomfort might be replicated after deep inhalation or other chest wall motions. Treatment options for intercostal neuralgia include non-somatic therapy, interventional pain management, and pharmaceutical therapy with tricyclic antidepressants or anticonvulsants.

    Intercostal nerve blocks are a good way to provide analgesia, but because of their proximity to the pleural space, technique, and anatomy must be carefully considered. The architecture of the intercostal nerves and the vasculature that surrounds them must thus be well understood by medical professionals doing such treatments.

    Surgical Importance

    During thoracotomy surgeries, the intercostal nerves are always at risk of injury. During the insertion of a chest tube, the intercostal nerves are potentially susceptible to injury or transection.

    In contrast to a stab insertion, there have been case reports detailing chest tube installation methods that involve meticulous dissection of the intercostal areas and identification of the intercostal nerve. Additionally, anesthetic blocks of the intercostal nerves before thoracotomy closure have been reported to cause hypotension in both cases with and without a spinal block.

    FAQs

    How to stop intercostal nerve pain?

    Some options to treat intercostal neuralgia are:
    Non-steroidal anti-inflammatory drugs (NSAIDs)
    Antidepressant or anticonvulsant medication.
    Intercostal nerve block.
    Radiofrequency lesioning.
    Occupational therapy.
    Physical therapy.
    Cognitive or behavioral therapy.
    Surgery.

    What irritates intercostal nerves?

    Your intercostal nerves, which are located just beneath your ribs, can become irritated, inflamed, or compressed, resulting in intercostal neuralgia. This can be caused by several factors, including chest trauma. viral infections, such as shingles.

    How do you sleep with intercostal nerve pain?

    Back sleepers should cushion their upper back by holding a body pillow to their chest, while side sleepers should avoid resting on the side that is strained and put a pillow between their knees. Many individuals struggle to get to sleep and remain asleep.

    Can anxiety cause intercostal pain?

    Hyperventilation during panic attacks may lead to musculoskeletal chest pain, with strain or spasms of intercostal chest wall muscles. Esophageal dysmotility can be caused by acute anxiety this dysmotility may lead to esophageal spasm, a well-described cause of noncardiac chest pain.

    Can intercostal nerve pain go away?

    Intercostal Neuralgia: Does It Go Away? Depending on the underlying cause, intercostal neuralgia may go away with treatment in a few weeks to months. Furthermore, symptoms could disappear on their own without medical help. Conversely, some people will experience chronic pain for a very long period.

    References

    • Intercostal nerves. (2023, October 30). Kenhub. https://www.kenhub.com/en/library/anatomy/intercostal-nerves
    • Intercostal nerves. (2023, May 22).StatPearls.https://www.ncbi.nlm.nih.gov/books/NBK538238/

  • Cervical Plexus

    Cervical Plexus

    Introduction

    The cervical plexus is a collection of cervical nerves created by the anterior (ventral) rami of spinal nerves C1-C4 (sometimes known as the first through fourth cervical nerves). The cervical plexus’ roots (limbs) are shown here.

    The 5th cervical nerve (the anterior ramus of spinal nerve C5) may also be regarded as a member of the plexus since it helps to produce one of the cervical plexus’ motor branches, the phrenic nerve. As a result, the cervical plexus may alternatively be characterized as a network of nerves created by the anterior rami of spinal nerves C1-C5, which produces both motor (deep) and sensory (superficial) branches.

    Course

    Sensory branches

    Lesser occipital nerve: This branch is created only by the second cervical nerve (C2) and serves to feed the skin of the neck and scalp posterosuperior to the collarbone.

    Great auricular nerve: This sensory branch is derived from the C2 and C3 nerves. It travels diagonally upwards, crossing the sternocleidomastoid muscle and ending at the parotid gland. It then separates and innervates the skin around the parotid gland, the posterior side of the auricle, and a region of skin that stretches from the mandibular angle to the mastoid process.

    Transverse cervical nerve: The transverse cervical nerve is composed of axons from the second and third cervical nerves. It provides the skin that covers the front triangle of the neck. This branch curls around the center of the sternocleidomastoid muscle’s posterior border before crossing deep into the platysma muscle.

    Supraclavicular nerves: These branches are produced from the C3 and C4 spinal neurons and emerge as a single trunk behind the sternocleidomastoid muscle. This separates into three smaller branches (medial, middle, and lateral) that reach the skin of the neck. Some branches cross the clavicle to supply skin on the shoulder.

    Motor branches

    The ansa cervicalis: The five motor branches of the ansa cervicalis loop mentioned above arise from the C1 to C3 nerves. The ansa cervicalis is made up of two roots, superior and inferior, created by fibers from the cervical spinal neurons’ anterior rami. They feed the infrahyoid muscles in the anterior cervical triangle.

    The phrenic nerve: The phrenic nerve is primarily derived from the 4th cervical nerve (C4), with contributions from the 3rd and 5th cervical nerves (C3 and C5). It develops in the superior section of the lateral border of the anterior scalene muscle, near the superior border of the thyroid cartilage. The phrenic nerve has motor, sensory, and sympathetic nerve fibers. It supplies the diaphragm’s only motor supply as well as feeling in its middle region.

    The phrenic nerve in the thorax innervates the mediastinal pleura and pericardium of the heart. The phrenic nerve descends obliquely across the anterior scalenus muscle, passing through the prevertebral layer of deep cervical fascia and the transverse cervical and suprascapular arteries. As it reaches the thorax, it passes anterior to the internal thoracic artery and posterior to the subclavian vein.

    Function

    The cervical plexus provides a network of branches that supply sensory and muscular innervation to regions in the head, neck, and trunk. Some branches also get input from cranial nerves, which innervate their respective tissues. The cervical plexus is two distinct plexuses, one superficial and the other deep.

    The superficial plexus is made up of lateral terminal branches that form loops that give rise to the sensory branches of the cervical plexus, which include the great auricular nerve, the external auditory meatus, the transverse cervical nerve, and the lesser occipital and supraclavicular nerves. The deep plexus then divides into muscle branches, which include the ansa cervicalis, phrenic nerve, and other segmental branches.

    Branches

    Sensory

    Motor branches feed muscles, whereas cutaneous branches innervate the skin of the anterolateral neck, the upper region of the thorax (superolateral thoracic wall), and the scalp between the auricle (pinna) and the external occipital protuberance.

    The sensory (posterior or cutaneous) branches of the plexus arise around midway along the posterior edge of the sternocleidomastoid muscle. This location is clinically significant and recognized as the neck’s nerve point.

    Four sensory branches emerge from the two loops created by the anterior rami of spinal nerves C2 and C3, and C3 and C4. They are:

    Branches of the loop between C2 and C3:

    • Lesser occipital nerve (formed by C2)
    • Great auricular nerve (C2 and C3)
    • Transverse cervical nerve (formed by C2 and C3)

    Branches of the loop between C3 and C4:

    Supraclavicular nerves (formed by C3 and C4)

    The bolded letters in the names of the four sensory branches can be used to create a mnemonic for memorizing them. Thus, the mnemonic for the sensory branches is Let’s Go To Sleep.

    Motor

    On the other hand, the motor branches of the cervical plexus create the ansa cervicalis (C1-C3), a nerve loop that innervates the infrahyoid muscles in the anterior cervical triangle.

    They also create the phrenic nerve (C3-5), which nourishes the diaphragm and pericardium of the heart. Additional muscular branches are also formed to supply innervation to the prevertebral, sternocleidomastoid, and trapezius muscles.

    Susan Saw from Game of Thrones is a mnemonic for Ansa cervicalis.

    • Sternohyoid nerve (C1 – C3)
    • Sternothyroid nerve (C1 – C3)
    • Geniohyoid nerve (via hypoglossal nerve) (C1)
    • Omohyoid nerve (C1 – C3)
    • Thyrohyoid nerve (via hypoglossal nerve) (C1)

    Phrenic nerve (contributed mostly by C4, with minor contributions from C3 and C5)

    Muscular branches for the prevertebral, sternocleidomastoid, and levator scapulae muscles

    The mnemonic MAP (Muscular branches, Ansa cervicalis, Phrenic nerve) helps you recall the motor branches of the cervical plexus.

    Embryology

    The ventral roots of the spinal nerves originate in the mantle layer of the neural tube. In this mantle layer, neuroblast processes form rootlets that emerge in a continuous longitudinal series on the ventrolateral boundary of the neural tube.

    The direction in which the ventral root fibers emerge from the tube varies depending on the size and position of the ganglion crest. The superficial cervical plexus is formed by the anterior branch fusion of C2 and C3, which produces the descendens cervicalis; this then connects in a loop with the hypoglossal nerve and, together with the first cervical nerve, forms the plexus. The deep plexus is composed of the lateral terminal branches. While the cervical plexus develops in a complicated manner, one important branch of the deep cervical plexus, the phrenic nerve, has been precisely documented throughout development.

    During development, the diaphragm grows around the newly formed nerves. Some origins mention the phrenic nerve growing immediately ventral to the diaphragm during development. As the fetus grows, the locations of origin and insertion of the phrenic nerve gradually move apart due to the diaphragm’s drop and the elevation of the cervical nerves as other tissues in the neck develop.

    Clinical Importance

    Phrenic nerve severance

    The phrenic nerve is severed (injured), resulting in diaphragmatic paralysis. A phrenic nerve block can cause temporary diaphragmatic paralysis. In this instance, an anesthetic is injected around the nerve, which is situated on the anterior surface of the anterior scalene muscle’s middle section. A surgical phrenic nerve crush will result in a prolonged duration of paralysis.

    Cervical plexus block

    A nerve block is a technique for inhibiting nerve impulse conductance, typically for regional anesthesia before surgical procedures. A cervical plexus block involves injecting an anesthetic substance at numerous sites along the posterior border of the sternocleidomastoid muscle, primarily at the intersection of its superior and middle thirds, which is the neck’s nerve point. Because the cervical plexus block paralyzes the phrenic nerve that supplies the diaphragm and pericardium, this technique is not performed on patients with pulmonary or cardiac illnesses.

    Surgical Importance

    Cervical plexus blocks are often used in this location to enhance anesthesia and as a regional pain block during neck surgeries. These operations include cervical fat pad biopsy, lymph node biopsy, and other superficial neck surgeries.

    If performed appropriately, this sort of block provides anesthesia to the neck, occipital area, shoulder region, and upper pectoral region. To begin, to properly do this nerve block, an analgesic solution must be injected subcutaneously at the midpoint of the sternocleidomastoid’s posterior border. Anesthetized skin should be used to infiltrate the regions lateral to the transverse processes of the second, third, and fourth cervical vertebrae. It is critical to avoid intrathecal and intravascular injections while using this method. One case study also revealed injections into the phrenic and vagus nerves, while another demonstrated Horner syndrome as a result of this technique.

    If more extreme surgical treatments are necessary, such as neck dissections, mass excision, thyroglossal cysts, trachea and laryngeal surgeries, and even carotid endarterectomy, local anesthetic must be supplied through the carotid sheath. This injection must be administered underneath the adventitia of the carotid bifurcation and into the superior angle of the incision. Unfortunately, thyroidectomies are seldom performed with this procedure since the bilateral blockage causes the patient to choke and increases the risk of bilateral phrenic blockade.

    FAQs

    What is the difference between the cervical plexus and the brachial plexus?

    The cervical plexus sends nerves to the posterior head and neck, as well as the diaphragm. The brachial plexus sends nerves to the arm. The lumbar plexus provides nerves to the anterior leg.

    What are the 4 major plexuses?

    Cervical Plexus—Serves the Head, Neck, and Shoulders.
    The brachial plexus connects the chest, shoulders, arms, and hands.
    The Lumbar Plexus serves the back, belly, groin, thighs, knees, and calves.
    The sacral plexus connects the pelvis, buttocks, genitals, thighs, calves, and feet.

    What are the two types of cervical plexus?

    The cervical plexus contains two branches, cutaneous and muscular. Cutaneous (4 branches): Lesser occipital nerve – innervates the skin and the scalp posterosuperior to the auricle (C2) Great auricular nerve – innervates skin near concha auricle (outer ear) and external acoustic meatus (ear canal) (C2-C3)

    Does the phrenic nerve form part of the cervical plexus?

    The phrenic nerve originates in the cervical spinal roots C3, C4, and C5. This may be recalled using the limerick, “C3, 4, and 5 keep the diaphragm alive”. The primary contribution comes from the spinal root C4, with minor contributions from C3 and C5, as well as some connecting fibers from the cervical plexus.

    What is the neck muscle called?

    Sternocleidomastoid muscle

    The sternocleidomastoid is a big, two-headed muscle in the neck. The clavicular head develops from the medial portion of the clavicle, while the sternal head develops from the sternum’s manubrium.

    References

    • Cervical plexus. (2023, June 15). Kenhub. https://www.kenhub.com/en/library/anatomy/cervical-plexus
    • Cervical plexus. (2023, July 24).StatPearls.https://www.ncbi.nlm.nih.gov/books/NBK538514/