Lumbar Spine Examination
The lumbar spine examination is a structured assessment used to evaluate lower back function, mobility, strength, and potential sources of pain. It typically includes observation, palpation, range of motion testing, neurological assessment, and special tests to identify conditions such as disc herniation, spinal stenosis, or muscle imbalances. A thorough examination helps guide diagnosis and treatment planning for optimal spinal health.
Anatomy:
Your lumbar spine is made up of the five vertebrae in your lower back. The largest vertebrae in your entire spine are the lumbar vertebrae, also referred to as L1 through L5. Your lumbar spine is situated above the five fused bones that comprise your triangular sacrum bone and under your 12th thoracic (chest) vertebra.
Your lumbar vertebrae are bigger, thicker, and more block-like than the other vertebrae in your spine. Your lumbar vertebrae support your back and spinal column and act as a point of attachment for several ligaments and muscles. Your lumbar vertebrae support the majority of your body weight. It also acts as the center of balance for your body. Your lumbar spine and the muscles and ligaments that attach to it allow you to walk, run, sit, lift, and move your body in all directions.
A lordotic curve is a small inward curvature of your lumbar spine.
Your lumbar spine serves several purposes, such as:
- Supports your upper body and evenly distributes your body weight.
- Makes your body move.
- Protects the cauda equina and spinal cord.
- Regulates the mobility of the legs.
Lumbar spine muscles:
The big, flat, broad muscle with a triangle shape is called the latissimus dorsi. It spans the width of your middle and lower back, beginning at the base of the sixth thoracic vertebrae and the final three or four ribs. Your upper arms are where part of the latissimus attaches. Your lats enable you to bend sideways, raise your rib cage for breathing, and utilize your arms to raise your body weight.
Iliopsoas: These three muscles move the hip joints. When you walk, run, or get out of a chair, your iliopsoas muscles, one on each side of your body, flex and stabilize your hip and lower back.
The three muscles that make up the paraspinals run the length of your spine. These muscles allow you to rotate, side bend, and extend. They also assist you in maintaining an erect posture.
Disks in the lumbar spine:
Intervertebral disks works as a “shock absorber” located between each vertebra. Five disks are located between the vertebrae of your lumbar spine. Apart from serving as a shock absorber, they also facilitate movement between vertebrae and support the weight of your body by absorbing the load that travels down your spine. The most common cause of lower back discomfort or pain that travels down your legs and feet is disk degeneration or herniation in the lumbar region.
Ligaments in the lumbar spine:
Anterior longitudinal ligament: This ligament goes along the front of your lumbar vertebrae. This ligament maintains the stability of your lumbar joints by limiting extension, or the backward bending of your lumbar spine.
The ligament that runs down the back of the lumbar vertebrae is called the posterior longitudinal ligament. It limits the flexion, or forward bending, of your lumbar spine.
Interspinous and supraspinous ligaments: The supraspinous ligament connects the tips of vertebrae L1 and L3. The interspinous ligament is a thin layer of connective tissue that runs from each vertebra’s tip to the base of the spinous process. Both ligaments limit flexion or forward bending.
Ligamentum Flavum: The back side of each vertebra’s internal hole, where your spinal cord travels, is lined with these ligaments. These ligaments conceal and protect your spinal cord from behind.
Intertransverse ligament. This ligament connects the vertebrae’s transverse processes. They assist in preventing your trunk from bending sideways.
Iliolumbar ligament. This ligament runs from the tip of the L5 transverse process to the upper rear of your iliac bone crest (pelvis). It assists in lumbosacral spine stabilization.
Spinal cord:
From the bottom portion of your brain to around your L1 vertebra, your spinal cord is a get caught of nerve tissue. Your brain sends signals to your muscles through it. The cauda equina, the remaining nerve roots, go along the remainder of your spinal canal.
Lumbar spine nerves:
Your genital area and groin are sensed by the L1 spinal nerve, which also facilitates hip muscle movement.
The inner side of your lower leg and the front portion of your thigh are sensed by the L2, L3, and L4 spinal neurons. The motions of the hip and knee muscles are likewise regulated by these nerves.
The L5 spinal nerve senses the upper part of your foot, the space between your first and second toes, and the outside of your lower thigh. This nerve also controls the movements of the hip, knee, foot, and toe.
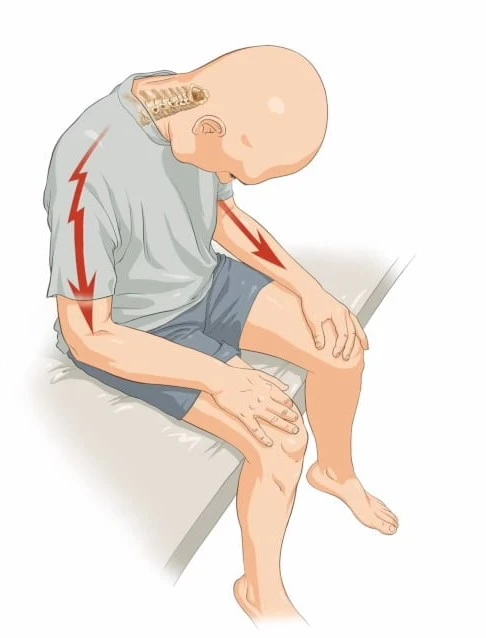
The L4 and L5 nerves, as well as additional sacral nerves, make up the sciatic nerve. Beginning in the back of your pelvis, your sciatic nerve travels down the back of your leg and ends in your foot.
Blood vessels in the lumbar spine:
Your lumbar region’s muscles, ligaments, and vertebrae receive blood and oxygen from branches of the extensive abdominal aorta.
Diseases, illnesses, and conditions affecting your lumbar spine:
- Lower back pain
- Lumbar stenosis
- Spondylolisthesis
- Vertebral compression fracture
- Sciatica
- Herniated disk
- Lumbar lordosis or “swayback ”
- Muscle spasm
- Degenerative disk disease
- Cauda equina syndrome
Examination:
Observation:
Once the patient enters the clinic, observe their gait. Make a note of any abnormalities in posture, movement, or deformities. Next, check for lumps and bumps, hairy patches or fat pads, café au lait spots, and scars.
Keep an eye out for the typical shape of the spine because individuals with TB and spinal tumors may exhibit noticeable kyphosis or muscular dystrophy, which frequently leads to an elevated lumbar lordosis. Friedreich’s ataxia and syringomyelia are also frequently accompanied by scoliosis. Examine the patient’s sitting position and how they get up from it.
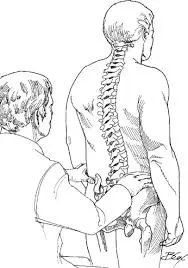
Palpation:
Check for scoliosis or step-offs linked to spondylolisthesis by palpating the spinous processes while standing up. Additionally, compare the gluteal folds, posterior superior iliac spines (PSIS), and iliac crests in height. They should be roughly aligned and symmetrical.
To determine whether the patient’s posture changes from a seated to a standing position, you can also palpate while they are seated. Palpating the quadratus lumborum, paraspinals, and erector spinae while seated is another way to feel for soreness and muscle guarding.
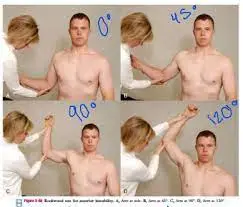
Movement Examination:
An essential component of a lumbar spine examination is determining the lumbar spine’s range of motion (ROM). Inadequate spinal mechanics is linked to abnormal spinal motion. All planes of motion, including flexion, extension, side bending, and rotation, are examined for the lumbar spine.
- Flexion – 50 degrees
- Extension – 15 degrees
- Right lateral flexion – 20 degrees
- Left lateral flexion – 20 degrees
- Right rotation – 5 degrees
- Left rotation – 5 degrees
Muscle Testing:
One of the most important aspects of low back pain therapy is the “proper functioning” of the transversus abdominis. To activate these muscles, do the drawing maneuver.
If myotome testing hasn’t been evaluated as part of the neurological examine, it should be done during muscle testing.
Testing for Joint Mobility:
Passive Physiological Intervertebral Motion (PPIVM):
When side-lying:
- Segmental shift toward flexion
- Movement of segments into extension
- Movement of segments into rotation
- Keep an eye out for hypomobile, normal, or hypermobile movements.
Passive accessory intervertebral motion (PAIVM):
Prone testing for
- Moves from the Posterior to the Anterior (PAs)
- Unilateral glides from the posterior to the anterior (UPAs)
Special Tests:
Milgram test:
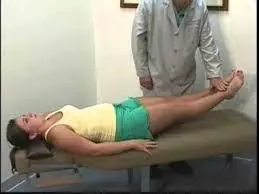
The Milgram test is used to check for neurological problems in the leg.
The method refers to the patient’s initial supine position.
The patient is next instructed to voluntarily lift both legs off the examination table at the same time, elevating them 5 to 10 cm (2 to 4 inches) off the ground and maintaining that position for 30 seconds.
Result: If the affected limb or limbs cannot be held for 30 seconds or if the symptoms are replicated in the affected limb, the test is considered positive.
This test should always be performed carefully since it places a significant amount of stress on the lumbar spine.
One-leg standing lumbar extension:
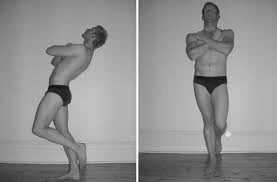
This one-leg standing lumbar extension test is used to assess the pathophysiology of the facet joints.
Method:
- The patient extends their spine, balances, and stands on one leg.
During the examination, the patient stands on the other leg.
According to the findings, a positive test is linked to spondylolisthesis, or a stress fracture of the pars interarticularis, and back discomfort. - If the stress fracture is unilateral, standing on the ipsilateral limb causes more pain.
Rotation that is accompanied by pain and extension could be a sign of facet joint illness on the side that is impacted.
Quadrant test:
This test aims to determine the maximal narrowing of the intervertebral forearm.
Method:
- The examiner stands behind the patient while both of them rise.
- The patient stretched their spine as the examiner (therapist) held onto their shoulder to regulate the motion.
- The examiner can support the weight of the head by using the shoulders to grip the occiput.
- During the extension, excessive pressure is used while the patient’s side flexes and rotates to the painful side.
- Until symptoms appear or the upper limit of the range is reached, the movement keeps going.
As a result, the facet joints on the side where rotation occurred experienced tension, and the intervertebral forearm contracted to its maximum.
If symptoms are present, the test is positive.
Schober test:
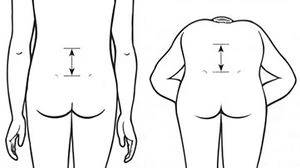
The goal of the Schober test is to determine how far the lumbar spine is bent.
Method
- The Schober test can be performed to assess the degree of lumbar spine flexion.
- There is a spot between the two PSIS. Characterizes the S2-level pelvic dimples.
- After that, points are drawn 10 cm (4 inches) above and 5 cm (2 inches) below the level.
While the three sites are being measured, the patient is requested to lean forward, and the distance is then measured again. - The degree of flexion in the lumbar spine is indicated by the difference between the two measurements.
- It is unclear how to evaluate extension using a Schober test variant.
The patient’s spine was stretched once the flexion action was finished, and the distance between the markers was recorded.
Little also recommended separating the four marking spots by 10 cm (4 inches).
Yeoman’s test:
The purpose of this test is to assess lumbar spine discomfort.
Method:
- For the test, the patient rests in the prone position.
- The examiner (therapist) extends the patient’s knee in order to stabilize the pelvis and extend each patient’s hip in turn.
- Next, while maintaining a bent knee, the examiner (therapist) stretched each patient’s leg independently.
The patient is docile in all circumstances.
Lumbar spine pain throughout any test component indicates a positive test.
Bragard’s Signs:
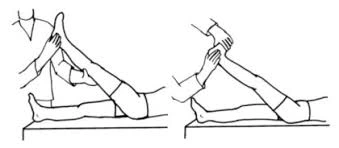
To find out whether lumbar or ischemic pain is caused by lumbosacral radiculopathy (such as disc herniation causing nerve root compression), one can utilize the Bragard’s sign, also known as the Braggard’s test.
Approach
The patient is in a supine position. The Straight Leg Raise Test, commonly referred to as Lasegue’s Sign: The leg is raised straight while flexing the hip until noticeable pain occurs. The foot dorsiflexes by allowing the leg to drop just below the pain threshold. For Bragard, the return of the usual pain is a positive indication. This would suggest that the patient’s pain was caused by involvement of a neurological system.
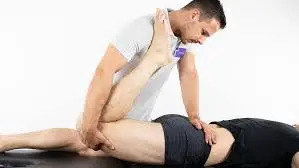
Femoral nerve tension test:
The femoral nerve tension test is applied to the dorsal aspect of the leg to assess soft tissue sensitivity to stretching that could be connected to root impingements.

Method
- While the patient is in a prone posture, the physical therapist stands beside them, using one hand to stabilize the pelvis and prevent anterior rotation.
- Conversely, the physical therapist then increases the knee’s maximal range of motion. If this posture shows no promising signs, the physical therapist then extends the hip while maintaining the knee flexed.
- The physical therapist may alter the test position to identify the damaged nerve. In contrast to the Saphenous Nerve Bias Test, which requires prone reclining, passive hip extension, abduction, and external rotation in addition to knee flexion, ankle dorsiflexion, and eversion, the lateral femoral cutaneous nerve bias test includes an active hip extension, abduction, and external rotation.
- Normal response: The normal response is to flex the knee such that the heel touches the buttocks. The quadriceps may feel strained or pulled.
- If, between 80 and 100 degrees of knee flexion, there is unilateral soreness in the lumbar region, buttocks, posterior thigh, or any combination of these locations, the test is considered positive.
- When the dura is tensioned between 80 and 100 degrees, positive results in this range may indicate a disk herniation affecting the L2, L3, or L4 nerve root.
Positive results from a disc herniation may differ from quadriceps problems depending on the range of discomfort that is replicated. - An injury or tight quadriceps may be the cause of knee flexion below 80 degrees. Furthermore, if there is stiffness, the pelvis on that side rises as the hip flexes in response to passive knee flexion. Examine both sides and compare the symptoms because anterior thigh pain can also be caused by a tight rectus femoris.
FAQs
What is the anatomy of the lumbar spine?
Your lumbar spine is situated above the five fused bones that comprise your triangular sacrum bone and under your 12th thoracic (chest) vertebra. Your lumbar vertebrae are bigger, thicker, and more block-like than the other vertebrae in your spine.
What signs and symptoms indicate an issue with the lumbar spine?
Walking long distances or leaning forward to relieve strain on your lower back are two symptoms of lumbar spinal stenosis. Additionally, you can experience numbness or pain in your legs.
Lumbar spondylosis: What is it?
A disorder called lumbar spondylosis results in the degeneration of the lower back’s disks and bones. Osteoarthritis and degenerative disk disease are other names for it.
Which nerves does lumbar spondylosis affect?
The lower limbs are innervated by the five pairs of lumbar spinal nerves. The L1 spinal nerve may help move the hip muscles and supplies feeling to the genital and groin areas. The inside of the lower leg and the front portion of the thigh are sensed by the L2, L3, and L4 spinal neurons.
What occurs if L5 gets damaged?
Damage to the L4-L5 nerve usually manifests as weakness, tingling, numbness, and chronic lower back pain that travels to the legs and foot. Damage to the spinal nerve can be severe.
How is the mobility of the lumbar spine tested?
Placing two or three fingers over the lumbar spine allows you to measure lumbar flexion and extension. Request that the patient touch their toes by bending. When you flex your fingers, they should separate, and when you extend them, they should rejoin.
How are L4 and L5 palpated?
You can begin at the iliac crest and work your way across to the spine to palpate the L4 and L5 vertebrae. The L4 and L5 vertebrae can also be felt from beneath the umbilicus.
What is a test for lumbar compression?
The patient stands in their typical, comfortable standing position to do this test. The practitioner visually checks for “buckling” in the lumbar spine while applying a vertical force through the shoulders.
What occurs if L3 sustains damage?
The first vertebra in the lumbar spine without a spinal cord segment is the one which is the middle one. Weakness, numbness, and loss of flexibility in the legs, hips, and/or groin are typical signs of an L3 lumbar spinal injury.
Reference:
- Professional, C. C. M. (2025b, January 24). Spine structure and function. Cleveland Clinic. https://my.clevelandclinic.org/health/body/10040-spine-structure-and-function/
- TeachMeAnatomy. (2020, June 17). The lumbar spine – joints – ligaments – TeachMeAnatomy. https://teachmeanatomy.info/abdomen/bones/lumbar-spine/
- Woon, C., MD. (n.d.). Lumbar spine anatomy – spine – orthobullets. https://www.orthobullets.com/spine/2071/lumbar-spine-anatomy
- Beasley, K., DO. (n.d.). Lumbar spine anatomy and pain. Spine-health. https://www.spine-health.com/conditions/spine-anatomy/lumbar-spine-anatomy-and-pain
- Low Back Exam, Approach to. (n.d.). Stanford Medicine 25. https://stanfordmedicine25.stanford.edu/the25/BackExam.html
- Examination of the spine. (n.d.-c). Versus Arthritis. https://versusarthritis.org/about-arthritis/healthcare-professionals/training-and-education-resources/clinical-assessment-of-patients-with-musculoskeletal-conditions/the-musculoskeletal-examination-rems/examination-of-the-spine/