40 Best Iliopsoas Muscles Exercises
Overview
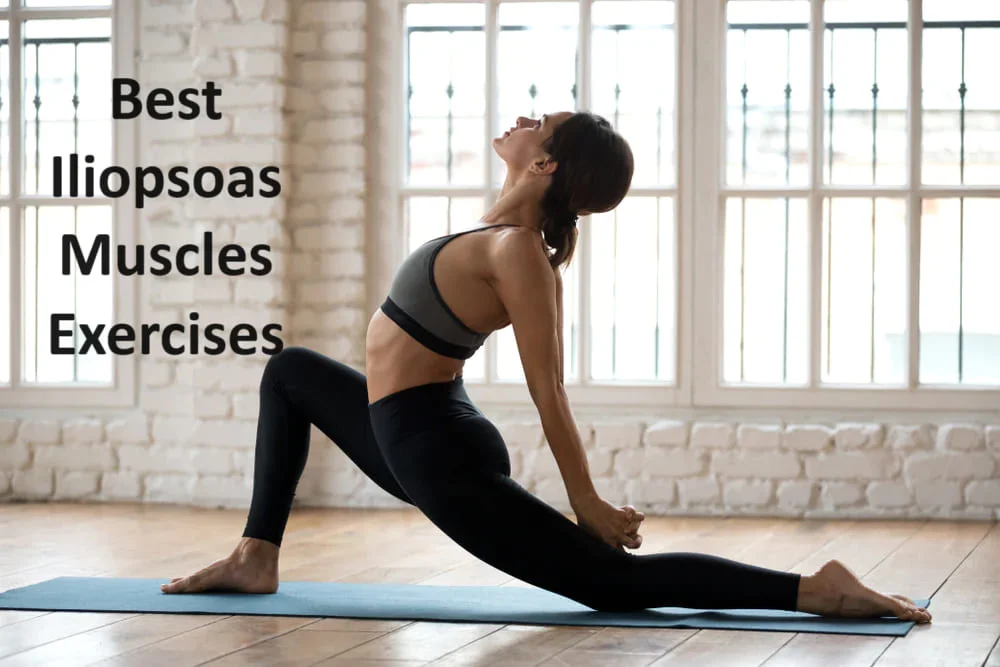
- The Iliopsoas Muscles may not be well known, but it plays an important role in activities such as walking, climbing stairs, and keeping your spine healthy and pain-free. The iliopsoas muscle flexes and externally rotates the thigh at the hip joint. It also helps to flex and stabilize the trunk, as well as maintain good posture.
- The iliacus, psoas major, as well as psoas minor muscles, join together to form the iliopsoas muscle. This muscle group connects the spine and femur. It is located deep within the body, near the spine and pelvis.
- The Psoas, or soul muscle! The psoas is an extremely important muscle that many people overlook, which is unfortunate because stretching and strengthening the psoas can make a huge difference in how we feel and move.
- If you suffer from lower back pain, hip pain, or other forms of tightness as well as stress in your body, psoas stretches as well as strengthening exercises may be able to resolve these issues completely.
- The iliopsoas muscle is an important muscle group found deep within the hip region. It consists of the iliacus and the psoas major muscles. They work together to flex the hip joint while offering support and stability during movement.
- Strengthening as well as stretching the iliopsoas muscles is critical for maintaining proper hip function and avoiding injury.
What is the Anatomy of the iliopsoas muscle?
- The iliopsoas muscle is an immense compound muscle situated in the inner hip joint.
- The iliacus as well as the psoas major muscles form the iliopsoas muscle
- The iliopsoas muscle has a broad origin:
- The Psoas major muscle originates from the 12 thoracic and 5 lumbar vertebrae.
- The iliacus muscle originates primarily from the pelvic fossa.
- Then, both muscle fibers combine to form a single muscle belly around the pelvic brim.
- The iliopsoas muscles are located in the femur’s lesser trochanter.
- The iliopsoas muscle’s function is to flex the hip joint.
- Because of these proximal attachments, the psoas major muscle is activated to allow for additional lumbar vertebral column movement.
How does the psoas muscle work?
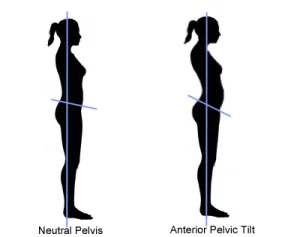
- The psoas muscle originates in the lower back and ends at the front of the femur, extending from the back to the front of the body. It belongs to the hip flexor muscle group.
- These muscles lift the thigh closer to the body. Hip flexion, or lifting of the thighs, is required for everyday activities such as walking and climbing stairs.
- When the psoas muscle is too tight, it tilts the pelvis forward, putting more strain on the lower back.
What is iliopsoas muscle stretching?
- At the hip joint, the thigh is flexed and rotated laterally by the iliopsoas muscle. This aids in flexion, trunk stabilization, and good posture.
- The iliacus, psoas major, and psoas minor muscles work together to form the iliopsoas muscle.
Iliopsoas stretching is an excellent exercise for increasing flexibility and improving posture, and trunk stability. This exercise offers numerous health benefits and fitness levels. - This muscle group connects the spine and the femur. Psoas begins with the lower six vertebrae of the spine. The iliacus originates in the pelvic bowl.
- They meet and inlay at the top of the femur, or upper leg bone. The iliopsoas muscle works to keep the trunk stable during activities such as lifting, pulling, and pushing.
- The iliopsoas additionally curve the knees toward the chest. Such as swinging the leg forward while running or kicking in sports like soccer.
- The iliopsoas stretch provides numerous benefits in daily life performance.
What are the health benefits of stretching your Iliopsoas muscle?
There are numerous benefits to performing iliopsoas stretches. Some are below:
- Tight iliopsoas muscles are a prevalent issue for many people, especially if they spend the majority of their time sitting. This is because the iliopsoas muscle shortens & becomes inactive while we sit. However, excessive sitting may lead to problems for your iliopsoas muscles.
- Stretching the iliopsoas muscle regularly may reduce the risk of injury, help stabilize the trunk, and enhance posture. It can also help you stand up from a seated position. Stretching the iliopsoas muscle may also alleviate hip pain and improve mobility. If you are experiencing lower back pain, stretching the iliopsoas can help relieve it and prevent further injury.
- Soccer, basketball, football, and running, as well as having tight hamstrings and weak glute muscles, can all cause your iliopsoas muscles to tighten. Tight or short iliopsoas muscles in some people can cause iliopsoas tendonitis, impingement, or syndrome, all of which require treatment to recover.
- What is the good news? Performing exercises such as the kneeling hip flexor stretch and glute bridge may help you avoid more serious conditions as well as allow you to perform daily tasks more comfortably.
- It’s simple to incorporate some iliopsoases stretches into your workout or stretching routine; just make sure your body is warmed up before stretching.
- Many people suffer from tight iliopsoas muscles, particularly if they spend the majority of their time sitting.
- That’s because sitting causes the iliopsoas muscle to shorten and become inactive. The iliopsoas stretch can help you lose tight muscles.
- Daily iliopsoas muscle stretching may assist in enhancing posture, stabilize the trunk, & lower the chance of injury.
It can help you transition from sitting to standing. - Stretching the iliopsoas muscle may also relieve hip pain and improve mobility. If you have lower back pain, performing proper iliopsoas stretches can help reduce it and prevent further injury.
- It also helps you walk and complete your daily tasks.
- It improves blood flow to the front of your thighs.
- Stretching relaxes your muscles.
- increases the hip joint’s range of motion. Such as hip flexion as well as lateral rotation.
What are the different types of iliopsoas stretches?
There are several types of iliopsoas stretches:
- Standing Hip Flexor Stretch
- Kneeling Hip Flexor Stretch
- Hip Flexor Bed Stretch
- Table Psoas Stretch
- Hips Elevated stretch
- High Lunge
- Hero Pose
- Seated butterfly stretch
- Pigeon Pose
- Standing Stance Pelvic Tilt
- Cobra Stretch
- Wall psoas Stretch
- Sumo Squat Stretch
Standing hip flexor stretch (iliopsoas stretching)
This stretch is useful for people who are not able to kneel.
- How to Perform this Stretch: Stand tall, with your feet about hip distance apart.
- Make a split stance with your left foot by stepping forward.
- Engage the core muscle and tuck the pelvis. The patient may place their hands on their left leg.
- Lean the left leg forward gradually while maintaining the rear leg straight.
- The patient might experience a stretch in the front of the hip, groin, and right thigh.
- Hold the lunge position for 20-30 seconds. If you do, relax the stretch.
- Slowly return to where you started and switch sides.
- Repeat the kneeling hip flexor stretch two to three times per side.
Kneeling Hip Flexor Stretch
- How to Perform this Stretch: Take a half-kneeling place with the left leg about two feet ahead of the right leg.
- The left knee should form an angle of 90°. The mat must be used by the patient as padding.
- Maintain an upright posture by placing your hands on your left knee.
- Then, tilt your body forward slightly until your right hip, groin, & thigh start to stretch.
- Keep your knees bent for a duration of twenty to thirty seconds. The person shouldn’t experience any lower back pain.
- The individual should not experience any lower back pain. If the patient does, relax the stretch.
- Gradually go back to the beginning position and then switch sides.
- While kneeling, stretch your hip flexors two or three times on each side.
Hip Flexor Bed Stretch
- How to Perform this Stretch: Lie supine on the bed, your left leg closest to the edge.
- Gradually lower your left leg to the side of the bed.
- You can keep your right leg bent and place your foot on the bed.
- The patient feels the stretch in his hip flexors.
- The foot should ideally not touch the ground, but rather linger above it. But if it makes contact with the earth, it’s okay.
- Deepen the stretch by slowly bending the knees. The person should feel across the thigh and the front of the hip.
- Hang there for a duration of twenty to thirty seconds.
- Go back to the bed’s left leg and turn it so that the right side is closest to the edge.
- The hip flexor bed stretch should be performed two or three times on each side.
Table Psoas Stretch
- How to Perform this Stretch: Choose a table that is slightly lower than your hip level.
- Stand with your left side next to the table, then lift your left leg behind yourself and place it on a table with your knee facing down.
- The leg will be aligned. To relieve pressure from a table, the patient can place a folded towel beneath their knee.
- In front of you, place your left hand on the table. You should have a small flexion in your right leg.
- Carefully move into the stretch by raising the chest and opening up the hip flexors.
- When your left hip starts to extend, stop.
- grasp the standing position for 20 to 30 seconds.
- Repetition on the other side occurs when you release the stretch.
- Repeat the table psoas stretch 3 times on each side.
Hips elevated stretch
- How to Perform the Stretching Exercise: Lie supine, with your legs extended in front of you and your arms by your sides.
- Next, position the block or foam roller beneath the hips & lower back.
- As a result, the shoulders and head are supported by the grounded hips.
- Bend the right knee and wrap your arms around the shin to bring it closer to your chest.
- Stay there for 60 to 120 seconds.
- Next, carry out the motion again on the other side.
Hero Pose
- How to Perform this Stretch: Begin by kneeling with both knees on the ground.
- Then place a block or foam roller between the feet, just below the tailbone.
- Flex your knees to lower yourself onto the block or roller.
- Keep the knees together and the tops of the feet pressed into the ground.
- Sit tall, shoulders directly above hips.
Seated Butterfly Stretch
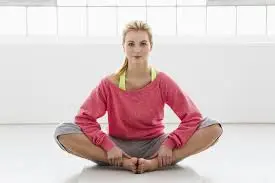
- How to Perform this Stretch: Sit on the floor or on an exercise mat.
- In the direction of you, press your feet together.
- Allow the knees to flex out on either side.
- Keep your back straight and your abs engaged.
- Relax the knees and allow them to drop to the floor.
- Hold the butterfly pose for ten to thirty seconds.
- To feel a deeper stretch, lean forward while keeping your back straight.
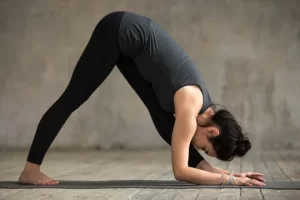
Pigeon pose
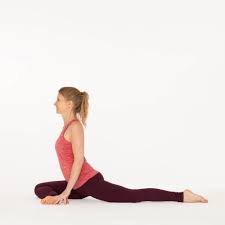
- How to perform this stretch:
- Begin in the plank position.
- Slide your right foot forward, keeping your knee close to your right hand and the foot near your left.
- Move your right foot forward so that your foot is close to your left and your knee is beside your right hand.
- The place where your toes and knees fall depends on your flexibility.
- Lower yourself to the ground as well as onto your elbows, lowering your torso as much as possible.
- Retain the stretch by keeping your chest raised.
- Change sides when you think you’ve had enough stretching.
Standing Position Pelvic Tilt
- How to perform this stretch: Stand tall with good posture, chest cavity pointed up, and shoulders back.
- Push the pelvis back and under.
- grasp the standing pose for 10 to 20 seconds.
- Release.
Cobra Stretch
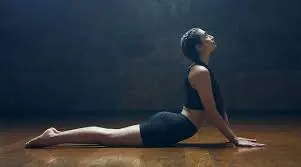
- How to perform this stretch: Lie down in a prone position.
- To extend the back, press through the hands.
- To stabilize a pelvis, engage the gluteus muscles.
- When the patient appears stretched in front of the thigh, pause and then release.
- Perform the cobra stretch three to four times.
Wall psoas stretch
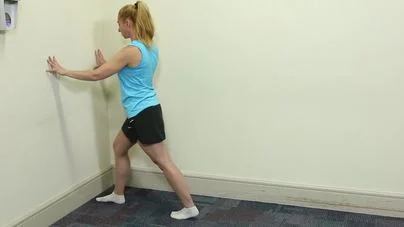
- How to Perform this Stretch: Step forward and thrust for a wall.
- Rest your right foot against a wall.
- Drive the knee closer to the wall.
- Rotate the hips backward again.
- To reduce the stretch’s intensity, drive the knee forward.
- Hold the psoas stretch for fifteen to twenty seconds and repeat 3 to 4 times.
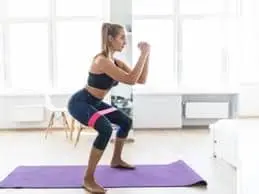
Sumo Squat Stretch
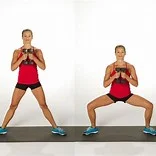
- How to Perform this Stretch: Lean back with your feet wider apart.
- Laterally rotate your feet.
- The knees and toes are pointing outward.
- Maintain a straight back and an upward-facing chest.
- Keep your thighs facing out as you squat down.
- Pause the squatting position for ten to fifteen seconds and repeat it 2-3 times.
What safety precautions should the patient take during the iliopsoas stretch?
There is a guideline you must follow while stretching the iliopsoas.
- The patient must hold the iliopsoas stretch for a set amount of time, typically 20-30 seconds. As a result, they are usually recommended after a workout, when the muscle group is at ease. Because the iliopsoas muscle is connected to the hips and trunk, it is critical to stretch with proper form.
- When stretching, take it slowly and never push yourself to the point of discomfort.
- To get the most out of your stretching routine, experts recommend doing flexibility exercises for all of the major muscles and tendon groups at least two to three times per week. Do not stretch the muscle if you have a previous injury, such as a sprain, bursitis, or fracture.
- Do not bounce while stretching; this can lead to muscle injuries.
- Never skip stretching; doing so may result in a reduction in muscle range. The patient can increase it by stretching daily.
Additional Tips for Effective Iliopsoas Stretching
To keep your iliopsoas muscle loose and flexible, incorporate these stretches into your routine and repeat them several times per week.
Keep in mind the following tips:
- If you sit for long periods during the day, try to get up at least once an hour to walk or do some of the stretches listed above.
- This can help prevent iliopsoas tightness along with other muscle imbalances by increasing circulation while keeping your muscles loosened.
- Look for ways to sit less during the day.
In addition to the exercises listed above, several yoga poses may stretch your iliopsoas muscle. - These poses are the cobra pose, camel pose, half pigeon, tree pose, as well as warrior. incorporating yoga into your daily schedule is an excellent way to maintain overall flexibility.
- You can also use a foam roller to improve circulation and relax this muscle. Set the foam roller at the top of your thigh muscle and roll it up to your hip bone. Avoid rolling over your hip bone and instead use small up and down motions.
- To target the other muscle (the psoas), place the foam roller on the side of your lower back. Make sure not to place it on the spine. Roll slowly upwards and downwards.
What are the different types of iliopsoas strengthening exercises?
Lifting your legs in front of you is a good exercise for strengthening the iliopsoas along with the hip flexor muscles.
Glute Bridge
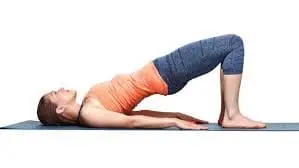
- How to Perform This Strengthening Exercise: A bridge allows you to stretch the iliopsoas while also strengthening the glute muscles.
- Place the exercise mat on the floor.
- Lie supine with arms at your sides, knees bent, and feet flat on the floor.
- Engage the glutes and raise the hips to form a bridge between the knees as well as the shoulders.
- Lift the hips until you feel a stretch in both legs’ iliopsoas muscles.
- If you have lower back pain, lower the hips slightly while keeping the glutes tight.
- The patient may not always feel the stretch, so do not continue to force through back pain. Grasp the bridge position for 20 to 30 seconds.
- Lower the hips to the floor and repeat. Do the glute bridge ten times.
- This also helps you walk and complete daily tasks.
- This improves blood flow to the front of the thighs. Stretching relaxes the muscles.
- broadens the hip joint’s range of motion. Such as hip flexion as well as lateral rotation.
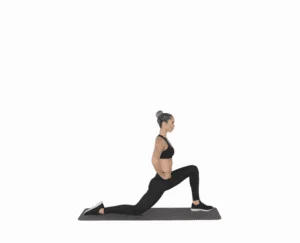
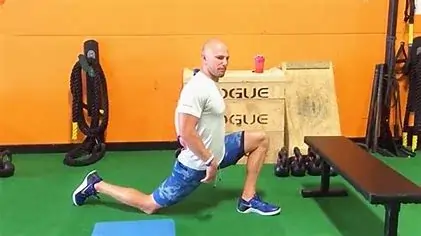
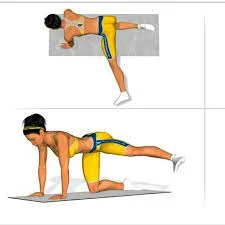
Runner’s Lunge
- How to Perform This Strengthening Exercise: Begin kneeling with both knees on the ground.
- After that, advance your left foot till your left knee is exactly above your left ankle.
- Extend your right leg behind you, maintaining the knee behind the hip as well as the top of the foot on the ground.
- Rest your hands on the left thigh.
- To stretch deeper, drive the top of the back of your foot into the ground.
- Pause for 60-120 seconds and continue the movement on the other side.
- It is a single repetition. Do it three to four times.
High Lunge
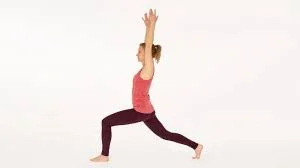
- How to Perform This Strengthening Exercise: Stand tall with your feet shoulder-width apart and your hands by your sides.
- Bend the left knee at 90° and place it directly above the left ankle. Step the right foot a few feet behind you.
- Press the right toes and ball of the foot into the ground, then straighten the arms directly overhead.
- Hang on for approximately two minutes before repeating on the other side.
Half Frog
- How to Perform This Strengthening Exercise: Begin by lying on your stomach, legs extended behind you.
- Rest your forehead on the backs of your hands.
- Bend the left knee until it is parallel to the left hip, then flex the left foot.
- The left shin should line up with the right leg.
- Press the left knee into the ground, bringing the left inner thigh as close to the mat as possible.
- Hold for 60-120 seconds, then repeat on the opposite side.
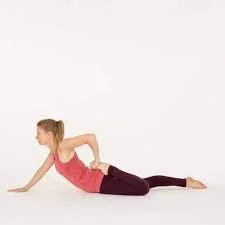
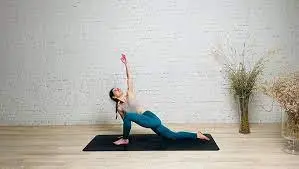
Supported Side-Plank Reach
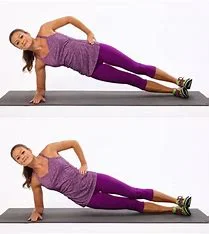
- How to Perform This Strengthening Exercise: Begin kneeling with both knees on the ground, then extend your right leg to the side.
- Set the left palm on the ground, just below the left shoulder, and extend the right arm over the right ear.
- Your body should form a straight line from your left ankle to your right wrist.
- Begin by pressing your right foot into the floor and rotating your shoulders to align with the wall in front.
- Pause for one to two minutes before repeating the movement on the opposite side.
Lying hip rotation
- How to Perform This Strengthening Exercise: You are lying on the floor, feet flat, knees bent.
- Then Position one ankle joint throughout the other knee joint.
- Rotate the hip joint in and out.
- Take this exercise position for ten seconds.
- Three times a day and ten times in a single session, complete this exercise.
Sidekick
- How to Perform This Strengthening Exercise: You are standing and raising one leg out to the side.
- Perform this exercise on both sides, repeating 10 times each.
- When strength improves, try adding light weights to the ankle joint.
- You additionally hold onto a wall for support if necessary.
- Hold this exercise position for ten seconds.
- Three times a day and ten times in a single session, complete this exercise.
Hip raises
- How to Perform This Strengthening Exercise: You’re lying on the ground, both feet planted on the floor near your buttocks.
- Then try to raise one leg straight up while keeping your thighs parallel.
- Raise the hip joint from the ground.
- Hold this exercise position for ten seconds.
- Three times a day and ten times in a single session, complete this exercise.
Leg raises
- How to Perform This Strengthening Exercise: Place both your hands and knees on the floor.
- Then, raise one foot toward the sky then get back to all fours.
- Hold this exercise position for ten seconds.
- Three times a day and ten times in a single session, complete this exercise.
Frankenstein
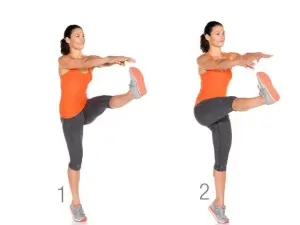
Frankensteins for psoas muscle is an exercise that works the psoas muscle, a deep muscle that runs from the lower back to the top of the thigh. The psoas muscle flexes the hip joint and stabilizes the spine.
To do Frankensteins for psoas muscle exercises, follow these steps:
- Stand with your feet hip-width apart and your arms by your sides.
- Raise the right leg straight out in front of you, keeping it as straight as possible.
- Your toes must be pointed towards the ceiling.
- Keep the right leg straight and lower it back to the ground.
- Apply the same pressure to your left leg.
- Continue alternating legs for 10 to 12 repetitions.
Frankenstein’s psoas muscle exercise can improve hip flexibility, strengthen the psoas muscle, as well as alleviate lower back pain. It’s a low-impact exercise that can be done anywhere and requires no equipment.
Hanging Leg Raise
- How to Perform This Strengthening Exercise: First Hang from a pull-up bar that is high enough to keep your feet off the ground when your legs are extended.
- Try to flex your knee and hip joints at the same time as you bring your legs up and toward your chest without using momentum, using a solid overhand hold.
- After that, slowly go back to where you were before and repeat.
- Hold this exercise position for ten seconds.
- Three times a day and ten times in a single session, complete this exercise.
Bridging Psoas March:
- How to Perform This Strengthening Exercise: First Wrap a mini band around the ball of your feet.
- Then, place your heels on an elevated surface, toes pointed up and body straight.
- Try to lift your hip joint while engaging your core and glute muscles.
- Try to bring a knee towards your chest while keeping the other leg straight.
- Avoid the hip joint sagging your buttocks.
- Then Return the working leg slowly and repeat on the opposite side.
- Hold this exercise position for ten seconds.
- Three times a day and ten times in a single session, complete this exercise.
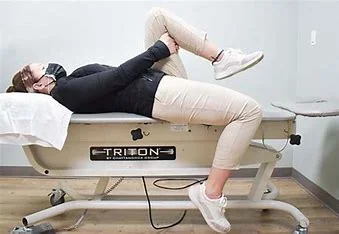
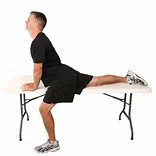
Romanian Chair Leg Raises With Dumbbells
- How to Perform This Strengthening Exercise: First, position yourself in the Roman chair, with a light dumbbell securely between your feet.
- Keep your torso upright and press your lower back against the backrest with your forearms resting on the pad.
- Lift your legs parallel to the floor by flexing your hips while keeping your knees straight.
- Then slowly reverse to the starting position and repeat.
- Hold this exercise position for ten seconds.
- Three times a day and ten times in a single session, complete this exercise.
Lunge
- How to Perform This Strengthening Exercise: Begin this exercise by standing, looking straight ahead, and taking a generous step forward with your right foot.
- Must be Maintain your trunk upright throughout the movement.
- Then, bend your extended knee joint and transfer your weight to your right leg.
- Once your left knee is on the floor, gradually lower yourself into a lunge again.
- Your right knee joint should be directly above the right ankle joint.
- Step back into a standing position and repeat with your left leg in front.
- Hold this exercise position for ten seconds.
- Do this workout three times a day and ten times in a single session.
Boat pose
- How to Perform This Strengthening Exercise: You’re sitting on a mat with your torso upright, knees bent, and feet flat on the ground.
- Lean back slowly, tucking your tailbone under to avoid putting pressure on it.
- While leaning back, try to extend your legs into the air and bring your spine into a neutral position by removing the arching.
- Lift your chest, keep your shoulders down, and hold for some time.
- Take a minute or two to maintain this stance.
- Perform this pose five times in a single session, and three times daily.
Hanging leg raises
Hanging leg raises are an advanced exercise that focuses on the psoas muscles. This exercise requires you to hang from a pull-up bar or a set of parallel bars. Here are the steps to perform hanging leg raises:
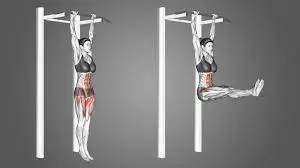
- Begin hanging from the bar, with your arms fully extended and your shoulders relaxed. Your body should be straight, with your legs together.
- Pulling your shoulder blades down and back helps to engage your core muscles and stabilize your upper body.
- Gradually raise your legs in the direction of your chest, keeping them straight. Use your core power to control the movement and avoid swinging or momentum.
- Continue to lift your legs until they are parallel to the ground or as high as you can comfortably reach.
- Pause briefly at the highest point of the movement before gradually lowering your legs back to their starting position.
- Repeat several times.
Hanging leg raises are effective at engaging the psoas muscle because they require hip flexion against gravity. This movement strengthens and stretches the psoas, which improves overall function and promotes proper posture and movement.
Bridging Marches
Bridging Marches is an exercise that works the psoas muscle, which is located deep within the body. This muscle is essential for pelvic stability and lower back support, but it can become tight and weak as a result of prolonged sitting or poor posture. Bridging Marches may stretch and strengthen the psoas muscle, improving its function and lowering the likelihood of injury.
To perform bridging marches, follow these steps:
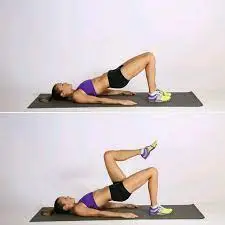
- Start by lying on your back. Knees should be bent; feet should remain flat on the ground. Your arms should be by your sides, palms facing downward.
- To activate your core muscles, pull your belly button in the direction of your spine. This will help to stabilize your pelvis while also protecting your lower back.
- Raise your hips off the floor and align them with your body, forming a straight line from your shoulders to your knees.
- The weight of your body should be evenly distributed across both feet, with your shoulders relaxed.
- Once in the bridge position, lift one foot off the ground while bringing your knee to your chest. Hold this position for a few seconds before lowering your foot back to the ground and repeating on the opposite side.
- Alternate lifting each foot for several repetitions, keeping your hips level and stable throughout the movement.
As you perform Bridging Marches, contract your glutes and hamstrings to lift your hips while also engaging your core muscles to keep them stable. This will help to activate the psoas muscle, increasing its strength and flexibility over time.
Repeat for several sets of 10-15 repetitions, or however many you feel comfortable with.
V sits
V-sits are an excellent exercise for strengthening the psoas muscle, which is located deep in the abdomen as well as connects the spine and legs. Here’s how to do V-sits.
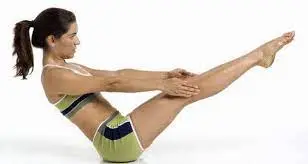
- Sit on the floor, legs straight out in front of you, hands resting on the ground beside your hips.
- Engage your core muscles as well as lift your legs off the ground, bringing them closer to your chest.
- At the same time, extend your arms forward and raise your upper body off the ground, forming a V shape with your body.
- Hold this position for a few seconds before slowly lowering your legs and upper body back to the starting position.
- Repeat several times, gradually increasing the number of reps and sets as you gain strength.
It is critical to keep your core active throughout the exercise to protect your lower back and maintain proper form. If you require additional assistance, you can modify the exercise by bending your knees or placing a support such as a yoga block or towel under your hips.
Stability Ball Passes
Stability ball passes are another effective way to strengthen the psoas muscle. Here’s how to do this exercise.
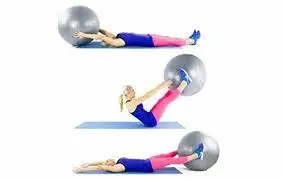
- Lie flat on your back on a mat or the floor, arms extended above your head and legs straight in front of you.
- Hold a stability ball between your feet and squeeze it tightly to keep it in place.
- Engage your core muscles and lift your legs and the stability ball off the ground, bringing them closer to your chest.
- At the same time, extend your arms forward and raise your upper body off the ground, forming a V shape with your body.
- Pass the weight of the ball from your feet to your hands, then return your legs and upper body to their starting position.
- Repeat the exercise by passing the stability ball between your hands and feet several times.
It is critical to keep your abdominal muscles engaged throughout the exercise to protect your lower back and maintain proper form. You can also modify the exercise by using a smaller stability ball or adjusting the ball’s weight as necessary. As you gain strength, you can increase the number of reps and sets to push yourself even further.
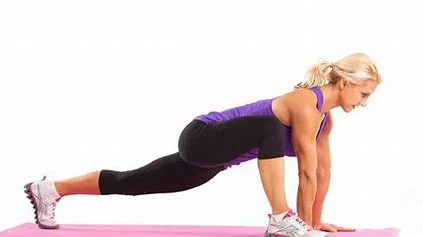
Mountain Climbers With Ankle Weights
Mountain climbers with ankle weights are an effective way to strengthen the psoas muscle. Here’s how to do this exercise.
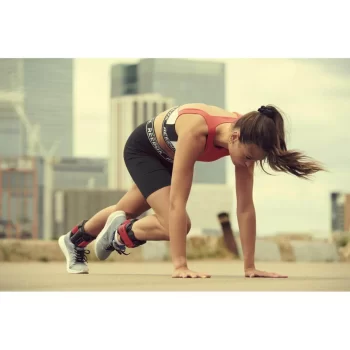
- Begin in a plank position, holding your hands shoulder-width apart and your ankles weighted.
- Engage your core muscles and raise your right knee to your chest, leaving your left leg extended behind you.
- Quickly switch legs, raising your left knee to your chest as well as extending your right leg behind you.
- Continue alternating legs in a quick running motion for several reps.
- Keep your hips level as well as your core engaged throughout the exercise to protect your lower back and maintain proper form.
- You can alter the exercise by changing the weight of the ankle weights or the speed of the movement.
- As you gain strength, you can increase the number of sets and repetitions to push yourself even further. This exercise works not only the psoas muscle, but also the core, glutes, and legs.
Suspension Straps Pikes and Tucks
Suspension strap pikes and tucks are another effective way to strengthen the psoas muscle. Here’s how to do this exercise.
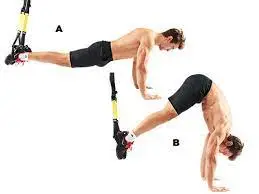
- Begin by securing suspension straps to a solid anchor point, such as a door frame or pull-up bar.
- Stand facing away from the anchor point, feet hip-width apart, and grasp the suspension strap handles.
- Engage your core muscles and lift your legs off the ground to form a plank position with your body in a straight line from head to heels.
- From here, raise your hips to the ceiling, lift your legs, and bend at the waist to form a pike position.
- Lower your hips back to plank position, then tuck your knees in towards your chest.
- Lower your legs back to the plank position as well as repeat the pike and tuck movements several times.
- Keep your core engaged throughout the workout to protect your lower back and maintain proper form.
You can modify the exercise by changing the angle of your body or the speed of the movement.
As you gain strength, you can increase the number of reps and sets to push yourself even further. This exercise strengthens not only the psoas muscle but also the core, shoulders, and arms.
Psoas March
Psoas marching is an exercise that focuses on the psoas muscle, which is located deep in the core as well as connects the lower spine and hip joint. Here’s how to do this exercise.
- Start by placing your feet flat on the ground while lying on your back.
- Lift one foot and bring your knee to your chest while keeping the other foot on the ground.
- Wrap a little resistance band around each foot’s ball.
- As you bring your knee to your chest, contract your core muscles and press your lower back into the ground.
- Slowly lower your foot back to the ground, then repeat with the other leg.
- Alternate legs for a few reps, keeping your movements slow as well as controlled.
- You can increase the intensity of the exercise by using ankle weights or holding a lightweight on your chest.
Psoas marching is a low-impact exercise that can be performed anywhere and is appropriate for all fitness levels. It helps to strengthen the psoas muscle, which can improve posture, alleviate lower back pain, and increase overall core stability.
Camel pose
Camel pose, also called Ustrasana, is a yoga pose that can help stretch and strengthen the psoas muscle. Here’s how to do this exercise.
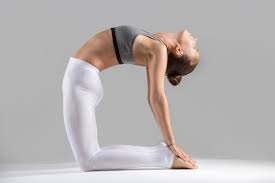
- Start by kneeling on a very soft surface, such as a yoga mat or carpet. Put your hands on your lower back, fingers pointing down toward your hips.
- Slowly arch your back, bringing your hips forward while lifting your chest to the ceiling.
You should feel a stretch in the front of your body, specifically in the psoas muscle. - If you feel comfortable, reach back with your hands as well as place them on your heels to deepen the stretch.
- Hold the pose for 20-30 seconds, then release and return to a neutral position.
Repeat the exercise several times, gradually increasing the length of the stretch as you gain comfort.
Camel pose is an excellent way to stretch and strengthen the psoas muscle, while also improving overall flexibility and posture. However, you should listen to your body and avoid pushing yourself too hard. If you experience any pain or discomfort during the exercise, stop and consult with a healthcare provider.
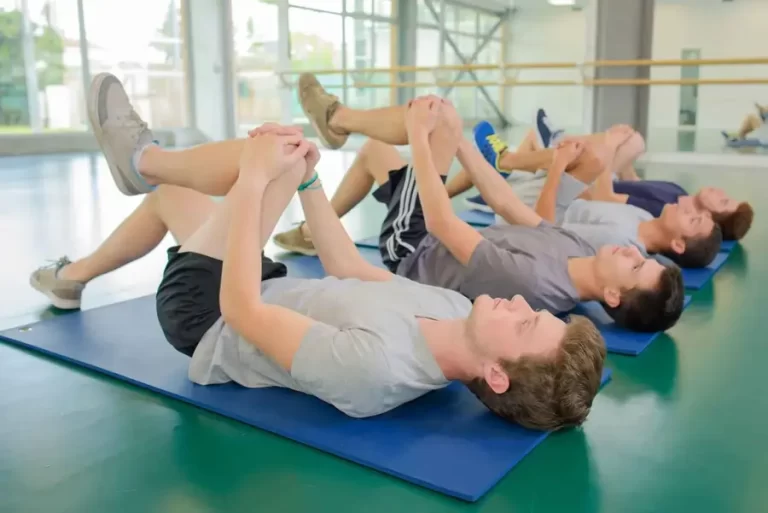
Knee to chest
The knee-to-chest exercise is a simple and effective method for stretching and strengthening the psoas muscle. Here’s how to do this exercise.
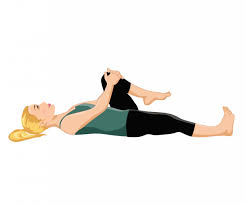
- Lie on your back on a mat or carpet, legs extended.
- Bring one knee towards your chest and grasp it with both hands.
- Keep your opposing leg extended and resting on the ground.
- Hold the stretch for 15-30 seconds to feel a gentle stretch in your hips and lower back.
- Let out the stretch and repeat with the other leg.
- To increase the stretch, gently rock back and forth while keeping your knee to your chest.
The knee-to-chest exercise can help increase psoas muscle flexibility and mobility while also relieving tension and discomfort in the lower back and hips. However, avoid straining or pulling too hard during the stretch, as this can cause injury. While working out, if you experience any pain or discomfort, stop and see a doctor.
Romanian Chair Leg Raises with Dumbbell
- How to Perform This Strengthening Exercise: Sit in the Roman chair with a small dumbbell between your feet.
- Keep your torso upright and press your lower back against the backrest with your forearm resting on the pad.
- Flex your hips and keep your knees straight to raise your legs until they are parallel to the floor.
- Return slowly to the starting position before you proceed.
- This exercise increases the strength of all of your core muscles, with a focus on the psoas.
Low Lunge Twist
The Low Lunge Twist is another exercise that works the psoas muscle, hip flexors, and spine. It’s a yoga pose that can be done on a yoga mat or any flat surface.
To do the Low Lunge Twist for psoas muscle exercises, follow these steps:
- Start in a low lunge position, with your right foot moving forward and your left knee on the ground behind you. The right knee must be directly above your ankle.
- Place both hands on the floor, on either side of your right foot.
- Inhale deeply and extend your spine, raising your chest to the ceiling.
- Exhale, twist your torso to the right, and place your left elbow on the outside of your right knee.
- Take the twist for 20-30 seconds before releasing and switching sides.
The Low Lunge Twist can help you improve hip flexibility, relieve lower back pain, and increase spinal mobility. It is a more difficult exercise than the Thomas Stretch, but it offers a deeper stretch to the psoas muscle.
Pyramid Pose
Pyramid Pose, also called Parsvottanasana, is a yoga pose that works the psoas muscles, hamstrings, calves, and spine. It can be done on a yoga mat or any flat surface.
To do Pyramid Pose for Psoas Muscle Exercise, proceed with these steps:
- Begin with a standing position as well as your feet hip-width apart.
- Put your left foot back 3-4 feet and turn it out at a 45-degree angle.
- Keep your hips facing forward and your shoulders square in the direction of your front foot.
Inhale deeply and extend your spine, raising your chest to the ceiling. - Exhale and fold forward over your front leg, hands resting on either side of your foot.
- Keep your back leg erect and push the heel into the floor.
Maintain the pose for twenty to thirty seconds before releasing and changing sides.
Pyramid Pose can help you improve hip flexibility, relieve lower back pain, as well as increase spinal mobility. It is a more advanced exercise than the Thomas Stretch as well as the Low Lunge Twist, but it provides a deeper stretch to the psoas muscle.
Tree Pose
Tree Pose, also known as Vrksasana, is a yoga pose that works the psoas muscles, hips, thighs, and ankles. It can be done on a yoga mat or any flat surface.
To do Tree Pose for Psoas Muscle Exercise, proceed with these steps:
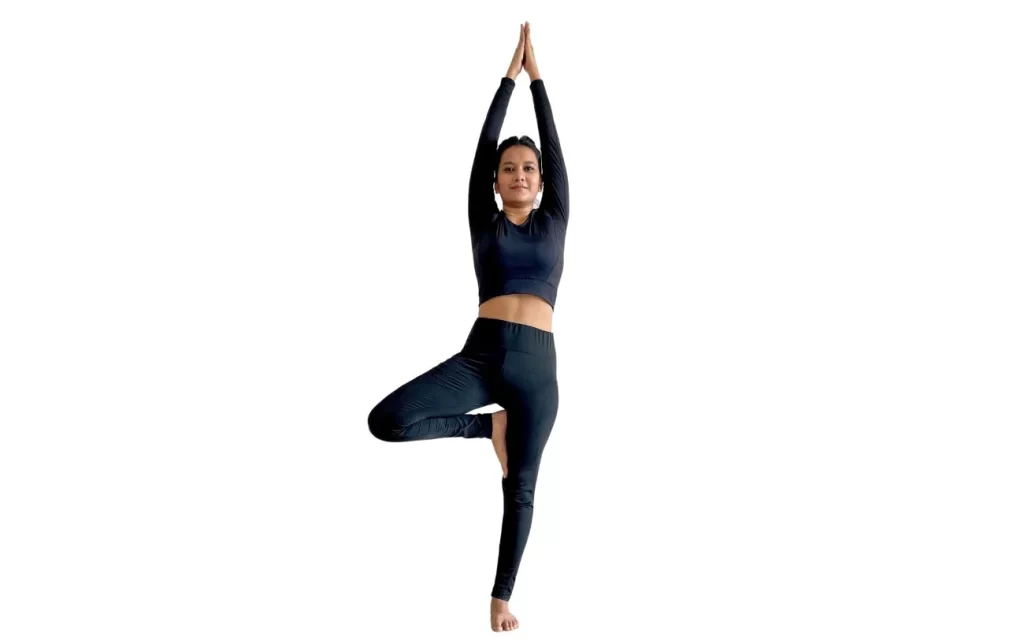
- Begin with a standing position as well as your feet hip-width apart.
- Transfer your weight to your left foot as well as raise your right foot off the ground.
- Place the sole of the right foot on the inside of your left thigh, with your toes pointing towards the floor.
- Press the right foot into your left thigh, then your left thigh into your right foot to form a strong connection.
- Place both hands together in front of your heart in a prayer position.
- Inhale deeply and extend your spine, raising your chest to the ceiling.
- To maintain balance, exhale while activating your core muscles.
- Maintain the pose for twenty to thirty seconds before releasing and changing sides.
Tree Pose can help you improve hip flexibility, relieve lower back pain, as well as increase spinal mobility. It is easier for beginners to exercise than Pyramid Pose, but it still works well for stretching the psoas muscle.
The Importance of Strengthening the Iliopsoas
Walking, running, jumping, as well as squatting all require the iliopsoas muscles to function properly. A weak iliopsoas can cause imbalances in the hip, pelvis, and lower back, resulting in poor posture, reduced athletic performance, and an increased risk of injury. Strengthening these muscles can improve hip stability, increase overall performance, and lower the risk of developing hip problems.
Bottom line
The iliopsoas muscle controls hip and spine movement and can also affect posture. Sitting for long periods can cause this muscle to tighten. Certain sports activities, like cycling, running, or jumping rope, can overwork this muscle and cause inflammation. A tight or annoyed iliopsoas muscle can cause lower back or hip pain. To keep your muscles flexible and avoid muscle imbalances and injuries, perform a total-body stretching routine that includes the stretches listed above.
FAQs
What is the cause of iliopsoas tightness?
A psoas muscle can become tight due to strain or overuse, causing lower back and leg pain. Tight psoas muscles are typically caused by excessive sitting or overuse from walking or other physical activities such as running bicycling, or even sit-ups.
How does one stretch the iliopsoas muscle?
Kneel on the floor, calves flat and hands on your hips. Bring the afflicted leg forward and lay the affected foot flat on the ground. Lean gently forward, hold the stretch for two seconds, and then shift your weight back.
How Do I Maintain Flexibility and Looseness in My Iliopsoas Muscle?
Try to incorporate these stretches into your daily routine and do them multiple times a week to maintain the elasticity and looseness of your iliopsoas muscle. If you spend a lot of time sitting down during the day, try to get up at least once per hour to walk or do some of the stretches mentioned above.
Which stretches aid in iliopsoas muscle lengthening?
The iliopsoas muscles can be stretched in several ways, such as the glute bridge, kneeling hip flexor stretch, standing hip flexor stretch, and table psoas stretch. All of these stretches aid in iliopsoas muscle lengthening. Try each of these or select the ones that best suit your skill level from this list.
What muscle is the iliopsoas?
The iliopsoas muscle, which you may not have heard much about, is crucial for motions like walking and stair climbing as well as for maintaining a pain-free and healthy spine. At the hip joint, the thigh is flexed and rotated externally by the iliopsoas muscle.
How can I make my hip flexors and psoas stronger?
The following is how to perform this exercise to strengthen your hip flexors and psoas muscle: With your palms facing forward, leap up and grasp onto a pull-up bar or the bar at the top of a squat rack. Hang fully stretched, keeping your midsection and upper body as still as you can.
What kind of PSOAS workout is good?
An excellent isometric psoas exercise is holding the V-sit position, sometimes known as the yoga boat pose. All of your abs, lower back, deep core muscles, and even your quadriceps will get stronger. To complete this psoas exercise, follow these steps: With your arms outstretched over your head, lie on your back.
REFERENCES
- V. (2024, February 29). Iliopsoas Workout: Strengthen and Stretch Your Hip Muscles. A4 Fitness. https://www.a4fitness.com/iliopsoas-workout/#google_vignette
- Lindberg, S. (2023, June 28). 5 Essential Iliopsoas Stretches. Verywell Fit. https://www.verywellfit.com/essential-iliopsoas-stretches-5072152
- Patel, D. (2023, December 13). 21 Best Stretching and Strengthening Exercise of Psoas Muscle. Mobile Physiotherapy Clinic. https://mobilephysiotherapyclinic.in/stretching-and-strengthening-exercise-of-psoas-muscle/#Hanging_leg_raises
- Physiotherapist, N. P. (2023, December 13). Iliopsoas stretching exercise: Health benefits, types & how to do? Mobile Physiotherapy Clinic. https://mobilephysiotherapyclinic.in/iliopsoas-stretching-exercise/#What_are_the_Safety_and_Precautions_you_should_take_during_iliopsoas_stretch
- Copeland, B. (2021, January 13). Stretching/Strengthening for the Psoas Muscle – Enhance Physiotherapy. Enhance Physiotherapy. https://enhancephysiotherapy.net.au/psoas-muscle/
- Ladva, V. (2022, May 27). Iliopsoas muscle pain: Cause, Symptoms, Treatment & Exercises. Samarpan Physiotherapy Clinic. https://samarpanphysioclinic.com/iliopsoas-muscle-pain-treatment/#Strengthening_Exercises
- Petrella, V. (2024, March 10). All About the Psoas Muscle: Psoas Exercises for Pain Relief. Flex Fitness. https://flexfitnessapp.com/blog/psoas-exercises/
- Bryant, N. (2020, August 6). Exercises for Iliopsoas. Fitness Is Great! https://noahstrength.com/fitness/exercises-for-iliopsoas/
- E, C. (2023, June 13). 5 Psoas Strengthening Exercises to Solve the Root Cause. Precision Movement. https://www.precisionmovement.coach/psoas-strengthening-exercises/
- Sofia, C. (2024, February 27). 7 BEST Psoas Stretches to Release Tightness (PDF Included!). Coach Sofia Fitness. https://www.coachsofiafitness.com/psoas-release-stretches/
- Hacking, C., & Knipe, H. (2014, January 13). Iliopsoas muscle. Radiopaedia.org. https://doi.org/10.53347/rid-26909
- GoodRx – Error. (n.d.). https://www.goodrx.com/well-being/movement-exercise/psoas-muscle-exercises