45 Best Hip Adductor Muscle Exercises
Hip Adductor muscle exercises are vital for improving athletic performance, preventing injuries, and enhancing overall lower body strength, flexibility, and stability. The hip adductor muscles play a crucial role in stabilizing the pelvis and facilitating movements of the hip joint.
Overview
- Adductors support your hips as well as your lower body. incorporating Hip Adductor Muscles Exercises that target these muscles can help you gain mobility and reduce your risk of injury.
- Strong hips are essential for athletic performance, preventing injuries, and retaining mobility as you age.
- The adductors are an important group of muscles that helps with hip strength and mobility.
- The adductors are frequently overlooked in strength training due to their difficulty in properly training.
- In this article, we’ll go over the function of the adductors, where they’re located, a few exercises to strengthen them, and some pointers to remember when training them.
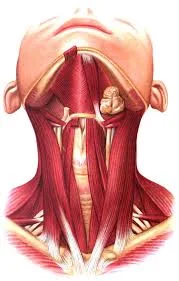
What are adductor muscles?
- The adductor muscle in the inner thighs moves the legs toward the center of the human body.
- Adduction is the movement of carrying the legs inside.
- Squeezing your legs together activates your inner thigh muscles known as adductors. The hip adductors are a set of 5 muscles in the inner thighs. The primary function of the hip adductor muscles is to adduct the hips as well as bring the thighs together in the center of the body.
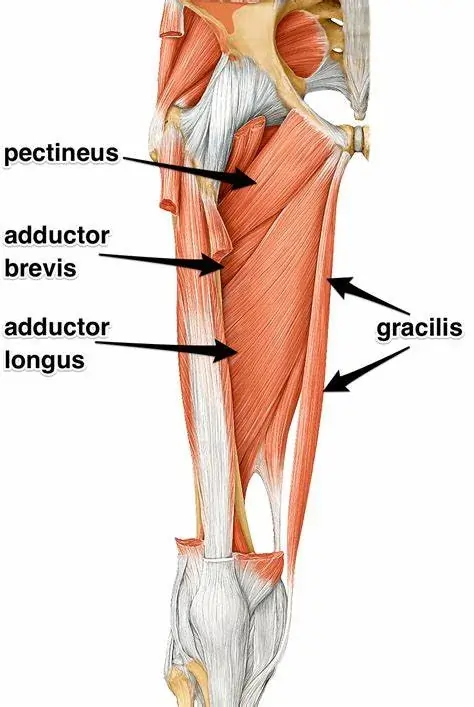
The hip adductors consist of the following muscles:
- Adductor Brevis: The shortest of the hip adductors, the adductor brevis is a triangle muscle located behind the adductor longus and anterior to the adductor magnus. The primary function of the adductor brevis muscle is to help adduct the hip. This muscle also helps with hip flexion and, possibly, external rotation of the hip.
- Adductor Longus: The hip adductors’ most anterior muscle is triangular. The main purpose of the adductor longus is hip adduction. This muscle also helps with hip flexion and extension.
- Adductor Magnus: This muscle is fan-shaped. This is the biggest hip adductor muscle. The adductor Magnus muscles support hip flexion and thigh extension.
- Gracilis: One of the less powerful hip adductor muscles, located most superficially. It overlies the other adductor muscles. The gracilis action is a flexor and internal rotator of the leg at the knee joint.
- Pectineus: This is a short muscle. This muscle action flexes and adducts the thigh at the hip joint.
What is the distinction between hip adductors as well as abductors?
Many people are confused about the difference between hip abductors and hip adductors, even though they perform opposing functions in the body. As previously stated, the hip adductors are responsible for bringing the thighs together in the center of the body, whereas the hip abductor muscles are accountable for opening the thighs away from the body.
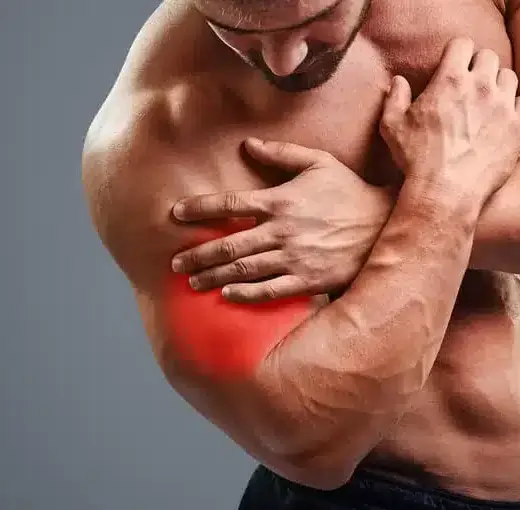
What causes the adductors to be tight?
Tight adductors and pulled groins are usually caused by overuse or unexpected lateral movements. This strain is most common in sports that require abrupt sideways movements with the thighs, such as hockey and soccer.
Tight adductors can affect anyone, especially if you’re starting a new exercise program or training the legs more frequently than usual.
What happens when the adductors are tight?
Tight adductors can restrict your range of motion when your thighs move apart. They will also reduce your ability to press your thighs together.
In reality, you would notice pain as well as decreased performance in activities that require you to use your legs. Stretching your adductors is essential for maximum performance and preventing future strains.
Health Advantages of Hip Adductor Muscle Exercises.
The hip adductors are often disregarded when it comes to strength training, but this is a mistake. If you do not strengthen these muscles, you risk developing groin injuries.
Below are some of the advantages of performing hip adductor exercises.
- Better Balance: Better Balance exercises help you improve your balance by keeping your body upright during sudden lateral motions. Some hip adductor exercises involve unilateral movement, which catches the small muscles and improves balance.
- Enhanced Rotational Power: Strong hip adductors enable our bodies to generate more rotational power. Internal hip rotation is required in some games, such as baseball or tennis, and is partially supported by these adductor muscles.
- Boost Hip Adduction: Hip adduction is important in some of the larger compound lifts, such as squatting and deadlifts. Exercises for the hip adductors can help you do better in lifts, perform better on the field, and live a simpler daily life.
- Reduce the Risk of Injury: Groin pulls are prevalent in athletes and everyday life. The cause of groin strain is tight or weak hip adductors. Strengthening and stretching the adductor muscles can reduce your chances of getting this injury.
- Athletes, in particular, rely on this muscle group to aid in rapid motions like jumping, running, and rapidly moving from side to side.
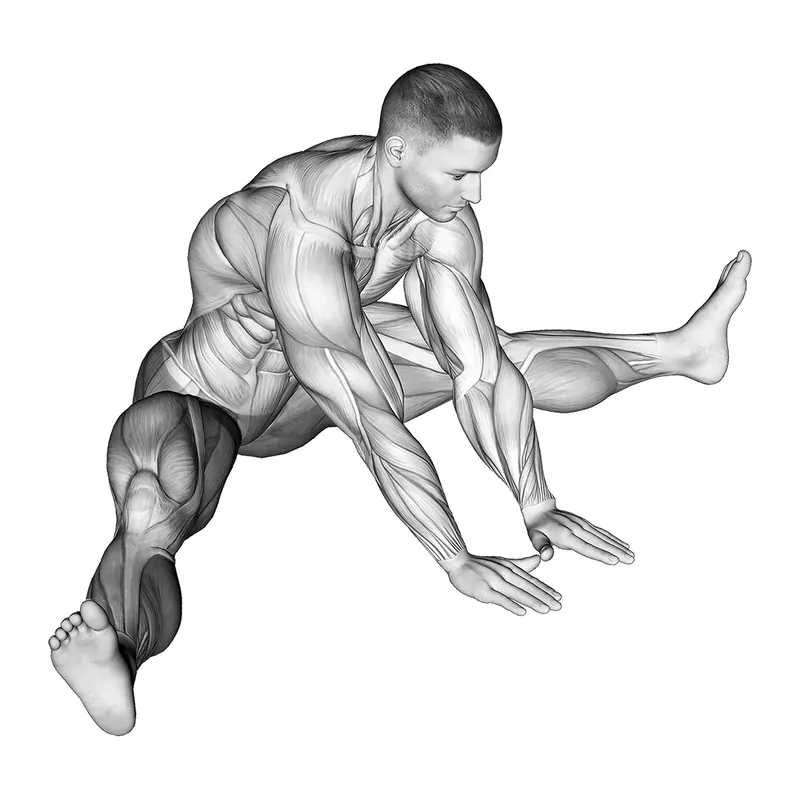
What is the stretching exercise for the hip adductor muscles?
The adductors work the inner leg muscles known as the groin. The adductor muscle stretch will involve the muscles with the highest muscle mass. The primary action of these muscles is to pull the leg inward. These muscles are more useful in sports like soccer, where they are used to kick the ball with the inside of the foot. Finally, they are used to flex and extend the thigh against resistance or while running.
Hip adductor muscle stretching exercises
- Adductor Lunge Stretch
- Standing Lateral Lunge Adductor Stretch
- Butterfly Stretch
- Adductor AIS Release
- Supine Wall Stretch
- Standing Adductor Stretch
- Kneeling adductor stretch
- Half-kneeling adductor dips
- Frogger stretch
- Lateral squat
- Crossover stretch
- Seated Adductor Stretch
- Reclining angle bound pose
- Standing banded adduction
- Hip Opener and Groin Stretch
- Squatting Groin Stretch
- Frog Squat With Arm Raise
- Runner’s Lunge
1. Adductor Lunge Stretch
How to stretch:
- Begin by kneeling on the floor in a lunge position.
- Bend your torso forward and bring the outside shoulder to the inside of the lead knee.
- Then lunge forward until your hips slide forward. It’s done at home as well.
- Take this adductor stretch for 5-10 seconds before releasing.
- Perform 10 to 12 repetitions.
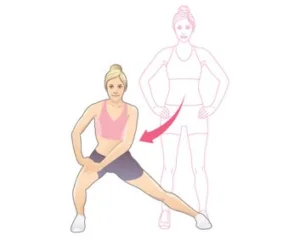
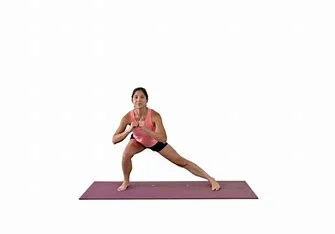
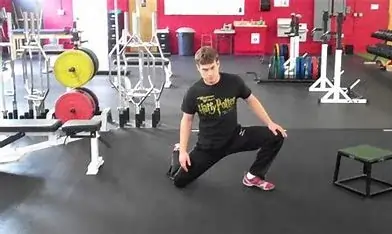
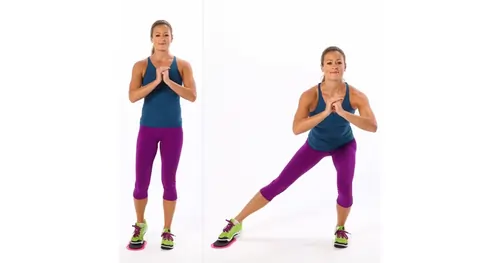
2. Standing Lateral Lunge Adductor Stretch
How to stretch:
- Take a wide stance position.
- Now bend your knees and move your hips to that side.
- Maintain a posterior pelvic tilt throughout the stretch.
- You can feel the stretch inside the opposite thigh.
- Hold for 5-10 seconds, then release.
- You can improve your holding time as you progress.
- Repeat this adductor stretch 4-5 times.
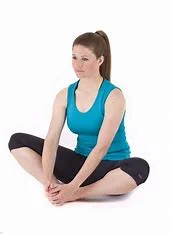
3. Butterfly stretch

How to stretch:
- Sit down on the ground, legs in front of you.
- Reach forward and grab your left foot.
- Bending the knee can help the hand and foot join.
- Slowly bend your left foot up towards the groin until it is in a comfortable position with the sole facing your right thigh.
- Bend your right knee and bring your right foot toward your groin, ensuring that its sole impacts the sole of your left foot.
- Take both feet with your hands and rest your elbows on the knees.
- Allow the knees to fall to the ground while your back remains straight.
- You can apply light pressure to the inner thigh by gradually pressing your elbows against the knees.
- You might experience pulling and tension in your groin.
- Take the butterfly stretch for 20–30 seconds.
- Release and repeat 2-3 times.
4. Adductor AIS Release
How to stretch:
- Begin in a supine position, with a resistance strap around one foot.
- The other end of the strap is grasped with the hand.
- Then actively slide your foot sideways.
- Remember to slide the foot, not raise it, or the hip flexors will contract.
- At the end of the movement, gradually pull the foot outwards using the resistance strap.
- The adductors feel stretched.
- grasp the stretch for 5 to 10 seconds before sliding to return.
- Perform 8 to 10 repetitions.
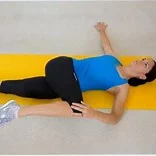
5. Supine Wall Stretch
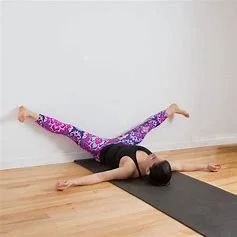
How to stretch:
- Supine in front of a wall, with one leg elevated.
- shift as close to the wall as you can while keeping a comfortable hamstring stretch.
- Maintain a straight leg while gradually splitting accessible until you feel a stretch on the inside of your legs.
- Take the stretch for 15 to 30 seconds.
- Relax and repeat three times.
6. Standing adductor stretch
How to stretch:
- Begin standing with the feet about three feet apart.
- Move your weight to one side as well as bend your knees.
- Maintain the other knee straight for a stretch on the inside of your thigh.
- grasp the stretch for 15 to 30 seconds.
- Relax and repeat on the opposite side.
7. Kneeling adductor stretch
How to stretch:
- Begin with your knees as well as hands on the ground.
- Straighten your left leg to the side.
- Bring your buttocks again to the heel of the right bent knee.
- The stretch can be felt on the inner side of the left leg. Pause for 8-10 seconds before releasing the stretch and returning to the position.
- Repeat 8 to 10 times.
8. Half-kneeling adductor dips
How to stretch:
- Starting in a half-kneeling position, with your right knee on the floor and your left leg bent, foot on the ground.
- Extend the left leg out to the sides as much as possible.
- The foot could be at a right angle with your knee.
- Dip your entire body toward the left leg while keeping your hands on the hips.
- You feel the stretch in the inner thigh, particularly on the right side.
- Repeat 8 to 10 times.
9. Frogger Stretch
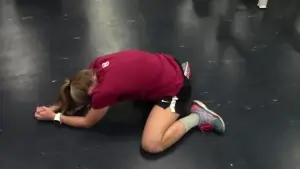
How to stretch:
- Start by putting your knees as well as forearms on the ground, making your toes and knees wider.
- Sit the buttocks back against the heels and feel the stretch in your inner thighs.
- Pause for 10 to 15 seconds before releasing the stretch and returning to the position.
- Repeat 8 to 10 times.
10. Lateral squat
How to stretch:
- Stand tall, with the feet double shoulder width apart.
- Transfer your weight to the left leg, bend your left knee, and push your hips back like you’re sitting.
- Drop as low as possible while keeping the right leg straight.
- Keep your chest raised and place your weight on your left leg. Breathe as well as hold for fifteen to twenty seconds before returning to your starting position.
- Repeat 2-3 times, then move to the opposite side.
11. Crossover Stretch
If you enjoy dancing, this move, which is similar to the “grapevine” dance move, may come naturally to you.
How to stretch:
- Begin with your feet together, then take a few steps to the right with your right foot.
- Cross your two feet.
- Step to the opposite side again with your right foot, then bring the left foot along with it.
- accustomed to the movement.
- Repeat on the opposite side once both feet are together.
- You can start slowly and gradually increase your stride.
- Repeat it 5-10 times.
12. Seated adductor stretch
How to stretch:
- Straighten the legs out to the side and form a “V” shape.
- To avoid joint strain, don’t overdo this pose.
- Many people discover that simply sitting in this position helps to stretch their inner thighs.
- If you’d like to feel more stretched, keep your back straight and lean toward the floor with your hip joints.
- Stay there for about 10 to 15 seconds. Breathe normally.
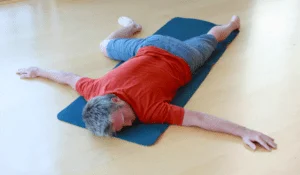
13. Reclining angle bound pose
This is the best stretch for those who spend the majority of their day sitting.
How to stretch:
- Take a supine position on the floor.
- Bend both knees and draw your soles inward until their borders touch.
- Move the knees down toward the floor to feel the groin muscles stretch.
- Breathe and remain in this position for fifteen to thirty seconds.
- Repeat 3–4 times. With each stretch, try to move your feet closer to your buttocks.
14. Standing banded adduction
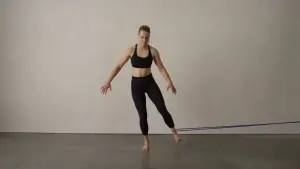
How to stretch:
- Stand with your feet wide apart and your toes pointing outward.
- Begin squatting slowly until the knees are directly over your ankles and bent at 90 degrees.
- Place both hands on top of the inside of your thighs and gently push outwards to open your hips.
- You will feel a stretch on the inner side of each leg.
- Hold for 20 to 30 seconds, then relax and repeat a total of three times.
15. Hip opener and groin stretch
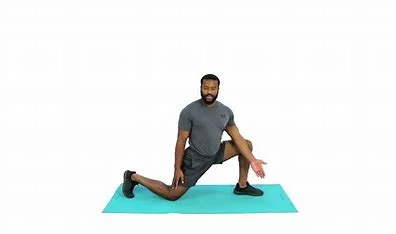
How to stretch:
- Begin in a forward lunge and lower the right knee to the floor.
- Position your left elbow against the inside of your left knee, as shown.
- Gently press your left elbow into your left knee, then twist your body to the right.
- Reach your right arm behind you and feel a gentle stretch in the lower back and left groin.
- Hold the stretch for twenty to thirty seconds before releasing and repeating with the right leg.
16. Squatting Groin Stretch
How to stretch:
- Stand with your feet wide apart and your toes pointing outward.
- Begin squatting slowly until the knees are directly above your ankles and bent 90 degrees.
- Place your hands on top of the inner thighs and gently push outward to open the hips.
- You will feel a stretch on the inside of each leg.
- Hold for between twenty and thirty seconds, then relax. Repeat three times.
17. Frog Squat with Arm Raised
How to stretch:
- Place the right hands on the ground immediately following the first stretch.
- Continue as you gently push your inner thigh outward as you raise your left hand directly to the roof, fingers pointing upward.
- Twist the upper body slightly as you breathe, aiming as high as possible.
- Your right heel may lift slightly.
- Then switch to the other side.
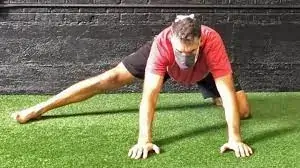
18. Runner’s Lunge
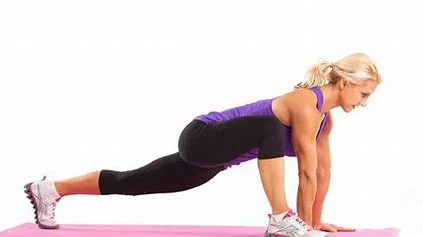
How to stretch:
- Get on all fours and face the front of the mat.
- Plant your fingertips gently into the floor while extending your right leg behind you, keeping the knee rested or slightly lifted.
- Push the right heel toward the back of the room.
- Bring your left foot forward until it is in line with your left hand.
- Keep your head up.
- Inhale and exhale, pushing the hips deeper into the ground in each breath.
- Then move to the opposite sides.
What are some hip adductor muscle-strengthening exercises?
Adductor exercises target several small muscles in the inner thigh that are responsible for pulling the thighs together, providing balance as well as support, and ensuring proper hip alignment. Most people should only think about doing hip adductor exercises when they walk previous the hip adductor machine in the gym, but we are here to change that mindset.
Strengthening the adductor muscles is essential for increasing mobility and flexibility, improving stability, and preventing leg injuries. Strong abductors are essential for athletic performance, maintaining mobility, and preventing injuries as you age. This is the primary muscle group that promotes hip mobility and strength. The adductors are often overlooked in strength training because they are difficult to train properly.
Hip adductor muscle strengthening exercises
- Hip Adductor Isometric Strengthening Exercise
- Standing Leg Circles
- Sumo Squat
- Cross Scissors
- Dumbbell Side Lunge.
- Cossack Squat
- Copenhagen Side Plank
- Cable Hip Adductor
- Seated Hip Adduction
- Adductor Machine
- Wide stance squat
- Standing banded adduction
- Seated banded adduction
- Lateral lunge
- Single-leg glute bridge with a squeeze
- Side leg raises
- Slider-side lunge
- Slider plank jacks
- Kneeling slider adduction
- Standing side leg raise
1. Hip Adductor Isometric Strengthening Exercise
How to Perform this Strengthening Exercise:
- First, the patient must assume a supine position.
- After that, the physical therapist should place the ball or pillow between the flexed knee, which was approximately 60 degrees flexed.
- Next, the physical therapist may instruct the patient to squeeze the ball by performing an adduction. Once the patient has completed the initial stage, they can proceed to the progression phase.
- During the progression, the therapist should instruct the patient to hold the squeezed ball for approximately ten seconds.
- Complete this exercise ten times in one session. Complete 3 sessions in one day.
2. Standing Leg Circles
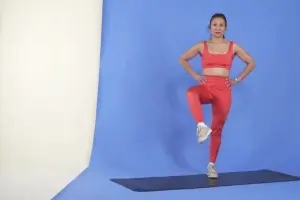
How to Perform this Strengthening Exercise:
- This is a dynamic warm-up exercise that improves blood circulation to the hip muscle and upper leg.
- To perform this exercise, a patient must stand with feet hip-width apart.
- Lift the left leg off the ground. Pose on the right leg and form a small ring with the left leg.
- Perform ten to twenty repetitions on the left side, then switch to the right leg.
- Note: If the patient has a balance problem, stand near a prop so that he can help stabilize the body by holding something.
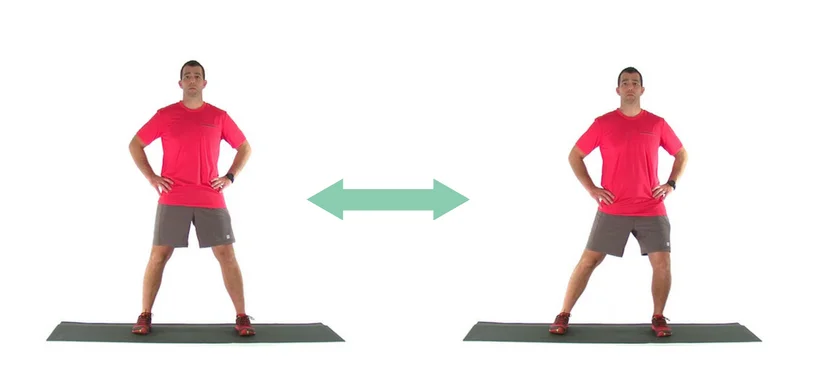
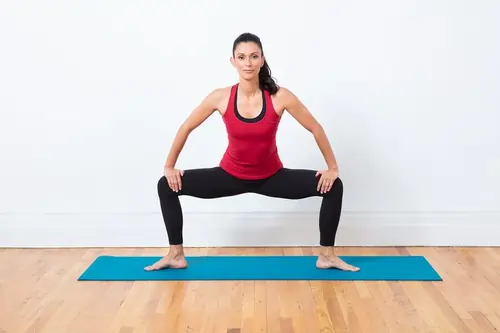
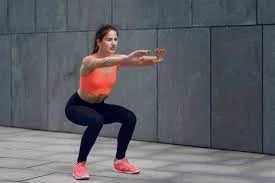
3. Sumo Squat
How to perform sumo squat strengthening exercises:
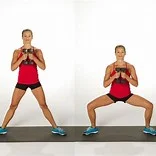
- This squatting variation targets the large muscle groups in the lower limb, as well as the inner thighs.
- Keep a straight back as well as a raised chest all through the exercise.
- Even though the sumo squat has a shorter range of motion than a regular squat, it is still a useful exercise that can be incorporated into a regular workout.
- For this exercise, the patient must stand in a wider-than-shoulder-width stance, pointing outside.
- Squat with your back straight and chest up, dropping your hips down and back until your thighs are parallel to the ground.
- Push off through the ground and come back to your starting position.
Note: If the patient wants to add some challenge to the exercise, hold a kettlebell in one hand.
4. Cross Scissors
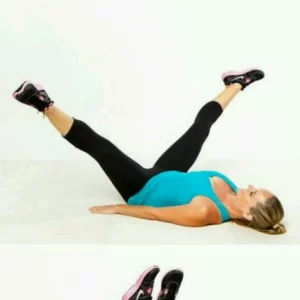
How to Perform this Strengthening Exercise:
- This is an excellent exercise for working both the hip adductor and core muscles at the same time.
- Cross scissors pose a challenge because the patient must remain crunched throughout the motion.
- To maintain your position, cross your legs in front of you and contract all of your stabilizing muscles.
- For this exercise, the patient must sit down and brace themselves by placing their hands on the floor, back to you.
- Move your leg off the ground in front of you at a 30- to 40-degree angle, one leg crossed over the other.
- The core muscle should participate throughout the motion in a semi-“V” position, moving both legs out to the sides and then closing them while crossing the other leg over.
- Repeat this with the alternate leg until you have completed 10 to 20 repetitions on each side.
- Note: The patient can make cross scissors more difficult by sitting in a “V” position and not bracing the upper limb with the arms.
5. Dumbbell Side Lunge
How to Perform this Strengthening Exercise:
- The side lunge is an excellent exercise for increasing balance, stability, and lower-limb strength.
- The side-to-side motion is a strengthening and stretching exercise. This exercise works the hip abductors and adductor muscles.
- For this exercise, the patient must stand with their shoulders hip-width apart and hold dumbbells at chest level.
- Take a large step to the side, dropping the hips down and back until the thighs are parallel to the ground and the foot is planted on the floor.
- Push through the flexed foot and return to the starting position.
- Repeat for ten to twenty repetitions before moving on to the next leg.
Note: To make this exercise easier, the patient can perform bodyweight side lunges. The back should be neutral, with the chest up and trying not to lean forward.
6. Cossack Squat
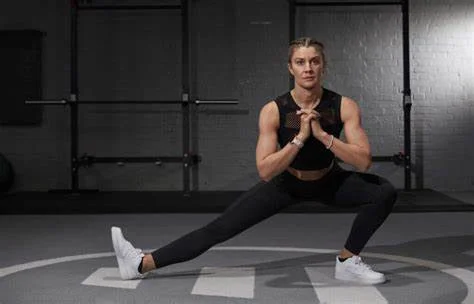
How to Perform this Strengthening Exercise:
- This exercise moves the body in the frontal plane, from side to side.
- The patient will improve stability by mastering this exercise, which includes a good stretch and strengthening of the hip adductors.
- For this exercise, the patient must stand in a wide stance with toes pointing outside while dropping the hips downward and back. Squat down to one side and shift your weight while the other leg is extended out heels on the floor, and toes pointing up.
- Push through the floor with the flexed leg and return to the embarking position.
- Repeat the exercise on the opposite leg, shifting the weight and lowering it into a squat position.
Note: This exercise requires a high degree of mobility, so if the patient is unable to go all the way down, he should go as far as he can while attempting to improve each workout. The back should stay in a neutral position all through the exercise.
7. Copenhagen Side Plank
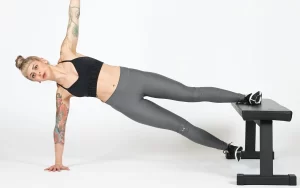
How to Perform this Strengthening Exercise:
- This is the most difficult plank variation because it works both the core muscles and the hip adductors.
- This exercise will help to balance the strength in the muscles on the outside of the hips.
- For this exercise, the patient must lie on the ground, perpendicular to the bench, and brace himself with his forearm and elbow.
- Lift with the flexed knee, then place the top leg on the bench.
- You should maintain this position to the greatest extent possible.
- Complete ten to twenty repetitions for one or two sets, then repeat on the other side.
Note: To make this exercise more difficult, extend the legs and place only the ankle on the bench.
8. Cable Hip Adductor
How to Perform this Strengthening Exercise:

- Patients may observe women performing it at the gym while men avoid it.
- It is time to change the perception that cable hip adductions are not important; everyone should perform this exercise to strengthen the adductors and reduce the risk of injury.
- Before performing this exercise, make sure the patient is warmed up with some dynamic stretches.
- Begin with less weight and maximum repetitions until the patient is sufficiently at ease to increase the weight. Locate an attachment that the patient can use to secure the ankle closest to the pulley.
- Set up the pulley around the calve level. Stand to one side of the pulley. Brace your hand against the machine in a safe location where your fingers will not be pinched.
- The active leg should be raised off the ground, facing the pulley.
- Pull the leg away from the pulley and toward the center of the body.
- Slowly return the leg to its starting position. Completed the desired number of repetitions.
Note: This exercise can also be performed using the same technique by attaching the band of resistance to a fixed anchor point.
9. Seated Hip Adduction
How to Perform this Strengthening Exercise:
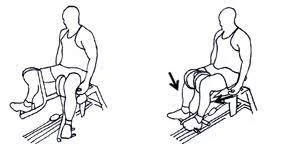
- When the patient is seated, the seated hip adduction isolates the hip adductor muscles, leaving only the thighs to be brought together.
- Add this exercise at the end of the leg day, after you’ve completed the larger compound lifts like squatting.
- Sit in the machine with your back to the backrest.
- Adjust the length of the knee pads to a comfortable position that provides a good stretch to the inner thighs without overstretching the adductor muscles.
- Set up a lightweight for the first time so that the patient does not overdo things.
- Exhale and squeeze your thighs together until your knees meet in the middle of your body.
- Slowly return to the starting position. Complete the maximum number of repetitions.
10. Adductor Machine
How to Perform this Strengthening Exercise:
- When most individuals consider isolating the adductors, they might picture the conventional adductor machine that is seen in gyms all over the world.
- Although this machine may do a great job of training the adductor, it is not the only motion that can produce positive results.
- This exercise is ideal for beginners because the patient can control the amount of weight and width of the pads. To acquire a feel for the exercise and avoid injury, start very lightly.
- For this exercise, a patient must sit on an apparatus with the pads positioned among the legs as wide as is comfortable and select the ability-based resistance. To feel the muscles contract, contract the thighs together in a controlled way until the pads make contact.
- Gradually reverse the motion to bring the thighs back to their starting position. Repeat the procedure about ten times in a single session. Complete three sessions in a single day.
- If you’re just getting started, try 2 or 3 sets of ten repetitions.
11. Wide stance squat
How to Perform this Strengthening Exercise:
- Squatting is the king of leg exercises, and it will strengthen the entire leg.
- There are various squat variations, but we’ll focus on the wide stance squat, also known as the sumo squat, which works the inner thigh muscles.
- They can perform this exercise with various weighted equipment, including a barbell, kettlebell, dumbbell, or even a sandbag, or simply by using their body weight.
- For this exercise, the patient must stand slightly wider than the shoulder hip-width apart and turn their toes outside.
- Shift the weight backward and gradually lower the hips until the thighs are parallel to the floor.
- Then return to the starting position by pushing with the ground, contracting the inner thigh muscles.
- Perform approximately 10 to 12 times in one session. Perform three sessions in a single day.
12. Standing banded adduction

How to Perform this Strengthening Exercise:
- This exercise requires the patient to wrap a resistance band around a solid anchor.
- The patient must stand on either side of the body, facing the anchor point and resistance band.
- Allow a resistance band to pull the leg to one side while resisting the motion.
- Use a controlled motion to gradually release the leg to the side.
- Switch legs and repeat ten to twenty times for one to two sets on each leg.
13. Seated banded adduction
How to Perform this Strengthening Exercise:
- For this exercise, the patient will need to wrap a resistance band around the solid anchor.
- The patient must sit on a bench on either side of the body, facing the anchor point and resistance band.
- Put the inside foot through a resistance band, which is located just below the knee joint. Allow a band of resistance to pull the leg to the anchor point.
- Contract the adductor muscle to bring the leg closer to the body’s center.
- Repeat this for both legs.
- Perform between 10 and 20 repetitions in a single session. After that, perform two sessions of this exercise in one day for optimal strength.
14. Lateral lunge
How to Perform this Strengthening Exercise:
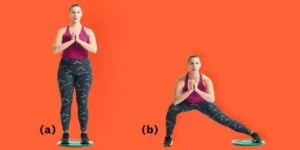
- To perform a lateral lunge exercise, a patient must stand with feet hip-width apart.
- Step out of the left leg and begin by sending the hip back while flexing the left knee.
- If desired, the patient can reach forward with his or her arms to counterbalance.
- During descent, the knee should not move over two inches beyond the toes and should be aligned with one to two toes.
- The toe turns slightly outward. Push off to the left to return to the starting position.
- To complete the first repetitions, repeat with the right side leg.
- Do two or three sets of 10 to 12 repetitions on each leg.
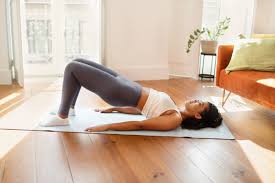
15. Single-leg glute bridge with a squeeze
Equipment required: A foam roller or a small Swiss ball.
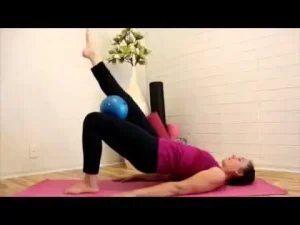
How to Perform this Strengthening Exercise:
- First and foremost, the person must lie on their back, knees bent, and feet flat on the floor.
- After that, place the foam roller or a small Swiss ball between your thighs. Following that, place your arms by your sides.
- Then, lift one left leg into the air, leaving the other on the floor.
- Push the hips up toward the sky, squeezing your glutes in the highest position. Simultaneously squeeze a foam roller or ball between your thighs.
- Lower your hips back to the floor.
- Repeat ten times during one session. Complete 3 sessions in one day.
In progression: After squeezing, hold the position for five to ten seconds to ensure proper strength. Perform this exercise five times in one set. Perform two sets in one day.
16. Side leg raises
Equipment needed: Floor mat
How to Perform this Strengthening Exercise:
- This must-do hip adductor exercise is similar to the side-leg raise.
- To begin, the person should lie on the floor mat, resting on their side. The individual can support their head by propping it on their elbow or resting it on an extended arm.
- After that, lift the top leg into the air and keep it as straight as possible.
- Keep the top leg suspended in mid-air and bring the other leg up to meet it.
- When the legs meet in the air, lower the bottom leg to the ground.
- Once the bottom leg has touched the floor, raise it again to meet the other.
- Repeat the same exercise on one side before switching to the other.
- Repeat this exercise 10 times in one session. Complete three sessions in one day.
Note: The height of a suspended top leg varies with fitness level. The higher it is, the more difficult it will be to keep it in the air while raising the bottom one. The lower it is, the easier it is to manage.
17. Slider-side lunge
Equipment needed: Sliders
How to Perform this Strengthening Exercise:
- First, the patient must stand with their feet shoulder-width apart. After that, one foot should be on the ground and the other should be standing on one slider.
- Then, go as low as possible before tightening the abdominal muscles and sliding the leg back to the center, while standing up.
- Finish the repetitions on one side before switching to the other.
- Do approximately ten repetitions in one session. Complete three sessions in one day.
In Progression:
- The patient must repeat the above exercise but hold the end position of hip adduction for approximately ten seconds.
- Do between 5 and 7 repetitions in a single session. Complete 2 sessions in one day.
- Notes: If the individual does not have sliders, a plastic bag or a towel on a hard, smooth surface will suffice.
18. Slider plank jacks
Equipment required: Slides
How to Perform this Strengthening Exercise:
- To begin, the person assumes the plank position, placing their wrists directly below the shoulders and the arms straight. The legs should be straight behind him. Make sure the patient is on their toes while standing on one slider for each foot. The feet are close together.
- Spread the legs out wide with a smooth and controlled movement, using the sliders. To maintain a straight body, ensure that the patient engages his or her abdominal muscles. The exercise becomes more difficult as the legs spread out.
- Slide the feet back closer together.
- This exercise should be repeated ten times per session. Do two sessions each day.
Notes: As with a plank, the person must maintain a straight back and tuck the pelvis in. Do not allow the hips to sag to the ground with the back arching, nor should the hips be pushed up too high. Maintain a straight line.
19. Kneeling slider adduction
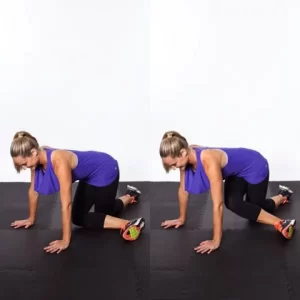
Equipment required: Sliders
How to Perform this Strengthening Exercise:
- To begin, place the patient in a position of kneeling on the floor with one slider beneath each knee, but ensure that he is sitting up.
- The person’s knees should be in a straight line with their head.
- After that, gradually slide the knees separate as far as he can. Participate in the core so that the person can remain upright. Your feet should stay close together behind you.
- Next, returns to the starting position by closing his knees.
- Do this exercise ten times in one session. Do two sessions each day.
In progression:
- The patient has to maintain the adduction end position for approximately ten seconds. Perform this progression of physical activity five to six times in a single session.
- Increase the number of repetitions over time.
20. Standing side leg raise
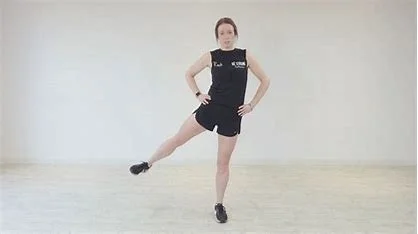
How to Perform this Strengthening Exercise:
- It is a useful bodyweight exercise that can hit the hip adductors of one leg while hitting the hip abductors of the other leg because the patient will be maintaining an isometric hold on the other leg to keep it in the air.
- For this exercise, the patient must stand with their shoulders hip-width apart. Now stand on your left leg, facing away from the body.
- Following that, Lift your right leg as far as is comfortable and hold for 4 to 6 seconds.
- Raise the left leg until it touches the right leg, then lower it back to the start position—complete 10 to 12 repetitions of one or two sets.
Note: To make this exercise harder, strap ankle weights to both legs.
When did the patient not perform this exercise?
- If the physical therapist recommends that the patient rest.
- If the patient is already experiencing back and knee pain.
- If the lower limb bone has recently fractured.
- If the patient experiences pain while performing this exercise.
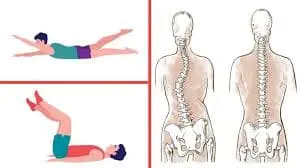
Why Is Strengthening the Adductors Important?
- A man doing squats.
- Strengthening the adductors is important because it improves your athletic performance by increasing hip extension, flexion, as well as internal and external rotational power.
- In my experience, these movements distinguish outstanding from average athletes, particularly in sports such as figure skating and others mentioned above.
- This also applies to squatting, sprinting, jumping, and deadlifting, as well as a variety of other common movements.
In addition,
- Strong hip adductors, according to one study on the PubMed website, help to prevent groin strains, knee injuries, and other common ailments.
- Injury prevention is critical because these injuries can cause decreased range of motion, chronic pain as well as muscle weakness, missed playing time, or even the inability to play sports again.
- If the knees point outward during a squat, there may be a weakness in your hip adductors compared to your reciprocal hip muscles (hip abductors).
Why is adductor training necessary? (The advantages of strong adductors.)
Adductor training is important because it improves frontal plane strength and helps with hip extension.
Why is this important?
A strong adductor can:
- Stabilize the knee joint while walking, running, or slowing down.
- Stabilizing your hip joint improves balance and coordination, especially during single-leg exercises. It also allows for pelvic rotation and separation, which are essential for various sports and athletic events.
Some Yoga Poses For Adductor Muscle
- Wide-Legged Forward Bend Pose – Prasarita Padottanasana
- Intense Side Stretch Pose (Parshvottanasana)
- Tree Pose: Vrikshasana
- Extended Hand-to-Foot Pose Variation
- Garland Pose: Malasana
- Supine Spinal Twist – Supta Matsyendrasana
- Corpse Pose: Savasana
1. Wide-Legged Forward Bend Pose – (Prasarita Padottanasana)
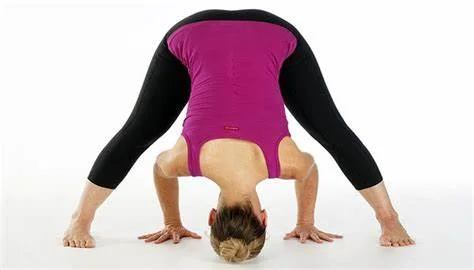
- We’ll start in a Wide-Legged Forward Bend, hands on hips.
- From the hips, fold forward, initially bringing the palms to the mat, then deeper, bringing the crown of the head to the mat.
- You can use a block to move the ground closer to you if necessary. Think about lifting the hips straight while lengthening the tailbone toward the sky.
- Engage the muscles in the legs, press into your feet, and feel the stretch in your outer hips.
- As you sink your hips into the chair pose, begin to heel-toe with both feet.
- Press into your feet and lift your hips to stand. Inhale as well as raise your arms above your head.
2. Intense Side Stretch Pose (Parshvottanasana)
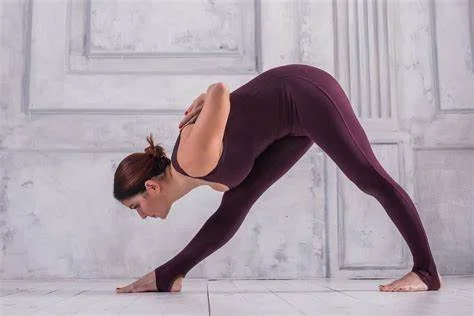
- Step the right foot straight back, toes slightly outward. Bring the hands to the hips, square the hip points forward, and engage all of the leg muscles, drawing up energy from the feet.
- Inhale, lengthen the spine, and exhale by bending from the hips, carrying the chest forward, and then over the left leg.
- Breathe deeply, rotating the right hip forward and dragging the left back until you find a balance. Press down evenly on both feet as well as feel the strength activate in each leg.
- Return the hands to the hips, inhale, lift from the chest, and raise the torso. Step the right foot towards the left. Inhale as well as raise your arms above your head.
- Exhale and lower them down. Inhale and step your left foot back. We will now repeat on the opposite side. Same thing. Square the hips, engage the legs, and extend the spine.
- Inhale as well as exhale, hinge at the hips, and fold over. Truly activate the legs while pulling the hips in opposite directions.
- This pose is known as Intense Side Stretch, and it should feel exactly like that in abductors. Bring your hands to your hips, and inhale to lift your chest and torso.
- Step both feet together. Inhale while holding your palms overhead. Exhale through the heart center.
3. Tree Pose: Vrikshasana
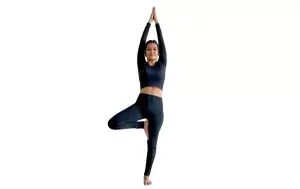
- Inhale, bring your hands to your waist or hips, then shift your weight to the left foot.
- Keep the hips level and slightly forward. Bring the sole of your right foot up to the ankle, calf, or inner thigh.
- Press your foot into the supporting leg, drawing energy and strength from it. Tree Pose involves bringing the palms together in front of the arm or extending the arms over the head.
- Tree pose is excellent for utilizing the stability as well as mobility that abductors provide.
- To achieve balance in this pose, engage the core as well as the hips while lengthening the spine.
- Reduce the hands and feet. Now shift your weight to the right foot. Let us recite with our left foot supporting the right leg.
- Draw the navel in and lengthen the spine. Tilt your hips slightly forward. Make sure the hips are level here. Please lower your left foot to balance out your hips.
- Raise the arms to achieve a balanced and concentrated stillness in this posture. Lower the arms and legs. Shake out each leg a little. Come to the mountain.
- Inhale and raise your arms over your head. Exhale and bring them to your sides.
4. Extended Hand-to-Foot Pose Variation
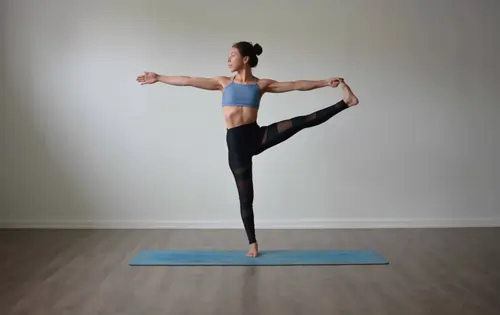
- Returning to the tree pose, we’ll add a twist to stretch the sides of the hips & upper legs. Shift your weight over to your left leg.
- Draw your right knee toward the chest then wrap your hands around it for support.
- Look over the right shoulder & twist from your lower abdomen. Concentrate on a focal point then breathe into the posture.
- Try to feel the stretch by pushing your right knee away from the hand and extending from the hip. Return your right knee as well as your hand to the center.
- Lower the leg down. Shake it out, then repeat on the opposite side.
- Move your weight to the right foot. Pull your left knee into the chest. Pull the left knee throughout the body with the right hand, twisting from the lower abdomen, while extending the left arm wide.
- Tuck the navel, extend the spine, and even the hips. Return to the center position. Lower the legs. Shake it out.
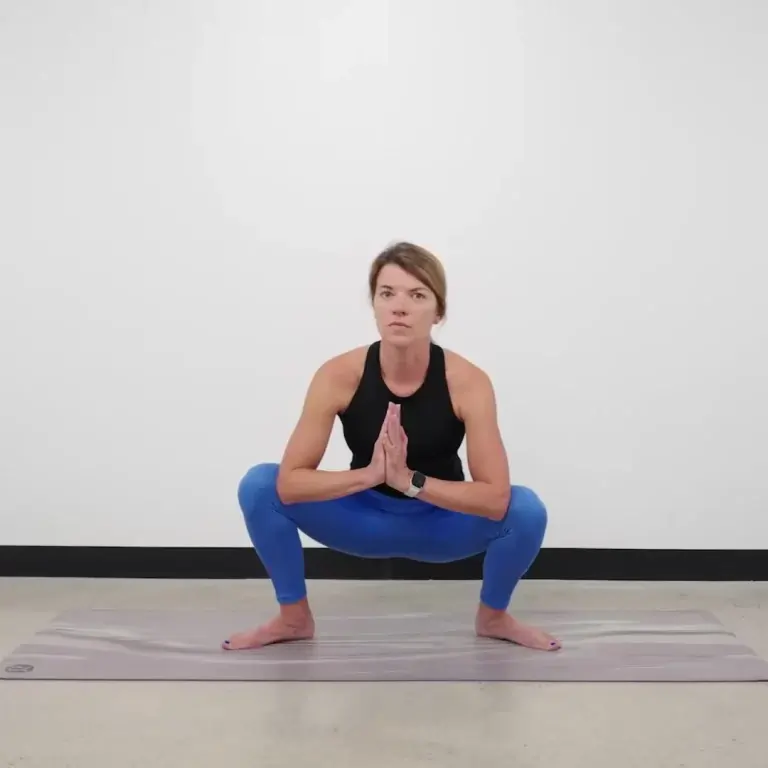
5. Garland Pose: Malasana
- Step the legs out wide and lower the hips into Garland Pose, formerly known as Squat Pose.
- Bring your hands to a prayer place at the sternum.
- Lift the chest, then press the elbows into the knees and the knees into the elbows.
- Take three deep breaths here, really focusing on the hip creases.
6. Supine Spinal Twist – Supta Matsyendrasana
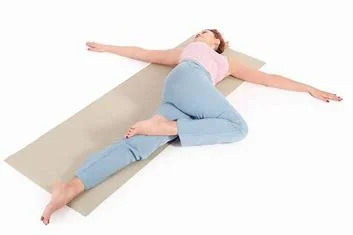
- Lower to the mat. Keep your knees bent as well as your torso lowered to the mat. Inhale, then tuck your knees into your chest.
- use a rocking motion to massage the lower back.
- Allow your knees to fall to your left as your gaze shifts to the right, and open your arms wide into a T shape.
- Maintain the shoulder blades flat on the ground. Adjust the knees to get deeper into the stretch.
- Allow the inhalation to deepen the stretch, and with each exhale, relax the muscles. Relax.
- Inhale to bring the knees back to center, then exhale to let them fall to the right side while your gaze moves over to the left arm.
- Take five deep breaths now. Adjust the knees as needed. Find a good restorative stretch.
7. Corpse Pose: Savasana
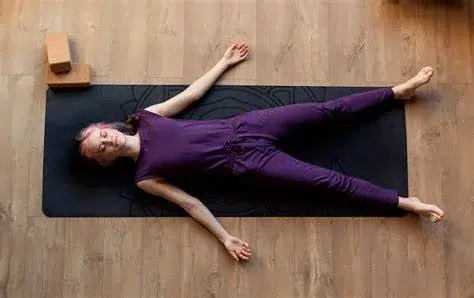
- Extend the legs completely in front of the body and bring the arms to the sides.
- Find your preferred Savasana pose. Let go of the breath. Let go of any tensions.
- Allow the entire body to relax.
Summary
Hip abduction is the movement of your legs outwards and to the side. Hip abduction muscles, particularly the gluteus medius, help to maintain pelvic stability. Strong hip abductors can help prevent a variety of symptoms and conditions, including low back pain, hip pain, as well as patellofemoral syndrome. Hip abduction exercises may be performed from a variety of positions.
FAQs
How does the patient determine whether my hip adductors are weak?
According to Laudner, if the knees point outward during a squat, it may indicate hip adductor weakness. This occurs when the hip adductors are weaker than the reciprocal hip muscles.
Why should you strengthen your hip adductors?
Adductors are crucial for hip stability and pelvic rotational control, making them applicable beyond ‘cutting’ sports. Long-distance running, for example, requires strong hip and pelvic control
What causes weakened hip adductors?
Underuse of muscles, as well as prolonged sitting, can result in weak hip flexors. Osteoarthritis may cause muscle weakness.
Do weak glutes result in tight adductors?
Weak or inhibited glutes can cause tight hamstrings and adductors, leading to injuries like anterior knee pain, ACL injuries, low back pain, hamstring strains, hip impingement, and ankle sprains. The gluteus medius muscle’s primary function is hip abduction.
Does walking work the adductor muscles?
Walking not only has numerous health benefits, but it also exercises several different muscle groups. Walking relies primarily on the quadriceps, hamstrings, calf muscles, and hip adductors.
What happens when a patient has weakened hip abductors?
Hip abductor weakness has been linked to issues such as shin splints and foot hyperpronation (flat feet). Biomechanical collaborators are aware of foot hyperpronation and weak hip abductors. Weakness in the gluteus medius causes increased pressure on the inside of the foot, leading to a lower arch.
How does the patient determine whether he has tight adductors?
The primary sign of a tight adductor, additionally referred to as a groin pull, is a pain in the medial thigh near the point of strain. Acute injuries typically cause sharp pain, while chronic conditions cause duller pain. Palpation causes increased pain in the affected area.
REFERENCES
- Fox, J. (2022, August 4). 15 Hip Adductor Stretches to Loosen Tight Groin & Inner Thighs. Nutritioneering. https://www.bodybuildingmealplan.com/adductor-stretch/
- H. (2019, September 11). Seven Hip Abductor Stretches For Pain – Jivayogalive. Jivayogalive. https://jivayogalive.com/seven-hip-abductor-stretches-for-pain/
- Set, S. F. (2023, February 22). 11 Best Hip Adductor Exercises To Strengthen Your Inner Thighs. SET FOR SET. https://www.setforset.com/blogs/news/hip-adductor-exercises
- Prajapati, N. (2023, January 16). Hip adductor muscles strengthening exercises Benefits, How to do? Samarpan Physiotherapy Clinic. https://samarpanphysioclinic.com/hip-adductor-muscles-strengthening-exercises/#Adductor_machine
- Cpt, J. C. B. (2024, January 4). 5 Best Adductor Exercises For Hip Strength & Mobility. Total Shape. https://totalshape.com/fitness/best-adductor-exercises/
- Valand, B. (2022, September 21). Adductor muscle exercises – Health Benefits, How to do? Samarpan Physiotherapy Clinic. https://samarpanphysioclinic.com/adductor-muscle-exercises/#What_are_the_hip_adductor_muscle_Strengthening_Exercises
- Cht, A. B. P. D. (2023, June 5). How to Do Hip Abduction Exercises. Verywell Health. https://www.verywellhealth.com/hip-abduction-7483282
- Cpt, A. R. M. C. B. R. M. (2022, March 24). 7 Top Adductor Exercises You Can Do At Home [Without Equipment] – The White Coat Trainer. The White Coat Trainer. https://whitecoattrainer.com/blog/adductor-exercises
- Tirgar, P. (2023, September 18). Hip adductors muscles strengthening exercises: Benefits, How? Mobile Physiotherapy Clinic. https://mobilephysiotherapyclinic.in/hip-adductors-muscles-strengthening-exercises/#When_did_you_not_do_this_exercise
- Cpt, K. S. (2016, December 19). Hip Abductor Exercises to Prevent Injury and Promote Strength. Healthline. https://www.healthline.com/health/fitness-exercise/hip-abductor-exercises#The-Takeaway
- McLean, S. (2023, November 10). 5 Best Adductor Exercises For Hip Strength & Injury Prevention (CPT-Reviewed). BarBend. https://barbend.com/best-adductor-exercises/
- Freutel, N. (2019, January 9). The Benefits and Effectiveness of Hip Abduction Exercises. Healthline. https://www.healthline.com/health/fitness-exercise/hip-abduction#hip-abduction-anatomy