Frozen Shoulder
What’s Frozen Shoulder?
Millions of individuals worldwide struggle with the common shoulder joint condition known as frozen shoulder. Although the exact causes of frozen shoulder are unknown, deterioration of the rotator cuff tendons and muscles is usually accepted to be the primary cause. This illness may be painful and have an impact on several aspects of everyday life. Although the exact causes and progression of the illness remain unclear, the deterioration of the rotator cuff tendons and muscles is widely accepted as the cause.
Another name for it is adhesive capsulitis. It’s a disorder marked by shoulder joint stiffness and discomfort, making it extremely difficult to move the shoulder. The onset of signs and symptoms normally takes place gradually, gets worse over time, and then goes away, usually in a year or three.
Recovering from an illness or surgery that limits arm movement, such as a stroke or mastectomy, as well as those with diabetes, increases the risk of having a frozen shoulder. Exercises involving a range of motion are used to treat frozen shoulder, and corticosteroids and anesthetic drugs can be injected into the joint capsule.
A small percentage of patients require arthroscopic surgery to release the joint capsule and allow for more joint motion. Frozen shoulder often occurs in the same shoulder, however in certain individuals, it develops in the opposing shoulder.
The main treatment for a frozen shoulder is physical therapy, which focuses on shoulder flexibility.
Women are more likely than males to be impacted by frozen shoulder, which most typically affects adults between the ages of 40 and 60.
Anatomy of shoulder Joint
Bones of the shoulder:
- The humerus, or upper arm bone, is the “ball” of the shoulder. The scapula is a flat, triangular bone that is frequently referred to as the shoulder blade.
- Many muscles and ligaments have attachment sites on the scapula.
- The ‘ball’ of the humerus is received by the glenoid, a shallow “socket” on the side of the scapula.
- connect one another and create the shoulder’s “ball and socket” configuration.
- The collarbone, or clavicle, is shaped like a S even though it seems straight.
- The rib cage, or thorax, is where muscles and ligaments attach.
Bone junctions or joints of the shoulder :
Around the shoulder, there are four bone connections.
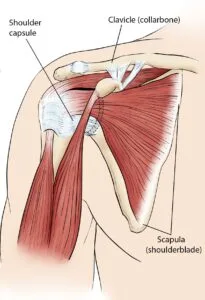
Glenohumeral joint :
It is the shoulder’s primary joint.
The head of the humerus and the glenoid of the scapula meet in the joint.
Merely 20% to 30% of the humeral head is encircled by the flat socket of the glenoid.
Due to its insufficient fit, the joint mostly depends on the surrounding soft tissue for support.
The labrum is a ring of fibrocartilage tissue that surrounds more of the humerus and is connected to the glenoid.
Acromioclavicular joint, or AC joint :
It is the apex of the shoulder’s bony tip.
By joining the acromion on the scapula to the clavicle, or collar bone, it stabilizes the scapula on the chest. Large fibrocartilage disks function as shock absorbers in the spaces between the bones.
Ligaments and the surrounding capsule provide support to the joint.
The Sternoclavicular joint, or SC joint :
It is attached to the sternum, or “breastbone,” at the opposite end of the clavicle. There is a fibrocartilage disk in the joint that helps the bone fit the bone better.
Additionally, the joint capsule and surrounding ligaments provide great support.
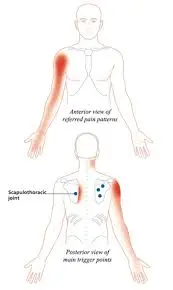
Scapulothoracic articulation :
It is the region where the thoracic rib cage is moved over by the scapula, which is embedded in muscle.
In order for the arm to move appropriately, the surrounding muscles and ligaments maintain the scapula in its normal posture.
The cartilage of the shoulder :
The shoulder joint has two various types of cartilage:
Articular cartilage :
It is the glenoid’s inner layer and the shining white covering that covers the end of the humeral head.
The cartilage has two purposes: to create a smooth, slippery surface for easy mobility.
It has developed into a shock-absorbing material that covers the underlying bone.
Fibrocartilage :
The thick tissue that makes up the labrum, the disk of the AC, and the SC joints depend on the glenoid.
There are three roles for fibrocartilage:
serve as a shock-absorbed cushion.
improve the fit of the bones, which helps to support the joint.
serve as a spacer to enhance the contact between the surfaces of the articular cartilage.
Ligaments of the shoulder :
The ligament provides a great deal of support for the shoulder.
It provides static stability in the joint and is attached from bone to bone.
With regular motion, it will alternately become tight and loose.
They will maintain the joint within its typical range of motion.
The glenoid labrum and the joint capsule of the humerus are the two locations where the glenohumeral ligaments are layered.
The ligamentous group that spans the acromion and the coracoid process (bony projections) is known as the coracoacromial arch.
Most of the support for the AC joint comes from the acromioclavicular ligament and the coracoclavicular ligament.
Muscles and Tendons of the Shoulder:
Both contribute to the “dynamic” stability of the shoulder joint.
Shoulder muscles consist of four groups:
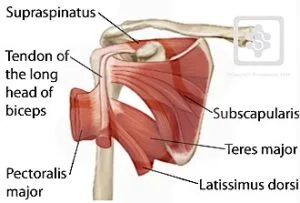
Rotator cuff muscles :
in the subscapularis muscle, supraspinatus muscle, infraspinatus muscle, and teres minor muscle, among other rotator cuff muscles.
They serve as the main stabilizers, keeping the humerus’ “ball” in the glenoid “socket.”
Too little security can be provided by the shallow socket for the humerus.
In order to properly secure the humeral head in the socket, the four muscles form a “cuff” around it.
This set of muscles, as their name suggests, also rotates the arms.
These muscles guard against dislocation of the glenohumeral joint and permit the big muscles that regulate the shoulder and provide significant movement to the arm.
Biceps tendon complex :
These muscles are also helpful in raising the arm and maintaining the humeral head in the glenoid.
Scapulothoracic muscles :
The scapula and the thorax are attached to the scapulothoracic muscles.
The muscles’ primary job is to support the scapula so that the shoulder can move properly.
Superficial muscles :
These are the vast, external, strong layers of muscles in the shoulder.
These muscles are essential to the shoulder’s general functionality.
The deltoid muscle, which covers the rotator cuff muscles, is a member of this group.
Bursa of the shoulder :
A bursa is a hollow that is like a cushion and is partially filled with fluid.
The purpose of plural bursae is to lessen friction and provide a smooth transition between two hard structures, such as a bone, and a tendon or a bone and muscle.
There are 50 bursa in the human body, the biggest of which is the subacromial bursa, located below the shoulder acromion.
The subdeltoid bursa, located between the deltoid muscle, and the subacromial bursa are sometimes regarded as one entity.
This bursa is situated apart from the acromion, between the deltoid and rotator cuff muscles.
Pathology of the Frozen Shoulder:
The axillary pause, the coracohumeral ligament, and the anterior-superior joint capsule were all impacted by this disease process.
The patient has a small joint with a tight anterior capsule, axillary fold loss, and mild to severe synovitis, but no real adhesion.
Patients with frozen shoulders have also been shown to have rotator cuff contracture, which may contribute to their reduced range of motion.
These contradict the underlying pathology, which might be an inflammatory disease, a goneurodystrophic process, or a fibrosing illness.
Causes of the Frozen shoulder :
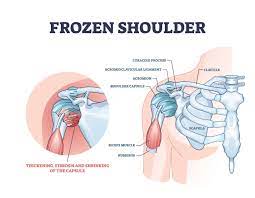
This happens when the capsule around the shoulder joint gets thicker and tighter, limiting its range of motion.
Additionally, the capsule becomes excessively inflammatory, leading to the development of adhesions—scar formations.
Individuals with diabetes may get frozen shoulders.
Other conditions such as hyperthyroidism, Parkinson’s disease, and heart illness are some of the other health issues linked to a frozen shoulder.
Another illness like a stroke or a surgical procedure like a mastectomy.
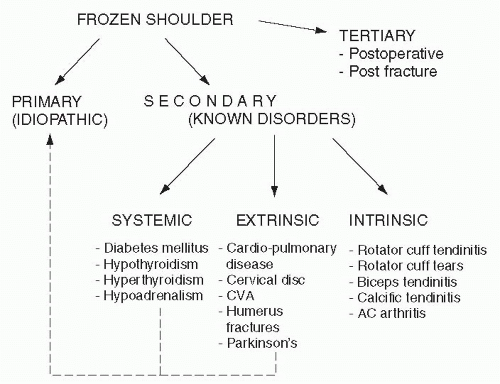
Classification of the Frozen Shoulder:
- Primary
- Secondary
- Tertiary
Stages of the Frozen Shoulder:
- Freezing stage.
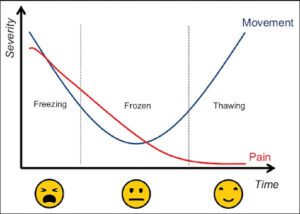
Shoulder discomfort starts with any movement, and the shoulder’s range of motion begins to decrease.
- frozen stage.
At this point, the pain may start to lessen, the shoulder may get stiff, and using the shoulder may become more difficult.
- thawing stage.
Shoulder range of motion starts to get better.
In this stage, some people have nighttime pain that gets severe and occasionally disrupts sleep.
Symptoms of frozen shoulder :
- Typically, shoulder pain is dull or painful.
- Early in the morning is usually when it is worse.
- It is often situated over the outer shoulder region and occasionally the upper arm.
- The primary signs of a frozen shoulder are discomfort and stiffness, which make shoulder movement difficult or impossible.
- There is swelling in the frozen shoulder.
- In addition to experiencing trouble with daily activities, the patient’s shoulder range of motion (ROM) has decreased.
- Occasionally, elevated blood sugar levels and diabetes are linked to symptoms of chest discomfort.
Diagnosis of frozen shoulder:
Physical Examination :
The physiotherapist examines the shoulder after talking about the patient’s medical history and symptoms.
The shoulder will be gently moved in all directions by the physiotherapist to observe shoulder mobility. Patients with frozen shoulders have a reduced range of motion and experience discomfort when moving.
Physiotherapists do passive movement following active movement, which is similar to giving the patient a stretch after the active range of motion.
People with frozen shoulders have a restricted range of motion in both active and passive domains.
Imaging Tests :
Additional tests that assist the physician in ruling out alternative sources of pain and stiffness include X-rays of dense structures like bones.
X-rays:
X-rays might reveal further shoulder issues, such as arthritis.
Magnetic resonance imaging (MRI) and ultrasound:
Magnetic resonance imaging (MRI) and ultrasound are two techniques that improve the picture of soft tissues. It is helpful in identifying other shoulder issues, such as a torn rotator cuff, but it is not necessary for diagnosing a frozen shoulder.
Risk factors of the frozen shoulder :
Several factors raise the possibility of getting a frozen shoulder.
Age and sex:
Adults are defined as those who are 40–60 years old.
In particular, women are more impacted by frozen shoulders than men are.
Reduced mobility or Immobility:-
Individuals with decreased shoulder mobility or extended immobility are more susceptible to developing a frozen shoulder.
Immobility following a recent shoulder injury can be caused by a variety of reasons, such as:
recovery from the rotator cuff injury following surgery
fractured
Stroke
Systemic diseases:
Individuals with particular diseases seem to get frozen shoulder.
The following illnesses raise the risk:
- Heart-related conditions
- Hyperthyroidism and Diabetes
- low thyroid function
- Parkinson’s disease
- tuberculosis
- shoulder damage from a direct hit, a dislocation, FOOSH
- A collapse of the veins
- Metastases disease
Treatment of Frozen Shoulder
Treatment for frozen shoulders is primarily symptomatic. When trying to recover from a frozen shoulder, medical, physiotherapy, and exercise interventions are beneficial. If these methods are not successful, surgery is the last resort.
Additionally, joint mobilization is a favored choice prior to surgery under anesthesia.
Medical treatment :
NSAIDs, or nonsteroidal anti-inflammatory drugs,
medications like ibuprofen and aspirin
It is used to lessen edema and discomfort.
other similar medication that exhibits symptoms, for example. Control diabetes and, if it exists, chest discomfort.
An injection of corticosteroids is administered to the shoulder joint to alleviate discomfort and enhance range of motion.
Distension of the joints
In order to extend the shoulder capsule, inject sterile water into it during this therapy.
It is beneficial to have easy shoulder movement.
Surgery of the frozen shoulder :
Another name for the surgical procedure used to treat frozen shoulder is arthroscopic capsular release.
The small camera is implanted into the shoulder joint during this procedure.
Small tools are also implanted to address the issue through tiny incisions made by other people.
The tight and thickened capsule around the shoulder is the cause of the frozen shoulder.
As a result, the procedure involves cutting the tight capsule to give the joint more movement.
Devices are introduced to open the capsule around the shoulder socket.
Patients will occasionally give their arms specialized splints to maintain their shoulder capsules extended.
Usually, physical therapy begins right after following surgery to prevent scar tissue from beginning to develop around the joint.
Alternatives to Arthroscopic Release :
Nonsurgical Treatment:
Prior to considering any invasive therapies, patients must first attempt nonsurgical therapy for their frozen shoulder.
A lot of people are unaware of how long a frozen shoulder lasts, and it can take up to 18 months for symptoms to go away with therapy.
In order for the majority of surgeons to not see these therapies as failing until they had been tried for several months.
Manipulation Under Anesthesia:
It is executed in a less frequent manner.
It involves gently extending the shoulder while the patient is sleeping.
Benefit: It provides a considerably greater stretch for the joint capsule, however there are many disadvantages.
Following the treatment, pain is experienced, and if someone pushes too hard, their bones can break or tear.
Open Capsular Release:
Open Capsular Release: This surgical technique is performed less frequently.
This therapy involves an arthroscopic operation, in which the shoulder capsule is split and an open incision is made by the surgeon to view the shoulder.
A corticosteroid injection:
An injection of corticosteroids is administered to the shoulder joint to relieve discomfort and enhance range of motion.
Joint distension:
To extend the shoulder capsule, inject sterile water into it during this therapy.
It is beneficial to have easy shoulder movement.
Acupuncture of the frozen shoulder :
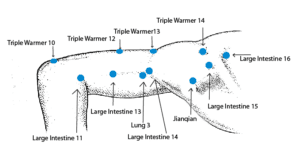
This is the insertion of extremely small needles into the skin at particular bodily locations.
The needles are left in for a duration of 15 to 40 minutes.
While the needles were being moved or worked on.
Due to the needle’s thin, flexible nature and shallow insertion.
For the most part, this therapy is painless.
Massages for a frozen shoulder :
Physiotherapists treat the shoulder by using the proper stretches and massages.
They are appropriately used in this massage.
Massages might injure more people if they are applied poorly.
- Massage underarms using a foam roller:
Position the foam roller below the affected arm’s underarm.
Place the arm on the ground.
Stretch out your arm.
Apply the foam roller gently.
Continue for a maximum of one minute.
- Shoulder massage using a foam roller:
Position the foam roller beneath the affected arm’s underarm.
Stretch out your arm and maintain the effect arm’s upward-extending hand.
Continuously roll back and forth.
self-care techniques Just plain.
Massage the affected shoulder and arm with the other hand.
Give attention to any sensitive regions.
Move the affected arm gently while massaging the shoulder and arm.
Physiotherapy Treatment :
Physiotherapy mostly consists of electrotherapy methods for pain relief and exercises to increase the range of motion, stretch tight muscles in the shoulder region, and strengthen weak muscles.
Modalities for frozen shoulder :
- Electrocutaneous Nerve Stimulation (TENS)
- Interferential Current Therapy (IFC)
- Shortwave Diathermy, or SWD
- Infrared radiation is IR.
- Hot Pack
- This modality is used on patients in order to relieve their discomfort.
- utilized for the acute stage of pain management.
- Additionally, SWD and IR are used to lessen stiffness.
- The entire machine is used for ten minutes.
- Every piece of equipment is used prior to exercising.
- To relieve discomfort after exercise, apply a hot pack.
Exercise for frozen shoulder
In order to naturally recover the function of the shoulder joint, exercise is the most recommended treatment for frozen shoulder generally. It helps to increase flexibility, strengthen weak muscles, and increase range of motion (ROM).
Which objectives are achieved with the Frozen Shoulder exercise?
The following objectives are supported by exercise in cases with frozen shoulders:
- To reduce discomfort in the shoulders
- In order to avoid tight joints
- To improve the shoulder joint’s stiffened and tight capsule’s flexibility in order to recover or regain range of motion
- To increase the shoulder muscle’s strength
- Reduction of shoulder pain
- Improvement of shoulder motion across all planes
- improvement of the rotator cuff’s and the scapular stabilizer’s strength and endurance
- To enhance everyday life activities.
Health Benefits of exercise for Frozen shoulder
- Increase the effectiveness of your movements
- Promote self-dependence
- Reduce discomfort
- maintain and preserve joint integrity
- Preserve your muscular qualities.
- Expand the range of motion, improve lymphatic and venous drainage, and promote relaxation
- keep your muscular qualities
- expand the shoulder’s range of motion; improve lymphatic and venous drainage; and cause the shoulder muscles to relax.
Exercise for Frozen Shoulder
Relax passive movement for frozen shoulder
- Shoulder flexion

Position of the patient: supine; therapist position: stand next to the patient; technique: the therapist’s left hand limits the wrist and carpometacarpal mobility.
The patient’s lower arm should be held in the therapist’s right hand. A small amount of lengthy horizontal traction is provided, and it is maintained throughout the motion.
The therapist’s left hand maintains traction above 90 degrees while the right hand applies stage traction at the beginning and performs the movement up to a range that is accessible.
- Shoulder extension
The patient lies on his or her side, and the therapist stands behind the patient, covering the patient’s face and shoulder joint. The patient’s wrist mobility is restricted by the therapist’s hand, and the patient’s forearm is put across the therapist’s right forearm.
The patient’s shoulder joint is stabilized by the therapist’s left hand, while the therapist’s right hand performs an extension action.

- shoulder abduction
the patient’s supine position The therapist should stand next to the patient and face them when they are lying or sitting. The patient’s elbow flexes 90 degrees during the face treatment. The therapist’s left-hand grips the patient’s wrist. The therapist’s right hand is gripping the dorsal portion of the elbow and the lower arm. The therapist moves the shoulder abduction with both hands.
Patient position: laying supine; Therapist position: stand behind the patient technique, with the elbow flexed 90 degrees and the shoulder abducted 90 degrees.
The patient’s lower humerus was held in place by the therapist’s left hand, while the patient’s wrist and hand were held in place by their right.
The shoulder is rotated medially, laterally, and with extended axial traction.
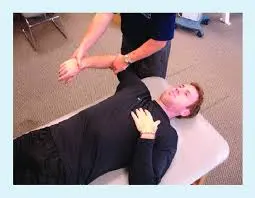
indications for relaxed, calm motion in cases of a frozen shoulder
- the patient who is unable to move actively
- the patient whose range of motion is limited
- The patient is completely immobile.
multi-angle isometrics
During multi-angle isometrics, the therapist asks the patient to move their shoulders; the patient must equal the resistance with the same effort.
Isometric Shoulder Exercises
- Isometric Shoulder Flexion
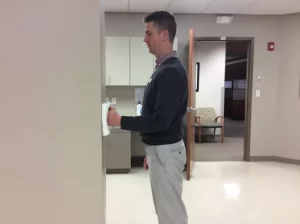
Place yourself facing a wall.
Make a fist with the affected side’s elbow bent.
Press the hand gently into the wall by placing a folded towel between the fist and the wall.
Five seconds of holding.
The exercise involves 10 to 15 repetitions that stimulate the shoulder muscles.
- Isometric Shoulder Abduction
To practice the shoulder abduction isometrically:

Place yourself around six inches away from a wall, but make sure that your body is parallel to the wall.
The impacted side’s shoulder needs to be near the wall.
Form a fist and firmly push it against the wall; for added comfort, place a folded towel between your fingers.
As though you were attempting to raise your arm out to the side, gently press into the wall and keep it there for five seconds.
Release the wall’s pressure gradually.
Do 10-15 reps.
- Isometric Shoulder External Rotation
This exercise helps strengthen the teres minor muscle, infraspinatus muscle, a muscle in the rotator cuff.
To carry out the task:
Maintain your perpendicular position, around six inches away from a wall.
The side of the injured shoulder that is close to the wall is the shoulder.
Make a fist, bend the elbow 90 degrees, and rotate the arm outward by pressing the back of the hand against the wall.
Press the hand gently against the wall for approximately five seconds.
Release the wall’s pressure gradually.
Perform ten to fifteen reps.

- Isometric Shoulder Internal Rotation
To rotate the shoulder in an isometric method:
Body position: turn to face a wall’s outer corner or a door frame.
The injured side’s shoulder should be close to the corner or door opening.
Making a fist and bending the elbow 90 degrees, gently press into the door jamb or corner wall as though you were attempting to twist your hand inside towards your belly button.
Apply a little, folded towel as a barrier.
hold for a duration of five seconds.
Do ten to fifteen reps.
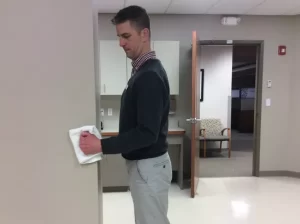
- Isometric Shoulder Extension
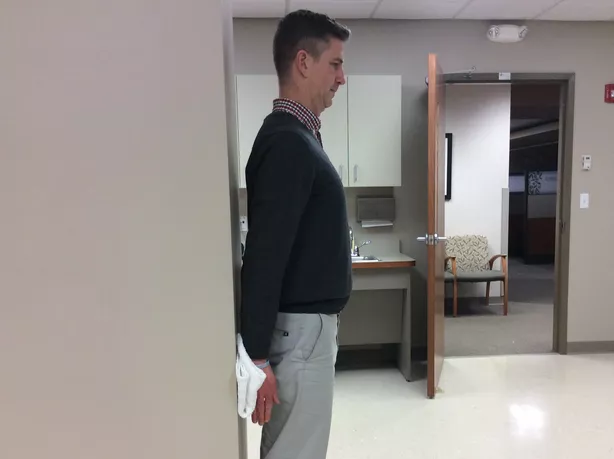
With your back to the wall, take a position six inches away from it to do an isometric shoulder extension.
To keep your hand down close to your hip, keep your elbow straight.
Form a fist and press it firmly against the wall behind you.
Shoulder mobility should be very limited.
After five seconds of holding the pressure on the wall, release it gradually.
Perform ten to fifteen reps.
Stretching exercise for frozen shoulder
Take ten to fifteen minutes in a warm bath or massage before beginning frozen shoulder exercises.
- Pendulum stretch
First, do this task.
Take your shoulders and relax.
Allow the affected arm to dangle down while you stand or slightly slant forward.
The limb Swing in a circle that is roughly the diameter of a foot.
Once a day, complete the 10 repetitions in either direction.
Increase the swing diameter as the symptoms become better, but don’t push it.
When the patient is prepared for further circles, increase the stretch and hold the swinging arm lightly.
- Towel stretch
With one hand, hold one end of the three-foot-long towel behind your back, and with the other, grasp the other end.
Holding the towel horizontally is the position.
To stretch and raise the affected arm, use your strong arm.
In an advanced version of the exercise, the towel is pulled over the shoulder and is in good condition.
Holding the towel’s bottom in the affected arm, move the unaffected arm’s hand toward the lower back.
Ten to twenty repetitions of this exercise are made each day.
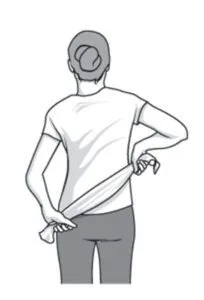
- Finger walks
and observes the wall from three arm’s length away.
With the affected arm’s fingertips, reveal and make contact with the wall at waist level.
With the elbow slightly bent, carefully stroll the fingers in the direction of the wall, like a crawler, until the arm is as high as is comfortable. finger movement as opposed to shoulder muscular contraction.
Repeat, moving slowly down the lower arm.
Exercise with the finger walks ten to twenty times a day.
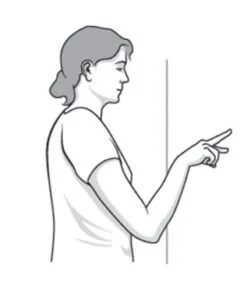
- Cross-body reach
Move the affected arm at the elbow with the unaffected arm, then raise it across your body and apply some pressure to open up your shoulder.
Hold the cross-body stretch for ten to twenty seconds.
Ten to twenty times a day, perform this exercise.
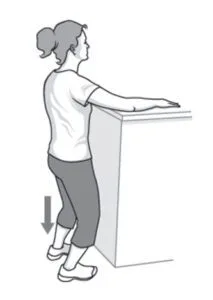
- Armpit stretch
Lift with the affected arm around breast-high while using the undamaged arm.
Bend your knees slightly and spread your underarms.
Bending slightly depending on the knee, softly extend the armpit.
Stretches a little bit farther after each knee bend, without pushing it.
Stretch your armpits ten to twenty times a day.
- Pectoralis stretch
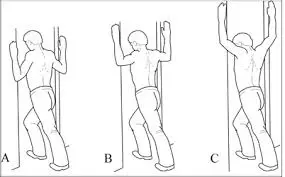
Stand with your arms sideways inside a door frame. Hold onto the door frame and go forward a few feet until your shoulder and biceps start to ache. Stretch for 5–10 seconds in a minute, then release it for two repetitions.

- Internal Rotation Belt Stretch
Pick up an old leash or belt. Starting with the belt pulled across the buttocks, place the affected hand behind the back. Hold for ten to fifteen seconds. Repeat twice for a minute each.
Progression: To advance the backhand up the spine, place the involved hand behind your back and use the non-involved hand to tug the belt. For two minutes, repeat.
- Posterior capsule stretch
Patient position: side laying; therapist position: standing next to the patient; procedure: suspend the affected arm at the table’s edge and the unaffected arm behind the ear with a 90-degree bend in the elbow
Stretch gently using the therapist’s left hand over the rear side of the shoulder joint and their right hand over the elbow joint. Hold for two seconds. Reps: three to five times.
- Sleeper stretch
Transfer to the affected shoulder. Elbow alignment should be parallel to the shoulder. Push the forearm down toward the floor using the side that is not engaged. three sets of thirty seconds of holding.
- Upper thoracic stretch
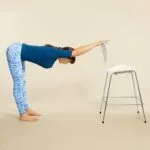
Keep your distance from a cooking area table or stair rail as close as possible. Lean forward while holding onto the handle until your upper back and shoulders start to ache. Hold for one minute and twice.
Yoga exercise for the frozen shoulder :
- Paschim Namaskarasana
- Ardha Matsyendrasana
- Bhujangasana
- Halasana
- Dhanurasana
- Garudasana
- Ustrasan
- Purvottanasana
- Paschim Namaskarasana (Reverse Prayer Pose):

First, perform the Tadasana. Hold your hands erect and hang to each side. Let go of your shoulders and slightly bend your legs. As in a prayer position, extend the arms backward and bring the palms together.
Press the inside surface palm toward the spine while you inhale slowly, and hold this posture for a little while.
Now, slowly release the breath, lower your palms, and return to the beginning position.
For optimal effects, perform the yoga pose four or five times.
- Ardha Matsyendrasana (Sitting Half Spinal Twist):
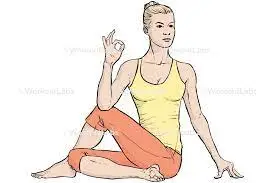
Firm Sit with your feet together and your legs extended.
Bend your right leg and position your right foot’s heel next to your left hip.
Over the right knee, grasp the left leg.
Put your right hand on your left foot and your left hand behind you.
Turn to the left at the waist, shoulders, and neck, then turn to face the shoulder on the left.
Hold this position while you inhale and exhale slowly and deeply.
Return to your starting location as usual. Repeat these yoga poses slowly on the opposite side.
- Bhujangasana (Cobra Pose):

With the head on the ground, lie flat on your stomach.
Maintain both hands on each shoulder side.
Apply pressure to the hand and slowly raise the body of the torso, extending the muscles in your back and abdomen.
Keep your shoulder blades tight against your back and your arms straight.
Maintain eye contact with the ceiling point for a duration of 15-30 seconds.
Then release the breath and return to your regular posture.
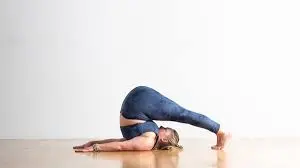
- Halasana (Plow Pose):-
Raise both legs over the tummy while lying on your back.
Bend your torso, attempt to lift your legs above your head, and plant your toes on the ground.
Repeat this exercise after holding the pose for ten to fifteen seconds, then letting go for a minute.
- Dhanurasana (Bow Pose)
Raise your body and legs backward while lying flat on your stomach.
Stretch your arms back and put your hands on both of your feet.
For as long as you can, maintain the position and take a regular breath in.
Continuing your regular posture, perform this exercise five or six times.

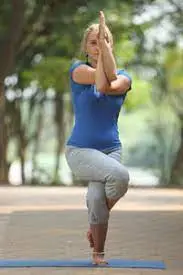
- Garudasana:-
Extend to your upper back and shoulders.
Release any tension in them and loosen the shoulder.
- Ustrasana:-
The front of the body is strengthened and stretched.
relieve lower back pain in the body.
- Purvottanasana:
stretch the neck, shoulders, and chest; strengthen the back, ankles, and wrists.
Active assisted exercise for frozen shoulder.
- Finger ladder:
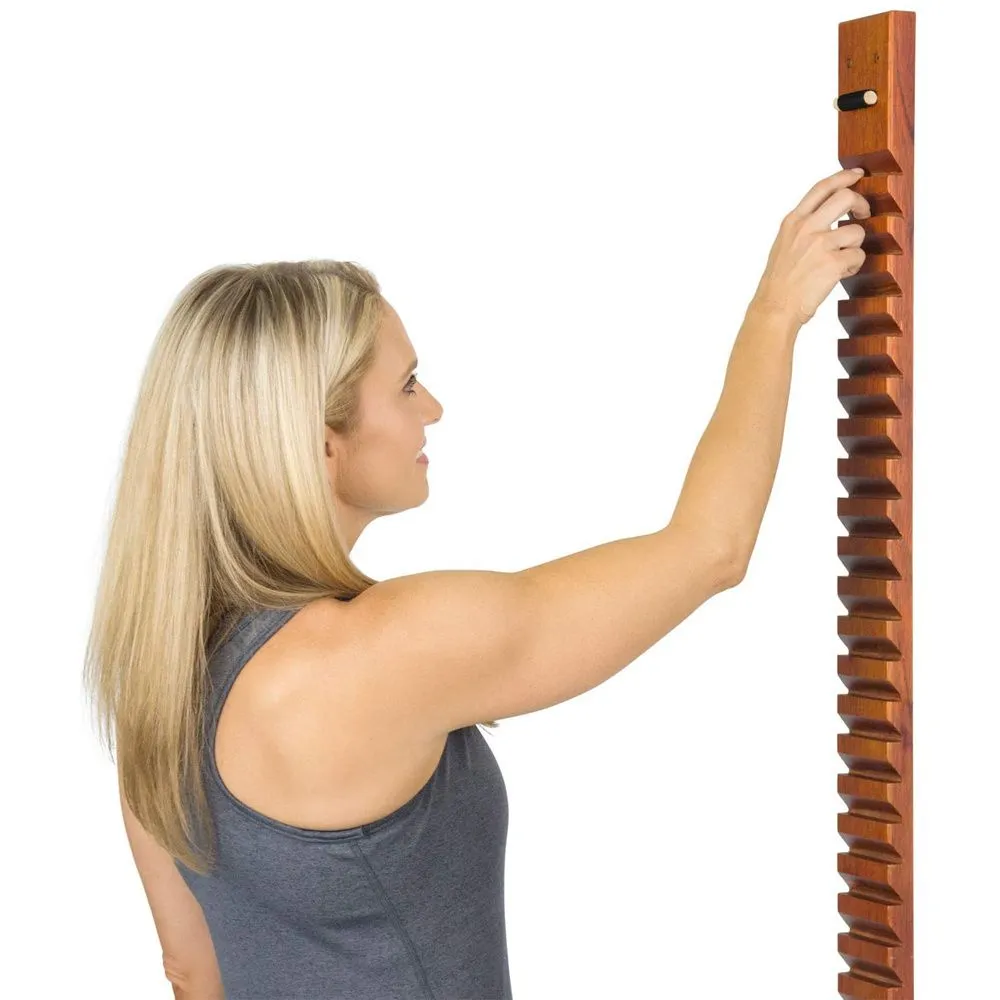
Ask the patient to face the ladder from both the front and the side, then raise the affected shoulder’s finger in tandem with the ladder to do the maximum number of 10 repetitions three times a day.
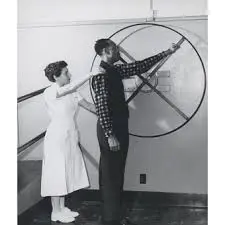
- Shoulder wheel:
Request that the patient stand sideways on the shoulder wheel, grasp the handle, and rotate the shoulder wheel 10 times every day, clockwise and anticlockwise.
- Rope and pulley:
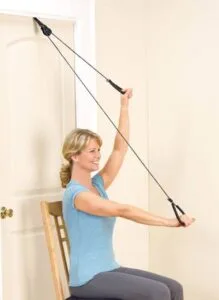
Request that the patient stand or sit in a chair with back support. Then, have them both grasp a pulley’s handle and shift the painful hand to the upper side, flexing the shoulder. ten reps, three times a day.
Strengthening exercise for frozen shoulder:
equipment used to strengthen the shoulder joint Different exercises that strengthen the shoulder joint are performed in the progression stage of a frozen shoulder.
- dumbbell
- weight cuff
- Theraband
- Dumbell shoulder press
steps: take a seat in the chair; begin with small dumbbells (then go on to heavy ones); pull the dumbbells up to the starting position sideways.
Place the dumbbells in front of your shoulders and raise them. (start position)
Raise the dumbbells straight up in a controlled, steady motion.
Arm extension (end position)
go back to the starting position and keep it there for two seconds.
- Dumbell side raises
begin by standing up straight and maintaining good posture.
Raise the dumbbell straight out to the side until the arms are parallel to the ground while holding it sideways with your palms facing each other. Take a two-second hold and then go back to your starting position.
- Dumbell’s front raise
begins in the standing posture.
Raise the dumbbells straight out in front of you until your arms are parallel to the floor while holding them like palms and opposite your body. Take a two-second hold and then go back to your starting position.
- Bent over dumbell side raise
Begin by standing, then bend your body at the waist to position your upper body parallel to the floor. Maintain a straight back and grip the dumbbell at the bottom.
Raise the dumbbell in a reverse fly motion, straight out to the side.
Return to the regular position after holding the position for two seconds.
- Dumbell upright row
With the weight supported by your front thighs and your palms opposite down, pick up the dumbbells, stand up straight, activate your shoulder, and raise your hands and elbows upward.
preserve palm facing to the floor at the height of the action with the shoulder muscle completely contracted weight on the hand should be in line with the shoulder and face forward
bending the elbow 90 degrees, holding it there for two seconds, then reverting to the original position
Each set has three sets. 8–12 repetitions.
- Dumbell shoulder shrug
Holding the weight outside the hips (sideways of the thigh), pick up a dumbbell in each hand and completely extend your arm with your elbows. Raise the dumbbell as high as you can while bending back.
Shrug your shoulder up toward your ears, holding it there for two seconds before lowering it and frowning again. 3 sets of 8–12 repetitions each Dumbbell exercises for strengthening involve using the anterior, middle, and posterior muscles (deltoid). This workout increases shoulder joint mobility.
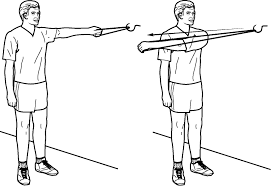
- Theraband exercises for frozen shoulder
Depending on how well the patient with a frozen shoulder tolerates it, five different colors of theraband are utilized for exercising. begin with the lowest resistance yellow theraband and work your way up to the greatest resistance red, green, blue, black, silver, and golden theraband.
3.0 pounds of yellow red 3.7 lbs. of green 4.6 lbs of blue 5.8 lbs of black 7.3 lbs of silver 10.2 lbs of golden 14.2 lbs.
- Outward rotation:
Keep the theraband between your hands and your elbows 90 degrees out from your sides.
rotates the affected arm’s bottom portion clockwise until it is two or three inches out; maintain the position for five seconds.
Once a day, perform 10 to 15 repetitions of the outward rotation.
- Inward rotation:-
Place the rubber workout band near the door and hook one end around the doorknob.
Keep the other end in the affected arm’s hand and hold the elbow at a ninety-degree angle.
Hold the theraband for five seconds after pulling it two or three inches toward the body. Do this exercise ten to fifteen times, once a day.
- Shoulder flexion with theraband
Ask the patient to grasp the band upward toward the top and then back down again. Hold one end of the band held by the patient and the other end on the door knob.
Use a theraband to show how to stretch your shoulders. two to three times a day, ten repetitions each.
Shoulder abduction with theraband Ask the patient to take the band away from their body and return to the neutral position by holding one end of the band beside them and placing the other end beneath the sole of their foot. Use a theraband to show shoulder abduction two to three times a day for ten repetitions each.
- Shoulder adduction with theraband
Ask the patient to take the theraband outside and away from their body, then return to the neutral position. The therapist should hold one end of the theraband while the patient holds the other.
Do a shoulder adduction while holding a theraband. The therapist will practice these exercises two to three times a day, with ten repetitions each time.
Weight cuff exercise for frozen shoulder
Several kg weight cuffs are used.
0.5, 1, 1.5, and 2 kilogram
- Shoulder flexion
patient positions: standing, sitting on a chair, and supine; begin by applying a little weight on the wrist joint.
When the patient begins to make progress, gradually increase the weight. Ask the patient to lift their arm upward; maintain the position for two seconds. Then, gently move their arm downward.
Do the exercise two to three times a day, completing ten repetitions each time.
Using a different kg weight cuff, perform an additional strengthening exercise in the same way.
Home exercise for frozen shoulder
Foundational stage
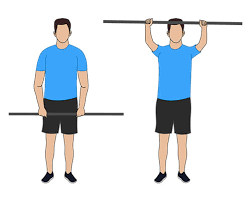
- Stick shoulder flexion
posture: either seated or standing
First, hold the stick straight in front of you. Next, bend forward and grab hold of the stick. Step 3: Feel the strain in your shoulder flexion repetitions pause for a half-minute.
sets: Three sets Take a 30-second pause after every interval of three to five times a week.
- Stick shoulder abduction
posture: either supine or upright
Step 1: Take hold of the stick with your right palm pointing away from your body and your left palm facing your body.
Step 2: Place your elbow at your side while keeping it straight.
Step 3: Push the right arm as high as it will go to the right side using the left arm.
Step 4: Lower your right and left arms gently. Repeat on the opposite side. Change the posture of your hands by turning your left palm away from your body and your right palm toward it. Reps: Ten to fifteen times every side set: three sets
frequency: three to five times a week
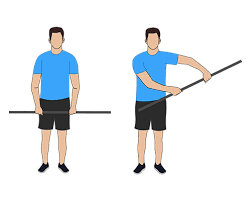
- Stick shoulder rotation
posture: supine or standing
step 1: Using both hands, pick up the stick or towel, bend the elbow to 90 degrees, and insert it inside.
Step 2: Loop your hands in a clockwise direction, then turn them around in the reverse direction (left side).
reps: ten to fifteen on each side
organized: Three frequency sets: three to five times a week.\
- Stick overhead shoulder stretch
position: supine; first, lie on your back while holding a stick. Step 2: Lower your hands overhead and experience the stretch. Hold overhead
Step 3: Tighten your core muscles during the action and aim to maintain your shoulder blades pressed against the floor.
Step 4: Hold for a duration of 5 to 10 seconds
Step 5: Raise your arm above and do another rep. Set 8–10 times: 3 sets
frequency: three to five times a week.
Intermediate stage
Proceed with the basic phase.
- broom pull
place: standing
Step 1: Using both hands, grip a towel or stick with one over the head and one behind the back.
Step 2: Using your upper hand, pull until your lower arm and shoulder extend. Repeat with the other arm.
Hold for 10 to 15 seconds between exercises. Sets: Three sets, each with a 30-second stop at the designated frequency: three to five times a week
- Stick shoulder extension
Step 1: Take a standing stance; grasp a staff, broom, or cane behind your back and stretch your arm behind it.
Step 2: Avoid shoulder discomfort and strain by keeping the shoulder blades pulled together and feeling the stretch in the chest muscle.
reps: 30-second hold
sets: three sets, each separated by a 30-second pause; frequency: three to five times a week
Every exercise in the intermediate stage increases mobility, flexibility, and range of motion.
Home-based strengthening exercise for frozen shoulder
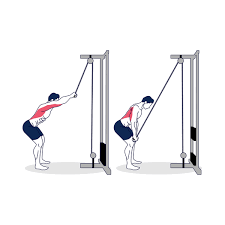
- Low row
Step 1 is to link a theraband to a solid item while in the standing or sitting posture on a stability ball.
Step 2: Pull the band toward you while squeezing your shoulder blades together and extending your elbows backward.
Step 3: Let the theraband retract forward one more while maintaining your engaged shoulder blades.
repetitions: ten to fifteen
sets: 3–5 frequencies: three to five times a week
level 2: Place your left arm and left knee on a bench, hold a weight in your right hand, and conduct a left side exercise.
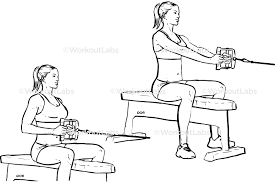
- Straight arm lateral pull-down
Place yourself on the stability ball, either standing or sitting.
Step 1 is to link a theraband to a firm object.
Step 2: Pull the band toward you while squeezing your shoulder blades together and extending your elbows backward.
Step 3: Let the theraband retract forward one more while maintaining your active shoulder blades.
repetitions: ten to fifteen
sets:3–5 frequency: 3–5 occasions a week
The advanced stage
proceeds with the exercises for the basic and intermediate levels.
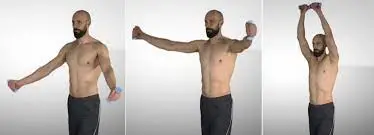
- Scaption
place: standing
Step 1: Point your hands toward the ceiling with your hands 20 to 30 degrees in front of your thumb.
Step 2: Raise your hands gently above, being mindful to keep your shoulder blades down and your core muscles relaxed.
step 3: Go back to the starting position gradually
reps: eight or ten times
arranged: three sets
frequency: three to five times a week
Dumbbell exercise level 2: add one or two pounds of weight
level 3: grasp the ends of the band while standing in the center of it.
Exercises to strengthen the advanced stage of frozen shoulder:
- External rotation with theraband
stance: either standing or sitting on the exercise ball
First, take a Theraband.
Step 2: Squeeze your shoulder blades and contract your core muscles.
Step 3: Keep the elbow in the midline and progressively rotate the arm outward.
Step 4: Return gradually to the starting position while attempting to maintain consistent pressure on the theraband repetitions. Sets of ten times–5 sets of frequencyEngage in this physical exercise three to five times a week (by the patient)
Proprioception/functional exercise
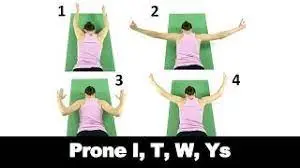
- Prone “t”,”y”,”l”,”w”
position: rest face down on the floor with a towel under your forehead.
Step 1: pull your belly button toward your spine to activate your gluteal and abdominal muscles.
Step 2: extend your arm straight out to the side at a 90-degree angle, with your body and thumb pointing toward the ceiling.
Step 3: Raise the arm off the ground, bring the shoulder blades back and down, and hold for three counts.
Step 4: Continue to raise the arm to progressively higher heights, making the letters “y” and “l,” and then bend the elbow to move the arm sideways to form the letter “w.”
Step 5: Hold each of the four postures for three counts while pointing the thumb upward toward the ceiling.
Step 6: Repeat after resetting the muscles in your glutes, abdomen, and shoulder blades.
reps: sets of three to five times: two to three times per week: three to five times a week.
The most beneficial exercises are T and Y, so focus on those throughout the functional stage.
When not to do exercise of frozen shoulder??
- adult stroke survivors between the ages of 40 and 60 who have either hyperthyroidism or hypothyroidism
- those suffering from Parkinson’s disease and cardiac conditions
- women who have had mastectomy recent shoulder trauma, such as a rotator cuff tear fracture of the collarbone, shoulder blades, or upper arm
- a patient in recovery from an illness or surgery that limits her range of motion, such as pregnancy with a shoulder splint or arm brace
- recently breakdown The Bone
- Recently, pop
- Inflammation or damage in recent
- Cancerous growth.
Precaution for frozen shoulder.
- Don’t completely stop moving your shoulder if it hurts. When recuperation begins, keep moving gently. Avoid activities that require quick movements, such as heavy lifting.
- Prevent irritability
- doesn’t sleep on the shoulder that is injured; doesn’t skip regular exercise and physical therapy; doesn’t ignore your nutrition; quits drinking and smoking; sees a shoulder specialist if treatment for frozen shoulder is unsuccessful; exercises as directed by a doctor.
Prevention
If you begin physical therapy soon after any shoulder injury that causes discomfort or difficulty with shoulder mobility, you can lower your chance of developing a frozen shoulder. A physical therapist or orthopedic surgeon can create an exercise regimen tailored to your individual requirements.
Prognosis
In a year or less, simple therapies like cortisone injections combined with shoulder exercises and pain medications are frequently sufficient to restore mobility and function. Range of motion and shoulder usage improve on their own, even in the absence of any treatment, but frequently more slowly. After around two years, full or almost full recovery is observed.
Conclusion
Living with adhesive capsulitis, often known as a frozen shoulder, may be quite difficult. It may become difficult or even impossible for you to carry out everyday tasks that you used to be able to do without any trouble due to shoulder joint discomfort and stiffness.
Speak with your healthcare practitioner if self-care measures like rest and painkillers are ineffective. They can suggest beginning with physical therapy or other non-invasive methods. If the frozen shoulder doesn’t go away after a long time, surgery is a possibility. To determine the best course of therapy for you, see your physician.
FAQ
Can exercise help a frozen shoulder?
Most persons with frozen shoulders should be able to reduce discomfort and increase their range of motion with regular shoulder stretches and exercises. Usually, improvement takes time.
Should you rest or exercise a frozen shoulder?
It is preferable to first take a break and perform mild, rhythmic shoulder mobility exercises. People can perform progressively difficult range-of-motion exercises for frozen shoulders as their symptoms start to get better.
With a frozen shoulder, which exercises should you avoid?
Individuals who suffer from frozen shoulders should start with activities that encourage any kind of mobility, such as lifting something above. Patients with locked shoulders should refrain from certain weight training exercises like pull-ups in the gym and from throwing balls.
Which exercise is best for a frozen shoulder?
For a frozen shoulder, stretching and strengthening exercises are recommended.
How do you treat frozen shoulders naturally?
To aid with pain and swelling reduction, apply ice and heat to the affected region. Exercises for range of motion and mild stretching are part of physical therapy.
What is the best remedy for frozen shoulder?
Combining the following nonsurgical techniques frequently reduces discomfort and increases range of motion:
Changes in activity.
anti-inflammatory drugs.
injection of corticosteroids into the shoulder joint.
giving the shoulder joint ice or heat.
physical therapy and range-of-motion exercises.
What is the reason for a frozen shoulder?
The precise etiology of this illness is unknown. A frozen shoulder can result from immobilization of the shoulder (following an arm injury, for example). The shoulder joint may also get frozen due to inflammation of the muscles and/or tendons, such as in cases of bursitis or rotator cuff tendinitis.
Will a frozen shoulder heal on its own?
Without medical intervention, a frozen shoulder typically resolves on its own. There are instances, nevertheless, where a person never fully regains their pre-loss range of motion. For frozen shoulder, there are a few different therapy approaches that may be combined, but there isn’t a clear-cut plan of action that works for everyone.
Which four stages relate to a frozen shoulder?
Physical therapy treatment can expedite the resolution process and facilitate the restoration of function.
‘Pre-Freezing’ is Stage 1 It’s likely that you have been dealing with the symptoms of adhesive capsulitis for some time if you have been diagnosed with it.
Phase Two: “Freezing”
Phase Three: “Frozen”
Phase Four: “Thawing”
Which posture is ideal for sleeping when you have a frozen shoulder?
Try sleeping on your back with your hands facing down and your arms straight at your sides. The least amount of strain on your shoulder joints is placed in this prone position with your arms at your sides, allowing your soft tissues and muscles to slowly stretch and relax.
Which is better for a frozen shoulder, heat or ice?
For a few days, try applying ice to your shoulder for 15 minutes at a time, then take it off for another 15 minutes. Repeat three or four times daily. To prevent frostbite, make sure you cover the ice with fabric. To relieve pain and swelling, take an ibuprofen. Return to your usual schedule gradually as soon as you start to feel less uncomfortable.
What is the first-line treatment for a frozen shoulder?
Relieving discomfort and regaining mobility and shoulder function are the main objectives of therapy for frozen shoulder syndrome (FSS). FSS is self-limiting; no matter what kind of therapy is taken, long-term results are essentially the same. For all phases of FSS, physiotherapy and at-home exercise are the initial lines of treatment.
How is a frozen shoulder massaged?
First off, a foam roller is an excellent tool for massaging the shoulders. On a counter or table, place it beneath your armpit. To release tension in your shoulder muscles, gently roll back and forth while extending your arm as though you’re reaching for something.
What is a recommended cream for frozen shoulder?
Shoulder pain and other localized traumatic inflammation can be relieved with the use of Voltaren Emulgel. Shoulders are especially vulnerable to damage, sprains, strains, and excruciating stiffness known as a frozen shoulder.
Which at-home treatments are available for shoulder pain?
At-Home Nursing
Place ice on the shoulder area for fifteen minutes, then take it off for an additional fifteen. For two to three days, try this three to four times a day.
Over the next few days, give your shoulder some rest.
Gradually get back to your regular schedule.
Ibuprofen or acetaminophen (found in Tylenol) can help reduce pain and inflammation.
Which medication works well for shoulder pain?
Medication-free pain relief is possible with products containing 10% menthol (Icy Hot, BenGay) or diclofenac (Voltaren). If those are ineffective, consider alternative over-the-counter pain relievers. These include naproxen sodium (Aleve), ibuprofen (Advil, Motrin IB, and other brands), and acetaminophen (Tylenol, among others).
References
- Ladva, V., & Ladva, V. (2021, November 1). Frozen shoulder : Samarpan Physiotherapy Clinic. https://samarpanphysioclinic.com/frozen-shoulder/
- Mandaliya, D. (2022, September 29). Exercise for Frozen shoulder. Samarpan Physiotherapy Clinic. https://samarpanphysioclinic.com/exercise-for-frozen-shoulder/
- Professional, C. C. M. (n.d.). Frozen Shoulder (Adhesive Capsulitis). Cleveland Clinic. https://my.clevelandclinic.org/health/diseases/frozen-shoulder-adhesive-capsulitis




6 Comments