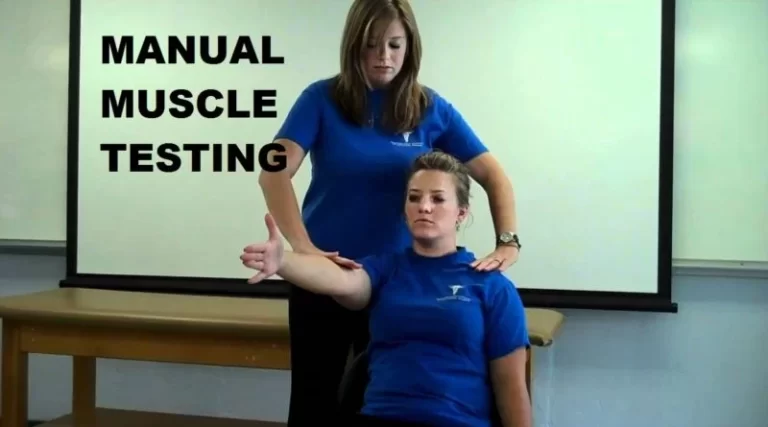
Cervical Spine Examination
What is a Cervical Spine Examination?
A cervical spine examination assesses the neck region’s structure and function, focusing on posture, alignment, range of motion, and potential sources of pain or dysfunction.
The examination involves inspection, palpation, movement assessment, and neurological testing, including motor, sensory, and reflex evaluations of the upper limbs.
It is essential for diagnosing conditions such as cervical radiculopathy, neck strain, disc herniation, and degenerative changes, aiding in targeted treatment planning.
Anatomy:
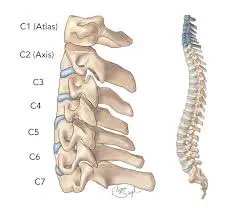
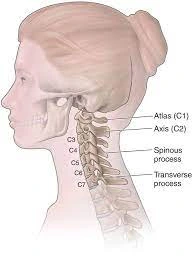
- The seven positioned bones that make up your cervical spine, or neck region, are known as vertebrae. Your cervical spine’s first two vertebrae have a specific shape and purpose. The first vertebra (C1), also known as the atlas, is a ring-shaped bone that begins at the base of your skull. It is named for the Greek mythological figure Atlas, who carried the entire universe. Your head is held up by the atlas. The atlas can pivot against your second vertebra (C2), also known as the axis, to enable the side-to-side “no” rotation of your head.
- Your neck may move forward, backward, and rotate due to a type of joint called a facet joint, which connects your seven cervical vertebrae (C1 through C7) at the back of the bone.
- Additionally, muscles, nerves, tendons, and ligaments encircle your cervical spine. Intervertebral disks are “shock-absorbing” disks that are placed in between each vertebra. In the middle of your entire spine is your spinal cord. Your brain, which regulates every element of your body’s operations, communicates with your spinal cord.
Cervical Spine Muscles:
The following are the main muscles that connect to your cervical spine:
- Sternocleidomastoid: This muscle extends from behind your ear to the front of your neck, with one on each side. It attaches to both your collarbone and breastbone (sternum). This muscle enables you to tilt your chin up and rotate your head from side to side.
- Trapezius: From the base of your head, these two triangle muscles run down your cervical and thoracic spine and end at your shoulder blade. They assist in lifting your shoulder blades, rotating your head to the right or left, and tilting your head forward or backward.
- Levator scapulae: The top of the edge of your shoulder (scapula) and the first four cervical vertebrae are where this muscle is attached. It facilitates head rotation, sideways head bending, and shoulder blade elevation.
- Erector spinae: This muscle group is composed of many muscles. These muscles support proper posture, neck rotation, and backward neck extension in the cervical spine region.
- Deep cervical flexor. Your cervical spine’s anterior region is connected to these muscles. They help maintain the stability of your cervical spine and enable you to flex your neck forward.
- Suboccipital muscle: The base of your head and the top of your cervical spine are joined by these four muscle pairs. They provide you with the ability to turn and extend your head.
Cervical spine’s ligaments:
- Anterior longitudinal ligament: This ligament runs down the front of the cervical vertebra from the base of your skull. It stretches to prevent the neck from moving backward.
- Posterior longitudinal ligament: This ligament runs down the back of your cervical vertebrae, beginning at C2. It stretches to prevent the neck from moving forward.
- Ligamentum flava. The rear of each vertebra’s internal hole, where your spinal cord travels, is lined with these ligaments. These ligaments cover and shield your spinal cord from the back.
Disk in the cervical region:
- The “shock absorber cushions” that rest between each vertebra are called cervical disks. The seven cervical vertebrae are separated by a total of six disks (one between two vertebrae). The disks not only protect your neck from strains but also make it easier for you to flex and rotate your head when you’re moving.
Cervical spine’s nerves:
- Your head and neck motions are controlled by the cervical nerves C1, C2, and C3. Your head’s upper region is sensed by the C2 nerve, whereas your back and side of your face are sensed by the C3 nerve.
- One of the nerves that regulates the diaphragm, a muscle at the base of your rib cage that aids in breathing, is cervical nerve 4, which also controls your upward shoulder motion. Parts of your neck, shoulders, and upper arms are sensed by C4.
- The deltoid muscles in your shoulders and biceps are controlled by the cervical nerve 5. The top portion of your upper arm down to your elbow is sensed by C5.
- Both your biceps and wrist extensor muscles are controlled by the cervical nerve 6. The thumb side of your forearm and hand are sensed by C6.
- Your wrist extensor muscles and triceps are controlled by the cervical nerve 7. Your middle finger and the back of your arm are sensed by C7.
- Your hands are controlled by cervical nerve 8, which also provides sensation to your forearm and finger side.
Cervical spine diseases and disorders:
- Cervical radiculopathy
- Neck pain
- Cervical degenerative disk disease
- Cervical spondylosis
- Cervical spinal fracture
- Cervical stenosis
- Cervical spinal tumor and cancer
- cervical spondylotic myelopathy
Examination:
History:
- It is important to take a thorough patient history. Pay close attention to the patient’s history of current illness and past medical history. Much of the information required to lead a cervical examination and rule out red flags can be found in the patient’s story.
- Asking the patient if they have pain or other symptoms in other areas, such as their shoulder or thoracic spine, is essential while gathering their medical history.
- At this point, outcome measures such as the Patient-Specific Functional Scale or the Neck Disability Index may also be utilized.
Observation:
- Observing the patient’s posture both while they are seated and when they are standing. Postural deviations may be adjusted as part of an assessment to see how they affect a patient’s symptoms.
- Typical posture abnormalities:
- Long cervical spine or even a forward-leaning head position
- Round shoulders with prolonged shoulder girdle
- Kyphotic or even flexed posture of the upper thoracic spine
- Extended or even lordotic stance
- Normal
Palpation:
- supine position
Check for tenderness or movement by palpating both sternoclavicular joints.
Next, look for any acromioclavicular joint movement or discomfort.
Assess for shortness or even soreness by palpating the pectoralis minor, levator scapula, upper trapezius, and suboccipital muscles. - prone position
Both the central and peripheral cervical and thoracic spines
Palpate the upper and mid-thoracic region’s ribs 1 through 7.
proximal to an anterior accessory action are ribs 1 through 7.
Movement examination:
- Begin by asking that the patient do an active range of motion.
- Head up and chin in is the neutral stance.
- Flexion (forward bending): 50 to 60°
- Extension (Bending backward): 45 to 55°
- Bending 30 to 40 degrees laterally to the right and left
- Left and right rotation: 50 to 60°
Special test:
Mobility Test: Cervical rotation in the flexion
- Holding the cradle head in both hands
- Make contact with the fingertips of the posterior side of C1.
- Cervical flexion
- Calculate each side’s degree of rotation.
- When twisting the cervical spine, keep it flexed.
Neck Flexor Muscle Endurance Test:
- A hook is lying with a patient in the supine posture. When a patient lifts their head and neck till they are about 2.5 cm (1 in) above a plinth while maintaining their head retracted to their chest, their chin is maximally retracted and maintained isometrically.
- A physical therapist lays the patient’s hand on a table just below the occipital bone of the patient’s head and concentrates on the skin that folds with the patient’s neck. When a patient’s occiput meets a physical therapist’s palm or skin folds begin to split, the therapist will give vocal instructions, such as “tuck the chin” or “hold the head up.”
- If a patient’s head brushes a clinician’s hand for more than a second or if skin folds or folds separate due to chin tuck loss, the test is over.
- Reliability
- Individuals who do not have neck pain: SEM 8.0–15.3 seconds, ICC = 0.67–0.91 seconds
- Individuals suffering neck pain: SEM 11.5 seconds, ICC = 0.67
Distraction Test:
- The significance of this examination: Cervical radiculopathy identification
- One of the patients is lying down.
- The patient’s neck is flexed to a comfortable position, the examiner grasps under the chin and occiput, and a small distracting force of up to 14 kg is applied.
- When a patient’s scapular or upper extremity symptoms are lessened or gone, the test is positive. A test is not advised if a patient has no symptoms in the scapular area or even in the upper extremities.
- 0.44 is the sensitivity.
- 0.90 is the specificity.
- Probability Ratio = 4.40 – Probability Ratio = 0.62
Valsalva Test:
- How to carry out this test:
- A patient must sit down and be given instructions by the physical therapist to inhale deeply and hold the position for five to seven seconds while exhaling.
- Reproduction of symptoms results in a good response.
- 0.22 is the sensitivity.
- 0.94 is the specificity.
- 3.50 – Likelihood Ratio = 0.83 is the likelihood ratio.
Percussion Test:
- How to take this test: An examiner taps the spinous processes of each exposed vertebrae while the patient’s cervical spine is gently flexed.
- How to do an examination: A fracture or functional impairment of the muscles or even ligaments can be indicated by localized non-radicular discomfort. Then, radicular symptoms indicate intervertebral disk disease and irritation of nerve roots.
Jackson compression test:
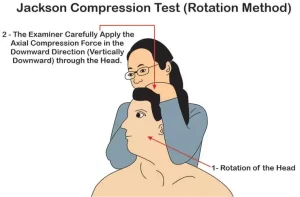
- How to administer this examination to the patient:
- The patient must sit. Standing behind a patient and placing a hand on top of their head, an examiner passively tilts the patient’s head to either side. During maximum lateral bending, an examiner presses down on the head to apply axial pressure on the spine.
- Examination: An axial loading results in increased compression of the facet joints, exiting nerve roots, and intervertebral disks. Distal discomfort that does not precisely correspond to distinguishable segmental dermatomes is caused by pressure on the intervertebral foramina acting on a facet joint.
- Inflammation of the nerve roots can cause symptoms of radiating pain.
flexion compression test:

- The patient must sit down in order to do this exam. An examiner not only stands behind the patient but also moves the cervical spine into the flexion position, which passively tilts the patient’s head forward. After that, axial compression is applied to the top of the head.
- How to do an assessment: It is a useful method for assessing the integrity of an intervertebral disk. If there is posterolateral disk extrusion, the method may press an extruded disk piece posteriorly, increasing the compression on the nerve root.
- An increase in radicular symptoms could be a sign of posterolateral disk extrusion.
Foraminal compression test, or Spurling test:
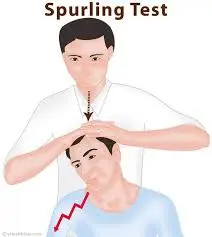
- assessment of facet joint discomfort and irritation of nerve roots.
- The procedure requires the patient to sit with their head inclined to one side and rotated.
- An examiner stands behind the patient and places one hand on the patient’s head. An examiner lightly taps (compresses) a hand that is lying on a patient’s head with another hand. The first test step is repeated with the cervical spine stretched if the patient can handle it.
- How to do an examination: A test provides clinical evidence of nerve root compression and facet syndrome. An examination may make the discomfort worse if there is facet joint inflammation or nerve root compression.
- Continuous cervical spine extension results in a 20–30% reduction in intervertebral foramina width. The movement may exacerbate radicular pain that already exists.
Shoulder depression test:
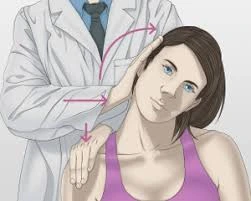
- To assess the level of compression of the nerve roots
- Method:
- Before applying downward pressure on the opposite shoulder (affected side), the patient’s head is flexed on the unaffected side.
- An increase in pain is a positive indicator.
- The test shows evidence of nerve root compression.
Cervical rotation and lateral flexion test:

- Goal
- This test is performed to check for hypomobility in the first ribs in patients with brachialgia.
- Method
- During this test, the patient is primarily seated. Both passive and maximum rotation of the cervical spine away from the side under examination are performed. To maintain the position, an ear is brought closer to the chest while the spine is gently flexed as much as it can.
- A positive result for this test is when a lateral flexion motion is blocked.
Cervical Flexion-Rotation Test:
- Method
The patient is in a comfortable supine position. - The examiner’s occiput rests against their abdomen while their cervical spine is fully flexed.
Next, both the left and right sides of the patient’s head are rotated.
This cervical rotation flexion test is considered positive and a limited rotation of the C1 on the C2 is the assumed diagnosis if there is modest resistance, discomfort occurs, and the range is limited before the expected end range.
Extension Compression Test:
- The patient can sit while the examiner stands behind them to give the test. The cervical spine is stretched by 30 degrees. The teste, who is in command of the examination department, applies axial compression to the top of the skull.
- How to do an assessment:
- This test assesses the integrity of an intervertebral disc. In situations where there is a posterolateral extrusion with the intact annulus fibrosus, symptoms can be alleviated by shifting pressure on the disks anteriorly.
- may exacerbate the pain without producing radicular pain, which usually indicates irritation in the facet joints as a result of reduced mobility brought on by degenerative changes.
Vertebral Artery Test:
- This test’s method
Before a passive examination, the active range of motion of the cervical spine is frequently finished. - After that, the patient should be put in a supine position so that the head and neck can be passively extended and side-flexed.
- Passively rotate the neck to the same side and hold it there for around 30 seconds.
- Try shifting your head to the opposite side and repeating the test.
- The repeat test is deemed positive if there is hand pronation, loss of balance, or arm dropping; these symptoms point to a reduction in blood supply to the brain.
- Modification: After that, turn a head as far as it can to the side being examined and hold it there for five to seven seconds.
- Go back to neutral for five to seven seconds.
- For 10 to 11 seconds, hold your head out.
- Return to the neutral posture for five to seven seconds.
- The head is fully extended and turned (against the opposing testing side) for nine to fifteen seconds.
- Positive symptoms include the five D’s: nystagmus, nausea and vomiting, drop attacks, diplopia, dysarthria, dysphagia, dizziness, and sensory abnormalities.
Cervical Distraction Test:
- One way to diagnose cervical radiculopathy is via a cervical distraction test. The position that is supine or even seated
- How to carry out this test:
- The patient is resting supine and has their neck in a comfortable position. An examiner can hold a patient firmly by standing at his head, placing both hands around his mastoid processes, or even resting one hand on the patient’s forehead and the other on his occiput. Apply the distraction force by pulling the patient’s head towards the back and slightly flexing their neck.
- A test is considered positive when symptoms subside or even accompany the traction of the tissues under examination.
- The cervical spine’s facet joints are surrounded by joint capsules and neural foramen. When symptoms go away or even appear when the tissues being examined are pulled, the test is deemed positive.
- A positive test result
- When the tissues under examination are removed, the test is considered positive if the symptoms disappear or even manifest. The amount of pressure and the degree of discomfort alleviated during a cervical distraction test could be used to determine the grade of pressure.
FAQs
What is the anatomy of the cervical spine?
Vertebrae are the seven stacked bones that comprise your cervical spine, or neck area. The first two vertebrae in your cervical spine have a particular shape and function. The first vertebra (C1), also known as the atlas, is a ring-shaped bone that begins at the base of your skull.
Which nerves are affected by C5, C6, and C7?
Via the lateral and medial pectoral nerves, the lateral cord supplies the pectoralis major and minor muscles, while the musculocutaneous nerve supplies the coracobrachialis, brachialis, and biceps brachii. The lateral forearm’s skin is sensitive due to the musculocutaneous nerve.
What cervical nerve symptoms are present?
Cervical nerve disorders manifest as neck, arm, and hand pain, tingling, numbness, and weakening. Cervical radiculopathy and pinched nerve are other names for this condition.
What is the name of C2?
The axis (C2) cervical vertebra is the second vertebra in the spine. It is special because it has the odontoid process, which is a pivot point that allows the C1 atlas to spin. The word “odontoid” means “tooth,” and that is how this bone looks. Odontoid injuries are frequently sustained in falls and car crashes.
How can stiff necks be examined?
Neck stiffness: Flex the patient’s neck passively. If resistance can be felt, the test is positive. Put the patient in a supine position with their hips 90 degrees flexed to demonstrate Kernig’s sign. The test is successful if the knee hurts while passively stretched.
What is an examination of the cervical spine?
The patient is placed in a prone position. Segmental mobility and pain response of the cervical and thoracic spines are examined. The examiner uses their thumbs to make contact with each cervical spinous process. A shifting posterior to anterior force is applied by the examiner.
Reference:
- Cervical spine. (2023, November 14). Kenhub. https://www.kenhub.com/en/library/anatomy/cervical-spine
- Professional, C. C. M. (2024b, December 19). Cervical spine. Cleveland Clinic. https://my.clevelandclinic.org/health/articles/22278-cervical-spine
- TeachMeAnatomy. (2024, September 5). The cervical spine – features – joints – ligaments – TeachMeAnatomy. https://teachmeanatomy.info/neck/bones/cervical-spine/
- Mba, J. C. M. (n.d.). Cervical Spine Anatomy: Overview, Gross Anatomy. https://emedicine.medscape.com/article/1948797-overview
- Moore, D. W., MD. (n.d.). Neck & Upper Extremity Spine Exam – Spine – orthobullets. https://www.orthobullets.com/spine/2001/neck-and-upper-extremity-spine-exam
- Spine examination. (n.d.-b). https://examination.lexmedicus.com.au/collection/spine