Ankle and Foot Examination
Introduction
The ankle and foot examination is a critical component of musculoskeletal assessment, focusing on evaluating the structure, function, and integrity of the bones, joints, ligaments, tendons, and surrounding soft tissues. A systematic approach typically includes inspection, palpation, range of motion assessment, strength testing, and special tests to identify conditions such as fractures, sprains, tendonitis, and deformities.
Clinical evaluation aids in diagnosing injuries, guiding treatment plans, and monitoring recovery, particularly in patients with trauma, sports injuries, or chronic conditions like arthritis.
Anatomy
Ankle structure:
- The foot may bend dorsiflex and plantarflex due to the ankle joint, also known as a talocrural joint. The subtalar, talocalcaneonavicular, and upper ankle joint (tibiotarsal) are its three constituent joints. The lower ankle joint is the collective term for the latter two.
- The upper ankle joint is formed by the inferior surfaces of the tibia and fibula as well as the superior surface of the talus. The lower ankle joint is made up of the talus, calcaneus, and navicular bone. The joint is supported by the lateral collateral ligament and the medial collateral ligament, also referred to as the deltoid ligament.
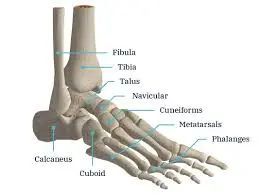
Foot bones:
- Three groups comprise the 26 bones of the foot:
- The seven tarsal bones
Five bones in the metatarsals
Fourteen phalanges - Tarsals offer a solid basis for supporting weight. They are similar to the carpals in the wrist and are divided into three groups: proximal, intermediate, and distal.
- The calcaneus and talus are the proximal tarsal bones.
- The middle tarsal bone is called the navicular.
- The distal tarsals consist of a cuboid with medial, middle, and lateral cuneiform bones.
- They aid in supporting the body’s weight. On the plantar side of the first metatarsal head, two distinct sesamoid bones are visible: a medial and a lateral one.
- Phalanges also run parallel to the hand; the lateral four toes are made up of the proximal, middle, and distal phalanges. The great toe (hallux) is made up of only two phalanges: the proximal and distal.
Foot joints:
- In addition to the ankle joint that connects the foot and leg, the bones of the foot articulate with each other through a number of synovial joints. The four types of foot joints are intertarsal, tarsometatarsal, metatarsophalangeal, and interphalangeal.
Foot muscles:
- Foot muscles allow toe movements, plantar flexion and dorsiflexion, and foot eversion and inversion.
- The foot muscles are made up of the dorsal and plantar groups. While the plantar muscles are further separated into three groups—medial, central, and lateral—the dorsal group is made up of only two muscles.
- The dorsal foot muscles, which are found on the dorsum of the foot, are responsible for extending the toes. The extensor digitorum brevis and extensor hallucis brevis are these muscles.
- The lateral, central, and medial groups of plantar foot muscles are separated by the foot’s deep fasciae. Plantar muscles can alternatively be viewed as four layers, even though they are depicted above as groups.
- The lateral plantar muscles influence the fifth toe. The flexor digiti minimi brevis, abductor digiti minimi, and opponens digiti minimi are the muscles in question.
- The central plantar muscles influence the lateral four toes. The flexor digitorum brevis, quadratus plantae, four lumbricals, three plantar interossei, and four dorsal interossei are among these muscles.
- The medial plantar muscles influence the hallux, or great toe. The abductor hallucis, adductor hallucis, and flexor hallucis brevis are these muscles. Despite being anatomically located in the middle compartment of the foot, the adductor hallucis is functionally associated with the medial plantar muscles due to its actions on the great toe (hallux).
Ankle nerves:
- Nerves, which work similarly to cables, carry electrical signals from your brain to the rest of your body. These impulses might cause you to feel things and move your muscles. Your ankle contains the following nerves:
- Tibial nerve.
- Superficial Peroneal nerve.
- Deep peroneal nerve.
Ankle blood vessels:
- Anterior Tibial Artery.
- Posterior Tibial Artery.
- Peroneal Artery.
Disorders and Conditions:
- Ankle and foot arthritis.
- Gout.
- Bursitis.
- Tendinitis.
- Foot flat.
Sports-related ankle injuries are among the most common:
- Ankle sprain.
- Achilles tendon rupture.
- Ankle fracture.
Common indications of issues with the ankle joint
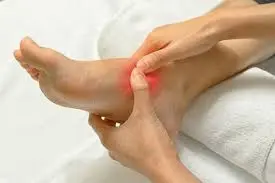
- Discomfort, particularly when moving.
- Swelling/inflammation.
- Rigidity.
- Instability.
- Redness or discoloration around the ankle.
- A feeling of warmth or comfort.
History:
- Pain, edema, deformity, stiffness, instability, and/or abnormal gait are among the common reasons why patients visit the foot and ankle.
- Before seeing a new patient or one for whom a diagnosis has not yet been made, we encourage the examiner not to look at the prior records. This fantastic exercise allows the examiner to think more imaginatively by bringing fresh views to the problem.
Pain:
- Ask the patient to point to the exact spot where the pain is the worst with their fingers. When the pain is dispersed rather than focused in one area, try to identify which side or position is the most unpleasant.
- Ask about the severity of the pain (0–10), whether it is associated with weight bearing (degenerative changes, stress fracture, or inflammatory conditions like plantar fasciitis), whether it radiates up the leg or toward the toes, whether it interferes with activity, whether it wakes you up at night, whether it is intermittent or persistent, whether it is related to walking distance, whether you are walking on a flat or uneven floor, whether it interferes with climbing and descending stairs, whether it is related to shoes, and whether there are any mitigating factors. (pain alleviation, relaxation, and preferred footwear)
Deformity
- Inquire about the duration of the deformity, the area it affects, when the patient or a family member first observed it, whether it is getting worse, and whether it is related to any other symptoms (e.g., discomfort, recurrent infections, skin ulcers, rapid shoe wear, or cosmetic).
Swelling
- Identifying whether the inflammation is bilateral or unilateral, localized to one area or the entire leg or ankle, activity-related, and how often and for how long is crucial. When bilateral edema involves the entire ankle and foot, it is usually linked to more systemic pathology, such heart or kidney problems.
- Swelling that only affects the area around the ankle joint may be caused by inflammatory arthropathy or degenerative changes. However, localized edema is more likely to be caused by a particular local pathology.
- For example, swelling anterior to the distal fibula may indicate chronic damage to the anterior inferior tibiofibular ligament (ATFL), whereas swelling posterior to the distal fibula may indicate disease of the peroneal tendon. Acute painful or painless swelling, with or without the midfoot deformity, might be a symptom of Charcot neuropathy.
Unpredictability
- Determine the time of the first sprain or instability incident, its frequency, and the potential etiology.
History of Trauma
Trauma history, including the date and details of any acute symptoms, as well as any identified infections, surgeries, injections, or treatments.
Related symptoms
Red flag symptoms like fever, night sweats, or weight loss should be closely monitored as they may be signals of malignancy or an infection. Peripheral neuropathy or spinal issues are usually linked to neurological symptoms including burning, limb weakness, or numbness.
Examining the patient’s shoes, insole, and walking aids:
First, ascertain whether the patient is wearing surgical or retail shoes. Look at the wear pattern, which usually affects the outside of the shoe heel. Different wear patterns suggest unusual foot-ground interaction.
Early lateral, proximal, or mid-shoe wear indicates a supination deformity, whereas wear along the medial border indicates a pronation deformity. It can only display a brand-new, unworn pair of shoes if there is no wear. Look for any orthoses or walking aids. Examine each insole and let the patient know which one is comfortable and which hurts.
Standing examination:
- The patient is seated in a chair at the start of the examination in most clinical settings. After telling the patient to stand up, assess the general alignment of the lower limbs. Watch for significant abnormalities of the valgus or varus knee. Examine the alignment of the spine for signs of scoliosis and look for any signs of pelvic tilt. Look for any signs of thigh or calf muscular atrophy.
- Check the arches of the feet from the side for pes cavus, pes planus, and any swelling or scarring. Look for huge toe deformities like hallus valgus, hallux valgus interphalangeus, or hallus varus, or minor ones like claw toes, hammer toes, or mallet toes. The medial side heel pad should not be seen when viewing a normal ankle from the front. If it was visible, pes cavus would have what is called the “peek a boo” sign. Because a wide heel pad or visible metatarsal adducts could provide a false-positive result, it is important to compare both sides.
- Gait: Determine when the patient can walk without assistance and be prepared to assist elderly patients and those who may have difficulty standing. Ask the patient to walk as they normally would. Examining the front and rear gaits facilitates the assessment of shoulders and pelvic tilt. analyzing first contact, hip and knee motions, antalgesia, stride length, cadence, and the three rockers.
Observation:
Carefully inspect the sole first, followed by the rest of the foot. Examine the nails, scars, ulcers, hard or soft corns, callosity (thickened skin), lack of hair (circulatory changes), and any other signs of infection.
Palpation:
First, ask the patient if any areas are uncomfortable to touch to avoid causing discomfort throughout the examination. Then you start by feeling the skin’s temperature softly, continuously comparing it to the other side.
Neurologic Evaluation:
- With the help of a neurologic evaluation, the physical therapist might be able to identify the potential neurological origin of the observed ankle or other foot pathologies. This includes peripheral neuropathy and even central nervous system disorders.
- A thorough neurological examination may include inspection, reflex testing, assessment of muscle tone, Achilles tendon (S1), Patella Ligament (L3/L4), sensory testing (proprioception, light touch, sharp/dull), plantar reaction (also called a Babinski response), clonus, and more.
Vascular Evaluation:
- If circulation is found to be poor, a physical therapist may palpate to assess the dorsalis pedis artery pulses.
- The state of a vascular system can also be assessed by observing how symptoms respond to elevation of the lower limbs and positions of reliance.
Movement Examination:
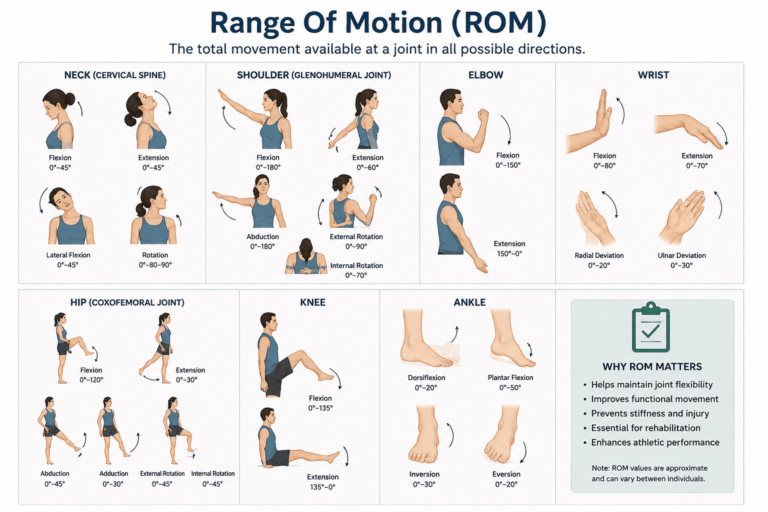
- When assessing the ankle and foot’s active range of motion (AROM) and passive range of motion (PROM), a patient may find comfort in any of the testing positions. Ankle dorsiflexion and plantarflexion, for instance, are assessed when the patient is prone.
- If the patient is unable to assume the necessary posture, a physical therapist may modify the position and document it for additional testing.
- When an ankle fracture has been ruled out but the patient is unable to fully participate in a range of movement evaluation due to discomfort, the best course of action is to immobilize the ankle joint and delay the investigation until the pain subsides.
Special tests:
Knee To Wall Test:

- Must always be performed while assessing injuries to the feet and ankles:
- Provide a method for calculating the dorsiflexion range of motion of the ankle joint.
- Examining conditions such as foot overpronation or plantar fasciitis requires
- Place your toes against the wall to start the test, then slowly back away. The distance between your toes and the wall is measured with the ruler and recorded for future use and assessment.
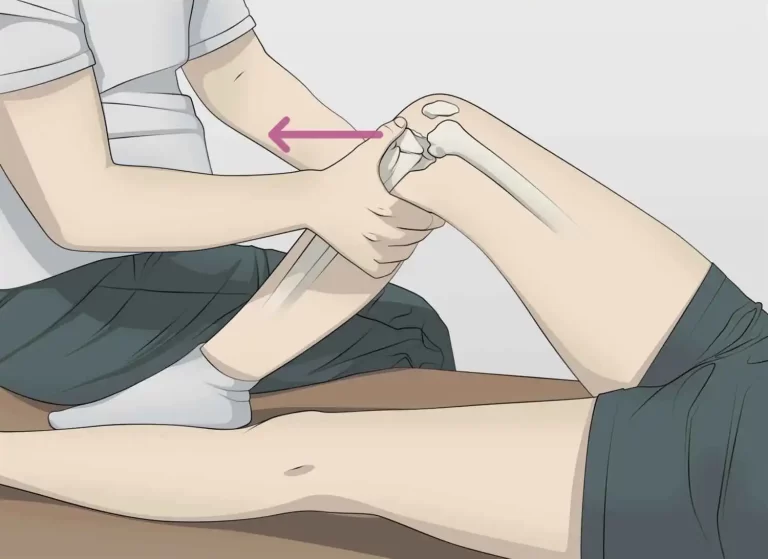
Ankle’s Anterior Drawer Test:
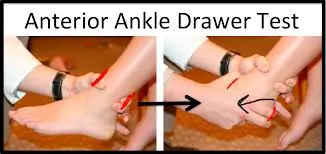
- The purpose of the reported test was to determine whether the talocrural joint (also known as the higher ankle joint) was connected with any ankle mechanical imbalance or perhaps hypermobility in the sagittal plane.
- How to finish this exam
- With the ankle bent 20 degrees and the heel resting on the examiner’s palm resting on the table, the patient can lie comfortably in a supine position. A calcaneus is stabilized as a result.
- An examiner then stabilizes the tibia and fibula while drawing the calcaneus anteriorly in order to gauge the amount of anterior translation at the lateral aspect of an ankle and the final change in feel. It is noted how much anterior translation there is as well as how the end feeling eventually deteriorate from hard ligamentous to weakly elastic.
- A posterior translation of more than 1 cm relative to a healthy opposing ankle and a discernible loss of end feeling are the most prominent indicators of a partial or even complete rupture of the anterior talofibular ligament.
- This test has a 4-point rating system. No laxity is represented by a value of 0 and excessive laxity by a value of 3.
One Leg Stance Test:
- The One Leg Stance (SLS) Test is used to assess balance control and static posture.
- An essential clinical tool for managing fall risk and monitoring neurological and musculoskeletal disorders is the balance test, such as the SLS test.
- Approach
- finished with your eyes wide and both hands on your hips.
- The client can stand unassisted on one leg if the timer is set to start when another toe leaves the floor and stop when the foot touches the floor again and the arms release the hips.
- If a client can’t stand for five seconds or less, they are more likely to get hurt in a fall.
Squeeze Test’s:
- Syndesmotic ankle sprains can be diagnosed with the help of the squeeze test. The literature suggests that the squeeze test, also known as the fibular compression test, should be performed in tandem with the ankle external rotation test.
- Approach
- The squeeze test evaluates the strength of the bone, the interosseus membrane, and the syndesmotic ligaments by applying pressure to the proximal fibula on the tibia. Positive pain is experienced when a fracture or diastasis occurs.
Kleiger’s test:
- Kleiger’s examination, also known as the external rotation, is used to assess inferior tibiofibular syndesmotic sprains, deltoid ligament sprains, and medial ankle sprains.
- The patient is seated with their knee bent at a 90-degree angle and their ankle relaxed.
- Examiner
- While the patient sits at the level of the ankle to be assessed, one hand stabilizes the leg from behind while the other hand neutrally grasps the ankle and rotates the foot externally.
- Nussbaum et al. experimented with the ankle fully dorsiflexed.
- A positive test result
- whether there is pain medially or at the location of the interosseous membrane. Depending on the extent of the damage, pain may spread to the leg.
Thompson Test:

- Approach
The patient lies prone with one foot over the end of the table. With his knee bent 90 degrees, the patient could also lie prone. The examiner presses on the gastrocnemius-soleus complex and other calf muscles with his hand. When the calf is compressed, the Achilles tendon should contract, causing plantar flexion. There will be no plantar flexion if the Achilles tendon is torn. - Three more clinical indicators that support the diagnosis of Achilles tendon rupture are as follows:
- A foot on a ruptured side hangs straight down because the tendon tone is weak. Before a tendon penetrates into the calcaneus, it may have a discernible gap of three to six centimeters. The capacity used for plantar flexion is significantly reduced when the patient is lying prone with their ankles fully relaxed.
Prone Anterior Drawer Test:
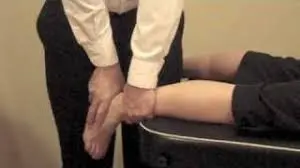
- An alternative method for performing an anterior drawer examination of the ankle is to have the patient lie prone with their ankle and foot sticking out past the plinth’s end.
- The examiner applies a continuous anterior push through the patient’s heel while holding the patient’s foot near the talofibular joint with one hand. Both sides of a translation are compared.
- An explanation
Compared to the uninjured foot, the foot has more anterior motion and has cracking on both sides near the Achilles tendon. This implies a successful test outcome. - A positive test also indicates a rupture of the anterior talofibular joint. This ankle test has no known psychometric properties.
Navicular Drop Test:
- Place the patient standing so that their full weight is supported through the lowest point, keeping the foot in the subtalar joint’s neutral position.
- Note the distance between the floor or step that supports the navicular tuberosity and its most conspicuous component. Use a ruler to measure the navicular sagittal plane excursion after the patient has calmed down. The test can also be administered in reverse, with the subject standing in a relaxed, talar-neutral stance.
- Many doctors also use an index card placed inside the foot to record the beginning and ending locations of the navicular, then use a ruler to quantify the difference.
Eversion Stress test:
- The eversion stress test, also known as the Eversion Talar Tilt test, evaluates the durability of the deltoid ligament.
- Techniques
- For the Inversion stress test, the participant is positioned similarly. The examiner stabilizes the distal tibia while everting and abducting the heel. Both sides are put to the test.
- The damaged side may be more uncomfortable and loose than the unaffected side if the test results are positive. A complete tear is indicated by a spongy or inconsistent finish.
Talar tilt test:
- The talar tilt test, also called the inversion stress test, places stress on the calcaneofibular ligament.
- Procedure
- The patient’s knee is fully extended when they are sitting or lying supine.
- The examiner stabilizes the distal leg with one hand while holding the heel with the ankle in a neutral position. The heel is positioned inverted with respect to the tibia.
- The talus and calcaneus must be held together to avoid excessive subtalar movement.
- A clunk or pain in the ligament area would be indicative of a positive test. A spongy or indeterminate end feel and an outward translation of more than 5 degrees on the injured side relative to the unaffected side are signs of a complete tear of the CFL.
FAQs
What is the foot and ankle’s basic anatomy?
Complex joints formed by the ankle and foot facilitate mobility and provide stability and balance to the body. The foot and ankle are composed of 26 bones, 33 joints, and a large number of muscles, tendons, and ligaments. The three bones that comprise the ankle joint are the talus, fibula, and tibia.
Which ankle issue is the most prevalent?
Ankle fractures, sprains, and strains are among the most common orthopedic injuries. Although ankle injuries are commonly considered sports injuries, you don’t have to be an athlete to sustain one. Ankle twisting and pain could be caused by something as simple as walking on an uneven surface.
What is the number of ligaments in a foot?
The plantar fascia, the calcaneocuboid ligament, the Lisfranc ligaments, and the plantar calcaneonavicular ligament—also referred to as a spring ligament—are the four major ligaments of the foot.
Which seven tarsal bones are they?
Calcaneus, talus, cuboid, navicular, and the internal, middle, and exterior cuneiforms are the seven bones that make up the tarsus.
Which three unique tests are utilized to diagnose ankle sprains?
Among the other special tests is the ankle ligament stress test. talar tilt test. Eversion stress test.
When assessing an ankle injury, what are the five things to look for?
Walking is observed in the patient, but only in the absence of serious injuries that weight bearing can aggravate or complicate. Examined are asymmetry with the opposite side, skin pigmentation, muscular atrophy, edema, and anomalies of the ankle.
How can an ankle sprain be tested?
During a physical examination, your doctor will examine your ankle, foot, and lower leg. The doctor will manipulate your foot to evaluate range of motion or feel for painful patches on the skin surrounding the injury to identify which postures cause pain or discomfort.
The eversion test: what is it?
That Eversion Stress Test helps assess the level of instability following a medial ankle injury and assesses the deltoid ligament’s integrity.
What is an ankle CFL?
The calcaneofibular ligament is a crucial component of the lateral ligamentous complex of the ankle. Because it covers both the talocrural and talocalcaneal joints and is intimately connected to the peroneal tendon sheath, it is physically unique.
Reference :
- Professional, C. C. M. (2025, February 4). Ankle joint. Cleveland Clinic. https://my.clevelandclinic.org/health/body/24909-ankle-jointFoot & ankle injuries & surgery types
- OINT Foot & Ankle Care. (n.d.). https://www.oint.org/foot-ankle-surgeon-frisco-mckinney-dallas-tx-foot-and-ankle.html