15 Best Exercise For Anterior Pelvic Tilt
Introduction:
Exercises For Anterior Pelvic Tilt are an essential part of your entire treatment plan. Depending on the individual’s assessment, these exercises should mainly include resisted exercises for weak muscles and stretching exercises for tight muscles.
A postural imbalance known as anterior pelvic tilt (APT) results in an abnormal curvature of the lower back when the pelvis tilts forward. Poor posture, hip tightness, and lower back pain can result from this problem. The primary causes of anterior pelvic tilt (APT) include tight hip flexors, weak core muscles, and extended sitting. Fortunately, by strengthening weak muscles and loosening tight ones, specific workouts can help correct this imbalance.
Important Muscles Involved
- Tight Muscles: Lower back muscles (erector spinae), hip flexors (rectus femoris, iliopsoas)
- The glutes, hamstrings, and core muscles (obliques, abdominals) are weak muscles.
Causes:
The primary causes are as follows:
- Bad Habits of Posture
The forward tilt is increased when standing or walking with the lower back arched.
Unbalances may be worsened by improper lifting techniques, such as excessive lumbar extension.
- Overly severe lumbar lordosis
Anterior Pelvic Tilt may be worsened by hyperlordosis, a severe inward curvature of the lower back.
- Muscular Imbalances
The rectus femoris and iliopsoas are examples of tight hip flexors, which drive the pelvis forward.
Weak Hamstrings and Glutes: These muscles are in charge of hip extension and stability, but they weaken and are unable to resist the hip flexors.
Weak Core & Abdominal Muscles (e.g., rectus abdominis, transverse abdominis): An excessive forward tilt is made possible by a weak core, which is unable to properly support the pelvis.
The erector spinae and quadratus lumborum are examples of tight lower back muscles that become hyperactive and cause the lower back to arch even further
- Living a Sedentary Lifestyle
Long periods of sitting weaken the glutes and core and shorten the hip flexors, which maintain the pelvic tilt.
- Not Being Active
An excessive pelvic tilt might result from instability caused by weak muscles from inactivity.
- Anatomical and Genetic Factors
Some persons are born with a higher anterior pelvic tilt because of their skeleton or genetics.
Benefits Of Exercise:
Exercise is essential for correcting muscular imbalances and improving posture, which helps to correct anterior pelvic tilt (APT). The main advantages of specific exercises for anterior pelvic tilt are as follows:
- Makes Weak Muscles Stronger
Strengthening the glutes and hamstrings helps in getting the pelvis back to its neutral position.
Strong core muscles, particularly the rectus abdominis and transverse abdominis, stabilize the pelvis and stop excessive forward tilting.
- Avoids More Injuries
Better movement patterns are supported by balanced muscles, which lowers the likelihood of knee problems, lower back pain, and strains.
- Promotes Better Spinal Alignment and Posture
Reduces excessive lower back arch, or lumbar hyperlordosis, by strengthening postural muscles. Improves posture when standing and sitting.
- Increases Flexibility & Mobility
Helps keep the lower back and hips moving more freely, avoiding stiffness.
- Releases Tight Muscles
Hip Flexors: By lengthening these muscles, exercises like lunges and hip flexor stretches lessen the pull they have on the pelvis.
Exercise For Anterior Pelvic Tilt:
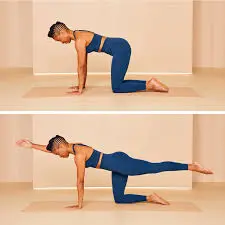
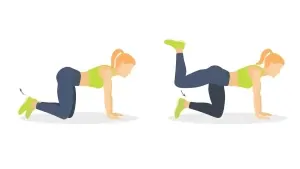
Bird Dog
- Assume a tabletop position by placing your hands beneath your shoulders and your knees beneath your hips.
- Keep your core active and your spine neutral.
- Next, raise your right arm forward and your left leg back.
- Avoid arching your back and keep your hips level.
- Hold this position for a few seconds.
- Return to the beginning position slowly.
- Then relax.
- Repeat these exercises 5 to 10 times.
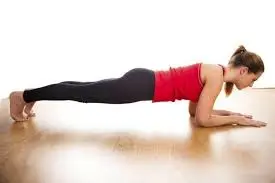
Planks
- Place yourself on your forearms and toes and lie face down.
- You must place your elbows directly beneath your shoulders.
- Make sure your feet are hip-width apart and your toes are planted on the ground.
- Make your legs, glutes, and abs tight.
- Don’t raise your butt too high or let your hips droop.
- Maintain a neutral neck position and look slightly up rather than down.
- Hold this position for a few seconds.
- Then return to your neutral position.
- Then relax.
- Repeat these exercises 5 to 10 times.
Pelvic-tilt
- Lying on your back, put your knees bent and your feet flat on the ground.
- Your hands ought to be on your hips or by your sides.
- Maintain a neutral posture with a slight space beneath your lower back.
- Make sure your abdominal muscles are tight and your lower back is level against the floor.
- Pull your belly button toward your spine and imagine your pelvis tilting upward.
- As you breathe normally, hold the tilted position for a few seconds.
- Then return to your neutral position.
- Then relax.
- Repeat these exercises 5 to 10 times.
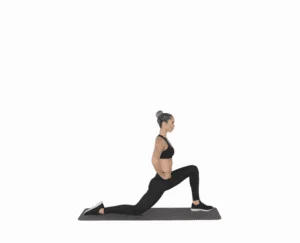
Hip Flexor stretching
- Position your right knee at a 90-degree angle with your left foot ahead and your right knee on the floor.
- Straighten your back and engage your core.
- Slowly move your hips forward while maintaining an upright posture.
- You should feel stretched in the front of your right hip and thigh.
- Keep your lower back from arching.
- Pull your tailbone under a little to maintain a neutral pelvis position.
- Hold the position for a few seconds.
- Then return to your neutral position.
- Then relax.
- Repeat these exercises 5 to 10 times.
- Continue on the opposite side.
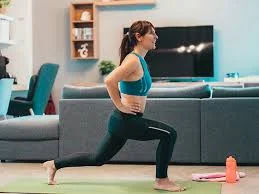
Lunges
- Stand upright with your feet hip-width wide.
- Put your right leg forward and take a big step.
- Lower yourself until both knees are 90 degrees bent.
- Don’t put your front knee past your toes; instead, keep it in line with your ankle.
- The back of your knee should be slightly elevated.
- Hold this position for a few seconds.
- Return to the beginning posture by pressing through your front heel.
- Then relax.
- Repeat these exercises 5 to 10 times.
- Do the same with the other leg.
Donkey kicks
- To create a tabletop position, put your knees beneath your hips and your hands beneath your shoulders.
- To prevent your spine from arching, maintain a flat back and use your core.
- Raise your right leg toward the ceiling while maintaining a 90-degree bend in your knee.
- Maintaining your hips straight to the floor, push through your heel.
- To avoid arching your lower back, squeeze your glutes at the top.
- Hold this position for a few seconds.
- Return to the beginning posture by slowly lowering your leg without letting it touch the floor.
- Then relax.
- Repeat these exercises 5 to 10 times.
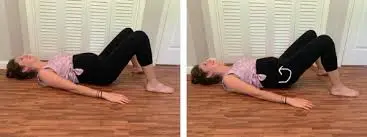
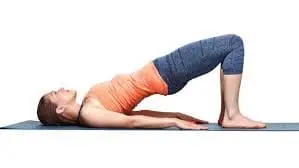
Bridging
- Place your feet flat on the floor, hip-width apart, and bend your knees while lying on your back.
- Press your lower back against the floor while using your core.
- Raise your hips toward the ceiling while pushing through your heels.
- At the highest point, squeeze your glutes so that your shoulders and knees make a straight line.
- Keep your lower back from arching.
- Hold this position for a few seconds.
- Return your hips slowly to the floor without making contact.
- Then return to your neutral position.
- Then relax.
- Repeat these exercises 5 to 10 times.
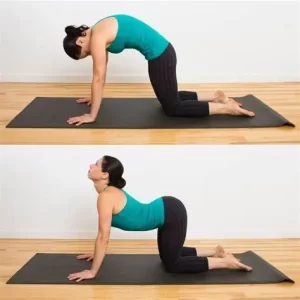
Cat cow
- Start on your hands and knees at the tabletop position.
- Position your wrists under your shoulders and your knees under your hips.
- Drop your belly toward the floor and arch your back downward.
- Raise your chest and head and look straight ahead.
- Your shoulders should be stretched away from your ears.
- Keeping your chin tucked into your chest, round your spine toward above.
- Engage your core by pressing through your hands and pulling your tummy in.
- Imagine separating your shoulder blades.
- For a few seconds, move between the cow and the cat pose.
- Inhale deeply, then align your breathing with your movements.
- Then return to your neutral position.
- Then relax.
- Repeat these exercises 5 to 10 times.
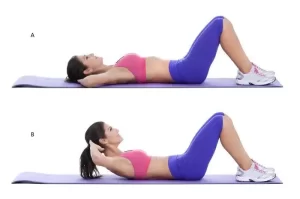
Partial-sit-up-exercise
- Place your feet flat on the floor, hip-width apart, and bend your knees while lying on your back.
- Put your hands over your chest or behind your head, being careful not to pull your neck.
- Take a breath out and raise your upper back and shoulders off the floor.
- Keep your neck from straining and keep your lower back on the floor.
- Pay attention to your core muscles rather than your neck or your speed.
- After taking a breath, carefully return your upper body to the beginning posture.
- To maintain tension in your abs, don’t let yourself relax entirely at the bottom.
- Then return to your neutral position.
- Then relax.
- Repeat these exercises 5 to 10 times.
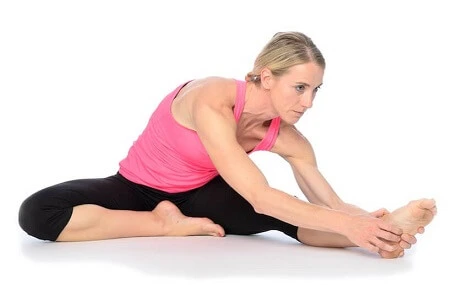
Seated hamstring stretch
- Sit on the floor and your legs extended straight in front of you.
- Make sure your toes point up by flexing your feet.
- Lean forward from your hips slowly while maintaining a straight back.
- As far as it is comfortable for you, reach toward your toes.
- As you reach forward, make sure your knees are straight not locked, but extended.
- Hold this position for a few seconds.
- Then return to your neutral position.
- Then relax.
- Repeat these exercises 5 to 10 times.
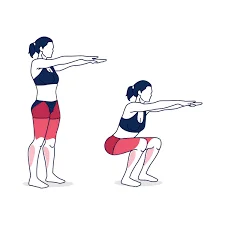
Squats
- Position your feet with your shoulders apart and standing with your toes extended slightly out.
- Maintain a neutral spine, shoulders back, and chest up.
- Stabilize your body by using your core.
- As you prepare to sit in a chair, start by pushing your hips back.
- Lower your body while maintaining an upright chest by bending your knees.
- Don’t allow your knees to give out; instead, keep them tracking over your toes.
- Ideally, you should lower yourself as much as you can until your thighs are parallel to the floor, or lower if you can.
- To get back to standing, straighten your legs and push through your heels.
- As you rise, keep your chest raised and squeeze your glutes.
- As you lower yourself into the squat, take a breath.
- As you push yourself back up to standing, release your breath.
- Then return to your neutral position.
- Then relax.
- Repeat these exercises 5 to 10 times.
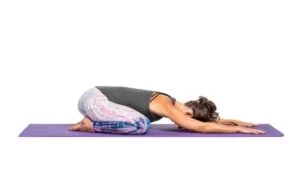
Child’s Pose
- Start by putting your big toes together and kneeling on the floor with your legs wide apart, about the width of your mat.
- You can put a blanket or cushion between your thighs and calves if sitting back on your heels is painful.
- Gently start lowering your body toward the floor, supporting yourself with a block or pillow, or putting your forehead on the floor.
- Put your arms out in front of you on the mat with the palms facing down, or if it’s more comfortable, place them by your sides with the palms facing up.
- Let your body relax into the stretch by taking slow, deep breaths.
- With each exhale, try to release more tension from your hips, lower back, and shoulders.
- Depending on how comfortable you are and what your body requires, hold Child’s Pose for a few seconds.
- You can switch to another position if you’d like, or you can slowly raise your chest back up and sit on your heels to leave the pose.
- Then return to your neutral position.
- Then relax.
- Repeat these exercises 5 to 10 times.
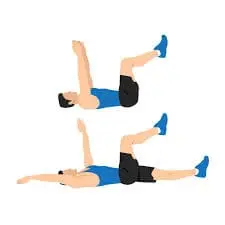
Dead Bug
- Position yourself on your back with your knees bent at a 90-degree angle (thighs parallel to the floor, calves parallel to the floor) and your arms reaching toward the ceiling.
- To maintain a neutral spine, engage your core by pressing your lower back into the floor.
- Maintain a comfortable head position on the mat and a neck that is in line with your spine.
- While keeping your left leg straight out and only a few inches off the ground, slowly lower your right arm straight back toward the floor.
- Keep your core active and your lower back firmly planted on the floor.
- Put your left leg and right arm back in the beginning position.
- Now, while keeping your spine neutral and your core engaged, extend your right leg and lower your left arm in the same controlled way.
- As you drop your arm and leg, take a breath.
- As you get back to the beginning position, release your breath.
- Then return to your neutral position.
- Then relax.
- Repeat these exercises 5 to 10 times.
- Keep switching between your arms and legs slowly and carefully.
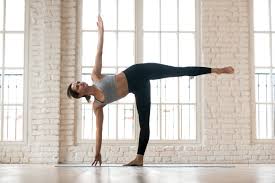
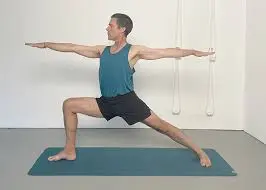
Warrior 2 Pose
- Start by standing with your arms relaxed at your sides and your feet spaced around three to four feet apart.
- With your left foot angled slightly inward (approximately 45 degrees), turn your right foot out 90 degrees so that your toes point to the side.
- Make sure your heels are about parallel to one another.
- Make sure your right knee is exactly above your ankle by bending it until your thigh is parallel to the floor, or as low as you can comfortably go. Maintain a powerful, straight left leg.
- To keep your balance, push through your left foot’s outer edge.
- Spread your arms out to the sides, palms down, parallel to the ground.
- Keep your arms firm and your shoulders relaxed, as though you were reaching in both directions.
- Maintaining a constant forward look, turn your head to look at your right fingertips.
- Hold this position for a few seconds.
- Breathe in to stimulate your body and stretch your spine.
- As you go deeper into the position, release your breath and stretch through your arms and chest while grounding your feet and grounded your legs.
- Then return to your neutral position.
- Then relax.
- Repeat these exercises 5 to 10 times.
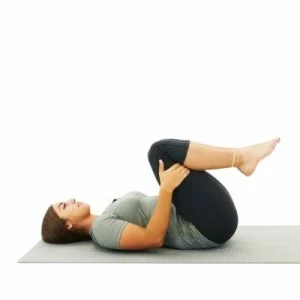
Double Knee to Chest
- Start by resting flat on your back on a cozy surface, such as a yoga mat.
- Keep your feet flat on the floor, hip-width apart, and your knees bent.
- Put your arms at your sides, palms down, and relax.
- Lift both knees to your chest slowly.
- Pull your arms gently toward your chest after putting them around your knees or shins.
- As you hug your knees toward you, you should get a stretch throughout your glutes, hips, and lower back.
- Breathe deeply and relax into the stretch while you hold the pose for a few seconds.
- Release any tension in your upper body by attempting to relax your neck and shoulders.
- Return to the beginning posture by carefully lowering your knees back to the floor after holding for a few breaths.
- Then relax.
- Repeat these exercises 5 to 10 times.
What safety measures should be followed when working out?
Safety is essential when performing exercises to correct anterior pelvic tilt (APT) to avoid injury and guarantee proper muscle activation. The following are the important safety precautions to take:
- Make sure you properly warm up.
Before working out, use mobility exercises and dynamic stretches (such as leg swings and hip circles) to release tense muscles.
Five to ten minutes of light aerobics helps to improve blood flow.
- Adjust the exercises as necessary.
Reduce range of motion or change the movement if an exercise hurts.
Before increasing, start with lower weights or resistance bands.
- Keep Your Form Correct
Use your core: To stabilize your pelvis, maintain an upright abdominal position.
Neutral spine: Stay away from excessive lower back rounding or arching.
Controlled motions: Slow, careful motions are more effective than fast ones.
- Start by strengthening your weak muscles.
Before adding weight, give priority to workouts that activate your glutes, hamstrings, and core.
Anterior pelvic tilt can be worsened by compensatory movements caused by weak glutes and core.
- Breathe correctly.
Breathe in through your nose and out when you exert yourself. Holding your breath can cause unnecessary anxiety, so avoid doing it.
- Pay Attention to Your Body
Stop right away and review your technique if you experience sudden pain or irritation.
Increase the intensity gradually to avoid getting hurt.
- Do not overstretch your lower back.
Excessive arching or hyperextension of the spine could worsen anterior pelvic tilt. Instead of doing strenuous backbends, concentrate on hip flexors and quad stretches.
- After working out, stretch and cool down.
Stretch your quadriceps, lower back, and hip flexors statically. Tight muscles can be released with foam rolling.
When should you quit working out?
It’s important to know when to stop or take a break when performing anterior pelvic tilt (APT) exercises to avoid injury and guarantee a healthy recovery. The following are the main indicators that you should stop exercising or change your routine:
- Sudden or Sharp Pain
Stop right away if you get severe, stabbing pain. Knee, hip, or lower back pain could be a sign of overuse or poor technique.
- Loss of Correct Form
Stop and start over if your knees collapse, your hips shift incorrectly, or your lower back arches excessively. Instead of improving anterior pelvic tilt, bad form can make it worse.
- Chronic Pain That Gets Worse
It’s natural to have some minor pain, but if it gets worse as you go, stop and evaluate. This could be an indication of strained muscles or too much joint stress.
- Inflammation or Swelling
Stop exercising and apply ice if you experience knee, hip, or lower back swelling. An overuse injury may be indicated by swelling.
- Severe Weakness or Fatigue
Continuing could result in poor form and damage if your muscles give out or feel unstable. Take a break and give yourself enough time to heal before resuming.
- Lightheadedness, nausea, or dizziness
These signs point to overexertion, low blood sugar, or dehydration.
If necessary, take a break, drink water, and eat.
- Over time, no improvement or worsening symptoms
Your plan might not be working if you’ve been exercising regularly but haven’t noticed any changes. Think about changing your workouts, seeing a physical therapist, or scheduling additional days off.
Which exercises should be avoided if you have anterior pelvic tilt?
Certain workouts may worsen anterior pelvic tilt (APT) by causing muscular imbalances or placing undue strain on the lower back. The following exercises are ones you should either avoid or change:
Overly Prolonged Lower Back Extensions
- Superman workout
- Extremely long stretches on a Roman chair
- Excessive backbends (such as the yoga posture known as “Cobra”).
Having too many quadriceps quadriceps-dominant workouts
- Leg press (if not executed correctly)
- lunges forward (without activating the glutes)
- Deep squats with a forward lean that is too intense
Hip Flexor Overload
- Sit-ups
- Hanging leg raises
- Straight-leg crunches
Running or jogging too much without strengthening your glutes
- Lower lower back pain can result from running with an anterior pelvic tilt, which overworks the hip flexors.
Without Core Engagement, Overhead Pressing
- Military press (if the lower back is arched)
- Dumbbell press with heavy overhead
Deadlifts Done Incorrectly
- Deadlifts can worsen lumbar lordosis, or an abnormal arch in the lower back if performed improperly.
How Can Anterior Pelvic Tilt Be Prevented?
- Keep Your Posture Correct
When sitting, avoid bending over, keep your feet flat, and use your core. If necessary, use a lumbar support.
When standing, balance your weight, prevent arching your lower back too much, and use your core and glutes. When walking, keep your pelvis neutral and refrain from overstriding.
When walking, maintain a neutral pelvic position and refrain from overstriding.
- Do Not Sit for Long
Every 30 to 60 minutes, take a moment to stand, stretch, or go for a short walk. If at all possible, choose an adjustable workstation or standing desk.
- Improve Your Sleeping Position
Do not sleep on your stomach.
If you sleep on your back, place a pillow beneath your knees to lessen lumbar strain.
- Use Your Core When Working Out
Maintain a neutral spine and refrain from excessive lower back arching when lifting weights.
To keep your core stable, use the right breathing techniques.
- Continue to Move and Be Active
To improve hip and spine movement, include functional activities like yoga, pilates, or mobility drills.
Summary:
Each person’s condition may be different, and it’s important to remember that several factors might interact and contribute to Anterior Pelvic Tilt. Anterior Pelvic Tilt is usually treated with a mix of stretches to loosen up tense muscles, exercises to strengthen weak muscles, and develop good posture and movement patterns all day long.
You’re actively working toward strengthening postural balance, lowering pain, and experiencing a healthier, more aligned body by investing time and energy into these focused workouts.
For long-lasting advantages, continue to remain consistent and aware of your body alignment. Speaking with a qualified physical therapist or other healthcare professional can help you create a suitable correction plan and gain more understanding of your particular situation.
FAQ:
Anterior Pelvic Tilt: What Is It?
The lower back arch (lumbar lordosis) is extended by a forward tilt of the pelvis, which causes anterior pelvic tilt. Lower back pain, muscular imbalances, and poor posture can all be the results of this.
Anterior Pelvic Tilt: What causes it?
Tight lower back and hip flexor muscles
Weakness in the hamstrings, core, and glutes
Poor posture or extended periods of sitting
Lack of exercise or incorrect technique.
Can the Anterior Pelvic Tilt be fixed by exercise?
Indeed! Anterior Pelvic Tilt can be prevented and corrected with targeted workouts that strengthen the core, hamstrings, and glutes in addition to stretching tense muscles.
Which exercises are most effective for correcting anterior pelvic tilt?
Glute bridges
Hip flexor stretch
Quadriceps stretch
Child’s pose
Planks & dead bugs
With anterior pelvic tilt, which exercises should be avoided?
Overexertion of the lower back (superman exercise, for example)
Sit-ups & hanging leg raises (tighten the hip flexors)
Presses overhead with a back arched Improper glute activation during deep squats
How much time does it take to fix anterior pelvic tilt?
Patience is key! Within four to twelve weeks, improvements can be observed with consistent exercise and posture modification.
Can pain be caused by anterior pelvic tilt?
Pain in the lower back (caused by severe spinal arching)
Tight hip flexors are the cause of hip pain.
Pain in the knee (due to muscular imbalances)
How may anterior pelvic tilt be avoided?
Make your core, hamstrings, and glutes stronger.
Stretch your lower back and hip flexors.
Keep your posture straight, especially when you’re sitting.
Stay away from extended sitting and take pauses to move.
Does the Anterior Pelvic Tilt benefit from walking?
Indeed! Walking improves posture and hip mobility, but it’s important to keep your pelvis neutral.
For anterior pelvic tilt, should I consult a professional?
A physical therapist can provide a customized strategy if you have severe imbalances, chronic pain, or no improvement.
When Are These Pelvic Tilt Exercises Suitable?
You can do these workouts whenever and anywhere you choose. You can perform them at the gym or home. Before beginning, make sure you warm up, and thereafter, relax.
References:
- Patel, D. May 16, 2023a. Samarpan Physio offers the top nine exercises for anterior pelvic tilt. Samarpan Clinic for Physiotherapy. Here are the top nine exercises for anterior pelvic tilt: https://samarpanphysioclinic.com/
- Ginta, D. December 20, 2024. Five anterior pelvic tilt exercises. Anterior Pelvic Tilt Exercises, Healthline. https://www.healthline.com/health/fitness-exercise
- Pelvic tilt anterior. (n.d.). Health Baptist. Sports medicine/anterior pelvic tilt https://www.baptisthealth.com/blog
- S. McQuilkie, DC. July 3, 2023b. Ten exercises to correct anterior pelvic tilt posture Intelligence from the back. Back Intelligence. https://backintelligence.com/anterior-pelvic-tilt-fix/
- Proremedy Physio, “5 exercises for anterior pelvic tilt,” September 25, 2024. https://proremedyphysio.com/5-exercises-for-anterior-pelvic-tilt/ by Proremedy Physio
- Correct anterior pelvic tilt: specific alignment and alleviation exercises. (undated). To correct anterior pelvic tilt, https://www.icicilombard.com/blogs/health-insurance/mb/best-exercises
- Leonard, J. (May 11, 2017). For anterior pelvic tilt, there are six solutions. The article 317379 can be found at https://www.medicalnewstoday.com.
- Image 1, Janine, C. (April 1, 2024). A bird dog exercise: what is it? as well as how to do it. Popsugar. How to Work Your Back with a Bird Dog Exercise: https://www.popsugar.com/fitness/40441615