Hip Adduction
Hip Adduction
Hip Adduction is the movement of bringing the leg toward the midline of the body. It involves muscles like the adductor longus, brevis, and magnus, as well as the gracilis and pectineus.
Strengthening these muscles improves stability, balance, and lower body strength, which is essential for activities like walking, running, and maintaining proper posture.
Hip abduction and adduction: what are they?
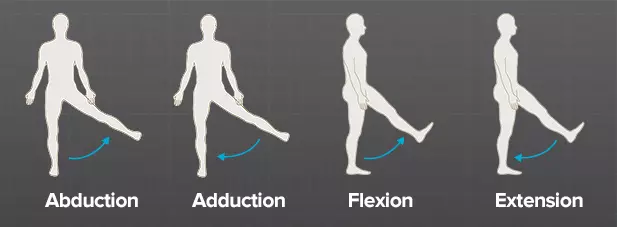
The horizontal movement of the leg toward or away from the body’s midline is a component of hip abduction and adduction, two basic hip joint actions. Walking, running, and sports that call on lower body strength, stability, and coordination all depend heavily on these motions.
Hip Abduction: is the movement of the leg away from the body’s midline, starting at the hip joint. Your leg is moved outward and away from the center of your body when you do hip abduction. The gluteus medius and gluteus minimus, two muscles involved in hip abduction, are the main focus of this exercise. These muscles, which are situated on the outside of the hip, are crucial for maintaining balance, supporting correct condition during exercises, and stabilizing the pelvis.
Hip Adduction: However, the movement of the leg toward the body’s midline is referred to as hip adduction. In this motion, the leg moves back inside, toward the body’s core. The muscles needed to adduct the hip joint, including the gracilis, adductor magnus, adductor longus, and adductor brevis, are used during hip adduction. These muscles, which are situated on the inside of the thigh, are used for lateral movements, direction changes, and crossing one leg over the other.
For both everyday tasks and sports performance, balance, stability, and correct biomechanics depend on both hip abduction and adduction motions. You may improve your lower body strength, play sports more effectively, stay injury-free, and move more normally overall by exercising these muscles. Exercises that target these motions and help in the development of the corresponding muscles include side leg lifts for abduction and standing cable adductions for adduction.
Hip Adduction: What Is It?
The movement of the leg or thigh toward the body’s midline is known as hip adduction. It describes the movement of crossing the body’s midline by putting one foot closer to the other. The leg stretches straight out and then moves in during hip adduction.
The hip adductor muscles on the inside thigh are contracted during the hip adductor movement. The foot is moved toward the midline by these muscles working together. Gracilis, pectineus, magnus, adductor longus, and adductor brevis are the primary hip adductor muscles.
Several actions, including walking, running, direction changes, and maintaining balance while moving, depend on hip adduction. This is crucial for motions that call for bringing the legs together, such as crossing one leg over the other or reducing one’s stance from wide to narrow.
Increasing the strength of the hip adductor muscles helps enhance balance, stability, and general lower extremity function. A varied exercise routine might include hip adduction exercises to increase the strength and coordination of these muscles.
Muscles of the Hip Adductor
These muscles are situated on the inside of the thigh and are called the hip adductors or adductors. The stability and mobility of the hip are significantly influenced by these muscles. Hip adduction, or the movement of the thigh toward the body’s midline, is the main function of the hip adductors.
Many muscles make up the hip joint’s adductor group. The most crucial ones are:
- Adductor Magnus: a few of the group’s muscles, this one is the biggest and strongest. Starting from the pubic bone and the ischium (lower portion of the pelvis), it crosses the femur (thigh) at the posterior border, also known as the linea aspera. In addition to hip adduction, it facilitates hip extension and medial rotation.
- Adductor Longus: This muscle extends from the middle portion of the linea aspera to the pubic bone. It connects the hip joint to help improve pelvic stability while running or walking.
- Adductor Brevis: Deep to the adductor longus, this muscle crosses the pubic bone and enters the linea aspera, right below where the adductor longus insertion occurs. Additionally, it helps in hip flexion and adduction.
- Gracilis: Its involvement in hip adduction makes it frequently included even though it is not a component of the basic hip adduction. Running across the hip and knee joints, it connects the pubic bone to the tibia (shin bone). It is beneficial for internal rotation and knee flexion in addition to hip adduction.
When walking, jogging, or standing, these muscles cooperate to create actions like pulling the legs together, crossing the legs, or supporting the pelvis. Enhancing lower body stability, and athletic performance, and preventing injuries linked to the hips and groin can all be achieved by strengthening the hip adductor muscles.
Hip Adduction ROM
The range of motion that may be achieved by the hip moving the thigh closer to the body’s midline is known as the hip adduction range. Range of motion varies from person to person and can be affected by several factors, including muscular strength, flexibility, and any underlying injuries or illnesses.
A goniometer, a tool used to measure joint angles, is often used to determine an adult’s normal hip adduct range of motion. The typical range of motion for hip adduction when standing with the hip joint in a neutral position is between 20 and 30 degrees. This indicates that the thigh can shift 20–30 degrees from its initial position inward, toward the body’s midline. A range of motion can be impacted by a variety of variables, such as individual variances, joint constraints, and muscle imbalances. Due to exercise and flexibility, athletes and those who perform activities that demand more hip mobility, such as dancers or martial arts practitioners, may have an expanded range of motion.
How to Assess Hip Adduction Range of Motion
The hip adduction range of motion may be measured using a basic goniometer.
- Preparation: A clear, open area where you can move about comfortably should be provided. Additionally, a protractor—a device for measuring common angles—might be required. Before using the goniometer, make sure it has been checked correctly.
- Position: Place your feet shoulder-width apart and remain upright. Look ahead with your hips in a neutral stance. Keep your posture straight during the test.
- Starting point: Put a hand on the hip of the side you wish to assess. You can identify your pelvic motions during the exam with the help of this arm. The opposite hand is used to hold the goniometer.
- Align the goniometer: Set the goniometer’s fixed arm horizontally and level with your body’s midline. The femur, or thigh bone, must line up with the moving hand.
- Movement: From the side being assessed, slowly raise the leg and start moving it across the body in the direction of the midline. Please do not force the movement; instead, let it occur naturally.
- Measurement: Stop and maintain the posture for a short period when you have reached the end of a comfortable range of motion. At this stage, measure the angle formed by the goniometer’s stationary and moving arms. Your hip adduction range of motion is represented by this angle.
- Save: Store the measured angle for comparison or future use. To make sure the measurement is accurate and consistent, you can do it several times.
Test of Hip Adduction
The tensor fasciae lata (TFL), iliotibial band (ITB), and gluteus medius and minimus are the hip adductor muscles used in the hip adduct test, also called the Ober test. This is how the test is done:
- Making preparations: On a level surface, such as a mat or exam table, lie on your healthy side—the side you are not testing on. Bend your upper knee a little while keeping your leg straight.
- Placement: The exam will be administered with assistance from a researcher or medical expert standing behind you. On the testing side, they form a line.
- Starting point: The examiner raises your leg and bends your knee while completely flexing your hip joint. The thigh needs to be parallel to the mat or examination table.
- Movement: Next, with the leg bent, the examiner gradually extends the pelvis. Additionally, they maintain the legs’ condition with the torso.
Observation: The examiner slowly lowers your legs to the table or mat while maintaining an expanded pelvis. - Assessment: the test assesses the hip muscles’ abilities to extend, and allow the leg to reach the table or mat. The hip adductors, particularly the TFL, ITB, gluteus medius, and minimus, are tense or contracted if the leg stays above the ground.
- Measurement: The foot’s level above the ground is noted and contrasted with the expected range of mobility. This gives information regarding the hip adductors’ tightness or limits.
Not all of the hip adductor muscles are evaluated by the Ober test; rather, it focuses on the tensor fasciae latae ligament, the iliotibial band, and the gluteus medius and minimus. If necessary, further examinations and tests may be utilized to evaluate certain adductor muscles.
Hip Adduction Special Test
There are clinical tests that can evaluate the strength and function of the hip adduction muscles, but there is not a “specific test” for this muscle. When assessing hip joint dependence, the two most used tests are as follows:
Compression test:
A simple exercise to evaluate hip joint strength and coordination is the push-up.
The individual is seated with their feet on the floor and their knees bent on a solid platform.
They place a cushion or little ball between the knees.
It is recommended that the user maintain the proper position and avoid compensatory movements while applying as much pressure as possible to the ball or pillow with the knees.
The observer looks at the compression and assesses its symmetry and strength.
The results of these tests might provide important details on the hip adductor muscles’ strength and functionality.
Manual Muscle Testing Of Hip Adduction
Assessing the strength and functionality of particular muscles surrounding the hip joint is known as manual muscle testing. Healthcare providers including physical therapists, orthopedic specialists, and sports medicine practitioners frequently utilize it to assess hip-related muscle imbalances, weakness, or injury.
Muscle testing
- Adductor Magnus
- Adductor Brevis
- Adductor Longus
- Pectineus
- Gracilis
Position of the patient
To evaluate students in grades 3 through 5 The upper leg, which is not being examined, should be abducted to a 25° angle while the patient is side-lying. In a side-lying posture, look at the lower leg.
The patient should be in a supine position to evaluate grades 0–2. The non-examine side is abducted by 25°.
Position of the Therapist
When the patient is lying on their side with their fixing to the non-examine side in abduction, the therapist should stand behind them.
- When assessing in a supine posture, the therapist stands on the side of the patient.
- The pelvis should be steady when lying on one’s side.
- Palpate the hip adductor muscles when in a supine position.
What is the test procedure?
To stop the patient from rotating their pelvis throughout the test, the therapist should stand by their side and use one hand to support their pelvis.
In order to get the patient to push their leg straight down toward the table, the therapist should position their second hand right above the patient’s ankle. In order to help the patient press down, the therapist should offer resistance to the leg.
The patient does the hip adduction on their own.
Apply resistance force to the medial femur in the opposite direction of adduction to evaluate grades 4 and 5.
By assessing the resistance used against the patient’s movement, the therapist may determine how strong the hip adductors are. This is how grades are given:
- Grade 0: No noticeable contraction
- Grade 1: There is no movement, just a brief sensation or sign of contraction.
- Grade 2: Motion that is gravity-free (horizontal)
- Grade 3: Move without resistance but against gravity.
- Grade 4: Act with mild to moderate resistance and against gravity.
- Grade 5: Active movement with maximum resistance.
In order to evaluate endurance, the therapist may additionally ask the patient to maintain the posture for a short period of time.
Repeating the test on both sides will allow for comparison.
Note: It is crucial to make sure the patient maintains good form during the test, which includes preventing compensatory movements such as trunk or pelvic rotation and maintaining the leg straight. To minimize pain or damage, it is also critical to avoid applying too much pressure to the inner thigh region during the test.
Take Precaution
- If the patient has recently undergone hip surgery or has a hip ailment that the testing might worsen, do not do the test.
- Throughout the diagnostic procedure, make sure the patient is supported and at ease.
- When providing resistance, exercise caution to prevent the patient from experiencing pain or harm.
- Avoid overtesting or repeating the test repeatedly, since this may cause the patient to experience pain or muscular fatigue.
- During the test, if the patient feels pain or discomfort, stop right away and, if required, get medical help.
- To stop the transmission of infection, always practice good infection control practices, such as wearing gloves and practicing good hand cleanliness.
Exercises for Hip Adduction
The muscles that move your legs toward your body’s midline are the focus of hip adduction exercises. Here are efficient hip-contracting exercises:
Adductor Machine
Many individuals may think of the traditional adductor machine that is seen in gyms all around the world when they consider focusing on the adductors.
The inner thigh can be effectively trained with this machine, but it is not the only action that can provide positive effects.
This action is excellent for beginners since you may change the size of the pads and the amount of weight.
To obtain a sense of the exercise and prevent injury, it is important to start quite light.
Method of performance:
- To begin, choose your preferred resistance while sitting on the machine with the pads as wide between your legs as is comfortable.
- Squeeze your thighs together gently until the pads make contact, feeling the muscles tense.
- Reverse the motion slowly, bringing your thighs back to the beginning position.
- Continue until you reach the appropriate amount of repetitions and sets. Start with two or three sets of ten repetitions.
Squat with a wide stance
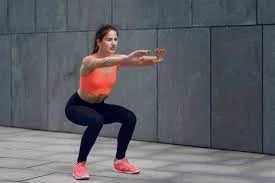
Because it enhances the utilization of whole-leg muscles, the squat is sometimes referred to as the “king of leg exercises,” and for good reason.
Out of all the squat varieties, the wide stance squat, sometimes called a sumo squat, is most effective in targeting the inner thigh muscles.
A barbell, kettlebell, dumbbell, sandbag, or any other weighted object can be used for this exercise, or you can use your body weight alone.
Method of performance:
- Your toes should be turned slightly outward and your feet should be slightly wider than shoulder width.
- Once your thighs are parallel to the floor, softly drop your hips by shifting your weight back.
- Feel your gluteal and leg muscles, especially your adductors, contract as you push through the floor in a controlled manner to return to the beginning position.
- Continue until you reach the appropriate amount of repetitions and sets. Sets of 10–12 repetitions should be your goal.
Banded adduction standing
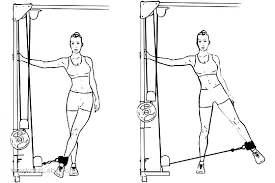
Resistance bands are an excellent tool for effectively training the adductors from many angles when the goal is to isolate them.
It is easy to set a different level of difficulty because bands come in a variety of resistance levels and lengths.
Method of performance:
- A resistance band should first be wrapped around a sturdy anchor, such as a power rack or other floor-mounted equipment.
- While standing, wrap the band around your inner (working) foot with both sides facing the anchor point.
- To change the resistance band’s tension, stand further away from the anchor point or tighten the band’s wrapping.
- The band should pull your leg to the side, but you should resist the pull.
- Standing tall, move your banded leg toward the middle of your body to begin the exercise. Feel your adductors contracting well.
- Controllably and slowly drop your leg back to the side.
- For the required number of sets and repetitions, switch legs and repeat. Sets of 10–12 repetitions should be your goal.
Banded adduction while seated
Because it requires less stability, this sitting variant of the standing banded adduction is a little easier.
For beginners who want to work on their adductors, this version is a great choice.
The way to do this:
- To begin, wrap a resistance band around a sturdy anchor, such as a power rack or other floor-mounted equipment.
- Place both sides of your body facing the anchor point and band while seated on a weight bench.
- Place your inner foot just below your knee and slide it through the band.
- As you prevent the movement, let the band draw your leg toward the anchor point.
- Tighten your adductors to bring your leg back nearer your body’s midline.
- Continue doing this with every leg until you have completed the required amount of sets and repetitions. Make an effort to finish two or three sets of 10 to twelve reps.
side-lying Adduction
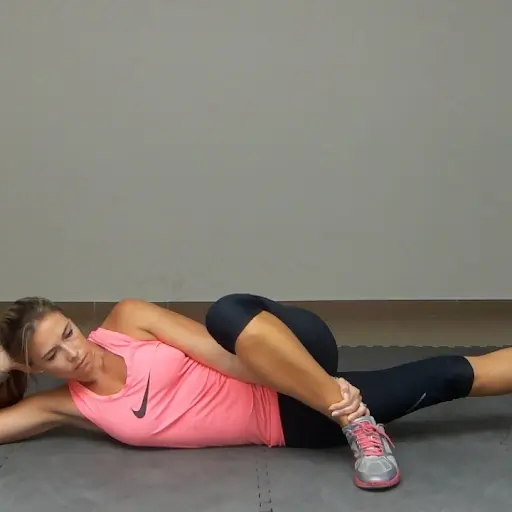
This is an excellent exercise for beginners and does not require any special equipment.
How to perform:
- On a mat, lie on your side. Make sure your hips are stacked and your spine is neutral. Keep your top hand on the floor in front of your tummy and your bottom arm folded beneath your head.
- Place the foot flat on the floor in front of your bottom leg and bend your top knee so it points toward the ceiling.
Contract your adductors to raise your bottom leg off the floor while maintaining a long, flexed foot.
In a controlled motion, let your leg gently drop back to the floor.
For as many sets and repetitions as you like, repeat the action with your opposite leg. Aim for 2–3 sets and 10–12 repetitions.
Lateral lunge
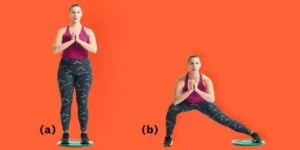
Any skill level may benefit greatly from the lateral lunge. If you want to make it more difficult, you may change it by adding dumbbells.
How to perform:
- Place your feet hip-distance apart as you stand.
- Bend your right knee, step out with your right leg, and start pushing your hips back. If you want to counterbalance, you can extend your arms forward. Your knee should remain between your second and third toes during the descent, and it should not extend more than two inches past your toes. When a foot steps out, its toe may turn slightly outward.
- To get back to standing, push off with your right leg.
- To finish one rep, repeat on your left leg.
- Do two to three sets of ten to twelve repetitions for each leg.
Hip Adduction Pain
Hip adduction pain refers to discomfort felt when moving the leg toward the body’s midline. It can result from muscle strain, tendonitis, groin injuries, or issues like hip impingement. Common symptoms include sharp or aching pain in the inner thigh or groin, especially during movement or exercise.
FAQs
Which muscles adduct the hip?
The pectineus, adductor longus, gracilis, adductor brevis, and adductor magnus are the main hip adductors. Naturally, this muscle group’s main function is to produce adduction strength, which pulls the lower extremities in toward the midline.
What are the benefits of hip adduction strength?
Stability: Maintaining correct disease and avoiding injuries during movement depends on the pelvis and hips being stabilized by strong adductor muscles.
Balance: These muscles help you stay balanced, especially when you are doing things that require you to move your weight from one leg to the other.
How to train adductors at home?
Place both your upper leg and foot flat on the floor in front of you while lying on your side. To feel a pull on the inside and outside of your thigh, raise your lower leg toward the ceiling upward. You have the option of holding the position or repeating the movement up and down. Your adductor muscles will get stronger as a result of this.
Is hip adduction good for the knees?
However, recent research indicates that strengthening the hip abductor and adductor muscles may be crucial for lowering the knee adduction moment. These muscles stabilize the pelvis on the frontal plane hip joint during walking.
What causes weak hip adductors?
Long periods of sitting during the day can cause weak gluteal (buttock) muscles, including the hip abductors, in many people. The body may effectively “turn off” certain muscles after prolonged inactivity, making it more difficult to use (activate) them during exercise.
References:
- Cscs, D. P. R. (2023, May 19). Hip exercises for building adductor strength and preventing injury. Healthline. https://www.healthline.com/health/adductor-exercises#training-tips
- Patel, D. (2023f, May 24). Manual muscle testing of Hip – Flexion, Extension, Abduction. Samarpan Physiotherapy Clinic. https://samarpanphysioclinic.com/manual-muscle-testing-of-hip/
- Patel, D. (2023s, July 8). Hip abduction and adduction – movement, ROM, exercise, muscles. Samarpan Physiotherapy Clinic. https://samarpanphysioclinic.com/hip-abduction-and-adduction/#google_vignette