Knee Examination
What is a Knee Examination?
A knee examination is a systematic assessment used to evaluate knee function, stability, and potential pathology. It typically includes inspection, palpation, range of motion testing, and special tests to assess ligaments, menisci, and joint integrity.
The femur, tibia, and patella are the three bones of the knee joint, a synovial joint. The tibiofemoral and patellofemoral joint are the two articulations of this intricate hinge joint. The patella and the femur articulate at the patellofemoral joint, whereas the tibiofemoral joint articulates between the tibia and the femur.
The largest and possibly most strained joint in the body is the knee. Motions include flexion, extension, medial rotation, and lateral rotation.
Knee bones
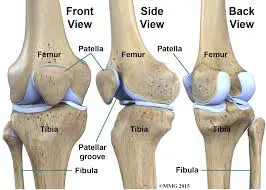
Three bones make up the knee joint:
- The thigh bone, or femur.
- Tibia (bone of the shin).
- Kneecap, or patella.
knee cartilage
Cartilage is the flexible connective tissue that protects your joints. It acts as a shock absorber throughout your body.
Your knee has two different kinds of cartilage:
- The most prevalent kind of collagen in your body is hyaline cartilage. Some medical professionals refer to it as articular cartilage. It caps both ends of the cartilage and lines your joints. Because hyaline cartilage is smooth and slick, your bones can glide past one another in your joints with ease. Hyaline cartilage lines the surfaces in your femur, tibia, and patella that come into contact with one another.
- Fibrocartilage: Fibrocartilage is stiff cartilage composed of thick fibers, as the name suggests. It’s resilient enough to absorb blows and hold body parts in place. Your knee’s meniscus is made up of two fibrocartilage wedges. It acts as a cushion between your tibia and femur.
Surfaces of the articulations:
- Tibiofemoral joint: tibial plateaus, lateral and medial femur condyles.
- Patellofemoral joint: posterior patella surface, patella surface of femur
Menisci and Ligaments tibial (medial) collateral ligament, fibular (lateral) collateral ligament, oblique popliteal ligament, arcuate popliteal ligament, anterolateral ligament (ALL), patellar ligament, and medial and lateral patellar retinacula are examples of extracapsular ligaments.
The medial meniscus, lateral meniscus, posterior cruciate ligament (PCL), and anterior cruciate ligament (ACL) are examples of intracapsular ligaments.
Knee muscles
Soft tissue composed of elastic fibers makes up muscles. To force and move portions of your body, they flex or tense up. Your knee movements are controlled by numerous muscles that are connected to your legs.
Flexor muscles pull in your knee and include the following:
- Genus Articularis.
- Rectus femoris.
- Vastus lateralis.
- Vastus intermedialis.
- Vastus medialis..
Your knee can be extended by the extensor muscles, which work opposite to your flexor muscles.
Your knee controls by the extensors listed below:
- Biceps femoris
- Semitendinosus muscle
- Semimembranosus muscle
- Gastrocnemius muscle
- Plantaris muscle
- Gracilis muscle
- Popliteus muscle
The knee’s nerves
Electrical impulses are sent from the brain to the body through nerves, which act like cables. These impulses enable muscle movement and sensation. The nerves in your knee include
- Femoral nerve.
- Sciatic nerve.
- Tibial nerve.
- Peroneal nerve.
Most prevalent problems or ailments affecting the knees:
- Arthritis.
- Osteoarthritis.
- Bursitis.
- Tendinitis.
- Osteoporosis.
Among the most frequent knee injuries are those sustained in sports:
- ACL injuries
- MCL injuries
- Meniscus injury.
- Knees that are excessively straightened
- Sprains
- Bone fractures
- Disturbance
- PFPS, which stands for patellofemoral pain syndrome, is a condition that causes pain in the area around the kneecap.
Typical signs and symptoms of knee joint problems:
- Discomfort, particularly when moving.
- Swelling/inflammation.
- Redness or discoloration around your knee.
- A sensation of heat or coziness.
- A sensation of grinding.
- A popping sound or sensation.
There are various components to the knee examination:
history
subjective analysis
Palpation/Inspection Special test
Personal
- The patient’s diet
- Present history ( any trauma or infection)
Extra Details
- Pre-existing medical issues are referred to as past medical history (PMH).
- Drug history (DH): Are there any pertinent prescription drugs?
- Social History (SH) (Affected by hobbies, sports, or work?
Examination and Palpation Inspection Incorporation
- Inadequate Alignment
- Painful Muscle Wasting
- Medial or Lateral collateral ligament line
- Hamstrings Tendons Popliteus Patella Retinaculae Patellar Tendon.
ROM:
- Flexibility
- 125–135 degrees
- Extension
- Ten degrees of hyperextension
- Rotation (femur stabilization)
- Internal and external tibial rotation: 10–15 degrees
Examination
When the patient is standing check the patient’s gait.
Typical gaits consist of:
- Weight-bearing on a sore leg causes analgia. The stance phase is reduced, resulting in the patient’s individual “limping.”
Trendelenburg: weakening of the gluteus Medius and minimums, the hip abductors. This is a general examination finding rather than a sign of knee pathology.
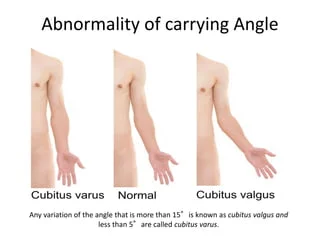
Check for deformity and symmetry.
- Bilateral Genu varum (or bow-legged) patellar level, when the tibia is medially angulated for the femur
- The condition known as genu valgum, or knock-kneed, occurs when the tibia is laterally angulated for the femur.
Request that the patient lie down on the bed.
- Check for Changes in the skin (such as redness from septic arthritis)
- scars from a previous arthroplasty or arthroscopy.
- Swellings such as para meniscal cysts, Baker’s cysts, inflammatory bursae (usually pre-patellar and infra-patella bursae), or joint effusions
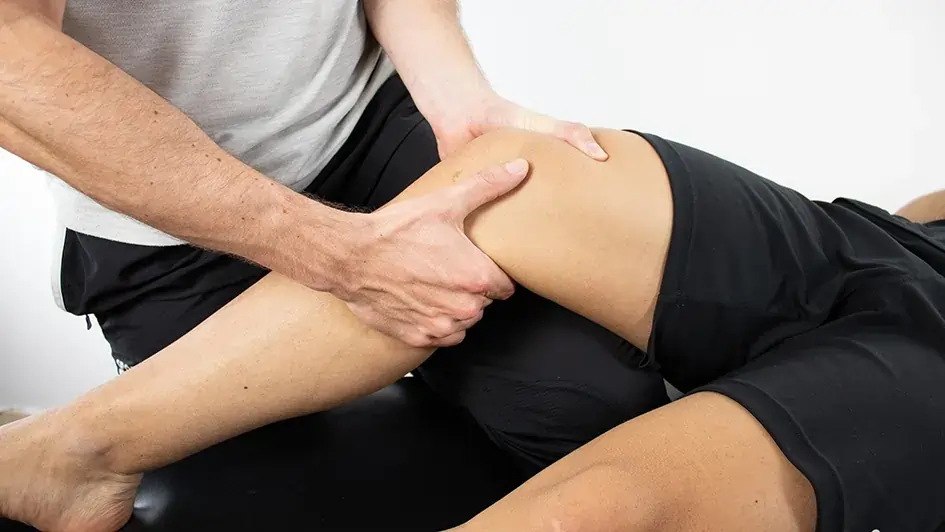
Check for fluids.
Method 1
- Move your hand upward after gently pressing just medially on the patella. Next, apply firm pressure to the knee’s lateral aspect.
- Usually, no fluid will be valued.
- A significant amount of fluid is associated with a medial aspect that “bulges” out following downward pressure (positive “bulge sign”).
- A lot of fluid is consistent with a medial aspect that tightly reflects lateral pressure without bulging.
Method 2
- Check for fluid by lightly pressing down on the suprapatellar pouch, which empties into the knee joint, with one hand above the patella. Next, push toward the patella with the other hand. The patellar tendon will roll off below the bone if there is an accumulation (patella tap test).
- A “ballotable” knee is indicated by a palpable or audible tap, which is suggestive of at least a significant volume of fluid.
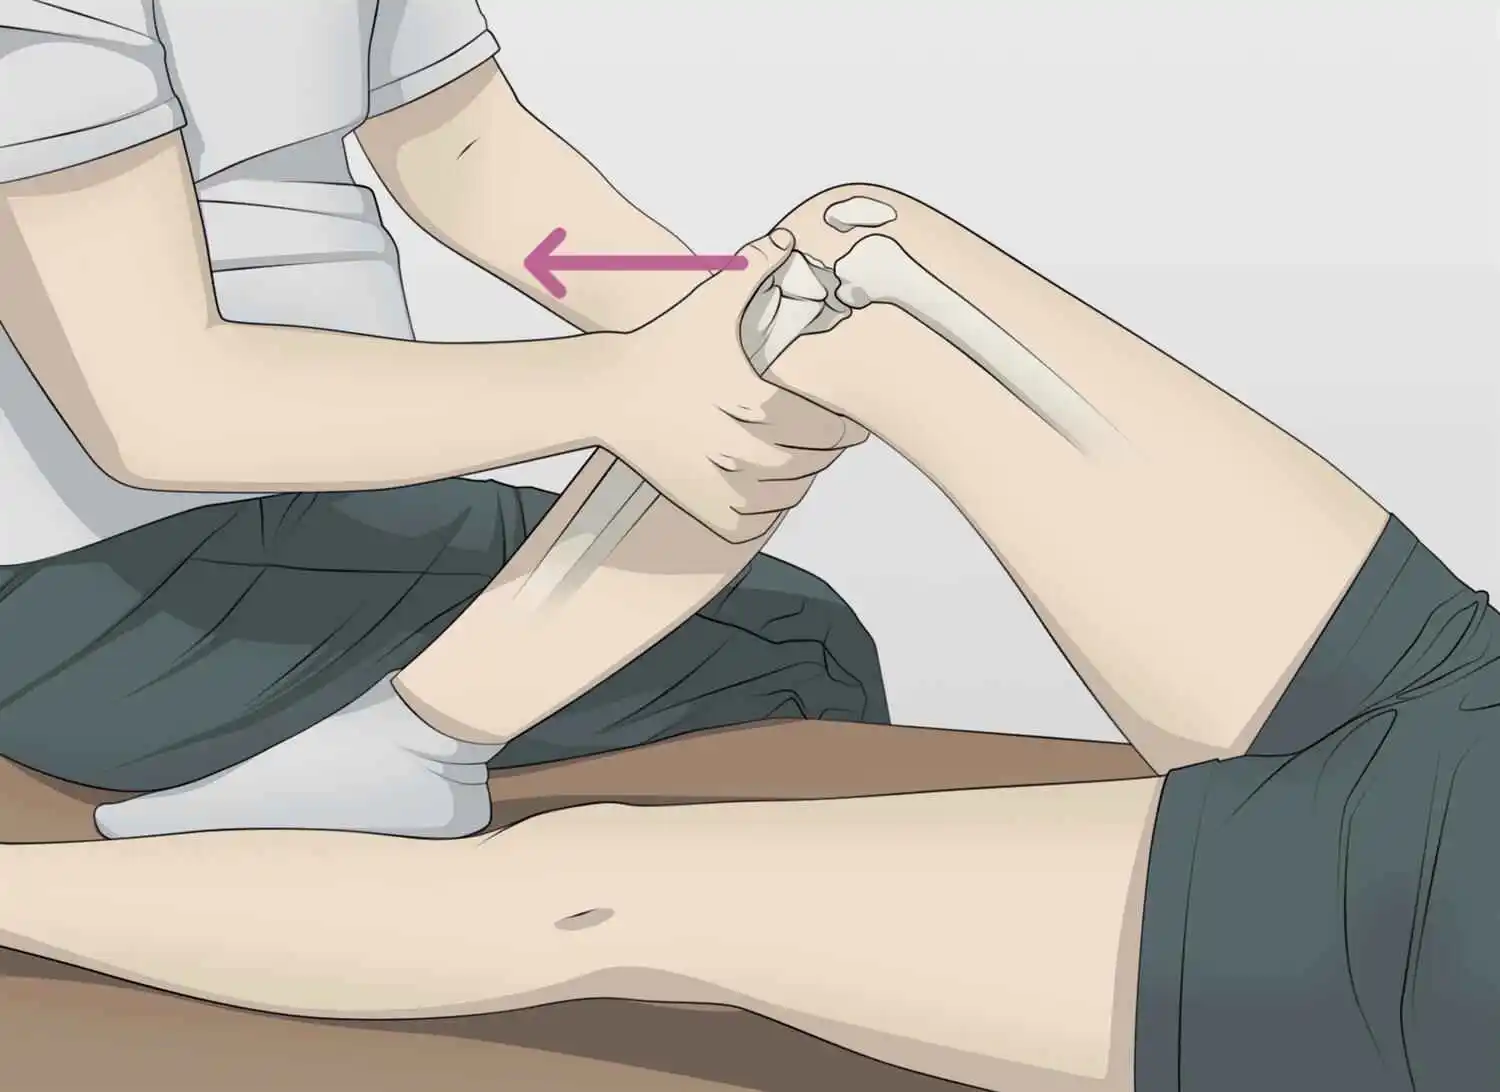
Check for laxity
- As the patient lies down, ask them to flex their knee and place their foot on the examination table. To immobilize the foot, sit on it. Then, using both hands, grip the tibia’s head and pull anteriorly.
- An anterior cruciate ligament (ACL) tear is associated with movement greater than 1 cm (positive anterior drawer sign).
- Legs hanging will complicate any results, so avoid trying to generate an anterior drawer sign with them.
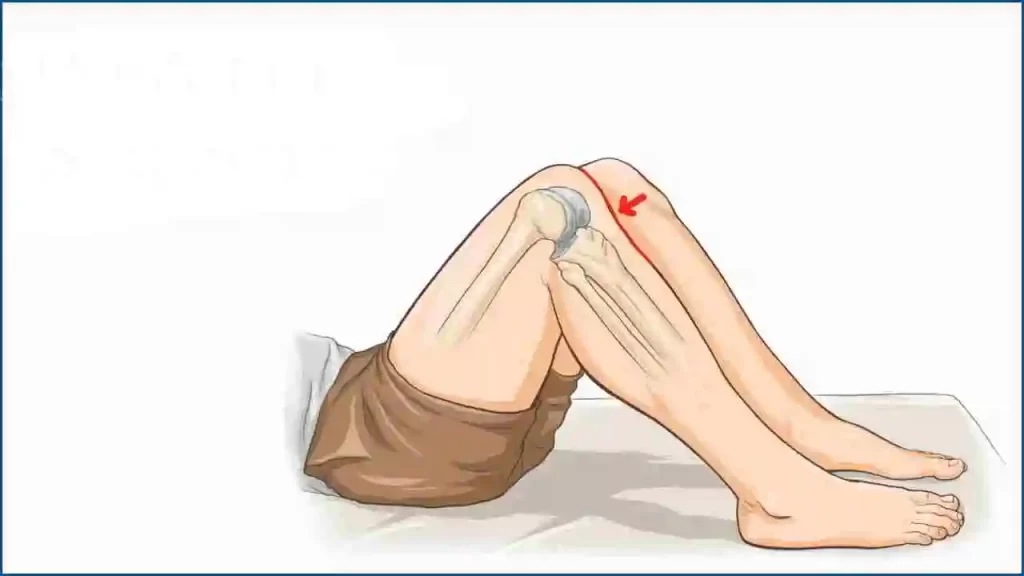
Lachman test:
- Try pulling the tibia anteriorly about the femur after flexing the knee just 20–30 degrees (as opposed to 90 degrees in the anterior drawer indication). If the test is positive, a defective ACL will show increased forward motion. The anterior drawer sign is believed to be less sensitive than this test.
- Put one hand above the patella and your other hand behind the heel to try to hyperextend the knee. It is uncommon to have more than 2-3 cm (i.e., to be allowed to place one or two fingers under the heel while the leg is flat and extended).
- Flex and extend the knee with both hands. Continue while adding lateral and medial rotation. Check for any locking or catching that might be taking place.
- Apply valgus and varus stresses to produce deviations larger than a few millimeters while maintaining a straight leg.
Check for pathologies of the cartilage.
Patellar cartilage tear, or Apley’s grind test: by pressing firmly with the palm against the patella and moving it in the sagittal plane. Only when associated with tenderness, which is associated with patellar cartilage pathology when crepitus present .
Meniscus cartilage tear, or McMurray test:
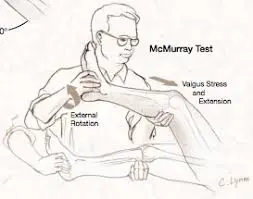
- Lateral meniscus tear: While the patient is in a supine position, fully flex the knee and place the forefingers on the lateral side of the joint line. Then, apply valgus stress, rotate the leg internally, and extend the knee while feeling discomfort and a snap or click.
- Medial meniscus tear: While the patient is in a supine position, fully flex the knee and place the forefingers on the medial side of the joint line. Then, apply varus stress and rotate the leg externally, extending the knee while checking for discomfort and pops or clicks.
Bounce Home Test:
- A bounce-home test is used to check the integrity of the menisci.
- Method
- While the patient is supine, the therapist holds the heel of his foot in his palm and passively flexes the patient’s knee. After that, the knee is permitted to passively stretch. When fully extended, the knee may “bounce home” having a sharp end feel.
- To pass the test, the knee must extend completely or feel spongy at the end, exhibiting symptoms of an intra-articular illness or a torn meniscus.
- In the literature, a bounce-home test has already modified twice. The first change On highlighted was the knee-jerk test. It creates discomfort from the wounded tissue and forces the knee to extend.
- The second alteration, which was only a variation of forced knee hyperextension, was described by Shybut and McGinty. The test is successful if forceful hyperextension is prevented.
Ege’s test :
- Starting Position:
The patient stands with their feet 30 to 40 centimeters apart and their knees outstretched. The patient’s feet are positioned to provide maximum knee rotation for the medial meniscus or maximum knee rotation for the lateral meniscus, depending on which meniscus you are examining. - After kneeling with both lower legs in maximal external rotation, the patient carefully stands up to conduct the examination movement for medial meniscus injuries. Each knee externally rotates as the squat continues, increasing the space between them. The squat shall be performed with the greatest external rotation to create genu varus (knees outward). The patient returns to the initial position (with the knee extended) after squatting as much as they can.
- To find a lateral meniscus tear, the two lower limbs are kept at their maximum internal rotation while the patient stands and squats. Since it is rarely possible to perform a full squat in the full internal rotation, even with healthy knees, the patient is allowed to stabilize themselves for a slightly less-than-full squat.
- In contrast to the standard meniscus test, as the crouching continues, the knees go inside-turned and the distance between them decreases. Squatting with the greatest internal rotation will cause genu valgus, or inward knees. The patient returns to the initial position (together with the knee extended) after squatting as much as they can.
final result
- The test is considered successful when the patient feels discomfort or a clicking sound at the location of the joint line. Not all patients need a full squat because further squatting is stopped right away as the discomfort or click is felt. On rare occasions, the patient could not feel discomfort or click until they reach the maximum squats or as soon as they get out of the squat, in which case both are still regarded as positive results for this test. At about 90° of knee flexion, one frequently feels pain or maybe a click.
Other tests:
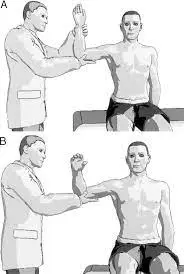
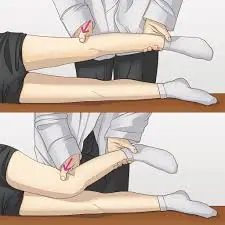
Ober Test
The goal of the Ober test is to find a restricted iliotibial band. With the sore side facing up, position the patient on their lateral side to do the Ober test. Then, as seen in the example below, lay your hand beneath the lower leg and raise the entire leg posteriorly. Next, try to lower the leg below the other leg’s level while maintaining hip stability.
A tight iliotibial band and a positive Ober’s test are suggested by the inability to lower the leg to the level of the lower leg. When a patient has lateral knee discomfort, a positive Ober’s test is strongly predictive of iliotibial band syndrome.
Noble Test
The noble test involves putting the patient in a supine position and flexing the knee slightly. Next, as shown in the example, position the thumb above the iliotibial band before its insertion into the lateral femoral condyle. Try to stretch the leg while applying force with your thumb, feeling for soreness beneath it.
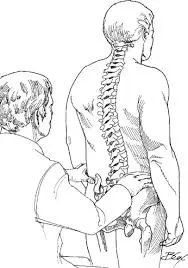
Instability at the Back
Sag sign:
Look for backward translation of the tibia tuberosity of the injured knee relative to the contralateral knee while the patient is supine, hips flexed to 45°, and knees flexed to 90°. Quad activation can be used to enhance this examination.
Posterior Instability
- Place the patient in the supine position.
- With the knee bent to 90° and the hip bent to 45°
- The tibia remains in neutral rotation.
- Sit on the patient’s foot to stabilize their lower extremities.
- Try to move the tibia about the femur posteriorly.
- A positive test is increased posterior translation.
Frontal Instability
Pivot shift test:
- Put the patient in a supine posture and ask the patient to relax. ‒ Hold the knee in flexion while using one hand to grasp the ankle and the other to grasp the proximal tibia. A positive test is characterized by posterior sliding (reduction) of the lateral tibia plateau at approximately 30 degrees of flexion. This motion is secondary to the iliotibial band, which exerts an anterior force on the knee during extension and a posterior force during flexion. An ACL-deficient knee is anteriorly laterally unstable. ‒ Internally move the knee and apply a valgus stress as the knee is slowly extended.
External Rotation Recurvatum Test:
- An external rotation recurvatum test is used in the initial evaluation of a patient suspected to have posterolateral rotatory instability.
- During the test, an examiner determines if this knee’s excessive extension is more severe than on the other side.
- The test is used to measure the amount of knee recurvatum by raising the great toe and delivering a stabilizer to the distal thigh.
- This is usually calculated using the heel position in centimeters. Measurements of the medial side of the foot are frequently made, and the outcomes are contrasted with those of the opposite side of the normal knee.
- Studies have shown that a simultaneous anterior cruciate ligament tear is usually indicated by a higher amount of recurvatum after a posterolateral knee injury.
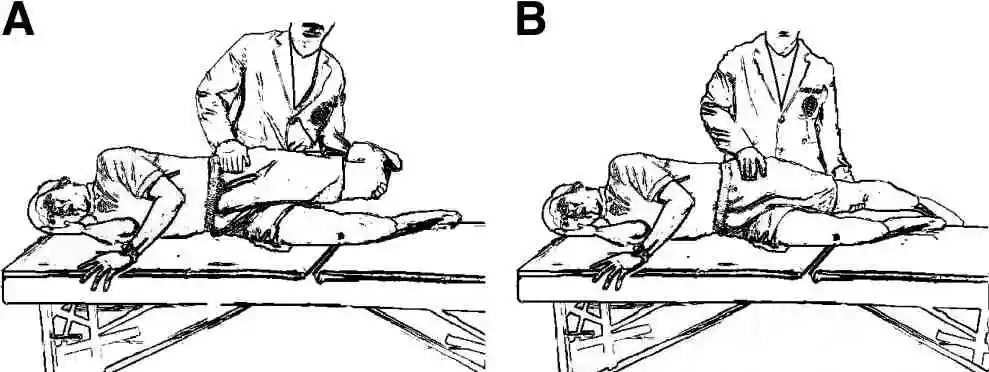
Apley’s test:
- Description of the test
- For Apley’s grinding test, the patient lies prone with their knee flexed to 90 degrees. The patient’s thigh is subsequently secured to the exam table using the examiner’s knee. First, the examiner uses distraction to rotate the tibia laterally or medially, noting any excessive movement, limitation, or discomfort.
- After that, compression is used to repeat the process instead of a distraction. If rotation with distraction causes more discomfort or shows more rotation than the normal side, the lesion is probably ligamentous. If there is less rotation than the typical side or if the rotation plus compression becomes more severe, the lesion is probably a meniscus damage.
Patellar grinding test:
Approach
- The knee in issue is stretched when the patient is either long-sitting or supine. The examiner positions his hand’s web just over the patella while applying pressure. The patient is told to gently and gradually contract their quadriceps muscle. A positive result from this test is indicated by discomfort in the patellofemoral joint.
A Different Approach
- Rieder advises applying pressure to the patella directly. After that, the tester requests the patient to tighten their quadriceps muscles by applying pressure.
The individual is on their side with their knees bowed.
The examiner positions the thumb’s web area on the superior border of the patella while standing next to the affected side. - As the inspector delivers declining and substandard stress to the patella, the individual is approached to obtain the quadriceps muscle.
- Pain when moving the patella or difficulty finishing the test are signs of patellofemoral dysfunction.
The test is considered negative if the patient can complete and continue the compression without experiencing any pain.
If the patient has retro patellar pain and cannot sustain a contraction pain-free, the test is considered positive.
Precautions
Because even normal persons can react favorably to increased pressure, the amount of pressure that is applied must be carefully managed.
The Sensitizer
- The best method is to repeat the process several times, applying more pressure as necessary, and then compare the results to those on the unaffected side.
- To assess different patellar components, the knee should be examined at 30 degrees, 60 degrees, and 90 degrees, as well as full extension.
Slocum Test:
- Method
- An examiner places the patient in a supine posture, with the foot secured to the examination table and the knee flexed 90 degrees. Rotating the foot applies a tibia of 30 degrees of inside rotation. To check for anterolateral rotational instability, the physician tugs on the tibia anteriorly. Bilateral comparisons of the results are made.
Positive:
- Anterolateral instability is indicated by an increased quantity of anterior translation of the tibia with tibial inner rotation or excessive movement on the lateral side of a knee.
- The sign of an anterior cruciate ligament, or ACL, deficiency in the knee is anterolateral rotatory instability (ALRI).
- Because of the knee’s 90-degree flexion, the technique enables the hamstrings to relax because the hamstrings’ origin and insertion are closer to one another in flexion.
To investigate anteromedial rotary instability, a tibia is dragged forward once again and laterally rotated by 15 degrees. Bilateral comparisons of the results are made.
Positive:
- Abnormal anterior rotation of a medial tibial plateau shows laxity of the medial structures, which can occur when a tibia on a femur is pathologically elevated in both forward and outward displacement.
- Another method for testing anterolateral rotatory instability has also been developed.
- With his uninvolved side, uninvolved hip, and knee flexed, the patient might be in a supine laying position. The pelvis is rolled backward by the patient until it is 30 degrees off the supine position. With the knee fully extended, the medial aspect of the feet of the affected extremity is securely positioned on an examination table surface.
- The position causes a tibia to rotate internally on a femur, eliminates any hip rotation, and permits a knee to drop into the valgus position.
- When a patient slowly flexes their knee while holding both hands on the lateral aspect of the knee joint, the examiner assists with the procedure and applies downward pressure to cause valgus stress on the knee and, if rotatory instability is present, anterior displacement of the tibia. When the knee flexes beyond 25 to 40 ° of the flexion position, the subluxation can be felt and seen to lessen.
FAQs
Which three unique knee tests are there?
Three Typical Orthopedic Knee Anterior Drawer Tests. One of the most straightforward and popular orthopedic exams for the knee is the Anterior Drawer Test. Another is the Pivot Shift Test. Another very popular and reliable test for determining a patient’s joint stability and ACL stability is the Pivot Shift Test. The McMurray Test.
How are your knees examined?
Check for warmth, discomfort, and swelling (including bursal or additional soft-tissue swelling, effusion, and bone swelling) by palpating. As much as you can, extend and flex your knees to move them. Zero degrees of extension to 135 degrees of flexion is the typical range. Make a comparison between the two knees.
What is the best knee test?
Lachman test: try pulling the tibia anteriorly about the femur after flexing the knee just 20–30 degrees (as opposed to 90 degrees in the anterior drawer indication). A defective ACL will show increased forward motion if the test is positive. The anterior drawer sign is believed to be less sensitive than this test.
Which three components make up the knee joint?
Three bones make up the knee joint:
The thigh bone, or femur
Tibia (bone of the lower leg)
Kneecap, or patella
What is a patella?
Your kneecap is called the patella. It is more than just a knee cover, considering that it protects your joints. It also facilitates knee movement and the proper function of muscles, tendons, and ligaments.
What is cartilage?
Your bones and joints are shielded by cartilage, a robust and pliable connective tissue. Your entire body uses it as a shock absorber.
What is the number of ligaments in the knee?
Each knee has four major ligaments. Trauma from a car collision might result in injuries to the knee ligaments. Sports injuries may also be the cause. One of the most often injured ligaments is the anterior cruciate ligament (ACL).
A meniscus: what is it?
The C-shaped part of the cartilage called the meniscus serves as an insert between the thighbone (femur) and shinbone (tibia). There are two menisci on each knee. A meniscus tear, also known as cartilage damage, can be caused by a violent twist or translation of the knee.
References:
- Knee exam. (n.d.). Stanford Medicine 25. https://stanfordmedicine25.stanford.edu/the25/knee.html
- Examination of the knee joint – TeachMeSurgery. (2022b, September 7). TeachMeSurgery. https://teachmesurgery.com/examinations/orthopaedic/knee-joint/
- Knee joint. (2023, October 30). Kenhub. https://www.kenhub.com/en/library/anatomy/the-knee-joint
- Battista, C., MD. (n.d.). Knee physical exam – adult – recon – orthobullets. https://www.orthobullets.com/recon/12755/knee-physical-exam–adult
- Walrod, B. & The Ohio State University Wexner Medical Center. (n.d.). A standardized approach to the knee examination. https://ccme.osu.edu/storage/WebCastsFiles/876Knee%20Disorders%20-%204.pdf
- Professional, C. C. M. (2024a, May 1). Knee joint. Cleveland Clinic. https://my.clevelandclinic.org/health/body/24777-knee-joint