Shoulder Range Of Motion Exercise
Introduction of Shoulder Range of Motion Exercise
Exercises for the shoulder range of motion can be classified as active, passive, or assisted because they include moving the shoulder through its whole range of motion with or without assistance.
This is a reference to an exercise regimen designed to enhance the shoulder joint range of motion. The way the bone surfaces inside the shoulder joint are arranged, the joint capsule, ligaments, tendons, and muscles that work on the shoulder joint are all factors that influence this motion.
A Brief Overview of the Three Kinds of Range-of-Motion Activities
When performing a passive range of motion exercise, the person’s shoulder joint remains fully relaxed while an external force moves the body part in this case, the shoulder through its entire range of motion. This range of motion could be the outcome of most of the motion used by a therapist or by someone helping the patient.
The last type of exercise is the active range of motion, which involves a person moving their shoulder joint totally. It is not recommended to apply any external force during this kind of exercise.
Passive Shoulder Range of Motion Exercise
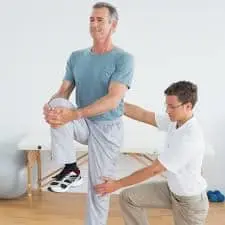
This is helpful for shoulder joints that have become immobile as a result of trauma or even paralysis episodes. A therapist moves the upper limb or other body part of the tight shoulder joint while gradually stretching the muscles and instructing the patient how to move appropriately. To encourage quicker healing of the stiff shoulder joint, therapeutic stretching activities are typically combined with passive range-of-motion exercises. Here, the therapist stretches the shoulder’s soft tissue to release tension and relax the muscles around it.
The most popular and secure passive range of motion (ROM) exercises for the shoulder involve stretching the nearby muscles in an effort to improve their suppleness. While these exercises help a patient hold the stretch longer, the best approach to perform passive range of motion exercises for the shoulder is to have a physical therapist assist with the stretch. To improve muscle flexibility, a skilled practitioner does this kind of exercise by moving the upper arm into a stretch and holding it there.
This is better in a few ways.
First, the physical therapist is aware of appropriate boundaries and knows when to draw them. The physical therapist is also aware of how long to hold the stretch.
Finally, in order to maximize benefits, therapists are educated to determine whether they are focusing on the right location. keeping that in mind.
In which conditions should a physical therapist perform a passive range-of-motion exercise on the shoulder joint?
Shoulder passive range of motion (PROM) exercises are usually employed in the following situations: paralysis attacks, comatose patients, healing fractures, and pain that is evoked during active muscle contraction. Combating the detrimental consequences of immobilization is one of the primary objectives of PROME; nonetheless, it is crucial to keep in mind that muscle atrophy cannot be stopped by passive range of motion (PROM) exercise.
A Few Advantages of Shoulder Exercises Using a Passive Range of Motion:
Exercises that promote the passive range of motion not only help maintain healthy joint functionality but also help patients feel better by lowering pain, encouraging healing, and regaining and maintaining. They also help patients gain muscle mass, which improves blood flow and oxygen levels.
Guidelines for Passive Range of Motion
- Maintain constant support for an arm’s weight.
- Provide support both above and below the patient’s moving shoulder joint.
- Maintain both slow and fluid movements.
- If the shoulder joint or muscle is stiff, do not push the motion.
- The therapist should restrict their movements to what the shoulder joint or muscle will tolerate.
- There should be no pain during the passive range of motion. Stop the shoulder motions and inform the therapist if they pain.
Passive Range of Motion Exercises:
- Passive Shoulder Flexion up to 90Degrees
The therapist then uses gentle pressure to support the arm at the elbow and wrist/hand. The patient should then be informed when the therapist gradually raises the arm to a 90-degree angle at shoulder height and attempts to move the arm during the movement. Don’t turn more than ninety degrees during the initial phase. Perform ten rounds in a session. Work out three times a day.
- Passive Shoulder Abduction up to 90Degrees
First, have the patient lie down in a comfortable posture on the plinth. Next, the physical therapist applies gentle pressure to the elbow and wrist/hand regions of the arm. After that, instruct the patient to try to move their arm in the direction of the motion as the physical therapist slowly moves it, Don’t turn more than ninety degrees during the initial phase. In one session, perform ten repetitions. Work out three times a day.
- The Passive Range of Motion Exercise: Towel Stretch
Place a towel horizontally in your hands. An advanced variation of this exercise can also be performed by the patient with a towel draped over their healthy shoulder. Perform this Exercise in one session ten to twenty times a day. Work out three times a day.
- Supine Passive External Rotation
After about ten seconds of holding, release the arm. Perform ten rounds in a session. Work out three times a day.
- Supine Passive Internal Rotation
Additionally, push on the affected arm’s hand with the cane or long stick in the other hand to cause the affected arm to rotate inward. After about five seconds, release one arm. In one session, perform ten repetitions.
- Standing Passive Internal Rotation
First, instruct the patient to stand in the doorway with their back to the door frame or close to the wall’s edge. The hand should be placed against the wall or doorframe, and the affected arm should be held firmly against the side with the elbow at the correct (90-degree) angle. Rotate the body in the direction of the wall or door with the feet to cause the shoulder to rotate inward.
- Standing Passive External Rotation
Begin by instructing the patient to stand in a doorway with their back to the door frame or even close to a wall’s edge. After that, maintain the injured arm firmly against the side with the elbow at the proper (90-degree) angle while holding the hand across from a wall or door frame. Rotate the body away from the wall or door by shifting the feet to cause the shoulder to rotate outward.
- Standing Passive Forward Flexion
Raise one arm while maintaining a straight elbow. Repeat ten times at a 90-degree angle. Complete ten repetitions fully overhead if the patient is able to do so without straining their shoulder blades.
- Passive Forward Elevation
The purpose of these Exercises is to enhance the passive forward elevation of the shoulder. Perform a minimum of ten repetitions of each of these exercises in a single session. Work out three times a day.
Then, with the aid of a healthy hand, raise the cane over the patient’s head or as high as possible. Try the same exercise while sitting up straight in the chair if it doesn’t hurt. Perform ten rounds in a session. Work out three times a day.
Assisting the affected arm with forward flexion: Whether seated in a chair or lying down on your back, use your unaffected arm to support the affected arm.
Wall slides: To move the body forward and climb or even “walk” the wall, use your fingers.
- Passive Shoulder Flexion
The therapist should then hold the arm at both the wrist and elbow. Next, move it upward and straight ahead toward the side of the ear. Return to the embarking position after that. Perform ten rounds in a session. Work out three times a day.
- Passive Shoulder Extension
First, instruct the patient to lie down in a comfortable posture (such as a supine position), with their palm facing up. Next, grasp the arm at both the wrist and elbow. Ten times during a session, do it. Work out three times a day.
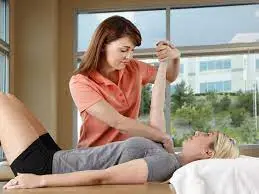
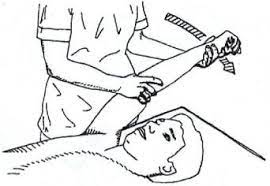
- Passive Shoulder External Rotation
The therapist should then gently move the arm to the side, level with the shoulder. The arm should be held at the elbow and wrist while bent, and it should be rolled forward toward the bedside. Raise the shoulder gently. Perform ten rounds in a session. Work out three times a day.
- Passive Shoulder Internal Rotation
Subsequently, the therapist ought to rotate the arm to the side at shoulder height. In one session, perform ten repetitions. Work out three times a day.
- Passive Horizontal Abduction
Ten times during the session, repeat this exercise. Work out three times a day.
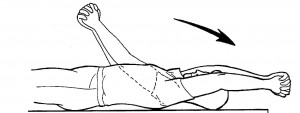
- Passive Shoulder Abduction
Ask the patient to lie down in a comfortable posture, such as supine, to begin. A physical therapist should then grip an arm at the wrist and elbow. The medical professional then moves it away from the midline of the body and makes an attempt to contact the ear. Return to the starting position after that. In one session, perform ten repetitions. Work out for three a day.
Ask the patient to lie down in a comfortable posture, such as supine, to begin. A physical therapist should then grip an arm at the wrist and elbow. The medical professional then moves it away from the midline of the body and makes an attempt to contact the ear. Return to the starting position after that. In one session, perform ten repetitions. Work out three times a day.

- Passive Shoulder Flexion as Well as an Extension With the use of a Pulley and Rope
Tell the patient to get into a comfortable position before starting, such as sitting on the table. The patient should be instructed by the therapist to grip the rope’s two ends in each hand. At the finish, hold for two to three seconds, then gradually let the affected arm descend. Ten times throughout each session, repeat this action with both the damaged and uninjured hands. Work out three times a day.
- Adduction and Abduction of the Shoulders Passively Using Rope and Pulley
The therapist should first instruct the patient to settle into a comfortable position, like sitting at a table. Next, fasten the pulley to a hook above or above a door. Next, let the damaged arm raise by using the healthy arm to pull the rope down and up. At the finish line, hold for the following two to three seconds before lowering the wounded arm gradually. In a single session, perform this motion or activity ten times using both affected and unaffected hands. Perform this drill thrice daily.
Active-Assisted Shoulder Range of Motion Exercise
As the name suggests, the primary source of assistance for these exercises is either the patient or a physical therapist, either partially or completely. The patient performs the majority of the movement, but little help is provided to ensure that the shoulder movement is performed appropriately. Most often, weakness or even pain from bumps, bruises, or accidents, up to major injuries, is the reason for this limited shoulder motion. Before assisting with movement, a therapist typically secures the shoulder joint with a band or strap. When doing these exercises, a patient may initially experience severe pain and weakness, but with time, there is a good chance that their range of motion around the shoulder joint will gradually and permanently improve.
A Few Advantages of the Active-Assisted Range of Motion Exercise for the Shoulders
- Increase the shoulder joint’s range of motion.
- Enhance the effectiveness of motion.
- Increase independence.
- Reduce the soreness in your shoulders.
Active-Assisted Range of Motion Exercises:
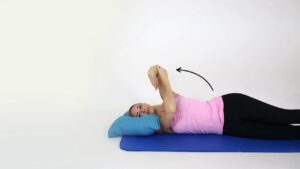
- Supine Active-Assisted Arm Elevation
Start by lying on your back. The wounded arm should then be raised upward, almost like you would bring an arm aloft, utilizing the strength of the uninjured arm, and then carefully lowered back to the bed. Ten times during a session, do it. Work out twice a day.
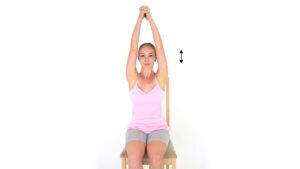
- Supine Active-Assisted Forward Flexion
Tell the patient to lie on his or her back first. Next, with the damaged arm supported by the uninjured arm, elevate the injured arm up and then back down as though reaching aloft while holding the stick with both hands about shoulder-width apart. Every repeat, hold for ten seconds. Perform three sessions a day, with ten repetitions for each session.
- Behind The Back Active-Assisted Internal Rotation
Initially, assume a sitting or standing position, and place the damaged arm’s hand behind your back near your waist. Help the damaged hand go closer to the shoulder blade by using the therapist’s healthy hand. The patient follows the therapist’s instructions to raise their hand, but if they are unable to do so, the therapist helps them to reach their full range. Ten more seconds of holding, then let go. Ten times during a session, do it. Work out twice a day.
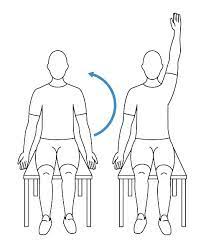
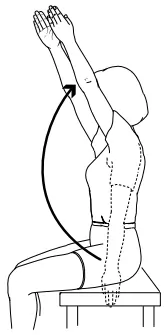
- Active-Assisted Forward Elevation (Either in a Seated or Supine Position): (upper arm rise)
The patient has the option to sit or stand throughout this stage. If lying on the back is more comfortable, start there and work your way up to standing or even sitting until the patient reaches their maximum range of motion. Look straight ahead while maintaining an erect posture and standing up straight. In the beginning, the healthy hand is used to aid with both the ascent and descent throughout this length, in addition to the injured arm. The patient can raise and lower their arm on their own as they gain strength. Lifting the wounded arm to the point of pain or as high as feasible is the best course of action.
- Active-Assisted Shoulder Extension and Flexion Using a Pulley and Rope
First, instruct the patient to settle into a comfortable position, like sitting at a table. The pulley can then be fastened to a hook above or above a door. Using both hands, grasp the rope’s two ends. At the finish line, hold for five seconds before lowering the wounded arm gradually. Ten times during a single session, repeat this motion with both affected and unaffected hands. Perform this drill three times in a single day.
- Active-Assisted Abduction of the Shoulder and Adduction Using a Pulley and Rope
The therapist should first instruct the patient to settle into a comfortable position, such as sitting at a table. Ten times throughout each session, repeat this gesture or action with both damaged and uninjured hands. Perform this three times a day.
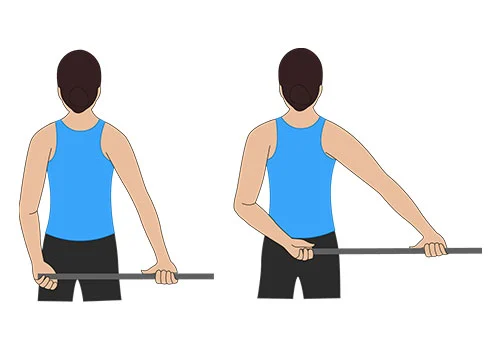
- Exercise Using a Stick to Actively Assist Shoulder Extension and Flexion Range of Motion
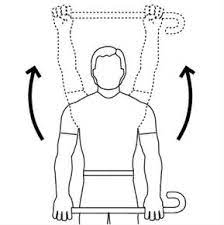
First, instruct the patient to assume a comfortable position, such as a supine position or a sitting position with a supported back. The patient should then be instructed by the therapist to move their shoulder upward, or to the side of their ears, using a healthy hand while holding the two ends of the stick in both hands. Perform this exercise ten times in a session, three times a day.
- Active-Assisted Shoulder Abduction and Adduction Range of Motion Exercise With The Use of a Stick
First, instruct the patient to assume a relaxed position, such as sitting with their back supported or lying supine. The patient should then be instructed by a physical therapist to hold the two ends of a stick in both their affected and unaffected hands. The uninjured hand should be used to move the shoulder upward by moving it side to side, but the injured hand must be worked during this movement. If the injured hand is not working, the uninjured hand should work, i.e., towards the side of the ear. Ten times during a session, do it. Work out three times a day.
- Exercise for Active-Assisted Shoulder Internal Rotation Range of Motion Using the Stick
Initially, instruct the patient to assume a comfortable posture, such as sitting with their back unsupported and their elbows 90 degrees bent. The patient should then be instructed by the physical therapist to hold the two ends of the stick in both their injured and uninjured hands. The affected hand must be worked while performing the internal rotation movement; if the affected hand is not functional, the healthy hand should function. Perform this drill ten times in a single session. Work out three times a day.
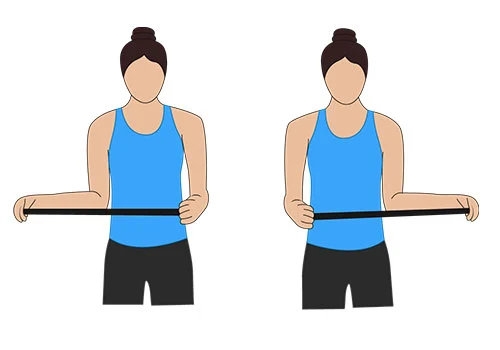
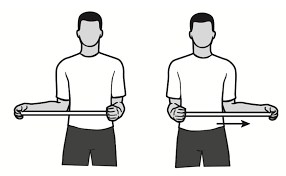
- Active-Assisted Shoulder External Rotation Range of Motion Exercise With the Use of the Stick
The patient should then be instructed to hold the two ends of a stick in both hands by the therapist. The unaffected hand should be used to move the shoulder outward, but the injured hand must be used to perform the external rotation motion; if the injured hand is not functional, the good hand should function. Ten times during a session, do it. Work out three times a day.
- Active-Assisted Shoulder Flexion and Extension Range of Motion Exercise With the Use of The ladder
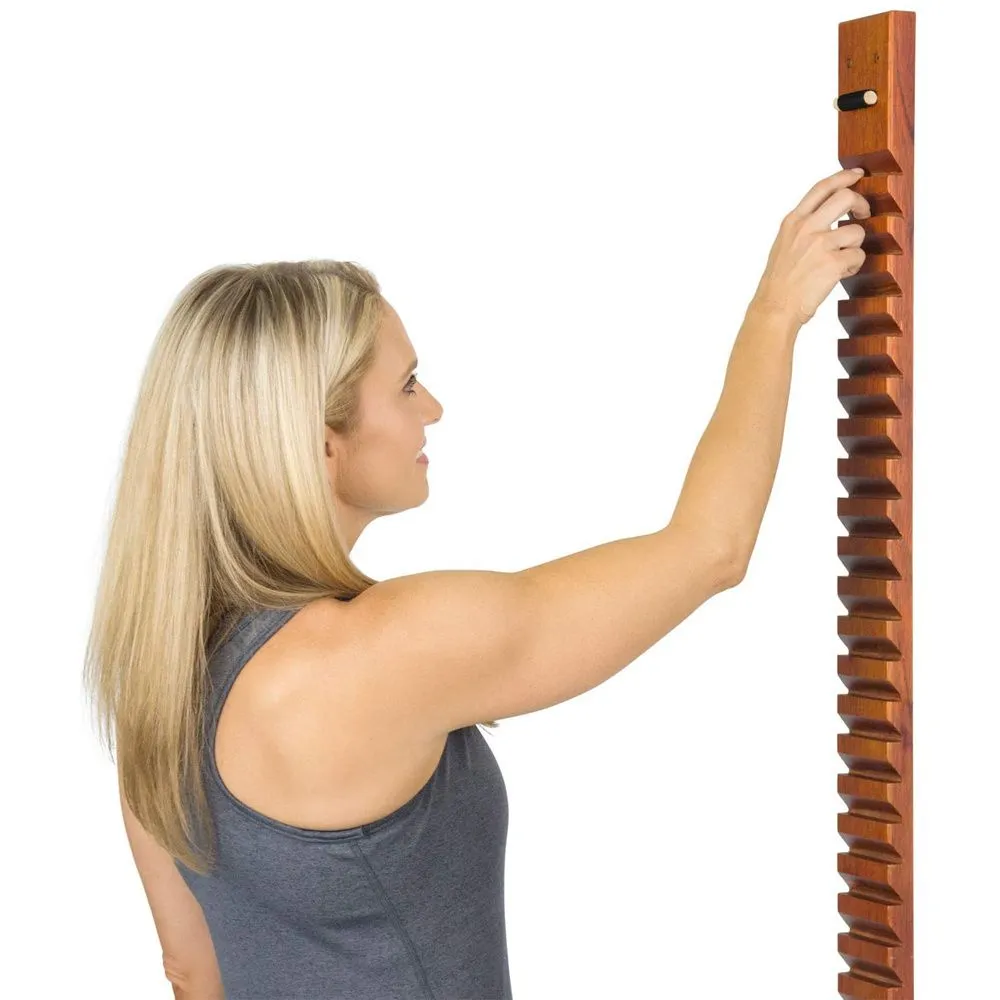
Instruct the patient to take a position in front of the finger ladder before proceeding. Subsequently, set the affected hand on the finger ladder, raise the fingers by increasing the ladder’s steps as much as you can, flex your shoulder, and return to the neutral position. Ten times during a session, do it. Work out three times a day.
- Active-Assisted Shoulder Abduction and Adduction Range of Motion Exercise With the Use of the Ladder
First, have the patient stand ninety degrees away from the finger ladder with the injured side facing the ladder. Subsequently, elevate an injured hand on the finger ladder, move the fingers upward on the ladder (i.e., maximize the ladder’s steps), and do shoulder abduction before returning to the initial position. Ten times in a single session, do it. Work out three times a day.
Active Shoulder Range of Motion Exercises:
The Active Range of Motion Exercise has a few objectives.
- Increase your strength
- Maintain or improve endurance
- Promote circulation
- Maintain or extend range of motion (ROM)
Precautions or Even Patient Education:
- The elbow joint has no active range of motion (AROM).
- No excessive shoulder stretching or range of motion for external rotation
- Using the sling to reduce the amount of biceps activity
- No object lifting using the working shoulder
- Make sure incisions are dry and clean.
Active Range of Motion Exercises
- Active Circles
First, instruct the patient to lean forward in order to disengage their arm from their body. Following that, the patient should be instructed by the therapist to spin their arm ten times in a clockwise direction and ten times in an anti-clockwise direction during each session. Work out three times a day.
- Active Shoulder Shaping Up and Down and Clapping
First, instruct the patient to get into a comfortable position, such as standing. Subsequently, the patient should be instructed by the therapist to raise their arm above their head and forward. Try raising it then such that the inner arm makes contact with the ear and gives a clap. Raise an arm back up and away. Return it as far behind the body as you can. Ten times during the session, repeat this exercise. Work out three times a day.
- Moving your shoulders actively and clapping from side to side
Initially, the patient should be instructed by the therapist to assume a comfortable position, such as sitting or standing. Following that, the patient should clap and extend their arm as high over their head as they can. Put the arm back on the side. Ten times during a session, do it. Work out three times a day.
- Active Shoulder Rotation
Starting out, the patient should be given an order by the therapist to raise both shoulders toward the ears, mimicking a shrug. Release the shoulders and lower them to the embarking position. Retract your shoulders. Next, let them relax once again. Make a smooth circle motion with the shoulders. Next, roll your shoulders in the opposite direction in a smooth circle. Perform ten rounds in a session. Work out three times a day.
- Active Shoulder Flexion
Initially, the patient should be instructed by the physical therapist to sit or lie down in a comfortable position for shoulder flexion exercises. The therapist should next instruct the patient to slowly raise their hand toward the ceiling while keeping their elbow straight, starting with the arm by the affected side. Next, carefully lower the arm by its side while maintaining a straight elbow. Ten times during the session, repeat this exercise. Work out three times a day.
- Active Shoulder Extension
For the first shoulder extension exercise, the therapist should instruct the patient to lie down comfortably or sit with their hand flexed. The physician should next instruct the patient to carefully bring their hand toward the ground while keeping their elbow straight, starting with the arm by the damaged side. Work out three times a day.
- Active Shoulder Abduction

Before beginning shoulder abduction exercises, the therapist should instruct the patient to find a comfortable position, such as sitting, side lying down, or supine. The physical therapist should next give the patient instructions to begin this exercise with their arm by the damaged side. They should be instructed to slowly lift their hand and move it toward the ceiling while keeping their elbow straight. Next, carefully lower one arm back down by its side while maintaining a straight elbow. Work out three times a day.
- Active Horizontal Adduction(transverse flexion)
Next, give the patient instructions on how to move their humerus in a transverse or horizontal plane, both toward and across their chest. Ten times during a session, do it. Work out three times a day.
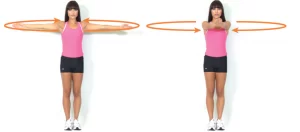
- Active Horizontal Abduction(transverse extension)
The patient should next be instructed by the therapist to move the humerus in a horizontal or transverse plane, sometimes known as horizontal abduction.
- Active Shoulder Internal Rotation
Initially, the therapist directs the patient to lie down or stand in a posture that is comfortable for them. Subsequently, the therapist should direct the patient to elevate their arm to shoulder height at a 90º angle to their body. They should then twist their hand inward when standing or upward when lying down until their elbow is parallel to their hand. Next, turn the hand slowly to the embarking position. Ten times during a session, do it. Work out three times a day.
- Active Shoulder External Rotation
First, the patient should be instructed by the physical therapist to lie down or stand in a comfortable position. The doctor should then direct the patient to lift their arm to shoulder height at a 90º angle to their body. If the patient is supine, they should twist their hand downward until it is even with their elbow. Allow the hand to rotate slowly to the embarking position after that. Ten times in a single session, do it. Work out three times a day.
- Diagonal Active Abduction
Tell the patient to stand correctly first. Proceed to move the humerus along the diagonal plane, which is at an angle with respect to the midline of the body. Ten times during a session, do it. Work out three times a day.
- Diagonal Active Adduction
Initially, the patient should be instructed by the therapist to move their humerus in a diagonal plane towards the body’s midline. Ten times in a single session, do it. Work out three times a day.
- Finger Walk
One type of active-assisted exercise that the patient should perform with the aid of the wall is this one. First, the patient who is facing the wall three-quarters of an arm’s length away should receive instruction from the therapist. Subsequently, extend your arm and use your fingertips to make contact with the wall at waist height. Once the patient has raised his or her arm as far as is comfortable, carefully walk the fingers up the wall in a spider-like motion with the elbow slightly bent. Lower the arm slowly, using the healthy arm to help if needed. Ten times in a single session, do it. Work out three times a day.
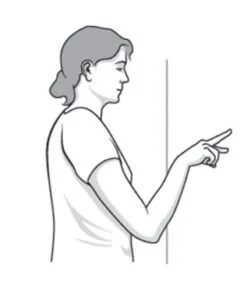
- Exercises to Flexion and Extension the Pendular Shoulders
First, instruct the patient to stand with their wounded arm hanging down to the side and to slant slightly at the waist. As pain permits, begin by bending over as little as possible. As comfort and pain permit, gradually bend over more to get greater movement. Next, make little circles with the body by swinging it back and forth with the weight of an arm and gravity. Arm movements: forward, backward. Perform ten rounds in a session. Work out three times a day.
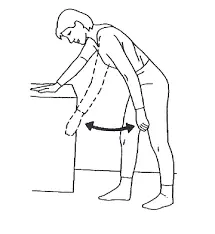
- Adduction Exercises with Pendular Shoulder Abduction
To begin, instruct the patient to stand up, bend slightly at the waist, and hang their affected arm to the side. As pain permits, start by bending slightly over, and as comfort and discomfort permit, gradually bend even more to obtain more range of motion. Next, move your body in small circles by swinging it back and forth with the weight of an arm and gravity. Arm movement: side to side. In one session, perform ten repetitions. Work out three times a day.
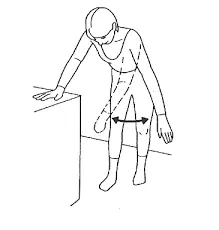
- Pendular Shoulder Rotation Exercises

First, instruct the patient to stand with their arm hanging down at the side and to slant their body slightly at the waist. As soon as pain permits, begin by bending over as much as possible. As comfort and discomfort permit, gradually bend over more to obtain more movement. Turn and counterturn the arm. Perform ten rounds in a session. Work out three times a day.
FAQs
What is the shoulder’s functional range of motion?
A person needs about 120° of forward elevation, 45° of extension, 130° of abduction, 115° of cross-body adduction, 60° of external rotation, and 100° of internal rotation to successfully do the activities of daily living.
What kind of exercise makes your shoulders stronger?
It can be done standing with a barbell or dumbbells or seated with a pair of dumbbells. To work on any weaknesses in your muscles, use the dumbbells if you see any imbalances.
What’s the name of the shoulder joint?
The glenohumeral joint, commonly referred to as the shoulder joint, is a ball and socket joint that has the largest range of motion in the human body.
What causes a limited range of motion in the shoulder?
Your shoulder’s range of motion may be restricted by an injury to any area of the shoulder or by a chronic illness that results in shoulder degeneration. Shoulder arthritis is one condition that may make it more difficult for you to move your shoulder.
How do I get more range in my shoulders?
Internal Rotation: Turn your arms down so that your palms are in contact with the wall, as opposed to up. Shoulders coming forward or arms falling are used to accomplish this.
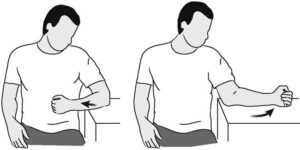
What shoulder rotation exercise is there?
Rotation of the Shoulders Supported (Assisted)
Maintain a stationary elbow and a downward, unified shoulder blade position. Move your forearm in the indicated direction. Alternatively, you can use a cane or stick to help extend your arm during this exercise while maintaining your elbow at your side. Ten repetitions are required for each session.
How do you work on the range of motion in your shoulders?
Flexion forward while standing
Raise the arm while maintaining a straight elbow. Perform ten iterations at 90 degrees.
Which five shoulder motions are there?
This mobility in the upper extremities allows for large ranges of motion, such as flexion, extension, internal and external rotation, and 360° circumduction in the sagittal plane. The shoulder also permits scapular depression, elevation, retraction, and protraction.
Which range of shoulder ROM is normal?
Shoulder flexion ranges normally from 180 degrees. To do this, raise your arms as high over your head as possible, starting with your palms against the side of your body.
How can the shoulder range of motion be restored?
Maintaining proper posture while sitting up straight and placing your hand on a table towel with your thumb pointing upward. Gently extend your hand sideways as far as it is comfortable to do so. Return to your starting place cautiously and slowly.
How can I extend the range of motion in my joints?
Strengthening exercises are frequently recommended in addition to or soon after the range of motion exercises since greater joint movement without corresponding strength increases run the risk of re-injury.
What is the shoulder joint’s range of motion?
A 180-degree range of motion is typical. This motion is also somewhat assisted by the brachial muscles. Extension: Bringing the upper limb posterior in the sagittal plane is its definition.
What is shoulder range of motion exercise?
Exercises for Shoulder Range of Motion (ROM)
You can move the injured joint in all directions that it should be able to move with the use of shoulder range of motion exercises. These are active exercises because you perform them on your own, without assistance from others, using your own muscle strength and force. This enhances the general strength and functionality of the muscles surrounding your shoulder.
References
- Prajapati, N. (2022, May 12). Shoulder Range of motion exercise: Types, How to do? – Samarpan Physio. Samarpan Physiotherapy Clinic. https://samarpanphysioclinic.com/shoulder-range-of-motion-exercise/