Shoulder Flexion
What is shoulder flexion?
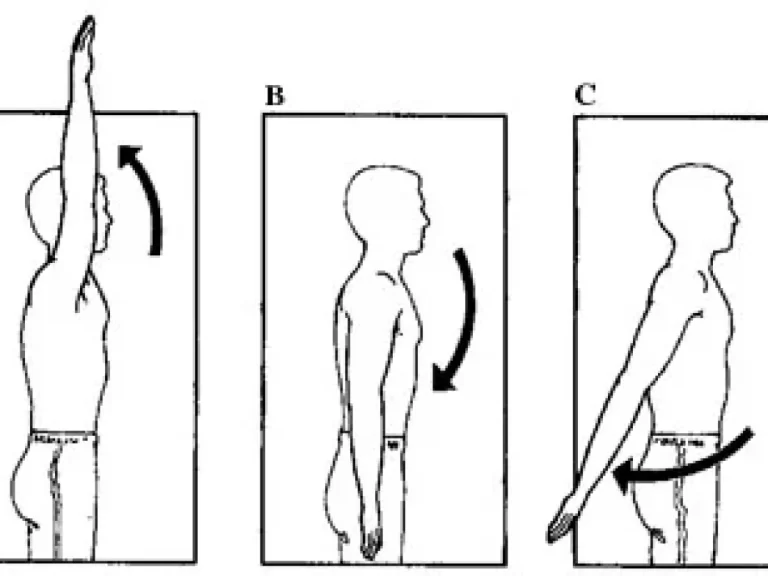
Shoulder flexion refers to the movement of raising the arm forward and upward, involving the motion of the arm towards the front of the body. This movement is fundamental in many daily activities, such as reaching overhead or lifting objects.
Shoulder flexion refers to the movement of raising the arm forward and upward, involving the motion of the arm towards the front of the body. This movement is fundamental in many daily activities, such as reaching overhead or lifting objects.
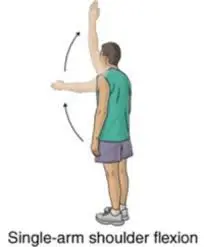
You probably move like this throughout the day without even noticing. Reaching from shelf to jar is one method to illustrate shoulder flexion. Additionally, most games that use the upper body require this action anytime a volleyball player passes or makes a forward hit. They stretch their shoulders when shooting three-pointers. Shoulder flexor stretches Stretching can help prevent injuries and improve flexibility.
After every workout, finish with these shoulder stretches, which include shoulder flexion exercises.
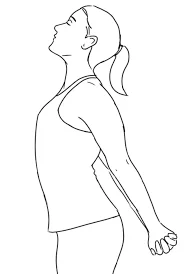
- Chest stretch with hands behind the back
Your pectoral and shoulder muscles will feel the effects of this easy-to-do yet powerful stretch.
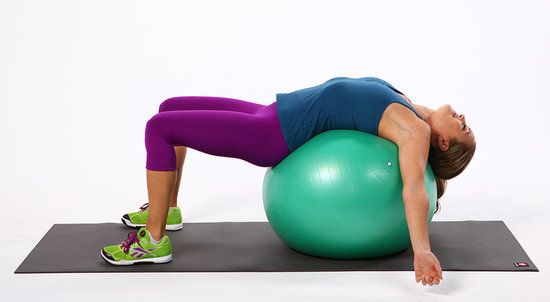
palms up tightly interlocked hands behind your back. Lower your hands and firmly compress your shoulder blades. Stretch your arms, look up, pull your hands to the floor, and raise your chest to the ceiling. Ten to twenty seconds of holding, then release. - Chest stretch with a stability ball
Once you are sitting on the ball, carefully extend your feet so that your back is supported completely as you lie down. If you require help with balance, lean against a wall for stability. While you rest your head and hips back on the ball, let your arms gradually drop to the ground. Feel your core and chest being stretched deeply.
What muscles are used in shoulder flexion?
The primary shoulder flexors are the pectoralis major, coracobrachialis, and anterior deltoid. Although not as much, the biceps brachii also help with this movement.
What is the shoulder flexion range of motion?
The shoulder can move 180 degrees normally. Keep your hands at your sides, and raise your arms as high over your head as possible.
Benefits of Shoulder flexion training
- Shoulder pain relief: Building strength in the shoulder-supporting muscles might aid in the reduction of shoulder discomfort.
- You may increase your shoulder joint’s range of motion by performing shoulder flexion exercises.
- strengthens the shoulder muscles.
- Shoulder flexion exercises are a good way to improve the flexibility of your shoulders.
- shoulder size and tone are increased by exercising the deltoid muscles.
- Your shoulder joint must be able to move freely throughout this exercise, which improves mobility.
- Better lifting technique: You may enhance your lifting technique using flexion exercises.
- Several upper-body muscular groups are worked during this exercise.
- contributes to keeping upper limb strength.
- encourages the shoulder joint’s stability and mobility.
- facilitates upper limb motions.
Exercises for Shoulder Flexion
Exercise with a weight.
- When you stand, shift your weight to the injured shoulder. Raise your arms as high as over your head as possible without experiencing pain, while maintaining a straight arm position. Wait for your doctor’s order before raising your arms over your head. Keep it from lifting off your shoulder. Hold this posture for the duration specified. Return to the starting position slowly.
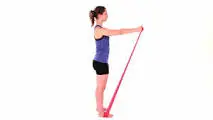
Shoulder Flexion Exercise using a resistance band.
- To flex your shoulder, wrap the training strap over a stable, heavy item close to your leg. Grasp the strap with the hand on your affected shoulder. Maintain a straight-arm posture. As far as you can without experiencing discomfort, slowly draw the strap up and over your head. Keep your shoulder from raising it. For the selected amount of time, maintain this position. Return to the initial position gradually.
What is the proper way to bend?
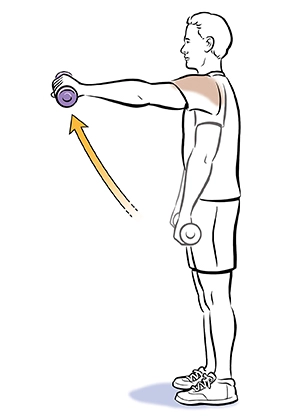
Shoulder flexion Curl up Exercise with dumbbells
- To increase shoulder flexion, begin with three to four sets of ten to twelve repetitions. Before going on to higher weights, select sets and repetitions that allow you to keep flawless form.
- Holding the bar, go back to where you were. Allow your feet to remain shoulder-width apart, and flex your knees gradually. The ideal posture is tall and upright, with shoulders above the hip joint. Maintaining the head and neck in a neutral position is crucial.
- Your chin should be held behind your chin the entire time, much like you would if you were having an egg. To maintain balance, maintain both feet flat on the ground and equally distribute your weight between them. Grip the dumbbells in front of your body with your hands facing your feet. Your elbows should be slightly bent in both of your arms.
- When you contract your core, tense your shoulders and hips. This is where you have to start each repeat. slowly raising your arms off of your body. Raise your arms so that your elbows are either slightly below or in line with your shoulder joints. Allow the shoulder joints to move naturally.
- Palms should face the earth at the top of the movement. Lower the dumbbells once you’ve held them for a little while. Extend your arms slowly to bring the dumbbells back to the starting position.
Shoulder Flexion Exercise With Barbell
- This variation requires using a bar rather than a pair of dumbbells; it requires a shorter movement than the barbell exercise and equally distributes the weight.
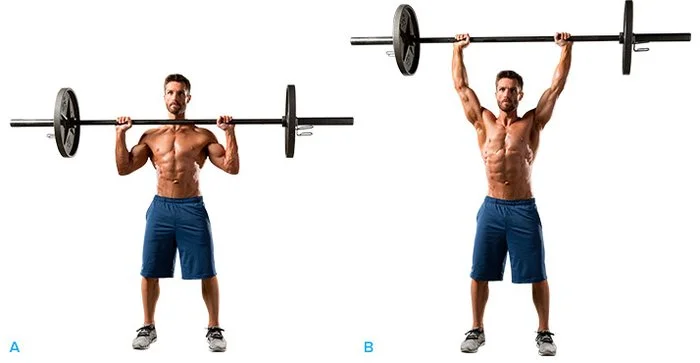
How to do it?
- Grasp the bar and stand up straight. Allow your feet to remain shoulder-width apart, and flex your knees gradually. Standing tall and erect with shoulders above hip level is the ideal posture.
- A neutral position for the head and neck is required. Keep your chin tucked in as though you were cradling an egg beneath you for the duration of the exercise. Keep both feet on the ground and evenly distribute your weight across them to maintain balance.
- Keeping your palms towards your feet, hold the bar in front of you. With elbows slightly bent, maintain a straight arm position.
- Gradually lift your arms above your head and out from your body. Raise your arms such that your elbows are either slightly below or in line with your shoulder joints.
- Allow the shoulder joints to move naturally. Palms should face the earth at the top of the movement. After holding it for a short while, lower the bar. Lower your arms gradually to bring the bar back to its starting position.
Shoulder Flexion Exercise With Weight Plate
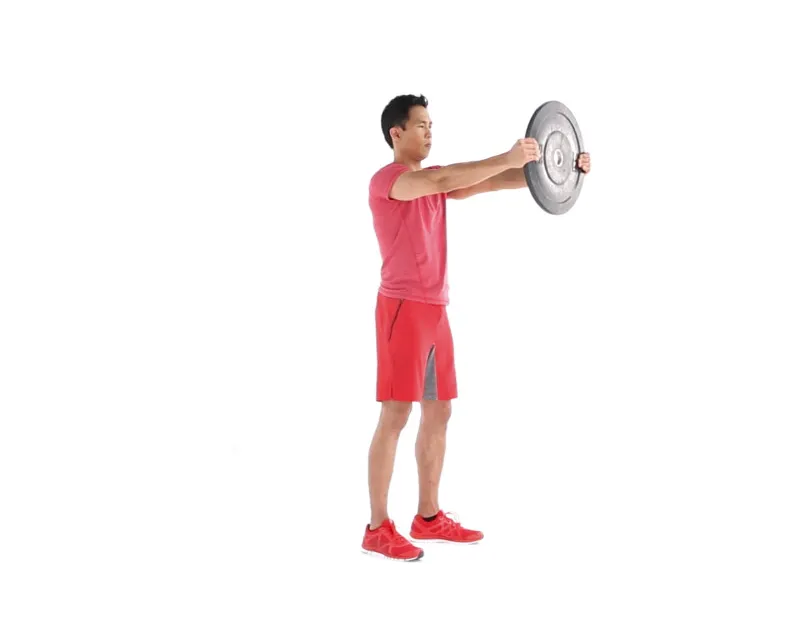
- Placing both hands on a weight plate. Hold the plate with an inside grip while extending your arms forward and keeping your feet hip-width apart. Raise the plate gradually overhead until your biceps touch your ears, maintaining straight arms and relaxed elbows.
- Hold the weight plate for a little while, then carefully move it back to its starting position.
Shoulder Flexion Exercise With Kettle
How to do it?
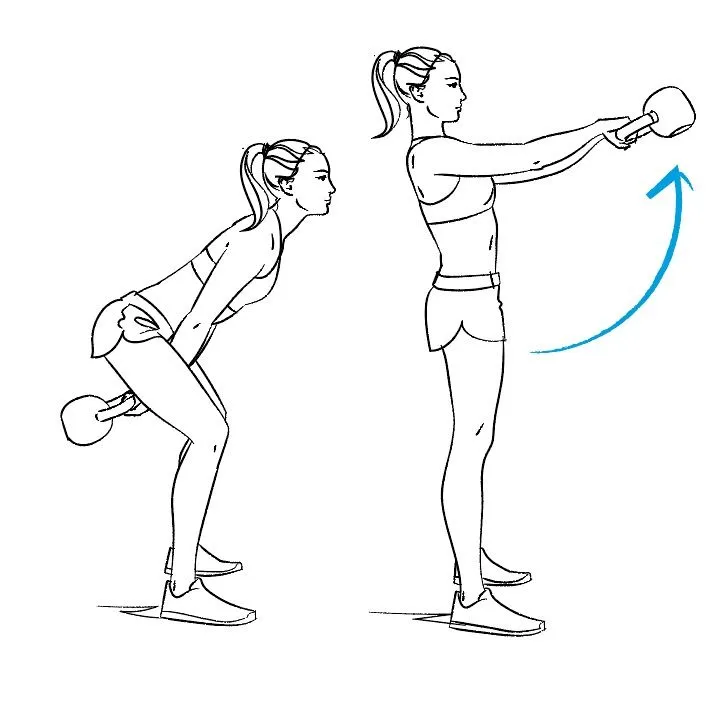
- Stand Tall, erect, with shoulders above the hip joint, is the ideal posture. To maintain balance, maintain both feet flat on the ground and equally distribute your weight between them. Step your feet shoulder-width apart and gently bend your knees.
- The head and neck should be held in a neutral posture at all times. Using both hands, grab the kettlebell. Your palms should be towards your feet while you hold the kettlebell in front of your body.
- Slowly raise your arms out from your body and towards the ceiling. Elevate your arms until your elbows align with your shoulder joints or a little below them. Allow your shoulders to naturally move into your shoulder joint.
- As you reach the peak of the action, your palms should be facing the earth. Remove the kettle by pressing and holding it for a little while. Lower your arms slowly to bring the kettlebell back to its starting position.
Shoulder Flexion Exercise With Cable Machine
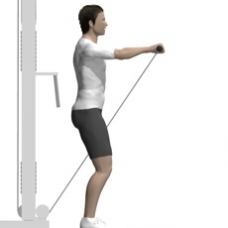
How to do it?
- A rope and pulley are required for this exercise. There should be a straight bar attached to the pulley that fixes the bottom of the cable machine.
- Lean your back on the cable machine while keeping a shoulder-width gap. Then, while holding both ends of the rope in your hands, raise your arms straight in front of you. Raise your hands to the ceiling at shoulder level. then drop your arms to the beginning position, go back to the beginning position, and repeat the action.
Note: You could assume that these variants are all the same. But what makes these variants of this exercise unique is the varying angles at which they engage your pectoral muscles. To build strength, your deltoids are subjected to varying loads throughout each of these workout variants.
Manual Muscle Testing: Shoulder Flexion
Introduction
Muscle/tendon strength (or lack thereof) may be evaluated through the use of Manual Muscle Tests (MMTs). The documentation format is demonstrated to be consistent based on the examiner’s numerical grades. Regular testing and documentation are required to assess the patient’s response to treatments during the rehabilitation process. Examiners can use the baseline measurement obtained from performing MMTs as a reference point if necessary.
It takes precise placement for the muscular motions to perform an MMT. With his accuracy, the tester can identify the exact muscle causing the motions. The examiner can designate suitable treatments to counteract the weakness based on the MMT grade.
Shoulder Flexion Biomechanics:
Osteokinematics:
The range of motion (ROM) for shoulder flexion is normally 0–180° and it happens in the sagittal plane. The osteokinematics of shoulder flexion are associated with the glenohumeral joint, which is situated in the shoulder girdle. The glenohumeral joint is located between the glenoid fossa and the humeral head.
Arthrokinematics:
In summary, the convex humeral head moves the concave glenoid fossa in response to shoulder flexion. Shoulder bending is accomplished by the humeral head rolling posteriorly on a fixed glenoid fossa. Simultaneous with this posterior roll occurs an inferior glide (during the first 60°).
The humeral head’s posterior roll into the glenoid fossa is started by the coracobrachialis muscle. The anterior deltoid, biceps brachii, and coracobrachialis assist the posterior roll from this starting point till the conclusion of the range.
The humeral head’s inferior glide on the glenoid fossa also signals the start of shoulder flexion. The humeral head remains securely in the glenoid fossa when the inferior glide comes to a stop at around 60° of shoulder flexion.
The shoulder flexor muscles must contract concentrically with the other shoulder girdle muscles to achieve a full range of motion.
Grading MMT:
Purpose:
The patient’s strength is taken into consideration when the examiner assigns an MMT grade. Using numerical ratings, examiners indicate whether a patient can actively resist gravity (fair 3 and up), resist external pressure (fair 3+ and higher), or move through a range of motion (fair 3 and below). A reliable way to assess whether a patient is improving, declining, or staying the same is by numerical grades.
Break Test:
If the patient is capable of actively resisting gravity, the examiner will gradually apply pressure in a direction perpendicular to the testing posture. The muscle is deemed breakable if the patient is unable to maintain the initial testing posture or exhibits any unfavorable signs or symptoms in response to the applied pressure. Ideally, the tester should not move the patient from the testing posture. If the tester is unable to break the patient’s muscles, then their strength is considered normal (5/5).
Grading:
Normal(5): The examiner demonstrates the ability to sustain the test posture under extreme pressure and to apply over 95% of their effort. Examiners are not allowed to “break” the test position.
Good (4+): Can hold the test position and tolerate moderate to high pressure until the muscles give out; the examiner puts in 75–95% of their effort.
Good (4): Able to maintain test posture and withstand mild pressure till muscular breakdown; examiner exerts 50–74% of their effort.
Good (4-): Capable of withstanding mild to moderate pressure and resisting gravity till muscle failure; examiner puts in 25–49% effort.
Fair (3+): Capable of defying gravity and withstanding light pressure till muscular exhaustion; examiner exerts 1-24% effort.
Fair (3): Capable of withstanding gravity without the need for further force.
Fair (3-): The patient progressively loses the test position as they are unable to resist gravity.
Poor (2+): Attempting to maintain a *gravity eliminated (GE) posture, the individual can only complete a partial range of motion (ROM) against gravity and can only move through full ROM with resistance at the end range.
poor (2): Unable to defy gravity while maintaining full range of motion in a GE posture,
Inadequate (2-): Capable of moving across a portion of the range in a GE stance, but unable to maintain an agape attitude.
Trace (1): The examiner can palpate a contraction of the muscle or tendon; no obvious osteokinematic movement.
Zero (0): There is no perceptible muscle or tendon contraction or discernible osteokinematic movement.
- Gravity Eliminated, or GE: The patient is positioned such that there is no need to activate muscles to defy gravity Usually, this location is found in the horizontal plane.
Coracobrachialis:
Actions: To flex and abduct the shoulder, the coracobrachialis muscle contracts concentrically.
Innervation: Musculocutaneous Nerve
Signs of weakness: entire elbow flexion, entire forearm supination, and synchronous shoulder flexion are indicators of weakness.
Patient Position:
- Sitting or Supine
Position of the Therapist:
- Standing on the side of the shoulder being examined
Stabilizing hand: Stabilisation is not necessary if the trunk is stable. However, stabilize the contralateral shoulder if the trunk does not return to its initial testing posture.
Hand movement: The humerus’s distal anteromedial surface.
Force direction: perpendicular to the movements of the muscles. shoulder adduction and extension are used in a diagonal sweeping motion.
How to perform the MMT:
- The examiner asks the patient to lie on the table in a *hook-lying posture.
- The examiner passively places the affected shoulder in flexion and modest external rotation, the elbow in full flexion, and the forearm in full supination to minimize the assistance of the biceps brachii.
- To confirm that the patient has achieved a full range of motion, the examiner next asks them to complete the tasks on their own.
- The examiner places the patient back in the initial test posture and gradually applies resistance on the anteromedial surface of the distal humerus in the direction of shoulder extension and mild abduction if the patient reports no discomfort.
- Every attempt is made by the patient to endure the strain caused by the external shoulder flexion and adduction (muscle motions).
- Pressure is applied gradually until there is a “break” in position or the examiner feels the test is finished.
Hook-lying: The patient is in the hook-lying position, supine on the table with their knees bent.
Anterior Deltoid:
Actions: The anterior fibers of the deltoid muscle contract concentrically to flex and rotate the shoulder internally.
Innervation: Axillary nerve
Signs of weakness: The patient may have weak anterior deltoid fibers if they have difficulty internally rotating and flexing their shoulders.
Patient Position:
- The patient’s position is comfortable sitting with feet flat on the floor.
Therapist Position:
- The therapist takes a position behind the patient. Place a mirror in front of the patient and see how they respond.
Stabilizing hand: Surfaces of the shoulder and scapula, superior and posterior.
Manipulating hand: The humerus’ distal anteromedial surface.
The direction of Force Action: perpendicular to the direction of shoulder extension muscle contractions.
How to perform the MMT:
- Sitting with their feet flat on the floor, the patient is comfortable.
- The shoulder is passively positioned by the examiner in its original alignment, which is about 80 degrees of abduction, slight flexion, and little lateral rotation. Then, the patient is passively guided through the muscle motions by the examiner.
- The patient is asked to actively execute the action to ensure they have the proper range of motion.
- When the active range of motion is pain-free, the hands that stabilize and manipulate come next. It is requested of the patient to maintain that posture and oppose the outside force.
- The examiner pulls the patient into shoulder adduction and extension, gradually applying perpendicular force to their posture.
- Gradual pressure is given until there is a “break” in position or the examiner determines the test is finished.
Biceps Brachii:
Actions: There are two heads to the bicep muscle—the long and the short. Shoulder abduction is facilitated by the bicep brachii’s short head. Shoulder flexion and abduction are made easier by the long head of the bicep brachii. The short and long heads of the biceps brachii flex and supinate the elbow together at their insertion
Innervation: musculocutaneous nerve
Signs of weakness: If the patient cannot flex his or her elbow, there is weakness in the bicep brachii muscle. Since it will have a significant influence on their everyday activities, this will probably be their top concern.
Position of the Patient:
- Supine; lying on a hook.
The position of the Therapist
- ipsilateral side of the arm being assessed when standing
Stabilization hand: The distal posterior humerus is located just anterior to the olecranon; make sure it is loose and packed by using a towel.
Manipulating hand: The distal palmer, or anterior, surface of the forearm is situated immediately proximal to the wrist joint line.
Direction of Force: perpendicular to the direction of elbow extension muscle contractions.
How to perform the MMT:
- The patient is placed on a hook lying position on the table, with a towel placed beneath the patient’s distal posterior humerus.
- The patient is then moved passively by the examiner in the flexion and extension of the elbow while keeping the forearm fully supinated.
- To confirm the active range of motion, the patient is then asked to repeat the motion.
- As the stabilizing and manipulating hands are placed, the patient is brought back to the first test position if there is no discomfort.
- The next task given to the patient is to hold still and oppose the outside force.
- The patient is pulled into elbow extension by the examiner using gentle force.
- Pressure is applied gradually until there is a “break” in position or the examiner feels the test is finished.
FAQs
How do you assess shoulder flexion?
The examiner asks the patient to lie on the table in the *hook-lying position. The examiner gently moves the affected shoulder into flexion and minimal external rotation completely flexes the elbow, and fully supinates the forearm.
What is flexion movement?
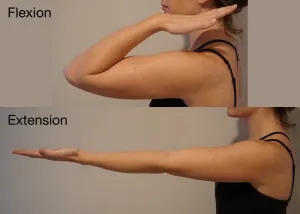
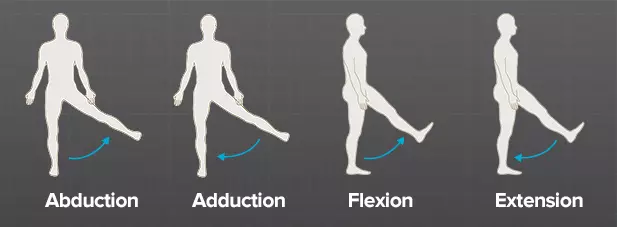
A movement known as flexion results in a reduction in the angle between a joint’s bones.
What is the functional limit of shoulder flexion?
To do ADL activities, they found that healthy persons need to flex their shoulders forward around 120 degrees, extend their shoulders 45 degrees, and abduct their shoulders 130 degrees.
which nerve does the shoulder flex?
The axillary nerve runs from your neck to your shoulder. It makes your shoulder and the back of your upper arms move and feel. If there is an injury to this nerve, you might not be able to rotate or elevate your arm.
What causes poor shoulder flexion?
Shoulder arthritis is one of the conditions that might result in difficulty moving your shoulder. arthritis in the shoulders. tears to the rotator cuff.
References:
- Patel, D. (2023, June 17). Shoulder Flexion & Extension – Range of motion, muscle, exercise. Samarpan Physiotherapy Clinic. https://samarpanphysioclinic.com/shoulder-flexion-extension/
- Physiopedia – Manual Muscle Testing – Shoulder Flexion – https://www.physio-pedia.com/Manual_Muscle_Testing:_Shoulder_Flexion
- Shoulder Flexion (Strength). (n.d.). Saint Luke’s Health System. https://www.saintlukeskc.org/health-library/shoulder-flexion-strength
- Shoulder Flexion Exercise With Weight Plate – Google Search. (n.d.). https://www.google.com/search?q=Shoulder+Flexion+Exercise+With+Weight+Plate&sca_esv=029398843723f323&sca_upv=1&rlz=1C1RXQR_enIN1074IN1074&hl=en&biw=1366&bih=641&sxsrf=ADLYWILg8k56sCvDamCkrnmAxKKpJZ6Vvw%3A1727678477349&ei=DUj6Zo35FMGcseMPz_yRUQ&ved=0ahUKEwjNs7bvh-qIAxVBTmwGHU9-JAoQ4dUDCA8&uact=5&oq=Shoulder+Flexion+Exercise+With+Weight+Plate&gs_lp=Egxnd3Mtd2l6LXNlcnAiK1Nob3VsZGVyIEZsZXhpb24gRXhlcmNpc2UgV2l0aCBXZWlnaHQgUGxhdGUyBRAhGKABMgUQIRigAUiuIFDvDVjvDXABeAGQAQCYAbICoA
- Text – Shoulder Flexion (Strength) – HealthClips Online. (n.d.). https://www.healthclips.com/Asset/View/WN15146/shoulder-flexion-strength


2 Comments