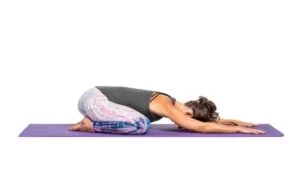
Blog

  • Potts fracture

    Potts fracture

    Introduction

    A Potts fracture refers to a type of ankle fracture that occurs when the fibula, one of the bones in the lower leg, breaks at the ankle joint. It is commonly caused by a sudden twisting motion or impact, often resulting from sports injuries, falls, or accidents. Treatment can range from immobilization and physical therapy to surgical intervention, depending on the severity of the fracture.

    This fracture may also involve ligament damage, making it a complex injury that affects both the stability and function of the ankle. Treatment can range from immobilization and physical therapy to surgical intervention, depending on the severity of the fracture.

    Small fractures surrounding the ankle and foot (e.g., Potts fracture) and straining or rupture of the muscles around the ankle (e.g., calf, peroneal, tibialis anterior) should also be considered when diagnosing ankle pain.

    Mechanism of Injury

    During actions such as landing from a jump (volleyball, basketball) or rolling an ankle, the tibia, fibula, and ankle joint are put under stress. Activities that require a fast change of direction, such as football and rugby, can also result in fractures around the malleoli.

    A Potts fracture is frequently associated with other injuries, such as an inversion injury, ankle dislocation, or other fractures of the foot, ankle, or lower leg. Inversion injuries can cause both disorders, which include intense pain, swelling, and impairment to varied degrees.

    Classification

    They have been characterized in a variety of ways, including the mechanism of damage, joint stability, number of malleoli implicated, and fracture depth.

    Henderson’s Classification

    Types 1–3 are unimalleolar, bimalleolar, and trimalleolar. This does not address fracture patterns, mechanism of damage, or ligamentous injuries.

    Lauge-Hansen’s Classification

    This categorization is based on radiographic, clinical, and experimental data. It includes the following types:

    • Supination-Adduction.
    • Supination-External Rotation: causes rupture of the deltoid ligament, fracture of the posterior malleolus or posterior tibiofibular ligament, anterior tibiofibular ligament disruption, and spiral oblique fracture of the distal fibula.
    • Pronation-Abduction: induces a transverse fracture of the medial malleolus or rupture of the deltoid ligament, rupture of all syndesmotic ligaments or avulsion fracture of their insertions, and a brief, horizontal fracture of the fibula above the syndesmosis.
    • Pronation-External Rotation:- If the stress is applied indefinitely, the posterior tibio-fibular ligament will tear or the postero-lateral section of the tibia may fracture.
    • Pronation-Dorsiflexion.

    Clinical Presentation

    In extreme circumstances, weight bearing may not be possible.

    In addition, disabilities such as flat feet are typical in Potts fracture cases. causing the person to walk in the wrong position and develop a flat foot.

    Differential Diagnosis

    There are several different diseases and injuries that might resemble a Potts Fracture in the absence of an apparent, acute injury.

    • Acute Compartment Syndrome
    • Lateral Ankle Ligament Tear
    • Deep Vein Thrombosis
    • Thrombophlebitis
    • Syndesmotic Disruption
    • Gout
    • Rheumatoid Arthritis
    • Talar Fracture

    Diagnostic Procedures

    Once diagnosed, it is common practice to classify the fracture using either the Lauge-Hansen classification based on the rotational mechanism of injury or the Danis-Weber classification system.

    Treatment

    One of the most crucial aspects of rehabilitation after a Potts fracture is that the patient rests sufficiently from any activity that causes them pain. Activities that put a lot of stress on the ankle, especially heavy weight-bearing activities like sprinting, leaping, standing, or walking, should be avoided.

    For many weeks following surgery, a protective boot, brace, or plaster cast, as well as crutches, are utilized.

    The massage is intended to prevent the production of heterotopic ossification. This is the process by which bone tissue develops outside the skeleton. Electrotherapy, taping and bracing, strength, flexibility, balance exercises, and hydrotherapy may all be used in the treatment.

    Achilles tendon lengthening has been shown to be effective in treating difficult Potts fractures.

    Various types of fixation devices, such as malleolar screws, malleolar tension band wire, fibula plate fixing, and syndesmotic screws, were employed.

    Fixation of Lateral Malleolus: Lag screws alone can be used to repair an oblique fracture that is more than twice the diameter of the bone. Although displacement and shortening may still occur, carriage wires may still be added to the intramedullary device.

    Anterior Malleolus: The front edge of the tibia is rarely fractured in isolation.

    Prognosis

    Patients with the most severe Potts fractures frequently recover completely with adequate treatment. Returning to activities or athletics normally takes a few weeks or months.

    Conclusion

    In conclusion, a Potts fracture is a significant ankle injury that requires prompt and appropriate treatment to ensure proper healing and restore ankle function. With the right care, including immobilization, rehabilitation, or surgery when needed, most individuals can achieve a full recovery and return to their regular activities.

    FAQs

    What signs of a Potts fracture are present?

    Potts fracture patients typically have pain, bruising, and edema when they touch the damaged bone area forcefully.

    What signs of a Potts fracture are present?

    Potts fracture patients typically have pain, bruising, and edema when they touch the damaged bone area forcefully.

    What side effects may a Potts fracture cause?

    A Potts fracture can result in long-term issues like persistent pain, ankle joint instability, and an elevated chance of developing ankle arthritis if it is not treated or is not treated appropriately.

    References

    • Khare, R., Kumar, N., Arora, N., & Khare, K. (1999). POTT’S FRACTURE. Medical Journal Armed Forces India, 55(4), 335–338. https://doi.org/10.1016/s0377-1237(17)30366-0
    • Wikipedia contributors. (2022, September 6). Pott’s fracture. Wikipedia. https://en.wikipedia.org/wiki/Pott%27s_fracture
  • Craniosacral Therapy

    Craniosacral Therapy

    Introduction

    Craniosacral therapy (CST) is a complementary and different medicine that explores gentle touch to detect rhythmic movements in the bones of the head and produce a healing effect. Because of its methods, some have referred to CST as quack medicine and pseudoscience.

    Medical studies have not discovered convincing proof that cranial osteopathy (CST) provides any health benefits. Attempting to reconstruct the bones of the skull is dangerous, especially in infants and young children. The fundamental presumptions of CST are false, and clinicians diagnose patients in ways that contradict and are mutually incompatible.

    Effectiveness and safety

    There is no extra essential training program, no professional organization to manage the treatment, and it is not supervised.

    According to Ernst, this is an indication that “CST leaders have less control over taxpayers”. The fundamental presumptions of CST are false, and clinicians diagnose patients in ways that contradict and are mutually incompatible.

    CST experts say that they are effective in treating many diseases, including cancer treatment and drugs. Doctors strongly recommend the use of CST in young patients. As per records of the American Cancer Society, children under the age of two are not eligible to receive CST. Doctors have expressed concern about CST’s direct bad effects on infants and toddlers.

    There is no such proof that CST is effective for people with autism, and might be turning out harmful. As of 2018, there are two deaths related to the manipulation of the CST landmass. In small studies, CST may increase symptoms in people who have experienced headaches. Moreover, choosing CST as a treatment for serious illnesses can be dangerous. As a result, the American Cancer Society encourages patients with cancer or various major illnesses to talk to their doctor before starting manual therapy.

    As per the records American Cancer Society, while craniosacral therapy (CST) may relieve stress or tension symptoms, as well presently inadequate scientific evidence to support claims that CST is useful for the treatment of carcinoma or other diseases. Mirroring criticisms have been levied for cranial osteopathy; a 1990 paper stated that none of the claims made by the practitioners examined had any scientific foundation.

    There is a dearth of data supporting CST, and no physiologically viable mechanism has been established. Without thorough, thoughtfully planned randomized controlled trials, It is pseudoscience, and quackery is what it practices. Tests reveal that CST practitioners are unable to recognize the claimed differences in the patient’s findings. A craniosacral practice is not demonstrated scientifically.

    Regulation

    According to Edzard Ernst, a pamphlet was released in 2005 by Prince Charles’s organization in the United Kingdom named CST as one of the numerous well-liked complementary treatments but acknowledged the therapy was unmanaged and lacked both professional organization oversight and a well-defined training program.

    History

    In the 1930s, William Garner Sutherland pioneered cranial osteopathy, which proceeded CST. While examining a disarticulated skull, Sutherland observed that the cranial sutures of the temporal bones where they meet the parietal bones were “beveled, resembling fish gills, suggesting they could function in a respiratory mechanism.”

    From 1975 to 1983, independent reviews by Ernest W. indicated that the research findings did not support the validity or effectiveness of the skull bone theory.

    A research team was formed to explore the claimed pulse and to further investigate Sutherland’s theory regarding cranial bone movement. However, independent assessments of this research concluded that the findings did not validate the existence or effectiveness of the proposed movement of cranial bones.

    Overall, independent evaluations of this study determined that the results did not substantiate the concept of skull bone movement.

    How is craniosacral treatment administered?

    The goal of CST is to assist relieve tension in your body’s connective tissue by gently placing your hands on certain areas. We call this “fascia” (pronounced “fash-ee-uh”). The Latin word for band is facia. Your body is made up of casings that house your blood vessels, brain, spinal cord, muscles, glands, organs, and nerves. Throughout the body, the fascia weaves a web of connective tissue.

    The human body’s physiological and anatomical parts are interrelated. This implies that there may be an impact on one bodily part from another. CST aims to relieve tension (fascial This may improve the way that other interconnected bodily components operate by:

    • self-discipline.
    • Self-rectification.
    • self-repairing.

    Which are the conditions that can be managed through craniosacral therapy?

    Applying craniosacral therapy to address the following disorders might assist in symptom management:

    • Chronic pain.
    • Complex regional pain syndrome.
    • Fibromyalgia.
    • Headaches like migraines.
    • Neuralgia.
    • Post-concussion syndrome.
    • Scoliosis.
    • Stroke.
    • Temporomandibular joint syndrome.

    Your healthcare professional should advise craniosacral therapy in addition to other forms of treatment.

    Is craniosacral treatment appropriate for all patients?

    Craniosacral therapy can help patients of all ages, including adults and children…

    Your healthcare practitioner may decide to postpone craniosacral therapy until you are well enough to receive treatment if you have recently encountered any of the following:

    • thrombi.
    • a head injury.
    • Brain enlargement.
    • cerebral aneurysm.
    • Chiari malformation.

    any disease that causes a build-up, leakage, or pressure of CSF fluid.

    If you meet the requirements for CST, a medical specialist will notify you.

    Procedure Details

    What takes place in a craniosacral therapy session?

    Massage treatment and a craniosacral therapy session differ mainly in that you remain fully clothed throughout the process. The environment is often designed to enhance relaxation, featuring soft music and dim lighting.

    Before the session starts, your experienced therapist will have a conversation with you. They will inquire about your medical history, current condition, and the goals of the session.

    During the treatment, you’ll lie on a massage table, although you might sit in a chair if needed due to specific circumstances. Your therapist will continuously monitor your comfort throughout the session.

    To ensure you are informed, they will explain the process before making any physical contact. If anything feels uncomfortable, don’t hesitate to let your therapist know.

    Your therapist will gently apply pressure to areas such as your head, neck, back, and around the spine that are causing discomfort.

    Advantages and applications

    Craniosacral therapy (CST) is believed to relieve tension in the head, neck, and back muscles, potentially reducing discomfort and stress for both the body and mind. It may also assist in easing restrictions in the head, neck, and nerves, thereby enhancing cranial mobility.

    Craniofacial sacral therapy can be beneficial for individuals of all ages and may be incorporated into treatment for various conditions, including:

    • headaches and migraines
    • irritable bowel syndrome (IBS) with constipation
    • insomnia and erratic sleep patterns
    • scoliosis
    • sinus infections
    • neck ache
    • fibromyalgia
    • babies with persistent ear infections or colic
    • recuperation from TMJ trauma, including whiplash damage
    • mood disorders such as sadness and anxiety
    • challenging pregnancies

    Despite a plethora of anecdotal evidence demonstrating the efficacy of CST, further research is necessary to draw this conclusion. While some studies indicate that it may primarily benefit infants, toddlers, and children, there is evidence showing that it can also help reduce tension and stress in others.

    Nevertheless, more study indicates that CST could be helpful in treating some diseases, or at the very least, a helpful part of a therapy plan. According to a 2012 research, it helped those with severe migraines feel less uncomfortable. According to different research, CST helped fibromyalgia sufferers feel better about their pain and anxiety.

    Risks and side effects

    When receiving cranial sacral therapy from a qualified professional, the most typical side effect is some degree of soreness after the procedure. Most of the time this is just temporary and passes within a day or two.

    There are certain persons who should not use CST. Among them are those who have: severe bleeding disorders and aneurysms that have been identified as a history of recent traumatic head traumas, such as skull fractures or cranial haemorrhage.

    Sessions of craniosacral treatment might run anywhere from thirty to sixty minutes. Keeping up with your goals is necessary for more than one session.

    Can you treat yourself with craniosacral therapy?

    By mastering self-massage techniques for your head and neck, you can encourage relaxation at home between sessions with a licensed professional. This approach should only be applied by trained specialists who have received proper craniosacral therapy education.

    Who performs craniosacral therapy?

    The following healthcare providers and therapists practice craniosacral therapy:

    • A physician assistant.
    • A physician with osteopathic training (DO).
    • An occupational or physical therapist.
    • A certified massage practitioner.

    Benefits

    What possible advantages can craniosacral treatment offer?

    • easing of pain.
    • unwinding.
    • enhanced emotional health.
    • reduction of stress.

    Is craniosacral treatment effective?

    Research indicates that many people report feeling improvements after receiving craniosacral therapy. However, results can vary as each individual’s situation and motivations for seeking treatment are unique. Ongoing studies aim to further understand the effectiveness of craniosacral therapy for various medical conditions.

    How risky is craniosacral therapy?

    Craniosacral therapy is a gentle, non-invasive approach to healthcare, with potential side effects that may include feelings of:

    • lightheaded.
    • Weary.
    • dizzy.
    • little discomfort.

    Recovery and Outlook

    How long before the effects of my craniosacral therapy become apparent?

    Some people experience immediate relief from their symptoms after craniosacral therapy, while for others, it may take several days for their bodies to adjust to the changes caused by the treatment. Depending on your treatment objectives, it might require multiple sessions over several weeks or months to notice improvements.

    When to Make a Doctor’s Appointment

    When ought I to give my healthcare provider an awareness?

    Reach out to your healthcare provider after a craniosacral therapy session if you experience significant pain, discomfort, or new or worsening symptoms. Consult your healthcare practitioner for guidance if anything doesn’t feel quite right with your body.

    How well does craniosacral treatment work?

    There have been very few studies investigating the use of CST in disease treatment. This indicates that further study is required to confirm the complementary or alternative therapy’s efficacy.

    Studies bolstering CST

    Most of the CST research is rather old. A 2010 research looked into how CST affected fibromyalgia sufferers. Ninety-two individuals with the disease received CST or a placebo for a duration of twenty weeks. The outcomes demonstrated that medium-term pain improved for individuals who had CST.

    A further 2011 study on CST and fibromyalgia indicates that the treatment may lessen anxiety and enhance the quality of life for persons who have the illness.

    A Brief 2016 Investigation According to a reliable source, CST may assist patients with neck discomfort to operate better, live better, and experience less severe pain. More research is yet required because these studies are smaller and older.

    Studies that cast doubt on CST

    Overall, studies that reviewed and discussed earlier research have concluded that the claims made for CST are not sufficiently supported by the available data. They argue that there are flaws in the research’s effectiveness. Again, though, most of these assessments are more recent. An analysis from 2011 examined eight CST-related research.

    A 2012 study concluded with six randomized controlled trials. The analysis demonstrated that there was probably bias in five of the six trials and that there was insufficient evidence from the sixth experiment to validate the effectiveness of CST.

    Conceptual basis

    Practitioners of cranial osteopathy and CST assert that the small, regular movements of the cranial bones are affected by either cerebrospinal fluid pressure or arterial pressure. Fundamental to CST is the notion that the cranial bones move in a rhythmic fashion that is perceptible to the hand and that these motions may be modulated by certain pressures to yield therapeutic outcomes. However, there is no evidence to support the claim that these procedures can really realign the bones in a person’s skull.

    The main concept of cranial osteopathy is attached to our procession of the structure and function of the human spine, brain, and skull.

    CST practitioners, similar to those in many other forms of alternative medicine, believe that physical manipulation can help alleviate energy or fluid blockages, which they consider to be the root cause of all illnesses. They believe they are able to recognize and modify the regular movement of the bones in the skull.

    The patient’s body is gently palpated by the therapist, who also pays close attention to the motions that are expressed. The feeling a practitioner gets when they are attuned to a patient is called entrainment.

    The two disciplines are essentially the same, according to contemporary cranial osteopaths, however, cranial osteopathy has “been taught to non-osteopaths under the name CranialSacral therapy.”

    How may it enhance well-being and health?

    Some conditions, such as migraine headaches, chronic pain, chronic fatigue syndrome, PTSD, trauma of any type, post-surgical recovery, TMJ, and others, are treated using craniosacral therapy in addition to other therapies.

    When administered by a qualified professional in a caring and courteous manner, craniosacral treatment has no negative effects. It might encourage clients to adopt a more direct and personal perspective on their well-being or a sense of “being more at peace with oneself.”
    Additionally, it could encourage an organic transition to self-acceptance, a stronger inclination towards loving relationships, and a feeling of aliveness.

    The cerebrospinal wave: what is it?

    There is considerable discussion and speculation in the literature on craniosacral therapy regarding the characteristics of the cranial-rhythmic impulse, often referred to as the cerebrospinal wave.

    Where the pulse comes from (the literature does not address this). Should the skull’s bones shift (cranial sutures move; craniosacral therapists disagree; classical anatomists frequently think that the cranial sutures fuse in maturity), etc. Whether or not there is a regular, detectable pulse (there have been several unsuccessful efforts to measure the craniosacral pulse’s cycle rate per minute).

    Whether or whether the practitioner’s presence influences the pulse (this issue is crucial to the debate between integrative and allopathic philosophies; we think it is foolish to think we have no power over what we perceive, touch, or observe).

    Where can I locate a professional?

    Craniosacral treatment

    Obtaining references is crucial when selecting a practitioner, but in the end, you have to figure out who “feels right to you.”

    Online directories for craniosacral therapists in the United States and overseas include the Directory of Registered Craniosacral Therapy Practitioners from The Craniosacral Therapy Association of North America and Upledger’s International Association of Healthcare Practitioners.

    In order to get insurance overage, providers usually need to hold a license in a certain specialty (such as physical therapy, chiropractic care, or massage treatment).

    Summary

    Several systematic evaluations have shown that there is a dearth of high-quality research on CST. Though there is little chance of damage, some people may benefit from CST, especially in terms of stress and anxiety reduction. If CST encourages people to see their health and well-being more optimistically, then they could benefit from it.

    CST should never be used in place of medical care or other tried-and-true patient therapies by practitioners.

    FAQs

    What is the purpose of craniosacral therapy?

    CST facilitates headache and neck pain alleviation. This therapy may help get rid of discomfort and side effects that come with cancer treatment.

    Is craniosacral treatment authentic or fraudulent?

    It also proceeded to CST as pseudoscience and quack medicine because of the practices. It is predicated on essential false beliefs regarding the structure and function of the human skull, and it’s marketed as a panacea for many various medical ailments.

    What is the CranioSacral treatment success rate?

    As for the CST group, over 78% reported minimally significant improvements in pain intensity at week 20, and 48% even reported significant therapeutic benefits.

    Which three forms of craniosacral treatment exist?

    William Sutherland’s “Aha” moment in 1948 broadened his understanding of cranial osteopathy, a discipline he founded that ultimately gave rise to the Upledger, Biodynamic, and Visionary bodies of CranioSacral Therapy.

    For whom is craniosacral treatment inappropriate?

    Individuals who suffer from any of the following medical conditions shouldn’t receive craniosacral therapy: thrombi. other traumatic brain injuries, such as concussions. Brain enlargement.

    References

    • Craniosacral Therapy. Cleveland Clinic. https://my.clevelandclinic.org/health/treatments/17677-craniosacral-therapy
    • Craniosacral therapy: Does it work? https://www.medicalnewstoday.com/articles/318490
    • Cranial Sacral Therapy. Healthline. https://www.healthline.com/health/cranial-sacral-therapy
    • Wikipedia contributors. Craniosacral therapy. Wikipedia. https://en.wikipedia.org/wiki/Craniosacral_therapy
  • Pusher Syndrome

    Pusher Syndrome

    What is a Pusher Syndrome?

    Pusher Syndrome, also known as controversial pushing, is a neurological condition often observed in patients who have experienced a stroke or brain injury, particularly those affecting the right hemisphere.

    Patricia Davies originally discussed this in 1985. It is typically seen after a stroke and is frequently accompanied by severe inattention and chemosensory impairments. The literature reports varying incidence rates of this disease following stroke, ranging from around 5–10% to 63%.

    Pathology

    The origins and symptoms of Pusher Syndrome are being studied more thoroughly, although the presentation is still unclear. According to some theories, pusher behavior might arise from a high-order interruption of somatosensory information processing from the paretic hemi-body, or it could be the result of a conflict.

    Pusher syndrome patients may also experience motor impairments, poor proprioception, primary visual abnormalities, or visual perception issues. These conditions make it more difficult for them to regain balance and posture.

    According to a number of earlier research, individuals with right brain injury were more likely than those with left brain damage to exhibit pusher behavior. Additionally, Abe et al. Three key factors should be considered when diagnosing pusher behavior.

    Signs and Symptoms

    Patients who behave like pushers may require lengthier rehabilitation.

    Additionally, when it comes to subjective visual verticals, individuals don’t appear to exhibit any abnormal vestibular or visual processing. When the patient is upright and unable to support their body weight on the weaker lower extremity, the push manifests as a powerful lateral lean toward the affected side, making the patient extremely unstable.

    Some earlier hypotheses argue that pusher syndrome develops as a result of neglect, and the terms “pusher syndrome” and “hemispatial neglect” are occasionally used interchangeably. Contrary to popular belief, hemispatial neglect is mostly associated with right hemisphere injuries; nevertheless, different research found that pusher syndrome can also develop in individuals with left hemisphere lesions, resulting in aphasia.

    Karnath combines these two opposing viewpoints and concludes that there is a strong correlation between pusher syndrome and both aphasia and neglect. This correlation may be caused by the closeness of important brain areas linked to the two diseases. The essay continues, nevertheless, by emphasizing how important it is to understand that pusher syndrome is not primarily caused by aphasia or neglect.

    Clinical Presentation

    • affected side limbs in a flexed posture
    • Position of the unaffected side limbs extended
    • opposition to any efforts at correction
    • Left brain damage combined with spatial aphasia.

    Differential Diagnosis

    Because it stresses moving the non-hemiparetic extremities towards the contralateral side of the brain lesion, the phrase “controversies pushing” is unique in this respect. Furthermore, the hemiparetic patient without pushing syndrome exhibits tugging rather than pushing when he or she recognizes they have lost their balance and seeks to grip onto anything with their non-paretic hand.

    Diagnostic Procedures

    Three diagnostic variables for Pusher Syndrome are identified by Karnath and Broetz  and are displayed below:

    • Spontaneous Body Posture  (severe, moderate, and mild)
    • It is necessary to check the patient for contralateral tilting based on their initial posture, which should preferably be supine to sit or sit to stand, right after a positional shift. This may be observed falling to the side opposite the brain lesion or not.
    • Capture and Expansion of the Nonparetic Limbs
    • Reluctance to Accept Passive Adjustment of Slanted Posture
    • When a therapist uses physical interventions to modify their body posture, patients usually aggressively resist.

    Pusher Syndrome may be quickly and easily identified by doctors using the SCP, which can be applied in both acute and rehabilitative settings.

    Treatment of Pusher Syndrome

    Giving the patient visual input on their changed body position is the first aim of beginning therapy, according to Karnath and Broetz. Patients can sense whether they are in an erect posture when they perceive that they are inclined because they are given visual information about their surroundings.

    Patients should be questioned about their ability to see if they are upright when in various postural configurations. They should also be provided visual cues and references to assist them orient themselves upright as well as feedback regarding their body alignment.

    It is envisaged that with consistent therapy, individuals with Pusher Syndrome would be able to use training techniques independently and make use of their surroundings to obtain visual input from vertical structures, even if they may initially require urging when using visual feedback.

    Based on their clinical experience, Karnath and Broetz proposed that the following therapy sequence might be useful in treating Pusher Syndrome:

    • Give the patient the opportunity to visually investigate their surroundings, the body’s connection to those surroundings, and whether or not they are orientated upright. The therapist’s arm or a variety of vertical objects.
    • keeping an upright body posture while carrying out functional tasks.

    More modern therapies advise:

    • Acquire the skills required to place your body vertically.

    Additional treatment techniques that have been discovered to be effective recently include standing frames, robot-assisted gait training, lateral stepping with body weight-supported treadmill training, interactive visual feedback training, and mirror visual feedback training.

    When treating these individuals, physical therapists concentrate on motor learning techniques. Weight shifting, verbal signals, regular feedback, and practicing proper orientation are all useful techniques for lessening the consequences of this illness. One potential treatment for pusher behavior is to have the patient sit with their stronger side against a wall and tell them to lean that way.

    Treatment is arranged so that patients may become aware of their changed perception of the vertical, learn the motions required to achieve optimal vertical position, use visual aids for feedback regarding body orientation, and maintain vertical body position while engaging in other activities.

    Prognosis

    According to some writers, Pusher Syndrome is infrequently observed six months after a stroke and has been proven to have no detrimental effects on the patient’s final functional result, however, it can cause a three-week delay in rehabilitation. However, according to a case study by Santos-Pontelli et al., three patients had Pusher Syndrome that persisted for up to two years after a stroke, severely impairing their functional capacities.

    To see if it affected the degree of recovery. Based on their research, they hypothesized that 90.5% of patients with just a motor presentation might “recover” from Pusher Syndrome in 27 days, scoring 0 or 1 on the Burke Lateropulsion Scale. In around 59% of cases, the patients who had two deficiencies met the aim.

    FAQs

    How may pusher syndrome be resolved?

    These experts will assist in assessing the severity of symptoms and offer practical recommendations for supporting survivors in keeping an upright posture while sitting, standing, and moving around.

    What pusher syndrome mechanism exists?

    A clinical condition known as “pusher syndrome” that develops after left or right brain injury causes patients to deliberately push away from their nonhemiparetic side, impairing their postural balance. It is only lately that the mechanism behind this condition and the anatomy associated with it have been discovered.

    What differentiates Wallenberg syndrome from pusher syndrome?

    Usually, individuals with medulla-related infarctions have Wallenberg’s syndrome. They have an SVV (subjective visual vertical) tilt.

    How often does pusher syndrome occur?

    Lateropulsion, often known as pusher syndrome (PS), is a frequent disability following a stroke. Patients with it typically push forcefully toward their hemiparetic side and show resistance to the body’s passive adjustment to a vertical upright position. According to a recent survey, 41% of stroke victims had PS.

    What is the pusher’s purpose?

    With them, you may handle extra activities once events are sent and change, filter, and adjust them without having to maintain your own infrastructure.

    References

    • Wikipedia contributors. (2024, January 19). Pusher syndrome. Wikipedia. https://en.wikipedia.org/wiki/Pusher_syndrome
    • Pontelli, T. E. G. D. S., Pontes-Neto, O. M., Colafêmina, J. F., De Araújo, D. B., Santos, A. C., & Leite, J. P. (2005). Posture control in Pusher syndrome: influence of lateral semicircular canals. Brazilian Journal of Otorhinolaryngology, 71(4), 448–452. https://doi.org/10.1016/s1808-8694(15)31197-6
  • 16 Best Exercise for Claw Toe Deformity

    16 Best Exercise for Claw Toe Deformity

    Introduction:

    Exercise for Claw Toe Deformity is an important part of your overall treatment approach, in addition to medical care and a brace.

    Regular physical activity can help maintain the lightness, flexibility, and pain-free condition of muscles and tendons for as long as is practical. Joints are stiffer and more painful with time, and toe deformity gradually appears. Extending your toes not only feels fantastic, but it can also help you control and avoid foot issues in the future. They might aid in preventing problems. This post may contain workouts for improving your flexibility, foot strength, and stretching. These workouts help in increasing muscle flexibility and mobility.

    When a bony growth occurs, the toes “claw,” pressing into the shoe bottoms and creating uncomfortable ulcers. Although they can happen at any age, those between the ages of 60 and 80 are most likely to get bunion pain.

    Claw Toe Types:

    Rigid Claw Toes

    • Stiff claw toes are significantly more difficult than flexible toes because the toe joints become inflexible and cannot be extended or flexed correctly.
    • Usually, it takes on a leg injury, like a fracture or trauma, which can harm the muscles and nerves of the troubled joint.
    • In addition to having trouble selecting shoes and engaging in activities that involve prolonged standing or walking, people with this illness frequently feel severe walking pain.

    Flexible Claw Toes

    • This type of claw toe is caused by injury or gradual muscular degeneration in the legs.
    • This condition can cause pain when wearing certain kinds of shoes or make it difficult for the person to walk, flex, or stretch their toes.

    Congenital Claw Toes

    • A disorder called congenital clubfoot develops at birth before an injury to the foot’s affected area occurs.
    • Over time, genetic conjunctivitis may occasionally be resolved with certain workouts.
    • In some situations, if the problem is severe enough or if walking or wearing shoes causes intense pain or suffering, surgery may be necessary.

    Causes:

    • A stroke
    • Bunions
    • Genetics
    • Unsuitable footwear
    • Diabetic nerve damage
    • Spinal cord injuries
    • Accidents or Traumas
    • Arthritis, either osteoarthritis or rheumatoid
    • Inflammation or trauma.

    Signs and symptoms:

    • Toe Pain
    • Walking and balance difficulties due to the incorrect position of the toes
    • Foot and toe pain when wearing shoes
    • The toe joint is stiff
    • Corns may develop above the toes or under the foot’s heels.
    • Loss of strength in the forefoot muscles
    • Swelling

    Exercise for Claw Toe Deformity:

    Toe raise, point, and curl

    • Get started by standing on the floor.
    • When you raise your heels, only your toes and heels should make contact with the floor, leaving your toes flat.
    • Hold this position for a few seconds.
    • Next, make sure your big and second toes are the only ones that touch the ground by pointing your toes.
    • Hold it a five-second hold.
    • Make sure the tips of your toes touch the ground and your heel remains above it by curling your toes beneath.
    • Let it be a five-second hold.
    • Then return to your neutral position.
    • Then relax.
    • Repeat this exercise five to ten times.
    Toe raise, point, and curl
    Toe raise, point, and curl

    Banded toe raise

    • Put a band around your big toe and fasten the other end under your other foot.
    • Raise your big toe off the ground as high as you can.
    • Hold this position for a few seconds.
    • Then slowly drop it back.
    • Then return to your neutral position.
    • Then relax.
    • Repeat this exercise five to ten times.
    Banded toe raise
    Banded toe raise

    Figure eight rotation

    • First, get into a relaxing place on the ground.
    • Just move your big toe like an eight instead of a circle, and you’ll complete the task.
    • It improves the big toe muscles’ flexibility in motion and movement.
    • Then return to your neutral position.
    • Then relax.
    • Repeat this exercise five to ten times.
    seated figure eight rotation exercise
    seated figure eight rotation exercise

    Toe pull

    • first sits down on a bed.
    • Extending your leg in front of you.
    • As an exercise tool, you can utilize resistance bands.
    • Your toes should be moved as close to your body as you can.
    • Hold this position for a few seconds.
    • Then return to your neutral position.
    • Then relax.
    • Repeat this exercise five to ten times.
    toe pull
    toe pull

    Toe extension

    • Getting comfortable in the chair is the first step.
    • After picking it up, place one foot on your opposing thigh.
    • Grasp your toes with one hand and extend them toward your ankle after feeling a stretch in the heel cord and along the sole of your foot.
    • Hold this position for a few seconds.
    • Then return to your neutral position.
    • Then relax.
    • Repeat this exercise five to ten times.
    Active-assisted toe extension
    Active-assisted toe extension

    Marble pickup

    • You will need a bowl and ten to twenty marbles for this exercise.
    • The container and marbles should be on the floor.
    • Using your toes, raise each marble into a basin.
    • Keep your toe gripping the marble tightly.
    • Then return to your neutral position.
    • Then relax.
    • Repeat this exercise five to ten times.
    marble pickup
    marble pickup

    Tip toe walking

    • Using this effective technique, you may strengthen the muscles and ligaments in your toes, ankles, and feet.
    • It strengthens stability as well.
    • Five to ten rounds of toe walking can be easily finished in one session.
    • Walking on tiptoe helps to improve the ankle joint‘s balancing muscles.
    • Then return to your neutral position.
    • Then relax.
    • Repeat this exercise five to ten times.
    Tip Toe Walking
    Tip Toe Walking

    Toe raise

    • Stand upright and set your feet shoulder-width spread.
    • With your front foot and toes raised off the ground, stand up straight on your heels.
    • The sole areas of your body that make contact with the ground should be your heels.
    • Hold this position for a few seconds.
    • Next, bring your feet to the floor.
    • Then return to your neutral position.
    • Then relax.
    • Repeat this exercise five to ten times.
    toe-raise
    toe-raise

    Big toe stretch

    • In a chair, sit up straight with your toes on the floor.
    • The left foot should be placed on the right leg.
    • Your fingers can be used to gently extend the big toe up, down, and sideways.
    • Hold this position for a few seconds.
    • Then return to your neutral position.
    • Then relax.
    • Repeat this exercise five to ten times.
    big-toe-stretch
    big-toe-stretch

    Alphabet write exercise

    • Look for a comfortable place for you to stand or sit.
    • Sitting, use just your ankle for drawing the letters in the air with your big toe.
    • Use lengthy, lowering movements.
    • Then return to your neutral position.
    • Then relax.
    • Repeat this exercise five to ten times.
    Alphabet
    Alphabet

    Toe Crawling

    • When you start the foot crawl, you should be kneeling with both feet on the ground.
    • Use your toes to exert pressure while trying to maintain your grip on the ground.
    • Now, extend all of your toes forward as though you were crawling.
    • Continue doing this until both feet feel comfortable, but be careful not to use your leg muscles to drive your feet forward; instead, use your toes to “crawl.”
    • Then return to your neutral position.
    • Then relax.
    • Repeat this exercise five to ten times.
    toe-crawling-exercise
    toe-crawling-exercise

    Foot-screw

    • Starting with taking a seating position.
    • To maintain the heel’s stability, use your hand.
    • Now, at the maximum of your calf, use your right hand to pull the leg a foot apart.
    • Swing your foot forward slightly and come down as you get to the internal of resistance of your foot.
    • Then return to your neutral position.
    • Then relax.
    • Repeat this exercise five to ten times.
    foot-screw-exercise
    foot-screw-exercise

    Foot roll massage

    • First, settle into a sitting position on the table or chair.
    • The ideal situation would be to place a tennis ball close to your feet.
    • By exerting as much force as you can manage with one foot, you can move the ball in various directions.
    • The heel’s action involves exerting pressure on the foot.
    • Continue the ball going after another two or three minutes.
    • Then return to your neutral position.
    • Then relax.
    • Repeat this exercise five to ten times.
    Golf-ball-roll-exercise
    Golf-ball-roll-exercise

    Toe splay

    • On the floor, assume a standing stance.
    • Toes spread to the maximum comfortable level.
    • Hold this position for a few seconds.
    • Then return to your neutral position.
    • Then relax.
    • Repeat this exercise five to ten times.
    Toe-splay
    Toe-splay

    Towel curl

    • Ensure that you sit straight while maintaining your feet flat on the floor.
    • Arrange a towel on the floor with the shorter side at your feet.
    • Use one foot’s toes to try to pull the towel toward you.
    • Hold this position for a few seconds.
    • Put your foot at relax.
    • Then return to your neutral position.
    • Then relax.
    • Repeat this exercise five to ten times.
    Towel-curl
    Towel-curl

    Sand walking

    • Visit a beach, a desert, a volleyball court, or any other location containing sand.
    • Remove your shoes and socks.
    • Walk as much as you can.
    • Consider progressively lengthening your walks to prevent overstressing your calves and feet.
    • Then relax.
    • Repeat this exercise five to ten times.
    Sand-walking
    Sand-walking

    What safety measures should be taken when exercising?

    • When exercising, maintain your posture.
    • Stretches should be performed under the protocol before and after sets, as well as for the recommended number of repetitions for each exercise.
    • When exercising, find yourself and maintain your focus to prevent falling.
    • Try not to use force or rapid movements when working out.
    • Avoid attempting difficult physical activity.
    • Exercise should be stopped as soon as the pain gets severe.
    • You may improve your range of motion and encourage relaxation by working out in loose, comfortable clothing. Stay away from anything that is extremely tight or stylish.
    • Bending and stretching gently is important.
    • Keep hydrated

    When are you going to stop working out?

    • Fever
    • Headache
    • Exercise should be stopped if it hurts.
    • Severe burning in the muscles.
    • You don’t feel good.
    • If numbness or pain are present.
    • Blurred vision

    Prevention:

    Your physicians or physical therapists might advise the following suggestions;

    • Put on shoes that fit properly

    Select footwear with a deep, flexible toe that fits the foot and toes correctly. For people with bunions, the best shoes have robust arch support and short heels.

    • Do some toe exercises

    Toe-pick up little objects by extending your toes. Carried out specific toe exercises, including rotation, curling, flexion, and extension. Extending your toes while using a resistance band.

    • Make use of orthotics or specific equipment

    Put arch supports or heel pads in your shoes to prevent the line between the foot’s bones and the toe joints from changing too much, so that the toe’s curvature is reduced and you have more support when walking and standing. Make adjustments to the shoelaces or straps to avoid uncomfortable pressure points at the top of the toes.

    • Maintain proper foot hygiene

    Keeping dry feet at all times requires frequent washing and inspection.

    Summary:

    Your toe develops a claw toe when its last two joints grow rigid and bend like a claw. Commonly referred to as hammertoes or mallet toes, claw toes can be inherited, the result of poorly fitting footwear, muscular imbalances, or a sign of a neurological disorder. They may hurt and make running or walking challenging.

    Taking care of your feet can be achieved by wearing shoes that fit properly and by using a splint from the beginning of the ailment. Splints help you keep proper anatomical posture, which is important for this illness. Recognize that as soon as you see symptoms of claw toe, treatment needs to start.

    You might need surgery if you wait until they grow rigid. It is recommended to start exercising early in order to maintain toe mobility, build toe flexibility, and strengthen the foot muscles.

    FAQ:

    Which muscles are responsible for the claw toe’s malformation?

    The flexor digitorum first contacts and overwhelms the other toe muscles, dragging the middle toe down and twisting the proximal and middle toe joints upward.

    Is balance affected by claw toes?

    In addition to being strange-looking, toes can hurt and be hard to move. Infections on your skin or calluses where your lowered elevated toes touch against your shoes are other possible conditions. You might find it hard to find shoes that fit properly. A serious injury to your toes could make it difficult for you to balance.

    How are abnormalities of the toe claw fixed?

    When trying to treat claw toes, non-surgical methods should be explored first. Shoes that are excessively high or too tight are not as good as those with soft, broad toe boxes. You can put your toes and toe joints back in their natural places with your hands. Toe exercises include picking up marbles or smashing a towel that is located level on the floor.

    How can claw toes be naturally straightened?

    Shoe inserts, such as arch supports or padding, can be used to support the toe. Exercise helps to strengthen and expand the toe muscles. Apply a splint or tape to keep your toes in the proper places. Don’t wear high heels.

    Does claw toe result from nerve injury?

    Claw toes may be the result of nerve problems in the legs, arthritic symptoms, or problems with the spinal cord. It is often unclear what caused it. Claw toes are mostly harmless by themselves. In rare cases, they could be a sign of a more serious brain disorder.

    Is hammer toe helped by yoga?

    Along with offering relief from specific foot aches like plantar fasciitis, arch pain, and heel pain, strengthening and extending the toes can help avoid the development of foot problems that frequently arise with aging, such as bunions and hammertoes.

    When do people start having claw toes?

    The majority of claw toe instances occur in people between the ages of 60 and 80, while it can affect anyone at any age.

    References:

    • In 2023, Prajapati, D. August 15. The Best 23 Exercises for Claw Toe Deformities by Samarpan Physio. Clinic for Samarpan Physiotherapy. For the best exercise to treat claw-toe deformity, visit https://samarpanphysioclinic.com/23
    • Claw Toes. 2024, August 16. Cleveland Clinics. https://my.clevelandclinic.org/health/diseases/16875-claw-toes
    • February 20, 2024; Sauer, J.A Complete Guide to Effective Exercises to Treat Claw Toes. Exercises for the claw-toes: https://cadense.com/blogs/cadense-cares? srsltid=AfmBOopjh_96zsOEPa6e-6TRuO7Bx6nchWMnFlpIOnJDihldFYW8UZiO Claw-toes exercises
    • December 13, 2023c, Bariya, D. Mobile Physio’s Recommended 22 Foot Exercises for Bunions. A mobile physiotherapy clinic. The top 22 foot exercises for bunions are as follows: This URL is https://mobilephysiotherapyclinic.in.
    • Image 11, What Are The Advantages Of Adult Crawling Exercises? (No date). Sweat. Crawling exercises for adults: https://sweat.com/blogs/fitness
    • Image 12, On July 20, 2023, Prajapati, D. Physio Samarpan: The Top 18 Exercises for Hallux Valgus. Physiotherapy Clinic in Samarpan. The best exercise for Hallux valgus is found at https://samarpanphysioclinic.com/18.
  • Scissor Gait

    Scissor Gait

    Introduction

    Scissor gait refers to an irregular walking pattern in which the legs cross or overlap while the person walks. A kind of spastic paraparetic walk when the adductor muscles are noticeably toned. In addition to excessive adduction that causes the knees and thighs to strike, or occasionally even cross, in a scissors-like motion, it is characterized by hypertonia and flexion in the legs, hips, and pelvis. Children with cerebral palsy often exhibit a scissor-like stride as they walk. The manner of walking is typical of a marionette walk.

    Children with cerebral palsy (CP) frequently experience difficulties learning to walk because the disorder can cause major changes or impairments in gait. One mobility issue that might result from cerebral palsy is the development of the scissor gait. Mobility may become uncomfortable, laborious, and unusually slow when walking this way.

    When a child develops spastic cerebral palsy, they often exhibit the scissor gait, which is an unnatural gait. The issue is associated with a gait caused by upper motor neuron damage. Parents may find this walking style comparable to a puppet’s movements or gaits. Furthermore, hypertonia results in varying degrees of flexion of the legs, hips, and pelvis, which makes crouching seem.

    Walking irregularly due to tight adductor muscles results in the knees and thighs crossing in a scissor-like motion, while the abductors, the opposing muscles, weaken from inactivity. The child will remain on tiptoes unless the plantar flexor muscles are released through orthopedic surgery.

    What is Scissor Gait?

    The term “scissor gait” describes the way people who have spastic paraplegia walk. This walking style is similar to that of a marionette. Tight adductors produce extreme adduction, characterized by knees and thighs hitting, or occasionally even crossing, in a scissors-like movement, while the opposing muscles, the abductors, become relatively weak from lack of use. Hypertonia in the legs, hips, and pelvis causes these areas to flex to varying degrees, giving the appearance of crouching.

    Patients with spastic cerebral palsy are most likely to have to walk on tiptoe unless an orthopedic surgical surgery releases the plantar flexor muscles.
    Regardless of how severe or moderate the spastic CP disease is, these characteristics are most common with the scissors gait and typically lead to some degree of it:

    Regardless of how severe or moderate the spastic CP disease is, these characteristics are most common with the scissors gait and typically lead to some degree of it:

    • Stiffness and extreme leg adduction during a swing.
    • Ankle’s plantar flexion.
    • Knee flexion.
    • Internal rotation and adduction at the hip.
    • Increasing spastic muscular contractures.
    • Complex upper limb assistance movements during walking.

    Disorders associated with a Scissor Gait

    • Arthrogryposis
    • Spastic diplegia
    • Pernicious anemia
    • A cerebrovascular accident
    • A disorder affecting the vertebrae in the neck called cervical spondylosis with myelopathy
    • Liver Failure 
    • Multiple sclerosis
    • Stroke
    • Muscular Dystrophy
    • Parkinson’s disease
    • Trauma to the spinal cord
    • Tumor of the spinal cord
    • Syphilitic meningomyelitis
    • Syringomyelia
    • Other kinds of cerebral palsy, 

    Diagnosis of the Scissor Gait

    Medical History

    • A medical professional will be paying a close eye on the patient’s walk. Together with any other indications of aberrant gait, they will search for the specific scissor-like action of the legs.
    • The patient’s medical history, including any family history of neurological disorders, developmental delays, or trauma, will be questioned by the physician.

    Neurological Examination:

    • A thorough neurological examination will be carried out to evaluate muscle strength, reflexes, coordination, and sensory function. For this, tests such as the deep tendon reflex and the Babinski reflex may be applied.

    Diagnostic Tests:

    Other tests might be prescribed based on the suspected underlying cause, such as:

    • Imaging study: Structural abnormalities in the brain that may be causing spasticity can be found with the use of MRI or CT scanning.
    • Electromyography (EMG): This test measures nerve function by recording the electrical activity of muscles.
    • Genetic Testing: In certain situations, underlying genetic problems may be found by genetic testing.

    Treatment for the Scissor Gait

    For children with cerebral palsy, early intervention is crucial to reducing the development of a scissoring gait. There are two techniques for dealing with a scissoring gait. To allow the muscles to freely contract and relax, spasticity must first be reduced. Second, the child needs to regularly work on enhancing their gait.

    Several therapies that can help children with cerebral palsy reduce a scissoring gait will be covered below. Some interventions might be better than others, depending on how severe your child’s spasticity is. To choose the best and most advantageous course of therapy, consult your child’s pediatrician or physical therapist.

    Medication

    • Muscle relaxants like baclofen can help reduce muscular hyperactivity for the temporary relief of spasticity. Oral muscle relaxants taken multiple times a day usually only provide short-term relief from spasticity.
    • Muscle relaxants may make your child feel sleepy, exhausted, or weak. They can also hurt the overall body. This might not be the greatest choice for folks whose legs are just spastic.
    • Another option is an intrathecal pump, which is surgically implanted and can also be used to deliver medication for relieving the problem. Because the muscle relaxant in the pump is given directly to the spinal cord, the risk of side effects is reduced and lower dosages can be used.

    Botox Injection

    • Another therapy that helps children with cerebral palsy temporarily lessen stiffness is Botox injections. It functions by obstructing the nerve impulses that initiate muscular contraction.
    • Following Botox injections, stiffness reduction should ordinarily persist for three to six months. Its effects might, however, wear off sooner based on your child’s spasticity severity and the quantity administered.
    • It’s critical to realize that Botox and muscle relaxants may not be the best choices for long-term use because they only offer temporary relief.
    • Children with cerebral palsy (CP) should take advantage of their decreased spasticity when using Botox, and they should pursue an intense gait training program to enhance their form.

    Orthotics

    • Braces and splints are examples of orthotic devices that can support appropriate musculoskeletal alignment and form.
    • Uncontrollable tightness in children might give rise to improper types of development. By using an orthosis, spastic muscles can be prevented from gradually becoming tighter.
    • Furthermore, orthotic devices such as SWASH (Sitting Walking And Standing Hip) orthoses or de-rotation straps can assist in maintaining leg symmetry and preventing crossing.

    Surgery

    • Children with cerebral palsy who have different types of surgeries might not be as spastic. In our practice, surgery is reserved for the last resort, in cases where no other course of action is available or effective.
    • For instance, in cases where there is no other option, children who walk with a scissoring gait may benefit from adductor lengthening surgery. It is required for increasing the inner thigh muscles.
    • Spasticity can be reduced using a specific dorsal rhizotomy treatment. Muscle contractions can be stopped and prevented by a surgeon by removing the overactive nerve fibers. Once the nerve fibers are destroyed, the muscles cannot grow back, thus they will not become spastic.

    Physical Therapy for the Scissor Gait

    • Children who have always had a scissor gait may still retain it even if their spasticity is significantly reduced. While surgery, muscle relaxants, and nerve blockers can reduce stiffness, they cannot teach your child how to walk correctly.
    • Your youngster will find it awkward to walk without their scissoring gait if that is all they have ever known. Children will need to go to physical therapy sessions and learn new walking techniques to improve their form.
    • A physical therapist will evaluate the mobility of your child and provide a customized exercise program to help them with their gait. The more people walk with proper form, the more comfortable and strong the brain networks behind that movement pattern may become.

    Specific Physical Therapy Procedures

    • Stretching: Regular stretching helps increase the range of motion and flexibility of your muscles.
    • Strengthening Activities: Certain activities might help strengthen tight or weak muscles that contribute to scissor gait.
    • Enhancing one’s ability to balance can help people walk more steadily and lower their chance of falling. This may entail undertaking tasks such as one-legged standing and walking on uneven terrain.
    • Using sensory feedback to enhance bodily awareness is known as proprioceptive training.
    • Assistive aids, such as crutches or braces, can help support gait and lessen the effects of scissor gait in some situations.
    • Many people who have limb spasticity have trouble balancing and may use a walker to help them move around.
    • People can practice bearing weight on their legs by using a walker, which may improve circulation and strengthen their bones and muscles.
    • Some walkers have elements like straps or cushions that may keep the legs apart to prevent them from scissoring.

    Complications related to Scissor Gait

    Scissor gait can lead to several problems, including:

    • Fatigue: A scissor gait can be physically demanding and requires a lot of energy, which leads to fatigue.
    • Pain and discomfort: Persistent friction and leg crossing can cause pain and discomfort, which makes daily chores more challenging.
    • Fall risk: Using a scissor motion when walking makes it harder to stay balanced, increasing the likelihood of tripping and falling.
    • Decreased mobility: Playing sports, climbing stairs, walking long distances, and other physical activities may be challenging for those with a scissor gait since it restricts their legs’ range of motion.
    • Social isolation: Due to walking-related issues, people with scissor gait might stay away from social gatherings and feel cut off from their peers.
    • Restricted freedom: People with scissor gait impairments may be less independent and be forced to rely on others to assist them with daily tasks.
    • Reduced quantity and quality of life: A person’s ability to work, interact with others, and follow their interests can all be significantly hampered by a scissor gait.
    • Seeking medical help for scissor gait as soon as feasible is essential to minimizing these problems and improving results.

    The dangers of an incorrectly managed Scissor Gait

    The brain damage that causes cerebral palsy is a static disorder, which means that it won’t become worse with time. However, if cerebral palsy problems like spasticity are not adequately controlled, they may worsen.
    The following are possible dangers linked to improperly controlled scissor gait:

    • Abnormalities in development or stunted growth as a result of unequal muscular pull.
    • Increased chance of falling as a result of inadequate balancing abilities.
    • Knees rubbing against one another all the time increases the risk of pressure sores.
    • A severely restricted degree of motion is caused by tight joints.
    • Pain is caused by persistent joint strain and muscular tightness.
    • Decrease in walking abilities.

    Spasticity can get worse with age, but it can also be lessened with regular care. Seeking spasticity control as soon as possible is crucial to maximizing your child’s mobility. Children’s minds are more elastic than adult’s. This indicates that compared to adults, youngsters find it easier to adjust and develop new behaviors. Abnormal walking patterns can be replaced before they become set habits by practicing proper form and managing spasticity early.

    Summary

    A child that crosses their legs over one another when walking has a scissor gait. The gait generally suggests cerebral palsy, muscle weakness, stiffness, and other underlying problems. To identify the reason for the scissor gait, the doctor will conduct a comprehensive examination and may prescribe tests.

    A scissoring gait can impair growth and balance if left untreated. Spasticity can get worse over time, so early intervention is crucial. Reducing spasticity and encouraging proper form are key components of managing scissoring gait effectively.

    FAQs

    What is a scissor gait?

    A particular paraparetic spastic gait is distinguished by strongly toned adductor muscles. It is characterized by excessive adduction that causes the knees and thighs to hit, or occasionally even cross, in a scissors-like motion, along with hypertonia and flexion in the legs, hips, and pelvis.

    Which symptoms are associated with scissoring?

    A youngster with a scissoring gait walks in a characteristic way where their legs cross over one another with each stride, creating a scissor-like motion. This medical condition could indicate the presence of underlying musculoskeletal issues such as spasticity, contractures, or muscle weakness.

    What does a scissoring gait represent?

    When a child walks, their legs cross over one another, demonstrating a scissor gait. The gait usually suggests cerebral palsy, muscle weakness, stiffness, and other underlying diseases. To identify the reason for the scissor gait, the doctor will conduct a comprehensive examination and may prescribe tests.

    Does scissoring indicate spasticity?

    Overly strong deep tendon reflexes (such as the knee-jerk) clonus, or repetitive jerky movements, particularly in response to movement or touch. The process of scissoring involves folding the legs over as the scissors’ tips are linked together. The affected part of the body may be painful or deformed.

    What are scissoring gait orthotics?

    The orthotic device has blocks that are specifically made for it. To enable walking action, the blocks slide back and forth against one another during the gait cycle, fit pleasantly against the legs, and separate the legs. You can use belts for attaching the blocks to the legs.

    References:

    • Gait (scissors). (2018, January 1). https://gpnotebook.com/pages/uncategorised/gait-scissor
    • Cota, B. B. (2022, May 4). Scissoring Gait and Cerebral Palsy: Causes, Risks, & Treatment. Flint Rehab. https://www.flintrehab.com/scissoring-gait-cerebral-palsy/
    • Medical City Children’s Orthopedics & Spine Specialists. (2023c, December 9). Scissor Gait | Those with Cerebral Palsy | We treat this condition. https://medicalcitykidsortho.com/scissor-gait/
    • Jain, W. B. D. J. K., & Jain, R. B. D. V. (2023, December 21). Scissor Gait – CP Case Study – Trishla Foundation. Trishla Foundation. https://www.trishlafoundation.com/scissor-gaits/
    • Wikipedia contributors. (2023a, March 22). Scissor gait. Wikipedia. https://en.wikipedia.org/wiki/Scissor_gait
    • Patel, D. (2023b, May 2). Scissor Gait – Cause, Treatment, Exercise, Gait Training. Samarpan Physiotherapy Clinic. https://samarpanphysioclinic.com/scissor-gait/#google_vignette
  • Dermatomes

    Dermatomes

    Dermatomes: What are they?

    Dermatomes are skin sites that receive sensory information from the Afferent nerve fibers that emerge from a certain spinal nerve root’s dorsal root. An external portion of a nerve that “communicates” with the spinal cord is known as a vertebral nerve root.

    The entire spinal cord is made up of nerve roots (like C3 and C4), and many, but not all, of these individuals come together to create a plexus (brachial, lumbar, or lumbosacral), which, as mentioned before, divides peripheral nerves. This configuration permits a single nerve root to supply several peripheral nerves.

    Overall, thirty individual dermatomes—eight cervical nerves, twelve thoracic nerves, five lumbar nerves, and five sacral nerves—transmit sensation from one part of the skin’s outer layer to the brain’s centers and one cervical nerve. (Notice how C1 lacks a matching dermatomal region).

    History:

    Dermatomes arose as an early attempt to link the anatomy and physiology of feeling. Dermatomes are defined in several ways, and different maps are frequently used. Dermatomes are useful, although they can vary across maps and even between persons. An appropriate amount of evidence implies that the present dermatome maps are untrustworthy and based on questionable research.

    Medical professionals were typically familiar with two primary dermatome maps. As discussed in the next section, the dermatomes in the Keegan and Garret Map (1948) symbolize the early stages of limb development. More importantly, the 1933 authors of Foerster Map depict the pattern of pain transportation following a myocardial infarction or angina by emphasizing the medial region of the upper limb transmitted by T1-3.

    In their comprehensive research, Lee et al. examined the variations among dermatome maps and created an “evidence-based” map by combining components from prior maps.

    Although the phrase “evidence-based” may raise some eyebrows, their suggested map is an organized effort to compile the most reliable data currently accessible.

    Anatomy:

    The dermatomes—where are they?

    Skin regions known as dermatomes depend on nerves that attach to your spinal cord. That means that your entire body is covered in dermatomes except for your face. Because they do not have connections that pass through your spinal cord, the nerves in your face are an exception.

    The neural connections at the spinal column’s base allow for significant overlap between dermatomes. Thus, feelings originating from a particular dermatome pass via several spinal nerves simultaneously.

    A single vertebra, or set of interlocking bones, makes up your spine, commonly called your backbone.

    There are five portions to your spine:

    • The cervical vertebral column is located in this specific area of the neck.
    • Thoracic vertebrae form the middle decades and upper back.
    • lumbar spine: lower region of the back.
    • The sacral spine has five pairs of spinal nerves and five vertebrae, which normally fuse by the time you’re an adult. The pelvic bones are located in the sacral spine, which has a butterfly-like shape. Your pelvic bones would act as the butterfly’s wings, and your sacral spine as its primary body.
    • “coccygeal spine” is the coccyx or tailbone. It consists of one pair of spinal nerves and four vertebrae, which normally fuse when you’re an adult.

    Workers in the medical field utilize a letter-number combination to refer to the spinal nerves.

    Dermatomes

    Cervical spine-related dermatomes:

    head, neck, shoulders, arms, and hands are connected Dermatomes in the cervical region of your spine. The prevalence of cervical vertebral column nerves is categorized into numerous dermatomes, which are listed below:

    • C1: This dermatome is located in the center of the back of the head for people with it.
    • C2 to C3: Back of the head, upper neck, and jaw beneath each ear.
    • C3-C4: Located between the neck’s back, chest, and lower portion.
    • C4 to C5: Shoulders and upper arms
    • The thumb, upper arm, and thumb make up the forearm region (C5–C6).
    • C6-C7: forearm, index, and middle fingers.
    • C6-C8 depicts a ring on your finger, lower forearm, and wrist.

    Thoracic spine-related dermatomes:

    Most of your thoracic spine’s dermatomes are located on your trunk, which comprises your back, abdomen, and chest. The dermatomes of T1 (wholly on your arms) and T2 (on your arms and trunk) are the only thoracic-connected dermatomes not on your trunk. The dermatomes, which are T3–T12 in number, surround your body’s trunk in rings.

    The dermatomes are located where:

    • T1: the upper chest, armpit, and arm.
    • T2 (upper chest and back)
    • T3 (upper chest and back)
    • T4: upper chest (nipples) and back
    • T5: mid-chest, back
    • T6: middle chest and back
    • T7: middle chest and back
    • T8: Upper abdomen and mid-back.
    • T9 refers to the upper abdomen and middle back
    • T10: abdominal (belly button) and mid-back
    • T11: abdominal and mid-back.
    • The mid-back and lower abdomen are represented by T12.

    Lumbar spine-related dermatomes:

    Your hips, legs, and feet are connected to the lumbar spine’s dermatomes. The dermatomes throughout can be discovered wherever they are:

    • L1–L2: the lower back( vagina, penis, and testicles ).
    • L2-L3 includes the lower extremities, groin muscles, and back.
    • L3-L4: kneecap, lower back, leg, and front-thigh quadriceps muscles.
    • L4-L5 calf muscles, front of the lower leg, kneecap, and inside surfaces of the foot, including big, second, and third toes.

    The sacral and coccygeal spine’s dermatomes:

    Your rear legs and the region surrounding your buttocks are among the dermatomes of your sacral spine. In the coccygeal region of your spine, there is only one spinal nerve and one associated dermatome.

    • S1 to S2: The outer side of your ankles, your fourth and fifth toes, the middle and outer portions of the back of your thighs, and calf muscles.
    • S2 to S3: A vertical region in the center of your buttocks that passes across the upper-middle and inner-middle portions of your calf muscles and the back of your thigh.
    • S3 and below: the genitalia, anus, and the skin region between them (referred to as the perineum) are all connected to every spinal neuron from S3 down, including the coccygeal spinal nerve.

    Which prevalent ailments and illnesses impact the dermatomes?

    Although dermatomes are skin regions, the disorders that affect them are usually caused by deeper problems within your body. The dermatomes are impacted by problems that affect specific spinal nerves or the spinal cord in that region. For this reason, symptoms affecting dermatomes might arise from any illness affecting your spinal cord or spinal nerves. In certain instances, the harm is highly confined, although the consequences can be extensive based on the impacted dermatomes.

    The following conditions might cause this type of injury or effect:

    Injuries. These kinds of injuries are most frequently caused by vehicle accidents, penetrating trauma (such as gunshot or knife wounds), and spinal fractures from falls. Injuries received during childbirth or in the first few weeks of life may also cause this (cerebral palsy is one example).

    Tumors of the spine. including malignancies. This can include cancer that begins elsewhere in your body and spreads to your spine, or it can comprise cancer that grows on or near your spinal cord.

    cysts, or cavities filled with fluid. They are referred to as syringomyelia when they develop around your spinal cord.

    infections. These may induce edema and inflammation or directly target your nerve roots and spinal cord. It can place too much pressure on your spinal nerves or the spinal cord itself because there isn’t much area for that swelling surrounding your spinal cord.

    Blood flow is absent (ischemia). Blood flow is essential for many physiological systems, including the spinal cord and spinal neurons.

    birth defects. myelomeningocele and spina bifida.

    Shingles.

    The virus that gives rise to becomes active and causes shingles, is most commonly referred to as herpes zoster. The virus may go dormant following chickenpox recovery and subsequently reactivate as shingles.

    Before the rash, sometimes there may be localized discomfort, burning, or tingling.

    symptoms that may appear are:

    • a headache and light sensitivity
    • a generalized sensation of illness
    • A shingles rash that covers three or more trusted Source dermatomes may appear more widely distributed in an individual with a compromised immune system.
    • Physicians call this widespread zoster.

    Pinched nerves.

    This compression typically affects the lumbar, or lower, part of the spine, however, it can occur elsewhere along the spine.

    A pinched nerve in its corresponding dermatome may cause numbness, tingling, or pain. Based on where the symptoms present, a doctor can determine which nerve is impacted.

    After that, the physician determines the pinched nerve’s underlying cause, cures it, and offers suggestions for symptom relief.

    Which of the following are some of the most prevalent signs of dermatome disorders?

    Deviations from normalcy in the nerves or spinal cord result in disorders affecting the dermatomes. Such disruptions can result in a variety of symptoms. Three categories apply to the symptoms:

    • motor (about movement).
    • sensory (connected to touch).
    • autonomic (about automatic bodily processes).

    Motor signs and symptoms:

    • weakened or paralyzed muscles.
    • Uncontrollably active or ineffective muscles can move uncontrollably.

    Sensory signs and symptoms:

    • Pain
    • tingling
    • numbness

    Autonomic symptoms:

    Body processes known as autonomic processes operate continuously whether or not you are aware of them. These processes aid in your body’s upkeep and regulation, making them crucial. If dermatome damage compromises autonomic functioning, you may have symptoms suggesting that your body cannot naturally control processes in that region. As an example, consider:

    • excessive perspiration (hyperhidrosis) or little perspiration (anhidrosis).
    • bladder or bowel muscle dysfunction that impairs your ability to control when you urinate (urinary incontinence).
    • Sexual dysfunction.

    Which common tests are available to screen for dermatome issues?

    The most popular types of testing are those that use imaging and nerve signal detection, such as:

    • CT scans, or computed tomography.
    • Magnetic resonance imaging (MRI) scans.
    • Cisternogram scan.
    • Electromyogram (EMG) tests.

    The purpose

    Dermatome testing is part of the neurological evaluation. They are frequently used to establish the neurologic “level” of a spinal cord injury and whether sensory loss on a limb is due to a single spinal segment.

    Method:

    A metal pin and cotton fabric wool are the best instruments for Dermatome testing. When the patient shuts their eyes, have them rate the various stimuli for the therapist.

    • Light Touch Test – Apply a piece of cotton wool to a small patch of skin to detect a light touch feeling.
    • A pinprick Examination: Pain Sensation: Ask the patient if they feel sharp or dull when gently pressing a pin against their skin.

    Enquiring carefully about the pattern or distribution of sensory symptoms (such as tingling, numbness, diminished, or absent sensation) from the patient during the review of systems gives the therapist some initial information to help direct the examination and help identify the dermatome(s) and nerve(s) involved.

    Compared to pain dermatomes, light-touch dermatomes are larger. In circumstances when just one or two subsections are impacted, pain sensitivity testing is a more sensitive evaluation method than light touch tests.

    What therapies are available for problems associated with dermatomes?

    Alternative therapies for spinal nerve disorders and associated dermatomes vary based on the underlying cause and context. A healthcare practitioner is the best person to advise you on the numerous therapies and what they propose because therapeutic options vary substantially.

    What measures can I take to avoid problems and issues with my dermatomes?

    Beginning with your spine is the initial step in taking care of your dermatomes because they are markers of the condition of your spinal cord and spinal nerves. Keep the options that follow details regarding your spine and spinal nerves in mind:

    Wear safety equipment, such as seat belts and other restraints, as directed. Spinal injuries are frequently caused by motor vehicle incidents. Seat belts and other safety precautions can help avoid major injuries.

    Lift safely. One way to prevent damage to your spinal cord and spinal nerves (like a herniated disc) is to lift using your legs rather than your back. You might need to wear a back support brace if you have a history of back issues, particularly if your profession involves a lot of lifting or if you lift weights regularly for physical activity.

    Use caution when handling weapons. gunshot wounds are the main cause. No matter what, you should ALWAYS handle firearms with the finest caution. Even when you’re positive they’re not loaded, act like they are.

    To prevent falls, take safety measures. When operating at an elevation, safety gear—especially safety harnesses is crucial. Additionally, you should take precautions against falls at home, particularly on staircases and in restrooms. This may entail installing handrails, using non-slip footwear and flooring, and removing potential trip hazards from the staircase.

    Give your bones top consideration. Vertebral fractures can result from conditions like osteoporosis and osteopenia, which are linked to bone loss.

    It matters how you position yourself. Your back is not designed to withstand the kind of strain that poor posture while standing or sitting can cause. As an illustration, consider a pinched nerve.

    Summary

    One spinal neuron connects each dermatome, or skin region. These regions come together to form a surface map of the body.

    Damage or malfunction of the spinal nerve may be the source of symptoms in the appropriate dermatome. Nerve injury or dysfunction can be brought on by trauma, infection, or compression.

    The degree and location of nerve injury can occasionally be ascertained by doctors using the intensity of symptoms in a dermatome. After that, they try to identify and address the damage’s root cause.

    FAQs

    What is the purpose of a dermatome?

    For skin grafting, tiny skin sheets are sliced with a surgical instrument known as a dermatome. Dermatomes come in a variety of varieties. Cutting dermatomes are portable instruments that need a high degree of technical expertise and may not consistently produce accurate results.

    Why do we only have thirty dermatomes?

    Thirty dermatomes make up your body—one more than spinal nerves. This is due to the infrequent presence of a sensory root in the C1 spinal nerve. Dermatomes thus start with spinal nerve C2. Your body’s dermatomes are distributed in different segments.

    How do dermatomes work?

    Dermatomes are skin areas that are associated with certain spinal nerve roots. On the way to and from your brain, nerve traffic to these regions passes through the designated spinal nerve (as well as occasionally its neighbors).

    Dermatomal pain: what is it?

    For a pain pattern to be categorized as dermatomal, it must originate from the associated nerve root at the location specified in the reference sources.

    Why is it vital to monitor dermatomes?

    Dermatomes are valuable tools for diagnosing and evaluating a wide range of illnesses. Dermatomes can be neurologically screened to identify patterns of sensory loss that may indicate a particular spinal nerve’s involvement.

    What dermatome symptoms are present?

    In its corresponding dermatome, a pinched nerve may cause numbness, tingling, or pain. So, a doctor can determine which nerve is impacted by the symptoms based on where they are presenting.

    References

    • Professional, C. C. M. (2024a, May 1). Dermatomes. Cleveland Clinic. https://my.clevelandclinic.org/health/body/24379-dermatomes
    • Nichols, H. (2024, August 5). Shingles (Herpes Zoster). https://www.medicalnewstoday.com/articles/154912#symptoms

  • Gate Control Theory of Pain

    Gate Control Theory of Pain

    The Gate Control Theory of Pain, proposed by Ronald Melzack and Patrick Wall in 1965, revolutionized our understanding of how pain is perceived in the human body.

    This theory suggests that pain is not merely a direct result of physical injury or tissue damage, but rather is modulated by complex interactions between sensory signals, nerve fibers, and the central nervous system.

    What is the nature of pain?

    A number of things, such as illness, trauma, or mental discomfort, can cause pain, which is a complex and unique feeling. One of the numerous mechanisms influencing pain perception is the nervous system’s capacity to transfer information from peripheral nerves to the brain and spinal cord, where pain is finally experienced.

    Ronald Melzack and Patrick Wall originally developed the gate-control theory of pain in 1965. The perspective postulates that a spinal cord gating mechanism, which permits or prohibits pain impulses from reaching the brain, regulates the amount of pain experienced. This theory has affected our understanding of the physiological processes behind pain and impacted the development of pain management strategies.

    The structure of pain:

    Gaining a solid comprehension of pain awareness is essential to fully comprehend the gate control theory of pain. Peripheral nerves, which are sensitive to unpleasant stimuli including pressure, severe temperatures, and tissue injury, are the source of pain signals. By using the dorsal root entry point, sensory neurons enter the spinal cord and transmit these electrical signals. After entering the spinal cord, several neurons filter the pain signals before sending them to the brain for interpretation and pain perception.

    The gate control theory of pain:

    pain pathways
    pain pathways

    The Gate Control Theory of Pain contends that interactions between complicated processes occurring at different levels of the nervous system govern how pain is perceived, rather than just being a linear experience. The core principle of the Gate Control Theory of Pain is that nociceptive impulses can be facilitated or prevented from contacting the brain via a neural “gate” situated in the spinal cord.

    Modulating this gate are both small-diameter unmyelinated C fibers and large-diameter myelinated A fibers. While the A fibers convey information about non-painful sensations like touch and pressure, the C fibers convey information about pain and other unpleasant sensations.

    The neurological circuitry that controls the gate is housed in the horn of the spinal cord. Substance P, a neurotransmitter released by activated C fibers, opens the gate and activates these neurons, allowing nociceptive impulses to reach the brain. But when the A fibers are stimulated, they release glutamate, a separate neurotransmitter that triggers a distinct group of neurons to close the gate and block the passage of nociceptive impulses.

    Apart from the aforementioned major fibers, various other factors can also influence the opening and closing of the gate. These factors include descending routes originating from the brainstem and higher centers in the brain, along with additional sensory data gathered from the body and surroundings. Anxiety and concentration, for instance, are examples of emotional and cognitive variables that can affect how pain is perceived by triggering descending pathways that either increase or decrease dorsal horn neuron activity.

    Physiology:

    Substituting the portion of substantia gelatinosa in the dorsal horn of the spinal column is the pain gate mechanism. When the substantia gelatinosa interneurons connect with primary afferent neurons, the gating mechanism occurs there. Consequently, the sensory data arriving from the primary afferent neurons is modulated by the substantia gelatinosa.

    Three types of primary neurons exist:

    Neural cues like light pressure, gentle touch, and hair transpiration stimulate the large diameter A-ß fibers. Because of their myelination, these fibers have a rapid impulse transmission rate.
    Smaller in diameter A-d fibers are lightly myelinated and triggered by noxious stimuli, specifically sharp, strong, tingling sensations, pain, and warmth.

    Because they are not myelinated, C fibers, like A-d fibers, transmit impulses at the slowest rate. Pain and temperature, specifically prolonged burning sensations, activate C neurons.

    In this case, non-noxious diameter A-ß fibers stimulate the interneurons in the substantia gelatinosa, causing an inhibitory response and blocking the transmission of pain signals to the brain. This closes the “pain gate.”

    Whenever the smaller-diameter A-d or C fibers stimulate the interneurons, an excitatory response is produced. Here, the brain receives pain signals that can be changed, transmitted back down through descending modulation, and experienced as different intensities of pain.

    The small diameter A-d and C fibers’ ability to transmit can likewise be lessened and inhibited by activating the big diameter A-ß fibers.

    Consequences for managing pain:

    The theoretical idea of gate control of pain has significant benefits for pain treatment. One of the main ramifications is that non-pharmacological treatments including physical therapy, cognitive-behavioral therapy, and relaxation methods might influence how much pain is felt. These treatments may decrease pain signals and enhance the spinal cord’s gating system by promoting inhibitory pathways in the brain and spinal cord.

    The spinal cord’s gate mechanism can also be changed via pharmacological means. In one instance, opioids such as morphine may reduce the transmission of pain signals by activating inhibitory circuits in the brain and spinal cord. Lowered excitatory neuron activity in the spinal cord is another way that non-opioid medications such as pregabalin and gabapentin can modify the gate mechanism.

    How to attempt to minimize your suffering:

    It separates the terminology used to describe bodily discomfort into two categories:

    The sensational aspect of pain is linked to the intensity or kind of pain you’re experiencing. Words like “throbbing,” “aching,” “sharp,” “tingling,” or “burning” might be used to describe these sensations, which are processed in the somatosensory cortex region of your brain.

    Pain’s affective dimension is linked to its psychological component, which includes factors like pain’s level of discomfort. The limbic system of your brain processes these emotions, which can be described by adjectives like “agonizing,” “torturous,” “miserable,” or “excruciating,” among others.

    To keep those gates closed, the goal is to figure out how to keep that area of your brain dormant. These three factors affect your limbic system, which can reduce pain.

    The diversion

    Your brain is unable to give your discomfort its full attention when it is preoccupied with something else.

    Has there ever been a case where a person with chronic pain disappears to pursue their hobby? That is the ability of diversion. For instance, crocheting, crossword puzzles, virtual reality, or even binge-watching your favorite TV show can help distract you from your discomfort while you’re healing from surgery.

    Profound calm

    Deep relaxation techniques are so effective that they have been demonstrated to assist patients limit, and in some cases even totally avoiding, the usage of opioids following surgery. Research indicates that individuals who engage in deep relaxation practices have a quicker healing rate following surgery.

    Reflections

    Your viewpoint on pain affects not only how much physical pain you endure but also how long it takes you to recuperate.

    She suggests engaging in a method known as “thought-stopping,” which is precisely what it sounds like choosing to divert particular ideas when they arise.

    Imagine yourself at a stop sign, watching as your mind wanders in that direction. Ultimately, the decision to follow that route is all yours. If you know the course will only make you feel worse, feel free to take an alternative one. However, you are welcome to continue on that one.

    Conclusion:

    In conclusion, there are significant therapy implications for the Gate Control Theory of Pain. It offers a framework for creating non-pharmacological pain management techniques including massage, acupuncture, and physical therapy.

    It is believed that these methods work by reducing the number of nociceptive impulses that are transmitted to the brain by opening the gate and stimulating the A fibers. New pharmacological painkillers that target the neurotransmitters and receptors responsible for opening and closing the gate have also been developed as a result of the notion.

    All things considered, the Gate Control Theory of Pain offers a thorough comprehension of the perception and management of pain. It has gained widespread acceptance and greatly advanced methods and therapies for pain control. It is crucial to remember that the hypothesis has drawbacks and that more investigation is required to completely comprehend the intricate interactions between the neurological system and pain perception.

    FAQs

    What is the theory of pain gait?

    The central nervous system can record pain if the gate is open, allowing pain impulses to enter the system. By blocking the gate, pain signals are not going to be capable of entering the brain and the person will not feel pain.

    Which quartet of pain theories exists?

    The Specificity (also known as the Labeled Line), Intensity, Pattern, and Gate Control Theories of Pain are the four most prominent theories of pain perception.

    Who first proposed the pain gate theory?

    Ronald Melzack and Patrick Barriers devised the Gate Theory of Pain, published in Science in 1965. Its purpose was to offer a method for encoding the nociceptive aspect of cutaneous sensory input.

    What is pain and the Neuromatrix theory?

    Neuronal functions and impulse patterns are the source of pain, according to the neuromatrix theory. Each person has a unique neuro matrix that is shaped by their genetic makeup and altered over time by memories and sensory experiences.

    What does the gate theory of pain look like in practice?

    Another illustration of the gate control hypothesis of pain would be if someone were to stub their big toe. The nervous system’s spinal cord would get the pressure and touch sensation right away, and the projection neurons in the cord would subsequently send the signal to the brain.

    References

    • Clinic, C. (2024b, August 2). Pain and the Brain: What Is the Gate Control Theory? Cleveland Clinic. https://health.clevelandclinic.org/gate-control-theory-of-pain
    • Vaghela, M. (2023, March 4). Gate control theory of pain – Samarpan Physio. Samarpan Physiotherapy Clinic. https://samarpanphysioclinic.com/gate-control-theory-of-pain/
  • Best Exercises For Stiff Neck

    Best Exercises For Stiff Neck

    Best Neck Exercises For Stiff Neck

    Exercises for stiff neck are essential for relieving discomfort and restoring range of motion. Whether caused by poor posture, stress, or long hours spent at a desk, a stiff neck can limit your daily activities.

    Incorporating gentle stretches and mobility exercises can help reduce muscle tension, improve flexibility, and prevent future stiffness. With regular practice, these exercises can promote better neck health and overall well-being.

    The best defense against injury is having strong, flexible muscles and joints that can tolerate stress and damage. The back and neck move in synchrony.

    Long periods of immobility, such as spending hours in front of a computer screen, increase the risk of developing back or neck pain. The best defense against back and neck pain is movement. When you’re not using your computer screen, stretch often.

    These simple neck pain exercises aim to assist manage mild to moderate neck discomfort episodes.

    Neck Glide

    neck glide
    neck glide

    The neck glide is a mild range-of-motion stretching method that can assist increase the neck’s flexibility. Additionally, it can lessen soreness and stiffness.
    However, you may safely and effectively stretch your neck muscles with neck slides. Your range of motion and flexibility may improve if you perform these exercises on a daily basis.

    Steps To Follow:

    • Sit up straight and keep your shoulders relaxed to perform a neck glide.
    • Slowly tilt your forehead forward while tucking your jaw into your chest.
    • Next, carefully lift your head to reveal the ceiling’s surface.
    • Hold once more for a short while.
    • Note: If you experience any pain while performing the workout, stop right away and contact your physician.

    Neck Extension

    Bhujangasana (Cobra Pose)
    Bhujangasana (Cobra Pose)

    To prevent damage, it’s crucial to begin slowly and gradually raise the intensity of your activities.

    Your workouts can become more severe as you progress by increasing the resistance, holding the movements for longer, or adding more repetitions. But it’s crucial to pay attention to your body and quit if you begin to feel uncomfortable.

    Steps To Follow:

    • reclining on your stomach
    • In front of you, extend your arms.
    • After holding it for a few seconds, progressively lower it once more.
    • Ten to fifteen times, repeat.

    Neck Rotation

    Neck Rotation
    Neck Rotation

    Make gentle, slow movements with your neck. Keep your head small and avoid tilting it to one side.
    If your profession involves holding your head motionless for extended periods, such as when using a computer, this is a good exercise to do at work.

    Steps To Follow:

    • Focus on the immediate ahead to begin.
    • Slowly turn your head to the left.
    • Next, turn your head carefully to the opposite side.
    • Hold for ten seconds.
    • Return to the starting point.
    • Next, do it ten more times.

    Lateral Extension

    Lateral Extension

    A straightforward stretching technique that can assist improve the neck muscles’ range of motion and flexibility is lateral neck flexion, sometimes referred to as lateral neck bending.

    Steps To Follow:

    • Sit or stand straight, shoulders relaxed.
    • Put your ear on your shoulder and tilt your head slightly to one side.
    • Avoid placing your head in an unpleasant posture while maintaining a modest stretch.
    • As you tilt your head farther, place your hand on the opposite side and gradually increase the resistance.
    • This will allow you to continue the stretch and concentrate on the deeper neck muscles.
    • Breathe steadily while maintaining the lateral flexion position for five to ten seconds.
    • Gradually return your head to its initial neutral posture.
    • With your head cocked towards the opposite shoulder, repeat the process.
    • As your flexibility increases, increase the amount of repetitions you do on each side to five to ten.

    Shoulder Shrugs

    Shoulder-shrug
    Shoulder-shrug

    The shoulder shrug is a straightforward yet powerful exercise for strengthening the muscles in the upper back and shoulders. They are also quite effective in promoting better posture and relieving tension.

    Steps To Follow:

    • As you stand, keep your arms by your sides and place your feet shoulder-width apart.
    • Raise your shoulders slowly in the direction of your ears, as though you were trying to touch them.
    • After letting go a few times, gradually drop your shoulders once more.
    • Ten to fifteen times, repeat.

    Tilted Forward Flexion

    Tilted-Forward-Flexion
    Tilted-Forward-Flexion

    Bending the head and neck forward from a neutral position is known as tilted forward flexion. This movement is commonly seen in those who have poor posture or who spend a lot of time on their phones or laptops.
    This simple exercise called tilted forward flexion, can help you stretch the muscles at the front of your neck and extend your range of motion. It’s also an excellent workout for reducing stiffness and soreness in the neck.

    Steps To Follow:

    • Maintain a straight back and relaxed shoulders whether you’re standing or seated.
    • Carefully lower your chin to your chest if you have tension in the front of your neck.
    • Hold the stretch for 5–10 seconds.
    • Gradually revert to your initial position.
    • Repeat ten to fifteen times.

    Deep Stretching

    Deep-Stretching
    Deep-Stretching

    Steps To Follow:

    • Maintain proper posture when you tilt your head to rest against your shoulder.
    • You can use your hand to exert pressure, as demonstrated.
    • Hold for thirty seconds, three times.

    Resistance Presses

    Resistance-Presses
    Resistance-Presses

    Resistance pressing is one type of isometric neck workout that can aid in the development of stronger neck muscles. They may also aid in reducing stiffness and soreness in the neck.

    Steps To Follow:

    • Maintain head in a neutral position.
    • For five seconds, press into your head in each of the following positions, then let go.
    • Put a hand on your forehead to stretch. Stretch your hand behind your head.
    • Take 30 seconds to complete this.

    Towel Pull

    TowelPull
    TowelPull

    A cervical traction treatment called a towel pull is used to ease neck discomfort and stiffness. It’s an easy and efficient at-home workout routine.

    Steps To Follow:

    • Using your hands to secure the ends, wrap the towel over your neck.
    • Roll your head over the fabric and slowly elevate your eyes as high as you can.
    • To support your cervical spine while stretching your head back, apply light pressure on the cloth.
    • Avoid remaining in that posture.
    • Still, head back to where you were.
    • Repeat ten times.

    How Often to Perform Neck Stretches?

    If you have a tight, painful neck that is difficult to move again, it may be helpful to try each of these stretches only once.

    These stretches can be made more comfortable with additional practice, and they can even be extended to encompass multiple sets or ten-second holds. It’s imperative to remember that the goal is to improve neck flexibility and function rather than to constantly make things more uncomfortable.

    Once the initial symptoms subside, long-term neck strengthening and stretching exercises can be done to lessen neck stiffness and discomfort. It lessens the chance of experiencing discomfort again.

    When to Get Medical Help?

    If you have a stiff neck along with other troubling symptoms including weakness, tingling in the arms, fever, nausea, dizziness, or headache, get medical help immediately once.
    Additionally, before starting any fitness program, make an appointment with a doctor if the patient has a history of severe diseases or if the tightness or soreness in their neck doesn’t disappear after a few days.

    Conclusion

    A stiff neck is often accompanied by pain, stiffness, and limited neck range of motion. Although muscular sprains or strains are typically the reason, other possible causes include meningitis, whiplash, or arthritis.

    Common signs of a stiff neck include soreness, stiffness, and limited neck range of motion, though these may differ according to the underlying cause. Relocating may cause minor to serious neck soreness. Additionally, you might be experiencing arm, shoulder, or headache pain.

    Most stiff necks resolve on their own within a few days or weeks. Nonetheless, you ought to consult a physician if your discomfort is extreme or does not go away in a few days.

    FAQs

    Which treatment is best for a tight neck?

    The greatest ways to quickly relax stiff neck muscles are often to stretch, apply a little heat, and take pain medicine.

    Which workout is best for a tight neck?

    Forward Slope Flexion
    Using your fingers, gently massage your chin back until the nape of your neck expands gradually and painlessly. For no more than 20 seconds, maintain the position. Return to the beginning position after doing this a few times.

    What is the duration of a stiff neck?

    Neck pain from a muscular strain or tension usually goes away on its own in a few days. Exercise stretches, massage, and physical therapy are often beneficial when neck pain persists for longer than a few weeks. Sometimes steroid injections or surgery are required to relieve neck pain.

    How do I relax my neck and shoulders?

    Shoulder shrugs: Raise your shoulders slowly to your ears, then hold them there for five seconds before letting go. Repeat ten times over.
    Tilt your head to one side and bring it near your shoulder to lengthen your ear. After five seconds of holding, switch sides. On each side, repeat five times.

    References:

    • Neck Stretches for Pain Relief: How to Stretch Your Neck. (2024, June 30). WebMD. https://www.webmd.com/fitness-exercise/fitness-neck-stretches
    • Meyler, Z., DO. (n.d.). 4 Easy Stretches for a Stiff Neck. Spine-health. https://www.spine-health.com/wellness/exercise/4-easy-stretches-stiff-neck
    • Sharma, R. (2023, December 13). 9 Best Exercises For Stiff Neck – Mobile Physio. Mobile Physiotherapy Clinic. https://mobilephysiotherapyclinic.in/best-exercises-for-stiff-neck/
  • Waddling Gait

    Waddling Gait

    Introduction

    Waddling gait, also known as myopathic gait, is one example of an inappropriate gait. The reason for the waddling is a weakening of the pelvic girdle’s proximal muscles. For instance, in myopathies, weakness in the muscles of the upper thighs and hip region results in pelvic instability during standing as well as walking. When the hip joint’s extending muscles are weakened, the hip joint’s posture flexes and lumbar lordosis worsens.

    Patients typically struggle to get to their feet after sitting down. The hip on the side of the swinging leg falls with every stride because of weakening in the gluteus medius muscle (also known as the Trendelenburg sign).

    Pregnancy, congenital hip dysplasia, muscular dystrophies, and spinal muscular atrophy are conditions linked to a myopathic gait. Waddling is the apparent gait. Patients often try to prevent the hip from falling on the swinging side by bending their trunk towards the side that is in the stance phase (this is known as the Duchenne sign in German literature).

    When the origin and insertion point of the gluteus medius muscle are closer than normal due to orthopedic difficulties, such as posttraumatic elevation of the femoral neck’s trochanter or pseudoarthrosis.

    What is the Waddling gait?

    Waddling gait is another name for mayopathic gait, which is a walking form. A bowl-shaped framework of bones and muscles that connects your upper body to your hips and legs, the pelvic girdle is responsible for those muscles that are weak.

    It is also in charge of assisting with your balance. A weak pelvic girdle makes walking tougher. Your body therefore sways side to side to prevent you from falling. As you walk, your hips could also sag to one side. To find out more about the reasons behind a waddling gait in kids as well as adults, continue reading.

    What causes the Waddling gait?

    Pregnancy

    Pregnant women frequently exhibit waddling gaits, particularly in the third trimester. This might be impacted by different reasons.

    • During the second trimester, your body begins to create relaxin, which relaxes and expands the ligaments and joints of your pelvis.
    • A broader pelvis can change how you walk, but it also makes labor and delivery safer and easier.
    • Your pelvis could widen in addition to relaxing due to the downward pressure of the growing fetus. Your stomach starts expanding greatly in the later weeks of pregnancy, which can cause your center of gravity to shift and make it more difficult to balance, particularly when walking.
    • You may also begin to lean back a little when standing or walking as your spine and pelvis begin to curve in to support your expanding tummy. A waddling gait might also result from both of these conditions.
    • Waddling while pregnant is common, so don’t freak out. Indeed, it may even lower your chance of falling. After delivery, waddling gaits usually come to an end, however they could persist for a few months.

    Age

    The majority of young children, particularly toddlers, do not walk like adults do. Perfecting balance and walking mechanics takes time. Waddling and taking little steps are common in youngsters under the age of two. But if a waddling gait persists until the age of three, it could indicate a more serious problem, particularly if it’s associated with:

    • Walking on the balls of your feet.
    • An enlarged stomach.
    • Tripping or falling.
    • Low endurance.

    Kids older than three who waddle may be showing signs of:

    Lumbar lordosis is one of these disorders that frequently resolves on its own. Others, on the other hand, need to be treated, therefore it’s ideal to collaborate with your child’s pediatrician to identify the root reason. In certain situations, your child might only require physical therapy.

    Muscular Dystrophy (MD)

    A class of rare disorders known as muscular dystrophy (MD) weakens muscles and eventually causes them to break down. A waddling gait is suggestive of some MDs, including:

    • Duchenne Muscular Dystrophy: Boys are almost entirely affected by Duchenne muscular dystrophy, a disorder that affects the arms, legs, and pelvis. One of the first indications is difficulty crawling or getting off the ground.
    • Becker Muscular Dystrophy: This disorder, which is a milder version of Duchenne MD, is likewise more prevalent in boys. It affects the shoulder, hip, pelvic, and thigh musculature. In late childhood or early adolescence, Becker MD is frequently diagnosed.

    Although MD cannot be cured, there are ways to improve mobility and decrease the disease’s progression. Such therapies include assistive devices, physical therapy, medication surgery, and gait training.

    Hip dysplasia in infants

    The hip joints of some infants do not develop normally. As a result, hip dislocation is considerably more likely due to shallow hip sockets. Instability can occasionally result from loose ligaments holding the hip joint in place. Hip dysplasia in infants can develop during the first year of life or be present from birth. In certain cases, newborn hip dysplasia can also result from overly tight swaddling.

    Additional indicators of neonatal hip dysplasia include:

    • Different lengths of legs.
    • Walking on tiptoe or with a limp.
    • Reduced range of motion or flexibility in one leg or a particular side of the body.
    • Uneven folds of skin on the thighs.

    Hip dysplasia in infants is often screened and diagnosed by pediatricians at birth and during the first year of routine examinations. It can typically be addressed with supportive aids, like a brace or harness, if detected early. Older babies may need a body cast or surgery for the right treatment.

    Spinal muscular atrophy (SMA)

    SMA, or spinal muscular atrophy, is a neurological condition that is acquired. This weakness in the muscles and other problems have been triggered by the degeneration of your spinal cord’s motor neurons. Thigh muscle weakness and loss are symptoms of autosomal dominant spinal muscular atrophy with lower extremity predominance, a kind of SMA. Occasionally, infancy is when this kind of SMA typically initially appears.

    Autosomal dominant spinal muscular atrophy with lower extremity predominance can also result in a waddling gait, as well as:

    • Foot abnormalities.
    • Muscular tone (high or low).
    • Excessive curvature of the lower back.
    • Respiratory issues.
    • The head is small in size.

    Although there isn’t a cure for SMA, symptoms can be managed with medicine, physical therapy, and surgery.

    How is Waddling Gait diagnosed?

    There are multiple ways to identify the cause of a waddling gait. Along with a physical examination, your doctor will discuss your symptoms with you. They might additionally verify:

    • Coordination, tone, and strength of muscles.
    • Check for any irregularities in your neck and spine.
    • To figure out your vulnerability to falls.
    • Blood pressure readings when standing and sleeping.
    • Your outlook.
    • Regarding neurological conditions like muscular dystrophy.
    • For arthritis.

    Based on the findings, more testing or imaging investigations might be required.

    • Using genetic testing to find particular disease indicators.
    • Muscle biopsy for confirmation of muscle disorders.
    • An enzyme blood test to look for signs of MD, such as increased creatine kinase levels.
    • Using ultrasonography to detect hip dysplasia.

    What’s the Treatment for Waddling Gait?

    The etiology of the waddling gait will determine the course of treatment. Several circumstances may improve on their own. Additional alternatives for treatment include:

    • Walkers and canes for equilibrium.
    • Physical therapy to support flexibility, balance, and strength.
    • Fall safety precautions
    • Splints or leg braces to assist in foot alignment
    • Health Care
    • Prosthetics or surgery

    Physical therapy for Waddling Gait

    Physical therapy is a common and effective therapy for the waddling gait. Its main goals are to increase overall coordination, increase flexibility, and strengthen the weaker muscles.

    • Strengthening exercises: Exercises that target strengthen the gluteus medius and other hip abductor muscles. This can involve hip bridges, clamshells, and side-lying hip abduction.
    • Stretching exercises: Exercises that increase the flexibility of the back, legs, and hips.
    • Balance exercises: Exercises for balance include using a balancing board, walking in pairs, and standing on one leg. They also improve balance and stability. Enhancing balance and reducing the risk of falling can be achieved through particular balancing exercises and activities.
    • Correcting Posture: To increase efficiency and lessen muscle strain, physical therapists can assist people with waddling gait in learning appropriate posture and body alignment.
    • Proprioception training: Activities like walking on uneven terrain or closing your eyes while standing that improve coordination and body awareness.
    • Assistive equipment: To offer assistance and enhance mobility, it may occasionally be advised to use assistive equipment like canes or braces.
    • Aquatic Therapy: Water-based workouts can provide a low-impact means of enhancing coordination, strength, and flexibility. This is known as aquatic therapy.

    Exercises for Improving Waddling Gait

    The following exercises may be beneficial in building muscle strength in the areas required for keeping a stable gait:

    side-lying-hip-abduction
    side-lying-hip-abduction

    Side Lying Hip Abduction:

    • With your legs positioned on top of one other and your knees slightly arched, rest on your side.
    • Make sure your top foot is flat on the ground and maintain a hip-shoulder alignment.
    • Gently elevate your upper leg in the direction of the roof while keeping it in line with your body.
    • After a few seconds of holding the highest position, carefully lower your leg back down.
    • Keep performing ten to twelve times on each of the sides.
    Clam Shell exercise
    Clam Shell exercise

    Clamshell:

    • Lying on your side, hold your feet and flex your knees.
    • Hold your feet together and open your knees like a clamshell.
    • Use theraband for resistance.
    lunges
    lunges

    Lunges:

    • Step forward on one leg and lower yourself until your knees are 90 degrees bent.
    • Preserving an erect back is essential when performing lunge movements.
    Hip bridge exercise
    Hip bridge exercise

    Bridge:

    • Flex your knees and place both feet gently on the carpet while you lie on your backside.
    • Raise your hips away towards the ceiling so that your knees and shoulders line up.
    One-Leg Stand
    One-Leg Stand

    One-Leg Stand:

    • Assume a standing posture with your feet together, arms by your sides, or grasping the chair.
    • Preservation of an erect knee, carefully lift one leg off the base.
    • To retain your balance, stand on one leg for as long as you can. With another leg, repeat the process.
    Tandem Stance
    Tandem Stance

    Tandem Stance:

    • Bringing both feet together, step one foot directly behind the other to balance on a narrow base.

    Summary

    Pregnant women frequently experience waddling gait, which usually goes away a few months or soon after the baby is born. It also frequently goes away on its own in kids under the age of two. If not, it can be a sign of a more serious illness like MD or baby hip dysplasia.

    FAQs

    What is the waddling gait?

    A waddling stride, which resembles the walk of a duck, is produced by overdoing the movement of your upper body. Waddling gait can result from either hip dislocation or a slow, inherited muscle deterioration.

    What sort of waddling gait occurs by muscle weakness?

    Myopathic gait is another name for waddling gait, which is a walking manner. Your muscle weakness comes from the pelvic girdle, a structure composed of bones and muscles that form a bowl and join your torso to your hips and legs. It is also responsible for helping you maintain that sense of balance

    What is the appearance of a waddling gait?

    Waddling down to the river were the ducks. A chubby, short waiter approached. The penguins swam in their pool and waddled on their rocks. An old female customer waddled in as the door jangled.

    Can the waddling gait be cured?

    Early intervention and focused therapies, including physical therapy, can often address the root reasons for a waddling gait and help improve function and mobility.

    How can one stop their walking waddling?

    Strengthening Your Hamstrings: During walking, your hamstring muscles, which are located in the rear of your thighs, are essential for stability and balance. Waddling lessens the chance of developing a waddling gait by strengthening these muscles with workouts like leg curls and bridges.

    References

    • Kahn, A. (2018, September 29). Walking Abnormalities. Healthline. https://www.healthline.com/health/walking-abnormalities#diagnosis
    • Wikipedia contributors. (2023, April 12). Myopathic gait. Wikipedia. https://en.wikipedia.org/wiki/Myopathic_gait
    • What to Know About Waddling Gait. (2024, February 15). WebMD. https://www.webmd.com/a-to-z-guides/what-to-know-waddling-gait
  • 15 Best Exercises for Labral Tears of the Hip

    15 Best Exercises for Labral Tears of the Hip

    Exercises for hip labral tears Improving range of motion, power, and mobility could help in the treatment of hip labral tears.

    Along with keeping proper posture and awareness of your movements, you can help reduce pain while improving your general health by including these exercises in your daily routine. Never begin a new exercise program without consulting a physical therapist, especially if you have a particular injury or health issue.

    What is a Labrum?

    The “Hip Labrum,” or fibrous, cartilage-encircling Acetabular Labrum, encircles the hip socket. Its major function is to stabilize the lower body and hold the thighbone in place. The labrum functions as a rubber seal to promote movement and regulate the amount of fluid in the joint when it is healthy.

    The leg may rotate and move in a variety of planes because of the complex hip joint. Ignored labrum tears can be extremely painful and result in severe hip instability.

    How Do Hip Labral Tears Develop?

    As an example, consider the hip joint. Acetabulum is situated at the apex of the femur, which is the ball that makes up the shinbone. When the soft tissue covering the acetabulum becomes damaged, a labral tear develops.

    The labrum makes it easier for the femoral head to glide smoothly inside its socket. This relieves pain and facilitates painless pelvic movement. It also acts as a cushion to maintain the ball and socket’s separation and interaction.

    Repeatedly engaging in twisting and turning sports and long-distance running are common causes of hip labral tears. The degree of symptoms varies.

    Causes:

    A hip labral tear may result from multiple sources, including repetitive strain, unplanned or violent movements, or actual joint injury. In certain situations, untreated structural defects of the bones can lead to issues that worsen with time.

    • Injury

    The hip joint itself can suffer damage that results in hip labral injuries. This can happen to those who play activities that need strong, repeated movements, such as golf, football, hockey, and soccer.

    • Repeating Motions

    A larger risk applies to athletes and anyone engaged in activities involving repeated hip movements.

    • Structural Conditions

    Additional causes of hip labral tears include illnesses that cause abnormal hip mobility. The femur head does not fit into the socket correctly in femoroacetabular impingement (FAI). Range of motion restriction and persistent groin pain may result from this ill-fitting garment. For certain patients, it can result in osteoarthritis if treatment is not received.

    • Degenerative conditions

    Chronic (long-term) degeneration of the interarticular cartilage results in osteoarthritis. As time passes, the cartilage ages more slowly and is more prone to tearing. Having overweight or older may increase your risk of developing osteoarthritis. Osteoarthritis patients typically experience pain and stiffness in multiple joints, including the hip and knee.

    Signs and symptoms:

    Hip labral tear symptoms are simple to identify. The lower back, hips, hamstrings, and abdomen are common places for the ache to radiate after starting down in the groin. Even during ordinary, stress-free activities like walking, twisting, or sitting in a car or at a computer, patients frequently experience pain.

    Among these indications are:

    Weakness in the muscles surrounding the hip.

    • Pain

    Hip pain is a typical symptom. Usually felt in the hip or groin region, it may also cause a sharp, deep ache.

    • Restricted Range of Motion

    Activities like bending, twisting, or rotating the hip may be uncomfortable because labral tears can reduce the hip joint’s range of motion. stiffness in the hips when moving at full range.

    • Pinching, irritating, or hip-catching sensation

    Many persons with labral tears express feeling like something clicks, pops, or stops when they move their hip. The flexion, abduction, and external rotation of the knee in an extended and bent position cause pain when attempting to raise a straight leg against opposition.

    Physical Therapy’s Advantages:

    Despite the etiology, a rupture of the cartilage labral ring can have a significant effect on the hip’s stability and functionality.

    As a result, it can be quite beneficial when working together with a musculoskeletal specialist like a physical therapist and a movement specialist.

    • Create an exercise schedule that will help in your speedy recovery and return to your daily activities.
    • Support in your recovery in the event that arthroscopic hip surgery comes out to be necessary.

    Exercises for Labral Tears of the Hip:

    During typical movements, the hip’s ball and socket joint is stabilized by a ring of cartilage known as the labrum. Although these ailments can affect anyone, athletes are more likely to experience them owing to overuse, trauma, or muscular imbalances. Whether or not surgery is required, your recovery from a sprained hip depends on the activities you do to encourage healing and circulation.

    Butterfly pose

    • Start by sitting on the floor.
    • Keeping your ankles in place, push your feet closer together.
    • After that, move your feet together until your toes touch.
    • Your hands should be wrapped around your ankles.
    • Pull the knees as close to the floor as you can with minimal effort.
    • Hold this position for a few seconds.
    • Then return to your neutral position.
    • Then relax.
    • Perform this exercise five to ten times.
    Butterfly-stretch
    Butterfly-stretch

    Kneeling Hip Flexor Stretch

    • Maintaining that foot flat on the floor, extend the other leg out in front of you while kneeling on the injured leg.
    • When you need to, you could put your hands on your front knee for stability.
    • Maintain the upper body straight.
    • Then, push yourself forward until you’re experiencing stretch.
    • Hold this posture for a few seconds.
    • Then return to your neutral position.
    • Then relax.
    • Perform this exercise five to ten times.
    Hip flexors strech exercise
    Hip flexors strech exercise

    Piriformis stretch

    • Start by lying down on the ground surface.
    • Make sure to flex each knee.
    • Keep your feet level with the ground.
    • Currently, place your right ankle over your left leg.
    • Cover the left leg with your hands.
    • Pull your leg in close to your upper body.
    • Hold this posture for a few seconds.
    • Then return to your neutral position.
    • Then relax.
    • Perform this exercise five to ten times.
    Piriformis Stretching.
    Piriformis Stretching.

    Hamstring wall stretch

    • Look for an open door.
    • Check that your left leg is fully extended and your lower back is aligned to the floor.
    • There should be space for the left leg to pass through the door opening.
    • Bring your right leg into line with the wall next to the door.
    • After adjusting the body’s distance from the wall, the right leg should feel slightly compressed.
    • Hold this position for a few seconds.
    • Then return to your neutral position.
    • Then relax.
    • Perform this exercise five to ten times.
    Hamstring stretch on wall
    Hamstring stretch on wall

    Calf Stretch

    • Start with facing a wall.
    • Ensure that you perform the exercise using the correct posture.
    • For the duration of the process, hold onto the leg that needs stretching.
    • Continue to walk forward while keeping your knee straight on the part you are extending until your knee or calf feels stretched.
    • Hold this position for a few seconds.
    • Then return to your neutral position.
    • Then relax.
    • Perform this exercise five to ten times.
    standing calf stretch
    standing calf stretch

    Quadriceps Stretch

    • Reach out and grasp a table, countertop, door frame, or wall while keeping your feet hip-width apart.
    • To grip onto your ankle, bend your knee to get it back toward your butt.
    • Once your balance is done, gradually advance your foot toward your butt until your front thigh feels fully extended.
    • To hold the stretch, you need to keep your posture straight and upright.
    • Hold this position for a few seconds.
    • Then return to your neutral position.
    • Then relax.
    • Perform this exercise five to ten times.
    Quadriceps stretching exercises
    Quadriceps stretching exercises

    Straight Leg Raise

    • Make yourself comfortable first by resting on a table or the floor.
    • Now bend your knee slightly.
    • Next, carefully raise your leg.
    • While the other knee stays straight.
    • Hold this position for a few seconds.
    • After that, lower your leg.
    • Then return to your neutral position.
    • Then relax.
    • Perform this exercise five to ten times.
    Straight-leg-raise
    Straight-leg-raise

    Standing hip abduction

    • Maintaining a straight posture and placing your feet shoulder-width apart are essential.
    • Reach out with your left arm and grab a sturdy item, like a chair or table.
    • Raise your right leg out to the side while keeping your feet together.
    • Refrain from bending your hips; instead, keep your left leg upright.
    • Hold this position for a few seconds.
    • Then return to your neutral position.
    • Then relax.
    • Perform this exercise five to ten times.
    Standing-hip-abduction
    Standing-hip-abduction

    Prone leg raise

    • Moving your head to one side while lying face down might be more comfortable for you.
    • Maintaining your hips level, lift one leg slightly off the ground.
    • Now, contract your buttocks and stomach muscles.
    • Hold this position for a few seconds.
    • Lower your leg.
    • Then return to your neutral position.
    • Then relax.
    • Perform this exercise five to ten times.
    prone-leg-raise
    prone-leg-raise

    Seated Leg Adduction

    • The first step is to sit down on the chair.
    • Make sure you have a little cushion or exercise ball between your knees.
    • For stability, the upper body must remain static and the core must be active.
    • Push your knees together and squeeze into the ball or cushion, which is positioned between them.
    • Hold this position for a few seconds.
    • Then return to your neutral position.
    • Then relax.
    • Perform this exercise five to ten times.
    Seated Leg Adduction
    Seated Leg Adduction

    Standing Hip Circles

    • Begin by standing comfortably on the ground.
    • To help you balance better, place your hands on your hips.
    • To begin the exercise, slowly push your hips forward and to the right as they are rotating in a circle.
    • For more circular hip rotation, rotate your hips to the right, then back, then left, and finally forward again.
    • Swing your hips many times, in a clockwise and counterclockwise direction.
    • Then return to your neutral position.
    • Then relax.
    • Perform this exercise five to ten times.
    Hip circles
    Hip circles

    Standing hip flexion

    • Maintain a straight standing posture.
    • With arm extended forward, grasp a sturdy object for support, like a table or chair.
    • Your right knee should be gradually raised to hip level or as high as feels comfortable.
    • Hold this position for a few seconds.
    • Then return to your neutral position.
    • Then relax.
    • Perform this exercise five to ten times.
    standing-hip-flextion
    standing-hip-flexion

    Fire hydrants

    • Get down on your knees on the floor first.
    • Look down and contract your core muscles.
    • After that, you must extend your left leg 45 degrees off the ground.
    • Maintain a 90-degree bend in your knee.
    • Maintain a stable pelvis and core.
    • The only movable component in your body should be your hip.
    • Return your leg to the beginning position to complete a single repetition.
    • Then return to your neutral position.
    • Then relax.
    • Perform this exercise five to ten times.
    Fire-Hydrant-workout
    Fire-Hydrant-workout

    Single-leg glute bridge

    • Initially, person should lie down on the ground.
    • Now bend your knees.
    • Raise one leg straight up into the air upward as you can.
    • Apply pressure by putting your body weight via the leg that is on the floor.
    • Maintain a straight hip position.
    • This form ought to make your entire thigh and buttocks feel exhausted.
    • Hold this position for a few seconds.
    • Then return to your neutral position.
    • Then relax.
    • Perform this exercise five to ten times.
    Single-Leg Bridge Exercise
    Single-Leg Bridge Exercise

    Dead bug

    • To begin, lay down on the floor in a relaxed supine position.
    • Then your knees bent 90 degrees.
    • After that, lift your feet off the ground and reach your arms up to the ceiling.
    • Stretch the opposing leg toward the floor and reach one arm straight back by your ear.
    • Pulling your right arm back and extending your left leg toward the floor is one process to get started.
    • Without contacting the ground, try to maintain your right arm and left leg a few inches off it.
    • Stay flat on the floor for a few seconds by contracting the muscles in your abdomen.
    • Take care not to arch your back.
    • Then return to your neutral position.
    • Then relax.
    • Perform this exercise five to ten times.
    dead bug exercise
    dead bug exercise

    What safety precautions are required when exercising?

    • Ensure that every piece of equipment you use has been adjusted correctly.
    • Refrain from engaging in difficult activities.
    • Stretching should be done as many times as suggested by the exercise’s guidelines, both before and after sessions.
    • Use gentle stretching and bending motions.
    • To increase your range of motion and encourage relaxation while training, dress comfortably and loosely.
    • Between your workouts, give yourself a rest.
    • While working out, maintain a straight posture.
    • Keep yourself hydrated.
    • As soon as the pain becomes severe, exercise should be discontinued.
    • Typically, stretching the muscles in your stiff joints is difficult. Stretch and exercises should not hurt you or give you the impression that someone has wounded you because they are terrible for you and exacerbate your problem.

    When are you going to stop working out?

    • Fever
    • Headache
    • If exercising hurts, you ought to stop.
    • Intense muscle burning.
    • You’re not feeling well.
    • If there is pain or numbness.

    Avoid the following workouts if you have a torn hip labrum:

    Physical therapy is a possible recommendation from your doctor for your torn labrum. This typically means doing exercises that strengthen the muscles that support the hips the quadriceps, gluteal muscles, and hip flexors. These movements may help alleviate pain, widen the range of motion, and lessen stiffness.

    But not every activity is good for a labrum injury. As you recover from a hip labral tear, you should avoid the following kinds of workouts:

    • High-Impact Activities

    High-impact exercises like plyometrics, running, and leaping can aggravate the injury in addition to causing pain and discomfort.

    • Sports Including Twisting Moves

    Sports that require a lot of bending and turning, such as soccer, hockey, football, tennis, golf, ballet, and tennis, might exacerbate a hip labral rupture. Motions that twist might exacerbate the labral tear and cause tiny tears in the labrum.

    • Deep, Static Stretches

    Although deep, static stretches are usually a part of therapy, your healthcare professional may encourage you to concentrate on dynamic poses instead. Such stretches, which entail holding the stretch for extended periods, can exacerbate discomfort and stiffness by pulling on injured tissue and compressing the tear against other hip joint structures.

    • Practicing Heavy Lifting

    Excessive weightlifting, particularly in hip-centric exercises or when the hips must support a large amount of the weight, might exacerbate the problem. Sports requiring a lot of hip rotation and deep squatting are two examples of motions that your doctor or physical therapist could advise you to stay away from.

    If you’d like, you might be able to resume weightlifting after a corrective exercise regimen. When your hip labral tear heals, your doctor or physical therapist will give you advice on what exercises to undertake in the interim and how to gradually resume lifting.

    Prevention:

    Hip labral tears can be avoided by lowering the risk of injury, altering actions to protect the hip joint, and keeping the hips healthy.

    These are a few methods of prevention;

    • Speak With a Specialist doctor

    Getting advice from a doctor or orthopedic specialist on managing and preventing hip problems is advisable if you have structural abnormalities in your hip, such as femoroacetabular impingement (FAI).

    • Stay Active and Exercise

    Exercise that strengthens and increases hip flexibility regularly may improve hip joint health. Exercises that target the hip abductors, external rotators, and adductors should be included.

    • Adjust Equipment Correctly

    To lessen the possibility of poor mechanics causing hip problems, make sure that sports equipment, such as bicycles or exercise machines, is correctly suited to your body.

    • Maintain a Healthy Weight

    An excessive amount of body weight might worsen hip joint pain. preserving a healthy weight and eating a balanced diet may help prevent hip issues.

    • Use the Correct Form

    Adopt correct body mechanics and form when playing sports or going about your everyday business. Refrain from making unnatural motions or using excessive force, as these actions might cause strain on the hip joint and muscles.

    • Stretch and Keep Your Flexibility

    You keep your hips flexible by stretching on a regular schedule. Your primary focus should be on stretching your quadriceps, hamstrings, hip rotators, and hip flexors.

    • Refrain from Overusing

    If you play sports or engage in other activities that require repeated hip movements, you should be very careful about overuse injuries. Take breaks, change up your activities, and allow your body time to recover.

    • Keep Your Posture Correct

    Sitting correctly relieves unnecessary stress on the hip joint. Keep your hips supported by maintaining the right alignment while standing or sitting.

    • Pay Attention to Your Body

    Keep an eye out for any indications of hip pain, stiffness, or pain. Get early evaluation and advice from a healthcare professional if you have ongoing hip pain or discomfort.

    • Proper Footwear

    Put on shoes that are suitable for the tasks at hand. Equal pressure distribution across the hip joint can be facilitated by shoes with strong arch support and cushioning.

    Summary:

    The labrum is the ring-shaped piece of cartilage that surrounds the acetabulum, or hip socket. A ruptured hip labral tear is the medical term for this type of cartilage damage. Although it mostly affects athletes, anyone can get a torn labrum. Moreover, those with hip structural issues are considerably at risk.

    The degree of the damage determines how hip labral tears are treated. Physicians may suggest physical therapy exercises as a means of reducing pain, restoring range of motion, and avoiding surgery for tiny breaks at the cartilage’s edge.

    FAQ:

    Can someone with a hip labral tear exercise?

    When exercising for a hip labral tear, people should proceed with caution and seek medical advice or physical therapy supervision. Certain workouts may help promote recovery, while others may exacerbate the problem.

    Which exercises should I avoid doing if I have a labral tear in my hip?

    Exercises that require a lot of resistance, high-impact movements, or prolonged hip flexion are generally not recommended. Running, severe squats, and forceful lifting might exacerbate the rupture.

    Does engaging in physical activity help a hip labral tear heal?

    Yes, specific exercise regimens might play a major role in the healing process. Exercises aimed at improving hip stability, mobility, and strength hasten healing and reduce pain.

    Should I stretch if I have a hip labral tear?

    Although stretching offers many benefits, it must be done carefully and under supervision. Focus on light stretching to release the tension in the muscles surrounding the hip joint without aggravating the tear.

    When I exercise, what signs of a hip labral tear should I watch out for?

    Exercise should be stopped if your hip pain, stiffness, or clicking/catching sensation gets worse.

    Is it possible to go back to my previous level of physical activity after a hip labral rupture?

    Depending on the extent of the tear and your recovery, it may be possible for you to return to your previous activity level with the appropriate therapy and guidance from your healthcare team.

    References:

    • On October 12, 2023, Patel, D. 37 Powerful Activities for Hip Labral Injuries in Physiotherapy Samarpan. Physiotherapy Clinic in Samarpan. Which workouts are most effective for hip labral tears? https://samarpanphysioclinic.com/
    • Sapienza, K. ( November 30, 2021). Hip Labral Tear: Integrative Spine & Sports – 8 Tried-And-True Exercises To Reduce Hip Pain. Sports & Integrative Spine. Hip ligament tear at Integrative Spine and Sports, Inc.
    • What Exercises Can I Perform Without Risk If I Have a Torn Labrum? (No date). https://www.americanhipinstitute.com/blog/exercises-to-avoid-when-having a torn ligament in 40196.html
    • Bone and Joint Clinic and Duplantier, N. L. (n.d.). Rehabilitation Procedure. Hip-Labral-tear.pdf can be found at https://boneandjointclinic.com/wp-content/uploads/2016/11.
    • Image 10, Raleigh’s Orthopaedic Specialists. (As of now). Exercise Program for Physical Therapy. /uploads/pdf/Hip_Knee_AROM_Sitting.pdf Orthonc
    • Image 11, Daisy. June 5, 2021c. Hip Circles | Exercise Guide with Illustrations. SPOTEBI. https://www.spotebi.com/exercise-guide/hip-circles/