Hip Flexion
Hip Flexion and Extension: What Is It?
Hip flexion and extension are basic hip joint motions that are necessary for a variety of tasks, including sitting, jogging, jumping, and walking. It is necessary to understand hip flexion and extension for the purpose of evaluating and improving functional mobility, athletic performance, and rehabilitation.
Hip flexion is the movement of the thigh bone, or femur, toward the front of the body. This action is typically initiated by contracting the hip flexor muscles, which comprise the iliacus, rectus femoris, and psoas major. During hip flexion, the angle between the leg and the body decreases, allowing for activities such as lifting the knee, moving forward, or performing sit-ups.
The thigh bone is moved farther from the front of the body during hip extension to increase the angle between the thigh and the torso. The gluteus maximus, the largest muscle in the buttocks, is principally in control of hip extension, together with the hamstrings (biceps femoris, semitendinosus, and semimembranosus), adductor magnus, and the posterior fibers of the gluteus medius.
Hip flexion and extension are necessary to maintain stability, balance, and proper alignment during a range of tasks. Since hip flexion pulls the leg forward, and hip extension pulls the body forward, these movements must be coordinated to walk.
To prevent injuries, improve athletic performance, and optimize overall movement patterns, the hip flexor and extensor muscles should remain stable, strong, and flexible. Regular exercises that target specific muscle groups for strengthening and stretching can help improve range of motion, reduce musculoskeletal imbalances, and promote functional capacity.
Numerous factors, such as aging, a sedentary lifestyle, muscular imbalances, and specific medical conditions, can influence the flexion and extension of the hips.
Hip flexion: What is it?
By moving the lower leg or thigh closer to the front of the body, hip flexion decreases the angle between the thigh and the torso. It is one of the main hip joint motions and is required for a variety of activities, such as walking, jogging, and sitting.
The femur and pelvis combine to form the hip joint, which is a ball-and-socket joint. When you flex your hip, the muscles that control this movement contract, causing your thigh to raise and advance.
The iliopsoas (which includes the iliacus and psoas major muscles), rectus femoris (a quadriceps muscle), and tensor fasciae lathe (a hip and thigh muscle) are some of the muscles that contribute to hip flexion. In order to bend the hip joint and start motions like raising the knee, bringing the knee to the chest, or kicking or stepping forward, these muscles cooperate.
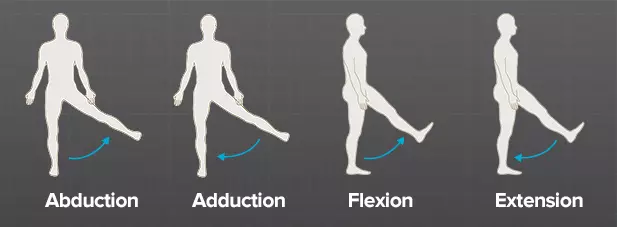
Keep in mind that hip flexion is just one of the motions that take place in the hip joint. Hip extension (moving the thigh backward), abduction (pushing the thigh away from the midline), adduction (moving the thigh toward the midline), and rotation are other actions. When combined, these motions provide the hip joint with a great deal of range of motion and functioning.
Muscles of the Hip Flexors
The hip flexors, which are muscles situated close to the front of the hip joint, are primarily responsible for hip flexion in addition to other functions like hip stability and pelvic control.
Muscles of the Main Hip Flexors
- Iliopsoas: The iliopsoas, which flexes the hip joint, is made up of the iliacus and psoas major muscles. The psoas major originates in the iliac spine of the ilium and the lumbar vertebrae of the lower spine. Both enter the femur or thigh. The iliopsoas muscle, one of the strongest hip flexors, is used for walking, running, and bringing the thigh up to the chest.
- Rectus femoris: The rectus femoris is one of the quadriceps muscles attached to the front of the thigh. Along with knee extension, the rectus femoris assists in hip flexion. It emerges from the ilium (hip bone) and connects to the patella (knee bone) and tibia (shin bone).
- Sartorius: The sartorius muscle is long and narrow, and it diagonally spans the front of the humerus bone. It originates from the anterior superior iliac spine (ASIS) of the pelvis and is located on the medial side of the tibia. The sartorius muscle helps in hip flexion and other movements, such as leg crossing, as an external rotator, hip flexor, and abductor.
- Tensor Fasciae Latae (TFL): The tensor fasciae latae is a small muscle that runs along the lateral side of the hip. The iliac spine joins the iliotibial region, a thick band of connective tissue on the outside of the thigh, starting at the highest point of the pelvis. Although its main function is abduction, or moving the thigh away from the midline, it also helps in hip flexion.
Working together, these muscles facilitate walking, running, climbing stairs, and knee lifts. Both proper posture and healthy pelvic alignment depend on them. Maintaining these muscles’ flexibility and balance is essential to preventing hip imbalance or damage.
Hip Flexion Range of Motion
Individual differences in hip flexor range of motion can be determined by a variety of factors, including age, joint health, and flexibility. The thigh can be raised forward and upward at an angle of around 90 degrees with the torso since adults typically have a range of motion in hip flexion of about 120 degrees.
However, one must keep in mind that the range of motion may vary greatly from person to person. Some people may be more flexible and have a larger range of motion than others due to factors including tight muscles, joint limitations, or prior injuries.
Remember that hip flexion can also be influenced by other factors, such as hip position and spinal alignment. For instance, tight hip flexors or limitations in the lower back may limit the range of motion during the hip flexion phase.
Walking, jogging, squatting, and other sports motions are only a few of the exercises and activities that need to maintain appropriate hip flexibility. Regular hip-flexion-based physical activity and stretching techniques can help maintain and increase range-of-motion flexibility. It is advised that you get the appropriate assessment and direction from a doctor or physical therapist if you have hip flexion restrictions or are worried about your hip flexibility.
Methods for Assessing Hip Flexion ROM
By doing a quick measurement known as the hip range of motion (ROM), you may determine your hip flexion range of motion. The following is one way to achieve this.
- Preparations: Choose an open space where you can comfortably rest and dress in loose or tight clothing that allows for mobility. You may also need another individual to help you measure.
- Laying down: Lean on a level surface, such as a bed or carpet, and spread your legs wide.
- Beginning position: bend the other leg at the knee joint to bring the knees to the chest while keeping the other leg flat on the ground. When evaluating the hip flexion range of motion, this is the initial position.
- Measurement: Hold the bent leg’s thigh lightly above the knee joint with a partner, then softly press down to stabilize it.
- Movement: Raise the thigh gently to the chest while keeping the knee bent. Try to bring the knee as near to the chest as you can without experiencing any pain or discomfort.
- Measuring: Using a goniometer or other comparable tool, your partner can determine the angle between your thigh and the surface once you have attained your maximum comfort level. The goniometer has to line up with the hip joint and the femur’s axis.
- On the opposite leg, repeat: Repeat the measurement process on the opposite leg and compare the results.
- Interpretation: Age, flexibility, and individual variances all affect the typical range of hip flexion range of motion. A healthy adult’s hip flexion range of motion should generally be between 120 and 140 degrees. A doctor, such as a physiotherapist or an orthopedist, is advised if you have a history of hip illness or injury. They may offer a more thorough evaluation and advice on how to quantify hip flexion.
Hip Flexion Special Test
A few particular tests are useful for evaluating hip flexion. In clinical settings, healthcare providers frequently utilize these tests to evaluate hip function. Two instances of particular hip flexion tests are as follows:
Thomas test
A popular test for determining hip flexor contracture and joint muscle tension is the Thomas test.
What to do:
Make sure your legs extend over the edge of a bed or table. — Make both legs stand up to your chest with your hands. — Allow one leg to hang lightly while maintaining the other knee firmly in position. — Drop the non-stick leg slowly onto the table while keeping it as straight as possible. — Observe whether the extended leg is flat on the table or still bent at the hip joint.
If the straightened leg’s thigh remains above the table, it indicates a restriction of hip flexion, which may indicate a hip flexor contracture or joint muscle tension.
Modified Ober test
Hip flexion may be limited by tension or tightness in the iliotibial band (IT band) and tensor fasciae lata (TFL), which may be evaluated using the modified Ober test.
What to do:
- Lay flat on your side with your lower leg bent slightly to support it. Confirm that the upper leg is straight. The physician stands behind you and gently lifts your upper arm. The leg is then allowed to slowly go down the spine.
- Interpretation: If your leg stays up or does not descend close to the table, tension or rigidity emerges in the TFL and IT area. Hip flexion may be limited as a result. It is important to keep in mind that these specialized tests can only be performed by trained professionals who are capable of accurately interpreting the results.
Techniques for hip flexor stretches.
To help your flexors and hip joints relax, try these exercises. Its original function was to increase the joint’s range of motion. After your body has warmed up following an exercise session, these stretches are great.
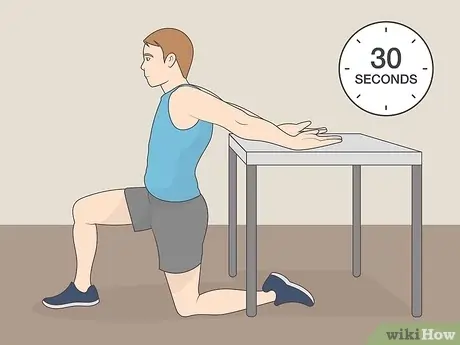
Stretch your hip flexors while half kneeling.
This simple exercise will stretch the iliopsoas/hip flexors on the back leg and the glutes on the front leg. For this exercise, you can use a folded towel under your knee or a yoga mat.
- In front of you, your left foot should be flat, and your right knee should be on the floor behind you.
- Continue this exercise with your trunk in an upright position. Your hands should remain on your left knee so that you can stay balanced.
- You can slowly move your right knee back to feel a small stretch in the front of your hip.
- Using your right glute as if you were pushing forward, compress your hips and trunk to bring them closer to your left foot. Tuck your hips to add a slight tilt to your pelvis.
- Hold this position for 10 to 30 seconds after breathing deeply.
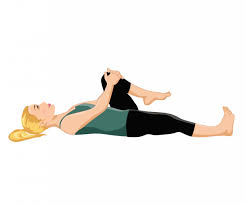
Stretching from knee to chest
- Lying on your back, spread your legs wide on the floor. Gradually bend one leg toward your chest.
- Keeping your back flat, pull your knee as close to your chest as you can without experiencing any discomfort.
- Stretch your straight leg as far as you can while squeezing your glute.
- Once you’re back in the starting position, repeat with the other leg.
- If you don’t feel any stretch, try performing this stretch on a bench with your lower leg hanging over.
The well-known “pigeon” pose in yoga is an advanced one. Only assume the attitude if it feels natural to you. You can change it by lying down or sitting in a chair and doing a figure-four stretch.
- Take a plank stance to begin.
- Raise your left foot off the ground and move it forward until your foot is close to your right hand and your knee is on the floor beside your left hand. Your flexibility will determine the exact position of your knee and toes.
- Sliding your right leg back as far as you can while keeping your hips square. Bring your upper body as far down as you can as you lower yourself to the floor and onto your elbows.
- Maintain the stretch by keeping your chest up. Change sides as soon as you feel like you have had a good stretch.
Bridge
This exercise can help extend the hip flexors while strengthening the gluteal muscles.
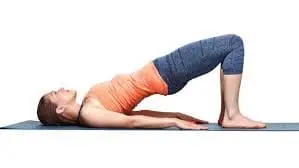
- With your feet hip-distance apart, knees bent, and arms at your sides, lie on your back. Your feet should ideally be positioned such that your fingertips may touch your heels.
- Raise your hips off the floor and toward the ceiling while tightening your glutes and pressing into your heels. This should be felt in your hamstrings and glutes rather than your lower back.
- Repeat many times after holding the position for a few seconds and then going back to the beginning position. Keep breathing!
Benefits of hip flexion exercises
- Increased mobility
- You can walk, run, climb stairs, and do other activities more easily with the help of hip flexor exercises.
- Enhanced posture
- By stabilizing your torso and pelvis, hip flexors can help you have better posture.
- Lower chance of harm
- Strong hip flexors may lessen the load on your joints and surrounding muscles, which helps you avoid injuries.
- Pain less after sitting
- Sitting for extended periods shortens your hip flexors, therefore strengthening them can help release tension.
- Enhanced athletic ability
- Many sports, such as running, leaping, and kicking, require strong hip flexors.
Hip Flexion Exercise
Many tasks require hip mobility and flexibility might benefit from increased hip flexibility. The following exercises can help you increase your hip flexion:

Rooster March Lying:
With your knees bent and your feet flat on the ground, lie on your back. Raising one leg off the floor and raising the knee to your chest requires core strength. Lower your leg gradually after holding for a few seconds. Do the opposite. Perform 10–12 reps for each leg.
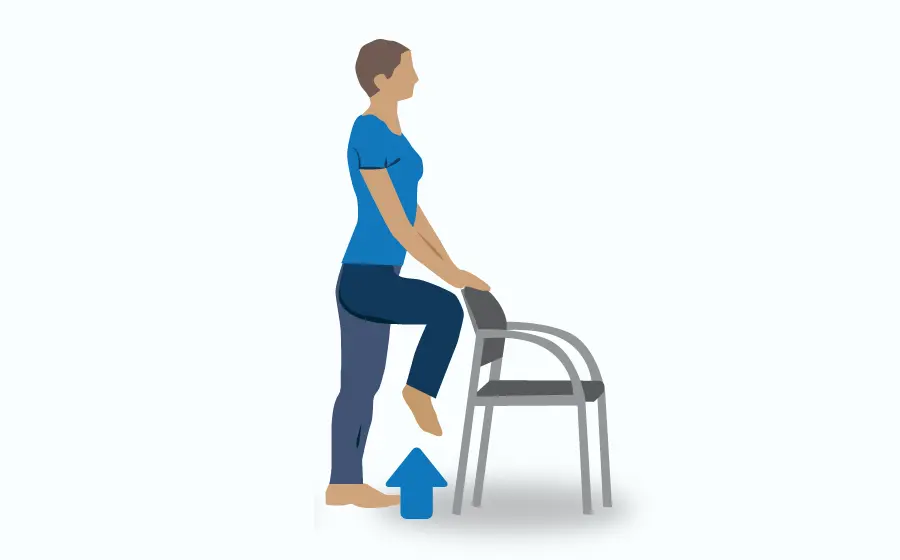
Standing hip flexion:
Place your feet apart, stand tall, and, if necessary, place your hands on a hard surface. To raise one leg, bend the knee and bring it as near to the chest as you can while keeping your balance. Hold for a short while, then drop your legs. Do the opposite. Try to do 10 to 15 repetitions on each leg.
Lunge
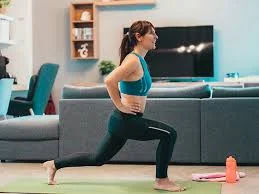
The rectus femoris, a hip flexor, and the lead glute and quadriceps muscles are worked during lunges. Additionally, they stretch the back leg’s hip flexors, which must lengthen based on how far you step forward.
- Standing, take a big stride forward with your right foot while keeping your eyes front. Keep your trunk upright during the entire exercises.
- Transfer your weight to your right leg by bending your extended knee. Until your left knee hangs just above or lightly touches the floor, keep lowering yourself slowly into the lunge. The ideal position for your right knee is just over your right ankle.
- Return to a standing posture. Repeat in front of your left leg.
Sliding mountain climbers on the ground
Grab anything that slides, such as paper plates, sliding discs, or even hand towels. Prepare to ascend!
- Place yourself on a smooth surface, such as a wood floor.
- Assume a pushup stance and put the sliders beneath the balls of your feet.
- As with regular mountain climbers, pull your right leg into your chest and switch with your left.
- Start gently and progressively quicken your speed.
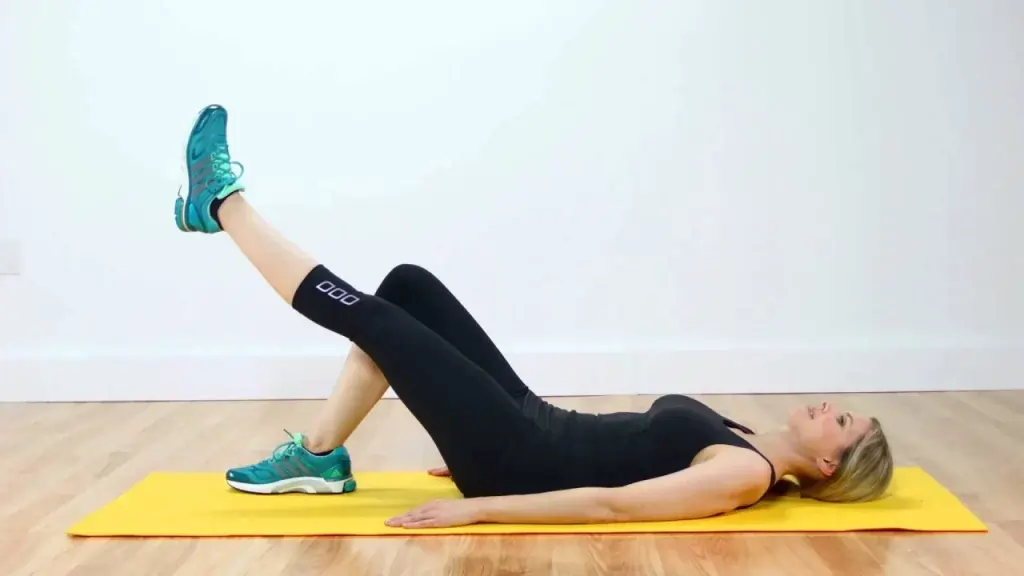
Straight-leg rise
The rectus femoris and iliopsoas are worked in this exercise. The trunk is stabilized by the abdominal muscles while the leg raises.
- Bend one knee while lying on your back. With the knee straight, extend the other leg.
- As you raise the leg such that the thigh aligns with the opposite bent knee, contract your abdominal muscles.
- After holding for two counts, gradually return to the starting position. Repeat.
Psoas hold
This exercise develops the psoas, a deep hip flexor muscle that helps lengthen strides and prevent injuries. A situation where everyone benefits!
- Raise your upper leg toward the sky while standing and bending your right knee.
- For approximately 30 seconds, maintain your right knee and thigh at hip level while maintaining balance on your left foot.
- Slowly lower your right leg, then do the same with your left.
- Maintain a tall trunk during the whole exercise. Reduce the height of your leg if your head is bobbed forward or your trunk is rounding.
Manual Muscle Testing: Hip Flexion
Muscle strength testing is a crucial aspect of the physical examination that identifies any strength differences between the involved and uninvolved hips. It is usually done as part of the patient’s objective evaluation.
When assessing weakness, manual muscle testing can be useful in identifying between imbalances or low endurance and actual weakness. Strength testing helps the physical therapist establish a clear objective for the patient, which is to restore the involved hip’s strength to that of the uninvolved hip.
Participating Muscles
Three primary muscles are involved in hip flexion. The Sartorius, Tensor Fasciae Latae, and Rectus Femoris are two-joint muscles. The hip and knee are crossed by these muscles. In contrast, the Iliopsoas is a single, one-joint muscle that only crosses at the hip.
- Iliopsoas
- Tensor Fasciae Latae
- Sartorius
- Rectus femoris
Position of the patient
To evaluate students in grades 3 through 5 the patient should sit for a brief period of time with their thighs supported.
The patient should be side-lying to evaluate grades 0–2, as gravity has little effect on this position.
Position of the Therapist
The therapist should stand by the patient to assess their side.
Feel the flexor muscles in your hips.
- Grade 5: While the patient holds the posture, the therapist exercises maximal resistance in the opposite direction of hip flexion.
- Grade 4: While the patient holds the posture, the therapist provides mild to moderate resistance in the opposite direction of hip flexion.
- Grade 3: The patient performs hip flexion in the normal way.
- Grade 2: After supporting the leg, the therapist instructs the patient to raise it as high as possible.
- Grade 1: After supporting the leg, the therapist asks the patient to try lifting it. The patient only raises his leg a limited distance.
- Grade 0: There is no movement.
How can I test?
To make the exam easier for the patient to grasp, provide instructions in his or her language.
The patient does the hip flexion on their own.
To assess grades 4 through 5 Provide resistance to the distal femur in the opposite direction of flexion.
Active resistance testing is required for grade 5, or normal muscular performance activity, and requires the patient to be strong enough to move through the whole range of motion.
For the break test, patients need to keep their endpoint range opposing the maximal resistance force.
- Grade 0: No motion
- Grade 1: There is trace movement but not a noticeable contraction of muscles.
- Grade 2: Elimination of movement with gravity
- Grade 3: Opposition of gravity
- Grade 4: Weak movement despite considerable resistance
- Grade 5: Good strength
To check for variations in muscle strength, the therapist should use the identical technique on the other side.
Along with any relevant discoveries or observations, the therapist should record the degree of muscular strength on each side.
FAQs
How can I improve my hip flexion?
Lunges strengthen the quadriceps and the main glute, which includes the rectus femoris, a hip flexor.
sliding mountain climbers on the ground. Get some sliding discs, paper plates, or even hand towels, or anything that glides, for that matter.
Psoas hold. Straight-leg rise.
What is an example of hip flexion?
When the femur, or upper leg, travels forward, as it does when long jumpers land or at the conclusion of a football kick, the hip joint flexes.
What are the 5 muscles that flex the hip?
A set of muscles located close to the upper part of your thighs, the hip flexors allows you to bend forward at the hip and raise your knee toward your chest. Together, the iliacus, pectineus, psoas major, rectus femoris, and sartorius muscles provide for hip flexion.
What causes poor hip flexion?
Hip flexor discomfort can also be caused by poor posture, general overuse, and occasionally arthritis. Similar symptoms can be seen in iliopsoas muscle strains, tears, tendinosis, and bursitis. The reason is frequently overuse or eccentric hip flexion against resistance.
Is walking good for tight hips?
Get up and move more during the day to maintain the suppleness of your hip flexors. I suggest switching positions every thirty to forty-five minutes, or even earlier if required, to avoid tightness.
References:
- Patel, D. (2023n, July 8). Hip flexion and extension – muscles, ROM, exercise. Samarpan Physiotherapy Clinic. https://samarpanphysioclinic.com/hip-flexion-and-extension/
- Kelly, E. (2023, March 17). 8 of the Best Hip Flexor Stretches and Exercises. Healthline. https://www.healthline.com/health/fitness-exercise/hip-flexor-exercises#bottom-line
- Patel, D. (2023c, May 24). Manual muscle testing of Hip – Flexion, Extension, Abduction. Samarpan Physiotherapy Clinic. https://samarpanphysioclinic.com/manual-muscle-testing-of-hip/
One Comment