Forearm Pronation
What are wrist supination and pronation?
Important forearm movements that are essential to many daily activities and functional duties are wrist pronation and supination. These motions cause the radius and ulna, the forearm bones, to rotate around one another, changing the hand and wrist’s alignment.
Pronation is the process of moving the hand and forearm inward, resulting in the palm facing down or toward the back of the body. The rotation of the radius over the ulna, followed by the hand and wrist, is known as pronation. This motion is frequently seen when a doorknob is turned downward or the hand is placed on a flat surface.
Supination, on the other hand, is the opposite motion, which entails turning the hand and forearm outward so that the palm faces up or toward the front of the body. The palm faces upwards during supination as the hand and wrist follow the radius and ulna’s untwisting. Pouring liquid from a container or turning an automobile’s steering wheel both commonly require this motion.
The coordination of numerous forearm muscles, tendons, and ligaments is necessary for both pronation and supination. The pronator quadratus, pronator teres, supinator, and other wrist muscles are the main muscles in charge of these motions. Together, these muscles produce the force and control required for precise and fluid pronation and supination.
Many activities, including everyday chores like typing, cooking, and carrying goods, require the ability to perform wrist pronation and supination. These motions are essential for sports like throwing motions, racquet sports, and golf swings.
Athletes, medical professionals, and anybody looking to avoid or treat wrist and forearm injuries should all understand the biomechanics and correct technique of wrist pronation and supination. These motions, as well as general performance and functionality in a variety of circumstances, can be improved with the use of appropriate training, conditioning, and flexibility exercises.
What is Wrist Pronation?
A wrist joint movement that turns the palm downward or toward the rear of the forearm is called wrist pronation. The movement of the hand and forearm rotated so that the palm is facing backward or downward is known anatomically as pronation. To do this, the forearm’s radius must be passed across the ulna.
Wrist pronation can be observed by holding your hand palm up in front of you. Next, turn your forearm and hand inwards until the palm is toward the back of the forearm or downward. Pronation is the term for this motion. This is the reverse of supination, in which the palm faces forward or upward.
In daily actions like pouring water, using a screwdriver, or typing on a keyboard, wrist pronation is a crucial movement that facilitates a variety of functional activities. Proper pronation is especially crucial for grip-intensive sports and activities like tennis and weightlifting because it maximizes control and force. While the rotation of the forearm bones is the primary cause of wrist pronation, the wrist joint itself also contributes to movement facilitation.
Wrist Pronation Muscles
Coordinated use of multiple forearm muscles is required for a wrist push-up. Together, these muscles allow the forearm to rotate and the wrist joint to pronate. The following are the main muscles engaged when flexing the wrist:
- Pronator Teres: Originating from the medial epicondyle of the humerus, which is the bony projection on the inside of the elbow, the pronator Teres muscle is situated on the forearm’s radius. It is among the most significant muscles in charge of pronation and plays a significant part in this movement.
- Pronator Quadratus: This muscle, which is situated deep within the forearm, joins the distal ends of the ulna and radius. It helps pronate the wrists and turns the radius.
- Flexor Carpi Radialis: The primary function of the flexor carpi radialis is wrist flexion, however, it also partially contributes to wrist pronation. It is located around the bases of the hand’s second and third metacarpals and originates from the humerus’s medial epicondyle.
- Palmaris Longus: This muscle also plays a role in wrist pronation, and some persons lack it. It starts from the humerus’ medial epicondyle and travels to the palmar aponeurosis along the inside of the forearm.
Wrist pronation is the result of these muscles working together. They rotate the palm downward or toward the rear of the forearm when they are contracted, exerting force on the forearm’s bones.
Range of Motion of Wrist Pronation
Wrist pronation range of motion is the amount of rotation or range of motion that the wrist joint can accomplish when pronating. It varies from person to person and is assessed in degrees depending on anatomical variances, strength, and flexibility. Typically, wrist pronation can move between 80 and 90 degrees. Accordingly, the wrist can be twisted inwards (pronation) after beginning with the palm facing up (supination) until the palm is facing down or in the direction of the back of the forearm.
Numerous elements might impact movement, including human anatomy, joint health, and muscle flexibility. It is important to note that some illnesses or injuries can also inhibit wrist joint movement, which can impact the range of motion. Conditions like tendinitis, arthritis, or prior wrist or forearm fractures, for instance, might restrict the normal range of motion and make pronating uncomfortable or painful.
It is advised that you see a physician, such as an orthopedist or physiotherapist if you have concerns about wrist pronation or movement restrictions. They can evaluate your particular circumstances and recommend wrist mobility-enhancing exercises, stretches, or therapies.
Take the following easy self-assessment methods to determine your wrist pronation range of motion:
Place your arm palm up on a level surface, such as a table, while you sit or stand comfortably.
Make sure your forearm is relaxed and supported, and maintain a 90-degree elbow bend.
The palm should be turned down or toward the back of the forearm as you start to gradually twist it inward. When you experience pain or discomfort, stop moving and stay within your comfort zone.
Keep track of the movement as you turn, noting when you are unable to bend your wrist any farther. This is your wrist-prone or terminal maximal movement duration.
To make sure your estimate is accurate and consistent, repeat the procedure a few times.
Completing these steps will help you understand wrist pronation. It is crucial to remember that self-assessment could not be a reliable indicator and that in situations when there are special conditions or concerns, it is advised to speak with a healthcare provider who can provide a more comprehensive assessment. Furthermore, a physician, such as an orthopedist or physical therapist, can measure and assess your mobility precisely using a variety of methods, including manual evaluation or goniometry, which measures joint angles with a particular tool.
Wrist Pronation Test
One common technique for assessing wrist pronation is the “active pronation test. “This test aids in evaluating the wrist flexion muscles’ strength and range of motion. The active pronation test can be finished as follows.
- With your palm facing up, place your forearm on a level surface, such as a table, and sit or stand comfortably.
- Maintain a 90-degree elbow bend and ensure that your forearm is relaxed and supported.
- Try to turn the palm as far to the back of the forearm or down as you can to start by deliberately twisting the forearm inward.
- While keeping your movement fluid and under control, gradually increase your strength and effort.
- Take note of any pain, discomfort, or limits you experience when moving.
- Take note of the angle or level of pronation you achieve before experiencing pain or the goal. You can determine any restrictions or discomfort during wrist pronation and evaluate your range of motion using the active pronation test.
Wrist pronation Special test
A particular test to evaluate wrist pronation alone does not exist. Nonetheless, a variety of clinical tests that evaluate the wrist’s general range of motion and function can be employed, some of which indirectly evaluate pronation. Limitations or irregularities in wrist mobility can be found with the aid of these tests. To assess the wrist, some of the most popular tests are as follows:
Wrist range of motion test: This includes evaluating the wrist joint’s pronation as well as its active and passive range of motion. The examiner watches the movement and determines how much pronation was attained.
Wrist Strength Test: The wrist muscles’ strength, especially the pronators, is evaluated by this test. The patient might be asked to refrain from using a resistance device or the examiner’s arm.
Assessment of grip strength: Wrist function and grip strength are strongly associated, and grip strength may be a proxy for pronator muscle strength. A dynamometer is one type of equipment for measuring grip strength.
Functional tests: Functional tests evaluate the wrist’s capacity to carry out specific pronation-related actions, like gripping objects, turning a screwdriver, or turning a doorknob.
During functional movements, these tests evaluate wrist strength and coordination. It is crucial to remember that these examinations are often carried out by medical specialists with experience assessing the wrist joint and associated movements, such as orthopedists or physical therapists. They can offer a comprehensive evaluation and explain test findings in light of your ailment or worry.
Wrist-pronation stretching:
Your arms are placed in front of you, and palms up. Encourage wrist pronation by holding your fingers with your other hand and gradually pulling them down. Keep the stretch just a little bit longer—about 20 to 30 seconds. After releasing the stretch, do it again with the other arm. Perform two to three reps per arm. The wrist pronators’ range of motion and flexibility are improved by this stretch. Make sure the weight you choose will allow you to perform the exercise with control and without cause.
This exercise promotes wrist pronation and range of motion while strengthening the pronator muscles. It is critical to exercise with correct form and steer clear of pain or discomfort.
Benefits Of The Wrist Pronation Exercises
- Increased range of motion: Exercises that involve wrist pronation can assist increase the wrist joint’s range of motion.
- Improved motor control: Exercises that involve wrist pronation can assist increase wrist motor control.
- Decreased risk of injury: Exercises that involve wrist pronation can help lower the risk of wrist injuries.
- Enhanced wrist flexibility: It is possible to improve wrist flexibility through wrist exercises.
- Strengthened grasp: Exercises for the wrist can help strengthen the grip.
Exercise For Wrist Pronation
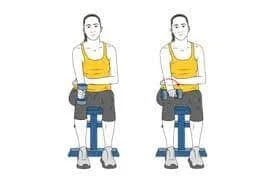
Wrist Pronation With Dumbbells:
On a table or thigh, place your forearm palm up, either standing or seated. In your hand, hold a light bar or something similar in weight. Rotate your forearm slowly while pronating it palm down. Hold the prone position for a little moment. Return to supination with the palm facing up after slowly bringing the forearm back to its initial position.

Wrist Pronation With Theraband:
Start by placing your wrist over the table’s edge in a neutral posture while holding a piece of theraband. The opposite hand should keep the theraband at the same level as the injured wrist. Return to the starting position by gradually rotating the injured wrist (palm up) against the band’s resistance. hold it for a few seconds and then go back to their starting position.
Manual Muscle Testing: Forearm Pronation
These muscles are used:
- Prorate teres
- Pronator quadratus
Patient’s position
Grades 3 to 5: The patient should be in a brief sitting position with their arm at their side in order to evaluate grades three through five. Supination of the forearm and elbow in 90-degree flexions are required.
Grade 2: To assess grade 2, the patient should sit for a short time with their shoulders flexed between 45° and 90°. The forearm should be in the neutral position, with the elbow bent 90 degrees.
Grade 1 and 0: The patient should be in the short sitting posture with their arm and elbow flexed, much like in grade 3, in order to evaluate grades 1 and 0.
Therapist’s position
Grades 3 to 5: Therapists stand beside or in front of patients in grades three through five. The patient’s elbow is supported by the therapist’s hand, which also holds the forearm on the dorsal portion of the wrist to provide resistance force.
Grade 2: For therapists in grade two Cup the hand under the elbow to support the side arm being checked.
Grade 1 and 0: Therapists should keep their forearm support just beyond the elbow.
How can I test?
Give instructions to the patient for the test procedure in its language so that he or she understands easily.
Try to pronate the patient’s forearm until the palm is facing down, to begin with the supination patient.
The therapist applies resistance towards supination.
Grade 5: Complete the entire range of motion and make the most resistance possible.
Grade 4: use your entire range of motion and maintain moderate to low resistance.
Grade 3: Move through the entire range of motion without applying the any resistance.
Grade 2: educate the patient on the pronation of their forearms.
Grade 1: Feeling the pronator teres muscles in the volar aspect of the upper third of the forearm, diagonally from the lateral side of the radius to the humerus’ medial condyle, is recommended. There is contraction activity, but no hand movement.
Grade 0: Contractile action is absent for grade 0.
Evaluate your strengths. By rating the patient’s capacity to withstand the applied resistance, the examiner can determine how strong the patient is. The system of grades for manual muscle testing is as follows:
- 5: With normal strength, the patient can bear the highest resistance.
- 4: The patient has good strength and can withstand mild resistance.
- 3: The patient has a fair amount of strength and can withstand gravity but not resistance.
- 2: Insufficient strength, allowing the patient to move the limb without the use of gravity.
- 1: Trace strength: There is a noticeable muscle tension, but there is no movement.
- 0: No visible contraction or strength of muscles is present.
Repeat on the opposite side. To evaluate bilateral strength, repeat the same procedures on the other side after finishing the test on the first.
Document results Each side’s strength grade should be recorded in the patient’s medical file by the examiner. Should there be a disparity in strength between the sides, this should be noted, and additional assessment might be required.
It should be noted that the biceps brachii muscle frequently helps with the movement during manual muscle testing for forearm pronation. The examiner may ask the patient to slightly flex their elbow throughout the test in order to isolate the pronator teres muscle. The examiner should also make sure the patient is not compensating by engaging their trunk or shoulder muscles while taking the test.
Precaution
- Instead of moving quickly or jerkily, the examiner should provide resistance gradually. This will guarantee accurate results and protect the patient from harm.
- During the examination, the examiner should be mindful of muscle weariness. To avoid harm, the test should be halted if the patient is unable to sustain their strength.
- The patient’s safety during the examination should be guaranteed by the examiner. Any tools or supports that are employed ought to be stable and safe.
- Throughout the test, the patient should be kept informed by the examiner so that they know what is expected of them. It is important to report any pain or discomfort right once.
FAQs
What is pronation movement in the wrist?
When pronating, the palm turns downward, and when supinating, it turns upward. These movements are made possible by the special anatomy of the forearm.
What is normal wrist pronation?
60 degrees of pronation.
What muscle allows pronation?
The pronator teres, pronator quadratus, and brachioradialis muscles are the primary muscles that allow the upper limb to pronate.
What is the inability to pronate the wrist?
damage to the hand, wrist, or arm’s muscles, ligaments, or tendons.
Why is my wrist weak?
Carpal tunnel syndrome, diabetic neuropathy, peripheral neuropathy, hand osteoarthritis, cervical radiculopathy, herniated discs, Saturday night palsy, and ulnar neuropathy are a few of the more prevalent causes.
References
- RBFT Physiotherapy Department & RBFT Physiotherapy (Hand Therapy Unit). (2023). Wrist strengthening exercises. https://www.royalberkshire.nhs.uk/media/2nlmnkdu/wrist-strengthening-exercises_mar23.pdf
- Patel, D. (2023a, May 21). Manual Muscle Testing of the Forearm – Supination and Pronation. Samarpan Physiotherapy Clinic. https://samarpanphysioclinic.com/manual-muscle-testing-of-the-forearm/
- Patel, D. (2023h, July 4). Wrist Pronation and Supination – ROM, Movement, Muscles. Samarpan Physiotherapy Clinic. https://samarpanphysioclinic.com/wrist-pronation-and-supination/


