16 Best Exercises For Middle Back Pain
Introduction:
Middle back pain is a frequent issue that many people face daily. Back pain is relieved and prevented from worsening by regular exercise.
Sharp or shooting pain, stiffness, and irritation are some signs of mid-back pain. Additionally, people may find some movements challenging. Other parts of the body, such as the neck or lower back, may experience the same pain. A comprehensive evaluation by a medical practitioner is frequently necessary to identify the specific cause of middle pain in back.
Exercises for Middle Back Pain can be utilized to improve the strength and tone of the central area of the back. It’s important to develop a strong and distinct mid-back. This has an impact on functional fitness, spine health, and general posture.
Maintaining good posture, supporting the spine, and allowing movement are all made possible by the mid-back. Toning this area can be achieved by incorporating a productive workout into your everyday regimen. Additionally, it can help make the spine stronger and healthier.
When you first start, perform each exercise multiple times. You can then increase how often you exercise as it gets easier for you. If your back pain is chronic or you have just suffered a back injury, speak with a physical therapist about safe exercise options.
Benefits of exercise:
One of the best and most long-lasting ways to relieve middle back pain is via exercise, particularly if the problem has been caused by a sedentary lifestyle, bad posture, or muscle tension.
Here is a list of specific exercises for middle back pain, as well as a thorough explanation of the advantages of exercise.
Improves Posture
One of the most frequent causes of middle back pain is poor posture, particularly from prolonged sitting or slouching.
- The muscles that maintain your spine upright, the rhomboids, trapezius, and erector spinae, are activated by exercises like wall angels and scapular squeezes.
- Lessens the rounded shoulders and forward head posture that puts stress on the thoracic vertebrae.
Increases Circulation and the Delivery of Nutrients
The supply of nutrients to the spinal discs and surrounding muscles is slowed down by inactivity.
- Increases blood flow to soft tissues and discs, hastening the healing process.
- Helps in eliminating waste products from metabolism, such as lactic acid.
- Improves stress resistance by encouraging the intervertebral discs to stay hydrated.
Improves Flexibility and Mobility of the Spine
Limiting rotation and extension, a stiff thoracic spine puts more strain on other parts of the body, such as the neck or lower back.
- Restores the proper range of motion in the spinal joints by mobilizing them.
- Prevents further stiffness by maintaining the flexible nature of connective tissue.
- Increases lung capacity by enlarging the rib cage.
Prevents Pain Recurrence
The best prevention against subsequent episodes of pain is frequent exercise once it resolves.
- Increases awareness of the body, thereby helping in automatically correcting posture.
- Supports the musculoskeletal system throughout life.
Develops Stability and Strength
Weak core and mid-back muscles cause instability and put too much strain on passive tissues like joints and ligaments.
- Increases the strength of the core, which includes the obliques and transverse abdominis, which support the spine.
- Promotes spinal endurance by strengthening the thoracic extensor muscles.
- Minimizes regional back pain by promoting a balanced load distribution.
Lessens Spasms and Tension in the Muscles
The middle back muscles may become tense and hyperactive due to prolonged immobility or tension.
- Promotes relaxation by increasing blood flow to tense muscles.
- Balances movement by activating opposing muscular groups, such as the chest and back.
- Produces endorphins, which are your body’s natural analgesics.
Minimizes Mental Strain and Stress
Chronic pain frequently leads to a vicious cycle of worry, anxiety, and disturbed sleep.
- Lowers the stress hormone cortisol levels.
- Improves mood and sleep by releasing endorphins. Encourages self-control and well-being
Before beginning an exercise program, the following safety measures should be taken into account:
It’s important to consider a few safety measures and enhance the benefits before beginning any exercise regimen. To find out which exercises are best for your particular problem, speak with your doctor or physical therapist.
When your body feels uncomfortable, it’s vital to listen to what it needs and refrain from pushing yourself. Chronic or severe pain may indicate overwork, but some pain is a common side effect of exercise. Start with low-impact exercises until you can tolerate more pain, then work your way up to more challenging ones.
Repetitive injuries can be prevented by maintaining good form and posture. A doctor should be consulted if you are unsure about how to begin exercising correctly. Before beginning any workout, warm up your muscles and joints to prepare them for the activity.
Exercises For Middle Back Pain:
Before starting to exercise to relieve mid-back pain, it is best to consult your doctor.
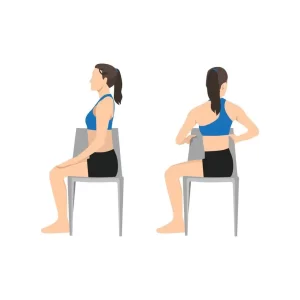
Spinal twist
- Sit comfortably on a supporting chair with your feet level on the floor and your knees at a 90-degree angle.
- Breathe deeply.
- Get your back straight now.
- Tilt your upper body slightly to the right, exhale, and lay your left hand on your right knee.
- The twist appears deeper as you gaze over your right shoulder.
- Hold this position for a few seconds.
- Then return to your neutral position.
- Then relax.
- Repeat these exercises 5 to 10 times.
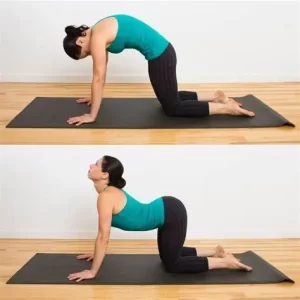
Cat-cow
- Start tabletop position on the floor.
- Be careful, you have a straight back.
- Keep both hands and feet planted.
- Breathe in.
- Raise your head and inhale the oxygen.
- Hold this position for a few seconds.
- Then exhale, draw your chin into your chest, and bend your back toward the ceiling.
- It gently stretches your lower back.
- Hold this position for a few seconds.
- Then return to your neutral position.
- Then relax.
- Repeat these exercises 5 to 10 times.
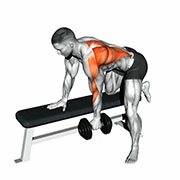
Dumbbell row
- The bench should be adjusted to a 30 to 45-degree inclination.
- On the bench, assume a prone position.
- Each of your hands should be holding a dumbbell.
- Next, drop your arms straight down.
- Stabilize your spine by using your core.
- Pull the dumbbells up towards your chest while bending your elbows.
- When you reach the top, concentrate on pressing your shoulder blades together.
- Lower the weights.
- Remain in control and refrain from allowing the dumbbells to swing.
- Pull them up and release the breath.
- Then return to your neutral position.
- Then relax.
- Repeat these exercises 5 to 10 times.
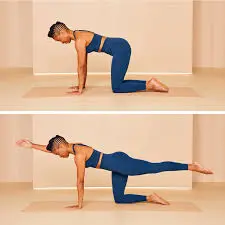
Bird dog exercise
- Start on all fours (tabletop).
- Keep your spine in a neutral position.
- Between your shoulder blades, squeeze.
- Then raise your right arm and left leg into the air as high as possible.
- Your hips and shoulders should remain parallel.
- Hold this pose for a few seconds.
- Then return to your neutral position.
- Then relax.
- Repeat these exercises 5 to 10 times.
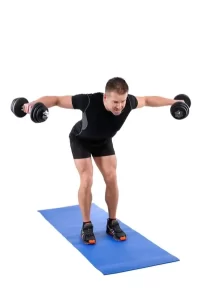
Reverse fly
- Start with a standing position.
- Keeping dumbbells close at hand.
- Your hips should be bent back.
- After that, your chest is drawn forward and nearly parallel to the ground.
- Maintain a strong core and an upright back.
- As you let the weights fall straight down, bend your knees a little.
- Breathe out.
- Then raise both arms to your sides.
- Maintain a gentle elbow bend.
- Then return to your neutral position.
- Then relax.
- Repeat these exercises 5 to 10 times.
Seated row
- Holding the handles with your palms facing each other, sit comfortably on the floor.
- As you gently draw the grips of the resistance band to your lower belly, bend your knees a little, and arch your lower back.
- After the handles come into contact with your chest, push your shoulder blades together.
- Hold this position for a few seconds.
- Then return to your neutral position.
- Then relax.
- Repeat these exercises 5 to 10 times.

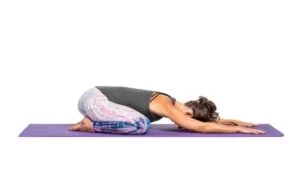
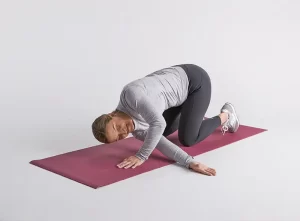
Child pose
- Take a comfortable kneeling position to start.
- Take a breath.
- Then lower your body by leaning forward.
- Place your forehead on the floor.
- Hold this position for a few seconds.
- Exhale.
- Then return to your neutral position.
- Then relax.
- Repeat these exercises 5 to 10 times.
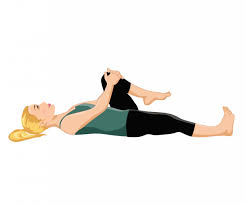
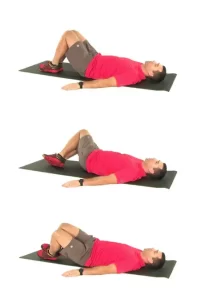
Knee to chest
- To begin, place your feet flat on the ground and lie on your back.
- Your hand should be placed directly below your kneecap or behind your knee.
- Now raise your knee to your chest.
- Hold this position for a few seconds.
- Then let go of your leg.
- Then return to your neutral position.
- Then relax.
- Repeat these exercises 5 to 10 times.
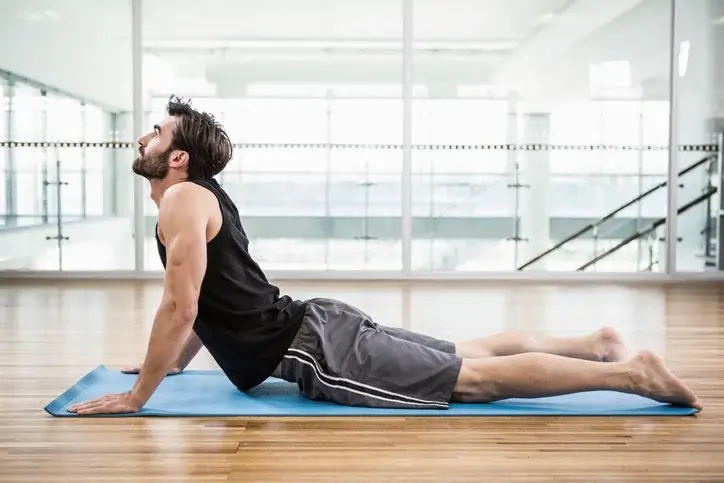
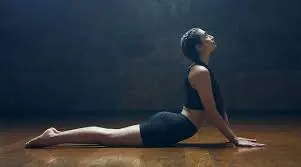
Cobra pose
- Near your shoulders, place your palms flat on the ground.
- Maintain a neutral neck position and take a moment to stand back and gaze directly down at your mat.
- Your pubic bone should be pressed into the ground’s surface.
- Inhale.
- Lift your chest from the floor.
- While rolling your shoulders back, keep your low ribs on the floor.
- Make sure to maintain your elbows at your sides.
- Avoid letting them move in opposite ways.
- Keep your neck position neutral.
- Continue to focus on the ground.
- Hold this position for a few seconds.
- To get back on the floor, exhale.
- Then return to your neutral position.
- Then relax.
- Repeat these exercises 5 to 10 times.
Thread the needle
- Begin by lowering yourself onto your hands and knees to a tabletop posture.
- After taking a breath, move your right arm palm up over your body to slide it beneath your left arm.
- Following that, allow your right ear and shoulder to relax on the mat.
- You can extend the stretch by extending forward or by keeping your left hand on the floor for support.
- Hold this position for a few seconds.
- Then return to your neutral position.
- Then relax.
- Repeat these exercises 5 to 10 times.
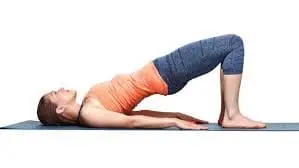
Bridge Pose
- To start, settle into a comfortable posture on the bed.
- Now, place your feet flat on the bed.
- Then bend your knees.
- Then, contract your abdominal muscles. Lift your upper body.
- Keep your arms by your sides, please.
- Hold this position for a few seconds.
- Lower your body.
- Then return to your neutral position.
- Then relax.
- Repeat these exercises 5 to 10 times.
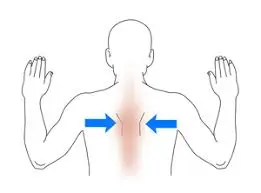
Shoulder blade squeeze
- Start with a standing position.
- To prevent rounding your back, move your weight a little forward. Calm down.
- Lift your arms to shoulder height, elbows flexed, palm facing forward.
- Arms outstretched, compress shoulder blades firmly.
- Hold this position for a few seconds.
- Then return to your neutral position.
- Then relax.
- Repeat these exercises 5 to 10 times.
Lower back rotational stretch
- Starting on your back is comfortable.
- Both knees should be bent.
- Keep your feet flat on the floor.
- Take a deep breath.
- Make sure your shoulders are firmly grounded.
- On one knee, bend over.
- Now look at the other side.
- Hold this position for a few seconds.
- Then return to your neutral position.
- Then relax.
- Repeat these exercises 5 to 10 times.
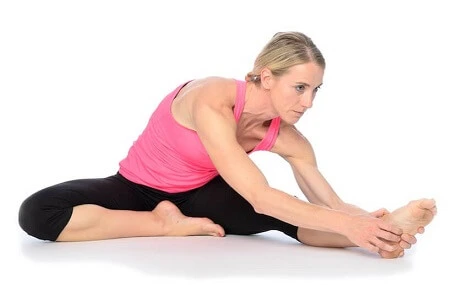
Seated hamstring stretch
- Assume an upright posture on your mat, placing your feet out in front of you and your legs straight.
- Extend your arms in front of yourself.
- Next, when you exhale, bend forward.
- Make sure you have a stretched back rather than an arched one.
- Pull your head down toward your lower body and reach your hands as far down your legs as you feel comfortable.
- To increase your reach, you can bend your knees if needed.
- Hold this position for a few seconds.
- Then return to your neutral position.
- Then relax.
- Repeat these exercises 5 to 10 times.
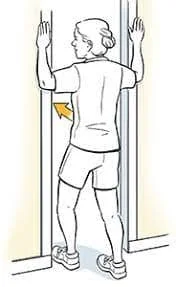
Doorway stretch
- Stand at a corner of two walls or a doorway.
- With your elbows bent at a 90-degree angle, place your forearms on the doorframe, putting them higher on the wall or doorframe.
- Step into the corner or doorway with one foot.
- This makes it easier to stretch without tensing up the chest muscles.
- While maintaining a raised arm position, gently shift your hips and shoulders forward.
- Hold this position for a few seconds.
- Then return to your neutral position.
- Then relax.
- Repeat these exercises 5 to 10 times.
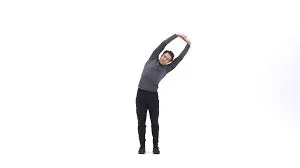
Standing-side-bend-stretch
- Your feet should be roughly hip-width apart when you stand tall.
- Then lift your arms high or at your sides.
- Breathe deeply.
- Maintaining an open chest and a long spine, progressively bend your body to the right as you release your breath.
- Avoid twisting; instead, consider bending sideways from ear to hip.
- Stretch the left side of your body, including your mid-back, ribs, and lats.
- Hold this position for a few seconds.
- Deeply inhale into your rib cage.
- Go back to the middle slowly.
- Then return to your neutral position.
- Then relax.
- Repeat these exercises 5 to 10 times.
Which safety measures need to be followed when working out?
The safety precautions you should take when performing exercises for middle back pain are covered in this comprehensive and useful article. These rules make sure your exercises are safe, efficient, and help you avoid more injuries or flare-ups.
Be sure to warm up thoroughly.
By preparing muscles and joints for activity, warming up lowers the chance of tension and stiffness.
Start with;
- Marching or lightly walking in place
- Shoulder rolls and arm circles
Make Use of Correct Placement and Form
Poor form might worsen pre-existing back issues or cause compensations that cause pain in other places.
- Keep your spine neutral (natural curvature).
- Pay attention to fluid, controlled motions.
- For support, use your core muscles during every movement.
Begin slowly and make progress over time.
Early in the healing process, overloading might cause flare-ups or difficulties.
- Begin with bodyweight, low-resistance exercises.
- Add resistance bands or light dumbbells gradually.
- Before applying resistance, increase repetitions.
Pay Attention to Your Body
- Stop right away if you get sharp, stabbing, or shooting pain.
- When pain radiates into the arms or legs, see a doctor.
- Muscle soreness or fatigue is typical, especially if it is minor and goes away in 24 to 48 hours.
If necessary, use objects and support.
- For thoracic mobility, use foam rollers sparingly.
- To provide support during stretches, use yoga blocks or cushions.
- For more secure, supported rows, use an inclined bench.
- Strength exercise with resistance bands is controlled and good for your joints.
Take Proper Breaths While Working Out
- Your spine may get strained if you do the Valsalva technique, which involves holding your breath.
- The entire workout should not be performed with your breath held.
After working out, stretch and cool down.
- Cooling down facilitates muscle repair and helps avoid stiffness.
Maintain Consistency But Take Breaks When Necessary
- Depending on intensity, work out three to five days a week.
- At least one day should be dedicated to active relaxation or recovery.
- Get enough sleep since muscles repair themselves when you’re not moving.
When did you quit working out?
Here’s an extensive guide on how to efficiently recover while avoiding damage by recognizing when to stop, halt, or get help.
If necessary, break or modify the exercise.
- Little tiredness or stiffness
- Mild pain from a prior workout; little form breakdown due to poor posture
- Pain only during certain motions
After 10 to 15 minutes, stop if:
- Your posture is poor, and your movement seems constricted or unstable.
- You’re either breathing slowly or heavily.
Remember the 24-48-Hour Rule.
- Following any new or difficult exercise, it’s common to have soreness that goes away in a day or two.
- Pain that worsens or lasts longer than 48 hours might be a sign of strain or misuse.
- See a doctor if the pain is limited to one side or if there is tingling.
Get Medical Help Right Away If You Have
- loss of control over one’s bowels or bladder (emergency: potential spinal cord compression)
- Unexpected weakness in the arms or legs
- Constant ache at night, no matter what position
If you have middle back pain, which exercises should you stay away from?
Certain exercises and moves might make your middle back pain worse or make your symptoms worse. This comprehensive guide explains which exercises to stay away from in order to preserve your middle back while continuing to be active and pursuing recovery.
Excessive Deadlifts
- Deadlifts put a lot of strain on the whole spine, particularly the middle back, especially when done improperly.
- Because the exercise involves bending and raising a large weight, it may cause disc compression or strained muscles in the middle back.
Overhead Press (Heavy)
- Shoulders that are rounded or the core not fully engaged might cause strain on the thoracic spine (middle back) during the overhead press.
- Lifting big weights above the shoulders might induce the back to hyperextension, which can put excessive strain on the spine.
Cardio with a High Impact (Jumping, Running, etc.)
- Repetitive stress to the spine from running or high-impact exercises like burpees, box jumps, and jump squats may worsen middle pain in back pain.
- Such movements could worsen the symptoms of an existing medical condition, like a strained muscle or a ruptured disc.
Crunches and sit-ups
- Conventional crunches and sit-ups may place a lot of pressure on the middle and lower back by causing your spine to twist repeatedly, especially if your core is weak or the activity is performed improperly.
- By overusing the rectus abdominis without properly using other core muscles, they might potentially result in muscular imbalances.
Squats (heavy)
- Even though squats are a fantastic workout, your middle back may be overstressed if you perform them heavily or incorrectly.
- The thoracic spine may be strained if the hips or back rounds do not expand correctly.
High-Impact Twisting Motions
- Russian twists, weighted torso twists, and several sporting activities are examples of exercises that cause excessive twisting of the spine, which can strain the muscles or irritate the middle back discs.
- Additionally, these motions put strain on the thoracic spine’s facet joints.
Bent-Over Rows (No Assistance)
- When performed incorrectly, bent-over rows can put stress on the middle back by forcing your spine into a flexed position.
- This exercise may result in disc bulging in the thoracic (middle back) region and strain the erector spinae muscles.
Back Extensions (Hyperextensions)
- Hyperextension of the spine can result from excessive back extension, particularly while using a machine or a Roman chair.
- This can worsen pain by putting strain on the middle back’s facet joints or discs.
Summary:
Pain in the middle of the back can be extremely painful and disrupt daily activities. Think about strengthening and extending the upper and midback muscles that support your thoracic spine to help reduce this pain. Regular stretching and exercise can help with posture and back pain by strengthening and relaxing the middle back muscles.
Your backside’s central region can properly support your spine if you incorporate these workouts into your everyday regimen. These easy yet powerful exercises increase range of motion and lessen muscular imbalances. Consequently, daily duties may have a stronger basis.
Regular mid-back exercises and proper posture might help avoid soreness. Additionally, you should pay attention to your posture throughout the day, especially when working on inactive tasks.
FAQ:
How severe is middle back pain?
Pain that is dull, searing, or acute, as
well as muscular stiffness or tightness, is are common sign of upper
and middle back pain. Numbness or tingling in your arms, legs, chest,
or abdomen, loss of control over your bowels or bladder, and weakness
in your arms or legs are more severe symptoms that require immediate
medical attention.
Is it beneficial to stretch for middle back pain?
When people sit with bad posture, their mid-
back muscles are affected and become fatigued.
This could lead to stiffness and ongoing pain if it happens every day.
Stretching your latissimus dorsi, commonly referred to as your lats, rh
omboids, and lower and mid trapezium muscles, might be helpful.
How can I strengthen my core?
Incorporate movements such as hamstring
stretch, bridges, and planks into your routine and make sure you are in
the right posture.
When performing these exercises, concentrate on using your abdominal, b
ack, and pelvic muscles.
Which types of exercises work best for middle
back pain relief?
Cat-Cow Stretch
Child’s Pose
Wall Angels
Incline Dumbbell
Rows
Standing Side Bend Stretch
Bridge exercise
How frequently must I perform these exercises?
Depending on your degree of fitness and the intensity of your pain, try
to do this three to five times a week.
Combine workouts for flexibility, strength, and stretching.
Add days of active recuperation or relaxation.
Can I get rid of my middle back pain with only stretching?
Although stretching can momentarily ease stiffness, mobility and streng
th training are also necessary to:
Encourage the correct positioning of the spine, improve your posture
stop the pain from coming back.
Do these workouts cause any pain?
There
should never be any intense or shooting pain, however, you can have
mild strain or a muscular ache.
Stop and reevaluate if the pain gets worse during or after the workout:
Change the motion, make use of less resistance.
Take it easy and see a doctor if the pain doesn’t go away.
Can posture be improved by these exercises?
Indeed. Correcting your posture is a key component of many middle back pain exercises, particularly if the pain has been caused by: Rounded shoulders, Head posture forward,Long periods of sitting or slouching. Your spine’s posture will gradually improve as a result of strengthening your upper back and core.
How much time does it take to notice progress?
With regular, proper exercise, most individuals start to feel better in two to four weeks. Depending on the reason and intensity of the pain, improvement varies. Keep going and make posture and mobility a part of your daily routine.
When ought I to consult a physician or physical therapist?
See a specialist if your pain is severe, ongoing, or becoming worse. You experience weakness, tingling, or numbness. There is pain when you sleep or rest. Pain is associated with trauma or damage.
References:
- Crichton-Stuart’s eight moves for the middle back in 2023.
- Heyn’s 5 Exercises for 2023 Mid back Relaxation and Relief
- The top 15 middle back exercises for total injury rehabilitation in 2023, according to Bean’s list
- Professional Guidance on 2025 Lower Back Pain Exercises
- Do 15 minutes of back exercises every day.
- Five 2019 OCS exercises for middle and upper back discomfort
- 2025’s top mid-back stretches and back pain workouts, Seidenburg
- 7 Upper and Middle Back Pain Relief Exercises | QI Spine – 2024
- Leonard’s 2024 article on the causes and remedies of middle back pain
- 11 Pain relief exercises and stretches for middle back pain | Arizona Pain – 2022 – Arizonapain
- Image 3, CSCS’s 2023 guide on how to perform a dumbbell row with chest support for a stronger back and biceps
16 Best Exercises For Middle Back Pain