27 Best Exercises for Lower Cross Syndrome
Lower Cross Syndrome (LCS) is a common postural imbalance characterized by tightness in certain muscles and weakness in others, primarily affecting the lower back, hips, and pelvis. Addressing LCS often involves a combination of stretching, strengthening, and corrective exercises to restore muscle balance and alleviate pain. Some effective exercises include hip flexor stretches, glute bridges, pelvic tilts, and core stabilization exercises.
Exercises that combine strengthening and stretching are necessary for treating Lower Cross Syndrome.
We will look at the finest exercises in this article to help with Lower Cross Syndrome symptoms and improve general posture and musculoskeletal health.
What is a Lower Cross Syndrome?
The common postural issue known as Lower Cross Syndrome is typically caused by prolonged sitting. Prolonged sitting causes the tendons in the hips and lower back to shorten and tighten. To help the lower back return to its natural posture, the weaker abdominal and glute muscles must be strengthened.
Lower cross syndrome is caused by an imbalance in the hip, lower back, and pelvic muscles. This condition generally comes on by hypertense and hyperactive calves, hip flexors, and adductor muscles of the inner thigh.
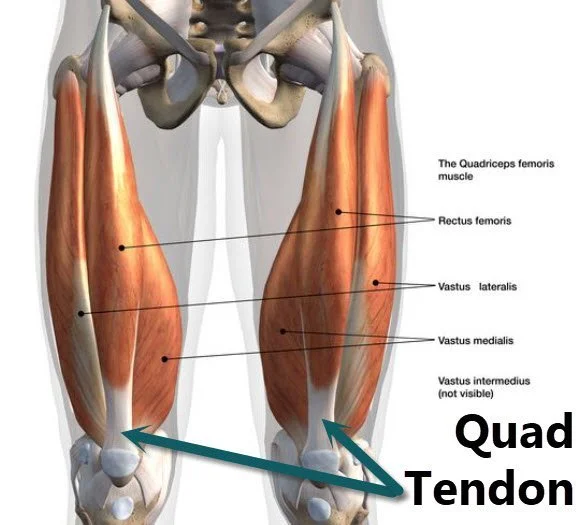
Weakness may develop in the following muscles;
- The transversus abdominis, located on either side of the wall of the abdomen
- The gluteus medius, located outside the pelvis
- The gluteus maximus is located among your buttocks.
- Outside the tibia bone is the anterior tibialis muscle
- Both internal and external oblique are found on either side of the abdominal wall.
Exercise is always important to keep muscles active and in excellent condition. It also helps solve bad posture, which is one of the main causes of Lower Cross Syndrome.
Strengthening the strained muscles in your lower back is important for restoring optimal muscular function and correcting postural alignment.
Along with medical care and physical therapy, exercises for Lower Cross Syndrome are an essential component of your total treatment strategy. Many exercises can help reduce pain while improving your general strength and flexibility.
The goal of exercises is to strengthen the muscles in the hips, abdomen, and lower back to improve spinal stability.
Lower Cross Syndrome: What Causes It?
logically speaking, The gradual shortening or overuse of some muscle groups and the progressive weakening and underuse of other muscle groups cause lower Cross syndrome.
Typical reasons for these muscular imbalances consist of;
- Long hours using a computer or desk
- Lifting weights incorrectly
- Being overweight
- Getting Older
- Pregnancy
- Lifestyle of inactivity
Prolonged sitting times are typically a contributing factor. Long periods of sitting cause our brains to react adaptively. Our stomach muscles and glutes weaken at the same time. Not only do our lower back muscles stiffen, but also our hip flexors get shorter.
Symptoms of Lower Cross Syndrome:
Back pain is the primary sign of Lower Cross Syndrome. But some people might experience additional Lower Cross Syndrome symptoms, like;
- Aches or tightness in the lower back and hips
- Hamstring and back muscles that are stiff
- Postural abnormalities characterized by an anterior pelvic tilt, which can resemble a protruding abdomen or buttocks, and an exaggerated lumbar curve
- Having trouble staying upright or standing for long periods of time
- Modifications in walking style, like a slight waddling or shuffle
- Exhaustion and weakness, especially in the abdominal and gluteal regions
The following are some benefits of exercise for lower cross syndrome:
Regular exercise can help you achieve the benefits explained below;
- Improve movement
- Increase flexibility
- Helps in building up weakened muscles
- Minimize pain
- Better balance or posture
- Improves performance in daily activities
- Reduce the tightness or stress
- Exercise may help you restore your mobility.
How does exercising for lower cross syndrome affect you?
- The best course of treatment for Lower Cross Syndrome to manage any lower back pain is exercise.
- Exercise has a major role in managing the overall illness and pain associated with Lower Cross Syndrome.
- Exercises that target your hip flexors or abdomen are the best because they improve any weakness.
- The first line of treatment for lower cross syndrome is the releasing of tight crossover.
- You can release your hip flexors by stretching your tight muscles in this area using foam rollers and other floor activities.
Exercises for Lower Cross Syndrome:
The best workouts for lower cross syndrome treatment include those listed below.
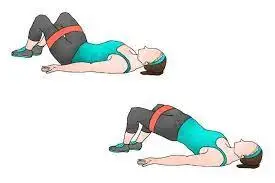
Glute Bridge with Bands
- Lying on your back with your knees bent, put the elastic band just above your knees.
- You can find your pelvic tilt by rotating your hips or pelvis back to the point where your lower back touches the ground.
- Choose a resistance band that is suitable for the level of fitness you maintain.
- The resistance band should be wrapped around both thighs so that it comes slightly above your knees.
- Pull your body upward, squeeze your glutes, and push out with your knees against that elastic band.
- Hold this position for a few seconds.
- Keeping the pelvic tilt in place, pressing against the elastic band, holding it at the top, and then slowly lowering it.
- Then return to your neutral position.
- Then relax.
- Repeat this exercise 5-10 times.
Lateral Squat Walk
- Place the band slightly above each ankle and wrap it around both legs, making sure it is flat and not tight.
- Place the two feet shoulder-width apart.
- The band needs to be stretched but not tightened.
- To engage your gluteus medius, slightly bend your knees and lower yourself into a half-squat.
- Place your feet parallel to your shoulders, face upward, and evenly divide your body weight over both feet.
- While keeping your weight on one leg, take a step backward with the other leg to continue the half-squat position.
- Perform five to ten repetitions of sideways in and out movement with this leg.
- Maintain a level hip throughout the exercise.
- You should maintain a low, forward-facing posture during this exercise.
- Your back should be straight, not arched.
- Adjust your legs and gradually shift your weight.
- Take five or ten lateral steps.
- Then return to your neutral position.
- Then relax.
- Repeat this exercise 5-10 times.
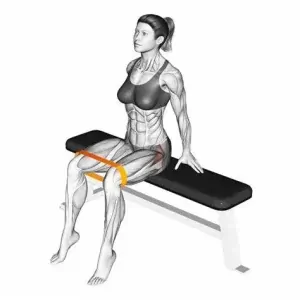
Hip abduction with resistance band
- Sit in a chair with your abs squeezed in and your lower back gently flexed.
- Just above the knees, put the theraband around your thighs.
- With your hands by your sides, place them on the bench.
- Make a controlled movement by slowly pushing your knees out to the side and back in.
- Take your time, and keep your posture straight throughout the workout.
- Then return to your neutral position.
- Then relax.
- Repeat this exercise 5-10 times.
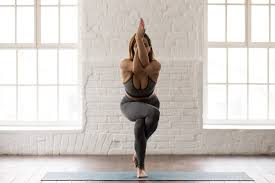
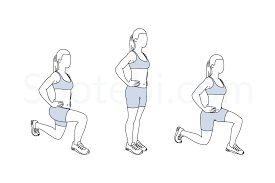
Lunges
- Step onto the floor in a comfortable standing stance, your feet hip-width apart.
- To put one leg in front of the other, take a longer step forward than you would when walking.
- When your foot hits the ground, it must stay flat.
- Then, bending your knees to a 90-degree angle, lower yourself.
- Maintaining a straight core is important.
- Hold this position for a few seconds.
- Raise your front leg gently to get back to the starting position.
- Then return to your neutral position.
- Then relax.
- Repeat this exercise 5-10 times.
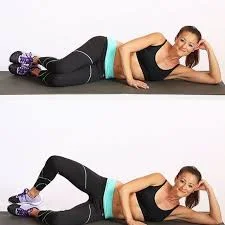
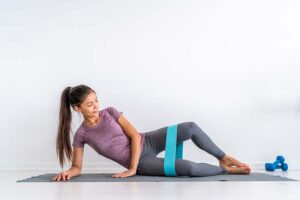
Clam Shell
- Lie on your side, legs extended and knees bent at 45 degrees.
- With your upper arm supporting your body, place your head on your lower arm.
- The upper hip can rock backward, so make sure your legs are placed on top of one another.
- Your spine and pelvis will become more stable if you pull in your belly button while contracting your abdominals.
- Maintaining touch with your feet, elevate your upper knee as high as you can without affecting your hips or pelvis.
- Make sure your lower leg is always on the ground.
- Hold this position for a few seconds.
- Then return to your neutral position.
- Then relax.
- Repeat this exercise 5-10 times.
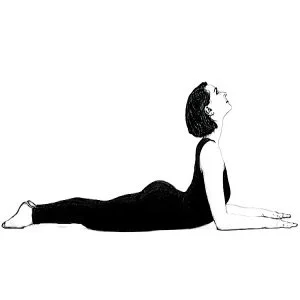
Sphinx stretch
- Lie face down on the floor and place your hands directly below your shoulders to begin.
- Point your toes to ensure that your feet are on the ground.
- Exhale and elevate your upper body by pressing through your shoulders, keeping your forearms on the mat.
- Breathe lightly and maintain your abdominal contractions.
- You can progress this technique by pushing your front hips off the ground, straightening your arms, and standing up to your hands.
- Hold this position for a few seconds.
- Then return to your neutral position.
- Then relax.
- Repeat this exercise 5-10 times.
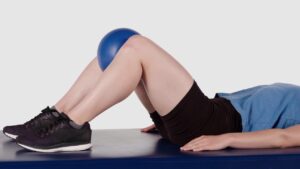
A supine ball squeezes
- Start with a relaxing supine line position on the bed.
- Place both hands on a stability ball that is positioned between your thighs.
- Contract the muscles in your abdomen.
- Raise your feet off the ground and flex your knees and hips to a 90-degree angle.
- The muscles surrounding your chest and hips should be tight, as well as the muscles in your abdomen.
- Hold this position for a few seconds.
- Then return to your neutral position.
- Then relax.
- Repeat this exercise 5-10 times.
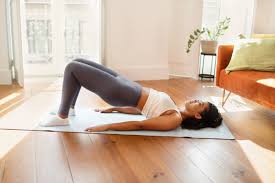
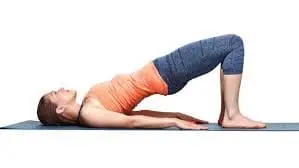
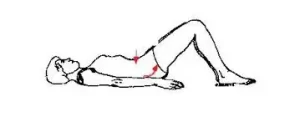
Bridges
- Rest on your back on an open area of the floor using a mat, if you have one.
- Put your feet flat on the floor under your knees, bend your knees, and rest your hands by your sides.
- Press your lower back into the ground to contract the muscles in your buttocks and abdomen.
- Lift your hips to create a straight line between your shoulders and knees.
- Pull your belly button back toward your spine while contracting your core.
- Hold this position for a few seconds.
- Then return to your neutral position.
- Then relax.
- Repeat this exercise 5-10 times.
Clamshell exercise with a resistance band
- On the floor, begin in the side-lying posture.
- Select a resistance band based on your strength and fold it over both thighs, slightly above the knees.
- Position yourself on your right side, your hips and legs extended, and your knees bent at a 45-degree angle.
- Maintaining your leg secured raise your left knee to the ceiling.
- Avoid letting your right foot lift off the ground.
- Hold this position for a few seconds.
- Then return to your neutral position.
- Then relax.
- Repeat this exercise 5-10 times.
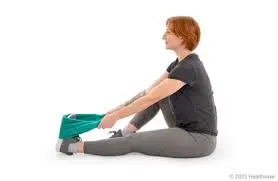
Achilles tendon seated stretch
- First, take a seat on the ground.
- Keeping your heel on the ground, bend one knee and extend the opposing leg in front of you.
- Put a bandage, belt, or workout band over your foot’s heel to help your toes come closer to you.
- Hold this position for a few seconds.
- Then return to your neutral position.
- Then relax.
- Repeat this exercise 5-10 times.
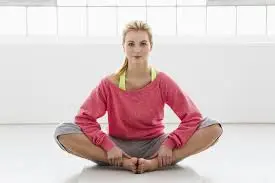
Butterfly stretch
- Legs out in front of you, take a seat on the floor or the ground.
- Grip your right foot with a forward movement.
- To improve the connection between your hand and foot, you can flex your knee.
- Pull your right foot up gently toward your belly button, bending it over the sole face of your left thigh and you can find a comfortable position.
- Place your hands on your feet and put your elbows on your knees.
- Let your knees slide toward the floor while maintaining a straight spine and without leaning forward.
- By lightly pressing with the elbows on the knees, you can apply mild pressure to the inner thigh.
- In your abdomen, you should feel a slight pulling sensation.
- Hold this position for a few seconds.
- Then return to your neutral position.
- Then relax.
- Repeat this exercise 5-10 times.
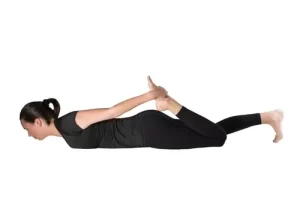
Prone Quadricep Stretch
- On your stomach, lie flat on the ground.
- With your left hand gripping your left foot, bend your left knee.
- As you keep pressing your hips down toward the floor, squeeze your heels against your buttocks.
- Take a moment to rest your head.
- A straight line should be maintained at the ankles, hips, and knees.
- Inhale deeply a few times as you maintain this position.
- Then return to your neutral position.
- Then relax.
- Repeat this exercise 5-10 times.
- Repeat the opposite side exercise.
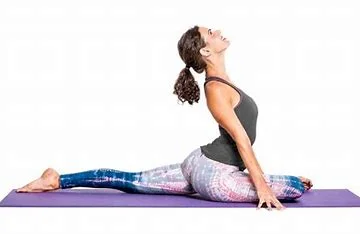
Pigeon Stretch
- To begin, choose a comfortable seat and place your hands on your knees on the floor.
- Now contract your abdominal muscles.
- Then extend your left knee forward and to the side while bending it.
- Sliding your right leg back will push your right toes under.
- On the left, spread your toes apart.
- Straighten your back and raise your eyes.
- Hold this position for a few seconds.
- Then return to your neutral position.
- Then relax.
- Repeat this exercise 5-10 times.
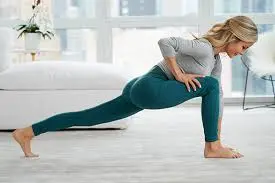
Runner’s Lunge
- Begin in a low lunge position on all fours, then bring your left foot up between your hands.
- Your left knee should be bent to a 90-degree angle and be above your ankle.
- Move your right leg backward until your hips start to stretch.
- Put both of your hands down on the ground.
- To raise the knee, pull in your back toes and squeeze your back thigh.
- Maintaining your hips flexed forward and your knee exactly above your ankle, apply strong pressure through your left heel.
- Your inner thighs should be squeezed toward one another.
- By engaging your core to keep the position, pull your chest up and forward so that your back heel, and head make a straight line.
- Maintain the position by taking a breath as you extend your body and letting it out as you go down.
- Raise your hands above the floor, increasing hip and core engagement, to test your balance and core strength.
- Then return to your neutral position.
- Then relax.
- Repeat this exercise 5-10 times.
- On the other side, perform the same procedure.
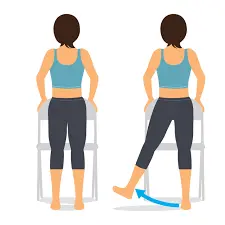
Hip Abduction standing
- Place a chair or table next to you and stand with your legs shoulder-width apart to maintain stability.
- As you stand with your feet pointed forward, keeping your back straight.
- Keep your posture straight.
- Until you feel pressure on the outside of your hip and leg, extend your right leg to your right side.
- Hold this position for a few seconds.
- Then return to your neutral position.
- Then relax.
- Repeat this exercise 5-10 times.
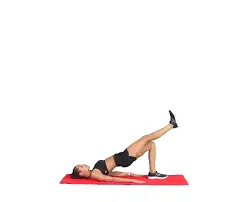
Single Leg Bridge
- Lie down on your back with your knees and feet a few inches apart from your buttocks, and rest your hands flat on the floor with your arms by your sides.
- Raise one leg and bend the knee to a comfortable position.
- To raise your hips into the air and engage your posterior pelvic chain, take a deep breath and push through the heel of your other foot.
- When you extend your hips, they should be parallel to your shoulders and knee.
- Exhaling, lower your buttocks to the floor while maintaining the highest position for just a few seconds.
- Then return to your neutral position.
- Then relax.
- Repeat this exercise 5-10 times.
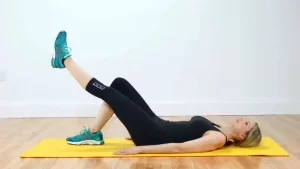
Straight leg raise
- Start by lying back on your back and relaxing.
- At this point, bend just one knee.
- Then raise your one leg with care.
- While keeping the other straight knee.
- Hold this position for a few seconds.
- After that, lower your leg.
- Then return to your neutral position.
- Then relax.
- Repeat this exercise 5-10 times.
Iliopsoas Stretch
- Lying flat on your back on the bed, place your right leg closest to the edge.
- Gradually let your right leg hang off the edge of the bed.
- Your left leg can stay bent while your foot is on the bed.
- You’ll feel a stretch in your hip joint.
- It feels better for your foot to hang over the ground rather than touch it, but if it does, that is fine.
- Your knee can be bent more gradually to extend the stretch.
- This should impact the front of the hip and thigh.
- Hold this posture for a short while.
- Then return to your neutral position.
- Then relax.
- Repeat this exercise 5-10 times.
Pelvic Tilt
- With your feet flat on the ground and your knees bent, take a position on the floor (or a mat placed there).
- Spread your arms out in front of your body, palms down.
- Your neck and spine should be in alignment, and the back of your head should be in contact with the mat.
- Maintain the natural bend of your back by giving your lower back some space from the mat.
- It should have been possible for you to get your hands on this space.
- Take a breath.
- When you release your breath, tighten your abdominal muscles to lift your body and squeeze the space that exists between your lower back and the mat or floor.
- Your lower back will extend slightly as a result.
- Breathe in and let your pelvis and spine adjust to their starting positions.
- Then relax.
- Repeat this exercise 5-10 times.
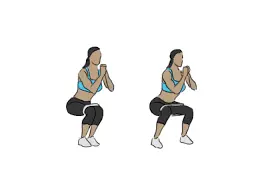
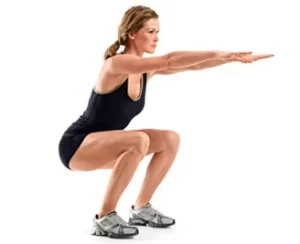
Squats
- Start with your feet a little wider apart than hip-width, with your toes turned slightly out.
- Engage your core muscles and shift your weight back into your heels as you push your hips back, maintaining an outward-facing chest and even pressure in your feet.
- Step down into a squat until your body bends or extends forward, or until your heels start to rise off the ground.
- How deep you go will depend on your posture.
- To go back to your starting posture, push through your heels with your chest out and your core tight
- At the highest point, tighten your glutes.
- Then return to your neutral position.
- Then relax.
- Repeat this exercise 5-10 times.
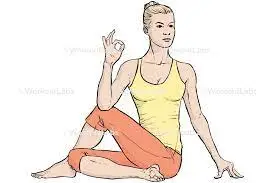
Seated spinal twist
- Take a comfortable seat on the floor and extend both of your legs in front of you.
- Afterward, bend your left knee and plant it flat on the outside of your right thigh.
- Place your right arm outside of your left leg at this moment.
- Keep your hand behind you.
- Very carefully, turn your body to the left.
- Hold this posture for a short while.
- Then return to your neutral position.
- Then relax.
- Repeat this exercise 5-10 times.
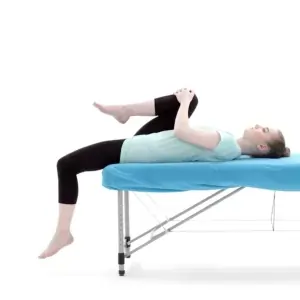
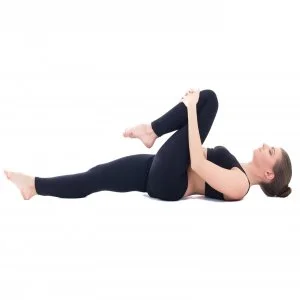
Knee to chest
- With your knees bent and your feet flat on the ground, begin by lying down on your back.
- Then, raise one knee to your chest by putting your hands around it.
- Hold that knee to your chest and keep your lower back pressed into the ground for a short amount of time.
- Stay relaxed as you return your knee to its starting position.
- Then relax.
- Repeat this exercise 5-10 times.
- Change knees and repeat the motion of bending.
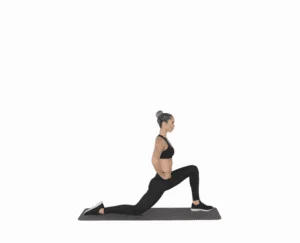
Hip flexor stretch
- Start by combining the use of both knees.
- Step forward now, bending your knee to a ninety-degree angle.
- You can put your hands on your front knee if you need support.
- keeping the upper body upright.
- Then, extend your body forward until you experience compression.
- For a short while, maintain this position.
- After that, take a step back to go back to a neutral posture.
- Then return to your neutral position.
- Then relax.
- Repeat this exercise 5-10 times.
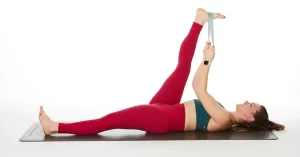
Hamstring Stretch
- Sit comfortably in a supine position on the yoga mat to begin.
- With the knee slightly bent, raise one leg off the mat.
- Place a resistance band over the heel of the extended leg.
- Pull the leg in as close to your chest as is comfortable.
- Hold this posture for a short while.
- Then return to your neutral position.
- Then relax.
- Repeat this exercise 5-10 times.
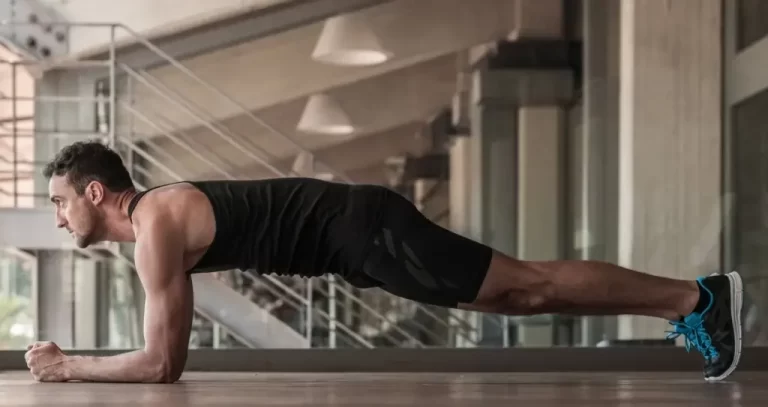
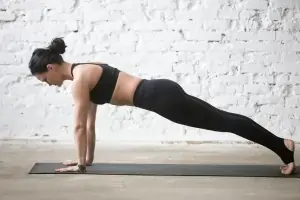
High Plank
- Start by getting on your knees.
- Your hands and knees should be apart by around the width of your hips.
- When you lift your knees off the floor and step your feet back, your legs should be straight and fully extended.
- To avoid arching your back, keep your quads, butt, and core tight.
- When you think about yourself, visualize yourself as extending from the top of your head to your heels at the same time.
- Maintaining a neutral neck position can be achieved by looking down at the floor a few inches ahead of your hands.
- Hold this position for a few seconds.
- Then return to your neutral position.
- Then relax.
- Repeat this exercise 5-10 times.
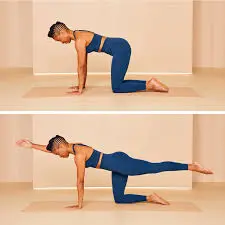
Bird Dog
- Start in the tabletop position while on all fours.
- Place your knees beneath your hips and your hands beneath your shoulders.
- Make sure your abs are engaged to keep your spine neutral.
- Squeeze your shoulder blades together.
- While maintaining your shoulders and hips parallel to the floor, raise your left leg and right arm.
- To look down at the floor, extend the back of your neck and pull your chin into your chest.
- Hold this position for a few seconds.
- Then return to your starting position by lowering yourself.
- Then relax.
- Extend your right leg and left arm, then hold this posture for a short while.
- Put yourself back in the same position as before.
- Then relax.
- This is the only round.
- Repeat this exercise 5-10 times on both sides.
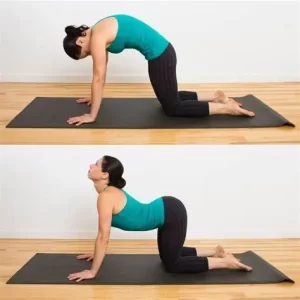
Cat-Cow
- Starting from a tabletop position, place your knees under your hips and your wrists directly below your shoulders.
- Breathe in as you lower your belly to the mat and stretch your back.
- Make a small bend in your spine by raising your head and buttocks toward the ceiling.
- Make sure to look forward and keep your shoulders separated from your ears.
- Breathe out slowly while lowering your chin into your chest and bending your spine.
- Squeeze your abdomen inward toward your spine by tightening your abs.
- In between your shoulder blades and along your back, feel the stretch.
- Keep alternating in a continuous movement between the cow and cat poses.
- Then return to your neutral position.
- Then relax.
- Repeat this exercise 5-10 times.
How Lower Cross Syndrome Can Be Relieved by Exercise:
- Your body may suffer significantly if you have inactive work habits or hobbies.
- It’s true what doctors say about sitting and bending over being bad for your health for extended periods.
- Living a sedentary lifestyle can lead to muscles that are weaker or more restricted due to lack of use and exercise.
- As improper posture is a major contributing factor to Lower Cross Syndrome, exercise is usually necessary to maintain strong, healthy muscles.
- Given that lower cross syndrome is a result of imbalances in several muscle groups, exercise is the best defense against the effects it causes.
What safety precautions are required while working out?
- Warm up and stretch before working out.
- Avoid doing intense workouts.
- Exercise should be stopped if you feel any unexpected pain.
- Take a break in between workouts.
- Keep yourself hydrated.
When are you going to stop working out?
- Severe pain in the muscles
- Fever
- You are a spreadable disease
- Headache
- If exercise causes pain, stop.
How To Care For Lower Crossed Syndrome:
Fortunately, a combination of stretches and lifestyle modifications can help to improve and, in many cases, resolve Lower Cross Syndrome;
- Reduce your sitting
While many of us must work while seated at a desk, you may consider utilizing a standing desk, taking more breaks, and moving around more after work.
- Improve your posture
Learn the knowledge of correct body alignment and create the habit of maintaining the right posture while standing, sitting, and exercising.
- Increase your productivity
Observe your workstation or desk. Take into consideration chairs with backs and adjustable workstations, among other ergonomic devices.
- Become active
Adjust your program to include low-impact exercises like yoga. In addition to helping in weight loss and reducing lack of activity, these exercises can improve your body flexibility, stability, and balance.
- Keep a healthy weight
Losing weight can relieve pressure on the lumbar spine and can be achieved by regular exercise, a balanced diet, and good lifestyle choices.
When to visit a doctor:
Patients with chronic pain in their lower back ought to meet with their doctor. Lower back pain might have several underlying causes, such as lower cross syndrome. Speaking with a doctor is also an excellent choice before beginning any new exercise program, especially one that attempts to help with posture correction.
Summary
The imbalance of muscles surrounding the pelvis is referred to as the lower cross syndrome. When the gluteus and abdominal muscles are chronically weak, it is the most typical type of muscular imbalance.
Pain in the lower back and noticeable changes in an individual’s posture, steps, or manner of movement are possible signs.
Exercises for lower cross syndrome can also be used for managing the condition. Keep in mind to prevent poor posture practices that aggravate the pain when performing the workouts.
FAQ:
What are the weak muscles in lower cross syndrome?
Lower body cross syndrome may be caused by prolonged sitting. The hip flexors, or the muscles in front of your hips that allow you to move your legs, and the low back muscles get smaller and tighter, while the gluteal and abdominal muscles are longer and weaker.
How is recovery from lower cross syndrome achieved?
The main goals of hip flexor or abdominal exercises are to stretch and relax tight muscles and strengthen weak muscles that contribute to Lower Cross Syndrome. Exercise also has an important impact on controlling the overall pain associated with Lower Cross Syndrome.
Can exercising help with lower cross syndrome?
Exercise is an effective way to manage pain and stop more injuries and pain. One kind of exercise that improves the strength of the muscles supporting the body is stretching. Regular physical activity can help you experience chronic pain less frequently.
Which stretches for lower cross syndrome work best?
Hamstring stretching
Knee to chest
Archilious tendon stretch
Prone quadriceps stretch
Butterfly stretch
About lower cross syndrome, where is the source of pain?
Lower cross syndrome is caused by muscular imbalances that lead to improper posture and movement. Significant adjustments to a person’s posture, steps, or ways of sitting, standing, or breathing can reduce pain in the back.
Which factors are involved in the lower cross syndrome?
Sedentary behavior or a lifestyle characterized by extended periods of inactivity are the causes of lower cross syndrome. Workplace activities that require extended periods of sitting, such as desk jobs, binge-watching television, using computers for extended periods, and other activities, can all lead to inactive behavior.
How frequently should an individual who has lower cross syndrome exercise?
It could be done to complete the lower cross syndrome exercises for at least 20 to 30 minutes each day. You will benefit from an everyday routine of stretching and light exercise.
When you have lower cross syndrome, how do you sleep?
A small pillow under your knees can provide support if you sleep on your back by relieving pressure from your lower back. If you sleep on your side, you may get more support by placing a pillow between your knees.
How does a person experience lower cross syndrome?
Hip or pelvic painful joints, as well as lower back pain, are common symptoms of Lower Cross Syndrome. In addition, individuals may feel stiffness or a reduction in hip, hamstring, lumbar, or pelvic range of motion. pain in the groin, hip flexors, gluteal muscles, or spine.
Is walking helpful in reducing cross syndrome?
Frequent exercise, particularly walking, supports optimal pelvic muscle and connective tissue balance, allowing for pain-free, fluid mobility.
Is cross-training beneficial for recovery?
You can guarantee that supporting muscles can function effectively by exercising various muscle groups. Additionally, you’re allowing your most frequently used muscles to rest and recover. If you are a frequent runner, you can give your legs a rest by cross-training by swimming or riding.
What kind of exercise program would be best done at home to deal with lower cross syndrome?
Glute Bridge with Bands
Lunges
Clam Shell
Single Leg Bridge
Straight leg raise
Pelvic Tilt
Squats
How does upper and lower cross syndrome differentiate from one another?
The term “upper cross syndrome” describes the upper body, specifically the neck, upper back, chest, and shoulders. The lower body surrounding the pelvis, lower back, abdomen, and upper thighs is referred to as lower cross syndrome.
Is the syndrome of lower crossed common?
One of the most typical corrective patterns is lower crossed syndrome. An anterior tilt to the pelvis (arched lower back) is its defining characteristic. It is a result of living inactivity and frequently appears as an excessive lower back arch and lumbo-pelvic-hip complex.
The reference:
- J. Fletcher. October 30, 2020. A brief overview of the lower cross syndrome. Lower Cross Syndrome Article, Medical News Today, May 15, 2017.
- Lower Cross Syndrome Exercises | Moyer Total Wellness. September 14, 2022. The website Moyer Total Wellness provides workouts for those with lower cross syndrome.
- Seven Exercises and Treatment Plans for Lower Cross Syndrome. (As of now). Exercises and Treatment Plans for Lower Cross Syndrome: https://www.chiro-med.ca/blog/7-lower-cross-syndrome
- December 31, 2014, Magazine, C. C. Five exercises to cure moving lower cross syndrome. Magazine for Canadian Cycling. https://cyclingmagazine.ca/sections/news/5-exercises-to-correct-lower-cross-syndrome-in-cyclists/.
- Do You Want To Strengthen Your Core? Try This Traditional Abs Exercise. June 23, 2022. [https://www.mindbodygreen.com/articles/high-plank] Mindbodygreen
- December 20, 2021, Evergreen, B.Lower Cross Syndrome: Corrective Posture Techniques. Evergreen Wellness and Rehab Langley, Surrey, and Coquitlam. How to Correct Your Posture in Lower Cross Syndrome: Evergreen Clinic, Inc.
- B. Passalacqua (2023, December 13). Subluxation Cross Syndrome Yoga: Practices, Origins, and Cure. Inhaling deeply. Breathing Deeply: “Yoga therapy for sitting on our butts all day”
- Image 2, P. Tirgar (2022, 26 February). Exercise: Lateral banded walk: Muscle exercised, Health Benefits, How to perform? Mobile Clinic for Physiotherapy. [#google_vignette] at https://mobilephysiotherapyclinic.in/lateral-banded-walk-exercise
- Image 6, The MasterClass 2024 edition of “How to Do Sphinx Pose 4 Benefits of Sphinx Pose” April 29, 2021. Sphinx Pose Guide: https://www.masterclass.com/articles
- Image 7, Ferreira, K. M., Araújo, A. F., and Maia, J. S. (2021). Pubsaúde, 5, 1–5. https://pubsaude.com.br/wp-content/uploads/2021/01/111-A-pandemia-e-os-novos-horizontes-para-o-enfermeiro-na-aviacao.pdf. Publication number: 10.31533/pubsaude5.a111
- Image 9, Lower Body Resistance Band Exercises – InSync Physiotherapy (n.d.). Resistance band workouts for the lower body from InSync Physiotherapy. https://insyncphysio.com/
- Image 10, Lamb, S. E., Kearney, R. S., Achten, J., Parsons, N., & Costa, M. L. (2012). This study examined the Achilles tendon total rupture score in individuals with acute tendon ruptures, focusing on responsiveness, internal consistency, and convergent validity. Conclusions on Health and Quality of Life, 10(1), 24. 10-24, 1477-7525, https://doi.org/10.1186
- Image 12, October 6, 2023; Cpt, J. C. The Runner’s Lunge: Why It Should Be Done by Everyone, Especially Non-Runners. BODi. Runners-lunge: https://www.beachbodyondemand.com/blog
- Image 18, The website livebetterphysiotherapy.com.au (n.d.). Finding hip flexor relief with psoas stretches: https://www.livebetterphysiotherapy.com.au/?i=psoas-stretches-dd-lwJ17LcP
- Image 25, Do You Want To Strengthen Your Core? Try This Traditional Abs Exercise. June 23, 2022. [https://www.mindbodygreen.com/articles/high-plank] Mindbodygreen
- Image 26, D. on June 3, 2021. Exercise Guide with Illustrations for Bird Dogs. Bird dogs are a type of exercise guide available on SPOTEBI.
- Image 27, Ryt, M. A. H. and Ryt, M. A. H. (December 14, 2023). Pose: Marjaryasana-Bitilasana, or Cat-Cow. Cat-cow pose (also known as Marjaryasana-Bitilasana) is offered by Yogajala.