18 Best Exercises For Knee Valgus Deformity
The knees can be stabilized and realigned with exercise. The physical therapist will recommend exercises to strengthen the muscles in the legs, hips, and thighs based on the severity of the deformity and its underlying cause. Certain stretches might also help with symptom relief.
What is the Knee Valgus Deformity?
The condition known as knee valgus deformity sometimes referred to as genu valgum or just knock-knee, is defined by the inward angle of the knees when the legs are extended. As a result, the ankles stay apart while the knees come into contact with one another. Adults and children can also have knee valgus, which can range in severity from mild to severe.
Genu valgum is more often known as “knock-knee.” A person with genu valgum stands with their knees together and has at least 8 centimeters (3.1 inches) of gap between their ankles. The knees will appear to press against each other more closely.
The majority of affected children are typically between the ages of three and six. By the time a child is seven years old, the majority of their diseases will have gone away on their own. In rare cases, genu valgum can continue throughout youth. In other cases, it could happen to children or elderly people as a result of a medical condition.
In the case that genu valgum is not resolved on its own or develops later in life, a person may require medical treatment. In most cases, genu valgum cannot be prevented. However, a variety of treatment options may be able to alleviate some of the symptoms.
The causes:
Genu valgum can be caused by metabolic bone abnormalities or genetic disorders, however, this type is not usually clear. However, most genu valgus situations do not constitute a danger.
Risk factors for genu valgum include the following;
- Deficiency in vitamin D
- Incident or illness that results in leg or knee skeletal dysplasia.
- Obesity
- Malunion
- Rickets
- Scurvy
- Not enough calcium
- Paralytic condition(poliomyelitis)
- Arthritis, particularly in the knee
Symptoms:
- knee pain or hip pain
- knee instability
- A limp while walking
- When standing with your knees together, you are unable to touch your feet.
Exercises Are Important for Knee Valgus Deformity:
Knee valgus deformity, sometimes referred to as knock-knee or genu valgum, is a condition in which the knees turn inward and come into contact with one another when the legs are extended. This condition may cause discomfort as well as pain, and in more serious instances, it may aggravate other musculoskeletal problems. It’s important to remember, though, that there are differences in the degree of knee valgus and associated differences in available treatment choices.
Exercise has a significant impact on knee valgus deformity management and may even improve it. Even though exercise alone might not be able to fully treat the issue, it can help by strengthening the muscles that surround the hips and knees, which will improve stability and support. Furthermore, some activities might help with general posture and alignment of the lower body, which may help manage knee valgus in an indirect way.
It is important to take a comprehensive approach when creating an exercise program for knee valgus, including mobility training, stretches, and strengthening exercises. Additionally, it’s important to speak with a physical therapist to develop a customized fitness program that meets the specific requirements and situations of the individual. They can guide suitable physical routines, ideal form, and suitable exercise numbers, ensuring that the fitness program is effective and secure.
People with knee valgus deformity may benefit from increased muscular strength, joint stability, and total functional movement with regular and proper exercise, which will improve their overall quality of life.
Exercises For Knee Valgus Deformity:
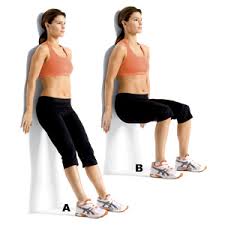
Wall squat
This is an activity you can do anywhere you can get to a straight wall.
- Starting with your back against a wall, step back two feet or so with your feet shoulder-width wide.
- Lowering your back down the wall until your thighs are parallel to the floor requires you to contract your abdominal muscles.
- Instead of putting your knees over your toes, place them directly over your ankles by adjusting your feet.
- Hold this position for a few seconds.
- Maintain a straight back onto the wall.
- Slide up the wall and gradually come back to a standing posture.
- Then return to your neutral position.
- Then relax.
- Repeat this exercise four to seven times.
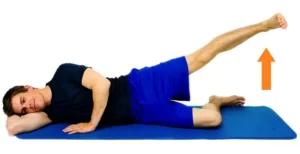
Side lying abduction
- Place your hips on top of each other while lying on your side with your legs outstretched.
- Allowing the entire weight of your head to rest on your forearm in alignment with your vertebrae requires bending your bottom elbow and putting your lower arm below your head.
- Maintain a neutral foot posture where your feet are straight to your legs.
- With the thigh extended upright, the upper arm rests on the outside of it.
- You are meant to begin right here.
- Exhaling as you raise your upper leg to a position slightly above your hip joint.
- Hold the pose for a couple of seconds when you notice your hips and back becoming tight.
- Taking a deep breath, slowly go your leg to its beginning position.
- Make sure your upper leg is straight and positioned exactly above your lower leg
- Then return to your neutral position.
- Then relax.
- Repeat this exercise four to seven times.
Side lunges
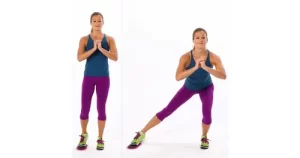
For correcting knock knees, side lunges are quite beneficial, particularly for your inner thighs. In addition, it helps to align your knees, which improves your stance and posture.
- Place your feet hip-width apart and start standing.
- Step wide and extend your left leg to the side.
- Your feet should be level on the floor, with both toes pointing in the same direction.
- While taking a step out, flex your left knee while maintaining an upright posture.
- Your lower body should feel as though you are attempting to sit on just one side of a chair.
- Hold this position for a few seconds.
- Push off with your left foot to release the position and go back to the beginning position.
- Then relax.
- Repeat this exercise four to seven times.
Banded Spanish Squats
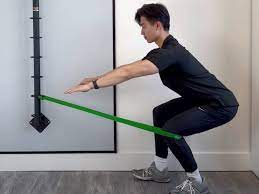
- Tighten a long or pull-up band around a fixed object.
- Using the same band, wrap your knees behind your lower legs.
- Place your toes forward and place your feet hip-width apart.
- Maintain an upright posture by shifting your weight into your heels.
- By engaging your core muscles to prevent your lower back from flexing, you can maintain a relaxed shoulder posture instead of lowering your shoulders over your ears.
- After that, return to a squat position gradually.
- Only down as far as is comfortable for you, and keep your posture down.
- To get the most benefits, try to keep your position at a 90-degree angle.
- Hold this position for a few seconds.
- To go back to standing posture, push through your heel after you’ve achieved a comfortable level.
- Then relax.
- Repeat this exercise four to seven times.
Lunges
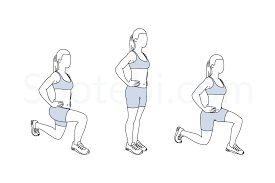
- Place your right foot approximately two to three feet forward of your left foot to form a split posture.
- Your hands are resting on your hips, your body is straight, your shoulders are back and down, and your core is active.
- Your body should be lowered with your knees bent until your back knee is only a few inches from the ground.
- Your weight is equally distributed between both legs at the bottom of the exercise, with the front thigh parallel to the floor and the back knee pointing in the direction of the floor.
- Push yourself back up to the starting position while keeping your weight on the heel of your front foot.
- Then relax.
- Repeat this exercise four to seven times.
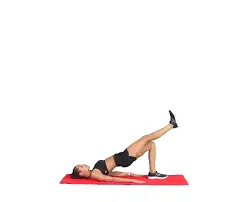
Single-Leg Bridge Exercise
- Having your knees bent, feet flat on the floor (under your knees), and hands by your sides, take a supine position.
- Elevate one foot and fully extend the leg, making it nearly 45 degrees from the floor.
- This is the starting position.
- When your shoulders and knees are in a straight line, raise your hips while contracting your abs and buttocks to help with the lift.
- Similarly contract your core, as though attempting to pull your belly button back towards your spine.
- For a count of a few seconds, maintain this posture.
- To get back to the starting position, slowly and carefully lower your hips to the floor while maintaining your leg extended.
- Then return to your neutral position.
- Then relax.
- Repeat this exercise four to seven times.
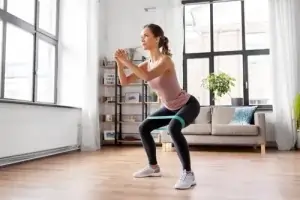
Resistance band squat
- You needed a resistance band that matched your strength for the resistance band exercise.
- Make sure your back is straight your body weight is centered, and your core is active when performing a band squat.
- Additionally, keep in mind not to bend over.
- Place an elastic or small loop band slightly above your knees and stand with your feet slightly wider than hip-width apart.
- With your hands on your hips or in front of you, your toes should be pointed slightly outward.
- While bending your knees, gradually push your hips back into a sitting posture.
- Hold this posture for a few seconds.
- Then return to your neutral position.
- Then relax.
- Repeat this exercise four to seven times.
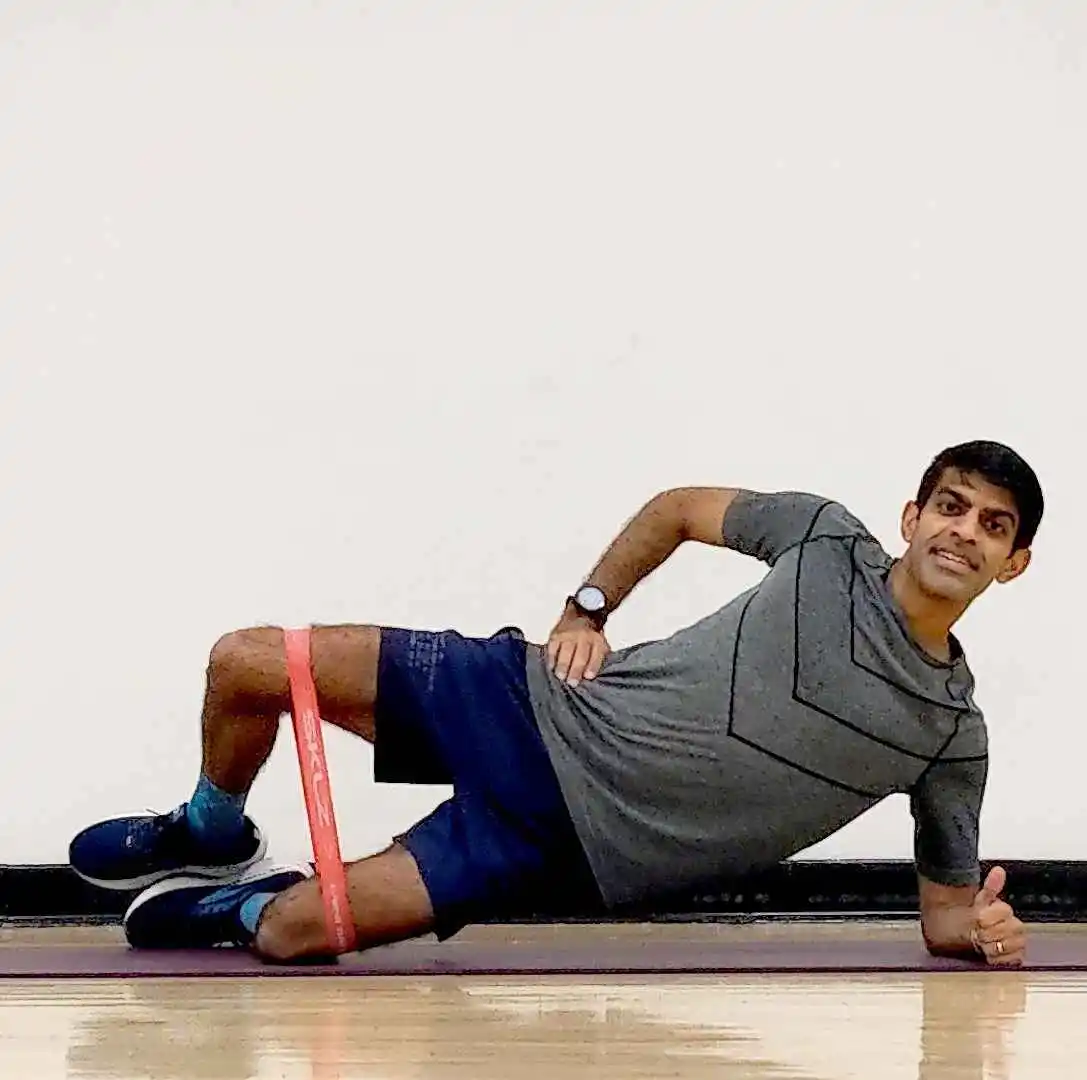
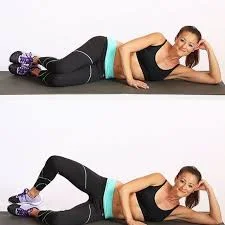
Clamshell exercise
- To perform the clamshell exercise, you can lie sideways on a mat or plinth with your ankles resting on each other and your hips and knees a little bent.
- Use your upper arm to support your body while you place your head on your lower arm.
- The upper hip can slide backward, so make sure your hipbones are placed on top of each other.
- Pulling in your belly button can help you activate your abdominals and stabilize your pelvis and spine.
- Raise your upper knee as high as you can without moving your hips or pelvis, keeping your feet in contact.
- Make sure your lower leg is always on the surface of the ground.
- Hold this position for a few seconds.
- Then return to your neutral position.
- Then relax.
- Repeat this exercise four to seven times.
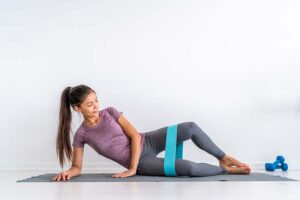
Clamshell Resistance Band
- Put the band around each leg, just above the knees.
- Lying on one side, position your hips and legs with your knees at a 45-degree angle.
- Tighten your abdominal muscles to maintain a stable core.
- Raise your upper knee as high as possible without shifting your hips or pelvis as long as your feet stay in touch with one another.
- Maintain your lower leg flat on the ground.
- Hold this position for a few seconds.
- Then return to your neutral position.
- Then relax.
- Repeat this exercise four to seven times.
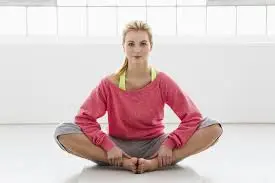
Butterfly flutters
During this yoga pose, your kneecap and other nearby muscles are stretched in a way that allows for proper alignment. Your knee alignment will gradually become better the more you flutter and bring the knee nearer the ground.
- Start by sitting down.
- Press the soles of your feet together and bend your knees gently.
- Put your hands on your ankles or shins.
- Spread your spine wide and extend your chest.
- Pull your shoulders back and downward.
- Hold this position for a few seconds.
- Stretch your legs forward and lean on your hands to release the posture.
- Then return to your neutral position.
- Then relax.
- Repeat this exercise four to seven times.
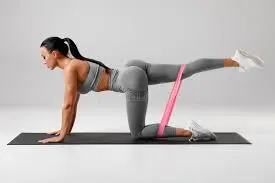
Kickbacks
Strengthening the muscles in the outer thighs, this exercise helps with foot coordination.
- Position your feet shoulder-width apart and place an elastic workout band under your knees.
- Raise one leg slowly as you get ready to hit the ball.
- Hold this position for a few seconds.
- Then return to your neutral position.
- Then relax.
- Repeat this exercise four to seven times.
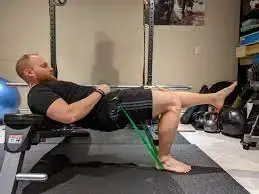
Hip Thrust in One Leg With Band
- An elevated bench is also necessary for this workout.
- Starting with your feet hip-width apart, place yourself on a bench or other high surface while supporting your mid-back with your arms.
- Wrap the resistance band above your knees.
- Raise one leg to your chest to give the resistance band an extra push.
- In addition to pulling up, the lifted hip should be pointing slightly outward toward your shoulder.
- Then return to your neutral position.
- Then relax.
- Repeat this exercise four to seven times.
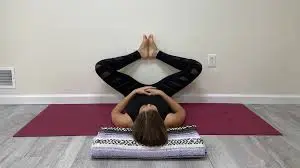
Legs-up-the-Wall Butterfly Pose
- This particular variation of Butterfly Pose is excellent for reducing pain in the knee and valgus deformity while also supporting the spine.
- Place your right side up and your back against the wall while seated.
- Flexed from knee to chest.
- After putting your legs up against the wall, lie on your back.
- Put your hips up against the wall or a little bit away from it.
- Widen your knee flexion as much as you can.
- Take your heels as low as you can.
- Put pressure on the toes of your feet.
- Hold this position for a few seconds.
- Then return to your neutral position.
- Then relax.
- Repeat this exercise four to seven times.
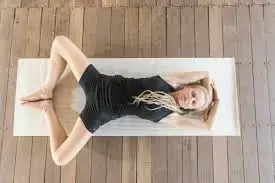
Reclined Butterfly Pose
- Start with extending your legs while sitting on the floor.
- Form the legs into a diamond shape by bringing the soles of the feet together and extending the knees out to the side.
- Relax by lying back on a cushion or the ground.
- Spread your hands apart or place them on your abdomen.
- Hold this position for a few seconds.
- Rotate onto your side and raise yourself back up to a sitting position with the help of your hands to exit.
- Then return to your neutral position.
- Then relax.
- Repeat this exercise four to seven times.
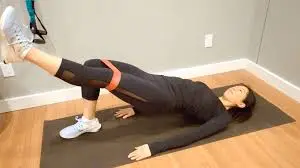
Single-Leg Bridge–Band
- As you begin the single-leg bridge exercise, lie down on your back with a resistance band placed just above your knees.
- So that your knees don’t buckle, push out against the band.
- Next, raise one foot off the floor and stretch the leg in front of you until your quadriceps muscles are parallel to one another.
- Maintain force on the band when you bridge, putting your upper back and heel through the ground.
- As you bridge upward, prevent the urge to flex your knee.
- Squeeze your glutes and fully extend your hips while holding for a few seconds at the top of the exercise.
- Then return to your neutral position.
- Then relax.
- Repeat this exercise four to seven times.
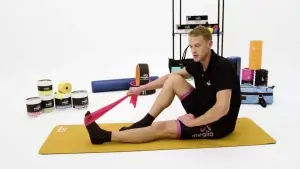
Leaning Ankle Band Stretches
- The resistance band you are holding through your hand must be horizontal to your leg.
- After you have placed the strap around the closest ankle, our feet should be further apart than hip-width.
- Bend the knee that is not in contact with the resistance band as you lean away from it.
- The band should be pulling on the inside of your ankle.
- Hold this position for a few seconds.
- Then return to your neutral position.
- Then relax.
- Repeat this exercise four to seven times.
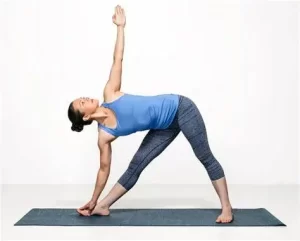
Triangle pose (Trikonasana)
- Place your feet about a leg’s distance apart and face the long side of your mat to enter the Triangle pose, also known as Trikonasana.
- As you turn your left foot in, roughly 45 degrees, turn your right foot out so that your toes are facing toward the short side of the mat.
- Stability between both legs is what you need.
- Pull your legs together and extend your right thigh till your right knee aligns with your first two toes.
- Pull your lower abdomen in and upward, stretch through both sides of your waist, and raise your arms so they are parallel to the ground.
- Breathe in and extend your body over your right leg, bringing your hips toward the back of the mat as you reach to the right.
- Breathe out as you lower your right arm and rest your hand on a block, the floor, or a leg.
- Turn your abdomen so that it faces upward.
- Raise your left arm straight up to the sky, keeping your hand parallel to your shoulder and your palm pointing upwards.
- Maintaining your neck’s alignment with your spine, extending through its sides.
- Just look directly ahead, or lower your chin slightly and look up at your left hand.
- As you continue to press through the feet, extend through the fingertips and top of the head, and rotate your upper body, maintain a relaxed posture and take gentle breaths.
- To leave, plant your feet firmly on the ground, take a breath, and raise your left arm to the ceiling as you straighten up again.
- Then return to your neutral position.
- Then relax.
- Repeat this exercise four to seven times.
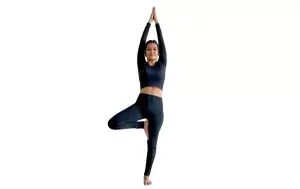
Tree pose (Vrikshasana)
- Keep your body in a straight line and put two inches between your feet.
- Turn your entire weight to your left leg.
- Use your left foot’s four corners as a point of contact.
- With your right hand extended, bend your right knee and hold your ankle.
- With your right foot either above or below your knee joint, set it on the inside of your left leg while bending your right knee.
- The side of your knee is pointing outward.
- Apply pressure on your inner thigh and then your foot to make sure the correct position.
- Make sure your core muscles are engaged.
- Extend your spine, relax your shoulders, get your chin slightly back, and firmly plant your left hip.
- In the prayer position, place your hands in front of your heart or raise your arms to the sky.
- Hands may continue to be shoulder-width apart.
- Hold this position for a few seconds.
- As you release the breath, lower your arms and legs.
- Then relax.
- Repeat this exercise four to seven times.
Consider the following advice:
- Low-impact exercises
Choose low-impact workouts that are easier on the knees, including riding an elliptical machine, swimming, or cycling. These exercises can support the maintenance of cardiovascular fitness without overstressing the knee joint.
- Stay away from high-impact activities
Activities that aggravate knee valgus deformity should be avoided, such as jumping, jogging on hard surfaces, and sudden changes in direction.
- Be careful when performing strength training
Exercises that strengthen the muscles surrounding the knees and hips might be helpful, but it’s important to use good form and stay away from exercises that could worsen knee alignment.
It is advisable to consult a physical therapist who can create a safe and specific workout plan that’ll improve knee alignment and strengthen the surrounding muscles.
Keep in mind that your physical activity routine will change based on the degree of your knee valgus deformity and any underlying medical conditions. Before beginning any fitness program or significantly reducing your level of activity, you must speak with a physical therapist or orthopedic expert. In addition to making sure you participate in activities that are secure and correct for your particular condition, they can offer you individualized counseling.
Loss of weight:
An overweight person may make their genu valgum worse. Increased weight bearing puts extra strain on the knees and legs, aggravating knock-knee. The doctor of an overweight individual will most likely recommend combining diet and exercise to lose weight.
Orthotics:
Orthodontic insoles are placed into shoes to help improve a person’s gait, or how their foot contacts the ground as they walk or run. This could be quite helpful for someone who has genu valgum, or one leg longer than the other.
Doctors may prescribe orthotics in place of or in addition to braces or splints for specific children. The braces are meant to help the bones grow in the right places.
Safety Factors to Remember:
While muscle weakness is a common cause of genu valgum, underlying skeletal and anatomical abnormalities can also be the cause in certain cases.
In this case, you could find that doing particular exercises hurts your knees. Exercise shouldn’t hurt; if it does, quit right away.
You can consult your doctor for a review and possible treatments other than exercise if your genu valgus is bothering you.
Observation and precautions:
Valgus knee is a quite frequent condition. If it is followed by a rapid onset of pain or swelling, buckling of the knee joint, or a progressive weakening of the leg muscles, you need to get medical treatment. These should be reported to a doctor right away since they could be indicators of more serious health issues.
Exercises you should stay away from:
- Aerobics
- Engaging in sports like basketball, soccer, volleyball, etc. In general, everything involves a lot of running.
- Jogging
Summary
Genu valgum, also referred to as “knock knees,” is a deformation of the legs and knees. The shape or pull of the knee joint causes the legs to bend inward. When a person with genu valgum stands with their knees together, their feet do not come into contact.
Although modest incidences of children’s genu-valgum are common and often don’t cause problems, the condition typically goes away on its own without treatment. However, some people find that it hurts their knees and makes walking difficult. Several exercises can potentially alleviate genu valgus pain for people who experience it.
With the right footwear, focused exercises, stretches, orthotic solutions, and lifestyle modifications, valgus knees can be effectively controlled. You may reduce pain, realign your knees, and improve your knee health by including these techniques in your daily routine. Always keep in mind that maintaining a routine is necessary.
FAQ
For knee valgus, which muscles need to be strengthened?
Exercise strengthens the gluteus medius, tibialis posterior, and popliteal muscles. These muscles affect how far apart the hip, knee, and ankle joints can move.
Which muscles in the valgus are weak?
Knee valgus, or inward bending of the knees, is a common misalignment observed during squat exercises. This usually happens when the solid hip adductor muscles (located on the inside thigh) suppress the weak hip abductors, the gluteus medius and minimus.
For valgus, which muscles are used?
The co-contraction of the quadriceps and hamstrings frequently supplied most of the muscle support for the varus and valgus moments. Moreover, co-contraction supported 11–14% of the external moment in pure valgus and pure varus, respectively.
Is it possible to manage knee valgus with exercise?
Knee stability is mostly dependent on the muscles in your quadriceps, hamstrings, ankles, and hips. If any of these muscles are excessively weak or taut, knock knees may become uncomfortable. By strengthening and realigning these muscles, certain cases of genu valgum can be reversed and the knee joint supported.
Is valgus in the knee treatable?
Knee valgus irregularities can be effectively treated with a V-shaped supracondylar osteotomy. The advantages of this extremely simple method are low morbidity, good stability with early weight-bearing, no need for internal fixation, and the flexibility to adjust alignment with the postoperative cast.
Is valgus knee a dangerous condition?
Joint stiffness, knee pain, limping, or instability in gait are all possible symptoms of Valgus deformity. As a result of the increased strain on ligaments and muscles, pain may eventually arise in the ankles, feet, or hips. You may also experience instability and fall risk.
What signs and symptoms are present with valgus?
Depending on the person and the underlying cause of the illness, the severity of these symptoms could vary. Common signs and symptoms of genu valgus include visible abnormality on the legs. knee pain, particularly following exercise or long walks or stands.
Is valgus painful?
While some people have very little pain at all even with having a severe deformity, others have severe pain even with a mild case of hallux valgus. Metatarsal pain: As the condition worsens, the big toe and the first metatarsal become so unstable that patients frequently are unable to bear weight on them.
How is walking affected by valgus?
Research results on gait showed delayed heel rise, decreased velocity, lengthened strides, and single-limb support times; however, the patients with valgus deformity showed more pronounced reductions in these factors.
Does the valgus knee last forever?
Usually, parents know that their child’s genuvalgus will disappear by the time the child turns eight years old. Physical therapy and exercises are effective ways to realign the knees of older children and adults who suffer from genuvalgus.
References:
- Best Exercises to Reduce Vacuum. (November 12, 2020). WebMD. Top exercises for general vague: https://www.webmd.com/a-to-z-guides/ Inside-Text Reference: (Best Practices for Genu Valgum, 2020)
- August 4, 2023; Prajapati, D. The Top 25 Exercises for Knee Valgus Deformity Correction. Physiotherapy Clinic in Samarpan. The top 25 exercises to treat knee valgus deformity can be found at Savannah Physio Clinic.
- November 19, 2023: Renow, B., & Renow, B. Practical Remedies for Valgus Knees. SelectFlex. valgus knees: excellent options for pain reduction. https://selectflex.com/blogs/pain-relief
Reference within the text: (Renow & Renow, 2023) - On December 13, 2023, Parmar, D. The Top 12 Exercises for Knee Valgus Deformity – Mobile Physiotherapy Clinic. Best exercises for valgus deformity of the knee: https://mobilephysiotherapyclinic.in/ In-text Reference: (Parmar, 2023)
- N. Bhardwaj (2020, Dec. 15). Is this your first time doing yoga? So stay away from these seven positions. 7 yoga poses novices should avoid when practicing yoga for weight loss, according to Healthshots.
- T. P. P. Ocs (2011) 4 Jan. Exercises to Strengthen Your Valgus Knee. Livestrong.net. Strengthening exercises for valgus knee: https://www.livestrong.com/article/349188
- November 21, 2023: Gupta, A. Try these 7 yoga poses for help if you have knock knees. The website Healthshots provides fitness information, on staying in shape, including yoga positions for knock knees.
- Image 4, Drum (2022) 24 October. How to Do, Why to Do It, and When to Use Spanish Squats Exercise Drum. Exercise Drum. Spanish squats can be found at Fitnessdrum.com.
Citation inside the text: Drum, 2022 - Image 5, L. Putra (2023, Jan. 3). Download the illustrated exercise instruction featuring a healthy man performing a two-step lunge workout to firm your buttocks. The illustrated fitness guide by a healthy man that demonstrates a two-step lunge program for firming buttocks and legs can be found on Vecteezy.
Reference within the text: Putra, 2023 - Image 6, Astorino, D. M. (January 14, 2017). How to Build a Bridge with Just One Leg. Pop Sugar. How-to-do-single-leg-bridge-42996498 https://www.popsugar.com/fitness
- Image 7, January 20, 2021: Drucker, G. To strengthen your muscles and improve your form, use resistance bands. The website PhillyVoice provides information on resistance band workouts, squats, deadlifts, clamshells, glute bridges, and more.
- Image 11, F. (1986). Grey studio background with a young, lovely woman in the Bird dog pose. It’s time for dreams. Exercise in Kickback. htm https://www.dreamstime.com/photos-images
- Image 12, D. Yores (2022, Mar. 9). Straight-Leg Hip Thrust: Ideal Form, Common Mistakes, and Adjustments. Systems of Roman Fitness. /articles/single-leg-hip-thrust/ on Roman Fitness Systems
- Image 13, Anderson, M., and A. Kjellgren (2015). Yoga practice for wellbeing and relaxation. Yoga & Physical Therapy Journal, 5(04). The doi: 10.4172/2157-7595.1000219
- Image 14, 2022, November 2. Y. This is a 60-minute yin yoga program that explores the yoga butterfly posture (#8211). Yoga Therapy Training with Yin. The pose that mimics a butterfly is called the “yoga-butterfly” pose.
- Image 15, InSync Physiotherapy, Knee Ligament Injuries – One Leg Looped Band Bridges (n.d.). Sync Physical Therapy. knee ligament injuries one leg looped band bridges https://insyncphysio.com/
- Image 16, On December 20, 2016, M. T. Resistance band exercises to improve ankle stability. YouTube. /watch?v=CgnMoSHF0qE
- Image 17, November 24, 2021: Ryt, A. P. How to Perform the Yoga Asana Triangle Pose (Utthita Trikonasana). well-fitted. This is the extended triangle pose (Utthita Trikonasana-3567129) on https://www.verywellfit.com.
- Image 18, S. Kamdar (2021, Feb. 3). Why Vrikshasana (Tree Pose) Can Be The Perfect Fitness Start To Your Day. Women. This article explains why the Vrikshasana tree pose can be the ideal way to start your day with fitness (185386. html).
