14 Best Exercise For Wrist Sprain
A wrist sprain occurs when the ligaments supporting the wrist are stretched or torn, often due to a fall or sudden impact. Gentle exercises can aid recovery by improving mobility, strength, and flexibility. Always start with light movements and progress gradually to avoid further strain.
Introduction:
A wrist sprain happens when the wrist’s ligaments rupture or stretch as a result of an unintentional fall, rapid movement, or excessive force. While rest and healing are important, Exercise For Wrist Sprain can help the wrist regain its strength, flexibility, and function once the initial pain and swelling are gone.
After the initial pain and swelling have gone down, start doing light workouts. Depending on the extent of the sprain, this usually takes a few days to a week. It’s important to speak with a physician or physical therapist to ensure that beginning exercise is safe for your condition.
Three grades are typically used to classify sprains:
- Grade 1 sprain (mild): The ligaments are not torn, but they are strained.
- Grade 2 sprain (moderate): There is partial ligament tearing. A certain amount of function loss may result from this kind of injury.
- Grade 3 sprain (severe): Either the ligament is pushed away from its attachment to the bone, or it is torn. These are serious wounds that can need advanced medical or surgical treatment.
Causes:
When too much force causes the wrist’s ligaments to strain or tear, a sprain happens. Typical reasons include:
- Landing on a Hand Outstretched
The most frequent reason for sprains of the wrist. This happens when you automatically extend your hands to break a fall.
- Injuries in Sports
Wrist sprains are more likely to take place in contact sports like football, basketball, and soccer. Skiing, skateboarding, and gymnastics all involve sudden falls and frequent wrist injuries.
- Overuse or Repetitive Strain
Over time, repetitive activities like typing, playing an instrument, or using tools can cause the wrist ligaments to worsen. Can result in sprains and long-term wrist instability.
- Improperly Lifting Heavy Objects
Ligaments may be strained if lifting is done with improper wrist posture. Frequently used for hauling big items, construction jobs, and weightlifting.
- Sudden Bending or Twisting Motions
The wrist ligaments may get overstretched by an uncomfortable bend or a strong twist.
Prevalent in sports including martial arts, weightlifting, yoga, and tennis.
- Fatigued or Weak Wrist Muscles
Ligaments are prone to damage when wrist strength is low. Lack of warm-up before physical activity can make it worse.
- Auto accidents or direct contact
Ligament damage can result from a direct impact on the wrist, such as one from a steering wheel in an accident.
Signs and symptoms:
When the wrist’s ligaments rupture or stretch, a sprain happens. Depending on how severe the injury is, symptoms might vary, however they typically include:
Acute or aching pain, particularly when the wrist is moved. Can vary from slight pain to severe pain.
- Swelling
Inflammation may cause the wrist to swell or bulge up. After an injury, swelling may worsen in the initial hours.
- Tenderness to Touch
Pain when applying pressure to the wounded area. May be restricted to the area surrounding the torn or strained ligament.
- Bruising (Discoloration)
Red, blue, or purple bruises may appear on an injured wrist. Caused by harm to tiny blood vessels.
- Sensations of popping or tearing (at the time of injury)
When the ligament is stretched over its breaking point, some people experience a pop or snap.
- Limited Motion and Stiffness
Decreased wrist flexibility and trouble extending, twisting, or bending. After resting for a while, stiffness could get worse.
- Tingling or numbness (in severe cases)
You can experience burning, tingling, or numbness in your fingers or hand if swelling damages your nerves.
- Wrist Weakness
Inability to hold or grip items. It’s possible that the wrist feels unstable or incapable of bearing weight.
Exercise’s advantages:
Following a wrist injury, doing mild workouts may help in the healing process. These are the main advantages:
- Speeds up the Healing Process
Promotes healing by promoting blood flow to the affected area. Keeps the joint flexible, which avoids stiffness.
- Prevents Atrophy and Muscle Weakness
Muscle tone can be maintained through activity, as immobilization can weaken muscles.
Keeps the wrist healthy and strong.
- Restores Wrist Power
Strengthens the wrist’s ligaments and muscles. Restores grip strength, which facilitates daily tasks.
- Lessens Swelling and Pain
Inflammation is decreased by using gentle movements to empty extra fluid. Endorphins, which are released during low-impact workouts, help in the reduction of pain.
- Increases Range of Motion and Flexibility
Lessens the stiffness that follows an injury. Causes no pain or tightness and permits the wrist to move freely.
- Prevents Wrist Injuries in the Future
Increases joint stability and strengthens ligaments. Helps in avoiding re-injury from normal activities or sports.
- Improves Hand-Coordination
Helps in wrist retraining for tasks including gripping, lifting, and writing. Improves wrist control and general flexibility.
Exercise For Wrist Sprain:
The purpose of these exercises is to increase strength, flexibility, and range of motion.
Do them carefully and slowly.
Wrist Circles
- Put your arms out in front of you, palms down.
- Rotate your wrists slowly in a circle.
- Complete ten to fifteen clockwise circles.
- Turn around and do ten to fifteen counterclockwise rounds.
- Then return to your neutral position.
- Then relax.
- Repeat this exercise 5 to 10 times.
Wrist flexion and extension
- With your fingers pointed directly ahead and your palm facing down, extend your arm in front of you.
- Gently pull your fingers down to the floor by bending your wrist downward.
- Hold this position for a few seconds.
- Then return to your neutral position.
- With your palm facing up and your fingers pointing directly forward, extend your arm in front of you.
- Gently lift your fingers to the ceiling by bending your wrist backward.
- Hold this position for a few seconds.
- Return to your neutral position.
- Then relax.
- Repeat this exercise 5 to 10 times.

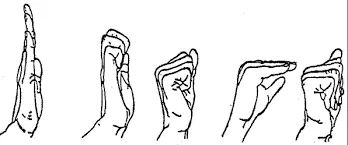
Fist exercise
- Start by holding your hands out and extending your fingers.
- Carefully tighten your fingers into a fist.
- Take a few seconds to squeeze.
- Hold this position for a few seconds.
- Then return to your neutral position.
- Then relax.
- Repeat this exercise 5 to 10 times.
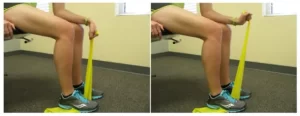
Resisted wrist extension
- Place your forearm palm down on a table or your thigh while you sit.
- Secure the other end of a resistance band beneath your foot or a stable object while holding the other end.
- Raise your wrist against the resistance gradually.
- Hold this position for a few seconds.
- Then return to your neutral position.
- Then relax.
- Repeat this exercise 5 to 10 times.
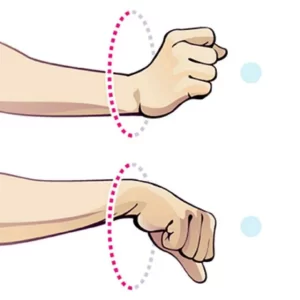
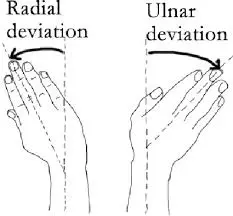
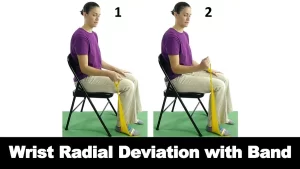
Wrist Side-to-Side (Radial and Ulnar Deviation)
- Hold your arm out in front of you, palm down.
- Move your wrist slowly from side to side, first in a radial deviation toward your thumb and then in an ulnar deviation toward your pinky.
- Only your wrist should move; your forearm should remain still.
- Do 5–10 repetitions in each direction.
- Then return to your neutral position.
- Then relax.
- Repeat this exercise 5 to 10 times.
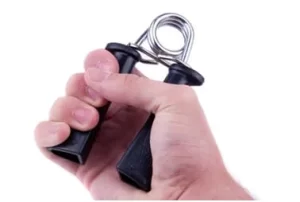
Grip Strengthening
- Choose a hand gripper that is suitable for your grip strength level to start.
- Your fingers should be wrapped around the gripper as you hold it in your hand.
- Make sure the other fingers are on the other side of your thumb.
- Using your fingers and thumb, squeeze the gripper as firmly as you can.
- Be careful not to pinch with your palm.
- Release the gripper gradually after a few seconds of holding the squeeze.
- Don’t release the equipment too soon.
- Then return to your neutral position.
- Then relax.
- Repeat this exercise 5 to 10 times.
Resisted radial deviation
- With your forearm palm sideways (thumb up) and resting on your thigh or a table, take a comfortable seat.
- Under your foot or a stable object, fasten one end of the resistance band.
- Place your hand in a neutral posture (such as a handshake) and hold the other end.
- Against the resistance, move your wrist radially, upward toward your thumb.
- Hold this position for a few seconds.
- Return to the starting position gradually.
- Then return to your neutral position.
- Then relax.
- Repeat this exercise 5 to 10 times.
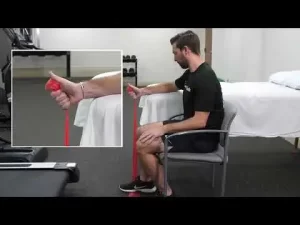
Resisted ulnar deviation
- Place your forearm palm sideways (thumb up, pinky down) on your thigh or a table.
- Under your foot or a stable object, fasten one end of the resistance band.
- Place your hand in a neutral posture (such as a handshake) and hold the other end.
- Against the resistance, move your wrist ulnar, or lower, toward your pinky.
- Hold this position for a few seconds.
- Then return to your neutral position.
- Then relax.
- Repeat this exercise 5 to 10 times.
Wrist Curl with Light Resistance
- Place your forearm palm up on a table or your thigh while you sit.
- Under your foot or a stable object, fasten one end of the resistance band.
- Maintain a comfortable grasp on the opposite end.
- Gradually raise your wrist against the resistance.
- Hold this position for a few seconds.
- Then return to your neutral position.
- Then relax.
- Repeat this exercise 5 to 10 times.

Wrist Pronation and Supination
- Sit with your forearm parallel to the floor and your elbow bent at a 90-degree angle.
- Rotate your wrist slowly from palm down (pronation) to palm up (supination).
- Avoid using your shoulder and move carefully.
- Then return to your neutral position.
- Then relax.
- Repeat this exercise 5 to 10 times.
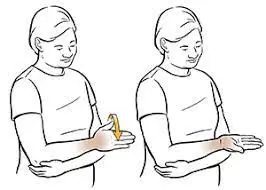
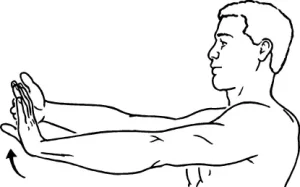
Wrist Flexor Stretch
- With the palm up, hold out one arm straight in front of you.
- Pull your fingers gently back toward the floor with your other hand.
- Feel the stretch in your forearm while maintaining a straight elbow.
- Hold this position for a few seconds.
- Then return to your neutral position.
- Then relax.
- Repeat this exercise 5 to 10 times.
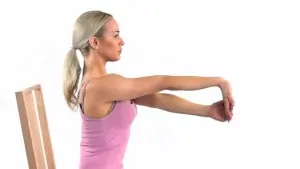
Wrist Extensor Stretch
- Straighten one arm out in front of you, palm down.
- Apply light pressure to the back of your hand and fingers with your other hand.
- As you feel the stretch over the upper part of your forearm, keep your elbow straight.
- Hold this position for a few seconds.
- Then return to your neutral position.
- Then relax.
- Repeat this exercise 5 to 10 times.
Resisted wrist flexion
- Place your forearm palm up on a table or your thigh while you sit.
- Secure the other end of the resistance band beneath your foot or a stable object while holding the other end.
- Gradually raise your wrist against the resistance.
- After a few seconds of holding, gradually lower yourself back down.
- Then return to your neutral position.
- Then relax.
- Repeat this exercise 5 to 10 times.
Resisted Wrist Pronation and Supination
- Attach one end of a resistance band to a solid object or beneath your foot.
- Stabilize your forearm while holding the other end in your hand.
- Against the resistance, rotate your wrist palm down (pronation).
- Hold this position for a few seconds.
- Then switch back to neutral.
- Against opposition, rotate your grip palm up (supination).
- Hold this position for a few seconds.
- Then relax.
- Repeat this exercise 5 to 10 times.
When exercising, which security precautions should be followed?
When doing wrist exercises, take the following precautions to guarantee a successful and secure recovery:
Begin gently and slowly.
- To prevent wrist strain, start with low-intensity movements.
- As the healing process advances, progressively increase the number of repetitions and intensity.
Stay away from painful movements.
- It’s natural to feel a little pain, but if you feel acute pain or swelling, stop.
- Avoid pushing through extreme pain as this could worsen the damage.
Use the Right Support When Necessary
- If a doctor advises it, wear a wrist wrap or brace.
- Gives additional stability when moving.
Keep Your Wrists Properly Aligned
- Keep your wrists in a neutral position to prevent additional strain.
- Don’t bend or twist your wrist too much.
Get warmed up before working out.
- To improve blood flow, massage the area or rotate your wrists gently.
- Helps in releasing tense ligaments and muscles.
After working out, take some ice and rest.
- Use ice for 10 to 15 minutes to minimize swelling if your wrist hurts after working out.
- To avoid overuse, take rests in between sessions.
Don’t Hurry Your Rehabilitation
- Make sure you progress gradually because rushing into strenuous exercise can cause re-injury.
- Before starting heavy lifting or other high-impact activities again, give yourself time to recover.
Pay Attention to Your Body
- You should stop exercising and see a doctor if you feel numb, tingling, or weaker.
When should you stop exercising?
To prevent a wrist sprain from getting worse, it’s important to know when to stop exercising. If you encounter any of the following, stop right away:
- Acute or Severe Pain
The wrist isn’t prepared for that action if the pain is severe, stabbing, or getting worse. Mild pain is normal. Carrying on could result in more ligament damage.
- The sounds of clicking, popping, or grinding
While a slight popping sound could be typical, painful clicking or grinding could be a sign of joint or ligament damage.
- Elevated Inflammation or Swelling
Stop and apply ice if your wrist expands during or after exercise. Swelling is a sign of overuse or irritation.
- A stiffness that worsens rather than gets better
Although some stiffness is normal, the workouts could be too strenuous if it gets worse.
- Tingling or numbness in the fingers or wrist
An indication of not enough circulation or nerve compression. May be caused by incorrect motions or too much tension.
- Loss of Grip Strength or Weakness
Before starting workouts again, give your wrist more rest if it feels weak or unstable. Stay away from tasks requiring strong grasping.
- No progress was made after a few weeks.
Stop and get medical help if the pain, stiffness, or weakness lasts longer than two to three weeks.
Which exercises should you avoid if you have a sprained wrist?
Until your wrist is completely healed, refrain from performing the following exercises to avoid further harm and to guarantee proper healing:
Hand Weight-Bearing Activities
The wrist ligaments are overly stressed by these:
- Planks
- Handstands
- Push-ups
- Pose types for yoga, such as downward dog
- Jerky or High-Impact Movements
Stay away from wrist exercises that require rapid force or impact:
- Jumping rope (tight grips might cause wrist strain)
- Punching or boxing exercises
- Sports like tennis, golf, or racquetball (which demand powerful wrist movements)
Performing Heavy Lifting
- Exercises using dumbbells or barbells (overhead press, bench press)
- Chin-ups or pull-ups
- Deadlifts
- Can cause injury to the repairing ligaments and postpone healing.
Repeated Motions of the Wrist
Stay away from extended wrist motions that may result in overuse strain:
- Typing continuously for long periods
- playing an instrument (drums, guitar, piano)
- Using instruments (such as hammers and screwdrivers) that require repetitive wrist motion
Summary:
Sprained wrists can make it difficult to move your hand or arm effectively, making even the easiest tasks difficult to do. If you have a sprained wrist, you might be wondering how to speed up the healing process. There are several therapy methods available, but including these exercises in your routine may help improve wrist mobility and lessen pain and swelling.
It takes time and an organized strategy for rehabilitation to recover from a wrist strain. Regularly performing these exercises can help you regain your strength and range of motion while avoiding more injuries. To guarantee a healthy recovery, always pay attention to your body and get medical advice when necessary.
For the best recovery, do these exercises regularly. Progressively increase the length and intensity of your workouts. For individualized counsel and treatment, speak with a physician or physical therapist.
FAQ:
How soon after a wrist sprain should I begin exercising?
After the pain and swelling are gone, which should happen in a few days to a week, you should begin mild exercises. Before starting any activities, always get the advice of your physician or physical therapist.
Which exercises are effective for treating a sprained wrist?
Wrist Flexion and Extension
Wrist Rotations
Finger Flexion and Extension
Grip Strengthening
When I work out, should I wear a brace?
Wearing a brace might offer support during the initial phases of healing if your doctor recommends it. To regain mobility, you should attempt movements without it as your strength improves.
How frequently ought I to perform these exercises?
Do each exercise ten to fifteen times, two to three times a day. If you feel pain, stop.
How can I know if I’m going excessively?
Overexertion symptoms include:
A rise in pain
Swelling,
Tingling, or numbness
Wrist weakness
What is the average recovery time for a sprained wrist?
More severe sprains can take up to six weeks to heal, but milder sprains heal in two to four weeks. It could take several months to reach full strength and flexibility.
Can wrist workouts stop injuries from happening again?
Indeed! Exercises that increase flexibility and stability through strengthening and stretching lower the chance of sprains in the future.
When should I visit a physician?
See a physician if you suffer from:
Extreme pain or edema
After several weeks, there was no progress. Having trouble moving your fingers or wrist
A tingling or numb feeling
What are the typical reasons why people sprain their wrists?
Falling onto a hand that had been extended
Injuries related to sports (e.g., basketball, gymnastics)
Incorrectly lifting large stuff
Sudden twisting motions or repetitive strain
What signs and symptoms indicate a sprained wrist?
pain, particularly when the wrist is moving
Inflammation and bruises Wrist weakness or instability
Restricted range of motion At the moment of injury, a popping or tearing sensation
How should a wrist sprain be treated initially?
Rest: Stay away from wrist-straining activities.
Ice: To lessen swelling, apply ice for 15 to 20 minutes every two to three hours.
Compression: To offer support, apply a bandage or wrist brace.
Elevation: To reduce swelling, keep the wrist up.
When will I be able to use my wrist again?
More severe sprains can take more than six weeks to heal, although milder sprains may mend in two to four weeks. After the pain and swelling are gone, start with mild movement and strengthening activities.
References:
- Levo. June 13, 2022. The top five wrist exercises for sprains. Orthopaedic motion. The best five wrist exercises are available at https://www.motionorthodocs.com/blog/best-5-exercises/.
- NHS Trust MTW (2021). sprain of the wrist. Leaflet-wrist-sprain.pdf https://www.mtw.nhs.uk/wp-content/uploads/2015/11
- A brief introduction to wrist sprains. (n.d.). WebMD. Wrist sprain: https://www.webmd.com/fitness-exercise
- Clinic, C. (September 25, 2024b). 11 Wrist pain exercises and stretches. Cleveland Medical Center. Wrist Pain Exercises: https://health.clevelandclinic.org
- OrthoInfo, AAOS, “Wrist sprains” (n.d.). Wrist sprains: https://orthoinfo.aaos.org/en/diseases–conditions/
- Symptoms and Treatment of Sprained Wrist | Mass General Brigham (n.d.). Conditions/hand-arm/wrist-sprain https://www.massgeneralbrigham.org/en/patient-care/services-and-specialties/sports-medicine
- Rehab exercises for a sprained wrist. (undated). Bedside/216,bo1522 https://nyulangoneib.staywellsolutionsonline.com
- Image 1, Wrist Circles swm. skimble.com, n.d. 59105-wrist-circles-swm-how-to-do-exercise https://www.skimble.com/exercises
- Image 4, https://www.facebook.com/mariposaphysio/posts/two-rehab-exercises-that-can-can-help-strengthen-a-wrist-after-a-sprain-are-resi/1708261242846687/
- Image 5, Patel, D. July 4, 2023. Wrist radial and ulnar deviation: movement, muscles, range of motion. Samarpan Clinic for Physiotherapy. This is a Google Vignette: https://samarpanphysioclinic.com/radial-and-ulnar-deviation-of-the-wrist.
- Image 7, AskDoctorJo. (September 27, 2016). Ask Doctor Jo about Wrist Radial Deviation with Band [Video]. YouTube. This is the video: https://www.youtube.com/watch?v=WQxQNjs7kt8.
- Image 8, Baptist Health. July 22, 2020. Resistance Band Ulnar Deviation [Video]. YouTube. e7f0ReWyuvA https://www.youtube.com/watch?