14 Best Exercises for Sinus Tarsi Syndrome
Introduction:
Including the right Exercises for Sinus Tarsi Syndrome in your rehabilitation regimen will help manage symptoms and promote healing if you have Sinus Tarsi Syndrome (STS). The symptoms of Sinus Tarsi Syndrome (STS), which is often caused by biomechanical problems, overuse, or past ankle injuries, include ankle pain and tenderness in the sinus tarsi area.
The fundamental reasons for Sinus Tarsi Syndrome, such as weak ankle stabilizers, abnormal biomechanics, and restricted range of motion, can all be significantly improved with exercise. A balanced and pain-free gait depends on strengthening the ankles, restoring flexibility, and improving the sense of balance, or awareness of joint position. With the right exercises, all of these are achievable.
It is important to remember that the beneficial effects of exercises may vary based on particular factors, including the intensity of your post-traumatic stress disorder and any related conditions. Therefore, to get a customized exercise plan catered to your unique needs, it’s best to speak with a licensed healthcare provider, such as a physical therapist or orthopedic specialist, before beginning any exercise regimen.
We will look at a few of the exercises that are frequently suggested for people with Sinus Tarsi Syndrome in the sections that follow. Keep in mind that these exercises should only be done under the supervision of a medical practitioner to verify that they are secure and right for your situation. They are meant to be used as basic guidelines.
What is Sinus Tarsi Syndrome?
The painful swelling in the area between your heel and ankle bone is known as sinus tarsi syndrome. The area of your subtalar joint where your heel and ankle bones meet is called the sinus tarsi. Typically, ankle sprains are the reason. Surgery is rarely required to cure sinus tarsi syndrome.
Although the exact cause of Sinus Tarsi Syndrome is not commonly known, it is frequently linked to trauma, such as ankle sprains or fractures. The tarsal sinus ligaments can get damaged by trauma, which leads to instability. This problem may develop as a result of additional factors like overuse, arthritis, or structural abnormalities in the foot.
A thorough examination by a medical professional, usually an orthopedic specialist or podiatrist, is necessary to diagnose sinus tarsi syndrome. The main goal of the diagnostic approach is to correctly diagnose sinus tarsi syndrome while ruling out other conditions that may present with similar symptoms.
Causes:
Any condition or trauma that affects your sinuses or subtalar joint might cause sinus tarsi syndrome.
Ankle sprains are most commonly the cause. When spraining their ankle, most individuals (approximately 80%) with sinus tarsi syndrome rolled it outward, away from their stomach. People commonly sprain their ankles via sports-related injuries, falls, and slips.
Another complication of an ankle injury is called sinus tarsi syndrome, which can be carried on by swelling in the subtalar joint as a result of synovitis.
Sinus tarsi syndrome can develop over time as a result of additional strain placed on your sinus tarsi by your natural foot form, your gait, and certain medical problems.
Sinus tarsi can arise from non-injury sources such as;
- Arthritis in the feet and ankles.
- Being overweight.
- Being flat-footed.
- Bone Spurs
- Foot biomechanics problems
- Unsuitable Footwear
- Weakness in the muscles and poor flexibility
- Using excessive pronation whether running or walking.
Signs and symptoms:
Sinus tarsi injuries can be treated similarly to a sprained ankle since they frequently connect with damage to the ankle’s lateral ligaments. If so, there might be some improvement when the lateral ligaments mend; but, if sinus tarsi syndrome is also present, the ankle might not feel better for several weeks after the injury. Typically, this discomfort is worse in the morning and gets better over the day.
The following are typical signs of sinus tarsi syndrome:
- Pain and tenderness in the ankles
- Patients with sinus tarsi syndrome often feel hindfoot instability when walking on surfaces that are uneven.
- Pain on the feet that gets worse over time.
- Swelling
- The foot and ankle are painful on top and/or outside.
- A feeling of sharp pinching.
- Decreased range of motion
- Balance problem
Risk factors:
Due in large part to the prevalence of ankle sprains, sinus tarsi can affect anyone.
You can be put in more trouble if you;
- Pregnant women are more likely to overpronate.
- Sprain the same ankle multiple times. There is a greater chance of sinus tarsi syndrome if you sprain your injured ankle again.
- Engage in an activity that requires you to twist and unexpectedly shift course, such as hockey, basketball, or soccer.
- Exercise or spend a lot of time standing on hard surfaces.
Consider the following safety precautions before starting exercises:
Before starting any workout program, consider a few safety measures and maximize the advantages. Consult your physician or physical therapist to determine the most effective exercises for your issue.
It’s important to know what your body needs and to refrain from exerting yourself when it aches. While pain is a frequent side effect of exercise, persistent or severe pain may indicate that you overexert yourself. Before moving on to more strenuous activities, begin with low-impact exercise routines until you can handle a greater degree of pain.
To stop injuries from happening again, it’s critical to maintain proper form and posture. If you are unclear about how to start exercising correctly, see a doctor. To get your joints and muscles ready for the task at hand, warm them up before beginning any exercise.
Exercises for Sinus Tarsi Syndrome
It is often recommended that patients with this condition engage in the exercises suggested below. Before starting, you should speak with your physical therapist about how suitable these exercises are.
Always begin cautiously and work your way up to a higher level of difficulty or longer time of exercise as tolerated. It’s critical to stop exercising and speak with a healthcare provider if you feel any pain or discomfort during or after.
Ankle pump
- This causes your toe joints to move, which reduces stiffness.
- Seated on the ground or in bed.
- 10 to 20 clockwise rotations of the foot should be done first.
- After finishing it, draw 10 to 20 more circles in the opposite direction.
- Then return to your neutral position.
- Then relax.
- Repeat this exercise five to ten times.
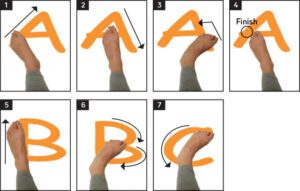
Ankle alphabet
- Select a comfortable place to sit.
- Lift your foot a few inches and use your big toe to write the alphabet in the air starting with the capital letters.
- Make long, downward movements.
- Once you’ve finished writing the alphabet, move on to lowercase characters.
- Then return to your neutral position.
- Then relax.
- Repeat this exercise five to ten times.
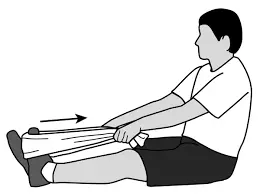
Towel stretch
- This is a simple stretch that you may do in bed or while seated on the floor.
- Legs out in front of you, take a seat on the floor or your bed.
- Underneath both heels of your feet, place a rolled-up towel and hold onto both ends.
- With your knees straight, slowly draw the towel in your direction.
- Hold this position for a few seconds.
- Then return to your neutral position.
- Then relax.
- Repeat this exercise five to ten times.
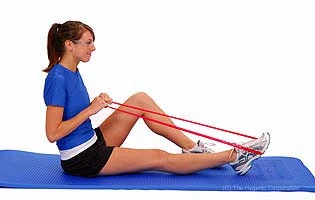
Ankle Plantarflexion
- Seated on the floor, one leg bent at the knee, place your heel on the floor and your other leg comfortably resting on it.
- As you loop the band around the front of your foot, hold onto the ends with both hands.
- Pointing your toes forward and then back will help release pressure.
- Hold this position for a few seconds.
- Then return to your neutral position.
- Then relax.
- Repeat this exercise five to ten times.
Toe curls
- Seat yourself with your heels beneath your knees.
- Check that your legs and feet are level with each other and that the toes point forward.
- After spreading the towel, place a level foot on top of it.
- It will begin to move toward you, the towel.
- Just keep your heel down while you raise your toes and flex your foot back.
- Remaining with your heel on the towel, stretch your foot equally on both sides and in the middle to get it as far out as possible.
- Keeping your heel constant pinch the towel in with your toes and upward.
- Pull the towel in your direction.
- Using all five toes on either side of the foot, create a broad circle beneath the arch area.
- Every time you push back and stretch, the towel can only be moved in a limited region.
- Then return to your neutral position.
- Then relax.
- Repeat this exercise five to ten times.
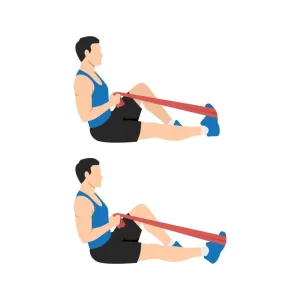
Ankle dorsiflexion
- Sit for a long time on the mat, keeping your legs straight in front of you.
- Wrap the band over one foot after securing it around the leg of a chair or table.
- Step back and start again after softly pointing your toes in your direction.
- Hold this position for a few seconds.
- Then return to your neutral position.
- Then relax.
- Repeat this exercise five to ten times.
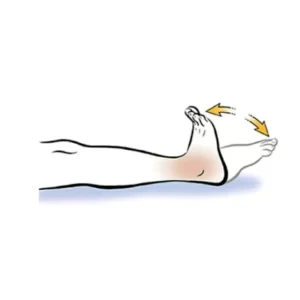
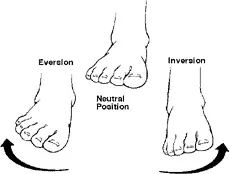
Inversion and eversion of the ankle
- Your affected foot should be flat on the ground to begin this exercise.
- After that, extend your toe tips and the outside of your foot before resuming your normal position.
- Next, inwardly bend your toe tips.
- Keep your leg action apart from your foot and ankle to avoid overreacting.
- Then return to your neutral position.
- Then relax.
- Repeat this exercise five to ten times.
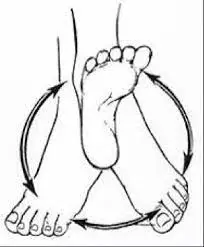
Ankle circle
- Start by lying down on the ground in a comfortable position.
- Ten moderate rotations of your ankle in both clockwise and counterclockwise directions are recommended.
- Make sure you are only moving your foot and ankle and not your entire leg.
- For an interesting variation on the stretch, try circling the letters with your big toe.
- Then return to your neutral position.
- Then relax.
- Repeat this exercise five to ten times.
Gastrocnemius Stretch
- Place yourself three feet away from a wall.
- Move forward and press your right foot into the wall.
- Put your two palms against the wall.
- Your right knee should be bent.
- Lean forward while maintaining a straight left leg and a planted left heel.
- Hold this position for a few seconds.
- Then return to your neutral position.
- Then relax.
- Repeat this exercise five to ten times.

Heel raise
- Start up in a relaxed standing posture.
- Take a seat next to a wall or use the chair’s back as support.
- Elevate both of your heels off the ground to take a position on your heels.
- Hold this position for a few seconds.
- Lower your heels now.
- Then return to your neutral position.
- Then relax.
- Repeat this exercise five to ten times.
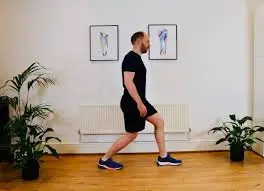
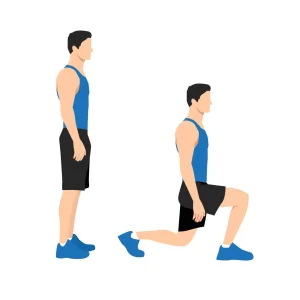
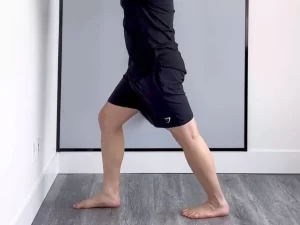
Lunge
- Start with your feet hip-width apart while standing.
- Take a longer step forward than a walking stride, placing one leg in front of your body and the other behind.
- When your foot touches the ground, it should land and stay level.
- Your heel will come off the ground when you elevate it.
- While lowering yourself, bend your knees to around a 90-degree angle.
- Always maintain an upright trunk and a tight core.
- Hold this position for a few seconds.
- To get back to where you were initially, push off with your front leg firmly.
- Then return to your neutral position.
- Then relax.
- Repeat this exercise five to ten times.
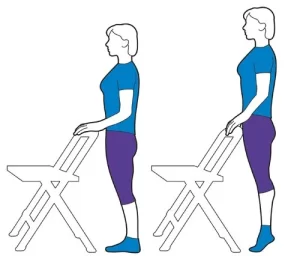
Standing single leg
- Grab a sturdy chair or tabletop for support.
- Keep your back to the chair or tabletop and keep it within reach.
- Bend the knee to a comfortable posture and raise one foot off the ground.
- Depending on the comfort level and capabilities of the patient, the non-standing leg may be maintained straight, slightly elevated, or bent.
- Your primary objective should be to keep your balance while using your core muscles.
- Don’t lean or rely on one direction.
- Gradually extend the first short moment of balance as your strength grows.
- If necessary, you can use the chair or countertop for support, but as you get more stable, try reducing how much you rely on it.
- Then return to your neutral position.
- Then relax.
- Repeat this exercise five to ten times.

Standing calf stretch
- Place yourself facing a wall to begin.
- Step with one leg straight forward and one leg behind you.
- Make sure your other foot is firmly planted on the ground.
- Next, take a lean against the wall.
- As soon as you feel a pulling sensation in the rear of your left leg.
- Hold this position for a few seconds.
- Then return to your neutral position.
- Then relax.
- Repeat this exercise five to ten times.
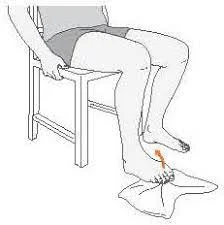
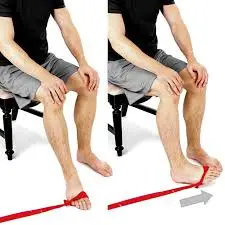
Resisted ankle inversion
- Individuals should be able to put their legs down on the floor while seated in a chair.
- Make a long loop with the band; knot one end under the foot on the ground and the other around the inside of the foot that is injured.
- Raise the affected foot inside out and rotate it against the resistance of the band.
- Hold this position for a few seconds.
- Then return to your neutral position.
- Then relax.
- Repeat this exercise five to ten times.
Which safety measures should I follow when working out?
- As you work out, remember to warm up and stretch.
- When working out, avoid making any sudden or abrupt movements.
- Stay away from difficult activities.
- The recommended number of repetitions for each exercise, together with stretches before and between sets, should all be performed in the correct sequence according to the protocol.
- Between each set of exercises, take a rest.
- It may be challenging to stretch the tight muscles in your joint, but it’s normal and even essential. Exercise and stretching should never cause stabbing or painful sensations as this is harmful and worsens the illness.
- Wearing loose, casual clothing that promotes freedom of movement and relaxation is perfect for working out. Avoid wearing tight or stylish clothing.
When do you stop working out?
- Fever
- Your health is not good.
- If pain or numbness is experienced.
- Headache
How may sinus tarsi syndrome be prevented?
Particularly if you’re an athlete, there may be no way to avoid sinus tarsi syndrome. You can, however, reduce your risk in a few ways.
- Don’t “play with the pain” if you experience ankle pain during or after physical activity.
- Before engaging in sports or physical activity, warm up and stretch.
- After a workout, stretch and cool down.
- Verify that you are using the right footwear that fits properly.
- After an intense workout, give your ankles some time to rest and heal.
Prognosis:
A proper physical therapy program helps in the recovery of the majority of people with this illness. In contrast, this might be a protracted process that takes several months for people who have had their condition for a long time. When detected and treated properly, mild cases of this illness typically go away in a few weeks. To speed up healing and guarantee the best possible result, early physical therapy treatment is essential.
Summary:
A common cause of ligamentous injuries or chronic foot conditions is sinus tarsi syndrome, which is characterized by ankle pain and instability. It is a quiet disruptor that frequently goes unnoticed until it begins to interfere with day-to-day activities. One typical characteristic of sinus tarsi syndrome is subtalar joint instability, which may be on by an injury to these ligaments.
Although sinus tarsi syndrome can have significant adverse effects on quality of life, it can also be efficiently cured and prevented with the appropriate information and proactive care.
Keys to managing sinus tarsi syndrome include knowing the signs and symptoms, identifying the many treatment choices, and knowing the role that sinus tarsi plays in preserving ankle stability.
FAQ:
For sinus tarsal syndrome, who provides care?
The optimum course of action for treating sinus tarsi syndrome can be determined by an orthopedic foot and ankle surgeon before surgery is recommended.
For what length of time does sinus tarsi heal?
The course of treatment for sinus tarsi syndrome might often involve several weeks when employing conservative measures. Patients frequently require several weeks of recovery following surgery. In certain cases, it may take them three months to get back to their previous level of athletic performance and six to twelve months to fully recover.
Methods for treating sinus tarsi syndrome?
Exercises for strengthening muscles, bracing and taping, proprioceptive training, and balancing training, and are all part of the STS treatment regimen. Anti-inflammatory medications can help lessen the inflammation in athletes who suffer from synovitis of the joint.
Is it possible to exercise with sinus tarsi syndrome?
Standing on one leg is one of the balance exercises that improves the sense of balance and stability, two important aspects of controlling sinus tarsi syndrome. Other exercises that improve ankle range of motion include the Ankle Alphabet exercises, in which the patient grabs the alphabet with their toes.
Which nerve passes via the sinus tarsi?
The cutaneous dorsolateral nerve, a branch of the superficial peroneal nerve, proprioceptive nerve endings, ligaments, adipose connective tissue, and branches of the peroneal and posterior tibial arteries that anastomose in the sinus are among the structure’s contents.
What kind of pain does sinus tarsi syndrome cause?
Signs and symptoms of sinus tarsi syndrome include localized discomfort or swelling that is restricted to one area. Your subtalar joint the joint where your calcaneus and talus meet may become more painful as you move, making walking and other activities challenging and uncomfortable.
Is ice beneficial for sinus tarsi syndrome?
Since sinus tarsi causes swelling in and around the foot and ankle joint, icing is usually advised.
Does sinus tarsi syndrome make walking worse?
Long periods of time spent walking or standing up frequently aggravate the pain. Possible soreness or weakening.
Is Sinus Tarsi Syndrome a chronic medical condition?
Results for sinus tarsi syndrome differ based on how severe the problem is and how well treatment goes. If they obtain the proper medicine, many patients can manage the disease and experience a reduction in their symptoms.
Is it possible for Sinus Tarsi Syndrome to affect both feet at once?
Indeed, depending on the underlying causes and contributing variables, Sinus Tarsi Syndrome can affect one or both feet at the same time.
References:
- December 13, 2023b; Tirgar, P.Mobile Physiotherapy Clinic: Eleven Finest Workout for Sinus Tarsi Syndrome. Telemedicine Physical Therapy Clinic. The mobilephysiotherapyclinic.in website has the top 11 exercises for treating Sinus Tarsi Syndrome.
- Modern Foot & Ankle: A Guide to Symptoms, Causes, and Recovery for Sinus Tarsi Syndrome: Find Relief. (n.d.-b). Sinus Tarsi Syndrome: https://www.modernfootankle.com/resources/foot-care/guides
- Sinus Tarsi Syndrome. May 1, 2024. Cleveland Clinic. The Cleveland Clinic website describes Sinus Tarsi Syndrome as one of the diseases.
- Ankle, C. F. A. June 28, 2023. Approaching and Managing Tarsal Sinus Syndrome. Experts in Foot and Ankle Care Certified. How can tarsal sinus syndrome be diagnosed and treated? https://certifiedfoot.com/
- Tarsi Syndrome of the Sinus. (2024a, 7 March). Masterton Foot Clinic, New Zealand. www.mastertonfootclinic.co.nz/condition/sinus-tarsi-syndrome