13 Best Exercises For Shoulder Dislocation
Introduction:
After a shoulder dislocation, targeted rehabilitation exercises are essential to restore stability, strength, and range of motion. These exercises focus on gradually reactivating the rotator cuff muscles, improving joint control, and preventing future dislocations. A structured program typically progresses from gentle mobility work to strengthening and proprioceptive training, all tailored to the stage of recovery.
In addition to lowering the chance of future dislocation, Exercises For Shoulder Dislocation help maintain the condition. To increase your shoulder strength, start with these shoulder dislocation exercises that are easy and gradually get harder.
Types of Shoulder Dislocation:
The Most Typical Anterior (Forward) Dislocation
- The humerus moves from its socket.
- Usually the result of a direct hit or a strong external rotation.
Posterior Dislocation (Backward Dislocation)
- The humerus shifts out of the socket and backward.
- Frequent causes include electric shocks, seizures, and fall-related damage.
Inferior Dislocation (Downward Dislocation)
- The lower humerus moves.
- Usually happens as a result of a powerful downward force, such as hanging from something above.
Causes:
When the humerus, the upper arm bone, is forcefully separated from its glenoid socket in the scapula, the shoulder blade, a shoulder dislocation takes place. Although the shoulder joint has a large range of motion due to its high mobility, this also puts it at risk for dislocation. Effective risk management and injury prevention can be achieved by being aware of the causes of shoulder dislocation.
Weak Muscles & Repetitive Overuse
Overuse of the shoulder joint raises the risk of dislocation, particularly in specific occupations and activities.
Shoulder Ligaments & Muscles Weak
- The shoulder joint becomes unstable if the rotator cuff muscles, which support it, are weak.
- Dislocation is more common when there is significant joint flexibility due to connective tissue disorders, such as Ehlers-Danlos Syndrome.
Repetitive Motion in Workers and Athletes
- Repetitive shoulder motions from sports like weightlifting, tennis, and swimming might eventually damage the ligaments.
- Chronic instability and dislocation can result from occupations that require a lot of overhead movement, such as manufacturing workers, painters, and construction workers.
Sudden, Severe Motions
The shoulder may dislocate as a result of some severe movements.
Improper Lifting Techniques for Heavy Items
- Shoulder displacement may happen when lifting a big object with a bad posture or sudden jerky motions.
Extending the Arm Too Much
- Throwing a baseball or serving in tennis are examples of powerful arm swings that can dislocate the joint if the force is excessive.
Unexpected Arm Moving or Pulling
- A dislocation may result from a sudden, strong pull on the arm, like being pulled forward.
- A nursemaid’s elbow is a common condition in youngsters when someone pulls their arm too hard.
Electric shocks and seizures
- Intense muscle spasms caused by seizures may result in posterior shoulder dislocations.
- The shoulder may be pulled out of its socket by sudden, powerful muscle contractions caused by high-voltage electric shocks.
Traumatic Damage
One of the most frequent causes of dislocation is direct contact or sudden force applied to the shoulder.
Sports-Related Injury
- Shoulder dislocations may result from hits and falls that are common in contact sports like football, soccer, and hockey.
- Baseball, basketball, and volleyball are examples of overhead sports where repetitive overhead motions can cause shoulder pain.
- Athletes participating in martial arts, gymnastics, and wrestling are also at a higher risk of injury from falls and forceful arm motions.
Accidents & Falls
- The most frequent cause of anterior dislocations is falling on an outstretched hand (FOOSH injury).
- Dislocation may result from slipping on wet surfaces and landing on the shoulder.
- Because of seatbelt injuries and high-impact incidents, shoulder dislocations may happen in auto accidents.
Congenital and Structural Factors
Through anatomical variations or genetic diseases, certain people are inherently more prone to shoulder dislocations.
Loose or hypermobile joints
- Some people (double-jointed people) have loose ligaments by nature, which makes it simpler for the shoulder to pop out.
- Joint instability results from conditions that impact connective tissue, such as Ehlers-Danlos Syndrome and Marfan Syndrome.
Shoulder Dislocations in the Past
- Due to damaged cartilage and stretched ligaments, shoulder dislocations are more likely to happen again.
- Chronic shoulder instability is the term for this disorder, which means that even small motions can result in dislocations.
Signs and symptoms:
The most commonly displaced joint in the body is the shoulder joint since it is one of the most mobile joints. Recognizing the symptoms of a shoulder dislocation is essential to receiving treatment in a timely manner and avoiding more harm.
Intense Shoulder Pain
- At the time of dislocation, there is immediate and severe pain.
- The elbow or hand may experience pain that travels down the arm.
- The pain gets worse when you move your arm.
Restricted Motion Range
- The arm hurts and is unstable, making it unable to move normally.
- There may be a clicking or grinding sound when you try to move the arm.
Muscles Spasms
- Additional pain may result from an involuntary tightening of the shoulder muscles.
Observable Deformity
- The shoulder’s typical circular form is squared off or flattened.
- Under the skin, there can be an outgrowth (the displaced bone).
The arm’s weakness or numbness
Compression or injury to the nerves may result in:
- Tingling or numbness in the hand, arm, or shoulder.
- Weakness when trying to lift or hold something.
A sensation of popping or clicking
- A “pop” or “snap” may be heard by some at the time of dislocation.
- Clicking or crushing sounds may be produced as the arm is moved.
Bruising and Swelling
- Inflammation causes swelling to appear quickly.
- Within hours, bruises may develop around the upper arm and shoulder.
Risk factors:
A shoulder dislocation is more likely to happen when certain conditions are present:
- Age
Because of their active lifestyles, young athletes (15–30 years old) are most risk.
Dislocations may happen in older persons (50+) as a result of falls and weakening muscles.
- Gender
Shoulder dislocations are more common in men, especially during playing sports.
- Previous Shoulder Injury
Shoulder dislocations are more likely to occur in the future if they happened previously.
- Weak Muscle Flexibility and Strength
Instability is more likely in people with weak rotator cuff muscles and low flexibility.
- Engaging in Activities at High Risk
Physically demanding occupations, weightlifting, and contact sports raise the risk of dislocation.
Benefits of exercises:
A shoulder dislocation is a common injury that needs to be properly rehabilitated to strengthen the joint, restore function, and avoid recurrence. Pain reduction, increased mobility, and long-term stability are just a few advantages of performing particular exercises during the healing process.
The advantages of shoulder dislocation exercises and their importance for a speedy recovery are covered in detail below.
Keeps the Upper Body and Shoulders Strong Overall
- Prevents muscular imbalances, which can result in additional injuries.
- Maintains the strength and functionality of the surrounding muscles, such as the upper back, triceps, and biceps.
- Enhances upper body balance and coordination.
Increased flexibility and range of motion
- If shoulder dislocations are not properly recovered, they may result in stiffness and limited mobility.
- Stretching exercises, both passive and active, help in regaining the shoulder joint’s complete range of motion.
- Keeps adhesive capsulitis, often known as frozen shoulder, from developing, which is a typical side effect of shoulder injuries.
Pain Relief and Decreased Inflammation
- Mild range-of-motion exercises reduce stiffness and edema by increasing blood circulation.
- Over time, strengthening activities lessen joint strain and pain by supporting the joint.
- By releasing tense muscles, stretching exercises help avoid uncomfortable spasms.
Prevent Shoulder Dislocations in the Future
- Joint stability is improved by strengthening the scapular stabilizers and rotator cuff.
- Lowers the chance of unexpected dislocations through improving proprioception, and the body’s knowledge of joint position.
- Ensures that the shoulder is in its ideal place by helping in postural correction.
Improves Athletic Performance and Everyday Function
- Improves shoulder strength for routine tasks including reaching, lifting, and carrying.
- Regains the ability to use the arm without worrying about being hurt.
- Exercises help athletes in getting back to their best in sports like baseball, basketball, and swimming.
Increases Shoulder Muscle Strength
- The deltoids and rotator cuff muscles, which stabilize the shoulder, are the focus of strengthening workouts.
- Prevents the weakening of muscles caused by idleness, or muscle atrophy.
- It improves joint control and lowers the chance of further dislocations.
Prevents Chronic Shoulder Instability and Improves Joint Stability
- Shoulder dislocations cause the joint to become loose by stretching the ligaments and capsule.
- The soft tissues surrounding the joint are strengthened and tightened by exercise.
- Lessens the possibility of repeated dislocations, which can cause long-term instability in the shoulder.
Avoids Chronic Issues (Arthritis & Frozen Shoulder)
- If the joint is not properly healed, dislocations raise the chance of developing osteoarthritis in the shoulder.
- Joint wear and strain are decreased by regular mobility and strengthening activities.
- Prevents frozen shoulder, a painful condition in which inactivity causes the shoulder to become rigid.
Increases Healing and Blood Circulation
- Exercise speeds up tissue recovery by increasing blood flow to the wounded area, which delivers nutrients and oxygen.
- Facilitates the elimination of waste materials from the wounded tissues and lessens inflammation.
- Promotes the growth of new connective tissue to help repair joints.
Improves Confidence and Mental Health
- Exercise that helps you recover from a painful injury increases your confidence when moving.
- Helps people resume their regular activities by lowering their worry of getting hurt again.
- Endorphins, which are released during physical exercise, help in the management of stress and pain.
Exercises For Shoulder Dislocation:
Pendulum Exercise
A comfortable and effective technique to start shoulder rehabilitation following a dislocation is with pendulum exercises. They help in pain relief, circulation improvement, and the gradual return of movement.
- Place yourself next to a chair or table.
- Place your uninjured arm on the table to support your body.
- Allow your weakened arm to hang freely down.
- As much as you can, keep your arm and shoulder muscles relaxed.
- Swing your arm softly using your body movements rather than your shoulder muscles.
- Make tiny, counterclockwise, and clockwise circles.
- Increase the circle’s size gradually as tolerated.
- Then return to your neutral position.
- Then relax.
- Repeat these exercises 5 to 10 times.

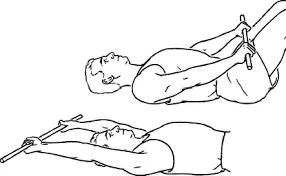
Supine Shoulder Flexion
Another mild early-stage rehabilitation activity following a shoulder dislocation is supine shoulder flexion using a wand (stick). This exercise is particularly helpful for regaining range of motion in shoulder flexion (raising the arm overhead).
- For comfort, bend your knees while lying on your back.
- Place both hands shoulder-width apart and palms down on the wand.
- Keep your arms resting on your body and your elbows straight.
- For help in moving the injured arm, use your unaffected arm.
- Raise the wand as far as it feels comfortable over your head, toward the floor behind you.
- Don’t push yourself over the point of pain, only a slight stretch.
- Hold this position for a few seconds.
- Avoid arching your back and maintain relaxed shoulders.
- Carefully return the wand to its initial position.
- Then return to your neutral position.
- Then relax.
- Repeat these exercises 5 to 10 times.
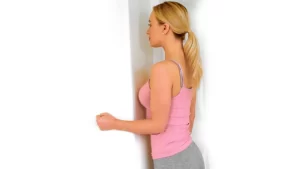
Isometric Shoulder abduction
The early to mid-rehab stage following a shoulder dislocation is ideal for isometric shoulder abduction workouts. They make them safer while mobility is still restricted by helping to strengthen and reawaken muscles like the supraspinatus and deltoid without causing the joint to move.
- With your affected arm closest to a wall, stand sideways beside it.
- Keep your elbow close to your body and bend it to a 90-degree angle.
- As though you were attempting to raise your arm sideways, gently press it outward into the wall.
- After 5–10 seconds of holding the contraction, release it.
- Then return to your neutral position.
- Then relax.
- Repeat these exercises 5 to 10 times.

Isometric Shoulder adduction
Following a dislocation, isometric shoulder adduction exercises are a secure and effective method to increase shoulder stability, particularly for strengthening the latissimus dorsi, teres major, and pectoralis major muscles without compromising the shoulder.
- With your affected arm by your side, stand or sit.
- Lean your elbow or upper arm against a wall or door frame and place it there.
- Try to pull your arm closer to your body by gently pressing inward.
- After 5–10 seconds of holding, release.
- Then return to your neutral position.
- Then relax.
- Repeat these exercises 5 to 10 times.
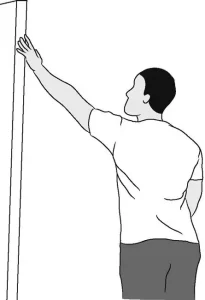
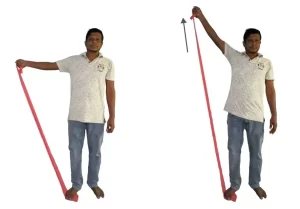
Wall Walks
For shoulder dislocation rehabilitation, wall walks are great, particularly when the acute healing period is over and you’re ready to restore control, range of motion, and mobility. They help with activating and gently stretching shoulder muscles without overloading the joint.
- Position yourself 6 to 12 inches from a wall.
- Your affected arm’s fingers should be at waist height on the wall.
- As high as you can without experiencing any pain, slowly “walk” your fingertips up the wall.
- Hold for five to ten seconds after you’ve reached your limit, then slowly lower your fingers again.
- Then return to your neutral position.
- Then relax.
- Repeat these exercises 5 to 10 times
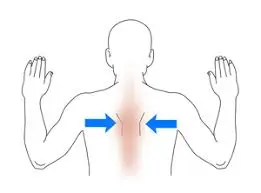
Shoulder Blade Squeezes
During shoulder dislocation rehabilitation, shoulder blade squeezes, also known as scapular retraction exercises, are essential. In order to maintain healthy shoulder function and avoid re-injury, they help in the restoration of scapular stability and posture.
- Arms relaxed at your sides, sit or stand upright.
- Pull your shoulder blades down and back gently, as if you were attempting to squeeze a pencil between them.
- Your shoulders should be kept away from your ears; do not shrug them.
- Hold this position for a few seconds.
- Then return to your neutral position.
- Then relax.
- Repeat these exercises 5 to 10 times.
Resistance Band Rows
One of the greatest strengthening exercises for shoulder dislocation rehabilitation is the resistance band row, especially once the initial healing phase is over. In order to stabilize the shoulder joint and avoid re-injury, they strengthen the rotator cuff, posterior shoulder, and upper back.
- Start with a band with light to medium resistance.
- With your palms facing inward, hold one end of the band in each hand (neutral grip).
- Place your arms out in front of you to begin.
- Pulling the band toward your ribcage requires you to contract your core and squeeze your shoulder blades together.
- Hold this position for a few seconds.
- Elbows should return to your sides in a straight line.
- Then return to your neutral position.
- Then relax.
- Repeat these exercises 5 to 10 times.
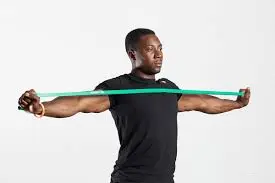
Shoulder Abduction (theraband)
Following a shoulder dislocation, performing shoulder abduction exercises with a TheraBand (resistance band) is an excellent method to regain control and strength, particularly in the mid-to-late rehabilitation stage. These exercises primarily target the muscles that are essential for stabilizing the shoulder joint: the deltoid, supraspinatus, and portions of the rotator cuff.
- You can tie the band to something low and stable or stomp on it to anchor it at your side.
- With the injured arm at your side and the elbow slightly bent, hold the other end in the affected arm.
- With your shoulder blades set (back and down), stand erect.
- As far as your pain-free range allows, slowly raise your arm out to the side (abduction) to around shoulder height (90°).
- Hold this position for a few seconds.
- Carefully lower yourself back down slowly.
- Then return to your neutral position.
- Then relax.
- Repeat these exercises 5 to 10 times.
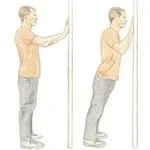
Wall Push-Ups
For shoulder dislocation rehabilitation, wall push-ups are a safe and effective exercise, particularly during the early to mid-recovery stages. Without overloading the recovering joint, they help restore shoulder stability, strengthening the rotator cuff, pectorals, deltoids, and triceps, and teaching correct scapular control.
- Face a wall and stand one to two feet away.
- Position your hands shoulder-width apart and shoulder-high on the wall.
- Hold your back straight and keep your core active.
- Flex your elbows gently as you move your chest toward the wall.
- Don’t let your elbows extend out too much; keep them at a 45° angle.
- Proceed as far as is comfortable for you no pinching or pain.
- Hold this position for a few seconds.
- Using your shoulder and chest muscles, push yourself back to the starting position.
- Then return to your neutral position.
- Then relax.
- Repeat these exercises 5 to 10 times.
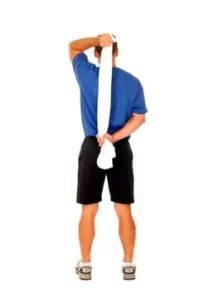
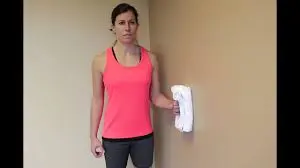
Towel Stretch
Simple yet very effective, towel stretch exercises help increase shoulder mobility and flexibility. They are particularly useful for restoring internal and external rotation following a shoulder dislocation. They are simple to perform at home, mild, and frequently included in early to mid-rehab regimens.
- With the arm that was injured at the bottom and the good arm at the top, grasp a towel or strap behind your back with one hand.
- Your affected hand is behind your lower back, and your good hand is over your shoulder.
- Use the top hand to gently pull upward.
- Follow with the lower arm to extend the posterior capsule and internal rotators.
- Hold this position for a few seconds.
- Then return to your neutral position.
- Then relax.
- Repeat these exercises 5 to 10 times.
Isometric Internal Rotation
Strengthening the subscapularis and pectoralis major, two important muscles that help in stabilizing the shoulder joint following a dislocation can be achieved gently and effectively using isometric internal rotation exercises. These exercises are great for regaining control without putting undue strain on the recovering joint because they don’t need movement, making them safe to start early in rehabilitation.
- Stand close to a doorway or wall.
- Pressed near your side, elbow bent at a 90-degree angle.
- Against the wall, palm facing inward
- As though you were attempting to turn your forearm inward (toward your abdomen), gently press your palm against the wall.
- Don’t move at all; keep your elbow firmly against your side.
- Hold this position for a few seconds.
- Then return to your neutral position.
- Then relax.
- Repeat these exercises 5 to 10 times.

Isometric External Rotation
Without moving the shoulder joint, isometric external rotation exercises are a safe and mild method of activating the rotator cuff, particularly the teres minor and infraspinatus. This is especially important in the initial phases of shoulder dislocation rehabilitation, when movement may be restricted yet muscle activation is essential to begin reestablishing joint stability.
- Place yourself sideways beside a doorframe or wall.
- Hold your elbow close to your side and keep it bent at a 90-degree angle.
- Press your hand’s back against the wall.
- As though attempting to spin your arm away from your body, gently press your hand outward into the wall.
- Hold the pressure without moving your arm.
- Hold this position for a few seconds,
- Then return to your neutral position.
- Then relax.
- Repeat these exercises 5 to 10 times.
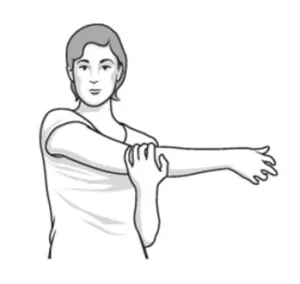
Cross Body Stretch
After a dislocation, one of the safest and most effective stretches for regaining posterior shoulder flexibility is the cross-body stretch. It helps in the extension of the teres minor, infraspinatus, and posterior deltoid muscles. It is particularly helpful for improving horizontal adduction, which is frequently restricted following shoulder injuries.
- Sit or stand up straight, shoulders relaxed.
- Place your injured arm shoulder-high across your chest.
- Gently pull the elbow or upper arm toward your chest with your opposing arm.
- Avoid shrugging and maintain a relaxed, down-shoulder posture.
- Hold this position for a few seconds.
- Then return to your neutral position.
- Then relax.
- Repeat these exercises 5 to 10 times.
Which safety precautions should be taken when working out?
Exercise must be done carefully and gradually while recovering from a shoulder dislocation. Exercise can help regain strength, mobility, and stability, but if done incorrectly, excessively, or too quickly, it can cause chronic instability, re-injury, or other problems.
Here are all the specifics of the safety measures to take when exercising following a shoulder dislocation.
Before exercising, get permission from your doctor.
- Your shoulder’s capability for exercise should be verified by a physician or physical therapist.
- An early workout may result in more joint damage, pain, or re-injury.
- To find out whether the shoulder has healed correctly, imaging tests like MRIs or X-rays could be necessary.
Before working out, warm up, and after, cool down.
Warming up improves joint lubrication, decreases stiffness, and increases blood flow.
Recovery is facilitated and muscle stiffness is avoided by cooling down.
- Warm up lightly for five to ten minutes before working out.
- After working out, stretch gently and take deep breaths to relax.
- Muscles that are cold and stiff when you first begin exercising increase the chance of strain.
Begin with Easy, Painless Motions
Incomplete recovery or excessive use can be indicated by pain.
Chronic instability can result from forcing motions that strain or harm soft tissues and ligaments.
- Before moving on to active workouts, start with helped range-of-motion motions and passive exercises (like pendulum swings).
- Avoid pushing through pain; if it gets worse, stop right away.
Exercises should be done slowly and properly.
Fast, jerky movements raise the possibility of subluxation or partial dislocation.
Controlled motions guarantee that ligaments and muscles are progressively developed without putting unnecessary strain on them.
- Keep your movements stable and fluid by moving gently and under control.
- Refrain from making quick, uncontrollable movements like reaching out or throwing.
Start by limiting overhead movements.
The healing joint is particularly stressed by overhead lifting.
The danger of shoulder impingement or re-dislocation is increased by early overhead movements.
- As stability increases, gradually add overhead movements.
- In the early phases of recuperation, stay away from throwing sports, overhead presses, and pull-ups.
Stay away from heavyweights in the beginning.
Early use of high resistance can strain the stabilizing muscles and rotator cuff, resulting in re-dislocation.
Stability and control of the shoulder must be restored before carrying higher loads.
- Before moving forward, begin with resistance bands or little weights (1-2 lbs).
- In the beginning, refrain from lifting or pressing large objects overhead.
Keep Your Method and Posture Correct
An excessive amount of tension is placed on the shoulder joint by improper form, which raises the possibility of re-dislocation or muscle strain.
The joint can be stabilized and supported by using the correct muscles.
- To guarantee good posture, do exercises in front of a mirror.
- To prevent compensatory movements, keep your shoulders engaged and relaxed.
- Avoid incorrect postures that can cause abnormal muscle activation, such as slumping your shoulders, arching your back, or letting your arm hang low.
Keep your self hydrated maintain a healthy diet.
Joint health and muscle rehabilitation are supported by proper food and water.
Weaker connective tissues and slower healing can result from poor nutrition.
- To help with muscle recovery, consume foods high in protein and drink lots of water.
- Stay away from processed sugar and junk food, as they may worsen inflammation.
If suggested wear supportive equipment.
During the initial stages of rehabilitation, a physical therapy tape or shoulder brace might offer additional support.
Compression sleeves may offer minimal support and lessen edema.
- If your doctor recommends it, wear shoulder braces.
- Instead of depending too much on external support, concentrate on building your muscles.
Concentrate on strengthening your scapular and rotator cuff muscles.
For shoulder stability, the scapular stabilizers and rotator cuff are essential.
Shoulder dislocations are more likely to happen in the future when stabilizing muscles are weak.
- Make rotator cuff workouts a priority, such as internal and external rotations with resistance bands.
- Don’t start heavy shoulder workouts, pull-ups, or chest presses before your stabilizers are strong.
Pay attention to your body and take time off.
Shoulder overuse causes exhaustion, irritation, and a longer recovery time.
After every exercise, the body requires time to heal its ligaments and muscles.
- Between strength training sessions, take at least one day off.
- Overuse injuries can result from training the same muscle part every day.
Follow a structured rehabilitation program and make progress gradually.
Shoulder re-injury could happen if advanced workouts are rushed into.
A well-organized program guarantees proper recovery and consistent strength development.
- Start with mild range-of-motion exercises and work your way up to strength training as part of a progressive rehabilitation regimen.
- Do not begin high-intensity exercises before your shoulder is ready.
After working out, use ice therapy if necessary.
Particularly in the early stages of recovery, exercise may result in moderate discomfort or swelling.
Ice helps in pain management and inflammation reduction.
- After working out, apply ice packs for 15 to 20 minutes if there is any swelling.
- Heat should not be used right after exercise because it may worsen swelling.
When did you quit working out?
A thorough explanation of when and why you might stop or alter shoulder exercises during rehabilitation can be given below.
Stopping Exercises Right After Dislocation (Acute Phase)
The ligaments, tendons, and joint capsule are stretched immediately following a dislocation and require time to recover.
Recurrent dislocations or chronic instability might result from excessive movement too quickly.
- If, after beginning an activity program, edema, pain, or instability increases.
- The shoulder feels loose if there is a possibility of re-dislocation.
- Whether a physician recommends short-term immobilization, often for one to three weeks.
Stopping Particular Exercises Because of Pain
Pain is a sign of poor form, excessive use, or incomplete healing.
Rotator cuff injuries, impingement syndrome, and tendinitis can result from ignoring pain.
- If a specific workout results in sudden shoulder pain, swelling, or popping.
- If you experience extreme exhaustion, joint instability, or weakness.
- If you suffer from nerve issues, such as arm tingling or numbness.
Temporarily Stopping Exercises Because of an Illness
- If you experience a partial dislocation (subluxation) or re-dislocate your shoulder.
- If, after moving on to increasingly difficult workouts, you start to feel new pain, instability, or swelling.
- If additional injury (such as a labral tear or rotator cuff tear) is seen by an imaging test (MRI or X-ray).
After a shoulder dislocation, which workouts should be avoided?
Exercises that put too much strain on the joint, improve instability or cause re-dislocation should be avoided after a shoulder dislocation. Certain activities might aggravate the injury or postpone recovery by putting strain on the rotator cuff muscles and ligaments, which are still healing.
Sports involving throwing and overhead (Early Stages)
- The rotator cuff and ligaments are overworked by these motions.
- Repetitive motion might slow recovery and worsen instability.
Baseball Pitching
Tennis Overhead Serve
Volleyball Spikes
Swimming Freestyle (Early Stages)
Overhead Shoulder Presses
- The weak shoulder ligaments are overstressed by overhead motions.
- There is a greater chance of re-dislocation since the shoulder is in an unsecured and prone posture.
- The rotator cuff muscles may become strained and affected when lifting large weights.
Overhead Dumbbell Press
Barbell Shoulder Press
Military Press
Handstand Push-ups
Chest Flys and Bench Press
- Bench presses’ external rotation might put stress on the joint capsule.
- Overloading the shoulder stabilizers with heavy weights increases the chance of injury.
- The anterior shoulder ligaments, which are already weak following dislocation, are overextended by the chest fly motion.
Barbell Bench Press
Dumbbell Bench Press
Dumbbell Chest Flys
Heavy Lifting or Unexpected Unstable Motions
- Shoulder joint instability might result from jerky or explosive movements.
- A partial or complete dislocation of the shoulder could result from the sudden force applied to it.
Olympic Lifts (Snatch, Clean & Jerk)
Heavy Deadlifts with Shrugs
Medicine Ball Slams
Dips and Triceps Dips
- The anterior shoulder capsule is severely strained in the deep extension position.
- This raises the possibility of re-dislocation by weakening and stretching the ligaments.
Parallel Bar Dips
Bench Dips
Lat pulldowns and pull-ups (behind the neck)
- The shoulder is abducted and externally rotated during pull-ups and lat pulldowns, which can lead to instability.
- Movements behind the neck put excessive stress on the rotator cuff and shoulder capsule.
Pull-ups / Chin-ups
Wide-Grip Lat Pulldown
Behind-the-Neck Lat Pulldown
Wide-Grip Exercises using Barbells
- A broad grasp makes the shoulder more unstable by increasing external rotation.
- It puts excessive stress on the shoulder’s anterior ligaments.
Wide-Grip Bench Press
Wide-Grip Lat Pulldown
Wide-Grip Pull-ups
Summary:
Trauma, recurrent strain, congenital conditions, or sudden, severe motions are common causesof shoulder dislocations. People with weak shoulder muscles or loose ligaments, athletes, and those who do repetitive overhead motions are more susceptible to injury.
Following a dislocation, shoulder exercises are essential for both healing and long-term joint health. These exercises strengthen muscles, lessen pain, increase mobility, and stop dislocations in the future. People can regain complete shoulder function, prevent chronic instability, and confidently resume daily activities by following a planned rehabilitation regimen.
The chance of dislocation can be decreased by taking preventative steps like strengthening the shoulder muscles, keeping proper posture, and avoiding excessive movements. Before beginning an exercise program following a shoulder injury, always get medical advice.
FAQ:
What is a Shoulder Dislocation?
When the humerus, the upper arm bone, pops out of the glenoid shoulder socket, it is called a shoulder dislocation. It may be complete (full dislocation) or partial (subluxation).
How Does a Shoulder Dislocation Happen?
Trauma or Injury – Vehicle accidents, sports injuries, falls
Sports Activities – Contact sports (baseball, rugby, football), overhead sports (volleyball, baseball)
Repetitive Motion – swimming, weightlifting, or overhead work
Weak Ligaments or Previous Dislocation – After a shoulder dislocation, it becomes prone to further injuries.
Which symptoms indicate a dislocated shoulder?
Severe shoulder ache
Deformity visible: Shoulder appears “out of position”
Unable to move the arm
Bruising and swelling
Arm weakness or numbness.
How Much Time Does a Shoulder Dislocation Take to Heal?
The severity affects the recovery time:
Mild dislocation: two to four weeks
Moderate injury: six to twelve weeks
Surgery or severe cases: 4-6 months
Which Exercises Are Good Following a Shoulder Dislocation?
Swinging pendulums: A gentle mobility exercise
Isometric shoulder exercises: These strengthen muscles without causing joint movement.
Resistance band workouts: They increase stability
Scapular strengthening: Helps in avoiding dislocations in the future
After a shoulder dislocation, which exercises should I avoid?
Overhead presses
Bench press & dips
Pull-ups & behind-the-neck pulldowns
Heavy deadlifts & explosive movements
Wide-grip exercises
Are Shoulder Dislocations Preventable?
Strengthen your stabilizing and rotator cuff muscles.
Increase the flexibility and mobility of your shoulders.
When lifting or participating in sports, use good form.
If the shoulder is unstable, stay away from unsafe movements.
After a shoulder dislocation, when can I begin exercising?
Mild dislocation: After the pain goes away, begin light movements a few days to a week later.
Moderate dislocation: Start rehabilitation activities two to three weeks after the sling is taken off.
Surgery or severe cases: Under medical supervision, physical therapy begins 4-6 weeks later.
After a Shoulder Dislocation, Can I Lift Weights?
Begin with workouts using resistance bands and your body weight.
Add light dumbbells (1–5 lbs) gradually.
Only gradually increase weight when there is no pain.
Stay away from wide-grip and overhead lifts in the beginning.
Are Exercises for Shoulder Dislocation Effective Without Surgery?
Yes, rehabilitation is enough to mend the majority of first-time dislocations.
Surgery is only required if
Recurrent dislocations occur.
The labrum or rotator cuff is ripped.
There is a lot of instability even after treatment.
Can a Shoulder Dislocation Heal Completely?
Yes, but it needs strengthening along with suitable rehabilitation. Poor rehabilitation can lead to long-term instability.
References:
- The top 7 exercises for shoulder dislocations Mehta, Dr., San Jose. August 19, 2024. Orthopedic Resilience. There are exercises for the shoulder and dislocation at https://www.resilienceorthopedics.com/
- Shoulder dislocation. 19 March 2025. Cleveland Clinic. 17746-dislocated-shoulder https://my.clevelandclinic.org/health/diseases
- Exercise regimen for dislocated shoulders. n.d. Saint Luke’s Health System. https://www.saintlukeskc.org/health-library/exercise-program-shoulder-landing
- Hospitals of Guy and St. Thomas. (n.d.). Dislocation of the shoulder. Pl-954.1-shoulder-dislocation.pdf https://www.kch.nhs.uk/wp-content/uploads/2023/01/
- S. Physio, n.d.-a. Surrey Physio’s Top 5 Shoulder Dislocation Exercises (Strengthening Phase). Surrey Physio. Following the shoulder dislocation strengthening phase, here are the top 5 exercises: https://www.surreyphysio.co.uk/top-5/best-5-exercises/
- Comella, T. (April 28, 2024). E3 Rehabilitation. https://e3rehab.com/shoulder-instability/ Shoulder Dislocation & Instability Rehabilitation
- Shoulder dislocation or dislocation | Pantai Hospitals, n.d. Health-pulse/shoulder-dislocation-exercises: https://www.pantai.com.my
- M. H. Therapy (2024, Oct. 25). Your Recovery Guide to Treating Shoulder Dislocations. Hand therapy in Melbourne. Shoulder dislocation recovery plan: https://www.melbournehandtherapy.com.au/
- Image 2, ROM: Wand (Supine): Flexion (n.d.). 0290000928shld093m_English.html https://iris.hattiesburgclinic.com/patadv/exkit/Orthopedic/English
- Image 4, YOGABODY. July 16, 2023. 10-Minute At-Home Flow to Reduce Sciatic Pain [Video]. YouTube. YouTube video: https://www.youtube.com/watch?v=3S3_9zi7exw
- Image 5, OrthoInfo, AAOS, “Shoulder Surgery Exercise Guide” (n.d.). The following is a guide to shoulder surgery exercises: https://orthoinfo.aaos.org/en/recovery.
- Image 8, Ekka, S. S. (September 5, 2023). A thorough explanation of 7 simple resistance band exercises for shoulder mobility an